

Page 1

USER’S
GUIDE
digitalsatellitereceiverdigitalsate
satellitereceiverdigitalsatelliterec
ereceiv erdigitalsatellitereceiverdi
erdigitalsatellitereceiverdigitalsat
alsatellitereceiverdigitalsatelliter
itereceiverdigitalsatellitereceiver
rdigitalsatellitereceiverdigitalsate
satellitereceiverdigitalsatelliterec
ereceiverdigitalsatellitereceiverd
erdigitalsatellitereceiverdigitalsa
alsatellitereceiverdigitalsatelliter
itereceiverdigitalsatellitereceiver
rdigitalsatellitereceiverdigitalsate
satellitereceiverdigitalsatelliterec
ereceiv erdigitalsatellitereceiverdi
erdigitalsatellitereceiverdigitalsa
alsatellitereceiverdigitalsatelliter
itereceiverdigitalsatellitereceiver
rdigitalsatellitereceiverdigitalsate
satellitereceiverdigitalsatelliterec
ereceiverdigitalsatellitereceiverd
erdigitalsatellitereceiverdigitalsat
alsatellitereceiverdigitalsatelliter
itereceiverdi ellitereceiver
rdigitalsat elliterecei
satellitere elliterec
erecei ceiverd
erdi igitalsat
alsat lsatelliter
itere receiver
rdig italsate
sat terec
er verd
Page 2
Safety Information
WARNING
To reduce risk of fire or
shock hazard, do not
expose this digital
satellite receiver to rain
or moisture.
WARNING
RISK OF ELECTRIC SHOCK
DO NOT OPEN
This symbol indicates
“dangerous voltage” inside the
product that presents a risk of
TO REDUCE THE RISK OF ELECTRIC SHOCK, DO NOT
REMOVE COVER (OR BACK). NO USER SERVICEABLE
PARTS INSIDE. REFER SERVICING TO QUALIFIED SERVICE
PERSONNEL.
This symbol indicates
important instructions
accompanying the product.
electric shock or personal injury.
Cautions
Note to Cable TV Installer: This reminder is provided to call your attention to Article 820-40 of the National
Note to Satellite Dish Antena
nstaller:
Do not stack electronic components or other objects on top of the digital
satellite receiver. The slots on top of the receiver must be left uncovered to allow
proper airfow to the unit. Blocking the airflow to the unit could impair performance
or damage your receiver and other components.
Do not stack the digital satellite receiver on top of a “hot component” such as an
audio power amplifier.
FCC Regulations state that unauthorized changes or modifications to this equipment
may void the user’s authority to operate it.
Electrical Code (Section 54 of the Canadian Electrical Code, Part 1) which provides
guidelines for proper grounding and, in particular, specifies that the cable ground
shall be connected to the grounding system of the building as close to the point of
cable entry as practical.
This reminder is provided to call your attention to Article 810 and in particular
article 810-15 of the National Electrical Code which covers proper installation and
grounding of television receiving equipment as well as to article 820-40 of the
National Electrical Code which specifies that the satellite dish cable ground shall be
connected to the grounding system of the building as close to the point of cable
entry as practical.
IMPORTANT NOTICE: This device incorporates an anticopy process technology that is protected by U.S.
Care and Cleaning: Use a soft cloth or the dusting attachment of your vacuum cleaner to dust your
Product Registration
Please fill out the product registration card and return it immediately. Returning the card allows us to contact you if needed.
Keep your sales receipt to obtain warranty parts and service and for proof of purchase. Attach it here and record the serial and model
numbers in case you need them. The numbers are located on the back of the digital satellite receiver.
Model No. ____________________________________________________
Serial No. _____________________________________________________
Purchase Date: ________________________________________________
Dealer/Address/Phone:
___________________________________________________________________________________
patents and other intellectual property rights. The anticopy process is licensed for
non-commercial, home use only. Reverse engineering or disassembly is prohibited.
receiver. Remove dust from the ventilation holes on the top and bottom.
Plastic surfaces are easily scratched and can be marred by alcohol and various
solvents. Avoid excessive use of oil-based furniture polishes since the materials used
in the cabinet will accumulate more dust. A non-abrasive, anti-static cleaner/polisher
is recommended.
Page 3

Table of Contents
Setup and Connections .......................................................... 3
Step 1: Unpack the DIRECTV System ...............................................4
Step 2: Connect Your Digital Satellite Receiver to Your TV
and VCR ............................................................................................4
Basic Connection........................................................................7
Advanced Connection ............................................................... 8
Step 3: Find the Video Input Channel on your TV..........................9
Step 4: Interactive Setup................................................................10
Step 5: Place Batteries in the Remote Control .............................10
Step 6: Plug in and Turn on the DIRECTV System ......................... 10
Step 7: Order Programming ..........................................................10
Using the Remote..................................................................... 11
Remote Control Buttons ................................................................ 12
The Point and Select Method ........................................................14
Programming the Remote Control ...............................................14
Testing the Remote Control .................................................... 14
Using the Remote to Control a Device ...................................16
Modes of Operation ................................................................16
Using the Remote to Control a Second Digital Satellite
Receiver ....................................................................................16
Program Guides ....................................................................... 19
Anatomy of a Program Guide ....................................................... 20
The Channel Banner....................................................................... 21
Using the GUIDE Button..........................................................22
Getting Around in the Guides ................................................ 22
Tuning to a Program................................................................23
Additional Program Guides.....................................................24
Sorting the Guides ...................................................................26
The Menu System ...................................................................... 31
Using the Menu System ................................................................. 32
Back and Help ..........................................................................32
Menu Descriptions ...................................................................33
The Program Guide ........................................................................34
The Mailbox....................................................................................35
How to Tell When you Have Mail ...........................................35
Checking Your Mail.................................................................. 35
1
Page 4

Table of Contents
Pay-Per-View Programs..................................................................36
Purchasing and Previewing .....................................................36
Tuning to a Pay-Per-View Program......................................... 36
Using the Program Guide for Pay-Per-View Programs .......... 37
Using the Attractions Guide....................................................37
Using the Purchases Menu ......................................................38
Reviewing and Canceling an Upcoming Purchase.................39
Spending Limits........................................................................39
Timers Feature................................................................................40
Profiles ............................................................................................ 40
Creating a Profile Channel List ...............................................41
Setting the Rating Limit ..........................................................41
Viewing Hours..........................................................................42
Setting Up Spending Limits.....................................................43
Locking a User’s Profile............................................................ 43
Locking the System.................................................................. 44
Choosing Your Profile .............................................................. 45
Options ...........................................................................................45
Interactive Setup......................................................................46
System Info...............................................................................46
Look and Feel........................................................................... 46
System Options ........................................................................47
Audio Language ......................................................................47
Alternate Data .........................................................................47
The Dish Pointing Menu Screen .................................................... 48
Using the On-Screen Signal Meter..........................................49
Home Control .................................................................................50
Edit Fetch Menu ............................................................................. 52
Customizing the Fetch Menu .................................................. 53
Customizing the FETCH Button...............................................54
Tips & Troubleshooting ........................................................ 55
Running the System Test................................................................56
Fine-Tuning the Signal ...................................................................57
How Signal Flow Works .................................................................58
Appendix A: Warranty Information............................. 61
Appendix B: FCC Regulations ...............................................65
Appendix C: Accessories.........................................................67
Index ............................................................................................ 69
StarSight-Licensed: The manufacture and sale of the television schedule feature of this product was licensed
under one or more of the following patents of StarSight Telecast, Inc.; U.S. Patent Nos. 4,706,121; 4,977,455;
5,151,789; 5,335,277: and 5,353,121.
2
Page 5

Setup and Connections
Setup and Connections
Getting Started
This manual is designed to get you started quickly. The first
three sections of the manual introduce you to your DIRECTV
System and show you how to use the on-screen guides and
menus.
In Setup and Connections, you’ll learn:
• about the jacks and cables
• things to know before connecting the components
• different ways to connect the digital satellite receiver to your TV
• how to order programming
The “Using the Remote” section defines the buttons of the
remote control and how to program it.
The “Program Guides” section details the items and features
associated with the different guides.
The Rest Of The Manual
The rest of the book includes menu information,
troubleshooting information—such as running a test of your
DIRECTV System—and an index.
Setup and Connections
1
➣
Using the Remote
2
➣
Program Guides
3
➣
The Menu System
4
➣
Tips & Troubleshooting
5
3
Page 6
Setup and Connections
Step 1: Unpack the DIRECTV System
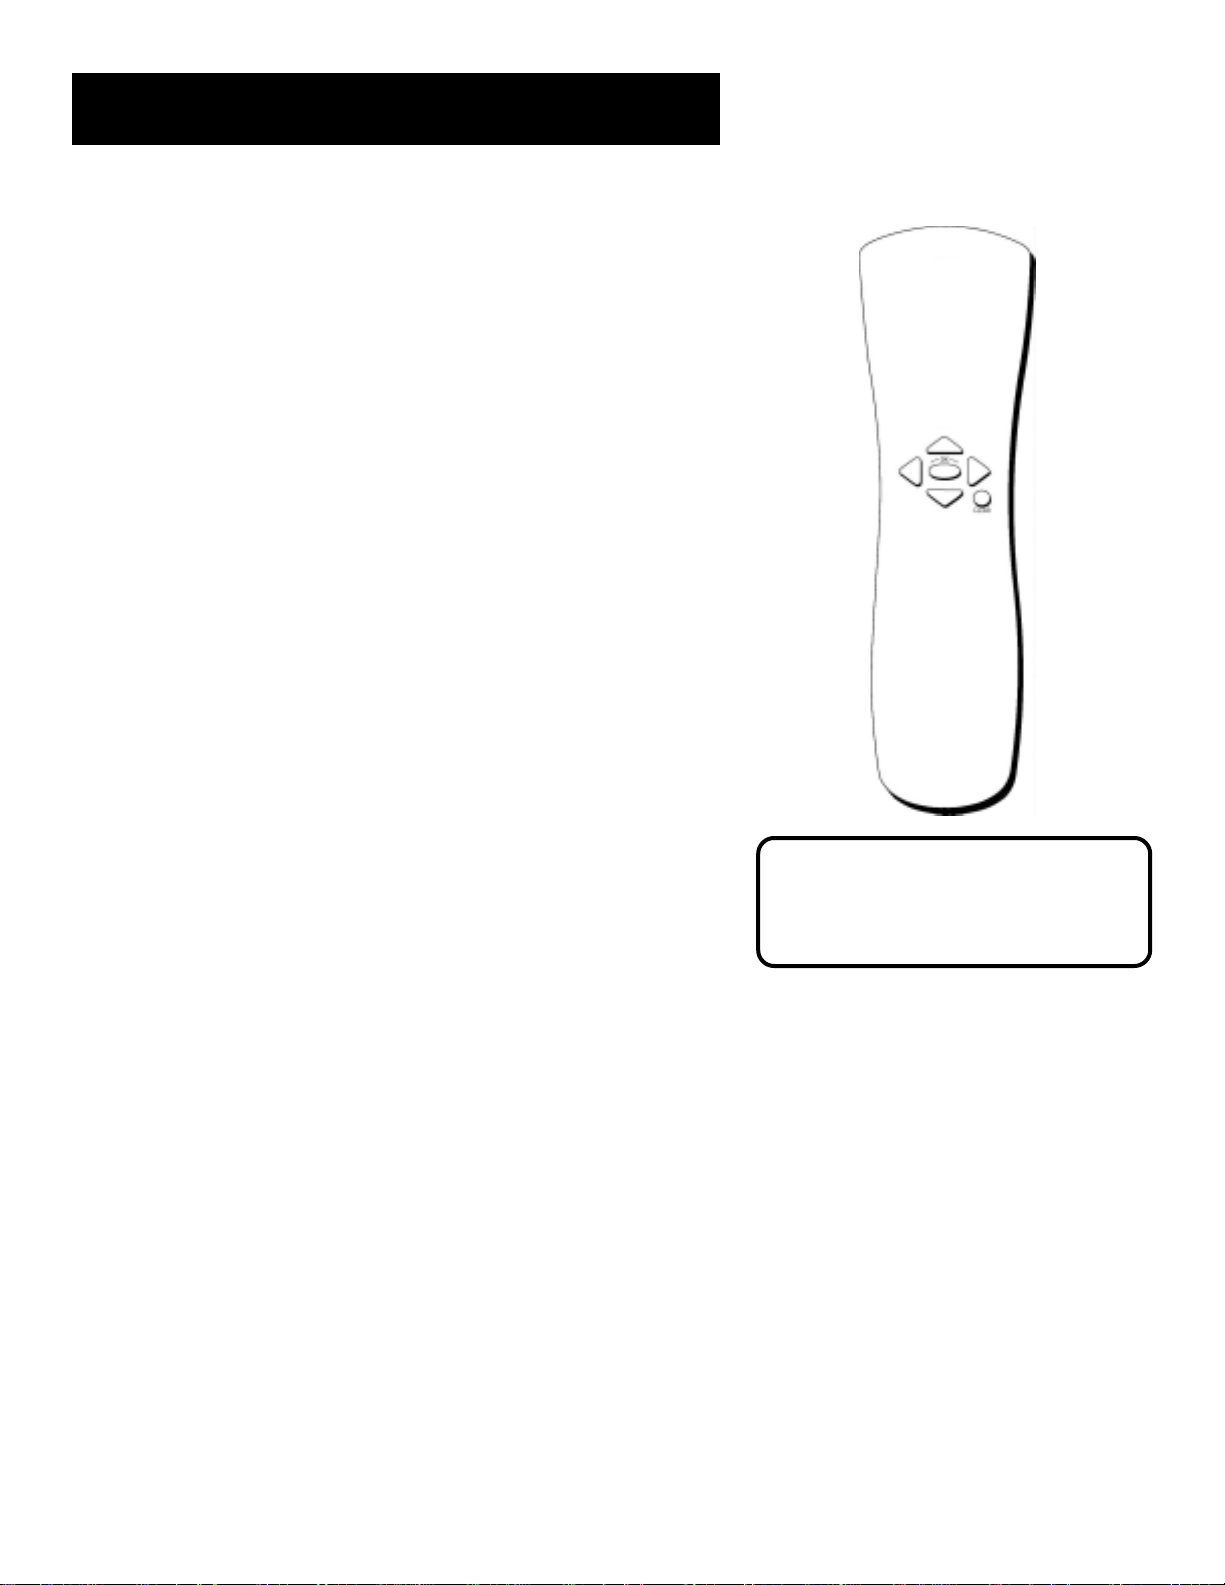
Make sure to locate the remote control.
Step 2: Connect Your Digital
Satellite Receiver to Your TV and
VCR
During the satellite dish antenna installation, the digital satellite
receiver may have been connected to your TV with just a coaxial cable
for the system test. Depending on what components you have, another
connection may provide better picture and audio quality. The following
sections provide cable and connection information to help you decide
what connection is best for you.
Things to Know Before Connecting
Components
Protect Your Components from Power Surges
• Connect all components before plugging any power cords into the
wall outlet.
• Always turn off the digital satellite receiver, TV and other
components before you connect or disconnect any cables.
Position Cables Correctly to Avoid Audio Hum or
Interference
• Insert all cable plugs firmly into their jacks.
Remote Control
Digital Satellite Receiver
• Place the audio/video cables to the sides of the TV’s back panel
instead of straight down the middle after you connect your
components.
• Try not to coil any twin-lead cables and keep them away from the
audio/video cables as much as possible.
• Make sure all satellite dish antennas and cables are properly
grounded. Refer to the Safety sheet packed with your unit.
4
Page 7

Setup and Connections
S-Video Jack
RF Jack
Protect Your Components from Overheating
• Do not block ventilation holes in any of the components. Arrange
the components so that air can circulate freely.
• Do not stack components.
• Allow adequate ventilation when placing your components in a
stand.
• Place an amplifier or digital satellite receiver on the top shelf of the
stand so heated air rising from it will not flow around other
components.
Jacks and Cables
Below is a description of the jacks and cables you can use to make
connections. Note that not all cables may come with your DIRECTV
System.
S-Video Jack and Cable
The S-Video jack provides the best picture quality for your DIRECTV
System.
This jack is available on many TVs and is used in conjunction with audio
cables to connect the digital satellite receiver to your TV. Remember also
to connect the left and right audio cables because the S-Video jack
carries only the picture signal, not the sound.
RF Jacks and Coaxial Cables (F-type)
The RF jacks provide good picture and mono sound quality, and are to
be used if audio/video connections are not available for your TV.
These jacks are required for satellite dish antenna or cable-TV
connections. The RF jacks on the digital satellite receiver are labeled IN
FROM ANT and OUT TO TV.
5
Page 8
Setup and Connections
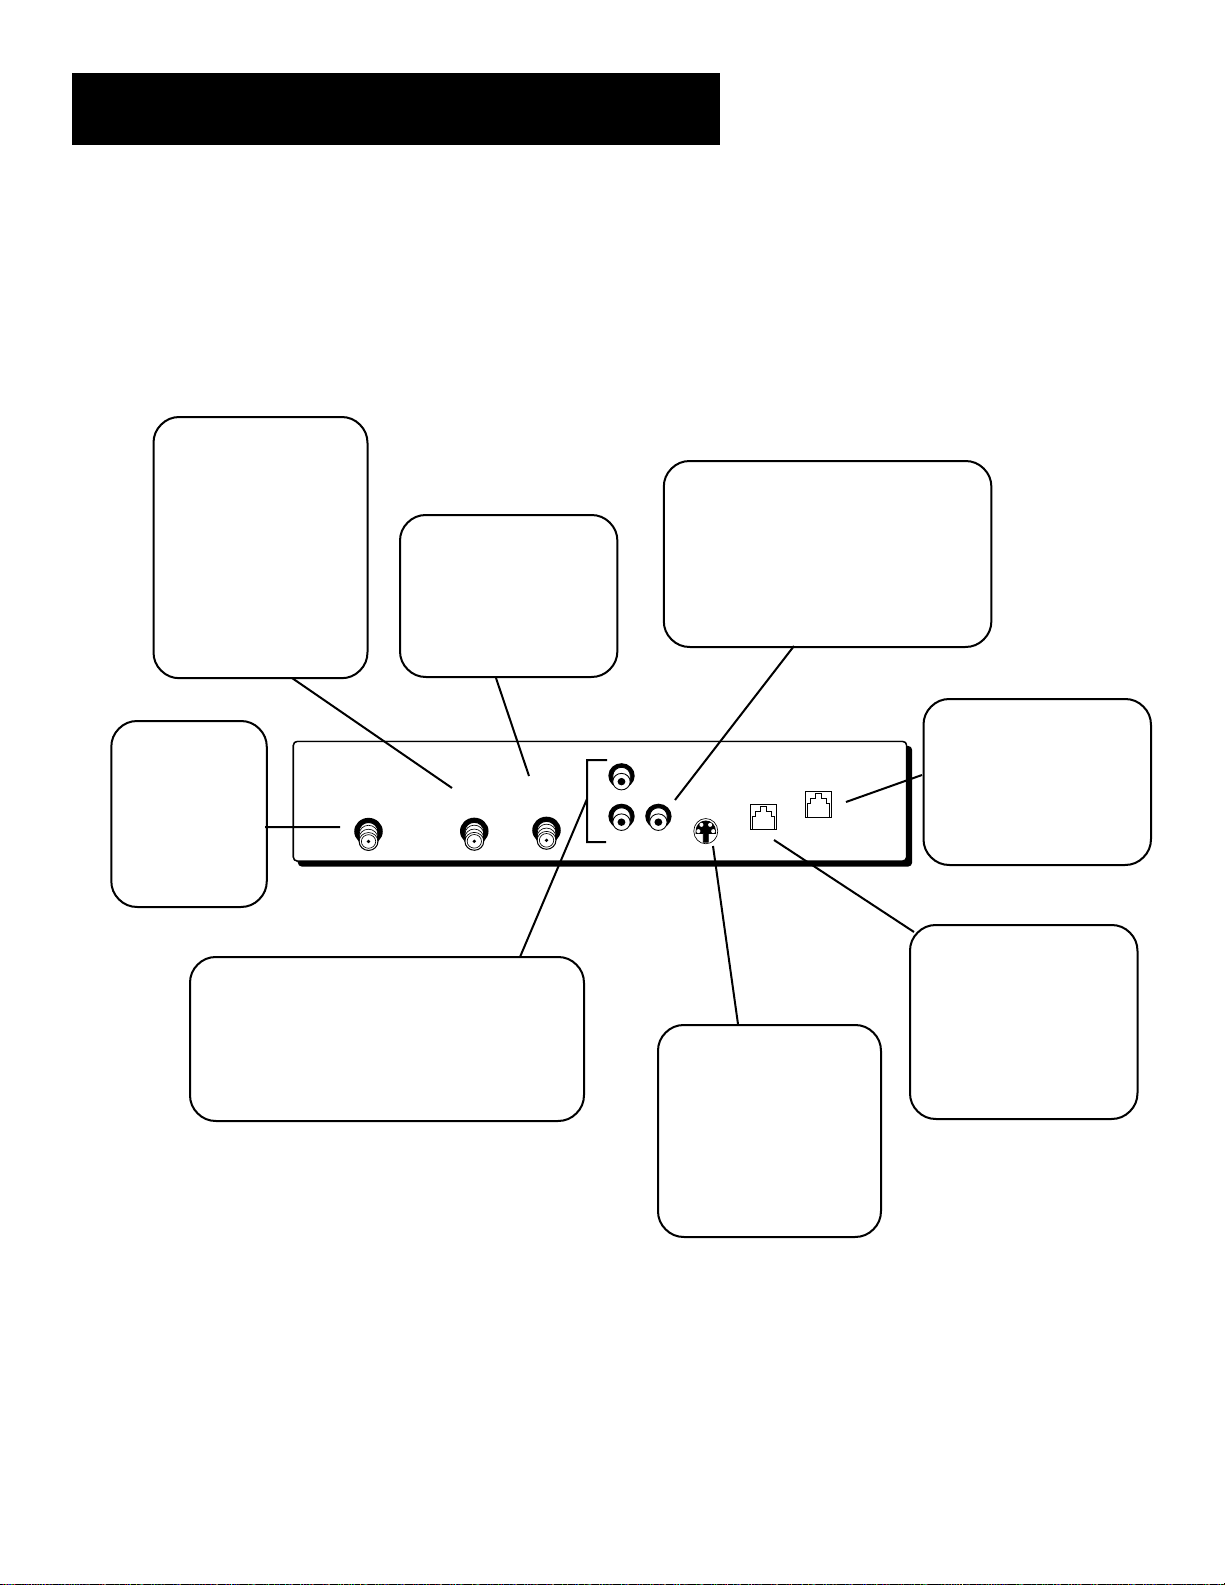
Back of the Digital Satellite Receiver
The diagram below describes each of the back panel jacks found on
your digital satellite receiver. When connecting A/V cables, be sure to
connect corresponding OUTPUTS and INPUTS (Video to Video, Right
Audio to Right Audio, etc.).
OUT TO TV Use to
connect the digital
satellite receiver to
your TV. However, if
your TV has audio/
video jacks, you
should use those
jacks to get better
picture and sound
quality.
IN FROM ANT Use to
connect an off-air
satellite dish antenna
or cable TV signal to
the digital satellite
receiver.
VIDEO Provides better picture
quality than the OUT TO TV jack. If
your TV has audio/video capability,
use this jack to connect the digital
satellite receiver to your TV. You
must also connect the AUDIO
jacks for sound.
SATELLITE IN
Use to connect
the digital
satellite
receiver to the
satellite dish
antenna.
AUDIO (R and L) Provide better sound
quality than the OUT TO TV jack. If your TV
has audio/video capability, use these jacks
to connect the digital satellite receiver to
your TV. You must also connect the VIDEO
jack.
SATELLITE IN
PHONE JACK Use to
connect the digital
R
VIDEO
OUT
TO
TV
IN
FROM
ANT
AUDIO
L
S-VIDEO
HOME
CONTROL
PHONE JACK
satellite receiver to a
phone line. The receiver
periodically calls out to
program providers.
HOME CONTROL This
jack allows you to
connect the digital
satellite receiver to
S-VIDEO Provides the
best picture quality. If
your TV has S-VIDEO
accessories, such as the
Home Control base
module.
capability, use this jack
along with the audio/
video jacks to connect
the digital satellite
receiver to your TV.
6
Page 9

Setup and Connections
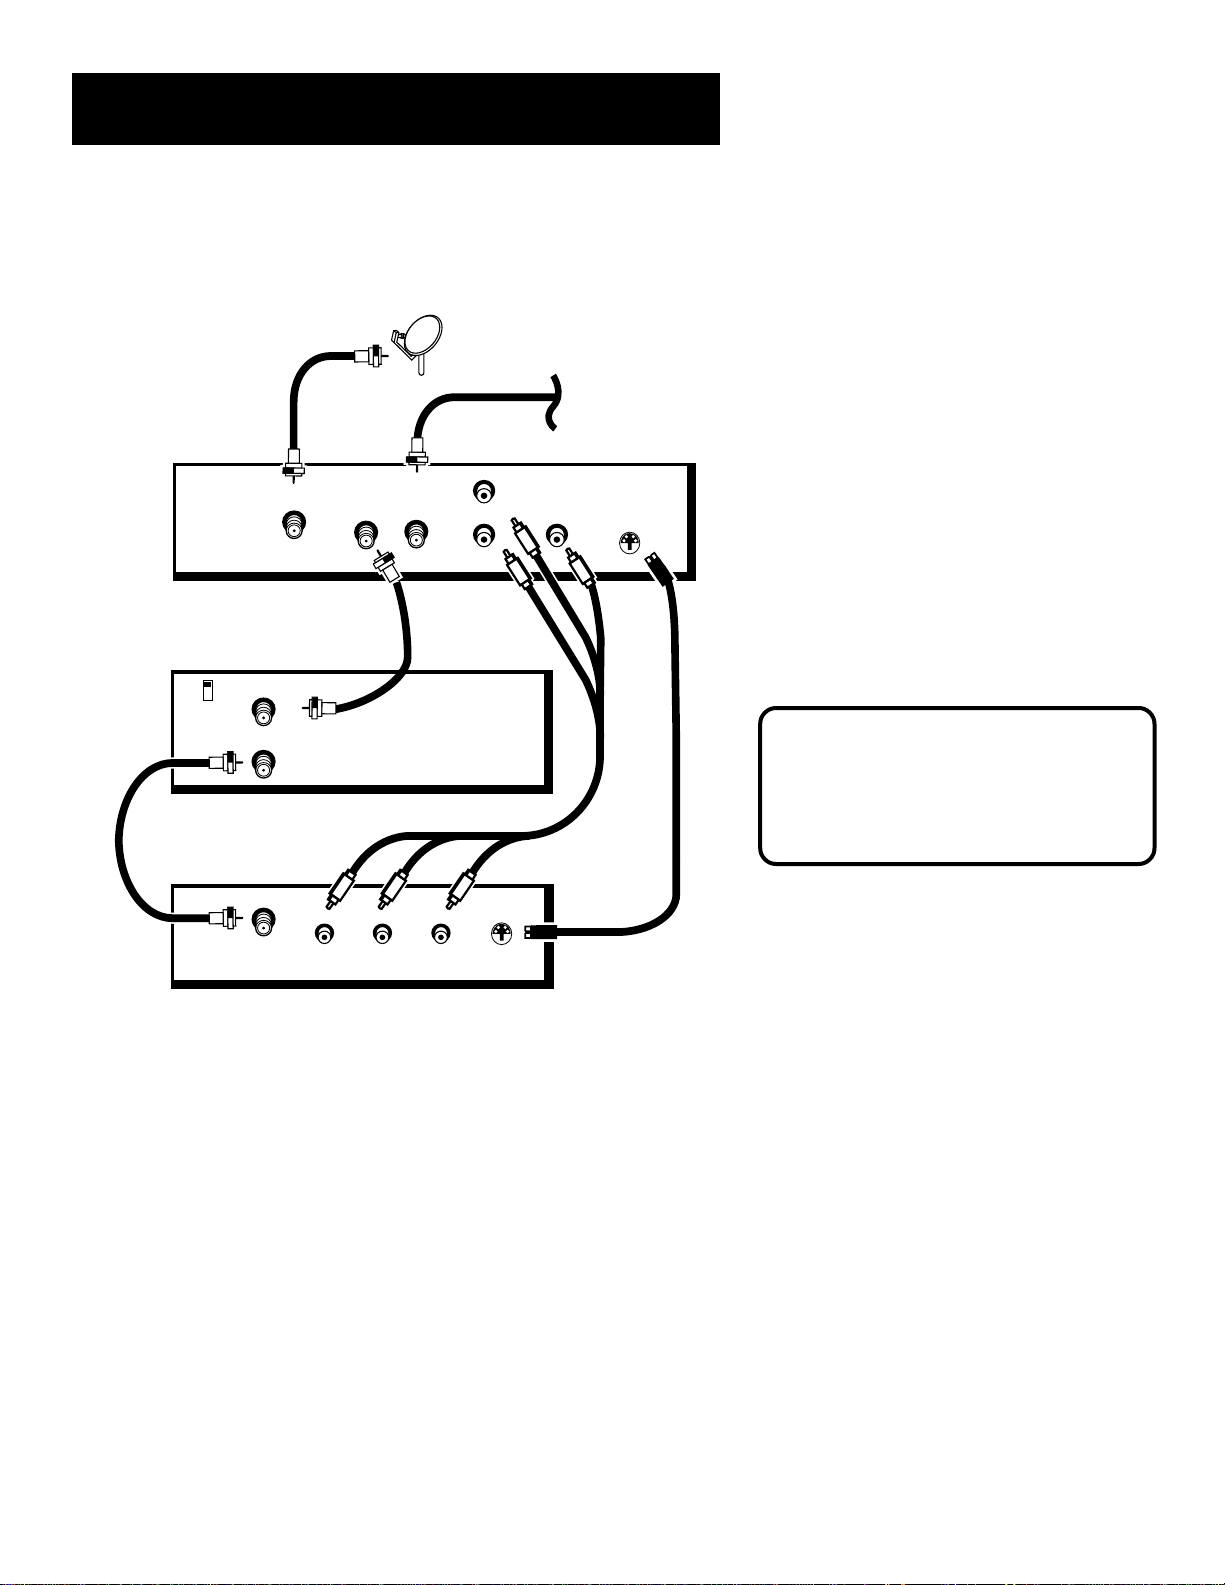
Basic Connection
DIGITAL
SATELLITE
RECEIVER
SATELLITE IN
VCR
IN FROM ANT
CH3
CH4
OUT TO TV
TV
OUT
TO
TV
IN
FROM
ANT
SATELLITE
DISH ANTENNA
CABLE OR
OFF-AIR ANTENNA
How to View Your Components
To watch programming received via satellite
with this connection, tune the TV to either
channel 3 or 4. (The default is channel 3. You
may change the output channel to 4 by
choosing Options from the Main menu, then
selecting System Options,thenOutput
Channel.)
To record programming, tune the digital
satellite receiver to the desired channel and
set your VCR to record on channel 3 or 4.
To view VCR recordings, tune the TV to the
VCR output channel (usually CH 3 or 4) and set
your VCR to play. If your VCR is a brand other
than RCA, GE, or PROSCAN, you may need to
program the remote to control the VCR. See
the next section, “Programming the Remote.”
CAUTION
Do not stack electronic components or
other objects on top of the digital satellite
receiver. See “Safety Information” inside
the front cover.
IN
7
Page 10
Setup and Connections
Advanced Connection
DIGITAL
SATELLITE
RECEIVER
IN
OUT
FROM
TO
TV
ANT
VCR
CH3
CH4
SATELLITE IN
IN FROM ANT
OUT TO TV
SATELLITE
DISH ANTENNA
R
AUDIO
L
VIDEO
CABLE OR
OFF-AIR ANTENNA
S-VIDEO
How to View Your Components
To watch the digital satellite receiver in this
connection, tune the TV to the video input
channel. (To find your TV’s video input
channel, follow Step 3 on the next page). Then
tune the receiver to the desired channel.
To record programming, tune the digital
satellite receiver to the desired channel. Then
set your VCR to record on channel 3 or 4.
To view VCR recordings, tune the TV to the
VCR output channel (usually CH 3 or 4) and set
your VCR to play. If your VCR is a brand other
than RCA, GE, or PROSCAN, you may need to
program the remote to control the VCR. See
the next section, “Programming the Remote.”
CAUTION
Do not stack electronic components or
other objects on top of the digital satellite
receiver. See “Safety Information” inside
the front cover.
TV
IN
LR
VIDEOAUDIO
S-VIDEO
8
Page 11

Setup and Connections
Step 3: Find the Video Input Channel on your TV
• Note: You do not need to complete this step if you used the
basic connection.
If you used the advanced connection, you must tune your TV to the
video input channel to see the satellite screens. Since there are so
many brands and models of TVs, there are just as many ways to
access a TV’s video input channel. Below are some things you can
try.
• If your TV brand is RCA, GE, or PROSCAN, press TV on the
remote control that came with your digital satellite receiver.
Then press the WHO•INPUT button on the remote.
• If your TV brand is not RCA, GE, or PROSCAN, consult your TV
Owner’s Manual.
If you cannot find your TV Owner’s Manual, you will have to
investigate. You might access the TV’s video input channel by:
• pressing a button on the remote control
• finding it through the TV’s menu system
• tuning directly to it by pressing a specific channel number
• going through all channels in the list by pressing the channel up
or down buttons on the TV
Below are lists of some of the different ways manufacturers label
the video input channel.
Video Channel Variations
Button/switch
on the TV
VIDEO
SIGNAL
VID 1
VID 2
S-VID
S-VIDEO
Button on the
TV Remote
VID 1
LINE
VID
VIDEO
S-VID
INPUT
SOURCE
AUX
Channel #
00
90
91
92
VID 1
VID 2
Signal Flow
The choice of video input channel is best
made with an understanding of signal
flow—the way the signal flows through
your components and ends up as a picture
on your TV screen.
To learn more about signal flow, see the
example in the “Troubleshooting” section.
9
Page 12

Setup and Connections
Step 4: Interactive Setup
If you self-installed your satellite dish antenna, you may have
already used the interactive setup to find the dish pointing
coordinates, acquire and fine-tune the signal, and run a test of your
DIRECTV System.
If you need to run the interactive setup again, select Options from
the Main menu, then select Interactive Setup.
If you did not self-install the satellite dish antenna, you may just
want to check your dish pointing coordinates, or run the signal
strength meter. Select Dish Pointing from the Main menu.
Step 5: Place Batteries in the Remote Control
Follow these steps whenever you need to install or change the batteries
in your remote control
1. Remove the cover from the battery compartment.
2. Insert batteries in the battery compartment, matching the +
and – end of each battery.
3. Replace the cover.
STEP 6: Plug in and Turn on the DIRECTV System
Plug the end into the wall outlet, matching the wide blade of the plug
with the wide slot in the outlet. Be sure to insert the plug completely.
To turn on the DIRECTV System, press the DIRECTV button on the remote
control or the ON•OFF button on the front panel of the digital satellite
receiver. If your TV brand is RCA, GE, or PROSCAN, press the TV button
on the remote to turn on the TV. If your TV brand is not RCA, GE, or
PROSCAN, see the next section, “Using the Remote,” for details on
how to use the remote to control your TV.
Step 7: Order Programming
After you have installed your DIRECTV System, you should contact the
service providers, DIRECTV and USSB, to receive programming.
Programming with DIRECTV: Call 1-800-347-3288
When you order programming, you need
to know your access card number. To get
the number, select Options from the Main
menu, then System Options, and then
select System Test.
Wait for the DIRECTV System to run all of
its tests. The access card number is
displayed at the end of the test.
Write the access card number in the space
below for easy reference:
Programming with USSB: Call 1-800-204-USSB
10
______________________________
Page 13

Using the Remote
Using the Remote
How to use your Universal Remote
Control
This section defines the buttons of the remote and how to
program it to control other components.
The universal remote can be programmed to control most
brands of remote controllable VCRs, digital satellite
receivers, and cable boxes. If you have an RCA, GE, or
PROSCAN component, you probably don’t need to
program it at all.
Setup and Connections
1
➣
Using the Remote
2
➣
Program Guides
3
➣
The Menu System
4
➣
Tips & Troubleshooting
5
11
Page 14

Using the Remote
Remote Control Buttons
ON•OFF Turns the device you are controlling on or off. You can also
use the power button on the front panel of the digital satellite receiver
to turn it on and off.
VCR Tells the remote to control the VCR.
TV Tells the remote to control the TV.
DVD Tells the remote to control the DVD player.
HOUSE ICON Tells the remote to control the home control devices.
LED Light which indicates programming mode when programming the
remote control. The LED on the front panel of the digital satellite
receiver flashes when you have mail.
AUX Tells the remote to control other components, such as a cable box
or laser disc player (on older remotes, this may be labelled “SAT2”).
DIRECTV Tells the remote to control the digital satellite receiver (on
older remotes, this may be labelled “SAT1”).
LED
MUTE Reduces the TV’s volume to its minimum level. Press again to
restore the volume.
SKIP This key is not used by the digital satellite receiver.
CH+/CH- Use to scan up and down through the channels in the current
channel list. If you are in the program guide or menu system, use the
CH+/CH- buttons to page up and down a screen at a time. You can also
use the channel up and channel down buttons on the front panel of the
digital satellite receiver to change the channel.
VOL UP/DOWN Adjusts the audio volume.
FETCH Either brings up the Fetch menu or tells the digital satellite
receiver to take the action you programmed it to take.
GO BACK Moves you back and forth between your last two selected
channels. In the menu system, returns you to the previous screen.
GUIDE Brings up the on-screen program guide. Press the GUIDE button
several times to toggle through the different types of guides.
INFO Brings up the on-screen channel banner. Press again to get
program details. When in a program guide, pressing INFO gives you
more details about the highlighted channel or program.
ARROWS Use the navigation arrows to move the on-screen highlight
up, down, left, or right. Using the arrows to highlight a menu item is
also called “pointing.”
OK Selects a highlighted choice if you are already in the menu system.
MENU Displays the Main menu. If you are already in the menu system,
press OK or MENU to select a highlighted choice.
12
Page 15

Using the Remote
CLEAR Removes the on-screen displays and returns to normal viewing.
DIGIT KEYS (0 - 9) Use the digit keys to tune directly to a channel. If
you are in the menu system, use the digit keys to enter numbers for the
time, date, channel and passwords.
WHO•INPUT Press the WHO button one or more times to toggle
through your user profiles.
ANTENNA Lets you switch the source of the video signal from satellite
signals to an off-air satellite dish antenna or cable signal when using the
OUT TO TV jack.
TRANSPORT KEYS (REVERSE, PLAY, FORWARD, RECORD, STOP,
PAUSE) Use when controlling an auxillary device, such as a VCR or
laserdisc player.
OFF When in home control mode, turns off the selected device.
DIM When in home control mode, dims the selected device.
BRIGHT When in home control mode, brightens the selected device.
ON When in home control mode, turns on the selected device.
13
Page 16
Using the Remote
The Point and Select Method
Point and Select is the two-step method you use to navigate through the
menu system and program guides. Once you know how to point and
select, you can explore the on-screen menus.
1. Point
You point by pressing the arrow keys on the remote. Pressing the
arrow keys moves the on-screen highlight to different items in the
program guide and the menu screens. Pressing an arrow once moves
the highlight one space in the direction of the arrow.
For example, to point down (that is, to move the highlight toward
the bottom of the screen), press the down arrow. To point right,
press the right arrow.
2. Select
Once you have pointed to an item on the screen, select it by
pressing the OK button on the remote. Selecting an item tells the
menu system to go ahead and make the change you have indicated.
For example, the instructions in the User’s Manual might tell you to
Point to the Back button and press OK.
Programming the Remote Control
The DIRECTV System’s remote can be programmed to control most
brands of remote controllable TVs. The remote is programmed to
control most RCA, GE and PROSCAN TVs. The remote needs to be
programmed to control other manufacturers’ brands.
Testing the Remote Control
To determine whether the universal remote control needs to be
programmed, turn a device on, such as a VCR, point the remote at the
VCR, and press the VCR button. Then press POWER or CH+ (channel up)
or CH-(channel down) to see if the VCR responds to the remote
commands. If not, the remote needs to be programmed.
Don’t worry about getting stuck inside a
menu. Pressing the CLEAR button on the
remote takes you out of the menu system
and back to the program you were
watching.
There are two ways to program the remote: automatic or direct entry.
14
Page 17

Using the Remote
Using Automatic Code Search
The following instructions can be used to program the remote to control
each of the devices connected to your TV. If you want to exit the
automatic code search without programming any of your devices, press
CLEAR until the LED turns off.
1. Turn on the device you want to control (VCR, digital satellite
receiver, etc.)
2. Press and hold the device button you want to program (VCR, AUX,
DIRECTV, etc.). While holding the device button, press and hold
ON•OFF until the red light on the remote control turns on, then
release both buttons.
3. Press and release PLAY, then wait 5 seconds or until the LED stops
flashing.
At this point the remote control is searching for the correct code to
program. If, after 5 seconds, the device you want to control does
not turn off, press PLAY again to tell the remote to search the next
set of codes.
This remote control may not operate all
models of the brands that are shown. Use
the codes shown in this manual, or on
the sheet packed with your remote.
Continue pressing PLAY until the device turns off or you have
searched through all of the codes. There are 20 total sets of codes. If
the device does not turn off after pressing PLAY 20 times, then the
remote cannot control that particular device.
If the device you want to control does turn off:
1. Press and release REVERSE, then wait 2 seconds. Repeat thisstep
until the device turns back on.
2. To finish, press and hold STOP until the red light on the remote
turns off.
Using Direct Entry
1. Turn on the component to be programmed.
2. Look up the brand and code number(s) for the component on the
code list on the last page of this section, “Using the Remote.”
3. Press and hold the remote control button corresponding to the
device that you want to program.
4. Enter the code from the code list.
5. Release the button, and then press ON•OFF to see if the component
responds to the remote control commands. If it doesn’t, try pressing
the component button and then ON•OFF again.
6. If you get no response, repeat these steps using the next code listed
for your brand, until the component responds to the remote control
commands.
15
Page 18

Using the Remote
Using the Remote to Control a Device
Once the remote has been programmed successfully, you are ready to
use it to control your devices.
To operate the device:
1. Press the device button (TV, VCR, DIRECTV, DVD, or AUX) to set the
remote to control the device.
2. Press ON•OFF to turn the device on or off.
3. Use the remote control buttons that apply to that device.
Modes of Operation
Because this universal remote can control several different components
(DVD player, VCR, Cable Box, etc.) it uses operational modes triggered by
the component buttons. For example, if you want the remote to control
the TV, you must first press the TV button to put the remote into TV
mode.
Using the Remote to Control a Second
Digital Satellite Receiver
The remote can control two digital satellite receivers. From the Main
menu, select Options, then System Options, then Remote Control Setup.
Have the DIRECTV button control the first receiver; have the AUX button
control the second receiver.
16
Page 19

Using the Remote
ABEX.......................................................................... 1172
ADMIRAL....................................................... 1001, 1173
ADVENTURA .......................................................... 1174
AIK O .......................................................................... 1016
ALLERON ................................................................. 1046
AMTRON.................................................................. 1038
AKAI........................................................................... 1002
ANAM NATIONAL ..................................... 1003, 1038
AOC ......... 1004, 1005, 1006, 1007, 1175, 1176
AUDIOVOX ............................................................. 1038
BELCOR .................................................................... 1004
BELL & HOWELL............................... 1001,1083, 1162
BRADFORD ............................................................. 1038
BROKWOOD .......................................................... 1004
CANDLE .................................. 1004, 1006, 1008, 1174
CAPEHAR T .............................................................. 1175
CELEBRITY ............................................................... 1002
CENTURION........................................................... 1009
CITIZEN.. 1004, 1006, 1008, 1016, 1038, 1105, 1171,
CLAIRTONE ............................................................. 1176
COLORTYME............................................... 1004, 1006
CONCER TO ................................................. 1004, 1006
CONTEC/CONY1012, 1013, 1014, 1038, 1176
CRAIG ....................................................................... 1038
CROWN........................................................ 1038, 1171
CURTIS MA THES ........ 1000, 1004, 1006, 1015, 1105,
1162, 1171..........................................................................
CXC ........................................................................... 1038
DAEWOO 1004, 1005,1006, 1016, 1017, 1018, 1127,
1171 .....................................................................................
DA YTR ON.......................................... 1004, 1006, 1171
DIMENSIA................................................................. 1000
DUMONT...................................................... 1004, 1151
D YNA TECH ............................................................. 1178
ELECTROBAND .......................................... 1002, 1176
ELECTROHOME......... 1003, 1004, 1006, 1019, 1022
EMERSON...............................................................
1004, 1006, 1012, 1014, 1023, 1024, 1025, 1026,
1027, 1028, 1029, 1030, 1031, 1032,1033, 1034, 1035,
1036, 1037, 1038, 1039, 1041, 1042, 1043, 1044,
1046, 1047, 1123, 1124, 1162, 1171, 1176, 1177,
1179, 1191..........................................................................
ENVISION...................................................... 1004, 1006
FISHER .................1048, 1049, 1050, 1051, 1162, 1180
FUJITSO..................................................................... 1046
FUNAI............................................................. 1038, 1046
FUTURETEC ............................................................ 1038
GE ..1000, 1003, 1004, 1006, 1022, 1052, 1054, 1055,
1087, 1164, 1165, 1166, 1167, 1168, 1181 ...................
GIBRAL TER ................................................... 1004, 1151
GOLDSTAR........1004,1005, 1006, 1012, 1019, 1056,
GRUND Y ............................................ 1038, 1046, 1171
HALLMARK................................................... 1004, 1006
HARVARD ................................................................ 1038
HITACHI.. 1004, 1006, 1012, 1013, 1059, 1060, 1061,
1135, 1136, 1137, 1138, 1139,1140, 1141, 1142, 1143,
IMA ............................................................................. 1038
INFINITY................................................................... 1062
1057, 1058, 1155, 1156, 1171, 1172
1144, 1145, 1146, 1148, 1150, 1179
1174, 1177
JANEIL ......................................................................... 1174
JBL ................................................................................. 1062
JCB ................................................................................ 1002
JC PENNY . 1000, 1004, 1005, 1006, 1008, 1022, 1052,
1054, 1058, 1063, 1064, 1072, 1087, 1105, 1128, 1171,
JENSEN ............................................................. 1004, 1006
JVC ... 1012, 1013, 1054, 1060, 1065, 1066, 1067, 1089,
KAW ASHO........................................... 1002, 1004, 1006
KA YPANI..................................................................... 1175
KENWOOD ........................................ 1004, 1006, 1019
KLOSS NOVABEAM ............... 1068, 1069, 1174, 1183
KTV .................................. 1038, 1070, 1171, 1176, 1177
LOEWE ........................................................................ 1062
LOGIK ......................................................................... 1083
LUXMAN ......................................................... 1004, 1006
LXI ... 1000, 1006, 1049, 1062, 1071, 1072, 1073, 1162,
MAGNAVOX....... 1004, 1006, 1008, 1019, 1062, 1068,
1069, 1074, 1075, 1076, 1077, 1088, 1089, 1130, 1131,
MAJESTIC .................................................................... 1083
MARANTS .................................................................. 1062
MARANTZ ................................ 1004, 1006, 1062, 1078
MEGATR ON ................................................... 1006, 1059
MEI ................................................................................ 1176
MEMOREX ..................... 1001, 1006, 1082, 1083, 1162
MGA 1004, 1005, 1006, 1019, 1022, 1051, 1079, 1080,
MIDLAND ...................... 1054, 1151, 1171, 1172, 1181
MINUTZ ...................................................................... 1052
MITSUBISHI1004, 1005, 1006, 1019, 1022, 1051, 1079,
MONTGOMERY WARD ......................................... 1083
MOTOR OLA................................................... 1003, 1173
MTC ...................... 1004, 1005, 1006, 1105, 1176, 1178
MULTITECH.................................................... 1038, 1178
MULTIVISION............................................................ 1084
NAD ............................................ 1006, 1071, 1072, 1185
NEC .................................. 1003, 1004, 1005, 1006, 1089
NIKKO.............................................................. 1006, 1016
NTC ............................................................................. 1016
ONWA ........................................................................ 1038
OPTIMUS .................................................................... 1185
OPTONICA .................................................... 1095, 1173
ORION ............................................................. 1035, 1191
PANASONIC ............................ 1003, 1054, 1062, 1170
PHILCO ..... 1003, 1004, 1005, 1006, 1008, 1012, 1019,
1062, 1068, 1069, 1074, 1075, 1077, 1183, 1184
PHILIPS ......1003, 1004, 1008, 1012, 1019, 1062, 1068,
1069, 1074, 1075, 1076, 1086, 1087, 1088, 1089
PILOT................................................................ 1004, 1171
PIONEER ....1004, 1006, 1090, 1091, 1092, 1179, 1185
PORTLAND ................... 1004, 1005, 1006, 1016, 1171
PRICE CLUB............................................................... 1105
PRISM ........................................................................... 1054
PROSCAN ....................................................... 1000, 1181
PROTON ......................... 1004, 1006, 1012, 1093, 1175
PULSAR .......................................................................1151
TV Codes
1157, 1158, 1159, 1182
1132, 1133, 1134, 1183, 1184
1080, 1081, 1082, 1082, 1125
1172, 1181
1181
1082
PULSER ........................................................................... 1004
QUASAR ........................................ 1003, 1054, 1070, 1094
RADIO SHACK/REALISTIC ..... 1000, 1004, 1006, 1012,
RCA .... 1000, 1003, 1004, 1005, 1006, 1007, 1019, 1096,
1098, 1099, 1100, 1101, 1102, 1103, 1129, 1179, 1181,
RHAPSOD Y................................................................... 1176
RUNCO ......................................................................... 1151
SAMPO ................................ 1004, 1006, 1171, 1172, 1175
SAMSUNG ... 1004, 1005, 1006, 1012, 1015, 1019, 1104,
SAMSUX......................................................................... 1171
SANSUI........................................................................... 1191
SANYO1004, 1048, 1049, 1050, 1080, 1107, 1108, 1162,
SCOTCH........................................................................ 1006
SCOTT...........1004, 1006, 1012, 1024, 1035, 1038, 1046
SEARS. 1000, 1004, 1006, 1013, 1019, 1046, 1048, 1049,
1050, 1051, 1066, 1071, 1072, 1109, 1110, 1162, 1180,
SHARP 1004, 1006, 1012, 1029, 1095, 1111, 1112, 1113,
SHOGUN....................................................................... 1004
SIGNA TURE .............................................1001, 1083, 1115
SIMPSON ....................................................................... 1008
SONIC ............................................................................ 1176
SONY.............................................................................. 1002
SOUNDESIGN .................. 1004, 1006, 1008, 1038, 1046
SQUAREVIEW.............................................................. 1189
SSS..........................................................................1004, 1038
STARLITE....................................................................... 1038
SUPRE-MACY ............................................................... 1174
SUPREME ....................................................................... 1002
SYL VANIA.... 1004, 1006, 1008, 1019, 1062, 1068, 1069,
1074, 1075, 1076, 1077, 1088, 1116, 1161, 1183, 1184
SYMPHONIC ...........................................1033, 1038, 1189
T AND Y ........................................................................... 1173
T A TUNG..............................................................1003, 1178
TECHNICS .................................................................... 1054
TECHWOOD..........................................1004, 1006, 1054
TEKNIKA ..... 1004, 1005, 1006, 1008, 1012, 1013, 1016,
1038, 1046, 1076, 1082, 1083, 1105, 1170, 1171
TELECAPTION ............................................................ 1117
TMK.......................................................................1004, 1006
TOSHIBA ..... 1049, 1071, 1072, 1089, 1105, 1109, 1117,
TO TEVISION ................................................................ 1171
UNIVERSAL .........................................................1052, 1087
VICTOR................................................................1066, 1182
VIDTECH .................................................. 1004, 1005, 1006
VIKING ........................................................................... 1174
WARDS........ 1000, 1001, 1004, 1005, 1006, 1019, 1024,
1033, 1046, 1052, 1062, 1068, 1069, 1074, 1075, 1076,
Y AMAHA........................................1004, 1005, 1006, 1019
ZENITH.................... 1004, 1083, 1151, 1152, 1153, 1154
1038, 1049, 1095, 1162, 1171, 1172
1187, 1188, 1190
1105, 1106, 1171, 1172
1169, 1180
1181, 1189
1122, 1171, 1173
1118, 1160, 1162
1083, 1087, 1088, 1095, 1119, 1120, 1184
Laserdisc/DVD Player Codes
GE ............................................................................... 2001
PROSCAN ................................................................. 2001
RCA ............................................................................. 2001
17
Page 20

Using the Remote
Admiral .................................................................................. 2131
Adventura.............................................................................. 2026
Aiko ........................................................................................ 2027
Aiwa............................................................................. 2002, 2026
Akai............. 2003, 2004, 2005, 2007, 2008, 2111,2112, 2113
American High ..................................................................... 2021
Asha ........................................................................................ 2013
Audio Dynamics ....................................................... 2009, 2010
Audiovox ............................................................................... 2014
Bell & Howell........................................................................ 2011
Beaumark .............................................................................. 2013
Broksonic ................................................................... 2012, 2025
Calix ....................................................................................... 2014
Candle ...................2013, 2014, 2015, 2016, 2017, 2018, 2019
Canon............................................................... 2021, 2022, 2114
Capehart..................................................................... 2020, 2110
Carver .................................................................................... 2062
CCE ............................................................................. 2027, 2061
Citizen........ 2013, 2014, 2015, 2016, 2017, 2018,2019,2027
Colortyme ............................................................................ 2009
Colt......................................................................................... 2061
Craig ...................................................... 2013, 2014, 2023, 2061
Curtis-Mathes ..................................... 2000, 2002, 2009, 2013,
.......................................... 2016, 2018, 2021, 2022, 2024, 2115
Cybernex ............................................................................... 2013
Daewoo ..... 2015, 2017, 2019,2025, 2026, 2027, 2028, 2110
Daytron.................................................................................. 2110
Dbx .............................................................................. 2009, 2010
Dimensia................................................................................ 2000
Dynatech .................................................................... 2002, 2026
Electrohome .............................................................. 2014, 2029
Electrophonic ....................................................................... 2014
Emerson .......................................................... 2002, 2012,2014,
......................2015, 2021, 2024, 2025,2026,2029, 2030, 2032,
.........2033, 2034, 2035, 2036, 2037, 2038, 2039, 2040, 2041,
2042, 2044, 2045, 2047, 2065, 2105, 2113, 2116, 2117, 2130
Fisher.......... 2011, 2023, 2048, 2049, 2050, 2051, 2052,2118
Fuji ............................................................................... 2021, 2119
Funai ............................................................................ 2002, 2026
Garrard .................................................................................. 2026
GE ...............2000, 2001, 2013, 2021, 2022, 2053, 2115, 2120
Goldstar..................................... 2009, 2014, 2018, 2054, 2121
Gradiente .............................................................................. 2026
Harley Davidson .................................................................. 2026
Harman Kardon ................................................................... 2009
Harwood ............................................................................... 2061
Headquarter ......................................................................... 2011
Hitachi........ 2002, 2055, 2056, 2057, 2107, 2111, 2120, 2122
HI-Q ....................................................................................... 2023
Instant Replay ....................................................................... 2021
JCL .......................................................................................... 2021
JC Penney .......................... 2009, 2010, 2011, 2013, 2014, 2021,
...................... 2022, 2055, 2056, 2058, 2059, 2060, 2107, 2118
Jensen .................................................................. 2055, 2056, 2111
JVC............................2009, 2010, 2011, 2018, 2058, 2111, 2123
Kenwood...... 2009, 2010, 2011, 2016, 2018, 2058, 2111,2123
KLH ........................................................................................... 2061
Kodak ............................................................................. 2014, 2021
Lloyd............................................................................... 2002, 2026
Logik.......................................................................................... 2061
LXI ............................................................................................. 2014
Magnavo x.................2021, 2022, 2062, 2063, 2104, 2108, 2124
Magnin ....................................................................................... 2013
Marantz .............................................................. 2009, 2010, 2011,
.............................................. 2016, 2018, 2021, 2058, 2062,2064
Marta ......................................................................................... 2014
Masushita.................................................................................. 2021
MEI............................................................................................. 2021
Memorex...................................................................... 2002, 2011,
................................. 2013, 2014, 2021, 2023, 2026, 2104, 2131
MGA.................................................................... 2029, 2065, 2113
MGN T echnology .................................................................... 2013
Midland ..................................................................................... 2053
Minolta ................................................................ 2055, 2056, 2107
Mitsubishi ............... 2029, 2055, 2056, 2065, 2066, 2067, 2069,
...................... 2070, 2071, 2072, 2073, 2074, 2106, 2113, 2123
Montgomery Ward...................................................... 2075, 2131
Motorola........................................................................ 2021,2131
MTC .................................................................... 2002, 2013, 2026
Multitech ............................2002, 2013, 2016, 2026, 2053, 2061
NEC.............................................. 2009, 2010, 2011, 2016, 2018,
................................. 2058, 2064, 2076, 2078, 2079, 2111, 2123
Nikko......................................................................................... 2014
Noblex ...................................................................................... 2013
Olympus ................................................................................... 2021
Optimus......................................................................... 2014, 2131
Optonica................................................................................... 2096
Orion ........................................................................................ 2035
Panasonic............................2021, 2022, 2109, 2125, 2126, 2127
Pentax ........................................... 2016, 2055, 2056, 2107, 2120
Pentex Research ..................................................................... 2018
Philco........................................................ 2021, 2022, 2062, 2063
Philips ....................................................... 2021, 2062, 2096, 2124
Pilot ........................................................................................... 2014
Pioneer.......................................... 2010, 2055, 2080, 2081, 2123
Portland ................................................... 2016, 2017, 2019, 2110
Proscan .......................................................................... 2000, 2001
Protec........................................................................................ 2061
Pulsar......................................................................................... 2104
Quarter .................................................................................... 2011
Quartz....................................................................................... 2011
Quasar ................................................................ 2021, 2022, 2125
VCR Codes
RCA ....................................... 2000, 2001, 2003, 2013, 2021,
................. 2055, 2056, 2082, 2083, 2084,2085, 2086,2087,
................ 2088, 2089, 2090, 2091, 2107, 2115, 2120, 2125
Radioshack/Realistic....................... 2002, 2011, 2013, 2014
.... 2021, 2022, 2023, 2026, 2029, 2049, 2050, 2096, 2131
Radix................................................................................... 2014
Randex ............................................................................... 2014
Ricoh .................................................................................. 2128
Runco ................................................................................. 2104
Samsung ...................... 2005, 2013, 2015, 2033, 2053, 2112
Sanky .......................................................................2131, 2104
Sansui ................................................ 2010, 2092, 2111, 2123
Sanyo ............................................................ 2011, 2013, 2023
Scott ...... 2012, 2015, 2025, 2032, 2035, 2038, 2065, 2093,
Sears ....................................... 2011, 2014, 2021, 2023, 2048,
........................... 2049, 2050, 2051, 2055, 2056, 2107, 2118
Sharp ................ 2002, 2017, 2029, 2094, 2095, 2096, 2131
Shintom............................................. 2004, 2056, 2061, 2098
Shogun ............................................................................... 2013
Signature................................................................ 2002, 2131
Singer............................................................ 2021, 2061, 2128
Sony ............................. 2002, 2004, 2098, 2099, 2119, 2128
STS........................................................................... 2021, 2107
Sylvania.. 2002, 2021, 2022, 2026, 2062, 2063, 2065, 2124
Symphonic.............................................................. 2002, 2026
T andy ....................................................................... 2002, 2011
T ashik o ............................................................................... 2014
T atung...................................................................... 2058, 2111
TEAC...................................... 2002, 2026, 2058, 2085, 2111
Technics .................................................................. 2021, 2109
Teknika ........................ 2002, 2014, 2021, 2026, 2100, 2129
TMK.............................................................. 2013, 2024, 2047
Toshiba ............. 2015, 2049, 2051, 2055, 2065, 2093, 2116
ToteVision .............................................................. 2013, 2014
Unitech .............................................................................. 2013
V ector Research ............................. 2009, 2010, 2015, 2016
Victor ................................................................................. 2010
Video Concepts ................... 2009, 2010, 2015, 2016, 2113
Videosonic ........................................................................ 2013
Wards............. , 2002, 2013, 2014, 2015, 2021, 2023, 2026,
..... 2029, 2055, 2056, 2061, 2096, 2101, 2102, 2103, 2107,
XR-1000 ...................................................... 2021, 2026, 2061
Y amaha........................ 2009, 2010, 2011, 2018, 2058, 2111
Zenith..................................... 2004, 2098, 2104, 2119, 2128
Aux .....................................................................................4004
Phono ................................................................................. 4005
CD ...................................................................................... 4007
T a pe .................................................................................... 4006
2116
2116, 2131
ABC ....................... 5002, 5003, 5004, 5005, 5006, 5007, 5053
Antronix ......................................................................5008, 5009
Archer.................................................... 5008, 5009, 5010, 5011
Cabletenna ............................................................................. 5008
Cableview............................................................................... 5008
Century ..................................................................................5011
Citizen..................................................................................... 5011
Colour V oice ...............................................................5012, 5013
Comtronics.................................................................5014, 5015
Contec .................................................................................... 5016
Eastern ....................................................................................5017
Garrard ................................................................................... 5011
GC Electronics...................................................................... 5009
Gemini ..............................................................5018, 5019, 5049
General Instrument ............................................................. 5003
Hamlin......................................... 5020, 5021, 5022, 5035, 5045
Hitachi..................................................................................... 5003
Hytex.......................................................................................5002
Jasco ........................................................................................5011
Jerrold ......... 5003, 5005, 5007,5018, 5023, 5024, 5046, 5053
18
Cable Box Codes
Magnavox.................................................................................. 5025
Memorex.................................................................................. 5026
Movie Time ........................................................ 5002, 5027, 5028
NSC ..................................................................... 5002, 5027, 5028
Oak ....................................................................... 5002,5016, 5029
Panasonic....................................................................... 5048, 5052
Paragon ..................................................................................... 5026
Philips ............ 5011, 5012, 5013, 5019, 5025, 5030, 5031, 5032
Pioneer........................................................................... 5033, 5034
Pulsar......................................................................................... 5026
RCA ..................................................................... 5047, 5049, 5052
Realistic.......................................................................... 5009, 5049
Regal ............................................................................... 5022, 5035
Regency .................................................................................... 5017
Rembrandt ............................................................................... 5003
Runco ........................................................................................ 5026
Samsung ......................................................................... 5014, 5034
Scientific Atlanta..................................... 5006, 5036, 5037, 5038
Signal............................................................................... 5014, 5018
Signature................................................................................... 5003
SL Marx............................................................................. 5014
Sprucer ............................................................................. 5052
Starcom........................................................5007, 5018, 5053
Stargate .................................................................. 5014, 5018
Starquest........................................................................... 5018
T andy ................................................................................. 5040
Teleview ............................................................................ 5014
Tocom ..........................................................5004, 5023, 5041
Toshiba .............................................................................. 5026
Tusa .................................................................................... 5018
TV86 .................................................................................. 5027
Unika ............................................................ 5008, 5009, 5011
United Artists .................................................................. 5002
United Cable ................................................................... 5053
Universal...........................................5008, 5009, 5010, 5011
Videoway.......................................................................... 5044
Viewstar............................................5015, 5025, 5027, 5040
Zenith...........................................................5026, 5050, 5051
Page 21

Program Guides
Program Guides
What is a Program Guide?
A program guide is an on-screen programming schedule.
There are several types of guides, each presenting the
schedule in a different format.
Using the program guide is easy as long as you remember the
Point and Select rule. Point to items on the screen by pressing
the arrow keys on the remote control or front panel. Then,
press OK to select your choice.
Setup and Connections
1
➣
Using the Remote
2
➣➣
Program Guides
3
The Menu System
4
➣
Tips & Troubleshooting
5
19
Page 22
Program Guides
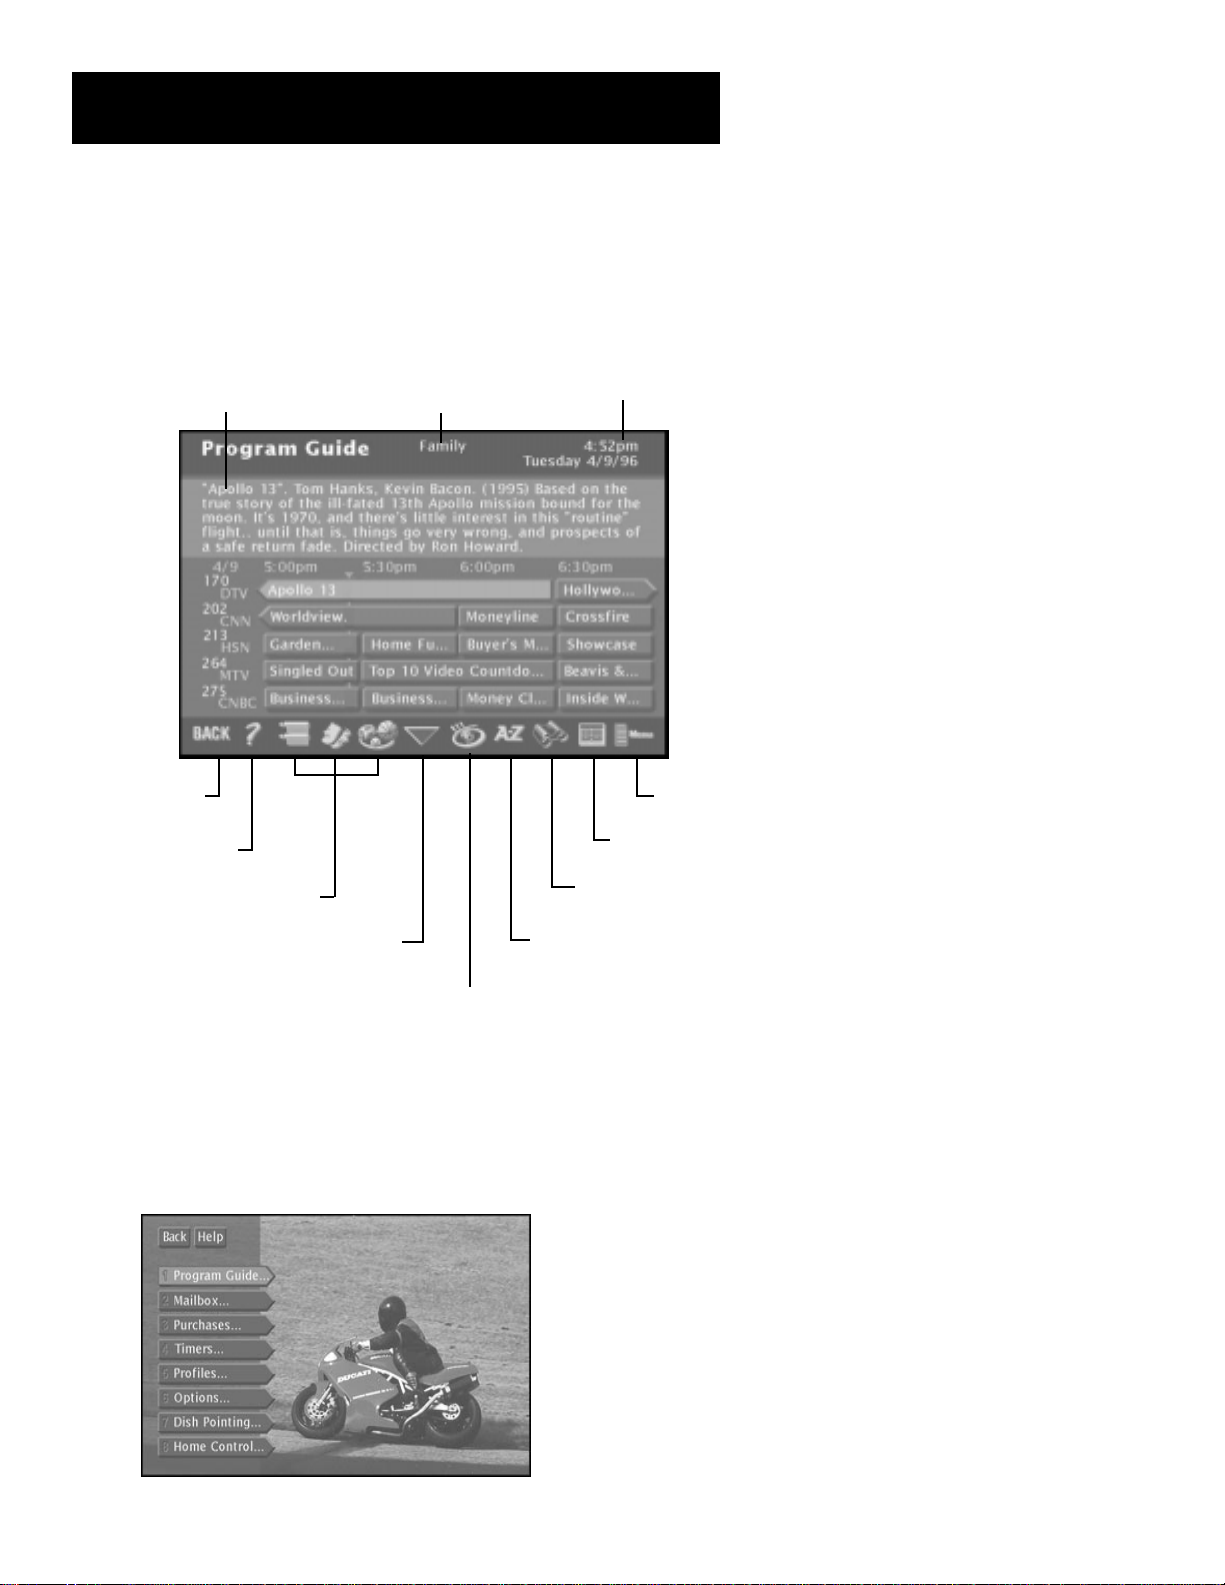
Anatomy of a Program Guide
The following diagram shows you the kind of information you will see
in the program guides.
Program titles
and information
Returns you to
previous screen
Help gives you
more information
Sort the guide by
topics, movies, or
sports
“Family” is one of five
selectable Profiles
Scrolls through
the guide
Indicates current time
Takes you to
the Main menu
Displays more
sorting options
Searches guide for
specific information
Sorts the current guide
alphabetically by title
Shows all available programs
Bringing Up the Program Guides
You can access the program guides by pressing MENU on the remote
control and selecting Program Guide, or by using the GUIDE button on
the remote.
20
Page 23

Program Guides
The Channel Banner
The channel banner appears whenever you tune to a channel, exit a
guide, or press INFO or DIRECTV on the remote control. Use the arrow
buttons and OK to choose an item.
On-screen icons represent frequently-used menu items. Some icons also
change appearance to show the item’s status. Some of the items you
select in the guides can also be selected in the channel banner.
Program titles
and information
Takes you to
the Main menu
Locks and unlocks
the system
Sorts the guide
alphabetically by title
Main menu icon When selected, will take you to the Main menu.
Green Unlock icon The system is unlocked. Spending, viewing and other
limits can be accessed and changed.
Yellow Unlock icon A password has been entered to override family or
profile limits. No limits can be accessed or changed.
“Family” is one of five
selectable Profiles
Cycles through the
Alternate Audio choices
Use home control or
data port
Read mail from
program providers
Searches guide for
specific information
Yellow Unlock icon with a “P” A password has been entered to override
limits for the current program only. After the program ends, limits are
restored.
Red Lock icon No limits can be accessed or changed. A password is required
to override limits or access the system.
AlphaSort icon When selected, allows you to sort program titles
alphabetically.
Highlighted Scout (binoculars) icon A Scout has found program
information. When not highlighted, selecting it enables you to set up a scout.
Highlighted Mail icon Indicates a message in your mailbox. When not
highlighted, selecting it transfers you to the mail control panel.
Home Control or Data Port icons The icon changes appearence
depending on how the Home Control jack on the back panel is used.
Alternate Audio icon When selected, cycles through the available
alternate audio choices.
21
Page 24

Program Guides
Using the GUIDE Button
Each press of the GUIDE button takes you to an alternate type of
program guide.
The Grid Guide
The Grid Guide shows seven channels in a time-and-channel format,
with the full title of the highlighted program at the top of the guide.
The Detail Guide
The Detail Guide shows five channels in a time-and-channel format, with
program information for the highlighted program at the top of the
guide.
The SurfGuide
The SurfGuide displays seven channels in a half-hour time-and-channel
format. Press the right arrow button to extend the SurfGuide to show
the next two hours.
Grid Guide
Getting Around in the Guides
This section describes how to change channels and move around the
program guide.
Point to Channels With the Number Keys (0-9)
You can point quickly to any channel in the program guide by entering
the channel number with the number keys (0-9). For example, to point
to channel 228, press the numbers 2-2-8 on the remote control. To point
to channel 530, press 5-3-0.
Scrolling Channel By Channel
The programs that you see on the TV screen make up one section—or
page—of the total program guide. You can scroll to other sections using
the arrows: point to other times with the left and right arrows; point to
other channels with the up and down arrows.
Scrolling Page By Page
If you want to scroll up or down through the program guide faster, press
the CH +/- buttons on the remote control. The highlight scrolls a page at
a time.
Detail Guide
SurfGuide
By default, the Detail Guide appears when
you press GUIDE on the remote control.
You can change the default guide from
the Detail Guide to the Grid Guide or
SurfGuide.
Select Options from the Main menu.
Select Look and Feel, then set the Default
Guide.
22
Page 25

Program Guides
Tuning to a Program
To tune directly to a current program listed in the guide, point to the
program and press OK.
To see information about a program in the guide, point to it and press
INFO.
The Program Details screen appears and gives you
several options.
Then, you can select:
• View Channel to tune to that channel
• Other Times to see what other times the program is available. The
program title is automatically entered and sorted in the AlphaSort
control panel.
The options available to you may vary according to the type of program
you select.
23
Page 26

Program Guides
Additional Program Guides
Besides the Detail Guide, Grid Guide, and SurfGuide, there are a few
more guides: the Channel Guide, the Logo Guide and the Attractions
Guide.
You can access these guides by selecting the Other Guides button at the
bottom of the Detail Guide and Grid Guide.
The Channel Guide
Displays a channel’s programming schedule in a channel-by-channel
format.
Other Guides button
The Channel guide
The Logo Guide
Displays channel logos for the current user’s channel list.
The Logo guide
You can point to any program then tune
to that channel or get more information
by pressing the OK button.
Exiting A Program Guide
There are three ways to exit a guide:
• Point to a channel and press OK.
• Point to Back and press OK.
• Press CLEAR or GO BACK on the
remote control.
24
Page 27

Program Guides
The Attractions Guide
Displays a list of channels that show coming attractions and special
events information.
The Attractions guide
The Other Guides button also lets you sort the guide by different
variables, such as future times, user profile channel lists, and
channel groups. You can then choose a guide format to view the
program information.
Select the Other Guides button. You can select multiple sort
parameters. For example, you could sort the guide by pay-per-view
movies that are available at a future time.
Other Guides button
Select Guide Data and use the arrow and OK buttons to choose the
Guide Data group.
Guide Data lets you see what’s on in the
future.
25
Page 28

Program Guides
Then, select PPV in the Channel Groups category.
Channel Groups is another way to sort types of
programming.
Select Back, or press the GO BACK button on the remote control to
return to the previous guide. You can also choose another guide format
from the category list.
Sorting the Guides
Sorting the guide is a way of organizing the guide to show only the
types of programs that interest you. There are several on-screen buttons
that sort the guide in different ways.
The Sorting buttons appear at the bottom of the
Grid Guide and Detail Guide.
26
Page 29

Program Guides
Topics
The Topics button sorts the guide according to the current user’s
preferences. Select the Topics button to sort the guide.
The Topics button changes to the Topics Themes button. Press the Topics
Themes button to edit the current user’s themes preferences. These
preferences are saved in each user’s profile.
Checkmark the themes that interest you.
Select the categories, and checkmark the themes you would like to
appear when you select the Topics button in the guides. Programming
that fits the description of checkmarked themes will appear in the guide
when you sort by the Topics button.
Topics button
Topics Themes button
Movies
Select the Movies button to list movies only. After selecting Movies, the
Movies button changes to a Movies Themes button.
Select the Movies Themes button to sort the guide to list specific types
of movies, such as comedies or musicals.
Select a Movies Theme that interests you.
Movies button
Movies Themes button
27
Page 30

Program Guides
Sports
Select the Sports button to list sporting events only. After selecting
Sports, the Sports button changes to a Sports Themes button.
Select the Sports Themes button to sort the guide to list specific types of
sports, such as basketball or soccer.
Select a Sports Theme that interests you.
All
The All button resets the guide to show all available topics, channels and
listings for the current Profile.
AlphaSort
AlphaSort lists in alphabetical order all the program titles in the current
guide. Select the AlphaSort button to search for specific program titles
that are in the current program guide. Use the arrow buttons to
highlight a character, then press OK.
Sports button
Sports Themes button
All button
For example, to search for the program, Auto Racing, the first letter you
should point to and select is “A”. (Words like “The”, “A” and “An”
appear at the end of a title.) All titles that begin with “A” appear in the
AlphaSort list. Next, enter the letter “U”. All titles beginning with “AU”
appear in the list.
AlphaSort searches for specific titles in the guide.
AlphaSort button
28
Page 31

Program Guides
Continue entering the specific title’s letters until it appears in the
AlphaSort list. If you enter the wrong letter, select either Backspace or
Clear All.
Use the arrow buttons to highlight the title you are looking for. Press
the OK button to select it, or the INFO button to see more information.
Only titles that are in the current program guide can be found by
AlphaSort.
Scout
The Scout button lets you assign “Scouts” to search the guide for very
specific program information, such as actors’ names or program
descriptions. Select the Scout button from the program guide to view
the available scouts.
Point to an available Scout, and select it. Select the Enter Text button to
set up the information the Scout will look for in the program guide. Use
the on-screen keyboard to enter the desired search parameters.
For example, if you are interested in National Basketball Association
events, enter a common term you might see in program information,
like “NBA.”
Scout button
Select Enter Text to set up a Scout.
If “NBA” appears within a program title or program description, the
program will be included in the Scout Results program list.
The Scout will search for information when the digital satellite receiver
is off. (This may take up to 30 minutes for a full guide search.) You can
check a Scout’s results by selecting a Scout button.
Scouts look for specific program information.
A checkmark next to the Scout means it is
in use.
A highlighted binocular icon means the
Scout has found something.
29
Page 32

Program Guides
The Other Buttons
Back
Exits the guide and returns you to normal viewing on the current
channel. Press OK to continue.
Help
Brings up additional information about the guide. Press OK to continue.
Down Arrow
The arrow button allows you to scroll down through other channels in
the guide. Point to the down arrow, and then press OK to scroll down
through the program guide.
The Main Menu
Back button
Help button
Arrow button
Brings up the system Main menu. Press OK to continue.
Main menu button
30
Page 33

The Menu System
The Menu System
What’s a Menu?
The on-screen menu is a list of choices, just like a menu in a
restaurant. And, just as a restaurant menu is divided into sections
such as appetizers, entrees, and desserts, the on-screen menus are
also separated into sections to help you find the information you
need.
Don’t Forget Point and Select
As with all of the on-screen displays, you use Point and Select to
navigate.
Setup and Connections
1
➣
Using the Remote
2
➣
Program Guides
3
➣➣
The Menu System
4
Tips & Troubleshooting
5
31
Page 34

The Menu System
Using the Menu System
To bring up the Main menu, press MENU on the remote control.
Use point and select to choose an item from the Main
menu.
To use the menu system, you need to know the Point and Select rule (see
the “Using the Remote” section). Use the arrows on the remote control
to point to an item on the screen, and then press OK to select it.
Back and Help
There are Back and Help buttons at the top of most screens. Point to
Back and press OK to leave that screen. Point to Help to see more
information about that screen.
Use the MENU button to bring up the
Main menu, and then use Point and
Select to choose a menu option.
Exiting a Screen
There are three ways to exit a menu:
• Point to Back and press OK.
• Press the CLEAR button on the remote control. The on-screen
displays clear from the screen and you return to TV viewing.
• Press the GO BACK button on the remote control. You return to the
previous on-screen display or normal programming.
Using Help
All menus have a Help button. For example, selecting the Help button
from the Main menu shows you information about using the Main menu
screen.
The rest of the Help buttons in the menu system bring up helpful
information explaining one aspect of that menu.
If the Main menu doesn’t appear when
you press MENU, the remote control
might not be in DIRECTV mode. Try
pressing the DIRECTV button on the
remote control, and then press OK.
Context-Sensitive Help
Most of the screens contain information
to help you decide what to do next. If
you get stuck, look for the help text at
the bottom of the screen.
32
Page 35

The Menu System
Menu Descriptions
This section briefly describes each of the available Main menu options.
More information about each menu and its features is included later in
this chapter.
Program Guide
Shows the on-screen programming schedules.
Mailbox
Use to read mail messages from your program providers.
Purchases
Use to review or cancel upcoming purchases, to review
past purchases, and to set spending limits.
Timers
Allows you to schedule the DIRECTV System to tune to a specific channel
at a specific time.
Profiles
Allows you to set rating limitss, spending limits, and viewing hours, as
well as create favorite channel lists.
Options
Allows you to find out more about the digital satellite receiver and
remote control, change how your DIRECTV System looks, run the system
test, and install a new access card.
Dish Pointing
Use to find your dish pointing coordinates, and to access the on-screen
signal strength meter.
Home Control
With the proper equipment, this feature lets you control certain devices
and appliances in your house.
Don’t Be Afraid to Explore
Once you’ve learned the basics, feel free to poke around the menu
system—exploring is the best way to learn. The context-sensitive help at
the bottom of the screen provides instructions for getting through the
current menu or control panel. Remember, press CLEAR at any time to
leave the menu system and return to regular viewing.
Don’t Forget About the CLEAR
Button
Press the CLEAR button on the remote
control to remove the on-screen menus
and return to normal viewing.
33
Page 36

The Menu System
The Program Guide
Selecting Program Guide brings up your default program guide: the
Detail Guide, the Grid Guide or SurfGuide.
Anatomy of a Program Guide
The following diagram shows you the kind of information you will see in
the Detail Guide and Grid Guide.
Program titles
and information
Returns you to
previous screen
Help gives you
more information
Sort the guide by:
Topics, Movies, or Sports
“Family” is one of five
selectable Profiles
Scrolls through
the guide
Indicates current time
Takes you to
the Main menu
Displays more
sorting options
Searches guide for
specific information
Sorts the current guide
alphabetically by title
Shows all available programs
Bringing Up the Program Guides
Besides selecting Program Guide in the Main menu, you can press the
GUIDE button on the remote control.
34
Want More Information?
Read the “Program Guides” section of this
book for all the details.
Page 37

The Menu System
The Mailbox
The mailbox shows you messages that are sent—or “mailed”—from your
program providers. For example, you may receive a message calling your
attention to a new service.
How to Tell When you Have Mail
There are two ways to tell if you have mail, depending on whether the
digital satellite receiver is turned on or off.
• If the receiver is turned on, the mail icon in the channel banner is
highlighted.
• If the receiver is turned off, the power light on the front panel of
the receiver flashes.
Checking Your Mail
Select Mailbox on the Main menu or channel banner to view your mail.
1. Point to a message and press OK. The message is opened for you to
read.
Mail provides the latest information from program
providers.
2. Press OK again to close the letter.
After you read a message and want to erase it, point to Erase
Message and press OK. When you exit the display screen, messages
not erased are saved in memory.
35
Page 38

The Menu System
Pay-Per-View Programs
Pay-per-view programs (PPV) are programs that you purchase—like a
movie ticket—on an event-by-event basis. For instance, a channel with
pay-per-view programs may run nothing but previews for movies. After
previewing the movie, you can purchase it or find out more details
about it. Pay-per-view programs are labeled “PPV” in the Program
Guide.
Purchasing and Previewing
There are several ways to purchase and preview Pay-Per-View movies
and events:
• Tune to a pay-per-view program’s channel. Program providers may
offer on-screen purchase instructions, usually as the program begins.
• Choose a pay-per-view program from the program guide.
• Preview a coming attraction by selecting a channel from the
Attractions Guide.
Tuning to a Pay-Per-View Program
When you use the channel buttons or digits on the remote control to
tune to a pay-per-view channel, you need to press the INFO button to
bring up the Program Details screen in order to purchase a program.
Use the program guide to get to the Program
Details screen.
Follow the on-screen instructions to purchase the selected program.
You may need to enter your four-digit
password to order a pay-per-view
program if it costs more than the
spending limit you set up in the Profiles
menu.
36
Page 39

The Menu System
Using the Program Guide for Pay-PerView Programs
Another way to get to the Program Details screen is by using the
program guide. Highlight the program name in the guide and press
INFO.
The Program Details screen gives you several
options.
You need to connect your phone line to
your digital satellite receiver to be able to
order pay-per-view programs using the
on-screen menus.
You can select:
• View Channel to tune to that channel
• Buy Program to purchase the program
• Other Times to see what other times the program is available. The
program title is automatically entered and sorted in the AlphaSort
control panel. If no other times are available, this option will not be
available.
The options available to you may vary according to the type of program
you select.
Using the Attractions Guide
Your program providers may offer future programming events not
currently listed in your program guide. These events are called “coming
attractions” and can be previewed in the Attractions Guide.
1. Press the GUIDE button on the remote control until the Detail Guide
or Grid Guide appears on-screen.
2. Use the down arrow button to move the highlight to the bottom of
the screen.
3. Point to and select the Other Guides button.
4. Point to and select the Attractions Guide.
37
Page 40

The Menu System
The Other Guides menu provides several guide
formats.
5. Point to a channel and select it.
The Attractions Guide is accessed through the
Other Guides menu.
Using the Purchases Menu
The Purchases menu allows you to review upcoming and past purchases.
The Purchases menu shows you upcoming or past
purchases, and spending limits.
The list of purchases may be longer than one screen; use the down
arrow keys to see more items. The display also shows the title, channel,
date, time, and cost of each program.
• Note that the Past Purchases list might be modified after each
billing cycle and show purchases for which you have
already paid.
38
Page 41

The Menu System
Reviewing and Canceling an Upcoming Purchase
Use Point and Select to choose an upcoming purchase from the Future
Purchases screen. You can review the program description, as well as
cancel an upcoming purchase.
The Purchase Edit screen lets you cancel an
upcoming purchase.
Spending Limits
Use the Spending Limit option to indicate a per-event spending limit for
pay-per-view programs.
1. Point to Spending Limit, and press OK.
You can set a per-event spending limit for each
Profile.
2. Use the digits on the remote control or use the arrow keys to enter
a single-program spending limit.
After a spending limit is set and the system is locked, you must enter a
password to purchase a pay-per-view program that costs more than your
spending limit allows.
Important!
Spending limits are in effect only when
the system is locked. See the section
“Locking the System” for details.
39
Page 42

The Menu System
Timers Feature
The Timers feature allows you to preset your digital satellite receiver to
automatically tune to a particular channel at a predetermined time.
To use the Timers feature, select Timers from the Main menu to bring up
the Timers screen. Select a Timer (1-8) and then use the arrow keys to
complete the on-screen sentence. When the sentence is complete, select
Run Timer.
Complete the on-screen sentence to set up a timer.
Profiles
When you select Profiles from the Main menu, the first screen you see is
the Master Edit control panel. In addition to the Family profile, you can
create as many as four different profiles that can be easily accessed by
using the WHO button on the remote control.
On-screen icons are an easy way to
understand the timers:
Indicates that the timer is set.
Indicates a timer conflict.
Editing or Canceling a Timer
From the Timers screen, select the Timer
you want to edit or cancel, and then do
the following:
• Use the arrow keys to edit the
Timer, then select Run Timer.
• Select Clear Timer to cancel the
timer.
• To watch the program daily
or weekly, edit that program’s
timer.
You can personalize the profile by entering a name.
You can personalize each profile.
You can also edit the user profiles. Select a profile from the Edit Users
control panel. By moving down the options you can create or edit the
user’s channel list, set a rating limit, viewing hours, per-event spending
limits and assign a profile password.
40
Page 43

The Menu System
Creating a Profile Channel List
1. Point to and select a user.
2. Point to Edit Channels and press OK.
To start, you can add or delete all channels.
3. Use the arrow keys to point to a channel, and press OK to remove
(or replace) the check mark. Checkmarked items appear in the
channel list.
Add or Delete All Channels
You might be able to save time when creating a channel list by using the
Add All Chans option or the Delete All Chans option to either add all
channels or delete all channels before removing or adding individual
channels.
Also, program providers may make additional channels available. To
prevent new channels from appearing in a profile channel list, choose
Delete All Chans and checkmark only the channels you want to appear
in the list.
Setting the Rating Limit
The Rating Limit menu enables you to set a maximum viewing limit for
rated movies (based on the MPAA ratings system), as long as the
program provider has transmitted the proper code.
• Note that the rating limit cannot be enforced if a program has not
been rated, if rating information for that program is not
transmitted by the program provider, or if the system has not been
locked.
1. Point to Set Rating Limit and press OK.
41
Page 44

The Menu System
Use the arrow keys to move the selector up and
down.
2. Use the up and down arrows to move the rating selector to the
highest rating you want to be able to view. In the preceding
illustration, movies that are rated up to and including a “PG-13”
rating can be viewed.
After the Rating Limit is set and the system is locked, you must enter the
system password to watch programs with a rating higher than your
limit.
Viewing Hours
Use the Viewing Hours option to limit the total amount of time, as well
as the viewing hours, that a user can watch programming.
1. Point to Viewing Hours, and press OK.
You can limit viewing seven days a week.
2. Use the digits on the remote control or point to the + or – and press
OK to complete the on-screen sentence. Choose the days to view,
how many hours can be viewed each day (0-24 hours), and when
programming can be viewed. Be sure to lock the system for these
limits to take effect.
Important!
You need to lock the system in order for
rating limits, channel limits, viewing
hours, and spending limits to go into
effect.
After you lock the system, you need to
enter the system password to edit the
limits. See “Locking the System” for
details.
42
Page 45

The Menu System
Setting Up Spending Limits
Select the Spending Limit option to indicate a per-event spending limit
for pay-per-view programs.
1. Point to Spending Limit, and press OK.
You can set a per-event spending limit for each
profile.
2. Use the digits on the remote control or use the arrow keys to enter
a single-program spending limit.
After a Spending Limit is set and the system is locked, you must enter
the system password to purchase a pay-per-view program that costs
more than your Spending Limit allows.
Locking a User’s Profile
Each user can be assigned a personal password to lock his or her profile.
When a password is assigned, the user must enter the password before
he or she can view programs using that profile. Profile passwords do not
allow access to or editing of the profile limits. You must enter the system
password to edit profile limits.
1. Point to Lock User and press OK.
Each user can have a password.
2. Use the arrow or digit keys to select each number of the password.
After the system has been locked, you
must enter the correct password in order
to access the Edit Users control panel.
Don’t Forget Your Password
If you forget a USER password, you need
to unlock the system and then assign a
new user password.
If you forget the SYSTEM password,
contact your program provider’s
authorization center.
43
Page 46

The Menu System
Locking the System
You can lock the system to activate the ratings, spending, viewing, and
channel limits you have set up. When you lock the system, no one can
modify any of these settings without first entering the four-digit system
password.
1. Point to Lock System and press OK.
Locking the system protects the limits you set up.
2. Use the arrows or the digits to enter a four-digit
system password.
3. Enter the password a second time to confirm it.
Your limits are now in effect. Exit out of the menu system to block access
to the limits.
Unlocking the System
When the system is unlocked, the channel, spending, viewing, and
rating limits that you set are no longer in effect. To unlock:
1. Point to Unlock System in the Profiles menu and press OK.
2. Point to Yes and press OK to confirm that you want to unlock the
system.
When you attempt to access a channel that is blocked by one or more
limits and the system is locked, you will be asked to override limits by
entering the four-digit system password.
If you enter the password to override a limit, all limits are unlocked until
you turn off the digital satellite receiver. When you turn on the receiver
again, the system will be locked, and the Family profile channel list will
be selected. If you want to re-lock the system without turning off the
receiver, you can select the lock icon in the channel banner.
Program Unlock
If the system is locked and you want to access a blocked program
without unlocking all settings, press INFO and highlight the Lock icon in
the channel banner. Make sure to check the box beside Unlock this
program only, and enter the system password. This program is no longer
blocked, but all other settings remain in effect. After the program ends,
the system will return to its fully-locked state.
The Lock/Unlock icons in the channel
banner provide an easy way to lock or
unlock the system. Just press INFO and
select the icon to change the lock status.
Green Unlock icon The system is unlocked.
Spending, viewing and other limits can be
accessed and changed.
Yellow Unlock icon A password has been
entered to override family or profile
limits. No limits can be accessed or
changed.
Yellow Unlock icon with a “P” A password
has been entered to override limits for the
current program. After the program ends,
limits are restored.
Red Lock icon No limits can be accessed or
changed. A password is required to
override limits or access the system.
44
Page 47

The Menu System
Choosing Your Profile
Each time you turn on the digital satellite receiver, the Family profile is
selected by default. To select a different Profile:
1. Press the WHO•INPUT button to scroll through the profiles.
The WHO•INPUT button toggles through the profiles.
2. When your profile appears, enter your four-digit personal password
to activate your profile.
• If the profile is not password protected, you can just press OK to
activate it.
The channel, spending, rating, and viewing limits associated with the
chosen profile will be active only when the system is locked.
Options
The Options menu lets you set up preferences for the look and feel of
your DIRECTV System as well as how some of the features work.
The Options menu lets you change how different
features work.
The following sections explain your options when changing your
personal preferences. Follow the on-screen instructions to make changes
to the DIRECTV System.
45
Page 48

The Menu System
Interactive Setup
If you self-installed your satellite dish antenna, you may have already
used the interactive setup to find the dish pointing coordinates, acquire
and fine-tune the signal, and run a system test. If you just want to check
your dish pointing coordinates, or run the signal strength meter, select
Dish Pointing from the Main menu.
System Info
Select System Info from the Options menu to choose from a list of onscreen Help topics. Point and select to find out about the specific parts
of the DIRECTV System.
Program Guide shows a screen-by-screen overview of the Program
Guide features.
Menu System shows a screen-by-screen overview of the DIRECTV
System menus.
Remote Control shows a descriptive list of the remote control buttons.
Front Panel shows a list of the digital satellite receiver’s front panel
features. Point to an item to see a brief description.
Back Panel shows a list of the digital satellite receiver’s back panel
features. Point to an item to see a brief description.
Glossary shows a list of common DIRECTV System and TV terms. Point
to a glossary item to see a brief description.
Look and Feel
Default Guide lets you choose which guide appears first when you
press the GUIDE button on the remote control. The choices are Grid
Guide, Detail Guide and SurfGuide.
Color Scheme lets you pick which color appears in the guides and
menu system.
Translucency lets you choose the translucency of the menu displays.
Slide the indicator bar to make the screens more opaque or less opaque.
Animation lets you select which graphics are displayed and also lets you
select the animation time-out.
Edit Fetch lets you combine your favorite menu items onto one menu,
or assign one function to the Fetch button on the remote control.
46
Page 49

The Menu System
System Options
System Test The System Test display screen is accessed through the
Options menu, and allows you to initiate diagnostic procedures on the
DIRECTV System. Use this feature to get your access card number, or
when your digital satellite receiver doesn’t seem to be working correctly.
A message screen appears, telling you whether the DIRECTV System has
passed each test. If it fails a test, run the system test several times before
concluding that there is a problem. Occasional fluctuations in the phone
line or DIRECTV signal can give temporary false readings.
New Access Card Periodically, your program provider may issue you a
replacement access card. The New Access Card Setup display screen allows
you to transfer the information from the old card onto the new one. The
access card fits into the digital satellite receiver through the front panel.
Follow the display screen prompts to initialize your new card. Once you
have transferred the information to the new card, your old card becomes
invalid.
Because your specific account information is stored in the access card,
power failures should have no effect on your DIRECTV System.
Remote Control Setup Lets you choose which remote control button
will control the digital satellite system if you are using a universal remote
control that did not come with the system.
Output Channel Lets you choose on which channel to view satellite
programming, either channel 3 or channel 4.
Picture Size The Picture size display screen allows you to choose
between a standard TV screen and a Cinema option. A standard TV
screen has an aspect ratio of 4:3; the Cinema option has an aspect ratio
of 16:9.
Data Port Lets you choose whether the low speed data port is used for
low speed data or communicating with the Home Control Base accessory.
See the Home Control section in this book for more information.
Audio Language
When you select Audio Language from the Options menu, the Audio
Language display screen comes up.
Point to the audio language or audio type you want and press OK. The
digital satellite system audio will then automatically be set to the
selected language (when the language is available).
Alternate Data
Selects from among the available data on the current channel.
47
Page 50

The Menu System
The Dish Pointing Menu Screen
Follow these steps to obtain your dish pointing coordinates:
1. Turn on your television and digital satellite receiver.
2. Tune your television to the receiver’s output channel.
3. Press MENU on the remote control to bring up the Main menu.
4. Use the arrows to highlight Dish Pointing, and then press OK to
access the dish pointing screen.
NOTE: The menu screen that you see may be slightly different from
the one pictured here.
5. Use the arrows on the remote control or the front panel to
highlight ZIP Code, and then press OK.
6. Enter the ZIP Code for the satellite dish antenna location.
7. Record the elevation and azimuth numbers below.
Elevation _____________ Azimuth ___________
Elevation is the up/
down angle that the
satellite dish antenna
is pointed.
Azimuth is the sideto-side direction that
the satellite dish
antenna is pointed.
You only need to use one of the available
methods to find your dish pointing
coordinates. If you know the ZIP Code for
the satellite dish antenna location, use
that.
48
Page 51

The Menu System
Using the On-Screen Signal Meter
The signal strength meter is used to determine whether or not you are
receiving the satellite signal; it also indicates the strength of the
satellite signal.
Follow these steps to bring up the on-screen signal meter:
1. Turn on your television and digital satellite receiver.
2. Tune your television to the receiver’s output channel.
3. Press MENU on the remote control to bring up the Main menu.
4. Use the arrows to highlight Dish Pointing, and then press OK to
access the dish pointing screen.
5. Use the arrows on the remote control to highlight Signal Meter
and then press OK.
If the satellite dish antenna is pointed to the
correct azimuth and elevation, the signal meter
will show you the current signal strength (and you
should hear a continuous tone).
If you are not receiving a signal, you need to incrementally adjust the
azimuth setting on the satellite dish antenna. After you receive a signal,
you will want to continue to adjust the azimuth to try to get the best
possible signal.
Important
Changing transponders is not the same as fine-tuning the satellite dish
antenna. Although the signal strength may appear to change, this may
be due to different types of interference. To fine-tune the satellite dish
antenna, consult the Installation Guide and follow the instructions on
adjusting the satellite dish antenna elevation and azimuth.
Peak Signal
The “Peak Signal” indicates the highest
signal strength you have obtained, which
is not necessarily the highest possible
signal.
Although the maximum signal strength is
100, the signal strength you achieve will
probably be less. There is no difference in
picture quality between signal strengths
of 60 and 85, however, the higher the
signal, the less likely you are to
experience negative effects in degraded
conditions such as rain or snow (called
“rain fade”).
49
Page 52

The Menu System
Home Control
home control lets you remotely control several lamps and devices
through your digital satellite receiver.
Home Control Setup
The Home Control Data Interface connects to the HOME CONTROL jack
on the back of the digital satellite receiver. Once connected, you must
tell the receiver to use this port for home control.
1. Press MENU to bring up the Main menu.
2. Point to and select Options.
3. Point to and select System Options.
4. Point to and select Data Port and choose Home Control as the
default setting.
Device Setup
1. From the Main menu select Home Control.
Home control can control several devices.
2. Select a device you would like to control.
3. Complete the on-screen sentence using the arrow buttons and OK.
Press OK to scroll through the lists of devices and locations.
To use the home control feature, you must
connect one end of the Home Control
Data Interface to a remote module
attached to the appliance you want to
control. The other end should connect to
the HOME CONTROL jack on the back of
the digital satellite receiver via a coiled
telephone handset cord (available from
most retailers).
50
Home Control Jack
on the Back Panel
Home control modules are available as
accessories sold through your satellite
dealer or the accessories order form at the
back of this book.
Page 53

The Menu System
Keep track of devices by assigning a label.
4. Use the arrow buttons and OK to select the house and module
codes that match the device’s remote control module and label the
module. Select Save Setup to complete the setup.
Device Control
Once the device is set up, there are three ways to control it: with the
menu system, with a timer, or with the remote control.
If you use the menu to control the device:
Select a device from the Home Control menu screen. You can then turn
it on, turn it off, or adjust the brightness for lamp modules.
Select Edit Setup to change a device.
Control the device from the menu.
If you use a timer to control a device:
1. Select Set Timer.
2. Schedule a timer by completing the on-screen sentence.
On-screen icons are an easy way to
understand the timers:
Indicates that the timer is set.
Complete the on-screen sentence to schedule a
timer.
Indicates that the timer is suspended.
You can schedule several timers to control
the same device at different times.
51
Page 54

The Menu System
3. Use the arrows and OK to enter an on and off time.
4. Point to and select Run T imer.
Clear Timer removes all the timer information.
Suspend turns off the timer, but saves the timer information.
If you use the remote to control a device:
1. Press the HOUSE ICON button on the remote control to put it in
home control “mode.”
2. Press the digit key (1-8) corresponding to the device number you
would like to control.
3. Use the remote control buttons that apply to home control (OFF,
DIM, BRIGHT, and ON). The DIM and BRIGHT buttons will only work
for devices you have identified as lamps in the home control setup.
The ON and OFF buttons work as DIM and BRIGHT buttons for
lamps.
Edit Fetch Menu
Press the HOME CONTROL icon on the
remote control, then press 0, then ON, to
simultaneously turn on all devices that
you have identified as lamp modules.
Press the HOME CONTROL icon, then 0,
then OFF, to turn off all devices at once.
The Edit Fetch menu gives you the option of using Fetch in two ways:
• You can customize eight functions on the Fetch menu, or
• You can customize the Fetch button on the remote control to take a
certain action each time it is pressed.
To view the Edit Fetch Menu, press MENU to bring up the Main menu,
select Options, select Look and Feel, and then select Edit Fetch.
The Edit Fetch menu is a convenient way to call up
frequently used menu items.
52
Page 55

The Menu System
Customizing the Fetch Menu
To customize your Fetch menu:
1. Press MENU to bring up the Main menu.
2. Point to and select Options, Look and Feel, and then Edit Fetch.
3. Select Fetch Control.
4. Press OK to choose Show Fetch Menu.
5. Select Fetch List from the Edit Fetch menu.
6. Choose up to eight menu items you would like to include in your
customized menu by checkmarking them with the OK key.
Choose which menu items to include in your
customized Fetch menu.
7. Press the left arrow key to confirm your selections and return to the
menu.
When you would like to access your customized menu, press the FETCH
button on the remote control.
53
Page 56

The Menu System
Customizing the FETCH Button
To customize the FETCH button on the remote control so it performs one
function when pressed:
1. Press MENU to bring up the Main menu.
2. Point to and select Options, Look and Feel, and then Edit Fetch.
3. Select Fetch Control.
4. Choose Assign One Function.
5. Select Fetch List from the Edit Fetch menu.
6. Choose which menu item you would like to assign to the FETCH
button by pointing and selecting.
Choose which menu item to assign to the FETCH
button.
7. Press the left arrow key to confirm your selection and return to the
menu.
You may press the FETCH button on the remote control and execute the
assigned function at any time while viewing satellite programming.
54
Page 57

Tips & Troubleshooting
Tips & Troubleshooting
Tips for Solving Problems
You may have some questions about using your digital
satellite system that you are unsure how to answer. This
section provides the answers to such questions. You will
find out how to run a system test, and how to diagnose
and correct problems.
Setup and Connections
1
➣
Using the Remote
2
➣
Program Guides
3
➣
The Menu System
4
➣
Tips & Troubleshooting
5
55
Page 58

Tips & Troubleshooting
Running the System Test
The System Test allows you to run a basic diagnostics check on your
DIRECTV System. If you are experiencing any trouble with your system,
run the system test. It will allow you to get your Access Card number, or
to initiate diagnostic procedures on the DIRECTV System.
First make sure that:
• All connections—jacks, cables, etc.—are correctly in place. See the
section “Setup and Connections” for more information.
• There are batteries in the remote control and they are working.
• The access card is installed in the receiver.
Follow these steps to run the system test:
1. Turn on your TV and the receiver.
2. Press the DIRECTV button on the remote control to put it in
DIRECTV System mode, then press MENU to bring up the Main
menu.
3. Point to and select Options.
4. Point to and select System Options.
5. Point to and select System Test.
6. If your system does not pass the system test, check these potential
trouble areas: cabling, pointing the satellite dish antenna, phone
connection, and access card.
7. If you continue to have problems, call 1-800-679-4776.
You should run a system test several
times before concluding that there is a
problem. Occasional fluctuations in the
phone line or satellite signal can give
temporary false readings.
56
Page 59

Tips & Troubleshooting
Fine-Tuning the Signal
If you self-installed your satellite dish antenna, you may have already used
the interactive setup to find the dish pointing coordinates, acquire and
fine-tune the signal, and run a system test.
If you need to run the interactive setup again, select Options from the
Main menu, then select Interactive Setup.
Selecting Interactive Setup from the Options menu.
If you just want to check your dish pointing coordinates, or run the signal
strength meter, select Dish Pointing from the Main menu.
If the satellite dish antenna is pointed to the correct
azimuth and elevation, the signal meter will show you the
current signal strength (and you should hear a continuous
tone).
57
Page 60

Tips & Troubleshooting
How Signal Flow works
Satellite Signal
From dish antenna
Digital Satellite Receiver
IN
If you use coaxial cables
(and no audio/video
cables), view the DIRECTV
or off-air antenna signal
by tuning the:
TV to channel 3
VCR to channel 3
SATELLITE IN
ANT IN
OUT TO TV
OUT
FROM
TO
ANT
TV
Audio Out
Right
Left
Video Out
Video
S-Video
VCR
CH 3
CH 4
TV Signal
From antenna or cable
If you use coaxial cables along
with audio/video cables, view
the DIRECTV signal or off-air
antenna by tuning the TV to its
video input channel.
Audio/video cables
Coaxial cables
TV
ANT IN
Audio In
Left
Right
Video
Video In
S-Video
How the Satellite Signals get to Your TV
In the example above:
1. Program providers send signals to your satellite dish antenna.
2. The satellite dish antenna sends the signal to the receiver’s SATELLITE IN jack.
3. The signal continues through the coaxial cable to the VCR and then to the TV. (The VCR may seem like an
unnecessary link in the chain, but this setup lets you record programming and off-air antenna/cable programming.)
If you use audio/video cables, the satellite signal also flows through the audio/video cables to the TV’s line inputs (left,
right, and video or S-video).
How Off-Air Antenna/Cable Signals get to Your TV
In the example above:
1. Off-air/cable broadcasters send signals to your off-air antenna or through cable to your home.
2. The signal continues through the coaxial cable to the digital receiver and then to the VCR. The signal can also pass
through the VCR to the TV. (The VCR may seem like an unnecessary link in the chain, but this setup lets you record
programming and off-air antenna/cable programming.)
58
Page 61

Tips & Troubleshooting
Wrong picture
The digital satellite receiver and most VCRs let you toggle between pictures:
one is the picture from the receiver and one is from the VCR. If you don’t see
the picture you think you should be seeing, try using these buttons to toggle
between the pictures:
• Press the TV/VCR button on the VCR remote control or on the VCR’s
front panel.
• Press the ANTENNA button on the remote control.
Taking either of these actions lets you switch the source of the video signal
from satellite to the off-air satellite dish antenna or cable, and vice versa.
Problems with the remote control
• Maybe something is between the remote control and the remote sensor.
• Maybe the remote control is not in DIRECTV (or, if your remote is older,
SAT1) mode. Press the DIRECTV button so the remote will control the
satellite receiver.
• Maybe the batteries in the remote control are weak, dead or installed
incorrectly. Try replacing batteries. (Note, if you remove the batteries,
you may have to reprogram the remote to control other components.)
• Remove the batteries and hold the number 1 button for at least 60
seconds to drain the microprocessor inside the remote. Release the
button, replace the batteries, and (if necessary) reprogram the remote.
• Remove all batteries for approximately 12 hours. Then replace batteries
and (if necessary) reprogram the remote.
Blank screen
• Maybe the device (VCR, receiver, DVD, etc.) connected to the input jacks
is not on.
• Try another channel; there may just not be any programming on at that
time.
Digital satellite receiver will not turn on
• Check to make sure it is plugged in.
• Check the wall receptacle (and extension cord, if applicable) to make
sure it is “live” by plugging in something else.
• Maybe batteries in remote control are “dead.”
• Maybe remote control is not aimed at remote sensor.
• Unplug for 5 minutes. Plug in again.
LED light flashes on front panel
• You have mail. Read the message by selecting Mailbox from the Main
menu and selecting the message. Flashing will stop.
59
Page 62

Tips & Troubleshooting
Turns off while playing
• Electronic protection circuit may have been activated because of a
power surge. Wait 30 seconds and then turn on again. If this
happens frequently, the voltage in your house may be abnormally
high or low.
TV turns on or changes channels unexpectedly
• Scheduled Watch from the Timers menu may have been activated.
60
Page 63

Appendix A: Warranty Information
Repair Help
Thomson Consumer Electronics offers hardware repair service should
you encounter any problems with your digital satellite system. Many
problems can be diagnosed over the phone, or if necessary, a
replacement unit can be shipped to you. Please have your DIRECTV
model, serial number and date of purchase ready when you call.
If your unit is out of warranty, we will quote the cost of an exchange
unit to you. Refer to RCA Satellite System Limited Warranty for the
repair service phone number.
Returning Equipment to Thomson for Repair or
Exchange
If we are unable to resolve your problem over the phone we will gladly
service your unit or exchange it for a new or refurbished unit. Refer to
the limited warranty included in the booklet to learn about your specific
rights and responsibilities. Always consult Thomson and get a Return
Authorization number before returning anything. Obtain a Return
Authorization (RA) number from the telephone representative before
returning your equipment to avoid delays, accounting errors, or even
loss of your unit.
Important Information to Customers Who Ship
Defective Equipment to Thomson Consumer
Electronics
The Thomson representative who authorizes the return of your
equipment will give you an RA number over the phone. The
representative will also provide you with instructions on where and how
to return your unit. Write the number in large, clear characters on the
outside of the box. To avoid confusion and misunderstandings,
shipments without an RA number clearly visible on the outside of the
box will be returned to you at your expense.
Include a brief note describing the problem and any conversations you
have had with Thomson personnel about the problem. Include your
name, address and model/serial number of your unit. These numbers
are located on the back of your receiver. If your satellite system is within
the warranty period, please provide a copy of the bill of sale to verify
purchase date. Use the original box and packing material to protect the
equipment from damage in shipment. For your protection, insure all
shipments for full replacement value and use a reliable shipper.
Thomson assumes no responsibility for warranty shipments from the
customer to the factory if not shipped in the manner prescribed by
Thomson.
61
Page 64

Appendix A: Warranty Information
RCA SATELLITE SYSTEM LIMITED
WARRANTY
What your warranty covers:
• Any defect in materials or workmanship.
For how long after your purchase:
• 90 days - Unit exchange, which includes parts and labor.
• 91 days to 1 year - Unit exchange, which includes parts only; you pay
the labor.
• The warranty for rental units begins with the first rental or 45 days
from date of shipment to the rental firm, whichever comes first.
What we will do:
• During the initial 90 days:
Exchange the defective portion of your DIRECTV System with a new
or, at our option, refurbished unit.
• After the 90 days and within one year:
Exchange the defective portion of your DIRECTV System with a new
or, at our option, refurbished unit. We will charge you a flat
exchange cost to replace a defective receiver. This charge covers the
labor cost for its repair.
How you get service:
• Call 1-800-679-4776 and have your unit’s date of purchase and
model/serial number ready. The model/serial number information is
on the back of your receiver.
• A representative will troubleshoot your problem over the phone.
• If the representative determines that you should receive a
replacement digital satellite receiver you will be provided with a
Return Authorization (RA) number and the location of a nearby
exchange point if one exists. No returns will be accepted without
the RA number.
• If the representative determines that your satellite dish antenna is
defective he or she will arrange for its repair or replacement.
62
Page 65

Appendix A: Warranty Information
Option 1
1. Provide your Discover, MasterCard or Visa account number and
expiration date to your phone representative. This is for security
purposes only and your account will not be charged at this time.
2. We will send you a replacement unit.
3. If you return the unit to us within 14 days from the date you were
provided a RA number, only items not covered by warranty will be
charged to your account. If your unit is not received within 14 days, the
suggested retail value of the receiver will be charged to your credit card.
This amount will be credited, less a $10 handling fee, if the unit is
subsequently received.
4. Ship your defective unit back to us using the replacement unit’s carton.
Shipping instructions will be included on the carton along with your RA
number which will allow you to easily ship the unit back to us. Make
sure you insure your shipment in case of damage or loss. Include with
the shipment:
• Evidence of purchase date such as a bill of sale.
• A brief note describing your receiver problem.
• Your name, address and phone number.
Option 2
1. We will send a replacement unit to our exchange point.
2. The exchange location will notify you of its arrival.
3. Take your unit and evidence of purchase date, such as a bill of sale, to
the exchange location and you will be provided the new or refurbished
unit. Please retain all accessories such as the remote control hand unit.
4. If the repairs are covered by your warranty, you will not be billed.
Thomson assumes no responsibility of warranty shipments from the
customer to the factory if not shipped in the manner prescribed by
Thomson.
To receive a replacement digital satellite receiver after
we have received your unit:
• Write the RA number on the outside of the carton used to return the
unit. Make sure you insure your shipment in case of damage or loss.
• Carefully pack the unit using the original box and packing material if
possible. Please retain all accessories that were included with your unit
such as the remote control hand unit.
• Include with the shipment:
1. Evidence of purchase date such as a bill of sale.
2. A brief note describing your digital satellite receiver problem.
3. Your name, address and phone number.
63
Page 66

Appendix A: Warranty Information
• The representative will advise the address to mail a cashier’s check or
money order for payment if there are any out of warranty labor or
parts charges, and you elect not to use your credit card.
• After we receive your product, a new or refurbished unit will be
shipped to you.
What your warranty does not cover:
• Acts of God, such as but not limited to lightning damage.
• Adjustment of customer controls.
• Damage from misuse or neglect.
• A unit that has been modified or incorporated into other products
or is used for institutional or other commercial purposes.
• Batteries.
• Units purchased, serviced or operated outside the continental U.S.A.
or Alaska.
• For units intended for use in Alaska, this warranty does not cover
installation or the dish antenna. It only covers the digital satellite
receiver.
• Loss of programming.
• Installation.
• Shipping damage if the unit was not packed and shipped in the
manner prescribed by Thomson.
• Storage fees may be charged by the exchange point if you fail to
pickup the replacement unit in a timely manner.
Product registration:
• Please complete and mail the Product Registration Card packed with
your product. It will make it easier to contact you should it ever be
necessary. The return of the card is not required for a warranty
coverage.
How state law relates to warranty:
• This warranty gives you specific legal rights and you may have other
rights, which vary from state to state.
If you purchased your product outside the United
States:
• This warranty does not apply. See your dealer for warranty
information.
64
Page 67

Appendix B: FCC Regulations
FCC Registration Information
Your equipment is registered with the Federal Communications
Commission and is in compliance with parts 15B and 68, FCC Rules and
Regulations.
1. Notification to the Local Telephone Company.
On the bottom of this equipment is a label indicating among other
information, the FCC Registration number and Ringer Equivalence
Number (REN) for the equipment. You must, upon request, provide this
information to your telephone company.
The REN is useful to determine the number of devices you may connect
to your telephone line and still have all these devices ring when your
telephone number is called. In most (but not all) areas, the sum of the
RENs of all devices connected to one line should not exceed 5. To be
certain of the number of devices you may connect to your line as
determined by the REN, you should contact your local telephone
company.
Note: This equipment may not be used on coin service provided by the
telephone company. Party lines are subject to state tariffs, and therefore
you may not be able to use your own telephone equipment if you are on
a party line. Check with your local telephone company.
Notice must be given to the telephone company upon permanent
disconnection of your equipment from your line.
2. Rights of the Telephone Company.
Should your equipment cause trouble on your line which may harm the
telephone network, the telephone company shall, where practicable,
notify you that temporary discontinuance of service may be required.
Where prior notice is not practicable and the circumstances warrant such
action, the telephone company may temporarily discontinue service
immediately. In case of such temporary discontinuance, the telephone
company must: (1) promptly notify you of such temporary
discontinuance (2) afford you the opportunity to correct the situation
and (3) inform you of your right to bring a complaint to the Commission
pursuant to procedures set forth in Subpart E of Part 68, FCC Rules and
Regulations.
The telephone company may make changes in its communications
facilities, equipment, operations of procedures where such action is
required in the operation of its business and not inconsistent with FCC
Rules and Regulations. If these changes are expected to affect the use or
performance of your telephone equipment, the telephone company
must give you adequate notice, in writing, to allow you to maintain
uninterrupted service.
65
Page 68

Appendix B: FCC Regulations
Radio Interference
This equipment has been type tested and found to comply with the
limits for a Class B Digital Device in accordance with the specifications in
Part 15 of FCC Rules. These rules are designed to provide reasonable
protection against radio and television interference in a residential
installation. This equipment generates, uses and can radiate radio
frequency energy and, if not installed and used in accordance with the
instructions, may cause harmful interference to radio communications.
However, there is no guarantee that interference will not occur in a
particular installation.
If this equipment does cause interference to radio or television reception
(which you can determine by turning the equipment off and on), try to
correct the interference by one or more of the following measures:
• Reorient or relocate the receiving antenna (that is, the antenna for
radio or television that is “receiving” the interference).
• Change the position of the digital satellite receiver with respect to
the radio or television equipment that is receiving interference.
• Move the satellite dish antenna away from the equipment that is
receiving interference.
• Plug the digital satellite receiver into a different wall outlet so the
receiver and equipment that is receiving interference are on
different branch circuits.
If these measures do not eliminate interference, please consult your
dealer or an experienced radio/television technician for additional
suggestions. Also, the Federal Communications Commission has
prepared a helpful booklet, “How To Identify and Resolve Radio/TV
Interference Problems”. This booklet is available from the U.S.
Government Printing Office, Washington, D.C. 20402. Please specify
stock number 004-000-00345-4 when ordering copies.
66
Page 69

Appendix C: Accessories
Accessory Order Form for Satellite Systems
RG-6 Coaxial Burial Cable
with weatherproof “F”
connectors
Self-Installer’s Kit contains
cable and hardware to
install the dish and connect
the system.
Remote Control replaces a
lost remote. Or, order a
second remote for
convenience.
RG-6 Coaxial Cable
12 feet D912 $12.95
25 feet D925 $15.95
50 feet D950 $21.95
75 feet D975 $29.95
S-Video Cable 12 feet D913 $12.95
Weatherproof “F” Connector (2) D905 $ 5.95
TVRO Bullet Amplifier D903 $24.95
Self-Installer’s Kit DKIT96 $69.95
Remote Control 240968 $34.95
Home Control Kit HCDSS10 $59.95
Lamp Module HC10LM $14.95
2-Prong Appliance Module HC20AM $16.95
3-Prong Appliance Module HC25AM $16.95
Part No.Description
Price
Qty
HCDSS10 Home Control Kit*
contains a Data Interface
that connects to the receiver
and a lamp module.
HC10LM Lamp module* lets
you control incandescent
lamps. Use to dim or
brighten and to turn lamps
on and off.
HC20AM or HC25AM
appliance modules* turn
small appliances, like coffee
pots, popcorn makers, or
stereos, on or off. Also
controls non-incandescent
lamps. Choose 2-prong
(HC20AM) or 3-prong
(HC25AM).
Prices are subject to change without notice.
Total Merchandise ...............................................................
Sales Tax.............................................................................
We are required by law to collect the appropriate sales tax
for each individual state, country, and locality to which
the merchandise is being sent.
Shipping, Handling, and Insurance .....................................
Total Amount Enclosed........................................................
Use VISA, MasterCard, or Discover preferably.
Money order or check must be in U.S. currency only.
✂
No COD or CASH.
$
$
$ 5.00
$
* To use the home control feature, you must connect
the Home Control Data Interface module to the
HOME CONTROL jack on the back of the reciever via
a coiled telephone handset cord (available from
most retainers).
All accessories are subject to availability.
Detach Here
Please complete other side also
67
Page 70

Appendix C: Accessories
Charge your order on your VISA,
MasterCard, or Discover Card by
USE YOUR CREDIT CARD
IMPORTANT: Copy complete account number
IMPORTANT: Copy complete account number
Copy Number
above your
name on
MasterCard
IMPORTANT: Copy complete account number
filling in below
from your VISA card
My card expires:
from your MasterCard
My card
expires:
from your Discover Card
Placing an Order
To place your order by phone, have your Visa,
®
s
rr
TM
MasterCard or Discover Card ready and call the toll-free
number listed below between 8AM and 10PM (EST)
Monday through Friday or between 9AM and 5PM (EST)
Saturday.
Use this number only to place on order for accessory
items listed on this order form.
1-800-338-0376
To place your order by mail, detach and mail the
completed order form with credit card information,
money order or check in US currency (made payable to
Thomson Consumer Electronics, Inc.) to the following
address:
Video Accessories
PO Box 8419
Ronks, PA 17573
My card expires:
AUTHORIZED SIGNATURE
(Credit card order will not be processed without signature)
Prices are subject to change without notice.
Print or type your name and
address clearly.
Name:
Street:
City:
State:
A complete and correct
order will save you days
of waiting.
Apt:
Zip:
Please make sure that both sides of this form
have been filled out completely.
• Allow 4 weeks for delivery.
• All accessories are subject to availability.
• Prices are subject to change.
68
Page 71

Index
A
Access card
number 10
Accessories 67
All button 28
AlphaSort button 28
Alternative data 47
ANTENNA button 13
Arrows on remote 12
Attractions Guide 25,37
Audio Language 47
AUX button 12
B
Buttons 12
C
Cancelling purchases 39
Channel banner
anatomy 21
icons 21
Channel Guide 24
Channel lists 41
add channels 41
delete channels 41
CLEAR button 13
Connections
jacks and cables 5
D
Data port 21
Default guide 22
Detail Guide 22
DIRECTV button
12, 16, 32, 56, 59
Dish Pointing 48
azimuth 48
elevation 48
menu 33
DVD button 12
E
Exiting
menus 32, 33
program guides 24
F
Fetch
customizing 53
items 53
menu 52
FETCH button 12
G
GO BACK button 12
Grid Guide 22
GUIDE button 22
Guides. See program guides
H
Help 30
Home Control 50
accessories 67
icon 21
menu 33
setup 50
timers 51
Home Control remote
buttons 13
I
Icons 21, 40, 44, 51
INFO button 12
Interactive setup 9, 46, 57
L
LED light 12, 59
Locking
a profile 43
the system 21, 42, 44
Logo Guide 24
Look and feel 46
M
Mailbox
checking your mail 35
deleting mail 35
icon 21
Main menu 30, 31, 35
MENU button 12, 32
Menu system
exit 32
help 32
icons 40, 44, 51
navigation 14
Menus
Dish Pointing 33, 48
Fetch 52
Home Control 33, 50
Mailbox 33, 35
Options 33, 45
Profiles 33, 40
Program Guide 33
Purchases 33
Timers 33, 40
Movies button 27
MUTE button 12
O
OK button 12
Options menu 33, 45
Other Guides
Attractions Guide 37
button 25
P
Passwords 43
Pay-per-view programs 36
tuning to 36
Profiles
channel lists 41
choosing 45
locking 43
menu 33, 40
ratings limits 41
spending limits 43
unlocking 45
viewing hours 42
Program guides 19
anatomy 20, 34
Attractions Guide 25
buttons 25
Channel Guide 24
default 22
Detail Guide 22
exiting 24
Grid Guide 22
help 30
Logo Guide 24
scrolling 22
sorting 26
SurfGuide 22
tuning to a program 23
Programming the Remote 14
Purchases 36
cancelling 39
menu 33, 38
previewing 36
reviewing 39
spending limits 39
R
Rating limit 41
Remote control
buttons 12
Reviewing purchases 39
S
Scout 29
button 29
results 29
Scrolling 22
Signal Flow 58
Signal meter 49
peak signal 49
SKIP button 12
Sorting
program guides 26
Sorting by
All button 28
AlphaSort button 28
Movies button 27
Scout button 29
Sports button 28
Topics button 26
Spending limits 39, 43
Sports button 28
SurfGuide 22
System lock 44
System options 47
System test 56
System unlock 44
T
Timer feature
editing or cancelling 40
Timers
Home Control 51
icons 40, 51
Timers menu 33, 40
Topics button 26
Transponders 49
Tuning to a program 23
TV button 12
U
Unlocking
a profile 45
the system 21, 44
V
VCR button 12
Viewing hours limit 42
W
Warranty information 62
WHO•INPUT button 13
69
Page 72

If your satellite system needs service, please contact your dealer or
the nearest Servicenter from the Yellow Pages. Please do not send
any products to the Indianapolis address listed in this manual or on
the carton. This will only add delays in service for your product.
100%
10330 North Meridian Street
Indianapolis, IN 46290
©1999 Thomson Consumer Electronics, Inc.
Trademark(s)® Registered
Marca(s) Registrada(s)
DIRECTV is a trademark of DIRECTV, Inc., a Hughes Electronics unit,
and is used with permission.
Printed in USA
TOCOM 15423980
RECYCLED PAPER
MINIMUM 40% POST CONSUMER
 Loading...