

Page 1
I
DSSSqsrem
Installation
TrainingFlanual
Page 2
Foreword
This publication is intended to assist the installation technician installing the RCA brand DSS TM Digital
Satellite System. In this publication, basic installation techniques are covered for most common situations.
Included in each explanation is a suggested material and tool list. Also included is an overview of the DSS
System plus a signal flow description of the DSS receiver. This information is included to help the technician
install the system and explain its operation to their customers.
Safety Information!
DANGER Avoid Power Lines! When following the instruction in this guide to install and connect the
satellite antenna and connections, take extreme care to avoid contact with overhead power lines, lights, and
power circuits. Contact with these items may prove fatal.
Outdoor Dish Grounding: The outdoor dish used to receive satellite signals and the cable used to connect
the outdoor dish to the indoor receiving unit are required to comply with local installation codes and the
appropriate sections of the National Electrical Code (NEC), especially Article 810 and Article 820. These
codes require proper grounding of the metal structure of the outdoor dish and grounding of the connecting
cable at a point where it enters the house (or other building). The DSS System Installation Training Manual
contains instructions on how to install the system in compliance with the National Electrical Code (NEC).
If additional local installation codes apply, contact local inspection authorities.
Compliance with National Electrical and Local Codes: Before installing the Digital Satellite System,
check the electrical codes in your area.
Restrictions: Before installing the dish, check the zoning codes, covenants, and community restrictions in
your area. Some rules prohibit installing large satellite dishes, but may allow small ones. Also, there may
be restrictions in your area that limit the mounting height of dishes.
If you encounter homeowner or community restriction's, call 1-800-679-4776. Personnel at this number
can provide information that may be helpful when attempting to obtain permission to install the DSS Digital
Satellite System on the property.
* DSS and Digital Satellite System is an official trademark of DIRECTV, Inc., a unit of GM
Hughes Electronics.
Prepared by
Second Edition 9415 - First Printing
Copyright 1994
Thomson Consumer Electronics, Inc.
Trademark(s)® Registered Marca (s) Registrada(s)
Thomson Consumer Electronics, Inc.
Technical Training Department
10330 North Meridian St.
Indianapolis, Indiana 46290-1024
Page 3

Table of Contents
Overview ................................................................................................................................... 5
Technical Overview ................................................................................................................. 10
Satellites ............................................................................................................................... 12
Dish ...................................................................................................................................... 14
Receiver Circuitry ................................................................................................................ 16
Diagnostics ........................................................................................................................... 17
Site Survey ................................................................................................................................ 22
Installation ................................................................................................................................ 32
Mounting the Dish ................................................................................................................ 32
Vertical Mounting Systems .................................................................................................. 42
Panel Siding ............................................................................................................................................. 42
Lap Siding ................................................................................................................................................. 46
Brick ......................................................................................................................................................... 52
Onder Block ............................................................................................................................................. 56
Horizontal Mounting Systems .............................................................................................. 63
Deck Railing ............................................................................................................................................. 63
Roof ..........................................................................................................................................................64
SpecialMounting Systems ...................................................................................................69
PoleMount ...............................................................................................................................................69
Chimney....................................................................................................................................................72
Dish Assembly .....................................................................................................................79
AssembletheDish.....................................................................................................................................79
InstalltheLNB Cable...............................................................................................................................81
InstalltheLNB ..........................................................................................................................................86
AttachingLNB CabletoReceiver.............................................................................................................88
TelephoneCableInstallation...................................................................................................................91
InstallingtheReceiver..........................................................................................................98
System Connections..................................................................................................................................I00
AligntheDish ......................................................................................................................105
DetermineAzimuthand Elevation............................................................................................................106
AdjustElevation........................................................................................................................................I07
AdjustAzimuth..........................................................................................................................................107
AcquiringSignal.......................................................................................................................................I09
Troubleshooting ....................................................................................................................... 114
APPENDICES
A. Finding DSS Azimuth and Elevation .............................................................................. 118
B. Using a Compass ............................................................................................................. 130
C. National Electrical Code .................................................................................................. 126
D. DSS Reference Publications ............................................................................................ 129
E. RCA DSS Dish Parts List ................................................................................................ 132
Glossary .................................................................................................................................... 133
Index ....................................................................................................................................... 136
Page 4
Overview 5
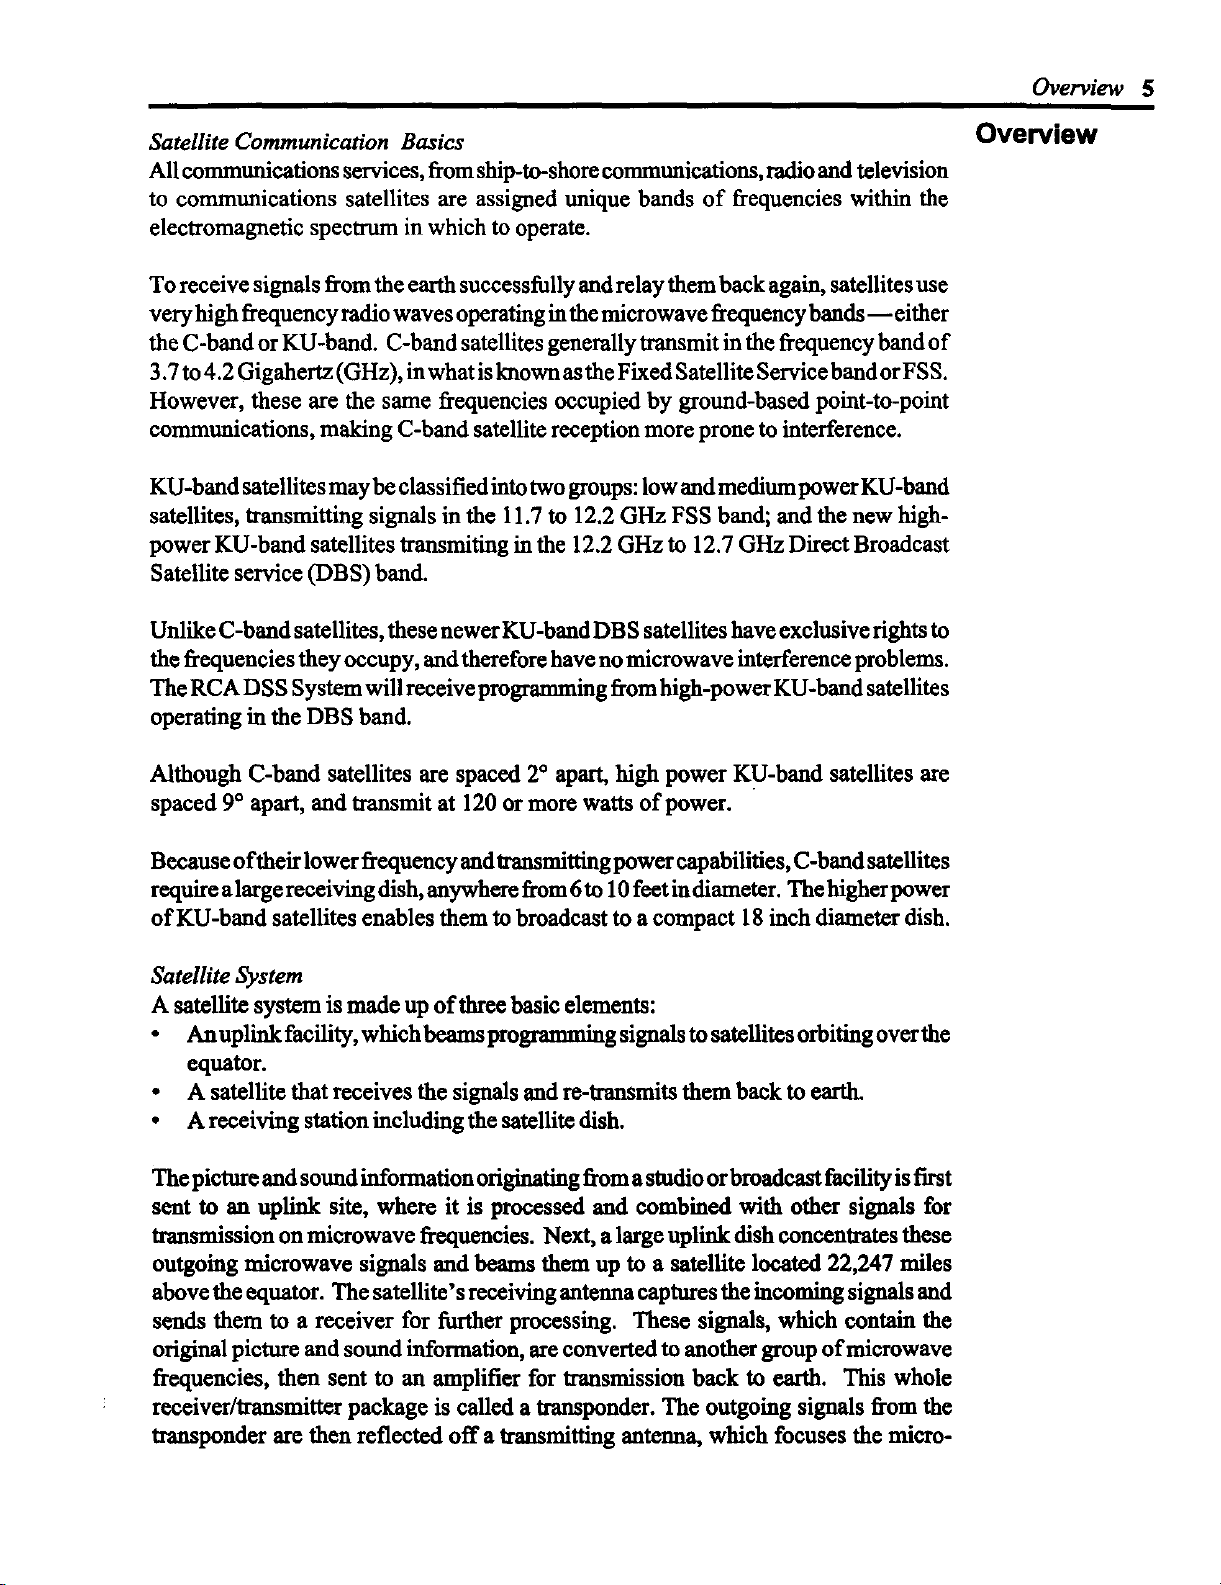
Satellite Communication Basics
All comm_'cations services, from ship-to-shore communications, radio and television
to communications satellites are assigned unique bands of frequencies within the
electromagnetic spectrum in which to operate.
To receive signals from the earth successfully and relay them back again, satellites use
very high frequency radio waves operating in the microwave frequency bands--either
the C-band or KU-hand. C-band satellites generally transmit in the frequency band of
3.7 to 4.2 Gigahertz (GHz), in what is known as the Fixed Satellite Service band orFSS.
However, these are the same frequencies occupied by ground-based point-to-point
communications, making C-band satellite reception more prone to interference.
KU-band satellites may be classified into two groups: low and medium power KU-band
satellites, transmitt'mg signals in the 11.7 to 12.2 GHz FSS band; and the new high-
power KU-band satellites transmiting in the 12.2 GHz to 12.7 GHz Direct Broadcast
Satellite service (DBS) band.
Unlike C-band satellites, these newer KU-band DBS satellites have exclusive rights to
the frequencies they occupy, and therefore have no microwave interference problems.
The RCA D SS System will receive programming from high-power KU-band satellites
operating in the DBS band.
Overview
Although C-band satellites are spaced 2° apart,high power KU-band satellites are
spaced 9° apart,and transmit at 120 ormore watts of power.
Because o ftheir lower frequency and transmitting power capabilities, C-band sate llites
require a large receiving dish, anywhere from 6 to 10 feet in diameter. The higher power
of KU-band satellites enables them to broadcast to a compact 18 inch diameter dish.
Satellite System
A satellite systemis made up of three basic dements:
• An uplink facility, which beams programming signals to satellites orbiting over the
equator.
• A satellite that receives the signals and re-transmits them hack to earth.
• A receiving station including the satellite dish.
The picture and sound information originating from astudio or broadcastfacility is first
sent to an uplink site, where it is processed and combined with other signals for
transmission on microwave frequencies. Next, a large uplink dish concentrates these
outgoing mierowave signals and beams them up to a satellite located 22,247 miles
above the equator. The satellite's receiving anteuna captures the incoming signals and
sends them to a receiver for further processing. These signals, which contain the
original picture and sound information, are converted to another group of microwave
frequencies, then sent to an amplifier for transmission back to earth. This whole
receiver/transmitter package is called a transponder. The outgoing signals from the
transponder are then reflected off a transmitting antenna, which focuses the micro-
Page 5
6 Overview
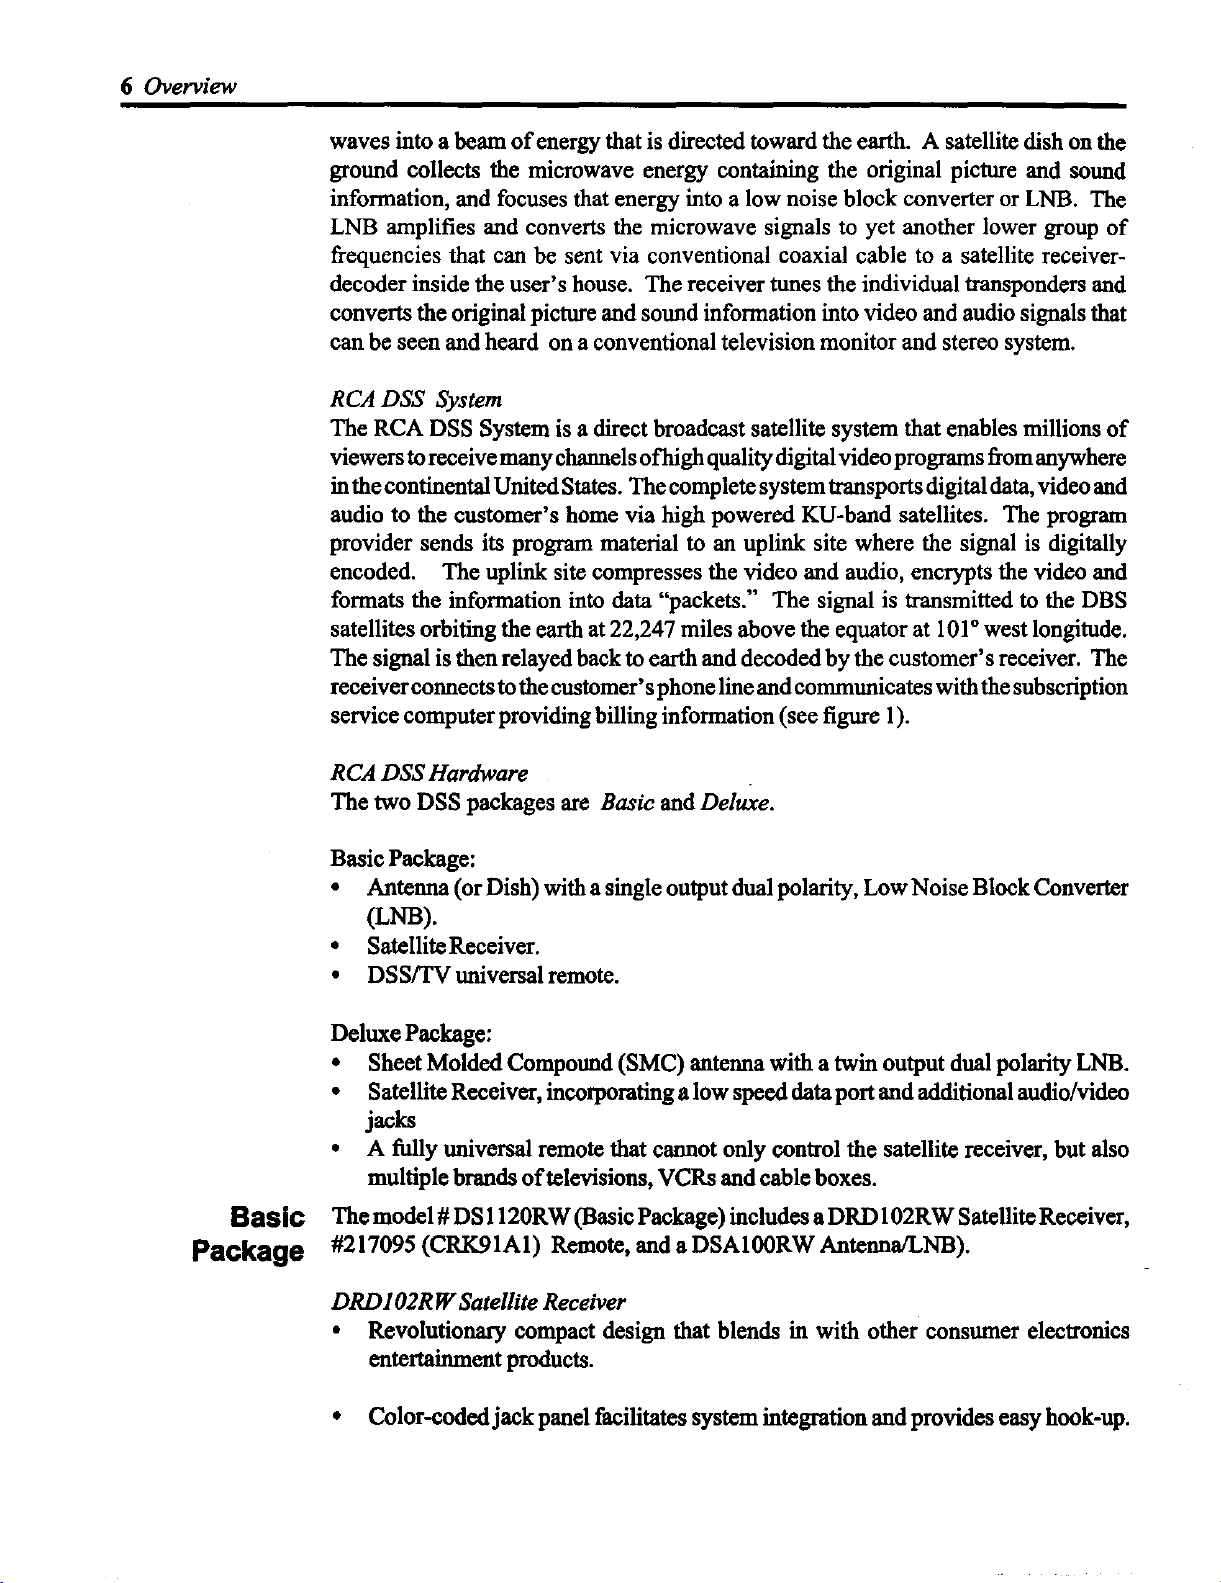
waves into a beam of energy that is directed toward the earth. A satellite dish on the
ground collects the microwave energy containing the original picture and sound
information, and focuses that energy into a low noise block converter or LNB. The
LNB amplifies and converts the microwave signals to yet another lower group of
frequencies that can be sent via conventional coaxial cable to a satellite receiver-
decoder inside the user's house. The receiver tunes the individual transponders and
converts the original picture and sound information into video and audio signals that
can be seen and heard on a conventional television monitor and stereo system.
RCA DSS System
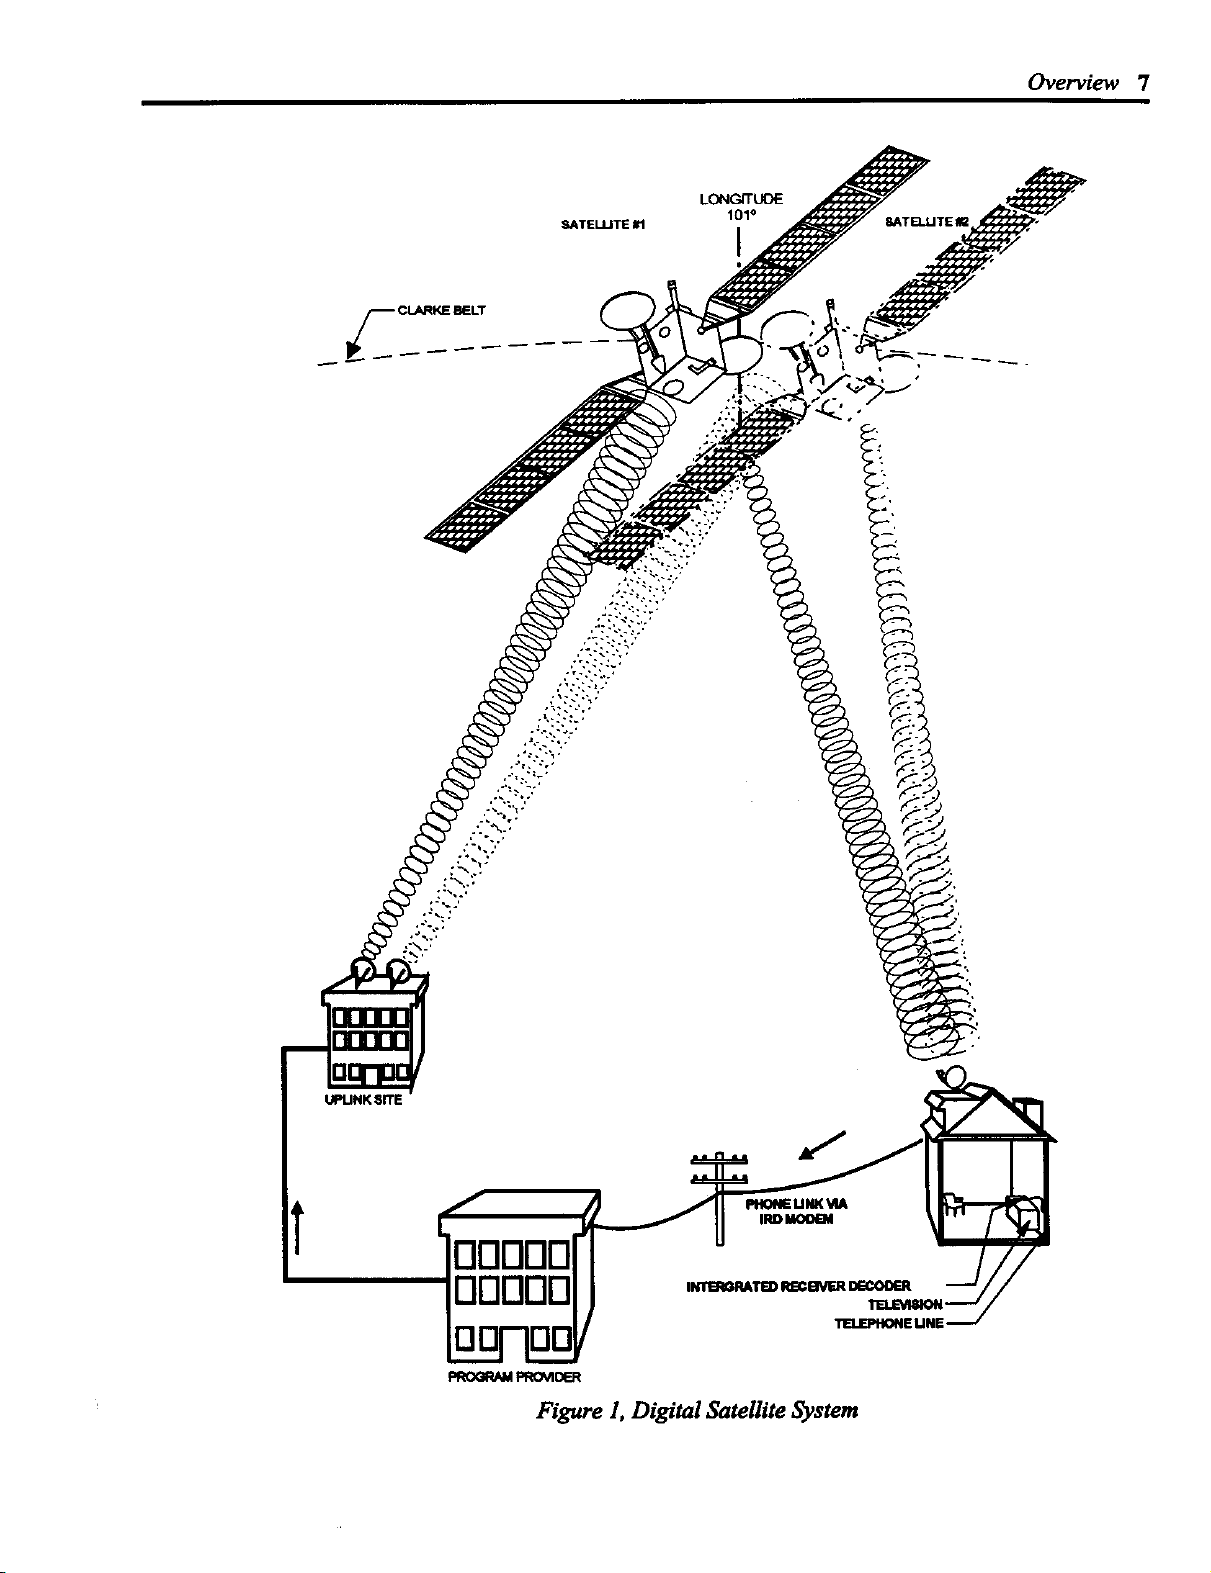
The RCA DSS System is a direct broadcast satellite system that enables millions of
viewers to receive many channels of high quality digital video programs fi,om anywhere
in the continental United States. The complete system transports digital data, video and
audio to the customer's home via high powered KU-band satellites. The program
provider sends its program material to an uplink site where the signal is digitally
encoded. The uplink site compresses the video and audio, encrypts the video and
formats the information into data "packets." The signal is transmitted to the DBS
satellites orbiting the earth at 22,247 miles above the equator at 101° west longitude.
The signal is then relayed back to earth and decoded by the customer's receiver. The
receiver connects to the customer's phone line and communicates with the subscription
service computer providing billing information (see figure 1).
Basic
Package
R CA DSS Hardware
The two DSS packages are Basic and Deluxe.
Basic Package:
• Antenna (or Dish) with a single output dual polarity, Low Noise Block Converter
(LNB).
• Satellite Receiver.
• DSS/TV universalremote.
DeluxePackage:
• SheetMoldedCompound(SMC)antenna with a twin outputdualpolarity LNB.
• SatelliteReceiver,incorporatingalowspeeddataport and additional audio/video
jacks
• A fullyuniversalremotethatcannotonly control the satellitereceiver, butalso
multiplebrandsof televisions,VCRsand cableboxes.
Themodel# DS1120RW(BasicPackage)includesaDRD102RWSatelliteReceiver,
#217095 (CRK91AI) Remote,and aDSA100RWAntenna/LNB).
DRD102R W Satellite Receiver
• Revolutionary compact design that blends in with other consumer eleca:onics
entertainment products.
• Color-coded jack panel facilitates system integration and provides easy hook-up.
Page 6
_ TELUTE #1
Overview 7
UPLINK 5ffE
PHONEUNK_IA
IRDMOO_I
DDDDD
TELEPHONE UNE
PROGRAMPRO_IOER
Figure 1, Digital Satellite @stem
Page 7

8 Overview
Connections include:
Satellite in: Provides direct connection from the satellite antenna/LNB.
In from Ant: Provides connection from an off-air antenna or cable feed.
Out to TV: Provides connection to antenna input of television.
S-VIDEO: Provides direct Y/C output to compatible televisions and VCRs.
Video, R/L Audio: Provides direct video and audio signals to television receivers,
VCRs and audio components.
Wideband Data Port: Enables reception of future services such as HDTV.
Phone: Provides connection to telephone line for program billing.
Indicators: LED on front panel that indicates "on" and blinks when there's a
message waiting.
• Local Controls: Eight buttons on the Satelfite Receiver's front panel allow full
operation of the satellite receiver, even without the remote control.
Access Card: A special card inserted into a slot on the receiver's front panel that
provides the means to track subscriber service requests and enable "turn-on" and
"turn-off" capability for subscription and pay-per-view events.
An electronic serial number unique to each card and satellite receiver enables the
Satellite Receiver to receive electronic messages from the communications center.
Messages are displayed on the television screen.
• 16x 9 widesereen formatcompatible: Processes panand scan commands fromthe
video data in a 16x 9broadcast, allowing the viewer to watch on a 4 x 3 television.
• Program Guide displays an electronically updated matrix of currentand future
programs sortedby service and time.
The system also supports specific guides, such as pay-per-view, sent by program
providers.
• Additional capabilities include the ability to display individual categories of
programming such as sports, news, movies, music, etc.
Favorite (Multiple) Channellists provideeasy selection of all orupto two favorite
groups of channels when utilizing the channel up/down buttons.
Alternate audio selection capability provides access to any of the audio channels
associated with each video channel. For example, foreign language audio may be
available for certain programs.
User Locks allow you to limit access to certain features, channels, select the rating
limit of the system and to password-protect this limit with a four-digit PIN
(Personal Identification Number).
Page 8
Additional Menus provide:
Dish positioning and adjustment.
Diagnostics.
Access to help screens.
Ability to set-up and customize operation.
Review/cancel purchases and services.
# 217095 (CRK91A1) Infrared Remote Control
• 30-button keypad.
• Ergonomicdesign.
• Provides complete satellite receiver operation.
• Large color-coded buttons are clearly identified for easy operation.
• Pre-programmed codes control the primary functions of most television brands
manufactured after 1984 utilizing infrared technology.
DSA100R W Antenna/LNB
• Small 18" parabolic reflector is lightweight and inconspicuous.
• Installation task is similar to "off-air" antenna.
• Designed to be easily mounted to the side of ahome, deck rail, roof or chirrmey that
provides an unobstructed view of the 101oWest longitude position pointing toward
Texas.
Overview 9
The model DS2430RW Deluxe Package includes a DRD203RW satellite receiver,
#217094 (CRK91B 1)remote and a DSA400RW antenna/LNB.
DRD203RW Satellite Receiver
Includes all of the features of the DRD102RW plus:
• Second pair of AN jacks on Satellite Receiver.
• Computer serial port for downloading data.
# 217094 (CRK91B1) Infrared Remote Control
Includes all of the features of the # 217095 remote with the following upgrades:
• 39-button keypad.
• Preprogrammedto controltheprimary functions ofmostmanufacturers' brands of
televisions, VCRs, laserdisc players and cable boxes utilizing infrared technology.
DSA4OOR W Antenna/LNB
Includes all of the features of the DSA200RW with the following upgrades/additions:
• Sheet molded compound (SMC) reflector-- more durable than metal.
• Antenna/LNB developed with twin outputs capable of operating two or more
compatible satellite receivers.
Deluxe
Package
Page 9
10 OverviewTechnical
Technical
Overview
Uplink
The DSS System transports digital data, video and audio to the customer's home via
a high powered KU-band satellite. The program provider sends its program material
to the uplink site where the signal is digitally encoded. The "uplink" is the portion of
the signal transmitted from the earth to the satellite. The uplink site compresses the
video and audio, encrypts the video and formats the information into data "packets"
that are transmitted. The signal is transmitted to a satellite where it is relayed back to
the earth and decoded by the customer's receiver.
MPEG2 Compression
The video and audio signals are transmitted as digital signals instead of conventional
analog. The amount of data required to code all the video and audio information
would require a transfer rate well into the hundreds ofMbps (Mega-bits per second).
This is too large and impractical a data rate to be processed in a cost effective way with
current hardware. In order to minimize the data transfer rate, the data is compressed
using MPEG2 compression. MPEG (Motion Pictures Expert Group) is an organiza-
tion who has developed a specification for transportation of moving images over
communication data networks. Fundamentally, the system is based on the principle
that images contain a lot of redundancy from one frame of video to another - the
background stays the same for many frames at a time. Compression is accomplished
by predicting motion that occurs from one frame of video to another and transmitting
motion vectors and background information. By coding only the motion and
background difference instead of the entire frame of video information, the effective
video data rate can be reduced from hundreds of Mbps to an average of 3 to 6 Mbps.
This data rate is dynamic and will change depending on the amount of motion
occurring in the video.
In addition to MPEG video compression, MPEG audio compression is also used to
reduce the audio data rate. Audio compression is accomplished by eliminating soft
sounds that are near loud sounds in the fi'equency domain. The compressed audio data
rate can vary from 56 Kbs (Kilo-bits per second) on mono signals to 384 Kbps on
stereo signals.
Data Encryption
To prevent unauthorized signal reception, the video signal is encrypted (scrambled)
at the uplink site. A secure encryption "algorithm" or formula know as the Digital
Encryption Standard (DES) is used to encode the video information. The keys for
decoding the data are transmitted in the data packets. The customer's Access Card
decrypts the keys which allows the receiver to decode the data. When a Access Card
is activated in a receiver for the first time, the serial number of the receiver is encoded
on the Access Card. This prevents the Access Card from activating any other receiver
except the one in which it was initially authorized. The receiver will notfunction with
the Access Card removed.
Data Packets
The program information is completely digital and is transmitted in data "packets."
This concept is very similar to data transferred by a computer over a modem. Five
Page 10

Technical Overview 11
different types of data packets are Video, Audio, CA, PC compatible serial data and
Program Guide. Video and audio packets contain the visual and audio information of
the program. The CA (Conditional Access) packet contains information that is
addressed to individual receivers. This includes customer E-Mall, Access Card
activation information and which channels the receiver is authorized to decode. PC
compatible serial data packets can contain any form of data the program provider
wants to transmit, such as stock reports or software. The Program Guide maps the
channel numbers to transponders and SCID's (more on this later). It also gives the
customer TV program listing information.
Figure 2 shows a typical uplink configuration for one transponder. In the past, a single
transponder was used for a single satellite channel. With digital signals, more than one
satellite channel can be sent on the same transponder. The example shows three video
channels, five stereo audio channels (one for each video channel plus two extra for
other services such as a second language), and a PC compatible data channel. Audio
and video signals from the program provider are encoded and converted to data
packets. The configurations can vary depending on the type of programming. The
data packets are then multiplexed into serial data and sent to the transmitter.
!
Data
,t_tlosl ,.at.at..t.,
8CI0
Program
Progrul Guidw iltlkos the
cltei_nel numbers Io
trenspcmders ar,d
8C10_. It dso _S
_r PmO'm Ibtir_
PT......L
,F 3
,E 3--
licit
Figure 2, Uplink
_ €_¢waa ma_ra
_ CA _ Null Data Vldee I_11 Alldle
Page 11
12 Technical Overview
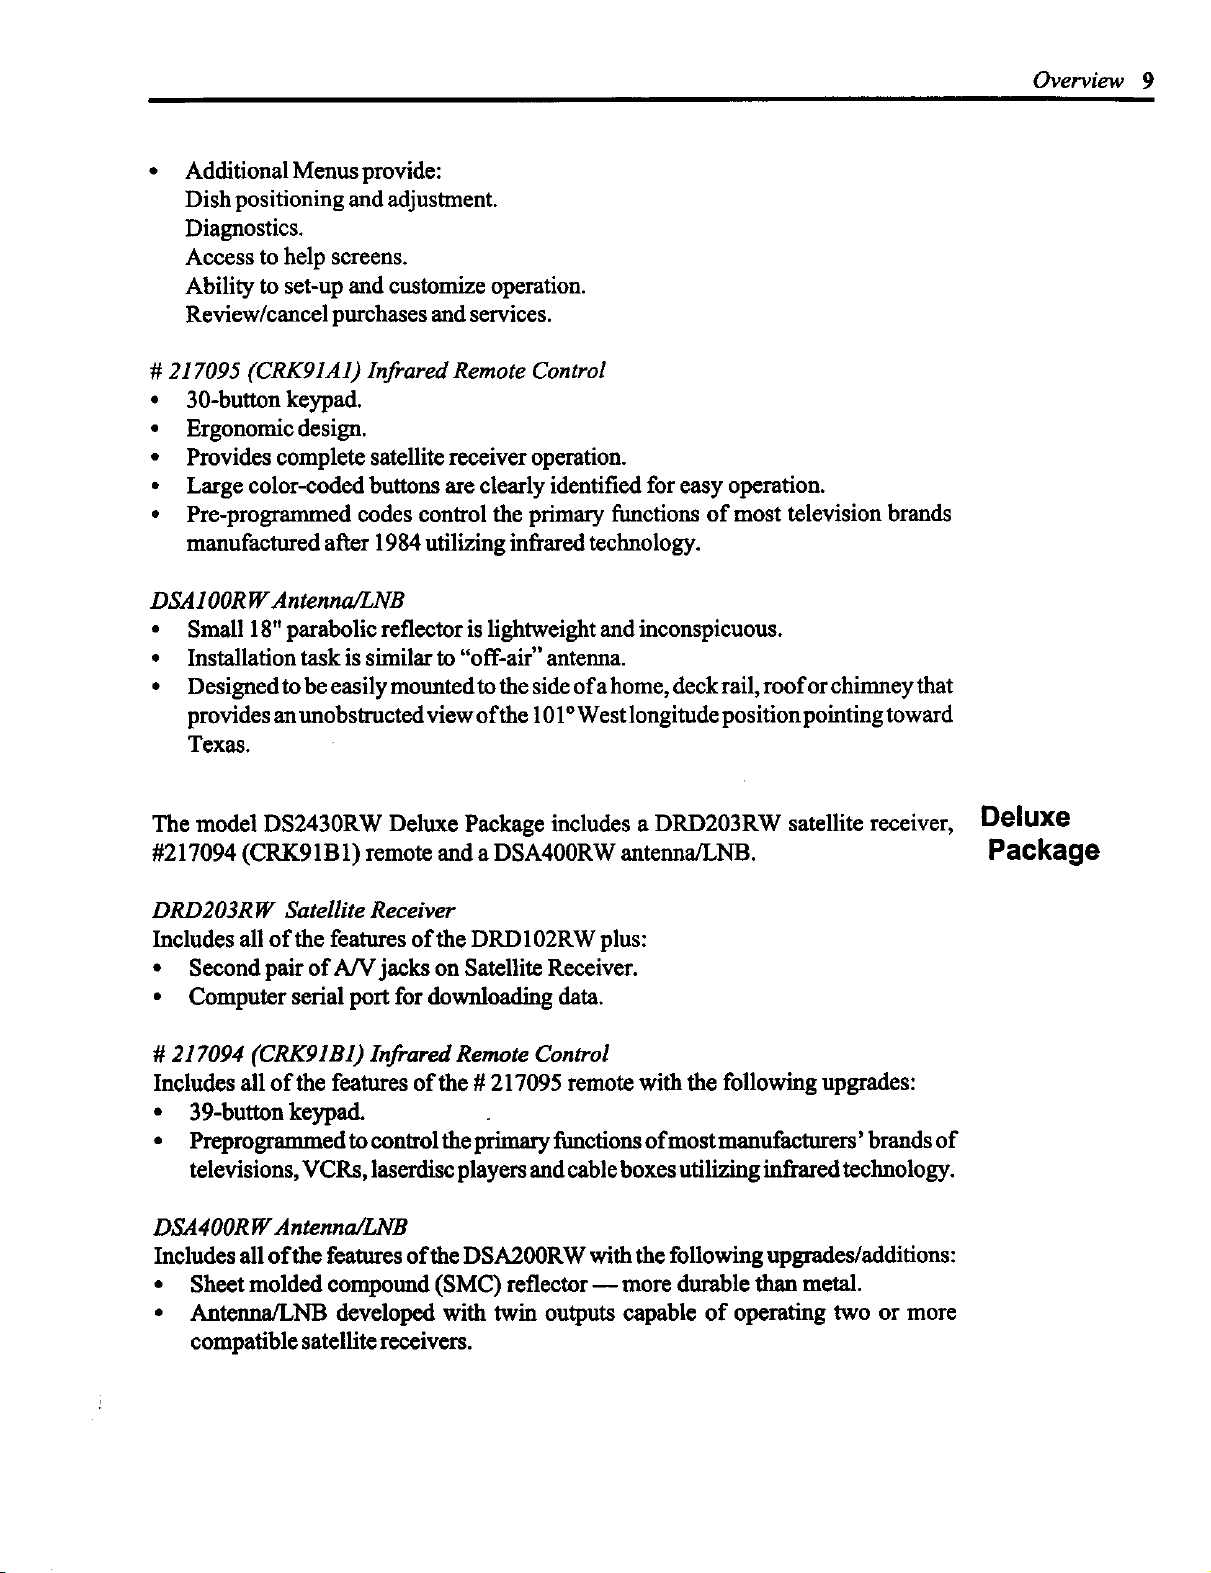
Each data packet is 147 bytes long. The firsttwo bytes (a byte is made up of 8 bits)
of information contain the SCID and Flags. The SCID (Service Channel ID) is a
unique 12bit number from0to 4095 that uniquely identifies the packet's datachannel.
The Flags are made up of 4 bits used primarily to control whether or not the packet is
encrypted and which key to use. The third byte of information is made up ofa 4 bit
Packet Type indicator and a4 bit Continuity Counter. The Packet Type identifies the
packet as one of four data types. When combined with the SCID, the PacketType
determ'mes how the packet is to be used. TheContinuity Counter increments once for
each Packet Type and SCID. The next 127 bytes of information consists of the
"payload" datawhich isthe actual usable information sentfromthe program provider.
(See figure 3.)
2 BYT_.S 1BYTE
Satellites
I I PAYLON) FORWARDERROR
SCID & FLAGS PACKETTYPE& CORRECTION
CONTINUITYCOUNTER
Figure 3, Data Packet
,=, BYTES I 17 BYTES I
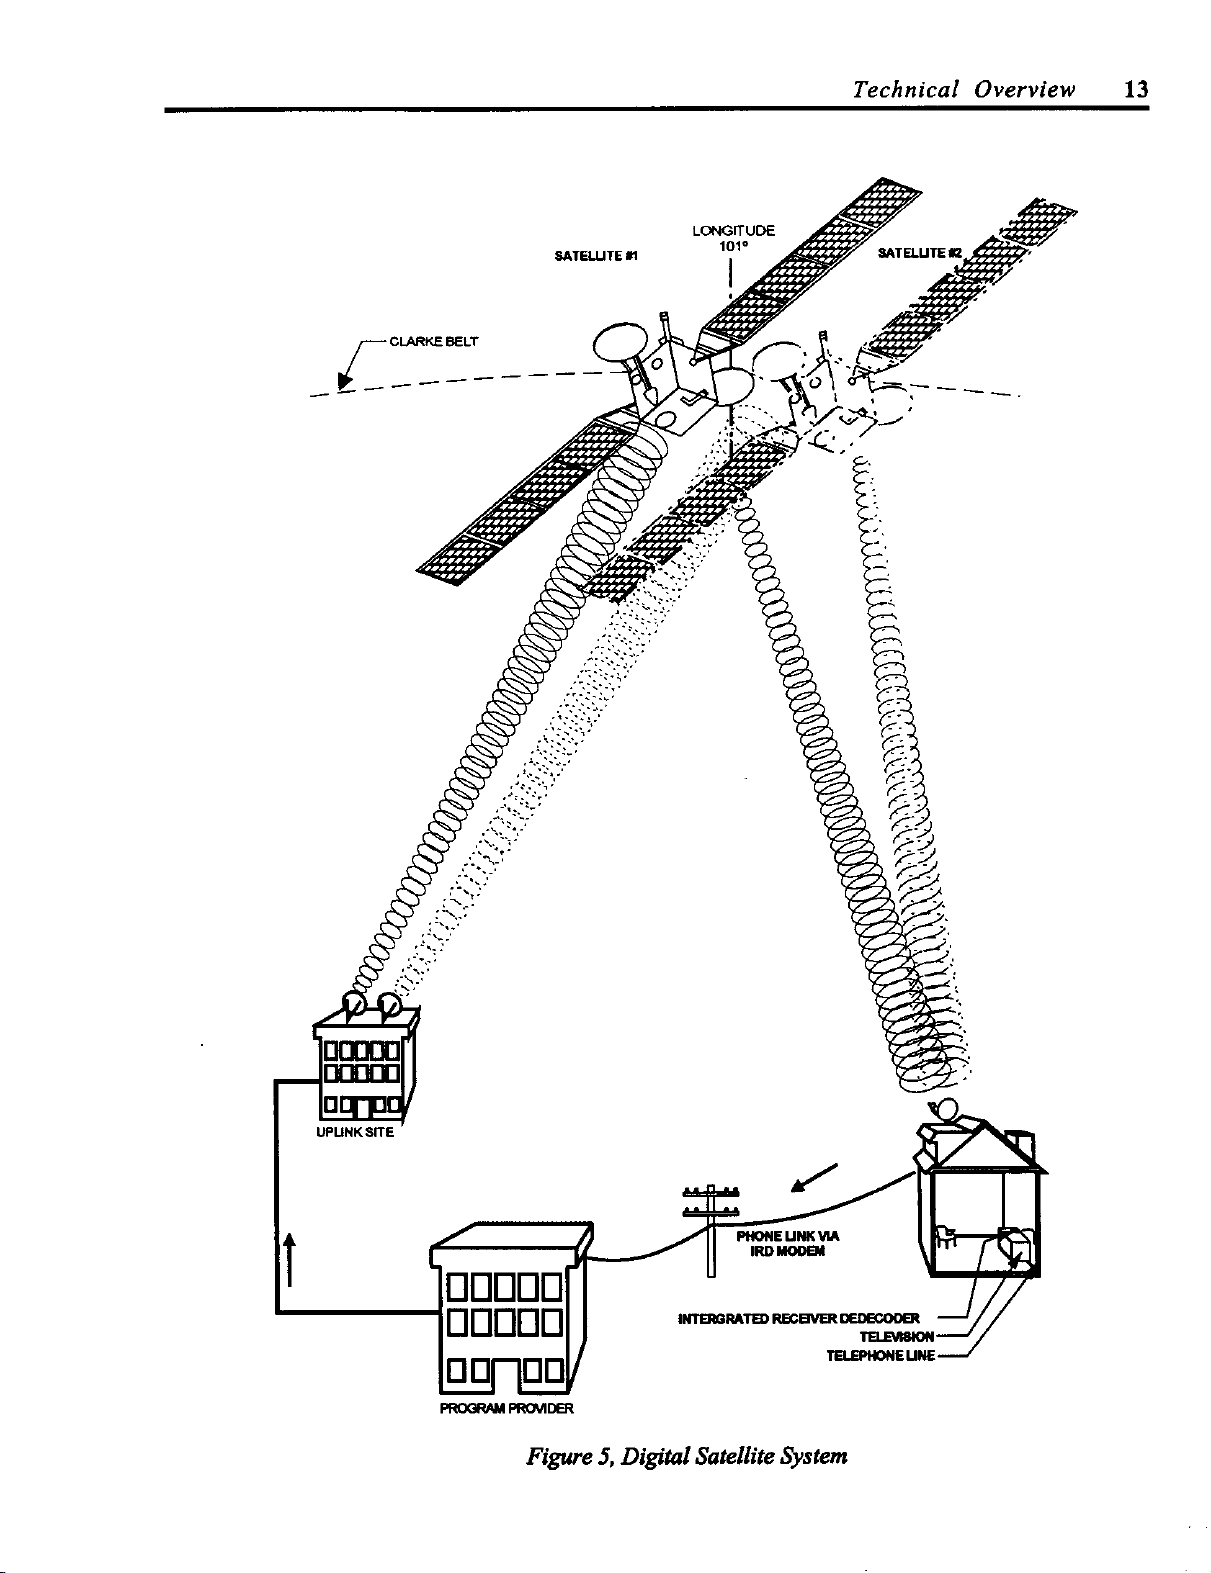
Two high power KU-band satellites provide the DSS signal for the receiver. The
satellites arelocated inageostationary orbitin the "Clarke" belt, 22,247 miles above
the equator. They are positioned less than .5° apartfrom each other with the center
between them at 101° W. longitude. This permits a fixed antenna to be pointed at the
101° slot and receive signals from both satellites. The downlink frequency is in the
K4 part of the KU-band at 12.2 GHz to 12.7 GHz. The total transponder channel
bandwidth is 24 MHz per channel with channel spacing at 14.58 MHz. Each satellite
has sixteen 120 watt transponders. The satellites have a life expectancy of 12
years.(See figure 5.)
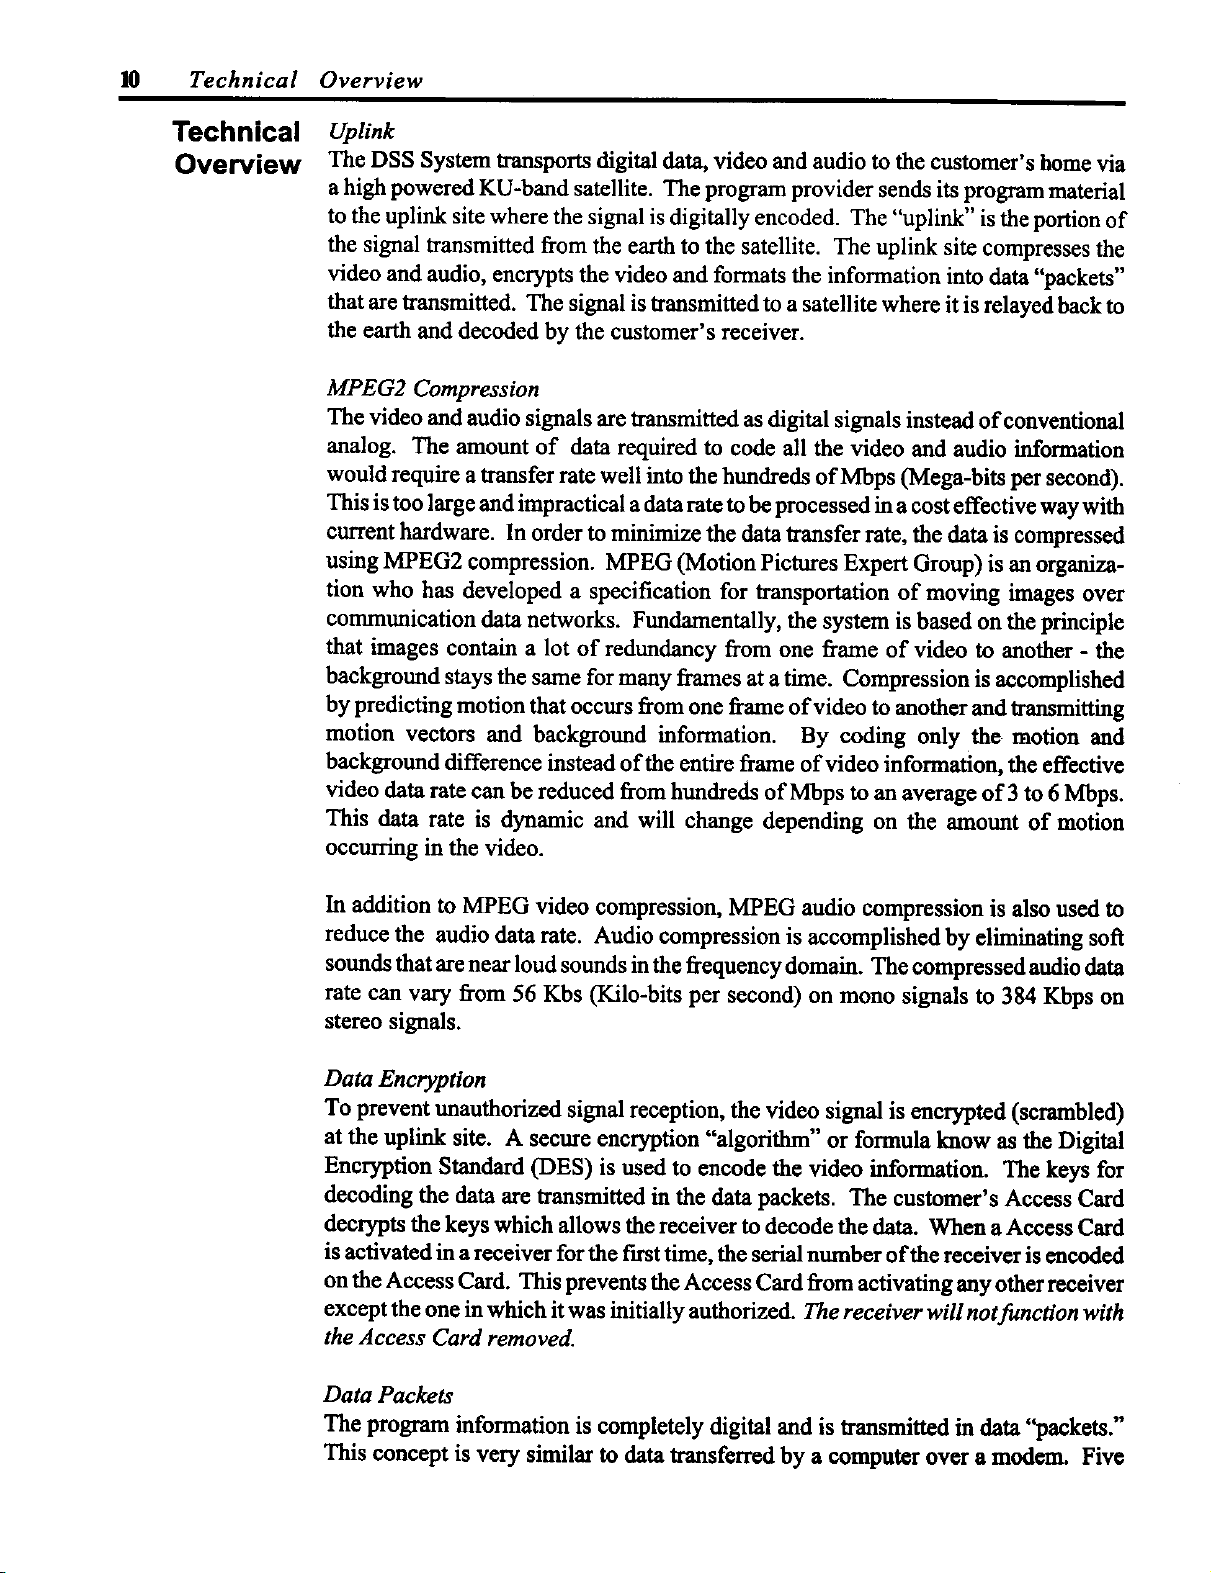
Unlike C-band satellites that use horizontal and vertical polarization, the DSS
satellites use circular polarization. The microwave energy is transmitted in a spiral-
like pattern. The direction of rotation determines the type of circular polarization
(Figure 4). In the DSS System, one satellite is configured foronly right-handcircular
polarized transponders and the other is configured for only left-hand circular polar-
ized transponders. This nets 32 total transponders between two sateliites.
RightHandCircularlyPoladzedWave LeftHandCircularlyPoladzedWave
Figure 4, Right-hand and Left-hand Circular Polarization
Page 12
LONGITUDE
101°
I
Technical Overview 13
UPHNK SITE
DDDDD
OOOOO
TELEPHONEMNE,
PROGRAMPRO_DER
Figure 5, Digital Satellite System
Page 13

14 Technical Overview
Although there areonly 16 transponders per satellite, the channel capabilities arefar
greater. Using datacompression andmultiplexing, the two satellites workingtogether
have the possibility of carrying over 150 conventional (non-HDTV) audio and video
channels via 32 transponders.
Dish
The"dish" is an 18 inch, slightly oval shaped KU-band antenna. The slight oval shape
is due to the 22.5 °offset feed of the LNB (Low Noise Block converter), figure 6. The
offset feed positions the LNB out of the way so it does not block any surface area of
the dish, preventing attenuation of the incoming microwave signal.
Figure 6, Satellite Dish
0
Page 14
Technical Overview 15
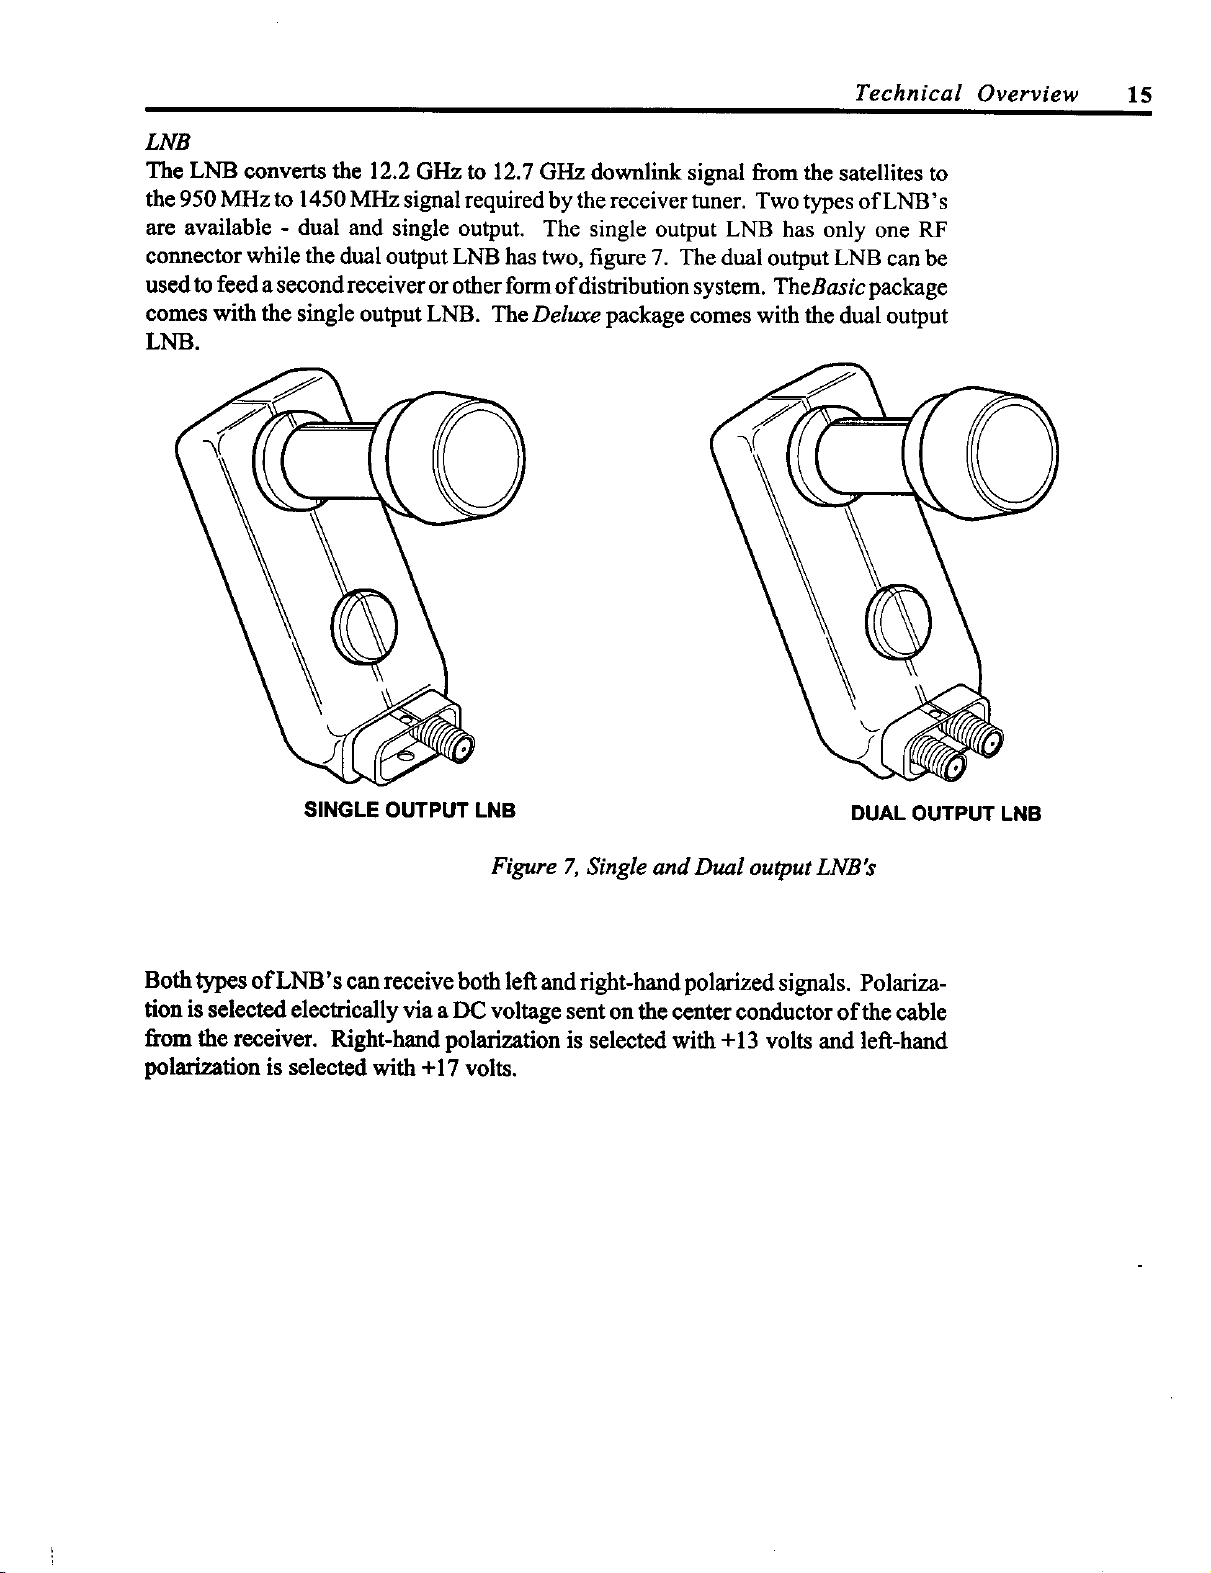
LNB
The LNB converts the 12.2 GHz to 12.7 GHz downlink signal fi'om the satellites to
the 950 MHz to 1450 MI-Iz signal required by the receiver tuner. Two types of LNB's
are available - dual and single output. The single output LNB has only one RF
connector while the dual output LNB has two, figure 7. The dual output LNB can be
used to feed a second receiver or other form of distribution system. TheBasic package
comes with the single output LNB. The Deluxe package comes with the dual output
LNB.
SINGLE OUTPUT LNB
Figure 7, Single and Dual output LNB's
DUAL OUTPUT LNB
Both types of LNB's can receive both left and fight-hand polarized signals. Polariza-
tion is selected electrically via a DC voltage sent on the center conductor of the cable
from the receiver. Right-hand polarization is selected with +13 volts and left-hand
polarization is selected with +17 volts.
Page 15
16 Technical Overview
Receiver
Circuitw
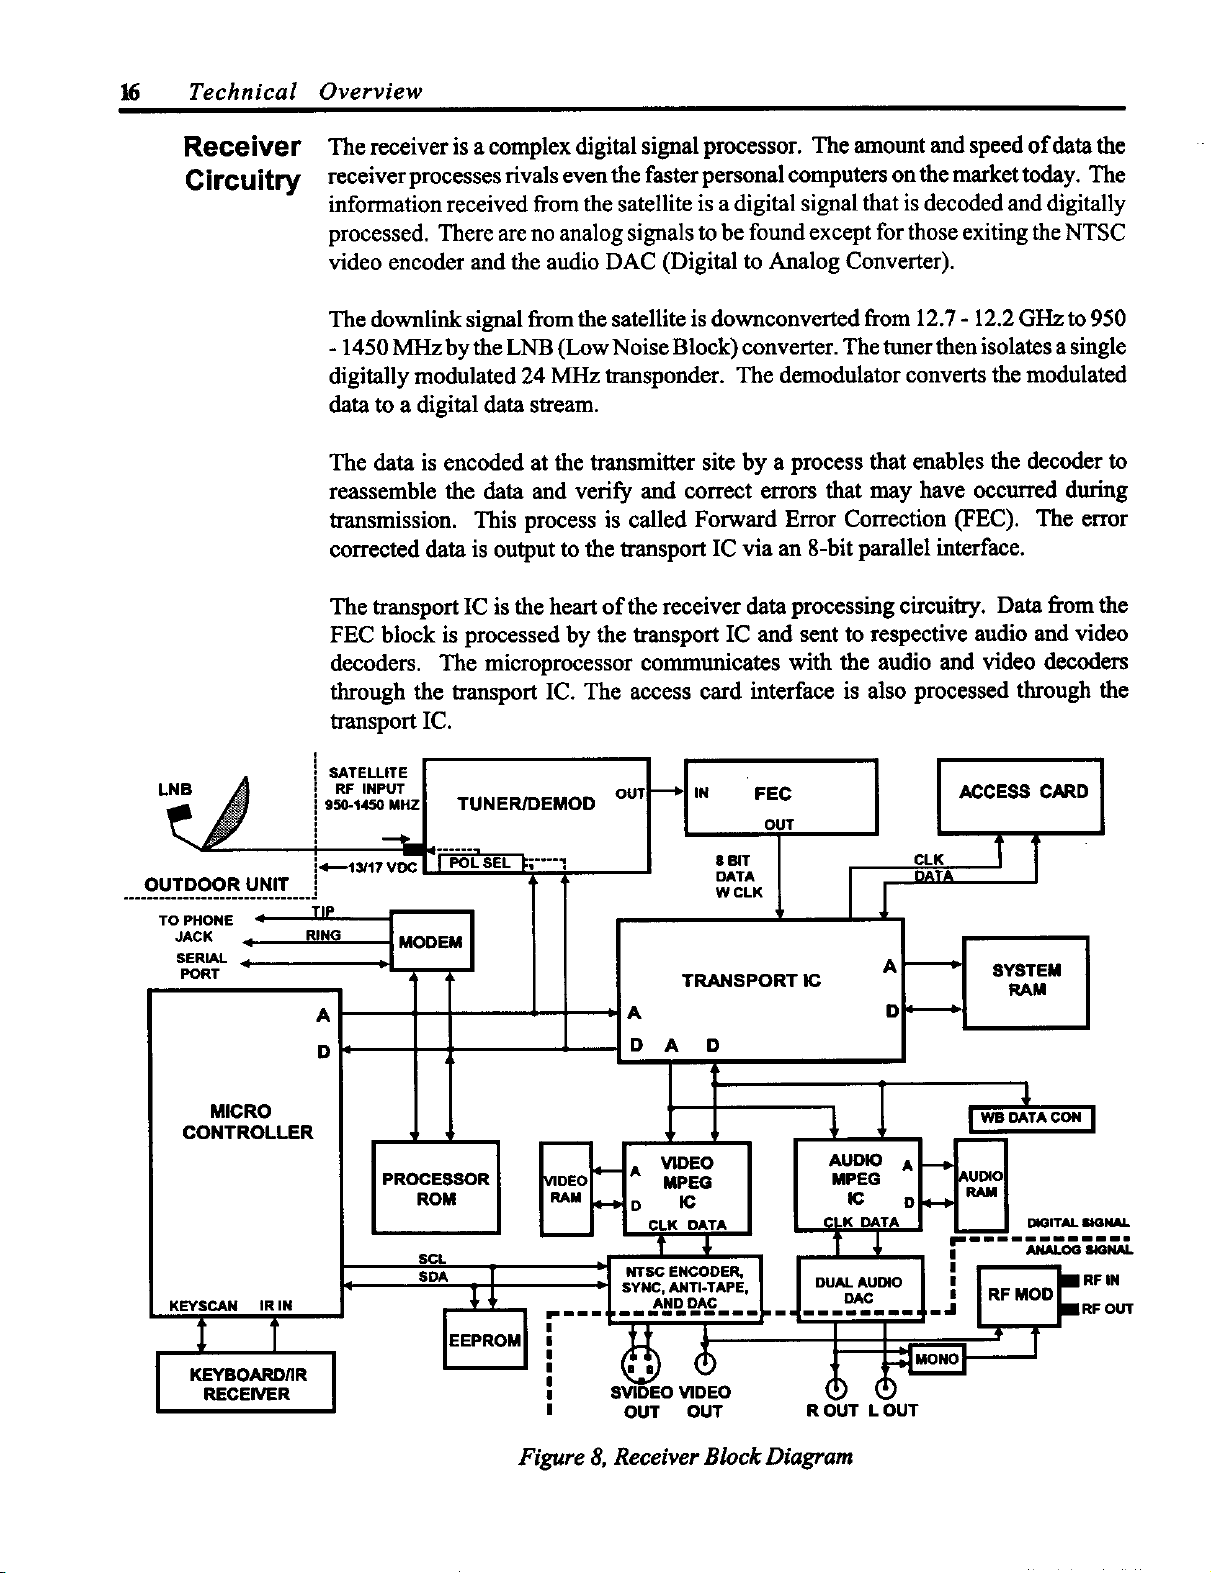
The receiver is a complex digital signal processor. The amount and speed of data the
receiver processes rivals even the faster personal computers on the market today. The
information received from the satellite is a digital signal that is decoded and digitally
processed. There are no analog signals to be found except for those exiting the NTSC
video encoder and the audio DAC (Digital to Analog Converter).
The downlink signal from the satellite is downconverted from 12.7 - 12.2 GHz to 950
- 1450 MHz by the LNB (Low Noise Block) converter. The tuner then isolates a single
digitally modulated 24 MHz transponder. The demodulator converts the modulated
data to a digital data stream.
The data is encoded at the transmitter site by a process that enables the decoder to
reassemble the data and verify and correct errors that may have occurred during
transmission. This process is called Forward ErrorCorrection (FEe). The error
corrected data is output to the transport IC via an 8-bit parallel interface.
The transport IC is the heart of the receiver data processing circuitry. Data from the
FEC block is processed by the transport IC and sent to respective audio and video
decoders. The microprocessor communicates with the audio and video decoders
through the transport IC. The access card interface is also processed through the
transport IC.
SATELLITE
LN.A ,:,:_1 TONO_MOOou,M,N'_C I I.CCE.C'_OI
21...... I I , , i
OUTDOOR UN_
................................
_D.?.o._._ T wcL./ I
TOPHONE TIP _ / T I
TO PHONE -_
...... --" ' '& -- DATA DATA /
OUT I I
/I
TRANSPORT IC
.I I I / .I. o--.I " I
"1 1 I I -I i i
L i l i ID A O
Co_CR_
CONTROLLER
,_s_,,,, I _ ...k._.o_.,.c..[I .._c...l.,I'F'°°=,,o,,
_O_/IR
I _o,_. I ' ' _ _ :1.
I _cE_,_ I w ,:,
°iII If
', I I---I k _o I I ,uo_AM......I
I PROCESSORII_oEor--I.,E. I I MPEGI P£.=."I
I Ro. I I" Ho "= I I _ °l'-'l-" I
I I I I I c.K OATA I 1 CtK_TA , _ ==,rN-..,
I sc, _ t _ T _ :".... _,_
I so* l 'I NTSGENCODER, I I I I I'_mJ_.RFI N
( B SYNC, ANTI-TAPE, DUAL AUDIO :
T IE_,,o.Ir "_ _ " _W
SVIDEO VIDEO
OUT OUT R OUT L OUT
DIGITAL _NJkl.
Figure 8, Receiver Block Diagram
Page 16
Technical Overview 17
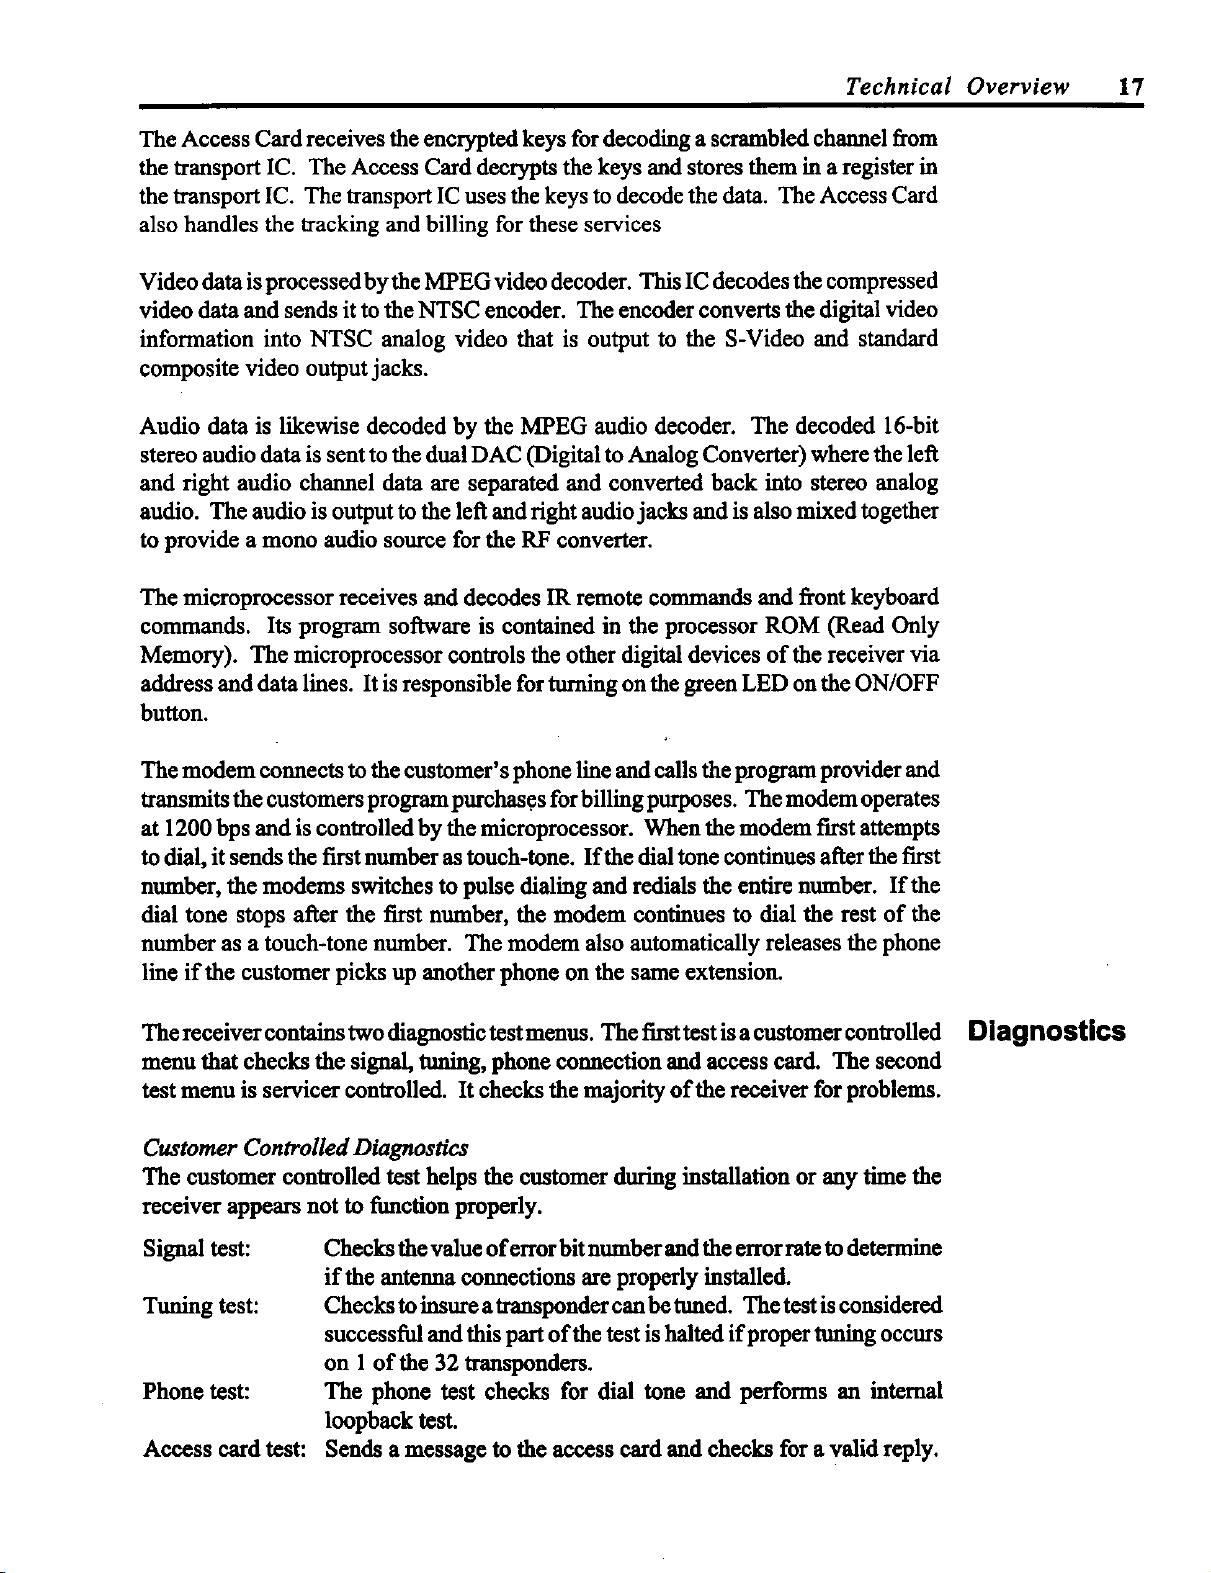
The Access Card receives the encrypted keys for decoding a scrambled channel from
the transport IC. The Access Card deerypts the keys and stores them in a register in
the transport IC. The transport IC uses the keys to decode the data. The Access Card
also handles the tracking and billing for these services
Video data is processed by the MPEG video decoder. This IC decodes the compressed
video data and sends it to the NTSC encoder. The encoder converts the digital video
information into NTSC analog video that is output to the S-Video and standard
composite video output jacks.
Audio data is likewise decoded by the MPEG audio decoder. The decoded 16-bit
stereo audio data is sent to the dual DAC (Digital to Analog Converter) where the left
and right audio channel data are separated and converted back into stereo analog
audio. The audio is output to the left and right audio jacks and is also mixed together
to provide a mono audio source for the RF converter.
The microprocessor receives and decodes IR remote commands and front keyboard
commands. Its program software is contained in the processor ROM (Read Only
Memory). The microprocessor controls the other digital devices of the receiver via
address and data lines. It is responsible for turning on the green LED on the ON/OFF
button.
The modem connects to the customer's phone line and calls the program provider and
transmits the customers programpurchas.es for billing purposes. The modem operates
at 1200 bps and is controlled by the microprocessor. When the modem first attempts
to dial, it sends the first number as touch-tone. If the dial tone continues after the first
number, the modems switches to pulse dialing and redials the entire number. If the
dial tone stops after the first number, the modem continues to dial the rest of the
number as a touch-tone number. The modem also automatically releases the phone
line if the customer picks up another phone on the same extension.
Thereeeivercontainstwodiagnostictestmenus. ThefirsttestisacustomercontroUed Diagnostics
menu that checks the signal, tuning, phone connection and access card. The second
test menu is servicer controlled. It checks the majority of the receiver for problems.
Customer Controlled Diagnostics
The customer controlled test helps the customer during installation or any time the
receiver appears not to function properly.
Signal test:
Tuning test:
Phone test:
Access card test:
Cheeks the value of error bit number and the error rate to determine
if the antenna connections are properly installed.
Checks to insure a transponder can be tuned. Thetestis eousidered
successful and this part of the test is halted if proper tuning occurs
on 1 of the 32 transponders.
The phone test checks for dial tone and performs an internal
loopbaek test.
Sends a message to the access card and cheeks for a valid reply.
Page 17
18 Technical Overview
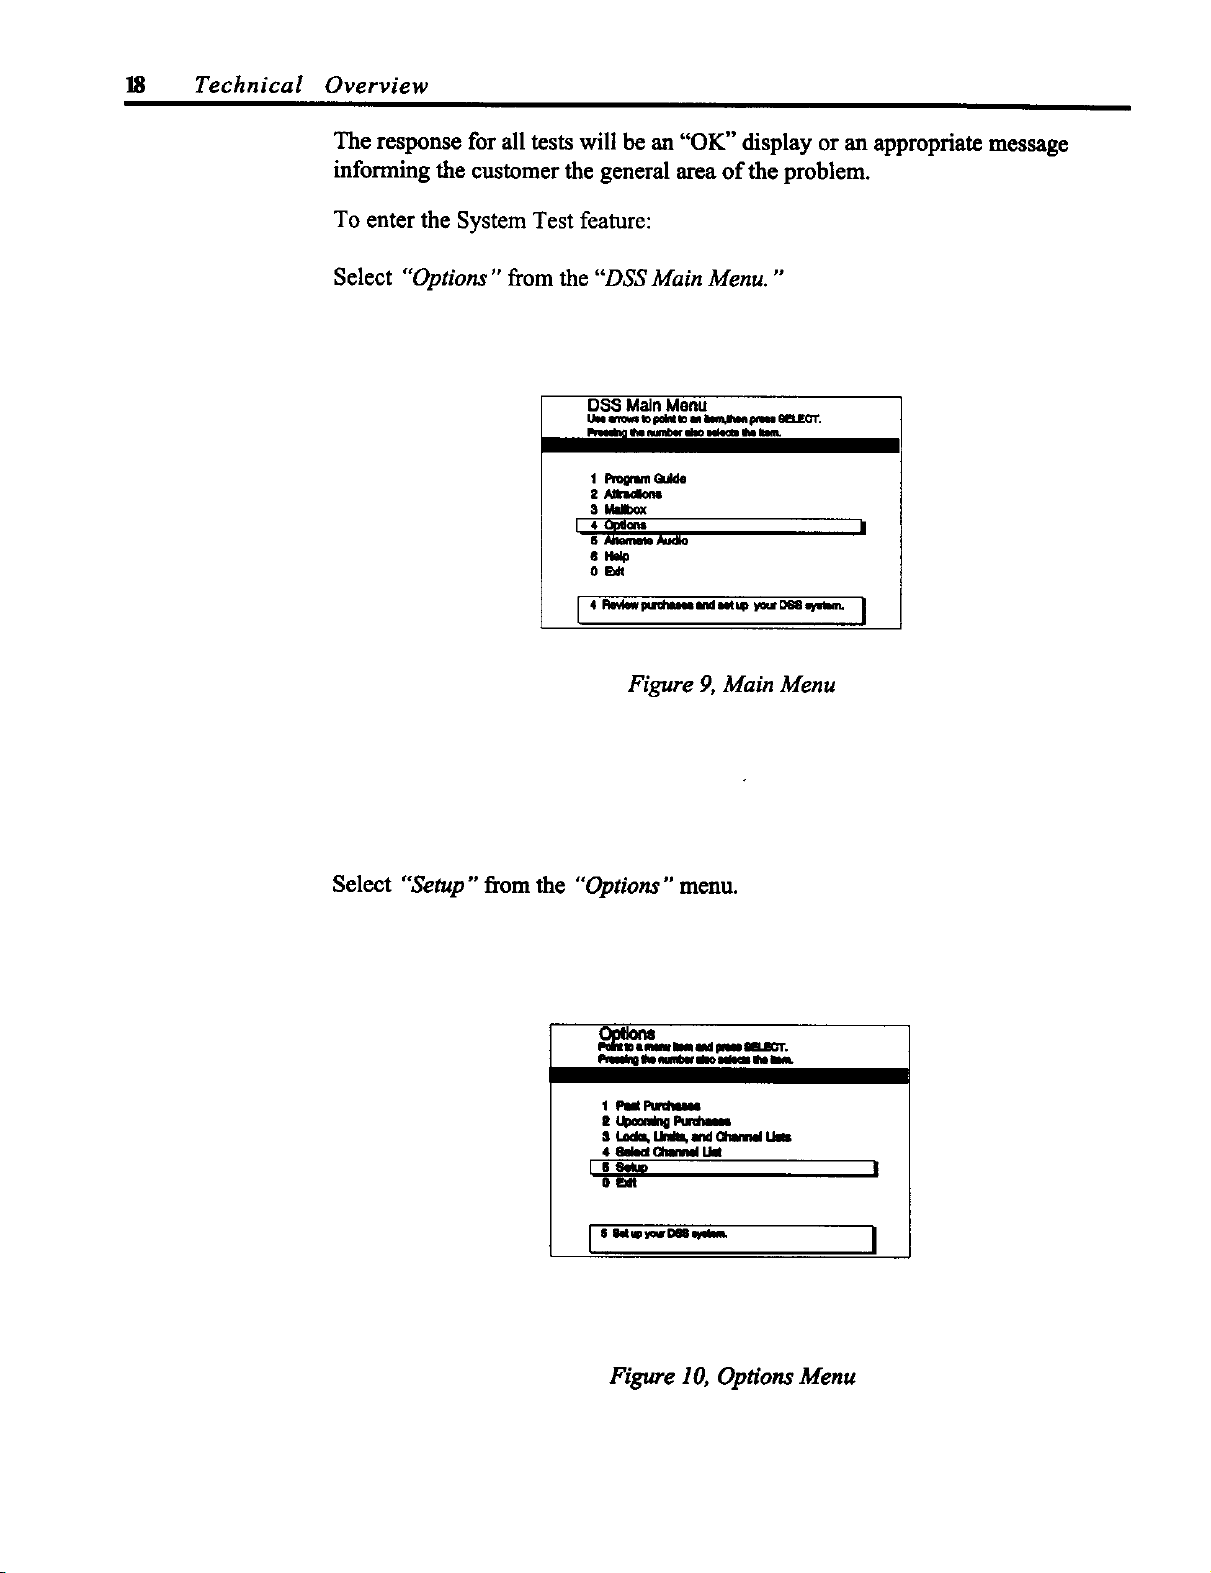
The response for all tests will be an "OK" display or an appropriate message
informing the customer the general area of the problem.
To enter the System Test feature:
Select "Options" from the "DSS Main Menu. '"
DSS Main Menu
Fmedrl k e_l_er mP_em h m
1Pe_eu_
2Aeltadlor_l
I 4opqn
S_mlwfehJdlo
et_'W
OE5_
I 4 P_w_h_dutMp yo_ I
Figure 9, Main Menu
Select "Setup" from the "Options" menu.
_wnn_k
!
RNm
s LadL unl_ andGwld IJm
IS_p
Ol_lt
Is 8_w_DIS_
Figure 10, Options Menu
Page 18

Select "'System Test" from the "Setup "'menu.
1_ Dil_ P01flllng
3 IndJl A_em C_d
4 PiO_e S_e
0Bdt
I Deim1"_dJyo_D_D_il_mm_l_. J
Figure 11, Setup Menu
Select "'Test" from the "System Test'" menu.
Technical Overview 19
_om Tost
T_ _ _ a_JGT.
_ t]mmM m _ m N lk_ MWsJ.
N_IN
Figure 12, System Test Menu
The system test results are displayed automatically wben the test is complete. The
following two screens show whether the receiver passed or failed the test. If the access
card passes the test, the access card ID number will be displayed in the window.
_Teet Results
aml imlm allJlO1".
G_t_ _14_md m
llhl:l_l:
Ohukl_omm
mcll_
G'mckm cml U
_Te_ Results
md_im IIELECT,
OK
OK
_orM_
OK
_Camk
OK
Figure 13, System Test Results
Page 19
Technical Overview
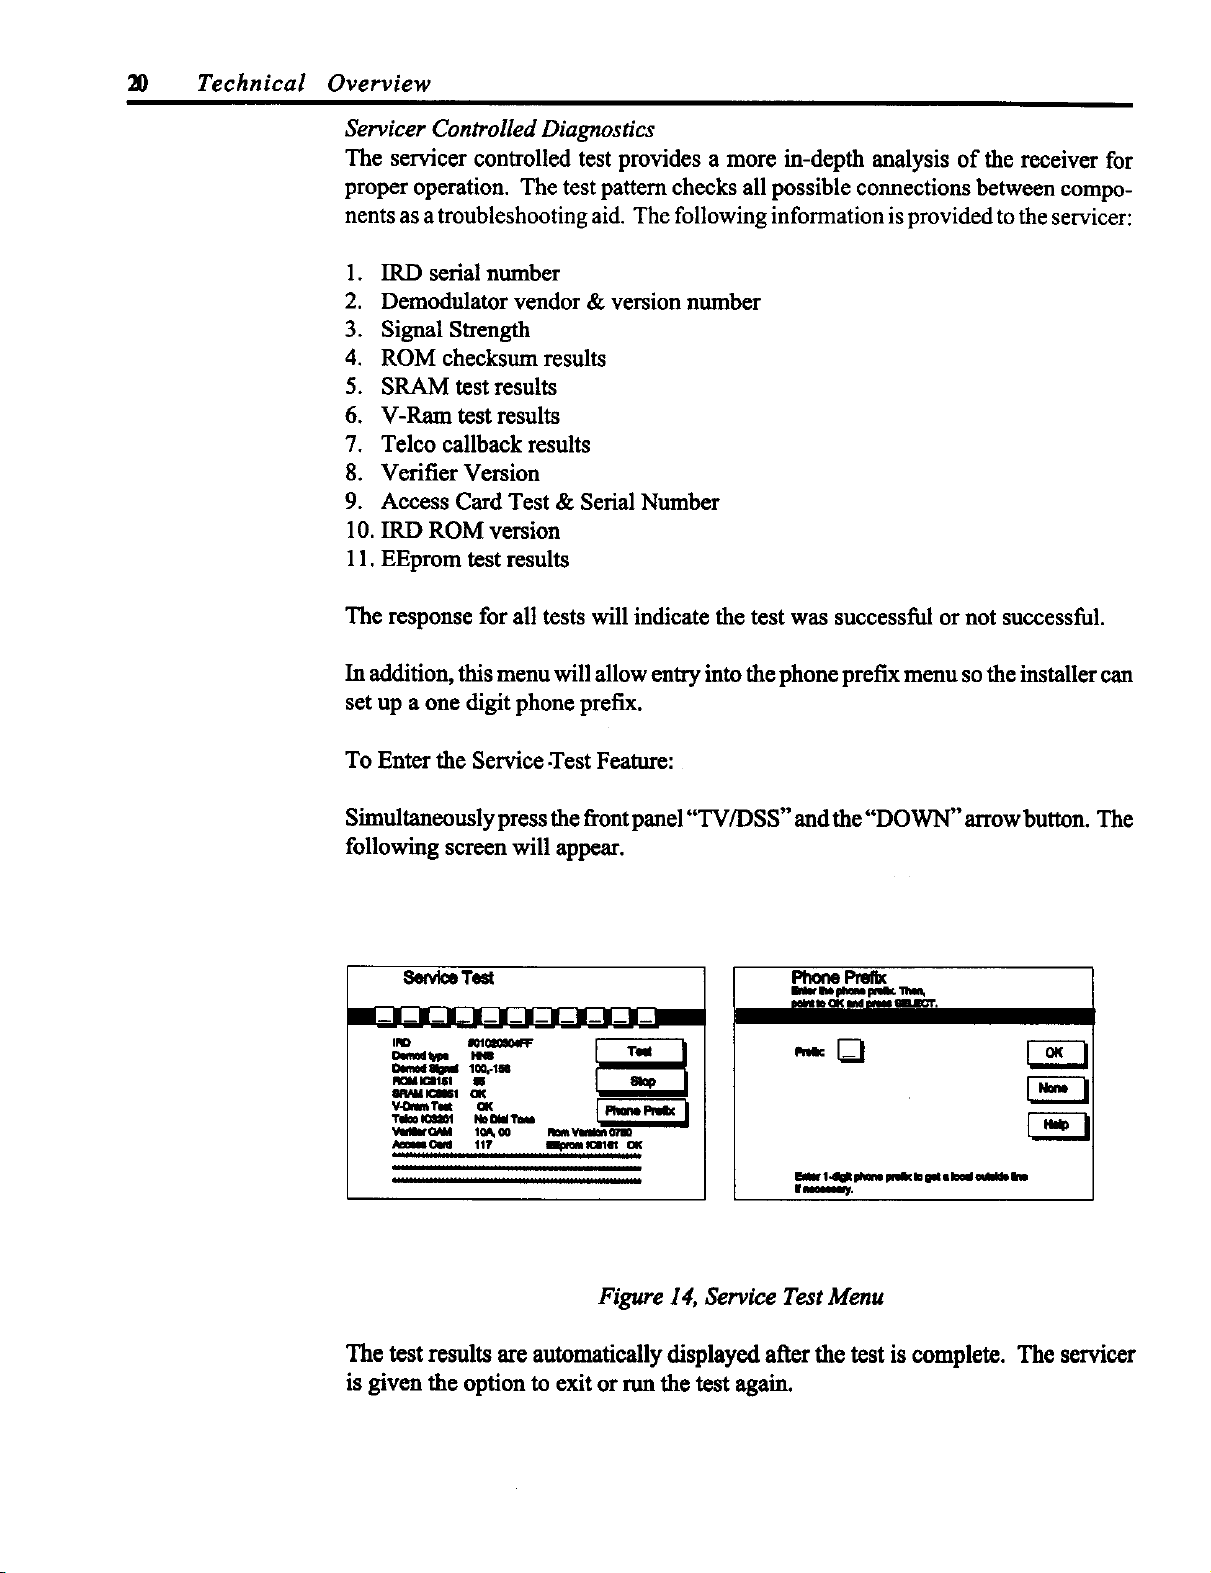
ServicerControlledDiagnostics
The servicer controlled test provides a more in-depth analysis of the receiver for
proper operation. The test pattern checks all possible connections between compo-
nents as a troubleshooting aid. The following information is provided to the servicer:
1. IRD serial number
2. Demodulator vendor & version number
3. Signal Strength
4. ROM checksum results
5. SRAM test results
6. V-Ram test results
7. Telco callback results
8. Verifier Version
9. Access Card Test & Serial Number
10. IRD ROM version
11. EEprom test results
The response for all tests will indicate the test was successful or not successful.
In addition, this menu will allow entry into the phone prefix menu so the installer can
set up a one digit phone prefix.
To Enter the Service -Test Feature:
Simultaneously press the front panel "TV/DSS" and the "DOWN" arrow button.The
following screen will appear.
$etvl_ TNt
IRD _I¢_K4FF
RDM I_1111 I
V-DramTea
VJlIWOM4 I_G0
mill1 117
iiiiiiiiii i i
i iii ii
IllamW 07m
HHIHIH
PhonoF_f_
le_em_m_F_x _m_
es_l _ ol( et_ _ gim_'T.
E3
l_st l.o_ _sra _t lo pl a _ _ lm
Figure 14, Service Test Menu
The test results are automatically displayed after the test is complete. The servicer
is given the option to exit or run the test again.
Page 20
IOFF
MESSAGE
Technical Overview 21
A
Figure 15, Front Panel Buttons
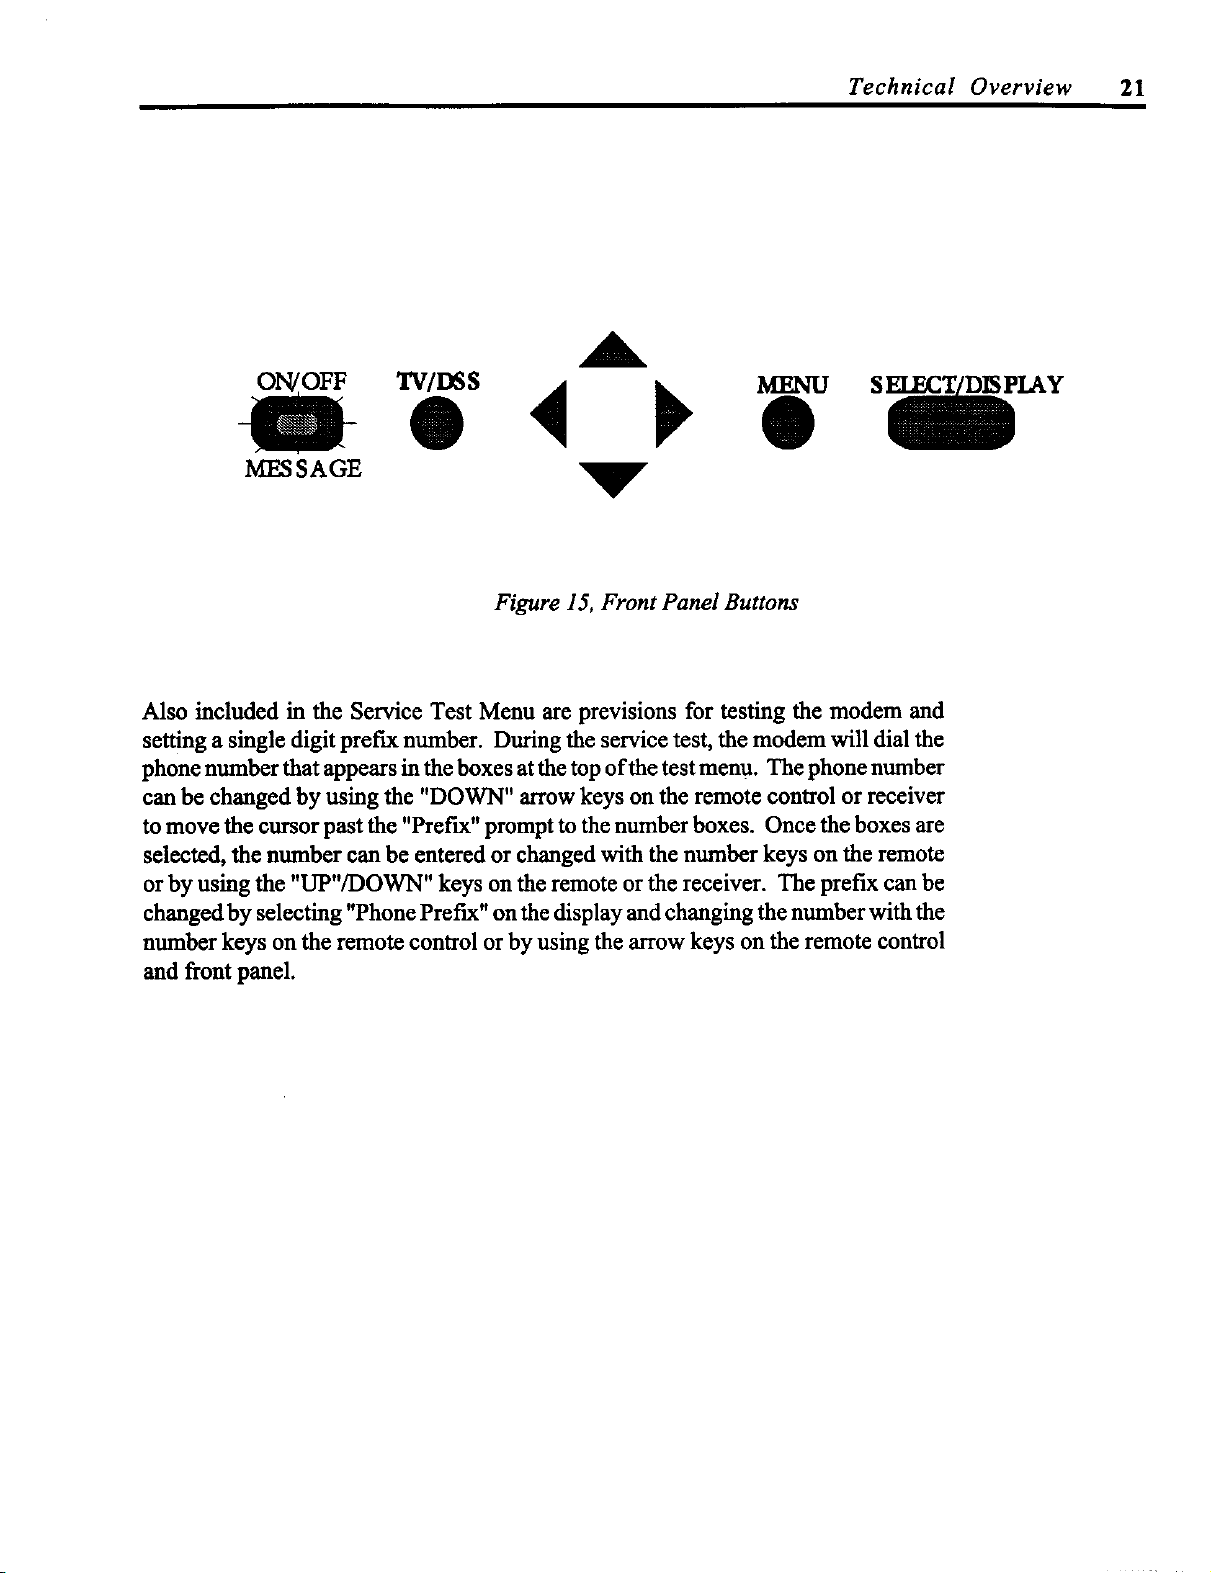
Also included in the Service Test Menu are previsions for testing the modem and
setting a single digit prefix number. During the service test, the modem will dial the
phone number that appears in the boxes at the top of the test menu. The phone number
earl be changed by using the "DOWN" arrow keys on the remote control or receiver
to move the cursor past the "Prefix" prompt to the number boxes. Once the boxes are
selected, the number can be entered or changed with the number keys on the remote
or by using the "UP"/DOWN" keys on the remote or the receiver. The prefix can be
changed by selecting "Phone Prefix" on the display and changing the number with the
number keys on the remote control or by using the arrow keys on the remote control
and front panel.
Page 21

22 Site Survey
SITE
SURVEY
The purpose of the site survey is to plan the installation of the Digital Satellite System.
This planning includes the locations of the dish, receiver, and routing of cables. This
helps to determine the tool and hardware requirements for the installation; plus,
identifies any potential problems.
While performing the site survey, one of the most important things to do is involve the
customer. An installation requires drilling holes and routing cables through their
home. The customer may have specific locations they want this done. Involving them
in the site survey provides you an opportunity to learn what these preferences are. It
also enables you to explain why suggested locations may not work and help them to
select alternative locations.
First Step The site survey starts with the phone call to the customer toarrange the date and time
of the installation. This phone call is your initial contact with the customer and most
likely the only contact before the installation appointment. If possible, try to
determine as much about the installation as you can during this phone call. Ask
questions to help you anticipate the tool and equipment needs for the installation.
These questions should include:
Second Step
• How many televisions will be connected to the system?
• Will an audio system be connected?
• Are there any preferences for dish and receiver locations?
The more of this information you obtain before the installation appointment, the better
your chances of having the right tools and mounting hardware needed to complete the
installation decreasing the installation time.
Another question to ask the customer before the installation appointment is if there are
any codes, covenants, regulations, and restrictions pertaining to the installation of the
DSS dish. Knowing these covenants is the responsibility of the customer, but any
input you can offer may reduce any problems that arise.
The second step of the site survey occurs at the customer's home at the time of the
installation. At this point, the installer and customer should work together to
determine the details of the installation. These details include:
• A location for the dish.
• A dish mounting system (horizontal, vertical, chimney, or pole).
• A route for the cables that run from the dish to the receiver.
• How to Connect the Digital Satellite System to the Customer's Audio/Video
Components.
• Evaluate off-air solution.
Page 22
37g
MINNEAPOLIS
MN
HOUSTON
Site Survey 23
DISH
ELEVATION
48_
TX
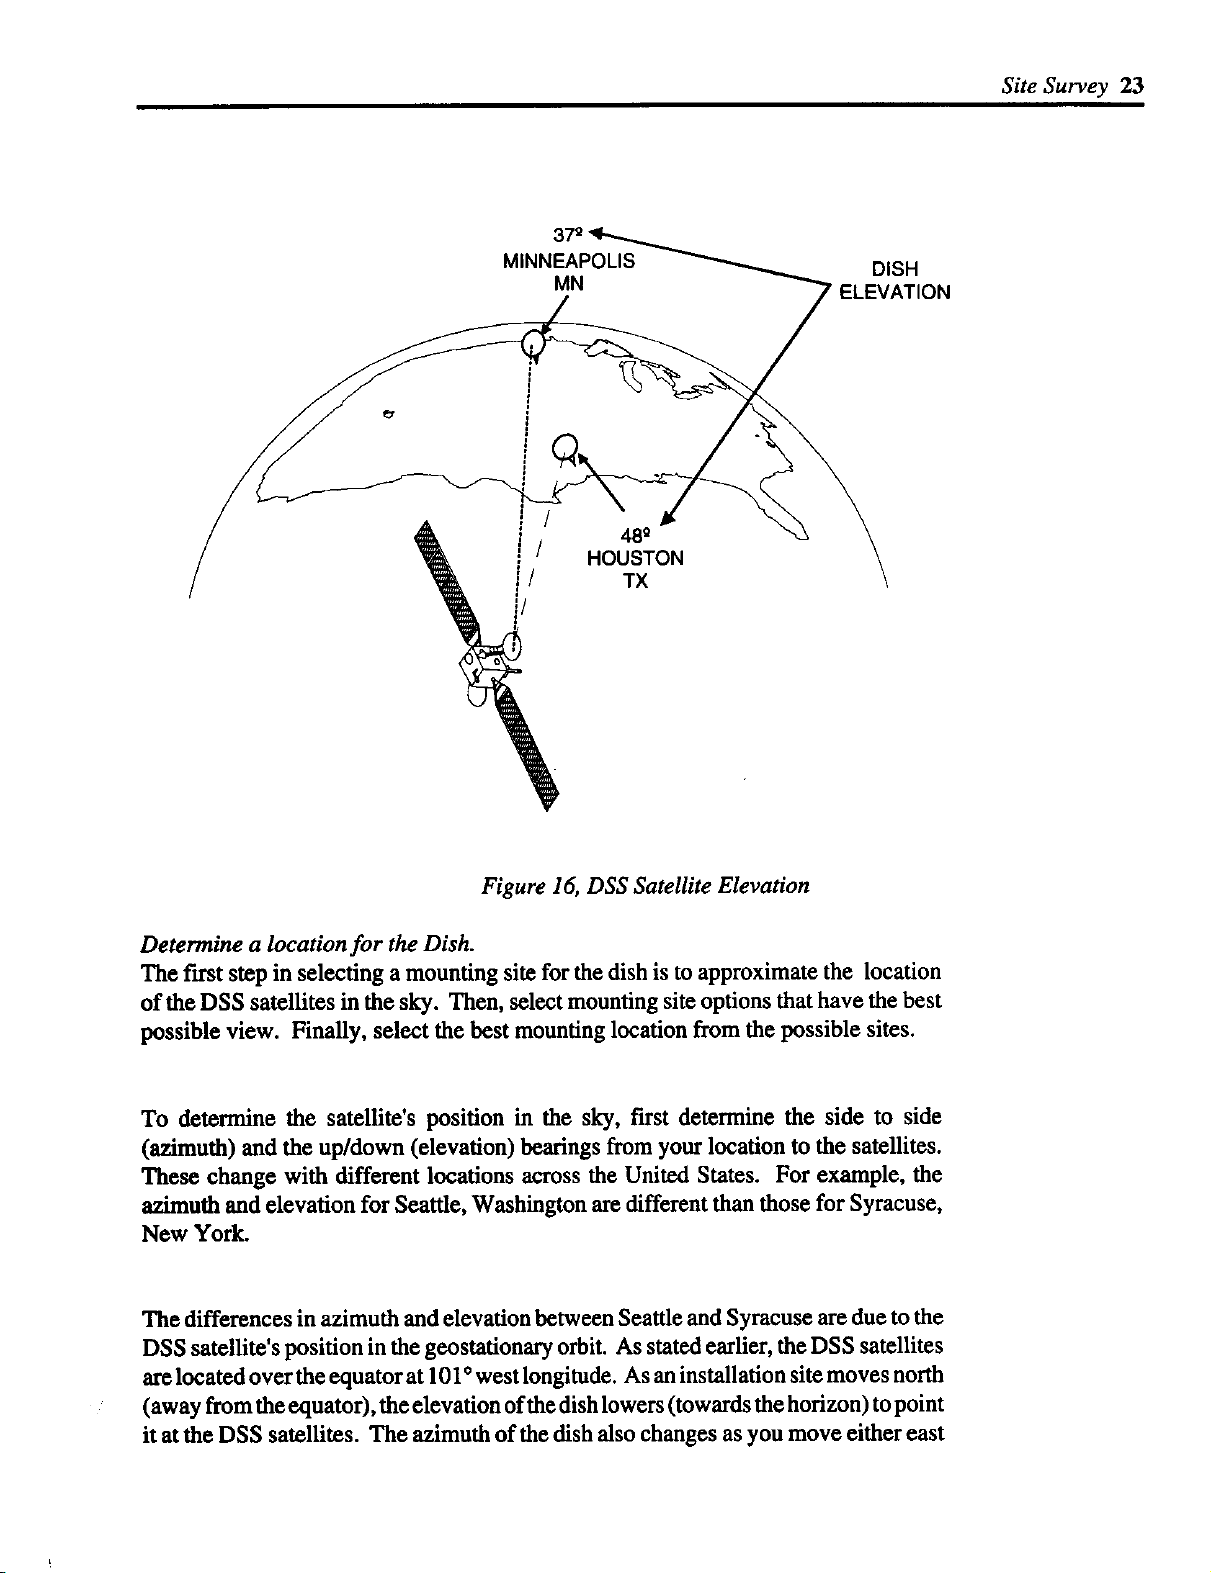
Figure 16, DSS Satellite Elevation
Determine a location for the Dish.
The first step in selecting a mounting site for the dish is to approximate the location
of the DSS satellites in the sky. Then, select mounting site options that have the best
possible view. Finally, select the best mounting location from the possible sites.
To determine the satellite's position in the sky, first determine the side to side
(azimuth) and the up/down (elevation) bearings from your location to the satellites.
These change with different locations across the United States. For example, the
azimuth and elevation for Seattle, Washington are different than those for Syracuse,
New York.
The differences in azimuth and elevation between Seattle and Syracuse are duetothe
DSS satellite's position in the geostationary orbit. As stated earlier, the DSS satellites
are located over the equator at 10I* west longitude. As an installation site moves north
(away from the equator), the elevation of the dish lowers (towards the horizon) to point
it atthe DSS satellites. The azimuth of the dish also changes as you move either east
Page 23
24 Site Survey
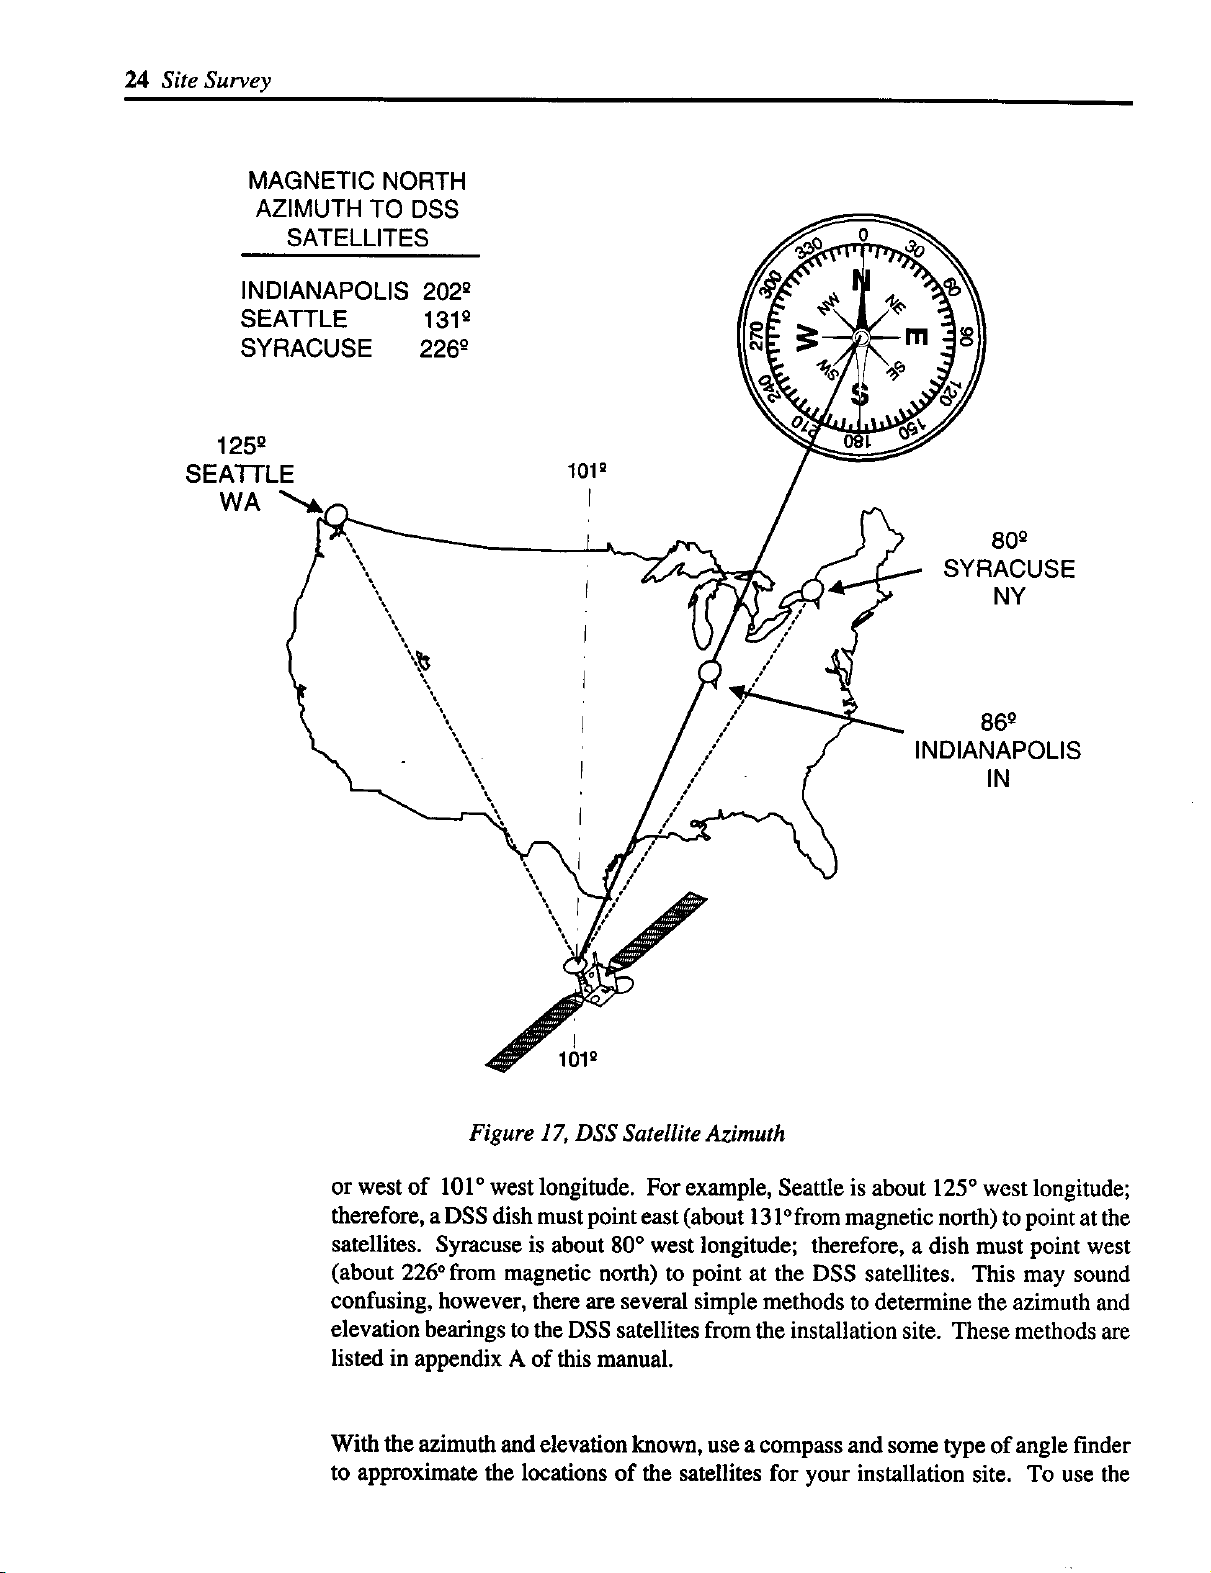
INDIANAPOLIS 202 °
SEATTLE 131o
SYRACUSE 226 g
125 °
SEATTLE
WA
MAGNETIC NORTH
AZIMUTH TO DSS
SATELLITES
101_
80 g
SYRACUSE
NY
I
0o 86g
/
/ INDIANAPOLIS
/ IN
/
101Q
Figure 17, DSS Satellite Azimuth
or west of 101 ° west longitude. For example, Seattle is about 125 ° west longitude;
therefore, a DSS dish must point east (about 131°from magnetic north) to point at the
satellites. Syracuse is about 80 ° west longitude; therefore, a dish must point west
(about 226 ° from magnetic north) to point at the DSS satellites. This may sound
confusing, however, there are several simple methods to determine the azimuth and
elevation bearings to the DSS satellites from the installation site. These methods are
listed in appendix A of this manual.
With the azimuth and elevation known, use a compass and some type of angle finder
to approximate the locations of the satellites for your installation site. To use the
Page 24
compass, first align the arrow of the compass with magnetic north. With the compass
aligned correctly, draw an imaginary line from the center of the compass to the
azimuth of the satellites. This is the general direction the dish must point. If possible,
pick a landmark in the distance that aligns with this bearing. If not, repeat this
procedure whenever confirming possible locations for the dish.
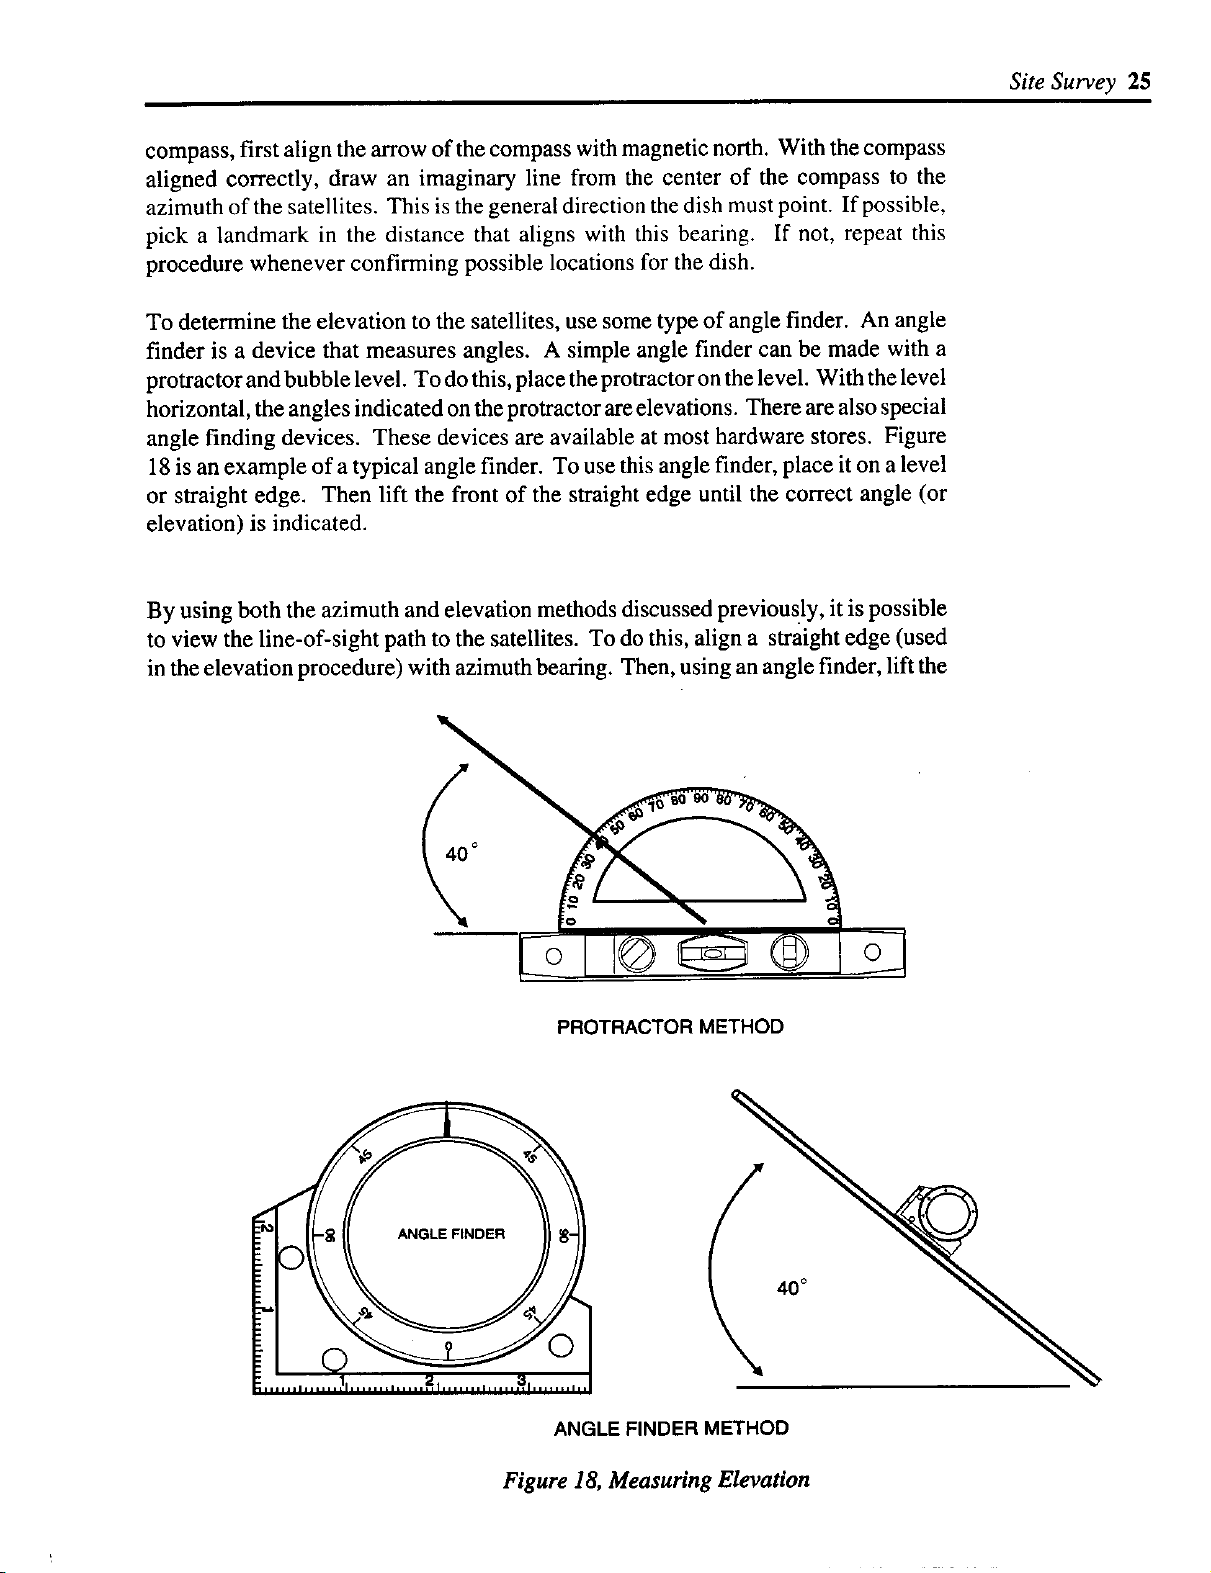
To determine the elevation to the satellites, use some type of angle finder. An angle
finder is a device that measures angles. A simple angle finder can be made with a
protractor and bubble level. To do this, place the protractor on the level. With the level
horizontal, the angles indicated on the protractor are elevations. There are also special
angle finding devices. These devices are available at most hardware stores. Figure
18 is an example of a typical angle finder. To use this angle finder, place it on a level
or straight edge. Then lift the front of the straight edge until the correct angle (or
elevation) is indicated.
By using both the azimuth and elevation methods discussed previously, it is possible
to view the line-of-sight path to the satellites. To do this, align a straight edge (used
in the elevation procedure) with azimuth bearing. Then, using an angle finder, lift the
Site Survey 25
40 °
PROTRACTOR METHOD
ANGLE FINDER METHOD
Figure 18, Measuring Elevation
Page 25
26 Site Survey
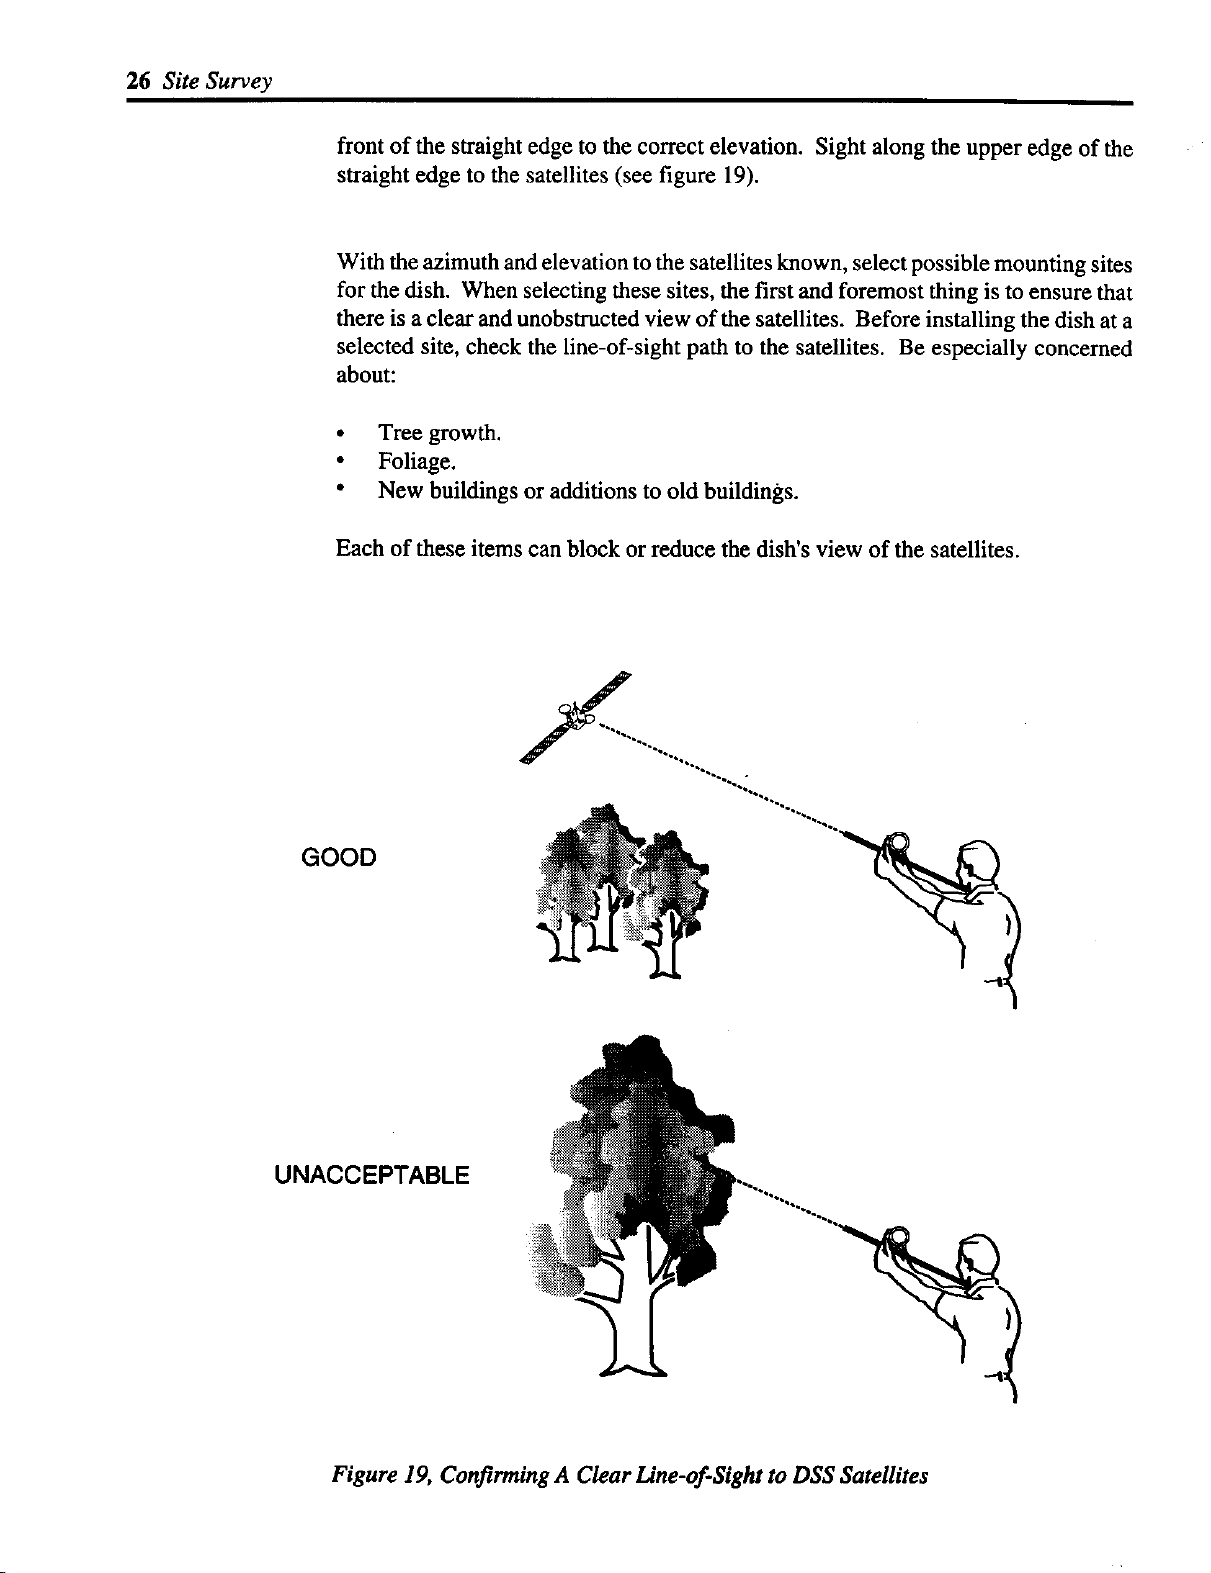
front of the straight edge to the correct elevation. Sight along the upper edge of the
straight edge to the satellites (see figure 19).
With the azimuth and elevation to the satellites known, select possible mounting sites
for the dish. When selecting these sites, the first and foremost thing is to ensure that
there is a clear and unobstructed view of the satellites. Before installing the dish at a
selected site, check the line-of-sight path to the satellites. Be especially concerned
about:
• Tree growth.
• Foliage.
• New buildings or additions to old buildings.
Each of these items can block or reduce the dish's view of the satellites.
GOOD
UNACCEPTABLE
Figure 19, Confirming A Clear One-of-Sight to DSS Satellites
Page 26
Selecting a Mounting System for the Dish
There are several different mounting systems for the DSS dish. These include
horizontal, vertical, and special. Use a horizontal mounting system for horizontal
surfaces and vertical for vertical surfaces. Special mounting systems include pole and
chimney mounts. When selecting a mounting system for the dish, consider these
items:
• Safety.
• Line-of-sight path to the satellite.
• Mounting structure.
When following these instructions, take extreme care to avoid contact with overhead
power lines, lights, and power circuits. Also, do not position the dish anywhere
contact with one of these items may occur. When digging holes, be sure and contact
the local utilities and have them locate any underground services.
How to check the line-of-sight path to the satellites from your installation site is
covered earlier in this section. For each mounting system considered, the line-of-sight
path must be checked for obstructions. If there is an obstruction, another mounting
site may need to be considered.
SiteSurvey27
Even though the DSS dish is relatively small, the surface it mounts to is very important.
This surface must be structurally sound and not have an excessive amount of
movement. A structurally sound surface can be the wall of a home, a deck rail, or a
chimney. These surfaces should withstand at least several hundred pounds of force
that the dish may place on it. This force is not constantly placed on the mounting
surface, it is only present when wind pushes on the dish. Keep these forces in mind
whenever installing a dish and selecting a mounting surface and system.
Identify a Route For the Cables that Run from the Dish to Receiver
Another important aspect of the site survey is the route of the LNB cable. This cable
connects the dish to the satellite receiver. The site survey is the opportune time to plan
the path of this cable. Also, if there are no phone jacks in the area of the receiver, plan
the installation of a telephone cable. If possible, select the shortest possible path to the
satellite receiver for each of these cables. Also try to take advantage of crawl, closet,
and attic spaces. Using these spaces to your advantage can reduce the installation time
by preventing the routing of cables through the inside of walls. The goal of any cable
installation is to keep the cables out of sight and as short as possible.
Connecting the Receiver to the Customer's Audio-Video Components
One of the last items of the installation to consider is the connection of the receiver to
the different video and audio components the customer may have. These components
can include VCR's, laser disc players, and audio systems. Explain to the customer the
best method of connecting their components to the receiver. If there are several
Page 27
28 Site Survey
possibilities, explain them to the customer pointing out the advantages and disadvan-
tages of each. If the customer is unsure of how they would like to connect the receiver,
use your experience to recommend a hookup that will work best for them.
Evaluate Off-Air Solution
Local programming is not available via the DSS satellites. If the customer does not
have an off-air (terrestrial) antenna or cable in the home, you may suggest the
installation of one. If you need assistance in selecting the best antenna for your area,
consult the DSS Accessories and Antenna Components Catalog (publication T-
8743CM).
Third Step
One of the last items to consider during the site survey is whether the different details
of the installation fall within the "basic" installation plan outlined by Thomson
Consumer Electronics. If there are components of the installation that fall outside the
"basic" installation guidelines, additional time and materials may be required. It is
important to discuss any additional charges with the customer before the installation
Thomson Consumer Electronics "basic" installation guidelines
ale:
The dish unit can be mounted on a stable structure of the dwelling - a vertical wall,
chimney, or roof, within a 100-foot cable length of the connected TV. Hardware
necessary to mount the dish must be provided by the installer and included in
"basic" installation price. This includes screws or bolts, grounding hardware, and
an occasional inexpensive Thomson-approved chimney mount.
The installer provides up to 100 feet of Thomson-approved RG-6 coaxial cable
and up to 100 feet of telephone cable.
The satellite receiver should be connected to one TV (and VCR is the VCR is
located at connected TV location).
The antenna is grounded to meet the National Electric Code (NEC) requirements.
The coax cable routed through a normal frame structure or only one layer of
masonry (brick or block).
All cables should be routed to the TV either through an exterior wall or from a
basement or crawl space.
A telephone connection should be installed at the location of the DSS receiver. An
existing phone outlet may be used if within a reasonable distance of the connected
TV and acceptable to the consumer. The installer should assume that most
installations will require a telephone cable hook-up.
Page 28
• Providing up to 20 minutes of customer education on system operation.
• Estimated time to complete a "basic" installation is 2 hours.
• The "basic" install includes travel up to 25 miles (or 25 minutes in dense metro
areas) for the installation without additional mileage charge to the consumer.
Any installation falling within these guidelines is considered a basic installation and
no additional cost is passed on to the customer. If there are aspects of the installation
that fall outside of these guidelines, additional cost can be quoted to the customer to
cover the additional expense. Some examples of items that increase the cost of an
installation are the installation of a pole mount system or using over 100 feet of cable.
Remember, these costs must be explained to the customer before the installation starts.
If the customer does not want pay the additional costs, another mounting site that falls
within the basic guidelines must be found.
Here are some installation add-ons for which a customer may be charged by the
Installer:
Site Survey 29
• The outdoor antenna unit must be mounted at significant distance from the
dwelling, requiring lengthy underground cabling.
• Multiple masonry walls or a solid concrete wall must be penetrated.
• The satellite antenna unit must be installed at a location which requires more
than 100 feet of coax cable to connect the TV and would require amplification.
• Multiple TVs are to be connected. This would probably require multiple
satellite receivers.
• An off-air (VHF-UHF) antenna is needed to capture local signals.
• Complying with state and local codes for grounding more stringent than the
National Electric Code.
• Fishing cable in the walls.
• Travel distance beyond that included with the "basic" installation.
Make certain the consumer understands the costs of any additional options before
you begin the installation work.
Page 29
30 Si_Survey
Optional accessories are items that may be required for an installation but not included
in the basic installation guidelines. Therefore, cost of these items can be passed on to
the customer. Some example of optional accessories are:
• 12' AN cables. There may be several types of cables required: stereo audio cables,
video, and S-video.
• Telephone accessories. These accessories include a telephone extension cable
and/or modular telephone connectors (in-line and T).
• Antenna system parts. Included in this category are indoor and outdoor antennas,
in-line signal amplifiers, and signal combiners.
• AC and telephone surge protectors.
The tools required to complete a basic installation include:
• Drill and bits. Depending on the installation site, it may be necessary to use
masonry bits.
• Assorted hand tools. These tools include pliers, wire cutters, hammer, flashlight,
screwdrivers, etc.. These tools should also include coax cable strippers and
crimping tools for the installation of "F' fittings on cable.
• Compass.
• Ladder. The length of this ladder must be enough to reach attics and roof tops as
required for the installation. It is recommended that a fiberglass ladder be used.
• Cleaning equipment. This equipment should be enough to clean the debris
resulting from the installation of the dish. Items in this list include a broom, dust
pan, hand held vacuum cleaner, rags, and some type of cleaner.
Once the site survey is finished and the materials gathered, the installation of the
system can begin. After reading this, it may appear as though the site survey requires
too much time to do. Once you are experienced with doing site surveys, the whole
process should not take over 15 minutes. Once the site survey is finished and the
installation starts, you'll find that the steps taken during the site survey will save you
both work and time.
Page 30

NOTES
Site Survey 31
Page 31

32 Installation
INSTALLATION The two major components of the Digital Satellite System are the dish and receiver.
These components are packed separately in the carton. The dish packaging contains
five pieces. These are the dish, LNB support arm, foot and mast assembly, LNB, and
a package that contains the nuts and bolts required to assemble the dish. The receiver
packaging contains the receiver, remote control, RF cable, and a telephone cable. The
deluxe system receiver (DRD203RW) contains the basic components listed above,
plus audio, video, and S-video cables. The dish packaging is almost the same for both
the deluxe and the basic (DS1120RW) systems. The difference between the two
antenna systems is the LNB and dish. In the deluxe system, the LNB is a dual output
while the basic system's LNB is a signal output. The dish used with the deluxe system
is made of SMC material, while the basic package includes a metal dish. Before
starting an installation, check for the presence of all pieces in the system packing.
In this section of the training manual, installation of the Digital Satellite System is
divided into four steps. Each step forms a different section of this manual. The steps
are:
1. Mounting the Dish (page 41)
2. Assembling the Dish (page 78)
3. Installing the Receiver (page 98)
4. Aligning the Dish (page 104)
Mounting the
Dish
Included in each of these sections are instructions for performing the step; plus, tool and
material lists required for the step. To see what tools are needed to do a step, go to the
section that matches your installation site. Then, look at the list of tools and materials.
To install the system, you must perform each of these steps. You may choose to perform
these steps in a different order given than that in this manual and the way you install the
system may vary. However, the goal is to install the system quickly and efficiently. The
order you perform the steps should help you do this.
This section addresses mounting the foot and mast assembly to a surface. There are
three basic mounting systems for the dish: vertical, horizontal, and special. Both the
vertical and horizontal mounting systems use the foot and mast assembly included
with the Digital Satellite System. Special mounting systems include chimney and pole
mounts. These systems require the use of hardware that is not included with the RCA
Digital Satellite System, such as a metal pole and concrete for a pole mount system and
a chimney bracket for a chimney mount system. In the explanations of the different
mounting systems, the material lists include the additional hardware needed to install
that system.
Page 32

DISH
Installation 33
\
LNB
MAST AND FOOT ASSEMBLY
HARDWARE
PACKAGE
LNB SUPPORT ARM
Figure 20, Dish Packaging
Page 33

34 Installation
Before starting the installation, there some important things to remember about
installing the system. First, never mount the dish on a surface that is not structurally
sound. Excessive movement of the mounting surface will reduce the performance of
the system. Second, whenever drilling holes in a home, follow the old rule of measure
twice and drill once. Drilling a hole in the wrong place can be difficult and costly to
repair. Finally, read and follow all the safety instructions at the start of this manual.
These warnings are for both you and your customer's safety.
Leveling Basics One of the key steps of the installation is leveling the mast. When mounting the foot
and mast on any surface, the mast must be level both horizontally and vertically. If the
mast is not level, alignment of the dish becomes difficult without the help of special
sighting equipment.
Figure 21 is the mast and foot assembly. This assembly can mount on either a horizontal
or vertical surface by adjusting the position of the mast on the foot. This is the only
adjustment on the foot. Therefore, the position of the foot on a horizontal or vertical
surface is important. Whenever positioning the foot on a nonlevel surface, orient the
foot's adjustment in the direction of the pitch. This simplifies the leveling procedure and
prevents the need of spacers to level the mast.
ADJUSTMENT
VERTICAL
Figure 21, Mast and Foot Assembly Adjustment
HORIZONTAL
Page 34

Installation 35
I
/
Figure 22, Horizontal Leveling with Bubble Level
There are two leveling procedures, one for mounting the foot on a vertical surface and
the other for a horizontal surface. Leveling procedures for special mounting systems
are provided in the specific mounting instructions given later in this manual.
The following leveling procedures gives a basic understanding of how to level the
mast for each mounting system. Abbreviated leveling instructions are also given later
in this manual in the instructions for different mounting surfaces.
Vertical Mounting System
With mounting the foot on a vertical surface, the mast is leveled horizontally (side to
side) and vertically (up and down). Use either a bubble level or plumb line with the
following procedures to level the mast.
Use the following procedure to level the mast with a bubble level.
1. Place the level on the mast as shown in figure 22. Move the bottom of the
mounting foot to center the bubble in the window of the level.
2. With apencil, draw line from the center line of tbe lower f6ot onto the waU.
This line is a reference mark that enables the foot to be restored to level
without using the level again. Before drilling the remaining holes required
to install the foot, ensure this line aligns with the center line of the
mounting foot.
Page 35

36 Installation
When horizontal leveling with a plumb line, use the following procedure:
1. Hold the string of the plumb line over the top of the mast so it hangs as shown
in figure 23.
2. Move the lower part of the foot until the plumb line aligns parallel to the side
of the mast.
3. With a pencil, draw a line from center line of the mounting foot onto the wall.
This line is a reference mark that enables the foot to be restored to level without
using the plumb line again. Before drilling the remaining holes required to install
the foot, ensure this line aligns with the center line of the mounting foot.
\
Figure 23, Horizontal Leveling with Plumb Line
r
Page 36

ADJUST
t
Figure 24, Vertical Plumbing with Bubble Level
To level the mast vertically with a bubble level, use the following procedure.
lns_l_tion 37
1. Loosen the two bolts holding the mast in position on the foot.
2. Place the level on the mast as shown in figure 24.
3. Move the mast vertically center the bubble in the window of the level.
4. Tighten the two mounting bolts securing the mast to the mounting foot.
CORRI_CT
Figure 25, Vertical Leveling with Plumb Line
Page 37

38 Installation
To level the mast vertically with a plumb line, use the following procedure:
1. Loosen the two bolts holding the mast in position on the foot..
2. Hold the string of the plumb line over the top of the mast so it hangs as shown
in figure 25.
3. Move the mast vertically until the plumb line hangs parallel with the mast.
4. Tighten the two mounting bolts securing the mast to the mounting foot.
Horizontal Mounting System
When mounting the foot on a horizontal surface, the mast must also be leveled. This
leveling is different than the leveling done for a vertical surface. Instead of leveling
in a horizontal and vertical direction as you do on vertical surfaces, horizontal surfaces
require the mast he leveled vertically in all directions. To do this requires at least two
measurements of the mast. Each measurement must be at right angles to the other
measurement (see figure 26). Both aplumb line and a bubble level will work for making
these measurements.
MEASUREMENT MEASUREMENT
1 2
Figure 26, Measuring Level Horizontal Mounting System
Page 38

The important thing in horizontal mast leveling is positioning of the foot on the
mounting surface. This is due to the one adjustment of the foot. When positioning the
foot on a horizontal surface, orient the adj u stment in the direction that has the most angle
to it. For example, if you are mounting the foot on a roof, orient the foot so the
adjustment is parallel to the pitch of the roof (see figure 27).
Insml_tion 39
Figure 27, Orient the Mounting Foot on a Horizontal Surface
Use the following procedure to level the mast on a horizontal surface:
1. With a bubble level, check the level of the mounting surface. While doing
this, check several different angles at the foot location. Mark the direction
with the most angle.
2. Position the foot on the mounting surface, aligning the foot's adjustment with
the direction marked in step one.
3. With the adjustment on the foot, level the mast (see figure 28).
Page 39

40 Installation
MOVE
ADJUSTMENT
Figure 28, Horizontal Surface Mast Leveling with Foot Adjustment
SPACERS
(IF REQUIRED)
Figure 29, Horizontal Surface Side to Side Leveling
Page 40

.
Move the bubble level (or plumb line) 90 degrees and measure. If level, double
check both measurements and secure the foot (skip steps 5 and 6). If it is not
level, continue to step 5.
,
If the side to side measurement of the mast is not level, use spacers to level
it. To use spacers, determine the side that must be raised. Then, place 5/16
washers under the foot to level the mast. Position these washers under the
mounting holes so the mounting bolts will secure them.
6, Once the side to side measurement is level, confirm the level of both
measurements and secure the foot to the surface. Always double check the
level of the mast after it is secured. If it is not level, re-adjustment may be
necessary.
Installation 41
Instructions for leveling is also given in each horizontal system installation proce-
dure.
Page 41

42 Installation/Mounting the Dish
Material List:
• 2EA. I "x3"
screws.
• 4EA /16 xlV2"Lag
screws.
• 2EA. 1-
• 4 EA. 5/is" Flat wash-
ers
Tool List:
• Drill.
• l/s" Twist drill bit.
3/16"Twist drill bit.
• Bubble level or plumb
line.
• 7/16"Box or open end
wrench.
• 3/s" Box or open end
wrench.
• Pencil.
/4 Lag
5 II
/4 Flat washers.
PANEL SIDING
__ WOOD PANEL
CENTER
HOLE
_1 I/sTuD
STUD
I
OUTSIDE/ I I NOUTSIDE
HOLES(_k I ] / HOLES
! I CENTER
HOLE
Figure 30, Panel Mounting Mast and Foot Assembly
Page 42

Installation/Mounting the Dish 43
Panel siding is typically a 4' x 8' sheet of material mounted over some type of insulating
sub layer. The thickness of these panels varies from 3/8" to 5/8". Nails secure the
panels to the frame structure of the home. Usually, the edges of panels are cut so that
lap joints form where two panels meet. This provides a relatively flat mounting
surface for the DSS dish.
Panel siding can be made of many different types of materials. These materials range
from composite materials to solid wood or plywood. Do not mount the dish to any type
of composite material. Composite materials include strand board, fiber board, and
particleboard. Acceptable siding materials include solid wood panels and plywood.
If you are unsure of the mounting material or its thickness, look at a cross sectional
view of the material by removing the cover from an exterior electrical outlet.
Due to the variety of solid wood and plywood panels used in home construction, it is
always recommended that the mounting foot be secured to one of the studs that make
up the framework of the wall.
Use the following procedure to install the foot on panel type siding:
DANGERZ
When following these instructions, take extreme care to avoid
contact with overhead power lines, lights and power circuits.
Contact with power lines, lights, and circuits may prove fatal.
Vertical
Mounting
Systems
1. Locate a wall stud close to the area selected in the site survey. To locate a stud
underneath panel siding, locate the nails securing the panel to the wall frame.
These nails are driven into the studs and usually form a track vertically on the
siding. This vertical track of nails aligns with the center of the stud and provides
an easy guide to the locations of the studs.
2x4 STUD
WOOD PANEL
/
NAIL
TRACK
Figure 31, Finding Wall Stud
Page 43

44 Installation/Mounting the Dish
2. Place the mounting foot on the panel aligning the center holes with the center
of the stud. With a pencil, mark the upper center hole of the mounting foot.
3. Remove the mounting foot and drill a 1/8" hole in the location just marked.
J
With a 114" x 3" lag screw and washer, attach the mounting foot to the wall
using the hole drilled in step three. Tighten the lag bolt until itjust holds the
mounting foot to the wall. The lower half of the mounting foot should move
slightly back and forth.
5. Horizontally level the mast using either a bubble level or a plumb line.
To horizontally level the mast, place the level or plumb line on the mast at an
perpendicular angle to the wall. If you are using a bubble level, move the
bottom of the mounting foot to center the bubble in the window of the level.
If you are using a plumb line, move the lower part of the foot until the plumb
line aligns parallel to the side of the mast. With a pencil, draw line from the
center line of the lower foot onto the wall. For details on this procedure, see the
Leveling the Dish section of this manual.
6. Using a 7/16" wrench, loosen the lower two nuts holding the mast onto the
mounting foot. With these two nuts loose, move the mast to gain access to the
lower center mounting hole.
7. Align the center mark of the mounting foot with the line drawn in the horizontal
leveling procedure.
8. Drill a 118" pilot hole in the lower center mounting hole.
9. Insert a 1/4" x 3" lag screw with washer into the lower mounting hole. At this
time tighten both top and bottom lag screws.
10. With a 3/16" bit in the drill, drill two pilot holes in opposite comers of the
mounting foot.
11. Insert 5116" x 1-1/2" lag screws with washers into the outside holes and
tighten.
Note: Inserting lag screws into these holes in the four comers of the mounting
foot is optional and only done to improve the appearance of the installation. A
minimum of two lag screws in opposite comers of the mounting foot are
Page 44

LOOSEN
Installation/Mounting the Dish 45
Figure 32, Loosening Lower Nuts
required for the installation. These screws reduce the side-to-side movement
of the dish.
12. Vertically level the dish with a bubble level or plumb line.
To do this, place the level, or plumb line, on the mast at an parallel angle to
the wall. If you have not loosened the two bolts securing the azimuth
adjustment on the mounting foot, do it now. If you are using a bubble level,
move the mast vertically to center the bubble in the windov¢ of the level. If
you are using a plumb line, hold the string of the plumb line over the top of
the mast so it hangs at a perpendicular angle to the mounting surface. Move
the mast vertically until the plumb line hangs parallel to the side of the mast.
Tighten the two mounting bolts securing the mast to the mounting foot. For
a more detailed description of this procedure, see the Leveling the Dish
section of this manual.
13. Check tightness of all bolts and proceed to the Assembling the Dish section.
Page 45

46 Installation/Mounting the Dish
Material List:
• 2 EA.I/4" x 3" Lag
SCI_WS.
• 4 EA. s/16" x IV2"
Lag screws.
• 4 EA. 5/16"Flat
washers.
• 2 EA. 1/4"Flat
washers.
LAP SIDING
_>.2x4 STUD
/
I r
Tool List:
• Drill.
• ]/s" Twist drill bit.
3 it . . .
• /16 Twist dnll bit.
• Bubble level or
plumb line.
7 Ig
• 1,6 Box or open
end wrench.
3 "
• /8 Box or open end
wrench.
• Pencil.
(Optional)
CENTER
HOLE STUD
\I I-I
/I I\
OUTSIDE \ I I / OUTSIDE
HOLES _ _ %_/ HOLES
I"° I IN, or|
I I N
I I
CENTER
HOLE
Figure 33, Mounting the Foot and Mast Assembly to a Lap Sided Wall
Page 46

Installation/Mounting theDish 47
Lap sided walls are made up of many narrow boards stacked horizontally up the wall.
Each board is lapped by the board above it. Usually, all the boards on one wall are the
same width; however, the width of lap siding material can vary from 4 to 10 inches.
Therefore, it is possible for one wall to use 5" boards and another wall to use 7" boards.
This can make finding alocation on the wall wide enough for the mounting foot difficult.
Another characteristic of lap sided walls is the siding style. Depending on this style,
the wall surface is either flat or uneven. If the surface is uneven, each board's surface
is not parallel to the vertical plane of the wall. Several common siding styles are drop,
rustic, rabbetted, bevel (also called taper), and clapboard. The wall surfaces with drop
and rustic siding styles are relatively fiat. Rabbetted, bevel, and clapboard styles have
uneven wall surfaces. Installing the dish on a wall with rustic and drop styles of siding
is the same as installing it on panel siding. If you are installing the DSS dish on one of
these siding styles, see the panel siding explanation in this manual. When installing
the system on clapboard, bevel, and rabbetted styles of siding, the mounting process
must change slightly.
DROP RUSTIC RABBEITED BEVEL
SIDING SIDING SIDING SIDING
Figure 34, Lap Siding Styles
CLAP-
BOARD
Page 47

48 Installation/Mounting the Dish
\
FACE
WIDTH
w m
-- B
\
Figure 35, Lap Siding Face Width
Another difference with the siding styles that do not have flat surfaces is the different
amount of exposed board, called the face width. For example, the face width of bevel
and taper siding styles can vary from 3-1/2" to 9". This presents a problem when
mounting the DSS foot to boards with the narrower face widths. The mounting foot
is about 7" long and mounts across aboard. When installing the foot on boards narrower
than 7", a portion of the foot will not contact the wall. This often looks unprofessional
and can reduce the strength of the installation. To install the mounting foot on siding
with a face width less than 7", a spacer can be installed with the foot in the area of the
overhang. This spacer keeps the foot securely fastened to the wall. The material used
for this spacer can be wood or plastic and must be soft enough to have holes drilled into
it. Once installed, the color of this spacer should match either the wall or mounting foot.
Page 48

Installation/Mounting the Dish 49
Lap siding can be made from many different types of materials. These materials range
from solid wood to aluminum. Do not mount the DSS Dish on any type of
aluminum or vinyl siding,. We also do not recommend mounting the system on any
type of composite material. This includes strand board, chip board, fiber board, and
particleboard. An acceptable siding material is solid wood or plywood.
There are also several types of solid wood siding sold today. This wood varies in
hardness and strength. Due to this, secure the mounting foot to one of the studs that
make up the framework of the wall.
Use the following procedure to install the mounting foot on a lap sided wall:
DANGER!
When Following these instructions, take extreme care to avoid
contact with overhead power lines, lights, and power circuits.
Contact with power lines, lights, and circuits may prove fatal.
1. Locate a wall stud close to the area selected in the site survey.
To locate a stud underneath the siding, locate the nails securing the siding to the
wall frame. These nails are driven into the studs and usually form a vertical track
on the wall. This vertical track of nails often aligns with the center of the stud
and provides an easy guide to the location of the stud.
2. Place the mounting foot on the face of a siding board aligning the center holes
of the foot with the center of the stud. With apencil, mark the upper center hole
of the mounting foot.
Note: If the foot is wider than the face of the siding board, a spacer must be
installed under the part of the foot that does not touch the siding. Tips for
installation of this spacer is given later in this section.
3. Remove the mounting foot and drill a 1/8" hole in the location just marked.
.
Use a 1/4" x 3" lag screw and washer to attach the mounting foot to the wall--
use the hole drilled in step three. Tighten the lag screw until it just holds the
mounting foot to the wall. The lower half of the mounting foot should slightly
back and forth.
Page 49

50 Installation/Mounting the Dish
5. Horizontally level the mast using either a bubble level or a plumb line.
To horizontally level the mast, place the level, or plumb line, on the mast atan
perpendicular angle to the wall. If you are using a bubble level, move the
bottom of the mounting foot to center the bubble in the window of the level.
If you are using a plumb line, move the lower part of the foot until the plumb
line hangs parallel to the side of the mast. With a pencil, draw a line from the
center line of the lower foot onto the wall. For details on this procedure, see
the leveling the dish section of this manual.
6. With a 7/16" wrench, loosen the lower two nuts holding the mast onto the
mounting foot. With these two nuts loose, move the mast to gain access to the
lower center mounting hole.
7. Align the center mark of the mounting foot with the line drawn in the horizontal
plumb procedure.
8. Drill a 1/8" pilot hole in the lower center mounting hole.
9. Insert a 1/4" x 3" lag screws with washer into the lower mounting hole. At this time
tighten both top and bottom lag screws.
10. With a 3/16" bit in the drill, drill holes in the four comers of the mounting foot.
11. Insert a 5/16" x 1-1/2" lag screws with washers into each of the four outside holes
and tighten.
NOTE: Inserting lag screws into the four comers of the mounting foot is
optional and only done to improve the appearance of the installation. A
minimum of two lag screw in opposite comers of the mounting foot is required.
These lag screws reduce the side-to-side movement of the dish.
12. Vertically level the dish with a bubble level or plumb line.
To do this, place the level, or plumb line, on the mast at an parallel angle to the
wall. If you have not loosened the two bolts securing the azimuth adjustment
on the mounting foot, do it now. If you are using a bubble level, move the mast_
vertically to center the bubble in the window of the level. If you are using a
plumb line, hold the string of the plumb line over the top of the mast so it hangs
at a perpendicular angle to the mounting surface. Move the mast vertically
until the plumb line hangs parallel to the side of the mast. Tighten the two
mounting bolts securing the mast to the mounting foot. For a more detailed
description of this procedure, see the Leveling the Dish section of this manual.
Page 50

Installation/Mounting the Dish 51
13. Check the tightness of all bolts and proceed to the Assembling the Dish section.
Installing a Spacer (Optional)
If the siding is too narrow for the mounting foot, a spacer must be installed. The spacer
can be held in place by the lower two mounting bolts of the mounting foot. To do this,
use the following steps.
1. Remove the lag bolts from the lower outside holes of the mounting foot.
2. Insert the spacer under the mounting foot and mark the location of the two outside
holes. If the space has not been previously sized, mark the size of the spacer using
the mounting foot as a guide. Use these marks to trim the spacer to the correct size.
3. With a 1/4" drill bit, drill the two holes just marked.
4. Slide the spacer under the mounting foot and reinstall the two lag screws in the
outside holes.
5. Once the spacer is installed, check tightness of all bolts and proceed to Assembling
the Dish Components section.
Page 51

52 Installation l Mounting the Dish
Material List:
• 4EA. l/4" Wall
anchors.
• 4 EA. 1/4"x 11/2"
Machine screws.
• 4EA. V4"Flat
washers.
BRICK WALL
Tool List:
• Drill.
• V2"Masonry drill
bit.
• Bubble level or
plumb line.
• 7116"BOX or open
end wrench.
• 3/." Box or open
end wrench.
• Hammer.
• Pencil.
OUTSIDE/
HOLES _
a,
?
OUTSIDE
HOLES
\(o
Figure 38, Mounting Foot and Mast Assembly to a Brick Wall
Page 52

Installation/Mounting theDish 53
Using wall anchors, the foot can be mounted to most brick walls. Wall anchors insert
into a hole drilled into the brick. These anchors come in a variety of types and sizes.
When selecting a wall anchor to use, select one that will work in brick and has at least
300 pounds of pull out strength. An example of a wall anchor for the DSS dish is a
114" Rawl brand double expansion anchor (BB4015).
When installing the mounting foot in brick, use four wall anchors in the outside holes
of the mounting foot. This is due to the different densities of various types of brick.
Use the following instructions install the mounting foot on a brick surface:
DANGER!
When following these instructions, take extreme care to avoid
contact with overhead power lines, lights, and power circuits.
Contact with power lines, lights, and power circuits may prove
fatal.
1. Select a mounting location. This location should be relatively flat. A good way to
check this is to hold the mounting foot on the wall. If the wall is flat, all four comers
of the mounting foot will rest on the wall. If the wall is not fiat, one or several
comers will lift from the brick surface.
2. Hold the mounting foot in position and, using a pencil, mark one of the outside holes.
3. Remove the mounting foot. Then drill a 112"hole at the location just marked. This
hole should be at least 1-3/4" deep (The depth of this hole depends on the length
of the machine screws).
Note: A 1/2" hole is for a 1/4" expansion anchor. The size of hole you drill
will depend on the wall anchor you use, follow the manufacturer' s recommen-
dations for drilling the correct size of hole.
4. With a brush or air, clean the dust from the hole.
5. Insert the wall anchor.
6. With a 1/4" x 20 x 1- 1/2" machine screw and 1/4" washer, attach the mounting foot
to the wall. This screw should be tightened until the mounting foot is snug against
the wall.
Page 53

54 Installation/Mounting the Dish
1 3/4"
DEPTH BRICK
(MINIMUM) J
Figure 37, Drilling Holes for Wall Anchors
7. Horizontally level the mast with a bubble level or plumb line.
To horizontally level the mast, place the level, or plumb line, on the mast at an
perpendicular angle to the wall. If you are using a bubble level, move the bottom
of the mounting foot to center the bubble in the window of the level. If you are
using a plumb line, move the lower part of the foot until the plumb line aligns
parallel to the side of the mast. With a pencil, draw line from the center line of
the lower foot onto the wall. For a details on this procedure, see the leveling the
dish section of this manual.
8. Align the center mark of the mounting foot with the line drawn in the horizon-
tal level procedure, With a pencil, mark the remaining three outside holes.
9. Remove the mounting foot. Then, drill three 1/2" holes at the locations just
marked. These holes should be at least 1-3/4" deep (The depth of this hole
depends on the length of the machine screws).
10. With a brush or air, clean the dust from the holes.
Page 54

Installation/Mounting the Dish 55
11. Insert expansion anchors in each hole.
12. Use four 1/4" x 20 x 1-1/2" machine screws and 1/4" washers to attach the
mounting foot to the wall. Tighten all four screws.
13. Vertically Level the dish with a bubble level or plumb line.
To do this, place the level, or plumb line, on the mast at an parallel angle to the
wall. If you have not loosened the two bolts securing the azimuth adjustment
on the mounting foot, do it now. If you are using a bubble level, move the mast
vertically to center the bubble in the window of the level. If you are using a
plumb line, hold the string of the plumb line over the top of the mast so it hangs
at a perpendicular angle to the mounting surface. Move the mast vertically until
the plumb line hangs parallel to the side of the mast. Tighten the two mounting
both securing the mast to the mounting foot. For a more detailed description of
this procedure, see the Leveling the Dish section of this manual.
14. Check tightness of all bolts and proceed to the Assembling the Dish Compo-
nents section.
Page 55

56 Installation/Mounting the Dish
CINDER BLOCK WALL
Material List:
• 4EA. V4"x3"
Machine screws.
• 4 EA. 1/4"Hollow
wall anchors or
togglers.
• 4 EA. 1/4"Flat
washers.
Tool List:
• Drill.
• 1/2"Masonary drill
bit.
• Bubble level or
plumb line.
• 7/16"Box or open end
• Screw driver.
• Pencil.
Figure 38, Mounting DSS foot and Mast Assembly to a Cinder Block Wall
Page 56

Installation/Mounting the Dish 57
Cinder blocks can come in a variety of sizes. These sizes vary in length and in the
number of cores, or cavities, in the block. The block sizes are three core (8" x 8" x 16"),
two core (8" x 8" x 16"), and a smaller two core (8" x 8" x 12"). In many areas, the
two core 16" block is the most common.
16"
THREE CORE
16" 8"
TWO CORE TWO CORE
Figure 39, Types of Cinder Block
To install the DSS foot on a cinder block wall, you want to use some type of hollow
wall anchor (we recommend the use of togglers) that will mount in the core of the
cinder block. It is recommended that you use four anchors in the outside holes of the
mounting foot.
Figure 40, Toggler Type of Wall Anchor
When installing wall anchors in a cinder block wall, it is important to position them
in thecores oftheblock. Figure41 showsthe optimumlocation for the mounting foot
on a 16" two core block. In this position, the center of the foot aligns with center wall
of the cinder block and the four outside holes of the foot land in the cores of the block.
To position the foot on the wall, measure 7-1/2" from the edge to the center of a block.
Center the foot at that location.
Figure 41, Locating Wall of Two Core Cinder Block
Page 57

58 Installation/Mounting the Dish
Installing the Mounting Foot on a Cinder Block Wall Using Togglers:
When following these instructions, take extreme care to avoid
contact with overhead power lines, lights, and power circuits.
DANGER! J
Contact with power lines, lights, and circuits may prove fatal.
1. Select amounting location. Remember to position the foot so the outside holes align
with the hollow cores of the cinder block.
2. Hold the mounting foot in position and, using a pencil, mark one of the outside
holes.
3. Remove the mounting foot. Then drill a 1/2" hole at the location just marked.
4. Install a toggler wall anchor.
Toggler Installation Steps:
4.1. Insert the metal channel end of the toggler into the hole. To do this, hold
the metal channel alongside the plastic straps and slide it through the hole.
METAL
FOLD
IN
WALL
Figure 42, Toggler Installation Step 1
4.2. With one hand, pull the ring so the metal channel rests flush behind wall.
With the other hand, slide the plastic cap along the straps unit the flange of
the cap is flush with the wall.
Page 58

Installation/Mounting the Dish 59
WALL
PLASTIC
CAP
CHANNEL
RING
Figure 43, Toggler Installation Step 2
4.3. Place thumb between plastic straps. Push side to side snapping off straps
flush with wall.
Figure 44, Toggler Installation Step 3
5. With the 1/4" x 20" x 1-1/2" machine screw and 1/4" washer, attach the mounting
foot to the wall. This screw should be tightened until the mounting foot is snug
against the wall (Do not overtighten).
1/4"
WASHER
l/4"x20x1-1/2"
MACHINE
SCREW
Figure 45, Attaching Mounting Foot to Wall
Page 59

60 Installation/Mounting the Dish
HORIZONTAL
LEVELING
VERTICAL
LEVELING
Figure 46, Horizontal and Vertical Leveling
Page 60

Installation/Mounting theDish 61
6. Horizontally level the mast with a bubble level or plumb line.
To level the mast horizontally with either a bubble or plumb line, place them on the
mast at an perpendicular angle to the wall. If you are using a bubble level, move
the bottom of the mounting foot to center the bubble in the window of the level.
If you are using a plumb line, move the bottom of the mounting foot until the line
hangs parallel with the mast. Then, with a pencil, draw line from the center line
of the lower foot onto the wall. For a detailed procedure on horizontal leveling,
see pages 35 of this manual.
7. Align the center mark of the mounting foot with the line draw n in the horizontal level
procedure, With a pencil, mark the remaining three outside holes.
8. Remove the mounting foot. Then drill three 112" holes at the locations just marked.
9. Install a wall anchor in each hole.
10. Use four 1/4" x 1-/12" machine screws and 1/4" washers to attach the mounting
foot to the wall. Tighten all four of these screws.
11. Vertically Level the dish.
First loosen the bolts on the mounting foot securing the vertical adjustment.
Place the level, or plumb line, on the mast at an parallel angle to the wall. If
you are using a bubble level, move the mast vertically to center the bubble in
the window of the level. If you are using aplumb line, move the mast vertically
until the line hangs parallel with the mast. Then, tightan the two mounting bolts
securing the mast to the mounting foot. For a detailed explanation of vertical
leveling, see page 35 of this manual.
12. Check tightness of all bolts and proceed to the Assembling the Dish Compo-
nents section.
Page 61

62 Installation/Mounting the Dish
Material List:
• 4 EA. /16 x 1112"
Wood lag screws.
• 4 EA. 5/16"Flat
washers.
5 Ii
DECK RAILING
Tool List:
Drill.
• sit6" Twist drill
bit.
• Bubble level or
plumb line.
• Screwdriver.
• Pencil.
OUTSIDE/_ o "o
OUTSIDE
i / HOLES
HOLES _ j o
Figure 47, Mounting DSS Foot and Mast Assembly to a Deck Rail
Page 62

Installation/Mounting the Dish 63
When selecting horizontal mounting surface for the DSS dish, select one that is both
structurally sound and offers some protection from traffic. Do not position the dish
where it may be used as a hand rail or have objects hung from it. Deck railings and
floors are examples of good mounting surfaces for the system if the right location is
chosen.
The type of mounting material the system mounts to, determines the number and
location of the bolts used to secure the system. For example, if you mount the foot to
a 2 x 4 or 2 x 6 board, you may want to use two 1/4" screws in the center holes, if you
are mounting the foot to 3/4" plywood, you will want to use four screws in the outside
holes.
Use the following procedure to install the DSS foot on a deck rail with four
screws:
DANGER!
When following these instructions, take extreme care to avoid
contact with overhead power lines, lights, and power circuits.
Contact with power lines, lights, and power circuit s may be
fatal.
Horizontal
Mounting
Systems
.
With a bubble level, check the level of the mounting surface. While doing this,
check several different angles. Mark the direction with the most angle to it.
6
Position the foot and mast assembly on the mounting surface aligning the foot
adjustment with the direction marked in step one. If the width of the mounting
surface does not permit this, select a different site.
,
With the foot in position, mark the four outside holes.
4.
Remove the foot and drill 3/16" pilot holes in the marked locations.
5.
With four 5/16" x 1- 1/2" lag bolts and washers, secure the foot to the mounting
surface.
4
Using the adjustment on the foot, level the mast.
8.
Tighten all bolts on and foot and mast before proceeding to the assembling the
dish section.
Page 63

64 Installation/Mounting the Dish
Material List:
• 2 EA. 1/4" x 3" lag
screws.
• 4EAS16"x 11/2''
lag screws.
• 2 EA. 1/4"Flat
washers.
• 4 EA. 516"Flat
washers.
• Roof Sealant.
ROOF INSTALLATION
Tool List:
• Drill.
• V8"Twist drill bit.
• 3/16"Twist drill
bit.
• Bubble level or
plumb line.
• 7/16"Box or open
end wrench.
• 3/8" Box or open
end wrench.
• Ladder.
• Pencil.
CENTER
HOLE
_._ii i_ j- RAFTER
OUTSIDE/ I I NOUTS DE
HOLES _ I/ HOLEs
i i\
, , CENTER
HOLE
Figure 48, Mounting Foot and Mast Assembly to a Roof
Page 64

Installation/Mounting theDish 65
Do a roof installation only if there is no other mounting option for that installation site.
This is due to the difficulties of installing a satellite dish on a roof. These difficulties
include damaging the roof by walking on it or causing leaks by not correctly sealing
the mounting holes. These problems increase with the age of the roof and the type of
roofing materials.
If you do install the dish on a roof, do it only on asphalt type shingles. Do not mount
the dish on wooded shake or slate shingles. Also, do not mount the dish over the
overhang of the roof. Finally, due to the different construction materials under a
shingle roof, always secure the mounting foot to a rafter.
Use the following procedure to install the dish on a roof:
DANGER!
When following these instructions, take extreme care to avoid con-
tact with overhead power lines, lights, and power circuits. Contact
with power lines, lights, and power circuits may prove fatal.
1. Locate a rafter near the mounting location of the foot.
There are several methods to locate the rafters under the roof surface. One of
the simplest is using the nails that hold the facing board of the roof as a reference.
On most roofs, a facing board covers the end of the rafters. This board connects
to the roof by nails driven through it into the rafters.
FIAFfERS
NAILS
FACING
BOARD
Figure 49, Locating Rafters
Page 65

66 Installation/Mounting theDish
RAFTERS
TRANSFER
MEASUREMENT
TO
ROOF
SHINGLE
OVERHANG
MEASURE
FACING FROM ROOF EDGE
BOARD TO NAILS
Figure 50, Locating Rafters
To locate the rafter near the mounting site, look at the facing board near the site.
Locate the closest nails securing the facing board. Measure from the edge of the
roof to the nails and record that distance. To find a rafter near the mounting
location, transfer the previous measurement to the roof. Be sure to include any
shingle overhang in your measurements.
Other methods of locating rafters include tapping on the roof and listening to the
sound or climbing into the attic space and finding a reference point that can be
located on the roof. Regardless of the method you use, the goal should be to find
the center of the rafter and drill as few holes in the roof as possible.
Page 66

Installation/Mounting the Dish 67
2. Position the mounting foot so that the center two holes align with the center of the
rafter.
3. Mark the two center holes (the mast may need to be repositioned for marking of
the second hole).
4. Drill two 1/8" holes in the locations marked. Fill each hole with a small amount
of roof sealant.
5. Attach the mounting foot to the roof with two 1/4" x 3" wood type screws and
washers.
6. With a 3/16" drill bit in the drill, drill four pilot holes in the outside holes of the
mounting foot. Fill each hole with a small amount of roof sealant.
7. Insert four 5/16" x t-1/2" with washer into these holes.
8. With a roof type of sealant, seal the mounting foot to the roof. When applying the
sealant, seal the areas marked in figure 51.
9. With a 7/16" wrench and bubble level, level the mast with the adjustment on the
mounting foot.
SEALANT
SEAL ALL EDGES _ HOLES
Figure 51, Sealing Roof
Page 67

68 Installation/Mounting the Dish
Material List:
• 1EA. 1 1/4"ID
Schedule 40 galva-
nized steel pipe (1-
1/20D).
• 3 Bags quick
setting concrete.
• 1 EA. 1 l/2" Ground
clamp.
• 1 EA. Ground rod
• 1 EA. Ground rod
clamp.
• Ground Conductor
(NO. 10 copper or
NO. 8 aluminum).
• Wire ties.
Tool List:
• Hole digging tools.
• Hammer.
• Wheelbarrow.
• Bubble level or
plumb line.
• Assorted box or
open end wrenches.
• Screwdriver.
• Pencil.
POLE MOUNT
1 1/4
I.D.
SCH40
GROUND ROD ,- ,_
_L
o
o o
p_o o_c
p o 'd I_o c
,,d ._° o _ I_. b.,
St
o
]k
CLAMP
32"
lr
26"
MIN
4. .11
8"
¶r
Figure 52, Pole Mounting DSS Dish
Page 68

Installation/Mounting the Dish 69
In this mounting system, a pole replaces the foot and mast assembly supplied with the
DSS dish. This pole is placed in a hole and secured in the ground with concrete. The
dish is held on the pole by the clamp of the LNB support arm. This clamp fits over
the pole.
Before installing the dish on a pole, carefully read the following:
• Have the local utilities locate the power, telephone, cable, water, and sewer
lines in the area before you do any digging.
• Components of the pole mount system, such as the pole and concrete, are not
included in the basic installation outlined by Thomson Consumer Electronics.
To fit in the LNB support ann holder, the pole must have a 1-I/2" outside diameter.
Pole and pipe sizes are measured by inside diameter and wall thickness. To obtain a
pole with the correct outside diameter, look for a pole with an 1-1/4" inside diameter
and a schedule 40 wall thickness.
Special
Mounting
Systems
The length of the pole varies with the depth of the hole and the height of the dish above
ground. The depth of the hole must be enough to support the dish (a minimum 26")
and extend at least 6" below the frost line. For most installations, a pole length of 6'
is sufficient. This allows for a hole at least three feet deep and positions the dish three
feet above the ground. In most areas in the Continental United States, a hole three feet
deep will extend below the frost line.
One important step of a pole mount installation is grounding. Local electrical codes
and the National Electrical Code require that the dish be connected to a grounding
electrode. This rule applies to a pole mount system. The small area covered with dirt
in a pole mount system does not satisfy the requirements of a grounding electrode.
Therefore, connect the pole or mounting foot to a proper ground electrode (see
appendix C of this manual for a list of grounding electrodes).
Use the following steps to install the DSS dish on a pole:
DANGERI
When Following these Instructions, take extreme care to
avoid contact with overhead power lines, lights, and power
circuits. Contact with these Items and circuits may prove
fatal.
Page 69

70 Installation/Mounting the Dish
1. Dig a 8" diameter hole at least 26" deep.
CAUTION:
Before you dig, call your local utility and phone company
for help In locating underground utility lines.
o
With a hack saw, cut bottom edge of the pole to about a45 °. This prevents the pole
from rotating in the concrete over time.
t
CUT
POLE
Figure 53, Cutting Bottom of Pole at an Angle
3. Place the pole in the hole and fill the hole with just enough dirt, or small stones,
to hold it upright.
4. Level the mast.
To do this, use a bubble level or plumb line. Measure the level of the mast in at
POLE
VIEW
LEVEL
Figure 54, Leveling Pole
Page 70

GROUNDING
CONDUCTOR
ROD
GROUND
Installation/Mounting the Dish 71
CLAMP
°
o
Figure 55, Grounding Pole
least two different locations on the side of the pole. These two measurement
should be at right angles to each other.
Note: The dirt or stone placed in the hole in step two should hold the pole upright.
If not, attach guy wires to the pole to keep it upright.
5. With prepared quick drying cement, fill the hole. Stop filling when the cement level
is about two inches from the top of the hole.
o
Connect the pole to the grounding electrode.
Using a ground damp, connect the grounding conductor to the pole. Then route
the ground conductor to the grounding electrode. Connect the ground conductor
to the ground electrode. A detailed list of grounding electrodes and how to connect
to them is given in appendix C.
6. Let the cement completely dry before proceeding with mounting the dish to the
pole.
Page 71

72 Installation/Mounting the Dish
CHIMNEY INSTALLATION
Material List:
• 1 EA. RCAD915
chimney mount kit.
Tool List:
• Bubble level or
plumb line.
• 7/1_"Box or open
end wrench.
• Ladder.
Figure 56, Chimney Mount Installation
Page 72

CHIMNEY BRACKET
!
Installation/Mounting the Dish 73
STRAPS
CLAMPS
EYEBOLTS
Figure 57, RCA (D915) Chimney Mount Kit
To mount the dish on achimney requiresthe use ofthe chimney mount kit (RCA model
number D915) and the foot and mast assembly included with the dish. The chimney
mount kit includes a bracket, straps (2EA), eye bolts (2EA.), clamps (2 EA), and bolts
(4 EA.). Confirm the presence of these pieces before starting the installation.
CAUTIONI
Only use the chimney mount on structurally sound chim-
neys. Unstable chimneys can be damaged easily by the
vibrations placed on them from the dish.
When mounting the dish on a chimney, make every attempt to keep it out of the soot
and smoke coming out of the chimney. The chemicals in this smoke may prematurely
corrode the dish reducing its life. To reduce the amount of smoke striking the dish,
position it below the top of the chimney. Also, if possible, position the dish on the
prevailing wind side of the chimney.
Page 73

74 Installation/Mounting the Dish
Before climbing a ladder, assemble the chimney mount kit. To do this, use the
following steps:
1. From the chimney mount kit, locate the straps and chimney bracket. Each metal
strap in the chimney mount kit has a pre-attached eyebolts. Insert both strap's
eyebolts in the appropriate hole in the chimney bracket.
2. Thread a nut on the eyebolts and tighten it to about 1/2" from the end ofthe eyebolt.
3. Repeat steps 1 and 2 for the second metal strap.
4. Locate the remaining eyebolts in the chimney mount kit. Insert these eyebolts in
the chimney bracket.
5. Thread a nut on the eyebolts and tighten to about 1/2" from the end of the eyebolt.
6. Locate the foot and mast assembly. Align the mounting foot's four outside holes
with the four holes of the chimney bracket.
EYEBOLTS
\
STRAPS
BRACKET
Figure 58, Assembly of Chimney Mount Kit Steps 1 througth 5
Page 74

Installation/Mounting the Dish 75
!
FOOT
BOLTS
Figure 59, Assembly of Chimney Mount Kit Steps 6 and 7
7. Secure the mounting foot to the chimney bracket with the four bolts supplied with
the chimney mount kit.
With the chimney mount assembled, install the mount on the chimney. Use the
following steps to do this:
1. Place the chimney bracket on the comer of the chimney as shown.
Danger!
When following these instructions, take extreme care to avoid contact
with overhead power lines, lights, and power circuits. Contact with
these items and circuits may prove fatal.
Page 75

76 Installation/Mounting the Dish
2. Stretch one metal strap around the chimney. Do not allow the strap to twist.
3. Pull the strap tight around the chimney. Make sure the strap is horizontal all the
way around.
4. Insert the free end of the strap through the eyebolt supplied with the kit. Then,
attach the strap clamps as shown below.
Figure 60, Attaching Mount to Chimney
5. Tighten the strap around the chimney by tightening its eyebolts.
6. Repeat steps 1 through 5 of this procedure to attach the second metal strap.
STRAP
BOLT
BRACKET
Figure 61, Installing Strap Clamps
Page 76

7. With the mounting foot adjustment, vertically level the mast.
To do this, place the level, or plumb line, on the mast at an perpendicular angle
to the chimney. If you have not loosened the two bolts securing the azimuth
adjustment on the mounting foot, do it now. If you are using a bubble level,
move the mast vertically to center the bubble in the window of the level. If you
are using a plumb line, hold the string of the plumb line over the top of the mast
so it hangs at a perpendicular angle to the mounting surface. Move the mast
vertically until the plumb line hangs parallel to the side of the mast. Tighten
the two mounting both securing the mast to the mounting foot. For a more
detailed description of this procedure, see the Leveling the Dish section of this
manual.
Installation/Mounting the Dish 77
Figure 62, Vertically Aligning the Mast On a Chimney
Page 77

78 Installation/Dish Assembly
Material List:
• RG6 coax cable.
• Coax cable ground
block.
• "F" fittings for RG6
coax cable.
• Ground Conductor
(No. 10 copper or
No. 8 aluminum
wire).
• Telephone wire
(minimum two
conductor).
• RJll/14 telephone
plugs.
• Coax cable sealant.
• Silicon sealant.
• Cable clips.
DISH ASSEMBLY
INSTALL
LNB
l ASSEMBLE
.if
INSTALL
LNB CABLE
_" DISH
CONNECT
Tool List:
• Drill.
• 1/2"Twist drill bit.
• Adjustable wrench.
• Phillips head screw-
driver.
• Hammer.
• Coax cable wire
stripers.
• Crimp tools (for
RG6 "F" fittings and
modular plugs).
• Pencil.
k °-"'° ,
Figure 63, Assembling the Dish
Page 78

Installation/DishAssembly 79
This section uses four steps to assemble the different components of the DSS dish
antenna. The first and second steps are assemble the dish and install the LNB cable.
The third step explains the installation of the LNB. This includes connecting the LNB
cable to the LNB and fastening the LNB to the dish. Finally, the fourth step points out
the basics of installing a telephone cable. Once these steps are complete, all that
remains to finish the installation is to point the dish at the satellites.
Dish Assembly
In this part of the assembly, attach the dish to the LNB support arm. In most
installations the location of the dish will be high above ground. In these cases, a ladder
will generally be needed. To make assembly easier and prevent multiple trips up and
down a ladder, do most of the assembly work on the ground. When the basic assembly
is complete, lift the dish onto the mast.
Use the following steps to attach the dish to the LNB support arm:
1. Locate the dish, LNB support arm, and the four pan head bolts.
Note: The DSA400RW dish antenna uses a SMC dish with mounting studs molded
into the SMC material.
Assemble the
Dish
2. Place the dish on the LNB support arm bracket aligning the four holes of the dish
with the holes in the support arm.
DISH
PAN
HEAD
BOLTS
LNB
SUPPORT
ARM
Figure 64, Attach Dish to LNB Support Arm
Page 79

80 InstallationZ Dish Assembly
3. insert a pan head bolt into one of the holes. Thread a nut onto this bolt.
4. Align the remaining three holes and nuts and bolts in each.
5. With a 7/16" wrench, tighten all four bolts. When tightening, use your thumb to hold
the heads of the pan head bolts flat on the dish.
6. Mount the dish on the mast assembly. To do this, slide the mast clamp of the LNB
support ann over the mast. At this point do not tighten the azimuth bolts.
LNB
SUPPORT
ARM
CLAMP
Figure 65, Mount Dish On Mast Assembly
MAST
Page 80

Installation/DishAssembly 81
Installing the LNB Cable
Depending on the installation site and the type of system installed, there may be up to
three cables run into the home during the installation. If you are installing the basic
system, there may be up to two cables. One cable is from the dish and carries the LNB
signal to the receiver. The second cable is a telephone cable. If you are installing the
deluxe system, two cables carry LNB signals to two different receivers while the third
cable is a telephone cable. The following explanation describes the installation of a
basic system. The installation of an advanced system is the same except for the
addition of one LNB cable. A description of the telephone cable installation appears
later in this manual.
The LNB cable carries signals from the LNB to the receiver. These signals are in the
frequency range of 950 to 1450 MHz. It requires a cable with low signal loss to carry
signals in this frequency range. A poor quality cable may allow noise to enter the
system, reducing its performance. Minimum specifications for the LNB cable are:
, Specification
Cable Type
Impedance
Shielding
Rating
RG6
75 Ohms
Minimum
Double
Shield
General Comments
Requires a minimum 100%
foil shield covered with a
40% woven braid.
Must be suitable for both
Outer Cover
Figure 66, LNB Cable Specifications
Due to the frequency range of the signals carded by the LNB cable, this be cable must
be RG6 coax cable. RG6 cable has the correct impedance (75 ohms) and acceptable
signal losses at 950 to 1450 MHz. When selecting an RG6 coax cable for the LNB
signal, select a type that is double shielded with a 100% braid foil shield covered with
at least 40% woven braid. If you are in an area that has a lot of RF noise, a woven braid
shield of higher than 40% may be required. If you are unsure of your cable
specifications, ask the cable supplier for the specifications of the cable you are using.
PVC
indoor and outdoor use.
Page 81

82 Installation / Dish Assembly
Depending on the routing of the LNB cable, you may want to use a type that can be
buried. When normal coax cable is buried, soil decays its outer cover and shortens its
life. Cables that are suitable to be buried use a special outer cover that resists
breakdown. Some of these cables also place a special coating on the ground shield.
This coating resists corrosion caused by water which could get in the cable. Anytime
the LNB cable is buried, use cable that can be buried. It will save you problems in the
future.
The goal of any cable installation should be to protect the cable from physical damage
and moisture penetration. To protect the cable from physical damage, secure it to
walls or any stable surface with cable clamps. This prevents the cable from sagging
and being damaged by people stepping on it or running over it with yard equipment.
Prevent moisture penetration by using weatherproof connectors or sealing any,
connection that is exposed to the elements. Drip loops add additional protection in the
area of a connection. These loops stop moisture from traveling down the cable and
entering the connection.
WATER SEAL
Figure 67, Weatherproof F-Fitting
Page 82

DRIP
LOOP
GROUND
CONDUCTOR
Installation / Dish Assembly 83
GROUND
BLOCK
COAX
CABLE
GROUND WIRE
CONNECTION
Figure 68, Coax Cable Ground Block and Drip Loops
The LNB cable supplies the signal from the LNB to the receiver. This cable also
carries the DC power to the LNB from the receiver. For the LNB to receive power and
operate, it is important that any splitters or amplifiers inserted in the LNB cable must
pass DC.
Another important aspect of the LNB cable installation is grounding. The National
Electrical Codes (Article 820-33) requires that any coax cable exposed to possible
contact with lightning or power conductors must have the outer shield grounded.
There also may be other rules regarding grounding in your area. It is important to
consult and follow all codes and regulations in your area during the installation.
The best method of grounding the outer shield of acoax cable is with aground block.
This block is a barrel connector with a means to connect a ground conductor (like a
terminal or a drilled hole and set screw). The terminal is where the outer conductor
of the coax cable is connected to the grounding electrode. When installed, the ground
block passes the LNB signal and DC voltages straight through it while grounding the
outer conductor of the coax.
Where should the ground block be placed in the LNB cable? One factor determining
the ground block location is the location of an acceptable ground electrode. The
National Electrical Code specifies that the grounding conductor (the wire that runs
Page 83

84 Installation/DishAssembly
between the ground block and ground electrode) must be in a straight line, if possible,
from the ground block to the grounding electrode. Also, splices in the conductor
between the electrode and grounding block are prohibited. Article 820-33 of the
National Electrical codes also states that, "Where coaxial cable is exposed to lightning
•.. the cable ground shall be connected to the grounding system of the building, as
close to the point of cable entry as practical." This can be either inside or outside the
home. Therefore, when selecting a location for the grounding block, try to make the
ground conductor as short and straight as possible and close to the cable entrance point
into the home.
The National Electrical Code also has specifications for the size of the grounding
conductor that connects to the ground electrode. This conductor must be a least a No.
10 copper wire or No. 8 aluminum wire. Insulation over the conductor wire is not
required. As with any cable, the grounding conductor must be securely fastened to a
surface to protect it from physical damage. If the conductor cannot be protected from
damage, the size of the wire should increase to withstand any physical strain placed
on it.
The National Electrical Code is also specific on acceptable ground electrodes. Some
possible electrodes are:
Grounded Interior Metal Water Piping (cold water).
Ground Rod (must be driven at least 8 feet into the ground)•
Grounded Metallic Service Raceway.
Grounded Electrical Service Equipment Enclosure.
There are also specific instructions for attaching the grounding conductor to ground-
ing electrodes. For more details on this, consult the National Electrical Code
handbook and any active codes in your area. Sections of the National Electrical codes
that apply to the DSS system are printed in appendix C of this manual.
Use the Following Steps to Install the LNB Cable:
1. Determine the location of the ground block. Remember to position this block to
allow a short and straight route for the ground conductor to the grounding.
electrode.
2. With two screws, secure the grounding block to a stable mounting surface.
Page 84

Installation / Dish Assembly 85
3. Connect one end of the LNB cable to the grounding block.
4. Route the cable from the ground block to the dish mounting foot. Leave enough
slack in the cable to form a 3" to 5" drip loop. Also, leave enough cable to reach
the LNB from the mounting foot (about 3 feet).
5. Secure the cable with cable clips. Do not forget to form the drip loop and secure
it with cable clips.
6. Install the ground conductor on the ground terminal of the coax .ground block.
7. Route the ground conductor to the grounding electrode. Remember to secure the
cable to a wall or some surface to protect it.
8. Connect the ground conductor to the grounding electrode.
TO
DISH
CABLE
CLIPS
CONDUCTOR
GROUND
ELECTRODE
(GROUND ROD)
Figure 69, LNB Cable Installation
DRIP
LOOP
Page 85

86 Installation / Dish Assembly
Attaching the LNB
The LNB attaches to the LNB support arm. To do this step, you will need the LNB
mounting bolt, washer, and nut from the hardware packet. You will also need to
remove the LNB from the packaging. The tools you will need are a Phillips head
screwdriver and the tools required to install an F-type connector (you will only need
this if the cable is not pre-terminated with an F-fitting). If the F-type connector you
are using is not weatherproof, you will also need some type of coax cable sealant. This
sealant prevents moisture from seeping into the LNB through the coaxial connector.
Most LNB failures are due to moisture penetration. Therefore, always use some type
of sealant or a weatherproof connector to protect this connection.
Use the following steps to install the LNB onto the LNB support arm:
1. Route the LHB cable through the foot, mast, and LNB support arm.
CABLE
TO
GROUND
BLOCK
Figure 70, Routing Cable Through Dish
Page 86

Installation / Dish Assembly 87
LNB
CONNECTOR
LNB
CABLE
Figure 71, Connecting LNB Cable To LNB
2. Install an F-type connector on the end of the cable. If the cable already has a
connector on it, disregard this step.
3. Thread the coax cable onto the LNB connector.
4. If the connector is not weatherproof, seal it.
5. Slide the end of the LNB into the rectangular opening of the LNB support ann.
Position the LNB to align it with the hole in the support arm.
6. Insert in the LNB bolt into the hole on the bottom side of the LNB support arm.
7. Place the washer on the LNB nut and insert the nut into the hole on the top side
of the LNB support arm.
8. Tighten the bolt with a Phillips head screwdriver.
NUT
BOLT
Figure 72, Attaching LNB
Page 87

88 Installation / Dish Assembly
Attaching the LNB Cable to the Receiver
In the next step of the installation, route the LNB cable from the ground block to the
receiver. In most installations, there is more than one way to get the LNB cable to the
receiver from the grounding block. If the receiver is located on an outside wall, go
through the wall. If the receiver is on an inside wall, use crawl, basement, or attic
spaces. Whenever routing the LNB cable to the receiver, take the shortest possible
path and always protect it from physical damage.
Use the following steps install the cable from the ground block to the receiver:
1. Drill a 1/2" hole in the home at the access point of the cable. Before drilling, ensure
there are no wires or pipes in the area of the hole.
2. Connect one end of the cable to the ground block.
3. Form a 3 to 5 inch drip loop in the cable before inserting it in the access hole.
SEALANT
INTO
HOME TO
CABLE DISH
CLIPS
DRIP LOOPS
Figure 73, LNB Cable Installation
Page 88

CONNECT
LNB
CABLE
u: .e. 0000000000000 0000000O00000000O!
E_::=o)
Installation / Dish Assembly 89
Figure 74, Connect LNB Cable to Receiver's "Satellite In" Jack
4. With cable clips, secure the drip loop and cable to the wall.
5. In the home, route the cable to the rear of the receiver. Depending on the installation
site, this could be through a floor or directly to the rear of the receiver. If the cable
goes straight though a wall, a wall plate may be used to dress up the access point.
Remember, every attempt should be made to hide and protect the cable.
6. Connect the cable to the "SATELLITE IN" jack of the receiver.
7. If the connectors on the coax ground block are not weatherproof, seal them. This
can be done with tape or other types of coax connector sealant.
8. Seal the access point into the home with silicon sealant.
Grounding the DSS dish
The National Electrical Codes requires masts and metal structures supporting anten-
nas be grounded. These guidelines include the DSS dish. This grounding is similar
to the ground required for the LNB cable. Basically, use a NO. 10 or larger copper
wire (insulation is not required on the wire) connect it to the DSS foot and to a
grounding electrode. As with the LNB cable ground conductor, the dish ground
conductor must also be securely fastened to a wall or other surface to protect it from
physical damage. This conductor must not be spliced and it must be correctly
connected to a grounding electrode.
Page 89

90 Installation / Dish Assembly
GROUNDING
CONDUCTOR
MOUNTING
HOLES
Figure 75, Attaching Grounding Conductor to Mounting Foot
The National Electrical code is also very specific on acceptable electrodes for the
ground. Some possible grounding electrodes are:
Grounded Interior Metal Water Pipe (cold water).
Ground Rod (must be driven at least 8 feet into the ground).
Grounded Metallic Service Raceway.
Grounded Electrical Service Equipment Enclosure.
There are also specific instructions for the correct method of attaching to each
ground electrode to the ground conductor. For more details on each of these
grounding electrodes, consult the National Electrical Code handbook and any
active codes in your area.
Note: Appendix C of this manual contains sections of the National Elec-
trical Codes that apply to the installation DSS system.
There are two holes in the mounting foot for connecting a ground conductor.
Hardware (a nut, bolt, and star washer) to connect the ground conductor to the foot
is included in the hardware package.
Use the Following steps to connect the mast to a grounding electrode:
1. Attach the grounding conductor to the mounting foot with a bolt, nut, and star
washer.
Page 90

InstaUation / Dish Assembly 91
2. Route the grounding conductor to the grounding electrode. While doing this,
use the shortest and straightest possible path.
3. Attach the grounding conductor to the grounding electrode. The method of
attaching the conductor will vary with different grounding electrodes, use the
correct method for the electrode you are connecting to.
4. Secure the grounding conductor to a wall or other surface. This conductor must
be protected from physical damage.
Telephone Cable
There are many options available to connect the a phone line to the receiver. Three
of the most common are:
• Use an existing phone jack.
• Install a phone jack.
• Use a wireless phone jack system.
To connect the receiver to an existing telephone jack, install a modular line cord
between the receiver and the phone jack. The line cord has modular plugs on each end
that insert into the receiver and telephone jack.
Usually, homes have telephone jacks in most rooms. These jacks often have a single
output for one telephone. Often, there is a telephone already plugged into this jack
leaving no place to connect the cable for the receiver. If you run into this, there are
several ways to increase the number of outputs from a modular jack. The first of these
is to use a modular duplex adapter. Another option is to replace the single wall plate
with adualtype. Finally, useanotherphonejackthatis located nearby. Ifyoudothis,
remember to conceal the cord from view.
If aphone jack is not available orconvenient, you may need to install a cable from a
junction box or an existing phone jack. This cable can be run through crawl, attic, or
garage spaces to the receiver. Once the cable is at the receiver, a modular connector
or a wall plate may be installed. If a modular connector is used, plug it directly into
the receiver. If you install a wall plate instead of a modular plug, use a modular
extension cable between the wall plate and receiver.
To install telephone jack, it helps to understand some basics of the telephone system.
The telephone company supplies a phone cable to each home. This cable connects
directly to ajunction block, or box, called the point of demarcation. This point divides
the wiring responsibility between the customer and the telephone company. The
Page 91

92 Installation / Dish Assembly
wiring from the telephone company to one side of this junction box is the telephone
company's responsibility, while the wiring connected to the other side of the box is
the customer's responsibility. The customer can add additional wiring and telephones
to their home as long as they follow local and FCC guidelines and do not connect
anything directly to the telephone company's side of the point of demarcation.
Usually, the telephone company marks or seals their side of the demarcation point to
prevent accidental connections.
The cable supplied to the home from the phone company normally consists of four
wires. The color of these wires are red, green, yellow, and black. Homes that have
only one telephone line in service use the red and green wires to carry signals. These
two wires are called Ring (red wire) and Tip (green wire). The yellow and black wires
can serve several purposes. Often they are the Ring and Tip wires to a second line.
They may also provide power to telephone accessories. Every junction box has a
terminals for each of these wires. These terminals are usually color coded. When
installing telephone cables, it is important to follow the color code.
HOME OWNER
RESPONSIBILITY
TELEPHONE
COMPANY
RESPONSIBILITY
Figure 76, Telephone Junction box
Page 92

Installation/ DishAssembly93
COLORS
RED
GREEN
YELLOW
BLACK
VARIATION
1
BLUE
WITH A
WHITE STRIPE
WHITE
WITH A
BLUE STRIPE
ORANGE
WITH A
WHITE STRIPE
WHITE
WITH AN
ORANGE STRIPE
VARIATION
2
BLUE
WITH A
WHITE STRIPE
WHITE
WITH A
BLUE STRIPE
ORANGE
WITH A
WHITE STRIPE
WHITE
WITH AN
ORANGE STRIPE
VARIATION
3
BLUE
WHITE
ORANGE
WHITE
WITH AN
ORANGE STRIPE
GREEN
N/A
N/A
WITH AN
WHITE STRIPE
WHITE
WITH AN
GREEN STRIPE
Figure 77, Telephone Wire Color Code
There are cables that use a slight variation of the color code. The following table is
alist of some various color codes. When connecting to the phone system with different
cables, every attempt must be made to follow this color code.
The type of cable used in the phone jack installation can be critical to the performance
of the system. If the cable mn is short and not exposed to the weather, a typical four-
conductor cable that is used for most telephone extension cables will work. If the
installation requires a long cable ran, select a cable that uses twisted pairs of wire. The
twisting of the wires reduces the amount of noise picked up by the system. If the cable
is outside and exposed to the weather, use a weatherproof type of cable.
Page 93

94 lnstallation / Dish Assembly
Use the following procedure to install a telephone jack:
I. Find an accessible telephone junction box (this could even be the point of
demarcation). Plan the installation of the cable from that point to the receiver.
2. Remove the customer access cover on the junction box and connect the wires of the
telephone cable to the terminals. Remember to follow the color code: red wires
connect to red wires and green to green.
Never work with active telephone lines. When the
telephone is ringing, the current carried on these lines
may shock you. While working on the telephone line,
disconnect the wiring at the point of demarcation. If
SAFETY NOTE:
you are unable to do this, take all the telephone
handsets off the hook.
3. Route the cable to the receiver. Use crawl, attic, and garage spaces where ever
possible. As you route this cable, secure it to wails and other supporting structures
to prevent physical damage.
4. Install the modular plug or RJ11/14 type wall plate.
@
Figure 78, Telephone Junction Box Terminals
TELEPHONE
CABLE
WIRE
TERMINALS
Page 94

Installation/Dish Assembly95
Modular Plug Installation
Different modular crimping tools have slightly different procedures. Follow
the procedure the accompanies the crimping tool you are using.
1. With the cable cut to length, trim the ends so they are straight and not
diagonal.
2. Strip approximately 3/8" from the outer conductor of the cable (this is for
fiat four-conductor telephone line and may vary slightly for twist and
outdoor cable). Do not strip the insulation from the four inner wires of this
cable (see figure 79)
MODULAR
CABLE
Figure 79, Modular Plug Installation Steps I and 2
3. Place the modular plug onto the prepared end of the cable. While doing this,
make sure the cable is oriented correctly in the modular connector. If the
connector is to be plugged into the receiver, follow the color code shown
in figure 80.
Spring Clip
MODULAR
CABLE
Figure 80, Modular Plug Installation Step 3
Page 95

96 Installation / Dish Assembly
NOTE: In most installations, the other end of the telephone cable will be
hardwired to a junction box. If you must install a modular connector on the
other end of the cable, the orientation of the wire in the connector is different.
Oriented this cable as shown in figure 81.
Spring Clip
MODULAR
CABLE
Figure 81, Installing a Modular Plug On a Modular Line Cord
4. With the wire positioned correctly in the modular connector, use a modular
connector crimping tool the seat the connector on the wire.
Clip
MODULAR
CABLE
Figure 82, Crimping the Plug With the Crimp Tool
Wall Plate installation
To install the wall plate, follow the instructions that accompanies the plate you
purchased. Remember to follow the color code included in the wall plate
instructions.
5. Seal all entrypoints of the cable into the home and check to be sureit is secured
and hidden from view where possible.
Page 96

Installation/Dish Assembly 97
Use a Wireless Phone Adaptor
These units use the AC wiring of the home to connect a remote telephone or the DSS
receiver to the telephone lines. Wireless phone adaptors usually include two pieces.
One piece, called the base unit, plugs into an AC outlet near an existing phone jack.
A modular telephone cable then connects between the existing phone jack the base
unit. The second piece, called the extension jack, plugs into an AC outlet near a remote
phone or the DSS receiver. The telephone or DSS receiver then plugs into the
extension jack. This system allows new phone jacks to be installed quickly and easily.
Page 97

98 Installation/Installing the Receiver
Installing
Receiver
the _[[ _,
All connections to the receiver are made at the back panel. These connections are
slightly different for the two models of receiver's.
DRD102RW
Figure 83 is the rear panel of the DRD 102RW receiver. Its connection can be divided
in inputs and outputs. The following is a functional list of the jack panel connections:
INPUTS:
PHONE
This jack connects the to the telephone cable. The DSS receiver uses a toll free number
to update the access card. This update usually last a few seconds and ensures
continuous program service.
SATELLITE IN
This is the 950 to 1450 MHz input from the LNB. Also carries the DC voltages from
the receiver to the LNB.
Figure 83, Rear Panel DRDIO2RW
....e !0 01!
fZ _
[
J
IN FROM ANT
Connect either a cable signal or an antenna to this connector.
OUTPUTS:
OUT TO TV
The RF out (either channel 3 or 4) of the receiver. This RF can be one of two signals.
One signal, is RF signal applied to the IN FROM ANT connector. The other signal
is the output of the receiver. The TV/DSS button on the front of the receiver
determines which signal is present on the jack.
The RF channel output on this jack is controlled by the RF switch. When the switch
is in the channel 3 position, the RF out will be channel 3. The same is true for channel
4.
S-VIDEO
This connector outputs an S-video signal to a compatible television or VCR. Only an
S-video connector can be inserted into this jack.
VIDEO
This connector outputs the video signal from the receiver. This allows you to connect
the receiver to a monitor type of television or a VCR.
Page 98

Installation/Installing the Receiver 99
AUDIO R (fight) and AUDIO L (left)
This is left and right channel audio signal from the receiver. If you are connecting the
receiver to a monitor type of television, connect these to the audio inputs. You can also
connect there connectors to the audio input of a stereo amplifier.
Wide BAND DATA
This 15 pin connector is designed to be used in conjunction with future technology:
such as high definition TV.
DRD203RW
Figure 84 is the rear panel of the DRD203RW receiver. Its connection can be divided
in inputs and outputs. The following is a functional list of the jack panel connections:
INPUTS
PHONE
This jack connects the to the telephone cable. The DSS receiver uses a toll free number
to update the access card. This update usually last a few seconds and ensures
continuous program service.
SATELLITE IN
This is the 950 to 1450 MHz input from the LNB. Also carries the DC voltages from
the receiver to the LNB.
IN FROM ANT
Connect either a cable signal or an antenna to this connector.
OUTPUTS
OUT TO TV
The is the RF out (either channel 3 or 4) of the receiver. This RF can be one of two
signals. One signal, is RF signal applied to the IN FROM ANT connector. The other
signal is the output of the receiver. The TV/DSS button on the front of the receiver
determines which signal is present on the jack.
r @ooooooooo oooo ooooooo00000000001- , ,. ooooo/
I I
INFROM ,_1" _JACK
®®®
Figure 84, Rear Panel DRD203RW
Page 99

100 Installation/Installing the Receiver
The RF channel output on this jack is controlled by the RF switch. When the switch
is in the channel 3 position, the RF out will be channel 3. The same is true for channel
4.
S-VIDEO
This connector outputs an S-video signal to a compatible television or VCR. Only an
S-video connector can be inserted into this jack.
VIDEO
These two connectors are bridged in the receiver. Because they are bridged, both have
the same signal on them. These connectors are the output the video signals from the
receiver. One of these connectors can be connected to a monitor type of television
while the other to VCR.
AUDIO R (fight) and AUDIO L (left)
There are two connectors for the right channel and two for the left channels. The two
connectors for the right channel are bridged together and the two for the left channel
are bridged together. The signal on these connectors is the right and left channel audio
signals from the receiver. If you are connecting the receiver to a monitor type of
television, connect one set (a set is the right and left channel) to the audio inputs. The
other set can go to a VCR or stereo amplifier. If the second video output is connected
to a VCR, the second set of audio cable must also be connected to the VCR.
WIDE BAND DATA
This 15 pin connector is designed to be used in conjunction with future technology:
such as high definition TV.
LOW SPEED DATA
This 9 pin serial interface is designed to be used in conjunction with data services.
SYSTEM CONNECTIONS
Figure 85 is a basic connection system that will work with both the DRD102RW and
DRD203RW. The connection system works with a standard television using RF
cables. The TV/DSS button on the front of the receiver switches the RF signal applied
to the television between the antenna, or cable, signal and the signal from the receiver.
If the television is capable of receiving video and audio signals from the receiver, add
the video and audio cables. To watch the satellite signal select the monitor inputs to
the television.
To connect a stereo amplifier to this system, there are several options. If you are using
a standard television, connect a stereo audio cable to the AUDIO R and AUDIO L
output of the receiver and to the inputs of the amplifier. If your television is a monitor
and equipped with audio output jacks, with a stereo audio cable connect the televisions
audio output to the amplifier.
Page 100

Installation/Installing the Receiver 101
RECEIVER (DRD102RW) TOTV
SATELLITE
RECEIVER
TV
Material List:
• 1 EA RF Cable (must have
screw type of Fconnectors)
I
Figure 85, Basic Hookup With Either DRDIO2RW or DRD203RW
 Loading...