

user
manual
DRC 618N
It is important to read this instruction book prior to using your new product for the first time.
Es importante leer este manual antes de usar por vez primera su euipo
WARNING
RISK OF ELECTRIC SHOCK
DO NOT OPEN.
This symbol indicates
"dangerous voltage" inside the
product that presents a risk of
electric shock or personal injury.
FCC INFORMATION
This equipment has been tested and found to comply with the limits for a Class
B digital device, pursuant to Part 15 of the FCC rules. These limits are designed
to provide reasonable protection against harmful interference in a residential
installation. This equipment generates, uses and can radiate radio frequency
energy and, if not installed and used in accordance with the instructions,
cause harmful interference. However, there is no guarantee that interference
will not occur in a particular installation.
equipment does cause harmful interference to radio or television reception,
which can be determined by turning the equipment off and on the user is
encouraged to try to correct the interference by one or more of the following
measures.
Reorient or relocate the receiving antenna
Increase the separation between the equipment and receiver.
Connect this equipment into an outlet on a circuit different from that to
which the receiver is connected.
Consult the dealer or an experienced radio/TV technician for help.
This class B digital apparatus meets all requirements of the Canadian
InterferenceCausing Equipment Regulations.
Refer to the identification/rating label located on the back
panel of your product for its proper operating voltage.
Caution:To prevent electric shock, match wide blade of plug
to wide slot, fully insert.
Attention: Pour viter les chocs lectriques, introduire la
lame la plis large de la fiche dans la borne correspondante
de la prise et pousser jusq au fond.
Product Registration: Please fill out the product registration card(packed
separately) and return it immediately. For U.S. customers: Your RCA Consumer
Electronics product may also be registered at www.rca.com/productregistration
Registering this product allows us to contact you if necessary.
Keep your sales receipt to obtain warranty parts and service and for proof of
purchase. Attach if here and record the serial and model numbers in case you
need them. The numbers are located on the back of the player.
Model number: Serial Number:
Purchase date:
Dealer address and phone:
T oreduceriskofelectricalshock,donot
remove cover or back (no user
serviceable parts inside). Refer servicing
to qualified personnel.
This symbol indicates
important instructions
accompanying the product.
!
If this
éé
ù
may
WARNING To reduce the risk of fire
or shock hazard, do not expose this
DVD player to rain or moisture. No
objects filled with liquids, such as
vases, shall be placed on the
apparatus.
CAUTION
THIS PRODUCT UTILIZES A LASER.
USE OF CONTROLS OR ADJUSTMENT OR PERFORMANCE OF
PROCEDURES OTHER THAN THOSE
SPECIFIED HEREIN MAY RESULT IN
HAZARDOUS RADIATION
EXPOSURE. DO NOT OPEN COVERS
AND DO NOT REPAIR YOURSELF.
REFER SERVICING TO QUALIFIED
PERSONNEL.
CAUTION
FCC Regulations state that
unauthorized changes or modifications to this equipment may void
the user's authority to operate it.
Note:
This device is protected by U.S.
Patent numbers 4,631,603 and
4,577,216 and 4,819,098 and
4,907,093 and 6,516,132. The use
of Macrovision's copy protection
technology in the device must be
authorized by Macrovision and is
intended for home and other limited
pay-per-view uses only, unless
otherwise authorized in writing by
Macrovision. Reverse engineering
or disassembly is prohibited.
This DVD player is designed and
manufactured to respond to the
Region number of a DVD disc does
not correspond to the Region
number of this DVD player, this
DVD player cannot play the disc.
The Region number for this DVD
player is Region No 1.
Apparatus shall not be exposed to
dripping or splashing and that no
objects filled with liquids, such as
vases, shall be placed on
the apparatus.
CLASS 1
LASER
PRODUCT
EN

Important Safety Instructions For Battery Pack
EN
Read these instructions.
Keep these instructions.
Heed all warnings.
Follow all instructions.
Do not use this apparatus near water.
Clean only with a dry cloth.
Do not block any ventilation openings. Install in accordance with the
manufacturer's instructions.
Do not install near any heat sources such as radiators, heat registers, stoves,
or other apparatus (including amplifiers) that produce heat.
Do not defeat the safety purpose of the polarized or grounding type plug.
A polarized plug has two blades with one wider than the other. A grounding type
plug has two blades and a third grounding prong. The wide blade or the third
prong is provided for your safety.When the provided plug does not fit into your
outlet, consult an electrician for replacement of the obsolete outlet.
Protect the power cord from being walked on or pinched particularly at plugs,
convenience receptacles, and the point where they exit from the apparatus.
Only use the attachments/ accessories specified by the manufacturer.
Use only with a cart, stand, tripod, bracket, or table specified by the
manufacturer,orsold with the apparatus. When a cart is used, use caution
when moving the cart/apparatus combination to avoid injury from tip-over.
Unplug this apparatus during lightning storms or when unused for
long periods of time.
Refer all servicing to qualified service personnel. Servicing is required when
the apparatus has been damaged in any way,suchas power supply cord or
plug is damaged, liquid has been spilled or objects have fallen into the
apparatus, the apparatus has been exposed to rain or moisture, does not
operate normally,orhas been dropped.
Note:
This battery pack (SB11) is just for DRC618N & SDV17-X series only.use

Table Of Contents
INTRODUCTION
Table Of Contents........................
Types Of Discs Playable On
This Player........................................
Marks indicated on DVDs......................
Disc structure.........................................
Using These Operating
Instructions.................................
1
2
2
3
4
BEFORE USING
Checking The Accessories.........
Remote Control Unit And
Main Unit Preparations...............
Notes on using the remote
control unit.............................................
Replacing the battery.............................
Remote control unit
operating range.......................................
Parts And Functions...................
Liquid crystal display..............................
Main unit control section........................
Main unit left side....................................
Main unit right panel...............................
Main unit rear side..................................
How to stand...........................................
Main unit bottom side.............................
Remote control unit (frequently
used buttons)..........................................
Remote control unit (other
buttons)...................................................
Names of battery parts and
their functions.........................................
Connecting The Player
To Other Devices........................
Connecting to a TV.................................
Connecting to a Dolby Digital/ DTS/
MPEG decoder or an amplifier
with built-in decoder.............................
Connecting to a digital amplifier
that is not Dolby Digital/ DTS/
MPEG compatible..................................
Connecting to active speaker
systems...................................................
Connecting earphone............................
Using The Battery.......................
Recharging the battery pack................
Notes for recharging.............................
Attaching the battery pack to
the player................................................
AC power operation...............................
Removing the battery pack
from the player.......................................
This product incorporates copyright protection technology that is protected by method claims of certain U.S.
patents and other intellectual property rights owned by Macrovision Corporation and other rights owners. Use of this
copyright protection technology must be authorized by Macrovision Corporation, and is intended for home use only
unless otherwise authorized by Macrovision Corporation. Reverse engineering or disassembly is prohibited.
15
20
5
6
6
6
7
8
8
8
9
10
11
11
11
12
13
14
15
16
17
18
19
20
21
21
22
22
1
-EN
BASIC OPERATIONS
Turning On The Power...............
Playback Functions...................
Loading ..... ..........................................
Playing...................................................
If a menu screen appears....................
Stopping playback...............................
Pausing playback....................................
Returning to the previous chapter
or track(DVDs, video CDs and Cds)......
Moving to the next chapter or track
(DVDs, video CDs and CDs)..................
Removing the disc................................
Turning Off The Power...............
23
24
28
ADVANCED OPERATIONS
Various Language And
Subtitle Settings.........................
Viewing in slow motion DVDs and
video Cds................................................
Repeating DVDs, video CDs and
Cds...........................................................
Selecting angle
(multi-angle).............................................
Advanced Functions...................
Changing from AV OUT
to AV IN....................................................
Setting Parental Lock Level...................
Video Enhance........................................
29
31
ADDITIONAL INFORMATION
Troubleshooting Tips....... ...........
Handling Cautions........... .....
Handling Discs................ .....
Operation Of The
Battery Pack...............................
Operation of the battery pack................
Storage....................................................
Service life and disposal........................
Recommendations and information
concerning discs........................
Limited Warranty........................
32
33
34
35
36
38
Graphics are for representation only.Your unit may differ slightly.
EN
24
25
25
26
26
27
27
27
30
30
30
31
31
31
35
35
35
Introduction
EN
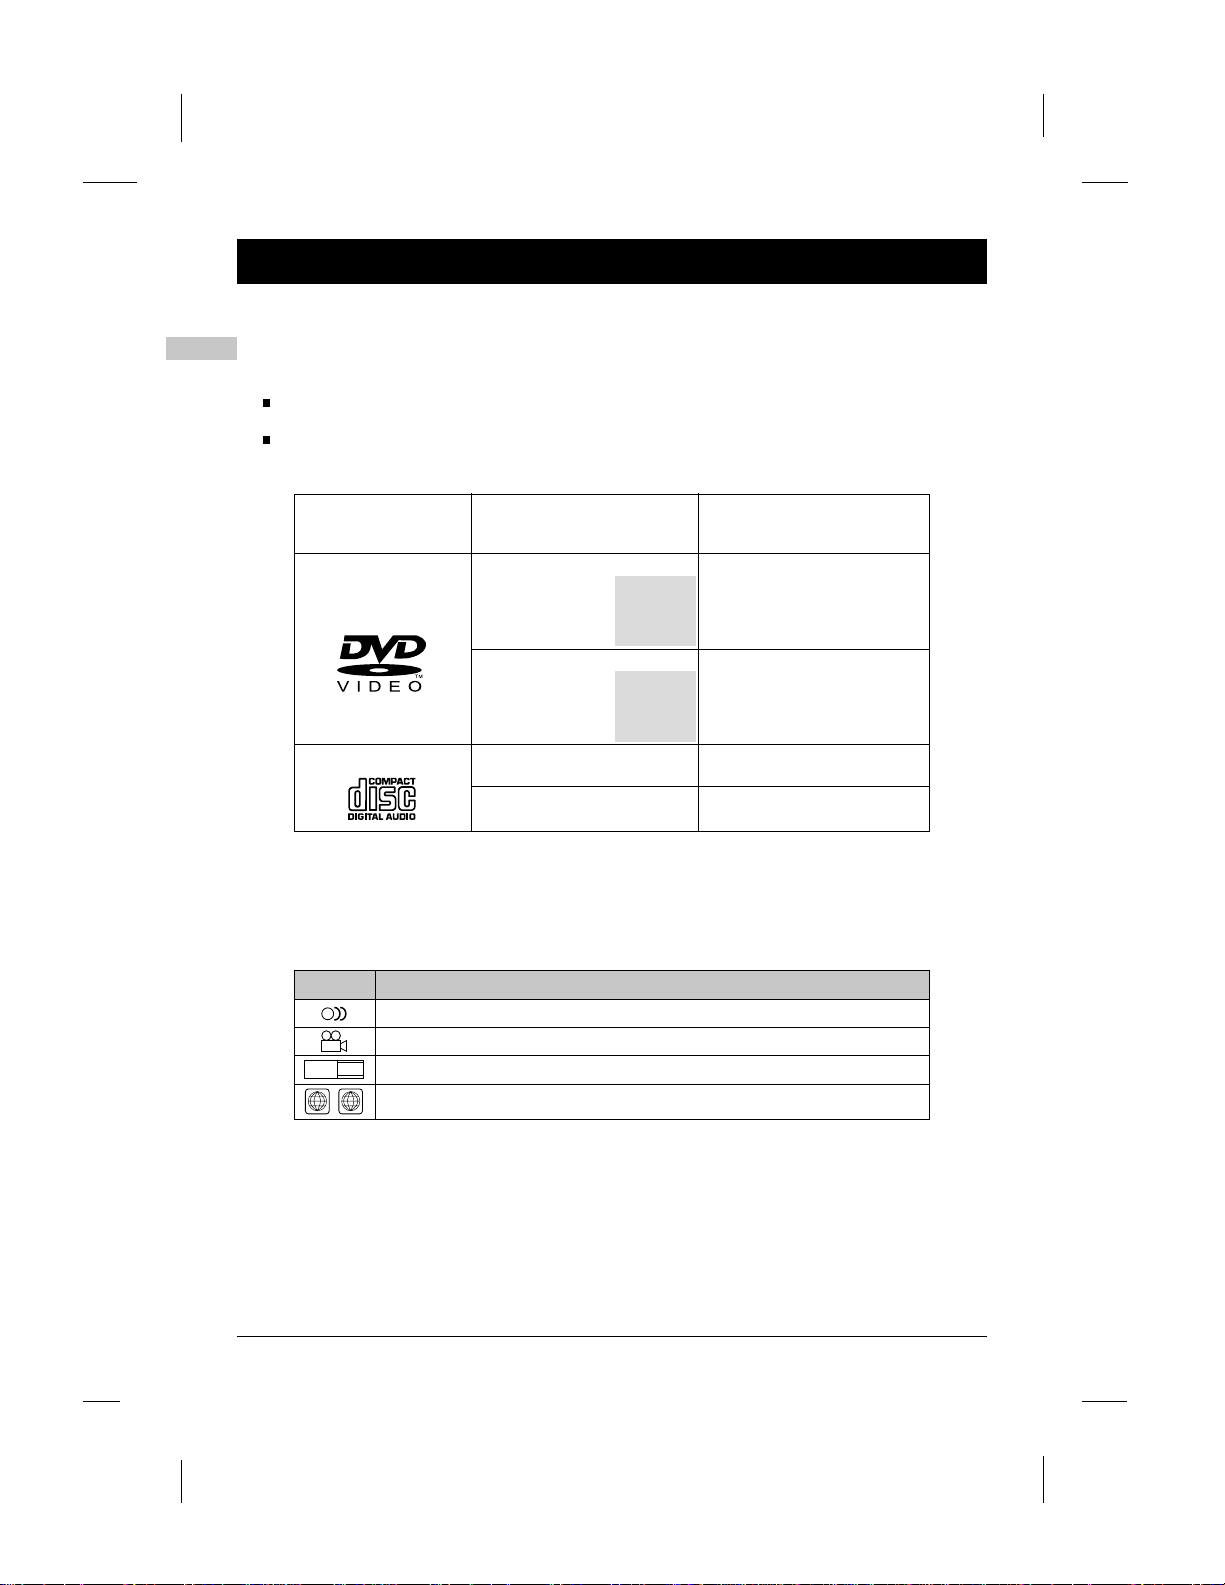
Types of Discs Playable on this Player
The discs listed on the table below can be played on this player without an adapter.
The marks shown on the table below are indicated on the disc's label, package or jacket.
Types of playable
discs and their
marks
DVD-Video disc
CD
Diameter/Playable sides
DVD video
12cm/singlesided
12cm/doublesided
DVD video
8 cm/singlesided
8 cm/doublesided
CD
12 cm/single-sided
CD
8 cm/single-sided
1 layer
2 layer
1 layer
2 layer
1 layer
2 layer
1 layer
2 layer
Marks indicated on DVDs
DVD discs or packages include the marks shown below.These marks indicate the type of
video or audio signals recorded on the disc and the functions that can be used.
Playback time
Playback time
(MPEG 2format)
133 minutes(4.7GB)
242 minutes(8.5GB)
266 minutes(9.4GB)
484 minutes(17GB)
(MPEG 2format)
41 minutes
75 minutes
82 minutes
150 minutes
74 minutes
20 minutes
Mark
2
3
16:9
2
Meaning
Indicates the number of audio tracks.
Indicates the number of angles.
LB
Indicates the selectable picture aspect ratio.
ALL
Indicates the playable region number.
2
-EN
Graphics are for representation only.Your unit may differ slightly.
Introduction
Disc structure
CDs are divided in units called tracks. (Generally one track corresponds to one song. Tracks are
sometimes further divided into indexes.)
CD
S
Track1 Track2 Track3 Track4 Track5
DVDs are divided in units called titles, which are further divided in chapters. They also
include menu screens that do not belong to any title. With movies, normally one movie
corresponds to one title. On karaoke discs, one song corresponds to one title. Some discs
are not divided in this way,however, so be careful when using the search and
programming functions.
DVD
S
Chapter 1
Title 1 Title 2
Chapter 2 Chapter 1 Chapter 2
EN
3
Graphics are for representation only.Your unit may differ slightly.
-EN

Introduction
EN
Using These Operating Instructions
Be sure to read the operating instructions carefully before using the player. It can
ensure you taking maximum advantage of all functions of this player.
When this player is connected to a TV or AVamplifier, the setup screen should be displayed.
Choose the various corresponding settings according to the connected equipment.
With DVDs it is possible to use setup to change the subtitle and audio languages and select
the desired sound mode from among multiple sound tracks.
In order to take full advantage of the many functions of this player,be sure to store this
OPERATINGINSTRUCTIONS in an accessible place.
4
Graphics are for representation only.Your unit may differ slightly.
-EN
Before Using
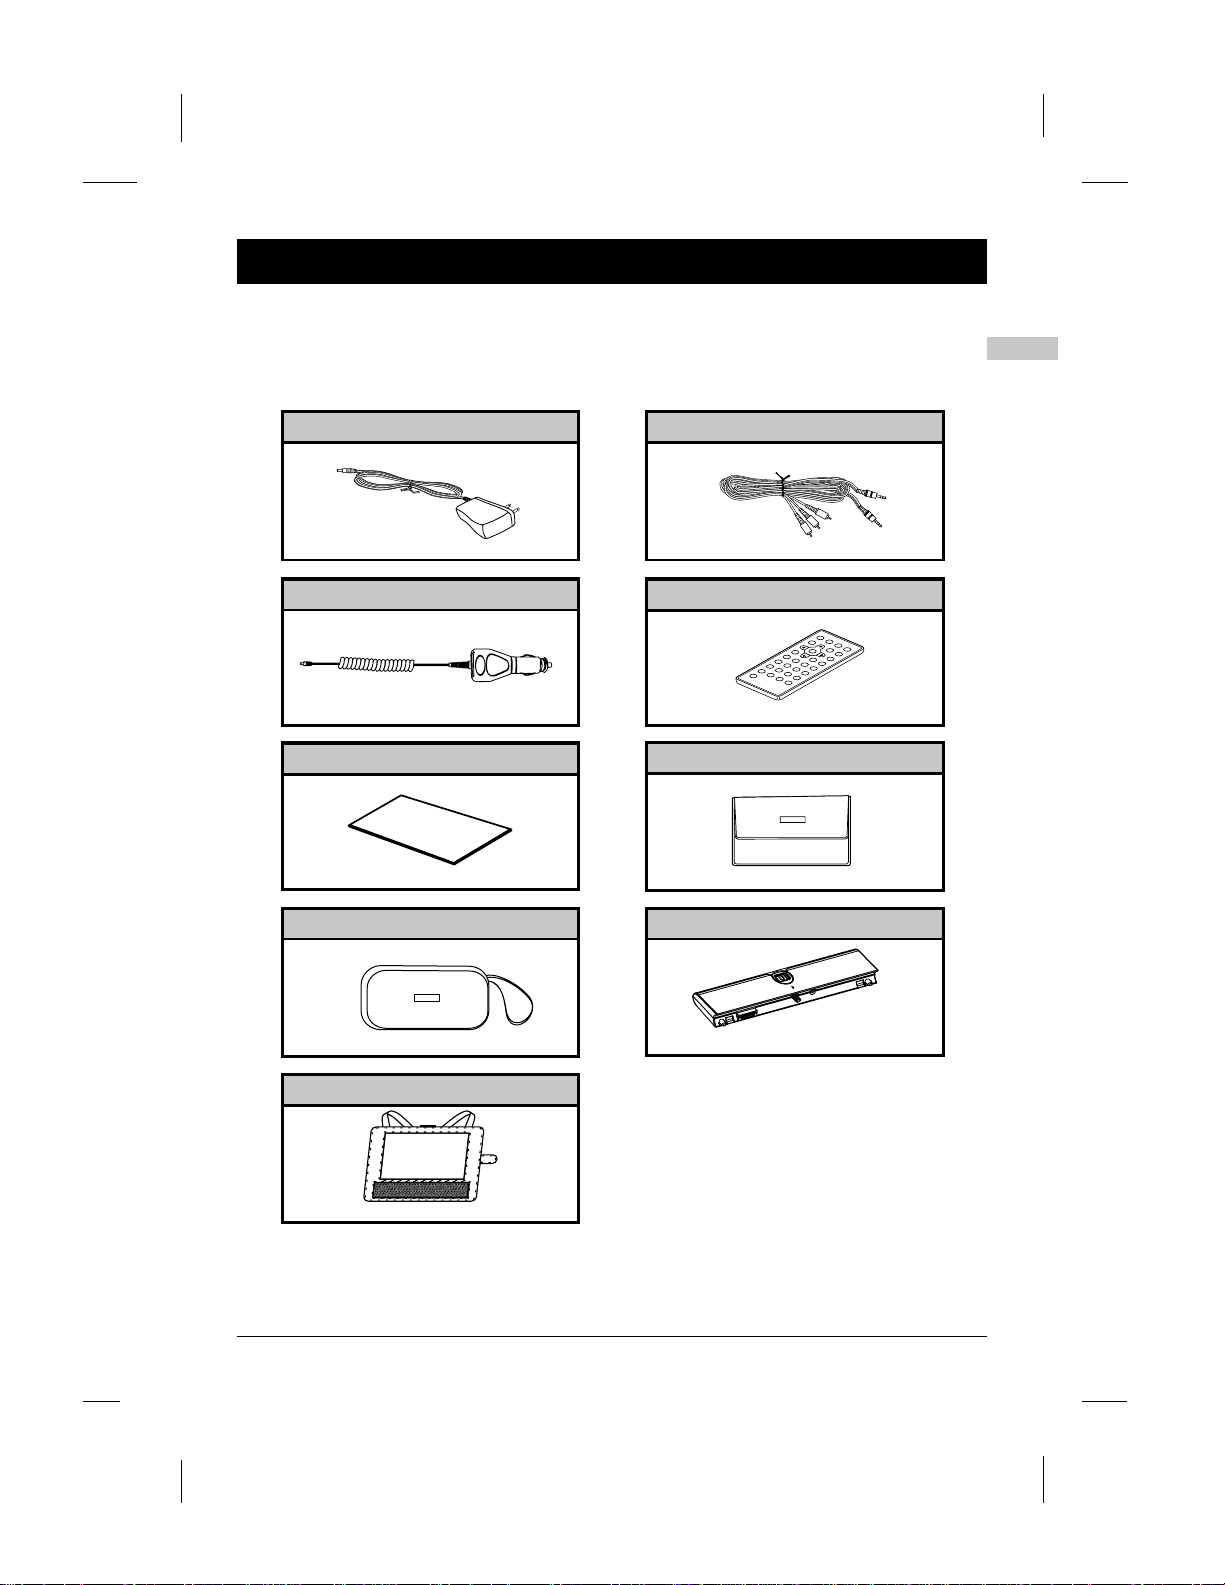
Checking the Accessories
After unpacking, check that all the accessories listed below are included.
AC/DC adapter
Car power cable
Operating instructions (this manual)
INSTRUCTIONS
OPERATION
Accessories bag
Card-type remote control unit
AV cable
Soft carrying bag
Battery (SB11)pack
EN
Short car bag
5
Graphics are for representation only.Your unit may differ slightly.
-EN
Before Using
EN
Remote Control Unit and Main Unit Preparations
Notes on using the remote control unit
Do not drop or step on the remote control unit or subject it to shocks. Doing so may
damage it.
Note that the remote control unit may not work if there are obstacles between it and
the remote sensor.
Do not expose the remote sensor to strong light. Doing so may make operation
impossible.
Use the remote control unit within the specified operating range.
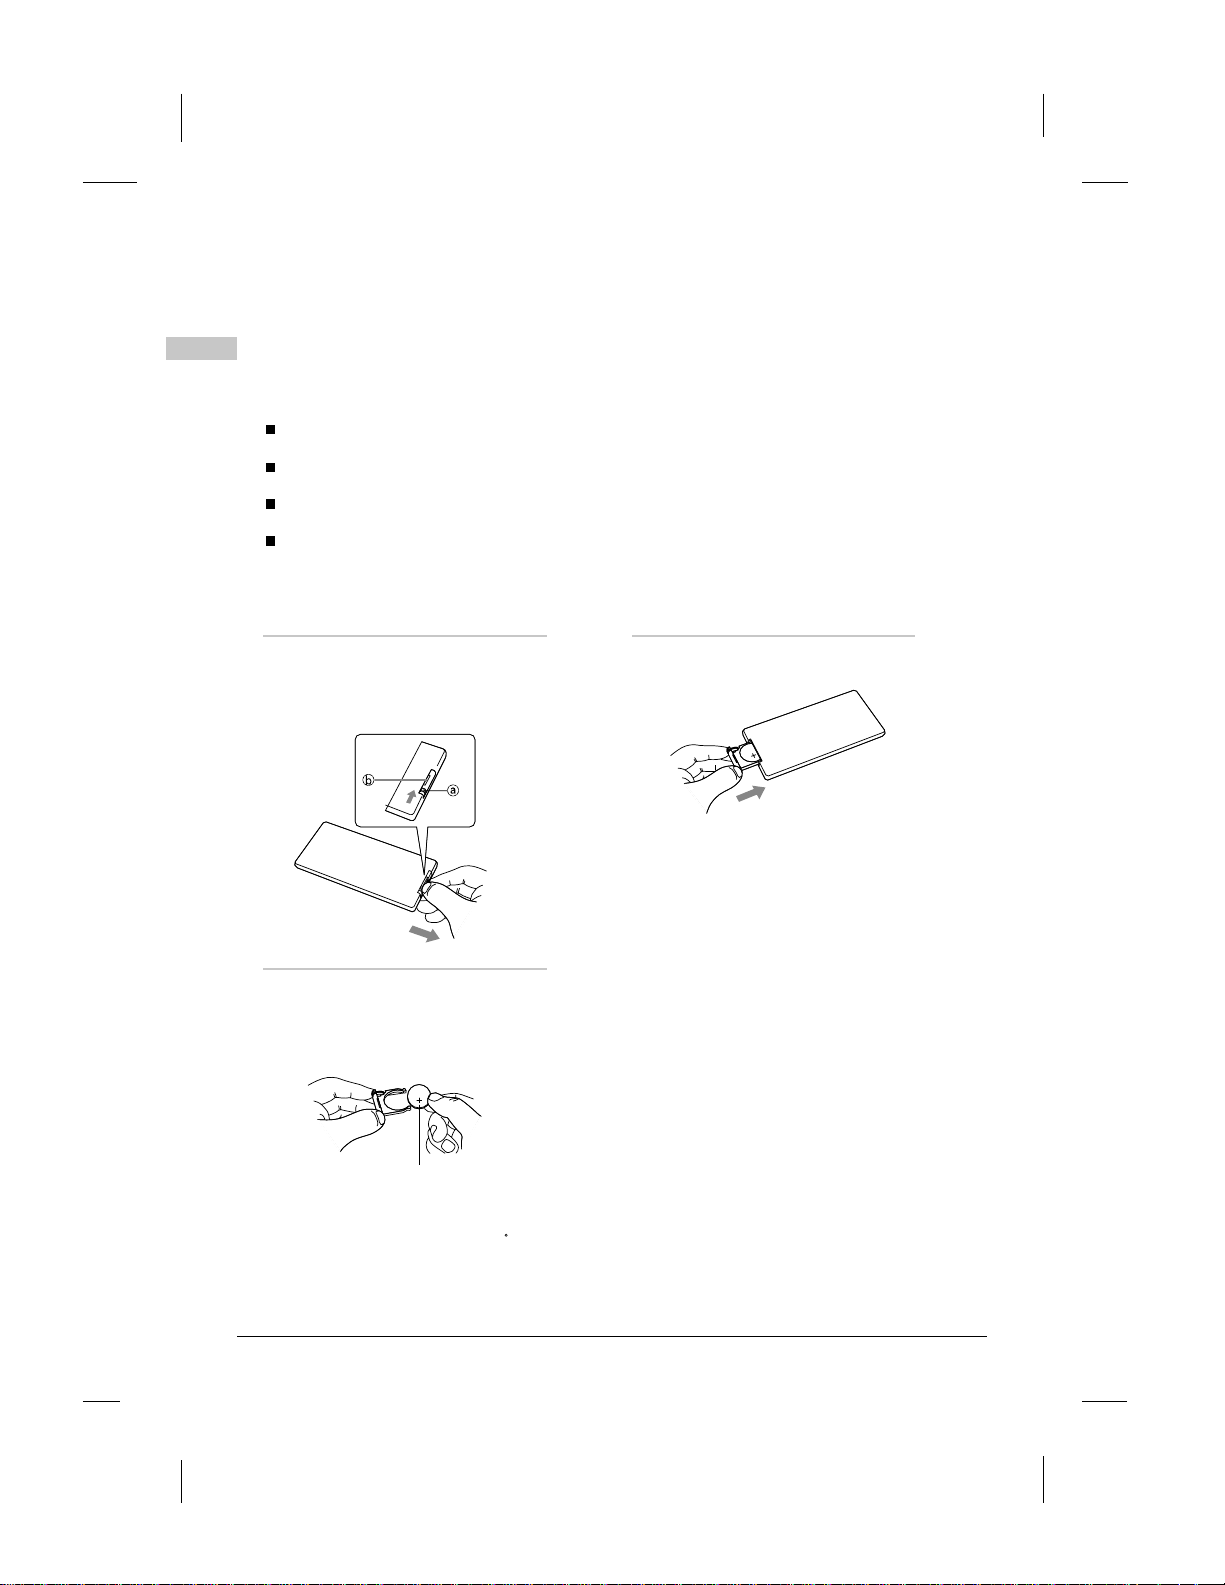
Replacing the battery
Insert your finger nails into A and
1
B on the diagram below,press A
according to the direction, then pull
out the battery holder.
Remove the old battery,then insert
2
the new battery into the battery
holder with the + side facing
upwards.
CR2025
Lithium battery (CR2025)
A.B.Caution:the battery may present a risk of fire if mistreated ,do not recharge ,
disassemble, heat above 100 C ,Replace battery with same type.
Fit the battery holder back to its place.
3
Note:
To prevent leakage of fluid from the
lithium battery,remove the battery
when not using the remote control
unit for long periods of time (one
month or more). If the battery leaks
fluid, carefully wipe it out of the
battery case, then change to a new
lithium battery.
Dispose of used battery properly,keep away from children and do not dispose of in fire.
6
Graphics are for representation only.Your unit may differ slightly.
-EN
Before Using
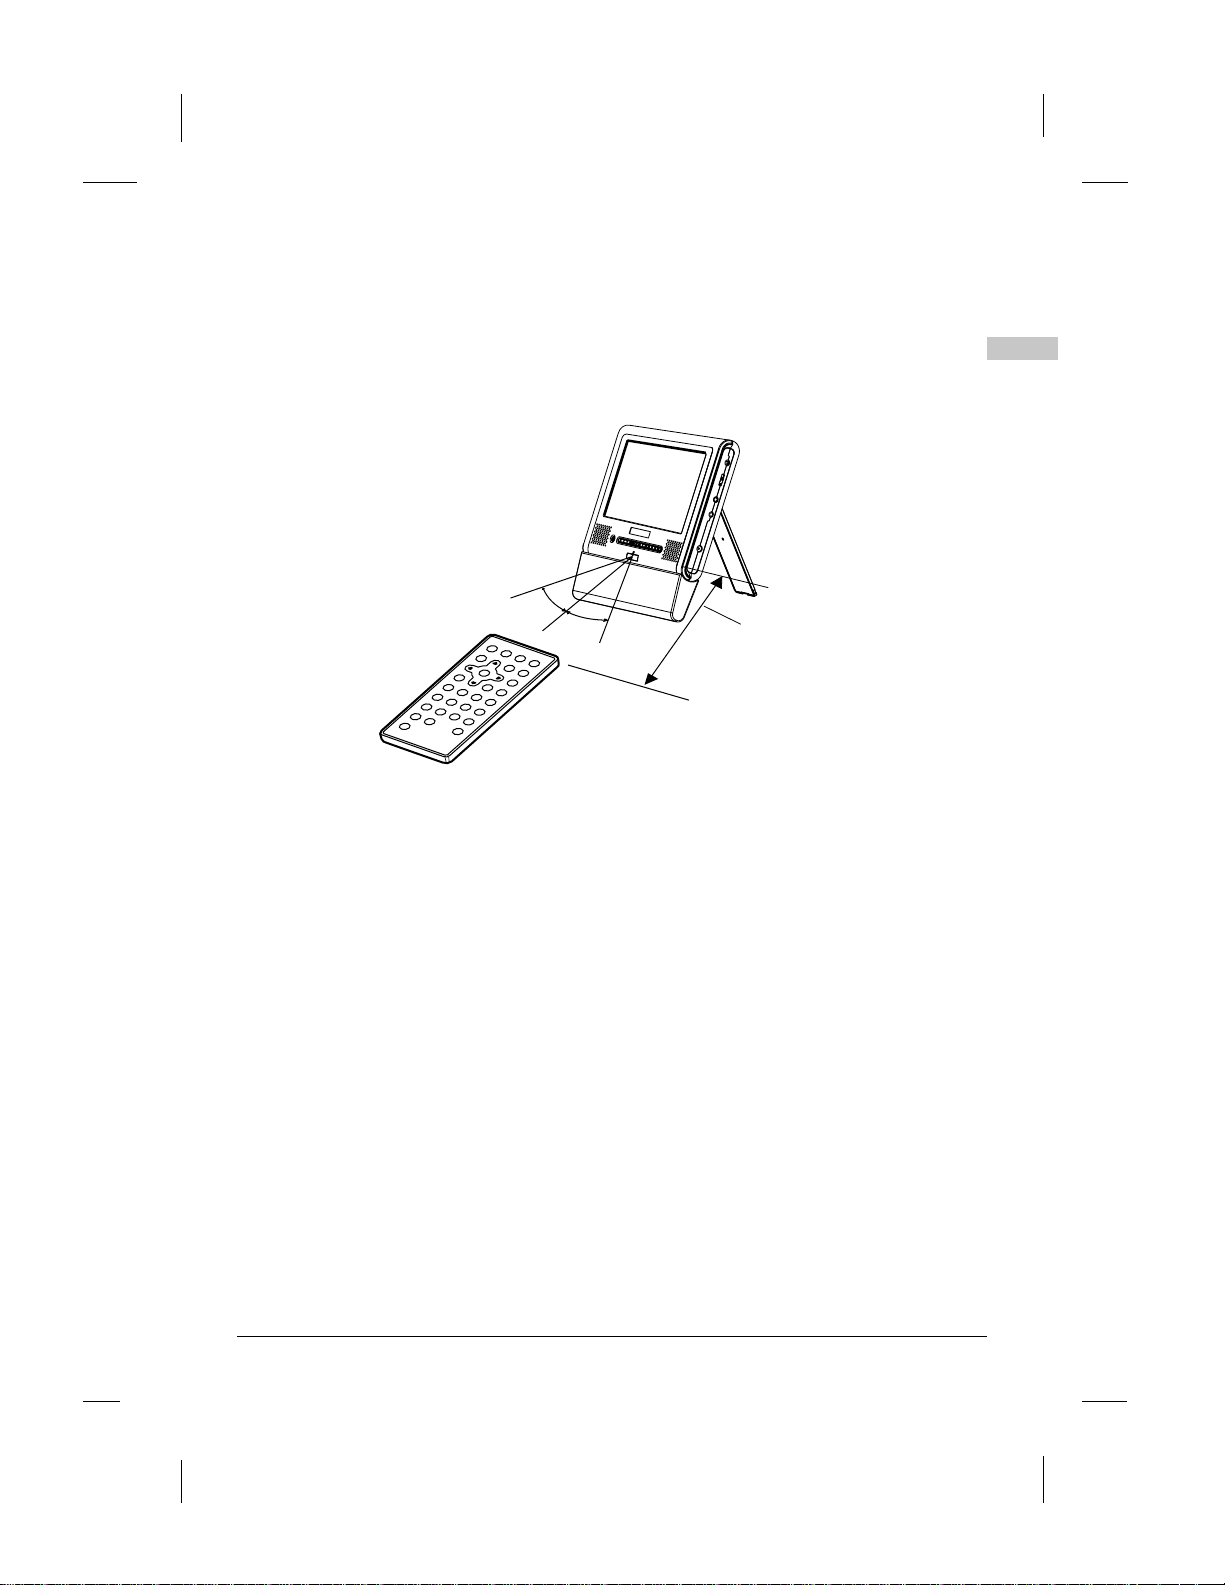
Remote control unit operating range
30
30
Approx.
5 meters
The remote control unit can operate within a distance of approximately 5 meters.
Note:
Most of the players operations can be done by using the remote control unit.
Some operations, however, can only be done by using the main unit buttons.
,
EN
7
Graphics are for representation only.Your unit may differ slightly.
-EN
Before Using
Parts and Functions
EN
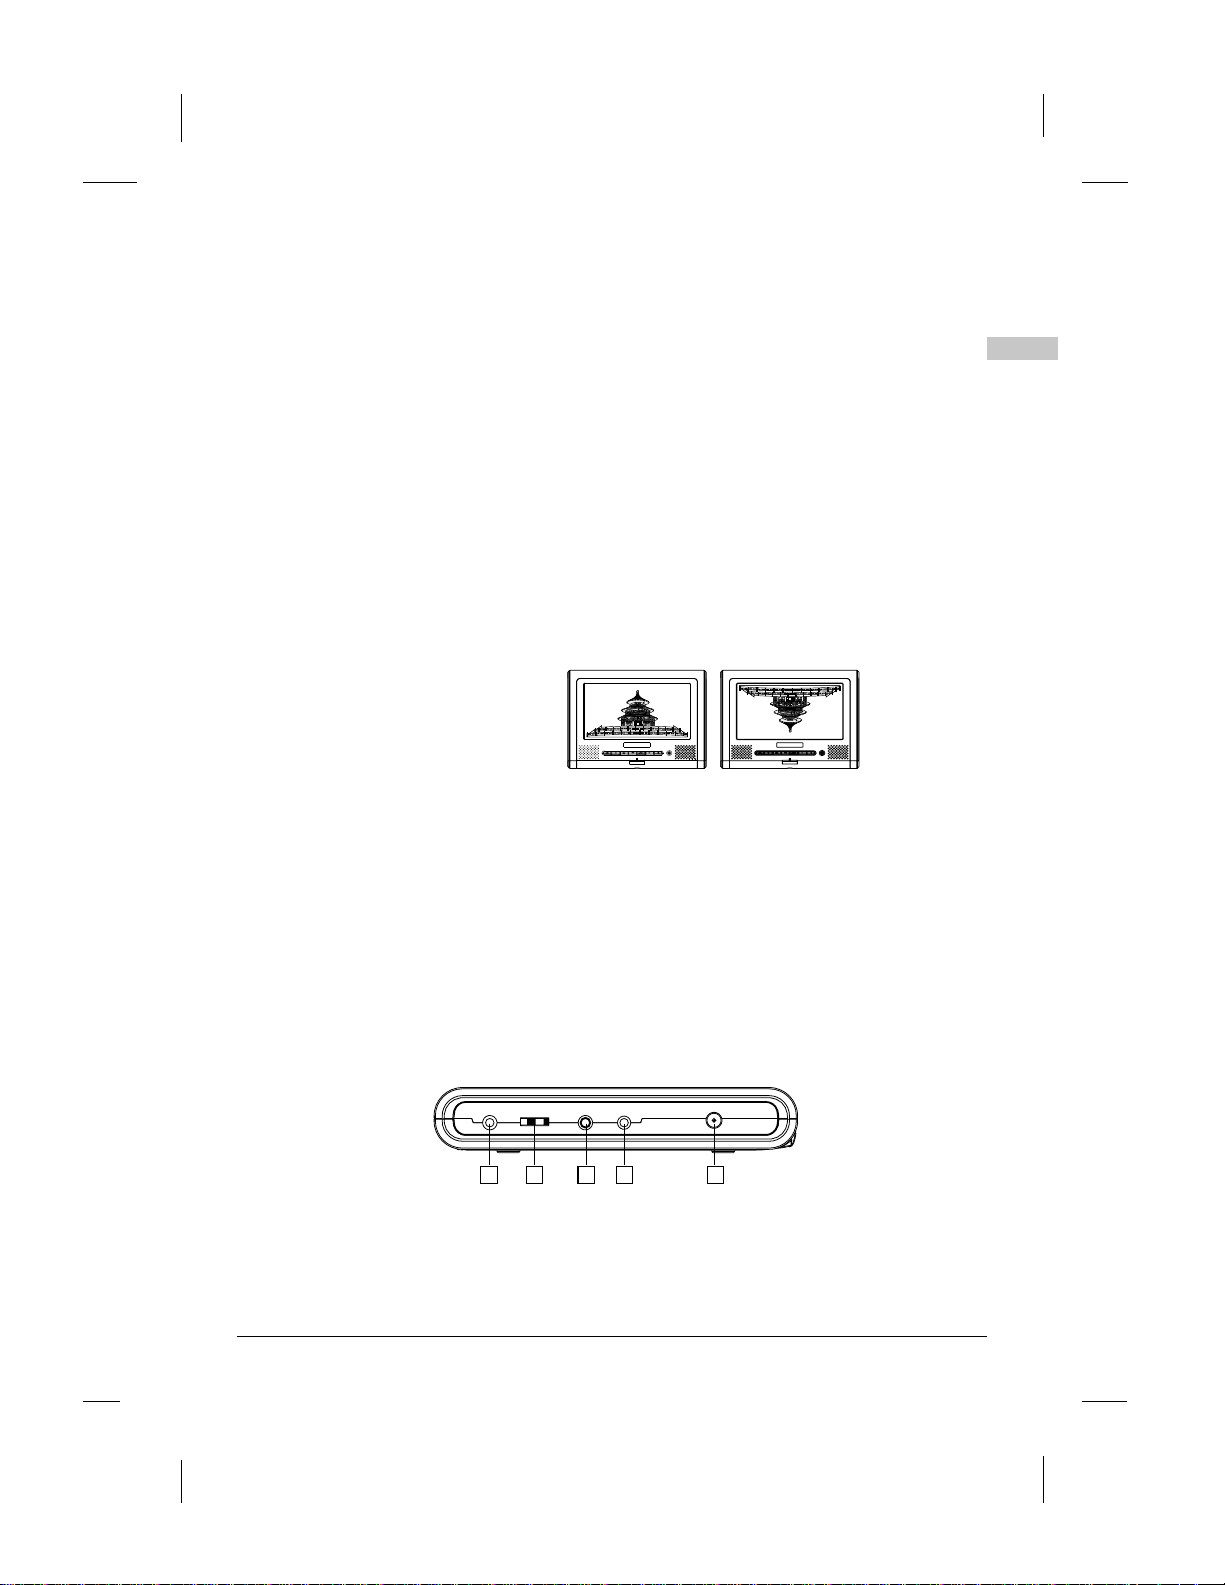
Liquid crystal display
The portable DVD player is equipped with a liquid crystal display.
1
Liquid crystal display
2
Speakers
3
Control section
Control buttons
4
Remote sensor
The remote control signals are received here.
3
1
2
4 5
5 Power indicator
Off: No power connection.
Red: The player is set to standby mode.
Blue:The player is on. Turn on the power using ON button on the main unit or the STANDBY
button on the remote control unit.
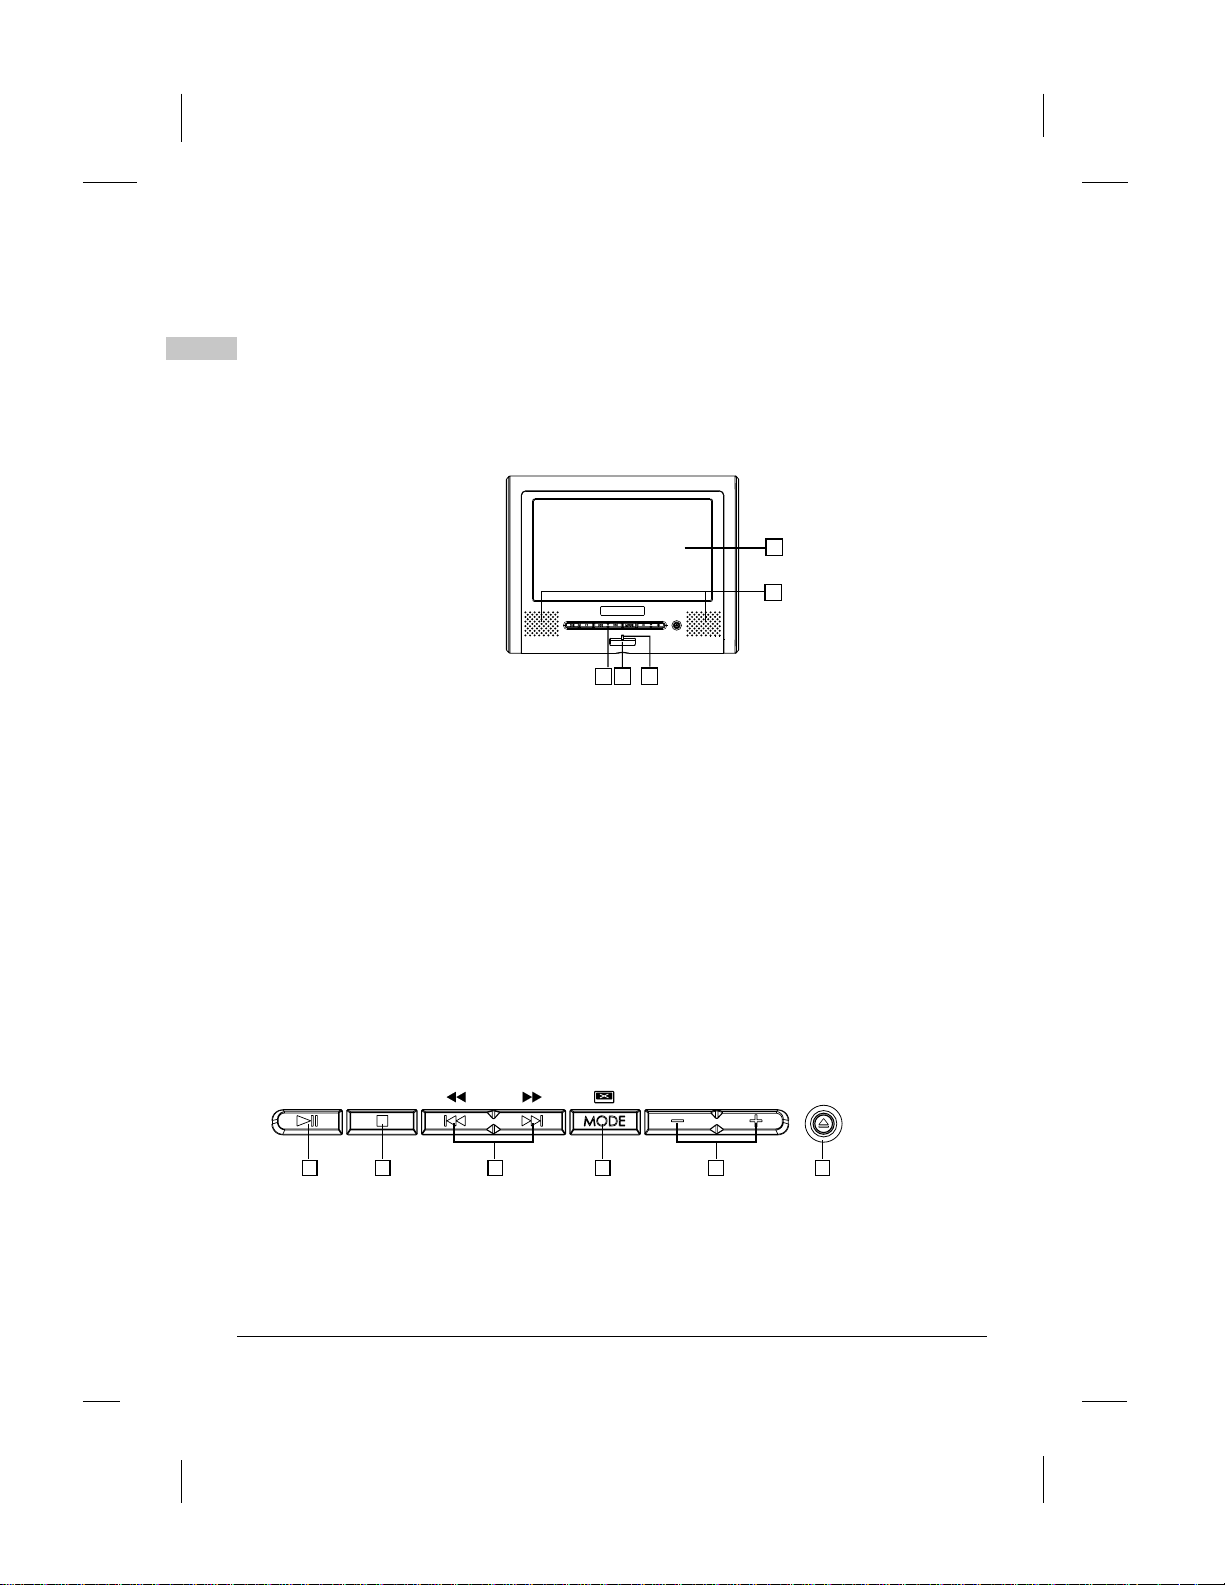
Main unit control section
ON OFF
1 2 3 4 5
8
Graphics are for representation only.Your unit may differ slightly.
-EN
6
Before Using
Play/pause button
1
Press it to play. When pressing during playback mode, pause mode is set. Press again to
resume playback.
Keep pressing it for about 1.5 seconds to power on the unit.
Stop /off button
2
Press it to stop playback.
Keep pressing it for about 1.5 seconds to turn off the unit (standby status).
Previous/next buttons
3
Use it to locate at the beginning of previous/next tracks or chapters.
Keep pressing it for about 1.5 seconds during playback to switch playing speed of
backward/forward through X2, X4, X8, X20, X2.
Mode button
4
Use +/- key to adjust after entering one mode.
BRIGHTNESS: Level 0 to 8.
COLOR: Level 0 to 8.
TFT MODE: switch screen between
16:9 and 4:3.
VIEW MODE: switch screen between
reverse and observe.
AVINPUT/OUTPUT: switch the AV
function between input and output.
Keep pressing the button about 1.5 seconds to turn off the display. and press it to resume.
obverse reverse
EN
- /+ buttons
5
Press it to adjust display mode.
OPEN button
6
Press it to slide the tray out
Main unit left side
Graphics are for representation only.Your unit may differ slightly.
1 2 3 4 5
9
-EN
Before Using
Phone jack
1
EN
For connecting stereo headphone or an amplifier.
Volume control
2
Use it to adjust the volume of the speakers or headphone.
Video in/out jack
3
Input or output video signals to connected device by setting AVIN/OUT mode value.
The included AVcable is connected here.
Audio in/out and optical output jack
4
Input or output audio signals to connected device by setting AVIN/OUT mode value.
Output optical audio signals to connected device.
The included AVcable or optical digital cable is connected here.
DC in
5
Connect the included AC adapter here.
Main unit right panel
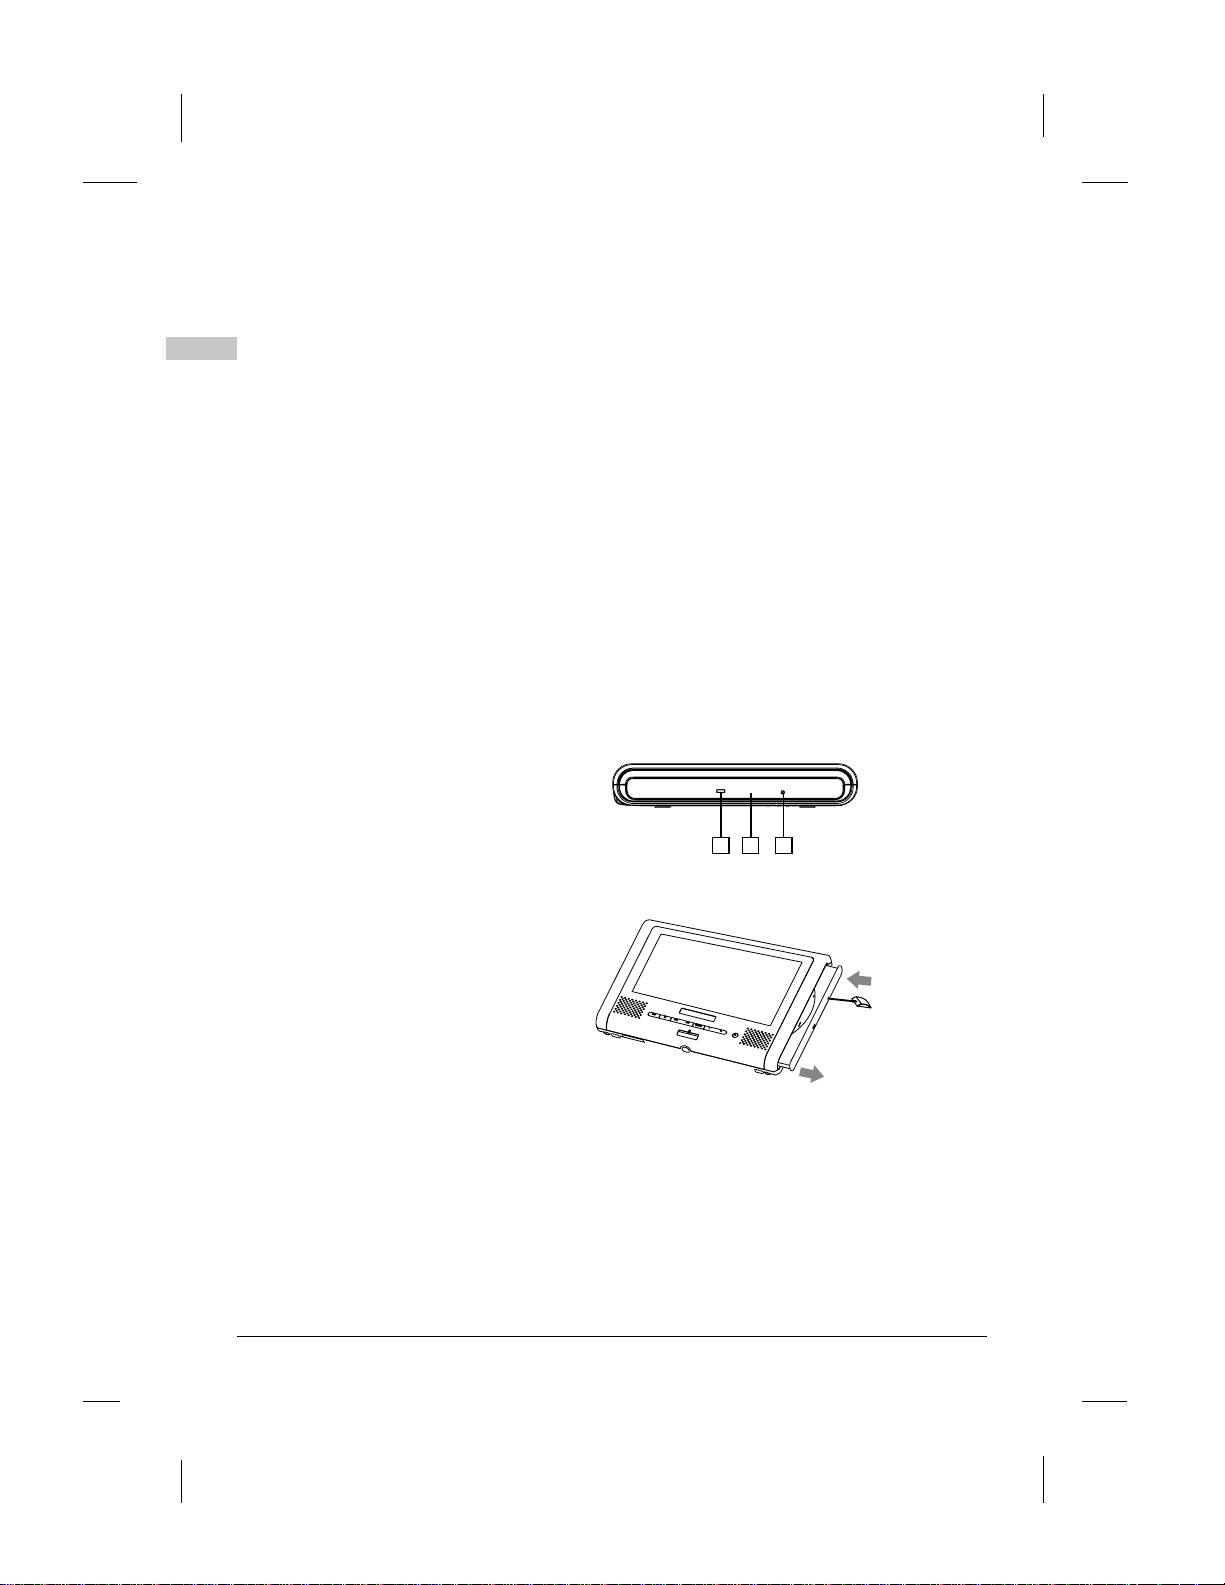
1
Loader status indicator LED
Indicate loader status.
2
Tray
1 2 3
3
Open hole
When you insert the open-stick into
this hole, the tray will slide out.
Please turn offtheunitbeforethis
operation.
Graphics are for representation only.Your unit may differ slightly.
10
1
2
-EN
Before Using
Main unit rear side
Open-stick Support12
You can use it to open the tray.
1
1 2
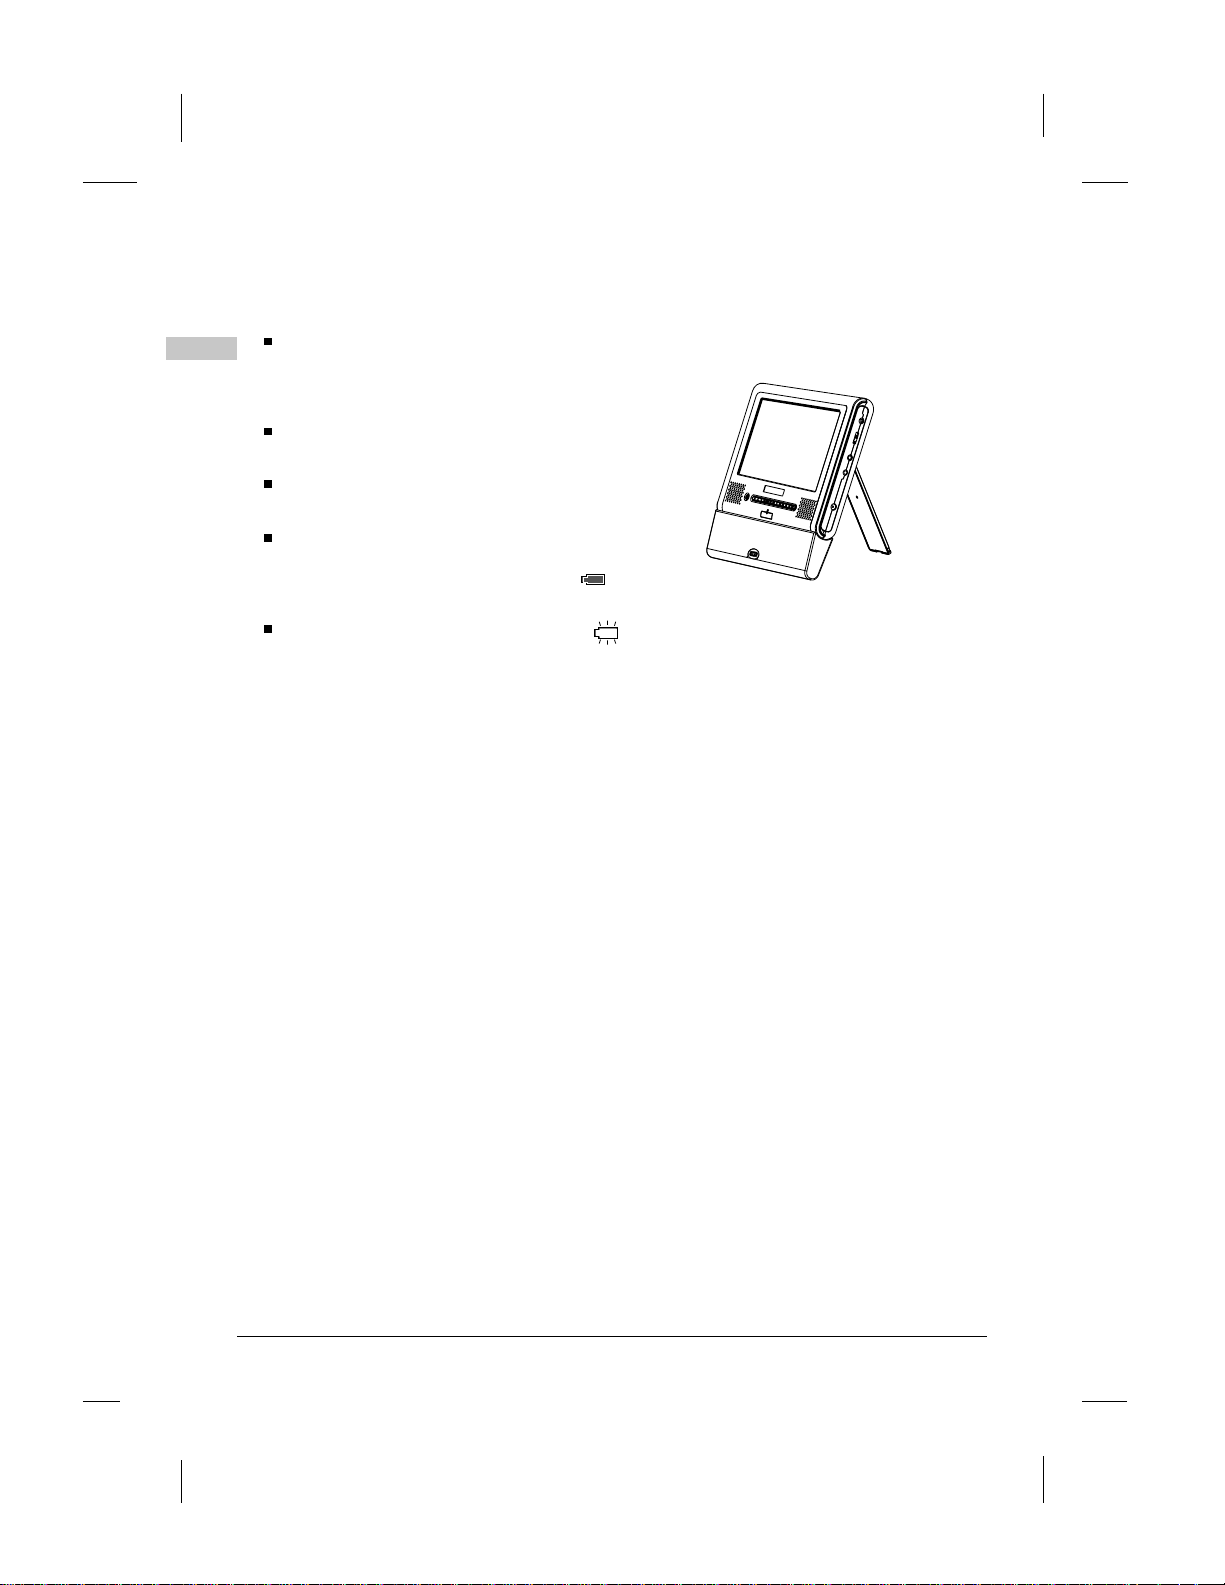
The unit can stand with this device.
2
How to stand
1
Pull out the support.
1
2
Draw out the support to a proper position .
2
3
Pull down the button to lock it.
3
UNLOCK
LOCK
UNLOCK
LOCK
EN
1 2 3
Main unit bottom side
1
Hole for Battery Pack
1
Nut for Battery Pack
2
2
Battery connector
3
3
Note:
Remember to insert back the rubber cover to 3. BATTERY CONNECTOR after
using the battery pack.
Graphics are for representation only.Your unit may differ slightly.
1 3 2 1
11
-EN
Before Using
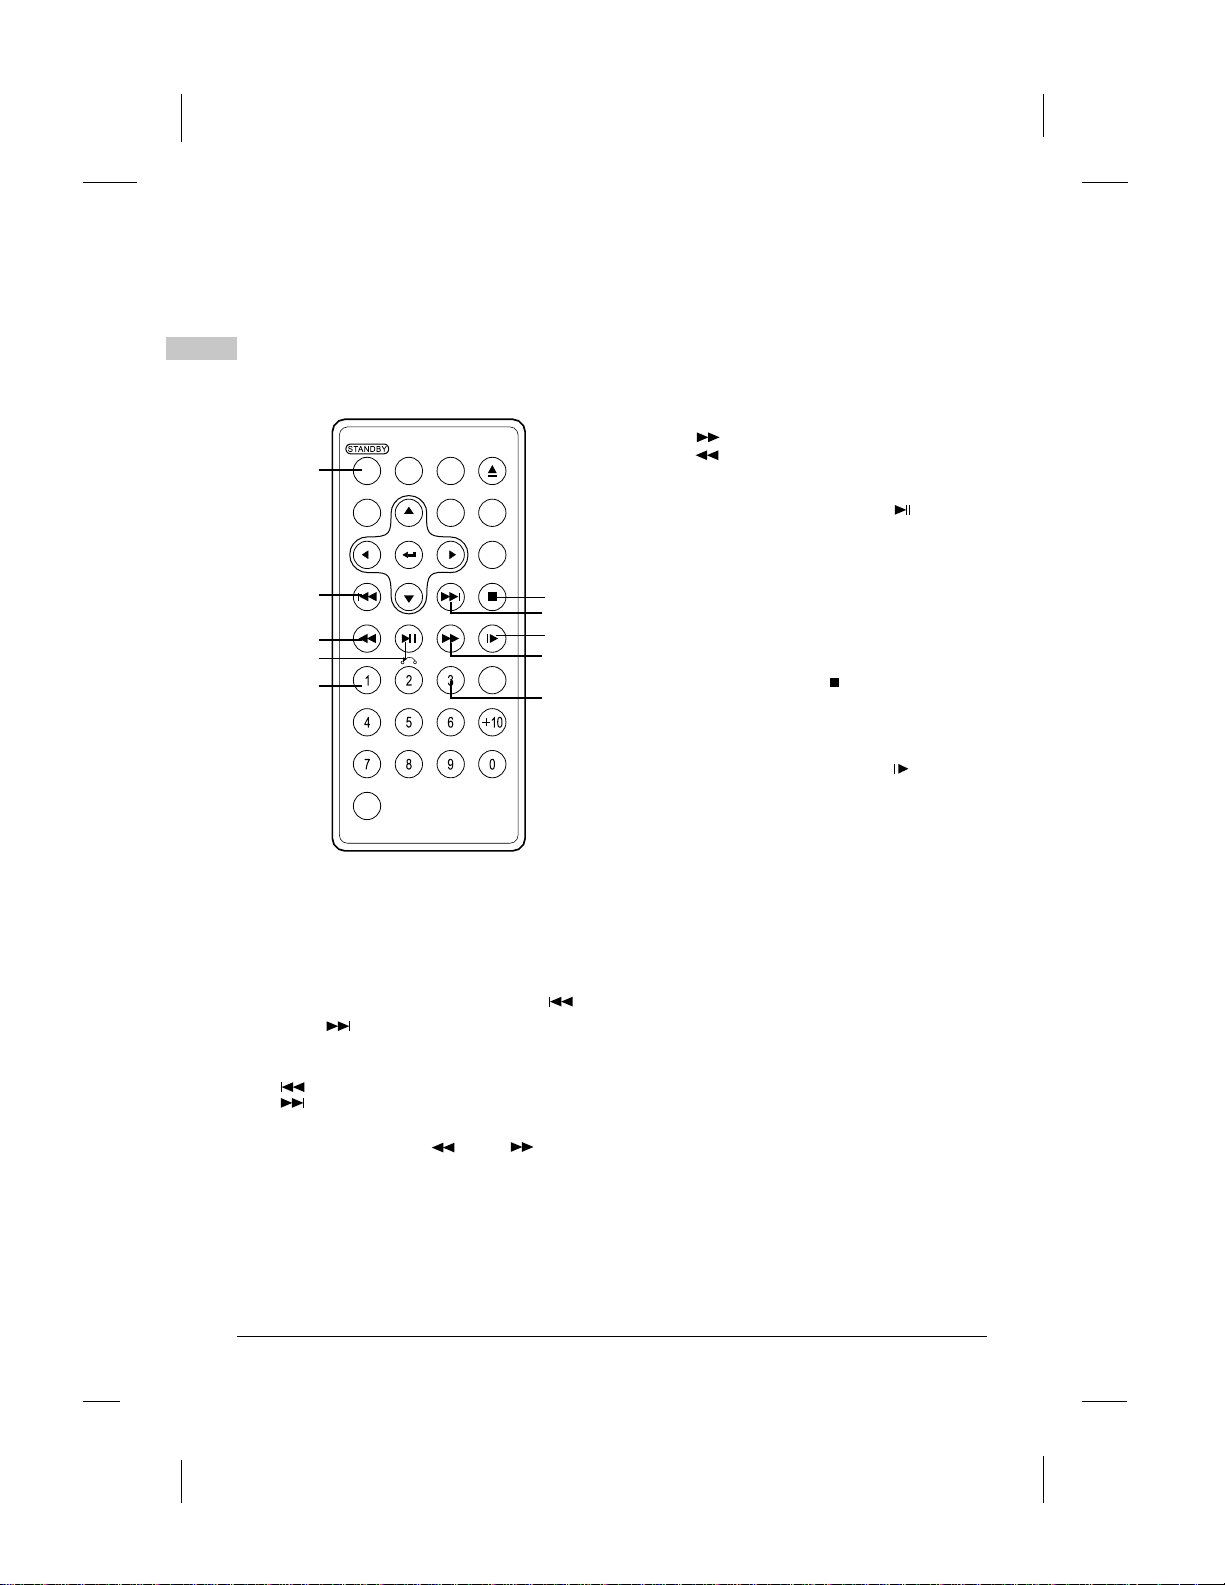
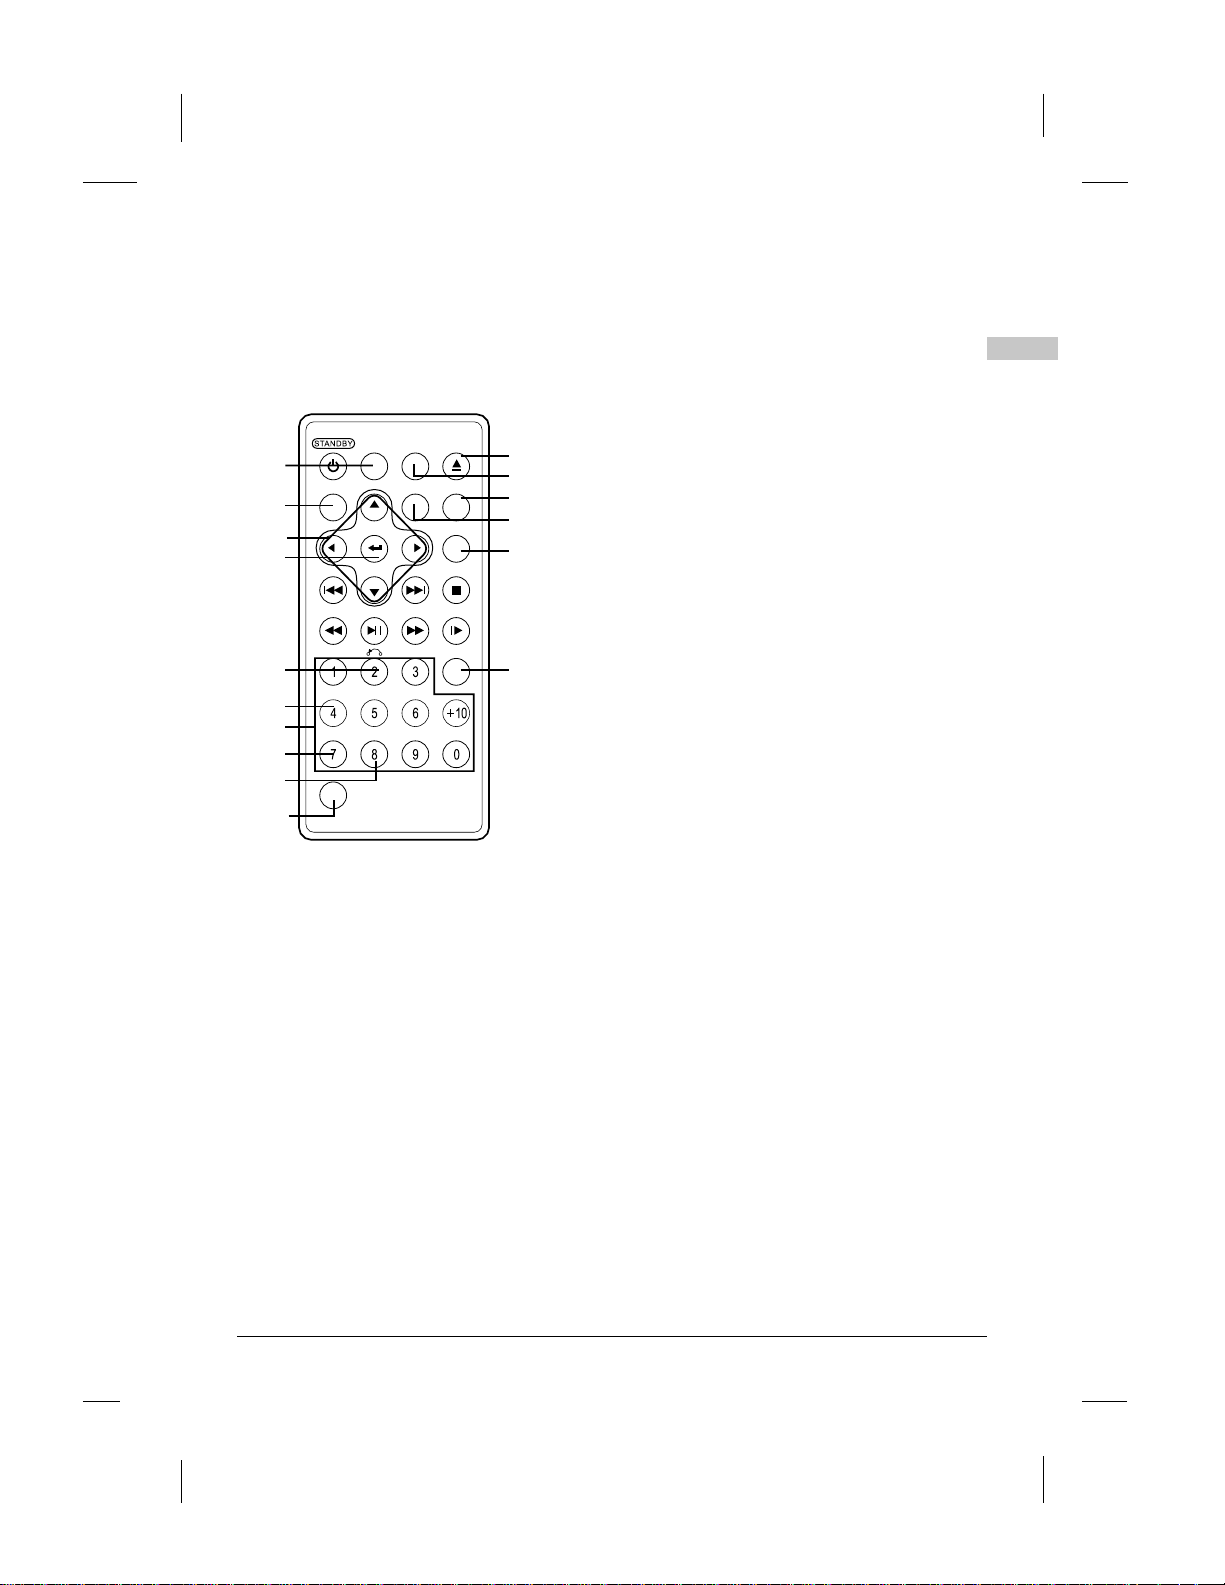
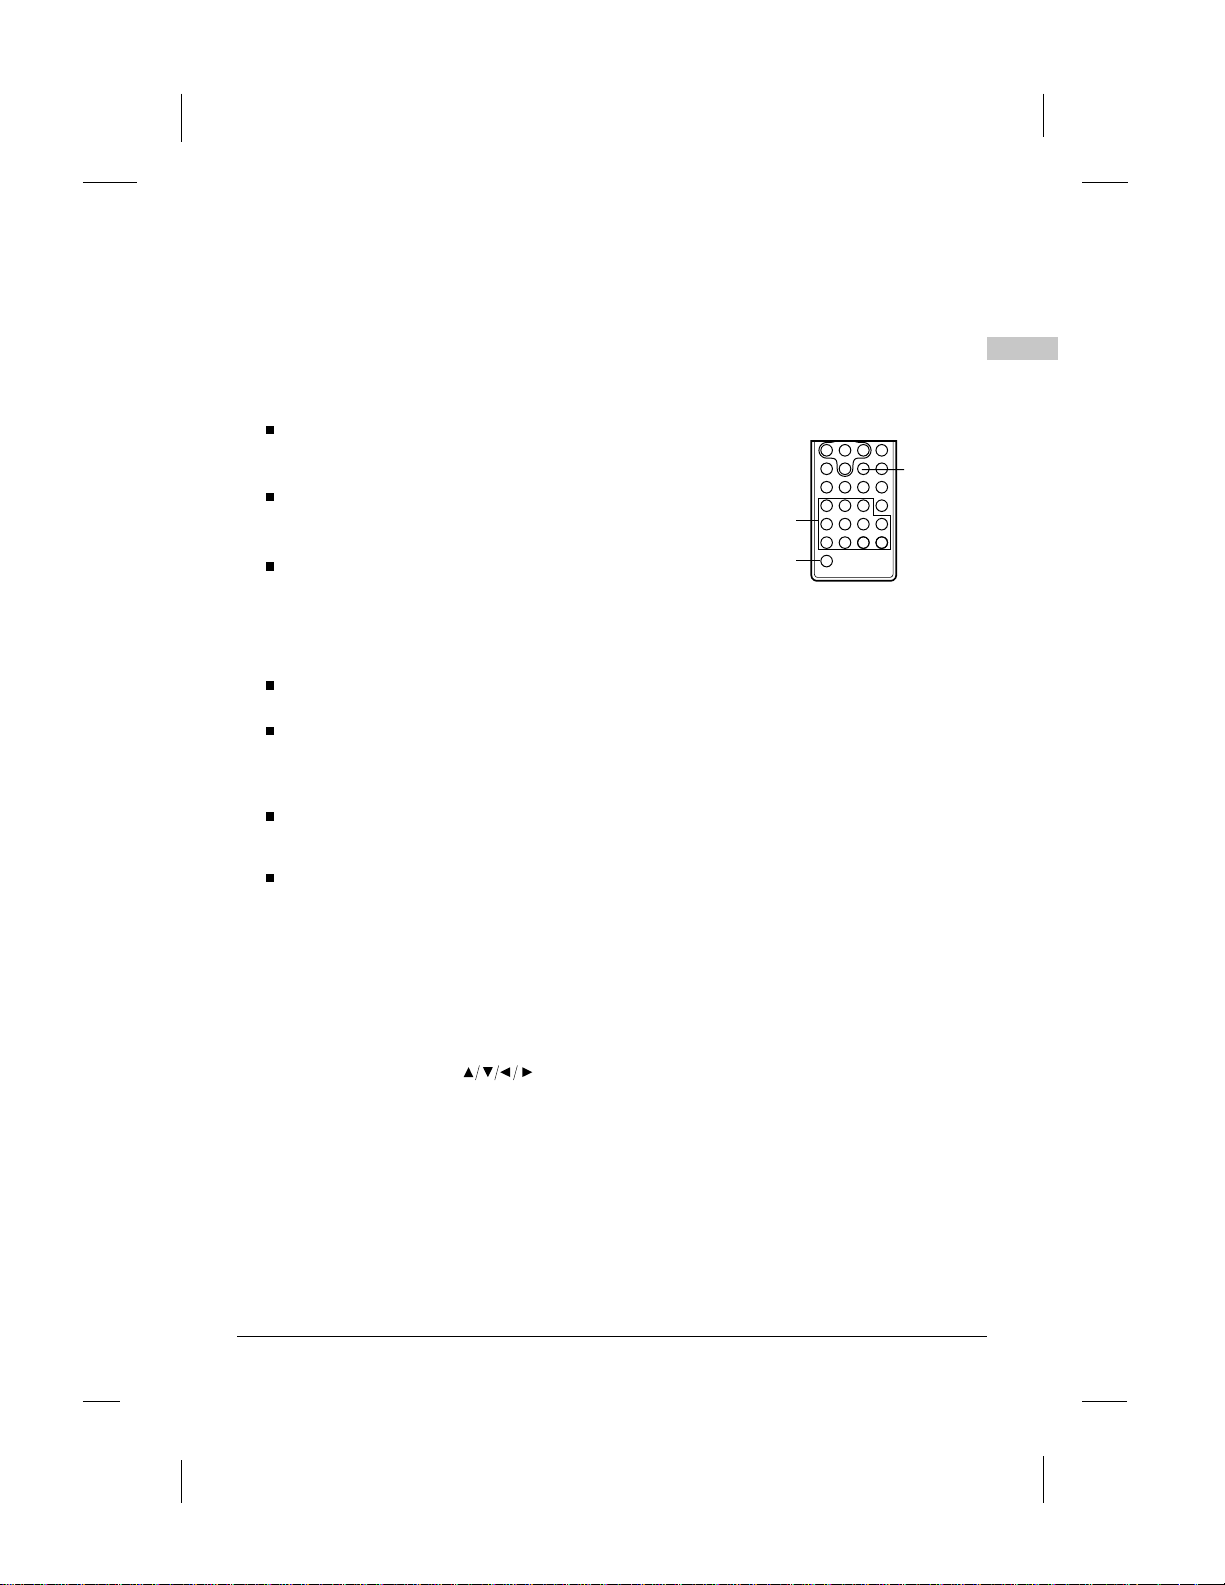
Remote control unit (frequently used buttons)
EN
AUDIO SUBTITLE
OPEN
1
SETUP
PREV
ANG EL
SEARCH
STOPNEXT
2
D
FW
STEP/SLOWPLAY/PAUSEREV
3
4
MENU TITLE
5
ZOOM
A-BREPEAT
SHIFT
STANDBY button
1
Press this button to turn on or off
the power.
PREVIOUS/NEXT button
2
and
Use these buttons to search for the
beginnings of tracks or chapters.
(
: Backward direction
: Forward direction
CLEAR
OSD
C
: Forward direction
: Backward direction
(
4 PLAY/PAUSE button
Use this button to play or pause
playback.
6
2
7
5 MENU button
Press this button to display the
DVD's menu screen.
(
3
(
8
6 STOP button
Press this button to stop playback.
(
7 STEP/SLOW buttons( )
Press this button to slow playback at
1/2, 1/4,1/6,1/7 speed. If at pause
status, press this button to playback
step-by-step.
TITLE button8
Press this button to display
the DVD's title.
(
Scan buttons and
3
Use these buttons to switch playing speed
of playing forward or backward.
(
Graphics are for representation only.Your unit may differ slightly.
(
12
-EN
Before Using
Remote control unit (other buttons)
6 ZOOM
Zoom the picture on screen.
7 Number buttons
Press these buttons to input numbers.
Pressing the SHIFT button to switch from
function to number if necessary.
8 REPEAT button
For DVDs, use this button to play titles
or chapters repeatedly. For CDs, use
this button to play tracks or the entire
disc repeatedly.
9 A-B REPEAT button
Press this button during playback to set
two points and play the section between
them repeatedly.
SHIFT button10
Press the shift button to switch number
& function. (Defaut: function)
OPEN11
Open the tray and replace/take disk.
SUBTITLE button12
Press it to switch the DVD's
subtitle language.
13 OSD button
Press this button to display the disc
information.
14 ANGLE button
Press it to switch angle.
15 SEARCH button
Locate a title/ chapter/ time and play.
16 CLEAR button
Clear the numbers inputted before.
1
2
3
4
5
AUDIO SUBTITLE
SETUP
PREV
MENU TITLE
ZOOM
ANG EL
FW
OPEN
11
OSD
SEARCH
12
13
14
15
STOPNEXT
D
STEP/SLOWPLAY/PAUSEREV
CLEAR
C
16
6
7
A-BREPEAT
8
SHIFT
9
10
AUDIO button1
Press this button to switch the audio
language.
2 SETUP button
Press this button to display setup screen
when at stop status.
Press this button to display Video Enhance
screen during playback.
3 Cursor buttons
Use these buttons to move the cursor up,
down, left and right when selecting
setting items .
4 ENTER button
Press it to enter/confirm setting item.
5 RETURN button
Press it to return back the previous item.
(Only for VCD, PBC on)
EN
13
Graphics are for representation only.Your unit may differ slightly.
-EN
Before Using
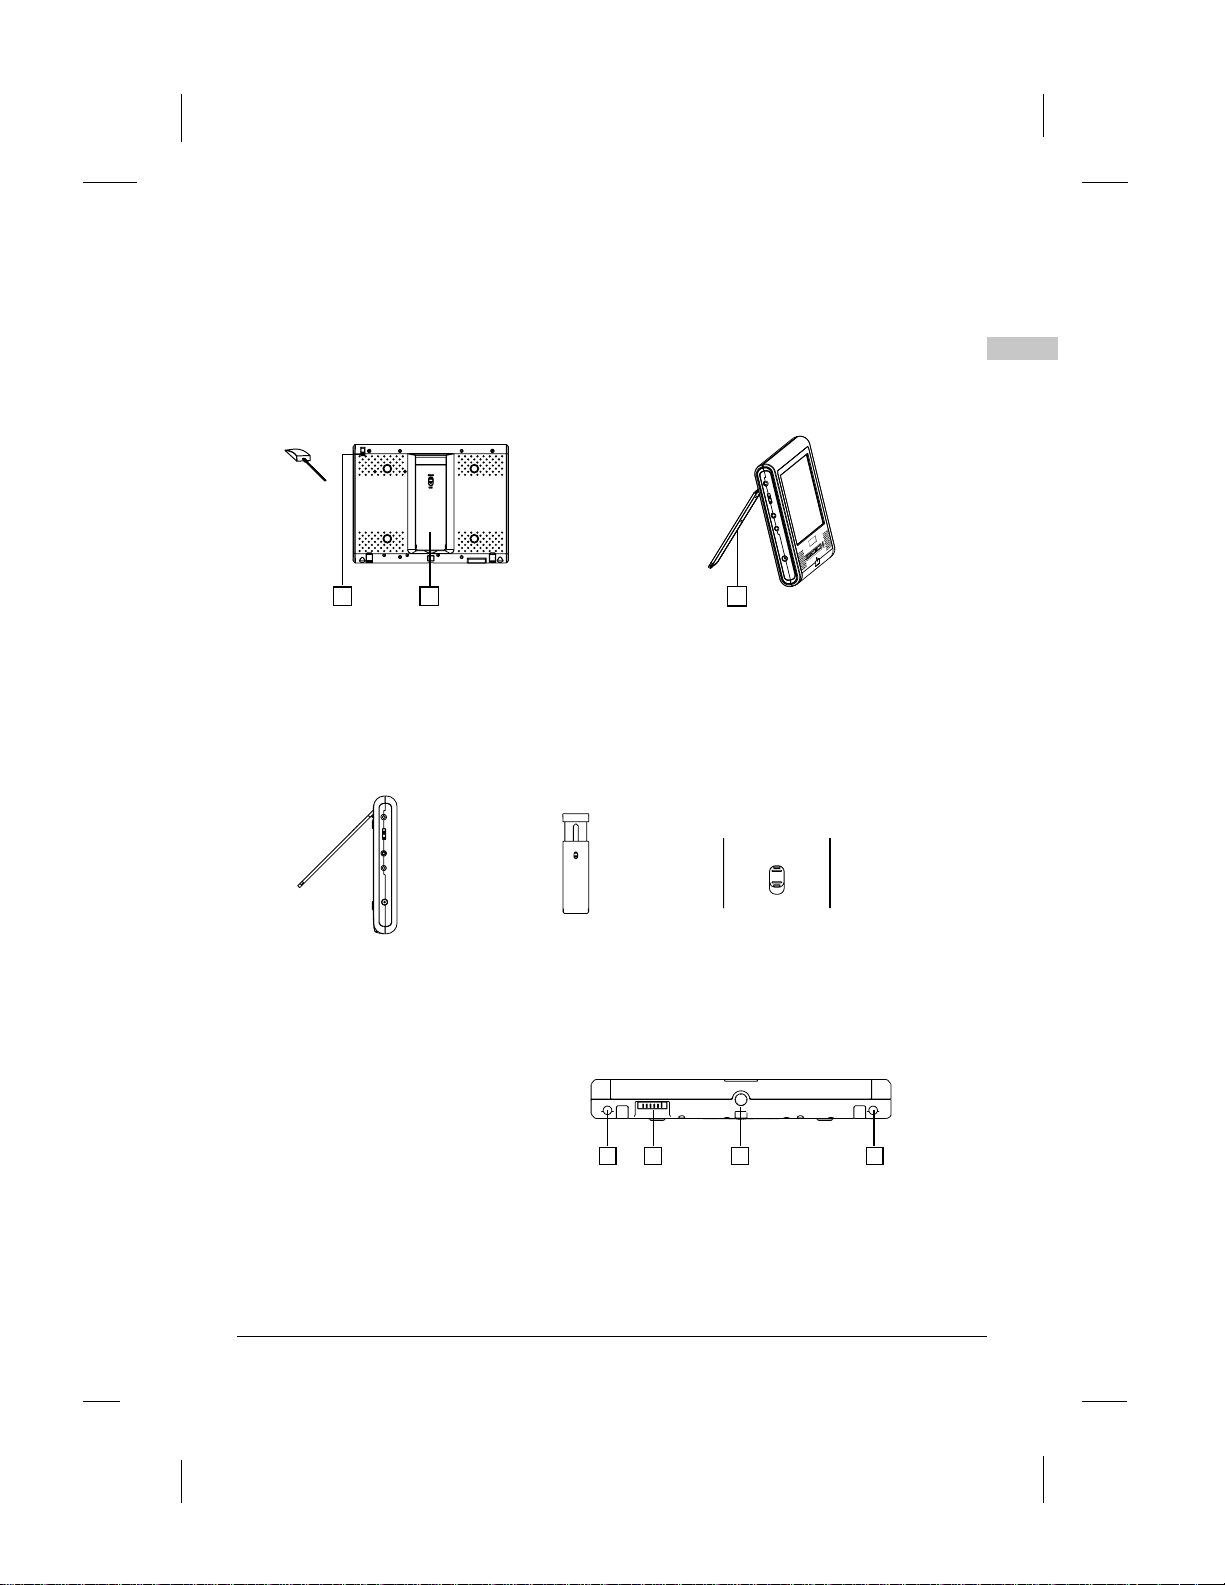
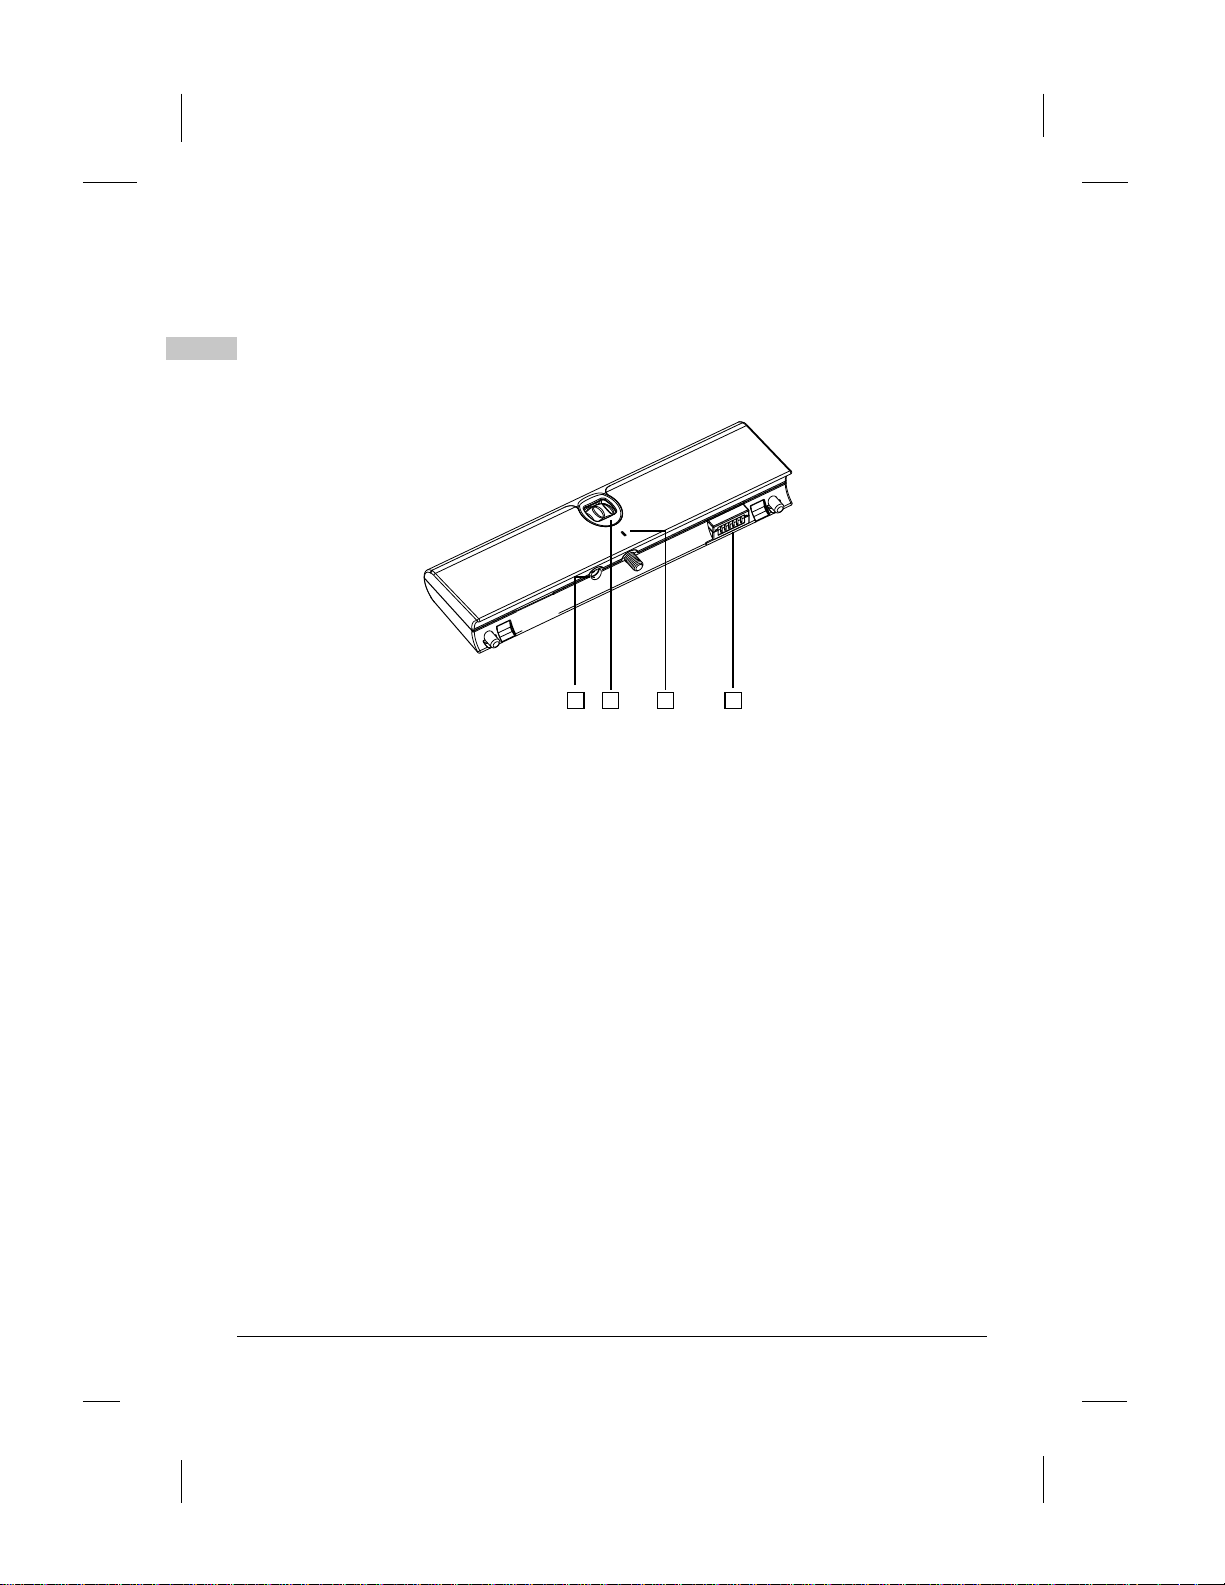
Names of battery parts and their functions
EN
1 2 3 4
DC IN connector
1
Connect thepoweradapterto recharge.
2
Battery knob
Twistto tighten/detach the battery pack.
3
Battery indicator LED.
When thebatteryisdischarging, LED is off.
When rechargingthebattery, LED is red.
When theLEDbecomesgreen, means finishing recharge.
4
Player terminals
Supply powertotheplayer.
CAUTION:
Do notshort-circuittheterminals.
14
Graphics are for representation only.Your unit may differ slightly.
-EN
Before Using
Connecting the Player to Other Devices
Before connecting
Turnoffthe power of the player and the devices to be connected.
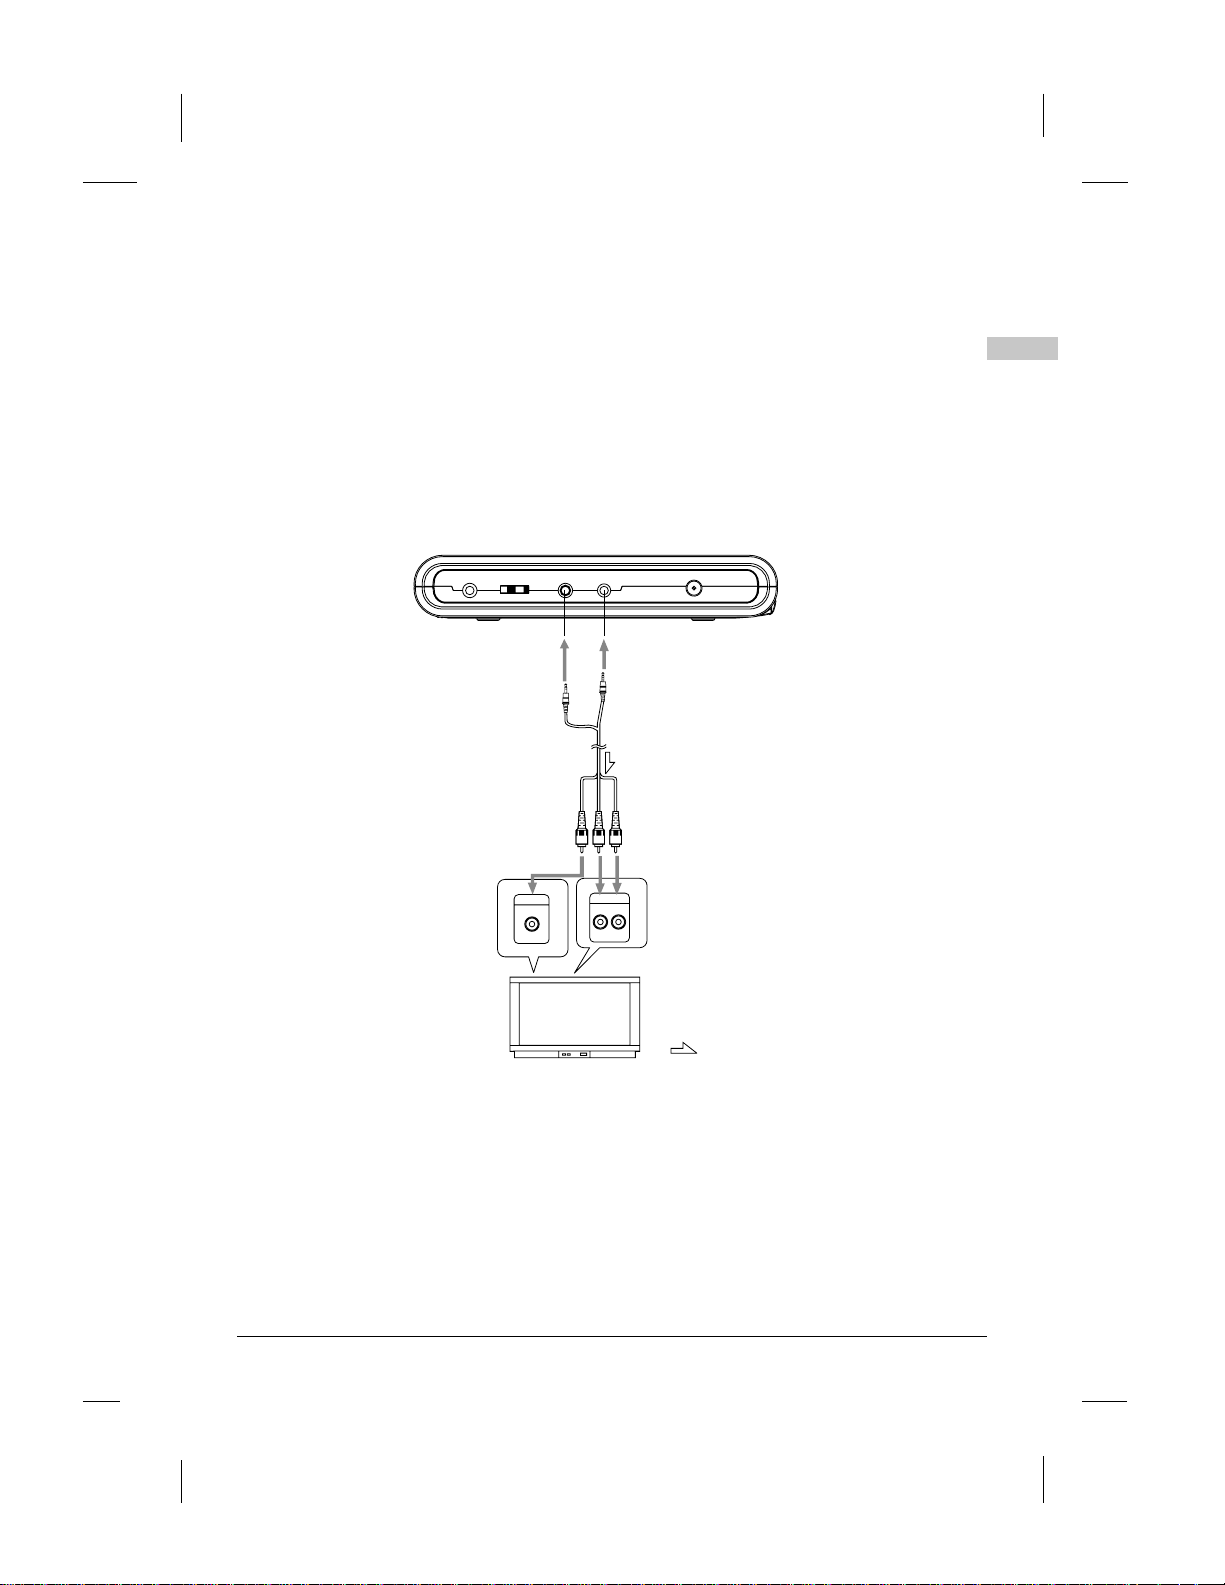
Connecting to a TV
Video / audio cable
(included)
T o video input jack
(yellow)
T o audio input jack
(white)
T o audio input jack
VIDEO IN
AUDIO IN
RL
(red)
EN
TV
: Signal flow
15
Graphics are for representation only.Your unit may differ slightly.
-EN

Before Using
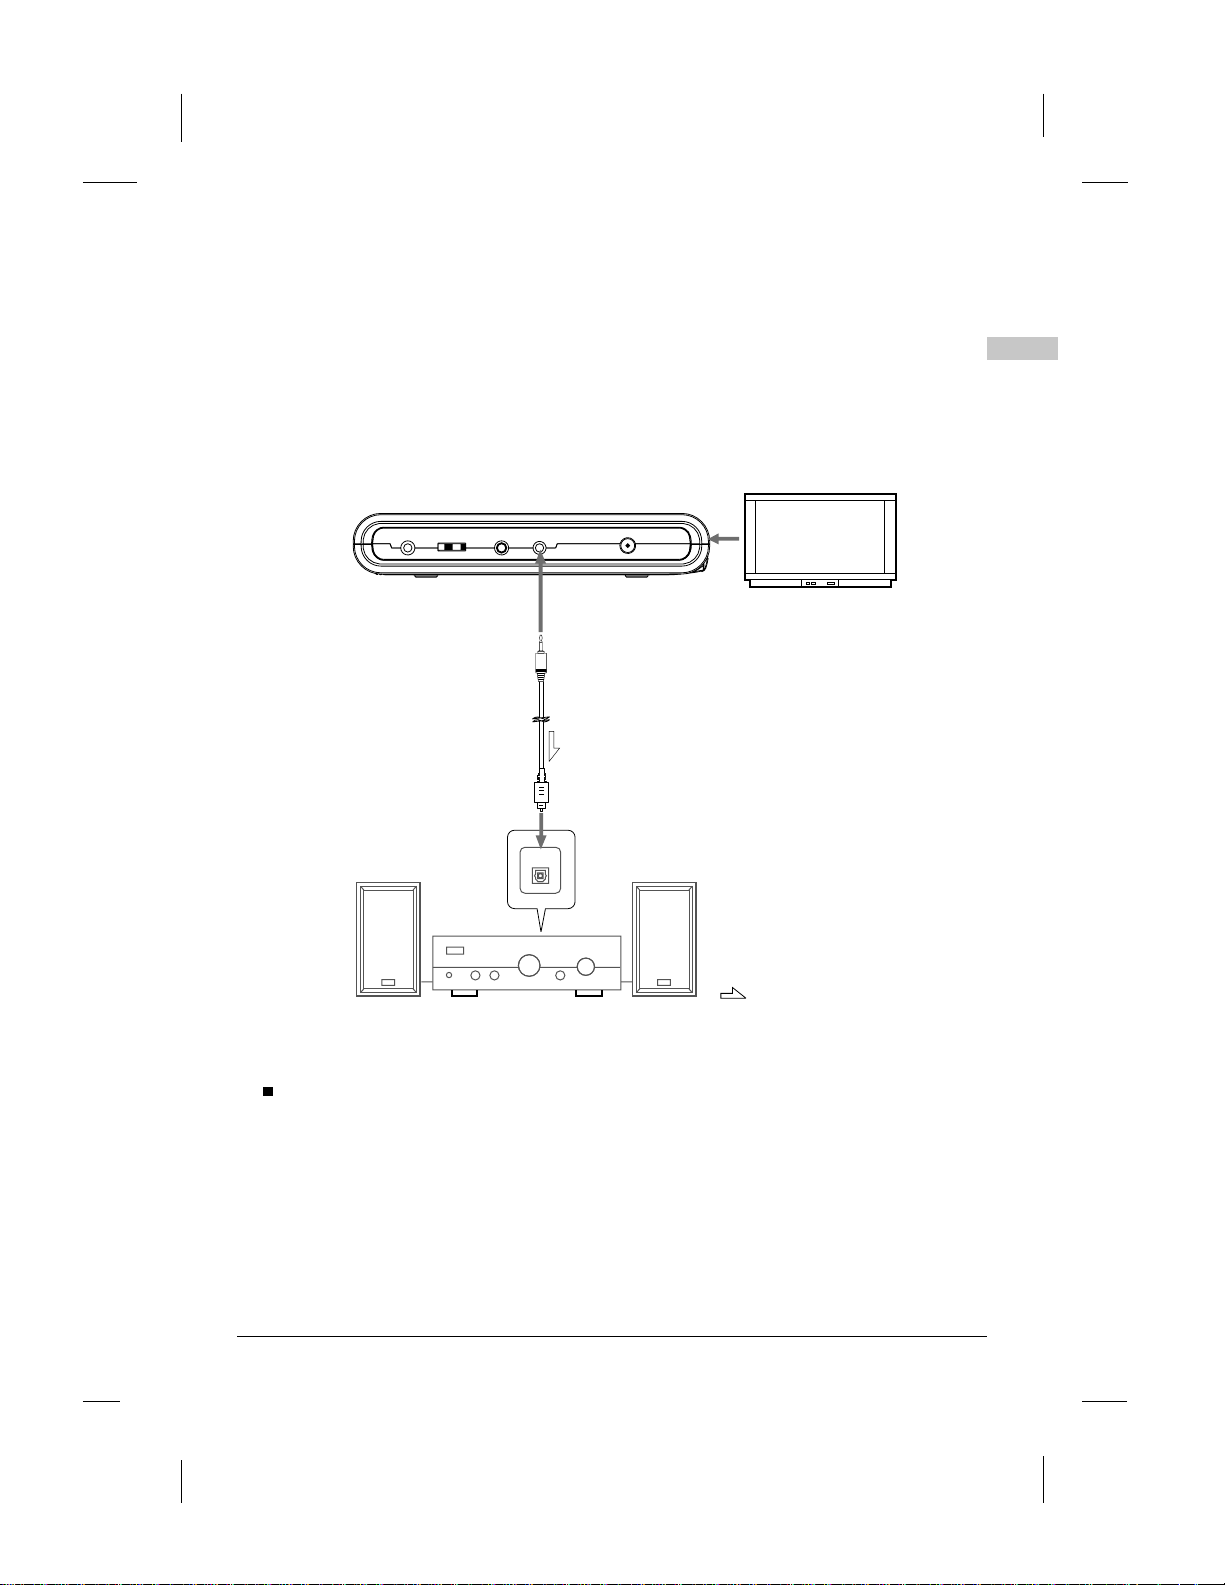
Connecting to a Dolby Digital / DTS / MPEG decoder or an
EN
amplifier with built-in decoder
With thisplayer, you can enjoy powerful Dolby Digital, DTS orMPEGsound.Output the digital
signals fromtheplayer'sdigital output to a decoder or amplifier withbuilt-indecoder.
Main unit left panel
Optical digital cable (not included)
Front
speaker
Front speaker (left)
(left)
Surround
speaker
Hint:
For a compatible decoder or amplifier, 5 speakers (front left/right, center and surround
left/right) and a subwoofer are required to enjoy Dolby Digital/DTS 5.1-channel sound.
Center
speaker
DIGITAL IN
(right)
Surround
speaker (right)
See page 22 for
details of connections
to TV .
Subwoofer
: Signal flow
16
Graphics are for representation only.Your unit may differ slightly.
-EN
Before Using
Connecting to a digital amplifier that is not Dolby Digital /
DTS / MPEG compatible
Output thedigitalsignalsfrom the player's digital output to a digitalamplifierthat is not
Doby/DTS/MPEG compatible.
Main unit left panel
Optical digital cable
(not included)
To digital audio
input jack
DIGITAL IN
See Page 22 for
details of connections
to TV .
EN
: Signal flow
Notes:
Carefully check the player s digital output settings before connecting the player to an
amplifier equipped with a digital audio input jack which is not Dolby Digital / DTS / MPEG
compatible.
Do not play DVDs when the audio settings are not correct. Or may cause strong
noise and damage your speakers.
,
17
Graphics are for representation only.Your unit may differ slightly.
-EN
Before Using
Connecting to active speaker systems
EN
: Signal flow
Main unit left panel
Video/audio cable
(included)
VIDEO INVIDEO IN
TV
T o video input
jack
Active speaker systems
T o audio input
jacks
18
Graphics are for representation only.Your unit may differ slightly.
-EN
Before Using
Connecting earphone
Connect the earphone' s plug securely to the PHONE JACK on the player.Tolistentomusic
through the earphone, first use the VOLUME CONTROL on the left side of the main unit to
lower the volume to minimum level, then adjust the volume to comfortable level. Be careful
not to set the volume to too high level when using earphone.
Main unit left
To PHONE jack
Insert the headphone plug securely.
No sound will be heard if the
earphone is securely
Note:
It is not possible to hear the sound of DTS-compatible DVDs over earphone. Strong
noise is produced when DTS discs are played, so do not listen to such discs through
earphone.
panel
Earphone
VOLUME
Notes:
connected.
EN
19
Graphics are for representation only.Your unit may differ slightly.
-EN
Before Using
EN
Using the Battery
Recharging the battery pack
Recharging the battery pack as described below.
1
Connect the DC output plug of AC adapter to the battery pack.
1
Connect the AC adapter to the power outlet.
2
2
When recharging starts, the recharge LED lights in red.
The recharge LED lights in green when recharging completes. Remove the power
cord from battery pack.
Recharging usually completes in about 4~5 hours.
1
2
The batterypackcanbe used for about 300 cycles of rechargingandoperations, though this is
variable dependingontheoperating conditions.
Charge thebatterypackfully before using it for the first time.
CAUTION
Place thebatterypackand AC adapter on a flat surface forrecharging.
Do notshort-circuittheterminals of the battery pack and AC adapter.
Notes:
The batterycharger(ACadapter)is compatible with supply voltage between
100 and240VAC and can be used universally.
When youwanttouse it on an overseas travel, however,be sure to prepare
a powerplugadaptermatching the local power outlet.
20
Graphics are for representation only.Your unit may differ slightly.
-EN
Before Using
Notes for recharging
When the battery pack is hot, it may take longer time than usual for recharging
or may sometimes be unusable to be recharged. Waitforthebatterypackto
cool down before retrying recharging.
If the recharge LED can not be lit, check whether the AC adapter and battery
pack are connected firmly to have perfect contact.
To protect the battery pack, do not recharge a fully charged battery pack
repeatedly.Repeated overcharging may deteriorate the battery performance.
The battery pack becomes hot after recharging, but this is not malfunction.
The battery pack may not be recharged fully if recharging at a hot place.
Do not recharge it under very hot environment, it may cause explosion.
The surrounding temperature during recharging affectstherechargeefficiency.
Recharge is the most efficientbetween10cand30c.Recharging the battery
pack at a place within this temperature range whenever possible.
Attaching the battery pack to the player
Attach the battery pack to the player as described below.
1
Attach the battery pack to the unit.
1
2
2
Align the guide hole of the player
with the guide rod on the battery
pack. Turning the battery knob
clockwise until the battery pack
is tighten with the player.
EN
3
Now the player can be operated.
If the battery pack is fully recharged, the
player can play DVDs continuously for
over 3 hours.
Graphics are for representation only.Your unit may differ slightly.
21
-EN
1
2
Before Using
ENEN
If the power is switched on while the battery pack is
not fully charged, the player operation may
sometimes become unstable. Be sure to charge the
battery pack fully before using.
The battery pack is being recharged slowly while the
player is playing with AC adapter connected.
The battery pack is being recharged while the player
is at STAND BY mode with AC adapter connected.
After connecting the battery pack and power on,
press OSD button on remote control at PLAY
PAUSEor STOP status to show symbol .
This symbol indicates capacity of the battery pack.
While the battery pack has lower capacity,
will be flashed to remind you.
""
""
AC power operation
12Connect the DC output plug of the AC adapter to the DC IN jack on the player.
1
Connect the AC adapter to a power outlet.
2
Now the player can be operated.
CAUTION:
Be sure to use the AC adapter provided with the player.
Before inserting or removing the DC output plug of the AC adapter, always be sure to turn off
the power of the portable DVD player.
Removing the battery pack from the player
The battery pack can be removed from the player as described below.
Turn off the power of the player.
1
Turning the battery knob anti-clockwise to remove battery pack.
2
22
Graphics are for representation only.Your unit may differ slightly.
-EN
Basic Operations
Turning On the Power
2
1
Main unit (front panel)
3
ON OFF
Remote control unit
3
Connect the AC adapter to a power
1
outlet.
2
Connect the DC output plug of the
adapter to the DC input jack on the
main unit.
3
Keep pressing the ON button
on the main unit for about 1.5
seconds.
The power LED is lit blue.
The player can be used now.
At standby mode (when the power
LED is lit red), the power can also
be turned on by pressing the
standby button on the remote
control unit.
Hint:
The included AC adapter is
compatible with voltage from 100
to 240 V, you can use it on trips
overseas.
EN
Note that you need a converter plug
4
23
Graphics are for representation only.Your unit may differ slightly.
(available in stores) suited for the
region in which you are travelling.
-EN

Basic Operations
ENEN
Playback Functions
Loading
1
2
3
,
Press OPEN button to open.1
(If no disk is placed in, the tray will
open automatically after power on.)
2
If no power supply, the tray
will not open, you must
insert the open-stick into
the hole to open it.
3
Place in disc and press down
the disc with your fingers
near the center hole.
A clickisheard.
Notes:
Set the disc securely.Failure to set it
securely could result in damage.
Do not use cracked or warped discs.
Doing so could result in damage.
Place single-sided DVDs or CDs in
with the label (printed) side facing
upwards.
For double-sided DVDs, check each
side carefully,then place the disc in
securely (until a click is heard).
For CDs or one-sided DVDs, you do
not have to worry about touching the
label (printed) side of the disc with
your fingers. Since two-sided DVDs,
however,have signals recorded on
both sides, so be careful not to
scratch them when removing them
from the player.
Push the tray into the player.4
The player starts loading.
24
Graphics are for representation only.Your unit may differ slightly.
-EN
Basic Operations
Playing
Load the disc.1
One of the following messages appears on the screen:
DVD, VCD, CD.
For some discs, playback starts automatically when
the tray is closed.
For the disc which had been programmed and stored
in memories, playback starts automatically in the
programmed order.
Number
buttons
Shift
2 Press the play/pause button.2
Playback starts.
For some discs, a menu screen appears. For video CDs, they are played according to the
instructions on the disc's menu screen which is called PBC (playback control).
Hint:
For video CDs, it is also possible to play a disc without displaying the menu screen.
For example, press 1 ( number button) while at STOP mode to play track 1.
For CDs, in order to save power, the screen display will be closed automatically if no button is
pressed for 1 minute during playing. Press any button to wake it up.
EN
Next
If a menu screen appears
For DVDs with menu screen or video CDs with playback control (PBC), a menu screen appears.
DVD
Use the cursor buttons ( ) to select the item, then press the ENTER button.
In order to use the number buttons on the remote control unit to select the item, first press
the SHIFT button until NUMBER is displayed on screen, then press number buttons to
select the item.
Example: For DVDs with menu screen
25
Graphics are for representation only.Your unit may differ slightly.
-EN
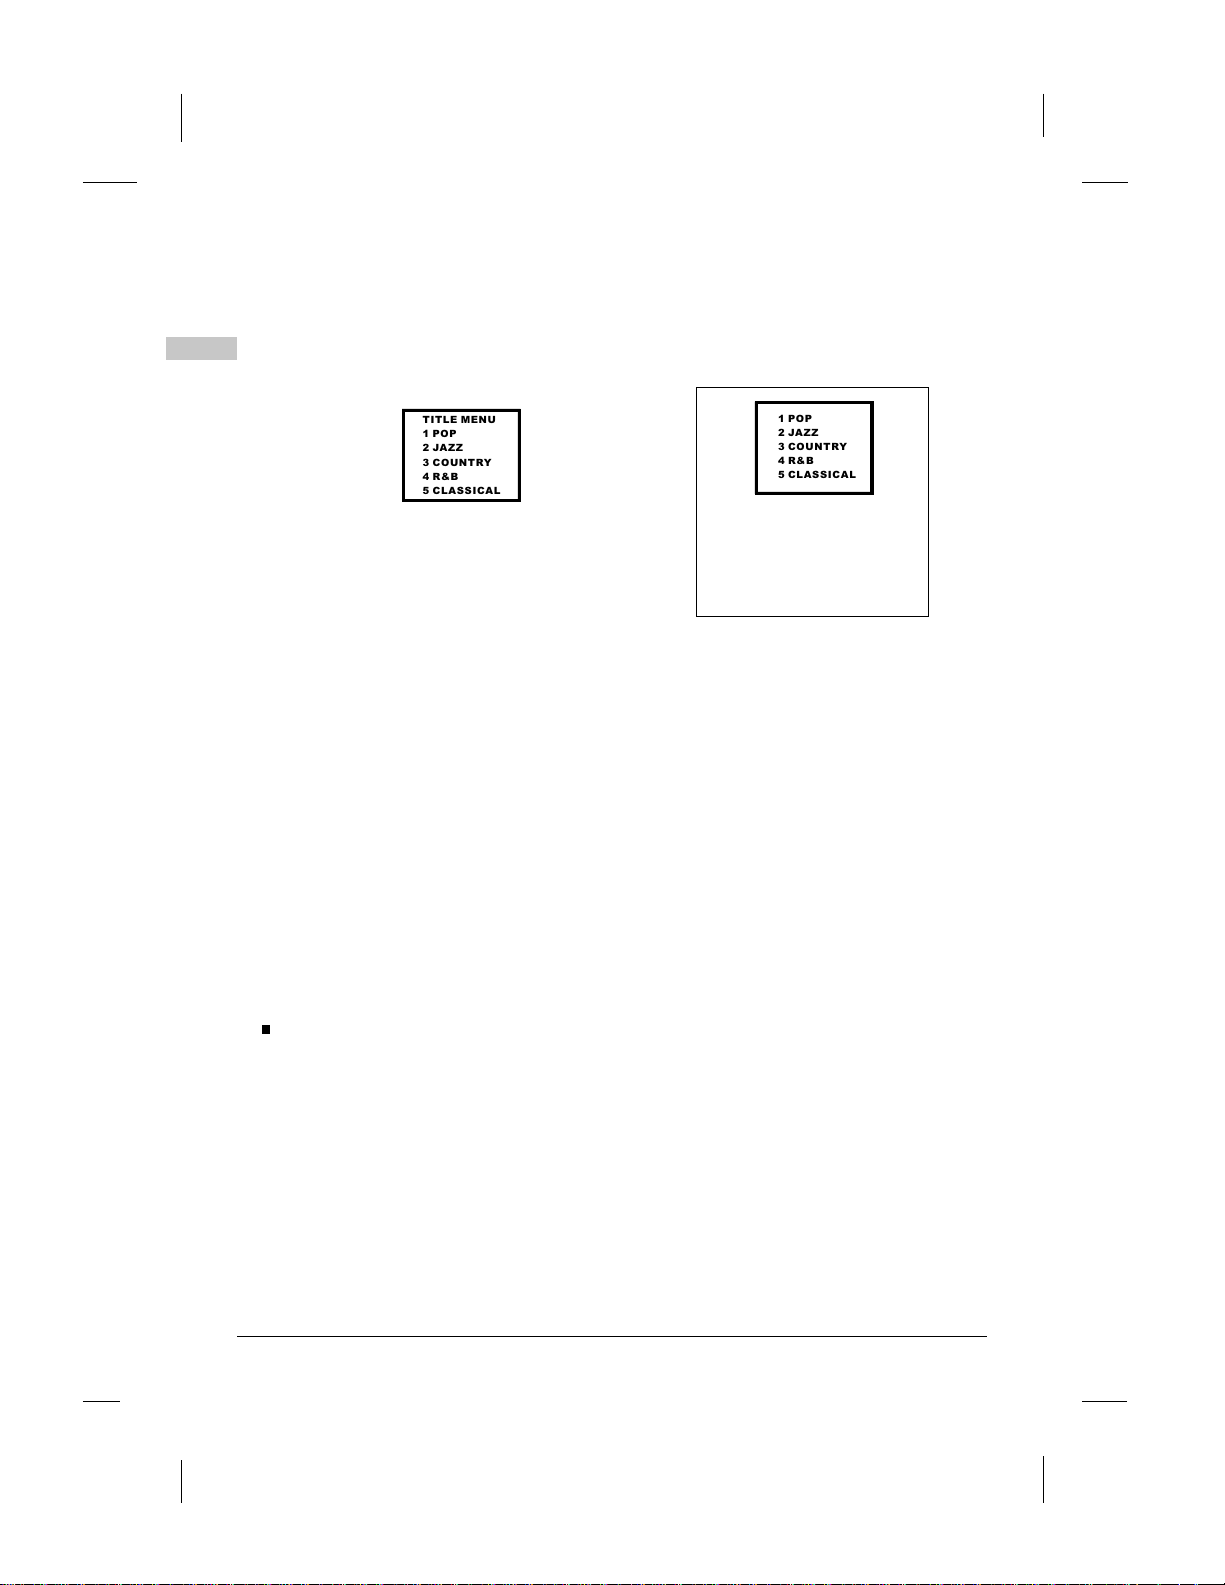
Basic Operations
ENEN
TITLE MENU
1POP
2JAZZ
3 COUNTRY
4R&B
5 CLASSICAL
Video CD
Select by pressing the
after pressing the buttontoswitch
number buttons
SHIFT
If the video CD's menu screen
includes more than one page,
change page based on the
information on screen.
1POP
2JAZZ
3 COUNTRY
4R&B
5 CLASSICAL
to display NUMBER on screen.
Example: ForvideoCDswith playback
control (PBC)
To display the menu screen
The way in which the menu screen is displayed differs from disc to disc. Press the MENU, TITLE
button during playback of DVDs, the RETURN button during PBC playback of video CDs. For
details, refer to the documentation included with the disc.
Stopping playback
Press the STOP button. Playback will be stopped.
Resume function (DVDs and Video CDs, exept VCD2.0 with PBC function on):
After the STOP button is pressed, if the play button is pressed, playback will start from the position
at which it was stopped. If the disc is removed or the STOP button is pressed again, the resume
function is cancelled.
Note:
For some discs, playback may not start from the position at which it was stopped.
Pausing playback
Press the play/pause button to pause playback.
Press this button again to resume playback.
26
Graphics are for representation only.Your unit may differ slightly.
-EN

Basic Operations
Returning to the previous chapter or track(DVDs,
video CDs and CDs)
Press the previous button during playback.
After pressing the previous button, playback returns to the beginning of the previous
chapter or track.
Moving to the next chapter or track(DVDS,
video CDs and CDs)
Press the next button during playback.
After pressing the next button, playback moves forward to the beginning of the next chapter or track.
Removing the disc
1
Press the STOP button.
2
Press to open the tray.
3
Remove the disc.
4 Push the tray into the player.
Note:
For CDs or one-sided DVDs, you do not have to worry about touching the label (printed) side of
the disc with your fingers. Two-sided DVDs, however, have signals recorded on both sides, so be
careful not to scratch them when removing them from the player.
EN
Hint:
For JPEG discs, the pictures are played one by one automatically, press STOP button to display
JPEG menu. To play a specific picture, pls select by pressing the
after pressing SHIFT to switch to display NUMBER on screen. To play pictures continuously,
use the cursor buttons ( ) to select and then press PLAY button.
27
Graphics are for representation only.Your unit may differ slightly.
-EN
number buttons

Basic Operations
ENEN
Turning Off the Power
1 When the power is on, press OFF and hold it for about 1.5S.1
The power LED becomes red and the standby mode is set.
The power can also be turned off by pressing the STANDBY button on the remote
control unit.
Unplug the power cord from the power outlet.
232
Disconnect the AC adapter from the player's DC input jack.
3
CAUTION:
When connecting the player to an external TV monitor, please make sure that (for better
audio and visual performance) you switch/adjust the TV shape (Marked )and the
"TV system" (Marked ) to the corresponding one.
Example: Change from 16:9 (default setting) to 4:3 or change from NTSC (default setting)
to PAL as the below SETUP MENU shows:
Language
A
TV Shape 16:9 4:3 PS
TV System NTSC 4:3 LB
Brightness Off 16:9
Edges Off
Video Output CVBS
Video
""
Audio
Parental
Language
A
TV Shape 16:9
TV System NTSC NTSC
Brightness Off PAL
Edges Off Auto
Video Output CVBS
Video
Audio
Parental
Note:
Before changing from AV OUTPUT to AV INPUT , please turning the player to the correct
TV Shape for better visual performance , and turning to the correct TV System or you can
only see the black and white picture.
28
Graphics are for representation only.Your unit may differ slightly.
-EN

Advanced Operations
Various Language and Subtitle Settings
Please stop playback when you are going to change system settings. Press SETUP
button on the remote control unit to display setup screen when playback is stopped.
At this section we use the setup screen to change the language and subtitle settings.
Setting the on-screen display language
Select the language to be used for the on-screen
display.You can select a preferred language for the
on-screen display.
Setting the subtitle language
Select the language to be used for the subtitles.
You can select a preferred subtitle from those
included in the DVD Video disk.
(The screen on your player may have difference
with the screen shown here)
Language
A
OSD Menu English
Subtitle English
Audio English
DVD Menu English
OSD On
Factory Set Reset
Language
A
OSD Menu English
Subtitle English
Audio English
DVD Menu English
OSD On
Factory Set Reset
Video
Video
Audio
Audio
English
French
German
Spanish
Italian
Auto
Off
Parental
English
Francis
Deutsch
Espa ol
Italiano
Parental
EN
,
~
n
Setting the audio language
Select the language to be used for the audio.
You can select a preferred audio from those included
on the DVD video disk.(The screen on your player
may have difference with the screen shown here)
29
Graphics are for representation only.Your unit may differ slightly.
-EN
Language
A
OSD Menu English
Subtitle English
Audio English
DVD Menu English
OSD On
Factory Set Reset
Video
Audio
Parental
English
French
German
Spanish
Italian

Advanced Operations
ENEN
Advanced Functions
Searching for a specific scene
1
Press the SEARCH button.
1
2
2
Press the number button to input specific time or
title/chapter.
3
Press the PLAY button or ENTER button. Playback
3
starts from the specified position.
Viewing in slow motion (DVDs and video CDs)
Press the SLOW button during playback, the playback speed changes to 1/2, 1/4, 1/6 or 1/7 of
the normal speed.
Repeating DVDs, video CDs and CDs
1
3
2
2
Repeat a Title, Chapter, or Track
Press the REPEAT button.
Select the title, chapter, or track you want to repeat.
Repeat a section between point A and B.
During playback, press A-B button on the remote control unit at the starting point of the section
you want to repeat. (point A)
Press A-B button again at the ending point of the section you want to repeat. (Point B) The
repeating starts.
Press A-B button again to cancel the A-B repeat function.
Selecting angle (multi-angle)
Press the ANGLE button while playing a scene with multiple angles.
If your DVD disc is not recorded with multiple angles, press ANGLE button will not have
function.
30
Graphics are for representation only.Your unit may differ slightly.
-EN

Advanced Operations
Changing from AV OUT to AV IN
You can change the player from AVOUT(output AV signal to TV, etc) to AV IN(input AV signal
from other device)and use it as a TFT Monitor. Default setting is AV OUT.
1
Press MODE button on main unit and switch
LCD mode to AV IN/OUT.
2
Press + or - button to switch between AV OUT
and AV IN.
Note:
Avoid to input AV signals from AV JACK when
AVsignals inputted
from other device
AVcable(included)
the player is set to AV OUT, or interference
will be caused to affect current playback and
lower down playing quality.
Setting Parental Lock Level
At STOP status, press the SETUP button to display
1
1
the setup screen, use the cursor buttons to select
Parental Lock .
Input your password to unlock setting.
2
2
Default password is 9999.
When at unlock situation, you can change the rating
3
3
by using ENTER button.
Language
A
PASSWORD ---Rating 8.Adult
Video
Audio
EN
Parental
Move to password and input your new password to
4
4
lock the setting.
Video Enhance
Press the SETUP button while playing
disk, the Video Enhance screen will be
displayed. Change brightness or edges
of pictures by using cursor buttons to
improve picture quality.
,
,
Graphics are for representation only.Your unit may differ slightly.
31
-EN
Video Enhance
Brightness
Edges
08
08

Additional Information
ENEN
Troubleshooting Tips
Picture is disturbed when playing a DVD recorded by a VCR.
This player incorporates copyright protection technology. Some discs include signals protected against
copied by a VCR. Such recorded discs can not be played properly.
Player cannot be operated with the remote control unit
Remote control unit is too far fromthe main unit or have too large angle with the remote sensor.
.
Remote control unit s battery is worn out.
TV or other device operates erroneously
The player s remote control unit may cause some TVs with wireless remote control to
operate erroneously.
No sound is produced from speakers or sound is distorted
For some discs, 96 kHz digital output of linear PCM audio signals is
Disc is dirty .
Pause or slow play mode is set.
Earphone is plugged in.
Volume is different for DVDs and CDs
This is due to the different recording methods.
No sound is produced or sound is distorted when connected to a TV ,
a amplifier, etc.
Connection cables are not firmly plugged in or not contacted well.
Connection plugs or jacks are dirty.
Audio cablesarenotProperly connected.
Audio digital output is connected to a non-compatible AV amplifier,etc.
Have wrong DTS setting.
,
,
Main unit s volume is set to minimum.
prohibited.
Bad playback quality
The player is set to AV OUT but there are other AV signals inputted from AV jack.
Player gets hot
This is normal.
Notes:
The player may stop operation properly due to static electricity or other external influences.
In this case, usually solve the problem by unplugging the power cord and then
plugging it in again. If still can not solve it, consult with the nearest service center.
Liquid crystal display
A few picture elements may be black or a particular color displayed on the LCD screen.
This is normal.
32
Graphics are for representation only.Your unit may differ slightly.
-EN

Additional Information
Handling Cautions
Do not move the player during playback
During playback,thediscspins at high speed, so do not liftormovethe player.
Doing somaydamagethe disc.
Transporting the player
When transportingtheplayerbe sure to remove the disc and turnoffthe power,
then unplugthepowercord .
Place of installation
Select astableplacenear the TV or stereo system to whichyouaregoing to connect the player.
Do notplacetheplayer on top of a TV or colormonitor. Install theplayerawayfrom cassette decks
or otherdeviceswhichare easily affected by magnetic forces.
Do not place objects on top of the player
Do notplaceanyobjects on top of the player.
Turn off the power when not using the player
If theplayerisconnected to your TV but not in usethenswitchthe power off this will prevent
interference withyournormalTV picture.
Noise problemsmayalsobe experienced if used near a radio.
Special note regarding use of player in vehicles
Westronglyadviseagainst using the player while driving.
Most countriesandstateshave laws which prohibit or severely restrict the
use oftheplayerin vehicles while driving.
Do notleavetheplayer or the battery pack in places wherethe temperature
is extremelylow(about-10c or lower) or extremely high (about 60cor
higher), suchas inside the passenger cabin or trunkin midsummer. Doing
so may warp the outer case or reduce theperformanceor quality of the
battery pack.
When carrying on planes
Heed theairlinecompany'srules.
When carrying in hospitals
Heed thehospital'srules.
Cleaning the player
Normally clean the player using a soft, dry cloth. For tough dirt, apply some neutral
detergent diluted in 5 to 6 parts water to a soft cloth, wring out thoroughly,wipe off the dirt,
then wipe the player with a dry cloth. Note that alcohol, thinner,benzene, insecticides, etc.,
may cause the print or coating to peel off. Also avoid leaving rubber or plastic products in
contact with the player for long periods of time, as this may damage the cabinet. When
using chemically treated cloths, read the cloth's instructions carefully.Always unplug the
power cord from the power outlet before cleaning the player.
To clean dirt off the liquid crystal display,wipethedisplaygently with a soft, dry cloth(such
as an eyeglass cleaning cloth). Note that leaving water droplets on the display for long
periods of time may result in discoloration or stains. For tough dirt, use a commercially
available liquid crystal display cleaner.
Copyrights
Unauthorized duplication, broadcast, public performance or rental of discs is
prohibited by law.
EN
33
Graphics are for representation only.Your unit may differ slightly.
-EN

Additional Information
ENEN
Handling Discs
Handling discs
Handling
When holding
with both hands
Do not use damaged (cracked or warped)
discs.
Do not scratch the signal surface or let it
get dirty.
Do not attach paper or seals to discs.
The player may be damaged if there is
any exposed glue, etc., on discs.
For rental discs in particular, extra labels
are often attached to the discs.
Check carefully for any exposed glue
before using such discs.
When holding
with one hand
Cleaning discs
Fingerprints or dust on discs may reduce
sound or picture quality.
Remove them by gently wiping the disc
from the center toward the edges using a
soft cloth.
Do not use benzene, thinner or other
volatile chemicals.
Do not use record spray or antistatic
spray either.
We recommend using the separately sold
cleaning set to clean discs.
For tough dirt, apply some water to a soft
cloth, wring out thoroughly , wipe off the
dirt, then wipe the disc with a dry cloth.
Irregular shaped discs
Irregular shaped discs (heart-shaped
discs, hexagonal discs, etc.) cannot be
played on this player.
Doing so could damage the player.
Never use such discs.
Storing discs
Always place discs in their case and store
them vertically.
Avoid storing discs in hot or humid places,
places exposed to direct sunlight and places
in which the temperature is extremely low.
Read any cautions included with the disc
carefully.
Graphics are for representation only.Your unit may differ slightly.
34
-EN

Additional Information
Operation of the battery pack
Operation of the battery pack
Charge the battery pack fully before using it for the first time.
When the surrounding temperature is high, the battery pack may sometimes be unusable
due to activation of protection circuitry.
When the portable DVD player is powered from the battery pack and if the player has
not been operated for about 10 minutes with the power switched on, the player will turn off
automatically.(Auto power off) The battery pack becomes hot after use and the
portable DVD player also becomes hot during use. This is not malfunction.
When the battery pack is not to be used for a long period, be sure to remove it from
the portable DVD player.If the battery pack is left attached, continual flow of weak
current renders it overdischarged and eventually unusable even when
you try to charge it later.
If the portable DVDplayer is switched on while the battery pack is not fully charged, the oper
ation may sometimes be unstable. Be sure to charge the battery pack fully beforeuse.
Storage
The battery pack should be stored under an surrounding temperature between 15 c and 25 c.
Avoid storing it under extremely low temperatures, in a place with high temperature and
high humidity or in a place subject to soot, etc.
When the battery pack is stored for a long period, at least once a year it is recommended
to discharge it fully on the portable DVD player,recharge it fully and store it again.
Service life and disposal
When the charging time or available operation time becomes extremely short, the battery
may be reaching the end of its life. The battery pack can be used for about 300 cycles of
recharging and operations.
EN
To dispose of a used battery pack, wrap a piece of tape around the terminal section and
treat it in compliance with your local regulations.
Caution:
Danger of explosion if battery is incorrectly replaced.
Replace only with the same or equivalent type.
35
Graphics are for representation only.Your unit may differ slightly.
-EN

Additional Information
ENEN
Recommendations and information concerning discs
CD-R and CD-RW discs
This player can play most CD-R and CD-RW discs. However, depending on the recorder of the discs
of your personal computer, the type of disc and recording method used, some discs might not play,
or the performance might not meet the expected standard of quality. When playing a CD-R disc, it is
completely normal for the unit to take up to 20 seconds to recognize the disc before it plays. If the
disc is not recognized after a period of 20 seconds, remove the disc, and then insert it again. If after
several trials, the disc cannot be recognized, make sure you have followed the recommendations
below or try another type of disc.
Whatever the actual recording capacity of a disc, do not fill it to maximum capacity.
Use CD-R discs rather than CD-RW(re-recordable CDs), as replay of CD-RWs may
sometimes not work properly.
Use a reliable and good quality recording software.
Before recording on a disc, close all applications on you personal computer in order to
optimize the quality and reliability of recordings on the disc.
CD-R and CD-RW discs with mp3 format "Sound" files
In the case of discs that include mp3 files, follow not only the general recommendations for CD-R
and CD-RW discs, but also the following specific recommendations:
The format of your mp3 files should be ISO 9660 or JOLIET. These files are compatible with DOS
and Windows applications as well as with Mac OS.
Your mp3 files must have a name no longer than 12 characters as well as the suffix ".mp3". They
must be recorded in the form: title.mp3.Ensure that you do not leave spaces or use special
characters such as (.,/,\,=,+) in the name.
Do not attempt to record protected mp3 files. Such files are coded and protected.
Use a decompression transfer rate of at least 128 kb/sec (kilobytes/second) when recording mp3 files.
Sound quality with mp3 files basically depends on the rate of compression/decompression you
choose. Getting audio CD quality sound requires and analog/digital sampling rate, that is conversion
to mp3 format, of at least 128 kb/sec and up to 160 kb/sec. However, choosing higher rates,
like 192 kb/sec or more, only rarely give even better sound quality. Conversely, files with sampling
rates below 128kb/sec will not be played properly.
Important: The above recommendation cannot be taken as a guarantee that the DVD player
will play mp3 recordings, or as an assurance of sound quality. You should note that certain
technologies and methods for mp3 file recording on CD-Rs prevent optimal playback of
these files on your DVD player (that is degraded sound quality and even, in some cases,
inability of the player to read the file or files).
36
Graphics are for representation only.Your unit may differ slightly.
-EN

Additional Information
CD-R and CD-RW discs with JPEG format "image" files
To view your JPEG images on a TV set you do not need to record your photographs with a resolution
above 400,000 pixels(which corresponds to an image format of your photographs before recording on
a disc in order not to impede the proper running of your player. This is because excessively loaded
pictures would slow down or might prevent the proper functioning of the slide show during playback
on your player. Compatibility of JPEG files depends on the software on which they were created and
on the size of files expressed in pixels. Some JPEG files, including continuous JPEG files
(displayed in stages) and CMYK format files cannot be played on this player.
Video CD(VCD) discs
VCD (Video Compact Disc) discs enable up to 74 minutes of VHS quality video associated with still
pictures, audio tracks and interactive menus to be recorded on a CD.
Super Video CD(SVCD) discs
SVCD (Super Video Compact Disc) discs comply with standard IEC62107, making it possible to
record up to 70 minutes of digital images and sound at standard MPEG-2 for video and MPEG-1 for
audio. Compatibility of SVCD discs depends on the MPEG coding software, the disc design software ,
as well as the recording software used and the discs themselves.
DVD-R and DVD-RW discs
Your player can play DVD-R and DVD+R (single recording) and DVD-RW and DVD+RW
(re-recordable) discs. Recordings on DVD-RW discs must be made in DVD Video mode. Recordings
on DVD+RW discs must be made in accordance with the specifications for the 4.7 GB capacity
DVD+RW disc format.
Compatibility is dependent on which DVD writer, writer software and disks are used.
Important : Despite considerable progress made in providing compatibility with as many
different discs as possible, reading of discs not conforming to Audio CD, Video CD and
Super Video CD (S-VCD) disc standards cannot be guaranteed.
EN
37
Graphics are for representation only.Your unit may differ slightly.
-EN

Additional Information
ENENENEN
Limited Warranty
What your warranty covers:
Defects in materials or workmanship.
For how long after your purchase:
90 days from date of purchase Unit exchange, which includes parts and labor.
91 days to 1 year from date of purchase-Unit exchange, which includes parts only ;
you pay the labor.
The warranty for rental units begins with the first rental or 45 days from date of shipment to the
rental firm, whichever comes first.
What we will do:
During the initial 90 days:
Provide you with a new, or at our option, a refurbished unit. The exchange unit is under warranty
for the remainder of the original product's warranty period.
After the 90 days and within one year:
Provide you with a new, or at our option, a refurbished unit. The exchange unit is under warranty
for the remainder of the original product's warranty period. We will bill you a flat exchange charge
to replace a defective unit. This charge covers the labor cost for its repair.
How to make a warranty claim:
Properly pack your unit. Include any cables, etc., which were originally provided with the product.
We recommend using he original carton and packing materials.
Proof of purchase in the form of a bill of sale or receipted invoice which is evidence that the
product is within the warranty period must be presented to obtain warranty service. For rental
firms, proof of first rental is also required.
Also print your name and address and a description of the defect. Send via standard UPS or its
equivalent to:
Thomson Inc.
11721 B Alameda Avenue
Socorro,Texas 79927
Pay any charges billed to you by the Exchange Center for service not covered by the warranty.
Insure your shipment for loss or damage. Thomson accepts no liability in case of damage or
loss en route to Thomson.
A new or refurbished unit will be shipped to you freight prepaid.
What your warranty does not cover:
Acts of nature, such as but not limited to lightning damage.
Adjustment of customer controls.
Damage from misuse or neglect.
A unit that has been modified or incorporated into other products or is used for institutional or
other commercial purposes.
Batteries.
A unit purchased or serviced outside the U.S.A.
Shipping damage if the unit was not packed and shipped in the manner prescribed by Thomson.
38
Graphics are for representation only.Your unit may differ slightly.
-EN

Additional Information
Product Registration:
Please complete and mail the Product Registration on www.rca.com/p oductregistration or
complete and mail the Product Registration Card packed with your unit. It will make it easier
to contact you should it ever be necessary. The return of the card is not required for
warranty coverage.
r
Limitation of Warranty:
THE WARRANTY STATEDABOVE IS THE ONLY WARRANTY APPLICABLE TO THIS
PRODUCT. ALL OTHER WARRANTIES, EXPRESS OR IMPLIED (INCLUDING ALL IMPLIED
WARRANTIES OF MERCHANTABILITY OR FITNESS FOR A PARTICULAPURPOSE) ARE
HEREBY DISCLAIMED. NO VERBAL OR WRITTEN INFORMATION GIVEN BY THOMSON
MULTIMEDIALTD., ITS AGENTS OR EMPLOYEES SHALL CREATE A GUARANTY OR IN ANY
WAY INCREASE THE SCOPE OF THIS WARRANTY.
REPAIROR REPLACEMENT AS PROVIDED UNDER THIS WARRANTY IS THE EXCLUSIVE
REMEDY OF THE CONSUMER. THOMSON MULTIMEDIA LTD. SHALL NOT BE LIABLE FOR
INCIDENTALOR CONSEQUENTIAL DAMAGES RESULTING FROM THE USE OF THIS
PRODUCT OR ARISING OUT OF ANY BREACH OF ANY EXPRESS OR IMPLIED WARRANTY
ON THIS PRODUCT. THIS DISCLAIMER OF WARRANTIES AND LIMITED WARRANTY ARE
GOVERNED BY THE LAWS OF THE STATE OF INIDANA. . EXCEPT TO THE EXTENT
PROHIBITED BY APPLICABLE PROVINCIAL LAW, ANY IMPLIED WARRANTY OF
MERCHANTABILITYOR FITNESS FOR A PARTICULAR PURPOSE ON THIS PRODUCT IS
LIMITED TO THE APPLICABLE WARRANTY PERIOD SET FORTH ABOVE.
How state law relates to warranty:
Some states do not allow the exclusion nor limitation of incidental or consequential damages,
or limitation on how long an implied warranty lasts, so the above limitations or exclusions may
not apply to you.
This warranty gives you specific legal rights, and you also may have other rights that vary
from state to state.
EN
39
Graphics are for representation only.Your unit may differ slightly.
-EN

A TTENTION
RISQUE DE DECHARGE
ELECTRIQUE.
NE JAMAIS OUVRIR L'APPAREIL
Ce symboleindique la
F
présence de « voltage
dangereux »àl'intérieur de
l'appareil présentant unrisque
de chocélectrique ou de
blessure corporelle.
CONFORMITé FCC
Cet équipement aété vérifié et déclaré conforme à la partie 15
des règlements dela FCC (Federal CommunicationsCommission)
avec leslimites d'un appareil numérique declasse B. Ces limites
sont établies pourfournir une protection raisonnablecontre les
interférences nuisibles d'uneinstallation résidentielle. Cetéquipement
produit, utiliseet peut émettredel'énergie sous formede fréquence
radio et,s'il n'est pas installé etutilisé selon lesinstructions, il peut
causer desinterférences nuisibles quipeuvent se produire ounon dans
une installationen particulier.Sicet appareil produitdesinterférences
nuisibles à laréceptiondelaradiooudelatélévision, ce quipeut être
confirmé en fermantet en allumant l'équipement, l'utilisateur devrait
essayer decorriger le problème en appliquantune ou plusieurs des
suggestions suivantes:
Réorienter ourelocaliserl'antenne réceptrice.
Augmenter ladistance entre cet équipement et lerécepteur.
Brancher cetéquipement dans unepriseappartenant à un circuit
différent de celuidu récepteur.
Consulter lerevendeur ou un technicien radio/TVcompétent pour
obtenir del'assistance.
Cet appareilnumérique de classeBrépond à toutes les
exigences desrèglements du Canadasurles équipements causant
de l'interférence.
Consultez l'étiquette d'identification/classificationsur le
panneau arrière del'appareil pour connaître le voltage
adéquat de l'alimentation.
Avertissement:pour prévenir un choc électrique, introduire
la lamela plus large dela fiche dans laborne correspondante
de laprise et poussez fermement.
Enregistrement duproduit : SVP remplirla carte d'enregistrement du
produit (emballéeséparément) etnousla retourner immédiatement.
Pour lesclients des États-Unis : Vous pouvez aussi enregistrer votre
appareil électronique RCAsur notre site
www.rca.com/productregistration.L'enregistrement nous permetde
communiquer avecvous si nécessaire.
Pour éviter tout risque de feu ou de
décharge électrique ne pas laisser cet
appareil sous la pluie ou dans un
endroit humide.
Ce symbolesignale des
instructions importantes
concernant leproduit.
!
ATTENTIONPoureviter tout risque
de feu ou de dechargeelectrique ne
pas laisser cet appareil sous la pluie
ou dans un endroit humide.Cet
appareil contient des composantes
a haute tension.
ATTENTION
CE PRODUIT UTILISEUN LASER.
L'UTILISATIONDES CONTRÔLES,
D'AJUSTEMENTS OU
L'APPLICATIONDE PROCÉDURES
AUTRES QUE CELLESSPÉCIFIÉES
CI-DESSUS PEUVENT CAUSERUNE
EXPOSITION DANGEREUSE ÀDES
RADIATIONS.N'OUVREZ PAS LES
COUVERCLES ET NEFAITES AUCUNE
RÉPARATION VOUS-MÊME. CONFIEZ
L'ENTRETIEN ET LARÉPARATIONÀ
DU PERSONNEL COMPÉTENT.
ATTENTION
Les règlements de la FCC stipulent
que les modifications ou altérations
faites sur cet appareil peuvent
annuler le droit de l'utilisateur à
le faire fonctionner.
Remarque :
Cet appareil est couvert par les
brevets américains suivants :
4,631,603 et 4,577,216 et 4,819,098
et 4,907,093 et 6,516,132. L'utilisation
dans cet appareil de la technologie
de protection Macrovision contre le
piratage doit être autorisée par
Macrovision et est destinée
uniquement aux utilisations
domestiques et à d'autres usages
limités payables à la carte.
L'ingénierie inverse et la le
désassemblage sont interdits.
Ce lecteur DVD est conçuet
fabriqué pour fonctionner avec le
code régional des disques DVD. Si
le disque DVD ne correspond pas
au code régional de ce lecteur,
celui-ci ne peut lire le disque. Le
code régional de ce lecteur de DVD
est:Région No. 1.
L'appareil ne doit pas être exposé
à la pluie ou aspergé et aucun
objet contenant des liquides comme
des vases, ne doit être déposé
sur l'appareil.
Gardez votrecoupon de caisse commepreuve d'achat et pourobtenir
les piècesetleservice.Attachez-leicietnotezlenuméro du modèle et
le numéro desérieaucasoù vous en auriez besoin.Les numéros sont
inscrits à l'arrière de l'appareil.
No. dumodèle : No. desérie :
Date d'achat:
Nom etadresse du revendeur :
PRODUIT
LASER
CLASSE 1

Table Des Matières
INTRODUCTION
Table Des Matières........................
Types De Disques Utilisables
Avec Ce Lecteur...........................
Symboles indiqués sur les DVD.............
Structure des disques.............................
Utilisation De Ce Mode
D'emploi........................................
AVANT UTILISATION
Vérification Des Accessoires......
Installation De La Télécommande
Et De L'appareil............................
Utilisation de la télécommande..............
Insertion de la pile...................................
Champ de fonctionnement.....................
Composantes Et Fonctions...........
Ecran à cristaux liquides.........................
Touches de fonctionnement
du lecteur..................................................
Côté gauche du lecteur...........................
Côté droit du lecteur...............................
Arrière du lecteur....................................
Pied .........................................................
Partie inférieure du lecteur....................
Télécommande (touches
fréquemment utilisées)...........................
Télécommande (autres touches)...........
Batterie....................................................
Connexion Du Lecteur
À D'autres Appareils...................
Connexion à une TV..............................
Connexion à un décodeur Dolby
Digital/DTS/MPEG ou à un
amplificateur avec
décodeur incorporé..............................
Connexion à un amplificateur
digital non compatible avec
Dolby Digital/DTS/MPEG......................
Connexion à un
haut-parleur actif..................................
Connexion à un
casque d'écoute....................................
Utilisation De La Batterie..........
Rechargement de la batterie.................
Remarques sur le rechargement...........
Connexion avec le lecteur.....................
Alimentation avec courant
alternatif...................................................
Retrait de la batterie...............................
15
20
OPÉRATIONS DE BASE
.......
.......
......
......
23
24
28
29
31
32
33
34
35
36
38
F
24
25
25
26
26
27
27
27
30
30
30
31
31
31
35
35
35
1
Mise En Marche Du Lecteur ........
Fonctions De Lecture................
2
2
3
4
5
Insérer un disque......................... ..
Lecture du disque........................ ..
Affichage du menu................... .....
Arrêt de lecture......................... .....
Pause de lecture................. ...........
Retour au chapitre/plage précédent(e)
sur DVD, CD vidéo et CD audio...........
Saut au chapitre/plage suivant(e)sur
DVD, CD vidéo et CD audio ................
Retrait du disque..................................
.......
Eteindre Le Lecteur..................
6
6
6
7
8
8
8
9
10
11
11
11
12
13
14
OPÉRATIONS AVANCÉES
Réglage De La Langue Et Des
Sous-titres..................................
Réglage de la langue d'affichage
à l'écran.................................................
Réglage de la langue
des sous-titres.....................................
Réglage de la langue audio................
Fonctions Avancées...................
Passer de la sortie AV à l'entrée AV......
Niveau de restriction d'utilisation
(Controle parental )................................
Amélioration vidéo.................................
PRÉCAUTIONS D'EMPLOI
Problèmes..................................
15
16
17
18
19
Attention:Manipulation des.........
Manipulation des disques..........
Utilisation de la batterie............
Utilisation de la batterie........................
Stockage................................................
Durée d'utilisation et recyclage...........
Recommandations et
renseignements sur les disques...
Garantie limitée...................
20
21
21
22
22
This product incorporates copyright protection technology that is protected by method claims of certain U.S.
patents and other intellectual property rights owned by Macrovision Corporation and other rights owners. Use of this
copyright protection technology must be authorized by Macrovision Corporation, and is intended for home use only
unless otherwise authorized by Macrovision Corporation. Reverse engineering or disassembly is prohibited.
1
-F
Graphics are for representation only.Your unit may differ slightly.

Introduction
Types de disques utilisables avec ce lecteur
F
Les types de disques indiqués dans le tableau ci-dessous peuvent être lus par le lecteur
sans adaptateur.
Les symboles indiqués ci-dessous sont inscrits sur l'étiquette du disque, sur l'emballage
ou le livret accompagnant.
Types de disques
utilisables et
leurs marques
Diamètre/face lisible
DVD vidéo
12cm/une
face
12cm/double
face
DVD vidéo
8cm/une
face
8cm/double
face
CD
12cm/une face
CD
8cm/une face
1 couche
2 couches
1 couche
2 couches
1 couche
2 couches
1 couche
2 couches
Durée de lecture
(format MPEG2)
133 minutes (4,7 Go)
242 minutes (8,5 Go)
266 minutes (9,4 Go)
484 minutes (17 Go)
(format MPEG2)
41 minutes
75 minutes
82 minutes
150 minutes
74 minutes
20 minutes
Symboles indiqués sur les DVD
Les symboles ci-dessous sont indiqués sur les disques DVD ou sur les emballages.
Ces symboles indiquent le type de signal vidéo ou audio enregistré sur le disque et les
fonctions utilisables.
Symbole
Signification
Indique le nombre de langues audio
Indique le nombre d'angles
Indique le format de l'image
Indique le numéro de zone
2
Graphics are for representation only.Your unit may differ slightly.
-F

Structure des disques
Introduction
Les CD sont divisés en unités appelées morceaux. (En général, un morceau correspond à une
chanson. Les morceaux sont parfois sous-divisésenrépertoires).
CD morceau 1 morceau 2 morceau 3 morceau 4 morceau 5
Les DVD sont divisés en unités appelées titres, qui sont eux-mêmes sous-divisés en chapitres.
De plus, les DVD proposent un (ou des) menu(s) qui n'appartiennent à aucun titre.
Dans le cas de DVD de films, un film correspond généralement à un titre. Dans le cas de DVD de
karaoké, une chanson correspond à un titre. Il existe cependant certains DVD divisés d'une autre
façon veuillez utiliser les fonctions de recherche et de programmation précautionneusement.
DVD titre 1 titre 2
chapitre 1 chapitre 2 chapitre 1 chapitre 2
F
3
Graphics are for representation only.Your unit may differ slightly.
-F

Introduction
Utilisation de ce mode d'emploi
F
Lire ces instructions attentivement avant toute utilisation de l'appareil
pour assurer une utilisation et un fonctionnement optimaux de l'appareil.
Lorsque le lecteur est branchéàune TV ou un amplificateur AV, le menu des
réglages doit être affiché et les réglages doivent être effectués en fonction des
appareils auxquels le lecteur est branché.
Pour la lecture de DVD, il est possible de sélectionner la langue audio et la langue
des sous-titres et de choisir le type de son parmi différentes plages sonores.
Afin d'assurer une utilisation optimale des nombreuses fonctions de cet appareil,
conserver soigneusement ce mode d'emploi pour le consulter à tout moment.
4
Graphics are for representation only.Your unit may differ slightly.
-F

Vérification des accessoires
Avant Utilisation
Après avoir déballé le lecteur, vérifier que tous les accessoires indiqués ci-dessous sont
inclus dans l'emballage.
Adaptateur courant alternatif AC
Câble d'alimentation pour voiture
Mode d'emploi
INSTRUCTIONS
OPERATION
Sac pour accessoires
Câble AV
Télécommande
Sac de transport
Batterie
F
Petit sac pour voiture
Graphics are for representation only.Your unit may differ slightly.
5
-F

Avant Utilisation
Utilisation de la télécommande et de l'appareil
F
Utilisation de la télécommande
Ne pas lâcher ou marcher sur la télécommande, cela pourrait l'endommager.
Assurez-vous qu'aucun obstacle n'est situé entre la télécommande et le capteur de l'appareil,
cela pourrait nuire au bon fonctionnement de la télécommande.
Ne pas exposer la télécommande à une lumière forte.Elle pourrait ne pas fonctionner.
Utiliser la télécommande dans le champ de fonctionnement indiqué.
Insertion de la pile
Insérer vos ongles dans les
cavitésAetBindiqués ci-dessous.
Appuyer sur A dans le sens de la
flèche et retirer le support à pile.
Retirer la pile usagée, insérer une
nouvelle pile dans le support avec
le signe + vers le haut.
pile au lithium (Cr2025)
Réintroduire le support de la pile
dans la télécommande.
Remarque :
Pour éviter tout risque de fuite de la
pile, retirer la pile lorsque la
télécommande n'est pas utilisée
pendant une période prolongée
(un mois ou plus). Si la pile coule,
nettoyer délicatement le
compartiment à pile et placer une
nouvelle pile au lithium.
A.
Attention : la pile peut présenter des risques d'incendie si elle n'est pas traitée avec soin;
ne pas la recharger,la démonter ou la chauffer à plus de 100 C; remplacer avec une pile
du même type.
Défaites-vous de la pile usagée correctement; gardez à l'écart des enfants et
B.
n'incinérez pas.
6
Graphics are for representation only.Your unit may differ slightly.
-F
o

Avant Utilisation
Champ de fonctionnement
30
30
environ
5 mètres
La télécommande peut fonctionner jusqu'à une distance de 5 mètres.
F
Remarque :
La plupart des fonctions du lecteur peuvent être exécutées au moyen de la télécommande.
Cependant, certaines fonctions ne peuvent l'être qu'à partir du lecteur même.
7
Graphics are for representation only.Your unit may differ slightly.
-F

Avant Utilisation
Composantes et fonctions
F
Ecran à cristaux liquides
Le lecteur de DVD portable est équipé d'un écran à cristaux liquides.
Ecran à cristaux liquides
Haut-parleurs
Touches de fonctions
Senseur de la télécommande
Indicateur d'alimentation
Off : éteint
Rouge : alimentation mise en veille
Bleu : appareil en marche. (allumer l'appareil en appuyant ON située sur l'appareil ou sur la
touche d'alimentation d'alimentation de la télécommande)
Touches de fonctionnement du lecteur
8
Graphics are for representation only.Your unit may differ slightly.
-F

Avant Utilisation
Touche de lecture/pause
Appuyer sur cette touche pour commencer la lecture du disque. Pendant la lecture,
appuyer sur cette touche pour mettre le disque en mode pause (arrêt momentané de l'image
ou du son). Appuyer à nouveau pour continuer la lecture.
Appuyer pendant +/- 2 secondes sur cette touche pour allumer l'appareil.
Touche STOP/OFF (éteindre l'appareil)
Appuyer sur cette touche pour arrêter la lecture.
Appuyer pendant environ 2 secondes pour éteindre l'appareil (mise en veille).
Touches saut avant/ saut arrière
Appuyer sur ces touches pour sauter d'un titre à l'autre, pour rechercher le début d'un morceau
ou d'un chapitre.Pendant la lecture, appuyer pendant +/- 2 secondes pour accélérer la vitesse
de lecture avant/arrière de 2x, 4x, 8x, 20x, 2x.
Touche mode
Aprèssélection d'un des modes suivants,
ajuster à l'aidedes touches + et Luminosité : niveaux 0 à 8
Couleur : niveaux 0 à 8
Renverser : renverser l'image à
l'écranavers renversé
Entrée AV/Sortie AV:Commuter
d'une entréeAVà une sortie AV.
Appuyer sur la touche Mode
pendant environ 2 secondes pour éteindre l'affichage LCD.Appuyer à nouveau sur cette touche
pour réactiver l'écran.
Image normale Image renversée
F
Touches + et -
Ajuster les réglages en mode LCD à l'aide de ces touches.
Touche ouverture
Appuyer sur cette touche pour ouvrir le compartiment.
Côté gauche du lecteur
9
Graphics are for representation only.Your unit may differ slightly.
-F

Avant Utilisation
Prise pour casque
Brancher un casque stéréoouà un amplificateur.
F
Contrôle du volume
Ajuster le volume des haut-parleurs ou des écouteurs .
Entrée/Sortie vidéo
Connecter le lecteur à une entrée/sortie vidéo d'un autre appareil en réglant
ENTREE/SORTIEAV. Utiliser le câble AVinclus.
Entrée/Sortie audio et prise sortie optique
Connecter le lecteur à une entrée/sortie audio d'un autre appareil en réglant le mode
ENTREE/SORTIEAV.
Connecter l'appareil à la sortie audio optique.
Utiliser le câble AVoudigitaloptiqueinclus.
Prise DC (courant continu)
Brancher l'adaptateur AC inclus
Côté droit du lecteur
le mode
Indicateur lumineux de
présence de disque dans le
compartiment
Compartiment à disque
Orifice d'ouverture manuelle
Insérer la tige d'ouverture pour
ouvrir le compartiment à disque.
Toujours éteindre l'appareil avant
cette opération !
Graphics are for representation only.Your unit may differ slightly.
10
1 2 3
1
2
-F

Arrière du lecteur
Avant Utilisation
Tige d'ouverture
Utiliser cette tige pour ouvrir le compartiment
à disque.
Support
Sortir le support de son logement
Ajuster le support dans la position choisie
Bloquer le support en plaçant le bouton en position "Lock".
Support
Maintient l'appareil enposition verticale.
débloquer
bloquer
F
Partie inférieure du lecteur
Guide pour la batterie
Vis de fixation
Connecteur de la batterie
Remarque:
Veuiller replacer la protection sur les connecteurs après avoir enlevé la batterie.
11
Graphics are for representation only.Your unit may differ slightly.
-F

Avant Utilisation
Télécommande (touches fréquemment utilisées)
F
: lecture rapide avant
: lecture rapide arrière
4 Touche PLAY/PAUSE
lecture/pause ( )
Appuyer sur cette touche pour
commencer la lecture ou l'arrêter
momentanément.
5
Touche MENU
Appuyer sur cette touche pour
afficherlemenuduDVDà l'écran.
6
Touche STOP arrêt ( )
Appuyer sur cette touche pour
arrêter la lecture du disque.
7
Touche STEP/SLOW ( )
Appuyer sur cette touche pour
réduire la vitesse de lecture (1/2,
1/4, 1/6, 1/7). En mode pause,
appuyer sur cette touche pour
procéder à une lecture image
par image.
1 Touche STANDBY mise
en veille
Appuyer sur cette touche pour
allumer/éteindre l'appareil
2
Touches PREV/NEXT saut
arrière/avant
Appuyer sur ces touches pour rechercher
le début d'une plage ou d'un chapitre
: saut arrière
: saut avant
Touche TITLE titre
8
Appuyer sur cette touche pour
afficherletitreduDVD.
3 Touches REV/FWD lecture
arrière/avant rapide ( et )
Appuyer sur ces touches pour lire
rapidement en avant ou en arrière un film
ou un morceau.
Graphics are for representation only.Your unit may differ slightly.
12
-F

Télécommande (autres touches)
Avant Utilisation
5 Touche RETURN retour
Appuyer sur cette touche pour retourner au
réglage précédent (uniquement pour VCD,
PBC activé)
6 ZOOM
Faire un zoom sur l'image à l'écran
7 Pavé numérique
Appuyer sur SHIFT et sur les touches du pavé
nu mérique pour entrer des chiffres.
8 Touche REPEAT répétition
Pendant la lecture d'un DVD, appuyer sur cette
touche pour répéter des titres ou des
chapitres. Pendant la lecture d'un CD, appuyer
pour répéter une plage ou un disque entier.
9 Touche A-B REPEAT répétition de A-B
Pendant la lecture appuyer sur cette touche
pour délimiter les deux extrémités d'une
séquence à répéter.
10 Touche SHIFT
Maintenir cette touche enfoncée et utiliser le
pavé numérique pour entrer des chiffres et
des fonctions.
11 Touche OPEN (ouverture)
Ouverture du compartiment à disque pour
insérer/changer un disque.
12 Touche SUBTITLE sous-titres
Appuyer sur cette touche pour changer la
langue des sous-titres.
F
13 Touche OSD
Appuyer sur cette touche pour afficher les
informations du disque.
14 Touche ANGLE
Appuyer sur cette touche pour modifier
l'angle de la prise de vue du DVD .
15 Touche SEARCH recherche
Rechercher un titre/chapitre et commencer
la lecture.
16 Touche CLEAR effacer
Effacer les chiffres entrés.
13
Graphics are for representation only.Your unit may differ slightly.
-F

Avant Utilisation
Batterie et fonctions
F
1 Connecteur DC (courant continu)
Brancher l'adaptateur pour la recharger.
2 Molette de fixation de la batterie
Faire tourner pour fixer/détacher la batterie
3 Indicateur lumineux de la batterie
L'indicateur est éteint lorsque la batterie est déchargée.
L'indicateur est rouge lorsque la batterie se recharge.
L'indicateur devient vert lorsque le rechargement est terminé.
4 Connecteurs du lecteur
Alimente le lecteur
ATTENTION:
Ne pas court-circuiter les connecteurs !
Graphics are for representation only.Your unit may differ slightly.
14-F

Avant Utilisation
Connexion du lecteur à d'autres appareils
Avant de connecter
Eteindre le lecteur et les appareils destinés àêtre connectés.
Connexion à une TV
Câble vidéo/audio
(inclus)
VIDEO IN
AUDIO IN
RL
F
Prise d'entrée vidéo
(jaune)
Prise d'entrée audio
(blanc)
Prise d'entrée audio
(rouge)
TV
direction du signal
:
15
Graphics are for representation only.Your unit may differ slightly.
-F

Avant Utilisation
Connexion à un décodeur Dolby Digital / DTS / MPEG
ou à un amplificateur avec décodeur incorporé
F
Connecter le signal digital du lecteur à un décodeur ou amplificateur avec décodeur
incorporé afin de bénéficier d'un puissant son Dolby Digital, DTS ou MPEG.
Côté gauche du lecteur
Câble digital optique (non inclus)
Enceinte
Enceinte avant
(gauche )
(Gauche)
Enceinte
latéral
Remarque :
Un décodeur ou amplificateur compatible, 5 enceintes (avant gauche/droite, central et
latéral gauche/droite) et un subwoofer sont nécessaires pour bénéficier
d'un son Dolby Digital / DTS canal 5.1
Enceinte
central
avant
(droite)
Enceinte
latéral(droite)
Voir page 22
pour une connexion
avec une TV
Subwoofer
(Caisson de basses)
: direction du signal
16
Graphics are for representation only.Your unit may differ slightly.
-F

Avant Utilisation
Connexion à un amplificateur digital non compatible
avec Dolby Digital / DTS / MPEG
Connecter le lecteur par sa sortie digitale incompatible avec Dolby/DTS/MPEG.
F
Côté gauche du lecteur
Câble optique digital
(non inclus)
Vers une prise
entrée audio digitale
Remarques :
Vérifier soigneusement les réglages d'émission digitale du lecteur avant de connecter le lecteur
à un amplificateur équipé d'une prise entrée audio digitale qui n'est pas compatible avec Dolby
Digital / DTS /MPEG.
Si les réglages audio ne sont pas corrects, un bruit très fort peut se produire
pendant la lecture d'un DVD, ce qui peut endommager les haut- parleurs.
Voir page 22 pour
les connexions
à une TV
: direction du signal
17
Graphics are for representation only.Your unit may differ slightly.
-F

Avant Utilisation
Connexion à un haut-parleur actif
F
: direction du signal
Connexion à un haut-parleur actif
Câble audio/vidéo
(inclus)
Vers une prise
entrée vidéo
Vers des prises
entrée audio
Haut-parleurs actifs
18
Graphics are for representation only.Your unit may differ slightly.
-F

Connexion à des écouteurs
Avant Utilisation
Insérer correctement la fiche des écouteurs dans la prise PHONES du lecteur pour écouter de la
musique via ceux-ci. A l'aide de la roulette VOLUME située sur le côté gauche du lecteur,
diminuer tout d'abord le volume du son puis régler selon votre choix. A pleine puissance, l'écoute
prolongée via des écouteurs peut endommager l'oreille de l'utilisateur.
Côté gauche du lecteur
Vers la prise pour
écouteurs PHONES
Insérer la prise correctement.
Si la prise n'est pas insérée
Remarque :
Il n'est pas possible d'entendre le son de DVD compatibles DTS à travers des écouteurs.
Lorsque des disques DTS autres que des DVD sont lus, des bruits aigus sont émis.
Ne pas écouter ces disques avec des écouteurs.
Remarque:
correctement
aucun son ne sortira
à travers les écouteurs
Ecouteurs
F
19
Graphics are for representation only.Your unit may differ slightly.
-F

Avant Utilisation
Utilisation de la batterie
F
Rechargement de la batterie
Recharger la batterie selon les instructions ci-dessous.
1 Brancher l'adptateur AC à la batterie à partir d'une prise DC.
2 Connecter l'adaptateur AC à une prise murale.
Lorsque le rechargement commence, l'indicateur lumineux de rechargement est rouge.
L'indicateur lumineux de rechargement devient vert lorsque le rechargement est terminé.
Débrancher la prise murale et la batterie.
La batterie se recharge complètement en environ 4-5 heures.
La batterie permet environ 300 cycles de rechargement/utilisation. Ce nombre peut varier selon
les conditions d'utilisation.
Charger la batterie entièrement avant la première utilisation.
ATTENTION
Placer la batterie et l'adaptateur sur une surface horizontale pendant le rechargement.
Ne pas court-circuiter les connecteurs du chargeur de la batterie.
Remarque :
Le chargeur (AC) de la batterie peut être utilisé dans le monde entier et fonctionne
avec une tension variant entre 100 et 240 V CA.
Si vous prévoyez d'utiliser l'adaptateur dans d'autres pays, veuillez prendre un
adaptateur de prise adapté aux prises des pays correspondants.
20
Graphics are for representation only.Your unit may differ slightly.
-F

Remarques sur le rechargement
Avant Utilisation
Si la batterie est chaude, le temps de rechargement peut être plus long ou il peut être
impossible de recharger la batterie. Laisser refroidir la batterie avant de la recharger.
Si l'indicateur de rechargement ne s'allume pas, vérifier que l'adaptateur et la batterie sont
correctement connectés.
Pour la protéger, ne pas recharger une batterie entièrement rechargée.
Cela pourrait l'endommager.
La batterie chauffe après le rechargement. Ce phénomène est normal.
Lorsque le rechargement est effectué dans un endroit à température élevée, il est possible que
le rechargement ne se fasse pas entièrement.
La température ambiante influence l'efficacité du rechargement.
Le rechargement est le plus efficace à des températures entre 10°Cet30°C.
Il est préférable de charger de batterie dans cette plage de température.
Connexion avec le lecteur
Connecter l'adaptateur de la batterie et le lecteur selon les instructions ci-dessous.
1 Fixer la batterie au lecteur.
2 Aligner la cavité située sur le lecteur avec la
vis située sur la
batterie. Serrer fermement la vis dans le sens
des aiguilles d'une montre.
3 Le lecteur est prêt à être utilisé.
Lorsque la batterie est entièrement rechargée, le lecteur
peut lire des DVD pendant plus de 3 heures sans interruption.
F
21
Graphics are for representation only.Your unit may differ slightly.
-F

Avant Utilisation
Si le lecteur est en marche alors que la
batterie n'est pas entièrement rechargée, il est
F
possible que le lecteur ne fonctionne pas de façon
optimale. Recharger la batterie entièrement avant
toute utilisation.
Le temps de rechargement sera plus long
en mode de lecture.
Le rechargement continue alors que le lecteur
est mis en veille tant que l'adaptateur CA
est branché.
Lorsque la batterie est connectée au lecteur et
que le lecteur soit en mode LECTURE, PAUSE
ou ARRET, appuyer sur la touche OSD sur la
télécommande et le symbole s'affiche.
Ce symbole indique l'état de la batterie.
Lorsque la batterie est pratiquement
vide, le symbole clignote.
“”
“”
Alimentation avec courant alternatif
12Connecter la prise DC de l'adaptateur AC au connecteur DC IN situé sur le lecteur.
Connecter la prise de l'adaptateur AC à une prise murale. Le lecteur est prêt àêtre utilisé.
ATTENTION
Utiliser l'adaptateur AC inclus avec le lecteur.
Avant de brancher ou de débrancher la prise d'émission DC de l'adaptateur AC,
veuillez toujours éteindre le lecteur portable.
Retirer la batterie du lecteur
Séparer le lecteur et la batterie selon les instructions ci-dessous.
1 Eteindre le lecteur (placer l'interrupteur sur off).
2 Dévisser la molette de la batterie et retirer la batterie.
22
Graphics are for representation only.Your unit may differ slightly.
-F

Opérations De Base
Mise en marche du lecteur
Lecteur (touches situées à l'avant)
1
Brancher l'adaptateur AC à une
prise DC.
Brancher la prise sortie DC de
2
l'adaptateur à l'entrée DC du
lecteur.
Appuyer sur la touche ON du
3
lecteur pendant environ 2
secondes.
L'indicateur d'alimentation
est bleu. Le lecteur est prêt àêtre
utilisé.
En mode veille
(l'indicateur d'alimentation est rouge),
le lecteur peut également être mis en
marche en appuyant sur la touche
STANDBYde la télécommande.
F
Télécommande
Conseil :
L'adaptateur AC inclus supporte des
tensions de 100 à 240 V. Il peut
donc également être utilisé dans
d'autres pays.
Il vous faut cependant un adaptateur
de prise murale approprié pour les
pays dans les lesquels vous utiliserez
le lecteur de DVD.
23
Graphics are for representation only.Your unit may differ slightly.
-F

Opérations De Base
Fonctions de lecture
F
Insérer un disque
1
Appuyer sur la touche OPEN pour
compartiment à disque
(si le compartiment est vide, il
s'ouvre automatiquement lorsque le
lecteur est allumé).
Sans alimentation, le
2
compartiment ne s'ouvre pas.
Insérer la tige d'ouverture dans le
petit orifice pour ouvrir le
compartiment.
3 Insérer le disque en appuyant
légèrement au centre du disque
jusqu'à entendre un petit déclic.
Remarques :
Vérifier que le disque est correctement
inséré. Une mauvaise manipulation
pourrait endommager le disque gravement.
Ne pas utiliser des disques rayésou
endommagés.
Insérer les CD et DVD à une face avec
l'étiquette imprimée dirigée vers le haut.
En utilisant des DVD à deux faces, choisir
le côté souhaité et insérer correctement
le disque.
En utilisant des CD et DVD simples
vous pouvez toucher avec vos doigts le
côté portant l'étiquette imprimée. A
l'inverse, avec des DVD à double face,
veiller à ne toucher aucun des côtés car
ils contiennent tous deux des
informations. Retirer le disque
délicatement du lecteur pour ne pas le
rayer.
Pousser le compartiment dans le
4
lecteur.
Le lecteur commence le chargement.
24
Graphics are for representation only.Your unit may differ slightly.
-F

Lecture du disque
Opérations De Base
Insérer un disque.
L'écran affiche DVD, VCD ou CD.
Avec certains disques, la lecture commence
automatiquement lorsque le compartiment se
referme.
Lorsque une programmation mémoriséea
été effectuée pour un disque, la lecture
commence automatiquement selon
cette programmation.
Appuyer sur la touche play/pause (lecture/pause).
La lecture commence.
Avec certains disques, un menu apparaît à l'écran. La lecture d'un CD vidéo selon les
instructions indiquées dans le menu du disque est appelé lecture PBC
(playback control (lecture contrôlée).
Conseils :
Avec les CD vidéo, il est possible de lire un disque sans afficher le menu. Par exemple, appuyer
sur le chiffre 1 quand la lecture est arrêtée pour commencer la lecture de la plage 1.
Avec les CD, pour économiser de l'énergie, l'écran s'éteint automatiquement après 1 minute de
lecture si aucune touche n'est activée et se rallume en appuyant sur une touche quelconque.
Pavé
numérique
SHIFT
NEXT
(saut
avant)
Apparition d'un menu
Un menu s'affiche lorsqu'un DVD avec menu ou un CD vidéo avec lecture PBC est
inséré dans le lecteur.
F
DVD
Effectuer vos sélections à l'aide des touches du navigation ( ) et appuyer
sur la touche ENTER.
Pour utiliser le pavé numérique de la télécommande, appuyer simultanément sur la touche
SHIFT et sur le pavé numérique.
Par exemple pour les DVD avec menu.
25
Graphics are for representation only.Your unit may differ slightly.
-F

Opérations De Base
F
TITLE MENU
1POP
2JAZZ
3 COUNTRY
4R&B
5 CLASSICAL
CD Vidéo
Appuyer simultanément sur la touche SHIFT
tout en appuyant sur le pavé numérique
pour afficher les chiffres à l'écran.
Si le menu du CD vidéo
contient plus qu'une plage,
utiliser les touches de saut
avant/arrière pour passer
d'une plage à l'autre.
Par exemple pour les CD vidéo avec lecture
contrôlée PBC.
Afficher le menu
L'affichage du menu varie d'un disque à l'autre. Appuyer sur la touche MENU, sur la touche TITLE
pendant la lecture de DVD ou sur la touche RETURN pendant la lecture de CD vidéo.
Lire attentivement les instructions accompagnant le disque.
Arrêt de lecture
Appuyer sur la touche STOP. La lecture s'arrêtera.
1POP
2JAZZ
3 COUNTRY
4R&B
5 CLASSICAL
Fonction de reprise (DVD et CD vidéo, excepté les VCD2.0 avec la fonction PBC activée) La lecture
du disque s'arrête lorsque la touche STOP est enfoncée.
Appuyer sur la touche PLAY pour reprendre la lecture au moment où elle a été arrêtée.
Si le disque est retiré du lecteur ou que la touche STOP est enfoncée à nouveau, la fonction de
reprise ne fonctionne plus.
Conseil :
Avec certains disques, la lecture peut ne pas reprendre à l'endroit où la lecture a été arrêtée.
Si la touche STOP et la touche saut arrière sont enfoncées pendant que la fonction de continu
est enclenchée, la lecture recommence au début du titre.
Pause de lecture
Appuyer sur la touche play/pause pour interrompre la lecture.
Appuyer sur cette touche à nouveau pour reprendre la lecture.
26
Graphics are for representation only.Your unit may differ slightly.
-F

Opérations De Base
Retour au chapitre/plage précédent(e) sur DVD,
CD vidéo et CD audio
Pendant la lecture, appuyer sur la touche saut arrière.
La lecture reprend au début du chapitre ou plage précédent(e).
Saut au chapitre/plage suivant(e) sur DVD,
CD vidéo et CD audio
Pendant la lecture, appuyer sur la touche saut avant.
La lecture reprend au début du chapitre ou de la plage suivant(e).
Retirer un disque
1 Appuyer sur la touche STOP.
2 Appuyer sur pour ouvrir le compartiment à disque.
3 Retirer le disque.
4. Rentrer délicatement le compartiment dans le lecteur.
F
Remarque :
En utilisant des CD et DVD simples, vous pouvez toucher avec vos doigts la
face portant l'étiquette imprimée. A l'inverse, avec des DVD à deux faces,
prendre soin de ne toucher aucune des faces car elles contiennent toutes deux
des informations. Retirer le disque délicatement du lecteur pour ne pas rayer.
27
Graphics are for representation only.Your unit may differ slightly.
-F

Opérations De Base
Eteindre le lecteur
F
Lorsque le lecteur est allumé, appuyer sur OFF
pendant environ 2 secondes.
L'indicateur d'alimentation devient rouge et le lecteur passe en mode
veille.
Vous pouvez également éteindre l'appareil en appuyant sur la touche
STANDBYde la télécommande.
Débrancher le câble d'alimentation de la prise murale.
Débrancher l'adaptateur AC de la prise entrée DC du lecteur.
ATTENTION :
Lorsque vous branchez le lecteur à un moniteur de télévision, assurez-vous, afin
d'obtenir un meilleur rendement audio et vidéo, de commuter ou d'ajuster le format de
l'image de télévision (Marqué ) et le système de télévision (Marqué )
selon les appareils utilisés.
Exemple : passer du rapport 16:9 (par défaut) à 4:3 ou passer de NTSC (par défaut)
à PAL comme illustré ci-dessous dans le Menu de Réglage (SETUP MENU) :
Language
A
TV Shape 16:9 4:3 PS
TV System NTSC 4:3 LB
Brightness Off 16:9
Edges Off
Video Output CVBS
Video
Audio
Parental
Language
A
TV Shape 16:9
TV System NTSC NTSC
Brightness Off PAL
Edges Off Auto
Video Output CVBS
Video
Audio
Parental
Remarque :
AvantdepasserdelasortieAV(AVOUTPUT)à l'entréeAV(AVINPUT),réglez le lecteur
au bon format de l'écran pour une meilleure performance et sélectionnez le bon système
de télévision ou vous ne verrez qu'une image en noir et blanc.
28
Graphics are for representation only.Your unit may differ slightly.
-F

Opérations Avancées
Réglage de la langue et des sous-titres
Arrêter la lecture avant de modifier la configuration du système. Appuyer sur la
touche SETUP de la télécommande pour afficher le menu des réglages.
Modifier la langue audio et celle des sous-titres à l'aide du menu des réglages.
Réglage de la langue d'affichage à l'écran
Sélectionner la langue du menu desréglages.
Vous pouvez sélectionner la langue de
l'OSD par défaut.
Réglage de la langue des sous-titres
Sélectionner la langue des sous-titres.
Vous pouvez sélectionner une langue parmi celles
proposées sur le disque DVD.
(L'affichage sur votre écran peut être différent de
l'affichage ci-contre.)
Language
A
OSD Menu English
Subtitle English
Audio English
DVD Menu English
OSD On
Factory Set Reset
Language
A
OSD Menu English
Subtitle English
Audio English
DVD Menu English
OSD On
Factory Set Reset
Video
Video
Audio
Audio
Parental
English
Francis
Deutsch
Espa ol
Italiano
Parental
English
French
German
Spanish
Italian
Auto
Off
F
,
~
n
Réglage de la langue audio
Sélectionner la langue audio.
Vous pouvez sélectionner une langue parmi celles
proposées sur le disque DVD.
(L'affichage sur votre écran peut être différent de
l'affichage ci-contre.)
29
Graphics are for representation only.Your unit may differ slightly.
Language
A
OSD Menu English
Subtitle English
Audio English
DVD Menu English
OSD On
Factory Set Reset
-F
Video
Audio
Parental
English
French
German
Spanish
Italian

Opérations Avancées
Fonctions avancées
F
Recherche d'un titre/chapitre
Appuyer sur la touche SEARCH.
Appuyer sur le chiffre du pavé numérique
correspondant au titre/chapitre désiré.
Appuyer sur la touche PLAY ou ENTER.
La lecture commence à l'endroit
sélectionné.
Lecture au ralenti d'un DVD/CD vidéo
Appuyer sur la touche SLOW pendant la lecture. La vitesse de lecture passe à 1/2,
¼, 1/6 ou 1/7 de la vitesse normale.
Répétition de lecture d'un DVD, CD vidéo et CD audio
Répéter la lecture d'un titre, chapitre ou plage
Appuyer sur la touche REPEAT.
Sélectionner le titre, chapitre ou plage que vous désirez répéter.
Répéter une section délimitée par un point A et un point B.
Pendant la lecture, appuyer sur la touche A-B de la télécommande au début de la
section que vous désirez répéter (point A).
Appuyer à nouveau sur la touche A-B à la fin de la section que vous désirez
répéter (point B).
Appuyer à nouveau sur la touche A-B pour annuler la répétition de la section A-B.
Séléction de l'angle d'un DVD (multi angle)
Appuyer sur la touche ANGLE pendant la lecture d'une séquence filmée sous
plusieurs angles.
Si le disque DVD n'a pas été enregistré sous plusieurs angles, la touche ANGLE
aucun effet.
30
Graphics are for representation only.Your unit may differ slightly.
-F

Fonctions avancées
Opérations Avancées
Passer de la sortie AV à l'entrée AV.
Vous pouvez commuter le mode AV OUT du lecteur (sortie signal AV vers la TV)
en mode AV IN (entrée signal AV à partir d'un autre appareil) et l'utiliser comme
écran TFT. La configuration par défaut est AV OUT.
1
Appuyez sur la touche MODE du
lecteur et commuter le mode LCD à
AVIN/OUT.(ENTREE/SORTIE AV)
2
Appuyez sur la touche + ou – afin de
commuter entre AV OUT (SORTIE
AV)et AV IN (ENTREE AV).
Remarque
Eviter d’entrer des signaux AV à partir
de la prise AV lorsque le lecteur est placé
en mode AV OUT afin d'éviter toute
interférence susceptible d'affecter et de
réduire la qualité de la lecture en cours.
Commuter du
mode AV OUT
au mode AV IN
Niveau de restriction d'utilisation (Controle parental )
En mode STOP, appuyer sur la touche
SETUP pour afficher le menu des réglages.
A l'aide des touches du curseur, sélectionner la fonction de Contrôle parental
Entrer un nouveau mot de passe à l'aide
du pavé numérique.
Le mot de passe par défaut est "9999".
Modifier le niveau de restriction en
ENTER.
F
Amélioration vidéo
Appuyer sur la touche SETUP
pendant la lecture pour améliorer
la luminosité et la qualité de l'image.
Modifier la luminosité et les contours
à l'aide des touches de navigation.
Graphics are for representation only.Your unit may differ slightly.
31
-F

Précautions D'emploi
Problèmes
L'image est déformée lorsqu'un DVD est enregistré ou lu par un magnétoscope
F
Ce lecteur est muni de la technologie de protection et restriction de copie.
Certains disques comprennent des signaux interdisant la copie et ne peuvent pas être lus ni enregistrés
correctement par un magnétoscope.
Le lecteur ne répond pas à la télécommande
La télécommande est située trop loin du lecteur ou à un angle trop élevé pour être perçue par le
senseur du lecteur.
La pile de la télécommande est plate.
La TV ou d'autres appareils ne fonctionnent pas correctement
Il est possible que la télécommande du lecteur interfère avec certaines TV disposant de télécommande .
Aucun son n'est émis par les haut-parleurs / Distorsion du son
Pour certains disques, une émission digitale 96 kHz de signaux audio PCM linéaires est interdite.
Le disque est sale.
Le mode pause ou lecture au ralenti est enclenché.
Le volume du lecteur est réglé au minimum.
Les écouteurs sont branchés au lecteur.
Le volume est différent entre les DVD et les CD
Cela est du aux différentes méthodes d'enregistrement propres à chaque disque.
Aucun son n'est émis/distortion du son lorsque le lecteur est raccordé
à une TV, un amplificateur, etc.
Les câbles de connexion ne sont pas correctement branchés.
Les prises de connexion sont sales.
Les câbles audio ne sont pas correctement branchés.
La sortie audio digitale est branchéebranchée à un amplificateur AV non
Mauvaise configuration DTS.
Mauvaise qualité de lecture
Le lecteur est sur le mode AV OUT (SORTIE AV)mais d'autres signaux AV proviennent de la prise AV.
Le lecteur chauffe
Ce phénomène est normal.
Remarque :
Il est possible que le lecteur ne fonctionne pas correctement à cause d'électricité statique ou
d'autres influences extérieures.
Débrancher le câble d'alimentation et le rebrancher.
Si les problèmes persistent, adressez-vous à un revendeur spécialisé.
Ecran à cristaux liquides
Il est possible que certains éléments de l'image soient noirs ou d'une couleur étrange.
Ce phénomène est normal.
32
Graphics are for representation only.Your unit may differ slightly.
-F

Précautions D'emploi
Attention:Manipulation des
Ne pas déplacer l'appareil pendant la lecture
Pendant la lecture, le disque tourne à une vitesse très rapide.
Ne pas soulever ou déplacer le lecteur pour éviter d'endommager le disque.
Transport du lecteur
Retirer le disque avant de déplacer le lecteur pour éviter d'endommager le disque.
Eteindre l'appareil et débrancher le câble d'alimentation lorsque l'indicateur d'alimentation est rouge.
Emplacement
Placer le lecteur sur une surface horizontale et stable proche de la TV ou du système stéréo
auquel vous allez le brancher.
Ne pas placer le lecteur sur la TV ou le moniteur couleur. Placer le lecteur loin de lecteurs
cassettes ou d'autres appareils facilement perturbés par des champs magnétiques.
Ne pas placer sur le lecteur.des objets
Eteindre l'appareil lorsqu'il n'est pas utilisé
Lorsque votre lecteur est à l'arrêt et est connectéàvotre TV, il peut se produire
une altération de l'image de votre TV. Eteignez-le. Des interférences sonores
peuvent se produire lors d'une utilisation à côté d'une radio.
Remarque spéciale sur l'utilisation du lecteur dans un véhicule
Nous déconseillons fortement d'utiliser le lecteur pendant la conduite d'un véhicule.
La plupart des pays et des états ont des lois interdisant ou limitant considérablement l'utilisation
du lecteur pendant la conduite d'un véhicule.
Ne pas laisser le lecteur ou la batterie dans des endroits aux températures extrêmement
basses (-10°C ou plus bas) ou extrêmement élevées (60°C ou plus haut), comme la
cabine ou le coffre d'un véhicule. Cela pourrait déformer l'emballage extérieur de l'appareil ou
diminuer le fonctionnement ou la qualité de la batterie.
F
A bord d'un avion
Respecter les consignes de sécurité de la compagnie d'aviation
Dans un hôpital
Respecter les consignes de l'hôpital
33
Graphics are for representation only.Your unit may differ slightly.
-F

Précautions D'emploi
Manipulation des disques
F
Manipulation des disques
Manipulation
Manipulation Manipulation
avec deux mains à une main
Ne pas utiliser des disques rayésou
endommagés.
Ne pas gratter ou salir la surface comportant
les informations.
Ne pas coller du papier ou apposer de
cachet sur les disques.
Le lecteur peut être endommagé si de la
colle est déposée sur la surface des disques,
etc.Des étiquettes supplémentaires sont
souvent ajoutées sur les disques de location.
Vérifier qu'il n'y a pas de colle sur le disque
avant de l'utiliser.
Nettoyage
Des empreintes digitales ou de la
poussière sur le disque peuvent
réduire la qualité de l'image ou du son.
Nettoyer délicatement le disque à l'aide
d'un chiffon doux, en partant de
l'extérieur du disque.
Ne pas utiliser de benzine, diluant ou
autre produit chimique.
Ne pas utiliser de spray antistatique.
Nous recommandons l'utilisation de
set de nettoyage pour disque vendu
séparément.
Si le disque est très sale, humidifier un
chiffon doux avec de l'eau, bien essorer,
nettoyer la saleté et sécher avec un
chiffon sec.
Disques de forme irrégulière
Les disques de forme irrégulière (en
forme de cœurs, hexagonaux, etc.) ne
peuvent pas être utilisés sur ce
lecteur. Cela pourrait endommager
gravement l'appareil .
Ne jamais les utiliser sur ce lecteur.
Rangement
Toujours remettre les disques dans leur
boîtier et les ranger verticalement.
Eviter de ranger les disques dans un endroit
très chaud ou humide, directement exposé
au soleil ou à des températures extrêmement
basses.
Lire attentivement les indications fournies
avec le disque.
Graphics are for representation only.Your unit may differ slightly.
34
-F

Précautions D'emploi
Utilisation de la batterie
Utilisation de la batterie
Recharger la batterie entièrement avant la première utilisation
Lorsque la température ambiante est élevée, il est parfois possible que la batterie ne soit
momentanément pas utilisable suite à l'activation automatique de la protection contre
un court-circuit.
Lorsque le lecteur de DVD fonctionne avec la qu'il n'a pas été utilisé pendant
environ 10 minutes, il s'éteint automatiquement.La batterie ainsi que le lecteur chauffent pendant
l'utilisation. Ceci est normal et ne représente aucun
Déconnectez la batterie du lecteur s'il n'est pas utilisé pendant une période prolongée.
Si la batterie reste à l'intérieur du lecteur, elle continue à alimenter légèrement l'appareil, ce
qui ce qui peut la vider entièrement et la rendre inutilisable même si vous
tentez de la recharger plus tard.
Si le lecteur est allumé alors que la batterie n'est pas entièrement rechar- gée,le fonctionnement
peut en souffrir et ne pas être optimal.
Assurez-vous de recharger complètement la batterie avant utilisation.
batterie et
dysfonctionnement.
Stockage
La batterie doit être rangée à une température ambiante de 15°C à 25°C. Ne pas ranger la
batterie dans un endroit très humide ou poussiéreux, à température extrêmement haute ou basse.
Si la batterie n'est pas utilisée pendant une période prolongée, nous recommandons de la vider
entièrement en l'utilisant dans le lecteur DVD. La recharger complètement la ranger.et ensuite
Durée d'utilisation et recyclage
Lorsque le temps de rechargement ou d'utilisation devient extrêmement court, cela signifie que la
batterie atteint la fin de sa durée d'utilisation.
La durée d'utilisation est d'environ 300 rechargements et utilisations.
F
Avant de jeter la batterie épuisée, enrouler un morceau de ruban adhésif autour
de la partie terminale.
Respecter la réglementation en vigueur dans votre ville en jetant la batterie.
Attention:
Danger d'explosion en cas de mauvaise installation de la batterie.
Remplacez votre batterie uniquement par le même type de batterie.
35
Graphics are for representation only.Your unit may differ slightly.
-F

Précautions D'emploi
Recommandations et renseignements sur les disques
F
Disques CD-R et CD-RW
Ce lecteur peut lire la plupart des disques CD-r et CD-RW.Cependant, certains disques
peuvent ne pas être lus ou la performance peut ne pas atteindre celle que vous attendez
d'un haut niveau de qualité; cela dépend du graveur de disques de votre ordinateur,
du genre de disque utilisé et de la méthode d'enregistrement employée. Quand vous placez
un disque CD-R, il est tout à fait normal que le lecteur prenne jusqu'à 20 secondes pour
reconnaître le disque avant de commencer la lecture. Si le disque n'est pas reconnu après
20 secondes, retirez-le et insérez-le de nouveau. Si, après plusieurs essais, le disque n'est
toujours pas reconnu, assurez-vous de suivre les recommandations suivantes ou essayez
un autre type de disque.
Quelle que soit la capacité de stockage d'un disque, ne l'enregistrez pas à pleine capacité.
l
Utilisez des disques CD-R de préférence aux CD-RW (ré-inscriptibles) qui ne
l
fonctionnent pas toujours bien en lecture.
Utilisez un logiciel de gravure fiable et de bonne qualité.
l
Avantd'enregistrerundisque,fermeztouteslesautresapplicationssurvotreordinateur
l
pour optimiser la qualité et la fiabilité des enregistrements.
Disques CD-R et CD-RW avec fichiers musicaux mp3
En ce qui concerne les disques contenant des fichiers musicaux mp3, en plus de suivre les
recommandations ci-dessus, observez les précautions suivantes :
Le format des fichiers mp3 doit être ISO 9660 ou JOLIET.Ces types de fichiers sont
compatibles avec les applications DOS, Windows et Mac OS.
Vosfichiers mp3 doivent avoir un nom ne dépassant pas 12 caractères ainsi que le
suffixe« .mp3 ». Ils doivent être enregistrés sous cette forme : titre.mp3.
Assurez-vous que le nom du fichier ne comprend pas d'espaces, ni de caractères spéciaux
comme (.,/,\,=,+) .
N'essayez pas d'enregistrer des fichiers mp3 protégés contre la copie. Ces fichiers sont
codésetprotégés.
Utilisez un taux de décompression d'au moins 128 kb/sec (kilobytes par seconde) quand
vous enregistrez des mp3.
La qualité sonore des fichiers mp3 dépend essentiellement du taux de compression/déc
ompression que vous choisissez. Pour une qualité CD, il faut un taux d'échantillonnage
analogue/numérique, c'est-à-dire une conversion en mp3 au taux minimum de
128 kb/sec jusqu'à 160 kb/sec. Cependant, le fait de choisir des taux de 192 kb/sec
ou même plus, ne vous donnera pas un son de meilleure qualité la plupart du temps.
À l'inverse, les fichiers enregistrés à des taux inférieurs à 128 kb/sec ne donneront pas
une bonne qualité.
Important : Les recommandations ci-dessus ne doivent pas être interprétées comme
une garantie que le lecteur DVD va lire les enregistrements mp3, ni comme une
assurance de la qualité de reproduction. Vous devriez être au courant que certaines
technologies et certaines méthodes d'enregistrement de fichiers mp3 sur les disques
CD-R empêchent la lecture optimale de ces fichiers sur votre lecteur DVD (ce qui se
traduit par une sonorité médiocre et dans quelques cas, par l'impossibilité de lire le
ou les fichiers).
36
Graphics are for representation only.Your unit may differ slightly.
-F

Précautions D'emploi
Disques CD-R et CD-RW avec fichiers graphiques JPEG
Pour visualiser les images JPEG sur un téléviseur, vous n'avez pas besoin d'enregistrer
vos fichiers dépassant 400 000 pixels (ce qui correspond à un format de vos photographies
avant de les enregistrer sur un disque, afin de ne pas nuire au fonctionnement normal du
lecteur). En fait, des fichiers graphiques trop lourds ne feraient que ralentir ou empêcher le
fonctionnement optimal d'un diaporama sur le lecteur.La compatibilité des fichiers JPEG
dépend du logiciel avec lequel ils ont été créés et de la grosseur des fichiers expriméeen
pixels. Certains fichiers JPEG, incluant les fichiers JPEG continus (affichésparétapes),
ne peuvent être lus sur ce lecteur.
Disques CD (VCD) vidéo
Les disques VCD (VideoCompactDisk)permettentjusqu'à 74 minutes d'enregistrement
de qualité vidéo VHS, incluant les images fixes, les pistes audio et les menus interactifs.
Disques Super Vidéos (SVCD)
Les disques SVCD (Disques Compacts Super Vidéo) sont conformes à la norme IEC62107,
ce qui autorise un enregistrement allant jusqu'à 70 minutes d'images numériques au form
at standard MPEG-2 pour le vidéo et MPEG-1 pour l'audio. La compatibilité des disques
SVCD dépend du logiciel d'encodage MPEG, de la conception du disque, du logiciel
d'enregistrement et des disques eux-mêmes.
Disques DVD-R et DVD-RW
Votrelecteur peut lire les disques DVD-R et DVD+R (enregistrement unique) ainsi que les
disques DVD-RWetDVD+RW(ré-inscriptibles). Les enregistrements sur disques DVD-RW
doivent êtrefaitsenmodeVidéo DVD. Les enregistrements sur disques DVD+RW
doivent être conformes aux spécifications du format des disques DVD+RW
de capacité de 4,7 GB.
La compatibilité dépend du graveur de DVD, du logiciel de gravure et des disques utilisés.
F
Important : Malgré les progrès considérables accomplis afin de pourvoir la plus
grande compatibilité possible entre ces différents types de disques, la lecture de
disques ne respectant pas les normes des DC Audio, des DC Vidéos et des DC Super
Vidéo (S-VCD) ne peut être garantie.
Graphics are for representation only.Your unit may differ slightly.
37-F

Précautions D'emploi
Garantie limitée
F
Ce qui est couvert par la garantie :
l Défauts de matériaux ou de fabrication.
Pour combien de temps après l'achat
l
Dans les 90 jours de la date d'achat, Échange de l'appareil, ce qui comprend les pièces
et la main d'oeuvre.
Entre 91 jours et 1 an de la date d'achat, Échange de l'appareil, ce qui couvre les pièces
l
seulement; vous payez la main d'oeuvre.
La garantie des appareils de location commence lors de la première location ou 45 jours à
l
compterdeladated'expédition à la compagnie de location selon la première éventualité.
Ce que nous ferons
Pendant les 90 premiers jours :
Nous vous remettrons un appareil neuf ou remis à neuf, à notre choix. L'appareil remis en
l
échange est garanti pour le reste de la période de garantie du produit original.
Après les 90 premiers jours jusqu'à un an :
Nous vous remettrons un appareil neuf ou remis à neuf, à notre choix. L'appareil remis en
l
échange est garanti pour le reste de la période de garantie du produit original. Nous vous
facturerons un montant forfaitaire pour remplacer un appareil défectueux. Ce montant
couvre les coûts de main d'oeuvre pour la réparation.
Comment faire une réclamation en vertu de la garantie :
l
Emballez soigneusement votre appareil. N'oubliez pas d'inclure les câbles, etc. qui vous
ont été fournis avec l'appareil.
Nous vous recommandons d'utiliser la boîte et les matériaux d'emballage d'origine.
Une preuve d'achat comme un coupon de caisse ou une facture à votre nom qui prouve
l
que l'appareil est sous garantie doit être fournie pour obtenir le service de la garantie.
Pour les compagnies de location, une preuve de la première location est également
requise. Écrivez lisiblement vos nom et adresse ainsi qu'une description du problème.
Faites parvenir l'appareil par le service UPS Standard ou un équivalent à :
Thomson Inc.
11721 B Alameda Avenue
Socorro, Texas 79927
Payez tout montant qui vous a été facturé par le Centre d'échange pour le service non
l
couvert par la garantie.
Assurez votre envoi pour la perte et le bris. Thomson n'accepte aucune responsabilité pour
l
la perte ou les dommages encourus pendant le transport chez Thomson.
Un appareil neuf ou remis à neuf vous sera expédié port payé.
l
Ce que la garantie ne couvre pas :
l
Calamités naturelles, comme mais non limitées aux dommages par un éclair.
Ajustement des contrôles de l'utilisateur.
l
Dommage résultant de mauvaise utilisation ou négligence.
l
Un appareil qui a été modifié ou incorporé dans d'autres produits ou utiliséàdes fins I
l
nstitutionnelles ou commerciales.
Piles.
l
Appareil acheté ou réparé hors des Etats-Unis ou du Canada.
l
Dommage au cours de l'expédition si l'appareil n'a pas été emballé et acheminé selon les
l
prescriptions de Thomson.
38
Graphics are for representation only.Your unit may differ slightly.
-F

Précautions D'emploi
Enregistrement du produit :
SVP remplir et poster la carte d'enregistrement incluse avec votre appareil ou enregistrez
votre achat en ligne à www.rca.com/productregistration. Il nous sera plus facile de
communiquer avec vous si nécessaire. Le retour de la carte de garantie n'est pas
nécessaire pour obtenir le service sous garantie.
Limites de la garantie :
LA GARANTIE DÉCRITE PLUS HAUT EST LA SEULE GARANTIE QUI S'APPLIQUE À
l
CE PRODUIT. TOUTES LES AUTRES GARANTIES, EXPRESSES OU IMPLICITES
(INCLUANT TOUTESGARANTIESIMPLICITESDECOMMERCIALITÉ, CONVENANCE À
UNE UTILISATIONSPÉCIFIQUE) SONT EXCLUES. AUCUNE INFORMATIONÉCRITE
OU VERBALE FOURNIE PARTHOMSON MULTIMEDIALTÉE, SES AGENTS OU
EMPLOYÉS NE PEUT FORMER UNE GARANTIE NI AUGMENTER LA PORTÉE
DE LA PRÉSENTE GARANTIE DE QUELQUE FAÇON QUE CE SOIT.
LA RÉPARATION OU LE REMPLACEMENT SONT LES SEULS RECOURS DU
l
CONSOMMATEUR.THOMSON MULTIMEDIALTÉENEPEUTÊTRE TENU
RESPONSABLE DE TOUTDOMMAGEINCIDENTOUCONSÉCUTIF À LA SUITE DE
L'UTILISATIONDE CE PRODUIT OU SURVENANT À LA SUITE DE TOUT
MANQUEMENT À UNE GARANTIE EXPRESSE OU IMPLICITE DE CE PRODUIT.
LES RESTRICTIONS À CETTE GARANTIE ET LA GARANTIE LIMITÉE SONT RÉGIES
PARLES LOIS DE L'ÉTAT DE L'INDIANA. . SAUF DANS LE CAS D'INTERDICTION PAR
UNE LOI PROVINCIALE, TOUTEGARANTIEIMPLICITEDECONVENANCEÀ UNE
UTILISATIONPARTICULIÈRE DE CE PRODUIT EST LIMITÉE À LA PÉRIODE DE
GARANTIE APPLICABLE TELLE QUE DÉCRITE PLUS HAUT.
Comment les lois interagissent avec la garantie :
Comme certains états ou certaines provinces ne permettent pas la limitation de
l
dommages incidents ou consécutifs, ou des limites sur la durée d'une garantie implicite,
les limites et exclusions ci-dessus peuvent ne pas s'appliquer à vous.
Cette garantie vous donne des droits juridiques spécifiques et vous pourriez avoir d'autres
l
droits selon les états ou provinces.
F
39
Graphics are for representation only.Your unit may differ slightly.
-F

Para reducir el riesgo de descarga eléctrica, no
ATENCIÓN
RIESGO DE DESCARGA
ELÉCTRICA, NO ABRIR
E
Este símbolo indica " voltaje
peligroso " dentro del producto
que presenta un riesgo de
choque eléctrico o lesión
personal.
NFORMACION FCC
Este equipoha sido probado yse verificó que cumple conlos límites
para undispositivo digital Clase B,conforme a la Parte15 de los
reglamentos FCC.Estos límites están diseñados paraproporcionar
protección razonable contrainterferencia dañina enuna instalación
residencial. Elequipo genera, usa ypuede irradiar energíade
frecuencia deradio y,si no se instalay usa de acuerdocon las
instrucciones, puedecausar interferencia dañina en unainstalación
particular.Si este equipocausainterferencia dañina a la recepciónde
radio otelevisión, lo cualpuede ser determinadoencendiendoy
apagando elequipo, se invita alusuario a corregir lainterferencia
mediante unao más de la medidassiguientes.
Reoriente oreubique la antena receptora.
Aumente laseparación entre elequipo y el receptor.
Conecte esteequipo en un receptáculo deun circuito diferente de
aquel enel que está conectado elreceptor.
Consulte aldistribuidoroauntécnico experimentado enradio/TV
para solicitarayuda.
Este aparatodigital clase B cumplecon todos los requisitosde las
Regulaciones deEquipos que Causan Interferencia.
Refiérase a laetiqueta de clasificación/identificación
ubicada enel panel posterior desu equipo para verificarsu
voltaje deoperación apropiado.
Precaución: Para prevenirchoque eléctrico, hagacoincidir
la cuchillade contacto ancha dela clavija con laranura
ancha, completamenteinsertada.
Registro deProducto: Por favor llenela tarjeta de registrode producto
(empacada porseparado) y regrésela inmediatamente. Paraclientes de
los EstadosUnidos: su Producto deElectrónica del ConsumidorRCA
puede sertambién registrado enwww.rca.com/productregistration .
Registrar esteproducto nos permite contactarlosi es necesario.
Guarde sucomprobante de venta paraobtener las refacciones y
servicios degarantía ycomoprueba de compra.Anéxelo aquí y
registre losnúmeros de modeloy de serie encaso de necesitarlos.
Los números selocalizan en la parteposterior del reproductor.
Número demodelo: Número de serie:
Fecha decompra:
Direcciónyteléfono deldistribuidor:
quite la cubierta de la unidad ni su parte trasera.
T ampocointroduzca objetos extraños en su
interior y acuda a servicio técnico cualificado si
tiene algún problema o duda.
Este símbolo indica
instrucciones
importantes que
!
acompañan al producto.
PELIGROPara reducir el riesgo de
incendio o una posible descarga
eléctrica, no exponga esta unidad a
la lluvia .o humedad, ni a goteras ni
salpicaduras, ni coloque objetos que
contengan líquidos, como jarrones,
encima del mismo.
PRECAUCION
ESTE PRODUCTO UTILIZA UN LÁSER.
EL USO DE CONTROLES O AJUSTE O
DESEMPEÑO DE PROCEDIMIENTOS
DISTINTOS A LOS ESPECIFICADOS
EN ESTE DOCUMENTO PUEDE
RESULTAR EN EXPOSICIÓN
ARADIACIÓN PELIGROSA. NO
ABRA LAS TAPAS Y NO INTENTE
REPARARLOUD. MISMO. REFIÉRASE
A PERSONAL DE SERVICIO CALIFICADO.
PRECAUCION
Las Regulaciones FCC indican que
los cambios o modificaciones no
autorizados a este equipo puede
invalidar la autoridad del usuario
para operarlo.
Nota:
Este dispositivo está protegido por
los números de Patente de EE.UU.
4,631,603 y 4,577,216 y 4,819,098
y 4,907,093 y 6,516,132. El uso de
la tecnología de protecciónde
copias de Macrovision en el
dispositivo debe ser autorizado por
Macrovision y está destinado al
hogar y para otros usos de pago por
ver solamente, a menos que sea
autorizado de otra forma por escrito
por Macrovision. La ingenieríaenr
eversa o el desensamble están
prohibidos.
Este reproductor DVD está diseñado
y fabricado para responder al número
de Región de un disco DVD, si el
disco no corresponde al número de
la Región de este reproductor DVD,
este reproductor DVD no podrá
reproducir el disco. El número de
Región para este reproductor DVD
es Región No. 1.
El aparato no deberá ser expuesto a
goteos o salpicaduras y ningún
objeto tal como vasos con líquidos,
deberá ser colocado sobre el aparato.
PRODUCTO
LASER
CLASE 1

Índice
INTRODUCCIÓN
Índice............................................
Discos soportados por este
reproductor...................................
Símbolos indicados en los DVDs..........
Estructura del disco................................
Cómo usar el presente manual
de usuario....................................
ANTES DE USAR EL REPRODUCTOR
Comprobar todos los
accesorios que incluye.................
Preparar el mando a distancia
y la unidad principal.....................
Aclaraciones sobre el mando a
distancia....................................................
Sustituir la pila del mando a
distancia...................................................
Campo de funcionamiento del
mando a distancia....................................
Nombres y funciones
de cada parte...............................
Pantalla informativa de
cristal líquido............................................
Controles de la unidad principal............
Parte izquierda de la
unidad principal.......................................
Panel derecho de la unidad principal.....
Parte trasera de la unidad principal........
Cómo colocar la unidad principal...........
Parte inferior de la unidad principal........
Mando a distancia (los botones
de uso más frecuente).............................
Mando a distancia (otros botones).........
Nombre de las diferentes partes de
la batería y sus funciones........................
Conectando el reproductor
a otros equipos.............................
Conexión a la televisión...........................
Conexión con un decodificador Dolby
Digital / DTS/ MPEG o un amplificador
que incorpore decodificador....................
Conexión con un amplificador
digital que no sea compatible
Dolby Digital / DTS / MPEG......................
Conexión con un sistema
de altavoces activo..................................
Conexión con los auriculares.................
Funcionamiento de la batería
del reproductor............................
Cargando la batería..................................
Anotaciones sobre la
recarga de batería....................................
Acoplar la batería al reproductor...........
Conectar a la red.....................................
Quitar la batería al reproductor..............
15
20
FUNCIONES BÁSICAS
1
2
2
3
4
5
6
6
6
7
8
8
8
9
10
11
11
11
12
13
14
Encender el reproductor...........
Funciones para la reproducción
de la unidad..............................
Loading discs.........................................
Cómo reproducir los discos..................
Qué hacer si aparece un menú en
la pantalla...............................................
Cómo parar de reproducir un
disco........................................................
Cómo hacer una pausa en la
reproducción...........................................
Retroceso al capítulo o título anterior
(DVD, CD de Vídeo y CD).......................
Avance al capítulo o título siguiente
(DVD, CD de Vídeo y CD)........................
Extracción del disco...............................
Apagar el reproductor................
FUNCIONES AVANZADAS
Configuración de idiomas y
subtítulos...................................
Configuración del idioma del menú
que aparece en pantalla.......................
Configuración del idioma
de los subtítulos...................................
Configuración del idioma
del sonido................................................
Funciones avanzadas.................
Cambio de salida AV (AV OUT)
a entrada AV (AV IN)..............................
Configuración del bloqueo paterno....
Mejora vídeo..........................................
23
24
28
29
31
24
E
25
25
26
26
27
27
27
30
30
30
31
31
31
PRECAUCIONES DE USO
15
Resolución de problemas..........
Atención:Cómo manipular un....
16
17
18
19
20
21
21
22
22
Cómo manipular un disco..........
Funcionamiento del pack
de batería........................................
Funcionamiento del pack de batería...
Almacenamiento...................................
Vida útil y desecho...............................
Recomendaciones e información
respecto de los discos ..........
Garantía Limitada.....................
32
33
34
35
35
35
35
36
38
This product incorporates copyright protection technology that is protected by method claims of certain U.S.
patents and other intellectual property rights owned by Macrovision Corporation and other rights owners. Use of this
copyright protection technology must be authorized by Macrovision Corporation, and is intended for home use only
unless otherwise authorized by Macrovision Corporation. Reverse engineering or disassembly is prohibited.
1
-E
Graphics are for representation only.Your unit may differ slightly.

Introducción
Discos soportados por este reproductor
Los discos listados en la tabla siguiente pueden ser reproducidos por esta unidad sin
necesidad de adaptador.
E
Las marcas que se muestran en la tabla siguiente figuran en los discos o paquetes de discos.
Tipos de discos
soportados y sus
marcas
Diámetro / Caras
reproducibles
DVD vídeo
12 cms/ sencillo
DVD vídeo
12 cms/ doble
cara
DVD vídeo
8 cms/ sencillo
DVD vídeo
8 cms/ doble
cara
CD
12 cms/ sencillo
CD
8 cms/ sencillo
1 capa
2 capa
1 capa
2 capa
1 capa
2 capa
1 capa
2 capa
Tiempo de
reproducción
Formato MPEG2
133 minutos (4,7 GB)
242 minutos (8,5 GB)
266 minutos (9,4 GB)
484 minutos (17 GB)
Formato MPEG2
41 minutos
75 minutos
82 minutos
150 minutos
74 minutos
20 minutos
Símbolos indicados en los DVDs
Los discos DVD o los paquetes que los embalan, pueden incluir las marcas que se muestran
a continuación. Estas marcas indican el tipo de señales de audio o vídeo grabadas en el
disco y las funciones que pueden soportar.
Marca
Significado
Indica el número de pistas de audio
Indica el número de ángulos
Indica el tipo de pantalla seleccionada
Indica el número de región
2
Graphics are for representation only.Your unit may differ slightly.
-E

Introducción
Estructura del disco
Los CDs están divididos en unidades llamadas pistas (generalmente una pista corresponde a una
canción. Las pistas algunas veces están divididas en índices).
CDS Pista1 Pista2 Pista3 Pista4 Pista5
Los DVDs están divididos en unidades llamadas títulos que están a su vez divididos en capítulos.
Los capítulos también incluyen menú que no pertenecen a ningúntítulo. Con las películas,
normalmente una película corresponde a un título. En discos de karaoke, una canción
corresponde a un título. Algunos discos no pueden ser divididos así; tenga esto en cuenta cuando
utiliza las funciones de búsqueda y programación.
E
Capítulo1 Capítulo2 Capítulo1 Capítulo2
Título1 Título2
3
Graphics are for representation only.Your unit may differ slightly.
-E

Introducción
Cómo usar el presente manual de usuario
Le recomendamos lea detenidamente el presente manual de usuario antes de utilizar
por primera vez el reproductor para sacar de él el máximo rendimiento.
E
Cuando el reproductor está conectado a una televisiónoaunamplificador,semuestrala
pantalla de configuración y le permite realizar las configuraciones correctas de acuerdo al
equipo al que haya sido conectado.
Cuando reproduce discos DVD es posible cambiar mediante la configuración los subtítulos
y el idioma del sonido así como seleccionar el modo de sonido deseado entre las múltiples
pistas de audio.
Para sacar máximo partido a todas las funciones que ofrece el presente reproductor de DVD,
asegúrese de guardar el presente manual de usuario en un sitio accesible.
4
Graphics are for representation only.Your unit may differ slightly.
-E

Antes De Usar El Reproductor
Comprobar todos los accesorios que incluye
Una vez haya comprado la unidad y la haya desembalado, asegúrese que incluye
los siguientes accesorios:
Adaptador de corriente
Cable de audio/vídeo
E
Adaptador para coche
Manual de usuario
INSTRUCTIONS
OPERATION
Bolsa adicional
Bolsa corta para coche
Mando a distancia tipo tarjeta
Bolsa de transporte
Batería
5
Graphics are for representation only.Your unit may differ slightly.
-E

Antes De Usar El Reproductor
Preparar el mando a distancia y la unidad principal
Aclaraciones sobre el mando a distancia.
E
No tire, golpee o dañe el mando a distancia para evitar dañarlo.
Es posible que el mando a distancia no funcione si hay algún obstáculo entre el mando y el DVD.
No exponga el mando a distancia a un foco de luz intensa.
Utilice el mando a distancia dentro del campo específico de operatividad.
Sustituir la pila del mando a distancia.
Inserte sus uñasdeAaBsegún
diagrama posterior, pulse A
siguiendo la dirección de la flecha y
saque el soporte donde debe ir la
pila.
Quite la pila gastada e inserte
una nueva pila en el soporte con
la cara + hacia arriba.
Inserte y ajuste nuevamente el
soporte de la pila en el lugar
correspondiente.
Nota:
Para prevenir la fuga de fluido de la
pila de litio, quite la pila si no va a
ser utilizada durante un largo
periodo de tiempo (un mes o más).
Si hay fuga de fluido, limpie el fluido
de la carcasa e introduzca la nueva
pila de litio.
Batería de litio (Cr2025)
A
. Precaución. La batería puede presentar un riesgo de incendio si es maltratada,
no la recargue, no la desarme, ni la caliente por arriba de 100 grados centígrados.
Reemplace la batería con otra del mismo tipo.
. Disponga de la batería adecuadamente, manténgala lejos de los niños y
B
no la arroje al fuego.
6
Graphics are for representation only.Your unit may differ slightly.
-E

Antes De Usar El Reproductor
Campo de funcionamiento del mando a distancia.
30
30
Approx.
5 meters
El mando a distancia funciona dentro de una distancia aproximada de 5 metros.
E
Nota:
La mayoría de las funciones de este reproductor de DVD pueden ejecutarse desde el mando a
distancia. Algunas otras funciones, sin embargo, sólo pueden ejecutarse desde la unidad principal.
7
Graphics are for representation only.Your unit may differ slightly.
-E

Antes De Usar El Reproductor
Nombres y funciones de cada parte
Pantalla informativa de cristal líquido.
El reproductor portátil de DVD está equipado con una pantalla de cristal líquido.
E
Pantalla de cristal líquido.
Altavoces.
Sección de control Botones de control.
Sensor del mando a distancia.
Las señales del mando a distancia se reciben en ese sensor.
Indicador de estado.
Off: sin conexión.
Rojo: Modo de espera (Standby)
Azul: reproductor activado. Actívelo presionando el botón ON de la unidad
principal o el botón Standby del mando a distancia.
Controles de la unidad principal.
8
Graphics are for representation only.Your unit may differ slightly.
-E

Antes De Usar El Reproductor
Botón Reproducir /Pausa (Play / Pause)
Presiónelo para poner en marcha la reproducción. Cuando lo presione durante el modo de
reproducción, introducirá el modo de Pausa. Presiónelo otra vez para proseguir la reproducción.
Manténgalo presionado durante un segundo y medio aproximadamente para apagar la unidad.
Botón STOP/OFF (parar/apagar).
Pulse este botón para parar la reproducción de la imagen o sonido actual.
Mantenga este botón pulsado durante 2 segundos para apagar la unidad.
(modo de espera o Standby)
Botones PREVIOUS/NEXT (anterior/siguiente).
Pulse estos botones para localizar el comienzo de los capítulos o pistas anteriores o
posteriores.Siga presionándolos durante 2 segundos durante la reproducción para cambiar la
velocidad de la reproducciónrápida hacia delante o hacia atrás X2, X4, X8, X20 y X2.
Botón MODE (modo).
Utilice la tecla +/- para realizar los ajustes después de haber introducido un modo.
Brillo: niveles0a8
Color: niveles0a8
MODO TFT: cambia la pantalla
entre 16:9 y 4:3
MODO DE VISIÓN: cambia la
pantalla entre anverso y reverso
ENTRADA / SALIDA AV: varíala
función AV entre salida y entrada.
Presiónelo durante aproximadamente
2 segundos para desactivar la pantalla y presiónelo para proseguir.
Botones+/-
Presiónelos para ajustar el modo de la pantalla
E
Botón OPEN (abrir).
6
Pulse este botón para abrir la
bandeja del disco.
Parte izquierda de la unidad principal.
9
Graphics are for representation only.Your unit may differ slightly.
-E

Antes De Usar El Reproductor
Clavija de los auriculares.
Para conectar a los auriculares estéreosoaunamplificador.
Control de volumen.
E
Permite ajustar el volumen de los altavoces o auriculares.
lavija de entrada y salida de vídeo (Video in / out jack)
Entrada o salida de las señales de vídeo al mecanismo conectado mediante la
introducción del valor del modo AV IN / OUT.El cable AV (incluido) se conecta aquí.
Salida audio/óptica.
Entrada o salida de señales de audio al mecanismo conectado configurando
los valores del modo AV IN / OUTSalida de señales ópticas y de audio al
mecanismo conectadoEl cable de AV proporcionado o el cable digital / óptico
se conecta aquí.
Alimentación.
Para conectar el adaptador de corriente incluido.
Panel derecho de la unidad principal.
Indicador LED del estado de
cargaIndica el estado del
cargador.
Bandeja.
Orificio para la apertura
Cuando inserte el abridor en este
orificio, la bandeja se abrirá
automáticamente. Apague la unidad
antes de realizar esta operación.
Graphics are for representation only.Your unit may differ slightly.
10
1
2
-E

Antes De Usar El Reproductor
Parte trasera de la unidad principal.
Abridor.
Puede utilizar el palito "abridor"
para abrir la bandeja.
Soporte.
La unidad se soporta sobre
este dispositivo.
Cómo colocar la unidad principal.
Saque el soporte.
Regule el soporte hasta conseguir la posición deseada.
Baje el botón hacia la posición LOCK para sellar la posición elegida.
Parte inferior de la unidad principal.
E
Agujero para la batería.
Tuerca para la batería.
Conector de la batería.
Nota:
no olvide volver a insertar la cubierta de goma en el conector de baterías 3
después de utilizar el pack de baterías.
11
Graphics are for representation only.Your unit may differ slightly.
-E

Antes De Usar El Reproductor
Mando a distancia (los botones de uso más frecuente).
Botón Reproducir / Pausa
E
Botón STAND BY
(modo de espera)
Pulsando este botón encenderá y
apagará el reproductor.
Utilice este botón para reproducir o
hacer una pausa en la reproducción.
Botón MENU (Menú).
Pulse este botón para desplegar el
menú del DVD en pantalla.
Botón STOP (Parar)
Pulse este botón para parar la
reproducción de una imagen o
canción.
Botón STEP (Paso) y
SLOW (a cámara lenta) Pulse este
botón para reproducir a cámara
lenta pudiendo seleccionar las
siguientes velocidades: ½, ¼, 1/6,
1/7. Si el reproductor está en modo
PAUSA,la reproducciónirá
paso a paso.
Botón TITLE (Título).
Pulse este botón para mostrar el
título del DVD.
Botón PREVIOUS/NEXT
Y
Use estos botones para buscar el
principio de las pistas o capítulos.
: Hacia atrás
: Hacia delante
Botones Scan
Utilice estos botones para cambiar
la velocidad de reproducción hacia
delante o hacia atrás.
Hacia delante
Hacia atrás
Y
Graphics are for representation only.Your unit may differ slightly.
12
-E

Antes De Usar El Reproductor
Remote control unit(other buttons)
Botón AUDIO (Sonido)
Pulse este botón para seleccionar el
idioma del sonido.
Botón SETUP (Configuración)
Pulse este botón para desplegar el
menú de configuración de pantalla
desde el modo de parada. Presiónelo
para ver en pantalla la Mejora de
Vídeo durante la reproducción.
Cursores
Para realizar la configuraciónde
diferentes valores, utilice estos
botones para subir, bajar o
desplazarse izquierda, derecha.
Botón ENTER (Validar)
Pulse este botón para validar las
configuraciones seleccionadas.
Botón RETURN (Volver)
Este botón le permitirá volver
al menú anterior. (sólo para VCD,
con el PBC activado)
Zoom
Aleja o acerca la imagen en pantalla.
Botones numéricos
Presione estos botones para
introducir números. Presione el botón
SHIFT para cambiar de funcióna
número, si fuera necesario.
Botón REPEAT (Repetir)
En discos DVD, este botónle
permite reproducir títulos o capítulos
repetidamente. En discos CD, este
botón le permite reproducir pistas o
discos enteros repetidamente.
Botón REPEAT A-B (Repetir
entre A-B)
Pulse el botón durante la
reproducción para configurar los
puntos de partida (A) y finalización
(B) de la sección que desee
reproducir repetidamente.
Botón SHIFT
Pulse este botón para cambiar de
número y de función (defecto:
función)
OPEN (Abrir)
Abra la bandeja y saque o
reemplace el disco.
Botón SUBTITLE (Subtítulo)
Pulse este botón para seleccionar
el idioma del subtítulo deseado en
discos que permiten esta función.
Botón OSD (Menú
desplegable en pantalla)
Pulse este botón para desplegar
toda la información relativa al disco.
Botón ANGLE (Angulo)
Pulse este botón para cambiar
de ángulo.
Botón SEARCH (Búsqueda)
Permite localizar un título, capítulo
y hora de reproducción.
Botón CLEAR (Borrar)
Permite borrar los números
introducidos anteriormente.
E
13
Graphics are for representation only.Your unit may differ slightly.
-E

Antes De Usar El Reproductor
Nombre de las diferentes partes de la batería y sus funciones.
E
Conector de entrada DC Conecte el adaptador de energía para recargar.
Proporciona energía al reproductor.
Interruptor de la batería
Gírelo para apretar o aflojar el pack de baterías.
Indicador LED de baterías
Cuando la batería está descargada, el LED estará apagado.
Cuando se está recargando, el LED estará rojo.
Cuando se ponga verde, la recarga habrá finalizado.
Terminales del reproductor
Proporcionan energía al reproductor.
ATENCIÓN:
Para evitar cortocircuitos, no manipule los terminales.
14
Graphics are for representation only.Your unit may differ slightly.
-E

Antes De Usar El Reproductor
Conectando el reproductor a otros equipos.
Antes de realizar la conexión
Apague primero el reproductor y los componentes que deban ser conectados.
Conexión a la televisión.
Cable de audio y vídeo
(incluido)
Clavija de entrada de vídeo
(color amarillo)
Clavija de entrada de sonido
(color blanco)
Clavija de entrada de sonido
(color rojo)
E
Flujo de señal
15
Graphics are for representation only.Your unit may differ slightly.
-E

Antes De Usar El Reproductor
Conexión con un decodificador Dolby Digital / DTS/ MPEG o
un amplificador con decodificador incorporado.
Realizando las configuraciones correctas, este reproductor le permitirá disfrutar del potente sonido
Dolby Digital, DTS ó MPEG. Basta con sacar las señales digitales de la salida digital del
E
reproductor hacia un decodificador o un amplificador con un decodificador incorporado.
Panel izquierdo de la
unidad principal
Cable óptico digital (no incluido)
Altavoz
frontal
Altavoz frontal (izquierdo)
(Izquierdo)
Altavoz
trasero
Nota:
Con un decodificador o amplificador compatibles , se necesitan 5 altavoces
(frontal izquierdo/derecho, central y envolventes izdo./dcho.) y un potenciador de graves
(subwoofer) para poder disfrutar el canal de sonido Dolby Digital/DTS 5.1.
Altavoz
central
(derecho)
Altavoz
trasero (derecho)
Ver página 22 para más
detalles respecto a las
conexiones con la TV.
Subwoofer
Flujo de señal
16
Graphics are for representation only.Your unit may differ slightly.
-E

Antes De Usar El Reproductor
Conexión con un amplificador digital que no sea
compatible Dolby Digital / DTS / MPEG.
Salida de las señales digitales de la salida digital del reproductor a un amplificador digital que no
sea compatible con Dolby/DTS/MPEG
E
Panel izquierdo de la
unidad principal
Cable óptico digital
(no incluido)
Clavija de entrada de
sonido digital.
Nota:
Antes de conectar el reproductor a un amplificador con entrada de audio digital que no sea
compatible Dolby Digital, DTS ó MPEG, verifique cuidadosamente que son correctas las
configuraciones de salida digital del reproductor.
Ver página 22 para más
detalles respecto a las
conexiones con la TV.
Flujo de señal
No olvide que puede dañar los altavoces y escuchar un fuerte ruido,
si reproduce discos DVD cuando las configuraciones de sonido no se han
realizado correctamente.
17
Graphics are for representation only.Your unit may differ slightly.
-E
 Loading...