


DVD Player
User’s Guide
DRC615N
Changing entertainment. Again.
WARNING
RISK OF ELECTRIC SHOCK.
DO NOT OPEN.
To reduce risk of electrical shock, do
not remove cover or back (no user
serviceable parts inside). Refer servicing
to qualified personnel.
WARNING: To reduce the risk of fire or
shock hazard, do not expose this DVD
player to rain or moisture. No objects
filled with liquids, such as vases, shall be
placed on the apparatus.
This symbol indicates “dangerous
voltage” inside the product that
presents a risk of electric shock
or personal injury.
This symbol indicates
important instructions
accompanying the
product.
WARNING: Handling the cord on this product or cords associated with
accessories sold with this product, will expose you to lead, a chemical known
to the State of California to cause birth defects or other reproductive harm.
CAUTION: THIS PRODUCT UTILIZES
A LASER. USE OF CONTROLS OR
ADJUST-MENTS OR PERFORMANCE
OF PROCEDURES OTHER THAN THOSE
SPECIFIED HEREIN MAY RESULT IN
HAZARDOUS RADIATION EXPOSURE.
DO NOT OPEN COVERS AND DO NOT
REPAIR YOURSELF. REFER SERVICING
TO QUALIFIED PERSONNEL.
Wash hands after handling.
FCC INFORMATION
This equipment has been tested and found to comply with the limits for a Class
B digital device, pursuant to Part 15 of the FCC rules. These limits are designed
CAUTION: FCC Regulations state that
unauthorized changes or modifications
to this equipment may void the user’s
authority to operate it.
to provide reasonable protection against harmful interference in a residential
installation. This equipment generates, uses and can radiate radio frequency
energy and, if not installed and used in accordance with the instructions, may
cause harmful interference to radio communications. However, there is no
guarantee that interference will not occur in a particular installation. If this
equipment does cause harmful interference to radio or television reception,
which can be determined by turning the equipment off and on, the user is
CAUTION: These servicing instructions
are for use by qualified service personnel
only. To reduce the risk of electric shock,
do not perform any servicing other
than that contained in the oeprating
instructions unless you are qualifieid
to do so.
encouraged to try to correct the interference by one or more of the following
measures.
• Reorient or relocate the receiving antenna.
• Increase the separation between the equipment and receiver.
• Connect this equipment into an outlet on a circuit different from that to
which the receiver is connected.
• Consult the dealer or an experienced radio/TV technician for help.
This class B digital apparatus meets all requirements of the Canadian
Interference--Causing Equipment Regulations.
The Shock Hazard Marking and Associated Graphical Symbol is provided on the
bottom panel of unit.
Refer to the identification/rating label located on the back panel of your
product for its proper operating voltage.
Caution: To prevent electric shock, match wide blade of plug
to wide slot, fully insert.
Attention: Pour éviter les chocs électriques, introduire la
lame la plus large de la fiche dans la borne correspondante
de la prise et pousser jusqú au fond.
Note: This device is protected by U.S.
patent numbers 4,631,603 and 4,577,216
and 4,819,098 and other intellectual
property rights. The use of Macrovision’s
copy protection technology in the device
must be authorized by Macrovision and
is intended for home and other limited
pay-per-view uses only, unless otherwise
authorized in writing by Macrovision.
Reverse engineering or disassembly is
prohibited.
This DVD player is designed and
manufactured to respond to the Region
Management Information. If the
Region number of a DVD disc does
not correspond to the Region number
of this DVD player, this DVD player
cannot play the disc. The Region
number for this DVD player is Region
No 1.
Product Registration: Please fill out the product registration card (packed
separately) and return it immediately. For U.S. customers: Your RCA Consumer
Electronics product may also be registered at www.rca.com/productregistration
Registering this product allows us to contact you if necessary.
Keep your sales receipt to obtain warranty parts and service and for proof of
purchase. Attach it here and record the serial and model numbers in case you
need them. The numbers are located on the back of the player.
Model number: Serial Number:
Purchase date:
Dealer address and phone:
Apparatus shall not be exposed to
dripping or splashing and that no
objects filled with liquids, such as
vases, shall be placed on the apparatus.
CLASS 1
LASER
PRODUCT

Table of Contents
Chapter 1: Connections and Setup
What’s in the Box .........................................................2
Initial Setup of the Remote Control ..........................2
The Player’s Power Supply ...........................................3
Attaching and Removing the Battery ......................... 3
Charging the Battery ..................................................... 3
Using the AC Power Adapter ......................................4
Connecting your DVD Player to Other
Components ............................................................. 4
Buttons, Jacks, and Controls ........................................5
Front View ........................................................................5
Right Side View ................................................................ 6
Open Expanded View ....................................................6
Remote Control ............................................................8
Using Different Menus ............................................... 10
Locking the DVD Player Buttons .............................. 10
Chapter 2: Playing Discs
Compatible Discs ........................................................11
Regional Coding .......................................................... 11
Turn on the DVD Player ............................................11
How to Load and Play a Disc ....................................11
Basic Playback Features .............................................12
Picture Scan ...................................................................12
Frame Advance ..............................................................12
Slow Motion .................................................................12
Skip Forward/Backward ..............................................12
Title/Chapter Direct or Time Search ......................12
Track Direct or Time Search .....................................13
DISPLAY Button ............................................................13
Advanced Playback Features .....................................13
Audio Menu ...................................................................13
Subtitle Menu .................................................................14
Title Menu ......................................................................14
Audio Mode Menu (Audio CDs only) .....................14
3D Sound ........................................................................14
Zoom ...............................................................................14
Camera Angle ................................................................15
Repeat .............................................................................15
Using the REPEAT Button (DVD) .......................15
Using the REPEAT (CD/VCD) .............................15
Using the A-B REPEAT Button
(DVD/CD/VCD) .................................................15
Random Playback ..........................................................16
Playback Control (VCD 2.0 only) .............................16
Program Playback (DVDs/Audio CDs/
some VCDs and SVCDs) ........................................16
Bookmarks .....................................................................16
Digest (DVD and VCD) ...............................................17
Playing mp3 and WMA Files .......................................18
Displaying JPEG Files ....................................................19
Playing JPEG Files and mp3 or WMA
Files at the Same Time .............................................19
Chapter 3: Menu System
The DVD Player Menu System ..................................20
The General Setup Menu ...........................................20
TV Display ......................................................................20
TV Type ............................................................................21
Menu Language (On-screen Display Language) .....21
The Video Quality Setup Menu ................................. 21
Brightness .......................................................................21
Contrast ..........................................................................21
Color ...............................................................................21
The Dolby Digital Setup Menu .................................. 22
The Preferences Setup Menu ....................................22
Audio ...............................................................................22
Subtitle .............................................................................22
Disc Menu .......................................................................22
Ratings (Parental Control ...........................................23
Changing the Password ...............................................23
Chapter 4: Additional Information
Troubleshooting ..........................................................24
Maintenance of Cabinet ............................................. 26
About WMA ................................................................ 27
About MPEG4 ............................................................. 27
About JPEG .................................................................27
Recommendations and Information
Concerning Discs .................................................... 28
Specifications ............................................................... 29
Limited Warranty .......................................................30
Accessory Information ............................................... 32
Carrying Case ..............................................................33
This product incorporates copyright protection technology that is protected by method claims of cer tain U.S. patents and
other intellectual property rights owned by Macrovision Corporation and other rights owners. Use of this copyright protection
technology must be authorized by Macrovision Corporation, and is intended for home use only unless otherwise authorized by
Macrovision Corporation. Reverse engineering or disassembly is prohibited.
1
Chapter 1 Connections and Setup
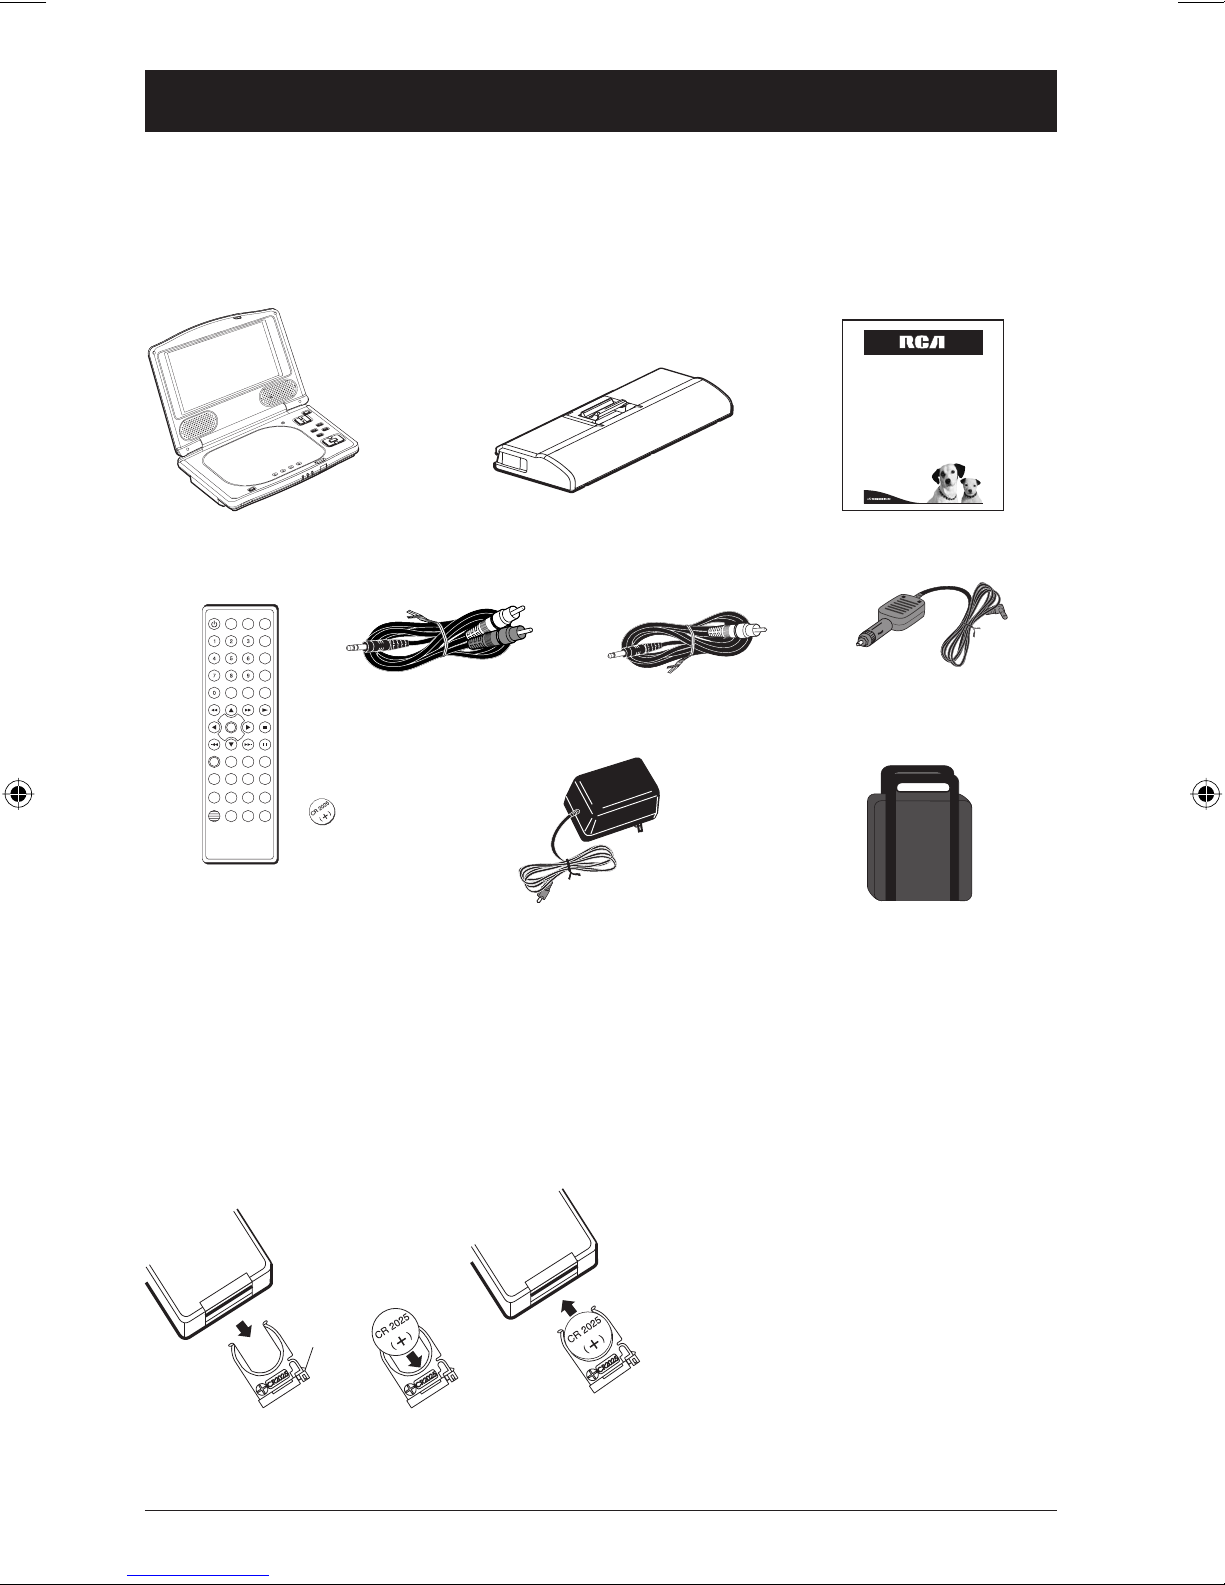
What’s in the Box
Thank you for purchasing the DVD Player. Unpack the box completely and tear off any
protection films. We recommend that you retain the original carton and packing materials for use
should you transport or ship the unit in the future. Keep this manual handy for future reference.
DVD Player
User’s Guide
DRC615N
Changing entertainment. Again.
Portable DVD Player
STANDBY SCREEN
ON/OFF ON/OFF DISPLAY RANDOM
PROGRAM
REPEAT
A-B
CLEAR SLOW/R SLOW/F
PLAY
STOP
ENTER
PAUSE/
STEP
SETUP RETURN PBC SEARCH
TITLE AUDIO DVD
SUBTITLE MENU MENU MENU
AUDIO
MODE 3D ANGLE ZOOM
KEY
MUTE LOCK DIGEST BOOKMARK
Audio Cable
DVD Battery
Video Cable
User’s Guide
Car Adapter
Remote Control
with battery (CR2025)
AC Adapter
Carrying Case
Initial Setup of the Remote Control
Remove the battery holder from the remote control by pushing the tab release toward the
battery compartment. While holding the tab, pull out the battery holder. Insert a CR2025 battery,
and reinsert the battery holder into the remote control compartment.
.
Tab Release
Graphics are for representation only. Your unit may differ slightly.
In order to avoid any risk of explosion,
observe polarity indicated on the battery
holder. Replace only with the type of battery
specified. Do not throw the battery into fire
or attempt to recharge it. If you are not using
the remote control unit for an extended
period (several weeks), take the battery out.
2

Connections and Setup
The Player’s Power Supply
You can power your player either from the battery or power adapter. The battery must first
be charged using the AC power adapter.
Attaching and Removing the Battery
The battery has three plugs that must be engaged in the three holes located under the DVD
player.
1. Install the battery into the player while taking care to align the plugs on the battery with
the holes located under the player.
2. Slide the battery into place until you hear it click.
3. To remove the battery, press the Lock/Release lever and pull the battery away from the
player.
Note: Contact the applicable local governmental office and your current waste removal provider for
assistance in determining the appropriate disposal method in your area for old batteries.
Lock/Release
Lever
Charging the Battery
1. Make sure the player is turned off when charging the battery.
2. Insert the plug of the AC power adapter into the DC IN jack on the right side of the
player. Plug the other end into the AC wall outlet.
The CHARGE indicator at the front of the player turns red when the battery is
charging. When the battery is fully charged, the FULL indicator turns green.
3. Disconnect the adapter from both the battery and AC outlet, when the charging is
completed.
Notes: Fully charge the Ni-MH battery before using it for the first time.
The battery is fully charged approximately 10 to 15 hours after plugging it into the AC outlet.
Use only the supplied AC adapter with this player and battery. Using any other adapter will void the
warranty.
Low Battery Indication
The STANDBY indicator blinks when the battery power is nearing depletion. Within a
while, the power turns off. Refer to the “Charging the Battery” section above to recharge
the battery.
Graphics are for representation only. Your unit may differ slightly.
3
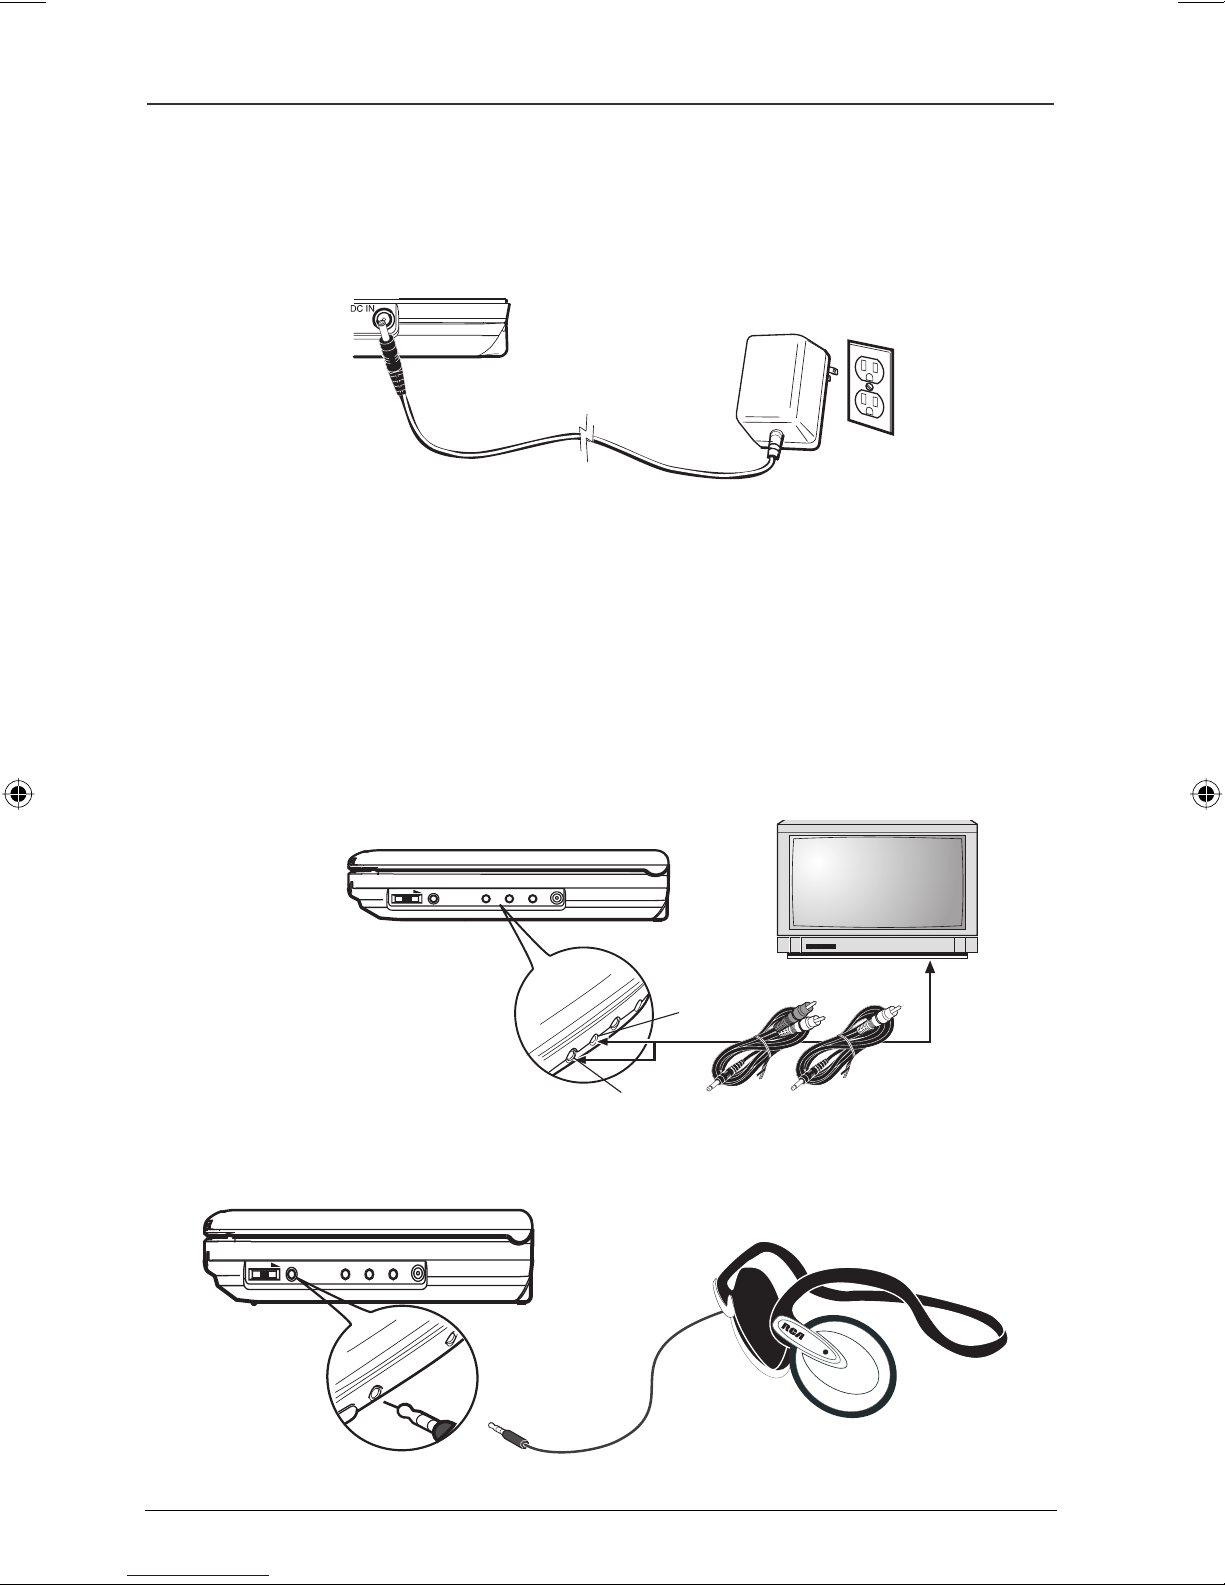
Connections and Setup
VOLUME PHONES
AUDIO ---- VIDEO S-VIDEO
DC IN
P
HO
N
ES
AUDIO OUT
VIDEO OUT
VOLUME PHONES
AUDIO ---- VIDEO S-VIDEO
DC IN
AU
DI
O
–
VID
EO
S-VIDEO DC
IN
Using the AC Power Adapter
1. Connect the plug from the power adapter to the player’s DC IN jack on the right side of the
player.
2. Connect the other end of the power adapter to an AC power outlet.
Connecting Your DVD Player to Other Components
Note: When connecting your DVD player to other components, make sure the power is turned off and the AC
adapter is not connected.
Connecting the Player to a Television
If you want to watch DVD discs on your TV by using your DVD player, you can connect it to a
television set using Audio-Video cables and/or S-VIDEO cable (not supplied). When using the
S-VIDEO jack (if available on your TV), make sure you also connect the audio as the S-VIDEO
cable only carries video.
Note: Remember to turn your TV on and
tune it to the Input channel on the TV to
view the video from the DVD player.
Using Headphones
For private listening, use the headphone jacks to connect headphones (not included) to the player. .
Graphics are for representation only. Your unit may differ slightly.
4
Connections and Setup
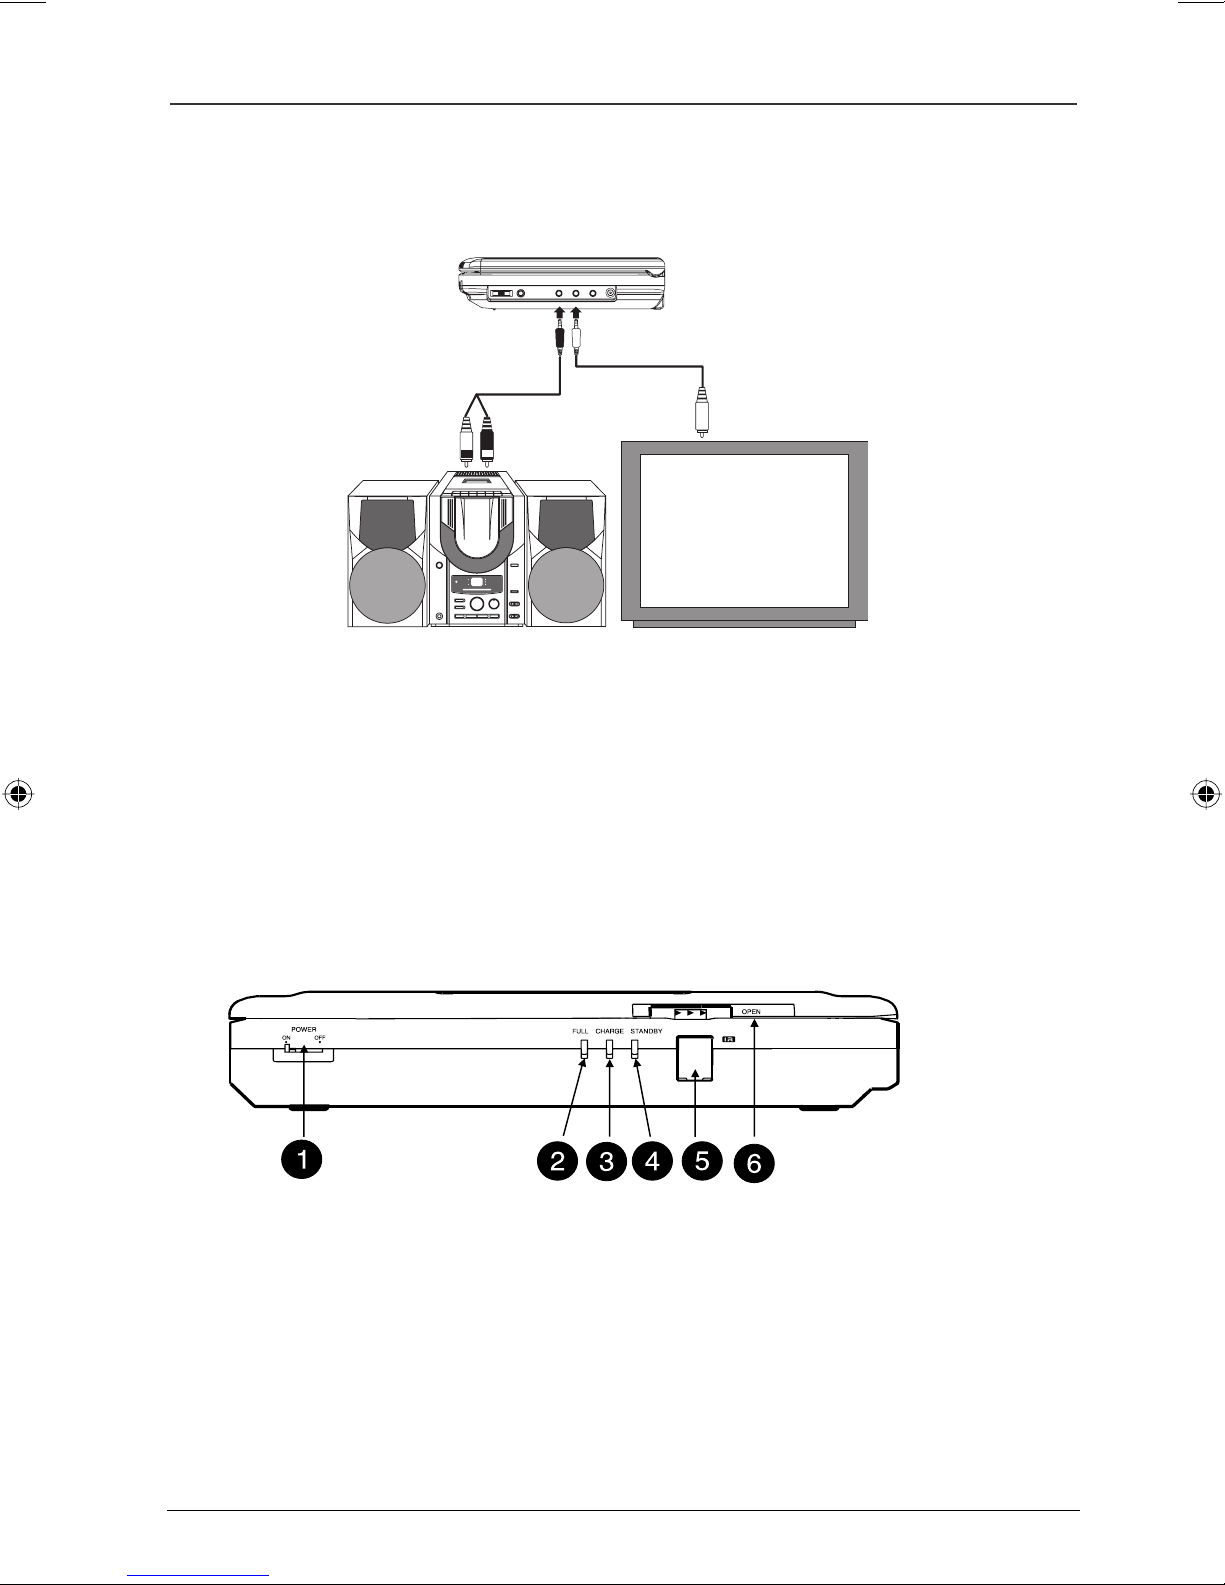
Connecting Your DVD Player to an Audio System
If you want to use an audio source like an amplifier or audio system and TV, follow the
illustration below. Use the audio/video cables.
Note: Remember to turn your TV on and
tune it to the Input channel on the TV to
view the video from the DVD player.
Micro System
with AUX IN
AUDIO
CABLE
VIDEO
CABLE
TV
Connecting the DVD Player to the Car Cigarette Lighter
Make sure the car and the player are turned off before connecting the player to the cigarette
lighter. Using a car adapter, connect the socket end of the car adapter to the cigarette lighter and
the other end of the adapter to the DC IN connector on the player.
Note: To prevent the car’s battery from discharging, disconnect the DC power cord from the cigarette lighter
socket when not in use.
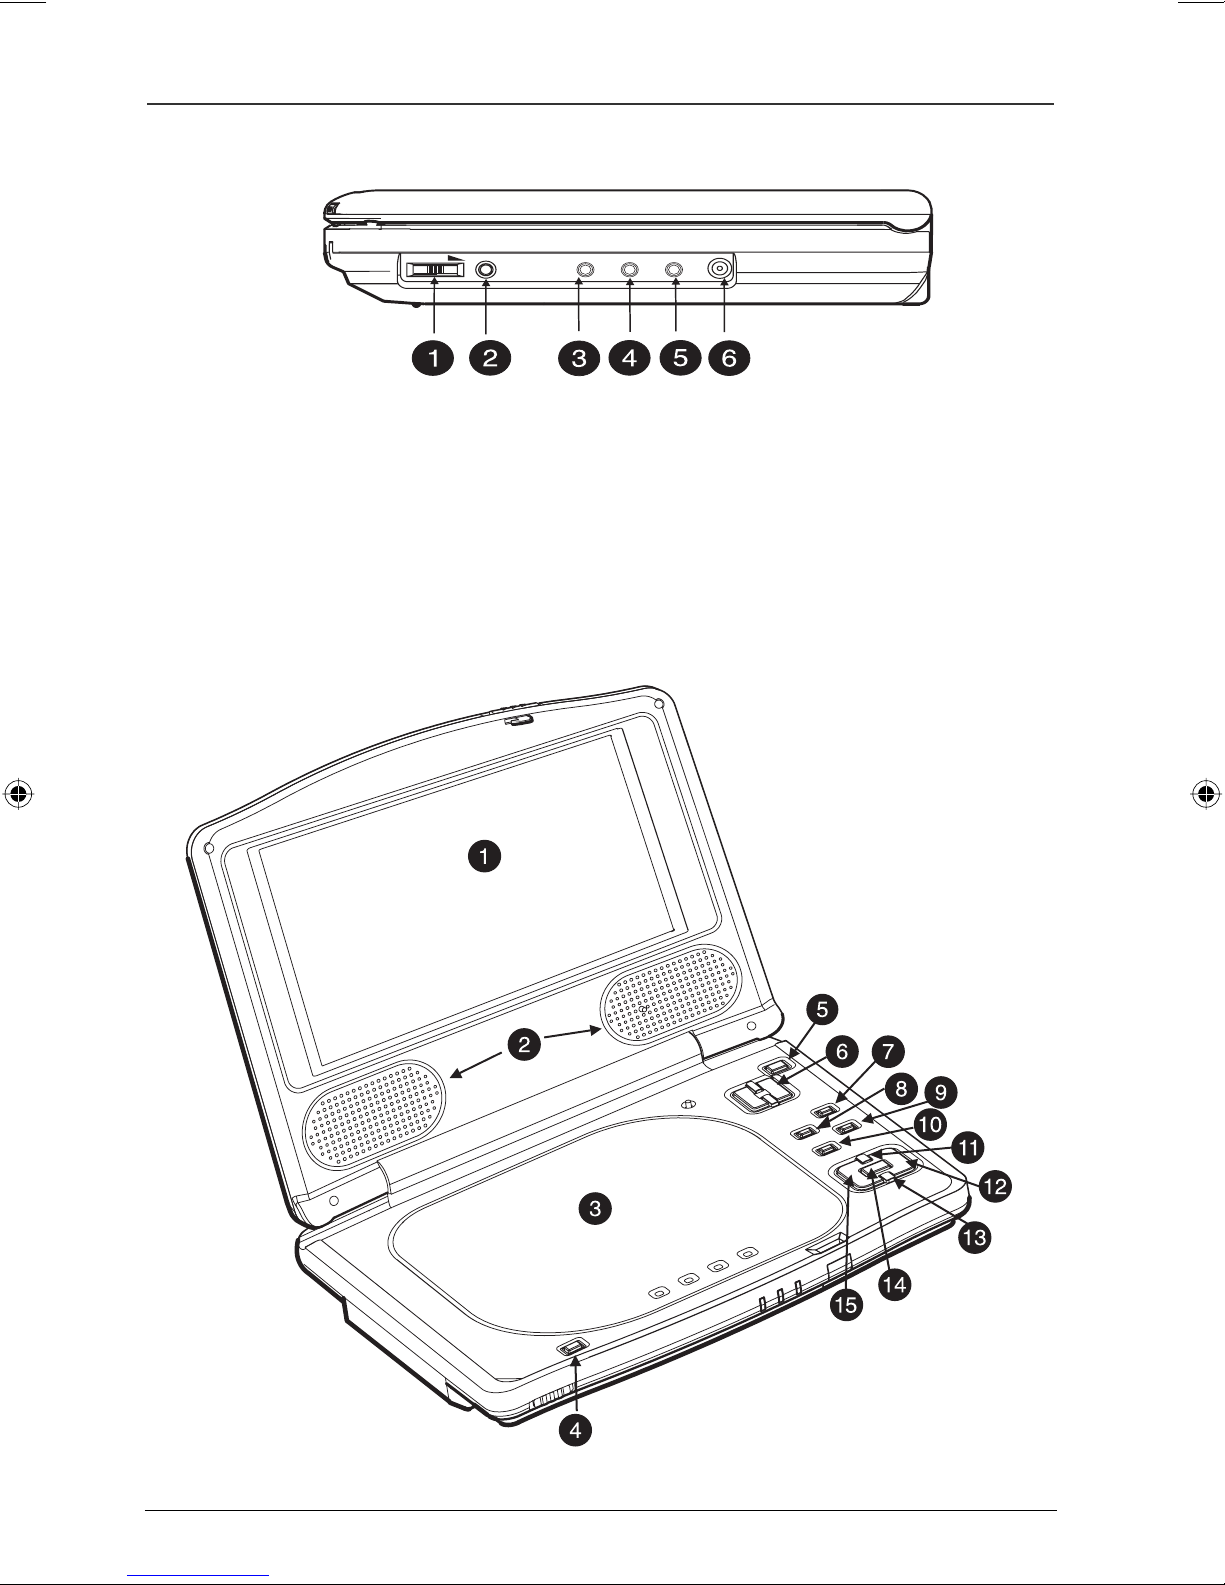
Buttons, Jacks, and Control
Front View (from left to right)
1 POWER switch: Turns the DVD player on and off.
2 FULL indicator: Lights green when the battery is fully charged.
3 CHARGE indicator: Lights red when the battery is being charged.
4 STANDBY indicator: Flashes when the DVD player is turned off; the DVD player is still
receiving some power.
5 Remote sensor: Accepts the remote control signal.
6 OPEN: Opens the disc compartment.
Graphics are for representation only. Your unit may differ slightly.
5
Connections and Setup
Right Side View (from left to right)
VOLUME PHONES
AUDIO ---- VIDEO S-VIDEO
DC IN
1 VOLUME knob: Increases or decreases the audio.
2 PHONES jack: Plug in your headphones.
3 AUDIO out jack: Used to connect a component with an AUDIO in jack.
4 VIDEO out jack: Used to connect a component with a VIDEO in jack.
5 S-VIDEO out jack: Used to connect a component with an S-VIDEO in jack.
6 DC IN jack: Used to connect the power or car adapter.
Open Expanded View
Graphics are for representation only. Your unit may differ slightly.
6

1 DVD screen display
2 Speakers
3 Disc compartment
Connections and Setup
4 DOOR OPEN (
5 ENTER: Selects the adjustment or menu item.
6 Navigation buttons
adjustments.
7 TITLE MENU/PBC (Playback Control: Accesses the Title /Chapter of the disc when
playing a disc. When playing a VCD, it turns Playback Control on and off.
8 SETUP: Accesses the DVD player’s menu.
9 DISPLAY: Accesses the disc’s information during playback.
10 DVD MENU: Accesses the disc’s menu.
11 Stop
12 Skip Forward
13 Pause
14 Play
: Stops playback.
: Pauses a disc during playback.
: Plays a disc.
): Opens the disc tray.
: Used to highlight on-screen items, and make some menu
: Goes to next chapter (DVD) or track (CD).
15 Skip Reverse
: Goes to previous chapter (DVD) or track (CD).
Graphics are for representation only. Your unit may differ slightly.
7
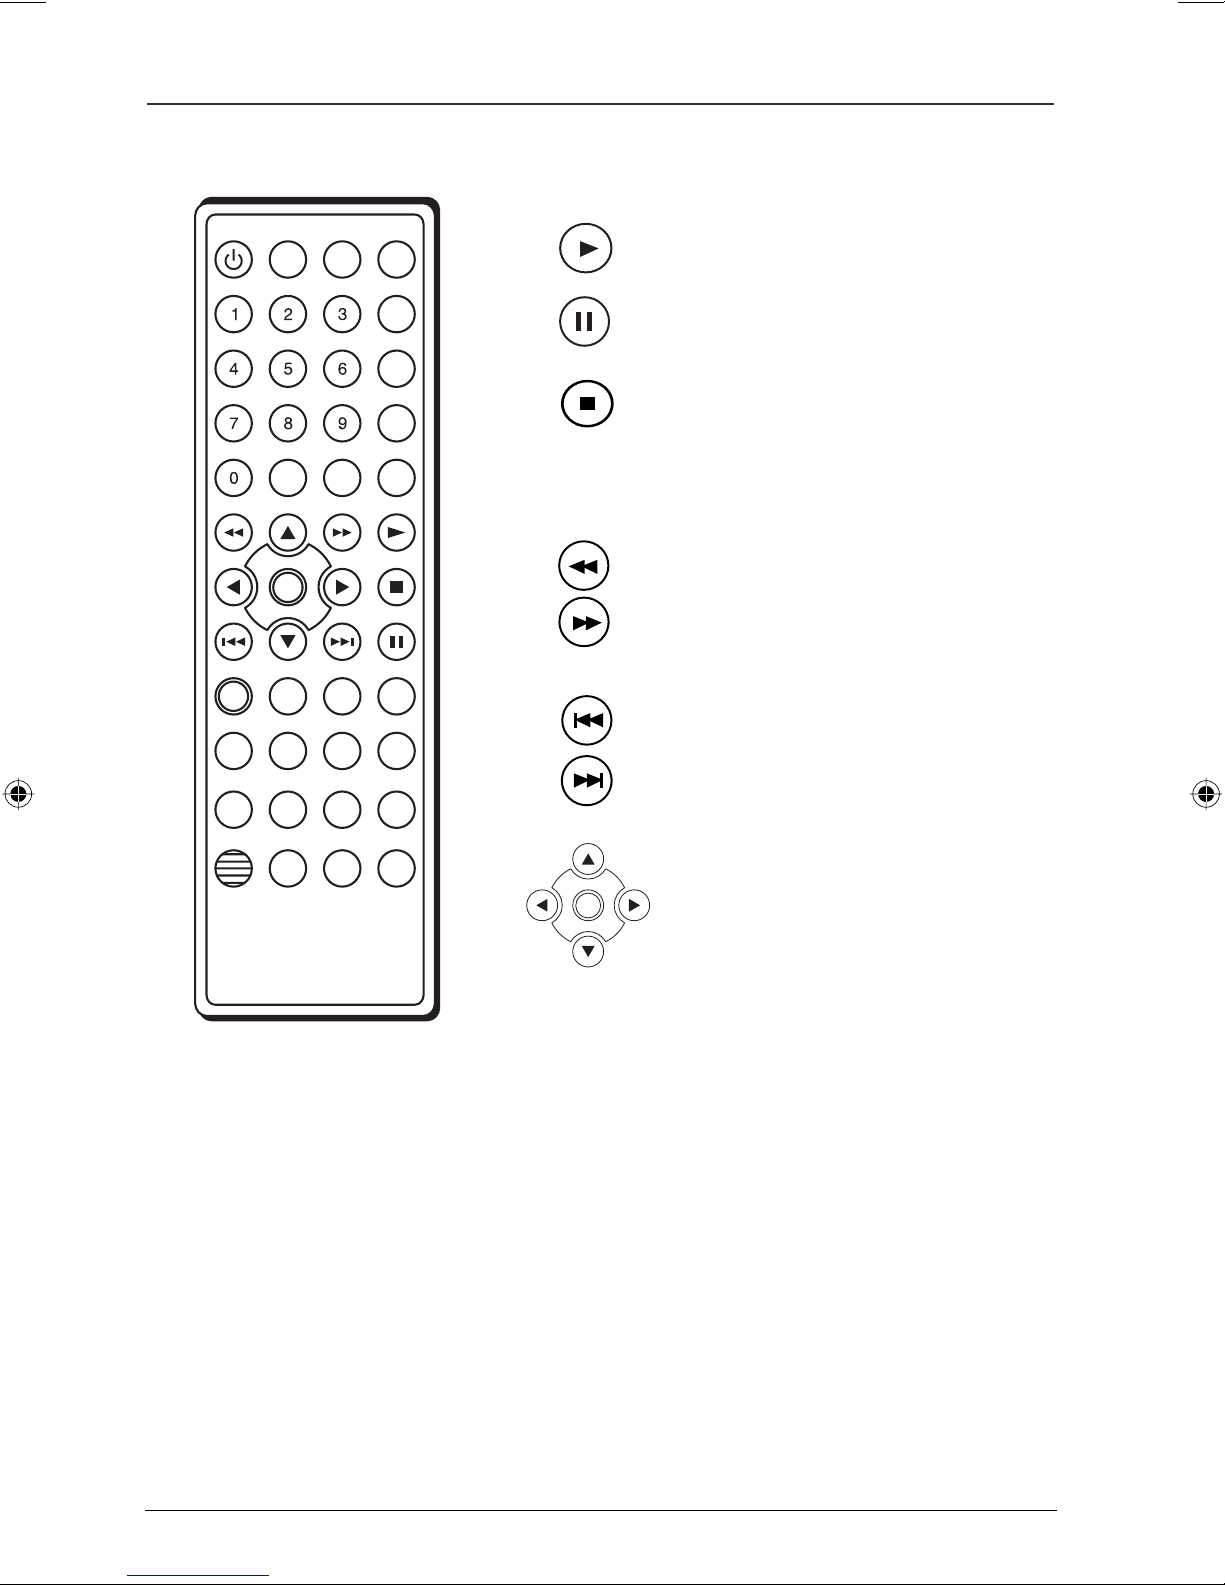
Connections and Setup
PROGRAM
REPEAT
TITLE AUDIO DVD
SUBTITLE MENU MENU MENU
STANDBY SCREEN
ON/OFF ON/OFF DISPLAY RANDOM
A-B
CLEAR SLOW/R SLOW/F
AUDIO
MODE 3D ANGLE ZOOM
PAUSE/
STEP
STOP
PLAY
SETUP RETURN PBC SEARCH
KEY
MUTE LOCK DIGEST BOOKMARK
ENTER
Remote Control
Play a disc.
Pause a disc and advance one frame
at a time.
Stop disc playback. Press once for prestop mode (playback starts at location
where you stopped). Press twice for
complete stop (playback starts at
beginning of disc).
Search Reverse and Search Fast Forward
playback.
Buttons listed alphabetically
0-9
Use to input information such as chapter numbers and track numbers.
3D
ANGLE
AUDIO MENU
AUDIO MODE
BOOKMARK
that point.
CLEAR
DIGEST
seconds of each.
Skip forward/back one chapter (DVD)
or track (CD).
Arrow buttons and ENTER button:
these are the navigation buttons
ENTER
you use to highlight on-screen menu
items. Press ENTER to select the
item that is highlighted.
Enhances sound quality when the player is connected to a stereo system.
Accesses the Camera Angle option of a DVD disc, if available.
Changes the audio language of a disc, if available.
Selects audio mode for audio CDs only, if available.
Marks a point on the disc so you can quickly start playing the disc from
Use to remove menus or displays from the screen.
Displays the first scene of all the chapters/tracks or plays the first few
DISPLAY
Displays elapsed and remaining time when a disc is playing.
Graphics are for representation only. Your unit may differ slightly.
8

Connections and Setup
DVD MENU
ENTER
Accesses the disc’s menu when playing a disc.
Use with the navigation buttons; selects the item that is highlighted
in the menu system.
KEY LOCK
Disables the keys on the DVD player except for the POWER
button and VOLUME control.
MUTE
Press to reduce the audio level to minimum level; press again to
restore audio. MUTE appears on screen of the DVD player.
PBC
PAUSE/STEP ( )
Turns Playback Control on and off for VCD 2.0 only.
Press once to pause a disc; press again to advance one frame at a
time.
PLAY ( )
PROGRAM
RANDOM
REPEAT/REPEAT A-B
Plays a disc.
Allows you to program what order chapters/tracks play.
Turns random playback on and off for VCD, SVCD, and CD discs.
Repeat the title or chapter of the disc. Press repeatedly to scroll
through the options (CHAPTER, TITLE, OFF or TRACK, ALL, OFF).
Define a specific segment on the disc that you want to repeat.
RETURN
Stops playback and returns to the PBC menu (VCD).
SCREEN ON/OFF
Turns the TFT screen temporarily off to save battery power when
playing a CD, mp3, or other audio media.
SEARCH
Fast Forward ( )
Searches for a Title, Chapter, or Time during playback.
Accesses forward search during playback. Press several times to
change playback speed.
Reverse ( )
Accesses reverse search during playback. Press several times to
change playback speed.
SETUP
Turns the DVD player’s menu on and off.
SKIP FORWARD ( )
SKIP REVERSE ( )
SLOW/F
Goes to the next chapter (DVD) or track (CD).
Goes to the previous chapter (DVD) or track (CD).
Accesses forward slow motion during DVD playback. Press several
times to change playback speed.
SLOW/R
Accesses reverse slow motion during DVD playback. Press several
times to change playback speed.
STANDBY ON/OFF
STOP( )
SUBTITLE MENU
Accesses a DVD disc’s Subtitle menu, if available.
Turns the DVD player on and off.
Stops playback.
TITLE MENU
ZOOM
Enlarges the picture on the screen (DVD, VCD only).
Accesses the DVD disc’s Title menu, if available.
Graphics are for representation only. Your unit may differ slightly.
9
 Loading...