


DVD Player User’s Guide
DRC500L
Please read this User’s Guide before
using your product for the first time.
Tocom: 15909580
www.rca.com/latinamerica
IB/DRC500L cover 6/7/02 10:25 AM Page 1
To reduce risk of electrical shock, do not
remove cover or back (no user
serviceable parts inside). Refer servicing
to qualified personnel.
FCC INFORMATION
This equipment has been tested and found to comply with the limits for a Class B digital device, pursuant to Part 15 of the
FCC rules. These limits are designed to provide reasonable protection against harmful interference in a residential installation.
This equipment generates, uses and can radiate radio frequency energy and, if not installed and used in accordance with the
instructions, may cause harmful interference to radio communications. However, there is no guarantee that interference will
not occur in a particular installation. If this equipment does cause harmful interference to radio or television reception, which
can be determined by turning the equipment off and on, the user is encouraged to try to correct the interference by one or
more of the following measures.
• Reorient or relocate the receiving antenna.
• Increase the separation between the equipment and receiver.
• Connect this equipment into an outlet on a circuit different from that to which the receiver is connected.
• Consult the dealer or an experienced radio/TV technician for help.
This class B digital apparatus meets all requirements of the Canadian Interference--Causing Equipment Regulations.
Note:
This device is protected by U.S. patent
numbers 4,631,603 and 4,577,216 and
4,819,098 and other intellectual property
rights. The use of Macrovision’s copy
protection technology in the device must be
authorized by Macrovision and is intended for
home and other limited pay-per-view uses
only, unless otherwise authorized in writing by
Macrovision. Reverse engineering or
disassembly is prohibited
This DVD player is designed and manufactured
to respond to the Region Management
Information. If the Region number of a DVD
disc does not correspond to the Region
number of this DVD player, this DVD player
cannot play the disc. The Region number for
this DVD player is Region No 4.
Refer to the identification/rating label located on the back panel of your product for its proper operating
voltage.
Power consumption: 100VAC-240VAC, 50Hz/60Hz @ 25 watts.
Caution: To prevent electric shock, match wide blade of plug to wide slot, fully insert.
Attention: Pour éviter les chocs électriques, introduire la lame la plus large de la fiche dans la borne
correspondante de la prise et pousser jusqú au fond.
CAUTION
FCC Regulations state that unauthorized
changes or modifications to this equipment
may void the user’s authority to operate it.
CAUTION
THIS PRODUCT UTILIZES A LASER. USE OF
CONTROLS OR ADJUSTMENTS OR
PERFORMANCE OF PROCEDURES OTHER
THAN THOSE SPECIFIED HEREIN MAY
RESULT IN HAZARDOUS RADIATION
EXPOSURE. DO NOT OPEN COVERS AND DO
NOT REPAIR YOURSELF. REFER SERVICING
TO QUALIFIED PERSONNEL.
WARNING To reduce the risk of fire or shock
hazard, do not expose this DVD player to rain
or moisture. No objects filled with liquids,
such as vases, shall be placed on the
apparatus.
WARNING
RISK OF ELECTRIC SHOCK.
DO NOT OPEN.
This symbol indicates
“dangerous voltage” inside the
product that presents a risk of
electric shock or personal
injury.
This symbol indicates
important instructions
accompanying the
product.
Keep your sales receipt to obtain warranty parts and service and for proof of purchase. Attach it here and record the serial
andmodel numbers in case you need them. The numbers are located on the back of the player.
Model number: DRC500L Serial Number: Purchase date:
Dealer address and phone:
CLASS 1
LASER
PRODUCT
Product Registration: Please fill out the product registration card packed with this product, and return it. immediately
Returning this card enables us to contact you if necessary.
IB/DRC500L cover 6/7/02 10:25 AM Page 2

Chapter 1: Setup and Connections
Things to consider before you connect ......................................2
Types of Discs your DVD player can play ....................................2
Choose your connection................................................................3
Connection: DVD + TV + VCR ..............................................4
Connection: DVD + TV ..........................................................5
Connection: DVD + TV + Audio Receiver ............................6
Install batteries in the remote control ........................................8
Turn on the TV and DVD player ..................................................9
Chapter 2: The Remote Control
Component Buttons ............................................................10
DVD Buttons ........................................................................10
Programming the Remote ..........................................................13
Tune to the TV’s Input Channel..........................................13
Remote Control Codes ................................................................14
Chapter 3: Playing Discs
Regional Coding ..........................................................................16
Using Different Menus................................................................16
Loading and Playing Discs ..........................................................17
Using a Disc Menu ......................................................................18
Using the On-Screen Info Display ............................................19
Time Display ................................................................................19
Selecting a Title ..........................................................................20
Selecting a Chapter ....................................................................20
Table of Contents
Disc Playback Features................................................................22
Using Subtitles ............................................................................24
Using Bookmarks ........................................................................26
Changing the Audio Language ..................................................27
Changing the Camera Angle ......................................................28
Audio CDs ....................................................................................29
Programmed Play ........................................................................31
Video CDs ....................................................................................34
MP3 Files......................................................................................35
Viewing JPEG files ......................................................................37
Chapter 4: The DVD Players Menu System
Creating a Password and Setting Ratings ................................39
TV Aspect ....................................................................................43
Linear PCM ..................................................................................46
Languages Menu..........................................................................47
Chapter 5: Additional Information
Troubleshooting ..........................................................................51
Handling Cautions ......................................................................54
Description of Jacks ....................................................................56
Front Panel Controls....................................................................57
Explanation of Input Jacks and Cables......................................58
Limited Warranty ........................................................................60
Video Input Channel....................................................................64
1
IB/500L Body 6/7/02 11:12 AM Page 1

Chapter 1: Setup and Connections
2
Things to consider before you connect
Protect components from overheating
• Don’t block ventilation holes on any of the components. Arrange the components so that air can circulate freely.
• Don’t stack components.
• When you place components in a stand, make sure you allow adequate ventilation.
• If you connect an audio receiver or amplifier, place it on the top shelf.
Position cables properly to avoid audio interference
• Insert each cable firmly into the designated jack.
• If you place components above the TV, route all cables down the side of the back of the TV instead of straight down
the middle of the back of the TV.
• If your antenna uses 300-ohm twin lead cables, do not coil the cables. Also, keep the twin lead cables away from
audio/video cables.
Connection Pictures
Audio/video cables are usually bundled together. For better visibility, the connection pictures in this book show each cable
separately (audio left, audio right, and video).
Types of discs your DVD player can play
• DVD discs – DVD discs contain high quality picture and sound content.
• Audio discs – Audio CDs contain musical or sound content only. MP3 discs are CDs that contain
MP3 files.
• Video CD discs – Like DVD video discs, Video CDs contain picture and sound content. The
difference is the amount of information that can be stored on the disc. VCDs typically have
lower picture and sound quality than DVD discs.
VIDEO CD
Some discs may not be
compatible due to laser pickup
and disc design.
IB/500L Body 6/7/02 11:12 AM Page 2
3
Chapter 1: Setup and Connections
DVD TV VCR
DVD TV
DVD TV Audio Receiver
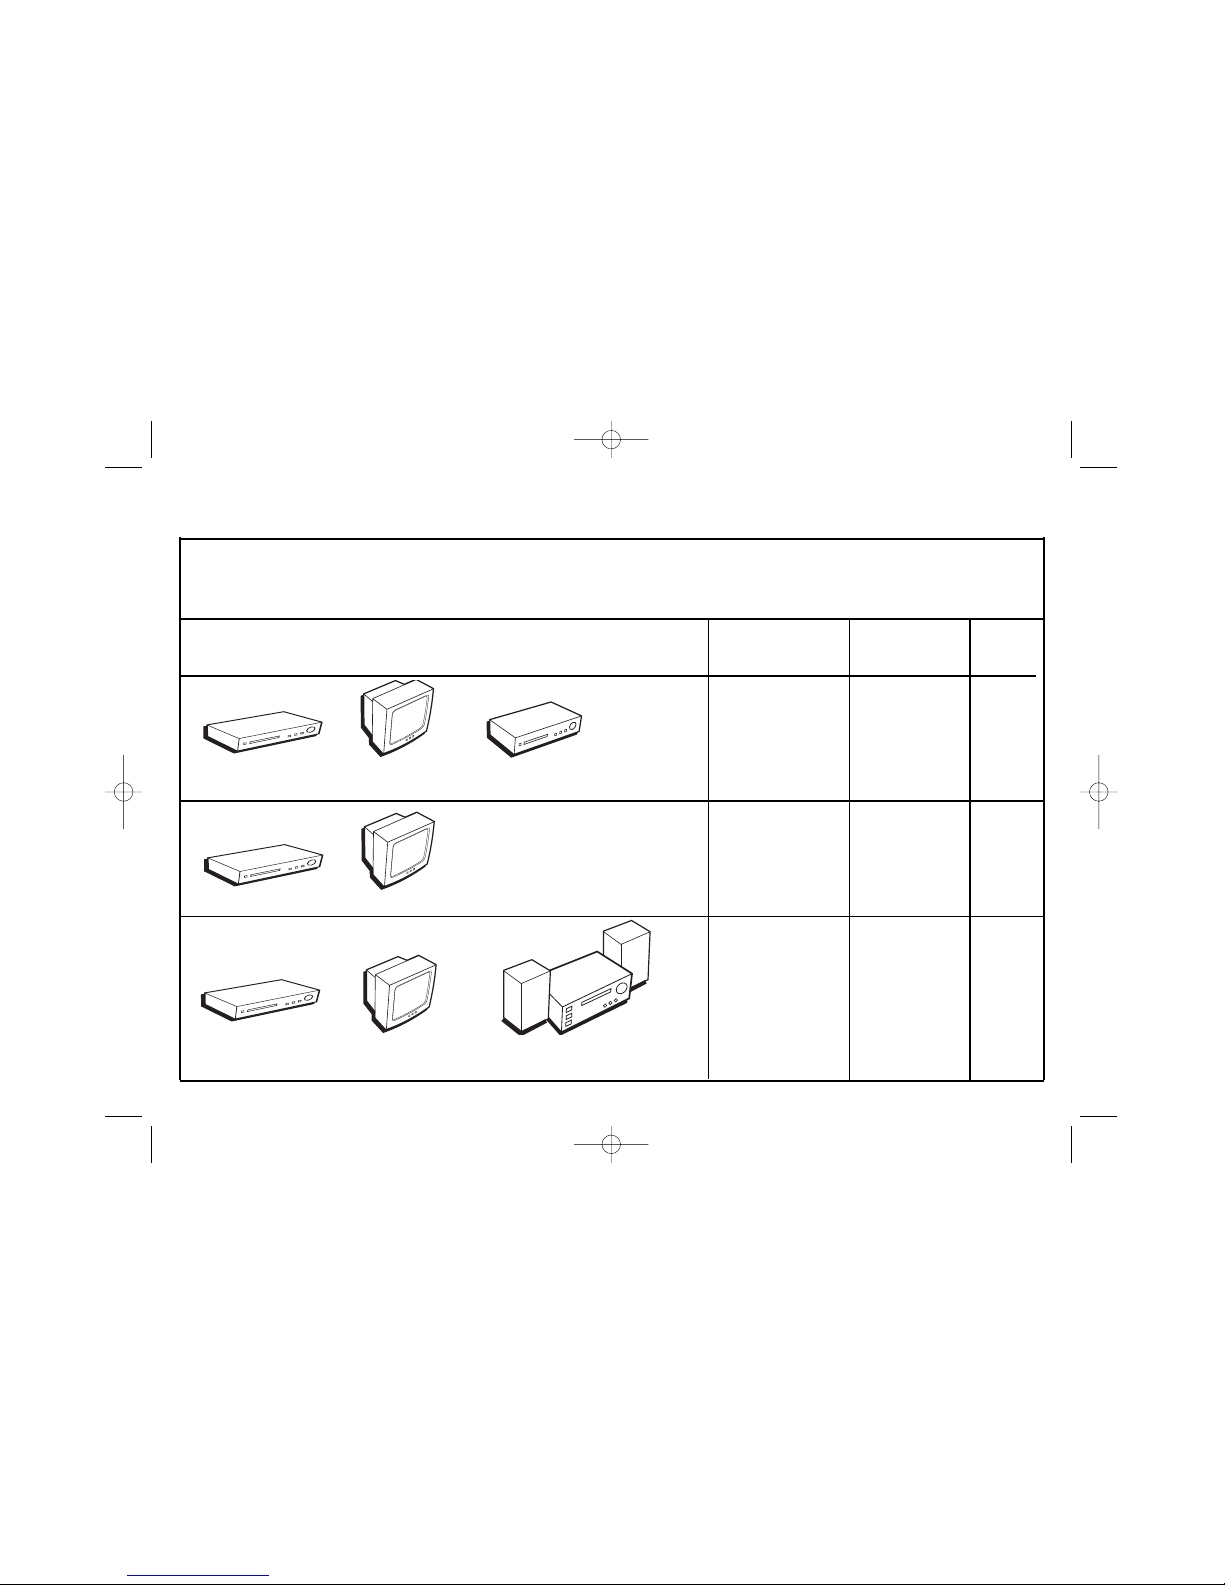
Choose Your Connection
There are several ways to connect your DVD player. Please use the following chart to determine which connection is best for
you. Turn to the appropriate page, and connect your DVD Player.
Components Cables Needed Connection Go to...
Title
• Coaxial DVD + TV + VCR 4
• Audio/video
• S-Video (optional)
• Coaxial DVD + TV 5
• Audio/video
• S-Video (optional)
• Coaxial DVD + TV + 6
• Audio/video Audio Receiver
• S-Video (optional)
IB/500L Body 6/7/02 11:12 AM Page 3
4
Chapter 1: Setup and Connections
VIDEO
AUDIO
L R
OUT TO TV
Back of VCR (example)
CABLE
OR
OFF-AIR SIGNAL
IN FROM ANTENNA
VIDEO OUT
OPTICAL
COAXIAL
DIGITAL OUT
VIDEO
AUDIO
L R
S-VIDEO
CABLE/ANTENNA
Back of TV (example)
Back of DVD Player
Y
PB
PR
COMPONENT
VIDEO OUT
S-VIDEO
VIDEO OUT
R
L
AUDIO OUT
R
L
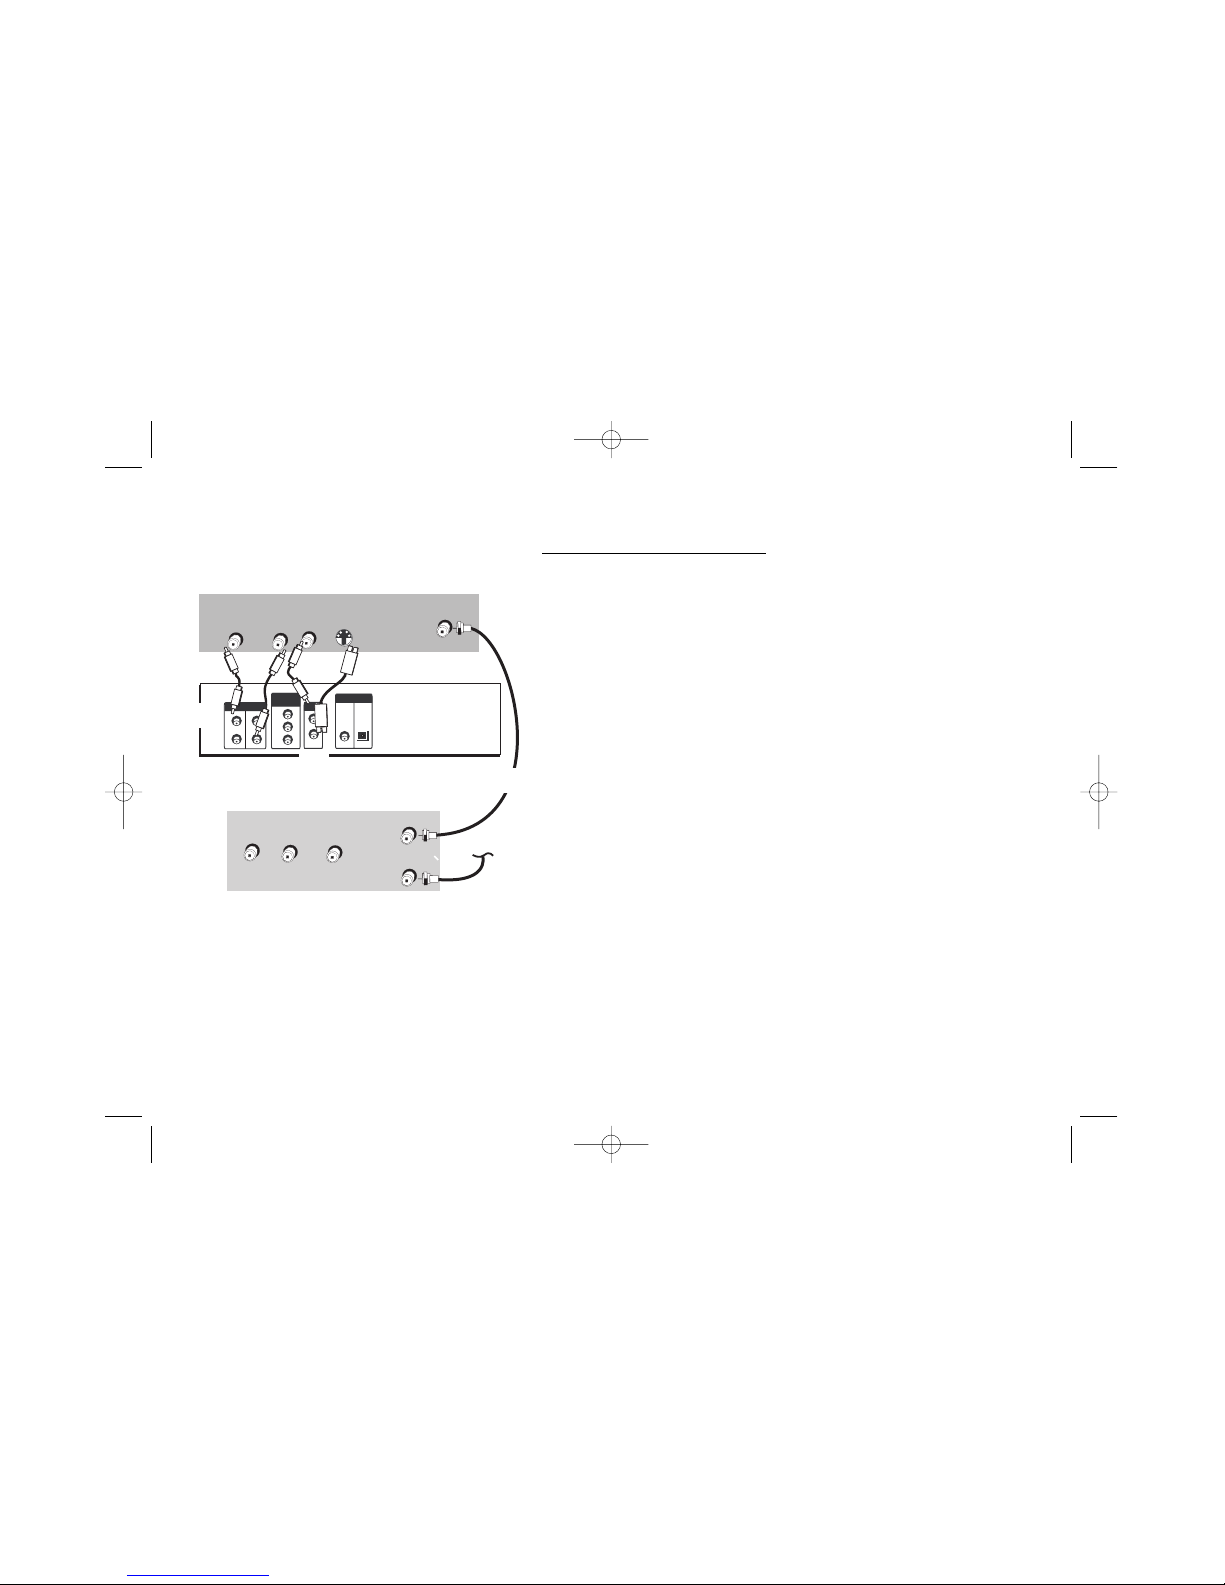
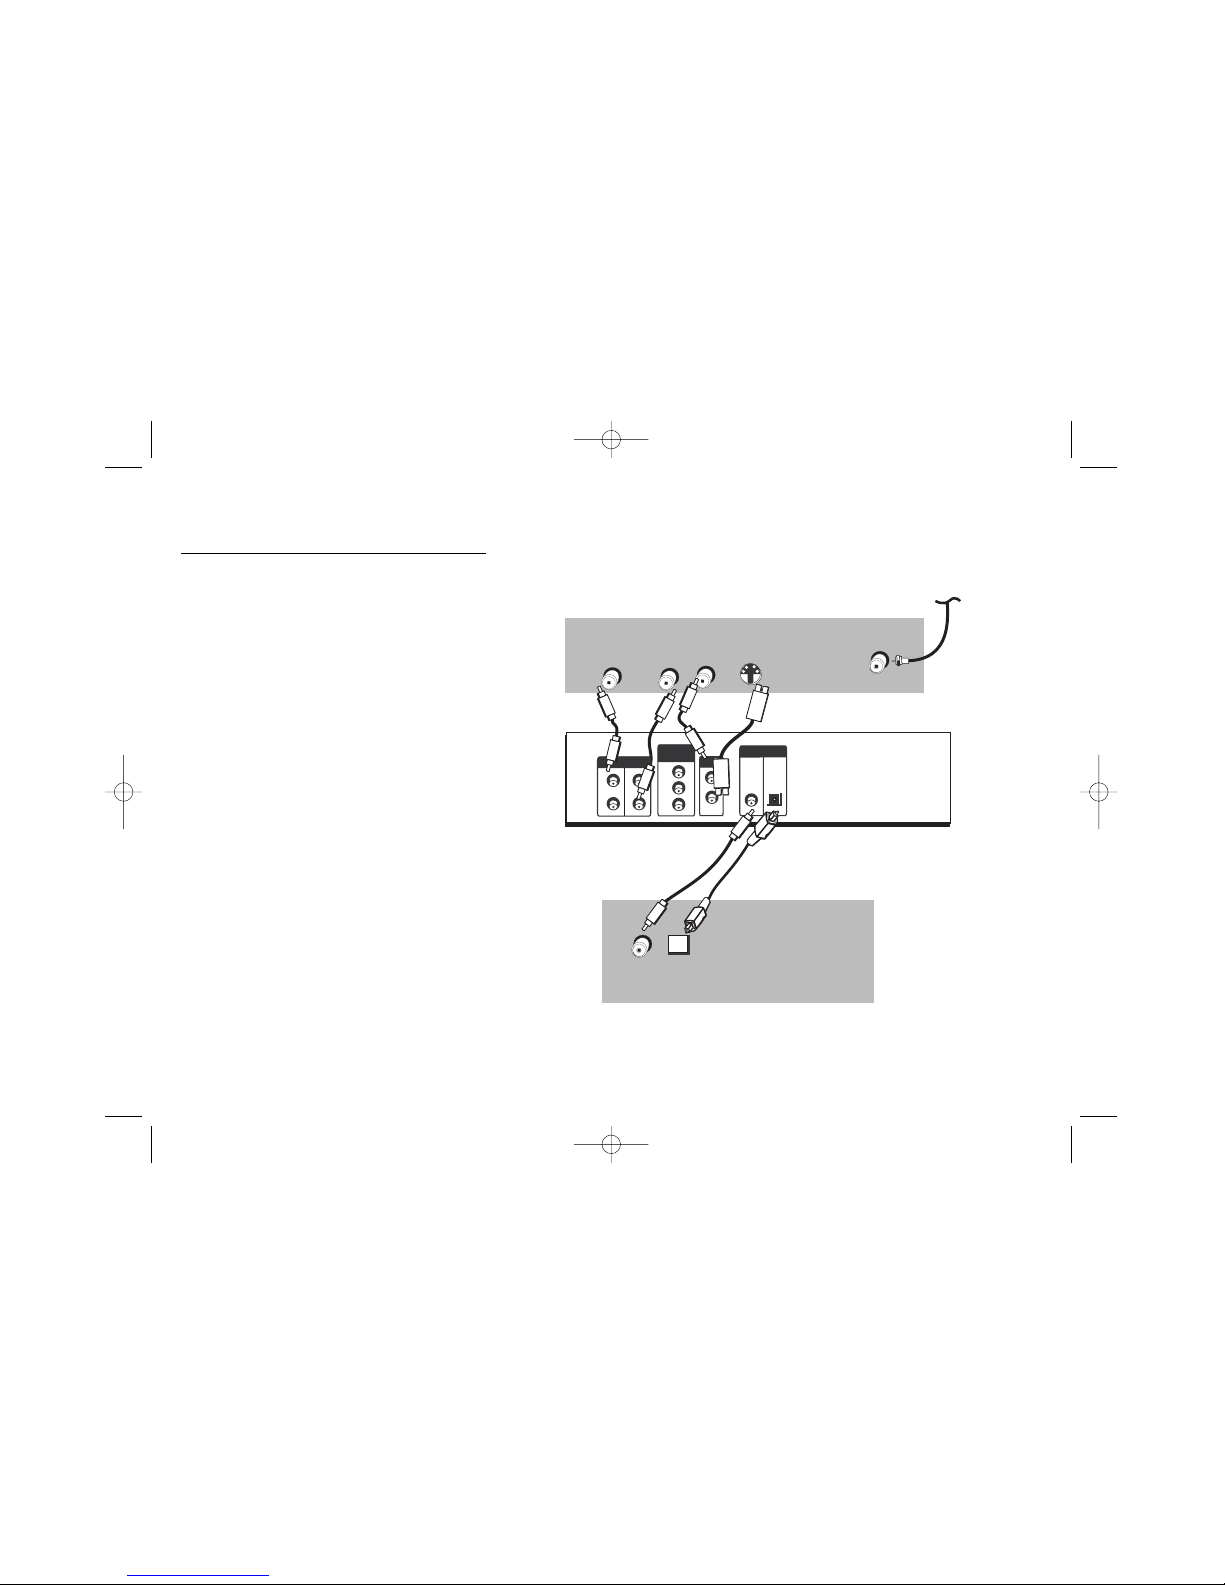
Connection: TV + DVD + VCR
1. Connect the audio cables to the AUDIO OUT L (left – white) and R
(right – red) jacks on the back of your DVD Player, and to the
corresponding Audio Input jacks on your TV (sometimes labeled
AUDIO IN L and R).
2. Connect the video cable.
A.Basic video connection – Connect the video cable (yellow) to the
VIDEO OUT jack on the back of your DVD Player, and to the Video
Input jack on your TV (sometimes labeled VIDEO IN).
- OR -
B. S-Video (optional) – If your TV has an S-Video jack, connect the
S-Video cable (not provided) to the S-VIDEO OUT jack on the back
of your DVD Player and to the S-VIDEO jack on your TV.
Note: If your TV has component video (Y, Pb, Pr) jacks, use video-grade cables (not
provided) to connect the TV to the DVD player (Y to Y, Pb to Pb, etc.). It is essential to
match the color coded connectors with a compatible TV.
3. Connect the antenna or cable to the Antenna Input jack on the VCR
(sometimes labeled IN FROM ANT).
4. Connect a coaxial cable to the Antenna Output jack on the VCR
(OUT TO TV) and to the Antenna Input jack (CABLE/ANTENNA) on
the TV.
5. Insert the AC power cord into an AC outlet.
Go to page 8
1
2A
2B
4
3
The back of your TV and VCR might look different than
the ones pictured here.
Details about the different kinds of cables used to connect
your DVD player are on page 56.
Note: Don’t connect the DVD player to the VCR, or
through the VCR. Doing so could negatively affect the
picture quality and/or disable the DVD player.
IB/500L Body 6/7/02 11:12 AM Page 4
5
Chapter 1: Setup and Connections
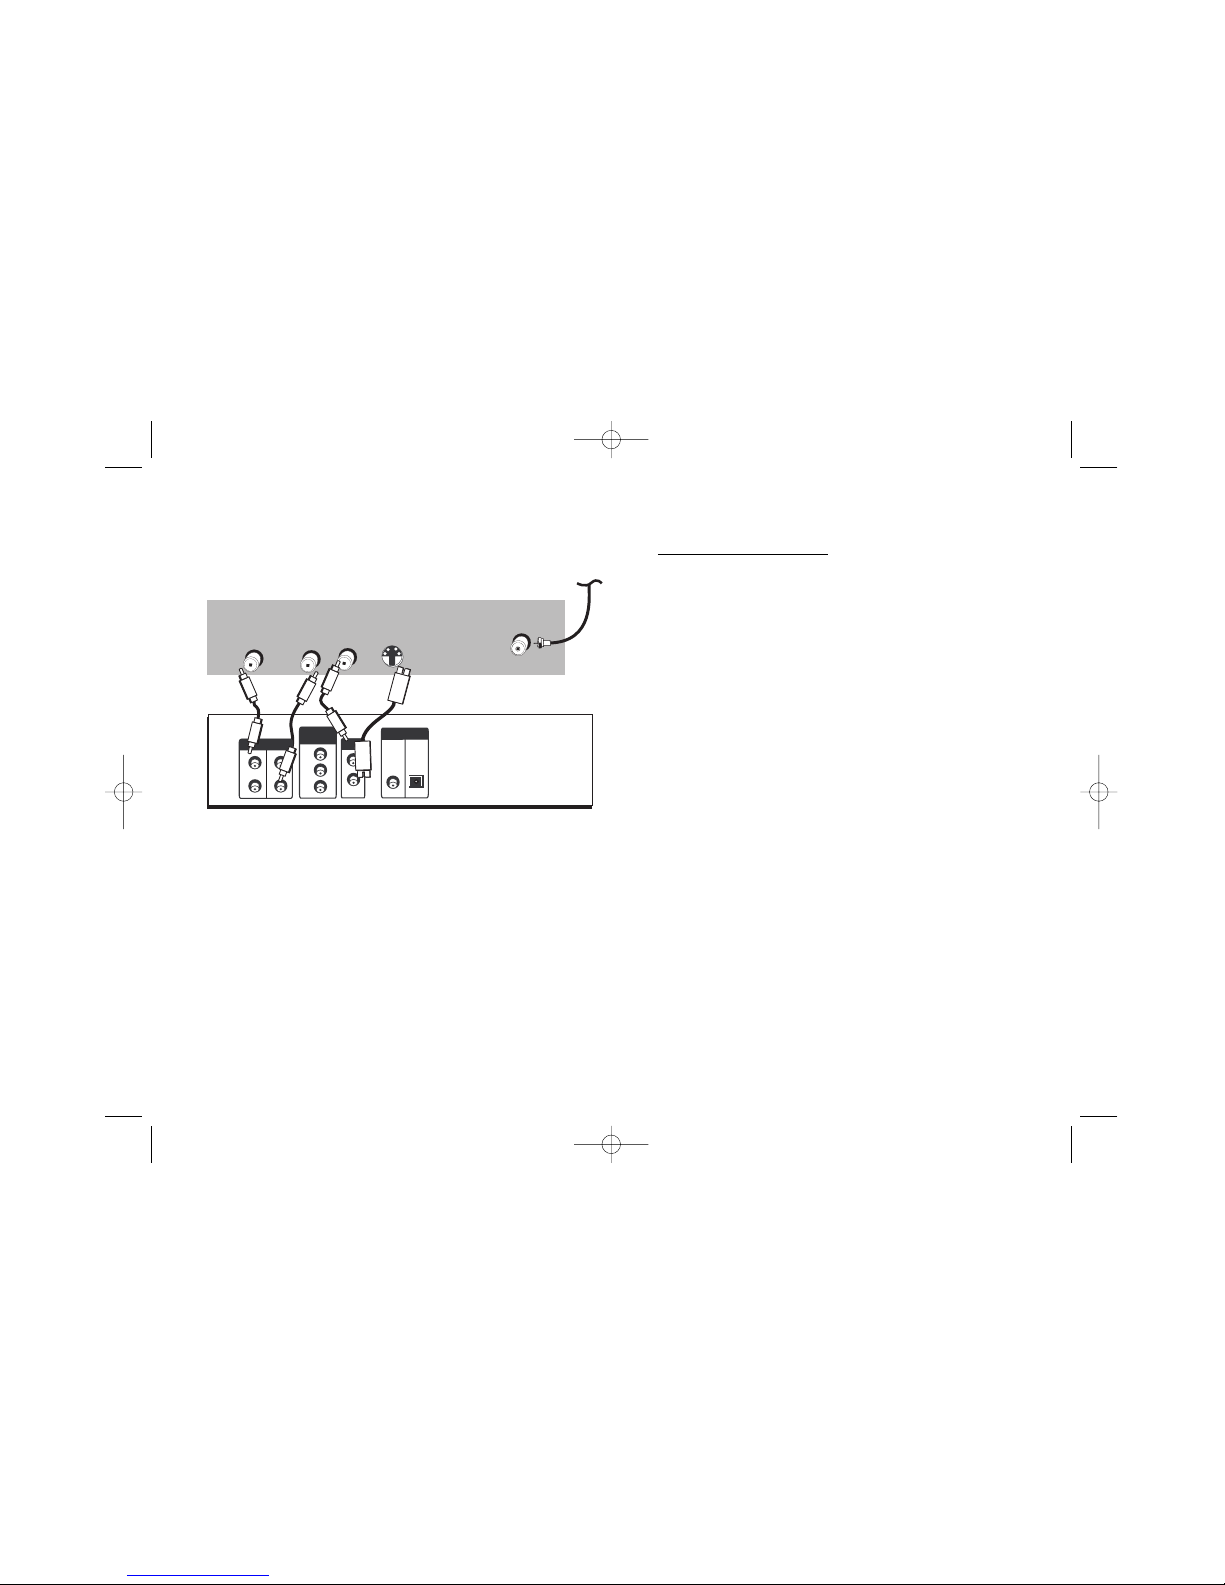
Connection: DVD + TV
1. Connect the audio cables to the AUDIO OUT L (left –
white) and R (right – red) jacks on the back of your DVD
Player, and to the corresponding Audio Input jacks on
your TV (sometimes labeled AUDIO IN L and R).
2. Connect the video cable.
A. Basic video connection – Connect the video cable (yellow)
to the VIDEO OUT jack on the back of your DVD Player, and to
the Video Input jack on your TV (sometimes labeled VIDEO IN).
B. S-Video (optional) – If your TV has an S-Video jack,
connect the S-Video cable (not provided) to the S-VIDEO OUT
jack on the back of your DVD Player and to the S-VIDEO jack
on your TV.
Note: If your TV has component video (Y, Pb, Pr) jacks, use
video-grade cables (not provided) to connect the TV to the
DVD player (Y to Y, Pb to Pb, etc.). It is essential to match the
color coded connectors with a compatible TV.
3. Connect the AC power cord into an AC outlet.
4. Connect your cable or off-air antenna to your
television. You may need to consult your television
manual for details.
Go to page 8
VIDEO OUT
OPTICAL
COAXIAL
DIGITAL OUT
VIDEO
AUDIO
L R
S-VIDEO
CABLE/ANTENNA
Back of TV (example)
Back of DVD Player
CABLE
OR
OFF-AIR SIGNAL
Y
P
B
P
R
COMPONENT
VIDEO OUT
S-VIDEO
VIDEO OUT
R
L
AUDIO OUT
R
L
The back of your TV and VCR might look different than
the ones pictured here.
Details about the different kinds of cables used to connect
your DVD player are on page 56.
IB/500L Body 6/7/02 11:12 AM Page 5
6
Chapter 1: Setup and Connections
VIDEO OUT
OPTICAL
COAXIAL
DIGITAL OUT
VIDEO
AUDIO
L R
S-VIDEO
CABLE/ANTENNA
Back of TV (example)
Back of DVD Player
Back of Receiver (example)
OPTICAL
COAXIAL
CABLE
OR
OFF-AIR SIGNAL
Y
P
B
P
R
COMPONENT
VIDEO OUT
S-VIDEO
VIDEO OUT
R
L
AUDIO OUT
R
L
Consult the
manual that
came with
your receiver
to connect it
completely.
Both Dolby Digital® and DTS® are audio formats
used to record 5.1-channel audio signals onto the
digital track of film (while the film is being made).
Both of these formats provide up to six separate
channels: left, right, center, left rear, right rear, and
common subwoofer. The disc will play 5.1-channel
sound only if you’ve connected a DTS or Dolby
Digital receiver or decoder and if the disc is
encoded in the Dolby Digital or DTS format.
Please Read This Before Using the DIGITAL
AUDIO OUT Jack!
This player’s digital output jack is designed for a
connection to a Dolby Digital or DTS receiver or
decoder. Older digital equipment may not be
compatible with the Dolby Digital bitstream. Such a
connection can create a high level of noise that may be
harmful to your ears, and could damage headphones or
speakers. It is important to choose the correct Digital
Output setting in the DVD Player’s Sound menu,
especially when you use either of the DIGITAL AUDIO
OUT jack. For more information, go to page 45.
Manufactured under license from Dolby Laboratories. “Dolby” and the
double-D symbol are trademarks of Dolby Laboratories. Confidential
unpublished works. © 1992-1997 Dolby Laboratories, Inc. All rights reserved.
DTS is a registered trademark of Digital Home Theater Systems, Inc.
Connection: DVD + TV + Audio
Receiver
IB/500L Body 6/7/02 11:12 AM Page 6

7
Chapter 1: Setup and Connections
DVD Player + TV + Audio Receiver
1. Connect the left and right audio cables to your audio/video receiver and to the AUDIO OUT L (left –
white) and R (right – red) jacks on the back of your DVD Player.
2. If you have a Dolby Digital or DTS receiver, use one of the DIGITAL AUDIO OUT jacks to connect the
receiver to the DVD player. You must also set the Digital Output setting in the Sound menu (go to
page 45).
Note: The DIGITAL AUDIO OUT jack has two options: OPTICAL and COAXIAL. Some Dolby Digital receivers have one
type of Digital Audio Input jack, and some have both. Under most conditions, optical and coaxial connections work
equally well — the only difference is the type of cable you connect to the jack.
Rarely, but sometimes, coaxial cables — especially long ones, pick up radio frequency (RF) interference from household
appliances, nearby power lines, and/or broadcast towers. If you want to use a less expensive cable, connect a coaxial
cable to the COAXIAL jack.
If you would rather use the OPTICAL jack, connect an optical digital cable to the DVD player and to the corresponding
digital optical input jack on the receiver.
3. Connect the video cable.
A. Basic video connection – Connect the video cable (yellow) to the VIDEO OUT jack on the back of
your DVD Player, and to the Video Input jack on your TV (sometimes labeled VIDEO IN).
B. S-Video (optional) – If your TV has an S-Video jack, connect the S-Video cable to the S-VIDEO OUT
jack on the back of your DVD Player and to the S-VIDEO jack on your TV.
Note: If your TV has component video (Y, Pb, Pr) jacks, use video-grade cables (not provided) to connect the TV to the
DVD player (Y to Y, Pb to Pb, etc.). It is essential to match the color coded connectors with a compatible TV.
4. Connect the AC power cord into an AC outlet.
Go to page 8
IB/500L Body 6/7/02 11:12 AM Page 7

8
Chapter 1: Setup and Connections
Install Batteries in the Remote
1. Remove the battery compartment cover on the back of the remote.
2. Insert new batteries. Match the polarities (+ and –) on the batteries with the diagram on the
remote.
3. Put the battery compartment cover back on the remote.
Important Battery Information
• If you’re not going to use the remote for a month or more, be sure to remove the batteries because they can leak
and cause damage.
• Dispose of batteries in the proper manner, according to federal, state, and local regulations.
• Any battery may leak electrolyte if mixed with a different battery type, if inserted incorrectly, if all batteries are
not replaced at the same time, if disposed of in fire, or if an attempt is made to charge a battery not intended to
be recharged.
• Discard leaky batteries immediately. Leaking batteries can cause skin burns or other personal injury.
Point the Remote in the Right Direction
When you want the remote to operate the DVD Player, point the remote at the DVD Player, not the TV.
The remote has to be pointed in the correct direction and toward the correct component in order for the
remote control’s signal to communicate with the sensor on the component. Make sure there is a clear
path between the remote control and the component you want to operate, so the signal isn’t blocked.
IB/500L Body 6/7/02 11:12 AM Page 8
9
Chapter 1: Setup and Connections
Turn on the TV and DVD Player
1. Turn on your TV and tune it to the correct Video Input Channel (if
you don’t know which channel is your the Video Input channel, go
to page 13 for help).
2. Press the DVD button on the DVD remote or the STANDBY/ON
button on the DVD Player.
Note: To go to the DVD Player’s menu press MENU on the remote. English is the
default language for the menu. For more information, go to page 47.
Next Steps
This chapter is dedicated to connecting your DVD Player. Before you start
playing discs, you might want to get familiar with the remote control —
Chapter 2 has details.
If you want to skip straight to playing discs, go to Chapter 3. It explains
playback features of DVDs, Audio CDs, Video CDs, discs that contain MP3
files, and discs that contain JPEG files.
The DVD Player’s menu system is outlined in Chapter 4, and Chapter 5
contains troubleshooting assistance, your Limited Warranty, and additional
information about your DVD Player.
STOP PAUSE
TV
ON•OFF
AUX
3-D
MARKER
PLAY FORWARDREVERSE
PLAY MODE
MUTE
INFO
MENU
OK
CLEAR
GUIDE
ANTENNA
1
2
3
4
5
6
7
8
9
0
INPUT
DVD
ZOOM
C
H
+
C
H
–
V
O
L
V
O
L
RANDOM
GO BACK
DISC
REPEAT
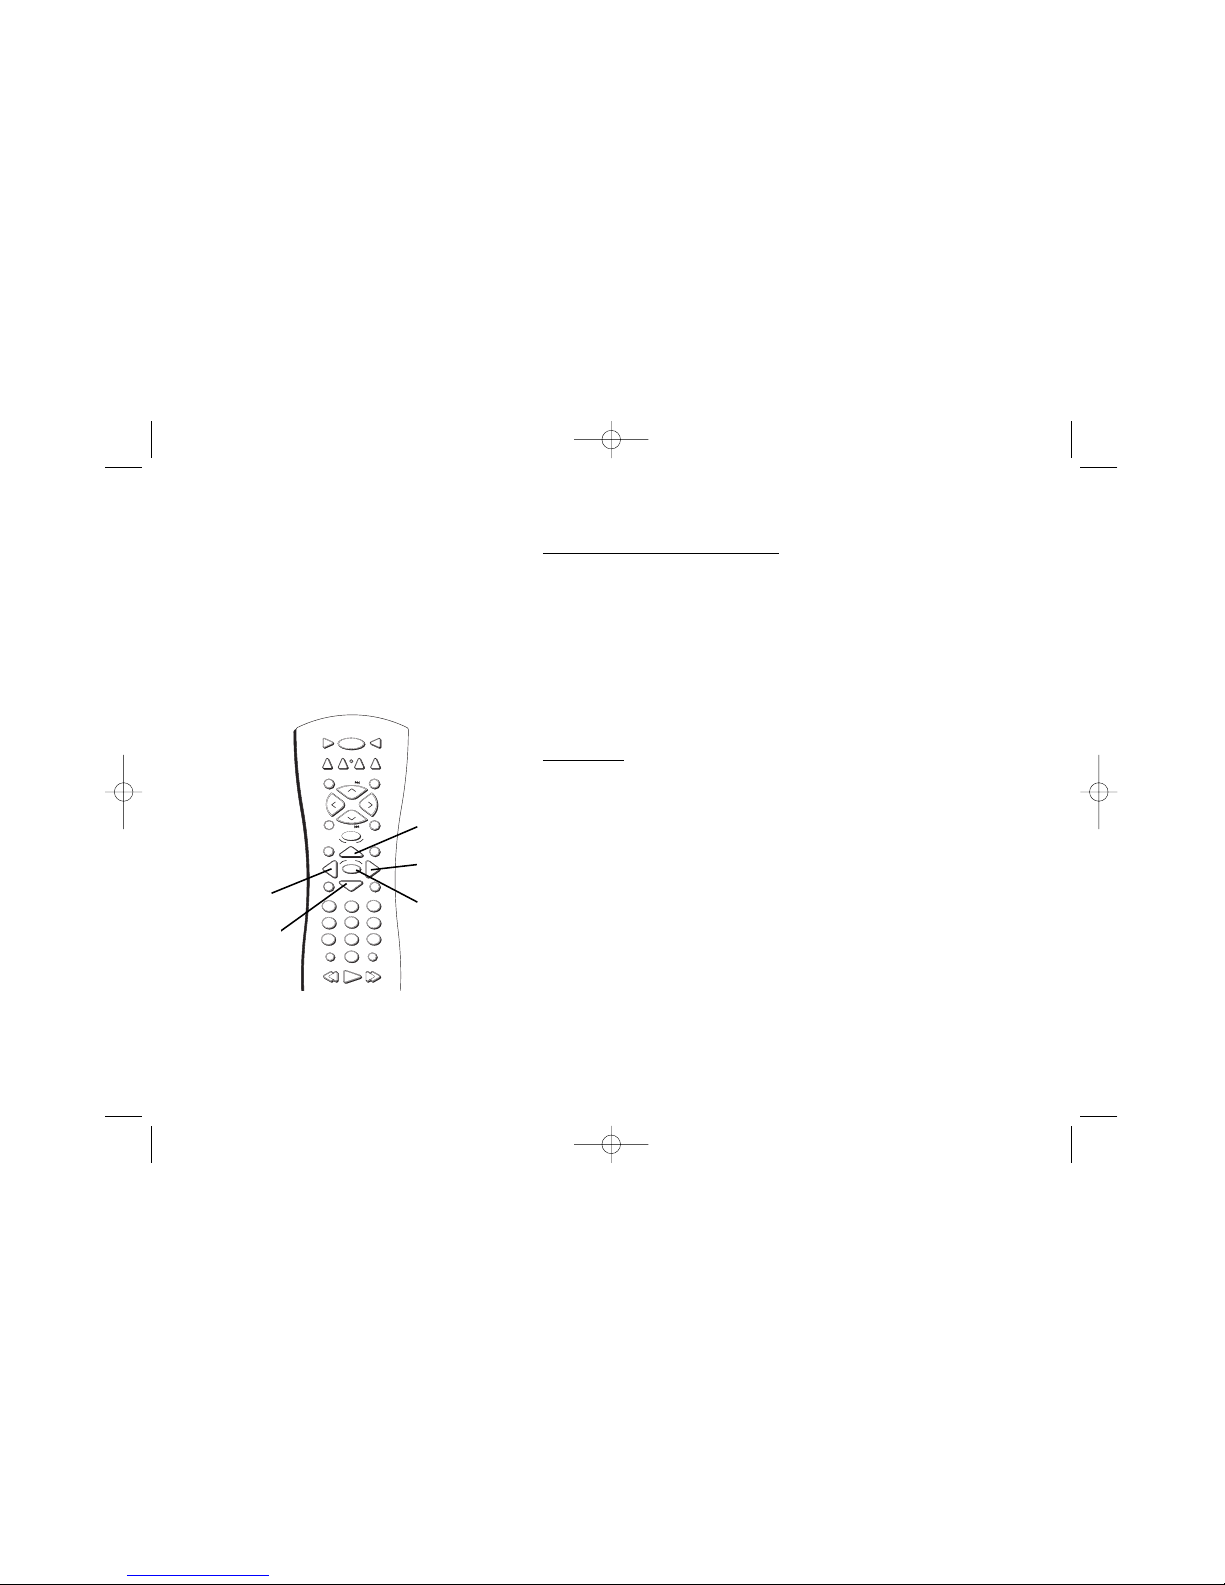
Up arrow button
Right arrow
button
OK button
Left arrow
button
Down arrow
button
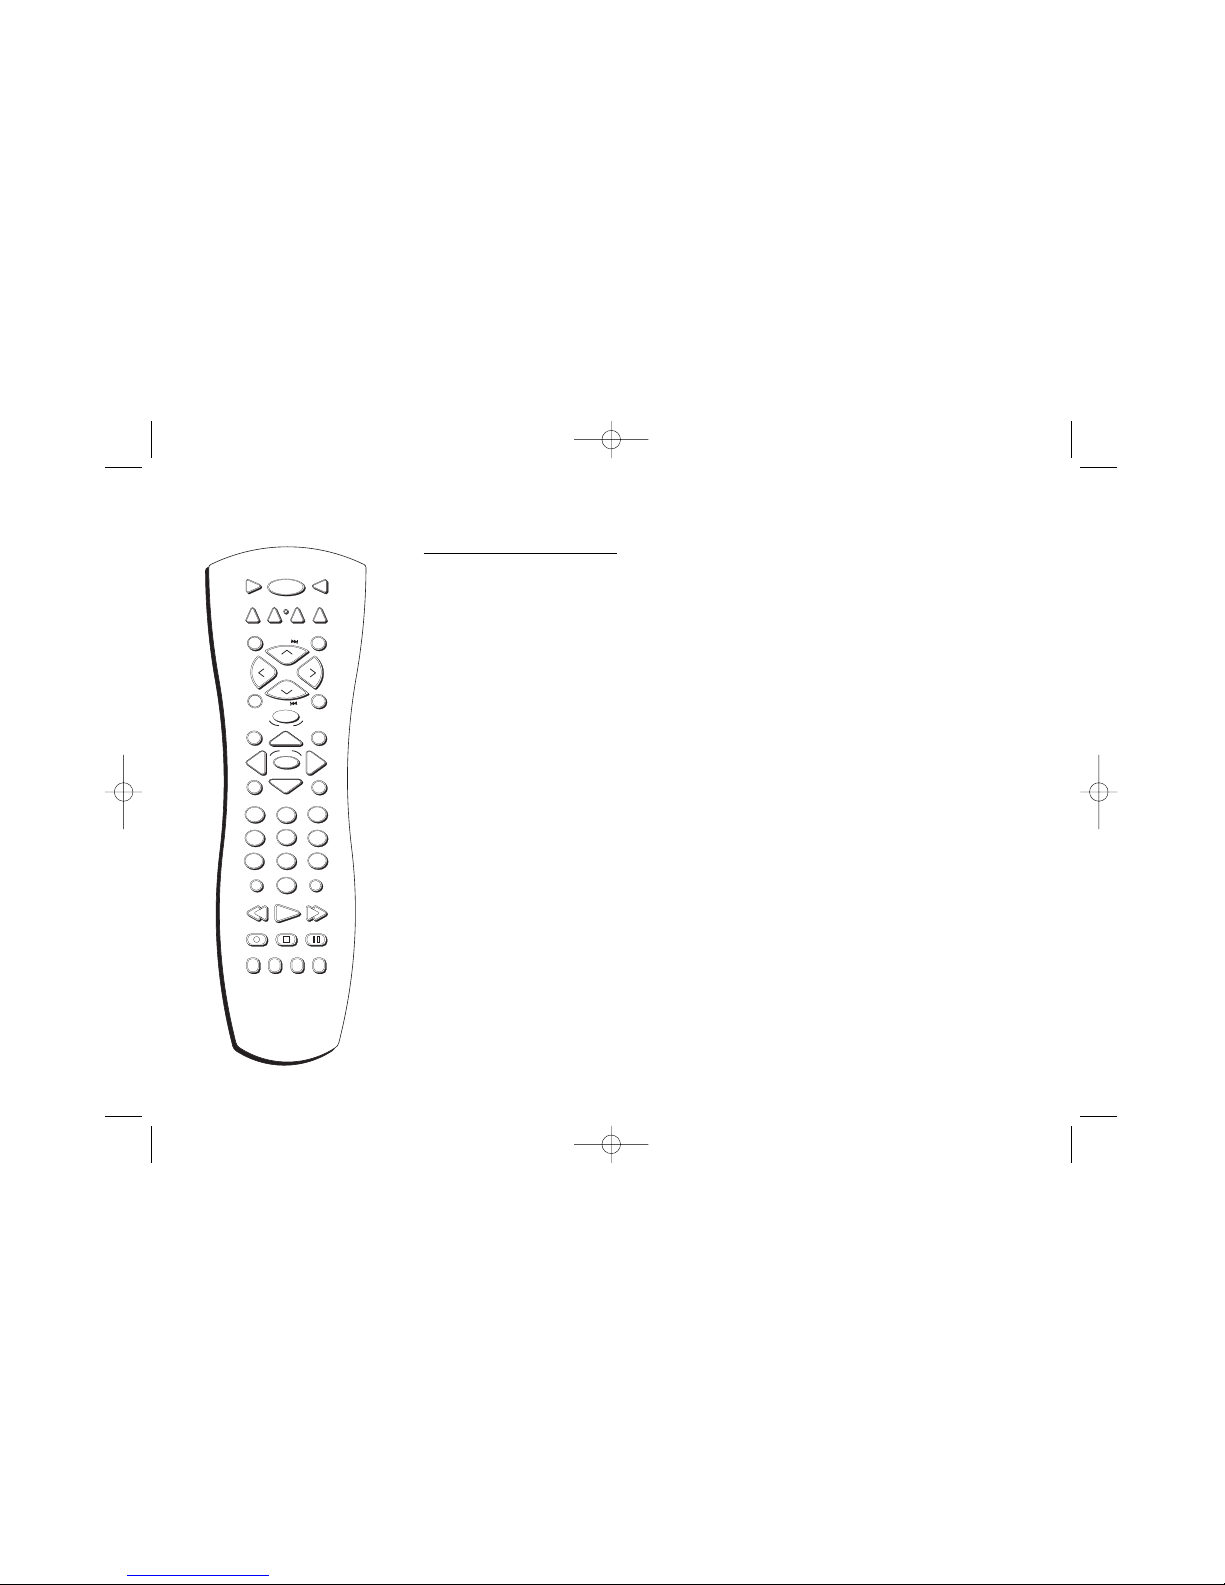
Use the the arrow buttons on the
remote to move through on-screen
menus. Press the OK button to select a
menu item that is highlighted.
IB/500L Body 6/7/02 11:12 AM Page 9
10
Chapter 2: The Remote Control
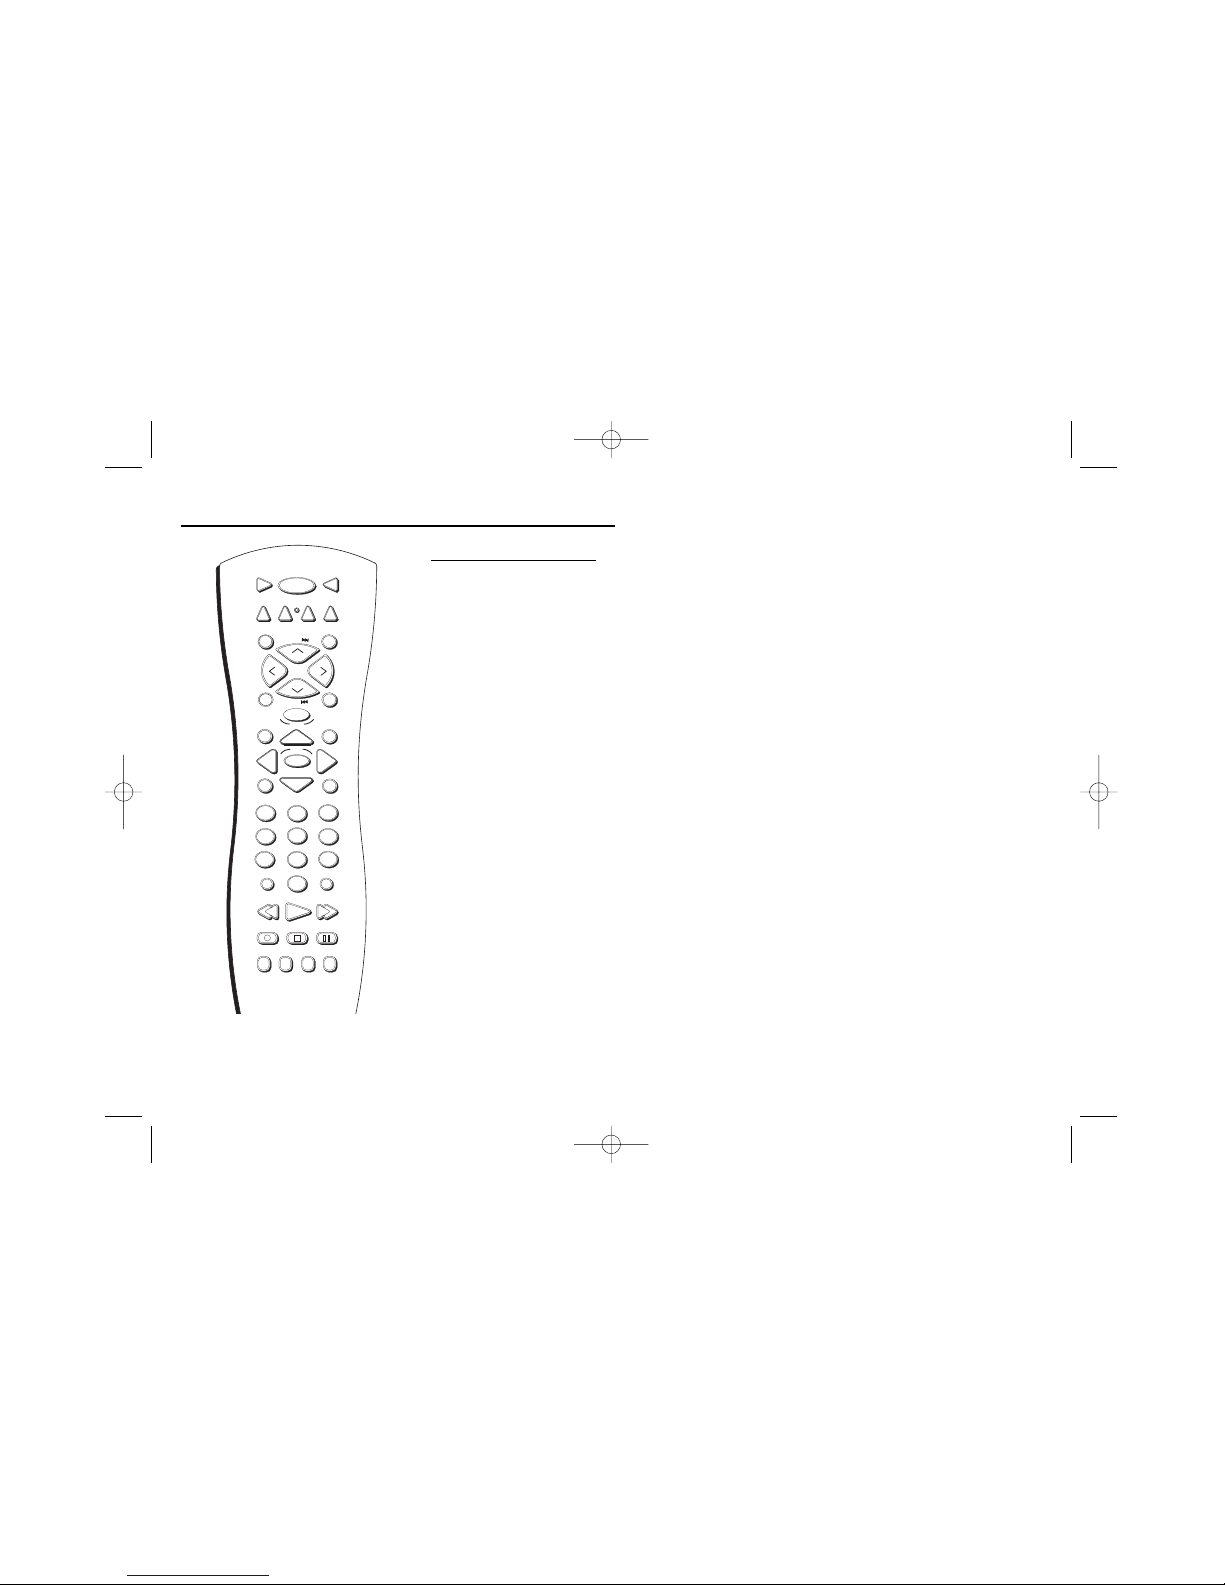
A Tour of the Remote
You can use this remote to control compatible components. The component buttons are
programmed to operate some PROSCAN, RCA and GE components. The buttons must be
programmed to operate other brands of components. (See page 13 for instructions.)
Component Buttons
(Buttons listed in alphabetical order)
Use these buttons to turn on the component and set the remote to control the selected
component.
AUX Use this button to turn on a compatible audio receiver after it has been programmed. Used
with the ON•OFF button to turn on some brands of components.
DVD Turns on the DVD Player, and puts the remote in DVD mode.
TV Use this button to turn on a compatible TV and set the remote to control the TV. Used with
the ON•OFF button to turn on some brands of TVs. To find out if your TV is compatible with this
remote control, go to page 13.
DVD Buttons
(Buttons listed in alphabetical order)
3-D Press this button to simulate a 3-D surround effect from 2 stereo speakers if the disc was
recorded using Dolby Surround or Dolby Digital.
ANGLE Use this button to access various camera angles on a DVD disc (if the DVD disc contains
multiple camera angles.)
ANTENNA Switches modes.
Arrow buttons (up, down, left, right) Use the arrow buttons to move through the on-screen
menus. You highlight a menu item by pressing the arrow buttons. You select a highlighted item
by pressing the OK button.
STOP PAUSE
TV
ON•OFF
AUX
3-D
SUBTITLE
MARKER
ANGLE
AUDIO
PLAY FORWARDREVERSE
PLAY MODE
MUTE
INFO
MENU
OK
CLEAR
GUIDE
ANTENNA
1
2
3
4
5
6
7
8
9
0
INPUT
DVD
ZOOM
OPEN•CLOSE
C
H
+
C
H
–
V
O
L
V
O
L
RANDOM
GO BACK
DISC
REPEAT
The TV button on this remote
turns on most RCA, GE, and
Proscan TVs.
IB/500L Body 6/7/02 11:12 AM Page 10

11
Chapter 2: The Remote Control
AUDIO Accesses various audio features while playing a disc.
CH + Advances to the next chapter, track, index or MP3 title.
CH – Reverses to the preceding chapter, track, index or MP3 title.
CLEAR Allows you to clear information, such as remove the Info display from the screen.
DISC Displays the disc menu (if available) when playing a prerecorded disc or the Index Picture screen when playing a DVD+RW disc.
FORWARD Searches forward through the disc while it is in PLAY mode (or slow speed search in pause mode). Press repeatedly to increase
speed.
GO BACK Accesses the Scene Again
TM
feature - replays the last several seconds of the title you’re playing. Also returns you to the
previous channel.
GUIDE Displays the titles that are available on the current disc (if available).
INFO While playing a disc, this displays the on-screen Info Display.
INPUT Use with the TV button to tune to the Video Input Channel. This may not work with all TVs.
MARKER Brings up the Marker display. The Marker display allows you to set markers to points on the disc that you’d like to return to.
Press again to remove display from the screen.
MENU Displays the DVD disc menu in play mode and set up menu in stop mode.
MUTE Lowers the volume to its minimum level. Press again to restore volume. (Mute is not operational in DVD mode).
Number buttons (0-9) Press to input chapter numbers, track numbers, or to make selections on some menu screens.
OK Press this button to select a highlighted menu item.
ON•OFF Turns the DVD Player on and off.
IB/500L Body 6/7/02 11:12 AM Page 11
12
Chapter 2: The Remote Control
OPEN•CLOSE Press to open and closed the disc tray.
PAUSE Pauses disc play. When disc play is paused, press PAUSE again to advance one frame.
PLAY Begins disc play (and closes disc tray if it is open).
PLAY MODE Press this button to access the Play Mode info display to set random and program
playback.
RANDOM Press to play chapters, tracks, titles or discs randomly.
REPEAT Accesses the repeat feature, allowing you to repeat portions of a disc.
REVERSE Allows you to search backward through a disc while it is in play mode (or slow speed
search in pause mode).
STOP Stops disc play.
SUBTITLE Use to turn subtitles off and on. While the subtitle info area is displayed press the
arrow up and down buttons on the remote to change subtitle languages (if available).
VOL +/– Increases/decreases the volume level on the TV or audio device.
ZOOM Use this button to zoom in on certain areas of the screen.
STOP PAUSE
TV
ON•OFF
AUX
3-D
SUBTITLE
MARKER
ANGLE
AUDIO
PLAY FORWARDREVERSE
PLAY MODE
MUTE
INFO
MENU
OK
CLEAR
GUIDE
ANTENNA
1
2
3
4
5
6
7
8
9
0
INPUT
DVD
ZOOM
OPEN•CLOSE
C
H
+
C
H
–
V
O
L
V
O
L
RANDOM
GO BACK
DISC
REPEAT
This remote operates most
RCA, GE, and Proscan TVs.
IB/500L Body 6/7/02 11:12 AM Page 12
13
Chapter 2: The Remote Control
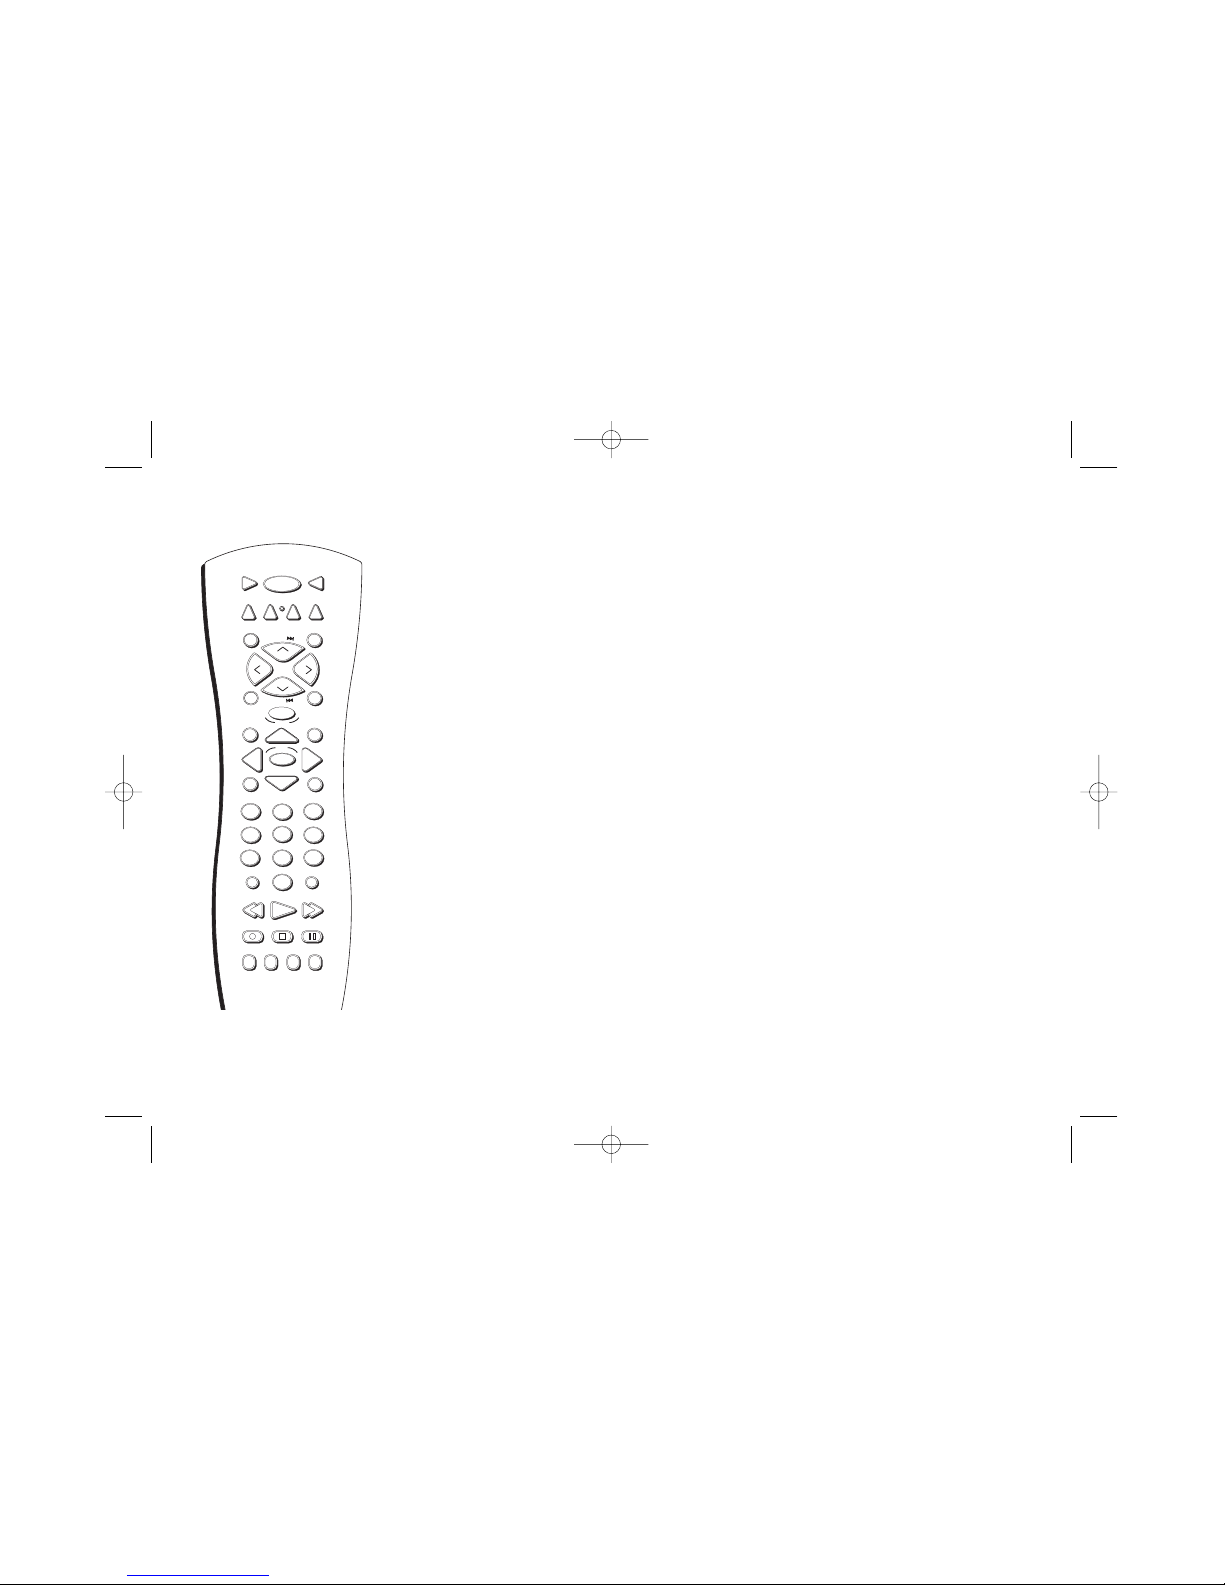
Programming the Remote
The remote can be programmed to control most brands of remote-controllable TVs. The
remote is already programmed to control most RCA, GE, Proscan, and RCA Scenium TVs.
1. Press the TV button.
2. Press the ON•OFF button (if the TV turns on or off, this remote will operate the TV).
3. To control a TV that is not from RCA, GE, Proscan or RCA Scenium you’ll need to
enter the specific code for the brand of TV you have. See the following page for code
list.
Tune to the TV’s Input Channel
To watch DVDs, the TV needs to be tuned to the Video Input channel that corresponds with
the jacks you used to connect the DVD Player to the TV.
1. Press the TV button on the remote.
2. Press the INPUT button until you see the picture from the DVD Player (the DVD main
menu or if a disc is playing, you’ll see the movie on the screen). If you need more help
in finding your Video Input channel, go to page 64.
STOP PAUSE
TV
ON•OFF
AUX
3-D
SUBTITLE
MARKER
ANGLE
AUDIO
PLAY FORWARDREVERSE
PLAY MODE
MUTE
INFO
MENU
OK
CLEAR
GUIDE
ANTENNA
1
2
3
4
5
6
7
8
9
0
INPUT
DVD
ZOOM
OPEN•CLOSE
C
H
+
C
H
–
V
O
L
V
O
L
RANDOM
GO BACK
DISC
REPEAT
IB/500L Body 6/7/02 11:12 AM Page 13

14
Chapter 2: The Remote Control
Code List
1096, 1097, 1098, 1100,
1107, 1116, 1118, 1119, 1124,
1143, 1191, 1224, 1226
Colortyme ..1116, 1118, 1121,
1241, 1014
Concerto ....1116, 1118, 1096
Contec..................1049, 1082
Contec/Cony ..................1122,
1123, 1143
Craig ..........1082, 1015, 1143
Crown..............................1093
Curtis Mathes......1093, 1100,
1107, 1116, 1118, 1124,
119 1 , 1 219
CXC..................................1082
Daewoo ....1016, 1091, 1092,
1093, 1108, 1117, 1119,
1125, 1126, 1206, 1207,
1235
Daytron ................1014, 1118
Dixi ............1029, 1052, 1090
Dumont ..........................1214
Electroband ....................1115
Elta ..................................1090
Emerson....1001, 1012, 1083,
1084, 1085, 1086, 1087,
1088, 1089, 1090, 1093,
1121, 1130, 1131, 1132, 1133,
1134, 1135, 1136, 1137, 1138,
1139, 1140, 1141, 1142, 1143,
1144, 1145, 1146, 1147, 1148,
1149, 1150, 1151, 1204,
1219, 1225, 1226, 1246,
1257
TV Codes
Admiral ................1115, 1224
Adventura ......................1224
Aiko ................................1124
Akai............1063, 1090, 1116
Alba ................................1033
Alleron ............................1143
A-Mark ..........................1029
Amstrad ..........................1089
Amtron ............................1143
Anam........1028, 1029, 1082,
110 4
Anam National ..1237, 1238,
1255, 1143
AOC 1014, 1029, 1098, 1107,
1108, 1117, 1118, 1240
Archer..............................1029
Audiovox ..............1143, 1029
Bauer ..............................1035
Belcor ..............................1116
Bell & Howell ......1114, 1180,
1219
Bradford ..........................1143
Brockwood............1014, 1116
Brokwood ........................1116
Candle........1014, 1107, 1116,
1118, 1120, 1225, 1094,
1096, 1097
Capehart..........................1014
Celebrity ..........................1115
Circuit City......................1014
Citizen ......1018, 1094, 1095,
Envision ..........................1107
Etron ..............................1090
Fisher1050, 1082, 1152, 1153,
1154, 1220
Formenti ........................1035
Fortress ..........................1039
Fujitsu........1015, 1088, 1149
Funai ........1015, 1082, 1088,
1149
Futuretech............1015, 1082
GE ............1020, 1080, 1081,
1083, 1101, 1104, 1105, 1111,
1128, 1155, 1156, 1157, 1184,
1221, 1222, 1223,
1228,1248,
1254
Genexxa ..............1020, 1033
Gibralter ..............1020, 1214
Goldstar....1052, 1078, 1079,
1093, 1096, 1108, 1117, 1121,
1126, 1127, 1158, 1159, 1160,
1218
Granada ..........................1003
Grandiente ......................1003
Grundy ............................1149
Hinari ..............................1088
Hitachi......1003, 1010, 1019,
1024, 1071, 1073, 1074, 1075,
1076, 1077, 1093, 1096,
112 1,
1122, 1161, 1162, 1211, 1212,
1213, 1214, 1226, 1241
Infinity..................1064, 1163
Janeil ..............................1224
JBL ........................1064, 1162
JC Penney 1046, 1080, 1100,
1108, 1110, 1117, 1119, 1128,
1154, 1155, 1159, 1164, 1165,
1171, 1184, 1191, 1229
JCB ..................................1115
Jensen..............................1070
JVC ..........1066, 1067, 1068,
1069, 1121, 1122, 1155, 1160,
1166, 1167, 1219, 1229
Kawasho..........................1065
Kenwood ....1107, 1126, 1127
Kloss ....................1036, 1097
Kloss Novabeam ............1168,
1169, 1224, 1231
KTV ..........1082, 1083, 1084,
1170, 1225
Loewe ..............................1162
Logik ....................1180, 1251
Luxman ..........................1096
LXI ............1025, 1030, 1047,
1050, 1064, 1110, 1151, 1162,
1172, 1173, 1219, 1228, 1249
Montgomery Wards ......1037,
1080,
1088, 1101, 1251, 1252, 1253
Magnavox ..........1004, 1036,
1064, 1094, 1099, 1107, 1119,
1126, 1162, 1174, 1175, 1176,
1182, 1185, 1208, 1209,
1210, 1230, 1231, 1253
Majestic................1180, 1177
Marants ..........................1162
Marantz....1052, 1064, 1162,
Matsui ............................1090
Memorex ............1050, 1090,
1114,1179, 1180, 1219, 1251,
1050
MGA..........1062, 1108, 1109,
1117, 1126, 1127, 1128, 1153,
1178, 1179
Midland ....1155, 1214, 1228
Minutz ............................1154
Mitsubishi ..........1007, 1027,
1061, 1062, 1063, 1108, 1110
1117, 1126, 1127, 1128, 1153
1177, 1179, 1180, 1205
Montgomery Ward........1181
Motorola..............1223, 1254
MTC ..........1096, 1100, 1108,
1117, 1191
NAD ............1030, 1111, 1171
1232, 1248
National................1013, 1104
National Quenties ..........1013
NEC ..........1023, 1096, 1100,
1107, 1108, 1109, 1117, 1127,
1183, 1242, 1254
Nikkai ..................1033, 1034
Nikko ..............................1124
Normande ......................1260
NTC ..................................1124
Optimus ..........................1232
Optonica ..1037, 1039, 1190,
1223
IB/500L Body 6/7/02 11:12 AM Page 14

Chapter 2: The Remote Control
15
1094, 1167, 1168, 1173,
1174, 1175, 1181, 1185,
1200, 1230, 1232, 1252
Symphonic1015, 1234, 1256
Tandy....................1033, 1039
Tatung ..................1104, 1226
Technics ................1105, 1155
Teknika ....1031, 1032, 1088,
1094, 1095, 1097, 1100,
1109, 1122, 1124, 1174, 1179,
1180, 1191, 1251
Tera ......................1102, 1233
Thompson ......................1005
Toshiba ....1030, 1046, 1050,
1072, 1100, 1151, 1171, 1191,
1193, 1242, 1248
Universal....1080, 1154, 1184
Victor ........1069, 1166, 1230
Video Concepts ..............1063
Viking ..................1097, 1224
Wards ........1114, 1130, 1154,
1167, 1168, 1173, 1174, 1180,
1181, 1184, 1185, 1189,
1201, 1202, 1231, 1256
Zenith........1113, 1215, 1216,
1217, 1247, 1252, 1258
Zonda ..............................1029
Receiver codes
RCA ......................3000, 3033
Aiwa ........3001, 3002, 3003,
3004, 3005, 3006, 3007,
3016
Carver..............................3035
Citizen ............................3038
Fisher ..............................3035
Orion ........1015, 1140, 1245
Osaki ..............................1034
Panasonic..1006, 1011, 1012,
1013, 1060, 1064, 1104,
1105, 1106, 1155, 1162, 1171,
1251, 1254
Philco ........1036, 1094, 1119,
1121, 1126, 1167, 1168, 1173,
1175, 1181, 1230, 1231,
1252, 1254
Philips ......1052, 1064, 1119,
1121, 1126, 1167, 1168, 1173,
1174, 1184, 1185, 1186,
1254, 1259, 1260
Pioneer ......1059, 1076, 1112,
1187, 1188, 1227, 1233,
1250
Portland ..........................1124
Price Club ........................1191
Prism................................1155
Proscan ................1228, 1110
Proton ......1121, 1189, 1234,
1026, 1103
Pulsar ....................1214, 1112
Quasar........1011, 1104, 1105,
1155, 1169, 1170
Radio Shack ........1034, 1037,
1151, 1189, 1219
RCA ..........1000, 1017, 1025,
1053, 1054, 1055, 1056,
1051, 1058, 1076, 1102, 1110,
1228, 1236
Realistic ....1050, 1151, 1189,
1219
Runco ..............................1214
Saisho ..................1089, 1090
Samsung ..1008, 1014, 1034,
1052, 1101, 1123, 1125,
1127, 1191, 1242, 1244,
1261
Sansui ............................1245
Sanyo ..................1049, 1050,
1051,1081, 1151, 1152, 1177,
1193, 1227
SBR ..................................1052
Schneider ........................1052
Scott ........1086, 1088, 1130,
1140, 1149
Sears ........1009, 1030, 1040,
1041, 1042, 1043, 1044,
1045, 1046, 1047, 1048,
1050, 1051, 1081, 1088,
1110, 1122, 1127, 1149, 1151,
1152, 1153, 1166, 1171,
1194, 1195, 1227, 1228,
1235, 1248
Sharp ........1021, 1022, 1037,
1038, 1039, 1135, 1189,
1196, 1197, 1198, 1199,
1203, 1223
Siemens ..........................1049
Signature ..1114, 1180, 1251
Simpson ..........................1119
Sony ..........1002, 1114, 1115,
1245, 1254
Soundesign 1094, 1119, 1149
Spectricon............1029, 1098
Squareview ..........1015, 1234
Supre-Macy ........1097, 1224
Supreme ..........................1115
Sylvania....1035, 1036, 1064,
GE....................................3040
Goldstar ..........................3019
Hitachi ............................3046
JVC ......................3008, 3032
Kenwood..............3009, 3020
Luxman ..........................3015
Marantz ..........................3037
Memorex ........................3021
NAD ................................3025
Nakamichi 3023, 3021, 3031
NEC ................................3045
Onkyo........3018, 3028, 3029
Optimus ..........................3026
Panasonic........................3036
Pioneer ............................3017
Proton ............................3034
Quasar ............................3036
Scott................................3030
Sharp....................3041, 3044
Sherwood........................3024
Sony ..........3010, 3011, 3016,
........................................3022
Techniques......................3036
Toshiba............................3039
Victor ..............................3032
Yamaha ....3012, 3013, 3014
3027
IB/500L Body 6/7/02 11:12 AM Page 15

16
Chapter 3: Playing Discs
Regional Coding
Both the DVD Player and the discs are coded by region. These regional
codes must match in order for the disc to play. If the codes don’t match, the
disc won’t play. This player’s code is region 4.
Using Different Menus
Each disc is programmed with different features. There are three separate
types of menus that you can use to access features:
• The Disc menu – The Disc menu is part of each disc and is separate
from the DVD player’s menu. The contents of each Disc menu vary
according to how the disc was authored and what features are
included.
The Disc menu is turned on and off (while the disc is playing) with the
MENU button on the remote.
• The DVD player’s Info Display – The Info Display appears as icons
across the top of the screen when a disc is playing. It can only be
accessed while you are playing a disc. It’s turned on and off with the
INFO button on the remote.
• The DVD player menu – If a disc is playing, press STOP and MENU
(the menu appears).
Remember: A feature will only work if the disc was programmed with that
feature. For example, if you choose subtitles on the Info Display, the subtitles
will only appear if the disc was created with subtitles. If a menu item is
“grayed out” it means that item isn’t available.
VIDEO CD
This DVD Player is capable of playing the following types
of discs:
•DVD discs
•Video CD discs
•Audio CD discs
•CD-R discs, CD-RW discs
•DVD+RW, DVD-RW, DVD-R, DVD-ROM (with movie
information).
Before you load a disc make sure it is compatible. The
following discs CANNOT be used with this player:
•Laserdiscs
•CD-I, CD-ROM (computer-only discs)
•DVD-ROM (without movie information)
•Discs recorded using other broadcast standards (i.e. PAL
or SECAM)
•DVD RAM
Chapter Contents
The beginning of this chapter pertains to DVD discs.
Many of the player’s features work the same way with
other types of discs. Video CDs, Audio CDs, and MP3
CDs are explained later in the chapter.
IB/500L Body 6/7/02 11:12 AM Page 16
17
Chapter 3: Playing Discs (DVDs)
Loading and Playing Discs
Turn on the TV and your DVD Player (press STANDBY/ON on the player or press the DVD button on
the remote control).
1. Press the OPEN•CLOSE button (the disc tray opens).
2. Place a disc gently into the first slot in the tray with the disc’s label facing up (double-sided
discs have content on both sides, so you can place either side up).
3. Press the SKIP button to rotate the disc tray. Continue placing discs into the tray as described
above. There are 5 discs in the disc tray.
4. Press the OPEN•CLOSE or PLAY button. The disc tray closes.
The DVD Player reads the disc’s table of contents, and then one of two things happens depending
on how the disc was programmed:
• The disc starts playing.
• The disc menu appears on screen. One of the options will start disc play. Highlight that option
and press OK.
When you stop playing a disc, the player remembers where you stopped. When you start playing
the disc again, the DVD Player picks up where you left off unless the disc is removed, the player
is unplugged, or if you pressed the STOP button twice.
Disc Exchange
The Exchange button on the front panel allows you to change up to 4 discs while the fifth disc plays.
1. With a disc playing, press EXCHANGE on the front of the player. The disc drawer opens with
four slots available.
2. Use the SKIP button to turn the platter to the other slots.
3. After you’ve loaded or changed discs, press EXCHANGE again to close the disc drawer.
C
a
n
'
t
C
a
t
c
h
U
p
C
a
n
'
t
C
a
t
c
h
U
p
C
a
n
'
t
C
a
t
c
h
U
p
(
W
i
d
e
s
c
r
e
e
n
V
e
r
s
i
o
n
)
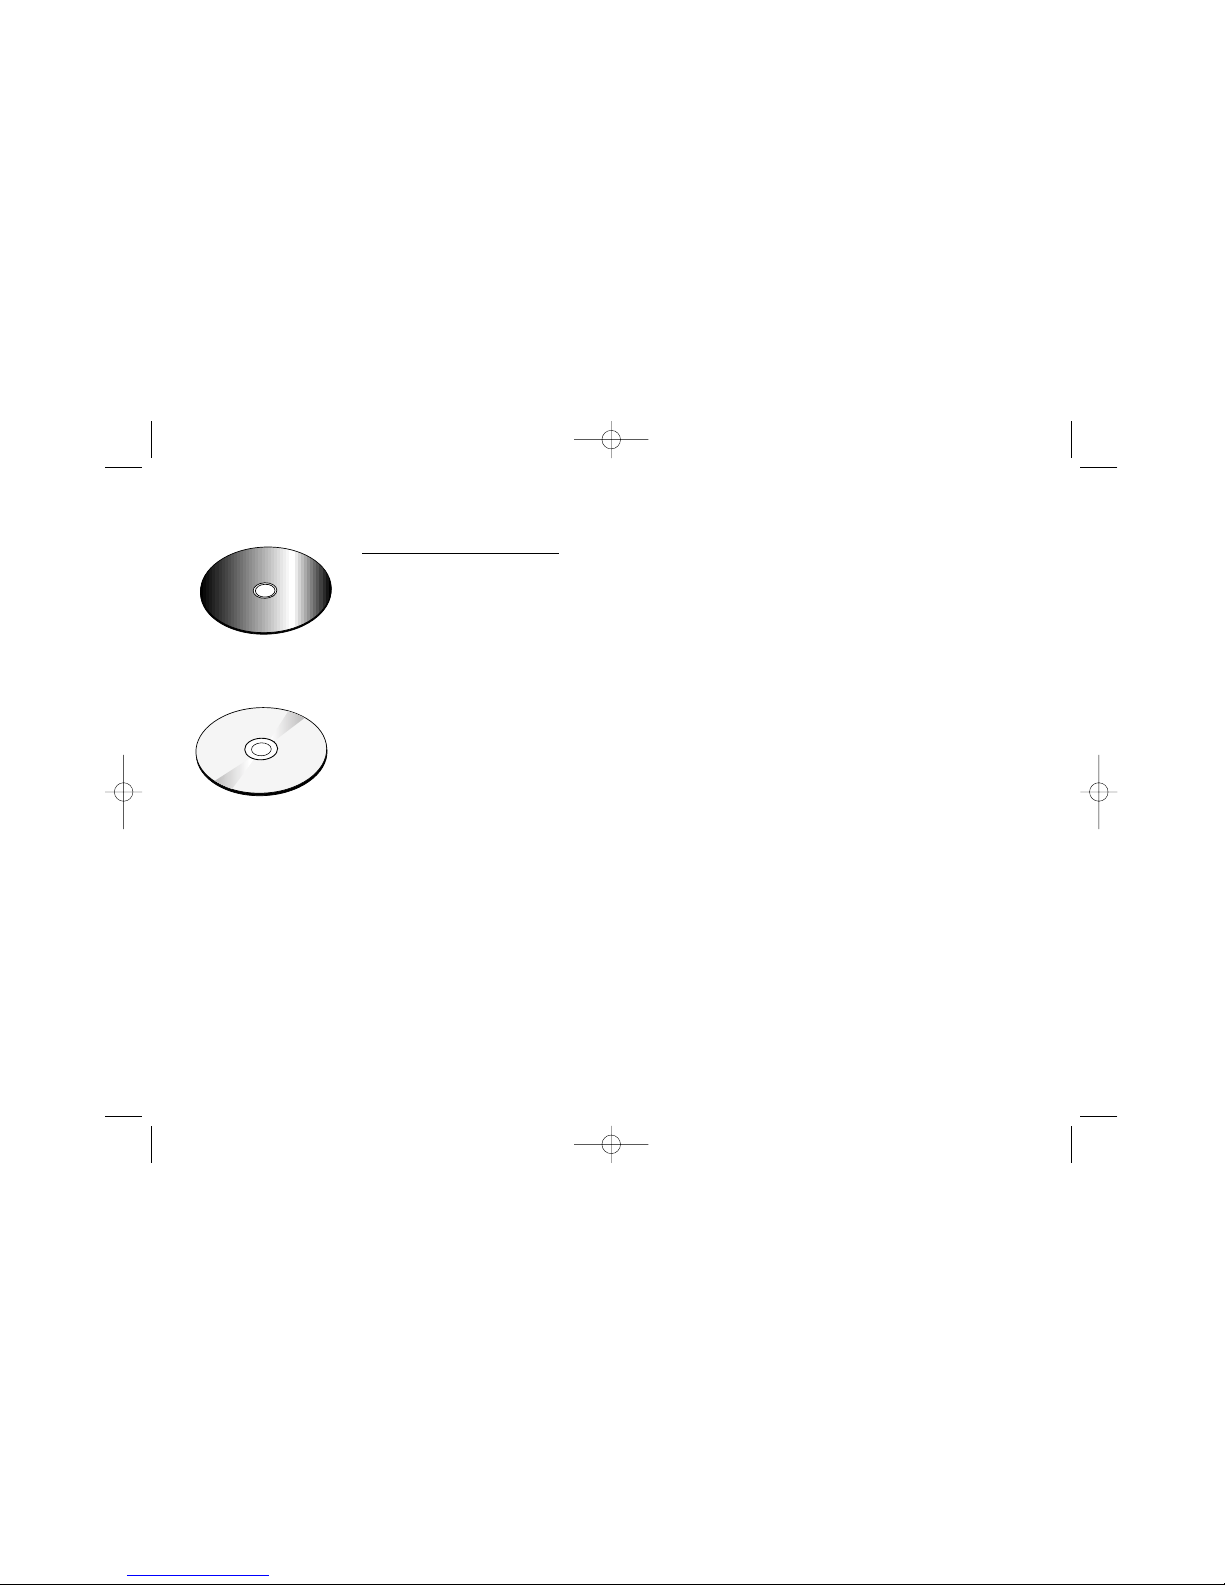
This is an example of a
two-sided disc — the title
is usually in the center
of the disc.
This is an example of a
one-sided disc.
Note: Before you begin
playing discs, the
EXCHANGE button can
be used to open the disc
drawer to load discs.
IB/500L Body 6/7/02 11:12 AM Page 17

Chapter 3: Playing Discs (DVDs)
18
Using a Disc Menu
A disc is capable of having an on-screen menu that is separate from the DVD player’s menu system and on-screen Info Display.
Although the content and operation of disc menus vary from disc to disc, the following example will give you an idea of what to
expect.
1. While the disc is playing, press the MENU button. The disc menu appears.
2. Press the up/down arrow buttons to highlight the section of the disc menu you want to choose, and press OK.
3. Press the up/down arrows to select a language, and press OK.
4. Press MENU to resume playback.
Note: Any settings you change on the disc menu only override the default settings in the DVD Player’s menu temporarily. Default settings are the
settings that you set up in the DVD Player’s menu system.
IB/500L Body 6/7/02 11:12 AM Page 18
19
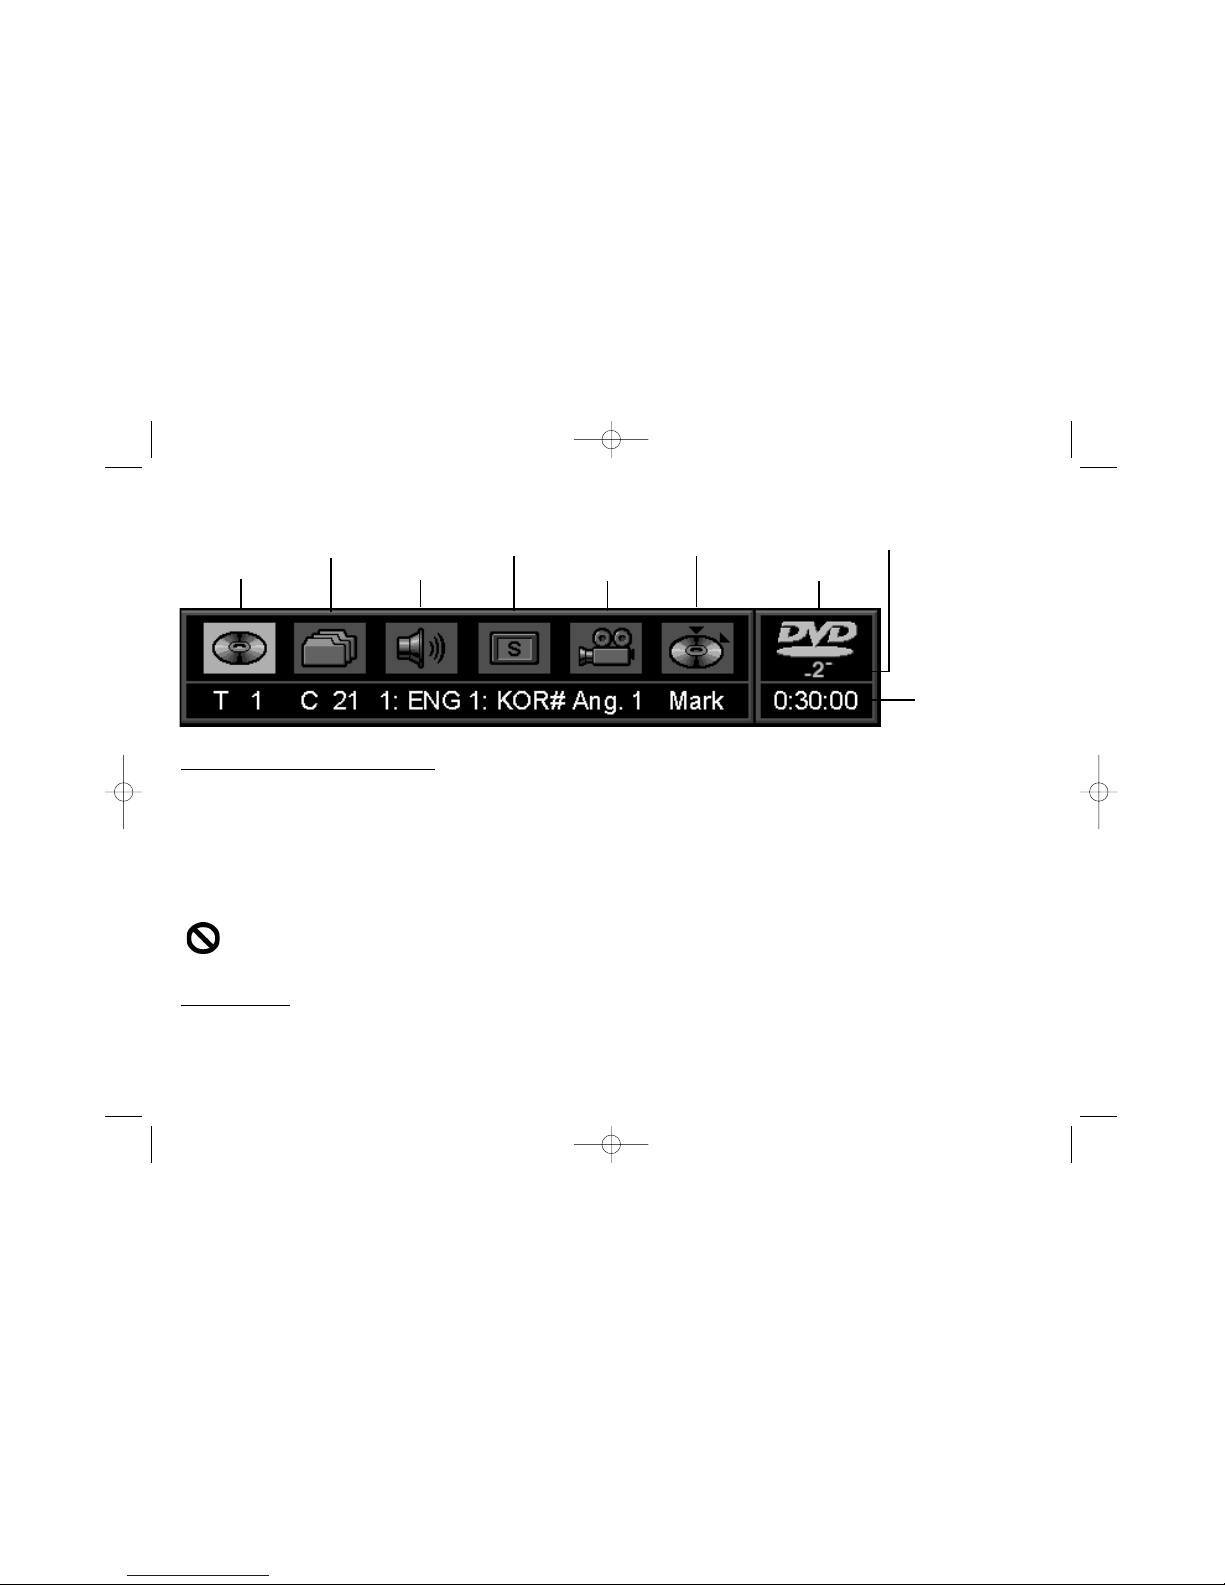
Using the On-Screen Info Display
The on-screen Info Display contains many playback features. To see the Info Display, press the INFO button on the remote while a
disc is playing (the Info Display appears across the top of the screen). Each feature is represented by an icon. Use the left/right
arrow buttons to move through the different icons in the Info Display. When an icon is highlighted, press OK to select it.
Remember, you can only access the Info Display when you’re playing a disc. Also, the Info Display features are only available if
the disc was created with that particular feature (i.e., if you select the Subtitle icon, you won’t be able to change the subtitle
language unless the author of the disc created the disc with subtitles).
The invalid symbol appears on the screen when you press a button that doesn’t have any function. If one of the icons is
“grayed out” that Info Display feature isn’t available for the disc you’re playing. To make the Info Display disappear from
the screen, press INFO on the remote control.
Time Indicator
This feature displays the audio/video time. For DVD discs, the time displayed refers to the current title time. for Audio CDs and
MP3 discs, it refers to the current track time.
Chapter Subtitles Bookmarks Disc Number
Title Audio Angles Disc Type
Time Indicator
Chapter 3: Playing Discs (DVDs)
IB/500L Body 6/7/02 11:12 AM Page 19
 Loading...