

RCA ColorTrak 2000 Owner's Manual
ncA
Digital
Control
TV
Owner's Manual
Operating Instructions &
Warranty Information
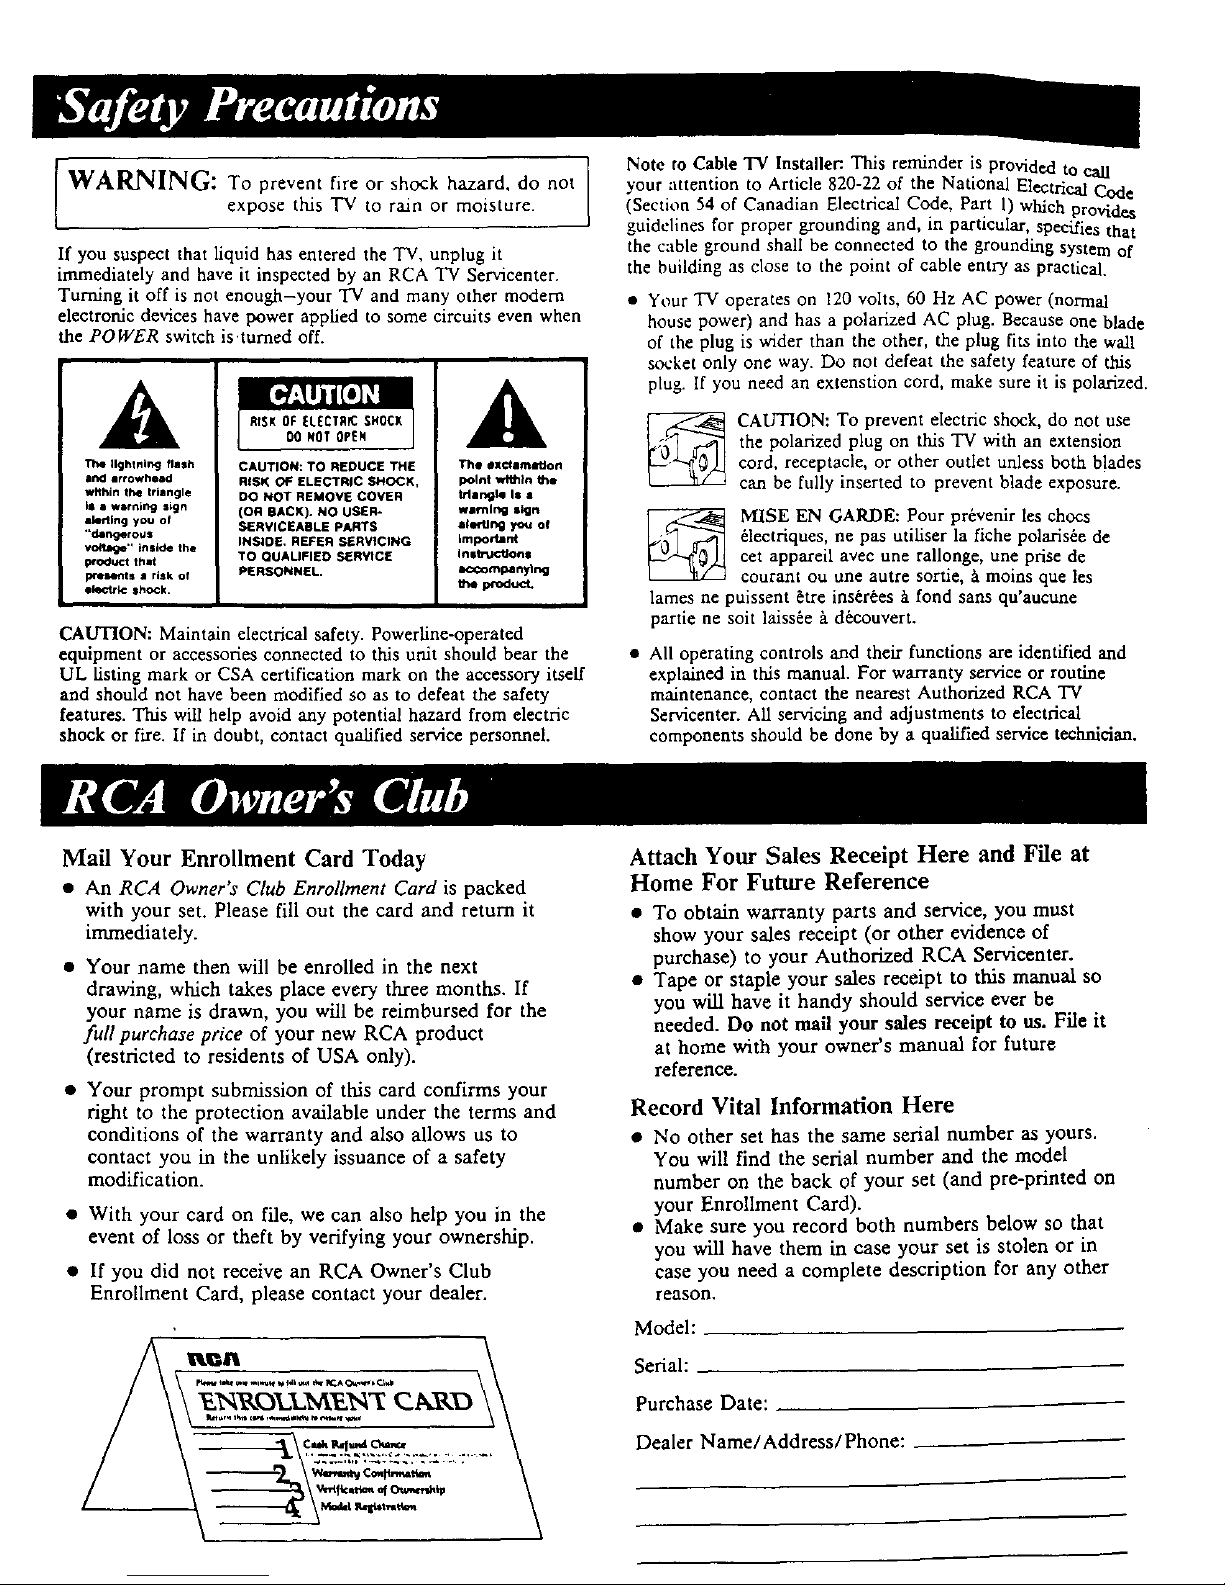
WARNING: To prevent fire or shock hazard, do not
expose this "IV to rain or moisture.
If you suspect that hquid has entered the TV, unplug it
immediately and have it inspected by an RCA TV Servicenter.
Turning it off is not enough-your TV and many other modem
electronic devices have power applied to some circuits even when
the POWER switch is.turned off.
The Ilghtnirl<J flash
ii1(I lrrOwhllid
within the triangle
is • wsrnlng s_n
alerllng you of
"dangeroo•
voyage" _nslae the
product t_at
presents • risk of
electric ShOCk.
CAUTION: TO REDUCE THE
RISK OF ELECTRIC SHOCK,
DO NOT REMOVE COVER
(on BACK). NO USER-
SERVICEABLE PARTS
INSIOE. REFER SERVICING
TO OUALIFIED SER¥1CE
PERSONNEL.
The llxl_lllltlltlo rl
point within the
triangle Is •
wsrnlng sign
ale,-tlng you of
important
insl_JcUons
IK:componylng
theproduct.
CAUTION: Maintain electrical safety. Powerline-operated
equipment or accessories connected to this unit should bear the
UL fisting mark or CSA certification mark on the accessory itseff
and should not have been modified so as to defeat the safety
features. This will help avoid any potential hazard from electric
shock or fire. If in doubt, contact qualified service personnel.
Note to Cable "IV Installer:. This reminder is provided to call
your anention to Article 820-22 of the National Electrical Code
(Section 54 of Canadian Electrical Code, Part 1) which provides
guidelines for proper grounding and, in particular, specifies that
the cable ground shall be connected to the grounding system of
the building as close to the point of cable entry as practical.
• Your TV operates on 120 volts, 60 Hz AC power (normal
house power) and has a polarized AC plug. Because one blade
of the plug is wider than the other, the plug fits into the wall
socket only one way. Do not defeat the safety feature of this
plug. If you need an extenstion cord, make sure it is polarized.
CAUTION: To prevent electric shock, do not use
the polarized plug on this TVwithanextension
cord, receptacle, or other outlet unless both b!ades
can be fully inserted to prevent blade exposure.
MISE EN GARDE: Pour pr_venir les chocs
_lectriques, ne pas utiliser la fiche polaris_e de
cet appareil avec une rallonge, une prise de
courant ou une autre sortie, b.moins que les
lames ne puissent &re ins_r_es _tfond sans qu'aucune
partie ne soit laiss_e b. d_couvert.
• All operating controls and their functions are identified and
explained in this manual. For warranty service or routine
maintenance, contact the nearest Authorized RCA TV
Servicenter. All servicing and adjustments to electrical
components should be done by a qualified service technician.
Mail Your Enrollment Card Today
• An RCA Owner's Club Enrollment Card is packed
with your set. Please fill out the card and return it
immediately.
• Your name then will be enrolled in the next
drawing, which takes place every three months. If
your name is drawn, you will be reimbursed for the
full purchase price of your new RCA product
(restricted to residents of USA only).
• Your prompt submission of this card confirms your
fight to the protection available under the terms and
conditions of the warranty and also allows us to
contact you in the unlikely issuance of a safety
modification.
• With your card on file, we can also help you in the
event of loss or theft by verifying your ownership.
• If you did not receive an RCA Owner's Club
Enrollment Card, please contact your dealer.
Attach Your Sales Receipt Here and File at
Home For Future Reference
• To obtain warranty parts and service, you must
show your sales receipt (or other evidence of
purchase) to your Authorized RCA Servicenter.
• Tape or staple your sales receipt to this manual so
you will have it handy should service ever be
needed. Do not mail your sales receipt to us. File it
at home with your owner's manual for future
reference.
Record Vital Information Here
• No other set has the same serial number as yours.
You will find the serial number and the model
number on the back of your set (and pre-printed on
your Enrollment Card).
• Make sure you record both numbers below so that
yon will have them in case your set is stolen or in
case you need a complete description for any other
reason,
Model:
Serial:
Purchase Date:
Dealer Name/Address/Phone:
Thank you for choosing RCA
Congratulations on your purchase of
an RCA TV. You have selected a
high-quality, precision-engineered
instrument designed to give you years
of video and audio enjoyment.
Despite its sophistication, your new
TV is amazingly simple to operate
because it has so many automatic
features. To simplify operation even
more, the TV provides on-screen
prompts that guide you thru each step
of the special functions. The remote
control allows adjustment of major
operating controls and special features
from the comfort of your favorite easy
chair.
Not only is your new set a state-of-
the-art television receiver that
combines sophistication with ease of
operation, it also has full monitor
capability thus providing you total
flexibility whenever you choose to add
additional components.
About This Manual
To take fuU advantage of all the
features and benefits of this unique
TV, be sure to read this owner's
manual carefully and then keep it in a
safe place for future reference.
This manual is divided into two
sections. Section I explains how to
install the TV and use the basic
operating controls before you connect
any other components to it.
Section II describes the monitor jack
panel and illustrates how to connect
components to your monitor/receiver.
A simplified remote operating guide is
printed inside the Back Cover for
convenient quick reference.
Table of Contents
Safety Precautions ...................................... Inside Front Cover
Warranty Registration .................................. Inside Front Cover
Television Features ....................................................... 2
Basic Installation Instructions
General Installation Information ........................................ 3
Antenna/Cable Information ............................................ 3
Home Antenna Connections ............................................ 4
Cable-TV Connections ................................................. 5
Cable-TV Operation .................................................... 6
Basic Operating Instructions
Remote Control Operation ........................................... 7-9
Front Panel Controls ............................................... 10-11
VIDEO Button-General Instructions .................................. 12
Video (Picture) Adjustments ........................................... 13
AUDIO Button-General Instructions .................................. 14
Audio Adjustments .................................................... 15
Stereo Broadcasts ..................................................... 16
SAP Broadcasts ....................................................... 17
Speakers On/Off ...................................................... 18
SETUP Button-General Instructions .................................. 19
Sleep Timer ........................................................... 20
Alarm ............................................................. 21-22
Parental Control ...................................................... 23
Channel Memory (AutoProgram) ...................................... 24
Channel Memory (Adding/Deleting Channels) ......................... 25
Changing An.tenna Input .............................................. 26
Clock ................................................................. 27
Picture Memory .................................................... 28-29
Cable/Air Control .................................................... 30
Message Style ......................................................... 31
Autocolor ............................................................. 32
Additional Operating Notes ........................................... 33
Automatic Demonstration ............................................. 34
Tips To Read Before Connecting Components ......................... 36-37
Monitor Jack Panel ................................................... 38-39
Component Connections
Speakers .............................................................. 40
Camcorder ............................................................ 41
Super-VHS VCR ...................................................... 41
Standard VCR ........................................................ 42
Dubbing/Editing with Two VCR's ..................................... 44
Cameras (Surveillance Systems) ........................................ 45
Stereo Amplifier or Audio Cassette Recorder ........................... 46
Computers/Video Games .............................................. 47
Remote Buttons That Control Compatible RCA VCR .................... 43
Trouble Checks ...................................................... 48-49
Cleaning & Care Tips ................................................... 50
Specifications ........................................................... 50
Swivel Lock Information ................................................. 51
Index (Alphabetical Reference) ........................................ 51-52
Quick-Reference Remote Operating Guide ................................ 53
Warranty ...................................................... Back Cover
S-VHS(Super VHS) Compatible-
S-VHS is a completely new video
recording format that is based on the
original VHS format. The S-VHS
connector on the back of the TV
allows you to connect external S-VHS
VCR's or camcorders to your TV to
take full advantage of this new
format.
Wideband Video Amplifier-A new
wideband video amplifier boosts the
video signal response to the 7 MHz
range when an appropriate wideband
device (such as a Super VHS VCR) is
connected to the set's video inputs. As
a result, the ColorTrak 2000 Monitor-
Receiver can reproduce up to 560
lines of resolution* when used with
wideband video components. That's
noticeably better than the 260 lines of
resolution delivered by conventional
broadcast television, or even the 330
lines of resolution provided by
baseband video devices.
*Through S-VHS video input jacks
using a wideband video source.
Vista Screen Hi-Con_ Picture Tube-
The "Vista Screen" is one of the most
significant picture tube improvements
in over 20 years. Compared to picture
tubes using conventional designs,
"Vista Screen" has a flatter face and a
virtually planar screen border,
minimizing distortion at corners and
edges. COTY picture tube gun
technology gives a brilliant color
picture with better definition and
reliability. And contrast is enhanced
by a Hi-Con_ screen with black
matrix.
Stereo Sound System-lets you enjoy
high-fidelity stereo sound from MTS
stereo TV broadcasts (where
available). Built-in dbx* system
automatically suppresses unwanted
noise. Audio also reproduces
2-channel sound from stereo VCR
playback. Includes separate 5-watt-
per-channel amplifiers.
*dbx is a trademark of dbx inc.
SAP Channel-your 'IV is capable of
also reproducing a Second Audio
Program if brbadcast. (SAP channels
sometimes are used for bilingual
movies.)
Digital Remote Control-provides total
remote control of nearly all operating
functions from the comfort of your
favorite easy chair. Controls not only
your TV, but also compatible RCA
2
VCR's and audio equipment.
Cable-compatible Quartz Tuning-
receives up to 147 channels in the
USA including 91 non-scrambled
cable channels. (In Canada, up to 120
channels can be received including 64
non-scrambled cable channels.) Quartz
synthesizer tunes the channels, and
digital counters and comparators
automatically lock the tuning system
to the signal.
Automatic Cable/Air Switching-
during AutoProgramming, the TV's
tuner automatically senses whether the
set is hooked up to cable-TV or an
off-air antenna and then automatically
switches to the proper mode.
EIA MUL TIPOR T Connector-is a
"universal interface" that may be used
in the future to connect a variety of
video and audio accessories. The
connector conforms to industry
standards and may enable you to use
the new technology when it is
introduced.
Monitor Capability-your 'IV also has
an audio/video jack panel on the back
that enables you to connect up to
three video components directly to the
TV. This jack panel makes it easy to
connect VCR's, external speakers,
audio equipment, etc.
Picture Memory-lets you program
your favorite picture settings into
memory so that pressing the RESET
button will automatically change the
video functions to whatever settings
you programmed into Picture
Memory. Also lets you return picture
settings to original (out-of-box)
positions whenever desired.
Sleep Timer-aUows you to program
TV to turn off after a pre-selectey:l
period of time (up to six hours).
Alarm Timer-allows you to program
TV to turn on to your favorite
channel and/or off by itself at the
time you select.
Parental Control-allows you to block
out up to six channels so that your
children can watch only programs on
channels you prefer, even if you're not
home.
Multicolored On-Screen Displays-
provide immediate information about
your TV's status including channel
number, time, stereo/SAP sound,
sleep timer, etc. Also provide visual
guides to assist in operating all set
functions.
On-screen Time Display-after you set
the clock, the time will appear on the
screen whenever you press the TV or
DISPLAY button on the remote
control or change chanr_els.
AutoProgramming- an tomatically
programs active channels (whether
off-air or cable) into the channel
memory so that the CHANNEL A/V
buttons stop only at pre-selected
channels.
Two Antenna Inputs-allow you to
connect two different signal sources to
your TV (such as a cable-TV system
to one input and a home antenna to
the other). Then, by pressing the ANT
button on the remote, you can switch
back and forth between the two
signals.
Message Style Choice-lets you
choose the message style you like best
for the on-screen displays, either
"edged" or "blocked".
Comb Filter-separates color from
black & white detail information in
the video signal, resulting in a
sharply-defined picture with enhanced
resolution.
Video Noise Reduction-dynamically
reduces visible interference in dark
picture areas while retaining sharpness
and detail in brighter areas.
Automatic Picture Control System-
Automatic Color Control monitors and
adjusts color to maintain constant
color levels even after program or
channel changes. Fleshtone Correction
maintains natural fleshtones while
preserving fidelity of background
colors. Contrast/Color Tracking
balances contrast and color, with a
single contrast adjustment. After
initial adjustment, the Brightness and
Color functions rarely need individual
correction. Light Sensor automatically
adjusts Contrast/Color Tracking
circuitry as room brightness changes.
BlackLock Contrast Circuit enhances
contrast by keeping dark areas dark,
minimizing distortion, and
maintaining detail at high brightness
levels.
Unitized XtendedLife Chassis-features
advanced technology, including
several microchips that replace dozens
of color processing components. Cool-
operating electronic regulation circuits
enhance reliability and efficiency for
outstanding performance, longer life
expectancy, and lower power
consumption.
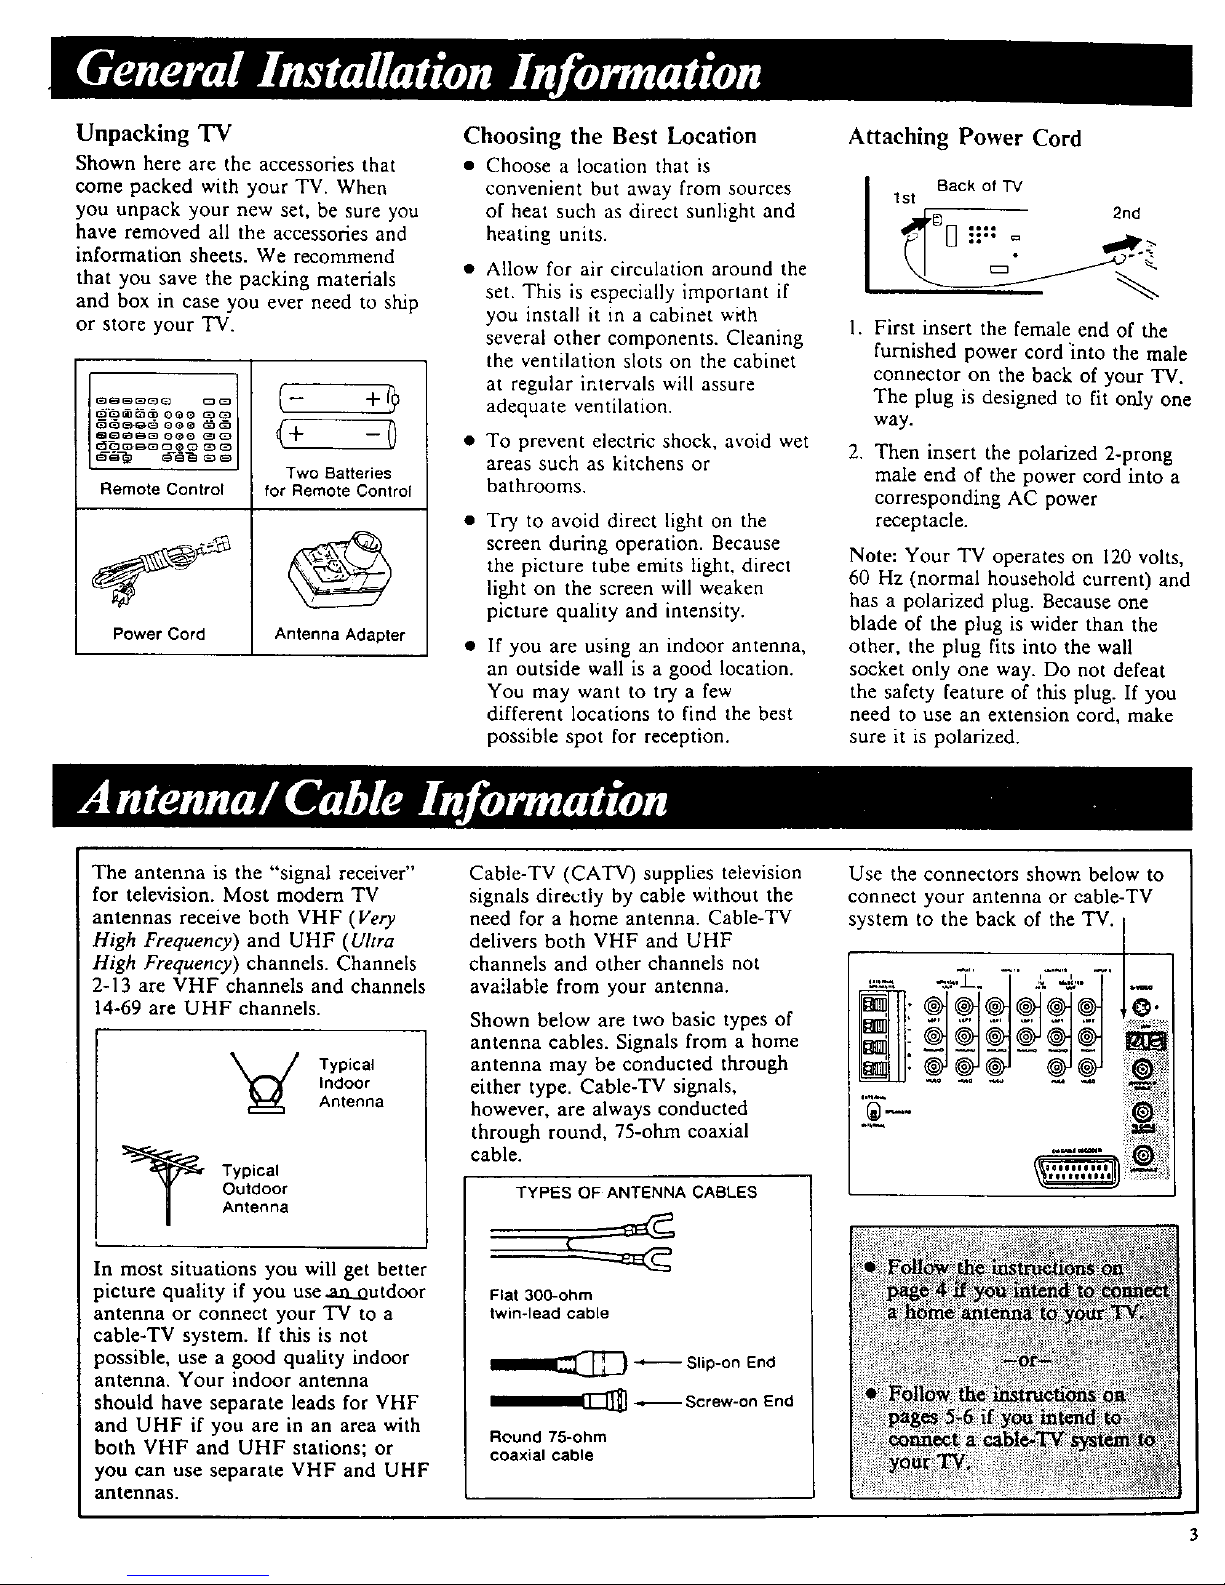
Unpacking TV
Shown here are the accessories that
come packed with your TV. When
you unpack your new set, be sure you
have removed all the accessories and
information sheets. We recommend
that you save the packing materials
and box in case you ever need to ship
or store your TV.
_OQtI_30 Q_O t_Co
Remote Control
Power Cord
Two Batteries
for Remote Control
Antenna Adapter
Choosing the Best Location
• Choose a location that is
convenient but away from sources
of heat such as direct sunlight and
heating units.
• Allow for air circulation around the
set. This is especially important if
you install it in a cabinet with
several other components. Cleaning
the ventilation slots on the cabinet
at regular intervals will assure
adequate ventilation.
• To prevent electric shock, avoid wet
areas such as kitchens or
bathrooms.
• Try to avoid direct light on the
screen during operation. Because
the picture tube emits light, direct
light on the screen will weaken
picture quality and intensity.
• If you are using an indoor antenna,
an outside wall is a good location.
You may want to try a few
different locations to find the best
possible spot for reception.
Attaching Power Cord
Back of TV
tst
1.
,
First insert the female end of the
furnished power cord "into the male
connector on the back of your TV.
The plug is designed to fit only one
way.
Then insert the polarized 2-prong
male end of the power cord into a
corresponding AC power
receptacle.
Note: Your TV operates on 120 volts,
60 Hz (normal household current) and
has a polarized plug. Because one
blade of the plug is wider than the
other, the plug fits into the wall
socket only one way. Do not defeat
the safety feature of this plug. If you
need to use an extension cord, make
sure it is polarized.
The antenna is the "signal receiver"
for television. Most modem TV
antennas receive both VHF (Very
High Frequency) and UHF (Ultra
High Frequency) channels. Channels
2-13 are VHF channels and channels
14-69 are UHF channels.
Typical
Indoor
Antenna
Typical
Outdoor
Antenna
In most situations you will get better
picture quality if you use an_outdoor
antenna or connect your TV to a
cable-TV system. If this is not
possible, use a good quality indoor
antenna. Your indoor antenna
should have separate leads for VHF
and UHF if you are in an area with
both VHF and UHF stations; or
you can use separate VHF and UHF
antennas.
Cable-TV (CATV) supplies television
signals directly by cable without the
need for a home antenna. Cable-TV
delivers both VHF and UHF
channels and other channels not
available from your antenna.
Shown below are two basic types of
antenna cables. Signals from a home
antenna may be conducted through
either type. Cable-TV signals,
however, are always conducted
through round, 75-ohm coaxial
cable.
TYPES OF ANTENNA CABLES
Flat 300-ohm
twin-lead cable
II_ ""--'-'- Slip-on End
Round 75-ohm
coaxial cable
Use the connectors shown below to
connect your antenna or cable-TV
system to the back of the TV.
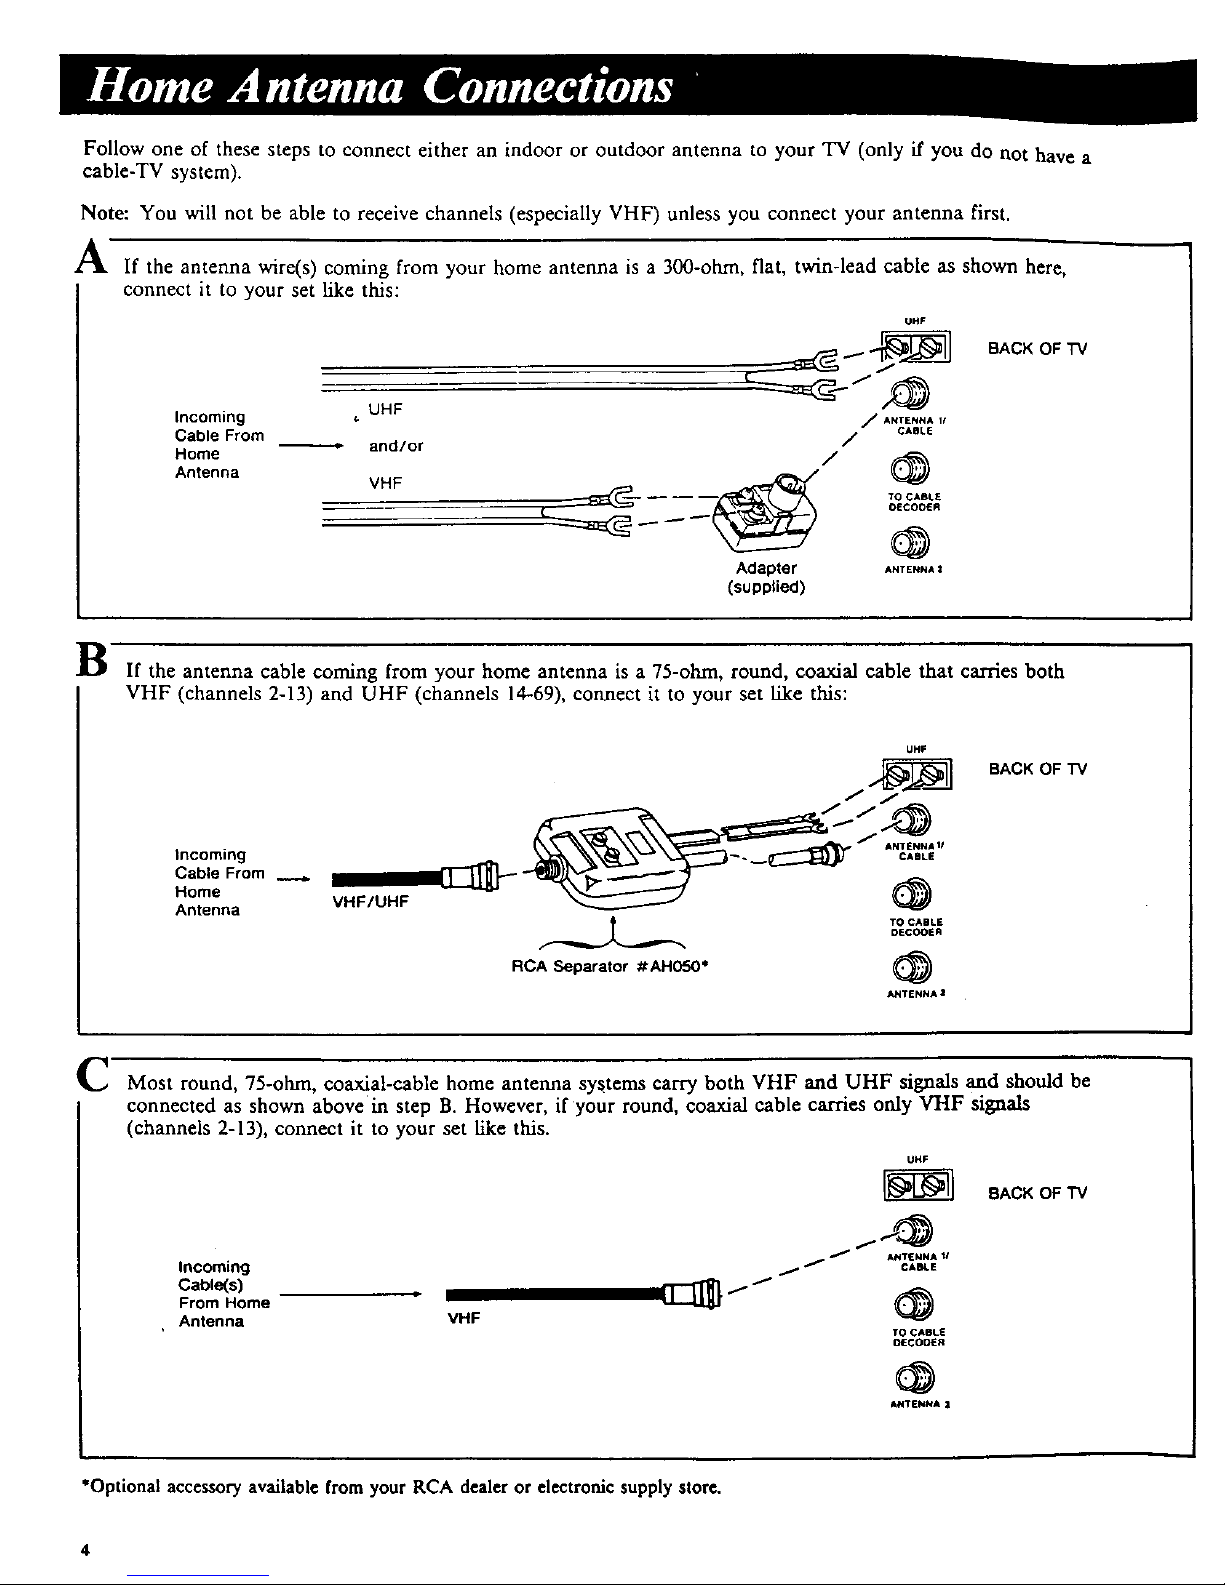
Follow one of these steps to connect either an indoor or outdoor antenna to your TV (only if you do not have a
cable-TV system).
Note: You will not be able to receive channels (especially VHF) unless you connect your antenna first.
A If the antenna wire(s) coming from your home antenna is a 300-ohm, flat, twin-lead cable as shown here,
connect it to your set like this:
UHF
/
Incoming = UHF / ANTENN*U
Cable From / ¢AaLE
Home -- and/or / (_
Antenna
VHF @
"_ _ TO CABLE
OECOOER
Adapter ANTENNA l
(supplied)
BACK OF TV
B If the antenna cable coming from your home antenna is a 75-ohrn, round, coaxial cable that carries both
VHF (channels 2-13) and UHF (channels 14-69), connect it to your set llke this:
Incoming
Cable From ..__..
Home
Antenna
UHF
VHF/UHF _
TO CABLE
DECKER
RCA Separator #AH050*
_NTENNA l
BACK OF "rv
C' Most round, 75-ohm, coaxial-cable home antenna systems carry both VHF and UHF signals and should be
connected as shown above in step B. However, if your round, coaxial cable carries only VHF signals
(channels 2-13), connect it to your set like this.
UHF
BACK OF TV
Incoming
Cable(s)
From Home
Antenna VHF
/' ANTENNA 1/
/ / CAEt.E
TO CABLE
OECOQER
@
ANTENNA |
"Optional accessory available from your RCA dealer or electronic supply store.
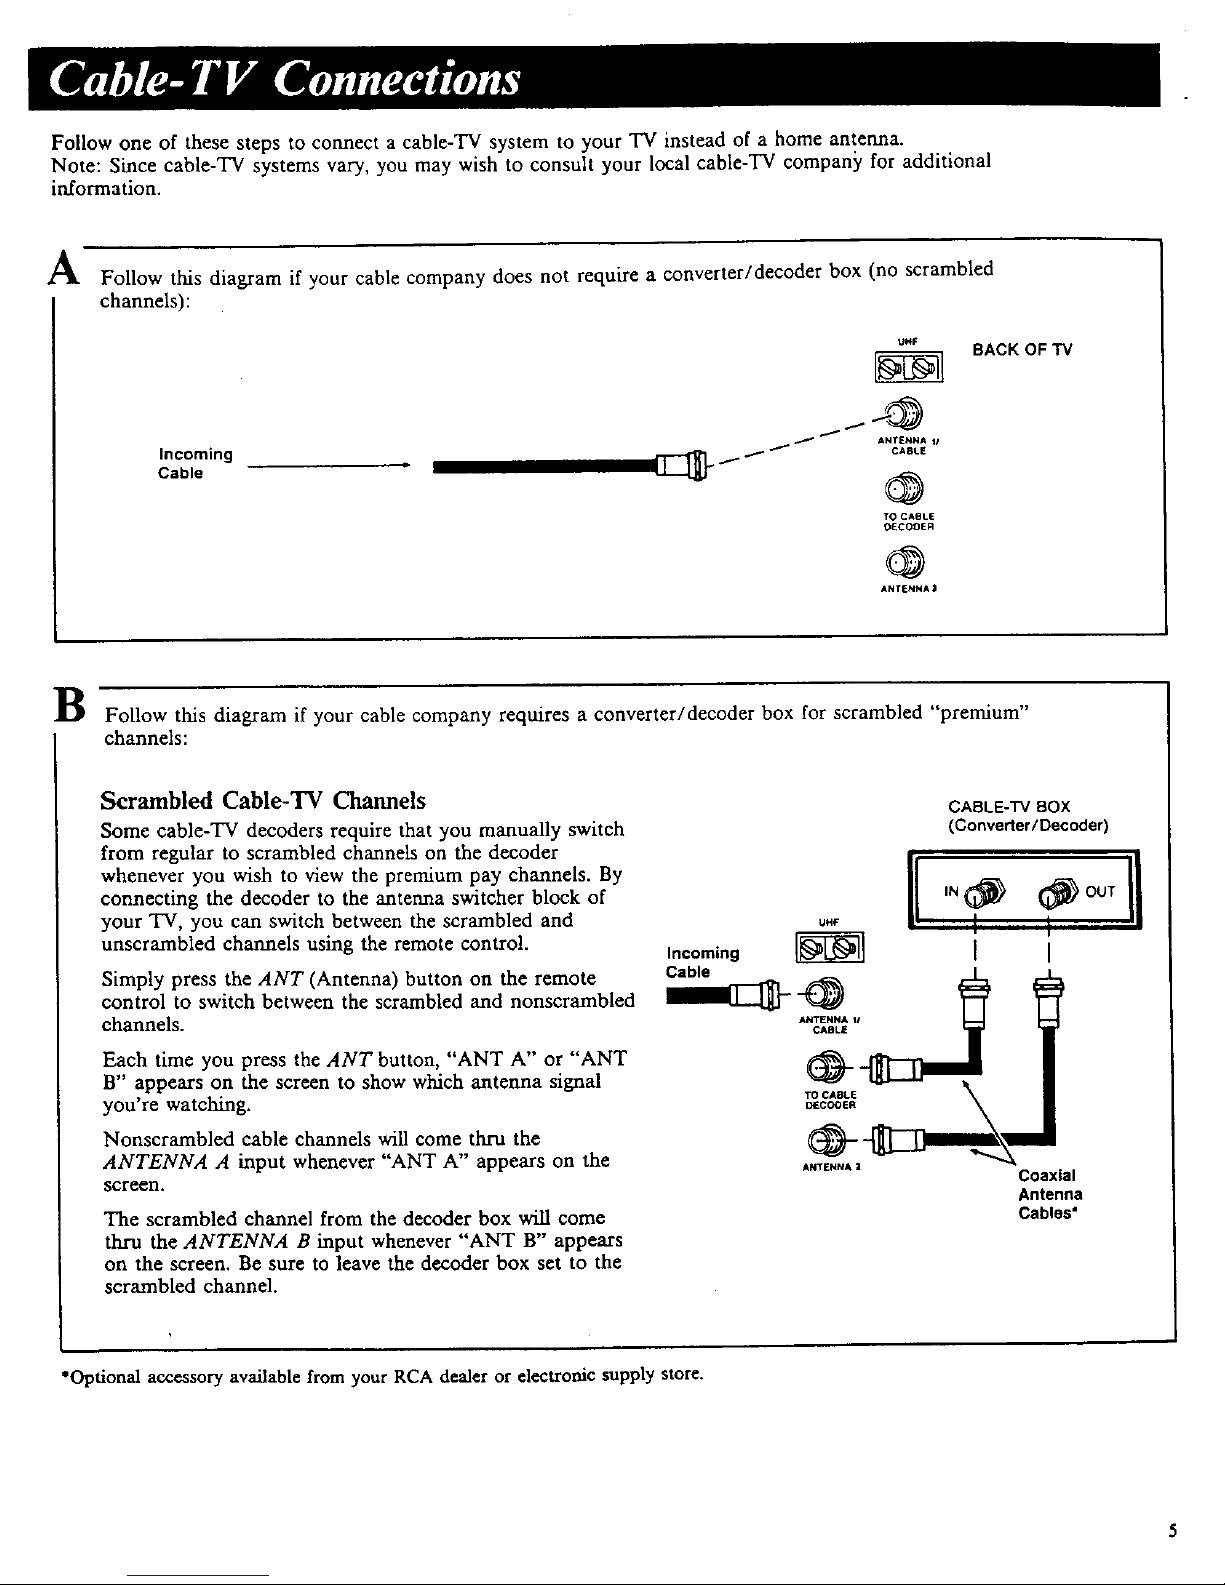
Follow one of these steps to connect a cable-TV system to your TV instead of a home antenna.
Note: Since cable-TV systems vary, you may wish to consult your local cable-TV compan_€ for additional
in.formation.
A
Follow tins diagram if your cable company does not require a converter/decoder box (no scrambled
channels):
Incoming
Cable
UHF
&NTENNA II
1 CABLE
TO CABLE
0_C00ER
ANTENNA :1
BACK OF TV
B Follow tins diagram if your cable company requires a converter/decoder box for scrambled "premium"
channels:
Scrambled Cable-TV Channels
Some cable-TV decoders require that you manually switch
from regular to scrambled channels on the decoder
whenever you wish to view the premium pay channels. By
connecting the decoder to the antenna switcher block of
your TV, you can switch between the scrambled and
unscrambled channels using the remote control.
Simply press the ANT (Antenna) button on the remote
control to switch between the scrambled and nonscrambled
channels.
Each time you press the ANT button, "ANT A" or "ANT
B" appears on the screen to show which antenna signal
you're watching.
Nonscrambled cable channels will come thru the
ANTENNA A input whenever "ANT A" appears on the
screen.
The scrambled channel from the decoder box v611 come
thru the ANTENNA B input whenever "ANT B" appears
on the screen. Be sure to leave the decoder box set to the
scrambled channel.
CABLE-'I'VBOX
(Conveder/Decoder)
_ I[ ÷
Incoming _ [ I
ANTI_NNA Z Coaxial
Antenna
Cables"
*Optional accessory available from your RCA dealer or electronic supply store.
Your new TV is designed to receive
up to 147 channels in the USA
including 91 non-scrambled cable
channels. (In Canada, up to 120
channels can be received including 64
non-scrambled cable channels.) To use
tins TV on a cable-TV system,
confirm that the cable-TV system is
properly connected to your TV as
shown on page 5. Since cable systems
vary, you may wish to consult your
local cable-TV company for additional
information.
If your cable-TV company follows
EIA/NCTA channel-identification
standards, most of the channels
offered by your cable company will be
identified by channel numbers that
are identical to those on your TV. For
example, if your cable-TV system has
programs on cable channel 20, you
can choose tins channel by selecting
channel 20 on your TV. If your cable
company offers cable channels A-I or
A-2, you can tune them by selecting
TV channels 99 or 98. (Cable
channels A-I and A-2 are not
available ha Canada.)
Some cable-TV companies do not
follow the EIA/NCTA standards and
instead assign their own channel
identification. For example, some use
the standard broadcast channel
numbers (2-13) for channels 2-13, but
identify their other channels with
letters. If your cable company does
not follow the EIA/NCTA standards,
ask them for a cross reference that
shows to which channels you should
tune your TV to receive their cable-
TV channels.
Not all cable-TV channels will be
active on your particular cable-TV
system. Also some cable companies
may require the use of a decoder with
their cable-TV system. Consult your
cable company or local RCA dealer
for details.
Scrambled Cable-TV Channels
Some cable COmpanies offer
"premium-pay" channels in which the
signal is scrambled. Descrambling
these signals for normal viewing
requires the use of a descrambler
device which is generally provided by
the cable company.
The descrambler device may or may
not be a part of the cable converter.
Diagram B on page 5 shows how to
connect tins type of converter/
descrambler device to the TV.
Since cable systems vary, you may
wish to COnsult your local cable
company for additional information.
Note: In the U.S.A., if your cable
company offers ultra-band cable
channels 65-89, you can tune them by
adding the optional accessories in
RCA Kit No. AH056 to the inCOming
cable. Check with your local RCA
dealer for more complete information.
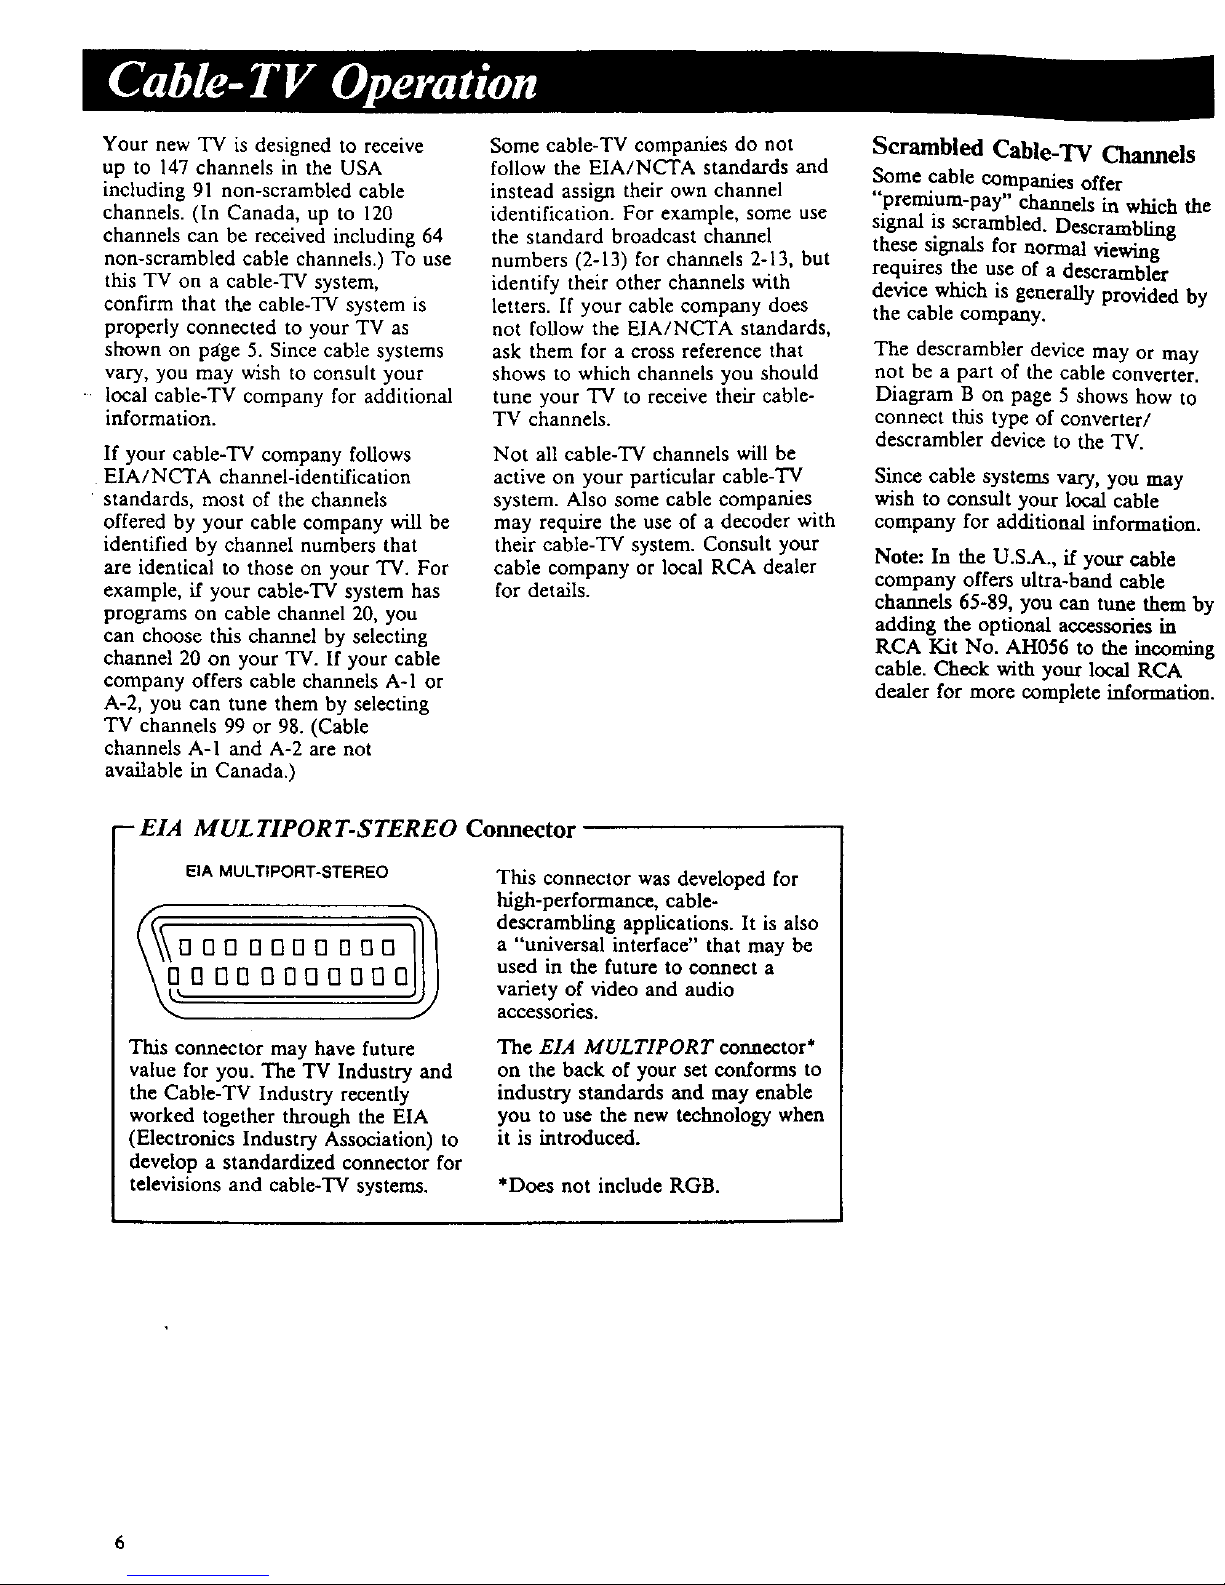
- EIA MUL TIPORT-STEREO Connectm
EIA MULTtPORT-STEREO
This connector may have future
value for you. The TV Industry and
the Cable-TV Industry recently
worked together through the EIA
(Electronics Industry Association) to
develop a standardized connector for
televisions and cable-TV systems.
This connector was developed for
high-performance, cable-
descrambling applications. It is also
a "universal interface" that may be
used in the future to connect a
variety of video and audio
accessories.
The EIA MULTIPORT connector*
on the back of your set conforms to
industry standards and may enable
you to use the new technology when
it is introduced.
*Does not include RGB.
Operating Remote Control
The Digital Control remote not only
controls your new TV but several
other compatible RCA VCR models
as well.
Before attempting to operate your
remote control, install the batteries as
shown below.
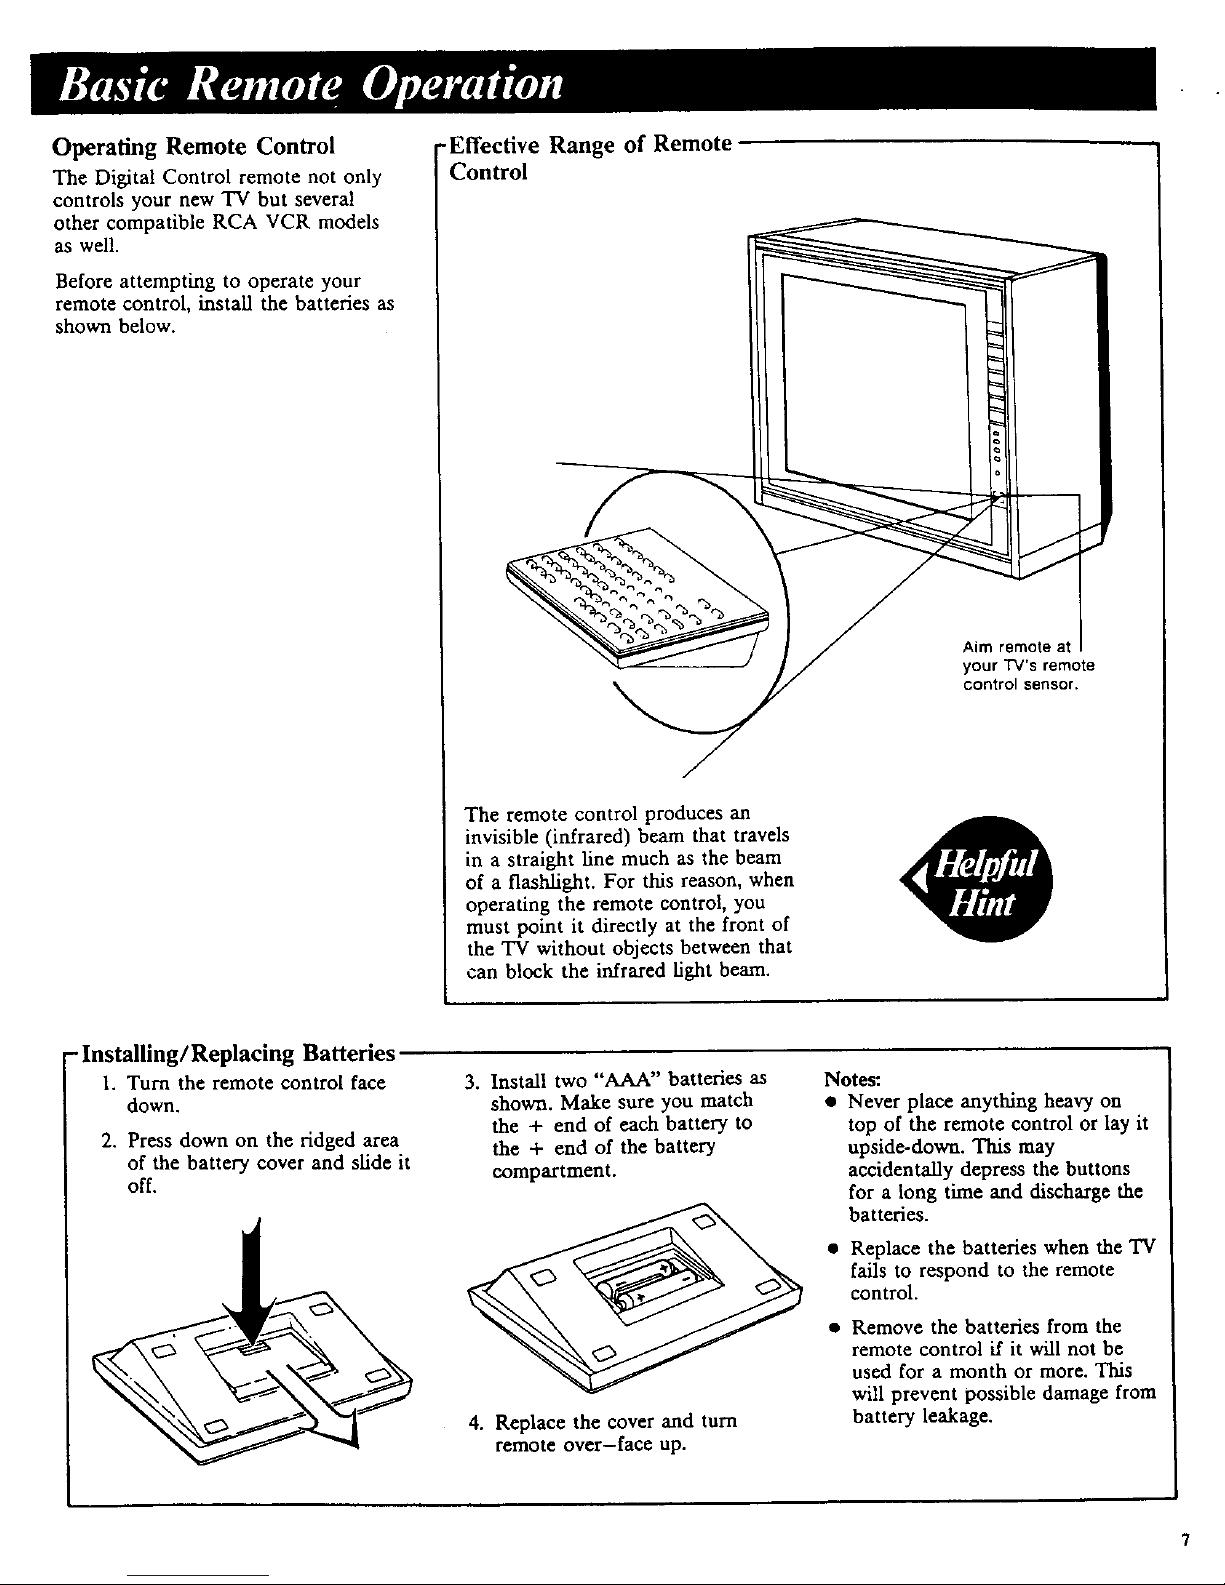
-Effective Range of Remote
Control
The remote control produces an
invisible (infrared) beam that travels
in a straight line much as the beam
of a flashlight. For this reason, when
operating the remote control, you
must point it directly at the front of
the 'IV without objects between that
can block the infrared fight beam.
Aim remote at
your TV's remote
control sensor.
- Installing/Replacing Batteries
1. Turn the remote control face
down.
2. Press down on the ridged area
of the battery cover and slide it
off.
3. Install two "AAA" batteries as
shown. Make sure you match
the + end of each battery to
the + end of the battery
compartment.
4. Replace the cover and turn
remote over-face up.
Notes:
• Never place anything heavy on
top of the remote control or lay it
upside-down. This may
accidentally depress the buttons
for a long time and discharge the
batteries.
• Replace the batteries when the TV
fails to respond to the remote
control.
Remove the batteries from the
remote control if it will not be
used for a month or more. This
will prevent possible damage from
battery leakage.
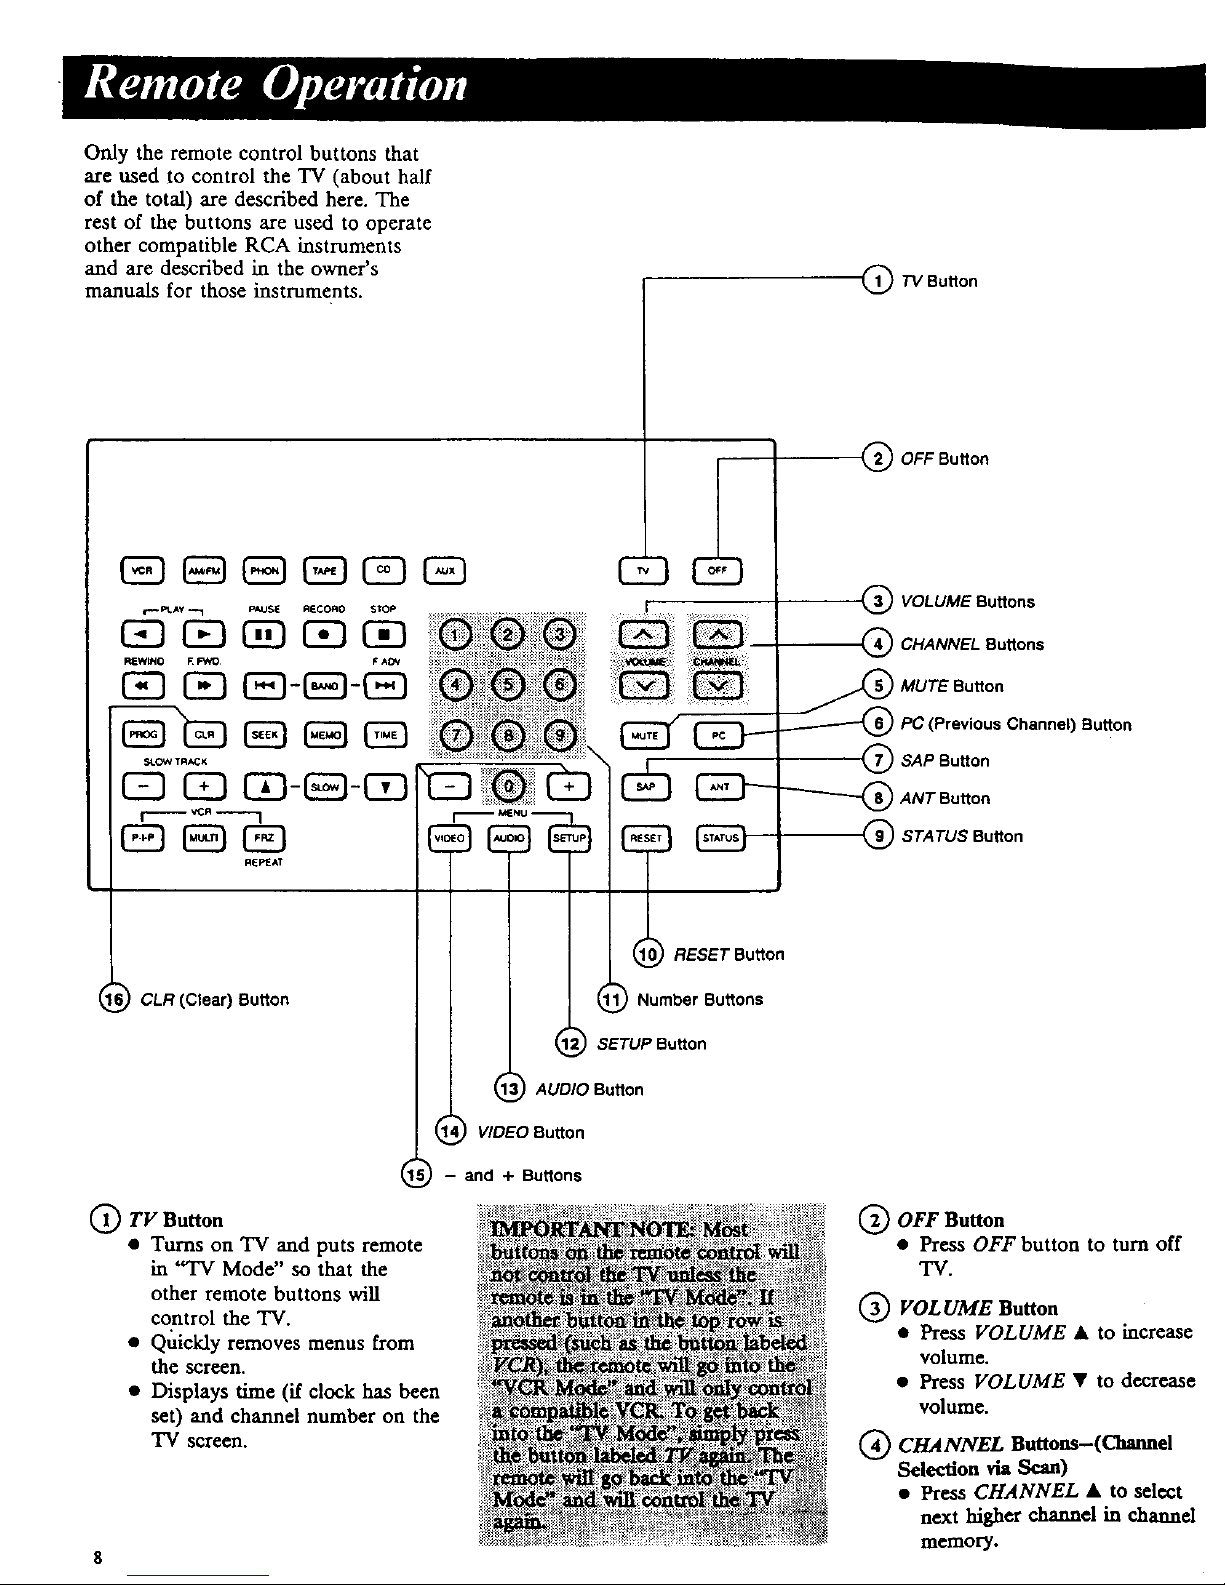
Onlytheremotecontrolbuttonsthat
areusedto control the TV (about half
of the total) are described here. The
rest of the buttons are used to operate
other compatible RCA instruments
and are described in the owner's
manuals for those instruments.
Q TVBuRon
¢_" PLAY ""1 PAUSE RIRCORO STOP
REWINO R FWO I=AOV
E3 C_9-c=1-_3
CB CB _-EEI-C_
r I
El E_I CSB
R_AT
6_CLR (Clear) Button
O TV Button
• Turns on TV and puts remote
in "TV Mode" so that the
other remote buttons will
control the TV.
• Quickly removes menus from
the screen.
• Displays time (if clock has been
set) and channel number on the
TVscreen.
8
E3 _9
Q OFF Button
l 11_ RESET Button
.( NumOerOuttons
1_ SETUP Button
_::_: Button
----_VOLUME Buttons
Q CHANNEL Buttons
_ MUTE Button
._) PC (Previous Channel) BuRon
--_ SAP Button
--'---"-'_ ANT Button
Q STATUS Button
- and + Buttons
Q OFF Button
• Press OFF button to turn off
"IV.
VOLUME Button
• Press VOLUME • to increase
volume.
• Press VOLUME • to decrease
volume.
Q CHANNEL Buttons-(Channel
Selection via Scan)
• Press CHANNEL • to select
next higher channel in channel
memory.
• PressCHANNEL • to select
next lower channel in channel
memory.
NOTE: Channels 2 thru 13 and
91 were programmed into the
channel memory for you at the
factory. Instructions for adding or
erasing channels in memory are
on pages 24-25.
MUTE Button
• Press MUTE to quickly reduce
sound to minimum level
without affecting the picture.
This is very useful during
telephone calls or other
interruptions.
• When sound is muted, the
word "MUTE" will be
displayed in the bottom left
corner of the screen.
• To restore sound, press MUTE
again or press VOLUME A.
Q PC (Previous Channel) Button
• Pressing the PC button causes
the TV to change back to the
last tuned channel. This is
useful should you want to
monitor two channels.
• To operate, select the first
channel you wish to watch.
Then select the other channel
by pressing two number
buttons (for example, press 0
then 6 for channel 6).
• The TV will now change back
and forth between the two
channels each time you press
the PC button.
Q SAP Button
• Some TV programs are
broadcast with more than one
audio channel. For example,
some programs are broadcast
in two languages at the same
time. The Second Audio
Program is called SAP, and the
TWs,SAP light will come on
whenever SAP audio is being
received. (The "AUDIO:
STEKEO/MONO" function
must be in "STEREO" mode
for SAP light to come on-
unless the SAP button has
been pressed.)
(_ANT (Antenna) Button
• Because your "IV has two
different antenna inputs on the
back (Labeled ANTENNA A/
CABLE and ANTENNA B),
you can connect more than one
antenna or signal source.
• Press the ANT button to swtich
from one input to the other.
• The words "ANT A" or "ANT
B" will appear in the bottom
right corner of the screen to let
you know which signal source
you are watching.
• If "ANT A" appears on the
screen, you are watching
whatever is connected to the
ANTENNA A/CABLE input
on the back of the TV.
• If "ANT B" appears on the
screen, you are watching
whatever is connected to the
ANTENNA B input on the
back of the TV.
(_) STA TUS Button
• Quickly remove menus and
displays from the screen.
• Displays time (if clock has been
set) and channel number on the
'IV screen.
RESET Button
• Press RESET to return the
VIDEO adjustments (Color,
Tint, Contrast, Brightness, and
Sharpness) to the settings
stored in "Picture Memory".
• Detailed information about
"Picture Memory" is on
pages 28-29.
_Number Buttons-(Direct Channel
Selection)
• Always press two number
buttons (first one, then another)
to select a channel. For
example, press "0" then "6" for
Channel 6. Press "1" then "3"
for Channel 13.
• Also used for viewing signals
from other components plugged
into the input jacks on the
back via channels 91 (INPUT
1), 92 (INPUT 2), and 93
(INPUT 3).
Q SETUP Button
• Press once to see functions in
first Setup Menu shown here:
1 SI.CCP TIMCR
2 AL_,RM SCT
3 PARENTAL CONTROL
4 J,UTOPROGRAM
5 'NT[NNk: INPUT A
PUSH SETUP FOR MORE
• Press again to see second Setup
Menu shown here:
I CLOCK SET
2 CHANNEL M_MORY
3 PICTURE MEMORY
4 CABLE/AIR: AIR
S MESSAGE STYLE
6 kUTOCOLOR: ON
• Det_led instructions begin on
page 19.
QA UDIO Button
• Press once to see functions in
Audio Menu shown here:
- R_gL£
BASS
BALANCE
AUDIO: STEREO
SAP: OFF
_PEAKERS : ON
• Detailed instructions begin on
page 14.
VIDEO Button
• Press once to see functions in
Video Menu shown here:
TINT
CONTRAST
BRIGHTNESS
SHARPN[XS
AUTO R[SST
• Detailed instructions begin on
page 12.
_- and + Buttons
• Use these buttons after you
have pressed one of the three
MENU buttons (VIDEO,
AUDIO, or SETUP).
• Press "+" to increase (or
change) a function.
• Press "-" to decrease (or
change) a function.
• After a display has
disappeared, use to recall the
last function you adjusted.
@ CLR (Clear)
Button
• Press CLR to erase entries from
the Sleep Timer, Alarm, Clock,
and Parental Control memories.
• Pressing CLR also clears screen
of on-screen display messages
(except MUTE).
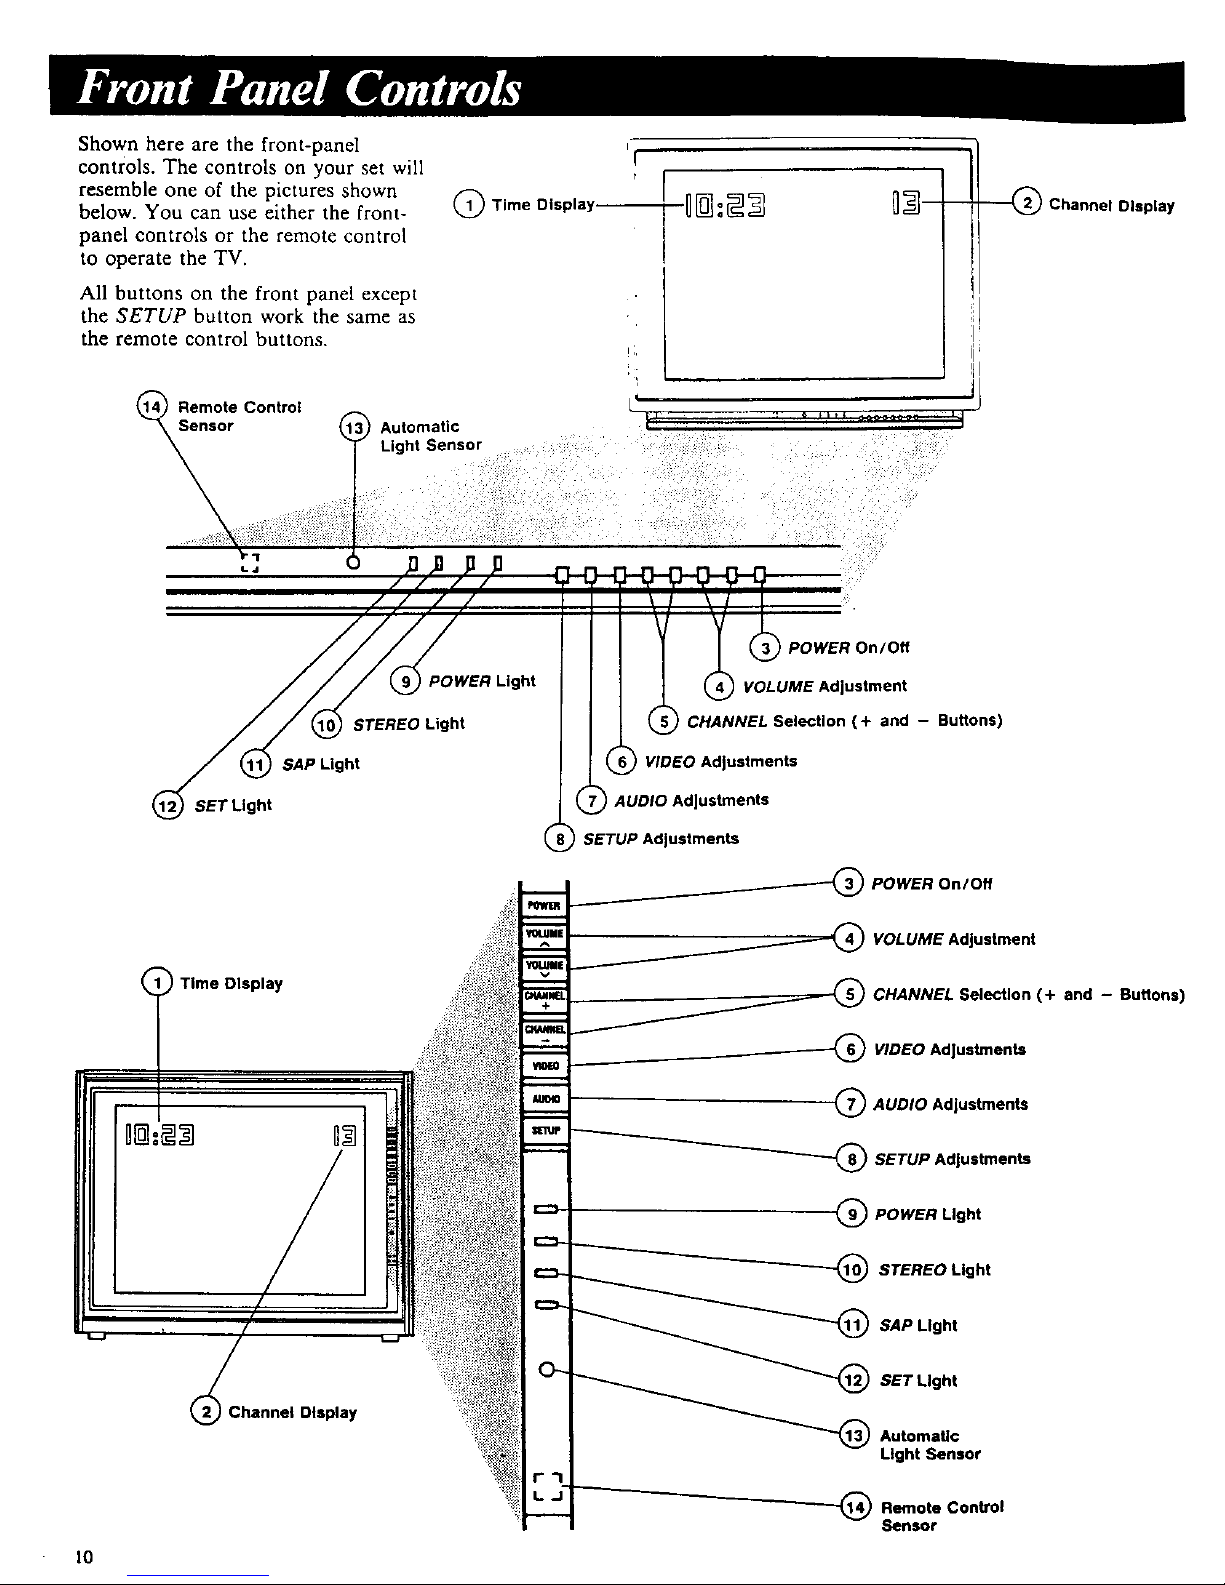
Shown here are the front-panel
controls. The controls on your set will
resemble one of the pictures shown
below. You can use either the front-
panel controls or the remote control
to operate the TV.
All buttons on the front panel except
the SETUP button work the same as
the remote control buttons.
Remote Control
Sensor
Automatic
Light Sensor
'!
r
Q Time Display--
"---_ Channel Display
10
POWER Light
STEREO Light
SAP Light
) Time Display
/
!
Channel Display
"I'OUlMI
i'_.klM I
I
0.-
r'"l
l_d
POWER On/Off
VOLUME Adjustment
I CHANNEL Selection (+ and - Buttons)
VIDEO Adjustments
AUDIO Adjustments
) SETUP Adjustments
_ POWER On/Off
_ VOLUME Adjustment
_ 0 CHANNEL Selection (+
___--_ VIDEO Adlustments
Q AUDIO Adjustments
_ SETUP Adlustments
(_ POWER Light
_--_--_ STEREO Light
_ SAP Light
]]]'
Light Sensor
_ Remote Control
Sensor
and - Buttons)
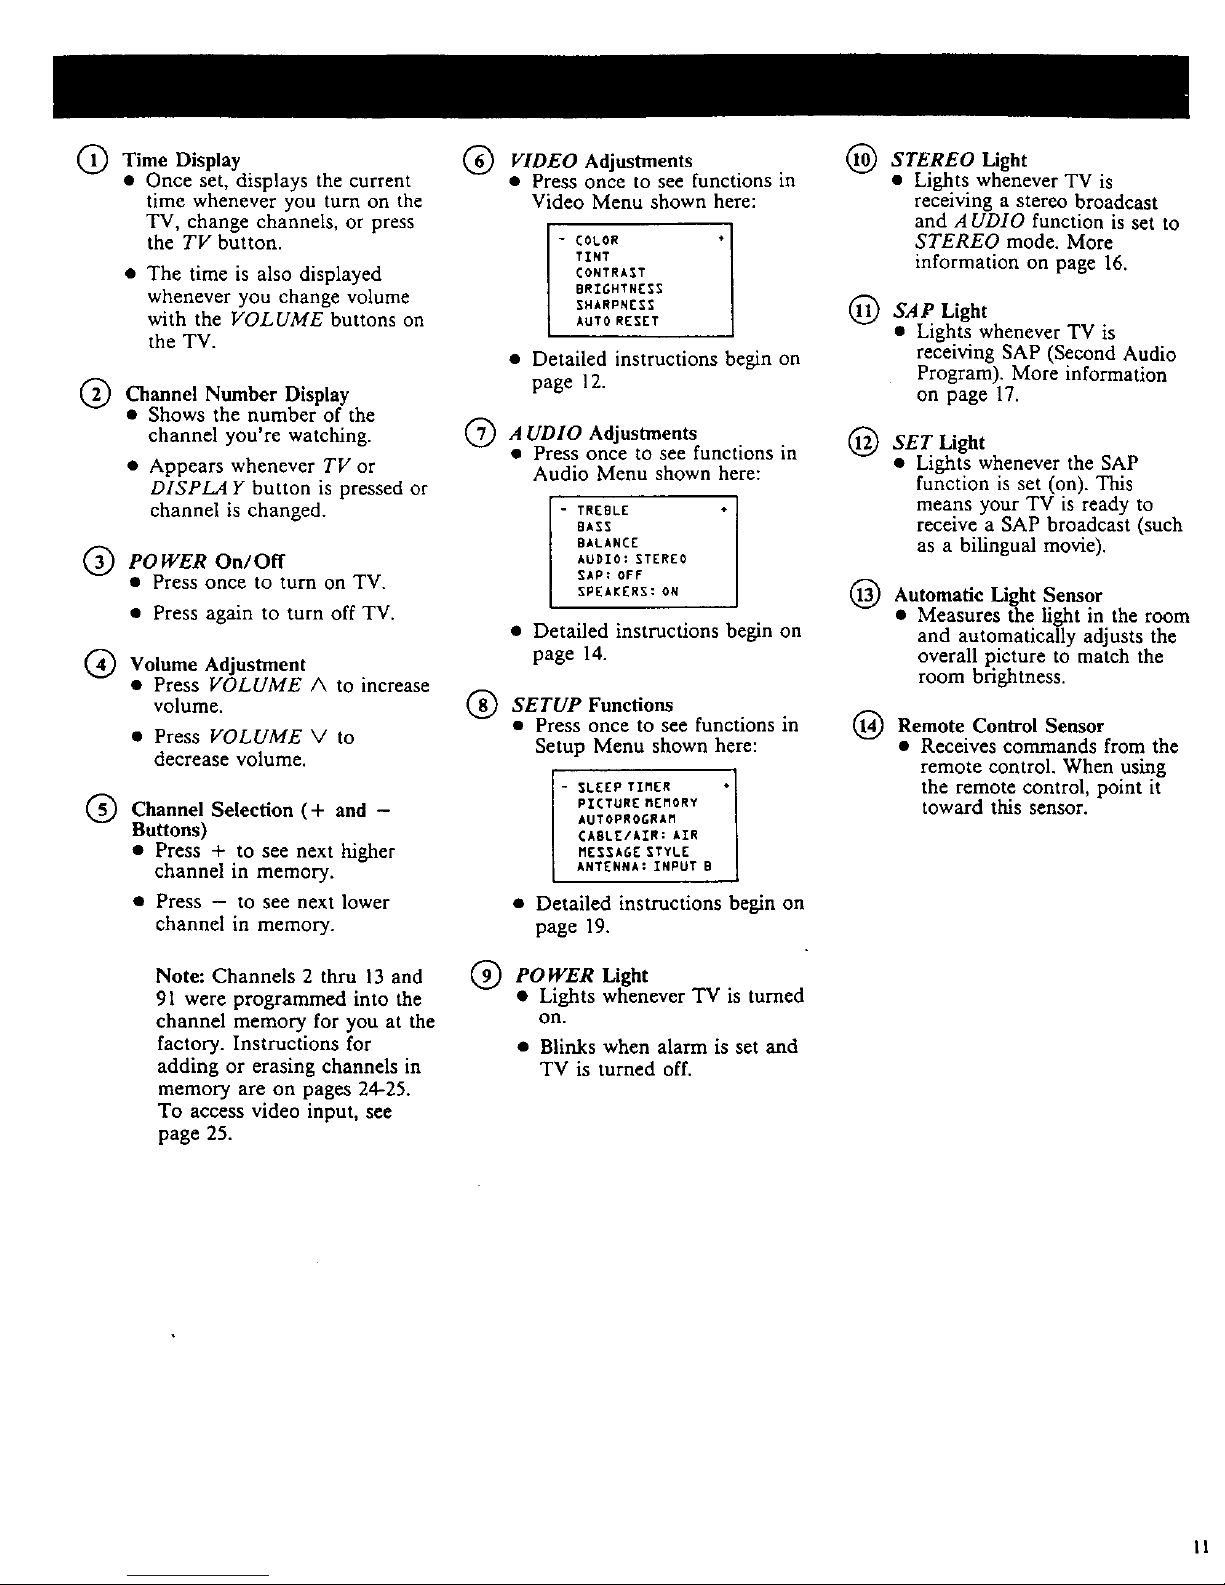
Time Display
• Once set, displays the current
time whenever you turn on the
TV, change channels, or press
the TV button.
• The time is also displayed
whenever you change volume
with the VOLUME buttons on
the TV.
Channel Number
Display
• Shows the number of the
channel you're watching.
• Appears whenever TV or
DISPLAY button is pressed or
channel is changed.
POWER On/Off
• Press once to turn on TV.
• Press again to turn off TV.
Volume Adjustment
• Press VOLUME A to increase
volume.
• Press VOLUME V to
decrease volume.
@Channel Selection and -
(
"4-
Buttons)
• Press + to see next higher
channel in memory.
• Press - to see next lower
channel in memory.
Note: Channels 2 thrn 13 and
91 were programmed into the
channel memory for you at the
factory. Instructions for
adding or erasing channels in
memory are on pages 24-25.
To access video input, see
page 25.
@ VIDEO Adjustments
• Press once to see functions in
Video Menu shown here:
- COLOR */
TINT
CONTRAST
BRIGHTNESS
SHARPNESS
AUTO RESET
• Detailed instructions begin on
page 12.
A UDIO Adjustments
• Press once to see functions in
Audio Menu shown here:
- TREBLE +
BASS
B,LANCE
AUDIO: STERBO
SAP: OFF
SPEAKERS: ON
• Detailed instructions begin on
page 14.
@SETUP Functions
• Press once to see functions in
Setup Menu shown here:
- LEEP TIMER */
PICTURE MEMORY
AUTOPROGRAM
CABLE/AIR: AIR
MESSAGE STYLE
ANTENNA: INPUT B
• Detailed instructions begin on
page 19.
POWER
Light
• Lights whenever TV is turned
on.
• Blinks when alarm is set and
TV is turned off.
STEREO Light
• Ligl]ts. whenever TV is
recelvmg a stereo broadcast
and A UDIO function is set to
STEREO mode. More
information on page 16.
SAP Light
• Lights whenever TV is
receiving SAP (Second Audio
Program). More information
on page 17.
@ SET Light
• Lights whenever the SAP
function is set (on). This
means your TV is ready to
receive a SAP broadcast (such
as a bilingual movie).
Automatic Light Sensor
• Measures the light in the room
and automatically adjusts the
overall picture to match the
room brightness.
Control Sensor
Remote
• Receives commands from the
remote control. When using
the remote control, point it
toward this sensor.
II
Bu on
I
- COLOR ÷:
TINT
CONTRAST
BRIGHTNESS
SHARPNESS
AUTO RESET
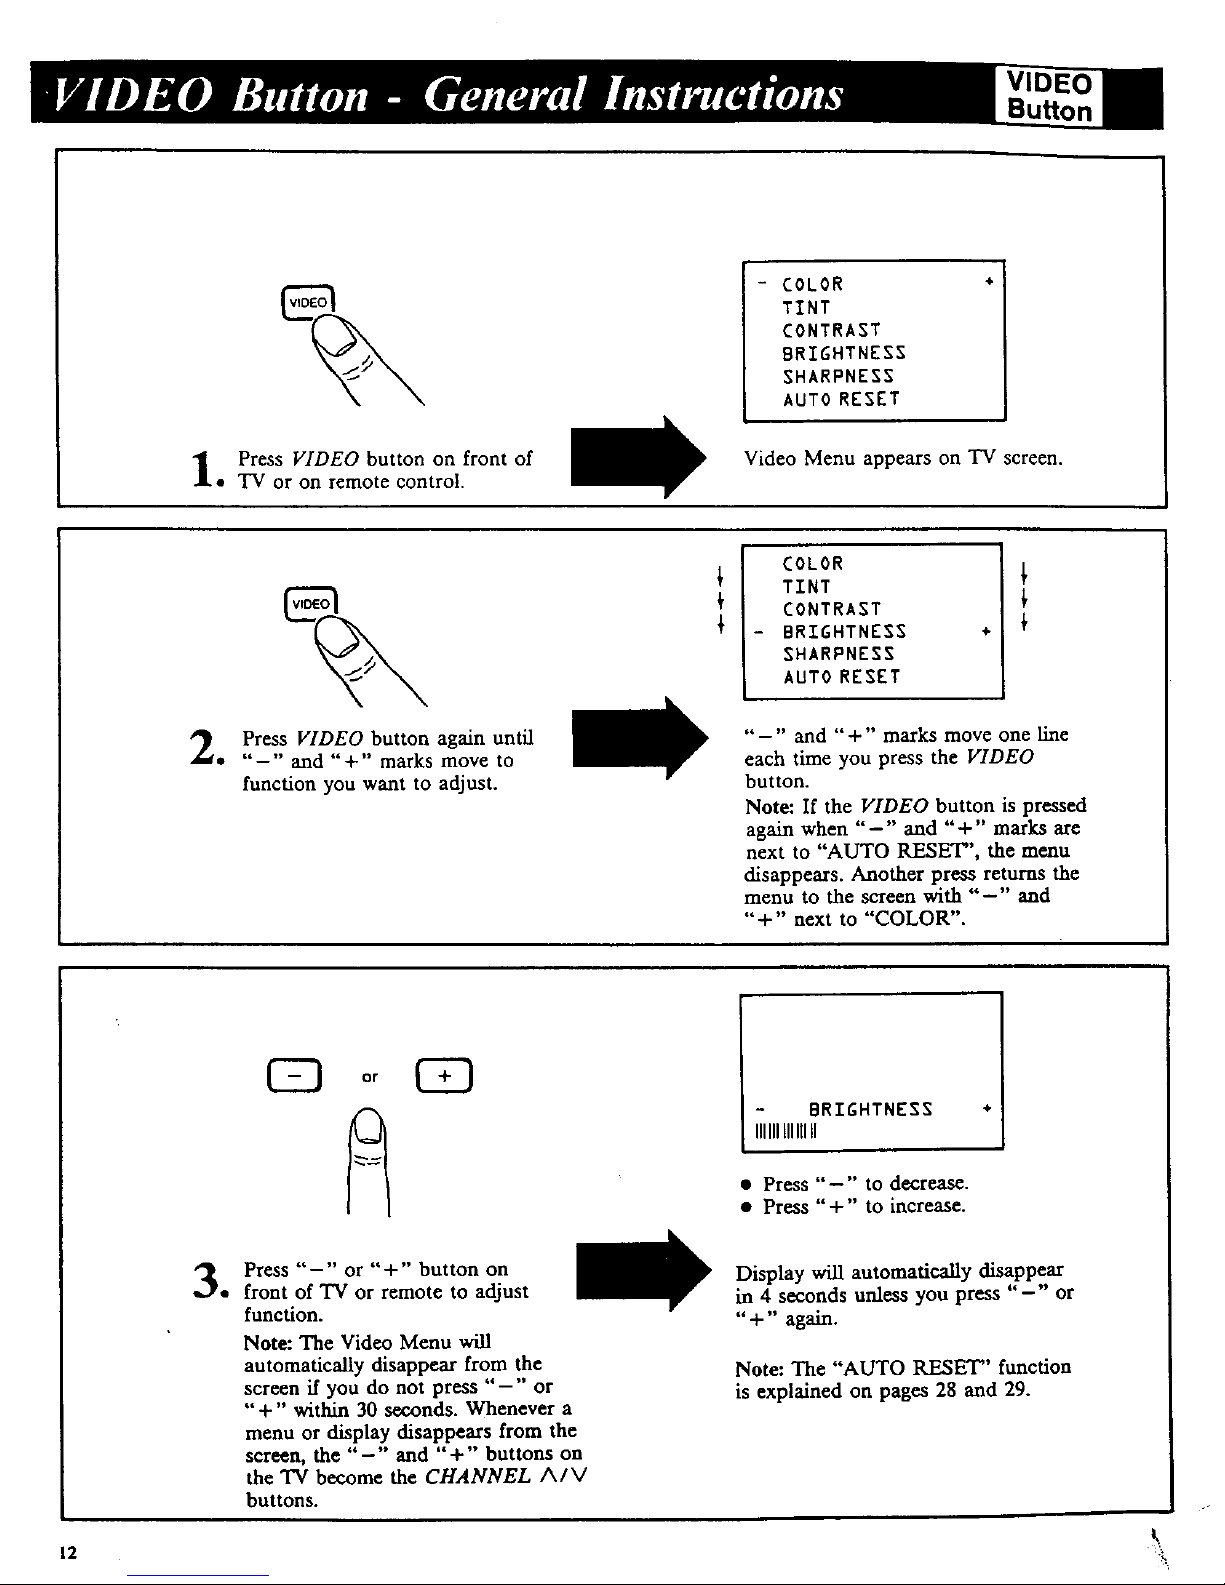
Press VIDEO button on front of
• TV or on remote control.
Video Menu appears on TV screen.
COLOR
TINT
CONTRAST
BRIGHTNESS
SHARPNESS
AUTO RESET
÷
Press VIDEO button again until
• "-" and "+" marks move to
function you want to adjust.
"-" and "+" marks move one line
each time you press the VIDEO
button.
Note: If the VIDEO button is pressed
again when "-" and "+" marks are
next to "AUTO RESET", the menu
disappears. Another press returns the
menu to the screen with "-" and
"+" next to "COLOR".
12
Press "-" or "+" button on
• front of TV or remote to adjust
function.
Note: The Video Menu will
automatically disappear from the
screen if you do not press "-" or
"+" within 30 seconds. Whenever a
menu or display disappears from the
screen, the "-" and "+" buttons on
the TV become the CHANNEL A/V
buttons.
BRIGHTNESS +
IIIIIILIIIllII
• Press "-" to decrease.
• Press "+" to increase.
Display will automatically disappear
in 4 seconds unless you press "-" or
"+" again.
Note: The "AUTO RESET'' function
is explained on pages 28 and 29.
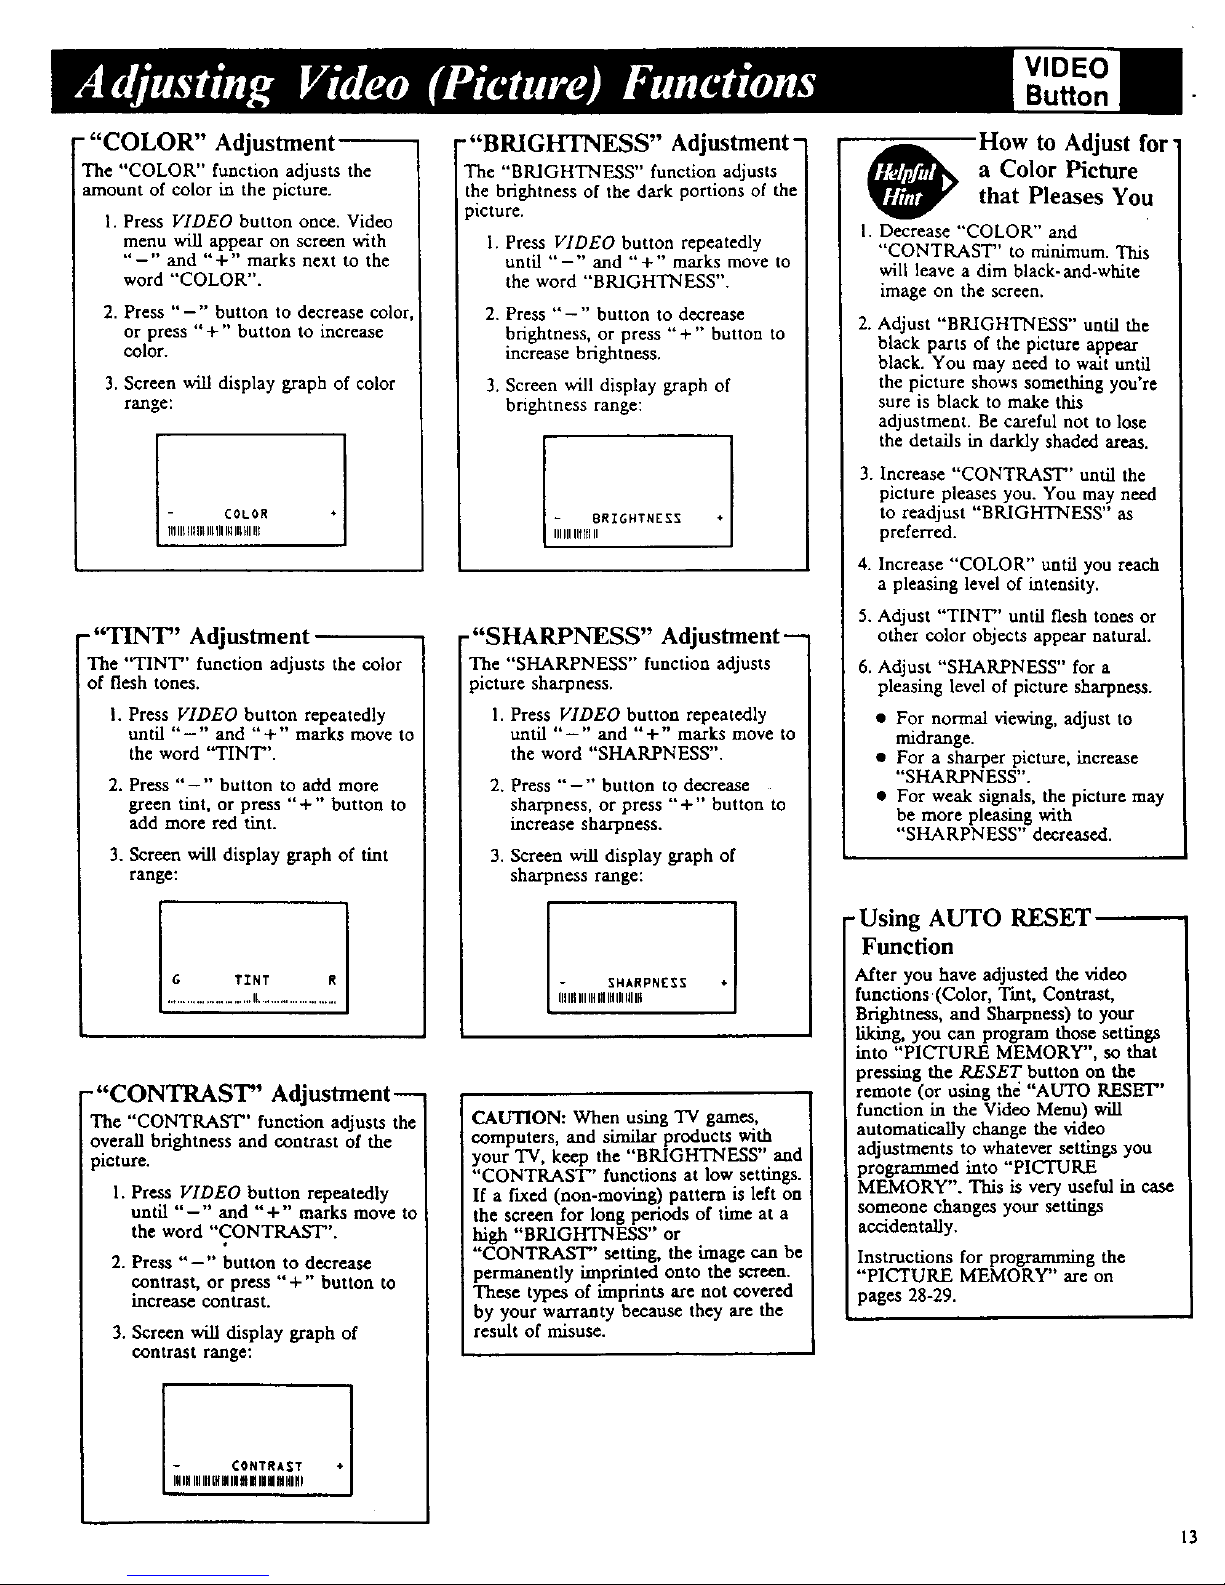
""COLOR" Adjustment
The "COLOR" function adjusts the
amount of color in the picture.
1. Press VIDEO button once. Video
menu will appear on screen with
"-'" and "+" marks next to the
word "'COLOR".
2. Press "-'' button to decrease color
or press "+" button to increase
color.
3. Screen will display graph of color
range:
-"TINT" Adjustment--
The "TINT" function adjusts the color
of flesh tones.
I. Press VIDEO button repeatedly
until "-" and "'+" marks move to
the word "TINT".
2. Press "-'" button to add more
green tint, or press "+" button to
add more red tint.
3. Screen will display graph of tint
range:
-"CONTRAST" Adjustment--
The "CONTRAST" function adjusts the
overall brightness and contrast of the
i picture.
1. Press VIDEO button repeatedly
until "-" and "+" marks move to
the word "CONTRAST".
2. Press "--" button to decrease
contrast, or press "+" button to
increase contrast.
3. Screen will display graph of
contrast range:
¢ONTRA_T ¢
_HIHlUIllUIIIINJt| IIIIIII HINI
-"BRIGHTNESS" Adjustment-
The "BRIGHTNESS" function adjusts
the brightness of the dark portions of the
ficture.
1. Press VIDEO button repeatedly
until "-" and "+'" marks move to
the word "'BRIGHTNESS".
2. Press "-" button to decrease
brightness, or press '"+'" button to
increase brightness.
3. Screen will display graph of
brightness range:
- BRIGHTNESS +1
IIIIIIlit$ II
-"SHARPNESS" Adjustment--
The "SHARPNESS" function adjusts
ficture sharpness.
1. Press VIDEO button repeatedly
until "--" and "+" marks move to
the word "SHARPNESS".
2. Press "--'" button to decrease
sharpness, or press + button o
increase sharpness.
3. Screen will display graph of
sharpness range:
CAUTION: When using TV games,
computers, and similar products with
)'our TV, keep the "BRIGHTNESS" and
"CONTRAST" functions at low settings.
If a fixed (non-moving) pattern is left on
the screen for long periods of time at a
high "BRIGHTNESS" or
"CONTRAST" setting, the image can be
permanently imprinted onto the screen.
These types of imprints are not covered
by your warranty because they are the
result of misuse.
VIDEO
BuRon
How to Adjust for
a Color Picturethat Pleases You
I. Decrease "COLOR" and
"CONTRAST" to minimum. This
will leave a dim black-and-white
image on the screen.
2. Adjust "BRIGHTNESS" until the
black parts of the picture appear
black. You may need to wait until
the picture shows something you're
sure is black to make this
adjustment. Be careful not to lose
the details in darkly shaded areas.
3. Increase "CONTRAST'' until the
picture pleases you. You may need
to readjust "BRIGHTNESS" as
preferred.
4. Increase "COLOR" until you reach
a pleasing level of intensiU.
5. Adjust "TINT" until flesh tones or
other color objects appear natural.
6. Adjust "SHARPNESS" for a
pleasing level of picture sharpness.
• For normal viewing, adjust to
midrange.
• For a sharper picture, increase
"SHARPNESS".
• For weak signals, the picture may
be more pleasing with
"SHARPNESS" decreased.
-Using AUTO RESET _-"
Function
After you have adjusted the video
functions(Color, T'mt, Contrast,
BrightneSs, and Sharpness) to your
liking, you can program those settings
into "PICTURE MEMORY", so that
pressing the RESET button on the
remote (or using thd "AUTO RESET"
function in the Video Menu) will
automatically change the video
adjustments to whatever settings you
programmed into "PIC'TUILE
MEMORY". This is very useful in case
someone changes your settings
accidentally.
Instructions for programming the
"PICTURE MEMORY" are on
pages 28-29.
13
AUDI(
Button
- TREBLE +
BASS
BALANCE
AUDIO: STEREO
SAP: OFF
SPEAKERS: ON
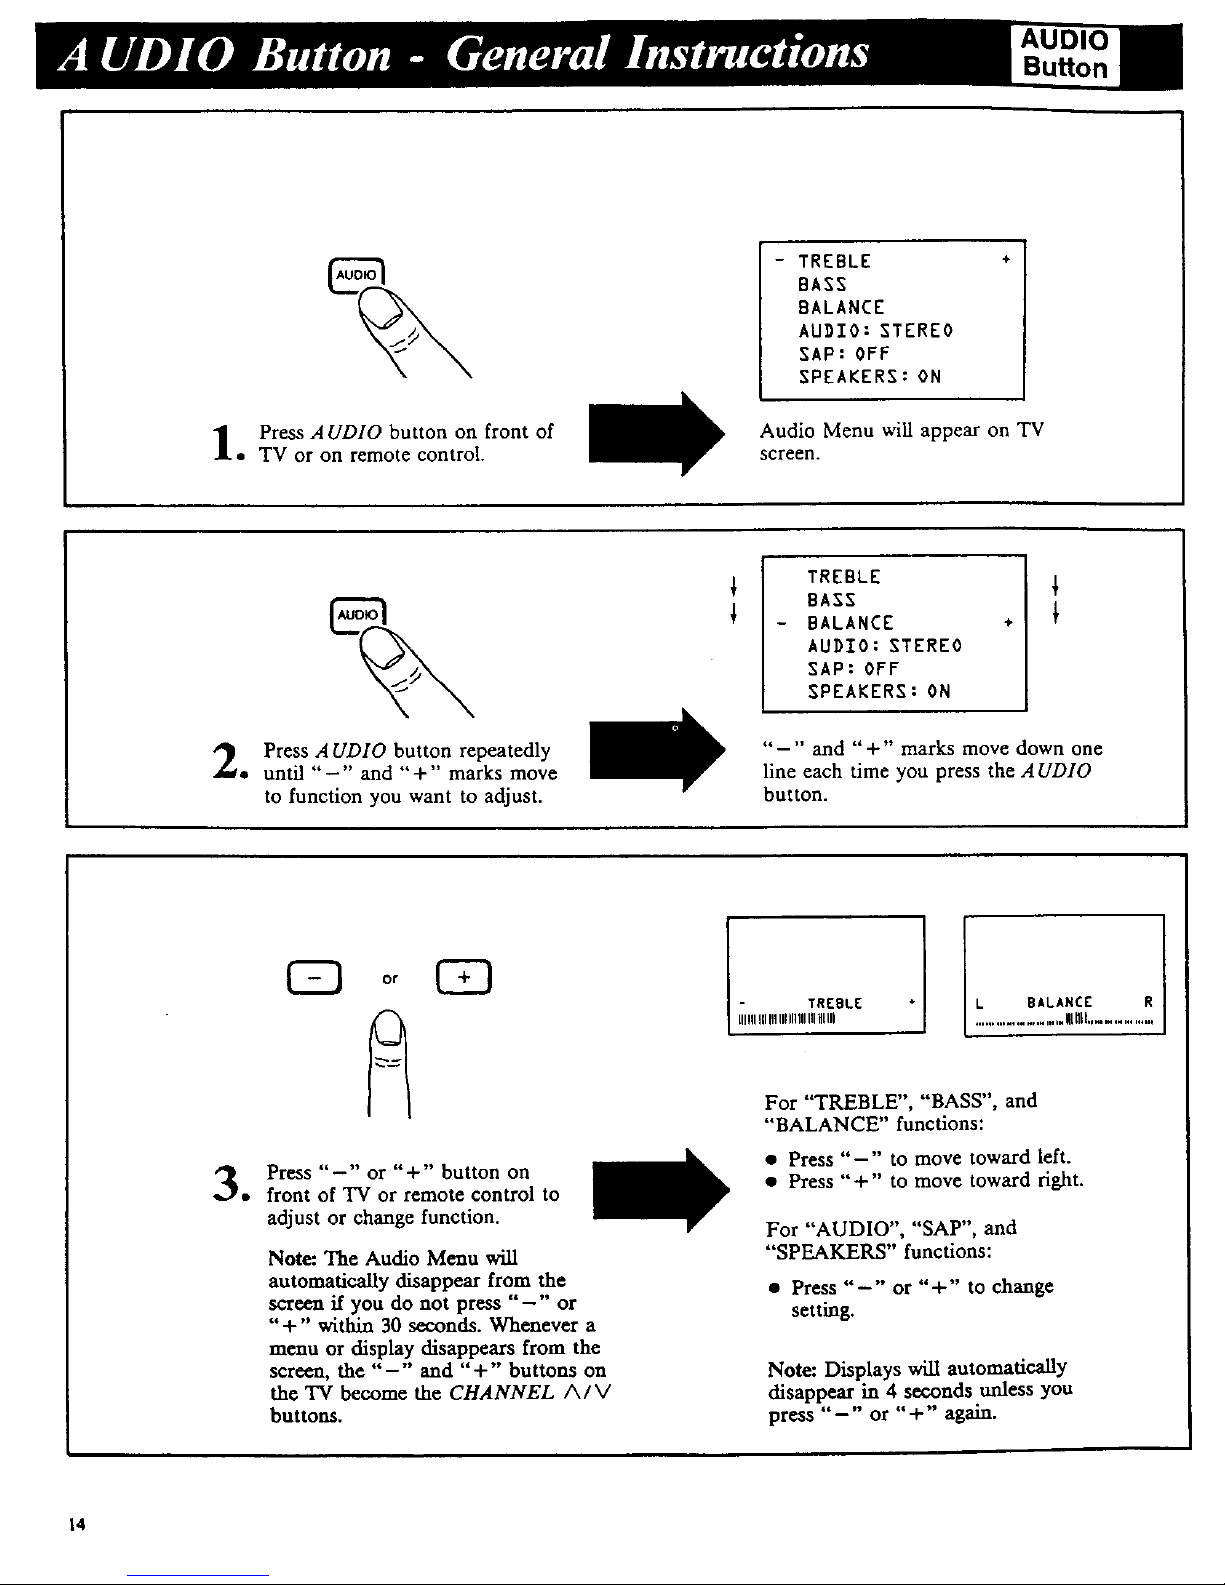
Press AUDIO button on front of
• TV or on remote control.
Audio Menu wiU appear on TV
screen.
TREBLE
BASS
BALANCE
AUDIO: STEREO
SAP: OFF
SPEAKERS: ON
÷
Press AUDIO button repeatedly
• until "-" and "+" marks move
to function you want to adjust.
"-" and "+" marks move down one
line each time you press the AUDIO
button.
Press "-" or "+" button on
• front of TV or remote control to
adjust or change function.
Note: The Audio Menu will
automatically disappear from the
screen if you do not press "-" or
"+" within 30 seconds. Whenever a
menu or display disappears from the
screen, the "-" and "+" buttons on
the 'IV become the CHANNEL A/V
buttons.
TREBLE
UlIIIIII111111111111111HIUl
BALANCE R
.....................Wnll...............
For "TREBLE", "BASS", and
"BALANCE" functions:
• Press "-" to move toward left.
• Press "+" to move toward fight.
For "AUDIO", "SAP", and
"SPEAKERS" functions:
• Press "-" or "+" to change
setting.
Note: Displays will automatically
disappear in 4 seconds unless you
press "-" or "+" again.
14
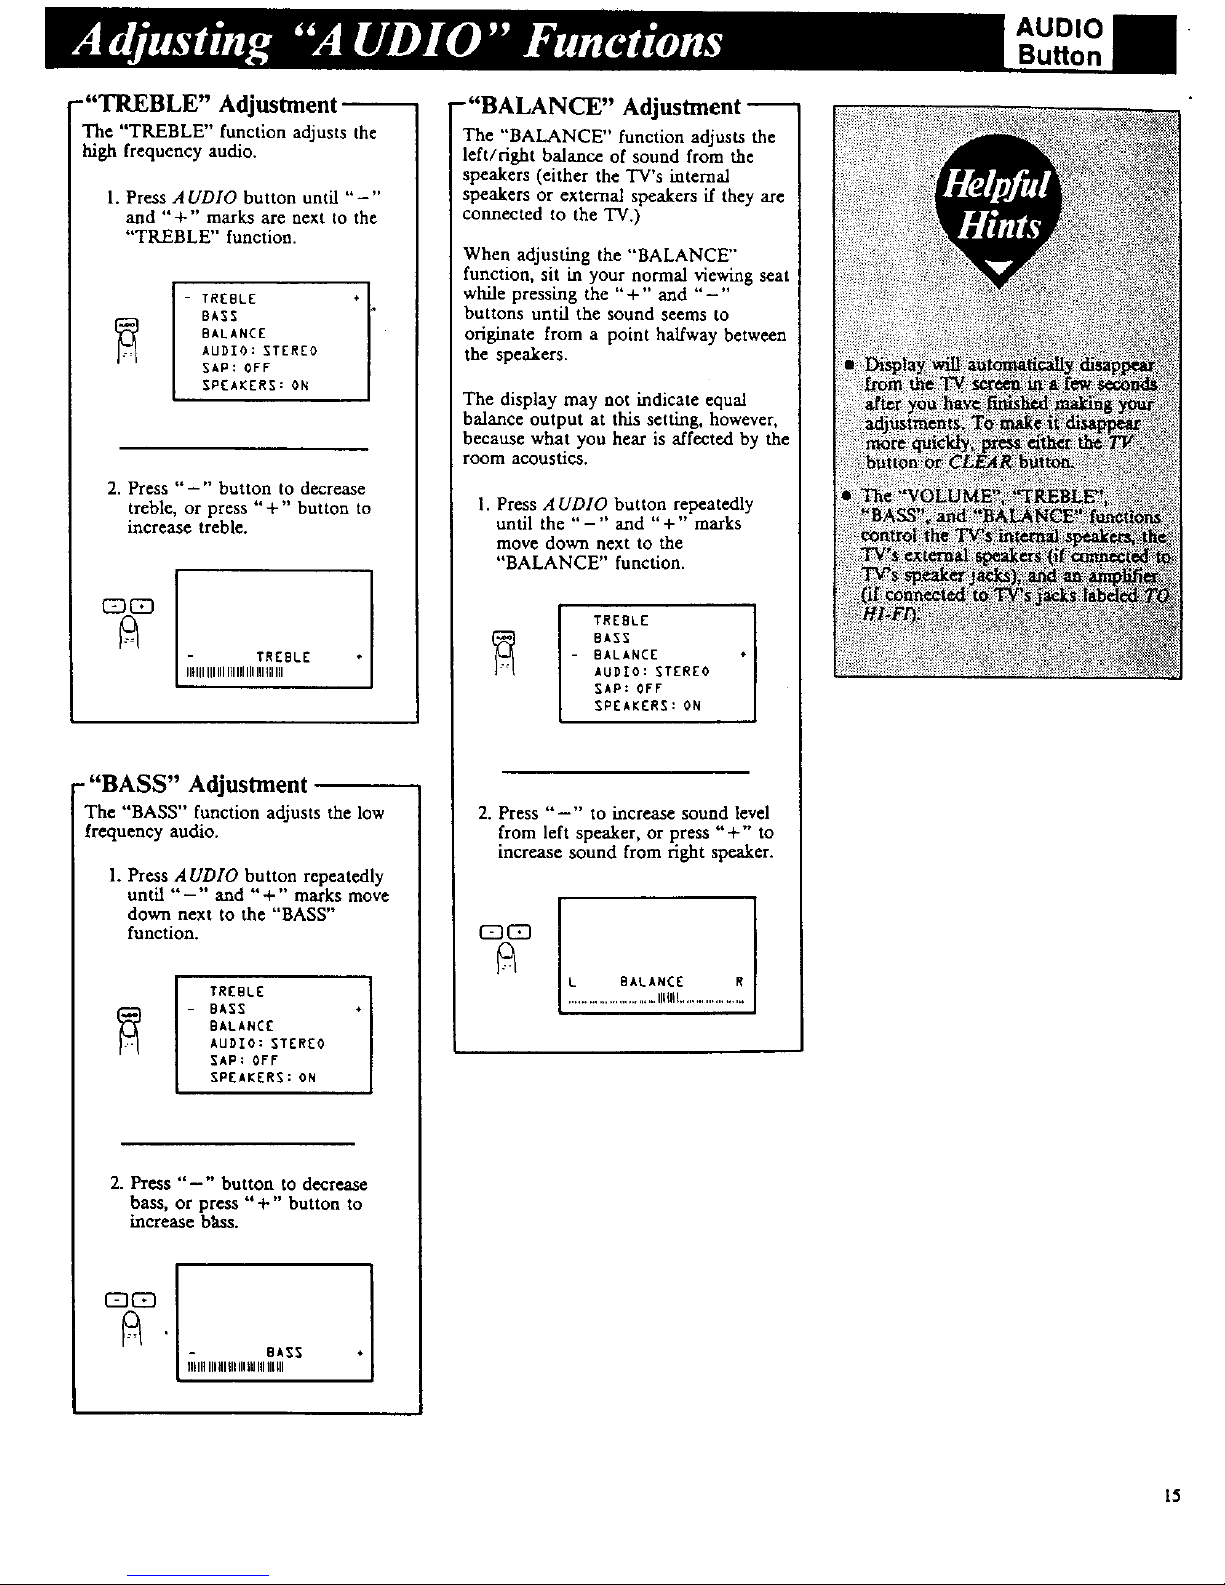
-"TREBLE" Adjustment
The "TREBLE" function adjusts the
high frequency audio.
1. Press AUDIO button until "-"
and "+" marks are next to the
"TREBLE" function.
- TREBLE ÷
BASS
BALANCE
AUDIO: STEREO
SAP: OFF
SPEAKERS: ON
2. Press "-" button to decrease
treble, or press "+" button to
increase treble.
" TREBLE
I1_111IIIIIII[IIllIIIIllI[IIII
- "BASS" Adjustment --
The "BASS" function adjusts the low
frequency audio.
1. Press AUDIO button repeatedly
until "-" and "+" marks move
down next to the "BASS'"
function.
I TREBLE
- BASS
BALANCE
AUDIO: STEREO
SAP: OFF
SPEAKERS: ON
2. Press "-" button to decrease
bass, or press "+" button to
increase bhss.
- BASS
IIHIIIIIIIIIIIIIIlUIIIIllUl
-"BALANCE" Adjustment
The "BALANCE" function adjusts the
left/right balance of sound from the
speakers (either the TV's internal
speakers or external speakers if they are
connected to the TV.)
When adjusting the "BALANCE"
function, sit in your normal viewing seat
while pressing the "+" and "-"
buttons until the sound seems to
originate from a point halfway between
the speakers.
The display may not indicate equal
balance output at this setting, however,
because what you hear is affected by the
room acoustics.
1. Press A UDIO button repeatedly
until the "-" and "+" marks
move down next to the
"BALANCE" function.
TREBLE
BASS
- BALANCE
AUDIO: STEREO
SAP: OFF
SPEAKERS: ON
i
2. Press "-" to increase sound level
from left speaker, or press "+" to
increase sound from right speaker.
L BALANCE R
........................... IlL'Ill....................
AUDIO
Button
15

You're ready to enjoy this new
dimension in television with your new
stereo TV. Your TV is fully capable
of reproducing stereo sound from TV
stations transmitting stereo sound in
your area. All you have to do to enjoy
stereo sound is make sure the TV's
"AUDIO: STEREO/MONO"
function is set to "STEREO" so the
"IV can receive stereo broadcasts.
Normally this function can be left in
the "STEREO" mode. Your 'IN will
then automatically reproduce either
stereo or monaural sound-whatever is
broadcast.
In some fringe viewing areas, however,
the stereo signal may not be strong
enough for quality reception. The
signal may drift or the reproduction
may become noisy. Should that occur,
change the "AUDIO: STEREO/
MONO" function to the "MONO"
mode to receive clearer, cleaner
sound.
AUDIO
Button
Resetting the "AUDIO: STEREO/MONO"
Function to Receive Stereo
--(with or _thout remote control)
1. Press AUDIO button repeatedly until
"-" and "+" marks move down to
"AUDIO: MONO/STEREO".
I REBLE
BASS
BALANCE
- AUDIO: STEREO
SAP: OFF
SPEAKERS: ON
2. Press either " -" or "+ '" to change
"AUDIO:" from "MONO" to
"STEREO".
Note: Each time you press the "-" or
"+" button, "'AUDIO:" will change
from "MONO" to "STEREO" or
"STEREO" to "MONO".
TREBLE
BASS
_ BALANCE
- AUDIO: MONO
SAP: OFF
SPEAKERS: ON
[:ji!:iii,:_
iiiiiiiiii_ii!iii!!i_
?]i !?ii:ii
t
r 5S?" _:I
I
:I
:r [] ::r : :_ : r : iN::_£, : _}::?':'_:::t
rr 2 : 2: ] [:]):: 1[ [_)i:::_
_:r_NN:,"
I
16
 Loading...