

Page 1

digitalstillcameradigitalstill
cameradigitalstillcameradig
italstillcameradigitalstillcam
eradigitalstillcameradigitals
tillcameradigitalstillcamera
digitalstillcameradigitalstill
cameradigitalstillcameradig
italstillcameradigitalstillcam
eradigitalstillcameradigitals
tillcameradigitalstillcamera
digitalstillcameradigitalstill
cameradigitalstillcameradig
italstillcameradigitalstillcam
eradigitalstillcameradigitals
tillcameradigitalstillcamera
digitalstillcameradigitalstill
cameradigitalstillcameradig
italstillcameradigitalstillcam
eradigitalstillcameradigitals
tillcameradigitalstillcamera
digitalstillcameradigitalstill
cameradigitalstillcameradig
italstillcameradigitalstillcam
eradigitalstillcameradigitals
tillcameradigitalstillcamera
digitalstillcameradigitalstill
cameradigitalstillcameradig
italstillcameradigitalstillcam
eradigitalstillcameradigitals
tillcameradigitalstillcamera
digitalstillcameradigitalstill
cameradigitalstillcameradig
CDS1005
USER’S
GUIDE
Page 2

Important Safety Information
* Be sure to read all the safety information on this page and inside the
manual before you begin to use this product.
i
Product Registration
Please fill out the product registration card and return it immediately. Returning this card allows us to contact
you if needed.
Keep your sales receipt for proof of purchase to obtain warranty parts and service and attach it here. Record
the serial number and model numbers located on the bottom of the camera.
Model No: ______________________________________________
Serial No: ______________________________________________
Purchase Date: __________________________________________
Purchased From: _________________________________________
CDS1005
To reduce risk of injury, charge only rechargeable batteries recommended by the
manufacturer for this camera. Other types of batteries may burst causing damage and
personal injury.
FCC Regulations state that unauthorized changes or modifications to this equipment may
void the user’s authority to operate it.
Radio Interference
This equipment has been type tested and found to comply with the limits for a class B Digital Device in
accordance with specifications in Part 15 of FCC Rules. These rules are designed to provide reasonable
protection against radio and television interference in a residential installation. The equipment generates,
uses, and can radiate radio frequency energy and, if not installed and used in accordance with the
instructions, may cause harmful interference to radio communications. However, there is no guarantee that
interference will not occur in a particular installation.
If this equipment does cause interference to radio or television reception (which you can determine by
turning the equipment off and on), try to correct the interference by one or more of the following measures:
• Reorient or relocate the receiving antenna (that is, the antenna for radio or television that is
“receiving” the interference).
• Change the position of the receiver with respect to the radio or television equipment that is
receiving interference.
• Move the receiver away from equipment receiving interference.
• Plug the receiver into a different wall outlet so the receiver and equipment receiving interference
are on different branch circuits.
If these measures do not eliminate interference, please consult your dealer or an experienced radio/
television technician for additional suggestions. Also, the Federal Communications Commission has
prepared a helpful booklet, “How to Identify and Resolve Radio/TV Interference Problems.” This booklet
is available from the U.S. Government Printing Office, Washington, D.C. 20402. Please specify the stock
number 004-000-00345-4 when ordering copies.
Page 3

1
We want to make sure you enjoy your new digital still camera. If you have any
questions, call:
Digital Camera Exchange Warranty .............. 877-833-3491
Customer Service .............................................. 877-833-3491
Accessories......................................................... 800-338-0376
Assistance
Table of Contents
Minimum System Requirements
PC System Requirements
Windows 95* PC with Available Serial Port
Windows 98* PC with Available USB or
Serial Port
Windows 2000* PC with Available USB
or Serial Port (USB Port Recommended)
486-33MHz or Faster Microprocessor
8 MB RAM
20 MB Available Hard Disk Space
CD-ROM Drive
Color VGA Display
Macintosh** System
Requirements
Macintosh OS** 8.1 or Later
Power Mac or iMac** (USB Compatible)
32 MB RAM
20 MB Available Hard Disk Space
Available USB Port
CD-ROM Drive
Color VGA Display
*Windows 95/98/2000 are registered trademarks of Microsoft Corporation in the United
States and/or other countries.
**Macintosh, iMac, and Mac OS are registered trademarks of Apple Computer, Inc.
Product Registration .................... i
Important Safety Information ..... i
First Things First ......................... 3
Unpack the Camera and
Accessories ............................ 3
Camera Details ........................ 4
Attach the Hand Strap .......... 5
Power Supply........................ 5
Inserting Batteries ............. 5
Auto Power Off ................ 6
Recording Pictures................... 6
Frame Your Picture ............... 6
Capturing Images.................. 6
Viewing Stored Images ......... 6
Page 4

2
Table of Contents
Adjusting Settings ........................ 8
On-Screen Menu Choices ........ 8
Changing Settings .................... 9
Record Mode ........................ 9
Setting Image Quality ....... 9
Self-Timer....................... 10
Adjusting the Exposure
Value (EV) ................... 10
Flash Control .................. 11
Battery Power Display .... 11
Playback Mode ................... 11
Viewing Images .............. 11
Erasing Single Images .... 12
Erasing All Images ......... 12
Software ...................................... 13
Installing Included Software.. 13
Connect the Camera to the
Computer ............................. 14
Save Your Photos ................... 15
Edit Your Photos .................... 15
References................................... 16
Camera User Interface ........... 16
Top View............................. 16
Front View .......................... 16
Back View ........................... 16
Bottom ................................ 16
Sides ................................... 16
Basic Button Functionality . 16
Troubleshooting ..................... 17
Taking Care of Your Camera . 18
Limited Warranty ................... 19
Accessories Order Form ........ 21
Specifications ........................ 24
Optional AC Adapter ............. 24
Page 5
3
First Things First
First Things First
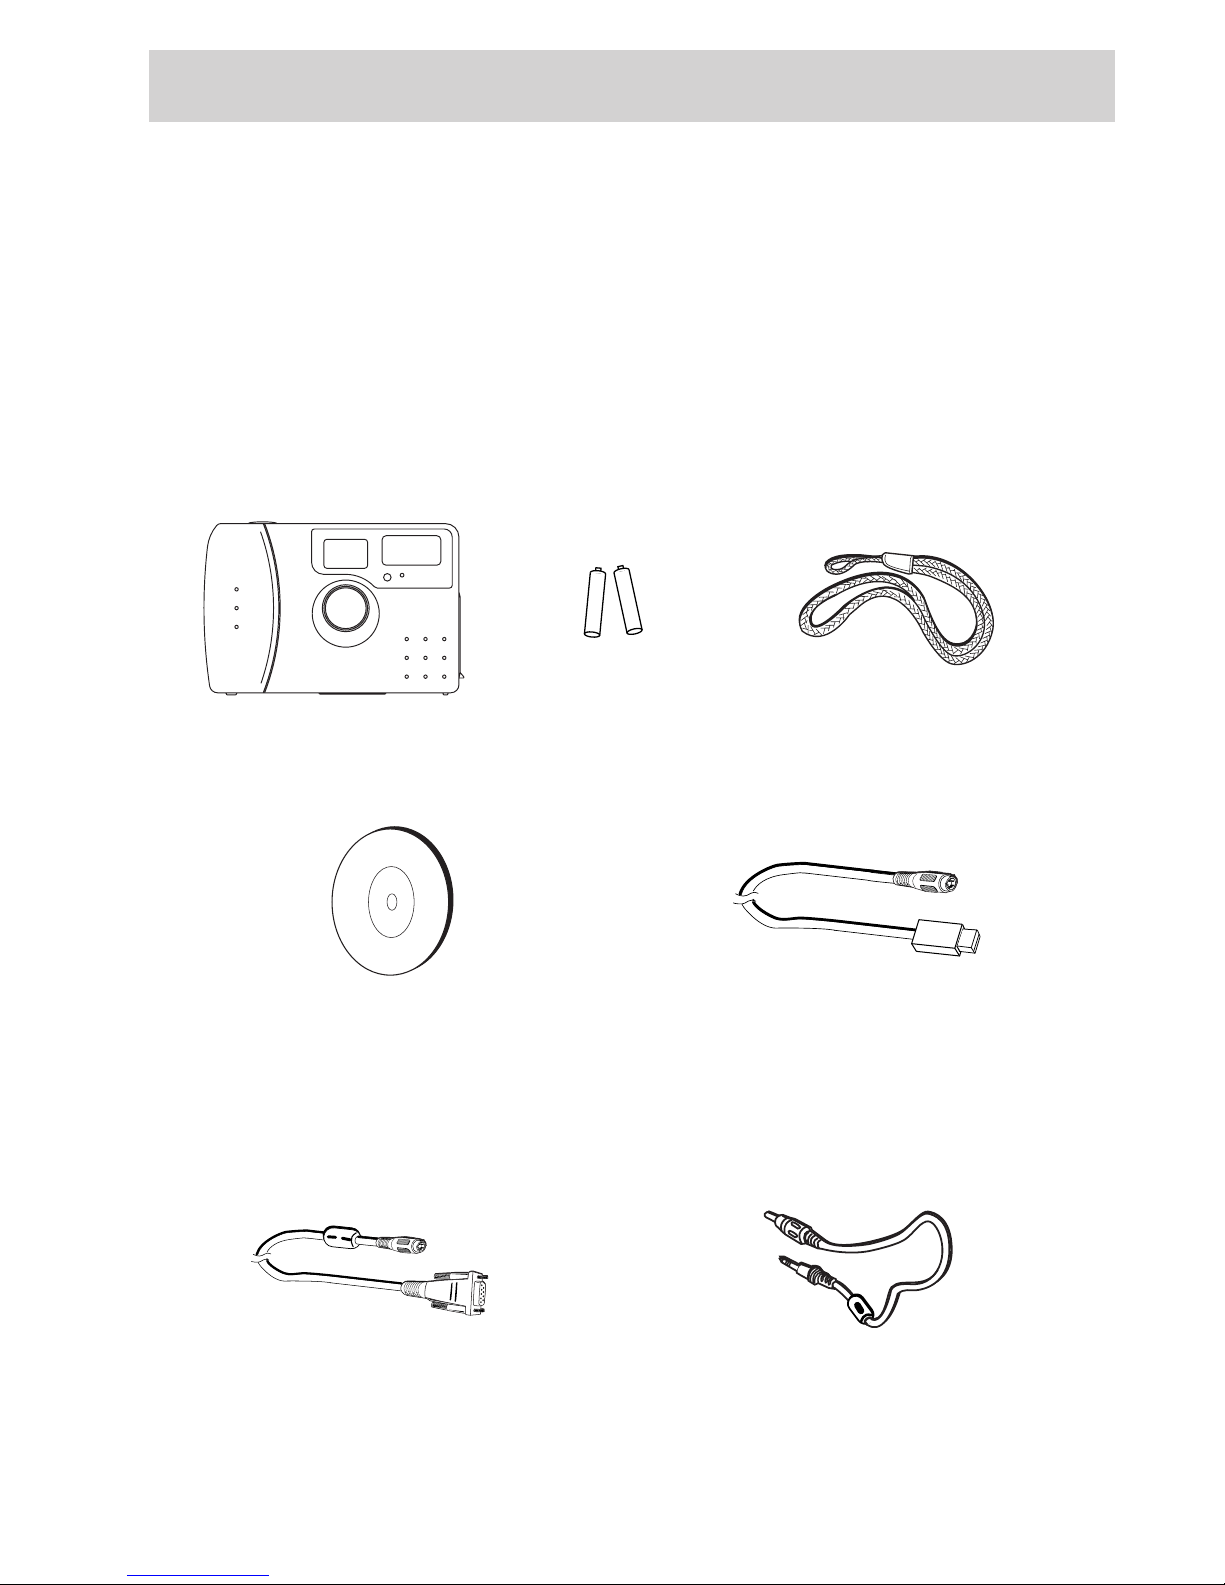
Unpack the Camera and Accessories
• Save the packing materials and box in case you ever need to ship or store
your digital camera.
• The items shown below are packed with your camera. If any are missing or
appear damaged, contact the dealer where the camera was purchased.
CDS1005 Digital Camera
NTSC Video Cable
RS-232C Digital Cable
Image Editing Software
(Macintosh and PC)
Hand Strap
USB Cable
(Macintosh or PC)
+ -
+ -
2 AA Batteries
Page 6
First Things First
4
EVEV
+
–
ON/OFF
AAx2
TV
DC IN 5V
DIGITAL
A
B
C
D
E
F
H
G
I
L
M
J
K
N
O
Q
R
P
S
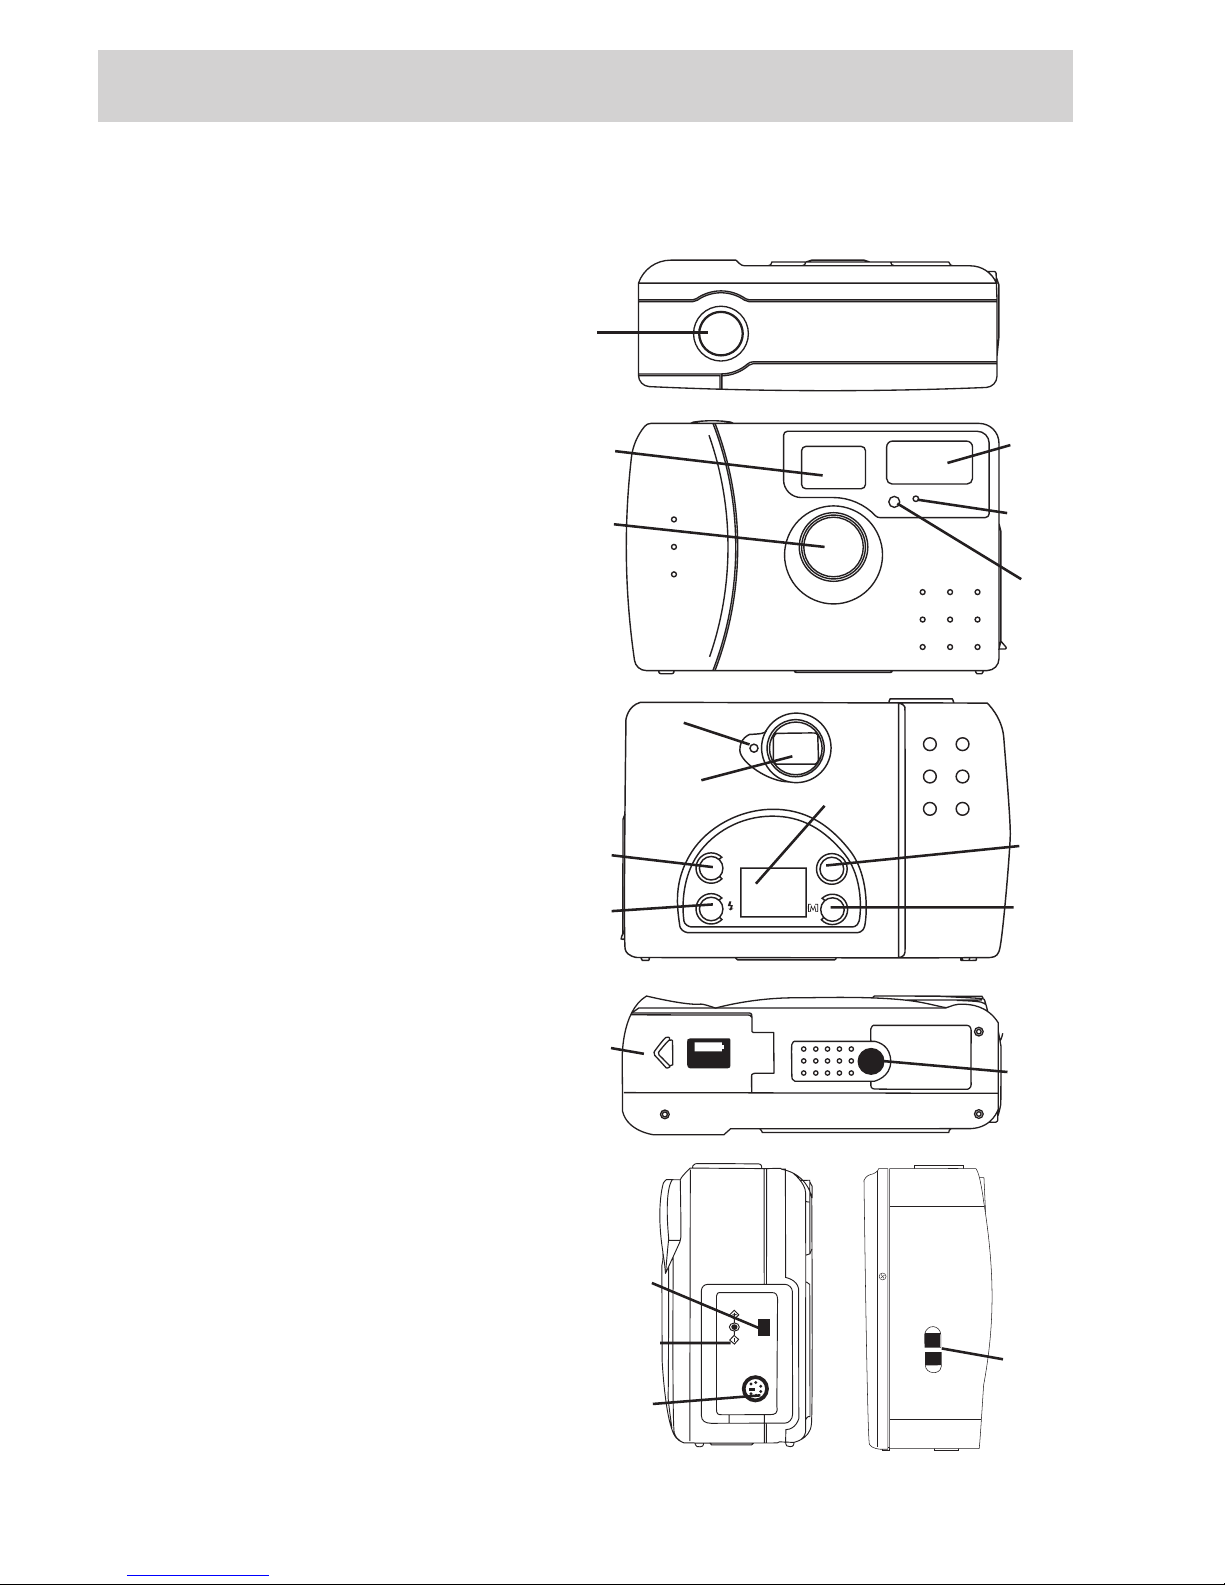
Camera Details
A Shutter release/OK button
B Optical viewfinder (front)
C Lens
D Flash
E Auto flash sensor
F Self-timer LED
G Ready/processing light
H Viewfinder (back)
I Menu screen
J Exposure value/
next image button
K Flash set/
previous picture button
L Power (ON/OFF) button
M Menu button
N Battery Cover
O Tripod mount
P Video out jack
Q AC Power adapter jack
R USB cable jack
S Hand strap eyelet
Page 7
5
First Things First
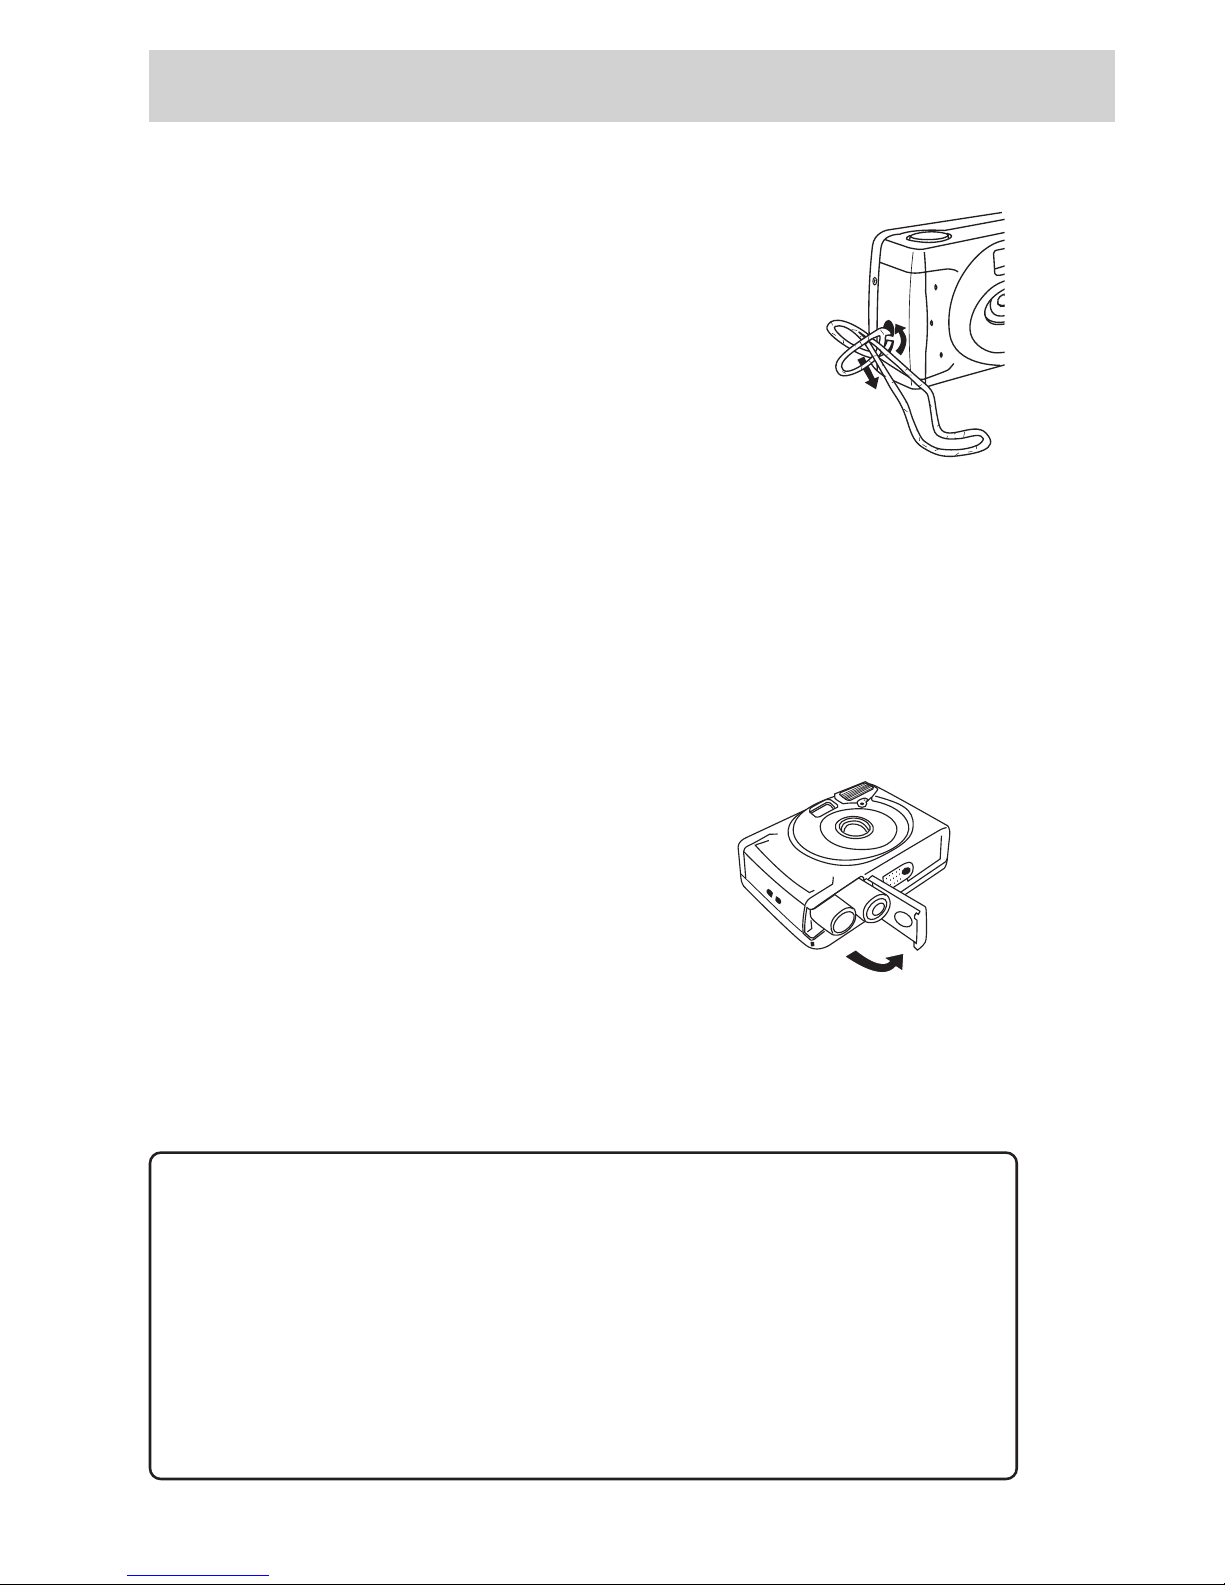
Attach the Hand Strap
Dropping a camera can cause serious damage both
internally and externally. So, to secure your investment,
attach the hand strap first thing, and use it every time.
1. Insert the small loop at the end of the strap under the
strap eyelet.
2. Insert the other end of the strap through the loop to tie
the strap onto the strap eyelet.
Power Supply
There are two ways to supply power to the camera; either use two batteries (size
AA) or supply power through a USB connection to the computer.
Notes: If you use the RS-232C Digital Cable to connect the camera to the computer
through a serial port, you must use the batteries to supply power to the camera. You can
also use an optional AC adapter (see Specifications section) to power the camera.
Inserting Batteries
1. On the bottom of the camera, slide the battery
chamber cover out in the direction of the large
arrow to open it. A click can be heard when the
compartment is released.
2. If necessary, remove the desiccant moisture
capsule from the battery compartment.
3. Insert two (2) AA batteries. Make sure to match the positive and negative ends
of the batteries to the markings inside the battery compartment.
4. Close the battery chamber cover by pushing down firmly and sliding it back
until the latch closes with a click.
Important Notes
• Never use manganese batteries.
• Your camera will not work if the batteries are inserted incorrectly.
• Remove batteries from camera if it will not be used for an extended
period of time.
• Never mix old batteries with new ones.
• Never mix batteries of different types.
• Never destroy batteries or dispose of by fire. Doing so can cause an
explosion or leak caustic materials into the environment.
Inserting the Hand Strap
Battery Compartment
Page 8
First Things First
6
Auto Power Off
To conserve energy, the camera goes into “sleep” mode automatically if no buttons or
switches are pressed for approximately 2 minutes. Press the ON/OFF button on the back
of the camera to turn it back on.
Recording Pictures
Since there needs to be pictures taken before the camera will display stored files, let’s
walk through the steps to capture images.
Your camera automatically defaults to the recording mode (as indicated by the icon
on the rear LCD display) the first time it is turned on. If, for some reason, the camera is
not in record mode, quickly pressing and releasing the button near the lower right of
the LCD screen should display the record icon.
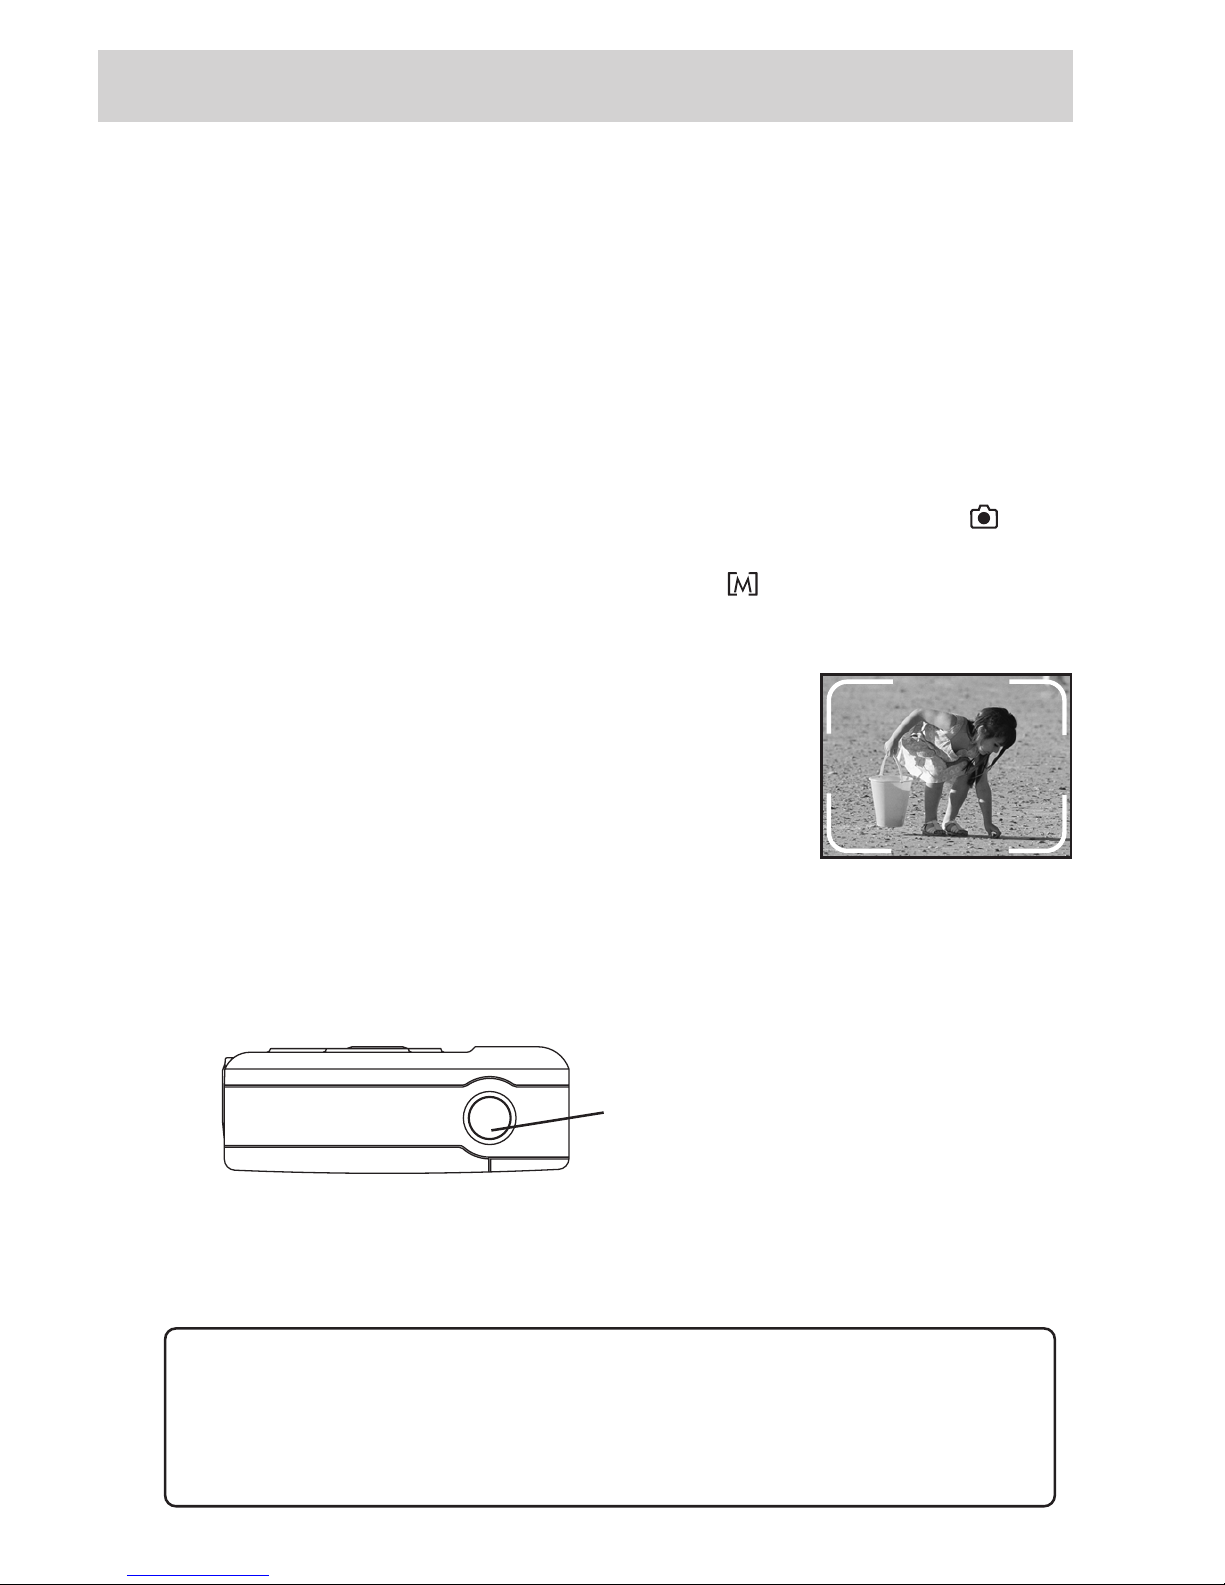
Frame Your Picture
Frame the picture with the optical viewfinder using the
marks on the edge to enclose the image you want to take.
The actual picture captured will be slightly larger than
what you see in the optical viewfinder.
Capturing Images
Center the image you want to take in the viewfinder and hold the camera still and level
while you press the shutter release button on top of the camera to capture the image.
• Do not block the lens or flash with your fingers or open the battery chamber cover.
After the picture is taken, the green light near the optical viewfinder on the back of the
camera blinks while the image is processing. The picture number on the LCD screen
may decrease by one after the picture is stored, depending on camera settings.
Shutter Release Button
WARNING: While the camera is processing, uploading, or erasing images, the
green LED light located on the back of the camera flashes. While the green light is
flashing, DO NOT remove the batteries, remove power from the camera, turn the
camera off, disconnect the camera from a computer, or perform any other
operation. This will cause fatal damage to the operating system of the camera.
Page 9
7
First Things First
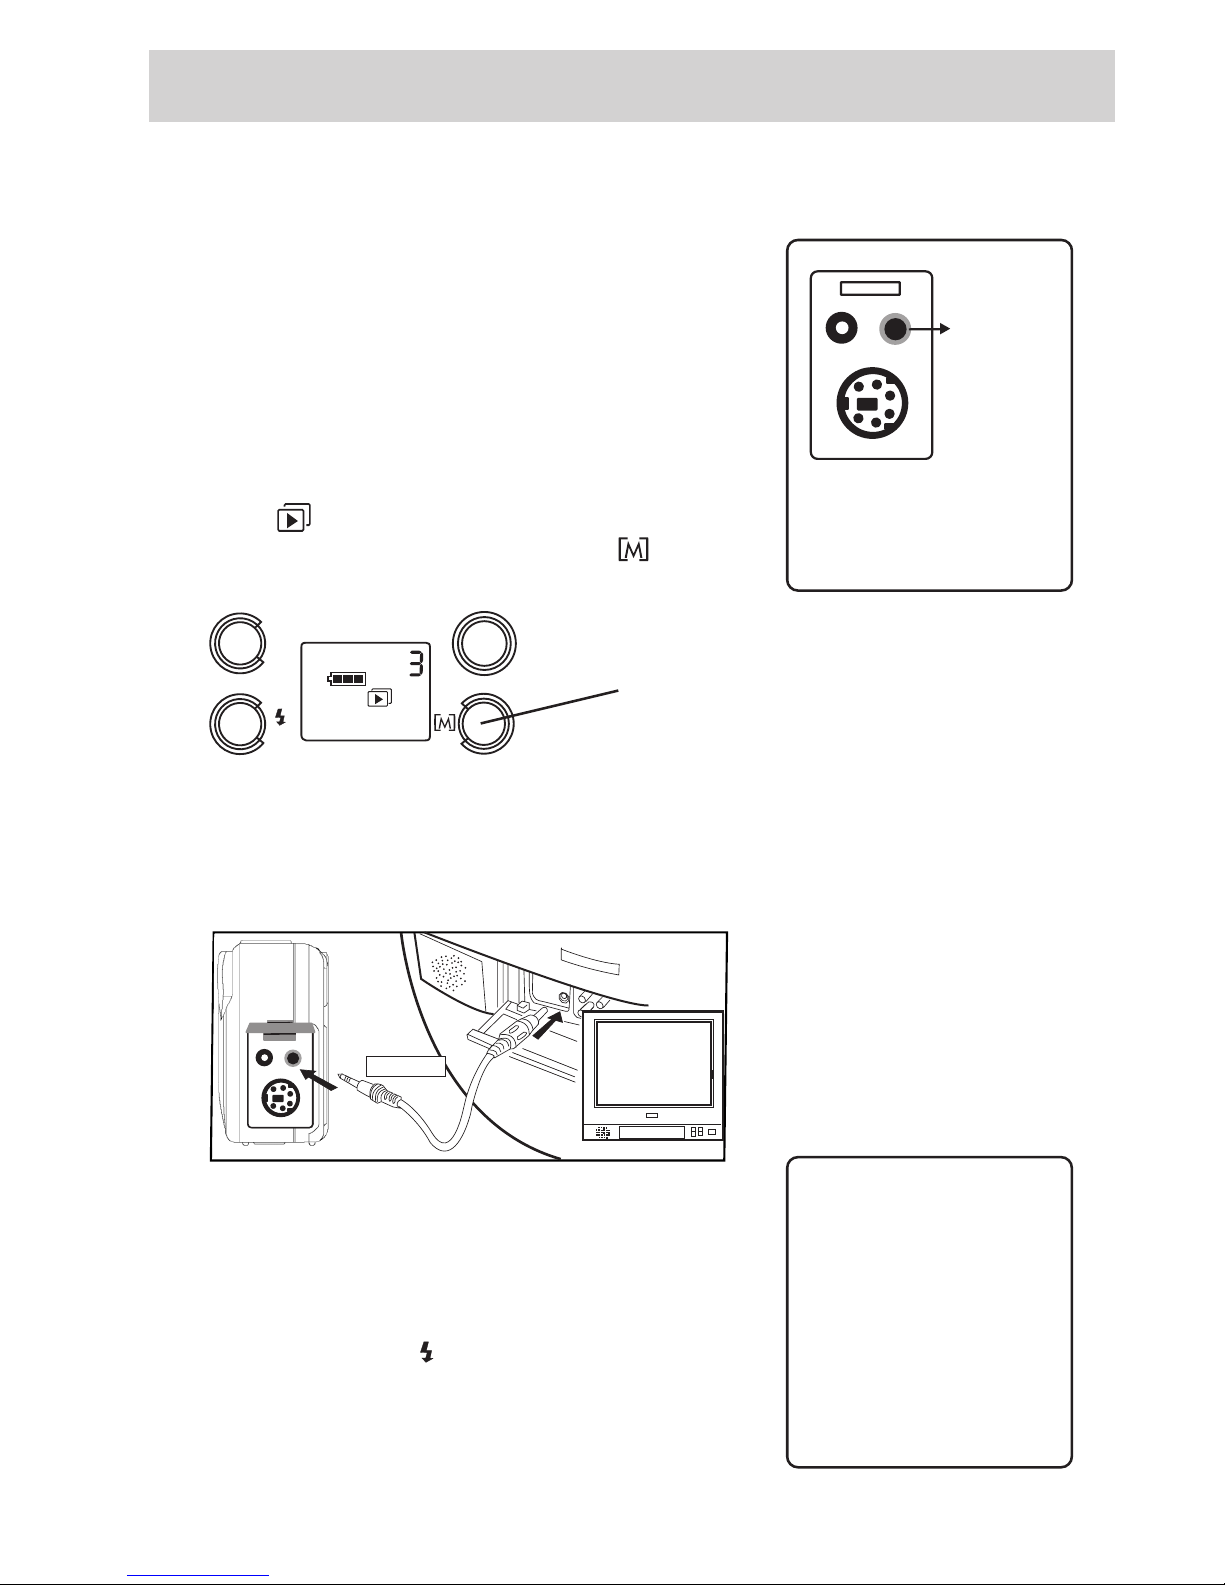
Viewing Stored Images
The images stored in the camera’s memory may be
viewed on a TV screen or downloaded to your computer.
For more information about viewing images on the
computer, see the section, Working with Images, in this
manual.
Picture Viewing
1. Put the camera into playback mode (as indicated
by the icon on the rear LCD display) by quickly
pressing and releasing the menu button ( ) on the
back of the camera.
EV
+
–
NTSC
ON/OFF
2. Connect the video cable to the camera’s video
input jack.
3. Connect the other end of the video cable to the
Video Input jack on your television set.
VIDEO
IN
VIDEO PORT
TV
4. Tune your television to the Video Line Input to view
the camera’s stored images (for more information
about finding your TV’s Video Line Input, see the
Owner’s Manual that came with the set).
5. Use the EV/+ or the /– button on the back of the
camera to scroll through the stored images. The plus
button advances to the next picture number, and the
minus button goes to the previous picture.
Quickly pressing and releasing the menu
button on the back of the camera will toggle
between record and playback modes.
The camera’s video input
port allows pictures to be
viewed on any TV that has
video input jacks.
AC ADAPTER
DC IN 5 V
Getting Pictures
on the Computer
For more information
about getting pictures
from the camera to
the computer, see the
section, Software, in
this manual.
Page 10

Adjusting Settings
8
Adjusting Settings
On-Screen Menu
Choices
To get the most benefit from your
digital camera, you must know and be
able to navigate through the LCD menu
choices. In the main menu of either the
record ( ) or playback ( ) mode of
the camera, you can change settings for
different aspects of the camera’s
performance.
That’s right, there are two different
menus, one for playback mode and
another for record, whichever you are
using the camera for.
Playback mode allows browsing
through stored pictures. It also offers
the chance to erase stored pictures. The
record menu, on the other hand, offers
the chance to change how pictures are
captured.
Recording Mode
When the camera is in record mode,
you can control:
• Image quality settings
• Self-timer mode
• Flash
• Exposure Value (EV)
Playback Mode
When the camera is in playback mode,
you can control:
• Image display
• Erasing images
EVEV
+
–
ON/OFF
Navigating menus in either record or playback mode
offers the ability to customize certain settings and change
how pictures are taken or stored.
Page 11

9
Adjusting Settings
Changing Settings
To switch between recording mode ( )
and playback mode ( ), quickly press
and release the Menu button ( ) at the
lower right of the LCD screen until the
on-screen icon changes.
Pressing and holding the Menu button
enters the camera into a submenu level
in either playback or record modes.
Once at the submenu level, quickly
pressing the Menu button toggles
through available choices.
To choose an item, press the shutter
release button on top of the camera.
This acts as the “OK” selection.
Record Mode
Since pictures have to be taken and
stored before they can be viewed or
erased, let’s concentrate on different
ways to capture images.
Setting Image Quality
The digital camera can take two
different kinds of images; normal and
fine. Normal mode allows for a
minimum of 32 images at a resolution
of 640x480 pixels.
Normal mode uses a high compression
scheme which makes the images low in
file size, allowing you to take the most
pictures.
To set Normal picture quality:
1. Make sure the camera is in record
mode ( ).
2. Press and hold the Menu button( )
until you see a blinking “N.” This
represents Normal picture quality.
3. Press the shutter release button on
top of the camera to select “OK.”
The other option is to shoot pictures in
fine mode. While this option also uses a
resolution of 640x480 pixels, less file
compression is used meaning the
quality of the image is better. When the
camera is set to fine resolution, a
minimum of 16 images can be captured.
To set Fine picture quality:
1. Make sure the camera is in record
mode ( ).
2. Press and hold the Menu button
( ) until you see a blinking “N.”
Press the Menu button again, this
time quickly, and a blinking “F” will
be displayed on the LCD. This
represents fine picture quality mode.
3. Press the shutter release button on
top of the camera to select “OK”
and activate fine picture quality.
Note: The camera will remain in fine
quality mode until manually changed.
If the batteries are removed, it will
change back to the factory default
(Normal mode).
EV
+
–
NTSC
EV
+
0
•
1
A
ON/OFF
The buttons on the back of the camera allow you to change
from record to playback mode. These buttons also allow
changing how the camera records and displays pictures.
Page 12

Adjusting Settings
10
Turning on the Self-Timer
The self-timer creates a 10-second delay
from the time you press the shutter
release button and the time the picture is
taken. The time delay is indicated by the
status light indicator on front of the
camera (a red light near the flash)
blinking once per second
for seven seconds, and then twice per
second for the last three seconds.
The green ready light near the optical
viewfinder on back of the camera will
also blink until finished processing the
image completely.
Once an image has been captured, the
self timer turns off automatically.
To Activate the Self-Timer:
1. Make sure the camera is in record
mode ( ).
2. Press and hold the Menu button
( ) until first icon flashes.
3. Press the Menu button again, this
time quickly and repeatedly until
only the self-timer icon ( ) is
flashing on the LCD.
3. Press the shutter release button on
top of the camera to select “OK,”
activating self-timer mode. The self
timer icon ( ) appears in the LCD.
4. Frame a picture in the optical
viewfinder and press the shutter
release button to activate the
countdown.
TIP: For vibration-free photos, use a
tripod or other stable surface to
mount the camera during self-timer
mode.
Adjusting the Exposure Value (EV)
The digital camera’s exposure value is a
way to compensate for the amount of
time and light the shutter allows to
capture an image.
Using single values for exposure
settings (positive, normal, or negative) is
the digital camera’s way of dealing with
traditional f stops and shutter speeds.
The camera can be set to -1, -.5, 0, +.5,
or +1. A negative value can be used to
compensate for pictures taken in
settings that allow too much light,
causing an image to be overexposed
(too bright). Positive values can be used
for settings that can cause underexposed
images (too dark).
While the camera is set by default to
automatically choose the appropriate
value, exposure settings can also be
adjusted manually. To do so:
1. Make sure the camera is in record
mode ( ).
EV
+
–
NTSC
EV
+
0
•
1
A
2. Use the EV/+ button at the upper
left of the LCD monitor to increase
the exposure value setting or the /–
button to decrease it.
Note: Exposure values are shown on the
mark next to “E” on the LCD screen.
An arrow highlights 0, • (.5), or 1.
Positive exposure values have a plus
symbol (+), and negative values are
reflected with a minus symbol (--).
Use the + or –
indicator to
determine the EV
setting. This
screen shows a
+.5 exposure
value.
Page 13

11
Adjusting Settings
camera to automatically determine if
the flash needs to be fired. It will not
fire if there is enough light to take a
picture.
Battery Power Display
One icon that can show up in either
record or playback mode is the battery
power indicator ( ). Weak batteries
should be replaced as soon as possible.
• Never allow dead batteries to remain
in the camera. Corrosion could
cause serious damage.
• Never mix different brands of
batteries.
• Never mix weak batteries with fresh
batteries.
• Dispose of batteries responsibly.
Playback Mode
In playback mode ( ) , the digital
camera is able to upload images to a
computer or TV screen, and erase
images that are no longer wanted.
Remember, to switch from Record
mode to Playback mode, quickly press
and release the menu button ( ) until
the playback mode icon ( ) appears.
Viewing Images
The easiest way to see the images you
have stored on the camera is to set up a
video line to a television.
Once connected, you can view images
through your TV’s video input line.
1. Make sure the camera is turned on
and in playback mode ( ).
2. Connect the video cable to the
camera’s video out jack and the
other end of the cable to the TV’s
Video In jack.
VID
EO
IN
VIDEO PORT
TV
3. Tune the TV to its video input line
(for more information about video
line, see the manual that came with
the TV).
4. Pictures from the camera should be
visible at this time. To see the next
picture stored, use the EV/+ button.
To see the previous picture number,
use the /– button.
Flash Control
The digital camera is set by default to
automatically fire its flash if there is not
enough light for a picture. Flash firing
can be turned off manually as well.
To turn the flash off:
1. Make sure the camera is in record
mode ( ).
EV
+
–
NTSC
EV
+
0
•
1
A
2. Use the /– button at the lower left
of the LCD monitor to toggle
between Flash On (A) and Flash
Off ( ) in record mode.
Note: Flash On mode allows the
Continued on the Next Page
Use the /– button to
toggle between Flash
On (A) and Flash Off
( ) in record mode.
Page 14

Adjusting Settings
12
Note: For information about putting
pictures on a computer, see the
Software section of this manual.
Erasing Single Images
When an image has been loaded onto a
computer or is no longer wanted, it can
be erased from memory, freeing up
space for additional pictures.
When erasing, it might be a good idea
to have the camera connected to the TV
with the video serial cable (see the
previous step, Viewing Images).
1. Make sure that the camera is turned
on and is in playback mode ( ).
2. Press and hold the menu button ( )
until the erase single image icon
( ) is displayed and flashing in the
lower right-hand corner of the LCD.
3. Choose the image number that you
want to erase by using either the
EV/+ or /– buttons to make the
selection.
4. When the correct image number is
displayed on the LCD, press the
shutter release button on top of the
camera to OK erasing the picture.
Note: Another image can be selected
with the EV/+ or /– buttons and erased
following the above steps.
Erasing All Images
An alternative to erasing images one at
a time is to erase all stored images at
once. To do this, use the Erase All
command.
1. Make sure that the camera is turned
on and is in playback mode ( ).
2. Press and hold the menu button ( )
until the first icon is displayed and
flashing in the lower right-hand
corner of the LCD.
3. Press the menu button ( ) quickly
to advance to the next icon, Erase
All ( ).
4. When the Erase All ( ) icon is
displayed and flashing on the LCD,
press the shutter release button to
OK the erasing of all stored pictures.
Notes:
While the camera is processing,
uploading, or erasing images, the
green LED light located on the back
of the camera flashes. While the
green light is flashing, DO NOT
remove the batteries, remove
power from the camera, turn the
camera off, disconnect the camera
from a computer, or perform any
other operation. This will cause fatal
damage to the operating system of
the camera.
Page 15

13
Software
*ArcSoft and PhotoImpression 2000 are registered trademarks of ArcSoft Corporation.
Important Note
This section of the
manual assumes that
you are familiar with
using all aspects of
the computer
including installing
software, launching
applications, and
saving files. If you have
any questions about
computer operation,
please consult the
documentation that
came with the
computer.
Software
Installing the Included
Software*
Use the provided software and cables to transfer
your photos from the digital camera to a
computer for saving and editing. The images
saved on the computer can be edited using the
included ArcSoft PhotoImpression 2000* imageediting program.
To Install:
1 . Turn on your computer and insert the
software CD containing the software.
2. Double click the installer icon and follow the
on-screen instructions to install the software.
Important Note to Window 95 Users
After you install the camera drivers and ArcSoft
PhotoImpression 2000* for your connection
(RS232 digital cable connecting the camera
through a serial port), you must exit the
program and install the Dial-Up Networking
Upgrade on your computer.
• Exit the installation program.
• The Dial-Up Networking Upgrade is located
on the included software CD. Double click
the icon and use this upgrade to replace any
earlier version of Dial-Up Networking you
may have on your computer.
3. Restart your computer.
Page 16

Software
14
Connect the Camera to the Computer
Now that there are images stored in the camera, you can connect it to
the computer and “upload” the data to the Your RCA Camera folder
that was installed on your computer.
If the camera is properly connected, the images on the camera will
appear in Your RCA Camera file on the computer.
Make sure that the proper cable is used to connect the camera to the
correct port for your type of computer and operating system.
USB Port Using USB Cable
• All Macintosh Users
• PC Windows 98 Users
• Recommended for PC Window 2000 Users
Serial Port Using RS232 Digital Cable
• PC Windows 95 or 98 Users
• PC Window 2000 Users (USB Port Recommended)
Note: The camera is powered through a USB connection. If you are using a
serial port connection, you must power the camera using the batteries or an
optional AC adapter.
DIGITAL
USB PORT
COMPUTER
If the software does not automatically connect to the camera,
try restarting your computer.
PC Users- Make sure that the USB or serial port that the camera is
connected to is active using the “Ports” control panel.
Macintosh Users- Make sure that the icon for the USB port appears
on the desktop.
Sample Connection Showing USB Port
Page 17

15
Software
Save Your Photos
The images in Your RCA Camera folder are not saved. If you erase them
from the camera without saving them to the computer, they will be lost.
We suggest that you save the photos to a file on your computer or in
albums in the PhotoImpression 2000 program.
If you double click an image in the Your RCA Camera folder. The
PhotoImpression 2000 program should open.
Notes: If the program does not open, you can change the JPEG default of your
computer to ArcSoft PhotoImpression 2000.
PC Users- In My Computer, select Folder Options in the View menu. Click the
File Types tab and select JPEG. Click Edit and in Actions, click Open. Click
Edit and under Application used to perform action, enter ArcSoft
PhotoImpression 2000.
Macintosh Users- Select the file type in the File Translation section of the File
Translation Control Panel and assign PhotoImpression 2000.
You can also open the PhotoImpression 2000 program and select the photos.
Edit Your Photos
The PhotoImpression 2000 image-editing program lets you easily
organize your photos by saving them in albums. You can also edit your
photos using the many editing features, including cropping, retouching,
enhancing, simple red-eye correction, and adding text. It is also simple
to create greetings cards, calendars, and fun items (such as magazine
covers) as well as frame your photos in many different ways.
You may want to save a copy of your photo before you start editing it.
Note: For any questions you have concerning PhotoImpression 2000, refer to
the PhotoImpression 2000 user’s manual in PDF format located on the software
CD you received with the camera.
WARNING: While the camera is processing, uploading, or erasing
images, the green LED light located on the back of the camera flashes.
While the green light is flashing, DO NOT remove the batteries, remove
power from the camera, turn the camera off, disconnect the camera
from a computer, or perform any other operation. This will cause fatal
damage to the operating system of the camera.
Page 18

References
16
References
Camera User Interface
Camera Top View
Camera Front View
Camera Back View
EVEV
+
–
ON/OFF
Bottom of the Camera
AAx2
Sides of the Camera
Basic Button Functionality
Button Playback mode Record mode
EV/+ Advances to next Adjusts the exposure
stored picture value in .5 increments
ranging from -1 to +1
/– Displays preceding Toggles between auto
picture number flash (flash on) and
flash off
ON/OFF Power ON/OFF Power ON/OFF
Menu (
) Pressed quickly: Pressed quickly:
switches to record switches to playback
menu. Pressed menu. Pressed
and held: toggles and held: enters
through submenu submenus. Pressed
choices (erase one, quickly in submenus
erase all, etc.) toggles through choices
(picture quality, self
timer, etc.)
Shutter Selects highlighted Captures images
release menu choice * Selects highlighted
menu choice in menu
mode.
Page 19

17
References
Troubleshooting
Q: The camera doesn’t turn on when I press the ON/OFF button.
A: The batteries are missing, dead, or are not loaded correctly. Correctly load new
batteries in the battery chamber. If you are using an AC adapter, make sure you
are only using an AC adapter with the correct specifications for this camera.
Q: The power suddenly turned off.
A: Most likely, the batteries you have are getting too weak to sustain operation of
the camera. Check the LCD display to see if the weak battery icon is displayed. If
so, replace old batteries with new. Also, make sure that manganese batteries are
not in use. Replace manganese batteries with alkaline batteries immediately.
Q: There’s a half-battery icon on the LCD.
A: This is the low battery icon indicating that the batteries in use are getting too
weak to operate the camera. Replace old batteries with new.
Q: The camera doesn’t record when I press the shutter release button.
A: The mode of the camera is set to playback. Quickly press the menu button to
switch from playback mode ( ) to record mode ( ).
Q: Why is there no picture on the TV monitor when the camera is connected to
the VIDEO IN jack?
A: The connection between the camera and the TV is loose. Make sure that all
fittings are snug. If this does not work, verify that your TV is set to its video input
“channel.” For more information about finding your TV’s video input line, see
the User’s Manual that came with it.
Q: Why can’t the camera communicate with a computer?
A: There could be a disconnected wire between the camera and the computer.
Make sure that all fittings are snug and correct and that the camera is turned on.
If this does not work, verify that you have installed the software correctly and that
the port used by your USB or digital cable is activated.
For more information about software installation, see the documentation that
came with the disks.
For more information about turning on your computer’s port, see your computer’s
documentation.
Q: Why are pictures blurry, too light, or too dark?
A: You may have moved or tilted the camera while taking the photo. Hold the
camera level and still. Make sure there is enough light for photos. Set flash to
auto, adjust exposure value, or add light. If you are too close to your subject, the
photo may look “washed” out.
Page 20

References
18
Taking Care of Your Camera
Your camera is a precision instrument designed and manufactured to give you reliable
service. Handled and cared for properly, the camera should give years of trouble-free
imaging.
In order to avoid damaging the unit:
Do Not:
• Drop or bang the camera. Always transport the unit in a carrying case;
• Drop into water or expose the camera to rain or splashing. Your camera is not
waterproof and is particularly susceptible to damage from salt water. The camera must
be protected from salty breezes or sprays to prevent damage. If your camera does get
wet, wipe it dry immediately and have it examined at an authorized service center;
• Point the camera directly at the sun. This could damage the camera;
• Subject the camera to extreme high or low temperature and/or humidity. Your
camera’s batteries will not function properly in extreme conditions. Excessive
temperature and humidity may cause serious damage;
• Subject the camera to excessive vibrations. When you travel, always make sure to use
the carrying case, and pack the camera where it will not be subjected to a lot of jarring
movement. This could loosen screws or damage internal camera components;
• Disassemble the camera. This will void your warranty and potentially damage
precision internal parts.
Do:
• Make sure any tripod used has a screw that fits the camera’s tripod mount properly.
A longer tripod screw could puncture and damage the camera’s casing and internal
structure.
Page 21

19
References
Limited Warranty
What your warranty covers:
• Any defect in materials or workmanship.
For how long after your purchase:
• One year - Unit exchange, which includes parts and labor.
• The warranty for rental units begins with the first rental or 45 days from date of shipment to the
rental firm, whichever comes first.
What we will do:
• Exchange a defective Digital Still Camera with a new or, at our option, refurbished unit.
How you get service:
• Call 1-877-833-3491 and have your unit’s date of purchase and model/serial number ready. The
model/serial number information is on the back of your camera.
• A representative will troubleshoot your problem over the phone.
• If the representative determines that you should receive a replacement camera you will be provided
with a Service Request (SR) number and the location of a nearby exchange point if one exists. No
returns will be accepted without the SR number.
Option I:
1. Provide your Discover, MasterCard or Visa account number and expiration date to your phone
representative. This is for security purposes only and your account will not be charged at this time.
2. We will send you a replacement unit.
3. If you return the unit to us within 14 days from the date you were provided an SR number, only items
not covered by warranty will be charged to your account. If your unit is not received within 14 days,
the suggested retail value of the camera will be charged to your credit card. This amount will be
credited, less a $10 handling fee, if the unit is subsequently received.
4. Ship your defective unit back to us using the replacement unit’s carton. Shipping instructions will be
included on the carton along with your SR number which will allow you to easily ship the unit back
to us. Make sure you insure your shipment in case of damage or loss. Include with the shipment:
• Evidence of purchase date such as a bill of sale.
• A brief note describing your camera’s problem.
• Your name, address and phone number.
Option II:
1. For a fee of $10.00, we will send a replacement unit to our exchange point.
2. The exchange location will notify you of its arrival.
3. Take your unit and evidence of purchase date, such as a bill of sale, to the exchange location and you
will be provided the new or refurbished unit. Please retain all accessories.
4. If the repairs are covered by your warranty, you will not be billed.
* Thomson assumes no responsibility for warranty shipments from the customer to the factory if not shipped in
the manner prescribed by Thomson.
Page 22

References
20
To receive a replacement camera after we have received your unit:
• Write the SR number on the outside of the carton used to return the unit. Make sure you insure your
shipment in case of damage or loss.
• Carefully pack the unit using the original box and packing material if possible. Please retain all
accessories that were included with your unit.
• Include with the shipment:
1. Evidence of purchase date such as a bill of sale.
2. A brief note describing your camera’s problem.
3. Your name, address and phone number.
• The representative will advise the address to mail a cashier’s check or money order for payment if
there are any out of warranty labor or parts charges, and you elect not to use your credit card.
• After we receive your product, a new or refurbished unit will be shipped to you.
What your warranty does not cover:
• Acts of God, such as but not limited to lightning damage.
• Adjustment of customer controls.
• Damage from misuse or neglect.
• A unit that has been modified or incorporated into other products or is used for institutional or other
commercial purposes.
• Batteries.
• Units purchased, serviced or operated outside the U.S.A.
• Loss of images.
• Shipping damage if the unit was not packed and shipped in the manner prescribed by Thomson.
• Storage fees may be charged by the exchange point if you fail to pick up the replacement unit in
a timely manner.
* Thomson assumes no responsibility for warranty shipments from the customer to the factory if not
shipped in the manner prescribed by Thomson.
Product Registration:
• Please complete and mail the Product Registration Card packed with your camera. It will make it
easier to contact you should it ever be necessary. The return of the card is not required for warranty
coverage.
How state law relates to warranty:
• This warranty gives you specific legal rights and you may have other rights that vary from state to
state.
If you purchased your product outside the United States:
• This warranty does not apply. See your dealer for warranty information.
Page 23

21
Accessories
Optional Accessories Order Form (CDS1005)
Description Part No. Price Qty. Total
NiMH Battery Charger PC224 $29.95
(includes 4 rechargeable AA batteries)
Rechargeable Batteries (AA)
2-pack Alkaline batteries PC102AK $3.95
4-pack Alkaline batteries PC104AK $4.95
2-pack Nickel Metal Hydride batteries
PC202MH $9.95
4-pack Nickel Metal Hydride batteries
PC204MH $19.95
Gear Bags
Blue PC556 $29.95
Black PC555 $29.95
Prices are subject to change without notice.
Total Merchandise ........................................................................................... $_________
Sales Tax .......................................................................................................... $_________
We are required by law to collect the appropriate
sales tax for each individual state, county, and
locality to which the merchandise is being sent.
Shipping and Handling .................................................................................... $
5.00
Total Amount Enclosed ................................................................................. $_________
Use VISA, MasterCard, or Discover.
Money order or check must be in U.S.
currency only. No COD or cash.
Detach Here
✂
Please complete other side also
Page 24

Accessories
22
®
rr
s
TM
Charge your order on your VISA, MasterCard,
or Discover Card by filling in the provided form:
USE YOUR CREDIT CARD
IMPORTANT:
Copy complete account number from your VISA card
IMPORTANT:
Copy complete account number from your MasterCard
Expiration date:
Expiration date:
Copy Number above your name on MasterCard
AUTHORIZED SIGNATURE
Please make sure that both sides of this form have been filled out completely.
¥ Allow 4 weeks for delivery.
¥ All accessories are subject to availability.
¥ Prices are subject to change without notice
IMPORTANT:
Copy complete account number from your Discover Card
Expiration date:
Print or type your name
and address clearly.
A complete and correct order
will save you days of waiting.
Name:
Street:
Apt:
City:
State:
Daytime Phone No.:
Zip:
Detach Here
✂
Page 25

23
Accessories
To order accessories, contact your local Dealer.
If a dealer is not nearby, you can also follow the directions below to order by
telephone or direct-by-mail.
To order by phone:
To place your order by phone, have your Visa, MasterCard, or Discover card ready
and call the toll-free number listed below.
Use this number only to place an order for accessory items listed on
this order form.
1-800-338-0376
To order by mail:
To place your order by mail, detach and mail the completed order form with credit
card information, money order, or check in U.S. currency (made payable to
Thomson Consumer Electronics, Inc.) to the following address:
Digital Camera Accessories
PO Box 8419
Ronks, PA 17573
Page 26

References
24
Specifications
Product Type: Digital Still Camera
Imaging Device: 1/3-inch CMOS
Image Quality: Fine/Normal
Image Resolution: 640 x 480 pixels
Recording System: Digital (JPEG based)
Recording Medium: 2 Mb internal flash memory
Erase Functions: Single image or all images
Video System: NTSC output
Computer Interface: USB or PC RS-232C
Focal Length: 7 mm
Aperture: f=2.0
Focus Range: .5 ~ infinity
Flash Modes: Auto/Off
Shutter Speed: 1 to 1/10000 second (auto)
LCD Monitor: B/W indicator
Power Source: 2 AA-size batteries (Alkaline, NiCd, or Lithium)
Weight: 120g without batteries
Dimensions: 95.5(W) x 63.8 (H) x 34.6 (D) mm
Optional AC Adapter
Use only an AC adapter with the following specifications to operate
this camera. Use of any other adapter could damage the camera.
Output: DC 5V/2.OA 100V~240V
Jack: 4.75mm diameter
* Design and specifications are subject to change without notice.
Page 27

25
Index
A
AA Batteries 3
Accessories 1
included 3
optional 23
order form 21
ordering 23
Auto flash sensor 4
B
Basic Button Functionality
16
Batteries 3, 5
Battery Charger 21
Battery power display 11
Bottom of the Camera 16
buttons
EV/+ 16
flash/– 16
menu 16
ON/OFF 16
shutter release 16
C
Camera
back view 16
caring for 18
front view 16
top view 16
Camera details 4
Camera settings
changing 9
Camera user interface 16
Capturing Images 6
Computer
connecting camera 14
Customer Service 1
E
Erasing 12
EV/+ button 16
Exposure value 10
F
Flash 4
built in 11
Flash/– button 4, 16
H
Hand strap 3
attaching 5
I
Image quality settings 8
Images
erasing all 12
erasing single 12
viewing on a TV 7, 11
L
Lens 4
M
Menu button 16
N
NTSC Video Cable 3
O
On-screen menus 8
playback mode 8
record mode 8
Optical viewfinder 4
Order form, accessories 21
P
Picture
edit 15
framing 6
save 15
taking 6
viewing 7
Playback mode 8
Power (ON/OFF) button 16
Power supply 5
batteries 5
Problem solving 17
Product registration i2
R
Rechargeable batteries 21
Record mode 8
Recording pictures 6
RS-232C digital cable 3, 5
S
Self timer/+ button 4
Self-timer
activating 10
LED 4
Shutter release button 4, 16
Sides of the camera 16
Software 3
Software CD 13
Specifications 24
System requirements 1
T
Troubleshooting 17
V
Viewfinder 4
W
Warranty 19
digital camera exchange 1
Page 28

10330 N Meridian Street
Indianapolis, IN 46290
©2000 Thomson Consumer Electronics, Inc.
Trademark(s)® Registered
Marca(s) Registrada(s)
Printed in Taiwan
TOCOM 15636790
 Loading...