

Page 1
EN
WARNING : TO PREVENT
FIRE OR ELECTRICAL
SHOCK HAZARD, DO NOT
EXPOSE THIS PRODUCT TO
RAIN OR MOISTURE.
CAUTION
RISK OFELECTRIC SHOCK
DO NOTOPEN
THE LIGHTNING FLASH
ANDARROW HEADWITHIN
THE TRIANGLE IS A
WARNING SIGN ALERTING
YOU OF "DANGEROUS
VOLTAGE" INSIDE THE
PRODUCT.
CAUTION: TO REDUCE THE RISK OF
ELECTRIC SHOCK, DO NOT REMOVE
COVER (OR BACK). NO USER
SERVICEABLE PARTS INSIDE. REFER
SERVICING TO QUALIFIED SERVICE
PERSONNEL.
THE EXCLAMATION POINT
WITHINTHE TRIANGLE IS A
WARNING SIGN ALERTING
YOU OF IMPORTANT
INSTRUCTIONS
ACCOMPANYING THE
PRODUCT.
SEE MARKING ON BOTTOM/BACK OF PRODUCT
FCC Information
This device generates and uses radio frequency (RF) energy, and if not installed and used
properly, this equipment may cause interference to radio and television reception.
This equipment has been type tested and found to comply with the specifications in Subpart J of
Part 15 of FCC Rules. These rules are designed to provide reasonable protection against radio
and television interference in a residential installation. However, there is no guarantee that
interference will not occur in particular installations.
If this equipment does cause interference to radio or television reception (which you can
determine by turning the equipment off and on), try to correct the interference by one or more
of the following measures:
• Reorient the receiving antenna (that is, the antenna for the radio or television that is “receiving” the interference).
• Move the unit away from the equipment that is receiving interference.
• Plug the unit into a different wall outlet so that the unit and the equipment receiving
interference are on different branch circuits.
If these measures do not eliminate the interference, please consult your dealer or an experienced radio/television technician for additional suggestions. Also, the Federal Communications
Commission has prepared a helpful booklet, “How To Identify and Resolve Radio TV Interference Problems.” This booklet is available from the U.S. Government Printing Office, Washington, DC 20402. Please specify stock number 004-000-00345-4 when ordering copies.
For Your Safety
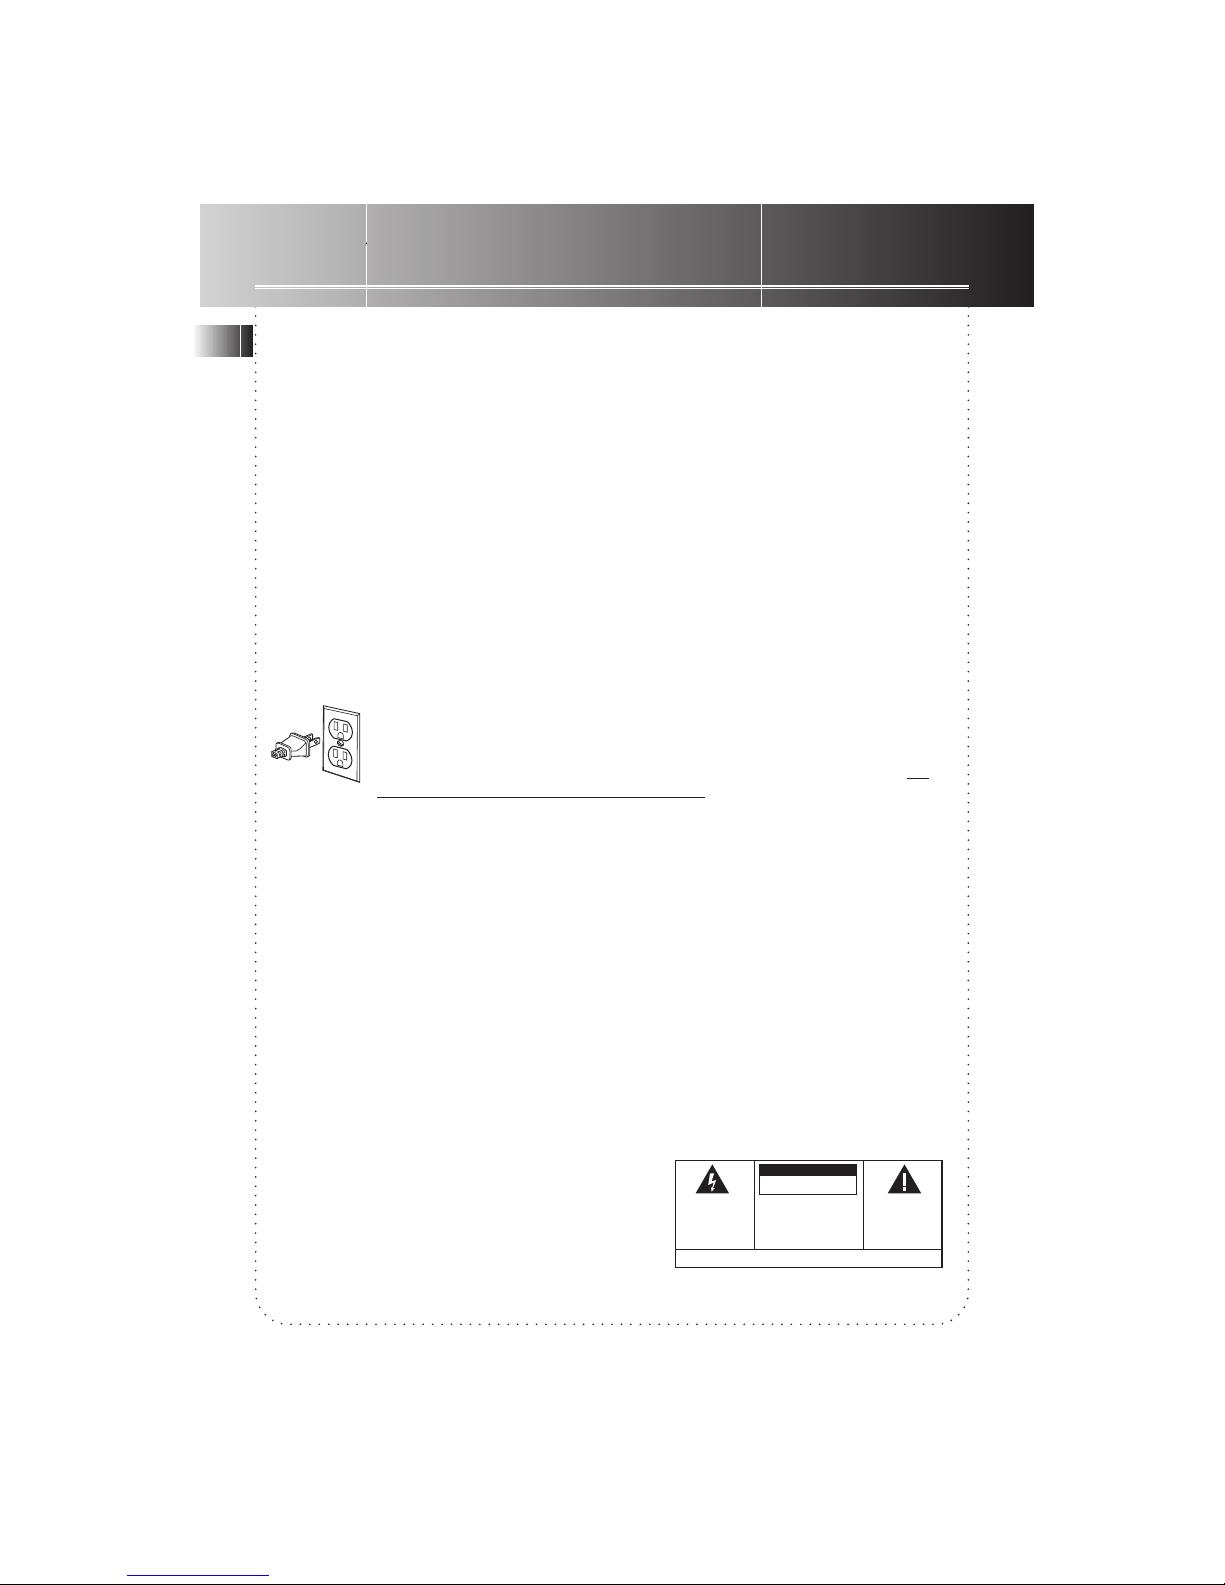
The AC power plug is polarized (one blade is wider than the other) and only fits
into AC power outlets one way. If the plug will not go into the outlet completely, turn the plug over and try to insert it the other way. If it still will not fit,
contact a qualified electrician to change the outlet, or use a different one. Do
not attempt to bypass this safety feature.
Service Information
This product should be serviced only by those specially trained in appropriate servicing techniques. For instructions on how to obtain service, refer to the warranty card included with this
product.
For Your Records
In the event that service should be required, you may need both the model number and the
serial number. In the space below, record the date and place of purchase, and the serial
number:
Model No.
Date of Purchase
Place of Purchase
Serial No.
Page 2

FCC/ Safety Information
First Things First ................. 2
Unpack the System ............................2
Check for Moisture ............................ 2
Choosing System Location ................ 2
Inserting Batteries into
Remote Control ................................. 2
Cable Connections .............................3
Power Connections............................ 3
Panel Controls .................... 4
The Display ......................... 5
The Remote Control........... 6
Playing ................................. 7
Basic Operations ................................ 7
Special Operations......................... 7-9
(Dual Mode, Random Play, Introductory
play, DJ Mode, Repeat, Live Effects,
Program, Clearing Program)
Recording .......................... 10
Loading Discs ................................... 10
Select Recording Mode ............. 10-11
(Dubbing Mode, Live Dubbing Mode,
External Recording Mode, Sychronized
Digital Recording Mode, Program
Recording, Microphone Recording)
Finializing/ Unfinializing/ Erasing
Recordings........................................12
More Special Functions ... 13
Assigning Disc Titles ........................ 13
Editing Disc Titles ............................13
Storing Playback Programs and
Disc Titles ..........................................13
Recalling Playback Programs
and Disc Titles..................................14
Erasing Disc Titles ............................ 14
Display Messages ............. 14
Troubleshooting ............... 15
More Information ............ 16
Cleaning the Exterior ...................... 16
CD Care .............................................16
CD Lens Care....................................16
Precautions .......................................16
Don’t Infringe .................................. 16
Discs for Recording .......................... 16
Equipment Specifications................ 16
Index.................................. 17
Limited Warranty ............. 18
EN
Contents
1
Page 3
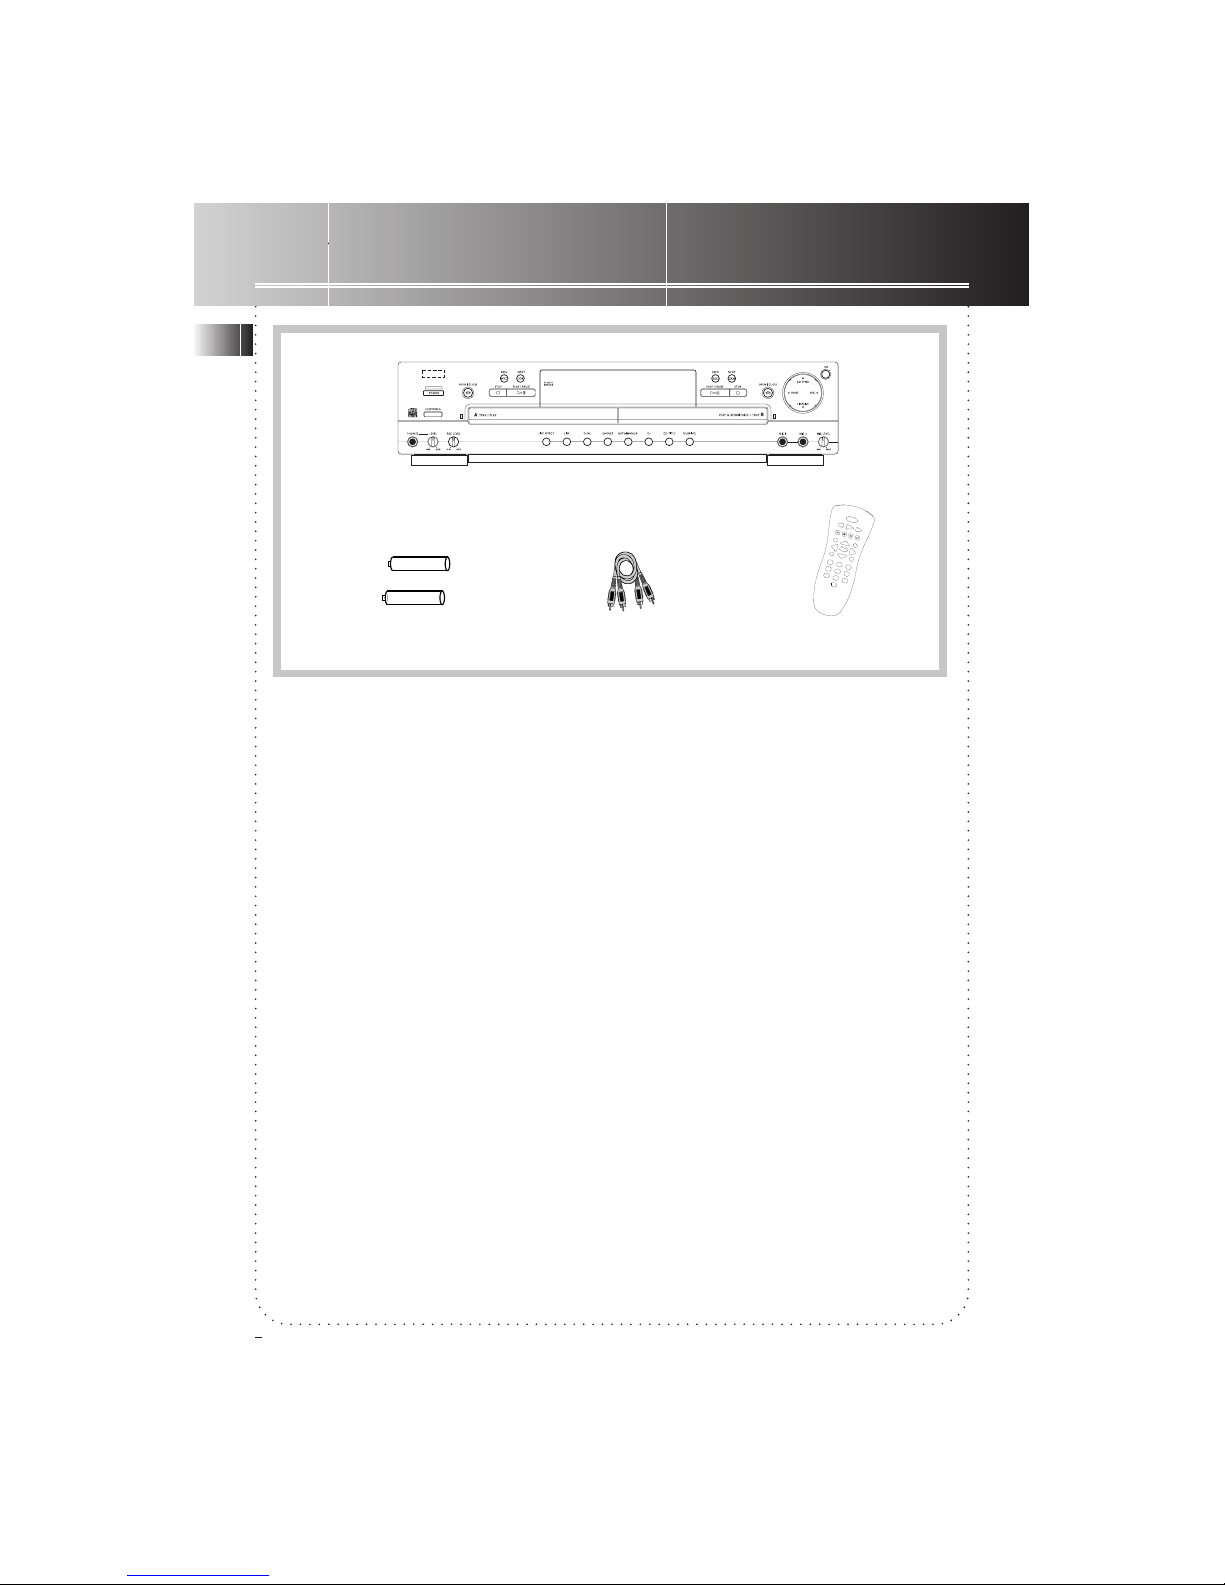
Main Unit
One Pair of AAA batteries One Audio Cable
Remote Control
Unpack the System
Unpack your new CD Player and Recorder
and locate all the accessories. You should
have:
• one main unit;
• one Remote Control;
• one audio cable (two wires) with red and
white connectors.
• one pair of AAA batteries;
• one user’s guide;
• and one safety leaflet.
Check for Moisture
Just as moisture can form on the inside of
windows on a cold day, it can also form on
the inside of your audio system causing it to
malfunction.
If there is any moisture inside the system, the
system may not operate properly, In this
case, you are suggested to disconnect the
power to the unit and wait for about 30
minutes for the moisture to evaporate.
Choosing System Location
It is recommended to follow these guidelines
when setting up your system:
• Choose a solid, level surface. Don’t place on
surfaces like carpet or foam rubber.
• Choose a location away from direct sunlight,
radiator, air ducts and sources of heat.
• Avoid locations subject to moisture,
mechanical vibration, shock or excessive dust.
• Ensure that the location is adequately
ventillated, as it is essential to protect the
unit from internal heat build-up.
Inserting Batteries into
Remote Control
Open the battery compartment door on the
back of the remote unit and insert correctly
2 AAA batteries with + and - signs matching
with indications.
To use the remote control, point it directly at
the unit.
First Things First
EN
2
+ -
+ -
POWER
CD
1
2
3
6
9
8
7
45
0
CD-SYNC CDR
ERASE
RECORD
SHIFT
FINALIZE
OPEN/CLOSE
DJ
INTRO
REPEAT
PROGRAM
SHUFFLE
CD TITLE
DISPLAY
LIVE SELECT
LIVE
O
K
REVERSE
PLAY
FORWARD
PREV
STOP
PAUSE
NEXT
Page 4
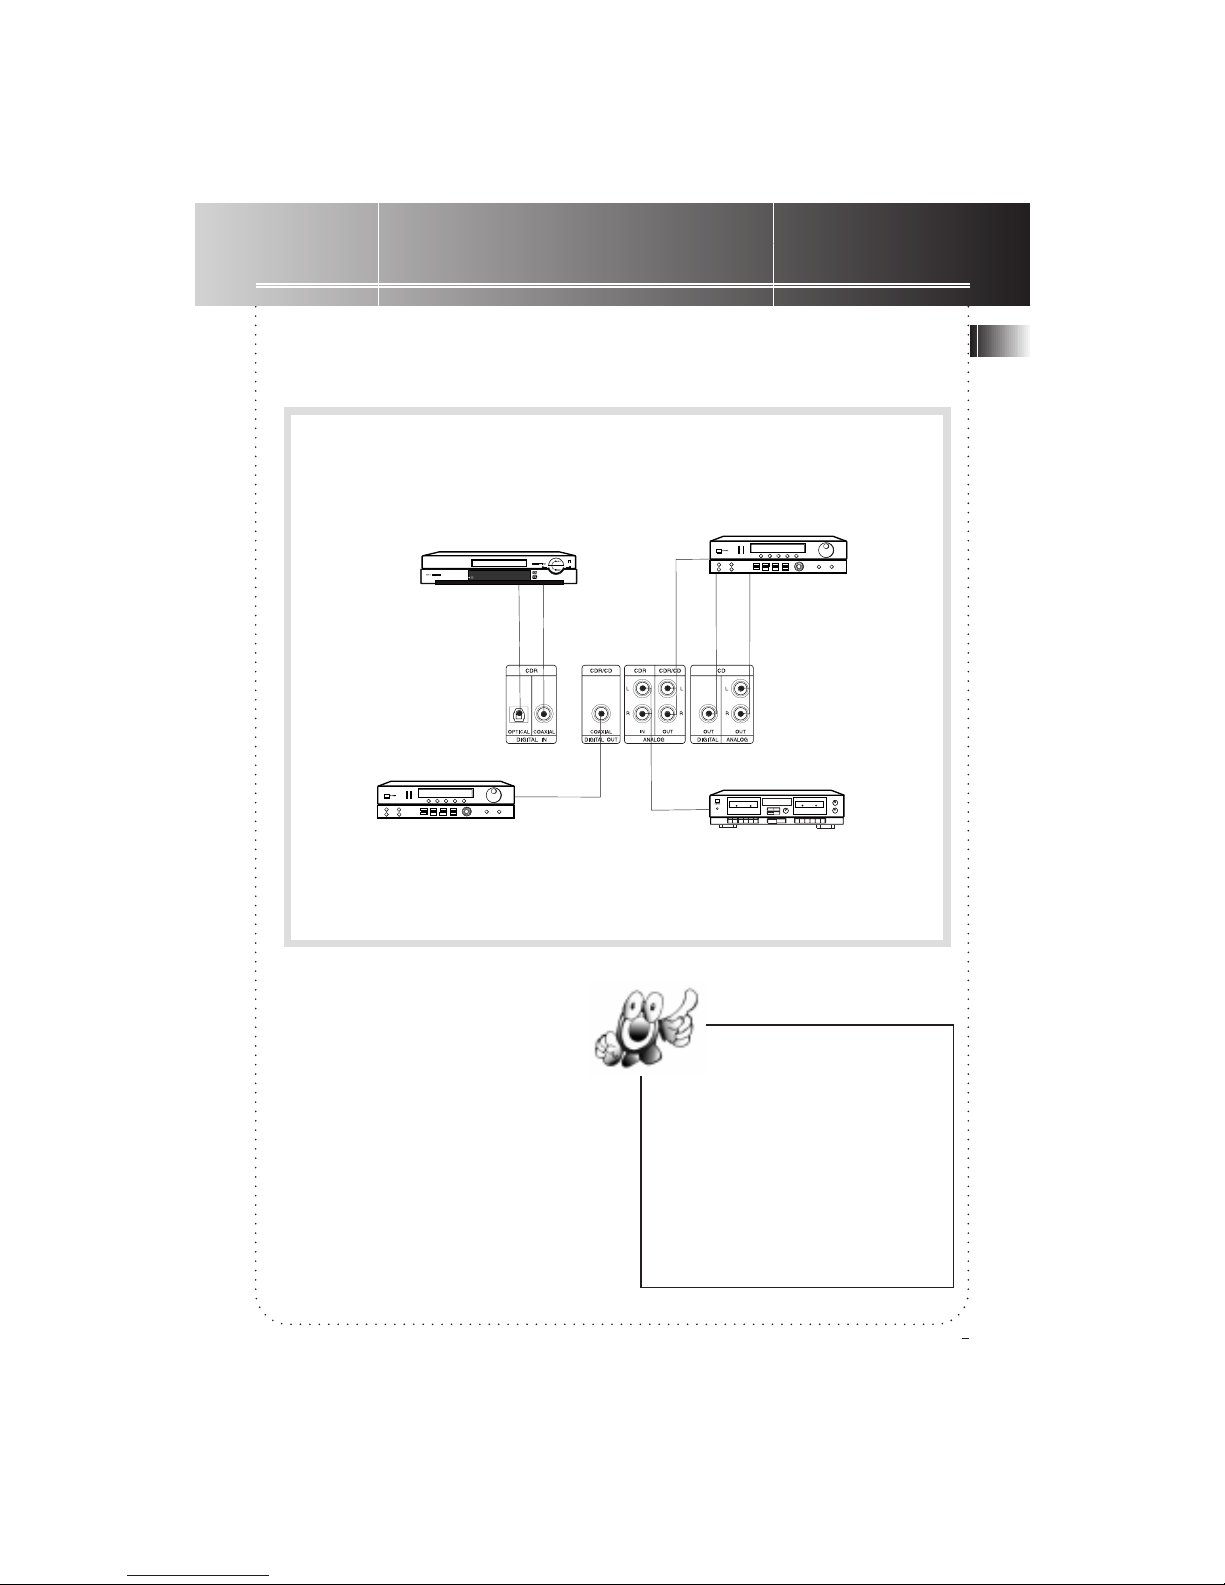
Power Connections
Plug the power supply cord into an AC
power outlet.
Note: For the sake of safety, complete all
cable connections before you plug for
power.
Connections
Cable Connections
First Things First
EN
3
Tips:
• Digital recordings (digital / coaxial) offer
the best performance in sound quality and
usability (e.g. auto track numbering).
• If possible, connect both digital and analog
cables so that you can always make analog
recordings when digital recording is not
possible.
• As minimum setting, CD Analog cables must
be connected for CD playback.
1. For recording from an external
source with digital output (e.g MD)
through optical or coaxial digital cable
(not supplied).
2. Connection to external
receiver (e.g. amplifier) with
digital coaxial in for digital
playback.
3. For recording from an external source
with analog output (e.g. tape player)
through analog audio cable.
4. Connection to external
receiver (e.g amplifier) through
analog/ digital/ coaxial audio
cable for playback.
SET
DEMO
1
2
3
4
4
4
SET
DEMO
Connenction
jacks on the back
panel
Page 5
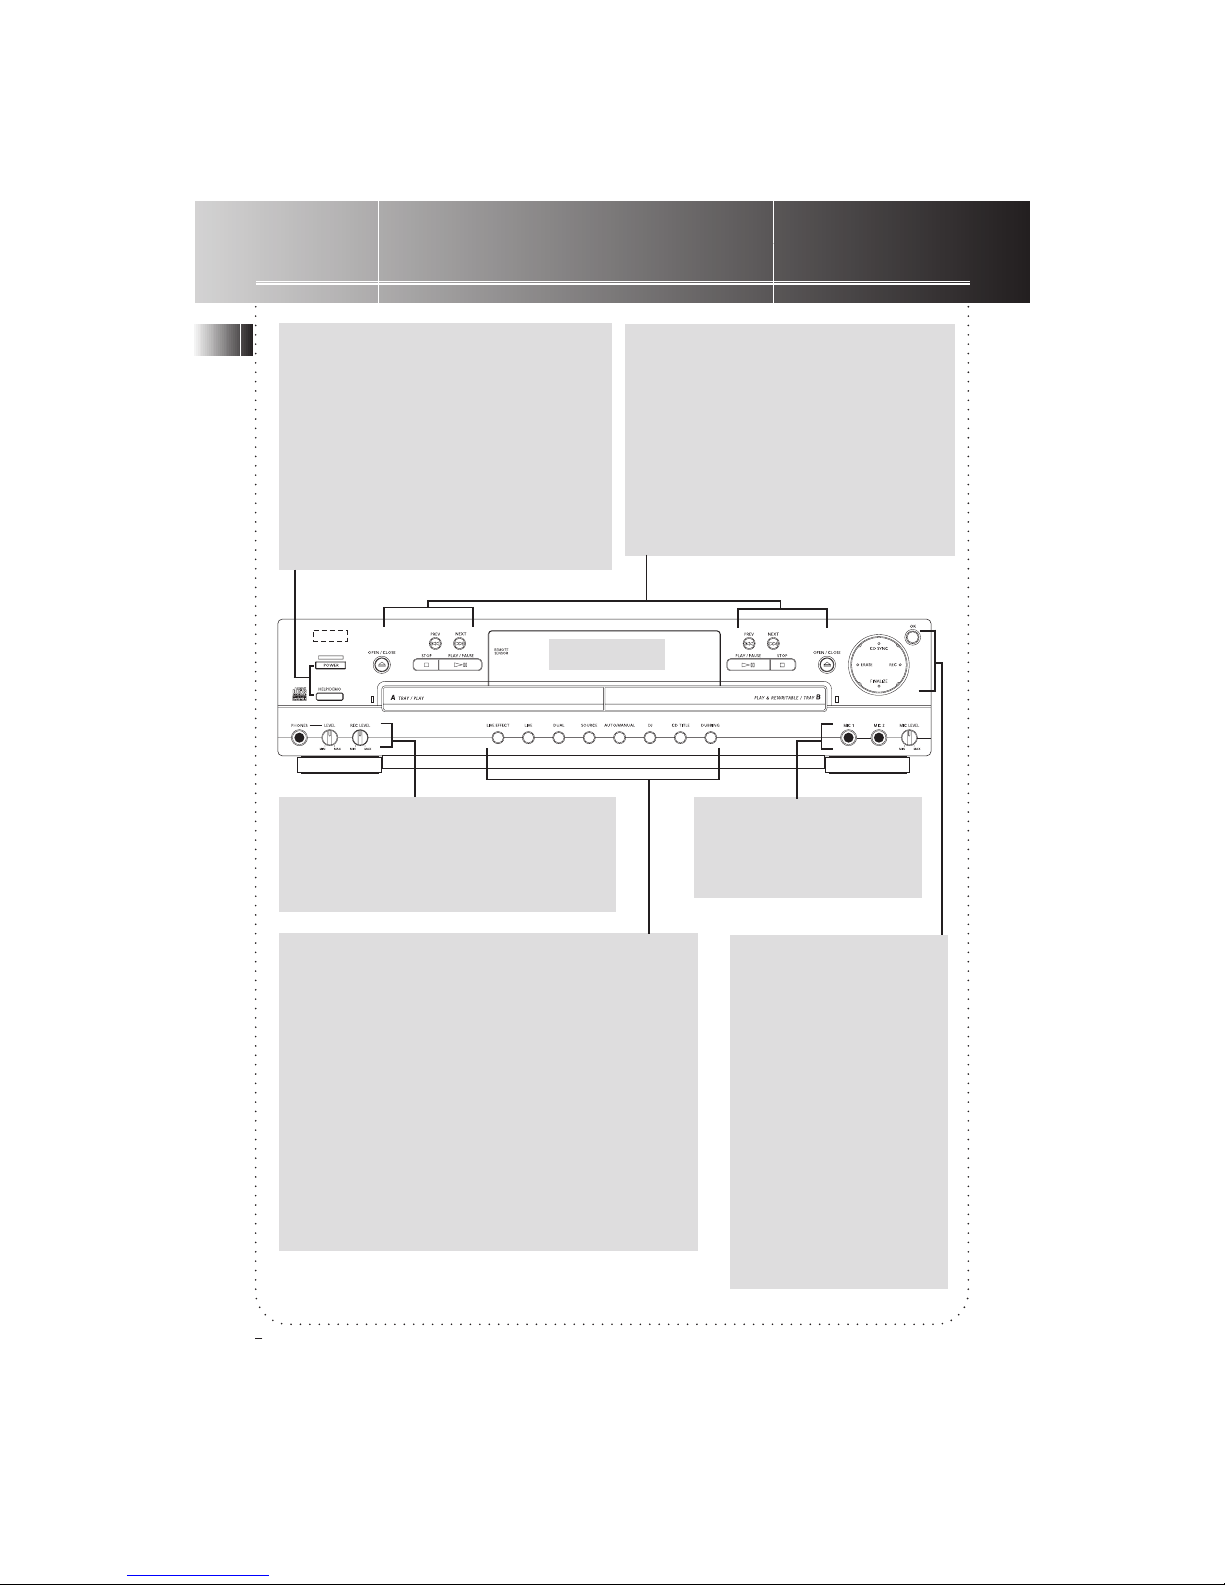
LIVE EFFECT - Selects
among the live effects of
Applause/ Cheer/ Encore/
Live Effect Off.
LIVE - Activates LIVE
EFFECT.
DUAL - Enables the two
players to play individually
or at the same time.
SOURCE - Selects source
(Optical, Coaxial or Analog)
matching with external
input.
AUTO/MANUAL - Selects
between auto/ manual
track numbering.
DJ -Enables alternating
playback of Tray A and
Tray B.
CD TITLE -Assigns disc
titles.
DUBBING -Activates
dubbing mode.
OK - Confirms
your selections.
CD SYNC Activates
synchronized digital
recording.
ERASE - Edits
play program
or erases
recordings.
REC Enters
recording
mode.
FINALIZE -Finalizes
CD-R & CD-RW or
unfinalizes CD-RW.
( Refer to relevant sections for function details )
POWER - Turns the unit on/off. Demo shows
once plugged for power. Blue light indicates
standby (off) mode.
HELP/DEMO - Shows demo when unit is in
standby mode. Enters help mode when unit
is in operation mode (Press PREV/ NEXT/
STOP/ PLAY on main unit or POWER on
remote control to enter operation mode
from standby mode).
Note: Once plugged for power, demo will
scroll on display. You can cancel this function
by pressing the button for about 3 seconds.
PREV & NEXT - Press once
to skip to the next or
previous track. Press & hold
for forward or backward
searching operations
during playback. Stop
searching by pressing
PLAY. Also select alphabets
and symbols for CD titles.
PLAY/PAUSE - Starts or
pauses playback.
OPEN/CLOSE Opens or closes
TRAY A/ B
STOP - Stops
playback/
dubbing/
recording. Quits
from your
selections.
PHONES -Connects
headphones for
private enjoyment.
Adjust LEVEL to
control volume.
REC LEVEL - Controls
recording level
during analog
recording.
MIC 1 & MIC 2 - For
connection with microphones. Adjust MIC LEVEL
to control sound level.
Panel Controls
EN
4
The Display
Page 6

Track Introductory mode
activated.
Random Play
mode activated.
(MIX for
Thomson model)
REPEAT - Current disc
to be repeated.
REPEAT 1 - Current
track to be repeated.
REPEAT (flashing) Discs on both trays to
be repeated.
When they light/ flash:
Shows elapsed playback time,
total remaining track time, total
track time, track numbers,disc
titles, selected live effect mode
& messages during recording,
dubbing etc.
Shows selected erasing
mode ( i.e. ERASE
TRACK - erasing a
track/ ERASE DISC erasing all tracks on a
disc ).
Shows sound
output levels
and red bars
indicate level is
high.
Program
mode
activated.
Play/ Pause
Shows type of
inputing signals.
Shows track
numbers are to
be assigned
automatically or
manually.
Unit is in
dual on
mode.
Player is
performing
recording.
Shows type of
CD loaded.
Player is
performing
dubbing.
Disc has been
finalized.
Player is performing synchronized
digital recording.
Green Led
Lights when the tray is selected.
The Display
EN
5
Tip: Whenever you plug or turn on for
power, there are about 3 seconds for
initialization. During this time, you cannot
activate any key.
PLEASE WAITPLEASE WAIT
PLEASE WAITPLEASE WAIT
PLEASE WAIT scrolls
on display if you touch
PLAYPLAY
PLAYPLAY
PLAY,
STOPSTOP
STOPSTOP
STOP,
NEXTNEXT
NEXTNEXT
NEXT/
PREVPREV
PREVPREV
PREV during initialization.
Page 7

POWER
CD
1
2
3
6
9
8
7
45
0
CD-SYNC
CDR
ERASE
RECORD
SHIFT
FINALIZE
OPEN/CLOSE
DJ
INTRO
REPEAT
PROGRAM
SHUFFLE
CD TITLE
DISPLAY
LIVE SELECT
LIVE
O
K
REVERSE
PLAY
FORWARD
PREV
STOP
PAUSE
NEXT
You can control or adjust most of the function keys as those are present on the main unit
through the remote control.
However, the following keys are present on the remote control only:
CD, CDR -
Selects which player
you want to operate.
(CD - Tray A, CDR Tray B)
SHIFT Press it before you
want to activate the
functions as indicated
below the numerical
keys.
PROGRAM -
Activates program mode.
DISPLAY -
Selects among the
displays.
INTRO -
Plays all tracks
briefly on a disc.
REPEAT -
Selects among the
repeat modes.
SHUFFLE (MIX for
Thomson model)-
Activates random
play.
Numerical Keys -
Input track numbers
for direct selection.
REVERSE, FORWARD Starts forward/ reverse
search operations during
playback.
The operations of all other function keys on
the remote control are identical as the main
unit except the following:
PREV, NEXT, PLAY, PAUSE, STOP, FORWARD, REVERSE, OPEN/CLOSE
Press CD or CDR to choose which player you
want to operate before using the above
buttons.
All functions indicated under the
numberical buttons ( e.g. PROGRAM, DJ )
Press SHIFT before you select these keys.
( refer to relevant sections for function
details )
The Remote Control
EN
6
Page 8

TRAY A TRAY B
CD OUT CDR/CD OUT
CD OUT, CDR/CD OUT CDR/CD OUT
Connect to:
DUAL ON
DUAL OFF
Playing
EN
7
Basic Operations
Similar to common CD players, press PLA Y,
PREV, NEXT, STOP, PAUSE for basic opera-
tions. (see page 4 “Panel Control” for more
information)
1. Player in stop mode. Showing total
number of tracks and total disc time.
2. Player in playback mode. Press SHIFT &
then DISPLAY repeatedly on remote
control to select among the displays
showing:
a) current track with elapsed playing time
b) current track with remaining playing time
c) total disc playing time
d) total disc remaining playing time
Special Operations
Dual Mode
You can play the 2 trays individually or at the
same time. However, you must have an extra
CD output cable connected to a receiver for
this function (see page 3 and table below).
1. Activate dual mode.
2. Follow the basic operations to operate
the players.
3. Quit dual mode.
Random Play (SHUFFLE/ MIX)
1. Enter random play mode.
2. Start random playback.
3. Quit random play mode.
Introductory Play
You can listen to the beginning 10 seconds of
each track on a disc with this feature.
1. Enter introductory play mode.
Playback starts automatically.
2. Quit introductory play mode.
PLAY
3
SHUFFLE
SHIFT
3
SHUFFLE
SHIFT
8
INTRO
SHIFT
Note:
MIX MIX
MIX MIX
MIX instead of
SHUFFLE SHUFFLE
SHUFFLE SHUFFLE
SHUFFLE for Thomson model.
STOP
Page 9

Playing
EN
8
Repeat
1. Press repeatedly to select
among repeat modes
When Dual mode is on:
When Dual mode is off:
REPEAT 1; repeating
current track
REPEAT; repeating
entire disc
De-selection
REPEAT 1; repeating
current track
REPEAT; repeating
entire disc
REPEAT (flashing);
repeating discs on both
trays
De-selection
Live Effects
You can insert live effects (applause/ cheer/
encore) at anytime during playback. The live
effect lasts for about 7 seconds.
1. Press repeatedly to select
live effect (applause/ cheer/
encore) or de-selection.
2. Start playback.
3. Insert live effect.
DJ Mode
This allows alternating playback of both
players.
1. Activate DJ mode. Both
trays open with DJ MODE
ON scrolls on display.
2. Load disc on a tray (e.g. Tray A). Total
number of tracks (e.g. TOT 16) shows on
display.
3. Select track (e.g. track 3)
4. Start playback on tray A.
5. Repeat steps 2-3 on tray B.
6. Confirm track selection
on tray B.
8. Quit DJ mode. DJ MODE
OFF scrolls on display.
7. Repeat steps 2-3 & 6 for further playback
on tray A, then tray B...
Tips on DJ mode:
• Display shows remaining playing time instead of
elapsed playing time during playback. You can
count down to the next track!
• You can connect microphone for public address
over music during playback.
PLAY
PLAY
PLAY
7
DJ
SHIFT
7
DJ
SHIFT
9
REPEAT
SHIFT
6
LIVE
SHIFT
SHIFT
5
LIVE SELECT
Page 10

Playing
EN
9
4. Confirm selection.
6. Review program.
7. Erase unwanted tracks.
8. Enter program standby mode.
Display shows total programmed tracks and time
9. Start program playback.
10. Quit program mode.
1. Press and hold PROGRAM for
about 3 seconds.
Clearing Program
2. Confirm clearing program.
Tips on program:
• Repeat steps 1-4 again if you want to
further edit your program in program standby
mode.
• Opening or closing disc tray will quit from
program mode. Input program will be lost.
• You can also assign your discs with disc titles
& playback programs for recall everytime you
load the discs on the player. (see p.13 for
details)
Tips on general playing:
• Place a CD, audio CD-R or audio CD-RW in the
appropriate tray recess with label side up.
• To avoid music skips or inferior sound quality,
please be sure that the disc is free from dust
particles or scratches.
• An unfinalized disc will not play on tray A.
Program
You can program up to 32 tracks in dual off
mode & 16 tracks in dual on mode in any
desired sequence. Tracks can be programmed
more than once but each time counts as a
track.
1. Enter program mode.
2. Select tray if Dual mode is off.
3. Select track (e.g. 03).
CDR
CD
5. Repeat steps 2-4 for more selections.
0
9
ERASE
STOP
PLAY
1
PROGRAM
SHIFT
1
PROGRAM
SHIFT
O
K
O
K
1
PROGRAM
SHIFT
Page 11

Step 1 Loading Discs
Recording
EN
10
1. Insert a blank audio CD-R or CD-RW on
TRAY B (the recorder). The recorder will
search automatically the end of the last track
and stop to continue recording if recordings
already exist.
Note: REWRITABLE (for CD-RW) or RE-
CORDABLE (for CD-R) icon must light on
display. Otherwise, your disc may not be an
audio one and no recording can be made.
(see “More Information” for details on discs
for recording)
2. Load source CD on TRAY A. Otherwise
connect and select external source for
recording.
Step 2 Selecting Recording
Mode
Dubbing Mode
1. Enter dubbing mode
2. Press repeatedly to select
dubbing speed (HIGH SPEED/
NORMAL SPEED)
3. Confirm selection.
4. Press repeatedly to select
between DISC DIGITAL (whole
disc) or TRACK DIGITAL (one track)
dubbing (see tip).
5. Confirm selection. Dubbing
starts automatically after
about 10-15 seconds.
6. Stop dubbing or dubbing
will stop automatically at end
of track or disc.
Live Dubbing Mode
Live effects can be inserted automatically at
the last 7 seconds of selected tracks or each
track on a disc during dubbing.
4. Press repeatedly to select
live effect you want to insert.
1. Press and hold LIVE for
about 3 seconds to enter live
dubbing mode.
2. Press repeatedly to select
between DISC LIVE (whole
disc)/ TRACK LIVE (one track)
dubbing (see tip).
3. Confirm selection. Recording
starts automatically after about
10-15 seconds.
5. Stop dubbing or dubbing
will stop automatically at end
of track or disc..
Tips on dubbing/ live dubbing:
• Dubbing mode is for recording from Tray A
to Tray B.
• For track dubbing, select desired track in
stop mode before entering dubbing mode.
STOP
STOP
SHIFT
5
LIVE SELECT
6
LIVE
SHIFT
6
LIVE
SHIFT
O
K
O
K
O
K
Page 12

Recording
EN
11
1. Select source (analog/ optical/
coaxial) to match with external
input (e.g. MD)
External Recording Mode
2. Select auto/ manual track
numbering (see tip).
3. Enter recording mode.
4. Start recording.
6. Stop recording.
Synchronized Digital Recording
Mode (from External Source)
Synchronized Digital Recording enables fast and
easy digital recording. Track numbers are
automatically assigned as detected from the
digital source material. However, manual
assignment of track numbers is not possible.
1. Enter CD-SYNC mode.
2. Press repeatedly to select
between DISC SYNCREC
(whole disc) / TRACK SYNCREC
(one track) recording.
3. Confirm selection.
4. Synchronized recording is on standby.
Start playback of external source and
recording will start automatically.
5. Stop recording or recording
will be stopped automatically at
end of track or disc.
STOP
STOP
CD-SYNC
CD-SYNC
RECORD
5. Start playing source material.
O
K
O
K
Program Recording
1. Select Dual mode ON.
2. Load source disc on tray A and destination disc on tray B.
3. Refer to “Program” (steps 1-7, p. 9) to
create program on source disc (Tray A).
4. Refer to “Dubbing Mode” (p.10) for
program recording (Note: DISC DIGITAL
must be selected for step 4).
Microphone Recording
1. Connect microphone(s) into jack(s) and
adjust microphone level.
2. Refer to “External Recording Mode”
(p.11) for recording (Note: ANALOG must
be selected for step 1). With the recording
of your favourite music from external input,
you can sing along to make your own
digital recording.
Read tips on recording on the
next page!
Page 13

Recording
EN
12
1. Enter finalization mode.
Step 3 Finalizing/
Unfinalizing/ Erasing
Recordings
Finalizing Recording
You must finalize your CD-R or CD-RW after
recording for playback on Tray A or other
external CD players.
2. Confirm finalization. Rotating
star shapes indicate finalization
is in progress. It takes about 1-2
minutes before finalization is
complete.
Unfinalizing Recording ( for CDRW only )
In case you want to do further recording or
erase the last track on a finalized CD-RW, you
have to unfinalized it before doing so.
1. Enter unfinalization mode.
2. Confirm unfinalization.
Rotating star shapes indicate
unfinalization is in progress. It
takes about 1-2 minutes before
unfinalization is complete.
Erasing Recording
This is for CD-RW only. You can erase either
track by track from the end or the whole disc.
1. Enter erasing mode.
2. Press repeatedly to select
between ENTIRE DISC/
LAST TRACK erasing.
3. Confirm erasing. Rotating star
shapes indicate erasing is in
progress. It takes about 15
seconds before completion.
FINALIZE
ERASE
ERASE
FINALIZE
O
K
O
K
O
K
Tips on recording:
• The steps for audio CD-R disc and audio CD-RW disc
on recording are identical.
• Use an audio CD-RW as you are still familiarizing
yourself with the steps in recording. Recording
mistakes can be erased.
• There must have at least 7 seconds of recording time
left on the disc. Otherwise you will not be able to
enter record standby mode.
• A maximum of 99 tracks can be recorded on a disc.
Minimum track length is 4 seconds.
• TRACK NUMBERING-
AUTO AUTO
AUTO AUTO
AUTO: track numbers are
assigned automatically after a silence on original
material of minimum 3 seconds.
MANUALMANUAL
MANUALMANUAL
MANUAL: track
numbers are assigned manually by pressing
NEXT NEXT
NEXT NEXT
NEXT or
SKIP+SKIP+
SKIP+SKIP+
SKIP+. (Track numbers cannot be changed after
recording)
• If you connect microphone for recording, source of
input should be changed to ANALOG.
• For analog recording, you may need to listen to the
source material and adjust an optimum recording level
prior to recording.
• Finalized CD-RW discs play only on CD-RW
compatible CD players.
• CD SYNC is not applicable if external source is DVD
player.
• You can directly erase entire disc even if the disc is
not unfinalized. For erasing the last track or adding
more recordings on disc, you must have it unfinalized
first.
Page 14

More Special Functions
EN
13
Assigning Disc Titles
You can assign your discs with disc titles so
that they can be read everytime you load the
discs on the player.
2. Select alphabets &
symbols.
3. Confirm selection.
4. Repeat steps 2-3 for further input.
5. Confirm CD title.
1. Press and hold CD TITLE
until the first letter starts to
blink.
Storing Playback Programs
and Disc Titles
This feature allows playback programs to be
stored with disc titles and be reloaded for your
enjoyment.
1. Follow steps 1-7 in the section “Program” to create a playback program.
2. Follow steps 1-5 in the section “Assigning
Disc Titles” to create disc name. After
pressing OK, you will be asked to store
program (STORE PROG) with disc title.
1. Enter CD title mode.
3. Confirm storing program (or
STOP to quit).
6. After Disc title has been assisgned,
display will show alternately disc information and disc title in stop mode.
Editing Disc Titles
2.Repeat steps 2-5 in section “Assigning
Disc Titles” to edit disc titles.
O
K
SHIFT
0
CD TITLE
SHIFT
0
CD TITLE
SHIFT
0
CD TITLE
O
K
Notes on creating playback program for
storing:
• Tracks cannot be programmed more than
once within a playback program.
• Programmed tracks can only be on the same
disc only.
• Programmed tracks must be in ascending
order (e.g. 1,3,5,6,10 instead of 1,5,3,10,6)
• Track number greater than 30 cannot be
stored.
Tip on disc title:
• You can store at maximum 127 CD titles in
this unit.
Page 15

More Special Functions
EN
14
Recalling Playback
Programs and Disc Titles
1. Load disc with playback program & disc
title stored. Display shows program
information and disc title alternately.
2. Start program playback (or
STOP to quit for normal
playback).
Erasing Disc Titles
1. Press and hold CD TITLE
for about 3 seconds to enter
erasing mode.
2. Press repeatedly to select
ERASE ONE (current) or
ERASE ALL disc title(s)
3. Confirm erasing (or STOP to
quit). SURE ? shows on display if
you select ERASE ALL. Press OK
again to re-confirm erasing.
Erasure takes only a few seconds.
Note: Playback program will also be erased if you
have created one and perform the above steps.
Display Messages
A> = Tray A is selected.
B> = Tray B is selected.
BLANK DISC = Disc is empty.
CLOSE = Tray is closing.
NO DISC = No disc in current tray.
READ = Player is reading disc information.
OPEN = Tray is open.
PLEASE WAIT = Player is under initialization.
STANDBY = Unit is in standby (off) mode.
PLAY
O
K
SHIFT
0
CD TITLE
SHIFT
0
CD TITLE
Page 16

Problem
• System doesn’t turn on
• No Sound
• CD doesn’t play
• CD Sound Skips
• Remote Control won’t
work
• Cannot record
• Analog recording is
distorted
• PLEASE RESET shows on
display
• RECOVER shows on
display during recording
Possible Cause
• The power source is not
connected.
• Batteries are dead in the
remote control.
• There is no power at that
particular power outlet.
• Volume is not turned up at
the receiver.
• The connection is loosen or
wrong.
• Wrong mode is selected at the
receiver.
• There is no CD in the tray.
• The disc’s label does not face
up.
• PAUSE function is activated.
• CD is dirty.
• CD is warped, scratched or
cracked.
• There is shock or vibration
affecting the system.
• The system has not plugged
yet.
• The system has not turned on
yet.
• Batteries are dead.
• The remote control sensor
cannot sense the signal.
• You are too far away from the
remote control sensor.
• There are obstacles between
the remote control and the
system.
• CD-RW is not unfinalized.
• Recordable CD is not used.
• Disc is not an Audio one.
• Wrong input source chosen.
• Record level is too high
• System/ data error during
recording.
• Power failure or vigorous
vibration has occured. CD
recorder is trying to repair the
disc. (Note: this process will
take around 2 minutes)
Solution
• Fit the power plug and
plug it into power outlet
properly.
• Replace with fresh
batteries.
• Plug the system to
another power outlet.
• Adjust the volume level.
• Re-connect the wires
properly.
• Choose the correct mode
at the receiver.
• Load a CD.
• Turn the disc over.
• Deactivate the PAUSE
function.
• Clean the CD.
• Don’t play the CD as it
may damage the CD lens.
• Relocate the system to a
firm, level and stable
surface.
• Plug the system into a
working AC outlet.
• Press POWER to turn on
the system.
• Replace with fresh
batteries.
• Point the remote control
directly at the system.
• Move closer towards the
system.
• Remove the obstacles.
• Unfinalized CD-RW
• Use CD-R or CD-RW
• Use an appropriate disc.
• Select the correct input
source.
• Re-do recording at
optimum volume level.
• Turn off the unit and start
over again.
• If total disc recordable
time (eg. 74’30”) shows
on display, the disc cannot
be further recorded or
finalized. For CD-RW disc,
the track being recorded
is lost, but recording and
finalization is still
possible.
Troubleshooting
15
EN
Page 17

Cleaning the Exterior
Prior to cleaning the exterior, be sure to
unplug the power cord from the AC power
outlet. Wipe the exterior with a soft, clean,
and slightly water-dampened cloth.
CD Care
Handling CDs
• Always handle CDs by their edges or hold it
with your index finger in the hole and a
thumb at one edge. Do not put your finger
pads onto the signal (shiny) side of a disc.
• The label side of a disc should be left as is;
should not affix any adhesive tapes or labels,
not should there be any scratching or
damage done to it.
• Never use any damaged (such as cracked or
warped) discs as the system spins CDs at very
high speed.
Cleaning CDs
• CDs need to be cleaned regularly because
any dust or foreign particles may cause the
system to output poor sound quality. To
clean a CD, use a soft clean cloth to wipe
the CD from the hole (at the centre of the
disc) outwards to the disc’s edge.
• If a CD is particularly dirty, wet a soft cloth
in clean water, wring it out to rid the cloth
of excess water, gently wipe away the dirt.
Use another dry cloth to soak up remaining
water droplets.
• Cleaning liquids other than clean water can
damage a CD. Never use cleaning sprays,
antistatic agents, benzene, thinner, or any
other volatile solvents to clean CDs.
CD Lens Care
When your CD lens gets dirty it can also
cause the system to output poor sound
quality. To clean the lens you will need to
purchase a CD lens cleaner which can
maintain the output sound quality of your
system. For instructions on cleaning the CD
lens, refer to the ones accompanying the
lens cleaner.
Precautions
• Never open the cabinet under any
circumstances. Any repairs or internal
adjustments should be made only by a
trained technician.
Don’t Infringe
This product should only be used for the
purposes for which it is sold, that is,
entertainment, violating no copyright law.
Any attempts to use this product for which
it is not intended is unlawful and therefore
not condoned by Thomson Consumer
Electronics.
Discs for Recording
You can use the following types of discs for
recording with this unit:
Audio CD Recordable (Audio
CDR): You can record your own
disc content freely but cannot
make changes. When finalized,
these discs play on all CD players and
recorders.
Audio CD ReWritable (Audio CDRW): You can erase and record
disc content freely by
unfinalizing the disc. When
finalized, they play on CD-RW compatible
CD players and recorders only.
Discs with following logos cannot be used.
They are designed for use in computer CD-R
drive only.
Equipment Specifications
Power Supply: CDRW121- 120V~60Hz,
DAR2060 - 230V~50Hz
Unit Dimensions: (HxWxD in mm)
105x430x330
CD Player: frequency response 20Hz - 20kHz
More Information
16
EN
Recordable
ReWritable
Recordable
ReWritable
• Warning: Never operate this product with the
cabinet removed.
• Do not touch the CD player with wet hands. If
any liquid enters the unit, take the player to a
trained technician for inspection.
• The CD player of this unit uses a laser to read
the music on the disc. The laser mechanism
corresponds to the cartridge and stylus of a
record player.
Page 18

A
Accessories 2
ANALOG 3, 4, 5
Assigning disc title 13
AUTO/ MANUAL track numbering 4, 8
B
Batteries, inserting 2
C
CD-R & CD-RW 16
CD Care 16
CD, CDR 6
CD Lens Care 16
CD SYNC button 4, 5
CD TITLE button 4
Clearing program 9
CLOSE 4
Coaxial 3, 4, 5
Connections ( cables, power ) 3
Copyright 16
D
DJ 4, 8
Digital recording 11
Display 5, 6, 8
Display messages 14
Dual 4, 5, 6, 7
Dubbing 4, 5, 10
E
Editing disc title 13
Erase 6
Erasing disc title 14
Erasing recording 12
Equipment Specifications 16
External recording 11
F
Finalize 4, 5, 12
FORWARD 6
H
Help/ Demo 4
I
INTRO 6
Introductory play 7
L
LIVE 4, 9
Live dubbing 10
LIVE EFFECT 4, 8
Index
17
EN
Loading Discs 10
Location, choosing 2
M
Microphone 4
Microphone recording 11
Moisture 2
N
NEXT 4
Numerical keys 6
O
OK 4
OPEN 4, 14
Optical 3, 5
P
PAUSE 4
Phone 5
PLAY 4
POWER 4
PREV 4
Program 6, 9
Program recording 11
R
Random play 6, 7
Recalling playback programs and disc titles 14
Record Level 4
Repeat 5, 6, 8
S
SHIFT 6
SKIP 6
SOURCE 4
STOP 4
Storing playback programs and disc titles 13
Synchronized digital record 11
T
Troubleshooting 14
U
Unpack the system 2
Unfinialize 12
W
Warranty 16, 17
Page 19

RCA AUDIO SYSTEMS - LIMITED WARRANTY
What your warranty covers:
• Any defect in materials or workmanship.
For how long after your purchase:
• One year for labor and parts
• The warranty period for rental units begins with the first rental or 45 days from date of
shipment to the rental firm, whichever comes first.
What we will do:
• Pay any Authorized RCA Audio Service Center the labor charges to repair your unit.
• Pay any Authorized RCA Audio Service Center for the new or, at our option, refurbished
replacement parts required to repair your unit.
How you get service:
• Take your unit to any Authorized RCA Audio Service Center. To identify your nearest Authorized RCA Audio Service Center, ask your dealer, look in the Yellow Pages, or call 1-800-336-1900
(for Canada, call Canadian Customer Relations 1-800-522-0338).
• Show the Authorized Service Center Representative your evidence of purchase date or first
rental.
• Pick up your unit when repairs are completed.
What your warranty does not cover:
• Customer instruction. (Your Owner’s Manual clearly describes how to install, adjust, and
operate your unit. Any additional information should be obtained from your dealer.)
• Installation and related adjustments.
• Signal reception problems not caused by your unit.
• Damage from misuse or neglect.
• Cleaning of audio heads.
• Batteries.
• A unit that has been modified or incorporated into other products or is used for institutional
or other commercial purposes.
• A unit purchased or serviced outside the U.S.A.and Canada.
• Acts of God, such as but not limited to lightning damage.
Product Registration:
• Please complete and mail the Product Registration Card packed with your product. It will
make it easier to contact you should it ever be necessary. The return of the card is not required
for warranty coverage.
How State Law relates to warranty:
• This warranty gives you specific legal rights and you also may have other rights that vary from
state to state.
If you purchased your unit outside the United States and Canada:
• This warranty does not apply. Contact your dealer for warranty information.
Limited Warranty
18
EN
 Loading...