

Page 1

Digital
Camcorder
User's G ide
Changing Entertainment.
Page 2

Jmp@ ant Enf@rmat @n
WARNING
To reduce the
risk of fire or
electric shock, do
not expose this
product or AC
charger to rain or
moisture.
To reduce the risk of electric
shock, do not remove cover (or
RISK OF ELECTRIC SHOCK
DO NOT OPEN
This symbol indicates _1_
"dangerous voltage"
inside the product that
presents a risk of
electric shock or
personal injury.
CAUTION: To prevent electric shock, match wide blade of plug to wide
slot, fully insert.
ATTENTION: Pour _viter les chocs _lectriques, introduire la lame la
plus large de la fiche dans la borne correspondante de la prise et
pousser jusqu au fond.
To reduce risk of injury, charge only rechargeable batteries
recommended by the manufacturer for this product. Other types of
batteries may burst causing damage and personal injury.
If the AC adapter is misplaced or needs to be replaced, obtain the
same type of adapter from an RCA dealer.
I AUTION
back). No user serviceable parts
inside. Refer servicing to qualified
service personnel.
This symbol
indicates
important
instructions
accompanying
the product.
FCC Regulations state that unauthorized changes or modifications to
this equipment may void the user's authority to operate it.
Product Registration
Please fill out the product registration card and return it immediately. Returning
this card allows us to contact you if needed.
Keep your sales receipt for proof of purchase to obtain warranty parts and service
and attach it here. Record the serial number and model numbers located on the
bottom of the camcorden
Model No.
Serial No.
Purchase Date.
Purchased From.
Page 3

ble @f ¢@n ents
Chapter 1: Connections & Setup
Parts Checklist ...................................................................................................... 6
Buttons and Controls .......................................................................................... 7
Using Some Basic Controls .................................................................................. 9
POWER CAMERA-OFF-PLAY switch ............................................................. 9
Selecting the Camcorder Mode ................................................................... 9
DISPLAY ON/OFF Button ............................................................................. 10
CONTROL Dial ............................................................................................. 10
Using Optional Stereo Earphones ............................................................. 10
Getting Started .................................................................................................. 11
Unpack the Camcorder and Accessories .................................................... 11
Adjust the Hand Strap ................................................................................ 11
Attach the Lens Cap to the Camcorder ..................................................... 12
Attach a Power Supply ............................................................................... 12
Insert and Remove a Memory Card ........................................................... 13
Turn on Camcorder and Set to Full-Auto Mode ....................................... 14
Set the DSC MODE (DUALITAPEICARD) Switch to DUAL .......................... 14
Insert a Cassette Tape ................................................................................. 15
Use the LCD Monitor or Viewfinder to See What's Recording ................ 16
Start Recording ........................................................................................... 17
Play Your Taped Recording ........................................................................ 18
View Your Still Pictures ............................................................................... 18
Turn off the Camcorder .............................................................................. 18
Powering the Camcorder .................................................................................. 19
Attaching the Battery to the Camcorder .................................................. 19
Removing the Battery from the Camcorder ............................................. 19
Charging the Battery .................................................................................. 20
Battery Level Icon ....................................................................................... 21
Using the Power Supply ............................................................................. 22
Battery Care and Storage ........................................................................... 22
Using the Shoulder Strap .................................................................................. 24
Attaching the Lens Hood .................................................................................. 24
Install the Clock Lithium Cell ............................................................................ 2S
Set the Area, Date and Time ............................................................................. 26
Changing to the 24-hour Time Mode ....................................................... 27
Set Daylight Saving Time ........................................................................... 28
Displaying the Date and Time of Recording ............................................. 29
Set the Tape Recording Speed .......................................................................... 30
Chapter 2: Using the Monitors
Seeing What You Are Recording......................................................................32
(continued on the? nuxt paqu) 1
Page 4

bJe @f ¢@ntents
Using the LCD Monitor ............................................................................... 32
Using the Viewfinder ................................................................................. 34
On-Screen Icons ................................................................................................. 35
Using the Mode Screens ................................................................................... 42
Using the Menu Screen ..................................................................................... 43
Chapter 3: Recording
Recording Details ............................................................................................... 46
TAPE-CAMERA Mode-Recording on Tape ................................................ 46
DUAL-CAMERA Mode-Tape and Card Recording .................................... 47
CARD-CAMERA Mode-Recording on a Memory Card ............................. 48
Full-Auto Mode .................................................................................................. 49
Journalistic Shooting ......................................................................................... 49
Self-Recording .................................................................................................... 49
Quick Return ...................................................................................................... 50
Edit Search ......................................................................................................... 51
Gamma Brightness ............................................................................................ 52
Select the Audio Mode ...................................................................................... 53
Zooming ............................................................................................................. 54
Using the Zoom Buttons (W and T) ........................................................... 54
Optical Zooming ......................................................................................... 54
Digital Zoom ............................................................................................... 55
Macro Zooming .......................................................................................... 55
Digital Image Stabilization (DIS) ...................................................................... 56
Fading Scenes .................................................................................................... 57
Video Light ......................................................................................................... 58
Multiple-Strobe Recording ................................................................................ 60
Still Recording on Tape ...................................................................................... 62
Select Still-Recording Mode ....................................................................... 62
Time Code Display ............................................................................................. 64
Recording From an External Source ................................................................. 65
Turn ON the S-Video Input ......................................................................... 65
Connections ................................................................................................ 65
To Record From an External Source ........................................................... 66
Recording Tips ................................................................................................... 66
Chapter 4: Playback
Playback Options ............................................................................................... 68
Tape Playback Using the LCD Monitor ...................................................... 68
Playback Using the Viewfinder .................................................................. 69
2
Page 5

ble @f ¢@n ents
Playback Features .............................................................................................. 69
Still Playback ............................................................................................... 69
Shuttle Search ............................................................................................. 70
Gamma Playback ........................................................................................ 70
Multiple-Strobe Playback ........................................................................... 71
Playback Zoom ............................................................................................ 72
Digital Effect Playback ............................................................................... 73
Tape Playback Using Index Images ............................................................ 74
Dubbing Images from a Tape to a Card ........................................................... 78
Auto Capture Still Images ................................................................................. 79
To Capture Still Images ............................................................................... 79
Audio Dubbing Feature ..................................................................................... 80
............................................................................................................................ 81
Audio Playback Mode ....................................................................................... 82
Dubbing to Another Digital Video Camcorder ................................................ 83
Connecting to a TV (or VCR) with Audio/Video
(and/or S-VIDEO) Input Jacks............................................................................ 84
Playback on a TV (or VCR) with Audio/Video/S-Video
Input Jacks ........................................................................................... 85
Dubbing to a VCR ....................................................................................... 85
Chapter 5: Advanced Features
Using Mode and Menu Screens For Advanced Adjustments ......................... 88
Mode and Menu Screen Definitions ................................................................ 89
Advanced Features ............................................................................................ 97
Night Mode ................................................................................................. 97
Program AE ................................................................................................. 98
White Balance Adjustment ...................................................................... 100
Exposure Control ...................................................................................... 102
Gain Control .............................................................................................. 103
Shutter Speed Control .............................................................................. 104
Auto and Manual Focus ........................................................................... 106
Digital Picture Effects ............................................................................... 108
Wide Mode (16:9) ..................................................................................... 109
Using the Zoom Microphone ................................................................... 110
Dialog Recording ...................................................................................... 112
Wind Cut ................................................................................................... 113
World Clock ............................................................................................... 114
Setting the Confirmation Sound ............................................................. 116
Demonstration Mode ............................................................................... 117
Using the LCD Monitor as a Remote Control ................................................ 118
(conti_wd on the? _ext /)age) 3
Page 6

bJe @f ¢@ntents
Chapter 6: Digital Still Camera
Card Recording ................................................................................................ 122
Select Picture Quality and Image Size ..................................................... 123
Select Image Size ...................................................................................... 124
Recording with a Guide Frame ................................................................ 125
Recording with the Self Timer ................................................................. 126
Formatting a Card .................................................................................... 127
Card Playback ................................................................................................... 128
Delete Protection ...................................................................................... 129
Deleting Stored Images ............................................................................ 130
Slide Show Playback ................................................................................. 132
Dubbing Images from a Card to a Tape .................................................. 134
Chapter 7: Viewing and Downloading
System Requirements for PhotoStudio 2000® .............................................. 136
Loading PhotoStudio 2000 .............................................................................. 137
How to Handle a CD-ROM ....................................................................... 137
Attaching the External Card Reader to Your Computer ........................ 138
Downloading Still Images to Your Computer ......................................... 140
Changing the JPEG Default ...................................................................... 142
Connecting to a Computer Using an Optional DV Cable ....................... 143
Chapter 8: Other Information
Troubleshooting ............................................................................................... 146
Final Notes ....................................................................................................... 150
Care and Cleaning ........................................................................................... 156
After Using the Camcorder ...................................................................... 156
Cleaning The Camcorder .......................................................................... 156
Dirty Video Heads ..................................................................................... 157
Proper Care and Storage .......................................................................... 158
Tape Care and Storage ............................................................................. 158
Things to Avoid ......................................................................................... 159
Traveling Tips ............................................................................................ 159
Specifications ................................................................................................... 160
RCA Digital Camcorder Limited Warranty ..................................................... 162
FCCDeclaration of Conformity and Industry Canada Information .............. 166
Optional Accessories ....................................................................................... 167
Accessories Order Form ............................................................................ 169
Index ................................................................................................................. 173
4
Page 7

Chapter 1
Connections & Setup
Chapter Overview:
• Parts Checklist
• Buttons and Controls
• Getting Started
• Powering the Camcorder
• Using the Shoulder Strap
• Attaching the Lens Hood
• Setting the Date and Time
• Setting the Tape Recording Speed
Changing Entertainment. Again.
5
Page 8

¢@nnec @ns Setup
Parts Checklist
M_Lk__ sure the box includes the items shown here:
Battery pack AC adapter/ Power cord for
Camcorder
CR2025 type Power connector Audio/Video/ Detachable LCD cable
lithium cell Part # 254335 S-video cable Part # 254337
Part # 252762 battery charger adapter/charger
Part # 252767 Part # 254598
Part # 254336
Lens hood Lens Cap Shoulder strap Video light
Part # 254415 Part #254233 Part # 254338 Part # 253402
Zoom microphone 16MB
Part # 254414 MultiMediaCard
Part # 254416
Card Reader/Writer
Part # 254417
Imaging software and
driver CD-ROMs (2)
<3
Ferrite Cores Cleaning Cloth
Caution: Only use the power supply provided with this unit. Using other power
supplies may damage the unit.
6 Chapte_
Page 9

Buttons and Controls
STILL
button
¢@nnec_@ns _ Setup
NIGHT MODE
"OFF/ON switch
Terminal
Audio/Video and
DV terminals
UNLOCK
buHon
Manual focus ring
RECSTART/STOP
bu_on
shoe
Microphone
Hand
strap
Zoom (W/T) and Volume
buttons (VOL +/-)
PHONES jack
POWER
CAMERA/OFF/PLAY
switch
FOCUS switch
AUTO/MANU/PUSH AUTO
DSC MODE
DUAL/TAPE/CARD
switch
CONTROL dial
Chapter _ 7
Page 10

¢@nnec @ns Setup
AUTO/MANUAUMANUAL LOCK switch
DISPLAY ON/OFF
button
POWER ON/OFF
button
LCD monitor
Card slot cover
Lithium battery
holder
card slot cover)
Viewfinder
focus
control
Shoulder strap
loop
LCD monitor
OPEN release
button
Card slot
CARD OPEN
button
TAPE OPEN
switch
Tripod
Camcorder Bottom View
8 Chap[e_
Page 11

¢@nnec @ns Setup
Using Some Basic Controls
Some of the camco1"der's basic controls are described h_'1"_'.
POWER CAMERA-OFF-PLAY switch
To turn the power on, hold down the Lock button
and set the POWER switch to CAMERA or PLAY_
To turn the power off set the POWER switch to OFF
without pressing the Lock button.
Lock
bu_on
DSCMODE
switch
Lock
button
POWER switch
POWER switch
Selecting the Camcorder Mode
This camcorder can be used as a vide{) CalTtera for
recoiling and playing back vide{) on tape or as a
digitaI stitl camera that records and plays back still
ilTtages on a ITtelTtOry card.
The DSC MODE ('IAPEiI)UALiCARD) switch along
with the POWER (CAMERA/PLAY/OFF) switch tells
the camcorder what you want it to do.
DSC MODE switch in "rAPE and POWER
switch in CAMERA: Use to record moving
video and still images on a tape.
DSC MODE switch in DUAL and POWER
switch in CAMERA: Use this mode to record
both moving video and still images on the tape
and still digital pictures on the memo W card.
DSC MODE switch in CARD and POWER
switch in CAMERA: Use this mode to record
still digital pictures on the memo W card.
DSC MODE switch in "rAPE (or DUAL) mid
POWER switch in PLAY: Use this mode to
playback moving video on a tap(,.
DSC MODE switch in CARD and POWER
switch in PLAY: Use this mode fi)r playback of
still images recorded on the memo W card.
Caution:
Do not switch the DSC MODE switch
during playback or recording, as this may
cause damage to the tape or card.
Chapter _ 9
Page 12

¢@nnec i@ns Setup
DISPLAY ON/OFF Viewfinder
CONTROL dial
DISPLAY ON/OFF Button
The DISPLAY ON/OFF button is used to turn tile
mode screens and on screen indicators on and off
in the viewfinder and LCD monitor.
Press the DISPLAY ON/OFF button to turn the
clisplays on or off.
CONTROL Dial
The CONTROL dial is used to adjust the settings on
the mode and menu screens in the viewfinder and/
or LCI) monitor. ['hese settings can also be adjusted
using the touch screen method on the LCI)
monitor.
The instructions for adjusting mode and menu
settings in this manual use the _)uch_screen
method.
To adjust the menu settings with the
CON ['ROL dial, f\)Ilow the rules below. This
method lets you adjust settings using only the
viewfinder.
1. Rotate tile CONTROL dial to highlight the
desired item.
2. Press the CONTROL dial in to select the
highlighted item.
VOL +/- buttons
PHONES jack
Open the jack cover,
and connect stereo
earphones with a 3.5
mm plug to the
PHONES jack.
Using Optional Stereo Earphones
You can ITIonitor tile sound using optional stere()
earphones during recording or playing back tapes.
Befi)re connecting stereo earphones, turn the
camcorder volume down to the lowest setting.
The built in speaker automatically turns off
xvhc_n s[_rcx) _arphonc_s arc _ connc_ctc_d It) the
PHONES jack.
When recording, you cannot adjust the volume
with the VOL. +/- bu_)ns.
10 Chapte_
Page 13

¢@nnec @ns Setup
Getting Started
This s_,ction c]_'scrib_'s the' basics on how to s_,t up your camcord_'r to r_'cord f_)r the"
first tim_'. Ref_,r to the olh_'r s_'ctions for cletai]_'d opt'ration and f'_'atul-_" options.
Unpack the Camcorder and Accessories
• The' it,'ms shown in l)arta _Chc,_ldL_t ;u_" pack_'d with the' camcorch'r. If"any pi_'c_'s
are missing or app_'ar damaged contact your ch'a]_'r immediately.
• R_'mov_" the' plastic f'ih_a that cov_'rs the' f)'ont and sich" Iogos on the" camcorch'r.
Us_" your f'ing_,rnai], not anything sharp to r_'move.
• Say+" all packing mat+'ria]s and box in cas+" th<' camcord+'r +'v+'r n+'_,ds to b+"
shipp_'d or stor_'d.
Adjust the Hand Strap
1. Lif_ the flap on the" hand strap and s_'parate the" X/elcro strip.
2. Insert your hand so your fingers can comf\)rtably reach the buttons.
3. Adjust the strap to fit snugly.
4. Refasten the strap, and R)ld the flap back down.
Chapter _ 11
Page 14

¢@nnec_i@ns _ Setup
Attach the Lens Cap to the Camcorder
1.
To prevent losing the lens cap, attach the
string to the camcorder as".%t?olgt?and
attach the lens cap to the clip on the
handstrap during recording.
2.
When you are finished recording, press in
the sides of the lens cap and place it over
the lens of the camcorder.
Attach a Power Supply
Since" the" battci T must [)_, charged b_,f\)r_" it can I)_" clsed the" first tim_', you n_,_'d to else an
AC outh't to pow_'r the" camcordor.
®
Power
connector
POWER switch
DC OUT jack
Power
cord
1. Place the POWER switch to the OFF position.
2. Pull out the viewfinder completely and lift up.
3. Align the refi'rence mark on the power connector with the mark on the camcorder.
Hold the top of the power connector flush against the camcorder, and press the
bottom of the power connector in and slide it down until it locks into place.
4. Connect the power connector's small plug with the arrow facing up into the DC
O[]T jack on the adapter/charger.
5. Connect the power cord to the adapter/charger, and insert the power cord's plug
into a working AC outlet.
12 Cl'_ap_eg
Page 15
¢@nnec @ns Setup
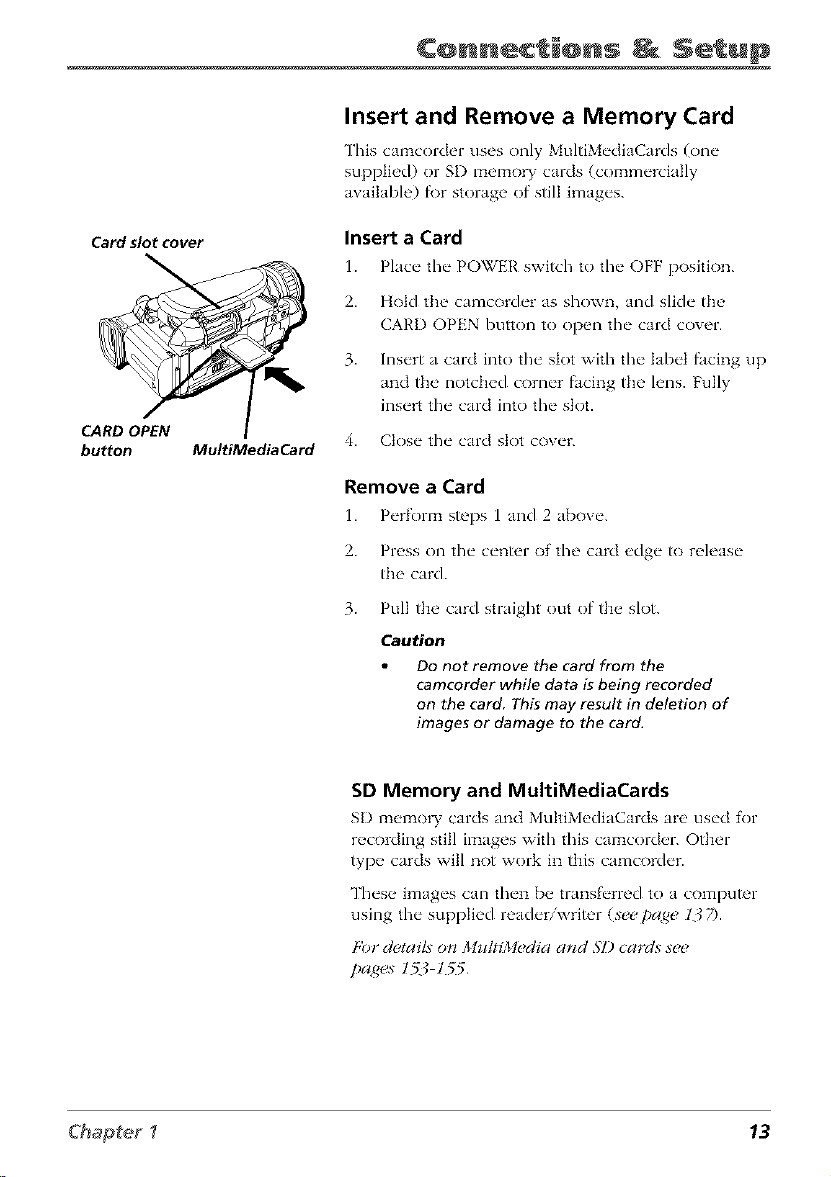
Insert and Remove a Memory Card
This camcorder uses only MultiMediaCards (one
supplied) or SD memory cards (commercially
available) fi)r storage of still images.
Card slot cover
CARD OPEN
button MultiMediaCard
Insert a Card
1.
Place" the" POWER switch to the" OFF position.
2.
Hold the camcorder as shown, and slide the
CARD OPEN button to open the card cover.
3.
Insert a card into the slot with the label facing up
and the notched corner facing the lens. Fully
insert the card into the slot.
4. Close the card slot cover.
Remove a Card
1. P_'rform steps 1 and 2 ab()v_'.
2. Press on the center of the card edge to release
the card.
3. Pull the card straight out of the slot.
Caution
Do not remove the card from the
camcorder while data isbeing recorded
on the card This may result in deletion of
images or damage to the card.
SD Memory and MultiMediaCards
SD memo W cards and MultiMediaCards are used for
recording still images with this camcorder. Other
type cards will not work in this camcorder.
These images can then be transf_'rred to a computer
using the supplied readeriwrimr (see page 13 7).
[,i)*"&¢tai£ on MultiM_¢diaand M) cards st¢t¢
pages 1_ 1_5
Chapter _ 13
Page 16

¢@nnec @ns Setup
Set the DSC MODE (DUAL/TAPE/
CARD) Switch to DUAL
The' cmqnc'order operates as both n \qdeo c'mqncra f_)r
recording on tap_" and a digital cam_,ra for recording
still pictures.
Lock
button DSC MODE
Lock
button POWER switch
FOCUS
switch
LCD monitor AUTO/
switch
Turn on Camcorder and Set to Full-
Auto Mode
1. Press in the Lock button and set the POWER
2. Set the AU ['O/MANUAL/MANUAL LOCK switch
3. S_,t the FOCUS switch to AU['O to have the
MANUAL/
MANUAL
LOCK switch
Caution: Do not change the DSC MODE
during recording or playback as it may cause
damage to your tape or memory card.
Set the, DSC MODE switch to DUAL to record
both video on tap_, and still pictures on the
MultiMediaCard.
Set the DSC MODE switch to 'IAPE to record
vide() on tape.
switch to the CAMERA position. The camcorder
enters the record stand,by mode.
Note: The camcorder automatically turns off
to save battery power if you leave it in record-
standby mode for more than five minutes. To
turn it back on, set the Power switch to OFF.
Press in fhe Lock button and set fhe POWER
switch to CAMERA.
to AUTO to have the camcorder automatically
select the best settings for your recording. AITFO
appears in the viewfinder or in the LCI) monitor.
Note: Any manual setting is cancelled,
camcorder automatically focus for you.
14 Chapte_
Page 17

Mini_'NTSC
Mini DV Cassettes
This camcorder is designed to
work exclusively with digital
video cassettes. Only cassettes
marked with a Mini DV logo can
be used with this unit. Also keep
in mind that this camcorder is not
compatible with ()tiler digital
media tape formats.
Cassette
Cassette holder Erase
compartment Protection
door_
PUSH
here to Mini DV
close tape TAPE OPEN
the switch
cassette
holder.
¢@nnec @ns Setup
Insert a Cassette Tape
1. Make sure the camcorder is conn_,cted to a
power supply.
2. Press in the Lock button and set the POWER
switch to tile CAMERA positkm.
3. Hold the camcorder as shown. Slide and hold
the [APE OPEN switch in tile directkm of the
arrow and open tile cassette compartlTtent door
completely.
Important: The cassette holder extends and
opens automatically. Do not open or close the
cassette compartment door while the holder
is opening.
Be careful not to touch the inside of the
cassette holder as you may hurt yourself.
4. Fully insert a Mini I)V tape with the tape
window facing up and the Erase Protection tab
facing out.
Note: Make sure the Erase Protection tab is in
the position that allows recording. If not,
slide the tab. Some tapes have removable
tabs. If the tab has been removed, cover the
hole with adhesive tape
5. Gently push on the area mark_,d PISH until the
cassette holder locks into place.
Important: The cassette holder retracts
automatically. Wait until it is completely
retracted before closing the cassette holder
COVet;
6. To dose the cow, r press the center of the cow'r
until it locks into place.
Important: If the battery is low, you may not
be able to close the cassette holder cove_ Do
not apply force. Replace the battery with a
fully charged one or connect the power
supply.
Notes:
You can't open the cassette tape holder
unless a power supply is attached.
The cassette tape holder can't be opened
while the camcorder is in the record
mode
Chapter _ 15
Page 18

¢@nnec_i@ns _ Setup
Use the LCD Monitor or Viewfinder
to See What's Recording
Using the LCD Monitor
1. Remove the h'ns cap.
2. Slide the OPEN button in the direction of the
3. You can tilt the monitor up to 180 fi)r
4. The brightness of the LCI) monitor can be
LCD monitor OPEN
button
arrow and open the LCD monitor 90.
convenient viewing while recording.
adiusted clsing the on screen menus
(see page 33).
Notes:
Adjusting the monitor brightness does
not affect the recorded image on the
tape.
When the monitor is open, the
viewfinder automatically turns of_
When the monitor is closed, the
viewfinder automatically turns on,
If the vertical rotation of the monitor is
between 135_and 180°when in one of
the CAMERA modes, both the monitor
and viewfinder are on.
Viewfinder
Eyepiece focus
control on
bottom of
viewfinder
Using the Viewfinder
1. Remove the h'ns cap.
2. Close the moniR)r.
Note: If the monitor is open, the viewfinder
turns off.
3. Pull the viewfinder completely out and lift it
tip.
4. Ad}ust the viewfinder to a comR)rtable viewing
position.
5. Slide the eyepiece R_cus control to adjust the
focus of the viewfinder for your vision.
16 Chap[e_
Page 19

¢@nnec @ns Setup
STILL
button
RECSTART/
STOP button p_
LCD monitor AUTO/
DSC MODE
switch
Lock WER
button switch
MANUAL/
MANUAL
LOCK switch
Start Recording
1. R_'move the" k'ns cap, and ()p_ql the" LCD
monitor.
2.
Make sure you have ilasertd a cassette for video
recording and/or a memo W card f\)r recording
still pictures.
Place tim AU ['OiMANUAL/MAN/JAL LOCK
3.
switch to the A/Yl'O position.
4.
Place the FOCUS switch to the AUI'O position.
5.
Place tim I)SC MODE switch to the I)UAL
position.
6.
Press in the Lock button and set the POWER
switch to the CAMERA position.
7.
Record video on tape or a still picture on the
memol T card.
Record Video on the Tape
• Press and release the REC STAR'IVSTOP button
to start and stop recording on the tape.
• RE(2 appears in tim viewfinder or LCI) monitor
while the camcorder is recording (but wont be
recorded on the tape).
• When you are not recording, the camcorder
enters the record pause mode and I)AUSP2
appears in the viewfinder or on the LCD
monitor.
Record a Still Picture on the Memory Card
• Place the camcorder in record pause mode
(IMUSP2appears in the viewfinder or on the
LCD monitor).
• Use the power Zoom WYI"buttons to f)ame
your subject.
• Press the S ['ILL button to record a still picture
on the memo W card. RE(]OI¢I)I3i(; '/()
MEMORY (2AA'Dappears in the viewfinder or
on the LCI) monitor.
Chapter _ 17
Page 20

¢@nnec_i@ns _ Setup
VOL +/- DSC MODE
buttons switch
t_
button POWER
]_
fIpLAYSACK 100-0000
switch
44
i
fin [] []'A°E'2
Play Your Taped Recording
1. S_'t tJ]__ I)SC MOI)E switch to [APE.
2. Pr_'ss in the" Lock button and set tl]_" POWER
switch to the" PLAY position.
3. ToucIl REWor H,'on d_ >LCD monffor/o r_'wind
or fast fol_vard the tap_ to the, desir_'d point.
4. Touch IqAY/S77LL to bvgin playback.
5. Touch 57Dl_when finished playing fl/v tapv.
Notes:
Sound will play back if the LCD monitor
is open or closed. To adjust the volume,
use the Zoom WtT buttons (also labeled
VOL +1-).
More information about using the LCD
monitor and viewfinder can be found on
pages 32-34
View Your Still Pictures
i. S_'t the, I)SC MOI)E switch to CAI,'I).
2.
Press in the Lock button and set the PO_TER
switch to the ¸PLAY position.
3.
If the image you want to see does not appear on
the monitor, touch _ or Ib to search through
the thumbnail images.
4.
When you see the image yotl want tO display,
highlighted, touch it once to display it full
SCr_2(2n.
Turn off the Camcorder
i. S_'t th_ _] O_ER swffd/ to OFF.
2. C}os_" the LCD monitor and replace t]/_" k'ns cap.
18 Chapfeg
• s
Page 21

¢@nnec_@ns _ Setup
Powering the Camcorder
You can power your camcorder with a battel T or the AC adapter/charger. The battel T must
be charged as d_scrih_,d oH the _xtpa<_ebefore ii can be used _) power the camcorder.
Attaching the Battery to the
Camcorder
Make" sur_" the POWER switch is set to OFR
2.
Pull th_ _ vi_'wfinch'r all the" way out and lift it up.
3.
Align the _ mark on the side of the batte W to
the _ on the camcorder.
4. Press the battery in and slide it down until it
locks into place.
Cautions:
Always stop recording or playback and
place POWER switch in OFF before
attaching or removing the batter_
Removing the battery while the
camcorder is recording or playing back
may cause damage to the tape or card.
Remove the battery if the camcorder will
not be used for a long period of time.
UNLOCK
button
Use only the recommended batteries for
this camcorde_ Use of other batteries
may present a risk of fire or explosion
Removing the Battery from the
Camcorder
1. Make sure the POWER switch is set to OFR
2.
Pull the viewfinder all the way out and lift it up.
3.
Press and hold the I NLOCK button in the
direction of the arrow and slide the batte W up
and relTtOVe it.
Chapter _ 19
Page 22

¢@nnec @ns Setup
Charging the Battery
I. Remove the pow_'r connectors cane from the
2.
• " " "tor
CHARGE POWER
3.
4. The CHARGE indicator will turn off wimn the
5. Slide tim battery pack out of the adapter charger
Notes:
AC adapter/charger if attached.
Connect tim supplied power cord to the AC
power socket on the AC adapter/charger and
insert the AC plug into a working AC outlet. The
POWER indicator lights.
Align the ref_'rence mark on the battery with the
mark on the adapter/charger. Slide the batte W
into the groove until it locks into place. The
CHARGE indicator lights.
battery is fully charged. Unplug the power
supply from the AC outlet.
and remow' it.
Tip
Before extended use, it is
recommended that you prepare
enough battery packs to cover 3
times the planned shooting time.
If a protective cap is on the battery, remove
it before use or charging.
When charging a battery for the first time or
after a long storage period, the CHARGE
indicator may not come on. Remove the
battery and try again.
Charge the battery in temperatures between
50° and 90° Fahrenheit (10-35° Celsius).
Charging times are based on a fully
discharged battery and vary depending on
temperature and battery conditions.
If you store a partially charged battery for a
long period of time, its performance is
reduced.
Charging and discharging isn't possible if the
wrong type of battery is used.
If the battery operation time remains
extremely short even after having been fully
charged, the battery may be worn out and
needs to be replaced.
20 Chap_e_
Page 23

Approximate Charging Time
Battery Charging Time
252762 approx. 100 rain.
252763 approx. 160 min
Approximate Recording Time (in Minutes)
¢@nnec @ns Setup
Battery Viewf_lderOn
252762 110
252763 220
Note: Recording time is reduced significantly when you use the
zoom or record-standby modes or LCD monitor repeatedl_
[_] AUTO
3lit,in
Battery
level icon
(_ (Green)
#
4" (Green) ]
(Red)
Battery Level Icon
The batte W level icon appears in the viewfinder or
LCI) monitor and shows the amount of power left in
the recbargeable batte W. While using the LCI)
monitor, touch any part of the monitor to display the
indicator.
When the battery power becomes ve W low, a
warning indicator will appear. Replace the batte D'
pack.
LCD Monitor On
90
180
Notes:
The battery level icon is not recorded on
the tape.
The remaining battery indicator is only
an approximation of actual time left.
Use of the Zoom WiT buttons during low
power conditions may cause the
camcorder to suddenly shut off.
Chapter _ 21
Page 24
¢@nnec_@ns _ Setup
Battery Care and Storage
After repeated charging and use, battel T life gradually decreases. Wh_'n opt, ration
time is too short to be useful, the battel T should be replaced.
If the batte W pack becomes too hot, remove it from the camcorder and let it coot
down.
Do not short the battel)"s terminals.
Do not attempt to disassembh" or modif_y ' the barrel)'. ']'here are no user_serviceable
parts inside.
/se the batte_ T only with specified adapter/chargers and camcorders.
Throwing the battel T into a fire or exposing it to excessive heat over 149F (65C)
could be hazardous.
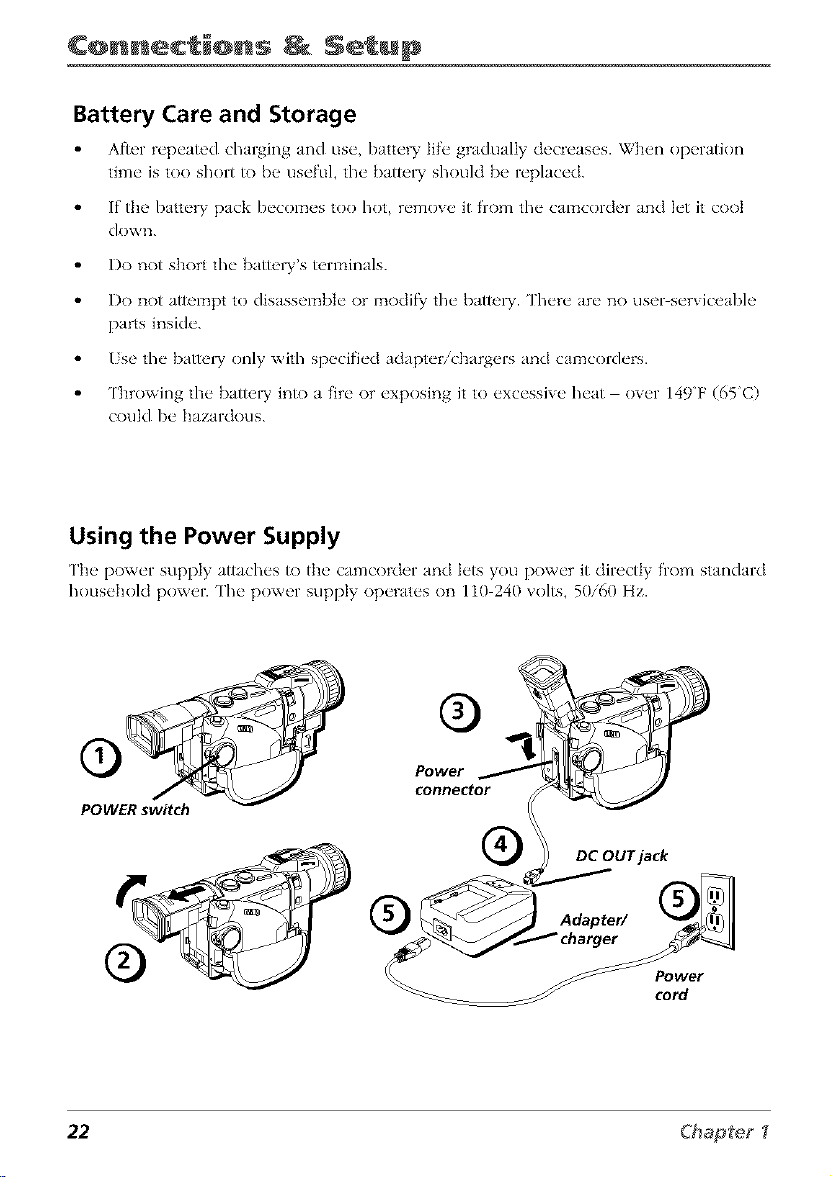
Using the Power Supply
['h_" power supply attaches to the' c tmcorder and h'ts you power it directly from standard
household power. The power supply operates on 110 240 xolts, 50/60 Hz.
Power
connector
POWER switch
DC OUT jack
Power
cord
22 Chap_e_
Page 25

¢@nnec @ns Setup
1. Place the POWER switch to the OFF position.
2. Pull out the viewfinder completely and liR up.
3. Align the refl'rence mark on tim power connector with tim mark on tim camcorder.
Hold the top of tim power connector flush against tim camcorder, and press the
bottom of the power connector in and slide it down until it locks into place.
4. Connect tim power connector's small plug with the arrow facing up into the DC OUP
jack on tim adapter/charger.
5. Connect tim power cord to the adapter/charger, and insert the power cord's plug
into a working AC outlet.
Caution: Only use the power supply provided with this unit. Using other power
supplies may damage the unit.
Removing the Power Supply
1. Mal<__ sure the" POWER switch is set to OFF.
2. Pull tt_ _ vit'wfindt'r all tht" way out and lift it up.
3. Pwss and hold tt_' I NLOCK button in the" ciirection of the arrow and wmow" the
po_,ver conn/_ctor.
Caution: Always stop recording or playback and place POWER switch in OFF before
attaching or removing the battery. Removing the battery while the camcorder is
recording or playing back may cause damage to the tape or card.
Using an Optional Plug Adapter in Foreign Countries
An optional plug adaptor might I)__ r('quirod in sore(" countri('s.
AC Plug Adapter
1. Plug tim power supply's plug into the AC plug aclapter.
2. Plug the AC plug adapter into the AC outlet.
Chapter _ 23
Page 26

¢@nnec @ns Setup
Using the Shoulder Strap
['h_' camcorder's shoulder strap is design_,d to let you carl T the camcorder from your
shoulder and when ready bring the camcorder to shooting position in one quick
1. Following the illustration, thread the strap through the eyelet.
2. Fold tile strap back and thread it througll the buckle.
3. Repeat the procedure to attach the other end of the strap to the other eyelet located
under the hand strap. Make sure the strap is not twisted.
Caution: When carrying the camcorder with the shoulder strap, you should close the
LCD monitor and rotate the viewfinder down and slide it in. This helps prevent
possible damage to the monitor or viewfinder from bumping against your body as you
move. Make sure the shoulder strap isfirmly attached before using it to carry the
camcorder.
Attaching the Lens Hood
When recording outdoors on a sunny day or in a location with bright lighting attach the
supplied h'ns hood to the camcorder.
Turn the lens hood in the direction of the
arrow to attach it.
To remove the lens hood, turn it in the
opposite directkm
Notes:
The lens cap can still be attached on top
of the lens hood
Filters and other accessories cannot be
attached on fop of the lens hood,
24 Chapfef
Page 27

¢@nnec @ns Setup
Install the Clock Lithium Cell
The supplied lithium cell must be installed f\)r the camcorder to remember the date and
time settings.
1. Slide the CARD OPEN button in the direction of
Card slot cover
CARD OPEN Lithium cell 4. Insert the cell holder back into the compartment.
button holder
the arro\v to open the card SlOt cover.
2. Pull out the cell bolder using the tip of a
ballpoint pen or other pointed object.
3. Insert the lithium ceil into the cell holder with
the + side of the ceil facing the + side of the
holder.
5. Close the card slot cover.
To Remove the Clock Lithium Cell
Peribrm steps 1 and 2 above, and Iili out the lithium
cell fiom the cell holder.
Notes."
Set the date and time after inserting a
lithium cell Not setting the date and
time causes extra wear on the lithium
cell
Replace the cell with a new CR2025
lithium cell when the time display starts
to fall behind the correct time.
Important: Lithium cell battery. Replace only with 3-volt lithium cell-such as
CR2025, Use of other cell presents a risk of fire or explosion, Must be disposed of
properly, Never handle punctured or leaking cell May cause burns or personal
injury.
Keep out of the hands of children. Can cause death or injury if swallowed, If
swallowed, consult a physician immediately for emergency treatment.
The Lithium cell used in this device may explode resulting in a fire or chemical burn
if mistreated Do not recharge, disassemble, heat above 212W (100"C), or
incinerate.
Never use metallic tweezers to hold the cell, and never short circuit the + and -
sides of the cell
Chapter _ 25
Page 28

¢@nnec @ns Setup
Set the Area, Date and Time
The date and time must be set before it can be
displayed. Set the clock for your standard time and
use the daylight saving f_'amre desc,'_i&_don pa_e 2,8'
to set daylight savings time.
Date and time information is ahvays recorded. ['he
Lock
button POWERswitch
display can be _lrned on or off during playback or
recording.
1. Press in the Lock button and set the POWER
2. Press the LCI) monitor OPEN button and open
3. Touch any point on the LCI) screen to display
switch to CAMERA.
the LCI) monitor.
the l/2 screen.
OPEN button
[_ AUTO
i,
_21t NEW YORK
ii DYLT SAVE
SETI ING
12H/24H
0 ISPLAY
IIETURH
4. Touch l/2to display the 2/2screen.
5. Touch J/llZ3iUto display the menu screen.
6. Touch ,I or t to select (D and then touch SHT
to display the (_ZOCK SHTmenu.
Note: If the date and time have been set, the
MANUAL SET menu appears
7. Touch ,I or t to select AI,'t_ and then touch
51"]7:
Touch ,I ori until your area appears (for
example, 20 XI!'W YORK if you live in New
York), and then touch .flY/'
Note:
See Time Zone Chart and Area Table on
pages ! 14-1 15 for the area number and
name of the representative city for your
time zone,
26 Chap{eg
Page 29
AREA
12N/24H 12:0SAM
RETURN
¢@nnec_@ns _ Setup
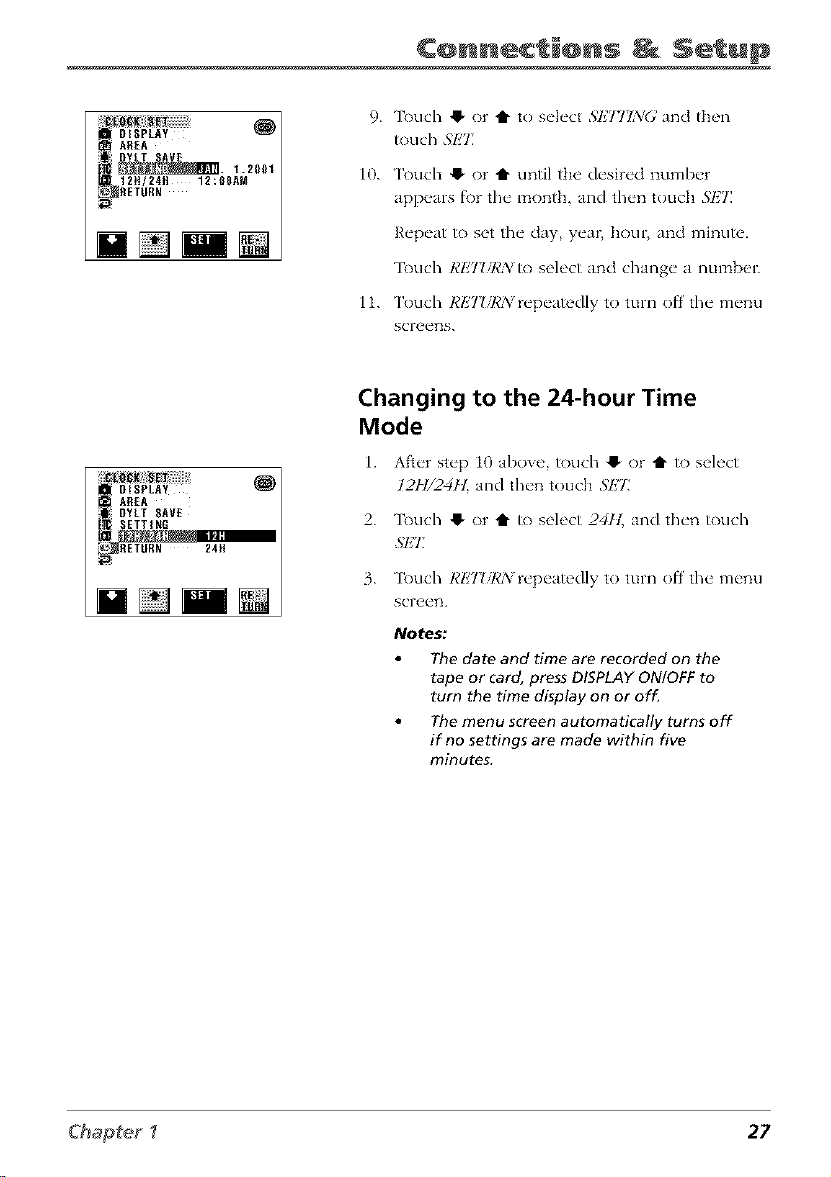
9. ]linch 0 or t to select $1,7771NG and then
_)uch .';I_'T
10. T_)uch O or t until the desired number
appears for the month, and then touch S]_7_
NN N
[ OtSPLAY
AREA
DYLT SAVE
ETTINR
RETURN 24ff
Repeat _) set the day, yea_ hour, and minute.
3buch RET_/R/V to select and change a numben
11. T_uch RETUR/vrepeatedly to turn offthe menu
screens.
Changing to the 24-hour Time
Mode
1. Afker step i0 aboxe, touch O or t1" to select
12H/24H and then touch ,'_k'T
2. 3_)uch @ or t1" to select 2411_ and then touch
3. 3_xlch RI_'7_sRN repeatedly to turn off the menu
screen.
Notes:
The date and time are recorded on the
tape or card, press DISPLAY ON!OFF to
turn the time display on or of_
The menu screen automatically turns off
if no settings are made within five
minutes.
Chapter _ 27
Page 30

¢@nne¢ i@ns Setup
Set Daylight Saving Time
P_'rfi)rm t];_"proc_'dml_"I)_'|ow to advance the" clock
of the camcord_'r one" hour fi)r daylight saving tim__.
1. Press in the Lock button and s_'t the POWER
2. Press the LCI) monitor OPEN button and open
Lock
button POWER switch
3. ['ouch any point on the LCI) screen to display
4. 'lkxlch l/2to display the 2/2 screen.
switch to CAMERA.
the LCI) monitor.
the l/2 screen.
[_]AUTO IO:30AM
3Bmin
DISPLAY
t AREA
:SETTING ON
:12H124H
_RETURH
[]
JUH. 2.2002
Daylight Savings
indicator
5. 'lkxlch MkWUto display the Menu screen.
6. 'lk)uch !1. or tl- to select (_) and then touch SET
to display the CZO(2KSETmenu.
7. 'lk)uch !1. or tl- to select DFLTSAVk'. and then
touch 3'1£T.
8. ['ouch !1. or tl- to select O2vand then touch
S/HJ
• The time automatically changes to daylight
saxings time.
• The daylight saxings indicator appears with
the time display.
9.
['ouch I,'I'22URA_repeatedly until the menu
screen tLII'I3S off.
To Reset to Standard Time
P_'rf_)rm st_'ps t through 8 abo_ _', and s_'k'ct
28 Ck_apte_
Page 31

JUN 2.2_Q2
10:30AM
¢@nnec @ns Setup
Displaying the Date and Time of
Recording
Follow the procedure below to display the date
or dat_, and time. You can display the date and
time during both recording and playback. ['he
dock cell must be installed and the time and
date set bel"ore you can display and record
them (see pa_es 252(5).
1. Follow steps 1 through 6 under ,',_,t
l)aFl{ght 5az DTg7Dne.
2. 'lk)uch 41- or t1" to select l)lSYlAYand
touch SI,_'I:
3. 'lk)uch !_ or t1"to select I)A'II,_
IrATE+TIME, or OET:and touch SET.
• Select Z)ATt,:to display and record the
date.
• Select I)A7E'+TIMI!to display and record
the date and time.
• Select OETqo turn ()If'the date and time
display. It will not be recorded.
4.
'lk)uch Rl,_T!/RNuntil the menu screen turns
I
off. The da_ or da_ and time are
displayed.
Notes."
Before recording, make sure that
the date and time have been
correctly set (see pages 26 and 27).
If they have not been set, the
display will be left blank when
playing back the recording. The
display will also be left blank for
unrecorded or damaged portions
of the tape.
In TAPE-PLAY mode, the current
date and time are displayed when
the tape is not being played back.
Chapter _ 29
Page 32

¢@nnec @ns Setup
DSC MODE
switch
Lock
button POWER switch
i PHOTO SNAP
!_ _ ULT[ FRAME
m16:9 LP
_RETURN
Set the Tape Recording Speed
You can select the LP tape recording speed and
record for approximately 50 percent more recording
time with the same picture quality as the SP
recording speed.
1. Place the I)SC MODE switch to the DIAL or
TAPE position.
2. Press in the Lock button and set the POWER
switch to CAMERA.
3. Press the LCI) monitor OPEN button and open
the LCI) monitor.
4.
Touch any point on the LCI) screen to display
the l/2 screen. Toudl l/2to display the 2/2
screen. 'lk)uch MkWl/to display the menu
screen.
5.
Touch ,I or t1"to select [_1, and then touch SHT]
6.
Touch ,I or t to select "IAPI_'.ST_l,]k7),and then
touch Sl!7]
7. Touch O or t to select IJ _and then touch SET
Notes:
To record in LP mode, be sure to use a
Mini DV cassette labeled for use with LP
recording speed.
Audio dubbing is not possible with LP
recorded tapes.
] [] AUT_
Tape Speed
indicator
30 Chapteg
Page 33

Using the Monitors
Chapter Overview:
• Seeing What You Are Recording
• Using the Mode Screens
• Using the Menu Screens
• On-Screen Icons
Cha@t÷r 2
Changing Entertain
31
Page 34

Usin@ the @nit@rs
Seeing What You Are Recording
1'o set, what is recording, use eitlwr the LCI) monitor or tI_e _iewfinder monitor. When
tile LCD monitor is open, tile viewfinder turns off. _il/en you close the LCI) monitor, the
viewfinder turns on.
Using the LCD Monitor
['h_' ctmcorder's LCI) monitor is a miniature color scn, en that you can use fi)r recording
or playback. L Open the LCI) molqitor. Tlw xicwfinder turns
Ofl'.
2.
For convenient viewh_g the LCI) monitor can
be tilted once it is open 90" from the camcorder.
Tilt the monitor fol_vard up 180 ¸¸or down up
to 90.
• From t high angle (such as over a crowd)
tilt the monitor down to record.
• From t low angle (such as when kneeling)--
tilt the monitor up to record.
Cautions
Never force the LCD monitor to rotate completely around. This could damage both
the monitor and/or the camcorder.
When carrying the unit with the shoulder strap, close the monitor to prevent possible
damage to it.
When the LCD COLOR menu item is adjusted, the picture on the LCD monitor may
differ from the picture actually recorded. Do not change the color setting unless it is
necessary. This adjustment only affects the screen picture, not the recorded image.
Adjusting the Screen Picture
If the picture on the scn'en is difficLflt to see ClU_"to mnbient lighting or other factors
acljust the screen picture settings.
1. Op_ql the monitor Jnd touch any place on the screen to dispk_y the Mode scre_ql.
2. Touch ]/2to display p'4ge 2/2 "and press the on_screml ,_11£'_J//button to clispIay the
3. Touch !_ or t to select LC'I)Jnd th_'n touch 5h'Tto dispk_y the l.C'l)/l?_Sl£Tm_,nu.
4. Touch e" or t to select LC'I) BRI(YH7 LC'I) C'OI.OR, or 17; BRI(YIIT, Jnd then touch
5"E7_
32
Page 35

LCD BRtGHT AUTO
LCD COLOR
VF BRIGHT
RETtJRN
Usin@ the @nit@rs
LCD BRIGHT: Adiusts the brightness of tile
picture on the LCD moniR)r.
LCD COLOR: Adiusts the color density of tile
picture on the LCI) monitor.
VFBRIGHT: Adiusts the brighmess of tile
picture in tile viewfinder.
Note: Use the CONTROL dial to adjust VF
BRIGHT while looking through the
viev_inde_
5.
Touch @ or t to acl}ust tile item to tile desired
setting and touch .gl;'7:
6.
Repeatedly touch RETZTRNuntil tile menu
screens tufi1 off.
Note: Recording outdoors on bright, sunny
days can make the LCD monitor hard to see.
Use the viewfinder instead,
Adjusting the Screen Backlight
1. Op_ql the"monitor and display the"M_'nuscw_ql
(see pagu 43).
2.
Touch @ or i" to select LCT)and touch .gETto
display tile LCI)/Vt: SETmenu.
3.
Touch 41, or t1" to select BA(]KLl(_l'lrand touch
SET
4.
Touch 41, or I" to select AUTD, :_iORMAL, or
BR_HT_ and _)uch ,_I;7_
ii i LCD COLOR BRIGHT
VF BRIGHT
LCD BRIGHT NORMAL
RETURN
AUTO: The camcorder automatically switches
between _'_()RMAL and BR_/17rdepending upon
light conditions. This mode is only awdlabIe in
tile CAMERA modes.
NORJlAL: For use indoors or under moderate
lighting conditions.
BRIGHT: For use outdoors under strong
lighting conditions, such as bright daylight.
5.
Touch RI;'7ZiI,'N repeatedly until tile menu screen
_]rns off.
33
Page 36

Usin@ the @nit@rs
Using the Viewfinder
The camcorder's viewfinder is a miniature color monitor that displays wlmt the
camcorder is recording or playing back. For convenient viewing, rotate the viewfinder
up or down.
Opening the viewfinder
1. Pull out tlw viewfinder completely and lift up.
2. Adiust the viewfinder to a comfortabIe position.
Cautions:
Do not try to raise the viewfinder until it
is completely pulled ouL
Do not lift the camcorder by the
viewfinde_
Notes:
When the LCD monitor is open, the
viewfinder turns off.
Use the CONTROL dial to adjust the
brightness of the viewfinder with the
LCD/VF SET menu_
LCD monitor
Cautions:
34
Viewfinder
Closing the viewfinder
1. Lower tlw vJewfJnder and push it in comph'tely.
Eyepiece Focus Control
The' eyepiece focus control lets you set the focus of
the viewfinder f\)r your vision. If" you wear
eyeglasses you probably can operate the camcorder
without them.
It is easiest to set the correct fl)cus by focusing on
one of the viewfinder's on screen displays. Look
through the viewfinder and adjust the eyepiece focus
Eyepiece focus
control
Never force the viewfinder to rotate completely arouncL This will damage
the viewfinder andlor the camcorde_
When carrying the unit with the shoulder strap, put the viewfinder down
and in to help prevent possible damage to it.
control f\)r your vision.
1.
Slide the eyepiece focus control until the
indicators in the viewfinder are clearly visible.
Note: The eyepiece focus control does not
affect the focus of the image captured by the
camcorde_
Page 37

Usin@ the @n t@rs
On-Screen Icons
Several displays appear on the LCI) monitor or in tile viewfinder to aid in the operation
of tim camcorder. Although it may look crowded, all of the icons shown below do not
appear on-screen at the same time. Also, not all screen icons are shown in the illustration.
Refi'r to the icon descriptions that follow.
NIGHT MODE
w---i----'r zoom 2
FADE JU_. 2.2002
I_ AUTO'S. 7: 31AM
30rain LP
Recording Menu Icons
Warning Icons
Displayed for
Three Seconds
BATTERY IS
TOO LOW.
INSERT
A CASSETTE.
EJECT THE
CASSETTE.
Playback Menu Icons
Displayed
After Three
Seconds
EJECT THE
CASSETTE.
GAMNA 1
TCg:05:35
INDEX 0/60
Description of Warning
hadicatcs that the" battel T is almost d_,pl_'tcd.
R_'plac_" it wifl/ a fully charged barn, W pack.
No vid('o cass_'tte in camcordor. Ins('rt a
cass_ttc.
SLIDE SHOW _, CA_nu
MEMORY CARD
AUTO
Card Only Menu Icons
Appears if the xideo cassette is defl'ctixe
and should be remox ed.
2122
_DNOBMA_
CASSETTE
NOT
RECORDABLE.
THETAPE
ENDSSOON.
CHANGETHE
CASSETTE.
-PROTECT[TAB-'".i.._ Flashes when you UT to record to a tape
; ; ; a _ _ _ _ , with the protect tab in the protect position.
TAI_E' E[_[i- Appears when a tape has almost reached its
"*" / _ I end dtll'illg recording.
TAPE END
Appears when a tape has reached its end
during recording.
(continued on next page) 35
Page 38

Usin@ the @nit@rs
Displayed for Displayed
Three Seconds After Three
Seconds
DEW
DEW
o
LAMP LAMP
Displayed for Five Seconds
Description of Warning
Appears if moisture occurs inside tile camcorder.
When this icon appears, remove the tape and wait a
fl'w hours befl)re using tim camcorder again. The
camcorder will turn off 10 seconds after this
warning.
Flashes if the vide() heads are clogged and should
be cleaned.
Appears if the fluorescent lamp behind the LCI)
monitor is close to tim end of its service lift'. Call
your local authorized RCA dealer fbr service.
All warnings will be indicated by <_ displayed in the
center of tim screen if the vertical rotation of the
LCD monitor is between 135 ° and 180 ° when in one
of the CAMERA modes, or if one of tim manual
screens is displayed. ['o check the type of warning,
rotate the monitor back to within 135 °, or press the
DISPLAY ON/OFF button to turn off the manual
Flashes when the MultiMediaCard is not inserted
correctly. Check card insertion.
Description of Warning
MEMORY CARD
FULL
NO DATA ON
MEMORY CARD
MEMORY CARD
ERROR
FORMAT
MEMORY CARD
MEMORY CARD
PROTECTED
DATA
PROTECTED
36
Appears when the MultiMediaCard's capacity has
been reached and it cannot store anymore images.
Delete some of the images or insert a new card.
Appears when MultiMediaCard has no data, or
when the data is corrupt.
Appears when there is data corruption or card is
recorded in a fl)rmat that is not compatible. Format
the card to use with this camcorder.
Appears when card has not been f\)rmatted.
Appears when the card is copy protected.
Appears when you are trying to delete protected
images or files.
Page 39

Usin@ the @n t@rs
Displayed for Five Seconds
MEMORY CARD
READ ERROR
CANNOT
STORE DATA
DATA NOT
FOUND
Description of Warning
Appears when the selected image cannot be read by
the eameorder.
Appears when the camcorder cannot read any data.
Replace the card.
The ID of the card and the tape do not match fk)r
Index Playback, or no index is reco_led on the
card. Insert a card with the indexes _)r the tape in
question or record indexes and then perf'orm Index
Playback.
Card Playback Status Displays
CARD Indicates a card is inserted.
617
NORMAL
1280
Current image number/total number of images.
Picture quality indicator.
o • •
lma_,e size indicator (resolutkm width).
100-0006 Image file name.
Appears when camcorder is copying still picture
from card to tape.
Appears when camcorder is copying a still picture
from the tape to the card.
(continued on next page) 37
Page 40

Usin@ the @nit@rs
Recording and Playback Icons
Date, Time, or Date and Time Icons
JUN. 2. 2002 lndicmcs the current date mad time and is recorded when it is
10:30AM dispktyed
Program AE with Special Effects Icons
SHU_
Appears when you manually select the shutter speed.
SPEED
EXPOSURE
SPORT
Appears when you m_mmflly select the exposure setting.
Appenrs when you select .S7_01¢75 to record fast moving action,
such as sporting events.
SUNLIGHT Appears when you select SI[_iLI(;HTto record fast moving
subjects with little blur.
PARTY
DUSK
Appears when you select ]_ARTYto record scenes in direct
lighting such as spotlights.
Appears when you select DUSKto record scenes at twilight,
fireworks, etc.
SOLARI Appears when you select SOLARIto give your recordings a
enbm_ccd Jrtistic quality.
NEGA
Appears when you select NI!'(;A to give your black and white
recordings an inverse color effi'ct.
SEPIA
BLUE
38
Appears when you select SI!7)IA to give your recordings a brown
tone like old photographs.
Appears when you select BLI@2 to give your recordings a blue
filter appearance.
Page 41

Usin@ the @n t@rs
B/W
Status Icons
REC
PAUSE
II
44
tq
Appears when you select B/_f, to record scenes in
classic black and white.
Appears when the camcorder is recording.
Appears during record stand[_y or record pause.
Appears when the camcorder plays a tape.
Appears during play pause.
Appears during fast f\)rward.
Appears during rewind.
Appears when timer is set.
Appears during self timer.
Indicates a MultiMediaCard is inserted or camcorder is
in Card Mode.
Time-Remaining Icon
120MIN
Fade Icon
FADE IN
FADE OUT
Focus Icons
AUTO
MF
Appears when Automatic Daylight Savings fi'ature is on.
Indicates the approximate time remaining on the
tape.
Appears during a fade in or fade out transition.
AUIO appears while the camera is in full auto mode. J/IF is
displayed when focus is set to manual.
(continued on next page) 39
Page 42

Usin@ the @nit@rs
Zoom Icons
W---I .... T D-ZOOM 40
W---I .... T ZOOM 2
IIIIIIIIOrlorlVOLUME
Audio Indicators
AUDIO1+2, AUDIO 1,
or AUDIO 2
Appears during zoom with digital zoom f_'ature.
Appears during zoom with optical zoom f_'ature.
Appears during w)lume adiustment.
Displays the audio playback mode.
NIGHT MODE Indicators
NIGHT MODE, IR LIGHT 1, Appears when the Night Mode feature is
IR LIGHT 2, or IR LIGHT 3 acti'_ated.
Gamma Indicators
GAMMA1,
or GAMMA2
Appears when Gamma has been manually adjusted
during playback.
GAMMA
[]
LIGHT
40
Appears during recording when the Gamma Feature is
used to make the only the sub}ect brighter.
Appears during recording when the Gamma fi'ature is
used to brighten the whole picture. The brighter
portions may appear washed out.
Appears when the Gamma f'_'ature needs to be adjusted
manually.
Page 43

DIS
Tape Speed
Icon
Usin@ the _@n_t@rs
Appears when you are using l)igital Image Stabilizer.
LP
Time Code Icon
TC0:06:20
Tape speed LPhas been selected
Indicates the recorded time code.
41
Page 44

Usin@ the @nit@rs
Using the Mode Screens
You can use the record and playback mode screens to select various functions. Follow
the procedure b_qowto display tilt" mode screen with the on-scre_qabutton f\)r tilt"
&,sired function.
Turn on the Mode Screens
1. Open the LCI) monitor and adjust the angle f\_r
convenient viewing.
2.
Set the DSC MODE and POWER switches to the
desired settings.
• When playing back a tape, the mode screen
appears after the POWER switch is set to
AUTO
_[_] AUTO
PLAY. Proceed to step 4.
3.
Touch any point on tile LCD screen to display
tile mode screen.
• When playing back a card, first display a frill
screen image (sc_)page 12,8'), and then touch
the LCD screen to display the Mode screen.
4.
Touch the page indicator l/2to display the next
Mode screen.
42
Touch the desired on-screen button fi)r the
a{Imi_
On-
Sc/'een
buttons
5.
mode you want/o use. Retbr to each fi'ature f\)r
details on the operation of that t't,ature.
Turn off the Mode Screens
Touch the" on-scrt,_,n l)lSlqx]tton /o turn off the
ITtode screens
Notes,"
The on-screen button indicators are displayed in yellow when the
corresponding functions are selected. These button indicators are displayed in
gray when the corresponding functions cannot be selected.
The CONTROL dial can also be used to operate the Mode and Menu screens.
Rotate the dial to select an item and press it in to set the item. This is
convenient when you are using the viewfinder
The example screens in this User's Guide are for explanation purposes, and may
differ slightly from the actual screen displays.
Page 45

Usin@ the @n t@rs
Using the Menu Screen
['he menu screen can be used to ad}ust the various settings of the camcorder. ['he
example below shows how to change the tape recording speed flom SP to LP.
Turn on the Menu Screen
D
_PHOTOSHOT
_ DOTL ZOOM
i TAPE SOEEO
_1U:9
OGTL ZOOM
MULTI FRAME
10:9 LP
_ RETURt{
[] AUT_
aQm_
i
1. Follow steps 1 through 4 under 7_r_l o_l the
_/odc __cr_!_?Ils.
2. Touch the on screen Mk'NI/button to display
the Menu screen.
3.
Touch e. or t to select the desired mentl, and
then touch _'Tto display the features of the
selected menu.
4.
Touch 4_ or t to select the desired menu item,
and touch L_7_
• • o • • •
The available settin_,s f\)r the selected merit1
item are displayed.
5.
Touch _ or _ to select the desired menu
setting, and touch SET_
• The selected menu setting is set.
• To adjust another menu item, touch I@]T!,7¢_Y
_ MULTI FSAME
DGTL ZOOM
O?Fa":m_I_'.Z'_BLP
16:9
PHOTO SHAP
RETORR
until the camcorder returns to the status in
step 3 or 4, and then repeat the procedure
from that point.
Turn off the Menu Screen
Touch Rl_'7_:l,'_'vuntil the Menu scre_q_ turns off'.
Notes:
Certain menu items are common among the camcorder modes. If the DISPLAY
menu item, for example, is set to "DATE+TIME" in TAPE-PLAY mode, it will be
automatically set to "DATE+TIME" in other modes.
The menu items are displayed in yellow when the corresponding functions are
selected The menu items are displayed in gray when the corresponding
functions cannot be selected.
The CONTROL dial can also be used to operate the Mode and Menu screens,
Rotate the dial to select an item and press it in to set the item, This is
convenient when you are using the viewfinde_
The menu screen automatically turns off if no settings are made within five
minutes,
43
Page 46

This page left intentionally blank.
Page 47

Recording
Chapter Overview:
• Recording Details
• Recording Features
• Recording Tips
Chapter 3
Changing Entertainment. Again.
45
Page 48

Recording Details
There are three recording modes you can select. TAPE CAMERA records moving video or
still pictures on the tape. I)UAL-CAMERA records both moving video or still pictures on
the tape and still images on the memory card. CARD CAMERA Ells the camcorder _) act
like a digital camera and record still images on the memo1T card.
TAPE-CAMERA Mode-Recording on
Tape
1. Place the AU ['OiMANUAL'MANUAL LOCK
DSC MODE
switch
REC START/
STOP
button
LCD monitor
POWER switch
Lock
button
FOCUS
switch Viewfinder 8.
AUTO/MANUAL/
MANUAL LOCK
switch
switch to tile A[ FI'O position.
2. Place the FOCUS switch to the AUTO position.
3. Place the DSC MODE switch to tile "IAPE
position.
4. Press in the Lock button and set the POWER
switch to the CAMERA position
Press the Zoom W or T button to zoom in or out
5.
on your sub}ect.
6.
Open the LCD monitor or adiust tile viewfinder.
7.
Press and release the REC S [AR'IVS ['OP button
to start recording. I@]Cappears in the viewfinder
or LCI) monitor (but won't be recorded).
When finished recording, press and release the
REC S_IART/S ['OP button again to stop
recording. The camcorder is now in the record
pause mode. tM!TSE appears in the viewfinder
or on tile LCD monitor.
Notes:
If the Record-Standby mode continues
for 5 minutes, the camcorder's power
shuts off automaticall_ Set the POWER
switch to OFF, and then back to CAMERA
to turn the camcorder on.
To remove the icons from the
camcorder's display during recording,
press the DISPLAY ON/OFF button
46
Page 49

STILLbutton
\
REC START/
STOP
button
LCD monitor
DSC MODE
switch
POWERswitch
Lock 7.
bu_on
FOCUS
switch Viewfinder 8.
AUTO/MANUAL/
MANUAL LOCK
switch
DUAL-CAMERA Mode-Tape and Card
Recording
1. Make" sun' a MultiM_'diaCard and DV cassette" arc
insvrtvd propt'1"ly.
2. Place tht. AU ['O/MANUAL/MANUAL LOCK
switch to the A{ TI'O position.
3. Place the FOCUS switch to the AUTO position.
4. Place the I)SC MODE switch to the DIAL
position.
5. Press in the Lock button and set the POWER
switch to tile CAMERA position.
6.
Open the LCD monitor or adjust the viewfinder.
Press the Zoom W or T button to zoom in or out
on your subject.
Record video on tape or a still picture on the
memo W card.
Record Video on the Tape
• Press and release the REC STAR']TSTOP button
to start and stop recording on the tape.
REC appears in the viewfinder or LCI) l:_onitor
while the camcorder is recording (but wont be
recorded on tile tape).
When you arc not recording, the camcorder
enters the record pause mode and I)AUSE
appears in the viewfinder or on the LCD
moniR)r.
Record a Still Picture on the Memory Card
• lqacc tilt. ca_zacordcr in n, cord pause mode'.
PAUSE app_,ars in tilt, viewfindcr or on tilt"
LCD monitor.
Press the S ['ILL button to record a still picture
on the _aemo W card. RtZ(]()RI)I3i(.: 70
MI;.M()RY CAR1)appears in tile viewfinder or
on the LCI) monitor.
47
Page 50

STILL button
\
Lock button
DSC MODE
switch
POWER switch
9. When finished recording, set the POWER switch
to OFF.
Notes:
If the Record-Standby mode continues
for 5 minutes, the camcorder's power
shuts off automaticall_ Set the POWER
switch to OFF, and then back to CAMERA
to turn the camcorder on.
To remove the icons from the
camcorder's display during recording,
press the DISPLAY ON/OFF button
CARD-CAMERA Mode-Recording on
a Memory Card
1. Insert the" suppli_'d MultiMediaC'ard.
2. Set the AUTO/MANUAL/MANUAL LOCK switch
/o AU 1'0.
3. Set the FOCUS switch to AU 1'O.
4. Set the I)SC MODE switch to CARD.
5. Press in the Lock button and set the POWER
switch to CAMERA.
6. Open the LCD monitor or ad}ust the viewfinder.
7. Press the STILL button to record a still image of
the subject.
FOCUS Viewfinder
AUTO/MANUAL/
LCD monitor MANUAL LOCK
switch
48
8. When finished recording, set the POWER switch
to OFF.
Note:
To remove the icons from the
camcorder's display during recording,
press the DISPLAY ON/OFF button
Page 51

Lock
button POWER switch
Full-Auto Mode
Use the Full Auto 1node to easily record good quality
ilnages.
1. Press in the Lock button and set the POWER
switch to the CAMERA position. ['be camcorder
enters the Record Standl_w 1node.
2. Set the AUI'OiMANUAL/MANUAL LOCK switch
to AUTO to have the camcorder automatically
select the best settings for your recording. AUfO
appears in the viewfinder or LCI) monitor.
Note: Placing the camcorder in the full-auto
mode will cancel all of the settings you may
have adjusted in the MANUAL screen
3. S_,t the" FOCUS switch to AU['O to have the
camcorder automatically focus for you.
LCD monitor
AUTO/
MANUAL/
MANUAL
LOCK switch
Journalistic Shooting
In some situations, diffl'rent shooting angles may
provide more dramatic results. Hold the camcorder
in tim desired position and tilt the LCI) monitor in
the most convenient direction. It can rotate 270° (90 °
downward, 180° upward).
Self-Recording
You can even record yourself while viewing your
own image in the LCI) monitor. Open the LCD
monitor and tilt it upward 180° so that it faces
t'ol_,vard, then point the lens toward yourself and start
recording.
49
Page 52

DSC MODE
switch
RECSTART/
STOP POWER switch
bu_on
Lock
bu_on
AUTO
Quick Return Screen
I
Quick Return
After playing back tim tape you recorded, you can
quickly return to tim end of the last recording by
using the Quick Return f_'ature on the Mode
screen.
1. Set the I)SC MODE switch to qAPE or DIAL,
and press in tile Lock button to set tile
POWER switch to CAMERA.
2. In the recording standby mode, touch any
point on the LCI) screen to display the 1/2
Mode screen.
3. Touch QtTCK R777_
• The tape begins fast fi)rwarding or rewinding
to the end of the last recorded scene.
• When the tape reaches the end of the last
recorded scene, QDTCK/,"/7,'s_i changes to
[qN]SHk7), and the camcorder enters the
Record Standby mode.
Notes:
To cancel Quick Return, touch QUICK
RTRN again.
Quick Return cannot be used if the
cassette has been removed since the
last recording or if no recording has
been made since the cassette was
loaded.
50
Page 53

LCD monitor
SEARCH
SEARCHScreen
DSC MODE
switch
POWER switch
Lock
button
AUTO
Edit Search
The edit search fl,ature allows you to search for the
point on the tape where you wish to start recording
without switching the POWER switch to PLAYI
1. Set the I)SC MODE switch to [APE or I)UAL,
and press in the Lock button to set the POWER
switch to CAMERA.
2. In the recording standby mode, touch any point
on tim LCI) screen to display the 1/2 Mode
screen.
3.
Touch 1/2 to clisplay the 2/2 Mode screen.
4.
Touch .qR(2Hto display the ,qlgAR(21t screen.
5.
Touch and hold _ (fol',vard edit search) or
(reverse edit search).
• In fol",vard edit search, the tape is played back
at normal speed. In reverse edit search, the
tape is played back at approximately 5.5 times
normal speed.
6.
When you locate the point where you want to
begin recording, release the _ or _ on
screen button.
• Playback stops, and the camcorder enters
Record Pause mode. The tape will record fiom
this point when you start recording.
7.
J_
I
Touch RT]¢A: repeatedly/o turn off the .';IMRCH
screen.
Notes:
The sound is off during search,
Some picture noise appears during
reverse edit search.
51
Page 54

Gamma Brightness
['he Gamma Brightness fea/ure improves the picture [_y increasing the brightness of the
image. Use this when a subject is backlit or when recording in a dark or poorly
illuminated area. ['he image will appear dark if it is recorded normally. LIGflTwill
appear on the moni/or when the Iight is insufficient.
1. Press in the Lock button and set the POWER
switch to CAMERA.
2.
In the Record Standby mode, touch any point on
th{' LCI) monitor/o dispIay th{, mode scre{,n. If
the on-screen GA}dMA I']FI{ buUon is not on this
screen, touch 1/2/o dispIay the next screen.
3. Touch (;AMMA Is7,7<to brighten the image.
(YA,*:IMA appears on the LCD moni/or.
Touch (;AMMA 1;7:1{again /o briglm'n tim
picture even more. The [] indica/or appears.
Note:
When only GAMMA is displayed, the
subject becomes brighter while leaving
the brighter portions of the image
unaffected. When [] is displayed, the
brighter portions of the image get
whited out.
Some picture noise appears when using
Gamma Brightness while LIGHT is
displayed.
Fine brightness adjustment is possible
using Exposure or Gain Control (see
pages !02-103).
52.
To Cancel Gamma Brightness Compensation
Touch (.:A,_d}clA1s7.7.'until GAMMA disapp_ars
Page 55

Select the Audio Mode
This camcorder allows you to select between the 12 bit and 16 bit audio recording
_aodes. The camcorder normally records audio in the 12-bit audio recording mode. For
higher quality audio recording, select the 16 bit audio recording mode.
Set the Audio Mode to 16Bit
1. Pr_'ssthe"Lock button in and s_'t the POWER
switch to CAMERA.
2. I)isplay the" Menu scre_'n (,v_ page, 43).
3. Touch @ or t to select _, and touch SI_T
4. Touch @ or i" to select Ag/l)lOMOl)k'and
R)uch .','l_'7Z
5. Touch @ or t R) select ldbit and then touch
.qk"l: 16bit is displayed on the monitor.
6. Touch REJZ/RXrepeatedly until the menu screen
turns of'f.
To Return to 12Bit Mode
Select 12bit and touch .q/!'TJn Slt'p 5 above.
Note: When using audio dubbing with 16-bit
audio recordings, both the dubbed and
original sounds will be recorded in mono (see
page 80)
53
Page 56

Zooming
Using the Zoom Buttons (W and 7)
'lb zoom in close" (teh, photo) or out (wkh" ang]_'), pr_'ss on_ _ of th__ zoom buttons.
Optical zooming is the' namraI non _,nhanced magnification that the" ctmacord_,r s h'ns will
support. Optical zooming is possibI_" up to t_'n tim_s when recording on tap_ _ and up to
s_'v_'n tim_s wh_'n rocording on the m_q_ory card.
Digital zooming mak_,s it possibt_" to capture" il_aag_,s up to a maximtma of 400 tim_,s
normal magnification. The camcorder uses technology to artificially enhance the image.
When using the zoom buttons an icon appears on screen to display the approximate
zoom ratio.
Notes:
While zooming, focusing may become unstable. If so, set the zoom while in
Record-Standby mode and adjust the image using manual focus (see page 106).
Once the focus is set, zoom the camcorder in or out while recording,
The zoom level icon moves during zoom. Once it reaches the end of the zoom
icon bar, all magnification from that point is through digital processing.
During digital zoom, the quality of the image may suffe_
Optical Zooming
You can zoom in and out for close_up or with" :mgl_" shot_ by pr_'ssing Zoom 3" or W.
'lIbe camcorch'r automatically f\)cus_'s at most distanc_'s wh_'n zooming.
Zoom buttons
T and W
Lock
button POWER switch
54
1.
Press T or W to zoom in or out on a subject.
• Press T to zoom in on the subject.
The ca_acorder is unable to fi)cus closer then
five f_'et (1.5m). It will automatically zoom out
and R)cus.
• Pr_'ss W tO ZOOITt ()Lit.
The on screen display shows the current zoom
setting.
2.
Press the zoom button harder to increase the
zoom speed or softer to decrease the speed.
Page 57

Digital Zoom
You can us_" digital zoom to magnify: image's to a maximum of 400 time's normal
magnification. I)igital zoom is l_ossibh ' up to 400 time's wh_'n recording on a tap_'.
1. Press the Lock button in and set the POWER
switch to CAMERA.
2. Display the Menu screen (s_page 40.
3. Touch 41-or t to select r91 and touch .qE2_
PHOTO SNAP
=_ MULTI FRAME
TAPE SPEED 40
15:£t 400
4. Touch 41-or t to select I)GTZ ZOOM and touch
.@IT
5. Touch 41-or t to select OFt 40 ,or 4(*9 and
touch 5k'2_
• Select ObT,' to turn digital zoom off.
• Select 40to have 10 40 times digital zoom.
• Select 4(X)to have 10 400 times digital zoom.
6. Touch RET?/RA/repeatedly until the Menu screen
turns off.
7. Press the Zoom W or T button to zoom. The
zoom indicator appears in the display.
Macro Zooming
Macro zooming allows you to take close-up shots of small obj_'cts. To r_'cord a magnifi_'d
imag_" that is within apl_roximat_'Iy f'iv_" f'_'_t of the camcorder, us_" Macro Zoom.
1. Press Zoom button W to zoom all the way out.
Zoom but_nW
2. Move the camcorder close to the subject until
you obtain the desired angle of view.
The camcorder will automatically focus on the
sub}ect.
Notes:
Make sure there is sufficient light for
macro recordings.
For best results, use a tripod during
macro recording.
55
Page 58

Digital Image Stabilization (DIS)
Digital Image Stabilization is used to compensnte fk)r unstable images cause by camera
shake, especially at high magnifications. This feature is turned <)i1 by defauh flom the
facto W.
Turning the DIS Feature ON and OFF
1. Press the Lock button in and set the POWER
switch to CAMERA.
2. Display the Menu screen (see page 4_).
3. 'lbuch !_ or t1" to select I_1 and touch SET
4. 'lbuch !_ or t to select l)lSand touch SET
5. 'lbuch !_ or t1" to select OPl,'or ONand touch
SI_E
• Select OFFto turn Digital Image Stabilization
off.
• Select ONto turn digital image stabilization on.
['he I)lS indicator (ILl,) appears on the screen.
'lbuch 1@27Zff¢N repeatedly until the menu screen
turns off.
Notes:
Accurate stabilization may not be
possible if hand shake is excessive,
Switch off stabilization when the
camcorder is mounted to a tripod.
56
Page 59

Fading Scenes
The fade fl, ature allows you to gradually bring the image and sound in or out at the
beginning or end of a scene _r creating scene transitions. This is especially effective _)r
indicating a dramatic change in scene_.
Fading In and Out
1. Press the Loci< button in and set the POWER
switch to CAMERA.
2. While recording, press the REC S3AR ['/STOP
FADE I_
3groin
butR)n to place the camcorder in the Record
Pause mode.
3. Touch the LCD monitor to display the l/2 Mode
screen and touch the on screen b_4Dl_'button.
• The [,'AZ)l_'indicator appears in the display.
4.
Press the REC S_l?kR ['iKFOP button to begin
recording. The picture will turn white and begin
_) _Lde in.
5.
Press the REC S3AR ['/STOP button to stop
recording. The image and sound will _de out
gradually as the image turns white. The
camcorder will then return to the Record Pause
ITlode.
Cancel Fade
Touch the on screen ,_IZ)L,'button again. The FADE
indicator turns off. The Fade mode is automatically
cancelled after you have faded out.
Fading Out Only
1. During recording touch the LCD monitor to
display the l/2 Mode screen and _)uch the on
screen /_4DE button.
2. Press the REC S'IARTiSTOP button at the point
where you wish _) s_)p recording and _de out.
57
Page 60

Video Light
'It) brigi_ten the scene when natural lighting is too dim, the camcorder uses a video light.
You can turn on the video light at all times, set it to turn on automatically when additional
light is needed, or turn it o_
Use the Video Light
Set to AUTO to have the light turn on when
recording in dark locations. LIGitt2'l_lst appear
_)r the light to turn on automatically.
Set to OFF to turn off the light.
Set to ON to turn the Iig]_t on whenever the
c_{mc()lCiel- IS turned on.
let the Light AU ['O/OFF/ON switch.
Notes:
The video light can only be used when
the camcorder is on and will not operate
if the DSC MODE button is set to CARD or
the NIGHT MODE switch is set to ON,
When not using the video light, turn it
off to save baftery powe_
Even if the battery level indicator does
not indicate a low battery, the camcorder
may turn off automatically if the video
light is turned on when you start a
recording or when you turn on the video
light.
When the Light switch is set to AUTO, the
light may keep turning on and off
depending on the lighting conditions. If
this happens, set the Light switch to ON
or OFF.
A
Cautions
Never operate the video light closer than one foot to people or
other objects,
The video light becomes very hot. Do not touch it during use or
right after use Serious injury may result.
Do not place the camcorder in a carrying case right after using the
light.
Never operate the video light close to flammable or explosive
material.
The video light and bulb need to cool for approximately 30 minutes
after use before the bulb assembly is replaced Replace the bulb
only with Replacement Part 253403 (6V, 3W bulb).
58
Page 61

Video light
Tightening ring
/
Attach the Video Light
1. Hold the' light as shown and attach it to file
accessol T shoc [_y sliding it in the' direction of
the arrow until it locks into place.
2. Turn tile tightening ring in the direction of the
arrow to secure the video light.
Remove the Video Light
Turn tile screw in the opposite direction fl'om the
arrow and pull off the light.
Cautions
Make sure to attach the video light
securel_
Do not use the video light to carry the
camcorde_
Replacing the Bulb
['be vide<) light's bulb will eventually have to be replaced. If tile bulb burns out, replace
it only with replacement part 253403. For more information about bulb replacement,
contact the nearest RCA service center or authorized dealer.
1.
_Zait at least 30 minutes after using the video light f\)r it to cool, and remove the
fI'()n_t cover as sho_vn.
2.
Grasp the tip of the bulb and pull it straight out of the reflecting plate.
3.
Insert the new bulb into the hole of the reflecting plate and reattach the flont cover
as shown.
Cautions
The video light and bulb need to cool for approximately 30 minutes after use
before the bulb assembly is replaced
Replace the bulb only with Replacement Part 253403 (6V, 3W bulb).
59
Page 62

Multiple-Strobe Recording
['he multiple strobe recording f_'amre allows you /o record a fasHnoving subject at
inWrvals of 1/10 of a second using a 9 or 16 frame picture on tape. This is useful when
you want to check your form in sports, such as/ennis or golf.
Set Multiple-Strobe Recording Mode
1. Pwss the' Lock bu//on in and s_'t the POWER
i_ MULTI FR_E STILL
TAPE SPEED
_6_g
i_ RETURN
=_ PHOTO SNAP
I TAPE SPEED
16:9
ii _ DGTL ZOOM
:;iliN_Ni_ii!JJiiiii16 £
switch to CAMERA.
2. Place the" I)SC ivlO/)E switch in 'DMq_L
3. I)isplay th{" Menu scr{'{'n (seepage 43).
4. "lk)uch !_ or t to select r'D1 and/ouch .SI!"£
5.
Touch !_ or t /o select t'HOTO .Sz_/APand
/ouch .SET]
6.
Touch !_ or t /o select I'HOTO .SHOT or STILl.
and touch 3'ET
• Select/'I/OTD S/lOTto record a multi frame
pit.ire for six seconds.
• Select STILL to record a multi fiame picture
until you press the REC SqARTiSTOP bu//on /o
stop recording.
7. Touch !_ or t /o select MDL71 t?I,'AJ/IEand
/ouch .SI!7_
60
8.
Touch !_ or t to select 9 (9 frame picture) or
16 (16 fram{" picture) and /ouch .S1!7_
9.
Touch REJZ/RA: repeatedly until the menu screen
turns off.
Notes:
When using PHOTO SHOT Mode, the
sound and visual effects of a camera
shutter are not available.
The picture quality will be slightly less
than normal when using Multiple-Strobe
modes.
Page 63

STILL button
RECSTART/
STOP
bu_on
Lock
bu_on
POWER
switch 4.
Record Using Multiple Strobe
1. Pn'ss the" Lock button in and s_'t the POWER
switch to CAMERA.
2. Display the Menu screen (se_e_page 43).
3.
I)uring Record_Pause mode, press the STILL
button. A multi t'rame picture of the subject is
displayed (9 or 16 frames whichever you
selecmd).
Press the REC S1AR ['/STOP button. The multi
_ame picture is recorded.
• If t'tlOTO 571OTmode is selects, d, the
CalT1corder returns /o Record Panse iTIode after
recording the multi frame picture for six
seconds.
• You can also press the STILL button during
recording to record a Multi Strobe picture on
your tape.
5.
If S2ILL is selected, press the REC SI2,R'ITSTOP
button to stop recording the picture.
Multi Strobe 16-Frame
Recording
To Cancel the Multi-Frame Picture
In PILOT0 3klOTmod_', pr_'ss tl](>S ['ILL button
while the camcorder is in the Record Pause
mode.
In STllL mode, press the STILL button.
Notes:
Multiple strobe recording can also be
used during recording by pressing the
STILL button,
The picture quality in Multiple-Strobe
recording mode will be slightly lower
than normal pictures.
Multiple Strobe recording cannot be
used with digital picture effects or the
wide-screen function
61
Page 64

Still Recording on Tape
YOu can record still im tges of subjects with normal sound on a tape. YOu can select
]_t07}0 SHOTand record a still picture for six seconds or STILL and continuously record
a still image.
Select Still-Recording Mode
1. Press the Lock button in Jnd set the POWER
switch to CAMERA.
2. I)ispkly the Menu screen (see !)age 43).
3. Touch !_ or t to select rgl and touch SEZ
:;;_N 1'
iljii DGTL Z0IlN
' TAI_E IIPE£[I
RETUR_I
="_ii:;ii_i_•;_:gTAI_EDGTLPHOTO_l_i_!ii]iii_l{l_E[0Z00_lSNAPI _
4. Touch !_ or t to select P1107()SNAP and
touch SEZ
5. l'ouch !_ or t to select PHOTD SHOT or
STILL and touch SEZ
• Select PHO?}O SHOTto record a still picture
f\)r six seconds.
• Select STZ/Z to record a still picture until you
press the REC S_IART/STOP button to stop
recording.
6.
l'ouch !_ or t to select MI&Tlt;JCAMH and
touch SET_
7. l'ouch !_ or t to select l and touch 5"H?]
8. l'oudl RHT?7¢N repeatedly until the Menu
screen turns o_'.
62
Page 65

LCD monitor
Record Still Images
1. Pr_'ss the" Lock button in and s_'t the POWER
switch to CAMERA.
2.
I)uring Record Pause mode, press the S ['ILL
bu//on. A still picture of the subject is displayed.
Press the REC S'IARTiSTOP bu//on. The still
3.
picture is recorded.
• If PHOTO .ST]OTmode is selec/_.d, the
CalT1corder returns It) Record Pause 12_ode aflor
recording the still pic/ure for six seconds.
• You can also press the STILL bu//on during
recording to record a still picture on your tape.
If PHOTO S/tOTis selec/ed, the sound and
visual eff_>ctof' the camera shutter is turned
of'f. ['be camcorder returns to record pause
mode aiker recording the still picture f\_r six
seconds.
4.
If S77LLmode is selec/_,d, press the REC SI_\R'I7
STOP bu//on/o slop recording the pic/ure.
Note: Toturn off the shutter sound, (see
page 116).
To Cancel the Still Picture
In lq107_),'_klOTmod_', pr_'ss tl](>S ['ILL button
while the camcorder is in the Record Pause
mode.
In S77LL mode, press the STILL button.
63
Page 66

Time Code Display
During recording, a time code is captured on the tape. This code confirms the location of
the recorded scene on the tape during playback.
If recording starts from a blank portion of the tape, the time code begins counting from
7UO:OO(.g)(hours: minutes: seconds). A flame number is displayed during still playback.
If recording starts from the end of a previously recorded scene, the time code continues
from the last time code number.
Turn Time Code Display On and Off
1. Pwss the' Lock button in and s_'t the POWER
switch to CAMERA.
2. Display the Menu screen (see page 40.
3. Touch !_ or tl" to select [TC and touch .S'l_'7:
4. Touch !_ or t to select TIME (lODE and touch
.@IT
5. Touch !_ or tl" /o select I)ISI_ OA: or I)lSI_ OFt:
and touch 5'E7_
The Time Code indicator appears on the display
when you select I)ISI{ ()_
6. "lkmch RET?iI,'Xrepeatedly until the menu screen
turns off.
TCO: 00 : 10 :_2_
Note: The time code is automatically set to
TC-:--:-- when a tape is ejected.
| |Second
| Minute
Hour
*l)isplayed during still playback
..._.j RENOTE
i ' SOUR8
"i RETUR_I
Display Time Code on TV During Playback
1. Whih, playing back a tap__ display t[w Menu
screen (see pa£(_ 43).
2. Touch !_ or t to select [TO,and touch SET
3. Touch !_ or t1" /o s_'h'ct 7U Oh7 and touch SET.
4. Touch !_ or tl" /o select ON or Ot,7,'and touch
.@IT
64
5. Touch I_ETI RN repeatedly until the menu
screen [urns off.
Page 67

Recording From an External Source
You can use this camcorder to record or edit videos f]om another source, such as a VCR
or TV. [b connect your camcorder to a TV (or VCR) with audio/video outputs, use the
supplied audio/videoiSVldeo cable.
Connections
1. Makt" stm" all units are tuln_.d off bt.fol-e making
any connections.
2. Connect the white plug of the cable to the left
AUDIO OUt' jack on the TV (or VCR).
Note: Some VCRsor TVsdo not offer left and
right audio jacks. For units with one audio
jack, usethe cable's white plug
3. Conn_'ct the" red plug of th(, cabh" to th(, right
AUI)IO OUt' jack on the TV (or VCR).
4. Connect the yellow plug to the VIDEO OIT jack
on the ['V (or VCR).
OR: Use the S-Video out for video out for an
S-Video connection.
5.
Open the jack cover on the camcorder and
connect the other end of the cable _) the AV+S
iack on the camcorder.
®
Note: Hold in the catches on the side of the
plug and pull it out to remove it from the
camcorde_ Do not pull on the cable without
holding in the catches.
Turn ON the S-Video Input
If" you haw _ conn_cted your camcorch'r using the S vich'o cabh' set the" .SVII)I£O f_,atul'e to
ON in the" m_'nu.
1. Place a tape in the camcorder, set the I)SC MODE switch to TAPE, and set the
POWER switch to PLAYL
2. Display the Menu screen (see page 4_).
3. 'lkmch !_ or t to select [Tgand touch SI£T
4. q_)uch !_ or t to select SVII)EO INand touch .SkT_
5. 'l_mch !_ or t to select ONand touch SET.
6. 'l_xlch RtHURN repeatedly until the metal screen turns off.
(co_iti_lu_d o_1 _1{.vtpa2_ ) 65
Page 68

To Record From an External Source
1. Place" a tap_" in the" camcold_'r set the" I)SC MODE switch to 'IAPE and set the"
POWER switch _) PLAY_
2.
Start playback flom the TV or VCR making sure you can see the picture on the
camcorder.
Note: If NO SIGNAL is displayed on the camcorder screen, make sure the audio/
video/S-Video cable is properly connected.
3. Press REC SIAR ['/STOP on the camcorder. The camcorder will enter the Record
Pause mode.
4. 'lbuch the on screen I_IAY/ST]LL button to begin recording.
• "lbuch bill to start and stop recording.
• Touch • to stop recording
Recording Tips
'lb improve" picturo quality and color roproduction, tlT to make" sure indoor scon_,s
are well lit.
Don't move the camcorder rapidly from side to side while recording. A steady,
gradual pan" avoids blurring and 'jitter".
Use the viewfinder or LCI) monitor to make sure the camcorder is level while
recording so that your scene isn't 'tilted."
Do not bump or tap the camcorder's microphone while recording as this sound will
be recorded.
Include close ups of individuals when taping family outings or group functions.
Fading in and out of scenes makes your videos appear more profi'ssk)nal.
Learn to use the special effi'cts to add variety to your recordings.
Be aware of video and audio backgrounds. Background details barely noticed while
recording may show up as visual clutter" on your recording. Background noises
(especially ['V sets, radk)s, household appliances, traffic sounds, etc.) might detract
flom the sound you want to record.
Avoid long "still" shots of landmarks and scenic attractions. Recordings are more
interesting if they include people and details. Local color" gives travel videos
lasting appeal. 'lb add interest, consider recording a familiar or landmark scene
f]'oman unfamiliar vantage point.
66
Page 69

Playback
Chapter Overview:
• Playback Options
• Playback Features
• Dubbing
• Connection to a TV (or VCR)
Chapt÷r 4
Changing Entertainment. Again.
67
Page 70

Playback Options
The camcorder's playback f'('atures include still, picture search, gamma, multiple slrobe,
digital ef}'('cts, and zoom. In fl/is section, you'll also learn how to connect your camcorder
to a TV or VCR.
The LCI) monitor screen functions as a bandy playback monitor. Nothing needs to be
connected, allowing instant on-screen playback with the sound through the built in
speaker.
Tiffs section mainly describes playback f('atures for your recorded tapes. See Chapter 6
f\)r detailed information on playback of' MultiMediaCards.
Tape Playback Using the LCD
44
I
i
Monitor
1. Insert a tap('.
2. Op(ql tl_(" LCI) monitor.
3. Plat'(, th(" I)SC MODE switch in the 'IAPE
position.
4. Press in the Lock button and set the POWER
switch to the PLAY position
5. Touch the on-screen buttons. The buttons will
change to indicators af_er playback begins.
• Touch REWor 1,2:button to rewind or fast
fk)l_vard tlm tape.
Tip5
The playback picture can be viewed
in the viewfinder (with the LCD
monitor shut), on the LCD monitor,
or on a connected TV (see page 84).
You can also view the playback
picture on the LCD monitor with it
flipped over and retracted
68
• Touch t_IAE/SJTLL to begin playback.
6. Touch STOYwhen finished playing the tape.
Adjust the LCD Monitor Brightness
You can adjust tb( _brightn('ss of th(" monitor using
tb(_m_'nu system. ['h(' brightn('ss of' th(" monitor do('s
not af'f('ct th(" r('cording (s_ pag_s 323._).
Page 71

VOL + and-
buttons
LCD monitor
CONTROL dial
Controlling Speaker Volume
You can adjust the _otum(, of the sp(,al_(,r during
• Press the VOL + button to turn up the _ olume.
_ playback.
Pr(,ss the VOL - button to turn down the
b \ olul]le.
Playback Using the Viewfinder
You can also watch tile l)Iaybacl,: in tile viewfinder
by dosing the LCI) l_aonitor with tile screen facing in.
No sound is available during viewfinder playback.
To operate the playback functions, rotate tile
CONTROL dial to select the desired on-screen
bu_)la or operatk)n and press the CONTROL
dial in.
To turn off tile playback operation indicators,
rotate the CONTROL dial to select the on screen
I)ISI >button and press the CONTROL dial in.
Press the CONTROL dial again to turn them
back on.
Playback Features
Still Playback
44
I
Still playback pauses th(" tap(" freezing a
single flame.
1. Touch tile on screen PIA_TS']7II_ button (I_/ll)
during playback to fieeze the image.
2. To resume normal l)Iayback, touch the PLAY/
$77!.Lbutton (i'/ll) again.
• If I3ttlSe COlltintles fOl" naol'e than five 17_intltes,
the camcorder automatically returns to normal
playback.
69
Page 72

Shuttle Search
Shuttle" search allows high-sp_'_'d searching in _'ith_'r
f'ol",vard or reverse directions.
1. "]kmch the on screen _ or _1 button during
playback.
• A slight mosaic effl, ct appears on screen
during shuttle search. This is normal.
I
• The sound is turned off during search.
2. To resume normal playback, touch _/||.
Gamma Playback
Gamma improves the" tap_" playback picture" by
increasing the brighmess of the subject while not
affi'cting the brighter portions.
1. I)uring playback, touch 1Z{ to display the page
2_? Mode screen.
2. "lkmch GAMMA PB once. The picture brightens
and GAMMA l appears in the display.
3. "lkmch (;AMMA PB again for an even brighter
picture. GAMMA2 appears in the display.
70
Cancel Gamma Playback
Touch GAMMA PB until GAMMA l and GAMMA2
clisappear fiom the display.
Note: Gamma playback has no effect during
still playback
Page 73

Multiple-Strobe Playback
Fbe multiple-strobe playback feature allows you to playback a fas>moving subject at
intervals of 1/10 of a second using a 9 or 16 frame picture. This is useful when you want
to check your f\_rm in sports, such as tennis or golf.
iiiii___!ii_ _i
[!:_:: I_lG. EFFECT
__CAPTUftE
STILL
button
Use Multi-Strobe Playback
1. Press the Lock button in and set the POWER
switch to PLAY.
2. Display the Menu screen (seepage 40.
3. Touch O or t to select _ and touc]] S/ZT]
4. Touch O or t1" to select MI&77 HCAMIZand
touch Sk'TZ
5.
Touch O or t1" to select 9 (9 frame picture) or
16 (16 frame picture) and touch S/ZT:
6.
Touch RET_/RN repeatedly until the menu screen
_]rns off.
7.
Playback the tape flom a point befl)re the part
you want to play back in Multi Strobe.
8.
Press the STILL button atthe point you want to
start Multi Strobe playback. A multi frame
picture of tlm image is displayed.
Notes:
If a memory card is inserted in the
camcorder, the still image dubbing
screen appears. Press the DISPLAY ON/
OFF button to remove the dubbing
screen.
You can dub the multi-strobe images to a
memory card (see page 78).
Cancel Multi-Strobe Playback
Pn_ss the _FILL button to cancel Multi Strobe
playback.
Note: Multi-Strobe playback does not
operate during still, search or with Picture
Effect.
71
Page 74

Playback Zoom
Tlw playback zoom feature allows you to magnify ttw playback picmn, up to ten times its
original size. The zoom fi'ature will work during tape or card playback.
Select the Zoom Magnification
1. Press the' Lock button in and set the POWER
switch to PLAY.
__ii_:ipIC.EFFECT
_Itlt.T{ FRAME 4x
_{ RETOnX 6x
Zoom W and T
(Also VOL +
and -) buttons
LCD monitor
PBZoom Indicator
2. Display the Menu screen (seepage 40.
3. Touch O or t to select _ and touch SIZ7_
4. Touch Q or t to select 1"t3ZOOM and touch
SET_
Touch ,! or Q to select the desired zoom
5.
magnification level (2_v, 4_v,6x, 8'x, or lOx) and
touch SIZT_
6.
Touch RET_/RN repeatedly until the menu screen
_lrns off.
7.
If you are playing back a tape, display the 2/3
Mode screen (l/2 Mode screen if playing back a
card) and touch the on screen PB ZOOMbutton.
The PB Zoom indicator (Q) appears on the
display.
Touch the picture where you want to zoom in.
The PB Zoom indicator changes to yellow and
the picture is centered and magnified.
• Each time you touch the picture, the image
switches between normal and magnified.
• When tim PB Zoom indicator is yellow, you
can use the Zoom T and W buttons to zoom in
on or out flom the magnified image.
72
I
Notes:
When the image is magnified (PB Zoom
indicator yellow) the VOL + and-
buttons do not operate.
Images may lose some quality when
using playback zoom
9. Touch CA3/CIZLto turn off Zoom Playback.
Page 75

Digital Effect Playback
/se one of the digital picture playback effects to add a more dramatic look to your
recording.
Select a Digital Effect for Playback
1. Press the Lock button in and set the POWER
switch to PLAY.
2.
Display the Menu screen (see t_age 40.
3.
Touch 41-or t1" to select _ if you are playing a
tape (g"l if you are playing back a card) and
touch SET:
Touch @ or t1" to select l'lClz'bT:lz'CTand touch
4.
.... B/W
MULTI FRAME SOLARt
RETURX NEBA 5.
BLUE
.gET
Touch @ or t1" R) select the picture effect you
want, and then touch .gE77
• Select O/:Fh)r normal playback.
• Select H/Wto have the picture displayed in
black and white.
• Select SkY_IA to display the picture with a
brownish tint like old photos.
• Select SOIARIto display the picture with
enhanced contrast creating a unique artistic
image.
• Select NEGA to display the picture with tile
blacks and whites of the image reversed and
the colors of the image inverted.
• Select IJMd_'to display the picture with tile
effect of recording through a blue filter.
6.
Touch REJ?/I,'N until tile menu screen turns off.
To Cancel the Digital Picture Effect
Select 0t,'t: and tb_,n touch .';ETin step 5 above.
Note: Digital picture effects cannot be
selected when a still image is displayed.
73
Page 76

Tape Playback Using Index Images
The initial parts of each recording on a tape can be automatically recorded on a memol T
card to make an index list of your recordings. It is also possible to manually add a
desired scene to the index list. You can then easily select where you want to start
playback from the IXIJI']X screen.
Creating Index Images
1. lns_,rt a r_'COld_'d DV cass_'tte and a m_q_ory
card in tl_" cal_COl'del'.
2. Place the I)SC MODE switch in the 'IAPE
position.
3. Press in the Lock button and set the POWER
switch to tile PLAY position.
4. Make sure the tape is rewound to the beginning.
5. Touch IZJ until the 3/3 Mode screen appears.
6. Touch INI)I']X to display the IXI)I']X screen.
7. Touch the on-screen AU'/E) button
AUTO INDEX
Number
oflndexes _OEX _0
Created
• The camcorder uses fast fl)rward, search, and
still playback to locate each scene in order and
record an index on the card.
• When the camcorder finishes creating the
indexes, tile A 171_)IXI)EX screen automatically
turns off.
To Cancel Creating Index Images
Touc]] the on_sc-r_,n ],'tZ7_/R:_/button.
Caution: Do not turn the power off or remove the card while creating indexes, as this
may result in deletion of images on the card or damage to the card.
Notes."
Maximum of 60 indexes can be created for one tape.
It is possible to create indexes for multiple tapes on a single card.
It may not be possible to create 60 indexes depending on the available storage
capacity of the card.
It may not be possible to create an index for a short scene having a recording
time of approximately 30 seconds or less.
74
Page 77

gB
Manually Add an Index for a Scene
1. lns_,rt a r('corck'd I)V cass('tte and a m_qnory
card in the" camcorder.
2. Plac_' thv I)SC MODE switch in the 'IAPE
position.
3. Press in the Lock button and set the POWER
switch to the PLAY position.
4. Make sure the tape is rewound to the beginning.
5. Touch IZ3 until the 3/3 Mode screen appears.
6. Touch IA:I)lzXto display the IA:l)lzXscreen.
7. Touch the on screen MANLIdL button to display
the MANUAL 13iI)P]X screen.
8. Use Ft ICEg,_ and PIAY/577LL to locate the
beginning of the scene you want to index.
9. "lbuch IqAY/STILL to begin playback and touch
.ql!Tat the point you want to index. The image is
recorded on the card as an index.
10. If you want to add another index, touch $7_)]"
and repeat steps g and 9.
11. "lk)uch STOl'anci then touch RETI/RNto Wrn off
tl_e MANI ML ]NI)P]X screen.
DELETE ALL ?
To
Delete Indexes
1.
Perf\)rm st_'ps 1 6 above.
2.
Touch DP]L to display the INI)EX Dl!TETI,2 screen.
Note: If the index you want to delete does
not appear, touch 0 or 0 to scroll through
the indexes.
• Delete a Particu "lar Index
Touch the' Jnd_'x you want to d('l('/o and touch
the' on-scr_'_qa l)1_7,button. Pr_'ss YES to deh, tv
the index. Pr_'ss NO to cancel.
• Delete all the indexes on the card
Touch the on-screen DlzZ ALL button. When
the confirmation screen appears, press YESto
delete all indexes. Press NO to cancel.
75
Page 78

Tape ID Number
Page Number
Index Playback
1. lns_,lt flw recorded tape and the memo1 T
card wRb the h_dexes for the tape.
2. Place tim I)SC MODE switch in the 'IAPE
position.
3. Press in the Lock button and set the
POWER switch to the PLAY position.
4. Touch 1_7_until the 3/3 Mode screen
appears.
5. Touch INI)I,2X to display the INDEX Menu
screen.
6. If the index of the scene you want to
play does not appear, touch @ or Ii' to
scroll through tim indexes.
7. Touch the desired index to select (frame
and lfiglfiight), and then touch the index
again to select it for playback.
• To select tim index already enclosed by
the selection frame, you only n_,ed to
touch the index once.
• The tape rewinds or fast folxvards to
the beginning of the selected scene and
playback star_ au_)matically.
76
Page 79

Looking Up the Indexes on a Card
You can use, this f_,ature to find out wh_thc'r indexes for file tap_ _ that you want to play
back are recorded on the card in the camcorde_
1. Insert the recorded tape and the memory card
with tile indexes for tile tape.
2.
Place tile I)SC MODE switch in the '[APE
position.
3.
Press in tile Lock button and set tile POWER
switch to the PLAY position.
4.
Touch //_ until tile 3/3 Mode screen appears.
5.
Touch tile on screen J/ll_li!)utton.
6.
Touch !_ or t to select [TC and touch 3'1{/:
7.
Touch !_ or t1" to select INDI']X 3'RdT! and touch
.';l_7: Touch Sl_7'again to 1,2XI,X]I_ The first
index for each tape recorded on the card in the
camcorder is displayed.
If tile index for the tape you are searching for
does not appear and muhiple index list pages
are recorded, touch @ or z!' to switch tile page.
9.
Touch the correct index fi)r the tape in the
camcorder. ['he rest of tile indexes for that tape
will appear. [buch the index where you want
playback to begin to highlight it. Touch again to
start playback.
• To select tile index already enclosed [_y tim
selection f]ame, you only need totouch the
index once.
• The tape rewinds or fast folxvards to tile
beginning of the selected scene and playback
starts automatically.
10.
Touch REJZ/RN repeatedly until the menu screen
_]rns off.
Note: To return to a previous screen touch
RETURN.
77
Page 80

Dubbing Images from a Tape to a Card
It is possible to make a still image fiom your favorite f)ame of a motion video recorded
on the tape and dub that image on the memory card. It is also possible _) au_)matically
dub still images recorded on the tape to the card (Au_) Cap.ire).
To Dub an Image
1. lns_,rt a r_'corded I)V cass_'tte and a card in the"
CalTtCol-d_r.
I
0
2. Place the I)SC MODE switch in the 'IAPE
position.
3. Press in the Lock button and set the POWER
switch to the PLAY position.
4. Press the S ['ILL button at the point where the
desired image appears during playback. The
Dubbing screen automatically appears.
• To cancel dubbing, touch CANCI!Z.
5. Touch RIiC to dub the still image to the card.
The U"Iindicator flashes red while the still image
is being recorded.
6. Touch CANCEL to cancel the still image.
Caution: Do not turn the power off or remove
the card during Auto Capture, as this may result in
deletion of images on the card or damage to the
card itself.
78
Page 81

Auto Capture Still Images
[]s(" of the auto capture f('atur(" allows still images of 30 seconds or longer recorded on a
tap(" to b(" automatically dubb('d on th( >card.
To Capture Still Images
1. h_s_,rt a r('corch'd I)V cass('tte and a card in the
CalTtCOI'd('I'.
2.
Place the I)SC MODE switch in the 'IAPE
position.
:=: pI .EFFECT 3.
P8 ZOOM
RETURN
Press in tim Lock button and set the POWER
swflch to the PLAY positkm.
4
Display the Menu screen (seepage 4_).
Touch 41-or i" to select i"_----I,and then touch
.qIH_
Number 6.
Touch 41"or t to select ()APT_7¢E, and then
touch ,';1,71'[_)uch .';ETagain to I']Xk'CUIT':and
Images
Copied _ SEARCH 7.
of [[ CA,TU.E ))
[]
display the CAl>TlTeEscreen.
Touch .';ETto begin Auto Capture.
• The calz_corder uses fast f_)rward, search, and
still playback to locate each still il:_age and
record them in order on the card.
• When Auto Capture is finished, FINISIIIH) is
displayed.
8. Touch (]ANCI']I_ to turn off the CAPT_JCE
screen, and then touch I_ETURN until the menu
screen tHFns Off.
Notes:
To cancel Auto Capture, touch CANCEL on the CAPTURE screen.
/f the card fills up during Auto Capture, MEMORY CARD FULL will be displayed
and copying operations will end,
5till images of less than 30 seconds in length may not be recorded during Auto
Capture.
/f the motion video recorded between one still image and the next is 30
seconds or less in length, the next still image may not be recorded during Auto
Capture.
Caution: Do not turn the power off or remove the card during Auto Capture, as this
may result in deletion of images on the card or damage to the card itself.
79
Page 82

Audio Dubbing Feature
You can add narration to a tape recorded with this camcorder by using the buil>in stere<)
microphone, while preserving the original audio and vide<) recording. Select your
recording mode.
Note: Audio dubbing cannot be performed via the DV terminal
Audio Recorded in the Audio Dubbing Mode
Audio can be recorded and dubbed in 12 or 16 bit. To change tl_e recording mode s_
pag_ _. The chart below shows how audio is recorded ill the normal and dubbing
modes.
In Normal Recording Mode
12-Bit Audio Recording
The audio is rocord_,d in st_'r_'o on
Audio L
• Audio 1: Stereo (left and right)
sound
• Audio 2: No audio
16-Bit Audio Recording
'l'b_' audio is rocord_,d in st_'r_'o with
the" l_'ft and right sound on two
s_'parate chann_qs.
• Audio 1: Left sound
• Audio 2: Right sound
In Audio Dubbing Mode
12-Bit Audio Recording
'llb{ ` dubbd audio is r_'corded on
Audio 2.
• Audio 1: Original stere<) (left and
right) sound
• Audio 2: Dubbed stereo (left and
right) sound
16-Bit Audio Recording
'lIbe dubb_,d audio is r_'c'ord_,d on
Audio 2 ov_'r the" original right sound.
Both the dubbed and original sounds
are in ITtOnO.
• Audio 1: Original left sound
• Audio 2: Dubbed sound
80
Page 83

AUDIO DUB
,'11I[;| fill
AUDIO DUB
To Audio Dub
1. Play back the recorded I)V cassette and Iocat_,
the tape position where you wish to start audio
dubbing.
Note: Use a Mini DV cassette recorded in SP
mode Audio Dubbing is not possible with LP
mode recordings
2. Touch I_/ll on the 1_? screen io pause
playback.
Touch 1_? to display the 2//7 screen.
3.
4.
Touch AUDIO l)l sBto display the AI/I)IO I)UB
screen.
5.
Touch STARTto begin audio dubbing.
• To pause audio dubbing touch $7_)1 ).
• To quit audio dubbing, touch RI!TIiRN. Fhe
AI/I)IO l)lJH screen turns off and playback
stops.
I
To Change Dubbed Audio or Dub Additional
Scenes
1. Touch RIZT_iRA:to turn off the AUI)IO L)DB
screen.
2. Repeat steps 1 to 5 above.
Notes."
It is recommended that you use Audio Dubbing only with recordings made
with this camcorde_ Use of recordings made with other digital video
equipment may result in poor audio quality.
Audio dubbing will automatically pause if the original audio changes from 12-
bit mode to !6-bit mode or vice versa. Touch START to resume operation.
Audio dubbing will automatically stop if a portion of the tape recorded in LP
mode or an unrecorded portion of the tape is encountered
You can play back the dubbed audio and the original audio together or
separately (see Audio Playback Mode on the next page).
81
Page 84

Audio Playback Mode
You can select three diff',rent audk) playback modes to listen to the dubbed audio
recorded on the tap_<
Select an Audio Playback Mode
1. Play back a Mini DV cassette with dubb_'d
audio.
2. Touch //.3 until the 3/3 Mode screen appears.
• The audio playback l:_ode indicator is
displayed.
Touch AIJl)K)to select the desired audio
3.
playback l:_ode.
AUDIO 1+2
• 12 bit audio recording in
stereo (Audio 1 and Audio 2
channels)
• 16 bit audio recording in
stereo (left and right
channels)
AUDIO 1
• 12 bit audio recording in
stereo (Audio 1 channel
only)
• Touch A_Jl210 repeatedly to select an audio
playback lzaode. Select A _)10 l +_ A Iil)lO l or
AI_)I02. The Cimrt on the left shows which
audio is played back _)r flint mode.
Notes:
The audio playback mode indicator,
AUDIO, is displayed in different colors
depending on fhe audio recording mode
(12- or 16-bit) used for the recording
being played back,
A white display indicates 12-bit audio
recording mode, and a green display,
16-bit audio recording mode,
• 16 bit audio recording in
mono (left channel only)
A UDIO 2
• 12 [)it audio recording in
stereo (Audio 2 channel
only)
• 16 [)it audio recording in
mono (right channel only)
82
Page 85

Dubbing to Another Digital Video Camcorder
You can also copy a recording to anotb_'r camcol'der wRh a DV jack using an optional
I)V cable. Be sure to attach fl_e included f_q'rite core to fl_e I)V cable (seepaNe 146).
To Use this Camcorder as the Playback Camcorder:
1. Make, sure all units are turn_'d off before making any conn_,ctions.
2. Connect one end of the optional I)V cable to each digital camcorder.
3. Press the camcorder's t_IAY/STILL bu_)n (b_/||) _) start playback.
4. While watching the playback on the monitor, start file receiving camcorder's record
mode flom the spot on the source tape you want to begin recording.
Notes:
It is recommended to use the power supply instead of the battery for uniform
playback.
For digital dubbing, this camcorder can be connected to only one device at a
time This camcorder can also be used as the recording camcorder
Even though the DV cable is connected correctly, sometimes the image may not
appear during playback. If this occurs, turn off the power and make
connections again.
83
Page 86

Connecting to a TV (or VCR) with Audio/Video
(and/or S-VIDEO) Input Jacks
'It) connect your camcorder to a ['V (or VCR) with audio/video (or S Video) inputs, use
the supplied AudioiVideoiS Video cable. If your rv is already connected to a VCR,
attach the camcorder to the VCR and watch what the camcorder is recording or playing
on the TV.
TV or VCR
®
1. Make sure all units are turned off before making any connections.
2. Connect the white plug of the cable to the left AUI)IO IN jack on the TV (or VCR).
/Vote: Some VCRs or YVs do not offer left and right audio jacks. For units with
one audio jack, use the cable's white plug.
3. Connect the red plug of the cable to the right AUI)IO IN jack on the TV (or VCR).
4. Connect the yellow plug to the VIDEO IN iack on the TV (or VCR).
OR: Connect the S-Video plug for video for an S-Video connection,
5. Open the jack cover on the camcorder and connect the other end of the cable to
the AV+S iack on the camcorder.
Note: Hold in the catches on the side of the plug and pull it out to remove it
from the camcorde_ Do not pull on the cable without holding in the catches.
84
Page 87

Playback on a TV (or VCR) with Audio/Video/S-Video
Input Jacks
1. Turn on th_ _ ['V and tune it to the' vich'o input chann_'t or turn on the' VCR and place
it in the' 'lin_" or 'cam_'ra mode". (If"your VCR do_s not have a lin_" or cam_qa
mode,', consult the" VCR users guide.) Opt, rate the" TV as you normally do to s_'_, the"
signal coming fiom the" VCR.
2. Op_'n the LCD monitor.
3. Pn'ss in th__ Lock button and s_'t the POWRR switch to the PLAY position.
4. 'l_xlch the" on scre_'n I_[AY/5"77LI. button to b_'gin playback.
I)uring playback, use tile playback f_'atures.
5. Press S70P when you are finished.
Notes:
It is recommended to use the power supply instead of the battery for power to
achieve uniform playback.
Adjust the TV sound volume to its minimum level to avoid a sudden burst of
sound when the camcorder is turned on,
If you have a TV or speakers that are not specially shielded, do not place the
speakers next to the TV as interference will occur in the camcorder playback
picture
Dubbing to a VCR
1. Following the" illustration conn_'ct the" camcorder and the VCR.
2. Pn'ss in the" Lock button and s_'t the' POWER switch to the" PLAY position. Turn on
the" VCRs pow_'r, and insert the' appropriate" tape's in the" camcorder and VCR.
3. Mak_ _sure the" VCR is in th_ _appropriate, AUX (IANR or VH)EO IN) mo&" and in the"
Record Pause" mode'.
4. ls_' the' camcordors on-scr_'_,n FF, RtZIX,_and I)LAY/S77Ll. buttons to find a spot just
before tile edi>in point. Once it is reached, press PlAY/STILL on the camcorder.
5. When you're ready to start recording, press PlAY/STILL on the camcorder and press
tile appropriate record button on the VCR.
6. When you want to stop recording, press the VCR's pause button and press PIA}7
STlLL on the camcorder.
7. Repeat steps 4 through 6 for aclditional editing. Then stop the VCR and camcorder
when finished.
85
Page 88

This page left intentionally blank.
Page 89

Chapter 5
Advanced Features
Chapter Overview:
* Using the Menus for Advanced Adjustment
,, Menu Definitions
• Using the Advanced Features
Changing Entertainment. Again.
87
Page 90

Advanced Features
Using Mode and Menu Screens For Advanced
Adjustments
This camcorder is equipped wifll an on-screen menu system that simplifies many of tile
more detailed camcorder settings. Simply touch tile screen to make your selection.
1.
Open tile LCD monitor and adjust.
2.
Press in tile Lock button and set tile POWER
4y
AUTO
0
switch to CAMERA or PLAY_
Note: When playing a tape, the Mode screen
appears after the POWER switch is set to PLAY
(go to step 4)
3.
Set the" AU ['O/MAN[]AL/MAN[]AL LOCK switch
/o AUTO.
4.
Touch any point on the LCI) screen to display
tile Mode screen.
On-Screen button
On-Screen MENU
button
Notes,"
Certain menu items are common among the camcorder modes. If the DISPLAY
menu item, for example, is set to "DATE+TIME" in TAPE-PLAY mode, it will be
automatically set to "DATE+TIME" in other modes
The menu items are displayed in yellow when the corresponding functions are
selected The menu items are displayed in gray when the corresponding
functions cannot be selected.
The CONTROL dial can also be used to operate the Mode and Menu screens.
Rotate the dial to select an item and press it in to set the item.
The menu screen automatically turns off if no settings are made within five
minutes.
88
_[_ AUTO
88mi_
[_] AUTO
3DmiN
Note: When playing a card, first display a
full-screen still image (see page !28), and
then touch the LCD monitor to display the
Mode screen.
5.
Toud] tile f_'ature you want to select. Touch the
page indicator (1Z{, 2/3, or 3ZJ) to display tile
next Mode screen. If you want a Menu screen,
press the ME3iUbutton when it appears.
6.
Touch !_ or t to select the desired fl, ature or
menu, and then touch 5ETto set the selected
fl,aR]re or menu. Continue using !_ or tl" /o
select the item, and then touch SI£'E
Note: To adjust another menu item, touch
RETURN until the camcorder returns to the
item you want to set.
7. Touch RETZ/RX until tile menu screens turn off.
Page 91

Advanced Fea_u_s
Mode and Menu Screen Definitions
The fk)Ilowing charts contain brief definitions of tim fi'atures of the Mode and Menu
screens. These screens o_r different features _r each recording and playback mode.
For a more detailed explanation on how _) use each feature, refer to the corresponding
section.
DSC MODE Switch Set to DUAL or TAPE-- POWER Switch in
CAMERA.
Mode Screens
FADE Fades in and out of scen_s (s_pa_ 57).
GAMMA EFF. Adds brightness to dark image (s_ pa£_ 52).
QUICK RTRN Returns you to beginning of recorded segment (s_pa£_, 50).
SRCH Lets you visually search the tape in CAMERA mode (s_pa_e 5l).
MENU Screens
MANUAL SET Screens
The f\)tlowing menus are available when I_1 is selecmd.
PIC. | l)igitaI picture effects alk)w you to record with a more dramatic
DIS Factory Preset: ltefer to l)igital In ge S ) ze- (seep_£e 56)
EFFECt ON_ effec (sec page 108)
CAMERA SETMenus
The folk)wing menus ar__awfilaMe when r91 is selected.
PHOTC
SNAP
MULTI
FRAME
PHOTO SHOT
STILL
1
9
16
Alk)ws you to record still images of subiects with normal
sound on a tape. Only awtilable in 'IAPE mode
(see pages 62 @D
Used with the PHOTO SHOT tl, ature to make multiple
strobe recordings of fasbmoving subjects at intervals of 1/10
of a second using a 9 or 16 flame picture. Only available in
'IAPE mode (see pagt_s 60 6 i)
89
Page 92

Advanced Features
DGTL OFF The optical zoom limit is 10X. When OFF is set, digital zoom is
ZOOM not used.
Factory Preset: Allows you /o rise the Digital Zoom. By digitally
40 processing and magnifying images, zooming is possible from
10X (the optical zoom Iimi0 to a maximum of 40X digital
magnification.
400 Allows you to use the i)igitaI Zoom. By digitally processing and
"TAPE Select the recording tape speed (seo pa_ge 301.
SPEED
16:9 ])oes not display black bars. []se for normal recording.
AUDIO SET Menus
The f\)tlowing menus are aw_ilabh' when _ is selected.
AUDIO 12 bit Factol T Preset: Enables vide() recording of stereo sound on f\)ur
MODE separate channels.
ZOOM
M1C
WIND Mild wind noise is reduced automatically.
SP
LP
OFF
ON
16 bit Enables video recording of stere() sound on two separate
AUTO
TELE
OFF
NORMAL
STRONG
OFF
magnif_'ing images zooming is possible from lOX (the optical
zoom limit) to a maximum of 400X digital magnification.
Allows you to record black bars at the top and bo_)m of the
screen to produce a wide screen effect.
channels.
Allows you to use the zoom microphone to record audio
according _) the magni_cation of the zoom lens. You can also
use the zool]l iTnicrophone _) record sounds ill the distance
(,veo page 110).
Strong wind noise is largely eliminated.
Lets you record sounds without changes in wind intensity
changing tonal qualities.
DIALOG
REC
OFF
ON
Set to ON to record from a distance at a lecture, workshop or
other occasion when the speaker's voice may blend with ambient
sounds, lse this to record the speaker's voice more distinctly.
9O
Page 93

Advanced Fea u s
LCD/VF SET Menus
The f\)tlowing menus are awfilable when ED is selected.
BACKLIGHT AUTO
NORMAL
BRIGHT
LCD BRIGHT
LCD COLOR
VF BRIGHT
Camcorder switches between NORMAL and Bikini'[{7 r
depending on the ambient lighting.
Jse _r indoors and moderate lighting.
Jse outdoors under strong lighting or bright sun.
Adiusts the brightness of the pic_]re on the LCI) monitor.
Adiusts the cok_r density of the picture on the LCD moni_
Adiusts the brightness of the picture in the viewfinder
moni_)r.
CLOCK SET Menus
The f\)tlowing menus are availabh' when (_) is selected.
DISPLAY
AREA
DYLT SAVE OFF
SE1TING
12H/24H 12H
OFF
DATE
DXIE+'IIME
ON
24H
The date/time does not appear.
The date appears.
The date and time appear.
World Clock: automatically adiusts the time to local time.
Enter area number to adiust (see [)aRe 114)
I)oes not set clock to Daylight Savings Time.
Advances the clock one hour/o I)aytight Savings Time.
[Jse this to set the time and date (see])aNe 26Z
Selects a 12 hour dock f\)rmat.
Selects a 24 hour dock f\)rmat.
91
Page 94

Advanced Features
OTHERS Menus
The f\)tlowing menus are awlilable when ETCis selected.
SOUND CHIME A chiming sound is mxlde when any operation is performed.
BEEP Beeps sound when any operation is performed.
OFF All confirmation sounds are turned off and shutter sounds
during PHOTOSHOTS are also turned off.
MEDIA OFF Media Display will not appear.
DISP
"lIME
CODE DISP.O_ Time Code is displayed on the Cal_Col"der.
TC OUT OFF Time Code is not displayed on 'I'V_
DEMO OFF Auto demonstratkm will not operate.
MODE
ON I¢IiCOI¢I)ING _7_) 724PE or I_EC'(_I¢I)IN(_ "ID MEMORY
CARD appears when recording a still image.
DISP.OF] Factol T Preset: Time Code is not displayed on camcorder.
ON Time Code is displayed on the TV. Frame numbers are not
displayed during recording.
ON Auto demonstratkm will operate (see pare 1l 7).
DSC MODE Switch Set to CARD - POWER Switch in CAMERA
Mode Screens
GAMMA EFF. Adds brightness to clxn'k im:lg_, (see pare 52).
SELF-TIMER Ref_,r to self timer operation (seepage 126).
92
Page 95

Advanced Fea u s
MENU Screens
CAMERA SET Menus
The f\)tlowing menus are avai]abh' when r91 is selected.
REC NOPLMAL Records images with standard image quality.
MODE
IMAGE 1280x960 hnages are recorded in 1280x960 pixels.
SIZE 640x480 Images are recorded in 640x480 pixels.
GUIDE OFF No Guide Frmnes are displayed.
FRM
ECONOMY Allows you take more shots than in NORMALInocle but with
a lower quality.
FINE Records in higher quality than NORMAL but with a lower
number of shots.
CLOSE_UP Displays a Guide Frame f\)r recording a close up face shot.
PORTRAIT Displays a Guide Fralne f\)r recording an upper body view of
a person.
FULL- Displays a Guide Frame f\)r recording a full body view of a
BODY person.
LCD/VF SET Menus
The f\)tlowing menus are availal)h' when leD is selected. Saln_ as on previous page.
CLOCK SET Menus
The f\)tlowing menus are available when (D is selected. Sam__ as on previous page.
OTHERSMenus
The folk)wing lnenus are awdlable when [T_ is selected.
FORMAT
SOUND
MEDIA
D1SP
EXECUTE
CHIME
BEEP
OFF
OFF
ON
Used to fi)rmat a card. This will erase all of its contents
(see pa,_e 12 7).
A chiming sound is made when any operation is performed.
Beeps sound when any operation is performed.
All confirmation sounds are turned off and shutter sounds
during PHOTOSHOTS are also turned off.
The Media Display will not appear.
RE(]ORI)ING 7_) 7ZIPI,2or RI!'(]ORI)ING 7_) MEMORY CMRD
appears when recording a still image.
93
Page 96

Advanced Features
DSC MODE Switch set to TAPE - POWER Switch in PLAY
Mode Screens
REW [_uch to rewind tap_ _.
PLAY/STILL 'l_)uch to start a tap(" playing. 'l_)uch again to display a still pictur('.
FF 'l_uch to fast f'ol_vard a tape.
STOP 'l_)uch to stop the current camcord_'r operation.
PB ZOOM 'lt_uch to activate playback zool_a (see page 72).
GAMMA PB 'lt_uch to increase the brightness of' a subject (see page 70).
AUDIO DUB Ref_'r to Audio Dubbing (see page 80).
AUDIO Selects audio playback mode (seepage 8'2).
INDEX Ref'_'r to using indexes (see pa,_e 74).
PLAYBACK SET Screens
The following menus are awdlabIe when _ is selected.
PIC. Digital picture effl'cts allow you to playback with a more
EFFECT dramatic effl'ct (seepa,qe Z$).
CAI_'URE EXECUTE Allows you to capture a still picture that has been recorded
for 30 seconds or mor_" on the tap_" and transfl'r it to the"
card (see page 79).
PB ZOOM 2X, 4X, 6X, Playback zoom magnification settings let you magnifiy' the
8X, or IOX playback picture up to 10X (seepa,_e 72).
MULTI 1, 9, or 16 Multiple Strobe' Playback lets you capture the action of' a
FRAME fast moving object at intervals of 1/10 of a second using a 9
or 16 flame picture (seepa,_e 7l).
LCD/VF SET Menus
The f\>tlowing m_'nus ar_"available when [_D is s_'h'ct_'d.Sam__as on pr_'vious page'.
94
Page 97

Advanced Fea u s
OTHERS Menus
The f\)tlowing menus are awfilable when ETCis selected.
REMOTE ON There is a buil_in remote sensor f_)r an optional remote control.
Set this fl, amre to ON to use an optional remote.
OFF Remote sensor is turned off.
SOUND CHIME A chiming sound is made when any operation is perf\)rmed.
BEEP Beeps sound when any operation is perf\)rmed.
OFF All confirmation sounds are turned off and shutter sounds
during PHOTOSHOTS are also turned off.
"rIME DISP. OFF Factory Preset: Time Code is not displayed on camcorder.
CODE
DISP. ON 'I'hTt_* Code is displayed on the camcordcr.
TC OUT DFF Time Code is not displayed on TV_
DN Time Code is displayed on the TV. Frame numbers are not
displayed during recording.
INDEX EXECUTE []se to find out if indexes f\)r the tape you want to playback arc
SRCH recorded on the card.
S-VIDEO OFF This is factoiT preset to OFE S VIDEO IN is turned off.
-IN
ON Set to ON to use the camcorder's S VIDEOIN jack.
CLOCK SET Menus
The f\)t]owing menus arc available when (_) is sch'ctcd.
DISPLAY OFF The date/time does not appear.
DATE The date appears.
DXIE+'nME The date and time appear.
DSC MODE Switch Set to CARD - POWER Switch in PLAY
Mode Screens
MUL'n SCRN Touch to dispkty a thumbnail of the images (,v_ t_ag_,12,'_>).
PB ZOOM Touch to activate playback zoom.
PROTECr Touch to protect an image flom being deleted (,v_page 129).
DEL 'lk)uch to delete an image (see page 130).
95
Page 98

Advanced Features
PLAYBACK SET Screens
The f\)tlowing menus are awfilable when D is selected.
P1C. Digital picture eff_'cts allow you to playback with a more
EFFECT dramatic eff_'ct (s_/)a_ Z:/).
SLIDE EXECUTE Play back consecutive still images recorded on a card
SHOW (s_!_!page 132).
SLIDE OFF Slide show ef'f_'ctsare off.
EFF.
OVERLAP A still image fades out as the next still image fades in. The
two images momentarily overlap.
WIPE A still image is replaced with the next still image first
PB ZOOM 2X, 4X. 6X, Playback zoom magnification settings let you magnif}' the
8X, or 10X playback picture up to 10X (see page 72).
OTHERS Menus
The f\)tlowing menus are awlilable when E/¢is s.>ct.d.
REMOTE ON There is a bull>in remote sensor fk)r an optional remote control.
OFF Remote sensor is turned off.
SOUND CHIME A chiming sound is made when any operation is perf\)rmed.
BEEP Beeps sound when any operatkm is perf\_rmed.
OFF All confirmation sounds are turned off and shutter sounds
appearing in the middle of the screen and gradually
expanding to fill the screen.
Set this f_'ature to ON to use an optional remote.
during PHOTOSHOTS are also turned off.
LCD/VF SET Menus
The f\)tlowing menus are awfilable when LCDis selected. Sam_, as on previous page.
CLOCK SET Menus
The f\)llowing menus are availabh' when (D is selected. Sam__as on previous page.
96
Page 99

Advanced Fea u s
Advanced Features
The' camcorder has many advanced features to mak_ _your recording look more
prof_'ssiona].
Night Mode
This fi'ature can make dark subjects or areas even brighter than they would be under
good, natural lighting. Although the recorded image is not grainy, it may have a strobing
effect due/o the slow shutter speed.
1.
NIGHT MODE switch
POWER switch IR LIGHT
button
Press in the Lock button while setting the
POWER switch to CAMERA.
2.
Set tim NIGH[' MODE switch to ON. ,_41(J'[tT
MOI)I,2 appears and the picture becomes
brighter.
3.
Press IR LIGHT button to make the picture
brighter.
_;I(;[[']rMODE changes to IR LIGHT l and the
camcorder emits infrared light flom the
translTtitter.
The picture becomes monochrome.
Each press of the IR LIGHT button increases the
IR light mode. Set tim IR light number higher
for darker Iocatkms.
]VI(._F.IrMOI)I/ I_ IR LIGHT 1
t1" tP"
Infrared
light
transmitter
4. When finished using Night Mode, set the NIGHT
Notes:
Use Night Mode when LIGHT appears on the display.
During Night Mode many of the camcorder's manual functions cannot be used.
The infrared light emitted from the camcorder illuminates up to a distance of
about 10 feet away with IR LIGHT3.
During Night Mode, it may be difficult to bring the camcorder into focus. Try
using a tripod or manual focus,
IR LI(;HT3" _1 IR LIGl_tTr2*
•Not available for recording on the card.
MODE switch to OFR
97
Page 100

Advanced Features
Program AE
You can set th(' camcorder to the b(_st shooting mode for a specific situation by selecting
one of the scen(, settings.
1.
Press in the Lock button while setting the
POWER swish to CAMERA.
In Record Standby, set the AU ['O/MANUAL/
_AUTO
_AUTO
_AUTO
_AUT0 3.
MANUAL _ 2.
_0FF
i
"°,00,,, E0÷1
MANUAL LOCK switch to MANUAL. ['he
J/IANIM1. screen will appear.
Touch S(2I!)_/I!'2/ItZNI/to display the S(]IL'_:E2/ItZNU
screen.
4.
Touch the desired scene setting.
• The selected scene setting is displayed in
yellow.
• If you select the 5Hill' SPI!TZI) or lYl)OS_JeE
scene setting, follow the steps on the next
page.
• To cancel selecting a scene setting, touch O[gt(
5.
Set the AU ['O/MANUAL/MANUAL LOCK switch
to MAN/AL LOCK to lock the selected scene.
98
';2°$2 ÷1,
/
• Tile selected scene indicator is displayed on
the LCD monitor.
6.
To cancel scene setting, touch Ot,7,'in step 4.
Notes:
Only one mode can be engaged at a
time,
Scene setting cannot be used with Night
Mode.
Select an Exposure Setting
1. After comph'ting steps 1 3 above touch
IZXPOSURtZto display th(' SCI;7_k'2/IEXg/
I']XPOSURI']adjustm(qlt SCl'(_(_n.
2. Touch !) or t1" to select the
F number.
 Loading...