

Page 1

Digital
Camcorder
User's G ide
Changing Entertainment.
Page 2

Jmp@ ant Enf@rmat @n
WARNING
To reduce the
risk of fire or
electric shock, do
not expose this
product or AC
charger to rain or
moisture.
To reduce the risk of electric
shock, do not remove cover (or
RISK OF ELECTRIC SHOCK
DO NOT OPEN
This symbol indicates _1_
"dangerous voltage"
inside the product that
presents a risk of
electric shock or
personal injury.
CAUTION: To prevent electric shock, match wide blade of plug to wide
slot, fully insert.
ATTENTION: Pour _viter les chocs _lectriques, introduire la lame la
plus large de la fiche dans la borne correspondante de la prise et
pousser jusqu au fond.
To reduce risk of injury, charge only rechargeable batteries
recommended by the manufacturer for this product. Other types of
batteries may burst causing damage and personal injury.
If the AC adapter is misplaced or needs to be replaced, obtain the
same type of adapter from an RCA dealer.
I AUTION
back). No user serviceable parts
inside. Refer servicing to qualified
service personnel.
This symbol
Alk
indicates
important
instructions
accompanying
the product.
FCC Regulations state that unauthorized changes or modifications to
this equipment may void the user's authority to operate it.
Product Registration
Please fill out the product registration card and return it immediately. Returning
this card allows us to contact you if needed.
Keep your sales receipt for proof of purchase to obtain warranty parts and service
and attach it here. Record the serial number and model numbers located on the
bottom of the camcorden
Model No.
Serial No.
Purchase Date.
Purchased From.
Page 3

ble @f ¢@n ents
Chapter 1: Connections & Setup
Parts Checklist ...................................................................................................... 6
Buttons and Controls .......................................................................................... 7
Using Some Basic Controls .................................................................................. 9
POWER CAMERA-OFF-PLAY Switch ............................................................. 9
Selecting the Camcorder Mode ................................................................... 9
MENU/DISPLAY Button ............................................................................... 10
CONTROL Dial ............................................................................................. 10
Using Optional Stereo Earphones ............................................................. 10
Getting Started .................................................................................................. 11
Unpack the Camcorder and Accessories .................................................... 11
Adjust the Hand Strap ................................................................................ 11
Attach the Lens Cap to the Camcorder ..................................................... 12
Attach a Power Supply ............................................................................... 12
Insert and Remove a Memory Card ........................................................... 13
Turn on Carncorder and Set to Full-Auto Mode ....................................... 14
Set the DSC MODE (DUALITAPEICARD) Switch to DUAL .......................... 14
Insert a Cassette Tape ................................................................................. 15
Use the LCD Monitor or Viewfinder to See What's Recording ................ 16
Start Recording ........................................................................................... 17
Play Your Taped Recording ........................................................................ 18
View Your Still Pictures ............................................................................... 18
Turn off the Camcorder .............................................................................. 18
Powering the Camcorder .................................................................................. 19
Attaching the Battery to the Camcorder .................................................. 19
Removing the Battery from the Camcorder ............................................. 19
Charging the Battery .................................................................................. 20
Battery Level Icon ....................................................................................... 21
Using the Power Supply ............................................................................. 22
Battery Care and Storage ........................................................................... 22
Using the Shoulder Strap .................................................................................. 24
Attaching the Lens Hood .................................................................................. 24
Install the Clock Lithium Cell ............................................................................ 2S
Set the Area, Date and Time ............................................................................. 26
Changing to the 24-hour Time Mode ....................................................... 27
Set Daylight Saving Time ........................................................................... 28
Displaying the Date and Time of Recording ............................................. 29
Set the Tape Recording Speed .......................................................................... 30
Chapter 2: Using the Monitors
Seeing What You Are Recording ...................................................................... 32
Using the LCD Monitor ............................................................................... 32
Using the Viewfinder ................................................................................. 34
(c-o_t#_ued o_ the next pa,_e) 1
Page 4

bJe @f ¢@ntents
User Modes ........................................................................................................ 3S
Select a User Mode ..................................................................................... 35
Using the Menu Screens ................................................................................... 36
Turn on Menu Screens (User Mode Set to AUTO) .................................... 36
Turn on Menu Screens (User Mode Set to MANUAL) ............................... 36
Turn on Menu Screens (User Mode Set to EASY) ...................................... 37
Turn Off the Menu Screens ........................................................................ 37
On-Screen Icons ................................................................................................. 38
Chapter 3: Recording
Recording Details ............................................................................................... 46
TAPE-CAMERA Mode-Recording on Tape ................................................ 46
DUAL-CAMERA Mode-Tape and Card Recording .................................... 47
CARD-CAMERA Mode-Recording on a Memory Card ............................. 48
Full-Auto Mode .................................................................................................. 49
Journalistic Shooting ......................................................................................... 49
Self-Recording .................................................................................................... 49
Quick Return ...................................................................................................... 50
Edit Search ......................................................................................................... 51
Gamma Brightness ............................................................................................ 52
Select the Audio Mode ...................................................................................... 53
Zooming ............................................................................................................. 54
Using the Zoom Buttons (W and T) ........................................................... 54
Optical Zooming ......................................................................................... 54
Digital Zoom ............................................................................................... 55
Macro Zooming .......................................................................................... 55
Digital Image Stabilization (DIS) ...................................................................... 56
Fading Scenes .................................................................................................... 57
Video Light (Optional) ...................................................................................... 58
Multiple=Strobe Recording ................................................................................ 60
Still Recording on Tape ...................................................................................... 62
Select Still-Recording Mode ....................................................................... 62
Time Code Display ............................................................................................. 64
Recording From an External Source ................................................................. 65
Connections ................................................................................................ 65
Turn On the S-Video input ......................................................................... 65
To Record From an External Source ........................................................... 66
Recording Tips ................................................................................................... 66
2
Page 5

ble @f ¢@n ents
Chapter 4: Playback
Playback Options ............................................................................................... 68
Tape Playback Using the LCD Monitor ...................................................... 68
Playback Using the Viewfinder .................................................................. 69
Playback Features .............................................................................................. 69
Still Playback ............................................................................................... 69
Shuttle Search ............................................................................................. 70
Gamma Playback ........................................................................................ 70
Multiple-Strobe Playback ........................................................................... 71
Digital Effect Playback ............................................................................... 72
Dubbing images from a Tape to a Card ........................................................... 73
To Dub an image ........................................................................................ 73
Audio Dubbing Feature ..................................................................................... 74
Audio Playback Mode ....................................................................................... 76
Dubbing to Another Digital Video Camcorder ................................................ 77
Connecting to a TV (or VCR) with Audio/Video
(and/or S-VIDEO) Input Jacks............................................................................ 78
Playback on a TV (or VCR) with Audio/Video/S-Video
input Jacks ........................................................................................... 79
Dubbing to a VCR ....................................................................................... 79
Chapter 5: Advanced Features
Using Mode and Menu Screens For Advanced Adjustments ......................... 82
Mode and Menu Screen Definitions ................................................................ 83
Advanced Features ............................................................................................ 92
Night Mode ................................................................................................. 92
Program AE ................................................................................................. 93
White Balance Adjustment ........................................................................ 94
Exposure Control ........................................................................................ 95
Shutter Speed Control ................................................................................ 96
Auto and Manual Focus ............................................................................. 98
Digital Picture Effects ............................................................................... 100
Wide Mode (16:9) ..................................................................................... 101
Using the Zoom Microphone ................................................................... 102
Dialog Recording ...................................................................................... 104
Wind Cut ................................................................................................... 105
World Clock ............................................................................................... 106
Setting the Confirmation Sound ............................................................. 108
Demonstration Mode ............................................................................... 109
(conti_wd on the? _ext /)age) 3
Page 6

bJe @f ¢@ntents
Chapter 6: Digital Still Camera
Card Recording ................................................................................................ 112
Select Picture Quality and Image Size ..................................................... 113
Recording with a Guide Frame ................................................................ 115
Recording with the Self Timer ................................................................. 116
Formatting a Card .................................................................................... 117
Card Playback ................................................................................................... 118
Delete Protection ...................................................................................... 119
Deleting Stored Images ............................................................................ 120
Slide Show Playback ................................................................................. 122
Dubbing Images from a Card to a Tape .................................................. 124
Chapter 7: Viewing and Downloading
System Requirements for PhotoStudio 2000® .............................................. 126
Loading PhotoStudio 2000 .............................................................................. 127
How to Handle a CD-ROM ....................................................................... 127
Attaching the External Card Reader to Your Computer ........................ 128
Downloading Still images to Your Computer ......................................... 130
Changing the JPEG Default ...................................................................... 132
Connecting to a Computer Using an Optional DV Cable ....................... 133
Chapter 8: Other Information
Troubleshooting ............................................................................................... 136
Final Notes ....................................................................................................... 140
Care and Cleaning ........................................................................................... 147
After Using the Camcorder ...................................................................... 147
Cleaning the Camcorder .......................................................................... 147
Dirty Video Heads ..................................................................................... 148
Proper Care and Storage .......................................................................... 149
Tape Care and Storage ............................................................................. 149
Things to Avoid ......................................................................................... 150
Traveling Tips ............................................................................................ 150
Specifications ................................................................................................... 151
Limited Warranty ............................................................................................. 153
FCCDeclaration of Conformity and Industry Canada Information .............. 157
FCCDeclaration of Conformity ....................................................................... 158
Optional Accessories ....................................................................................... 159
Accessories Order Form ............................................................................ 161
Index ................................................................................................................. 164
4
Page 7

Chapter 1
Connections & Setup
Chapter Overview:
• Parts Checklist
• Buttons and Controls
• Getting Started
• Powering the Camcorder
• Using the Shoulder Strap
• Attaching the Lens Hood
• Setting the Date and Time
• Setting the Tape Recording Speed
Changing Entertainment. Again.
Page 8
¢@nnec @ns Setup
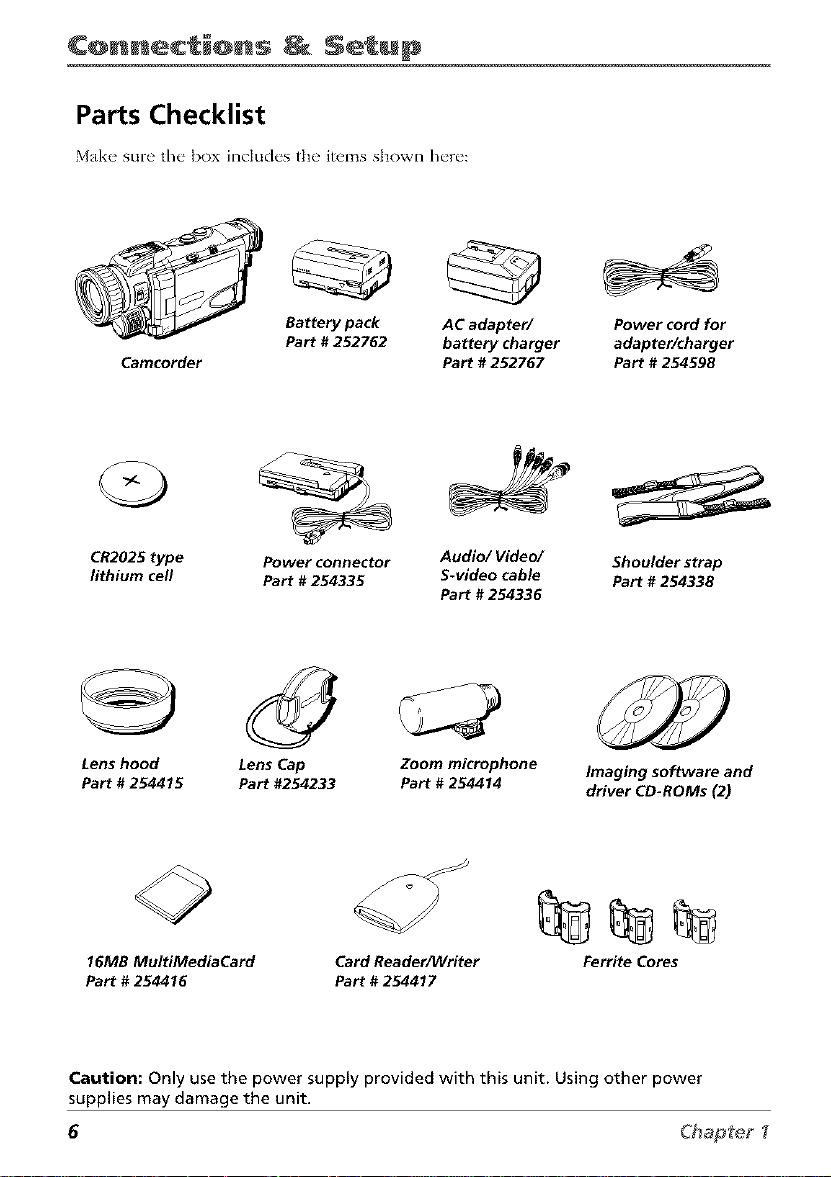
Parts Checklist
M_Lk__ sure the box includes the items shown here:
Battery pack AC adapter/ Power cord for
Camcorder
CR2025 type Power connector Audio/Video/ Shoulder strap
lithium cell Part # 254335 S-video cable Part # 254338
Part # 252762 battery charger adapter/charger
Part # 252767 Part # 254598
Part # 254336
Lens hood Lens Cap Zoom microphone
Part # 254415 Part #254233 Part # 254414
16MB MultiMediaCard
Part # 254416
Caution: Only use the power supply provided with this unit. Using other power
supplies may damage the unit.
Card Reader/Writer
Part # 254417
Imaging software and
driver CD-ROMs (2)
Ferrite Cores
6 Chapte_
Page 9

Buttons and Controls
STILL
button
UNLOCK
buHon
RECSTART/STOP
bu_on
¢@nnec_@ns _ Setup
NIGHT MODE
"OFF/ON switch
Terminal
'Audio/Video/S- Video
and DV jacks
DUAL/TAPE/CARD switch
Hand
strap
POWER
CAMERA/OFF/PLAY
switch
Zoom (W/T) and Volume
buttons (VOL +/-)
shoe
Manual focus ring
CONTROL dial
FOCUS switch
AUTO/MANU/PUSH AUTO
Microphone
PHONES jack
Chapter _ 7
Page 10

¢@nnec_@ns _ Setup
EASY/MANUAL/AUTO switch
MENU/DISPLAY
button
Navigation
buttons
Viewfinder
focus
control
loop
OPEN release
button
Card slot cover
Lithium battery
holder
card slot cover)
Card slot
CARD OPEN
button
TAPE OPEN
switch
Tripod
Camcorder Bottom View
8 Chap[e_
Page 11

¢@nnec @ns Setup
Using Some Basic Controls
Som_" of the" camcord_'r's basic controls ar_, dcscrib_'d her{'.
POWER CAMERA-OFF-PLAY Switch
To turn th(" powor on, hold down th(" Lock button
and set the" POWER switch to CAMERA or PLAY_
To turn the" power off set the" POWER switch to OFF
without pressing the Lock button.
Lock
button POWERswitch
DSC MODE
switch
Lock
button POWER switch
Selecting the Camcorder Mode
This camcorder can be used as a vide() camera for
recording and playing back vide() on tape or as a
digital still camera that records and plays back still
images on a ITtelTtOrycard.
The DSC MODE ('IAPEiI)UALiCARD) switch along
with the POWER (CAMERA/PLAY/OFF) switch tells
the camcorder what you want it to do.
DSC MODE switch in "rAPE and POWER
switch in CAMERA: Use to record moving
video and still images on a tape.
DSC MODE switch in DUAL and POWER
switch in CAMERA: Use this mode to record
both moving vide() and still images on the tape
and still digital pictures on the memo W card.
DSC MODE switch in CARD and POWER
switch in CAMERA: Use this mode to record
still digital pictures on thv mvmo D, card.
DSC MODE switch in "rAPE (or DUAL) mid
POWER switch in PLAY: Us{" this mode to
playback moving video on a tap(,.
DSC MODE switch in CARD and POWER
switch in PLAY: Use this mode fi)r playback of
still images recorded on the memo W card.
Caution:
Do not switch the DSC MODE switch
during playback or recording, as this may
cause damage to the tape or card_
Chapter _ 9
Page 12
¢@nnec i@ns Setup
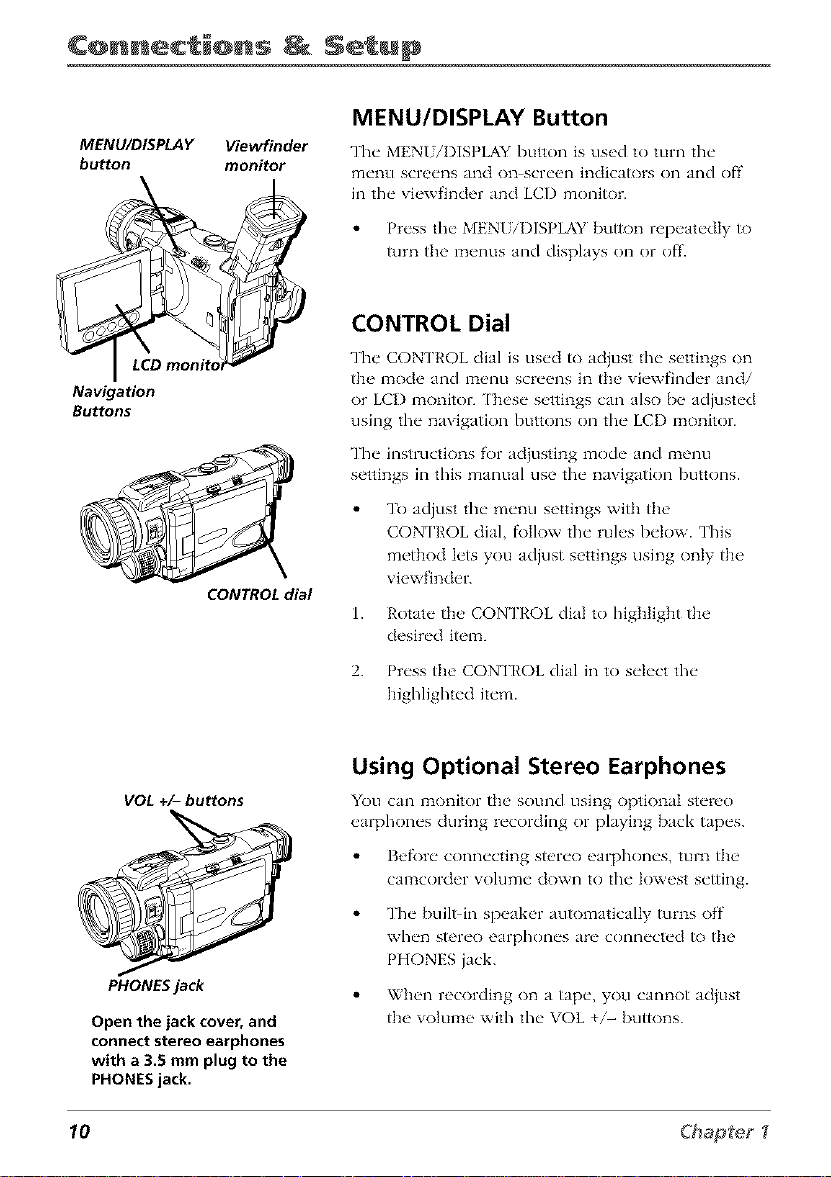
MENU/DISPLAY Button
MENU/DISPLAY Viewfinder
button monitor
Navigation
Buttons
CONTROL dial
The MENI iI)ISPLAY button is used to turn the
menu screens and on screen indicators on and off'
in the viewfinder and LCD monitor.
CONTROL Dial
The CONTROL dial is used to ad}ust the settings on
the mode and menu screens in the viewfinder and/
or LCI) monitor. ['hese settings can also be adjusted
using the navigation buttons on the LCI) monitor.
The instructions f'or adjusting mode and menu
settings in this manual use the navigation buttons.
1. Rotate the CONTROL dial to highlight the
2. Press the CONTROL dial in to select the
Press the MENI iI)ISPLAY button repeatedly to
turn the menus and displays on or off.
To adjust the menu settings with the
CON ['ROL dial, f\)Ilow tile rules below. This
method lets you adjust settings using only the
viewfinder.
desired item.
highlighted item.
Using Optional Stereo Earphones
VOL +/- buttons
PHONES jack
Open the jack cover, and
connect stereo earphones
with a 3.5 mm plug to the
PHONES jack.
10 Chapter "f
You can ITIonitor the sound using optk)naI stere()
_'arphon_'s during r_'cording or playing back tape's.
Befk)re connecting stereo earphones, turn the
camcorder volume down to the lowest setting.
The built in speaker automatically turns off
when stereo earphones are connected It) the
PHONES jack.
When recording on a tape, you cannot acijust
the volume with the VOL +/- buttons.
Page 13

¢@nnec @ns Setup
Getting Started
This s_,ction c]_'scrib_'s the' basics on how to s_,t up your camcordcr to r_'cord f_)r the"
first tim_'. Rof_,r to the oth_'r s_'ctions for clotai]_,d opt'ration and f'_'atur_" options.
Unpack the Camcorder and Accessories
The" it,'ms shown in Partx Cb(,_lalixt ar_" pack_'d with the' camcorch'r. If"any pi_'c_'s
ar_, missing or app_'ar damaged contact your ch'al_'r imm_,diately.
Remoxe the plastic film that coxers the f_ont and side Iogos on the camcorder. [Jse
your fingernail, not anything sharp, to remove.
Save all packing materials and box in case the camcorder exer needs to be
shipped or stored.
Adjust the Hand Strap
1. Lift the flap on the, hand strap and s_'parate the" Velcro strip.
2. Insert your hand so your fingers can comf\)rtably reach the buttons.
3. Adjust the strap to fit snugly.
4. Refasten the strap, and fold the flap back down.
Chapter _ 11
Page 14

¢@nnec_i@ns _ Setup
Attach the Lens Cap to the Camcorder
1.
To prevent losing the lens cap, attach the
string to the camcorder as".%t?olgt?and
attach the lens cap to the clip on the
handstrap during recording.
2.
When you are finished recording, press in
the sides of the lens cap and place it over
the lens of the camcorder.
Attach a Power Supply
Since" the" battci T must [)_,charged b_,f\)r_"it can b_"clsed the" first tim_', you n_,_'d to else an
AC outh't to pow_'r the" camcordor.
®
Power
connector
POWER switch
DC OUT jack
®
Power
cord
1. Place" the POWER switch to th__OFF position.
2. Pull out the"vi_wt'in&,r comph't_'ty and lift up.
3. Align the refi'rence mark on the power connector with the mark on the camcorder.
Hold the top of the power connector flush against the camcorder, and press the
bottom of the power connector in and slide it down until it locks into place.
4. Connect the power connector's small plug with the arrow facing up into the DC
O[}T jack on the adapter/charger.
5. Connect tim power cord to the adapter/charger, and insert the power cord's plug
into a working AC outlet.
12 Chap_eg
Page 15

¢@nnec i@ns Setup
Insert and Remove a Memory Card
This camcorder uses only MultiMediaCards (one
supplied) or SD memory cards (commercially
available) fi)r storage of still images.
Card slot cover
CARD OPEN
button MultiMediaCard
Insert a Card
1.
Place" the" POWER switch to the" OFF position.
2.3.Hold the camcorder as shozz n, and slide tim
CARD OPEN button to open the card slot cove_
Insert a card into the slot with the label facing up
and the notdled corner facing the lens. Fully
insert the card into the slot.
4. Close the card slot cover.
Remove a Card
1. P_'rform steps 1 and 2 above'.
2. Press the center of the card edge in to release the
card.
3. Pull the card straight out of the slot.
Caution
Do not remove the card from the
camcorder while data is being recorded
on the card This may result in deletion of
images or damage to the card,
SD Memory and MultiMediaCards
SD memo W cards and MultiMediaCards are used for
recording still images with this camcorder. Other
type cards will not work in this camcorder.
These images can then be transf_'rred to a computer
using the supplied readeriwrimr (see page 130).
t,br dt_tails on M_tltiM_dia a_d Sl) cards, st_t_
[)ag_s 144 146
Chapter _ 13
Page 16

¢@nnec @ns Setup
Set the DSC MODE (DUAL/TAPE/
CARD) Switch to DUAL
The' cmqnc'order operates as both n \qdeo c'mqncra f_)r
recording on tap_" and a digital cam_,ra for recording
still pictures.
Lock
button DSC MODE
Lock
button POWER switch
LCD monitor
switch
EASY/
MANUAL/
AUTO switch
Turn on Camcorder and Set to Full-
Auto Mode
1. Press in the Lock button and set the POWER
2. Set the EASY/MANUAL/AUFO switch to AUI'O
3.
Caution: Do not change the DSC MODE
switch during recording or playback as it may
cause damage to your tape or memory card.
Set the, DSC MODE switch to DUAL to record
both video on tap_, and still pictures on the
MultiMediaCard.
Set the DSC MODE switch to 'IAPE to record
vide() on tape.
switch to the CAMERA position. The camcorder
enters the record stand,by mode.
Note: The camcorder automatically turns off
to save battery power if you leave it in record-
standby mode for more than five minutes. To
turn it back on, set the POWER switch to OFF.
Press in the Lock button and set the POWER
switch to CAMERA.
to have the camcorder auto_z_atically select the
best settings fk)ryour recording. AU7D appears
in the viewfinder or in the LCI) _:_onitor.
Notes:
Any manual setting is cancelled,
Details about the User Modes using
the EASY/MANUAL/AUTO switch are on
page 35.
S_,t the FOCUS switch to AU['O to have the
camcorder automatically focus for you.
14 Chapte_
Page 17

Mini_'NTSC
Mini DV Cassettes
This camcorder is designed to
work exclusively with digital
video cassettes. Only cassettes
marked with a Mini DV logo can
be used with this unit. Also keep
in mind that this camcorder is not
compatible with ()tiler digital
media tape formats.
Cassette
Cassette holder Erase
compartment Protection
door_
PUSH
here to Mini DV
close tape TAPE OPEN
the switch
cassette
holder.
¢@nnec @ns Setup
Insert a Cassette Tape
1. Make sure the camcorder is conn_,cted to a
power supply.
2. Press in the Lock button and set the POWER
switch to tile CAMERA p()sition.
3. Hold the camcorder as shown. Slide and hold
the [APE OPEN switch in tile directkm of the
arrow and open tile cassette compartlTtent door
completely.
Important: The cassette holder extends and
opens automatically. Do not open or close the
cassette compartment door while the holder
is opening.
Be careful not to touch the inside of the
cassette holder as you may hurt yourself.
4. Fully insert a Mini I)V tape with the tape
window facing up and the Erase Protection tab
facing out.
Note: Make sure the Erase Protection tab is in
the position that allows recording. If not,
slide the tab. Some tapes have removable
tabs. If the tab has been removed, cover the
hole with adhesive tape
5. Gently push on the area mark_,d PISH until the
cassette holder locks into place.
Important: The cassette holder retracts
automatically. Wait until it is completely
retracted before closing the cassette holder
coveE
6. To close, the cassette compartm_,nt door pr_,ss
the center of the door until it locks into place.
Important: If the battery is how, you may not
be able to close the cassette holder. Do not
apply force. Replace the battery with a fully
charged one or connect the power supply.
Notes:
You can't open the cassette tape holder
unless a power supply is attached.
The cassette tape holder can't be opened
while the camcorder is in the record
mode
Chapter _ 15
Page 18

¢@nnec_i@ns _ Setup
Use the LCD Monitor or Viewfinder
to See What's Recording
Using the LCD Monitor
1. Remove the h'ns cap.
2. Slide the OPEN button in the direction of the
3. You can tilt the monitor up to 180 fi)r
Navigation
Buttons
LCD OPEN
monHor button
4. The brightness of the LCI) monitor can be
arrow and open the LCD monitor 90.
convenient viewing while recording.
adiusted clsing the on screen menus
(see page 33).
Notes:
Adjusting the monitor brightness does
not affect the recorded image on the
tape.
When the monitor is open, the
viewfinder automatically turns of_
When the monitor is closed, the
viewfinder automatically turns on,
If the vertical rotation of the monitor is
between 135_and 180°when in one of
the CAMERA modes, both the monitor
and viewfinder are on.
Viewfinder
Eyepiece focus
control on
bottom of
viewfinder
Using the Viewfinder
1. Remove the h'ns cap.
2. Close the moniR)r.
Note: If the monitor is open, the viewfinder
turns off.
3. Pull the viewfinder completely out and lift it
tip.
4. Ad}ust the viewfinder to a comR)rtable viewing
position.
5. Slide the eyepiece R_cus control to adjust the
focus of the viewfinder for your vision.
16 Chap[e_
Page 19

¢@nnec @ns Setup
STILL
button
RECSTART/
STOP button
LCD monitor
DSC MODE
switch
Lock
button switch
Power Zoom
W and T
buttons
EASY/
MANUAL/
A UTO switch
Start Recording
1. Remove the lens cap, and ()p_ql the LCD
monitor.
2.
Make sure you have inserted a cassette for video
recording and/or a memo W card f\)r recording
still pictures.
Place tim EASY/MANUAL/AIYI'O switch to the
3.
A[ Yl'O position.
4.
Place the FOCUS switch to the AUtO positkm.
5.
Place tim I)SC MODE switch to the DIAL
positk)n.
6.
Press in the Lock button and set the POWER
switch to tim CAMERA position.
7.
Record video on tape or a still picture on the
memol T card.
Record Video on the Tape
• Press and release the REC STAR'IVSTOP button
to start and stop recording on the tape.
• RIX] appears in tim viewfinder or LCI) monitor
while the camcorder is recording (but wont be
recorded on the tape).
• When you are not recording, the camcorder
enters the record pause mode and I)AUSP2
appears in the viewfinder or on the LCD
monitor.
Record a Still Picture on the Memory Card
• Place the camcorder in record pause mode
U'AUSE appears in the viewfinder or on the
LCD monitor).
• Use the power Zoom W,q" buttons to fiame
your subject.
• Press the S ['ILL button to record a still picture
on the memo W card. RtX]ORI)ING 7}0
ME,*dORY CAR1)appears in the viewfinder or
on the LCI) monitor.
Chapter _ 17
Page 20

¢@nnec_@ns _ Setup
VOL +/- DSC MODE
buttons switch
t_
button POWER
I tt
switch
2
Play Your Taped Recording
i. Set the, I)SC MOI)E switch to [APE.
2. Press in the Lock button and set the POWER
switch to the PLAY position.
3. Press _ or _ on the LCD monitor to rewind
or fast fol_vard the tape to the desired point.
4. Press I_/ll to begin playback.
5. Press • when finished playing the tape.
Note: Sound will play back if the LCD monitor
is open or closed. To adjust the volume, use
the Zoom W/T buttons (also labeled
VOL +/-).
More inf'ormaton about using the LCI) monitor
and viewfinder can be found o_ pa_es 3234.
View Your Still Pictures
1. Set th_ _ I)SC MOI)E switch to CARI).
2. Press in the Lock button and set the POWER
switch to the PLAY position.
3. If" d_ , image you warn to se_, does not app_,m on
the monitor press _1 or _ to search through the
flmmbnail imagus.
_PLAYBACK 100-0006
NOBMAL PAGE1/2
PB I I 4 I _* I
4. When you see th_, image you want to display
hightiglm, d, press PB to display k full screen.
Turn off the Camcorder
i. Set the, ] O_ER switch to OFF.
2. Close fl_e LCI) monitor and replace fl_e h'ns cap.
18 Chapfeg
Page 21

¢@nnec_@ns _ Setup
Powering the Camcorder
YOu can pow_q your camcorder with a batt_q T or th__ AC adapter/charger. The barrel T must
b__charged as descrihed o_ the _e:ct page b_f\_re it can b__used to power file camcorder.
Attaching the Battery to the
Camcorder
1. Make sure the P()WER switch is set to OFR
2. Pull the viewfinder all the way out and lift it up.
3. Align tile _ mark on the side of the batte W to
the _1 on the camcorder.
4. Press the battery in and slide it down until it
locks into place.
Cautions:
Always stop recording or playback and
place POWER switch in OFF before
attaching or removing the batteo_
Removing the battery while the
camcorder is recording or playing back
may cause damage to the tape or card.
Remove the battery if the camcorder will
not be used for a long period of time.
UNLOCK
button
Use only the recommended batteries for
this camcorde_ Use of other batteries
may present a risk of fire or explosion
Removing the Battery from the
Camcorder
1. Make sure the POWER switch is set to OFR
2.
Pull the viewfinder all the way out and lift it up.
Press and hold the UNLOCK button in the
3.
direction of tile arrow, slide tile battel T up, and
relTtove it.
Chapter _ 19
Page 22

¢@nnec @ns Setup
Charging the Battery
I. Remove the pow_'r connectors cane from the
2. Connect the supplied power cord to the AC
• " " "tor
CHARGE POWER
3. Align the relY'fence mark on the battery with the
4. The CHARGE indicator will turn off when the
5. Slide the battery pack out of file adapter charger
Notes:
AC adapter/charger if attached.
power socket on the AC adapter/charger, and
insert the AC plug into a working AC outlet. The
POWER indicator lights.
mark on the adapter/charger. Slide the batte W
into the groove until it locks into place. The
CHARGE indicator lights.
battery is fully charged. I nplug the power
supply from the AC outlet.
and renlove it.
Tip
Before extended use, it is
recommended that you prepare
enough battery packs to cover 3
times the planned shooting time.
if a protective cap is on the battery, remove
it before use or charging.
Charge the battery in temperatures between
50° and 90° Fahrenheit (10_35 ° Celsius).
Charging times are based on a fully
discharged battery and vary depending on
temperature and battery conditions.
if you store a partially charged battery for a
long period of time, its performance is
reduced.
Charging and discharging isn't possible if the
wrong type of battery is used.
if the battery operation time remains
extremely short even after having been fully
charged, the battery may be worn out and
needs to be replaced.
20 Chap_e_
Page 23

Approximate Charging Time
Battery Charging Time
252762 approx. 100 rain.
252763 approx. 160 min
Approximate Recording Time (in Minutes)
¢@nnec @ns Setup
Battery Viewf_lderOn
252762 110
252763 220
Note: Recording time is reduced significantly when you use the
zoom or record-standby modes or LCD monitor repeatedl_
Battery
level icon
BATTERY IS
TOO tOW. I_
Battery Level Icon
The batte W level icon appears in the viewfinder or
LCI) monitor and shows the amount of power lel_ in
the rechargeable battery. While using the LCD
monitor, press the MENUiI)ISPLAY button to display
the icon.
When the battery power becomes ve W low, a
warning indicator will appear. Replace the batte D'
pack.
LCD Monitor On
90
180
Notes:
The battery level icon is not recorded on
the tape.
The remaining battery indicator is only
an approximation of actual time left.
Use of the Zoom WiT buttons during low
power conditions may cause the
camcorder to suddenly shut off.
Chapter _ 21
Page 24

¢@nnec_@ns _ Setup
Battery Care and Storage
After repeated charging and use, battel T life gradually decreases. Wh_'n opt, ration
time is too short to be useful, the battel T should be replaced.
If the batte W pack becomes too hot, remove it from the camcorder and let it coot
down.
Do not short the battel)"s terminals.
Do not attempt to disassembh" or modif_y ' the barrel)'. ']'here are no user_serviceable
parts inside.
/se the batte_ T only with specified adapter/chargers and camcorders.
Throwing the battel T into a fire or exposing it to excessive heat over 149F (65C)
could be hazardous.
Using the Power Supply
['h_" power supply attaches to the' c tmcorder and h'ts you power it directly from standard
household power. The power supply operates on 110 240 xolts, 50/60 Hz.
Power
connector
POWER switch
®
DC OUT jack
®
Power
cord
22 Chap_e_
Page 25

¢@nnec @ns Setup
1. Place the POWER switch to the OFF position.
2. Pull out the viewfinder completely and liR up.
3. Align the refl'rence mark on tim power connector with tim mark on tim camcorder.
Hold the top of tim power connector flush against tim camcorder, and press the
bottom of the power connector in and slide it down until it locks into place.
4. Connect tim power connector's small plug with the arrow facing up into the DC OUP
jack on tim adapter/charger.
5. Connect tim power cord to the adapter/charger, and insert the power cord's plug
into a working AC outlet.
Caution: Only use the power supply provided with this unit. Using other power
supplies may damage the unit.
Removing the Power Supply
1. Mal<__ sure the" POWER switch is set to OFF.
2. Pull tt_ _ vit'wfindt'r all tht" way out and lift it up.
3. Pwss and hold tt_' I NLOCK button in the" ciirection of the arrow and wmow" the
po_,ver conn/_ctor.
Caution: Always stop recording or playback and place POWER switch in OFF before
attaching or removing the battery. Removing the battery while the camcorder is
recording or playing back may cause damage to the tape or card.
Using an Optional Plug Adapter in Foreign Countries
An optional plug adaptor might I)__r('quirod in sore(" countri('s.
AC Plug Adapter
1. Plug tim power supply's plug into the AC plug aclapter.
2. Plug the AC plug adapter into the AC outlet.
Chapter _ 23
Page 26

¢@nnec @ns Setup
Using the Shoulder Strap
['h_' camcorder's shoulder strap is design_,d to let you carl T the camcorder from your
shoulder and when ready bring the camcorder to shooting position in one quick
1. Following the illustration, thread the strap through the eyelet.
2. Fold tile strap back and thread it througll the buckle.
3. Repeat the procedure to attach the other end of the strap to the other eyelet located
under the hand strap. Make sure the strap is not twisted.
Caution: When carrying the camcorder with the shoulder strap, you should close the
LCD monitor and rotate the viewfinder down and slide it in. This helps prevent
possible damage to the monitor or viewfinder from bumping against your body as you
move. Make sure the shoulder strap isfirmly attached before using it to carry the
camcorder.
Attaching the Lens Hood
When recording outdoors on a sunny day or in a location with bright lighting attach the
supplied h'ns hood to the camcorder.
Turn the lens hood in the direction of the
arrow to attach it.
To remove the lens hood, turn it in the
opposite direction.
Notes_
The lens cap can still be attached on top
of the lens hood.
Filters and other accessories cannot be
attached on fop of the lens hood,
24 Chapfef
Page 27

¢@nnec @ns Setup
Install the Clock Lithium Cell
The supplied lithium cell must be installed f\)r the camcorder to remember the date and
time settings.
1.
Slide the CARD OPEN button in the direction of
Card slot cover
tile arrow to open the card slot cover.
Pull out the cell bolder using the tip of a
ballpoint pen or other pointed object.
Insert the lithium ceil into the cell holder with
3.
the + side of the ceil facing the + side of the
holder.
CARD OPEN Lithium cell 4.
button holder
Insert the cell holder back into the compartment.
Close the card slot cover.
5.
To Remove the Clock Lithium Cell
Peribrm steps 1 and 2 above, and Iili out the lithium
cell fiom the cell holder.
Notes."
Set the date and time after inserting a
lithium cell Not setting the date and
time causes extra wear on the lithium
cell
Replace the cell with a new CR2025
lithium cell when the time display starts
to fall behind the correct time.
Important: Lithium cell battery. Replace only with 3-volt lithium cell-such as
CR2025, Use of other cell presents a risk of fire or explosion, Must be disposed of
properly, Never handle punctured or leaking cell May cause burns or personal
injury.
Keep out of the hands of children. Can cause death or injury if swallowed, If
swallowed, consult a physician immediately for emergency treatment.
The Lithium cell used in this device may explode resulting in a fire or chemical burn
if mistreated Do not recharge, disassemble, heat above 212_F (!00_C), or incinerate
Never use metallic tweezers to hold the cell, and never short circuit the + and -
sides of the cell
Chapter _ 25
Page 28
¢@nnec @ns Setup
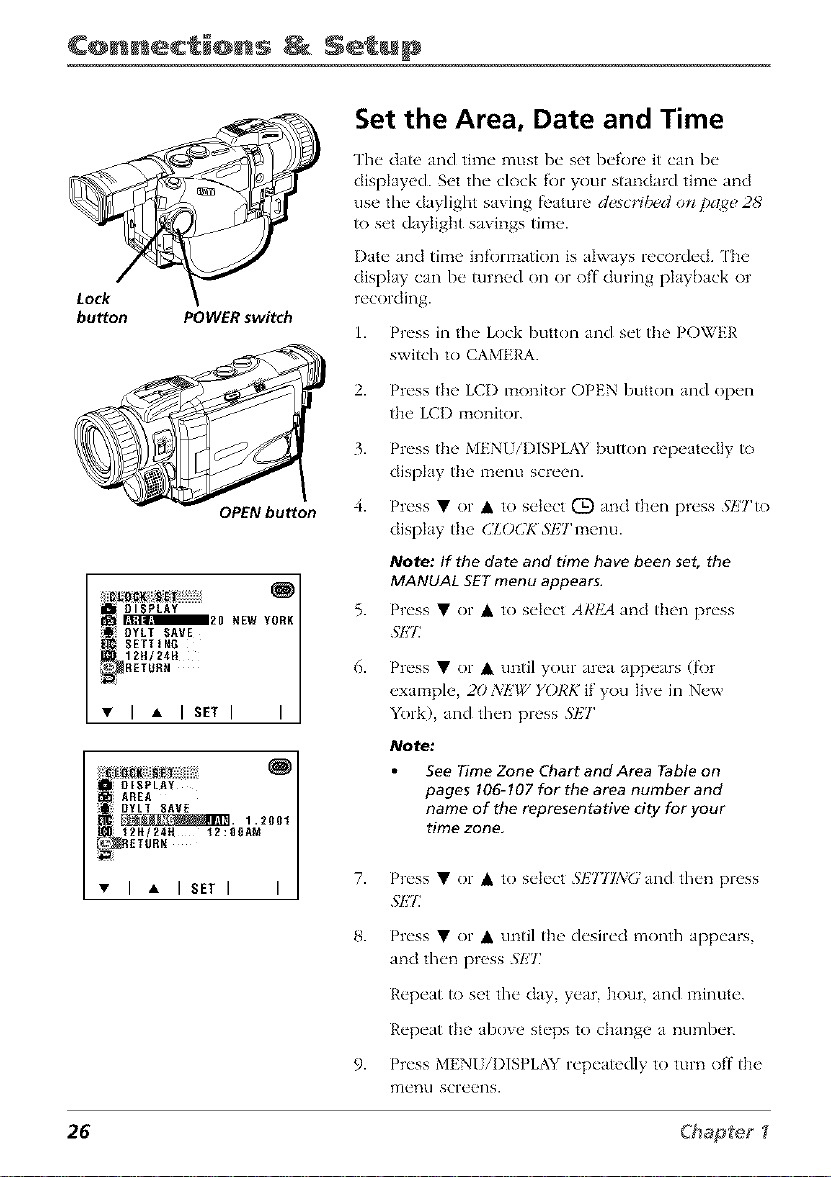
Set the Area, Date and Time
The date and time must be set before it can be
displayed. Set the clock for your standard time and
use the daylight saving fi'ature desc,q&_d on pa_e 28'
to set daylight savings time.
Date and time information is ahvays recorded. ['he
Lock
button POWERswitch
OPEN button
iOISPLAY
_20 HEW YORK
i_ OYLTSAVE
i 12H/24H
RETURN
SETTING
• I • ISETI I
i OISPLAY
i AREA
I DYLT SAVE
_;_. 1.2ool
i 12H/24R 12:00AN
RETURN
i :1
• I • ISETI I
display can be _]rned on or off during playback or
recording.
1. Press in the Lock button and set the POWER
2. Press the LCI) monitor OPEN button and open
3.
4.
5.
6.
7. Press • or • to select SI':777NG and then press
switch to CAMERA.
the LCI) monitor.
Press the MENI iI)ISPLAY button repeatedly to
display the menu screen.
Press • or • to select (D and then press .g/Z'/'to
display the dZOCK SI,II" menu.
Note: If fBe date and time have been set, the
MANUAL SET menu appears.
Press • or • to select ARt_ and then press
._I':T
Press • or • until your area appears (fi)r
example, 20 NEW YORK if you live in New
York), and then press SET
Note:
See Time Zone Chart and Area Table on
pages !06-107 for the area number and
name of the representative city for your
time zone,
.gI,]'l:
8. Press • or • until the desired month appears,
and then press .gET:
Repeat to set the day, year, hour, and minute.
Repeat the above steps to change a number.
9. Press MENI/I)ISPLAY repeatedly to turn off the
menu screens.
26 Chapteg
Page 29

i OISPLAY
AREA
DYLT SAVE
ETTI_G
tETURN 24H
• I • ISETI I
¢@nnec_@ns _ Setup
Changing to the 24-hour Time
Mode
1. After step 8 o / thep "ez'io spa ge, press • or •
O
to select 12[1/24[t_ and then press M,2T.
2. Press • or • to select 24EI, and then press
3. Press the MENU/I)ISPLAY button repeatedly to
tklrI] off' tile menu screen.
Notes:
The date and time are recorded on the
tape or card. Press the MENU/DISPLAY
button to turn the time display on or
of_
The menu screen automatically turns off
if no settings are made within five
minutes.
Chapter _ 27
Page 30

¢@nnec @ns Setup
Set Daylight Saving Time
If"your area obs_,rves daylight saving time turn on
this fenture so the cnmcorder can automatically set
its clock for daylight saving time.
1. Press in the Lock button and set the POWER
switch to CAMERA.
Lock
button POWERswitch
AREA
_ OISPLAY
12H/24H
SETTING 0
RETURN
• I • ISETI I
I_1 30rain _ 11 31AM
FADEI_AM_AI JI_RCH I"
Jtt_. 2.2882
Daylight Savings
indicator
2. Press the LCD iiaonitor OPEN button and open
the LCD monitor.
3. Press the MENI 7I)ISPLAY button repeatedly to
display the menu screen.
4. Press • or • to select (D and then press .';UI"
to display the CZOCK,';I_Tmenu.
5. Press • or • to select l,_7_7".';A_7_',and then
press SET
6. Press • or • to select ONand titan press SEZ
• The tilzae autolz_atically changes to daylight
savings time.
• The daylight savings indicator appears with
the time display.
7. Press the MENI/I)ISPLAY button repeatedly
until the menu screen turns off.
To Reset to Standard Time
Perf_)rm steps t through 6 above, and select
DY]/IrSAVk ' Ot,_,'.
28 Chapter
Page 31

¢@nnec +@n+ Smtup
Displaying the Date and Time of Recording
Folk_w the procedure below to display the date or date and time. You can display
tlw date and tim_" during both r_'cording and playback. ['he clock cell must be
installed and the time and date set before you can display and record them (see
pa_s 252,S').
1.
Follow steps 1 through 4 under 5"t_tl)cZrl{@t
5"azi_g ? b+>:).
2.
Press • or • to select I)ISPLAYand press 5"/z'T
3.
Press • or • to select I)A'It,_ DA7I'J+JIMPJ,or
ObT:and press SEE
{i ii/ DYLT SAVE OATE÷TIME
I SETTInG
i12H/24H
RETURN
DATE
• I • ISETI I
FAOEIGA_MAI JUN. 2.2002IO:3OAN
50min I secxl
• Select !)AT]alto display and record the dato.
• Select DA7E+77ME to display and record the
date and time.
• Select Obl,'to turn off the date and time
display. It will not be recorded.
4.
Press the MENUiI)ISPLAY button repeatedly
until the menu screen turns off. The date or date
and time are displayed.
Notes:
Before recording, make sure that the
date and time have been correctly set
(see pages 26-28). If they have not been
set, the display will be left blank when
playing back the recording. The display
will also be left blank for unrecorded or
damaged portions of the tape
In TAPE-PLAY mode, the current date and
time are displayed when the tape is not
being played back.
Chapter _ 29
Page 32

¢@nnec @ns Setup
DSC MODE
switch
Lock
button POWER switch
_PHUT0 SNAP
[ SNAP EFF.
_ OGTL ZOON
16:9 LP
RETURN
• I • lSETI I
LP
Set the Tape Recording Speed
You can s_'h'ct the" LP tap_" recording sp_,ed and
record _)r approximately 50 percent more recording
time with the same picture quality as the SP
recording speed.
1. Place the I)SC MODE switch to the DIAL or
TAPE position.
2. Press in the Lock button and set the POWER
switch to CAMERA.
3. Press the LCI) monitor OPEN button and open
the LCI) monitor.
4. Press the MEN1. iI)ISPLAY button repeatedly to
display the menu screen.
5. Press • or • to select r91, and then press SET
6. Press • or • to select 72iPk'_';IVilz7),and then
press SI_T
7. Press • or • to select LPand then press .g/i7:
Notes:
Torecord in LPmode, be sure to usea
Mini DV cassette labeled for use with LP
recording speed.
Audio dubbing is not possible with LP
recorded tapes.
I_1 30rain L_
TapeSpeed
indicator
30 Chap{eg
Page 33

Using the Monitors
Chapter Overview:
• Seeing What You Are Recording
• Selecting a User Mode
• Using the Menu Screens
• On-Screen Icons
Chapter 2
Changing Entertainment. Again.
Gra])hics contained u,ith#l this-publication arejbr r_q)r_e_ltatio_l onli, 31
Page 34

Usin@ the _@nit@rs
Seeing What You Are Recording
1'o set, what is rt'cording, use t'itlwr tht" LCI) monitor or ti_e _it'wfindt'r monitor. When
tl/_2 LCD monitor is op_2n_ tl/_2 viewfincler Rn-ns off. _il/_2n you clos_2 the LCI) monitor> the
vi_2wfinck2r turns on.
Using the LCD Monitor
['h_' cuncord_'r>s LCI) monitor is a mini_ttur_" color scn,_'n their you can use f_)r n'cording
o1 playback. L Opt'n the LCI) 13_onitor. Tlw xicxvfindt, r Rlrns
Of 1'.
b_ tilled once it is open 9{)¸¸from tl/_2 c_Lmcorcler.
Tilt the monitor fol_v_ucl up i8{) ¸¸or down up
to 9{)¸¸.
• From a high angle (¸such as ov_2r "4crowd)
tilt t]/_2 monitor down [o r_2corcL
2. For comenient _it'wing tlw LCI) monitor can
• From a k)w angk2 (such as when kne_2Iing)--
tilt t]/_2 monitor up [o _x2corcL
Cautions
Never force the LCD monitor to rotate completely around. This could damage both
the monitor and/or the camcorder.
When carrying the unit with the shoulder strap, close the monitor to prevent possible
damage to it.
When the LCD COLOR menu item is adjusted, the picture on the LCD monitor may
differ from the picture actually recorded. Do not change the color setting unless it is
necessary. This adjustment only affects the screen picture, not the recorded image.
Adjusting the Screen Picture
If the" pictLH'C on tlK' SCn'_'n is difficult to s{'_" clu_"to JmbMnt lighting or other f_tctors
acljust the" scrc_'n picture s_'ttings.
1. Opma tlw monitor Jnd pn'ss the MENU/I)ISPLAY button n, pt, atcdly to dispk_y tlw
I]1 {'nLI scr{_t'n.
2. P,-<,ss• or •/o s{,](,ctLCD_,ndth,,n p,-<,ss.S'/:'TtoclispI;tythe l.(/l)/l't_._;IZTmenu.
3. Prt'ss • or • /o select I_(/lJ BI_I(;It7] I£1) (/01.0£, or Ut_BI_I(,'ItT; and then press
SIfT
32
Page 35

_ AUTO
• I • ISETI I
Oe¢_sDss k_crease
Usin@ the @n t@rs
LCD BRIGHT: Adiusts tim brightness of the
picture on the LCD moniR)r.
LCD COLOR: Adiusts the color density of tile
picture on the LCI) monitor.
VFBRIGHT: Adiusts the brightness of tile
picture in the viewfinder.
Note: Use the CONTROL dial to adjust VF
BRIGHT while looking through the
viewfinde_
4.
Press • or • to adiust tile item to the desired
setting and press .ql':7:
5.
Repeat_,dly press the MENU/DISPLAY button
until the menu screens turn off.
Note: Recording outdoors on bright, sunny
days can make the LCD monitor hard to see.
Use the viewfinder instead,
Adjusting the Screen Backlight
1. Op(ql th(" monitor and r('l)(_at('dly press th("
MENI /I)ISPLAY button to display thv mvnu
screen.
2.
Press • or • to select LeDand press S/S/'to
display the LCl;/_Y:SETrmenu.
3.
Press • or • to select BACKLIGHTand press
SP]7:
• I • ISETI I
4.
Press • or • to select A&7_), NORMAL, or
BRI(;H7 and press SET
AUTO: The camcorder automatically switches
between 3;ORMAL and BR_HTrdepending upon
light conditions. This mode is only awdlabIe in
the CAMERA modes.
NOI_IAL: For use indoors or under moderate
lighting conditions.
BRIGHT: For use outdoors under strong
lighting conditions, such as bright daylight.
5.
Press tile MEN{J/DISPLAY button repeatedly
until the menu screen turns off.
33
Page 36

Usin@ the @nit@rs
Using the Viewfinder
The camcorder's viewfinder is a miniature color monitor that displays wlmt the
camcorder is recording or playing back. For convenient viewing, rotate the viewfinder
up or down.
Opening the viewfinder
1. Pull out tlw viewfinder completely and lift up.
2. Adiust the viewfinder to a comfortabIe position.
Cautions:
Do not try to raise the viewfinder until it
is completely pulled ouL
Do not lift the camcorder by the
viewfinde_
Notes:
When the LCD monitor is open, the
viewfinder turns off.
Use the CONTROL dial to adjust the
brightness of the viewfinder with the
LCD/VF SET menu_
LCD monitor
Cautions:
34
Viewfinder
Closing the viewfinder
1. Lower tlw vJewfJnder and push it in comph'tely.
Eyepiece Focus Control
The' eyepiece focus control lets you set the focus of
the viewfinder f\)r your vision. If" you wear
eyeglasses you probably can operate the camcorder
without them.
It is easiest to set the correct fl)cus by focusing on
one of the viewfinder's on screen displays. Look
through the viewfinder and adjust the eyepiece focus
Eyepiece focus
control
Never force the viewfinder to rotate completely arouncL This will damage
the viewfinder andlor the camcorde_
When carrying the unit with the shoulder strap, put the viewfinder down
and in to help prevent possible damage to it.
control f\)r your vision.
1.
Slide the eyepiece focus control until the
indicators in the viewfinder are clearly visible.
Note: The eyepiece focus control does not
affect the focus of the image captured by the
camcorde_
Page 37

Usin@ the @n t@rs
User Modes
During recording, you can select ti_ree differem lser Modes that determine which
menus appear when you press the MENUiI)ISPLAY bu_)n. The menus have different
_mctions available on the menu screens that appear.
Select a User Mode
EASY/MANUAUAUTO
1. Open the LCI) monitor and adjust the angle f\)r
conw'niem viewing.
2. Set the DSC MODE and POWER switches to the
desired recording settings.
3. Set the EASY/MAN{]AL/AUTO switch to the
mode you want to use.
• Set the switch to AUTO fl)r normal recording.
These menus let you adjust all of the
camcorder functions except the manual
settings.
• Set the switch to EASY to display a menu
with only basic recording functk)ns.
• Set the switch to MANI AL to adiust all
settings including the manual settings for
fi)cus, shutter speeds, and exposure.
4.
The indicator for the mode you select is
displayed.
Notes:
The EASYIMANUAL/AUTO switch has no
function during playback
All manual settings are cancelled when
you set the EASY/MANUAL/AUTO switch
to AUTO,
The example screens used in this
manual assume the EASYIMANUALI
AUTO switch is set to AUTO unless
indicated otherwise.
The example screens in this manual are
for explanation purposes, and may
differ slightly from the actual screen
displays,
35
Page 38

Usin@ the _@nit@rs
Using the Menu Screens
During recording, the type of menu screens that appear depend on tt_e setting of the DSC
MODE and EASY/MANIAL/AU['O sw tc (seep'e,io_sp<g_% ' e menu screens can be
used to adjust the various settings of the camcorder.
Turn on Menu Screens (User Mode
Set to AUTO)
1.
_qth the EASYiMAN[]AL/AI2I'O switch set to
AUTO and the DSC MODE DUAL/IAPEiCARI)
switch set to [APE, press the MENUTDISPLAY
button repeatedly to display the menu screen.
2.
Press • or • to select the desired menu, and
then press SETto display the fi'atures of the
selected menu.
3.
Press • or • to select the desired menu item,
and press SET. ['he available settings f\)r the
selected menu item are displayed.
4.
Press • or • to select the desired menu
setting, and press .glxT_
• The selected menu setting is set.
5.
'lb adjust another menu item, press • or • to
select RI']TUI_'¢ and press 5l_7'until the
camco_ler returns _) the status in step 3 or 4,
and repeat the procedure _om that point.
0 0 SRAe
S_APEFF.
OGTL ZOOM
15:9 LP
RETUR[_
• I • ISETI I
_PHOT0 SNAP
,_ SHAP EFF.
_ i.trtr_iNff_l._lLpDGTLZOOM
IS:9
RETURN
• I • ISETI I
O
O
__l:+ HUT. SPEEII AUTO
t _!.%_° I
R[TORR
_°1", I_s,I I
36
Turn on Menu Screens (User Mode
Set to MANUAL)
All of the menus are displayed plus the MANdriL
3'ETmenu that lets you manually adjust focus,
shutter speed, and exposure.
1. With the EASY/MANUAL'AUTO switch set to
MANUAL and the I)SC MODE DIJALqAPEi
CARD swflch set to 'IAPE, press the MENU/
DISPLAY button repeatedly to display the menu
screen.
2. Follow steps 2 5 above to select and set a menu
item.
Page 39

WiND
SOUND
DISPLAY
RETURN
• I • ISETI I
Easy MENU Screen
for Tape Recording
SELF TIN[R
80Ut19
DISPLAY
}IETIIRlt
Usin@ the @n t@rs
Turn on Menu Screens (User Mode
Set to EASY)
These menus off_'r the" convenience of displaying
only the basic functions.
1.
With the EASY/MANUAL/AUTO switch set to
EASY and the I)SC MODE I)IJAL,'_I)kPEiCARD
switch set to 'IAPE, press the MENU/I)ISPLAY
button repeatedly to display the menu screen.
Note: There is also an EASY menu screen
when recording with the DSC MODE DUAL/
TAPE/CARD switch set to CARD
Turn Off the Menu Screens
• I • ISETI I
Pr_'ss the MENI._/I)ISPLAY I)utton rep_at_'dly until
the m_qm sc'r_'n turns off.
Easy MENU Screen
for Card Recording
Notes:
Certain menu items are common among the camcorder modes. If the
DISPLAY menu item, for example, is set to "DATE+TIME" in TAPE-PLAY
mode, it will be automatically set to "DATE+TIME" in other modes
The menu items are displayed in yellow when the corresponding functions
are selected. The menu items are displayed in gray when the corresponding
functions cannot be selected.
The CONTROL dial can also be used to operate the menu screens. Rotate the
dial to select an item and press it in to set the item This is convenient when
you are using the viewfinde_
The menu screen automatically turns off if no settings are made within five
minutes.
The EASY/MANUAL/AUTO switch has no function during playback.
All manual settings (except manual focus) are cancelled when you set the
EASY/MANUAL/AUTO switch to AUTO.
The example screens used in this manual assume the EASY/MANUAL/AUTO
switch is set to AUTO unless indicated otherwise.
The example screens in this user'5 guide are for explanation purposes, and
may differ slightly from the actual screen displays.
37
Page 40

Usin@ the @nit@rs
On-Screen Icons
Several displays appear on the LCI) monitor or in tile viewfinder to aid in the operation
of tim camcorder. Although it may look crowded, all of the icons shown below do not
appear on-screen at the same time. Also, not all screen icons are shown in the illustration.
Refi'r to the icon descriptions that f\)tlow.
GAMNA 1 O,
W---I----T ZOOM 2 REC
NIGHT NODE
SPORT JU,_. 2.2082
AUTO LIGHT
31/min LP _/_7 : 31 AM
FADEIGAMNA I ISRCH I
Recording Menu Icons
Warning Icons
Displayed for
Three Seconds
BATTERYIS
TOO LOW.
TC0:05:35
Playback Menu Icons
Displayed
After Three
Seconds
AUDIOI÷2
Description of Warning
hadicatcs that the" battel T is almost d_.pl_'tcd.
R_'plac_" it with a fully charged I)att_"W pack.
O _CARD
NORMAL
RECORDING TO
NEMORY CARD
A_ SLIDE SHOW [_
IGAMMAI I ICANCEL
Card Only Menu Icons
2]22
INSERT
A CASSETTE.
EJECT THE
CASSETTE,
CASSETTE
NOT
RECORDABLE.
THE TAPE
EN DS SOON,
CHANGE THE
CASSETTE,
38
No video cassette in camcorder. Insert a
cassette.
EJECT THE
CASSETTE.
Appears if the xideo cassette is defl'ctixe
and should be remoxed.
-PROTECT[TAB-'""_'_ "*_ Flashes when you twto record to a tape
_ * ¢ _ , . . with the protect tab in the protect positkm.
i,_l_E ' i:_113 Appears when a tape has almost reached its
-_ _ _ _ _ _ _- end during recording.
TAPE END
Appears when a tape has reached its end
during recording.
Page 41

Usin@ the @n t@rs
Displayed for Displayed
Three Seconds After Three
Seconds
DEW
DEW,
o
LAMP LAMP
"÷ -÷
Displayed for Five Seconds
Description of Warning
Appears if moisture occurs inside the camcorder.
When this icon appears, remove the tape and wait a
fl'w hours befl)re using tim camcorder again. The
camcorder will turn off 10 seconds after this
warning.
Flashes if the vide() heads are clogged and should
be cleaned.
Appears if the fluorescent lamp behind the LCI)
monitor is close to tim end of its service lift'. Call
your local authorized RCA dealer fbr service.
All warnings will be indicated by @ displayed in the
center of tim screen if the vertical rotation of the
LCD monitor is between 135 ° and 180 ° when in one
of tim CAMERA modes, or if one of tim manual
screens is displayed. [k) check the type of warning,
rotate tim monitor back to within 135 °, or press the
MENUiI)ISPLAY button to turn off the manual
Flashes when the MultiMediaCard is not inserted
correctly. Check card insertion.
Description of Warning
MEMORY CARD
FULL
NO DATA ON
MEMORYCARD
MEMORY CARD
ERROR
FORMAT
MEMORY CARD
MEMORYCARD
PROTECTED
DATA
PROTECTED
Appears when the MultiMediaCard's capacity has
been reached and it cannot store anymore images.
Delete some of the images or insert a new card.
Appears when MultiMediaCard has no data, or
when the data is corrupt.
Appears when there is data corruption or card is
recorded in a fl)rmat that is not compatible. Format
the card to use with this camcorder.
Appears when card has not been fl)rmatted.
Appears when the card is copy protected.
Appears when you are trying to delete protected
images or files.
(continued on next page) 39
Page 42

Usin@ the _@nit@rs
Displayed for Five Seconds
MEMORY CARD
READ ERROR
CANNOT
STORE DATA
Description of Warning
Appears when the selected image cannot be read by
the eameorder.
Appears when the camcorder cannot read any data.
Replace the card.
Card Playback Status Displays
CARD Indicates a card is inserted.
6/7 Current image number/total number of images.
NORMAL Picture quality indicator.
1280 Image size indicator (resolution widlh).
100-0006 Image file name.
._ I_ [] App,'ars ,vhe,_ camcorder is copying still picture
[] I_ -_ App,'al's when camcord,,r is copying a still picture
from card to tape.
from the tape R) the card.
40
Page 43

Osin@ the @n t@rs
Recording and Playback Icons
Date, Time, or Date and Time Icons
J UN. 2. 2002 lndica/es the current dale and time and is recorded when it is
1 0 :3 0A M displayed
Program AE with Special Effects Icons
SPORT
SUNUGHT
DUSK
PARTY
DIS (Digital Image
Stabilizer) Icon
Tape Speed Icon
LP
Appears when you select SPORTto record fast moxing action,
such as sporting events.
Appears when you select SI_:\ZI(_HTrtO record fast moving
subjects with little blur.
Appears when yoL1 select DILS'K to record scenes at twilight,
fireworks, etc.
Appears when you select I_ARTYto record scenes in direct
lighting, such as spotlights.
Appears when you are using l)igital Image Stabilizer.
Tape speed LP has been selected
Time Code Icon
TC0:06:20 Indicates the recorded time code.
(continued on next page) 41
Page 44

Usin@ the @nit@rs
Status Icons
REC
PAUSE
II
44
Time-Remaining Icon
120min
Appears when the camcorder is recording.
Appears during record stand[_y or record pause.
Appears when the camcorder plays a tape.
Appears during play pause.
Appears during fast fi)rward.
Appears during rewind.
Appears when timer is set.
Appears during self timer.
Indicates a MultiMediaCard is inserted or camcorder is
in Card Mode.
Appears when Automatic Daylight Savings f_'ature is on.
Indicates the approximate time remaining on the tape.
FocusIcon
MF
AUTO Icon
AUTO
Volume Indicator
IIIIr r r NVOLUME
42
Mi"is displayed when focus is set to manual.
AUTO appears while the camera is in full auto mode.
Appears during volume adjustment.
Page 45

Zoom Icons
Usin@ the @n t@rs
W---I .... T D-ZOOM 40
W---II .... T ZOOM 2
Appears during zoom with digital zoom f_'ature.
Appears during zoom with optical zoom f_'ature.
Audio Indicators
AUDIO1+2, AUDIO 1,
or AUDIO 2
Displays the audio playback mode.
NIGHT MODE Indicators
NIGHT MODE, IR LIGHT 1, Appears when the Night Mode fi'ature is
IR LIGHT 2, or IR LIGHT 3
actiwm, d.
Gamma Indicators
GAMMA1,
or GAMMA2
Appears when Gamma has been manually adjusted
during playback.
GAMMA Appears during recording when the Gamma Feature
is used _) make only the subiect brighte_
m
LIGHT
Appears during recording when the Gamma feature
is used to brighten the whole picture. The brighter
portions may appear washed out.
Appears when the Gamma f'_'ature needs to be
adiusted manually.
(continued on next page) 43
Page 46

This page left intentionally blank.
Page 47

Recording
Chapter Overview:
• Recording Details
• Recording Features
• Recording Tips
Chapter 3
Changing Entertainment. Again.
Grd[)bics co,ira#led u,itbi_l tbis publicatio_l a_',) ibr r_,])reJe_ltatio_l o_1I_, 45
Page 48

Recording Details
There are three recording modes you can select. %\PE CAMERA records moving vide() or
still pictures on the tape. I)UAL-CAMERA records both moving video or still pictures on
the tape and still images on the memory card. CARD CAMERA Ells the camcorder _) act
like a digital camera and record still images on the memo1 T card.
TAPE-CAMERA Mode-Recording on
Tape
1. S_t the EASY/MANUAL/AUTO switch to the
DSC MODE Zoom WIT
switch buttons
REC START/
STOP
button
LCD monitor
POWER switch
Lock
button
FOCUS Viewfinder
switch
EASY/MANUAL/
AUTO switch
A[ ]1'0 position.
2. Set the FOCUS switch to the AIYPO position.
3. Set tile I)SC MODE switch to tile 'IAPE position.
4. Press in the Lock button and set the POWER
switch to tile CAMERA position
5. Open tile LCI) monitor or adjust tile viewfinder.
6. Press the Zoom W or T button to zoom in or out
on your subject.
7. Press and release the REC S [AR'IVS ['OP button
to start recording, l@2C appears in the viewfinder
or LCI) monitor (but won't be recorded).
When finished recording, press and release the
REC S_IART/S ['OP button again to stop
recording. The camcorder is now in the record
pause mode. tMUSE appears in the viewfinder
or on tile LCD monitor.
Notes:
If the Record-Standby mode continues
for 5 minutes, the camcorder's power
shuts off automaticall_ Set the POWER
switch to OFF, and then back to CAMERA
to turn the camcorder on.
To remove the icons from the
camcorder's display during recording,
press the MENU/DISPLA Y button.
46
Page 49

STILL button
\
REC START/
STOP
button
LCD monitor
DSC MODE
switch
POWER switch
Lock
button
FOCUS
switch Viewfinder
EASY/MANUAL/
AUTO
switch
DUAL-CAMERA Mode-Tape and Card
Recording
1. Make sure a Mu]fiMedJaCard and I)V cassette are
inserted properly.
2. Set the EASY/MAN[)AL/AUTO switch to the
A[)['0 position.
3. Set the FOCUS switch to the AU'PO positkm.
4. Set the I)SC MODE switch to the DIAL positkm.
5. Press in the* Lock button and set the POWER
switch to the CAMERA position.
6. Open the LCD monitor or adjust the viewfinder.
7. Press tile Zoom W or T button to zoom in or out
on your subject.
8. Record video on tape or a still picture on the
memol T card.
Record Video on the Tape
• Press and release the REC STAR']'/STOI _ button
to start and stop recording on the tape.
RI/C app_,ars in the vi_'wfinch, r or LCI) monitor
while the camcorder is recording (but wont be
recorded on the tape).
When you are not recording, the camcorder
enters the record pause mode and I)AUSP]
appears in tile viewfinder or on tile LCD
monitor.
Record a still Picture on the Memory Card
• Set the camcorder to record pause mode.
INUSI£ app_,ars in the viewfinder or on the
LCI) monitor.
Press the S ['ILL button to record a still picture
on the memo W card. RECORI)ING 70
MEMORY (]ARI)appears in the viewfinder or
on the LCI) monitor.
(co ni _ ed o __e_ctpa_e_ 47
Page 50

STILLbutton
\
DSC MODE
switch
9. When finished recording, set the POWER switch
to OFF.
Notes:
If the Record-Standby mode continues
for 5 minutes, the camcorder's power
shuts off automaticall_ Set the POWER
switch to OFF, and then back to CAMERA
to turn the camcorder on.
To remove the icons from the
camcorder's display during recording,
press the MENU/DISPLA Y button.
CARD-CAMERA Mode-Recording on
a Memory Card
1. Insert th__suppli_'d MultiMediaCard.
2. Set the EASY/MANUAL/AUTO switch to AUTO.
3. Set the FOCUS switch It) AU 1'O.
4. Set the I)SC MODE switch to CARD.
5. Press in the Lock button and set the POWER
switch to CAMERA.
POWER switch
Lock button
FOCUS
switch Viewfinder
EASY/MANUAL/
LCD monitor AUTO switch
48
6. Open tile LCD monitor or adjust tile viewfinder.
7. Press the STILL button to record a still image of
the subject.
8. When finished recording, set the POWER switch
to OFF.
Note:
TOremove the icons from the
camcorder's display during recording,
press the MENU/DISPLAYbutton.
Page 51

Lock
bu_on
POWER switch
Full-Auto Mode
Use the Full Auto 1node to easily record good quality
ilnages.
1. Press in the Lock button and set the POWER
switch to the CAMERA position. ['be camcorder
enters the Record Standl_y 1node.
2.
Set the EASY/MANUAL'AUTO switch to AUTO
to have the camcorder automatically select the
best settings fi)r your recording. AU70 appears
in the viewfinder or LCI) lnonitor.
Note: Placing the camcorder in the full-auto
mode will cancel all of the settings you may
have adjusted in the MANUAL screen
Set the FOCUS switch to AU['O to have the
camcorder automatically focus for you.
LCD monitor
EASY/
MANUAL/
AUTO switch
Journalistic Shooting
In some situations, diffi'rent shooting angles may
provide more dramatic resuhs. Hold the camcorder
in the desired position and tilt the LCI) monitor in
the most convenient direction. It can rotate 270 °
(90° downward, 180° upward).
Self-Recording
You can even record yourself while viewing your
own image in the LCI) monitor. Open the LCD
monitor and tilt it upward 180° so that it faces
t'ol_,vard, then point the lens toward yourself and start
recording.
49
Page 52

DSC MODE
switch
POWER switch
Lock
button
* g_{ I SI_E 0
i EXPOgURE
PIC. EFFECT
f .
SCEHE MENU
_OIS STOP
_i RETURN
• I • ]SET] I
Quick Return Screen
Quick Return
After playing back tim tape you recorded, you can
quickly return to tim end of the last recording by
using the Quick Return f_'ature on the Mode
screen.
1. Set the I)SC MODE switch to qAPE or DIAL,
and press in tim Lock button to set the
POWER switch to CAMERA.
2. In the Record-Standby mode, press the MENU7
DISPLAY button repeatedly to display the
menu screen.
3.
If tim MANIsAL SETmeml is not hightightd
press • or • to select I_1 and then press SET
to display the MANI_AL 5"/x'Tmenu.
4.
O
Press • or • to select QK RETZ/RA_ and then
press SI£T
5.
Press • or • to select S'/SiRTand then press
51£T
• SIMRCtJ flashes and the tape begins fast
t\)rwarding or rewinding to the end of the
last recorded scene.
• When tim tape reaches the end of the last
recorded scene, FIXISHED is displayed and
the camcorder enters the Record Standby
mode.
6.
Press the MENUiI)ISPLAY button repeatedly
until the menu screen Rirns off.
Notes:
To cancel Quick Return, repeat the
above steps and select STOP and then
press SET
Quick Return cannot be used if the
cassette has been removed since the
last recording or if no recording has
been made since the cassette was
loaded.
50
Page 53

DSC MODE
switch
Lock
button
LCD monitor Button
i =O
AUTO
1_7 30min 7:31AM
FADEIGAMMAI ISRCH I
POWER switch
JUN. 2.2002
Edit Search
The edit search fl,ature allows you to search for the
point on tlm tape where you wish to start recording
without switching the POWER switch to PLAYL
1.
Set the I)SC MODE switch to [APE or I)UAL
and press in the Lock button to set the POWER
switch to CAMERA.
2.
In the Record Stand[_y mode, if the displays arc
not visible, press the MENI/I)ISPLAY button
until the on-screen displays appear.
3.
Press 5R(]H.
4.
Press and hold _ (folavard edit search) or
(r_verse _'dit s_'arch).
• In fol",vard edit search, the tape is played back
at normal speed. In reverse edit search, the
tape is played back at approximately 5.5 times
normal speed.
5.
When you locate tim point where you want to
begin recording, release tile II_ or _ button.
• Playback stops, and the camcorder enters
Record Pause mode. The tape will record from
this point when you start recording.
6.
Press 5R(]Nto cancel the edit search function
and return to normal displays.
Notes:
The sound is off during search.
Some picture noise appears during
reverse edit search.
Im =0
AUTO
30mifl 7:31AM
JUN. 2.2002
FAOEIGAMMAI_I SBCHI_-
SEARCHScreens
51
Page 54

Gamma Brightness
['he Gamma Brightness feature improves the picture [_y increasing the brightness of the
image. Use this when a subject is backlit or when recording in a dark or poorly
illuminated area. ['be image will appear dark if it is recorded normally. LIGflTwill
appear on the monitor when the Iigbt is insufficient.
1. Press in the Lock button and set the POWER
switch to CAMERA.
2.
In the Record-Standby mode, press the MEN[J7
DISPLAY button to turn on displays.
3.
Press (.:AMMA to brighten the image.
• GAMMA turns yellow on the LCI) monitor.
• Press (/AMMA again to brighten tim picture
even more. The [] indicator appears.
Notes:
When only GAMMA is displayed, the
subject becomes brighter while leaving
the brighter portions of the image
- &o
AUTO
unaffected. When [] is displayed, the
brighter portions of the image get
whited out.
Some picture noise appears when using
Gamma Brightness while LIGHT is
displayed.
Fine brightness adjustment is possible
using Exposure.
52
To Cancel Gamma Brightness Compensation
Press (.:A,_clMAuntil [] disappears
Page 55

Select the Audio Mode
This camcorder allows you to select 12 bit or 1@bit audio recording mode. The
camcorder normally records audio in the 12 bit mode. For higher quality audio recording,
select the 16 bit mode.
Set the Audio Mode to 16Bit
1. Pr('ss th(" Lod< button in and s('t d_e POWER
switch to CAMERA.
2. Pr('ss th(" MENI iI)ISPLAY button rep(_at('dly to
clisplay the m(qm scr('en.
W)HD
DIALOG REC
ZOON NIC 16bit
"ETOR,
3. Pr_'ss • or • to sN_'ct _, and pr_'ss SE'/_
4. Pr_'ss • or • to select A UD/O MODE and press
• I • ISETI I
5. Press • or • to sdect 16bit and then press ._1:'7:
16bit is displayed on the monitor.
6. Press the MENUiI)ISPLAY button repeatedly
until the menu screen R]rns off.
To Return to 12Bit Mode
Select 12bit and press .q/!'TJn s/('p 5 above.
Note: When using audio dubbing with 16-bit
audio recordings, both the dubbed and
original sounds will be recorded in mono (see
page 74)
53
Page 56

Zooming
Using the Zoom Buttons (Wand 7)
'lb zoom in close" (teh, photo) or out (wkh" ang]_'), pr_'ss on_ _ of th__ zoom buttons.
Optical zooming is the' namraI non _,nhanced magnification that the" cal_acord_,r s h'ns will
support. Optical zooming is possibI_" up to t_'n tim_s when recording on tap_ _ and up to
s_'v_'n tim_s wh_'n rocording on the m_q_ory card.
Digital zooming mak_,s it possibt_" to capture" il_aag_,s up to a maximtma of 400 tim_,s
normal magnification. The camcorder uses technology to artificially enhance the image.
When using the zoom buttons an icon appears on screen to display the approximate
zoom ratio.
Notes:
While zooming, focusing may become unstable. If so, set the zoom while in
Record-Standby mode and adjust the image using manual focus (see page 98)
Once the focus is set, zoom the camcorder in or out while recording,
The zoom level icon moves during zoom. Once it reaches the end of the zoom
icon bar, all magnification from that point is through digital processing.
During digital zoom, the quality of the image may suffe_
Optical Zooming
You can zoom in and out for close_up or with" :mgl_" shot_ by pr_'ssing Zoom 3" or W.
'lIbe camcorch'r automatically f\)cus_'s at most distanc_'s wh_'n zooming.
Zoom T and W
buttons
Lock
button
54
POWER switch
1.
Press T or W to zoom in or out on a subject.
• Press T to zoom in on tlm subject.
Tim ca_acorder is unable to fi)cus closer than
five f_'et (1.5m). It will automatically zoom out
and R)cus.
• Pr_'ss W tO ZOOITt ()Lit.
The on screen display shows the current zoom
setting.
2.
Press the zoom button harder to increase the
zoom speed or softer to decrease the speed.
Page 57

Digital Zoom
You can us_" digital zoom to magnify: image's to a maximum of 400 time's normal
magnification. I)igital zoom is possil)h' up to 400 time's wh_'n recording on a tap_'.
1. Press the Lock button in and set the POWER
switch to CAMERA.
_ PHOT0SHAP
_E_ NODE
S_AP EFF.
L_I!TAPESPEEO 40
_i15:9 400
_{ RETURB
• I • ISETI I
2. Press the MENI iI)ISPLAY button repeatedly to
display the menu screen.
3. Press • or • to select r91 and press SI,2T.
4. Press • or • to select I)GT/= ZOOM and press
.ql'22_
5. Press • or • to select ()bT,',40 ,or 40(2 and
press 5'E7;
• Select ()bT,' to turn digital zoom off.
• Select 40to have 10 40 times digital zoom.
• Select 4(X)to have 10 400 times digital zoom.
6. Press the MENI iI)ISPLAY button repeatedly
until the menu screen turns off.
7. Press the Zoom W or T button to zoom. The
zoom indicator appears in the display.
Macro Zooming
Macro zooming allows you to take close-up shots of small obj.'ors. To r_'cord a magnifi_'d
imag_" that is within approximat_'Iy f'iv_" f'_'_t of the camcorder, us_" Macro Zoom.
Zoom button W
1. Press Zoom button W to zoom all the way out.
2. Move the camcorder close to the subject until
you obtain the desired angle of view.
The camcorder will automatically focus on the
sub}ect.
Notes:
Make sure there is sufficient light for
macro recordings,
For best results, use a tripod during
macro recording.
55
Page 58

Digital Image Stabilization (DIS)
Digital Image Stabilization is used to compensate fi)r unstable images caused [_y camera
shake, especially at high magnifications. This feature is turned on by default flom the
facto W.
Turning the DIS Feature ON and OFF
1. Press the Lock button in and set the POWER
switch to CAMERA.
2. Press the MENI iI)ISPLAY button repeatedly to
display the menu screen.
3. Press • or • to select I_ and press SE7_
4. Press • or • to select DIS and press SE7_
5. Press • or • to select Ot,7,'or ON and press
SI_I:
• I • ISETI I
• Select OFt:to turn Digital Image Stabilization
off'.
• Select ONto turn digital image stabilization on.
The DIS indicator (_) appears on the screen.
Press the MENU/I)ISPLAY button repeatedly
until the menu screen turns off.
Notes:
Accurate stabilization may not be
possible if hand shake is excessive,
Switch off stabilization when the
camcorder is mounted to a tripod.
56
Page 59

Fading Scenes
The fade fl, ature allows you to gradually bring the image and sound in or out at the
beginning or end of a scene _)r creating scene transitions. This is especially effective _)r
indicating a dramatic change in scene_.
Fading In and Out
1. Press the Lock button in and set the POWER
AUTO
I_1 30rain
FADEIGAMMAI ISRCHI
switch to CAMERA.
2. Set the I)SC MODE switch to 'IAPE.
3.
Press t_DI!'.
4.
Press the REC S_l)kR ['i_FOP button to begin
recording. The picture will turn white and begin
_) _Lde in.
5.
Press tt_e REC S'IAR ['/STOP button to stop
recording. The image and sound will _de out
gradually as the image turns white. The
camcorder will then return to the Record Pause
mode.
Cancel Fade
Pruss FAI)I_'again. The Fade mode is automatically
cancelled after you have faded out.
Fading Out Only
1. I)uring recording press I,'AI)IZ.
2. Press the REC S'IARTiSTOP button at the point
where you wish to stop recording and fade out.
57
Page 60

Video Light (Optional)
'It) brighten the scene when natural lighting is too dim, the camcorder can use an optional
vide{) light (s_page 15l). You can turn on tim video light at all times, set it _) turn on
automatically when additional light is needed, or turn it o_
Use the Optional Video Light
Set to AUTO to have the light turn on when
recording in dark locations. LIGHTmust appear
_)r the light to turn on automatically.
Set to OFF to turn off the light.
let the Light AU ['O/OFF/ON switch.
Set to ON to turn the Iig]_t on whenever the
A
_ The video light can only be used when
Cautions
Never operate the video light closer than one foot to people or
other objects.
The video light becomes very hot. Do not touch it during use or
right after use Serious injury may result.
Do not place the camcorder in a carrying case right after using the
light.
Never operate the video light close to flammable or explosive
material.
The video light and bulb need to cool for approximately 30 minutes
after use before the bulb assembly is replaced Replace the bulb
only with Replacement Part 253403 (6V, 3W bulb).
the camcorder is on and will not operate
if the NIGHT MODE switch is set to ON.
When not using the video light, turn it
off to save battery powe_
Even if the battery level indicator does
not indicate a low battery, the camcorder
may turn off automatically if the video
light is turned on when you start a
recording or when you turn on the video
light.
When the Light switch is set to AUTO, the
light may keep turning on and off
depending on the lighting conditions. If
this happens, set the Light switch to ON
or OFF
58
Page 61

Video light
Attach the Optional Video Light
1. Hold the' light as xbown and attach it to tb__
accessol T shoc [_y sliding it in the' direction of
the arrow until it locks into place.
2. Turn the tightening ring in the direction of the
arrow to secure the video light.
Remove the Optional Video Light
Turn the screw in the opposite direction fl'om the
arrow and pull off the light.
Cautions
Make sure to attach the video light
securely.
Do not use the video light to carry the
camcorde_
Replacing the Bulb
['be vide<) light's bulb will eventually have to be replaced. If the bulb burns out, replace
it only with replacement part 253403. For more information about bulb replacement,
contact the nearest RCA service center or authorized dealer.
1.
_Zait at least 30 minutes after using the video light f\)r it to cool, and remove the
flont cover as"s,5own.
2.
Grasp the tip of the bulb and pull it straight out of the reflecting plate.
3.
Insert the new bulb into the hole of the reflecting plate and reattach the flont cover
as"s/ool/'t_.
Cautions
The video light and bulb need to coo/for approximately 30 minutes after use
before the bulb assembly is replaced
Replace the bulb only with Replacement Part 253403 (6V, 3W bulb).
59
Page 62

Multiple-Strobe Recording
['he multiple strobe recording f_'a/ure allows you /o record a fast-moving subject at
in/_,rvals of 1/10 of a second using a 9 or 16 frame picture on tape. This is useful when
you want to check your f\)rm in sports, such as/ennis or golf.
Set Multiple-Strobe Recording Mode
1. Pr_'ss the' Loci< button in and s_'t the POWER
switch to CAMERA.
2. Set the" I)SC ivlOI)E switch to 'IAI'E.
3. l_2{'p{'a/edly pr{'ss the MENU/DISPLAY bu//on to
display the m{,nu scr{'en.
4. Pr{'ss • or • to s{'h'ct rgl and pr{'ss SET.
5.
Press • or • /o select/d/OTO 5£_/APand press
5"1£2_
6.
Press • or • /o select 5z_/AP or ST]I.L and press
.ST_T
• Select SNAP/o record a multi frame picRire for
six seconds.
• Select S2]LL to record a multi fiame picture
until you press the REC S [ART/STOP bu//on /o
stop recording.
STILL
15:9
RETUR_
• I • ISETI I
i RES NODE
PHOTO SNAP
__OFF
TAPE SPEED 9FRAMES
RETURN
PHOTO SHOT
• I • ISETI I
O
60
7. Press • or • to select SA:AP l!b7; and press SET
8. Press • or • to select 9 t?ICAMF_S(9 frame
picture) or 16 t?RA/vII!S(16 t'rame picture) and
press ,','IH_
9. Press the MENUiI)ISPLAY button repeatedly
until the menu screen/urns off.
Note: The picture quality will be slightly
less than normal when using Multiple-
Strobe modes.
Page 63

STILL button
RECSTART/
STOP
bu_on
Lock
bu_on
Multi Strobe 16-Frame
Recording
POWER
switch
Record Using Multiple Strobe
1. Pr_'ss the" Lock button in and s_'t the POWER
switch to CAMERA.
2.
Repeatdly press the MEN[I/DISPLAYbutton to
display the menu screen.
3.
During Record-Pause mode, press the STILL
button. A multi t'rame picture of the subject is
displayed (9 or 16 frames whichever you
selecmd).
4.
Press the REC S1AR ['/STOP button. The multi
_ame picture is recorded.
• You can also press tlm STILL button during
recording to record a Multi Strobe picture on
your tape.
5.
If S7ILL is selected, press the REC SI)_,R'IVSTOP
button to stop recording the picture.
To Cancel the Multi-Frame Picture
In PlIO7_)M/OTmod(', pr('ss th( >S ['ILL button
while the camcorder is in the Record Pause
mode.
In $77lL mode, press the STILL button.
Notes:
Multiple strobe recording can also be
used during recording by pressing the
STILL button,
The picture quality in Multiple-Strobe
recording mode will be slightly lower
than normal pictures.
Multiple Strobe recording cannot be
used with digital picture effects or the
wide-screen function
61
Page 64

Still Recording on Tape
You can record still images of subiects with normal sound on a tape. You can select
1'11070 5"/IOTand record a still picture for six seconds or SJILI. and continuously recorcl
a still image.
Select Still-Recording Mode
1. Press the Loci< button in and set the POWER
switch to CAMERA.
2. Repeatedly press the MENU/DISPLAY button to
display the menu screen.
OGTL ZOON
TAP[ SPEED
16:g
RETURB
• I • ISETI I
_ PHOTO SHAP
16:9 1S FRAMES
_{ RETUB_
• I • ISETI I
0
3. Press • or • /o select r91 ancl press .','/_'7_
4. Press • or • /o select t'HOTO SNAP and press
SI_I7
5. Press • or • /o select ,';<YAPor ST1LL and press
SI_I7
• Select SNAI>to record a still picture f\)r six
seconds.
• Select SJHZIo record a still picture until you
press the REC S'IARTiSTOP button /o stop
recording.
6.
Press • or • /o select SNAP l'_?gt(and press
SIYI_
7. Press • or • to select I'HOTO 5"/tOTand press
SI_I7
8. Press the MENU/I)ISPLAY button repeatedly
until the menu screen turns off.
62
Page 65

LCD monitor
Record Still Images
1. Pr_'ss the" Lock button in and s_'t the POWER
switch to CAMERA.
2.
I)uring Record Pause mode, press the S ['ILL
bu//on. A still picture of the subject is displayed.
Press the REC S'IARTiSTOP bu//on. The still
3.
picture is recorded.
• If PHOTO .ST]OTmode is selec/_.d, the
CalT1corder returns It) Record Pause 12_ode aflor
recording the still pic/ure for six seconds.
• You can also press the STILL bu//on during
recording to record a still picture on your tape.
If PHOTO S/tOTis selec/ed, the sound and
visual eff_>ctof' the camera shutter is turned
of'f. ['be camcorder returns to record pause
mode aiker recording the still picture f\_r six
seconds.
4.
If S77LL mode is selec/_.d, press the REC SI_\R'I7
STOP bu//on/o slop recording the pic/ure.
Note: To turn off the shutter sound, (see
page 108).
To Cancel the Still Picture
In lq107_),'_klOTmod_', pr_'ss tl](>S ['ILL button
while the camcorder is in the Record Pause
mode.
In S77LL mode, press the STILL button.
63
Page 66

Time Code Display
During recording, a time code is captured on the tape. This code confirms the location of
the recorded scene on the tape during playback.
If recording starts from a blank portion of the tape, the time code begins counting from
7UO:OO(.g)(hours: minutes: seconds). A flame number is displayed during still playback.
If recording starts from the end of a previously recorded scene, the time code continues
from the last time code number.
Turn Time Code Display On and Off
1. Pwss the' Lock button in and s_'t the POWER
switch to CAMERA.
TE
S-VIDEO IN
RETUR_
OISP. ON
• I • ISETI I
TCO: 00 : 10 :_2_
T T TFramenumber*
| |Second
| Minute
Hour
*Displayed during still playback
REMOTE
SOUND
p:fc ,
S-VtOEO h_ ON
{}_ RETURN
iiiiiii_
• I • ISETI I
2. Repeatedly press the MENU/DISPLAY button to
display the menu screen.
3. Press • or • to select ETCand press SIFT.
4. Press • or • to select 71,'71£C01)£ and press
.@]7:
5.
Press • or • to select DIS]_ OiV or Z)ISI{ 0t,7/
and press SET_
The Time Code indicator appears on the display
when you select l)lSl_ OA_
6.
Press the MENUiI)ISPLAY button repeatedly
until the menu screen turns off.
Note: The time code is automatically set to
TC-:--:-- when a tape is ejected.
Display Time Code on TV During Playback
1. Wbih' playing back a tape press the" MENI/
DISPLAY button repeatedly to display the menu
screen.
2. Press • or • to select Eg¢,and press 51_'7:
3. Press • or • to select 7U OI/I; and press ._;ET:
4. Press • or • to select OiVor OFFand press
5"E7:
64
5. Press the MENUiI)ISPLAY button repeatedly
until the menu screen Kmls off.
Page 67

Recording From an External Source
You can use this camcorder to record or edit videos f]om another source, such as a VCR
or TV. [b connect your camcorder to a TV (or VCR) with audio/video outputs, use the
supplied audio/videoiSVideo cable.
Connections
1. Makt" surt" all units are tuln_,d off bt, fOl-e making
any connections.
2.
Connect the white plug of the cable to the left
AUDIO OUt' jack on the TV (or VCR).
Note: Some VCRsor TVsdo not offer left and
right audio jacks. For units with one audio
jack, usethe cable's white plug
3.
Conn_'ct the" red plug of th(, cabh" to th(, right
AUI)IO OUt' jack on the TV (or VCR).
4.
Connect the yellow plug to the VIDEO OUT jack
on the ['V (or VCR).
OR: Use the S-Video out for video out for an
S-Video connection.
5.
Open the jack cover on the camcorder and
connect the other end of the cable _) the AV+S
jack on the calTtcorder.
®
Turn On the S-Video Input
If you have connected your camcorder using the S vide() cable, set the 5"VII)I'X) I:V
f_'ature to ON in the menu.
Note: Hold in the catches on the side of the
plug and pull it out to remove it from the
camcorde_ Do not pull on the cable without
holding in the catches.
1. Put in a tape and set the I)SC MODE switch to
TAPE and the POWER switch to PLAY.
I • ISETI
2. Repeatedly press the MEN[]/DISPLAY button to
display the menu screen.
3. Press • or • to select [TCand press ,','112:
4. Press • or • to select .S"VII)I'X) IX and press
.gEl:
5. Press • or • to select OX and press ,','1_2:
6. Press the MENU/DISPLAY button repeatedly
until the menu screen turns off.
(co_it#lu_d o_1 _1{.vtpa_ ) 65
Page 68

To Record From an External Source
1. Place a t_pe in the camcorder set the I)SC MODE switch to 'IAPE and set the
POWER switch _) PLAY_
2. Start playback fl'om the TV or VCR making sure you can see the picture on the
camcorder.
Note: If NO SIGNAL is displayed on the camcorder screen, make sure the audio/
video/S-Video cable is properly connected.
3. Press the REC _FAh' ['i_FOP button on the camcorder. The camcorder will enter the
Record Pause mode.
4. Press I_'/11 to begin recording.
• Press I_'/11 to start and stop recording.
• Press • to stop recording.
Recording Tips
'l_) improve picture quality and color reproduction, tl_' to m_ke sure indoor scenes
Jre well lit.
Don't m<)ve the camcorder rapidly from side to side while recording. A steacly,
graclual pan" avoids blurring and 'jitter".
Use the viewfinder or LCI) monitor to make sure the camcorder is level while
recording so that your scene isn't 'tilted."
Do not bump or tap the camcorder's microphone while recording as this sound will
be recorded.
Include close ups of individuals when taping fJmily outings or group functions.
Fading in and out of scenes makes your videos appear more profi'ssional.
Learn to use the special effi'cts to add variety to your recordings.
Be aware of video and audio backgrounds. Background details barely noticed while
recording may sh<)w up as visual clutter" on your recording. Background noises
(especially ['V sets, radios, household appliances, traffic sounds, etc.) might detract
flom the sound you want to record.
Avoid long "still" shots of landmarks and scenic attractions. Recordings are more
interesting if they include people and details. Local color" gives travel videos
lasting appeal 'lk) add interest, consider recording a familiar or landmark scene
flom an unfamiliar vantage point.
66
Page 69

Playback
Chapter Overview:
• Playback Options
• Playback Features
• Dubbing
• Connection to a TV (or VCR)
Chapt÷r 4
Changing Entertainment. Again.
Grd[)bics cotltaitled u,itbi_l tbis publicatiotl a_) /_Jr r_,])reJetltatio_l o_1I_, 67
Page 70

Playback Options
The camcorder's playback fbatures include still, picture search, gamma, multiple strobe
and digital eYDcts. In this section, youll also learn how to connect your camcorder to a TV
or VCR.
The LCI) monitor screen functions as a bandy playback monitor. Nothing needs to be
connected, allowing instant on-screen playback with the sound through the built in
speaker.
Tiffs section mainly describes playback f('atures for your recorded tapes. See Chapter 6
for detailed inf'orlT]ation on playback of MultiMediaCards.
Tape Playback Using the LCD
Monitor
1. Insert a tap('.
2. Op_ql the" LCI) monitor.
I 44
Tips
The playback picture can be viewed
in the viewfinder (with the LCD
monitor shut), on the LCD monitor,
or on a connected TV (see page 78).
You can also view the playback
picture on the LCD monitor with it
flipped over and retracted
3. Set the" I)SC MOI)E switch to the" 'I?kPE position.
4. Pr_'ss in the" Lock button and s_'t the POWEF.
switch to the" PLAY position.
5. Us_" th__monitor navigation buttons.
• Press the _ or _ bu_)n _) rewind or _Lst
forward the' tap__.
• Pl'{_SS Ib'/ll to b{'gin playback.
6. Press • when finished playing the tape.
Adjust the LCD Monitor Brightness
You can adjust th{_ brightn_'ss of the" monitor using
th{_m_'nu system. ['h{' brightn_'ss of' the" monitor do_'s
not af'f_'ct the" r_'cording (._/)a£(_s 32,:_;3).
68
Page 71

VOL + and-
buttons
Controlling Speaker Volume
_)u can adjust the volume of the speaker during
_ playback.
i Press the VOL + button to turn up the volume.
Pr_ss the VOL - button to turn down the
volulqq('.
LCD monitor
CONTROL dial
I I!
Playback Using the Viewfinder
You can also watch the playback in the viewfinder
by dosing the LCI) l_aonitor with the screen facing in.
No sound is available during viewfinder playback.
To operate the playback functions, rotate the
CONTROL dial to select the desired on-screen
bu_)n or operation and press the CONTROL
dial in.
Playback Features
Still Playback
Sti]I playback pauses the tap_ _ freezing a
single fl'am_ _.
1. Press I_/11 during playback to fi'_,ez{, the imag_,.
2. To resume normal playback, press I_/11 again.
• If pause continues for iiaore than five minutes,
the camcorder automatically returns to normal.
69
Page 72

I II
Shuttle Search
Sbt]ttl_" search allows bigh-sI)_'_'d searching in _'ith_'r
fol",vard or reverse directions.
1. Press _ or _ during playback.
• A slight mosaic el"fl,ct appears on screen
during shuttle search. This is normal.
• The sound is turned off during search.
2. "lk) resume normal p}ayback, press _/ll.
Gamma Playback
GammJ improvus the" t_p_" pl:@)ac'k pic'tur_" [_y
increasing the brightness of the subject while not
affl, cting the brigbt_'r portions.
1. I)uring playback press the MENUiI)ISPLAY
button to Wrn on tl]e displays.
2. Press (;AMMA once. The picture brightens and
(;AMMA l appears in the disp}ay.
3. Press (;AMMA again for an even brighter picture.
(;AMMA2 appears in the display.
70
Cancel Gamma Playback
Pr_'ss (_AMMA until GAMMA l Jnd GAMMA2
ciisapp_'_r fiom d_ _displ_y.
Note; Gamma playback has no effect during
still playback
Page 73

Multiple-Strobe Playback
Pbe multiple-strobe playback f('ature allows you to playback a fast moving subject at
intervals of 1/10 of a second using a 9 or 16 frame picture. This is useful when you want
to check your f\_rm in sports, such as tennis or golf.
Use Multi-Strobe Playback
AUDIO I}118
{ AUDIO
RETUR_ g FRAMES
{{{ 16 FRAMES
{
• I ,& ISETI I
STILL
button
1. Pwss the" Lock button in and s_'t the POWER
switch to PLAY.
2. Repeatedly press the MENUiI)ISPLAY button to
display the menu screen.
3. Press • or • to select _ and press 5'E7_
4. Press • or • io select MI/LJIFRAMI/and press
5.
Press • or • to select 9 t?RAMES (94hame
picture) or 16 t?RAJ/IES(16 flame picture) and
press 5'E7:
6.
Press the MENUiI)ISPLAY button repeatedly
until the menu screen turns off.
7.
Playback the tape t)om a point [)eft)re the part
you want to play back in Multi Strobe.
8.
Press the STILL button at the point you want to
start Multi Strobe playback. A multi frame
picture of tlm image is displayed.
Notes:
If a memory card is inserted in the
camcorder, the still image dubbing
screen appears. Press the MENU/DISPLAY
button to remove the dubbing screen.
You can dub the multi-strobe images to a
memory card (see page 73).
Cancel Multi-Strobe Playback
Pr{_ss the _FILL button to canc_'l Multi Strobe"
playback.
Note: Multi-Strobe playback does not
operate during still, search or with Picture
Effect_
71
Page 74

Digital Effect Playback
I. se one of the digital picture playback effects to add a more dramatic look to your
recording.
Select a Digital Effect for Playback
1. Press th(' Lock button in and set tl]e POWER
switch to ]'LAY.
2.
Repeatedly press the MENU/DISPLAYbutton to
display the menu screen.
3.
Press • or • to select _ if you are playing a
tape (g"] if you are playing back a card) and
AUDIO DUB
gAUDIO O
_MSLTI FRAME B/W
8ETUR_ SEPEA
SOLAR I
HEGA
BLUE
• I • ISE'r I I
press SET
4.
Press • or • to select PIC EFtglx'(flrand press
SE7_
5.
Press • or • to select the picture effi'ct you
want, and then press SET
• Select Cqgt,'fi)r normal playback.
• Select B/Wto have tile picture displayed in
black and white.
• Select SkT_IA to display the picture with a
brownish tint like old pho_)s.
• Select SOLARIto display the picture with
enhanced contrast creating a unique artistic
image.
• Select :'¢EGAto display the picture with tile
blacks and whites of the image reversed and
the colors of the ic_age inverted.
72
• Select BL_&'to display the picture with the
eYfect of recording through a blue filter.
6.
Press the MENUiI)ISPLAY button until tile menu
screen turns off.
To Cancel the Digital Picture Effect
Select OFF and ttwn press SI!'T in step 5 above.
Note: Digital picture effects cannot he
selected when a still image is displayed.
Page 75

Dubbing Images from a Tape to a Card
It is possible to make a still imag_, fiom your favorite frame of a motion _ideo recorded
on file tape and dub that image on file memo W card.
I
To Dub an Image
1. h_s_,rt a recorded ])V cassette and a card in the
cal3_Col-d_l -.
2.
Set tile I)SC MOI)E switch to tile %\PE position.
Press in the Lock button and set the POWER
3.
switch to tile PLAY position.
4.
[_N,* D
I RECI ICANCELI
r_-i ,, D
RECORDING T(
MEMORY CARD
I REC I I CANCELI
Press _-/It tO start playback, and then press the
STILL button at the point where the desired
image appears. The Dubbing screen
automatically appears.
• To cancel dubbing, press (._IY(.7_'L
5.
Press RI_'C to dub the still image to tile card. ['be
U"I indicator flashes red while tile still image is
being recorded.
6. Press C_INCT_Zto cancel tile still image.
73
Page 76

Audio Dubbing Feature
You can add narration to a tape recorded with this camcorder by using the buil>in stere<)
microphone, while preserving the original audio and vide<) recording. Select your
recording mode.
Note: Audio dubbing cannot be performed via the DV jack
Audio Recorded in the Audio Dubbing Mode
Audio can be recorded and dubbed in 12 or 16 bit. To change the recording mode s_
page 53. The chart below shows how audio is recorded in the normal and dubbing
modes.
In Normal Recording Mode
12-Bit Audio Recording
The audio is rocord_,d in st_'r_'o on
Audio 1.
• Audio 1: Stereo (left and right)
sound
• Audio 2: No audio
16-Bit Audio Recording
Tbu audio is rocord_,d in st_'r_'o with
the" l_'ft and right sound on two
s_'parate chann_qs.
• Audio 1: Left sound
• Audio 2: Right sound
In Audio Dubbing Mode
12-Bit Audio Recording
'llb{ ` dubb_'d audio is n'corded on
Audio 2.
• Audio 1: Original stere<) (left and
right) sound
• Audio 2: Dubbed stereo (left and
right) sound
16-Bit Audio Recording
'lIbe dubb_,d audio is n'cord_,d on
Audio 2 ov_'r the" original right sound.
Both the dubbed and original sounds
are ii] ITtOnO.
• Audio 1: Original left sound
• Audio 2: Dubbed sound
14
Page 77

r'l; Aum0 EXECUTE
MULTI FRAME
RETURN
• I • ISETI I
I
AUDIO DUB AUDIO1+2
ISTARTI STOP I ICARCEL
To Audio Dub
1. Play back th_ _ r_,corded DV cass_m , and locate,
the, tape position where you wish to start audio
dubbing.
Note: Use a Mini DV cassette recorded in SP
mode Audio Dubbing is not possible with LP
mode recordings
2. Press I_/11 to pause playback.
3. Press the MENI iI)ISPLAY button repeatedly to
display the menu screen.
4. Press • or • to select i"_-"],and then press SET
5. Press • or • to select AbLVO D_J$, and then
press SI!T The A_DIO I)bB screen will appear.
6. Press STARTto begin audio dubbing.
• To pause audio dubbing, press STOI{
• To quit audio dubbing, press CANCI!Z. ['he
AI/DIO l)l_B screen turns off and playback
stops.
To Change Dubbed Audio or Dub Additional
Scenes
1. Press (]A:'C(]I,]Lto turn off the A I/I)IO I)UB
screen.
2. Repeat steps 1 to 5 above.
Notes."
It is recommended that you use Audio Dubbing only with recordings made
with this camcorde_ Use of recordings made with other digital video
equipment may result in poor audio quality.
Audio dubbing will automatically pause if the original audio changes from
12-bit mode to 16-bit mode or vice versa, Press START to resume operation.
Audio dubbing will automatically stop if a portion of the tape recorded in LP
mode or an unrecorded portion of the tape is encountered
You can play back the dubbed audio and the original audio together or
separately (see Audio Playback Mode on the next page).
75
Page 78

Audio Playback Mode
You can select three diff',rent audk) playback modes to listen to the dubbed audio
recorded on the tap_ _.
Select an Audio Playback Mode
1. Play back a Mini I)V cassette with dubb_'d
audio.
2. Press the MENI iI)ISPLAY button repeatedly to
display the _:_enu screen.
3. Press • or • to select i"_-"l,and then press SI']Z
4. Press • or • to select AUDIO, and then press
SET
5. Press • or • to select the desired audio
playback l:_ode, and then press SET
• Select l+2(A!,l)lO l+2), l (AUI)IO l)or 2
AUDIO 1+2
• 12 bit audio recording in
stereo (Audio 1 and Audio 2
channels)
(AUI)IO 2). ['he Chart on the leii shows which
audio is played back for that mode.
• The audio playback l:_ode indicator is
displayed.
• 16 bit audio recording in
stereo (left and right
channels)
AUDIO 1
• 12 bit audio recording in
stereo (Audio 1 channel
only)
• 16 bit audio recording in
mono (left channel only)
AUDIO 2
• 12 bit audio recording in
stereo (Audio 2 channel
only)
• 16 bit audio recording in
mono (right channel only)
76
Notes:
The audio playback mode indicator,
AUDIO, is displayed in different colors
depending on fhe audio recording mode
(12- or 16-bit) used for the recording
being played back,
A white display indicates 12-bit audio
recording mode, and a green display,
16-bit audio recording mode.
Page 79

Dubbing to Another Digital Video Camcorder
You can also copy a recording to anoth_,r camcorder with a I)V jack using an optional
I)V cabh,. Be sur_" to attach the two small includod f_,rrito cor_'s on the _'nd of' the"
cabin" n_,xt to the" camcorch'r.
To Use this Camcorder as the Playback Camcorder:
1. Make, sure all units ar_" turn_'d off b_'f'ore making any conn_,ctions.
2. Conn_,ct one _'nd of the" optional I)V cabh' to _'ach digital camcorder.
3. Pr{'ss th<"CalTtCOl'd_,r $ It,-/ll button to start playback.
4. While watching the playback on the i_loniR)s_ start the receiving calzacorder's record
l:_ode fiOl:_ the spot on the source tape you want to begin recording.
It is recommended to use the power supply instead of the battery for uniform
playback.
For digital dubbing, this camcorder can be connected to only one device at a
time This camcorder can also be used as the recording camcorde_
Even though the DV cable is connected correctly, sometimes the image may not
appear during playback. If this occurs, turn off the power and make
connections again.
77
Page 80

Connecting to a TV (or VCR) with Audio/Video
(and/or S-VIDEO) Input Jacks
'It) connect your camcorder to a ['V (or VCR) with audio/video (or S Video) inputs, use
the supplied AudioiVideoiS Video cable. If your rv is already connected to a VCR,
attach the camcorder to the VCR and watch what the camcorder is recording or playing
on the TV.
TV or VCR
®
1. Make sure all units are turned off before making any connections.
2. Connect the white plug of the cable to the left AUI)IO IN jack on the TV (or VCR).
/Vote: Some VCRs or YVs do not offer left and right audio jacks. For units with
one audio jack, use the cable's white plug.
3. Connect the red plug of the cable to the right AUI)IO IN jack on the TV (or VCR).
4. Connect the yellow plug to the VIDEO IN iack on the TV (or VCR).
OR: Connect the S-Video plug for video for an S-Video connection,
5. Open the jack cover on the camcorder and connect the other end of the cable to
the AV+S iack on the camcorder.
Note: Hold in the catches on the side of the plug and pull it out to remove it
from the camcorde_ Do not pull on the cable without holding in the catches.
78
Page 81

Playback on a TV (or VCR) with Audio/Video/S-Video
Input Jacks
1. Turn on the, ['V ;rod tun_, it to th( _video input channel or turn on the VCR _md set it
to the 'line or 'c_mnera mode'". (If" your VCR do_s not haw, a qin_'" or cam_,ra
mode,', consult the VCR users guide.) Opt, rate the TV as you normMly do to se_, the
signM coming from the VCIL
2. Open the LCD monitor.
3. Press in the Lock button and set th_ _ POWER switch to the PLAY position.
4. Press b'/ll burton to b_gin pkwback.
During pl_wback use the pl_wback f_,atul"eS.
5. Press • when you are finished.
Notes:
It is recommended to use the power supply instead of the battery for power to
achieve uniform playback.
Adjust the TV sound volume to its minimum level to avoid a sudden burst of
sound when the camcorder is turned on,
If you have a TV or speakers that are not specially shielded, do not place the
speakers next to the TV as interference will occur in the camcorder playback
picture
Dubbing to a VCR
1. Following the illustration connect the camcorder and the VCR.
2. Press in th_ _ Lock button JIM set the' POWER switch to th_ _ PLAY position. Turn on
the VCRs power, and insert the" appropriate t_pes in the camcorder and VCR.
3. Mak_ _sure the VCR is in fl_e appropriate MIX (LINR or VH)EO IN) mode and in the
Record Pause mode.
4. lse the camcorder s _ _ and I_/11 buttons to find :l spot just b_*f\)re the cdibin
point. Once it is reached, press I_/11 on the camcorder.
5. When you're ready to start recording, press I_/11 on the camcorder and press the
appropriate record button on the VCR.
6. When you want to stop recording, press the VCR's pause button and press I_/11 on
the calTlcorder.
7. Repeat steps 4 through 6 for additional editing. Then stop the VCR and camcorder
when finished.
79
Page 82

This page left intentionally blank.
Page 83

Chapter S
Advanced Features
Chapter Overview:
* Using the Menus for Advanced Adjustment
,, Menu Definitions
• Using the Advanced Features
Changing Entertainment. Again.
Grd[)bics cotlta#led u,itbi_l tbis publicatiotl a_',)jbr r_,])reJetltatio_l o_1I_, 81
Page 84

Advanced Features
Using Mode and Menu Screens For Advanced
Adjustments
During recording, tt_e type of Mode and Menu screens that appear depend on the setting
of the DSC MODE and EASYiMANUALiAI;PO switch (¸see pag_s,_ff3 7). The Mode
screens appear automatically. The menu screens can be used to adjust many of the
advanced se_ings of the camcorder.
Turn on Menu Screens
1. Open the LCI) monitor and adjust.
_,E_:_ ............
_PHOTO SNAP
,_ SNAP EFF.
DGTL ZOOM
16:9 LP
RETURN
• I • ISETI I
: PHOTO SNAP
SNAP EFF.
DGTL ZOOM
IES NODE
_LP
16:9
AETOFIN
• I • ISETI I
2. Press in the Lock button and set the POWER
switdl to CAMERA or PLAY_
3. Press the MENUiI)ISPLAY button repeatedly to
display the menu screen.
Note: When playing a tape, the Menu screen
appears after the POWER switch is set to
PLAY (go to step 4)
4. Press • or • to select the desired menu Jnd
then press SETto displ_y the features of the
selected menu.
5. Press • or • to select the desired menu item,
and press NET ['he available settings for the
selected menu item are displayed.
6. Press • or • to select the desired menu
setting, and press 5"lx7:
• The selected menu setting is set.
82
7. 'Ik) adjust another menu item, press • or • to
select I?I_T!/]?N and press Sl_Tuntil the
camcorder returns to the stalls in step 5 or 6,
and then repeat the procedure from that point.
Notes."
Certain menu items are common among the camcorder mode_ /f the DISPLAY
menu item, for example, is set to DA_+T/ME in the _PE-PLAY mode, it will be
automatically set to DA_+ _ME in other modes,
The menu items are displayed in yellow when the corresponding functions are
selected, The menu items are d_/ayed in gray when the corresponding
functions cannot be selectecL
The CONTROL dial can a/so be used to operate the Mode and Menu screens.
Rotate the dial to select an item and press it in to set the item.
The menu screen automatically turns off if no settings are made within five
minute_
Page 85

Advanced Fea_u_s
Mode and Menu Screen Definitions
The fi)Ilowing charts contain brief definitions of tim fbatures of the Mode and Menu
screens. These screens o_r different features _r each recording and playback mode.
For a more detailed explanation on how _) use each feature, refer to the corresponding
sectk)n.
DSC MODE Switch Set to DUAL or TAPE-- POWER Switch in
CAMERA.
Mode Screens
FADE Fades in and ()tit of scenes (s_pa_e 579.
GAMMA Adds brightness to dark image (s_pa_ 52).
SRCH Lets you visually search the rope in CAMERA mode (,v_@age 51).
MENU Screens
MANUAL SET Menus
The f\)tlowing menus are available when I_1 is selecmd.
SHUT.
SPEED
EXPOSURE
AUTO
MANUAL
AUTO
M_NUAL
Allows you select AITID or MANDAL shutter speed. 3/IAN{_iL
allows you to adjust the shutter speed between 30 and 10000
(see i_a_e _).
Allows you select A{_ID or )/IAN{_IL exposure settings.
MANdriL allows you to adiust the exposure settings between
5 and 5 (see i_a#e 95L
PIC. EFFECT Digital picture effects allow you to playback with a more
dramatic effect (see page 100).
SCENE MENU Allows you to set the camcorder to the best shooting mode
f\)r a specific situation by selecting one of the scene settings.
QK. START
RETURN
DIS ON
STOP
OFF
Returns you to beginning of recorded segment (,vt_t@agt, 50).
Factory Preset: Refer to Digital Image Stabilizer (s_pa_ 56).
83
Page 86

Advanced Features
CAMERA SETMenus
The" following m_qms are availabI_" wh_'n r_ is s_,h,ct_,d.
REC Allows you to record images with diff.'rent quality
MODE settings. Only awfilable in CARD mode (see page 113).
PHOTO
SNAP
SNAP
EFF.
NORMAL
ECONOMY
FINE
SNAP
STILL
OFF
PHOTO SHOT
9 FRAMES
16 FRAMES
Allows you to record still images of subjects with normal
sound on a tape. Only awdlable in 'IAPE mode (.ve_pages
62 63)
Used with the PHOTO SNAP fi'ature to make multiple
strobe recordings of fast moving subjects at intervals of
1/10 of a second using a 9 or 16 frame picture. Only
awdlable in 'IAPE mode (,ve_ pages 60 61)
DGTL The optical zoom limit is 10X. When OFFis set, digital
OFF
ZOOM zoom is not used.
40 Facto W Preset: Ail(_ws you to use tim Digital Zoom. By
digitally processing and magnif_dng images, zooming is
possible from 10X (tim optical zoom limit) to a maximum
of 40X digital magnificatkm.
400 Allows you to use the Digital Zoom. By cligitally
processing and magnifying images, zooming is possible
from 10X (the optical zoom limit) to a maximum of 400X
digital magnification.
rAPE Select the recording tape speed (,ve_/)age 30).
SPEED
16:9 Does not display black bars. Use for normal recording.
SP
LP
OFF
ON
Allows you to record black bars at the top and bottom of
the screen to produce a wide screen effl'ct.
84
Page 87

Advanced Fea u s
AUDIO SET Menus
The f\)tlowing menus are awfilabh' when _ is selected.
AUDIO 12 bit Factoi T Preset: Enables recording of stereo sound on f\x]r
MODE separate channels.
16 bit Enables recording of stereo sound on two separate channels.
ZOOM
M1C
WIND Wind noise is largely eliminated.
DIALOG
REC
AIYFO
TELE
OFF
ON
OFF
ON
OFF
Allows you to use the zoom microphone to record audk)
according to the magnification of the zoom lens. You can also
use the zooiaa microphone _) record sounds ill tile distance
(,vce page 102).
Lets you record sounds without changes ill wind intensity
changing tonal qualifies.
Set to ON to record from a distance at a lecture, workshop or
other occasion when the speaker's w_ice may blend with ambient
sounds, lse this to record the speaker's voice more distinctly.
LCD/VF SET Menus
The f\_tlowing menus are available when [OOis selected.
BACKLIGHT AUTO Camcorder switches between XORMAL and BRIG'I_tT
depending on the ambient lighting.
NORMAL Use for indoors and moderate lighting.
BRIGHT Use ouOoors under strong lighting or bright sun.
LCD BRIGHT Ad}usts tile brightness of the picture on the LCI) monitor.
LCD COLOR Adjusts tile color density of tile picture on tile LCD monitor.
VF BRIGHT Adjusts tile brightness of the picture in tile viewfinder
monitor.
85
Page 88

Advanced Features
CLOCK SET Menus
The f\)tlowing menus are awfilable when (_) is selec/ed.
DISPLAY
AREA
DYLT SAVE OFF
SEATING
12H/24H 12H
OTHERS Menus
The following menus are available when [TC is selec/ed.
SOUND CHIME A chiming sound is made when any operatkm is perfbrmed.
MEDIA ON I@2COI_])IN(; "ID 7_IP/!' or I@2COI_])]NG 70 MIL_/IOI_Y
DISP CARD appears when recording a still image.
"rIME D1SP.OFF Fac/ory Preset: Time Code is not displayed on camcorder.
CODE
OFF
DArE
DKFE+alME
ON
24H
BEEP Beeps sound when any operation is perfbrmed.
OFF All confirmation sounds are turned off and shutter sounds
OFF Media Display will not appear.
D1SP.ON Time Code is displayed on the camcorder.
The date/time does not appear.
The date appears.
The dale and time appear.
_orld Clock: _m/omatically adjusts the time to local time.
Enter area number to adjust (see])a,_e 1iX;)
Does not set clock /o Daylight Savings Time.
Advances the clock one hour/o Daylight Savings Time.
Use this to set the time and dale (see[)a,_e 26).
Selects a 12 hour dock fbrmat.
Selects a 24 hour dock fbrmat.
during PHOTOSHOTS are also turned off.
TC OUT OFF Time Code is not displayed on 'l'Vi
ON Time Code is displayed on the TV. Frame numbers are not
displayed during recording.
DEMO OFF Auto demonstration will not operate.
MODE
ON Auto demonstration will operate (seej)a,_e 109).
86
Page 89

Advanced Fea u s
DSC MODE Switch Set to CARD - POWER Switch in CAMERA
Mode Screens
GAMMA Adds brightnvss to dark il:_age (see page 52).
MENU Screens
MANUAL SFF Menus
The f\_tlowing menus are available when t¢_ is selected.
SHUT.
SPEED
E_OSURE
AUTO
MANUAL
AUTO
MANUAL
Allows you select A{U{) or 3/IANDALshutter speed. MANUAL
allows you to adjust the shutter speed between 30 and 500
(see page 0(9.
Allows you select A_U_) or MAN(9_L exposure settings.
MANUAL allows you to adjust the exposure settings between
5 and 5 (seepage 9_.
SCENE MENU Allows you to set the camcorder to the best shooting mode
_r a specific si_]ati_i1 by selecting one of the scene se_ings.
SELF TIMER EXECUTE Ref_'r to self timer operation (seepa, ge 116).
CAMERA SETMenus
Thv folk)wing l:_'nus are availablv whvn r'D1is selected.
REC NOKMAL Records il:_ages with standard il:_age quality.
MODE
ECONOMY Allows you take" more shots than in NORMAL moth" but with
a lower quality.
FINE Rvcords in higher quality than NORMAL but with a lower
number of shots.
IMAGE 1280x960 Images are recorded in 1280x960 pixels.
SIZE 640x480 Images are recordvd in 640x480 pixvIs.
GUIDE OFF No Guid_" Frames are display_'d.
FRM
CLOSE-UP Displays a Guide Frame f\_r recording a dose up face shot.
POR'I_'F Displays a Guide Frame f\_r recording an uppe>body view of
a person.
FULL- Displays a Guide Frame f\)r recording a full body view of a
BODY person.
87
Page 90

Advanced Features
LCD/VF SET Menus
The folk)wing menus are awdlaNe when LeDis selected (same as pa,_e 85).
CLOCK SET Menus
The f'ollowing menus are awdlaNe when (_) is selected. (same as/)a,_e 6_6).
OTHERS Menus
The f\)tlowing menus are awfilable when ETeis selected.
FORMAl" EXECUTE (]sed to format a card. This will erase all of its contents
(see page l 17).
SOUND CHIME A chiming sound is made when any operation is performed.
BEEP Beeps sound when any operation is performed.
OFF All confirmation sounds are turned off and shutter sounds
during PHOTOSHOTS are also turned off.
MEDIA ON RF_C()I¢I)ING 70 7711_l!' or RI_COI¢I)ING 70 MIL_4ORY CARl)
DISP appears when recording a still image.
OFF The Media Display will not appear.
DSC MODE Switch set to TAPE - POWER Switch in PLAY
Mode Screens
Press '_ to rewind tape.
Press _'/|| to start a tape playing. Press again /o display a still picture.
Press 11_ to fast f'ol_vard a tape.
Press • to stop the current camcorder operation.
GANMA Press to increase the brighmess of a subject (see page 52).
88
Page 91

Advanced Fea u s
PLAYBACK SET Menus
The following menus are available when _ is selected.
AUDIO DUB
AUDIO 1+2
1
2
PIC. EFFECT Digital picture effi'cts allow you to playback with a
MULTI
FRAME
OFF
9 FRAMES
16 FRAMES
Refer to Audio Dubbing (see page 74).
Selects audio playback mode (see page 76).
more dramatic effect (seepa, ge 100).
Multiple Strobe Playback lets you capture the action of
a fastqnoving ob}ect at intervals of 1/10 of a second
using a 9 or 16 flame picture (seepa, ge ZI).
LCD/VFSETMenus
The following menus are awdlable when teDis selected (same aspage 89.
OTHERS Menus
The following menus are awdlable when [TCis selected.
REMOTE ON There is a built in remote sensor for an optional remote control.
Set this f'eaWre to ON to use an optkmal remote.
OFF Remote sensor is turned off.
_OUND CHIME A chiming sound is made when any operation is performed.
BEEP Beeps sound when any operation is performed.
OFF All confirmation sounds are turned off and shutter sounds
during PHOTOSHOTS are also turned off.
rIME D1SP. OFF Factol T Preset: ['ime Code is not displayed on camcorder.
EODE
D1SP. ON Time Code is displayed on the camcorder.
rc OUT OFF Time Code is not displayed on TV.
ON Time Code is displayed on the 'l'Vi Frame numbers are not
displayed during recording.
g-VIDEO OFF This is factory preset/o 01,7,'. SVII)liO IN is turned off.
1N
ON Set to ON to use the camcorder's 5VII)I/O IN jack.
89
Page 92

Advanced Features
CLOCK SET Menus
The folk)wing menus are awiilabIe when ([D is selected.
DISPL&Y OFF The date/time does not appear.
DATE The date appears.
D_I_+'IIME The date and time appear.
DSC MODE Switch Set to CARD - POWER Switch in PLAY
Mode Screens
MULTI Press to display a thumbnail of the images (see page 116').
PB Press to display the selected image full screen.
PLAYBACK SETScreens
The f\)tlowing menus are aw_ilabh' when t"'1 is selected.
SLIDE EXECUTE Play back consecutive still images recorded on a card
SHOW (see pa_e 122).
SLIDE OFF Slide sl]ow effi'cts are off.
EFF.
P1C. Digital picture effects allow you to playback with a more
EFFECT dramatic effi'ct (see page 100).
OVERLAP A still imag_' fades out as the n_'xt still image fades in. Tile
two images momentarily overlap.
WIPE A still image is replaced with the next still image first
appearing in the middle of the screen and gradually
expanding/o fill the screen.
PROTECF EXECUrE Select to protect an image from being deleted
(see/)a_e 179).
DELETE EXECUTE Select to delete an image (seepage 120).
DELETE ALL EXECUTE Select to delete all images (seepage 12l).
90
Page 93

Advanced Fea u s
OTHERS Menus
The f\)tlowing menus are awfilable when ETCis selected.
REMOTE ON There is a buil_in rel_aote sensor f_)r an optional remote control.
Set this f_'amre to ON to use an optional remote.
OFF Remote sensor is turned off.
SOUND CHIME A chiming sound is made when any operatkm is perf\)rmed.
DEEP Beeps sound when any operatkm is perf\)rmed.
OFF All confirmation sounds are turned off and shutter sounds
during PHOTOSHOTS are also turned off.
LCD/VFSETMenus
The f\)tlowing menus are available when tCDis selected (,vam_as page 85).
CLOCKSETMenus
The f\)tlowing menus are available when (D is selected (same aspage 5X)).
91
Page 94

Advanced Features
Advanced Features
The' camcorder has many advanced features to mak_ _your recording look more
profi'ssiona].
Night Mode
This fi'ature can make dark subjects or areas even brighter than they would be under
good, natural ligllting. Although the recorded image is not grainy, it may have a strobing
effl'ct due to the slow shutter speed.
1.
NIGHT MODE switch
POWER switch IR LIGHT
button
Press in the Lock button while setting the
POWER swish to CAMERA.
2.
Set tim NIGH[' MODE switch to ON. _/(;_r
MOI)F appears and the picture becomes
brighter.
3.
Press IR LIGH [' button to make the picture
brighter.
• :x/IGH7rMODEchanges to IRLI(;HT l and the
camcorder emits infrared Iigbt from the
translTtJtter.
• The picture becomes monochrome.
92
• Each press of tim IR LIGH[' button increases
the IR light mode. Set the IR light number
higher for darker locations.
]VI(._F.IrMOI)I/ I_ IR LIGHT l
t1" tP"
Infrared
light
transmitter
4. When finished using Night Mode, set the NIGHT
Notes:
Use Night Mode when LIGHT appears on the display.
During Night Mode many of the camcorder's manual functions cannot be used.
The infrared light emitted from the camcorder illuminates up to a distance of
about 10 feet away with IR LIGHT3.
During Night Mode, it may be difficult to bring the camcorder into focus. Try
using a tripod or manual focus.
IR LI(;HT3 _ _l IR LIGHTr2 *
•Not available for recording on the card.
MODE switch to OFR
Page 95

Advanced Fea u s
Program AE
You can s_,t th(" camcord_,r to the b('st shooting modo for a sp_cific situation by s('I('cting
on_ _ of the scon(, settings.
Select Scene Setting
i. Pr_'ss in tb__ Lock button wbih' s_tting the
POWER switch to CAMERA.
2. In Record Standby, press MENU/I)ISPLAY
repeatedly to display the menu screen.
PARTY
• I • ISETI I
m O
ABT0
SPORT
1_7 38mifl LP
FAOEIGAMMAI ISRCHI
6.
To cancel a scene setting or turn all scene settings off, repeat step 5 and select 0/,7:.
7.
Pr_'ss the MENU/DISPLAY button r('p_'atedly to remow" the m_qm scr_'_ql.
Notes:
On/y one mode can be engaged at a time
Scene setting cannot be used with Night Mode.
3. Press • or • to select I_1, and then press .';I/7_
4. Press • or • to select S(2k_IiMEXI_, and then
press 51iT
5. Press • or • to select the desired scene setting,
and then press .';I/7_
• The selected scene setting is displayed in
yellow.
• Tim selected scene indicator is displayed on
the LCI) monitor.
Scene Effect
Setting
SPORT You can record a fast moving subj_'ct with litth' motion blur. (Th(" shutter
spe_,d is set to 1/500 s_'c.) This is _'f'fi,ctivc for recording tennis swings
track and field events.
SUNLIGHT You can record without darkening the subject even if the background is
particularly bright. ['iris is ef}'_'ctive for recording at ski areas or when
swimming in the ocean.
DUSK You can accurately record the red of the setting sun and the surrounding
twilight.
You can record a picture with tim brightness adjusted fi)r a subject with a
PARTY large contrast to minimize white flaring, l'bis is ef}'ecti_e for recording
subjects illuminated by a spotlight.
93
Page 96

Advanced Features
White Balance Adjustment
White balance refers to the correctness of color reproduction under various lighting.
If th_, white balance is correct a]] other co]ors wi]] be accurately reproduced.
'l'h_' white balance is usually adjusted automatically. However you can reset this fLmction
manual]y to achieve a more profi'ssiona] c'oloritint r_,production.
Reset the White Balance
1. Press in the" Lock button whih' setting the
POWER switch to CAMEh'A.
2.
In Record Standby mode, set the EASY/
MAN[/AL/AUPO switch to MANUAL
3.
Hold a sheet of plain white paper in front of
the camcorder lens. Adjust the distance so that
the white paper fills the screen.
Note: It may be difficult to focus on the
white paper. In such a case, adjust focus
manually (see page 98).
4.
Press the W/B button to s_,t the white, balance.
P;@llTl! HAL flash('s whih' the camcorder is
locking the white balance.
• W/B LOCKwill appear when white balance
locking is complete.
5.
Press the WiB button to exit white balance
lock.
Notes."
If WHITE BAL does not stop flashing,
press the W/B button to cancel white
balance.
The camcorder will return to AUTO
White Balance mode if a scene setting
is selected and then canceled.
Manual White Balance cannot be used
with Night Mode.
WHITE BAL-
l/I/
FADEIGANNAI I SF=CHI
MANUAL
W/B LOCK
FADEIGAMMAI ISRCHI
W/B button
94
Page 97

Advanced Fea u s
Exposure Control
This fl'ature autoinatically adjusts the exposure for the b_'st available picture quality for
most recording. Mam]al exposure adjustment is recommended in the f'ollowing situations:
When shooting using reverse lighting or when the background is too bright
When shooting on a reflective natural background such as at the beach or when
skiing
When the background is overly dark or the sub}ect light
I.
Press in the Lock button while setting the
POWER switch to CAMERA.
GF_ T. SPEED
SCENE MEnU
OK.RETURN
ms
RETURN
AUTO
• I • ISETI I
MAHUAL
• EXPOSURE
+5
2.
In Record Standl_y, set the EASY/MAN//AL/
AUTO switch to MAN/AL. Press the MENI/
DISPLAY button repeatedly to display the menu
screen.
3.
Press • or • to select I_1, and then press SET:
4.
Press • or • to select I']XPOSI/I,'E, and then
press S1,27:
5.
Press • or • to select MANUAL, and then press
0)
-5
FAOEI GAMMAI ISRCHI
MANUAL
• EXPOSURE
+5
-5
FADEIUAMMAI ISBUHI
I t
• The exposure setting screen is displayed.
6.
Use the CONTROL dial to select an exposure
setting, and then press the CON ['ROL dial in to
select tim exposure setting (+5 most light
to 5qeast ]igh0.
7.
To return exposure to AITI{), repeat steps 2 5
and select AUTO.
8.
Press tile MENUiI)ISPLAY button repeatedly to
remove tile menu screen.
• The camcorder returns to Record Standby.
Notes:
The camcorder will return to AUTO
Exposure mode if a scene setting is
selected and then canceled afterward.
Exposure control cannot be used with
Night Mode.
95
Page 98

Advanced Features
Shutter Speed Control
Auto Shutter Speed adjusts tile shutter speed for tile best available pictm-e according to
the lighting conditions. You may want to adjust the shutter speed manually to create a
better quality picture. Recommended shutters speeds are .s,5ozzn on the next page,.
MENU/DISPLAY
button
Navigation EASY/
Buttons MANUAL/
EXPOSURE
SCER£ ME_U
QK.RETUR_I
_ ms
RETIIRN
AUTO switch
CONTROL dial
AUTO
• I *, ISETI I
== =0
MANUAL
• SHUT. SPEED
10000
1.
Press in the Lock button while setting the
POWER swish to CAMERA.
2.
In Record Stand,by, set the EASY/MANI ALi
A/]['O switch to MANI AL. Press the MENI/
DISPLAY button repeatedly to display the menu
screen.
3. Press • or • to select _, and then press SET
4.
Press • or • to select ,S_tIH: SPkJZI), and then
press ,'_El/:
5.
Press • or • to select MANDAL, and then press
S/_T
• The shutter speed setting screen is displayed.
• When recording on a tape, there are 17 shutter
speeds flom 30(1/30 see.) to IO(XX)(I/IO,O00
see.).
• When recording on a card, there are 9 shutter
speeds flom 30 (1/30 see.) to 500 (1/500 see.).
6.
Use the CONTROL dial to select a shutter speed.
and then press the CONTROL dial in to select
the shutter speed.
7.
To return shutter speed to AUIO, repeat steps 2
5 and select AUTD.
8.
Press the MENUiI)ISPLAY button repeatedly to
remove the ITtenkl screen.
• The camcorder returns to Record Stand,by.
30
FAOEIUaMMM ISRCH I
96
Page 99

Advanced Fea u s
Notes:
Fast shutter speeds can be used with the still recording functions to record
higher quality still images of fast-moving objects.
If the on-screen picture flickers when recording under fluorescent lighting, you
may be able to compensate by setting the shutter speed to I/!00 second.
Recording with shutter speeds faster than !/60 sec. may darken the picture
Make sure to record in brightly lit areas if using higher shutter speeds
Using higher shutter speeds under fluorescent lighting will cause flickering in
the picture and possibly color shifts.
Set the EASY/MANUAL/AUTO switch to MANUAL to check the manual settings.
The camcorder will return to AUTO Shutter Speed mode if a scene setting is
selected and then canceled afterward
Manual Shutter Speed cannot be used with Night Mode
Recommended Shutter Speeds
1/30 Second
Use to record in a poorly
illuminated location.
lse wtwn you want to create
artistic trailing images of fas_
moving subjects.
1/100 Second
{s_, wb('n you want to reduce
flw light by half.
Use as a substitute fbr an ND2
filter.
11250-1 / 1,000 Second
[]se _) record oukk)or sports
on a partially cloudy day.
Use to record an outside scene
through a cltr window (when
you want to minimize blur
caused by the camera shaking).
111,000-1110,000 Second
Use to record spor_ action in
bright daylight.
Use to record in bright daylight
at some locations, such as a ski
resort.
97
Page 100

Advanced Features
Auto and Manual Focus
'l'h_' camcorder's automatic fi)cus syst_'m off_'rs continuous shooting ability from close up
to infinity. During auto focus, the camcorder will focus on the" obj_'ct Iocated in the center
of th__scene. Auto fi)cus may not op_q'ah' correctly in fl_e situations ]ist_d below. You may
want to use manual f\)cusing.
When two subjects overlap in the saln_ _ scene
When i]]umhlation is ]ow
When the subject has no contrast (differs, rice in brightn_'ss and darkness), such as a
fiat on__ color wa]] or a clear, b]u_ _sky
When a dark obiect is barely visible
When fl_e scene contains small patterns or identical patterns fl_;ff are repeated
When the" scene is affected by light beams reflecting off water
When shooting a scene with a high contrast background
Auto Focus
1. Press in the, Lock button whih' setting the
POWER switch to CAMERA.
2. In Record Standby mode, set the FOCUS switch
to AUTO.
Manual
Focus
ring
Power Zoom
buttons
98
FOCUS
Zl/J_NU
_'_JSH
FOCUS switch
Manual Focus
1. Press in the, Lock button while setting the
POWER switch to CAMERA.
2.
In Record Standby mode, set the FOC[/S switch
_) MANU. MFis displayed.
Use the Zoom T and W buttons to zoom in or
3.
out on the object you want _) _)cus on.
4.
Rotate the manual fi)cus ring to fi)cus on the
sub}ect.
• II_ appears when the focus cannot be adjusted
any farther.
• _- appears when the f\)cus cannot be adjusmd
any closer.
 Loading...