

USER'S
GUIDE
CAMCO
Important Safety Information
Be sure to read all the safety information before you begin to use this product.
WARNING: To reduce the risk of fire or shock hazard, do not expose I
camcorder or AC adapter/charger to rain or moisture.
This symbol indicates "dangerous voltage"
RISK_B.ECIRICSHOCK
_NOTOPEN
TO REDUCE THE RISK OF ELECTRIC SHOCK, DO NOT REMOVE THE COVER (OR
BACK). NO USER-SERVICEABLE PARTS ARE INSIDE. REFER SERVICING TO
QUALIFIED SERVICE PERSONNEL.
inside the product that presents a risk of
electric shock or personal injury.
This symbol indicates important
instructions accompanying the product.
I
Cautions
CAUTION: To prevent electric shock, match wide blade of plug to
wide slot, fully insert.
ATTENTION: Pour 6viter les chocs 61ectriques, introduire la lame
la plus large de la fiche dans la borne correspondante de la prise et
pousser jusqu au fond.
To reduce risk of injury, charge only rechargeable batteries
recommended by the manufacturer for this camcorder. Other types of
batteries may burst causing damage and personal injury.
FCC Regulations state that unauthorized changes or modifications to this
equipment may void the user's authority to operate it.
Product Registration
Please fill out the product registration card and return it immediately.
Returning this card allows us to contact you if needed.
Keep your sales receipt for proof of purchase to obtain warranty parts
and service and attach it here. Record the serial and model numbers
located on the bottom of the camcorder.
Model No: CC635/CC636/CC637
Serial No:
Purchase Date:
Purchased From:
We want to make sure you enjoy your new camcorder. If you have any
questions, call:
Camcorder Exchange Warranty .......... 800-283-6503 (pages 100-101)
Customer Service ......................................... 800-336-1900 (page 99)
Accessories ............................................. 800-338-0376 (pages 84-89)
Safety Information .............................. i
Product Registration ........................... i
Table of Contents ............................ 1-2
First-Time Operation
• Assistance .......................................... 3
• Unpack Camcorder &
Accessories ...................................... 3
• Attach the Adapter/Charger ............... 4
• Insert a Tape ...................................... 4
• Adjust Handstrap ............................... 5
• Open Lens Cover ............................... 5
• Turn on Camcorder. ........................... 5
• Select a Recording Speed .................. 6
• Set the Mode Select Dial ................... 7
• Adjust Viewfinder and
Eyepiece Focus Control ................... 7
• Start and Stop Recording ................... 8
• Play Back Your Recording ................ 8
• Turn off the Camcorder ..................... 8
Remote Controls
• Model CC637 Only
• Install Battery Cell ....................... 17
• Remote Sensor .............................. 17
• Buttons .................................... 18-19
• Models CC635 and CC636
• Buttons .................................... 20-21
• Install Battery Cell ....................... 22
• Remote Sensor .............................. 22
Recording and Traveling Tips ........ 23
Video Cassettes ............................ 24-25
Recording
• Making a Recording ................... 26-27
• Viewfinder Displays ................... 28-31
• Viewfinder ....................................... 32
• Electronic Image Stabilizer (EIS)... 33
• Electronic Indexing ......................... 33
• Flying Erase Head ........................... 34
• Auto Head Cleaner .......................... 34
• Close Lens Cover .............................. 8
• Review Camcorder's
Operating Controls ..................... 9-11
Powering Your Camcorder
• Using Adapter/Charger. ................... I_
• Using Rechargeable Btittery ....... 13-15
• Using Optional Cat" Cord Adapter... 16
• Tally Light ....................................... 34
• Microphone ...................................... 34
• Quick Review .................................. 35
• QUICK REC Feature ....................... 35
• Camera Edit ..................................... 35
(colllilnmd 011 Ilt2X| page)
Recording (continued)
Mode Select Dial
• Full AUTO Mode ...... .................... 36
Playback
• Using the Cassette Adapter ........ 70-71
• Viewfinder Playback ...................... 72
• Exposure Control .......................... 37
• Focusing (Auto and Manual) ..38-39
• White Balance ............................ 40-41
• Recording Menu
• To Display Recording Menu ......... 42
• Tape Remaining Display ............... 43
• Set Tape Length ......................... 43
• Zooming ................................... 44-45
• Gain Up (Slow Shutter) ................. 46
• Color Filter .................................... 47
• Titler ........................................ 48-49
• Date and Time Display
• Set the Date and Time ............... 50
• Install the Clock Lithium Cell ...51
• Select Date or Date and Time
You Want to Record ........ 52-53
• Sub Menu
• Change a Feature In the
Sub Menu ............................... 54
• Tally Light ................................. 55
• Set JLIP Identification
Number .................................. 55
• Self Timer ................................... 56-57
• Animation Recording ................ 58-59
• Time-Lapse Recording .............. 60-61
• Fading or Wiping In or Out ........ 62-63
• Production Effects ...................... 64-65
• Audio Dubbing (Remote Only)..66-67
• Edit Insert (Remote Only) .......... 68-69
• Playback Features
• Visual Searching ........................... 73
• Tape Positioning ........................... 73
• Stop-Action Pause ......................... 73
• Time Counter ................................ 74
• Tracking ........................................ 75
• Playback on TV (or VCR) With
A UDIO!VIDEO IN Jacks ....... 76-77
• Model CC637 Only
• Programming Remote to Operate
Compatible VCR ................ 78-79
• Copying Tapes Using Programmable
Synchro Edit ...................... 80-81
• Playback on TV Without
Audio/Video Inputs ................. 82-83
Optional Accessories ................... 84-89
• Accessory Order Form ............... 87-89
Built-in Color Enhancement
Light ....................................... 90-91
Attaching the Shoulder Strap .......... 92
Information to User .......................... 93
Care and Maintenance ............... 94-95
Trouble Checks ........................... 96-98
Customer Assistance and Service ...99
Limited Warranty ................... 100-101
Specifications .................................. 102
Index (Alphabetical) ............... 103-105
2
This sectiondescribesonly the basicstepsnecessaryto setup yourcamcorderto
record. Referto the other sectionsfor detailedoperationand featureoptions.
Assistance
The toll-free numbers are available to help you with any problem you may encounter.
Camcorder Exchange Warranty ..... 800-283-6503
Customer Service ................ 800-336-1900
Accessories .................... 800-338-0376
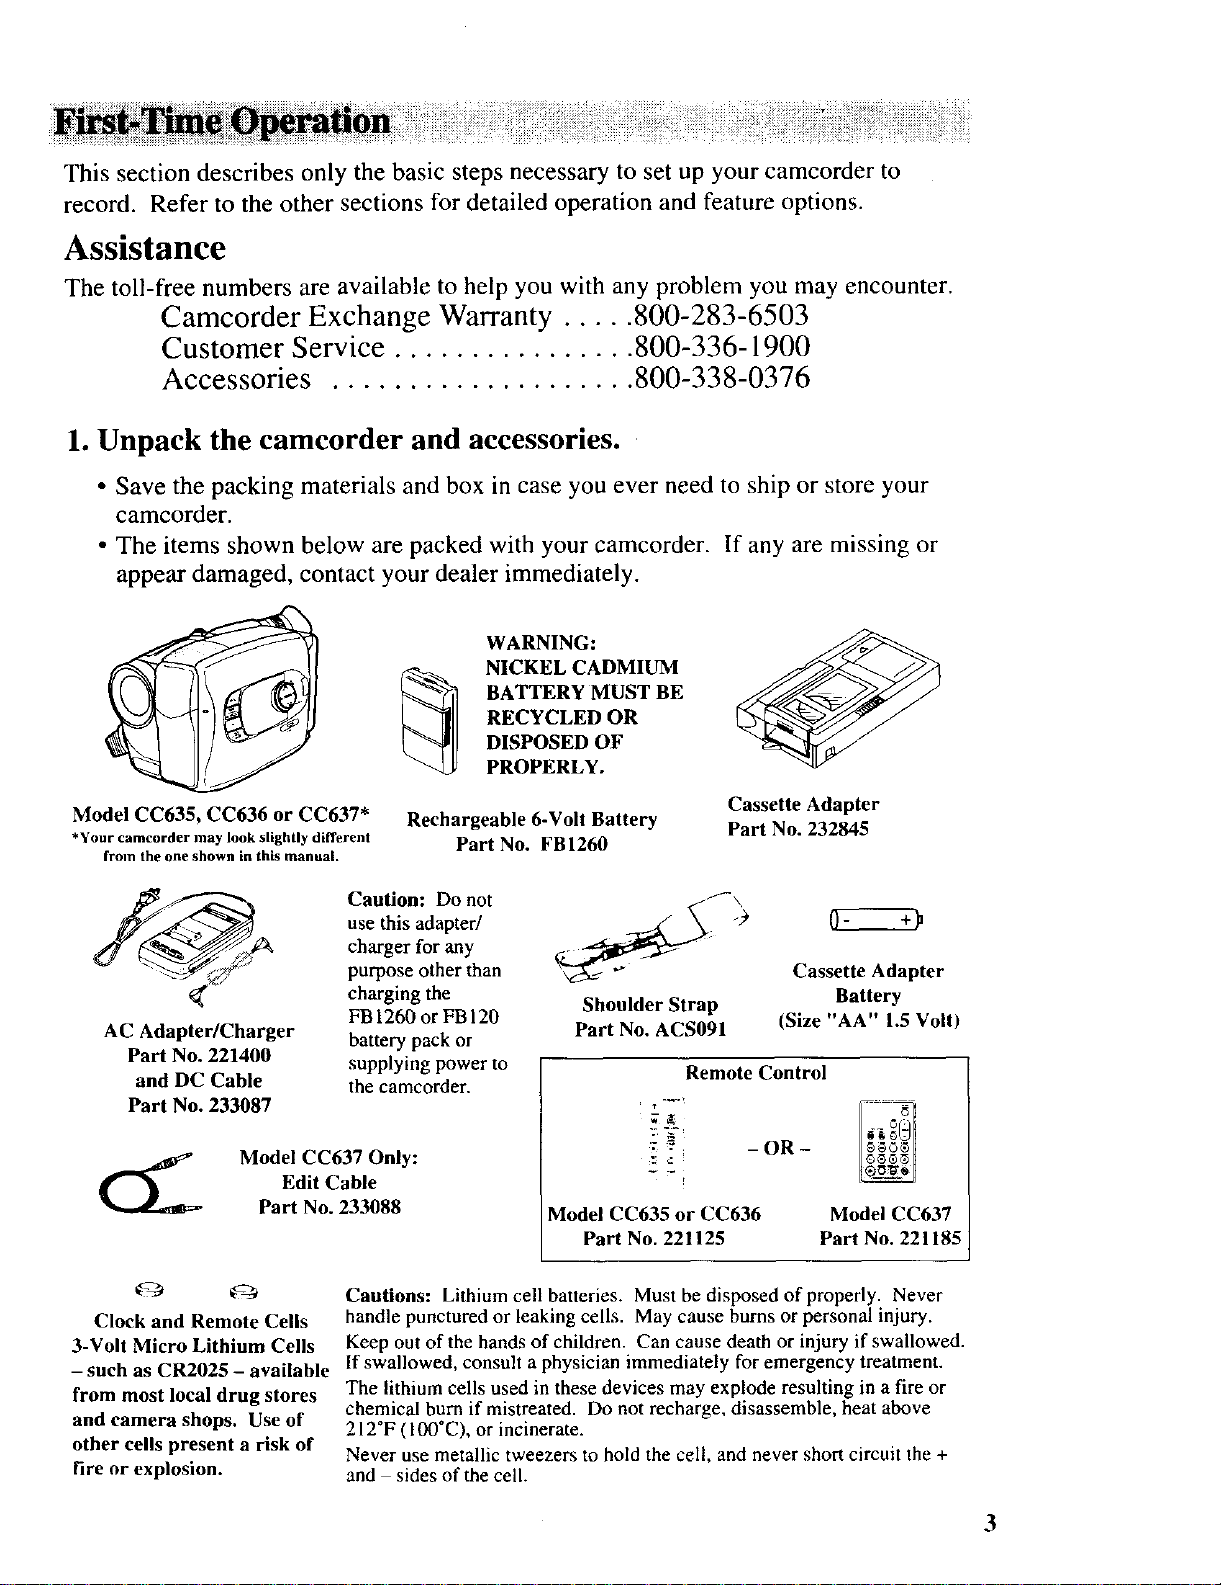
1. Unpack the camcorder and accessories.
• Save the packing materials and box in case you ever need to ship or store your
camcorder.
• The items shown below are packed with your camcorder. If any are missing or
appear damaged, contact your dealer immediately.
WARNING:
NICKEL CADMIUM
BATTERY MUST BE
RECYCLED OR
DISPOSED OF
PROPERLY.
Model CC635, CC636 or CC637"
*Your camcorder may look slightly different
from the one shown in this manual.
AC Adapter/Charger
Part No. 221400
and DC Cable
Part No. 233087
Edit Cable
Model CC637 Only:
Part No. 233088
Clock and Remote Cells
3-Volt Micro Lithium Cells
- such as CR2025 - available
from most local drug stores
and camera shops. Use of
other cells present a risk of
[ire or explosion.
Rechargeable 6-Volt Battery
Part No. FBI260
Caution: Do not
use this adapter/
charger for any
purpose other than
charging the
FB 1260 or FB 120
battery pack or
supplying power to
the camcorder.
Cautions: Lithium cell batteries. Must bedisposedofproperly. Never
handle punctured or leaking cells. May cause burns or personal injury.
Keep out of the hands of children. Can cause death or injury if swallowed.
If swallowed, consult a physician immediately for emergency treatment.
The lithium cells used in these devices may explode resulting in a fire or
chemical burn if mistreated. Do not recharge, disassemble, heat above
212°F (100*C), or incinerate.
Never use metallic tweezers to hold the celt, and never short circuit the +
and sides of the cell.
Shoulder Strap
Part No. ACS091
:: -" - OR -
Model CC635 or CC636
Part No. 221125
Cassette Adapter
Part No. 232845
Cassette Adapter
Battery
(Size "AA" 1.5 Volt)
Remote Control
Model CC637
Part No. 221185
3
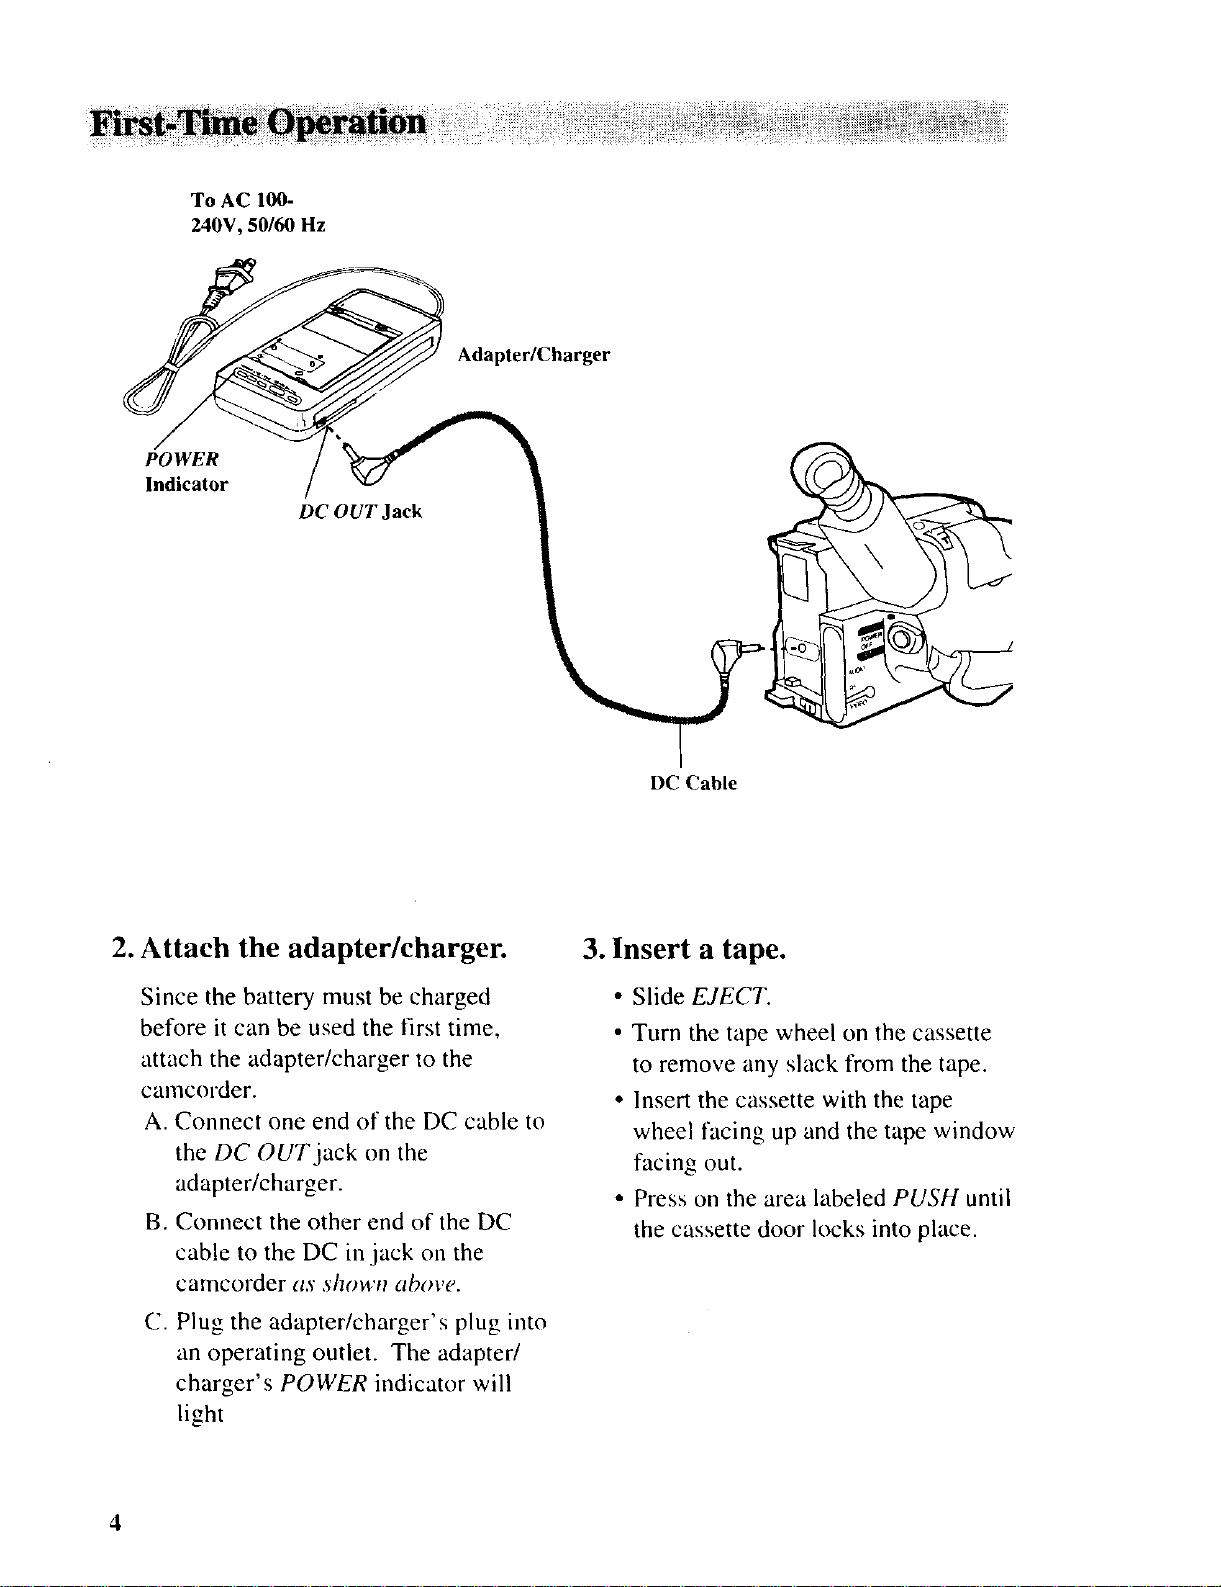
To AC 100-
240V, 50/60 Hz
POWER
Indicator
Adapter/Charger
DC OUT Jack
\
2. Attach the adapter/charger.
Since the battery must be charged
before it can be used the first time,
attach the adapter/charger to the
camcorder.
A. Connect one end of the DC cable to
the DC OUT jack on the
adapter/charger.
B. Connect the other end of the DC
cable to the DC in jack on the
camcorder as shown above.
C. Plug the adapter/charger's plug into
an operating outlet. The adapter/
charger's POWER indicator will
light
DC Cable
3. Insert a tape.
• Slide EJECT.
• Turn the tape wheel on the cassette
to remove any slack from the tape.
• Insert the cassette with the tape
wheel facing up and the tape window
facing out.
• Press on the area labeled PUSH until
the cassette door locks into place.
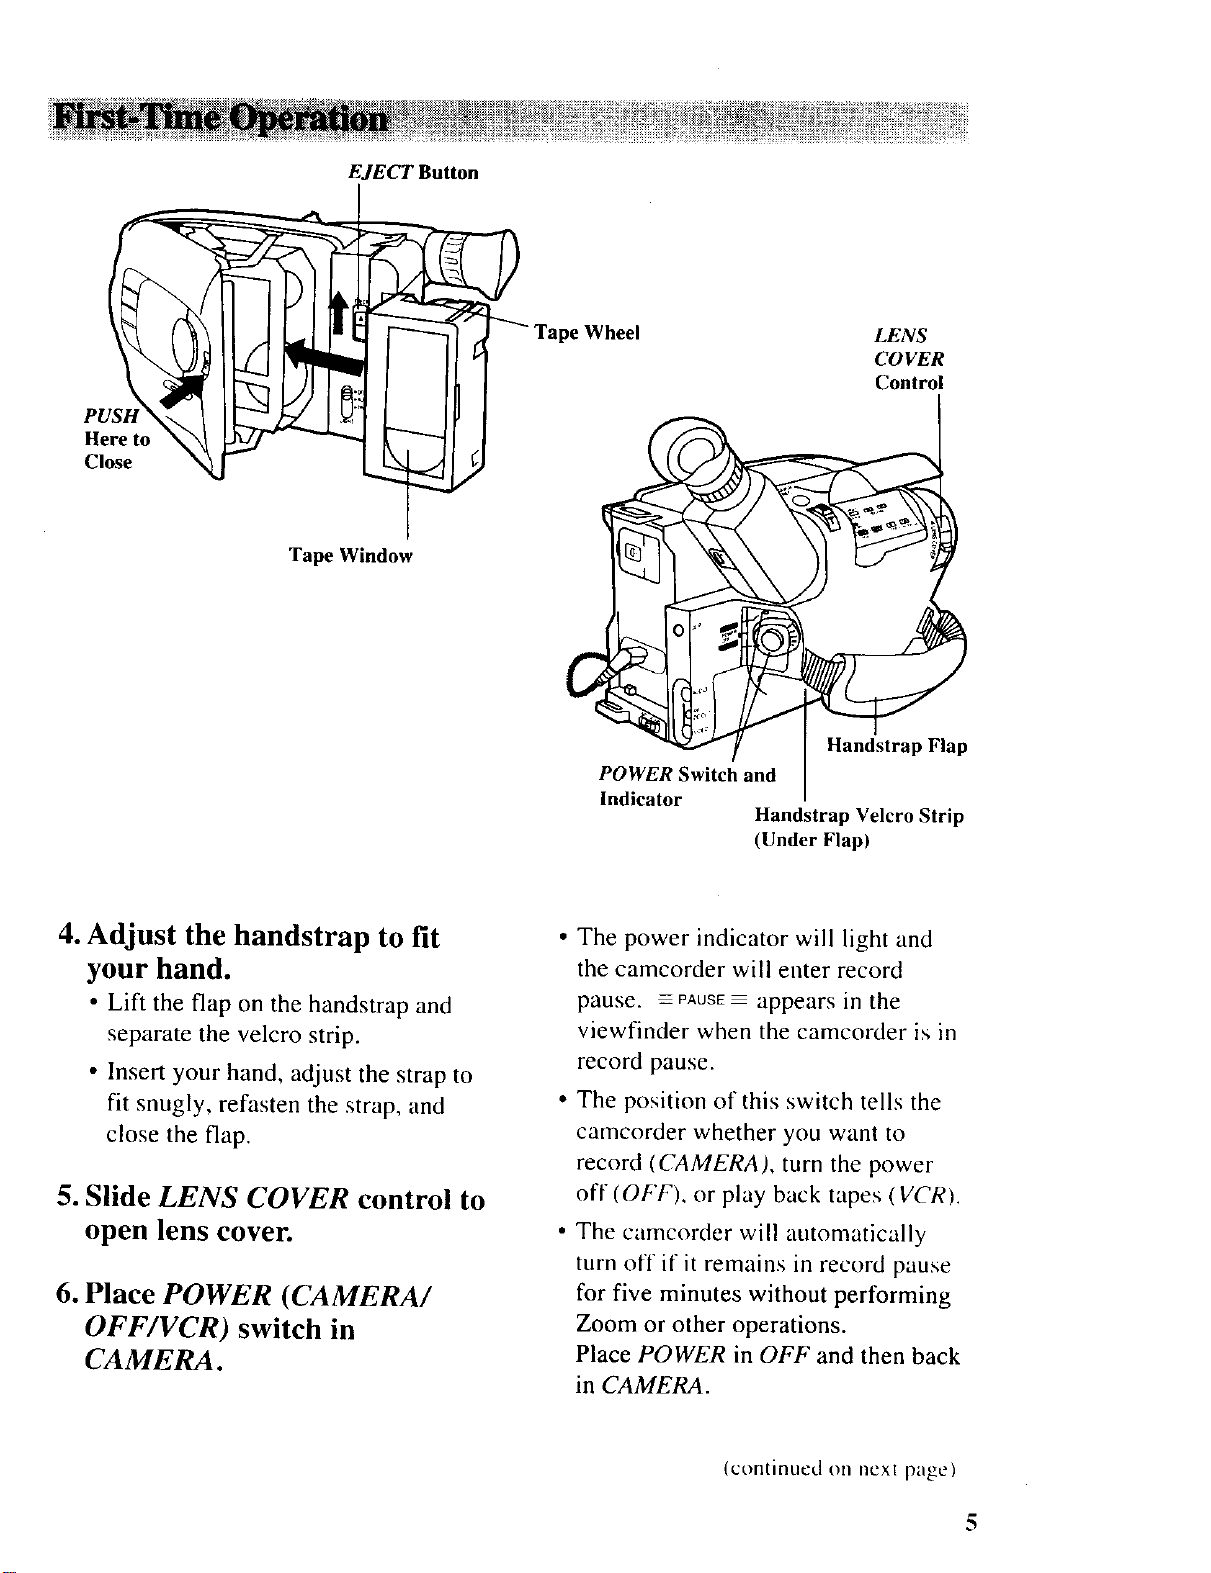
PUSH
Here to
Close
EJECT Button
LENS
COVER
Control
Tape Window
Handstrap Flap
POWER Switch and
Indicator
Handstrap Velcro Strip
(Under Flap)
4. Adjust the handstrap to fit
your hand.
• Lift the flap on the handstrap and
separate the velcro strip.
• Insert your hand, adjust the strap to
fit snugly, refasten the strap, and
close the flap.
5. Slide LENS COVER control to
open lens cover.
6. Place POWER (CAMERA/
OFF/VCR) switch in
CAMERA.
The power indicator will light and
the camcorder will enter record
pause. _PAUSE appears ill the
viewfinder when the camcorder is in
record pause.
The position of this switch tells the
camcorder whether you want to
record (CAMERA), turn the power
off (OFF), or play back tapes (VCR).
The camcorder will automatically
turn off if it remains in record pause
for five minutes without performing
Zoom or other operations.
Place POWER in OFF and then back
in CAMERA.
(continued on ncxl page)
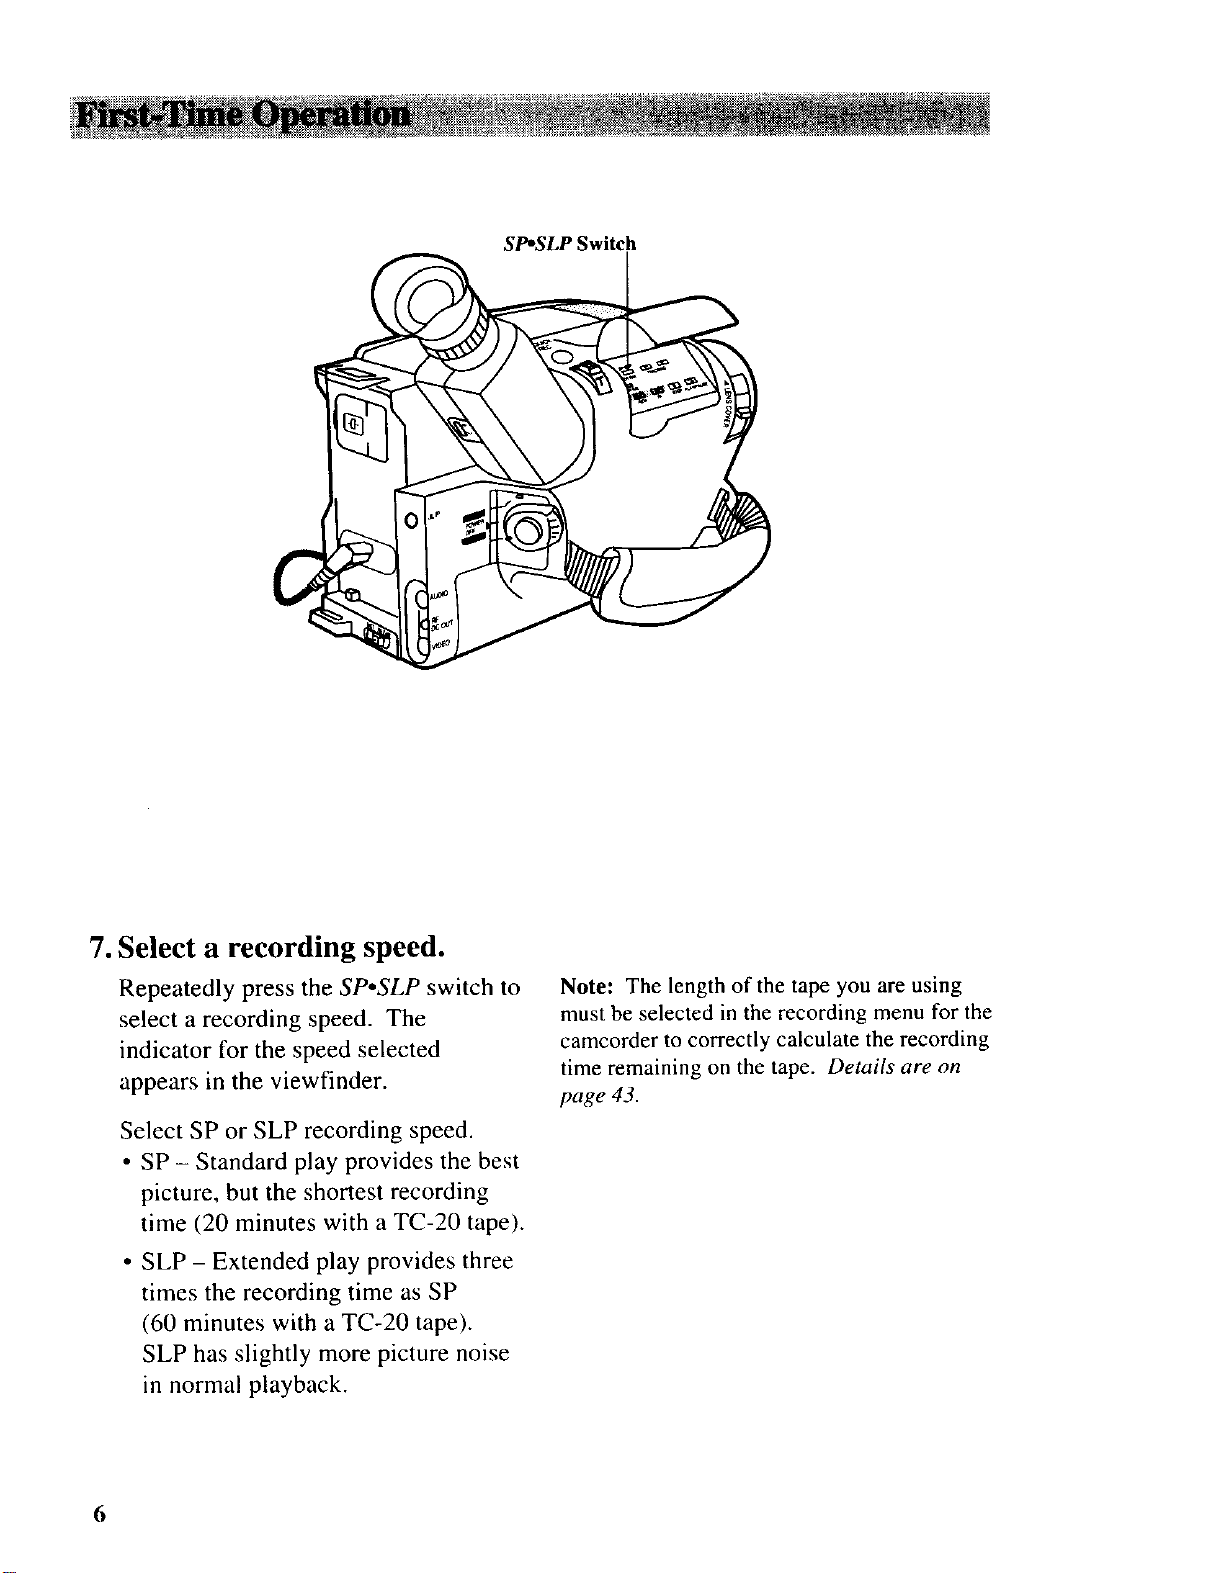
SP*SLP Switch
7. Select a recording speed.
Repeatedly press the SP.SLP switch to
select a recording speed. The
indicator for the speed selected
appears in the viewfinder.
Select SP or SLP recording speed.
• SP - Standard play provides the best
picture, but the shortest recording
time (20 minutes with a TC-20 tape).
• SLP - Extended play provides three
times the recording time as SP
(60 minutes with a TC-20 tape).
SLP has slightly more picture noise
in normal playback.
6
Note: The length of the tape you are using
must be selected in the recording menu for the
camcorder to correctly calculate the recording
time remaining on the tape. Details are on
page 43.
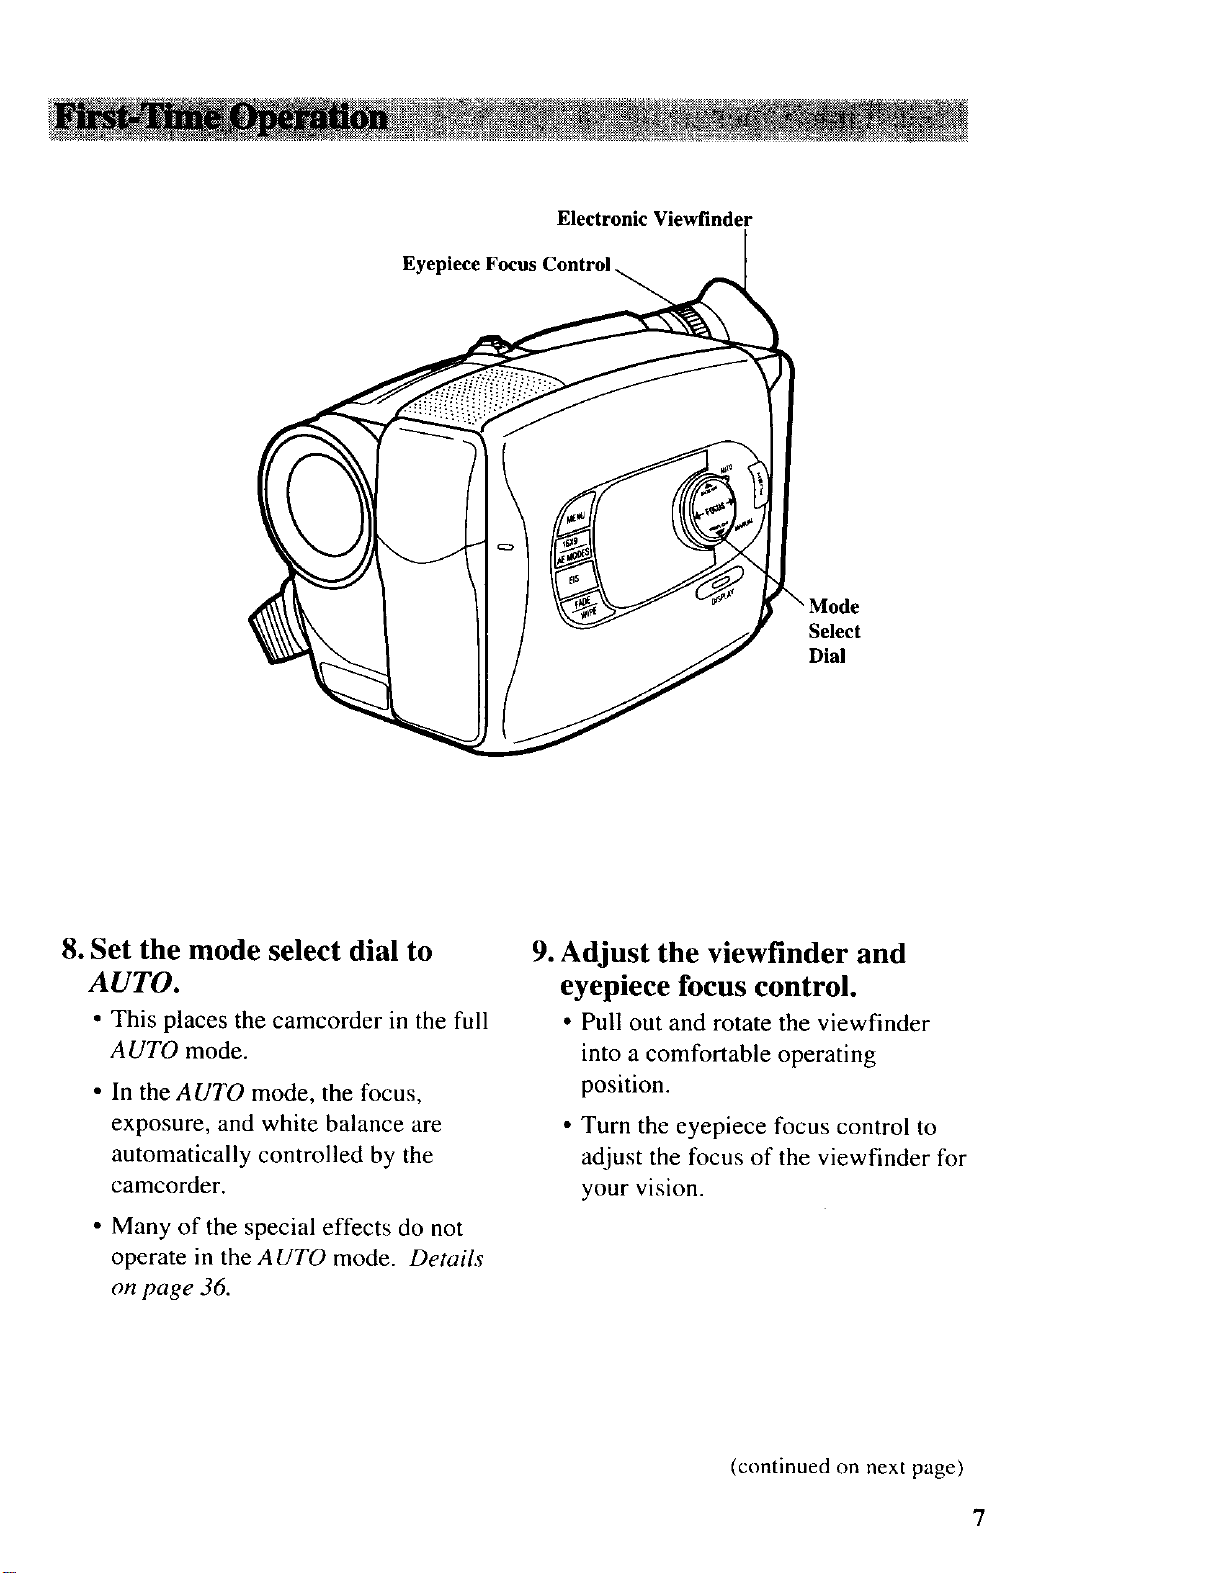
Electronic Viewfinder
Eyepiece Focus Control ..
" Mode
Select
Dial
8. Set the mode select dial to
AUTO.
• This places the camcorder in the full
A UTO mode.
• In the AUTO mode, the focus,
exposure, and white balance are
automatically controlled by the
camcorder.
• Many of the special effects do not
operate in the AUTO mode. Details
on page 36.
9. Adjust the viewfinder and
eyepiece focus control.
• Pull out and rotate the viewfinder
into a comfortable operating
position.
• Turn the eyepiece focus control to
adjust the focus of the viewfinder for
your vision.
(continued on next page)
7
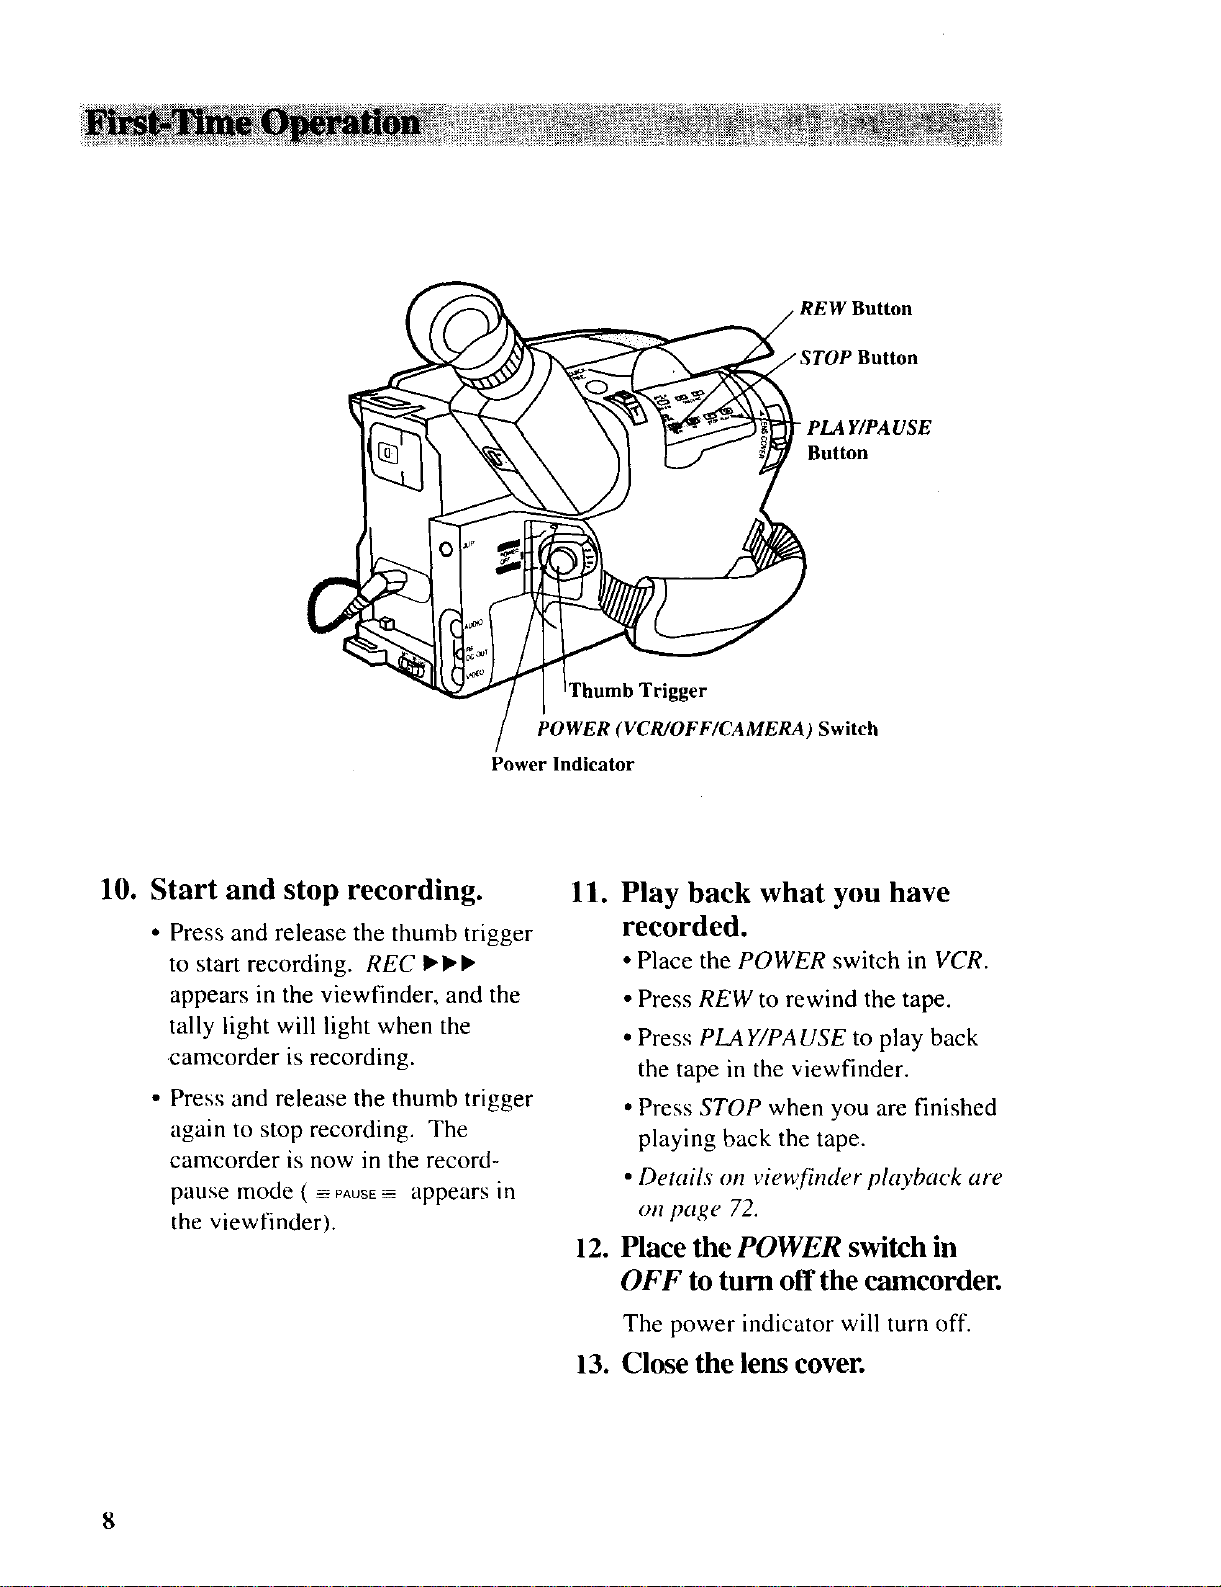
IThumb Trigger
POWER (VCR/OFF/CAMERA) Switch
Power Indicator
_ PLA Y/PA USE
_ Button
10. Start and stop recording.
• Press and release the thumb trigger
to start recording. REC ,,,
appears in the viewfinder, and the
tally light will light when the
camcorder is recording.
• Press and release the thumb trigger
again to stop recording. The
camcorder is now in the record-
pause mode ( ---=PAUSE------appears in
the viewfinder).
11. Play back what you have
recorded.
• Place the POWER switch in VCR.
• Press REW to rewind the tape.
• Press PLA Y/PA USE to play back
the tape in the viewfinder.
• Press STOP when you are finished
playing back the tape.
• Details on vie_finder playback are
on page 72.
12. Place the POWER switch in
OFF to turn off the camcorder.
The power indicator will turn off.
13.
Close the lens cover.
8
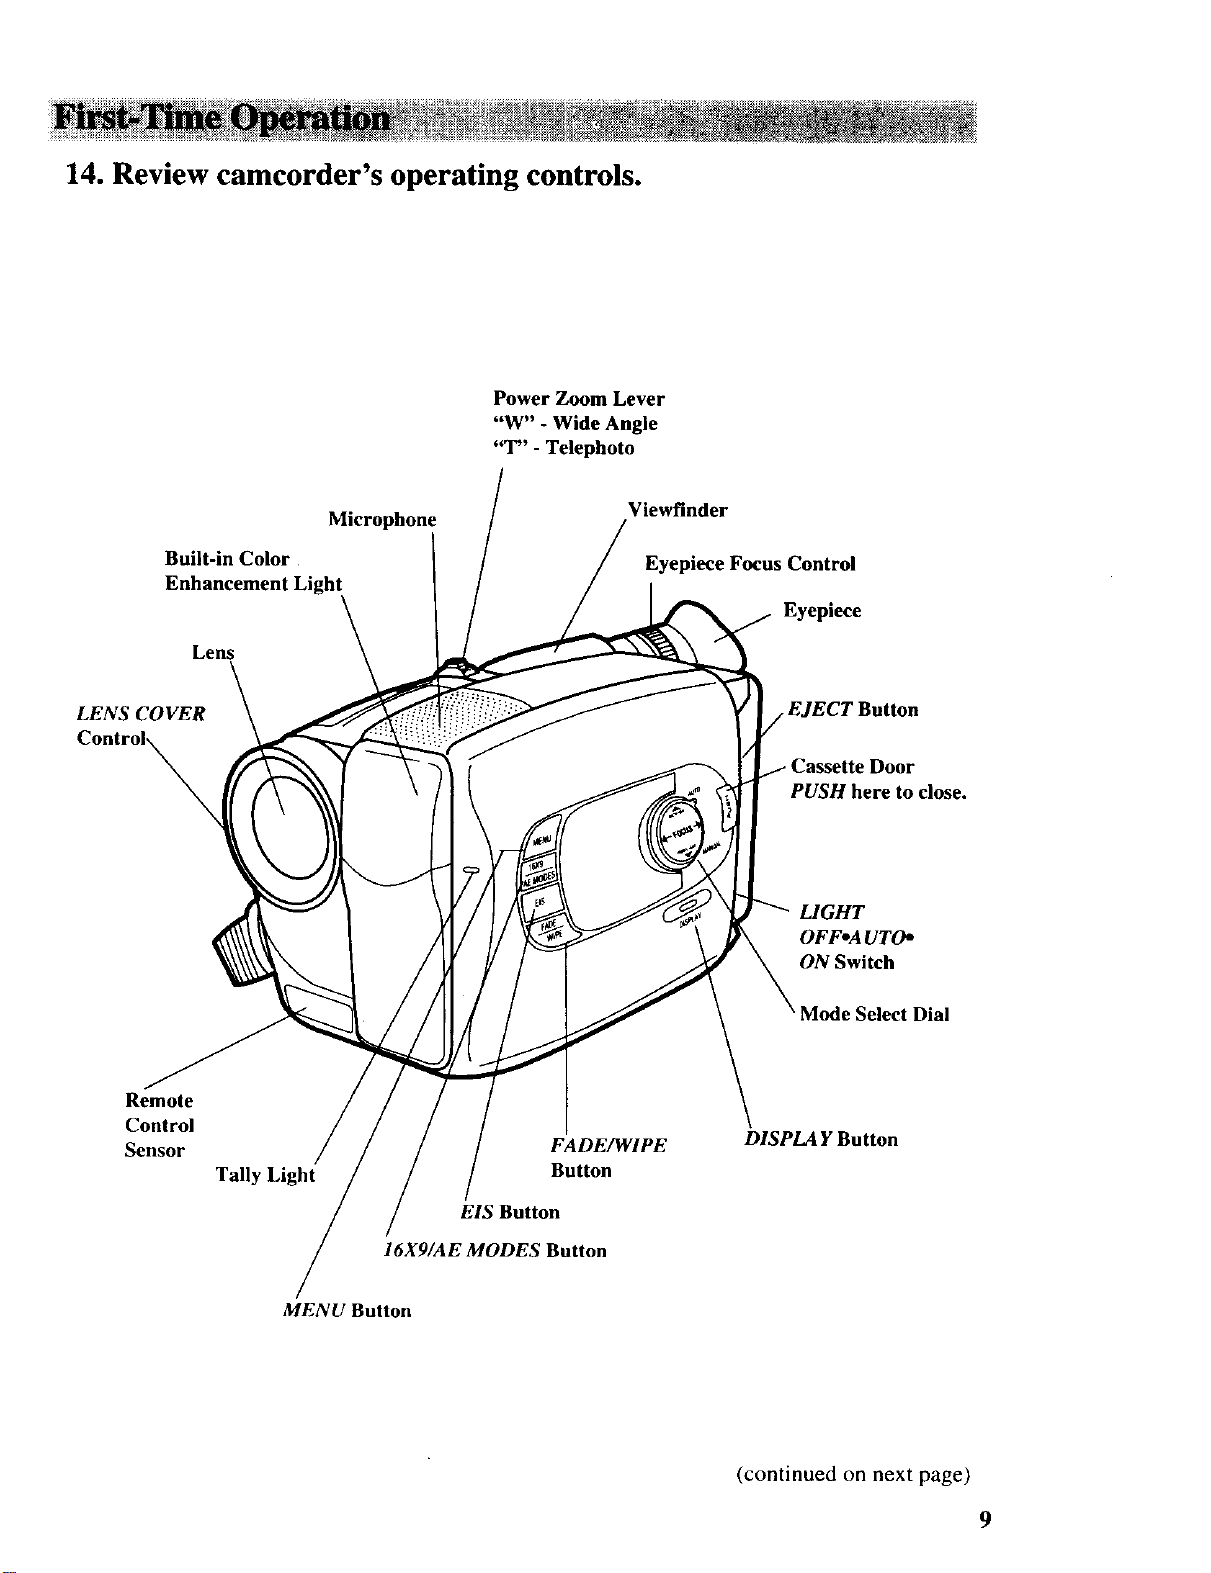
14. Review camcorder's operating controls.
Power Zoom Lever
"W" - Wide Angle
"T" - Telephoto
Built-in Color
Enhancement
LENS COVER
Lens
Microphone
Viewfinder
Eyepiece Focus Control
Eyepiece
EJECT Button
PUSH here to close.
LIGHT
OFFoAUTO*
ON Switch
Mode Select Dial
Remote
Control
Sensor
Tally Light
MENU Button
FADE/WIPE
Button
EIS Button
16X9/AE MODES Button
DISPLAY Button
(continued on next page)
9
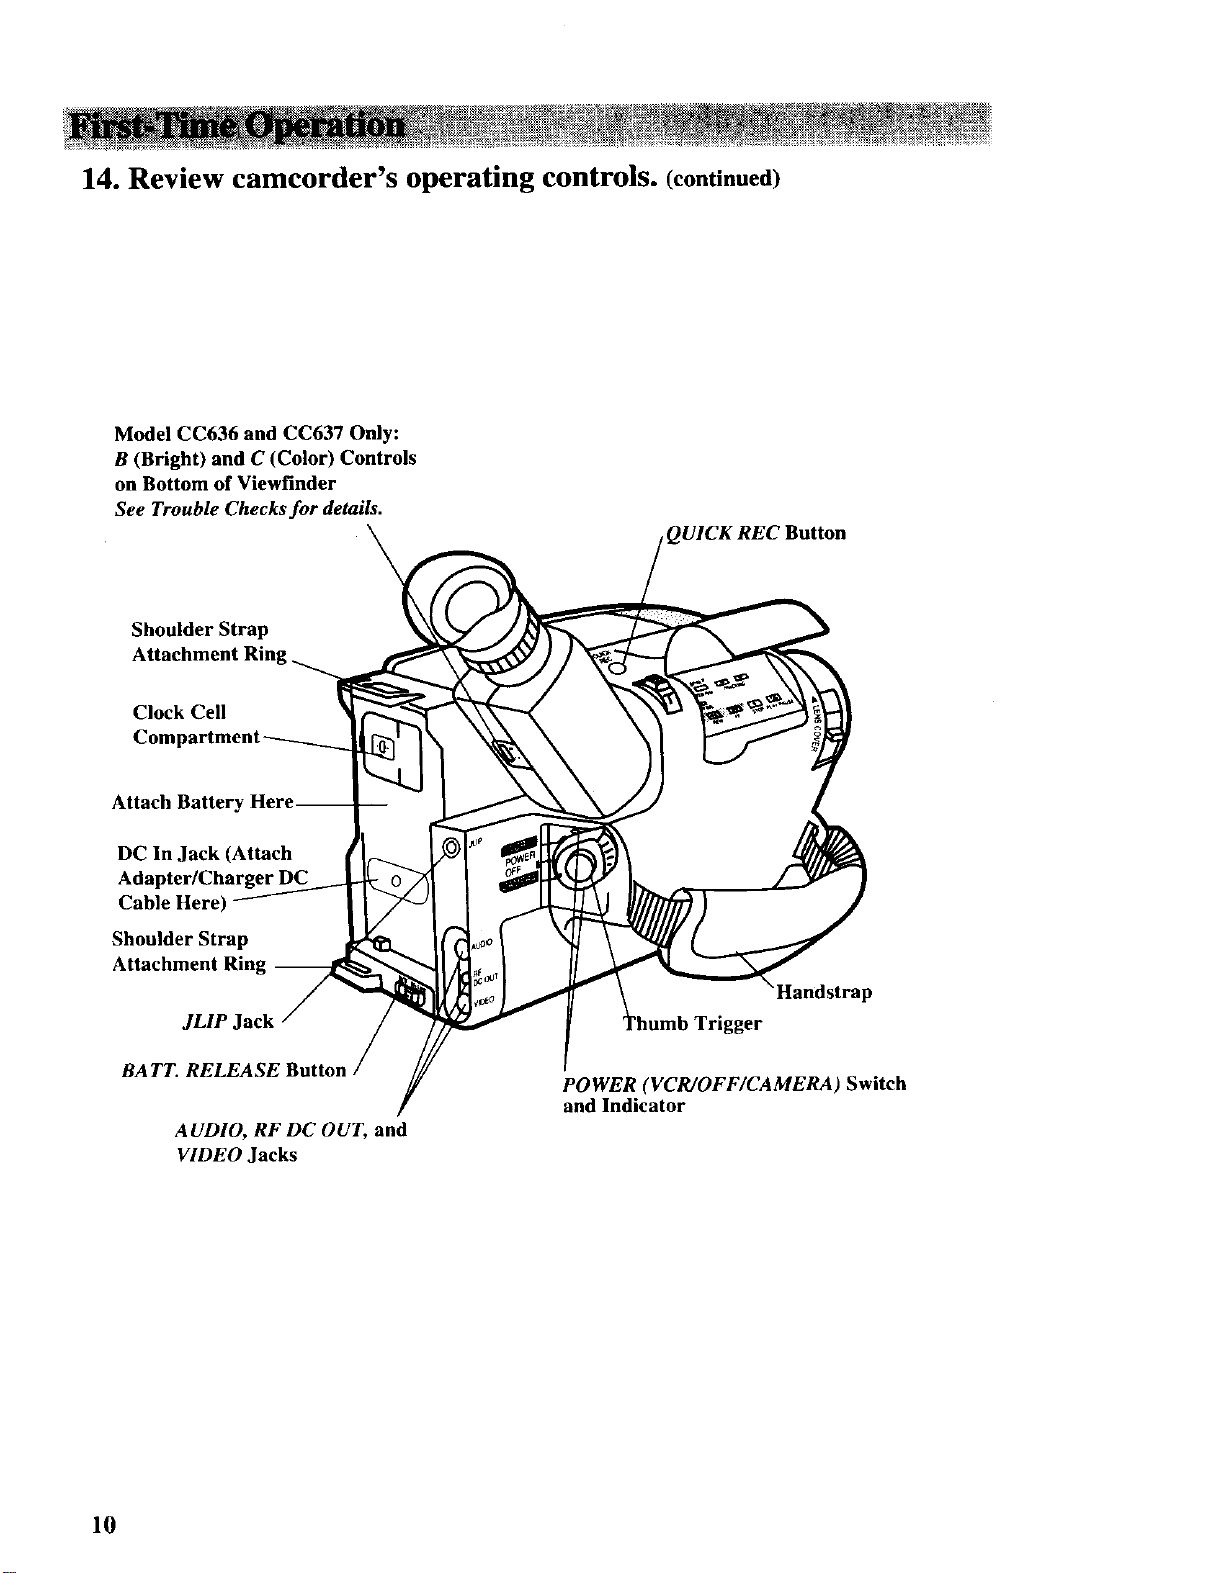
14. Review camcorder's operating controls. (continued)
Model CC636 and CC637 Only:
B (Bright) and C (Color) Controls
on Bottom of Viewfinder
See Trouble Checks for details.
QUICK REC Button
\
Shoulder Strap
Clock Cell
Attach Battery
DC In Jack (Attach
Cable Here)
Shoulder Strap
Attachment Ring --
JLIP Jack
RATT. RELEASE Button
A UDIO, RF DC OUT, and
VIDEO Jacks
Handstrap
er
POWER (VCR/OFF/CAMERA) Switch
and Indicator
10
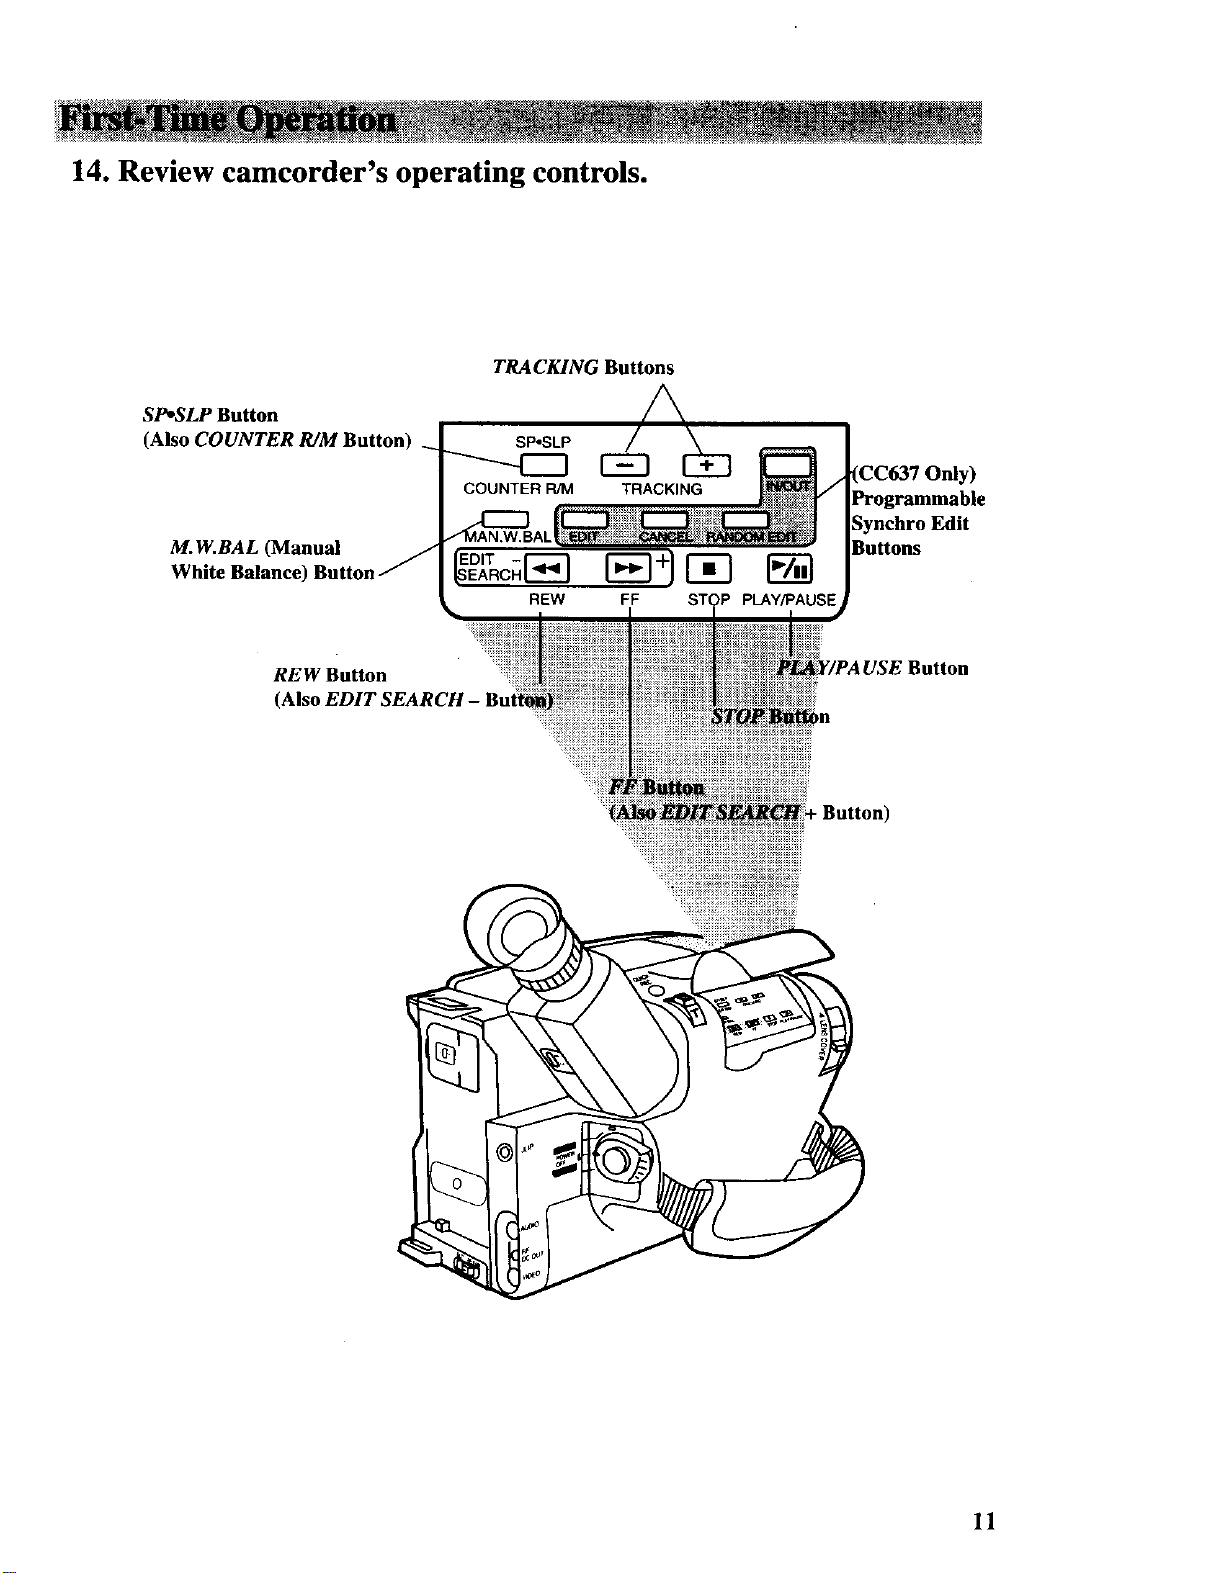
14. Review camcorder's operating controls.
TRACKING Buttons
SP*SLP Button
(Also COUNTER R/M Button)
COUNTER R/M TRACKING
M.W.BAL (Manual J
White Balance) Button
REW Button
(Also EDIT
_O'_c_r_r-_+lr-_ r_
REW FF PLAY/PAUSE
(CC637 Only)
Programmable
Synchro Edit
Buttons
11
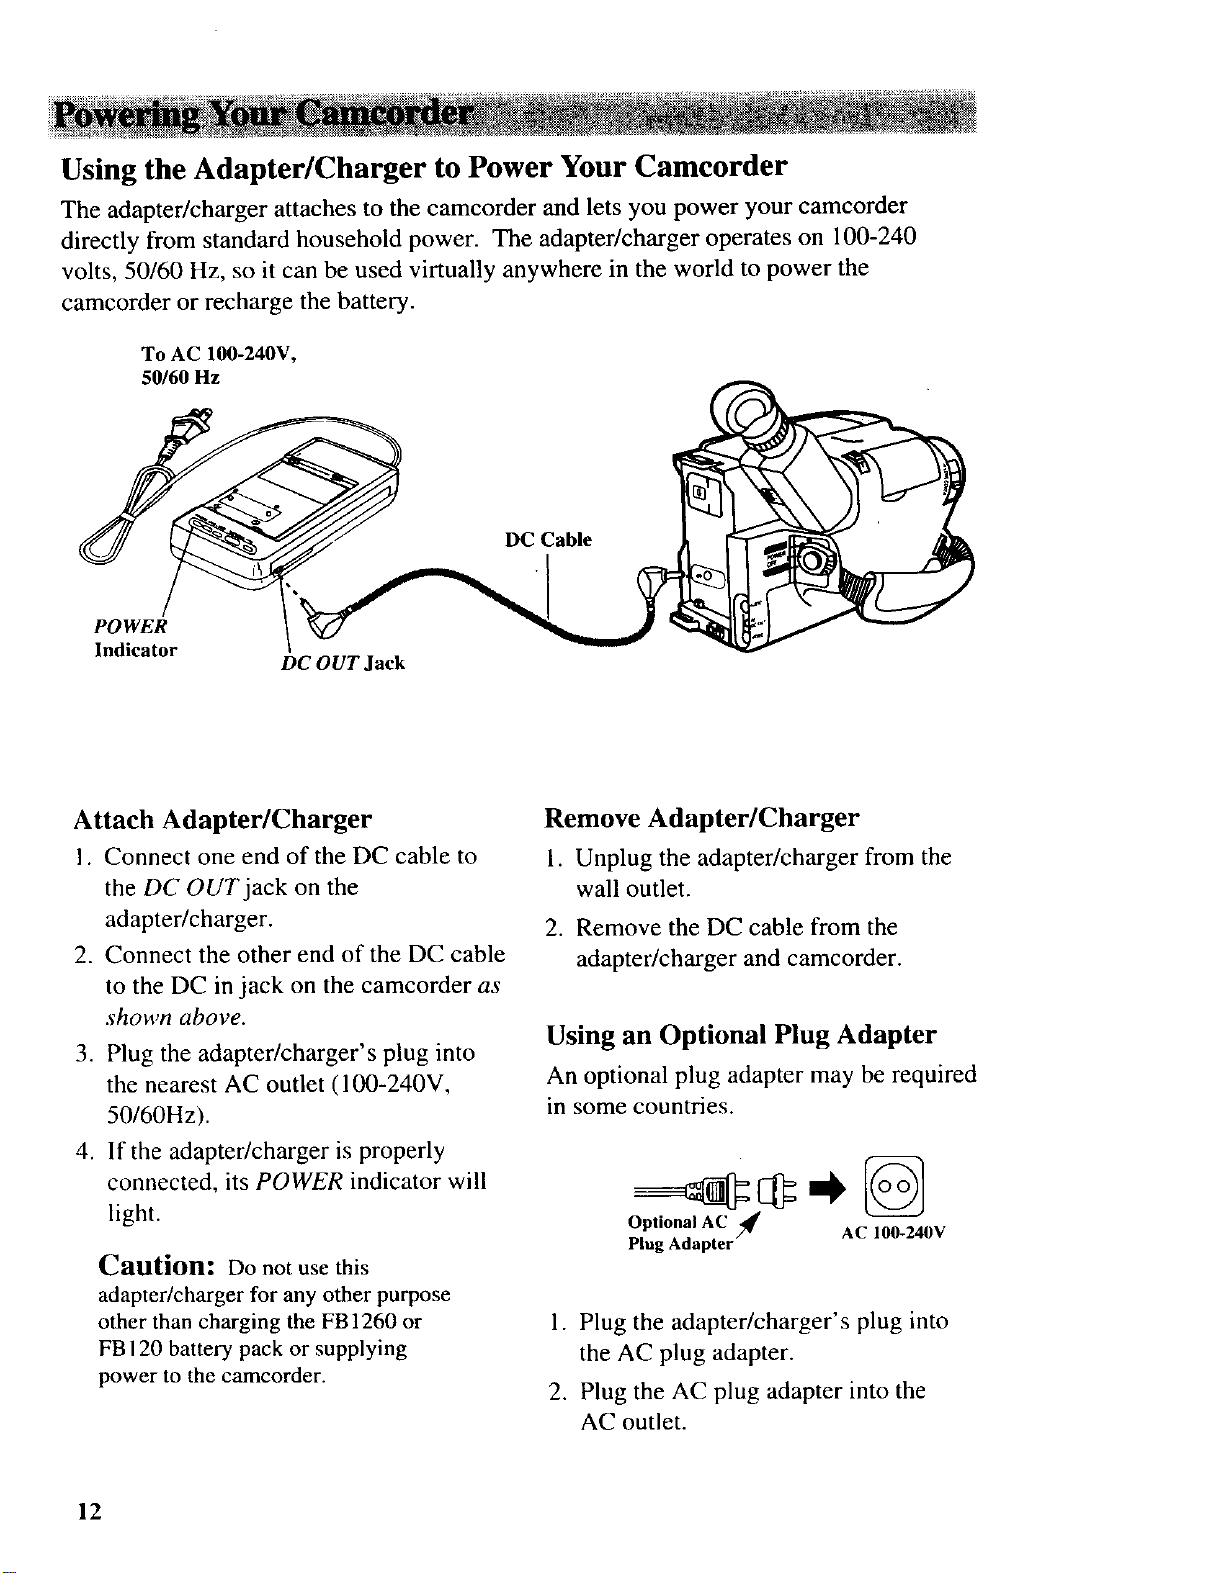
Using the Adapter/Charger to Power Your Camcorder
The adapter/charger attaches to the camcorder and lets you power your camcorder
directly from standard household power. The adapter/charger operates on 100-240
volts, 50/60 Hz, so it can he used virtually anywhere in the world to power the
camcorder or recharge the battery.
To AC 100-240V,
50/60 Hz
DC Cable
POWER
Indicator
DC OUT Jack
Attach Adapter/Charger
1. Connect one end of the DC cable to
the DC OUT jack on the
adapter/charger.
2. Connect the other end of the DC cable
to the DC in jack on the camcorder as
shown above.
3. Plug the adapter/charger's plug into
the nearest AC outlet (100-240V,
50/60Hz).
4. lfthe adapter/charger is properly
connected, its POWER indicator will
light.
Caution: Do not use this
adapter/charger for any other purpose
other than charging the FB 1260 or
FB 120 battery pack or supplying
power to the camcorder.
Remove Adapter/Charger
1. Unplug the adapter/charger from the
wall outlet.
2. Remove the DC cable from the
adapter/charger and camcorder.
Using an Optional Plug Adapter
An optional plug adapter may be required
in some countries.
Optional
Plug Adapter--
1. Plug the adapter/charger's plug into
the AC plug adapter.
2. Plug the AC plug adapter into the
AC outlet.
AC
/_ AC 100-240V
12
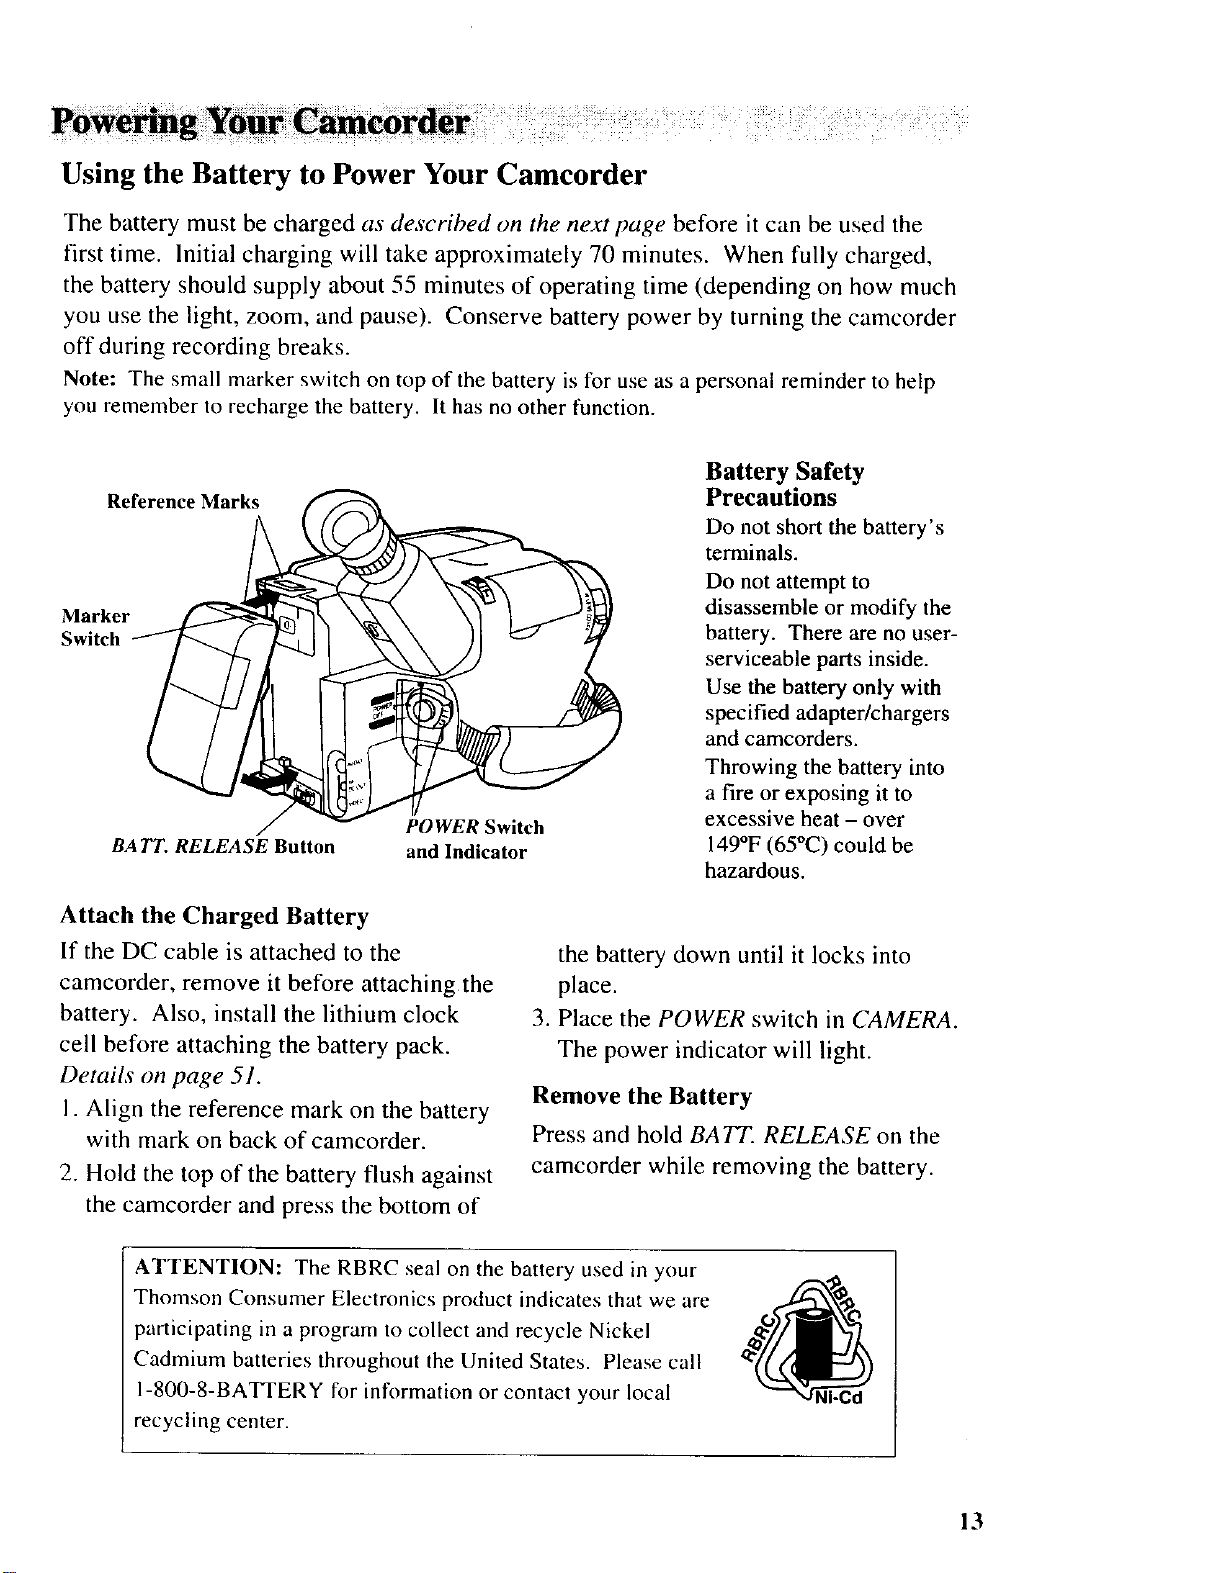
Using the Battery to Power Your Camcorder
The battery must be charged as described on the nextpage before it can be used the
first time. Initial charging will take approximately 70 minutes. When fully charged,
the battery should supply about 55 minutes of operating time (depending on how nmch
you use the light, zoom, and pause). Conserve battery power by turning the camcorder
off during recording breaks.
Note: The small marker switch on top of the battery is for use as a personal reminder to help
you remember to recharge the battery. It has no other function.
Battery Safety
Reference Marks
Marker
Switch
BA TT. RELEASE Button
POWER Switch
and Indicator
Precautions
Do not short the battery's
terminals.
Do not attempt to
disassemble or modify the
battery. There are no user-
serviceable parts inside.
Use the battery only with
specified adapter/chargers
and camcorders.
Throwing the battery into
a fire or exposing it to
excessive heat - over
149°F (65°(2) could be
hazardous.
Attach the Charged Battery
If the DC cable is attached to the
camcorder, remove it before attaching the
battery. Also, install the lithium clock
cell before attaching the battery pack.
Details on page 51.
1. Align the reference mark on the battery
with mark on back of camcorder.
2. Hold the top of the battery flush against
the camcorder and press the bottom of
ATTENTION: The RBRC seal on the battery used in your
Thomson Consumer Electronics product indicates that we are
participating in a program to collect and recycle Nickel
Cadmium batteries throughout the United States. Please call
1-800-8-BATTERY for information or contact your local
recycling center.
the battery down until it locks into
place.
3. Place the POWER switch in CAMERA.
The power indicator will light.
Remove the Battery
Press and hold BATT. RELEASE on the
camcorder while removing the battery.
"JNi-Cd
13
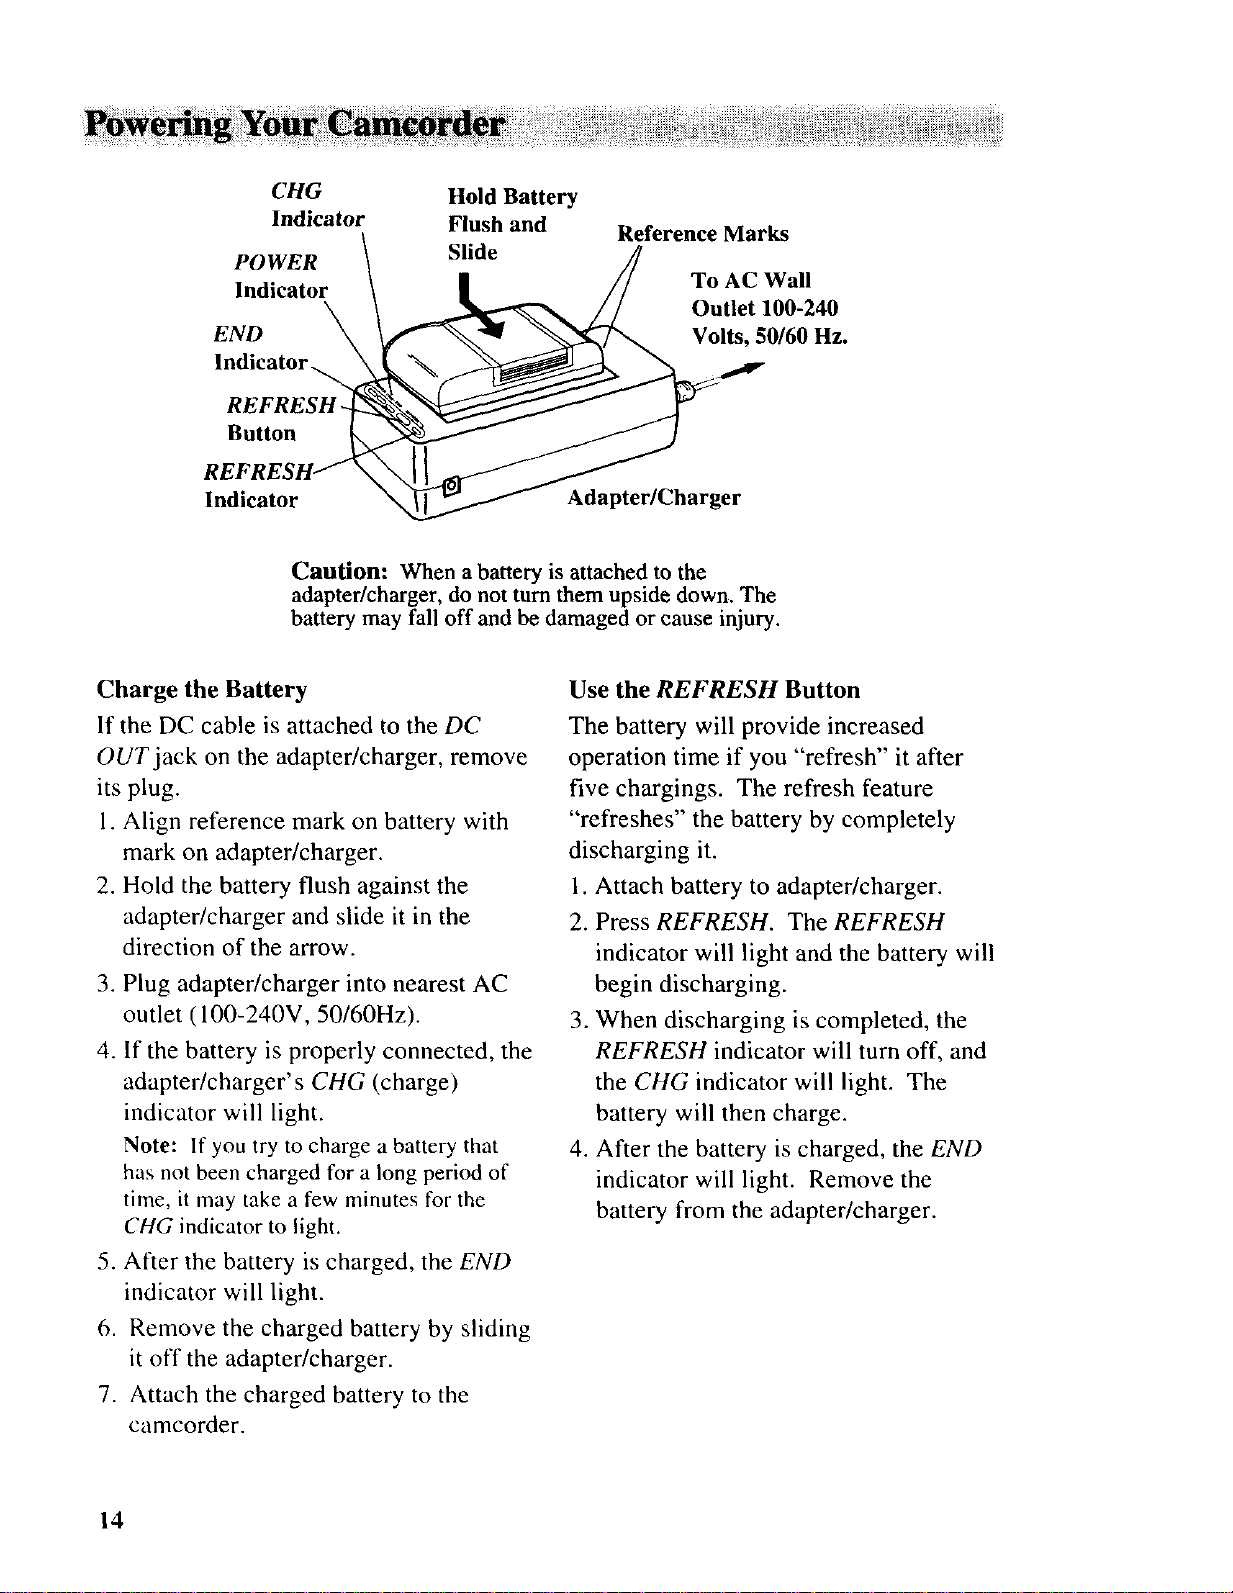
CHG
Indicator
POWER
Indicator
END
Indicator _.
REFRESH
Button
Hold Battery
Flush and
Slide
Reference Marks
To AC Wall
Outlet 100-240
Volts, 50/60 Hz.
Indicator
Caution: When a battery is attached to the
adapter/charger, do not turn them upside down. The
battery may fall off and be damaged or cause injury.
Charge the Battery
If the DC cable is attached to the DC
OUT jack on the adapter/charger, remove
its plug.
I. Align reference mark on battery with
mark on adapter/charger.
2. Hold the battery flush against the
adapter/charger and slide it in the
direction of the arrow.
3. Plug adapter/charger into nearest AC
outlet (100-240V, 50/60Hz).
4. If the battery is properly connected, the
adapter/charger's CHG (charge)
indicator will light.
Note: If you try to charge a battery that
has not been charged for a long period of
time, it may take a few minutes for the
CHG indicator to light.
Adapter/Charger
Use the REFRESH Button
The battery will provide increased
operation time if you "refresh" it after
five chargings. The refresh feature
"refreshes" the battery by completely
discharging it.
1. Attach battery to adapter/charger.
2. Press REFRESH. The REFRESH
indicator will light and the battery will
begin discharging.
3. When discharging is completed, the
REFRESH indicator will turn off, and
the CHG indicator will light. The
battery will then charge.
4. After the battery is charged, the END
indicator will light. Remove the
battery from the adapter/charger.
5. After the battery is charged, the END
indicator will light.
6. Remove the charged battery by sliding
it off the adapter/charger.
7. Attach the charged battery to the
camcorder.
14
Battery Level Indicator
The battery level indicator appears in the
viewfinder and shows you the amount of
power in the rechargeable battery.
IiI
Battery Level Indicator
in Viewfinder
• As the power is used _ and
appear.
• Whenthe battery power is almost gone,
flashes in the viewfinder. The
camcorder will turn off automatic_dly
after a few seconds. Place the POWER
switch in OFF to turn off the
camcorder before replacing the battery.
The battery level indicator will not be
recorded on the tape when it appears in
the viewfinder.
Battery Care and Storage
• Recharging takes approximately 70
minutes depending on the battery's
condition.
• Refreshing takes approximately 210
minutes depending on the battery's
condition.
• After repeated charging and use,
operation time will gradually decrease.
When operation time becomes too short
to be useful, it is time to replace the
battery.
• If the battery discharging must be
stopped in the middle, remove the
battery from the adapter/charger before
unplugging it from the AC outlet.
• Let a hot battery cool down before
attaching it to the adapter/charger.
The battery will also provide better
service if its power is completely
drained before storing it for long
periods of time (30 days or more).
The battery should be charged in the
temperature range of 50-95°F (10-35°C)
to prevent damage.
Do not operate the battery at
temperatures below 32°F (0°C) or
above 104°F (40°C). The battery may
be damaged if operated at temperatures
above 122°F (50°C). Operation time
will decrease at extremely low
temperatures.
Store the battery at normal room
temperature.
15
Optional Car Cord Adapter
The optional DCC08 car cord shown on
Cautions: The DCC08 is designed to be
page 84 allows you to power your
camcorder from the cigarette lighter
socket of a car, truck, or RV. It converts
12-volts to a 6-volt output.
Note: Consult the installation and operating
instructions enclosed with the DCC08 for
complete operating instructions.
used only with vehicles having negative
ground electrical systems.
Use only car cord adapter DCC08 with
this camcorder. Use of any other car
cord adapter may damage the camcorder
and void your warranty.
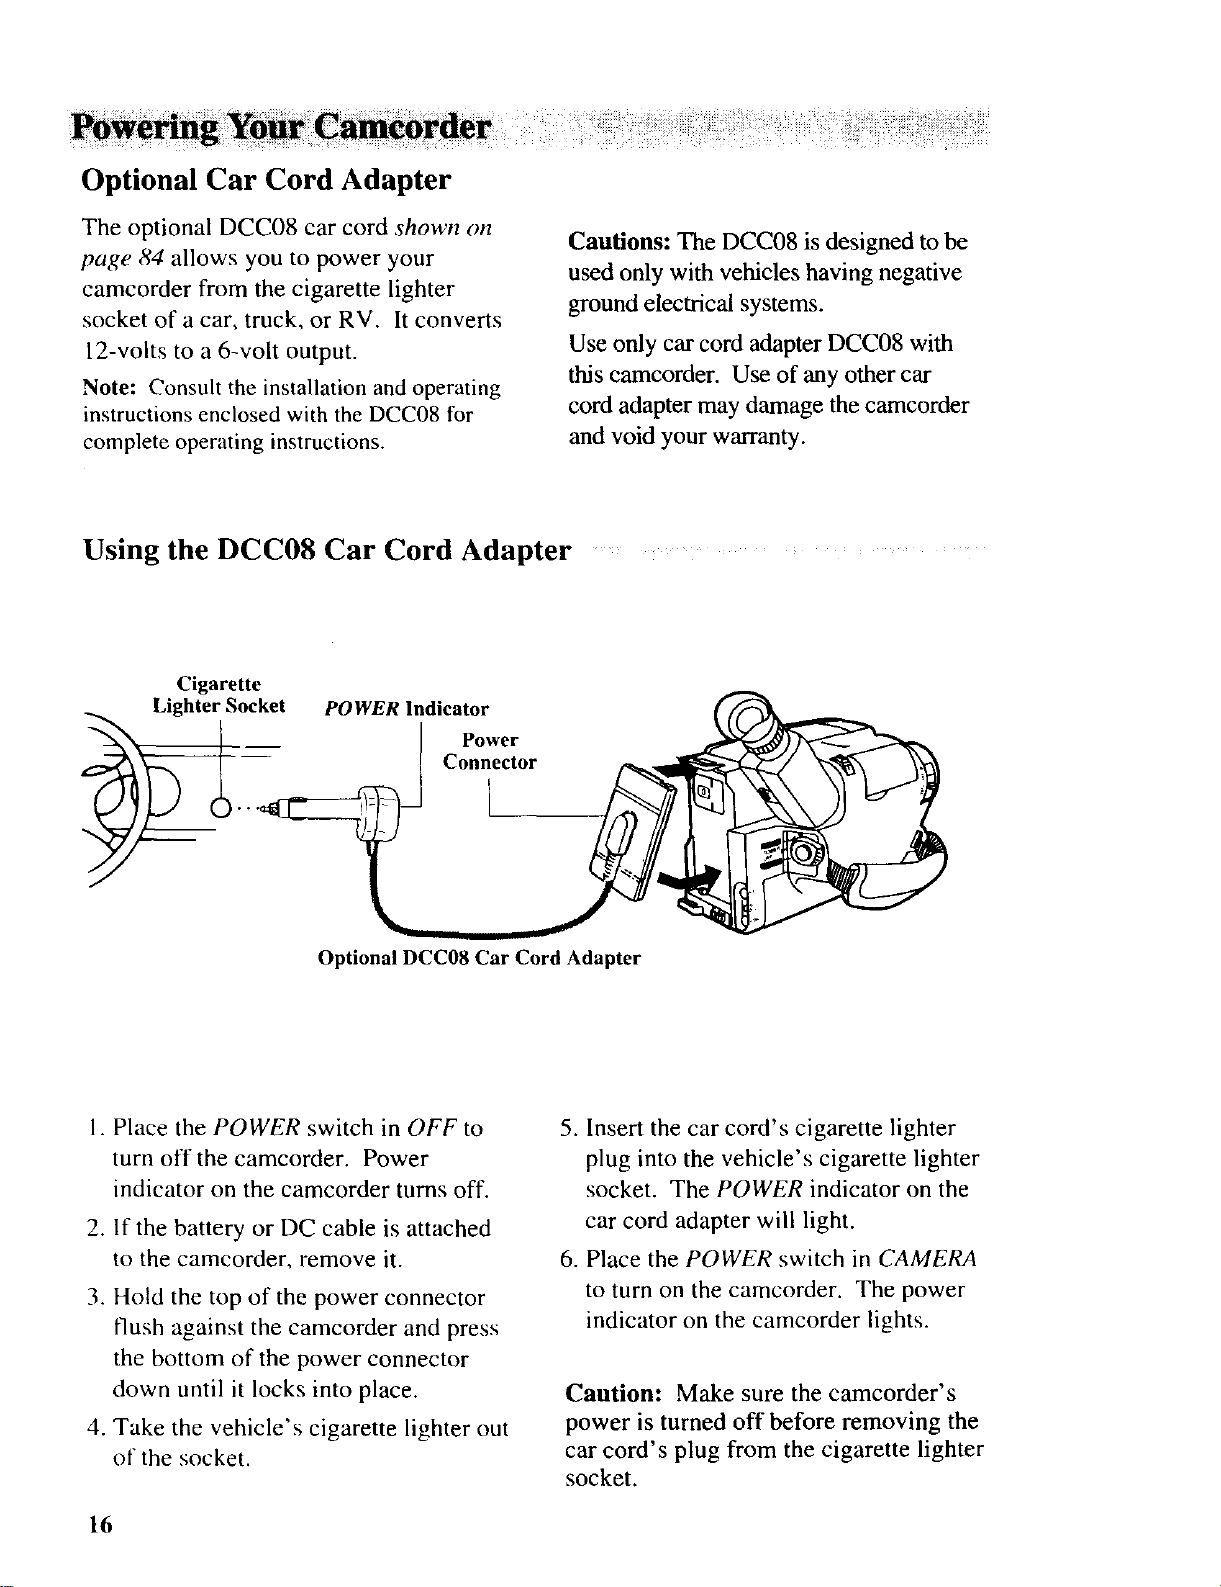
Using the DCC08 Car Cord Adapter ....
Cigarette
Lighter Socket POWER Indicator
Power
Connector
I
Optional DCC08 Car Cord Adapter
1. Place the POWER switch in OFF to
turn off the camcorder. Power
indicator on the camcorder turns off.
2. If the battery or DC cable is attached
to the camcorder, remove it.
3. Hold the top of the power connector
flush against the camcorder and press
the bottom of the power connector
down until it locks into place.
4. Take the vehicle's cigarette lighter out
of the socket.
16
5. Insert the car cord's cigarette lighter
plug into the vehicle's cigarette lighter
socket. The POWER indicator on the
car cord adapter will light.
6. Place the POWER switch in CAMERA
to turn on the camcorder. The power
indicator on the camcorder lights.
Caution: Make sure the camcorder's
power is turned off before removing the
car cord's plug from the cigarette lighter
socket.
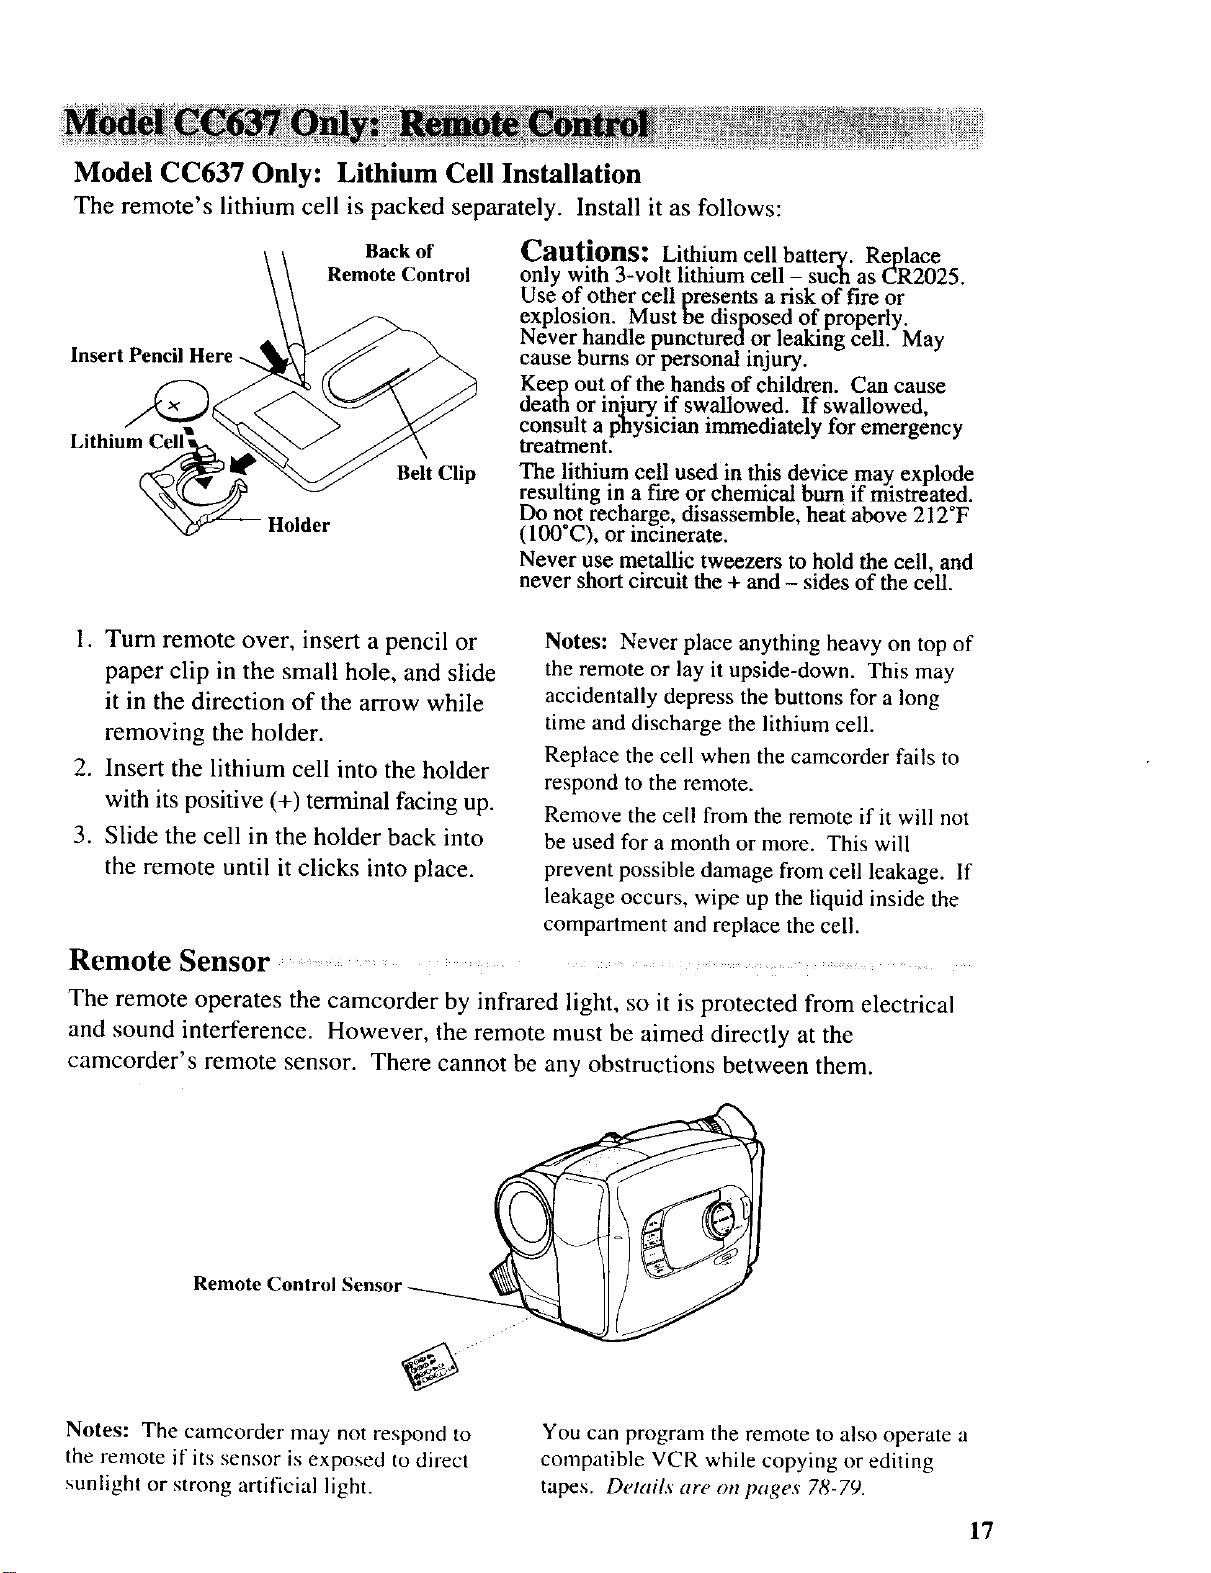
Model CC637 Only: Lithium Cell Installation
The remote's lithium cell is packed separately. Install it as follows:
Back of
Remote Control
Insert Pencil Here -.
Lithium (
Belt Clip
1. Turn remote over, insert a pencil or
paper clip in the small hole, and slide
it in the direction of the arrow while
removing the holder.
2. Insert the lithium cell into the holder
with its positive (+) terminal facing up.
3. Slide the cell in the holder back into
the remote until it clicks into place.
Remote Sensor ......... ........
Cautions: Lithium cell battery. Replace
only with 3-volt lithium cell - such as CR2025.
Use of other cell presents a risk of fire or
explosion. Must be disposed of properly.
Never handle puncturedor leaking cell. May
cause bums or personal injury.
Keep out of the hands of children. Can cause
death or injury if swallowed. If Swallowed,
consult a physician immediately for emergency
treatment.
The lithium cell used in this device may explode
resulting in a fLre or chemical burn if mistreated.
Do not recharge, disassemble, heat above 212 F
(100*C), or incinerate.
Never use metallic tweezers to hold the cell, and
never short circuit the + and - sides of the cell.
Notes: Never place anything heavy on top of
the remote or lay it upside-down. This may
accidentally depress the buttons for a long
time and discharge the lithium cell.
Replace the cell when the camcorder fails to
respond to the remote.
Remove the cell from the remote if it will not
be used for a month or more. This will
prevent possible damage from cell leakage. If
leakage occurs, wipe up the liquid inside the
compartment and replace the cell.
The remote operates the camcorder by infrared light, so it is protected from electrical
and sound interference. However, the remote must be aimed directly at the
camcorder's remote sensor. There cannot be any obstructions between them.
Remote q
Notes: The camcorder may not respond to
the remote if its sensor is exposed to direct
sunlight or strong artificial light.
You can program the remote to also operate a
compatible VCR while copying or editing
tapes. Details are on pages 78-79.
17
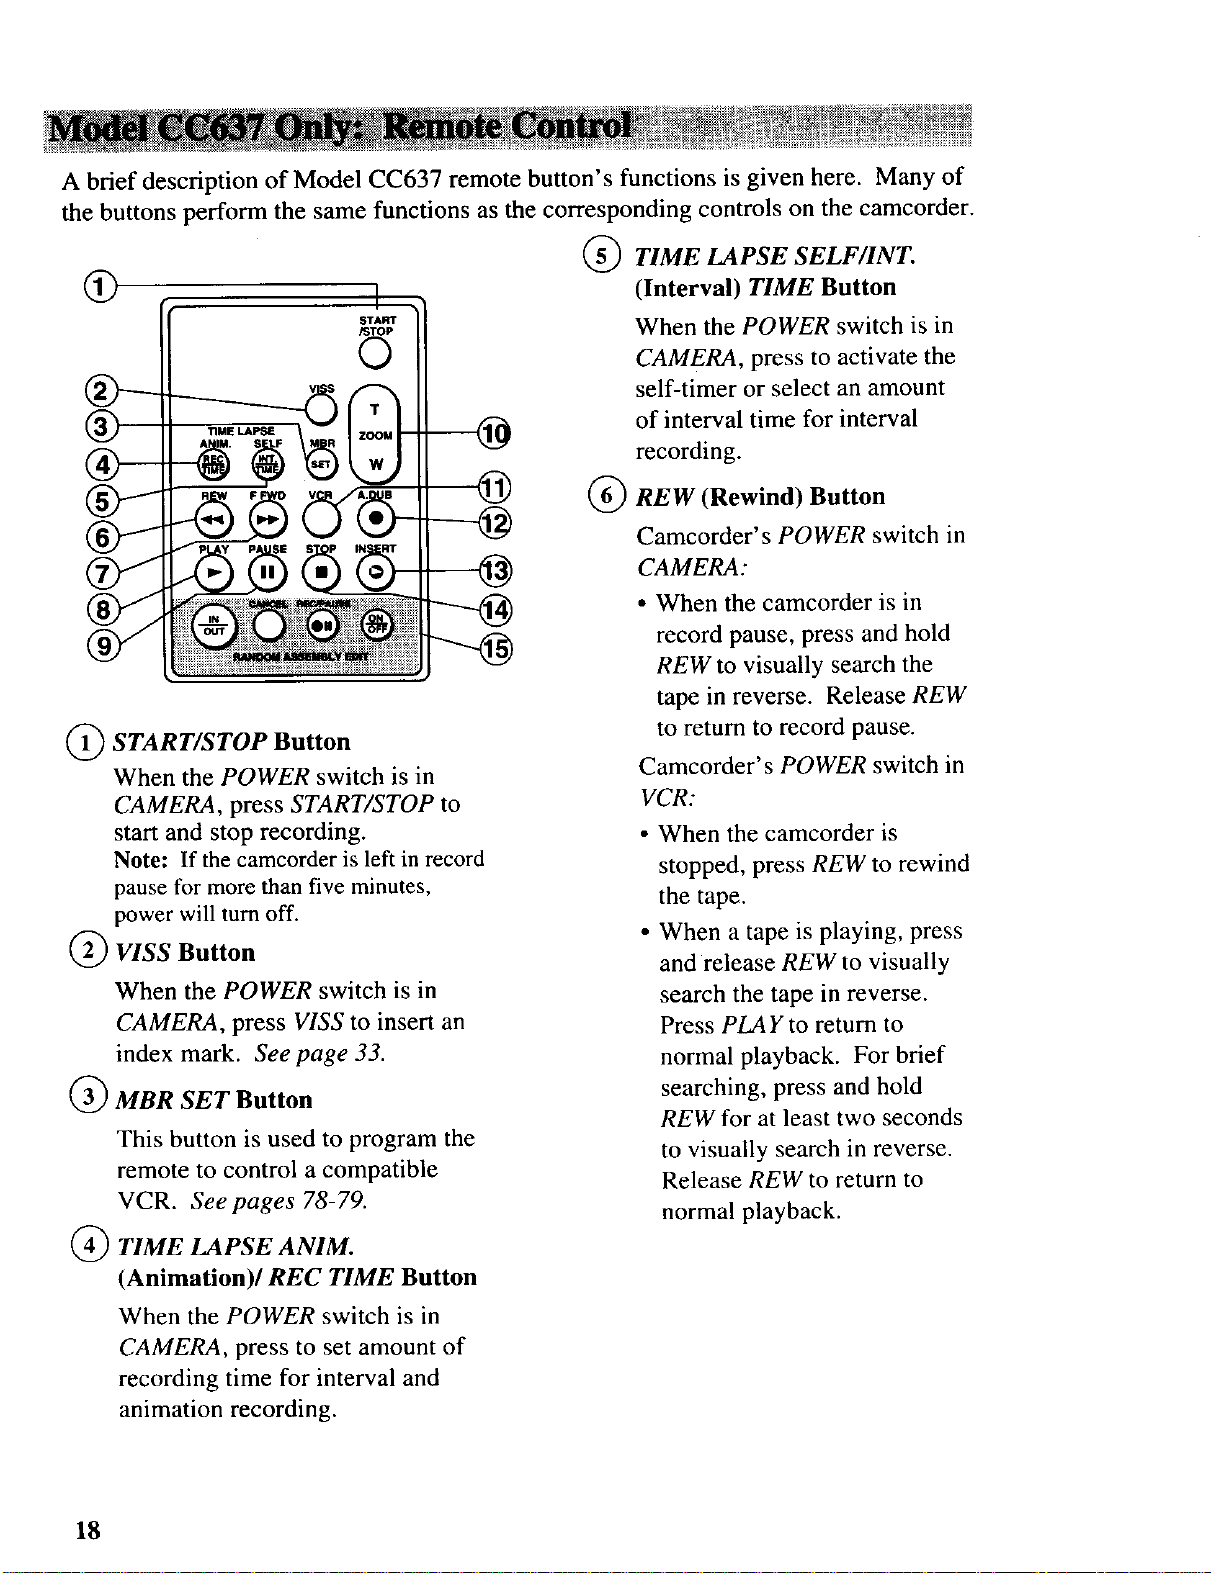
A brief description of Model CC637 remote button's functions is given here. Many of
the buttons perform the same functions as the corresponding controls on the camcorder.
TIME LAPSE SELF/INT.
®
(Interval) TIME Button
When the POWER switch is in
CAMERA, press to activate the
START
/STOP
0
I •
self-timer or select an amount
of interval time for interval
recording.
(_ START/STOP Button
When the POWER switch is in
CAMERA, press START/STOP to
start and stop recording.
Note: If the camcorder is left in record
pause for more than five minutes,
power will turn off.
VISS Button
When the POWER switch is in
CAMERA, press VISS to insert an
index mark. See page 33.
MBR SET Button
This button is used to program the
remote to control a compatible
VCR. Seepages 78-79.
TIME LAPSE ANIM.
(Animation)/REC TIME Button
@ ®
REW (Rewind) Button
Camcorder's POWER switch in
CAMERA:
• When the camcorder is in
record pause, press and hold
REW to visually search the
tape in reverse. Release REW
to return to record pause.
Camcorder's POWER switch in
VCR:
• When the camcorder is
stopped, press REW to rewind
the tape.
• When a tape is playing, press
and release REW to visually
search the tape in reverse.
Press PLAY to return to
normal playback. For brief
searching, press and hold
REW for at least two seconds
to visually search in reverse.
Release REW to return to
normal playback.
When the POWER switch is in
CAMERA, press to set amount of
recording time for interval and
animation recording.
18
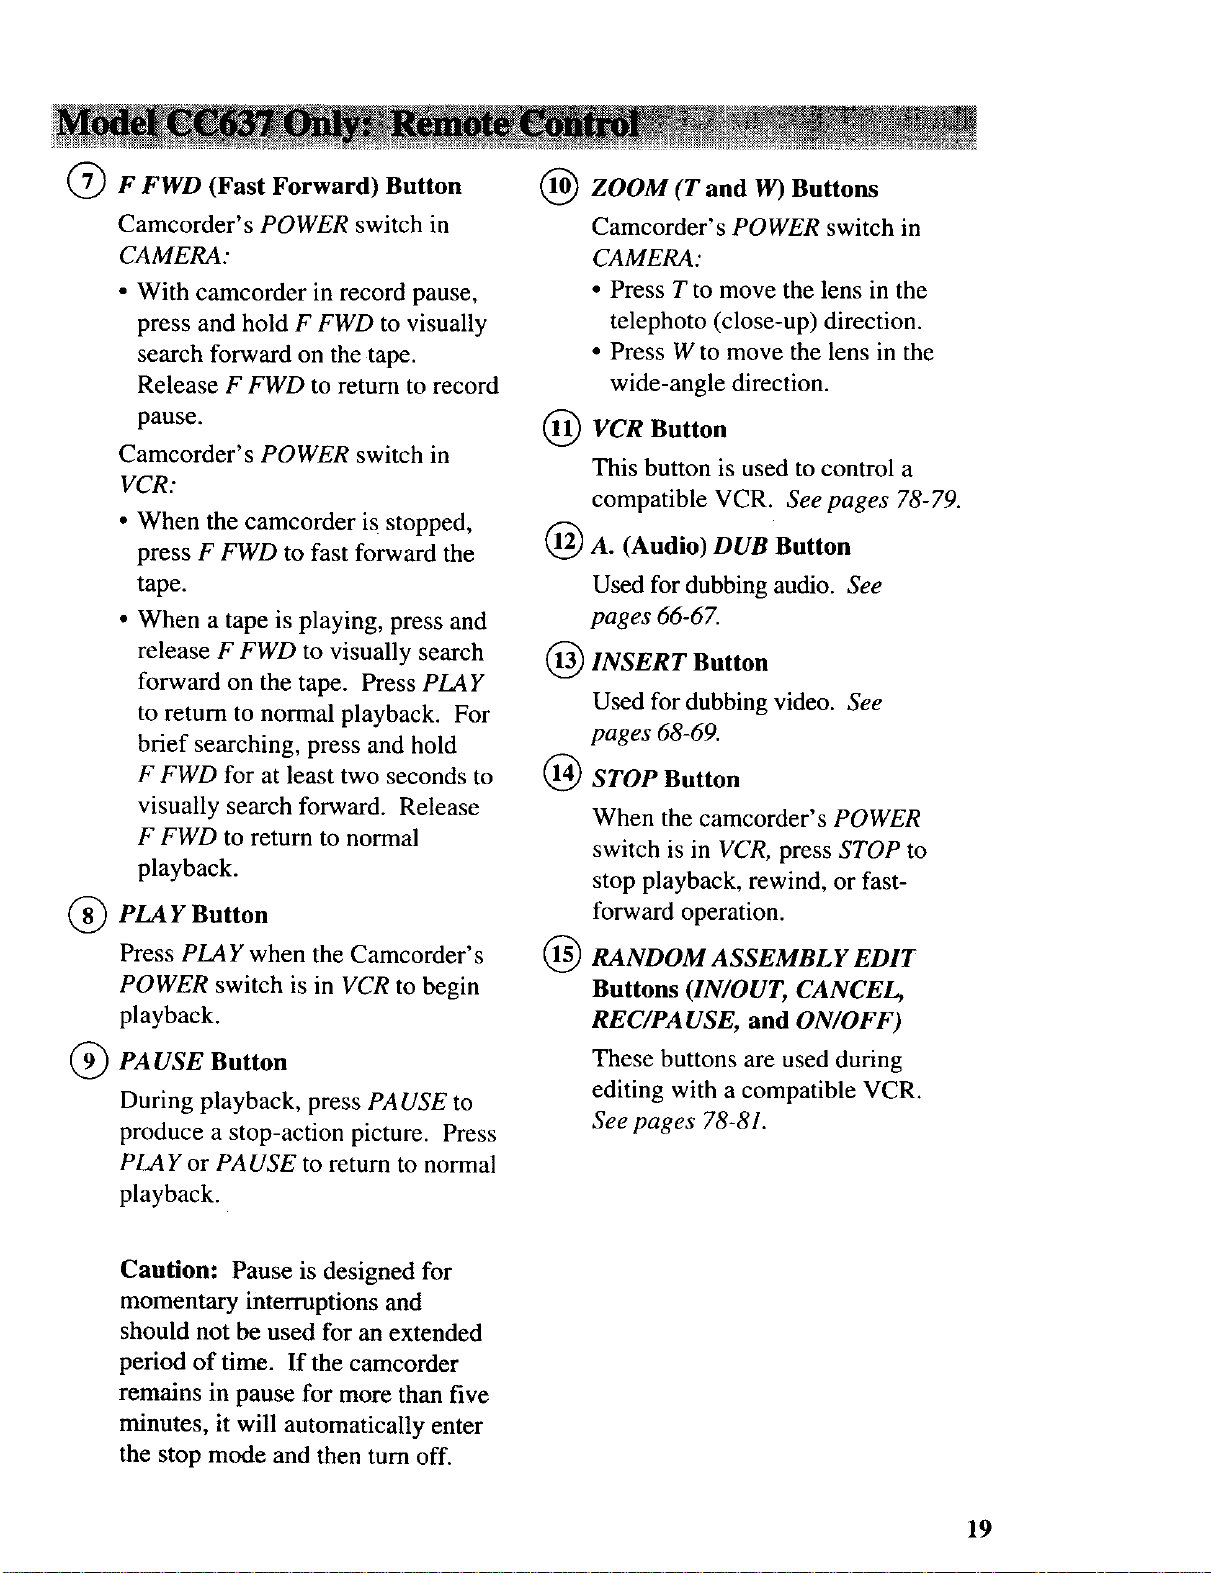
Q F FWD (Fast Forward) Button
Camcorder's POWER switch in
CAMERA:
• With camcorder in record pause,
press and hold F FWD to visually
search forward on the tape.
Release F FWD to return to record
pause.
Camcorder's POWER switch in
VCR:
• When the camcorder is stopped,
press F FWD to fast forward the
tape.
• When a tape is playing, press and
release F FWD to visually search
forward on the tape. Press PLAY
to return to normal playback. For
brief searching, press and hold
F FWD for at least two seconds to
visually search forward. Release
F FWD to return to normal
playback.
PLAY Button
Press PLAY when the Camcorder's
POWER switch is in VCR to begin
playback.
I(I_ZOOM (T and W) Buttons
Camcorder's POWER switch in
CAMERA:
• Press T to move the lens in the
telephoto (close-up) direction.
• Press W to move the lens in the
wide-angle direction.
VCR Button
This button is used to control a
compatible VCR. Seepages 78-79.
A. (Audio) DUB Button
Used for dubbing audio. See
pages 66-67.
INSERT Button
Used for dubbing video. See
pages 68-69.
STOP Button
When the camcorder's POWER
switch is in VCR, press STOP to
stop playback, rewind, or fast-
forward operation.
RANDOM ASSEMBLY EDIT
®
Buttons (IN/OUT, CANCEL,
REC/PA USE, and ON/OFF)
_ PA USE Button
During playback, press PAUSE to
produce a stop-action picture. Press
PLAY or PA USE to return to normal
playback.
Caution: Pause is designed for
momentary interruptions and
should not be used for an extended
period of time. If the camcorder
remains in pause for more than five
minutes, it will automatically enter
the stop mode and then turn off.
These buttons are used during
editing with a compatible VCR.
See pages 78-81.
19
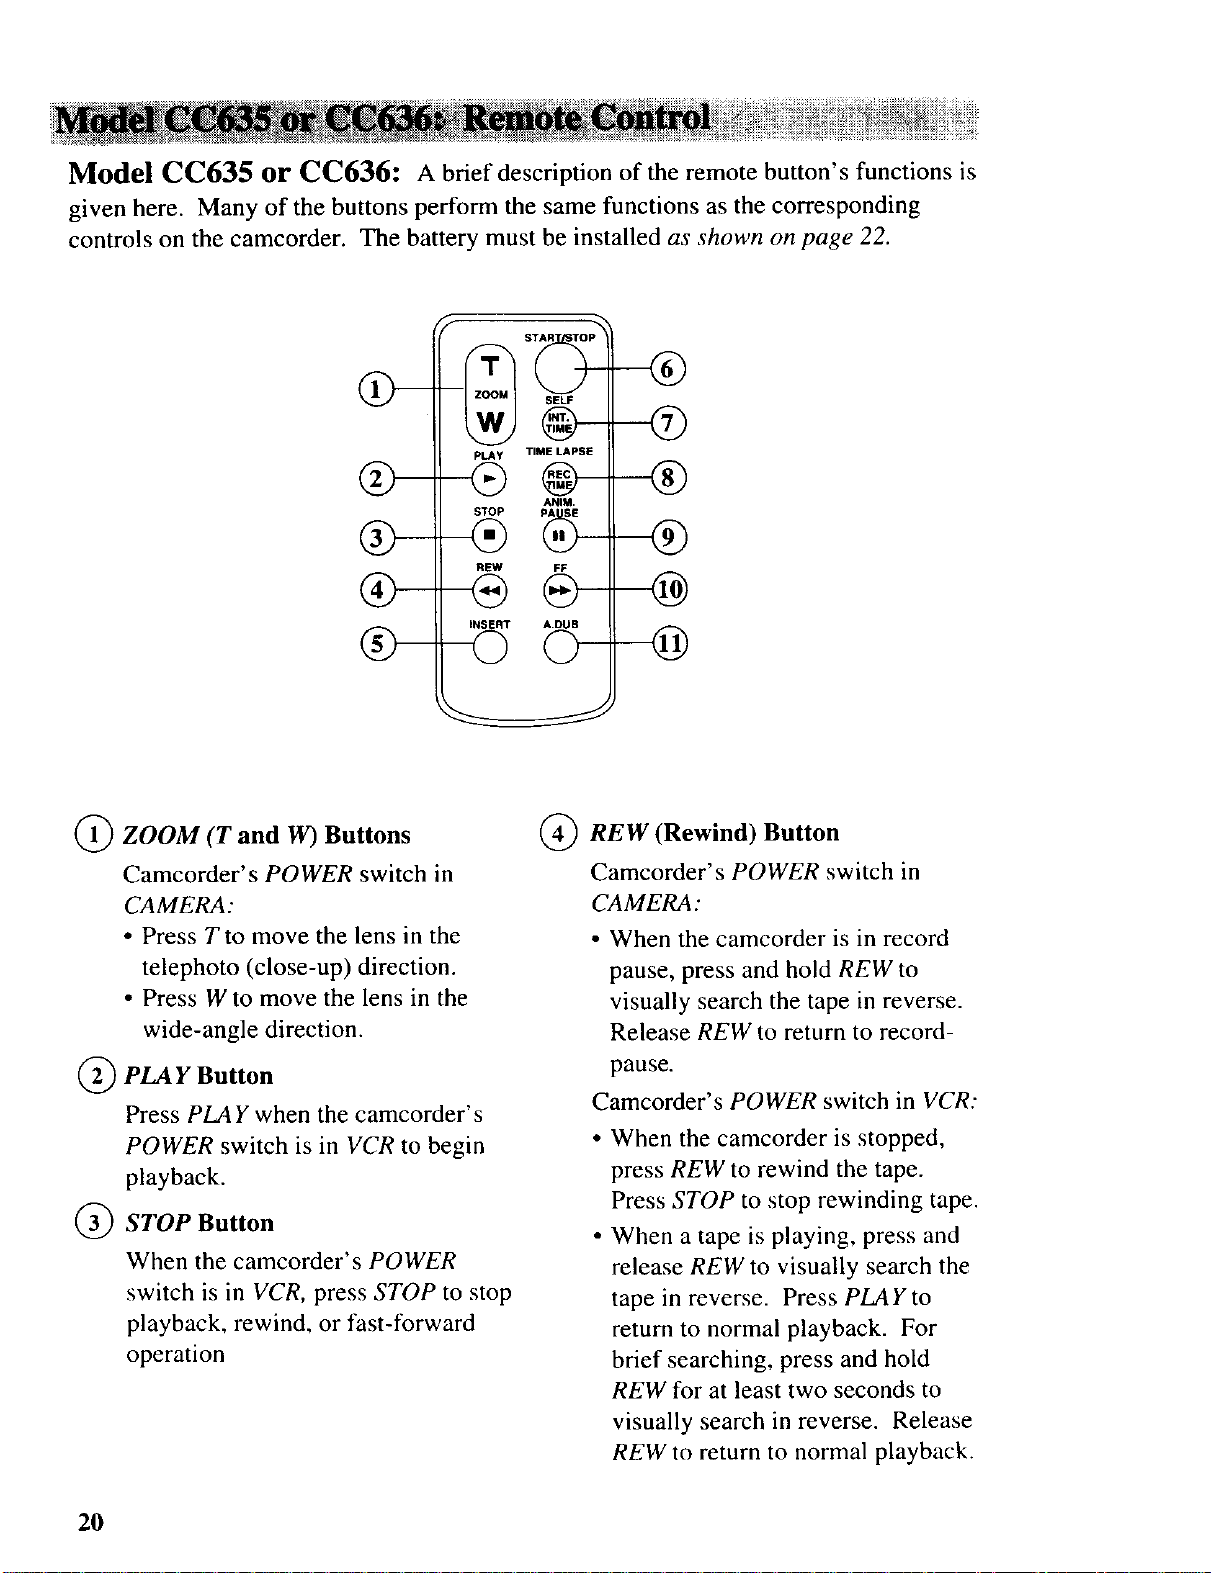
Model CC635 or CC636: A brief description of the remote button's functions is
given here. Many of the buttons perform the same functions as the corresponding
controls on the camcorder. The battery must be installed as shown on page 22.
--@
Q-
SELF
--@
PLAY TIME LAPSE
--@
ANIM.
-@
REW FF
--@
INSERT A.DUB
-Q
--@
(_ZOOM (T and W) Buttons
Camcorder's POWER switch in
CAMERA:
• Press Tto move the lens in the
telephoto (close-up) direction.
• Press W to move the lens in the
wide-angle direction.
_PLA g Button
Press PLAY when the camcorder's
POWER switch is in VCR to begin
playback.
STOP Button
When the camcorder's POWER
switch is in VCR, press STOP to stop
playback, rewind, or fast-forward
operation
(_REW (Rewind) Button
Camcorder's POWER switch in
CA MERA:
• When the camcorder is in record
pause, press and hold REW to
visually search the tape in reverse.
Release REW to return to record-
pause.
Camcorder's POWER switch in VCR:
When the camcorder is stopped,
press REW to rewind the tape.
Press STOP to stop rewinding tape.
When a tape is playing, press and
release REW to visually search the
tape in reverse. Press PLAYto
return to normal playback. For
brief searching, press and hold
REW for at least two seconds to
visually search in reverse. Release
REW to return to normal playback.
2O
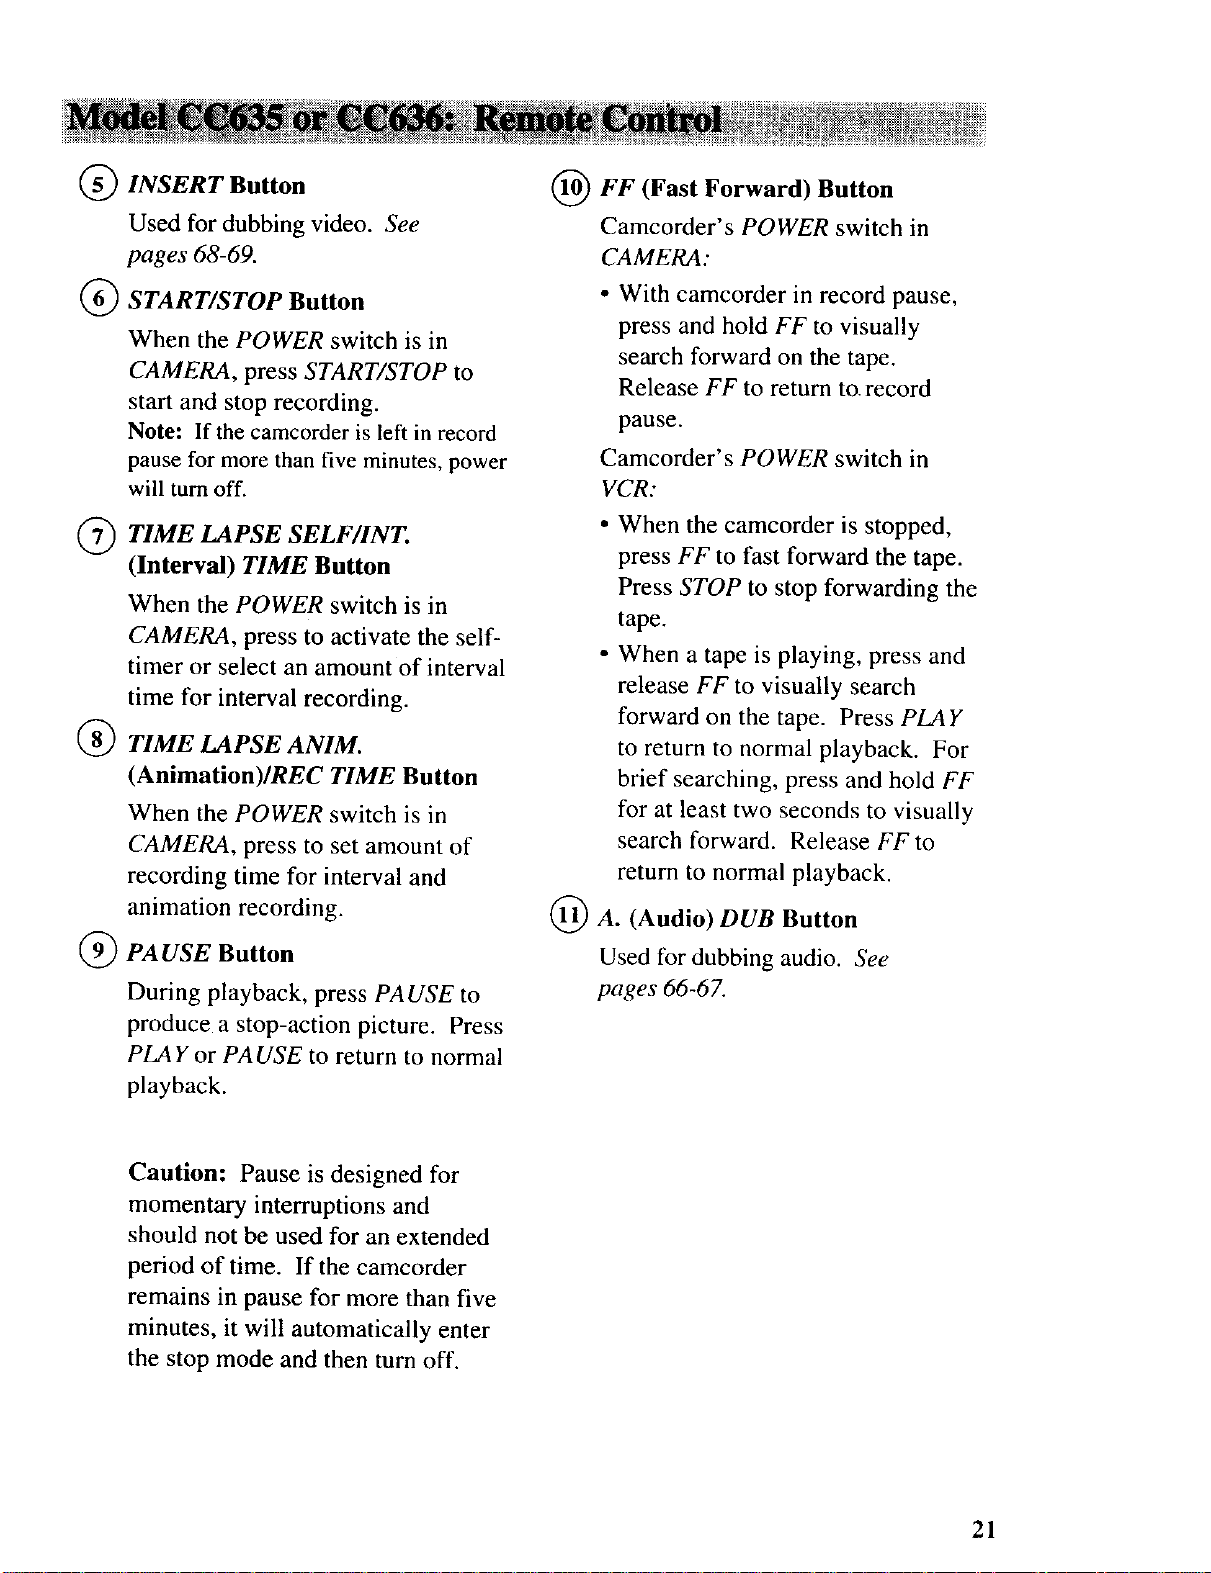
INSERT Button
Used for dubbing video. See
pages 68-69.
FF (Fast Forward) Button
Camcorder's POWER switch in
CAMERA:
START/STOP Button
When the POWER switch is in
CAMERA, press START/STOP to
start and stop recording.
Note: If the camcorder is left in record
pause for more than five minutes, power
will turn off.
Q TIME LAPSE SELF/INT.
(Interval) TIME Button
When the POWER switch is in
CAMERA, press to activate the self-
timer or select an amount of interval
time for interval recording.
TIME LAPSE ANIM.
(Animation)/REC TIME Button
When the POWER switch is in
CAMERA, press to set amount of
recording time for interval and
animation recording.
PAUSE Button
During playback, press PAUSE to
produce a stop-action picture. Press
PLAYor PAUSE to return to normal
playback.
• With camcorder in record pause,
press and hold FF to visually
search forward on the tape.
Release FF to return to.record
pause.
Camcorder's POWER switch in
VCR:
• When the camcorder is stopped,
press FF to fast forward the tape.
Press STOP to stop forwarding the
tape.
• When a tape is playing, press and
release FF to visually search
forward on the tape. Press PLAY
to return to normal playback. For
brief searching, press and hold FF
for at least two seconds to visually
search forward. Release FF to
return to normal playback.
(_A. (Audio) DUB Button
Used for dubbing audio. See
pages 66-67.
Caution: Pause is designed for
momentary interruptions and
should not be used for an extended
period of time. If the camcorder
remains in pause for more than five
minutes, it wilt automatically enter
the stop mode and then turn off.
21
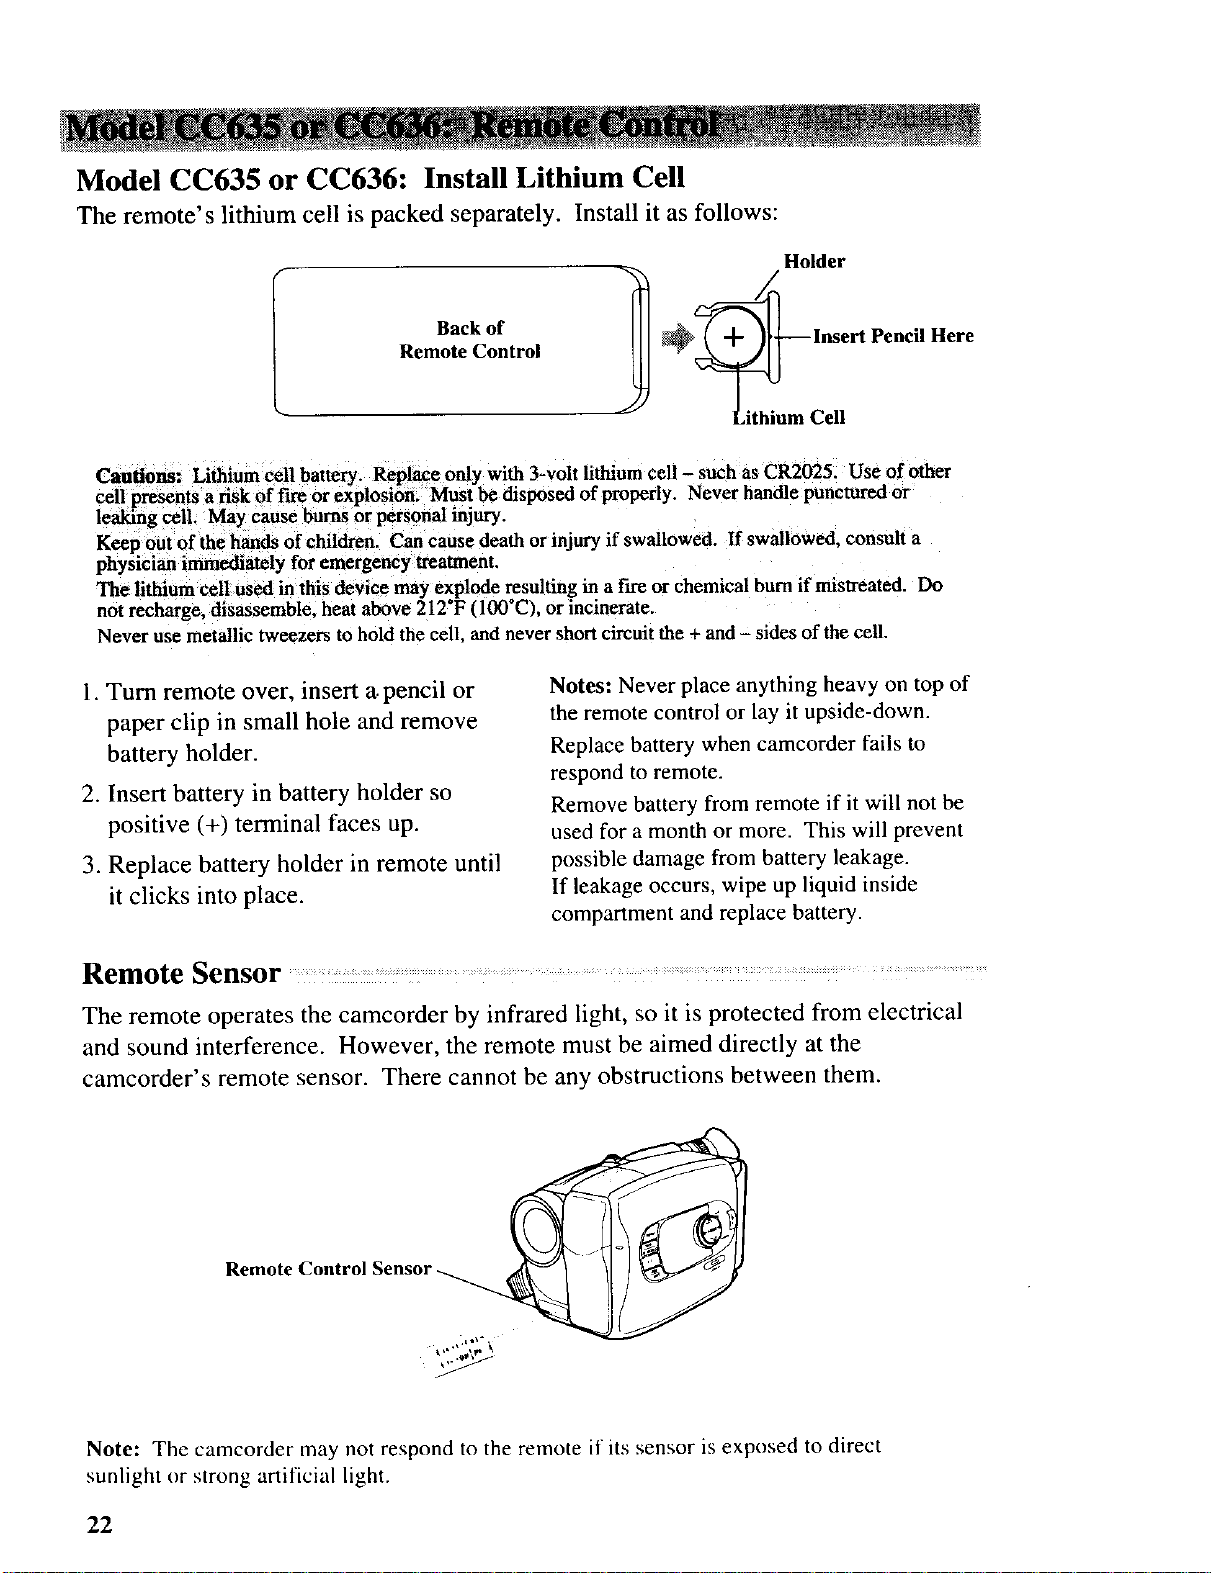
Model CC635 or CC636: Install Lithium Cell
The remote's lithium cell is packed separately. Install it as follows:
Holder
Back of
Remote Control
1@_ Insert Pencil Here,
LithiumCell
Cautions: Lithium cell battery. Replace only with 3-volt lithium cell - such as CR2025. Use of other
cell presents a risk of fire or explosion. Must be disposed of properly. Never handle punctured or
leaking ceil. May cause bums or personal injury.
Keep out of the hands of children. Ca_ cause death or injury if swallowed. If swallowed, consult a
physician immediately for emergency treatment.
The lithium cell used in this device may explode _sulting in a fire or chemical bum if mistreated. Do
not recharge, disassemble, heat above 212*F (100 C), or incinerate.
Never use metallic tweezers to hold the cell, and never short circuit the + and - sides of the cell.
1. Turn remote over, insert a.pencil or
paper clip in small hole and remove
battery holder.
2. Insert battery in battery holder so
positive (+) terminal faces up.
3. Replace battery holder in remote until
it clicks into place.
Notes: Never place anything heavy on top of
the remote control or lay it upside-down.
Replace battery when camcorder fails to
respond to remote.
Remove battery from remote if it will not be
used for a month or more. This will prevent
possible damage from battery leakage.
If leakage occurs, wipe up liquid inside
compartment and replace battery.
Remote Sensor ..................................... ......... ................................
The remote operates the camcorder by infrared light, so it is protected from electrical
and sound interference. However, the remote must be aimed directly at the
camcorder's remote sensor. There cannot be any obstructions between them.
Remote Control Sensor
• _._,t "_ ,
Note: The camcorder may not respond to the remote if its sensor is exposed to direct
sunlight or strong artificial light.
22
Recording Tips
• In case of fire or theft, make a video
recording of your home and contents to
store in a safe place.
• Try to make sure indoor scenes are
well-lit. Use the built-in light. This
improves picture quality and color
reproduction.
• Do not move the camcorder rapidly
from side-to-side while recording.
A steady, gradual "pan" avoids
blurring and "jitter".
• Use the viewfinder to make sure the
camcorder is level while recording or
your scenes will appear "tilted".
• Do not bump or tap the camcorder's
microphone while recording because
this sound will be recorded.
• Include close-ups of individuals when
taping family outings or group
functions.
• Fading or wiping in and out of scenes
will make your videos appear more
professional.
Learn to use the special production
effects available with your camcorder
to add variety to your recordings.
Be aware of video and audio
backgrounds. Background details
barely noticed while you are taping
may show up as visual "clutter" on
your recording. Background noises
(especially TV sets, radios, household
appliances, traffic sounds, etc.) can
detract from the sound you want to
record.
Avoid long "still" shots of landmarks
and scenic attractions. Recordings are
more interesting if they include people
and details. "Local color" will give
travel videos lasting appeal. Consider
recording a familiar or landmark scene
from an unfamiliar vantage point.
Traveling Tips
• Write down your camcorder's serial
number and keep it separate from the
camcorder when traveling. If your
camcorder is lost or stolen, you will be
able to identify it.
• Use extra care to avoid damage to your
camcorder and accessories when
operating them at a beach or pool.
Spray, sand, and dust should be
avoided. If your lens has been exposed
to the elements, clean it only with
proper lens cleaning supplies.
Make sure you have any plug adapters
that you may need before taking your
camcorder to other countries. Consult
your dealer for advice.
Carry your camcorder in a carrying
case when traveling. See page 84 for a
case designed especially for this
camcorder. An ordinary suitcase or
carry bag does not offer the protection
your camcorder needs. Treat your
camcorder as carry-on luggage to
protect it from rough handling.
23
We recommendthat our cassettesbe usedwith your camcorder. Useof poor quality
tapesor tapesthat havebeendamagedor mishandledcancontaminate the video heads,
resulting in asnowy picture or no picture at all during playback. Becausethereis no
control over thetype of tapepurchasedor rentedby consumers,headcleaning is not
coveredunder warranty. It is considerednormal maintenance.
Theautomatic head-cleaningsystemmimmlzes theneedfor accessorycleanersor
cleaningby aServicenter. Th_ssystemisactivated wheneveryou insertor remove a
cassette.
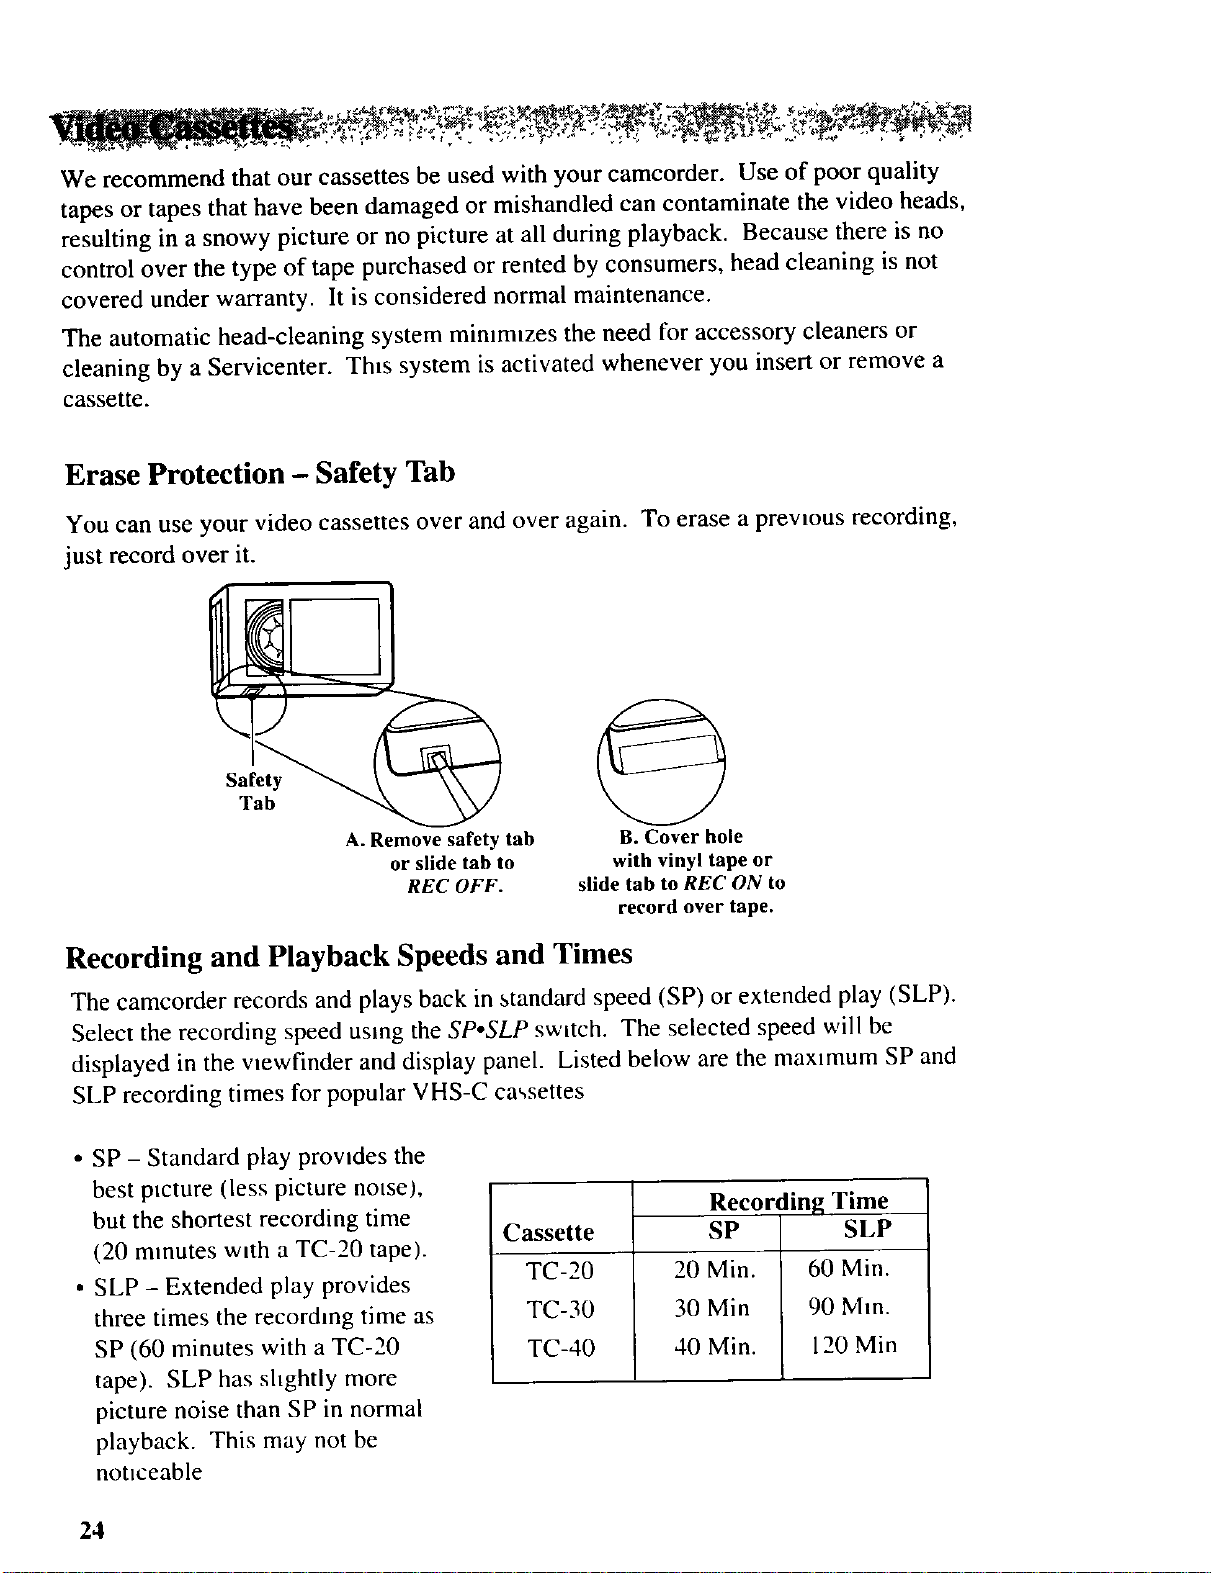
Erase Protection - Safety Tab
You can use your video cassettes over and over again. To erase a prewous recording,
just record over it.
Safety
Tab
A. Remove safety tab
or slide tab to
REC OFF.
B. Cover hole
with vinyl tape or
slide tab to REC ON to
record overtape.
Recording and Playback Speeds and Times
The camcorder records and plays back in standard speed (SP) or extended play (SLP).
Select the recording speed using the SpoSLP switch. The selected speed will be
displayed in the vmwfinder and display panel. Listed below are the max,mum SP and
SLP recording times for popular VHS-C cassettes
• SP - Standard play provides the
best ptcture (less picture norse),
but the shortest recording time
(20 minutes with a TC-20 tape).
• SLP - Extended play provides
three times the recording time as
SP (60 minutes with a TC-20
tape). SLP has shghtly more
picture noise than SP in normal
playback. This may not be
notmeable
Cassette
TC-20
TC-30
TC-40
Recording Time
SP SLP
20 Min. 60 Min.
30 Min 90 MIn.
40 Min. 120 Min
24
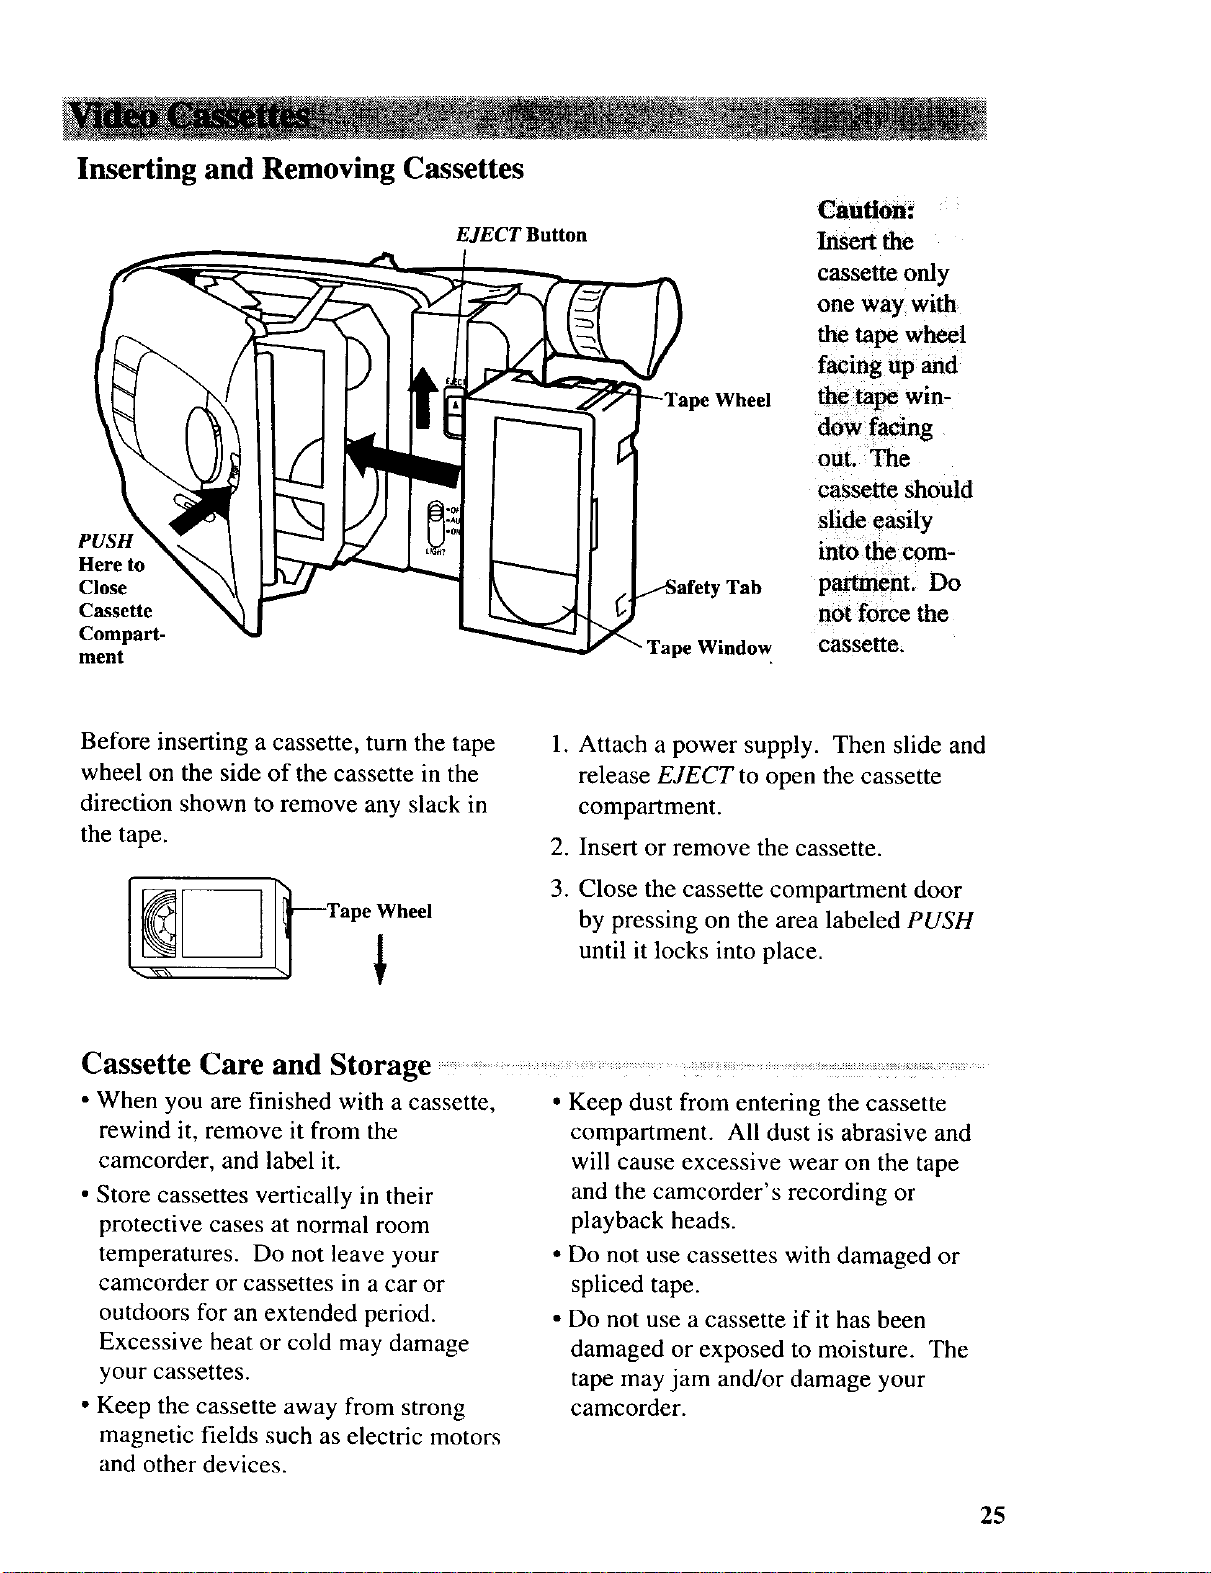
Inserting and Removing Cassettes
EJECT Button
Wheel
Caution:
Insert the
cassette only
one way with
the tape wheel
facing up and
the tape win-
dow facing
out. The
cassette should
PUSH
Here to
Close
Cassette
Compart-
ment
Before inserting a cassette, turn the tape
wheel on the side of the cassette in the
direction shown to remove any slack in
the tape.
Tab
tpe Window cassette.
.
Attach a power supply. Then slide and
release EJECT to open the cassette
compartment.
,
Insert or remove the cassette.
3.
Close the cassette compartment door
into the com-
partment. Do
not force the
by pressing on the area labeled PUSH
slide easily
[_ _--Tape Wheel
until it locks into place.
Cassette Care and Storage .................. .................: ....
• When you are finished with a cassette,
rewind it, remove it from the
camcorder, and label it.
• Store cassettes vertically in their
protective cases at normal room
temperatures. Do not leave your
camcorder or cassettes in a car or
outdoors for an extended period.
Excessive heat or cold may damage
your cassettes.
• Keep the cassette away from strong
magnetic fields such as electric motors
and other devices.
• Keep dust from entering the cassette
compartment. All dust is abrasive and
will cause excessive wear on the tape
and the camcorder's recording or
playback heads.
• Do not use cassettes with damaged or
spliced tape.
• Do not use a cassette if it has been
damaged or exposed to moisture. The
tape may jam and/or damage your
camcorder.
25
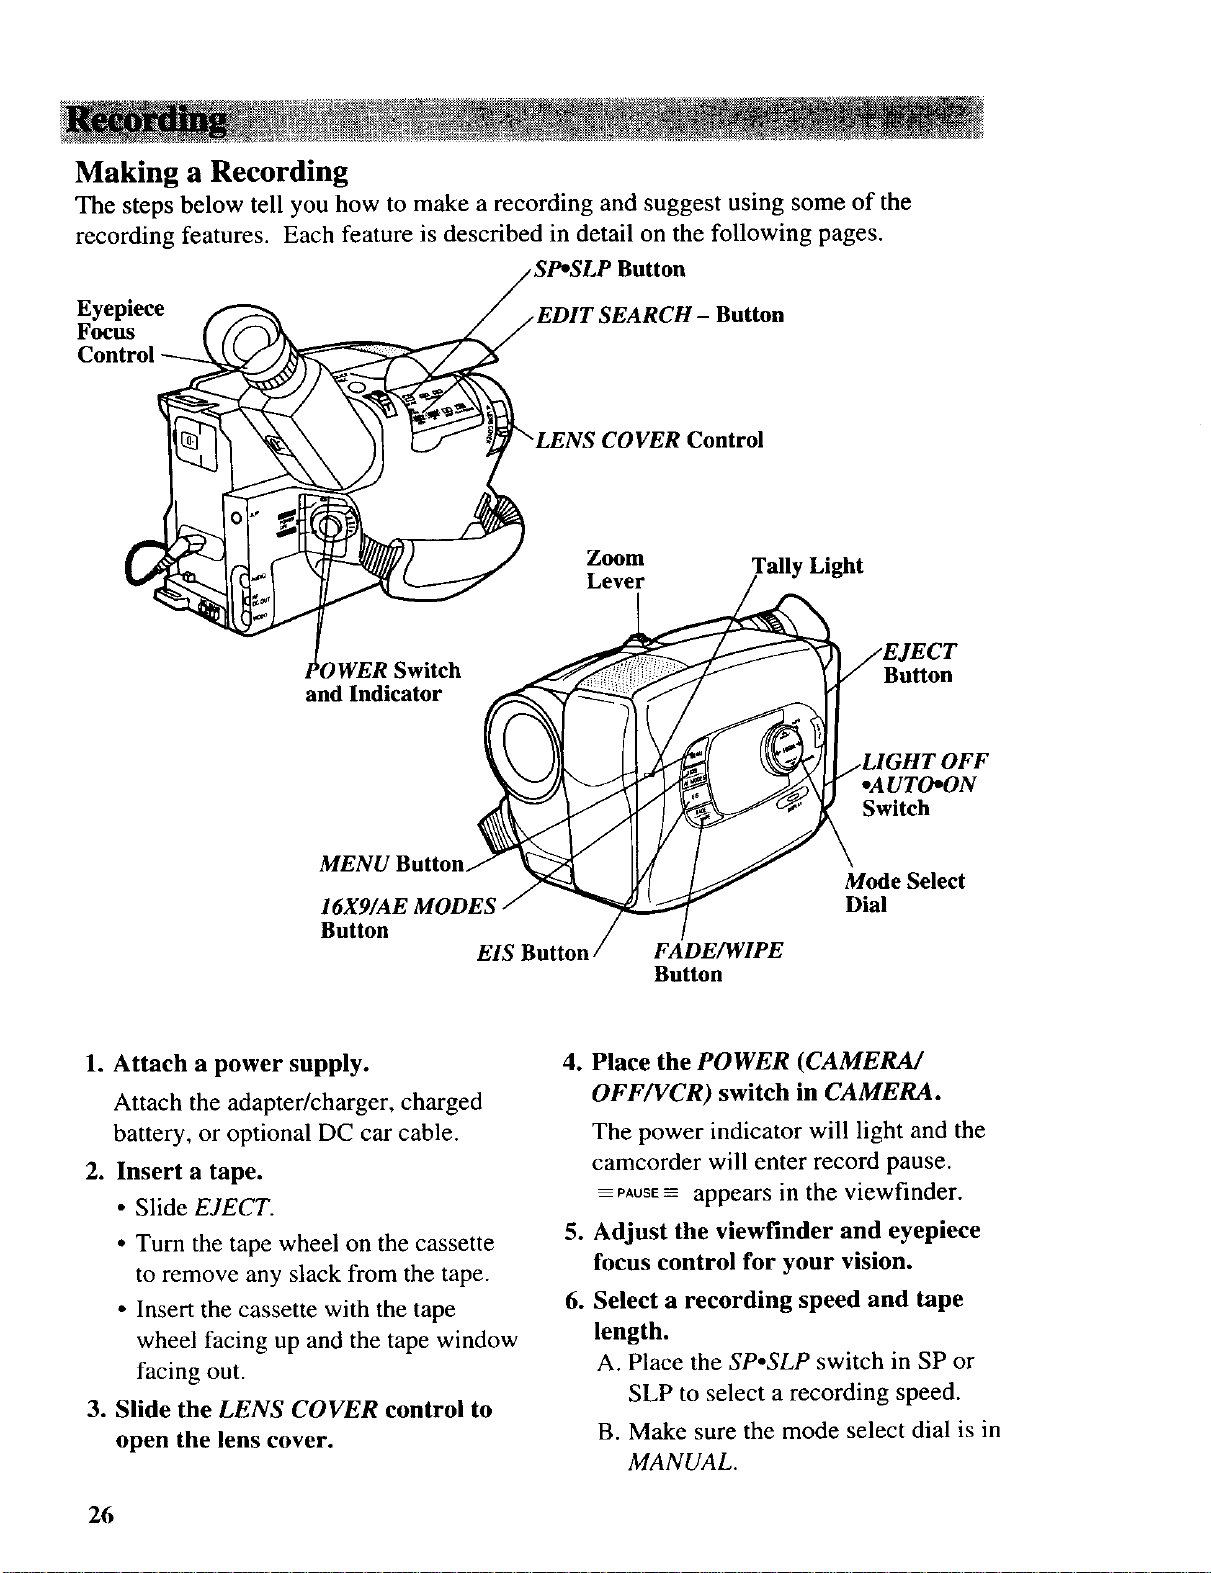
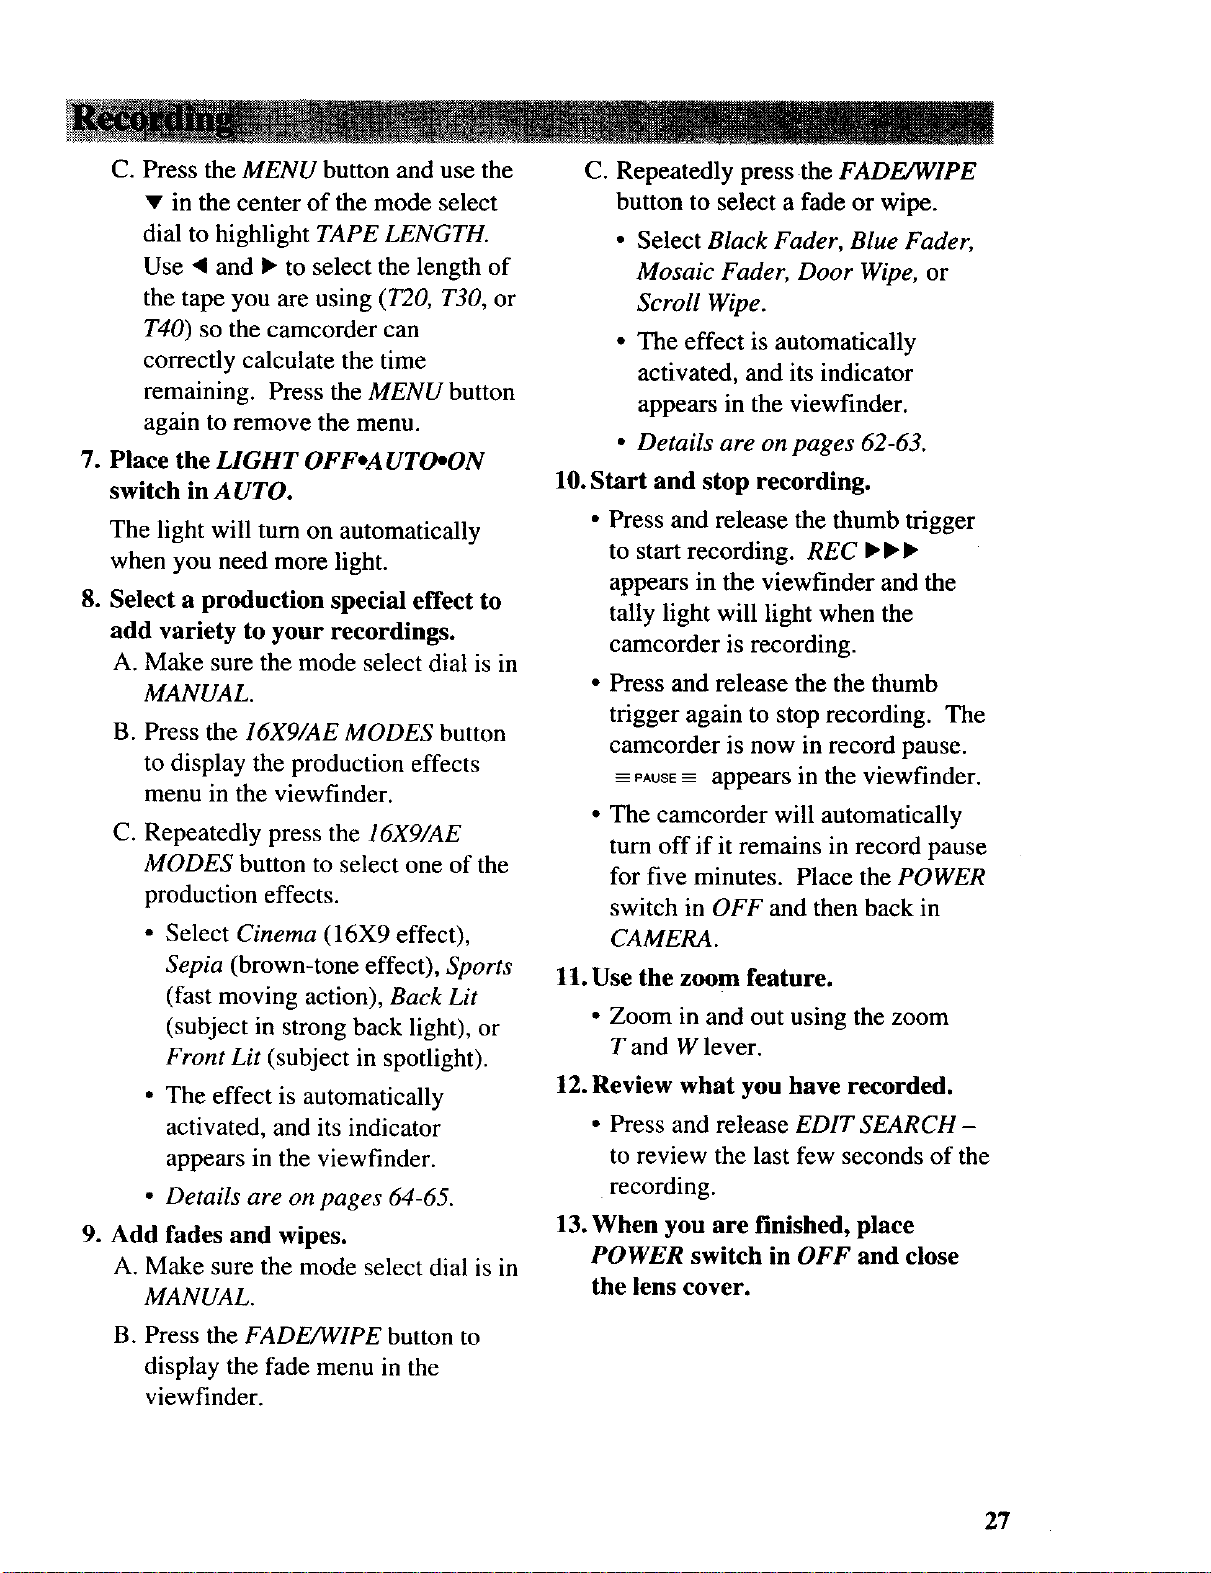
Making a Recording
The steps below tell you how to make a recording and suggest using some of the
recording features. Each feature is described in detail on the following pages.
Button
Eyepiece
Focus
iwitch
and Indicator
MENU Button
16X9/AE MODES
Button
EIS Button
_EARCH- Button
Control
Zoom Tally Light
Button
oAUTO*ON
Switch
Mode Select
Dial
FADE/WIPE
Button
1. Attach a power supply.
Attach the adapter/charger, charged
battery, or optional DC car cable.
2. Insert a tape.
• Slide EJECT.
• Turn the tape wheel on the cassette
to remove any slack from the tape.
• Insert the cassette with the tape
wheel facing up and the tape window
facing out.
3. Slide the LENS COVER control to
open the lens cover.
26
4. Place the POWER (CAMERA/
OFF/VCR) switch in CAMERA.
The power indicator will light and the
camcorder will enter record pause.
PAUSE------appears in the viewfinder.
5. Adjust the viewfinder and eyepiece
focus control for your vision.
6. Select a recording speed and tape
length.
A. Place the SP.SLP switch in SP or
SLP to select a recording speed.
B. Make sure the mode select dial is in
MANUAL.
C. Press the MENU button and use the
• in the center of the mode select
dial to highlight TAPE LENGTH.
Use a and • to select the length of
the tape you are using (T20, T30, or
T40) so the camcorder can
correctly calculate the time
remaining. Press the MENU button
again to remove the menu.
7. Place the LIGHT OFFoA UTO_ON
switch in A UTO.
The light will turn on automatically
when you need more light.
8. Select a production special effect to
add variety to your recordings.
A. Make sure the mode select dial is in
MANUAL.
B. Press the 16X9/AE MODES button
to display the production effects
menu in the viewfinder.
C. Repeatedly press the 16X9/AE
MODES button to select one of the
production effects.
• Select Cinema (16X9 effect),
Sepia (brown-tone effect), Sports
(fast moving action), Back Lit
(subject in strong back light), or
Front Lit (subject in spotlight).
• The effect is automatically
activated, and its indicator
appears in the viewfinder.
• Details are on pages 64-65.
9. Add fades and wipes.
A. Make sure the mode select dial is in
MANUAL.
C. Repeatedly press the FADE/WIPE
button to select a fade or wipe.
• Select Black Fader, Blue Fader,
Mosaic Fader, Door Wipe, or
Scroll Wipe.
• The effect is automatically
activated, and its indicator
appears in the viewfinder.
• Details are on pages 62-63.
10. Start and stop recording.
• Press and release the thumb trigger
to start recording. REC •••
appears in the viewfinder and the
tally light will light when the
camcorder is recording.
• Press and release the the thumb
trigger again to stop recording. The
camcorder is now in record pause.
_--PAUSE_----appears in the viewfinder.
• The camcorder will automatically
turn off if it remains in record pause
for five minutes. Place the POWER
switch in OFF and then back in
CAMERA.
1t. Use the zoom feature.
• Zoom in and out using the zoom
T and W lever.
12. Review what you have recorded.
• Press and release EDIT SEARCH-
to review the last few seconds of the
recording.
13. When you are finished, place
POWER switch in OFF and close
the lens cover.
B. Press the FADE/WIPE button to
display the fade menu in the
viewfinder.
27
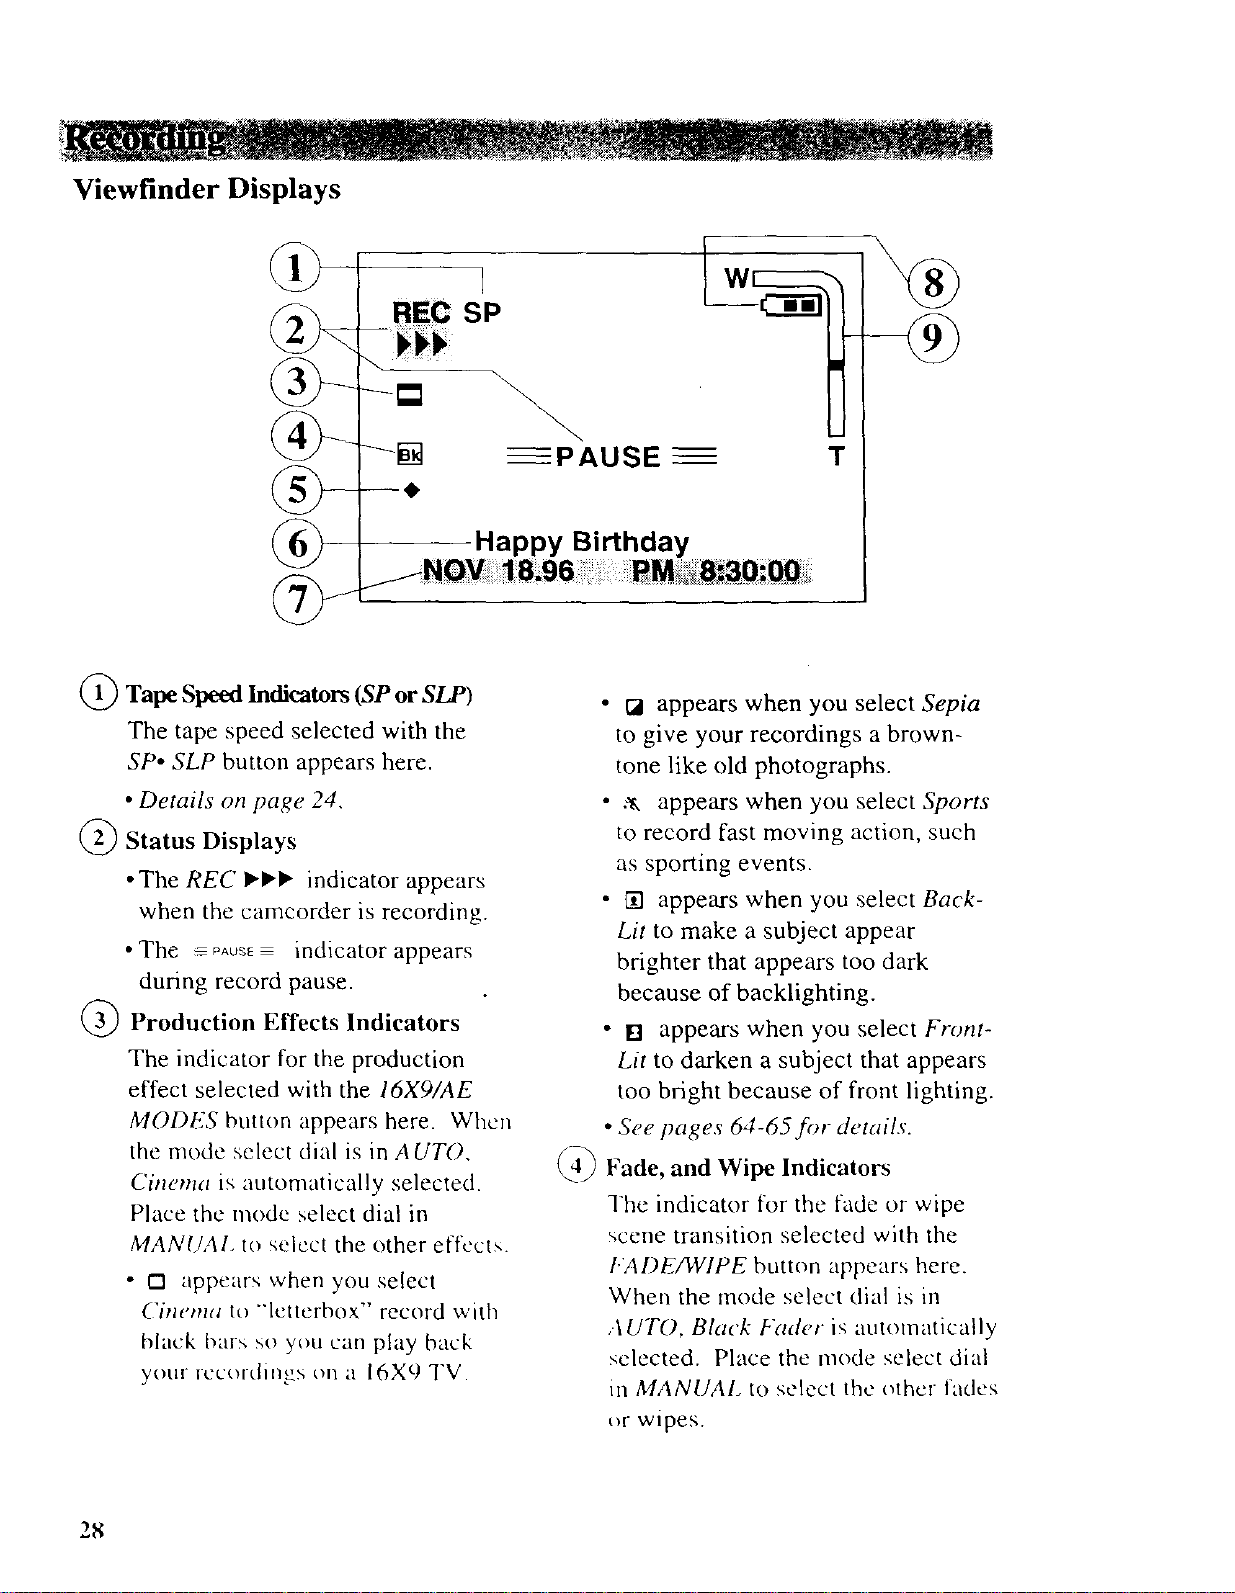
Viewfinder Displays
T
Happy Birthday
_) Tape Speed Indicators (SP or SLP)
The tape speed selected with the
SP. SLP button appears here.
• Details on page 24,
Status Displays
• The REC I_,1_ indicator appears
when the camcorder is recording.
• The _ PAUSE indicator appears
during record pause.
Production Effects Indicators
The indicator for the production
effect selected with the 16Xg/AE
MODES button appears here. When
the mode select dial is in AUTO,
Cinema is automatically selected.
Place the mode select dial in
MANUAl, to select the other effl'cts.
• O appears when you select
Cinema to "'letterbox" record with
black bar:, so you can play back
your recordings on a 16X9 TV.
• ca appears when you select Sepia
to give your recordings a brown-
tone like old photographs.
• .,,*, appears when you select Sports
to record fast moving action, such
as sporting events.
• [] appears when you select Back-
Lit to make a subject appear
brighter that appears too dark
because of baeklighting.
• [] appears when you select Front-
Lit to darken a subject that appears
too bright because of front lighting.
• See pages 64-65for details.
q)
Fade, and Wipe Indicators
The indicator for the fade or wipe
scene transition selected with the
I.ADE/WIPE button appears here.
When the mode select dial is in
,.\ UTO, Black Fader is automatically
selected. Place the mode select dial
in MANUAL to select the other fades
_t wipes.
28
 Loading...