

Page 1

nCJ/
camcorder
user's guide
CC6151/CC6251/CC6271
Page 2

Important. Safety Information
Be sure to read all the safety information before you begin to use this product.
WARNING: To reduce the risk of fire or shock hazard, do not expose
camcorder or AC adapter/charger to rain or moisture.
This symbol indicates "dangerous voltage"
inside the product that presents a risk of electric
shock or personal injury.
This symbol indicates important instructions
accompanying the product.
TO REDUCE THE RISK OF ELECTRIC SHOCK, DO NOT REMOVE THE COVER
(OR BACK). NO USER-SERVICEABLE PARTS ARE INSIDE. REFER SERVICING
TO QUALIFIED SERVICE PERSONNEL.
Cautions
CAUTION: To prevent electric shock, match wide blade of plug to
wide slot, fully insert.
ATTENTION: Pour 6viter les chocs 61ectdques, introduire la lame
la plus large de la fiche dans la borne correspondante de la prise et
pousser jusqu au fond.
To reduce risk of injury, charge only rechargeable batteries recom-
mended by the manufacturer for this camcorder. Other types of
batteries may burst causing damage and personal injury.
FCC Regulations state that unauthorized changes or modifications to
this equipment may void the user's authority to operate it.
Product Registration
Please fill out the product registration card and retum it immediately.
Returning this card allows us to contact you if needed.
Keep your sales receipt for proof of purchase to obtain warranty parts
and service and attach it here. Record the serial number and model
numbers located on the bottom of the camcorder.
Model No: CC6151 or CC6251 or CC6271
SerialNo:_,, ' :
Purchase Date-_ _ - , :
• _ : ._. ,!.
Purchased From: ;
Page 3

_..- m
We want to make sure you enjoy your new camcorder. If you have any
questions, call:
Camcorder Exchange Warranty ........... 800-283-6503 (pages 84-85)
Customer Service ................................... 800-336-1900 (page 83)
Accessories ............................................. 800-338-0376 (pages 70-75)
Safety Information .............................. i
First Time Operation
• Assistance ....................................... 3
• Unpack the Camcorder and
Accessories ................................. 3
• Attach the Adapter/Charger ............ 4
• Adjust the Handstrap to Fit
Your Hand .................................. 4
• Slide LENS COVER Control to
Open Lens Cover ........................ 4
• Insert a Tape .................................... 5
• Set POWER (CAMERA/OFF
VCR) Switch to CAMERA .......... 5
• Adjust the Viewfinder
and Eyepiece Focus Control ........ 6
• Select a Recording Speed ................ 6
• Select a Tape Length ....................... 7
• Set the AE Dial to AUTO ................. 8
• Start and Stop Recording ................ 8
• Play Back What you Have
Recorded .................................... 9
• Set the POWER Switch to OFF
to Turn Off the Camcorder ........ 9
• Close the Lens Cover ...................... 9
• Review Camcorder's
Operating Controls .............. 10-11
Power Your Camcorder
• Use the Adapter/Charger to
Power Your Camcorder ............ 12
• Use the Battery to Power
Your Camcorder ................... 13-15
• Use the Optional DCC08
Car Cord Adapter ..................... 16
Date and Time Display
• Install Clock Lithium Cell ........ 17
• Set the Date and Time .......... 18-19
• Record the Date, Time, and
Title Displays ................... 20-21
Videocassettes
• Erase Protection ............................ 22
• Recording and Playback
Speeds and Times ..................... 22
• Insert and Remove Cassettes ......... 23
• Cassette Care and Storage ............. 23
Recording
• Time-Remaining Display ......... 24-25
• Recording Tips .............................. 26
• Use the Viewfinder to See
What You Record ...................... 27
• Viewfinder Displays ................. 28-31
• Full Auto Mode ............................. 32
Page 4
• Quick Record Feature ................... 33
• Quick Review Feature ................... 33
• Tally Light ..................................... 33
• Camera Edit Feature ..................... 33
• Flying Erase Head ......................... 33
• Auto Head Cleaner ........................ 33
• Zooming
• Use the Zoom Buttons ......... 34-35
• Tele Macro Zooming ................ 35
• Focusing
• Auto Focus ................................ 36
• Manual Focus ...................... 36-37
• White Balance .......................... 38-39
• Exposure Control ..................... 40-41
• Fade In and Out ............................. 42
• AE Dial .......................................... 43
• Front Light and Back Light ........... 44
• Travel Tips .................................... 45
• Titles
• Record a Preset Title or
Title You Create .................... 46
• Create Your Own Title .............. 47
• Self-Timer Recording ............... 48-49
• Animation Recording ............... 50-51
• Time-Lapse Recording ............. 52-53
• Tally Light (Turn On or Off) .... ,.... 54
• Demo Mode .................................. 55
• JLIP (Joint Level Interface
Protocol) Identification
Number ..................................... 56
• Attach the Shoulder Strap ............. 57
• Model CC6271 Only: Built-In Color
Enhancement Light ............. 58-59
Playback
• Use the Viewfinder for
Playback .............................. 60-61
• Tracking ........................................ 61
• Playback Features
• Position the Tape ...................... 62
• Visual Search ............................ 62
• Stop-Action Pause .................... 62
• Time Counter ............................ 63
• Memory-Stop Feature ........... 63
• Use the Cassette Adapter ......... 64-65
• Playback on TV (or VCR)
with Audio/Video Inputs ..... 66-67
• Playback on a TV Without
Audio/Video Inputs ............. 68-69
Optional Accessories ................... 70-75
• Accessory Order Form ............. 73-75
Trouble Checks ........................... 76-79
Care and Maintenance
• Clean the Camcorder ..................... 80
• Clean the Camcorder's Lens ......... 80
• Clean the Camcorder's
Viewfinder ................................. 80
• Proper Care and Storage ............... 81
• Things to Avoid ............................. 81
Specifications .................................... 82
Information to User ......................... 82
Customer Assistance ........................ 83
Limited Warranty ....................... 84-85
Index ...................................... ,..... 86-89
2
Page 5

Thissectiondescribesthestepsnecessaryto setupyourcamcorderto record. Referto
theothersectionsfor detailedoperationandfeatureoptions.
Assistance
The toll-free numbers are available to help you with any problem you may encounter.
Camcorder Exchange Warranty ............... 800-283-6503
Customer Service ................................... 800-336-1900
Accessories ............................................. 800-338-0376
1. Unpack the camcorder and accessories.
• Save the packing materials and box in case you ever need to ship
or store your camcorder.
• The items shown below are packed with your camcorder. If any
are missing or appear damaged, contact your dealer immediately.
Model CC6151 or CC6251 or Rechargeable Battery
CC6271 Camcorder* Part No FB1260
(*Your camcorder may appear slightly or BB700
different than the one shown.)
Shoulder Strap
Part No. ACS091
AC Adapter/Charger
and DC Cable
Q
Clock Cell
3-Volt Micro Lithium
Cell - such as CR2025 -
available from most local
drug stores and camera
shops. Use of other cells
present a risk of fire or
explosion.
.......................................................................................................Cassette Adapter
Part No. VCAll5A
Part No. 241017
Part No. 233087
4+ "{1
Cassette Adapter Battery
(Size "AA" 1.5 Volt)
(continued on next page)
3
Page 6
o
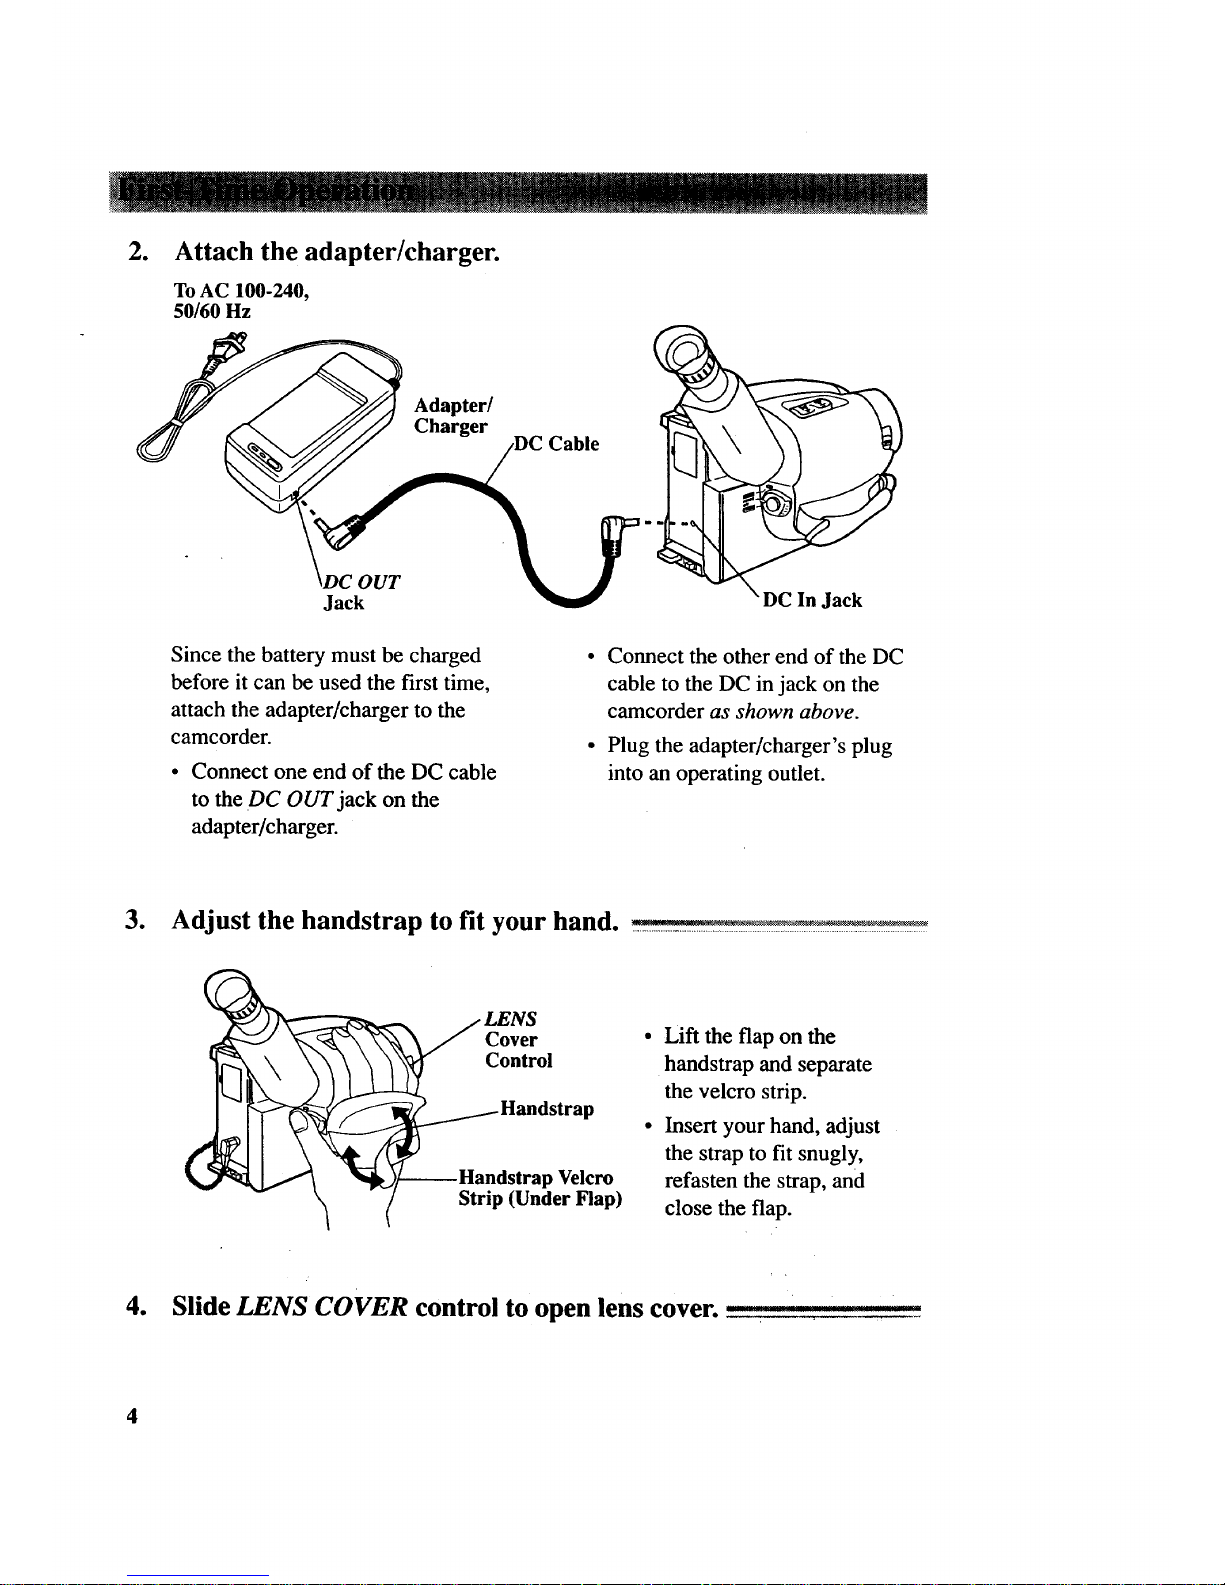
Attach the adapter/charger.
ToAC 100-240,
50/60 Hz
Adapter/
Charger
PUT
Jack
Cable
_DC In Jack
Since the battery must be charged
before it can be used the first time,
attach the adapter/charger to the
camcorder.
Connect one end of the DC cable
to the DC OUT jack on the
adapter/charger.
• Connect the other end of the DC
cable to the DC in jack on the
camcorder as shown above.
• Plug the adapter/charger's plug
into an operating outlet.
3. Adjust the handstrap to fit your hand. ___
_d LENS
Cover
Control
Handstrap
strap Velcro
trip (Under Flap)
Lift the flap on the
handstrap and separate
the velcro strip.
Insert your hand, adjust
the strap to fit snugly,
refasten the strap, and
close the flap.
4. Slide LENS COVER control to open lens cover. •
4
Page 7

5. Insert a tape. EJECT Button
PUSH Here to
Close Cassette
Compartment
• Slide the EJECT button up.
The cassette holder opens
automatically.
• Turn the tape wheel on the
cassette to remove any slack
from the tape.
j Tape Wheel
I ! TapeWindow
• Insert the cassette with the tape
wheel facing up and the tape
window facing out.
• Press on the area labeled PUSH
until the cassette holder locks
into place.
6. Set POWER (CAMERA/OFF/VCR) switch to CAMERA. _ _ ___
• Switch and
Indicator
• The power indicator lights and the
camcorder enters record-pause.
=- PAUSE--: appears in the
viewfinder when the"camcorder is
in record-pause.
• The position of this switch tells
the camcorder whether you want
, to record (CAMERA), turn the
power off (OFF), or play back
tapes (VCR).
The camcorder automatically turns
off if it remains in record-pause
for five minutes. Set POWER
switch to OFF and then back to
CAMERA. ,
(continued on next page)
5
Page 8

i@
SP/SLP
Button
Eyepiece
Electronic Focus
Viewfinder Control
7. Adjust the viewfinder and eyepiece focus control. __
You can see what you record in the
viewf'mder.
• Adjust the viewf'mder for a
comfortable viewing position.
• Turn the eyepiece focus control to
adjust the focus of the viewfinder
for your vision.
8. Select a recording speed. __
Select SP or SLP recording speed.
Press and hold the SP/SLP button to
select a recording speed. The tape
speed you select (SP or SLP) appears
in the viewfinder.
• SP-' Standard play provides the
best picture, but the shortest
recording time (20 minutes with a
TC-20 tape).
SLP - Extended play provides
three times the recording time as
SP (60 minutes with a TC-20
tape). SLP has slightly more
picture noise in normal playback.
6
Page 9

4ENU Dial
9. Select a tape length.
Set the length of the tape you are
using so the camcorder can correctly
calculate the recording time
remaining on the tape. ,
• Place the AE dial in MAN, and
press the MENU dial to display
the MENU in the viewfinder.
Rotate the dial to select TAPE
LENGTH.
• Press the MENU dial in to display
the TAPE LENGTH menu. Rotate
the dial to select the length of tape
you are using (T20, T30, or T40).
• Select T20 for a tape with 20
minutes or less recording time
in SP.
• Select T30 for a tape with 30
minutes recording time in SP.
• Select T40 for a tape with 40
minutes recording time in SP.
Press the MENU dial twice to
remove the menus from the
viewfinder.
• Details are on pages 24-25.
7
Page 10

Power
Indicator
Thumb POWER (VCR/
Trigger OFFICAMERA)
Switch
Tally
Light AE Dial
This places the camcorder in the
AUTO mode.
In the AUTO mode, the focus,
exposure, and white balance are
automatically controlled by the
camcorder.
• Many of the special effects do not
operate in the AUTO mode.
• Details on page 32.
11. Start and stop recording.
Press and release the thumb trigger
to start recording. _, appears in
the viewf'mder, and the tally light
lights while the camcorder is
recording.
Press and release the thumb trigger
again to stop recording. The
camcorder is now in the record-
pause mode. - PAUSE_= appears in
the viewfinder.
8
(continued on next page)
Page 11

VCR • •
Button
Button
STOP
Button
12.
Play back what you have 13.
recorded.
• Set the POWER switch to VCR.
• Press VCR • • to rewind the tape.
• Press PLAY/PAUSE to play back 14.
the tape.
• Press STOP when you are finished
playing back the tape.
• Details on viewfinder playback are
on pages 60-61.
Set the POWER switch to
OFF to turn off the
camcorder.
The power indicator turns off.
Close the lens cover.
(continued on next page)
9
Page 12

15. Review camcorder's operating controls.
ii_/I I Button
VCR 4,
Button
QUICK REC
(Record)" Button
DATE/TIME Button
(Also COUNTER R/M Button)
SP/SLP Button
Model CC6271
Only: Color
Enhancement
Light
-- VCR ,,
Button
Button
Lens
Tall'
Light
Microphone
Z
FADE TITLE€
CKLI
AE Dial
10
Page 13

_:: _ _ , _ _:_:_:_ _ , -,4: _ .......... .....
15. Review camcorder's operating controls. (continued)
Shoulder Strap
Attachment Ring
EJECT Button
PUSH Here to
Close Cassette MENU
Compartment Dial
Model CC6271 Only: LIGHT
OFF.A UTO.ON Switch
Shoulder Strap
Attachment Ring
BATT. (Battery)
RELEASE Button
Models CC6251 and
CC6271 Only
B (Bright) and C
(Color) Controls
(See Trouble Checks for
Details)
Focus Control
Power Zoom Buttons
LENS
Control
Clock Cell Battery
Compartment
Attach Rechargeable
Battery Here
Attach Adapter/
Charger's DC
Cord Here
JLIP Connector
(Located Under
Small Cover)
AUDIO (MONO), RF DC, and
VIDEO OUT Jacks
(Located Under Small Cover)
Handstrap
Indicator
POWER (VCR/OFF/
CAMERA) Switch
Thumb Trigger
11
Page 14

Use the Adapter/Charger to Power Your Camcorder
The adapter/charger attaches to the camcorder and lets you power your camcorder
directly from standard household power. The adapter/charger operates on 100-240
volts, 50/60 Hz, so it can be used virtually anywhere in the world to power the
camcorder or recharge the battery.
To AC 100-240,
50/60 Hz
,19(7OUT
Jack
Adapter/
Charger
Cable
DC In Jack
Attach Adapter/Charger
1. Connect one end of the DC cable to
the DC OUT jack on the adapter/
charger.
2. Connect the other end of the DC cable
to the DC in jack on the camc0rder as
shown above_
.
Plug the adapter/charger's plug into
the nearest AC outlet (100-240V,
50/60Hz).
Remove Adapter/Charger
1. Unplug the adapter/charger from the
wall outlet.
2. Remove the DC cable from the
adapter/charger and camcorder.
Using an Optional Plug Adapter
An optional plug adapter might be
required in some countries.
Optional AC / AC 100-240V
Adapter
1. Plug the adapter/charger's plug into
the AC plug adapter. •
2. Plug the AC plug adapter into the AC
_ outlet.
12
Page 15
Use the Battery to Power Your Camcorder
The battery must be charged as described on the next page before it can be used the
first time. Initial charging takes approximately 70 minutes for the FB 1260 (100
minutes for the BB700). When fully charged, the FB 1260 supplies approximately
50-55 minutes (BB700 approximately 75-85 minutes) of operating time - depending
on how much you use the light, zoom, and pause. Conserve battery power by turning
the camcorder off during recording breaks.
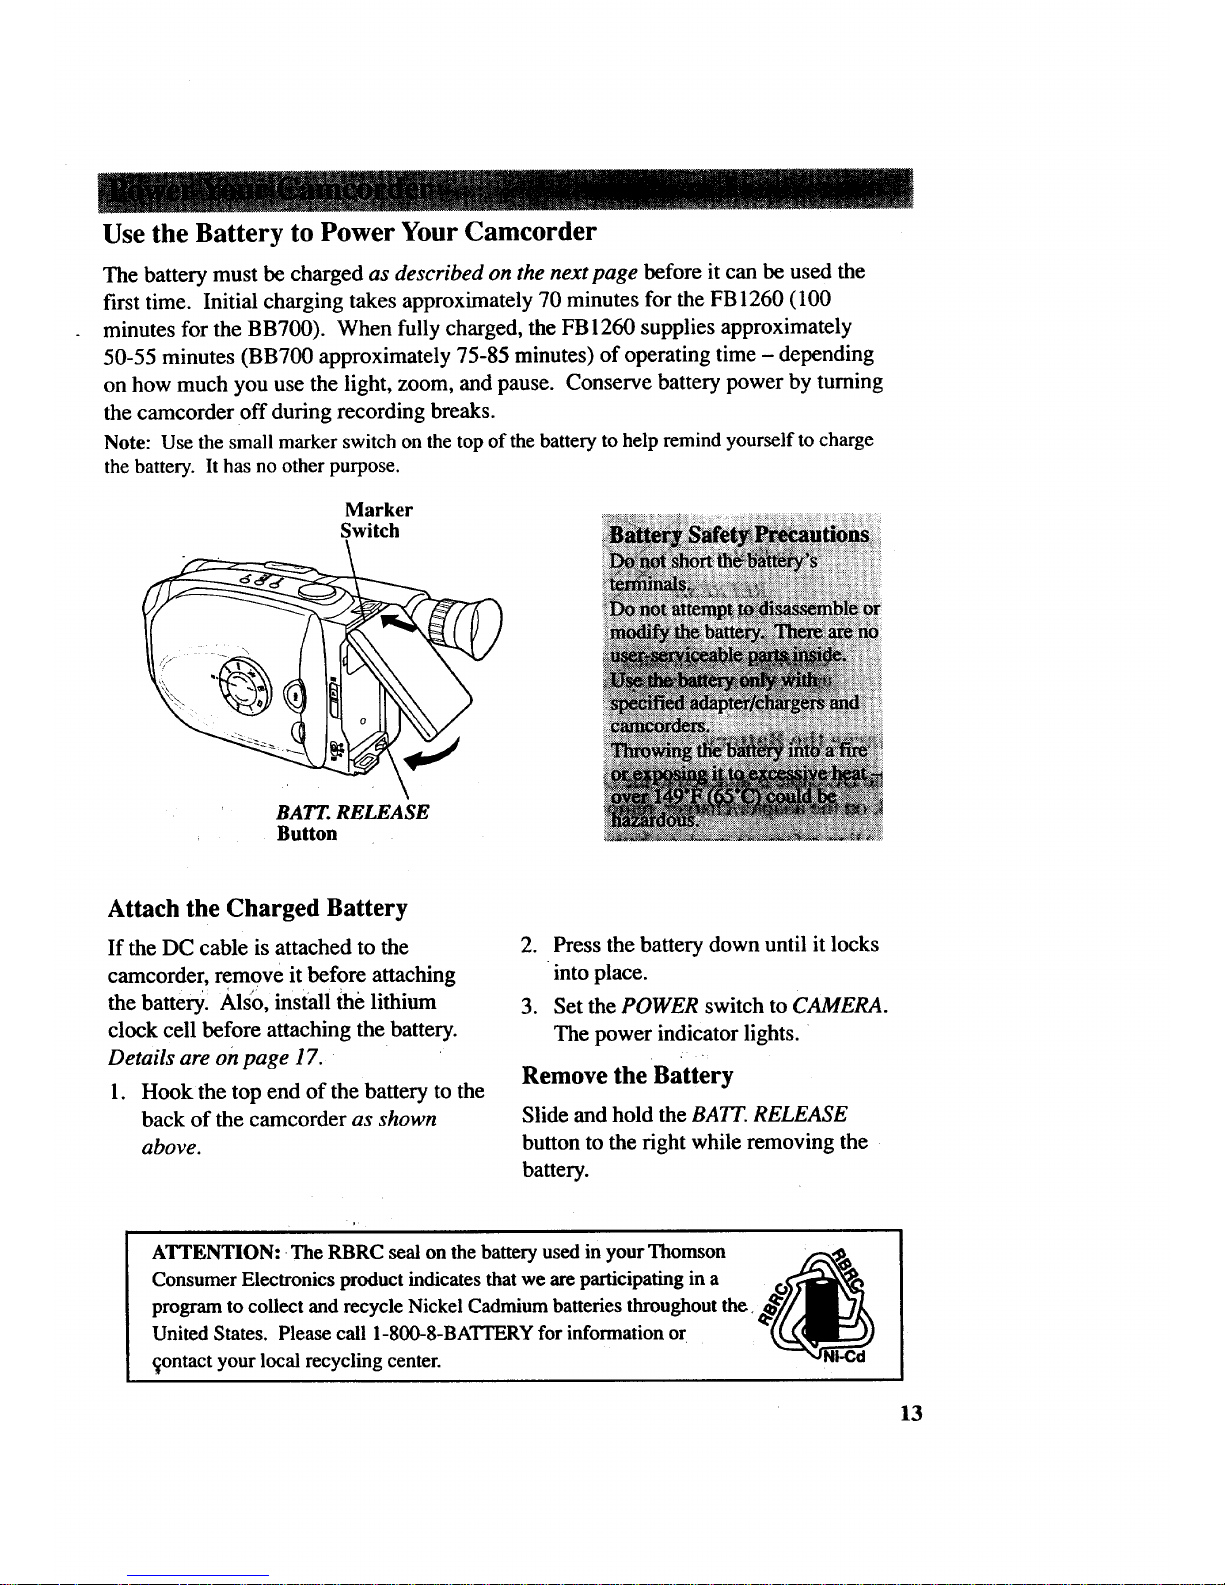
Note: Use the small marker switch on the top of the battery to help remind yourself to charge
the battery. It has no other purpose.
Marker
Switch
BATT. RELEASE
Button
Attach the Charged Battery
If the DC cable is attached to the
camcorder, remove it before attaching
the battery. Also, install the lithium
clock cell before attaching the battery.
Details are on page 17.
1. Hook the top end of the battery to the
back of the camcorder as shown
above.
2. Press the battery down until it locks
into place.
3. Set the POWER switch to CAMERA.
The power indicator lights.
Remove the Battery
Slide and hold the BATT. RELEASE
button to the right while removing the
battery.
ATTENTION: The RBRC seal on the battery used in your Thomson
Consumer Electronics product indicates that we are participating in a
program to collect and recycle Nickel Cadmium batteries throughout the,
United States. Please call 1-800-8-BATI'ERY for information or
_ontact your local recycling center.
13
Page 16

Use the Battery to Power Your Camcorder (continued)
CHG
(Charge)
Im
REFRESH
• Indicator
Hold Battery Flush
and Slide
Marks I
To AC Wall
Outlet 100-
240 Volts,
50/60 Hz.
Adapter/Charger
Button
Charge the Battery
If the DC cable is attached to the DC OUT
jack on the adapter/charger, remove it.
1. Align reference mark on battery with
mark on adapter/charger.
2. Hold the battery flush against the
adapter/charger and slide it in the
direction of the arrow.
3. Plug adapter/charger into nearest AC
outlet (100-240V, 50/60Hz).
4. If the battery is properiy connected,
the CHG indicator flashes.
Note: If you try to charge a battery that
has not been charged for a long period of
time, it may take a few minutes for the
CHG indicator to flash.
5. After the battery is charged, the CHG
indicator stops flashing and lights.
6. Remove the charged battery by sliding
it off the adapter/charger.
7_ Attach the charged battery to the
oamcorder.
Use the REFRESH Button
The battery provides increased
operation time if you "refresh" it after
five chargings. The refresh feature
"refreshes" the battery by completely
discharging it.
1. Attach battery to adapter/charger.
2. Press REFRESH. The REFRESH
indicator lights and the battery
begins discharging.
3. When discharging is completed, the
REFRESH indicator turns off, and
the CHG indicator flashes. The
battery now charges.
4. After the battery is charged, the
CHG (charge) indicator stops
flashing and lights.
5. Remove the battery from the
adapter/charger.
14
Page 17

Use the Battery to Power Your Camcorder (continued)
Battery Level Indicator
The battery level indicator appears in the
viewf'mder and shows you the amount of
power in the rechargeable battery.
• When the battery power is almost
gone, _:_" flashes in the viewfinder.
,,\
The camcorder turns off automatically
after a few seconds. Set the POWER
switch to OFF to turn off the cam-
corder before replacing the battery.
The battery level indicator is not recorded
on the tape.
mmml
• When _ appears, the battery is
fully charged.
• As the power is used _ and
appear.
Battery Care and Storage --_-
Recharging takes approximately 70
minutes for the FB 1260 and 100
minutes for the BB700 depending on
the battery's condition.
Refreshing takes approximately 3-1/2
hours for the FB 1260 and 5-1/2 hours
for the BB700 depending on the
battery's condition.
After repeated charging and use,
operation time gradually decreases.
When Operation time is too short to be
useful, it is time to replace the battery.
• If the battery discharging must be
stopped in the middle, remove the
battery from the adapter/charger before
Unpluggingit from the°AC outlet.
• If the battery pack become too hot,
remove it from the charger and let it
cool down.
Let a hot battery cool down before
attaching it to the AC adapter/charger.
15
Page 18
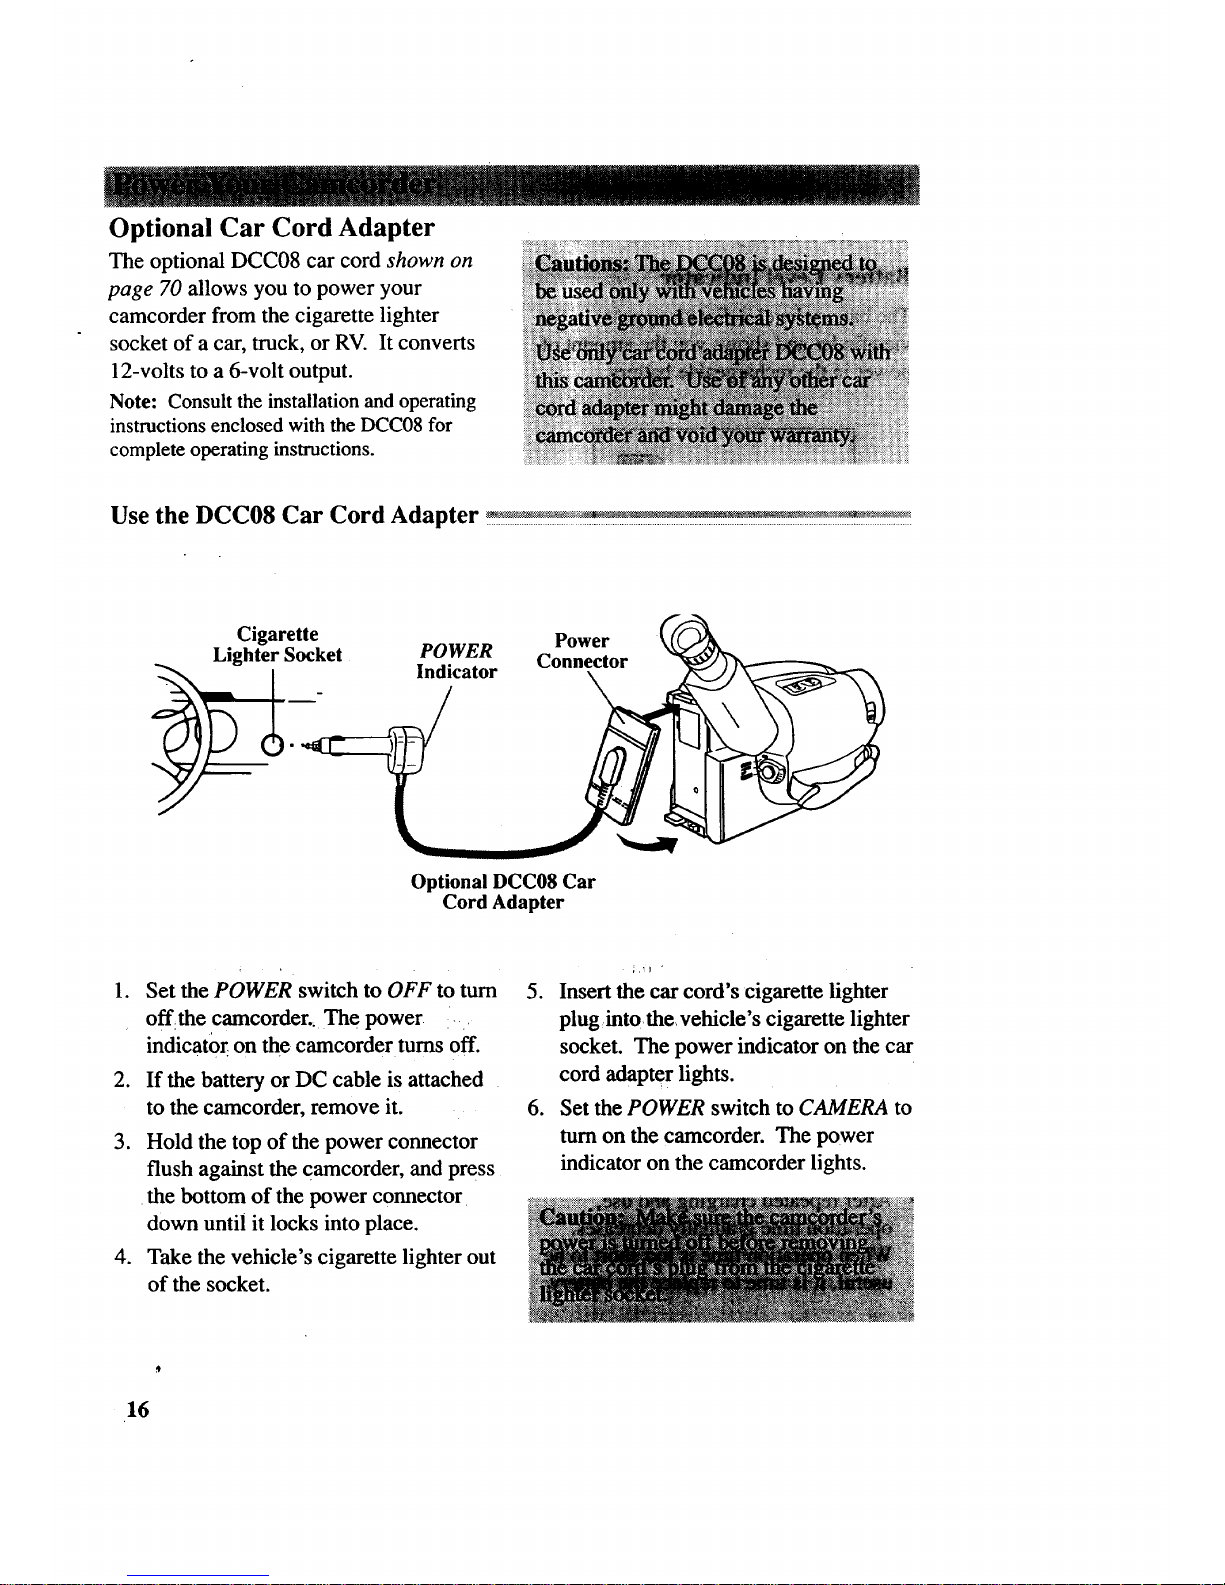
Optional Car Cord Adapter
The optional DCC08 car cord shown on
page 70 allows you to power your
camcorder from the cigarette lighter
socket of a car, truck, or RV. It converts
12-volts to a 6-volt output.
Note: Consult the installation and operating
instructions enclosed with the DCC08 for
complete operating instructions.
Use the DCC08 Car Cord Adapter __,____!!
Cigarette
Lighter Socket
Power
POWER Connector
Indicator
Optional DCC08 Car
Cord Adapter
1. Set the POWER switch to OFF to tum
.
off the camcorder., The power ....
indicator on the camcorder turns off.
If the battery or DC cable is attached
to the camcorder, remove it.
3. Hold the top of the power connector
flush against the camcorder, and press
•the bottom of the power connector
down until it locks into place.
4. Take the vehicle's cigarette lighter out
of the socket.
5. Insert the car cord's cigarette lighter
plug into the, vehicle's cigarette lighter
socket. The power indicator on the car
cord adapte r lights.
6. Set the POWER switch to CAMERA to
turn on the camcorder. The power
indicator on the camcorder lights.
16
Page 19

Install the Clock Lithium Cell
The clock cell indicator t_ flashes for a few seconds in the viewfinder when
you turn on the camcorder if the cell is not installed or needs replacing.
Insert Object Here
to Remove Cell
Clock Cell
(+ Side Facing Out)
Clock Cell
Compartmen!
.
Make sure camcorder is turned off,
and remove any power supply
attached to the camcorder.
2. Press release tab of clock cell
compartment cover and open the
compartment.
3. Insert the clock cell with the "+"
terminal facing out, and press it in.
4. Close the compartment cover.
It clicks into place.
To Remove Lithium Cell
To remove battery, insert a pointed
nonmetallic object between battery and
compartment and lift.
:, _ -t
17
Page 20

Set the Date and Time
You must set the correct date and time before you can display and record it
on your tapes. The clock cell must be installed as shown on the previous
page before "you can set the date.
MENU Dial
(Rotate or Press In)
18
1. Set thePOWER switch to CAMERA,
and make sure the AE dial is not set to
AUTO.
2. Press the MENU dial in to display the
main MENU in the viewfinder.
MENU
)'MENU END
EXPOSURE
DATErnME JAN 1.98
TELE MACRO OFF
TAPE LENGTH T30
M,W.B. AUTO
ZOOM SPEED FAST
),NEXT
3. Rotate the MENU dial to highlight
DATE/TIME.
MENU
),MENU END
FOCUS AUTO
EXPOSURE AUTO
JAN 1.98
TELE MACRO OFF
TAPE LENGTH T30
M.W.B. AUTO
ZOOM SPEED FAST
)'NEXT
4. Press the MENU dial to display the
DATE/TIME menu.
DATE/TIME
MONTH j_9_
DAY 1
TIME PM 12.-00
EXIT •
5. Rotate the MENU dial to highlight
YEAR. Press the MENU dial in.
Page 21

Set the Date and Time (continued)
.
.
When YEAR starts flashing, rotate the
MENU dial to select the year. When
the correct year appears, press the
MENU dial in to set the year.
Repeat step 5 to set the MONTH and
DAY.
Rotate the MENU dial to highlight
TIME.
DATE/TIME
YEAR 1998
MONTH NOV
DAY 18
_!i PM 12:00
EXIT
8. Press the MENU dial in. When the
hour starts flashing, rotate the MENU
dial to set the hour including AM
or PM.
9. Press the MENU dial in. When the
hour stops flashing and the minutes
start flashing, rotate the MENU dial to
set the minutes.
DATE/TIME
YEAR 1998
MONTH NOV
DAY 18
TIME AM 8:00
11. Press the MENU dial in. The main
MENU appears with MENU END
highlighted.
MENU
FOCUS AUTO
EXPOSURE AUTO
DATE/TIME NOV 18.98
TELE MACRO OFF
TAPE LENGTH 1"30
M.W.B. AUTO
ZOOM SPEED FAST
1_NEXT
12. Press the MENU dial in again to
remove the main MENU from the
viewfinder.
10. Press the MENU dial in. When none
of the settings are flashing, rotate the
MENU dial to highlight EX/T.
Notes:
If you decide to return the date and time tO the
previous settings while the DATEITIME menu
is displayed, rotate the MENU dial to highlight
EXIT, and press. Press the MENU dial again
to remove the main MENU from the
viewfinder.
To display and record the date and/or time, see
the following pages.
19
Page 22

Record the Date, Time, and Title Displays
You must install the clock cell and set the date and time (as shown on the previous
pages) before the you can select and record the correct date and time. You must
create your title (as described on pages 46-47) before you can select and record it.
DATEITIME
Button
-- AE Dial
Select Date, Time, Date and Time, AUTO DATE, or Title You
Created to Record On Your Tape
1. Attach a power supply and set
POWER switch to CAMERA. The
power indicator lights.
2. Make sure the AE dial is not set to
AUTO to select any mode except
AUTO DATE.
.
.
Note: AUTO DATE is selected when the
AE dial is set toAUTO.
Repeatedly press the DATE/TIME
button until the display you want to
record appears in the viewfinder.
Select date, time, date and time,
AUTO DATE, or the title you created.
• Date Display: The date is dis-
played and recorded.
• Time: The time is displayed and
recorded.
20
Date and Time Display: The
date and time are displayed
and recorded.
AUTO DATE: The date is auto-
matically recorded for approxi-
mately five seconds and then AUTO
DATE is displayed whenever:
• The date has been set or
changed.
• This display mode has just been
selected.
• The tape has been changed or the
tape compartment opened.
Title: The title you have created is
displayed and recorded. No display
appears if a title has not been created.
No Display: No display is dis-
played or recorded.
Page 23

Record the Date, Time, and Title Displays (continued)
NOV 18.98 AM 10:25:00
To Record the Date, Time, Date and Time, AUTO DATE,
or Title You Created
1. Make sure the camcorder is in
record-pause.
2. Make sure the AE dial is not set to
AUTO unless you want to record
AUTO DATE.
3. Repeatedly press DATE/TIME to
._display th_ date, time, date and time,_.
AUTO DATE, or title you created.
.
5.
Begin recording.
To remove the display, press DATE/
TIME until no display appears in the
viewfinder.
Note: If you do not want to record ad:_te or
time, press DATE/TIME to select the date and
time off mode before you begin recording.' '
No display appears in the viewfinder., _
21
Page 24

Make sure you select good quality tapes for your camcorder. Use of poor quality tapes
or tapes that have been damaged or mishandled can contaminate the video heads,
resulting in a snowy picture or no picture at all during playback. Because there is no
control over the type of tape purchased or rented by consumers, head cleaning is not
covered under warranty. It is considered normal maintenance.
The automatic head-cleaning system minimizes the need for accessory cleaners or
cleaning by a Service Center. This system is activated whenever you insert or remove
a cassette.
Erase Protection - Safety Tab
You can use your videocassettes over and over again. To erase a previous recording,
just record over it.
Safety
Tab
A. Remove
safety tab or
slide tab to
REC OFF.
B. Cover hole
with vinyl tape or
slide tab to REC ON to
record over tape.
Recording and Playback Speeds and Times ....-.......--.-......--....-........--................-.............._................-.-........_
The camcorder records and plays back in standard speed (SP) or extended play
(SLP). Select the recording speed by pressing and holding the SP/SLP button.
The selected speed is displayed in the viewf'mder. Listed below are the
maximum SP and SLP recording times for popular VHS-C cassettes.
SP - Standard play provides the
best picture (less picture noise),
but the shortest recording time (20
minutes with a TC-20 tape).
SLP - Extended play provides
three times the recording time as
SP (60 minutes with a TC-20 tape).
SLP has slightly more picture
noise than SP in normal playback.
This might not be noticeable.
Cassette
TC-20
TC-30
TC -40
Recording Time
SP
20 Min.
30 Min.
40 Min.
SLP
60 Min.
90 Min.
•120 Min.
22
Page 25

Insert and Remove Cassettes
SP/SLP Button
EJECT Button
Ta e Wheel
Push Here to
Close Cassette
Compartment
"Tape Window
Before inserting a cassette, turn the tape
wheel on the side of the cassette in the
direction shown to remove any slack in
the tape.
1. Press EJECT. The cassette holder
opens automatically.
2. _Insert the cassette with the tape wheel
facing:up and tape window facing out.
3. Press on the area labeled PUSH until
the cassette holder locks into place.
Cassette Care and Storage
• When you are finished with a cassette,
rewind it, remove it from the
camcorder, and label it.
• Store cassettes vertically in their
protective cases at normal room
temperatures. Do not leave your
camcorder or cassettes in a car or
outdoors for an extended period.
Excessive heat or cold might damage
your cassettes.
• Keep the cassette away from strong
magnetic fields such as electric motors
anU other devices.
Keep dust from entering the cassette
compartment. All dust is abrasive and
causes excessive wear on the tape and
the camcorder's recording or playback
heads.
Do not use cassettes with damaged or
spliced tape.
Do not use acassette if it has been
damaged or exposed to moisture. The
tape might j_'and/or damage your
camcorder. 3-_"
23
Page 26

Time-Remaining Display
The approximate time remaining on the tape in the camcorder for the tape
speed you select is displayed. You must set the correct tape length in the
TAPE LENGTH feature of the main MENU before the camcorder can
correctly calculate time remaining.
/ SPISLP
Button
.,S
/
MENU Dial
(Rotate or Press In)
Select a Tape Length
1. Set the POWER switch to CAMERA,
and make sure the AE dial is not set to
AUTO.
2. Press the SPISLP button to select a
tape speed.
3. Press the MENU dial in to display the
main MENU in the viewfinder.
MENU
),MENU END
EXPOSURE AUTO
DATE/TIME NOV 18.98
TELE MACRO OFF
TAPE LENGTH T30
M.W.B. AUTO
ZOOM SPEED FAST
)'NEXT
4. Rotate the MENU dial to highlight
TAPE LENGTH.
MENU
)*MENU END
FOCUS AUTO •
EXPOSURE AUTO
DATEfTIME NOV 18.98
TELE MACRO OFF
T_
M.W.B. AUTO
ZOOM SPEED FAST
_NEXT
24
Page 27

Time-Remaining Display (continued)
30MIN
29MIN
!
3MIN
l
2MIN
(Flashing)
1MIN
(Flashing)
,t
OMIN
(Flashing)
I
30MIN T30-
SP _
TAPE END
Time-Remaining Display
in Viewfinder
-- Tape Length
Indicator
"--Tape Speed
Indicator
.
.
Press the MENU dial to display the
TAPE LENGTH menu.
"!"30
T40
TAPE LENGTH
EXIT
Rotate the MENU dial to highlight the
type of tape you are using.
• Select T20 for a tape with 20
minutes or less recording time
in SP.
• Select T30 for a tape with 30
minutes recording time in SP.
• Select T40 for a tape with 40
minutes recording time in SP.
7. Press the MENU dial twice to select
the speed and remove the MENU.
,The time-remaining display starts
flashing when the remaining tape
time reaches two minutes.
TAPE END appears when the tape reaches
its end during recording or a cassette is
loaded thats tape is already at its end.
25
Page 28
Recording Tips
• Try to make sure indoor scenes are
well-lit. This improves picture quality
and color reproduction.
• Fading in and out of scenes makes
your videos appear more professional.
Do not move the camcorder rapidly
from side-to-side while recording.
A steady, gradual "pan" avoids
blurring and "jitter".
Use the viewfinder to make sure the
camcorder is level while recording so
that your scene isn't "tilted".
Do not bump or tap the camcorder's
microphone while recording because
this sound is recorded.
Learn to use the special production
effects available with your camcorder
to add variety to your recordings.
Be aware of video and audio back-
grounds. Background details barely
noticed while you are taping may
show up as visual "clutter" on your
recording. Background noises
(especially TV sets, radios, household
appliances, traffic sounds, etc.) might
detract from the sound you want
to record.
Include close-ups of individuals
when taping family outings or
group functions.
Avoid long "still" shots of landmarks
and scenic attractions. Recordings are
more interesting if they include people
and details. "Local color" gives travel
videos lasting appeal. Consider
recording a familiar or landmark scene
from an unfamiliar vantage point.
6
Page 29

Use the Viewfinder to See What You Record
The camcorder's viewfinder is a miniature monitor that displays the
picture seen by the camcorder when recording.
Eyepiece Focus Control
Viewfinder
Adjust Viewfinder for Convenient Viewing _,_._,: .........
For convenient viewing, slide the viewfinder out from the camcorder and
rotate it up and down.
Eyepiece Focus Control .....
The eyepiece focus control lets you set
the focus of the viewfinder for your
vision. If you wear eyeglasses, you
probably can operate the camcorder
without them.
It is easiest to set the correct focus by
focusing on one of the viewfinder's on-
screen displays. Look through the
viewfinder and adjust the eyepiece focus
control for your vision.
The eyepiece focus control does not affect
the focus of the picture actually recorded
by the camcorder.
27
Page 30

Viewfinder Displays
Q
[3 SEPIA
PAUSE
AT
MWB
J
HAPPY BIRTHDAY
AE Dial Special Effect Indicators
• AUTO (Full Auto Mode)
AUTO LOCK appears briefly when
you select AUTO.
• MAN (Manual Mode)
AUTO RELEASE appears briefly
when you select MAN.
• .'_ SPORTS
This indicator appears when you
select ._ to record fast-moving
action, such as sporting events.
• Q SEPIA
This indicator appears when you
select [_ to give your recordings a
brown-tone like old photographs.
• [] FRONT LIT
This indicator appears when you
select [] to darken a subject that
appears too bright because of front
lighting.
28
[] BACK LIT
This indicator appears when you
select [] to make a subject appear
brighter that appears too dark because
of background lighting.
_1 S 1/1000
This indicator appears when you
select 1/1000 to record fast-moving
action.
• HZ: HAZE
This indicator appears when you
select HAZE to soften the image and
create a misty white look.
• SD:SHADOW
This indicator appears when you
select SHDW to darken the picture
and reduce glare.
Page 31

Viewfinder Displays (continued)
Battery Level Indicator ( _il )
• This indicator shows the amount of
power left in the rechargeable battery.
• This indicator flashes when the battery
is almost empty.
Cassette Warning
• The _ indicator flashes when the
POWER switch is set to CAMERA and
there is no cassette in the camcorder.
• The _ indicator flashes when the
POWER switch is set to CAMERA and
the safety tab is set to REC OFF or
removed from the cassette.
Date, Time, Date and Time, AUTO
DATE, or Title you Created
Press the DATE/TIME button to display
the date, time, date and time, AUTO
DATE, or the title you created.
• These displays are recorded when they
are displayed. If you do not want to
record one of them, press DATE/TIME
until no display appears.
• Details are on pages 20-21.
Preset Titles
Press the TITLE button to display and
record one of the eight preset titles or the
title you created. Details are on page 46.
MWB (Manual White Balance
Indicators)
The indicator for the manual white
balance selected in the MENU appears
here.
• -,0,- appearswhen you select-_@_-:FINE
to record outdoors on a sunny day.
• -'_, appears when you select
"_;,, :CLOUD to record outdoors on a
cloudy day.
• :,_x appears when you select
-_. :HALOGEN to record using
halogen or tungsten lighting.
• MWB appears when you select MWB
to adjust the color temperatures.
• Details are on pages 38-39.
Status Displays
• The _, indicator appears when the
camcorder is recording.
• The = PAUSE= indicator appears
during record-pause.
• • appears when the camcorder plays
back a tape.
• | | appears during play-pause.
• • • appears during fast forward.
• •• appears during rewind.
(AT) Tracking Indicator
AT appears when the camcorder is
adjusting tracking automatically.
f]
Zoom Indicator ( _ )
The zoom indicator appears here when
you use the zoom lever.
29
Page 32

_i':" "'" " " "_ ":9 "-'. "' _ ..... :" • "" • ' _'_ _ ": _:_.!" _ ..... ." _ ....
Viewfinder Displays (continued)
5MIN -EFFECT
SP
I-ff_iFADER
T30
M 0:00:00
LENS COVER
TAPE END
+03
Dew Warning (_)
The dew indicator appear s when exces-
sive moisture (condensation) has entered
the camcorder. The camcorder will not
operate when this indicator appears.
Place the camcorder in a warm, dry area
until this indicator disappears.
Exposure Indicators (+03)
This indicator appears when you are
adjusting brightness manually using the
EXPOSURE menu. Make sure the AE
dial is not set to AUTO.
• Details are on pages 40-41.
Fade Indicators (I_EFFECT and
[] FADER)
The I>EFFECT and [] FADER indicators
briefly appear when you press the FADE
button to turn on fading. [] remains
when fading is tumed on. Press FADE
again to remove [] and turn off fading.
Focus Indicators ( _,4 •-*- )
These indicators appear when you are
adjusting focus manually using the
FOCUS menu. Make sure the AE dial is
not set toAUTO.
• The focus indicators ( _A,I_ ) flash _
when the auto-focus system cannot
operate properly. , , , ,
Page 33

Viewfinder Displays (continued)
• j, _o_appear when you have
selected MAN in the FOCUS menu.
,ll xll
• ,,4, and ,_,. flash while you adjust
manual focus and "A"and ".riflash
when you cannot adjust the focus
any farther.
• Details are on pages 36-37.
Lithium Cell ( d_ )
This indicator appears for a few
seconds when you turn on the cam-
corder and the clock cell is missing or
needs to be replaced.
• Details are on page 17.
Self-Timer, Animation, and Time-
Lapse Indicators (41 1S and _..315S)
• The interval time selected for self-
timer or time-lapse recording ( _ 15S,
30S, 1M1N, or 5MIN) appears here.
Details are on pages 48-49 and 52-53.
• The recording time selected for
animation or time-lapse recording
(_ 1/4S, 1/2S, 1S, or 5S)
appears here.
• Details are on pages 50-51 and 52-53.
Tape Length (T30)
The tape length (T20, T30, or T40)
selected in the main MENU appears here.
• Details are on pages 24-25.
Tape Speed Indicators (SP or SLP)
The tape speed selected with the SPISLP
button appears here.
• Details are on pages 24-25.
Time Counter (M0:00:00)
• The time counter appears during
playback. It is not recorded.
• An "M" appears in front of the time
counter when memory-stop is on.
• Details are on page 63.
Time-Remaining Display (5MIN)
The approximate time remaining on the
tape is automatically displayed. The
correct tape length must be set in the
TAPE LENGTH feature of the
main MENU.
• Details are on pages 24-25.
Warnings and Information
• LENS COVER briefly flashes to remind
you to open the lens cover.
LENS COVER might flash when the
camcorder is used in dark areas -- even
if the lens cover is open.
• TAPE END appears when the end of
the tape is reached during recording or
a cassette is inserted with its tape
already at the end.
31
Page 34

VCR • •
PLAY/PA USE
Button
VCR I_t, Button
QUICK REC Button
STOP Button
Tally
FADE TITLEc
Microphone
AE Dial
Full Auto Mode
The AE dial lets you select automatic or
manual control of several features.
To Turn on the Full Auto Mode
lo
.
3.
Set the POWER switch to CAMERA.
The power indicator lights and the
camcorder enters record-pause.
----PAUSE---- appears in the viewf'mder.
Set the AE dial to AUTO.
Press the thumb trigger to start
recording.
The camcorder automatically
controls focus, exposure, and white
balance. :
The MENU dial will not operate.
AUTO DATE is selected for the
date and time display.
To Turn Off the Full Auto Mode
1. Set the AE dial to MAN.
32
Page 35

Quick Record Feature
The quick record feature allows you to
record for five seconds providing short
scene transitions.
1. Set POWER switch to CAMERA.
2. Press QUICK REC to display _5S in
the viewfinder.
3. Press the thumb trigger to start
recording. The camcorder records for
five seconds and enters record-pause.
To Turn Off the Quick Record Mode
1. Press the QUICK REC button to
remove/Im5S from the viewfinder.
Camera Edit Feature
The camera edit feature allows you to
position the tape when the camcorder is in
record-pause. Set POWER switch to
CAMERA.
• Press and hold VCR ••
to visually search the recorded tape
in reverse.
• Press and hold VCR • •
to visually search forward on the
recorded tape.
Release the button to return the cam-
corder to record-pause at that point on
the tape. Press the thumb trigger to start
recording at this point.
Quick Review Feature
Press and release VCR • • when the
camcorder is in record-pause to review
the last few seconds of a recording. The
POWER switch must be set to CAMERA.
The camcorder plays back the last few
seconds of the recording, returns the tape
to its previous position, and returns to
record-pause.
Tally Light
The tally light lights when the camcorder
is recording. The tally light flashes during
self-timer and time-lapse recording.
The tally light must be set to ON in the
TALLY LAMP menu. See page 54 for
details.
Flying Erase Head
A separate erase head is mounted on
the spinning headwheel (hence the term
"flying"). This allows you to make clean
edits without the "glitches" or "rainbow
noise" that might occur at the beginning
or the end of recordings.
Auto Head. Cleaner
The camcorder has an automatic head-
cleaning system. Whenever you insert or
remove a cassette, this system
is activated.
The head-cleaning system minimizes the
need for accessory cleaners or cleaning
by a Service Center.
33
Page 36

Zooming
You can zoom in and out for close ups or wide-angle shots just by pressing the
zoom buttons on the camcorder. The camcorder automatically focuses when
you zoom at most distances.
To record a close-up of a small subject closer than three feet. Turn on the TELE
MACRO feature in the main MENU. You can record a small subject at a
distance of approximately 23 inches.
Zoom Buttons
(T and W)
Dial
(Rotate or Press In)
Use the Zoom Buttons (W and T)
lo
To zoom in or out, press one of the
zoom buttons on the camcorder.
• To move the lens in the telephoto
(close-up) direction, press T.
• To move the lens in the wide angle
direction,press W.
• The zoom level indicator appears in
the viewfinder during zooming.
34
Use the ZOOM SPEED Menu
Select ZOOM FAST or ZOOM SLOW
using the menus.
1. Make sure the POWER switch is set
to CAMERA and the AE dial is not
set to AUTO.
2. Press the MENU dial in to display
the main MENU.
MENU
),MENU END
FOCUS AUTO
EXPOSURE AUTO
DATE/'nME NOV 18.98
TELE MACRO OFF
TAPE LENGTH T30
M.W.e. ,Atp'q
,FAp'r
I_NEXT
Page 37

Zooming (continued)
3. Rotate the MENU dial to highlight
ZOOM SPEED.
4. Press the MENU dial in to display the
ZOOM SPEED menu.
ZOOM SPEED
FAST
EXIT
5. Rotate the MENU dial to highlight
FAST or SLOW, and press the dial in.
• Select FAST to zoom faster.
• Select SLOW to zoom slower.
6. Rotate the MENU dial to EXIT and
press the MENU dial in twice to
remove the MENUS.
Notes: For fastest zooming, select FAST in
the ZOOM SPEED menu and press the zoom
button firmly.
For slowest zooming, select SLOW in the
ZOOM SPEED menu and press the zoom
button lightly.
To
1.
.
.
°
Turn Tele Macro Zooming ON or OFF
Make sure the POWER switch is set to
CAMERA and the AE dial is not set to
AUTO.
Press the MENU dial in to display the
main MENU in the viewfinder.
MENU
_,MENU END
FOCUS AUTO
EXPOSURE AUTO
DATE/TIME , NOV,18.98
TAPE LENGTH
M.W.B. AUTO
ZOOM SPEED FAST
_"NEXT
Rotate the MENU dial to highlight
TELE MACRO.
Press the MENU dial in to display the
TELE MACRO menu.
TELE MACRO
OFF
EXIT
5. Rotate the MENU dial to highlight
ON or OFF and press the dial in.
• Select ON if you want to record a
small subject within approxi-
mately 23 inches.
• Select OFF for normal zooming.
6. Press the MENU dial twice to
remove the MENU.
35
Page 38

i.,.
Focusing
The camcorder adjusts focus automatically under normal conditions.
You might need to focus manually under certain conditions.
Zoom Buttons
(T and W)
Dial
(Rotate or Press In)
Auto Focus
During auto focus the camcorder
focuses on the object located in the
center area of the viewfinder.
Set the AE dial to AUTO to turn on
the auto focus feature. No focus
indicator appears in the viewfinder.
Notes: The low-contrast indicator
(m & ) in the viewfinder indicates
the auto-focus system might not
operate correctly due to low illumina-
tion, low or no contrast, repeated
patterns, or two subjects at different
distances overlapping.
Use tele macro zooming when
recording a subject close to the
lens or the camcorder may
zoom out to focus.
The lens must be clean for the cam-
corder to focus accurately.
Manual Focus
You might need to focus manually under
certain conditions.
.
.
.
Set the POWER switch to CAMERA, and
make sure the AE dial is not set to AUTO.
Press zoom button T to zoom in on the
subject and center the subject in the
viewf'mder.
Press the MENU dial in to display the
main MENU in the viewfinder.
MENU
P'MENU END
"A6TO
EXPOSURE AI_i"c)
DATE/TIME NOV 18.98
TELE MACRO OFF
TAPE LENGTH T30
M.W.B. . AUTO
ZOOM SPEED FAST
kNEXT
36
Page 39

Focusing (continued)
4. Press the MENU dial in to display the
FOCUS menu.
FOCUS
AUTO
EXIT
5. Rotaie the MENU dial to highlight
MANU (manual) and press the dial
in. Jt -*- appears in the
viewfinder. The focus is locked at
this point.
6. Adjust the focus for a subject nearer
or farther away.
• Rotate the MENU dial up to focus
on a subject farther away. "_
.
flashes while you are adjusting
the focus and ",i°flashes when
you cannot adjust the focus any
more.
• Rotate the MENU dial up to focus
,w.
on a subject nearer. ,_, flashes
while you are adjusting the focus
and "_,flashes when you cannot
adjust the focus any more.
Press the MENU dial twice to
remove the menus.
Notes: To return to auto focus, select
AUTO in the FOCUS menu or set the AE
dial to AUTO.
Conditions Requiring Manual Focus ................. :......
When recording a subject through a
window.
• When recording a subject having a
close foreground and a background that
is far away.
• When recording in low-light situations.
• When recording two subjects at
different distances that overlap in the
same scene.
• When the subject is not in the center of
the scene.
• When recording a scene with fast
motions, like a tennis swing.
37
Page 40

White Balance
Making colors look natural is what white balance is all about. This is achieved by
adjusting the way the camcorder "sees" and records the light source in the scene
you record. Your camcorder is equipped with automatic white balance.
You might want to adjust white balance manually under certain conditions, such as
recording an object with various shades of the same color or when recording a
predominantly red or brown object outdoors.
Zoom Buttons
(T and W)
MENU Dial
(Rotate or Press In)
Auto White Balance
Manual .White Balance
During auto white balance, the camcorder 1.
adjusts the white balance.
• Set the AE dial to AUTO to turn on the
automatic white balance feature. No 2.
indicator appears in the viewfinder.
Set the POWER switch to CAMERA,
and make sure the AE dial is not set to
AUTO.
Press the MENU dial in to display the
main MENU in the viewfinder.
MENU
)'MENU END
FOCUS AUTO
EXPOSURE AUTO
DATE/TIME NOV 18.98
TELE MACRO OFF
TAPE LENGTH ,T_ .
ZOOM SPEED
)'NEXT
38
Page 41

+
White Balance (continued)
3. Rotate the MENU dial to highlight
M.W.B. and press the dial in to display
the M.W.B. menu.
M.W.B.
•;*:-:RNE
-'/- :CLOUD
:HALOGEN
MWB
.
EXIT
Rotate the MENU dial to highlight the
white balance you want to use.
• No indicator appears when you
select AUTO white balance.
• Select -;.0_-:FINE when recording
outdoors on a sunny day.
• Select -_/.. :CLOUD when record-
ing outdoors on a cloudy day.
• Select :,z_x,:HALOGEN when
recording using halogen or tungsten
lighting.
• Select MWB when shooting
subjects with different color
temperatures and adjust the white
balance as follows:
.
A. Point camcorder at a white, flat
object such as a piece of white
paper.
B. While MWB is highlighted, press
and hold the MENU dial until
MWB starts flashing.
The MWB indicator flashes
while the camcorder is adjusting
white balance and stops flashing
when it is ready to record.
Note: To change the tint for special
recording, substitute colored paper for
white. The white balance is
adjusted based on the color.
Red paper - deeper green
Blue paper - orange
Yellow paper - deeper purple
Press the MENU dial twice to select a
white balance and remove the menus.
Notes: To return to auto white balance,
select AUTO in the M.W.B. menu or set the
AE dial to AUTO.
M.W.B,
AUTO
;0:-:RNE
:._-:CLOUD
LOGEN
Exrr
Note: Connecting your camcorder to a
color TV monitor may be helpful when
making white balance adjustments.
39
Page 42

Exposure Control
The camcorder controls the iris for you when the AE dial is set to AUTO.
The camcorder adjusts brighmess automatically under normal condi-
tions. You might need to adjust brightness manually when the back-
ground is too bright or too dark in comparison with the subject.
MENU Dial
(Rotate or Press In)
Auto Exposure
The camcorder adjusts the iris for
the best possible picture during
auto exposure.
• Set the AE dial to AUTO to turn on the
auto exposure feature. No exposure
indicator appears in the viewfinder.
Manual Exposure
You may need to adjust exposure
manually under certain conditions, such
as those listed on the next page.
1. Set the POWER switch to CAMERA,
and make sure the AE dial is not set
to A UTO.
40
Page 43

Exposure Control (continued)
.
.
Press the MENU dial in to display the
main MENU in the viewfinder.
MENU
I, MENU END
FOCUS _u;ro,
A O
ii_ "NO_ 1"8.98
DATE/TIME
TELE MACRO OFF
TAPE LENGTH T30
M.W.B. AUTO
ZOOM SPEED FAST
k NEXT
Rotate the MENU dial to highlight
EXPOSURE and press the dial in to
display the EXPOSURE menu.
EXPOSURE
AUTO
EXIT
The exposure indicator (00) appears in
the viewfinder.
5. Adjust the exposure for a dark or
bright subject.
• To brighten the image, rotate the
MENU dial up. You can adjust the
exposure to +06.
• To darken the image, rotate the
MENU dial down. You can adjust
the exposure to --06.
6. Press the MENU dial in to select an
.
exposure.
Press MENU again to remove the
main MENU.
Notes: To return to auto exposure, select
AUTO in the EXPOSURE menu or set the
AE dial to AUTO.
4. Rotate the MENU dial to highlight
MANU (manual) and press the dial in.
Conditions Requiring Manual Exposure
• When recording with a bright back-
ground or reverse lighting.
• When recording with a very dark
background or very bright subject.
• When recording a reflective natural
background m such as a beach or
when skiing.
41
Page 44

Fade In or Out
You can add a professional touch to your recordings when you fade in and out
of scenes. The picture gradually appears or disappears. The speed of the fade
is controlled by the camcorder.
FADE
Button
To Fade In or Out
1. Set POWER switch to CAMERA.
You can activate fading during record-
pause or recording.
PEFFECT
[j_]FADER
.
.
Press the FADE button. [] FADER
appears briefly and then [] remains
in the viewfinder.
Press the thumb trigger to start or stop
recording. The camcorder fades in or
out of the scene.
Notes: Press and hold the thumb trigger to
record a black screen.
The screen becomes slightly reddish if fade is
used with the sepia feature.
If the haze feature is selected, fading is in and
out from a white screen.
To Turn Off the Fade Feature
Pres_ the FADE button while [] appears
in the viewfmder. OFF appears briefly
when the fade feature is turned off.
42
Page 45

AE Dial
The AE dial lets you select one of several different effects. Turn the dial to
select the effect you want. The name and indicator for the effect appears briefly
and then the indicator remains. There are no indicators for AUTO or MAN. Set
the AE dial to MAN for normal recording.
AE Dial
Mode
AUTO
MAN
E!
1/1000
Name
and Indicator
A UTO LOCK
AUTO RELEASE
_'_ SPORTS
D BACK LIT
_] FRONT LIT
ff l S 1/1000
Uses
HAZE HZ:HAZE
SHDW SD:SHADOW ,
SEPIA [_ SEPIA
Places camcorder in full automode. Time and datedisplays,
title, manual focus, manual exposure, and manual white
balance will not operate.
Use this mode for recording using some of the manual
features.
Use to capture fast-moving action with less blurring. Use
when playing back a recording on a VCR featuring special
effects, such as pause or slow motion.
Use when subjects are infront of a window or have the sun
to their back. Compensates for subjects appearing too dark
becanse of backlighting. _ .... ,_
Use when there is a strong front light on the subject such as
spotlights. Compensates for subjects appearing too light
because of strong front lighting.
Sets shutter speed to 1/1000. Use to record faster moving
action than sports mode with less blurring. Use when
playing back a recording on a VCR featuring special effects,
such as pause or slow motion.
Use to soften the image and give the picture a misty white
effect. ' " "
Use to counter effects of glare and darken the picture with a
black mist.
Picture is recorded in sepia (brownish red) and;offers.the _.,
vintage look of old movies. :: : . .... .
43
Page 46

Front Light and Back Light
The camcorder adjusts the light automatically under normal conditions. You
might need to adjust for a strong front light or back light (such as spotlights
or subjects standing in front of a window with the sun at their backs). You
can adjust for a strong front or back light using the AE dial, FRONTLIGHT
button, or BACKLIGHT button.
FRONTLIGHT Button
AE Dial
BACKLIGHT Button
To Use the AE Dial
To compensate for a strong front light,
place the AE dial in front light ([i']).
FRONT LIT appears briefly and then
_!_! remains in the yiewf'mder.
To compensate for a strong back light
place the AE dial in back light ([]).
BACK LIT appears briefly and then
[] remains in the viewfinder.
Set the AE dial to AUTO to turn off the
front or back light feature.
To Use the FRONTLIGHT or
BA CKLIGHT Button
You may wantltotemporarily adjust for a
strong front or back light using the
FRONTLIGHT or BACKLIGHT buttonl " -
To compensate for a strong front light,
press and hold the FRONTL1GHT
button. [] and the exposure indicator
(-02) appear in the viewfinder.
Note: The exposure indicator shows a
setting two steps lower (up to -06) than the
current exposure setting.
To compensate for a strong back light,
press and hold the BACKLIGHT
button. [] and the exposure indicator
(+02) appear in the viewfinder.
Note: The exposure indicator shows a
setting two steps higher (up to +06) than
the current exposure setting.
Release the button to turn off manual
front or backlight.
44
Page 47

Travel Tips
Write down your camcorder's serial
number and keep it separate from the
camcorder when traveling. If your
camcorder is lost or stolen, you will be
able to identify it.
Make sure you have any plug adapters
that you might need before taking your
camcorder to other countries. Consult
your dealer for advice.
Use extra care to avoid damage to your
camcorder and accessories when
operating them at a beach or pool.
Spray, sand, and dust should be
avoided. If your lens has been exposed
to the elements, clean it only with
proper lens cleaning supplies.
Carry your camcorder in a carrying
case when traveling. See page 70 for
a case designed especially for this
camcorder. An ordinary suitcase or
carry bag does not offer the protection
your camcorder needs. Treat your
camcorder as carry-on luggage to
protect it from rough handling.
45
Page 48

Titles n Recording
The title feature lets you choose one of eight preset titles or create your own
title -- up to 18 characters. You must install the clock cell battery as shown on
page 17 before you can create or store your own title.
DATE/TIME Button
Button
MENU Dial
(Rotate or Press In)
Record a Preset Title or Title You Create
o
.
.
Make sure the camcorder is in record-
pause and the AE dial is not set to
AUTO.
Repeatedly press TITLE to select one
of the preset titles or the title you
created.
Start recording. The title is
superimposed and recorded on your
tape whenever it appears.
HAPPY BIRTHDAY
HAPPY HOLIDAYS
CONGRATULATIONS
.
OUR FAMILY
SOMEONE SPECIAL
VACATION
SUPER STAR
FIRST
Title you Created
Title Off- No Title
Press TITLE to remove the title from
the viewfinder when you are finished
recording it.
46
Page 49

Create Your Own Title
.
.
.
.
.
Make sure the camcorder is in record-
pause and the AE dial is not set
to AUTO.
Press the MENU dial in to display the
main MENU in the viewfinder.
MENU
b'MENU END
FOCUS AUTO
EXPOSURE AUTO
DATE/TIME NOV 18.98
TELE MACRO OFF
TAPE LENGTH T30
M.W.B. AUTO
Z_M_ SPEED FAST
Rotate the MENU dial to highlight
NEXT. The second MENU will
appear. Keep rotating the MENU dial
to highlight CHARACTER.
),BACK
REC TIME OFF
INT. TIME OFF
TALLY LAMP ON
JLIP ID NO. 07
DEMO MODE OFF
I_MENU END
Press the MENU dial in to display the
CHARACTER menu.
CHARACTER
0A B C D E F G H I
TUy .w.xYz
AE O I U I_1/EO A &
: . , ' - / ! ? /, V
0 1 2 3 4 5 6 7 8 9
008000000000000000
4BACK _ EXIT CLEAR
Rotate the MENU dial to highlight
BACK or NEXT. Repeatedly press the
MENU dial in to highlight the box
o
.
where you want the character to
appear.
When the box is highlighted, rotate
the MENU dial to select a character.
Press the MENU dial in to place the
character in your title.
Repeat steps 5 and 6 until you
complete your title.
Note: To erase a previous title, rotate the
MENU dial to highlight CLEAR, and press
the MENU dial in to erase the title.
To change or delete a character, highlight
BACK or NEXT and press the MENU dial
in to highlight the character you want to
change. Rotate the MENU dial to select
the new character (or blank space) and
press the MENU dial in to select the new
character.
CHARACTER
0A B C D E F G H I
JKLM NOPQ_)S
Tp y ,w,x Y z .&
AE 0 I U I_1/E_! A &
: ., ' / ! ? & V
0 1 2 3 4 5 6 7 8 9
TAYLOR IS FOUR!
<BACK NEXT). _ CLEAR
,
When you are finished, rotate the
MENU dial to highlight EXIT and
press the MENU dial in twice to
remove the menu.
To record your title, press the TITLE
button until your title is displayed as
described on the previous page. To
record your title and a preset title,
display the preset title and press DATE/
TIME to display your title as described
on pages 20-21.
To Stop Recording Your Title
Press the DATE/TIME button and/or
TITLE button to remove the title from the
viewfinder.
47
Page 50

Self-Timer Recording
You can set the self-timer to delay recording so you can be in the scene
when recording begins.
Tally
Light
MENU Dial
(Rotate or Press In)
To Set the Self Timer
1. Make sure the camcorder is in record-
pause and the AE dial is not set
to AUTO.
2. Press the MENU dial in to display the
main MENU in the viewfinder.
MENU
)'MENU END
FOCUS AUTO
EXPOSURE AUTO
DATE/TIME NOV 18.98
TELE MACRO OFF
TAPE LENGTH "r30
M.W.B. AUTO
PEED FAST
48
Page 51

Self-Timer Recording (continued)
.
Rotate the MENU dial to highlight 6.
NEXT. The second MENU appears.
Keep rotating the MENU dial to 7.
highlight INT. TIME.
Press the MENU dial twice to exit the
menu.
and the amount of delayed
recording time appear in the
viewfinder.
b,BACK
REC TIME .OF,F
::_!i_ OFF
TALLY LAMP "01_1"
CHARACTER
JLIP ID NO. 07
DEMO MODE OFF
b'MENU END
_.._15S
.
.
Press the MENU dial in to display the
INT. TIME menu.
INT. TIME
OFF
30S
1 MIN
5 MIN
EXIT
Rotate the MENU dial to highlight
the desired time (15S, 30S, 1 MIN,
or 5 MIN).
• Select 15S to delay the recording
for 15 seconds.
• Select 30S to delay the recording
for 30 seconds.
• Select 1M1N to delay the recording
for one minute.
• Select 5MIN to delay the recording
for five minutes.
• Select OFF if you donot want the
camcorder to delay recording.
8. Press the thumb trigger to start
recording.
Note: The tally light flashes. About five
seconds before recording begins, the tally
light starts flashing faster. When the
camcorder starts recording, the tally light
stops flashing.
9. To stop self-timer recording, press the
thumb trigger.
Note: To turn off self-timer recording
before it starts, press the thumb trigger
and set the interval time on the INT. TIME
menu to OFF.
49
Page 52

Animation Recording
You can produce an illusion of movement for an otherwise stationary scene
or object by shooting a series of pictures of slightly different poses (such as
cartooning).
SP/SLP
Button
Tally MENU Dial
Light (Rotate or Press In)
To Record Using Animation
1. Make sure the camcorder is in record-
pause and the AE dial is not set
to AUTO.
2. Press and hold SP/SLP to select SP.
SP appears in the viewfinder.
3. Press the MENU dial in to display the
main MENU in the viewfinder.
MENU
_'MENU END
FOCUS AUTO
EXPOSURE AUTO
DA'UE/llME NOV 18.98
TELE MACRO OFF
TAPE LENGTH 130
M.W.B. AUTO
EED FAST
Page 53

Animation Recording (continued)
4. Rotate the MENU dial to highlight
NEXT. The second MENU appears.
Keep rotating the MENU dial to
highlight REC TIME.
• BACK , , .
_! ,OFF
INT. TIME Oft:F"
TALLY LAMP ON
CHARACTER
JLIP ID NO. 07
DEMO MODE OFF
• MENU END
5. Press the MENU dial in to display the
REC TIME menu.
• Select OFF if you do not want to
record for a selected amount of
time.
7. Press the MENU dial twice to exit the
menu.
8.41 and the amount of recording
time appear in the viewfinder.
_5S
REC TIME
OFF
1/4S
1/2 S
1S
EXIT
6. Rotate the MENU dial to highlight
the amount of time you want the
camcorder to record.
• Select 1/4S to record for 1/4
second.
• Select 1/2S to record for 1/2
second.
° Select 1S to record for one second.
• Select 5S to record for five seconds.
9. Press the thumb trigger to start
recording.
Note: The recording stops automatically
after the selected period of recording
time. You might want to take two to five
shots of the subject in the same position.
10. Move the subject and repeat step 9
for the desired number of shots.
11.
To stop animation recording, set
the time in the REC TIME menu
to OFF.
51
Page 54

Time-Lapse Recording
You can make automatic recordings at preset time intervals. The recording
shows subtle changes (such as shifts in cloud formations or plant growth)
when it remains focused on an object.
SP/SLP
Button
Tally
Light
MENU Dial
(Rotate or
Press In)
To Record Using Time Lapse
1. Make sure the Camcorder is in record-
pause and the AE dial is not set
to AUTO.
2. Press and hold SP/SLP to select SP.
SP appears in the viewfinder.
3. Press the MENU dial in to display the
main MENU in the viewfinder.
MENU
)'MENU END
FOCUS AUTO
EXPOSURE AUTO
DATE/TIME NOV 18.98
TELE MACRO OFF
TAPE LENGTH T30
M.W.B. AUTO
PEED FAST
4. Rotate the MENU dial to highlight
NEXT. The second MENU appears.
52
Keep rotating the MENU dial to
highlight INT. TIME.
)_BACK
REC TIME ,OF,F.
TALLY LAMP
CHARACTER
JUP ID NO, 07
DEMO MODE OFF
_MENUEND
5. Press the MENU dial in to display the
INT. TIME menu.
INT. TIME
OFF
30S
1 MIN
5 MIN
EXIT
Page 55

Time-Lapse Recording (continued)
6. Rotate the MENU dial to highlight
the desired time between recordings
(15S, 30S, 1 MIN, or 5 MIN).
• Select 15S to delay the recording
for 15 seconds.
• Select 30S to delay the recording
for 30 seconds.
• Select 1MIN to delay the recording
for one minute.
• Select 5MIN to delay the recording
for five minutes.
• Select OFF if you do not want the
camcorder to delay recording.
7. Press the MENU dial in to display the
second MENU. Rotate the MENU
dial to highlight REC TIME.
INT. TIME
• Select 1/4S to record for 1/4
second.
• Select 1/2S to record for 1/2
second.
• Select 1S to record for one
second.
• Select 5S to record for five
seconds.
• Select OFF if you do not want
to record for a selected amount
of time.
10. Press the MENU dial twice to exit the
menus.
and the amount of recording time
and _ and the amount of interval
time between recordings appear in
the viewfinder.
TALLY LAMP
CHARACTER
JLIP ID NO. 07
DEMO MODE OFF
• MENU END
•, ! p
OFF
OlaF"
ON
8. Press the MENU dial in to display the
REC TIME menu.
REC TIME
OFF
1/4S
1/2S
1S
l
EXIT
9. Rotate the MENU dial to highlight
the amount of time you want the
oamcorder to record.
11. Press the thumb trigger to start
recording.
Note: The camcorder starts and stops
recording the selected amount of time.
The tally light flashes with the flash
speed increasing five seconds before
recording begins.
12. To stop recording, place the
camcorder in record-pause, and set the
REC TIME and INT. TIME in the
second MENU to OFF.
Note: Fade does not operate during animation
or time-lapse recording. ' ''_ :
53
Page 56

_:.. .
Tally Light (Turn On or Off)
You can turn the tally light on or off using the second MENU.
Tally Light
Dial
(Rotate or
Press In)
To Turn the Tally Light On or Off
1. Make sure the camcorder is in record-
pause and the AE dial is not set
to A UTO.
2. Press the MENU dial in to display the
main MENU in the viewfinder.
MENU
• MENU END
FOCUS AUTO
EXPOSURE AUTO
DATEtTIME NOV 18.98
TELE MACRO OFF
TAPE LENGTH "130
M.W.B. AUTO
PEED FAST
.
Rotate the MENU dial to highlight
NEXT. The second MENU will
appear. Keep rotating the MENU dial
to highlight TALLY LAMP.
54
•BACK
REC TIME OFF
CHARACTER
JUP ID NO. 07.
DEMO MODE OFF
• MENU END
.
,
°
Press the MENU dial in to display the
TALLY LAMP menu.
TALLY LAMP
OFF
EXIT
Rotate the MENU dial to highlight
OFF or ON. Press the MENU dial in
to select ON or OFF.
• Select ON if you want the tally
light to light during recording.
• Select OFF if you do not want the
tally light to light during recording.
Rotate the MENU dial to highlight
EXIT and press the dial in twice to
remove the menus.
Page 57

Demo Mode
You can turn on the DEMO mode in the second MENU to have a demonstration
of some of the camcorder's features.
MENU Dial
(Rotate or
Press In)
To Turn the Demo Mode On
Io Make sure the camcorder is in record-
pause and the AE dial is not set
to AUTO.
2. If a cassette is inserted, remove the
safety tab or set it to REC OFF.
3. Press the MENU dial in to display the
main MENU in the viewfinder.
.
MENU
),MENU END
FOCUS AUTO
EXPOSURE AUTO
DATE/TIME NOV 18.98
TELE MACRO OFF
TAPE LENGTH "130
M.W.B. AUTO
_EED FAST
•Rotate the MENU dial to highlight
NEXT. The second MENU appears.
Keep rotating the MENU dial to
highlight DEMO MODE.
•BACK
REC TIME OFF
INT. TIME . . OFF
TALLY LAMP ON
CHARACTER
JLIP ID NO. ,07. ,
.OF.
)' MENU END
.
Press the MENU dial in to display the
DEMO MODE menu.
DEMO
OFF
EXIT
6. Rotate the MENU dial to highlight
OFF or ON. Press the MENU dial in
to select ON or OFF.
• Select ON if you want the cam-
corder to demonstrate some of the
recording features.
Note: Zoom is the only feature that
operates during the demo mode.
• Select OFF if you do not want a
demonstration.
7. Rotate the MENU dial to highlight
EXIT and press the dial in twice to
remove the menus.
:::,j :, -
To Turn the Demo Mode Off
Turn offthecamcorder.
55
Page 58

JLIP (Joint Level Interface Protocol) Identification
Number
You can connect a device, such as a home computer, to the JLIP
connector on the camcorder.
MENU Dial
(Rotate or
Press In)
JLIP Connector
(Under Cover)
To Select a JLIP ID NO.
1. Make sure the camcorder is in record-
pause and the AE dial is not set
to AUTO.
2. Press the MENU dial in to display the
main MENU in the viewfinder.
.
56
MENU
• MENU END
FOCUS AUTO
EXPOSURE AUTO
DATE/TIME NOV 18.98
TELE MACRO OFF
TAPE LENGTH T30
M.W.B. AUTO
ZOOM SPEED FAST r
Rotate the MENU dial to highlight
NEXT. The second MENU will
appear. Keep rotating the MENU dial
to highlight JLIP ID NO.
•BACK
REC TIME
INT. TIME
TALLY LAMP
CHARACTER
DEMO MODE
• MENU END
OFF
OFF
' ON,
07
OFF
.
Press the MENU dial in to display the
JL1P ID NO. menu.
JLIP ID NO.
_84
EXIT
5. Press the MENU dial in to start the ID
NO. (numbers) flashing. Rotate the
MENU dial to select a number from
01 to 99. Press the MENU dial in to
select a JLIP number.
Use the number you select to identify
your camcorder if you connect it to a
computer using the JLIP connector.
6. Rotate the MENU dial to higl_,"ght
EXIT and press the dial in twice to
remove the menus.
Page 59

Attach the Shoulder Strap
The camcorder's shoulder strap is designed to let you carry the camcorder from
your shoulder and - when you are ready to shoot - bring the camcorder to shooting
position in one quick movement.
To Attach the Shoulder Strap
°
If the strap keeper
is over a double
section of the
strap, slide the
strap.keeper off the
end of the strap.
Replace the keeper
on the strap
between the buckle
and the end of the
strap as shown.
Keeper
4. Attach the other end of the strap to the
other shoulder strap attachment ring.
\
.
Loop the end of the strap over the top
of the shoulder strap attachment ring.
Attachment
Rings
5. Adjust the shoulder strap to the
desired length.
6. Slide both keepers up snugly against
the shoulder strap attachment rings to
prevent the strap from slipping.
.
Thread the end of the strap back
through the keeper and buckle
making sure it is threaded under the
outer strap. Make sure the strap is
not twisted.
57
Page 60

Model CC6271 Only: Built-In Color Enhancement Light
Model CC6271 's built-in color enhancement light automatically adds more
light when needed. The POWER switch must be set to CAMERA to operate
the video light.
/
LIGHT OFF.A UTOoON
Switch
Video Light
To Use the Light
Set the LIGHT OFFoAUTO •ON switch.
Set to ON to turn the light on.
Note: We recommend you set white
balance to _:HALOGEN in the M.W.B.
menu when using the light.
Set to AUTO to have the light come on
automatically when the camcorder
senses there is insufficient light for the
best recording.
Notes: If the lighting condition is unstable
the light might turn on and off. Set the
light to ON or OFF.
The light might stay on when using high
shutter speeds.
Set to OFF to turn the light off. Turn
the light off when you are not
recording to save battery power.
Note: When the light is turned on, the
camcorder may turn off if the battery's power
is low even though the battery level indicator
is not flashing.
58•
Page 61

Model CC6271 Only: Built-In Color Enhancement Light (continued)
Replace the Bulb Assembly
Carefully follow the instructions below.
To Replace the Bulb Assembly
1. Insert a flat nonmetallic object (such
as a plastic screwdriver) in the hole.
Bulb Assembly
Plastic
Screwdriver
.
Place the new bulb assembly into the
camcorder by inserting the top first
and then slide the assembly into
place.
. Pull on the sides of the bulb
assembly and remove it from the
camcorder as shown.
59
Page 62

Use the Viewfinder for Playback
You can see tapes using the viewfinder. There is no sound during
viewfinder playback.
_TOP Button
Eyepiece Focus
Control
V'_vfinder
EJECT
Switch
PUSH Button
To Play Back a Tape
1. Attach a power supply.
Attach the adapter/charger, charged
battery, or optional car cord.
2. Insert a tape.
• Slide EJECT up to open the cassette
compartment.
• Turn the tape wheel on the cassette
to remove any slack from the tape.
• Insert the cassette with the tape
wheel facing up and the tape _
window facing out.
• Press on the PUSH button to lock
the cassette compartment closed.
3. Set the POWER switch to VCR.
.
The power indicator lights.
Adjust the viewfinder for a
comfortable viewing position.
60
Page 63

Use the Viewfinder for Playback (continued)
.
• Turn the eyepiece focus control to
adjust the focus of the viewfinder
for your vision.
Press the PLAY/PAUSE button to
begin playback.
• If necessary, adjust tracking.
o
• During playback, use the playback
features on the following pages.
Press the STOP button when you
are finished.
Tracking
Dial
(Used for Tracking
During Playback)
During playback, streaks may appear in
the playback picture. Press the MENU
dial in to activate manual tracking. Rotate
it up or down to move the streaks up or
down and out of the picture.
• During stop-action playback, rotating
the MENU dial while in manual
tra.ckingmight reduce picture ,'jitter,
(picture bouncing up and down). Some
"jitter" is normal.
Press the MENU dial in again to turn
automatic tracking back on. AT flashes in
the viewfinder during automatic tracking.
Note: The tracking buttons might have no
effect on tapes recorded on othercamcorders
or VCRs.
61
Page 64

Playback Features
PLAY/PAUSE Button
I_111
VCR
VCR • • Button
STOP Button
Position the Tape
Set POWER switch to VCR and
press STOP.
• Press and quickly release the VCR • •
button or VCR • • button to rewind or
fast-forward the tape.
• Press STOP to stop the tape.
Visual Search
During playback, press and release
VCR •'_ button or VCR • • button if
you want to search the tape visually in
forward or reverse.
Press PLAY/PAUSE to return to normal
playback.
• For brief searching, press and hold
VCR • • button or VCR • • button for
more than two seconds.
• Release the button to return to normal
playback.
Stop-Action Pause
• During playback, press PLAY/PAUSE
to "stop the action" and view one frame
of the tape.
• Press PLAY/PAUSE to return to normal
playback.
62
Page 65

Playback Features (continued)
VCR < < Button
COUNTER
R/M Button
Button
I_1_Button
;TOP Button
Time Counter
The time-counter display shows the actual time elapsed when playing back a
segment of tape. The memory-stop feature helps locate a certain point on the
tape. Turn memory stop on to stop the tape automatically during rewind or fast
forward when the time counter reaches M 0:00:00.
To Use the Memory-Stop Feature
lo
Locate the place on the tape you want
to return to, set the POWER switch to
VCR, and press COUNTER R/M for
more than two seconds to reset the
counter to 0:00:00.
R 0:00:00
2. Press COUNTER R/M for less than
one second to turn the time counter's
memory-stop feature on or off.
When memory stop is on, an M
appears before the time counter.
3. Continue to play the tape. When you
want to return to the place you
marked, press the STOP button.
4. Press VCR'<<. The tape rewinds to
the time counter reading of
M 0:00:00.
, Time Counter With Memory
Stop Turned On
63
Page 66

Use the Cassette Adapter
The camcorder uses a smaller size cassette, but records in standard VHS format. The
cassette adapter allows you to play your VHS-C cassettes in a VCR just like other
standard VHS cassettes.
Insert the VHS-C cassette into the cassette adapter. Insert the cassette adapter into the
VHS VCR like a normal VHS cassette.
Install Cassette Adapter's Battery
Battery
Compartment
1. Remove battery compartment cover.
2. Install supplied "AA" battery so
positive (+) and negative (-) ends
align properly with (+) and (-)
terminals in battery compartment.
3. Replace battery compartment cover.
Notes: Replace the battery when the load time
becomes much longer than normal.
Remove the battery from the cassette adapter
if it is not used for a month or more. This
prevents possible damage from battery
leakage. If leakage occurs, wipe up the liquid
inside the compartment and replace the battery
with a new one.
Insert Cassette into Cassette Adapter __
Tape Wheel
EJECT Switch
t Cassette
Corn mrtment
Lid
.
.
Before inserting the cassette into the
adapter, remove any slack in the tape
by turning the tape wheel on the side of
the cassette.
Slide EJECT to the right to open the
cassette compartment lid.
.
Insert the cassette with the tape
window on the left and facing up.
Allow the cassette to drop into the
adapter. Do not force the cassette.
64
Page 67

Use the Cassette Adapter (continued)
Load Detector __
.
Gently close the cassette compartment
lid until it locks into place. Make sure
the c_sette reel area under the adapter
is free to turn while the cassette is
loading.
Note: You should hear a whirring sound
while the tape loads. The adapter's load
detector will automatically retract into the
adapter.
Remove Cassette from Cassette Adapter :::::::::::::::::::::::::
. AccessHo,o
1
.
Slide the adapter's EJECT switch to
the right. The load detector extends
from the side and the whirring sound
indicates the tape is being released
before the adapter's cassette
compartment- lid opens.
2. Use the access hole on the bottom of
the adapter to push the cassette up and
remove it from the adapter.
3. Gently close the adapter's cassette
compartment lid.
65
Page 68

Playback on TV (or VCR) with Audio/Video Inputs
To connect your camcorder to a TV monitor (or VCR) with audio/video inputs, you
need an optional audio/video cable, such as VH83 shown on page 72. If your TV is
already connected to a VCR, attach the camcorder to the VCR and watch what the
camcorder is recording or playing on the TV.
Back of
Mono VCR or
TV Monitor White
...,:^ m. - Audio/Video
_umy r,u_ Output Cable
_ "_--. | _ (Optional)
__y_AUDIOplug _Jack
,owV,d ...............
OR ""-..
"°'°..°
.°°..°"
°° ..°
Back of White ." ./
Stereo VCR or Y-Adapter ..
TV Monitor (Optional) AudiOplug Audio/VideOoutputCable .-'"" .. """" [[
_.--_--__--__..==_b I (Opti°nal) """ "" /
. VIDEO Jack
t
Yellow Video Plug
Installation
°
Attach the white plug on one end of 2.
the audio/video cable to the AUDIO
IN jack on the TV (or VCR). 3.
Notes: If your cable does not have white
and yellow PlUgs, attach the same color to
the audio jacks.
If your TV (or VCR) has stereo AUDIO IN
jacks, attach the plug to the one labeled 4.
MONO. If one is not labeled MONO, you
need a Y-adapter, such as AH25, shown on
page 72 to hear both channels.
Attach the yellow plug to the VIDEO
IN jack on the TV (or VCR).
Attach the white plug on the other end
of the audio/video cable to the AUDIO
jack (located under the small cover)
on the back of the camcorder.
Attach the yellow plug to the yellow
VIDEO jack on the camcorder.
66
Page 69

Playback on TV (or VCR) with Audio/Video Inputs (continued)
Playback Operation and How to Copy Tapes on the VCR
1. A°
.
Camcorder connected directly to
TV: Turn on the TV and tune it to
the video input channel.
B. Camcorder connected to VCR that
is already connected to TV: Turn
on VCR and place it in the "line"
or "camera mode". (If your VCR
does not have a "line" or "camera
mode", consult the VCR owner's
manual.) Operate the TV as you
normally do to see the signal
coming from the VCR.
Set the POWER switch to VCR to
turn on the camcorder. The power
indicator lights.
.
• During playback, use the playback
features on pages 62-63.
To copy what the camcorder is
playing, place a blank cassette in the
VCR, and press the VCR's RECORD
button.
Note: Make sure the memory-stop feature
is turned off (press COUNTER R/M) or the
camcorder enters play-pause when the
counter reaches M 0:00:00.
5. Press STOP when you are finished.
3. Press PLAY/PAUSE.
Viewing What the Camcorder is Seeing (or Recording)
l. m.
B_
Camcorder connected directly to
TV: Turn on the TV, and tune it to
the video input channel.
Camcorder connected to VCR that
is already connected to TV: Turn
on VCR and place it in the "line"
or "camera mode". (If your VCR
does not have a "line" or "camera
mode", consult the VCR owner's
manual.) Operate the TV as you
normally do to see the signal
coming from the VCR.
2. Set the POWER switch to CAMERA.
o
Note: Turn the TV's volume down to
prevent a high-pitched squeal caused by
feedback.
Press the thumb trigger to begin
recording. You can watch what the
camcorder is seeing (or recording) on
the TV screen.
67
Page 70

Playback on a TV Without Audio/Video Inputs
To connect your camcorder to a TV without audio/video inputs, you need an optional
1CVA 147C RF output adapter and an optional coaxial RF cable, such as VH82 or
VH90 shown on page 72. If your TV has audio and video inputs (or is connected to a
VCR), refer to pages 66-67.
VHF Antenna
OR
/N
n I
Optional
300-75 Ohm
Transformer
Optional Coaxial
RF Cable
(such as VH82 or VH90)
Back of TV
,€_:l--- t _
OUT TO TV Connector
\ VCRITV Switch
N
IN FROM ANT
Connector
CH3/CH4 Switch
I \
AUDIO, RF DC
OUT, VIDEO Jacks
RF Output
Adapter's Plug
t
Optional RF Output Adapter
(1CVAI47C)
Installation
l.
.
Disconnect the VHF antenna from
your TV. Connect the antenna to the
IN FROM ANT connector on the RF
output adapter if you are going to
leave the adapter connected to the TV.
Note: If your VHF antenna is the flat
twin-lead type attached by two screws,
you need an optional 300/75 ohm
transformer.
Attach one end of the optional coaxial
RF cable to the OUT TO TV
connector on the adapter, and attach
the other end to the VHF input on
,your TV as shown.
.
Note: If your TV has 300 ohm screw
terminals, you need a 75/300 ohm
transformer,such as VH54, shown on
page 72.
Attach the RF output adapter's plug to
the AUDIO, RF DC OUT, and VIDEO
jacks located under the small cover on
the back of the camcorder.
68
Page 71

Playback on a TV Without Audio/Video Inputs (continued)
Playback Operation
1. Set the CH3/CH4 switch on the RF
output adapter to channel 3 or 4.
2. Turn on the TV, and tune it to the same
channel you selected with the RF
output adapter's CH3/CH4 switch.
3. Place adapter's VCR/TV switch in
VCR.
4. Set POWER switch to VCR. Power
indicator lights.
5. Press PLAY/PA USE on the camcorder.
• During playback, use the playback
features described on pages 62-63.
6. Press STOP on the camcorder when
you are finished.
1. Turn on the TV and tune it to channel
3 or 4. Turn the TV's volume down to
prevent a high-pitched squeal caused
by feedback.
2. Set the CH3/CH4 switch on the RF
output adapter to the same channel
you selected on the TV.
3. Set adapter's VCR/TV switch to VCR.
4. Set POWER switch to CAMERA.
Power indicator lights.
5. Press the thumb trigger to begin
recording. You can watch what the
camcorder is seeing (or recording)
on the TV screen.
Normal TV Viewing ......................................................................................................................................................................................................................................................
For normal TV viewing, leave the RF
output adapter hooked up to the TV.
Disconnect the adapter's plug from the
camcorde r and place the adapter's VCR/
TV switch in TE.
Note to Cable TV Installer
This reminder is provided to call your attention to Article 820-40 of the
National Electrical Code (Section 54 of Canadian Electrical Code, Part I), that
provides guidelines for proper grounding and, in particular, specifies that the
cable ground shall be connected to the grounding system of the building as
close to the point of cable entry as practical.
69
Page 72

We invite you to take a look at some great ideas for sparking creativity and adding to
the fun of using your compact VHS camcorder. The following pages have a selection
of accessories to help make your memorable moments look and sound even better.
These accessories are designed to make the process of recording and watching your
videos more enjoyable.
To order accessories, contact your local Dealer.
If a dealer is not nearby, all accessories are available through toll-free ordering or by
using the order form on page 73.
AC201A Soft Carrying Case
DCC08 Car Cord Adapter
Custom compact soft case designed
especially to provide protection and utility
for your compact VHS camcorder and
most accessories. Rugged fabric lined
with soft non-abrasive material and
generous padding. Has three outside
pockets with storage for lens filters,
adapters, batteries, and tapes.
This car cord adapter enables you to
operate your camcorder from your car,
truck, or RV by plugging the car cord
directly into the vehicle's cigarette lighter
socket. The DCC08 is designed
specifically to convert power from a
12-volt battery to a 6-volt output.
Page 73

:'7
FB1260 and FB120 Rechargeable Using the Optional AC088 Tripod
Batteries
These rechargeable nickel-cadmium
batteries are designed specifically for long
life. The FB 1260 is a l-hour battery. The
FB 120 powers your camcorder twice as
long as the FB 1260 (depending on how
much you use zoom and pause). Both can
be recharged with the AC adapter/charger
that came with your camcorder.
CPS91 AC Battery Charger
The CPS91 battery chargerplugs directly
into an AC outlet and charges the
FB 1260, BB700, and FB 120 camcorder
batteries. Because the CPS91 operates on
100-240 Volts, 50/60 Hz, it can be used
virtually anywhere in the world. A plug
adapter might be required in some
countries. Charging takes approximately
seven hours for the FB 1260 (1-hour
battery), 11 hours for the BB700, and 13
hours for the FB 120 (2-hour battery).
Mounting the camcorder on a tripod, such
as AC088, keeps the camcorder steady
and produces excellent video results.
This tripod's fluid-effect head provides
smooth camera pan and tilt. The quick-
release mount makes it easy to attach or
remove the camcorder. The grooved,
tubular 3-section leg design folds down to
26" when not in use. Rubber feet allow
for sure footing.
71
Page 74

. -- .............................. lr
1CVA147C RF Output Adapter VH54 Cable Transformer
This RF output adapter is used with a
coaxial RF cable, such as VH82 or VH90,
to connect your camcorder to a standard
TV (one without audio/video inputs) for
playback. If your antenna cable is the fiat
twin-lead type attached by two screws,
you need a 300-to-75 ohm transformer. If
your TV has 300 ohm antenna screw
terminals, you need an optional 75-to-300
ohm transformer such as VH54.
Coaxial RF Cables
VH82 (6-ft)
VH90 (12-ft)
These RF cables are used with the RF
output adapter to connect your camcorder
to a standard TV (one without audio/video
input jacks) for playback. If your TV has
300 ohm antenna screw terminals, you
need an optional 75-to-300 ohm
transformer such as VH54. If your
antenna cable is the flat twin-lead type
attached by two screws, you need an
optional 300-to-75 ohm transformer.
p ..
This 75-to-300 ohm transformer is used to
connect a standard 75-ohm antenna cable
(such as VH82 or VH90) to the 300 ohm
screw terminals on a TV.
VH83 Audio/Video Cable
This six foot audio/video cable can be
used to connect the camcorder to a TV
monitor or VCR for tape playback or
copying tapes.
AH25 Y-Adapter
This Y-adapter allows you to connect your
camcorder's mono audio cable to a stereo
TV or VCR.
72
Page 75

_D
1.9
_D
Order Form for Camcorder Model CC6151/CC6251/CC6271
Description
Super Lightweight Tripod
Soft Camcorder Case
Shoulder Strap
Y-Adapter
AC Battery Charger
Car Cord Adapter
Rechargeable Battery (Extended)
Rechargeable Battery (Standard)
75-300 Cable Transformer
Coaxial RF-Cable
Audio/Video Cable
Coaxial RF-Cable
RF Output Adapter
AC Adapter]Charger
and
DC Cable
Cassette Adapter
Bulb Assembly (Model CC627i)
Part No.
AC088
AC201A
ACS091
AH25
CPS91
DCC08
FB 120
FB 1260
VH54
VH82
VH83
VH90
1CVA147C
241017
233087
232845
233430
Price
$ 39.95
$ 39.95
$ 12.95
$ 2.95
$ 59.95
$ 89.95
$ 89.95
$ 49.95
$ 2.95
$ 6.95
$ 5.95
$ 7.95
$ 59.95
$126.55
$ 27.80
$ 71.35
$ 33.80
Qty.
Total
Prices are subject to change without notice.
Total Merchandise ........................................................................................... $
Sales Tax .......................................................................................................... $
We are required by law to collect the appropriate
sales tax for each individual state, county, and
locality to which the merchandise is being sent.
Shipping and Handling .... :.................................................... ........................... $
Total Amount Enclosed ................................................................................. $
Use VISA, MasterCard, or Discover.
Money order or check must be in U.S.
currency only. No COD or cash.
:i I r
5.00
73
Page 76

Charge your order on your VISA,MasterCard,
or Discover Card by filling in below
USE YOUR CREDIT CARD
IMPORTANT: Copy complete account number from your VISA card [I/l__ i]
[--]""]"_ _ ['-X_ _ Expiration date: I--_
IMPORTANT: Copy complete account number from your MasterCard
I1 I I II I I I I[--I--]---N[-I-]---N
Copy Number above your name on MasterCard _ Expiration date: I I II I I
IMPORTANT: Copy complete account number from your Discover Card
I I I I II I I I II I I I II I I I I
Expiration date: _ [-'W'-]
AUTHORIZED SIGNATURE
Prices are subject to change without notice.
Print or type your name and
address clearly.
Name:
Street:
City:
State:
A complete and correct order will
save you days of waiting.
Apt:
Zip:
> • , J •
Please make sure that both sides of this form have been filled out completely.
• Allow 4 weeks for delivery.
• All accessories are subject to availability.
€3
, ?
74
Page 77

To order accessories, contact your local Dealer.
If a dealer is not nearby, you can also follow the directions below to order by
telephone or direct-by-mail.
United States and Canada Orders
To place your order by phone, have your Visa, MasterCard, or Discover card ready
and call the toll-free number listed below between 8 AM and 10 PM (EST)
Monday through Friday or between 9AM and 5PM (EST) Saturday.
Use this number only to place an order for accessory items listed on
this order form.
1-800-338-0376
To place your order by mail, detach and mail the completed order form with credit
card information, money order, or check in U.S. currency (made payable to
Thomson Consumer Electronics, Inc.) to the following address:
Video Accessories
PO Box 8419
Ronks, PA 17573
75
Page 78

Troubles sometimes are caused by simple "faults" that you can easily correct without
the help of a service technician by first checking a few basic remedies.
Before you call or take your camcorder to an Authorized RCA Camcorder Service
Center, look below for the type of trouble you are experiencing. Then perform the
simple checks and adjustments listed for that trouble.
If service should be necessary, the warranty information lists what your warranty
covers and explains how to get service.
No power
Won't record or
playback
• Set the POWER switch to CAMERA or VCR to turn on
the camcorder. The power indicator lights.
• If using battery, it might need to be recharged.
• If using AC adapter/charger, make sure it is plugged
into a working outlet.
No picture
Camcorder turns
itself off
• If using AC adapter/charger, make sure it is plugged
into a working outlet.
• If the dew indicator ( I'/]) flashes in the viewf'mder, there
is moisture in the camcorder. Wait until the dew
indicator no longer appears before operating the
camcorder.
• Make sure POWER switch is set to correct position for
desired operation.
• There might not be a cassette in the camcorder.
• Try ejecting and reinserting the cassette.
• The cassette tape might be broken, try another cassette.
• You might have reached the end of the cassette, try
rewinding it.
Won't playback • POWER switch must be set to VCR position.
Won't record • Safety tab removed or closed. (See page 22.)
• POWER switch must be set to CAMERA.
• Open lens cover.
76
Set POWER switch to OFF and then to CAMERA or
VCR to turn back on. If camcorder is left in record-
pause or play-pause for several minutes, it turns off to
prevent tape wear.
Page 79

Tapestopsduring
rewindor fast
forward
Camcorderremainsin
pausemode
Dew indicatorflashes
in viewfinder
Poor auto-focus
operation
Viewfinder displays
are out of focus
Picture is too dark or
subject too dark
Time-counter memory might be on. Whenever an "M"
appears with the time-counter display, the camcorder
stops rewinding (or fast forwarding) when counter
reads M 0:00:00. Press VCR • • or VCR • • again to
continue rewinding or fast forwarding, or press
COUNTER R/M to turn off the memory-stop feature.
Press PLAY/PAUSE to return to normal playback.
If the dew indicator ( l_ ) flashes in the viewfinder,
there is moisture in the camcorder. Wait until indicator
no longer appears before operating the camcorder.
• Subject is dark or behind glass. Auto-focus may not
work under these conditions. Rotate AE dial to MAN
and focus manually. See pages 36-37.
• Subject is not in center of viewfinder or two subjects
are at different distances. Rotate AE dial to MAN and
focus manually. See pages 36-37.
• Lens is smudged, and image appears unfocused.
Lens is smudged and image appears unfocused.
Eyepiece focus control is misadjusted.
The small C (color) and B (brightness) controls on the
bottom of the viewfinder control the color and bright-
ness of the viewfinder. These controls are set at the
factory and should require no adjustment. If the color
or brightness every does need adjustment, carefully use
a plastic screwdriver and make the adjustments with
caution to prevent damaging the miniature controls.
• For best results, only use higher shutter speeds
outdoors. Rotate AE dial to sports (._) or 1/1000.
See page 43.
• Subject in front of a strong backlight. Rotate AE dial
to select back lit (D) or press BACKLIGHT button.
See pages 43-44.
• Subject in front of a strong frontlight. Rotate AE dial
to select front lit ([]) or press FRONTLIGHT button.
See pages 43-44.
• Rotate AE dial to MAN and adjust exposure manually.
See pages 40-41 ......
• Model CC6271 Only: Turn on built-in light.
77
Page 80

Soundistoo low or
Subjectwastoofarfrom camcorder.
distorted
Picturerecorded
with specialeffect
Colorsdonotlook
naturalonrecording
Title recordedon
tape
Dateand/ortime are
recordedontape
Dateand/ortime are
incorrect
CannotsetREC or
INT. TIME for
animation or time-
lapse recording
Tally light does not
light during
recording
Vertical white lines
appear when shoot-
ing bright object
Error number (E01,
E02, etc.) appears in
viewfinder
• AE dial might be turned to special effect mode.
Rotate the AE dial to AUTO. See page 43.
• Try adjusting white balance. See pages 38-39.
• Title is recorded when it appears in viewfinder.
Remove the title. See pages 20-21 and 46.
Displays are recorded on tape whenever they appear
in the viewfinder. Remove them from viewfinder
when recording. See pages 20-21.
WhenAUTO DATE is selected (AE dial in AUTO),
date display is automatically recorded when you
begin recording or change the cassette.
See pages 20-21.
• Clock lithium cell battery might need replacing.
See page 17.
• Date or time might need to be set. See pages 18-19.
• Make sure there is a tape in the camcorder.
• Check tape speed setting. Tape speed must be set
to SP for time-lapse or animation recording.
• Make sure AE dial is not set to AUTO to display
MENU. Seepages50-53.
• TALLY LAMP feature set to OFF in the TALLY LAMP
menu. See page 54.
• This might occur when the background extremely
contrasts with the subject.
Try disconnecting power source. Wait ten seconds
and then connect power source again. If error
number doesnot _disappear from viewf'mder, consult
your Authorized RCA Camcorder Service Center.
78
Page 81

ModelCC6271:
light tumsonand
off
Streaksinpicture
duringplaybackor
play-pause
Bright, crystal-
shapedspotsin
viewfinder
Coloredbright
spotsappearin
viewfinder
Rechargeable
batteryrunsdown
soonerthan
expected
Lighting conditionchangesfrequently.SetLIGHT
AUTO.OFF.ON light switch to ON or OFF.
Adjust tracking with MENU dial. See page 61.
Sunlight is directly entering the lens.
Models CC6251 and CC6271: Black spots or bright spots
of light (red, green, or blue) may appear. These spots are
not recorded on the tape and are not due to a defect.
If battery has not been used for some time, completely drain
the battery's power and recharge it.
Battery run times are measured when the camcorder is
recording continuously. You can check your battery by first
fully charging it and then aiming the camcorder at a clock
and recording the picture of the clock. When the recording
stops, play the last recorded section and note the clock time.
A one-hour battery should give you about 60 minutes of
recording time. In practical use, you might not be able to
record for the full time because the camera uses battery
power when it is waiting between recordings (record-pause)
and zooming.
79
Page 82

Clean the Camcorder
To clean the camcorder's exterior, remove
any power source connected to the
camcorder and gently wipe it with aclean
soft cloth.
Clean the Camcorder's Lens ___
To clean the camcorder's lens, blow it with a blower brush and gently
wipe the lens with cleaning tissue and commercially prepared cleaning
solution designed for use on camera lens. Improper cleaning might
scratch the lens.
Clean the Camcorder's Viewfinder_
You can remove the viewfinder eyepiece for cleaning.
Reference
Marks
1. Turn the eyepiece counterclockwise
and pull it out.
2. Remove dust using a blower brush.
3. Reattach the eyepiece by aligning the
reference marks, and then turn the
eyepiece clockwise until it clicks.
80
Page 83

Proper Care and Storage
Keep dust and grit from entering the
camcorder's cassette door. Dust and
grit are abrasive and cause excessive
wear to both the camcorder's
recording/playback heads and
cassettes.
Always close the lens cover when the
camcorder is not in use.
Before handling your camcorder, make
sure your hands and face are free from
any chemical products such as suntan
lotion, as it might damage the finish.
The camcorder might be damaged by
improper storage or handling. Do not
subject the camcorder to swinging,
shaking, or dropping.
Do not store the camcorder in
temperatures below -22°F (-30_C) or
above 149°F (65-°C).
When the camcorder is not in use,
always remove the cassette and AC
adapter/charger or battery.
Retain the original carton for future
storage or shipping purposes.
Things to Avoid
Do not attempt to disassemble your •
camcorder. There are no user-
serviceable parts inside.
Avoid operating your camcorder
immediately after moving it from a •
cold location to a warm location. Give
the camcorder 1-1/2 to 2 hours to reach
a stable temperature before inserting a
cassette. When the camcorder is
moved from cold to warm,
condensation might cause the tape to
stick to the headwheel and damage the
headwheel or tape.
• Do not aim your camcorder at the sun
or other bright objects.
• Do not leave your camcorder in direct
sunlight for extended periods of time.
The resulting heat buildup might
permanently damage the camcorder's
internal parts.
• Do not operate the camcorder in
eXtremely humid environments.
Do not operate the camcorder near the
ocean as salt water or salt water spray
might damage the internal parts of the
camcorder.
Do not operate the camcorder for
extended periods in temperatures
below 40°F (4-°C) or above 95°F
Do not expose the camcorder or
adapter/charger to rain or moisture.
If any component becomes wet, turn
off the power and take the unit to an
Authorized RCA Camcorder
Service Center.
Do not use an adapter/charger or
batteries other than the ones specified
for the camcorder. Use of the wrong
accessories might cause damage to the
camcorder.
81
Page 84

General
Power requirement: 6VDC
Power consumption:
CC6151:5.0 watts
CC6251:5.1 watts
CC6271 (normal): 5. I watts
CC6271 (light on): 8.0 watts
Weight: CC6151:1.8 lbs. (800g)
CC6251: 1.8 lbs. (780g)
CC6271:1.8 lbs. (790g)
Dimensions - Including Viewfinder:
Models 6251 and 6271
4-1/2" (W) x 4-5/8" (H) x 8-3/4" (D)
114(W) x 117 (H) x222 (D) mm
Model 6151
4-1/2" (W) x 4-5/8" (H) x 9-9/16" (D)
114 (W) x 117 (H) x 242 (D) mm
Video Recorder Section
Format: VHS-C
Record/playback system:
Four video record/playback heads
One flying erase head
Video signal: EIA standard ,
NTSC color
Viewfinder
Models 6251 and 6271
.55" Color viewfinder
Model 6151
0.5" Black-and-white electronic viewfinder
Camera Section
Image sensor: 1/4" CCD imager
Lens: FI.6, f=3.8 to 83.6mm
22:1 power zoom lens
Filter diameter: 46 mm
Tripod Mount
One 1/4" x 20 threaded hole
AC Adapter/Charger
Power requirement: 100-240 V,
50/60 Hz.
Power consumption: 23 watts
Weight: .71 lbs. (300g)
Dimensions:
5-9/16"(W) x 1-11/16"(H) x 2-11/16"(D)
140 (W) x 42 (H) x 68 (D) mm
This equipment has been tested and found to
comply with the limits for a Class B digital
device pursuant to Part 15 of the FCC Rules.
These limits are designed to provide
reasonable protection against harmful
interference in a residential installation'. This
equipment generates, uses, and can radiate
radio frequency energy and, if not installed
and used in accordance with the instructions,
may cause harmful interference to radio
communications. However, there is no
guarantee that interference will not occur in a
particular installation. If this equipment does
cause harmful interference to radio or
television reception, which can be determined
by turning the equipment off and on, theuser
is encouraged to try to correct the interference
by one or more of the following measures:
• Reorient or relocate the receiving antenna.
82
• Increase the separation between the
equipment and receiver.
• Connect the equipment into an outlet on a
circuit different from that to which the
receiver is connected.
• Consult the dealer or an experienced radio/
TV technician for help.
Alterations or modifications carried out
without appropriate authorization may
invalidate the user's FCC right to operate the
equipment.
Page 85

YoucanreachThomsonatthe
followingnumber:
800-283-6503
(Toll free inside U.S.A.)
Our toll-free Camcorder number
operates from 8 a.m. to 5 p.m., CST
Monday - Friday
for U.S. customers only
Thomson provides a toll-free telephone
number to help you with any problems you
may encounter with your camcorder. Many
can be diagnosed over the phone, and if
necessary, repair or replacement will be
arranged. Please have your camcorder model/
serial number and date of purchase ready
when you call. If your unit is out of warranty,
we will quote the cost of a repair or
replacement unit to you.
Returning equipment to Thomson for
If we are unable to resolve your problem over
the phone, we will gladly service your unit or
exchange it for a new or refurbished
camcorder. Refer to the limited waixanty on
the reverse side to learn about your specific
rights and responsibilities.
repair or exchange
Always consult Thomson and get a Return
Authorization number before returning
anything! Obtain a Retum Authorization
(RA) number from the telephone
representative before returning your
equipment to avoid delays, accounting errors,
or even loss of your unit.
Important information to customers who ship defective equipment to
Thomson Consumer Electronics
The Thomson representative who authorized
the retum of your equipment will give you an
RA number oyer the phone. They will also
provide you with instructions on where and
how to return your Camcorder. Write the
number in large, clear characters on the
outside of the box. To avoid confusion and
misunderstandings, shipments without an RA
number clearly visible on the outside of the
box will be returned to you at your expense.
Include a brief note describing the problem
and any conversations about the problem you
have had with Thomson personnel.
Include your name, address and model/serial
number of your Camcorder. These numbers
are located on the bottom of your unit.
If your Camcorder is within the warranty
period, please provide a copy of the bill of sale
to verify purchase date. Use the original box
and packing material to protect the equipment
from damage in shipment.
For your protection, insure all shipments for
full replacement value and use a reliable
shipper. Thomson assumes no responsibility
for warranty shipments from the customer to
the factory if not shipped in the manner
prescribed by Thomson.
83
Page 86

:. ......
What your warranty covers:
• Any defect in materials or workmanship.
For how long after your purchase:
• 90 days for labor charges.
• One year for parts.
The warranty period for rental units begins
with the first rental or 45 days from date of
shipment to the rental firm, whichever
comes first.
What we will do:
Dl_ring the initial 90 day_
• Exchange your camcorder with a new or
refurbished unit, or repair your camcorder.
The option will be ours. There will be no
cost to you.
After the 90 days and within 9ne year
• Exchange your camcorder with a new or
refurbished unit, or repair your camcorder.
The option will be ours. Parts will be
provided at no charge, but you will be
responsible for the cost of labor required
for the repair.
How you get service:
Call 1-800-283-6503 and have your unit's
date of purchase and model/serial number
ready. The model/serial number
information is on the bottom of your
camcorder.
• A representative will troubleshoot your
problem over the phone. If the
representative determines that you should
receive a replacement unit, you will be
provided with a Return Authorization (RA)
number and the location of a nearby
exchange point if one exists. No returns
will be accepted without the RA number.
To receive a replacement Camcorder
before you return yours:
If you are located near an exchange point:
1. We will send a replacement unit to the
exchange point next business day delivery
in the continental U.S.A.
.
.
.
The exchange location will notify you of its
arrival.
Take your unit, excluding all accessories,
and your evidence of purchase date, such as
a bill of sale, to the exchange location and
you will be provided the new or refurbished
unit.
If the repairs were covered by your
warranty, you will not be billed.
If you are not located near an exchange
.
.
Provide your Discover, MasterCard, or Visa
account number and expiration date to our
phone representative. This is for security
purposes. If we receive your unit,
excluding all accessories, within 14 days
from the date you were provided the RA
number, only items not covered by
warranty will be charged to your account.
IF YOUR UNIT IS NOT RECEIVED
WITHIN 14 DAYS, THE SUGGESTED
RETAIL VALUE OF THE CAMCOR-
DER WILL BE CHARGED TO YOUR
CREDIT CARD. This amount will be
credited if the unit is subsequently
received.
We will send you a replacement unit next
business day delivery in the continental
U.S.A.
3. You will receive an invoice packed with the
replacement product, but will not be
charged for the unit portion of the invoice
amount if we receive your unit within 14
days from the date you were provided the
RA number. Any labor and parts charges
not covered by our warranty will be
included and charged against your account.
• 4. Ship the unit back to us, excluding all
accessories, using the replacement unit's
carton. Shipping instructions will be
included in the carton along with your RA
number which will allow you to easily ship
the unit back to us. Make sure you insure
your shipment in case of damage or loss.
Include with the Shipment:
84
Page 87

• Evidence of purchase date, such as a
bill of sale, to verify your unit's
warranty eligibility.
• A brief note describing your
camcorder's problem.
• Your name, address and phone number.
Return transportation, storage, handling, and
insurance costs are your sole responsibility.
We accept no liability in case of damage or loss.
To receive a replacement unit after we have
received your unit:
1. Write the RA number on the outside of
the ¢_rton used to return the unit.
Make _ure you insure your shiument in
ca_¢ of damage or loss.
2. Carefully pack the unit, excluding all
accessories, using the original box and
packing material if possible.
3. Include with the shipment:
• Evidence of purchase date, such as a
bill of sale, to verify your unit's
warranty eligibility.
• A brief note describing your camcorder
problem.
• Your name, address and phone number.
Return transportation, storage, handling, and
insurance costs are your responsibility. We
accept no liability in case of damage or loss.
4. The representative will advise the address
to mail a cashier's check or money order
for payment if there are any out of
warranty labor or parts charges and you
elect not to use your credit card.
5. Upon receipt of your product, a new or
refurbished unit will be shipped to you
next business day delivery in the
continental U.S.A.
To have your Camcorder repaired by an
Authorized RCA Camcorder Service
Center:
• Check with your dealer or call 1-800-336-
1900 for the Authorized RCA Camcorder
Sarvice Center nearest you.
• Take your unit to the Authorized RCA
Camcorder Service Center of your choice.
• Show the Authorized RCA Camcorder
Service Center representative evidence of
purchase date, such as a bill of sale.
• Pick up your camcorder when repairs are
complete.
What your warranty d_es not cover:
• Adjustment of customer controls.
• Damage from misuse or neglect.
• A unit that has been modified or
incorporated into other products or is used
for institutional or other commercial
purposes.
• Batteries for remote control and clock.
• Cleaning of video/audio heads.
• Camcorders purchased or serviced outside
the U.S.A.
• Return transportation, storage and handling
costs of your unit, including insurance for
loss or damage.
• Acts of God, such as but not limited to
lightning damage.
Product Registration:
Please complete and mail the Product
Registration Card packed with your
camcorder. It will make it easier to contact
you should it ever be necessary. The return
of the card is not required for warranty
coverage.
How State Law relates to warranty:
• This warranty gives you specific legal
rights and you also may have other rights
that vary from state to state.
If you purchased your camcorder outside
the United States:
• This warranty does not app!y_ Contact your
dealer for warranty information.
85
Page 88

1 S 1/1000 indicator 28, 43
A
Accessories
included 3
optional 70
order form 73
Accessory order form 73
Adapter/charger
charging battery 14
using 4, 12
AE dial
7, 8, 10, 18, 20, 21, 24, 32, 34, 35,
36, 38, 40, 43, 44, 46, 47, 48, 50, 52,
54, 55, 56
indicators 28, 43
features 43
Animation indicator 31, 51
Animation recording 50
Assistance 1, 3, 83
Attach shoulder strap, 57
Audio/video jacks 11, 66, 68
Auto date display 20, 32
Auto date feature 20, 32
Auto exposure 40
Auto focus 36
Auto head cleaner 33
AUTO indicator 28
AUTO mode 8, 32
Auto white balance 38
Automatic head-cleaning system 22
B
B (bright) control
(models CC6251 and CC6271) 11, 77
BACK LIT indicator 43, 44
Back-lit feature 43, 44
BACKLIGHT button 44
BATT. (battery) RELEASE button 11, 13
Battery
attaching and removing 13
care and storage 15
charging 14
level indicator 15, 29
refreshing 14'
using 13
Battery, installing in cassette adapter 64
86
Built-in light
(model CC6271) 58
Bulb for light, replacing
(model CC6271) 59
C
C (color) control
(models CC6251 and CC6271) 11, 77
Cable TV installer note 69
Camcorder, cleaning 80
Camcorder's operating controls 10
Camera edit feature 33
Car cord adapter 16
Care and maintenance
clean the camcorder 80
clean the camcorder's lens 80
clean the camcorder's viewfinder 80
proper care and storage 81
things to avoid 81
Care and storage
battery 15
camcorder 81
cassette 23
Cassette adapter 64
Cassette care and storage 23
Cassette compartment 11
Cassette warning 29
Cassettes
inserting and removing 23
Cassette's tape wheel 5, 23
Cautions i
CHARACTER menu 47
Checks and adjustments 76
Clean the camcorder 80
Clean the camcorder's lens 80
Clean the camcorder's viewfinder 80
Clock cell battery compartment 11, 17
Clock cell indicator 17, 31
Color enhancement light
(modelCC6271) 10, 58
Contents 1
Copy tapes 67
COUNTER R/M button 10, 63, 67
Customer assistance and service 83
Page 89

D
Date and time displays
setting 18
Date, time, and title displays
recording 20
DATE/TIME button 10, 20, 21, 29, 47
DATE/TIME menu 18
DCcable 12, 13, 14, 16
DC in jack 4, 12
Demo mode 55
DEMO MODE menu 55
Design specifications 82
Dew warn.ing 30, 77
Displays, status 29
E
EJECT button 5, 11, 23, 60
Erase protection 22
Exposure control 40, 41
Exposure indicator 41, 44
EXPOSURE menu 41
Eyepiece focus control 6, 11, 27, 60
F
Fade/wipe feature 42
First time operation 3
Flying erase head 33
Focus indicators 30, 37
FOCUS menu 37
Focusing 36
FRONT LIT indicator 43, 44
FRONTLIGHT button 44
Full auto feature 32
H
Handstrap 4, 11
Head cleaning 22, 33
HZ:HAZE indicator 28, 43
I
Indicators
1 S 1/1000 43
AE dial 28, 43
animation 31, 51
AUTO 28, 43
AUTO RELEASE 43
BACK LIT 28, 43, 44
battery level 15
cassette warning 29
clock cell 17, 31
date display 29
exposure 30, 41, 44
focus 30, 37
FRONT LIT 28, 43, 44
HAZE 28
HZ:HAZE 43
interval time 49, 53
LENS COVER 31
MAN 28
manual white balance 29
MWB 39
record time 51, 53
REFRESH 14
S 1/1000 28
SD:SHADOW 28, 43
self-timer 31
SEPIA 28, 43
SPORTS 28, 43
TAPE END 25, 31
tape length 31
tape speed 31
time counter 31
time display 29
time lapse 31, 53
time remaining 25, 31
title display 29
tracking 29
white balance 39
zoom level 29, 34
Information to user 82
Inserting and removing cassettes 23
INT. TIME menu 49, 52
Interval indicators 49, 53
J
JLIP (joint level interface protocol)
identification number 56
JLIP connector 11, 56
JLIP ID no. 56
JLIP ID NO. menu 56
87
Page 90

L
Lens 10
Lens cover 4
LENS COVER control 4, 11
LENS COVER indicator 31
Light, color enhancement
(model CC6271) 58, 59
LIGHT OFF.AUTO.ON switch
(modelCC6271) 11, 58
Limited warranty 84
Lithium cell
inserting and removing 17
Lithium cell indicator 17, 31
Low-contrast indicator 36
M
M.W.B. menu 39
Main MENU
18, 24, 29, 35, 36, 38, 41, 47,
48, 50, 52, 54, 55, 56
MAN indicator 28
Manual exposure 40
Manual white balance 38
Memory stop 63
MENUdial 7, 11, 18, 19, 24, 32, 34, 35,
36, 38, 41, 47, 48, 49, 50, 51, 52,
53, 54, 55, 56, 61
Microphone 10, 32
MWB indicator 39
O
Operating controls I0
Optional accessories 70
Optional plug adapter 12
Order form, accessories 73
P
Pause indicator 5, 8
Pause, stop-action 62
PLAY/PAUSE button 9, 10,. 61, 62, 67, 69
Playback
first 9
on a TV without audio/video inputs 68 :
on TV (or VCR) with audio/video ,,
inputs 66
using cassette adapter 64
viewfinder 60
88
Playback features
memory-stop 63
position the tape 62
stop-action pause 62
time counter 63
tracking 61
visual searching 62
Playback on a TV without audio/video
inputs 68
Playback on TV (or VCR) with
audio/video in jacks 66
Playback speeds 22
Plug adapter, optional 12
Power indicator 5, 11, 16
POWER switch
5, 9, 11, 13, 15, 16, 18, 20, 24, 29,
32, 33, 35, 36, 38, 40, 42, 58, 60,
62, 63, 67, 69
Powering your camcorder
using adapter/charger 12
using battery 13
using optional car cord adapter 16
Preset title, recording 46
Problem solving 76
.Product registration i
PUSH button 5, 11, 23, 60
Q
QUICK REC button 10, 33
Quick record feature 33
Quick review feature 33
R
RBRC seal 13
REC TIME menu 51, 53
Record indicator 8, 29
Record time indicators 31, 49, 51
Recording
animation 50
first time 3
self timer 48
time lapse 52, 53
titles 20, 46
Recording speeds 6, 22
REFRESH button 14
REFRESH indicator 14
Registration i
RF DC OUT jack 11, 68
Page 91

RFoutput adapter, optional 68
S
Safety information i
Safety precautions, battery 13
Safety tab 22
SD:SHADOW indicator 28, 43
Second MENU 47, 49, 51, 52, 53, 54, 55, 56
Self timer 48, 49
Self timer indicator 31, 49
SEPIA indicator 28, 43
Setting tape length 7 ............
Thumb trigger 11, 32, 33, 49, 51, 53, 67
Time counter 31, 63
Time display: 20
Time-counter display 31, 63
Time-lapse indicator 31, 53
Time-lapse recording 52, 53
Time-remaining display 24, 25, 31
Time-remaining feature 24
Tips
recording 26
_'_,_ _,::.,
travel 45 . _,:_ z:..
TITLE button 20, 46, 47 .
Tire- d_splay--20; 29, -;46,,-47
Shoulder strap, attach 57 ..TJt!e.s._
Shoulder strapattachment rings 11, 57 ........ - :-.....
Shutter speed indicator 43 ....
SLP recording speed 6
SLP tape speed 6, 22
Solving problems 76
SP recording speed 6, 22
creatmg your o_n 47'
............... reeording-preseI_ _4"6.:.!!"(!i_
_p',fi_gyour own 20 ..-, .
......... Track'ing 61 ............... ,.i:: ._
............ .Tracking.indic_it0_.,._9,:)6171
Travel tips 45 .
SP tape speed 6, 22 ..................... Tripod,--using 7_1_c;.,i"_:"....5"'_'-'
SP/SLP button 22, 24, 50, 52 ....
Specifications 82 ....... .......... Trouble checks _6 ,; .,,. . .-,
Speeds, recording and playback 22
Sports feature 43
SPORTS indicator 28, 43
Status displays 29
STOPbutton 9, 10, 61, 62, 63, 67, 69
Stop-action pause 62
T
Table of contents 1
Tally lamp feature 33, 54
TALLY LAMP menu 54
Tally light 8, 10, 32, 33, 49
Tally light feature 33, 54
Tape copying 67
TAPE END indicator 25, 31
Tape, inserting 5
Tape length feature 24
Tape length indicators 25, 31
TAPE LENGTH menu 7, 25
Tape length, set 7, 24
Tape wheel 5, 23
Tele macro feature 35
TELE MACRO menu 35
Tele macro zooming 35
Thing_ to avoid 81
U
Unpack camcorder and accessories 3
V
VCR buttons 9, 10, 33, 62, 63
Videocassettes 22
Viewfinder 6, 11, 27
adjust for viewing 27
eyepiece focus control 27
playback 60
Visual searching 62
W
Warranty, limited 84
White balance feature 38
White balance indicators 29, 39
Z
Zoom buttons 11, 34, 36, 38
Zoom level indicator 29, 34
Zoom speed feature 34
ZOOM SPEED menu 35
•Zooming 34
89
Page 92

_ THOMSON CONSUMER ELECTRONICS
10330 N Meridian Street
Indianapolis, IN 46290
© 1998 Thomson Consumer Electronics, Inc.
Trademark(s)@Registered
Marca(s) Registrada(s)
Printed in Japan
TOCOM 15331700
LYT0079-001A(VP)
 Loading...