

Page 1
Page 2
Important Safety Information
Be sure to read all safety information before using this product.
WARNING: To reduce the risk of fire or shock hazard, do not expose
camcorder or AC adapter/charger to rain or moisture.
This symbol indicates dan..erous voltage"
RISKOFELECTRICSHOCK
DO NOT OPEN
inside the product that presents a risk of
electric shock or personal injury.
RISQUEDECHOC
ELECTRIQUENEPASOUVRIR
TO REDUCE THE RISK OF ELECTRIC SHOCK. DO NOT REMOVE THE COVER
(OR BACK). NO USER-SERVICEABLE PARTS ARE INSIDE. REFER SERVICING
TO QUALIFIED SERVICE PERSONNEL.
This symbol indicates important instruc-
tions accompanying the product.
Cautions
CAUTION: To reduce the risk of electric shock, match the wide
blade of plug to wide slot, and fully insert.
ATTENTION: Pour fiviter les chocs dlectriques, introduire la
lame la plus large de la fiche dans la borne correspondante de la
prise et pousser jusqu au fond.
To reduce risk of injury, charge only rechargeable batteries
recommended by the manufacturer for this camcorder. Other
types of batteries may burst causing damage and personal injury.
FCC Regulations stale, that unauthorized changes or modifications
to this equipment may void the user's authority to operate it.
Product Registration
Please fill out the product registration card and return it immediately.
Returning this card allows us to contact you if needed.
Keep your sales receipt for proof of purchase to obtain warranty parts and
service and attach it here. Record the serial number and model numbers
located on the bottom of the camcorder.
Model No: CC4393
Serial No:
Purchase Date:
Purchased From:
Page 3
Assistance
We want to make sure you enjoy your new camcorder. So, if you have any
questions, please call:
Camcorder Exchange Warranty ....... 800-283-6503
Customer Service ................................ 800-336-1900
Accessories ........................................... 800-338-0376
Table of Contents
Important Safety Information .....
Product Registration ......................
First-Time Operation .................... 3
Included Accessories ....................... 11
Shoulder Strap ............................... I I
Built-In Lights ................................. 12
Buih-in Color Enhancement Light 12
Replacing the Light Bulb .............. 13
Powering the Camcorder ........... 15
Using the Adapter/Charger. ........... 15
Using the Battery ........................... 16
Using the RCA Optional
Car Cord Adapter ......................... 20
Videocassettes ............................... 2 I
Tape Recording Basics .................. 21
Date and Time Display ............... 23
Setting the Time and Date ............. 23
Correcting the Date or Time .......... 23
Charging the Clock Battery ........... 24
Record the Time and Date, Auto
Date, Auto Title. or Date .............. 24
Seeing What's Recorded ............ 25
Using the Viewfinder and LCD ..... 25
Camera Features .......................... 29
DISPLAY Button ........................... 30
Microphone ................................... 30
Demonstration Mode ..................... 30
Quick Review Feature ................... 30
AutoShot TM Feature ....................... 30
Auto Focus .................................... 3 I
Macro Focus .................................. 3 I
Steady Pix _s' feature ...................... 31
Tape-Remaining Display ............... 32
Electronic Indexing ....................... 32
Zooming ........................................ 33
Digital Effects ................................ 34
Adding Effects ............................... 34
Tape Counter ................................. 40
Locating Tape Segments ............... 40
Editing Videocassettes ................. 41
Editing Features ............................. 41
Camera Edit Feature .................. 41
Flying Erase Head ..................... 41
Audio Dubbing .............................. 42
Dubbing Onto a Recording ........ 42
Connecting to an External
Audio Source ........................... 43
On-screen Displays ...................... 27
Identifying On-screen Elements .... 27
Dubbing Both Audio and Video .... 44
Connecting to External Audio
and Video Sources .................... 45
Continued on Next Page
1
Page 4
Table of Contents
Editing Videneassettes ................. 41
Camcorder Tifler ........................... 46
Creating Personalized Titles ...... 47
Tiiler's Chart of Characters ....... 47
C{}rrccling Errors ....................... 47
Rcc{}rding onto a Tape in lhc
Camcorder. ............................... 48
Rccordlng Titles While C{}pyin._ a
Tape From the Camcorder to
Another VCR ........................... 48
Travel Tips ..................................... 49
Recnrding From a VCR or
TV Monitor. ................................. 50
C{}pying Tapes tn a Camcorder 5 I
Installation ..................................... 51
Recording ...................................... 5 I
Playback ......................................... 53
Playing Back Tapes ....................... 54
Pluvback Features ......................... 55
Plavback on a TV or VCR
Using A/V Input Jacks ................. 57
Playback on a TV Without
A/V inputs .................................... 59
Optional Accessories ................... 61
Removing the lens hood ................ 65
Attaching an accessory Lens ......... 65
Accessory Order Form .................. 66
References ...................................... 69
Troubleshooting ............................. 70
Care and Maintennace ................... 74-
Specifications ................................ 76
Customer Assislance and Service .. 77
Warranty ........................................ 77
Index .............................................. 80
Information to User ....................... 85
2
Page 5
First-Time Operation
This section describes the necessary steps to set up and record with the camcorder for
the first time. For more detailed operating and feature options, refer to the other
sections of this manual.
Io
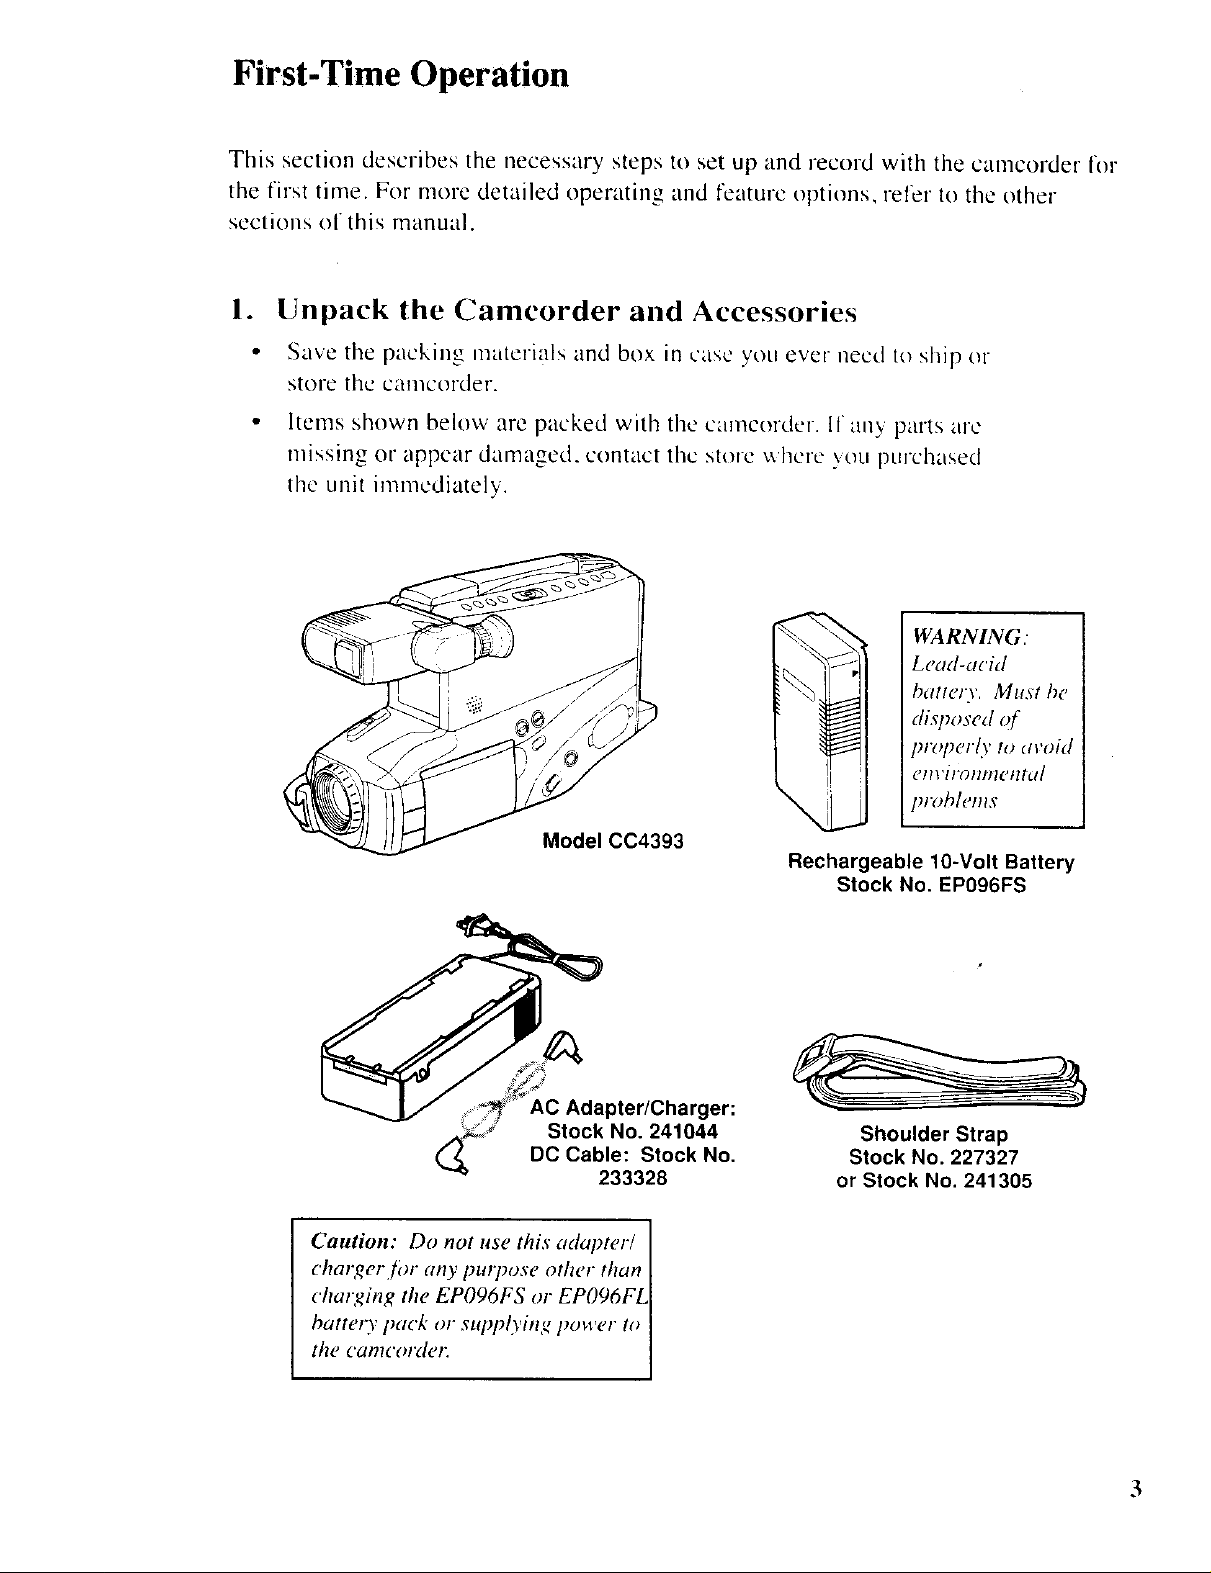
Unpack the Camcorder and Accessories
Save the packing materials and box in case you ever necd to ship or
store the camcorder.
Items shown bek)w are packed with the camcorder. If any parts are
missing or appear damaged, contact lhc store where \ou purchased
the unit immediately.
WARNING.
Lead-acM
ball#r\', mu,w he
disposed of
properly to avoid
em'iromnemu!
\
l)lvblems
Model CC4393
AC Adapter/Charger:
Stock No. 241044
DC Cable: Stock No.
233328
Caution: Do not use this adapter/
c'harger tbr any pulT_ose other than
cha,lging the EPO96FS or EPO96FL
batt_ ry pack or suppl) ing po_ er to
the camco/'de/2
Rechargeable 10-Volt Battery
Stock No. EP096FS
Shoulder Strap
Stock No. 227327
or Stock No. 241305
Page 6
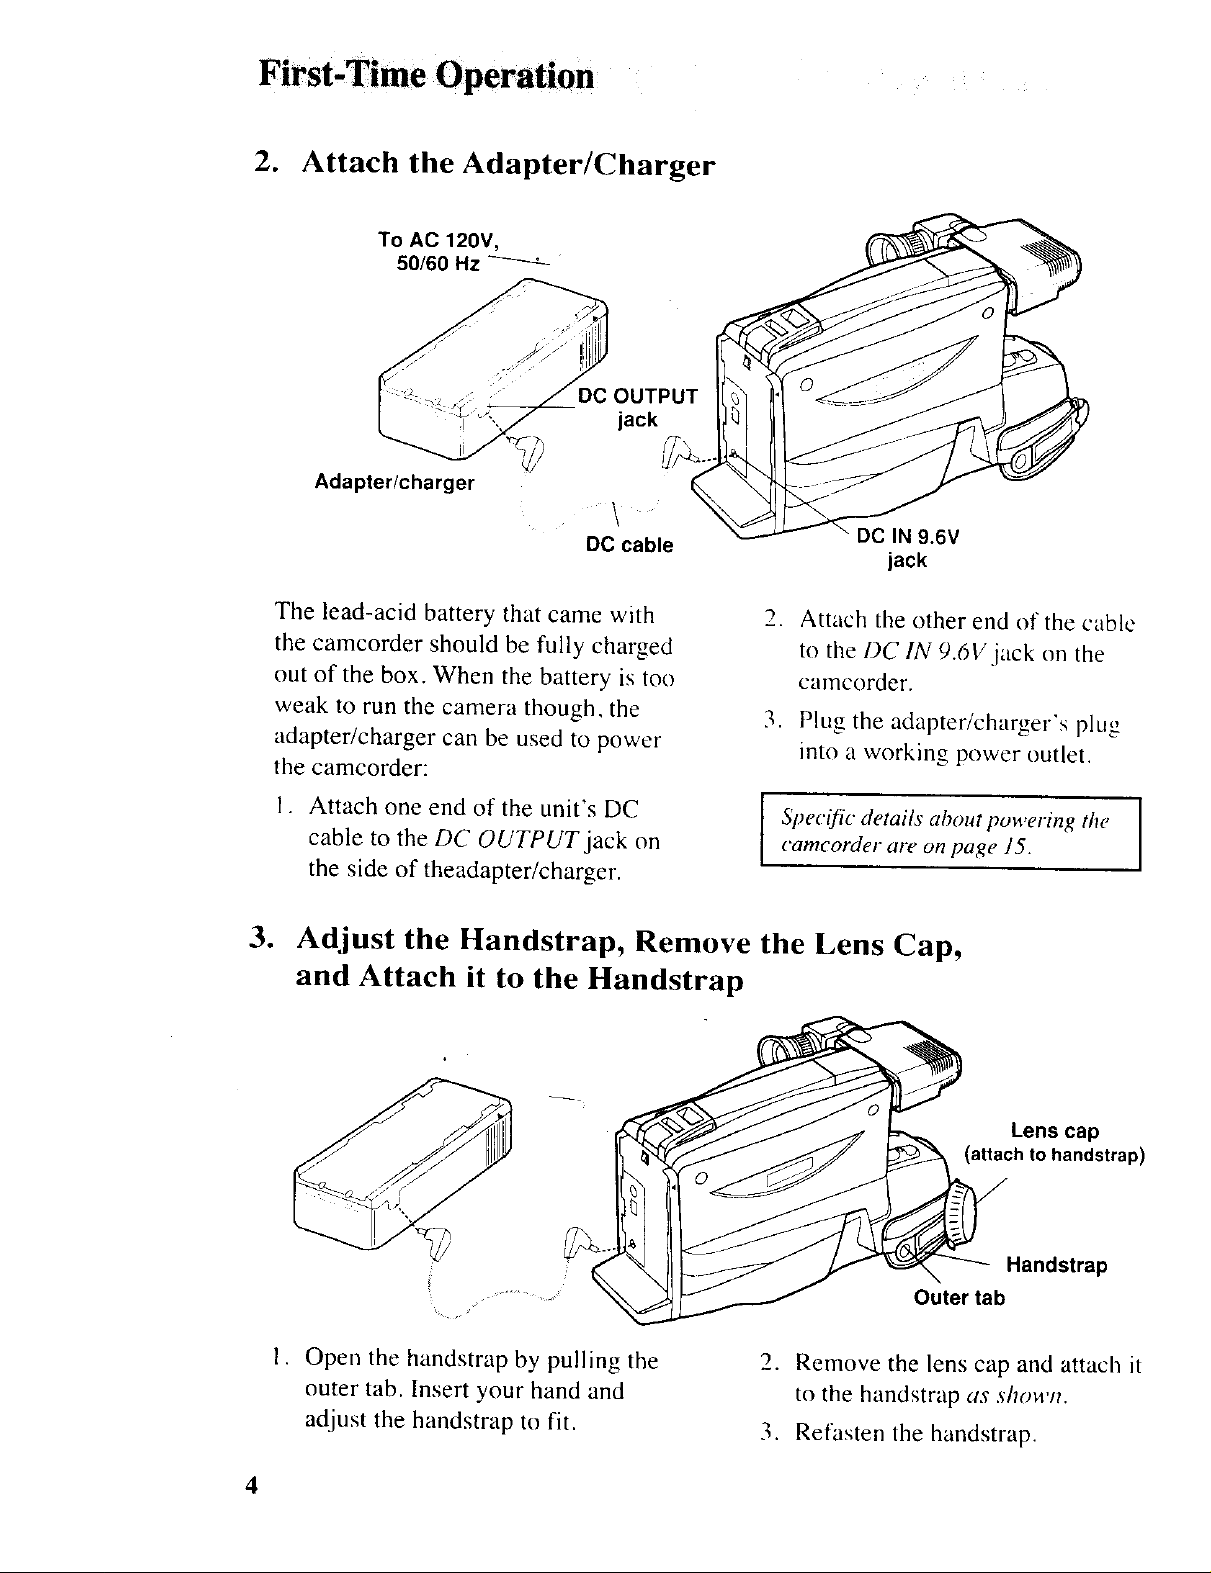
2. Attach the Adapter/Charger
To AC 120V,
50/60 Hz
Adapter/charger
DC cable
The lead-acid battery that came with
the camcorder should be fully charged
out of the box. When the battery is too
weak to run the camera though, the
adapter/charger can be used to power
the camcorder:
1. Attach one end of the unit's DC
cable to the DC OUTPUT jack on
the side of theadapter/charger.
2. Attach the other end of the cable
3. Plug the adapter/charger's plug
Specific details aboutpowering the
eamcorder are on page 15.
DC IN 9.6V
jack
to the DC IN 9.6V.iack on the
camcorder.
into a working power outlet.
3. Adjust the Handstrap, Remove the Lens Cap,
and Attach it to the Handstrap
1. Open the handstrap by pulling the
outer tab. Insert your hand and
adjust the handstrap to fit.
4
Lens cap
(attach to handstrap)
Handstrap
Outer tab
2. Remove the lens cap and attach it
to the handstrap as shown.
3. Refasten the handstrap.
Page 7
First-Time Operation
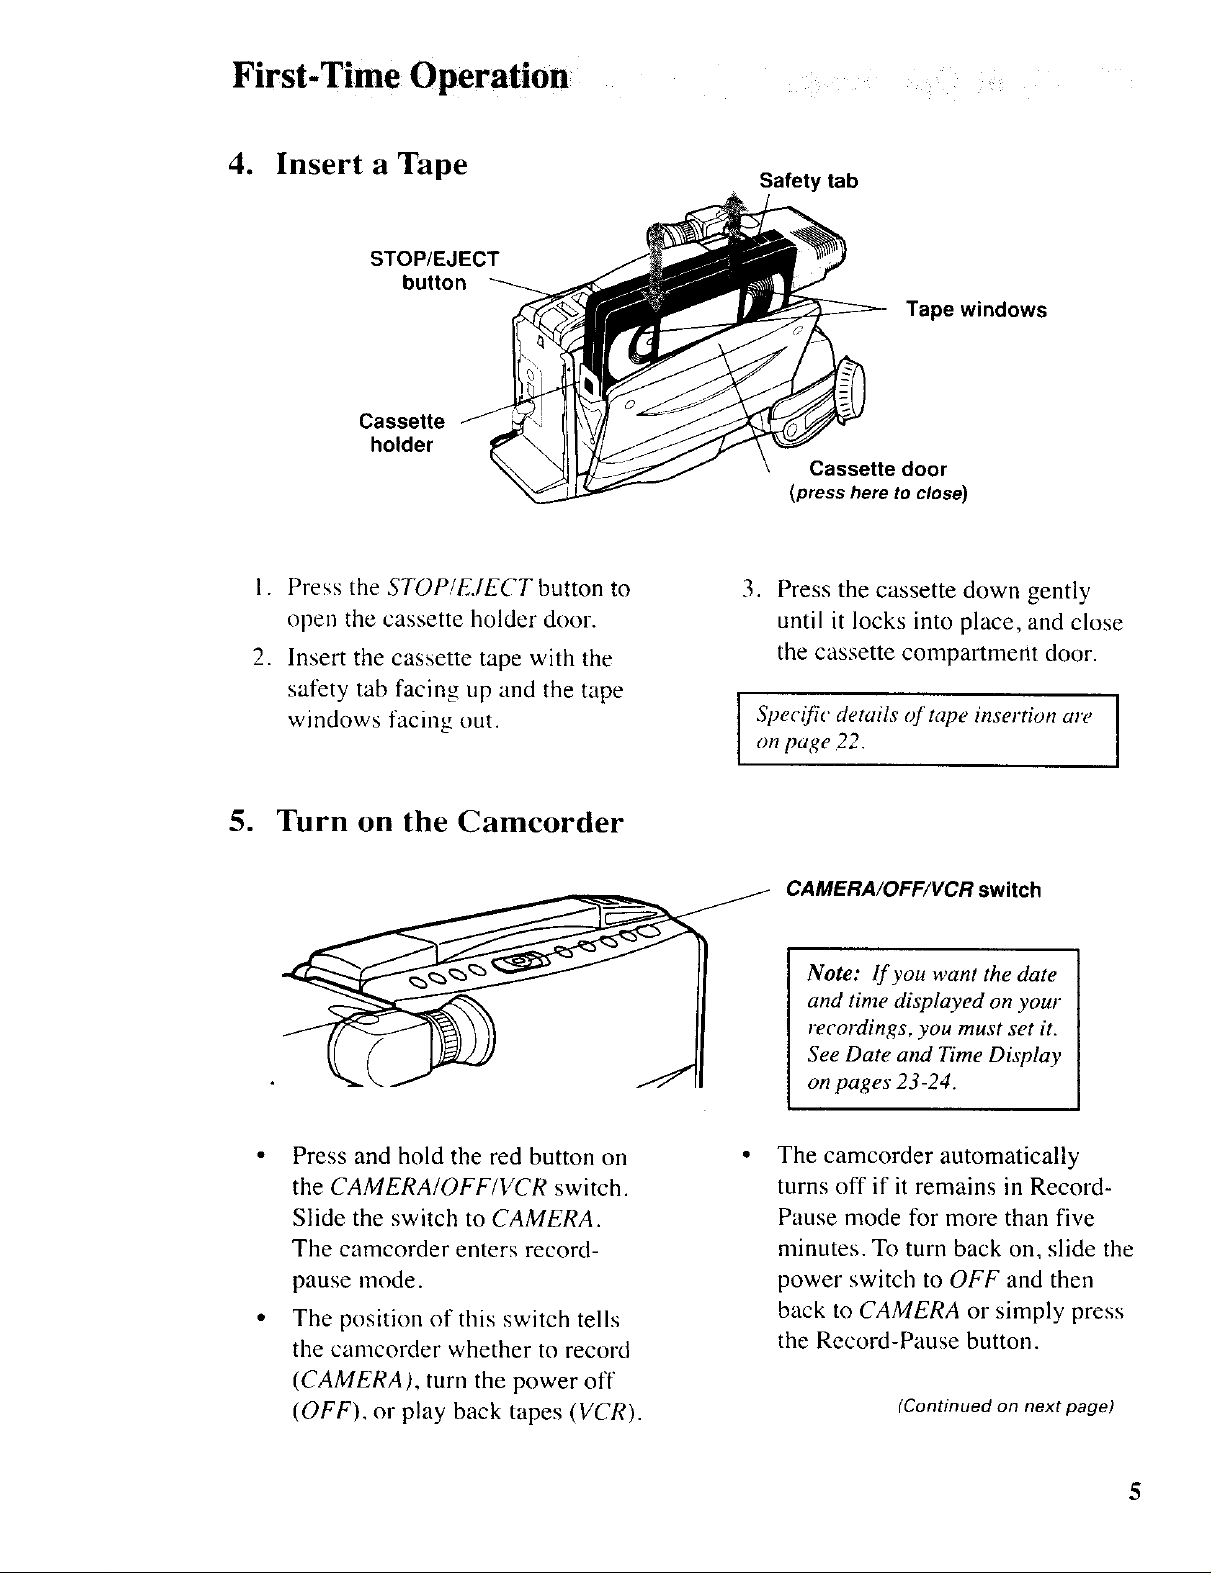
4. Insert a Tape
STOP/EJECT
button
Cassette
holder
l ,
Press the STOP!E.IECT button to
open the cassette holder door.
2.
Insert the cassette tape with the
safety tab facing up and the tape
windows facing out.
Safety tab
Tape windows
Cassette door
(press here to close)
3. Press the cassette down gently
until it locks into place, and close
the cassette compartment door.
on page 22
Specific details of tape insertion are I
5. Turn on the Camcorder
• Press and hold the red button on
the CAMERA/OFF/VCR switch.
Slide the switch to CAMERA.
The camcorder enters record-
pause mode.
• The position of this switch tells
the camcorder whether to record
(CAMERA), turn the power off
(OFF), or play back tapes (VCR).
CAMERA/OFF/VCR switch
Note: lf you want the date
and time displayed on your
recordings, you must set it.
See Date and Time Display
on pages 23-24.
The camcorder automatically
turns off if it remains in Record-
Pause mode for more than five
minutes. To turn back on, slide the
power switch to OFF and then
back to CAMERA or simply press
the Record-Pause button.
(Continued on next page)
5
Page 8
Electronic viewfinder
(Grasp here to move)
Viewfinder
BRIGHT control
(Under Viewfinder)
Eyepiece focus control
Eyepiece
LCD OPEN button
LCD bright control LCD monitor
Shoulder
extension
pad
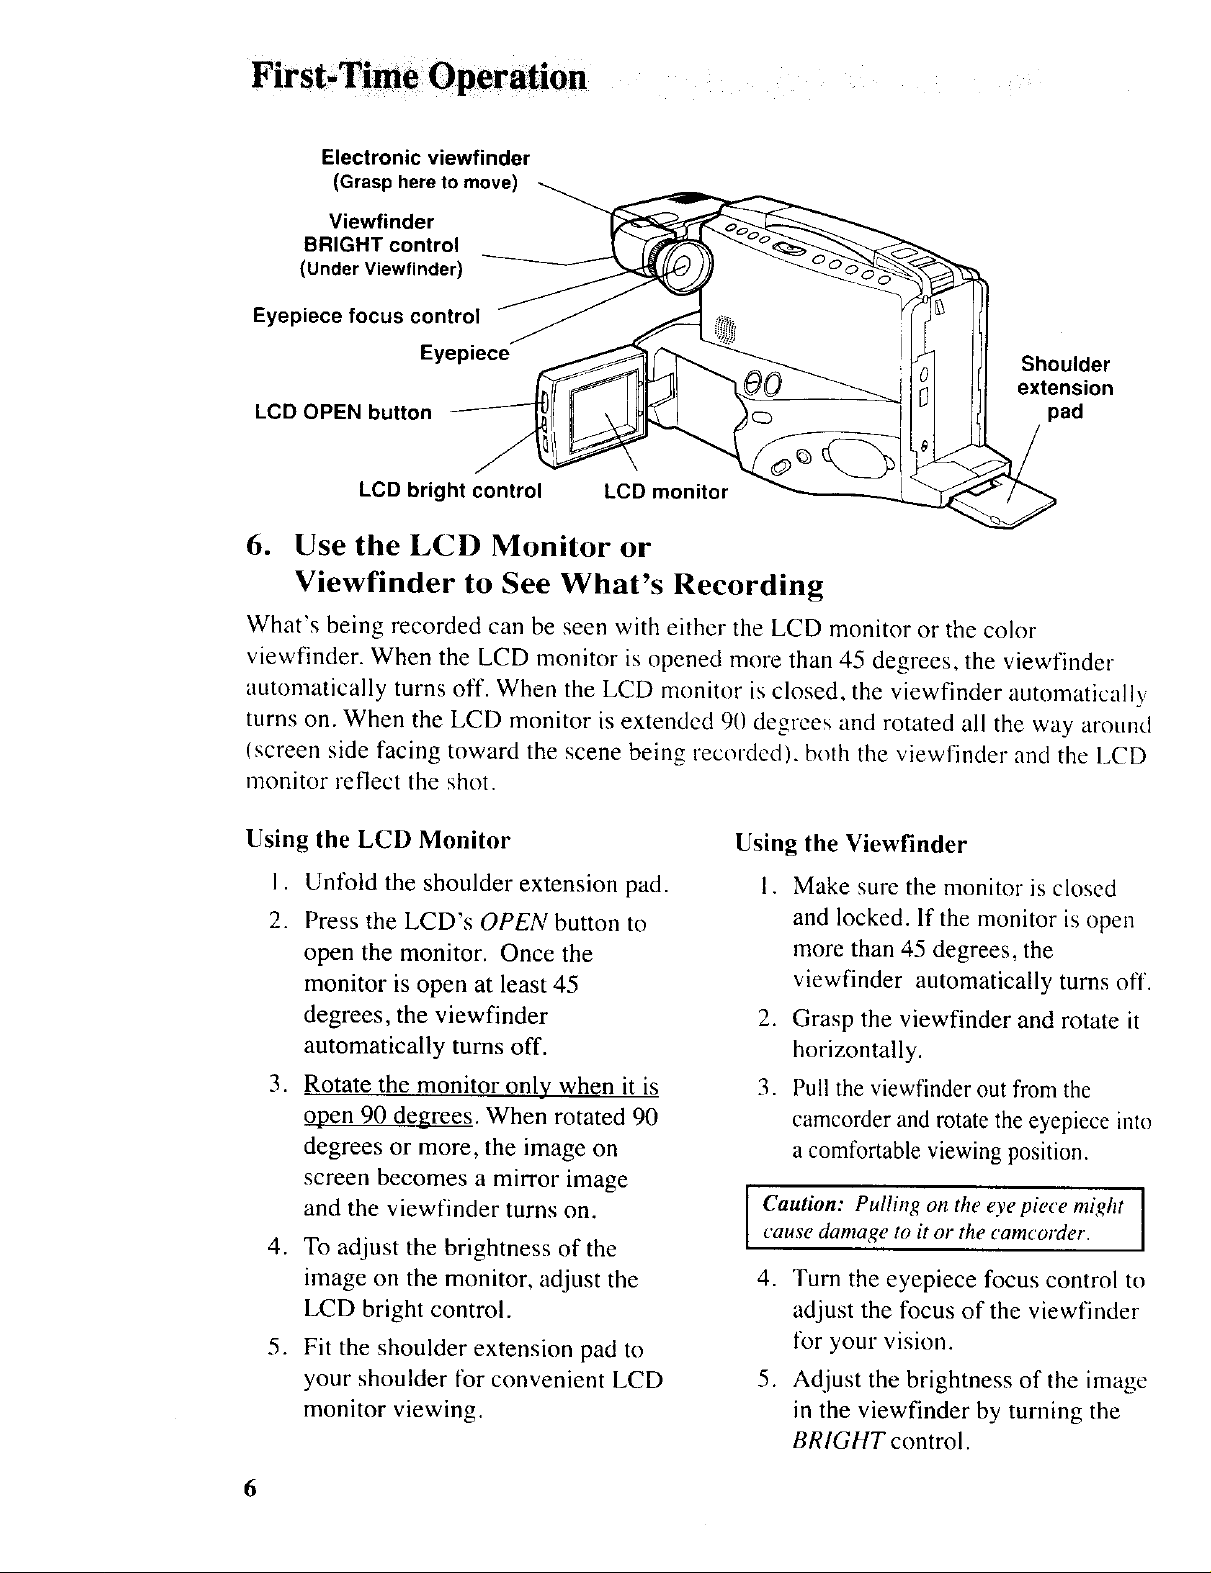
6. Use the LCD Monitor or
Viewfinder to See What's Recording
What's being recorded can be seen with either the LCD monitor or the color
viewfinder. When the LCD monitor is opened more than 45 degrees, the viewfinder
automatically turns off. When the LCD monitor is closed, the viewfinder automatically
turns on. When the LCD monitor is extended 90 degrees and rotated all the way around
(screen side facing toward the scene being recorded), both tile viewfinder and the LCD
monitor reflect the shot.
Using the LCD Monitor
I. Unfold the shoulder extension pad.
2. Press the LCD's OPEN button to
open the monitor. Once the
monitor is open at least 45
degrees, the viewfinder
automatically turns off.
Using the Viewfinder
1. Make sure the monitor is closed
and locked. If the monitor is open
more than 45 degrees, the
viewfinder automatically turns off'.
2. Grasp the viewfinder and rotate it
horizontally.
3. Rotate the monitor only when it is
open 90 degrees. When rotated 90
degrees or more, the image on
screen becomes a mirror image
and the viewfinder turns on.
4. To adjust the brightness of the
image on the monitor, adjust the
LCD bright control.
5. Fit the shoulder extension pad to
your shoulder for convenient LCD
monitor viewing.
6
3. Pull the viewfinder out from the
camcorder and rotate the eyepiece into
a comfortable viewing position.
Caution: Pulling on the eye piece might
cause damage to it or the camcorder.
4. Turn the eyepiece focus control to
adjust the focus of the viewfinder
for your vision.
5. Adjust the brightness of the image
in the viewfinder by turning the
BRIGHT control.
Page 9
First-Time Operation
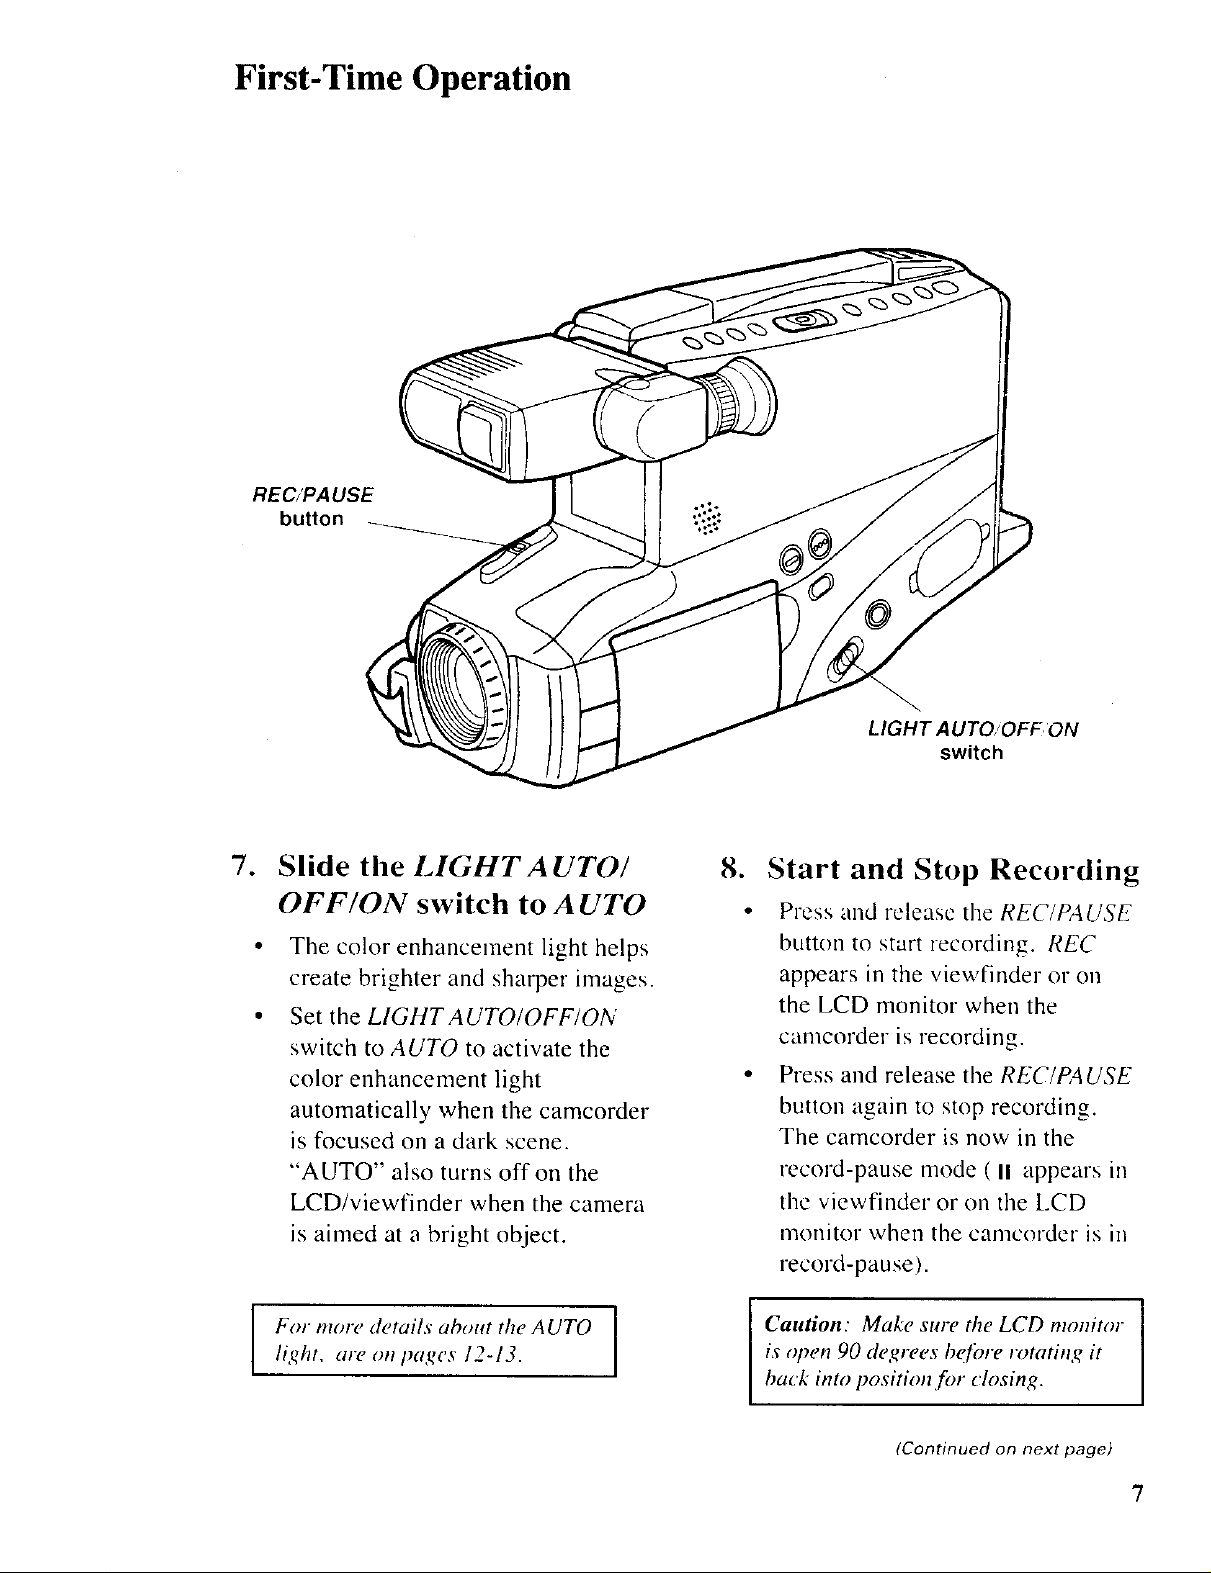
REC/PA USE
button
o
Slide the LIGHT A UTO/
OFF/ON switch to A UTO
The color enhancement light helps
create brighter and sharper images.
Set the LIGHT A UTOIOFF/ON
switch to AUTO to activate the
color enhancement light
automatically when the camcorder
is focused on a dark scene.
"AUTO" also turns offon the
LCD/viewfinder when the camera
is aimed at a bright object.
LIGHT AUTO/OFF ON
switch
8. Start and Stop Recording
• Press and release the REC/PAUSE
button to start recording. REC
appears in the viewfinder or on
the LCD monitor when the
camcorder is recording.
• Press and release the REC/PAUSE
button again to stop recording.
The camcorder is now in the
record-pause mode ( II appears in
the viewfinder or on the LCD
monitor when the camcorder is in
record-pause).
For more details about the AUTO
light, are on pages 12-13.
Caution: Make sure the LCD monitor
is open 90 degrees be lbre rotating it
I
hack into position for closing.
(Continued on next page)
I
7
Page 10
First-Time Operation
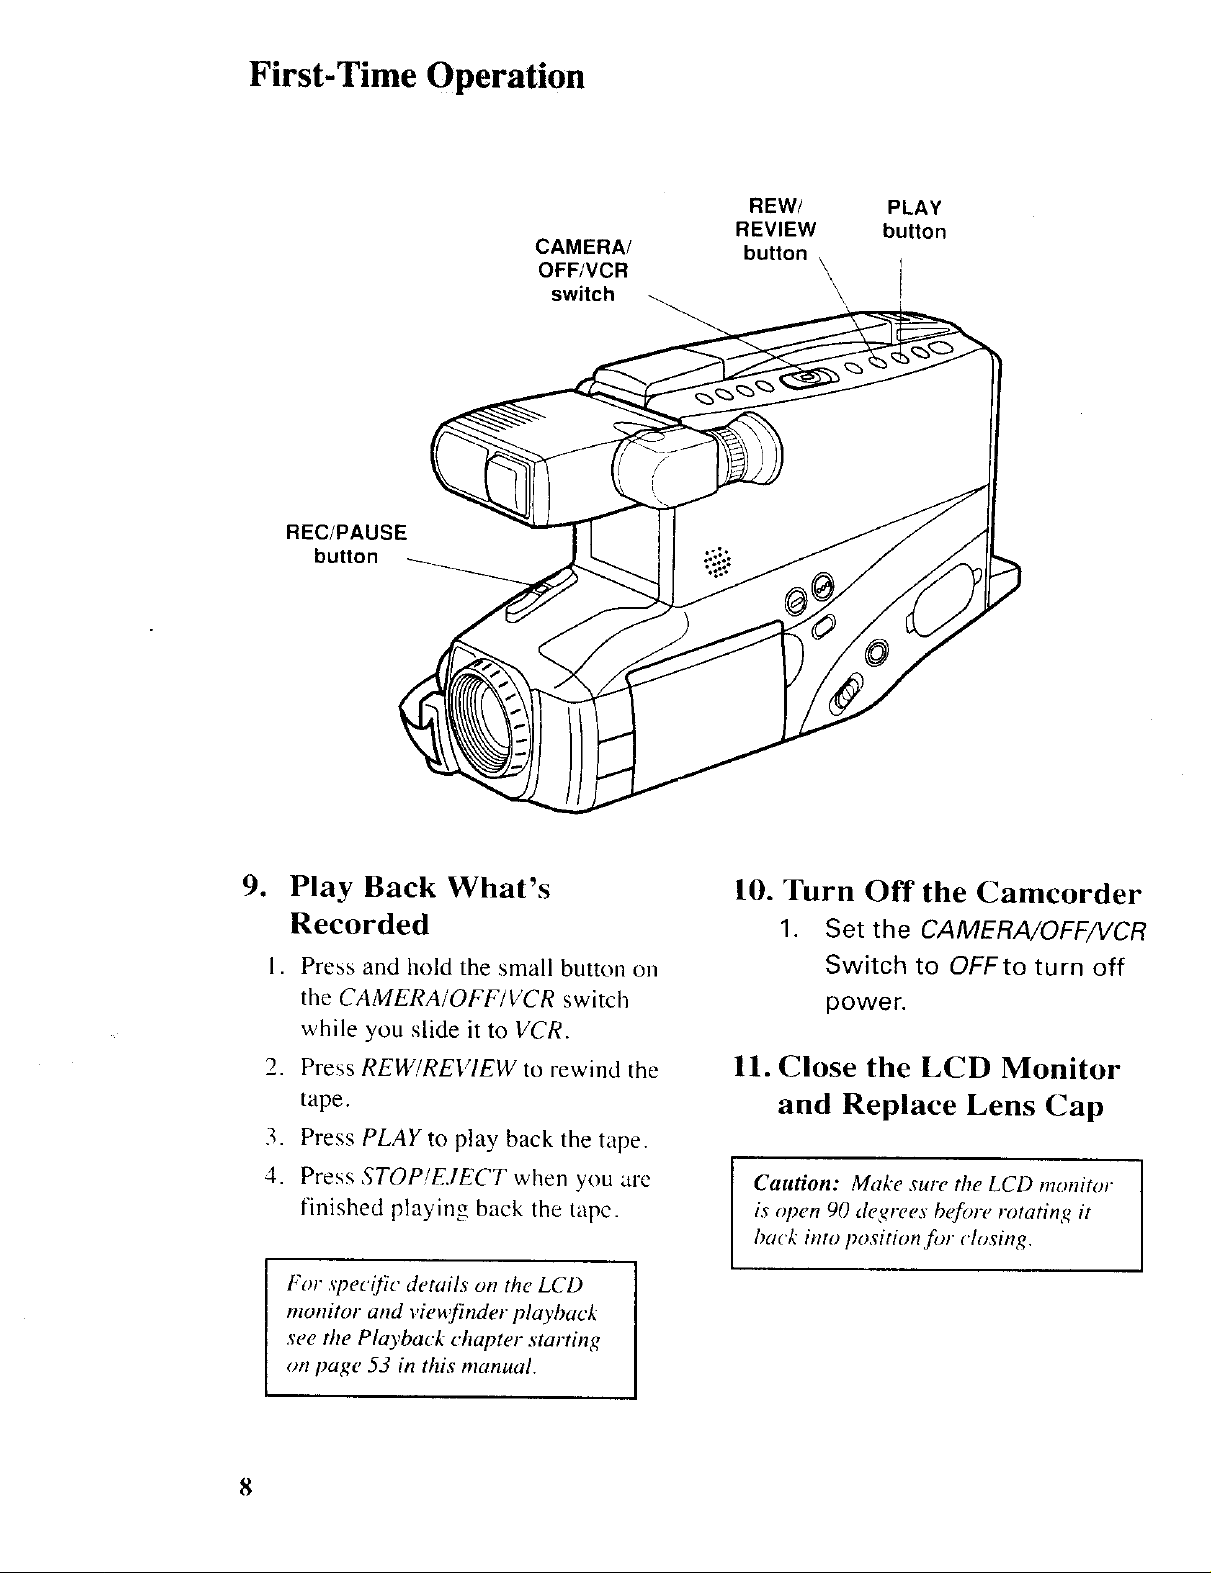
CAMERA/
OFF/VCR
REC/PAUSE
button
switch
REW/ PLAY
REVIEW button
button
\ i
\\\ !
9. Play Back What's
Recorded
1. Press and hold the small button on
the CAMERAiOFF/VCR switch
while you slide it to VCR.
2. Press REW!REVIEW to rewind the
tape.
3. Press PLAY to play back the tape.
4. Press STOP!EJECT when you are
finished playing back the tape.
For ._peeific details on the LCD
monitor and viewfinder playback
see the Playback chapter starting
on page 53 in this manual.
10. Turn Off the Camcorder
1. Set the CAMERA/OFF/VCR
Switch to OFFto turn off
power.
11. Close the LCD Monitor
and Replace Lens Cap
Caution: Make sure the LCD monitor
is open 90 degrees before rotating it
back imo position for closing.
I
8
Page 11
First'Time Operation
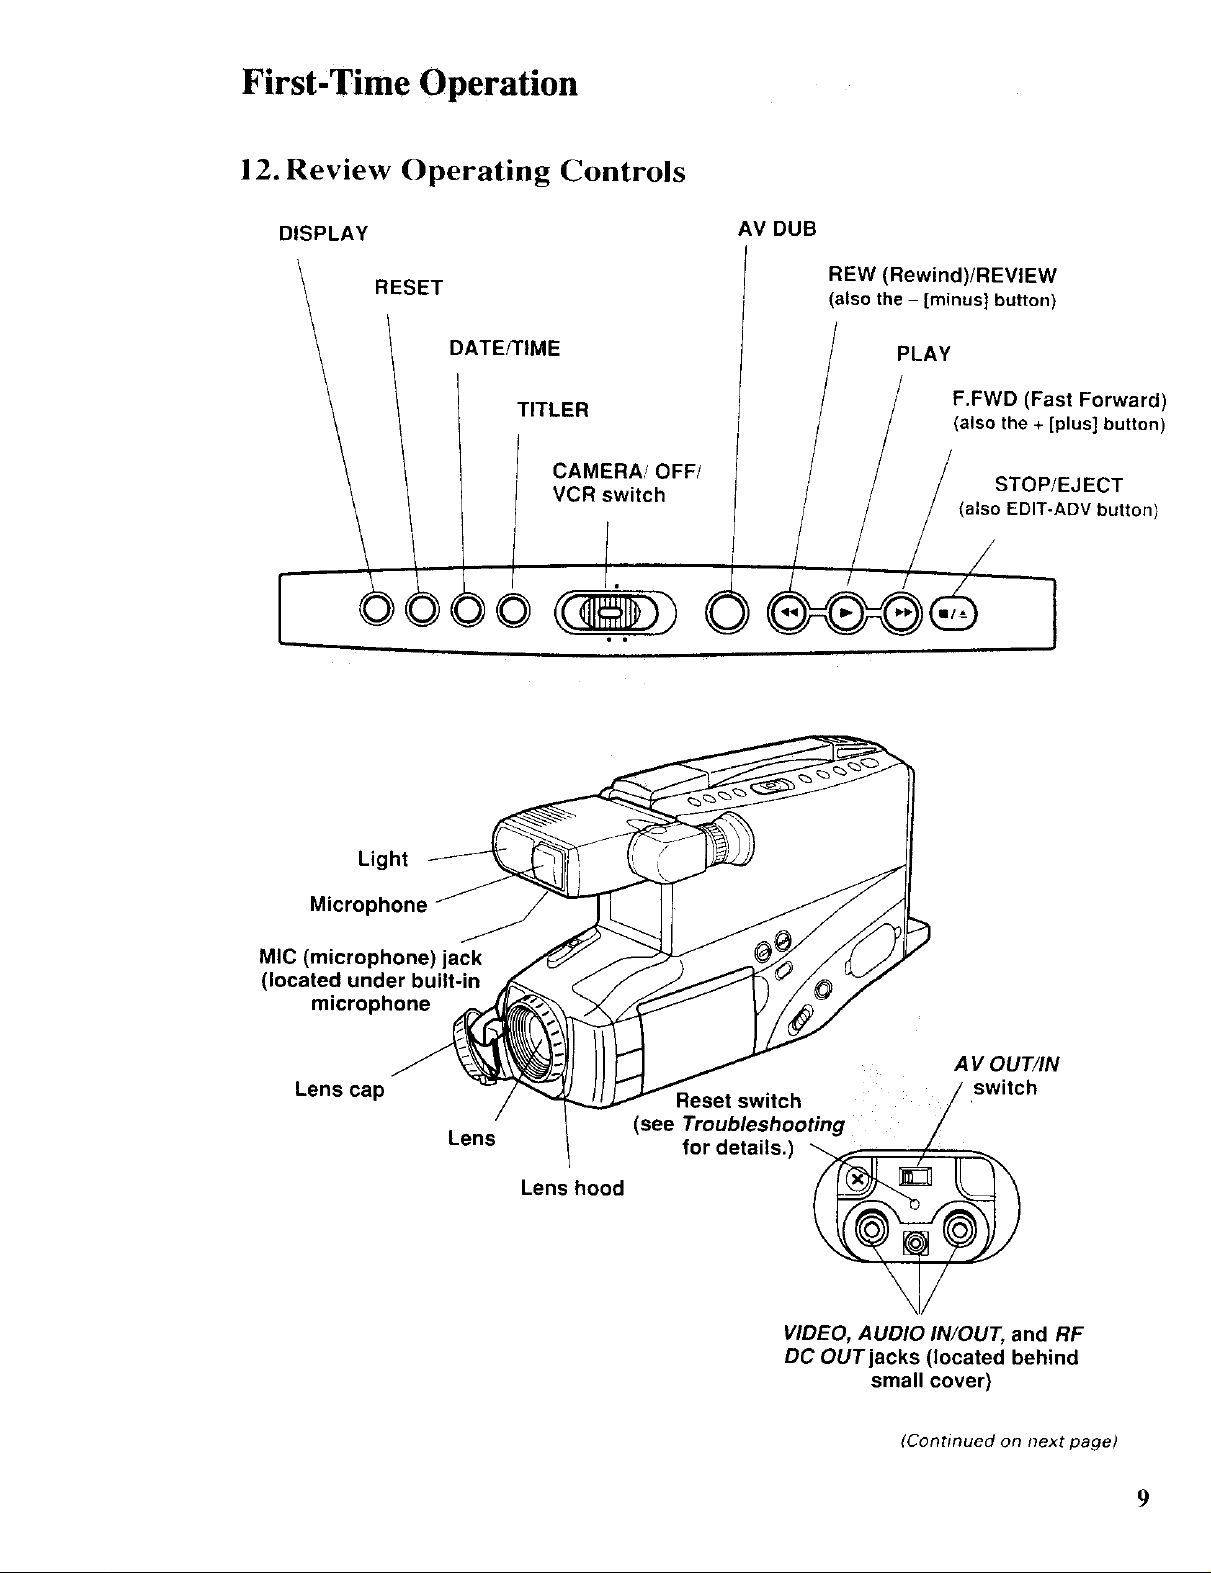
12. Review Operating Controls
DISPLAY
RESET
DATE/TIME
TITLER
/
)©
CAMERA,! OFF/
VCR switch
AV DUB
REW (Rewind)/REVlEW
(also the - [minus] button)
PLAY
/
F.FWD (Fast Forward)
(also the + [plus] button)
/
STOP/EJECT
(also EDIT-ADV button)
1
Light
Microphone
MIC (microphone) jack
(located under built-in
microphone
Lens cap
Lens
A V OUT/IN
Reset switch switch
Troubleshooting
for details.)
Lens hood
(see
VIDEO, AUDIO IN/OUT, and RF
DC OUT jacks (located behind
small cover)
(Continued on next page)
9
Page 12
First-Time Operation
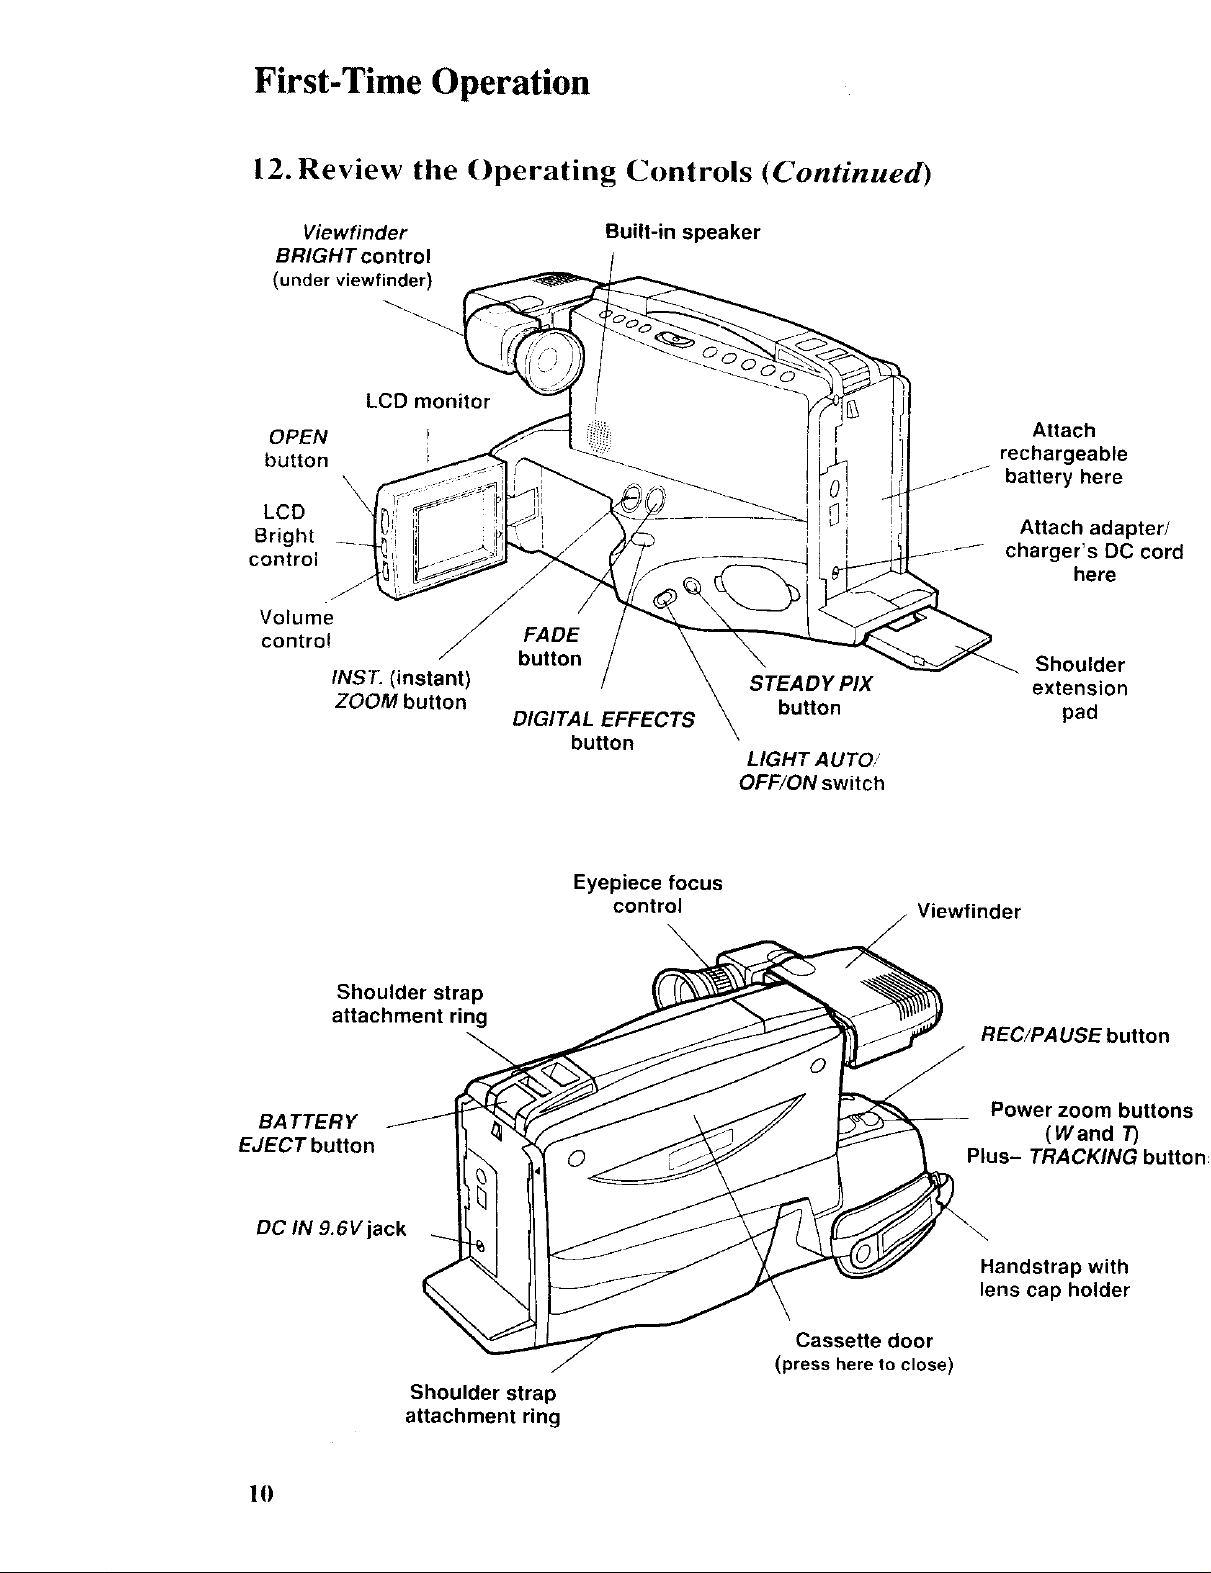
12. Review the Operating Controls (Continued)
Viewfinder
BRIGHT control
(under viewfinder)
LCD monitor
OPEN I
button
\
LCD
Bright
control
Volume
control FADE
/button
INST. (instant)
ZOOM button
DIGITAL EFFECTS
Built-in speaker
button
STEADY PIX
button
LIGHT AUTO/
OFF/ON switch
Attach
rechargeable
jr/ battery here
Attach adapter/
charger's DC cord
here
Shoulder
extension
pad
Shoulder strap
attachment ring
BATTER Y
EJECT button
DC IN 9.6V jack
Shoulder strap
attachment ring
Eyepiece focus
control
\
Viewfinder
REC/PAUSE button
Power zoom buttons
(Wand 7)
Plus- TRACKING button:
Handstrap with
lens cap holder
Cassette door
(press here to close)
!0
Page 13
Included Acce ories
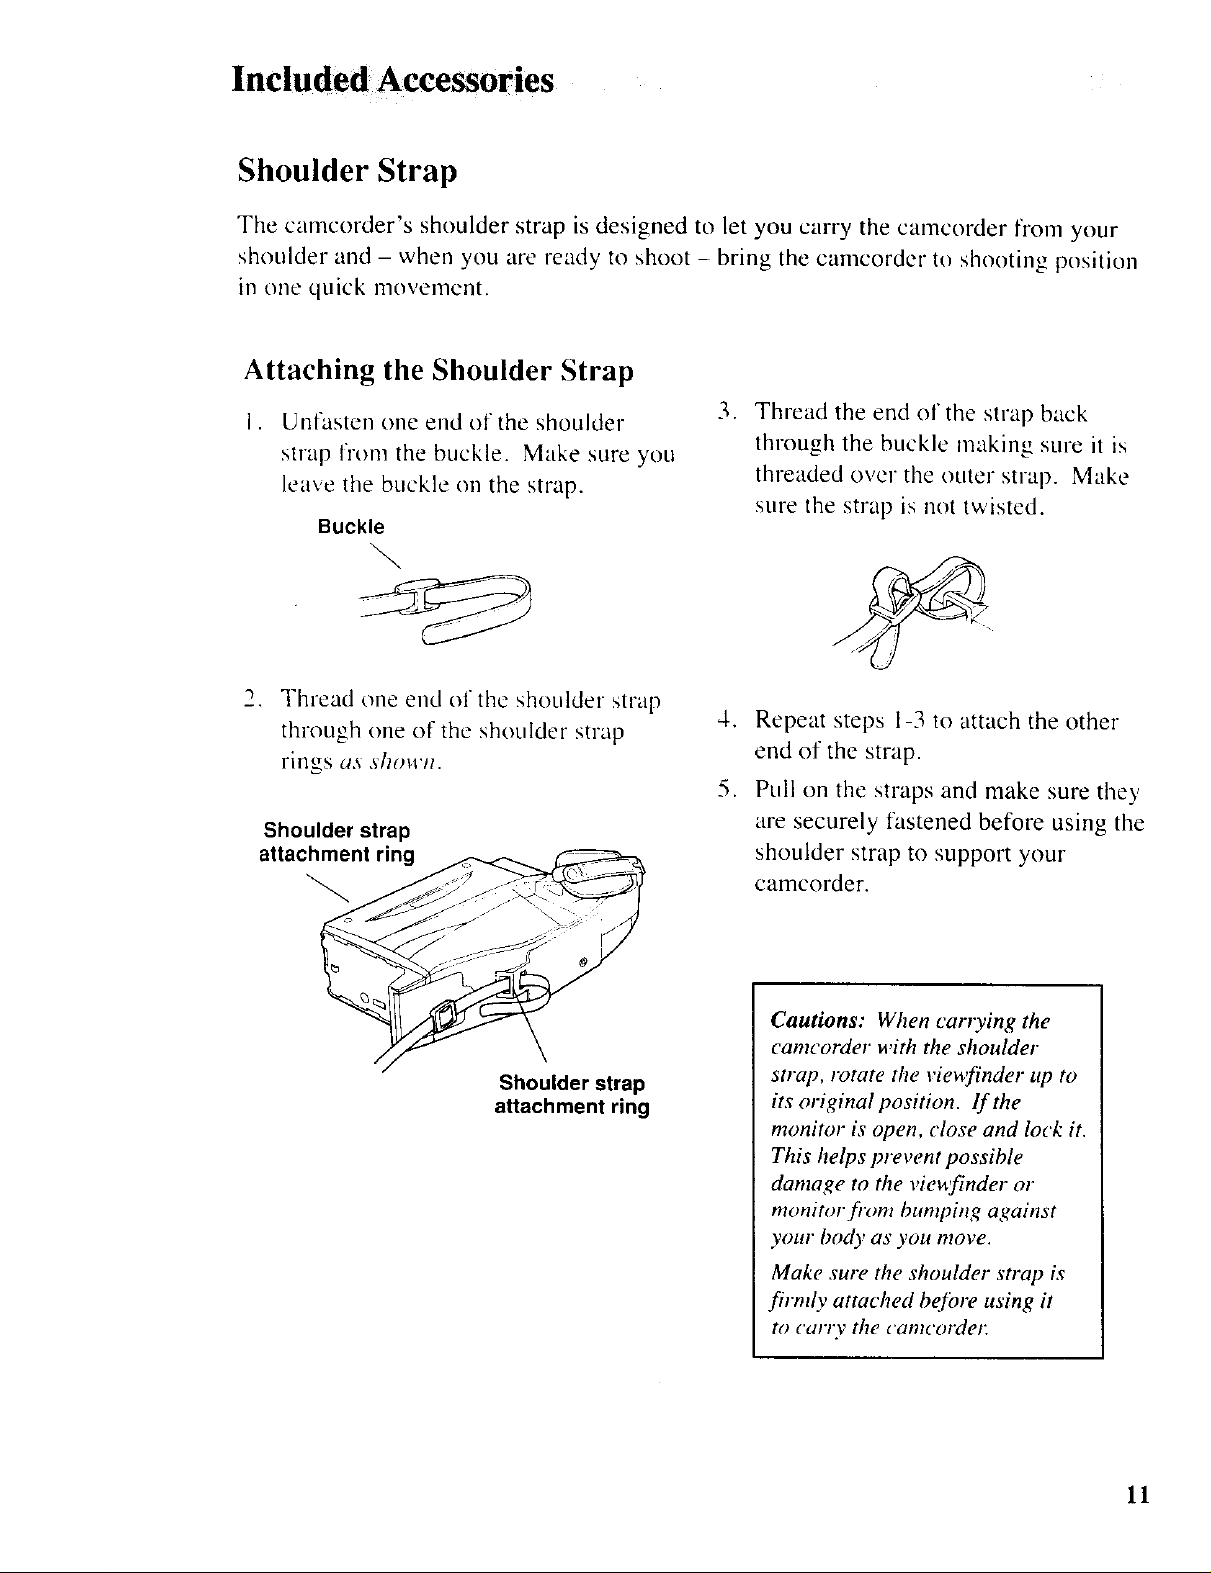
Shoulder Strap
The camcorder's shoulder strap is designed to let you carry the camcorder from your
shoulder and - when you tire ready to shoot - bring the camcorder to shooting position
in one quick movement.
Attaching the Shoulder Strap
,
I. Unfasten one end of the shoulder
strap from the buckle. Make sure you
leave the buckle on the strap.
Buckle
\
Thread the end of the strap back
through the buckle making sure it is
threaded over the outer strap. Make
sure the strap is not twisted.
Thread one end of the shoulder strap
through one of the shoulder strap
rings as shown.
Shoulder strap
attachment "
Shoulder strap
attachment ring
4. Repeat steps 1-3 to attach the other
end of the strap.
5. Pull on the straps and make sure they
are securely fastened before using the
shoulder strap to support your
camcorder.
Cautions: When carrying the
camcorder with the shoulder
strap, rotate the vie_finder up to
its original position, lf the
monitor is open, close and lock it.
This helps prevent possible
damage to the vieufinder or
monitor ffom bumping against
your body as you move.
Make sure the shoulder strap is
firmly attached be/ibre using it
to carry the camcordet:
11
Page 14
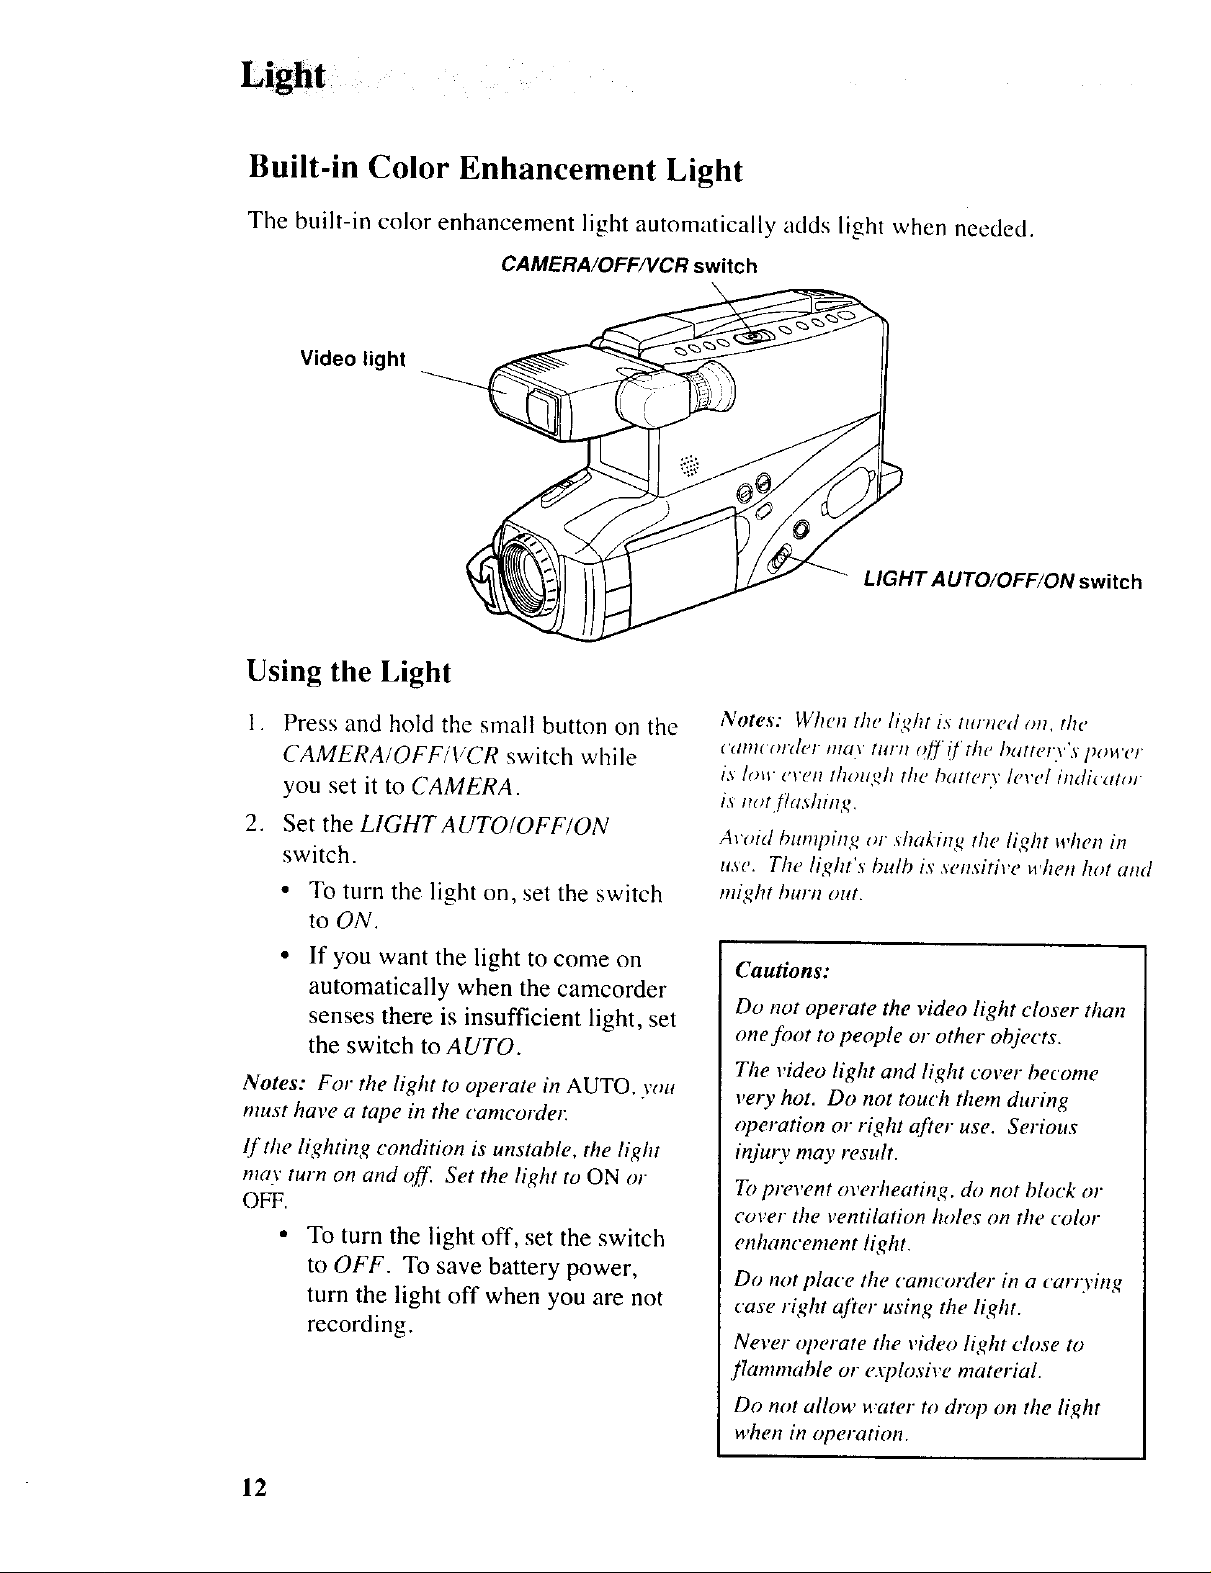
Light
Built-in Color Enhancement Light
The built-in color enhancement light automatically adds light when needed.
CAMERA/OFF/VCR switch
Video light
LIGHT AUTO/OFF/ON switch
Using the Light
I. Press and hold the small button on the
CAMERA/OFF/VCR switch while
you set it to CAMERA.
2. Set the LIGHTAUTO/OFF/ON
switch.
• To turn the light on, set the switch
to ON.
If you want the light to come on
automatically when the camcorder
senses there is insufficient light, set
the switch to AUTO.
Notes: For the light to operate in AUTO, you
must have a tape in the camcorder
l['the lighting condition is unstable, the light
may turn on and off_ Set the light to ON or
OFF.
To turn the light off, set the switch
to OFF. To save battery power,
turn the light off when you are not
recording.
Notes: When the light is turned on, the
calll( olde! l#l(l\' [lllll (?ff i/'the hatter.\"s power
is / ( ) ] * l ( ' _ ' e t _ t ] t _ ) _ [ 2 ] t the ha ttery level indicator
is m_t flashing.
Avoid bumping or shaking the light when in
use. The light'.s bulb is sensitive when hot and
might hum out.
Cautions:
Do not operate the video light closer than
one foot to people or other objects.
The video light and light cover become
very hot. Do not touch them during
operation or right after use. Serious
injury may result.
To prevent oveHwating, do not block or
cover the ventilation holes on the color
enhancement light.
Do not place the camcorder in a carrying
case right after using the light.
Never operate the video light close to
flammable or explosive material.
12
Do not allow water to drop on the light
when in operation.
Page 15
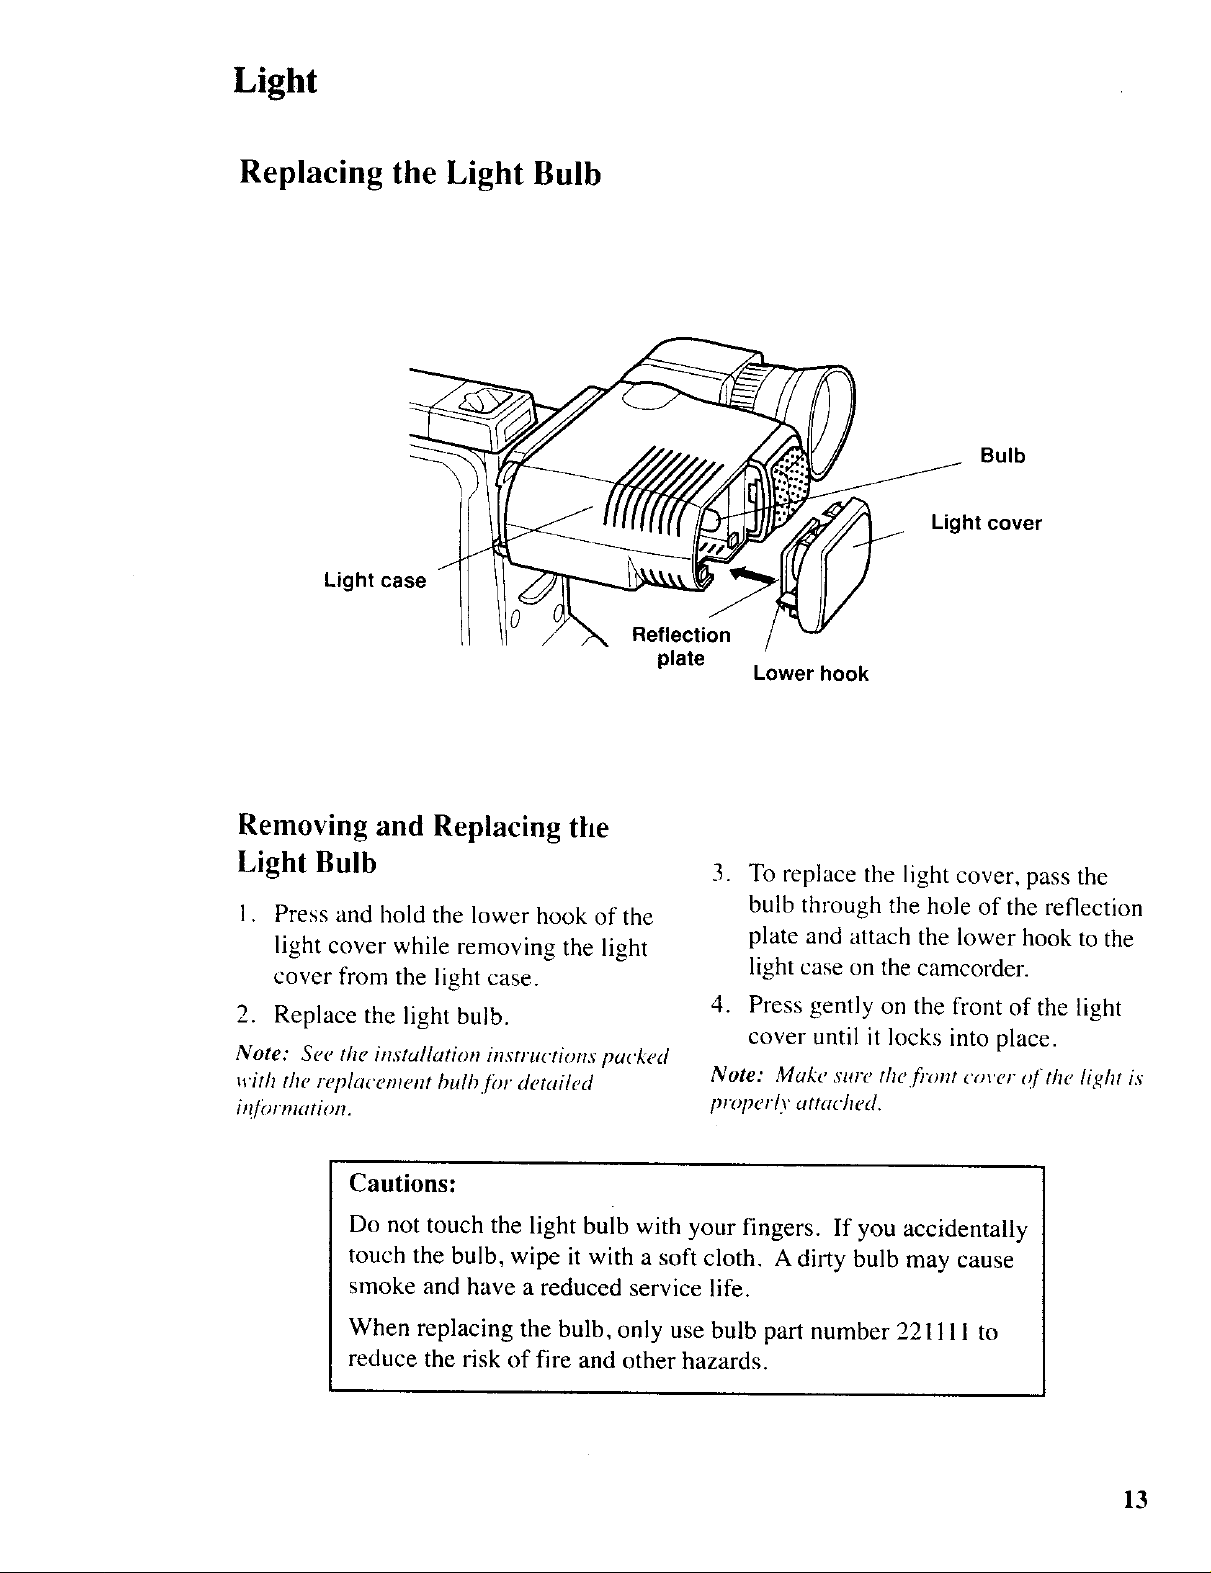
Light
Replacing the Light Bulb
Light case
Reflection
plate
Bulb
Light cover
Lower hook
Removing and Replacing tile
Light Bulb
1. Press and hold the lower hook of the
light cover while removing the light
cover from the light case.
2. Replace the light bulb.
Note: See the installation instructions pa_'ked
with the replacement bulh.[br detailed
iJ!/_n'mation.
Cautions:
Do not touch the light bulb with your fingers. If you accidentally
touch the bulb, wipe it with a soft cloth. A dirty bulb may cause
smoke and have a reduced service life.
When replacing the bulb, only use bulb part number 22l I I l to
reduce the risk of fire and other hazards.
3. To replace the light cover, pass the
bulb through the hole of the reflection
plate and attach the lower hook to the
light case on the camcorder.
4. Press gently on the front of the light
cover until it locks into place.
Note: Make sure the fi'ont cover qf'the light is
properly attached.
13
Page 16

14
Page 17
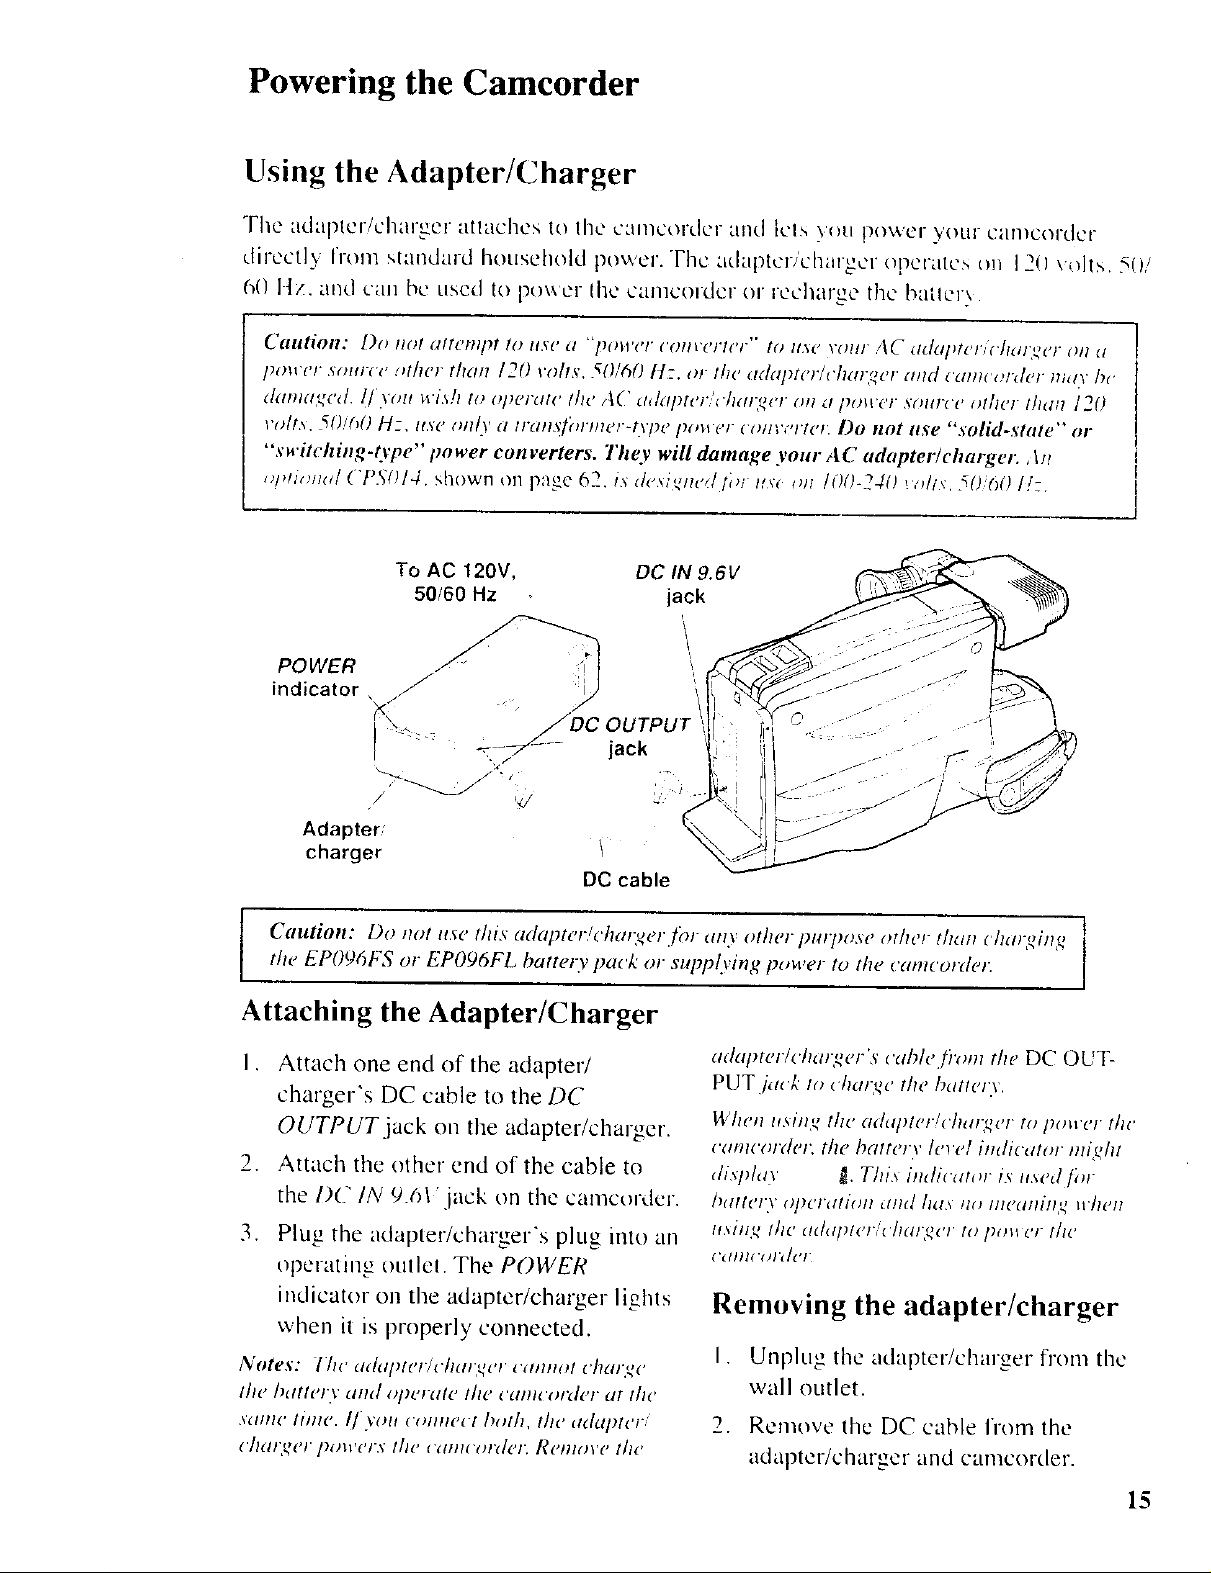
Powering the Camcorder
Using the Adapter/Charger
The ad_lp[cl-/chaf_el t/t|acllC_ [O |bL" _t_lllCOl"dcf al/d _C|_ _ot! pO\k'Cf ?'Ottl Call,CO "[ t?"
( "CCt]_ IlOl/l M;.mdard household power. The adaptcrichtugcr opcra{c_ on 12(1 \,fits. 5()/
6() HZ. al](] trill bc LISO¢] {0 po\_ CI the L'anlcoldcr or rcL'htH_o the baize]'\.
C(lllt]oll" [)(I IlOl z2ltetllpt Io llSe (7 "/)ell'e!" ('o!!l'('t'lel"" to IIAU VOIII A(" ddLl]Jtet'i('hdl'k'eF Oll d
power srmr('e _rller than 120 robs. 50/60 H=. m the adal)ter/ehar_er mid cant( _rd(q tmU bc
ddnld,_,eJ !/.volt Wis/I to o]_¢l'dle the A(" dddl)teF/_'/h'O_t_eF ell _l [)OW('F soltFee ol]leF t]tdl] ]20
volt,_. 50/(,0 Hz. tt._d on/\' a tran,_f_Jrlnel-iyp_' [_ower _ (mr;'rRu. Do trot rise "solid-state'" or
"'switching,type" power converters. They will damage your AC adapterlcharger. ,Dt
.ui_,mJ CP5()14. shown on page 62. is de_[k, nl'J f})i H',_ i!ll lO0-2JO _,'dm 50 (_0I1:
To AC 120V,
50/60 Hz
OC IN 9.6V
jack
i
OUTPUT
jack
Adapter'
charger
DC cable
Cautiott: Do not lISt this (l(l(Iptel'/ch(ll]_Ul'._()F Eltly otllei ])lO'poAe Ot/leF t/l_lfl ( /l_l!_ill_, Il
the EPO96FS or EPO96FL bactery pack or supplying power to the ('ameorder. J
Attaching the Adapter/Charger
I. Attach one end of the adapter/
charger's DC cable to the DC
OUTPUT jack on the adapter/charger.
2. Attach the other end of the cable to
the I)C IN 9.¢)l'jack on the camcordcr.
3. Plug the adapler/charger's plug ink) an
opcrath]g otltlct. The POWER
indicator on the adapter/charger lights
when it is properly connected.
Notes: ]Tie a_htl_ter/¢harqer emmet charge
the battery and operate the cam_ot_ler at the
,_dl/le tillle. I/'_'OIt eOllllee[ /)ot]l, tile _ldEl])/el/
(]ldl]_,_el pOWdl,\ tile i'dllHOl'del: Remove l]le
adapter/cttarger's eahle fi'om the DC OUT-
PUT iaek 1o ehar qe the battery.
When using the ad_q_ter/ehallq, er to power file
eameordet; the battery level iHdicator raiL,hi
di,fl_la_ _. T/ti_ indicator ix it,_ed fi)r
J)(itlel 3" O/)L'I'_IIlOII illld ]I_IA tlo tlle(lllill,'_ _ w]lel?
ll,_illk_ the _ld_ll)leF/( ]ldl',qel' tO [H)_I cI t/!c
('_tllt_'_!lklel
Removing the adapter/charger
I. Unplug the adapter/charger from thc
wall outlet.
2. Remove the DC cable from the
adapter/charger and camcorder.
15
Page 18
Powering the Camcorder
Using the Battery
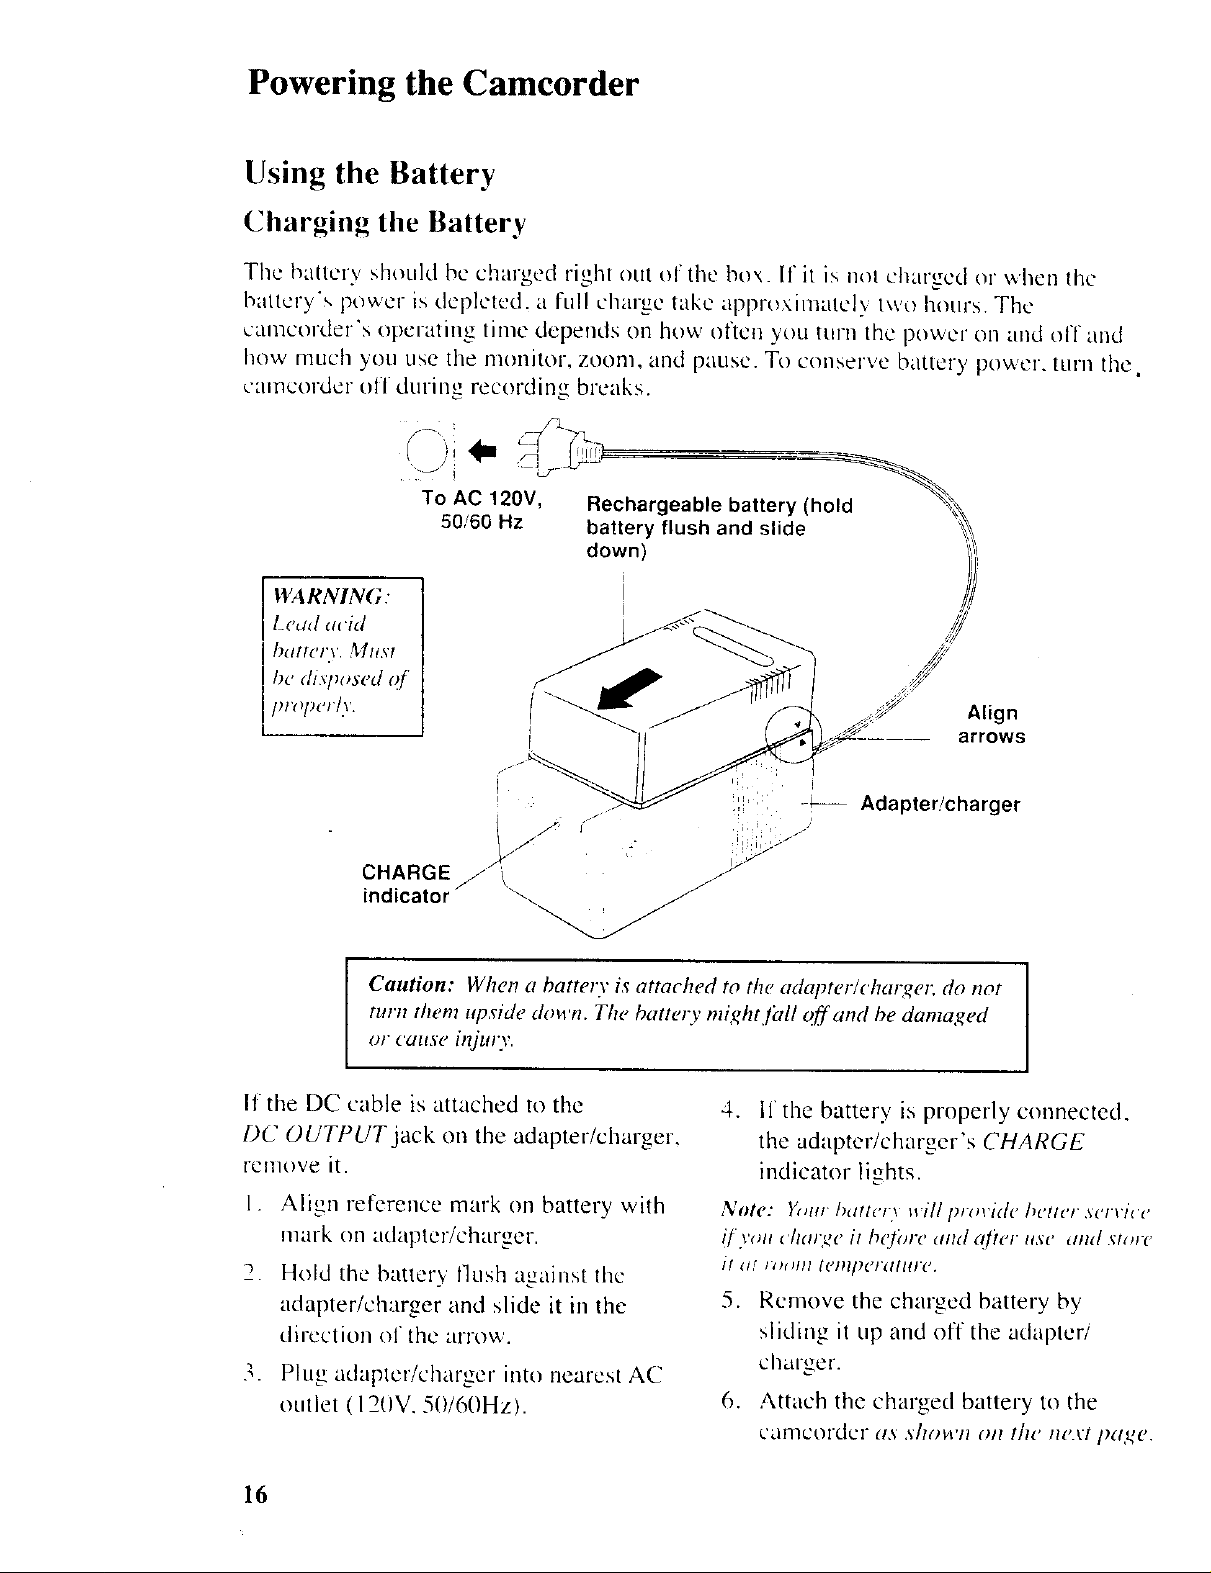
Charging the Battery
Tile baitmw should be charged righi out o1' the box if it is not d_ai'Tcd or when tile
battery "_,power is depleted, a full charge take al)proximatclv two hours. The
camcorder's opel-atil/g time depends oil how often yt)ll ttlrll the power oi1 tllld off alld
how nll.ich you use the rllonitor, zoom, and patiso. To conserve battery power, turn the
cailqColder off during recording breaks.
WA RNING :
Lead acid
hatte#'v. ._ll#,l
be dMposeU q(
proI_eHy.
CHARGE
indicator
Caution: When a battery is attached to the adapterlchaE_er, do not
turn them upside down. The batte O, mightJMI off'and be damaged
I
or cause injm3,. I
To AC 120V,
50160 Hz
Rechargeable battery (hold
battery flush and slide
down)
Align
arrows
If tile DC cable is attached to the
DC OUTPUT jack on the adapter/charger.
remove it.
1. Align reference mark on battery with
mark ('ill adapter/charger.
2. Hold the batter) ]]ush against the
adapterlcharger and slide it in the
direction of tile arrow.
?,. Plug aclaptcr/dlarger into nearest AC
outlet ( 120V. 60/60Hz).
16
4. If the battery is properly connected,
the adapter/charger's CHARGE
indicator lights.
Note: VtHll" h_tll('l 3 will l_rovide hetter.vcrvicc
if.Volt _ /Itlr.q{' it hgi/_)l'{' dltd (lltel it,sc {llltl SloIC
it .f 1"4H;lll[('Ill/)('I'_IgHI'U.
5. Remove the charged battery by
sliding it up and off the adapter/
charger.
6. Attach the charged battery to the
camcoldcr d, _, Allokl'll Oil t]le Ile.tl pd,t{e.
Page 19
Powering the Camcorder
Using the Battery (Continued)
CA MERA/OFF/VCR
switch
BA TTER Y EJECT
button
Rechargeable
battery -_
flush and " /
[Hold batter_ 1
slide down J
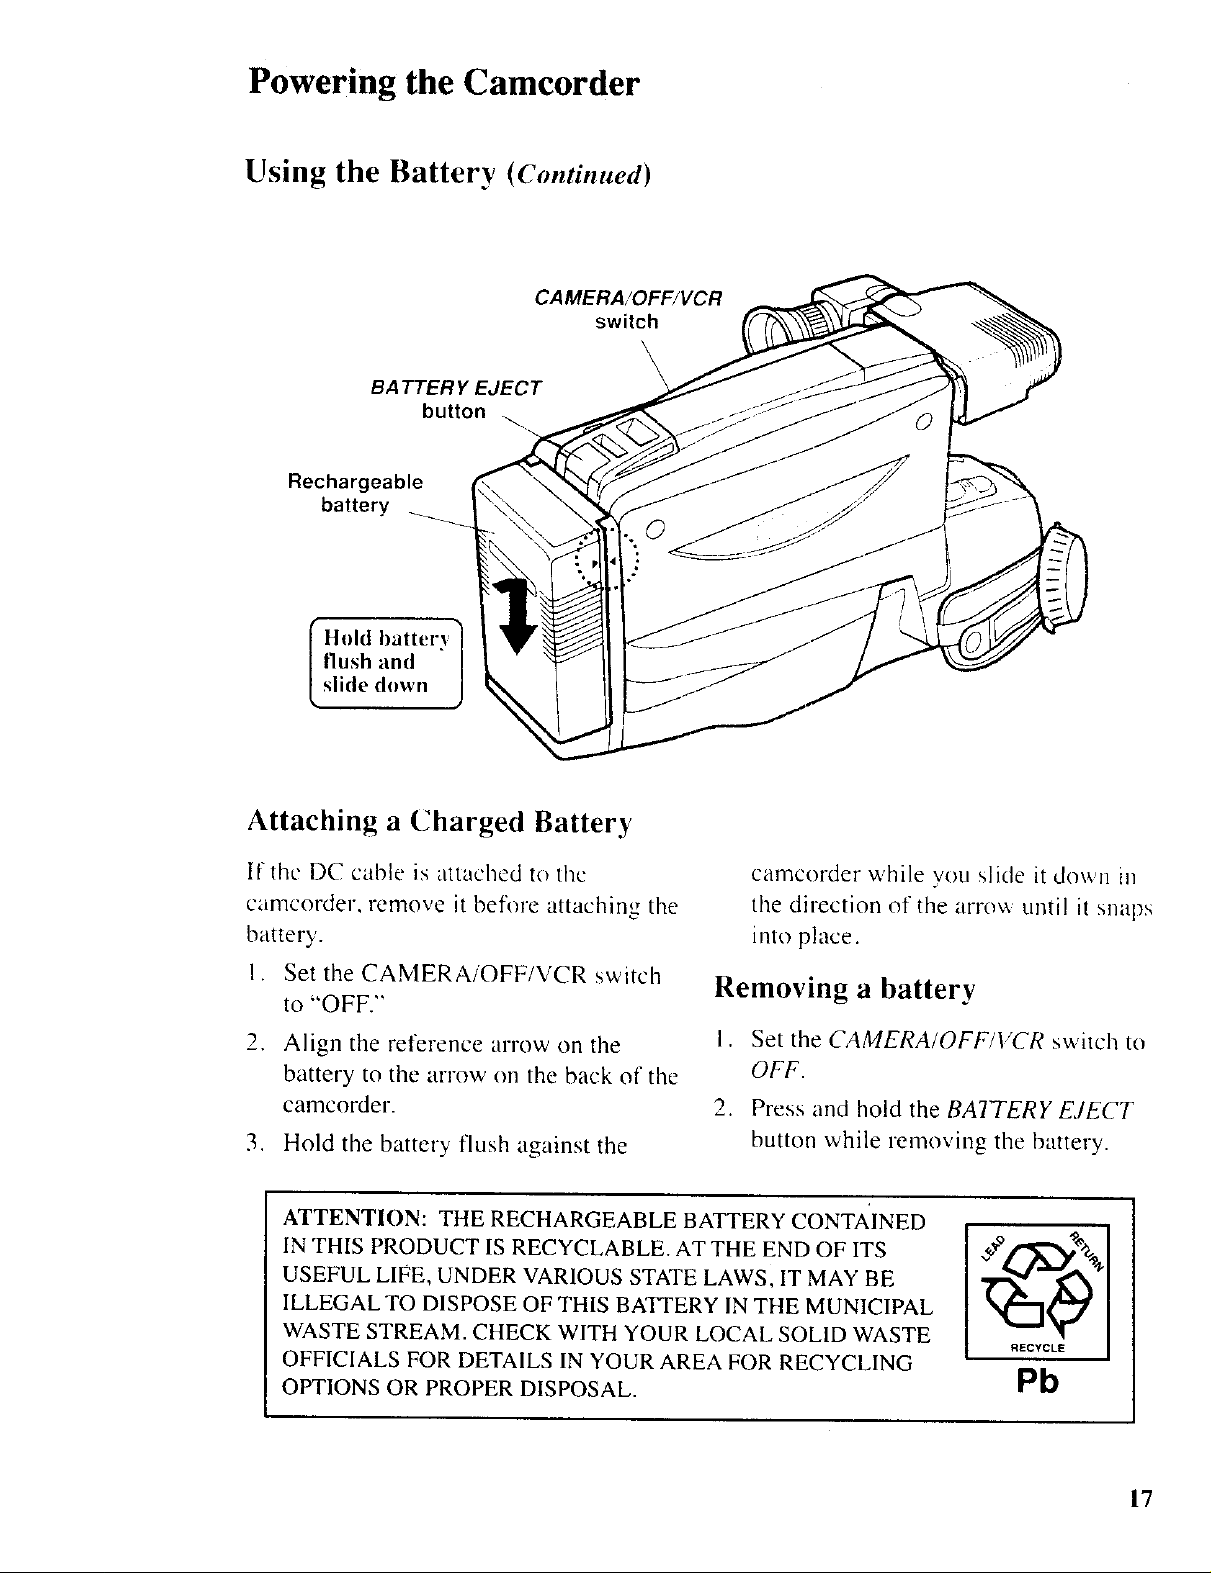
Attaching a Charged Battery
If the DC cable is aitached to the
camcorder, remove it befl_re attaching the
battery.
I. Set the CAMERAiOFF/VCR switch
to "OFF.'"
2. Align the reference arrow on the
battery to the arrow on the back of the
camcorder.
3. Hold the battery flush against the
ATTENTION: THE RECHARGEABLE BATTERY CONTAINED
IN THIS PRODUCT IS RECYCLABLE. ATTHE END OF ITS
USEFUL LIFE, UNDER VARIOUS STATE LAWS, IT MAY BE
ILLEGAL TO DISPOSE OF THIS BATFERY IN THE MUNICIPAL
WASTE STREAM. CHECK WITH YOUR LOCAL SOLID WASTE
OFFICIALS FOR DETAILS IN YOUR AREA FOR RECYCLING
OPTIONS OR PROPER DISPOSAL.
camcorder while you slide it dm_n in
tile direction of the arrow until il snaps
into place.
Removing a battery
1. Set the CAMERA/OFFiVCR switch to
OFF.
2. Press and hold the BATTERY EJECT
button while removing the battery.
RECYCLE
Pb
17
Page 20
Powering the Camcorder
Using the Battery (Continued)
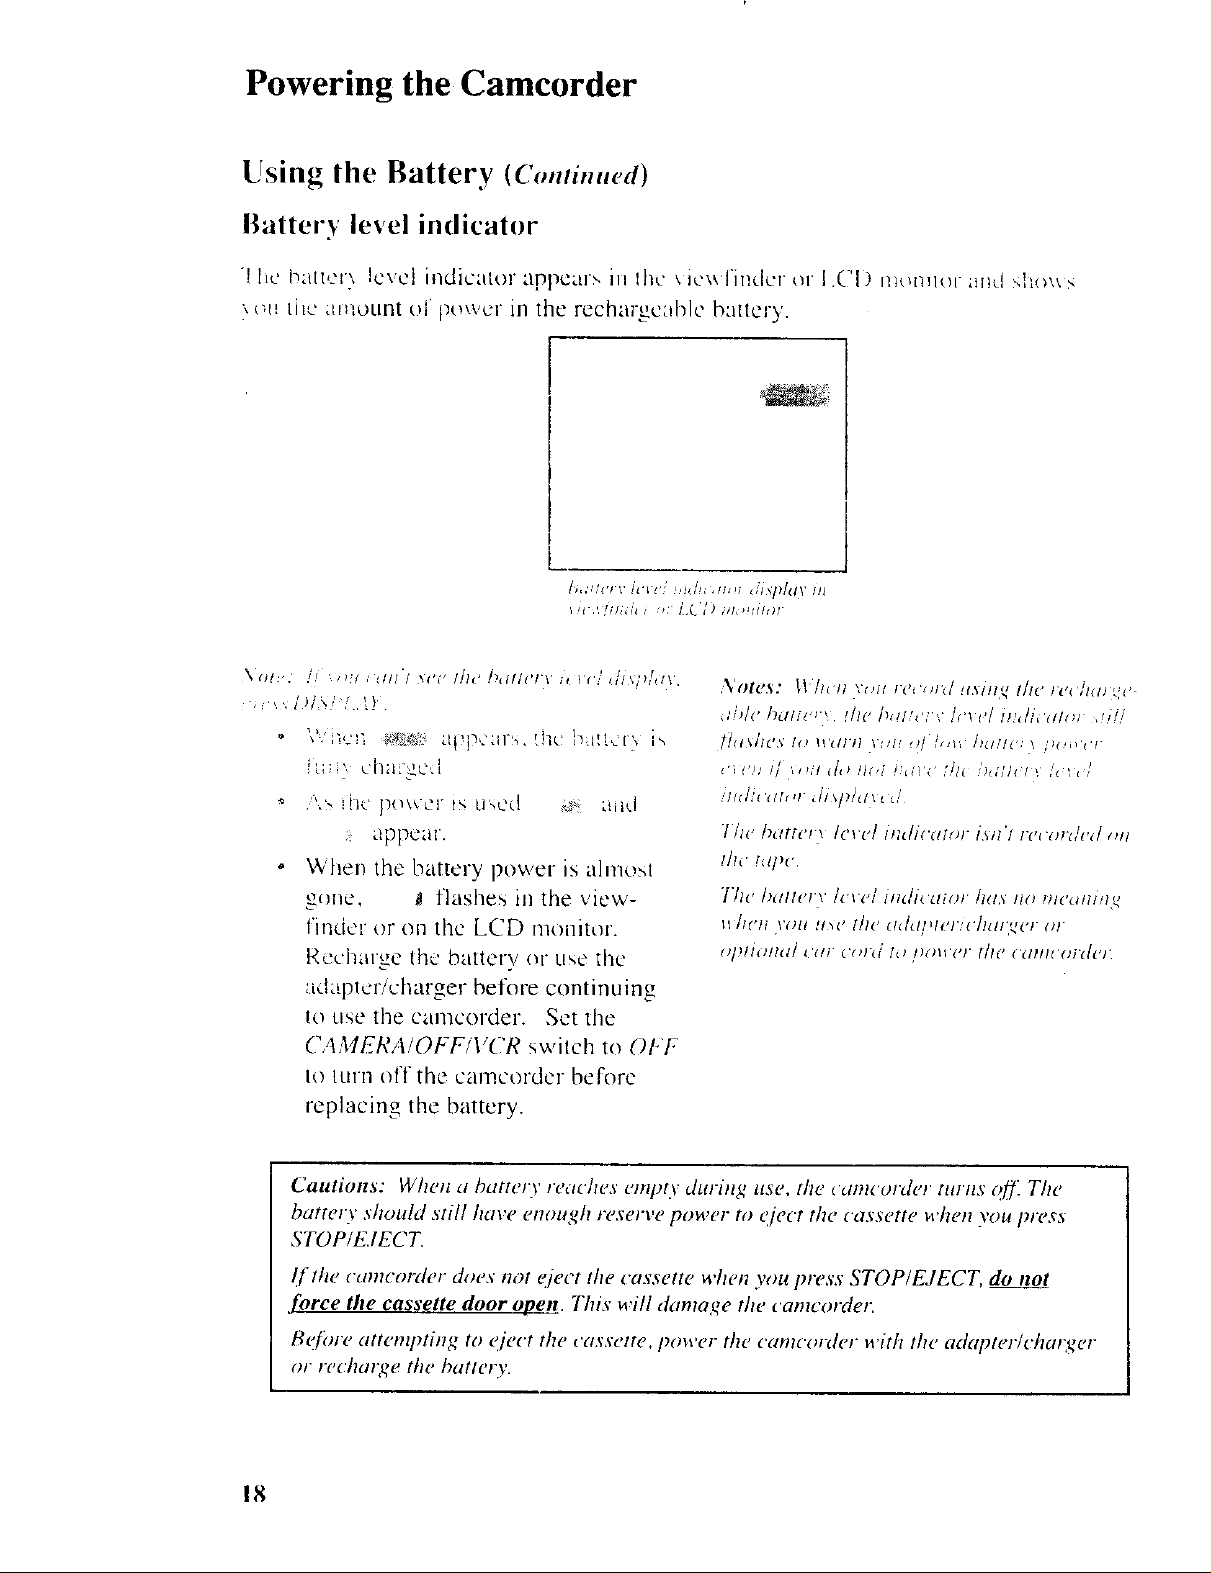
Battery level indicator
! hc b:_Ucr'_!t',el indicmor appear_ ill fl_c _ic\_finder or [.CI ) namuor ;rod ,h<_\_,
c;l! LiLc ;llilt)tln[ Ol' [)t_\vcr ifl the rechargc:d_le b3Ilcry.
[idUl'l'F /t'l_ H!/!_H!_!i _li_/l/_ll' IH
;< _.TJl',l l \)
'_\'F<C!] :_L; UI_Q,.';III+,. t!]C I1HI._;I'_ i',
!t; ], ohmgOd
','_ ihc power l,, i.l_CC! ;¢J_ tuid
k appc_'ar.
Vv ]tel) the battery power is almoM
gont:, ! flashes in the view-
Finder or on the LCD monitor.
Rec.:l?,;ugc the batlerv or u<_e the
.'Die 1)dli_'_t file t_<!i:_',' x !r'1vl iu<li< <m,_ .!,i"
t!._hev/<, ii,(li-i] I_/lf !71 i,,I IJ_IH_': t /_i_('/
<':<':,,il ,.,,i,1,>17<,:1<7< :!:, i)<,r/f+/ _i<_<l
7its' hatfes", /evu/i_Idi('amr isn'l/e_'urUuU vnl
l]li' hq_u
7hc IJtllltq'v Idwel //ltli( tliOt /1(t,_ HO s/It'Otl/#l_
It /If'If WHI !!_' [hc t/Jdl,leFi_'i/ds]t,_'r (H
()])[iIHltl/ ((!l 1'(_1"(/ [(I ])()ll'_'l" lilt' (YJI/IU(H'dCI]
adaplcr!charger before continuing
1o use the camcorder. Set the
CAMERA/OFF/V('R swilch to OFF
Io lurn off the camcordcr before
replacing the battery.
Cautions: W]lell a batle O' reae]ws empty dtumg ttse, the _ dlHco/zlet [ltlllS Qj_ The
batte O" should still have em_ugh reserve power to _ject the cassette when you press
STOP/KIECZ
If'the camcorder does not t_/ect the cassette when you press STOPIEJECT, do not
force the cassette door open. This will damaqe the eamcorder.
Btjbre attenq_ting to tject the cassette, power the canu'order with the adopter/charger
or recharge the battery.
18
Page 21
Powering the Camcorder
Using the Battery (Continued)
Battery care
• Your battery' will provide better
ser\,lce and longer performance if
you charge if before and after use.
and store it at normal room tem-
perature.
• The battery should be charged at a
temperatu,-e of 32°F - 95°F (0°C -
35°C) to prevent damage
• Do not operate the batteD' tit
temperatures belo_ I4°F<-I0°C) or
Battery storage
Store the battery' at normal room
temperature
Lead acid battm _e_,will completely'
dp, chargc it not u>ed The battery
should be rechanged at lea.,t once
every six rnonth.,, or it may lose its
abfllt 5 to hold a charge
above 95°F (35°C1. You might
damage the battery fl ._ou use nt at
temperatures above 122°F (50°C)
Operation tlnle decrease.`, at
extremely, low tenlperatures
Attez zepeated charges and use the
operatmn rune decreases. When the
opera[lOll time become`, too `,hort to
be LI`,el'LI[, It 1`, tln]c [o replace the
battery
A battery' stored for long periods
imght not ,,upply powm for the
`,pecffied tune. Addmonal
recharging might help re.`,tore
the battery"., opetanon nine
Battery safety precautions
• Batteries being recharged that have
not been used foi an extended
period may continue to charge after
the normal time. Do not charge a
battery' for more than 24 hours.
If the CHARGE indicator on the
adapter/charger starts flashing,
renlo,,e the battery, and reattach nt
If after .,,everal attempt.`,, the
Indlcatoi continue`, to flash, your
battmy cannot take a charge and
must be replaced
Throwmg the battery into a fire or
exposing the battery to excessuve
heat (o_er 149°F/65°C) could be
hazardous
• Do not short the batterv's terminals.
• Allow the battery to cool down
before attaching it to the adapter/
charger. The CHARGE indicator wdl
not light and the battery' wdl not
charge ff you attach a hot battery.
• Do not attempt to disassemble or
modify' the battery There a_e no
user-,,,ervnceable part, inside.
• Use the battery only with _peclfied
AC adapter/chargers and camcordm s
• If leakage hom a damaged battery
contacts your skin or clothing, wash
ntoff immediately' wLth runmng
water
19
Page 22
Powering the Camcorder
Using the RCA Optional Car Cord Adapter
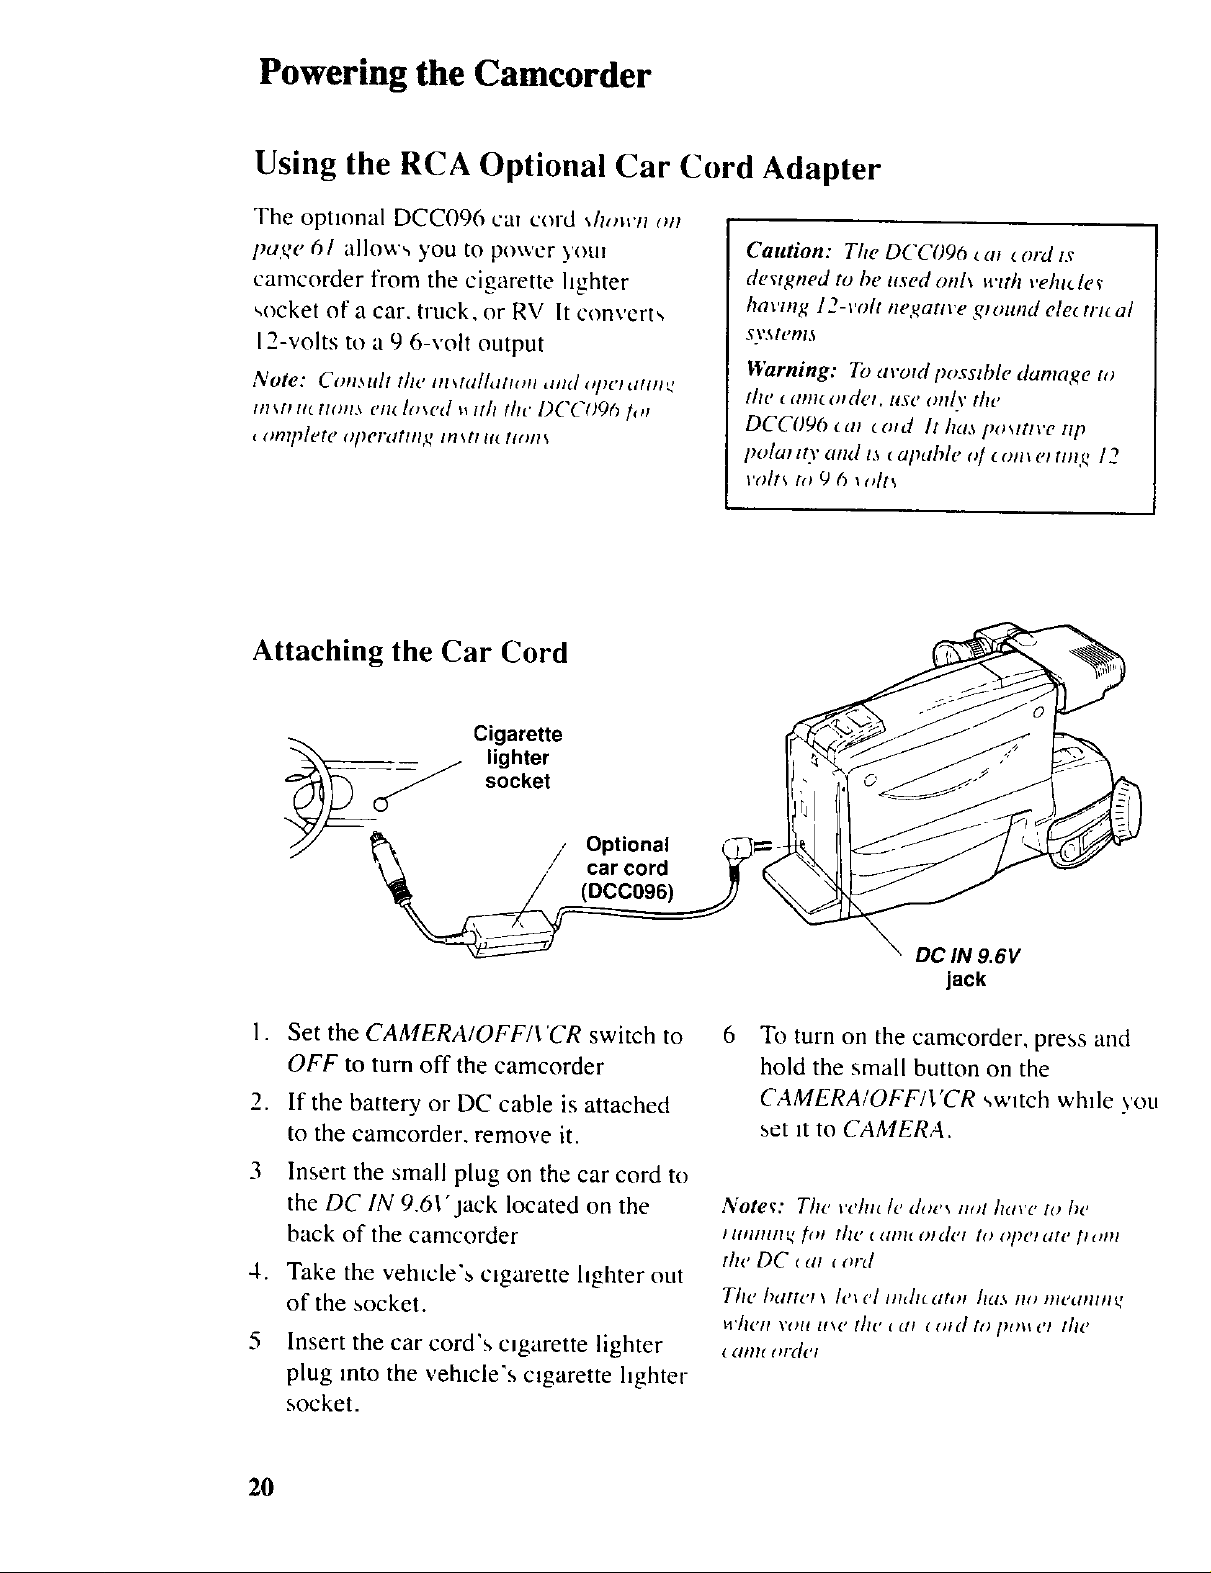
The optional DCC096 cal cord _h.wn/_n
I_u._e 61 allow,, you to power .,,'oul
camcorder from the cigarette hghter
',ocket of a car. truck, or RV It converts
12-volts to a 9 6-volt output
Note: Clm._ult the in,tall, trim ,,_d _q_emtt/t,,,
tt__rt_€(ttl,ts eta(h_cd _ till tllc D('CI_96 t_,t
, t_n?l_letl" O/)('l'dtlll,k _ 117_tl It( [1011
Attaching the Car Cord
Calttion: Tile D('C096 __l_t ord _s
de_fgned to be tlsed onl\ with vehtc le
having 12-t'olt negative ground ele_ trt_ al
sy._/t,t_l.',
Warning: To avotd pvsstble damage tl_
I]IC (alll( (ndo, llst' o11[\' t]l("
DCCO90 _11 _c.d It haa plmtfve np
I_olaf lO' and t._ t apahle o[ _onl et tin,q, 12
volt_ to 9 0 _i,Its
Cigarette
socket
_ _ lighter
// CO;_iOna/
.
Set the CAMERA/OFF/[ "CR switch to
OFF to turn off the camcorder
.
If the battery or DC cable is attached
to the camcorder, remove it.
3
Insert the small plug on the car cord to
the DC IN 9.6t,'jack located on the
back of the camcorder
.
Take the vehicle's c_garette hghter out
of the socket.
5
Insert the car cord's cigarette lighter
plug into the vehicle's cigarette hghter
socket.
DC IN 9.6V
jack
6
To turn on the camcorder, press and
hold the small button on the
CAMERA/OFF/VCR ,,witch while you
set _t to CAMER,4.
Note_: The t't'htt [t' does/t¢_/have 1o be
I llllll[ll_ _f_l f/It' t _llllt old(q to ol_('l _tf(' Ihtt_l
the DC €at t ord
Tht' /)dHc/ \ I('l ('1/lldltd[Ol ]1(15 IIO lflt'd/llll k'
H'h('/I \'o/t lt\_' [tit' l d/ _ _nd to ]_t_ ('/ Ills'
_1111( o/'d('l
20
Page 23
Videocassettes
Tape Recording Basics
Make sure you select good quvht,, tapes [or 3 our camcorder U,,e of poor quallt 3' tapes
or tape_ that have been damaged or mishandled can contaminate the video heads.
resulting in a snowy p_eture or no p_cttuc at all during pla 5back Because there z,, no
control over the type of tape purcha,,ed or rented by consumers, head cleaning is not
covered under warrant). It L-,considered normal maintenance.
If a snowy p,cture or no-p_cture condmon persists, con_nder the use of a dry chmmcal
nonabras,ve head-cleaning tape Be sure to follow the directions with the head-
cleaning kst carefully, lmpmpm u.-,e ot a head cleaner might damage your camcordm
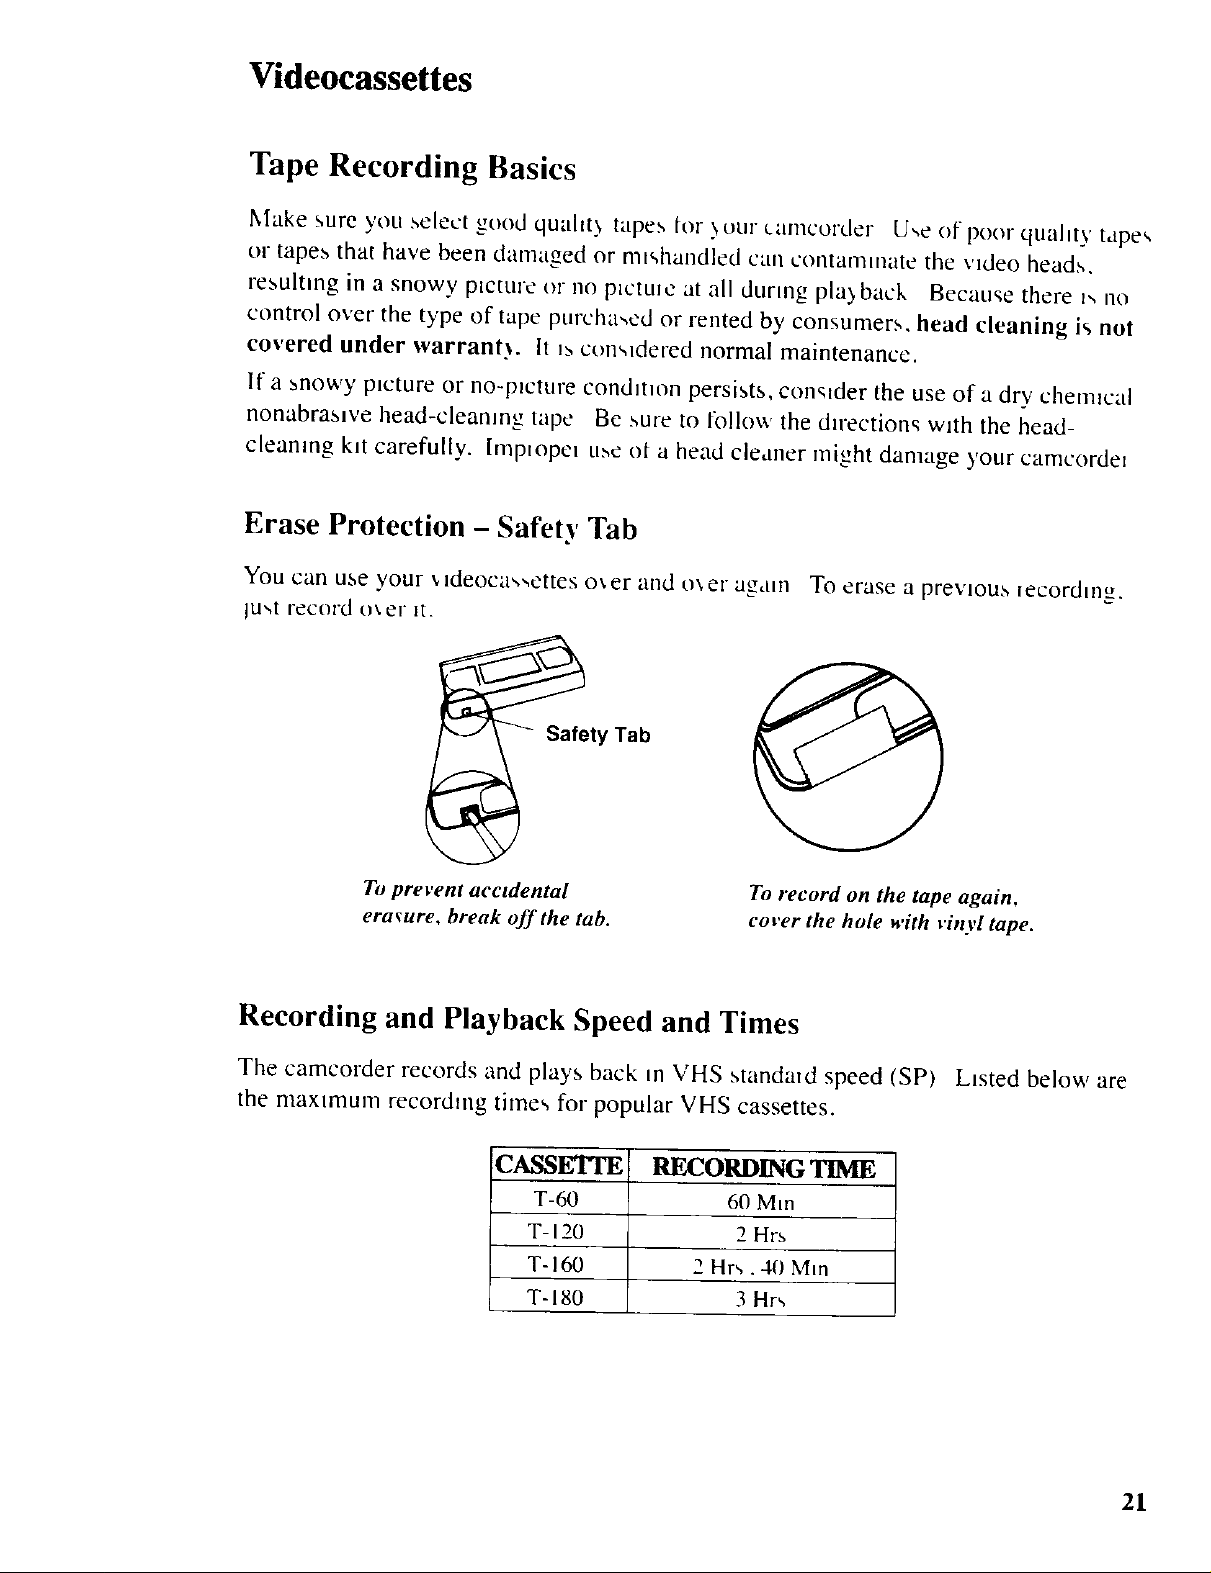
Erase Protection - Safety Tab
You can use 5,our ,,ldeoca,,,,ettes o_ er and o\ el again
lu.,t record o'.er it.
To prevent accidental
erasure, break off the tab.
To erase a previous _ecordlng.
To record on the tape again,
cover the hole with rinyl tape.
Recording and Playback Speed and Times
The camcorder records and play's back m VHS standmd speed (SP)
the maximum recording times for popular VHS cassettes.
CASSETTE RECORDING TIME
T-60 60 MIn
T- 120 2 Hrs
T-160 2 Hrs. 41) Min
Lsted below are
] T-180 3 Hrs
21
Page 24
Videocassettes
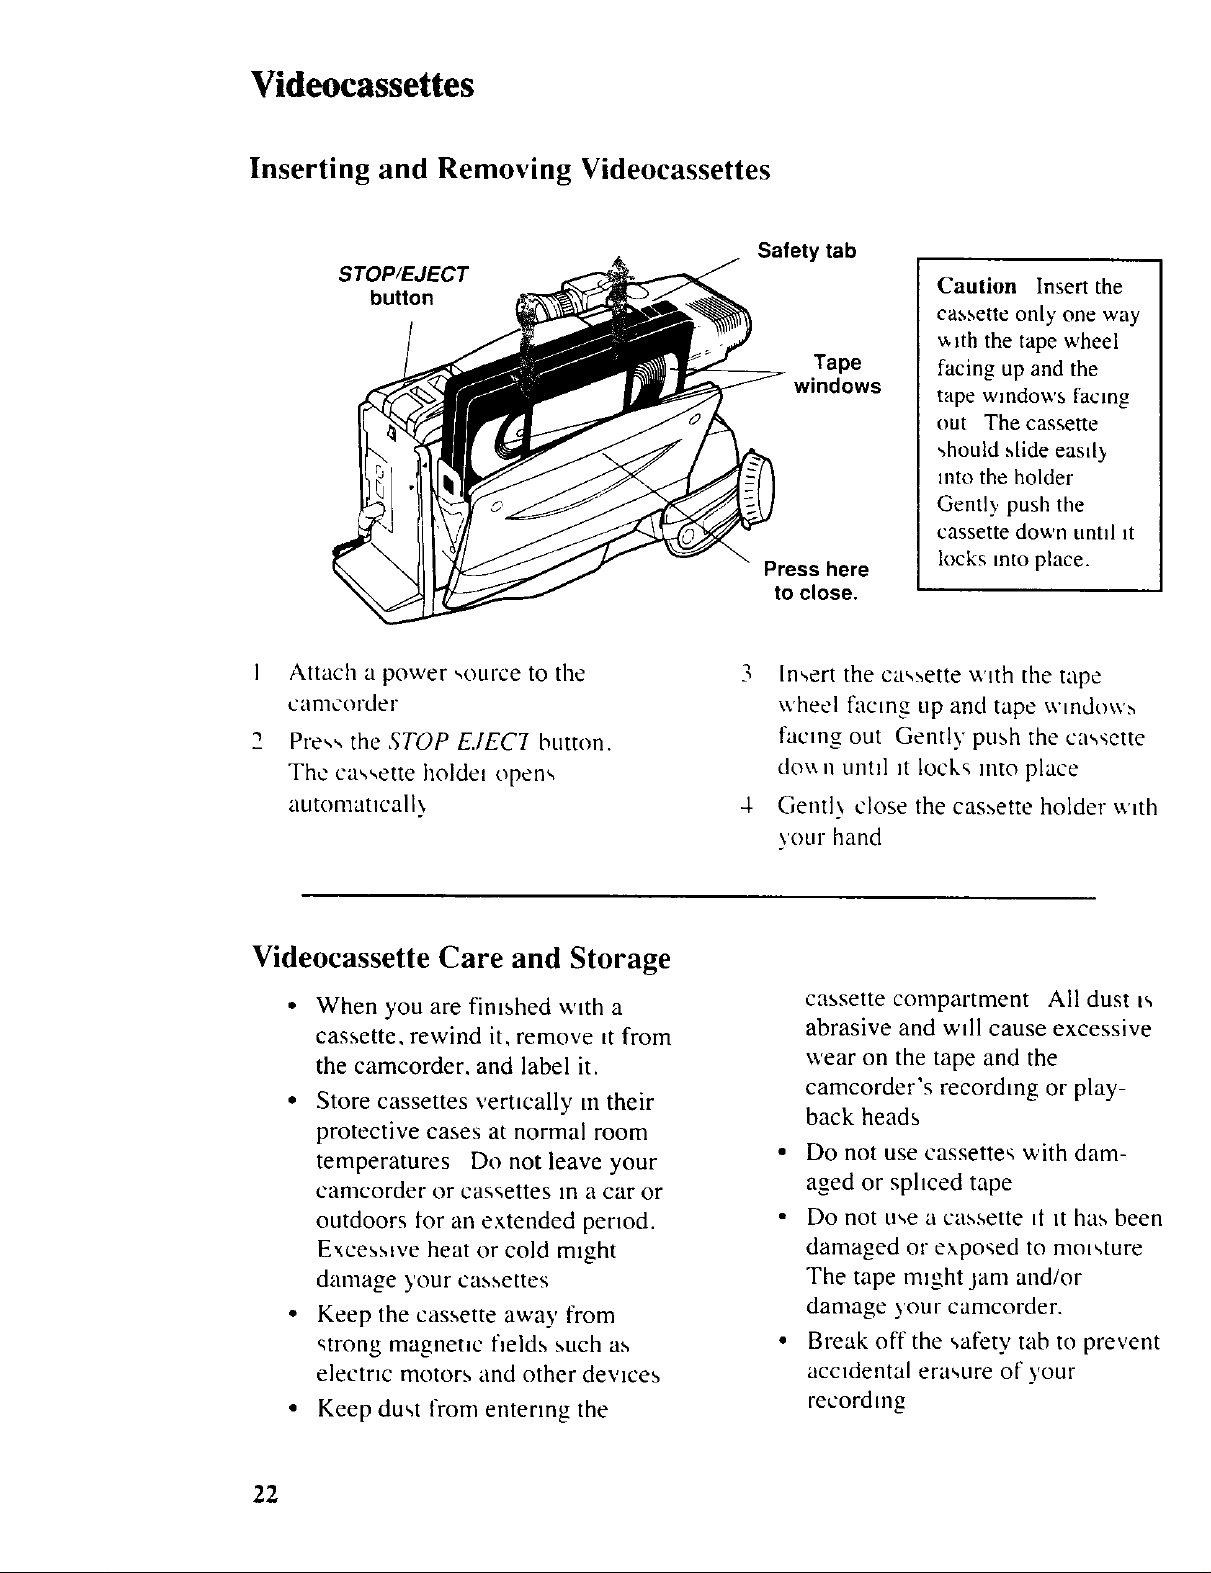
Inserting and Removing Videocassettes
STOP/EJECT
button
Safety tab
Tape
windows
Press here
to close.
Caution Insert the
cassette only one way
_,lth the tape wheel
facing up and the
tape windows facing
out The cassette
should slide east b
into the holder
Gentl}, push the
cassette down tmtll it
locks into place.
I
Attach a power ,,ource to the
camcorder
Press the STOP E.IEC7 button.
The cassette holdm opens
automat=callx
Videocassette Care and Storage
• When you are finished with a
cassette, rewind it, remove it from
the camcorder, and label it.
• Store cassettes vemcally un their
protective cases at normal room
temperatures Do not leave your
camcorder or cassettes In a car or
outdoors lor an extended period.
Excessive heat or cold might
damage }'our cassettes
• Keep the cassette away from
_trong magnetnc fields such as
electric motors and other devices
• Keep dust from entering the
3 Insert the cassette wnth the tape
wheel facing up and tape wlndo\v_
facing out Gently push the cassette
dov, n until it locks into place
4 Gentl3 close the cas,,,ette holder with
your hand
cassette compartment All dust is
abrasive and will cause excessive
wear on the tape and the
camcorder's recording or play-
back heads
• Do not use cassettes with dam-
aged or spliced tape
• Do not use a cassette it it has been
damaged or exposed to mmsture
The tape m+ght jam and/or
damage your camcorder.
• Break off the safety tab to prevent
accidental erasure of 5'our
recordmg
22
Page 25
Date and Time Display
Setting the Time and Date
You must set the correct date and time belore it can be displayed and recorded on your
tapes. Tile built-in clock cell must be charged as described on the next l)aXe.
Note: [/'po_*'er is I(1} on fin more llluII ldll millutes with I!o _'a,sseue ill lit{' {'attlCOl'¢h'r u/ld lll_' _&/¢'
nnt set or Uw built-in Hock t)allery _lol ch_nRed, the camcorder slo_ls tile demollslralion mode.
"l}* S!Op the' ddnlOllS[l_lliOll nlod{'. {tiscolllldCl and I'gCOI?IIgCI Ill{' pow_'l" _Oltl'('d or ilMerf cz ('glaX{'lte.
DA TE/TIME CAMERA/' OFF/
button VCR switch
\ \
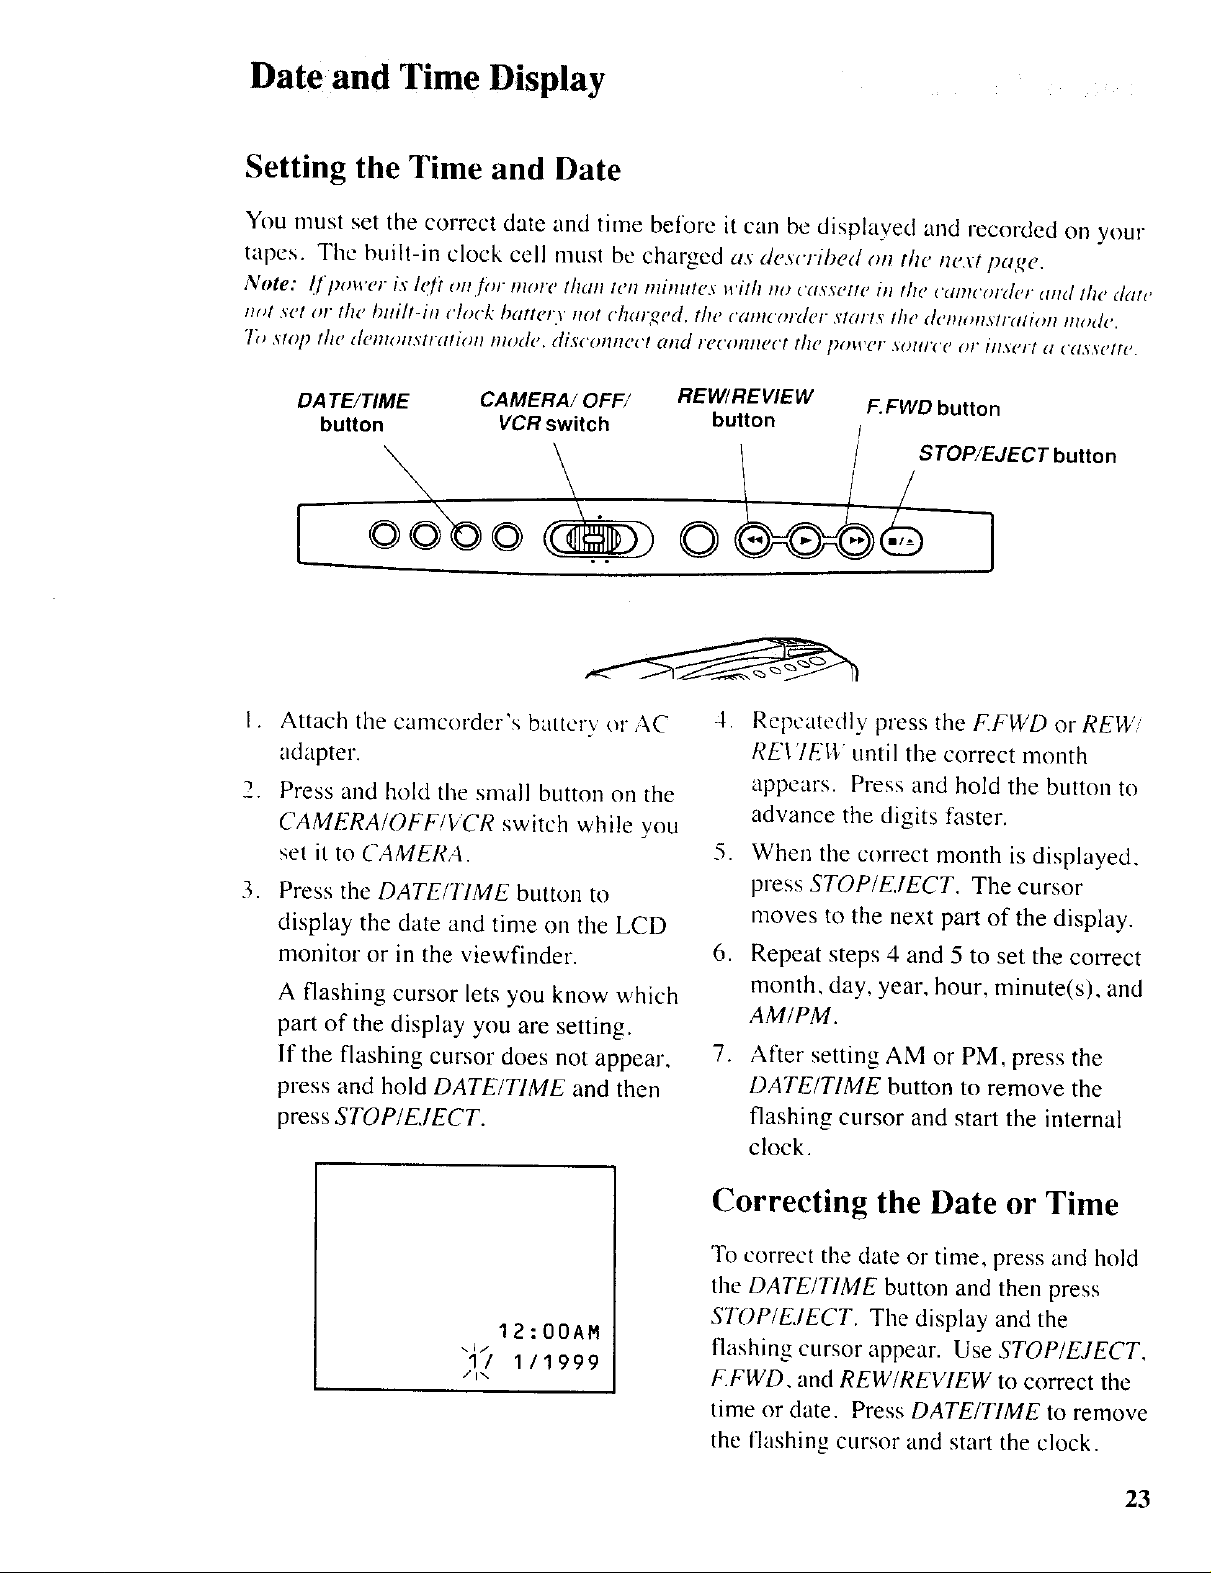
I. Attach the camcorder's battery or AC
adapter.
2. Press and hold the small button on the
CAMERA/OFF/VCR switch while you
set it to CAMERA.
. Press the DATE/77ME button to
display the date and time on the LCD
monitor or in the viewfinder.
A flashing cursor lets you know which
part of the display you are setting.
If the flashing cursor does not appear,
press and hold DATE/TIME and then
press STOP/E, IECT.
REW/REVIEW F.FWD button
button /
4. Repeatedly press the FFWD orREWi
RE\ 'IEI_' until the correct month
appears. Press and hold the button to
advance the digits faster.
5. When the correct month is displayed,
press STOP/EJECT. The cursor
moves to the next part of the display.
6. Repeat steps 4 and 5 to set the COtTect
month, day, year, hour, minute(s), and
AM/PM.
.
After setting AM or PM, press the
DATE/TIME button to remove the
flashing cursor and start the internal
clock.
12:00AM
I/ 1/1999
/I\
Correcting the Date or Time
To correct the date or time, press and hold
the DATE/TIME button and then press
STDP/E.IECT. The display and the
flashing cursor appear. Use STOP/EJECT,
F.FWD, and REW/REVIEW to correct the
time or date. Press DATE/TIME to remove
the flashing cursor and start the clock.
23
Page 26
Date and Time Display
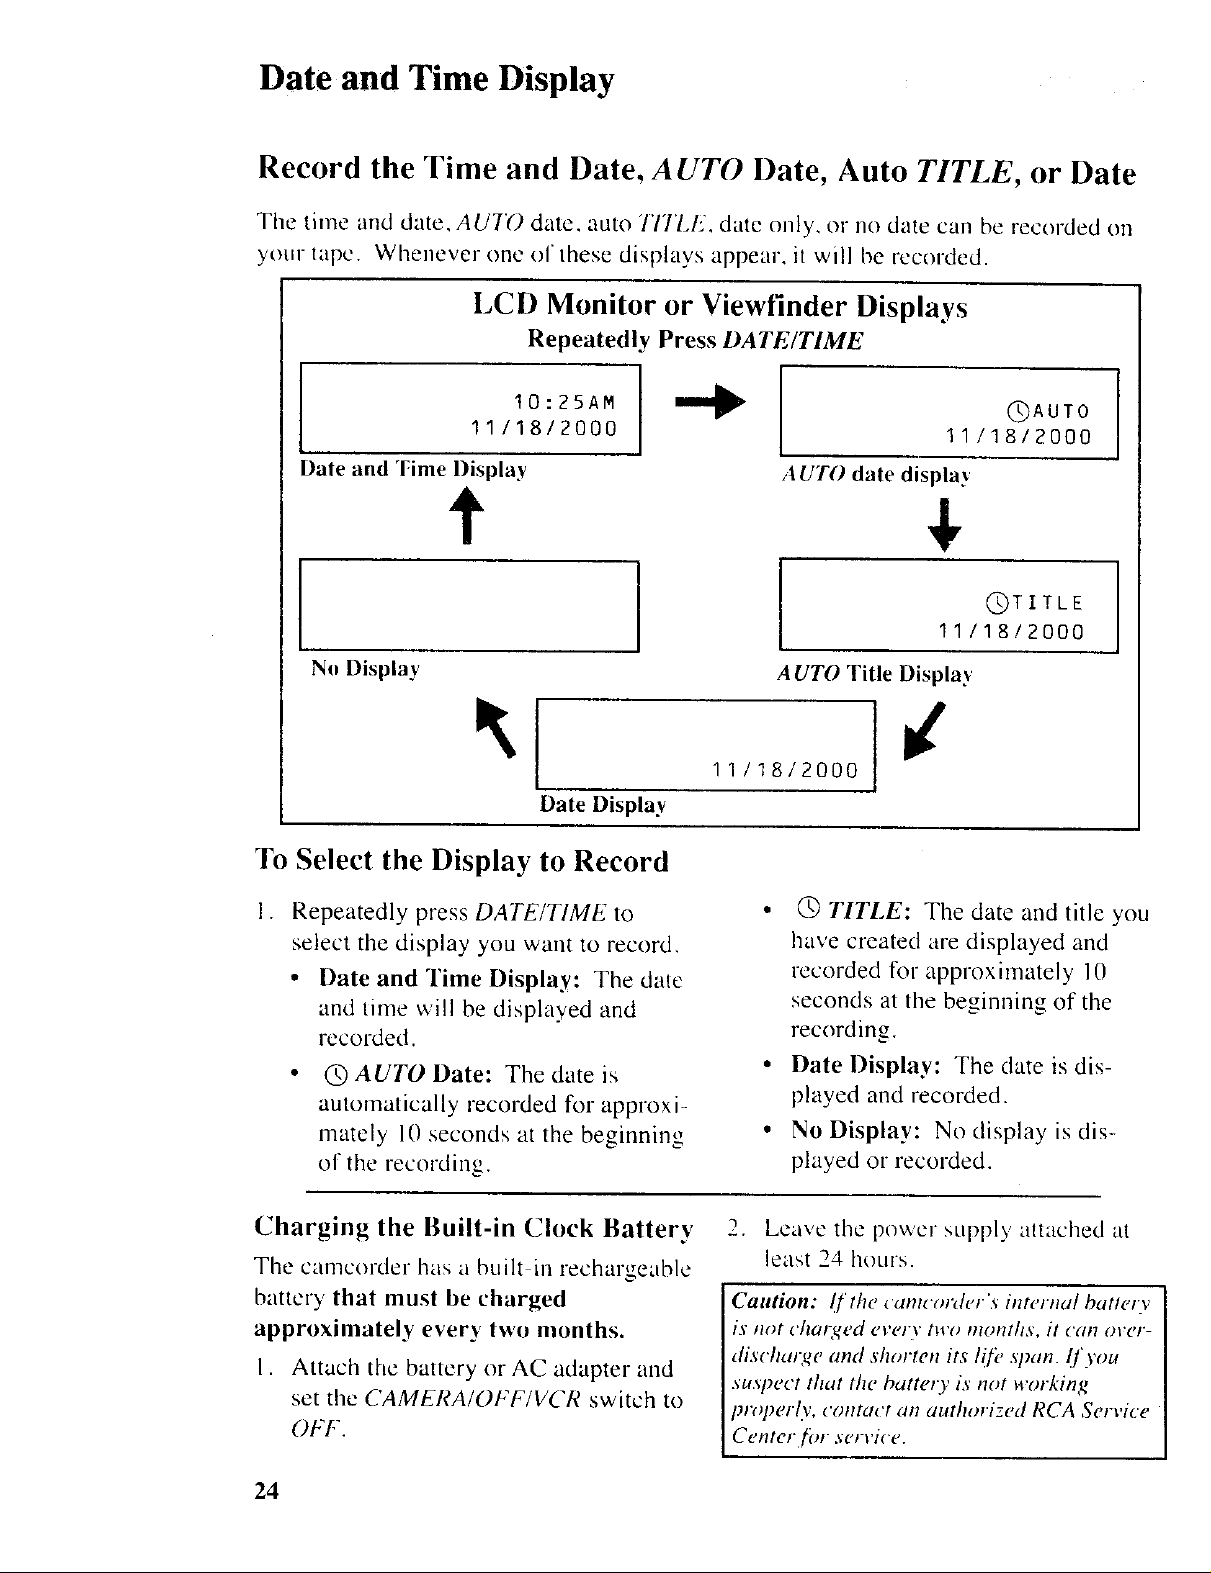
Record the Time and Date, AUTO Date, Auto TITLE, or Date
The time and date, AUTO date. auto TITLE, date only, or no date can be recorded on
your tape. Whenever one of these displays appear, it will be recnrded.
LCD Monitor or Viewfinder Displays
Repeatedly Press DATE/TIME
10:25AM
11118/2000
I*l oAoTor
11 /I 8/2000
Date and Time Display
t
I
No Display
Date Display
To Select the Display to Record
I. Repeatedly press DATE/TIME to
select the display you want to record.
• Date and Time Display: The date
and time will be displayed and
recorded.
@ AUTO Date: The date is
automatically recorded for approxi-
mately 10 seconds at the beginning
of the recording.
AUTO date displa+_
4,
@TITLE ]
11/18/2000
A UTO Title Display
€
11/18/2000
• @ TITLE: The date and title you
have created are displayed and
recorded for approximately 10
seconds at the beginning of the
recording.
• Date Display: The date is dis-
played and recorded.
• No Display: No display is dis-
played or recorded.
Charging the Built-in Clock Battery
The camcorder has a built in rechargeable
battery that must be charged
approximately ever++, two months.
I. Attach the battery or AC adapter and
set the CAMERA/OFF/VCR switch to
OFF.
24
Leave the power supply attached at
least 24 hours.
Caution: If the _anu'order's internal battely
is not charged every two months, it can over-
discharge and shorten its I_[k,span. l]'you
suspect that the battery is tTot working
I)roperly, contact an authorized RCA Service
Center /_)r service.
Page 27
Seeing What's Recorded
Using the Viewfinder and LCD
What is being recording can be viewed on the LCD monitor or through the camera's
eyepiece, called the viewfinder. Note that when the LCD monitor is open more than 45
• o -_ •
ck_iccs, the \,'iewfinder automatically turns off. Closing the I,CD automaticalh/turns
the viewfinder display back on.
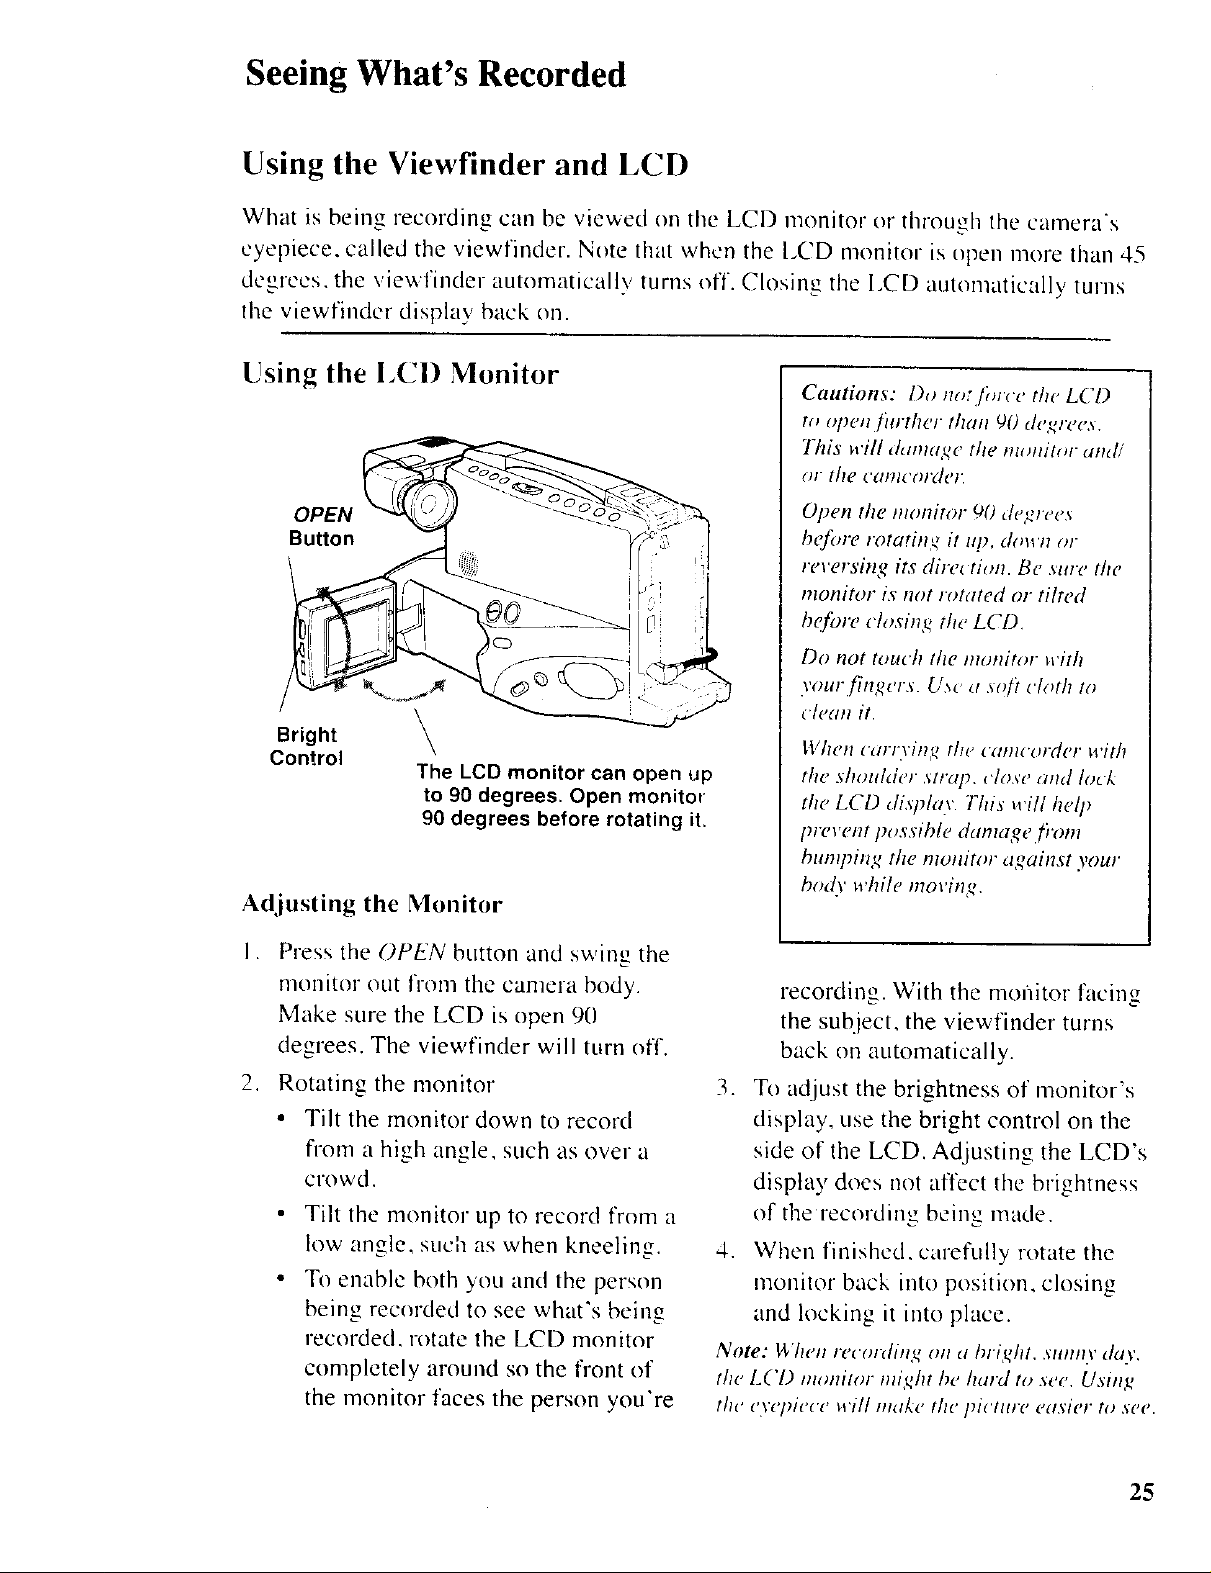
Using the I CI) Monitor
OPEN
Button
Bright
Control
Adjusting the Monitor
I. Press the OPEN button and swing the
monitor out from the camera body.
Make sure the LCD is open 90
degrees. The viewfinder will turn off.
2. Rotating the monitor
• Tilt the monitor down to record
from a high angle, such as over a
crowd.
Tilt the monitor up to record from a
low angle, such as when kneeling.
To enable both you and the person
being recorded to see what's being
recorded, rotate the LCD monitor
completely around so the I¥ont of
the monitor faces the person you're
\
The LCD monitor can open up
to 90 degrees. Open monitor
90 degrees before rotating it.
Cautions: l)o no: /hrce the LCD
to open/i_rther than 90 degree._.
This will d_l/ll(l,qe the mollilor amli
01 [he calllCol'del.
Open the monitor 90 de,<wees
b@)re rota#nk, it up, down m
reversing its direction. Be sure the
monitor is not rotated or tilted
before closing the LCD.
Do not touch the monitor with
your _'ngcrs. U._c _t ,sO/'Icloth to
Hean it.
When carrying the camcorder with
the shoulder sl;zq), close aml lock
the LCD dispho'. This will help
prevent pvssible damage./i'om
huntping the monitor against your
bo_lv while moving.
recording. With the mo_litor facing
the subject, the viewfinder turns
back on automatically.
3. To adjust the brightness of monitor's
display, use the bright control on the
side of the LCD. Adjusting the LCD's
display does not affect the brightness
of the recording being made.
4. When finished, carefully rotate the
monitor back into position, closing
and locking it into place.
Note: _rlt_'_ _'t'_'()l'di/l_ 011(t hright, sunny day.
the L('D monitor might he hard to see. Using
the eyepiece will make the pietttre easier to see.
25
Page 28

Seeing What's Recorded
Using the Viewfinder
The camcorder's viewfinder (which contains the eyepiece) is a miniature monitor that
displays the camcorder's recording image. When the LCD monitor is open from the
camera body more than 45 degrees, the viewfinder automatically turns off. For
convenient viewing, rotate the viewfinder horizomall}, pull it OLI[from the camcorder
body and rotate the eyepiece back to face tile camcorder's operator.
Viewfinder
Cautions: Do not pull on the
eyepiece. Do m_t._rce the eyepiece
to rotate _ompletely around. This
could damage the vie_]inder and/
or the camcorde/2
When caro,ing the camcorder with
the shoulder strap, put the
viewfinder back in its original
position. This helps prevent
possible danm_e to the view/inder
fiom bumping against your body
as poll Dl0l'C,
Viewfinder Controls
BRIGHT
control
!
__Eyepiece
focus control
BRIGHT Control
The brightness of the viewfinder's image
can be adjusted by rotating the BRIGHT
control. This does not affect the picture
being recorded by the camcorder.
Focus Adjustment
The eyepiece focus control allows
adjustment of the focus of the viewfinder
for your vision. If you wear eyeglasses,
you probably can operate the camcorder
without then:.
It is easiest to set the correct locus by
focusing on one of the viewfinder's on-
screen displays. Look through the
viewfinder and adjust the eyepiece lk)cus
control for your vision.
The eyepiece flmus control does not affect
the locns of the picture actually recorded
by the camcorder.
26
Page 29

On-Screen Displays
Identifying On-screen Elements
AE:60
ZM:2
I.ZOOM NO TAPE
A/V DUB
REC
The camcoider',, on-screen dlspla}
dehvels a variety of lnfolmatlon about
the camera's statu_ and settlng_ To sho,a
thp, mfolnlatlon, press the DISPL4Y
button on top of the calnera
The tollowlng is a hst of on-screen 1con,,
u,,ed to d_splay the camera's stattl,, and
current ,,ettlngs.
Auto Exposure/Shutter Speed
(AE:60)
De, plays the current shutter speed used by
the camcorder.
Battery Level Indicator (i)
Displays the amount of energy left In the
rechargeable battery. Fol detailed
lllJOI mtlttOtl ahout IIIc _ alllel (.l's batte_ y.
._ee pa,_e 16
Digital Effects (ZM:2)
Dp, ptay.,, the ,,elected indicator [or the
digital effect mode. To change the
selected setting, press the DIGITAL
EFFECTS button on top of the camera
until the de,qled format is displayed
0000M
E1
INDEX
10:30AM
11/18/2000
• 16X9- records m a ,,_lde format
mode Used lor recordings to be
displayed on a 16X9 TV
• VEGPOS- i-ever.,,es the captuied
mktge from positive to negative.
• ZM:2- activates extended zoom
mode (wide angle) to 240 times
when instant zoom is activated
ZOOM appears on-screen when an
linage i.-, zoonled over 16times
•MIRROR records mirror images
on the left and right sides of the
screen
• MOSAIC- records a mosmc, or
plxellated, image.
• FoJ detaUed tlgormanon about
Vw_ ml efi/lects, see pages 34-37
Steady Pix _"Indicator (:",,,)
The Stead 3 Plx feature is des,gned to
reduce the shakiness of recorded Lmages.
Often. x_hen a camcorder is hand-held
Irather than tripod mounted), there is
nonceable movement of the camera. The
Steady' Pix feature reduces nonceable
,,Ibranon In the recorded image.
I ( OllOllllud olI ll_' \1 I)t!k,[.')
27
Page 30

On-Screen Displays
To turn the Steady PIx feature on or off.
press the STEADY PIX button on tile side
of the camera The symbol. "' .appears
on s£'reen when tile feature _s activated
F<, detailed in[ol mation. _ee pa','c 31
Fade Indicator ( _117)
Activates one of four dlflerent t3 pc,, ol
fade effects from/to a blank ,,creen
• 25. indlc:lte.., a slow. gradual tilde
• '_ indicates a fade from the center of
tile qcreen.
• l_:? indicates a zooming fade
• B/W indicates a black-and-white fade
For more speclfi_ detail.s, sere/ to i_age_
38-39
Index Indicator (INDEX)
De, played when the camcorder l_ placing
an index mark on the tape. For spett/,
details, see page 32
Status Displays
The following indicators detail the status
of the camcorder:
• A. DUB- appears during audio
dubbing
Tape Counter with Memory Stop
(O000M)
Dl,,play,, the tape counter The tape counter
help,, locate segments ol tape Fo# mose
VW_d" detaU_, selel to paw 40
• Mcmoly stop is turned orz whencve,
the tape counter appears
]'ape Warnings (TAPE, NO
T.4PE, and TAPE END)
TAPL fla,,hc,, on screen when a
recording is attempted x_ith the
safety tab removed flom the
camera's x ideocassette.
TAPE flashes on screen when a
damaged tape is inserted into the
camera Remove the tape and
replace _t with a new one
NO TAPE flashes when you try to
recoid with no cassette inserted
T4PE END flashes when there is
approxHnately fixe minutes of
recoidlng time left on the tape. This
doe,,, not appear m the recording
TAPE END briefly appears when
you reach the end of the cassette
when you're recording This does
not appear in the recording.
• All" DUB- appears during dubbing
of audio and video.
• REC- appears during recording.
• _'>- appears while the camcorder is
fast-forwarding through tape
• 44- appear_ when the camcorder is
rewinding through tape
• il - appears when a recording is
paused
28
Time and Date Display
To display the time and date. press the
D.4TE/TIME button on top of the camera
Thi_ wdl appea* on Uw *egmdmg
Press the DATE/TIME button repeatedly
to toggle through tile iecolded selectmns
mcludmg AUTO date. auto TITLE. date
only. no date. or time and date when the
caracorder _s m record-pause mode.
Fo# motv vpe_ tfw detaUs, refe# m pages
23 -24
Page 31

On-Screen Displays
Tape-Remaining Indicator (_-,,_)
Press tile DISPL-1Y button on top of the camma to dJ.,,play the tape-remaining
indicator This dl,;play show,, the approximate amount ot tape left for recording
or playback Fm ,tm_, v_e_ ira detaH_ icier to page 32
Zoom Indicators (ZOOM and I.ZOOM)( . I
• Tile zoom indicator ( . ) appems x,.hen yOLIuse tile power zoom button,,
(7 and It _)
• ZOOM appear,, when you zoom with the T button and magnlfle,, the
m_age more than 16 runes
• I ZO0,'_I appears when \'ou pre,,,, the IN.ST ZOO,VI button to mHnethatelv
enlarge the picture I 5 hines.
• [)ctut[_ ulz, o/, pd,gc 33
Camera Features
Your camco_ der has a varmty of feature,,, which can be changed w_th the touch of a
button Re_ _ewmg the camcordm ,, leature,, lk)l a few moment,, now wdl help you get
the mo'a,t OUt of your recordmg,_
In thzs secuon, you can not only learn to work ,.\'_th the standard, necessary functmns
of the camera _such a,,, turning _t on and advancing o. revmwmg the tape), but also
,,ome of the more specml feature,_ that allow 3ou to add }'our own flmr to recordings.
DISPLA Y
Microphone
Zoom buttons
(Tand
REW/REVIEW
button
CAMERA/OFF/VCR
switch
STEADY PIX
button
((_(In[lllllt'd oil nt' i [ ]J¢l k_("t
29
Page 32

Microphone
DISPLA Y
External
Microphone
jack
(underneath)
Zoom buttons
(Tand W)
DISPLAY Button
Pressing the DISPLAY button toggles the
camera's on-screen display oll and off.
The display shows on both the LCD
monitor and the viewfinder's eyepiece.
This screen display shows information
about the battery level, the Steady Pix
feature, shutter speed, tape counter with
memory stop, remaining tape display,
index, fade, zoom and digital effects
indicators.
REWiREVIEW
button
CAMERA/OFF/VCR
switch
S TEA D Y PIX
button
the camera. This mode begins whenever
the unit's power has been left on lk/r more
than ten minutes with no cassette inserted,
without the date being set or the built-in
clock battery charged.
To cancel demonstration mode, remove
and reattach the battery or AC power
adapter or insert a cassette.
Note: To prevent the demonstration mode
from startin_ no matter how Ion_ the unit is
powered on wit/tot_t tape, set the date and
make sure the h.ilt-in clock hatterv is char qed.
Microphone
The microphone picks up and records the
sound during a taping. Being in the front
of the camera, the microphone is more
sensitive to sounds coming from
whichever direction the lens is pointed.
Using an external microphone will
deactivate the built-in mio'ophone.
Demonstration Mode
Your camcorder has a demonstration
mode which highlights certain features of
30
Quick Review Feature
To review the last few seconds of a
recording, press and release the
REW/REIqEW button on top of the
camera when the camcorder is in record-
pause mode. In order for this to work. the
CAMERA/OFF/VCR switch must be set
to CAMERA.
The camcorder will play back the last few
seconds of the recording, and then stop
the tape at its previous position, returning
the camera to record-pause mode.
Page 33

Camera Features
AutoShot'" Feature
Wittl this K'atul'c activated, the canlcordcr
autonlatically adjusts lbcus, white
balance, iris, shutter speed, and lighthlg
according to the recording conditions.
Auto Focus
The camcorder lotuses on tile subject in
the center of tile canlcorder's frame. Auto
focus operates on tile telephoto IT) side
from approxinlately 3 foot to infinity. On
the _ ido-angle (I.V) side, auto focus v, oiks
l:ronl _]/_ of _.111inch [ronl tile lOllS SLIl'f{ice
{lllacFo fOCUS) to infinity.
Note: 77mAA irMivafol fin' HIu _llulrdl weed
_cle<md hv shy la#m ordes (1i60. II100, 1/120,
IilgO. 1i2511. !/3St). !1500, If751L t 10(lO,
!/ 1500. I/2000, ol I i4000) aplWal,, m sil<'ixt;
_l rl't'_; di._l![d_ W/h'!l lll livtlfcd [hi', will ffol
([[)/)c(rl Ofl !lie I't'{'f)lg('t/ hlhl_J( '
File lollowing conditions may prexcnt
auto focus frorn operating properly:
• Recording through a window.
• Rccordirig a subject that has a close
foregrotmd and a far background.
• Recording two subjects at different
distances that overlap.
• A subject not in center of the flame.
• Recording in low-light situations.
• Recording a scene with fast
motions, like a tennis swing.
Macro Focus
The camcordcr lens' macro-focus ability
allows recording of objects as close as
3/8 of till inch. To use MaCl'O focus;
1. Press and hold zoom button W until the
lens is completely zoonled out.
2. Position subject ill the center of the
frame and record.
Note: Zooming n'il/ autanlaticallv exit nlacro-
p,cus. T<>uhan<w' file si:e qt"flle s,hjeet lbeused
g;/1 ill rrrtl( ro.tburt.s, irrol'e l]le carrleolgler Jells
h_,'r _. /wlh_'r an'ayj)om il.
kt_r t>u,.l ;c',u/l_,. imreu.w lighting when
sk'( oll/Hrt, with flhri'roffiJcrl.\.
Stead), Pix TM feature
The Steady Pix feature corrects slight
shaking of images during sonic recording
modos hlchiding:
• Zooming in on a distant sub.loci.
• Recording till approaching small
subject.
• Recording while walking,
• Recording from a moving vehicle.
Using the Steady Pix Feature:
• Press tile STEADY FIX button to
activate. The steady pix indicator
( ) appears Oil screen but not in
the recording.
• Press the STEADY PIX button again
to deactivate. The steady pix icon
( ," ) disappears.
Notes: 7"zu-nthe Steady Pi.v,fi, ature off vl'hen
using a tripod. The fi'anrre ma.l' not operate
i,oper/3 when wide-angle or telephoto lens
a(Idl)lers ar'e ltsed,
77wre is a small change in the picture size
when using the Sleaclv Pix ]eature.
Accurate stabili:ation may not be possible if
hand shake is evcessire or when shooting the
fidhm'in,v.
• Subjects with vertical or horizontal
stripes.
• Dark or dim subjects.
• Subjects with excessive backlighting.
• Scenes with movement in various
directions.
• Scenes with low-contrast back-
grounds.
31
Page 34

Camera Features ....
Tape-Remaining Display
The tape-remaining display shows the
approximate amount of tape left for
recording or playback.
Taperem,dmn:4di.vfla.vwhk h duna_
III [/IL' L.( 'O mo¢litOl oi view/imler
• Press the DISPLAY button on top of
the camera to display the on-screen
display. The tape-remaining indicator
appears in the viewfinder or LCD.
Electronic Indexing
Each time you begin recording (after the
unit has been turned off for at least lkmr
hours), the camcorder automatically
records an index mark at the beginning of
a new recording.
When an indexed tape is played back in
a VCR that has a compatible indexing
feature (called "VHS Index Search
System"), these invisible marks can be
located automatically. See your VCR's
Owner's Maraud Ibr index playback
INDEX
• The camcorder takes approximately ten
seconds to calculate the remaining tape
when you first start playing or record-
mga tape.
.... appears while the
camcorder calculates the amount of
tape remaining•
Once the remaining tape has been
calculated, it is automatically updated
and readily available as long as the
same tape remains in the camcorder.
• When _m,,,,m appears, all or most of
the tape remains.
• _ and _E:_m appear as the tape
is being used.
• When the tape has approximately five
minutes left, "'TAPE END" flashes in
the viewfinder or on the LCD monitor.
INDEX display which shows m
tile LCI) monitor or view/inder
instructions.
When the DISPLAY button is pressed and
the on-screen menu appears, "INDEX"
appears briefly to let you know the
camcorder is recording an index mark.
Note: The camcorder does not record index
marks ever 3, time you stop and start recording.
An index mark is recorded only once - at the
start (_/'each re_orditt,_ session (or whenever
the unil has heepl turned qffjbr /bur /tours).
32
Page 35

Camera Features
Zooming
The zoom button,, IT and W) allow for close up_ and w_de-angle shots Whde the zoom
amom_t can be manually adju',ted u_mg the T and W button,,, instant zooming _s also
possible, mlmedlatelx magml_'mg the picture I 5 times.
Zoom buttons
(Tand IN)
\ INST. ZOOM
button
Using the Zoom Buttons
lT and W)
To zoom m or out up to 72 tunes the
normal magmfication, press zoom
button T or _1.
• To moxe the lens in the telephoto
(clo,,e-up _dlrecuon, pres,, T
• To move the lens m the w_de angle
dlrecnon, press W.
The zoom level indicator appears m the
on-screen displays when the DISPLAY
button is pressed. "'ZOOM" appears on
screen when the unage ts magnified more
than 16 rimes
Using the Instant Zoom Button
ffNST. ZOOM)
To instantly magmty the subject 1.5
times, press the INST ZOOM button
on the side of the camcorder.
"'1,ZOOM" appearb m the on-screen
display s during instant zooming
I. ZOOM
In sla/lt 2oo111 tit v_la\ s]lol_ n in the
on-xo,.'en dr, pl,.t,,', when _he DISPLM hlltlOl_ I_
Ill t'\ _ed
Zoom Level IBdlt ato/ III
LCD Momtl,t _, I'w_ffmch'l
33
Page 36

Digital Effects
Adding Effects
The camcorder has a digital processor that allows recording using one of five special
digital effects. One can record using: 10X9 mode (wide l_,nnlat), negative image
(reversing all colors). 240 times digital zoom (with instani zoom), mirror image
(showing tile inlage and its reversed oppositcj, or mosaic image (as though built with
mosaic tiles). Each effect is described in de|all in the follow iilg seclion.
Selecting a Digital Effect
I .
Place the canlcorder in record-pause
mode. Make sure the on-screen
displays appear in the viewfinder or
on the LCD monitor. If not. press 11_e
DISPLAY button.
.)
Repeatedly press the DIGITAL
EFFECI'S button uniil the indicator
for the desired digital effect appears
Oil screen. This icon will not be
recorded.
DIGITAL EFFECTS
button
On-screen digital effect displays
Repeatedly press tlw DIGITAL EFFECTS button to toggle through selections
16X9
NEGPOS
I
16 X 9 mode
t
Normal Picture (No Display)
t
MOSAIC
ZM:2 I
MIRROR
Negative mode
!
DigitaIZoonlmode
$
I
34
Mosaic mode
Mirror mode
Page 37

Digital Effects
Selecting a Digital Effect (Continued)
16X9 Mode
The camcoldet has a ,a _de tormat reco_dzn_ mode allnwmg tile czeatlOn of recordings
that are compattble _tth the 16X9 T\" format When 16X9 mode ts activated,the
L_alllcofder record.,, black bat.', at the top and bottom ol the plctnfe to produce the wlde-
-,t._ee_l elfect This _s a[-,_ kt/o_ n as lett('_ h¢_ _ccurdmg
New 16x9 TV Screen
Caution: Do not use this mode
unless you have a compatible
16 X 9 TI,: When played on a
regular (4 X 3) T_, black bars
appear on top and bottom of the
ptcture
Standard Shape TV Screen
Recording in 16X9 \lode
Place the camcos-der m record-pause
mode Make sure the on-screen
dt.,,pIays appeal m the ',tev, _u/der or
on the LCD monttor If not, ptes_ t/w
DISPLAY button.
2. Repeatedly press the DIGITAL
EFFECTS button untd 16X9 appear,,
3. Press REC/PAUSE to start recording.
4. To turn off 16X9 _ecordmg. presa
REC'PAUSE to pause recording, and
repeatedly press DIGITAL EFFECTS
untd no d_gmd effects display appears.
! •
16X9
IhXq tltv_/a_ tt_ \tlt*_t'tl /tt tht"
L(1) _l*,/i/ItJ/ _Jt _ 1_'_ tuldel
/(>\9 th_lh'
\r ,,ma! _.t,.h"
35
Page 38

Digital Effects
Selecting a Digital Effect (Continued)
Negative Mode
To use the camcorder":, negative mode
re,. erslng all colors"
I Put the camera m tecord patt,,e mode
Make ",ure the on-screen di-.plav,,
appear. If not. pre•s the DISPI,-11"
buttcm on top of the camera
2 Repeatedly press DIGIZ4L EFFECTS
until NEGPOS appears.
3 Press REC/PAUSE to start recording.
4 To turn off negatr,,'e recording, press
REC/PA USE to pause recording, and
repeatedly press DIGITAL EFFECTS
until no digital effects display appear •
Digital Zooming
The camcorder ha,, digital zooming
allowing magnification tip to 240 time•
(with instant zoom) Normal zc,oming is
up to 72 time _,
I Place the catncordcr nl lecord-pausc
mode. Make ,,,ure the on-screen
disphLv,, appeal If not. pre,,• the
DISPL 11 button
Repeatedl.', pie,,,, the DIGIT4L
EFFECTS button untd ZM 2 appear:,
Use the zoom buttons to zoom m and
out on the image ZOOM appear• on
screen when ilMglllflcatlon is greater
than 16 rune• but doe,, not record
U•e [he ill•[ailt !.OOIll feature v, hlle
ZM 2 appear• to magmf 3 up to 240
times
N,nmalMode
,Vcc,att_ e Mode
3. Press REC/PAUSE to start recording
4. To turn off dtgltal zooming, press
REC'P4USE to pause recolding, and
lepeatedly press DIGITAL EFFECTS
until no digital effects display appears.
Note: As the zoom h'vel m_ teases du# trig
dtgttal :mmnng. the ptctute wdl g#adually
he( onle le_ S]ltllT_ Use the htgh 2oom leveM
malnly Jol spe_ tal effec t_
36
Page 39

Digital Effects
Selecting a Digital Effect (Continued)
Mirror Mode
The camcorder has a nm-ror mode that lets
you display a symmetric image on the left
and right, obtained by placing a mirror at
the center of the screen.
I. Place the camcordcr io record-pause.
Make sure the displays appear in the
viewfinder or on the LCD monitor.
If they do not, press DISPLAY.
2. Repeatedly press DIGITAL EFFECTS
until MIRROR appears.
.
Press REC/PAUSE to start recording.
4.
To turn off mirror recording, press
REC/PAUSE to pause recording, and
repeatedly press DIGI7AL EFFECTS
until no digital effects display appears.
_lim, Mode
Mosaic Mode
The mosaic feature lets you add a mosaic
effect to your recording.
i. Make sure the displays appear in the
viewfinder or on the LCD monitor. If
they do not, press DISPLAY.
2. Repeatedly press DIGITAL EFFECTS
until MOSAIC appears.
3. Press REC/PAUSE to start recording.
4. To turn off mosaic recording, press
REC/PA USE to pause recording, and
repeatedly press DIGITAL EFFECTS
until no digital effects display appears.
Note: Mo._aic recording ('NIIIIO? he used with
digital :¢_omittg. iusmm zooming, steady pi.v,
or the :oont.[_tde.[_'atures.
Normal Mode
Mosaic Mode
37
Page 40

Digital Effects
Fading in and out of Scenes
A professmnal touch can be added to recordings by lading m and out of scenes. Both
the picture and sound gradually appear or disappear with these varlons affects. Tile
speed ol the fade ts controlled by the camcorder.
FADE button
Selecting Fade Types
Fade effects include w,hlte fade, black.
yellow, blue, and green wipe fade, zoom
fade, or black-and-white fade.
Press REC/PAUSE to pause recording.
Make sure the displays appear on
screen If not, press the DISPLAY
button
2 Repeatedly press the FADE button.
The indtcator for the fade selected wdl
appear on screen.
• Select [] (white) to fade m and out
to/from a white screen.
• Select [_ (black wipe) to fade m
and out to/from a black screen
• Select [_YEL. [_]BLU. []GRN
(yellow, blue, or green wqpe) to
fade to/from a yellow, blue, or
green screen.
• Select '<c- (zoom) to fade in and out
while zooming.
• Select B/}V (black-and-white) to
fade in and out to/from a black-and-
white ptcture.
• Select no fade indicator if you do
not want to fade m or out.
Notes: Zoom tade &_es not opet ate wtth
MIRROR and MOSAIC ._pec ml effe_ ts mode_
Presstng the DIGITAL EFFECTS button turn_
off the]ade mode Set the dtgmd effect you
want. and then set the fade
38
Page 41

Digital Effects
On-Screen Fade Effect Displays
Repeatedly press the FADE button to toggle through selections
I
While Fade
t
Normal Picture (No Fade)
t
B/W
Black-and-White Fade
t
I
I
Black Wipe Fade
4,
i_"Y E L I
Yellow Wipe Fade
4,
::BLU
Blue Wipe Fade
4,
Zoom Fade
Fading In
I. Press REC/PAUSE to pause recording. 1.
2. Repeatedly press FADE to select the
fade you want to use.
Note: The last fade used appears the first
time you press FADE. 2.
3. Press REC/PAUSE to start recording.
The picture and sound gradually
appears in place of the blank screen.
Green Wipe Fade
Fading Out
During recording, repeatedly press
FADE to select a fade.
Note: The last fade used appears the first
time you press F;4DE.
Press REC/PA USE to stop recording.
The picture and sound gradually
disappears.
39
Page 42

Tape Counter
Locating Tape Segments
The tape counter acts as a handy reference to help you locale tape segments. The
memory-stop feature helps locate a certain point on the tape. When the tape counter
appears, the tape stops amomatically during rewind or fast forward when llae tape
counter reaches O00(bVl.
DISPLA Y
button RESET
button
CAMERA/
OFF/VCR
switch
©©
Using Memory-Stop
I. Press REC/PAUSE to pause recording.
Make sure the displays appear on
screen. If not, press the DISPLAY
button.
2. Locate the space on the tape to be
returned to, and press RESET to reset
the counter to O000M.
O000M
REW/ REVIEW
button F.FWD button
/ s,o iE Ec,
/ / button
!
recording or the STOP/EJECT button
to stop playback.
4. Press and hold the small, red button
on the CAMERAiOFF/VCR switch
and slide the switch to VCR.
5. Press the REW/REWEW button.
The tape rewinds to the counter
reading of O000M, the space marked.
Notes: Pre.s.s the DISPLAY htaton to show or
liMe the tape cou;iter. This ntimber will appear
on the recording. Menu) 0' stop is turned on
H']I('II('V('F t]l_' RII)_' (OHllt('r al)p_,_llS.
[itpe ('otoller with Iilc'l!lOQV stup
3. Continue to record or play the tape.
To return to the marked space, press
the RE(/PAUSE button to stop
4O
The uanl_ cn¢ler automatically stops when the
_,mntcr reaches 0000M. To contintu' rewind-
ing or fitst fin'warding, press the pt'¢q_er hulton
_lk[tliH,
The tape counter _llllOmtltic(i/lv I'C,_{'IA Io
0000M whenever a ua._sette is inserted.
Page 43

Editing Videocassettes
Editing Features
The camcordcr incorporates a complete package of advanced editing ligatures to make
it easy and |tin to edit home videos giving them a professional touch. The m_tior editing
li:atures described in this section inchide:
• Camera Edit • A/V (Audio/Video) Dub
• Hying Erase Head • Titler
• Audio Dub
RESET CAMERA/OFF/VCR REW/REVIEW
button switch button F.FWD button
', /
L oboo , o o
Camera Edit Feature
The camera edit feature allows
positioning the tape at a specific area
while in record-pause mode. To enter
RECORD mode, press and hold the
small button on the CAMERA/OFF/
VCR switch and slide it to CAMERA.
Begin recording. When editing is
desired, press the PAUSE button. 7'o
position the tape for editing:
• Press and hold REW/REVIEW to
x isually search the recorded tape
in reverse.
• Press and hold F]FWD to visually
search forward on the recorded tape.
• Press and hold PLAY to view the
recorded tape at normal speed.
When the button used to search is
released, the camcorder returns to
record-pause mode, halted at that point
on the videocassette.
Flying Erase Head
A separate head for erasing is mounted
on a spinning (hence the term "flying")
headwbeel within the camera. This
flying head allows the creation of clean
edits without the "'glitches" or "rainbow
noise" that might occur at the beginning
or the end of recordings.
41
Page 44

Editing Videocassettes
Audio Dubbing
The audio dub feature lets you record new audio (sound) on previously recorded
video tape without erasing the original video (picture). The previous audio track
is erased and replaced with the new dubbed audio.
File audio dub feature increases editing flexibility. Video segmems c.'m be
assembled first and then voice-overs tit"music can bc added later.
How to add new audio:
Speaking into the camcordcr's built-in or external (not supplied) microphone.
Connecting an external sound system to the white AUDIO jack of the cam
corder. To connect the camcorder to an external audio source, see the diagram
on the next page.
Dubbing Audio Onto a
Recording
I. Enter playback mode by pressing
and holding the small button on the
CAMERA/OfT:/ICR switch, sliding
it to the VCR position.
2. If recording from an external audio
source, set the At OUT/IN switch on
the camcorder to the IN position.
Remember: Set the AV OUT!IN switch to
OUT.for m,'mal recording. 6.
3. Insert the tape to be dubbed and using
the buttons PLAY, F.FWD, and/or
REW/REVIEW, locate a point on the
tape a few seconds before the point
where dubbing will start.
4. Press the PLAY button to advance the
tape at normal speed. At the exact
point where dubbing is to begin, press
the REC!P4USE button to pause the
recording.
5. Press and hold the ,4_ DUB button,
and then press the PLAY button. If 7.
both buttons are released at the same
A.DUB
II
time, "A. DUB n'" appears on screen.
The camcorder is now ready to begin
audio dubbing.
To begin dubbing, start the audio
source and press the REC/PAUSE
button. The tl icon disappears when
dubbing starts.
Note: Dubbing can be stopped at a
certain point on the tape. To do so,.find
tile emt t_oint jbr the dub on the recordin_
am/,_et the tape counter to 0000M by
pressing the RESET butlon on t_q_ of the
c'tmwr_l. T!len rewind the t(lpe to tit(' sg_ll't
i)oint /_, (hcbbin_. The camcor_h'r .s'tops
d.l_bi._ aul(*matical/.v when it reaches
tlO00M.
Press the STOP/E, IECT button when
audio dubbing is finished.
42
Page 45

Editing Videocassettes
Connecting the Camcorder to an
External Audio Source
AV DUB button
AV OUT/IN switch
in ]ll /Whiteaud,op,ug,':wh,te
I' ,' '.. _ "_ '1_ (connected) _ ,,' , audio jack
connections _ --_ _ ,"
of mono VCR or _ _ ,'
taoe deck Audio/Video Cable "_ . j"
- _ _,4 (such as VH83) _ _"
\ ,..
AN connections _L.
of stereo VCR, . _.'_ Y-adapter
tape deck, laser disc "_, , (such as AH25)
player, DVD player, _-_. _'_,_ /
or CD player _._,,_,,_
Yellow video plug
(not connected)
-OR-
Yellow video plug
(not connected)
White audio plug
Audio/Video cable
(such as VH83)
Yellow video plug
(not connected)
Note: You need an _qmonal Audto/['tdeo t able, _t. h a_ _ H83 to _onne_ t to an
e \ tel H_;I (ntdlo \otll _ t, If the ulKho ',_;to _ _' has _7)at _lt_, left and ttght t)utl_ztt_, attach
the 4,'_ t able to the attdto phLq labeled MONO II one t_ not labeled MONO. you
mt,_ht need a )'-aduptet tt_ let otd audto [J onl hoth the rtqht and le]t _hannels (see the
ReleJ('n_ _,s ,,ectlon m ttal,, manual to orde_ optional accessories)
43
Page 46

Editing Videocassettes
Dubbing Both Audio and Video
The audio and \'ldeo dub feature allo_s the recording of both new aud,o (sound)
and \'idco Ipictute) o11 tt pleVlOtl',ly tecot-ded tape T]lc audio dnd video dtlb I'_
achte\ ed v. tth either
• Thc L_'dll/coldu'r's bulb-in microphone or :.Ill c\lelndl IlllL'rop]l(HlC (not II1
_.]udcd). and C[tlllCl d.
- <+t
• All exletll_.l] ,,Oulld ,.llld \ideo ,,_Me111 connected to Ill,..' uu.ttllCOt(_lct "s v,,hlte
-\l l)I0 and \ cllo\_ \ IDEO jacks To connect the catncot dot to e',.tcl na] audio
,tnd \ ldeo sOLllCes, _ee thc dlagranl oll the next page
Dubbing Audio and Video Onto a
recording
Enter playback mode by pressing
and holdmg the smal! btttton on the
__ \ UER,-\ Ok F \ ('R .,\\ itch, shdlng
it to thc _ CR posmon
It recol-dlll_ [i'onl external sOtiices
connected to the camcorder's white
4UI)IO and yello\\ / IDEO lack, set
the _1 Or"[ IN sx__tch to IN.
Remember: Set ttw _\' OUT'IN sum ht¢,
OUT !ot n¢. real tecot dm _, 7
3 Insert the tape to be dubbed and using
the buttons PL4Y FFII'D, and/or
REI[ REI 1Ell ,locate a point on the
tape a few seconds before the point
v,'here dubbing wdl start
4 Press the PLAY button to advance the
tape at normal speed At the exact
pomt \\ here dubbing p, to begin, press
the REC,'P-1USE button It) pause the
recording
5 Pre-,s and hold the A\ DUB button, 8.
and then press the PL4Y button. II
both buttons are released at the same
tlmc. "4 DUB II'" appears on screen.
The camcorder ts tlO\_, ready to begin
audio dubbing
.
To enter audto and video dub mode.
again press and hold the AV button.
whde pressing the PLAY button. 'AV
DUB II'" appear,, In the on-screen
dp, play The camera is now ready to
statt audio and \qdeo dubbing
Start the audm source and press the
REC,'P4USE button. The II tcon
disappears when dubbing starts
,Vote: Dut_hm _ can be stopped at a
totam pOltll Ontlw tape To do vo,find
the end point tot the dub on tlw re_ o1"0111£,
tllld set the tape cOlllltel to 0000_,'I[1\'
pres _tJtk' tht' RESET Stilton oil top +,/ the
(_lttl('l tl IT&'H t,'xt Itlcl the ltlp_' t_J the' _t_lt l
pOilU ]+)1 tlll])/HIl-, The t tlHIt t)ldt'l )lops
duhhtnk, tlll[ODlGHt a[lv u h('l! i[ i('(l( lies
O000M
Press the STOP/EJECT button when
audio dubbing is finl,,hed
44
Page 47

Editing Videocassettes
Connecting the Camcorder to
External Audio and Video Sources
AV DUB bu_on
AV OUT,IN switch
Yellow,_
AUDIO
OUT
VIDEO
OUT
_o.°o
Back of
VCR or
TV monitor
r-'@
AUDIO
OUT
L--R@
@
Back of
stereo VCR or
TV mondor
White audm plug
..= //
_,J'_ video plug , :,
Yellow ' '
video Jack "
,, White
t i
: '. ,, audiojack
:'. ,.
..... .'
Yellow video
plug AudioNideo cable
(such as VH83) White
Audio Plug
-OR- Yel,ow
Video Plug
Yellow video plug
Note: Y_lt tleed an ¢q_tlonal Audto't /t/e,_ _able, _ttt ]l as I.'H_'.*'to ( *tuner t t*_aH
e_tet hal amlto _ou_ e I1 the audto SOIII( e ]lll_ _epat (lie lett .ml m,_,ltt mttput3 atta_ tt
the A,I ( ahle to the audm plu,_ laheh'd MONO I1 one t_ not labeled MONO \me
m/qht need a }'-adapter to te_ oJd audio [Join both the t tqht dtt(l left _]tamwl_ Isee the
Re/eten_ e,s .section in this manual to order optional Lt_'cc'_,Olte_,)
45
Page 48

Editing Videocassettes
Camcorder Titler
The camcorder's bruit-in tltler can store added personalized text into memory
The created title can be displayed and recorded at an_, tune
Tile built-in character register contains more than 45 dlflerent chatactei's Your
tntle can contain up to 32 characters on two lines.
- (minus) button'
(also REW/REVIEW button)
+ (plus) button
CAMERA IOFF
VCR switch
TITLER
button
\ \
(Also F.FWD Button)
EDIT-ADV. button
(also STOP/EJECT
button)
ooo0 . 0
46
Page 49

dltl g V deocassettes
Creating Personalized Titles
I .
Attach a power source to the
camcorder. Press and hold the small
button on the CAMERA/OFF/VCR
switch and slide it to CAMERA.
.
Press the TITLER button to display the
titler register on screen. A flashing
cmsor will be visible.
,
Press the EDIT-ADV button to move
the cursor to the desired character.
4.
Make the first selection for a
customized title by pressing the +
(plus) or (minus) button until the
desired character appears on screen.
See life chart of charcters below)or availahle
sele_'lions.
5. After selecting the first character,
press the EDIT-ADV button to move
the flashing cursor to the next desired
character to appear.
Correcting Errors
I .
Press the TITLER button to display the
chart of characters on screen.
Press the EDIT-ADV button to move
the flashing cursor over the character
to be corrected.
.
Press the + (plus) or- (minus) button
until the correct character appears.
4.
When finished, press the TITLER
button to store the corrected
expression and remove the chart of
characters from on screen.
Note: I]you want l• delete a character, press
the + (pht.s) or - (minus) I_tttlons ttHl/l the
hhmk space al_pears.
6. Repeat steps 4 and 5 until you have
completed the customized title.
7. When finished, press the TITLER
button to store the customized
expression and remove the chart of
characters from on screen.
Remenlber: Be Sill'( _ N) i'('ntove []1(_ titler
,qr_tpl ics fi'ot the (. -screen d splay _ s this
be:fi)re contimdng to record.
Titler's Chart of Characters
ABCDEFGHIJKLM
N OPQRSTUVWXYZ
0 12 3 4 5 6 7 8 9 ')'./ ,
- ; : < > ! (BLANK)
47
Page 50

Editing Videocassettes
Recording onto a Tape in the
Camcorder
I, Attach a power source to the
camcorder. Press and hold the small
button on the ('AMERA/OFF/VCR
switch and slide it to the CAMERA
position,
2. Navigate to the desired location on
the tape to record a title.
Note: I/you record a title on a prerec_Jrded
tape, the audio and video is erased where
the title is i_l_erled. A tillec-lo:[_ttr seeotld
pause q[ bkm_ tape _lpl_ears I)efi.'e the pre-
e.vistin_, audio and video retttrtl.
7)J elinli_late the i_au_e._ qf blank tape. use
the a.dio and video duh /_'amre to a_M title,s
to prere_wrded Iape._ (See pages 42-43 for
more information).
3. Pxcs. l ll LLR to display the tiller
graphics in the view finder or on the
LCD monitor.
4. PI'(:si REC/PAb'S£ lo start recording
the title.
,
After you have recorded the title
for the desired length of time, press
the TITLER button to remove it.
The camera will now record
normally. To stop recording, press
the REC/PA USE button.
Recording Titles While
Copying a Tape From the
Camcorder to Another VCR
I. Attach a power source to the
camcorder.
2. Place the tape to copy in Ilae
camcorder, then press and hold the
small button on the CAMERA/OFF/
VC'R switch while sliding it to the
VCR position.
3. Place a blank tape in the VCR and
place the VCR in record-pause
mode.
4. Begin copying the tape from the
camcorder to the VCR. f'or specifh'
details..__'e p_"_,e._ 54-55.
5. Find the point on the tape to insert
a title and press the TITI.ER button.
6. After recording the title for a
desired amount of time, press the
TITLER button to stop recording it.
7. Stop the camcorder and VCR when
finished copying the tape.
hnportant Note: Remove the titler
,4raphies fin m.mal reeordinv hy pressing
the TITLER htaton.
Remember: Remove the titler gr_q_hies fi_r
IlOl'tll_l] reeordin,g,
Note: You can also use the automatic title
re_'ordin_ /_,cltut'e to aulonuttically record
the title and date /i, I0 seconds when you
he_in recording. Press the DATE/TIME
hutton to display _ TITLE icon b_jbre
startill? to re_ tJrd.
48
Page 51

Tips
Recording Tips
• Make sure indoor scenes are well lit.
Adequate lighting improves picture
quality and color reproduclion.
• Do not move the camcorder rapidly
fronl side to-side while recording.
:\ sicud)'giaduul "pan" avoids
bhuTing und "jitter."
• Use the vicwfinder {}l LCD monitor
i:{) eusure the camcorder is level while
rec{}rding so that scenes don't appear
"tilted."
Do nol bump or tap the camcorder's
microl)hone as u sound test while
recording to ensure the camera's view
doesn't become tilted.
li_cluding close-ups of individuals
when taping family outings or group
functions is a good way It) ensure
rnemorable moments.
Fading in and out of scenes makes
videos appear more professional.
l,eam to use lhe special digital effects
available with the camcorder to add
variety to personal recordings.
Be aware of xideo and audio back-
grounds. Background details barely
noticed during recording may show tip
as visual 'cluller'" on tape. Background
noises (especiully I'V sets, radios,
household appliances, traffic sounds.
etc.) can detract from the desired sound
to be captured.
Avoid long +'still" shots of landmarks
and scenic attractions. Recordings are
more interesting if they include people
and details. "'Local color" will give
travel videos lasting appeal. Consider
recording a familiar or landma,'k scene
from t n unfamiliar vantage point.
Travel Tips
Write down the camcorder's serial
number and keep it separate from the
camcorder when traveling. If it is lost
or stolen, you will be able to identify it.
Use extra care when using the
camcorder or accessories at a beach or
pool. Spray, sand. and dust should be
avoided as they can cause serious
damage to parts. If the lens hlts been
exposed to the elements, clean it only
with proper lens cleaning supplies.
Make sure to have all neccessary
adapters before taking the camcorder
to other countries. Consult with an
authorized dealer for advice on needs.
Carry the camcorder in a carrying case
when traveling. An ordinary suitcase or
carry bag does not offer proper
protection. Treat the camcorder as
carry-on luggage and protect it from
rough handling. See tile/tcccssoric._
Order F, rm in tDe References s{,(tio##
_f thi.v manttal.fi)r a _'ustom case.
49
Page 52

Copying _pes
Recording From a VCR or TV Monitor
To record from a VCR orTV monitor to a tape ill the camcorder using audio and
video output .jacks, an optional A/V cable, such as VH83 is needed. For detailed
information, see the "Optional Accessories" section in the manual's R{_/k'rem'es
section. To connect the camcorder to an external VCR or TV source, see the
diagram below.
AV OUT/IN switch
Yellow_
White
_) audio plug
AUDIO
OUT Yellow ,,
VIDEO
OUT \ ","
video jack P, • White
i", ,' audio jack
video plug
@.... / .q
Back of Yellow video Audio/Video c "
VCR or plug (such as VH83)
TV monitor
F--'_"
AUDIO
OUT
C_R@
,,%_o8.
Back of
stereo VCR or
TV monitor
/
-OR-
"__ Y-Adapter White audio
White audio
plug
Yellow
video plug
Audio/Video Cable
(such as VH83)
White audio
plug
50
Yellow
video plug
Page 53

Copying Tapes
Copying Tapes to the Camcorder
Installation
1. Attach the white plug on one end of
the optional audio/video cable to the
AUDIO OL/Tjack of the VCR oITV
monitor.
Note: Atl optiottal amlio/video cahle, such
as Vt!&_ is needed for this operation. I['the
amtiu source ha,_ separate I_/_ and right
OItI])IILS, atta_'h the audio phtg to the fl,'k
laheled MONO. 0' no jaek is labeh,d MONO,
a Y-ad_q_ter IIRI.\'he needed, as shown on
page 63 to reuord audio fiom hoth tile right
aml I</? ehamwls (vee. "Accessories," in the
References section of this manual fin"
il{fi;rnTation (lholtl orderin A,optional eahles).
Recording
1A.Camcorder connected directly to
TV monitor: turn onTV and tune TV
,
Attach the yellow plug on the same
end to the I,IDEO OUT jack on the
VCR or YV monitor.
.
Attach the yellow plug on the other
end of the cable to the yellow VIDEO
jack and the white plug to the white
AUDIO jack on the camcorder's side
panel.
.
Set the AV OUT/IN switch on the
camcorder to IN.
4. Insert a cassette with the safety tab
intact into the camcorder.
to channel you want to record.
l B.Camcorder connected to VCR that
is connected to TV: turn on VCR and
select the channel to record (or place
cassette to be copied in VCR).
Note: If you 14'allt to see what is being
recorded, turn on the 71"and tune it to the
channel that you normally use to see the signal
./)vm the VCR.
2. Set the AV OUT/IN switch on the
camcorder to the IN position.
3. Attach a power source to the
camcorder. Press and hold the small
button on the CAMERA/OFF/VCR
switch while sliding it to CAMERA.
5. Press the REC/PAUSE button to start
the camcorder's record mode.
If copying a tape, start playing the
VCR.
6. Press the camcorder's REC/PAUSE
button to stop recording when
finished.
Remember: Set the AV OUT/IN switch on the
cantt'order to OUT fin" norntal recordin£, on
the Canlcorder
Caution: T/w unatahorized recording of
television programs and other materials
may il{fringe the rights of others.
51
Page 54

52
Page 55

Using the LCD Monitor or Viewfinder
Recordings can be watched in color using the LCD monitor or viewfinder. When
the LCD monitor is open more than 45 degrees, the viewfinder automatically turns
off. Close the LCD monitor and the viewfinder amomatically turns on.
Rotate the monitor completely around and place it against the camcorder for
convenient playback. During phlyback, recorded sound can be heard through the
camcorder's built-in speaker when using the LCD monitor.
Eyepiece focus
control
Viewfinder
BRIGHT STOP/EJECT
control button
(underneath)
Speaker
OPEN
button
CAMERA/OFF/VCR
switch
PLA Y
button
Volume
control
Bright
control
53
Page 56

Playing Back Tapes
1. Attach a power supply.
Attach the adapter/charger, charged
battery, or optional car cord.
2. Insert atape.
• Press the STOP/KIECT button to
open the cassette compartment.
• lnsert the cassette with its safety tab
facing up and the tape windows
facing out.
• The camcorder can only play back
lapes recorded in the SP. pecd.
• Press the cassette down gently until
it locks into place, then close the
cassette compamnent door.
3. Press and hold the small button on
the (_AMERA,OFF/I CR switch
while setting it to the VCR position.
4. Use the LCD monitor or viewfinder
to view what you are playing back.
S •
Using the LCD Monitor
• Press the OPEN button to open
the LCD monitor. Make sure the
monitor is open at least 45 degrees.
Note that the viewfinder automati-
cally turns off.
• When opened 90 degrees, the LCD
monitor can be rotated around and
placed back against the camcorder.
• Fit the shoulder extension pad for
convenient viewing using the LCD
monitor.
• Adjust the brightness of the monitor
playback by turning the bright
control on the side of the LCD.
Note: The LCD nlOllilor lllay b_'COh'l_' '4'Orlll It)
lilt' lottch wJlell I_][ Ol;_'tl fi;r Gill _'.\lt'tlNt'd
period qJ lim e . l "/ lll ,] i[_' IIo r tll a l .
Using the Viewfinder
• Make sure the monitor is closed
and locked. If the monitor is open
more than 45 degrees, the view-
finder automatically turns off.
• Grasp the viewfinder and rotate it
horizontally.
• Pull the viewfinder out from the
camcorder and rotate the eyepiece
to atcomlol-table viewing position.
Caution: P dli g on the eyepiece migl t ca _'e [
damage to the eyepiece or camcorder. Pul! only.f}'om
the vieuChtdel:
• Turn the eyepiece locus control to
adjust the sharpness of the view-
finder for individual vision needs.
• Turn the BRIGHT control under-
neath the viewfinder to adjust the
brightness of the eyepiece.
Note: You cannot hear the sound.f!'om the
camcorder's speaker when using the view-
finder.f!)r playback.
5. Press the PLAY button to begin tape
playback.
• If necessary, adjust tracking.
• During playback, use the playback
features as described in this section.
6. Press the STOP/E, IECT button when
finished.
I
• Speaker volume can be adjusted by
turning the volume control.
54
Page 57

Playback
Playback Features
REW/REVIEW
CAMERA/OFF/VCR button
switch _. \
[ oooo o
REC/PAUSE
button
F.FWD
button STOP/EJECT
button
Tape Positioning
Press the small, red button on the
CAMERA/OFF/VCR switch while setting
it to the VCR position.
• Press and quickly release the
REW/REVIEW button or the E_FWD
button to rewind or fast-forward the
tape to the desired position.
• Press the STOP/E, IECT button once to
stop tile tape.
Visually Searching
During playback, press and hold the
FFWD button or REWiREVIEW button
to search tile tape visually in forward
or reverse.
• Release the button to return to normal
playback mode.
Stop-Action Pause
• During playback,press the REC/
PAUSE button to "stop the action"
and view one frame of the tape.
• Press the RECiPAUSE button again to
return to normal playback.
Caution: Pause it, designed only.]_r
momental 3, interruptions and should not
fie used]or an extended period qf time. (["
the camcorder remains in pause mode.¢_n"
more than five mimttes, it automatically
enters st&_ mod_, and turns off to prevent
eA'ce'ssi;'e lap(; weal:
55
Page 58

Playback
Playback Features (Continued)
TRACKING
buttons
(also Wand 7)
Tracking
During playback, streaks might appear in the recorded image. Press either TRACKING
button (W or 73 to move the streaks up or down and out of the picture.
• During stop-action playback, pressing
one tracking button might reduce
picture "jitter" (picture bouncing up
and down). Some "jitter" is normal.
Remove the tape to reset the tracking
to its preset center.
56
Note: The tracking buttons only q[fect tape
playback. They have rto _'[_b¢'t durinq tl e
recording ntode.
Page 59

Playback
Playback on a TV or VCR Using A/V Input Jacks
To connect your camcorder to a TV monitor or VCR with Audio/Video IN jacks, an
optional A/V cable such as VH83 is needed. See, "'Optional Accessories" m the
Refi'rences section of this manual to order necessary cables.
If your TV is already connected to a VCR. attach the camcorder to the VCR and watch
AV OUT/IN
switch
/
White audio
AUDIO
IN
VIDEO
IN
(_÷°°
..... "%_'_i€_ *'_ f i ,"' jack
....._ ....... _,_ _. :
plug jack
_ plug _ ' ,'
/ ........ _ : :
Back of
VCR or
TV monitor
Yellow Audio/video cable "_'" " _:) ', :
video plug (such as VH83) White audio :
--OR--
AUDIO
IN White audio
R_ "'_1_ _,_ (such as AH25) plug
v,oEo_ ...._-_.
Back of """"" • - -. _"'
stereo VCR or ""- --
TV monitor "•""
what the camcorder is recording or
playing on the TV.
Installation
I. Attach the white plug on one end of
the audio/video cable to the AUDIO
IN jack on theTV or VCR.
Notes: If the AIV cable does not have white and
yellow ends, be sure to attach the same color to
the A/V jacks of the camera and TVIVCR.
% Y-Adapter
Yellow VIDEO \
Yellow video : _ ,, ,
plug
Yellow
video plug
Yellow
video plug
..'! /1
, , , i White AUDIO
2_
Audio/video cable
(such as VH83)
attach the iTlu_ to the jack labeled MONO.//'
no jack is not labeled MONO. you might need
a Y-a&q_teJ; sm'h as AH25 to hear both
('hamlels. Far tin)re infi)rmation abtmt
Y- cables, see, "Optional Accessories" in the
R{{li'rem'es section o]'this mamml.
2. Attach the yellow plug to the VIDEO
IN jack on the TV or VCR.
3. Attach the white plug on the other end

Playback
of the A/V cable to the AUDIO jack
(located under the small cover on the
side of' the camcorder).
4. Attach the yellow plug to the yellow
VIDEO jack on the canlcorder.
5. Set the AVOUT/IN switch to OUT.
Playback Operation and How to
Copy Tapes on the VCR
I. A. Camcorder connected directly to
a TV: turn on the TV and tune it to
the video input channel.
B. Camcorder connected to a VCR
that is already connected to TV:
turn on VCR and place it in the 'line
input" or "camera mode" (if the
VCR does not have these modes,
consult the VCR Owner's Manual
for information about viewing
recordings from an external source).
Operate the TV as normal to see the
signal coming from the VCR.
2. Press and hold the small, red button
on the CAMERA/OFF/VCR switch
while setting it to the VCR position.
Note: The camcorder can only play back
t_q_es re{'orded in the SP sj_eed.
3. PressPLAY.
• During playback, use the playback
features mentioned previously in
this section.
• Turn the volume control on the
monitor down all the way to
prevent picture distortion.
4. To copy what the camcorder is
playing, place a blank cassette in
the VCR and press the VCR's
RECORD button.
Note: Make sure the memoo.-st_q_ /_,ature i._
turned Oil(press' DISPLAY) or the canlcorder
wil! enter I_/ay-patt_c when the (outlier
rea_ q_e._()(100M.
5. Press STOP/E, IECT when you arc
finished.
Viewing What the (2amcnrder is
Seeing (or Recording)
I. A.
2. Press and hold the small, red button
Note: Turn the TV's volume dowrt to prevent a
high-pitched squeal caused from fi, edtxwk.
3. Press the REC/PAUSE button to begin
Camcorder connected directly to
a TV: turn on the TV, and tune it to
the video input channel.
B.
Camcorder connected to a VCR
that is already connected to TV:
turn on VCR and place it in the
"line input" or "camera mode" (if
the VCR does not have these
modes, consult the VCR Owner',_
Mamlal fl)r information about
viewing recordings from an
external source). Operate the TV as
normal to see the signal coming
from the VCR.
on the CAMERA/OFF/VCR switch
while setting it to the VCR position.
recording. Watch what the camcorder
is seeing (or recording) on the TV
screen.
58
Caution: The unauthorized recording qf
copyrighted material may inf?inge the
I
rights of others.
I
Page 61

Playback
Playback on a TV Without A/V inputs
To connect your camcorder to a TV without A/V inputs, an optional CRF95 RF output
adapter and an optional coaxial RF cable, such as VH82 or VHg0, are necessary. For
more information about output adapters and coaxial cables, see, "'Optional
Accessories," in the R_[_,;ences section of this manual.
IftheTV hits AUDIO and VIDEO IN jacks (or is connected to a VCR).refer tothe
previous pages.
Antenna
I
OR OR
I ! ,
I _/' OR ',
OR I ',
I
AV OUT/tN switch ~
Antenna _-[@_ .... '"
Optional
Back of TV 300/75 ohm
transformer
LD-- -_ " IN ',
/ \ FROM
I [_J Optional 75-300 Ohm
L_ transformer (such as
VH54)
Optional coaxial RF cable
(such as VH82 or VH90)
Installation
I. Disconnect the VHF antenna from
your TV. Connect the antenna to the
IN FROM ANT connector on the RF
output adapter if you are going to
leave the adapter connected to the TV.
,'Vote: 
Playback
Playback Operation
I. Set the CH3/CH4 switch on the
RF output adapter to channel Clt3
or CH4.
2. Turn on the TV, and tune it to the
same channel you selected v,'ith the
RF output adapter's CH3/CH4 switch.
3. Press and hold the small button on the
CAMERA/OFF/VCR switch while you
set it to VCR.
Viewing What's Recording
4. Press PLAY on the camcorder.
• Turn the volume control on the
monitor down all the way to
prevent picture distortion.
• During playback, use the playback
features (s'ee pages 54-55,fin'.fidl
des{'J'iption).
5. Press STOP/E.IECT on the camcorder
when you are finished.
I. Turn on the TV and tune it to channel
3 or 4. Turn the TV's volume down to
prevent a high-pitched squeal caused
by feedback.
2. Set the Ct13/CH4 switch on the RF
output adapter to the same channel
you selected on the TV.
Normal TV viewing
For normal TV viewing, leave the RF output adapter hooked up to the TV. Disconnect
the adapter's plug from the camcorder or turn the camcorder's power off.
Note to Cable TV Installer
3. Press and hold the small button on the
CAMERA/OFF/VCR switch while you
set it to CAMERA.
4. Press• ' "the RE(/PAL,S£_• _ _ button to begin
recording. You can watch what the
camcorder is seeing (or recording)
on the TV screen.
60
This reminder is provided to call your attention to Article 820-40 of the
National Electrical Code (Section 54 of Canadian Electrical Code, Part I),
that provides guidelines for proper grounding and, in particular, specifies
that the cable ground shall he connected to the grounding system of the
building as close to the point of cable entry as practical.
Page 63

Optional Accessories
This section offers a look at some great ideas for sparking creativity and adding to
the fun of owning and using VHS camcorder. The following pages have a selection
of accessories which help make more memorable moments look and sound even
better.
These accessories are designed to make the process of recording and watching your
videos more enioyable.
To order accessories, contact your local RCA reseller or use the Optional
Accessries Order Form at the end of this section.
All accessories are available through toll-free ordering or traditional mail.
Soft carrying case
AC202
\
This case provides protection and utility
for full size camcorders and most
accessories. It is constructed of rugged
nylon fabric for years of reliable service.
Three outside pockets provide ample
accessory storage with mesh-covered lens
filter compartment and built-in holders for
memo pads. pens, and other accessories.
The hand grip and adjustable shoulder
strap allow for convenient, comfortable
transportation of the camcorder.
DC car cord adapter
DCC096
Warning: do not use any other
car cord with this camcordel:
This car cord adapter enables you to
operate your camcorder from your car,
truck, or RV by plugging the unit directly
into the vehicle's cigarette lighter socket.
The DCC096 is designed specifically to
convert power from a 12-volt battery to a
9.6-volt output.
61
Page 64

Optional Accessories
Rechargeable batteries AC battery charger
EP096FS and EP096FL CPS014
"1
\
The CPS014 battery charger plugs
These rechargeable lead-acid batteries
are designed specifically for long life.
The EP096FS is a l-hour battery. The
EPO96FL powers your camcorder twice
us long as the EP096FS (depending on
how much you turn the camcorder on
and off and use zoom and pause). Both
can be recharged with the AC adapter/
charger that came with your camcorder.
directly into an AC outlet and charges the
EP096FS and EP096FL camcorder
batteries. Because the CPS014 operates
on 100-240 Volts, 50/60 Hz, it can be
used virtuallv anywhere in the world. A
plug adapter might be required in some
countries.
RF output adapter
CRF95
This RF output adapter is used with a
coaxial RFcable, such as VH82 or VH90,
to connect your camcorder to a standard
TV (one without audio/video inputs) lk)r
playback. If your antenna cable is the fiat
twin-lead type attached by two screws,
you need a 300-to-75 ohm transfomler. If
your TV has 300 ohm antenna screw
terminals, you need an optional 75-to-300
Ohm transtkmner such as VH54.
62
Notice." All specifications and
descriptions of accessories are
I
subject to change without notice.
Page 65

Optional Accessories
Coaxial RF cables Audio/Video cable
VH82 (6-ft)
VH90 (12-ft)
These RF cables are used with the RF
output adapter toconnect the camcorder
to a standard TV (one withouI A/V input
jacks) li)r playback. If the TV has 300
ohm antenna screw terminals, an optional
75-to-30(1 ohm transformer, such as
VH54, is necessary. If the antenna cable is
the flat twin-lead type attached by two
screws, an optional 300-to-75 ohm
transformer is needed.
VH83
This six foot audio/video cable can be
used to connect the camcorder to aTV
monitor or VCR for tape playback or
copying tapes.
Cable transformer
VH54
This 75-to-300 ohm transfi3rmer is used to
connect a standard 75-ohm antenna cable
(such as VH82- or VH90-to-300 ohm
screw terminals on a TV).
Ail specifications and descriptions of accessories
are sut_iect to change without notice.
Y-adapter
AH25
This Y-adapter allows connection of the
camcorder's mono audio cable to a stereo
TV or VCR.
63
Page 66

Optional Accessories
Tripod
AC093
Mounting tile camcordcr on a tripod, such as AC093, keeps tile camcorder steady and
produces excellent video restilts.
This tripod's Iluid-efl;ect head provides smooth camera pan and tilt. The quick-release
motmt makes it easy to attach or i-el]]o\,re the camcorder. The _rooved, tubular 3-section
leg d0sign folds down to 24" when not in use. Rubber feet allow for sure footing and
built-in retractable lc_z spikes eliminate the need Ior removing the feet.
Cautions: Before using a tripod, make sure it is stable enough to hold the camcorder
without falling ove#: Do not transport the canworder attached to the tripod.
When attaching your camcorder to a tripod, be ca#_fM not to.fi)rce the tripod screw into the
camco#*de#"s tripod mounting hale.
The tripod screw should not protrude into the camcorder more than al_lm).rimately three-
eighth (3/8) inch. Fo#z'ing the screw could damage the mounting hole 0#7 the bottom qf the
cam_'ordeJ_
64
Page 67

Optional Accessories
Removing the lens hood
Remove the lens hood so you can attach optional accessories, such as wide-angle lens,
lens extenders, or lens filter kits.
Attaching an accessory Lens
I. Attach the lens cap over the lens hood.
7
,
Turn the accessory lens clockwise into
the camcorder's hens. Make sure the
lens is tightened firmly, but do not
over tighten.
2. To remove the lens cap and hood,
turn them counterclockwise with the
pahn of your hand.
Caution: Do not grasp the end ql"
the lens hood.
accessories are subject toc] art ge
I All specifications and de.scriptions ql" [
without notice.
65
Page 68

Optional Accessories
Order Form for Camcorder Model CC4393
Description
Deluxe Tripod
Soft Camcorder Case
Y-Adapter
AC Adapter/Charger ( 1(111-240V1
RF Output Adapter
Cal" Cord Adapter
Rechargeable Battery (Extended/
Rechargeable Battery (Standard)
75-300 Cable Transformer
Coaxial RE-Cable
Audio/Video Cable
Coaxial RF-Cable
Replacement Bulb (4 watt) for
Built-in Light
Shoulder Strap
AC Adapter/Charger (Supplied) and
DC Cable
Part No.
AC093
AC202
AH25
CPSOI4
CRF95
DCCO96A
EPO96FL
EPO96FS
VH54
VH82
VH83
VH90
224257
241305
241O44
233328
Price
$ 59.95
$ 49.95
$ 2.95
$219.95
$ 59.95
$ 44.95
$ 59.95
$ 693)5
$ 2.95
$ 5.45
$ 5.95
$ 7.95
S 2(I.15
$ 72O
$ 109.90
$ 16.N)
Qty.
Total
ca
t.-
_D
,-r
ca
00
X
Total Merchandise ........................................................................................... $
Sales Tax .......................................................................................................... $
We are required by law to collect the appropriate
sales tax for each individual state, county, and
locality to which the merchandise is being sent.
Shipping and Handling .................................................................................... $ 5.00
Total Amount Enclosed ................................................................................. $_
Use VISA, MasterCard, or Discover.
Money order or check must be in U.S.
currency only. No COD or cash.
Prices are subject to change without notice.
Please complete other side also
66
Page 69

Optional Accessories
Charge your order on your VlSA,MasterCard,
br Discover Card by filling in below
USE YOUR CREDIT CARD
IMI'()RTANT: Copy c_mq_lete ;ICCOUII[ Iltlllll_u'l" I1"1t111 yl!tll \/IS/\ CalLI
IMPORTANT: C_>py complde accomtl mlmbcr Irom bour MaslcrCavd
I-r-I-V-1_-r-r-1 F-l-l-I-1[ZZZ3
('Op} _X_[lll_bt21 itbo\¢ your ilillllC oli iK!liiMtw('illd I,.xpilalitm dale: _
IMPOrTaNT: ('opt, colnpletc accoltnl nulnl_et I't+Olll_OLIF Discover Card
VISA
[ZZ_ F--I-F_ _ F-F-FT-1
I xl_m,li,,ndale: _
AUTHORIZED SIGNATURE
P[ices are subiccl _o change x',ithout iIOlice.
Print or type your name and
address clearly.
Nalne:
Stred:
Apt:
City:
Stale:
[)aylinlc Phone No.:
Zip:
A complete and correct order will
save you days of waiting.
r"
L)
Please make sure that both sides of this form have been filled out completely.
• Alh)w 4 weeks for delivery.
• All accessories are subject to availability.
67
Page 70

Optional Accessories
To order accessories, contact an authorized
RCA reseller.
Ifa dealer is not nearby, you can also follow the directions below to order by
telephone or direct-by-mail.
Orders in the United States and Canada
To place your order by phone, have your Visa, MasterCard, or Discover card ready
and call the toll-free number listed below between 8 AM and I0 PM (EST)
Monday through Friday or between 9 a.m. and 5 p.m.(EST) Saturday.
Use this number only to place an order for accessory items
listed on this order form.
1-800-338-0376
To place your o,'der by, mail, detach and mail the completed order form with credit
card information, money order, or check in U.S. currency (made payable to
Thomson Consumer Electronics, Inc.) to the following address:
Video Accessories
PO Box 84 t 9
Ronks, PA 17573
68
Page 71

References
In this section, specific information about the camcorder can be found. This includes
care and maintenance, specifications, troubleshooting, warranty information, and an
index for the manual are sources found here.
69
Page 72

References
Troubleshooting
If you're ha\'ing trouble with your cumcorder, you probably can correct the problem
yoLn+sell+.Before you lake your camcorder to an Authot+ized RCA CalllCOrdel Service
Center or call a service person, use the ch_.trl below. Find the problem and try the
adiustmentts) that is listed to tile right.
If set\ ice should hc neccs>+ury, rcad you " warranty to find Otl[ what is covered and how
IO _.Ct SclX+ It..C,
Trouble [ Checks and Adjustments
No po\\ cr •
i
Set tile CAMERA/OFT:i\ CR switch to CAMERA or
\ CR to turn on tile camcolder.
• If using battery, it may need to be recharged.
• If usin._ AC adapter/charger, make sure it is plugged
into a working ontlel.
_Voll'l i'et..'Old t)t
pla> back
If u',ing AC adapter/charger, make NLHCit is plugged
into a v, orking outlet.
• Make sure C.\MKR,•\iOI"t=i\'('R switch is _,ct lo ton'eel
position for deshed operation.
• There migllt not be a cassette in the camcorder.
• Try ejecting and remserting the cassette•
• The cassette tape might be broken, try another cassette.
• You might have reached the end of the cassette, try
rewinding it.
• Moisture condensation might cause the tape to stick to
the headwheel and damage the headwheel or tape. Give
the camcorder 2 or 3 hours to reach a stable temperature
before reinserting a cassette.
Won't play back
Wont record i ° Sa|et\ tab on cassette is renloved. Use mlother tape.
No picture
CAMERA_OFF/\CR switch must be set to VCR.
CAMERAiOFk'iICR switch must he set to CAMERA.
Remove lens cap.
Camcorder ttll'ns
off
Set the ('AMERA/OI++t:iI('R switch to 0t+1. and then to
CAMERA or V(_.TRto turn hack oil. 11+camcorder is left
in record-pause or play-pause for several minutes, it
ttll+ns Off to prevent tape wear.
70
Page 73

References
Trouble Checks and Adjustments ]
1
Sotitld is |oo ]t)Vv Of
d Jstt)rtcd
Ta1+u still> clurhlg
re\\ md t)r tam
tt)n,_+ard t,t+\_,H! not
()pCldte cltNili_
IC'A ltld I'q I_iM
t _fl\v Hl+d
('utllC<'_]d,..'r reltl-tillS • Ptt_<,,s A'/+.( /.\r .SEo t-ctulll to IlOl'ili_+tl playback.
I!lpla) pau>,c !node
Poor auto !'ocu<+ " Low+ is smudgeci and image appear,4 unloci.lsed.
t)pct'_.ttiOll • l: • " • '
" it\'+ tIindur di>pla+,.>,
{ILL' t)Ll[ ()l" i])(+'{D, (i!"
h:ird to ->c,.'
l)Jcfuro qcialit? b,
poor d til+Jll7
pla> h+ick
• Subject was Ioo far [1O111 CalllCol'der.
Whenever the tape counter appears, the camcordor will
stop rewinding (or tasi fl)iv+ardJng) \_ hell countei reads
OOI)Ol4. Plcs,_ RI:tI/R/:_I IEIA or 1_1+_<1,1)ct._tihl tO Ct)llthluc
tc_ h/din 7 ()I fast loiv+:.irdJng, or pt-css I)],SPL+ W to tClllOVC
the tapL' c'OtilHCI'.
iVi:.tke SLIt+Cthief 71"al+_hicsdo not appear in ,+iowfhldcr or tm
L(J{) lllOllitor. Pro>> 777Lb.R bUllOn t(_,rcnitwt.'.
- , L) # , ,
+3,cplccc focus contl-iq is nlJsadjuslcd.
• Eyepiece locu:+ ccmtt-ol is nlisadjllb, tcd.
Adjust B/P/G://T COlllt+o]orl the hotlotn+oi ti/c ', lcvvfJndel.
• "Pape was rcct>lded on a different camct)l-der or VCR. If the
picture contains black-and-white streaks, press one of the
tracking buttons to correct it.
Pictl.lrc i-ecorded
with a special fade
OI+digital effect
(such as negative,
16X9, mosaic, or
mJlr()l)
¢v'alllt.'t Wclt2I M {ll'l S
(tCIll('IIIM iIal Jell rllode
• Cumuorder only has one speed (SP/. If the tape was
recorded at a different speed+ it cannot bc played back on
this camcorder.
A l:ade or fade wipe mode has been selected. Turn off the
fade effect by pressing FADE.
A digital recording effect has been selected. Turn off the
digital effects by pressing DIGITAl. I-FI:k2('TS.
I)t)\\ c.'l. (_I1 for ton nlhlulcs with no t_'_issclt0 iiisel-ted and date
I/Ot scl or buJll-in battery not charged, hlserl cassette, el +
FOIllOVC an(t leattactl tl+e powel SOUlCC.
71
Page 74

References
Trouble
Date and/or time or
title were recorded
o11 tape
Date and/or time • Date or time illa_, need to be set.
are incorrect
\iiewfindcr turns •
off _.nld t)u
Checks and Adjustments
Displays are recorded on tape whene\er they appear m the
viev, finder or on the I+CI) nlt+nitor. Remove them l'rom tile
viewfinder or LCD nlonitor when lecordhlg,
When G I)A'Fb: or Q TITLE is selected, tile display is
automaticall\, recorded whell yon hegin t-ecurding or
change tile casselle.
Title is recorded whenc\er it apl+JCat'sin tile ',iewlinder or
I.CD Monilol-. Pre<<sthe 7]T/.IgR button to lomo\ c the title
from the viewfinder or I+CI) nloliilor+
• Clock lithium cell battery may need rech;+u-+_ing.
LCD monitor is open at least 45 clegrces. The viewfinder
autoinaticall+_, turns off. Monitor closed, \,iewtinder tUlllS o11.
During recurding, viewfhlder I'LII'I1<+,Oil when nlonitor
rotated +.uound to face the sub.iect.
Camcorder does not
turn on and/or
function buttons
will not operate
No or low sound
during nlonitor
playback
Dtlrhlg phlyback, viewfinder tUrllS off when monitor
rotated around and placed against calllcorder+
Remove tile power source.
After one iniruJte press thc
reset switch gently using a
nonmetallic pointed item, such
as a toothpick+ until you feel a
click. This resets the can-l-
corder to the factory settings
and erases the date, time, and
custom settings. Wait for at
least one minute after
resetting the camcorder to
attach a power supply.
• Adjust the volume control oil thc side of the iYionitor.
• To hear sound during camcorder phiyback, rise the monitor.
There is no sound during viewfhlder playback.
switch
Reset switch
72
Page 75

References
Trouble Checks and Adjustments
Black bars on top
and bottom o1'
picture.
Bright. crystal-
shaped spots
appear in
icy+finder or on
t+Cl) m o11it+,_r
Colored bright
spots appear in
view finder or
I+CD m(mitor
Buck (tf I+CI)
lUOIlitOF J,; h(}[
Rechargcablc
battery runs down
sooner than
expected
• IOX9 feature selected.
• Sunlight is directly entering the lens.
Black spots or bright spots of light (red, green, or blue) may
appear in vie,_ finder or on the I_CD monitor. These spots are
not recorded on tile tape and are not due to a defect in the
unit.
• The light that iihnnin_te++ the LCD monitor gets hot. To cool
it dov,'n, close the [,CI) monitor and turn off the camcorder.
• l+ead-acid batleries Inust be kept charged. Charge your
battery before and after every use and at least every
six months.
Battery run times are measured when the camcorder is
recording continuously. To check your battery; charge it
completely, aim the camcorder at a clock, and record the
clock. When the carncorder stops recording, play the last
part of the tape and check the time on the clock. A one-hour
battery should gi,,e you about 60 minutes of recording time.
In pt+actical use. a fully charged battery might not record for
60 minutes because the battery uses power when you pause
the recording and uses extra power when you zoom.
73
Page 76

References
Cleaning the Camcorder
To clean the camcorder's exterior,
icnlo,.e _.llly pq,_v,cr source connecled to
lhe camo:lrder mid gentl_', wipe il wilh :.t
clean sol]cloth.
Cleaning lhe Lens
T.,+clean the cam,..'order's lens. blov, It with a t;h;,.,,cr I',rush. and then gently v,,'ipe the
Ion,-,with cleaning tissue ,:rod commercially prepat•cd cteanin_ _,ohltion designed for
LINd (/11 c_.llllCl+a It21]s. lnlproper cl,:'alling I]liglll N_21alct] t/]c _¢11'_.
Cautiou: Use o/'strong cleaning
i_t_uh_<'ts, _t¢ch as llu,se catttaining
alcohol or henzitw, might chlmage the
('alTl('()lk[('l]
Caut on: l)t_ ;1_, lom'/l Ihe lens uilh
.!vmr /inger._'. !Its' oil./)'ore your ,_kiJ_
Lens
Cleaning the LCI) Monitor
Monitor
Cleaning the Viewfinder
T_._cDan the ctun<ordct"s LCD
lllOllitol. USe LIc]eal_, soft cloth 1o
carefillly wipe the monitor. Improper
cleaning ma}, scralch the nloni[or.
Caution: Do not touch the mo//itor with
yore'fingers, Tile oil,/)'om your ,_kin
might damage the numito;:
I. Turn the eyepiece onunterclockwise
and pull it()tlt.
2. Gently use a cotton swab or blower
to remove the dust•
74
3. T',', vc_._ttach the eyepiece, align the
reference Ill_.uks al'ld lUl'll lhc eyepiece
until it clicks in';,.',I lace.
Page 77

References
Proper Care and Storage
Keep dust and grit lronl entering tile
canlcol'dcl"S cassette door. Dust and
grit are abrasive and cause excessive
wear to both the camcorder's record-
ing/phiyback heads and cassettes.
Always place the lens cap back on the
camcorder when it is not in use.
Before handling your camcorder, make
sure your bands and face are free from
any chetnical prodLIctS Stlch as suntan
lotion, as it i-night damage the finish.
Things to Avoid
• Do not attempt to disassemble your
canlcorder. There are no user-service-
able parts inside.
• The camcorder might be damaged by
iml)ropcr storage or handling. Do nol
subject the camcorder to swinging,
shak ing, or dl-oppi ng.
• Do not store the camcorder in tempera
lures below -22°F (-30°C) or above
149°F (65::C).
• When the camcorder is not in use,
al\\a},s lCnlove the cassette and AC
adaplcl'Ichar_er or battery.
• Retain the original C_.ll'ion lk)r future
storage or shipping t nrposes.
oceiln as sah watei o1 salt water spray
ini{Jll damage the internal parts of the
ca131corder.
• Avoid operating yotucamcorder •
immediately after movmg it from a
cold location to a warm location. Give
the camcorder 2 to 3 hours to reach a
stable temperature before inserting a •
cassette. When the camcorder is moved
from cold to warm. condensation might
cause the tape to stick to the headwheel
and damage the headwheel or tape.
• Do not aim your camcorder at the sun
or other bright objects, o
• Do not leave your camcorder in direct
sunlight for extended periods of time.
The resulting heat buildup might
permanently damage the camcorder's
irtternal parts. •
• Do not operate the camcorder in
extremely humid environments.
• Do not operate the camcorder near the
Do not operate the camcorder fl_!"
extended periods in temperatures
below 40°F (4°C) or above 95°F
(35°C).
Do uot expose the camcorder or
adapter/charger to rain or moisture.
If any component becomes wet, turn
off the power and take the unit to an
Authorized RCA Camcorder
Service Center.
Do not use an adapter/charger or
batteries other than the ones specified
for the camcorder. Use of the wrong
accessories might cause danmge to the
camcorder.
When carrying the camcorder, do not
hold it by the viewfinder or LCD
monitor. This could cause a malfunc-
tion, damage the camcorder, or cause
personal injury.
75
Page 78

References
Specifications
General
Power requirement: 9.6VDC
Power consunlption:
LCD monimr oil: 9 watts
Viewfinder on: 7.5 watts
Weight: 4.7 [bs. (2.15kg)
I)imensinns - Including Viewfinder:
4-3/4" (W) x 8-3/8" (H) x 13-I/8" (D)
121 (W) x 213 (H) x 334 (D! mm
Video Input
I1) Vp-p. 75 ohm
Video Output
1.0 Vp-p,75 ohm
Audio Input
-7.g dBs (316m Vrms),
more than 47 K ohm
Audio Output
-78 dBs (316m Vrms),
less than 1 K ohm
Viden Rec_lrder Seclion
Format: VHS
Record/playback system:
Two video record/playback heads
One flying erase head
Video signal: EIA standard
NTSC color
Viewfinder
0.55" color eleclronic viewfinder
LCD Monitor
3" diagonally measured
LCD/T['T active matrix system
Camera Section
Scanning: 525 Imcs/6/) l'ieids/31i frames
hnage Sensor: 1/4" CCD hnager
Lens: F I .4
16:1 (4-64 toni) power zoom lens
Diameter: 46 mm
Tripod Mount
One 1/4" x 10 threaded hole
Microphone Input
-68 dBs (316m Vrms),
more than I K ohm
76
AC Adapter/Charger
Power requirement: 12(IV,
50160 Hz.
Power consumption: 24 watts
Weight: .85 Ibs. (390g)
Dimensions:
6"(W) x 1.7"(H) x 2,7"(D)
152 (W) x 43 (H) x 69 (D) mm
Page 79

References
Limited Warranty
Thomson provides a toll-tree telephone
number to help you with any problems
You can reach Thomson ill the
R_llowmg number:
800-283-6503
(Toil free inside U.S.A.)
you may encounter with your camcorder.
Many can be diagnosed over the phone,
and if necessary, repair or replacemenl
will be arranged. Please have your
camcorder model/serial number and date
Our tollq'ree Camcorder number
operates fl'om 8 a.m. to 5 p.m., CST
Monday - Friday
for U.S. customers only
of purchase ready when you call. If your
unit is out of warranty, we will quote the
cost of a repair or replacement unit to you.
Returning Equipment to Thomson for Repair or Exchange
If we are unable to resolve your problem
o_er the phone, we will gladly service
your unit or exchange it for a new or, at
our option, refurbished camcorder. Reli:r
to the limited warranty on the next page to
learn about your specific rights and
responsibilities.
Always consult Thomson and get a Return
Authorization nttmher b@we retm'ning
anything! Obtain a Return Authorization
(RA) number fiom the telephone
representative before returning your
equipment to avoid delays, accounting
errors, or even loss of your unit.
hnportant Information to Customers Who Ship Defective
Equipment to Thomson Consumer Electronics
The Thomson representative who
authorized the return of your equipment
will give you an RA number over the
phone. They will also provide you with
instructions on where and how to return
your Camcorder. Write the number in
large, clear characters on the outside of
the box. To avoid confusion and
misunderstandings, shipments without an
RA number clearly visible on the outside
of the box will be returned to you at your
expense.
Include a brief note describing the
problem and any conversations about the
problem you have had with Thomson
personnel.
Include your name, address and model/
serial number of your Camcorder. These
numbers are located on the bottom of
your unit.
If your Camcorder is within the warranty
period, please provide a copy of the bill of
sale to verify purchase date. Use the
original box and packing material to
protect the equipment from damage in
shipment.
For your protec'ti(m, insure all shipment,_
./or.fidl replacement value and use a
reliable shipper. Thomson assumes no
responsibility fl_r warranty shipments
from the customer to the factory if not
shipped in the manner prescribed
by Thomson.
77
Page 80

References
What your warranty covers:
Any defect in materials or workmanship.
For how lung after your purchase:
90 duys for labor charges.
• One year for parts,
The warranty period it)l ielltai milts begins
w'dh the first rental or 45 days froul dl.ile of
shipment to tile rental l'irm+ whichever
comes first
What we will do:
l)urinu the initial 90 days
Exchauge 3our camcorder with a hey, or
nefurbished unit, or repair your camcorder.
The option ,aill be ours. There `<`+'illbe no
cos! to you.
After the 90 days and within one year
Exchange your canlcorder with a new or
refurbished unit. or repair your canlcorder.
Tile option `<_illbe otirs Parts will bc
pl'oX ided a! lie charge, but you '+'<illbe
responsible for the cost of labor required
for the repair.
How you get service:
• Call 1-800-283-6503 and have your unit's
date of purchase and model/serial number
ready. The model/serial nnmber informa-
tion is oil the bottom of your camcorder.
• A representative will troubleshoot your
problem over the phone. If the representa-
tive determines that you should receive a
replacement unit, you will be provided with
a Return Authorization (RA) number and
the location of a nearby exchange point if
one exi_:ts. No returns w ill be accepted
without the RA number.
"i'_receive a replacement Camcorder befure
you return yours:
O_)ption I
I. Prox'ide yout +Discover, MasterCard, or
Visa accou[It number and expirati(m date
to our phone representative. This is for
security purposes. If we receive your unit,
excluding all accessories, within 14 days
from the date you were provMed the RA
l)Ulllbcr. ()nIv ilclnS not c()Velud by
warranty will be charged to your accoutit.
IF YOUR UNIT IS NOT RECI_;IVEI)
WITHIN 14 DAYS, THE SUGt;ESTED
RETAIL VALUE (IF THE
CAMCt)RDER WILL BE CHARGEI)
1"O YOUR CREDIT CARl). This
anlonnt, less $10.00 handling, will be
credited if the null is subsequently
received.
2. We will send `+'c_na rul?lacenlent ilnit.
3. Ship tile unit back to tlS+cxchiding till
accessories, tisiilg the replacement tinit's
carton. Shipping instructions will be
inchided in the carton along with your RA
number which will allow you to easily
ship the clnil back tO tis. Make snre ynn
insure ._our shipnlenl in case of damage
or loss. lnc[udc with lhc shipnlcnI:
Evidence of purchase date. such as a
bill of sale to verify your unit's
warranty eligibility.
• A brief note describing your
camcorder's problem.
• Your name. address and phone number.
Rdtus'#7 tran,Wortation, storage, hamlli#tg, and
illMo'atwe ('(isis are I'OllF sole respo#Tsihilio,.
142,accept m) liahilitv in case (¢'damage or loss.
I. We will send a replacement unit to the
exchange point.
2. The exchange location will notify you o1"
its arrival.
.
Take your unit, excluding till accessories.
alld your evidence of purchase date, such
as a bill of sale, to the exchange location
and you will be provided the new or
refurbished unit.
78
Page 81

References
4. If tile repairs V_Cl-ecovered by your
v,,arranty, you will not be billed.
"12, I{'( '<'il'{' {I I{'/)/{l( Y'lll{'lll lftlil _ tl'(' /l{IV{"
r{'_'_'irud \¢)lll" Illllf."
.
Write the RA number on the outside of
tl|e carton used to return the unit. Make
sure you insure _our shipment in case of
damaue or loss.
2. Carefully pack the unit, excluding all
accessories, using tile original box and
packing material if possible.
3. Include wilh the shipmenl:
E,, idence oI purchase dale. stlch as a
bil! ot sale. to verif,, your <lnil's
\,.,alran ty el igibilit.,,,.
A brief note describhlg your
camcorder's problenl.
YOur []anlc. address and phone l/ulnber.
RCllll'l! II_III\/HH'[{IIIOll, _l(H'(Ig(', ha.dhng, tllld
ItiSlltkltll (' ( _)S[\ (ll'U \'Ot!t'.\Ol# I'{',k!?Oll._ilHlll.V.
14_'m_ ep[ im li,hi/i O' ill case qldumu,g,_' or
4. The representative will advise the address
to mail a cashier's check or money order
fix" payment it" there are any out of
warranty labor or parts charges and you
elect not to use your credit card.
5. Upon receipt of your product, a new or
refurbished unit will be shipped to you.
To have your Camcorder repaired by an
Authorized RCA Camcnrder Service
Center:
• Check v. ith your dealer or call 1-800-336
1900 for the Authorized RCA Camcorder
Service Center ncaresl you.
• Take your unit to the Authorized RCA
Camcorder Service Center of your choice.
Show die Authorized RCA Camcorder
Service Center representative evidence of
purchase date, such as a bill of sale.
Pick up your camcorder when repairs are
complete.
What your ',,,arrant_ _ cover:
Adjushl]enl of customer COlltrols.
Damage fron\ misuse or neglecl.
• a tit}it thai has been nlodified (11"incorpo-
raled ill(<}other products or is used for
hlstitutiomfl or other commercial purposes.
• Balleries for renlole conllol alld clock.
Cleaning of video/audio heads.
Camcorders purchased or serviced outside
the U.S.A.
• Return transportation. Slol-age and handling
COSlS Of yOUI" U]lil. includhlg insurance for
]os_ or danlage.
• Acts of God, such as but not Ihnited to
lighming damage.
Prodnct Registration:
Please complete and mail tile Product
Registration Card packed with yout
camcorder. It will make it easier to contact
you should it ever be necessary. The return
of tile card is not required for warranty
coverage.
How State Law relates to warranty:
• This warranty gives you specific legal
rights and you also may have other rights
that vary froth state to state.
If you purchased your camcorder
outside the United States:
• This warranty does not apply. Contact your
dealer for warranty information.
79
Page 82

References
Symbols
+ And - Buttons.
See Minus (-) Button.
See Also Plus (+) Button
16x9 Indicator 27, 35
A
A. Dub Indicator 28
A/V Input Jacks 57
AC 120v. 50/60 Hz 15
Accessories
Included 3
Opti(mal 61
AC Battery Charger 62
Audio/Video Cable 63
Cable Transformer 63
Cal- Cord Adapter 61
Carrying Case 61
Coaxial RFCables 63
Order Form 66
Ordering 68
Rechargeable Batteries 62
RF Output Adapter 62
Tripod 64
Y-adapter 63
Order Form 66
Ordering I
Adapter/Charger 15
Accessory 3
Charging Battery 16
Using 4. 15
Ae:On Focus Indicators 31
Align Arrows. See Battery, Attaching
And Removing
Assistance I, 77
Audio and Video Jacks
9, 42, 44, 57, 59
Audio Dub 42
A/V Dub Button 9, 42, 44
A/V Out/In Switch 9, 42, 44, 51
B
Battery 3
Attaching/Removing 17
Care I9
Charging 16
Safety Precautions 19
Storage 19
Using 16
Battery Eject Button I0. 17
Battery Level Indicator 18, 27, 28
Bright Control 10, 25, 53
Built-in Speaker 10
C
Cable TV Installer Note 60
Camcorder
Cleaning 74
Turning On 5
Camera Edit Feature 41
Camera/Off/VCR Switch
5, 9, 12. 17, 20. 23, 29, 31, 40,
42, 44, 46, 48, 51, 53, 54, 58, 60
Car Cord Adapter.
See Also Accessories: Optional
Care And Maintenance 74
Storage 75
Care And Storage
Videocassettes 22
Cassette Door 10
Cassette Holder 22
Cassettes
Video 21. See Also Videocassettes
Cautions I
Characters In Titler 47
Charge Indicator 16
Checks, Trouble. See Troubleshooting
Cleaning
LCD Monitor 74
Lens 74
Vicwfinder 74
80
Page 83

References
Clock Battery
Charging 24
Color Enhancement Light 7, 9, 12
Copying Tapes 58
Customer AssistanceJService 77
Customer Service Number 1
D
Date And Time
Display 23, 28
Recording 24
Setting 23
Date/Time Button 9, 23, 28, 48
DCCable 3. 15, 16, 17, 20
DCIng.6vJack |0, I5, 20
DC Output Jack 15
Design Specifications. See Specifications
Digital Effects Button 10, 27, 34
Digital Effects Indicators 27, 34
Digital Zooming 36
Display Button
9, 18, 27, 29, 3l, 34, 40, 58
Dubbing
Audio 42
Audio/Video 44
E
Edit-adv. Button 9, 46
Edit-adv, Button, See Also Stop/Eject
Button
Editing Features
A/V Dub 41
Audio Dub 41
Camera Edit 41
Flying Erase Head 41
Titler 41
Electronic Indexing 32. See Also Index
Indicator
Erase Protection 21
Exchange Warranty 1
Eyepiece 54
Focus Control 10. 53
F
F.FWD (Fast Forward) Button
9, 23, 40, 44. 46, 55
Fade Button 10. 38
Fade Feature 38
Fade Indicators 28, 38
Fast-forwarding Indicator 28
First Time Opcration 3
H
Handstrap 4, 10
Head Cleaning 21
I
Index Indicator 28, 32
Indicators
16x9 27, 35
AE Focus 31
Battery Level 18, 27
Digital Effects 27, 34
Fade 28, 38
Fast-forwarding 28
I.Zoom 29
Index 28, 32
Mirror 27, 37
Mosaic 27, 37
Negpos 27, 36
No Tape 28
Pause 28
Rec 7
Record-pause 7
Status 28
Steady Pix 28
Tape 28
81
Page 84

Index
Indicators (Cont.)
Tape Counter 28, 40
Tape End 28
Tape Remaining 29, 32
ZM:2 27, 36
Zoom 27, 29
Zoom Level 29, 33
Information to User 85
Inserting/Removing Cassettes. See
Cassettes: Insert And Remove
Inst. Zoom Button t0, 33
L
LCD Monitor 6, t0
Using For Playback 53
Lens 9
Lens Cap 4
Lens Cover 8
Lens Hood 9
Removing 65
Light
Color Enhancement 12
LigbtAuto/Off/OnSwitch 7, 10, 12
M
Macro Focus 31
Memory-stop Feature 40
Microphone 9, 29, 31, 41, 45
Minus (+) Button. See Also Rew/
Review Button
Minus (-) Button 46
Mirror Indicator 27, 37
Mirror Mode 37
Mosaic Indicator 27, 37
Mosaic Mode 37
N
Neg Pos Indicator 27. 36
Negative Mode 36
No Tape Indicator 28
O
Open Button 6, 10, 25, 53
Operating Controls 9
Optional Accessories. See Accessories
Order Form 66
Order Form, Accessories 66
Ordering Accessories 68
P
Pausing 55
PlayButton 8, 41, 44, 53, 58, 60
Playback
First 8
Playback 59
Playback Features 55
Stop-action Pause 55
Tape Counter 40
Tape Positioning 55
Tracking 56
Visual Searching 55
Playback on a TV
with A/V Jacks 57
Playback on a TV
no A/V Jacks 59
Playback on a TV without Audio/Video
Inputs 59
Playback on a TV (Or VCR) with
Audio/Video Inputs 57
Playback Speed 21
Playback Using LCD Monitor 53
Playback Using Viewfinder 53
Plus (+) Button 46. See Also F.FWD
Button
82
Page 85

Index
Power
Using Battery 16
Using Optional Car Cord Adapter 20
Power Indicator 15
Problem Solving. See 7)-oul_h>,d_(_otm_
Prodttc! Registration i
Q
Quick Review Feature 30
R
Rec Indicator 7. 28
Rec/Pause Button
7, 10, 35. 37, 39, 42, 44, 48, 51.
55, 58. 60
Rechargeable Battery 16
Record-pause Indicator 7
Recording From VCR lurTV) On
Camcorder 50
Recording Speed 21
Registration i
Reset Button 9, 40, 41
Reset Switch 9
Rew (Rewind)/Review Button
8, 9, 23, 29, 31, 40, 41, 42, 44, 46,
55
Rew/Review Button 41
Rewind Indicator 28
RF DC Out Jack 9, 59
RF Output Adapter, Optional 59
Rotating The Monitor 25
Searching During Playback 55
Shoulder Extension Pad 6, 10
Shoulder Slrap 3
Shoulder Strap Altachmcnt Rings 10, II
Solving Problems. See Troubleshooting
SP Speed 21. 54
Speaker 53
Speaker. Built-in 10
Specifications 76
Speed
Recording And Playback 21
Sltlitis hldictttors 28
SteadyPix Button 10, 28, 31
Sleady Pix Feature 31
Stop-action Pause 55
Stop/Eject Butlon
5, 8, 9. 18, 22, 23, 40. 42. 44,
46, 53, 58, 60
T
Tape Copying 58
On Camcorder 50
Tape Counter 28, 40
Tape End Indicator 28
Tape Indicator 28
Tape, Inserting 5
Tape Positioning 55
Tape Positioning 55
Tape Remaining Display 32
Tape Warnings 28
Tape-remaining Indicator 29
Things To Avoid 75
Time And Date
S
Safety Information i
Safety Precautions
Battery 19
Safety Tab 21
Setting 23
Time And Date Display 23, 28
Recording 24
Tips
Recording 49
Titler 46
Recording 24
TitlerButton 9, 46
83
Page 86

Index
Titles 47. See Also Titler
Correcting Errors 47
Tracking 56
Tracking Buttons 10,56
Tripod
Oplional 64
Using 64
Troubleshooting 70
TV Viewing 60
V
Video And Audio Jacks
9. 42, 44. 57. 59
Videocassettes 21
Copying To Canacorder 51
Copying To VCR 58
Playing Back 54
Viewfinder 10, 26
Playback 53
Viewfinder 6. 10, 53
Using For Playback 53
Viewing
Recordings 58, 60
Visual Searching 55
Volume Control 10, 53
W
Warnings, Tape 28
Z
ZM:2 Indicator 27, 36
Zoom Buttons 10, 33
Zoom Indicator 27, 29
Zoom Level Indicator 29, 33
Zoom Lever 38
Zooming 33
Digital 36
84
Page 87

References
Information to User
This equipment has been tested and fl.mnd to comply with the limits fl)r a
Class B digital device pursuant to Part 15 of the FCC Rules. These limits are
designed to provide reasonable protection against harmful interference in a
residential installation. This equipment generates, uses, and can radiate radio
frequency energy and, if not installed and used in accordance with the
instructions, may cause harmful interference to radio communications.
However. there is no guarantee that interference will not occur m a particular
installation. If this equipment does cause harmful intert_rence to radio or
telex ision reception, which can be determined by turning the equil)n_enl off
and on. the user is encouraged to try to correct the interference hy one or
more of the following measures:
• Reorient or relocate the receiving antenna.
• Increase the separation between the equipment and receiver.
• Connect the equipment into an outlet on a circuit different from that to which
the receiver is connected.
• Consult the dealer or an experienced radio/TV technician lk)r hell),
Aherations or modifications carried out without appropriate atithorization
II]_.Iyinvalidate the users PCC right to operate the eqtlipnlelll.
This Class B digital apparatus meets all requirements of the Canadian
Interference -- Causing Equipment Regulations.
Cet appareil numdrique de la classe B respecte toutes les exigences du
Rdglement sur le mat,Sriel brouilleur du Canada.
85
Page 88

_ THOMSON CONSUMER ELECTRONICS
10330 N Meridian Street
Indianapolis, IN 46290
©2(X)0 Thomson Consumer Electronics, Inc.
Trademark(s) ® Registered
Marca(s) Registrada(s)
Printed in Taiwan
TOCOM 15529660
QR32141
 Loading...