

Page 1

CANT1650F
Amplifi ed Flat Multi-Directional
Indoor Antenna
Antena multidireccional plana amplifi cada para interiores
User’s Guide
Guía del Usuario
FCC Statement:
This device complies with part 15 of the FCC Rules. Operation is subject to the following two conditions: (1) This device
may not cause harmful interference, and (2) this device must accept any interference received, including interference that
may cause undesired operation.
Note: This equipment has been tested and found to comply with the limits for a Class B digital device, pursuant to part 15
of the FCC Rules. These limits are designed to provide reasonable protection against harmful interference in a residential
installation. This equipment generates, uses and can radiate radio frequency energy and, if not installed and used in
accordance with the instructions, may cause harmful interference to radio communications. However, there is no guarantee
that interference will not occur in a particular installation. If this equipment does cause harmful interference to radio or
television reception, which can be determined by turning the equipment off and on, the user is encouraged to try to correct
the interference by one or more of the following measures:
• Reorient or relocate the receiving antenna.
• Increase the separation between the equipment and receiver.
• Connect the equipment into an outlet on a circuit different from that to which the receiver is connected.
• Consult the dealer or an experienced radio/TV technician for help.
Caution: Any Changes or modifi cations not expressly approved by the party responsible for compliance could void the user’s
authority to operate this equipment.
Industry Canada Regulatory Information
CAN ICES-3 (B)/NMB-3 (B)
Avis d’Industrie Canada
CAN ICES-3 (B)/NMB-3 (B)
Important: This power unit is intended to be correctly oriented in a vertical or fl oor mount position.
Congratulations on your purchase of the Amplifi ed Flat Multi-Directional Indoor Antenna.
With this contemporary antenna, rabbit ears are a thing of the past. This sleek, attractive
antenna features the most advanced technology, including a patented engineering design
that provides excellent reception for both analog and digital TV broadcasts.
Multi-Directional Antennas
A multi-directional antenna is able to receive signals from any direction. Useful for both
analog and digital reception, the antenna looks great, facilitates optimal reception, and
requires very little space. The patented multi-directional technology ensures that the
antenna does not need to be adjusted according to the location of the transmitting signal.
Antenna Features
The Amplifi ed Flat Multi-Directional Indoor Antenna is packed with features that make
it as functional as it is attractive. Because the antenna is multi-directional, there is no need
to constantly turn the antenna to improve reception. And, with its compact footprint, the
antenna is so unobtrusive, you can hang it on the wall, stand it up or lay it fl at. Its attractive
design complements any décor. The antenna:
Page 2

• Features a removable amplifi er to optimize reception of local standard defi nition and
high defi nition signals
• Outperforms traditional antennas due to patented design
• Eliminates constant adjustments with multi-directional reception pattern
• Gets great reception in any position—lying fl at, hanging, or standing
• Takes up minimal space
• Features a modern, contemporary look
Antenna Hardware
Before attempting to use your antenna, please remove all parts from the box and read the
instructions carefully The antenna package includes the following items:.
1 Flat Multi-Directional Antenna with Built-In 6’ Coaxial Cable
English
1 Amplifi er Insert with Built-In Coaxial Cable
Removable Foot Stand
Setting Up the Antenna
Find the best location for the antenna
Before you connect the antenna, determine the best spot in your home for optimum
reception. Then, try as much as possible to avoid obstructions between these transmitters
and your antenna.
Because of its amplifi cation and multi-directional capabilities, the antenna receives UHF,
VHF, and local high-defi nition broadcasts, providing quality reception from most locations.
Note: The antenna may work well sitting on your TV or other components. However,
because electronic components can sometimes interfere with the antenna’s reception, you
might notice an effect on the antenna’s performance. Likewise, placing the antenna on
a metal surface may interfere with reception. If the antenna isn’t performing as well as
expected, try moving it away from the component or placing it on another surface. Then,
re-scan for channels on your TV or converter box.
Positioning the Antenna
After locating the optimal position for your antenna, choose from one of three options:
• Lay the antenna fl at The antenna has raised feet on its bottom to prevent scratching
of furniture. Make sure you place the antenna on a fl at, level surface.
Note: This is the position that usually gives optimal performance.
• Hang the antenna The back of the antenna antenna has two mounting holes that can
be used for hanging. Place both holes over screws inserted in your wall.
• Stand the antenna upright The antenna comes with a removable stand. Simply place
the antenna in the stand to prop the antenna in an upright position.
2
Page 3
Connecting the Antenna
You can use the antenna with or without its amplifi er, depending on which connection
gives you the best signal. Try using the amplifi er fi rst. If you notice that you’ve lost channels
that you normally receive, try connecting without the amplifi er.
You can connect the antenna directly to your TV or use it with a converter box.
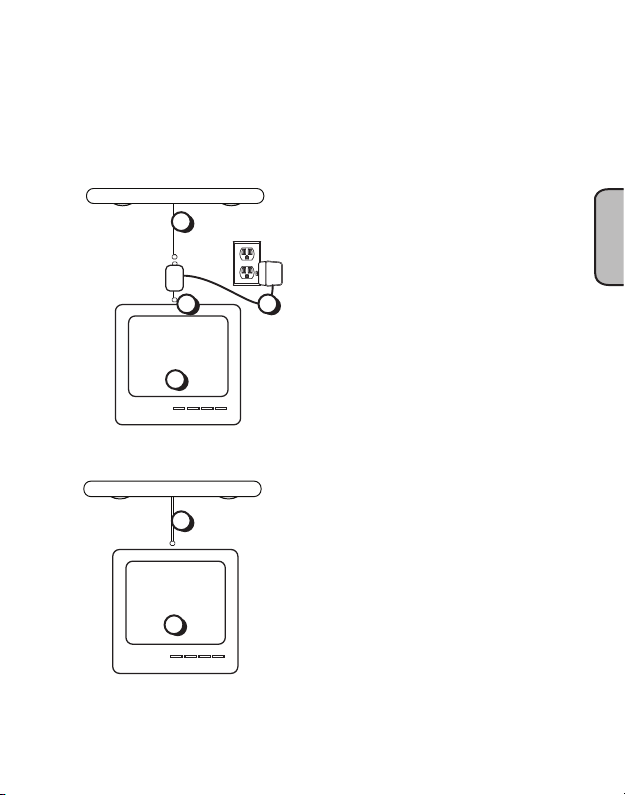
To connect the antenna with the
Built-In
Coaxial Cable
Amplifier
Insert
antenna
ANT1650
2
ANTENNA
TV/STB
3 4
amplifi er directly to your TV:
1. Make sure your TV is turned off.
2. Connect the antenna’s built-in cable to
the input jack of the amplifi er.
3. Connect the amplifi er’s built-in cable to
the antenna input on your TV.
4. Plug the amplifi er’s power cord into an
TV
5
electrical outlet.
5. Re-scan for channels on your TV.
To connect the antenna without the
Built-In
Coaxial Cable
2
antenna
ANT1650
amplifi er directly to your TV:
1. Make sure your TV is turned off.
2. Connect the antenna’s built-in coaxial
cable to the antenna input on your TV.
TV
3
3. Re-scan for channels on your TV.
English
3
Page 4
English
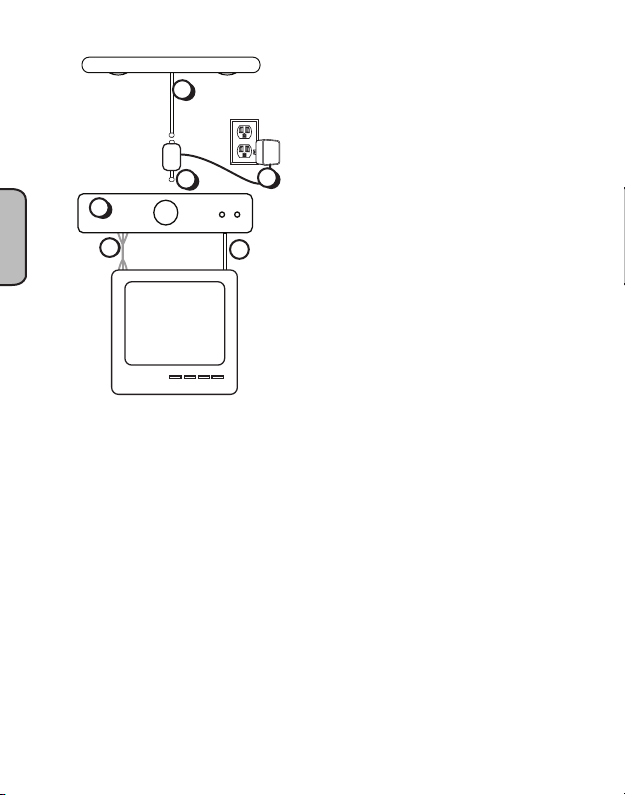
Built-In
Coaxial Cable
Amplifier
Insert
Converter Box
6
4a
Audio/Video
Cables
To connect the antenna with the
2
antenna
ANT1650
amplifi er to a converter box:
1. Make sure your converter box is turned
off.
ANTENNA
TV/STB
3
5
2. Connect the antenna’s built-in cable to
the input jack of the amplifi er.
3. Connect the amplifi er’s cable to the
antenna input on the converter box.
4. Connect the converter box to your TV
–or–
Coaxial
4b
Cable
using either audio/video cables or a
coaxial cable:
a. Audio/Video cable connection:
Connect the video (yellow) and stereo
TV
audio (red and white) cables to the
video and audio outputs on your
converter box. Connect the other ends
to the video and audio inputs on your
TV. Make sure you match the colors
of the jacks on each—yellow plug to
yellow jack, red plug to red jack, and
white plug to white jack.
b. Coaxial cable connection: Connect a
coaxial cable to the antenna output on
your converter box. Connect the other
end of the coaxial cable to the antenna
input on your TV.
5. Plug the amplifi er’s power cord into an
electrical outlet.
6. Re-scan for channels on your converter
box.
4
Page 5

Built-In
Coaxial Cable
Converter Box
4
3a
Audio/Video
Cables
To connect the antenna without the
amplifi er to a converter box:
1. Make sure your TV is turned off.
2
antenna
ANT1650
2. Connect the antenna’s built-in coaxial
cable to the antenna input on your
converter box.
3b
–or–
Coaxial
Cable
3. Connect the converter box to your TV
using either audio/video cables or a
coaxial cable:
a. Audio/Video cable connection:
TV
Connect the video (yellow) and stereo
audio (red and white) cables to the
English
video and audio outputs on your
converter box. Connect the other ends
to the video and audio inputs on your
TV. Make sure you match the colors
of the jacks on each—yellow plug to
yellow jack, red plug to red jack, and
white plug to white jack.
b. Coaxial cable connection: Connect a
coaxial cable to the antenna output on
your converter box. Connect the other
end of the coaxial cable to the antenna
input on your TV.
4. Re-scan for channels on your converter
box.
Notes: See your converter box’s owner’s
manual for more detailed connection
instructions.
5
Page 6

Coaxial Cable Installation Precautions
• Do not bend coaxial cables into less than a three-inch radius. Tighter bends can cause
shorts and can change a cable’s impedance.
• Do not install a coaxial cable where it will have a pulling tension greater than 15 pounds
during installation. After installation, make sure there is no tension on the cable.
• Use only round-headed staples. Any clamps or securing devices used with coax should
grip the cable evenly about the circumference without crushing the cable. Flat staples can
damage the coaxial cable.
• Do not expose a coaxial cable to a temperature greater than 176 degrees Fahrenheit. Keep
the cable away from heating vents and water heaters.
English
12 Month Limited Warranty
VOXX Accessories Corporation (the “Company”) warrants to the original retail purchaser of this product that should
this product or any part thereof, under normal use and conditions, be proven defective in material or workmanship
within 12 months from the date of original purchase, such defect(s) will be repaired or replaced (at the Company’s
option) without charge for parts and repair labor. To obtain repair or replacement within the terms of this Warranty, the
product along with any accessories included in the original packaging is to be delivered with proof of warranty coverage
(e.g. dated bill of sale), specifi cation of defect(s), transportation prepaid, to the Company at the address shown below.
Do not return this product to the Retailer.
This
Warranty is not transferable and does not cover product purchased, serviced or used outside the United States or
Canada. The Warranty does not extend to the elimination of externally generated static or noise. This Warranty does
not apply to costs incurred for installation, removal or reinstallation of the product, or, if in the Company’s opinion,
the product has been damaged through acts of nature, alteration, improper installation, mishandling, misuse, neglect, or
accident. This Warranty does not cover damage caused by
THE EXTENT OF THE COMPANY’S LIABILITY UNDER THIS WARRANTY IS LIMITED TO THE REPAIR
OR REPLACEMENT PROVIDED ABOVE AND, IN NO EVENT, SHALL THE COMPANY’S LIABILITY
EXCEED THE PURCHASE PRICE PAID BY PURCHASER FOR THE PRODUCT.
This Warranty is in lieu of all other express warranties or liabilities. ANY IMPLIED WARRANTIES, INCLUDING
ANY IMPLIED WARRANTY OF MERCHANTABILITY OR FITNESS FOR A PARTICULAR PURPOSE,
SHALL BE LIMITED TO DURATION OF THIS WARRANTY. ANY ACTION FOR BREACH OF ANY
WARRANTY HEREUNDER, INCLUDING ANY IMPLIED WARRANTY, MUST BE BROUGHT WITHIN
A PERIOD OF 24 MONTHS FROM THE DATE OF ORIGINAL PURCHASE. IN NO CASE SHALL THE
COMPANY BE LIABLE FOR ANY CONSEQUENTIAL OR INCIDENTAL DAMAGES WHATSOEVER.
No person or representative is authorized to assume for the Company any liability other than expressed herein in
connection with the sale of this product.
Some states/provinces do not allow limitations on how long an implied warranty lasts or the exclusion or limitation of
incidental or consequential damage so the above limitations or exclusions may not apply to you. This Warranty gives
you specifi c legal rights and you may also have other rights which vary from state/province to state/province.
U.S.A.: Voxx Return Center, c/o Genco ATC, 700 Commerce Parkway West Drive, Suite C, Greenwood, IN 46143
CANADA: Voxx Return Center, c/o Genco, 6685 Kennedy Road, Unit 3, Door 14, Mississauga, Ontario L5T 3A5
an AC adapter not provided with the product.
6
Page 7

Antenne amplifi ée multidirectionnelle plate intérieure
Guide de l’utilisateur CANT1650F
Déclaration de la FCC :
Cet appareil est conforme à la partie 15 du règlement de la FCC. Le fonctionnement est sujet aux deux conditions
suivantes : (1) cet appareil ne doit pas provoquer de brouillage préjudiciable et (2) cet appareil doit accepter tout brouillage
reçu, y compris le brouillage susceptible de provoquer un fonctionnement indésirable.
Cet équipement a été soumis à des essais et a été déclaré conforme aux limites stipulées pour un appareil numérique de
classe B, conformément aux spécifi cations de la partie 15 du règlement de la FCC. Ces limites ont pour but d’assurer une
protection raisonnable contre le brouillage nuisible dans une installation résidentielle. Cet équipement produit, utilise et
peut émettre de l’énergie en radiofréquence et, s’il n’est pas installé et utilisé conformément aux directives, il peut causer
un brouillage nuisible dans les communications radio. Cependant, il est impossible de garantir qu’aucun brouillage ne se
produira dans une installation particulière. Si cet équipement cause un brouillage de la réception de radio ou de télévision,
ce qu’il est possible de déterminer en éteignant puis en rallumant l’équipement, l’utilisateur est prié d’essayer de corriger le
brouillage au moyen de l’une ou de plusieurs des mesures suivantes :
• Réorienter ou déplacer l’antenne de réception.
• Éloigner davantage la distance entre l’équipement et le récepteur.
• Connecter l’équipement à une prise secteur ou à un autre circuit.
• Consulter le revendeur ou un technicien expérimenté de radio/télévision.
Attention : Les changements ou les modifi cations effectuées qui ne sont pas expressément approuvés par la partie responsable
de la conformité peuvent annuler l’autorisation accordée à l’utilisateur de se servir de l’équipement.
Avis d’Industrie Canada
CAN ICES-3 (B)/NMB-3 (B)
Important : Cet appareil électrique est conçu pour être orienté correctement à la verticale ou dans une position de support
sur le plancher.
Félicitations pour votre achat de l’antenne amplifi ée multidirectionnelle plate intérieure.
Grâce à cette antenne contemporaine, les antennes en oreilles de lapin appartiennent au passé. Cette
antenne mince et attrayante offre la technologie la plus avancée, incluant une conception technique
brevetée fournissant une réception excellente des signaux télévisuels analogiques et numériques.
Antennes multidirectionnelles
Une antenne multidirectionnelle permet de recevoir des signaux de toutes les directions. Utile
pour la réception de signaux analogiques et numériques, l’ antenne a une belle apparence, facilite
la réception optimale et requiert peu d’espace. La technologie multidirectionnelle brevetée vous
assure que l’antenne n’aura besoin d’aucun réglage en fonction de l’emplacement de la source du
signal transmis.
Caractéristiques de l’antenne
L’antenne amplifi ée multidirectionnelle plate intérieure est dotée d’un grand nombre
de caractéristiques qui combinent fonctionnalité et esthétisme. Comme l’antenne est
multidirectionnelle, vous n’avez pas besoin de la pivoter constamment pour améliorer la réception.
De plus, comme elle est compacte, l’antenne est discrète; vous pouvez l’accrocher à un mur ou
l’installer à l’horizontale ou à la verticale. Sa conception attrayante s’adapte à tous les décors.
L’antenne :
Français
7
Page 8

• Possède un amplifi cateur amovible pour optimiser la réception des signaux standard et haute
défi nition locaux
• Surpasse les antennes traditionnelles grâce à sa conception brevetée
• Élimine les ajustements constants grâce à sa réception multidirectionnelle
• Offre une bonne réception peu importe sa position : à l’horizontale ou accrochée
• Occupe peu d’espace
• Offre une apparence moderne, contemporaine
Pièces de l’antenne
Avant de tenter d’utiliser votre antenne, veuillez retirer toutes les pièces de l’emballage et lisez
attentivement les instructions. L’emballage de l’antenne inclut les éléments suivants :
1 antenne multidirectionnelle plate intérieure avec câble coaxial intégré de 1,8 m (6 pi)
1 amplifi cateur amovible avec câble coaxial intégré
Un support amovible
Installation de l’antenne
Trouver le meilleur emplacement pour l’antenne
Français
Avant de brancher l’antenne, trouvez le meilleur emplacement dans votre résidence pour une
réception optimale. Essayez autant que possible d’éviter les obstacles entre ces émetteurs et votre
antenne.
Grâce à sa fonctionnalité multidirectionnelle, l’ antenne reçoit les signaux UHF, VHF et hautedéfi nition locaux, offrant une réception de grande qualité presque partout.
Remarque : L’antenne peut fonctionner correctement si elle est installée sur votre téléviseur ou
un autre appareil. Par contre, comme les appareils électroniques peuvent parfois interférer avec la
réception de l’antenne, vous pourriez remarquer une diminution de la performance de l’antenne.
De même, l’installation de l’antenne sur une surface métallique peut interférer avec la réception.
Si l’antenne ne fonctionne pas aussi bien que vous le souhaitez, essayez de l’éloigner de l’appareil
ou de la déposer sur une autre surface. Ensuite, effectuez un nouveau balayage des canaux sur votre
téléviseur ou boîtier convertisseur.
Positionnement de l’antenne
Après avoir trouvé l’emplacement optimal pour votre antenne, choisissez l’une des trois options :
• Déposer l’antenne à l’horizontale L’antenne est dotée de pattes surélevées pour éviter
d’endommager le mobilier. Assurez-vous de déposer l’antenne sur une surface plane et de
niveau.
Remarque : C’est la position qui offre habituellement la performance optimale.
• Accrocher l’antenne L’arrière de l’antenne offre deux trous de montage pouvant être utilisés
pour l’accrocher. Alignez les deux trous sur des vis insérées dans le mur.
• Installer l’antenne à la verticale Un support amovible est fourni avec l’antenne. Vous
n’avez qu’à installer l’antenne dans le support pour la maintenir à la verticale.
8
Page 9

Branchement de l’antenne
Vous pouvez utiliser l’antenne avec ou sans son amplifi cateur, selon le branchement qui vous
offre le meilleur signal. Essayez d’abord en utilisant l’amplifi cateur. Si vous remarquez que vous
ne recevez plus certains canaux que vous recevez normalement, essayez de la brancher sans
l’amplifi cateur.
Vous pouvez brancher l’antenne directement à votre téléviseur ou l’utiliser avec un boîtier
convertisseur.
Pour brancher l’antenne et son
Câble
Cable coaxial
integrado
coaxial
intégré
Amplifi cateur
Amplificador
amovible
Câble
Cable coaxial
coaxial
integrado
intégré
2
ANTENNA
TV/STB
3 4
Téléviseur
TV
5
2
Téléviseur
TV
3
ANT1650
Antenne
Antenne
ANT1650
amplifi cateur directement à votre téléviseur :
1. Assurez-vous que votre téléviseur est fermé.
2. Branchez le câble intégré de l’antenne dans
la prise d’entrée de l’amplifi cateur.
3. Branchez le câble intégré de l’amplifi cateur
à l’entrée pour antenne de votre téléviseur.
4. Branchez le cordon d’alimentation de
l’amplifi cateur dans une prise électrique.
5. Balayez à nouveau les canaux sur votre
téléviseur.
Pour brancher l’antenne sans l’amplifi cateur
directement à votre téléviseur :
1. Assurez-vous que votre téléviseur est fermé.
2. Branchez le câble coaxial intégré de
l’antenne à l’entrée pour antenne de votre
téléviseur.
3. Balayez à nouveau les canaux sur votre
téléviseur.
Français
9
Page 10

Pour brancher l’antenne et son
amplifi cateur à un boîtier convertisseur :
Câble
Cable coaxial
integrado
coaxial
intégré
Amplifi cateur
Amplificador
amovible
Boîtier convertisseur
Convertidor
6
Antenne
2
ANTENNA
TV/STB
3
5
1. Assurez-vous que votre boîtier convertisseur
est fermé.
2. Branchez le câble intégré de l’antenne dans
la prise d’entrée de l’amplifi cateur.
3. Branchez le câble de l’amplifi cateur
à l’entrée pour antenne du boîtier
convertisseur.
4. Branchez le boîtier convertisseur à votre
ANT1650
téléviseur à l’aide de câbles audio/vidéo ou
4a
Cables de
Câbles audio/
vidéo
audio/video
ou
Câble
–o–
Cable
4b
coaxial
coaxial
d’un câble coaxial :
a. Branchement par câbles audio/vidéo :
Branchez les câbles vidéo (jaune) et audio
en stéréo (rouge et blanc) aux sorties vidéo
et audio de votre boîtier convertisseur.
Branchez les autres terminaisons aux
entrées vidéo et audio de votre téléviseur.
Assurez-vous de faire correspondre les
Français
Téléviseur
TV
couleurs des prises : la fi che jaune dans
la prise jaune, la fi che rouge dans la prise
rouge et la fi che blanche dans la prise
blanche.
b. Branchement par câble coaxial : Branchez un câble coaxial dans la sortie pour antenne
de votre boîtier convertisseur. Branchez l’autre terminaison du câble coaxial à l’entrée pour
antenne de votre téléviseur.
5. Branchez le cordon d’alimentation de l’amplifi cateur dans une prise électrique.
6. Balayez à nouveau les canaux sur votre boîtier convertisseur.
10
Page 11

Pour brancher l’antenne sans l’amplifi cateur
à un boîtier convertisseur :
Câble
Cable coaxial
coaxial
integrado
intégré
Boîtier convertisseur
Convertidor
4
3a
Câbles audio/
Cables de
audio/video
ANT1650
2
3b
ou
Câble
–o–
Cable
coaxial
vidéo
coaxial
1. Assurez-vous que votre téléviseur est fermé.
2. Branchez le câble coaxial intégré de
l’antenne à l’entrée pour antenne de votre
boîtier convertisseur.
3. Branchez le boîtier convertisseur à votre
téléviseur à l’aide de câbles audio/vidéo ou
d’un câble coaxial :
a. Branchement par câbles audio/vidéo :
Antenne
Branchez les câbles vidéo (jaune) et audio
en stéréo (rouge et blanc) aux sorties vidéo
Téléviseur
TV
et audio de votre boîtier convertisseur.
Branchez les autres terminaisons aux
entrées vidéo et audio de votre téléviseur.
Assurez-vous de faire correspondre les
couleurs des prises : la fi che jaune dans
la prise jaune, la fi che rouge dans la prise
rouge et la fi che blanche dans la prise
blanche.
b. Branchement par câble coaxial : Branchez un câble coaxial dans la sortie pour antenne
de votre boîtier convertisseur. Branchez l’autre terminaison du câble coaxial à l’entrée pour
antenne de votre téléviseur.
4. Balayez à nouveau les canaux sur votre boîtier convertisseur.
Remarques : Consultez le guide de l’utilisateur de votre boîtier convertisseur pour des instructions
plus détaillées sur le branchement.
Précautions concernant l’installation d’un câble coaxial
• Ne pliez pas les câbles coaxiaux à un rayon de moins de 7,6 cm (3 po). Des plis plus serrés
peuvent causer des courts-circuits et modifi er l’impédance du câble.
• N’installez pas un câble coaxial à un endroit où il subirait une tension de traction de plus de
15 livres pendant l’installation. Après l’installation, assurez-vous qu’il n’y a pas de tension le
long du câble.
• N’utilisez que des agrafes à tête ronde. Toute pince ou autre appareil de fi xation utilisé avec
un câble coaxial devrait serrer uniformément le câble sur sa circonférence, sans l’écraser. Des
agrafes plates peuvent endommager le câble coaxial.
• N’exposez pas le câble coaxial à une température de plus de 80 °C (176 °F). Gardez le câble
loin des sources de chaleur et des chauffe-eau.
Français
11
Page 12

Garantía Limitada de 12 Meses
VOXX Accessories Corporation (la “Compañía”) le garantiza a usted, el comprador original de este producto que si, bajo
condiciones y uso normales, se encontrara que este producto o alguna pieza presenta defectos materiales o de mano de
obra dentro de los primeros 12 meses a partir de la fecha de compra original, tales defectos serán reparados o reemplazados
(a opción de la Compañía) sin cargo alguno por las piezas y labores de reparación. Para obtener los servicios de reparación
o reemplazo dentro de los términos de esta Garantía, el producto junto con cualquier accesorio incluido en el empaque
original se entregarán con prueba de cubierta de garantía (por ejemplo, factura fechada de venta), especifi cación de los
defectos, transporte prepagado, a la Compañía a la dirección indicada abajo. No devuelva este producto al Distribuidor.
Esta Garantía no es transferible y no cubre un producto adquirido, mantenido o utilizado fuera de los Estados Unidos o
Canadá. Esta Garantía no incluye la eliminación de estática o ruido generados externamente. Esta garantía no incluye los
costos incurridos en la instalación, remoción o reinstalación de este producto, o, si es opinión de la Compañía, que este
producto ha sufrido daños debido a causas de fuerza mayor, alteraciones, instalación inadecuada, abuso, uso indebido,
negligencia o accidente. Esta Garantía no incluye daños ocasionados por un adaptador de CA que no haya sido suministrado
con el producto. EL ALCANCE DE LA RESPONSABILIDAD DE LA COMPAÑÍA BAJO ESTA GARANTÍA
ESTÁ LIMITADO A LA REPARACIÓN O EL REEMPLAZO PROVISTO ARRIBA Y, EN NINGÚN CASO,
DEBERÁ LA RESPONSABILIDAD DE LA COMPAÑÍA EXCEDER EL PRECIO DE COMPRA PAGADO POR
EL COMPRADOR DE ESTE PRODUCTO.
Esta Garantía reemplaza cualesquiera otras responsabilidades o garantías expresas. CUALESQUIERA GARANTÍAS
IMPLÍCITAS, INCLUYENDO CUALQUIER GARANTÍA IMPLÍCITA DE COMERCIABILIDAD O
ADAPTABILIDAD PARA UN PROPÓSITO EN PARTICULAR ESTARÁN LIMITADAS A LA DURACIÓN DE
ESTA GARANTÍA. CUALQUIER ACCIÓN PARA EL INCUMPLIMIENTO DE CUALQUIER GARANTÍA EN
EL PRESENTE, INCLUYENDO CUALQUIER GARANTÍA IMPLÍCITA, DEBERÁ PRESENTARSE DENTRO
DE UN PERÍODO DE 24 MESES A PARTIR DE LA FECHA DE COMPRA ORIGINAL. EN NINGÚN CASO
LA COMPAÑÍA SERÁ RESPONSABLE POR DAÑOS EMERGENTES O INCIDENTALES. Ninguna persona
ni representante está autorizado a asumir, a nombre de la Compañía, ninguna responsabilidad salvo la expresada aquí en
conexión con la venta de este producto.
Algunos estados/provincias no permiten limitaciones sobre la duración de una garantía implícita o la exclusión o la
limitación de daños incidentales o emergentes, de modo que es posible que las limitaciones o exclusiones anteriores no
apliquen en su caso. Esta Garantía le confi ere derechos legales específi cos; según el estado/provincia, puede disfrutar
además de otros derechos.
États-Unis :
Voxx Return Center, c/o Genco ATC, 700 Commerce Parkway West Drive, Suite C, Greenwood, IN
46143
CANADA : Centre de retours
Vox x
, att. : Genco, 6685 Kennedy Road, unité 3, porte 14, Mississauga, Ontario L5T 3A5
©2014 VOXX Accessories Corporation
3502 Woodview Trace, Suite 220, Indianapolis, IN
46268
Trademark(s) Registered
Marque(s) de commerce déposée(s)
www.rcaaudiovideo.com
All other brands and product names are trademarks or
registered trademarks of their respective owners.
Tous les autres noms de produit et de marques sont
des marques de commerce ou des marques déposées de
leur propriétaire respectif.
Product specifi cations are subject to change.
Les caractéristiques de cet appareil sont sujettes à des
modifi cations.
Printed in China
Imprimé en Chine
CANT1650F_IB_00
 Loading...