

Page 1

TV/VCR/DVD
User’s Guide
Changing Entertainment. Again.
16061510- cover 12/13/02 11:40 AM Page 1
Page 2

WARNING
To reduce the risk of fire or electric
shock, do not expose this product
to rain or moisture.
RISK OF ELECTRIC SHOCK. DO
NOT OPEN.
CAUTION
This symbol indicates “
dangerous voltage” inside
the product that presents
a risk of electric shock or
personal injury.
This symbol indicates
important instructions
accompanying the product.
Caution: To prevent electric shock, match wide blade
of plug to wide slot, fully insert.
Refer to the identification/rating label located on the
back panel of your product for its proper operating
voltage.
FCC Regulations state that unauthorized changes or modifications to
this equipment may void the user’s authority to operate it.
Caution: Using video games or any external accessory with fixed
images for extended periods of time can cause them to be permanently imprinted on the picture tube (or projection TV picture
tubes). ALSO, some network/program logos, phone numbers, etc.
may cause similar damage. This damage is not covered by your
warranty.
Cable TV Installer: This reminder is provided to call your attention to
Article 820-40 of the National Electrical Code (Section 54 of the
Canadian Electrical Code, Part 1) which provides guidelines for proper
grounding and, in particular, specifies that the cable ground shall be
connected to the grounding system of the building as close to the point
of cable entry as practical.
Product Registration
Please fill out the product registration card (packed separately) and return it immediately, or register on-line at
www.rca.com. Returning the card allows us to contact you if needed.
Product Information
Keep your sales receipt to obtain warranty parts and service and for proof of purchase. Attach it here and record
the serial model numbers in case you need them. These numbers are located on the product.
Model No. _________________________________ Serial No. ____________________________________________
Purchase Date: ____________________________________________________________________________________
Dealer/Address/Phone: ______________________________________________________________________________
CAUTION
THIS PRODUCT UTILIZES A LASER.
USE OF CONTROLS OR ADJUSTMENTS OR PERFORMANCE OF
PROCEDURES OTHER THAN SPECIFIED HEREIN MAY RESULT IN
HAZARDOUS RADIATION EXPOSURE. DO NOT OPEN COVERS
AND DO NOT REPAIR YOURSELF.
REFER SERVICING TO QUALIFIED
PERSONNEL.
Note:
This DVD player is designed and manufactured to respond to the Region
Management Information. If the
Region number of a disc does not correspond to the Region number of this
DVD player, this DVD player cannot
play the disc. The Region number for
this player is Region No. 1.
Information
This equipment has been tested and found to comply with the limits for a Class B digital device, pursuant to Part 15
of the FCC Rules. These limits are designed to provide reasonable protection against harmful interference in a residential installation. This equipment generates, uses and can radiate radio frequency energy and, if not installed and
used in accordance with the instructions, may cause harmful interference to radio communications. However, there is
no guarantee that interference will not occur in a particular installation. If this equipment does cause harmful interference to radio or television reception, which can be determined by turning the equipment off and on, the user is
encouraged to try to correct the interference by one or more of the following measures:
• Reorient or relocate the receiving antenna.
• Increase the separation between the equipment and receiver.
• Connect the equipment into an outlet on a circuit different from that to which the receiver is connected.
• Consult the dealer or experienced radio/TV technician for help.
CLASS 1
LASER
PRODUCT
Caution: To reduce the risk of electric shock, do not remove
cover (or back). No user serviceable parts inside. Refer servicing
to qualified service personnel.
I MPORTANT I NFORMATION
16061510- cover 12/13/02 11:40 AM Page 2
Page 3

CHAPTER ONE: YOUR NEW 3WAY COMBINATION UNIT 1
Chapter 1:
Your New 3Way Combination Unit . . . . . . . . . . . . . . . . . . . 3
Things to Consider Before You Connect . . . . . . . . . . . . . . . . . . . . . . . . . . . . . . . . . . . . . . . . 3
Protect Against Power Surges . . . . . . . . . . . . . . . . . . . . . . . . . . . . . . . . . . . . . . . 3
Protect Components from Overheating . . . . . . . . . . . . . . . . . . . . . . . . . . . . . . . 3
Position Cables Properly to Avoid Audio Interference. . . . . . . . . . . . . . . . . . . . 3
Important Stand and Base Safety Information . . . . . . . . . . . . . . . . . . . . . . . . . . 3
Use Indirect Light . . . . . . . . . . . . . . . . . . . . . . . . . . . . . . . . . . . . . . . . . . . . . . . . . 3
Cables Needed to Connect Components to Your TV/VCR/DVD. . . . . . . . . . . . . 3
Dolby Digital and DTS . . . . . . . . . . . . . . . . . . . . . . . . . . . . . . . . . . . . . . . . . . . . . . . . . . . . . . . 4
TV/VCR/DVD + Receiver . . . . . . . . . . . . . . . . . . . . . . . . . . . . . . . . . . . . . . . . . . . . . . . . . . . . . . 5
Familiarizing Yourself with The 3way Combination Unit . . . . . . . . . . . . . . . . . . . . . . . . . . . 6
Front Panel Buttons. . . . . . . . . . . . . . . . . . . . . . . . . . . . . . . . . . . . . . . . . . . . . . . . 6
Side Panel Jacks . . . . . . . . . . . . . . . . . . . . . . . . . . . . . . . . . . . . . . . . . . . . . . . . . . 7
Rear Panel Jacks . . . . . . . . . . . . . . . . . . . . . . . . . . . . . . . . . . . . . . . . . . . . . . . . . . 7
Remote Control (TV Function Buttons) . . . . . . . . . . . . . . . . . . . . . . . . . . . . . . . . 8
Remote Control (DVD Function Buttons) . . . . . . . . . . . . . . . . . . . . . . . . . . . . . . 9
Remote Control (VCR Function Buttons). . . . . . . . . . . . . . . . . . . . . . . . . . . . . . 10
Installing Batteries in the Remote Control . . . . . . . . . . . . . . . . . . . . . . . . . . . . . . . . . . . . . . 11
Setting the Optical Out Jack. . . . . . . . . . . . . . . . . . . . . . . . . . . . . . . . . . . . . . . . 11
Chapter 2: TV Operation. . . . . . . . . . . . . . . . . . . . . . . . . . . . . . . . . 12
Turning the TV On and Off . . . . . . . . . . . . . . . . . . . . . . . . . . . . . . . . . . . . . . . . . . . . . . . . . . 12
Viewing the Menus and On-Screen Displays. . . . . . . . . . . . . . . . . . . . . . . . . . . . . . . . . . . . 12
Viewing the Menus . . . . . . . . . . . . . . . . . . . . . . . . . . . . . . . . . . . . . . . . . . . . . . . 12
Viewing the Display . . . . . . . . . . . . . . . . . . . . . . . . . . . . . . . . . . . . . . . . . . . . . . 12
Selecting a Menu Language . . . . . . . . . . . . . . . . . . . . . . . . . . . . . . . . . . . . . . . . . . . . . . . . . 13
Memorizing the Channels . . . . . . . . . . . . . . . . . . . . . . . . . . . . . . . . . . . . . . . . . . . . . . . . . . . 13
Selecting the Video Signal-source. . . . . . . . . . . . . . . . . . . . . . . . . . . . . . . . . . . 13
Storing Channels in Memory (Automatic Method) . . . . . . . . . . . . . . . . . . . . . 14
Adding and Erasing Channels (Manual Method) . . . . . . . . . . . . . . . . . . . . . . . 15
Customizing the Picture. . . . . . . . . . . . . . . . . . . . . . . . . . . . . . . . . . . . . . . . . . . . . . . . . . . . . 16
Using Automatic Picture Settings. . . . . . . . . . . . . . . . . . . . . . . . . . . . . . . . . . . . . . . . . . . . . 17
Changing the Color Tone. . . . . . . . . . . . . . . . . . . . . . . . . . . . . . . . . . . . . . . . . . . . . . . . . . . . 18
Changing the Screen Size . . . . . . . . . . . . . . . . . . . . . . . . . . . . . . . . . . . . . . . . . . . . . . . . . . . 18
Fine Tuning Channels . . . . . . . . . . . . . . . . . . . . . . . . . . . . . . . . . . . . . . . . . . . . . . . . . . . . . . 19
Digital Noise Reduction . . . . . . . . . . . . . . . . . . . . . . . . . . . . . . . . . . . . . . . . . . . . . . . . . . . . . 20
Tilt . . . . . . . . . . . . . . . . . . . . . . . . . . . . . . . . . . . . . . . . . . . . . . . . . . . . . . . . . . . . . . . . . . . . . . 20
Customizing the Sound . . . . . . . . . . . . . . . . . . . . . . . . . . . . . . . . . . . . . . . . . . . . . . . . . . . . . 21
Using Automatic Sound Settings . . . . . . . . . . . . . . . . . . . . . . . . . . . . . . . . . . . . . . . . . . . . . 21
Choosing a Multi-Channel Soundtrack (MTS) . . . . . . . . . . . . . . . . . . . . . . . . . . . . . . . . . . . 22
Viewing a VCR or Camcorder Tape. . . . . . . . . . . . . . . . . . . . . . . . . . . . . . . . . . . . . . . . . . . . 23
Setting the Clock . . . . . . . . . . . . . . . . . . . . . . . . . . . . . . . . . . . . . . . . . . . . . . . . . . . . . . . . . . 23
Setting the On/Off Timer . . . . . . . . . . . . . . . . . . . . . . . . . . . . . . . . . . . . . . . . . . . . . . . . . . . . 26
Setting the Sleep Timer. . . . . . . . . . . . . . . . . . . . . . . . . . . . . . . . . . . . . . . . . . . . . . . . . . . . . 28
Viewing Closed Captions. . . . . . . . . . . . . . . . . . . . . . . . . . . . . . . . . . . . . . . . . . . . . . . . . . . . 29
Using the V-Chip . . . . . . . . . . . . . . . . . . . . . . . . . . . . . . . . . . . . . . . . . . . . . . . . . . . . . . . . . . 30
How the V-Chip Works . . . . . . . . . . . . . . . . . . . . . . . . . . . . . . . . . . . . . . . . . . . . 30
Setting Up Your Personal ID Number (PIN) . . . . . . . . . . . . . . . . . . . . . . . . . . . 30
How to Enable/Disable the V-Chip . . . . . . . . . . . . . . . . . . . . . . . . . . . . . . . . . . . 31
How to Set up Restrictions Using the “TV guidelines” . . . . . . . . . . . . . . . . . . 31
How to Set up Restrictions using the MPAA Ratings:
G, PG, PG-13, R, NC-17, X. . . . . . . . . . . . . . . . . . . . . . . . . . . . . . . . . . . . . . . . . . 32
How to Reset the TV after the V-Chip Blocks
a Channel (“Emergency Escape”) . . . . . . . . . . . . . . . . . . . . . . . . . . . . . . . . . . . 33
Chapter 3: DVD Operation . . . . . . . . . . . . . . . . . . . . . . . . . . . . . . . 34
Playing a Disc . . . . . . . . . . . . . . . . . . . . . . . . . . . . . . . . . . . . . . . . . . . . . . . . . . . . . . . . . . . . . 34
Playback . . . . . . . . . . . . . . . . . . . . . . . . . . . . . . . . . . . . . . . . . . . . . . . . . . . . . . . . 34
Pausing Playback. . . . . . . . . . . . . . . . . . . . . . . . . . . . . . . . . . . . . . . . . . . . . . . . . 34
Step Motion Playback (Except CD) . . . . . . . . . . . . . . . . . . . . . . . . . . . . . . . . . . 34
Slow Motion Playback (Except CD) . . . . . . . . . . . . . . . . . . . . . . . . . . . . . . . . . . 35
Using the Search and Skip Functions . . . . . . . . . . . . . . . . . . . . . . . . . . . . . . . . . . . . . . . . . 35
Searching through a Chapter or Track . . . . . . . . . . . . . . . . . . . . . . . . . . . . . . . 35
Skipping Tracks . . . . . . . . . . . . . . . . . . . . . . . . . . . . . . . . . . . . . . . . . . . . . . . . . . 35
Using the Display Function . . . . . . . . . . . . . . . . . . . . . . . . . . . . . . . . . . . . . . . . . . . . . . . . . . 36
Repeat Play . . . . . . . . . . . . . . . . . . . . . . . . . . . . . . . . . . . . . . . . . . . . . . . . . . . . . . . . . . . . . . . 37
Program Play and Random Play . . . . . . . . . . . . . . . . . . . . . . . . . . . . . . . . . . . . . . . . . . . . . . 38
Program Playback . . . . . . . . . . . . . . . . . . . . . . . . . . . . . . . . . . . . . . . . . . . . . . . . 38
Random Playback . . . . . . . . . . . . . . . . . . . . . . . . . . . . . . . . . . . . . . . . . . . . . . . . 38
Using the Disc View Function (VCD). . . . . . . . . . . . . . . . . . . . . . . . . . . . . . . . . . . . . . . . . . . 39
Track View/Index View . . . . . . . . . . . . . . . . . . . . . . . . . . . . . . . . . . . . . . . . . . . . 39
Selecting the Audio Language . . . . . . . . . . . . . . . . . . . . . . . . . . . . . . . . . . . . . . . . . . . . . . . 40
Using the AUDIO Button. . . . . . . . . . . . . . . . . . . . . . . . . . . . . . . . . . . . . . . . . . . 40
Using the DVD Setup Button (When in DVD mode). . . . . . . . . . . . . . . . . . . . . 41
C ONTENTS
16061510-CHAPTER 1 12/13/02 11:43 AM Page 1
Page 4

2 CHAPTER ONE: YOUR NEW 3WAY COMBINATION UNIT
Chapter 3: DVD Operation (Cont.)
Selecting the Subtitle Language. . . . . . . . . . . . . . . . . . . . . . . . . . . . . . . . . . . . . . . . . . . . . . 42
Using the SUBTITLE button . . . . . . . . . . . . . . . . . . . . . . . . . . . . . . . . . . . . . . . . 42
Using the DVD Setup Button (When in DVD mode). . . . . . . . . . . . . . . . . . . . . 43
Setting up the Language Features . . . . . . . . . . . . . . . . . . . . . . . . . . . . . . . . . . . . . . . . . . . . 43
Using the Player and Disc Menu . . . . . . . . . . . . . . . . . . . . . . . . . . . . . . . . . . . . 43
Using the Master Volume Control Function. . . . . . . . . . . . . . . . . . . . . . . . . . . . . . . . . . . . . 44
Changing the Camera Angle . . . . . . . . . . . . . . . . . . . . . . . . . . . . . . . . . . . . . . . . . . . . . . . . . 45
Using the Zoom Function (DVD/VCD) . . . . . . . . . . . . . . . . . . . . . . . . . . . . . . . . . . . . . . . . . 45
Using the Bookmark Function. . . . . . . . . . . . . . . . . . . . . . . . . . . . . . . . . . . . . . . . . . . . . . . . 46
Using the Bookmark Function (DVD/VCD) . . . . . . . . . . . . . . . . . . . . . . . . . . . . 46
Recalling a Marked Scene . . . . . . . . . . . . . . . . . . . . . . . . . . . . . . . . . . . . . . . . . 46
Clearing a Bookmark. . . . . . . . . . . . . . . . . . . . . . . . . . . . . . . . . . . . . . . . . . . . . . 47
MP3 Play . . . . . . . . . . . . . . . . . . . . . . . . . . . . . . . . . . . . . . . . . . . . . . . . . . . . . . . . . . . . . . . . . 48
MP3 Play Function. . . . . . . . . . . . . . . . . . . . . . . . . . . . . . . . . . . . . . . . . . . . . . . . 48
Program/Random playback . . . . . . . . . . . . . . . . . . . . . . . . . . . . . . . . . . . . . . . . 48
CD-R MP3 discs . . . . . . . . . . . . . . . . . . . . . . . . . . . . . . . . . . . . . . . . . . . . . . . . . . 49
Setting up the Parental Control . . . . . . . . . . . . . . . . . . . . . . . . . . . . . . . . . . . . . . . . . . . . . . 50
Setting up the Audio Options . . . . . . . . . . . . . . . . . . . . . . . . . . . . . . . . . . . . . . . . . . . . . . . . 52
Setting up the Display Options . . . . . . . . . . . . . . . . . . . . . . . . . . . . . . . . . . . . . . . . . . . . . . . 53
Chapter 4: VCR Operation . . . . . . . . . . . . . . . . . . . . . . . . . . . . . . . 54
Using the Safety Tab . . . . . . . . . . . . . . . . . . . . . . . . . . . . . . . . . . . . . . . . . . . . . . . . . . . . . . . 54
Inserting and Ejecting a Video Cassette Tape . . . . . . . . . . . . . . . . . . . . . . . . . . . . . . . . . . . 54
Using Picture Search. . . . . . . . . . . . . . . . . . . . . . . . . . . . . . . . . . . . . . . . . . . . . . 55
Using the Time Counter . . . . . . . . . . . . . . . . . . . . . . . . . . . . . . . . . . . . . . . . . . . 55
Using Memory Stop . . . . . . . . . . . . . . . . . . . . . . . . . . . . . . . . . . . . . . . . . . . . . . 56
Using P.PLUS . . . . . . . . . . . . . . . . . . . . . . . . . . . . . . . . . . . . . . . . . . . . . . . . . . . . . . . . . . . . . 57
Recording TV Programs As You Watch . . . . . . . . . . . . . . . . . . . . . . . . . . . . . . . . . . . . . . . . 58
Recording. . . . . . . . . . . . . . . . . . . . . . . . . . . . . . . . . . . . . . . . . . . . . . . . . . . . . . . 58
Editing While Recording . . . . . . . . . . . . . . . . . . . . . . . . . . . . . . . . . . . . . . . . . . . 59
Using Advanced Recording Features . . . . . . . . . . . . . . . . . . . . . . . . . . . . . . . . . . . . . . . . . . 59
Using One-Touch Recording . . . . . . . . . . . . . . . . . . . . . . . . . . . . . . . . . . . . . . . 59
Recording at a Later Time. . . . . . . . . . . . . . . . . . . . . . . . . . . . . . . . . . . . . . . . . . 60
Using Program Review. . . . . . . . . . . . . . . . . . . . . . . . . . . . . . . . . . . . . . . . . . . . 63
Using True Repeat . . . . . . . . . . . . . . . . . . . . . . . . . . . . . . . . . . . . . . . . . . . . . . . . . . . . . . . . . 64
Using Block Repeat . . . . . . . . . . . . . . . . . . . . . . . . . . . . . . . . . . . . . . . . . . . . . . . . . . . . . . . . 65
Using the HiFi Stereo. . . . . . . . . . . . . . . . . . . . . . . . . . . . . . . . . . . . . . . . . . . . . . . . . . . . . . . 66
Selecting the HiFi Mode . . . . . . . . . . . . . . . . . . . . . . . . . . . . . . . . . . . . . . . . . . . 66
MTS Recording/Monitor Mode . . . . . . . . . . . . . . . . . . . . . . . . . . . . . . . . . . . . . 66
Video Dubbing . . . . . . . . . . . . . . . . . . . . . . . . . . . . . . . . . . . . . . . . . . . . . . . . . . . . . . . . . . . . 67
Making the Connections . . . . . . . . . . . . . . . . . . . . . . . . . . . . . . . . . . . . . . . . . . . 67
Video Dubbing. . . . . . . . . . . . . . . . . . . . . . . . . . . . . . . . . . . . . . . . . . . . . . . . . . . 67
Tape Speeds . . . . . . . . . . . . . . . . . . . . . . . . . . . . . . . . . . . . . . . . . . . . . . . . . . . . . . . . . . . . . . 68
Chapter 5: Troubleshooting . . . . . . . . . . . . . . . . . . . . . . . . . . . . . . 69
Identifying TV Problems . . . . . . . . . . . . . . . . . . . . . . . . . . . . . . . . . . . . . . . . . . . . . . . . . . . . 69
Identifying DVD Problems . . . . . . . . . . . . . . . . . . . . . . . . . . . . . . . . . . . . . . . . . . . . . . . . . . . 70
Identifying VCR Problems . . . . . . . . . . . . . . . . . . . . . . . . . . . . . . . . . . . . . . . . . . . . . . . . . . . 71
Limited Warranty . . . . . . . . . . . . . . . . . . . . . . . . . . . . . . . . . . . . . . . . . . . . . . . . . . . . . . . . . . 72
C ONTENTS
16061510-CHAPTER 1 12/13/02 11:43 AM Page 2
Page 5

CHAPTER ONE: YOUR NEW 3WAY COMBINATION UNIT 3
Things to Consider Before You Connect
Protect Against Power Surges
• Connect all components before you plug any of their power cords into the wall outlet.
• Turn off the TV/VCR/DVD and/or component before you connect or disconnect any cables.
• Make sure all antennas and cables are properly grounded. Refer to the Important Safeguards sheet
packed with your TV/VCR/DVD.
Protect Components from Overheating
• Don’t block ventilation holes on any of the components. Arrange the components so that air can
circulate freely.
• Don’t stack components.
• When you place components in a stand, make sure you allow adequate ventilation.
• If you connect an audio receiver or amplifier, place it on the top shelf so the heated air from it won’t
flow around other components.
Position Cables Properly to Avoid Audio Interference
• Insert each cable firmly into the designated jack.
• If you place components above the TV/VCR/DVD, route all cables down the side of the back of the
TV/VCR/DVD instead of straight down the middle.
• If your antenna uses 300-ohm twin lead cables, do not coil the cables. Also, keep the twin lead
cables away from audio/video cables.
Important Stand and Base Safety Information
Choose the location for your TV/VCR/DVD carefully. Place the TV/VCR/DVD on a stand or base that is of
adequate size and strength to prevent the TV/VCR/DVD from being accidentally tipped over, pushed
off, or pulled off. This could cause personal injury and/or damage to the TV/VCR/DVD. Refer to the
Important Safeguards sheet packed with your TV/VCR/DVD.
Use Indirect Light
Don’t place the TV/VCR/DVD where sunlight or room lighting will be directed toward the screen. Use
soft or indirect lighting.
Cables Needed to Connect Components to Your TV/VCR/DVD
The pictures below show the cables needed for the connections represented in this book.
Notes: Audio/Video cables (A/V cables for short) are usually sold as a bundled set, but the connection picture in this
book shows each cable separately for better visibility.
This TV/VCR/DVD’s OPTICAL DIGITAL OUT jack fully complies with the international standard governing this type of
jack (IEC958), and is designed for connection to a Dolby Digital (AC-3® or PCM) receiver or Dolby Digital (AC-3 or
PCM) decoder. Older equipment, some of which is not fully compliant with IEC958, may not be compatible with the
Dolby Digital bitstream. Such a connection using anything other than Dolby Digital AC-3 or PCM receiver or decoder
could create a high noise level, causing damage to headphones or speakers.
Chapter One
YOUR NEW 3WAY C OMBINATION U NIT
Coaxial cable
Audio/Video cable
Optical Digital cable
16061510-CHAPTER 1 12/13/02 11:43 AM Page 3
Page 6

4 CHAPTER ONE: YOUR NEW 3WAY COMBINATION UNIT
YOUR NEW
3WAY C OMBINATION U NIT
Dolby Digital® and DTS®
Both Dolby Digital and DTS are audio formats used to record 5.1-channel audio signals onto the digital
track of film (while the film is being made). Both of these formats provide up to six separate channels:
left, right, center, left rear, right rear, and common subwoofer.
The disc will play 5.1-channel sound only if you’ve connected a DTS or Dolby Digital receiver or decoder
and if the original movie the disc was recorded from was encoded in the Dolby Digital or DTS format.
Please Read this Before Using the OPTICAL DIGITAL OUT Jack!
This TV/VCR/DVD’s digital output jack is designed for a connection to a Dolby Digital or DTS receiver
or decoder.
Older digital equipment may not be compatible with the Dolby Digital bitstream. Such a connection
can create a high level of noise that may be harmful to your ears, and could damage headphones or
speakers.
Make sure the Optical Out setting in the TV/VCR/DVD’s sound menu is on (go to page 11).
M
ANUFACTURED UNDER THE LICENSE FROMDOLBYLABORATORIES
. “D
OLBY” AND THE
DOUBLE
-D
SYMBOL ARE TRADEMARKS OFDOLBYLABORATORIES
. C
ONFIDENTIAL UNPUBLISHED
WORKS
. ©1992-1997 D
OLBYLABORATORIES
, INC. A
LL RIGHTS RESERVED
.
** DTS
IS A REGISTERED TRADEMARK OFDIGITALHOMETHEATERSYSTEMS
, INC.
TV/VCR/DVD
Receiver
1A
1B
16061510-CHAPTER 1 12/13/02 11:43 AM Page 4
TV/VCR/DVD Back Panel
OPTICAL
DIGITAL OUT
DOLBY DIGITAL
or DTS RECEIVER
DIGITAL IN
VIDEO
AUDIO
S-VIDEO
L
R
MONITOR
INPUT
OUT
75
From Antenna/Cable Feed
A/V RECEIVER
TAPE
-OR-
CD
IN
R
L
TV
IN OUT IN
IN
VCR
OUT
Page 7

CHAPTER ONE: YOUR NEW 3WAY COMBINATION UNIT 5
YOUR
NEW 3WAY
COMBINATION U NIT
TV/VCR/DVD + Receiver
1A. Connect the Dolby Digital or DTS receiver to the TV/VCR/DVD
If you have a Dolby Digital or DTS receiver with a Digital Input jack, connect an optical digital
cable (not provided) into the OPTICAL DIGITAL OUT jack on the TV/VCR/DVD player and to the
Digital Input jack on the back of the receiver. You must also set the digital output setting in the
DVD setup menu (Chapter 3 has details).
or
1B. Connect the A/V receiver to the TV/VCR/DVD
Connect the A/V cables to an A/V (audio/video) receiver. Connect audio cables to the
TV/VCR/DVD’s MONITOR OUT AUDIO (L and R) jacks and the other ends to the receiver’s
corresponding Audio Input jacks.
16061510-CHAPTER 1 12/13/02 11:43 AM Page 5
Page 8

6 CHAPTER ONE: YOUR NEW 3WAY COMBINATION UNIT
YOUR
NEW 3WAY
COMBINATION U NIT
Familiarizing Yourself with The 3way Combination Unit
Front Panel Buttons
The buttons on the front panel control your 3way Combination Unit’s basic features, including the
on-screen menu. To use the more advanced features, you must use the remote control.
1 Disc tray
Load the disc here.
2 VCR deck
Insert a standard VHS video tape.
3 SKIP/SEARCH (DVD)
Press to skip or search the title, chapter or track.
4 PLAY/PAUSE (DVD)
Press to play or pause the disc
5 STOP (DVD)
Press to stop the disc
6 OPEN/CLOSE (DVD)
Press to open and close the disc tray.
7 STAND BY indicator
Lit when TV power is Off.
8 Timer indicator
Lit when the program times are stored.
9 REC indicator
Lit when the VCR is recording.
10
Remote Control Sensor
Aim the remote control towards this spot on the TV.
11 REC (VCR)
Press to begin recording.
12 STOP/EJECT (VCR)
Press to stop a video tape during play, record, rewind, or
fast forward. Press to eject a video tape if the tape is
stopped.
13 REW/FF (VCR)
Press to rewind/fast forward a videotape.
14 PLAY/PAUSE (VCR)
Press to play or pause a video tape.
15 VOL – , +
Press to increase or decrease the volume.
16 CH ▼ and ▲
Press to change channels.
17 POWER
Press to turn the TV on and off.
16061510-CHAPTER 1 12/13/02 11:43 AM Page 6
VIDEO
L
1
/
PLAY/PAUSE
SKIP/SEARCH
STOP
SKIP/SEARCH
2
/
/
_
POWER
REC PLAY/PAUSESTOP/EJECT REW FF
OPEN/CLOSE
STAND BY TIMER REC
CH
VOL
+
AUDIO
R
Side Panel Jacks
/
PLAY/PAUSE
SKIP/SEARCH
STOP
5
OPEN/CLOSE
6
SKIP/SEARCH
3
4
STAND BY TIMER
7
/
/
REC PLAY/PAUSESTOP/EJECT
11
12
REW FF
13
REC
9
8
10
_
14
15
CH
VOL
+
16
POWER
17
Page 9

CHAPTER ONE: YOUR NEW 3WAY COMBINATION UNIT 7
YOUR
NEW 3WAY
COMBINATION U NIT
Side Panel Jacks
You can use the Side panel jacks to connect an A/V component that is used only occasionally, such as a
camcorder or video game.
VIDEO IN Jack
Used to connect a video signal from a camcorder or video game.
AUDIO IN Jacks
Used to connect the audio signals from a camcorder or video game.
Rear Panel Jacks
Use the rear panel jacks to connect an A/V component that will be connected continuously, such as a
VCR or a camcorder.
75 Ω (Ant/Cable) Receives a signal from an antenna or cable system when the TV/VCR/DVD is attached with an RF cable.
AUDIO (L and R) and VIDEO INPUT Receives signals from another component, such as another VCR or camcorder, when the
component is connected to these jacks. To see the content coming from the component connected to these jacks, press the INPUT button on
the remote until AV appears on the screen.
AUDIO (L and R) and VIDEO MONITOR OUT Sends signals from the TV/VCR/DVD to another component, like a stereo
amplifier or speakers when the other component is connected to these jacks. These jacks are shared between the DVD player output and VCR
player output. The output is from the DVD player when the TV/VCR/DVD is in the DVD mode. The output is from the VCR player when the
TV/VCR/DVD is in the VCR mode.
OPTICAL DIGITAL OUT Use a digital optical cable (not provided) or a shielded coaxial cable (not provided) to connect your
TV/VCR/DVD player to a compatible Dolby Digital or DTS receiver or decoder. You must set Optical Out to On (instructions on page 11). Digital
output is only available during DVD playback.
S-VIDEO Provides better picture quality than the VIDEO INPUT jacks because the color part of the signal is separated from the black and
white part of the picture. When using S-VIDEO, make sure to connect left and right audio cables to the AUDIO L and R INPUT jacks.
16061510-CHAPTER 1 12/13/02 11:43 AM Page 7
TV/VCR/DVD Back Panel
VIDEO
OPTICAL
AUDIO
S-VIDEO
L
R
MONITOR
INPUT
OUT
75
DIGITAL OUT
Page 10

8 CHAPTER ONE: YOUR NEW 3WAY COMBINATION UNIT
YOUR
NEW 3WAY
COMBINATION U NIT
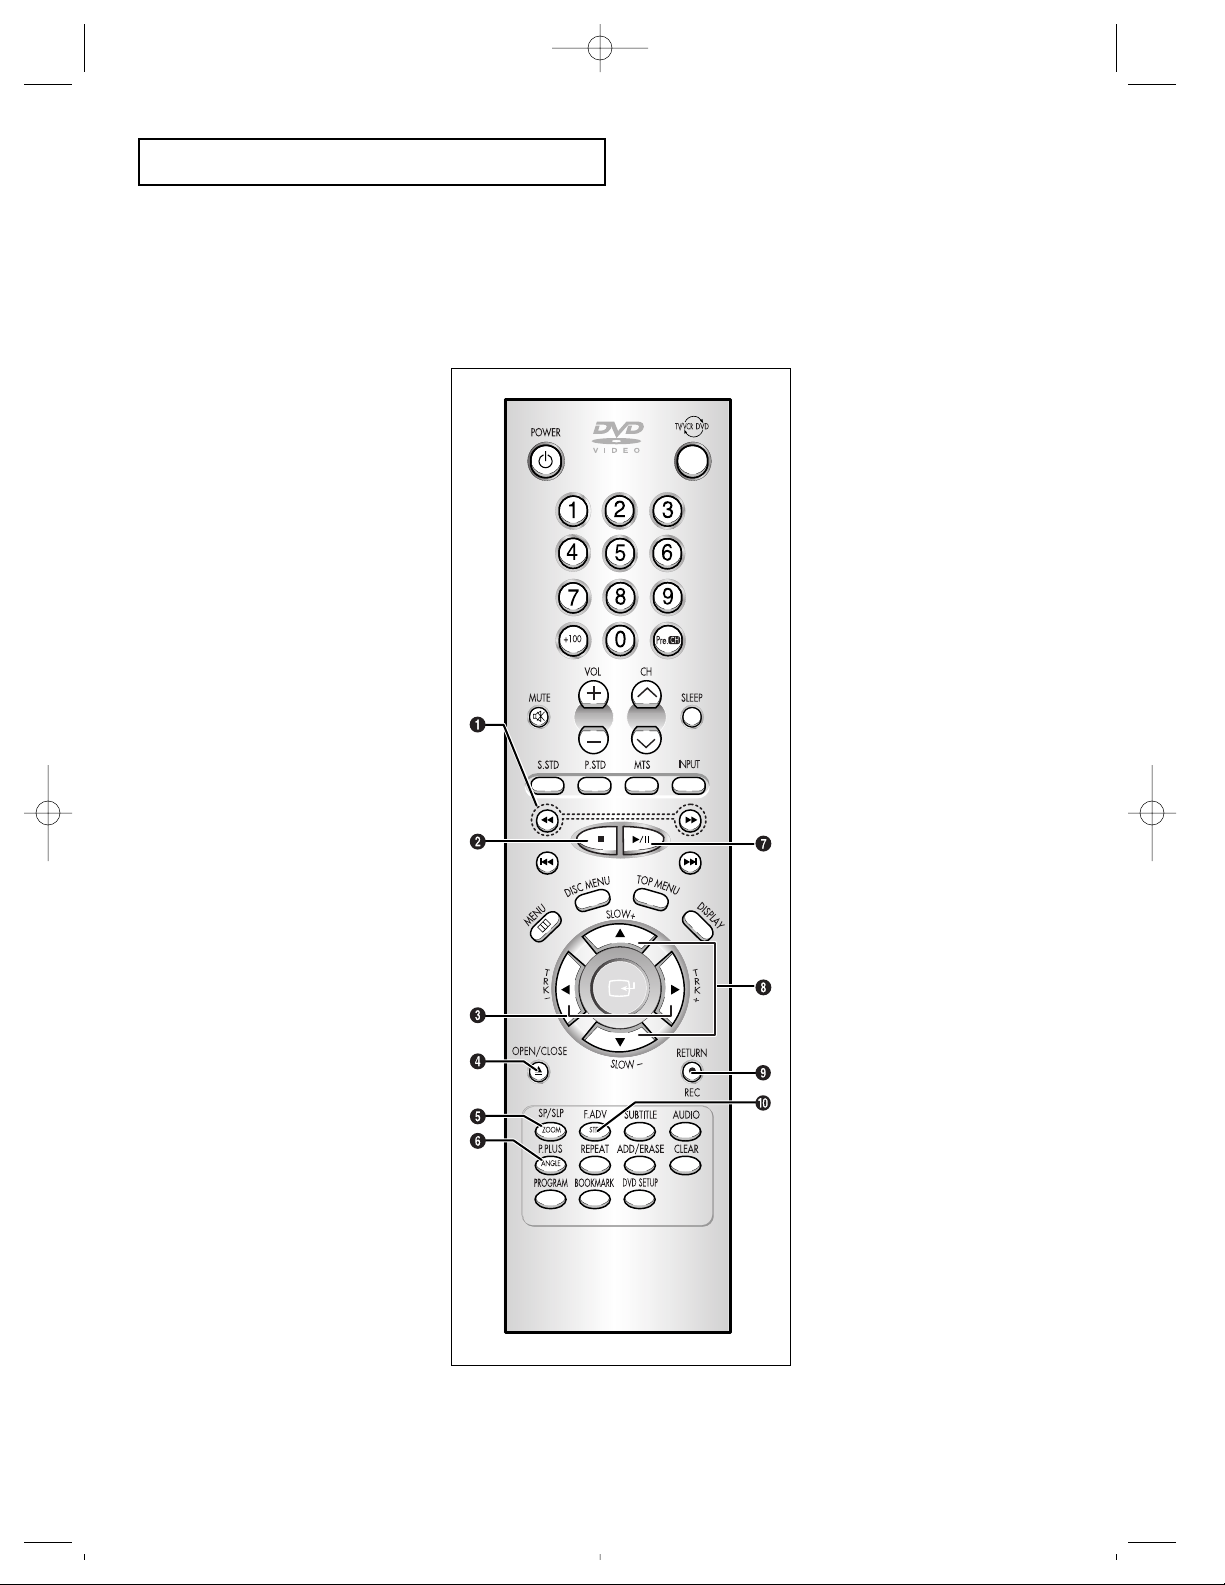
Remote Control (TV Function Buttons)
You can use the remote control up to about 23 feet from the TV.
When using the remote, always point it directly at the TV.
1 POWER
Turns the 3way Combination Unit
on and off.
2
+100
Press to select channels over 100.
For example, to select channel
121, press “+100,” then press “2”
and “1.”
3
VOL +, VOL -
Press to increase or decrease the
volume.
4
MUTE
Press to temporarily cut off
the sound.
5
S.STD
Adjust the TV sound by selecting
one of the preset factory settings
(or select your personal,
customized sound settings).
6
P.STD
Adjust the TV picture by selecting
one of the preset factory settings
(or select your personal,
customized picture settings).
7
MENU
Displays the main on-screen
menu.
8
Arrow buttons (up,
down, left, right)
Press to move through the
on-screen menus.
9
TV/VCR ↔ DVD
selection
Press to switch between TV/VCR,
and DVD mode.
10
PRE-CH
Tunes to the previous channel.
11
SLEEP
Press to select a preset time
interval for automatic shutoff.
12
CH and CH
(Channel Down/Up)
Press to change channels.
13
INPUT
Press to watch the TV picture or a
picture from a connected
component (VCR, camcorder
etc...)
14
MTS (Multichannel
Television Stereo)
Press to choose stereo, mono or
Separate Audio Program (SAP
broadcast).
15
DISPLAY
Press to see the channel, time,
current disc mode, audio/video
settings etc., on-screen.
16
ADD/ERASE
Press to add or erase channels in
the TV’s memory.
16061510-CHAPTER 1 12/13/02 11:43 AM Page 8
Page 11

CHAPTER ONE: YOUR NEW 3WAY COMBINATION UNIT 9
YOUR NEW 3WAY C OMBINATION U NIT
Remote Control (DVD Function Buttons)
1
Search
Press to search forward/backward through a disc.
2
Stop
Press to stop a disc.
3
DISC MENU
Press to display the disc menu.
4
ENTER
Confirms a selection.
5
OPEN/CLOSE
Press to open or close the disc
tray.
6
STEP
Press to advance play one frame
at a time.
7
ZOOM
Press to zoom-in during playback,
slow motion or pause mode on the
selected area of a scene.
8
ANGLE
Press to access various camera
angles on a DVD.
9
PROGRAM
For random and program play.
10
BOOKMARK
Press to memorize scenes for
replay.
11
Play/pause
Press to play or pause disc play.
12
Skip
Press to skip the title, chapter, or
track.
13
TOP MENU
Press to display the top menu on a
DVD or CD/VCD disc.
14
RETURN
Press to return to a previous menu
or exit.
15
SUBTITLE
Press to display the subtitle
language on-screen.
16
AUDIO
Press to access various audio
functions on a disc.
17
CLEAR
Press to clear on-screen displays.
18
REPEAT
Press to repeat a title, chapter,
track, or disc.
19
DVD SETUP
Displays the DVD Setup menu.
16061510-CHAPTER 1 12/13/02 11:43 AM Page 9
Page 12
10 CHAPTER ONE: YOUR NEW 3WAY COMBINATION UNIT
YOUR NEW 3WAY C OMBINATION U NIT
Remote Control (VCR Function Buttons)
1
REW/FF
Press to rewind/fast forward a
video tape.
2
Stop
Press to stop a video tape.
3
TRK+, – (tracking)
Press to adjust tape tracking.
4
OPEN/CLOSE
Press to eject a tape.
5
SP/SLP
Press to select the tape recording
speed.
6
P.PLUS
Press to compensate for a poor
rental tape.
7
Play/pause
Press to play or pause a tape.
8
SLOW+, –
Press to watch a tape in slow
motion.
9
REC
Press to begin recording.
10
F.ADV
(frame advance)
Press to advance a tape frameby-frame.
16061510-CHAPTER 1 12/13/02 11:43 AM Page 10
Page 13
CHAPTER ONE: YOUR NEW 3WAY COMBINATION UNIT 11
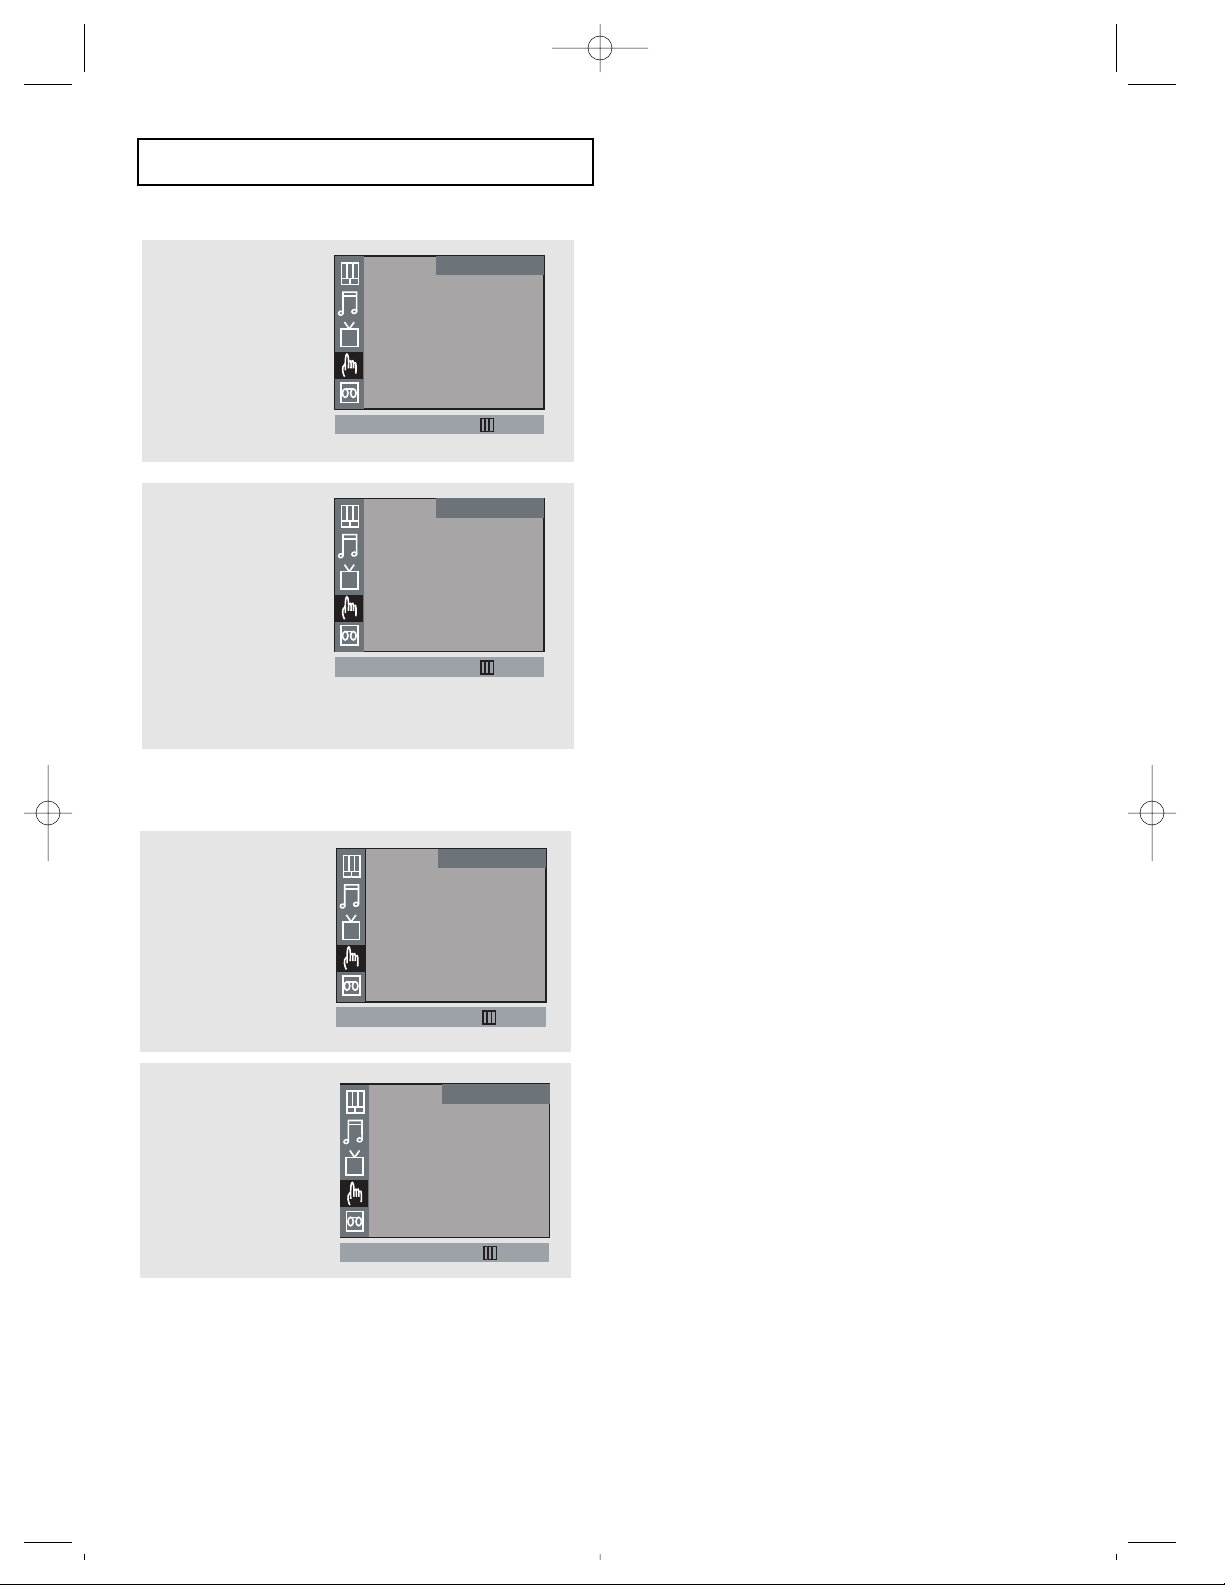
Setting the Optical Out jack (Only DVD mode)
1
Press the MENU button.
Press the DOWN arrow
button to select the
Sound icon, then press
the RIGHT arrow button to
access the Sound menu
options.
2
Press the DOWN arrow
button to select “Optical”,
then press the RIGHT
arrow button to select
“On” or “Off”.
Press the MENU button to
exit.
Note: The Optical Out function in the menu doesn’t appear while a normal TV channel (RF channel) is being watched.
3
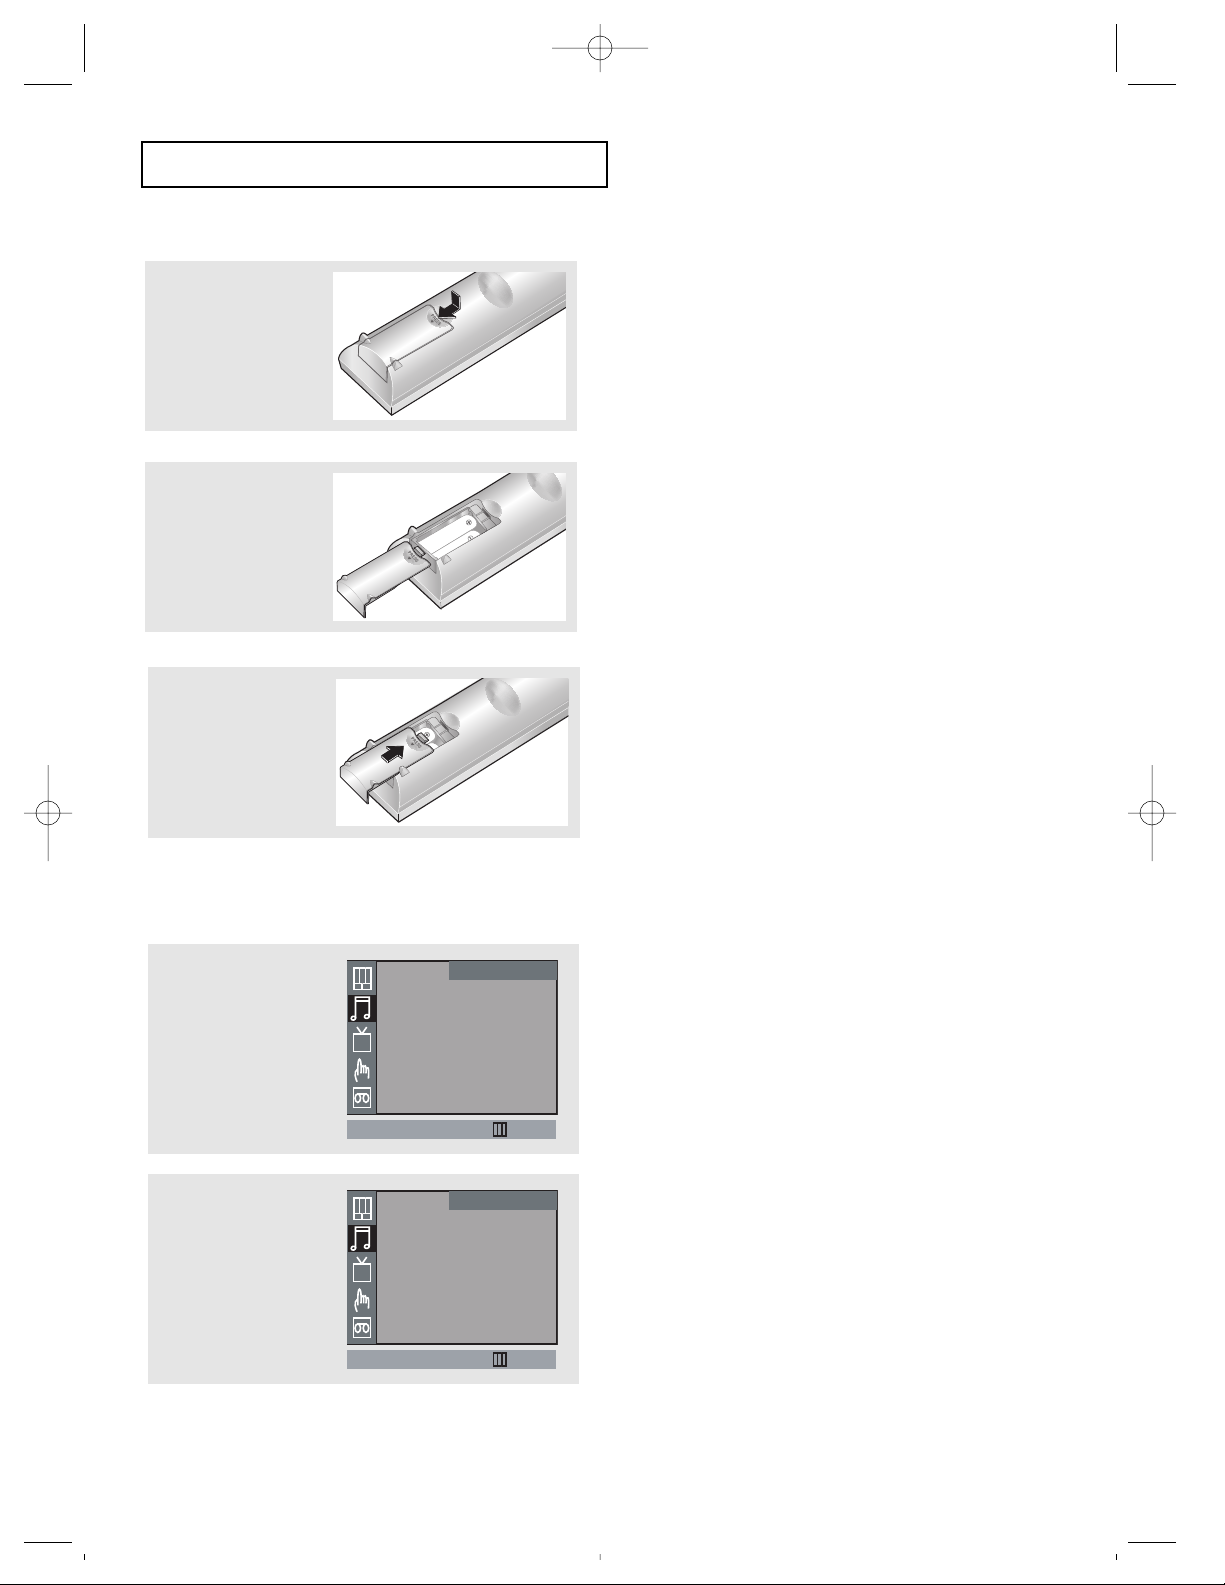
Replace the cover.
Remove the batteries and store them in a cool, dry place if
you won’t be using the remote control for a long time.
The remote control can be used up to about 23 feet from
the TV.
(Assuming typical TV usage, the batteries last for about one
year.)
2
Install two AA size
batteries.
Make sure to match the “
+” and “–” ends of the batteries
with the diagram inside the compartment.
Installing Batteries in the Remote Control
1
Slide the cover out
completely.
YOUR
NEW 3WAY
COMBINATION U NIT
16061510-CHAPTER 1 12/13/02 11:43 AM Page 11
Sound
Mode Custom
Adjust
MTS : Stereo
CH
Optical Out : On
Move Sel.
Mode Custom
Adjust
MTS : Stereo
CH
Optical Out : On
Move Sel.
Exit
Sound
Exit
Page 14

12 CHAPTER TWO: TV OPERATION
Viewing the Menus and On-Screen Displays
Viewing the Menus
1
With the power on, press
the MENU button.
The main menu appears on
the screen:
Picture, Sound, Channel,
Function and VCR setup.
The on-screen menus disappear from the screen after about
thirty seconds.
2
Use the UP/DOWN
buttons to select one of
the 5 items. Then press
the LEFT/RIGHT buttons to
access the item’s
sub-menu.
3
Press the MENU button to
exit.
Chapter Two
TV OPERATION
Turning the TV On and Off
Press the POWER button on the remote control.
You can also use the Power button on the front panel.
Viewing the Display
The display identifies the current channel and the status of certain audio-video settings.
The on-screen displays disappear after about ten seconds.
1
Press the DISPLAY button
on the remote control.
The TV will display the
channel, Time, disc mode,
the status of certain
picture and sound
settings, V-chip and the
type of sound.
Date : 09/01/2002
Clock : 12:15 pm
Disc : DVD
Picture : Custom
Sound : Custom
V-Chip : No
MTS : Stereo
Speed : SP
ANT 4
Stop
16061510-CHAPTER 2 12/13/02 11:44 AM Page 12
Picture
Mode : Custom
Adjust
Color Tone : Normal
CH
Size : Normal
Digital NR : Off
Tilt : 0
Move Sel.
Exit
Page 15

CHAPTER TWO: TV OPERATION 13
Memorizing the Channels
Your TV can memorize and store all of the available channels for both “off-air” (antenna) and cable
channels. After the available channels are memorized, use the CH up and down buttons to scan
through the channels. This eliminates the need to change channels by entering the channel digits.
There are three steps for memorizing channels: selecting a broadcast source, memorizing the channels
(automatic) and adding and deleting channels (manual).
Selecting the Video Signal-source
Before your television can begin memorizing the available channels, you must specify the type of signal
source that is connected to the TV (i.e., an antenna or a cable system).
1
Press the MENU button to
display the menu.
Press the DOWN arrow
button to select the
Channel icon.
Press the RIGHT arrow
button once to access the
Channel menu options.
TV OPERATION
Selecting a Menu Language
2
Press the DOWN arrow
button to select
“Language”.
Press the RIGHT arrow
button to select the
appropriate language:
English, Spanish, or French.
3
Press the MENU button to
exit.
1
Press the MENU button to
display the menu.
Press the DOWN arrow
button to select the
Function icon. Press the
RIGHT arrow button once
to access the Function
menu options.
Clock
Timer
Caption
V-chip
Language : English
Function
CH
Move Sel.
Exit
16061510-CHAPTER 2 12/13/02 11:44 AM Page 13
Function
Clock
Timer
Caption
CH
V-chip
Language : English
Move Sel.
Exit
Channel
TV/AV
ANT/CATV
Auto Program
CH
Fine Tune : 0
Add/Erase
Move Sel.
TV
ANT
Exit
Page 16

14 CHAPTER TWO: TV OPERATION
TV OPERATION
2
Press the DOWN arrow
button to select “ANT/CATV”.
Repeatedly press the RIGHT
arrow button to cycle
through these choices:
ANT (antenna), STD, HRC or
IRC (all cable TV).
Note: STD, HRC and IRC identify various types of cable TV
systems. Contact your local cable company to identify the
type of cable system that exists in your particular area.
3
Press the RIGHT arrow button. The TV begins memorizing all of
the available channels.
4
After all the available channels are stored, the Auto program
menu disappears. Press the MENU button to exit.
Storing Channels in Memory (Automatic Method)
The TV automatically cycles through all of the available
channels and stores them in memory. This takes about one
to two minutes.
Press the RIGHT button at any time to interrupt the
memorization process and return to the Channel menu.
2
Press the DOWN arrow
button to select “Auto
Program”.
1
Make sure the correct
signal source (ANT, STD,
HRC, IRC) has been
selected. See steps 1~2
on previous page.
Press the DOWN arrow
button to select the
Channel icon, then press
the RIGHT arrow button to
access the Channel menu
options.
16061510-CHAPTER 2 12/13/02 11:44 AM Page 14
TV/AV
ANT/CATV
Auto Program
CH
Fine Tune : 0
Add/Erase
Move Sel.
Channel
TV
ANT
Exit
Channel
TV/AV
ANT/CATV
Auto Program
CH
Fine Tune : 0
Add/Erase
Move Sel.
TV
ANT
Exit
Channel
TV/AV
ANT/CATV
Auto Program
CH
Fine Tune : 0
Add/Erase
Move Sel.
TV
ANT
Exit
Page 17

CHAPTER TWO: TV OPERATION 15
TV OPERATION
Adding and Erasing Channels (Manual Method)
You can view any channel
(including an erased channel) by
using the number buttons or
UP/DOWN buttons on the remote
control.
3
Press the LEFT/RIGHT
arrow buttons to select
the channel you want to
add or erase.
4
Press the DOWN arrow
button to select “Sel.”.
Press the RIGHT arrow
button to select “Added”
or “Erased”.
Press the MENU button to
exit.
2
Press the DOWN arrow
button to select
“Add/Erase”, then press
the RIGHT arrow button to
access the Add/Erase
menu.
1
Press the MENU button to
display the menu.
Press the DOWN arrow
button to select the
Channel icon.
Press the RIGHT arrow
button once to access the
Channel menu options.
16061510-CHAPTER 2 12/13/02 11:44 AM Page 15
Channel
TV/AV
ANT/CATV
Auto Program
CH
Fine Tune : 0
Add/Erase
Move Sel.
TV/AV
ANT/CATV
Auto Program
CH
Fine Tune : 0
Add/Erase
Move Sel.
TV
ANT
Channel
TV
ANT
Exit
Exit
Add/Erase
Channel : ANT 3
Sel. : Added
CH
Move Sel.
Channel
Exit
Page 18

16 CHAPTER TWO: TV OPERATION
TV OPERATION
1
Press the MENU button to
display the menu (the
Picture menu is
automatically displayed).
Press the RIGHT arrow
button to select Mode.
Customizing the Picture
You can use the on-screen menus to change the contrast, brightness, tint, color, and sharpness
according to personal preference. (Alternatively, you can use one of the “automatic” settings. See next
page.)
3
Press the UP/DOWN arrow buttons to select the item you want
to adjust.
Press the LEFT/RIGHT arrow buttons to increase or decrease
the value of a particular item.
4
Press the MENU button to exit.
2
Repeatedly press the
RIGHT arrow button until
“Custom” is selected.
Press the DOWN arrow
button to select “Adjust”,
then press the RIGHT
arrow button to display the
Adjust menu.
After adjusting an item, the gauge will
automatically disappear (after about 3 seconds).
16061510-CHAPTER 2 12/13/02 11:44 AM Page 16
Picture
Mode : Custom
Adjust
Color Tone : Normal
CH
Size : Normal
Digital NR : Off
Tilt : 0
Move Sel.
Exit
Picture
Exit
Adjust
Contrast 100
CH
Brightness 50
Sharpness 50
Color 50
Tint G 50 R 50
Move Sel.
Page 19

CHAPTER TWO: TV OPERATION 17
1
Press the MENU button to
display the menu. (the
Picture menu is
automatically displayed)
Press the RIGHT arrow
button to select Mode.
2
Press the RIGHT arrow button to select the “Dynamic”
“Standard,” “Movie” or “Custom” picture setting.
Press the MENU button to exit.
TV OPERATION
Using Automatic Picture Settings
Your TV has automatic picture settings (“Dynamic”, “Standard” and “Movie) that are
preset at the factory. You can activate these by pressing P.STD (or by making a
selection from the menu). Or, you can select “Custom” which automatically recalls
your personalized picture settings.
• Choose Dynamic for viewing the TV during the day or when there is bright light in the room.
• Choose Standard for the standard factory settings.
• Choose Movie when viewing a movie.
• Choose Custom if you want to adjust the settings according to personal preference.
Simply press the P.STD
button on the remote
control to select one of
the standard picture
settings.
Alternate method:
16061510-CHAPTER 2 12/13/02 11:44 AM Page 17
Picture
Mode : Custom
Adjust
Color Tone : Normal
CH
Size : Normal
Digital NR : English
Tilt : 0
Move Sel.
Exit
Page 20

18 CHAPTER TWO: TV OPERATION
TV OPERATION
1
Press the MENU button to
display the menu.
Press the RIGHT arrow
button to access the
Picture menu options.
2
Press the DOWN arrow
button to select Color
Tone.
Press the RIGHT arrow
button to select “Cool2”,
“Cool1”, ”Normal”,
“Warm1” or “Warm2”
according to personal
preference.
3
Press the MENU button to
exit.
Changing the Color Tone
Changing the Screen Size
• Normal : Sets the picture to 4:3 normal mode.
This is a standard TV screen size.
• Zoom : Sets the picture to Zoom mode.
• 16:9 : Sets the picture to 16:9 mode.
1
Press the MENU button to
display the menu.
Press the RIGHT arrow
button to access the
Picture menu options.
2
Press the DOWN arrow
button to select “Size”.
Press the RIGHT arrow
button to select “Normal”,
“Zoom” or “16:9”.
3
Press the MENU button to
exit.
16061510-CHAPTER 2 12/13/02 11:44 AM Page 18
Picture
Mode : Custom
Adjust
Color Tone : Normal
CH
Size : Normal
Digital NR : Off
Tilt : 0
Move Sel.
Mode : Custom
Adjust
Color Tone : Normal
CH
Size : Normal
Digital NR : Off
Tilt : 0
Move Sel.
Exit
Picture
Exit
Mode : Custom
Adjust
Color Tone : Normal
CH
Size : Normal
Digital NR : Off
Tilt : 0
Move Sel.
Mode : Custom
Adjust
Color Tone : Normal
CH
Size : Normal
Digital NR : Off
Tilt : 0
Move Sel.
Picture
Picture
Exit
Exit
Page 21

CHAPTER TWO: TV OPERATION 19
Fine Tuning Channels
Use fine tuning to manually adjust a particular channel for optimal reception.
1
Select the appropriate
channel.
Press the MENU button to
display the menu.
Press the DOWN arrow
button to select the Channel
icon. Press the RIGHT arrow
button to access the Channel
menu options.
2
Press the DOWN arrow
button to select “Fine tune”.
Press the LEFT/RIGHT
buttons to adjust the fine
tuning.
3
To store the fine tuning
setting in the TV’s memory,
press the UP button.
(An asterisk “*” will appear.)
To reset the fine tuning to
“0,”press the DOWN button.
4
Press the MENU button to
exit.
▼
After you adjust the fine tuning,
the color of Channel No. will turn red if
you press the DISPLAY button while
watching this channel.
TV OPERATION
16061510-CHAPTER 2 12/13/02 11:44 AM Page 19
Channel
TV/AV
ANT/CATV
Auto Program
CH
Fine Tune : 0
Add/Erase
Move Sel.
TV/AV
ANT/CATV
Auto Program
CH
Fine Tune : 0
Add/Erase
Move Sel.
TV
ANT
Channel
TV
ANT
Exit
Exit
TV/AV
ANT/CATV
Auto Program
CH
Fine Tune : + 1*
Add/Erase
Move Sel.
Channel
TV
ANT
Exit
Page 22

20 CHAPTER TWO: TV OPERATION
TV OPERATION
Digital Noise Reduction
If the broadcast signal received by your TV is weak, you can activate the Digital Noise Reduction
feature to help reduce any static and ghosting that may appear on the screen.
1
Press the MENU button to
display the menu.
Press the RIGHT arrow
button to access the
Picture menu options.
2
Press the DOWN arrow
button to select “Digital
NR”.
Press the RIGHT arrow
button to select Digital NR
“On”.
3
Press the MENU button to
exit.
▼
Pressing the LEFT/RIGHT buttons
will alternate between “On” and “Off”.
Tilt
Due to the Earth’s magnetic field there may be some minor image tilt depending on the TV’s location.
When this occurs, follow the steps below.
1
Press the MENU button to
display the menu.
Press the RIGHT arrow
button to access the
Picture menu options.
2
Press the DOWN arrow
button to select “Tilt”.
Press the LEFT/RIGHT
arrow button to adjust the
Tilt.
3
Press the MENU button to
exit.
16061510-CHAPTER 2 12/13/02 11:44 AM Page 20
Picture
Mode : Custom
Adjust
Color Tone : Normal
CH
Size : Normal
Digital NR : English
Tilt : 0
Move Sel.
Exit
Mode : Custom
Adjust
Color Tone : Normal
CH
Size : Normal
Digital NR : English
Tilt : 0
Move Sel.
Picture
Exit
Picture
Mode : Custom
Adjust
Color Tone : Normal
CH
Size : Normal
Digital NR : English
Tilt : 0
Move Sel.
Exit
Mode : Custom
Adjust
Color Tone : Normal
CH
Size : Normal
Digital NR : English
Tilt : 0
Move Sel.
Picture
Exit
Page 23

CHAPTER TWO: TV OPERATION 21
Using Automatic Sound Settings
Your TV has four automatic sound settings (“Standard,” “Music,” “Movie” and “Speech” ) that are
preset at the factory. You can activate any of them by pressing the S.STD button (or by making a
selection from the on-screen menu). Or, you can select “Adjust,” which automatically recalls your
personalized sound settings.
1
Press the MENU button to
display the menu.
Press the DOWN arrow
button to select the
Sound icon, then press
the RIGHT arrow button to
access the Sound menu
options.
TV OPERATION
1
Press the MENU button to
display the menu.
Press the DOWN arrow
button to select the Sound
icon, then press the RIGHT
arrow button to access the
Sound menu options.
Customizing the Sound
The sound settings can be adjusted to suit your personal preferences. (Alternatively, you can use one of
the “automatic” settings. See bottom of the page.)
2
Press the right arrow until
Custom is chosen.
Press the DOWN arrow
button to select “Adjust”,
then press the RIGHT
arrow button to access
the Adjust menu options.
3
Press the UP/DOWN arrow buttons to select a particular item.
Press the LEFT/RIGHT arrow buttons to increase or decrease the
value of a particular item.
4
Press the MENU button to exit.
▼
After adjusting an item, the gauge will
automatically disappear (after about 3 seconds).
16061510-CHAPTER 2 12/13/02 11:44 AM Page 21
Sound
Mode Custom
Adjust
MTS : Stereo
CH
Optical Out : On
Move Sel.
Adjust
Bass 15
Treble 15
CH
Balance L 15 R 15
Move Sel.
Exit
Sound
Exit
Sound
Mode Custom
Adjust
MTS : Stereo
CH
Optical Out : On
Move Sel.
Exit
Page 24

22 CHAPTER TWO: TV OPERATION
2
Press the RIGHT arrow button to select the “Standard,”
“Music,” “Movie,” “Speech” or “Custom” sound setting.
Press the MENU button to exit.
• Choose Standard for the standard factory settings.
• Choose Music when watching music videos or
concerts.
• Choose Movie when watching movies.
• Choose Speech when watching a show that is mostly
dialogue (i.e., news).
• Choose Custom to recall your personalized settings.
Simply press the the S.STD
button on the remote control
to select one of the standard
sound settings.
Alternate method:
TV OPERATION
Choosing a Multi-Channel Soundtrack (MTS)
Depending on the particular program being broadcast, you can listen to stereo, mono, or a Separate
Audio Program. (SAP audio is usually a foreign-language translation. Sometimes SAP has unrelated
information like news or weather.)
• Choose Mono for channels that are
broadcasting in mono, or if you are having
difficulty receiving a stereo signal.
• Choose Stereo for channels that are
broadcasting in stereo.
• Choose SAP to listen to the Separate Audio
Program, which is usually a foreign-language
translation.
1
Press the MENU button to
display the menu.
Press the DOWN arrow
button to select the Sound
icon. Press the RIGHT
arrow button to access
the Sound menu options.
2
Press the DOWN arrow
button to select “MTS”.
Press the RIGHT arrow
button repeatedly to
select “Mono,” “Stereo”
or “SAP”.
3
Press the MENU button to
exit.
You can also change the MTS setting by pressing the “MTS” button
on the remote control.
Alternate method:
16061510-CHAPTER 2 12/13/02 11:44 AM Page 22
Sound
Mode Custom
Adjust
MTS : Stereo
CH
Optical Out : On
Move Sel.
Mode Custom
Adjust
MTS : Stereo
CH
Optical Out : On
Move Sel.
Sound
Exit
Exit
Page 25

Setting the Clock
Setting the clock is necessary in order to use the various timer features of the TV. Also, you can check
the time while watching the TV (press the DISPLAY button).
Option 1: Setting the Clock Manually
1
Press the MENU button to
display the menu.
Press the DOWN arrow
button to select the
Function icon, then press
the RIGHT arrow button to
select Clock. Press the
RIGHT arrow again to set
the clock.
CHAPTER TWO: TV OPERATION 23
1
Press the MENU button to
display the menu.
Press the DOWN arrow
button to select the
Channel icon, then press
the RIGHT arrow button to
access the Channel menu
options.
2
Press the RIGHT arrow
button to switch between
viewing the signals
coming from equipment
connected to the TV’s A/V
jacks, and the TV signal.
Press the MENU button to
exit.
Viewing a VCR or Camcorder Tape
You must select the appropriate mode in order to view the VCR or Camcorder signal on the TV.
Simply press the INPUT
button on the remote control
one or more times until the
required input is displayed.
Alternate method:
TV OPERATION
16061510-CHAPTER 2 12/13/02 11:44 AM Page 23
Channel
TV/AV
ANT/CATV
Auto Program
CH
Fine Tune : 0
Add/Erase
Move Sel.
TV
ANT
Exit
Function
Clock
Timer
Caption
CH
V-chip
Language : English
Move Sel.
Exit
Page 26

24 CHAPTER TWO: TV OPERATION
TV OPERATION
2
Press the RIGHT arrow
button to select “Manual”.
3
Press the DOWN arrow
button to select “Clock”,
then press the RIGHT
arrow button to highlight
the hour setting.
Press the UP/DOWN
arrow buttons repeatedly
until the correct hour
appears.
▼
When selecting the hours, be sure to select the proper
time of day (am or pm).
You can change the hours by pressing the
UP or DOWN
arrow button repeatedly (or by holding down either of
these buttons).
4
After the hour is entered,
Press the RIGHT arrow
button (the minutes
setting is highlighted).
Press the UP/DOWN
arrow buttons to select
the correct minutes.
After selecting the correct
minutes, press the RIGHT
arrow button.
▼
The time will appear every time you press the DISPLAY
button.
Setting the Date
5
Press the DOWN arrow
button to select “Date”,
then press the RIGHT
arrow button to highlight
the month setting.
Press the UP/DOWN
arrow buttons to set the
current month.
6
Press the RIGHT arrow
button, then press the
UP/DOWN arrow buttons
to set the current day.
16061510-CHAPTER 2 12/13/02 11:44 AM Page 24
Function
Clock
Clock set : Manual
CH
Clock : --:-- am
Date : -- / -- / ---- __
Move Sel.
Exit
Clock
Clock set : Manual
CH
Clock : 10:30 am
Date : -- / -- / ---- __
Move Sel.
Clock
Clock set : Manual
CH
Clock : 10:30 am
Date : -- / -- / ---- __
Move Sel.
Clock
Clock set : Manual
CH
Clock : 10:30 am
Date : 10/ 9/ 2002
Wed
Move Sel.
Function
Exit
Function
Exit
Function
Exit
Page 27

CHAPTER TWO: TV OPERATION 25
3
Press the DOWN arrow
button to select “PBS
channel”, then press the
RIGHT arrow button to
activate the channelnumber field.
Press the UP/DOWN
arrow buttons to select
your local PBS channel.
Press the RIGHT arrow
button.
▼
If you make a mistake, press the LEFT arrow to move
back to the incorrect item. Press the UP/DOWN arrow
buttons to change the item.
7
Press the RIGHT arrow
button, then press the
UP/DOWN arrow buttons
to set the current year.
TV OPERATION
Option 2: Using the Local PBS Channel to Automatically Set the TV Clock
1
Follow Step 1 from Option
1: Setting the Clock
Manually.
2
Press the RIGHT arrow
button to select “Auto”.
16061510-CHAPTER 2 12/13/02 11:44 AM Page 25
Clock
Clock set : Manual
CH
Clock : 10:30 am
Date : 10/ 9/ 2002
Wed
Move Sel.
Function
Exit
Function
Clock
Timer
Caption
CH
V-chip
Language : English
Move Sel.
Clock
Clock set : Auto
CH
PBS Channel : ANT 3
Time Zone : ATL.
DST : No
Exit
Function
Move Sel.
Clock
Clock set : Auto
CH
PBS Channel : ANT 3
Time Zone : ATL.
DST : No
Move Sel.
Exit
Function
Exit
Page 28
26 CHAPTER TWO: TV OPERATION
5
Press the DOWN arrow
button to select “DST”
(Daylight saving time),
then press the RIGHT
arrow button to indicate
“Yes” or “No”.
The clock is set.
Press the MENU button to
exit.
4
Press the DOWN arrow
button to select “Time
Zone”, then press the
RIGHT arrow button to
change the Time zone.
Sequence: ATL., EAST,
CEN., MTN., PAC., ALAS.,
HAW..
TV OPERATION
Setting the On/Off Timer
1
Press the MENU button to
display the menu.
Press the DOWN arrow
button to select the
Function icon. Press the
RIGHT arrow button to
access the Function menu
options.
Clock
Timer
Caption
V-chip
Language : English
Function
CH
Move Sel.
Exit
▼
2
Press the DOWN arrow
button to select “Timer”,
then press the RIGHT
arrow button.
Before using the timer, you must set the TV’s clock. (See
Setting the Clock on page 23).
16061510-CHAPTER 2 12/13/02 11:44 AM Page 26
Function
Clock
Clock set : Auto
CH
PBS Channel : ANT 3
Time Zone : ATL.
DST : No
Move Sel.
Clock
Clock set : Auto
CH
PBS Channel : ANT 3
Time Zone : ATL.
DST : No
Move Sel.
Exit
Function
Exit
Function
Clock
Timer
Caption
CH
V-chip
Language : English
Move Sel.
Exit
Page 29

CHAPTER TWO: TV OPERATION 27
7
To set the Off time, press
the DOWN arrow button to
select “Off Time”.
Press the RIGHT arrow
button to set the hour and
minutes. (Follow the same
procedure as in steps 3~6.)
Timer
On time : 7:30 am On
Off time : -- : -- am Off
Sleep Timer : Off
On time volume : 10
Function
CH
Move Sel.
Exit
8
If you want to set the
volume level when the TV
turns on, press the DOWN
arrow button to select “On
time volume”. Press the
LEFT/RIGHT arrow buttons
to set the volume level you
want when the TV turns on.
9
When finished setting the
timer, press the MENU
button to exit.
4
Press the RIGHT arrow button to highlight the minutes setting.
Press the UP/DOWN arrow buttons repeatedly to select the
appropriate minutes.
5
Press the RIGHT arrow button to highlight “Off”.
Press the DOWN arrow button to turn the on timer “On.”
(Repeatedly pressing the UP/DOWN arrow buttons will alternate between On and Off.)
6
When finished, press the RIGHT arrow button.
▼
To deactivate the “On time,” select “Off” during this
step.
TV OPERATION
3
Press the DOWN arrow
button to select “On
Time.”
Press the RIGHT arrow
button to highlight the
hours setting.
Press the UP/DOWN
arrow buttons repeatedly
to select the appropriate
hour (i.e., the hour when
the TV will turn on.)
▼
When you set the hours, make sure the correct time of
day (am or pm) appears to the right of the hour.
16061510-CHAPTER 2 12/13/02 11:44 AM Page 27
Function
Timer
On time : 7:30 am On
CH
Off time : -- : -- am Off
Sleep Timer : Off
On time volume : 10
Move Sel.
Exit
Timer
On time : 7:30 am On
CH
Off time : -- : -- am Off
Sleep Timer : Off
On time volume : 10
Move Sel.
Function
Exit
Page 30

28 CHAPTER TWO: TV OPERATION
TV OPERATION
Setting the Sleep Timer
The sleep timer automatically shuts off the TV after a preset time (from 15 to 180 minutes).
1
Press the MENU button to
display the menu.
Press the DOWN arrow
button to select the
Function icon. Press the
RIGHT arrow button to
access the Function menu
options.
2
Press the DOWN arrow
button to select “Timer”,
then press the RIGHT
arrow button to display
the Timer menu options.
3
Press the DOWN arrow
button to select “Sleep
Tim er.”
Press the RIGHT arrow
button repeatedly until the
appropriate time interval
appears (any of the preset
values from “Off” to
“180”).
Press the MENU button to
exit.
Simply press SLEEP repeatedly until the appropriate time
interval appears (any of the preset values from “Off” to “180”).
After about 3 seconds, the sleep display will disappear from the
screen, and the time interval will be set.
Alternate method:
16061510-CHAPTER 2 12/13/02 11:44 AM Page 28
Function
Clock
Timer
Caption
CH
V-chip
Language : English
Move Sel.
Clock
Timer
Caption
CH
V-chip
Language : English
Move Sel.
Exit
Function
Exit
Function
Timer
On time : 7:30 am On
CH
Off time : -- : -- am Off
Sleep Timer : Off
On time volume : 10
Move Sel.
Exit
Page 31

CHAPTER TWO: TV OPERATION 29
TV OPERATION
Viewing Closed Captions
Your TV decodes and displays the closed captions that are broadcast with certain TV shows. These captions are usually subtitles for the hearing impaired or foreign-language translations. All VCRs record
the closed caption signal from television programs, so home-recorded video tapes also provide closed
captions. Most DVDs and pre-recorded commercial video tapes provide closed captions as well. Check
for the closed caption symbol in your television schedule and on the tape’s packaging: .
▼
▼
In caption mode, captions appear
at the bottom of the screen, and they
usually cover only a small portion of the
picture.
In text mode, information unrelated to
the program, such as news or weather,
is displayed. Text often covers a large
portion of the screen.
Different channels and fields
display different information: Field 2
carries additional information that
supplements the information in Field 1.
(For example, Channel 1 may have
subtitles in English, while Channel 2 has
subtitles in Spanish.)
1
Press the MENU button to
display the menu.
Press the DOWN arrow
button to select the
Function icon. Press the
RIGHT arrow button to
access the Function menu.
Clock
Timer
Caption
V-chip
Language : English
Function
CH
Move Sel.
Exit
2
Press the DOWN arrow
buttons to select “Caption”,
then press the RIGHT arrow
button to display the Caption
menu options.
3
Press the RIGHT arrow
buttons to turn closed
captioning on/off.
4
Press the DOWN arrow
buttons to select “Mode”.
Press the RIGHT arrow
button to select “Caption”
or “Text.”
5
Depending on the particular broadcast, it might be necessary to
make changes to “Channels” and “Field”:
Use the UP/DOWN arrow buttons and LEFT/RIGHT arrow buttons
to make the changes. (Follow the same procedure as in steps
3~4 above.)
Press the MENU button to exit.
▼
Misspellings and unusual
characters sometimes occur during
closed caption transmissions, especially
those of live events. There may be a
small delay before captions appear
when you change channels. These are
not malfunctions of the TV.
16061510-CHAPTER 2 12/13/02 11:44 AM Page 29
Function
Caption
Caption : Off
Mode : Caption
CH
Channels : 1
Field : 1
Move Sel.
Caption
Caption : Off
Mode : Caption
CH
Channels : 1
Field : 1
Move Sel.
Exit
Function
Exit
Page 32

30 CHAPTER TWO: TV OPERATION
TV OPERATION
Using the V-Chip
The V-Chip feature automatically locks out programming that is deemed inappropriate for children.
The user must first enter a PIN (personal ID number) before any of the V-Chip restrictions can be set up
or changed.
How the V-Chip Works
When the V-Chip software is activated (or turned on), it reads a code that most broadcasters send with
programs. That code tells the software the program’s age-based rating (TV-MA, TV-14, etc.) and content
themes [(Violence (V), Adult Language (L), etc.)]. If you have blocked the rating and/or content themes
that the program contains, a message appears and the channel won’t be available for viewing.
Broadcasters aren’t required to provide content themes, so programs that aren’t tagged with a content
theme can only be blocked if you block their age-based rating.
Setting Up Your Personal ID Number (PIN)
1
Press the MENU button to
display the menu.
Press the DOWN arrow
button to select the Function
icon. Press the RIGHT arrow
button to access the
Function menu options.
Clock
Timer
Caption
V-chip
Language : English
Function
CH
Move Sel.
Exit
2
Press the DOWN arrow
button to select “V-Chip”.
Then press the RIGHT arrow
button.
Enter Pin - - - -
Function
CH
Enter Pin
3
After entering a valid PIN
number, the “V-chip
mode” screen will appear.
Press the DOWN arrow
buttons to select “Change
pin”. Press the right arrow
to display the Change Pin
screen.
The “Enter pin” screen will appear. Enter your 4-digit PIN
number. Note: The default PIN number for a new TV set is
“0-0-0-0.”
4
Choose any 4-digits for your PIN and enter them.
As soon as the 4 digits are entered, the “Confirm new pin”
screen appears. Re-enter the same 4 digits. When the Confirm
screen disappears, your PIN has been memorized.
Press the MENU button to exit.
Note: If you forget the PIN, press the remote control buttons in
the following sequence, which resets the pin to 0-0-0-0:
POWER OFF ➜ MUTE ➜ 8 ➜ 2 ➜ 4 ➜ POWER ON.
16061510-CHAPTER 2 12/13/02 11:44 AM Page 30
V-chip
V-chip Lock : No
TV Guidelines
CH
MPAA Rating
Change pin
Move Sel.
Function
Exit
Page 33

CHAPTER TWO: TV OPERATION 31
TV OPERATION
How to Set up Restrictions Using the “TV guidelines”
First, set up a personal identification number (PIN), and enable the V-Chip. (See previous page.)
Parental restrictions can be set up using either of two methods: The TV guidelines or the MPAA rating.
How to Enable/Disable the V-Chip
1
Follow Steps 1-2 from Setting Up Your Personal ID Number (PIN).
2
To enable the V-Chip feature,
press the RIGHT arrow
button so that the “V-Chip
Lock” field is Yes. (Pressing
the LEFT/RIGHT arrow
buttons will alternate
between Yes and No.)
V-chip Lock : Yes
TV Guidelines
MPAA Rating
Change pin
Function
CH
Move Sel.
Exit
V-chip
1
Again, follow Steps 1-2 from Setting Up Your Personal ID Number
(PIN).
2
Press the DOWN arrow
button to select
“TV Guidelines”.
V-chip Lock : No
TV Guidelines
MPAA Rating
Change pin
Function
CH
Move Sel.
Exit
V-chip
3
Press the RIGHT arrow
button. The “TV guidelines”
screen appears. Press the
DOWN arrow button to
select one of the six agebased categories:
Note: These categories consist of two
separate groups: TV-Y and TV-Y7 (young
children through age 7), and TV-G
through TV-MA (everybody else).
The restrictions for these two groups
work independently: If a household
includes very young children as well as
young adults, the TV guidelines must be
set up separately for each age group.
(See next step.)
▼
TV-Y Young children
TV-Y7 Children 7 and over
-------------------------------------TV-G General audience
TV-PG Parental guidance
TV-14 Viewers 14 and over
TV-MA Mature audience
16061510-CHAPTER 2 12/13/02 11:44 AM Page 31
Exit
All FV V S L D
TV-Y U
TV-Y7 U U
CH
TV-G U
TV-PG U U U U U
TV-14 U U U U U
TV-MA
U U U U
U: Unblocked B: Blocked
Move Sel.
Function
Page 34

32 C
HAPTER TWO: TV OPERATION
How to Set up Restrictions using the MPAA Ratings: G, PG, PG-13, R, NC-17, X
The MPAA rating system uses the Motion Picture Association of America (MPAA) system, and its main
application is for movies. (Eventually, movie videocassettes and DVDs will be encoded with MPAA ratings.)
When the V-Chip lock is on, the TV will automatically block any programs that are coded with objectionable
ratings (either MPAA or TV-Ratings).
5
How to set the FV, D, L, S and V sub-ratings.
First, select one of these TV-Ratings: TV-Y7, TV-PG, TV-14 or TV-MA (See Step 4, on previous page).
Next, while the TV-Rating is selected, repeatedly press the RIGHT arrow button. This will cycle through the available
sub-ratings (FV,L, S, D or V).
A letter “U” or “B” will be displayed for each sub-rating. While the “U” or “B” is selected, press the
DOWN arrow button to change the sub-rating. Press the RIGHT arrow button to save the TV guidelines. A TV-Rating
will be selected. To select a different TV-Rating, press the UP/DOWN arrow buttons and then repeat the process.
Note: The V-chip will automatically block certain categories that are “More restrictive”. For example, if you block
“L” sub-rating in TV-PG, then the “L” sub-ratings in TV-14 and TV-MA will automatically be blocked.
6
Press the MENU button to clear all the screens. (Or proceed to the next section, and set up additional restrictions
based on the MPAA codes).
1
Press the MENU button to dis-
play the menu.
Press the DOWN arrow
button to select the Function
icon, then press the RIGHT
arrow button to access the
Function menu options.
2
Press the DOWN arrow
button to select “V-Chip”.
TV OPERATION
4
At this point, one of the TV-Ratings is selected.
Press the RIGHT arrow button: Depending on your existing setup, a letter “U” or “B” will be selected.
(U= Unblocked, B= Blocked)
While the “U” or ”B” is selected, press the UP/DOWN arrow buttons to block or unblock the category. Press the
RIGHT arrow button to save the TV guidelines. A TV-Rating will be selected. To select a different TV-Rating, press
the UP/DOWN arrow buttons and then repeat the process.
Note 1: The TV-Y7, TV-PG, TV-14 and TV-MA have additional options. See the next step to change any of the
following sub-ratings:
FV: Fantasy violence
D: Sexual suggestive dialog
L: Adult language
S: Sexual situation
V: Violence
Note 2: The V-Chip will automatically block certain categories that are “more restrictive.”For example, if you block
“TV-Y” category, then TV-Y7 will automatically be blocked. Similarly, if you block the TV-G category, then all the
categories in the “young adult” group will be blocked (TV-G, TV-PG, TV-14 and TV-MA). The sub-ratings (D, L, S, V)
work together similarly. (See next section.)
16061510-CHAPTER 2 12/13/02 11:44 AM Page 32
Function
Clock
Timer
Caption
CH
V-chip
Language : English
Move Sel.
Exit
Page 35

CHAPTER TWO: TV OPERATION 33
TV OPERATION
3
Press the RIGHT arrow button to enter your 4-digit PIN number.
G General audience (no restrictions).
PG Parental guidance suggested.
PG-13 PG-13 (Parents strongly cautioned).
R R (Restricted. Children under 17 should
be accompanied by an adult).
NC-17 No children under age 17.
X X (Adults only).
NR Not rated.
4
Press the DOWN arrow
button to select the
“MPAA Rating.” Press the
RIGHT arrow button to
display the MPAA Rating
screen.
5
Repeatedly press the
UP/DOWN arrow buttons
to select a particular
MPAA category.
While a particular category is selected, press the LEFT/RIGHT arrow buttons to activate it.
A letter (“U” or “B”) will be selected. Press the DOWN arrow button to select “U” or ”B”.
Press the RIGHT arrow button to save the settings and press the MENU button to exit.
Note: The V-Chip will automatically block any category that is “more restrictive.” For example, if
you block the “PG-13” category, then “R,” “NC-17,” and “X” will automatically be blocked also.
G U
PG U
PG-13 U
R U
NC-17
U
X
U
NR U
U: Unblocked B: Blocked
Function
CH
Move Sel.
B/U
Exit
How to Reset the TV after the V-Chip
Blocks a Channel (“Emergency Escape”)
If the TV is tuned to a restricted channel, the V-Chip will block it. The screen will go blank and the following
message will appear: “Excessive rating.”
To resume normal viewing, tune to a different channel using the number buttons. Under certain conditions
(depending on the rating of the local TV programs) the V-Chip might lock out all the channels.
In this case, use the V-Chip button for an “emergency escape”:
1. Select V-Chip from the Function menu.
2. Enter your PIN number, and press the RIGHT arrow button to temporarily disable the V-Chip Lock.
16061510-CHAPTER 2 12/13/02 11:44 AM Page 33
Function
V-chip
V-chip Lock : No
TV Guidelines
CH
MPAA Rating
Change pin
Move Sel.
Exit
Page 36

34
CHAPTER THREE: DVD OPERATION
Chapter Three
DVD OPERATION
Playing a Disc
Playback
1
Press the TV/DVD VCR
button to switch the DVD
mode.
2
Press the OPEN/CLOSE
button.
3
Place a disc gently into
the tray with the disc’s
label facing up.
4
Press the PLAY/PAUSE
() or OPEN/CLOSE
button to close the disc
tray.
▼
RESUME function
When you stop disc play, the player remembers where you
stopped, so when you press the PLAY again, it will pick up
where you left off (unless the disc is removed, the STOP( )
button is pressed twice or the set is unplugged).
If the player is left for 5 minutes in pause mode, it will stop.
This icon indicates an invalid button press.
Pausing Playback
Press the PLAY/PAUSE( )
or STEP button on the remote
control during playback.
• Screen stops, no sound.
• To resume again, press the
PLAY/PAUSE( ) button
once again.
Step Motion Playback (Except CD)
Press the STEP button on the
remote control during playback.
• Each time the button is pressed, a new frame will
appear.
• No sound is heard during STEP mode.
• Press the PLAY/PAUSE( ) button to resume normal
playback (You can only perform step motion playback
in the forward direction).
16061510-CHAPTER 3 12/13/02 11:46 AM Page 34
Page 37

• Each Title on a DVD can be divided into chapters
(similar to tracks on an audio CD).
• A DVD may contain several different titles. For
example, if a disc contains four different movies, each
might be considered a title.
C
HAPTER THREE: DVD OPERATION
35
DVD OPERATION
Using the Search and Skip Functions
Searching through a Chapter or Track
Press the FWD( ) or
REW( ) SEARCH but-
ton on the remote control
during playback.
• Press the FWD( ) or REW( ) SEARCH button on the remote control and press again to
search at a faster speed (2X/4X/8X/16X/32X/128X) on a DVD, (4X/8X) on a VCD and (2X/4X/8X)
on a CD.
• To return to normal speed playback, press the PLAY/PAUSE( ) button.
Skipping Tracks
During playback, press
the NEXT SKIP( ) or
BACK SKIP( ) button.
• When playing a DVD, if you press the NEXT SKIP ( ) button, it moves to next chapter. If you
press the BACK SKIP ( ) button, it moves to the beginning of the chapter. One more press
makes it move to the beginning of the previous chapter.
• When playing a VCD 2.0 in MENU OFF mode, a VCD1.1 or a CD, if you press the NEXT SKIP( )
button, it moves to next track. If you press the BACK SKIP( ) button, it moves to the the
beginning of the track. One more press makes it move to the beginning of the previous track.
• If a track exceeds 15 minutes when playing a VCD and you press the NEXT SKIP( ) button, it
moves forward 5 minutes. If you press the BACK SKIP( ) button, it moves backward 5
minutes.
• When playing a VCD 2.0 in the MENU MODE or Track View function, if you press the NEXT
SKIP( ) button, it moves to the next MENU or the next Track View display. If you press the
BACK SKIP( )button, it moves to the previous MENU or the previous Track View display.
▼
When in search mode (2X/4X/8X/16X/32X/128X) on a
DVD or high-speed playback on a VCD, no sound will be
heard.
Slow Motion Playback (Except CD)
Press the FWD( )
SEARCH button on the
remote control during PAUSE
or STEP mode.
• By pressing the FWD SEARCH button, you can select slow motion playback for 1/8, 1/4 or 1/2 of
normal speed.
• No sound is heard during slow mode.
• Press the PLAY/PAUSE( ) button to resume normal playback.
• When playing a VCD, the reverse slow motion play will not work.
16061510-CHAPTER 3 12/13/02 11:46 AM Page 35
Page 38

36 C
HAPTER THREE: DVD OPERATION
DVD OPERATION
Using the Display Function
1
During playback, press
the DISPLAY button.
Each feature is illustrated
with an icon. Use the up
or down arrow button on
the remote to highlight the
icon.
2
When an icon is highlighted,
use the LEFT or RIGHT
arrow button to display
other options if they are
available. If necessary,
press the ENTER button to
select the highlighted
option.
3
To make the screen
disappear, press the
DISPLAY button again.
DVD
T
DVD
T:01
C:02
0:01:25
ENG 5.1 CH
ENG
64
A
Type of Disc
Direct Title Search
Direct Chapter Search
Direct Time Search
Audio
Subtitles
Volume Value
16061510-CHAPTER 3 12/13/02 11:46 AM Page 36
DVD
DVD
T
T:01
C:02
0:01:25
ENG 5.1 CH
ENG
A
64
Page 39

C
HAPTER THREE: DVD OPERATION
37
DVD OPERATION
Repeat Play
Repeat the current track, chapter, title, a chosen section (A-B), or all of the disc.
1
Press the REPEAT button.
Repeat screen appears.
2
Select Chapter, Title or A-B
pressing the LEFT/RIGHT
arrow buttons.
Press the ENTER button
3
To return to normal
playback, press the REPEAT
button.
Press the LEFT/RIGHT
arrow buttons to select
“Off”, then press the
ENTER button.
Off Chapter Title A-B
A-B Repeat
1. Press the REPEAT button. Select A-B on screen with
the LEFT/RIGHT arrow buttons.
2. Press the ENTER button at the point where you
want the repeat play to start (A).
The B is automatically highlighted.
3. Press the ENTER button at the point where you
want the repeat play to stop (B).
4. The A-B Repeat that you set plays until you turn
Repeat off.
Note
• DVD repeats playback by chapter or title, CD and
VCD repeat playback by disc or track.
• Depending on the disc, the Repeat function may not
work.
• If the title or track is completed before marking the
end (B), the end of title or track becomes B
automatically.
• When in VCD 2.0 mode (Menu On mode), this
function does not work.
16061510-CHAPTER 3 12/13/02 11:46 AM Page 37
Page 40

38 C
HAPTER THREE: DVD OPERATION
DVD OPERATION
Program Play and Random Play
Program Playback
Random Playback
1
Press the PROGRAM button.
2
Press the LEFT/RIGHT
arrow buttons to select
“PROGRAM”.
Press the ENTER button.
1
Press the PROGRAM button.
2
Press the LEFT/RIGHT
arrow buttons to select
“RANDOM”.
Press the ENTER button.
The disc will be played
back in random order.
3
Press the LEFT/RIGHT
arrow buttons to select the
first chapter (or track) to
add to the program.
Press the ENTER button.
The selection numbers
appear in the Program
Order box.
4
Press the PLAY/PAUSE
() button.
The disc will be played
back in programmed order.
▼
Depending on the disc, the Program
and Random Playback function may not
work.
When in VCD 2.0 mode (Menu On
mode), these functions do not work.
To resume normal playback, press the
CLEAR button.
< DVD >< DVD >
16061510-CHAPTER 3 12/13/02 11:46 AM Page 38
Page 41

C
HAPTER THREE: DVD OPERATION
39
DVD OPERATION
Using the Disc View Function (VCD)
Track View/Index View
Displays the beginning view of each track and the track number (Track View).
Displays the equally divided 9 views of the current playing track (Index View).
1
During playback, press
the TOP MENU button.
2
Press the UP/DOWN arrow
buttons to select “Track
View” or “Index View”.
Press the ENTER button.
3
Select the desired view by
pressing the UP/DOWN
arrow or LEFT/RIGHT arrow
buttons.
Press the ENTER button.
▼
When pressing the TOP MENU
button with a DVD; the disc’s TITLE
MENU function comes up. A disc must
have at least two titles for the TITLE
MENU function to work.
When pressing the TOP MENU button
with a CD; the unit enters the INTRO
mode. INTRO lets you listen to the
beginning of each track for about 10
seconds.
< Track View >
< Index View >
16061510-CHAPTER 3 12/13/02 11:46 AM Page 39
Page 42

40 C
HAPTER THREE: DVD OPERATION
DVD OPERATION
Selecting the Audio Language
Using the AUDIO Button
You can select a desired language quickly and easily with the AUDIO button.
1
Press the AUDIO button.
2
Press the UP/DOWN arrow
buttons to select the
desired language on a
DVD.
The audio languages are
represented by
abbreviations.
3
Press the UP/DOWN arrow
buttons to select Stereo,
Right or Left (On VCD/CD).
▼
This function depends on what
languages are encoded on the disc and
may not work with all DVDs.
A DVD disc can contain up to 8 audio
languages.
To have the same audio language come
up whenever you play back a DVD, go to
the next page.
16061510-CHAPTER 3 12/13/02 11:46 AM Page 40
Page 43

C
HAPTER THREE: DVD OPERATION
41
DVD OPERATION
Using the DVD SETUP Button (When in the DVD mode)
1
Press the DVD SETUP
button.
2
The SETUP MENU is
displayed.
Press the DOWN arrow
button to select “Audio”.
Press the ENTER button.
3
Press the DOWN arrow
button to select the
appropriate language, then
press the ENTER button.
4
Press the RETURN button
to exit.
▼
Select “Original” if you want the
default soundtrack language to be the
original language the disc is recorded in.
If the selected language is not recorded
on the disc, the original pre-recorded
language is selected.
16061510-CHAPTER 3 12/13/02 11:46 AM Page 41
Page 44

42 C
HAPTER THREE: DVD OPERATION
DVD OPERATION
Selecting the Subtitle Language
Using the SUBTITLE button
You can select a desired subtitle quickly and easily with the SUBTITLE button.
1
Press the SUBTITLE button.
2
Press the DOWN arrow
button to select the desired
subtitle language.
The subtitle languages are
represented by abbreviations.
3
Press the LEFT/RIGHT
arrow buttons to determine
whether or not the subtitle
will be displayed.
Initially, the subtitling will
not appear on screen.
▼
This function depends on what languages are encoded on the disc and may
not work with all DVDs.
A DVD disc can contain up to 32 subtitle
languages.
To have the same subtitle language come
up whenever you play back a DVD, go to
the next page.
16061510-CHAPTER 3 12/13/02 11:46 AM Page 42
Page 45
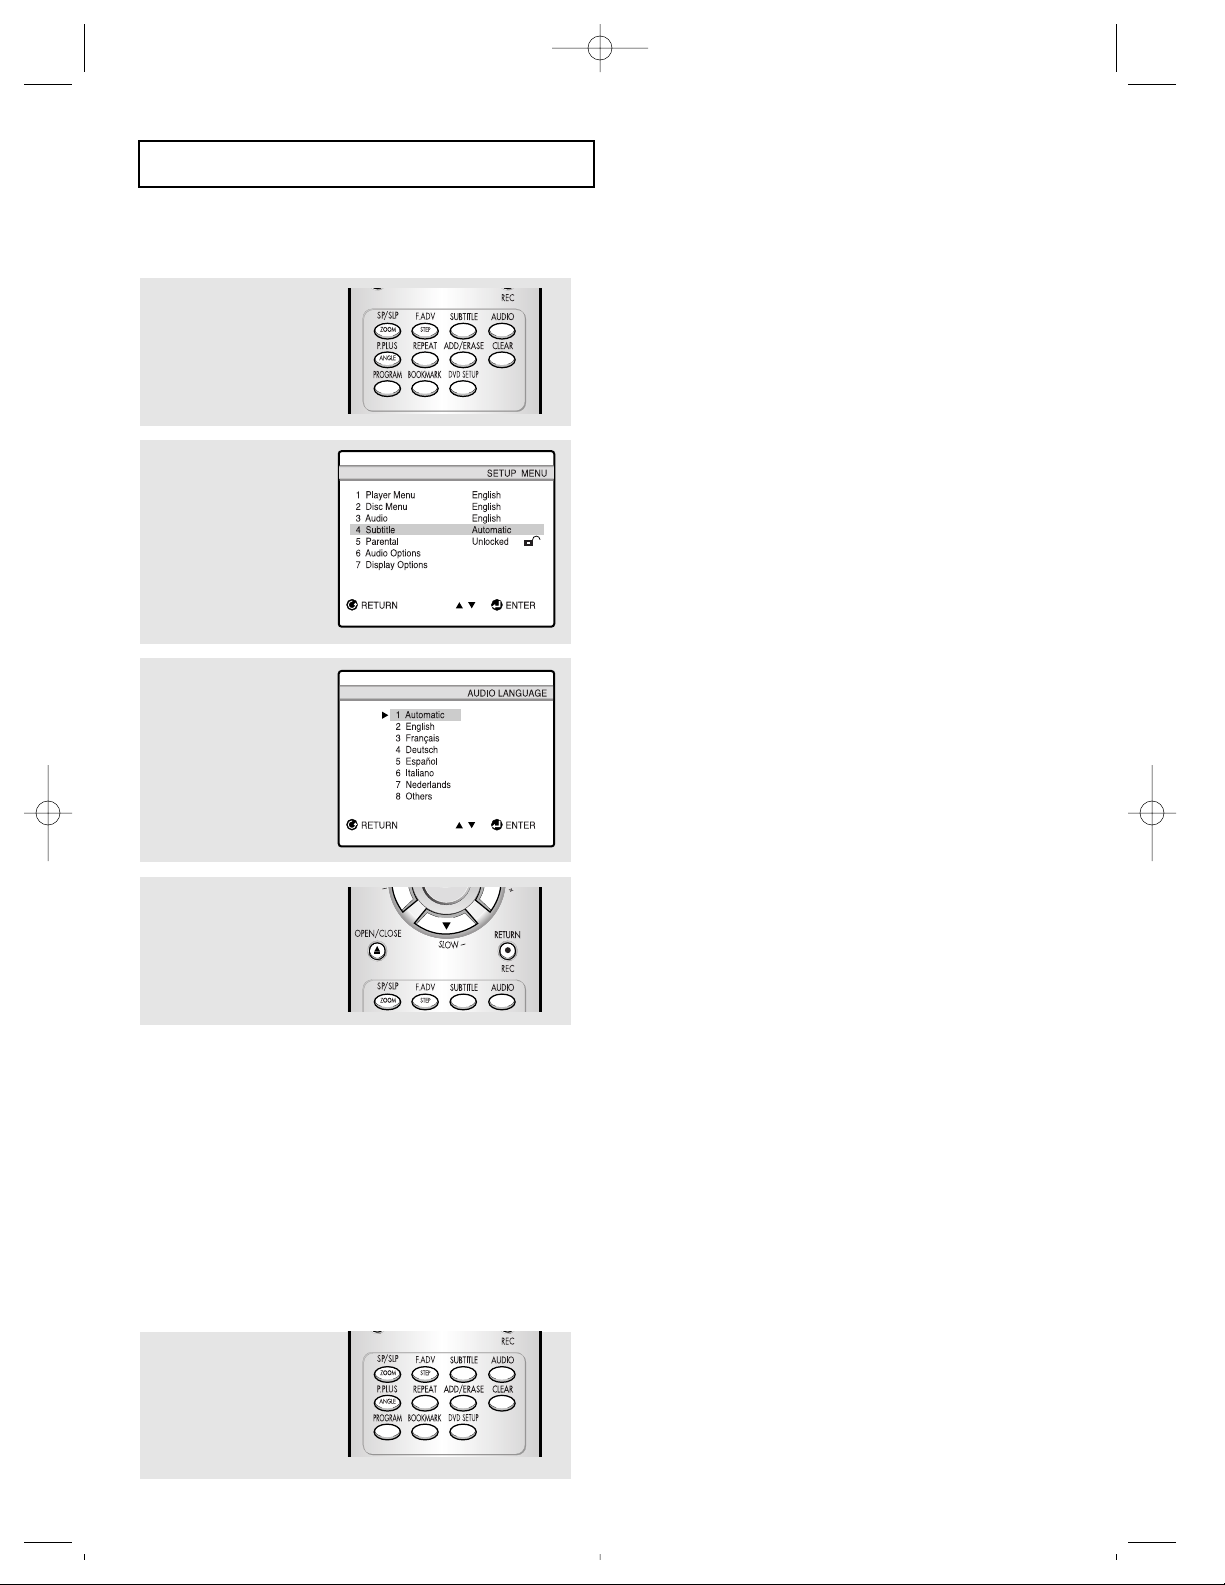
C
HAPTER THREE: DVD OPERATION
43
DVD OPERATION
Using the DVD SETUP Button (When in the DVD mode)
2
The SETUP MENU is
displayed.
Press the DOWN arrow
button to select “Subtitle”.
Press the ENTER button.
3
Press the DOWN arrow
button to select the
appropriate language, then
press the ENTER button.
▼
Select “Automatic” if you want the
subtitle language to be the same as the
language selected as the audio
preference.
If the selected language is not recorded
on the disc, the original pre-recorded
language is selected.
1
Press the DVD SETUP
button.
4
Press the RETURN button
to exit.
Setting up the Language Features
If you set the player menu, disc menu, audio and subtitle language in advance, it will come up
automatically every time you watch a movie.
Using the Player and Disc Menu
Use the Player preference menu to select the language for the player’s on-screen displays.
Use the Menu preference menu to select the language for a DVD’s disc menu.
To change the Audio or Subtitles language through the menu, see the previous pages.
1
Press the DVD SETUP but-
ton.
16061510-CHAPTER 3 12/13/02 11:47 AM Page 43
Page 46
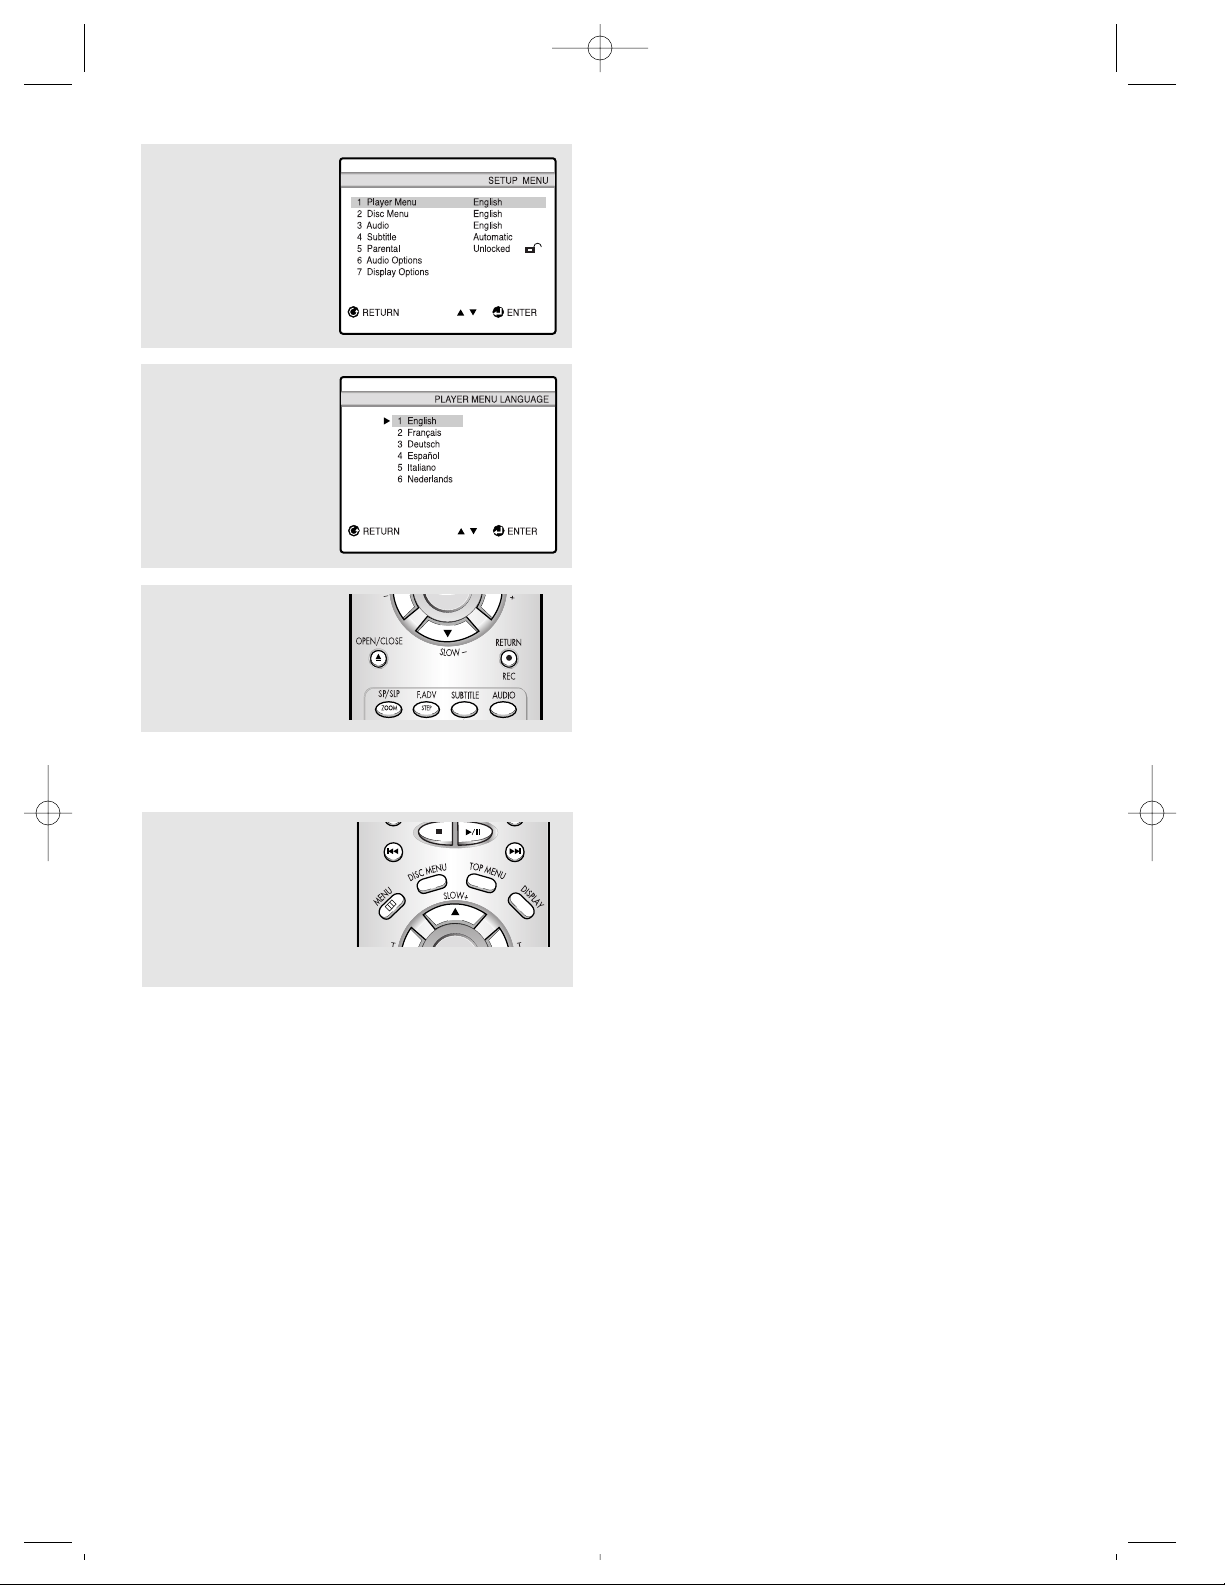
44 C
HAPTER THREE: DVD OPERATION
Using the Master Volume Control Function
Press the DISPLAY button,
then press the DOWN arrow
buttons to select master
volume control.
Press the LEFT/RIGHT arrow
buttons to select a suitable
volume.
• Master Volume Control function lets you adjust the volume of the player’s output.
This is useful for matching the player’s output level to other equipment in your
system.
• Volume control is only operative when using the Analog Audio outputs.
• There are up to 64 levels. Lowering each level reduces the audio level by 0.5dB.
3
Press the DOWN arrow
button to select the
appropriate language, then
press the ENTER button.
4
Press the RETURN button
to exit.
2
The SETUP MENU is
displayed.
Press the DOWN arrow
button to select “Player
Menu” or “Disc Menu”.
Press the ENTER button.
16061510-CHAPTER 3 12/13/02 11:47 AM Page 44
Page 47

C
HAPTER THREE: DVD OPERATION
45
DVD O
PERATION
Changing the Camera Angle
When a DVD contains multiple angles of a particular scene, you can select the Angle
function.
Using the ANGLE button
Press the ANGLE button to see if an ANGLE ( ) mark is present at the upper right
hand corner of the screen.
2
Press the UP/DOWN arrow
buttons to select the
desired screen angle,then
press the ENTER button.
To turn off the display,
press the ANGLE button
again.
1
When an ANGLE mark is
shown, press the ANGLE
button, then an ANGLE
select icon will appear at
the upper left hand corner
of the screen.
Using the Zoom Function (DVD/VCD)
2
Press the UP/DOWN or
LEFT/RIGHT arrow buttons
to select the part of the
screen you want to zoom.
Press the ENTER button.
1
During playback or pause
mode, press the ZOOM
button on the remote. A
square will be displayed on
screen.
• During DVD playback, press the ENTER button to zoom in 2X/4X/2X in order.
• During VCD playback, press the ENTER button to zoom in 2X.
16061510-CHAPTER 3 12/13/02 11:47 AM Page 45
Page 48

46 C
HAPTER THREE: DVD OPERATION
DVD OPERATION
Using the Bookmark Function
The Bookmark function lets you select parts of a DVD or VCD (MENU OFF mode) so
that you can quickly find the section at a later time.
Using the Bookmark Function (DVD/VCD)
Recalling a Marked Scene
2
Press the LEFT/RIGHT
arrow buttons to move to
the desired bookmark icon.
2
Press the LEFT/RIGHT
arrow buttons to select a
marked scene.
3
When you reach the scene
you want to mark, press the
ENTER button.
The icon will change to a
number (1, 2, or 3).
Press the BOOKMARK
button to turn off the display.
3
Press the PLAY/PAUSE
()button to skip to the
marked scene.
1
During playback, press the
BOOKMARK button.
A marker will be displayed.
1
During playback, press the BOOKMARK button.
A marker will be displayed.
16061510-CHAPTER 3 12/13/02 11:47 AM Page 46
Page 49

C
HAPTER THREE: DVD OPERATION
47
DVD OPERATION
Clearing a Bookmark
2
Press the LEFT/RIGHT
arrow buttons to select the
bookmark number you
want to delete.
3
Press the CLEAR button to
delete a bookmark number.
Press the BOOKMARK
button to turn off display.
1
During playback, press the
BOOKMARK button.
A marker will be displayed.
• Up to three scenes may be marked at the same time.
• When in VCD 2.0 mode (Menu On mode), this function does not work.
• Depending on the disc, the Bookmark function may not work.
16061510-CHAPTER 3 12/13/02 11:47 AM Page 47
Page 50

48 C
HAPTER THREE: DVD OPERATION
DVD OPERATION
MP3 Play
When an MP3 Disc is inserted into the DVD player, the first song file of the first folder
plays.
MP3 Play Function
1
Press STOP to stop
playback of the first song
file, then press RETURN to
display the music folder
menu on the right side of
the screen. Up to 8 music
folders can be displayed at
a time. If you have more
than 8 folders on a disc,
press the RIGHT arrow
button to bring them up on
the screen.
Program/Random playback
1
Press the PROGRAM button
to switch between the
RANDOM and PROGRAM
modes. See page 38 for
more information on these
modes.
2
Press the UP/DOWN arrow
buttons to select the
desired music folder, then
press ENTER. Press the
UP/DOWN arrow buttons
again to select a song file.
Press ENTER to begin
playback of the song file.
Notes:
• A musical note is displayed next to the file currently playing.
• Press the REPEAT button to hear only music continuously and press it once again to
release.
16061510-CHAPTER 3 12/13/02 11:47 AM Page 48
Page 51

C
HAPTER THREE: DVD OPERATION
49
DVD OPERATION
CD-R MP3 discs
In the case of CD-R MP3 discs, please follow all the recommendations for CD-R
above, plus the comments below:
• Your MP3 files should be ISO 9660 or JOLIET format.
ISO 9660 format and Joliet MP3 files are compatible with Microsoft's DOS and Windows, and
with Apple's Mac. These two formats are the most widely used.
• When naming your MP3 files do not exceed 8 characters, and place ".mp3" as the file
extension.
General name format of: Title.mp3. When composing your title, make sure that you use 8
characters or less, have no spaces in the name, and avoid the use of special characters
including: (.,/,\,=,+).
• Use a decompression transfer rate of at least 128 kb/sec (kilobytes/second) when
recording MP3 files.
Sound quality with MP3 files basically depends on the rate of compression/decompression you
choose. Getting audio CD quality sound requires an analog/digital sampling rate, that is
conversion to MP3 format, of at least 128 kb/sec and up to 160 kb/sec. However, choosing
higher rates, like 192 kb/sec or more, only rarely give better sound quality. Conversely, files
with sampling rates below 128 kb/sec will not be played properly.
• Do not try recording copyright protected MP3 files.
Certain "secured" files are encrypted and code protected to prevent illegal copying. These files
are of the following types: Windows Media
TM
(registered trade mark of Microsoft Inc) and
SDMI
M
(registered trade mark of The SDMI Foundation). You cannot copy such files.
• Your DVD player only accepts one level of file directory.
Consequently you must choose:
- either to save all your MP3 recording files at the root of the disc;
- and/or create folders in the directory for each artist or music type (e.g.classical, rock, jazz,
etc)
• Important:
The above recommendations cannot be taken as a guarantee that the DVD player will play
MP3 recordings, or as an assurance of sound quality. You should note that certain
technologies and methods for MP3 file recording on CD-Rs prevent optimal playback of these
files on your DVD player (degraded sound quality and in some cases, inability of the player to
read the files).
16061510-CHAPTER 3 12/13/02 11:47 AM Page 49
Page 52

50 C
HAPTER THREE: DVD OPERATION
DVD OPERATION
Setting up the Parental Control
The Parental Control function works in conjunction with DVDs that have been
assigned a rating - which helps you control the types of DVDs that your family
watches. There are up to 8 rating levels on a disc.
2
Press the DOWN arrow
button to select “Parental”.
Press the ENTER button.
3
Press the RIGHT arrow
button to select “Yes” if you
want to use a password,
then press the ENTER
button (the Enter Password
screen appears).
4
Enter your password.
The Re-enter Password
screen appears to confirm
the password. Enter you
password again. The
Parental Control screen
appears.
1
Press the DVD SETUP
button (the SETUP MENU
is displayed).
16061510-CHAPTER 3 12/13/02 11:47 AM Page 50
Page 53

C
HAPTER THREE: DVD OPERATION
51
DVD OPERATION
5
About the Rating
Level:
The Rating Level will work only
when use password is set to
“Yes”. To unlock the player, press
RIGHT arrow button to select
“No”.
• Press the DOWN arrow
button to select the “Rating
Level”, then press the ENTER
button.
• Press the UP/DOWN arrow
buttons to select the
Level(e.g. Level 8), then press
the ENTER button. Disc that
contain Level 7 will now not
play.
To cancel the rating level, press the LEFT/RIGHT arrow button
to select No in Use Password.
6
About Change Password:
• Press the DOWN arrow
button to select
“Change Password”
and press ENTER. The
Change Password
screen appears.
• Enter your new
password. Re-enter the
new password again.
7
Press the RETURN button to
exit.
16061510-CHAPTER 3 12/13/02 11:47 AM Page 51
Page 54

52 C
HAPTER THREE: DVD OPERATION
DVD OPERATION
Setting up the Audio Options
• Digital output
PCM: Converts to PCM(2CH) 48kHz/16Bit audio. Select PCM when using the Analog Audio
Outputs.
Bitstream: Converts to Dolby Digital BITSTREAM - 5.1CH (if MPEG-2, 7.1CH). Select BITSTREAM
when using the Digital Audio Output.
• DTS
On: Outputs DTS BITSTREAM via digital output only. Select DTS when connecting to a DTS
DECODER.
Off: Doesn’t output digital signal.
• Dynamic Compression
On: To select dynamic compression.
Off: To select the standard range.
Manufactured under license from Dolby Laboratories. “Dolby” and the double-D symbol are trademarks of Dolby Laboratories. Confidential unpublished works. ©1992-1997 Dolby Laboratories Inc.
All rights reserved.
“DTS” and “DTS Digital Out” are trademarks of Digital Theater Systems, Inc.
3
Press the DOWN arrow
button to select the desired
item, then press the RIGHT
arrow button.
4
Press the RETURN button
to exit.
1
Press the DVD SETUP
button (The SETUP MENU
is displayed).
2
Press the DOWN arrow
button to select “Audio
Options”. Press the ENTER
button.
16061510-CHAPTER 3 12/13/02 11:47 AM Page 52
Page 55

C
HAPTER THREE: DVD OPERATION
53
DVD OPERATION
Setting up the Display Options
• TV Aspect
4:3 Letter Box :Select when you want to see the total 16:9 ratio screen DVD supplies, even though
you have a TV with a 4:3 ratio screen. Black bars will appear at the top and bottom
of the screen.
4:3 Pan Scan : Select this for conventional size TVs when you want to see the central portion of the
16:9 screen. (Extreme left and right side of movie picture will be cut off.)
16:9 Wide : You can view the full 16:9 picture on your widescreen TV.
• Still Mode
Field : Select this feature when the screen shakes in the Auto mode.
Frame : Select this feature when you want to see small letters more clearly in the Auto mode.
Auto : When selecting Auto, Field/Frame mode will be automatically converted.
• Screen Messages
Use to turn on-screen messages on or off.
• Black Level
Adjusts the brightness of the screen.(On/Off)
3
Press the DOWN arrow
button to select the desired
item, then press the ENTER
button to view TV Aspects
or press the RIGHT arrow
button to toggle between
choices for other Display
Options.
4
Press the RETURN button
to exit.
1
Press the DVD SETUP
button (the SETUP MENU
is displayed).
2
Press the DOWN arrow
button to select “Display
Options”. Press the ENTER
button.
16061510-CHAPTER 3 12/13/02 11:47 AM Page 53
Page 56

54 C
HAPTER FOUR: VCR OPERATION
Chapter Four
VCR OPERATION
▼
2
Press the STOP/EJECT
button on the front control
to eject the tape.
After ejecting a tape, you should
remove it completely from the
compartment and turn off the VCR.
In this chapter, you will learn how to play a video cassette tape, how to use the time counter and
memory stop features, and how to record a program as you are watching TV.
Using the Safety Tab
Most video cassette tapes have a safety tab that prevent accidental erasure. The safety tab is on the end
opposite from where the arrow points.
The tab must be intact to record. You can repeatedly record over on the same tape as long as the tab is
intact. If you want to protect a tape from accidental erasure, break off the tab.
If you want to erase a recorded tape or record on a cassette with the tab removed, cover the hole with
cellophane tape.
Inserting and Ejecting a Video Cassette Tape
To insert a video cassette tape:
▼
1
Hold the video cassette
tape window-side up with
the arrow pointing away
from you.
Don’t try to insert a tape upside
down or backwards.
Use only video tapes labeled “VHS.”
European PAL VHS video tapes and
S-VHS pre-recorded tapes aren’t
compatible with this unit. Choose brand
name, high quality tapes for best results.
▼
2
Gently push the tape
through the compartment
door until you feel the VCR
pull it.
The VCR loads the tape
automatically.
If the power is off when you insert a
tape, the TV turns on automatically.
If the safety tab of your video tape has
been removed, the tape begins to play
automatically. You don’t have to press
PLAY.
To eject a video cassette tape,
1
Press the STOP( )
button to stop playing the
tape.
▼
When you’re finished playing a
pre-recorded video tape, it’s best to
rewind it to the beginning and remove it
from the VCR to protect it from wear
and tear.
16061510-CHAPTER 4 12/13/02 11:48 AM Page 54
Page 57

C
HAPTER FOUR: VCR OPERATION
55
Using the Time Counter
The time counter allows you to keep track of how much time (in hours, minutes, and
seconds) has elapsed on the video tape you’re watching. The counter can also be
useful if you want to find a specific point on a pre-recorded tape.
1
While a tape is playing,
press the DISPLAY button
twice.
▼
The counter displays time only for
recorded sections of tape. Blank tapes
or blank sections of tapes do not affect
the counter display.
2
The time counter appears
in the upper left corner of
the screen.
▼
3
Press the CLEAR button to
set the counter to “00:00:00.”
4
Press the DISPLAY button
twice again to remove the
time counter from the
screen.
The VCR automatically resets the
counter to “00:00:00” when you eject
a tape.
VCR OPERATION
Using Picture Search
Picture search lets you quickly search a pre-recorded video tape for a particular scene.
▼
There’s no sound while you search
for a picture at high speeds.
There may be some horizontal streaks
on the screen while you search.
This technique is good if you’re
searching through only a small amount
of tape. If you want to search through a
large amount of tape, stop the tape
before pressing FWD or REW.
2
When you find the scene
you want, press and
release the FWD( ) or
REW( ) button again
to resume playing the tape
at regular speed.
1
While playing a tape,
press and release the
FWD( ) or REW( )
button.
The images from the tape
are displayed on the
screen at a high speed.
16061510-CHAPTER 4 12/13/02 11:48 AM Page 55
Page 58

56 C
HAPTER FOUR: VCR OPERATION
VCR OPERATION
1
While playing a tape,
when you reach the scene
you want, press the
DISPLAY button twice.
2
The time counter appears
in the upper left corner of
the screen.
3
Press the CLEAR button to
reset the timer to
“00:00:00.”
4
Press DISPLAY again to
enter the scene into memory.
5
The letter “M” appears
beside the time counter.
▼
If you want to remove the time
counter memory from the screen and
cancel the memory stop feature, just
press the DISPLAY button again.
Using Memory Stop
Memory stop makes it easy for you to find a particular scene in a video tape. The VCR
automatically stops rewinding or fast forwarding when the memory counter is at
“00:00:00,” so you simply need to mark the desired scene as “00:00:00.” Then, you’ll be
able to search for that place the next time you watch the tape.
16061510-CHAPTER 4 12/13/02 11:48 AM Page 56
Page 59

C
HAPTER FOUR: VCR OPERATION
57
VCR OPERATION
To return to the scene you marked,
▼
1
Press the STOP( ) button.
For this feature to work, the time
counter and the letter “M” must still be
on the screen. If this isn’t the case,
press the DISPLAY button until the time
counter and the letter “M” are both on
the screen.
2
Press the FWD( ) or
REW( ) button to
return to the scene you
marked.
The VCR stops the tape
when the counter reaches
“00:00:00M.”
3
Press the PLAY/PAUSE
() button.
to view the scene again.
Using P.PLUS
Press P.PLUS to compensate for a poor rental tape.
1
Insert a tape and press the PLAY/PAUSE ( ) button.
2
Press the P.PLUS button
(“Picture plus Off”
appears on-screen.)
Press the P.PLUS button
again to turn to “Picture
plus On”. Picture Plus
functions only when a
tape is being played.
▼
If the tape is ejected and reinserted,
the Picture Plus feature will be Off.
16061510-CHAPTER 4 12/13/02 11:48 AM Page 57
Page 60

58 C
HAPTER FOUR: VCR OPERATION
VCR OPERATION
4
Press the REC button.
The record indicator on
the control panel
illuminates and the VCR
begins recording.
Notes:
• The VCR automatically stops recording and rewinds when it reaches the end of the tape.
• Press the STOP button at any time to stop recording.
• We don’t recommend changing tape speeds while a recording is in progress. Doing so may cause
distortion of the picture during playback.
• When you’re finished recording, rewind the tape to the beginning and remove it from the VCR
to protect the tape.
• When pressing the REC button on the front panel during DVD playback, the DVD will be
recorded on the VCR tape. If your DVD title has been equipped with a Copy Protect technology,
it can't be recorded on the VCR tape.
• You can play a DVD by switching into the DVD mode during channel recording.
• You can't play a DVD by switching into DVD mode during A/V recording.
• Mode Switching doesn't operate during recording in DVD mode.
2
Press the SP/SLP button
repeatedly until the speed
you want (SLP or SP)
appears.
3
Select the TV channel you
want to record.
Recording TV Programs As You Watch
Recording
▼
1
With your VCR turned on,
and with a tape in the unit,
press the SP/SLP button.
The tape speed appears in
on-screen.
Be sure the record safety tab is in
place. For information on the record
safety tab, see page 54.
▼
SP (Standard Play) is the most
common speed for recording. For more
information on tape speeds, see page
68.
16061510-CHAPTER 4 12/13/02 11:48 AM Page 58
Page 61

C
HAPTER FOUR: VCR OPERATION
59
2
Press the REC button
repeatedly until the length
of time you want to record
appears.
The VCR begins recording.
Using Advanced Recording Features
Using One-Touch Recording
One-touch recording (OTR) lets you record television programs with the touch of a
button. You can even program the length of time (up to four hours) that you want to
record.
▼
1
Insert a video cassette
tape, set the tape speed,
and select the channel
you want to record.
For information, see “Recording
Programs As You Watch” on page 58.
The VCR won’t record on a video
cassette tape if the record safety tab on
the tape has been removed. For
information on the record safety tab,
see page 68.
Editing While Recording
You can edit while recording, selecting only those scenes you want to record from the
current television program. This is especially helpful if you want to record a program
without the commercials.
▼
2
Press the PLAY/PAUSE
() button on the front
panel to temporarily stop
recording.
After ten minutes in the pause
mode, the VCR automatically stops the
tape and switches to TV mode to
protect the video heads from excessive
wear. If this happens, press REC to
resume recording.
▼
1
Be sure you have begun
recording and that the
record indicator light on
the front panel is
illuminated.
For information on recording, see
page 58.
VCR OPERATION
3
To resume recording, press the REC button on the front panel or
remote control again.
16061510-CHAPTER 4 12/13/02 11:48 AM Page 59
Page 62

60 C
HAPTER FOUR: VCR OPERATION
VCR OPERATION
Your recording time options are: 30 minutes, 1 hour, 1 hour and 30 minutes, 2 hours, 3 hours, or 4
hours.
You can increase the length of time you want to record at any time during the recording process by
pressing the REC button again and choosing additional time.
If you want to stop recording before the time is up, press the REC button until the OTR display
shows “0:00.” The recording stops after a few seconds. Or, press the POWER button on the front
panel, then immediately press the STOP/EJECT button.
Note: In DVD mode, the OTR function doesn't operate with the REC button on the front panel. A
normal recording only operates.
Recording at a Later Time
You can set the built-in timer for unattended recording of up to eight different TV
programs. The timer can turn on the TV at the time you select, record for a selected
length of time, and then turn off the TV – all without you being there.
You can also choose to record a program one time, daily (every day, Monday through
Friday), or weekly (the same day every week.)
▼
1
Press the MENU button.
Press the DOWN arrow
button to select the VCR
Setup icon, then press the
RIGHT arrow button
(Timer Record is
highlighted).
2
Press the RIGHT arrow
button to display the Timer
Record menu.
The clock must be set to the correct
time and date before you program the
timer. For more information on setting
the clock, see page 23.
3
Press the LEFT/RIGHT
arrow buttons to select
the channel you want to
record.
16061510-CHAPTER 4 12/13/02 11:48 AM Page 60
VCR Setup
Timer Record
Program Review
True Repeat : Off
CH
Block Repeat : 10
Move Sel.
Exit
Timer Record
CH : 7
START : 10:30 am
END : 12:30 pm
CH
Date : 1/ 01/ 2002
Fri
Speed : SP
Mode : Once
Move Sel.
VCR Setup
Exit
Page 63

C
HAPTER FOUR: VCR OPERATION
61
6
Press RIGHT arrow when
you START time has been
set, then press the DOWN
arrow button to select
“END”.
Repeat the process used
to set the Start time.
▼
The VCR automatically selects am
or pm for the starting time.
5
Press the RIGHT arrow
button, then press the
UP/DOWN arrow buttons
to select the minute when
you want to begin
recording.
7
Press the RIGHT arrow
button to highlight the
month setting.
Press the DOWN arrow
button to select the month
when you want to begin
recording.
8
Press the RIGHT arrow
button, then press the
DOWN arrow button to
select the day when you
want to begin recording.
Do the same to set the
year.
VCR OPERATION
4
Press the DOWN arrow
button to select “START”.
Press the RIGHT arrow button. (The hour setting is
highlighted).
Press the UP/DOWN arrow
buttons to select the hour
when you want to begin
recording.
16061510-CHAPTER 4 12/13/02 11:48 AM Page 61
VCR Setup
Timer Record
CH : 7
START : 10:30 am
END : 12:30 pm
CH
Date : 1/ 01/ 2002
Fri
Speed : SP
Mode : Once
Move Sel.
Timer Record
CH : 7
START : 10:30 am
END : 12:30 pm
CH
Date : 1/ 01/ 2002
Fri
Speed : SP
Mode : Once
Move Sel.
Exit
VCR Setup
Exit
Timer Record
CH : 7
START : 10:30 am
END : 12:30 pm
CH
Date : 1/ 01/ 2002
Fri
Speed : SP
Mode : Once
Move Sel.
Timer Record
CH : 7
START : 10:30 am
END : 12:30 pm
CH
Date : 1/ 01/ 2002
Fri
Speed : SP
Mode : Once
Move Sel.
VCR Setup
Exit
VCR Setup
Exit
Page 64
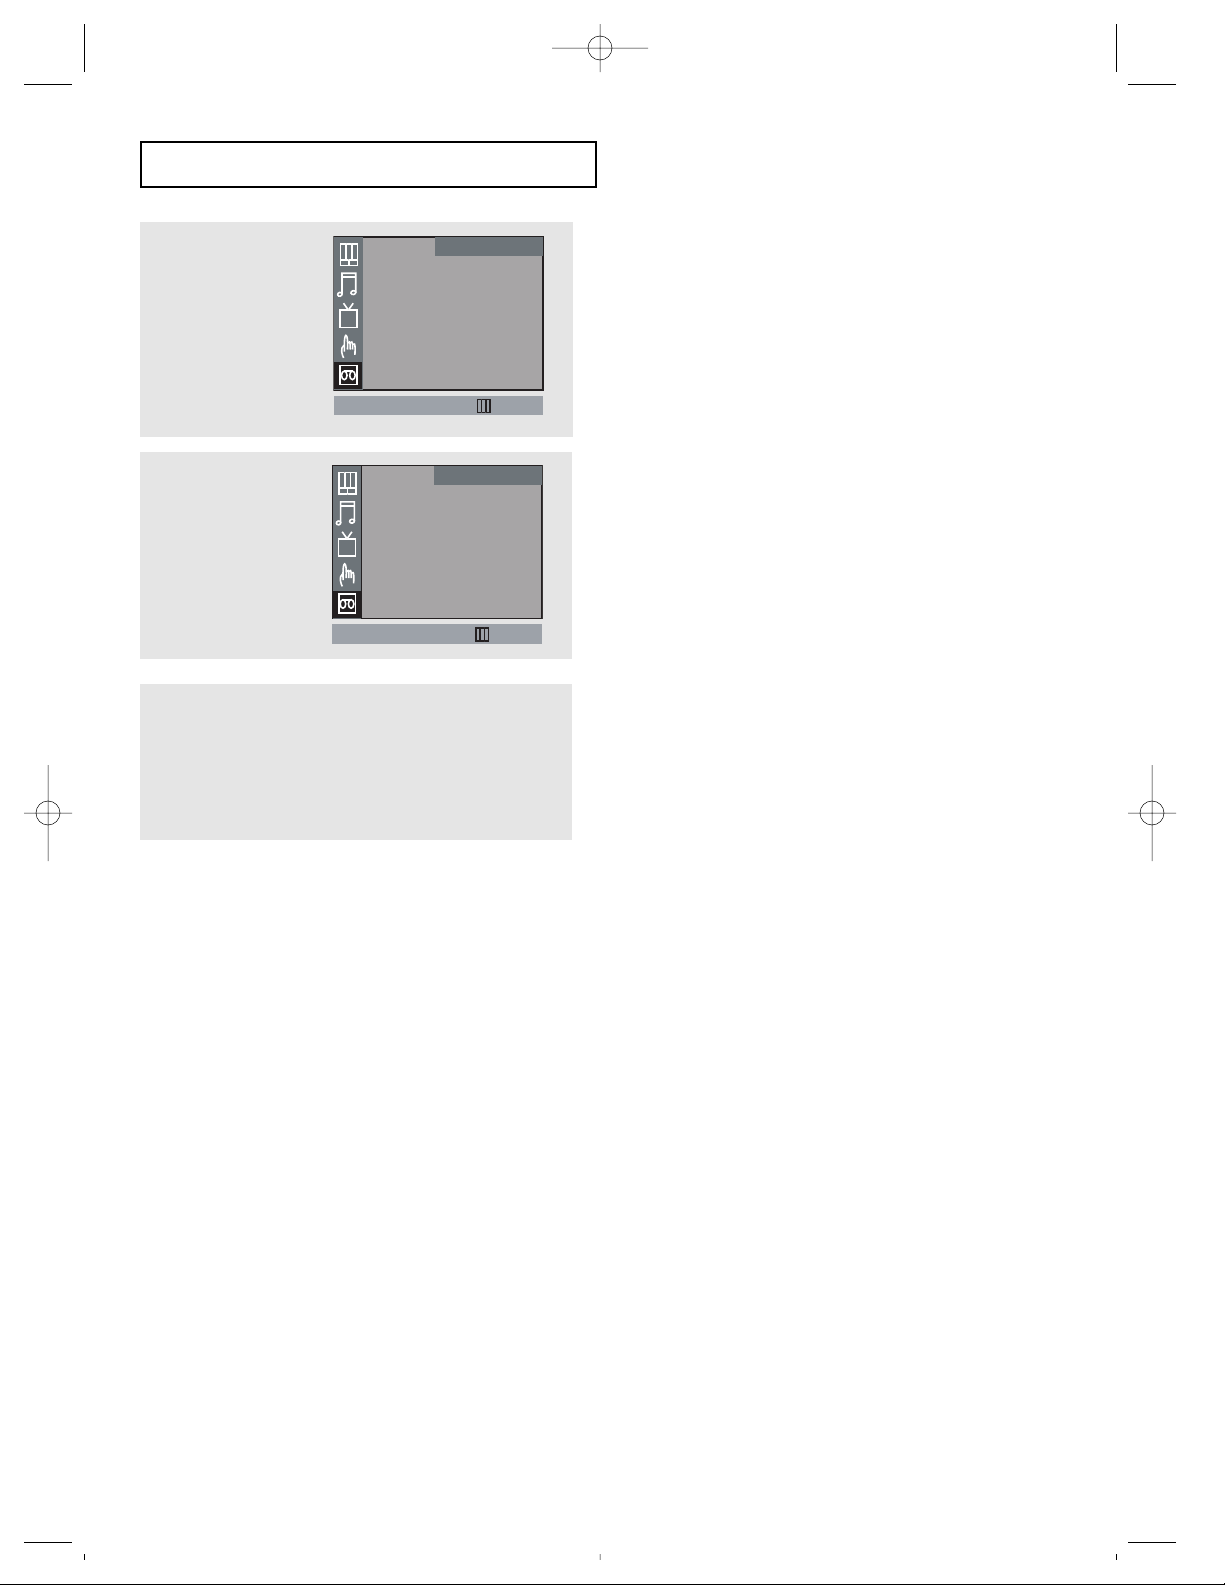
62 C
HAPTER FOUR: VCR OPERATION
VCR OPERATION
10
Press the DOWN arrow
button to select “Mode”,
then press the UP/DOWN
arrow buttons to select
“Once”, “Wkly”, or “Dly”.
▼
For more information on
selecting tape speeds, see page 68.
9
Press the DOWN arrow
button to select “SPEED”,
then press the RIGHT
arrow button to select
speed at which you want
to record.
▼
11
Press the MENU button to exit the menu system and return to
normal viewing.
12
Press the POWER button to turn off the VCR.
To enter additional program
recording times, repeat steps 1-10.
If you enter two program times that
overlap, a program overlap warning
appears on the TV screen, along with
instructions for fixing the overlap.
The timer indicator on the front panel
of the TV illuminates when program
times have been stored.
The TV should be turned off to record
the programs you’ve chosen.
IMPORTANT:
• The TV should be off to record the programs you’ve chosen. But, if you are recording a channel
that comes through a cable box, be sure to leave the cable box turned on and tuned to the
channel you want to record.
• When a timer recording is in progress, there is no picture on the monitor because the power is
off. If you want to watch the channel while it's being recorded, press POWER
on the remote
control only.
• One-time timer programs clear from memory automatically when the recording is finished.
Daily and weekly programs remain in the timer until you remove them. If power to the TV is
interrupted,timer program will be removed from memory. The clock and calendar, however, must
be reset.
16061510-CHAPTER 4 12/13/02 11:48 AM Page 62
VCR Setup
Timer Record
CH : 7
START : 10:30 am
END : 12:30 pm
CH
Date : 1/ 01/ 2002
Fri
Speed : SP
Mode : Once
Move Sel.
Timer Record
CH : 7
START : 10:30 am
END : 12:30 pm
CH
Date : 1/ 01/ 2002
Fri
Speed : SP
Mode : Once
Move Sel.
Exit
VCR Setup
Exit
Page 65

C
HAPTER FOUR: VCR OPERATION
63
VCR OPERATION
Using Program Review
Program Review allows you to review all of the programmed recordings currently
stored in the VCR’s memory and to remove a programmed recording quickly and easily.
2
Press the DOWN arrow
button to select “Record
View”, then press the
RIGHT arrow button.
The information for the
first program appears on
the screen.
1
Press the MENU button.
Press the DOWN arrow
button to select the VCR
Setup icon, then press the
RIGHT arrow button.
▼
Program Review is only available if
you have programmed your VCR to
record at a later time.
3
To see the information for the program number, press the RIGHT
arrow button.
4
If you want to remove a program from memory, press the CLEAR
button when the program you want to erase is highlighted. That
program is erased from memory.
Press the MENU button to exit.
▼
If you’re recording through a cable
box, the Program Review screen
displays the output channel of the
cable box as the channel number to be
recorded.
▼
The VCR is equipped with
a program memory backup that saves
all the timer program information if the
power to the VCR is interrupted. If the
unit has been without power, all of the
timer program information will be
disabled, until you reset the clock.
When the clock is reset, the programs
will be restored.
16061510-CHAPTER 4 12/13/02 11:48 AM Page 63
VCR Setup
Timer Record
Program Review
True Repeat : Off
CH
Block Repeat : 10
Move Sel.
Exit
VCR Setup
Mode CH Start End
Once 7 10:30 am 12:30 pm
---- --- -- : --am -- : --am
---- --- -- : --am -- : --am
CH
---- --- -- : --am -- : --am
---- --- -- : --am -- : --am
---- --- -- : --am -- : --am
SP 10/ 14/ 2002 Mon
Clear : REC Cancel
Move Sel.
Exit
Page 66

64 C
HAPTER FOUR: VCR OPERATION
▼
3
Insert and play a
pre-recorded video
cassette tape.
The VCR will play the tape
until it reaches a the end
of the tape. Then, the VCR
will stop the tape, rewind
it to the beginning, and
begin playing again.
4
Press the STOP button to
end the repeat.
If the VCR reaches an unrecorded
section of tape before it reaches the
end, it will search forward and check the
tape again. If it finds a recorded section
of tape, it will begin playing. If the tape
is still blank, it will continue to search
forward, until it reaches the end of the
tape.
Using True Repeat
You can set your VCR to automatically repeat a tape or a section of tape. When you
use True Repeat, your VCR will play until it reaches the end of a tape. Then, it will
rewind to the beginning of the tape and begin playing again.
VCR OPERATION
2
Press the DOWN arrow
button to select “True
Repeat”, then press the
RIGHT arrow button to
select “On”.
Press MENU to return to
normal viewing.
1
Press the MENU button.
Press the DOWN arrow
button to select the VCR
Setup icon, then press the
RIGHT arrow button.
16061510-CHAPTER 4 12/13/02 11:48 AM Page 64
VCR Setup
Timer Record
Program Review
True Repeat : Off
CH
Block Repeat : 10
Move Sel.
Exit
VCR Setup
Timer Record
Program Review
True Repeat : Off
CH
Block Repeat : 10
Move Sel.
Exit
Page 67

C
HAPTER FOUR: VCR OPERATION
65
Using Block Repeat
Block repeat allows you to repeat a section of tape that you select. You can
repeat this section of tape (the “block”) from one to ten times, or endlessly.
▼
You can choose to have your
“block” repeat from one to ten times,
or endlessly.
3
Insert and play a
pre-recorded video
cassette tape.
▼
4
Press the REPEAT button
at the beginning of the
“block” you want to
repeat.
“Repeat” section should be set up
at a minimum five-second interval.
▼
5
When you reach the end of the “block,” press the REPEAT
button again.
The word “Repeat” will appear on
the screen.
To stop block repeat, press the STOP, or
POWER button. You can also cancel
block repeat by fast forwarding or
rewinding to a point outside the
“block.”
The VCR will rewind the tape to beginning of the block and
repeat it.
The VCR will repeat the block as many times as the number
you set in step 2.
VCR OPERATION
2
Press the DOWN arrow
button to select “Block
Repeat”, then press the
RIGHT arrow button to
select the number of times
you want your “block” to
repeat.
Press the MENU button to
return to normal viewing.
1
Press the MENU button.
Press the DOWN arrow
button to select the VCR
Setup icon, then press the
RIGHT arrow button.
16061510-CHAPTER 4 12/13/02 11:48 AM Page 65
VCR Setup
Timer Record
Program Review
True Repeat : Off
CH
Block Repeat : 10
Move Sel.
VCR Setup
Timer Record
Program Review
True Repeat : Off
CH
Block Repeat : 10
Move Sel.
Exit
Exit
Page 68

66 C
HAPTER FOUR: VCR OPERATION
VCR OPERATION
Using the HiFi Stereo
You can record or listen to a program in HiFi stereo.
Selecting the HiFi Mode
▼
HiFi: High Fidelity which produces
better sound than standard stereo VCR.
2
Press the MTS button
repeatedly to select
“Mono,” “Stereo”, “Left”
or “Right”.
1
Insert the video cassette
tape.
If the tape doesn’t begin
to play automatically,
press the PLAY/PAUSE
() button.
MTS Recording / Monitor Mode
Type of broad
Regular
(Normal audio)
Stereo broadcast
Bilingual broadcast
Stereo & Bilingual
broadcast
Display on
the TV screen
None
Stereo
SAP
Stereo
SAP
Stereo/SAP
Selection
Invalid
Invalid
Stereo
SAP
Stereo
SAP
Normal audio
track
Mono
Left + Right
Main audio program
Sub audio program
Left + Right
Sub audio program
Hi-Fi audio track (2-channel)
L-channel R-channel
Mono Mono
Left Right
Main audio program Main audio program
Sub audio program Sub audio program
Left Right
Sub audio program Sub audio program
16061510-CHAPTER 4 12/13/02 11:48 AM Page 66
Page 69

C
HAPTER FOUR: VCR OPERATION
67
Video Dubbing
POWER
/TIMER
REC POWER
STOP/EJECT
REW PLAY FF REC
VOLUME
CHANNEL
▼
1
Insert the video cassette
tape you want to copy into
the playback VCR (or
camcorder).
Important Warning: One Federal
Court has held that unauthorized
recording of copyrighted TV programs
may be an infringement of copyright
laws.
2
Insert a blank video tape
(or any video tape with the
record safety tab intact)
into the recording VCR.
Video Dubbing
You can make a copy of another video cassette tape. This is called “dubbing.” To dub,
you need:
• your VCR
• a separate VCR (or camcorder), and
• two A/V cables with connectors. (You can find these at most electronics supply
stores.)
We recommend that you play the pre-recorded tape in the separate VCR (or
camcorder) and record on your TV.
Making the Connections
Attach one end of the first
cable to the VIDEO/AUDIO
OUT connector of the
playback VCR (or
camcorder) and the other
end to the VIDEO/AUDIO
IN connector of the TV.
VCR OPERATION
16061510-CHAPTER 4 12/13/02 11:48 AM Page 67
Page 70

68 C
HAPTER FOUR: VCR OPERATION
▼
3
Press the INPUT button on
the remote control of the
recording VCR.
The words “AV” appear in
the upper left corner of
the TV screen.
The VCR will be recording from the
incoming line rather than from the
normal broadcast signal.
“AV” will remain on-screen until the
PLAY button is pressed on the
playback VCR.
4
To begin recording, simultaneously press the REC button on
the recording TV’s remote control and the PLAY/PAUSE
() button. on the playback VCR (or camcorder).
5
When you are finished, press the STOP( ) button on both
the VCR (or camcorder) and the TV to stop recording.
6
Press the INPUT button to return to normal TV viewing.
VCR OPERATION
Tape Speeds
Your VCR is equipped with variable tape speed. You can play or record a tape at:
• SP (Standard Play)- gives the best quality recording; consequently, fewer programs
can be recorded on the tape.
• SLP (Super Long Play)- gives three times the recording time of tapes recorded in SP.
Tape SP SLP
T-60 1 hr. 3 hrs.
T-120 2 hrs. 6 hrs.
T-160 2 hrs. 40 mins. 8 hrs.
16061510-CHAPTER 4 12/13/02 11:48 AM Page 68
Page 71

CHAPTER FIVE: TROUBLESHOOTING 69
Possible Solution
Try another channel.
Adjust the antenna.
Check all wire connections.
Try another channel.
Adjust the antenna.
Try another channel.
Press the TV/VIDEO button.
Make sure the TV is plugged in.
Check the antenna connections.
Make sure the program is broadcast in color.
Adjust the picture settings.
If the set is moved or turned in a different direction, the power
should be OFF for at least 30 minutes.
Adjust the antenna.
Check all wire connections.
Unplug the TV for 30 seconds, then try operating it again.
Make sure the wall outlet is working.
Ensure that the disc is installed with the label side facing up.
Check the region number of the DVD.
This player cannot play CD-ROMs, DVD-ROMs, CD-R, etc. Insert a DVD,
a VIDEO-CD or a CD.
5.1 channel sound is reproduced only when the following conditions
are met. :
1) The DVD player is connected with the proper amplifier.
2) The disc is recorded with 5.1 channel sound.
• Check whether the disc being played has the “Dolby 5.1 ch” mark
on the outside.
• Check if your audio system is connected and working properly.
If the TV seems to have a problem, first try this list of possible problems and solutions. If
none of these troubleshooting tips apply, then call your nearest service center.
Identifying TV Problems
Chapter Five
T ROUBLESHOOTING
Problem
Poor picture
Poor sound quality
No picture or sound
No color, wrong colors or tints.
Picture rolls vertically.
The TV operates erratically
The TV won’t turn on.
Disc does not play.
5.1 channel sound is not being
reproduced.
16061510-CHAPTER 5 12/13/02 12:17 PM Page 69
Page 72

70 C
HAPTER FIVE: TROUBLESHOOTING
T ROUBLESHOOTING
Possible Solution
Ensure that the disc is installed with the label side facing up.
Check the region number of the DVD.
This player cannot play CD-ROMs, DVD-ROMs, CD-R, etc. Insert a DVD,
a VIDEO-CD or a CD.
5.1 channel sound is reproduced only when the following conditions
are met. :
1) The disc is recorded with 5.1 channel sound (check marking on the
outside).
• Check if your audio system is connected and working properly.
2) The DVD player is connected with the proper amplifier.
The features or action cannot be completed at this time because :
1) The DVD’s software restricts it.
2) The DVD’s software doesn’t support the feature (e.g., angles).
3) The feature is not available at the moment.
4) You’ve requested a title or chapter number or search time that is
out of range.
Check if the disc has a Menu.
Some of the functions selected in the Setup Menu may not work
properly if the disc is not encoded with the corresponding function.
The Screen Ratio is fixed on your DVD discs.
Make sure you have selected the correct audio in the Audio Options
Menu.
Go to the contents and find the section of the instruction book that
contains the explanations regarding the current problem, and follow
the procedure once again.
If the problem still cannot be solved, please contact your nearest
authorized service center.
Problem
Disc does not play.
5.1 channel sound is not being
reproduced.
The icon appears on screen.
Disc Menu doesn’t appear.
Playback mode differs from the
Setup Menu selection.
The screen ratio can not be
changed.
No audio.
If you experience other
problems.
Identifying DVD Problems
16061510-CHAPTER 5 12/13/02 12:17 PM Page 70
Page 73

CHAPTER FIVE: TROUBLESHOOTING 71
Possible Solution
Make sure the unit is plugged into a working wall outlet.
Press the POWER button.
Make sure the tape is window-side up with the
arrow pointing away from you.
Make sure there is no other tape in the compartment.
Make sure the antenna or cable is connected and that the TV/VCR is
receiving the broadcast signal.
Make sure the record safety tab is intact.
Check the Timer Record VCR Setup option.
Make sure the unit was turned off.
Check the programmed start and stop times.
Make sure the time is set correctly.
Adjust the tracking.
Clean the video heads.
Make sure there has been a recording on the tape.
Check the antenna or cable connections.
Make sure the VCR is not in pause mode.
Make sure the tape hasn’t already been rewound.
Make sure the VCR is not recording.
Make sure the VCR is not in pause mode.
Make sure the tape hasn’t already been forwarded.
Make sure the VCR is not recording.
This is normal for SP and LP recordings.
Problem
Unit won’t turn on.
Unit won’t take video tape
Unit didn’t record a
program.
Unit didn’t record a timer
program.
There is no picture, the picture
is distorted during video tape
playback, or there is noise or
streaks in the picture.
You can’t receive regular
broadcasts.
Rewind command doesn’t
work.
Fast forward command doesn’t
work.
Picture is streaked during pause
mode.
Identifying VCR Problems
T ROUBLESHOOTING
16061510-CHAPTER 5 12/13/02 12:17 PM Page 71
Page 74

72 CHAPTER FIVE: TROUBLESHOOTING
Limited Warranty
What your warranty covers:
• Defects in material or workmanship.
For how long after your purchase:
• One year from date of purchase for labor charges.
• One year from date of purchase for parts.
• Two years from date of purchase for picture tube.
The warranty period for rental units begins with the first rental or 45 days from date of shipment to
the rental firm, whichever comes first.
What we will do:
• Pay any Authorized RCA Television Service Center the labor charges to repair your TV/VCR/DVD.
• Pay any Authorized RCA Television Service Center for the new or, at our option, refurbished
replacement parts and picture tubes required to repair your TV/VCR/DVD.
How you get service:
• For 20" screen size: Take your RCA TV/VCR/DVD to any Authorized RCA Television Service Center
and pickup when repairs are complete.
• For screen sizes larger than 20": Request home or pick up, repair and return service from any
Authorized RCA Television Service Center, provided that your TV/VCR/DVD is located within the
geographic territory covered by an Authorized RCA Television Service Center. If not, you must take
your TV/VCR/DVD to the Service Center location at your own expense, or pay for the cost the Service
Center may charge to transport your unit to and from your home.
• To identify your nearest Authorized RCA Service Center, ask your dealer, visit RCA.com, look in the
Yellow Pages, or call 1-800-336-1900.
• Proof of purchase in the form of a bill of sale or receipted invoice which is evidence that the product
is within the warranty period must be presented to obtain warranty service. For rental firms, proof of
first rental is also required.
What your warranty does not cover:
• Customer instruction. (Your Owner's Manual clearly describes how to install, adjust, and operate
your TV/VCR/DVD. Any additional information should be obtained from your dealer).
• Installation and related adjustments.
• Signal reception problems not caused by your TV/VCR/DVD.
• Damage from misuse or neglect.
• Cleaning of audio/video heads.
• Batteries.
• Customer replacement fuses.
• Damage from images burned onto the screen.
• A TV/VCR/DVD that has been modified or incorporated into other products or is used for
institutional or other commercial purposes.
• Acts of nature, such as but not limited to lightning damage.
• A TV/VCR/DVD purchased or serviced outside the U.S.A.
Product registration:
• Please complete and mail the Product Registration Card packed with your TV/VCR/DVD. It will make
it easier to contact you should it ever be necessary. The return of the card is not required for warranty
coverage.
16061510-CHAPTER 5 12/13/02 12:17 PM Page 72
Page 75

CHAPTER FIVE: TROUBLESHOOTING 73
Limitation of Warranty:
• THE WARRANTY STATED ABOVE IS THE ONLY WARRANTY APPLICABLE TO THIS PRODUCT. ALL
OTHER WARRANTIES, EXPRESS OR IMPLIED (INCLUDING ALL IMPLIED WARRANTIES OF
MERCHANTABILITY OR FITNESS FOR A PARTICULAR PURPOSE) ARE HEREBY DISCLAIMED. NO VERBAL
OR WRITTEN INFORMATION GIVEN BY THOMSON INC., ITS AGENTS OR EMPLOYEES SHALL CREATE A
GUARANTY OR IN ANY WAY INCREASE THE SCOPE OF THIS WARRANTY.
• REPAIR OR REPLACEMENT AS PROVIDED UNDER THIS WARRANTY IS THE EXCLUSIVE REMEDY OF
THE CONSUMER. THOMSON INC. SHALL NOT BE LIABLE FOR INCIDENTAL OR CONSEQUENTIAL
DAMAGES RESULTING FROM THE USE OF THIS PRODUCT OR ARISING OUT OF ANY BREACH OF ANY
EXPRESS OR IMPLIED WARRANTY ON THIS PRODUCT. THIS DISCLAIMER OF WARRANTIES AND LIMITED
WARRANTY ARE GOVERNED BY THE LAWS OF THE STATE OF INDIANA. EXCEPT TO THE EXTENT
PROHIBITED BY APPLICABLE LAW, ANY IMPLIED WARRANTY OF MERCHANTABILITY OR FITNESS FOR A
PARTICULAR PURPOSE ON THIS PRODUCT IS LIMITED TO THE APPLICABLE WARRANTY PERIOD SET
FORTH ABOVE.
How state law relates to this warranty:
• Some states do not allow the exclusion nor limitation of incidental or consequential damages, or
limitations on how long an implied warranty lasts, so the above limitations or exclusions may not apply
to you.
• This warranty gives you specific legal rights, and you also may have other rights that vary from state
to state.
If you purchased your product outside the United States:
• This warranty does not apply. Contact your dealer for warranty information.
Service calls which do not involve defective materials or workmanship are not covered by
this warranty. Costs of such service calls are the sole responsibility of the purchaser.
16061510-CHAPTER 5 12/13/02 12:17 PM Page 73
Page 76

Please do not send any products to the Indianapolis address listed in this manual
or on the carton. This will only add delays in service for your product.
Thomson Inc.
10330 North Meridian Street
Indianapolis, IN 46290
©2002 Thomson Inc.
Trademark(s) ® Registered
Marca(s) Registrada(s)
Printed in Mexico
TOCOM 16061510
Visit the RCA web site at www.rca.com
16061510-CHAPTER 5 12/16/02 9:34 AM Page 74
 Loading...