

Page 1
Model 7114
Please read this manual before operating
product for the first time.
Visit the RCA web site at www.rca4phones.com
DECT 6.0
Corded & Cordless
Speakerphone with
Answering Machine
User's Guide
Equipment Approval Information
Your telephone equipment is approved for connection to the Public Switched
Telephone Network and is in c ompliance with p arts 15 and 68, FCC Rules
and R egulations and the Technical Requirem ents f or Telep hone Te rminal
Equipment published by ACTA.
1 Notication to the Local Telephone Company
On the bo ttom o f t his eq uipm ent is a la bel ind icat ing , a mong o ther
infor matio n, t he U S n umber and Rin ger Equiv alenc e Nu mber (REN ) fo r
the eq uipment . You must, upon request , provi de this inform ation t o your
telephone company.
The REN is useful in determini ng the number of devic es you may co nnect
to yo ur te lephone line and still have all of thes e devi ces r ing wh en you r
telephone number is called. In most (but not all) a reas, the sum of the RENs
of all devices connected to one line should not exceed 5. To be certain of the
number of devi ces you may connect to your line as determined by the REN,
you should contact your local telephone company.
A pl ug an d ja ck us ed to con nect this equipme nt to the prem ises wiring
and telepho ne network must comply with t he applicable FCC Par t 68 r ules
and re quirements adopted by the AC TA. A compliant teleph one co rd and
modular plug is provided with this product. It is designed to be connected to
a compatible modular jack that is also compliant . See installation instructions
for details.
Notes
This equipment may not be used on coin service provided by the telephone
company.
Party lines are subject to state taris, and therefore, you may not be able
to use your own telephone equipment if you are on a party line. Check with
your local telephone company.
Noti ce mus t b e g iven to t he tele phon e c ompa ny upo n p erma nent
disconnection of your telephone from your line.
If your home has speci ally wired ala rm e quipme nt c onnect ed t o th e
telephone line, ensure the installation of this product does not disable your
alarm equipment . If you have q uestions about what will di sable alarm
equipment, consult your telephone company or a qualified installer.
US Number is located on the cabinet bottom.
REN Number is located on the cabinet bottom.
2 Rights of the Telephone Company
Should your equip ment cause trouble on your line which may harm the
telephone ne twork, the telephone company shall, where prac ticable, notify
you that temp orary discontinuance of service ma y be required. Where prior
notice is not practi cable an d the circumsta nces wa rrant su ch acti on, the
telephone company may temporarily discontinue service immediately. In case
of such temporary discontinuance, the telephone company must: (1) promptly
notify you of such temporary discontinuance; (2) aord you the opportunity to
correct the situation; and (3) inform you of your right to bring a complaint to
the Commission pursuant to procedures set forth in S ubpart E of Part 68, FCC
Rules and Regulations.
The telephone company may make changes in its communications facilities,
equipment , operatio ns or procedures where such action is require d in t he
operation of its business and not inconsistent with FCC Rules and Regulations.
If t hese c hanges are expected to affect the use or pe rforman ce of your
teleph one e quipmen t, the teleph one c ompany must give you adequ ate
notice, in writing, to allow you to maintain uninterrupted service.
Interference Information
This device complies with Part 15 of the FCC Rules. Operation is subject to the
following two conditions: (1) This device may not cause harmful interference-;
and (2) Th is devi ce must ac cept an y inter fere nce rec eived , inclu ding
interference that may cause undesired operation.
This equ ipment has been tested and found to comply with the limits for a
Class B digit al device, pursuant to Part 15 of the FCC Rules. T hese limits are
designed to provide reasonable protection against harmful in terference in a
residential installation.
This equipment generat es, use s, and can radiate radio frequency energy
and, if not i nstall ed an d us ed i n acc ordance wit h the ins tructio ns, may
cause har mful interfe rence to radio comm unications. However, there is no
guarantee that interference will not occur in a particular installation. Privacy
of Communications may not be ensured when using this product.
If t his e quipment does caus e har mful interfe rence to ra dio o r tel evision
reception, which can be determined by turning the equipment o and on, the
user is encouraged to try to correct the interference b y one or more of the
following measures:
•
•
•
•
7114
Printed in China
12-26
Please do not send any products to the Indianapolis address listed in this
manual or on the carton. This will only add delays in service for your product.
Visit the RCA web site at www.rca4phones.com
Reorient or relocate the receiving antenna (that is, the antenna for radio or
television that is “receiving” the interference).
Reo ri ent o r re loc at e and i nc rea se t he se pa rat io n bet we en th e
telecommunications equipment and receiving antenna.
Connect the telecommun ications equipmen t into an o utlet on a circuit
dierent from that to which the receiving antenna is connected.
If these measures do not eliminate the interference, please consult your dealer
or an experienced radio/television technician for additional suggestions. Also,
the Fed eral Com munications Commissio n has prepared a helpfu l booklet ,
“How To Identify and Resolve Radio/TV Interference Problems.” This booklet is
available from the U.S. Government Printing Oce, Washington, D.C. 20402.
Please specify stock number 004-000-00345-4 when ordering copies.
Notice : The changes or modificati ons not ex pressly approved by the party
responsibl e for complianc e could void the us er's a uthority to ope rate the
equipment.
Hearing Aid Compatibility (HAC)
This telephone system meets FCC standards for Hearing Aid Compatibility.
FCC RF Radiation Exposure Statement
This equipment complies with FCC RF radiation exposure limits set forth for an
uncontrolled environment . This equipment should be installed and operated
with a minimum distance of 20 centimeters be tween the r adiator and your
body. This transmitter must not be co-located or operated in conjunction with
any other antenna or transmitter.
For body worn operation, this phone has been tested and meets the FCC RF
exposure guidelines when used with the belt clip supplied with this product.
Use of o ther accessories may not ensure compliance with FCC RF exposure
guidelines.
Information for DECT Product
This te lepho ne is comp liant wi th the DEC T 6 .0 stand ard
which ope rates in the 1.92G Hz to 1.93GHz freq uency range.
Installa tion of this equipme nt is subject to notificat ion an d
coordination with UTAM.Any relocation of this equipment must
be coordinated through and approved by UTAM. UTAM may be
contacted at 1-800-42 9-8826.
Industry Canada (I.C.) Notice
This product meets the applicable Industry Canada technical specifications.
Le présent materiel est conforme aux specifications techniques applicabl es
d'Industrie Canada.”
The Ringer Equivalence Number is an indication of the maximum number of
terminals allowed to be connected to a telephone interface. The termination
on an interface may consist of an y combinatio n of d evices subje ct only to
the requirement that the sum of the Ringer Equivalence Numbe rs of all the
devices does not exceed five.
L'indice d'équivalence de la sonnerie (IES) sert à indiquer le nombre maximal
de termi naux qui peuvent être raccord és à une interf ace télépho nique. La
terminaison d'une interface peut consister en une combinaison quelconque
de dispositifs, à la seule condition que la somme d'indices d'équivalence de la
sonnerie de tous les dispositifs n'excède pas 5.''
This Class B digital apparatus complies with Canadian ICES-003.
Cet appareil numérique de la classe B est conforme à la norme NMB-003 du
Canada.
IMPORTANT SAFETY INSTRUCTIONS
When using your telepho ne equ ipment , bas ic sa fety precautio ns sh ould
always be fo llowed to red uce th e risk of fire, electric shock and injury to
persons, including the following:
Do not use this product near water for example, near a bathtub, washbowl,
kitchen sink or laundry tub, in a wet basement or near a swimming pool.
Avoid using a telep hone (other than a cordless ty pe) during an electri cal
storm. There may be a remote risk of electric shock from lightning.
Do not use the telephone to report a gas leak in the vicinity of the leak.
Use onl y the power co rd and batteries indicated in thi s manual. Do n ot
dispose of batteries in a fire. They may explode. Check with local codes for
possible special disposal instructions.
SAVE THESE INSTRUCTIONS
•
•
•
•
•
•
•
IMPORTANT: Because cordless phones operate on electricity,
you should have at least one phone in your home that isn’t
cordless, in case the power in your home goes out.
Before You Begin
Parts Checklist (for 7114-2)
Make sure your package includes the items listed here.
For Model 7114-2 there will be ONE cordless handset , charge cradle, battery
pack and cover than shown above.
For Model 7114-3 there will be TWO cordle ss ha ndsets, charg e cra dles,
battery packs and covers than shown above.
For Mo del 711 4-4 ther e will be T HREE cor dless ha ndsets, charge cradles,
battery packs and covers than shown above.
Telephone Jack Requirements
To use t his ph one, y ou nee d an RJ1 1C typ e
modular telephone jack, which might look like the
one pict ured here, installed in your home. If you
don’t have a modul ar jack, call your local ph one
company to find out how to get one installed.
Installation
Digital Security System
Your cordless phone uses a digital secur ity system to protect against false
ringing, unauthorized access, and charges to your phone line.
INSTALLATION NOTE: Some cordless telephones operate at frequencies
that may cause or receive interference with nearby TVs, microwave
ovens, and VCRs. To minimize or prevent such interference, the base
of the cordless telephone should not be placed near or on top of a TV,
microwave ovens, or VCR. If such interference continues, move the
cordless telephone farther away from these appliances.
Certain other communications devices may also use the 1.9GHz DECT
frequency for communication, and, if not properly set, these devices
may interfere with each other and/or your new telephone. If you are
concerned with interference, please refer to the owner’s manual for
these devices on how to properly set channels to avoid interference.
Typical devices that may use the 1.9GHz DECT frequency for
communication include wireless audio/video senders, wireless computer
networks, multi-handset cordless telephone systems, and some longrange cordless telephone systems.
Important safety instructions
Use only the power supply listed in the user instructions.
Use only the batteries listed in the user instructions.
Do not allow the charging contacts or the battery to come into contact with
metal objects.
Do not open the handset, base station or charger as you could be exposed
to high voltages.
Do not allow the charger to come into contact with liquids.
Risk of explosion if battery is replaced by an incorrect type.
Dispose of used batteries according to the instructions.
Always use the cables provided with the product.
For p luggable equipm ent, the socket-out let sh all be insta lled n ear th e
equipment and shall be easily accessible.
This equipment is not designed to make emergency calls when the power
fails. An alternative has to be made available to allow emergency calls.
Do not expose the phone to excessive heat caused by heating equipment
or direct sunlight.
Do not drop your phone or allow objects to fall on your phone.
Do not use any cleaning agents containing alcohol, ammonia, benzene, or
abrasives as
these may harm the set.
Do not use the product in places where there are explosive hazards.
Do not let small metal objects come into contact with the product . This can
deteriorate audio quality and damage the product.
Active mobile phones in the vicinity may cause interference.
Metallic objects may be retained if placed near or on the handset receiver.
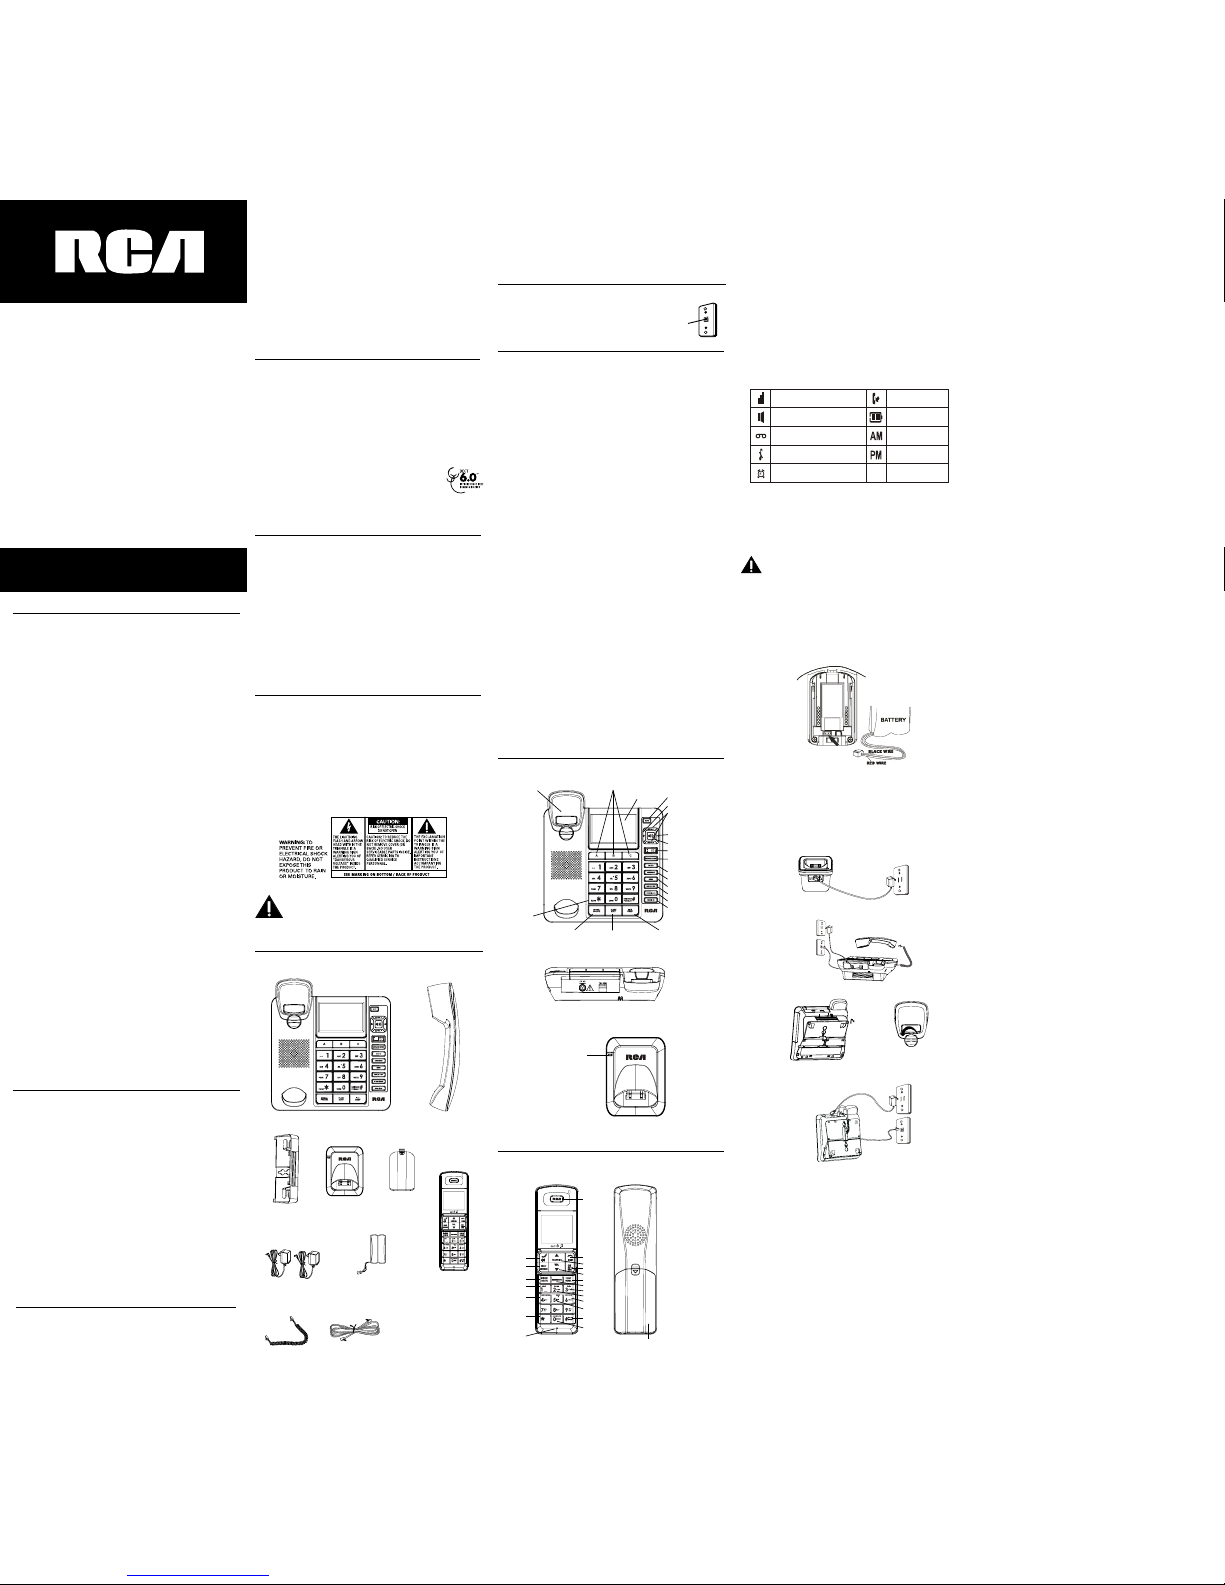
Overview of the base unit
•
•
•
•
•
•
•
•
•
•
•
•
•
•
•
•
•
•
Base
Handset
AC Power
adaptor
Handset
battery pack
Battery
compartment
cover
Telephone
line cord
Charge indicator
Overview of the cordless handset
1 • Earpiece.
2 • End the call.
• Exit the menu/operation.
3 • Scroll up on the menu.
• Increase the earpiece
volume.
• Enter the call log.
4 • Enter to the menu.
• Confirm selection.
• Mute/un-mute the
microphone.
5 • Scroll down on the menu.
• Decrease the earpiece volume.
6 • Enter redial list and dial the
recent number.
7 • Store phone number and
memory dialing.
8 • Message skip forward.
9 • Play & Stop message.
10 • Play Announcement.
11 • Play Memo.
12 • Press to select ringer level.
Installing the Phone
Installing the Handset Battery
NOTE: You must connect the handset battery before use.
Nickel metal Hydride battery (Ni-M H) batt ery Br and na me: FB;
(Model name: NI-MH AAA4 00 mAh 2. 4V, Capacity: 2.4 V/400mAh),
that is compatible with this unit.
Locate battery and battery door which are packaged together inside
a plastic bag and are separate from the handset.
Locate the battery compartment on the back of the handset.
Plug the battery pack cord into the jack inside the compartment.
Insert the battery pack.
1.
2.
3.
4.
NOTE: To ensure proper battery installation, the connector is keyed and
can be inserted only one way.
Close the batter y compartment by pushing the door up until it snaps into
place.
Base Station
Choose an area near an electrical outlet and a telephone wall jack (RJ11C),
and place your cordless telephone on a level surface, such as a desktop or
tabletop, or you may mount it on the wall.
Plug one end of the telephone line cord into the TEL LINE jack on the back
of the base and the other end into a modular jack.
5.
1.
2.
Plug the AC power converter into the electrical outlet and the DC connector
into the jack on the back of the base.
Place the handset in the base cradle. The charge/in use indicator turns on,
verifying the battery is charging.
Allow the phone to charge for 16 h ours prior to first use. If you d on’t
properly charge the phone, battery performance is compromised.
CAUTION: To reduc e risk of pe rsonal i njury, fire, or damage use o nly
the power adaptor (Manufact urer: SKY WILL, MODEL NO:SP060-0500U,
100-240Vac/6V/500mA) listed in the user’s guide. This power adaptor is
intended to be correctly orientated in a vertical or oor mount position.
There are a var iety of p rogramma ble m enus availab le fo r the base and
cordless handset.
While th e unit is in STANDBY mode , press MENU/OK on the base /co rdless
handset to enter t he program mode, There provide al l the s ystem settings .
Change them so that make the DECT phone work in your favorite status. In
the program mode, MENU/OK is used frequently as entering menu items and
3.
4.
5.
storing any update. Review t or u , p or q are for selecting items. Digit keys
(0..9) are used to input new values. The program mode will exit and return to
STANDBY in even of timeout (30s) or the EXIT key is depressed.
Note: base and cor dless hands et h ave their diffe rent setti ngs a nd
functions.
In Base, menu items sequenceRING TO ANSWER
MESSAGE LENGTH
REMOTE ACCESS
CONTRAST
RINGER TONE
LOCAL AREA CODE
>TONE PULSE
DATE TIME SETTING
>ENG FRA ESP
REGISTER ON>OFF
DEREGISTRATION
DEFAULT >NO
RING TO ANSWER
While the unit is in STANDBY mode, press MENU t o enter menu program
mode.
t or u to select the desired number (from 2 to 8, toll saver)
Press OK to confirm your selection and jump to the next menu item.
MESSAGE LENGTH
While unit is in STANDBY mode, press MENU until Message Length appears.
Press t or u to select the desired minute (from 1 to 4)
Press OK to confirm your selection and jump to the next menu item.
REMOTE ACCESS
While unit is in STANDBY mode, press MENU until remote access appears
Use dial keypad (0..9) to input your desired codes. t or u to move cursor .
Press OK to confirm the update and jump to the next menu item.
CONTRAST
While unit is in STANDBY mode, press MENU until contrast appears
Use t or u to change LCD contrast level ( 1 – 5)
Press OK to confirm the update and jump to the next menu item.
RINGER TONE
While unit is in STANDBY mode, press MENU until ringer tone appears
Use t or u to select your desired ringer melody (1 – 16 )
Press OK to confirm the update and jump to the next menu item.
LOCAL AREA CODE
While unit is in STANDBY mode, press MENU until local area code appears
Use dial keypad (0..9) to input your desired codes. t or u to move cursor .
Press OK to confirm the update and jump to the next menu item
>TONE PULSE
4. While unit is in STANDBY mode, press MENU until >tone pulse appears
5. Press t or u to change dial mode.
6. Press OK to confirm the update and jump to the next menu item.
SET THE YEAR
While unit is in STANDBY mode, press MENU until set the year appears
Press t or u to change item among “ set the year”, “set time/date” and
“*=AM,#=PM”
Use dial keypad 0-9 to input values,
Press OK to confirm the update and jump to the next menu item.
SET LANGUAGE
While unit is in STANDBY mode, press MENU until >ENG FRA ESP appears
Press t or u to change choice.
Press OK to confirm the update and jump to the next menu item.
REGISTER ON>OFF
While unit is in STANDBY mode , pre ss M ENU u ntil REGIS TER > ON O FF
appears
Press t or u to change choice.
If select OFF, press OK to skip the function and jump to the next menu item
If select ON, press OK to issue it and enter registration mode.
Note: For co rdless han dset , p lease also en ter regist er mode. (se e
Handset menu)
5. If successes, a confirmation tone from handset will be heard. Both handset
and Base shall exit to STANDBY mode.
Note: A base can be register up to 4 cordless handsets.
DEREGISTRATION
While unit is in STANDBY mode, press MENU until deregistration appears
Press t or u to select which handset to be deregistered .
Press OK to start deregistration and jump to the next menu item.
DEFAUTL >NO YES
4. While unit is in STANDBY mode, press MENU until default NO appears
5. Press |<< or >>| to select NO or YES.
6. If select YES, press OK to default all settings bu t message, call er log and
phone book.
In handset, menu items sequence –
ALARM
HANDSET SETUP
SET LANGUAGE
HANDSET NAME
RINGER TONE
RINGER VOLUME
AREA CODE
REGISTRATION
DEREGISTRATION
DEFAULT SETTING
CONTRAST
ALARM
While unit is in S TANDBY mode , double click at ME NU. “Alarm ON OFF”
appears and asks for choice.
Press p or q to select ON and OFF
To disable ALARM , please select OFF and press OK to confirm.
To enabl e ALARM , p lease sel ect ON and p ress OK to co nfirm. Th en will
require to SET ALARM.
Use dial keypad 0-9 input desired alarm time and *=AM,#=PM. Press OK to
confirm. There sh all come ONCE and DAILY selection.
p
or q to select it
and press OK to save.
HANDSET SETUP
SET LANGUAGE
While u nit is in STANDBY mode, press M ENU and then press p or q to
select HANDSET SETUP.
Press OK to enter and p or q to select SET LANUAGE
Press OK again to start SET LANUAGE
Press p or q to select choice
Press OK to save it and return to menu items.
HANDSET NAME
While unit is in STANDBY mode, press MENU and then press p or q select
HANDSET SETUP.
Press p or q to locate at HANDSET NAME.
Press OK to enter and dial keypad 0-9 to edit name.
Press OK to save and return to menu items.
1.
2.
3.
1.
2.
3.
1.
2.
3.
1.
2.
3.
1.
2.
3.
1.
2.
3.
1.
2.
3.
4.
1.
2.
3.
1.
2.
3.
4.
1.
2.
3.
1.
2.
3.
4.
5.
1.
2.
3.
4.
5.
1.
2.
3.
4.
Base
Handset
Handset
cord
Desktop
pedestal
1
2
3
4
5
6
7
8
9
10
21
11
12
13
14
15
16
17
18
19
20
13 • Message Delete.
14 • Microphone.
15 • Press to enter a * key.
16 • Select Answerer on/o.
17 • Message skip backward.
18 • Make the intercom call.
• Make the conference call.
19 • Enter to Answerer function.
• Flash key.
20 • TALK/SPEAKER button.
• Make and receive call.
21 • Battery door.
mute button
speaker button
VOL (+/-) buttons
delete button
menu button
store button
PLAY/STOP button
skip button
message speed
button
repeat button
memo button
announce button
ans on/o button
sha/exit buttonredial/pause button
*
tone button
hook switch
display
Quick dial/emergency
memory buttons
int/conf button
Signal strength
Speakerphone
Voicemail
Ringer OFF
Alarm ON
New Call
Battery
AM
PM
Display icons
Modular
telephone
line jack
Wall plate
180°
(Dia.1A)
Page 2

RINGER TONE
While unit is in STANDBY mode, press MENU and then press p or q select
HANDSET SETUP
Press p or q to locate at RINGER TONE.
Press OK to enter and p or q to select it.
Press OK to save and return to menu items.
RINGER VOLUME
While unit is in STANDBY mode, press MENU and then press p or q select
HANDSET SETUP
Note. You may use a one touch key to enter ringer volume, press # directly.
2. Press p or q to locate at ringer volume.
3. Press OK to enter and p or q to select level OFF,(1 – 5)
4. Press OK to save and return to menu items.
AREA CODE
While unit is in STANDBY mode, press MENU and then press p or q select
HANDSET SETUP
Press p or q to locate at AREA CODE
Press OK to enter and dial keypad 0-9 to input new code.
Press OK to save and return to menu items.
REGISTRATION
While unit is in STANDBY mode, press MENU and then press p or q select
HANDSET SETUP
Press p or q to locate at registration .
Press OK to enter and p or q to select YES or NO
If select YES and then press MENU to start registration . Also, you shall let
base enter registration mode in parallel. (see base registration)
Note – max 4 handsets can be registered with a base.
DEREGISTRATION
While unit is in STANDBY mode, press MENU and then press p or q select
HANDSET SETUP
Press p or q to locate at DEREGISTRATION
Press OK to enter and p or q to select YES or NO.
Press OK to confirm it and return to menu items.
DEFAULT SETTING
While unit is in STANDBY mode, press MENU and then press p or q select
HANDSET SETUP
Press p or q to locate at default setting
Press OK to enter and p or q to select YES or NO
Press OK to save and return to menu items.
Note: default all settings but not call log and phone book.
CONTRAST
While unit is in STANDBY mode, press MENU and then press p or q select
HANDSET SETUP
Press p or q to locate at CONTRAST.
Press OK to enter and p or q to select level (1- 5)
Press OK to save and return to menu items.
CALL OPERATION
Receiving a call with speakerphone / handset
When the phone rings, press the SPEAKER on t he bas e o r pi ck up
handset, and speak normally, at a minimum distance of 8-9 inches, into the
built-in microphone if in speakerphone model.
Adjust listening volume by vol+ / vol-
To end the call, press the SPEAKER again if in speakerphone m ode or
put back handset to the cradle again.
Making a call with speakerphone / handset
Press the SPEAKER or pickup handset, and wait for a dial tone
Dial the number (using a memory dial number, if desired) the number shows
in the display.
– or –
Dial the number and then press SPEAKER or pickup handset.
3. When the party answers, adjust speakerphone volume by vol- / vol+ .
4. To end the call, press the SPEAKER again if in speakerphone mode
or put back handset to the cradle again.
Switching between speakerphone and handset
You can switch between speakerphone and handset after dialing a number,
or at any time during a conversation.
Switch handset to speakerphone
While in handset mode, press SPEAKER and t hen put b ack han dset to
cradle.
Switch speakerphone to handset
While in speakerphone mode, pickup handset
Receiving a call with cordless handset
When the phone rings, press the TALK/SPEAKER on cordless handset.
Adjust listening volume by reviewing p or q .
To end the call, press the EXIT or put back cordless handset to the charger
again.
Making a call with cordless handset
Press the TALK/SPEAKER on cordless handset and wait for a dial tone.
Dial the number (using a memory dial number if desired) the number shows
in the display.
-or-
Dial the number and then press the TALK/SPEAKER .
3. When the party answers, adjust volume by reviewing p or q.
4. To end the call, press EIXT or put back handset to the charger again.
Switching between speakerphone and handset
You may press TALK/SPEAKER to toggle between them.
Call transfer
Transferring call from base to cordless handset
During an external call, you may transfer the external call from base to
handset.
Press the INT on the base to put the line on hold and transfer the call LCD
shows HS-NUMBER? input (1-4) that you expect the destination handset.
The inquired cordless handset will ring. Press TALK/SPEAKER to answer
the call.
Note: to cancel the transfer, press EXIT
Transferring call from cordless handset to another cordless
handset/base
During an external call, you may transfer the external call to another handset
or base.
Press the I NT on origi nal co rdless handset to put th e lin e on hold and
transfer the call. 0- BS, 12.3.4. – HS shall show.
Press your wanted number to start transferring to
Press the TALK /SPEAKE R on the ringing cordless handset or pick up the
corded handset on the base OR press the speaker on base to answer the
call.
Note: to cancel the call transfer, you may press E XIT on the originating
cord less ha ndse t, if th ere is no an swer wi thin 60 s econ ds afte r
transferring t he call, then both handsets will be rung back (call back).
If neither handset answers within 60 seconds, then external call will be
automatically dropped.
1.
2.
3.
4.
1.
1.
2.
3.
4.
1.
2.
3.
4.
1.
2.
3.
4.
1.
2.
3.
4.
1.
2.
3.
4.
1.
2.
3.
1.
2.
1.
2.
3.
1.
2.
1.
2.
1.
2.
3.
Conference the exte rnal caller with c ordless hands et and
base
Invited by base, base + cordless handset + external
If base is already in talking with an external party
Press INT on base, then input 1- 4 for the desired cordless handset.
The called cordless handset rings, pre ss TALK/SPEAKER on th e cal led
cordless handset.
Press base INT again and CONFERENCE appears. 3- party conference call is
setup.
Invited by cordless handset, 2 -cordless handset + external
If cordless handset is already in talking with an external party,
Press INT on cordless handset and 1-4 to select the called handset number.
The called handset rings, press TALK/SPEAKER on the cal led cord less
handset
Press th e origin ating han dset INT again and CON FERENCE a ppears. 3 –
party conference call is setup.
Invit ed by cordl ess h andset , co rdless handse t + base +
external
If cordless handset in already in talking with an external party,
Press INT on cordless handset and 0 to invite base
Base rings and press SPEAKER on base or pick up handset.
Press the originating cordle ss handset INT and CO NFERENCE appears. 3party conference call is setup.
Last Number Redial
To quickly redial the last number you dialed:
With cordless handset
Press the REDIAL to display redial number, then press TALK/SPEAKLER
to dial out.
If you get a bus y tone and want t o keep dialing the number, p ress th e
REDIAL to quickly redial the number again.
With corded handset or speakerphone
Lift the corded handset or press SPEAKER .
Press REDIAL.
CALL TIMER
After you p ress TALK /SPEAKER on the cordless handset or lift the corded
handset, or press the SPEAKER on the base, the built-in call t imer shows
in the display and begins counting the length of time of the call.
AUTO STANDBY
Placing the cordless handset in the charge cradle while the cordless handset is
o the hook (in talk mode) automatically hangs up the phone.
RINGER VOLUME
While unit is in STANDBY mode (not in talk mode),
- For base –
Press vol+/vol- to enter ringer volume setting.
Continue vol+/vol- to select OFF, 1 -5 for base ringer volume.
- For cordless handset –
Please see ringer volume in telephone setup section.
FLASH
Use the FLASH on the base or cordless h andset to activate custom call ing
services such as call waiting or call transfer, which are available through your
local phone company.
USING TEMPORARY TONE DIALING
If you have pulse (rotary) service and want to access customer calling services
that require ton e dia ling (such as telepho ne-bank ing a nd lo ng d istance
services), use this feature to temporarily change from pulse to tone service.
After dialing the telepho ne number and connecting to the customer calling
service:
Press and release *TONE.
Proceed with conversation.
When you hand up, the phone automatically returns to pulse dialing mode.
Paging handset
This feature helps you locate a misplaced handset.
Press the INT on the base, the display shows HS-NUMBER? Input 1 – 4 that
presents the misplaced handset. The destination handset rings for one minute
until you press EXIT on the base to cancel.
Mute
To have a private, o – line conversation, use the mute feature, the party on
the other end of the line cannot hear you, but you can still hear them.
Press the MUTE on the base or cordless handset. The mute indicator LED on
the base will turn ON. Or cordless handsets will turn on as MUTE ON shows
on the display.
Press MUTE again to cancel and return to your phone conversation.
Volume setting
Cordless handset
When the cordless handset is ON (in TALK mode), review p or q to adjust the
listening level. Choose from five volume settings.
Corded handset or speakerphone
When the ba se i n TA LK m ode, review vo l+/vo l- o n t he base to adju st
the h andset volume or s peakerpho ne. Four levels for handset and 8 for
speakerphone.
Memory
The base and cordle ss h andset eac h hav e th eir own separat e me mory
storage areas.
In number / name editing, t or u ,DELETE, dial keypad and PAUSE key are
used frequently .The program mode will exit and return to STANDBY in even
of timeout(30s) or the EXIT key is depressed
Note: Cordless handset has only M0 – M9.
2. Storing a name and Number in memory
--For base --
i. While base unit is in STANDBY mode, press STORE and then input any
location no (A, B, C, 0 – 9)
ii. To select location record appears on LCD, press STORE again to start
inputting number up to 32 digits.
iii. After number edit, press STORE again to start name inputting.
iv. After name edit, press STORE to save them and exit to STANDBY mode.
A confirmation tone will be heard.
- For handset –
Nothing special but dierent number and name edit orders. Double click at #
means PAUSE.
Storing a caller ID number to memory location
3. While reviewing CID number, press STORE.
4. Input location number (0-9, A, B, C)
5. Press STORE to save with a confirmation tone.
Storing redial number to memory location,
-- For base --
While unit is in STANDBY mode, press STORE and then input location (0 – 9, A,
B,C)
Press STORE again to start number edit.
Press REDIAL to show the redial number.
Press STORE to save it .
-- For handset --
Nothing special but dierent number and name edit orders.
Deleting memory location
While memory is in review, press DELE TE to delete it and a confirmation Tone
generates.
Note: There is a little dierence between operation in base and cordless
handset. Cordless handset needs conrmation of DELETE. Base directly
takes eect, without pressing DELETE again.
1.
2.
3.
1.
2.
3.
1.
2.
3.
1.
2.
1.
2.
1.
2.
3.
1.
2.
1.
1.
2.
3.
4.
Reviewing memory location
While unit is in STANDBY mode, press STORE and then input location number
(0..9, A, B, C).
-orReview p / q or t / u to change memory location
Dialing from memory location
- From TALK mode--
Make sure the phone is ON (in talk mode).
Press STORE
Input your desired memory location.
The location number will be automatically dialed out.
- From STANDBY mode –
While reviewing me mory location in base, pickup handset or press SPEAKER
(icon)
or
While reviewing memory location in cordless handset, press TALK (icon).
The displayed number will be automatically dialed out.
Caller ID
IMPO RTANT: In orde r to us e t his unit’ s C aller ID fea tures, yo u mu st
subscribe t o either the standard Name/Number Caller ID service or Call
Waiting calle r ID Servic e To know who is cal ling while you ar e on the
phone, you must subscribe to Call Waiting Caller ID Service.
This unit rec eives a nd dis plays C ID inf ormation transmit ted by your local
telephone company, this information can include the phone number, date and
time, name.
Call Waiting caller ID
Provided you subscri be to call waitin g call er ID servi ce fro m your phone
company. if you receive on incoming call and you are already on the phone, a
beep indicates the presence of a call waiting call on the line. Only the handset
that is in use at the time of the call will display and store the call waiting caller
ID information.
When you hear the call waiting beep, press the FLASH on the base or cordless
handset to put the current call on hold and answer the incoming call. Press
the FLASH again to return to the original call.
Receiving CID records
When you receive a call, caller ID informa tion is transmitted by the phone
company to your telephone between the first and second ring, The caller ID
information appears on your phone’s display while the phone rings,
Giving you a chance to monitor the information and decide whether or not to
answer the call.
Storing CID records (In CID memory)
If you are not at home or cannot answer your telephone’s caller ID memory
stores the data for the most recent 99 calls on the base set & 35 calls on the
cordless handset you received so that you can see who called while you were
unavailable. When the 100the call on the base set or 36th call on the cordless
handset is received , the oldes t call er ID record (1st call) is automat ically
deleted.
You will find the number of missed calls (NEW CALL xx) in cordless handset.
And #XX at the right-top corner of LCD in base while in STANDBY mode.
Unanswered call tells you of missing call.
Reviewing call records
As calls are received and stored, you will find total call and total new call.
The unit should be in on –hook state.
Review p / q or t / u to select the caller ID record .
The corresponding caller ID ‘s content should be displayed.
No t e : N ew c a l l will turns ON if the call is u nanswered a nd not
reviewed before.
Delete caller ID
While reviewing caller ID, press DELETE to remove it and the next record will
show.
Note: In cordles s han dset, need to press DELE TE on e mo re tim e to
conrm removal for every caller ID.
Delete all caller IDs
While reviewing caller ID, press and hold DELETE until DELETE ALL? shows,
press DELETE again to confirm. A confirmation tone will be heard.
Dialing back
When reviewing caller ID records, you can dial back a displayed number
Press Format key.
Note: If pickup phone shows in the d isplay, no other change to the
number can be made (such as adjusting the area code) the information
sent fro m the telephone company is kno wn to be a valid n umber fo r
dialing back (used only in v ery li mited areas). Once you pick u p the
phone, the number is automatically dialed.
If you did not program your local area code
Use review p / q or |<<, >>| key until the number you want to dial displays,
the number will display in a 10-digit format (i.e. 555-555-1234).
If you programmed your local area code
Use review p / q or |<<, >>| key until the number you want to dial displays,
the numbers displaying seven digits (i.e. 555- 1234) are whining your area
code; However, this doesn’t guarantee the call is a local call. A number with
10 or 11 digits (i.e. 555-5555-1234) is not a local call. Press FORMAT.
If the phone is on-h ook and PICKUP OR ADJ displays (or ADJUST if phone
is i n of f ho ok), adjust the pho ne n umber forma t by pre ssing FORMAT
repeatedly to Scroll through the 7-11-10 digit numbers.
To dial the displayed number while on-hook, pick up the handset or press
SPE AKE R , or TALK/ SPEA KER . NO W D IALI NG d ispl ays and the
number is dialed.
Using your answering machine
When a cal l comes in, the unit will ring the number of times you determ ine,
during initial setup, answer the call and play the greeting, and then record a
message from the incoming caller.
You can:
Answer the call before the unit answers.
Pick up the phone during the greeting.
Listen to the incoming message to decide if you want to answer the call
Pick up the phone during the incoming message, if wanted.
Review your messages from a remote location.
SET UP THE ANSWERING MACHINE
Personalize your answering machine by recording a greeting for callers. If you
Don’ t r ecord yo ur greet ing, ca ller s h ear the de fault gr eeti ng: We are
unavailable to take your call. Please leave a message , thank you f or your
calling.
RECORD THE GREETING
When rec ording th e greeting you should be about 6 inch es from the un it,
reduce as much background noise as possible.
Prepare your greeting. i.e. Hi, this is (your name ), sorry I can’t answer your
call now , so please leave your contact information and a b rief message
after the tone. I will call you back. Thanks for calling.
Pre ss & ho ld t he A NNO UN CE k ey , th e un it a nno un ce s “r eco rd
announcement after the tone and the screen display TO RECORD. After the
tone, recoding greeting no longer than 1 minute.
Release ANNOU NCE k ey whe n you finis h. Th e pho ne ann ounces “Your
announcement is + plays back your recording.
To go back to de fault greeting after you’ve made recorded a gree ting,
press ANNOUNCE and release it when you hear the tone or press and hold
DELETE when the greeting is playing.
1.
2.
3.
4.
1.
2.
3.
1.
1.
2.
3.
1.
2.
3.
4.
5.
1.
2.
3.
4.
REVIEW THE GREETING
Press and release the ANNOUNCE button to review your outgoing greeting.
AUTO DISCONNECT
Auto disconnect is a feature that tells the unit to stop playing the greeting
or recording a message when an extension phone is pickup, if the greeting
continues to play after picking up an extension phone, press PLAY/STOP
PLAY MESSAGES
Messages can only be played back through the speaker, use PLAY/STOP
button to play messages. The unit first plays new messages in order received
If there are no messages, the unit announces you have no message, if there
are n o new messag es, th e old messag es are played back . When playi ng
messages, the message number and date – time stamp display.
To play messages, press and release PLAY/STOP
To stop playback, press and release PLAY/STOP again.
To replay the previous message, press the |<< button
To play skipped messages, press and release >>| button
ERASE A SINGLE MESSAGE
Press and release DELETE while the messa ge is playing. The unit erases the
current message and announces “message erased.”
ERASE ALL MESSAGES
You can era se a ll old mess ages , le avin g ne w m essa ges and Call er ID
information.
While the unit is in STANDBY mode, hold down DELETE button until the unit
announces all old messages erased.
NOTE: New mes sages can not be erased in thi s wa y, t o e rase new
messages, play the message, and then press DELETE during play back.
MEMORY FULL
When the unit’s memory is full (possible 45 minutes of messages recorded), it
answers after 10 rings and announces ‘Memor y is full’. A 20 seconds waiting
period follows.
When you enter your security code. You can then play your messages a nd
erase som e of them to restore mem ory. If no entry is ma de during this 20
seconds period, the phone disconnects the call.
REMOTE ACCESS
You ca n acce ss you r answ ering machine from any t ouch-tone phone by
entering your 3 digits security code . The unit responds with an operations list.
Be aware that remote functions do not work with rotary to push-button pulse-
dialing phones.
Note: 123 is the default 3 digits security code
REMOTE ACCESS COMMANDS
If you want to –
Erase messages during playback 0
Repeat message during playback 1
Play messages 2
Stop playback during playback 2
Skip to the next message during playback 3
Turn answering machine on/o 4
Review menu again. 7
ACCESSING YOUR MESSAGES
Call your telephone number
Enter your 3-digit security code, you can enter this code any time during
the greeting or after the beep
The unit waits for a remote command for 20 s econds after the corrected
security code has been entered. Do menu selection according to the menu
voice prompt.
Note: Th e unit answers on the 10the ring when i t is turned off or the
memory is full. If memory is full, play messages and erase some of them
to restore memory.
After the unit plays the remote menu, it waits 20 seconds for a command and
then disconnects.
REMO TE ACCES S A NSWER ING MACH INE VIA COR DLESS
HANDSET
Except for TAM operati on on base , you can also get it throug h cord less
handset.
To activate the remote TAM access, ensure cordless handset is in STANDBY
mode, press Answerer button, then input command code list above.
During the remote access, press EIXT button to stop and return to STANDBY
mode.
MESSAGE INDICATORS
Xx MESSAGE messages count.
Xx CALLS call log count.
UNKNOWN NUMBER the service area is not linked to yours.
UNKNOWN NANE the name information for the number is not available.
BLOCKED the caller is registered as “private number “
NUMBER
START/END the end of call log record.
NO DATA absence of caller ID data.
memory list
Frequently asked questions
The signal icon blinks on the screen
• The handset is out of range. Move it closer to the base station.
• If the handset displays [UNREGISTERED], register the handset.
Tip
• For more information, see “Registration” on the Advanced settings section.
If I fail to register the additional handsets to the base station, what do I do?
Your base memory is full. Un-register the unused handsets and try again.
No dialing tone
• Check your phone connections.
• The handset is out of range. Move it closer to the base station.
No docking tone
• The handset is not placed properly on the base station/charger.
• The charging contacts are dirty.
Disconnect the power supply first and clean the contacts with a damp cloth.
The handset on the charger does not charge.
Ensure the battery pack is inserted properly.
Ensure the han dset is placed properly on the cha rger. The battery icon
animates when charging.
Batteries are defective. Purchase new ones from your dealer.
No display
• Ensure the batteries are charged.
• Ensure there are power and phone connections.
Bad audio (crackles, echo, etc.)
The handset is nearly out of range. Move it closer to the base station.
The ph one rec eives in terference from the n earby e lectrical applianc es.
Move the base station away from them.
The phone is at a location with thick walls. Move the base away from them.
The handset does not ring.
Ensure the handset ringtone is turned on.
The caller ID does not display.
• The service is not activated. Check with your service provider.
• The caller’s information is withheld or unavailable.
The h andset loses connect ion wi th th e base or the s ound i s dist orted
during a call.
••Disconnect the power supply from both the handset and base station. Try
1.
2.
3.
4.
1.
2.
3.
•
•
•
•
•
again after 1 minute.
Warranty Assistance
Your sales receipt will be required to demonstrate proof of purchase in order
to validate your warranty eligibility. You may want to attach either the original,
or a photocopy, of your sales receipt to this booklet for future reference.
If this product was rec eived as a gift, it is s uggested you j ot down the date
of gift receipt , as this information will be valuable should service be required
during the warranty period. If the equipment is causing harm to the telephone
network, the telephone company may require that you disconnect the equip-
ment until the problem is resolved.
Purchase Date or Date Received as Gift
Name of Store
For instructions on how to obtain warranty service, you may call Customer Care
at 1-877-722-4908 or you may visit our website at www.rca4phones.com. If you
prefer, you may write to us at:
Supreme Power USA LLC
PO Box 501045
Indianapolis IN 46250-1045
Please do not s end p roducts to this address as it on ly ad ds de lays in
service and may resul t in lost o r damag ed produ ct. This P O BOX is for
written communication only.
If the equipment is causing harm to the telephone n etwork, th e telephone
company may require that you disconnect the equipment until the problem is
resolved.
Limited Warranty
What your limited warranty covers:
Defects in materials or workmanship.
For how long after your purchase:
One year, from da te of purchase. Please retain your sales receipt , as that
will act as your proof of purchase in order to validate warranty status.
What we will do:
Provide you with a new or, at our opti on, a ref urbished exchan ge unit of
same or sim ilar mo del. T he exc hange model i s unde r warra nty fo r the
remainder of the original product's one year warranty, or 90 days from the
date the replacement product was shipped to you, whichever is longer.
How to get service:
Call Customer Care at 1-877-722-4908. Please have your product with you
and please have your model number and date code available when calling
us. The model number and date code can be found on the underside of the
base unit.
If you are within your lim ited warrant y period and it is determi ned that
service is required:
We will ask that you properly pack your product to avoid shipping damage.
We recommend that you use the original carton and packing materials.
We will ask you to include with your product the following:
Your name , r eturn shi pping ad dress and da ytime pho ne numbe r
handwritten or typed on a sheet of paper
A legib le copy of your sales receipt ( please do no t send the ori ginal
sales receipt )
Ship your product prepaid, to the address we provide. We suggest shipping
your product via a traceable carrier, as we are not responsible for lost, mis-
directed or damaged shipments. You may want to write the date shipped,
carrier and tracking number here:
Upon rece ipt of your produ ct we w ill valid ate your produ ct is u nder
warranty and if determined your product is warranty eligible, we will ship to
you a new or, at our option, a refurbished exchange unit of same or similar
model. This exchange unit will be shipped to you at no cost.
What your limited warranty does not cover:
Customer Instruction. (Your Owners Manual provides information regarding
operating and install instructions. Additional information may be obtained
by contacting the retailer)
Installation and set up service adjustments.
Batteries.
Damage from misuse, neglect, unauthorized repair.
Products which have been modified or incorporated into other products
Products that have been serviced by an unauthorized servicer.
Products purchased or serviced outside the USA or Canada.
Acts of nature, such as but not limited to, lightning damage.
Limitation of Warranty:
THIS LIMITED WARRANT Y IS THE ONLY WARRANTY APPLICABLE TO THIS
PRODUCT. AL L OTHER WARRANTIES, EXPRESS OR IMPLIED (INCLUDING
ALL IMPL IED WARRA NTIES OF ME RCHAN TABILI TY OR FITNE SS FOR
A PART ICULAR PURP OSE) ARE HEREBY DISCL AIMED. NO VERBA L OR
WRIT TEN INF ORMAT ION GIVE N B Y S UPRE ME POWE R U SA LLC, ITS
AGENTS, EMPLOYEES, RETAIL DEALERS OR INDEPENDENT CONTRACTORS
SHALL CRE ATE A GUARANT Y OR IN ANY WAY INCREASE THE SCOPE OF
THIS WARRANTY.
REPAIR OR REPLA CEMENT AS PROVI DED U NDER THIS WARRAN TY I S
THE EXCLUSIVE REMEDY OF THE CONSUMER. SUPREME POWER USA LLC
SHALL NOT BE LIABLE F OR INCIDENTAL OR CONSEQUENTIAL DAMAGES
RESULTING FROM THE USE OF THIS PRODUCT OR ARISING OUT OF ANY
BREACH OF ANY EXPRESS OR IMPLI ED WARRANTY ON T HIS PRODU CT.
THIS DI SCL AIME R O F W ARRA NTIE S A ND LIMI TED WAR RANT Y A RE
GOVERNED BY THE L AWS OF THE STATE OF INDIANA EXCEPT TO THE
EXTENT PR OHIBITED BY A PPLICABLE LAW, ANY IMPLIED WARRANT Y OF
MERCHANTABILIT Y OR FITNESS FOR A PARTICULAR PURPOSE ON THIS
PRODUCT IS LIMITED TO THE APPLICABLE WARRANTY PERIOD SET FORTH
ABOVE.
How state law relates to this warranty:
Some sta tes do not allo w th e e xclus ion nor limi tatio n o f in ciden tal or
consequential damages, or limitations on how long an implied warranty lasts
so the above limitations or exclusions may not apply to you.
This warra nty gives you speci fic legal rights, and you also may have oth er
rights that vary from state to state.
If you purchased your product outside the USA or Canada:
This warranty does not apply. Contact your dealer for warranty information.
Product Registration:
Please comp lete and mail the P roduct Regis tration Card pack ed wi th
your product or visit www.rca4phones.com to register your new product .
Product registration is not required for warranty coverage but doe s allow
us to contact you should it be necessary.
•
•
•
•
•
•
•
•
•
•
•
•
•
•
•
•
•
•
•
 Loading...