

Page 1
Retoumer te cahier pour ta version
fran_aise
TOCOM 1634765A
Page 2
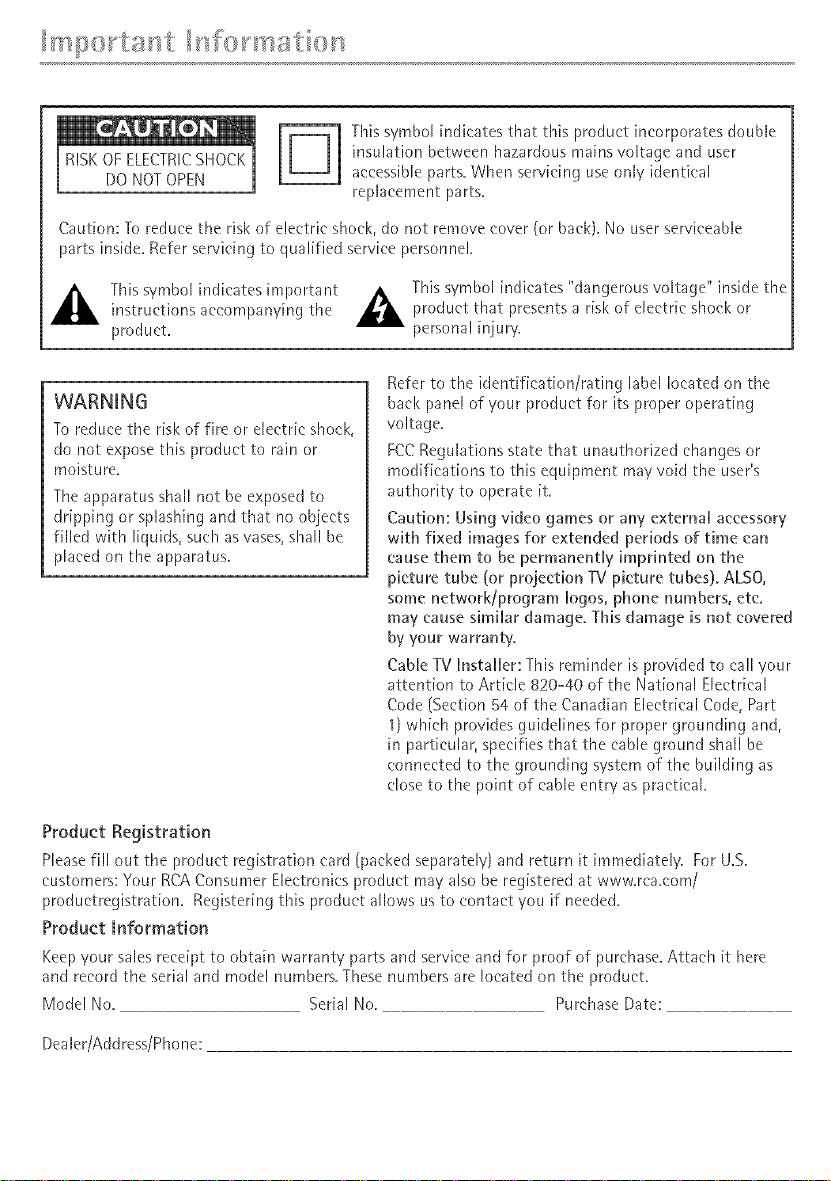
[_ his symbol indicates that this product incorporates double
Cautbn: To reduce the risk of electric shock, do not remove cover (or back). No user serviceable
parts inside. Refer servich'_gto qualified service personnel.
This symbol indicates [mpm'tant A This symbol indicates "dangerous voltage" inside the
instructiorls accompa'@ng the _ product that presents a risk of electric shock or
product, personal [njuw.
insulation between hazardous mains voltage and user
accessible parts. When servicing use only identical
replacement parts,
WARNING
To reduce the risk of fire or electric shock,
do not expose this product to rain or
moisture.
The apparatus shall not be exposed to
dripping or splashing and that no objects
filled with liquids, such asvases, shall be
placed on the apparatus.
Product Registration
Please fill out the product registration card (packed separately} and return it immediately. Fm U.S.
customers: Your RCA Consumer Electronics product may also be registered at www.rca.com/
productregistrat[on. Registering this product allows us to contact you if needed.
Product Information
Keep your sales receipt to obtain warranty parts and service and for proof of purchase. Attach it here
and record the serial and model numbers. These numbers are located on the product.
Model No. Serial No. Purchase Date:
Refer to the identification/rating label located on the
bacl< panel of your product for its proper operating
voltage.
FCCRegulations state that unauthorized changes or
modifications to this equipment may void the user's
authority to operate it.
Caution: Using video games or any external accessory
with fixed images for extended periods of time can
cause them to be permanently imprinted on the
picture tube (or projection 11/picture tubes)_ ALSO,
some network/program Iogos, phone numbers, etc.
may cause similar damage. This damage is not covered
by your warranty,
Cable TV Installer: This reminder is provided to call your
attention to Art[de 820-40 of the National Elech[cal
Code (Sect[on 84 of the Canadian Elech[cal Code, Part
1) which provides guidelines for propel grounding arid,
in particular, specifies that the cable ground shall be
connected to the grounding system of the building as
close to the point of cable entry as practical.
Dealer/Address/Phone:
Page 3
_ _ _l _ _ _ ...... _ ,,, 4 ....
Chapter I : Connections _€Setu_
Things to Consider Before You Connect ....................................................................... 3
ProtectAgainst PowerSurges....................................................................................................................3
ProtectComponentsfrom Overheating..................................................................................................3
PositionCablesProperlyto AvoidAudio Interference ........................................................................3
Important Standand BaseSafety Information .....................................................................................3
UseIndirect Light ..........................................................................................................................................3
CablesNeededto ConnectComponentsto Your TV............................................................................3
TV + DVD.......................................................................................................................... 4
Exphnation of Jacks ....................................................................................................... 5
The Front of Your TV ...................................................................................................... 6
Front InputJacks...........................................................................................................................................6
Front PanelButtons ......................................................................................................................................6
Hug in the TV .................................................................................................................. 6
Put batteries in the remote ........................................................................................... 6
How to Use the Remote Control to Complete the Initial Setup ................................ 7
Turn on the TV ................................................................................................................. 7
Complete the initial Setup ............................................................................................. 7
CompleteAuto ChannelSearch.................................................................................................................7
_ter 2: Using the Remote Control
Button Descriptions for TV Mode .................................................................................. 8
Button Descriptions for DVD and VCR Modes .............................................................. 8
Usingthe INPUTButton ...............................................................................................................................9
_ter 3: Using the ]Ii's Features
Channel Banner ............................................................................................................. 10
Why You Should Use the Auto Tuning Feature ......................................................... 10
How to Set Up the Auto Tuning Feature ...............................................................................................10
Parental Controls and V-Chip ....................................................................................... 11
How V-Chip Works ......................................................................................................................................12
USAV-Chip Rating System .......................................................................................................................12
Canadian English V-Chip Rating System ..............................................................................................13
Canadian French V-£h[p Rating System ...............................................................................................14
USAV-Chip TV Rating Limit .....................................................................................................................14
Blocking Specific Content Themes .........................................................................................................16
Viewing Specific Content Themes...........................................................................................................16
Page 4
, I> , .... i _, I i %..... i .......
Chapter 4: Using the ]_/'s Menu System
Sound Menu ................................................................................................................... 19
Picture Menu ................................................................................................................. 19
Setup Menu ................................................................................................................... 20
Parental Control Menu ................................................................................................. 21
Time Menu ..................................................................................................................... 21
Chapter S: Other Information
Troubleshooting ............................................................................................................. 22
Care and Cleaning ......................................................................................................... 24
Limited Warranty .......................................................................................................... 25
Accessory Information .................................................................................................. 27
Page 5
Thingsto Consider Before You Connect
Protect Against Power Surges
Connect all comporlents before you plug any of their power colds into the wall outlet.
Turn off the TV and/or component before you connect or disconnect any cables.
® Make sure all antennas and cables are properly grounded. Refer to the Important Safety Instructions
packed separately=
Protect Components from Overheating
o Don't block ventilation holes on any of the components, Arrange the components so that air can
circulate freely,
* Don't stack components.
® If you place components [n a stand, make smeyou allow adequate ventilation.
o If you connect an audio rece[vel or amplifier, place it on the top shelf so the heated air from it won't
flow around other components.
Position Cables Properly to Avoid Audio interference
o Insert each cable firmly into the designated jack.
o If you place components above the TV, route all cables down the side of the back of the TVinstead
of straight down the middle of the IV.
o If your anterma uses 300-ohm twin lead cables, do not coil the cables. Also, keep the twin lead
cables away from audio/video cables.
mmportant Stand and Base Safety information
Choose the location for your TV carefully. Place the IV on a stand or base that is of adequate size and
strength to prevent the IV from being accidentally tipped over, pushed off, or pulled off. This could
cause personal injury and/or damage the IV. Refer to the Important Safety Instructions packed
separately.
Use indirect Light
Don't place the IV where sunlight ol room lighting will be dheeted toward the screen. Use soft or
indirect lighting.
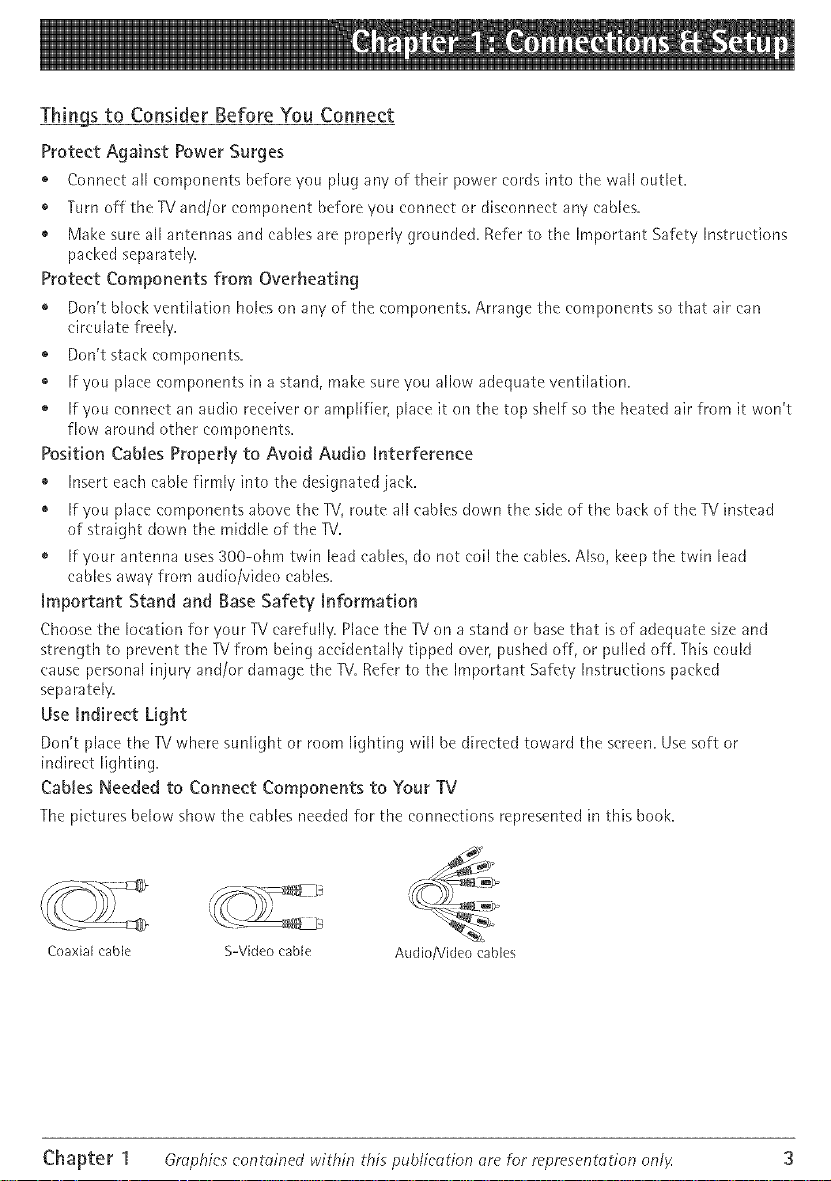
Cables Needed to Connect Components to Your TV
The pictures below show the cables needed fol the cormeet[ons represented in this book.
Coaxial cable S-Video cable Audio/Video cables
Chapter 1 Graphics contoined within this publie_ltion _lre for representotion only 3
Page 6
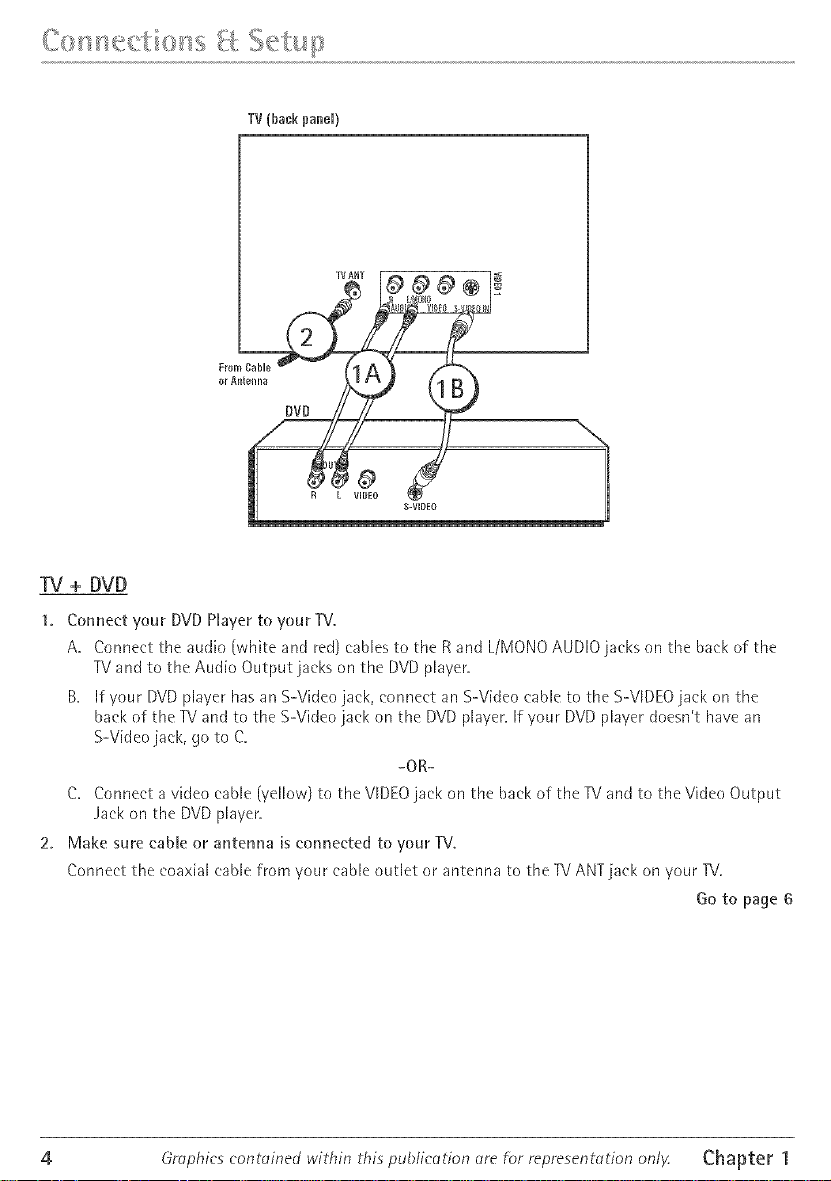
TV(backpanel)
TV ANT
FromCable
DVD
R L VIDEO
TV + DVD
1. Conne_'t your DVD Hayer to your TV.
A. Connect the audio (white and red) cables to the R and L/MONOAUDIO jaeks on the back of the
TVand to the Audio Output jacks on the DVD player.
B. If your DVD player has an S-Video jack, connect an S-Video cable to the S-VIDEO jack on the
back of the TV and to the S-Video jack on the DVD player. If your DVD player doesn't have an
S-Video jack, go to C.
-OR-
C, Connect a video cable (yellow) to the VIDEO jack on the back of the TV and to the Video Output
.Jack on the DVD pJayer.
2. Make sure cabJe or antenna is connected to your TV.
Connect the coaxial cable fl'om youl cable outlet or antenna to the TV ANT jack on 'four TV.
Go to page 6
4 Grophics contoined within this puDlieetion _lre for represent_tion onlF Chapter 1
Page 7
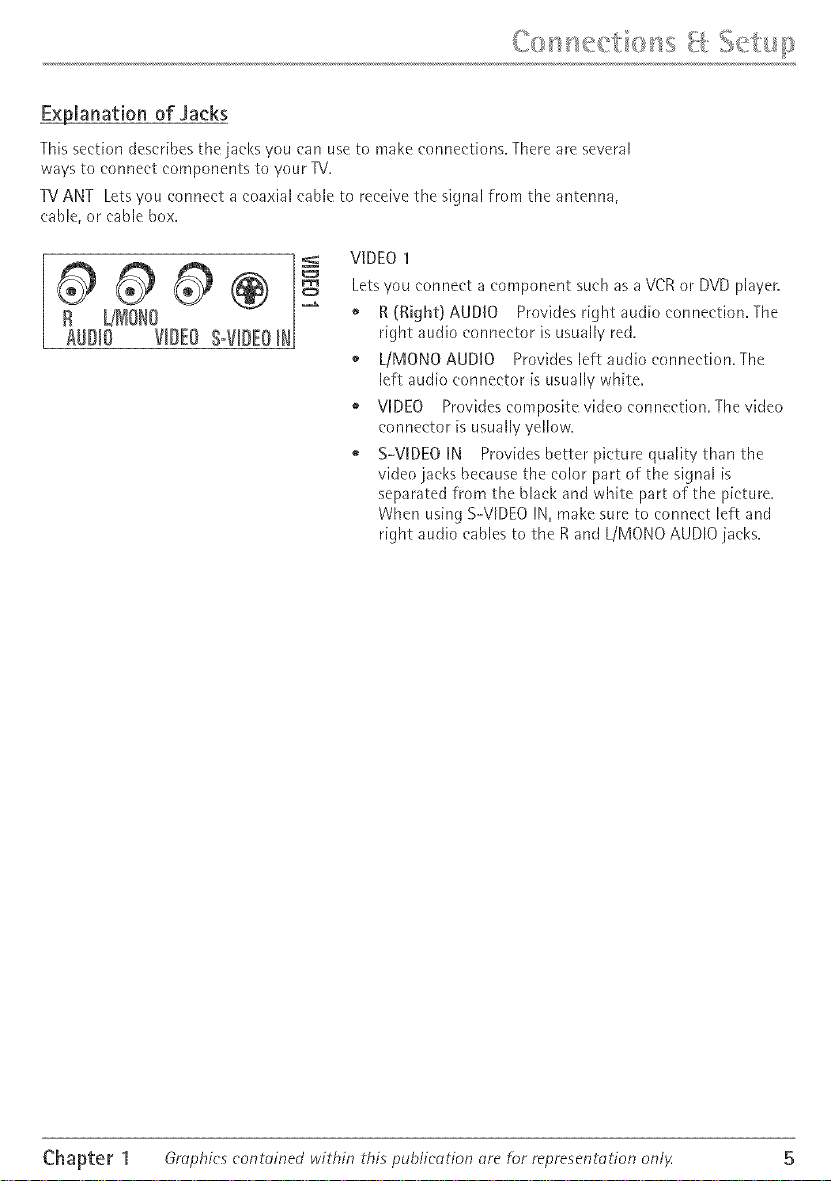
Exj_lanation of Jacks
This section describes the jacks you can use to make connections. There ale several
ways to connect components to your TV.
TVANT Letsyou connect a eoaxial cable to rece[ve the signal from the antenna,
cable, or cable box.
VIDEO1
@@@® -
R 'MoHo--
AUDIO VmDEOS-VIDEO[H
Lets you connect a compor_er_t such as a VCR or DVD player.
o R (Right) AUDIO Provides right audio connection. The
right audio connector is usually red.
o LiMONO AUDIO Provides left audio connection. The
left audio connector is usually white.
o VIDEO Provides composite video connection. The video
connectol is usually yellow.
o S-VIDEO IN Provides bettel picture quality than the
video jacks because the color palt of the signal is
sepalated from the black and white palt of the picture,
When using S-VDEO IN, make sure to connect left and
right audio cables to the R and L/MONO AUDIO jacks,
...... t p
Chapter 1 Graphics eontoined within this publication tire for representdtion only 5
Page 8
The Front of Your TV
Front input Jacks
The -rv has one set of front audio/video input jacks for your convenience, These
jacks are towards the front of the IV on the side, To access the component you
connected to the front of the IV, press the INPDT button on your remote until
FRNTappears on the screen, The jacks are ideal fol connecting a video game
console Ol a earncorder,
Note Whenconnecting a component thot onlyhasone audiojock,such ossome comcorders,
use the TV'sAUDIOL/NlONOjockto heor the oudio,
H-PHONE Allows you to connect headphor_es to l[sten to the sound coming from
the TV,
VUDEO Receives video from another component such as a VCR, camcorder, or
video game console,
L/MONO and R AUDIO Receives audio from another component such as a VCR,
camcorder, or video game console,
Front Panel Buttons
If you cannot locate your remote, you can use the buttons on the front of your _/
to operate many of the TV's features,
MENU/OK Brings up the Main menu, In the menu system, it selects highlighted
items,
CH v Scans down through the current channel list, In the menu system, acts like
the down arrow button on the remote control and adjusts menu controls,
CH ^ Scans up through the channel list, In the menu system, acts like the up
arrow button on the remote control and adjusts menu controls,
VOL< Decreases the volume, In the menu system, acts like the left alrow button
on the remote control and adjusts menu controls,
VOL> Increases the volume, In the menu system, acts like the right arrow button
on the remote control and adjusts menu controls,
POWER Turns the TV on and off,
Plug in the TV
Plug the end of the power cold into a grounded wall outlet, Insert the plug
completely into the outlet,
Put batteries in the remote
Remove the battery compartment cover from the back of the remote by
pushing down on and sliding off the cover,
o Insert 2 fresh "AAA" batteries, Make sure the polarities (+ and -) are aligned
correctl%
Replace the cover.
6 Grophics contained within this puL>lic_tion _lre for representotion onl_ Chapter 1
Page 9
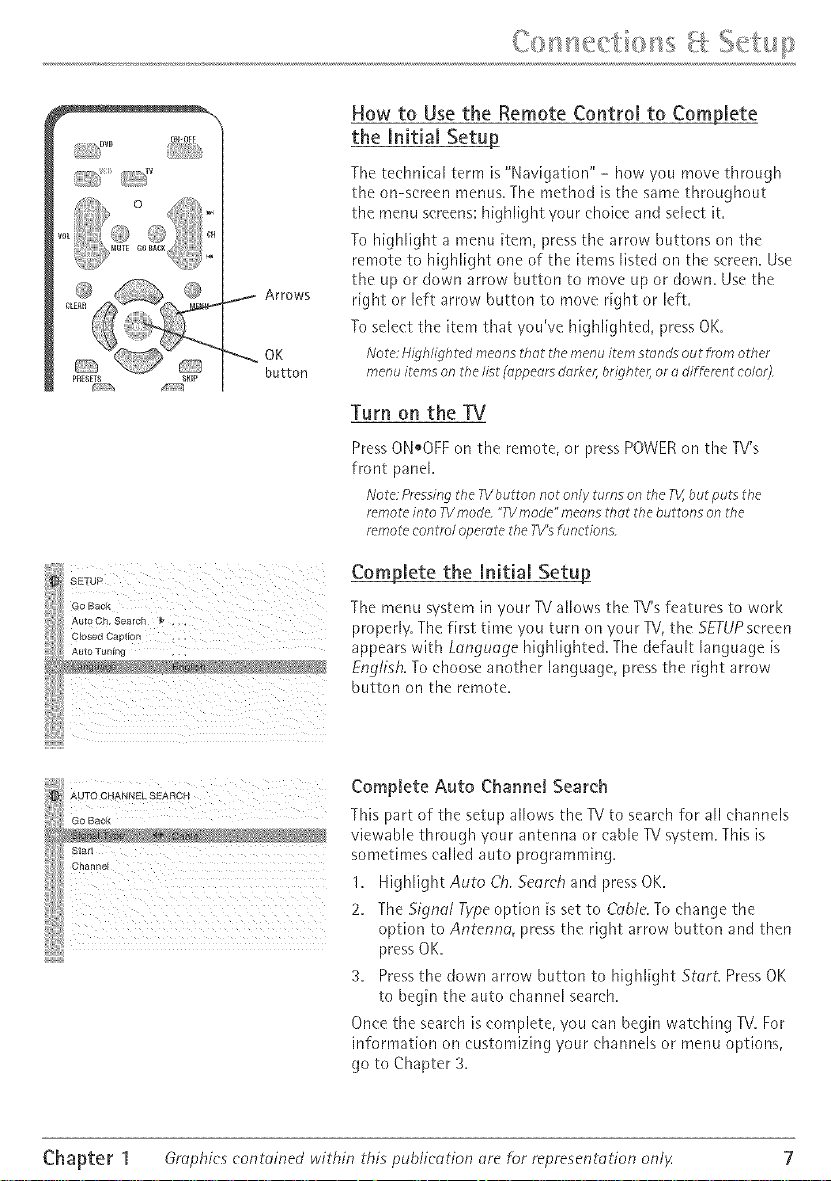
How to Use the Remote Control to Complete
the Initial Setu !
The technical term is "Navigation" - how you move through
the on-screen menus, The method is the same throughout
the menu screens: highlight your choice and select it.
To Mghlight a menu item, press the arrow buttons on the
rernote to highlight one of the items listed on the screen. Use
the up m down alrow button to move up or down. Use the
right or left arlow button to move right or left.
To select the item that you've highlighted, press OK.
Note;Highlightedmeansthat themenu itemstandsout from other
menu items on the list (appearsdarker,brighter,oradifferent color}
Turn on the TV
PressONoOFF on the remote, or press POWERon the TV's
front panel.
Note:Pressingthe TVOutrannot only turns on the TV,butputs the
remoteinto TVmode "77Vmode"meansthat the buttons onthe
remotecontrol operatethe7V'sfunctions
SETUP
: GO Back.
AutoCh, Search _ , , ,
Closed Caption •, ,
Au_o Tuning ,
_AUTO CHANN_ SEARCH
3hanne
Complete the Initial Setup_
The menu system in your TV allows the TV's features to work
properly. The first time you turn on your TV, the SEI-UPsereen
appears with Language highlighted. The default language is
English. To choose another language, Hess the right arrow
button on the remote.
Complete Auto Charme[ Search
TMs part of the setup allows the -IV to search for all channels
viewable through youl antenna or cable TV system. This is
sonletimes called auto programming.
1. Highlight Auto C& Search and press OK.
2. The Signal Type option is set to Cable. To change the
option to Antenna, press the right arrow button and then
press OK.
3. Press the down alrow button to highlight StarL Press OK
to begin the auto channel search.
Once the search is complete, you can begin watching TV.For
information on customizing your channels or menu options,
go to Chapter 3.
Chapter 1 Graphics contained within thispuDlieation are for representation only 7
Page 10
_HF_
!i/i/i__'_,,_,,,_,,,_
CZ:3_ CZJ
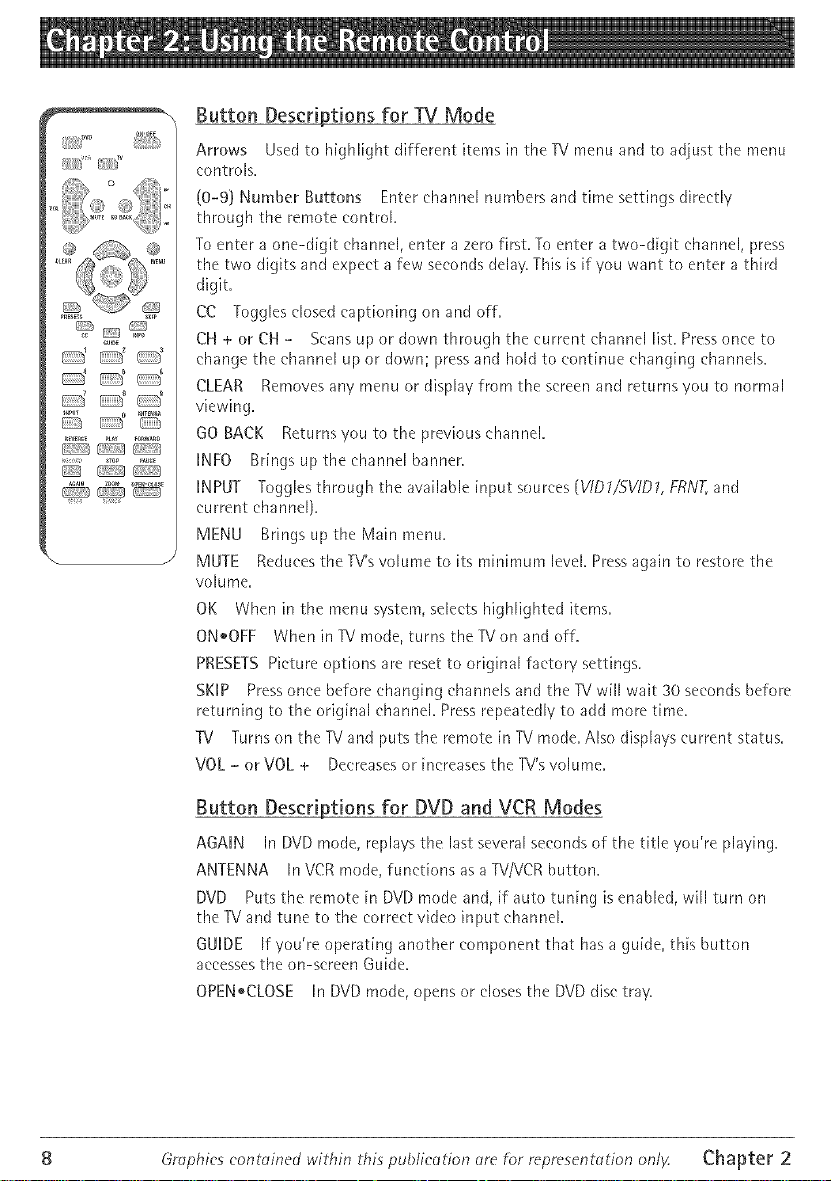
Button Descriptions for TV Mode
Arrows Used to highlight different items in therv menu and to adjust the menu
eontlols.
(0-9) Number Buttons Enter chanr_ei numbers and time settings directly
through the remote eontroi.
To enter a one-digit channel, enter a zero first. To enter a two-digit channel, press
the two digits and expect a few seconds delay. This [sif you want to enter a tMrd
digit.
CC Toggles closed captioning on and off.
CH+orCH- Seans up or down through the current channei iist. Press once to
change the channel up or down; press and hold to continue changing channels.
CLEAR Removesanymenuordisplayfromthesemenandretmnsyoutonormal
viewing.
GO BACK Returnsyou to the previous ehanneL
INFO Br[ngs up the channei banner.
iNPUT Toggles through the available input sources (VIDI/SVID1, FRNT, and
('urmnt channel).
MENU Brings up the Main menu.
MUTE Reduees the TV's volume to its minimum level. Pressagain to restore the
volume.
OK When in the menu system, selects highlighted items.
ON*OFF When inTVmode, turnsthelVonandoff.
PRESETS Picture options are reset to original factory settings.
SKiP Press once before changing channels and the TV will wait 30 seconds before
returning to the original channel. Press repeatedly to add more time.
1V Turns on the TVand puts the remote [n TV mode. Also displays currant status.
VOL - or VOL + Decreases or increases the TV'svolume.
Button Descriptions for DVD and VCR Modes
AGAIN In DVD mode, replays the last several seconds of the title you're playing.
ANTENNA In VCR mode, functions as a W/VCR button.
DVD Puts the remote [n DVD mode and, [f auto tin'ring is enabled, will turn on
the TVand tune to the correct video input channel
GUIDE Ifyou'moperat[nganothercomponentthathasagu[de, th[sbutton
accesses the on-screen Guide.
OPEN,CLOSE In DVD mode, opens or closes the DVD disc tray.
8 Graphics contained within thi_ publication _re fi)r representotion on/_ Chapter 2
Page 11

REVERSE, PLAY, FORWARD, RECORD, STOP, PAUSE Provides transpolt control for
most remote-controllable RCA, GE, or Proscan VCRs or DVD players.
SEARCH In VCR mode, accesses Index Search featule.
SPEED In VCR mode, selects a recold[ng speed.
VCR Puts the rernote in VCR mode and, if auto tuning is enabled, will turn on the
TV and tune to the colrect video input charmel.
ZOOM In DVD mode, zooms in on the picture.
Using the mNPUT Button
Use the INPUT button to serolJ through the available video input charmels and
view components you have connected to the IV.
1. Make sure the component you want to view is turned ON.
2. Press INPUT to tune to an available video input source and view the
component.
3. To return to the previous channel, continue pressing INPUT.
Chapter 2 Graphics contained within this publication are f_r representation only 9
Page 12

Channd Banner
There are several items that might appeal on-screen when
you press the INFO button on the remote. This display is
called the Channel Banner. The following list describes the
items on the Chanrlel Banner semen (left to right arid top to
bottom).
SAP Displayed when the current channel
is broadcasting SAP (Second Audio
Program) information.
V'
CC
Stereo or Mono
Skip: 0:30
07:18 dm
O6ABCDEF
(_x
Displayed when V-Chip has been
activated.
Displayed when Closed Captioning is
available on the current charmel.
Stereo displayed when the current
channel is broadcasting in stereo.
Mono displayed when the currant
channel is broadcasting [n mono.
Cm responds to the SKIP button.
Shows the amount of time left before
the TV switches back to the previous
channel.
Displays the currant time.
Displays the current charme[ and
label assigned to the channel.
Displayed when you mute the sound.
Why You Should Use the Auto Tuning Feature
The auto tuning feature tunes the TV to the correct charmel for different
components you have connected to your TV (like a VCR, DVD Player, etc.) When
you set up auto tuning in the menu system you don't have to remember to change
your TV to channel 3, for example, when you want to watch the tape in your VCR.
How to Set Up the Auto Tuning Feature
The way you set up the auto tuning feature in the TV's menu corresponds to the
component buttons on the remote and the way you have each component
connected to your TV. When you set up auto tuning, you're telling the TV what
channel to tune to when you press theVCR or DVD button on the remote control.
1. Press MENU (the MAiN MENU appears).
2. Highlight Setup and press OK on your remote control.
3. Highlight Auto Tuning and press OK.
4. Choose which channel you want to set:
10 Grophics contained within this publication (lre f_)r represent(_tion onl_ Chapter 3
Page 13

Set VCRt Lets you set up the channel the TV tunes to when you press the
VCR button.
Set VCR2 Not available with your remote conhoL
SetSAT/CABLE Not available with youl remote control.
Set DVD Lets you set up the channel theTV tunes to when you press the
DVD button.
5. Press the right alrow button to select the choice that matches the way you
have the component connected to this TV.
The choices and a bl[ef explanation follow:
AUTO ]UNING
GO Back
Set VCR2 \/IDl , ,
Set SAT!CABLE CB02, , i
Sel DVD CH08 ,
N/A Choose this if you don't have this particular
component connected to the Ri, ol if you don't want the TV
to automatically tune to the correct channel when you're
using this component.
CH02 (SAT/CABLE only- Not available with your remote
control.)
CH03 or04 Component is connected to the TV ANT jack on
the back of the TV, and you want the TVto tune to channel 3
when you press the corresponding button on the remote.
Reminder: make sure the component's Channel 3/4 switch is
set to the apHopr[ate channel.
VtD1 Component is connected to the VIDEO jack on the
back of the TV and you want the TVto tune to the video
input channel when you press the corresponding button.
SViD Component is connected to the S-VIDEO IN jack on
the back of the TV and you want the TVto tune to the
S-Video input channel when you press the colresponding
button.
FRNT(Front Video/nput_ Component is connected to the
VIDEO jack on the front of the TV and you want theTVto
tune to the front video input channel when you press the
corresponding button.
Parental Controls and V-Chip_
The choices in the USA V-CHIP menu invoive software inside your TV (referred to
as V-Chip) which allows you to block TV programs and movies based on violence,
sex, or other content you may believe children should not view.
Once you block Hograms, you can unbloek programs by enter[rig a password.
By default, the software inside 'your TV is turned "off." For instructions to turn on
V-Chip, go to page 18.
Chapter 3 Graphics contained within this publication are h_r representation only 11
Page 14

How V_Chip Works
V-Chip leads the program's age-based rating (R/-MA, TV-14, etc.) and eontent
themes [(Violence (V}, Adult Language (L), etc.)]. If you have blocked the rating
and/ol content themes that the program contains, you will receive the message
This channel has not been @proved for viewing. Change channel orpress OK to enter
password and tempomri/y deactivate the Parental Control
Broadcasters ale not required to provide content themes, so plograms received
with no content themes will only be blocked if you block their age-based rating.
You can also block out plograms that have been given a rating of Not Rated, and
programs that are considered unrated. The TV age-based ratings and content
themes you can block follow:
USA V-Chip Rating System
TV-MA (Mature Audience Only) Specifically designed to be viewed by adults and
may be unsuitable for children under 17. It contains one or more of the following
content themes: clude indecent language (L), explicit sexual activity (S), ol
graphic violence (V).
TV-14 (Parents Strongly Cautioned) Contains some matelia[ that many parents
would find unsuitable for children under 14. Paents are strongly urged to exercise
greater care in monitoring this program and are cautioned against letting children
under the age of 14 watch unattended. This program contains one or more of the
following content themes: intensely suggestive dialogue (D), strong coarse
language (L), intense sexual situations (S), or intense violence (V).
TV-PG (Parental Guidance Suggested) Contains material that palents may find
unsuitable for younger children. Many parents may want to watch it with their
younger children. The plogram contains one or more of the following content
themes: some suggestive dialogue (D), infrequent eoalse language (L),some sexual
situations (S), or modelate violence (V).
TV-6 (General Audience) Most parents would find this program suitable for all
ages. It contains little or no sexual dialogue (D) or situations (S), no strong
language (L), and little ol no violence (V).
TV-Y7 (Directed to Children 7 years and older) Designed for children ages 7 and
above. It may be more appropriate for childlen who have acquired the
developmental skills needed to distinguish between make-believe and reality.
Themes and elements in this program may include mild fantasy violence (F\/} or
eomedie violence, or may frighten children under the age of 7.
TV-Y (All Children} Themes and elements in tMs prograrn are designed for a young
audience, including eMIdren from ages 2-6. It is not expected to fl'ighten younger
children.
12 Graphics contained within _his publication are for representation onl_ Chapter 3
Page 15

Canadian English V-Chip Rating System
18+ (Adults) Programnqng intended fol adults 18 and older. It may contain
elements of violence, language, and sexual content which could make it unsuitable
for viewers under 18. Violence Guidelines: May contain violence integral to the
development of the plot, character ol theme, intended for adult audiences. Other
Content Guidelines: May contain graphic language and explicit poltrayals of
nudity and/or sex.
14+ (Viewers 14 and over) Proglarnming contains themes or content which may
not be suitable for viewers under the age of 14. Parents are strongly cautioned to
exercise discletion in permitting viewing by pie-teens and earl,/teens. Violence
Guidelines: May contain intense scenes of violence. Could deal with rnatule themes
and societal issues in a lealistic fashion. Other Content Guidelines: May contain
scenes of nudity and/or sexual activity. There could be flequent use of profanity.
PG (Parental Guidance) Programming intended for a general audience hut wMeh
may not be suitable for younger chil@en (under the age of 8). Palents may
consider some content inappropriate for unsupervised viewing by children aged
8-13. Violence Guidelines: Depictions of conflict and/or aggression will be limited
and rnodelate; may include physical, fantasy, ol supernatural violence. Other
Content Guidelines: May contain infrequent mild plofanity, or mildly suggestive
language. Could also contain brief scenes of nudity.
G (General Audience] Proglamm[ng considered acceptable fm all age gloups.
While not designed specifically for children, it is understood younger viewers may
be part of the audience. Violence Guidelines: Will contain very little violence,
eithel physical ol verbal or emotional Will be sensitive to themes which could
frighten a younger child, will not depict realistic scenes of violence which
minimize or gloss over the effects of violent acts. Other Content Guidelines: There
may be some inoffensive slang, no profanity and no nudity.
(38+ (Children 8 and Older} Prograrnrning genelally considered acceptable for
children 8 yeas arid over to watch on their own. Violence Guidelines: Violence will
not he portrayed as the preferred, acceptable, or only way to lesolve conflict or
encourage children to imitate dangerous acts wMch they may see on television.
Any realistic depictions of violence will be infrequent, discreet, of low intensity and
will show the consequences of the acts. Other Content Guidelines: There will be no
profanity, nudity ol sexual content.
C (Children] Programming intended for childrerl under age 8. Violence Guidelines:
Careful attention is paid to themes which could threaten children's sense of
security and well being. There will be no realistic scenes of violence. Depictions of
aggressive behaviour will be infrequent and limited to portrayals that are clearly
imaginaly, comedic ol unrealistic in nature. Other Content Guidelines: There will be
no offensive language, nudity or sexual contenL
Chapter 3 Graphics contained within this publication {lre for representdtion only 13
Page 16

Canadian French V-Chip Rating System
18+ (Adults) Programming is for adults only. This program contains sustained
violence or extremely violent scenes.
16+ (Viewers 16 and over) Programming is not suitable for those under age 16.
This Hograrn contains frequent scenes of violence or intensely violent scenes•
13+ (Viewers 13 and over) Programming may not be suitable for children under
the age of 13. This program either contains several violent scenes or one or more
scenes that are violent enough to affect them. Viewing in the company of an adult
is therefore strongly recommended for children under the age of 13.
8+ (Viewers 8 and over) Not recommended for yourlg children. This program is
suitable for most audiences, but it contains mild or occasional violence that could
upset young children• Viewing in the company of an adult is thelefme
recommended for young children (under the age of 8) who do not distinguish
between reality and imagination.
G (General Audience) This program is suitable for audiences of all ages. It contains
no violence, or any violence that it does contain is either minirnal or is presented
in a humorous manner, as a caricatur% or in an unrealistic way.
USA V-Chip R/Rating Limit
The V-Chip TV Rating Limit lets you decide which W
proglams can and cannot be viewed.
To set TV proglamming limits:
I. Choose PdrentelControlfl'om the MAIN MENU (the
PASSWORD screen appears the first time you enter the
P_lrentol Control menu). Create your passwold using the
number buttons on the lemote.
2.
Highlight and select USA V-C_fip. Then select TV
Rtltings.
3.
Once you get to the TVRATIN6 LIM/Tscreen, use the
arrow buttons and OK on your remote to change the
status of a TV program rating or content theme from
View to Block.
4. For TV rating limits to take effect, turn on V-Chip active
in the PARENTAL CONTROLmenu (box has check mark).
The following sections give you more details about how to
change the status of TV program limits.
Note:Ifyou forget your passwordyoucanreseti£ Makesure the
TVisoff:Simultaneouslypressandhold VOL< on the TV'sfront
panelandCLEARon theremotefor approximately5seconds,Enter
anewpa%word next time youaccessthePARENTALCONTROL
menu,
14 Graphics contained within this publication _lre for representation onlF Chapter 3
Page 17

TheV=Chip Rating Screen
The followh'_g is an example of where items are located within the iV RATING LIMIT
screen.
Rating StatusField
Lets you select whether the status of the age-based rating Hmit
to the left is View or Block,
Content Themes
Lists the content themes
you can block or view.
Rating Field
Lets you select from
a list of age-based
ratings you can
block or view.
TV-14 View Content_,,selectwMchStatusFields
TV-PG Vie,_ B V V V _e.s_ou
TV-G V_ew
TV-Y7 View v laun9,
V V V
content themes to view
for the selected
and whether the status of
the content theme is
currently View (V} or Block
(B).
Rating Settings Area
Lets you see the eurrerlt block/view state of age-based rat[rigs and
associated content.
Hierarchy of Age-Rased Ratings
TV-MA Mature Audience Only
71/- 14 Parents Strongly Cautioned
TV-PG Parental Guidance Suggested
TV-G Oeneral Audience
TV-Y7 Directed to Children 7 years and
aider
7"vcy All Children
You can automatically block all program ratings above a
specified age-based rating level.
To block programs with higher ratings:
1. Press the up or down arrow button to scroll to the lating
eolresponding with the lowest rating you do not want
the child to watch.
2. Press the OK button to toggle between View and Block.
The status for the rating listed to the left and all higher
ratings automatically changes to Block.
3. Press the up or down arrow button to highlight Go beck
and press OK.
4. Turn on V-Ch@ _lctiye in the PARENTALCONTROL menu
(box has cheek mark) for rating limits to take effect.
Viewing Age-Rased Ratings
After you block age-based ratings, you can change some of
the ratings back to View.
1. Press the up or down arrow button to select the rating
with a status of Block.
2. Press OK to select Wew.
Chapter 3 Graphics contained within this publieetion (ire for representation only 15
Blocking Age=Based Ratings
Page 18

Content Themes
D Sexuallyexplicit dialogue
L Adult language
S Sexualsituations
Y Violence
FV FantasyViolence
TV, PG View v V V V
TVY View
Blocking Specific Content Themes
You can block programs based on their content. (Content is
represented by the D, L, S, V and FVon yam screen.) When
you block a content theme for a particular lating, you
automatically block that content theme for higher rated
programs as well.
To block Hogram content:
I. Determine the content themes you want to block.
2. Press the down arow button to scroll to the rating
whose content theme you want to change.
3. Press the right allow button to move the highlight to a
particular content theme status.
4. Press the OK button to change its status to S. (In the
example to the left, you block the language (L)
corresponding with TV-14. The language for TV-MA is
blocked as well).
Notes;Broadcastersam not requiredtoprovide content themesor
age-basedratings
Youmust rememberto activate ParentalControlsfor rating limits to
takeeffect
Viewing Specific Content Themes
If you block specific content themes, you have the option of
going [Jack and changing some of the content themes back
to (V} View:
1. Determine the content themes you want to change to (Y)
View.
2. Press the down arrow button to scroll to the rating
whose content theme you want to change, such as B
under language (L) corresponding with TV-14.
3. Press the right arrow button to move the highlight to a
palticuiar content theme status.
4. Press the OK button to change the status back to V. Your
child would then be able to watch programs with the
TV-14 adult language content, {Jut not programs with
TV-MA language content.
Note; Only thecontent themestatus correspondingto TV 14 (LJ
languagechangesto {Y_ViewHigher rated content themes,suchas
that far TVMAlanguag6 do not change
16 Graphics contained within ihis publieetion {sre hJr represent{_tion onlF Chapter 3
Page 19

(,,_:S L_] B, , V 2,*
Blocking CanadianV-Chip Ratings
Uyou leeeive Canadian plograms you can block Canadian
18+
14+
V=Chip Movie Rating Limit
Set movie rating limits by bloddng movies rated above a specified level.
To access the Movie Rating Limit menu:
1. Press MENU on the remote control (the MAIN MENU appears).
2. Select ParentalControL
3. Select USA V-Chip.
4. Select Movie Ratings.
English and French V-Chip by ratings only. When you block a
particular rating, you automatically block the higher rated
programs as well.
To block Canadian English and French program ratings:
I. Select Canada V-Chip from the PARENTAL CONTROL
menu.
2, Highlight English Ratings or French Ratings and press
OK.
3. Determine the rating you want to block.
4. Press the down alrow button to scroll to the rating you
want to change.
5. Press the OK button to change its status to block (the
lock icon appears and all ratings above the one you
selected change to lock).
J
,4, • _ ...... ,
Blocking Movie Ratings
Once you are in the Movie Rating Limit menu, follow the same steps described for
blocking Canadian V-CMp Ratings.
V=Chip Exempt Program Block
The Exempt Prgms. option lets you decide if programs that the V-Chip recognizes
as unrated can be viewed. Umated TV programs may include news, spolts, political,
religious, local and weather programs, emelgency bulletins, public announcements,
and programs without ratings. The Exempt option applies to both USA and
Canadian unrated programs arm Canadian programs rated E.
Unlocked All unrated programs are available.
Locked All unrated programs are not available.
Note: Youmust rememberto activate V-Chipfor rating limits to takeeffect
Press the down arrow to Mghiight Exempt Prqms. Then press the right alrow to
toggle between the lock and unlock icon.
Chapter 3 Graphics contained within this puWication are for representation only 17
Page 20

V-CMp Active
Seleet[r_g this option lets you activate and deactivate parental control settings,
1. From the PARENTAL CONTROL menu, press the up or down arow to highlight
V-Chip active.
2. Press the right or left arrow to turn on (box has check mark) or off (box doesn't
have check mark) V-Chip active.
if you do not activate V-Chip, none of the settings for V-Chip will take effect.
If you forget your password you can reset it. Make sure the TV[s off.
Simultaneously press and hold VOL< on the TV's front panel and CLEAR on the
remote for approximately 5 seconds. Enter a new password next time you access
the PARENTALCONTROL menu.
Front Panel Lock
Selecting this option lets you lock (disable) or unlock (enable) the TV's front panel.
The remote still tunes to any channel. When using this as a Parental Control
method, remove access to any remote that [s capable of opelating the television.
1. From the PARENTAL CONTROL menu, press the up or down arow to highlight
Lock Fr: PaneL
2. Press the right or left arrow to turn on (box has cheek mark) or off (box doesn't
have check mark) front panel lock.
Change Password
Selecting this option lets you simply create a new password at any time. Once you
enter a new password from Change Passwd. in the PARENTAL CONTROL menu it [s
the password you use until you change it again.
18 Graphics contained within this publication are for representation onl_ Chapter 3
Page 21

SOUN[
Bas_
Baiance
Sound TvB_ _ereo
SAP []
;ii Oolor Warmth Normal ,:
Bdghiness
iii Conirast
ii Co,or
Sharpness
:::::::::::::::::
Sound Menu
Treble Incleases or decreases the heble.
Bass Increases or decreases the bass.
Balance Press the right arrow to increase the audio output
in the right speaker; press the left arrow to increase the
audio output in the left speaker.
Sound Type Press the right arrow to scroll through the
available audio types, which control the way the sound
comes through your speakers: Mona plays the sound [n mona
only. Use this setting when receiving broadcasts with weak
stereo signals; and Stereo to split the incoming st°leo audio
signal into left and right channels; and Enhaneedfm
simulated smround sound. Most TV programs and recorded
mat°dais have stereo audio. The word Stereo appears on the
TV when you tune to a program that [s broadcast in stereo.
5AP(SeeondAudio Program) Plays the program's audio in
a second language, if one [savailable. The TVdisplays the
word SAP when you tune to a program that [s broadcast with
SAP information. SAP audio [s broadcast in mona. SAP [s also
used to broadcast a program's audio with descl[pt[ons of the
video fol the visually impaired. Press OK to tmn SAPon or
off.
Picture Menu
The PICRJRE menu options apply to the video for the main
TV and video input selections,
Picture Preset Press the right arrow to scroll through the
available p[ctme preset settings: Natural, Bright, Soft, and
Personal. Choose the setting that is best for 'four viewing
elqvironnlent,
Auto Color Turn this option on to automatically correct the
color of the picture. This is especially useful for hacking
realistic flesh tone colors as you switch channels.
Color Warmth Press the right alrow to scloil through the
color adjustments: Coo/fol a more blue palette of picture
calms; Normal; and Warm for a more red palette of picture
colors.
Brightness Adjusts the brightness of the picture.
Contrast Adjusts the difference between the light and dark
areas of the picture.
Color Adjusts the richness of the color.
Sharpness Adjusts the crispness of the edges in the pictme.
Tint Adjusts the balance between the red and green levels.
Chapter 4 Graphie_ contained within this publication are for representation onlK 19
Page 22

When you change any of these picture settings, the Picture
Preset changes to PersonaL Use the left or right alrow
button to make adjustments. To return to the PICTURE menu,
press the up or down arrow button.
SETUP
Hs_ _ _ane_s
CEosed C_DI_on
Auto Tunmo
Language Engksn
Setup Menu
Auto Ch. Search (Auto Channel Search) Allows you to
choose your signal type and begin an auto channel search.
Signa/Type Press the left or right arrow to toggle
between the signal your TV is receiving. Choose Cable if
you ale cunently using ('able ol a ('able box fol TV
signals. Choose Antenna if you ale currently using an
off-air antenna for TV signals.
Slort Searches for channels the signal is receiving and
stoles them in the TV's channel list. Go to page 7 for
mole infol marion.
List 8: Labels Edit the channels in the list or choose labels
for each channel. For example, if channel 12 is NBC, you can
use this feature to label it NBCso it appears on-screen as
part of the Channel Banner.
To delete a ehannel from the channel list, highlight Channel
and use the left or right arrow button to select the channel.
Then highlight In/istand press the OK button. The box
should no longer display a eheek mark.
To add a label to a channel, select the channel in the Channel
option. Press the down arrow button to highlight Lot)d. Press
the right arrow button to highlight the fhst space• Use the
up or down allow button to ascend or descend through the
characters. Continue to press the right arrow button to
highlight the space and the up or clown anow button to add
a character. Press OK when you're finished adding a label.
Closed Q;ption Many programs are encoded with closed-
captioning infolmation, which lets you display the audio
portion of a program as text on the TV screen.
Closed captioning is not available on all channels at all times.
Only specific programs encoded with closed-captioning
information are applicable. When a program is closed
captioned, CCis displayed in the channel banner. Go to
Chaptel 2 for more information about the channel banner.
The closed caption options me:
20 Graphics contained within this publication are for representation onl_ Chapter 4
Page 23

CC Disploy Lets you ehoose the way elosed eaption[ng information is shown
on the smeen.
Off No captioning information displayed.
On Captioning information always appears, when available.
Muted=On Displays captioning [nfonllation, when available, whenever
the TV's sound is muted by pressing the MUTE button. The eapt[orAng
information is not displayed wher_ the sound is not rnuted.
CC Mode Choose which captioning mode is used for displaying captioning
information. If you are unsme of the differences among the modes, you may
prefer to leave the closed captioned mode set to CCI, which displays complete
text of the program in the primary language [n yore area.
Auto Tuning Displays a choice list that lets you set up the TVto automatically
tune to the correct input channel when you press a component button (VCR or
DVD) on the remote. Go to Chapter 3 fm details about the Auto Tuning feature.
Longuoge Lets you select your preferred language for the menus, which you
should have set [n the Initial Setup. Go to page 7 for more infolmat[on.
ParentaJ ControJ Menu
The Parental Control menu was explained in Chapter 3. Go to page 11for more
information.
Time Menu
i GO Back
Sleep T{mer 00:45
Sleep Timer Lets you set the TV to turn off after a given
time. Pressthe right arrow to add 15 minutes to the cloek
(up to foul hours).
Wake Up Time 08:15AM
i Wa_e-Up Oh 05
i
;rime ref: Ch (Time reference Chonnel) Choose your PBS
station to have the TV set the time for you.
Time Time is set if you select a reference channel (see
above). If time is not obtained, then enter it manually. If it is
8:28, fol example, you must first press the number 0 on the
remote, then number 8, then 2 and then B. Usethe OK
button to choose between AM and PM.
Woke-Up Timer Lets you set the TV to turn itself on.
Note;Whenthe7Vturns on bythe woke-up timer and noremoteor
front pone/bu ttons ampressedrot 2 hours,the TVwill turn %elf oft:
Woke-Up Time Lets you set the time you want the TVto
turn itself on.
Woke-Up Ch (Woke-Up Chonnel) Lets you select a spedfie
eharmel the 21/tunes to when the wake-up timer is set.
Chapter 4 Grophies eontoined within this puL)lieotion ore for representotion only 21
Page 24

Troubleshooting
Most problems you encounter with your TV can be corrected by consulting the
following troubleshooting list.
Note for U,S,customers Ir you prefer,wecanprovideyou with the nameof anAuthoriTedServk'e
Representativewho will visit yourhome for a feeto install your electronicentertainment system
and toinstruct youin itsoperation. Fordetailsabout this service call 1-888-206-3359, For
additional assistancewhile usingyourRCApmduct; pleasevisit wwwrca,com/eustomersupport
r_/Problems
TV won't turn on
* PresstheIV button.
* Make sure the ]_/is plugged in.
Check the wall receptacle (or extension cord) to make sure it is "live" by plugging in
something else.
* Something might be wrong with your remote control Press the POWERbutton on the
front of the TV. If the TVturns on, cheek the remote control solutions on page 23.
The front panel controls may be locked (disabled). Use the remote control to unlock the
front panel controls by selecting the Lock Fn Panel in the PARENTAL(?ONTROLmenu and
pressOK (box won't have check mark).
Buttons don't work
If you're using the remote control, press the T_!button first to make sure the remote is in
?v' mode.
The front panel controls may be locked (disabled). Use the remote control to unlock the
front panel controls by selecting the Lock Fn Panel in the PARENTALCONTROLmenu and
pressOK (box won't have check mark).
Unplug the TV for two minutes and then plug it back in. Turn the IV on and try again.
TV turns off unexpectedly
Sleep timer might have been aetiw_ted. Go to page 21 for instructions.
Wake-Up timer turned on the IV and no remote or front panel buttons were pressedfor
two hours.
Electronic protection circuit may have been activated because of a power surge. Wait
30 seconds and then turn on again. If this happens frequenth/, the voltage in your
house may be abnormally high or low.
Unplug IV. Wait five minutes. Plug it in again.
TV turns on unexpectedly
* Wake-Up timer might have been activated. Go to page 21 for instructions.
* You might have pressed ¢H+, CH- or OK on the remote accidentally.
Blank screen
* Make sure the cornponent connected to the -IVis turned on,
* Try another channel
22 Graphics contained within this publication _lre f_)r representation onl_ Chapter 5
Page 25

No sound, picture okay
Maybe the sound ismuted. Try pressing the volume up button to restore sound.
Ffusing %Video remember to also connect the component's left and right audio output
jacks to the TV's AUDFOjacks.
Can't select certain channel
Chanrlel may be blocked or not approved through the V-Chip.
If using a VCR, check to make sure the TV/VCRbutton on the VCRis in the correct
mode (press the TV/VCRbutton on your VCR).
Noisy stereo reception
o May be a weak station. Access the SOUND menu, highlight Sound Type and then
choose Mono.
No picture, no sound but TV is on
* Maybe the signal type is set wrong. Go to page 20 for detailed instructions.
* The channel might be blank- change channels.
* If you're watching your VCR and it's connected with coaxial cable to the rg ANT jack,
tune the TVto channel 3 or 4 (whichever channel isselected on the 3/4 switch on the
back of your VCR).Also check to make sure the 1-V/VCRbutton on the VCR is in the
correct mode (pressthe TV/VCRbutton on your VCR).
Sound okay, picture poor
Check antenna connections. Make sure all of the cables are firnlly connected to the
jacks.
Try adjusting sharpness function to improve weak signals. Go to page 19 for more
instructions.
Black box appears on the screen
* Closedcaptionmight beon,CheekC/osedCrJptioninthe SETUPmenu,Goto page20
for moreinstructions,
The Remote Control Doesn't Work
Something might be between the remote and the remote sensor on the component.
Make sure there is a clear path.
Maybe you are trying to operate a component that isn't a compatible RCA,GE,or
Proscan brand.
Maybe the remote isn't aimed directly at the component (DVD,TV,VCR) that you're
trying to operate.
Maybe remote is not in IV Mode. Pressthe -IV button so remote will control rv'.
Maybe batteries in remote are weak, dead, or installed incorrectly. Put new batteries in
the remote.
You might need to reset the remote: remove batteries and press the number 1 button
for at least 60 seconds. Release the 1 button, replace the batteries.
Chapter 5 Graphics contained within this pub/icetion (ire for representotion only 23
Page 26

ProblemswithV=CMp/ParentalControls
Theratinglimitsdon'twork
Youmustactivatethesettings,GototheMAIN MENU (press MENU on your
remote), select Parenlul Contro/, highlight and turn on V-Chip active (box has cheek
mark).
mdon't remember my password and mwant to unlock the rv'
If you forget your password you can reset it. Make sure the IV is off. Simultaneously
pressand hold VOL< on the TV's fl'ont panel and CLEARon the remote for
approximately 5 seconds. Enter a new password next time you accessthe PARENTAL
CONTROLmenu.
The V=Chip won't let me watch a program even though it's not rated as
violent.
Maybethe moviewasgiven aNR(Not Rated)status,Afteryou block movieratings,
you mustunlock NRseparatelyinorderto view movieswith an NRrating,
Care and C[eanin£
CAUTION: Turn OFFyour W before cleaning.
You can clean theW as required, using a soft lint-free cloth. Be sure to
occasionally dust the ventilation slots in the cabinet to help assure adequate
ventilation.
The TV's screen may be cleaned with a soft, lint-free cloth as well. Take care
not to scratch or mar the screen. If necessary, you may use a cloth dampened
with warm water, Never use strong cleaning agents, such as ammonia-based
cleaners, or abrasive powder, These types of cleaners will damage the TV.
While cleaning do not spray liquid directly on the screen, or allow liquid to run
down the semen and inside the TV.Also, novel place drinks or vases with water on
top of the TV. This could increase the risk of fhe m shock hazard or damage to the
W.
Caution: Using video games or any external accessmy with fixed images for
extended periods of time can cause them to be permanently imprinted on the
picture tube (or projection TV picture tubes). ALSO, some netwm k/program Iogos,
phone numbers, etc. may cause similar damage. This damage [s not covered by your
warranty.
24 Graphics contained within this publication tire for representotion onlF Chapter 5
Page 27

Limited Warranty
What your warranty covers:
® Defectsin material or workmanship.
For how long after your purchase:
® 90 days from date of purchase for labor charges.
o One year from date of purchase for parts.
o Two 'fears from date of purchase fol the picture tubes.
The warlanty period for rental units begins with the first rental or 45 days from date
of shipment to the rental film, whichever comes fhst.
What we will do:
o Pay any Authorized RCA Television Service Center the labor charges to repair 'four
television.
o Pay any Authorized RCA Television Service Centel for the new or, at our option,
rebuilt replacement parts and picture tube required to repair your television.
How you get service:
For 20" screen size: Fake your RCA television to any Authorized RCA Television
Service Center and pickup when repairs am complete.
For semen sizes larger than 20": Request home or pick up, repair and return
service flom any Authorized RCA Television Service Center, provided that 'four
television is located within the geoglaphic tenitory covered by an Authorized RCA
Television Service Center. If not, you must take 'four television to the Service
Center location at your own expense, or pay for the cost the Service Center may
charge to transport your television to and flom 'four home.
o To identify your nearest Authorized RCA Service Center, ask your dealer, visit
www.rca.com, look in the Yellow Pages, or call 1-800-336-1900.
o Proof of purchase in the form of a bill of sale or receipted invoice which is
evidence that the product is within the warranty period must be presented to
obtain warranty selvice. For rental fhms, proof of first rental is also required.
What your warranty does not cover:
® Customer instruction. (Your Owner's Manuai describes how to install, adjust, and
operate your product. Any additional information should be obtained fl'om youl
dealer.)
o Installation and related adjustments.
Signal reception problems not caused by your television.
® Damage fl'om misuse or neglect.
o Batteries.
® Customer replacernent fuses.
o Damage fl'om images burnt onto the semen.
® A television that has been modified ol [rlcorporated into other products or is used
for institutional or other commercial pulposes.
Acts of nature, such as but not limited to lightning damage.
o A television purchased or serviced outside the U.S.A.
Chapter 5 Graphics contained within this publication tire for representotion only 25
Page 28

ProductRegistration:
o PleasecompleteandmailtheProductRegistrationCardpackedwithyourTVor
registeron-lineatwww.rca.com/productregistration.Itwillmakeiteasierto
contactyoushoulditeverbenecessary.Theretulnoftheealdisnotrequired
forwarrantycoverage.
LimitationofWarranty:
THEWARRANTYSTATEDABOVEISTHEONLYWARRANTYAPPLICABLETO
THSPRODUCT.ALLOTHERWARRANTIES,EXPRESSORIMPLIED(INCLUDING
ALLiMPLiEDWARRANTIESOFMERCHANTABILITYORFITNESSFORA
PARTICULARPURPOSE)AREHEREBYDISCLAIMED.NOVERBALORWRITTEN
INFORMATIONGIVENBYTHOMSONINC.,ITSAGENTSOREMPLOYEESSHALL
CREATEAGUARANTYORINANYWAYINCREASETHESCOPEOFTHIS
WARRANTY.
o REPAIRORREPLACEMENTASPROVIDEDUNDERTHISWARRANTYiSTHE
EXCLUSIVEREMEDYOFTHECONSUMER.THOMSONINC.SHALLNOTBE
LIABLEFORINCIDENTALORCONSEQUENTIALDAMAGESRESULTINGFROM
THEUSEOFTHISPRODUCTORARISINGOUTOFANYBREACHOFANY
EXPRESSORIMPLIEDWARRANTYONTHISPRODUCT.THISDISCLAIMEROF
WARRANTIESANDLIMITEDWARRANTYAREGOVERNEDBYTHELAWSOF
THESTATEOFINDIANA.EXCEPTTOTHEEXTENTPROHIBITEDBYAPPLICABLE
LAW,ANYIMPLIEDWARRANTYOFMERCHANTABILITYORFITNESSFORA
PARTmCULARPURPOSEONTHISPRODUCTISLIMITEDTOTHEAPPLICABLE
WARRANTYPERIODSETFORTHABOVE.
Howstatelawrelatestothiswarranty:
o Somestatesdonotallowtheexclusionnorlimitationo1:incidentalor
consequentialdamages,orlimitationsonhowlonganimpliedwarrantylasts,
sotheabovelimitationsorexclusionsmaynotapplytoyou.
o Thiswalrantygivesyouspecificlegalrights,andyoualsomayhaveother
rightsthatvaW 1:ram state to state.
If you purchased your product outside the United States:
® This walranty does not apply. Contact,four dealer 1:ol warranty in1:olmation.
Service calls which do not involve defective materials or workmanship are not
covered by this warranty. Costs of such service calls are the sole responsibility
of the purchaser_
26 Graphics contained within this publication are for representation onl_ Chapter B
Page 29

Accessory information
Below are accessories available to conlplimerlt your product. Prices are subject to change without notice.
All accessories are subject to availability.
A shipping and handling fee will be charged upon oldering, and we are required by law to collect the
appropriate sales tax fm each individual state, county and locality to which the merchandise is being
sent.
How to Order
To place your order by phone, have 'your Visa, MasteK;ard or Discover Cad ready and call the toll-free
number listed below. Use tMs number only to place an order for aceessoly items listed on this page.
1-800-338-0376
_ czs__
.... /
Remote Control: This isthe
remote control that came
packed with your TV.
Replacements or spares can be
mdered as needed.
264862 $24.99
__! 2-way Signal Splitter: Helps
Stereo VCR Dubbing Audio/
Video Cable: A triple gold-tipped
cable that lets you connect the
video and audio jacks of stereo
components.
VH84 (6-ft) $9.95
S-Video Cable: Has multi-pin
connectors on each end for
connecting S-Videocomponents _q_ _ _/}
to 'your TV.
VH976 [6-ft/$7.95
VH913 [12-ft} $14.95
Screw-on Cable: Attaches to the
round antenna connectors
(called 75-ohm F-type) on the
back of your VCR or TV. The ends
screw onto the connectors for a
secure connection.
VH81 (3-ft) $3.95
VH82 (6-ft) $4.95
Standard Audio/Video cable
with RCA-type phono plugs.
VH83 _$5.95
you connect to a second TV or
VCR.
VH47 _3.95
Amplified VHF/UHF/FM
Antenna: Allows you to easily
switch from the antenna
signal to cable m satellite
easily without disconnecting
antenna.
ANT200 $49.95
Surge Protector: Provides
eight outlets, coaxial and
telepl'mne line protection.
Audible alarm fol surge
failure.
SCW4000C $49.95
Chapter 5 Graphics contained within this puC/icotion rlre for representotion only 27
Page 30

This page left intentionally blank.
Page 31

This page left intentionally bmank.
Page 32

Thisequipmenthasbeentestedandfoundtooomph/withthelimitsforaClassBdigitaldevice,
pursuanttoPart1goftheFCCRules.TheseIh'nitsaredesignedtoprovidereasonableprotectionagainst
harmfulinterference[naresidentialinstallation.Thisequipmentgenelates,uses,andcanradiateradio
frequerK'yenergyand,if notinstalledandusedinaccordarlcewiththeinstructions,maycauseharmful
[ntelferencetoradiocommunieations.However,thereisnoguaranteethat[nterfereneewillnotoceurin
apart[eularinstallation.Ifthisequipmentdoescausehalmfulinterferencetoradioortelevision
reception,wMehcanbedeterminedbyturningtheequipmentoffandon,theuserisencouragedtotry
tocorrecttheinterferencebyoneormoreofthefollowingmeasures:
oReorientorrelocatethereceivingantenna.
Increasetheseparationbetweentheequipmentandreceiver.
®Connecttheequipmentintoanoutletonacircuitdifferentfromthattowh[ehthereceiveris
connected.
, Consultthedeaieroranexperiencedradio/TVtechnicianforheip.
ThisClassBdigitalapparatuscomplieswithCanadianICES-O03
Visit the RCAweb site at www.rca.com
Please do not send any products to the Indianapolis address listed in this manual or on
the carton. This will only add delays in service for your product.
Thomson Inc.
10330 North Meridian Street
Indianapolis, IN 46290
u>2004Thomson Inc.
Trademark(s) _ Registered
Marca(s) Reg[strada(s)
TOCOM 1634765A
THOMSON
 Loading...