

Page 1

21028
2.4 GHz Dual Cordless Handset
Call Waiting Caller ID Phone System
User’s Guide
We bring good things to life.
1
Page 2

IMPORTANT INFORMATION
NOTICE: This product meets the applicable Industry Canada technical specifications.
The equipment must be installed using an acceptable method of connection. The customer
should be aware that compliance with the above conditions may not prevent degradation of
service in some situations.
Repairs to certified equipment should be made by an authorized Canadian maintenance
facility designated by the supplier. Any repairs or alterations made by the user to this
equipment, or equipment malfunctions, may give the telecommunications company cause to
request the user to disconnect the equipment.
Users should ensure for their own protection that the electrical ground connections of the
power utility, telephone lines and internal metallic water pipe systems, if present, are
connected together. This precaution may be particularly important in rural areas.
CAUTION: Users should not attempt to make such connections themselves, but should
contact the appropriate electric inspection authority, or electrician, as appropriate.
NOTES: This equipment may not be used on coin service provided by the telephone company.
INTERFERENCE INFORMATION
This equipment generates and uses radio frequency energy which may interfere with
residential radio and television reception if not properly installed and used in accordance
with instructions contained in this manual. Reasonable protection against such interference
is ensured, although there is no guarantee this will not occur in a given installation. If
interference is suspected and verified by switching this equipment on and off, the user is
encouraged to try to correct the interference by one or more of the following measures:
Reorient the radio/television receiver’s antenna, relocate the equipment with respect to the
receiver, plug the equipment and receiver into separate circuit outlets. The user may also
wish to consult a qualified radio/television technician for additional suggestions. This
equipment has been fully tested and complies with all limits for Class B computing devices
pursuant to part 15 FCC Rules and Regulations. This device complies with RSS-210 of
Industry Canada. Operation is subject to the following two conditions: (1) This device may
not cause interference, and (2) This device must accept any interference, including
interference that may cause undesired operation of the device.
HEARING AID COMPATIBILITY (HAC)
This telephone system meets FCC/Industry Canada standards for Hearing Aid Compatibility.
REN NUMBER IS LOCATED ON THE CABINET BOTTOM
2
Page 3
TABLE OF CONTENTS
IMPORTANT INFORMATION ....................... 2
NTERFERENCE INFORMATION ................... 2
I
HEARING AID COMPATIBILITY (HAC)........ 2
FCC RF R
NTRODUCTION ..................................... 5
I
HANDSET LAYOUT ................................. 7
ASE LAYOUT ...................................... 8
B
ANDSET CHARGE CRADLE LAYOUT ......... 8
H
PARTS CHECKLIST ................................. 9
T
NSTALLATION ..................................... 10
I
INSTALLATION GUIDELINES ................ 10
I
I
CONNECTING THE AC POWER ............ 12
C
S
ANSWERING SYSTEM SETUP ................ 13
V
CLOCK ........................................... 13
SPEAKER V OLUME ........................... 13
V
R
ANNOUNCEMENT............................. 14
R
ANNOUNCEMENT............................. 14
ANSWERING SYSTEM OPERATION ...... 14
M
L
SCREENING CALLS FROM THE BASE .... 16
M
M
ADIATION EXPOSURE STATEMENT5
ELEPHONE JACK REQUIREMENTS ........ 9
NSTALLING THE HANDSET BATTERY .....11
NSTALLING THE PHONE ..................... 11
ONNECTING THE T ELEPHONE LINE ..... 12
ETTING THE V OICE PROMPT LANGUAGE12
OICE T IME/DAY STAMP AND REAL T IME
OICE INSTRUCTION ......................... 14
ECORDING THE OUTGOING
EVIEWING AND CHOOSING THE
ESSAGE COUNTER ........................ 15
EAVING MESAGE ........................... 15
AILBOX INDICATOR ........................ 16
ESSAGES PLAYBACK ...................... 16
THE LIGHTNING
WARNING: TO
PREVENT FIRE OR
ELECTRICAL SHOCK
HAZARD, DO NOT
EXPOSE THIS
PRODUCT TO RAIN
FLASH AND ARROW
HEAD WITHIN THE
TRIANGLE IS A
WARNING SIGN
ALERTING YOU OF
“DANGEROUS
VOLTAGE” INSIDE
THE PRODUCT.
OR MOISTURE.
MEMORY FULL ............................... 17
RASING MESSAGES ....................... 17
E
LEAVING A MEMO ........................... 17
ELEPHONE SETUP .............................. 18
T
ROGRAMMING THE T ELEPHONE .......... 18
P
STANDBY SCREEN ........................... 18
ROGRAMMABLE FUNCTIONS ............. 18
P
OOM MONITOR ............................. 18
R
HANDSET SETUP ............................. 19
ANGUAGE ............................. 19
L
ANDSET NAME ...................... 20
H
RINGER T ONE .......................... 20
INGER VOLUME ...................... 21
R
ELODY .......................... 22
VIP M
STORING VIP MELODY ........... 22
HANGING A STORED VIP MELODY
C
RECORD ............................ 23
REVIEWING & DELETING STORED
VIP MELODY RECORD ......... 23
EY T ONE ............................... 23
K
MESSAGE ALERT ..................... 24
ING SELECT .......................... 24
R
ECURITY CODE ...................... 25
S
AREA CODE ............................ 25
EGISTRATION ......................... 26
R
E-REGISTRATION .................... 26
D
GLOBAL DE-REGISTRATION ......... 27
EFAULT SETTING .................... 28
D
ELEPHONE OPERATION ....................... 29
T
CHARGE INDICATOR ......................... 29
AKING CALLS .............................. 29
M
NSWERING CALLS ......................... 29
A
CAUTION:
RISK OF ELECTRIC SHOCK
DO NOT OPEN
CAUTION: TO REDUCE THE
RISK OF ELECTRIC SHOCK, DO
NOT REMOVE COVER (OR
BACK). NO USER
SERVICEABLE PARTS INSIDE.
REFER SERVICING TO
QUALIFIED SERVICE
PERSONNEL.
SEE MARKING ON BOTTOM / BACK OF PRODUCT
THE EXCLAMATION
POINT WITHIN THE
TRIANGLE IS A
WARNING SIGN
ALERTING YOU OF
IMPORTANT
INSTRUCTIONS
ACCOMPANYING
THE PRODUCT.
3
Page 4

SPEAKERPHONE OPERATION .................. 29
ANSWERING A CALL W/SPEAKERPHONE 29
AKING A CALL W/SPEAKERPHONE .... 29
M
ALL T IMER .................................... 30
C
AUTO STANDBY .............................. 30
INGER HI/LOW/OFF SHORTCUT .... 30
R
LASH/CALL WAITING ...................... 31
F
NUMBER REDIAL ............................. 31
XIT ............................................. 32
E
AGE ............................................ 32
P
HANDSET TO HANDSET PAGING .. 32
AGING FROM BASE/GROUP PAGE32
P
UTE ........................................... 32
M
RECEIVER V OLUME CONTROL ............. 33
O NOT DISTURB (DND)................ 33
D
NTERCOM OPERATION ......................... 33
I
MAKING AN INTERCOM CALL ..... 33
ECEIVING AN INTERCOM CALL ... 34
R
DVANCED INTERCOM FEATURES ........ 34
A
RECEIVING AN INCOMING CALL
DURING AN INTERCOM CALL .. 34
SING INTERCOM WITH EXTERNAL
U
TELEPHONE CALLS ................ 34
WO-WAY CALLING ................. 34
T
HREE-WAY CALLING ............... 34
T
TRANSFERRING EXTERNAL CALLS TO
OTHER HANDSETS ................ 35
EMORY ........................................... 35
M
STORING A NAME AND NUMBER IN
MEMORY ....................................... 36
TORING THE LAST NUMBER DIALED .. 36
S
INSERTING A PAUSE IN THE DIALING
SEQUENCE (OF A STORED NUMBER)... 37
EVIEWING RECORDS IN MEMORY...... 37
R
CHANGING RECORDS IN MEMORY ...... 37
ELETING RECORDS IN MEMORY ....... 37
D
IALING A NUMBER FROM MEMORY ... 38
D
CHAIN DIALING FROM MEMORY ......... 38
ALLER ID (CID) ............................... 39
C
RROR CODES ......................... 39
CID E
RECEIVING CID RECORDS ................. 39
TORING CID RECORDS (IN CALLER ID
S
EMORY) ...................................... 39
M
REVIEWING CID RECORDS ................ 40
TORING CID RECORDS IN INTERNAL
S
MEMORY ....................................... 40
DIALING A CID NUMBER .................. 41
ELETING A CID RECORD ................ 42
D
ELETING ALL CID RECORDS ........... 42
D
REMOTE ACCESS ................................ 42
ORDLESS HANDSET ....................... 42
C
NSWERING SYSTEM INDICATOR ........ 43
A
SCREENING CALLS FROM THE HANDSET 43
CCESSING THE ANSWERING SYSTEM
A
ANOTHER LOCATION ................ 43
FROM
MEMORY FULL ............................... 44
HANGING THE BATTERY ...................... 44
C
ATTERY SAFETY PRECAUTIONS ......... 45
B
BELT CLIP AND OPTIONAL HEADSET ....... 45
ONNECTING THE BELT CLIP .............. 45
C
ONNECTING AN OPTIONAL HEADSET TO
C
THE HANDSET ................................. 45
ISPLAY MESSAGES ............................ 46
D
ANDSET SOUND SIGNALS .................. 48
H
TROUBLESHOOTING GUIDE ................... 48
ENERAL PRODUCT CARE .................... 51
G
AUSES OF POOR RECEPTION ............... 51
C
INDEX ............................................... 52
ELEPHONE NETWORK INFORMATION ...... 54
T
UMBER ................................... 54
REN N
SERVICE ............................................ 54
CCESSORY ORDER FORM ................... 55
A
SAVE THESE INSTRUCTIONS
4
Page 5
FCC RF RADIATION EXPOSURE STATEMENT
This equipment complies with FCC RF radiation exposure limits set forth
for an uncontrolled environment. This equipment should be installed and
operated with a mininum distance of 20 centimeters between the radiator
and your body. This transmitter must not be co-located or operated in
conjunction with any other antenna or transmitter.
For body worn operation, this phone has been tested and meets the FCC
RF exposure guidelines when used with the belt clip supplied with this
product. Use of other accessories may not ensure compliance with FCC RF
exposure guidelines.
INTRODUCTION
CAUTION: When using telephone equipment, there are basic safety
instructions that should always be followed. Refer to the IMPORTANT
SAFETY INSTRUCTIONS provided with this product and save them for
future reference.
Congratulations on purchasing the GE Dual Cordless Handset Telephone
System. This system operates in the 2.4 GHz frequency range, and is unique
to conventional cordless telephones. When the base is connected to electrical
power and a telephone line, you can place a fully-featured cordless handset
anywhere electrical power is available.
Features:
• 2.4 GHz digital spread spectrum technology
• Handset to handset Intercom
• 3-way Conference
• Call Waiting and Caller ID Compatible
• VIP melody
• Up to 50 Name and Number Memory Dialing
• Answering machine with 3 maiboxes
• Expandable up to 4 handsets (by purchase of optional Model 21009A
Handset with recharge cradle)
NOTE: Spread Spectrum technology does not need the feature of
changing channel.
5
Page 6

This telephone has been designed to be simple to use, however, you can
reach its full potential more quickly by taking a few minutes to read this
Instruction Book. This telephone is a multifunction product for use with Call
Waiting and Caller ID services available from your local telephone company.
Your Caller ID Call Waiting phone allows you to:
• View the name and telephone number of a caller (Call Waiting Caller ID)
while you are on the phone.
• Identify callers before you answer the phone.
• View the time and date of each incoming call.
• Record up to 40 Caller ID messages sequentially.
• Know who called while you are on the other line or when you were away.
• Screen unwanted calls, eliminate harassment from annoying calls, or to
get prepared before answering a call.
IMPORTANT: Because cordless phones operate on electricity, you should
have at least one phone in your home that isn’t cordless, in case the power in
your home goes out.
IMPORTANT: In order to use all of the features of this telephone, you must
subscribe to two separate services available from your local telephone
company: the standard Name/Number Caller ID Service to know who is
calling when the phone rings and Call Waiting Caller ID Service to know who
is calling while you are on the phone.
6
Page 7
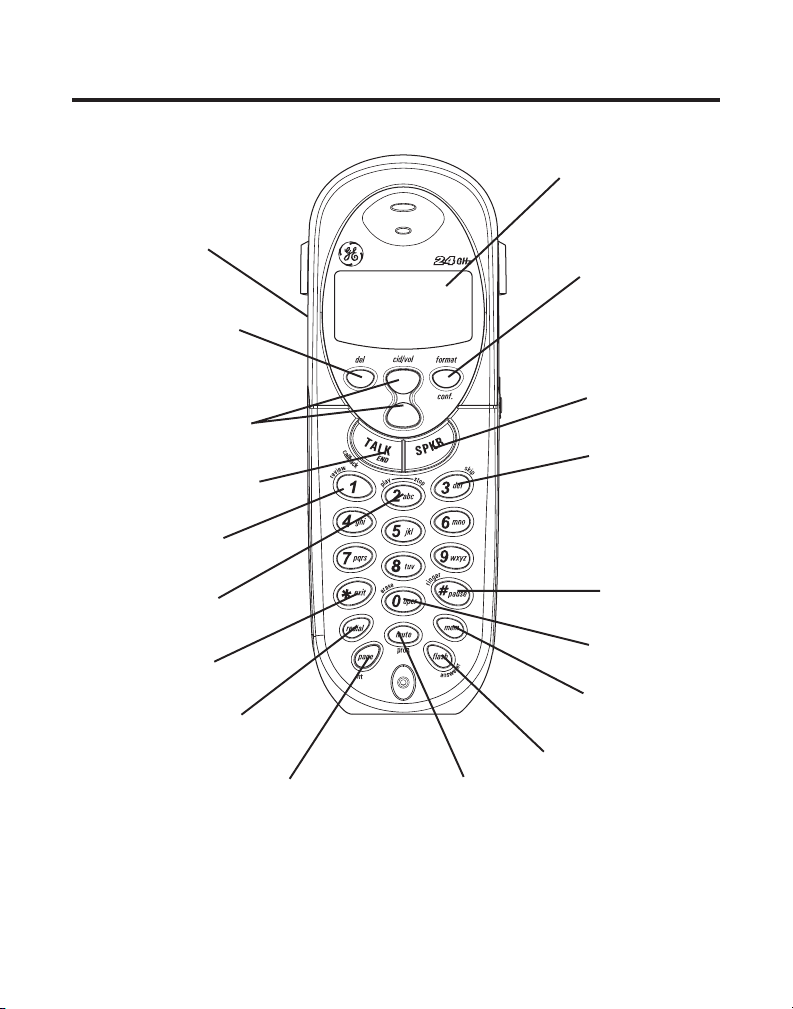
HANDSET LAYOUT
display
Speaker
del
(delete button)
cid/vol
(caller ID/volume button)
TALK/END/callback
(button)
review (button)
play/stop (button)
*exit (button)
redial (button)
(page/intercom button)
page/int
format/conf
(format/conference button)
SPKR
(speaker button)
skip (button)
# pause/ringer
(button)
erase button
mem
(memory button)
flash/answerer (button)
mute/prog
(mute/program button)
7
Page 8
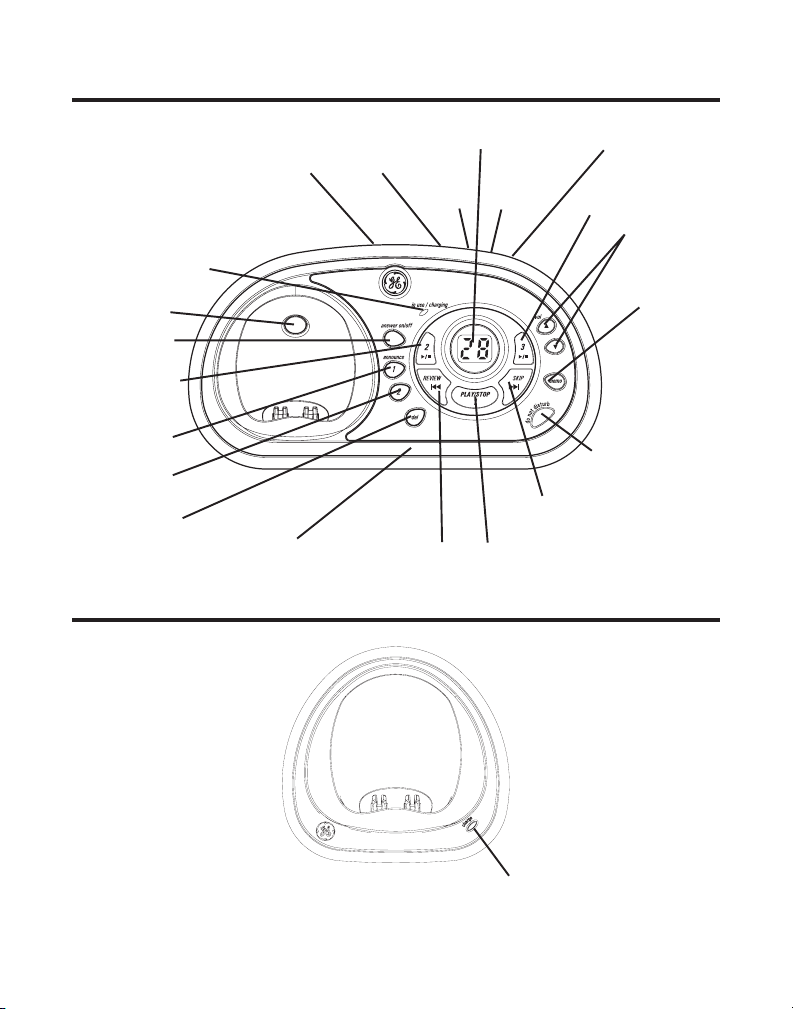
BASE LAYOUT
SPEAKER DAY/CHECK
HOUR
in use/charging (indicator)
PAGE (button)
answer on/off
(button)
PLAY/STOP 2
(button/indicator)
announce 1
(button)
announce 2
(button)
del
(button)
Microphone
REVIEW (button)
HANDSET CHARGE CRADLE LAYOUT
Message counter
MINUTE
PLAY/STOP 1 (button/indicator)
LANGUAGE
(button)
PLAY/STOP 3
(button/indicator)
vol (buttons)
DO NOT DISTURB
(button)
SKIP (button)
memo
(button)
charge indicator
8
Page 9
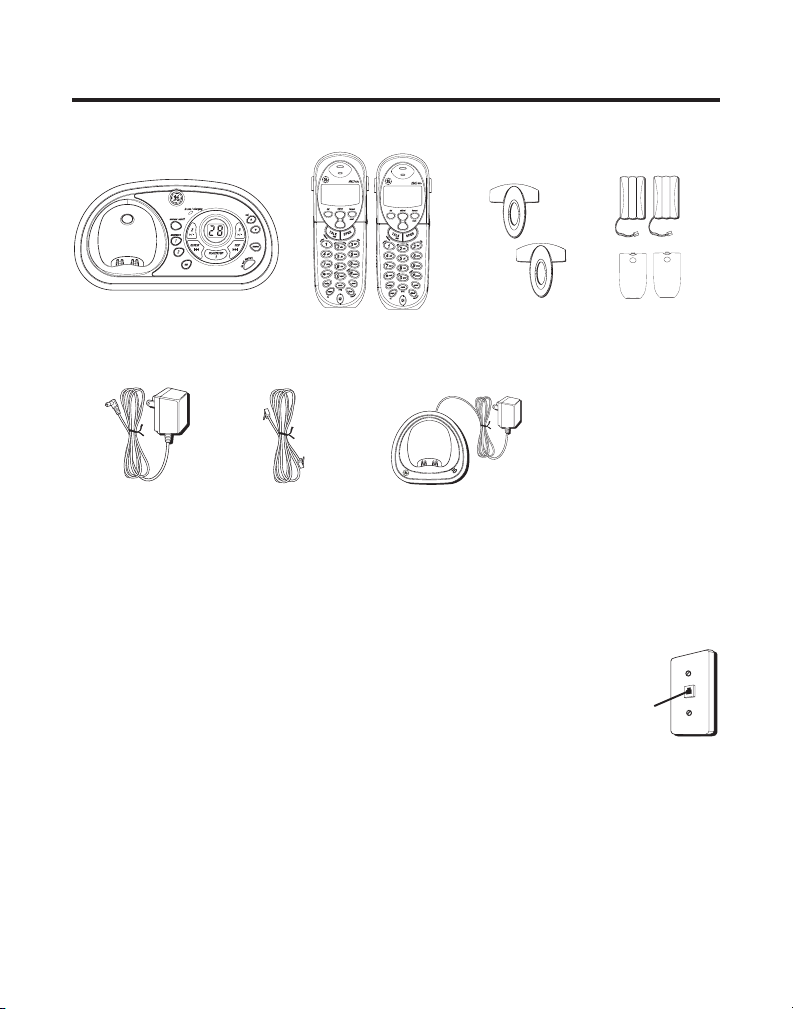
PARTS CHECKLIST
Make sure your package includes the items shown here.
Base
AC power supply
Telephone line
Dual Handsets Belt clips
Handset Charge Cradle
cord
TELEPHONE JACK REQUIREMENTS
To use this phone, you need an RJ11C (CA11A) type
modular phone telephone jack, which might look like the
one pictured here, installed in your home. If you don’t
have a modular jack, call your local phone company to
find out how to get one installed.
Batteries and battery
compartment doors
Wall plate
Modular
telephone
line jack
9
Page 10

INSTALLATION
INSTALLATION NOTE: Some cordless telephones operate at frequencies that
may cause or receive interference with nearby TVs and VCRs. To minimize or
prevent such interference, the base of the cordless telephone should not be
placed near or on top of a TV or VCR. If such interference continues, move the
cordless telephone farther away from these appliances. Certain other
communications devices may also use the 2.4 GHz frequency for communication,
and, if not properly set, these devices may interfere with each other and/or your
new telephone. Typical devices that may use the 2.4 GHz frequency for
communication include wireless audio/video senders, wireless computer
networks, multi-handset cordless telephone systems, and some long-range
cordless telephone systems.
• Never install telephone wiring during a lightning storm.
• Never install telephone jacks in wet locations unless the jack is
specifically designed for wet locations.
• Never touch non-insulated telephone wires or terminals, unless the
telephone line has been disconnected at the network interface.
• Use caution when installing or modifying telephone lines.
• Temporarily disconnect any equipment connected to the phone such as
faxes, other phones, or modems.
INSTALLATION GUIDELINES
• Install telephone near both a telephone (modular) jack and an electrical
power outlet.
• Avoid sources of noise, such as a window by a busy street, and electrical
noise, such motors, microwave ovens, and fluorescent lighting.
• Avoid heat sources, such as heating air ducts, heating appliances,
radiators, and direct sunlight.
• Avoid areas of excessive moisture or extremely low temperature.
• Avoid dusty locations.
• Avoid other cordless telephones or personal computers.
10
Page 11
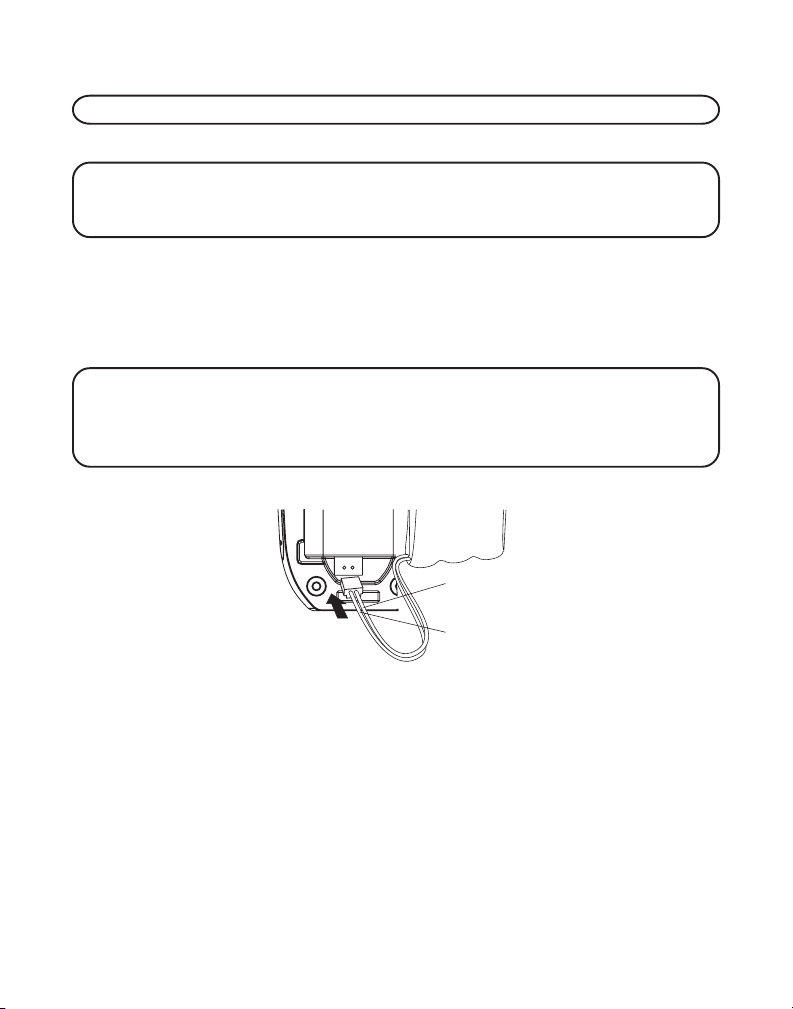
INSTALLING THE HANDSET BATTERY
NOTE: You must connect the handset battery before use.
1. Connect battery pack plug to jack inside compartment on base.
NOTE: It is important to maintain the polarity (black and red wires) to the
jack inside the compartment as shown in the illustration. To ensure proper
battery installation, the connector is keyed and can be inserted only one way.
2. Install compartment cover and snap into place.
3. Place the handsets in the charging cradles.
Allow handsets to charge for 16 hours prior to first use. If you don’t
properly charge the handsets, battery performance is compromised.
NOTE: If the battery is not properly installed in the handset, or if the battery
pack is not properly connected to the jack inside the battery compartment.
“NO BATTERY” shows in the display when the handset is placed in the
charging cradle.
BATTERY
BLACK WIRE
PRESS DOWN
FIRMLY
RED WIRE
INSTALLING THE PHONE
Choose the best location to install your base and handset charge cradle.
Your base and handset charge cradle should be placed on a level surface
such as a desk or table top.
11
Page 12
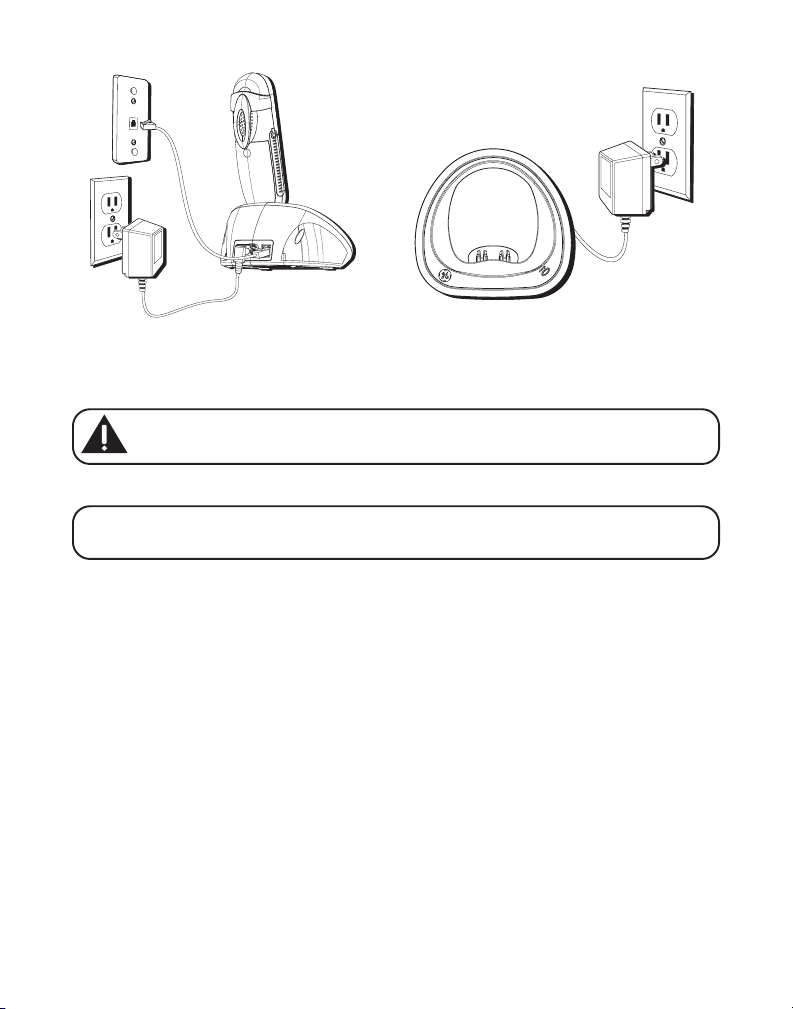
CONNECTING THE AC (ELECTRICAL) POWER
1. On the base, plug one end of the power supply cord into the power jack
on the back of the base and the other end into an electrical outlet.
CAUTION: Use only the ATLINKS USA, Inc. power supply 5-2596 that
came with this unit. Using other power supplies may damage the unit.
2. Plug the handset charge cradle into an electrical outlet.
NOTE: The in use/charging indicator on the base and the charge indicator on
the handset charge cradle turns on to indicate the handset battery is charging.
CONNECTING THE TELEPHONE LINE
On the base, plug the one end of the telephone line cord into the jack on
the back of the base and the other end into a modular wall phone jack.
SETTING THE VOICE PROMPT LANGUAGE
The default voice prompt language is English.
To change the answering system's voice prompt language,
• Press the language button to change to the FRENCH voice prompt.
The unit announces "
message counter.
• Press the language button again to change to the SPANISH voice
prompt. The unit announces "
shows in the message counter.
OPTION FRANCAISE
" and "
SELECCION ESPANOL
Fr
" shows in the
" and "
SP
"
12
Page 13
NOTE: To change to "English", press the language button again.
NOTE: In remote access mode, the system follows the selected language. The
voice prompt language cannot be switched remotely.
ANSWERING SYSTEM SETUP
This section shows you how to set up your answering system to receive
incoming calls. Before you begin the set up process, you must turn on the
answering system.
• Press the answer on/off button to turn the answering system on and off.
The MESSAGES indicator lights when the answering system is on. The
indicator blinks when you have messages.
NOTE: The answering system displays “- -” when it is off.
VOICE TIME/DAY STAMP AND REAL TIME CLOCK
1. Make sure the answering system is ON.
2. Press and hold the DAY/CHECK button to set the day of the week.
3. Press and hold the HOUR button to set the hour (a.m. or p.m.). Example:
12AM, 1AM,
4. Press and release the minute button to advance the clock in one minute
intervals. Press and hold to increase by 5-minute increments.
5. After the time is set, the real time clock will be displayed on the handset
within 1 minute.
NOTE: You must set the day manually. You may choose to set the time manually
as well though the time is automatically transmitted by your local phone
company as part of Caller ID service. If you subscribe to Caller ID service, the
current time is set automatically when you receive your first CID record.
or
12PM, 1PM
.
SPEAKER VOLUME
Use the vol ( or ) buttons to adjust speaker volume on the base to a
comfortable level. L1 is the minimum speaker volume and L8 is the maximum.
13
Page 14

VOICE INSTRUCTION
If you need additional assistance, press the REVIEW button in standby
mode and follow the voice instructions.
RECORDING THE OUTGOING ANNOUNCEMENT
For best results when recording, you should be about nine inches from the
microphone, and eliminate as much background noise as possible.
You may record 2 outgoing announcements in the answerer or choose the
default for your current outgoing announcement.
1. Make sure the answering system is ON.
2. Press and hold the announce 1 or announce 2 button until the speaker
announces “
3. Begin speaking after you hear the beep.
4. Release the button when you finish your announcement.
NOTE: If you choose not to record an outgoing announcement, a default
announcement plays instead. To return to the default announcement after you
have recorded your own outgoing announcement, press the announce 1 or 2
button and release it when you hear the beep.
Sample Outgoing Announcement
1) Sample Single Mailbox Outgoing Announcement
Hi, this is (use your name here), I can’t answer the phone right now, so please leave your
name, number and a brief message after the tone, and I’ll get back to you. Thanks.
NOTE: The maximum recording time for the outgoing announcement is
2 minutes.
RECORD ANNOUNCEMENT AFTER TONE
“.
2) Sample Multi-Mailbox Outgoing Announcement
Hi, this is (use your name here), We can't answer the phone right now, so please press 1 to
direct your message to (name 1), press 2 to direct your message to (name 2), press 3 to direct
your message to (name 3). Leave your name, number and a brief message after the tone,
and we'll get back to you soon. Thanks.
14
Page 15

REVIEWING AND CHOOSING THE ANNOUNCEMENT
Press and release the announce 1 button to review and select this one as
your outgoing announcement. Or, press and release the announce 2
button to review and select this one as your outgoing announcement.
ANSWERING SYSTEM OPERATION
This section discusses the buttons and features on the answering system.
MESSAGE COUNTER
The message counter gives you a numeric display of how many messages
you have. See below for the details.
a) Message counter has a number displayed without flashing - No new
messages. Shows total number of old messages.
b) Message counter has a flashing number displayed - There are new
messages. Shows total number of old and new messages.
c) Message counter has bars ( - - ) - Answerer is off.
d) Message counter has an "F " flashing on the display - Memory is full.
e) Message counter has a "CL" flashing on the display - Clock is not set
since power up or after power failure.
f) Message counter has a six horizontal bars flashing on the display -
MEMO recording.
g) Message counter has a "
incoming calls and recording an incoming call.
h) Message counter has "LA" - The answering machine is being
accessed remotely.
i) Message counter has a "
or Announcement 2 is selected as an current outgoing announcement
during Announcement selection and announcement recording/playing.
j) Message counter has "
current voice prompt during language selection.
k) Message counter has "
current voice prompt during language selection.
AN
" flashing on the display - Answering
A1
" or "
A2
" on the display - Announcement 1
EN
" on the display - English is selected as the
Fr
" on the display - French is selected as the
15
Page 16

l) Message counter has "
current voice prompt during language selection.
NOTE: While the messages are playing, the message counter will display the
messages in the order they were received.
NOTE: The maximum recording time for each message is 3 minutes and
thetotal recording time of this unit is 20 minutes.
SP
" on the display - Spanish is selected as the
LEAVING A MESSAGE
1. After the answerer gets the line and plays the outgoing announcement, the
caller can enter the mailbox number (1, 2 or 3) during the play of outgoing
announcement or within the 2 seconds after the end of outgoing
annoucement and then leave a message in that specific mailbox.
2. If there is no entry of mailbox number during that period, then your
message will be left in the default mailbox 1.
SCREENING CALLS FROM THE BASE
1. When the answering machine answers the call, listen while the caller
leaves a message (to determine who is calling).
2. To speak to the caller, pick up the handset, and press the TALK/END/
CALLBACK or SPKR buttons.
The answering system automatically stops recording when you activate
the handset or pick up an extension phone.
TIP: Make sure the volume on the base is set loud enough to hear your
incoming calls.
MAILBOX INDICATOR
The mailbox button/indicators inform you of messages for each individual
mailbox and whether they are new or old.
Mailbox button/indicator is on; stored messages.
Mailbox button/indicator is off; no messages.
Mailbox button/indicator is flashing; new messages.
MESSAGES PLAYBACK
The message counter and the base mailbox button/indicators (play/stop 1,
2 or 3) let you know when you have message(s) or new message(s). To
play the messages, press the corresponding play/stop 1, 2 or 3 button.
16
Page 17

While a message is playing, you may do the following:
• Press the corresponding play/stop 1, 2, or 3 button to stop the
message playback.
• Press and release the review button to restart the current message.
• Press and release the review button twice to go to the previous message.
• Press and release the skip button to go to the next message.
• Press the del button to erase the current message.
MEMORY FULL
When the answering system memory is full, the system answers after 10
rings. You should erase some messages so the answering system may
record new messages.
ERASING MESSAGES
You may erase messages in the following three ways:
To erase a message while it is playing
1. Press and release the respective mailbox button (play/stop 1 or play/
stop 2 or play/stop 3)
2. Press review and skip button to select and play the message you want
to erase.
3. Press the del button, the current message is erased, and the next
message plays.
To erase all previously played Messages in a mailbox
1. Make sure the phone is OFF (not in talk mode)
2. Press the del button, the answerer will announce "
MESSAGES, PRESS MAILBOX
3. Press the mailbox button (play/stop 1 or play/stop 2 or play/stop 3).
4. The answerer will announce "
To erase a message from the handset :
1. Press the flash/answerer button on the handset
2. Press the play/stop (key 2) followed by the mailbox number on the
handset (eg. Press key 2 and then key 3 to play messages in mailbox in
mailbox 3)
".
ALL MESSAGES ERASED MAILBOX X
TO ERASE
".
17
Page 18

3. Press the erase (key 0) on the handset to erase a message during playback.
NOTE: Erased messages cannot be restored.
LEAVING A MEMO
Use the memo feature to leave a message.
1. Press the memo button and it will announce “
HOLD MAILBOX
2. Press and hold the play/stop 1, 2, or 3 button. You must hold the button
until you finish recording the memo.
3. Begin speaking after it announces “
4. Release the mailbox button when finished.
”
RECORD MESSAGE
TO RECORD, PRESS AND
”.
TELEPHONE SETUP
PROGRAMMING THE TELEPHONE
STANDBY SCREEN
The handset displays the handset number and user name.
AM
11:30
RAYMOND
HANDSET 1
PROGRAMMABLE FUNCTIONS
The system uses a menu structure to give you access to all of the built-in
features. You may program the following items in main menu: Room
Monitor and Handset Setup.
ROOM MONITOR
1. Make sure your phone is OFF (not in talk mode).
2. Press the MUTE/PROG button to go to the main menu.
18
ROOM MONITOR
HANDSET SETUP
Page 19
3. Press CID/VOL ( or ) button to scroll to ROOM MONITOR.
4. Press MUTE/PROG button and
ROOM MONITOR EXTENSION?
shows
in the display.
ROOM MONITOR
EXTENSION ?
5. Press the handset number of the handset being monitored.
6. If handset 1 is the room monitoring initiator, the following displays will
be shown.
ROOM MONITOR
HANDSET 2
ROOM MONITOR
HANDSET 1
Calling handset 1 Called handset 2
NOTE: If handsets have been named, then the name will be displayed on LCD
instead of handset numbers.
NOTE: During the room monitoring, it will emit a beep tone if there are
incoming calls. You may press TALK/END/CALLBACK button to answer the
call and quit the room monitor mode.
NOTE: Press the *EXIT button on the handset to exit the room monitor.
NOTE: After you initiate the room monitor, you can switch to use handset
speakerphone to do the room monitoring by pressing the SPK button on the
initiater handset.
HANDSET SETUP
You may program the following items:
Language, Handset Name, Ringer Tone, Ringer Volume, VIP Melody, Key
Tone ON/OFF, Message Alert, Ring Select, Security Code, Area Code,
Registration, De-Registration and Default Setting.
During programming, you may press the *EXIT button at any time to exit
the menu and go to the sub-menu and keep the previous setting.
19
Page 20

LANGUAGE
1. Make sure your phone is OFF (not in talk mode).
2. Press the MUTE/PROG button to go to the main menu.
3. Press CID/VOL ( or ) button to scroll to
4. Press MUTE/PROG button to confirm.
5. Press the CID/VOL ( or ) button to scroll to the SET LANGUAGE menu.
6. Press MUTE/PROG button to enter the menu.
2FRA 3ESP
7. Use the touch tone pad on the handset to select
use the CID/VOL ( or ) button to scroll to the desired language.
English is the default setting.
8. Press the MUTE/PROG button to save your selection. You will hear a
confirmation tone and the selected language shows in the display.
shows in the display.
HANDSET SETUP.
SET LANGUAGE 1ENG
1ENG, 2FRA, 3ESP
or
HANDSET NAME
1. Make sure your phone is OFF (not in talk mode).
2. Press the MUTE/PROG button to go to the main menu.
3. Press CID/VOL ( or ) button to scroll to
4. Press MUTE/PROG button to confirm.
5. Press the CID/VOL ( or ) button to scroll to the HANDSET NAME menu.
6. Press MUTE/PROG button to enter the menu.
the display.
7. Use the touch-tone pad to enter a name (up to 15 characters). More than
one letter is stored in each of the number keys. For example, to enter
Bill Smith, press the 2 key twice for the letter B. Press the 4 key 3 times
for the letter I. Press the 5 key 3 times for the letter L. Wait for 1 second,
press the 5 key 3 times for the second letter L, and press the 1 key to
insert a space between the first and last name. Press the 7 key 4 times
for the letter S; press the 6 key once for the letter M; press the 4 key 3
times for the letter I. Press the 8 key for the letter T; press the 4 key twice
for the letter H.
HANDSET SETUP.
HANDSET NAME
shows in
20
Page 21

NOTE: If you make a mistake, use the DEL button to backspace and delete
one character at a time.
8. Press the MUTE/PROG button to save your name. You will hear a
confirmation tone and the handset name shows in the display.
RINGER TONE
You may choose from ten different ringer tones and ten different melodies.
1. Make sure your phone is OFF (not in talk mode).
2. Press the MUTE/PROG button to go to the main menu.
3. Press CID/VOL ( or ) button to scroll to
4. Press MUTE/PROG button to confirm.
5. Make sure the ringer is turned on. See Ringer Volume section.
6. Press the CID/VOL ( or ) button to scroll to the RINGER TONE menu.
7. Press MUTE/PROG button to enter the menu.
shows in the display. “01” is default setting.
8. Use the CID/VOL ( or ) button to scroll to the desired setting. You will
hear a sample of the ringer tone you select.
9. Press the MUTE/PROG button to save your selection. You will hear a
confirmation tone and the selected ringer tone shows in the display.
NOTE: Numbers 1 through 10 are for ringer tone and 11 through 20 are
for melodies.
HANDSET SETUP.
SET RINGER TONE 01
RINGER VOLUME
1. Make sure your phone is OFF (not in talk mode).
2. Press the MUTE/PROG button to go to the main menu.
3. Press CID/VOL ( or ) button to scroll to
4. Press MUTE/PROG button to confirm.
5. Press the CID/VOL ( or ) button to scroll to the RINGER VOLUME menu.
6. Press MUTE/PROG button to enter the menu.
3OFF
shows in the display.
HANDSET SETUP.
SET RINGER 1HI 2LOW
21
Page 22
7. Use the touch tone pad on the handset to select 1, 2 or 3, or use the CID/
VOL ( or ) button to scroll to your selection. HI is the default setting.
8. Press the MUTE/PROG button to save your selection. You will hear a
confirmation tone and the new volume setting shows in the display.
NOTE: If you turn the ringer OFF, the ringer off icon “ “ shows in
the display.
VIP MELODY
This feature allows you to assign a specific melody to someone whose call,
you want to get your attention. When a VIP melody is assigned and that
person calls, the VIP melody will ring instead of the normal ring. You may
choose from 10 different polyphonic melodies and 10 different ring tones.
NOTE: This feature only works when the following conditions are met; You
have subscribed to caller ID and you have your caller ID record transferred to
the memory. (Refer to Transferring CID Records To Memory).
STORING VIP MELODY
1. Make sure your phone is OFF (not in talk mode).
2. Press the MUTE/PROG button to go to the main menu.
3. Press CID/VOL ( or ) button to scroll to HANDSET SETUP.
4. Press MUTE/PROG button to confirm.
5. Press the CID/VOL ( or ) button to scroll to the VIP MELODY menu.
6. Press MUTE/PROG button to enter the menu.
display.
7. Press the CID/VOL ( or ) button to select the VIP melody memory
location (VIP 01 to VIP 10).
NOTE: If the memory location is occupied, the memory location and stored
melody and number appear in the display. If the memory location is empty,
EMPTY shows in the display.
VIP 1
shows in the
8. Press the MUTE/PROG button.
SELECT MEMORY
shows in the
display for 2 seconds and then display the user memory record for
the user to select.
22
Page 23
NOTE: If the memory dialing storage is empty, “NO USER MEMORY” shows in
the display.
9. Press the CID/VOL ( or ) button to select the desired memory record.
10. Press the MUTE/PROG button to confirm your selection. The display
shows
VIP MELODY
NOTE: If the desired number was previously stored in one of 10 VIP melody
records, “DUPLICATE NUMBER” shows in the display.
.
11. Press the CID/VOL ( or ) button to select the melody. You will hear a
sample of the melody you select.
12. Press MUTE/PROG button to confirm your selection. The selected
number and melody will show in the display for 2 seconds.
CHANGING A STORED VIP MELODY RECORD
1. Use the Storing VIP Melody procedure from item 1 to 12.
2. Then,
REPLACE VIP # ?
shows in the display, you must press MUTE/
PROG button on the handset to confirm replacement.
NOTE: To change a stored melody in a VIP melody location, you must first
delete it and then re-enter a new melody.
REVIEWING AND DELETING STORED VIP MELODY RECORD
1. Press the MUTE/PROG button to enter VIP MELODY menu.
2. Use the CID/VOL ( or ) button to scroll to the desired VIP melody record.
3. If you want to delete the information, press the DEL button on the
handset while the entry displays. The display show
4. Press DEL again to confirm. You will hear a confirmation tone and
DELETED
shows in the display.
DELETE VIP # ?
VIP#
KEY TONE
This feature lets you turn off the key tone at night or in a quiet environment.
1. Make sure your phone is OFF (not in talk mode).
2. Press the MUTE/PROG button to go to the main menu.
3. Press CID/VOL ( or ) button to scroll to
HANDSET SETUP.
23
Page 24

4. Press MUTE/PROG button to confirm.
5. Press the CID/VOL ( or ) button to scroll to the KEY TONE menu.
6. Press MUTE/PROG button to enter the menu.
shows in the display.
7. Use the touch tone pad on the handset to select 1 or 2, or use the CID/VOL
( or ) button to scroll to your selection.
8. Press the MUTE/PROG button to confirm. You will hear a confirmation
tone and the key tone setting shows in the display.
SET KEY TONE 1ON 2OFF
1ON
is the default setting.
MESSAGE ALERT (FOR ANSWERING MACHINE)
This feature sets your answering machine to give alert tone for every 10
seconds when there are new messages.
1. Make sure your phone is OFF (not in talk mode).
2. Press the MUTE/PROG button to go to the main menu.
3. Press CID/VOL ( or ) button to scroll to
4. Press MUTE/PROG button to confirm.
5. Press the CID/VOL ( or ) button to scroll to the MESSAGE ALERT menu.
6. Press MUTE/PROG button to enter the menu.
2OFF
shows in the display.
7. Use the touch-tone pad to enter the selection, or use the CID/VOL ( or
) button to scroll to the
8. Press the MUTE/PROG button to confirm. You will hear a confirmation
tone and the new setting shows in the display.
1ON
or
2OFF
HANDSET SETUP.
NEW MSG ALERT 1ON
. The default setting is
2OFF.
RING SELECT (FOR ANSWERING MACHINE)
This feature lets you select the number of times you want to phone to ring
before the answering system answers a call.
1. Make sure your phone is OFF (not in talk mode).
2. Press the MUTE/PROG button to go to the main menu.
3. Press CID/VOL ( or ) button to scroll to
4. Press MUTE/PROG button to confirm.
HANDSET SETUP.
24
Page 25

5. Press the CID/VOL ( or ) button to scroll to the RING SELECT menu.
6. Press MUTE/PROG button to enter the menu.
RING SELECT 3 4 5 6 TS
shows in the display.
7. Use the CID/VOL ( or ) button to scroll to the your selection. The
default setting is 5.
8. Press the MUTE/PROG button to confirm. You will hear a confirmation
tone and the new setting shows in the display.
NOTE: If you select Toll Saver (TS) the unit answers after the 3rd ring if there
are NEW messages, OR the unit answers after the 5th ring if there are NO new
messages. This allows user to access their answerer from another location and
then hang up after 4 rings to save long distance charges.
SECURITY CODE (FOR ANSWERING MACHINE)
You can access the answering system from a tone dialing telephone in
another (remote) location. The security code is required for remote access,
and it prevents unauthorized access to your answering system.
1. Make sure your phone is OFF (not in talk mode).
2. Press the MUTE/PROG button to go to the main menu.
3. Press CID/VOL ( or ) button to scroll to
4. Press MUTE/PROG button to confirm.
5. Press the CID/VOL ( or ) button to scroll to the SECURITY CODE menu.
6. Press MUTE/PROG button to enter the menu.
shows in the display.
7. Use the touch-tone pad to enter your new 3-digit security code. The
default setting is
123
.
8. Press the MUTE/PROG button to confirm. You will hear a confirmation
tone and the new security code shows in the display.
NOTE: If you make a mistake, use the DEL button to backspace and erase the
wrong digit.
HANDSET SETUP.
SECURITY CODE 1 2 3
25
Page 26

AREA CODE
1. Make sure your phone is OFF (not in talk mode).
2. Press the MUTE/PROG button to go to the main menu.
3. Press CID/VOL ( or ) button to scroll to
4. Press MUTE/PROG button to confirm.
5. Press the CID/VOL ( or ) button to scroll to the AREA CODE menu.
6. Press MUTE/PROG button to enter the menu.
shows in the display. The default setting is - - -.
7. Use the touch-tone pad to enter your 3 digit area code.
8. Press the MUTE/PROG button to confirm. You will hear a confirmation
tone and the new area code shows in the display.
NOTE: To restore the default setting to - - -, press and release DEL when
“SET AREA CODE” shows in the display.
HANDSET SETUP.
SET AREA CODE - - -
REGISTRATION
This setting may be made with the expandable handsets. Your dual
handsets are pre-registered and ready to use. It is not recommended that
handset be registered again unless absolutely necessary.
1. Make sure your phone is OFF (not in talk mode).
2. Press the MUTE/PROG button to go to the main menu.
3. Press CID/VOL ( or ) button to scroll to
4. Press MUTE/PROG button to confirm.
5. If necessary, press the CID/VOL ( or ) button to scroll to the
REGISTRATION menu. Then, press MUTE/PROG button to enter the menu.
REGISTRATION ? 1YES 2NO
6. Use the touch-tone pad to select 1 for
VOL ( or ) button to scroll to
7. If you select
selection.
1YES
, press the MUTE/PROG button to confirm your
HOLD BASE PAGE WAIT FOR BEEP
shows in the display. The default is
1YES
HANDSET SETUP.
YES
or 2 for NO. Or use the CID/
or
2NO
.
shows in the display.
2NO.
26
Page 27

8. Press and hold the page button on the base unit until you hear a long tone
at the handset.
HANDSET X REGISTERED
shows in the handset display,
where X is the handset number. You will hear a confirmation tone.
NOTE: After you have registered one handset, wait 10 seconds before
registering another handset to ensure successful registration.
DE-REGISTRATION
Deregistration cancels registration. During the de-registration process,
keep the handset near the base.
1. Make sure your phone is OFF (not in talk mode).
2. Press the MUTE/PROG button to go to the main menu.
3. Press CID/VOL ( or ) button to scroll to
4. Press MUTE/PROG button to confirm.
5. If necessary, press the CID/VOL ( or ) button to scroll to the
DEREGISTRATION menu. Then, press MUTE/PROG button to enter the
menu.
is
DEREGISTRATION? 1YES 2NO
2NO
.
6. Use the touch-tone pad to select 1 for
VOL ( or ) button to scroll to
WARNING: It is not recommended that a handset be de-registered unless
absolutely necessary because once a handset is de-registered, that handset's
telephone features cannot be used until the handset is re-registered.
1YES
7. Select NO, if you do not want to deregister.
8. If you select
TO BASE
1YES
, press the MUTE/PROG button and
displays for 2 seconds, then
in the display.
9. Press the touch-tone pad to select
or ) button to scroll to
10. If you select
DE-REGISTER .....
Then
HANDSET X DEREGISTERED
YES
, press the MUTE/PROG button to confirm.
shows in the display followed by a confirmation tone.
1YES
1YES
or
2NO
shows in the display to confirm the
handset is deregistered.
HANDSET SETUP.
shows in the display. The default
YES
or 2 for NO. Or use the CID/
or
2NO
.
MOVE NEAR
CONFIRM? 1YES 2NO
or
2NO
, or use the CID/VOL (
appears
.
27
Page 28
NOTE: When you complete the deregistration process, “HANDSET NEEDS
REGISTRATION” shows in the display. To use the handset, you must
register the handset.
GLOBAL DE-REGISTRATION
If one or more handsets becomes lost, you should de-register all handsets
to ensure proper system operation. Follow the steps below to deregister
both handsets at the same time.
WARNING: It is not recommended that a handset be de-registered unless
absolutely necessary because once a handset is de-registered, that handset's
telephone features cannot be used until the handset is re-registered.
NOTE: Before starting global de-registration procedure, let all handsets sit
idle for 20 seconds.
1. Press and hold the PAGE button on the base until the in use/charging
indicator on the base flashes.
2. Press and hold the PAGE button on the base again until the in use/
charging indicator on the base flashes rapidly.
3. Press and release the PAGE button on the base once. All handsets are deregistered and
HANDSET NEEDS REGISTRATION
shows in the display.
DEFAULT SETTING
As you become familiar with this system, you may prefer to use the
system’s original settings. Follow the steps below to return to the factory
default settings.
1. Make sure your phone is OFF (not in talk mode).
2. Press the MUTE/PROG button to go to the main menu.
3. Press CID/VOL ( or ) button to scroll to
4. Press MUTE/PROG button to confirm.
5. Press the CID/VOL ( or ) button to scroll to the DEFAULT
SETTING menu.
6. Press the MUTE/PROG button to enter the menu.
1YES 2NO
shows in the display.
HANDSET SETUP.
DEFAULT SETTING
28
Page 29

7. Use the touch-tone pad to select
button to move the cursor to
NOTE: If you choose “YES” all the settings in the programmable menu are
returned to factory default setting.
8. Press the MUTE/PROG button to save your selection. You will hear a
confirmation tone.
1YES
1YES
or
or
2NO. 2NO
2NO
, or use the CID/VOL ( or )
is the default setting.
TELEPHONE OPERATION
CHARGE INDICATOR
When the in use/charging indicator on the base or the charge indicator
on the extra charger is lit, the handset is correctly seated in the cradle
and is charging.
MAKING CALLS
1. Pick up the handset, and press the TALK/END/CALLBACK button.
Listen for a dial tone.
2. Dial the number you want to call, or dial the number first then press the
TALK/END/CALLBACK button.
3. When finished, press the TALK/END/CALLBACK button to hang up.
ANSWERING CALLS
1. When the phone rings, pick up the handset, and press the TALK/END/
CALLBACK button.
2. When finished, press TALK/END/CALLBACK to hang up.
NOTE: Adjust the handset volume by pressing the CID/VOL ( or )
button during a call.
SPEAKERPHONE OPERATION
ANSWERING A CALL WITH SPEAKERPHONE
1. When the phone rings, press the SPKR button on the handset.
2. When finished, press the SPKR button again to hang up.
MAKING A CALL WITH SPEAKERPHONE
1. Make sure the phone is OFF (not in talk mode).
29
Page 30
2. Dial the desired number
or
Press the CID/VOL ( or ) button to select the desired record,
or
Press MEM button and then use CID/VOL ( or ) button to scroll to
desired memory record.
3. Press SPKR to dial number
4. When finished, press the SPKR button again to hang up.
NOTE: If you are using the handset earpiece and want to switch to the
speakerphone, press the SPKR button, you can then press SPKR again to end
conversation. If you are using the speakerphone and want to switch to the
handset earpiece, press the TALK/END/CALLBACK button, you can then
press TALK/END/CALLBACK again to end conversation.
CALL TIMER
After you press the TALK/END/CALLBACK button on the handset, the built-in
call timer shows on the display and counts the length of time of the call in
minutes and seconds.
PRE-DIALING
1. Make sure the phone is OFF (not in talk mode).
2. Enter the telephone number you want to call. The telephone number
shows in the handset display.
3. Press the TALK/END/CALLBACK or SPKR buttons on the handset, and
the number automatically dials.
NOTE: You may enter up to 32 pre-dial digits.
NOTE: If you want to delete the pre-dial number you entered, press the DEL
button until all of the digits are erased, or press the *exit button to erase all
numbers at once.
AUTO STANDBY
If you place the handset in the cradle while the handset is off the hook
(during a call), the call is automatically disconnected.
RINGER HI/LOW/OFF SHORTCUT
Apart from the setting in the main menu, there is a shortcut to set the
ringer. Make sure the phone is OFF (not in talk mode).
30
Page 31

1. Press the #PAUSE/RINGER button to go to RINGER VOLUME menu.
RINGER 1HI 2LOW 3OFF
2. Use the touch tone pad on the handset to select 1HI, 2LOW or 3OFF, or
use the CID/VOl ( or ) button to scroll to your selection.
3. Press #PAUSE/RINGER button to save your selection. You will hear a
confirmation tone and the new volume setting shows in the display for 2
seconds and you will hear a confirmation tone.
shows in the display.
SET
FLASH/CALL WAITING
If you subscribe to the combined Call Waiting Caller ID service from your
local telephone company, you will receive Caller ID information (if
available) on Call Waiting calls. During a phone call, you will hear a beep
to indicate another call is waiting on the line and the Caller ID information
for the waiting call shows on the handset display.
• To connect to the waiting call, press the FLASH/answerer button on the
handset, and your original call is put on hold.
• To switch between the two calls, press the FLASH/answerer button.
TIP: Don’t press the TALK/END/CALLBACK button on the handset to activate
a custom calling service, such as call waiting, or you’ll hang up the phone.
NUMBER REDIAL
You may redial a number up to 32 digits long.
To quickly redial the last number you dialed:
1. Press the TALK/END/CALLBACK or SPKR buttons.
2. Press the REDIAL button.
-OR-
To choose from the last three numbers you dialed:
1. Press the REDIAL button first, then use the CID/VOL ( or ) button to
select the desired redial number.
• Press the CID/VOL () to review the oldest call and scroll toward the
most recent calls (higher numbers).
• Press the CID/VOL () button to review the newest call and scroll to
older calls (lower numbers).
2. Press the TALK/END/CALLBACK or SPKR buttons. The number dials
automatically.
31
Page 32

If you get a busy signal and want to keep dialing the number, press the
REDIAL button to quickly redial the number.
EXIT
Press the *EXIT button to exit a menu function and return to the
standby screen.
PAGE
The page feature helps you locate a misplaced handset. To send and receive
pages, all handsets must be registered. If your handset is not registered,
follow the instructions in the Registration section of this manual.
HANDSET TO HANDSET PAGING
Dual handsets are respectively named as Handset 1 and Handset 2.
1. Make sure the phone is OFF (not in talk mode).
2. Press and release the PAGE/INT button on a handset.
EXTENSION?
3. Use the touch-tone pad to enter the handset number you want to page.
NOTE: If more than 2 handsets have been registered, you can page all
handsets by pressing 5.
4. To cancel the page, press the *EXIT button, or press the PAGE/INT
button. Or you may press TALK/END/CALLBACK on the receiving
handset to enter intercom mode.
shows in the display.
PAGING
PAGING FROM THE BASE/GROUP PAGE
Use the base-only to page all registered handsets at the same time.
1. Press the page button on the base. Both handsets beep for two minutes,
and
PAGING FROM BASE
2. To cancel the page, press the page button on the base, or press the
TALK/END/CALLBACK button or the *EXIT button on each handset.
shows on each handset’s display.
MUTE
To have a private, off-line conversation, use the MUTE feature. The party
on the telephone line cannot hear you, but you can hear them.
1. Press the MUTE/PROG button. The handset display shows
2. Press the MUTE/PROG button to cancel and return to your
phone conversation.
MUTE ON
.
32
Page 33

RECEIVER VOLUME CONTROL
When the handset is ON (in talk mode) you may adjust the receiver volume by
pressing the CID/VOL ( or ) button. There are four volume levels to choose
from. When the maximum or minimum volume level is reached, the phone
beeps twice. VOL 1 is minimum and VOL 4 is maximum.
DO NOT DISTURB (DND)
DND allows you to turn off the ringer on the handsets and call screening
on the answerer at once even though the handsets have been set to High
or Low. To do this,
1. In the standby mode, press the DO NOT DISTURB button on the base.
The DND backlit indicator will turn on and “
each handset display.
2. To cancel, press DO NOT DISTURB again.
NOTE: You can also enable DND even when there is incoming call ringing in.
NOTE: You can also enable DND to stop the call screening after the call is
taken by the answerer.
DO NOT DISTURB
” shows in
INTERCOM OPERATION
The intercom feature allows you to have a conversation with another
registered handset without tying up the telephone line. And since the
telephone line is not in use, you may still receive incoming calls.
MAKING AN INTERCOM CALL
1. Make sure the phone is OFF (not in talk mode).
2. Press the PAGE/INT button on the handset.
3. Use the touch-tone pad to select the handset you want to page.
NOTE: To cancel page, press the PAGE/INT button again or the *EXIT
button on the sending handset.
4. Wait for the person at the receiving handset to press the PAGE/INT button.
NOTE: If the receiving handset does not answer within two minutes, the
intercom call is automatically canceled. The originating handset displays
“NO ANSWER”.
33
Page 34

5. When finished, press the *EXIT button or PAGE/INT button on either
handset to deactivate the intercom.
RECEIVING AN INTERCOM CALL
When you receive an intercom call, your handset beeps. To answer the call
press the PAGE/INT button or TALK/END/CALLBACK button.
ADVANCED INTERCOM FEATURES
RECEIVING AN INCOMING TELEPHONE CALL DURING AN INTERCOM CALL
If you receive a telephone call during an intercom call, the intercom call is
immediately terminated and both handsets ring. Either handset user may
press the TALK/END/CALLBACK button to answer the call.
USING INTERCOM WITH EXTERNAL TELEPHONE CALLS
During a telephone call, you may use the intercom/paging function to page
another handset and have an off line, private (two-way) intercom
conversation. You may also have a three-way conversation between the
external caller and the handsets, or you may transfer the external
telephone call to another handset.
NOTE: Before you intercom/page another handset, you must decide whether
you want to create a two-way or a three-way conversation.
TWO-WAY CALLING
1. During an external call, press the PAGE/INT button, and use the touchtone pad to enter the handset number (1 or 2) you want to call.
NOTE: The receiving handset presses the PAGE/INT button to answer the
intercom call. Both intercom users may speak privately. The external caller will
not hear the intercom conversation.
2. When finished, press the *EXIT button or PAGE/INT button to end the
intercom call, return to the talk mode, and resume your original
telephone conversation.
THREE-WAY CALLING
1. During an external call, press the PAGE/INT key.
EXTENSION?
34
shows in the display.
LINE ON HOLD
Page 35

2. Use the touch-tone pad to select Handset 1 or Handset 2. You will hear a
paging tone and
NOTE: “PAGING FROM...” shows in the display on the receiving handset, and
the receiving handset presses the PAGE/INT or TALK/END/CALLBACK
button to answer the intercom.
3. When the receiving handset connects, press the FORMAT/CONF button
on the originating handset to conference with the receiving handset and
the external caller.
originating and receiving handsets.
NOTE: A handset can enter conference directly by pressing TALK/END/
CALLBACK while another handset is talking on an external call.
PAGING
shows in the originating handset’s display.
CONFERENCE
shows in the display on the
TRANSFERRING EXTERNAL CALLS TO OTHER HANDSETS
During an external call, you may transfer the external call to another handset.
1. Press the PAGE/INT button on the originating handset to put an external
call on hold, and then page the receiving handset.
2. Use the touch-tone pad on the handset to select the receiving handset.
You will hear a paging tone.
display, and
3. When the receiving handset connects, press the TALK/END/CALLBACK
button on the originating handset to transfer the call.
Press the TALK/END/CALLBACK button on the originating handset to
transfer the call. If the receiving handset does not answer within 30
seconds, the originating handset rings back and displays
the originating handset does not answer within 20 seconds, the call is
automatically dropped.
PAGING FROM . . .
-OR-
PAGING
shows on the originating handset’s
shows on the receiving handset’s display.
CALLBACK
. If
MEMORY
You may store fifty 15-character names and 20-digit telephone numbers in
the handset memory.
35
Page 36

STORING A NAME AND NUMBER IN MEMORY
1. Make sure the phone is OFF (not in talk mode).
2. Press the MEM button to display
3. Press the desired memory location button (01 through 50) or use the
CID/VOL ( or ) button to scroll to desired the memory location.
NOTE: If the memory location is occupied, the memory location number and
stored name and telephone number appear in the display. If the memory
location is empty, EMPTY appears in the display.
SELECT MEMORY 01-50
.
4. Press the MEM button. The display shows
ENTER NAME
.
5. Use the touch-tone pad to enter a name (up to 15 characters). More than
one letter is stored in each of the number keys. For example, to enter Bill
Smith, press the 2 key twice for the letter B. Press the 4 key 3 times for the
letter I. Press the 5 key 3 times for the letter L. Press the 5 key 3 times for
the second letter L, and press the 1 key to insert a space between the first
and last name. Press the 7 key 4 times for the letter S; press the 6 key once
for the letter M; press the 4 key 3 times for the letter I; press the 8 key for
the letter T; press the 4 key twice for the letter H.
NOTE: If you make a mistake press the DEL button to backspace and erase
the wrong character(s) or number(s).
6. Press the MEM button to confirm and save the record. The display
shows
ENTER TEL NUMBR
.
7. Use the touch-tone pad to enter the telephone number (up to 20 digits,
including pauses), and press the MEM button again to save the record.
The unit beeps to confirm.
NOTE: The system treats PAUSES as delays or spaces in the dialing sequence.
8. To enter another name and number in a different memory location,
return to step 2 and repeat the process.
STORING THE LAST NUMBER DIALED
Make sure the phone is OFF (not in talk mode).
1. Repeat Step 1 through 6 in Storing a Name and Number in Memory
36
Page 37

2. Press the Redial button.
3. Press MEM button again to confirm. You will hear a confirmation tone.
NOTE: If the redial number is longer than 20 digits, the redial number cannot
be stored in memory.
INSERTING A PAUSE IN THE DIALING SEQUENCE (OF A STORED NUMBER)
Press the #PAUSE button on the handset’s touch-tone pad to insert a delay
in dialing sequence of a stored number when a pause is needed to wait
for a dial tone (for example, after you dial 9 for an outside line, or to
wait for a computer access tone.) Each pause counts as one digit in the
dialing sequence.
You can press the #PAUSE button to insert a P (pause) when you enter the
telephone number during memory storing.
REVIEWING RECORDS STORED IN MEMORY
1. Make sure the phone is OFF (not in talk mode).
2. Press the MEM button to display
3. Press the CID/VOL ( or ) buttons to scroll the records, or use the
handset’s touch-tone pad to enter the memory location number (01-50).
SELECT MEMORY 01-50
.
CHANGING RECORDS STORED IN MEMORY
Follow items 1 to 7 for Storing Names and Numbers in Memory.
DELETING RECORDS STORED IN MEMORY
1. Make sure the phone is OFF (not in talk mode).
2. Press the MEM button to display
3. Press the CID/VOL ( or ) buttons to scroll to the record you want
to delete or use the touch-tone pad to enter the desired memory
location (01-50).
4. Press the DEL button to mark the record for deletion. The display
shows
5. Press the DEL button to delete the record.
NOTE: If you don’t want to change or delete a record, simply press the
*EXIT button, or wait for one minute to exit the review mode automatically.
DELETE?
SELECT MEMORY 01-50
DELETED
shows in the display.
.
37
Page 38

DIALING A NUMBER FROM MEMORY
1. Make sure the phone is ON (in talk mode) by pressing the TALK/END/
CALLBACK or SPKR buttons.
2. Press the MEM button to display memo # - -.
3. Use the touch tone pad to enter the memory location number (01-50).
The number dials automatically.
-OR-
1. Make sure the phone is OFF (not in talk mode).
2. Press the MEM button to display
3. Press the memory location for the phone number you want to dial, or use
the CID/VOL ( or ) button to scroll to the number you want to dial.
4. Press the TALK/END/CALLBACK or SPKR buttons. The number dials
automatically.
SELECT MEMORY 01-50
.
CHAIN DIALING FROM MEMORY
Use this feature to make calls which require a sequence of numbers, such
as a calling card number used for a frequently called long distance
number. The following example shows how you can store each part of the
dialing sequence and use chain dialing to make a call through a long
distance service:
The Number For Memory Location
Long Distance Access Number 7
Authorization Code 8
Frequently called long distance number 9
1. Make sure the phone is ON (in talk mode) by pressing the TALK/END/
CALLBACK or SPKR buttons.
2. Press the MEM button, and then press 07.
3. When you hear the access tone, press the MEM button, and then press 08.
4. At the next access tone, press the MEM button and then 09.
38
Page 39

CALLER ID (CID)
Caller ID (CID) is a service available from your local telephone company.
For Caller ID to work on this system, you must subscribe to Caller ID
service. To receive Caller ID information for a Call Waiting call, you must
subscribe to the combined Call Waiting Caller ID service.
This telephone system receives and displays CID information transmitted
by your local telephone company. This information may include the phone
number, date and time; or the name, phone number, and date and time.
Time call received
Date call received
Caller’s name
Sequence number of calls received
Caller’s phone number
CID ERROR CODES
Various Caller ID error messages may appear in the display. Refer to the
Display Messages section of this User’s Guide for more information.
RECEIVING CID RECORDS
When you receive a call, the Caller ID information is transmitted between
the first and second ring. The Caller ID information appears on the display
while the phone rings, giving you a chance to monitor the information and
decide whether or not to answer the call.
STORING CID RECORDS (IN CALLER ID MEMORY)
If you are not at home or cannot answer, your telephone’s Caller ID
memory stores the data for the 40 most recent calls you received so you
can see who called while you were unavailable. When the 41st call is
received, the oldest Caller ID record (1st call) is automatically deleted.
You may review the stored information at any time. Calls received since
your last review show as
NEW
in the display.
39
Page 40

REVIEWING CID RECORDS
As calls are received and stored, the display is updated to let you know
how many calls have been received. To scroll CID records:
1. Make sure the phone is OFF (not in talk mode).
2. Press the CID/VOL () button to review the newest CID record.
3. Press the CID/VOL () button to review the oldest CID record first.
As you review CID records, the display shows you the following information
for each call:
• The telephone number of the caller.
• The number of the call, with regard to the order received.
• The name of the caller, if this service is available in your area.
• Time and date the call was received.
•
NEW
appears for all calls that have not been previously reviewed.
•
REPT
shows in the display for a call that has not been previously
reviewed but is received from the same number more than once.
NOTE: Check with your local phone company regarding name
service availability.
STORING CID RECORDS IN INTERNAL MEMORY
You may also store CID information in the phone’s internal memory. You
may not reformat CID records stored in memory.
TIP: To prevent the CID information from automatically being deleted, you
may want to store it in the phone’s memory.
NOTE: It is important that you format CID records correctly before storing in
internal memory.
1. Make sure the phone is OFF (not in talk mode).
2. Use the CID/VOL ( or ) button to scroll to the desired CID record.
3. Press the MEM button to display
SELECT MEMORY 01-50
.
40
Page 41
4. Use the touch-tone pad to enter a memory location number (for
example, press 01 to store the record in memory location one).
NOTE: If the memory location is occupied, “REPLACE MEMO?” is displayed,
and you must confirm replacement by pressing the MEM button.
NOTE: Press the *EXIT button once to keep the previous setting and return
to the sub-menu.
DIALING A CID NUMBER
While reviewing CID records, you may dial the phone number showing in
the display.
1. Make sure the phone is OFF (not in talk mode).
2. Press CID/VOL ( or ) button until the desired CID record shows in
the display.
NOTE: Depending on (a) how the incoming caller’s phone number is
formatted when it is received, and (b) whether or not you previously preprogrammed your local area code into the set up menu, you may need to
adjust the format of the incoming caller’s stored phone number before
making the call.
Available formats include:
Number of digits Explanation Example
Eleven digits long distance code “1 ” 1-317-888-8888
+3-digit area code
+7-digit telephone number.
Ten digits 3-digit area code + 317-888-8888
7-digit telephone number.
Seven digits 7-digit telephone number. 888-8888
3. If the number does not dial as shown, press the FORMAT/CONF button.
Repeat if necessary, until the correct number of digits show in the display.
41
Page 42

4. Press the TALK/END/CALLBACK button on the handset. The number
dials automatically.
NOTE: If the telephone number is corrupted, such as a number in a name
field or an alphabetical character in a number field, you will hear an error
tone and the number is not dialed.
DELETING A CID RECORD
1. Make sure the phone is OFF (not in talk mode).
2. Use the CID/VOL ( or ) button to display the CID record you want
to delete.
3. Press the DEL button. The display shows
4. Press the DEL button to erase the record showing in the display. The
display shows
NOTE: Press the *EXIT key to return to the standby mode.
DELETED
.
DELETE CALL ID?
DELETING ALL CID RECORDS
1. Make sure the phone is OFF (not in talk mode).
2. Use the CID/VOL ( or ) button to scroll to any CID record.
3. Press and hold the DEL button until
4. Press DEL button to erase all of the current CID records. The display
shows
NOTE: Press the *EXIT key on the handset to return to the standby mode.
DELETED
followed by
DELETE ALL?
NO CALLS
shows in the display.
.
REMOTE ACCESS
You may access the answering system with the cordless handset or from
any tone-dial compatible telephone.
CORDLESS HANDSET
Use the corresponding handset keys just like you would use the base
buttons (see “Answering System Setup”). The button functions are located
on the handset above each number key. For example, to play messages:
42
Page 43

• Press the FLASH/answerer button. The display shows
REMOTE ACCESS
• Press 2 (play/stop) followed by the mailbox number to play the message
in that mailbox. For example, press 2 and 3 to play the message in
mailbox 3.
• When you are finished listening to your messages, press the FLASH/
answerer button again.
.
ANSWERER
ANSWERING SYSTEM INDICATOR
The answering system is active when the indicator on the base is on.
SCREENING CALLS FROM THE HANDSET
Use the handset to screen calls even when you can’t hear the
answering system.
When the answering system picks up:
1. Press the FLASH/answerer button to access the answering system.
2. Listen as the caller leaves a message.
3. Press the TALK/END/CALLBACK or SPKR buttons to speak to the person
or press the FLASH/answerer button to stop screening the call.
ACCESSING THE ANSWERING SYSTEM FROM ANOTHER LOCATION
You can access your answering system from any touch-tone phone by
entering your 3-digit security code during the playing of outgoing
announcement or after you hear the outgoing announcement.
1. Dial the telephone number to which the answering system is connected.
2. Enter the security code during the outgoing announcement or after you
hear the tone.
3. Follow the voice menu to use the answering system’s remote functions.
The remote feature lets you perform the following functions:
To Press this button
Review message 1
Play back messages 2
Select mailbox 1 or 2 or 3
43
Page 44

Stop message playback 2
Erase message 0 (during message playback)
Skip message 3
Turn off/on answerer 4
Review voice menu options 7
MEMORY FULL
When answering system memory is full, the system answers after 10
rings, beeps and waits for you to enter the 3-digit security code. If you
don’t enter the security code within 8 seconds, the phone hangs up.
You should erase some messages so the answering system can record
new messages.
NOTE: The unit also answers after the 10th ring if it is turned off. To access
the answering system, enter your 3-digit security code after you hear the beep.
CHANGING THE BATTERY
CAUTION: To reduce the risk of fire or personal injury, use only the
battery 5-2522 that is compatible with this unit.
1. Make sure the telephone is OFF (not in
talk mode) before you replace battery.
2. Remove the battery compartment cover.
3. Disconnect the cord attached to the
battery pack from the jack inside the
battery compartment and remove the
battery pack from the handset.
4. Insert the new battery pack and reconnect
the battery plug.
5. Put the battery compartment cover back on.
6. Place handset in the base or handset charge cradle to charge. If you
don’t charge the handset battery properly (for 16 hours) when you first
set up the phone and/or when you install a new battery pack, the
battery ’s long-term performance will be compromised.
Battery
compartment
Battery pack
Battery pack
plug
Battery
compartment jack
44
Page 45

NOTE: If the battery is not properly installed in the handset, or if the battery
pack is not properly connected to the jack inside the battery compartment.
“NO BATTERY” shows in the display when the handset is placed in the
charging cradle.
NOTE: If a battery is disconnected from the phone and then reconnected, the
phone must be placed in the base or charging cradle for 2 minutes to allow it
to reset.
BATTERY SAFETY PRECAUTIONS
• Do not burn, disassemble, mutilate or puncture. Like other batteries of
this type, toxic materials could be released which can cause injury.
• Keep batteries out of the reach of children.
• Remove batteries if storing over 30 days.
BELT CLIP AND OPTIONAL HEADSET
CONNECTING THE BELT CLIP
1. To attach the belt clip, insert the sides of the belt clip into
the slots on each side of the handset.
2. Snap the ends of the belt clip into place.
CONNECTING AN OPTIONAL HEADSET TO THE HANDSET
Each handset can be used with an optional headset for hands
free operation.
1. Connect the headset to the headset jack
on the side of the handset The handset
receiver and microphone are disabled
when the headset is connected.
2. Adjust the headset to rest comfortably on
top of your head and over your ear. Move
the microphone to approximately two to
three inches from your mouth.
3. Press the TALK/END/CALLBACK button to
answer a call or make calls using the headset.
4. To return to normal operation, unplug the headset from the jack.
Slot for belt clip
Belt clip
Headset jack
Headset Plug
45
Page 46

DISPLAY MESSAGES
The following messages shows the status of the phone, provides Caller ID
information, or helps you set up and use your phone.
INCOMPLETE DATA CID information is interrupted during
transmission or the phone line is excessively noisy.
HANDSET NAME Prompt telling you to enter the user name for the
registered handset.
ENTER NAME Prompt telling you to enter a name in one of
the 50 memory locations.
LINE IN USE Displays on handset while the line is in use.
ENTER TEL NUMBR Prompt telling you to enter a telephone number
in one of the 50 memory locations.
DELETE ALL? Prompt asking if you want to erase all
CID records.
DELETE CALL ID? Prompt asking if you want to erase the CID record
showing on the display.
DELETE? Prompt asking if you want to erase one of the 50
records stored in the phone’s memory.
END OF LIST Indicates that there is no additional information
in CID memory.
NEW Indicates call or calls which have not
been reviewed.
UNKNOWN CALLER Indicates incoming call is from an area not serviced
by CID or the CID information was not sent.
NO BATTERY Indicates the battery is not properly installed in the
handset, or the battery pack is not properly connected
to the jack inside the battery compartment.
46
Page 47

ANSWERER REMOTE Indicates the answering system is being
ACCESS accessed remotely.
HANDSET NEEDS Indicates you must register a non-registered
REGISTRATION handset prior to use
SEARCHING Indicates handset is searching for the base.
OUT OF RANGE Indicates handset is too far away from the base.
Move closer to the base.
PAGING or Someone pressed the PAGE/INT button on the
PAGING FROM base or handset.
BLOCKED NUMBER Indicates the person is calling from a number
which is blocked from transmission.
REPT Indicates a repeat call message. Indicates a new
call from the same number was received more
than once.
NO CALLS Indicates there are no CID records in memory.
NO DATA Indicates no CID information was received , you
are not subscribed to CID service, or CID service
is not working.
NEW CALL XX XX represents the number of new CID records
not reviewed.
Low Battery Indicates the battery needs to be charged.
LONG DISTANCE Indicates CID record is from a long distance call.
PRESS TALK KEY Indicates CID record is Direct Dial Number and
cannot be formatted.
Charging............ Indicates the handset needs to be charging for
certain time before it can be functioned properly.
This will happen when place the handset on
cradle after you insert the battery.
47
Page 48

HANDSET SOUND SIGNALS
Signal Meaning
A long warbling tone (with ringer on) Signals an incoming call
Three short beeps Page signal
One long beep Confirmation tone for the
completion of a function
One short beep (every 7 seconds) Low battery warning
One short beep (during room monitoring) Ring alert tone
TROUBLESHOOTING GUIDE
TELEPHONE SOLUTIONS
No dial tone
• Check or repeat installation steps:
Make sure the base power cord is connected to a working electrical outlet.
Make sure the telephone line cord is connected to the base and the
wall jack.
• Connect another phone to the same jack. If it doesn’t work, the problem
might be your wiring or local service.
• The handset may be out of range of the base. Move closer to the base
• Make sure the battery is properly charged (for 16 hours).
• Make sure the battery pack (in the handset) is properly installed.
• The handset should beep when you press the TALK/END/CALLBACK
button, and the charge indicator on the base should be lit when the
handset rests in the cradle. If not, the battery may need to be charged.
• Place handset in charge cradle for at least 20 seconds to reset the unit.
Handset does not ring
• Make sure the handset ringer is set to on, this can be done through the
handset setup menu - Ringer Volume.
48
Page 49

• The handset may be out of range of the base. Move closer to the base.
• You may have enabled Do Not Disturb (DND). Make sure the DND is off.
• You may have too many extension phones on your line. Try unplugging
some extension phones.
• Check for a dial tone.
You experience static, noise, or fading in and out
• The handset may be out of range of the base. Move closer to base.
• Make sure base is not plugged into an electrical outlet with another
household appliance. If necessary, relocate the base.
• Charge the battery (for 16 hours).
Unit beeps
• Clean the charging contacts on the cordless handset.
• See solutions for “No dial tone ” on previous page.
• Replace the battery.
Memory dialing doesn’t work
• Did you program the memory location keys correctly?
• Did you follow proper dialing sequence?
Unit locks up and no communication between the base and cordless handset
• Unplug the power supply from the electrical outlet and the back of the
base. Remove the handset battery. Wait for 30 seconds and plugthe
power supply back into the base and electrical outlet. Reconnect the
battery and charge for 16 hours.
Handset displays “
with the base when TALK/END/CALLBACK button is pressed.
SEARCHING
” or “
OUT OF RANGE
” and cannot link up
• Handset may be out of range from the base. Move closer to the base.
• Make sure the power supply is properly installed.
• Disconnect the handset battery and plug it again. Place the handset on
the cradle for at least 2 to 3 minutes.
49
Page 50

• Disconnect the power supply and plug it in again. Then place the
handset on the cradle for at least 2 to 3 minutes.
Handset displays
• Follow the programming in the telephone procedures to re-register the
handset to the base.
• Press the MUTE/PROG key to start the registration and follow
the procedure.
HANDSET NEEDS REGISTRATION
CALLER ID SOLUTIONS
No Display
• Charge the battery (for 16 hours). Or replace the battery.
• Make sure the unit is connected to a non-switched electrical outlet.
Disconnect the power supply from the base and reconnect it.
Caller ID Error Message
• The unit displays this message if it detects anything other than valid
Caller ID information during the silent period after the first ring. This
message indicates the presence of noise on the line.
No Caller ID
• You must be subscribed to the standard Name/Number Caller ID service
from your local telephone company to receive CID information.
BATTERY
If you experience any of the following problems, even after recharging the
battery, you may need to replace the battery pack:
• Short talk time
• Poor sound quality
• Limited range
• In use/charging indicator of the base or charge indicator of the extra
charging cradle fails to turn on
50
Page 51

GENERAL PRODUCT CARE
To keep your unit working and looking good, follow these guidelines:
• Avoid dropping the handset, as well as other rough treatment to the phone.
• Clean the phone with a soft cloth.
• Never use strong cleaning agents, paint thinner, abrasive powder,
alcohol, or other chemical products to clean the unit. Doing so will
damage the finish.
• Retain the original packaging in case you need to ship the phone at a
later date.
• Periodically clean the charge contacts on the handset with a clean
pencil eraser.
CAUSES OF POOR RECEPTION
• Aluminum siding.
• Foil backing on insulation.
• Heating ducts and other metal construction that can shield radio signals.
• You ’re too close to appliances such as microwaves, stoves, computers, etc.
• Atmospheric conditions, such as strong storms.
• Base is installed in the basement or lower floor of the house.
• Base is plugged into AC outlet with other electronic devices.
• Baby monitor is using the same frequency.
• Handset battery is low.
• You ’re out of range of the base.
51
Page 52

INDEX
A
Accessing the Answering System from
Another Locati 43
Accessory Order Form 55
Advanced Intercom Features 34
Answering Calls 29
Answering System Indicator 43
Answering System Operation 14
Area Code 25
Auto Standby 30
B
Base Layout 8
Battery 50
Battery Safety Precautions 45
Belt clip and Optional Headset 45
C
Call Timer 30
Caller ID (CID) 39
Caller ID Solutions 50
Causes of Poor Reception 51
Chain Dialing from Memory 38
Changing a Stored VIP Melody Record
23
Changing Records Stored in Memory 37
Changing the Battery 44
Charge Indicator 29
CID Error Codes 39
Connecting an Optional Headset to the
Handset 45
Connecting the AC (Electrical) Power 12
Connecting the Belt Clip 45
Connecting the Telephone Line 12
Cordless Handset 42
D
De-Registration 26
Default Setting 28
Deleting a CID Record 42
Deleting All CID Records 42
Deleting Records Stored in Memory 37
Dialing a CID Number 41
Dialing a Number from Memory 38
Display Messages 46
Do Not Disturb (DND) 33
E
Erasing Messages 17
Exit 32
F
FCC RF Radiation Exposure Statement 5
Flash/Call Waiting 31
G
General Product Care 51
Global De-registration 27
H
Handset Charge Cradle Layout 8
Handset Layout 7
Handset Name 20
Handset Setup 19
Handset Sound Signals 48
Handset to Handset Paging 32
Hearing Aid Compatibility (HAC) 2
I
Important Information 2
Inserting a Pause in the Dialing
Sequence (of a St 37
Installation 10
Installation Guidelines 10
Installing the Handset Battery 11
Installing the Phone 11
Intercom Operation 33
Interference Information 2
Introduction 5
K
Key Tone 23
52
Page 53

L
Language 19
Leaving a Memo 17
M
Mailbox Indicator 16
Making an Intercom Call 33
Making Calls 29
Memory 35
Memory Full 17, 44
Message Alert 24
Message Counter 15
Messages Playback 16
Mute 32
N
Number Redial 31
P
Page 32
Paging from the Base/Group Page 32
Parts Checklist 9
Pre-Dialing 30
Programmable Functions 18
Programmation du Téléphone 18
R
Receiver Volume Control 33
Receiving an Incoming Telephone Call
During an Int 34
Receiving an Intercom Call 34
Receiving CID Records 39
Recording the Outgoing Announcement
14
Registration 26
Remote Access 42
REN Number 54
Reviewing and Choosing the
Announcement 14
Reviewing and Deleting Stored VIP
Melody Record 23
Reviewing CID Records 40
Reviewing Records Stored in Memory
37
Ring Select 24
Ringer HI/LOW/OFF Shortcut 30
Ringer Tone 20
Ringer Volume 21
Room Monitor 18
S
Screening Calls from the Base 16
Screening Calls from the Handset 43
Security Code 25
Service 54
Setting the Voice Prompt Language 14
Speaker Volume 13
Standby Screen 18
Storing a Name and Number in Memory
36
Storing CID Records (In Caller ID
Memory) 39
Storing CID Records in Internal Memory
40
Storing the Last Number Dialed 36
Storing VIP Melody 22
T
Telephone Jack Requirements 9
Telephone Network Information 54
Telephone Operation 29
Telephone Solutions 48
Three-Way Calling 34
Transferring External Calls to Other
Handsets 35
Troubleshooting Guide 48
Two-Way Calling 34
U
Using Intercom with External Telephone
Calls 34
V
VIP Melody 22
Voice Instruction 14
Voice Time/Day Stamp 13
53
Page 54

TELEPHONE NETWORK INFORMATION
Should your equipment cause trouble on your line which may harm the
telephone network, the telephone company, where practicable, may notify
you that temporary discontinuance of service may be required. Where
prior notice is not practicable and the circumstances warrant such action,
the telephone company may temporarily discontinue service immediately.
The telephone company may make changes in its communications
facilities, equipment, operations or procedures where such action is
required in the operation of its business. If these changes are expected to
affect the use or performance of your telephone equipment, the telephone
company will likely give you adequate notice to allow you to maintain
uninterrupted service.
Notice must be given to the telephone company upon termination of your
telephone from your line.
REN NUMBER
On the bottom of this equipment is a label indicating, among other
information, the Ringer Equivalence Number (REN) for the equipment.
The REN is useful in determining the number of devices you may connect
to your telephone line and still have all of these devices ring when your
telephone number is called. In most (but not all) areas, the sum of the
RENs of all devices connected to one line should not exceed 5. To be
certain of the number of devices you may connect to your line as
determined by the REN, you should contact your local telephone company.
SERVICE
ATLINKS Communications Canada, Inc., warrants to the purchaser or gift recipient that if any
manufacturing defect becomes apparent in this product within 1 year from the original date
of purchase, it will be replaced free of charge, including return transportation.
This warranty does not include damage to the product resulting from accidents, misuse or
leaking batteries.
Should your product not perform properly during the warranty period, either:
1. Return it to the selling dealer with proof of purchase for replacement,
OR
2. Remove the batteries (where applicable), and pack product complete with accessories in
the original carton (or equivalent).
54
Page 55

— Mail prepaid (with proof of purchase) and insured to:
ATLINKS Communications Canada, Inc.
c/o Thomson Multimedia Ltd.
6200 Edwards Boulevard
Mississauga, Ontario
Canada L5T 2V7
The provisions of this written warranty are in addition to and not a modification of or
subtraction from the statutory warranties and other rights and remedies contained in any
applicable legislation, and to the extent that any such provisions purport to disclaim, exclude
or limit any such statutory warranties and other rights and remedies, such provisions shall
be deemed to be amended to the extent necessary to comply therewith.
If you are unable to find a qualified servicer for out of warranty service, you may write to:
ATLINKS Communications Canada, Inc.
c/o Thomson Inc.
P.O. Box 0944
Indianapolis, Indiana, U.S.A., 46206-0944
Attach your sales receipt to this booklet for future reference. This information is required if
service is needed during the warranty period.
PURCHASE DATE _____________________________________________________________________
NAME OF STORE _____________________________________________________________________
ACCESSORY ORDER FORM
DESCRIPTION MODEL NO. PRICE*
AC power supply 5-2596 $20.85
Belt Clip (silver black) 5-2649 $4.95
Headset 5-2425 $36.35
Replacement Handset Battery 5-2522 $20.35
To place order, have your Visa, MasterCard, or Discover Card ready
and call toll-free 1-800-338-0376.
A shipping and handling fee will be charged upon ordering. Items are subject to availability.
We are required by law to collect appropriate sales tax for each individual state, country,
and locality to which the merchandise is being sent.
*Prices are subject to change without notice.
55
Page 56

Model 21028
00001087 (Rev 1 E/F )
04-52
Printed in China
ATLINKS Communications Canada Inc.
© 2004 ATLINKS Communications Canada, Inc.
Trademark(s) ® Registered
Marque(s) ® déposée(s)
Page 57

21028
Système téléphonique à deux combinés
de 2,4 GHz à afficheur d’appel en attente
Guide de l’utilisateur
Les bonnes choses de la vie.
1
Page 58

RENSEIGNEMENTS IMPORTANTS
AVIS: Ce produit est conforme aux spécifications techniques applicables d’Industrie Canada.
Avant d’installer cet appareil, l’utilisateur doit vérifier s’il est permis de le raccorder aux
installations de la compagnie locale de télécommunications. L’installation doit de plus
respecter les méthodes de raccordement approuvées. L’abonné doit savoir que le respect
des conditions mentionnées ci-dessus n’empêche pas nécessairement la détérioration du
service dans certaines situations.
La réparation des appareils certifiés doit être confiée à un service de maintenance canadien
dûment autorisé, désigné par le fournisseur. Toute réparation ou modification effectuée par
l’utilisateur peut amener la compagnie à exiger le débranchement de l’installation.
Par mesure de sécurité, les utilisateurs doivent s’assurer du raccordement réciproque des
circuits de mise à la terre du service public d’énergie, des lignes téléphoniques et — s’il y a
lieu — des systèmes intérieurs de conduites d’eau métalliques. Cette précaution peut
s’imposer particulièrement dans les régions rurales.
ATTENTION: Les utilisateurs ne doivent pas essayer de faire eux-mêmes ces
raccordements. Ils doivent communiquer avec le service d’inspection compétent ou faire
appel à un électricien, selon le cas.
NOTES: Cet appareil ne peut être utilisé pour le service payant (monnaie) fourni par la
compagnie de téléphone.
RENSEIGNEMENTS SUR L’INTERFÉRENCE
Cet appareil produit et utilise l’énergie radiofréquence qui peut gêner la réception radio et
télévision résidentielle s’il n’est pas installé ou utilisé conformément aux instructions
contenues dans ce guide. Une protection raisonnable est assurée contre une telle
interférence, mais rien ne garantit qu’un appareil donné ne produira pas d’interférence. Si
on soupçonne et confirme une interférence d’une ou plus des façons suivantes: réorienter
l’antenne du récepteur radio ou télévision, éloigner l’appareil du récepteur ou brancher
l’appareil et le récepteur dans des prises de circuits différents. L’utilisateur peut aussi
demander conseil à un technicien en radio-télévisìon compétent. Cet appareil a été mis à
l’essai et répond à toutes les limites des appareils informatiques de Classe B, conformément
à l’alinéa 15, des Règlements de la FCC. Cet appareil est conforme à la régle RSS-210
d’Industrie Canada. Son fonctionnement est soumis aux deux conditions suivantes : (1) Cet
appareil ne peut causer de l’interférence, et (2) Cet appareil doit accepter toute interférence,
y compris l’interférence pouvant entraîner le fonctionnement non souhaitable de l’appareil.
COMPATIBILITÉ AVEC LES PROTHÈSES AUDITIVES (CPA)
Ce téléphone est conforme aux normes FCC/Industrie Canada en matière de compatibilité
avec les prothèses auditives.
REN (facteur d’équivalence de sonnerie) SE TROUVE À LA BASE DE L’APPAREIL
2
Page 59
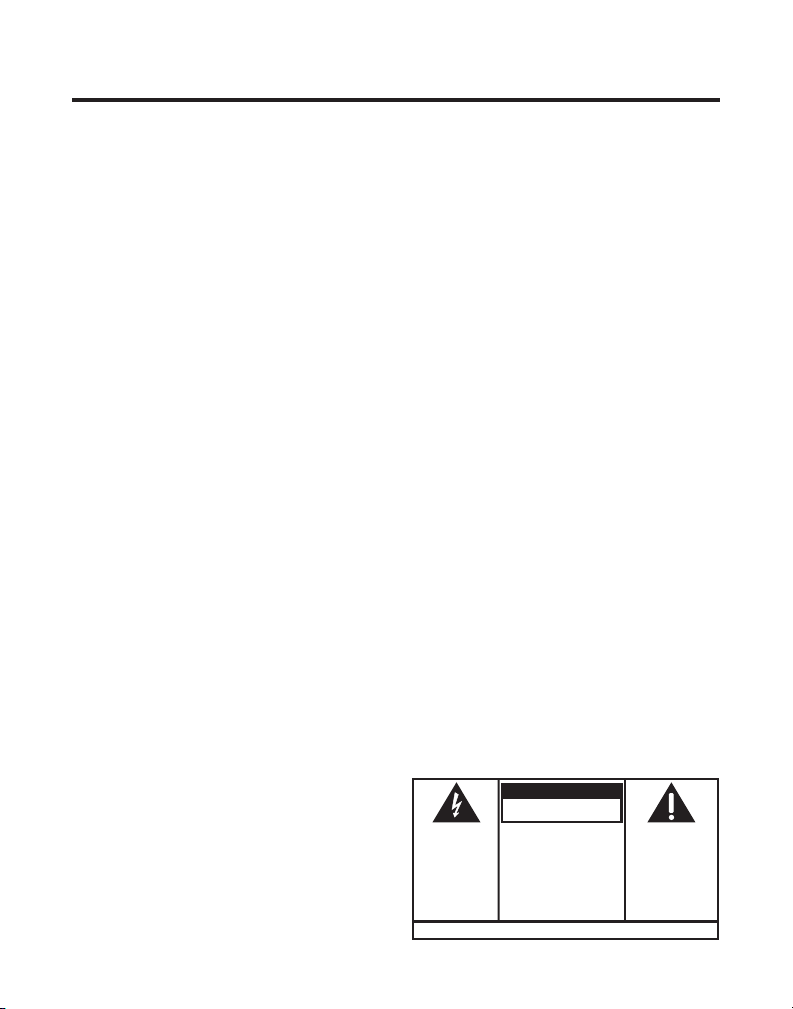
TABLE DES MATIÈRES
RENSEIGNEMENTS IMPORTANTS ....................... 2
RENSEIGNEMENTS SUR L’INTERFÉRENCE ............ 2
COMPATIBILITÉ AVEC LES PROTHÈSES A UDITIVES
(CPA) ................................................ 2
TABLE DES MATIÈRES ..................................... 3
ÉNONCÉ SUR L’EXPOSITION AU RAYONNEMENT RF
DE LA FCC .......................................... 5
INTRODUCTION ............................................. 5
PRÉSENTATION DU COMBINE ........................... 7
PRÉSENTATION DE LA BASE ............................ 8
PRÉSENTATION DU SOCLE DE CHARGEMENT DE
COMBINE ............................................ 8
LISTES DE PIECES ......................................... 9
EXIGENCES DE LA PRISE T ÉLÉPHONIQUE ........ 9
L’ INSTALLATION........................................... 10
LIGNES DIRECTRICES SUR L’ INSTALLATION ... 10
INSTALLATION DE LA PILE DANS LE COMBINE 11
INSTALLATION DU T ELEPHONE .................... 11
RACCORDEMENT DE L’ALIMENTATION C.A.
(ELECTRIQUE) ......................................... 12
RACCORDEMENT DE LA LIGNE T ELEPHONIQUE 12
SÉLECTION DE LA LANGUE DU MESSAGE D’ACCUEIL
12
PROGRAMMATION DU RÉPONDEUR ................. 13
ANNONCE VOCALE DATE /HEURE ET HORLOGE
T EMPS RÉEL ...................................... 13
EN
VOLUME DU HAUT-PARLEUR ...................... 13
INSTRUCTIONS VOCALES ........................... 13
ENREGISTREMENT DU MESSAGE D’ACCUEIL .14
RÉVISION ET SÉLECTION DU MESSAGE D’ACCUEIL
14
PROGRAMMATION DU RÉPONDEUR ................. 14
COMPTEUR DE MESSAGE ......................... 14
POUR LAISSER UN MESSAGE ..................... 15
FILTRAGE DES APPELS À PARTIR DE LA BASE 16
INDICATEURS DES BOÎTES VOCALES ............. 16
REPRODUCCIÓN DE MENSAJES .................. 16
EFFACER LES MESSAGES.......................... 16
ÉCOUTE DES MESSAGES .......................... 17
LAISSER UNE NOTE ................................. 17
PARAMÈTRES DU TÉLÉPHONE ......................... 18
PROGRAMMATION DU T ÉLÉPHONE ............... 18
ÉCRAN D’ATTENTE .................................. 18
FUNCTIONS PROGRAMMABLES .................. 18
ÉCOUTE À DISTANCE ................................ 18
PARAMÈTRES DU COMBINÉ ....................... 19
LANGUE ........................................ 19
NOM DE COMBINE .......................... 20
TONALITE DE SONNERIE ................... 20
VOLUME DE LA SONNERIE ................ 21
MÉLODIE VIP ................................ 22
MÉMORISATION DES MÉLODIES VIP ............... 22
MODIFICATION D’UN DOSSIER ENREGISTRÉ DE
MÉLODIE VIP ......................................... 23
REVUE ET SUPPRESSION D’UN DOSSIER
ENREGISTRÉ DE MÉLODIE VIP ................... 23
TONALITÉ DU CLAVIER ...................... 23
ALERTE DE MESSAGE ....................... 24
SÉLECTION DE SONNERIE .................. 24
CODE DE SÉCURITÉ .......................... 25
CODE RÉGIONAL ............................. 25
ENREGISTREMENT ........................... 26
DESENREGISTREMENT ...................... 27
DESENREGISTREMENT GLOBAL .......... 27
REGLAGE PAR DEFAUT ..................... 28
FONCTIONNEMENT DU T ELEPHONE .................. 28
INDICATEUR DE CHARGEMENT.................... 28
FAIRE DES APPELS .................................. 29
AVERTISSEMENT:
AFIN D'ÉVITER LES
DANGERS
D'INCENDIE ET
D'ÉLECTROCUTION,
NE PAS EXPOSER
CET APPAREIL À LA
PLUIE NI À
L'HUMIDITÉ.
ATTENTION:
RISQUE DE CHOC ÉLECTRIQUE
NE PAS ENLEVER
LE SYMBOLE DE
L'ÉCLAIR ILLUSTRÉ
DANS UN TRIANGLE
EST UN AVERTISSEMENT INDIQUANT
UNE "TENSION
DANGEREUSE" À
L'INTÉRIEUR DE
L'APPAREIL.
VOIR LES INSCRIPTIONS SOUS L'APPAREIL OU À L'ARRIÉRE DU BOÎTiER.
ATTENTION:AFIN DE RÉDUIRE
LES RISQUES
D'ÉLECTROCUTION, NE PAS
ENLEVER LE COUVERCLE (NI LE
CÔTÉ ARRIÈRE). AUCUNE
PIÈCE INTÉRIEURE NE PEUT
ÊTRE RÉPARÉE PAR
L'UTILISATEUR. POUR TOUTE
RÉPARATION, CONSULTER DES
TECHINICIENS COMPÉTENTS.
LE POINT D’EXCLAMATION
ILLUSTRÉ DANS UN
TRIANGLE EST UN
AVERTISSEMENT
INDIQUANT QUE
L’APPAREIL EST FOURNI
AVEC DES INSTRUCTIONS
IMPORTANTES.
3
Page 60

REPONDRE AUX APPELS ........................... 29
FONCTIONNEMENT DU HAUT-PARLEUR ............. 29
RÉPONDRE Á UN APPEL A VEC LE HAUT-PARLEUR
29
PLACER UN APPEL AVEC LE HAUT-PARLEUR 29
MINUTERIE D’APPEL ................................ 30
PRECOMPOSITION .................................... 30
ATTENTE AUTOMATIQUE .......................... 30
RACCOURCI DE NIVEAU DE SONNERIE HAUT/BAS/
ARRET .................................................. 30
FLASH/APPEL EN ATTENTE ....................... 31
RECOMPOSITION DU NUMERO ................... 31
QUITTER ............................................... 31
RECHERCHE ........................................... 32
RECHERCHE DE COMBINE A COMBINE .32
RECHERCHE A PARTIR DE LA BASE/
RECHERCHE DE GROUPE .............. 32
MUTE ................................................... 32
COMMANDE DE VOLUME DU RECEPTEUR ..... 32
SOURDINE ............................................. 33
FONCTIONNEMENT DE L’INTERPHONE .............. 33
FAIRE UN APPEL D’INTERPHONE ........ 33
RECEPTION D’UN APPEL D’INTERPHONE34
FONCTIONS AVANCEES DE L’ INTERPHONE..... 34
RECEVOIR UN APPEL PENDANT UN APPEL
D’INTERPHONE ........................... 34
UTILISATION DE L’INTERPHONE AVEC LES
APPELS EXTERIEURS ................... 34
APPEL A DEUX ....................................... 34
APPEL A T ROIS ....................................... 34
RENVOI D’APPELS EXTERIEURS A D’AUTRES
COMBINES ............................................. 35
MEMOIRE .................................................. 35
MEMORISATION D’UN NOM ET D’UN NUMERO 35
MÉMORISATION DU DERNIER NUMÉRO
COMPOSÉ .............................................. 36
INSERTION D’UNE PAUSE DANS LA SEQUENCE
COMPOSITION .................................... 37
DE
CONSULTATION DES NUMEROS MEMORISES 37
REMPLACEMENT DE DOSSIERS MEMORISES .37
SUPPRESSION DE DOSSIERS MEMORISES .... 37
COMPOSITION D’UN NUMERO MEMORISE ... 37
COMPOSITION EN CHAINE A PARTIR DE LA
MEMOIRE .............................................. 38
AFFICHEUR ................................................ 38
CODES D’ERREUR D’AFFICHEUR ................. 39
RECEPTION DE DOSSIERS D’APPELANTS ...... 39
MEMORISATION DE DOSSIERS D’APPELANTS
(DANS LA MEMOIRE
L’ AFFICHEUR)...................................... 39
DE
CONSULTATION DES DOSSIERS D’APPELANTS 39
MEMORISATION DES DOSSIERS D’APPELANTS
LA MEMOIRE INTERNE ..................... 40
DANS
COMPOSITION D’UN NUMERO D’APPELANT .40
SUPPRESSION D’UN DOSSIER D’APPELANT .. 41
EFFACEMENT DE T OUS LES DOSSIERS ......... 41
ACCÈS À DISTANCE ..................................... 42
COMBINÉ SANS FIL ................................. 42
INDICATEUR DE RÉPONDEUR .............. 42
FILTRER LES APPELS À PARTIR DU COMBINÉ 42
ACCÈS AU RÉPONDEUR À PARTIR D’UN AUTRE
ENDROIT ............................................... 43
MÉMOIRE PLEINE ................................... 43
REMPLACEMENT DE LA PILE .......................... 43
PRÉCAUTIONS À PRENDRE ........................ 44
PINCE-CEINTURE ET CASQUE EN OPTION ........ 44
RACCORDEMENT DE LA PINCE-CEINTURE ..... 44
RACCORDEMENT D’UN CASQUE OPTIONNEL AU
CASQUE ................................................ 45
MESSAGES D’AFFICHEUR ............................. 45
SIGNAUX SONORES DU COMBINE .................. 47
GUIDE DE DEPANNAGE ................................ 47
INDEX ....................................................... 50
SOINS ET ENTRETIEN ................................... 52
CAUSES DE MAUVAISE RÉCEPTION ................ 52
INFORMATION SUR LE RÉSEAU T ÉLÉPHONIQUE .. 52
FACTEUR D’ÉQUIVALENCE DE SONNERIE ......... 53
BON DE COMMANDE D’ACCESSOIRES ............. 53
SERVICE APRÈS-VENTE ................................ 54
CONSERVEZ CES INSTRUCTIONS
4
Page 61

ÉNONCÉ SUR L’EXPOSITION AU RAYONNEMENT RF DE LA FCC
Cet équipement est conforme aux limites d’exposition au rayonnement RF de la
FCC établies pour un environnement non contrôlé. Cet équipement doit être
installé et utilisé en maintenant une distance minimale de 20 centimètres entre le
radiateur et votre corps. Cet émetteur ne doit pas être placé ou utilisé avec une
autre antenne ou un autre émetteur.
Pour l’utilisation sur soi, ce téléphone a été mis à l’essai et est conforme aux
lignes directrices en matière d’exposition RF de la FCC lorsque utilisé avec la
pince-ceinture fournie avec ce produit. L’utilisation d’autres accessoires peut ne
pas être conforme avec les lignes directrices de la FCC en matière d’exposition RF.
INTRODUCTION
ATTENTION : Vous devez respecter certaines règles de sécurité lorsque vous
utilisez un appareil téléphonique. Reportez-vous aux INSTRUCTIONS
IMPORTANTES DE SÉCURITÉ qui accompagnent ce produit et conservez-les
pour référence ultérieure.
Nous vous félicitons d’avoir acheté ce système téléphonique à deux combinés
sans cordon de GE. Ce système, qui fonctionne dans l’échelle de fréquences de 2,4
GHz, est unique par rapport aux téléphones sans cordon conventionnels. Lorsque
la base est branchée dans une prise de courant et une ligne téléphonique, vous
pouvez placer un combiné sans cordon toutes fonctions partout où on trouve une
prise de courant.
Caractéristiques :
• Technologie numérique de l’étalement du spectre 2,4 GHz
• Interphone de combiné à combiné
• Conférence à 2
• Compatible avec l’appel en attente et l’afficheur
• Mélodie VIP
• Composition-mémoire d’un maximum de 50 noms et numéros
• Répondeur avec 3 boîtes vocales
• Extensible jusqu’à 4 combinés (avec l’achat du combiné optionnel, modèle
21009A, avec socle de chargement)
REMARQUE: La technologie d’étalement du spectre ne requiert pas de changements
de canaux.
5
Page 62

Ce téléphone est un appareil facile à utiliser, mais vous pouvez en tirer le
maximum plus rapidement en prenant quelques minutes pour lire ce guide de
l’utilisateur. Ce téléphone est un appareil multifonctionnel compatible avec les
services d’appel en attente et d’afficheur offerts par la compagnie de téléphone.
Le téléphone à afficheur et appel en attente permet de :
• Voir le nom et le numéro de téléphone d’un appelant (afficheur d’appel en
attente) pendant une conversation téléphonique.
• Identifier les appelants avant de répondre au téléphone.
• Voir l’heure et la date de chaque appel reçu.
• Enregistrer un maximum de 40 messages d’appelants en séquence.
• Sachez qui a appelé pendant que vous étiez au téléphone sur l’autre ligne ou
durant votre absence.
• Filtrer les appels inutiles, éliminer les appels ennuyeux ou vous préparer avant
de répondre.
IMPORTANT: Étant donné que les téléphones sans cordon fonctionnent à l’électricité,
vous devriez disposer d’au moins un téléphone avec cordon dans la maison, en cas de
panne de courant.
IMPORTANT: Pour utiliser toutes les fonctions de ce téléphone, vous devez être
abonné à deux services distincts offerts par la compagnie de téléphone : le service
d’afficheur de nom/numéro standard pour savoir qui appelle quand le téléphone
sonne et le service d’afficheur d’appel en attente pour savoir qui appelle pendant
que vous parlez au téléphone.
6
Page 63
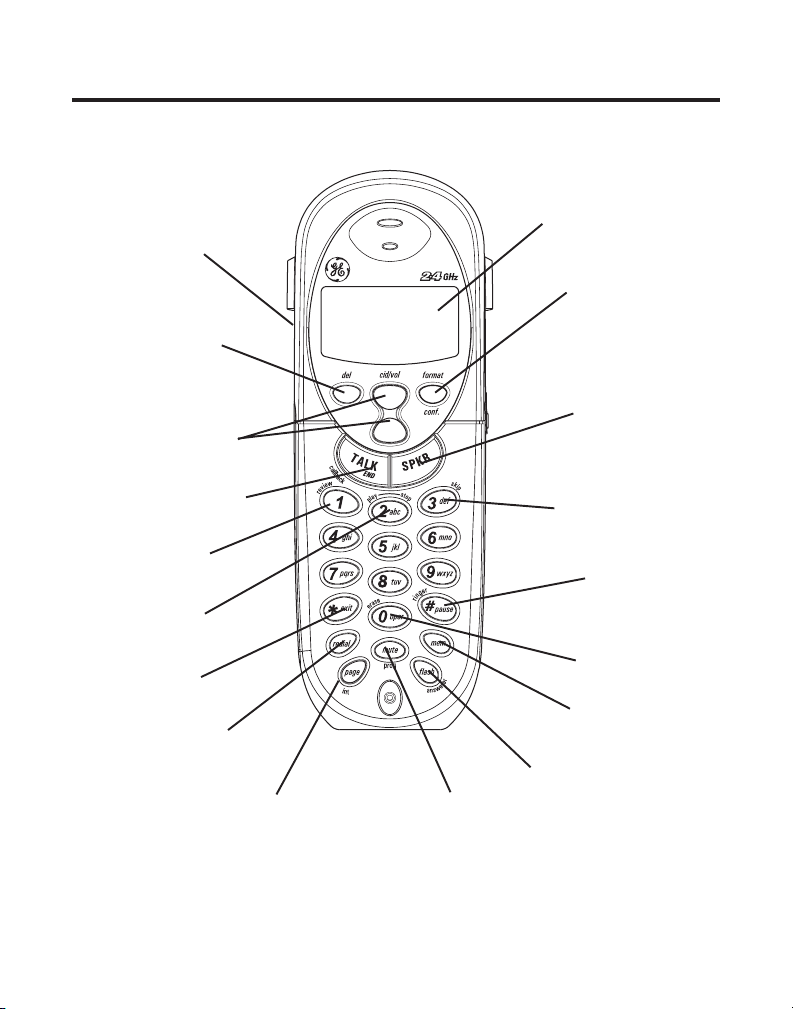
PRÉSENTATION DU COMBINE
Haut-parleur
del
(bouton suppresion)
Display
(Afficheur)
format/conf
(bouton format/
conférence)
cid/vol
(bouton ID
appelant/volume)
TALK/END/callback
(bouton parlow/fin/
rappeler)
review
(bouton révision)
play/stop
(bouton écoute/arrêt)
*exit
(bouton *quitter)
redial
(bouton recomposition)
(bouton recherche/
page/int
interphone)
mute/program
(bouton sourdine/
programmation)
SPKR
(bouton haut-parler)
skip
(bouton d’évitement)
# pause/ringer
(bouton #pause/
sonnerie)
erase
(bouton d’effacement)
mem
(bouton mémoire)
flash/answerer
(bouton flash/
résponse)
7
Page 64
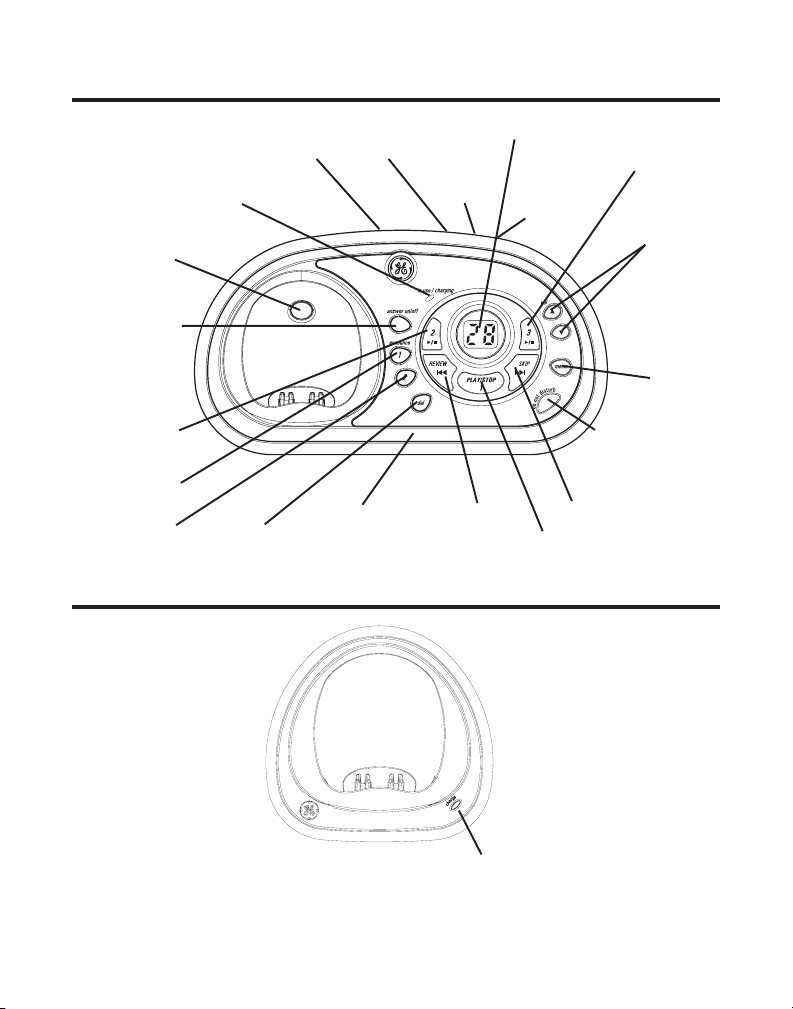
PRÉSENTATION DE LA BASE
Indicateur du compteur
de messages
HOUR
(bouton
heure)
REVIEW
(bouton révision)
(bouton/indicateur écoute/arrêt 1)
PLAY/STOP 3
(bouton/indicateur
écoute/arrêt 3)
MINUTE
(bouton)
DO NOT DISTURB
(bouton de sourdine)
SKIP
(bouton d’évitement)
PLAY/STOP 1
(bouton haut-parler)
in use/charging
(indicateur marche/
charge)
PAGE
(bouton
recherche)
answer on/off
(bouton marche/
arrêt du répondeur
PLAY/STOP 2
(bouton/
indicateur
écoute/arrêt 2)
announce 1
(bouton)
announce 2
(buoton)
SPEAKER
del
(bouton suppresion)
DAY/CHECK
(bouton jour/
vérification)
Microphone
PRÉSENTATION DU SOCLE DE CHARGEMENT DE COMBINE
vol
(bouton
volume)
memo
(bouton
mémo)
Indicateur de chargement
8
Page 65

LISTES DE PIECES
Assurez-vous que l’emballage contient les articles illustrés.
Base Combinés doubles
combiné
Piles et couvercles du
compartiment des piles
Pinces-ceintureAlimentation c.a. Cordon téléphonique Socle de chargement de
EXIGENCES DE LA PRISE TÉLÉPHONIQUE
Pour utiliser ce téléphone, vous devez disposer dans la
maison d’une prise téléphonique modulaire de type RJ11C
(CA11A), qui peut ressembler à celle illustrée ici. Si aucune
prise modulaire n’est installée, en faire installer une par la
compagnie de téléphone.
téléphonique
modulaire
Plaque murale
Prise de
ligne
9
Page 66

L’INSTALLATION
NOTE SUR L’INSTALLATION : Certains téléphones sans fil fonctionnent à des
fréquences qui peuvent causer ou subir de l’interférence de téléviseurs, fours à microondes et magnétoscopes situés à proximité. Pour réduire ou éviter cette interférence, la
base de votre téléphone sans fil ne devrait pas être placée près ou sur un téléviseur, un
four à micro-ondes ou un magnétoscope. Si l’interférence persiste, déplacez le
téléphone sans fil à une plus grande distance de ces appareils. D’autres appareils de
communications peuvent aussi utiliser la fréquence de 2,4 GHz pour communiquer et si
ces appareils ne sont pas installés correctement, ils peuvent interagir entre eux et avec
votre nouveau téléphone. Si vous êtes aux prises avec de l’interférence, consultez les
guides d’utilisation de ces appareils sur la manière de paramétrer les canaux afin
d’éliminer l’interférence. Les appareils courants susceptibles d’utiliser la fréquence de
2,4 MHz comprennent les émetteurs sans fil audio/vidéo, les réseaux informatiques sans
fil, les systèmes téléphoniques sans fil avec postes multiples et certains systèmes
téléphoniques sans fil à grande portée.
• Ne jamais installer les câbles téléphoniques pendant un orage électrique.
• Ne jamais installer de prises téléphoniques dans des endroits humides, à moins
qu’elles soient spécialement conçue pour endroits humides.
• Ne jamais toucher les fils ou bornes téléphoniques non isolés, à moins que la
ligne téléphonique ait été débranchée de l’interface réseau.
• Installer ou modifier les lignes téléphoniques avec soin.
• Débranchez temporairement tout équipement raccordé au téléphone, comme
des télécopieurs, d’autres téléphones ou des modems.
LIGNES DIRECTRICES SUR L’INSTALLATION
• Installez le téléphone près d’une prise téléphonique (modulaire) et d’une prise
de courant.
• Évitez les sources de bruit, comme une fenêtre donnant sur une rue
achalandée, et le bruit électrique produit par les moteurs, les fours à microondes et les lampes fluorescentes.
• Évitez les sources de chaleur, comme les conduites d’air chaud, les appareils de
chauffage et la lumière directe du soleil.
• Évitez les endroits extrêmement humides ou froids.
• Évitez les endroits poussiéreux.
• Évitez les autres téléphones sans cordon et les ordinateurs personnels.
10
Page 67
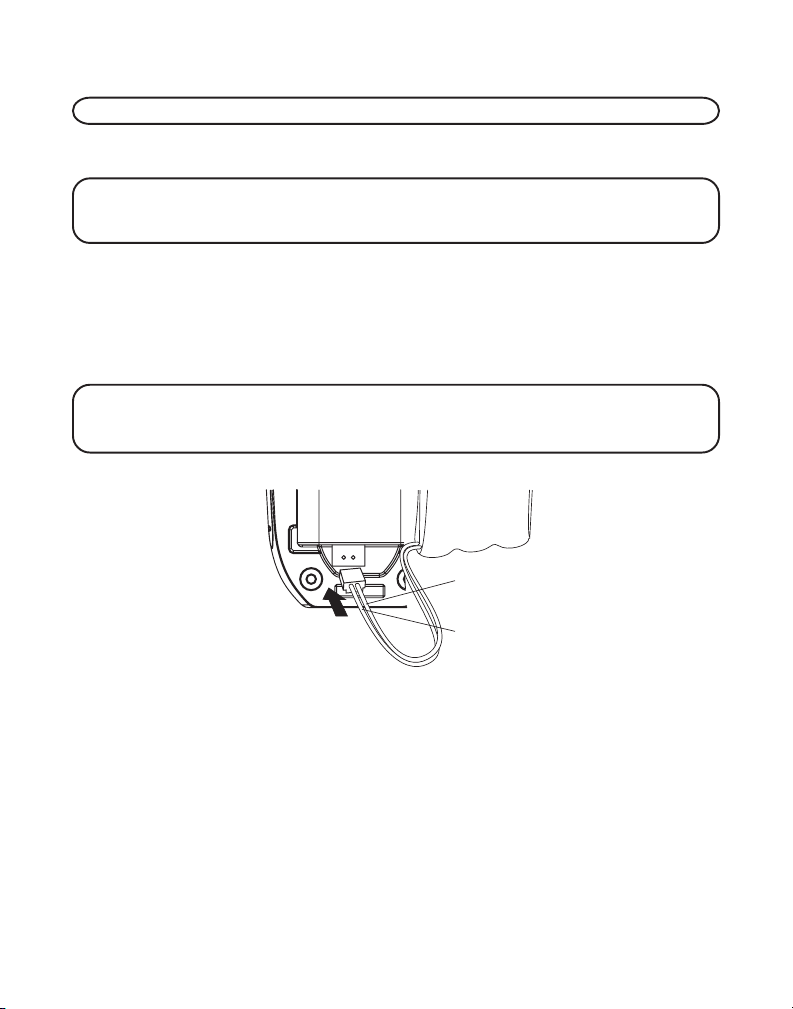
INSTALLATION DE LA PILE DANS LE COMBINE
REMARQUE: Vous devez raccorder la pile du combiné avant l’utilisation.
1. Insérez la fiche du bloc-piles dans la prise située à l’intérieur du compartiment
des piles.
REMARQUE: Il est important de maintenir la polarité (fils noir et rouge) de la prise à
l’intérieur du logement, tel qu’illustré. Pour assurer une installation correcte de la pile,
le connecteur est claveté et ne peut être inséré que dans une seule position.
2. Replacez le couvercle du compartiment et faites-le enclencher.
3. Placez les combinés sur les socles de chargement.
Laissez les combinés se charger pendant 16 heures avant l’utilisation initiale. Si
vous ne chargez pas correctement les combinés, le rendement de la pile sera
compromis.
REMARQUE: Si la pile n’est pas installée correctement dans le combiné ou si le blocpile n’est pas raccordé correctement à la prise dans le compartiment de la pile, le
message“NO BATTERY” (pas de pile) s’affiche quand le combiné est replacé sur le socle.
PILE
FIL NOIR
APPUYEZ
FERMENEN
FIL ROUGE
INSTALLATION DU TELEPHONE
Choisissez le meilleur endroit possible pour installer la base et le socle de
chargement des combinés. La base et le socle de chargement des combinés
doivent être placés sur une surface plane comme un bureau ou une table.
11
Page 68

RACCORDEMENT DE L’ALIMENTATION C.A. (ELECTRIQUE)
1. Sur la base, branchez une extrémité du cordon d’alimentation dans la prise de
courant à l’arrière de la base et l’autre dans une prise de courant.
ATTENTION : Utilisez seulement l’alimentation 5-2596 de ATLINKS USA, Inc.
qui accompagne l’appareil. L’utilisation d’autres alimentations peut
endommager l’appareil.
2. Branchez le socle de chargement des combinés dans une prise de courant.
REMARQUE: L’indicateur marche/chargement situé sur le socle et celui du socle de
chargement du combiné s’allument pour informer que la pile du combiné se charge.
RACCORDEMENT DE LA LIGNE TELEPHONIQUE
Sur la base, branchez une extrémité du cordon téléphonique dans la prise à
l’arrière de la base et l’autre dans une prise téléphonique murale modulaire.
SÉLECTION DE LA LANGUE DU MESSAGE D’ACCUEIL
L’anglais est la langue par défaut du message d’accueil.
Pour modifier la langue du message d’accueil du répondeur :
• Appuyez sur le bouton de sélection de la langue du message d’accueil pour
Français. L’appareil annonce
sur le compteur de messages.
• Appuyez sur le bouton de sélection de la langue du message d’accueil pour
Espagnol. L’appareil annonce
s’affiche sur le compteur de messages.
“OPTION FRANÇAISE”
“SELECCION ESPANOL”
et le message
“Fr”
et le message
s’affiche
“SP”
12
Page 69

REMARQUE: Pour revenir à “Anglais”, appuyez de nouveau sur le bouton de sélection
de la langue.
REMARQUE: En mode d’accès à distance, l’appareil fonctionne selon la langue
sélectionnée. La langue du message d’accueil ne peut pas être modifiée à distance.
PROGRAMMATION DU RÉPONDEUR
Cette section indique comment programmer le répondeur pour recevoir les appels.
Allumez le répondeur avant d’entreprendre la programmation.
• Appuyez sur le bouton answer on/off pour allumer et éteindre le répondeur.
L’indicateur MESSAGES s’allume quand le répondeur est en fonction.
L’indicateur clignote si vous avez de nouveaux messages.
REMARQUE: Le répondeur affiche “- -” quand il est éteint.
ANNONCE VOCALE DATE/HEURE ET HORLOGE EN TEMPS RÉEL
1. Assurez-vous que le répondeur est à ON.
2. Maintenez le bouton “DAY/CHECK” de la base enfoncé pour régler le jour de
la semaine.
3. Maintenez le bouton “HOUR”de la base enfoncé pour régler l’heure (a.m. ou
p.m.) Exemple :
4. Appuyez et relâchez le bouton minute pour avancer les minutes par intervalles
d’une minute. Appuyez et gardez enfoncé pour avancer par intervalles de 5
minutes.
5. Lorsque l’heure est réglée, l’heure courante sera affichée sur le combiné en
moins d’une minute.
REMARQUE: Vous devez régler le jour manuellement. Vous pouvez aussi choisir de
régler l’heure manuellement même si l’heure est transmise automatiquement par votre
compagnie de téléphone locale avec le service d’identification de l’appelant.’Si vous êtes
abonné au service d’identification de l’appelant, l’heure courante est automatiquement
réglée lorsque vous recevez votre premier appel CID (avec identification de l’appelant).
12AM, 1AM ou 12PM, 1PM
.
VOLUME DU HAUT-PARLEUR
Utilisez les boutons de “vol” (/) pour régler le volume du haut-parleur de la
base à un niveau agréable. L1 est le volume minimal du haut-parleur et L8, le
volume maximal.
13
Page 70

INSTRUCTIONS VOCALES
Si vous avez besoin d’aide supplémentaire, appuyez sur le bouton révision en
mode attente et suivez les instructions vocales.
ENREGISTREMENT DU MESSAGE D’ACCUEIL
Pour obtenir de meilleurs résultats lorsque vous enregistrez, placez-vous à environ
neuf pouces du microphone et essayez le plus possible d’éliminer le bruit de fond.
Vous pouvez enregistrer 2 messages d’accueil sur le répondeur ou sélectionner le
message par défaut
1. Assurez-vous que le répondeur est à ON.
2. 2. Appuyez et gardez enfoncé le bouton message d’accueil 1 ou message
d’accueil 2 jusqu’à ce que l’appareil émette le message
MESSAGE D’ACCEUIL APRES LA TONALITE.
3. Commencez à parler après le bip.
4. Relâchez le bouton quand vous avez terminé le message d’accueil.
REMARQUE: Si vous décidez de ne pas enregistrer un message d’accueil, un message
par défaut jouera. Pour revenir au message d’accueil par défaut après avoir enregistré
votre propre message d’accueil,’appuyez et gardez enfoncé le bouton message d’accueil
1 ou message d’accueil 2 jusqu’à ce que l’appareil émette une tonalité.
Exemple de message d’accueil
1) Exemple de message d’accueil d’une boîte vocale unique
Bonjour. Vous avez rejoint (votre nom). Je ne peux répondre présentement, alors laissez-moi vos nom
et numéro , de même qu’un court message après la tonalité et je vous rappellerai. Merci.
ENREGISTREZ LE
REMARQUE: La durée du message d’accueil enregistré est limitée à 2 minutes.
2) Exemple de message d’accueil de boîtes vocales multiples
Bonjour, vous êtes chez (utilisez votre nom). Nous ne pouvons répondre pour l’instant. SVP appuyez
sur 1 pour laisser un message à (nom 1), appuyez sur 2 pour laisser un message à (nom 2) ou
appuyez sur 3 pour laisser un message à (nom 3). Laissez votre nom, votre numéro et un bref message
après la tonalité et nous vous rappellerons. Merci.
14
Page 71

RÉVISION ET SÉLECTION DU MESSAGE D’ACCUEIL
Appuyez et gardez enfoncé le bouton message d’accueil 1 pour entendre et
sélectionner ce message comme message d’accueil. Alternativement, vous pouvez
appuyer et gardez enfoncé le bouton message d’accueil 2 pour entendre et
sélectionner ce message comme message d’accueil.
PROGRAMMATION DU RÉPONDEUR
Cette section traite des boutons et des fonctions du répondeur.
COMPTEUR DE MESSAGE
Le compteur de messages vous indique numériquement le nombre de messages
que vous avez. Voyez ci-dessous pour plus de renseignements.
a) Le compteur de messages affiche un nombre sans clignoter – Pas de nouveaux
messages. Il indique le nombre total d’anciens messages.
b) Le compteur de messages affiche un nombre clignotant – Il y a des nouveaux
messages. Il indique le total des anciens et nouveaux messages.
c) Le compteur de messages affiche des barres ( - - ) – Le répondeur est désactivé.
"F"
d) Le compteur de messages affiche
e) Le compteur de messages affiche
réglée depuis la mise en fonction ou depuis une panne électrique.
f) Le compteur de message affiche six barres horizontales en clignotant –
Enregistrement MÉMO.
g) Le compteur de messages affiche
appel et enregistre un message.
h) Le compteur de messages affiche
répondeur.
i) Le compteur de messages affiche
sélectionné comme message d’accueil en cours et pour l’enregistrement et la
lecture des messages.
j) Le compteur de messages affiche
pour les messages vocaux de l’appareil.
k) Le compteur de messages affiche
pour les messages vocaux de l’appareil.
en clignotant – La mémoire est pleine.
"CL"
en clignotant – L’horloge n’a pas été
"AN"
en clignotant – L’appareil répond à un
"LA"
– Quelqu’un a accès à distance au
"A1"
ou
"A2"
– Le message d’accueil 1 ou 2 est
"EN"
– L’anglais est la langue sélectionnée
"Fr"
– Le français est la langue sélectionnée
15
Page 72

l) Le compteur de messages affiche
pour les messages vocaux de l’appareil.
REMARQUE: Lors de l’écoute des messages, le compteur de messages affiche les
messages dans l’ordre de leur réception.
REMARQUE: La durée d’enregistrement maximale de chacun des messages est de 3
minutes et la limite d’enregistrement l’appareil est de 20 minutes au total.
"SP"
– L’espagnol est la langue sélectionnée
POUR LAISSER UN MESSAGE
1. Une fois que l’appareil a pris l’appel et lorsqu’il joue le message d’accueil,
l’appelant peut entrer le numéro de boîte vocale (1, 2 ou 3) pendant le message
d’accueil ou dans les 2 secondes suivant la fin du message et laisser un
message dans la boîte vocale spécifiée.
2. Si l’appelant ne spécifie pas de boîte vocale, le message sera déposé dans la
boîte vocale par défaut (1).
FILTRAGE DES APPELS À PARTIR DE LA BASE
1. Lorsque le répondeur prend l’appel, écoutez pendant que l’appelant laisse un
message pour savoir qui appelle.
2.Pour répondre vous-même à l’appelant, soulevez le combiné et appuyez sur les
boutons “TALK/END/CALLBACK” ou “SPKR”.
Le répondeur interrompt automatiquement l’enregistrement quand vous activez le
combiné ou décrochez un poste.
CONSEIL: Assurez-vous que le volume de la base est suffisamment élevé pour entendre
vos appels.
INDICATEURS DES BOÎTES VOCALES
Les boutons/indicateurs des boîtes vocales vous informent du contenu de chacune
des boîtes vocales et indiquent si les messages sont nouveaux ou anciens.
Le bouton/indicateur est allumé; messages enregistrés.
Le bouton/indicateur est fermé; aucun message.
Le bouton/indicateur clignote; nouveaux messages.
REPRODUCCIÓN DE MENSAJES
Le compteur de messages et les boutons/indicateurs sur le socle (écoute/arrêt 1, 2
et 3) vous avertissent si vous avez des messages ou de nouveaux messages. Pour
écouter les messages, appuyez sur le bouton/indicateur écoute/arrêt 1, 2 ou 3
correspondant.
Pendant l’écoute d’un message, vous pouvez:
16
Page 73

• Appuyez sur le bouton/indicateur écoute/arrêt 1, 2 ou 3 correspondant pour
mettre fin à l’écoute.
• Appuyez et relâcher le bouton de “REVIEW” (révision) pour reprendre l’écoute
du message depuis le début.
• Appuyez et relâcher le bouton de “REVIEW” (révision) à deux reprises pour
aller au message précédent.
• Appuyez sur le bouton skip pour passer au message suivant.
• Appuyez sur le bouton de “del” (suppression) pour effacer le message en cours.
EFFACER LES MESSAGES
Vous pouvez effacer les messages de trois façons : un message à la fois à partir de
la base ; tous les messages à partir de la base ; ou un message à la fois à partir du
combiné ou d’un téléphone placé ailleurs.
ÉCOUTE DES MESSAGES
Vous pouvez effacer un message selon une des méthodes suivantes.
Pour effacer un message pendant que vous l’écoutez :
1. Appuyez et relâchez le bouton/indicateur écoute/arrêt 1, écoute/arrêt 2 ou
écoute/arrêt 3 correspondant à la boîte vocale.
2. Appuyez sur le bouton révision et saut en avant pour sélectionner et écouter le
message que vous voulez effacer.
3. Appuyez sur le bouton de suppression; le message en cours est effacé et
l’appareil passe au message suivant.
Pour effacer tous les messages écoutés d’une boîte vocale :
1. Assurez-vous que le téléphone est désactivé - OFF (pas en mode conversation).
2. Appuyez sur le bouton de suppression; l’appareil émet le message
EFFACER LES MESSAGES, APPUYEZ SUR MAILBOX"
la boîte vocale).
3. Appuyez sur le bouton/indicateur écoute/arrêt 1, écoute/arrêt 2 ou écoute/arrêt 3.
4. L’appareil émettra le message "
EFFACES"
tonalité de confirmation.
Pour effacer un message avec le combiné :
1. Appuyez sur le bouton flash/répondeur du combiné.
2. Appuyez sur le bouton écoute/arrêt (touche 2) suivi du numéro de la boîte
vocale (ex. : appuyez sur la touche 2 puis sur la touche 3 pour écouter les
messages dans la boîte vocale 3)
(Suppression de tous les messages de la boîte vocale X) suivi d’une
MAILBOX X TOUS LES MESSAGES SONT
(Appuyez sur le bouton de
“POUR
17
Page 74

3. Appuyez sur la touche de suppression (touche 0) sur le combiné pour effacer le
message que vous écoutez.
REMARQUE: Il est impossible de rétablir les messages effacés.
LAISSER UNE NOTE
Utilisez la fonction de note pour laisser un message.
1. Appuyez sur le bouton mémo et l’appareil émettra le message “
TOUCHE DE MAILBOX ENFONCE POUR ENREGISTRER
enfoncé le bouton de boîte vocale).
2. Appuyez et gardez enfoncé le bouton écoute/arrêt 1, 2 ou 3. Vous devez garder
le bouton enfoncé jusqu’à la fin de l’enregistrement du mémo.
3. Commencez à parler après que l’appareil annonce “
MESSAGE
4. Relâchez le bouton de la boîte vocale quand vous avez terminé.
”. (Enregistrez le message)
” (Appuyez et gardez
ENREGISTREZ LE
MAINTENEZ LA
PARAMÈTRES DU TÉLÉPHONE
PROGRAMMATION DU TÉLÉPHONE
ÉCRAN D’ATTENTE
Le combiné affiche le numéro du combiné et le nom de l’utilisateur.
AM
11:30
PHILLIPE
COMBINE 1
FUNCTIONS PROGRAMMABLES
Le système utilise un menu structuré pour vous permettre d’avoir accès à toutes
ses fonctionnalités. Vous pouvez programmer les caractéristiques suivantes à
partir du menu principal: Ecoute à Distance, Paramètres du Combiné.
ÉCOUTE À DISTANCE
1. Assurez-vous que le téléphone est DÉSACTIVÉ (pas en mode conversation).
2. Appuyez sur le bouton “MUTE/PROG” pour aller au menu principal.
18
SURV. PIECE
PROGRAM COMBIN
Page 75

3. Appuyez sur le bouton “CID/VOL” ( ou ) pour afficher SURV. PIECE (ROOM
MONITOR).
4. Appuyez sur le bouton “MUTE/PROG” et le message
“SURV. PIECE POSTE ?”
(ROOM MONITOR EXTENSION ?) s’affiche.
SURV. PIECE
POSTE ?
5. Appuyez sur le bouton correspondant au numéro du combiné qui est sur écoute.
6. Si le combiné 1 est l’initiateur du mode d’écoute à distance, les messages
suivants s’affichent.
SURV. PIECE
COMBINE 2
SURV. PIECE
COMBINE 1
Combiné appelant 1 Combiné appelé 2
REMARQUE: Si les combinés ont été désignés par des noms, ceux-ci seront affichés sur
l’ACL au lieu des numéros.
REMARQUE: En mode d’écoute à distance, le combiné émettra une tonalité s’il y a un
appel entrant. Vous pouvez appuyer sur le bouton “TALK/END/CALLBACK” pour
prendre l’appel et quitter le mode d’écoute à distance.
REMARQUE: Appuyez sur le bouton “*EXIT” du combiné pour mettre fin à l’écoute à
distance.
REMARQUE: Après avoir initialisé l’écoute à distance, vous pouvez utiliser le haut-parleur
du combiné pour écouter en appuyant sur le bouton “SPK” du combiné initiateur.
PARAMÈTRES DU COMBINÉ
Vous pouvez programmer les paramètres suivants:
Langue, Nnom du Combiné, Tonalité de Sonnerie, Volume de Sonnerie, Mélodie
VIP, Tonalité des Touches ON/OFF, Alerte de Message, Sélection de la Sonnerie,
Code de Sécurité, Code Régional, Enregistrement, Désenregistrement, et
Paramètres par Défaut.
Pendant la programmation, vous pouvez appuyer à tout moment sur le bouton
“*EXIT” pour quitter le menu en cours et revenir au sous-menu en conservant les
paramètres précédents.
19
Page 76

LANGUE
1. Assurez-vous que le téléphone est DÉSACTIVÉ (pas en mode conversation).
2. Appuyez sur le bouton “MUTE/PROG” pour aller au menu principal.
3. Appuyez sur le bouton “CID/VOL” ( ou ) pour afficher
(HANDSET SETUP).
4. Appuyez sur le bouton “MUTE/PROG” pour confirmer.
5. Appuyez sur le bouton “CID/VOL” ( ou ) pour afficher le menu PROGR.
LANGUE (SET LANGUAGE).
6. Appuyez sur le bouton “MUTE/PROG” pour ouvrir ce menu. Le message
LANGUE 1END 2FRA 2ESP
7. Utilisez les touches du combiné pour sélectionner 1ENG, 2FRA ou 3ESP ou
utilisez le bouton “CID/VOL” ( ou ) pour choisir la langue désirée. L’anglais
est la langue par défaut.
8. Appuyez sur le bouton “MUTE/PROG” pour enregistrer votre sélection. Vous
entendrez une tonalité de confirmation et la langue sélectionnée s’affichera.
(SET LANGUAGE 1ENG 2FRA 3ESP) s’affiche.
PROGRAM COMBIN
PROGR.
NOM DE COMBINE
1. Assurez-vous que le téléphone est DÉSACTIVÉ (pas en mode conversation).
2. Appuyez sur le bouton “MUTE/PROG” pour aller au menu principal.
3. Appuyez sur le bouton “CID/VOL” ( ou ) pour afficher
(HANDSET SETUP).
4. Appuyez sur le bouton “MUTE/PROG” pour confirmer.
5. Appuyez sur le bouton “CID/VOL” ( ou ) pour afficher le menu COMBINE
NOM (HANDSET NAME).
6. Appuyez sur le bouton “MUTE/PROG” pour ouvrir ce menu. Le message
COMBINE NOM
7. Utilisez le clavier pour entrer un nom (jusqu’à 15 caractères). Chacune des
touches numériques comprend plus d’une lettre. Par exemple, pour entrer le
nom BILL SMITH, appuyez deux fois sur la touche 2 pour obtenir la lettre B.
Appuyez trois fois sur la touche 4 pour la lettre I. Appuyez trois fois sur la
touche 5 pour la lettre L. Appuyez trois fois sur la touche 5 pour la deuxième
lettre L et appuyez sur la touche 1 pour insérer un espace entre le prénom et le
nom. Appuyez quatre fois sur la touche 7 pour la lettre S, une fois sur la touche
6 pour la lettre M, trois fois sur la touche 4 pour la lettre I, sur la touche 8 pour
la lettre T et deux fois sur la touche 4 pour la lettre H.
(HANDSET NAME) s’affiche.
PROGRAM COMBIN
20
Page 77

REMARQUE: Si vous faites une erreur, appuyez sur le bouton “DEL” pour reculer en
effaçant un caractère à la fois.
8. Appuyez sur le bouton “MUTE/PROG” pour mémoriser le nom. Vous entendrez
une tonalité de confirmation et le nom du combiné s’affichera.
TONALITE DE SONNERIE
Vous avez le choix entre dix tonalités de sonnerie et entre dix mélodies différentes.
1. Assurez-vous que le téléphone est DÉSACTIVÉ (pas en mode conversation).
2. Appuyez sur le bouton “MUTE/PROG” pour aller au menu principal.
3. Appuyez sur le bouton “CID/VOL” ( ou ) pour afficher
(HANDSET SETUP).
4. Appuyez sur le bouton “MUTE/PROG” pour confirmer.
5. Assurez-vous que la sonnerie est activée. Consultez la section Volume de
la Sonnerie.
6. Appuyez sur le bouton “CID/VOL” ( ou ) pour afficher le menu
SONNE (RINGER TONE).
7. Appuyez sur le bouton “MUTE/PROG” pour ouvrir ce menu. Le message
REGLER TON SONNE 01 (SET RINGER TONE 01) s’affiche. Le paramètre par
défaut est "01".
8. Utilisez le bouton “CID/VOL” ( ou ) pour afficher le réglage désiré (de 1 à
20). Vous entendrez un extrait de la tonalité ou de la mélodie sélectionnée.
9. Appuyez sur le bouton “MUTE/PROG” pour enregistrer votre sélection.
Vous entendrez une tonalité de confirmation et la tonalité de sonnerie
sélectionnée s’affichera.
REMARQUE: Les numéros 1 à 10 correspondent à la sonnerie et les numéros 11 à 20,
aux mélodies.
PROGRAM COMBIN
T
ONALITE
VOLUME DE LA SONNERIE
1. Assurez-vous que le téléphone est DÉSACTIVÉ (pas en mode conversation).
2. Appuyez sur le bouton “MUTE/PROG” pour aller au menu principal.
3. Appuyez sur le bouton “CID/VOL” ( ou ) pour afficher
(HANDSET SETUP).
4. Appuyez sur le bouton “MUTE/PROG” pour confirmer.
5. Appuyez sur le bouton “CID/VOL” ( ou ) pour afficher le menu
SONNERI
6. Appuyez sur le bouton “MUTE/PROG” pour ouvrir ce menu. Le message
REGLER SONNERIE 1HAUT 2BA 3ARR
(RINGER VOLUME).
(SET RINGER 1HI 2LOW 3OFF) s’affiche.
PROGRAM COMBIN
VOLUME
21
Page 78
7. Utilisez les touches du combiné pour sélectionner 1, 2 ou 3 ou utilisez le bouton
“CID/VOL” ( ou ) pour afficher votre sélection. Le paramètre par défaut est
HAUT.
8. Appuyez sur le bouton “MUTE/PROG” pour enregistrer votre sélection.
Vous entendrez une tonalité de confirmation et le nouveau volume de
sonnerie s’affichera.
REMARQUE: Si vous placez la sonnerie à OFF, l’icône de sonnerie désactivée ( ) s’affiche.
MÉLODIE VIP
Cette caractéristique permet d’assigner une mélodie spécifique à une personne qui
retient votre attention lorsque ce numéro appelle. Lorsqu’une mélodie VIP est
assignée et que cette personne appelle, l’appareil jouera la mélodie VIP au lieu de
la sonnerie normale. Vous avez le choix entre 10 mélodies différentes et entre 10
tonalités de sonnerie.
REMARQUE : Cette caractéristique ne fonctionne que si les conditions suivantes sont
satisfaites : vous êtes abonné au service afficheur et le dossier d’identification de
l’appelant a été mémorisé. Consultez la section Transfert du Dossier CID en Mémoire.
MÉMORISATION DES MÉLODIES VIP
1. Assurez-vous que le téléphone est DÉSACTIVÉ (pas en mode conversation).
2. Appuyez sur le bouton “MUTE/PROG” pour aller au menu principal.
3. Appuyez sur le bouton “CID/VOL” (5 ou 6) pour afficher PROGRAM COMBIN
(HANDSET SETUP).
4. Appuyez sur le bouton “MUTE/PROG” pour confirmer.
5. Appuyez sur le bouton “CID/VOL” ( ou ) pour afficher le sous-menu
MELODIE VIP (MELODY VIP).
6. Appuyez sur le bouton “MUTE/PROG” pour ouvrir ce menu. Le message
s’affiche.
1
7. Appuyez sur le bouton “CID/VOL” ( ou ) pour sélectionner l’emplacement
de mémoire (VIP 01 à VIP 10) de la mélodie VIP.
REMARQUE: Si l’emplacement de mémoire est utilisé, l’emplacement de mémoire, la
mélodie VIP enregistrée et le numéro sont affichés. Si l’emplacement de mémoire est
vide, le message **VIDE** (EMPTY) est affiché.
VIP
8. Appuyez sur le bouton “MUTE/PROG”. Le message
CHOISER MEMOIRE
(SELECT MEMORY) s’affiche pendant 2 secondes, puis affiche le dossier de
mémoire de l’utilisateur pour’que celui-ci fasse une sélection.
22
Page 79
REMARQUE: Si l’espace de mémoire d’appel est vide, le message PAS D’APPEL (NO
USER MEMORY) est affiché.
9. Appuyez sur le bouton “CID/VOL” ( ou ) pour sélectionner l’emplacement
de mémoire désiré.
10. Appuyez sur le bouton “MUTE/PROG” pour confirmer votre sélection. Le
message
REMARQUE: Si le numéro désiré a déjà été enregistré dans un des 10 dossiers de
mélodie VIP, le message “DOUBLE NUMERO” (Duplication de numéro) s’affiche.
MELODIE VIP
s’affiche.
10. Appuyez sur le bouton “CID/VOL” ( ou ) pour sélectionner la mélodie. Vous
entendrez un extrait de la mélodie sélectionnée.
12. Appuyez sur le bouton “MUTE/PROG” pour confirmer votre sélection. Le
numéro et la mélodie sélectionnés s’afficheront pendant 2 secondes.
MODIFICATION D’UN DOSSIER ENREGISTRÉ DE MÉLODIE VIP
1. Utilisez les étapes 1 à 12 de la procédure de mémorisation de mélodie VIP.
2. Lorsque le message
REMPLACER VIP #?
(REPLACE VIP# ?) s’affiche, vous
devez appuyer sur le bouton “MUTE/PROG” du combiné pour confirmer
la modification.
REMARQUE: Pour modifier une mélodie dans un emplacement de mélodie VIP, vous
devez d’abord la supprimer et ensuite, entrer une nouvelle mélodie.
REVUE ET SUPPRESSION D’UN DOSSIER ENREGISTRÉ DE MÉLODIE VIP
1. Appuyez sur le bouton “MUTE/PROG” pour ouvrir le menu MELODIE VIP.
2. Appuyez sur le bouton “CID/VOL” ( ou ) pour afficher le dossier mélodie
VIP désiré.
3. Si vous voulez supprimer l’information, appuyez sur le bouton “DEL” du
combiné quand l’information est affichée. Le message
EFFACE VIP # ?
(DELETE VIP# ?) apparaît.
4. Appuyez de nouveau sur le bouton “DEL” pour confirmer. Vous entendrez une
tonalité de confirmation et le message
VIP# EFFACE
s’affichera.
TONALITÉ DU CLAVIER
Cette caractéristique vous permet de mettre en sourdine la tonalité des touches du
clavier pendant la nuit ou dans un environnement silencieux.
1. Assurez-vous que le téléphone est DÉSACTIVÉ (pas en mode conversation).
2. Appuyez sur le bouton “MUTE/PROG” pour aller au menu principal.
3. Appuyez sur le bouton “CID/VOL” ( ou ) pour afficher
(HANDSET SETUP).
PROGRAM COMBIN
23
Page 80

4. Appuyez sur le bouton “MUTE/PROG” pour confirmer.
5. Appuyez sur le bouton “CID/VOL” ( ou ) pour afficher le menu TONALIT
TOUCHE (KEY TONE).
6. Appuyez sur le bouton “MUTE/PROG” pour ouvrir ce menu. Le message
TON TOUCHE 1MA 2ARRET
7. Utilisez les touches du combiné pour sélectionner 1 ou 2 ou utilisez le bouton
CID/VOL (5 ou 6) pour afficher votre sélection. Le paramètre par défaut est 1MA.
8. Appuyez sur le bouton “MUTE/PROG” pour confirmer. Vous entendrez une
tonalité de confirmation et le paramètre de tonalité du clavier s’affichera.
(SET KEY TONE 1ON 2OFF) s’affiche.
REGL
ALERTE DE MESSAGE (POUR LE RÉPONDEUR)
Cette caractéristique vous permet de régler le répondeur pour qu’il émette une
tonalité d’alerte aux 10 secondes lorsqu’il y a de nouveaux messages.
1. Assurez-vous que le téléphone est DÉSACTIVÉ (pas en mode conversation).
2. Appuyez sur le bouton “MUTE/PROG” pour aller au menu principal.
3. Appuyez sur le bouton “CID/VOL” ( ou ) pour afficher
(HANDSET SETUP).
4. Appuyez sur le bouton “MUTE/PROG” pour confirmer.
5. Appuyez sur le bouton “CID/VOL” ( ou ) pour afficher le sous-menu INDIC
MESSAGE
6. Appuyez sur le bouton “MUTE/PROG” pour ouvrir ce menu. Le message NEW
MSG ALERT 1MA 2ARRET s’affiche.
7. Utilisez les touches du combiné pour faire une sélection ou utilisez le bouton
“CID/VOL” ( ou ) pour sélectionner 1MA ou 2ARRET . Le paramètre par
défaut est 2ARRET.
8. Appuyez sur le bouton “MUTE/PROG” pour confirmer. Vous entendrez une
tonalité de confirmation et le nouveau paramètre s’affichera.
(MESSAGE ALERT).
PROGRAM COMBIN
SÉLECTION DE SONNERIE (POUR LE RÉPONDEUR)
Cette caractéristique vous permet de choisir le nombre de fois que l’appareil
sonnera avant que le répondeur prenne l’appel.
1. Assurez-vous que le téléphone est DÉSACTIVÉ (pas en mode conversation).
2. Appuyez sur le bouton “MUTE/PROG” pour aller au menu principal.
3. Appuyez sur le bouton “CID/VOL” ( ou ) pour afficher
(HANDSET SETUP).
4. Appuyez sur le bouton “MUTE/PROG” pour confirmer.
PROGRAM COMBIN
24
Page 81

5. Appuyez sur le bouton “CID/VOL” ( ou ) pour afficher le menu SELECT SONN
(RING SELECT).
6. Appuyez sur le bouton “MUTE/PROG” pour ouvrir ce menu. Le message
SELECT SONN 3 4 5 6 TS
s’affiche.
7. Utilisez les touches du combiné ou utilisez le bouton “CID/VOL” ( ou ) pour
faire une sélection. Le paramètre par défaut est 5.
8. Appuyez sur le bouton “MUTE/PROG” pour confirmer. Vous entendrez une
tonalité de confirmation et le nouveau paramètre s’affichera.
REMARQUE: Si vous sélectionnez Toll Saver (TS) (Économiseur d’interurbains ÉI), le
répondeur prend l’appel après la troisième sonnerie s’il y a de NOUVEAUX messages
OU après la cinquième sonnerie s’il n’y a PAS de nouveaux messages. Cette
caractéristique permet de vérifier s’il y a de nouveaux messages à partir d’un autre
téléphone et de raccrocher à la quatrième sonnerie pour économiser les frais
d’interurbains.
CODE DE SÉCURITÉ (POUR LE RÉPONDEUR)
Vous avez accès au répondeur depuis tout appareil à tonalités situé à distance Le
code de sécurité est requis pour l’accès à distance afin d’empêcher l’accès non
autorisé au répondeur.
1. Assurez-vous que le téléphone est DÉSACTIVÉ (pas en mode conversation).
2. Appuyez sur le bouton “MUTE/PROG” pour aller au menu principal.
3. Appuyez sur le bouton “CID/VOL” ( ou ) pour afficher
(HANDSET SETUP).
4. Appuyez sur le bouton “MUTE/PROG” pour confirmer.
5. Appuyez sur le bouton “CID/VOL” ( ou ) pour afficher le menu CODE
SECURITE (SECURITY CODE).
6. Appuyez sur le bouton “MUTE/PROG” pour ouvrir ce menu. Le message
SECURITE 1 2 3
s’affiche.
7. Utilisez le clavier pour entrer le nouveau code de sécurité à 3 chiffres. Le
paramètre par défaut est 123.
8. Appuyez sur le bouton “MUTE/PROG” pour confirmer. Vous entendrez une
tonalité de confirmation et le nouveau code de sécurité s’affichera.
REMARQUE: Si vous faites une erreur, appuyez sur le bouton “DEL” pour reculer en
effaçant le mauvais chiffre.
PROGRAM COMBIN
CODE
25
Page 82

CODE RÉGIONAL
1. Assurez-vous que le téléphone est DÉSACTIVÉ (pas en mode conversation).
2. Appuyez sur le bouton “MUTE/PROG” pour aller au menu principal.
3. Appuyez sur le bouton “CID/VOL” ( ou ) pour afficher
(HANDSET SETUP).
4. Appuyez sur le bouton “MUTE/PROG” pour confirmer.
5. Appuyez sur le bouton “CID/VOL” ( ou ) pour afficher le menu INDICATIF
REG (AREA CODE).
6. Appuyez sur le bouton “MUTE/PROG” pour ouvrir ce menu. Le message
REGLER IND REGI - - -
7. Utilisez le clavier pour entrer le code régional de 3 chiffres.
8. Appuyez sur le bouton “MUTE/PROG” pour confirmer. Vous entendrez une
tonalité de confirmation et le nouveau code régional s’affichera.
REMARQUE: Pour revenir au réglage par défaut - - -, appuyez et relâchez le bouton
“DEL” quand le message REGLER IND REGI est affiché.
s’affiche. Le paramètre par défaut est - - -.
PROGRAM COMBIN
ENREGISTREMENT
Ce réglage peut se faire avec les combinés extensibles. Vos deux combinés sont
préenregistrés et prêts à être utilisés. On ne recommande pas d’enregistrer de
nouveau les combinés à moins que ce ne soit absolument nécessaire.
1. Assurez-vous que le téléphone est DÉSACTIVÉ (pas en mode conversation).
2. Appuyez sur le bouton “MUTE/PROG” pour aller au menu principal.
3. Appuyez sur le bouton “CID/VOL” ( ou ) pour afficher
(HANDSET SETUP).
4. Appuyez sur le bouton “MUTE/PROG” pour confirmer.
5. Si nécessaire, appuyez sur le bouton “CID/VOL” ( ou ) pour afficher le menu
ENREGISTREMENT (REGISTRATION). Appuyez ensuite sur le bouton “MUTE/
PROG” pour ouvrir ce menu. Le message
s’affiche. Le paramètre par défaut est 2NON.
6. Utilisez le clavier numérique pour choisir 1 pour OUI ou 2 pour NON. Ou utilisez
le bouton “CID/VOL” ( ou ) pour atteindre 1OUI ou 2NON.
7. Si vous choisissez 1OUI, appuyez sur le bouton “MUTE/PROG” pour confirmer
votre choix.
RECH BASE ENFON ATTENDRE BIP
ENREGISTREMENT 1OUI 2NON
apparaît dans l’afficheur.
PROGRAM COMBIN
26
Page 83

8. Maintenez le bouton de recherche de la base enfoncé jusqu’à ce que vous
entendiez une longue tonalité au combiné.
ENTEGISTRE
s’affiche: X correspond su numéro du combiné. Vous entendrez
Le message COMBINE X
une tonalité de confirmation.
REMARQUE: Attendez 10 secondes après avoir enregistré un combiné et avant d’en
enregistrer un autre pour assurer la réussite de l’enregistrement
DESENREGISTREMENT
Le désenregistrement annule l’enregistrement. Pendant le processus de
désenregistrement, gardez le combiné près de la base.
1. Assurez-vous que le téléphone est DÉSACTIVÉ (pas en mode conversation).
2. Appuyez sur le bouton “MUTE/PROG” pour aller au menu principal.
3. Appuyez sur le bouton “CID/VOL” ( ou ) pour afficher
(HANDSET SETUP).
4. Appuyez sur le bouton “MUTE/PROG” pour confirmer.
5. Si nécessaire, appuyez sur le bouton “CID/VOL” ( ou ) pour afficher le menu
DESENREGISTREM (DEREGISTRATION). Ensuite, appuyez sur le bouton “MUTE/
PROG” pour ouvrir ce menu. Le message
DESENREGISTREM 1OUI 2NON
s’affiche. Le paramètre par défaut est 2NON.
6. Utilisez le clavier numérique pour choisir 1 pour OUI ou 2 pour NON. Ou utilisez
le bouton “CID/VOL” ( ou ) pour atteindre 1OUI ou 2NON.
AVERTISSEMENT: Il n’est pas recommandé de désenregistrer un combiné à moins que
cela ne soit absolument nécessaire parce qu’un combiné est désenregistré, que les
fonctions du combiné sont inutilisables tant que le combiné n’a pas été réenregistré.
7. Choisissez NON pour ne pas désenregistrer.
8. Si vous choisissez 1OUI, appuyez sur le bouton “MUTE/PROG”;
est affiché pendant 2 secondes, puis
BASE
CONFIRMER? 1OUI 2NON
9. Appuyez sur le clavier numérique pour choisir 1OUI ou 2NON, ou utilisez le
bouton “CID/VOL” ( ou ) pour atteindre 1OUI ou 2NON.
10.Si vous choisissez OUI, appuyez sur le bouton “MUTE/PROG” pour confirmer.
DESENREGISTRE .....
confirmation.
apparaît dans l’afficheur, suivi d’une tonalité de
COMBINE X DESENREGISTRE
est ensuite affiché pour confirmer
que le combiné est désenregistré.
PROGRAM COMBIN
SE RAPPROCH
est affiché.
27
Page 84

REMARQUE: Une fois le désenregistrement terminé, BESOINS COMBIN ENREGISTREMENT
apparaît dans l’afficheur. Vous devez enregistrer le combiné avant de l’utiliser.
DESENREGISTREMENT GLOBAL
Si un ou plusieurs des combinés sont perdus, vous devez désenregistrer tous les
combinés pour assurer le bon fonctionnement du système. Suivez les étapes cidessous pour désenregistrer les deux combinés en même temps.
AVERTISSEMENT: Il n’est pas recommandé de désenregistrer un combiné à moins que
cela ne soit absolument nécessaire parce qu’un combiné est désenregistré, que les
fonctions du combiné sont inutilisables tant que le combiné n’a pas été réenregistré.
REMARQUE: Avant d’entreprendre un désenregistrement complet, laissez tous les
combinés en mode attente pendant 20 secondes.
1. Appuyez et gardez enfoncé le bouton “PAGE” (recherche) sur le socle jusqu’à ce
que l’indicateur marche/charge clignote sur le socle.
2. Appuyez et gardez enfoncé le bouton “PAGE” (recherche) sur le socle jusqu’à ce
que l’indicateur marche/charge clignote rapidement sur le socle.
3. Appuyez une fois sur le bouton “PAGE” (recherche) de la base. Tous les
combinés sont désenregistrés et
BESOINS COMBIN ENREGISTREMENT
apparaît
dans l’afficheur.
REGLAGE PAR DEFAUT
À mesure que vous vous familiariserez avec le système, vous préférerez peut-être
utiliser ses réglages initiaux. Suivez les étapes ci-dessous pour retourner aux
réglages par défaut de l’usine.
1. Assurez-vous que le téléphone est DÉSACTIVÉ (pas en mode conversation).
2. Appuyez sur le bouton “MUTE/PROG” pour aller au menu principal.
3. Appuyez sur le bouton “CID/VOL” ( ou ) pour afficher
(HANDSET SETUP).
4. Appuyez sur le bouton “MUTE/PROG” pour confirmer.
5. Appuyez sur le bouton “CID/VOL” ( ou ) pour afficher le menu REGLAGE
DEFAUT (DEFAULT SETTING).
6. Appuyez sur le bouton “MUTE/PROG” pour ouvrir ce menu. Le message
REGLAGE DEFAUT 1OUI 2NON
s’affiche.
PROGRAM COMBIN
28
Page 85

7. Utilisez le clavier numérique pour choisir 1OUI ou 2NON, ou le bouton “CID/
VOL” ( ou ) pour placer le curseur à 1OUI ou 2NON. Le réglage par défaut
est 2NON.
REMARQUE: Si vous choisissez “OUI”, tous les réglages du menu programmable
retournent au réglages par défaut de l’usine.
8. Appuyez de nouveau sur le bouton “MUTE/PROG” pour sauvegarder votre choix.
FONCTIONNEMENT DU TELEPHONE
INDICATEUR DE CHARGEMENT
Lorsque l’indicateur marche/charge situé sur le socle ou celui du socle
supplémentaire de chargement du combiné s’allument pour informer que la pile
du combiné se charge, le combiné est placé correctement sur le socle.
FAIRE DES APPELS
1. Décrochez le combiné et appuyez sur le bouton “TALK/END/CALLBACK”. Écoutez
le signal de manœuvre.
2. Composez le numéro désiré ou composez le numéro d’abord, puis appuyez sur
le bouton “TALK/END/CALLBACK”.
3. Quand vous avez terminé, appuyez sur le bouton “TALK/END/CALLBACK” pour
raccrocher.
REPONDRE AUX APPELS
1. Quand le téléphone sonne, décrochez le combiné et appuyez sur le bouton
“TALK/END/CALLBACK”.
2. Quand vous avez terminé, appuyez sur “TALK/END/CALLBACK” pour raccrocher.
REMARQUE: Réglez le volume du combiné en appuyant sur le bouton CID/VOL (
ou ) pendant un appel.
FONCTIONNEMENT DU HAUT-PARLEUR
RÉPONDRE Á UN APPEL AVEC LE HAUT-PARLEUR
1. Quand le téléphone sonne, appuyez sur le bouton “SPKR’ du combiné.
2. Quand vous avez terminé, appuyez de nouveau sur le bouton “SPKR” pour
raccrocher.
PLACER UN APPEL AVEC LE HAUT-PARLEUR
1. Assurez-vous que le téléphone est DÉSACTIVÉ (pas en mode conversation).
29
Page 86

2. Composez le numéro désiré
3. Appuyez sur “SPKR” pour appeler le numéro désiré.
4. Quand vous avez terminé, appuyez de nouveau sur le bouton “SPKR”
ou
Appuyez sur le bouton “CID/VOL” ( ou ) pour sélectionner l’emplacement
de mémoire désiré
ou
Appuyez sur le bouton “MEM” et utilisez le bouton “CID/VOL” ( ou ) pour
afficher le dossier en mémoire désiré.
pour raccrocher.
REMARQUE: Si vous utilisez le combiné et que vous voulez passer en mode hautparleur, appuyez sur le bouton “SPKR”. Pour terminer l’appel, appuyez de nouveau sur
SPKR. Si vous êtes en mode haut-parleur et que vous voulez passer en mode combiné,
appuyez sur le bouton “TALK/END/CALLBACK”. Pour terminer l’appel, appuyez de
nouveau sur “TALK/END/CALLBACK”.
MINUTERIE D’APPEL
Après que vous avez appuyé sur le bouton “TALK/END/CALLBACK” du combiné, la
minuterie d’appel intégrée apparaît dans l’afficheur et commence le décompte de
la durée de l’appel en minutes et en secondes.
PRECOMPOSITION
1. Assurez-vous que le téléphone est DÉSACTIVÉ (pas en mode conversation).
2. Entrez le numéro de téléphone désiré. Le numéro de téléphone apparaît dans
l’afficheur du combiné.
3. Appuyer sur les boutons “TALK/END/CALLBACK” ou “SPKR” sur le combiné et
le numéro est composé automatiquement.
REMARQUE: Vous pouvez entrer jusqu’à 32 chiffres de précomposition.
REMARQUE: Pour supprimer le numéro de précomposition entré, Appuyez et gardez
enfoncé le bouton “DEL” jusqu’à ce que tous les caractères soient effacés, ou appuyez
sur le bouton *exit pour effacer tous les numéros en même temps.
ATTENTE AUTOMATIQUE
Si vous déposez le combiné sur le socle pendant que le combiné est décroché
(pendant un appel), le combiné coupe automatiquement la communication.
RACCOURCI DE NIVEAU DE SONNERIE HAUT/BAS/ARRET
En plus du réglage à partir du menu principal, vous pouvez utiliser un raccourci
pour changer les paramètres de la sonnerie. Assurez-vous que le téléphone est
DÉSACTIVÉ (pas en mode conversation).
30
Page 87

1. Appuyez sur le bouton “#PAUSE/RINGER” message
2BA 3ARR
2. Utilisez les touches du combiné pour sélectionner 1HAUT, 2BA ou 3ARR ou
utilisez le bouton “CID/VOL” ( ou ) pour afficher votre sélection.
3. Appuyez sur le bouton “#PAUSE/RINGER” pour enregistrer votre sélection. Vous
entendrez une tonalité de confirmation et le nouveau volume de sonnerie
s’affichera pendant 2 secondes.
(SET RINGER 1HI 2LOW 3OFF) s’affiche.
REGLER SONNERIE 1HAUT
FLASH/APPEL EN ATTENTE
Si vous êtes abonné au service d’afficheur d’appel en attente combiné offert par la
compagnie de téléphone, vous recevrez l’information d’appelant (s’il y a lieu) lors
des appels en attente. Pendant un appel, vous entendrez un bip pour indiquer
qu’un autre appel est en attente sur la ligne et l’information de l’appelant en
attente apparaît dans l’afficheur du combiné.
• Pour prendre l’appel en attente, appuyez sur le bouton “FLASH/answerer” du
combiné ; l’appel initial est alors mis en garde.
• Appuyez sur le bouton “FLASH/answerer” pour passer d’un appel à l’autre.
CONSEIL: N’appuyez pas sur le bouton “TALK/END/CALLBACK “du combiné sans fil
pour activer un service d’appel personnalisé, comme l’appel en attente, sans quoi vous
raccrocherez le téléphone.
RECOMPOSITION DU NUMERO
Avec le bouton “REDIAL”, vous pouvez recomposer un numéro comptant jusqu’à
32 caractères.
Pour recomposer rapidement le dernier numéro composé :
1. Appuyez sur les boutons “TALK/END/CALLBACK” ou “SPKR”.
2. Appuyez sur le bouton “REDIAL”.
-OU-
Pour choisir entre les trois derniers numéros que vous avez composés:
1. Appuyez d’abord sur le bouton “REDIAL” (Recomposer) et utilisez le bouton
“CID/VOL” ( ou ) pour sélectionner le numéro à recomposer.
• Appuyez sur le bouton “CID/VOL” () pour rappeler l’appel le plus ancien et
faire défiler les numéros jusqu’au plus récent (numéro plus élevé).
• Appuyez sur le bouton “CID/VOL” ( ) pour rappeler l’appel le plus récent et
faire défiler les numéros jusqu’au plus ancien (numéro moins élevé).
2. Le numéro sera composé automatiquement.
31
Page 88

Si la ligne est occupée et si vous voulez continuer à recomposer le numéro,
appuyez rapidement sur REDIAL (Recomposition) pour signaler sans délai.
QUITTER
Appuyez sur le bouton “*EXIT” pour quitter une fonction de menu et retourner à
l’écran d’attente.
RECHERCHE
La fonction de recherche aide à repérer un combiné égaré. Pour envoyer et recevoir
des signaux de recherche, il faut enregistrer tous les combinés. Si votre combiné n’est
pas enregistré, suivez les instructions à la section Enregistrement de ce guide.
RECHERCHE DE COMBINE A COMBINE
Les deux combinés sont respectivement appelés Combiné 1 et Combiné 2.
1. Assurez-vous que le téléphone est DÉSACTIVÉ (pas en mode conversation).
2. Appuyez sur le bouton “PAGE/INT” du combiné.
dans l’afficheur.
3. Utilisez le clavier numérique pour entrer le numéro du combiné que vous
souhaitez rechercher.
REMARQUE: Si plus de 2 combinés sont enregistrés, vous pouvez rechercher tous les
combinés en appuyant sur la touche 5..
4. Pour annuler la recherche, appuyez sur le bouton “*EXIT”, ou appuyez sur le
bouton “PAGE/INT”. Vous pouvez aussi appuyer sur le bouton “TALK/END/
CALLBACK” sur le combiné qui reçoit pour passer en mode intercom.
RECHERCHE POSTE?
apparaît
RECHERCHE A PARTIR DE LA BASE/RECHERCHE DE GROUPE
Utilisez le socle seulement pour rechercher simultanément tous les
combinés enregistrés.
1. Appuyez sur le bouton “PAGE” de la base. Les deux combinés émettent un bip
pendant deux minutes et
chaque combiné.
2. Pour annuler la recherche, appuyez sur le bouton de recherche du socle
ou appuyez sur le bouton “TALK/END/CALLBACK” ou “*EXIT” sur chacun
des combinés
RECHERCHE DE BASE
apparaît dans l’afficheur de
MUTE
Utilisez la fonction SILENCIEUX pour converser en privé, hors ligne. La personne
en ligne ne peut vous entendre, mais vous pouvez l’entendre.
1. Appuyez sur le bouton “MUTE/PROG”. Le combiné affiche
2. Appuyez sur le bouton “MUTE/PROG” pour annuler et retourner à votre
conversation téléphonique.
SILENC ACTIVE
.
32
Page 89

COMMANDE DE VOLUME DU RECEPTEUR
Lorsque le combiné est décroché (en mode conversation), vous pouvez régler le
volume du récepteur en appuyant sur le bouton “CID/VOL” ( ou ). Vous pouvez
choisir parmi quatre niveaux d’écoute. Le téléphone émet deux bips quand
l’intensité maximale ou minimale est atteinte. VOL 1 est l’intensité minimale, VOL
4 l’intensité maximale.
SOURDINE
La fonction DND (sourdine) vous permet de fermer simultanément la sonnerie des
combinés et le filtrage d’appel du répondeur même si les combinés sont réglés à
une tonalité Haute ou Basse. Pour ce faire,
1. En mode d’attente, appuyez et gardez enfoncé le bouton “DO NOT DISTURB”
(Sourdine) sur le socle. L’écran de l’indicateur de sourdine s’allumera et le
message
2. Pour annuler, appuyez de nouveau sur le bouton “DO NOT DISTURB”.
REMARQUE: Vous pouvez même engager la sourdine quand l’appareil sonne en
recevant un appel.
REMARQUE: Vous pouvez même engager la sourdine pour arrêter le filtrage des appels
quand le répondeur prend un appel.
NE PAS DERANGER
s’affichera.
FONCTIONNEMENT DE L’INTERPHONE
La fonction d’interphone permet de converser avec une personne à un autre
combiné, sans occuper la ligne téléphonique. Puisque la ligne téléphonique n’est
pas utilisée, vous pouvez toujours recevoir les appels.
FAIRE UN APPEL D’INTERPHONE
1. Assurez-vous que le téléphone est DÉSACTIVÉ (pas en mode conversation).
2. Appuyez sur le bouton “PAGE/INT” du combiné.
3. Utilisez le clavier numérique pour choisir le combiné que vous souhaitez rechercher.
REMARQUE: Pour annuler la recherche, appuyez de nouveau sur le bouton “PAGE/
INT” ou sur le bouton “*EXIT”.
4. Attendez que la personne au combiné récepteur appuie sur le bouton
de “PAGE/INT”.
REMARQUE: Si le combiné récepteur ne répond pas dans les deux minutes,
l’appel par interphone est automatiquement annulé. Le combiné d’origine affiche
AUCUNE REPONSE.
33
Page 90

5. Quand vous avez terminé, appuyez sur le bouton “EXIT” ou le bouton
“PAGE/INT” de l’un ou l’autre combiné pour désactiver l’interphone.
RECEPTION D’UN APPEL D’INTERPHONE
Votre combiné émet un signal lorsque vous recevez un appel d’interphone.
Appuyez sur le bouton “PAGE/INT” ou sur le bouton “TALK/END/CALLBACK” pour
répondre à l’appel.
FONCTIONS AVANCEES DE L’INTERPHONE
RECEVOIR UN APPEL PENDANT UN APPEL D’INTERPHONE
Si vous recevez un appel téléphonique pendant un appel d’interphone, ce
dernier est immédiatement interrompu et les deux combinés sonnent. L’un ou
l’autre interlocuteur peut appuyer sur le bouton “TALK/END/CALLBACK” pour
répondre à l’appel.
UTILISATION DE L’INTERPHONE AVEC LES APPELS EXTERIEURS
Pendant un appel téléphonique, vous pouvez utiliser la fonction interphone/
recherche pour rechercher un autre combiné et converser à l’interphone, en privé
et hors ligne (deux sens). Vous pouvez aussi converser à trois avec l’appelant
extérieur et une personne à l’autre combiné, ou vous pouvez renvoyer l’appel
extérieur à un autre combiné.
REMARQUE: Avant de communiquer par interphone/rechercher un autre combiné,
vous devez décider si vous souhaitez converser à deux ou à trois.
APPEL A DEUX
1. Pendant un appel extérieur, appuyez sur le bouton “PAGE/INT” et utilisez le
clavier numérique pour entrer le numéro du combiné (1 ou 2) à joindre.
REMARQUE: La personne au combiné récepteur doit appuyer sur le bouton
“PAGE/INT” pour répondre à l’appel par interphone. Les deux personnes à
l’interphone peuvent converser en privé. L’appelant extérieur ne peut entendre la
conversation par l’interphone.
2. Quand vous avez terminé, appuyez sur le bouton “*EXIT” pour interrompre
l’appel par interphone, retourner en mode de conversation et poursuivre la
conversation téléphonique initiale.
APPEL A TROIS
1. Pendant un appel extérieur, appuyez sur le bouton “PAGE/INT”.
GARDE POSTE?
apparaît dans l’afficheur.
34
LIGNE EN
Page 91
2. Utilisez le clavier numérique pour choisir le Combiné 1 ou le Combiné 2.
Vous entendez une tonalité de recherche et
combiné d’origine.
REMARQUE: RECHERCHE DE . . . est affiché au combiné récepteur et la personne à ce
combiné doit appuyer sur le bouton “PAGE/INT” ou “TALK/END/CALLBACK” pour
répondre à l’appel par interphone.
3. Lorsque le combiné récepteur est raccordé, appuyez sur le bouton “FORMAT/
CONF” du combiné d’origine pour effectuer un appel conférence avec le
combiné récepteur et l’appelant extérieur.
l’afficheur du combiné d’origine et du combiné récepteur.
REMARQUE: Combiné peut entrer directement en mode conférence pendant un
appel en appuyant sur “TALK/END/CALLBACK” pendant qu’un autre combiné est en
communication avec un appel externe.
RECHERCHE
CONFERENCE
est affiché au
apparaît dans
RENVOI D’APPELS EXTERIEURS A D’AUTRES COMBINES
Vous pouvez renvoyer un appel extérieur à un autre combiné pendant qu’il est
en cours.
1. Appuyez sur le bouton “PAGE/INT” du combiné d’origine pour mettre un appel
extérieur en garde, puis rechercher le combiné récepteur.
2. Utilisez le clavier numérique du combiné pour choisir le combiné récepteur;
vous entendrez une tonalité de recherche.
l’afficheur du combiné d’origine et
combiné récepteur.
3. Quand le combiné récepteur entre en communication, appuyez sur le bouton
“TALK/END/CALLBACK” du combiné d’origine pour renvoyer l’appel.
-OU-
4. Appuyez sur le bouton “TALK/END/CALLBACK” du combiné d’origine pour
renvoyer l’appel. Si la personne au combiné récepteur ne répond pas dans les 30
secondes, le combiné d’origine rappelle et affiche
combiné d’origine ne répond pas dans les 20 secondes, l’appel est
automatiquement coupé.
RECHERCHE
RECHERCHE DE...
apparaît dans celui du
CALLBACK
apparaît dans
. Si la personne au
MEMOIRE
Vous pouvez mémoriser cinquante noms de 15 caractères et numéros de
téléphone à 20 chiffres dans la mémoire du combiné.
35
Page 92

MEMORISATION D’UN NOM ET D’UN NUMERO
1. Assurez-vous que le téléphone est DÉSACTIVÉ (pas en mode conversation).
2. Appuyez sur la touche “MEM” pour afficher
3. Appuyez sur le bouton d’emplacement-mémoire désiré (01 à 50) ou utilisez le
bouton “CID/VOL” ( ou ) pour atteindre l’emplacement-mémoire désiré.
REMARQUE: Si l’emplacement-mémoire est occupé, le numéro d’emplacement et le
nom et le numéro mémorisés apparaissent dans l’afficheur. Si l’emplacement-mémoire
est vide, EMPTY apparaît dans l’afficheur.
CHOISIR MEM 01-50
.
4. Appuyez sur la touche “MEM”. L’affichage indique
5. Utilisez le clavier numérique pour entrer un nom (maximum de 15 caractères).
Chaque touche numérique comprend plus d’une lettre. Par exemple, pour
entrer le nom Bill Smith, appuyez deux fois sur la touche 2 pour la lettre B.
Appuyez 3 fois sur la touche 4 pour la lettre l. Faites le 5 trois fois pour la lettre
L. Appuyez trois fois sur la touche 5 pour le second L, et appuyez sur la touche 1
pour insérer un espace entre la prénom et le nom. Appuyez 4 fois sur la touche
7 pour la lettre S ; appuyez une fois sur la touche 6 pour la lettre M ; appuyez 3
fois sur la touche 4 pour la lettre I ; appuyez sur la touche 8 pour la lettre T ;
appuyez deux fois sur la touche 4 pour la lettre H.
REMARQUE: Si vous faites une erreur, appuyez sur le bouton “DEL” pour revenir en
arrière et effacer le caractère ou le nombre incorrect.
6. Appuyez sur la touche “MEM” pour confirmer et sauvegarder le dossier.
L’affichage indique
7. Utilisez le clavier numérique pour entrer le numéro de téléphone (maximum de
20 chiffres pauses incluses), puis de nouveau sur la touche “MEM” pour
sauvegarder le dossier. L’appareil émet un signal de confirmation.
REMARQUE: Le système traite les PAUSES comme des espaces dans la séquence
de composition.
8. Pour entrer un autre nom et un autre numéro dans un emplacement-mémoire
différent, retournez à l’étape 2 et répétez l’opération.
ENTRER NUM TEL
.
ENTRER NOM
.
MÉMORISATION DU DERNIER NUMÉRO COMPOSÉ
1. Reprenez les étapes 1 à 6 de la Section Mémorisation d’un Nom et d’un
Numéro.
2. Appuyez sur le bouton “REDIAL” (recomposition).
36
Page 93

3. Appuyez de nouveau sur le bouton “MEM” pour confirmer. Vous entendrez une
tonalité de confirmation.
REMARQUE: S’il comporte plus de 20 chiffres, le numéro de recomposition ne peut
être mémorisé.
INSERTION D’UNE PAUSE DANS LA SEQUENCE DE COMPOSITION (D’UN
NUMERO MEMORISE)
Appuyez sur le bouton “#PAUSE/RINGER” sur le clavier du combiné pour insérer
un temps de pause dans la séquence de composition d’un numéro mémorisé si un
délai est requis par une tonalité. (par exemple, après avoir fait le 9 pour obtenir
une ligne extérieure ou pour attendre une tonalité d’accès à un ordinateur).
Chaque pause compte comme un chiffre dans la séquence de composition.
Vous pouvez appuyer sur le bouton “#PAUSE/RINGER” pour insérer P (pause)
quand vous entrez un numéro en mémoire.
CONSULTATION DES NUMEROS MEMORISES
1. Assurez-vous que le téléphone est DÉSACTIVÉ (pas en mode conversation).
2. Appuyez sur la touche “MEM” pour afficher
3. Appuyez sur le bouton “CID/VOL” ( ou ) pour faire défiler les dossiers, ou
utilisez le clavier numérique du combiné pour entrer le numéro d’emplacement.
CHOISIR MEM 01-50
.
REMPLACEMENT DE DOSSIERS MEMORISES
Suivez les étapes 1 à 7 de la Section Mémorisation des Noms et Numéros.
SUPPRESSION DE DOSSIERS MEMORISES
1. Assurez-vous que le téléphone est DÉSACTIVÉ (pas en mode conversation).
2. Appuyez sur la touche “MEM” pour afficher
3. Appuyez sur le bouton “CID/VOL” ( ou ) pour atteindre le dossier à
supprimer ou utilisez le clavier numérique pour entrer l’emplacement
désiré (01-50).
4. Appuyez sur le bouton “DEL” pour marquer le dossier à supprimer. L’affichage
indique
5. Appuyez sur le bouton “DEL” pour supprimer le dossier.
dans l’afficheur.
REMARQUE: Si vous ne souhaitez pas changer ou supprimer un dossier, appuyez
simplement sur le bouton “*EXIT”, ou attendez une minute avant de quitter
automatiquement le mode de consultation.
EFFACER?
CHOISIR MEM 01-50.
EFFACE
apparaît
37
Page 94

COMPOSITION D’UN NUMERO MEMORISE
1. Assurez-vous que le téléphone est ACTIVE (en mode conversation) en appuyant
sur les boutons “TALK/END/CALLBACK” ou “SPKR”.
2. Appuyez sur la touche “MEM” pour afficher memo # - -.
3. Utilisez le clavier numérique pour entrer le numéro d’emplacement (01-50). Le
numéro est composé automatiquement.
-OU-
1. Assurez-vous que le téléphone est DÉSACTIVÉ (pas en mode conversation).
2. Appuyez sur la touche “MEM” pour afficher C
3. Appuyez sur la touche d’emplacement du numéro de téléphone à composer, ou
utilisez le bouton “CID/VOL” ( ou ) pour atteindre le numéro à composer.
4. Aappuyant sur les boutons “TALK/END/CALLBACK” ou “SPKR”.
Le numéro est composé automatiquement.
HOISIR MEM 01-50
.
COMPOSITION EN CHAINE A PARTIR DE LA MEMOIRE
Utilisez cette fonction pour faire des appels qui exigent une séquence de numéros,
comme lorsque vous utilisez une carte d’appel pour un numéro interurbain
souvent appelé. L’exemple qui suit indique comment vous pouvez mémoriser
chaque partie de la longue séquence de composition et utiliser la composition en
chaîne pour faire un appel par un service d’interurbain :
Le numéro pour Emplacement-mémoire
Numéro d’accès à l’interurbain
Code d’autorisation
Numéro interurbain souvent appelé
7
8
9
1. Assurez-vous que le téléphone est ACTIVE (en mode conversation) en appuyant
sur les boutons “TALK/END/CALLBACK” ou “SPKR”..
2. Appuyez sur la touche “MEM”, puis sur 07.
3. À la tonalité d’accès, appuyez de nouveau sur la touche “MEM”, puis sur 08.
4. À la tonalité d’accès suivante, appuyez sur la touche “MEM”, puis sur 09.
38
Page 95

AFFICHEUR
Le service d’afficheur est offert par la compagnie de téléphone. Pour que l’afficheur
fonctionne avec ce système, vous devez être abonné au service d’afficheur. Pour
recevoir l’information d’appelant d’un appel en attente, vous devez être abonné au
service combiné d’afficheur d’appel en attente.
Ce système téléphonique reçoit et affiche l’information d’appelant transmise par la
compagnie de téléphone. Cette information peut comprendre le numéro de
téléphone, la date et l’heure, ou le nom, le numéro de téléphone, la date et l’heure.
Heure de réception d’appel Date de réception
d’appel
Numéro de téléphone de l’appelant
Séquence de numéro d’appels reçus
REPT
Nom de l’appelant
CODES D’ERREUR D’AFFICHEUR
Divers messages d’erreur d’afficheur peuvent apparaître dans l’afficheur. Consultez
la section Messages affichés de ce guide de l’utilisateur pour en savoir plus.
RECEPTION DE DOSSIERS D’APPELANTS
Quand vous recevez un appel, l’information de l’appelant est transmise entre la
première et la deuxième sonneries. L’information d’appelant est affichée pendant
que le téléphone sonne, vous donnant ainsi la possibilité de consulter
l’information et de décider de prendre ou non l’appel.
MEMORISATION DE DOSSIERS D’APPELANTS (DANS LA MEMOIRE
L’AFFICHEUR)
DE
Si vous êtes absent ou ne pouvez répondre, la mémoire de l’afficheur mémorise
les données des 40 plus récents appels reçus pour vous indiquer qui a appelé
pendant que vous n’étiez pas disponible. À la réception du 41e appel, le plus
ancien dossier d’appelant (1er appel) est automatiquement supprimé.
Vous pouvez consulter l’information mémorisée en tout temps. Les appels reçus
depuis la dernière consultation sont indiqués comme étant
NOUVEL
dans l’afficheur.
39
Page 96

CONSULTATION DES DOSSIERS D’APPELANTS
À mesure que les appels sont reçus et mémorisés, l’afficheur est mis à jour pour
vous indiquer le nombre d’appels reçus. Pour faire défiler les dossiers d’appelants:
1. Assurez-vous que le téléphone est DÉSACTIVÉ (pas en mode conversation).
2. Appuyez sur le bouton “CID/VOL” ( ) pour consulter le plus récent
dossier d’appelant.
3. Appuyez sur le bouton “CID/VOL” ( ) pour consulter le plus ancien
dossier d’appelant.
À mesure que vous consultez les dossiers d’appelants, l’afficheur indique
l’information suivante pour chaque appel:
• Le numéro de téléphone de l’appelant.
• Le numéro de l’appel par rapport à l’ordre de réception.
• Le nom de l’appelant, si ce service est offert dans la région.
• L’heure et la date de réception de l’appel.
NOUVEL
•
REPT
•
REMARQUE: Renseignez-vous auprès de la compagnie de téléphone concernant la
disponibilité du service d’affichage du nom.
apparaît pour tous les appels qui n’ont pas déjà été consultés.
apparaît pour un appel qui n’a pas déjà été consulté, mais est répété.
MEMORISATION DES DOSSIERS D’APPELANTS DANS LA MEMOIRE INTERNE
Vous pouvez aussi mémoriser l’information d’appelant dans la mémoire interne du
téléphone. Vous ne pouvez reformater les dossiers d’appelants mémorisés.
CONSEIL: Afin d’éviter que l’information d’appelant soit automatiquement effacée, on
recommande de la mémoriser dans la mémoire du téléphone.
REMARQUE: Vous devez formater vos dossiers d’appelants correctement avant de les
mémoriser dans la mémoire interne.
1. Assurez-vous que le téléphone est DÉSACTIVÉ (pas en mode conversation).
2. Utilisez le bouton “CID/VOL” ( ou ) pour atteindre le dossier d’appelant désiré.
3. Appuyez sur la touche “MEM” pour afficher
4. Utilisez le clavier numérique pour entrer un numéro d’emplacement-mémoire
(par exemple, appuyez sur 01 pour mémoriser le dossier au premier emplacement).
CHOISIR MEMOIRE 01-50
.
40
Page 97

REMARQUE: Si l’emplacement-mémoire est occupé, REMPLACER MEM? est affiché et
vous devez confirmer le remplacement en appuyant sur le bouton “MEM”.
REMARQUE: Appuyez une fois sur le bouton “*EXIT” pour conserver le réglage
précédent et retourner à l’écran de sous-menu.
COMPOSITION D’UN NUMERO D’APPELANT
Pendant la consultation des dossiers d’appelants, vous pouvez composer le
numéro de téléphone affiché.
1. Assurez-vous que le téléphone est DÉSACTIVÉ (pas en mode conversation).
2. Appuyez sur le bouton “CID/VOL” ( ou ) jusqu’à ce que le dossier désiré
soit affiché.
REMARQUE: Selon (a) le format du numéro de téléphone de l’appelant à sa réception
et (b) si vous avez déjà programmé votre indicatif régional dans le menu de
programmation, vous devrez peut-être régler le format du numéro de téléphone
mémorisé de l’appelant avant de faire l’appel.
Formats disponibles :
Nombre de chiffres Explication Exemple
Onze chiffres code d’interurbain “1 ” 1-317-888-8888
+ indicatif à 3 chiffres
+ numéro de téléphone à 7 chiffres
Dix chiffres indicatif à 3 chiffres + 317-888-8888
numéro de téléphone à 7 chiffres.
Sept chiffres numéro de téléphone à 7 chiffres. 888-8888
3. Si le numéro ne peut être composé tel qu’affiché, appuyez sur le bouton
“FORMAT/CONF”. Répétez au besoin jusqu’à ce que le bon nombre de
chiffres soit affiché.
4. Appuyez sur le bouton TALK/END/CALLBACK du combiné. Le numéro est
composé automatiquement.
REMARQUE: Si le numéro est corrompu, comme un chiffre dans un nom ou une lettre
dans un numéro, une tonalité d’erreur est émise au combiné et vous ne pouvez
composer le numéro.
41
Page 98

SUPPRESSION D’UN DOSSIER D’APPELANT
1. Assurez-vous que le téléphone est DÉSACTIVÉ (pas en mode conversation).
2. Utilisez le bouton “CID/VOL” ( ou ) pour trouver le dossier d’appelant à
effacer.
3. Appuyez sur le bouton “DEL”. L’afficheur indique
4. Appuyez sur le bouton “DEL” pour effacer le dossier affiché. L’afficheur
indique
REMARQUE: Appuyez sur la touche “*EXIT” pour retourner en -attente.
EFFACE
.
EFF AFFICHEUR?
EFFACEMENT DE TOUS LES DOSSIERS
1. Assurez-vous que le téléphone est DÉSACTIVÉ (pas en mode conversation).
2. Utilisez le bouton “CID/VOL” ( ou ) pour atteindre le dossier d’appelant
désiré.
3. Maintenez le bouton “DEL” enfoncé jusqu’à ce que
4. Appuyez sur le bouton “DEL” pour effacer tous les dossiers d’appelants
courants. L’afficheur indique EFFACE suivi de PAS D’APPEL.
REMARQUE: Appuyez sur la touche “*EXIT” du combiné pour retourner en mode attente.
EFFACER TOUT?
soit affiché.
ACCÈS À DISTANCE
Vous pouvez accéder au répondeur avec le combiné sans fil ou à partir d’un
téléphone compatible avec la composition par tonalité.
COMBINÉ SANS FIL
Utilisez les touches du combiné correspondantes comme si vous utilisiez les
boutons de la base (voir Installation du Répondeur). Les fonctions des boutons
sont indiquées sur le combiné, au-dessus de chaque touche numérique. Par
exemple, pour écouter les messages:
• Appuyez sur le bouton “FLASH/answerer”. L’afficheur indique
• Appuyez sur le bouton 2 (écoute/arrêt) suivi du numéro de la boîte vocale pour
écouter le message placé dans cette boîte. Par exemple, appuyez sur les
touches 2 et 3 pour écouter le message placé dans la boîte vocale 3.
• Appuyez de nouveau sur “FLASH/answerer” quand vous avez terminé d’écouter
vos messages.
REPONDEUR
.
42
Page 99

INDICATEUR DE RÉPONDEUR
Le répondeur est actif quand l’indicateur de la base est allumé.
FILTRER LES APPELS À PARTIR DU COMBINÉ
Utilisez le combiné pour filtrer les appels, même si vous ne pouvez entendre
le répondeur.
Quand le répondeur répond:
1. Appuyez sur le bouton “FLASH/answerer” pour accéder au répondeur.
2. Écoutez l’appelant laisser un message.
3. Appuyer sur le bouton “TALK/END/CALLBACK” ou “SPKR” pour entrer en
conversation avec la personne ou sur le bouton “FLASH/answerer” pour mettre
fin au filtrage de l’appel.
ACCÈS AU RÉPONDEUR À PARTIR D’UN AUTRE ENDROIT
Vous pouvez accéder au répondeur à partir de tout appareil à tonalité en entrant
votre code de sécurité de 3 chiffres pendant l’écoute du message d’accueil ou à la
suite de ce message.
1. Composez le numéro de téléphone auquel le répondeur est raccordé.
2. Entrez votre code de sécurité de 3 chiffres pendant l’écoute du message
d’accueil ou 8 secondes après la tonalité.
3. Suivez le menu vocal pour utiliser les fonctions à distance du répondeur.
Les fonctions à distance permettent de :
Pour Appuyez sur ce bouton
Réécouter le message 1
Écouter les messages 2
Sélection de la boîte vocale 1, 2 ou 3
Interrompre l’écoute du message 2
Effacer le message 0 (pendant l’écoute du message)
Sauter le message 3
Éteindre/allumer le répondeur 4
Consulter les options du menu vocal 7
43
Page 100
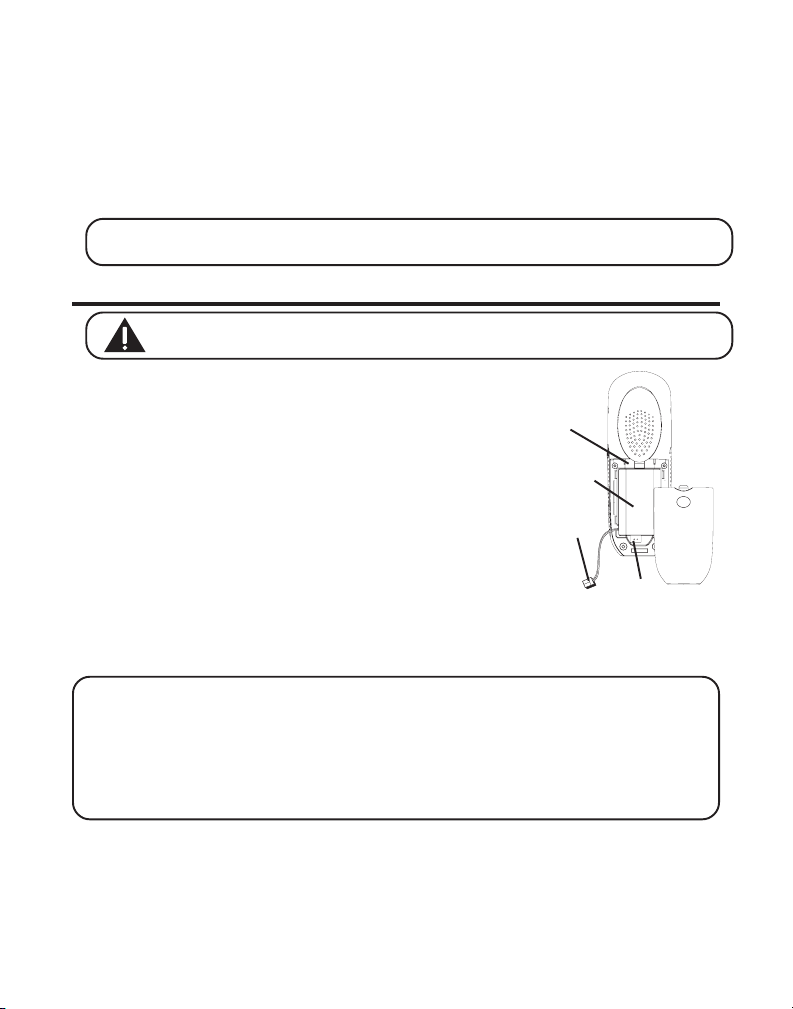
MÉMOIRE PLEINE
Si la mémoire du répondeur est pleine, le système répond après 10 sonneries,
émet un signal et attend que vous entriez votre code de sécurité à 3 chiffres. Si un
code de sécurité n’est pas entré dans les 8 secondes, le téléphone raccroche.
Effacez quelques messages pour que le répondeur puisse enregistrer les
nouveaux messages.
REMARQUE: L’appareil répond aussi après 10 sonneries s’il est éteint. Pour accéder au
répondeur, entrez votre code de sécurité à 3 chiffres après le bip.
REMPLACEMENT DE LA PILE
ATTENTION: Afin de réduire les risques d’incendie et de blessure, utilisez
seulement la pile 5-2522 compatible avec cet appareil.
1. Assurez-vous que le téléphone est désactivé (pas en
mode conversation) avant de remplacer la pile.
2. Retirez la porte du logement à piles.
Porte du
logement
à pile
3. Débranchez le cordon du bloc-pile de la prise à
l’intérieur du logement à pile et retirez la pile du
combiné.
4. Insérez la nouvelle pile et rebranchez la fiche.
5. Remettez la porte du logement à pile en place.
Pile
Prise de
bloc-pile
6. Placez le combiné sur la base ou le socle de chargement
pour charger la pile. Si vous ne chargez pas
correctement la pile du combiné (pendant 16 heures) au
moment de l’installation initiale du téléphone et/ou
Prise du
logement à pile
quand vous installez un bloc-pile neuf, le rendement à long terme de la pile sera
compromis.
REMARQUE: Si la pile n’est pas installée correctement dans le combiné ou si le bloc-pile
n’est pas raccordé correctement à la prise dans le compartiment de la pile, le message
“NO BATTERY” (pas de pile) s’affiche quand le combiné est replacé sur le socle.
REMARQUE: Si une pile est débranchée du téléphone puis reconnectée, le téléphone
doit être placé sur la base ou dans le socle de chargement pendant 2 minutes pour lui
permettre de se réinitialiser.
44
 Loading...