

Page 1
Television
User's Guide
Changing Entertainment. Again.
Page 2

Important Information
WARNING
To reduce the risk of fire or
electric shock, do not expose
this TV to rain or moisture.
WARNING
RISK OF ELECTRIC SHOCK
DO NOT OPEN
A This symbol indicates
"dangerous voltage" inside
the product that presents a
risk of electric shock or
personal injury.
To reduce the risk of electric shock, do not remove
cover (or back). No user serviceable parts inside.
Refer servicing to qualified service personnel.
This symbol indicates
A
important instructions
accompanying the product.
Caution; To prevent electric shock, match wide blade of
plug to wide slot, fully insert.
Attention: Pour éviter les chocs électriques, introduire
la lame ta plus large de la fiche dans la borne
correspondante de la prise et pousser jusqu au fond.
Refer to the identification/rating label located on the back panel of your
product for its proper operating voltage.
FCC Regulations state that unauthorized changes or modifications to this
equipment may void the user's authority to operate it.
If fixed (non-moving) images are left on the screen for long periods,
they may be permanently imprinted on the picture tube. Such
images include network logos, phone numbers, and video games.
This damage is not covered by your warranty. Extended viewing of
channels displaying these images should be avoided.
Cable TV Installer: This reminder is provided to call your attention to
Article 820-40 of the National Electrical Code (Section 54 of the Canadian
Electrical Code, Part 1) which provides guidelines for proper grounding and,
in particular, specifies that the cable ground shall be connected to the *
grounding system of the building as close to the point of cable entry as
practical.
Product Registration
Please fill out the product registration card and return it immediately. Returning the card allows us to contact
you if needed.
Keep your sales receipt to obtain warranty parts and service and for proof of purchase. Attach it here and record
the serial and model numbers in case you need them. The numbers are located on the back of the television.
Model No._____________________________________________________________
Serial No.
Purchase Date:
Dealer/Address/Phone:
G-LINK, VCR Plus+, C^, PlusCode, GUIDE Plus+, and GUIDE Plus-i- Gold are trademarks of Gemstar Development
Corporation.
The GUIDE Plus+ Gold system is manufactured under license from Index Systems Inc.
____
Thomson Consumer Electronics and Gemstar are not in any way liable for the accuracy of the program information
provided by the GUIDE Plus+ System. In no event shall Thomson Consumer Electronics or Gemstar be liable for any
arnount representing loss of profits, loss of business, or indirect, special, or consequential damages in connection
with the provision or use of any information equipment, or services relating to the GUIDE Plus+ System.
Page 3
Key Features Overview
Your 'rv is equippeci with tcaluivs that u ill add to yotir 'IV viewing experience. The Ibilowing
inloi Illation summarizes a tew ot the.se features. Cliapter 3 provides more information ahotit the
rest of the TV’s features and how to use them.
On-screen Program Guide
Description: rile GUIDE Plus+ .system is tin on-screen interactive list of
programs and information that is built into your T\f You can scroll through the
guide to .see what’s on and tune directly to that program from the guide. You
can also browse programs by eategoty with the sort feature.
When yoLi access the Neu'S feature, .MSNBC will appear in your video window
Fitness Tip
(s;
r
n
; 1 Late Late Show
I Access HolJy...
! ¥oi’' All inthe Fam...
Late Late Show
I Late Night Conan
Mews
RIcki Lake
if it's available through your TV.
One-Touch VCR Recording is another benefit of the GUIDE Plus-r system. You
don't liave to remember to program your VCR or use the menus in your VCR
to set up a recording.
Requirements:
• Remove the Demo Pin from the G-LINK jack.
Introduction
• Complete the on-.screen interactive setup. You’ll find detailed instructions
in Chapter 1.
• One-Touch VCR Recording: You must connect the G-LINK cable to the T\’
and place one of the wands in front of the remote sensor on the VCR.
• If you have a cable box, connect the G-LINK cable to the TV and place
one of the wands in front of the remote sensor on the cable box.
V-Chip: Parental Controls
Description: You can block programs and movies by content, age-based
ratings, and/or movie ratings.
Requirements:
• Set up the Parental Controls menu in the TV’s main menu (Chapter 3
has details).
• The broadcasters must use the rating system when they send the program
to your TV in order for your TV to block the program.
Auto Tuning
Description: Allows you to set up the TV to automatically tune to a specific
channel when you pre.ss a certain component (VCR, DVD Player, etc.) button
on the remote.
Requirements; Set up Auto Tuning in the TV’s menu system. (Chapter 3
has details).
Page 4

Introduction
(This page intentionally left blank)
Page 5

T^ble of Contents
Introduction
Key Features Overview.............................................................................................................1
On-screen Program Guide.................................................................................................1
V-Chip: Parental Controls..................................................................................................1
Auto Tuning.........................................................................................................................1
Chapter 1: Connections & Setup
Things to Consider Before You Connect................................................................................6
Protect Against Power Surges..........................................................................................6
Protect Components from Overheating
Position Cables Properly to Avoid Audio Interference
Important Stand and Base Safety Information ...............................................................6
Use Indirect Light............................................................................................................... 6
Connection Pictures...........................................................................................................6
Demo Pin..............................................................................................................................6
Choose Your Connection..........................................................................................................7
Connection: TV + VCR.............................................................................................................. 8
Connection; TV Only............................................................................................................... 9
Connection: TV + VCR + Satellite Receiver......................................................................... 11
Jacks on the Back of Your TV............................................................................................... 12
Why You Should Connect This G-LINK Cable......................................................................13
Placing the G-LINK Wands...............................................................................................13
How to Find the Remote Sensor......................................................................................13
Complete the Interactive Setup.............................................................................................. 15
Set the Menu Language....................................................................................................15
Complete Auto Channel Search......................................................................................15
The GUIDE Plus-r System Setup......................................................................................15
What to Expect........................................................................................................................ 20
Next Steps...............................................................................................................................20
...................
;......................................................5
..................................................
6
Chapter 2: Using the Remote Control
The Buttons on the Remote Control.....................................................................................22
Using the WHO*INPUT Button.......................................................................................23
Programming the Remote to Operate Other Components
Find Out If You Need to Program the Remote..............................................................24
Howto Program the Remote...........................................................................................24
How to Use the Remote After You've Programmed It........................................................25
................................................
24
Chapter 3: Using the TV's Features
About the GUIDE Plus+ System............................................................................................28
Downloading Data...........................................................................................................28
Getting In & Out of the GUIDE Plus+ System...............................................................29
The GUIDE Plus-r System Menus
Grid Guide........................................................................................................................29
Sort.....................................................................................................................................31
News..................................................................................................................................32
Schedule...........................................................................................................................32
..................................................................................
29
Page 6

T^ble of Contents
Messages...........................................................................
Channels.............................................................................. 24
Setup..................................................................................................................... ‘ZZ''.3A
How to Get More Information About an Advertisement or a Program
GUIDE Plus+ Menu Items........................................................................................................ 35
Channel Banner.................................................................................................................... 3g
Why You Should Use the Auto Tuning Feature
How to Set Up the Auto Tuning Feature........................................................................ 36
Parental Controls and V-Chip............................................................................................... 3g
How V-Chip Works........................................................................................................ 3g
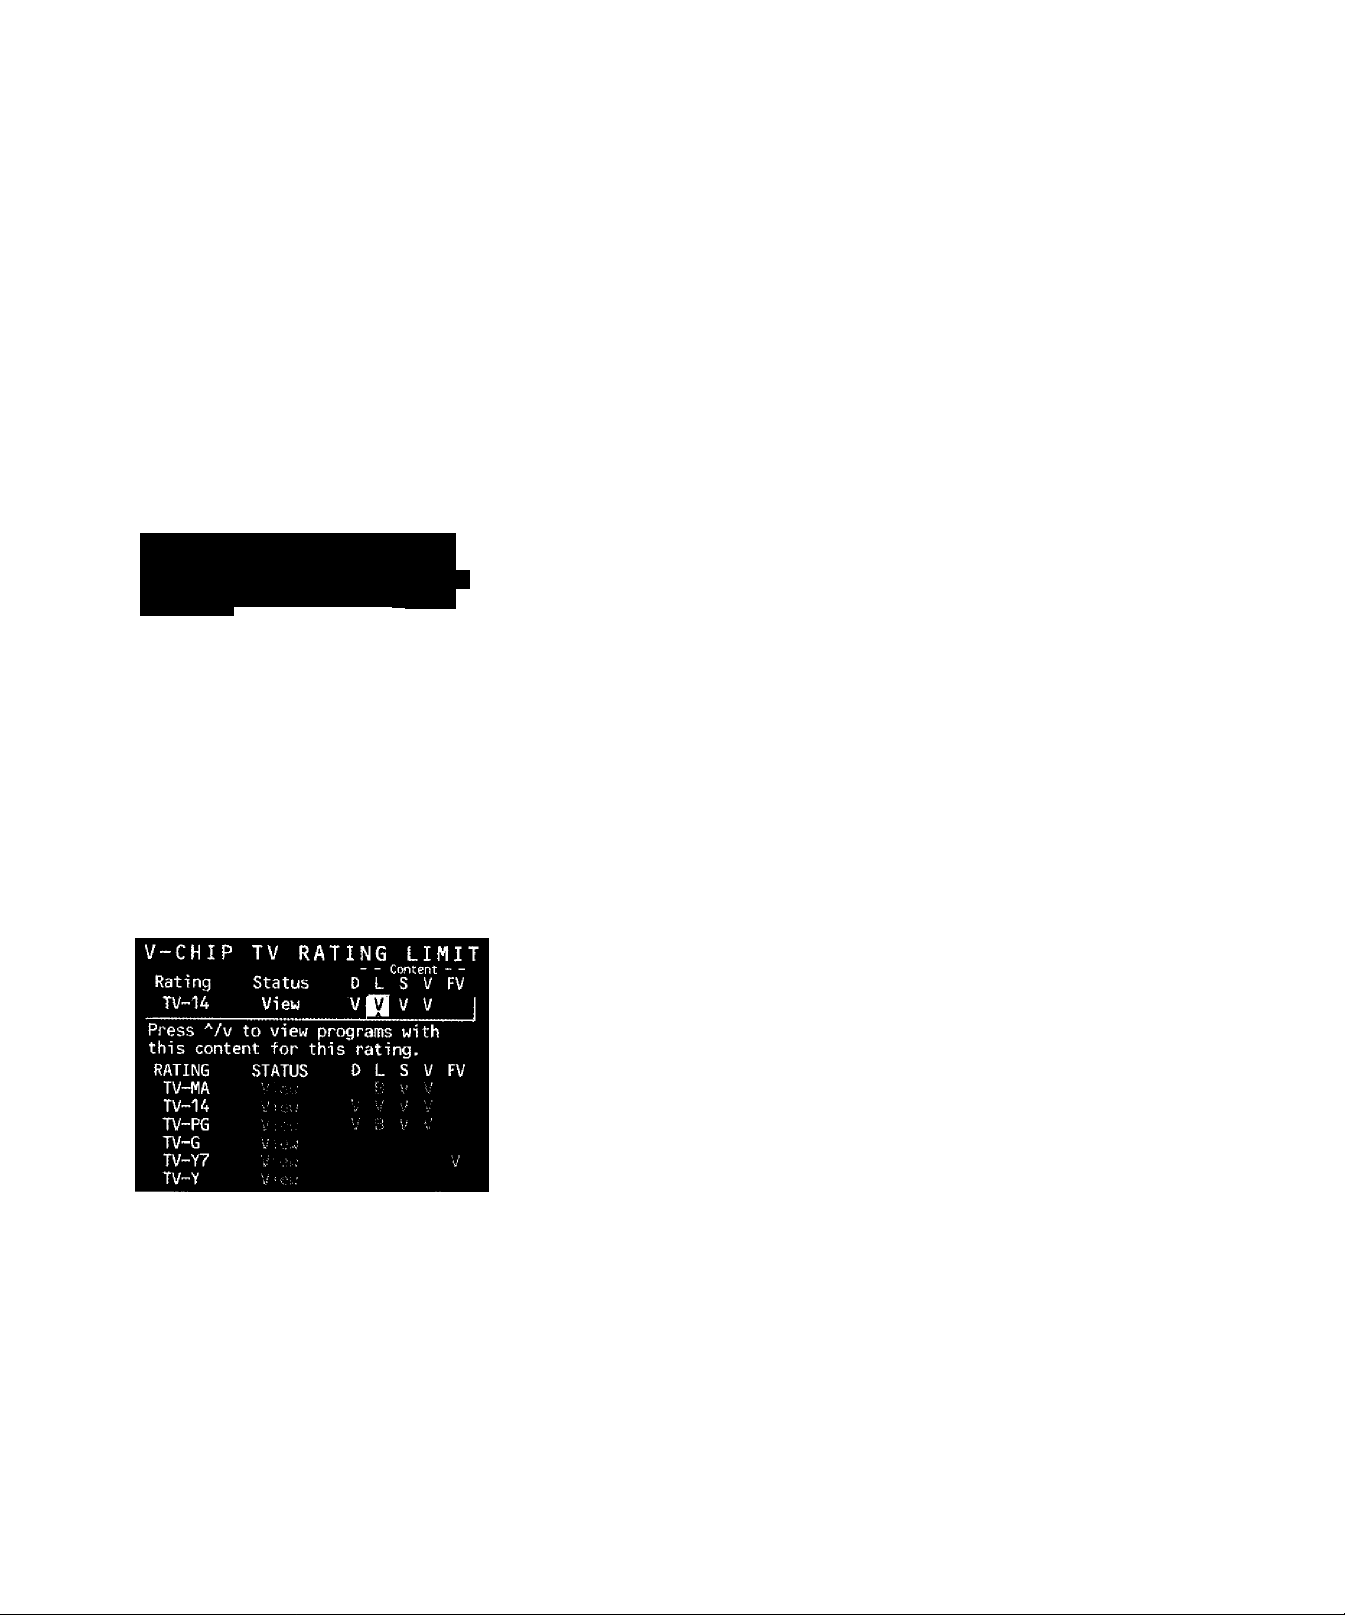
V-Chip TV Rating Limit................................................................................................... 3g
Blocking Specific Content Themes
Viewing Specific Content Themes.................................................................................. 42
V-Chip Movie Rating Limit............................................................................................... 43
V-Chip Unrated Program Block....................................................................................... 44
' Channel Block.....................................................................................................
Front Panel Block
Lock/Unlock Parental Controls....................................................................................... 44
...................................................................
...............................................................................
...................................................................
........................
..
41
44
44
35
Chapter 4: Using the TV's Menu System
How to Use Your TV's Menu System
Audio Menu............................................................................................................................. 4g
Picture Quality Menu............................................................................................................... 42
Screen Menu........................................................................................................................... 4g
Using Closed Captioning...................................................................................................... 4g
Channel Menu................................................................................................
Time Menu.................................................
....................................................................................
Chapter 5; Other Information
Troubleshooting................................................................................................ 52
Care and Cleaning........................................................................................................
Front Panel,
RCA TV Limited Warranty........................................................................................... 55
Index.................................................................................................. 5Q
54
.55
46
49
50
4
Page 7

Chapter 1
Connections & Setup
Chapter Overview:
Things to Consider Before You Connect
Choose Your Connection
Connections
Jacks on the Back of Your TV
Why You Should Connect This G-LINK Cable
Plug in the TV
Put Batteries in the Remote
How to Use the Remote Control to Complete the
Interactive Setup
Turn on the TV
Complete the Interactive Setup
Changing Entertainment. Again.
Page 8

Coimections & Setup
Things to Consider Before You Connect
Protect Against Power Surges
• Connect all components before you plug any of their power cords into the wall outlet.
• Turn off the T\' and/or component before you connect or disconnect any cables.
• Make sure all antennas and cables are properly grounded. Refer to the Important
Safeguards .sheet packed with your TV,
Protect Components from Overheating
• Don t block ventilation holes on any of the components. Arrange the component,s so that
air can circulate freely.
• Don’t stack components.
• When you place components in a stand, make sure you allow adequate ventilation.
• If you connect an audio receiver or amplifier, place it on the top shelf so the heated air
from it won’t flow around other components.
Position Cables Properly to Avoid Audio Interference
• Insert each cable firmly into the designated jack.
• If you place components above the TV, route all cables down the side of the back of the
TV instead of straight down the middle of the back of the TV.
• If your antenna uses 300-ohm twin lead cables, do not coil the cables. Also, keep the twin
lead cables away from audio/video cables.
Important Stand and Base Safety Information
choose the location for your TV carefully. Place the TV on a stand or base that is of adequate
size and strength to prevent the TV from being accidentally tipped over, pushed off, or pulled
off. This could cause personal injury and/or damage the TV. Refer to the Important Safeguards
sheet packed with your TV.
Use Indirect Light
Don’t place the TV where sunlight or room lighting will be directed toward the screen. Use soft
or indirect lighting.
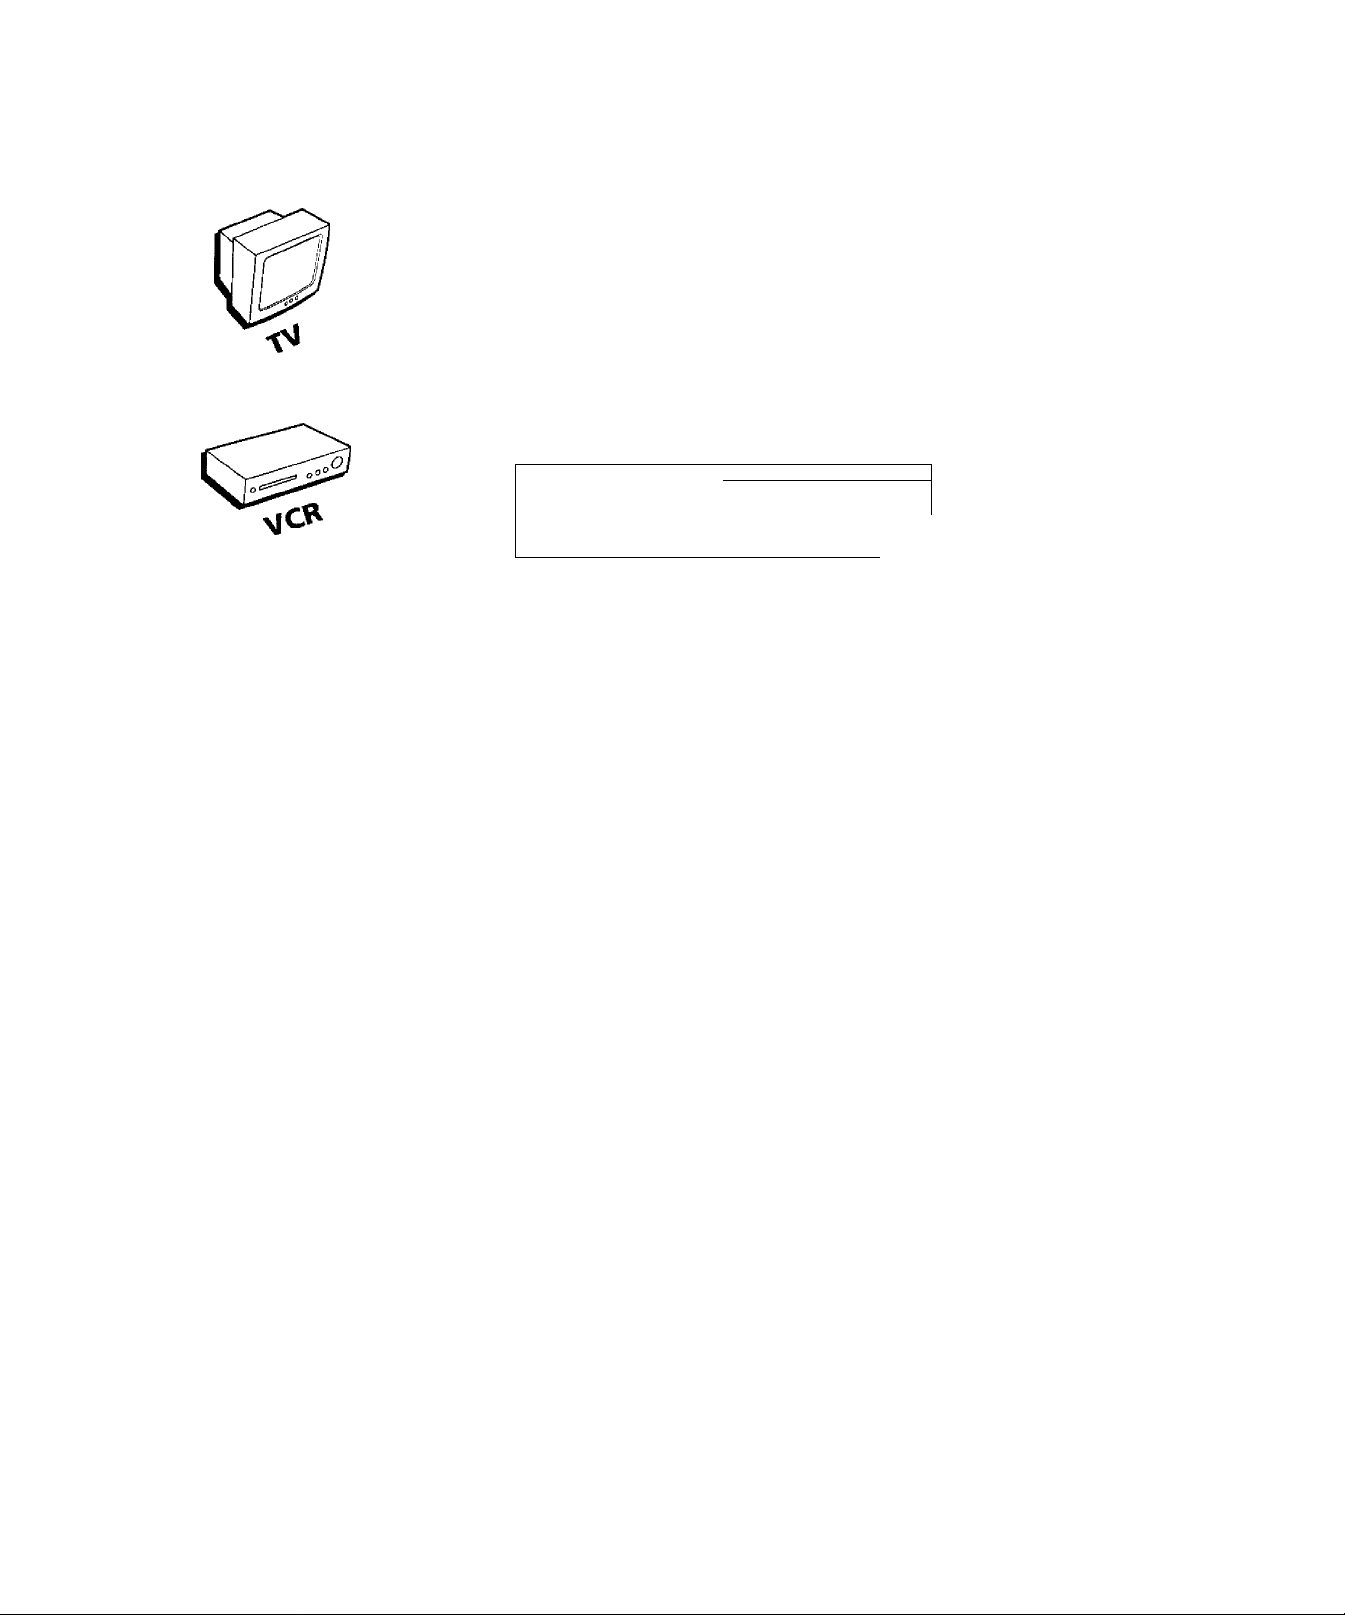
Connection Pictures
Audio/vkleo cables are usually bundled together. For better visibility, the connection pictures in
this book show each cable separately (audio left, audio right, and video).
Demo Pin
You must remove the Demo Pin from the G-LINK jack on the back of
your TV in order for your TV to operate properly and to connect the
G-LINK cable.
Chapter 1
Page 9

Connections & Setup
Choose Your Connection
There are several ways to connect your T\^. Please use the folkiwing chait to determine which
connection is best for you. Proceed to the appropriate page and connect your TV,
Cables Needed to Connect Components to Your TV
The pictures below show the cables needed for the connections represented in this book.
Notes: Audio/Video cables (A/V cables for short) are usually sold as a bundled set, hut
the connection pictures in this hook show each cable separately for better visibility.
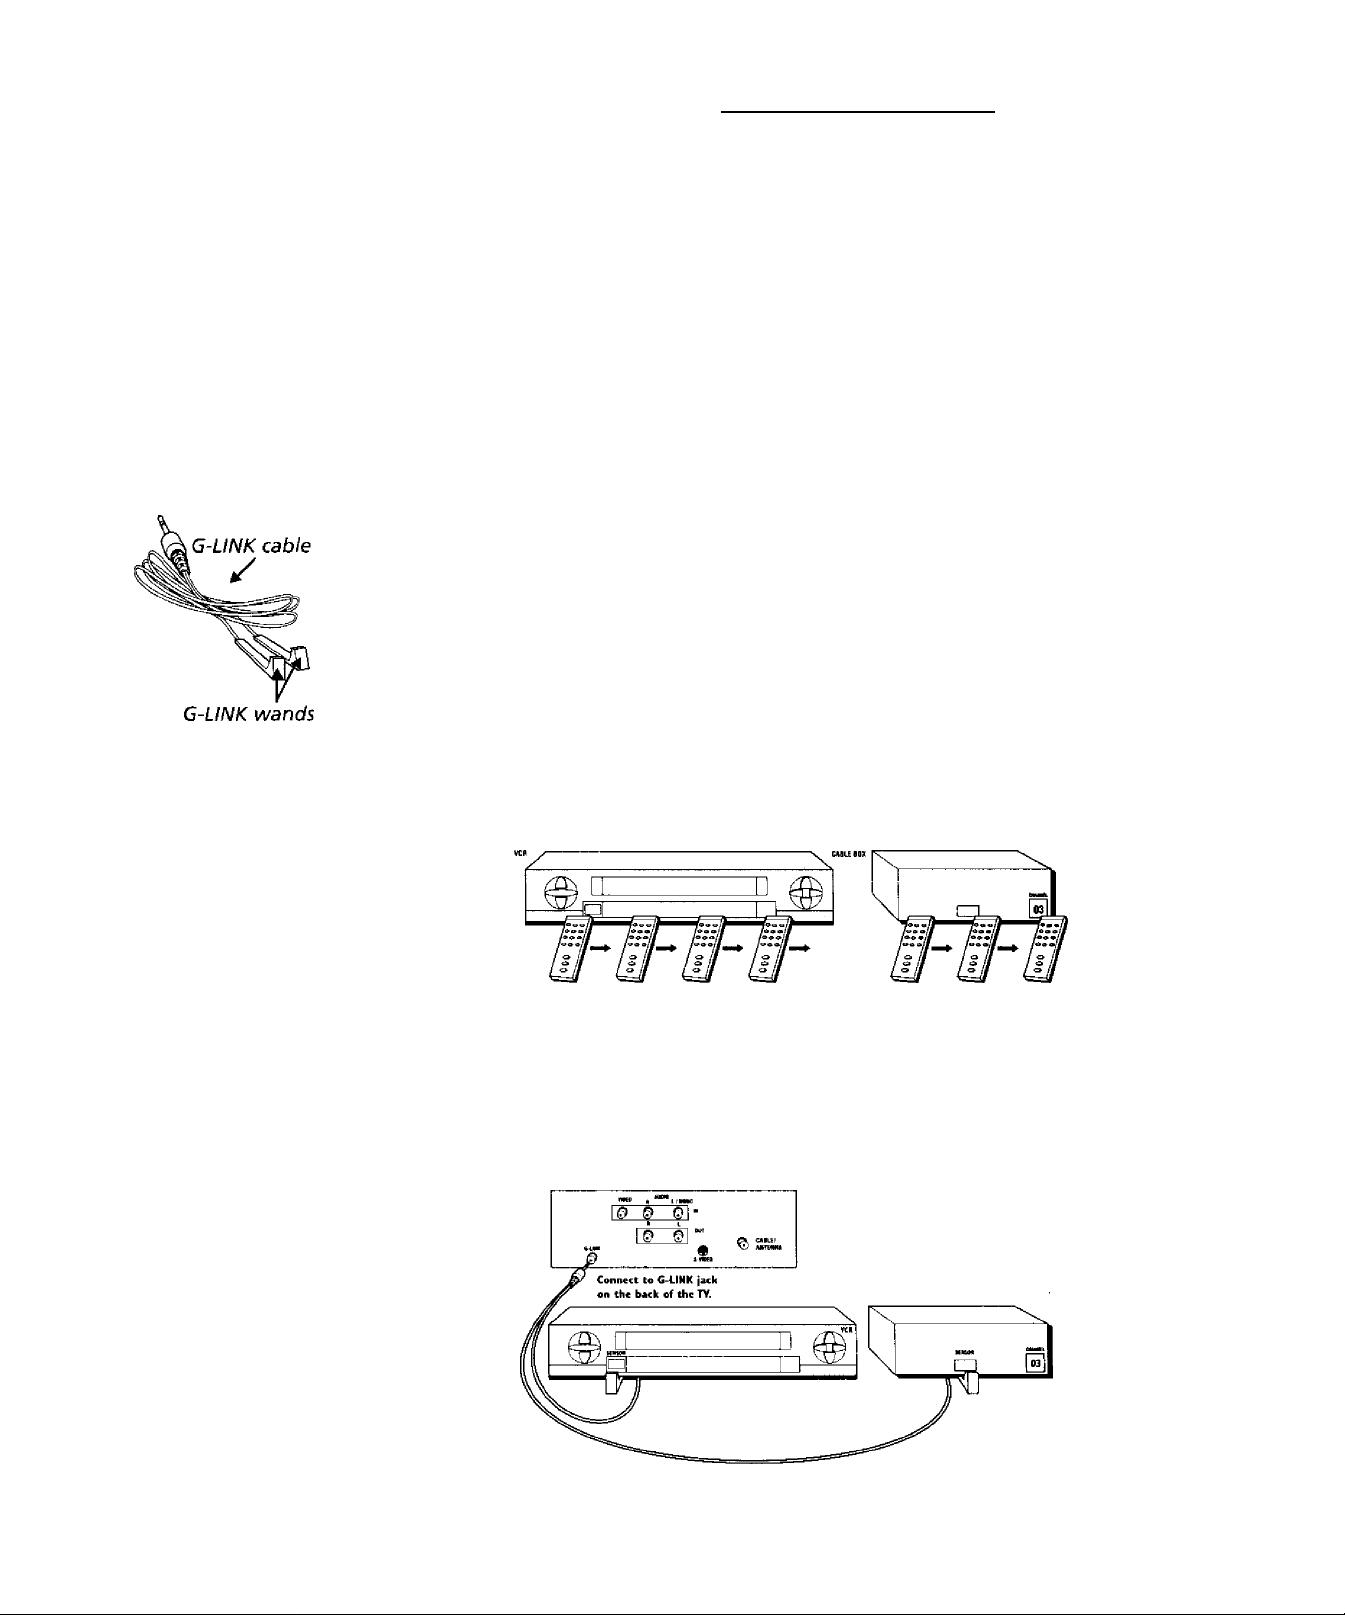
Please locate the G-LINK cable (provided) when you’re getting ready to set up your TV.
You need to connect this cable to your TV, and to your VCR and/or cable box in order for
all of the features of the program guide to work properly.
AudioA/ideo cables Coaxial cable
Chapter 1
S-Video cable
Page 10
Connections & Setup
TV (back panel)
CA6L&
. ANTENNA
1C
1AJ
VCR
VIDEO
Q
0
outO fr)
'4 ©
R . L
luoiot:;^ ~
IN FROM ANT
OUT TO
f2
CH3.
chaU
From Cable
or Aflterina
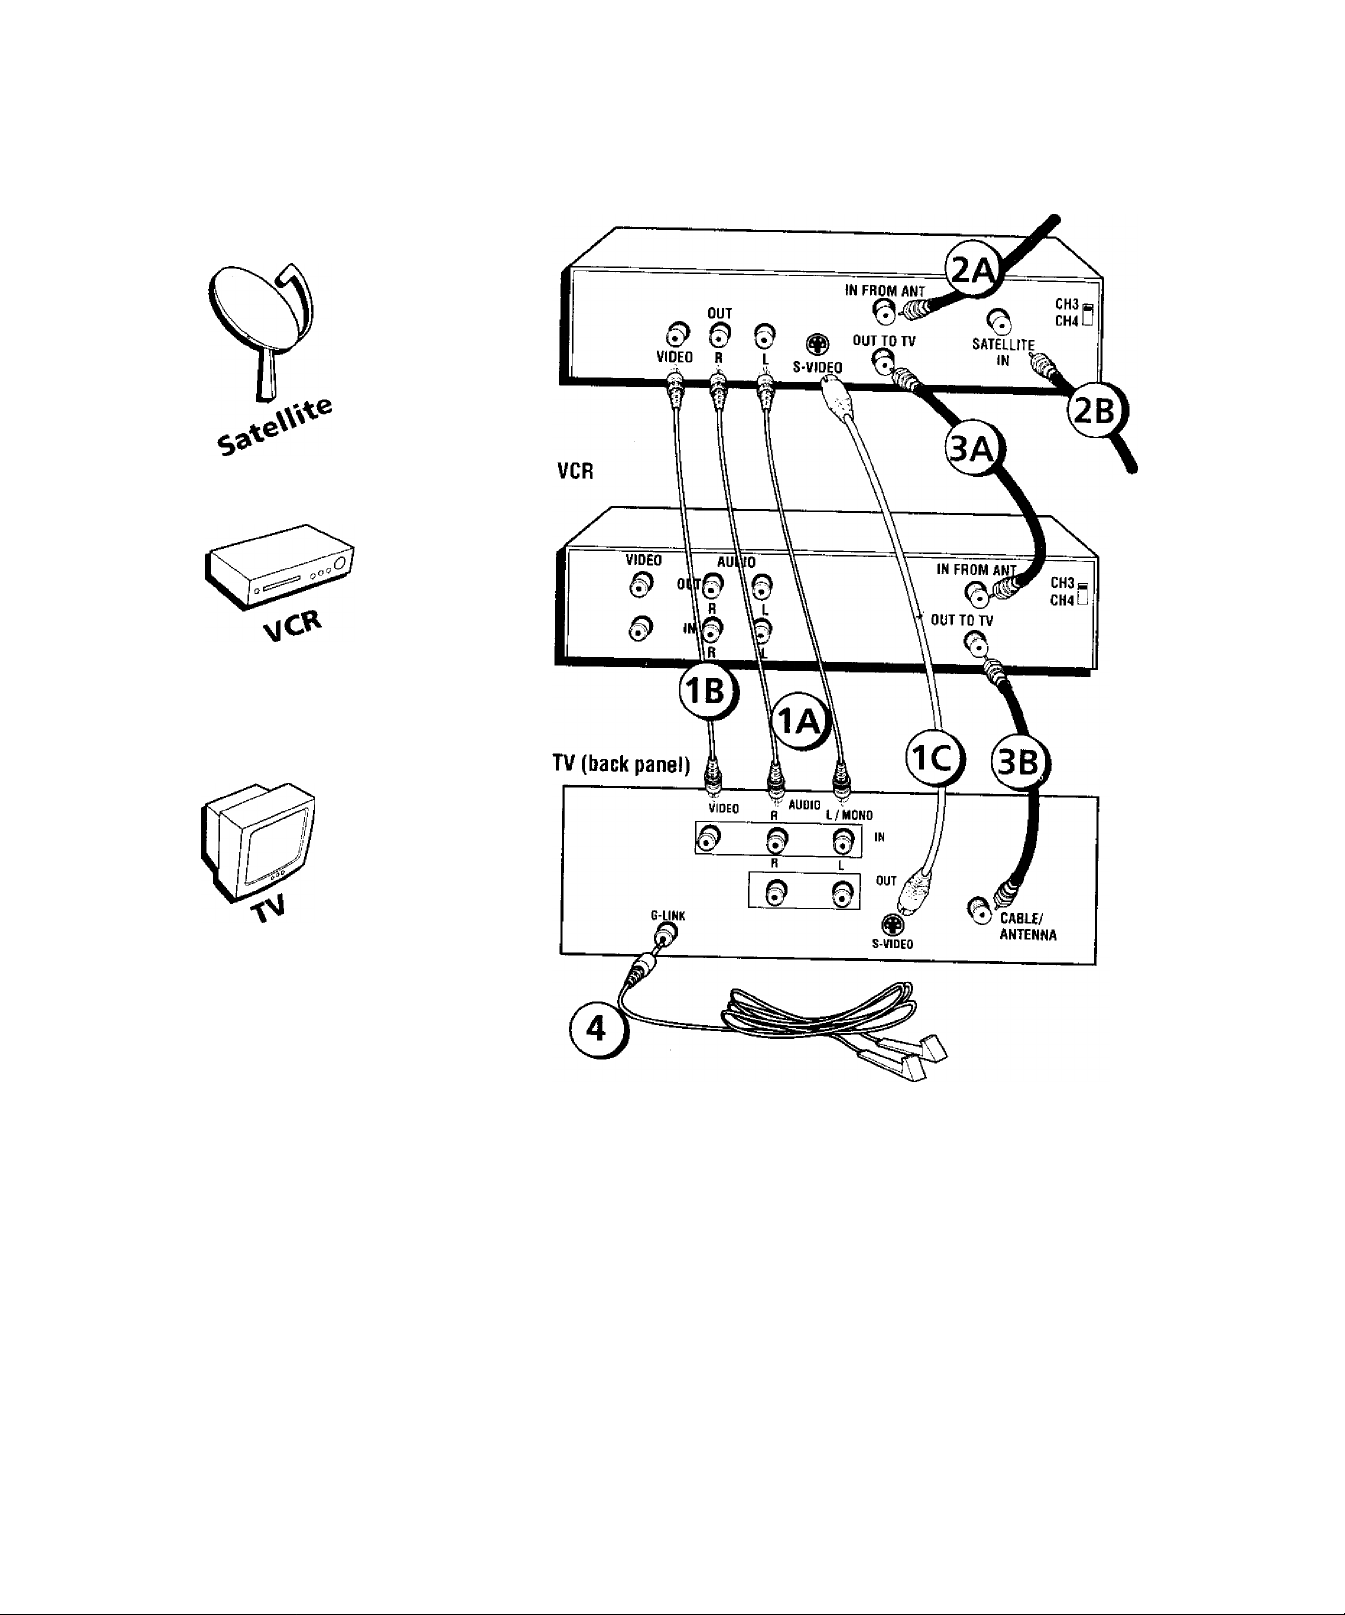
Connection: TV + VCR
1. Connect your TV to your VCR
voTvr» CABIE/ANTENNA jack on your W and ,o the Output Jack on
your VCR (sometimes labeled OUT TO TV), ^
B. Corinect the audio/video cables. Connect audio cables (white and red) to the AUDIO IN jacks
Dteied OUrt L) ^ Jacks on the VCR (sometimes
C, Connect the video cable (yellow) to the VIDEO IN jack on the back of the TV and to the Video
Output Jack on the VCR.
2. Connect cable or antenna to your VCR
Connect the coaxial cable from your cable outlet, cable box. or antenna to the Input Jack on your
VCR (sometimes labeled IN FROM ANTENNA or IN FROM ANT),
3. Connect the G-UNK cable to the TV
A. If you haven’t already done so, remove the Demo Pin from the G-LINK jack.
the G-LINK cable to work with your VCR (instructions are on p. 13).
place one of the wands of
Go to page 13
8
Chapter 1
Page 11
TV (back panel)
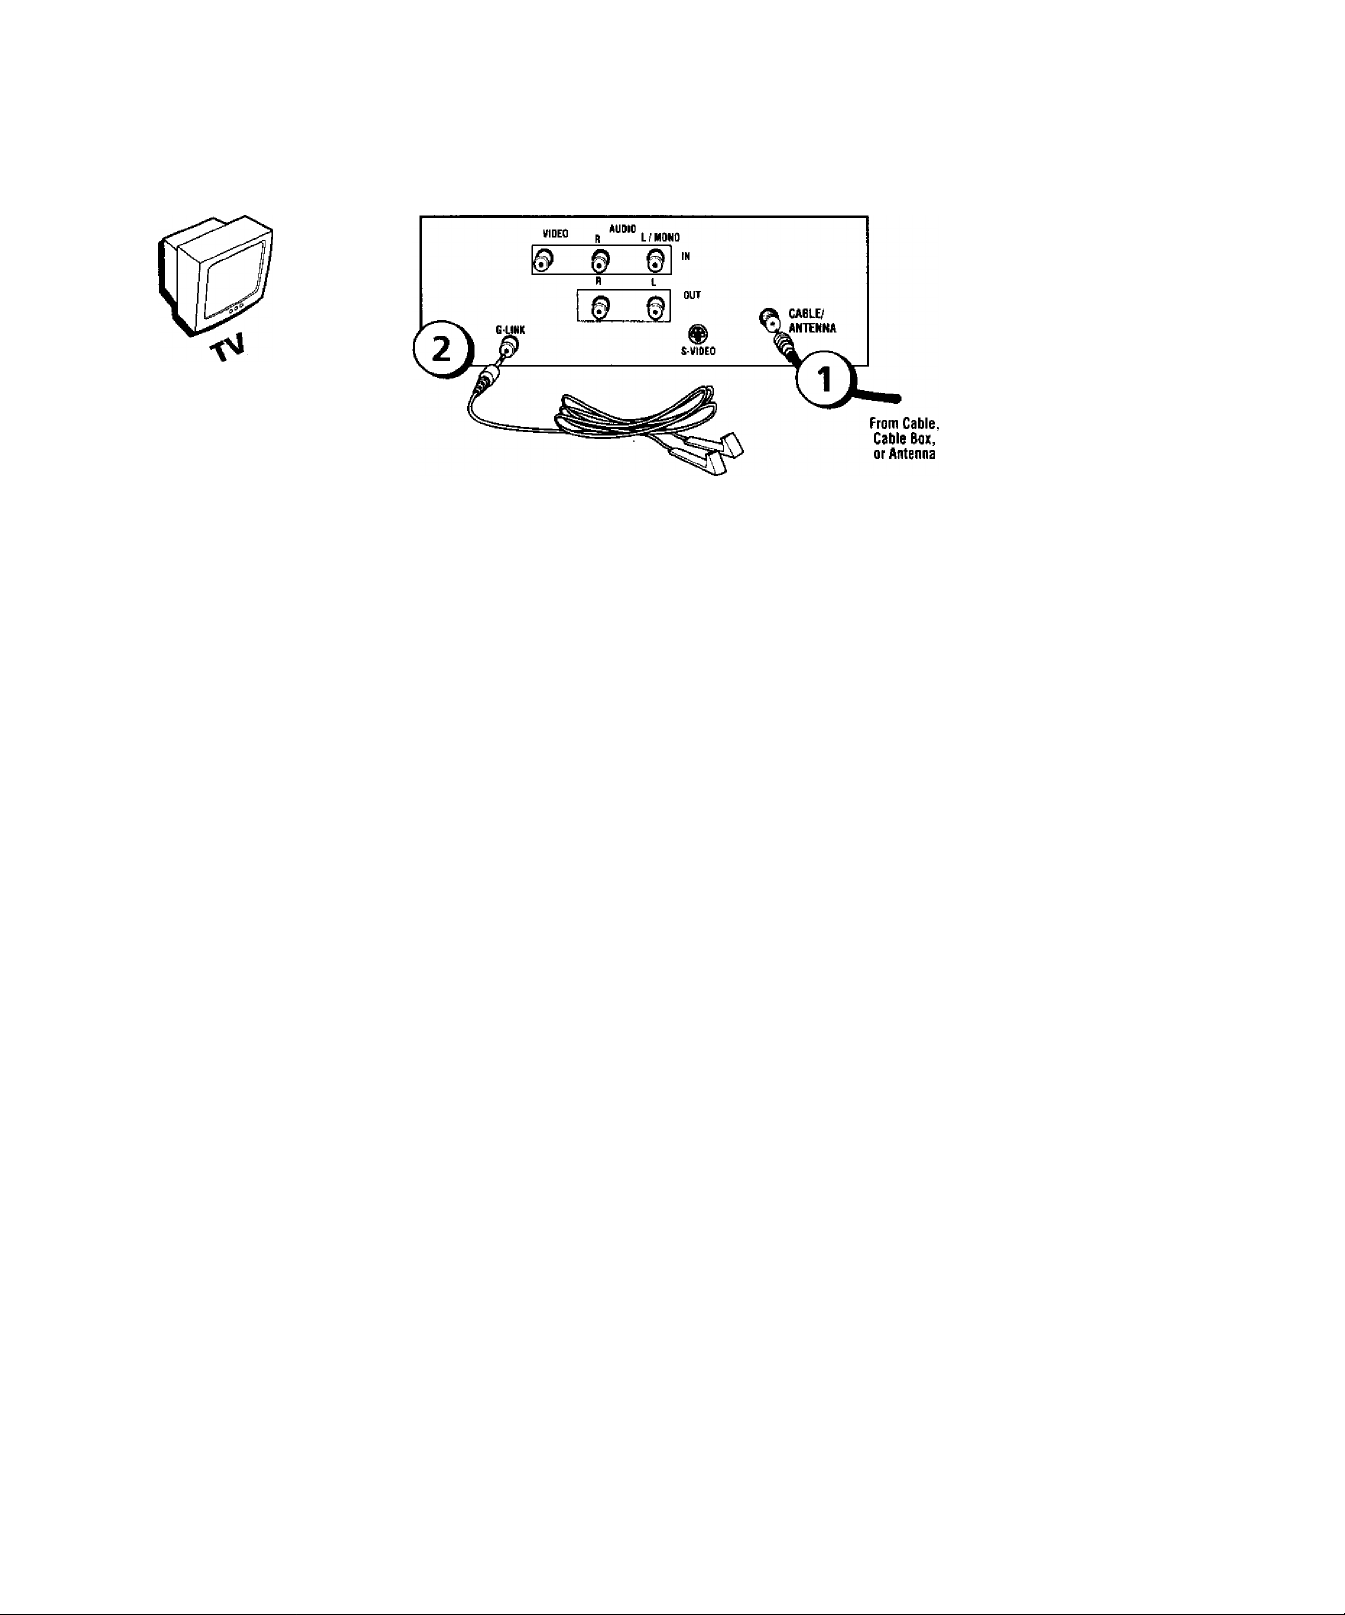
Connection: TV Only
1. Connect the TV to your cable or antenna
Connections & Setup
Connect the coaxial cable from your cable or antenna to the CABLE/ANTENNA jack on the back
of your TV.
Go to page 14
2. If you’re connecting a cable box, connect the G-LINK cable
A. If you haven’t already done so, remove the Demo Pin from the G-LINK jack.
B. Connect the G-LINK cable to the G-LINK jack on the TV. Next step, place the wands of the
G-LINK cable to the cable box (instructions are on p, 13)-
Go to page 13
Chapter 1
Page 12
Connections
Sk.
Setup
SATELLITE RECEIVER
From Cable or Antenna
Satellite
Signal
10
Chapter 1
Page 13

Connections St Setup
Connection; TV + VCR + Satellite Receiver
1. Connect your Satellite Receiver to your T\'
\. (lonni t I the ;m(lin \ tables. (>)iin(.xi ihe audio cables (while and reti) to die AliOIO
IN jacks (iti the bat k o| the lA' (l< aiul i. MONO) and U> the Autlio OulpLil Jacks tm the
Salt'!Hie Re(.ei\er. ’
15. Coiineet ihe \ ¡(.leo table ¡yellow ) lo ihe VlDliO IN jack on the back of the'l'\ and to the
)iH]'nii jack on liie satellite iveeivcr,
(i. (ioiinesl S \ KÌeo eabk.' io[)tionab- Connect an S-Vicleo calile lo the S-\ KM'O jack on the
■ |A and In die .N-Xll )li( ) jat'k on ihe saiellue reeei\er. tAn ,S-\ i^teo cable piovtdes better
picture (|iiaiil\ lhan a re.yular \ irieo cable, bui il is opiional.)
2. Conueet coaxial cables tt> the Satellite Receiver
.\. Conner i the coaxial cabk' from vour cable ourlet, cable box, or antenna to the In]int Jack
on \'onr satellite reeeixer (.sometimes labeled IN FROM A-N'D.
li. Connect the coa.xial calile from your satellite dish antenna to the In[iui Jack on your
satellite leceirer (sometimes labeled .S.ATFl.I.ITF. IN).
5. Connect the Satellite Receiver to the VCR and to the TV
,A. Connect a (.(laxial cable t(j the (butpnt kick (.sometimes labeled Ol.'T TO 'FA') on tlie
satellite receiver and lo tile Input Jack on the VCR (.sometimes labeled IN FROM ANT).
¡5. Connect a coaxial cable u.) the (.)uiput Jack on the VCR (sometimes labeled Ol.T TO 'FX')
and to the CAULE/ANTENNA jack on the 'lAa
4. Connect G-LINK cable
A. If you haven't done so. remove tile Demo Pin from the G-UNK jack. .
U. Connect the G-LINK cable to tile G-LINK jack on the TV. Next .step, place one of the .
wands of the G-l.INK cable to work with your VCR (instructions are on p. 13).
Go to page 13
Chapter 1
11
Page 14

Connections &: Setiip
Jacks on the Back of Your TV
If you are connecting many components, please consult the mtmual that came with each
component for connection instructions. The picture trf \ our T\''s Ixick panel describes the jacks
on the l:Kick ot your TV and what types of components that ytni can connect to these jacks.
When connecting, make sure you connect Output jacks to Input jacks. Video to Videtr, Kiuht
Audio to Right Audio, etc. ■ '
Audio and Video Input Jacks;
AUDIO R and L/MONO and VIDEO
Connect any of the following components:
• DVD Player • Satellite Receiver
• Laserdisc Player • VCR
• Internet Access Device
To watch the content from the component that’s
connected to the VIDEO Input Jack, press the
WHO • INPUT button on the remote (the TV switches
to the correct channel).
Audio Output Jacks:
R and L OUT
Connect audio cables to
these jacks and to an
amplifier or auciio receiver
for improved sound quality.
V_
TV
(back panel)
G-LINKJack
Connect the end of the
G-LINK cable (provided)
to thi.s jack. The G-LINK
cable enables the TV’s
Guide Plus+ system to
interact with the cable box
and/or the VCR. A picture
of the G-LINK cable is on
page 7.
G-LINK
VIDEO
AUDIO
R L/MONO /
§
R
L
©
S-VIDEO Jack
Connecting an
S-Video cable is
optional. S-Video
provides better picture
quality than a regular
video cable.
IN /
OUT
^ CABLE/
V/ ANTENNA
S-VIDEO
CABLE/ANTENNAJack
Connect the coaxial calile
from the VCR’s Output jack to
this jack. If you're not
connecting a VCR, connect a
coaxial cable tliat carries the
signal fixrm the antenna,
cable, or cable l-iox ttr the
CABLE/ANTENNA jack.
12
Chapter 1
Page 15
Connections & Setup
Why You Should Connect This G-LINK Cable
Tlie G-LINK cable enahie.s the GUllDli Plu.s+ system (the on-screen interactive program guide) to
wtrrk with your VCR anti/or cable box.
Cable Box — If yotir T\- is connected to a cable box you must connect the G-LINK cable to receive
TV program listings lor your area, and to tune directly to a channel when the program guide is on
your TV screen.
VCR — If your 'A' is ccrnncctcd to a VCR and you don't connect the G-LINK cable, one-touch VCR
recording won't vvxrrk. The rjther features of the guide \\ ill work properly.
How to Find the Remote Sensor
You have to place the G-LlNK wands in frcrnt of the remote sensor on the VCR and/or cable box.
Some cable boxes and VCRs have the remote .sensor labeled on the unit. If the remote sensor isn’t
labeled on your VCR and/or cable box, you need to use the remote control that came with the VCR
and/or cable box to locate the sensor.
1. Turn off the VCR and/or cable box.
2. Hold the remote control (not the one that came with your TV, but the one that came with the
cable box and/or VCR to which you're attaching the G-LINK cable) so that it is touching the
front of the component.
Tip
If you don't have both a
cable box and a VCR
connected to your TV,
just coil the cable of the
extra G-LINK wand with
a twist tie and leave it
behind the TV
3. Slowly move the remote control across the front of the component (VCR or cable box) while
you press the powei’ button on and off. You must press and release the power button each
tinre you move the remote (holding down the button w^on’t work).
4. "When the component turns on, you’ve located the remote sensor.
Placing the G-LINK Wands
Place the G-LINK wands in front of the remote sensor on yonr VCR and/or cable box approximately
one inch aw'ay from the remote sensor (see instructions below).
n (back panel)
Chapter 1
13
Page 16
Connections &. Setup
Plug in the TV
Plug the end of the pou et eord into the wall outlet. Match tlie wide blade of the
plug \\-ith the wide slot in the outlet. Insert tlie plug completely into
the outlet.
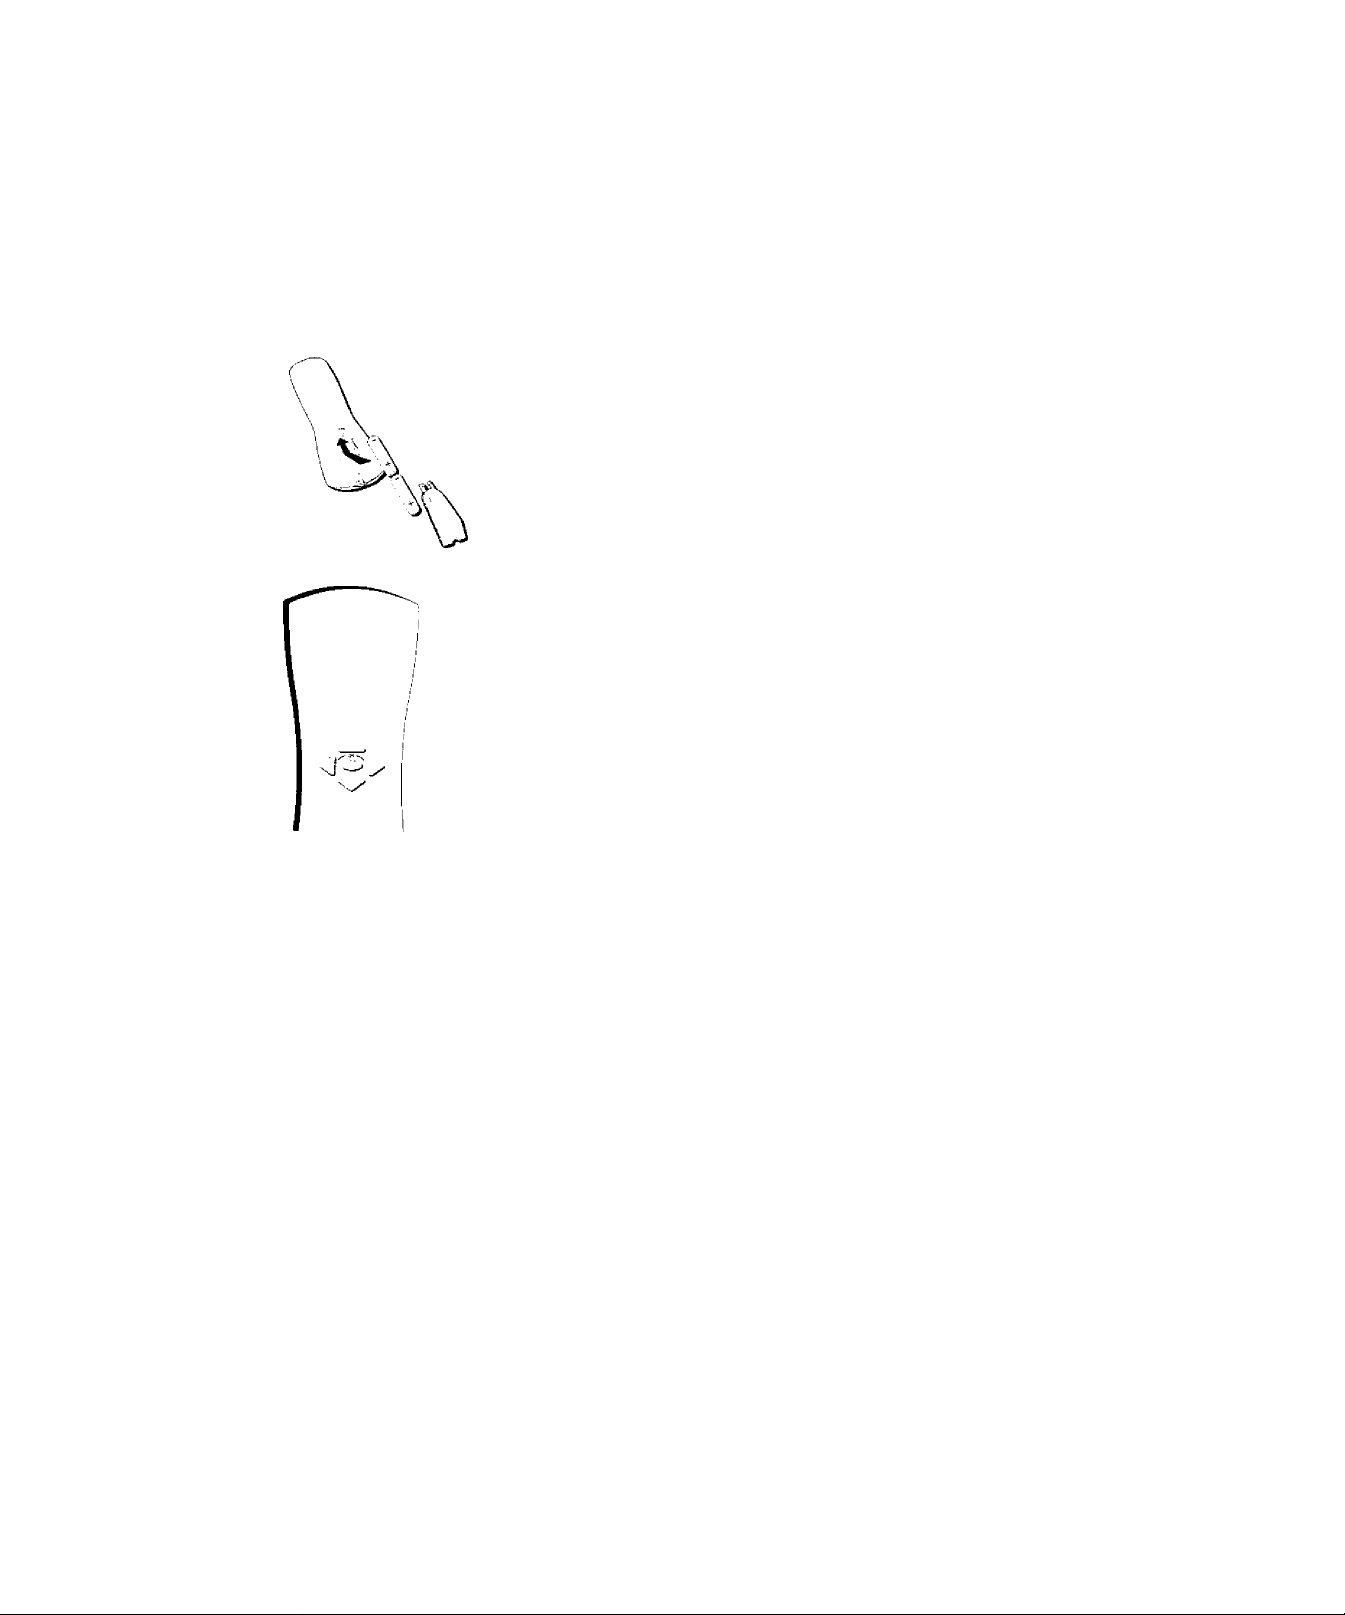
Put Batteries in the Remote
1. Remove the battery coiiipartment cover on the remote.
2. Insert new batteries. .Match the pcdarities {+ and d ttn the batterie.s with the
diagram on the remote.
3. Ptit the batteiy compartment cover back on the remote.
How to Use the Remote Control to
Complete the Interactive Setup
Use the arrow buttons and the OK
button to rnove through the menu
system.
The technical term is Navigation' - how you move through the on-screen
menus. The theory is the same throughout the menu screens: highlight your
choice and select it.
To highlight a menu item, press the arrow buttons on the remote to highlight
one of the items listed on the screen. Use the up or down arrow button to move
up or down. Use the riglit or left arrow button to move right or left.
To select the item that you’ve highlighted, press OK.
Note: Highlighted means that the menu item stands out from
other menu items on the list (appears darker, brighter, or a .
different color).
Turn on the TV
Press the TV button on the remote control or the POWER button on the TV (the
first screen of the Interactive Setup appears). The menu screens “time out” after
a period of time if you don’t make a .selection. The tips in this section tell you
how to access the Setup menu screens manually.
Note: Pressing the TV button not only turns on the TV, but puts the
remote into 7V mode. "TV mode” means that the buttons on the remote
control operate the TV's functions.
14
Chapter 1
Page 17
Connections & Setup
Complete the Interactive Setup
Tip
To access the setup menus manually,
press MENU and choose Setup.
SETUP
Would you tike the TV to search
■for all available channels? .
1 Search for channels
'thiii-step
The menu system in your TV allows the TV's features to work properly. In this
book, we call it the “interactive setup" hecatise the TV asks you questions, you
answ'er, and the TV makes the appropriate adjustments. The first time you turn
on your TT^, the .setup screens appear automatically.
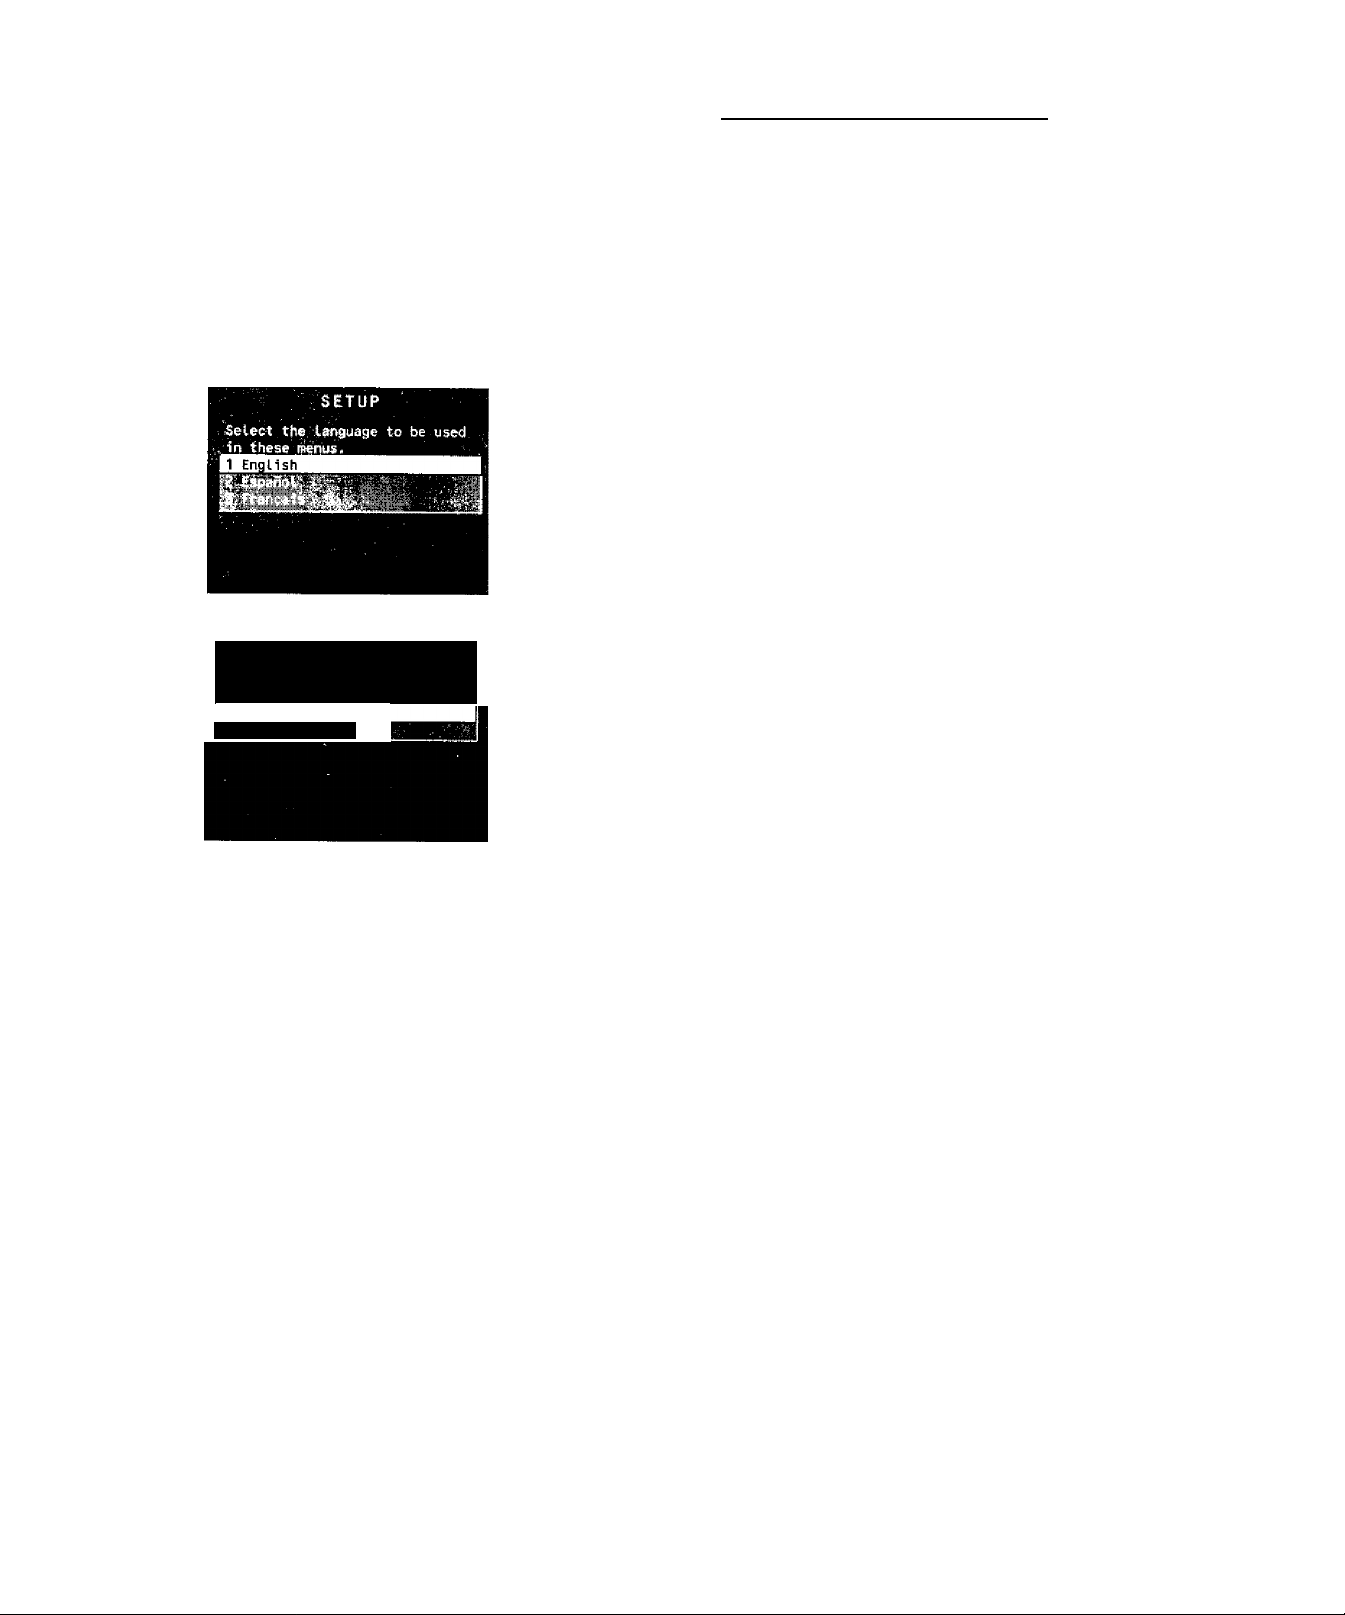
Set the Menu Language
The fiist pait of the ViTTZPasks you to .select your preferred language for the
menu .system.
1. Highlight your preferred language for the menu system.
2. Press OK to select that language.
Complete Auto Channel Search
The next part of the SETUP asks you if you want the T\' to search for all
channels viewable through your antenna or cable TV system. This is .sometimes
called “auto programming,”
1. Press OK to tell the TV to begin searching for channels. A progress report
appears on the screen.
Tip
If you move to a new zip or postal
code, or if any of your information
changes, you need to access the
setup screens from the TV's main
menu— press MENU, choose GUIDE
Plus+ Menu, and choose GUIDE
Plus+ Setup.
2, When the screen on tlie TV tells you the search is complete, press OK (the
first GUIDE Plus+ system setup screen appears).
Note: If you skip Auto Channel Search now, you can access it later
through the Channel menu. See Chapter 4 for more details.
The GUIDE Plus+ System Setup
The GUIDE Plus+ system is an on-screen interactive program guide that lists
what shows are on TV in your area. In order to receive program listings, you
need to complete the following steps.
The G-LINK cable must be connected to the back of your TV, and the wands
must be placed in front of the remote sensor of the cable box and/or VCR in
order for the GUIDE Plus+ system to work (go back to p. 13 for details).
1. You should see a screen displaying the features of the Guide Plus+ system.
Press OK to continue.
2. The next screen asks you to locate setup materials and hardware. Once you
have done this, press OK to continue.
Chapter 1
15
Page 18

Connections & Setup
STFP 1: itjeniiiytng Vow Location
T» t* MX
WMch .country s your TV. located In?
✓ LBA
Caiyida.,
On your TV linKM.osi llw upfiViVf. i«yi lo hiqJ'ivalit your awwet
PrestOMochoox.
STEP 1.‘ ktentrtylng Vow TV's Location
Hease enter the 5-iigit ?P code where your
TV is located.:
CHi ysu: TV remtjti.u« iriv tnupitwi keys to ?nie ygiy infamiattcn
Pliis Oli lo roiilinn
Step 1: Identifying Your TV's Location
1. II yoLd'cciLintry is highlit^htfd, prtiss OK on the remote contini.
If youi' coLintry isn t highlighted, pre.ss the tip t:r clown tirrow button on the
remote control to liighliglit yotir coimtry and pres.s OK.
2. Use tire number btittons on your renrote to enter your zip c'ode.
Press OK when you're finislied.
Note: Ifyourposlal code coiiUiiiis letters, press the up and down arrow
buttons on your remote to enter letters, and press the right arrow button
to go to the next space. The left arrow button moves you to the left.
Step 2: Configuring for Cable
The next series of screens asks you about your cable setup. To supply your TV
with the correct TV program listings, the GUIDE Plus+ system needs to know if
your TV is connected to cable.
STEP 7d. Coniiggrlrtg for Cable
\ 4, V "ÌT' t '
✓ Yes
On y.uii TV pwiicl?, Its« til? uplcjciwi; k?y$ w hktl’iqht yda imwFr
Pr?55 OK ts chow.
Tip
If you're not sure which channel is the
cable box's output channel, consult
the book that came with your cable
box or contact your cable company.
1. If your TV is connected to cable, highlight Fes' and press OK.
If your TV isn't connected to cable, highlight No and press OK (STEP 3;
Configuring for a UC7? appears).
If you have a cable box connected to this TV, highlight Yes and press OK on
your remote control.
Note: The next series of screens is very important because the GUIDE
Plus+ system must find the correct cable box information in order to
receive the coirect T\'program listings.
If you don’t have a cable box connected to this TV, highlight No and
pre.ss OK (STEP 3: Configuring for a UCff appears).
;'U
16
Chapter 1
Page 19

Connections & Setup
STEP 2: Conti^urtTK} for CabI«
T«eptrab|r«piir^w№}rNrt<iUibot,lMGUSCntiH«riMmMfd(t6lsww
On ttuniil )mir Tv It <n wlwi wtq th> uWi bm. tbt rnort comnorfr wfd
MjMi'diinnil b e.'PIUM tereuli )T«ur uMt pr»vklir V f«u tft mut. as an
iMomct Mkctton rmA In a M« or mif)) Rrecn iNtili watiMns TV.
Whtch channel is your TV tuned to when using
the cable box?
=-“-;az. ^
^ 03
:!'.:04 ■ . ■
V^ol/AliX
On yotfl Tv tsmciK, ttwi45i'iiiwn ro itow ansvrtr,
STEP 2: Contigurtng ror Cable
Stiedirig Qk «<T*ct uHt box brand Irem'ttM kt iMlow Is necM H
MMiatkstritMbvTVprotb'ambcirV' Vyourkiiwtlawwiiwubir
tM brJivt (luM <erMA yotr cabli providff
What brand of cable box Is connected to this
1V?^
Cfli youi rV riirwti.iiys tile upioowrt keys W Imd Vtui biarnt (mnet?rj[xt6
STEP 2: Coniiguring tor Cable
PiessOK to {h»s*. .
wiliappidT you nw¥< down) Pré» № tc (№)crie
HighliiTht the chiinnel to which you have to tune your W in order to see
cable prognimmin^, and press OK (a screen appears reminding yon ttr
connect yonr G-LINK cable to ytHir TV and cable box).
Notes: Channel (')-> is the most common.
Chouse Video 1/AUX if your cable box is connected to your TV with
andio/i'kieo cables instead of a coaxial cable. Go to page'7 for pictures of
these cables.
4. Highlight yonr brand of cable irox. and press OK.
[1 your hrancl isn't listed, highlight Not Listed and pre.ss OK.
Make sure your cable box is on.
.l^^IrTable box rrow tuned to channel OS?
/Yes
5>^^e^#hts.code again
DnyetH Tv rimoti.usi Uw upfttown keyi to highlight your Ji4w?r
PiwtOK Ic trtcoie
Tune the cable box to channel 02 (use the remote control that came with
your cable box, or press the channel buttons on the cable box).
Press OK (the GUIDE Plus+ system starts testing codes).
Important Note: When code testing is in progress, don't touch your TV,
VCR, cable box or any of the remote controls for these products.
Look at your cable box. If it is still on and changed to channel 09, the test
was successful. Highlight Yes, and press OK (STEP 3: Configuring for a VCR
appears).
It your cable box didn’t change to channel 09 or turned itself off, you have
two choices: No and Test this code again.
Test this code again: If you think the TV, the cable box, or any of the
remote controls might have been touched or bumped during the test,
highlight Test this code again and press OK (the GUIDE Plus+ system runs
the same .set of codes).
No: It you cion’t think the test was interrupted, highlight No and pre.ss OK
(GUIDE Plus+ system tests the next code).
Repeat the previous instructions until the T\^ finds the correct cable box
code. Follow the instructions on the screen.
Chapter 1
Note: If the TV can’t find your cable box code, a troubleshooting
checklist appears. Carefully review each checklist and follow the
instructions on the screen.
17
Page 20
Connections & Setup
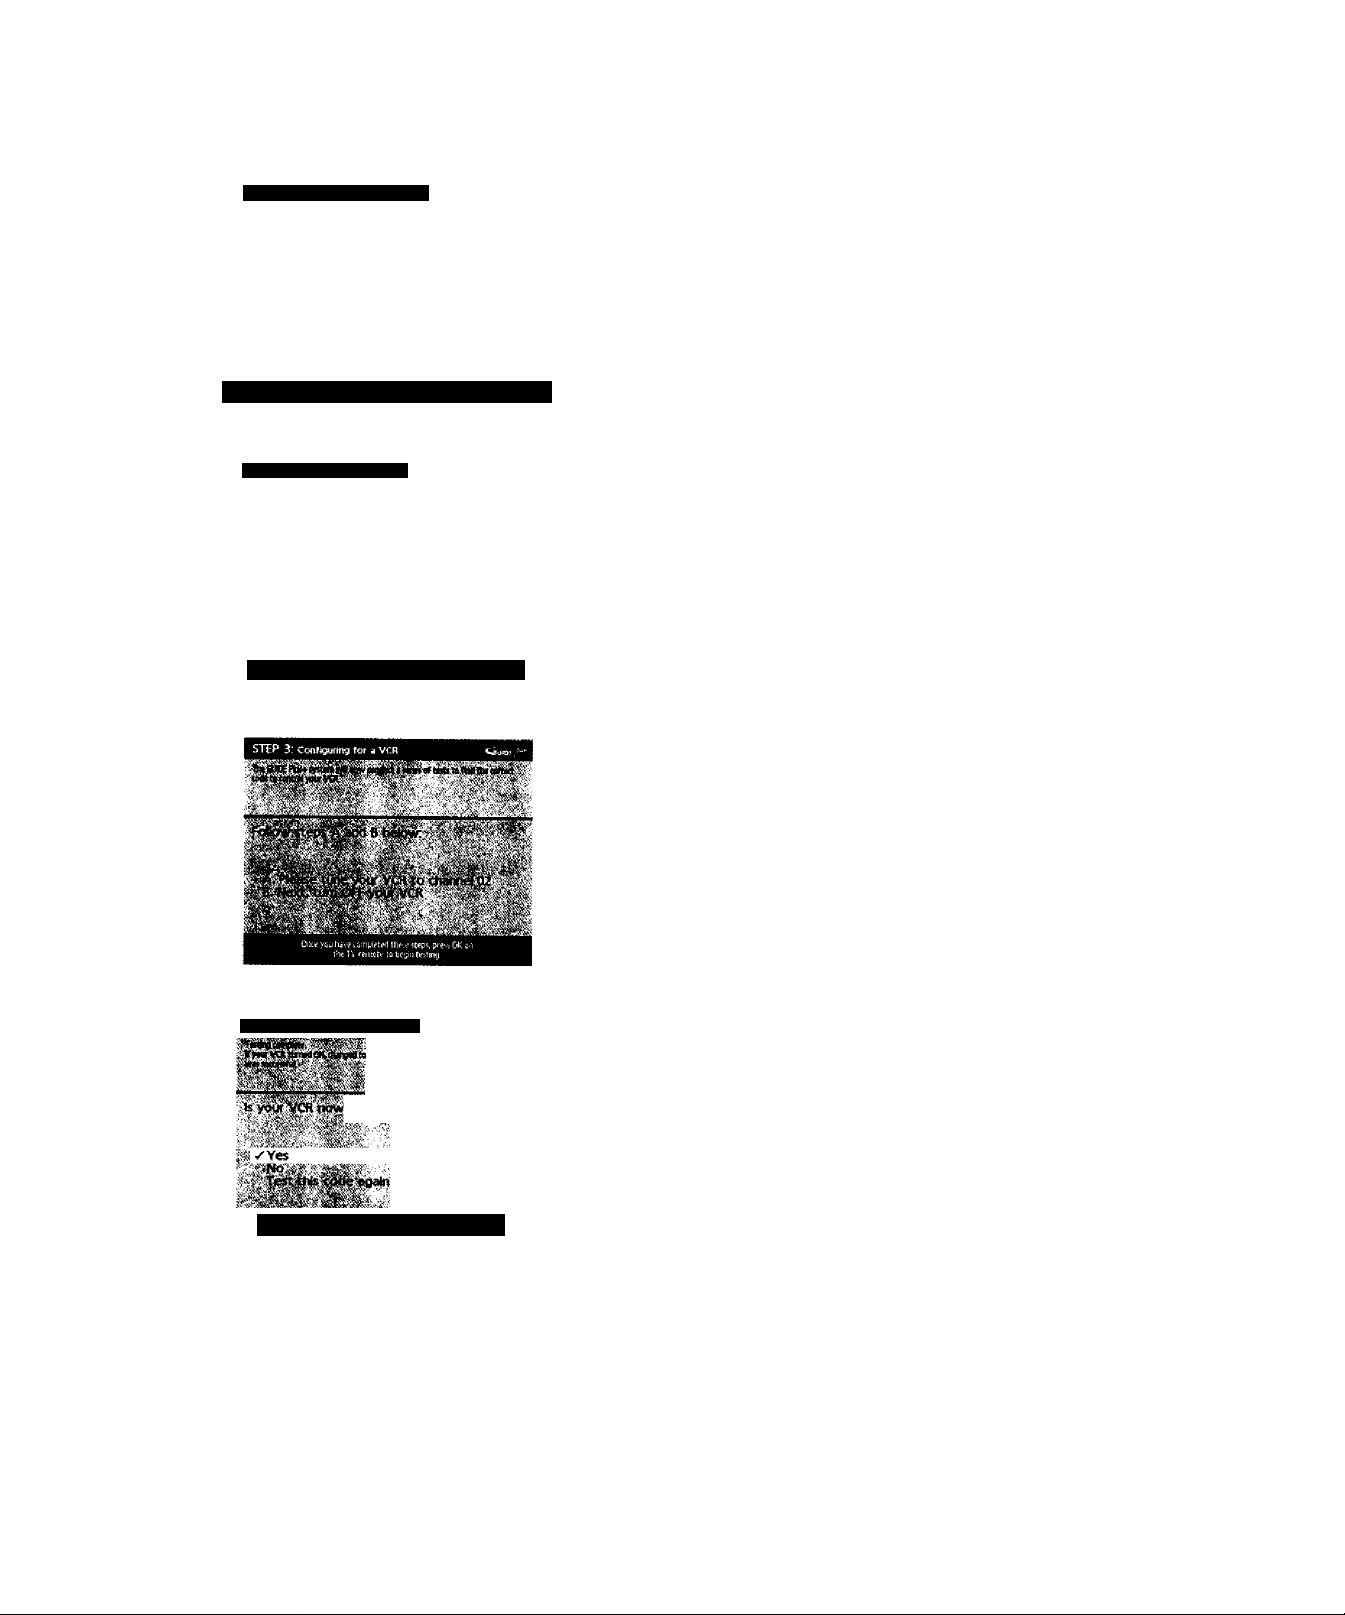
STEP 3; ConFigifhn^ 1o* 9 VCR
M > va ^ CMiMid tt III iy. yw <4n ilM 0» OJK Pis«
Wprar«nMifl»|B««fr4dMUirMer*ftwhgM9n((-tcMh
VarwrifiiiMWfi : . .
Is 8 VOl coonected to this TV?
Step 3: Configuring for a VCR
1. It your T\' is conno'cted to a VCR, press OK.
II' it is not, highlight A'oancI press OK (a screen will appear reminding yon
til connect your G-I.INK cable to yrnir TA'^ and VCR.).
<^Yes
No
On-ywr rv remore.u« thi i<>/tlowniuyi ichKj№oftt ypur ifcwef
STEP 3: Conf*guTHtg for a VCR
. To «pinta ufopeply wtth'jmir VCR. m QjCf Ph»* «ymm on* u
VOt RraM. Rn kKonNt bvtd miy'iNUf h profr^iTt racwdhg «rrtirs.
Pl'№ (X to (HiXH«.
2. L'se the up and down arrow buttons to highlight the brand of your VCR that
is connected to the T\’ and press OK. ’
It your bi'and isn't listed, highlight .\’ot Lisled iind press OK.
V№t brand of VCd is connected to this TV?
'jri ' ■t
Dpi yoiu TV r?ri]5le Lisi {tie [jpiiJovwi liFy> to tiKl ywx brjpviimore brjm!«
witl ippiip as you move pIowh) Press OK to £t»c«
1
3. Tune your VCR to channel 02. Next, turn OFF your VCR, When you
complete these steps, pres.s OK to begin testing.
STEP 3; Configuring for a VCR
jtuned to channel 09? '
Driyiput TV reiTicli.usethetJcW'JwnkystohighigJUi't.ai arswir
Pt«?s OK to (titwiv
Important Note: When code testing is in progress, don't touch your TV,
VCR, or any of the remote controls for these products.
4. Look at the front display of your VCR, If your VCR turned on automatically
and changed to channel 09, the test was successful. Highlight Yes and
press OK.
If your VCR didn't change to channel 09, you can either choose No or Test
this code again.
If you think your TV or remotes might have been touched during the test,
tune your VCR to channel 02, turn off your VCR and highlight Test this ’
code again.
If you don’t think the test was interrupted, highlight No. Tune your VCR to
clumnel 02 and turn off your VCR. Press OK (the GUIDE Plus+ system starts
testing another set of codes.)
Keep following the previou.s instaictions until the VCR finds the
correct code.
18
Chapter 1
Page 21

Connections & Setup
Tip
Leave your cable box turned ON to
download program information.
Leave your VCR fumed OFF to record
programs.
STEP 4: ConflrmirtQ Your Settb^
Уш h««« «Mmd ihi f«bwiv CUE Я«*tirrtm fittkisi. ■ av Ntttip 1»..
nwM HOOmrTE.iw liU iwt M-M't» UH thi* fudn <пй imu Mrrtplit«
iMMtiiBAbfCUKPMffynmttUp. ' . '
Ceunliry»USA •
гСсо4(<911*1
СлМУУ«
CatlrMirVts .
OfektoE «input 4илм>‘вЗ . •
CMbunmotfrenM.wdr-1|1тоИ1ИЗ - - " .< ' '
■ ■■-'•VC*, y«l ' ■ .. r ■
Are the ebeye eettkigt Correct? .
' V Yes, end setup
í-rv:;tlOÍ*e|te№iS*íup:prt^
Congratutatfoq$! j
Step 4: Confirming Your Settings
1. Check to make sure al! settings are complete and correct. If all settings are
,t ,v>. .Ytl.
Note: If the GVJDh system can't locate the correct code for the VCR,
a list oftroiihk’shootin,i> in.slmctions affecns to help you before you tiy
ада In.
• 'iiy \'CR configuration apaiii: repeal VCR setup,
• Test alternate codes: tests selected brands and if this fails, the test
continues with all codes in the system.
• Skip this step: the GUIDH Plus+ system icon V be able to automatically
schedule programs to record on your VCR.
coni[ilete. highlight fcs. end setup i\nû piess OK. If ycrur cable box and/or
\'CR code testing failed, you .slimild see INCOMPLETE where the caltle
box and VCli codes are listed. Once setup is complete, additional
screens appear,
If any settings are incomplete or incorrect, highlight No, repeat setup process
and press OK. Follow the instructions on the screen.
You can choose to view a demo of tlie GUIDE Plus+ features, which may
take a few minutes to load. If you don’t want to see the demo right now,
press OK to watch TV.
Chapter 1
19
Page 22

Connections & Setup
What to Expect
The next time you turn on your TV, the GUIDE l’lu,s+ system will appear on the .screen, The
following examples explain what you might .see:
• If all of the program information has been .sent to yttur T\', the GUIDE Plus+ system
appears with ail of your TV program listings.
• If the program information hasn’t been sent to your TV yet, an outline of the GUIDE
(without TV program listings) vvill appear on the .screen. Program informatitrn is usually
sent to your T\^ at night.
• If the TV detected that you have multiple cable companies in your tirea, STEP 5: Choosing
Your Channel Lineup appears.
Features of the GUIDE Plus+ system are explained in Chapter 3-
To clear the guide from your screen, press CLEAR or GUIDE on the remote control.
Next Steps
Now that you've finished the Interactive Setup, you’re ready to watch TV. This might be a good
time to program your remote control. The remote control that came with this TV can be
programmed to operate other components. Go to the next chapter to find out how to program
your remote.
20
Chapter 1
Page 23

Chapter 2
Using the Remote Control
Chapter Overview:
• The Buttons on the Remote Control
• Programming the Remote to Operate Other Components
• How To Use the Remote After You've Programmed It
• Code List
Changing Entertainment. Again.
Page 24

Using the Remote Control
LE.D.
The Buttons on the Remote Control
0-9 (Number buttons) Enter cliannel numbers and time settings directly
tlirrtugli the remote contixd.
To enter a tvvodigit channel, press tlie two digits. To enter a three-digit channel,
press and hold the First digit for two seconds tintil two dashes appear to the
right (d'tlie numlier, then add the secttnd two. Example: to tune to channel 123,
press and hold 1 for two seconds, press 2, then press 3.
Arrow buttons (up, down, left, right) Press the arrow buttons to move
through the on-.screen menu system.
ANTENNA Functions as TWVCR btitton in VCR mode and TV/receiver button
in SAT»CABLE mode.
AUX (auxiliary) Plus the remote in auxiliary mode to operate the component
yoLi’ve programmed the remote to operate with this button. You can program
this button to control a cable box, most RCA, GE and PROSCAN audio
components, a laserdisc player, or a VCR. If you set up the Auto Tuning feature
(Chapter 3), pre,ssing the AUX button automatically tunes the TV to the
correct channel.
CH (up and down) buttons Scan tip or down through the current channel list.
Press once to change the channel up or down; press and hold to continue
changing channels.
CLEAR Removes any menu or display from the screen and returns you to
TV viewing,
DVD Puts the remote in DVD mode. If you set up the Auto Tuning feature
(Chapter 3), pressing the DVD button automatically tunes the TV to the
correct channel.
FORWARD If you’re operating a VCR or DVD Player with the remote control,
press FORWARD to advance a disc or vicieotape.
GO BACK Returns you to the previous channel.
guide Press GUIDE to make the GUIDE Plus+ system appear on the screen:
press GUIDE again to remove it from the screen.
INFO Displays channel information.
L.E.D. (light-emitting diode) The little light on the remote that lights when you
are programming the remote. It also lights when you press a valid button on
the remote.
MENU Displays the TV’s Main menu. You can also press and hold for 2
seconds to display the GUIDE Plus+ system.
MUTE Lowers the volume to its minimum level. Press again to restore volume.
OK When a menu is on the screen, press OK to select the item that
is highlighted.
ON-OFF Turns the TV on and trff. When the remote is in another mode (VCR,
DVD, Satellite, etc.) and the remote is programmed to operate that component,
you can press ON-OFF to turn the component on and off.
22
Chapter 2
Page 25

Using the Remote Control
Tip
To turn off all the
RCA, GE. and
PROSCAN
components that are
connected to the TV,
press ON-OFF twice
within two seconds.
This feature only
works with most RCA,
GE and PROSCAN
products.
PAUSE If you’re operating a VCR or DVD Player with the remote control, press PAUSE when the di.sc
or videotape is playing to patise playback.
PLAY If yon'ie operating a VCR or DVD Player, plays the disc or videotape.
REC»VCR+ When the GUIDE Plu.s+ program gtiide is on the screen, press REC*VCR+ to program
yoLir VCR to record a program. If the remote is in VCR mode, pre.ss REC-VCR+ to start recording.
REVERSE If you're operating a VCR or DVD Player with the remote control, pre.ss REVERSE to go
backwards on a di.sc or videotape.
SAT»CABLE Puts the remote in SAT»CABLF. mode. If you set up the Auto Tuning feature (Chapter
3), pre.ssing the SAT*CABLE button auttjmatically tunes the TV tt) the correct channel.
SKIP If you pre.ss this button befttre you change the channel, the TV waits 30 seconds and
automatically goes back to the ttriginal channel. Each time you pre.ss SKIP, you add 30 seconds (i.e. if
you press SKIP two times before you change the channel, the TV waits 60 seconds and automatically
turns back to the original channel).
SOUND Di.splays the AUDIO PROCESSOR menu.
STOP If you’re operating a VCR or DVD Player, stops playing the disc or videotape.
TV Turns on the TV and puts the remote in TV mode. Also displays channel information.
VCRl Puts the remote in VCR mode. If you set up the Auto Tuning feature (Chapter 3), pressing the
VCRl button automatically tunes the TV to the correct channel.
VCR2 Puts the remote in VCR mode. If you set up the Auto Tuning feature (Chapter 3), pressing the
VCR2 button automatically tunes the TV to the correct channel.
VOL (up and down) buttons Decrease or increase the TV’s volume.
’WHO*INPUT In TV mode, press WHO»INPUT to toggle through the available Video Input channels
(VID/SVID and the current channel). In SAT mode, press to select available channel lists.
Using the WHO*INPUT Button
Use the WHO*INPUT button to toggle through the available input sources (VID and the current
channel) and view the content from the component you have connected to the TV.
1. Press TV to place the remote in TV mode. Make sure that the content from the component is
turned ON,
2. Press WHO*INPUT to tune to the available input source and view the component.
3. Press WHO*INPUT again to tune back to the channel you were previously watching.
Chapter 2
23
Page 26

Using the Remote Control
Programming the Remote to Operate
Other Components
rhc universal remote control can be programmed to operate most brands
of lemote controllable V'CR.s, satellite receivers and cable boxes. The
remote is already programmed to operate most RCA, GE and PROSCAN
T\’s, VCRs. DVD players, laserdisc players and satellite receivers.
Find Out If You Need to Program the Remote
lo determine whether the universal rentóte needs to be programmed,
turn a component ON, such as a VCR, point the remote at the VCR, and
press the VCRl button. Then press ON*OFF or channel tip or channel
down to see it the VCR responds to the remcrte commands. If not, the
remote needs to be programmed.
How to Program the Remote
There are two ways to program tlie remote control: automatic code
search and direct entry. Instructicrns for both ways follow.
You'll use these buttons when you program the
remote to operate another component.
The remote may not operate all models of
all brands.
Tip
To stop the automatic code search without
programming any components, press and hold CLEAR
until the light on the remote turns off.
Using Automatic Code Search
1. Turn on the component you want the remote to operate (VCR, DVD
Player, etc.) ’
2. Press and hold the component button on the remote control that
corresponds to the component you want the remote to operate
(VCRl, DVD, etc.). While you hold down the component button,
press and hold ON »OFF (when the red light on the remote turns
on, release both buttons).
3. Press PLAY (the red light on the remote, located below the ON»OFF
button, starts flashing).
The remote is searching the first set of component codes (there are
20 sets of codes). If the component you want to operate doesn’t
turn off automatically after 5 seconds, press PLAY again (the red
light starts flashing again as the remote searches through the next
set of codes).
Continue pressing PLAY until the component turns off.
Note: If the component doesn’t turn off after you’ve pressed the
PLAY button 20 times, the component can 'i he programmed.
4. Press REVER.SF, wait 2 seconds. Repeat tlhs step until the
component turns back on.
5. To finish, pre.ss and hold the STOP button until the red light on the
remote turns off
24
Chapter 2
Page 27

Using the Remote Control
Using Direct Entry
1. Turn on the component you want tlie remote to operate.
2. Look up the brand and code nuiuber(.s) for tlie component on the code list on page 26.
3- Press and hold the component button that corresponds to the component yoti want the
remote to operate (VCRl, DVD, etc.)
4. Enter the code from the code li.st.
5- Release the component btitttjn.
6. Press ON*OFF to see if the component responds to the remote commands. If it doesn't, try
pressing the component button and then ON»OFF again.
7, If you get no response, repeat these steps rising tlie next code listed for your brand until the
component responds to the remote commands.
How to Use the Remote After You've Programmed It
Tip
The buttons might
operate differently for
other components,
especially when you're
using another
component's menu
system.
Once the remote has been programmed successfully, you are ready to use it to control your
components. To operate the component:
1. Press the component button (TV, VCRl, VCR2, DVD, AUX, or SAT*CABLE) to set the remote
to operate the component.
2. Press ON«OFF to turn the component ON or OFF.
3- Use the remote buttons that apply to that component.
Note: If you keep pressing buttons and nothing happens, the remote is probably in the
wrong mode. You must press the component button that matches the component you
want to operate (i.e., if you want to operate the VCR, press VCRl on the remote control to
put the remote in VCR mode.)
Chapter 2
25
Page 28

Using the Remote Control
\ I TC
VCR
Atimir.il
..........................................................
A«.l\L-nlLira
.................................................................
>1
...............................................................
...............................................................................ÜK12. H\2i)
Akai
........
iOO r. 200S. 2(iiP, jiXi.s. 21 I 1.211 > 2J И
AnuTiam I li^it
Asha..................................................
Audio Dynamics
Audiovox.........................
lUI Ä IlnwdI
liuauniark
Eiuiksfuiif ............................................................ j,)p
Calix
Catidk-
anon ....................................................... 2021. 20J2 Mit
Ca[X'J^ari .......................................................... 2020
CaiA'ur ...................................................................... ’
CCf^
Mili>:cn.... 20IA. 2()I i 201-S. 2016, 20J'
Coloilvnic , ,
Cuk
..............
Craig
Curri.'^-.Malhcs
..................................
Cyhernex
Daewoo . 2013. 2017. 2019.2025, 2026, 2f)2". 2028, >110
Daytron........
.....................................................................2009, 2010
Dimensia ........................................................... '’OCX)
Dynatfch
Eltctrohonii.-
ELearophonic..............................’.............................. 20I4
Emerson.................................................... 2002, 2012,2014,
................2014, 2021, 2024. 2024,2026,2029, 2030, 2032!
■ ■ 2033, 2034, 2035, 2036, 2037. 20.3Й, 2039. 2040, 204 Г
... 2042, 20ч4, 2045, 2047. 2065. 2105. 2113. 211б] 2117.
, ¿130
F'Shcr
' '•’i;......................................................................2021, 2119
'■3'™'................................................................... 2002. 2026
Giirrard ..........................................................................2026
GE
........
Goldstar
Gradiente
Harley Davidson........................................ 2026
Harman Kardon
Harwood .........................................
Headquarter....................................................................2011
Hitachi .. 2СЮ2, 2055, 2056, 2057. 2107, 2111, 2120 2122
H'-Q...............................................................................2023
Instant Replay
.................................................................................2021
,IC Penney
............
.leasen......................................................... 2055, 2056, 211 !
JVC
..................
Kenwootl 2009, 2010, 2011, 2016, 2018 2058 2111 2123
................................................................... 2002. 2026
.............................................................................
LXl _
Majtnavox........ 2021, 2022, 2062, 206,3. 2104. 2108, 2124
■'Eiy.nin
■3J“''4niz.................................................. 2009. 2010, 2011.
Maria.
Ma.sii.sh ita
MKl
...............................
Memorex ............................................................ 2002. 2011,
....................... ¿013. 2014. 2021. 2023, 2020. 2104, 2131
.......................................................... 2029. 2065, 21И
MGN ledinology
Midland......................................................................... 2053
............
Mcjntgumery Ward
Moiartjla
..............................................................
..............................
..........................
.........................................
.................................
...........
201.-Ì. 20] I. 201 S. 2016, 2ПГ
...................................................
.............
............................................
........................................................
.......
.......................................................200J, 2026
.......................................................
.....
2011, 2023. 2048, 2049, 2050. 2051, 2052.21 Ш
, 2000, 2001, 2013. 2021, 2022. 2053, 2115 2120
................................
......................................................................
.............................................................
..................................................
.................
2022, 2055, 2056, 2058, 2059, 2060. 2107, 2118
2009. 2010, 2011, 2018. 2058, 2111, 2123
............................................................. C...........
.................................................................2014 2021
^
■
.......................................................2006
......................................................
.......................
......................
2016. 2018. 2021. ¿022. 202-1, 2115
2009, 2010, 2011, 2013, 2014, 2021,
201« 20I6.2()2"
2013, 201 I. 2023, 20()1
2000. 2UU2. 2009, 20И.
•........ ’ 2qi г¡
2009, 2014, 2018, 2054] 2121
....................
.........
20116. 2010
...........
..........
..........
201«. 2016
..................
.......
202^ 2061
>11U
201-i' 2029
2021
............................................
............... 2016, 2018, 2021, 2058, 2062,2064
.......
202]
' '
...........................................................
.....................................................
.....
2029, 2055. 2056. 2065. 20б6, ^об" 20б0
2070, 2071. 2072, 2073. 20’^i. 21fXi. 2113, 2123
.............................................
2055. 2056. 2IÌP
?0M
20^5^ 21,31
2021.2131
' j,, >’|
201.Ì
201 a
201]
.2013
2023
201Ч
2110
2(X.2
2061
2026
2009
2061
2061
.2014
20И
20Ы
.................
Muliitca h
....
\i-:c
.....................
........... .. .. .......
Nikkti..................
Nf'bicx
Olympu.'.
Optunus...............
Ojsu imca
Orion
Oaiiasonic
I’cnta.x
I’cntex Kv.seiuch
И1]1с<!
P!1ili[■5^
hilol......................
l-’KinfCT
Poriland
I’n bf;!,-)
hi ‘[ec
hilsai'...................
Quarter
Quart/.
'*CA
.............
.............
Kadioshacli. lieiihstie
llatli.x
Kandex...........
Ricoh
Runco
Samsung
Sanky
Sansui
.
^ 7116
........................
Shinioni .......................................... 2004, 2056. 2061 2098
^|Kn-'ture...............................................
■‘’'"■У'-'''
Scjn\ ,
STS
,, ,
Sylvania 2002, 2021, 2022 2026, 2062, 2063. 2065, 2124
Symphonk
I''My.....................................................................2002, 2011
Tashiko .....................
Technics.
" ' ..............'
Teknika .
TMK
, ,,
Tote\ ision
Unilech
,, ,
\eelorHeseardi
Video Contepts
MdfOsonic
. . _4
.........
.............
.............
...................
............
.................
...............
...........
............
.............
...............
...................
.................
...................
.....................................................3071, 7072. 7175
..................................
¿056, 2087. 7083, 71.18 1.7085. 2086.708-]
7088. 2089. 24)90. 2091. 210-, 2115. 2170. 2175
2021. 2022, 7023. 2026 2029, 2049, 2050 2096
............
.............
...........
........
.............
............
....................................................... 2011. 2013. 2073
....
¿612, 2015. 2075. 70.37. 70,35. 20,38, 20(>5, 209,3.
..................................
............... 2002. 2017. 2029, 2094, 2095, 2096. 2131
'У'"'
........................................................................
..................................................
...................................................................
........................................]]]]]]]]]]]]]]]]]],].]]]'2058]'2in
...................................
......
..........
..............................................................
.....................................
............
2029. 2655, 2056. 2061. 2096, 2101. 2102! 2Ì63’ iiO?!
iiOOi. >013, 2Ш4, 2015. 2021. 202^. 2026
...................................................
..................... 2009, 201)). 2011. 2018, 2058. 211 1
.................................
2t Ю2.
20<y I.
2021.
.....................
"
.................................................
................................................
..........................................................
................................................
......
¿005, 2013, 2015, 2033. 205.3. 2112
.................................................2131. 2104
............................
¿049, 2050, 2051. 2055. 2056, 2KP ’118
......
2002. 2004. 2098, 2099, 2119, 2128
...............................................
......
...........
......
2002. 2014, 2021, 2026. 2100, 2129
....................................
¿0'’- ¿UÀ9, 2051, 2055. 2065. 2093, 2116
................................................2013] 2014
..........................................................
................................
.....................
Cable Boxes
AbC..................S602, i003. 5004. 5(4)5. 5006. 51Ю7, 5053
Anironix.
’ . 5ÌJ08. 5009
............................................ 500«. 5(X19. 5010. 50 И
Cahletenna
Cahleview
Uenluiy......................................................
Citizen
Ccjlinir Voice.................................................. ;
C.onuronic.s
.............................................
.....................................
..............................
. 2002,
2013.
2016
2000.
2ПЮ.
20^0.
2(PS,
2022.
2100,
2016.
2055.
2621.
. 2021.
2055.
2016.
7!l()(). 7001. 7003. 2013. 2071
2002. 7611, 2013, 701 i
2010. 2092. 2111. 7123
¿011, 7014, 2021, 2023. 2048,
............
......
2014
2002, 2026, 2058, 2085, 2111
.................................
¿Ш. 2010, 2015. 2016
2009. 2010, 2015, 2016, 211,3
>61^
2004, 2098. 210t. 2119, 2128
2111.3. 2626
2026,
205.3, 2061
201
i.
2016. 261«.
2iP9.
21 II. 2125
.........
.........
...........
201 1. 21.51
........
........
2125.
120
2056.
2022
2002
2662
2006
20«[).
20« I
201“,
2019
2000,
..................¿911
4013
2СЮ2, 21,31
2021. 2061, 2128
2021,'2107
2026
2021,2109
2013,2024.2047
2013
..
2116, 2131
2021. 2026, 2061
5i)0S
500«
501 I
561 I
>61.^
.3614, ЗОН
201Ч
261.3
202i
2006
20.35
2 12“
2120
20]«
20C-3
. 2J J I
. 2o0 i
212.3
21 10
200]
2! to I
2hM
.2011
..
..
212«
..
Q'M............................................................................. 501
.......................................................... 5009
,...................................................... !8. 51! 19, 5)1,9
.e!ie,.)l l„.:M„neni
I iiiiti hi
.............
,, ...................................................................................
I h toA . .. - ,
, ' ..................................................................................
lvi'*ei.i
.....
■| II . . _........................................................... 1
.lemikl 5,jip |
IniR
■ ■ ■ ■
‘■ ■ ■ ■ ■ .
'
' 5(133:5031
..........................................................................
........................................................... . 50j<). 5652
............................................................... 5077, 5035
,
.......................................................................
...................................................•
,5c.iemiti9 .-Mlani;!...................... 51X16. 50 36 5037 503,8
................................................................ 5011, 5018
........................................................
..........................................................
......................................................................
...................................................
............................................................. 5011. 5018
.pk''................................................................................
........................................................
......................................................5W3. 5023, 50-n
.....................................................................
.............................................................................6018
^ S008. 3009, >011
United Artists...............................................
United Cable
......................................
.......................................................
.......................................
^'-■nioi .................................................... 5026, 5050. 5051
_______
Chapparal
' 'V
GE.................................................................................
General hiMiumenci
'')>na«4nie
I’nmesoii-..............................................................
ОгоУеап ................................................................................................... зд,
EGA............................................................................ 5000
Ee)'IE0e .......................................................................
‘'1^2 .............................................................................
0J63...............................................................................
’''’l"''a
E'';0lba ................................................................................................. 5117,
' '"den ......................................................................... 5069
..........................................................
.....................................................................
...................................................................
..................................................................................... 5073
......................................................................:'::5(xs4
.............................................................
.........................................................................
.....................................................
....................... >"20. 5U2I. 5622. ^0^3 5(in
' ' -rv, >
......
5ll |« 5!l5 •
5014. 503)
"
..
..
..
4036
..
..
,052
..
..
..
5026
..
............
- ,, ,
.......................................................■
.............. .........................
... ...... ............... ............
. . . .........................
.................................................................. 5079
.....................................
........................................................... 5009. 50-,9
...................................................................
................................................................ 5003
.......................
SOI)2. 5027, 562«
5t]62. ioi“. 562«
S6n2.50lh. 5629
........................
:;n| I Slii^ :;,|H , j
>25 5i »^0 I 51]^ )
.......
500’. 5018, 5055
.......................................................
..................................................
300«. 5009, 5010 5011
5015, 5025, 5027, 504O
Satellite Receivers
5058, 5059
...............................
5(,.',o, 5061 5062
..
..
..
..
..
..
¡OH
..
.
26
Chapter 2
Page 29

Chapter 3
Using the TV's Features
Chapter Overview:
• All About the GUIDE Plus+ System
• The Channel Banner
• Auto Tuning
• Parental Controls and V-Chip
Changing Entertainment. Again
Page 30

Using the TV's Features
Action Video Program Menu
buttons window information options
About the GUIDE Plus+ System
The GUIDE l>lus+ system is an interactive on-sereen protinim guide that lists T\'
schedules tor yotu' area and allows your IV direct cxtmrol of a\-ahle hov and/or
VCR. Ymi must Hrsi .set up the GUIDIi Ph.sr .Menu sv.siem in r>rder tet view tliis
on-screen program guide (see Chapter I tor details), tde.ss GUIDE to ivrina un
the GUIDE Plu.s-r system. '
There are si.x .sections of the GUIDE idus+ system:
• A row of Action buttons ;it the top of the screen / /. 2 atid j)
• Video window
Promotional
information
Channel
listings
Tip
Since.the program information provided by
the GUIDE Plus+ system is based on your
locale, you will need to run Setup again if
you move to a different zip or postal code.
• Program infornitttion
• A row (tf menu oiition.s fGtvV/. Son. Veir.v Schcctuk-. Messages.
Channels, Setup) ''
• Channel listings
• Promotional information
Note: The GUIDE Phis+ system screens Wusiraled in this hook are
representations of what you are likely to see. Not all channels, programs,
and GUIDE Plns+ information depicted will he available in your area. ’
New features and options can he downloaded to the GUIDE Plus+
system, so these too are subject-^o change.
Downloading Data
The GUIDE Plus+ system is not available until it completes its first download of
program li.stings. When the power is turned off, the T\^ loctttes a “host channel"
that carries GUIDE Plus+ .system data containing program schedule and channel
lineup information. A channel lineup is the list of stations and their respective
channels.
To ensure that your first download of data is complete, you should leave your
TV off overnight. Downloads occur several times a day. The TV must be turned
off for GUIDE Plus+ system data to download.
28
If the TV loses power or is unplugged. GUIDE P!us+ system program listings
may be lost. When power is restored, make sure the setup information is still
correct. The GUIDE Plus+ system will receive upciated program information
during the next scheduled download.
Channel Lineup
If more than one cable company services your area, you may be prompted with
STEP 5: Choosing Your Channel Lineup Miet the first GUIDE ldLis+ system
download. You will need ttt identify yrtur cable company Ivy selecting the
correct channel numbers for the stations in (|uestion.
Use the up and down tirrow buttons to change the channel group and
press OK when the correct channel grotip is higlilighted.
Chapter 3
Page 31

Using the TV's Features
Getting In & Out of the GUIDE Plus+ System
To entor the GUIDE Plus+ system;
• Press GUIDE on the remote.
• Press and hold MENU lor 2 .seconds on the fixrnt panel.
To exit the GUIDE Plus+ system: •
• Hifiiiliglrt a program and pres.s OK to exit tile GUIDE Plus+ system and ttine
to the channel.
• Pres.s GUIDE to exit the GUIDE Plus+ system and time to the diLinnel
displayed in the video window,
• Pres.s CLEAR to exit the GUIDE Plus+ system anti rettirn to the original
channel.
The GUIDE Plus+ System Menus
The GUIDE Plus+ system offers seven different options on the Menu bar: Grid,
Son, News, Schedule, Messages, Channels and Setup. To access tlie Menti bar;
Press GUIDE on the remote control to see
the GUIDE Plus+ system. To remove the
program guide from the screen, press
OK, GUIDE, or CLEAR.
1. Press GUIDE to access the GUIDE Plus+ system.
2. Press MENU or rise the up and down arrow buttons to selet:t the Menu bar
(the Grid Guide appears by default).
3. Use the left and right arrow buttons to access other menus.
4. Press OK, or MENU, or use the down arrow button to see the menu options.
Grid Guide
The Grid Guide appears each time you enter the GUIDE Plus+ system. It
displays the current programming for each channel. The current program is
displayed in the video window.
• Press the up and down arrow buttons on the remote to browcse channel
listings and the channel up and down buttons to page through the listings.
Use the right and left arrow' buttons to browse ftiture program listings.
• To tune to a channel, highlight the program you want to view in the
channel listing and press OK. Press CLEAR to exit the GUIDE Plus+ system
and return to the original channel. Press GLJIDE to exit the GUIDE P)us+
system and tune to the channel in the video window.
Then use the Grid Guide Action Buttons as described next.
Chapter 3
29
Page 32

Using the TV's Features
Grid guide
menu
selection
Grid guide action buttons
Grid Guide Action Buttons
Action buttons will change according to where you are in the GUIDE Elus+
system. Be sure to look at the action l:>ar before pressing the
command numbers. "
When highlighting the program, the following Action buttons appear
• Watch Pre.ss 1 on the remote to place a timer in the Schedule for the TV to
turn on and tune to the program highlighted in the channel listing. When
the TV turns on, the GUIDE Pkis+ system will tiutomatically appear with the
scheduled program highlighted and tuned in the vidett window.
• Go To Press 2 on the remote to bring up the direct dial box and enter the
numiier of the ciiannel you want. Press OK to highlight the channel and
current program in the channel listing of the Grid guide. Press OK again to
tune to the highlighted channel. If the \ ideo window is unlocked, it will
automatically tune to the channel.
• Record Press 3 on the remote to place a timer in the Schedule for the VCR
to record the program highlighted in the channel listing.
If you have a cable box, changing channels on the TV will not cause the
cable box channel to change while recording.
Record will only appear if you have set up the GUIDE Plus+ system and
specified your VCR type.
^^SflLock 2GgoTo
The program information window will display a confirmation when you have
successfully scheduled a program to watch or record.
Note: If you have selected two programs to watch or record which begin
at the same time or overlap, you will receive a timer conflict message.
You must choose between the two programs.
When highlighting the Channel names (the left column on the channel listing),
the following Action buttons appear; ’
• Lock/Vniock Press 1 to lock or unlock the video window to either stay at
one channel as you browse the GUIDE Plus+ system (lock) or change as
you browse through different channels (unlock),
• Go To Press 2 on the remote to bring up the direct dial box and enter the
number of the channel you want. Press OK to highlight the channel and
current program in the channel listing of the Grid Guide. If the video
window is locked, press OK to tune to the highlighted channel. If the video
window i.s unlocked, it will automatically tune to that channel.
30
Chapter 3
Page 33

Using the TV's Features
Sort menu
selection
Categories
Sort
The Son menu lets you browse programs by category. The channel to which
you are currently tuned i.s displayed in the videf) windt)w,
To Sort:
1. If the GUIDE Plus+ system isn't on your screen, press GUIDE on your
remote control.
2. Press MENU on the remote to select the Menu bar.
3. Use the arrows to highligiit Sari. 'When Sort is highlighted for the first time,
the Maries category i.s clisphued. Thereafter, the last category used becomes
the default. A listing ol subcategories is displayed below' the categor}' name.
Use the left and right arrttws to highlight other categories.
4. Use the up and dow'U arrow buttons to highlight a subcategory. For
example, highlight All and press OK (the GUIDE Plus+ system sorts
the programs).
5. Press the up and down arrow buttons to review the list one program at a
time. Press the channel up and down to review the list one page at a time.
6. Select MENU to return to the menu bar, or press GUIDE or CLEAR to exit
the GUIDE Plus+ system.
Then use the Sort Menu Action Buttons as described next..
Sort Menu Action Buttons
■When viewing the results of a Sort, the following Action buttons appear:
• Watch Press 1 on the remote to place a timer in the Schedule, and then
follow the on-line help for further options. Placing a timer in the Schedule
wilt cause the TV to turn on and tune to the program highlighted in the
channel listing at the predetermined time.
• Record Press 3 on the remote to set the VCR to record the program
highlighted in the channel listing. If you have a cable box, changing TV
channels will not cause the cable box channel to change while recording.
The program information window will display a confirmation when you have
successfully scheduled a program to watch or record.
Note: If you have selected two programs to watch or record which begin
at the satne time or overlap, you will receive a timer conflict message.
You must choose between the two programs.
Note: Be sure that du7ing the GUIDE Plus+ system setup you specified
that you have a VCR. If you didn’t, the RECORD option will not
be available.
Chapter 3
31
Page 34

Using the TV's Features
News menu
action buttons
A
News menu ^0\/y/5
selection
I’he .\'eii's iiKMUj luts voli hrcnvsc- curreni lu-ws .sioriL'.s b\- he;idline
1
li the GlUOh l>lus+ system isn't on your screen, press GUIDE on your
remote conti’ol.
Eress MENU on the remote control tti select the menu bar.
I .se the arrows to highlijtht Aetr.v (if MSNBC is a\'ai!able on your TV, it will
appear in the video window). '
Else the up Lind down arrows to highlight li story.
• L.'se the up and down Lirnrws to bi'ow se the list one story at a time.
• Lise the chLSnnel up tind down to browse through the list one page at
5.
Bress the right arrow button to see full te.xt.
6.
[f there are multiple page.s of text, press the right or left arrow button to
]iage forward or back thi'ough the pages of text. Pres.s the down arrow to
view the next story.
Select MENU to return to the Menu bar, or pres.s GUIDE or CLEAR on the
remote to exit the GUIDE Plus+ system.
a time.
Schedule menu
selection
Schedule
The Schedule menu allows you to alter timers for either viewing or recording
programs. The GUIDE Plus+ system allows one-totich VCR recording if you
have connected the G-LINK cable to your VCR. See Chapter 1 for more details
on connecting the G-LINK cable.
To schedule a program to watch or record:
1. If the GUIDE Plus-r system isn't on your screen, press GUIDE on your
remote control.
2. Press MENU on the remote to select the Menu bar.
3- Highlight a program within the channel listing.
4. Select Watch or Record from the Action buttons bar. The timer is then
automatically logged into the Schedule menu.
5. If you .select Record, make sure to place a bhmk tape in the VCR and turn
it off.
Note: If you have a cable box connected to your Wand VCR, tune your
VCR to the cable box output channel prior to turning off the VCR.
The program iniirrmaticin window will display li confirmation when you have
successfully .scheduled a program to watch or record.
Note: If you have selected lu>o programs to watch or record which begin
at the same time or overlap, you will receive a timer conflict message.
) 'ou must choose between the two programs.
32
Chapter 3
Page 35

Using the TV's Features
To remove or change the frequency (daily, once, (tr weekly) of a .scheduled
event, access the Schedule menu from the Menu bar.
1. Pre.ss GUIDt: to bring up the GUIDE Plus+ .system,
2. Press MENU on tire remote ttj .select the Menu bar.
3- Use the arrows to highliglrt the Schedule menu selection.
4. Use the up and down arrows to highlight the program you want to edit.
Then use the Schedule Menu Action Huttons as described next.
Schedule Menu Action Buttons
when viewing the Schedule menu the following Action Ixsttons appear:
• Remove Highlight the Watch or Record timer you wish to remove from
the schedule and press 1 on the remote.
• Change Highlight the Watch or Record timer you wish to change and
press 3 on the remote to toggle the frequence- between the following
choices:
DAILY records the same program each clay Monday- through Friday.
ONCE record.s only on that day.
Messages menu
selection
WEEKLY records the program each week at the same time.
Messages
Occasionally you will receive messages regarding your GUIDE Plus+ system, as
well as special programming information. You can access these messages from
the Messages menu on the Menu bar.
To read messages;
1. If the GUIDE Plus+ system isn’t on your screen, press GUIDE on your
remote control.
2. Press MENU on the remote to select the Menu bar.
3. Use the arrows to highlight the Messages menu selection.
4. Highlight the message you want to read by using the up and
down arrow buttons.
5. Press INFO to display thè full text of the message. If the text continues
beyond the screen, press INFO to view the next page of text. Once you
have reached the end of the message, press INFO to dose the expanded
information and return to the Me.s'X£j,iJe.s’screen.
Then use the Me.ssages Menu Action Button as de.scribed next.
1 ® Remove 2 Q
Chapter 3
Messages Menu Action Button
When viewing the Messages menu the following Action button appears:
• Remove Highlight the message you want to delete and pre.ss 1 cm
the remote.
33
Page 36

Using the TV's Features
Channels menu action buttons
if News
цАВС 13
■■[IFOX
less
Sdintfuli Messa^&^
Channels menu
selection
Ф Cancel 2 9 Change 3 Ф On/Off
«.ЛВЛПМа 4’’
' 6n"'‘:
. S ON :
ON "!
... e
Channels
You can customize tlic channel listing hy enabling or disabling the dis]day of
certain diannels. For instattce, you may disable channels tliat vou never watch.
Y'ou can restore disabled channels at a later point in lime.
1. И the Guide Plus+ system isn't on youi' screen, press Cd.'IDK on yrnir
remote control.
2. Press MPNt ' to .select the Menu bar.
.•i. Lrse the right and leh arrows to highlight the (Juimicls menu selection.
4. [,se the up and clown arrows to .select a channel.
Then use the Channels Menu Action Hutu.)ns as described next.
Channels Menu Action Buttons
While browsing the Channels mentc the Ixtllowing Action butttrns appear:
• Cancel Press 1 <.tn the remote to ctincel any changes you made since
entering the Channels Menu.
• Change Press 2 on the remote to change the chtmnel number for the
highlighted channel line.
• On/Off Press 3 on the remote to toggle the state of the channel between
On and Off.
Setup
The Setup menu allow's you to access the GUIDE Plus+ system setup information. To access the
Setup option:
1. If the Guide Plus+ system isn’t on your screen, press GUIDE on yonr remote control.
2. Press MENU to select the Menu Bar. .
3. Use the right arrow to highlight the Setup menti selection. ■
4. Use the up and down arrows to select Change system settings, Review options, or
View demo.
• Change system settings Confirms the settings you completed in the GUIDE Plus+
system setup are correct.
• Review options Displays the GUIDE Plus+ auto display options.
On Automatically, displays the GUIDE Plii.s+ system when you pre.ss the ON «OFF
button on the remote control.
Off Disables the GUIDE Plus+ .system from being displayed when you press the
ON «OFF button on the remote control.
• View demo Runs the GUIDE Pltis+ system clemcm.stration
Note: If you hare not completed your GUIDE Rlu.^+ system setup, these oplion.s iritt not he
anailahle. A screen wilt prompt you to complete your setup.
34
Chapter 3
Page 37

Promotional information
Using the TV's Features
How to Get More Information About an Advertisement or a Program
To find out more information ahotit a piogram, ad\-erti.semeni or special, use
tire left arrow button ter hi^nhli«ht the cirannel listing or pfomtrtional
information box.
Reqtie.sting more information about a particular .show displays the PhisCode
programnring ntimber and the Shotrs on Next for that channel.
Press the INFO button to exit the expanded information screen.
GUIDE Plus+ Menu Items
The GUIDE Phis+ Menu gives you access to feattires in the GUIDE Plus+ system.
To access the GUIDE Plus+ Menu:
1. Press MENU on the remote.
2. Highlight GUIDE Phis+ Menu and press OK.
Each menu and the sub-menus are li.sted below;
GUIDE Plus* Setup Displays the GUIDE Plus+ system setup screen.
Change system settings Confirms the settings you completed in the
GUIDE Plus+ system setup are correct.
Review options Displays GUIDE Plus+ .system auto display options.
View demo Runs the GUIDE Plus+ system demonstration.
GUIDE Plus* Label Displays the GUIDE Plus+ label menu.
On Displays the station name when you change channels.
Off The station name isn’t displayed when you change channels.
Continuous Demo Runs the GUIDE Plus+ system demonstration until it is
turned off. To turn off the demonstration, you must turn off the TV.
Note; If you have not completed your GUIDE Plus* system setup, these
options will not be available. A screen will prompt you to complete
your setup.
Chapter 3
35
Page 38

Using the TV's Features
Channel Banner
TIktc are se\ eral indicat<irs that miglit appear when you pres.s the TV or INFO
Initrons on the remote. This display i.s called the Channel Banner. The following
li.st describes the items on the Channel Banner .screen (left to right and top to
bottom). ■
12:01 Di.splays tiie current time.
Sample displays on a Channel Banner.
The lock i.s di.splayed to indicate when the Parental Controls
a
ESPN Di.splays the label assigned ttt the current channel.
60 Displays the ciirrent channel or input channel.
SAP Displayed when the current channel is broadcasting SAP
00:00 Displayed to count down time left on the commercial skip
are locked or unlocked.
Di.splayed when Closed Captioning is available on the
current channel.
Mute is displayed when you mute the audio.
Stereo i.s di.splayed when the current channel is broadcasting
in Stereo.
(Second Audio Program) information.
Displayed when the Sleep Timer has been set.
(SKIP) timer.
Why You Should Use the Auto Tuning Feature
With the auto tuning feature, you can
set up the TV to tune to the channel
you need to watch by pressing that
component's button.
36
The auto-tuning feature automatically tunes the TV to the correct channel for
different components you have connected to your TV (like a VCR, DVD Player,
etc.) When you set up auto tuning in the menu system you don't have to '
remember to change your TV to channel 3, for example, when you want to
watch the tape in your VCR.
How to Set Up the Auto Tuning Feature
The way you .set up the auto tuning feature in the TV’s menu corresponds to
the component buttons on the remote and the way you have each component
connected tf) your TV. When you set auto tuning, you’re telling the TV what
channel to tune to when you pre.ss the VCRl, VCR2, DVD, or SAT»CABLE
button on the remote control.
Chapter 3
Page 39

Using the TV's Features
Press MENU (the TT'AM/AhVffi'Vf'’appears).
Higlilight Chaunei And press OK on your ren'iote control.
Miglilight Ait!o aiul pres.s OK.
Choose whicli channel you woukl like to set;
Set VCR I Channel Displays a list that lets yoti set up the chttnnel that the
TV'' tunes to when you press the VCRl button on tlie remote.
Set VCR 2 Channel Dispkiys ti list thtit lets you set up the chtinnel that the
TV ttines to when you press the \'CR2 button.
Set DVD Channel Displat s ;i list that lets you select the diannel that the
TV tunes to wheri yoti isiess the DVD button.
Set SAT/CABLE Channel Dispkiys a list that lets you set up the channel
that the TV tunes to when you press SAT»CABLE,
5. Highlight the choice that matches the way you have the component
connected to this TV', and press OK.
SET VCR1 'CHANNEL
Not connected
;• ?:Channel' 2
f 3 'Channel 3 -
Charthel 4
V.5-Vidéo Input
The choices and a brief explanation follow:
Not connected Choose this if you don't have this particular component
connected to the TV' or if you don't want the TV to automatically tune to the
correct channel when you're using this component,
Channel 2 (SAT/CABLE only) Component (satellite or cable box) is
connected to the CABLE/ANTENNA jack on the back of the TV'', and you want
the TV to tune to channel 2 when you press the SAT» CABLE button on the
remote. Reminder; make sure the component's Channel 2/3/4 switch is set to
channel 2. Usually this switch is on the back of the component,
Channel 3 Component is connected to the CABLE/ANTENNA jack on the back
of the TV, and you want the TV to tune to channel 3 when you press the
corresponding button on the remote. Reminder: make sure the component’s
Channel 3/4 switch is .set to channel 3.
Channel 4 Component is connected to the CABLE/ANTENNA jack on the
back of the TV, and y'ou want the TV to tune to channel 4 when you press the
corresponding button on the remote. Reminder: make sure the component’s
Channel 3/4 switch is .set to channel 4.
Video Input Component is connected to the VIDEO jack on the back of the
TV and you want the TV to tune to VID (SVID if you used an S-Video cable)
Input Channel when you pres.s the component button.
Note: You should choose this for your VCR if you connected it to the TV
with audio/video cables.
Chapter 3
37
Page 40

Using the TV's Features
TV MA
1
A»d 1 0
2
M c t U r B .
3' Scr ee r i
-4:.
Cha nn el
6 Parental Control
IN ME NU
‘
m
m
Rating Limit
ty
"0
Parental Controls and V-Chip
The Parental Controls menu allows you to program your TV so that children
cannot see certain programs, channels, or u.se the fixtnt p;mel controls.
The first three choices in the Parental Controls menu involve software inside
yctur TV' (referred to as V-Chip) \v hich allows yoti to block TV programs and
movies based on violence, sex, or other content you may believe children
should not view. In other words, it lets yoti program your TV so it wtrn’t display
certain jsrograms.
Once you block programs, you or other adults can unblock programs by
entering a passworcl. -
By default, the software inside your TV' is turned "otl,' so it you don't want tt)
use this feature, you can just ignore it.
How V-Chip Works
When turned “on,” the V-Chip software read.s a code that most broadcasters
send with programs. That code tells the software the program’s age-based rating
(TV-MA, TV-14, etc.) and content themes [(Violence (V), Adult Language (L),
etc.)]. If you have blocked the rating and/or content themes that the program
contains, you will receive the message, “This channel is not approved for
viewing,” when you tune to that particular channel.
Broadcasters are not required to provide content themes, so programs received
with no content themes will only be blocked if you block their age-based
rating. You can also block out programs that have been given a rating of "Not
Rated,” and programs that are considered “unrated" because no code has been
sent by the broadcaster. The TV age-based ratings and content themes you can
block are listed in the following table.
38
Chapter 3
Page 41

Using the TV's Features
Age-Based
Rating
TV-MA
TV-14
TV-PG
TV-G
TV-Y7
TV-Y
Description and Content Themes for Age-Based Ratings
Mature Audience Only. Specifically designed to Iv viewed by adults and may be unsuitable for children
under 17. It contains one or more of the following content themes: crude indecent language (L), e.Kplicit
sexual activity (.S), or graphic violence (V),
Parents Strongly Cautioned. Contains .some material that many parents wotild find unsuitable tor children
under 14. Parents are .strongly urged to exercise greater care in monitoring this program and are cautioned
again.st letting children tinder the age of 14 watch unattended. This progratn contains one or more of tire
following ctrntent themes: intensely sugge.stive dialogue (D), strong ctrar.se language (L), intense .sextial
siuiations CS), or intense violence (V)’. '
Parental Guidance Suggested. Contains material that parents may find unsuitable for younger children. Manv
pai-ents may want to watch it with their younger children. The progi'ani contains one or more of the foilowdng
content themes: .some sugge.stive dialogue (D), infrequent coarse language (L), .some .sexual sittiations (S), or
moderate violence (V). '
General Audience. Most parents w'ould find this program suitable for ail ages. It contains
little or no sexual dialogue (DI or situations (S), no strong language (L), and little
or no violence (V).
Directed to Children 7 years and older. Designed for children ages 7 and above. It may be more
appropriate for children who have acquired the developmental skills needed to distinguish betw-een makebelieve and reality. Themes and elements in this program may include mild fantasy violence (FVf or ctrmedic
violence, or may frighten children under the age of 7,
All Children. Themes and elements in this program are designed for a young audience, including diildren
Irom ages 2-6. It is not expected to frighten younger children.
TV MAIN MENU
1 Audio '
2 Picture Quality
3 Screen
A Channel .
5 T i me
6 Parent a I C on trots
V-Chip TV Rating Limit
The V-Chip TV Rating Limit lets you decide which TV programs can and cannot
be viewed.
To set TV programming limits:
1. Choose Parental Controls from the Main menu. If Parental Controls have
previously been locked, you must enter your password. If they are not
locked, you will get a message reminding you that your limits will not be
effective until you lock Parental Controls.
2. Press MENU to continue.
3. Highlight and select V-Chip TV Rating Limit.
4. Once you get to the V-Chip TV Rating iimti screen, u.se the arrow buttons
and OK on your remote to change the status of a TV program rating or
content theme from View to Block.
The following sections give you mcire details about how ter change the status of
TV program limits.
Chapter 3
39
Page 42

Using the TV's Features
The V-Chip Rating Limit Screen
The following is an example of where items are located within the Rating Limit screen.
Rating Status Field
l.c(s you suJua wliutliur iliu stutus of [lit* iigu-liLised raiing limii to
die leh is View, or lilock.
Content Themes
Lists ihc Conicnt lilCilRS \ <!U
can l>k)ck nr \ K‘u
Rating Field
Lets you select f rf>m a
hst of Ligediased ni tings
yoLi can block or view .
Rating Rating
field status field
Rating Settings Area
[,ets you see the eurrent block.h'iew .state of Ligc-ltasetl ratings and
a.ssoeiated content. The View (V) settings are coded in green, and (tie
Block (B) .settings are coded in red.
Content
status fields
Blocking Age-Based Ratings
You can automatically block all program ratings above a specified age-based
rating level. For example, if you only want your child to watch programs that
have a TV-G rating and lower (in other words, you w'ant the child to watch
TV-G, 1Y-Y7, and TV-Y), then you need to block out other programming with
higher ratings.
Content Status Fields
I.eis you seiecl " liii li
content tlicmc'.^ m new I'or
le .selected rating, and
w hellier ihe status otilie
content tlieme is cui reiirK-
View (V) or Block (ti).
Tip
When you change the status of a rating to
Block, the system will auiomaf/ca/Zy block
higher ratings and all corresponding
content themes.
40
To block programs with higher ratings:
1. First, determine the lowest level rating you don't want the child to watch
(see chart of age-ba,sed ratings on next page).
2. Press the left and right arrtw buttons to highlight the Rating field.
3. Press the up and down arrow buttons on the remote to scroll through the
age-based rating limits. Keep scrolling until the rating corresponding with
the lowest rating you do not want the child to w-atch appears on the screen.
In the example discussed above, you would scroll thixjugh the yto/fng field
until TV-PG appears, since the highest rating you want the child to watch is
IV-G.
Chapter 3
Page 43

Using the TV's Features
Hierarchy of Age-Based Ratings
TV-MA
TV-14 Parents Strongly Cautioned
TV-PG
TV-G
TV-Y7
TV-Y
Mature Audience Only
Parental Guidance Suggested
General Audience
Directed to Children 7 years
and older
AH Children
Tip
To reset the ratings to View and V, press the RESET
button on the remote.
Rating
field
V-CHIP TV RATI N G LIMIT
■ rating Status D L S V FV
TV-H ' ..y.y.V V I
Press to view programs with
this rating. Press MENU to exit.
RATING STATUS D L S V FV
TV-MA - L. ■
TV-1A . V ■
TV-PG ■ ■ > c
TV-G ..
TV-Y7 ■ V
TV-Y . .
I
Rating
status field
/
Content
status fields
/
- ^ C»ttent ^ -
4. i^ress the right anxtw button to move tlie yellow highlight to the
Slaliis field.
5. Pres.s the up or clown arrow iititton to tttggle between ITew^'and Block. The
statu.s tor the rating li.sted to the left and all higher ratings automatically
chtinges to Block (and H).
6. Press OK on the remote to return tcj the menu or exit the screen when you
are finished.
7. Select Lack Bcirenhil Coatyois from the /kirciital Controls menu. Enter a
pas.swcrrd, and if you have not already set yotir pa.ssword, you will be
]-)rompted to enter it again to confirm.
Viewing Age-Based Ratings
After you block age-based ratings, you have the option of changing some of the
ratings back to View.
1. Determine wdrich blocked rating you want to view.
2. Use the up and down arrow buttons to select the rating with a status
of Block
3. Press the right arrow button to move the yellow highlight to the rating
status field.
4. Pres.s the up button to select View.
Content Themes
D
L
S
V
FV
TV-Y
Chapter 3
Sexually explicit dialogue
Adult language
Sexual situations
Violence
Fantasy Violence
All Children
Note: The content status fields cotresponding to the unblocked rating
become View as well. They and the age-based rating status are the only
fields that automatically change hack to View when you complete
this process.
Note: You must remember to lock Parental Controls for rating limits to
take effect.
Blocking Specific Content Themes
You can iilock programs ba.sed on their content. (Ccrntent is represented by the
D, L, S, V, FV and TV^-Y on your screen. .See the beginning of this section for
details.) When you block a content theme for a paiticul’ar rating, you ,
automatically block that content theme for higher rated programs as well.
For example, if you do not want your child to w'atch programs that have adult
language (L) rated T\^-PG or higher, then you could block out all programming
TV-PG and above containing adult language.
(Steps continued on next page)
41
Page 44

Using the TV's Features
Rating
field
Press '■/v to view programs with
this content -for this rating.
RATING
TV-tlA
TV-TA ■ '
-TV-PG
TV-G
TV-Y7
TV-Y View
Rating
status field
STATUS
V'i
Viirvj V
. View
D
B V V
V V V.,
B V .V
", '
Content
themes
S V
Content
status fields
Rating
field
Rating
status field
Content
themes
To block program contení:
1. Determine the lowest level of content \ou don't want the child to watch.
2. bse the up and down arrow buttons on the remote to scroll through the
age-based ratings until the rating that corresponds v. it!i the lowest content
you do not want the child to watch appears. (In the example alxwe. you
FV
would scroll through the ratings until the 'IV-FG rating ap]ieaied.t
3. Press the right arrow butUin to move the highlight to the fielti
corresponding with the content theme you want to block out.
' V
4. Press the tip or down ;iitow button to ehange content status from I'to H.
All higher ratings' content theme will auttrmatieally change to H
5. Press OK to return to tlie menu or exit the screen.
Note: Broadcasters are not recjuired to proride eonteitl themes or ape-
hased ratings. Programs receired ivith no content themes will ottly he
blocked if yoti block their age-based rating.
Note: Yon must remember to lock Parental Controls for rating limits to
take effect.
Viewing Specific Content Themes
If you block specific content themes, you have the option of going back and
changing some of the content themes back to iV) View:
Press ''/u to view prograitif with
this content for this rating.
RATING STATUS D L S V fV
TV-MA c V V
TV-1 A : ' ■ • '
TV-PG . f ii V
TV-G . ■
TV-Y7 .. .
TV-Y ■ .
7
Content
status fields
1.
Determine the content themes you want to change to (V) View
2,
Use the Lip and down arrow butttjns to scroll through the age-based ratings
until the rating whose content theme you want to change to V'/cu'appears.
3.
Press the right arrow button to move the yellow highlight to a paiticular
content theme status, such as the B under language (L) ccirresponding w'ith
TV-14.
Press the up or down arrow button to change its status back to V. Your
child would then be able to watch programs with TV-14 adult language
content, but not programs with TV-PG or TV-MA language content.
Note: Only the content theme status coiresponding to
(L) language changes to (V) View. Higher rated content themes, such as
that for TV-MA language, do not change.
42
Chapter 3
Page 45

Using the TV's Features
V-Chip Movie Rating Limit
You sei movie rating limits Ity blocking ttiovies rated tibove a speciHeti level.
I'low to block movie ratings and \ ie\\ movie ratings is cxplaiiieti in the next two
sections.
To access the T-CW/^T/Or//;'A'/177A'6'/.yj//7'menti:
1. Press MFNU on the remote ctrntrol (the 7%bl/d/A'iV№AT'appe;irs).
2. Select Parental Controls (pivss (-i).
3. Select \'-Chip Movie Patiufi I.nntl {press 1).
Rating field
Rating field
Rating
status field
>
Rating
status field
k
Blocking Movie Ratings
If you only want your child to watch movies thttt have a PG ntting and lower
(in other words, movies rated PG and G), then you could automatically block
out all other movies with liigher ratings.
To block movies:
1. Highlight the Rating i\e\d and press the up and down arrow butttins to find
the rating that is the lowest rating you don’t want the child to watch. (In
the example above, you wotild highlight the rating status button
corre.sprjnding to PG-13. since the highest rating you want the child to
watch is PG.)
2. Press the right arrow button to highlight the rating Status field. Press the up
and down arrow buttons to change the button from View to Block All
higlier ratings automatically change to Block.
3. Press OK to return to the menu or exit the screen.
4. If Parental Controls are not locked, you must lock them so the movie rating
limits will take effect,
Note: Some movies may be given a Not Rated (NR) rating. After blocking
movie ratings, you must set NR to View separately to view NR moi’ies.
Viewing Movie Ratings
After you block movie ratings, you have the 0[3tion of changing some of the
rating status buttons back to View. ■
Press c/v to block programs with
this rating. Press tIENU to exit.
• * NR . ■
Chapter 3
RATING STATUS .
. X iii-'k .
NC-ir iCf;;
R .
^ pe-13 EC s
P6 VO.; . ■
■ ■ e ■ ■Vir.i . :
1. Highlight the Rating field and press the up and down arrow buttons to find
the rating you want to view.
2. Press the right arrow btitton to highlight the rating Status field. Press the tsp
itnd down arrows to change the button from Block to View.
For example, if movies with a rating of PG-13 and higher are blocked, you can
change the racing status ctirresponding with NC-17. Your child would then be
able to wtitch all movies with a G, PG, and NC-17 Rating.
3. Press OK to exit the .screen, and be sure parental controls are locked,
43
Page 46

Using the TV's Features
V-Chip Unrated Program Block
SL-Icctinji this option lets you decide if pntgrams that the V-Clii]5 recognizes as
"unrated can he viewed. Note tiiat "unnited’' T\^ programs may include news,
sports, political, religiotis, local and weather programs, emergency bulletins,
public tmnoLincements, and programs withorit ratings.
View All unrated programs are ttvailabie.
Block All unrated programs are not available.
Note: You must rememher to lock ParenUtl Controls for rating limits to
take effect.
Channel Block
Selecting this optittn lets you decide what channels can be viewed.
View Makes the .selected chttnnel viewable.
Block The front panel and remote control CH (channel) button.s will tune
. rc
"s6 Loc
0 Exi
CHANNEL BLOCK
Channel it Status
Press * pr V, keypad, or CH Nv
to set phanneL, BENI) to exit.
cmly to channels that you have marked as View. The remote will still tune to
the blocked channel if you use the digits to access the channel, but the
channel will be bkjcked.
, Don’t forget to lock parental controls after you change the status of Channel
Block. If you do not, the channel block will not take effect.
PARENTAL controls
■1 V-Chip TV fating Limit
2 V-Chip ,Hov^ Jt&tirtg,Liaiit
3 y-Chip l^rated ProgfM Block
4 Channel’BLotk '
5 front Panel Block
FRONT PANEL BLOCK
1 tJhbLock
ISIS!
PARENTAL CONTROLS
'1 V*tbip TV Rating Limit '
2 V^hip Movie Rating L^lt
3 .tf^ip Unrated Program Block
A Channel Stock'
5 Frtxtt iwiel ¡Block -, .
6 Lock Parental Controls
Note: If you have a digital cable box channels 126-999 can be blocked
hut will not be removable from your scan list.
Front Panel Block
Selecting this option lets you block (disable) or unblock (enable) the TV’s front
panel. The remote still tunes to any channel. Front Panel Block an-.
• Keep children from watching TV when the parent is not present.
• Keep young children from playing with the buttons.
(When using this as a Parental Control method, you should remove access to
any remote that is capable of operating the television while yrru have the front
panel blocked.)
Don’t hrrget to lock parental controls after you change the status. If you do not,
the front panel block will not take effect.
Lock/Unlock Parental Controls
Selecting this option lets you lock and unlock parental controls .settings using a
password.
If you do not lock parental controls, none of the settings for V-Chip,
Channel Block, or Front Panel Block wlU take effect.
44
It you forget your pa.ssword, simultaneously press and hold MENU on the
television and volume down on the remote for 3 seconds. Nothing appears on
the screen, Parental Contrrrls simply unlock and you can re-enter a password via
Lock Parental Controls.
Chapter 3
Page 47

Using the TV's Menu System
Chapter Overview:
• How to Use the Different Types of Menus
• Audio Menu
• Picture Quality Menu
Chapter 4
• Screen Menu
• Channel Menu
• Time Menu
Changing Entertainment. Again.
Page 48

Usingi the TV's Menu System
How to Use Your TV's Menu System
You use the buttons on the remote or the Front oF ymir TV to access the menu system and
make changes to the settings.
The Following pages explain how to tise the diFFerent types oF mentis to adjust the Features oF
vour TV.
TV MAIN MENU
1 Audio
; 2 Picture-'Atátitjf’,.', ''' K
, 3 Screen -t ' V ‘
' A Channel ' ,
Í 5 Tin» , ^ ‘ ’ 'Jr
Í 6 Paréntá'litcíritrole .
; 7 fiuIDE PtMS-f.Hemi , -j
V S Setup '
0 Exit : : ■
Tip
Feel free to explore the menu system. If you're
ever unsure where you are In the menu system,
or you're just plain tired of exploring, press
CLEAR to remove the menus from the screen
and start over again.
Menus
The First menu i.s called the Main menu. Press MENU on the remcrte or on the
Front panel to bring up tile Main menu. Note that holding MENTi For 2 seconds
displays the GUIDE Plu.s+ system.
Mentis take you to another menu or a control panel. There are two ways to
select a choice in a menu;
• Use your arrow buttons on your remote control to highlight yotir choice,
and press OK.
• Press a number button on the remote. For example, in the Main menu press
3 to go straight to the Screen menu.
Exiting a menu
There are three ways to exit a menu:
• Highlight Exit and press OK.
• Pre.ss 0 on the remote.
• Press CLEAR. The on-screen displays are cleared From the screen and you
return to TV viewing.
iLAuEo
2 Piet
™*!яУт iüiitp
5 Time
6 Pare
7 5UID ;
a Setu
0 Exit ■
4S
TV MAIN MENU
_
_____
.....
AUDIO
.................................
2 Tof>e Controls •
3 Audio Processor
4 Audio Output & Speakers
0 Exit .
Audio Menu
Mute Press OK to reduce the TV’s volume to its minimum level. Press OK
again to restore the volume.
Tone Controls Displays the slider controls For adjusting tlie TV^'s treble, bass
and balance.
Audio Processor Displays a choice list oF available audio modes, which
control the way the .sound comes through your speakers. You can also access
the AUDIO PROCESSOR menu by pressing the SOUND button on the remote.
Mono Plays the sound in mono only. Use this setting \\ hen receiving
broadcasts with weak stereo signals.
Stereo Splits the incoming stereo audio signal into leFt and right channels.
Most TV programs and recorded materials have stereo audio. The \vord
STEREO appears on the lY'' when you tune to a program that is broadcast
in stereo.
Chapter 4
Page 49

Using the TV's IVIenu System
Expanded Stereo Electronically “widens” sound from stereo broadcasts,
stereo VCRs, digital satellite systems, DVD players, and LaserDisc players
for a fuller, more spacious sound.
Sound Logic" Stereo Reduces the annoying blasts in volume during
commeicial breaks, and also amplifies .softer soimds in program material.
Eliminates the need to constantly adjust volume control.
Second Audio Program (SAP) Plays the program’s audio in a second
language, if one is available. The word SAP appears on the TV when you
tune to a prrjgram that is broadcast with SAP information. SAP audio is
broadcast in mono, SAP is also used to broadca.st a program's audio with
descriptions of the video for the visually impaired.
Audio Output & Speakers Displays a choice list that lets you turn the TX^'s
internal speakers on or off, and set the audio outputs to fixed-level or variable
control level.
Variable Output, Speakers On This setting turns the TV's speakers on
and allows variable output from the TV’s audio output jacks.
Variable Output, Speakers QifTThis setting turns the TV’s speakers off
and allows variable output from the TV’s audio output jacks.
TV MAIN MENU
1 Audio
Fixed Output, Speakers QQ^This setting turns the TV’s speakers off and
allows fixed output from the TV’s audio output jacks to an external
component such as a surround sound amplifier. 'With Fixed Output On, the
TV’s volume control, tone controls, and mute are disabled.
Picture Quality Menu
Basic Picture Controls Displays the five slider controls for adjusting the way
the picture looks.
Contrast Adjusts the difference between the light and dark areas of ‘
the picture.
Color Adjusts the richness of the color.
Tint Adjusts the balance between the red and green levels.
Black Level Adjusts the brightness of the picture.
Sharpness Adjusts the crispness of the edges in the picture.
When exiting this menu, the Save Personal Picture Preset choice list will appear.
You can choose either Yes or No. If you save the settings as a Personal Picture
Preset, the TV will store the settings so you can re-select them quickly if
someone changes the settings.
Chapter 4
(Continued on next page)
47
Page 50

Using the TV's Menu System
Picture Presets Displays a choice list that lets you select one of three preset
picture settings: Bright Lighting, Normal Lighting, Soft Lighting or Personal
Picture Preset. Choose the setting that is best for your viewing environment.
Auto Color Displays a choice list that lets you turn on the feature that
automatically corrects the color of the picture. (This is especially useful for
tracking realistic flesh tone colors as you switch from channel to channel.)
Choo.se On or Off, depending on your preference. '
Color Warmth Displays a choice list that lets you set one of three automatic-
color adjustments: Cml for a more blue palette of picture colors; Normal-, and
Warm lor a more red palette of picture colors. The warm setting cttrresponds to
the NTSC standard of 6500 K.
TV «AIN HENU
1 Audio
2 Picture Quality
Screen Menu
Closed-Caption Display Displays a choice list that lets you choose the way
closed captioning information is shown on the screen.
Off always No captioning information is displayed.
On always Captioning information is shown always, when available.
On when sound is muted Captioning information is shown, when
available, whenever the TV’s sound is muted. (To mute the sound, press
the MUTE button.) The captioning information is not displayed when the
sound is not muted.
Closed-Caption Mode Displays a choice list that lets you choose which
captioning mode is used for displaying captioning information.
Menu Language Displays a choice list that lets you select your preferred
language for the menus: English, Spanish or French.
Picture Tilt (Direct View TV 31” or above) Your TV has an extra large picture
tube that makes it vulnerable to the effects of the Earth’s magnetic field. You
may need to adjust the picture tilt.
Using Closed Captioning
48
Many programs are encoded with closed-captioning information, which lets you
display the audio portion of a program as text on the TV screen.
Closed captioning is not available on all channels at all times. Only specific
programs encoded with closed-captioning information are applicable. When a
program is closed captioned, the CC icon is displayed in the channel banner.
See Chapter 3 for more information about the channel banner.
Chapter 4
Page 51

Using the TV's Мепц System
CLOSED-CAPTION MODE
Tip
If you don't know which Closed-Caption mode
to use, select CC1. CCi is probably the mode
that is used in your area. CC2, CCS, and CC4
are reserved for foreign languages, but are
rarely used at this time.
Closed-Caption Modes
The TV offers eight closed-captioneci modes, including four text modes.
To set the (.'¡osed-Captiou Mode.
1. Select Screen from the Main menu.
2. Highlight Oosed-Caption Mode'And press OK (the Closed-Caption Mode
appears).
3- Highlight yciur choice and pre.ss OK (the Screen menu ttppears agttin).
Note: The Text modes cover nearly half of the pictu re on the screen to
display the closed-captioned text. .Most broadcasters use the CC mode,
which displays a few lines of captions at a time.
Turning off Closed-Caption
1. Select Screen from the Main menu.
2. Press OK to select Closed-Caption Display.
3. Highlight Off Always and press OK. The closed captioning is turned off and
you go back to the Screen menu.
TV MAIN MENU
1 Audio
2 Picture GtuaLity
3 Screen
4 Channel
6 Pare. CHANNEL
I f 1 Signal Type
8 2 Auto Channel Search
P 3 List and Labels
A Autp;Tuning
5 Video Input Source
' 0 Exit
Channel Menu
Signal Type Displays a choice list that lets you select the current antenna
type. This option does not appear when the GUIDE Plus+ system is set up.
VHF/VHF Antenna Choose this if you are currently using an off-air
antenna for TV signals.
Cable TV Choose this if you are currently using cable or a cable box for
TV signals.
Auto Channel Search Tells the TV to search automatically for all the channels
available through the antenna input. When the TV finds an active channel, it
places it in the Normal channel list; inactive channels (weak stations or channels
with no signal at all) will be removed from the channel list. If you are using a
cable box anci have set up the GUIDE Pkis-t system, this option does not
appear.
List and Labels Displays a control panel that lets you edit your Norma!
channel list and choo.se a six-character label for each channel. Follow the <mscreen directions to enter your channels and other information.
(Continued on next page)
Chapter 4
49
Page 52

Using the TV^s Menu System
Tip
To enter a number greater than 99, press and
hold "1" to enter the hundreds digit, then
press the two remaining numbers.
TV MAIN MENU
1 Audio
2 Picture Suatity
3 Screen ‘
4 ChanneI c
Channel # Use the tip and down amnvs to scroll up and down throu<>h
the channels available via your antenna. You can enter the channel nuinher
directly usinji the number buttons.
Normal List Only the channels included in the Nttnual list are available
when you .scan up and down usiny channel up and down. U.se the up and
down arrow ixittons to indicate whether the channel number indicated is
included ( Vccv) ttr is not included (.\r;> in the Normal channel list.
Channel Label Use the ttp and down arrow bttttons to enter a six-
character label For each channel. Hold the button down to .scroll (|uicklv
tlirottgh the characters. The T\‘ can store up to 2“ labels in memoiy
Auto Tuning Displays a choice list that lets you set up the T\' to automtitically
tune to the correct inpitt channel when you press ;i component button (\'t:Kl.
DVD. VCR2, or SAT»CAHI.H) on the remote. Go t(t Chapter For dettuls about
the Auto Tuning Feature,
Video Input Source Lets you select whethei or tioi \'ou ha\ e tised the S-Video
jack to connect a component. IF you are rising the S-Video jack in this way.
select S-Video Input, if not, select Video Input.
Time Menu
Sleep Timer Displays a control panel that lets yori select the amount oF time
you want to give the TV before it shuts it.selF off.
Q Ex ^ Schedule
' 3 Set Time
1 Sleep Timer
■ 0 Exi t
Schedule Displays a control panel that lets you set up a schedule for turning
the TV on and off automatically. Reminder; you must turn the schedule On, The
on-screen directions guide you through the steps needed to set the schedule.
Set Time Displays a control panel that lets you enter the current time. The on
screen directions guide you through the ,step.s needed to set the time. If your
GUIDE Plus+ system is .set up, it will autcimatically update your time and this
option will not appear.
50
Chapter 4
Page 53

Other Information
Chapter Overview:
• Troubleshooting
• Care and Cleaning
• Front Panel Buttons
Chapter 5
• Limited Warranty
• Accessory Order Form
• Index
Changing Entertainment. Again.
Page 54

other Information
Troubleshooting
Most prolik-ms y<Hi encounter w ith your T\' you cun ccrrrect by consulting the Troubleshooting list that follows.
TV Problems
TV won't turn on ,
• Press the '1\' huiton.
• .Make .sLire the 'I'V is plugged in.
• Clietk the wall iei.e[r[aele (or ecten.sion cord) to make .sure it is “live" by plugging in something else.
• Something might be wrong with yotir remote control. Prews tile POWER button on the front of the TV. If the T\' curn.s on,
check the leniole control .sokitions on p. S4,
• the Imnt panel hurtons may be locked (disabled). Use the remote control to unlock tile front panel controls by .selecting the
Front Patu.4 Finch in tlie I’aiviital Controls menu and choosing View.
Buttons don't work
• If you're u.sing the remote control, press the TV button fir.st to make sure the remote is in TV mode.
• The Iront panel buttons may be locked (disabled). Use the remote control to unlock the front panel controls by selecting the
Front Panel Block m tile Parental Controls menu and choosing View.
• Unplug the TV for two minutes and then pitsg it back in. Turn the TV on and cry again.
TV turns off while playing
• Scheduled Off functioji may ha\ e been activated. Go to p. 50 for instructions.
• Electronic protection circuit may have been activated because of a power surge. Wait 30 seconds and then turn the TV on
again, it this happens freqtiently, the voltage in your house may be abnormally high or low.
TV turns on unexpectedly
• Scheduled On or Watch from the GUIDE Plus+ system may have been activated. Go to p. 50 for instructions.
Blank screen
• Make sure the component connected to the TV is turned on.
• Try another channel.
• Press RESET, in case the picture controls are set too low.
When 1 turn on the TV an icon is moving on the screen
• Make sure you have removed the Demo Pin from the G-LINK jack on the back of your TV.
No sound, picture okay
• Maybe .sound i.s muted. Press the volume up button to restore sound.
• Maybe speakcMS are turned off. Check the Audio Output and Speakers control panel in the Audio menu. Go to p. 47 for
detailed instructions.
• II Lising S^VTDEO ctihles to connect a component, remember to also connect the component’s left and right Audio Output Jacks
to tlie TV's left and right INPUT ];icks. '
Can't select certain channel
• Channel may be blocked or not ttpproved in the Parental Controls menu.
• It using VCR, make sure the TA' VCR button on tlie VCR is in the correct mode (press the TV/VCR button on your VCR),
Noisy stereo reception
• I he station might be weak. Press the SOUND button on your remote control to change from stereo to mono.
52
Chapter 5
Page 55

other Information
Troubleshooting
No picture, no sound but TV is on
• Maybe the calile/air setting is set to tlie wrong position. Select GUlnt: Plus+ Menu from the Main menu, .select
the option, and provide the correct information on the following screcn.s. Go to pages 16-17 for detailed ¡n.strnction.s.
• The channel might he empty — change channels.
• It yttti're watching your VCR and it's connected with coaxial cable to the CABLE/ANTTNNA jack, tune the T\' to channel 3 or -a
(whichever channel is selected on the 3/4 switch on the back of your VCR). Also check to make sure the T\ /VCR button on the
VCR is in the correct mode (press the TWVCR button on your VCR).
Sound okay, picture poor
• Check antennts connections. .Make sure all of the cables are firmly connected to the jacks.
• 1'ry adjusting slrarpness function to tmprove weak signals. Go to p;ige 47 for more instructions.
Biack box appears on the screen
• Closed-captioning might be on. Check the Chsed-Caption Display control panel in the Sen
instructions.
Every time I turn on the TV, the Guide is on the screen
• The GUIDE Plus+ system automatically appears on the screen when you use the TV button on the remote to turn on the TV. You
can turn off this feature by pressing GUIDE on your remote control and then select the Menu bar. Press the right tirrmv button lo
select Setup. Choose Review options and select OFF.
■ een menu. Go to page 48 frtr more
GUIDE Plus+ System Problems
GUIDE Plus+ setup won't switch to channel 9 for VCR and/or channel 02 cable box
• Make sure you have removed the Demo Pin from the G-LINK jack. Check to see if the G-LINK wands are positioned correctly in
front of components' remote sensors. ^
• GUIDE Plus+ system control of cable box is slower than direct control of the box itself. Keep this in mind when changing channels.
• You may have an incorrect GUIDE Plus+ Channel Lineup. The guide may get out of sync with the cable provider, Use the GUIDF
Pltis+ Setup in the GUIDE Pius+ Menu to change the zip code to 99999. Turn the TV off for 10 minutes. Use Setup again to change
the zip code back to the correct value. If asked, be sure to select the correct channel lineup from the on-screen list.
Program information doesn't download
• Review your setup information and make sure it's correct. Press MENU on the remote and select GUIDE Plus^ Setup Go to page 16
for detailed instructions about the GUIDE Plus+ Setup menus. ' * .
• The TV must be off to download information. Leave your TV off overnight, for at least 10 hours, to receive the initial download foiyour area. .
• If you re using a cable box, leave it on so you can receive program information.
Scheduled Watch or Record doesn't occur
• Check Schedule for timer conflicts. Go to page 50 for instructions,
• Make sure the wands of the G-LINK cable are placed in front of the remote sensorCs) on the component(s).
• Make sure your VCR is turned off during the time you've scheduled to record a program becatrse the sy.siem turns the VCR on when
it starts recording (if it's already on when recording .starts, the .system will turn it off).
• Make sure there i.s a tape in the VCR ;ind that the VCR is connected properly.
• Be SLire that you set up tile VCR in the GUIDE Flus+ .Setup menus. If yoti don't complete the Coii/ipuniiM fora 1 r;/(’steps
.sLicce.s.sttilly, tlie Recoid option won't be availalile. Go to p. IR for detailed instructions, '
• It a cable box i.s attached to your 'lY', make sure you set it up correelly in the GUIDE Flus^ Setup menus. Go to page 16-|7 for
detailed inslriietions
Chapter 5
S3
Page 56

other Information
The Remote Control Doesn't Work
• Something might be between the renioie mid the remote sensor on the component. Make sure there i.s a clear path.
• Maybe the renioie i.sn't aimed directly ;it lire component (TV or VCR) that you’re trying to operate.
• Maybe remote i.s not in TV Mode. Pre.s.s tile TV button so remote will control TV.
• Maybe batteries in remerte are weak, dead or in,stalled incorrectly. Put new batteries in the remote. (Note, if you remo\'e the
batteries, you may have to reprogram the remote to operate other components.) •
• You might need to drain the remote's micropi-oce,s.sor: remove batteries and pres.s the number 1 button for at least 60 .second.s.
Release the 1 button, replace the batteries, and (if necessary) program the remote again.
Problems with V-Chip/Parental Controls
The rating limits don't work
• You mtist lock the settings. Go to the 71 M/d/.VMi',Vi '(press MENU on your remote), select Parental Controls {pKss 6 on your
retiiote), select Lock Parental Conirols (press 6 on your remote).
I don't remember my password and I want to unlock the TV
• [f you forget your password, simultaneously press and hold MENU on the television and volume down on the remote for 3 seconds.
Nothing appears on the screen, Parental Ctrntrols simply unlock and you can re-enter a password via Lock Parental Controls.
The V-Chip won't let me watch a program even though it's not rated as violent.
• Maybe tire movie was given an NR (Not Rated) status. After you block movie ratings, you must set NR to Vt'ew* separately in order to
view movies with an NR rating.
Care and Cleaning
CAUTION: Turn OFF your TV before cleaning.
You can clean the TV as required, using a soft lint-free cloth. Be sure to occa,siona!ly dust the ventilation slots in the cabinet
to help assure adequate ventilation.
The TV’s screen may be cleaned with a soft, Unt-free clodi as well. Take care not to scratch or mar the screen. If
necessary, you may use a cloth dampened with warm water.
Never use strong cleaning agents, such as ammonia-based cleaners, or abrasive powder. These types of cleaners
will damage the TV.
While cleaning do not spray liquid directly on the screen, or allow liquid to run down the screen and inside the TV. Also,
avoid placing drinks or va.ses with water on top of the TV. This could increase the risk of fire or shock hazard or damage to
the TV.
Caution: If fixed (non-moving) images are left on the screen for long periods, they may be permanently imprinted on the
picture Cube. Such images include netw'ork logos, phone numbers, and video games. This damage is not covered by your
warranty. Extended viewing of channels di.splaying these images should be avoided.
54
Chapter 5
Page 57

other Information
Front Panel
If you can't find your remote cr)ntrol you can use the buttons on your TV to operate many of the TV's features.
MENU Brings up the T\'^ MAIN MENU. When in the menu system, it selects liighlighteci items. Also returns you to the
previous menu. Press and hold MENU for two seconds to access the GUIDE Pkis+ s\',stem.
CH V Scans down through the current channel list. When you're using the TV's menu system, it acts like the arrow dtwn
button on the remote control.
CH A Scans up through the channel list. When you’re using the TV's menu system, it acts like the arrow up button on the
remote control.
VOL- Decreases the volume. When you're using the TV’s menu system, it acts like the left arrow button on the
remote control.
VOL + Increases the volume. When you're using the TV^'s menu system, it acts like the right arrow button on the
remote control.
POWER Turns the TV on and off.
RCA TV Limited Warranty
■what your warranty covers;
• Any defect in materials or workmanship.
For how long after your purchase:
• 90 days for labor charges.
• One year for parts.
• Two years for the picture tubes.
The warranty period for rental units begins with the first rental or 45 days from date of shipment to the rental firm,
whichever comes first.
■What we will do:
• Pay any Authorized RCA Television Service Center the labor charges to repair your television.
• Pay any Authorized RCA Television Service Center for the new or, at our option, refurbished replacement pans and
picture tubes required to repair your television.
How you get service:
• For screen sizes of 26" and smaller: Take your RCA television to any Authorized RCA Television Service Center and pick
up when repairs are complete.
• For screen sizes larger than 26": Request home or pick up, repair, and return service from any Authorized RCA
Television Service Center, provided that your television is located within the geographic territory covered by an
Authorized RCA Television Service Center. If not, you must take your television to the Sendee Center location at votir
own expense, or pay for the cost the Service Center may charge to transptrrt your televisitrn to and from your home.
• To identify your nearest Authorized RCA Television Service Center, ask your dealer, look in tlie Yellow Pages or ( 'ill 1
800-336-1900. K s.ui I
Chapter 5
(Continued on next page)
55
Page 58

other Information
• Show the Authorized Serv'ice Center Representative your sales receipt or other evidence of purchase date or first rental
What your warranty does not cover:
• CListcMuei- instruction. (Your Owner's Manual clearly describes how to install, adjust, and operate ytnir television. Any
additional information should be obtained from your dealer).
• Installation and related adjustments.
• Signal reception pixrhlems not caused by your television.
• Damage frotn misuse rrr neglect.
• batteries.
• Customer re]ilacement fuses.
• Images brnmed onto the screen.
• A tele\ i.sion that has been modified rrr incorporated into other jtiroducts or is used for institutional or other commercial
prjrpi)ses.
• A television purchased or serviced otitside the U.S.A.
• .Acts of God, such as but not limited to lightning damage.
Product registration;
• Please complete and mail the Product Registration Card packed with your TV. It will make it easier to contact you
shotild it ever be necessary. The return of the card is not required for warranty coverage.
How state law relates to this warranty:
• This warranty gives you specific legal rights, and you also may have other rights that vaiy from state to state.
If you purchased your television outside the United States:
• This warranty does not apply. Contact your dealer for warranty information.
Service calls which do not involve defective materials or workmanship are not covered by this warranty. Costs of
such service calls are the sole responsibility of the purchaser.
56
Chapter 5
Page 59

VH81 (3-ft)
VH82 (6-ft)
VH89 (6-ft)
Gold-Tipped cable
VHS3 (6-ft)
Screw-on Cable attaches to
the round antenna
connectors (called 75-ohm
F-type) on the hack of your
I'CK or 7T ' ne ends screw
onto the connectors for a
secure connection.
Pusb-on Cable attaches
to the round antenna
connectors (called 75obm F-type) on the hack
of your VCR or TV Ends
push on for a quick
connection.
Monaural VCR Dubbing
Cable Double cable that lets
you connect the video and
audio Jacks of two VMS
VCRs to duplicate tapes,
Can also be used to connect
a VCR to your TV. Cable is
color-coded and shielded.
Has RCA-type phono plugs
on each end.
other Information
Accessory Order Form
Description
Screw-on antenna cable (3-ft)
Screw-on antenna cable (6-ft)
Push-on antenna cable (6-ft)
Monaural VCR Dubbing Cable (6-ft)
Stereo VCR Dubbing Cable (6-ft)
S-Video Cable (6-ft)
S-Video Cable (12-ft)
2-way Signal Splitter
Amplified Antenna
Antenna Mixer (not shown)
Remote Control (CRK76TE1)
Audio»Video Adapter (not shown)
Part No.
VH81
VH82
VH89
VH83
VH84
VH976
VH913
VH47
ANT200
193984
242524
228449
Price
S3.95
$5.95
$5.95
$5.95
$9.95
$7.95
$14.95
$3.95
$49.95
$11.15
$30.35
$4.45
Qty
Stereo VCR Dubbing Cable
Triple cable that lets you
connect the video and audio
jacks of stereo components.
Gold-Tipped cable
VH84 (6-ft)
S-Video Cable has multi
pin connectors on each
end for connecting S-Video
components to your TV.
VH976 (6-ft)
VH913 (12-ft)
Continued on next page.
1
£
a;
X
.c
u
(O
(U
Q
Prices are subject to change without notice.
Total Merchandise
Sales Tax
............................................
.....................................
We are required by law to collect the
appropriate sales tax for each individual
state, country, and locality to which the
merchandise is being sent.
Shipping and Handling
Total Amount Enclosed
....................................
..............................
Use VISA, MasterCard, or Discover Card
preferably.
Money order or check must be in U.S.
currency only.
No COD or CASH.
All accessories are subject to availability.
Where applicable, we will ship a superseding model.
Please complete other side also
$
$
$ 5.00
$
Chapter 5
57
Page 60

other Information
Charge your order on your VISA,
MasterCard, or Discover Card hy
filling in below
USE YOUR CREDIT CARD
IMPORTANT: Copy complete account number
from your VISA card
DC
My card expires: | | | [ | [
IMPORTANT: Copy complete account number
Copy Number
above your
name on
MasterCard
IMPORTANT: Copy complete account number
from your MasterCard
My card
expires:
from your Discover Card
n:
Splitter VH47
a j-j X
.j j
2-way Signal Splitter
Helps yoi) a/iniea a secon6l 71'
or 1 -CP.
Amplified Antenna
AUou'Syou to quickly su'ilch
from the ciuleuiui signal to the
cable or salellile signal wUhout
discauHeeling the antenna.
Remote Control
This is the remote control that
came packed with yvur TV.
Replacements or spares can he
ordered as needed.
n
My card expires: | |
AUTHORIZED SIGNATURE
(Credit card order will not be processed without signature)
Print or type your name and
address clearly.
Please make sure that both sides of this form
have been filled out completely.
• Allow 4 weeks for delivery.
• All accessories are subject to availability.
• Prices are subject to change.
A complete and correct
order will save you days
of waiting.
CRK76TE1
To Order
To place your order by phone, have your Visa,
MasterCard or Discover Card ready and call the toll-free
number listed below.
Use this number only to place an orcier for accessory
items listed on this order form,
1-800-338-0376
To place your order by mail, detach and mail the
completed order form with credit card information,
money order or check in US currency (made payable to
Thomson Consumer Rlectrttnics, Inc.) to the following
addre.ss:
Video Accessories
PO Box 8419
Ronks, PA 17573
01
Q
58
Chapter 5
Page 61

Index
Atci.-ssi lilt's
Ad\ aiKftl conncaioi’is 1 I
A^t’-lSast'd Hatiniis ."iiS
AM'i:\NA hurinn 22
Arrow hultons 22
Antlio
Oulpul \'oluinc iX Speakers i"
Processor id
AudioA'kico cable 7
AiU<i
Channel Search IS. t9
Color i.S
Tunin.n SO
I )\'D Channel .S7
S.AT.XIABI.I' Channel ,S7
V’tlli channels
■AL.'X (au.\iliar\0 buUon 22
B
Basic-
connections S. 9
PictLii'c Controls 07
Batteries for the remote 14
Black i.evel 4'
Block
.-\>;e-Ba.sed Rating’s aO
Front Panel 44
Movie Ratings 4.3
Sjiecitic Content 'Phemes 41
\’-Chip Unrated Program 44
BtitUms, remote control 22
Cable Box
code list 26
Cables
AudioA’ideo 7
ertaxial 7
G-LINK 7
S Video 7
CC (Closed Captioning) 48
CH + button 22
CM - btitton 22
Channel
2 37
3 37
Banner 33, .36
Block 44
Libels 30
l.ineiip 2H
Menn )9
Search 13
(lhannels menu 31
Ci.F.Ml biitlon 22
(Ik )sed (lap!!( m
Displav IS
.Motle 18
Coaxial calile ”
Code list
Cable Box 26
Satellite Receiver 26
VCR 26
Color Warmth |8
Connections
1Л' -r \41li 8
lA' + VCIÍ + Satellite lieeeiter
I 1
'IV Only 9
Content Tlienies 38
Contrast ■ i"’
Demo Pin 6, 8. 9. 11
DVD ■
Ixilton 22
Channel .З"^
F
Finding the .sensor 13
Fixed
images 34
Outptit, Speakers Off 47
FORWARD luitton 22
Front Panel
Blf)ck 44
Front panel 33
Front panel block 44
G
G-LlNK
cable 7
connecting 13
GO BACK button 22
Grid Guide menu 29
GUIDE button 22
GUIDE l-’lus+ .sy.stem
Channel Lineup 28
Channels 35
Downloading Information 28
Setup 13
Guide Blus+ system 15, 20
INFO button 22
Interactive setup 13
J
Jacks on the 1Л' 12
L
I..F.D. Ixitton 22
L.A10N0 jack 12
Lalx-ls 30
Language 48
[.angtiages
SrJeiling 13
I.ocating remóle sensor 1,3
Lock. Parental Conirols a i
M
.Vlemor\' 30
Menu
Audio 46
Channel u9
Channels .34
Grid Guicle 29
Language 48
.Messages ,33
.News 32
Picture Quality 47
Schedule 32
Screen -18
Setup 3-1
■ Son 31
Time 3(1
.VIKNU buturn 22
•Menus
GlIIDF Pius+ System setup 13
Messages menti 33
Mono 46
.Mute 46
-VIUTF button 22
N
New's menu 32
Normal Li.sr 50
Number buttons 22
o
OK button 22
ON»OFF button 22
P
Parental Controls
Locking, LJnlocking 44
menu 38
PAUSFl button 23
Picture
Presets 48
Quality Menu 47
Tilt 48
PLAY button 23
Program guide
after setup 20
R
Rating Limits
mov'ies 43
TV 39
RFC»VCR+ button 23
Remote, batteries 14
Kentote sensor 1.3
Ki’.VERSF liLitton 23
s
S VIDFIO
calile 7
SAB 17
3.A['*CABLF button 23
SAi /Cable Cliannel .37
Satellite Receiver
ctide list 26
connecting 11
Schedule
menu 32
time 30
Screen Menu 48
Second Audio Program (SAP
i7
Set
D\4> Channel 37
SAT/CABLK Channel 37
Time 30
VCRl Channel 37
VCR2 Channel 37
Setup
Gl'IDF Plus+ .svsteni
mentis 13
menu 3‘i
Shai-j-mess -¡7
Signal Tv|-)e
Cable T\‘ i9
l.iHF, VHF Antenna 49
SKIP button 23
Sleep Timer 36, 50
Sort metiu 31
SOUND Imtton 23
Stereo 46
STOP button 23
T
Time
Cun-ent 36
Menu 30
Tint 47
Tone Controls 46
Troubleshooting 52
TV button 23
u
UFIF/VHF Antenna 49
Unlock, Parental Controls 4-:
V
V-Cliip 38
Age-Based Ratings 38
Blocking Movies 43
Content Themes 38
Variable Oulptit, Speakers
On, Off 47
VCR
1 Cliannel 37
2 Channel 37
code list 26
connecting 8
VCRl button 23
VCR2 button 23
Video 30
VIDFX) IN jack 8, i 1 12
V'OL-r button /3
VOL- button /3
w
Wanant\- 33
WIIO-INBUT button 23
Chapter 5
S9
Page 62

(This page intentionally left blank)
Page 63

(This page intentionally left blank)
Page 64

^ £¿3
Please do not send any products to the Indianapolis address listed in this manual or on the carton. This will only
add delays in service for your product.
O THOMSON CONSUMER ELECTRONICS
10330 North Meridian Street
Indianapolis, IN 46290
©2000 Thomson Consumer Electronics, Inc.
Trademark(s)® Registered
Marca{s) Registrada(s)
Printed in USA
TOCOM 15491880 MODEL#:
F25648
F3I317
F27648
F32648
15491880
F36648 F26317
F27647 F35317
G27648
G27649
The following materials were used in
printing this publication;
60%
74) R EC Y CL E D P AP E R .
MIN I MU M 20 % P OS T CO N SU M ER
PRINTED WITH
SOYINK
 Loading...