

Page 1
31-5001.fm Page 1 Thursday, September 23, 1999 8:19 PM
11110000----BBBBaaaannnnd
Your RCA 10-Band Stereo Graphic
Equalizer gives you greater control over
your audio system’s sound. As you play or
record an audio source, you can tailor the
sound to suit your personal listening
preferences or to compensate for poor
recording quality, components, speaker
placement, or the room’s acoustics.
Your equalizer offers the following
features:
Stereo Image Enhancer – enhances the
stereo effect.
Spectrum Display — gives you a visual
display of the sound level of each
frequency band.
Tape Dubbing — lets you copy a tape
from one tape deck to the other.
Tape Monitoring — lets you listen to the
recorded sound.
Bypass — lets you play and record
without equalization.
d SSSStttteeeerrrreeeeo
d d
o GGGGrrrraaaapppphhhhiiiic
o o
c EEEEqqqquuuuaaaali
c c
lizzzzeeeerrrr
lili
WARNING:
shock hazard, do not expose this product to
rain or moisture.
CAUTION:
ELECTRIC SHOCK, DO NOT REMOVE
COVER OR BACK. NO USER-SERVICEABLE PARTS INSIDE. REFER SERVICING TO QUALIFIED PERSONNEL.
To reduce the risk of fire or
CAUTION
RISK OF ELECTRIC
SHOCK. DO NOT OPEN.
TO REDUCE THE RISK OF
This symbol is intended to alert
you to the presence of uninsulated dangerous voltage within
the product’s enclosure that
might be of sufficient magnitude
to constitute a risk of electric
shock. Do not open the product’s case.
This symbol is intended to
inform you that important oper-
!
ating and maintenance instructions are included in the
literature accompanying this
product.
!
EQ Record — lets you record equalized
and enhanced sounds while listening to
unmodified sounds.
Display Level Control — lets you adjust
the display to give you the best picture of
the sound levels for both the le ft and right
channels.
© 1999 Tandy Corporation.
All Rights Reserved.
Page 2
31-5001.fm Page 2 Thursday, September 23, 1999 8:19 PM
CCCCOOOONN
NNEEEECCCCTTTTIIIIOOOONNNNSSSS
NNNN
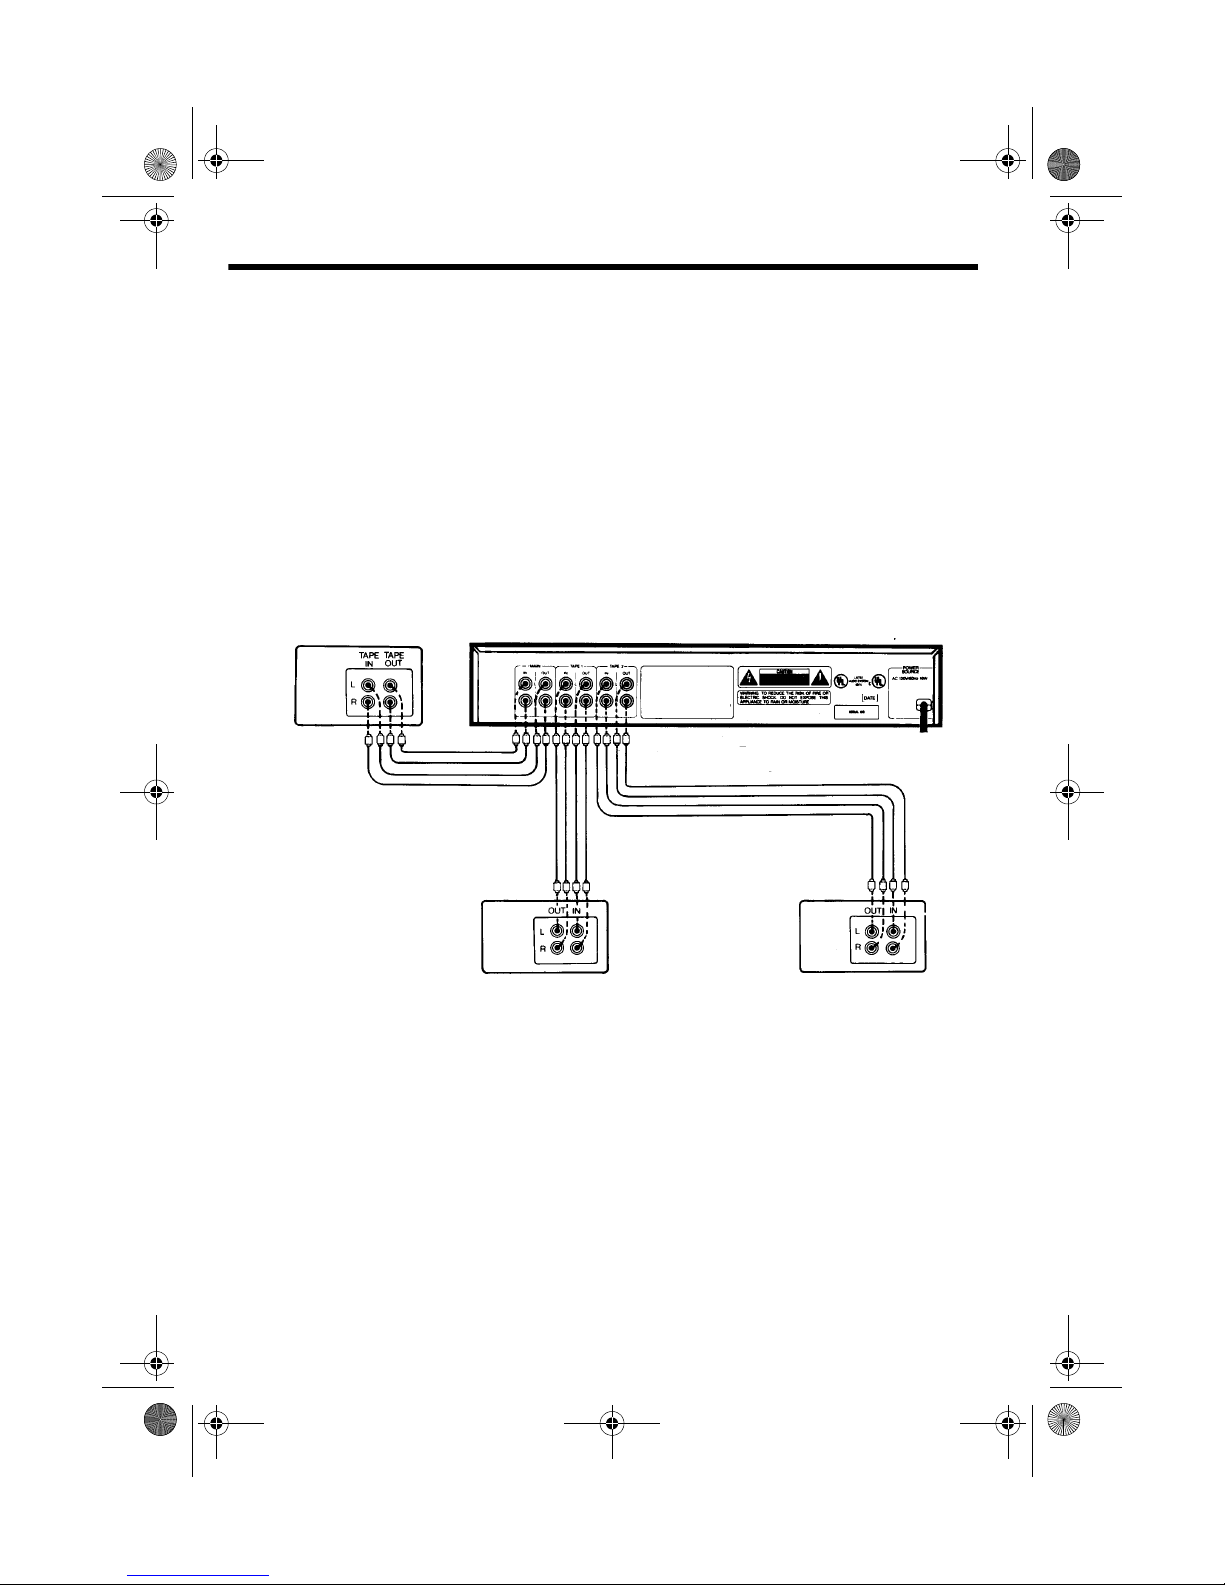
Follow these steps to connect the equalizer to your audio system.
Cautions:
• Use only shielded audio cable with phono-type connectors, available at your local
RadioShack store.
• Before you connect the equalizer, turn off all the components in your audio system and
unplug their power cords.
• Before you plug in the equalizer’s power cord, complete all the connections and be sure
the equalizer’s
Stereo Receiver
POWER
button is set to the out position.
1. To connect the equalizer to your
receiver, connect the receiver’s left and
right TAPE OUT jacks to the equalizer’s
and
L
R MAIN IN
the equalizer’s
jacks. Then connect
and
L
R MAIN OUT
jacks
to your receiver’s left and right TAPE IN
or TAPE MONITOR jacks.
2. You can connect a tape deck to each set
of tape jacks (
TAPE 1
and
TAPE 2
) on
the back of the equalizer. To connect
each tape deck, connect the equalizer’s
and
L
R TA PE OUT
jacks to the tape
deck’s left and right IN jacks. Then
2
Tape Deck 2Tape Deck 1
connect the tape deck’s OUT jacks to
the equalizer’s
and
L
R TAPE IN
jacks.
3. Plug the equalizer’s power cord into
your receiver’s switched power outlet or
any standard AC outlet.
Warning:
The equalizer’s power cord
has a polarized plug. To prevent electric
shock, do not use an extension cord or
other receptacle unless you can fully
and easily insert the plug’s blades.
4. Reconnect the other components’
power cords.
Page 3
31-5001.fm Page 3 Thursday, September 23, 1999 8:19 PM
OOOOPPPPEEEERRRRAAAATTTTIIIIOOOONNNN
Follow these steps to use the equalizer.
1. Turn the receiver’s volume control to its
lowest setting. Then set the receiver’s
tone controls to their center positions.
2. Set the equalizer’s slide controls to
(center positions).
Equalizer Slide Controls
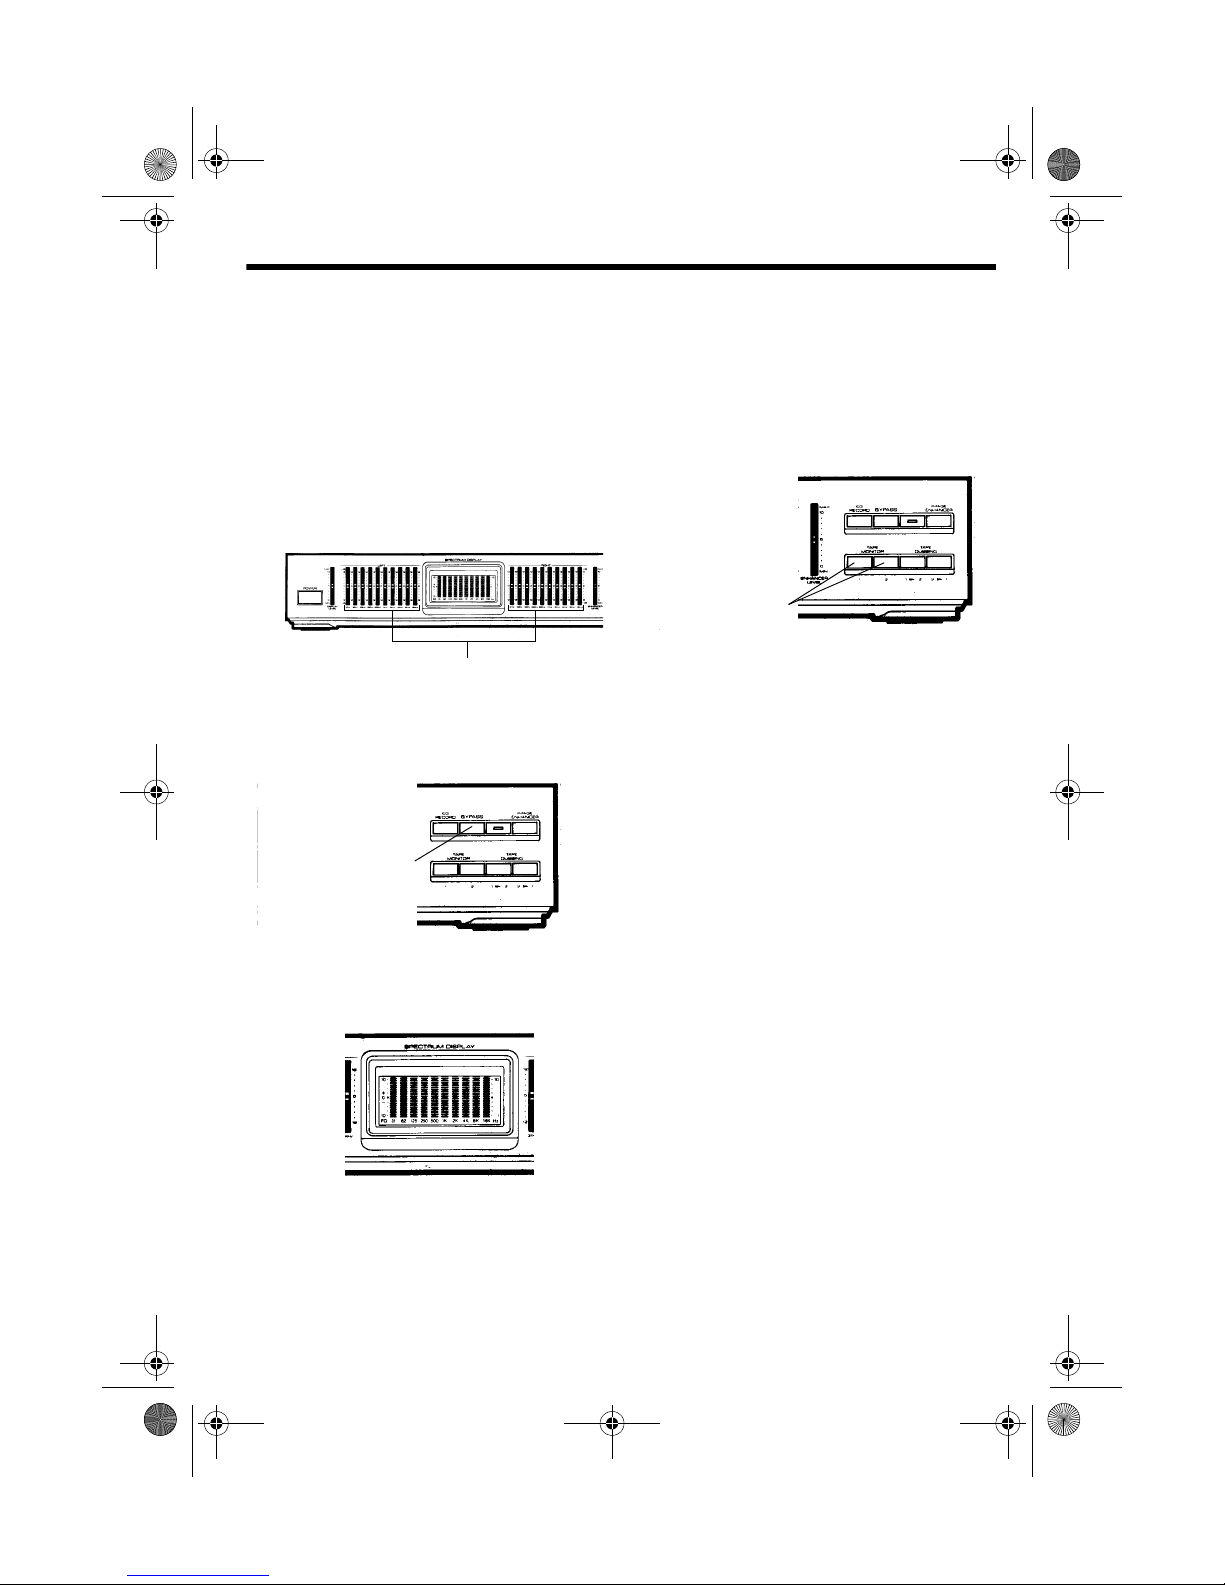
3. Be sure
BYPA SS
and
EQ RECORD
set to the out position. If either is set to
the in position, press it to release it.
BYPASS Button
4. Press
The
POWER
SPECTRUM DISPLAY
to turn on the equalizer.
lights.
0 dB
are
If the audio source is a tape deck, set
the appropriate
button (
1
TAPE MONITOR
or 2) to the in position. If the
source is not a tape deck, be sure both
of the equalizer’s
TAPE MONITOR
buttons are set to the out position.
TAPE MONITOR
Buttons
7. Start the audio source and adjust the
receiver’s volume.
8. Adjust the equalizer’s slide controls for
the desired sound (see “Frequency
Controls”).
You can view the effect of the
adjustments on the
DISPLAY
Note:
.
The display shows the sound
SPECTRUM
levels of the audio source you are
listening to. For example, if you are
dubbing from one tape deck to another
but listening to the CD player, the
display shows the sound levels of the
CD player.
5. Select the receiver’s tape monitoring
feature.
6. T urn on the receiver . Using the receiver’s
controls, select the audio source.
5
0
AAAAUUUUDDDDIIIIO
FFFFrrrreeeeqqqquuuueeeennnnccccy
O AAAADDDDJJJJUUUUSSSSTTTTMMMMEEEENNNNTTTTSSSS
O O
y CCCCoooonnnnttttrrrroooollllssss
y y
The equalizer has separate
and
channel controls so you can set
RIGHT
LEFT
channel
the sound differently for your left and right
speakers.
3
Page 4

S
31-5001.fm Page 4 Thursday, September 23, 1999 8:19 PM
You modify each channel’s sound by moving
the slide controls up or down. Each slide
control affects a small range of frequencies.
The frequency marked below a slide control
is the mid-point of the band affected by that
control.
To boost a frequency band’s level, slide the
control above
the control below
. To cut the level, slide
0 dB
. If you do not want
0 dB
to change the sound level of a frequency
band, leave its control set to
0 dB
.
The following information groups the
frequency bands into five ranges. This
information can help you adjust the sound
for the desired effect.
5
0
Mid-Range (400–2,600 Hz)
Example:
Most deep vocals
Changes in this range cause the greatest
effect. The best settings for this range vary
depending on the type of music.
Upper Mid-Range (2,600–5,200 Hz)
Example:
Most high vocals
Boost these frequencies to brighten the
sound. Cut these frequencies if the sound is
harsh.
High End (5,200–20,000 Hz)
Example:
Piccolo
Boost these frequencies to enhance the
brilliance of the music. Cut these
frequencies if the sound is piercing. You can
also cut these frequencies to filter highfrequency noise.
Bass (20–140 Hz)
Example:
Bass drum
Use these controls to enhance the music’s
low tones or to reduce rumble, acoustic
feedback, and other low-frequency noise.
Mid-Bass (140–400 Hz)
Example:
Bass guitar
Boost the frequencies in this range if the
sound is too thin. Cut these frequencies if
the sound is muddy or boomy.
4
DDDDiiiissssppppla
lay
y LLLLeeeevvvvel
y y
el
elel
shows the
lala
The
SPECTRUM DISPLAY
relative sound level of each frequency band.
The highest and lowest sound levels might
not fully appear.
If necessary, slide
DISPLAY LEVEL
up to
view low sound levels or down to view the
peaks of high sound levels.
DISPLAY LEVEL
lide Control
Page 5

31-5001.fm Page 5 Thursday, September 23, 1999 8:19 PM
BBBByyyyppppaaaasssss
To hear sounds without equalization (just as
you would hear them with all the equalizer
frequency controls set to
to the in position to bypass the equalizer
circuit. Set
return to equalization.
Caution:
amplifier or speakers, turn down the
receiver’s volume control before you press
BYPA SS
increase the volume.
SSSStttteeeerrrreeeeo
The stereo image enhancer lets you adjust
the perceived separation between the left
and right channels so you can broaden the
sound field. You can use this feature to
compensate for improper speaker placement
or simply to enhance the stereo effect.
Set
enhance the stereo effect. The image
enhancer indicator lights. Then adjust the
ENHANCER LEVEL
increase or decrease the effect. You hear the
expanded sound if you monitor either tape
deck.
s CCCCoooonnnnttttrrrroooollll
s s
0 dB
BYPA SS
To prevent overdriving your
. After you press
o IIIImmmmaaaagggge
o o
IMAGE ENHANCER
to the out position to
e EEEEnnnnhhhhaaaannnncccceeeerrrr
e e
to the in position to
slide control to
), set
BYPASS
BYP ASS
, slowly
Set
IMAGE ENHANCER
to return to normal sound. The image
enhancer indicator turns off.
The
Note:
affect the stereo image enhancer operation.
RRRREEEECCCCOOOORRRRDDDDIIIINNNNG
BYPA SS
G AAAAND D
G G
to the out position
control setting does not
ND DUUUUBBBBBBBBIIIINNNNG
ND DND D
AAAADDDDJJJJUUUUSSSSTTTTMMMMEEEENNNNTTTTSSSS
If you connect a tape deck to the equalizer as
described in “Connections” on Page 2, you
can record from any other audio source
connected to your receiver. If you connect
two tape decks, you can make two
recordings at the same time, or you can dub
(copy) a tape from one tape deck to the
other.
If you record the sound with
Note:
equalization, we recommend you play it
back without equalization. If you turn on
the stereo image enhancer when you record,
we recommend you turn off the stereo image
enhancer during playback. Otherwise, the
sound might distort.
The recorded sound and the sound you hear
as you record depend on the following
settings.
G
G G
Image Enhancer
Indicator
ENHANCER LEVEL
Slide Control
IMAGE ENHANCER
Button
EEEEQ
Q Re
Reccccoooorrrrd
Q Q
ReRe
To record sounds with equalization while
you listen to unmodified sounds, first adjust
the equalizer slide controls for the sound
you want. Then set
position and
You hear the equalized sound if you monitor
either tape deck. If you set
d CCCCoooonnnnttttrrrroooollll
d d
EQ RECORD
BYPA SS
to the out position.
to the in
BYPASS
to the
5
Page 6

31-5001.fm Page 6 Thursday, September 23, 1999 8:19 PM
in position, you record sounds without
equalization.
EQ RECORD Button
SSSStttteeeerrrreeeeo
o IIIImmmmaaaagggge
o o
To record sounds with enhanced stereo
effect while you listen to unenhanced
sounds, set
position. Adjust the
slide control to increase or decrease the
effect. Then set
position. You hear the expanded sound if
you monitor either tape deck.
The
Note:
affect the stereo image enhancer operation.
TTTTaaaappppe
e MMMMoooonnnniiiittttoooorrrr
e e
To hear a tape deck’s output, set the
appropriate
to the in position. To stop monitoring, set
or
to the out position.
2
Notes:
• Do not press in both
buttons. If you do, you mute the sound
from both tape decks.
• Some tape decks have a tape monitoring
feature. If you select your tape deck’s
monitoring feature, and you press in the
equalizer’ s
the tape deck you are recording to, the
sound you hear is the actual recording.
6
e EEEEnnnnhhhhaaaannnncccceeeerrrr
e e
IMAGE ENHANCER
ENHANCER LEVEL
EQ RECORD
BYPA SS
TAPE MONIT OR
control setting does not
TAPE MONITOR
TAPE MONITOR
to the in
to the in
button (1 or 2)
button for
DDDDuuuubb
bbiiiinnnngggg
bbbb
To dub a tape from Tape Deck 1 to Tape
Deck 2, set
in position. To dub a tape from Tape Deck 2
to Tape Deck 1, set
to the in position.
Note:
buttons. If you do, neither tape deck records.
TAPE DUBBING 1 2
T APE DUBBING 2 1
TAPE DUBBING
Buttons
Do not press in both
TAPE DUBBING
to the
CCCCAAAARRRREEEE
To enjoy your RCA 10-Band Stereo Graphic
Equalizer for a long time:
• Keep the equalizer dry. If it gets wet,
wipe it dry immediately.
• Use and store the equalizer only in
normal temperature environments.
• Handle the equalizer gently and
1
carefully. Do not drop it.
• Keep the equalizer away from dust.
Wipe the equalizer with a damp cloth
occasionally to keep it looking new.
Modifying or tampering with the equalizer’s
internal components can cause a
malfunction and invalidate its warranty.
This equalizer has been manufactured to the
specifications of RadioShack and is covered
by a limited warranty from RadioShack. If
your equalizer is not operating as it should,
take it to your local RadioShack store or call
1-800-THE-SHACK for assistance.
Page 7

31-5001.fm Page 7 Thursday, September 23, 1999 8:19 PM
SSSSPPPPEEEECCCCIIIIFFFFIIIICCCCAAAATTTTIIIIOOOONNNNSSSS
Equalizer
Frequency Response (Flat Setting) ..................................... 20 to 30,000 Hz +0.5 dB –1.0 dB
Control Ranges ........ ± 12 dB at 31, 62, 125, 250, and 500 Hz, and at 1, 2, 4, 8, and 16 kHz
Intermodulation Distortion ........................... 0.02% at 1V Output (70 Hz/7 kHz = 4/1 Ratio)
Harmonic Distortion .............................................. 0.015% at 1V Output (20 Hz–20,000Hz)
Hum and Noise (Shorted Input) .......................................................... 95 dB (at 1V Output)
Hum and Noise (All Controls at Maximum, Input = 4.7 kohms Terminated) ................ 1 mV
Channel Separation at 1 kHz (Input 0.775V and 4.7 kohms Terminated) ..................... 62 dB
Crosstalk Between Functions at 1 kHz (Input 0.775V and 4.7 kohms Terminated) ....... 70 dB
Level Ratio Main Channel at Enhancer:
VR Maximum ............................................................... L Channel 8 dB, R Channel 8 dB
VR Minimum ......................................................... L Channel 4.5 dB, R Channel 4.5 dB
Noise Level at Enhancer, VR Maximum (Input 4.7 kohms Terminated) ..................... 0.5 mV
Total Gain (Flat Setting) .................................................................................................. 0 dB
Spectrum Display
Control Frequency Accuracy at 31 Hz–16 kHz ............................................................. ±10%
Display Frequency Response at Main 31 Hz, 1 kHz = 0 dB (18 dB LED On Position) ... ±2 dB
Meter Tolerance at 1 kHz LED On Position .................................................................. ± 2 dB
Input Sensitivity MAIN IN at 18 dB On Position ......................................................... 75 mV
General
Power Requirements .............................................................................. 120 Volts AC, 60 Hz
Dimensions (HWD:
Cabinet ..................................................................................... 2
3
/4 × 161/2 × 81/2 Inches
(69.9 × 419.1 × 215.9 mm)
Overall ............................................................................... ....... 3
1
/4 × 161/2 × 91/6 Inches
(82.6 × 419.1 × 232.7 mm)
Weight ................................................................................................................. 6 lb, 1.6 oz
(2.77 kg)
Specifications are typical; individual units might vary. Specifications are subject to change and
improvement without notice.
7
Page 8

31-5001.fm Page 8 Thursday, September 23, 1999 8:19 PM
Limited Two-Year Warranty
This product is warranted by RadioShack against manufacturing defects in material and workmanship under normal use for two (2) years from the date of purchase from RadioShack companyowned stores and authorized RadioShack franchisees and dealers. EXCEPT AS PROVIDED
HEREIN, RadioShack MAKES NO EXPRESS WARRANTIES AND ANY IMPLIED WARRANTIES,
INCLUDING THOSE OF MERCHANTABILITY AND FITNESS FOR A PARTICULAR PURPOSE,
ARE LIMITED IN DURATION TO THE DURATION OF THE WRITTEN LIMITED WARRANTIES
CONTAINED HEREIN. EXCEPT AS PROVIDED HEREIN, RadioShack SHALL HAVE NO LIABILITY OR RESPONSIBILITY TO CUSTOMER OR ANY OTHER PERSON OR ENTITY WITH RESPECT TO ANY LIABILITY, LOSS OR DAMAGE CAUSED DIRECTLY OR INDIRECTLY BY USE
OR PERFORMANCE OF THE PRODUCT OR ARISING OUT OF ANY BREACH OF THIS WARRANTY, INCLUDING, BUT NOT LIMITED TO, ANY DAMAGES RESULTING FROM INCONVENIENCE, LOSS OF TIME, DATA, PROPERTY, REVENUE, OR PROFIT OR ANY INDIRECT,
SPECIAL, INCIDENT AL, OR CONSEQ UENTIAL DAMAGES, EVEN IF RadioShac k HAS BEEN ADVISED OF THE POSSIBILITY OF SUCH DAMAGES.
Some states do not allow the limitations on how long an implied warranty la sts or t he exclu sion of incidental or consequential damages, so the above limitations or exclusions may not apply to you.
In the event of a product defect during the warranty period, take the product and the RadioShack
sales receipt as proof of purchase date to any RadioShack store. RadioShack will, at its option, unless otherwise provided by law: (a) correct the defect by product repair without charge for parts and
labor; (b) replace the product with one of the same or similar design; or (c) refund the purchase
price. All replaced parts and products, and products on which a refund is made, become the property of RadioShack. New or reconditioned parts and products may be used in the performance of
warranty service. Repaired or replaced parts and products are warranted for the remainder of the
original warranty period. You will be charged for repair or replacement of the product made after the
expiration of the warranty period.
This warranty does not cover: (a) damage or failure caused by or attributable to acts of God, abuse,
accident, misuse, improper or abnormal usage, failure to follow instructions, improper installation or
maintenance, alteration, lightning or other incidence of excess voltage or current; (b) any repairs
other than those provided by a RadioShack Authorized Service Facility; (c) consumables such as
fuses or batteries; (d) cosmetic damage; (e) transportation, shipping or insurance costs; or (f) costs
of product removal, installation, set-up service adjustment or reinstallat i on.
This warranty gives you specific legal rights, and you may also have other rights which vary from
state to state.
RadioShack Customer Relations, 200 Taylor Street, 6th Floor, Fort Worth, TX 76102
We Service What We Sell
04/99
09A99 Printed in Korea
A Division of Tandy Corporation
RadioShack
Fort Worth, Texas 76102
31-5001
 Loading...