

Page 1

Control goes beyond pure power, it requires absolute adaptability. Complete
with the features of a full-fledged console controller, the Razer Serval elevates
your android gaming experience to a whole new level. Designed for the Razer
Forge TV, this Bluetooth enabled gaming controller has been built with the
same precision and ergonomics as Razer’s award winning console controllers.
Together with an adjustable game clip for your mobile phone, the Razer Serval
can be used for a multitude of functions, making it the ultimate controller for
gaming on your Android devices.
Page 2

CONTENTS
1. PACKAGE CONTENTS / SYSTEM REQUIREMENTS..................................... 4
2. REGISTRATION / TECHNICAL SUPPORT .................................................... 5
3. DEVICE LAYOUT ....................................................................................... 6
4. PAIRING WITH YOUR RAZER FORGE TV ................................................... 9
5. PAIRING WITH ANDROID MOBILE PHONES ........................................... 13
6. PAIRING WITH MULTIPLE DEVICES ........................................................ 15
7. ACCESSORIES......................................................................................... 18
8. RESTORING TO DEFAULT SETTINGS ....................................................... 20
9. LEGALESE .............................................................................................. 21
Page 3

1. PACKAGE CONTENTS / SYSTEM REQUIREMENTS
PACKAGE CONTENTS
Razer Serval
Battery casing
2 AA batteries
USB to micro USB cable
Detachable game clip
2 Analog stick rubber grip caps
Important product information guide
SYSTEM REQUIREMENTS
Android (Android 4.2 mobile device / Razer Forge TV)
Wired Mode: USB 2.0 port
Wireless Mode: Bluetooth 3.0® or higher
Page 4
2. REGISTRATION / TECHNICAL SUPPORT
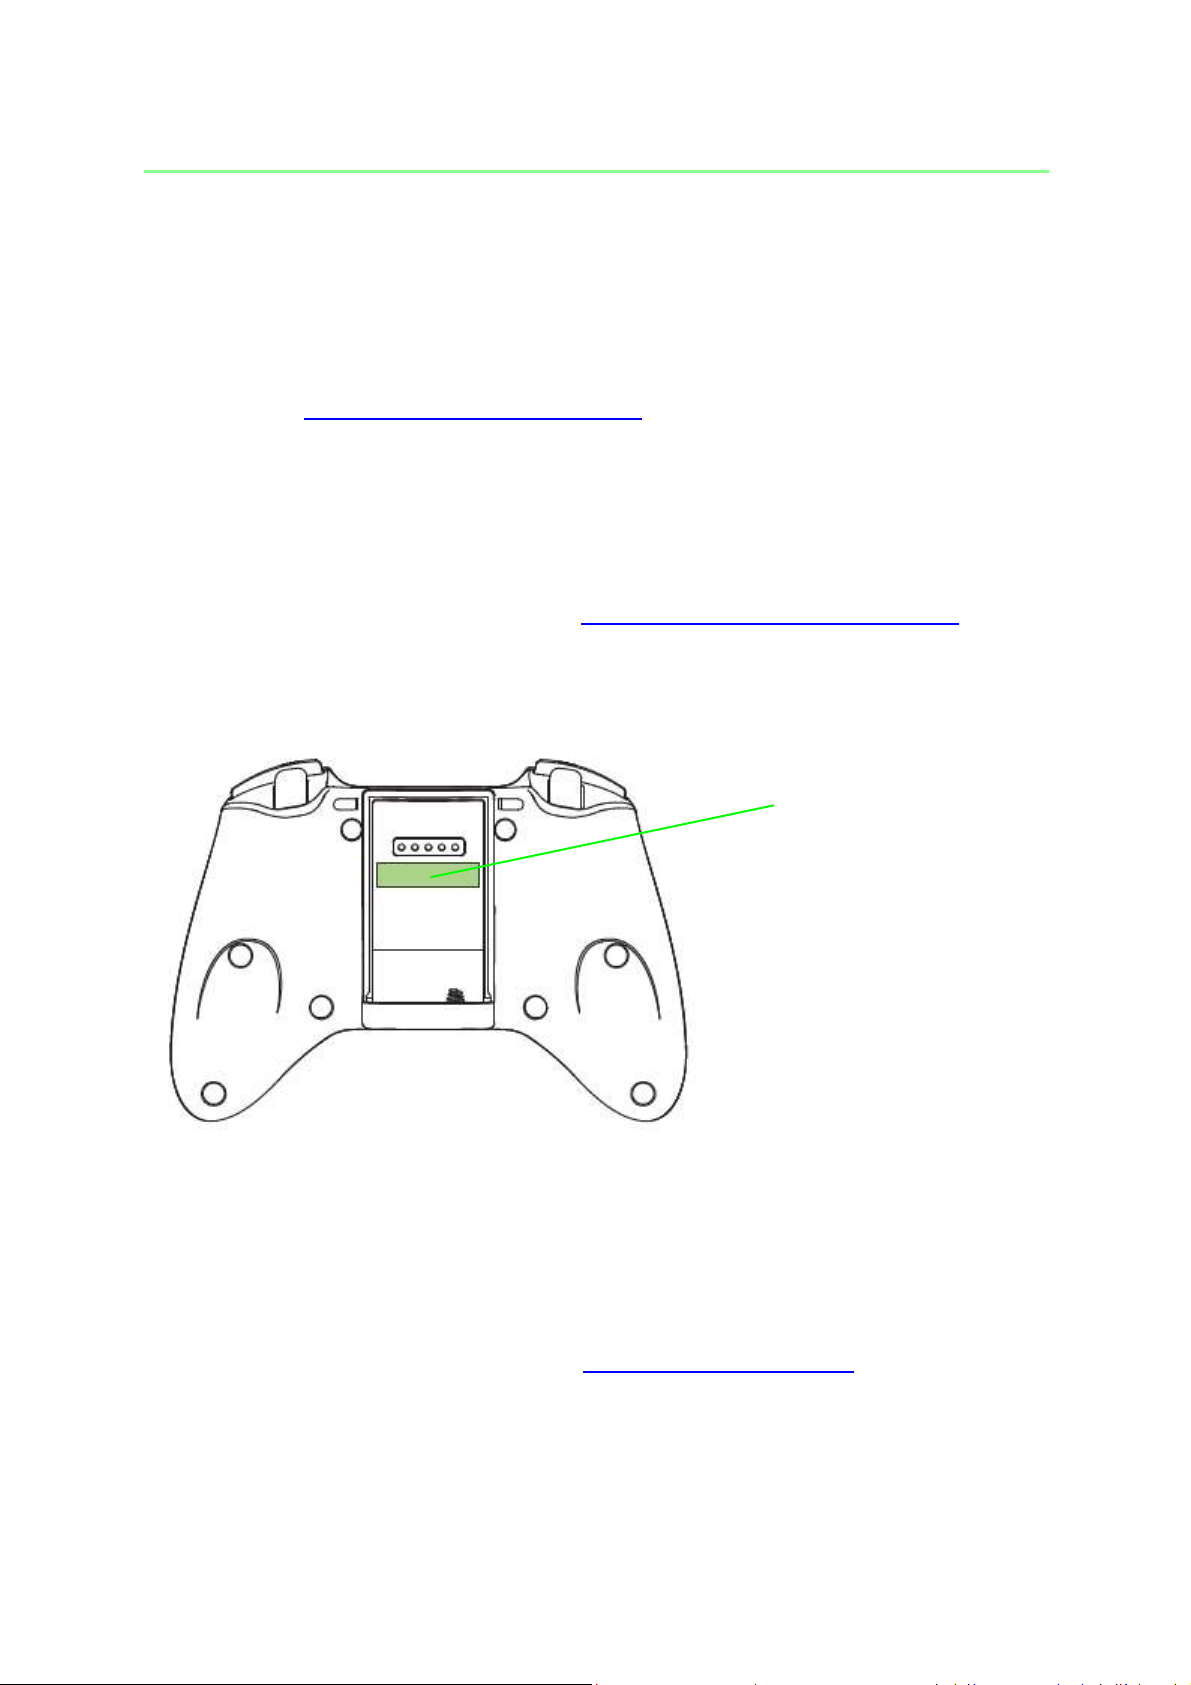
Your product’s serial number
can be found here.
REGISTRATION
Sign up now for a Razer Synapse account to get real-time information on your
product’s warranty status. To learn more about Razer Synapse and all its
features, visit www.razerzone.com/synapse.
If you are already a Razer Synapse user, register your product by clicking on
your email address at the Razer Synapse application and select Warranty
Status from the dropdown list.
To register your product online, visit www.razerzone.com/registration. Please
note that you will not be able to view your warranty status if you register via
the website.
TECHNICAL SUPPORT
What you’ll get:
1 year limited manufacturer’s warranty.
Free online technical support at www.razersupport.com.
Page 5

3. DEVICE LAYOUT
Up to 3.15”
80mm
A. Detachable game clip
B. Status indicator
C. Analog sticks
D. Select button
E. Power / Mode button
F. Start button
G. Action buttons
H. Directional pad
I. Back button
J. Home button
Page 6
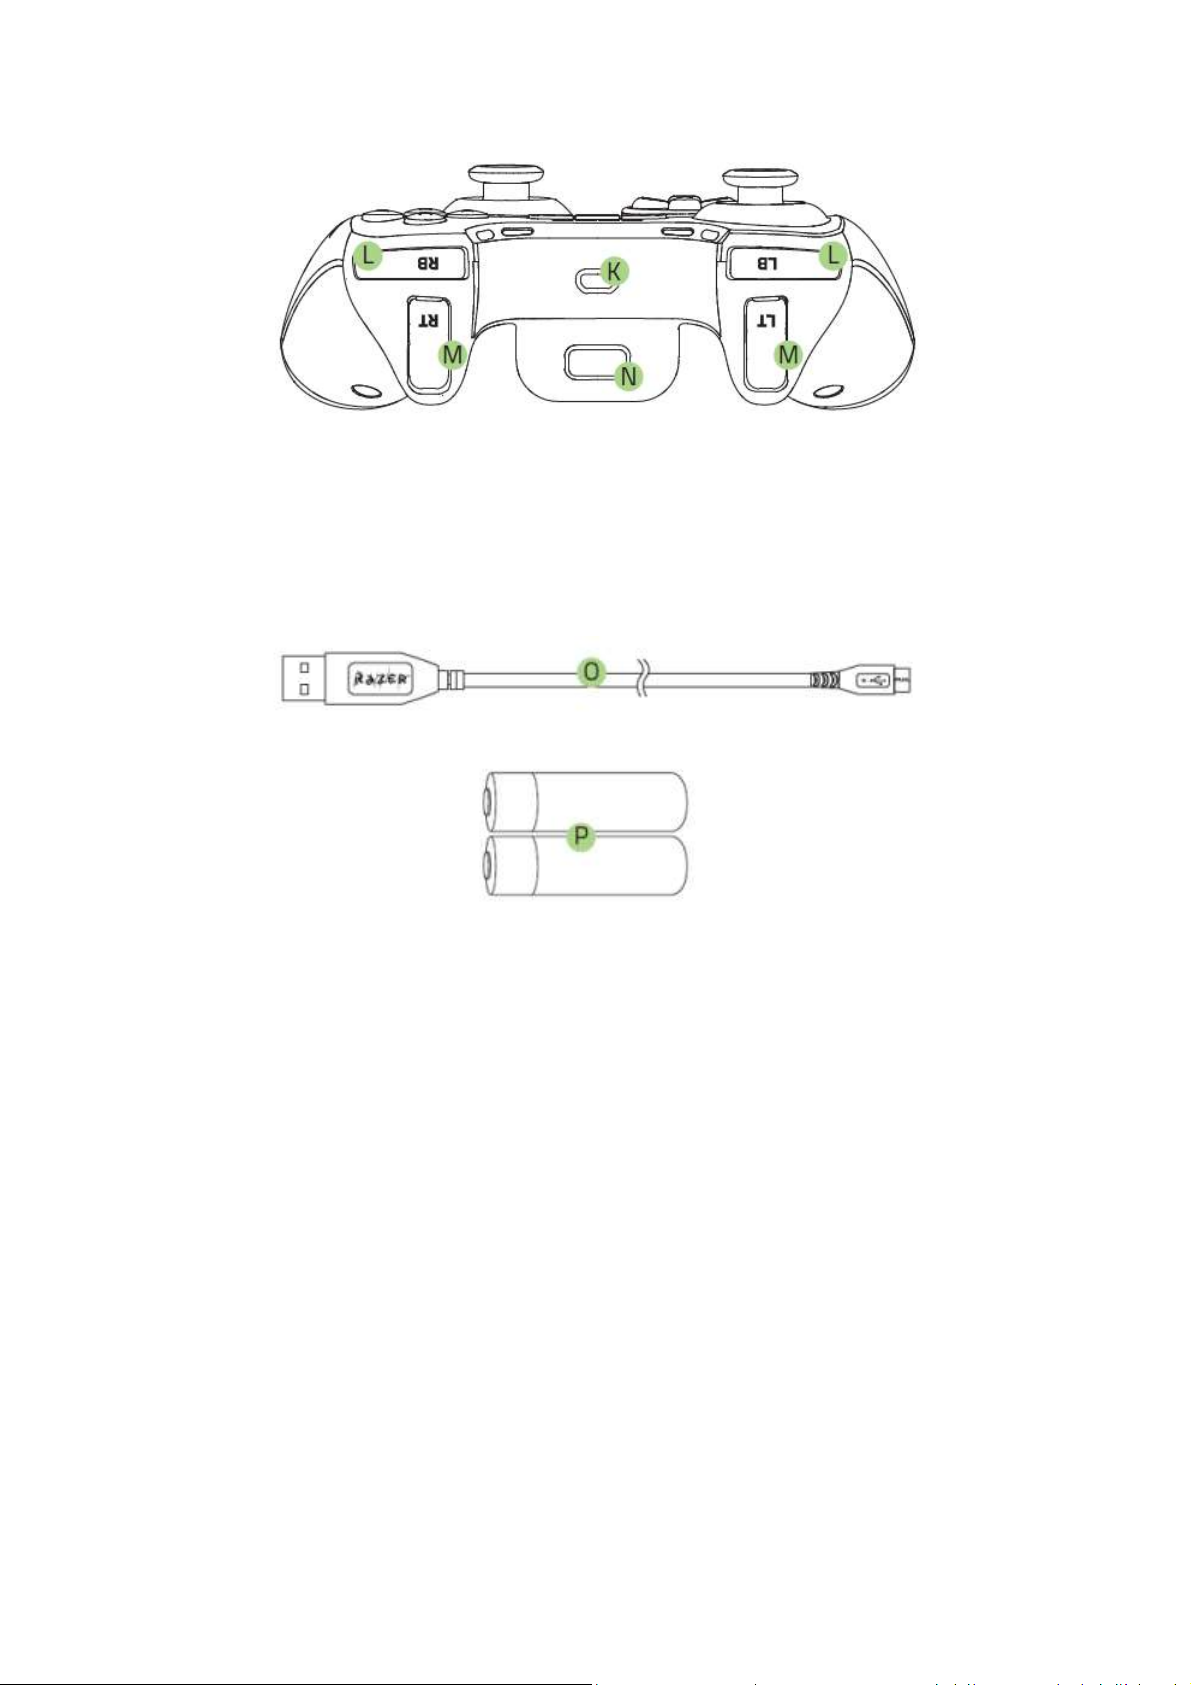
K. Micro USB port
L. Shoulder buttons
M. Shoulder triggers
N. Battery casing
O. USB cable
P. Batteries
Page 7
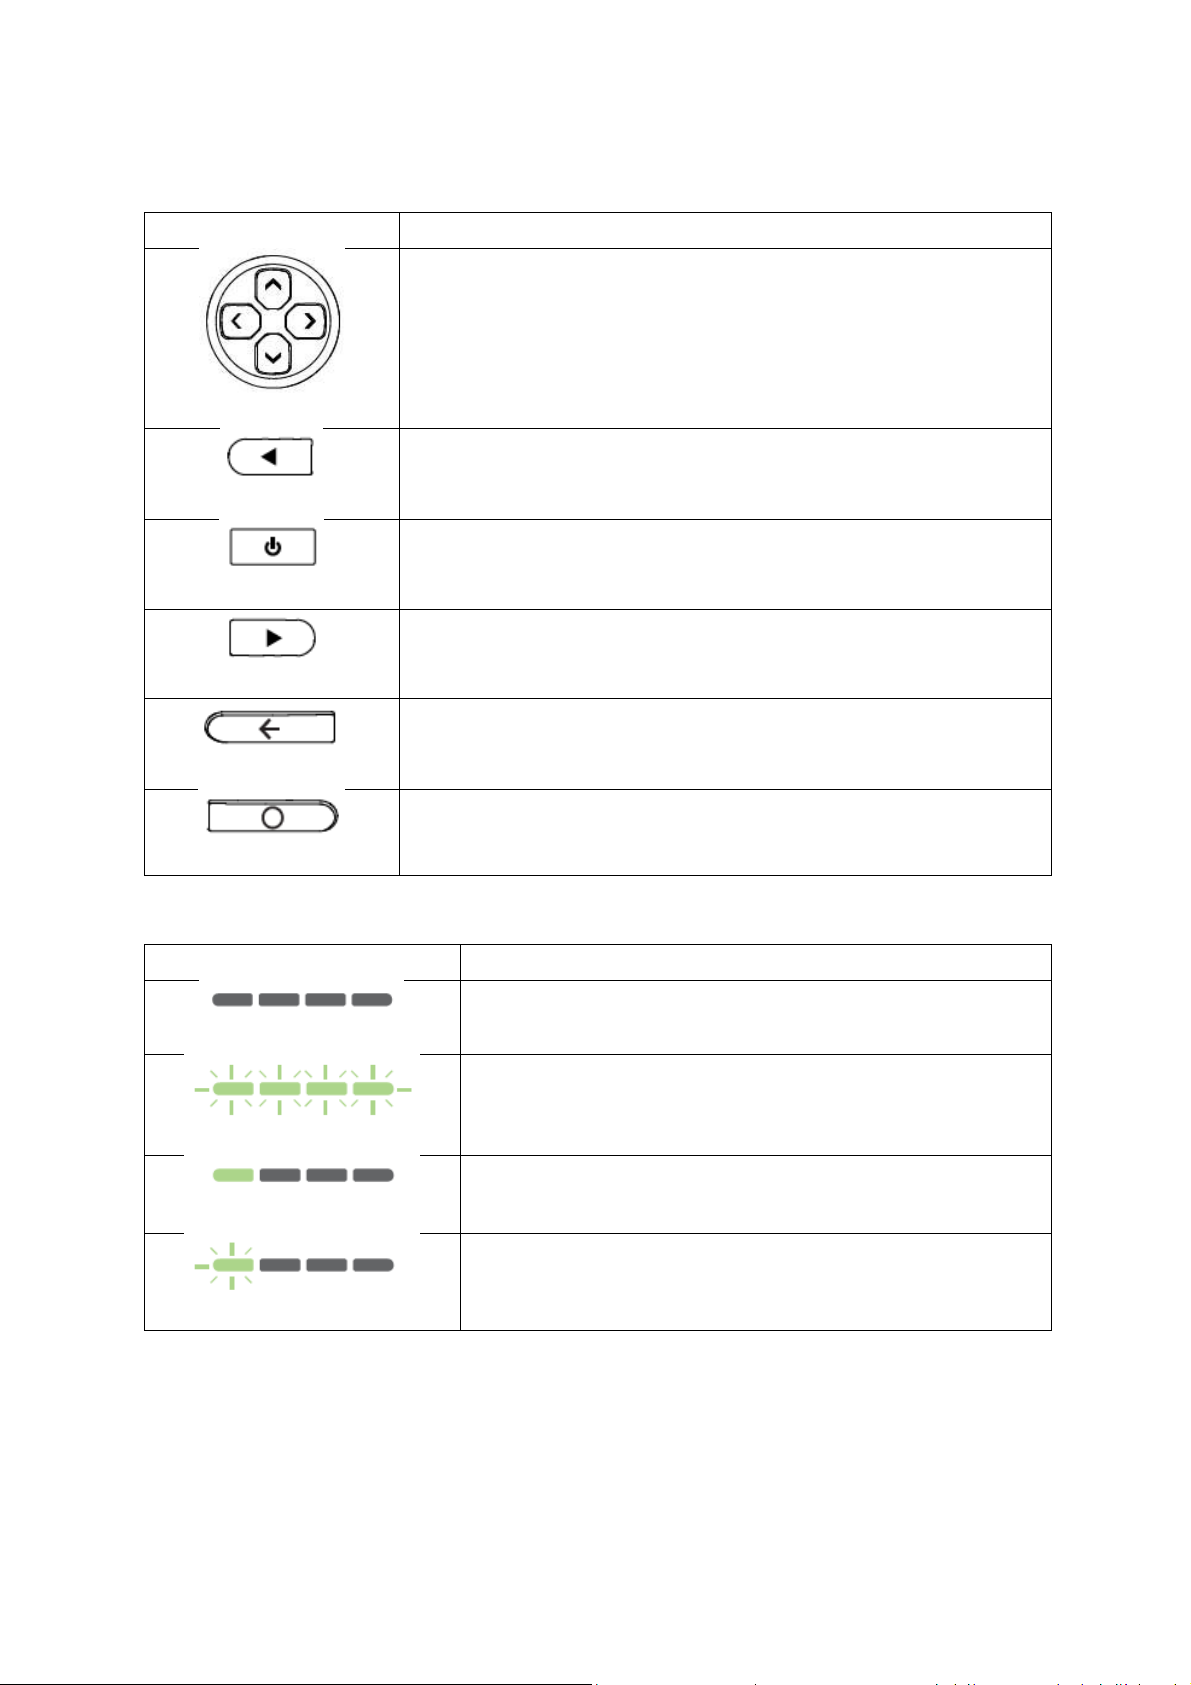
Button
Function
Directional Pad
Press the directional buttons to navigate the Home
screen.
Select Button
This button is mainly used for gaming to select an item
or a function.
Power Button
This button is used to turn on, turn off, or put the
controller to sleep.
Start Button
This button is mainly used for gaming to start or pause
the game.
Back Button
Press this button to return to the previous screen or
undo a previous action.
Home Button
Press this button to exit from an app and return to the
Home screen.
State
Description
(All off)
Powered down or in sleep mode
(All flashing)
Pairing to an Android device
(One button lit)
Connected and assigned as the corresponding
player
(One button flashing)
Low battery warning
Controller Basics
LED Status
Page 8

4. PAIRING WITH YOUR RAZER FORGE TV
Press for at least 3
seconds to turn on
1. Insert the batteries into the battery casing and attach the battery casing
onto the controller.
Note: Use only 2 AA ALKALINE batteries. Using non-Razer approved batteries may
harm the device and/or cause serious physical injury to the user.
2. Press the Power button for at least seconds to turn on the controller.
Page 9

3. Download and launch the Forge TV Remote app on your compatible
Android or iOS smartphone or tablet.
4. From the Home screen of your Forge TV, go to Settings > Remote &
accessories, and select Add accessories using the Forge TV Remote app.
(Process may vary for Android devices with customized user interface.)
Page 10

Simultaneously hold the Home and Back buttons for at least 3 seconds on the
Press and hold both buttons
for 3 seconds to pair
controller to activate pairing mode.
All 4 LEDs will blink simultaneously to indicate that the controller is attempting
to connect with the Razer Forge TV. Once paired, you only need to press the
Power button for half a second to turn on the controller.
For subsequent pairing with other devices, simultaneously hold the Back and
Home buttons for at least 3 seconds to reactivate pairing mode.
Page 11

Press and hold both buttons
for 3 seconds to pair
USING WIRED CONNECTION (OPTIONAL)
Connect the USB cable from the Razer Serval to your Forge TV’s USB port.
You are now ready to use the Razer Serval on your Razer Forge TV. Have fun!
Page 12

5. PAIRING WITH ANDROID MOBILE PHONES
Press and hold both buttons
for 3 seconds to pair
1. From the Home screen of your Android mobile phone*, go to Settings >
Network Connections (or Wireless & Network), select Bluetooth and
switch it on. (Process may vary for Android devices with customized user
interface.)
*Android mobile phone not included
2. While the controller is turned on, simultaneously press and hold the
Home and Back buttons for at least 3 seconds on the controller to
activate pairing mode.
Page 13

3. When the controller is discovered, select it from the list of discovered
devices, and wait until the controller is paired. Once paired, you only
need to press the Power button for half a second to turn on the
controller.
You are now ready to use the Razer Serval on your Android mobile phone.
Have fun!
Page 14

6. PAIRING WITH MULTIPLE DEVICES
The Razer Serval can remember up to four unique device pairings; allowing you
to seamlessly switch between multiple devices.
To save a recently paired device while the Razer Serval is turned on:
1. Press and hold the Power button for less than 3 seconds, then
immediately press the Action button you want to associate with the
device.
A corresponding LED will blink 3 times to indicate that the device is
successfully saved.
Page 15

Release
Press for at least 3
seconds to turn on
2. Release the Power button.
To load a saved device:
1. Turn off the Razer Serval by pressing the Power button for at least 3
seconds.
2. Press and hold the corresponding Action button for the saved device
Page 16

Press for half a
second to turn on
3. Press the Power button for half a second to turn on the Razer Serval.
4. Release the corresponding Action button for the saved device.
You are now ready to use the Razer Serval on multiple devices. Have fun!
Page 17

7. ACCESSORIES
Step 1
Step 2
Detach
DETACHABLE GAME CLIP
Attach the game clip to the controller if you are using an Android phone.
Page 18

ANALOG STICK RUBBER GRIP CAPS
The additional texture on the rubber grip caps prevent your thumbs from
slipping off the analog sticks during intense gaming sessions.
Page 19

8. RESTORING TO DEFAULT SETTINGS
Press for at least 2
seconds to reset
To restore your Razer Serval to its original settings, turn off the Razer Serval,
and then press and hold the Up, Home and Y buttons. While the button are
pressed, press and hold the Power button for at least 2 seconds. All 4 LEDs will
blink simultaneously to indicate that reset is successful.
Page 20

9. LEGALESE
COPYRIGHT AND INTELLECTUAL PROPERTY INFORMATION
©2015 Razer Inc. Patent Pending. All Rights Reserved. Razer™, the Razer TripleHeaded Snake logo, the Razer distressed word logo and other trademarks
contained herein are trademarks or registered trademarks of Razer Inc. and/or
its affiliated or associated companies, registered in the United States and/or
other countries.
The Bluetooth® word mark and logos are registered trademarks owned by
Bluetooth SIG, Inc. and any use of such marks by Razer is under license.
Android, Android TV, Google Cast, and other marks are trademarks of Google
Inc.
Razer Inc. (“Razer”) may have copyright, trademarks, trade secrets, patents,
patent applications, or other intellectual property rights (whether registered or
unregistered) concerning the product in this guide. Furnishing of this guide
does not give you a license to any such copyright, trademark, patent or other
intellectual property right. The Razer Serval (the “Product”) may differ from
pictures whether on packaging or otherwise. Razer assumes no responsibility
for such differences or for any errors that may appear. Information contained
herein is subject to change without notice.
LIMITED PRODUCT WARRANTY
For the latest and current terms of the Limited Product Warranty, please visit
www.razerzone.com/warranty.
LIMITATION OF LIABILITY
Razer shall in no event be liable for any lost profits, loss of information or data,
special, incidental, indirect, punitive or consequential or incidental damages,
arising in any way out of distribution of, sale of, resale of, use of, or inability to
use the Product. In no event shall Razer’s liability exceed the retail purchase
price of the Product.
Page 21

COSTS OF PROCUREMENT
For the avoidance of doubt, in no event will Razer be liable for any costs of
procurement unless it has been advised of the possibility of such damages, and
in no case shall Razer be liable for any costs of procurement liability exceeding
the retail purchase price of the Product.
GENERAL
These terms shall be governed by and construed under the laws of the
jurisdiction in which the Product was purchased. If any term herein is held to
be invalid or unenforceable, then such term (in so far as it is invalid or
unenforceable) shall be given no effect and deemed to be excluded without
invalidating any of the remaining terms. Razer reserves the right to amend any
term at any time without notice.
 Loading...