

Page 1

FOR GAMERS. BY GAMERS.™
0
USER MANUAL
MODEL: RZ09-02385,RZ09-02386
Page 2

FOR GAMERS. BY GAMERS.™
1
CONTENTS
1. PACKAGE CONTENTS / REGISTRATION / TECHNICAL SUPPORT ................................. 2
2. DEVICE LAYOUT ................................................................................................................. 3
3. SETTING UP YOUR RAZER BLADE ................................................................................... 5
4. USING YOUR RAZER BLADE ............................................................................................. 8
5. CONFIGURING YOUR RAZER BLADE ............................................................................... 9
6. SAFETY AND MAINTENANCE .......................................................................................... 27
7. LEGALESE ......................................................................................................................... 29
Page 3
FOR GAMERS. BY GAMERS.™
2
1. PACKAGE CONTENTS / REGISTRATION / TECHNICAL
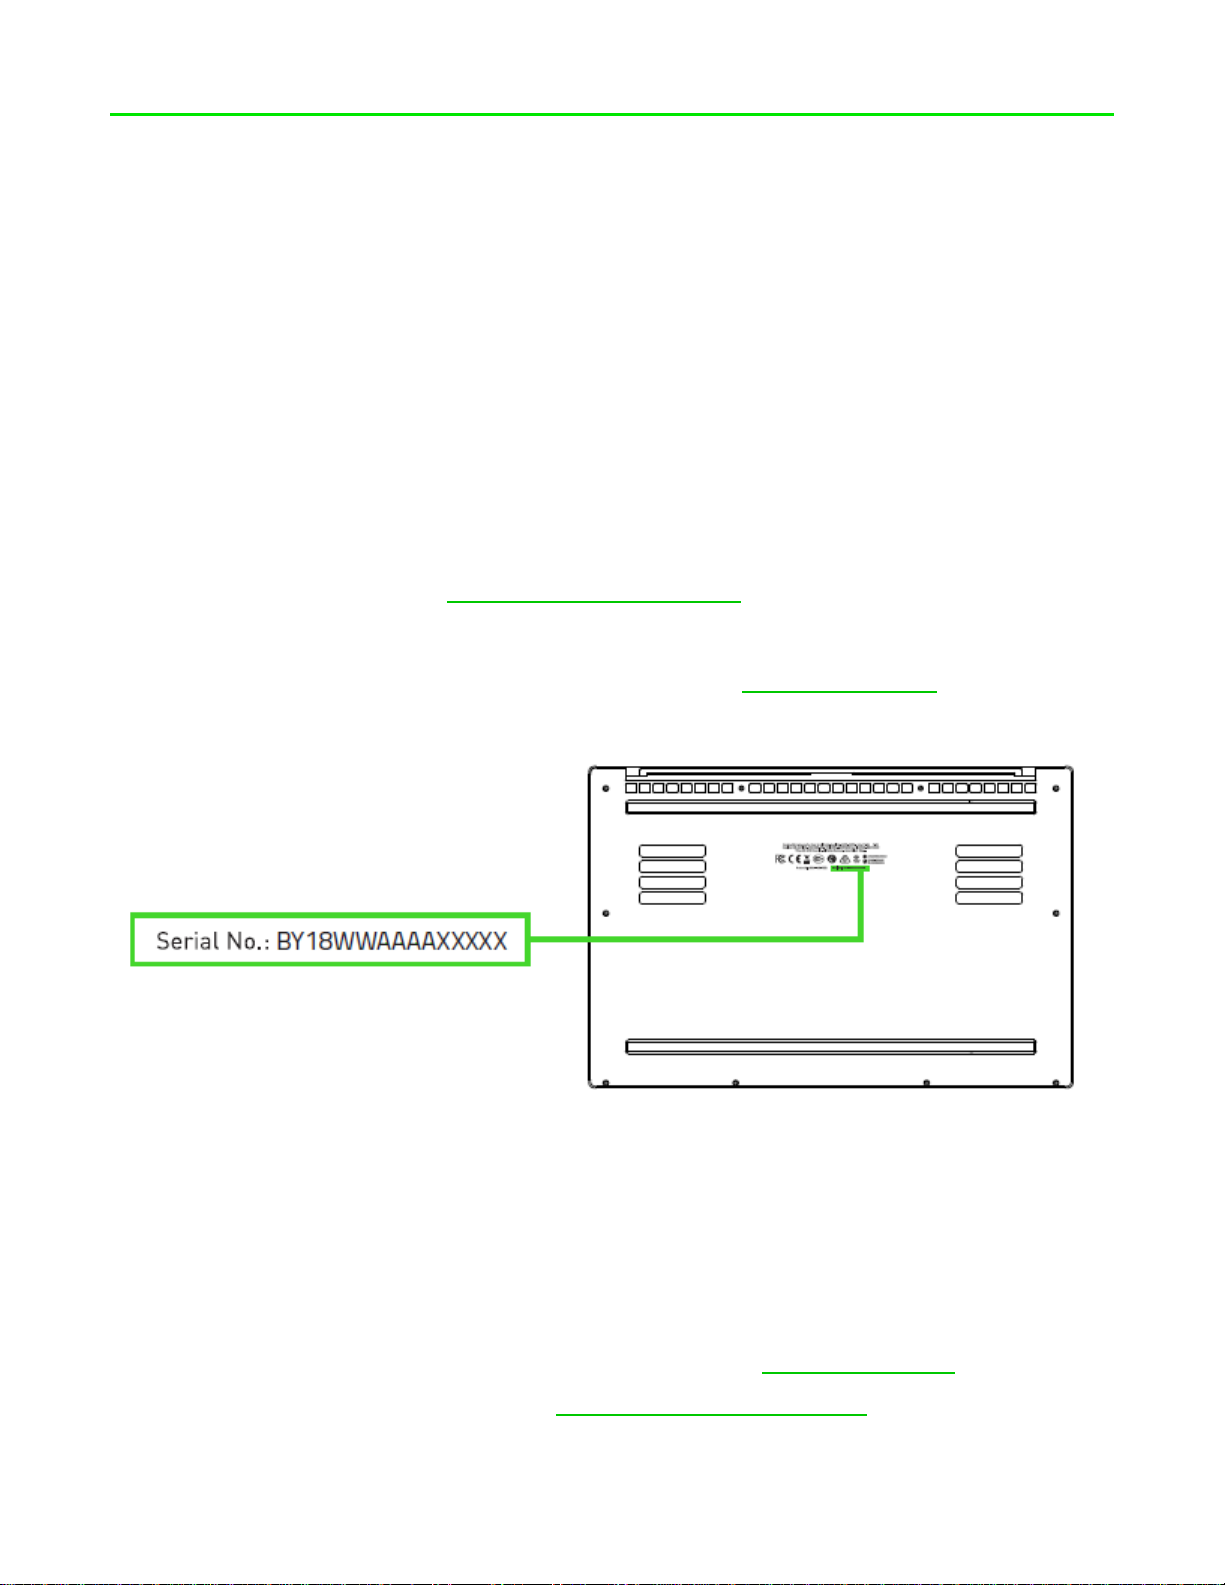
Yo ur p roduct’s ser ial
number can be found
SUPPORT
PACKAGE CONTENTS
Razer Blade
Power Adapter + regional power cord
Micro-fiber cleaning cloth
Important Product Information Guide
REGISTRATION
Register your product online at razer-id.razer.com/warranty to get real-time information on
your product’s warranty status.
If you haven’t registered for a Razer ID yet, register now at razer-id.razer.com to get a wide
range of Razer benefits.
TECHNICAL SUPPORT
What you’ll get:
1 year limited manufacturer’s warranty
1 year limited battery warranty
Access to manual and free online technical support at support.razer.com
For further assistance, please visit support.razer.com/contact-us
Page 4
FOR GAMERS. BY GAMERS.™
3
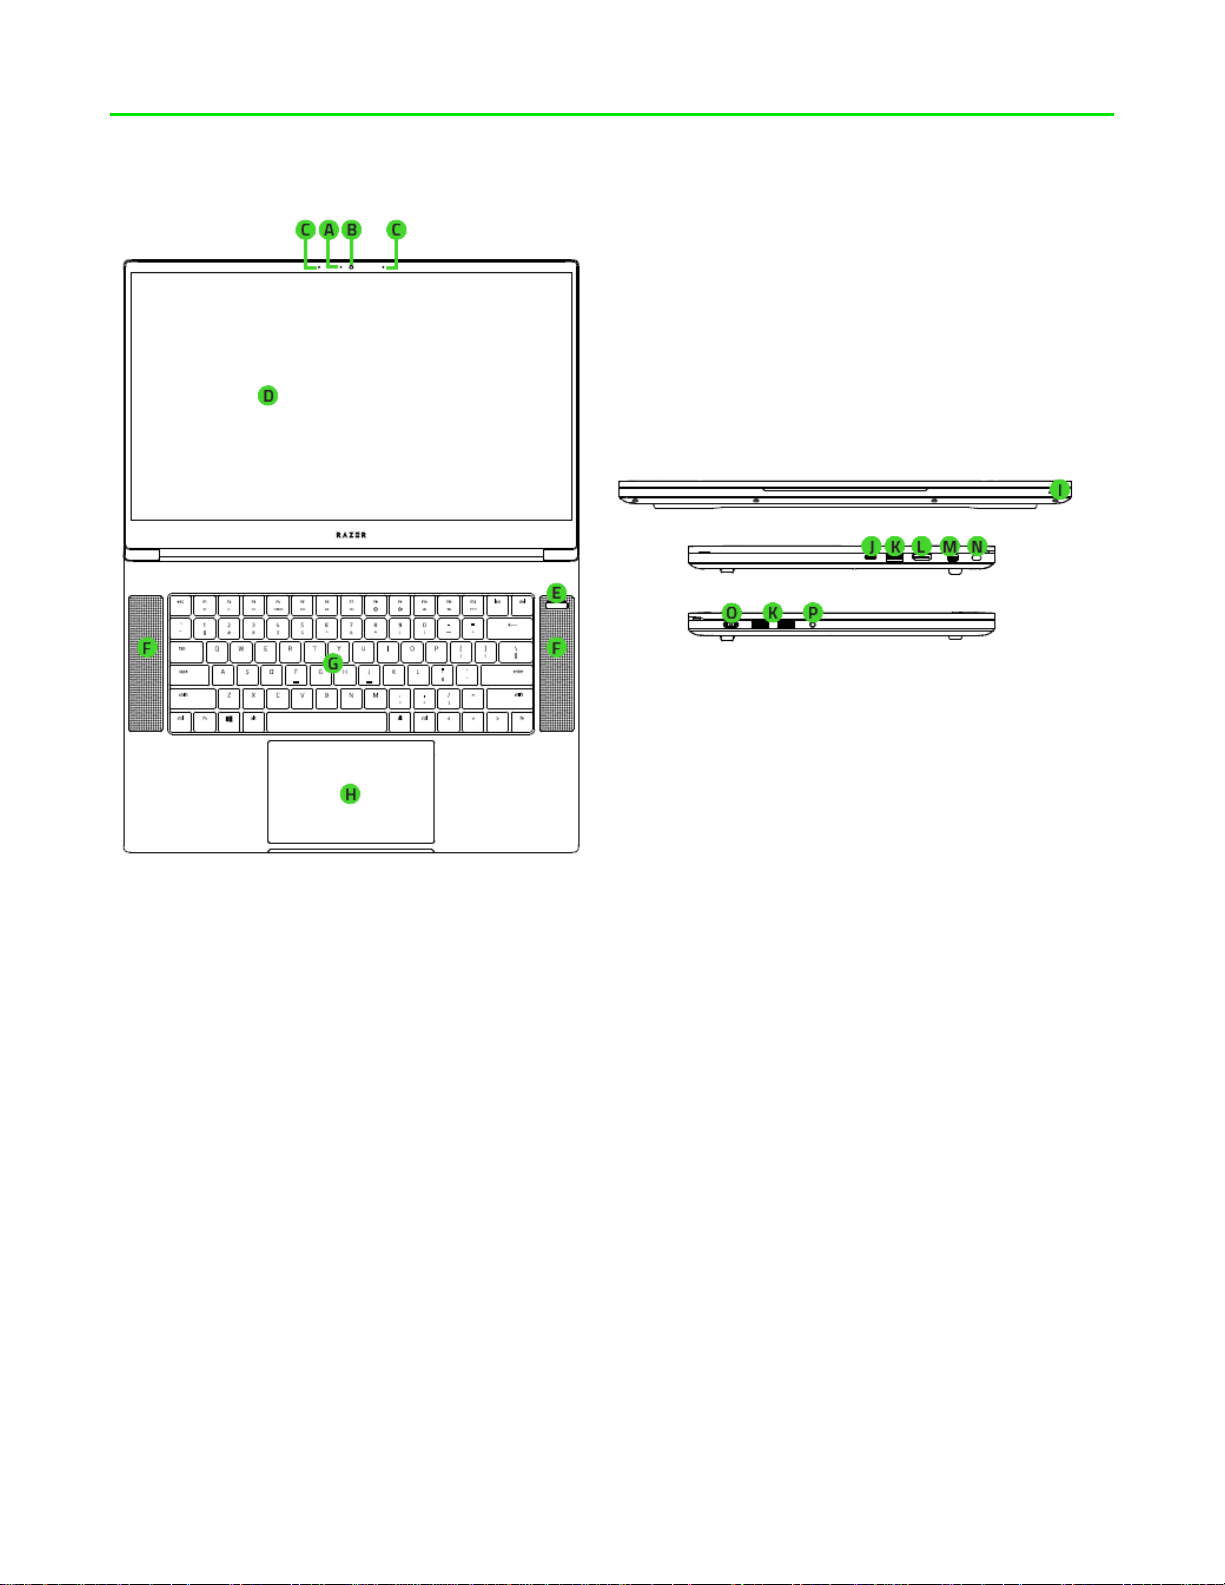
2. DEVICE LAYOUT
A. Webcam indicator light
B. Built-in webcam
C. Array microphone
D. 15.6” display (matte screen/multi-
touch screen)
E. Power button
F. Stereo speakers incorporating
Dolby® Atmos
G. Keyboard Powered by Razer
Chroma™
H. Precision glass touchpad
I. Front LED power indicator
J. Thunderbolt™ 3 port (USB-C™)
K. 3x USB 3.0 port
L. HDMI port
M. Mini DisplayPort™
N. Kensington™ security slot
O. Power port
P. 3.5mm combo port
Page 5
FOR GAMERS. BY GAMERS.™
5
3. SETTING UP YOUR RAZER BLADE
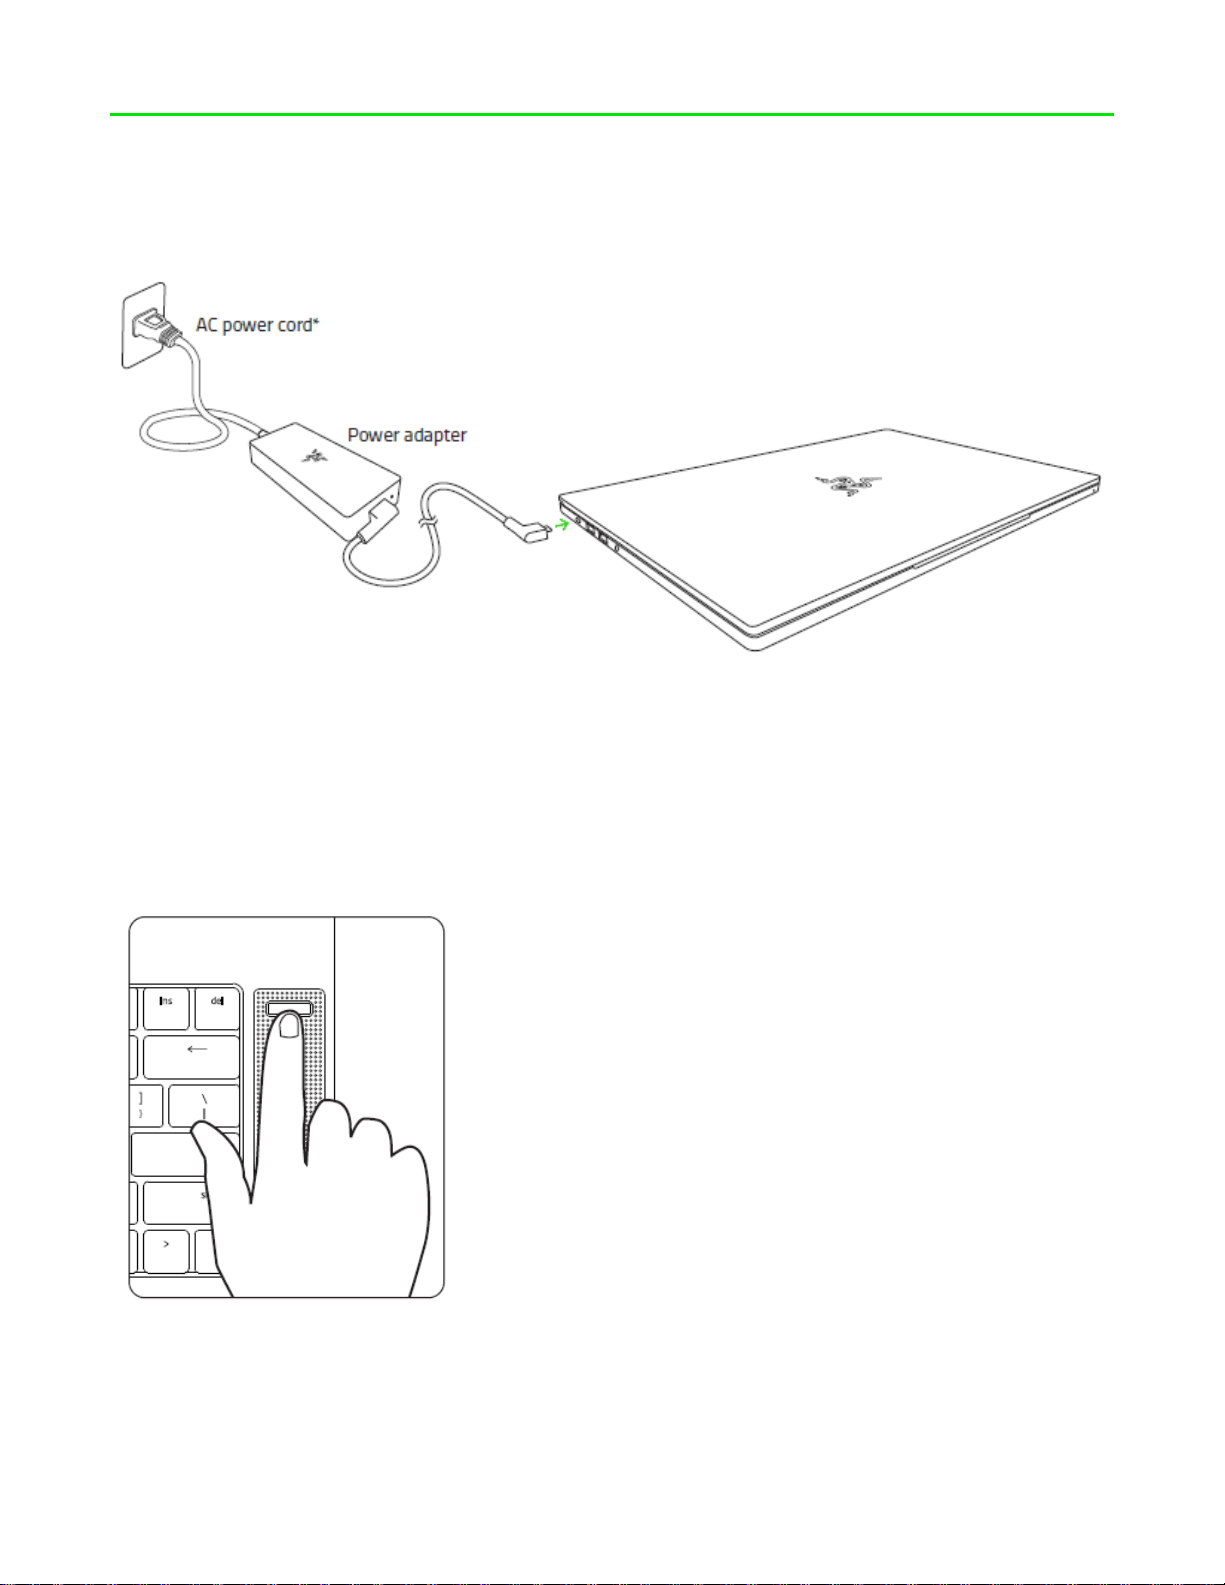
CONNECT THE POWER ADAPTER AS FOLLOWS:
Make sure that the AC plug is properly inserted into the power outlet and the power adapter.
An indicator will light up to show that the adapter is receiving appropriate power. Insert the
power adapter’s connector into the Razer Blade’s power port. Press the power button to turn
on your Razer Blade.
*Use the appropriate power cord for your region.
For first time use, please fully charge your Razer Blade or connect it to a power outlet before
turning it on. It takes approximately 3 hours to fully charge the Razer Blade.
Page 6
FOR GAMERS. BY GAMERS.™
6
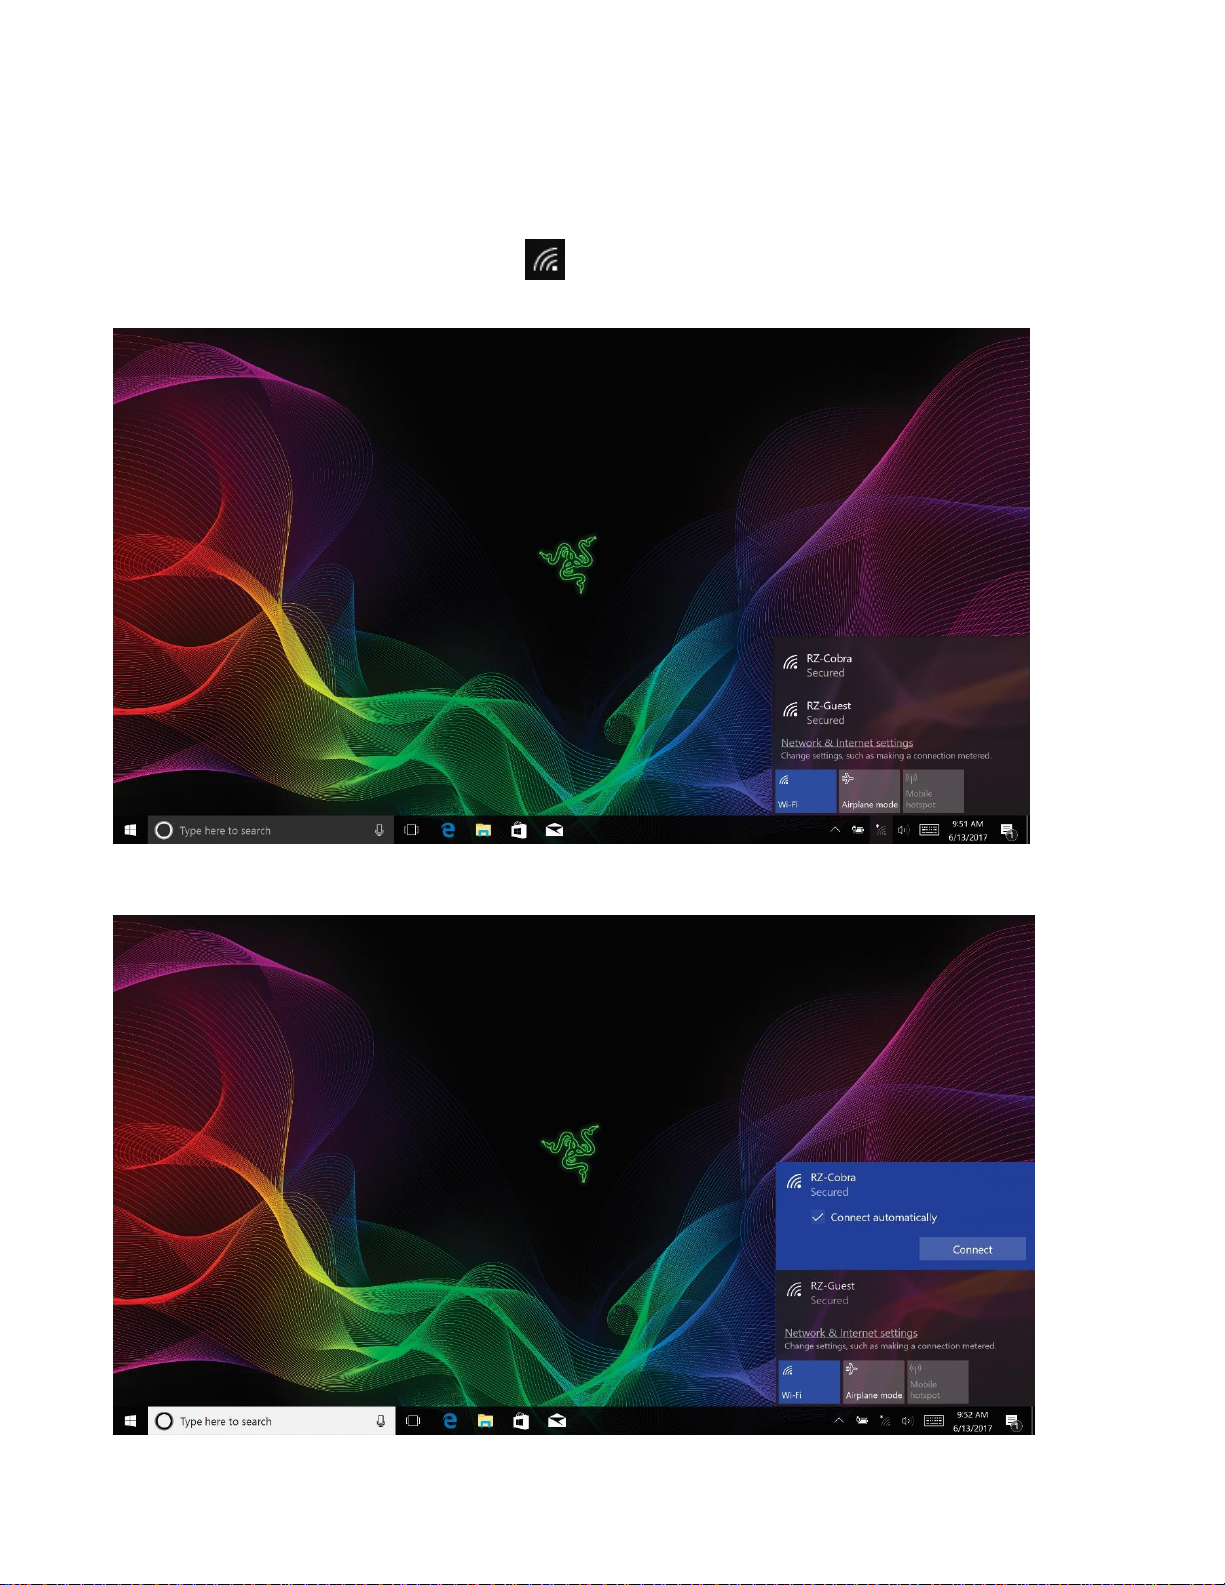
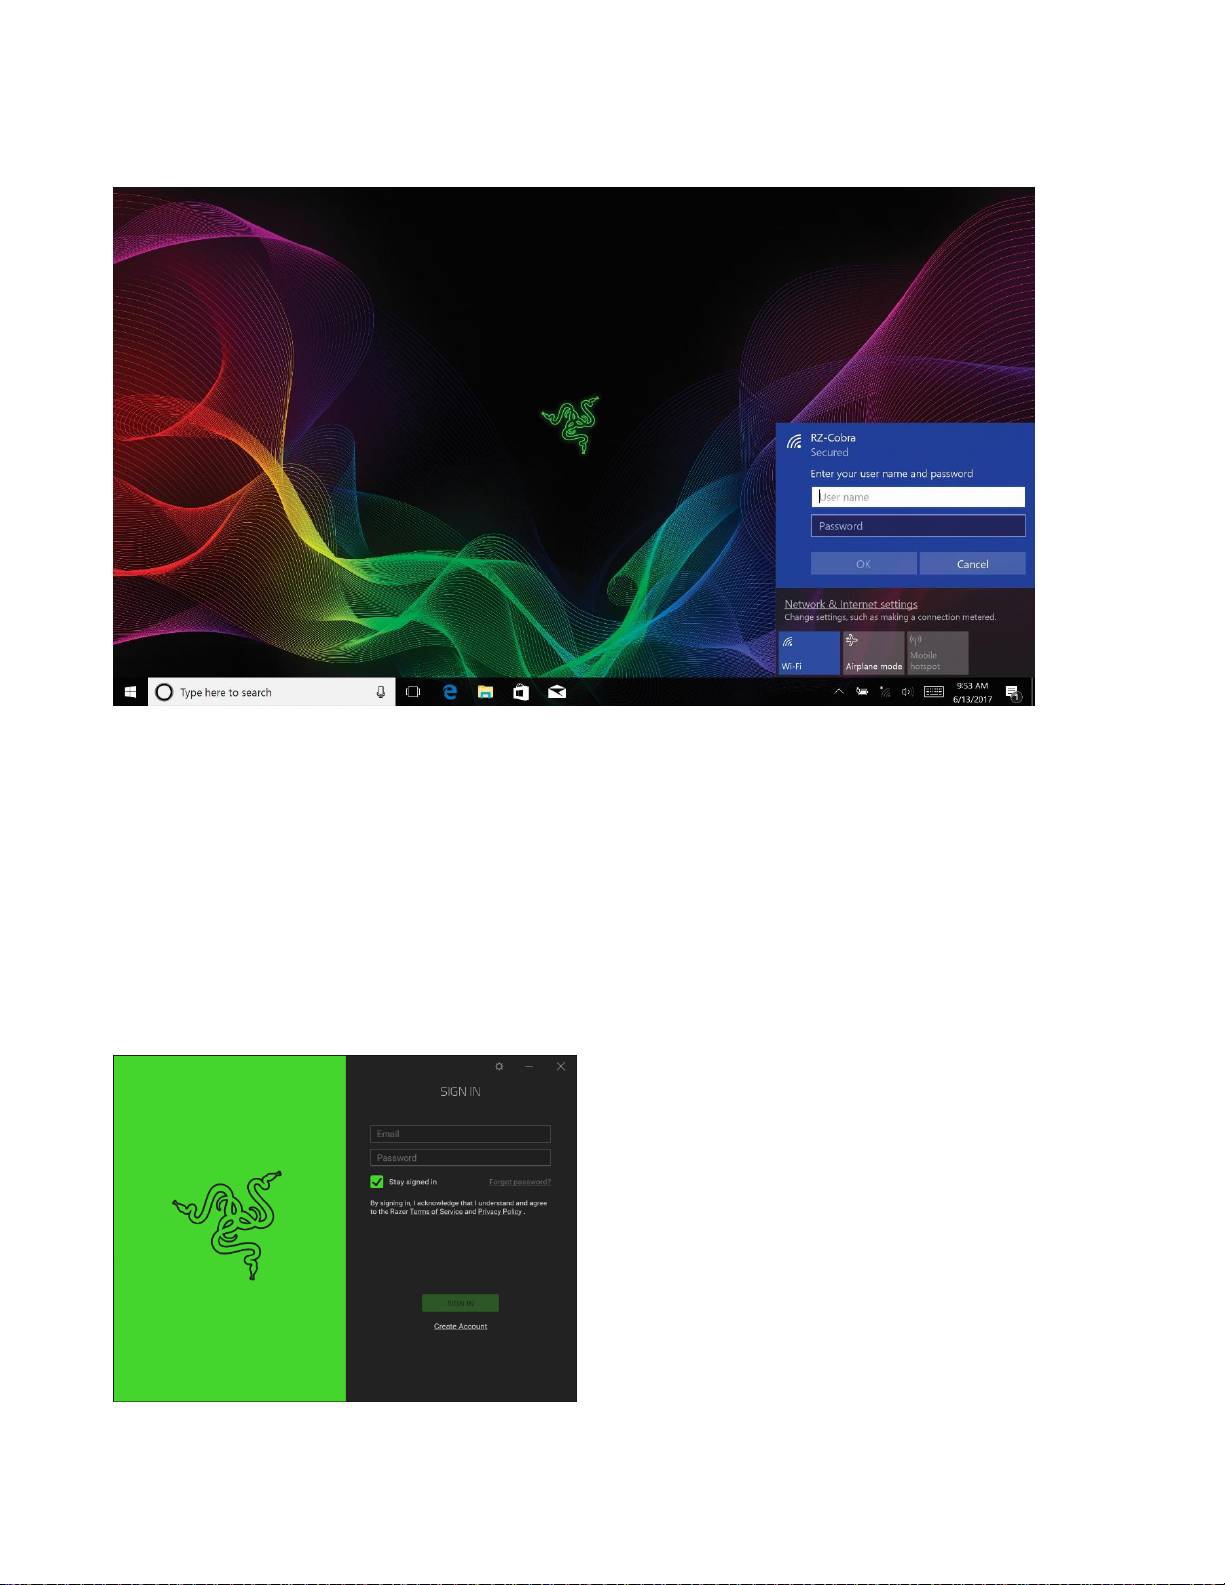
CONNECTING TO THE INTERNET
Disclaimer: The screens shown are subject to change based on the current version of your
Operating System.
1. Click the wireless network icon ( ) to bring up the Wireless network list. The
system will automatically search for wireless networks in range.
2. Click the network you wish to connect to and click Connect.
Page 7
FOR GAMERS. BY GAMERS.™
7
3. Enter the network password (if any) and select whether to enable network sharing.
Click Next.
4. Once you are connected to the wireless network, click anywhere outside the window to
return to the desktop.
RAZER SYNAPSE 3 ACCOUNT CREATION & INSTALLATION
Razer Synapse 3 allows you to sync your Razer Blade and other supported Razer peripherals
to a cloud server to download driver and firmware updates. You will also be able to configure
the key bindings, profiles, macros, backlighting and more within the application. All your
custom settings will be stored in the cloud too.
1. Razer Synapse 3 will start
automatically once you enter
Windows 10.
2. Register for a Razer ID and confirm
your new account.
3. Open Razer Synapse 3 and login to
your account.
4. Wait until Synapse 3 automatically
downloads and installs the
necessary drivers.
Page 8
FOR GAMERS. BY GAMERS.™
8
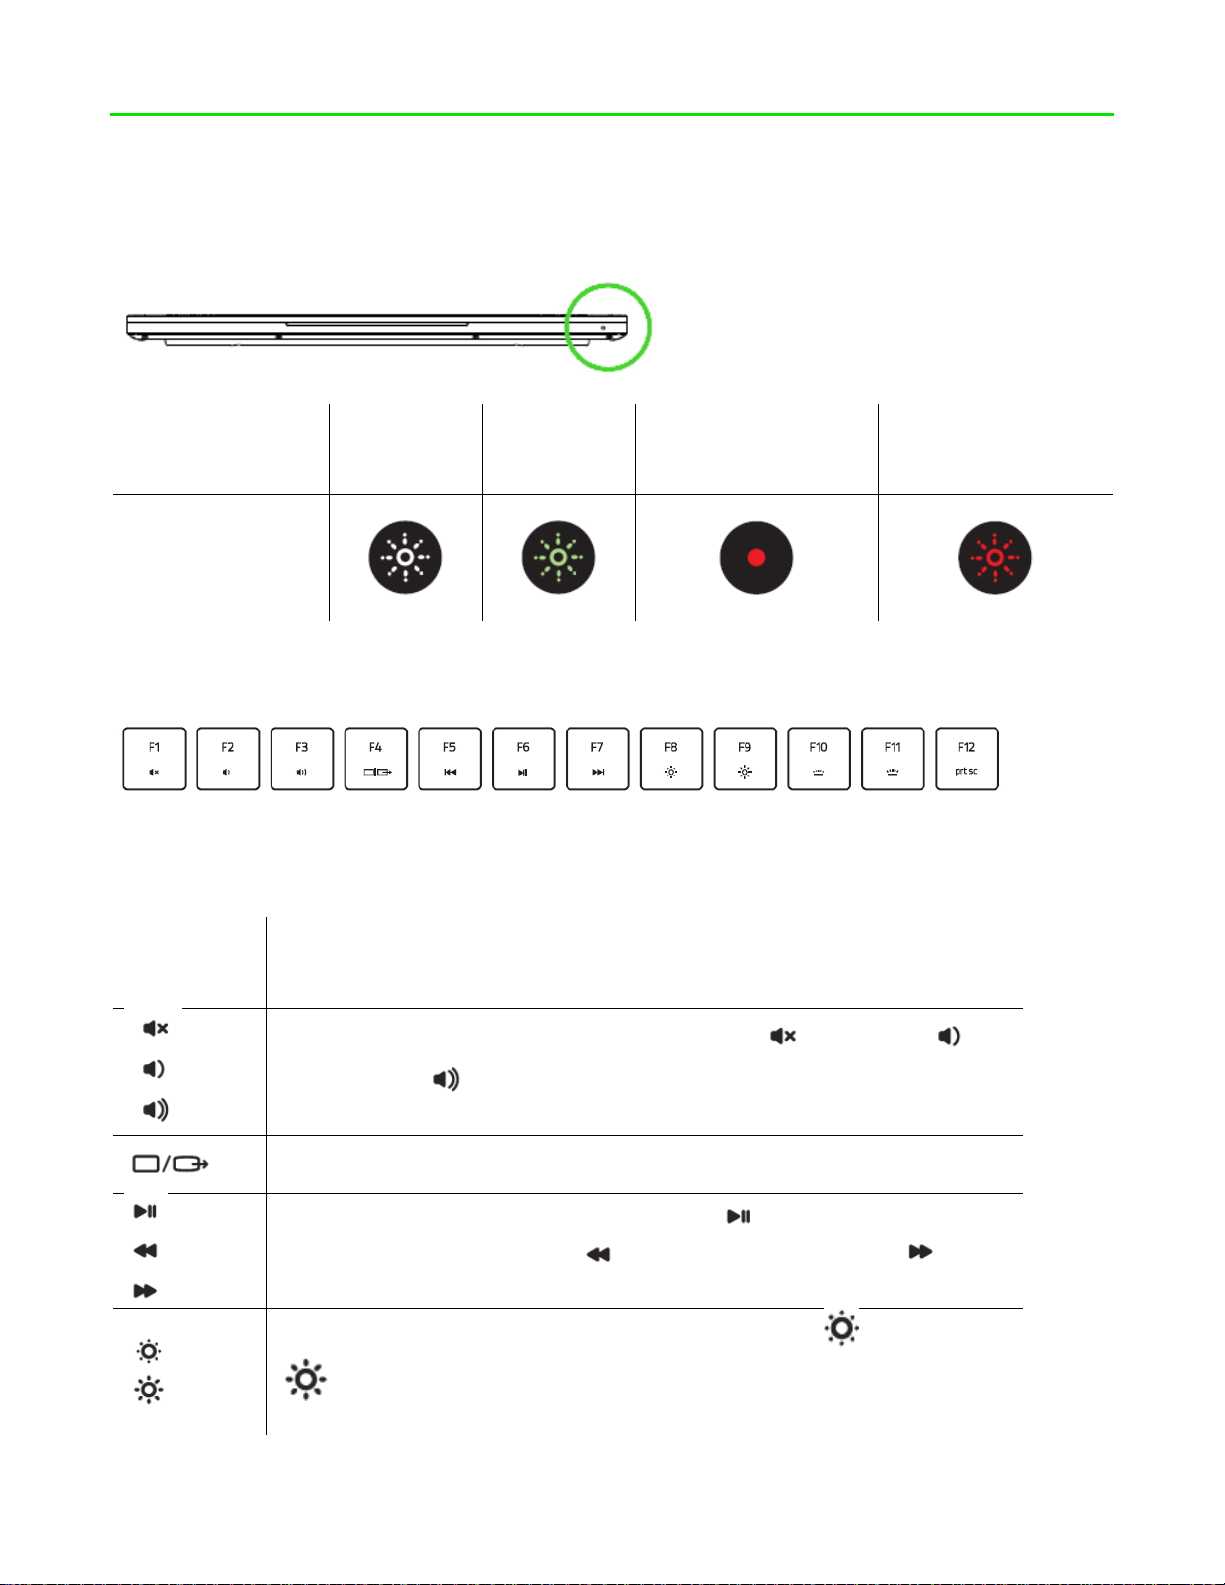
4. USING YOUR RAZER BLADE
Sleep
On
Low battery (10%
left)
Low battery (3%
left)
Front LED
indicator
Function
key
Secondary function description
The audio volume controls allow you to mute ( ), decrease ( )
and increase ( ) the audio output.
Toggles the monitor output.
The media keys allow you to play/pause ( ) the current track,
return to the previous track ( ) or skip to the next track ( ).
The screen brightness keys allow you to decrease ( ) or increase
( ) the brightness of the Razer Blade’s screen.
STATUS INDICATORS
KEYBOARD FUNCTION KEYS
Pressing the “FN” key in combination with the function keys will activate their secondary
functions.
Page 9
FOR GAMERS. BY GAMERS.™
9
The LED control keys allow you to decrease ( ) or increase
( ) the brightness of your keyboard’s LEDs.
5. CONFIGURING YOUR RAZER BLADE
Disclaimer: The features listed here require you to log in to Razer Synapse 3. These
features are also subject to change based on the current software version and your
Operating System.
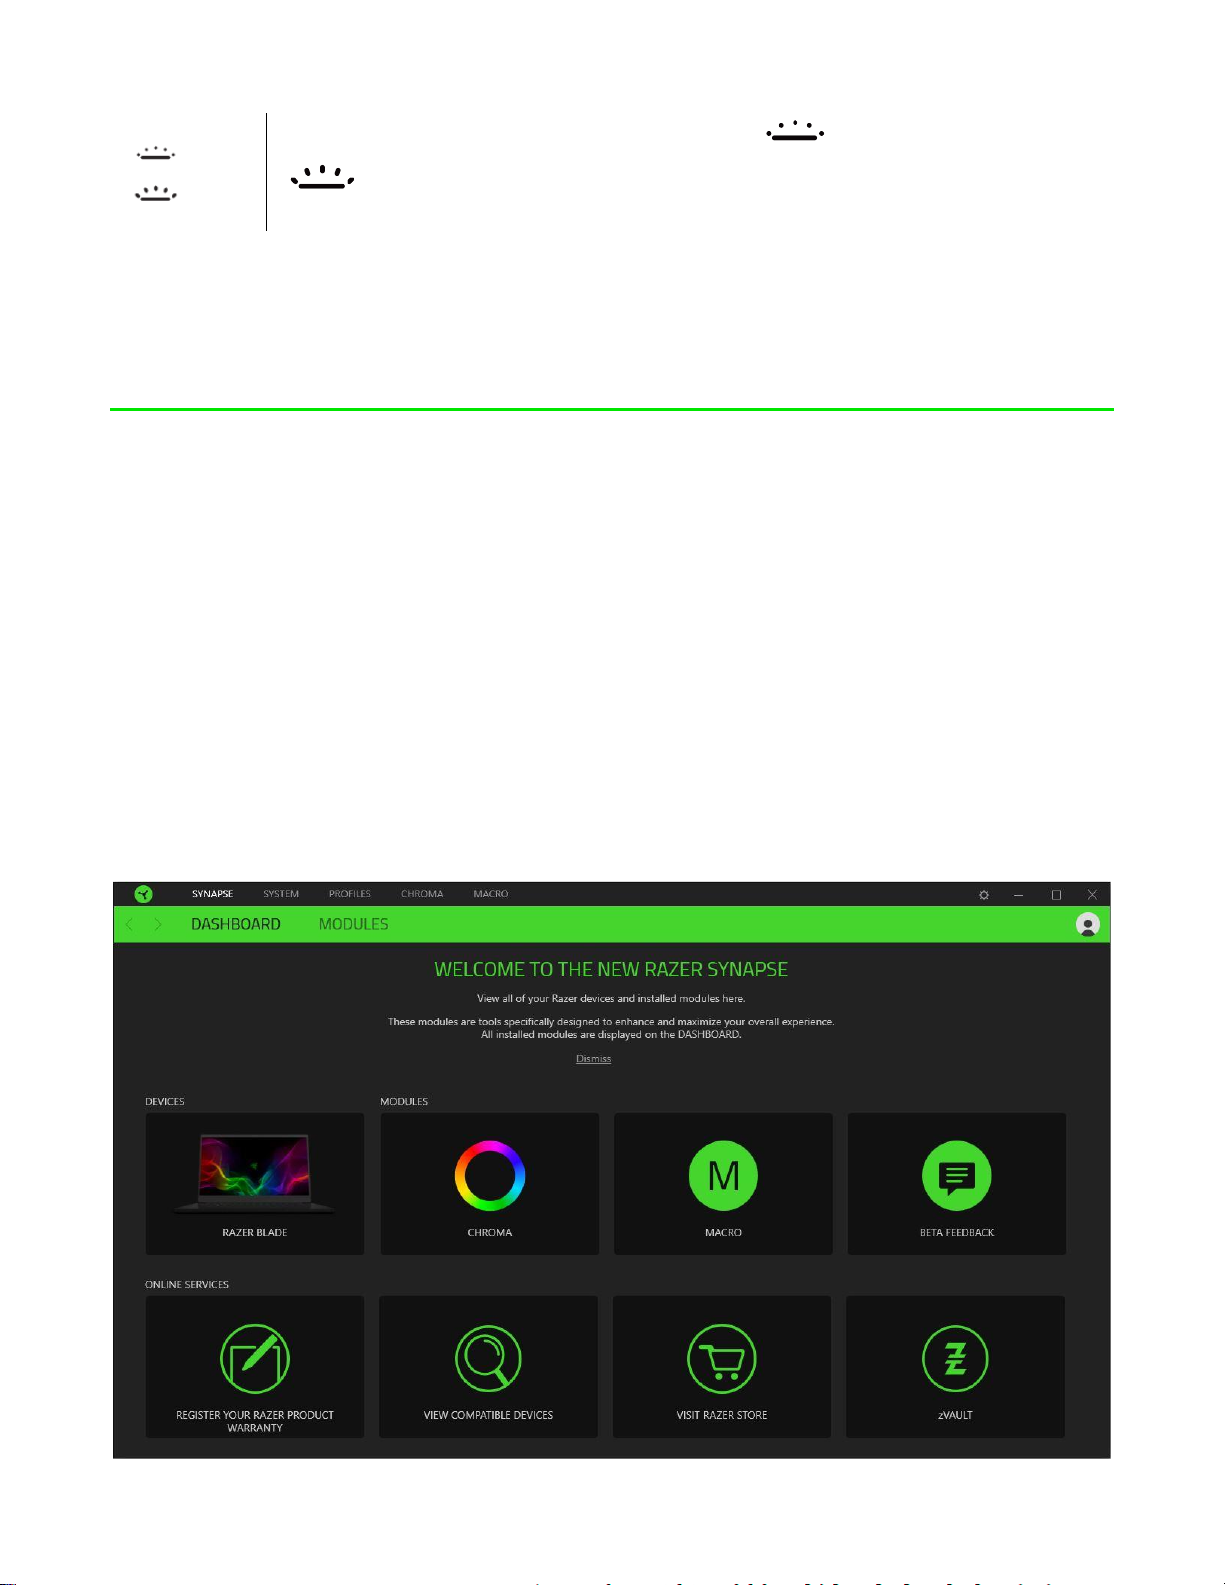
SYNAPSE TAB
The Synapse tab is your default tab when you first launch Razer Synapse 3.
Dashboard
The Dashboard subtab is an overview of your Razer Synapse 3 where you can access all
your Razer devices, modules, and online services.
Page 10

FOR GAMERS. BY GAMERS.™
10
Page 11

FOR GAMERS. BY GAMERS.™
11
SYSTEM TAB
The System Tab is your default tab when you first install Razer Synapse 3. This tab allows
you to customize your device’s profiles, key assignments, gaming mode settings, trackpad
options, lighting, and power saving features.
Customize
The Customize subtab is for modifying your device’s key assignments, primary function key
option, and gaming mode settings.
Profile
Profile is a data storage for keeping all your Razer peripheral’s settings. By default, the profile
name is based on your system’s name. To add, rename, duplicate, or delete a profile, simply
press the profile’s corresponding Miscellaneous button ( ).
Function Key Primary
Function Key Primary allows you to switch between the primary keys and secondary keys.
Primary keys are activated with a single key press while secondary keys require an additional
step pressing the FN key.
Trackpad Properties
Use the links under this option to set the scroll behavior, change the touchpad delay, edit
gestures, access cursor pointing options, and other advanced features.
Page 12

FOR GAMERS. BY GAMERS.™
12
Hypershift
Hypershift mode is a secondary set of key assignments that is activated when the Hypershift
key is held down. By default, the Hypershift key is assigned to the FN key of your Razer
Synapse 3 supported keyboard however, you can also assign any key as a Hypershift key.
Alternatively, you can skip to a specific key assignment by selecting it on the Customize tab.
Upon selecting a key assignment, you may then change it to one of the following functions:
Default
This option enables you to return the selected key to its original setting.
Keyboard Function
This option changes the key assignment into a keyboard function. You can also choose
enable Turbo mode which allows you to emulate repeatedly pressing the keyboard function
while the key is held down.
Mouse Function
This option allows you to change any key into a mouse function. Listed below are the
functions which you can choose from:
Page 13

FOR GAMERS. BY GAMERS.™
13
Left Click - Performs a left mouse click using the assigned button.
Right Click - Performs a right mouse click using the assigned button.
Scroll Click - Activates the universal scrolling function.
Double Click - Performs a double left click using the assigned button.
Mouse Button 4 - Performs a “Backward” command for most internet browsers.
Mouse Button 5 - Performs a “Forward” command for most internet browsers.
Scroll Up - Performs a “Scroll Up” command using the assigned button.
Scroll Down - Performs a “Scroll Down” command using the assigned button.
Scroll Left - Performs a “Scroll Left” command using the assigned button.
Scroll Right - Performs a “Scroll Right” command using the assigned button.
You can also choose to enable Turbo mode in some of the mouse functions which allow you
to emulate repeatedly pressing and releasing said function while the key is held down.
Macro
A Macro is a prerecorded sequence of keystrokes and button presses that is executed with
precise timing. By setting the key function to Macro, you can conveniently execute a chain of
commands. Click here to learn more about Macros
Switch Profile
Switch Profile enables you to quickly change profiles and load a new set of key assignments.
An on-screen notification will appear whenever you switch profiles.
Switch Lighting
Switch Lighting allows you to easily switch between basic and advanced lighting effects. Click
here to learn more about Advanced Chroma Effects
Razer Hypershift
Setting the key to Razer Hypershift will allow you to activate Hypershift mode as long as the
key is held down.
Launch Program
Launch Program enables you to open an app or a website using the assigned key. When you
select Launch Program, two choices will appear which requires you to search for a specific
app you want to open, or write the address of the website you want to visit.
Multimedia
Page 14

FOR GAMERS. BY GAMERS.™
14
This option allows you to assign multimedia controls to your Razer device. Listed below are
the multimedia controls you can choose from:
Volume Down - Decreases the audio output.
Volume Up - Increases the audio output.
Mute Volume - Mutes the audio.
Mic Volume Up - Increases the microphone volume.
Mic Volume Down - Decreases the microphone volume.
Mute Mic - Mutes the microphone.
Mute All - Mutes both microphone and audio output.
Play / Pause - Play, pause, or resume playback of the current media.
Previous Track - Play the previous media track.
Next Track - Play the next media track.
Windows 8 Charms
This option enables you to assign your preferred key into a Windows 8 shortcut command.
Listed below are the Windows 8 charm shortcuts you can choose from:
Snap App to Left – Maximizes an active window to the left side of the screen.
Snap App to Right – Maximizes an active window to the right of the screen.
Snap App to Up – Restores or maximizes an active window.
Snap App to Down – Restores or minimizes an active window.
Take Screenshot and Save to Pictures – Captures a screenshot which is then saved
directly to the Pictures folder of your PC.
App Bar* - Opens the Windows 8 app bar.
Search Charm – Opens the Search Charm pane* or the Windows Search bar.
Share Charm* – Opens the Share Charm pane.
Start [ Toggle between Desktop and Metro ] - Switches between Desktop mode and
Metro interface* or opens the Start menu.
Device Charm – Opens the Devices Charm pane* or the Connect Quick action pane.
Settings Charm – Opens the Setting Charm pane* or Windows Settings.
*Applicable for Windows 8 only.
Windows Shortcuts
Page 15

FOR GAMERS. BY GAMERS.™
15
This option allows you to assign your preferred key into a Windows Operating System
shortcut command. For more information, please visit: http://support.microsoft.com/kb/126449
Text Function
Text Function enables you to type a prewritten text with a touch of a key. Simply write your
desired text on the given field and your text will be typed whenever the assigned key is
pressed. This function has full Unicode support and you can also insert special symbols from
character maps.
Disable
This option renders the assigned key unusable. Use Disable if you do not want to use the
selected key or if it interferes with your gaming.
Page 16

FOR GAMERS. BY GAMERS.™
16
Lighting
Name
Description
How to set up
The Lighting subtab enables you to modify your Razer device’s light settings.
System Lighting
You can turn off your Razer device’s lighting by toggling the Brightness option or
increase/decrease the luminance using the slider. You can also adjust the logo lighting using
the dropdown option.
Switch Off Lighting
This power saving tool which allows you to disable your device’s lighting in response to your
system’s display turning off and/or automatically power down when your Razer Blade has
been idle for a set amount of time. You may also set the lighting to turn off when the device’s
battery level is below a certain percentage.
Effects
A number of effects can be selected and applied to your device’s lighting, as listed here:
Quick effects
Page 17

FOR GAMERS. BY GAMERS.™
17
Spectrum
cycling
The lighting will cycle between
16.8 million colors indefinitely
Default effect. No further
customization required
Wave
The lighting will scroll in the
direction selected
Select either left-to-right or rightto-left wave direction
Static
The LEDs will remain lit in the
selected color
Select a color
Breathing
The lighting fades in and out of
the selected color(s)
Select up to 2 colors or
randomize colors
Reactive
The LEDs will light up when a
key is pressed. The light will
fade off after a specified period
Select a color and a duration
Ripple
On key press, light will ripple
away from the pressed key
Select a color
Starlight
Each key will have a chance of
fading in and out at a random
time and duration
Select up to 2 colors or
randomize colors and select a
duration
Fire
Each key lights up in warm
colors to mimic the motion of
flames
No further customization
required
Studio Effects
The Studio Effects option allows you to choose from a dropdown menu a custom lighting
effect you want to use on your Razer Chroma-enabled peripheral. To start making your own
Chroma Effect, simply press the Chroma Studio button ( ). Click here to learn
more about the Chroma Studio
Page 18

FOR GAMERS. BY GAMERS.™
18
Performance
The Performance subtab allows you to manage your device’s energy consumption when
running on batteries. Use the different modes to control the performance and fan speed of
your Razer Blade.
Page 19

FOR GAMERS. BY GAMERS.™
19
PROFILES TAB
The Profiles tab is a convenient way of managing all your profiles and linking them to your
games and applications.
Devices
View which Razer device is using a specific profile using the Devices subtab. To create a new
profile within the selected device, simply click the add button ( ). To rename, duplicate, or
delete a profile, simply press the Miscellaneous button ( ). Each profile can be set to
automatically activate when you run an application using the Link Games option.
Page 20

FOR GAMERS. BY GAMERS.™
20
Linked Games
The Linked Games subtab gives you the flexibility to add games, view peripherals that are
linked to games, or search for added games. You can also sort games based on alphabetical
order, last played, or most played. Added games will still be listed here even if it is not linked
to a Razer device.
To link games to connected Razer devices, simply click on a game from the list, then click the
button to select the Razer device it will link with.
Once linked, you may click on the Miscellaneous button ( ) of the corresponding linked
device to select the device’s desired profile.
Page 21

FOR GAMERS. BY GAMERS.™
21
CHROMA TAB
The Chroma tab enables you to either create advanced lighting effects through Chroma
Studio or enable/disable third party integrated apps to all Razer Chroma-enabled devices for
a truly immersive lighting and gaming experience.
Studio
The Studio subtab enables you to create and edit your own Chroma Effects which you can
apply to all supported Razer Chroma-enabled devices. This tab can also be accessed under
the Dashboard’s Chroma module.
To add, rename, duplicate, or delete a Chroma Effect, simply click the Miscellaneous button
( ). To revert the selected layer to its original setting, click the Reset button ( ). And to
apply and save a modified layer, click the Save button ( ).
Quick Selections
The Quick Selections drop-down menu are a preset of lighting regions which you can use to
easily customize your Razer device. Alternatively, you can individually select an LED by
clicking on the area or select multiple LEDs by using click and drag.
Page 22

FOR GAMERS. BY GAMERS.™
22
Effect Layer
Lighting effects are arranged in layers wherein the topmost layer takes priority. You can group
multiple lighting effects by clicking the Add Group button ( ) and dragging the layers you
want to group to the newly added folder, duplicate a layer by clicking the Copy button ( ),
or delete a layer by clicking the Trash button ( ). Some layers may have overlapping effects
so you may need to arrange layers in a specific order.
Add Effect
All supported quick effects are listed under the Add Effect option which you can click to insert
onto the Effect Layer. Quick Effects can be edited on the Chroma Studio by allowing you to
change its preset color, properties, and playback options.
Apps
The Apps subtab is where you can enable or disable third party integrated apps for your
Razer Chroma-enabled peripherals. The Apps tab can also direct you to the Chroma
Workshop where you can download these third-party apps.
Page 23

FOR GAMERS. BY GAMERS.™
23
MACROS TAB
If you need to accurately execute a series of complex commands then you need a Macro. A
macro is a set of recorded keystrokes, button presses, and cursor movements. The Macros
tab allows you to create, edit, and organize these macros so that you can assign them to the
keys or buttons of your Razer device. You can also share macros with others using the import
button ( ) and export button ( ).
There are also other options available in the macro section such as creating a new macro by
clicking the Add button ( ), delete the current macro by clicking the Trash button ( ), and
duplicate the current macro using the Copy button ( ).
Page 24

FOR GAMERS. BY GAMERS.™
24
To create a macro, simply select a macro name to store your commands, then click the
Record menu. Assign a key or button for the macro on Shortcut Key field, select a delay, and
select if you want to include mouse movement tracking. Once you have chosen the settings
for the macro, click the Start button ( ). After a brief countdown, all your keystrokes
and button presses will be recorded on the macro screen. When you are done recording your
macro commands, click on the Stop button ( ) to end the session.
Page 25

FOR GAMERS. BY GAMERS.™
25
Once you have recorded a macro, you may edit the commands you have entered by selecting
each command on the macro screen. Each keystroke or button press is arranged sequentially
with the first command shown at the top of the screen.
The Insert drop-down menu allows you to put in additional keystrokes, button presses, type
texts, run commands, loop a set of commands, or insert an entire macro group.
Key Binds
The Key binds option allows you to view the Shortcut Keys for the selected macro.
Properties
The Properties option enables you to individually edit commands, adjust their delay, change
actions, and also change the total duration of the macro so that it executes faster or slower.
Page 26

FOR GAMERS. BY GAMERS.™
26
SETTINGS WINDOW
The Settings window, accessible by clicking the ( ) button on Razer Synapse, enables you
to configure the startup behavior and display language of Razer Synapse 3, view your Razer
device’s master guide, or perform factory reset on any connected Razer device.
General tab
The default tab of the Settings window, The General tab enables you to change the software’s
display language and start-up behavior, or view the master guide of all connected Razer
devices.
Reset tab
The Reset tab allows you to perform a factory reset on all connected Razer devices with on-
board memory and/or reset Razer Synapse tutorials to acquaint yourself again with Razer
Synapse 3’s new features on its next launch.
Note: By resetting a Razer device, all profiles stored on the selected device’s on-board
memory will be erased. Performing a factory reset on devices without on-board memory will
only create a new profile for your device on Razer Synapse 3 using the default settings.
About tab
The About tab displays brief software information, its copyright statement, and provides
relevant links for its terms of use. You may also use this tab to check for software updates, or
as a quick access to Razer’s social communities.
Page 27

FOR GAMERS. BY GAMERS.™
27
6. SAFETY AND MAINTENANCE
SAFETY GUIDELINES
In order to achieve maximum safety while using your Razer Blade, we suggest that you adopt
the following guidelines:
Should you have trouble operating the device properly and troubleshooting does not work,
unplug the device and contact the Razer hotline or go to support.razer.com for support. Do
not attempt to service or fix the device yourself at any time.
Do not take apart the device (doing so will void your warranty) and do not attempt to operate it
under abnormal current loads.
Keep the device away from liquid, humidity or moisture. Operate the device only within the
specific temperature range of 0°C (32°F) to 40°C (104°F). Should the temperature exceed
this range, unplug and switch off the device in order to let the temperature stabilize to an
optimal level.
COMFORT
Research has shown that long periods of repetitive motion, improper positioning of your
computer peripherals, incorrect body position, and poor habits may be associated with
physical discomfort and injury to nerves, tendons, and muscles. Below are some guidelines to
avoid injury and ensure optimum comfort while using your Razer Blade.
Position your laptop directly in front of you. If you have an external mouse, position it
next to the laptop. Place your elbows next to your side, not too far away and your
mouse within easy reach.
Adjust the height of your chair and table so that the laptop is at or below elbow height.
Keep your feet well supported, posture straight and your shoulders relaxed.
During gameplay, relax your wrist and keep it straight. If you do the same tasks with
your hands repeatedly, try not to bend, extend or twist your hands for long periods.
Do not rest your wrists on hard surfaces for long periods. When using an external
mouse, use a wrist rest to support your wrist while gaming.
Do not sit in the same position all day. Get up, step away from your desk and do
exercises to stretch your arms, shoulders, neck and legs.
Page 28

FOR GAMERS. BY GAMERS.™
28
If you should experience any physical discomfort while using your laptop, such as pain,
numbness, or tingling in your hands, wrists, elbows, shoulders, neck or back, please consult a
qualified medical doctor immediately.
BATTERY
The Razer Blade contains an internal, lithium-ion rechargeable battery. In general, the life
expectancy of such batteries is dependent upon usage. Heavy daily usage will result in
shorter battery life. Casual use will extend battery life. If you suspect that the lithium-ion
rechargeable battery inside the Razer Blade may be drained (has a low charge), try charging
it. If the battery does not recharge after several attempts, it may be non-operational. Dispose
of batteries according to your local environmental laws and guidelines.
Page 29

FOR GAMERS. BY GAMERS.™
29
7. LEGALESE
COPYRIGHT AND INTELLECTUAL PROPERTY INFORMATION
©2018 Razer Inc. All rights reserved. Razer, the triple-headed snake logo, Razer logo, “For
Gamers. By Gamers.”, and "Powered by Razer Chroma” logo are trademarks or registered
trademarks of Razer Inc. and/or affiliated companies in the United States or other countries.
Windows and the Windows logo are trademarks of the Microsoft group of companies.
DisplayPort™ and the DisplayPort™ logo are trademarks owned by the Video Electronics
Standards Association (VESA®) in the United States and other countries.
Manufactured under license from Dolby Laboratories. Dolby, Dolby Atmos, and the double-D
symbol are registered trademarks of Dolby Laboratories.
Thunderbolt and the Thunderbolt logo are trademarks of Intel Corporation in the U.S. and/or
other countries.
The terms HDMI and HDMI High-Definition Multimedia Interface, and the HDMI Logo are
trademarks or registered trademarks of HDMI Licensing LLC in the United States and other
countries.
Razer Inc. (“Razer”) may have copyright, trademarks, trade secrets, patents, patent
applications, or other intellectual property rights (whether registered or unregistered)
concerning the product in this Master Guide. Furnishing of this Master Guide does not give
you a license to any such copyright, trademark, patent or other intellectual property right. The
Razer Blade (the “Product”) may differ from pictures whether on packaging or otherwise.
Razer assumes no responsibility for such differences or for any errors that may appear.
Information contained herein is subject to change without notice.
LIMITED PRODUCT WARRANTY
For the latest and current terms of the Limited Product Warranty, please visit
razer.com/warranty.
LIMITATION OF LIABILITY
Razer shall in no event be liable for any lost profits, loss of information or data, special,
incidental, indirect, punitive or consequential or incidental damages, arising in any way out of
Page 30

FOR GAMERS. BY GAMERS.™
30
distribution of, sale of, resale of, use of, or inability to use the Product. In no event shall
Razer’s liability exceed the retail purchase price of the Product.
COSTS OF PROCUREMENT
For the avoidance of doubt, in no event will Razer be liable for any costs of procurement
unless it has been advised of the possibility of such damages, and in no case shall Razer be
liable for any costs of procurement liability exceeding the retail purchase price of the Product.
GENERAL
These terms shall be governed by and construed under the laws of the jurisdiction in which
the Product was purchased. If any term herein is held to be invalid or unenforceable, then
such term (in so far as it is invalid or unenforceable) shall be given no effect and deemed to
be excluded without invalidating any of the remaining terms. Razer reserves the right to
amend any term at any time without notice.
FCC DECLARATION OF CONFORMANCE
This equipment has been tested and found to comply with the limits for a Class B digital
device, pursuant to part 15 of the FCC Rules. These limits are designed to provide
reasonable protection against harmful interference in a residential installation. This equipment
generates, uses and can radiate radio frequency energy and, if not installed and used in
accordance with the instructions, may cause harmful interference to radio communications.
However, there is no guarantee that interference will not occur in a particular installation. If
this equipment does cause harmful interference to radio or television reception, which can be
determined by turning the equipment off and on, the user is encouraged to try to correct the
interference by one or more of the following measures:
Reorient or relocate the receiving antenna.
Increase the separation between the equipment and the receiver.
Connect the equipment into an outlet on a circuit different from that to which the
receiver is connected.
Consult the dealer or an experienced radio TV technician for help.
For more information, refer to the online help system on razer.com.
FCC CAUTION STATEMENT
Any changes or modifications not expressly approved by the party responsible for compliance
could void the user's authority to operate this equipment.
Page 31

FOR GAMERS. BY GAMERS.™
31
This device complies with Part 15 of the FCC Rules. Operation is subject to the following two
conditions:
This device may not cause harmful interference, and
This device must accept any interference received, including interference that may
cause undesired operation.
IMPORTANT NOTE:
FCC Radiation Exposure Statement:
This equipment complies with FCC radiation exposure limits set forth for an uncontrolled
environment. End users must follow the specific operating instructions for satisfying RF
exposure compliance. This transmitter must not be co-located or operating in conjunction with
any other antenna or transmitter.
USAGE RESTRICTIONS
This Razer device was developed and designed to comply with the various wireless and
telecom agency requirements throughout the world. This ensures that the device do not
cause any harm to Public Switching Telecommunication Networks (PSTN) and do not violate
any power and frequency spectrum allocations on a country by country basis. This device
was also designed to be compliant with regulatory agency limits for Electromagnetic
Compatibility (EMC).
IMPORTANT NOTICE FOR USE IN HEALTHCARE ENVIRONMENTS
This Razer device is not a medical device and is not listed under UL or IEC 60601 (or
equivalent). This device should be kept at a certain distance to avoid harmful effects to
patients or medical equipment.
AVIATION USAGE RESTRICTIONS
Certain restrictions apply to this device while on-board an aircraft. Razer encourages you to
understand these restrictions to ensure the flight’s safety and security.
Page 32

FOR GAMERS. BY GAMERS.™
32
Canada Statement
This device complies with Industry Canada’s licence-exempt RSSs. Operation is subject to the following two
conditions:
(1) This device may not cause interference; and
(2) This device must accept any interference, including interference that may cause undesired operation of the
device.
Le présent appareil est conforme aux CNR d’Industrie Canada applicables aux appareils radio exempts de
licence. L’exploitation est autorisée aux deux conditions suivantes :
(1) l’appareil ne doit pas produire de brouillage;
(2) l’utilisateur de l’appareil doit accepter tout brouillage radioélectrique subi, même si le brouillage est
susceptible d’en compromettre le fonctionnement.
The device meets the exemption from the routine evaluation limits in section 2.5 of RSS 102 and compliance
with RSS-102 RF exposure, users can obtain Canadian information on RF exposure and compliance.
Le dispositif rencontre l'exemption des limites courantes d'évaluation dans la section 2.5 de RSS 102 et la
conformité à l'exposition de RSS-102 rf, utilisateurs peut obtenir l'information canadienne sur l'exposition et la
conformité de rf.
The device for operation in the band 5150-5250 MHz is only for indoor use to reduce the potential for harmful
interference to co-channel mobile satellite systems
les dispositifs fonctionnant dans la bande 5150-5250 MHz sont réservés uniquement pour une utilisation à
l’intérieur afin de réduire les risques de brouillage préjudiciable aux systèmes de satellites mobiles utilisant les
mêmes canaux;
This Class B digital apparatus complies with Canadian ICES-003.
Cet appareil numérique de la classe B est conforme à la norme NMB-003 du Canada.
.
Hereby, Razer Inc. declares that the radio equipment type RZ09-02385, RZ09-02386 is in compliance
with Directive 2014/53/EU. The full text of the EU declaration of conformity is available at the
following internet address: www.razerzone.com.
Page 33

FOR GAMERS. BY GAMERS.™
33
In all EU member states, operation of 5150-5350MHz is restricted to indoor use only.
Support Wireless Frequency (Max e.r.i.p):
BT 3.0(2402-2480MHz):6.98dBm
BT LE(2402-2480MHz): 6.98dBm
WIFI 2.4GHz(2412-2472MHz):19.59dBm
WIFI 5GHz(5150-5725MHz):22.57dBm
WIFI 5GHz(5725-5850MHz):13.47dBm
RF exposure (SAR): The device can safely be used with a distance of 0 mm to the human
body.
 Loading...