


Date: 20 Sep 2018
USER MANUAL FOR Gaming Controller
RZ06-0280

PACKAGE CONTENTS / SYSTEM REQUIREMENTS
PACKAGE CONTENTS
Gaming Controller (Model: RZ06-0280)
USB Type-C to USB Type-C cable
USB Type-A to USB Type-C cable
Important Product Information Guide
SYSTEM REQUIREMENTS
Hardware requirements
Android™ 6.0 Marshmallow (or higher)
A free USB-C port or Bluetooth connectivity
Mobile app requirements
Android mobile device with Bluetooth compatibility
Internet connection
FOR GAM ER S. B Y GA ME RS.™ 1

LET’S GET YOU COVERED
You’ve got a great device in your hands—now maximize its potential by registering online! You
score exclusive Razer benefits, information on your controller’s limited 1-year warranty, and more.
[ PLACEHOLDER IMAGE ONLY ]
Got a question? Ask the Razer Support Team at support.razer.com
FOR GAM ER S. B Y GA ME RS.™ 2
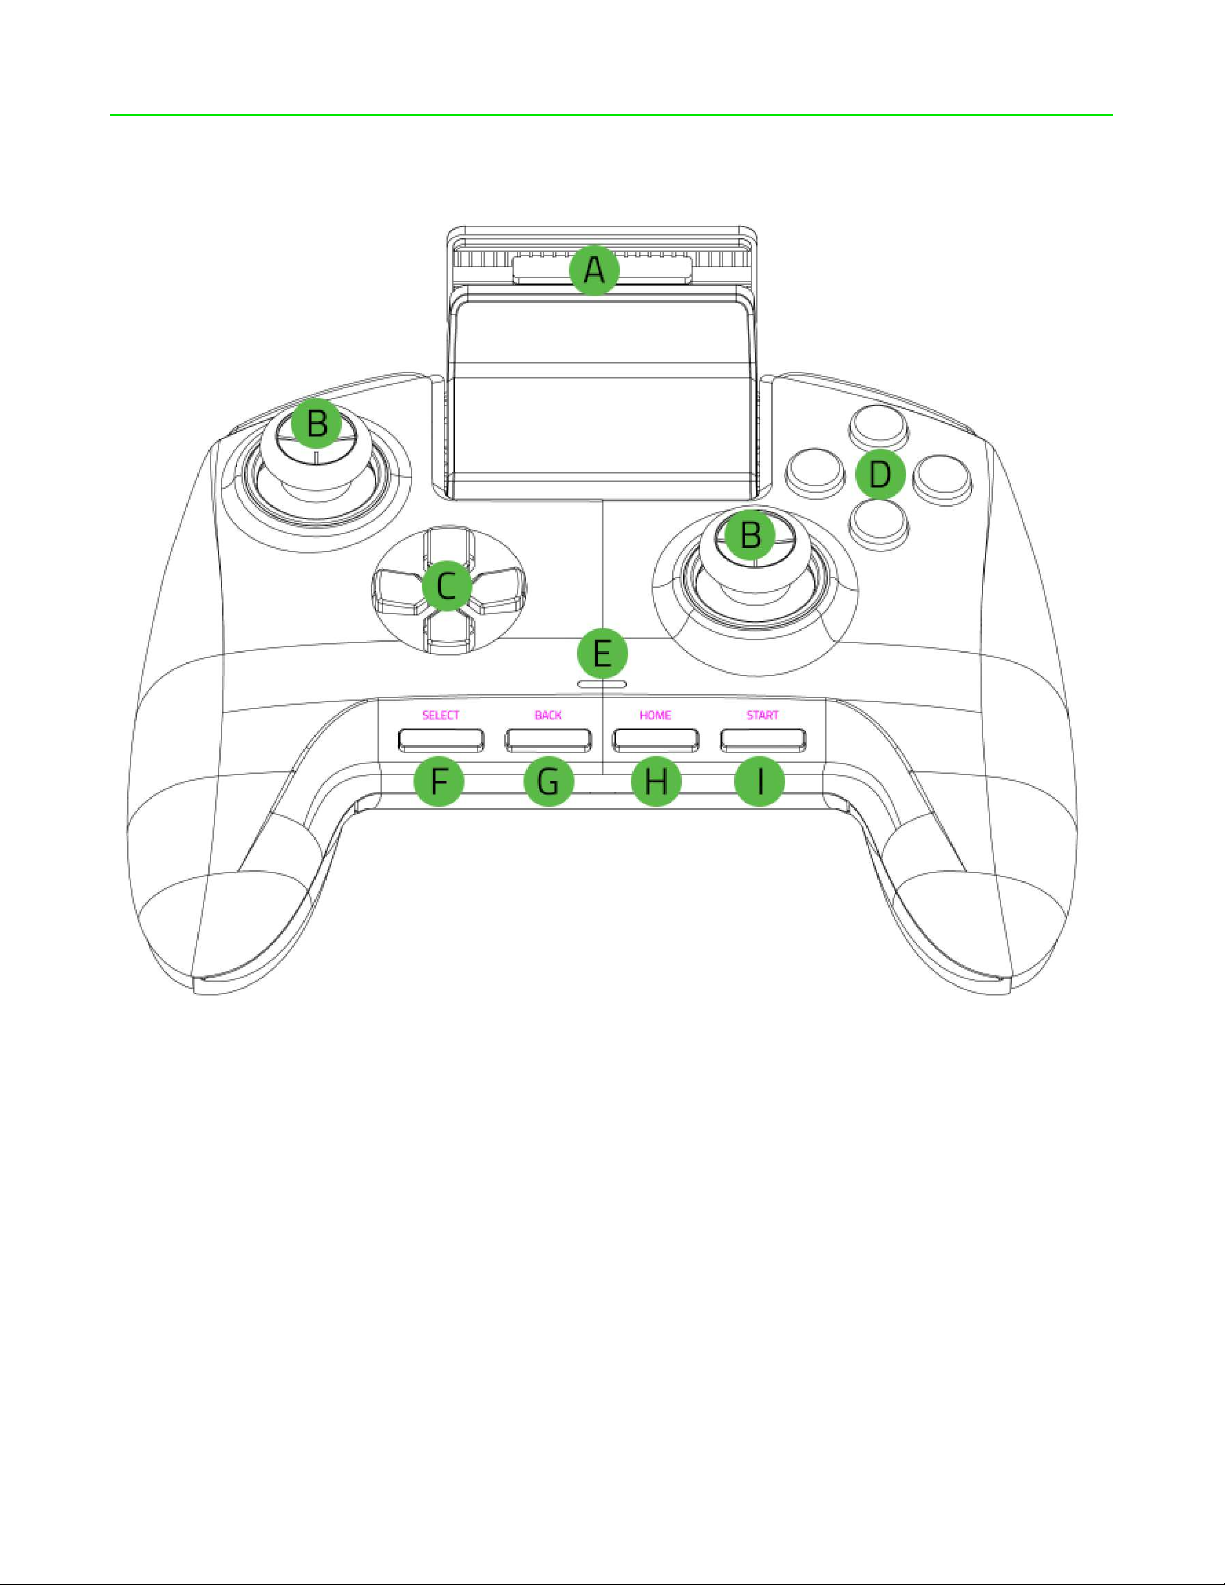
EXPLORING YOUR CONTROLLER
[ PLACEHOLDER IMAGE ONLY ]
A. Retractable phone grip
B. Standard thumbsticks (L3/R3 buttons)
C. Directional pad
D. Razer Mecha-Tactile action buttons
E. Status indicator
F. SELECT button
G. BACK button
H. HOME / Power button
I. START button
FOR GAM ER S. B Y GA ME RS.™ 3

J. Triggers (L2/R2)
[ PLACEHOLDER IMAGE ONLY ]
K. Bumpers (L1/R1)
L. Multi-Function buttons (M1-M4)
M. USB-C port
N. Trigger stop switches
O. Mode switch
P. USB Type-C to USB Type-C cable
Q. USB Type-A to USB Type-C cable
FOR GAM ER S. B Y GA ME RS.™
4

SETTING UP YOUR RAZER RAIJU FOR ANDROID
CHARGING YOUR RAZER RAIJU FOR ANDROID
For first time activation, plug in your controller to a powered USB port using the USB Type-A to
USB Type-C cable. It takes approximately 3.5 hours to fully charge your Razer Raiju for Android.
[ PLACEHOLDER IMAGE ONLY ]
Charging Charged
CONNECTING TO YOUR ANDROID PHONE
Wireless connection
1. Set the Mode switch to either BT1 or BT2.
Note: The device you will pair to will be registered to the selected BT mode.
[ PLACEHOLDER IMAGE ONLY ]
2. Power on the controller by pressing the HOME button until the status indicator starts to
blink in blue.
[ PLACEHOLDER IMAGE ONLY ]
BT Mode / OFF Searching / ON
FOR GAM ER S. B Y GA ME RS.™ 5

3. Press and hold both the HOME and START buttons until the status indicator starts to blink
in white to activate pairing mode.
[ PLACEHOLDER IMAGE ONLY ]
Pairing mode
4. On your phone, open its Bluetooth settings, and select Razer Raiju for Android from the list
of available devices.
[ PLACEHOLDER IMAGE ONLY ]
5. Wait until the status indicator becomes solid blue indicating that the pairing was successful,
and the controller is now ready to use.
[ PLACEHOLDER IMAGE ONLY ]
Paired
Note: Pairing mode will automatically stop if it does not pair with a device after 90 seconds.
6. Pull out the retractable phone grip, place your phone in and adjust the grip and its viewing
angle as needed.
[Placeholder image]
FOR GAM ER S. B Y GA ME RS.™ 6

Wired connection
Note: Make sure that you have fully charged the controller before proceeding.
1. Set the Mode switch to USB.
[ PLACEHOLDER IMAGE ONLY ]
2. With your phone placed into the phone grip, connect your phone to the controller using the
USB Type-C to USB Type-C cable. The status indicator will turn green indicating that the
controller is now ready to use.
[Placeholder image]
FOR GAM ER S. B Y GA ME RS.™ 7

USING YOUR RAZER RAIJU FOR ANDROID
UNDERSTANDING THE STATUS INDICATOR
Use the status indicator when checking the connection and power status of the controller in each
mode. The indicator may vary on the selected mode and/or connection used.
BT1 / BT2 Mode
Wireless Powered by USB
Status
Low battery Charging Fully charged
ON
OFF
Status
ON
USB Mode
Status Charging Fully charged
Connected to a USB host
device
Connected to a USB power
adapter*
*Not included.
N/A
Wireless / Powered by USB
Searching Pairing Paired
FOR GAM ER S. B Y GA ME RS.™ 8

USING THE TRIGGER STOP SWITCHES
The Trigger Stops allows you to activate the Left and Right Triggers faster by shortening their
travel distance and reducing their response time (Active Hair Trigger Mode). To enable the Trigger
Stops, simply slide the switches outwards; and to disable the Trigger Stops, slide the switches
inwards.
[Placeholder image]
POWERING OFF THE CONTROLLER IN ANY BT MODE
In any BT mode, simply press and hold the HOME button until the controller powers off.
[Placeholder image]
FOR GAM ER S. B Y GA ME RS.™ 9

CONFIGURING YOUR RAZER RAIJU FOR ANDROID
Customize your controller’s button functions, mappings, and other features with the Razer Raiju
for Android mobile app. Simply download the mobile app on your mobile device, launch the app,
and follow the onscreen instructions
Secure your victory in each game!
For in-depth instructions on how to fully use and customize your
controller for specific games, visit razer.com/raiju-for-android or
simply scan this QR code.
[ PLACEHOLDER IMAGE
ONLY ]
FOR GAM ER S. B Y GA ME RS.™ 10

REGULATORY
FCC Radiation Exposure Statement
This device complies with FCC radiation exposure
limits set forth for an uncontrolled
environment and it also complies with Part 15 of
the FCC RF Rules. This equipment must not
be co-located or operating in conjunction with any
other antenna or transmitter. End-users and
installers must be provide with antenna installation
instructions and consider removing the
no-collocation statement.
Caution
Any changes or modifications not expressly
approved by the party responsible for
compliance could void the user's authority to
operate the equipment.
FOR GAM ER S. B Y GA ME RS.™ 11

SAFETY AND MAINTENANCE
Canada Statement
This device complies with Industry Canada’s licence-exempt RSSs. Operation is subject to the
following two conditions:
(1) This device may not cause interference; and
(2) This device must accept any interference, including interference that may cause undesired
operation of the device.
Le présent appareil est conforme aux CNR d’Industrie Canada applicables aux appareils radio
exempts de licence. L’exploitation est autorisée aux deux conditions suivantes :
(1) l’appareil ne doit pas produire de brouillage;
(2) l’utilisateur de l’appareil doit accepter tout brouillage radioélectrique subi, même si le
brouillage est susceptible d’en compromettre le fonctionnement.
The device meets the exemption from the routine evaluation limits in section 2.5 of RSS 102
and compliance with RSS-102 RF exposure, users can obtain Canadian information on RF
exposure and compliance.
Le dispositif rencontre l'exemption des limites courantes d'évaluation dans la section 2.5 de
RSS 102 et la conformité à l'exposition de RSS-102 rf, utilisateurs peut obtenir l'information
canadienne sur l'exposition et la conformité de rf.
FOR GAM ER S. B Y GA ME RS.™ 12
 Loading...