

Page 1
Page 2
WHAT’S INSIDE / SYSTEM REQUIREMENTS
WHAT’S INSIDE
• Razer Turret for Xbox One wireless keyboard
• Razer Turret for Xbox One wireless mouse
• USB wireless dongle
• Keyboard-to-mouse charging cable
• USB-A to USB-C cable
• USB-A to Micro-USB cable
• Power adapter* with interchangeable plugs
• Important Product Information Guide
*Models may vary.
SYSTEM REQUIREMENTS
PRODUCT REQUIREMENTS
• Xbox One / Xbox One S / Xbox One X
OR
• PC (Windows 7 64-bit or higher) with free USB
port(s)
RAZER TURRET APP / RAZER SYNAPSE 3
REQUIREMENTS
• Internet connection
• 500 MB of free hard disk space
LET’S GET YOU COVERED
You’ve got a great device in your hands—now maximize its potential by registering online! You score exclusive
Razer benefits, information on your device’s limited 2-year warranty, and more.
Register now at razerid.razer.com/warranty
Your product’s serial number can be found here.
SAFETY STATEMENT
IMPORTANT! Before using the Xbox One with this product, read the Xbox One instruction manual for safety, health,
and other information regarding the use of the Xbox One.
EXPLORING YOUR DEVICE
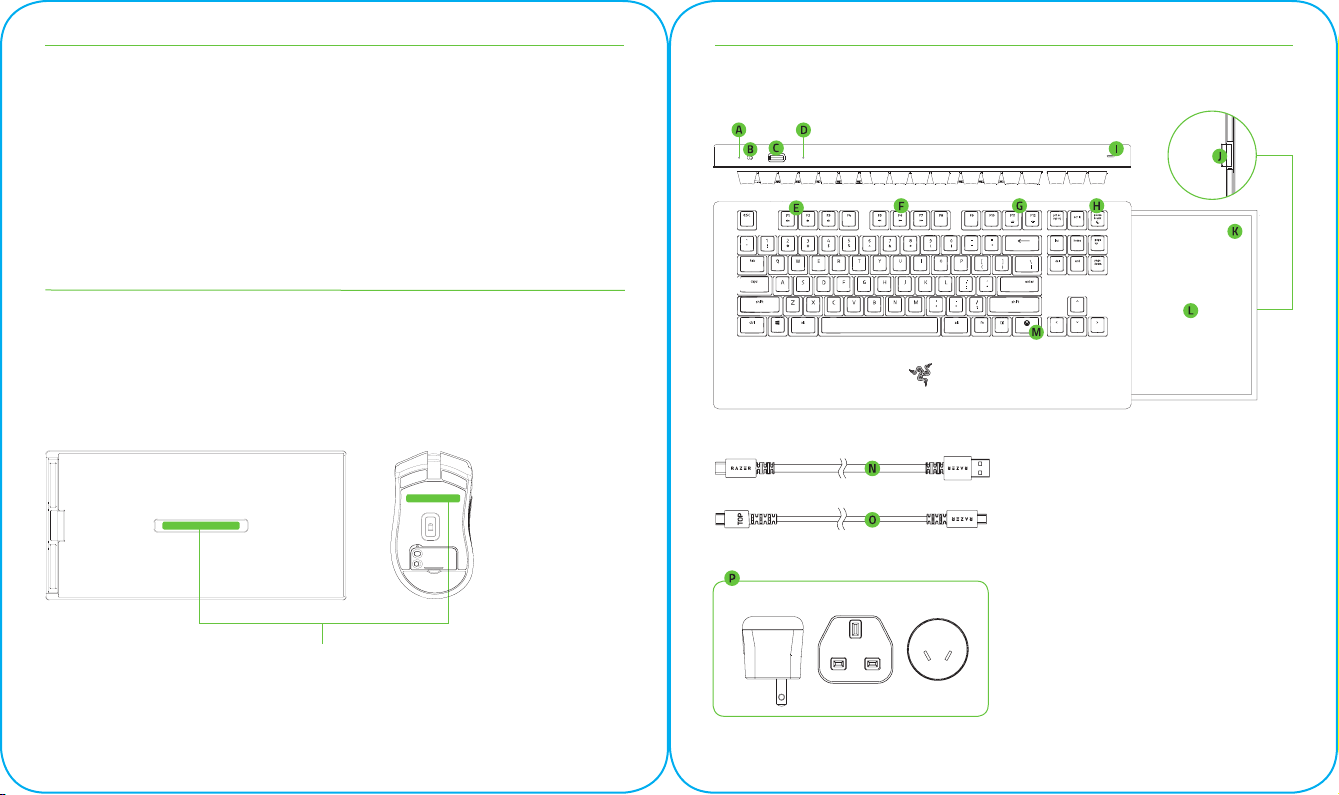
RAZER TURRET FOR XBOX ONE KEYBOARD
USA UK AU
A Power indicator
B Power switch
C USB-C port
D Reset button
E Volume control keys
F Media keys
G Backlight control keys
H Sleep mode key
I Mouse charging port
J Latch for stowable mouse mat
K Magnetized mouse docking area
L Stowable mouse mat
M Xbox key
N USB-A to USB-C cable
O Keyboard-to-mouse charging cable
P Power adapter*
*Power adapter models may vary.
Page 3
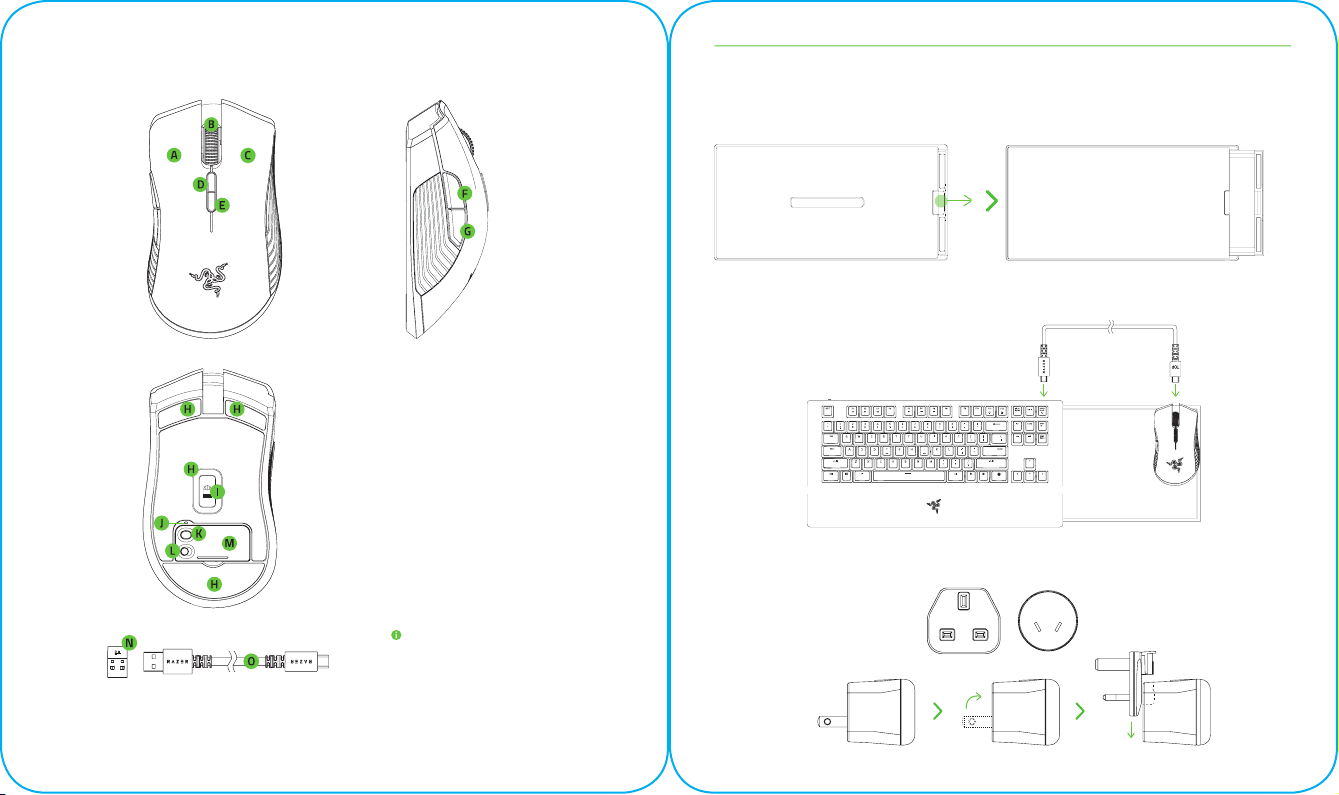
RAZER TURRET FOR XBOX ONE MOUSE
A Left mouse button
B Scroll wheel
C Right mouse button
D DPI stage up
E DPI stage down
F Mouse button 5
G Mouse button 4
H Ultraslick mouse feet
I True 16,000 DPI 5G optical sensor
J Profile indicator
K Profile button
L Power switch
M USB wireless dongle cover
N USB wireless dongle
O USB-A to Micro-USB cable
Default DPI stages are as follows: 800,
1800, 4500, 9000, and 16000. The DPI stages
can be customized using Razer Synapse 3
and the Xbox One home screen can only be
navigated with a controller or the keyboard;
all mouse cursor functions are only available
in-game.
SETTING UP YOUR RAZER TURRET FOR XBOX ONE
PREPARING YOUR DEVICES FOR FIRST USE
1. Hold down the latch on the right side of the keyboard to unlock and pull out the mouse mat.
2. Connect the mouse to the keyboard’s mouse port using the included Keyboard-to-mouse charging cable.
3. Select the appropriate power plug for your region and attach it to the power adapter.
Page 4
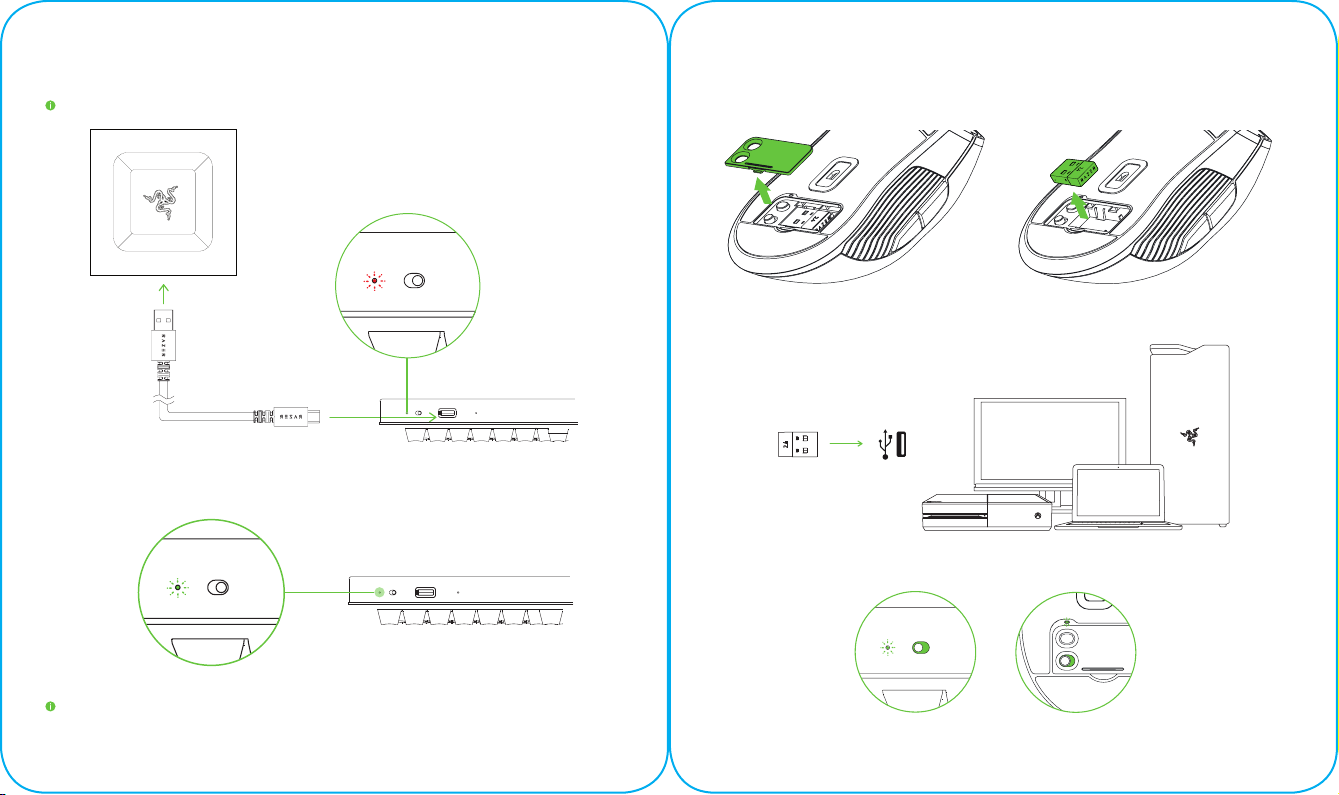
4. Connect the power adapter to the keyboard using the included USB-A to USB-C cable and plug it into a power
outlet. The power indicator will light up red to indicate that the keyboard is charging. The mouse will also begin
to charge.
Note: Use only the power adapter and USB-A to USB-C cable included with the product.
5. Wait for your keyboard to fully charge. The power indicator will light up green to indicate that it has fully charged.
CONNECTING THE RAZER TURRET FOR XBOX ONE TO YOUR XBOX ONE / PC
Wireless Mode
1. On the mouse, remove the USB wireless dongle cover and pull out the USB wireless dongle.
2. Connect the USB wireless dongle to the USB port of your Xbox One or PC.
3. Switch on the keyboard and mouse.
Note: For best results, please fully charge your Razer Turret for Xbox One before using it for the first time.
Keyboard Mouse
Page 5
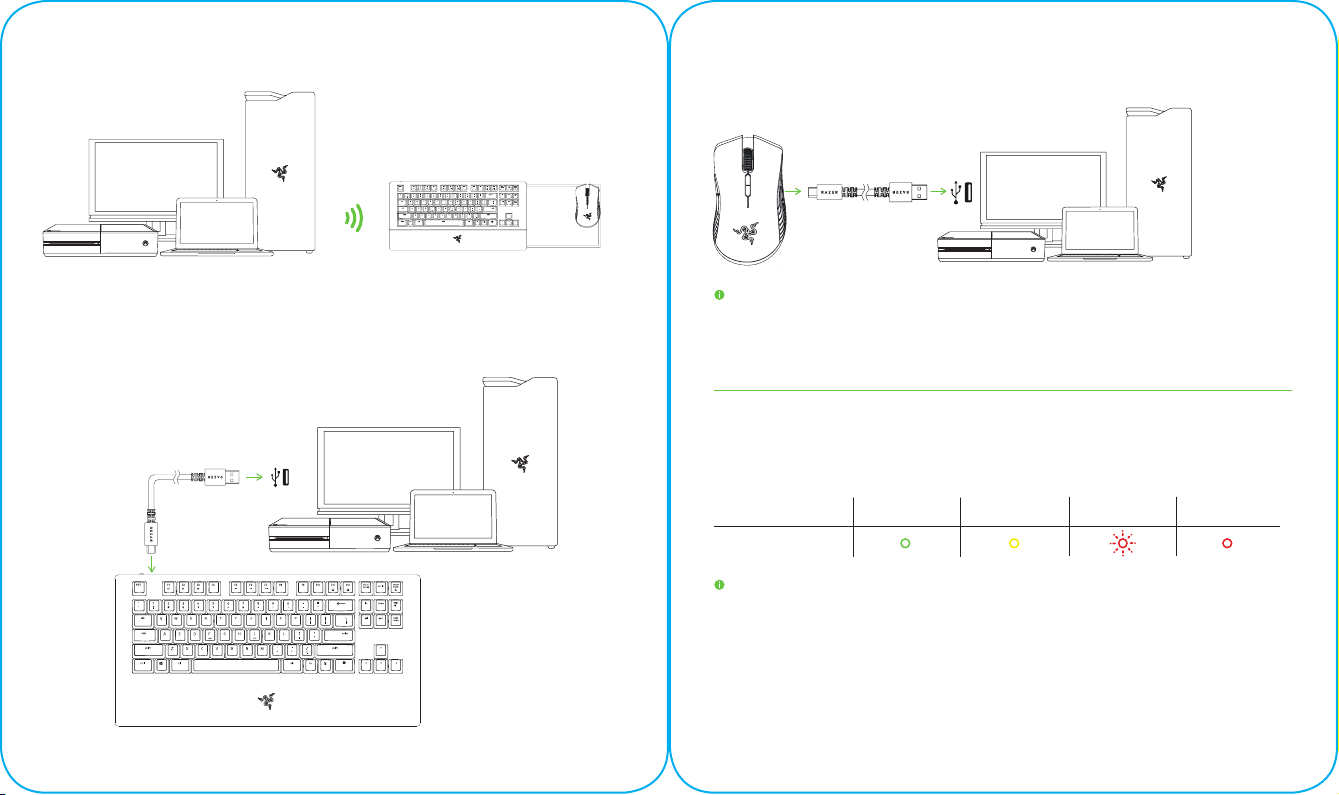
4. The Razer Turret for Xbox One is now ready for use in wireless mode.
MOUSE
Connect the mouse’s USB to Micro-USB port to your Xbox One or PC using the included USB-A to Micro-USB cable,
and then turn on the device.
WIRED MODE
KEYBOARD
Connect the keyboard’s USB port to your Xbox One or PC using the included USB-A to USB-C cable,
and then turn on the device.
Note: Connecting the keyboard and/or mouse via wired connection will also individually charge your devices. A
USB connection that can supply sufficient power to your device is required. The charging process may be affected if
connected to non-powered USB hubs or non-powered USB ports found on certain keyboards and other peripherals.
When in doubt, it is recommended to connect these devices directly to the USB ports of either your Xbox One or PC.
USING YOUR RAZER TURRET FOR XBOX ONE
UNDERSTANDING THE POWER INDICATORS
Power Indicator (keyboard)
The power indicator on the keyboard displays the keyboard’s battery status.
STATUS
INDICATOR
*Critical status indicates that the keyboard’s battery is less than 3%. This lighting sequence will repeat until the battery
is drained or the keyboard is charged. During this state, the lighting on the keyboard will also be disabled.
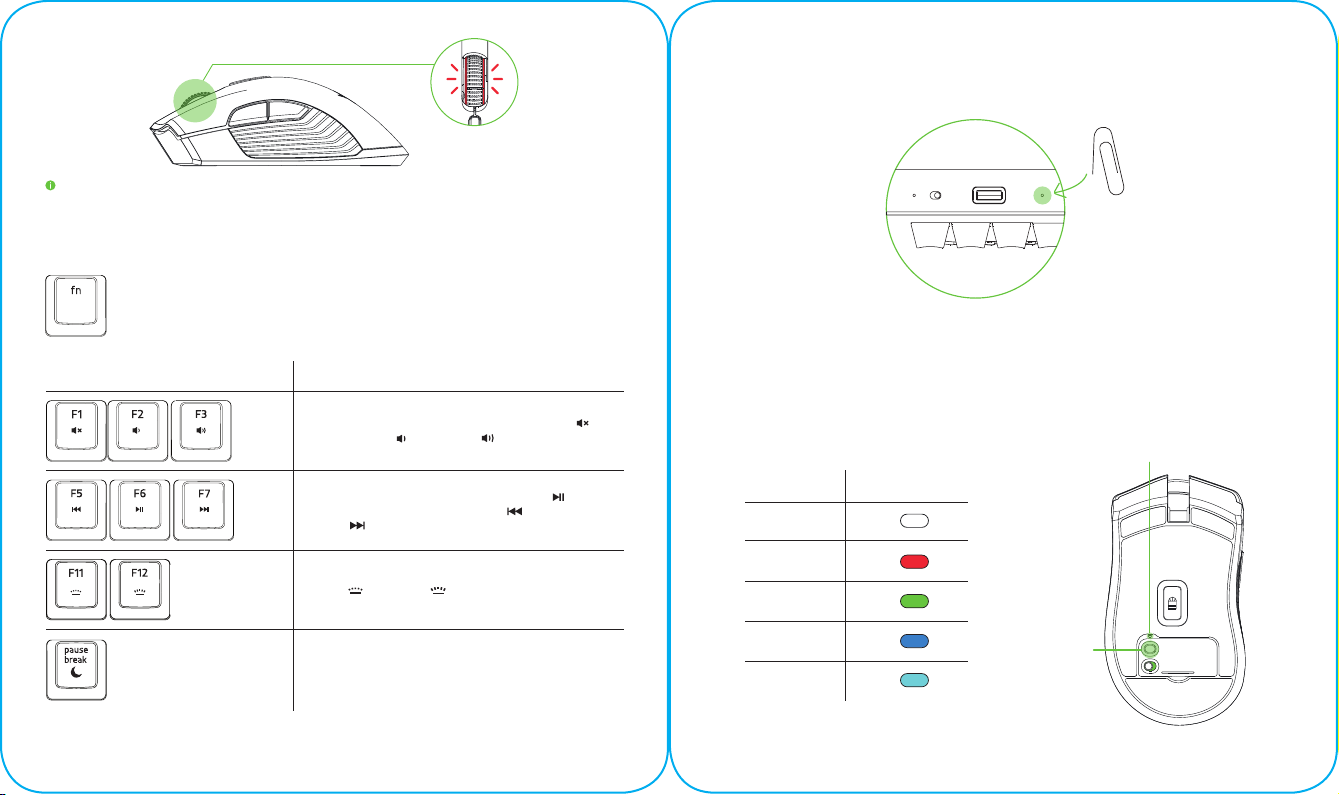
Low Power Indicator (mouse)
The mouse’s scroll wheel will blink red twice in repeated intervals to indicate that the battery’s power is less than
5%. This lighting sequence will repeat until the battery is drained or the mouse is connected to the PC via the USB-A
to Micro-USB cable.
Low Critical* ChargingFull
Page 6
You may view the individual battery percentage of each device and/or customize the indicator percentage of the mouse
using Razer Synapse 3 or the Xbox One home screen can only be navigated with a controller or the keyboard; all mouse
cursor functions are only available in-game.
FUNCTION KEYS (KEYBOARD)
When the “fn” key is held down, all function keys with secondary functions including other keys
which you can combine with the “fn” key will light up. Pressing the “fn” keys in combination with
these keys will activate their secondary commands on your PC.
FUNCTION KEYS SECONDARY COMMANDS
The audio volume controls allow you to mute ( ),
decrease ( ) and increase ( ) the audio output.
The media keys allow you to play/pause ( )
a track or skip tracks backward ( ) and forward
( ).
RESET BUTTON (KEYBOARD)
If your keyboard freezes or suddenly stops responding, simply press the Reset button on the keyboard using a
paper clip or any similar object to restart your device.
STORED PROFILES (MOUSE)
The Razer Turret for Xbox One mouse can store up to 5 profiles from Razer Synapse 3, which you can use on
systems that do not have Razer Synapse 3 installed. You can store your current profile temporarily until it is
replaced with a new active profile and pressing the Profile button will cycle from the current profile to profiles 1 to
4. The profile indicator will change its color to show which profile is presently selected.
Profile Indicator
DESIGNATED COLOR
Active profile
White
The backlight control keys allow you to decrease
( ) or increase ( ) the brightness of your
keyboard’s LEDs.
The sleep key allows you to suspend all operating
system activities. This function allows you to save
electricity while the computer is idle.
Profile 1
Profile 2
Profile 3
Profile 4
Red
Green
Blue
Cyan
Profile button
Page 7

INSTALLING RAZER SYNAPSE 3 / RAZER TURRET APP
PERSONALIZING THE LIGHTING OF YOUR DEVICES
Several lighting effects are made available for your keyboard and mouse when you download and install the Razer
Turret app on your Xbox One or the Razer Synapse 3 on your PC. Listed below are the lighting effects which you can
use to customize the lighting effects of your devices.
Note: Power indicators are not customizable.
DESCRIPTION HOW TO SET UP
Step 1: Make sure the USB wireless dongle is connected to the USB port of your Xbox One or PC.
Step 2: For Xbox One. Download and install the Razer Turret app from the Xbox Store of your gaming console.
For PC. Install Razer Synapse 3 on your PC when prompted* or download it from razer.com/synapse.
Step 3: Create your Razer ID or log into Razer Synapse 3 with an existing account.
*Applicable for Windows 8 or later.
Breathing
The lighting fades in and out of the selected color(s)
Reactive
The LEDs will light up when you press or click any of
the keys or mouse buttons
Ripple*
On key press, light will ripple away from the
pressed key
Spectrum cycling
The lighting will cycle between 16.8 million
colors indefinitely
Starlight*
Each key will have a chance of fading in and out at a
random time and duration
Static
The LEDs will remain lit in the selected color
Wave*
The lighting will scroll in the direction selected
*These effects are only available for the keyboard.
Please refer to the Online Master Guide at support.razer.com for in-depth instructions on how to configure and use
your Razer Turret for Xbox One.
Select up to 2 colors or randomize
Select the color and the length of
time for the LED to remain lit
Select a color
No further customization
required
Select up to 2 colors or
randomize colors and select
a duration
Select a color
Select either left-to-right or
right-to-left wave direction
Page 8

FRANÇAIS
CE QUI VOUS ATTEND
• Clavier sans fil Razer Turret for Xbox One
• Souris sans fil Razer Turret for Xbox One
• Dongle USB sans fil
• Câble de chargement clavier-à-souris
• Câble USB-A vers USB-C
• Câble USB-A vers micro-USB
• Adaptateur secteur* avec connecteurs interchangeables
• Informations importantes sur le produit
*les modèles peuvent différer
CONFIGURATION DE SYSTÈME NÉCESSAIRE
CONFIGURATION PRODUIT
• Xbox One / Xbox One S / Xbox One X
OU
• PC (Windows 7 64 bits ou supérieur) avec port(s)
USB libre(s)
CONFIGURATION DE L’APPLICATION RAZER TURRET / RAZER SYNAPSE 3
• Connexion Internet
• 500 Mo d’espace disque disponible
NOUS SOMMES LÀ POUR VOUS
Vous tenez un appareil d’exception entre vos mains. À présent, débloquez
tout son potentiel en l’enregistrant en ligne ! Vous pourrez obtenir des
avantages Razer exclusifs, des renseignements concernant la garantie
limitée à 2 ans de votre appareil, et bien plus.
Enregistrez-vous dès maintenant sur razerid.razer.com/warranty
DÉCLARATION DE SÉCURITÉ
IMPORTANT ! Avant d’utiliser la Xbox One avec ce produit, lisez le
manuel d’instructions de la Xbox One sur la sécurité, la santé et autres
informations concernant l’utilisation de la Xbox One.
DÉCOUVERTE DE VOTRE RAZER TURRET FOR XBOX ONE
CLAVIER
A Indicateur d’alimentation
B Interrupteur
C Port USB-C
D Bouton Réinitialisation
E Touches de réglage du volume
F Touches multimédias
G Touches de contrôle du rétro-éclairage
H Touche mode sommeil
I Port de charge pour souris
J Loquet pour tapis de souris rangeable
K Zone d’accueil magnétisée pour souris
L Tapis de souris rangeable
M Touche Xbox
N Câble USB-A vers USB-C
O Câble de chargement clavier-à-souris
P Adaptateur secteur*
* Les modèles d’adaptateur électrique peuvent différer.
SOURIS
A Bouton gauche de la souris
B Bouton droit de la souris
C Molette de la souris
D Niveau de sensibilité +
E Niveau de sensibilité F Bouton de souris 5
G Bouton de souris 4
H Pied de souris Ultraslick
I Capteur optique True 16 000 DPI 5G
J Indicateur de profil
K Bouton de prof il
L Interrupteur
M Couvercle de dongle USB sans fil
N Dongle USB sans fil
O Câble USB-A vers micro-USB
Les niveaux de sensibilité par défaut sont les suivants : 800, 1800,
4500, 9000 et 16 000. Les niveaux de sensibilité peuvent être personnalisés
grâce à Razer Synapse 3 et l’application Razer Turret.
CONFIGURATION DE VOTRE RAZER TURRET FOR XBOX ONE
PRÉPARATION DE VOS APPAREILS POUR LA PREMIÈRE UTILISATION
1. Abaissez le loquet situé sur le côté droit du clavier pour
déverrouiller et sortir le tapis de souris.
2. Branchez la souris au port de souris du clavier avec le câble de
chargement clavier-à-souris fourni.
3. Sélectionnez la prise appropriée à votre pays et branchez-la à
l’adaptateur.
4. Branchez l’adaptateur secteur au clavier grâce au câble USB-A vers
USB-C fourni, et branchez-le à une prise de courant. L’indicateur
d’alimentation du clavier s’allumera en rouge pour vous indiquer que
le clavier est en charge. La souris commencera également à se
charger.
Remarque : Utilisez uniquement l’adaptateur secteur et le câble
USB-A vers USB-C fournis avec le produit.
5. Attendez que votre clavier soit entièrement chargé. L’indicateur
d’alimentation s’allumera en vert pour vous indiquer que la charge
est terminée.
Remarque : Pour de meilleurs résultats, veuillez charger complètement votre
Razer Turret for Xbox One avant la première utilisation.
CONNEXION DE VOTRE RAZER TURRET FOR XBOX ONE À VOTRE XBOX
ONE / PC
Mode sans fil
1. Retirez le couvercle du dongle USB sans fil sur la souris, et retirez le
dongle USB sans fil.
2. Branchez le dongle USB sans fil à un port USB de votre Xbox One ou
de votre PC.
3. Allumez le clavier et la souris.
4. Le Razer Turret for Xbox One est maintenant prêt à l’emploi en
mode sans fil.
Mode câblé
Clavier
Connectez le port USB de votre clavier à votre Xbox One ou PC en vous
servant du câble USB-A vers USB-C fourni, puis allumez l’appareil.
Souris
Connectez le port Micro-USB de votre souris à votre Xbox One ou PC
en vous servant du câble USB-A vers Micro-USB fourni, puis allumez
l’appareil
Remarque : Une connexion filaire du clavier et/ou de la souris vous
permettra également de charger chacun de vos appareils. Vous devez
posséder une connexion USB pouvant fournir suffisamment d’énergie pour
permettre le fonctionnement de votre appareil. Le chargement peut échouer
si vos appareils sont branchés sur un concentrateur USB non alimenté
ou sur des ports USB non alimentés tels que ceux sur certains claviers et
périphériques. En cas de doute, il est recommandé de connecter ces appareils
directement aux ports USB de votre Xbox One ou de votre ordinateur.
UTILISATION DE VOTRE RAZER TURRET FOR XBOX ONE
COMPRENDRE LES INDICATEURS D’ALIMENTATION
Indicateur d’alimentation (clavier)
L’indicateur d’alimentation du clavier affiche l’état de la batterie du
clavier.
TRÈS
PLEINE
ÉTAT
INDICATEUR
*L’état « Très faible charge » indique que la charge de la batterie du
clavier est inférieure à 3 %. Cette séquence d’éclairage se répètera jusqu’à
épuisement de la batterie, ou jusqu’à ce que le clavier soit mis en charge.
L’éclairage du clavier sera également désactivé durant cet état de charge.
Indicateur de faible charge (souris)
La molette de la souris clignotera deux fois en rouge à intervalle
régulier pour indiquer une alimentation de la batterie inférieure à 5 %.
Cette séquence d’éclairage se poursuivra jusqu’à ce que la batterie soit
complètement déchargée, ou que la souris soit connectée à l’ordinateur
grâce au câble USB-A vers Micro-USB.
Vous pouvez consulter le pourcentage de batterie de chaque appareil et/
ou pouvez personnaliser l’indicateur de pourcentage de la souris avec Razer
Synapse 3 ou l’application Razer Turret.
BOUTON RÉINITIALISATION (CLAVIER)
Si votre clavier cesse de fonctionner ou cesse soudainement de
répondre, il vous suffit d’appuyer sur la touche Réinitialisation à l’aide
d’un trombone ou de tout autre objet similaire afin de redémarrer
votre appareil.
PROFILS ENREGISTRÉS (SOURIS)
Le Razer Turret for Xbox One peut contenir jusqu’à 5 profils enregistrés
depuis Razer Synapse 3 ; ceux-ci peuvent être utilisés sur des
systèmes où Razer Synapse 3 n’est pas installé. Vous pouvez stocker
temporairement votre profil actuel jusqu’à ce qu’il soit remplacé par
un nouveau profil actif et appuyer sur le bouton Profil passera du profil
actuel aux profils 1 à 4. La couleur de l’indicateur de profil change pour
indiquer le profil actuellement sélectionné.
CHARGE
FAIBLE
CHARGE
FAIBLE
CHARGE*
CHARGE
EN
COURS
COULEUR ASSOCIÉE
Profil actif
Profil 1
Profil 2
Profil 3
Profil 4
INSTALLATION DE RAZER SYNAPSE 3 / L’APPLICATION RAZER TURRET
Étape 1 : Vérifiez que le dongle USB sans fil est connecté à un port USB
de votre Xbox One ou de votre PC.
Étape 2 : Pour Xbox One. Téléchargez ou installez l’application
application Razer Turret depuis le Xbox Store de votre console.
Pour PC. Installez Razer Synapse 3 sur votre ordinateur lorsque
vous y êtes invité* ou téléchargez-le sur razer.com/synapse.
Étape 3 : Créez votre Razer ID ou connectez-vous à Razer Synapse 3
avec un compte existant.
*Valable pour Windows 8 et versions ultérieures.
PERSONNALISATION DE L’ÉCLAIRAGE DE VOS APPAREILS
Plusieurs effets d’éclairage sont disponibles pour votre clavier et votre
souris lorsque vous téléchargez et installez l’application Razer Turret
sur votre Xbox One ou le programme Razer Synapse 3 sur votre PC. Cidessous, vous trouverez les effets d’éclairage que vous pouvez utiliser
pour personnaliser vos appareils.
Remarque : Les indicateurs d’alimentation ne sont pas personnalisables.
*Ces effets sont uniquement disponibles pour le clavier
DESCRIPTION CONFIGURATION
Respiration
Les couleurs d’éclairage
sélectionnées s’intensifient et
s’estompent alternativement.
Réactif
Les voyants LED s’allument
lorsque vous appuyez ou
cliquez sur l’un des boutons
de la souris ou du clavier.
Ondulation*
Lorsque vous appuyez sur
une touche, la lumière ondule
à partir de la touche sur
laquelle vous avez appuyé
Cycle de spectre
L’éclairage du clavier fera
défiler de manière indéfinie
les 16,8 millions de couleurs
Blanc
Rouge
Vert
Bleu
Cyan
Choisissez
jusqu’à 2 couleurs
ou de manière
aléatoire.
Choisissez
la couleur
et la durée
d’éclairage des
voyants LED.
Sélectionnez
une couleur
Aucune autre
personnalisation
n’est requise.
Page 9

Starlight*
L’éclairage de chaque touche
s’intensifie et s’estompe
dans un ordre et pour une
durée aléatoires
Statique
Les voyants LED resteront
allumés dans la couleur
sélectionnée.
Vague*
L’éclairage du clavier défile
dans la direction sélectionnée.
Reportez-vous au mode d’emploi en ligne disponible à l’adresse support.
razer.com pour obtenir des instructions détaillées sur la configuration et
l’utilisation de votre Razer Turret for Xbox One.
Choisissez
jusqu’à 2
couleurs ou
randomisez-les
et choisissez une
durée
Sélectionnez
une couleur
Sélectionnez
la direction de
vague de gauche
à droite ou de
droite à gauche
DEUTSCH
LIEFERUMFANG
• Razer Turret for Xbox One – Kabellose Tastatur
• Razer Turret for Xbox One – Kabellose Maus
• Kabelloser USB-Adapter
• Tastatur-Maus-Ladekabel
• USB-A-auf-USB-C-Kabel
• USB-A-auf-Micro-USB-Kabel
• Netzadapter* mit austauschbaren Anschlüssen
• Wichtige Produktinformationen
*Je nach Land
SYSTEMANFORDERUNGEN
PRODUKTANFORDERUNGEN
• Xbox One / Xbox One S / Xbox One X
ODER
• PC (Windows 7 64-bit oder höher) mit freien
USB-Anschlüssen
SYSTEMANFORDERUNGEN FÜR RAZER SYNAPSE 3 / RAZER TURRET
APP
• Internetverbindung
• 500 MB freier Festplattenspeicher
HOL DIR DAS KOMPLETTPAKET
Du hältst ein fantastisches Gerät in deinen Händen — höchste Zeit, dass
du sein volles Potenzial entfesselst, indem du dich online registrierst! Du
kannst exklusive Razer Vorteile absahnen, Informationen zur 2-jährigen
eingeschränkten Garantie auf dein Gerät abrufen und noch viel mehr.
Registriere dich jetzt unter razerid.razer.com/warranty
SICHERHEITSHINWEIS
WICHTIG! Bevor du deine Xbox One in Verbindung mit diesem
Produkt verwendest, lies das Xbox One-Handbuch, um Sicherheits-,
Gesundheits- und andere Informationen zur Verwendung der Xbox One
zu erhalten.
DAS IST DEIN RAZER TURRET FOR XBOX ONE
TASTATU R
A Power-Kontrollleuchte
B Power-Schalter
C USB-C-Anschluss
D Reset-Taste
E Lautstärke-Regler
F Medientasten
G Hintergrundbeleuchtungstasten
H Ruhemodus-Taste
I Maus-Ladeanschluss
J Verriegelung für einziehbares Mauspad
K Magnetisches Maus-Dock
L Einziehbares Mauspad
M Xbox-Taste
N USB-A-auf-USB-C-Kabel
O Tastatur-Maus-Ladekabel
P Netzteil*
*Netzteil je nach Land.
MAUS
A Linke Maustaste
B Rechte Maustaste
C Mausrad
D DPI-Stufe +
E DPI-Stufe F Maustaste 5
G Maustaste 4
H Ultraslick-Gleitfüße
I Optischer 5G-Sensor mit echten 16.000 DPI
J Profil-Anzeige
K Profil-Taste
L Power-Schalter
M Abdeckung des Kabellosen USB-Adapters
N Kabelloser USB-Adapter
O USB-A-auf-Micro-USB-Kabel
Die Standard-DPI-Stufen sind wie folgt: 800, 1800, 4500, 9000 und
16000. Die DPI-Stufen kannst du mithilfe von Razer Synapse 3 und der
Razer Turret App anpassen.
SO RICHTEST DU DEINEN RAZER TURRET FOR XBOX ONE EIN
SO BEREITEST DU DEINE GERÄTE FÜR DEN 1. EINSATZ VOR
1. Schiebe die Verriegelung an der rechten Seite der Tastatur nach
unten, um das Mauspad zu entriegeln und herauszuziehen.
2. Verbinde mithilfe des Tastatur-Maus-Ladekabels die Maus mit dem
Maus-Anschluss der Tastatur.
3. Wähle den passenden Stromstecker für deine Region und befestige
ihn an dem Netzteil.
4. Verbinde das Netzteil per mitgeliefertem USB-A auf-USB-C-Kabel
mit der Tastatur und das Netzteil dann stecke in eine Steckdose. Die
Power-Kontrollleuchte der Tastatur leuchtet nun rot auf, was
bedeutet, dass die Tastatur aufgeladen wird. Auch die Maus wird
nun aufgeladen.
Hinweis: Verwende nur das Netzteil und das USB-A-auf-USB-C Kabel aus dem Lieferumfang des Produkts.
5. Bitte warte, bis dein Tastatur voll aufgeladen ist. Die Power Kontrollleuchte der Tastatur leuchtet grün auf, sobald die Tastatur
voll aufgeladen ist.
Hinweis: Um optimale Ergebnisse zu erzielen, lade deinen Razer Turret
für Xbox One bitte vor dem ersten Einsatz voll auf.
SO VERBINDEST DU DEINEN RAZER TURRET FOR XBOX ONE MIT
DEINER XBOX ONE / DEINEM PC
Kabelloser Modus
1. Entferne bei der Maus die Abdeckung des Kabellosen USB-Adapters
und nimm ihn heraus.
2. Verbinde deinen Kabellosen USB-Adapter mit einem freien USB Anschluss deiner Xbox One oder deines PCs.
3. Schalte Tastatur und Maus ein.
4. Dein Razer Turret for Xbox One ist nun bereit für den Einsatz im
kabellosen Modus.
Kabelgebundener Modus
Tastatur
Verbinde den USB-Anschluss der Tastatur per mitgeliefertem USB-A-
auf-USB-C-Kabel mit deiner Xbox One oder deinem PC und schalte das
Gerät dann ein.
Maus
Verbinde den Micro-USB-Anschluss der Maus per mitgeliefertem
USB-A-auf-Micro-USB-Kabel mit deiner Xbox One oder deinem PC und
schalte das Gerät dann ein.
Hinweis: Wenn du die Tastatur und/oder die Maus per Kabel
verbindest, werden beide Geräte ebenfalls aufgeladen. Dies erfordert eine
USB-Verbindung, die ein Gerät ausreichend mit Strom versorgen kann. Das
Aufladen kann eventuell durch eine Verbindung zu einem USB-Hub oder USBAnschlüssen ohne Stromversorgung beeinflusst werden, die an bestimmten
Tastaturen und anderen Peripheriegeräten vorhanden sind. Wenn du dir nicht
sicher bist, verbinde diese Geräte am besten direkt mit dem USB-Anschluss
deiner Xbox One oder deines PCs.
SO BENUTZT DU DEINEN RAZER TURRET FOR XBOX ONE
SO LIEST DU DIE POWER-KONTROLLLEUCHTEN RICHTIG AB
Power-Kontrollleuchte (Tastatur)
Die Power-Kontrollleuchte der Tastatur zeigt dir ihren Akkustatus an.
STATUS
ANZEIGE
*Der Akkustand der Tastatur liegt unter 3 %. Diese Beleuchtungssequenz
wiederholt sich fortlaufend bis der Akku erschöpft ist oder die Tastatur
aufgeladen wird. Die Beleuchtung der Tastatur wird bei diesem Status
ausgeschaltet.
Anzeige bei niedrigem Akkustand (Maus)
Das Scrollrad deiner Maus leuchtet in regelmäßigen Intervallen zweimal
rot auf, um anzuzeigen, dass der Akkustand unter 5 % gesunken ist.
NIEDRIG
KRITISCH*
AUFLADENVOLL
Diese Beleuchtungssequenz wiederholt sich fortlaufend bis der Akku
erschöpft ist oder die Maus per USB-A-auf-Micro-USB-Kabel mit dem
PC verbunden wird.
Per Razer Synapse 3 oder der Razer Turret App kannst du dir den
Akkustand jedes Geräts in Prozent anzeigen lassen und/oder die Anzeige in
Prozent bei der Maus anpassen.
RESET-TASTE (TASTATUR)
Reagiert deine Tastatur plötzlich nicht mehr, kannst du einfach
die Reset-Taste mithilfe einer Büroklammer oder einem ähnlichen
Hilfsmittel drücken, um das Gerät neu zu starten.
GESPEICHERTE PROFILE (MAUS)
Die Maus deines Razer Turret for Xbox One kann bis zu fünf Profile von
Razer Synapse 3 speichern, die du dann auch auf Systemen verwenden
kannst, auf denen Razer Synapse 3 nicht installiert ist. Du kannst dein
aktuelles Profil vorübergehend speichern, bis es durch ein neues aktives
Profil ersetzt wird. Drücke die Profil-Taste, um zwischen dem aktuellen
Profil und den Profilen 1 bis 4 umzuschalten. Die Profil-Anzeige ändert
ihre Farbe, um dir anzuzeigen, welches Profil derzeit ausgewählt ist.
ZUGEWIESENE FARBE
Aktives Profil
Profil 1
Profil 2
Profil 3
Profil 4
SO INSTALLIERST DU RAZER SYNAPSE 3 / RAZER TURRET APP
Schritt 1: Achte darauf, dass dein Kabelloser USB-Adapter mit einem
freien USB-Anschluss deiner Xbox One oder deines PCs
verbunden ist.
Schritt 2: Für Xbox One. Lade dir die Razer Turret App vom Xbox Store
deiner Konsole herunter und installiere die Software.
Für PC. Installiere bei Aufforderung* Razer Synapse 3 oder
lade dir as Installationsprogramm von razer.com/synapse
herunter.
Schritt 3: Lege eine Razer ID an oder melde dich mit einem
vorhandenen Konto bei Razer Synapse 3 an.
*Verfügbar ab Windows 8.
SO VERLEIHST DU DER BELEUCHTUNG DEINER GERÄTE EINE
PERSÖNLICHE NOTE
Mehrere Beleuchtungseffekte stehen dir für Tastatur und Maus
zur Verfügung, wenn du die Razer Turret App auf deiner Xbox
One oder deinem PC installiert hast. Im Folgenden findest du die
Beleuchtungseffekte, mit deren Hilfe du die Beleuchtung deiner Geräte
individuell gestalten kannst.
Hinweis: Power-Kontrollleuchten lassen sich nicht individuell anpassen.
Weiß
Rot
Grün
Blau
Türkis
Page 10

BESCHREIBUNG EINRICHTUNG
Atmung
Die Beleuchtung pulsiert in
der ausgewählten Farbe bzw.
den ausgewählten Farben.
Reaktiv
Die LEDs leuchten auf, wenn
du eine Taste der Tastatur
oder Maus betätigst.
Kräuseln*
Wird eine Taste gedrückt,
kräuselt sich das Licht von
ihr aus fort.
Durchlaufen des Farbspektrums
Die Beleuchtung wechselt
in einer Endlosschleife
zwischen 16,8 Millionen
Farben.
Sternenfunkeln*
Jede Taste erleuchtet und
verdunkelt sich zufällig für
einen per Zufall bestimmten
Zeitraum.
Statisch
Die LEDs leuchten in der
ausgewählten Farbe.
Welle*
Die Beleuchtung scrollt in
die gewählte Richtung.
*Diese Effekte stehen nur bei der Tastatur zur Verfügung.
Weitergehende Anweisungen zu Konfiguration und Verwendung
deines Razer Turret for Xbox One findest du im Online-Handbuch unter
support.razer.com.
Wähle bis zu
2 Farben oder
Zufallsfarben.
Bestimme, wie
lange die LED in
welcher Farbe
leuchtet.
Wähle eine Farbe.
Keine weitere
Anpassung
erforderlich.
Wähle bis
zu zwei
Farben oder
Zufallsfarben
und dann die
Dauer.
Wähle eine
Farbe.
Als Richtung der
Welle kannst
du “Links nach
Rechts” oder
“Rechts nach
Links” wählen.
PORTUGUÊS (BR)
CONTEÚDO DA EMBALAGEM
• Teclado sem fio Razer Turret for Xbox One
• Mouse sem fio Razer Turret for Xbox One
• Dongle USB sem fio
• Cabo de carregamento teclado para mouse
• Cabo USB-A para USB-C
• Cabo USB-A para Micro-USB
• Adaptador de energia* com plugues intercambiáveis
• Guia de informações importantes sobre o produto
*os modelos podem variar
REQUISITOS DO SISTEMA
REQUISITOS DO PRODUTO
• Xbox One / Xbox One S / Xbox One X
OU
• PC (Windows 7 de 64 bits ou superior) com porta(s)
USB livre(s)
REQUISITOS DO APLICATIVO RAZER TURRET / RAZER SYNAPSE 3
• Conexão com a Internet
• 500 MB de espaço livre no disco rígido
NÓS LHE DAMOS COBERTURA
Você tem um ótimo dispositivo nas suas mãos – agora, maximize seu
potencial registrando-o online! Você recebe benefícios exclusivos da
Razer, informações sobre a garantia limitada de 2 anos do dispositivo
e muito mais.
Registre-se agora em razerid.razer.com/warranty
DECLARAÇÃO DE SEGURANÇA
IMPORTANTE! Antes de usar o Xbox One com este produto, leia o
manual de instruções do Xbox One para obter informações sobre
segurança, saúde e outros tópicos referentes ao uso do Xbox One.
EXPLORANDO O SEU RAZER TURRET FOR XBOX ONE
TECLADO
A Indicador de energia
B Interruptor de alimentação
C Porta USB-C
D Botão Restaurar
E Teclas de controle de volume
F Teclas de mídia
G Teclas de controle da retroiluminação
H Tecla do modo de suspensão
I Porta de carregamento do mouse
J Trava para o tapete de mouse rebatível
K Área de acoplamento do mouse magnetizada
L Tapete de mouse rebatível
M Tecla do Xbox
N Cabo USB-A para USB-C
O Cabo de carregamento teclado para mouse
P Adaptador de energia*
*Os modelos do adaptador de energia podem variar.
MOUSE
A Botão esquerdo do mouse
B Botão direito do mouse
C Roda de rolagem
D Aumentar estágio de DPI
E Diminuir estágio de DPI
F Botão do mouse 5
G Botão do mouse 4
H Pés para mouse Ultraslick
I Sensor óptico 5G com resolução real de 16 000 DPI
J Indicador de perfil
K Botão Perf il
L Interruptor de alimentação
M Tampa do dongle USB sem fio
N Dongle USB sem fio
O Cabo USB-A para Micro-USB
Os estágios de DPI padrão são os seguintes: 800, 1800, 4500, 9000
e 16000. Os estágios de DPI podem ser personalizados usando o Razer
Synapse 3 e o aplicativo Razer Turret.
CONFIGURANDO O SEU RAZER TURRET FOR XBOX ONE
PREPARANDO OS SEUS DISPOSITIVOS PARA A PRIMEIRA UTILIZAÇÃO
1. Segure a trava no lado direito do teclado para destravar e puxe o
tapete de mouse.
2. Conecte o mouse à porta do mouse do teclado usando o cabo de
carregamento de teclado para mouse incluído.
3. Selecione o plugue adequado para a sua região e acople-o ao
adaptador de energia.
4. Conecte o adaptador de energia ao teclado usando o cabo USB-A
para USB-C incluído e conecte-o a uma tomada elétrica. O indicador
de energia do teclado acenderá em vermelho para indicar que o
teclado está sendo carregado. O mouse também começará a
carregar.
Observação: use apenas o adaptador de alimentação e o cabo
USB-A para USB-C que acompanham o produto.
5. Aguarde até que o teclado esteja totalmente carregado. O indicador
de energia acenderá em verde para indicar que o teclado está
totalmente carregado.
Observação: Para obter melhores resultados, carregue totalmente o
Razer Turret for Xbox One antes de usá-lo pela primeira vez.
CONECTANDO O RAZER TURRET FOR XBOX ONE NO XBOX ONE / PC
Modo sem fio
1. No mouse, remova a tampa do dongle USB sem fio e retire-o.
2. Conecte o dongle USB sem fio à porta USB do seu Xbox One ou PC.
3. Ligue o teclado e o mouse.
4. O Razer Turret for Xbox One está agora pronto para uso no modo
sem fio.
Modo com fio
Teclado
Conecte a porta USB do teclado ao seu Xbox One ou PC usando o cabo
USB-A para USB-C incluído e, em seguida, ligue o dispositivo.
Mouse
Conecte a porta Micro-USB do mouse ao seu Xbox One ou PC usando o
cabo USB-A para Micro-USB incluído e, em seguida, ligue o dispositivo.
Observação: Conectar o teclado e/ou mouse através da
conexão com fio também irá carregar individualmente os dispositivos. É
necessária uma conexão USB que possa fornecer energia suficiente ao
seu dispositivo. O processo de carregamento pode ser afetado se ele for
conectado a hubs USB não energizados ou a portas USB não energizadas
encontradas em certos teclados e outros periféricos. Na dúvida, é
recomendável conectar esses dispositivos diretamente às portas USB do
seu Xbox One ou PC.
USANDO O SEU RAZER TURRET FOR XBOX ONE
ENTENDENDO OS INDICADORES DE ENERGIA
Indicador de energia (teclado)
O indicador de energia no teclado exibe o status da bateria do teclado.
STATUS
INDICATOR
* status Crítica indica que a bateria do teclado está abaixo de 3%.
Esta sequência de iluminação será repetida até que a bateria esteja
descarregada ou o teclado seja carregado. Durante esse estado, a
iluminação no teclado também será desativada.
Indicador de energia baixa (mouse)
A roda de navegação do mouse piscará em vermelho duas vezes em
intervalos repetidos para indicar que a bateria está com menos de 5%
de carga. Esta sequência de iluminação se repetirá até que a bateria
seja drenada ou até que o mouse seja conectado ao PC através do cabo
USB-A para Micro-USB.
Você pode visualizar a porcentagem de bateria individual de cada
dispositivo e/ou personalizar a porcentagem do indicador do mouse usando
o Razer Synapse 3 ou o aplicativo Razer Turret.
BOTÃO RESTAURAR (TECLADO)
Se o teclado congelar ou repentinamente parar de responder, basta
pressionar o botão Restaurar no teclado usando um clipe de papel ou
qualquer objeto semelhante para reiniciar o dispositivo.
PERFIS ARMAZENADOS (MOUSE)
O mouse Razer Turret for Xbox One é capaz de armazenar até 5 perfis
do Razer Synapse 3, que podem ser usados em sistemas que não têm
o Razer Synapse 3 instalado. Você pode armazenar seu perfil atual
temporariamente até que seja substituído por um novo perfil ativo
e pressionar o botão Perfil alternará do perfil atual para os perfis 1 a
4. O indicador do perfil mudará sua cor para mostrar qual perfil está
atualmente selecionado.
Perfil ativo
Perfil 1
Perfil 2
Perfil 3
Perfil 4
INSTALAÇÃO DO RAZER SYNAPSE 3 / APLICATIVO RAZER TURRET
Etapa 1: Verifique se o dongle USB sem fio está conectado
à porta USB do seu Xbox One ou PC.
Etapa 2: Para o Xbox One. Baixe e instale o aplicativo Razer Turret na
Xbox Store do seu console de jogos.
Para o PC. Instale o Razer Synapse 3 no computador quando
solicitado* ou baixe-o em razer.com/synapse.
BAIXA
CRÍTICA*
COR ATRIBUÍDA
Branco
Vermelho
Verde
Azul
Ciano
CARREGANDOCHEIA
Page 11

Etapa 3: Crie o seu Razer ID ou entre no Razer Synapse 3
com uma conta já existente.
*Aplicável a Windows 8 ou superior.
PERSONALIZANDO A ILUMINAÇÃO DOS SEUS DISPOSITIVOS
Vários efeitos de iluminação são disponibilizados para o seu teclado e
mouse quando você baixar e instalar o aplicativo Razer Turret no seu
Xbox One ou o Razer Synapse 3 no seu PC. Listados abaixo estão os
efeitos de iluminação que você pode usar para personalizar os efeitos de
iluminação dos seus dispositivos:
Observação: Os indicadores de energia não são personalizáveis.
DESCRIÇÃO
Respiração
A iluminação acentua
e atenua a(s) cor(es)
selecionada(s)
Reativo
Os LEDs se acenderão
quando você pressionar ou
clicar em qualquer tecla ou
botão do mouse
Ondulação*
Ao pressionar uma tecla, a
luz se propaga a partir da
tecla pressionada
Ciclo de espectros
A iluminação percorrerá
16,8 milhões de cores
indefinidamente
Brilho estelar*
Cada tecla será acentuada
e atenuada em diferentes
momentos, com duração
aleatória
Estático
Os LEDs permanecerão
acesos na cor selecionada
Onda*
A iluminação se deslocará na
direção selecionada
*Estes efeitos estão disponíveis apenas para o teclado.
Consulte o Guia Principal Online em support.razer.com para obter
instruções aprofundadas sobre como configurar e utilizar o seu Razer
Turret for Xbox One.
COMO
CONFIGURAR
Selecione até 2
cores ou deixe
aleatório
Selecione a cor
e o tempo de
duração para o
LED permanecer
aceso
Selecione
uma cor
Não requer
personalização
adicional
Selecione até 2
cores (ou deixeas em modo
aleatório) e uma
duração
Selecione
uma cor
Selecione
“esquerda para
direita” ou
“direita para
esquerda” como
direção da onda
ESPAÑOL
CONTENIDO
• Teclado inalámbrico Razer Turret for Xbox One
• Ratón inalámbrico Razer Turret for Xbox One
• Adaptador dongle USB inalámbrico
• Cable de carga de teclado a ratón
• Cable USB tipo A a USB tipo C
• Cable USB tipo A a micro-USB
• Adaptador de alimentación* con conectores
intercambiables
• Guía de información importante del producto
*los modelos pueden variar
REQUISITOS DEL SISTEMA
REQUISITOS DEL PRODUCTO
• Xbox One
/ Xbox One S / Xbox One X
O
• PC (Windows 7 64 bits o superior) con puerto USB
3.0 libre
REQUISITOS DE APLICACIÓN RAZER TURRET / RAZER SYNAPSE 3
• Conexión a Internet
• 500 MB de espacio libre en el disco duro
NO PIERDAS COBERTURA
Tienes un dispositivo increíble entre las manos; aprovecha todo su
potencial al registrarlo en línea. Conseguirás beneficios exclusivos de
Razer, información sobre la garantía limitada de 2 años de tu dispositivo
y mucho más.
Regístrate ya en razerid.razer.com/warranty.
DECLARACIÓN DE SEGURIDAD
IMPORTANTE Antes de usar la consola Xbox One con este producto, lee
el manual de instrucciones de Xbox One para obtener información sobre
seguridad, salud y otros datos relacionados con el uso de Xbox One.
DESCUBRE TU RAZER TURRET FOR XBOX ONE
TECLADO
A Indicador de encendido
B Interruptor de alimentación
C Puerto USB de tipo C
D Botón Reset
E Teclas de control de volumen
F Teclas multimedia
G Teclas de control de la retroiluminación
H Tecla de modo Reposo
I Puerto de carga del ratón
J Seguro para alfombrilla de ratón plegable
K Base magnética para el ratón
L Alfombrilla de ratón plegable
M Botón Xbox
N Cable USB tipo A a USB tipo C
O Cable de carga de teclado a ratón
P Adaptador de alimentación*
*Los modelos del adaptador de corriente pueden variar.
RATÓN
A Botón izquierdo del ratón
B Botón derecho del ratón
C Rueda de desplazamiento
D Aumentar nivel de PPP
E Reducir nivel de PPP
F Botón 5 del ratón
G Botón 4 del ratón
H Base del ratón ultradeslizante
I Sensor óptico 5G de 16 000 PPP reales
J Indicador de perfil
K Botón de perfil
L Interruptor de alimentación
M Cubierta del adaptador USB inalámbrico
N Adaptador dongle USB inalámbrico
O Cable USB tipo A a micro-USB
Las fases predeterminadas de PPP son las siguientes: 800, 1800, 4500,
9000 y 16 000. Las fases de PPP se pueden personalizar con Razer Synapse
3 o Razer Turret en la aplicación.
CONFIGURACIÓN DE RAZER TURRET FOR XBOX ONE
PREPARACIÓN DE TUS DISPOSITIVOS PARA SU PRIMER USO
1. Quita el seguro del lado derecho del teclado para desbloquear y
desplegar la alfombrilla del ratón.
2. Conecta el ratón al puerto correspondiente del teclado mediante el
cable de carga de teclado a ratón.
3. Selecciona el conector apropiado para tu región y conéctalo al
adaptador de alimentación.
4. Conecta el adaptador de corriente al teclado con el cable USB tipo A
a USB tipo C y enchúfalo a una toma de alimentación. El indicador de
encendido del teclado se iluminará de color rojo para indicar que el
teclado se está cargando. El ratón también se empezará a cargar.
Nota: Utiliza únicamente el adaptador de corriente y el cable USB-A
a USB-C incluido con el producto.
5. Espera a que el teclado se cargue por completo. El indicador de
encendido se iluminará en verde cuando se haya cargado por
completo.
Nota: Para obtener los mejores resultados, carga totalmente tu Razer
Turret for Xbox One antes de usarlo por primera vez.
CONEXIÓN DE RAZER TURRET FOR XBOX ONE A TU XBOX ONE/PC
Modo inalámbrico
1. En el ratón, retira la cubierta del adaptador inalámbrico y extrae el
adaptador USB inalámbrico.
2. Asegúrate de que el adaptador dongle USB inalámbrico esté
conectado al puerto USB del PC o la Xbox One.
3. Enciende el teclado y el ratón.
4. El Razer Turret for Xbox One está listo para usarse en modo
inalámbrico.
Modo con cable
Teclado
Conecta el puerto USB de tu teclado a la Xbox One o al PC mediante el
cable USB tipo A a USB tipo C y enciende el dispositivo.
Ratón
Conecta el puerto micro-USB de tu ratón a la Xbox One o al PC mediante
el cable USB tipo A a micro-USB y enciende el dispositivo.
Nota: Al conectar el teclado y/o el ratón por cable también se cargarán
los dispositivos de manera individual. Se requiere una conexión USB que
proporcione suficiente energía al dispositivo. El proceso de carga podría verse
afectado si se conecta a un concentrador USB sin alimentación o a uno de los
puertos USB sin alimentación que se encuentran en determinados teclados y
otros periféricos. En caso de duda, se recomienda conectar estos dispositivos
directamente a los puertos USB de tu Xbox One o PC.
USO DE RAZER TURRET FOR XBOX ONE
DESCRIPCIÓN DE LOS INDICADORES DE CARGA
Indicador de carga (teclado)
El indicador de encendido del teclado muestra el estado de la batería
del teclado.
ESTADO
INDICADOR
*El estado de nivel de batería crítico indica que el nivel de carga del
teclado es inferior al 3 %. Esta secuencia de iluminación se repetirá hasta
que la batería se agote o se cargue el teclado. Además, durante este
estado, la iluminación del teclado se desactivará.
Indicador de carga baja (ratón)
La rueda de desplazamiento del ratón emitirá dos destellos de color
rojo repetidamente para indicar que la carga de la batería es inferior al
5 %. Esta secuencia de luz se repetirá hasta que la batería se agote por
completo o el ratón se conecte al PC mediante el cable USB de tipo A
a micro-USB.
Puedes ver el porcentaje de batería de cada dispositivo y/o personalizar
el indicador de porcentaje del ratón mediante Razer Synapse 3 o la aplicación
de Razer Turret.
BOTÓN RESET (TECLADO)
Si el teclado se queda bloqueado o de repente no responde, pulsa el
botón Reset del teclado con un clip o algún objeto similar para reiniciar
el dispositivo.
PERFILES GUARDADOS (RATÓN)
El ratón Razer Turret for Xbox One puede guardar hasta 5 perfiles
de Razer Synapse 3, que puedes usar en sistemas que no tengan
Razer Synapse 3 instalado. Puedes guardar tu perfil actual hasta que
se reemplace por un nuevo perfil activo; al pulsar el botón de perfil,
alternará entre el perfil actual y los perfiles 1 a 4. El indicador de perfil
cambiará de color para mostrar qué perfil está seleccionado en ese
momento.
Perfil activo
Perfil 1
Perfil 2
Perfil 3
Perfil 4
COMPLETA
NIVEL DE
BATERÍA
BAJO
NIVEL DE
CARGANDOCARGA
BATERÍA
CRÍTICO*
COLOR DESIGNADO
Blanco
Rojo
Verde
Azul
Cian
Page 12

INSTALACIÓN DE RAZER SYNAPSE 3/ APLICACIÓN RAZER TURRET
Paso 1: asegúrate de que el adaptador dongle USB
inalámbrico esté conectado al puerto USB de la
Xbox One o el PC..
Paso 2: Xbox One Descarga e instala la aplicación Razer
Turret en la Tienda Xbox de la consola.
PC Instala Razer Synapse 3 en tu ordenador
cuando recibas la indicación* o descárgalo en
razer.com/synapse
Paso 3: registra un Razer ID o inicia sesión en Razer Synapse 3
con una cuenta existente.
*Aplicable a Windows 8 o posterior.
PERSONALIZACIÓN DE LA ILUMINACIÓN DE TUS DISPOSITIVOS
Dispondrás de distintos efectos de iluminación para tu teclado y ratón
al descargar e instalar la aplicación de Razer Turret en Xbox One o
Razer Synapse 3 en tu PC. A continuación se muestran los efectos de
iluminación que puedes utilizar para personalizar tus dispositivos.
Nota: Los indicadores de carga no son personalizables.
DESCRIPCIÓN
Respiración
La iluminación se
desvanece y se enciende
gradualmente con los colores
seleccionados.
Reactivo
Los LED se iluminarán
cuando pulses o hagas clic
en cualquier tecla o botón
del ratón.
Ondulación*
Al presionar una tecla, la luz
se difundirá en ondas desde la
tecla pulsada.
Rotación de espectro
La iluminación del teclado
numérico rotará entre los 16,8
millones de colores de forma
continua.
Luz estelar*
La iluminación de cada tecla
tendrá la posibilidad de
encenderse y desvanecerse
gradualmente, en cualquier
momento y con duración
aleatoria.
CÓMO
CONFIGURARLO
Se pueden
seleccionar 2
colores o bien
hacer que el
cambio se
haga de forma
aleatoria.
Selecciona el
color y el tiempo
que permanecerá
iluminado el LED.
Selecciona un
color.
No se requiere
personalización
adicional.
Selecciona
hasta 2 colores
o usa colores
aleatorios y
selecciona una
duración.
Estático
Los LED se mantendrán
iluminados en el color
seleccionado.
Onda*
La iluminación del teclado
se desplazará en la dirección
seleccionada.
Selecciona un
color.
Selecciona
una dirección
de onda: de
izquierda a
derecha o
de derecha a
izquierda.
*Estos efectos solo están disponibles para el teclado.
Consulta la guía principal en línea en support.razer.com para consultar
instrucciones detalladas sobre la configuración y el uso de Razer Turret
for Xbox One.
РУССКИЙ
• Беспроводная к лавиатура Razer Turret for Xbox One
• Беспроводная мышь Razer Turret for Xbox One
• Беспроводной USB-адаптер
• Кабель д ля зарядки мыши от клавиатуры
• Кабель USB -A/USB-C
• Кабель USB -A/Micro-USB
• Адаптер питания* с набором сетевых переходников
• Важная информация о продукте
*модели могут отличаться
ТРЕБОВАНИЯ К УСТРОЙСТВУ
• Xbox One / Xbox One S / Xbox One X
ИЛИ
• Компьютер (Windows 7 или более новая,
64-разрядная версия) со свободными USB-портами
ПРИЛОЖЕНИЯ RAZER TURRET / RAZER SYNAPSE 3
• Подключение к Интернету
• 500 МБ свободного места на жестком диске
У вас в руках замечательное устройство — самое время использовать
его по полной, зарегистрировавшись в Интернете! В результате
вы получите эксклюзивные преимущества Razer, информацию об
ограниченной гарантии сроком на 2 года на свое устройство и
многое другое.
Зарегистрируйтесь по адресу razerid.razer.com/warranty
ПРЕДУПРЕЖДЕНИЕ О БЕЗОПАСНОСТИ
! Перед подключением данного продукта к Xbox One и
началом использования прочтите руководство к Xbox One по
технике безопасности и предотвращению травм, а также другую
информацию относительно использования Xbox One.
RAZER TURRET FOR XBOX ONE
КЛАВИАТУРА
A Индикатор питания
B Выключатель питания
C Порт USB-C
D Кнопка сброса
E Клавиши уровня громкости
F Мультимедийные клавиши
G Функциональные клавиши с фоновой подсветкой
H Клавиша спящего режима
I Зарядный порт мыши
J Защелка убирающегося коврика для мыши
K Магнитная область для мыши
L Убирающийся коврик для мыши
M Клавиша Xbox
N Кабель USB-A/USB-C
O Кабель для зарядки мыши от клавиатуры
P Адаптер питания*
*Модели адаптера питания могут отличаться
МЫШЬ
A Левая кнопка мыши
B Правая кнопка мыши
C Колесо прокрутки
D Увеличение DPI
E Уменьшение DPI
F Кнопка мыши 5
G Кнопка мыши 4
H Сверхгладкие ножки Ultraslick для мыши
I Оптический сенсор 5G с истинным разрешением 16 000 DPI
J Индикатор профиля
K Кнопка профиля
L Выключатель питания
M Крышка отделения для беспроводного USB-адаптера
N Беспроводной USB-адаптер
O Кабель USB-A/Micro-USB
Показатели оптического разрешения (DPI) по умолчанию:
800, 1800, 4500, 9000 и 16 000. Показатели DPI можно настроить с
помощью приложения Razer Synapse 3 и Razer Turret.
RAZER TURRET FOR XBOX ONE
ПОДГОТОВКА УСТРОЙСТВ К ПЕРВОМУ ИСПОЛЬЗОВАНИЮ
1. Удерживайте защелку с правой стороны клавиатуры, чтобы
разблокировать и извлечь коврик для мыши.
2. Подк лючите мышь к порту мыши на клавиатуре с помощью
прилагаемого кабеля для зарядки мыши от клавиатуры.
3. Выберите соответствующий штепсель-переходник для вашего
региона и прикрепите его к адаптеру питания.
4. Подк лючите адаптер питания к клавиатуре с помощью
прилагаемого кабеля USB-A/USB-C и вставьте его в
электрическую розетку. Индикатор питания клавиатуры
загорится красным для индикации ее зарядки. Мышь также
начнет заряжаться.
Примечание. Используйте только прилагаемые к устройству
адаптер питания и кабель USB-A/USB-C.
5. Дож дитесь полной зарядки клавиатуры. Индикатор питания
загорится зеленым для индикации того, что устройство
полностью заряжено.
Примечание. Для наилучшего результата полностью зарядите
Razer Turret for Xbox One, прежде чем использовать устройство в
первый раз.
ПОДКЛЮЧЕНИЕ RAZER TURRET FOR XBOX ONE К XBOX ONE ИЛИ
КОМПЬЮТЕРУ
Беспроводной режим
1. Снимите крышку отделения для беспроводного USB-адаптера на
мышке, а затем извлеките беспроводной USB-адаптер.
2. Подк лючите беспроводной USB-адаптер к USB-порту на Xbox
One или компьютере.
3. Вк лючите клавиатуру и мышь.
4. Пос ле этого комплект Razer Turret for Xbox One готов к работе в
беспроводном режиме.
Проводной режим
Клавиатура
Подключите USB-порт клавиатуры к Xbox One или компьютеру с
помощью прилагаемого кабеля USB-A/USB-C, а затем включите
устройство.
Мышь
Подключите порт Micro-USB мыши к Xbox One или компьютеру с
помощью прилагаемого кабеля USB-A/Micro-USB, а затем включите
устройство.
Примечание. Проводное подключение клавиатуры и/и ли
мыши также позволяет заряжать устройства по отдельности.
Необходимо использовать порты USB, способные обеспечить
достаточное питание для устройства. Подключение к маломощным
USB-концентраторам или маломощным USB-портам, которыми
оснащаются некоторые клавиатуры или периферийные
устройства, может негативно отразиться на процессе зарядки.
При возникновении сомнений рекомендуется подключать данные
устройства непосредственно к USB-портам Xbox One или
компьютеру.
RAZER TURRET FOR XBOX ONE
ЗНАЧЕНИЯ СИГНАЛОВ ИНДИКАТОРОВ ПИТАНИЯ
Индикатор питания (клавиатура)
Индикатор питания на клавиатуре отображает состояние
аккумулятора клавиатуры.
ИНДИКАТОР
*Критическое состояние означает, что уровень заряда
аккумулятора клавиатуры составляет менее 3%.
Последовательность индикации будет повторяться, пока
аккумулятор не разрядится или не начнется зарядка клавиатуры.
В этом состоянии подсветка клавиатуры также отключена.
*
Page 13

Индикатор низкого заряда (мышь)
Повторяющееся двойное мигание колесика мыши красным
цветом указывает на уровень заряда аккумулятора ниже 5%. Эта
последовательность подсветки будет повторяться, пока аккумулятор
не разрядится или мышь не будет подключена к компьютеру с
помощью кабеля USB-A/Micro-USB.
Просмотреть уровень заряда аккумулятора каждого из
устройств и/или настроить процент заряда аккумулятора
мыши, при котором срабатывает индикатор, можно с помощью
приложения Razer Synapse 3 или Razer Turret.
КЛАВИША СБРОСА (КЛАВИАТУРА)
Если клавиатура зависает или внезапно перестает отвечать, нажмите
кнопку сброса на клавиатуре с помощью скрепки или аналогичного
предмета для перезагрузки устройства.
СОХРАНЕННЫЕ ПРОФИЛИ (МЫШЬ)
Мышь Razer Turret for Xbox One может сохранять до 5 профилей
приложения Razer Synapse 3, которые можно использовать в
системах, где не установлено приложение Razer Synapse 3. Мышь
может временно хранить текущий профиль, пока он не будет сменен
новым активным профилем. Нажатие кнопки профиля позволяет
перейти от текущего профиля к профилям 1–4. Индикатор профиля
меняет цвет для отображения текущего выбранного профиля.
Профиль
Профиль 2
Профиль 3
Профиль 4
RAZER SYNAPSE 3 / RAZER TURRET
Шаг 1. Убедитесь, что беспроводной USB-адаптер подключен к USB порту на Xbox One или компьютере.
Шаг 2. Xbox One. Загрузите и установите приложение Razer
Turret из магазина Xbox Store с помощью игровой консоли.
. Установите приложение Razer Synapse
3 на компьютер после появления запроса* или скачайте с
веб-страницы razer.com/synapse.
Шаг 3. Создайте свой Razer ID или войдите в приложение Razer
Synapse 3 с помощью существующей учетной записи.
*Для Windows 8 или более поздней версии.
После скачивания и установки приложения Razer Turret для Xbox
One или приложения Razer Synapse 3 для компьютера становятся
доступны несколько эффектов подсветки клавиатуры и мыши. Ниже
перечислены эффекты подсветки, которые можно использовать на
своих устройствах.
Примечание. Индикаторы питания нельзя настроить.
Белый Активный профиль
Красный
Зеленый
Синий
Голубой
Подсветка появляется и
исчезает в выбранном
цвете (цветах)
Светодиоды загораются
при нажатии любой
клавиши клавиатуры
или кнопки мыши
*
При нажатии клавиши
свет расходится в
стороны от нажатой
клавиши
-
Непрерывное
циклическое изменение
цвета подсветки во
всем спектре 16,8 млн.
оттенков.
*
Разные клавиши
подсвечиваются и
затухают с разной
длительностью в
случайном порядке
Светодиоды светятся
выбранным цветом
*
Эффект подсветки
клавиатуры будет
последовательно
меняться в выбранном
направлении
*Данные эффекты доступны только для клавиатуры.
Чтобы получить подробные инструкции по настройке и
использованию Razer Turret for Xbox One, воспользуйтесь главным
интерактивным руководством на веб-сайте support.razer.com.
Выберите один
или два цвета
подсветки либо
установите
случайный
выбор цвета
Выберите цвет
подсветки
клавиш и время,
в течение
которого
клавиша
подсвечивается
Выберите цвет
Дополнительная
настройка не
требуется
Выберите один
или два цвета
подсветки либо
установите
случайный
выбор цвета,
а затем выберите
продолжительность
Выберите цвет
Выберите
направление
движения
волны: слева
направо или
справа налево
УКРАЇНСЬКA
• Безпроводова клавіатура R azer Turret for Xbox One
• Безпроводова миша Razer Turret for Xbox One
• Безпроводовий USB-адаптер
• Кабель для заряд жання клавіатура-миша
• Кабель USB-A – USB- C
• Кабель USB-A – Micro -USB
• Адаптер живлення* зі змінними вилками
• Важлива інформаці я про пристрій
*можуть використовуватися різні моделі
ВИМОГИ ДО ПРИСТРОЮ
• Xbox One / Xbox One S / Xbox One X
АБО
• ПК ( Windows 7 або пізніша 64-розрядна версія) з
вільними USB-портами (одним чи декількома)
ВИМОГИ ДО ЗАБЕЗПЕЧЕННЯ RAZER TURRET / RAZER SYNAPSE 3
• Підключення до Інтернету
• 500 МБ вільного місця на жорсткому диску
Ви маєте чудовий пристрій — тепер саме час зареєструвати
його через Інтернет і скористатися всіма його можливостями! Ви
отримаєте доступ до виняткових пропозицій Razer, відомостей про
обмежену гарантію на свій пристрій строком на 2 роки та багатьох
інших можливостей.
Веб-сторінка реєстрації: razerid.razer.com/warranty
ПОПЕРЕДЖЕННЯ ЩОДО БЕЗПЕКИ
! Перед початком використання цього пристрою з Xbox One
ознайомтеся з інструкцією з техніки безпеки, яка додається до Xbox
One, а також з іншою інформацію щодо використання Xbox One.
RAZER TURRET FOR XBOX ONE
КЛАВІАТУРА
A Індикатор живлення
B Вимикач живлення
C Порт USB-C
D Кнопка скидання
E Клавіші регулювання гучності
F Клавіші керування мультимедійним вмістом
G Клавіші регулювання підсвічування
H Клавіша режиму сну
I Порт для заряджання миші
J Фіксатор складаного килимка для миші
K Магнітна зона для утримування миші
L Складаний килимок для миші
M Клавіша Xbox
N Кабель USB-A – USB-C
O Кабель для заряджання клавіатура-миша
P Адаптер живлення*
*Можуть використовуватися різні моделі адаптера живлення.
МИША
A Ліва кнопка миші
B Права кнопка миші
C Коліщатко прокручування
D Збільшення роздільної здатності
E Зменшення роздільної здатності
F Кнопка миші 5
G Кнопка миші 4
H Ковзкі ніжки миші
I Оптичний датчик 5G з дійсною роздільною
здатністю 16000 DPI
J Індикатор профілю
K Кнопка профілю
L Вимикач живлення
M Кришка безпроводового USB-адаптера
N Безпроводовий USB-адаптер
O Кабель USB-A – Micro-USB
Стандартні рівні оптичної роздільної здатності (dpi): 800, 1800,
4500, 9000 і 16 000. Щоб налаштувати рівні роздільної здатності,
можна використовувати програмне забезпечення Razer Synapse 3 і
Razer Turret.
RAZER TURRET FOR XBOX ONE
ПІДГОТОВКА ПРИСТРОЇВ ДО ВИКОРИСТАННЯ
1. Щоб відкріпити та витягнути килимок для миші, притисніть і
утримуйте фіксатор з правого боку клавіатури.
2. Під’є днайте мишу до порту для миші на клавіатурі за допомогою
кабелю для заряджання клавіат ура-миша.
3. Підберіть штепсель-перехідник відповідно до свого регіону і
приєднайте до адаптера живлення.
4. Під’є днайте адаптер живлення до клавіатури за допомогою
кабелю USB-A – USB-C, а потім підключіть його до розетки. Коли
почнеться процес заряджання клавіатури, індикатор живлення
засвітиться червоним. Одночасно почнеться заряджання миші.
Примітка. Використовуйте лише адаптер живлення і кабель
USB-A– USB-C, якими укомплектовано пристрій.
5. Зачекайте, доки клавіат уру буде повністю заряджено. Після
закінчення процесу заряджання індикатор живлення засвітиться
зеленим. Примітка. Для забезпечення нормальної роботи
комплекту Razer Turret for Xbox One необхідно перед початком
експлуатації повністю зарядити його акумулятор.
ПІДКЛЮЧЕННЯ RAZER TURRET FOR XBOX ONE ДО XBOX ONE АБО ДО
КОМП’ЮТЕРА
Безпроводовий режим
1. Знім іть з миші кришку безпроводового USB-адаптера і витягніть
безпроводовий USB-адаптер.
2. Під’є днайте безпроводовий USB-адаптер до порту USB на
приставці Xbox One або на комп’ютері.
3. Увімкніть клавіатуру і мишу.
4. Комплек т Razer Turret for Xbox One готовий до роботи в
безпроводовому режимі.
Page 14

Проводовий режим
Клавіатура
Під’єднайте USB-порт на клавіатурі до приставки Xbox One або до
комп’ютера за допомогою кабелю USB-A – USB-C, а потім увімкніть
пристрій.
Миша
Під’єднайте порт Micro-USB на миші до приставки Xbox One або
до комп’ютера за допомогою кабелю USB-A — Micro-USB, а потім
увімкніть пристрій.
Примітка. У разі під’єднання клавіатури та (або) миші за
допомогою кабелів ці пристрої також заряджатимуться. Потрібне
таке USB-з’єднання, яке зможе забезпечити пристрою достатнє
живлення. Під’єднання до недіючих USB-концентраторів або
недіючих USB-портів, які є на деяких клавіатурах або периферійних
пристроях, може порушити процес заряджання акумулятора. У
разі будь-яких сумнівів рекомендується під’єднати ці пристрої
безпосередньо до USB-портів приставки Xbox One або комп’ютера.
RAZER TURRET FOR XBOX ONE
ЗНАЧЕННЯ СИГНАЛІВ ІНДИКАТОРІВ ЖИВЛЕННЯ
Індикатор живлення (клавіатура)
Індикатор живлення на клавіатурі відображає стан акумулятора
клавіатури.
СТА Н
ІНДИКАТОРА
*Сигнал «Критично низький заряд» свідчить про те, що рівень
заряду акумулятора клавіатури опустився нижче 3%. Цей сигнал
індикатора світитиметься, доки акумулятор клавіатури не буде
повністю розряджено або не почнеться заряджання акумулятора.
Під час такого стану акумулятора підсвічування клавіатури не
працюватиме.
Індикатор низького заряду (миша)
Якщо коліщатко прокручування миші періодично блимає червоним,
це свідчить про те, що рівень заряду акумулятора впав нижче 5%. Ці
світлові сигнали повторюватимуться, доки акумулятор миші не буде
повністю розряджено або мишу не буде під’єднано до комп’ютера за
допомогою кабелю USB – Micro-USB.
За допомогою програмного забезпечення Razer Synapse 3 або
Razer Turret можна переглядати рівні заряду акумуляторів кожного
пристрою, а також налаштовувати рівень заряду акумулятора
миші у процентах, при якому вмикатиметься індикація низького
заряду.
КНОПКА СКИДАННЯ (КЛАВІАТУРА)
Якщо клавіатура зависне або раптом припинить реагувати, просто
натисніть кнопку скидання на клавіатурі за допомогою скріпки
для паперу або іншого подібного предмета — пристрій буде
перезавантажено.
ЗБЕРЕЖЕНІ ПРОФІЛІ (МИША)
Миша Razer Turret for Xbox One може зберігати до 5 профілів
програмного забезпечення Razer Synapse 3, які можна
*
використовувати навіть у системах, де Razer Synapse 3 не
інстальовано. Миша може тимчасово зберігати поточний профіль,
поки не буде активовано інший профіль. У разі послідовного
натискання кнопки профілю відбувається циклічний перехід від
поточного профілю до профілів 1–4. Колір індикатора профілю
змінюється відповідно до поточного профілю.
Білий Активный профиль
Профіль 1
Профіль 2
Профіль 3
Профіль 4
RAZER SYNAPSE 3 / RAZER TURRET
Крок 1: переконайтеся, що безпроводовий USB-адаптер
під’єднано до порту USB на приставці Xbox One
або на комп’ютері.
Крок 2: Xbox One: завантажте та інсталюйте програмне
забезпечення Razer Turret з магазину Xbox Store
за допомогою ігрової приставки.
’: Інсталюйте програмне забезпечення
Razer Synapse 3 на своєму комп’ютері після
запиту* або завантажте його з веб-сторінки razer.
com/synapse.
Крок 3: Створіть свій ідентифікатор Razer ID або ввійдіть
у Razer Synapse 3 за допомогою наявного
облікового запису.
Червоний
Зелений
Синій
Блакитний
*У ОС Windows 8 або новішої версії
Після завантаження та інсталяції програмного забезпечення Razer
Turret (на Xbox One) або Razer Synapse 3 (на комп’ютер) ви отримаєте
можливість використовувати декілька світлових ефектів. Нижче
наведено перелік світлових ефектів, які можна використовувати у
ваших пристроях.
Примітка. Індикатори живлення не налаштовуються.
Підсвічування обраного
кольору (кольорів)
вмикається та згасає
Світлодіоди засвічуються
під час натисканні будь-якої
клавіші на клавіатурі або на
кнопки миші
Виберіть один
чи два кольори
підсвічування
або налаштуйте
випадковий
вибір кольорів
Виберіть колір
і тривалість
підсвічування
*
Під час натискання клавіші
світло розходиться хвилями
навкруги неї
Безперервна циклічна
зміна кольору
підсвічування в усьому
спектрі з 16,8 млн. відтінків.
*
Підсвічування окремих
клавіш вмикається та згасає
у випадковому порядку і
триває різний час
Світлодіоди постійно світяться
вибраним кольором
*
Підсвічування буде
переміщатися в обраному
напрямку
Виберіть колір
Не потребує
додаткового
налаштування
Виберіть один
чи два кольори
підсвічування
або налаштуйте
випадковий
вибір кольорів,
а потім виберіть
тривалість
Виберіть колір
Виберіть
напрямок руху
хвилі: зліва
направо або
справа наліво
*Ці ефекти можна використовувати тільки для клавіатури
Детальні вказівки щодо налаштування та використання Razer Turret
for Xbox One див. в Основному інтерактивному посібнику на вебсайті support.razer.com
POLSKI
W KOMPLECIE
• Klawiatura bezprzewodowa Razer Turret for Xbox One
• Mysz bezprzewodowa Razer Turret for Xbox One
• Bezprzewodowy adapter USB
• Przewód do ładowania klawiatura-mysz
• Przewód USB-A/USB-C
• Przewód USB-A/Micro-USB
• Zasilacz sieciowy* z wymiennymi wtyczkami
• Przewodnik Ważne informacje o produkcie
*różne modele
WYMAGANIA SYSTEMOWE
WYMAGANIA ZWIĄZANE Z PRODUKTEM
• Xbox One / Xbox One S / Xbox One X
LUB
• Komputer PC ( Windows 7 64-bit lub nowszy) z
wolnymi portami USB
WYMAGANIA APLIKACJI RAZER TURRET / RAZER SYNAPSE 3
• Połączenie z Internetem
• 500 MB wolnego miejsca na dysku
MAMY DLA CIEBIE COŚ JESZCZE
Masz już świetne urządzenie, ale możesz jeszcze zmaksymalizować jego
możliwości, rejestrując się online! Uzyskasz między innymi specjalne
korzyści oferowane przez Razer oraz informacje na temat dwuletniej
ograniczonej gwarancji na urządzenie.
Zarejestruj się już teraz pod adresem razerid.razer.com/warranty
OSTRZEŻENIE
WAŻNE! Zanim zaczniesz korzystać z konsoli Xbox One wraz z tym
produktem, zapoznaj się z informacjami na temat bezpiecznego
użytkowania oraz z pozostałymi wskazówkami dotyczącymi korzystania z
konsoli Xbox One, które znajdują się w podręczniku użytkownika konsoli.
ELEMENTY ZESTAWU RAZER TURRET FOR XBOX ONE
KLAWIATURA
A Wskaźnik zasilania
B Włącznik zasilania
C Port USB-C
D Przycisk Reset
E Regulacja głośności
F Klawisze multimedialne
G Klawisze sterowania podświetleniem
H Klawisz trybu uśpienia
I Port do ładowania myszy
J Zatrzask chowanej podkładki pod mysz
K Magnetyczny obszar dokowania myszy
L Chowana podkładka pod mysz M Klawisz Xbox
N Przewód USB-A/USB-C
O Przewód do ładowania klawiatura-mysz
P Zasilacz sieciowy*
* Dostępne są różne modele zasilaczy.
MYSZ
A Lewy przycisk myszy
B Prawy przycisk myszy
C Kółko do przewijania
D Zwiększenie DPI
E Zmniejszenie DPI
F Przycisk myszy 5
G Przycisk myszy 4
H Ślizgacze Ultraslick
I Sensor optyczny 5G o rozdzielczości rzeczywistej16 000 DPI
J Wskaźnik prolu
K Przycisk prolu
L Włącznik zasilania
M Osłona bezprzewodowego adaptera USB
N Bezprzewodowy adapter USB
O Przewód USB-A/Micro-USB
Page 15

Domyślne ustawienia DPI to: 800, 1800, 4500, 9000 i 16 000. Ustawienia
DPI można dostosować przy użyciu Razer Synapse 3 i aplikacji Razer Turret.
KONFIGURACJA ZESTAWU RAZER TURRET FOR XBOX ONE
PRZYGOTOWANIE URZĄDZEŃ DO PIERWSZEGO UŻYCIA
1. Prz ytrzymaj zatrzask z prawej strony klawiatury, aby odblokować i
wyciągnąć podkładkę pod mysz.
2. Podłącz mysz do portu myszy w klawiaturze dodanym w komplecie
przewodem do ładowania klawiatura-mysz.
3. Wybier z wtyczkę zasilania odpowiednią dla Twojego regionu i
podłącz ją do zasilacza sieciowego.
4. Podłącz zasilacz do klawiatur y dodanym w komplecie przewodem
USB-A/USB-C i do gniazdka sieciowego. Wskaźnik zasilania
klawiatury zaświeci się na czerwono, informując, że trwa ładowanie
klawiatury. Równocześnie rozpocznie się też ładowanie myszy.
Uwaga: Używaj tylko zasilacza i przewodu USB-A/USB-C dodanych
w komplecie z produktem.
5. Zaczek aj, aż klawiatura całkowicie się naładuje. Wskaźnik zasilania
klawiatury zaświeci się na zielono, informując, że ładowanie się
zakończyło.
Uwaga: Aby uzyskać najlepszy efekt, naładuj w pełni zestaw Razer
Turret for Xbox One przed pierwszym użyciem.
PODŁĄCZANIE ZESTAWU RAZER TURRET FOR XBOX ONE DO KONSOLI
XBOX ONE LUB KOMPUTERA PC
Tryb bezprzewodowy
1. Zdejmij z myszy osłonę bezprzewodowego adaptera USB i wyciągnij
adapter.
2. Podłącz bezprzewodowy adapter USB do gniazda USB w konsoli
Xbox One lub komputerze PC.
3. Włącz k lawiaturę i mysz.
4. Zestaw Razer Turret for Xbox One jest gotowy do użycia w trybie
bezprzewodowym.
Tryb przewodowy
Klawiatura
Połącz gniazdo USB klawiatury z konsolą Xbox One lub komputerem PC
przewodem USB-A/USB-C, a następnie włącz urządzenie.
Mysz
Połącz gniazdo Micro-USB myszy z konsolą Xbox One lub komputerem
PC przewodem USB-A/Micro-USB, a następnie włącz urządzenie.
Uwaga: Przewodowe połączenie klawiatury i myszy powoduje także
indywidualne ładowanie tych urządzeń. Wymagane jest połączenie USB,
które może zapewnić odpowiednie zasilanie urządzeń. Ładowanie może
być utrudnione, jeżeli urządzenie zostanie podłączone do niezasilanego
koncentratora USB lub niezasilanego portu USB dostępnego w niektórych
klawiaturach i innych urządzeniach peryferyjnych. W razie wątpliwości
zaleca się podłączyć te urządzenia bezpośrednio do portu USB konsoli Xbox
One lub komputera PC.
UŻYWANIE ZESTAWU RAZER TURRET FOR XBOX ONE
ZNACZENIE WSKAŹNIKÓW ZASILANIA
Wskaźnik zasilania (klawiatura)
Wskaźnik zasilania na klawiaturze prezentuje stan naładowania baterii.
PEŁNE
NAŁADO
Prol 1
Prol 2
Prol 3
Prol 4
WANIE
STAN
WSKAŹNIK
* Stan krytyczny oznacza, że procent naładowania baterii wynosi mniej
niż 3%. Ta sekwencja świetlna będzie powtarzana do wyczerpania baterii lub
do rozpoczęcia ładowania. W tym stanie podświetlenie klawiatury również
zostanie wyłączone.
Wskaźnik niskiego poziomu naładowania (mysz)
Kółko myszy będzie migać dwukrotnie co pewien czas, wskazując, że
poziom naładowania baterii jest niższy niż 5%. Ta sekwencja świetlna
będzie powtarzana do wyczerpania baterii lub podłączenia myszy do
komputera przewodem USB-A/Micro-USB.
Przy użyciu oprogramowania Razer Synapse 3 lub aplikacji Razer
Turret można sprawdzić procentowy poziom naładowania poszczególnych
urządzeń oraz dostosować wskazywany procent naładowania myszy.
PRZYCISK RESET (KLAWIATURA)
Jeżeli klawiatura nieoczekiwanie przestanie reagować, naciśnij przycisk Reset
na klawiaturze końcówką spinacza lub innym podobnym przedmiotem, aby
uruchomić ją ponownie.
ZAPISANE PROFILE (MYSZ)
W myszy Razer Turret for Xbox One można zapisać do 5 proli z
oprogramowania Razer Synapse 3, a następnie korzystać z nich na
urządzeniach, na których nie zainstalowano Razer Synapse 3. Mysz może
tymczasowo przechowywać aktualny prol, dopóki nie zostanie on
zastąpiony nowym aktywnym prolem, a naciskając przycisk prolu, można
przełączać między bieżącym prolem a prolami od 1 do 4. Wskaźnik prolu
zmieni kolor, wskazując aktualnie wybrany prol.
INSTALOWANIE APLIKACJI RAZER SYNAPSE 3 / APLIKACJI RAZER
TURRET
Krok 1: Podłącz bezprzewodowy adapter USB do gniazda USB w konsoli
Xbox One lub komputerze PC.
Krok 2: Dla użytkowników konsoli Xbox One. Pobierz aplikację Razer
Turret ze sklepu Xbox Store i zainstaluj ją na konsoli do gier.
Dla użytkowników komputera PC. Zainstaluj aplikację Razer
Synapse 3 na komputerze po wyświetleniu monitu* lub pobierz ją
ze strony razer.com/synapse.
Krok 3: Zarejestruj się, aby uzyskać identykator Razer ID, lub zaloguj się
do Razer Synapse 3, jeśli masz już konto.
* Dotyczy systemu Windows 8 lub nowszego.
NISKI POZIOM
POZIOM
KRYTYCZNY
PRZYPISANY KOLOR
Biały Aktywny prol
Czerwony
Zielony
Niebieski
Cyjan
ŁADOWANIE
PERSONALIZACJA PODŚWIETLENIA URZĄDZEŃ
Pobranie i zainstalowanie aplikacji Razer Turret na konsoli Xbox One
lub oprogramowania Razer Synapse 3 na komputerze PC powoduje
udostępnienie kilku efektów świetlnych na klawiaturze i myszy. Poniżej
przedstawiono efekty świetlne, które można personalizować na
urządzeniach.
Uwaga: nie można personalizować wskaźników zasilania.
OPIS JAK USTAWIĆ
Breathing (Miarowe)
Podświetlenie zapala się i gaśnie w
wybranym kolorze lub kolorach.
Reactive (Reaktywne)
Podświetlenie LED pojawia
się, gdy naciskasz klawisze
lub przyciski myszy
Ripple* (Kręgi wodne)
Podświetlenie rozchodzi się
od naciśniętego klawisza
Spectrum Cycling
(Całe spektrum)
Podświetlenie nieustannie
zmienia kolory z palety 16,8
miliona barw
Starlight* (Efekt
migoczących gwiazd)
Każdy klawisz zapala się i
gaśnie w różnym momencie
i z różnym czasem trwania
Static (Statyczne)
Diody LED świecą w
wybranym kolorze.
Wave* (Fala)
Podświetlenie przewija się
w wybranym kierunku.
* Te efekty są dostępne tylko na klawiaturze.
Szczegółową instrukcję na temat kongurowania zestawu Razer Turret
for Xbox One i jego obsługi znajdziesz w Przewodniku podstawowym
dostępnym online pod adresem support.razer.com.
Wybierz
do dwóch
kolorów albo
ustaw losowe
kolory
Wybierz kolor i
długość czasu
podświetlenia
Wybierz kolor
Dalsze
dostosowywanie
nie jest
wymagane
Wybierz do
dwóch kolorów
albo ustaw
losowe kolory
oraz wybierz
czas trwania
podświetlenia
Wybierz kolor
Wybierz kierunek
fali: od lewej do
prawej albo od
prawej do lewej
SAFETY AND MAINTENANCE
SAFETY GUIDELINES
In order to achieve maximum safety while using your Razer Turret
for Xbox One, we suggest that you adopt the following guidelines:
• Should you have trouble operating the device properly and
troubleshooting does not work, unplug the device and
contact the Razer hotline or go to support.razer.com for
assistance.
• Avoid looking directly at the tracking beam of your mouse or
pointing the beam in anyone racking beam is NOT visible to
the naked human eye and is set on an Always-On mode.
• Do not insert or connect foreign objects, cables, or devices
not intended for the device.
• Do not take apart the device (doing so will void your warranty)
and do not attempt to operate it under abnormal current
loads.
• When connecting cables or setting up the device, carefully
plan how the wires will be placed. Protect any connected
cables from being walked on or pinched, particularly at plugs,
convenience receptacles, or the point where they exit from.
• Keep the device away from liquid, humidity or moisture.
Operate the device only within the specific temperature
range of 0°C (32°F) to 40°C (104°F). Should the temperature
exceed this range, unplug and/or switch off the device in
order to let the temperature stabilize to an optimal level.
COMFORT
Research has shown that long periods of repetitive motion,
improper positioning of your computer peripherals, incorrect
body position, and poor habits may be associated with physical
discomfort and injury to nerves, tendons, and muscles. Below
are some guidelines to avoid injury and ensure optimum comfort
while using your Razer Turret for Xbox One.
1. Position your keyboard and monitor directly in front of you
with your mouse next to it. Place your elbows next to your
side, not too far away and your keyboard within easy reach.
2. Keep your feet well supported, posture straight and your
shoulders relaxed.
3. During gameplay, relax your wrist and keep it straight. If you
do the same tasks with your hands repeatedly, try not to
bend, extend or twist your hands for long periods.
4. Do not rest your wrists on hard surfaces for long periods.
5. Customize the keys on your keyboard to suit your style of
gaming in order to minimize repetitive or awkward motions
while gaming.
6. Do not sit in the same position all day. Get up, step away from
your desk and do exercises to stretch your arms, shoulders,
neck and legs.
If you should experience any physical discomfort while using
your keyboard, such as pain, numbness, or tingling in your hands,
Page 16

wrists, elbows, shoulders, neck or back, please consult a qualified
medical doctor immediately.
MAINTENANCE AND USE
The Razer Turret for Xbox One requires minimum maintenance to
keep it in optimum condition. Once a month we recommend you
switch off and unplug each device, remove all connected cables,
and then clean each device using a soft cloth or cotton swab to
prevent dirt buildup.
BATTERY WARNING
The Razer Turret for Xbox One both contain an internal,
lithium-ion rechargeable battery. In general, the life expectancy
of such battery is dependent upon usage. If you suspect that
the lithium-ion rechargeable battery inside the Razer Turret for
Xbox One may be drained (has a low charge), try charging it. If
the battery does not recharge after several attempts, it may be
non-operational.
CAUTION: Do not open, mutilate, or expose to conducting
materials (metal), moisture, liquid, fire, or heat. Doing so may
cause the battery to leak or explode, resulting in personal
injury. Do not leave any of the devices discharged or unused for
extended periods. When not using your Razer Turret for Xbox
One for more than 30 days, be sure to store each device in a fully
charged state. Battery life varies with usage.
REGULATORY AND
COMPLIANCE INFORMATION
FCC DECLARATION OF CONFORMANCE
This equipment has been tested and found to comply with the
limits for a Class B digital device, pursuant to part 15 of the
FCC Rules. These limits are designed to provide reasonable
protection against harmful interference in a residential
installation. This equipment generates, uses and can radiate
radio frequency energy and, if not installed and used in
accordance with the instructions, may cause harmful interference
to radio communications. However, there is no guarantee that
interference will not occur in a particular installation. If this
equipment does cause harmful interference to radio or television
reception, which can be determined by turning the equipment off
and on, the user is encouraged to try to correct the interference
by one or more of the following measures:
• Reorient or relocate the receiving antenna.
• Increase the separation between the equipment and the
receiver.
• Connect the equipment into an outlet on a circuit different
from that to which the receiver is connected.
• Consult the dealer or an experienced radio TV technician for
help.
For more information, refer to the online help system on razer.
com.
FCC CAUTION STATEMENT
This device complies with Part 15 of the FCC Rules. Operation is
subject to the following two conditions:
This device may not cause harmful interference, and this device
must accept any interference received, including interference that
may cause undesired operation.
IMPORTANT NOTE:
FCC Radiation Exposure Statement:
This equipment complies with FCC radiation exposure limits set
forth for an uncontrolled environment. End users must follow
the specific operating instructions for satisfying RF exposure
compliance. This transmitter must not co-located or operating in
conjunction with any other antenna or transmitter
NOTICE FOR CANADA
This Class B digital apparatus complies with Canadian
ICES-003. Cet appareil numérique de la classe B est conforme
à la norme NMB-003 du Canada. Caution! Any changes or
modifications not expressly approved by the party responsible
for compliance could void the user’s authority to operate the
equipment.
CANADIAN CLASS B STATEMENT:
This device complies with Industry Canada’s licence-exempt
RSSs. Operation is subject to the following two conditions: This
device may not cause interference; and This device must accept
any interference, including interference that may cause undesired
operation of the device.
Le présent appareil est conforme aux CNR d’Industrie Canada
applicables aux appareils radio exempts de licence. L’exploitation
est autorisée aux deux conditions suivantes :
l’appareil ne doit pas produire de brouillage;
l’utilisateur de l’appareil doit accepter tout brouillage
radioélectrique subi, même si le brouillage est susceptible d’en
compromettre le fonctionnement.
RADIATION EXPOSURE STATEMENT:
The product comply with the Canada portable RF exposure
limit set forth for an uncontrolled environment and are safe for
intended operation as described in this manual. The further RF
exposure reduction can be achieved if the product can be kept
as far as possible from the user body or set the device to lower
output power if such function is available.
DÉCLARATION D’EXPOSITION AUX RADIATIONS:
Le produit est conforme aux limites d’exposition pour les
appareils portables RF pour les Etats-Unis et le Canada établies
pour un environnement non contrôlé. Le produit est sûr pour
un fonctionnement tel que décrit dans ce manuel. La réduction
aux expositions RF peut être augmentée si l’appareil peut être
conservé aussi loin que possible du corps de l’utilisateur ou que le
dispositif est réglé sur la puissance de sortie la plus faible si une
telle fonction est disponible.
IMPORTANT NOTICE FOR USE IN HEALTHCARE ENVIRONMENTS
This Razer device is not a medical device and is not listed under
UL or IEC 60601 (or equivalent). This device should be kept at a
certain distance to avoid harmful effects to patients or medical
equipment.
BATTERY WARNING
Razer Turret for Xbox One wireless keyboard and Razer Turret for
Xbox One wireless mouse contain a Li-ion rechargeable battery. In
general, the life expectancy of such batteries is dependent upon
usage. If you suspect that the Li-ion rechargeable battery inside
the Razer Turret for Xbox One wireless keyboard and Razer Turret
for Xbox One wireless mouse may be drained (has a low charge),
try charging it. Caution: Do not open, mutilate, or expose to
conducting materials (metal), moisture, liquid, fire, or heat. Doing
so may cause batteries to leak or explode, resulting in personal
injury. Do not leave the rechargeable battery discharged or unused
for extended periods. Battery life varies with usage.
AUSTRALIAN CONSUMER LAW COMPLIANCE
Our goods come with guarantees that cannot be excluded under
the Australian Consumer Law. You are entitled to a replacement
or refund for a major failure and for compensation for any other
reasonably foreseeable loss or damage. You are also entitled
to have the goods repaired or replaced if the goods fail to be of
acceptable quality and the failure does not amount to a major
failure. Please refer to razerid.razer.com/warranty for further
details.
THE FOLLOWING LIMITED WARRANTY ONLY APPLIES TO
AUSTRALIA
Limited Warranty. Razer warrants the Product to be free from
defects in materials and workmanship (subject to the terms set
forth herein) when used normally in accordance with the official
documentation for the applicable Warranty Period from the date
of retail purchase. If the Product is, or contains, a rechargeable
battery, Razer does not provide any warranties for the battery
life, as all rechargeable batteries can be expected to lose charging
capacity over time and this is not considered a defect. Your
actual battery life will vary depending on the conditions in which
it is used.
Limited Warranty Period. You are eligible for Limited Warranty
support for the following periods of time commencing upon the
date of retail purchase of your Product (“Warranty Period”):
Razer wireless keyboard
and Razer
wireless
mouse
All new Products will have the Warranty Periods listed above,
subject to local law. Certain “end of life”, sell out or discontinued
Products may have a shorter Warranty Period; this will be clearly
marked at the time of purchase and the given Warranty Period
will be stated at that time. Factory Refurbished Products will have
a Warranty Period of 90 days. If you are uncertain whether your
Product is eligible for Limited Warranty support, please contact
our support team for clarification here.
Exclusions and Limitations. This Limited Warranty does not
cover:
(a) Software, including (without limitation), (i) the operating
system and software added to the Razer-branded hardware
products through our factory - mintegration system, (ii) thirdparty software, or (iii) the reloading of software, software
configurations or any data files;
(b) Non-Razer branded products and accessories, even if
packaged and sold with the Product;
(c) Problems with and/or damage to the Product caused by using
non-Razer accessories, parts, or components;
(d) Damage caused by service (including upgrades and
expansions) performed by anyone who is not officially acting
as an employee, representative or sub-contractor of Razer;
(e) Claims arising from any unacceptable use or care of the
Product, including (without limitation) misuse, abuse,
negligence,unauthorized modification or repair, unauthorized
commercial use or any operation of the Product outside
Razer’s recommended parameters;
(f) Claims arising from external causes, including (without
limitation), accidents, acts of God, liquid contact, fire or
earthquake;
(g) Products with a serial number or date stamp that has been
altered, obliterated or removed;
(h) Products for which Razer will not receive payment; or
(i) Cosmetic damage and normal wear and tear, including
(without limitation), scratches, dents and chips.
Razer does not warrant that the operation of the Product will be
uninterrupted or error-free.
Remedies under this Limited Warranty. The benefits to the
consumer given by this Limited Warranty are in addition to other
rights and remedies of the consumer under a law in relation to
the goods or services to which this Limited Warranty relates. If
an eligible claim on the Limited Warranty is received by Razer
within the applicable Warranty Period, Razer will (at its sole
option) either: (a) repair the Product or the defective parts at no
charge, using new or refurbished replacement parts; (b) provide
online Razer Store vouchers of a value equivalent to the retail
purchase price of the Product; or (c) exchange the Product
with a Product that is new or which has been manufactured
from new or serviceable used parts and is at least functionally
2 Years
Page 17

equivalent to the original Product. Goods presented for repair
may be replaced by refurbished goods of the same type rather
than being repaired. Refurbished parts may be used to repair
the goods. Razer reserves the sole right to determine whether a
claim is eligible and/or whether the Product is defective. Where
the Product is an “end of life” Product model, Razer may (at its
sole option) exchange the Product with a functionally equivalent
substitute model from Razer’s current Product range. Razer has
the sole option to provide any other type of remedy in addition
to or in substitution of the aforesaid remedies. Repaired or
exchanged Products shall be warranted free from defects for a
period of ninety (90) days after date of repair or exchange (as
the case may be), or for the remainder of the original Warranty
Period, whichever is longer.
Remedies under Australian Consumer Law. Our goods come
with guarantees that cannot be excluded under the Australian
Consumer Law. You are entitled to a replacement or refund for
a major failure and for compensation for any other reasonably
foreseeable loss or damage. You are also entitled to have the
goods repaired or replaced if the goods fail to be of acceptable
quality and the failure does not amount to a major failure.
Entire Limited Warranty. No Razer supplier, dealer, agent, or
employee is authorized to alter or extend the terms of this
Limited Warranty or to make any representation whatsoever.
Razer reserves the right to amend the terms of this Limited
Warranty at any time without notice.
Help Resources. Before lodging a claim on the Limited Warranty,
please review the online help resources at support.razer.com.
If the Product is still not functioning properly after making use
of these resources, please contact Razer through support.razer.
com or your authorized distributor or dealer. You may be required
to assist with the diagnosis process to verify and ascertain any
issues which you may be facing with the Product. Service options,
parts availability and response times may vary depending on the
country in which the Limited Warranty claim is lodged.
How to make a Limited Warranty claim.
IF YOU PURCHASED THE PRODUCT FROM A RAZER RESELLER,
PLEASE CONTACT THE RAZER RESELLER IN REGARDS TO YOUR
LIMITED WARRANTY CLAIM.
If you are unable to return the Product to the Razer reseller for
whatever reason, or if you have purchased the Product directly
from Razer at razer.com, then please follow the steps below:
(a) Go to support.razer.com/contact-us/ to obtain a Return
Merchandise Authorization Number (“RMA Number”).
(b) Note the RMA Number in a visible place on the outside of the
Product’s package.
(c) Enclose a Valid Proof of Purchase inside the Product’s
package. Please visit razer.com/warranty for examples of a
Valid Proof of Purchase.
(d) Send the Product to the following address:
Razer (Asia-Pacific) Pte Ltd
Attention: Technical Support Department
RMA Number: [Please note your RMA
number here]
514 Chai Chee Lane #07-05
Singapore 469029
DO NOT SEND RAZER ANY PRODUCT WITHOUT A VALID RMA
NUMBER.
We advise that you select a method of shipping that is traceable
(eg. UPS, DHL, FedEx). Any expense of claiming under this Limited
Warranty will be borne by the person making the claim (including
any shipping and handling charges in returning the Product
to Razer, as well as any applicable customs, duties or taxes in
relation to the claim). If the Product is validly returned under
the terms of this Limited Warranty, Razer will be responsible
for postage expenses for shipping the Product back to you (but
not any customs charges, duties, or taxes). You are responsible
for ensuring that the Product is properly packaged and will bear
the full risk of loss or damage for any Product that is returned
improperly packaged. Risk of loss or damage in the returned
Product only passes to Razer when the Product is received by
Razer and Razer shall not be responsible for items lost in transit
to us. In the event that the procedure herein is not followed,
Razer reserves the right to accept the delivery of the Product on
such terms that it may determine at its sole discretion.
Returns Not Covered by this Limited Warranty. If Razer receives
a Product from you that does not meet the requirements of this
Limited Warranty, including (but not limited to) a Product that (a)
lacks a valid RMA Number, (b) is not accompanied by a valid Proof
of Purchase, (c) is no longer covered under the Warranty Period,
or (d) does not have a defect covered by this Limited Warranty,
you may be responsible for an assessment fee, return shipping
and handling fees, and other reasonable fees as may be required
by Razer prior to the Product being returned to you.
General. This Limited Warranty applies only to the original
purchaser of the Product and is non-transferable. This Limited
Warranty is only valid in Australia. No Razer reseller, agent,
distributor, or employee is authorized to make any modification,
extension or addition to this Limited Warranty. If any term of
this Limited Warranty is held to be illegal or unenforceable, the
legality or enforceability of the remaining terms shall not be
affected or impaired.
This Limited Warranty is being offered to you by:
Razer Inc.
201 3rd Street, Suite 900, San Francisco, CA 94103, USA
Phone Number: +1(415) 266-5300
support.razer.com/contact-us/
STATEMENT OF
COMPLIANCE WITH EU DIRECTIVE
ENGLISH
STATEMENT OF COMPLIANCE WITH EU DIRECTIVE
Hereby, Razer (Europe) GmbH, declares that this The Razer Turret for
Xbox One is in compliance with the essential requirements and other
relevant provisions of Directive 2014/53/EU and 2015/863/EU.
FRANÇAIS
DÉCLARATION DE CONFORMITÉ AVEC LES DIRECTIVES DE L’UNION
EUROPÉENNE
Par la présente Razer (Europe) GmbH déclare que l’appareil The
Razer Turret for Xbox One est conforme aux exigences essentielles et
aux autres dispositions pertinentes de la directive 2014/53/EU and
2015/863/EU.
ITALIANO
DICHIARAZIONE DI CONFORMITA’ CON LE DIRETTIVE EU
Con la presente Razer (Europe) GmbH dichiara che questo The
Razer Turret for Xbox One è conforme ai requisiti essenziali ed alle
altre disposizioni pertinenti stabilite dalla direttiva 2014/53/EU and
2015/863/EU.
DEUTSCH
EG-KONFORMITÄTSERKLÄRUNG
Hiermit erklärt Razer (Europe) GmbH, dass sich dieser/diese/dieses The
Razer Turret for Xbox One in Übereinstimmung mit den grundlegenden
Anforderungen und den anderen relevanten Vorschriften der Richtlinie
2014/53/EU and 2015/863/EU befindet.
ESPAÑOL
DECLARACIÓN DE CONFORMIDAD CON LA DIRECTIVA DE LA UE
Por medio de la presente Razer (Europe) GmbH declara que el The Razer
Turret for Xbox One cumple con los requisitos esenciales y cualesquiera
otras disposiciones aplicables o exigibles de la Directiva 2014/53/EU
and 2015/863/EU.
PORTUGUÊS
DIRECTIVA DA UE COM DECLARAÇÃO DE CONFORMIDADE.
Razer (Europe) GmbH declara que este The Razer Turret for Xbox One
está conforme com os requisitos essenciais e outras disposições da
Directiva 2014/53/EU and 2015/863/EU.
DANSK
ERKLÆRING OM OVERENSSTEMMELSE MED EU-DIREKTIV
Undertegnede Razer (Europe) GmbH erklærer herved, at følgende udstyr
The Razer Turret for Xbox One overholder de væsentlige krav og øvrige
relevante krav i direktiv 2014/53/EU and 2015/863/EU.
POLSKI
OŚWIADCZENIE O ZGODNOŚCI Z DYREKTYWĄ UE
Niniejszym Razer (Europe) GmbH oświadcza, że The Razer Turret for
Xbox One jest zgodny z zasadniczymi wymogami oraz pozostałymi
stosownymi postanowieniami Dyrektywy 2014/53/EU and 2015/863/
EU.
ΕΛΛΗΝΙΚΑ
ΔΙΑΚΗΡΥΞΗ ΣΥΜΜΟΡΦΩΣΗΣ ΜΕ ΤΗΝ ΟΔΗΓΙΑ ΤΗΣ ΕΥΡΩΠΑΪΚΗΣ ΕΝΩΣΗΣ
ΜΕ ΤΗΝ ΠΑΡΟΥΣΑ Razer (Europe) GmbH ΔΗΛΩΝΕΙ ΟΤΙ The Razer Turret
for Xbox One ΣΥΜΜΟΡΦΩΝΕΤΑΙ ΠΡΟΣ ΤΙΣ ΟΥΣΙΩΔΕΙΣ ΑΠΑΙΤΗΣΕΙΣ
ΚΑΙ ΤΙΣ ΛΟΙΠΕΣ ΣΧΕΤΙΚΕΣ ΔΙΑΤΑΞΕΙΣ ΤΗΣ ΟΔΗΓΙΑΣ 2014/53/EU and
2015/863/EU.
IRELESS KEYBOARD:
W
Radio Frequency: 2.4Ghz SRD
Operating Frequency: 2400-2483.5Mhz
Max Output power: ≤8dbm
Wireless Mouse:
Radio Frequency: 2.4Ghz SRD
Operating Frequency: 2400-2483.5Mhz
Max Output power: ≤10dbm
The full Declaration of Conformity can be requested via the following :
Company: Razer (Europe) GmbH
Address: Essener Bogen 23, 22419 Hamburg, Germany
E-mail: compliance@razer.com
Internet address: razer.com
EU PRODUCT AND BATTERY
DISPOSAL INFORMATION
ENGLISH
Correct Disposal of This Product (Waste Electrical & Electronic
Equipment) and Battery Disposal
(Applicable in the European Union and other European countries
with separate collection systems)
This marking shown on the product or its literature, indicates
that it should not be disposed with other household wastes
at the end of its working life. To prevent possible harm to the
environment or human health from uncontrolled waste disposal,
please separate this from other types of wastes and recycle
it responsibly to promote the sustainable reuse of material
resources. Household users should contact either the retailer
where they purchased this product, or their local government
office, for details of where and how they can take this item for
environmentally safe recycling. Business users should contact
their supplier and check the terms and conditions of the purchase
contract. This product should not be mixed with other commercial
wastes for disposal.
FRANÇAIS
Comment éliminer ce produit (déchets d’équipements électriques
et électroniques) et l’élimination des piles
(Applicable dans les pays de l’Union Européen et aux autres pays
européens disposant de systémes de collecte sélective)
Ce symbole sur le produit ou sa documentation indique qu’il
ne doit pas être éliminé en fin de vie avec les autres déchets
ménagers. L’élimination incontrôlée des déchets pouvant porter
préjudice à l’environnement ou à la santé humaine, veuillez
le séparer des autres types de déchets et le recycler de façon
responsable. Vous favoriserez ainsi la réutilisation durable des
ressources matérielles. Les particuliers sont invités à contacter
le distributeur leur ayant vendu le produit ou à se renseigner
auprès de leur mairie pour savoir où et comment ils peuvent se
débarrasser de ce produit afin qu’il soit recyclé en respectant
l’environnement. Les entreprises sont invitées à contacter leurs
fournisseurs et à consulter les conditions de leur contrat de
vente. Ce produit ne doit pas être éliminé avec les autres déchets
commerciaux.
Page 18

ITALIANO
Corretto smaltimento del prodotto (rifiuti elettrici ed elettronici)
(Applicabile in i paesi dell’Unione Europea e in quelli con sistema
di raccolta differenziata) e lo smaltimento di pile
Il marchio riportato sul prodotto o sulla sua documentazione
indica che il prodotto non deve essere smaltito con altri rifiuti
domestici al termine del ciclo di vita. Per evitare eventuali danni
all’ambiente o alla salute causati dall’inopportuno smaltimento
dei rifiuti, si invita l’utente a separare questo prodotto da altri
tipi di rifiuti e di riciclarlo in maniera responsabile per favorire il
riutilizzo sostenibile delle risorse materiali. Gli utenti domestici
sono invitati a contattare il rivenditore presso il quale è stato
acquistato il prodotto o l’ufficio locale preposto per tutte le
informazioni relative alla raccolta differenziata e al riciclaggio
per questo tipo di prodotto. Gli utenti aziendali sono invitati a
contattare il proprio fornitore e verificare i termini e le condizioni
del contratto di acquisto. Questo prodotto non deve essere
smaltito unitamente ad altri rifiuti commerciali.
DEUTSCH
Korrekte Entsorgung dieses Produkts (Elektromüll)
(Anzuwenden in den Ländern der Europäischen Union
und anderen europäischen Ländern mit einem separaten
Sammelsystem) und Beseitigung von Batterien
Die Kennzeichnung auf dem Produkt bzw. auf der dazugehörigen
Literatur gibt an, dass es nach seiner Lebensdauer nicht
zusammen mit dem normalen Haushaltsmüll entsorgt werden
darf. Entsorgen Sie dieses Gerät bitte getrennt von anderen
Abfällen, um der Umwelt bzw. der menschlichen Gesundheit nicht
durch unkontrollierte Müllbeseitigung zu schaden. Recyceln Sie
das Gerät, um die nachhaltige Wiederverwertung von stofflichen
Ressourcen zu fördern. Private Nutzer sollten den Händler, bei
dem das Produkt gekauft wurde, oder die zuständigen Behörden
kontaktieren, um in Erfahrung zu bringen, wie sie das Gerät auf
umweltfreundliche Weise recyceln können. Gewerbliche Nutzer
sollten sich an Ihren Lieferanten wenden und die Bedingungen
des Verkaufsvertrags konsultieren. Dieses Produkt darf nicht
zusammen mit anderem Gewerbemüll entsorgt werden.
ESPAÑOL
Eliminación correcta de este producto (material eléctrico y
electrónico de descarte)
(Aplicable en la Unión Europea y en países europeos con
sistenmas de recogida selectiva de residuos) eliminación de
las pilas
La presencia de esta marca en el producto o en el material
informativo que lo acompaña, indica que al finalizar su vida útil
no deberá eliminarse junto con otros residuos domésticos.
Para evitar los posibles daños al medio ambiente o a la salud
humana que representa la eliminación incontrolada de residuos,
separe este producto de otros tipos de residuos y recíclelo
correctamente para promover la reutilización sostenible de
recursos materiales. Los usuarios particulares pueden contactar
con el establecimiento donde adquirieron el producto, o con las
autoridades locales pertinentes, para informarse sobre cómo
y dónde pueden llevarlo para que sea sometido a un reciclaje
ecológico y segu ales pueden contactar con su proveedor y
consultar las condiciones del contrato de compra. Este producto
no debe eliminarse mezclado con otros residuos comerciales.
PORTUGUÊS
Eliminação Correcta Deste Produto (Resíduo de Equipamentos
Eléctricos e Electrónicos) e descarte das baterias
Esta marca, apresentada no produto ou na sua literatura indica
que ele não deverá ser eliminado juntamente com os resíduos
domésticos indiferenciados no final do seu período de vida útil.
Para impedir danos ao ambiente e à saúde humana causados
pela eliminação incontrolada de resíduos deverá separar este
equipamento de outros tipos de resíduos e reciclá-lo de forma
responsável, para promover uma reutilização sustentável dos
recursos materiais. Os utilizadores domésticos deverão contactar
ou o estabelecimento onde adquiriram este produto ou as
entidades oficiais locais para obterem informações sobre onde
e de que forma podem levar este produto para permitir efectuar
uma reciclagem segura em termos ambientais. Os utilizadores
profissionais deverão contactar o seu fornecedor e consultar
os termos e condições do contrato de compra. Este produto
não deverá ser misturado com outros resíduos comerciais para
eliminação.
DANSK
Korrekt affaldsbortskaffelse af dette produkt (elektrisk &
elektronisk udstyr) og bortskaffelse af batterier
Mærket på dette produkt eller i den medfølgende dokumentation
betyder, at produktet ikke må bortskaffes sammen med
almindeligt husholdningsaffald efter endt levetid. For at
undgå skadelige miljø- eller sundhedspåvirkninger på grund af
ukontrolleret affaldsbortskaffelse skal dette produkt bortskaffes
særskilt fra andet affald og indleveres behørigt til fremme
for bæredygtig materialegenvinding. Hjemmebrugere bedes
kontakte forhandleren, hvor de har købt produktet, eller den
lokale myndighed for oplysning om, hvor og hvordan de kan
indlevere produktet med henblik på miljøforsvarlig genvinding.
Erhvervsbrugere bedes kontakte leverandøren og læse
betingelserne og vilkårene i købekontrakten. Dette produkt bør
ikke bortskaffes sammen med andet erhvervsaffald.
POLSKI
Prawidowe usuwanie produktu (Zużyty sprzęt elektryczny i
elektroniczny) i unieszkodliwienia baterii
Oznaczenie umieszczone na produkcie lub w odnoszących
się do niego tekstach wskazuje, ×e produktu po up ywie
okresu u×ytkowania nie nale×y usuwać z innymi odpadami
pochodzącymi z gospodarstw domowych. Aby uniknąć
szkodliwego wpływu na środowisko naturalne i zdrowie
ludzi wskutek niekontrolowanego usuwania odpadów,
prosimy o oddzielenie produktu od innego typu odpadów
orazodpowiedzialny recykling w celu promowania ponownego
u×ycia zasobów materialnych jako staej praktyki. W celu
uzyskania informacji na temat miejsca i sposobu bezpiecznego
dla śdowiska recyklingu tegoproduktu u×ytkownicy w
gospodarstwach domowych powinni skontaktowa ć się z
punktem sprzeda×y detalicznej, w którym dokonali zakupu
produktu, lubz organem wadz lokalnych. U×ytkownicy w firmach
powinni skontaktowa ć się ze swoim dostawcà i sprawdzić
warunki umowy zakupu. Produktu nie nale×y usuwać razem z
innymi odpadami komercyjnymi.
ΕΛΛΗΝΙΚΑ
Σωστή Διάθεση αυτού του Προϊόντος (Απορρίμματα Ηλεκτρικού &
Ηλεκτρονικού Εξοπλισμού), καθώς και των μπαταριών
(Ισχύει στην Ευρωπαϊκή Ένωση και σε άλλες Ευρωπαϊκές χώρες με
ξεχωριστά συστήματα συλλογής)
Τα σήματα που εμφανίζονται επάνω στο προϊόν , δείχνουν ότι
δεν πρέπει να απορρίπτεται με άλλα οικιακά απορρίμματα στο
τέλος του κύκλου της ζωής του. Προκειμένου να αποφευχθούν
ενδεχόμενες βλάβες στο περιβάλλον ή την ανθρώπινη υγεία
από την ανεξέλεγκτη διάθεση των αποβλήτων, παρακαλείστε
να το διαχωρίζεται από άλλους τύπους απορριμμάτων και να το
ανακυκλώνετε, ώστε να προωθηθεί η επαναχρησιμοποίηση των
υλικών πόρων. Οι οικιακοί χρήστες θα πρέπει να επικοινωνήσουν
είτε με τον πωλητή λιανικής όπου αγόρασαν αυτό το προϊόν, ή
με το τοπικό γραφείο της κυβέρνησης , για λεπτομέρειες σχετικά
με το πού και πώς μπορούν να πάρουν αυτό το στοιχείο για την
περιβαλλοντικά ασφαλή ανακύκλωση. Οι επιχειρήσεις-χρήστες
θα πρέπει να επικοινωνήσουν με τον προμηθευτή τους και να
ελέγξουν τους όρους και τις προϋποθέσεις της σύμβασης αγοράς.
Αυτό το προϊόν δεν πρέπει να αναμιγνύεται με άλλα συνηθισμένα
απορρίμματα.
LEGALESE
COPYRIGHT AND INTELLECTUAL PROPERTY
INFORMATION
©2019 Razer Inc. All rights reserved. Razer, the
triple-headed snake logo, Razer logo, “For Gamers.
By Gamers.”, and “Powered by Razer Chroma” logo
are trademarks or registered trademarks of Razer Inc.
and/or affiliated companies in the United States or
other countries.
Microsoft, Windows, the Windows logo, and Xbox One
are trademarks of the Microsoft group of companies.
All other trademarks are the property of their
respective owners.
Razer Inc. (“Razer”) may have copyright, trademarks,
trade secrets, patents, patent applications, or other
intellectual property rights (whether registered or
unregistered) concerning the product in this guide.
Furnishing of this guide does not give you a license
to any such copyright, trademark, patent or other
intellectual property right. The Razer Turret for
Xbox One (the “Product”) may differ from pictures
whether on packaging or otherwise. Razer assumes
no responsibility for such differences or for any errors
that may appear. Information contained herein is
subject to change without notice.
LIMITED PRODUCT WARRANTY
For the latest and current terms of the Limited
Product Warranty, please visit razer.com/warranty.
LIMITATION OF LIABILITY
Razer shall in no event be liable for any lost profits,
loss of information or data, special, incidental, indirect,
punitive or consequential or incidental damages,
arising in any way out of distribution of, sale of, resale
of, use of, or inability to use the Product. In no event
shall Razer’s liability exceed the retail purchase price
of the Product.
GENERAL
These terms shall be governed by and construed
under the laws of the jurisdiction in which the Product
was purchased. If any term herein is held to be invalid
or unenforceable, then such term (in so far as it is
invalid or unenforceable) shall be given no effect and
deemed to be excluded without invalidating any of the
remaining terms. Razer reserves the right to amend
any term at any time without notice.
Page 19

R A Z E R . C O M
©2019 Razer Inc. and affiliated companies. All Rights Reserved.
IPIG-RZ84-0282-181115TS
 Loading...