


DATE: 28 JULY 2018
USER MANUAL FOR
GAMING HEADSET
System model number RZ04-0268
Consist of Headset Model RC30-026801
and Wireless USB Transceiver
RC30-0267

PACKAGE CONTENTS / SYSTEM REQUIREMENTS
PACKAGE CONTENTS
Gaming headset (System model number RZ04-0268 Consist of Headset Model RC30-026801
and Wireless USB Transceiver RC30-0267)
USB wireless transceiver
Charging cable
3.5mm combo cable
Important Product Information Guide
SYSTEM REQUIREMENTS
HARDWARE REQUIREMENTS
Devices with a USB port
Mobile devices with a 3.5mm combo port
RAZER SYNAPSE 3 REQUIREMENTS
Windows® 7 64-bit (or higher)
Internet connection
500 MB of free hard disk space
FOR GAM ER S. B Y GA ME RS.™ 1
2. REGISTRATION / TECHNICAL SUPPORT
Placeholder image
REGISTRATION
Register your product online at razerid.razer.com/warranty to get real-time information on your
product’s warranty status.
If you haven’t registered for a Razer ID yet, register now at razerid.razer.com to get a wide range of
Razer benefits.
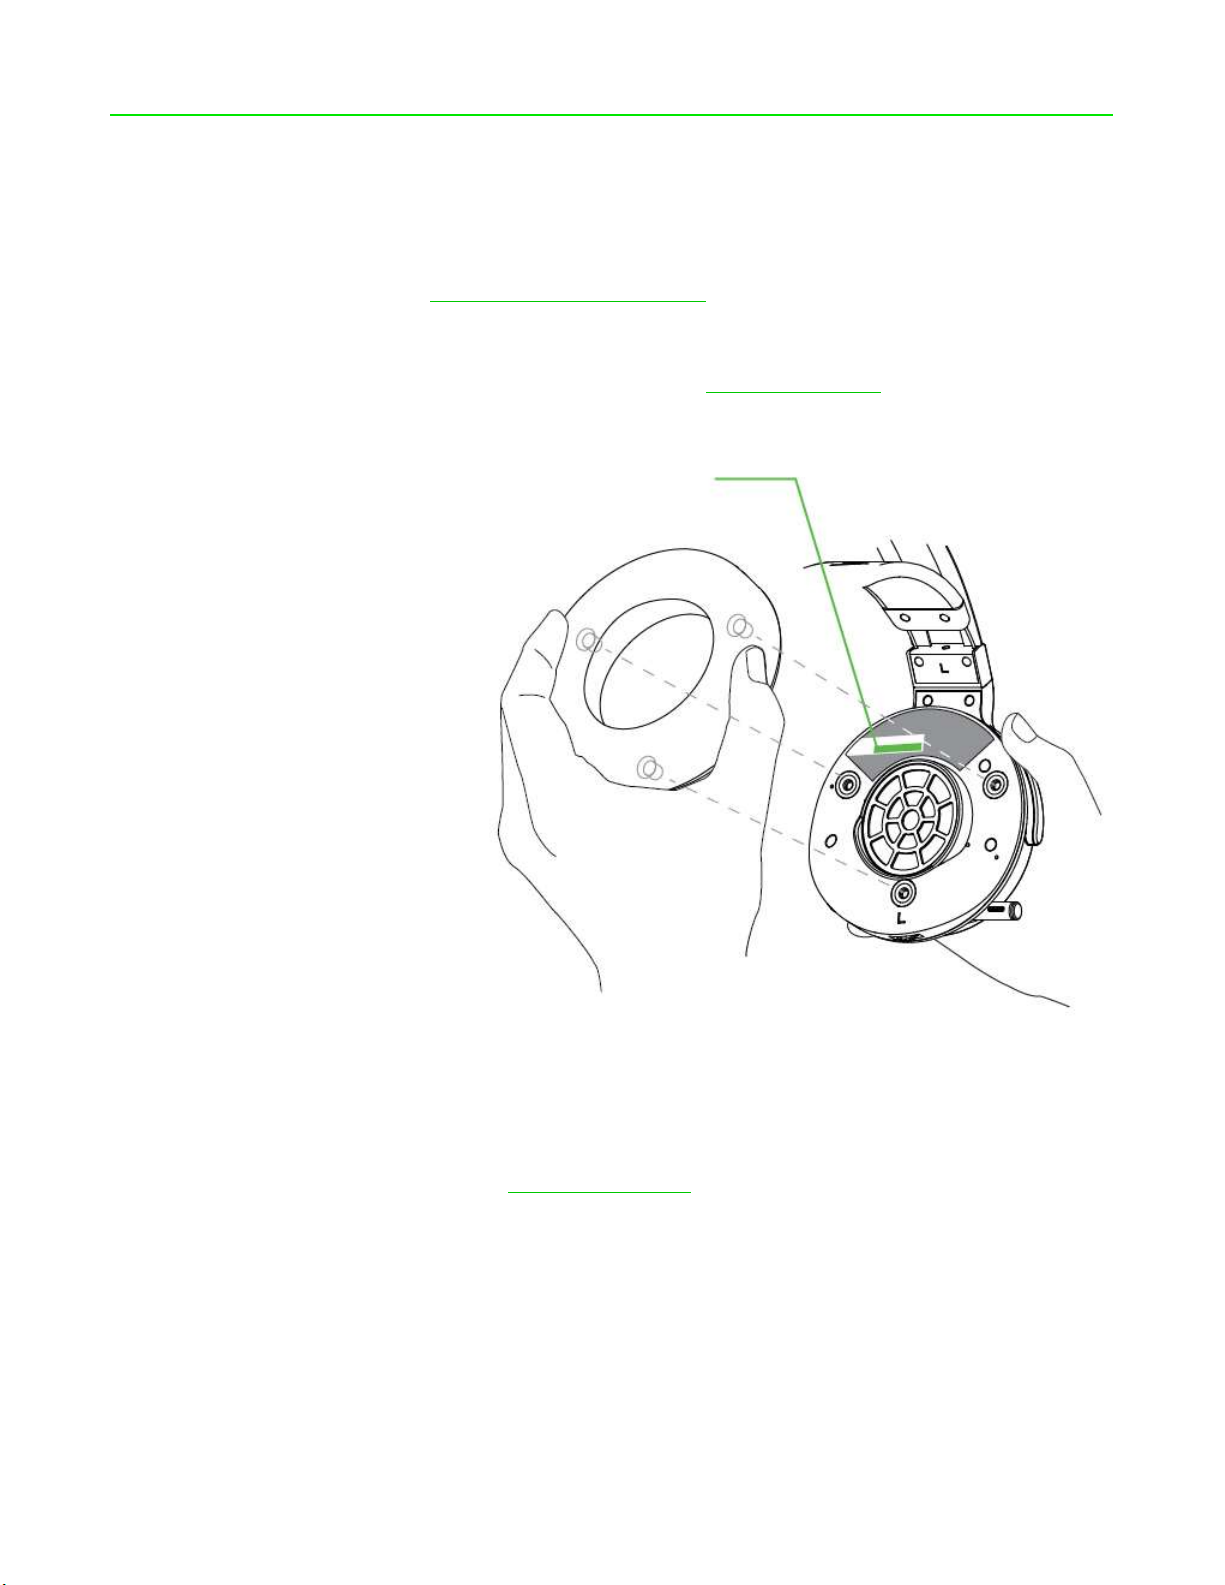
Your product’s serial number can be found
underneath the ear cushion, as shown here.
TECHNICAL SUPPORT
1 year limited manufacturer’s warranty
Free online technical support at support.razer.com
FOR GAM ER S. B Y GA ME RS.™ 2
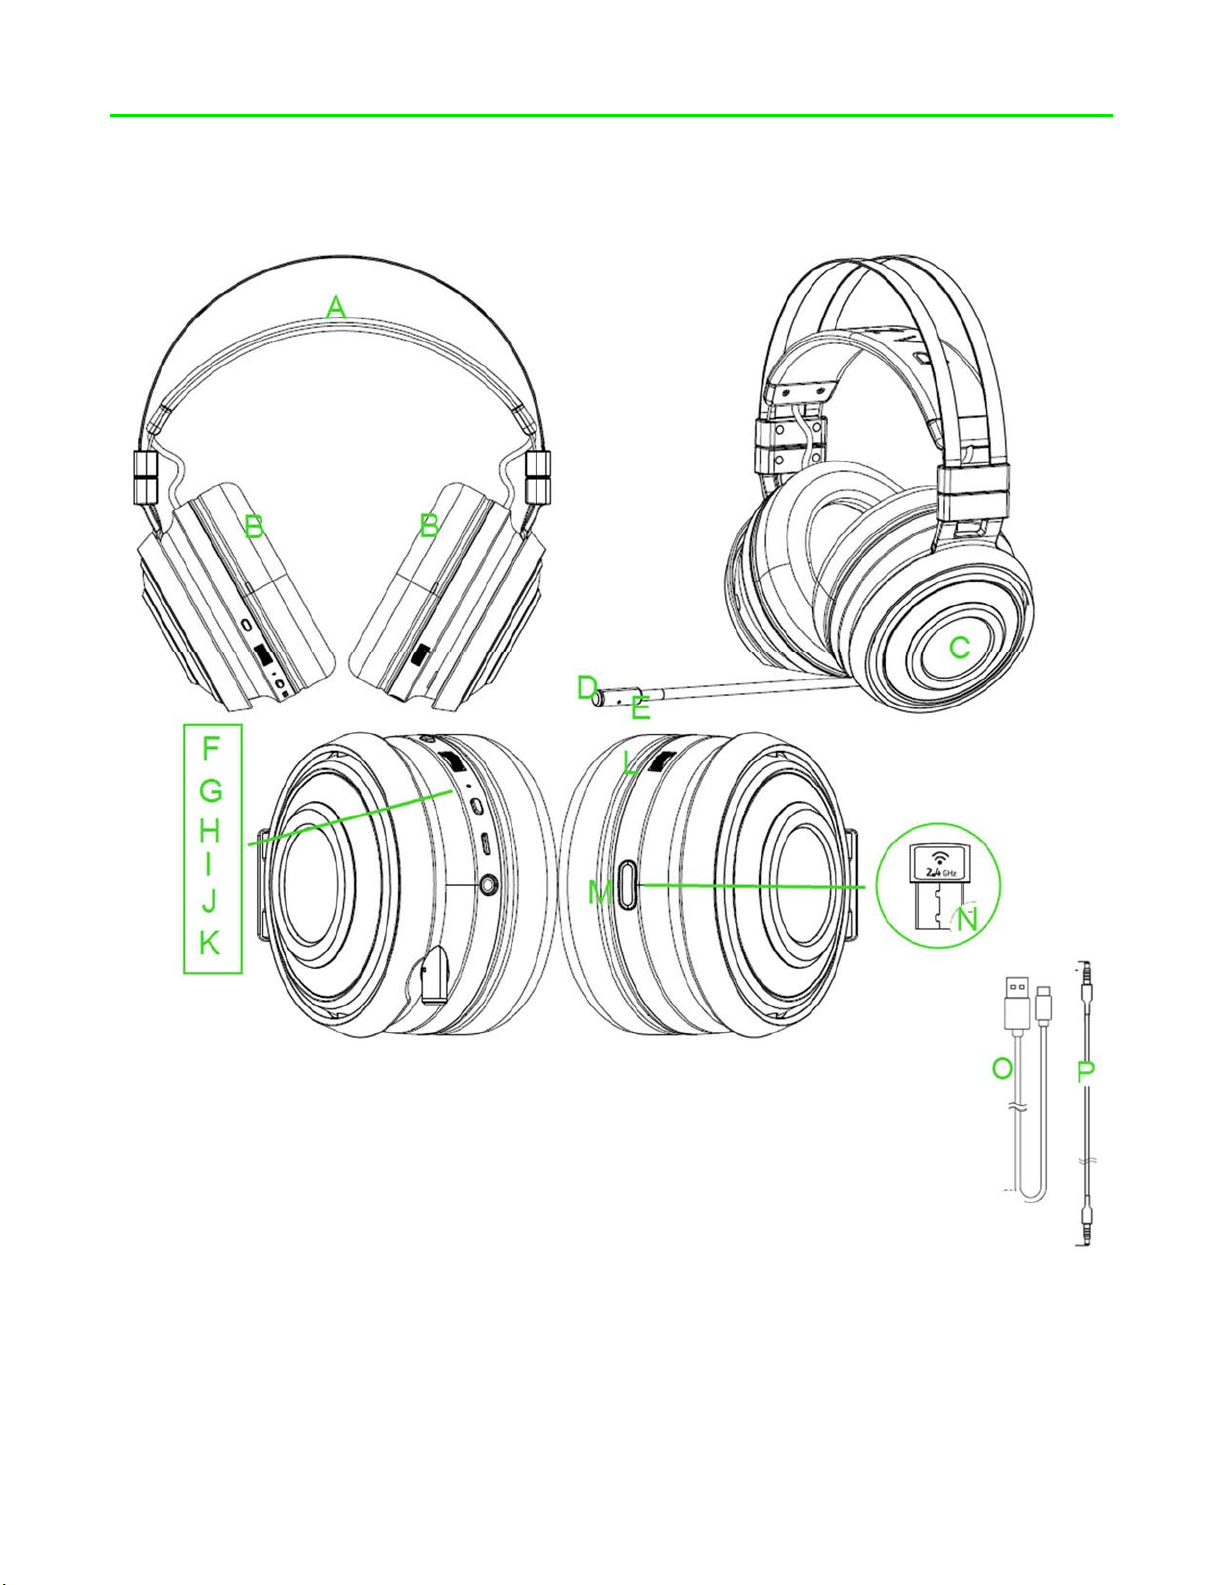
DEVICE LAYOUT
Placeholder image
A. Auto-adjusting headband
B. Cooling gel-infused ear cushions
C. Razer Chroma backlighting
D. Mic mute indicator
E. Retractable mic
F. Mic mute button
G. Game/Chat balance
H. Status indicator
FOR GAM ER S. B Y GA ME RS.™ 3
I. Power button
J. Charging port
K. 3.5mm combo port
L. Volume control
M. Transceiver storage
N. USB wireless transceiver
O. Charging cable
P. 3.5mm combo cable
SETTING UP YOUR RAZER NARI
Placeholder image
Placeholder image
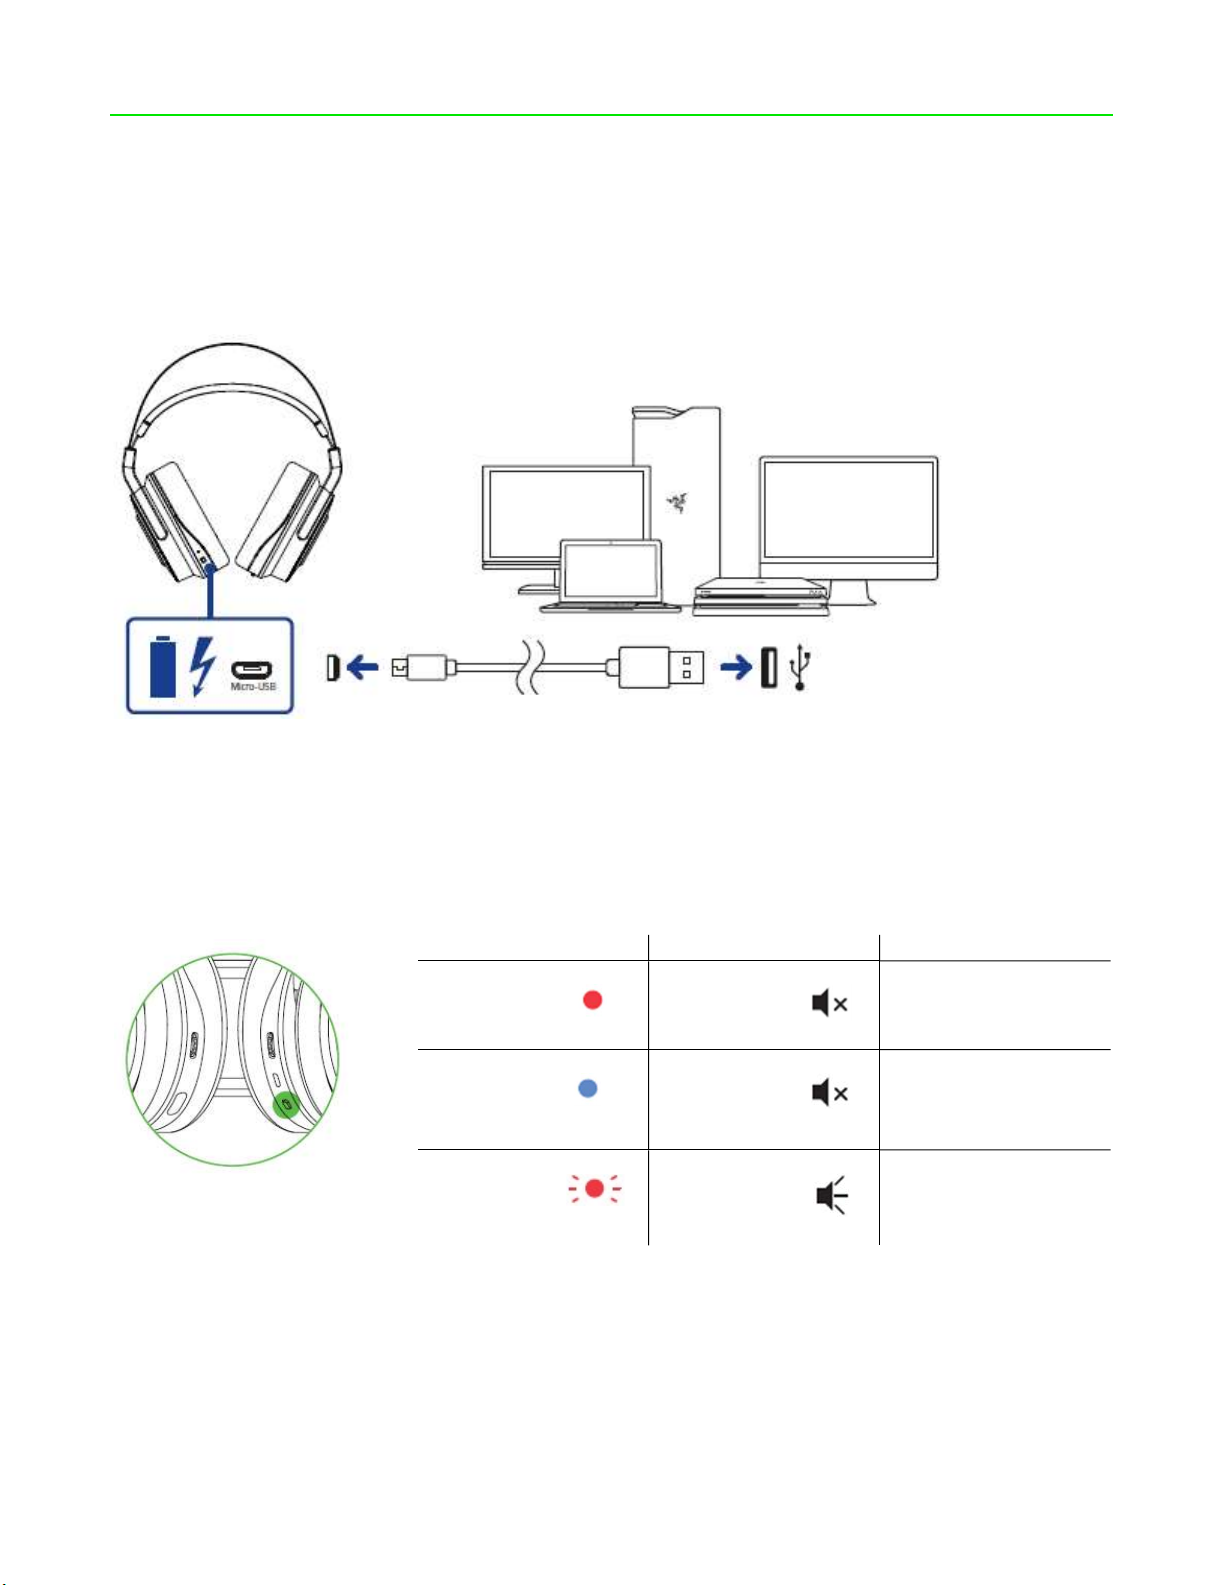
CHARGING YOUR HEADSET
Connect your Razer Nari to a powered USB port using the charging cable.
For best results, please fully charge your headset before using it for the first time. A depleted unit
will fully charge in about 4 hours.
UNDERSTANDING THE CHARGING NOTIFICATIONS
Your Razer Nari will send out notifications depending on its current charging status, as shown here:
STATUS INDICATOR SOUND INDICATOR DESCRIPTION
Static red
Static blue
Blinking red
None
None
Warning tone
Charging/low battery
Fully charged/full
battery
Low battery
FOR GAM ER S. B Y GA ME RS.™ 4
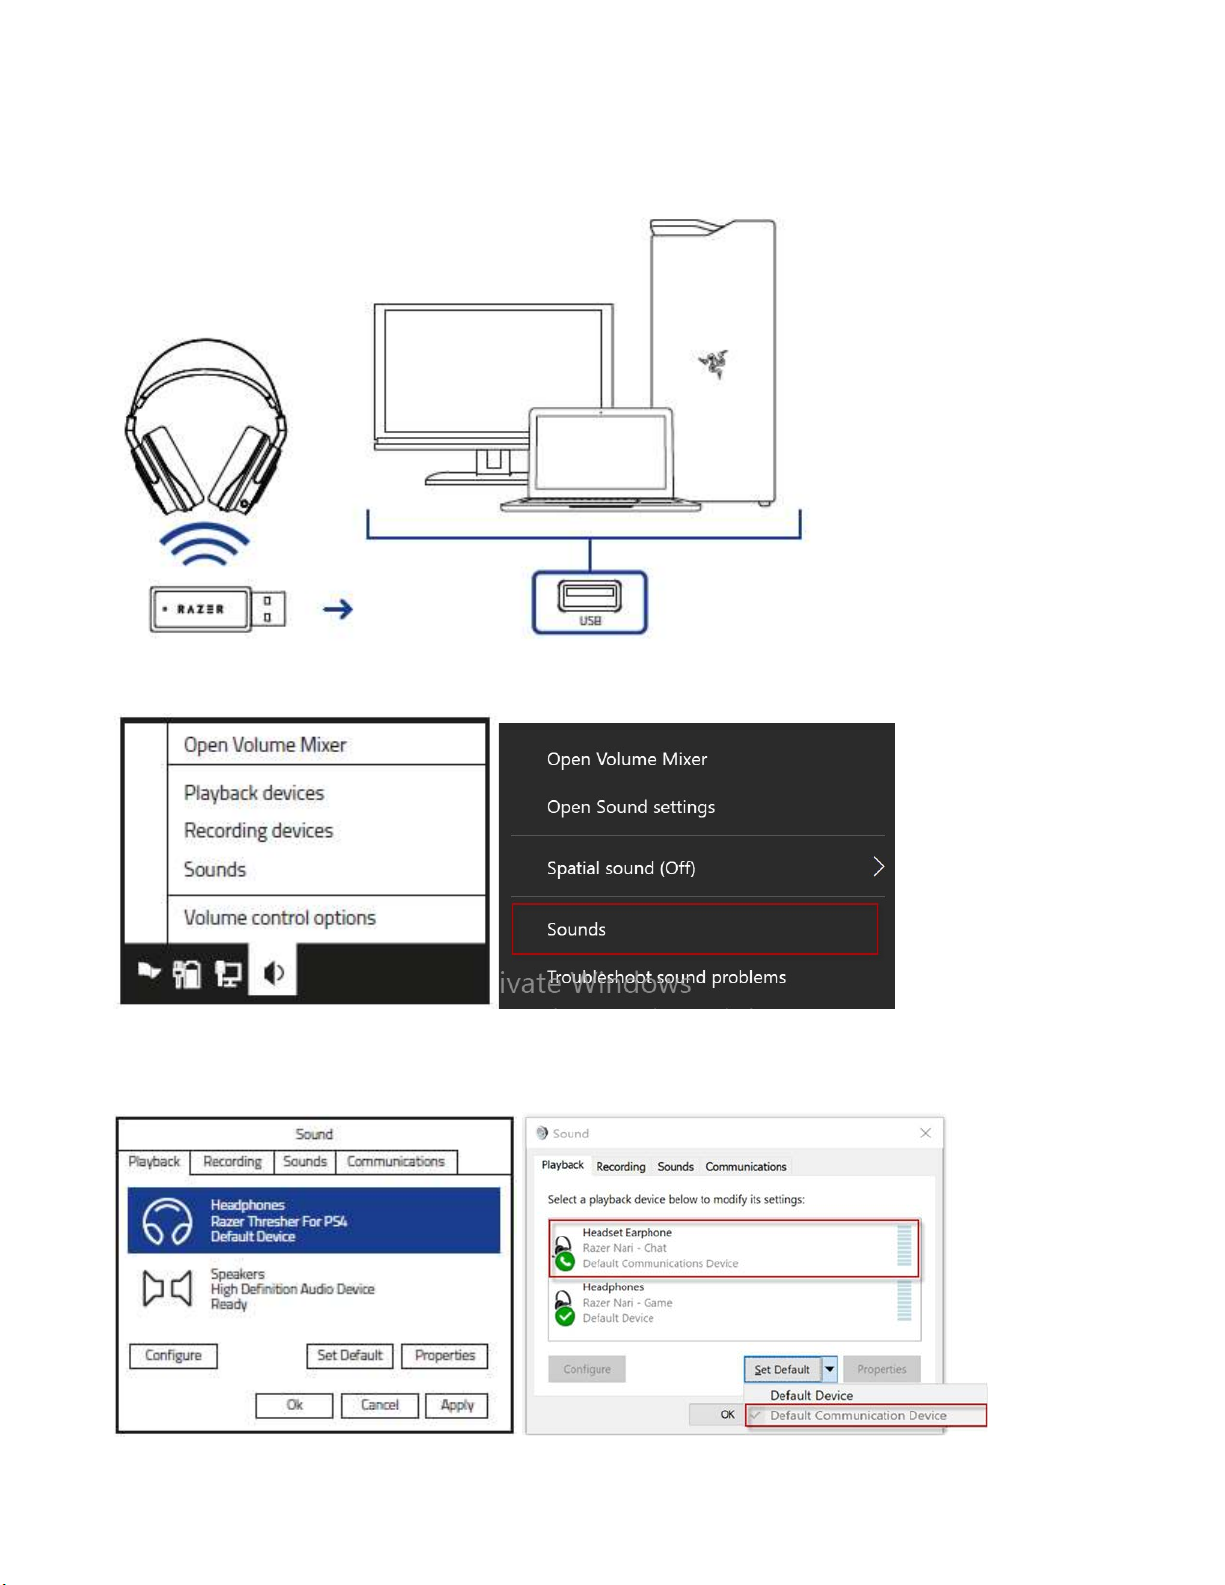
CONNECTING TO YOUR PC VIA USB PORT
1. Plug the USB wireless transceiver to your PC.
2. Right-click on the sound icon on the system tray, and then select Sounds.
3. On the Playback tab, select Razer Nari - Chat from the list, and then set it as the Default
Communication Device.
FOR GAM ER S. B Y GA ME RS.™ 5

4. On the Playback tab, select Razer Nari - Game from the list, and then set it as the Default
Device.
5. In the Recording tab, select Razer Nari - Chat from the list and click the ‘Set Default’ button.
FOR GAM ER S. B Y GA ME RS.™ 6

CONNECTING TO OTHER DEVICES VIA USB PORT
Placeholder image
Placeholder image
Placeholder image
1. Push in the USB wireless transceiver until you hear a click then release your finger so that it
ejects from your headset.
Note: To return the USB wireless transceiver, push it into the compartment until you hear a click.
2. Plug the USB wireless transceiver to your device and make sure your Razer Nari is the
default input and output audio device.
3. Power on your headset by holding the power button for at least 3 seconds or until you hear
2 short beeps.
FOR GAM ER S. B Y GA ME RS.™ 7

4. Wait until the status indicator is static blue.
Placeholder image
Placeholder image
NOTIFICATION STATUS
Pairing
Blinking
Connecting
Rapid blinking
Connected
Static
Note: Keep your headset within close proximity of the USB wireless transceiver for a faster and more
stable connection. If your headset fails to connect, it will automatically power off after a few minutes.
CONNECTING TO DEVICES VIA 3.5MM COMBO PORT
If your device has a 3.5mm audio + mic combined jack, simply plug the 3.5mm audio cable from
your headset to your device’s audio jack.
FOR GAM ER S. B Y GA ME RS.™ 8

USING YOUR RAZER NARI
Placeholder image
Placeholder image
Placeholder image
USING THE VOLUME CONTROL
Rotate the volume control to increase or decrease the volume.
USING THE GAME/CHAT BALANCE
Rotate the game/chat balance to increase the in-game volume and decrease the voice chat volume
or vice versa. By default, the notch on the wheel is set to the middle to indicate 50% chat and 50%
game volume.
USING THE RETRACTABLE MIC
Pull the tip of the mic until it is fully extended.
FOR GAM ER S. B Y GA ME RS.™ 9

Bend the mic until it is parallel to your mouth, then adjust the length as preferred. Make sure the
Placeholder image
Placeholder image
Placeholder image
mic diaphragm is in front and the air vent is facing away from your mouth.
Mic diaphragm
Air vent
Press the mic mute button to mute or unmute the mic. The mic mute indicator will light up when
muted.
EXTENDING YOUR HEADSET’S LIFESPAN
We recommend stretching the headset gently apart before placing them over your head to
minimize headband stress. However, please avoid overstretching the headset beyond its technical
limits.
FOR GAM ER S. B Y GA ME RS.™ 10

INSTALLING RAZER SYNAPSE 3 FOR YOUR RAZER NARI
Placeholder image
Step 1: Make sure your Razer device is connected to the USB port of your computer.
Step 2: Install Razer Synapse 3 when prompted* or download the installer from
razer.com/synapse.
Step 3: Create your Razer ID or log in using an existing account.
*Applicable for Windows 8 or later.
FOR GAM ER S. B Y GA ME RS.™ 11

CONFIGURING YOUR RAZER NARI VIA RAZER SYNAPSE 3
Name
Description
How to set up
Unleash the full potential of your Razer Nari by enabling this feature from Razer Synapse 3:
[Insert THX SA icon here] THX Spatial Audio - 360° positional audio for a natural and lifelike
experience.
LIGHTING EFFECTS
The Lighting tab enables you to customize the look of your Razer device by allowing you to choose
from various lighting effects or fully customizing your own. These lighting effects can also be
synchronized with other Powered by Razer Chroma devices that support the selected effect.
Breathing
Spectrum
cycling
Static
Please refer to the Online Master Guide at support.razer.com for in-depth instructions on how to
configure and use your Razer Nari.
The lighting fades in and out of the
selected color(s)
The LEDs will cycle between 16.8
million colors indefinitely
The LEDs will remain lit in the
selected color
Select up to 2 colors or
randomize
No further customization
required
Select a color
FOR GAM ER S. B Y GA ME RS.™ 12

SAFETY AND MAINTENANCE
SAFETY GUIDELINES
In order to achieve maximum safety while using your Razer Nari, we suggest that you adopt the
following guidelines:
Should you have trouble operating the device properly and troubleshooting does not work, unplug
the device and contact the Razer hotline or go to support.razer.com for support.
Do not take apart the device (doing so will void your warranty) and do not attempt to operate it
under abnormal current loads.
Keep the device away from liquid, humidity or moisture. Operate the device only within the specific
temperature range of 0°C (32°F) to 40°C (104°F). Should the temperature exceed this range,
unplug and/or switch off the device in order to let the temperature stabilize to an optimal level.
The device isolates external ambient sounds even at low volumes, resulting in lowered awareness
of your external surroundings. Please remove the device when engaging in any activity that
requires active awareness of your surroundings.
Listening to excessively loud volume over an extended period of time can damage your hearing.
Furthermore, legislation of certain countries permits only a maximum sound level of 86dB for 8
hours a day. We therefore recommend that you reduce the volume to a comfortable level when
listening for prolonged periods of time. Please, take good care of your hearing.
MAINTENANCE AND USE
The Razer Nari requires minimum maintenance to keep it in optimum condition. Once a month we
recommend you unplug the device from the computer and clean it using a soft cloth or cotton swab
to prevent dirt buildup. Do not use soap or harsh cleaning agents.
FOR GAM ER S. B Y GA ME RS.™ 13

LEGALESE
COPYRIGHT AND INTELLECTUAL PROPERTY INFORMATION
©2018 Razer Inc. All rights reserved. Razer, the triple-headed snake logo, Razer logo, “For Gamers.
By Gamers.”, and “Powered by Razer Chroma” logo are trademarks or registered trademarks of
Razer Inc. and/or affiliated companies in the United States or other countries. All other trademarks
and trade names are the property of their respective owners and other company and product
names mentioned herein may be trademarks of their respective companies.
Razer Inc. (“Razer”) may have copyright, trademarks, trade secrets, patents, patent applications, or
other intellectual property rights (whether registered or unregistered) concerning the product in
this guide. Furnishing of this guide does not give you a license to any such copyright, trademark,
patent or other intellectual property right. The Razer Nari (the “Product”) may differ from pictures
whether on packaging or otherwise. Razer assumes no responsibility for such differences or for
any errors that may appear. Information contained herein is subject to change without notice.
LIMITED PRODUCT WARRANTY
For the latest and current terms of the Limited Product Warranty, please visit: razer.com/warranty.
LIMITATION OF LIABILITY
Razer shall in no event be liable for any lost profits, loss of information or data, special, incidental,
indirect, punitive or consequential or incidental damages, arising in any way out of distribution of,
sale of, resale of, use of, or inability to use the Product. In no event shall Razer’s liability exceed the
retail purchase price of the Product.
GENERAL
These terms shall be governed by and construed under the laws of the jurisdiction in which the
Product was purchased. If any term herein is held to be invalid or unenforceable, then such term (in
so far as it is invalid or unenforceable) shall be given no effect and deemed to be excluded without
invalidating any of the remaining terms. Razer reserves the right to amend any term at any time
without notice.
FOR GAM ER S. B Y GA ME RS.™ 14

FCC Stat em ent
This equipment has been test ed and f ound t o comply with th e limits for a Class
B digital device, pursuant to part 15 of the FCC Rules. These limits are
designed t o pr ov ide reasonable protection against harmful int erferenc e in a
residen t ial inst allation . Th is equipment generates us es and c an radiat e radio
fr equen cy ener gy and, if not installed and used in ac cor dance with th e
inst ru ction s, may caus e har mful in t erfer ence to radio communication s.
How ev er, th ere is n o guar antee that interference will n ot occur in a particular
inst all at ion. If th is equipment does caus e har mful in t erfer ence to radio or
tel evision r eception, which c an be det ermin ed by turnin g the equipment off and
on , the user is en cour aged t o try t o correct th e int erference by one or more of
the following measures:
—Reor ient or rel oc ate the receiving antenn a.
—Increase th e separation between th e equipment an d receiv er.
—Connect th e equipment into an outlet on a circuit diff erent from that to which
the receiv er is conn ected.
—Consult the dealer or an experienced r adio/TV techn ician for help.
FCC Stat em ent
This device complies w ith Part 15 of th e FCC Rul es. O per ation is subject to the
following two conditions: (1) this device may not cause harmful interference,
an d ( 2) this device mu st accept any int erferenc e received, in cluding
int erfer ence th at may cau se undes ired oper at ion.
Caution!
Any ch anges or modifications not expr essly approv ed by th e party responsible
for com plianc e could void the user's authority to operat e the equipment.
Canada Statement
This device compl ies with Industry Canada’s licence-exempt RSSs. Operat ion
is subject to the following two con dit ion s:
(1) This device may not cause interfer ence; and
(2) This device must accept any int erferenc e, includin g interfer ence that may
cause undes ired oper at ion of the device.
Le présent appareil est conf orme aux CNR d’Industr ie Can ada appl icabl es aux
appareils r adio exempts de licen ce. L’expl oitation est au torisée aux deux
conditions suivantes :
(1) l’appareil ne doit pas produ ire de brouillage;
FOR GAM ER S. B Y GA ME RS.™
15

(2) l’u t ilisateur de l’appareil doit accept er tout brouillage r adioél ectriqu e subi,
même s i le brouillage est sus ceptible d’en compr om ettre le
fonctionnement.
FOR GAM ER S. B Y GA ME RS.™
16
 Loading...