

Page 1

RaySafe i2
dose manager
User ManUal
Page 2

© 2012.03 Unfors RaySafe 5001049-A
All rights are reserved. Reproduction or transmission in whole or in part, in any form or by any means,
electronic, mechanical or otherwise, is prohibited without the prior written consent of the copyright owner.
2
Page 3

RaySafe i2 dose manager user manual – Contents
CONTENTS
INTRODUCTION .................................................................................................... 5
About the RaySafe i2 System ......................................................................... 5
How the system works ................................................................................... 6
About this user manual ................................................................................... 6
GET TO KNOW DOSE MANAGER ...........................................................................7
Introduction to dose manager ........................................................................7
Application menu overview ........................................................................... 9
Home toolbar overview ................................................................................. 10
Dose navigation toolbar overview ................................................................ 18
Reports preview toolbar overview .............................................................. 22
All dosimeters window overview ................................................................ 24
Details tab overview .................................................................................... 26
Dose graph tab overview ............................................................................. 29
Dose table tab overview............................................................................... 32
USE DOSE MANAGER .......................................................................................... 33
Get started with dose manager ................................................................... 33
Work with the main window ......................................................................... 39
Analyze dose history from one dosimeter ................................................... 40
Analyze dose data from several dosimeters ............................................... 46
Reports ......................................................................................................... 50
Dose manager options ................................................................................. 52
Dose manager license .................................................................................. 53
USING THE DOSIMETER...................................................................................... 54
Introduction ................................................................................................... 54
Getting started .............................................................................................. 54
USING THE CRADLE ............................................................................................ 55
Introduction ................................................................................................... 55
Getting started .............................................................................................. 55
TROUBLESHOOTING ........................................................................................... 56
Dose manager and cradle ............................................................................ 56
System requirements .................................................................................... 56
3
Page 4

RaySafe i2 dose manager user manual – Contents
Other user manuals ...................................................................................... 56
TECHNICAL DATA ................................................................................................ 58
Dosimeter and real time display/dose manager memories ........................ 58
Time management ....................................................................................... 58
Security and privacy requirements ............................................................. 58
4
Page 5
RaySafe i2 dose manager user manual – Introduction
INTRODUCTION
ABOUT THE RAYSAFE i2 SYSTEM
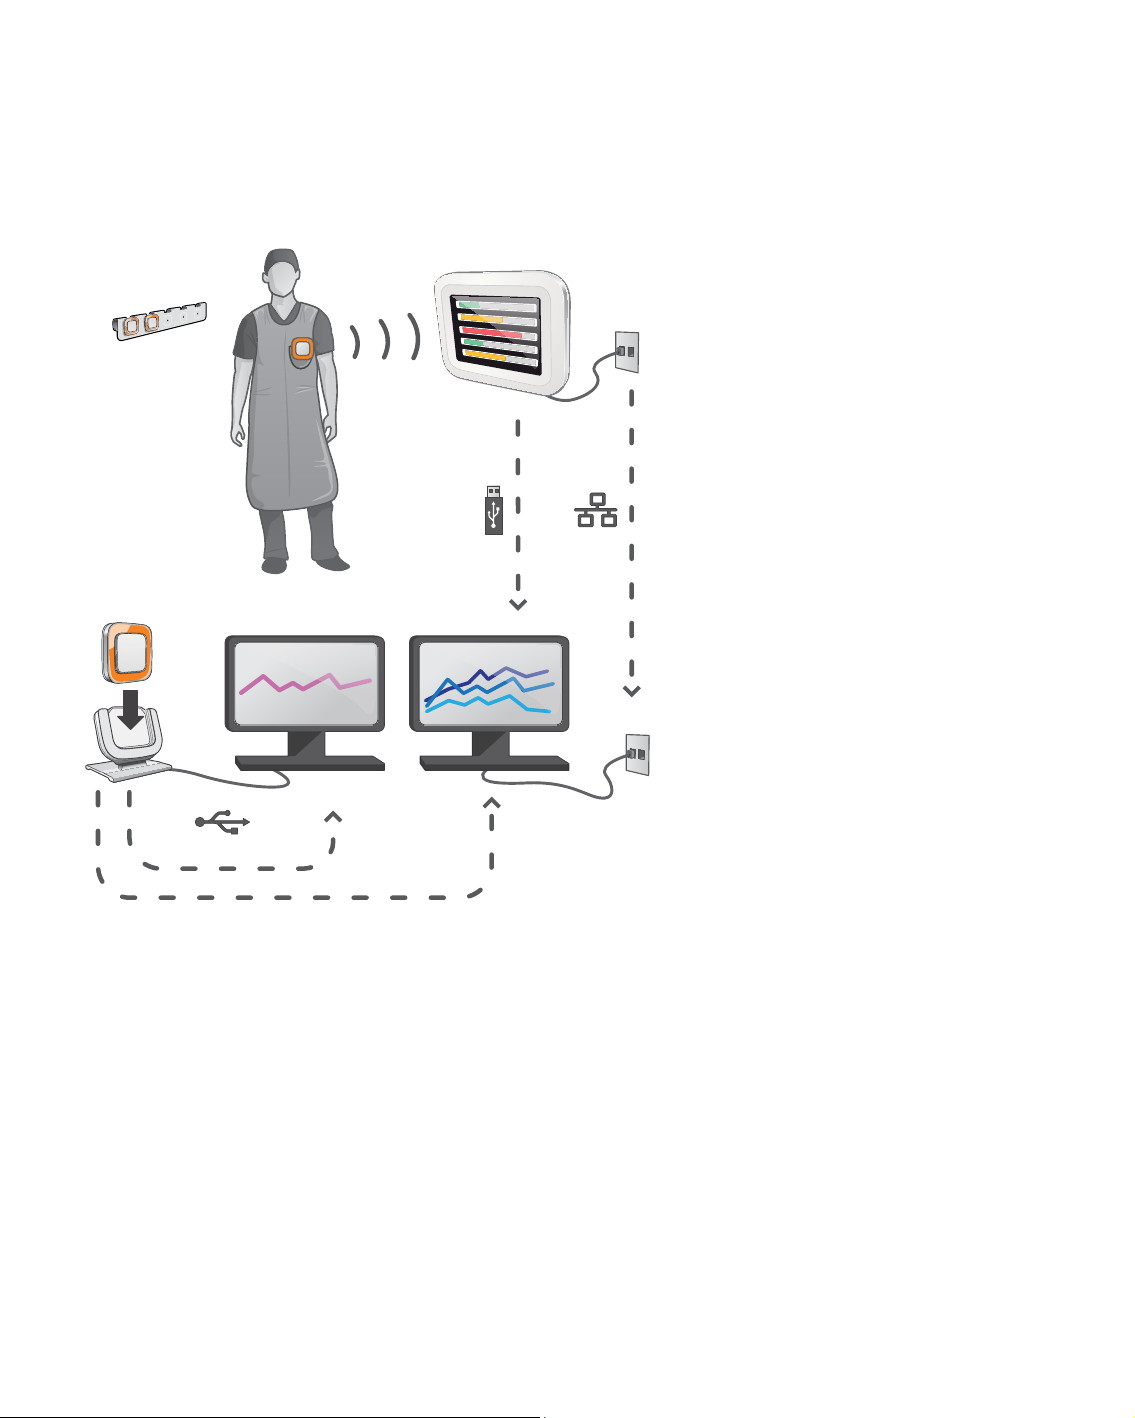
Figure 1. RaySafe i2 System overview
The RaySafe i2 System can contain the following components:
• dosimeter
• real time display
• dose viewer (computer software)
• dose manager (computer software)
• cradle (dock station used to connect dosimeters and computer)
• dosimeter rack (dosimeter storage)
5
Page 6

RaySafe i2 dose manager user manual – Introduction
HOW THE SYSTEM WORKS
The dosimeter measures and records X-ray exposure every second and transfers the data wirelessly, via radio,
to the real time display.
The real time display shows real time dose exposure from up to eight dosimeters in range at a time.
Color indication bars (green, yellow, red) represents the intensity of the currently received exposure. The
accumulated dose per individual is displayed next to the color indication bars. By tapping a dosimeter name
the user can look at historical data in separate views.
When the dosimeter is not in use, it should be stored in the dosimeter rack, away from the real time display.
More detailed historical dose information can be transferred from dosimeters via the cradle connected to a
computer and viewed using the computer software (dose viewer and dose manager).
The dose viewer software is also used for administrating dosimeters, change dosimeter names, colors and
reset dose history. The dose manager software is an advanced software for analyzing, reporting and archiving
dose information. It handles multiple dosimeters and can retrieve the dose information from multiple real time
displays through the hospital network or via USB storage.
ABOUT THIS USER MANUAL
This user manual are intended to assist users in the safe and eective operation of the product described.
Before attempting to operate the product, you must read these instructions for use, noting and strictly
observing all WARNINGS and CAUTION notices.
WARNING A WARNING alerts you to a potential serious outcome, adverse event or safety hazard. Failure
to observe a warning may result in death or serious injury to the operator or patient.
CAUTION A CAUTION alerts you to where special care is necessary for the safe and eective use of
the product. Failure to observe a caution may result in minor or moderate personal injury or
damage to the product or other property, and possibly in a remote risk of more serious injury,
and/or cause environmental pollution.
NOTE Notes highlight unusual points as an aid to an operator.
These Instructions for Use describe the most extensive configuration of the product, with the maximum number
of options and accessories. Not every function described may be available on your product.
6
Page 7

RaySafe i2 dose manager user manual – Get to know dose manager
GET TO KNOW DOSE MANAGER
This chapter describes the available features in dose manager. Instructions and commonly used work flows are
found in section “Use dose manager” on page 33 .
INTRODUCTION TO DOSE MANAGER
Dose manager is a powerful, easy-to-use tool for analyzing, reporting and storing dose information as well as
administrating multiple dosimeters.
Dose manager makes it possible for you to:
• Store and manage dose history for multiple dosimeters.
• Collect dose history from real time displays in your local network.
• Analyze dose data.
• View dose history as a graph or table.
• Export dose data for further analysis with other software tools, such as Excel.
• Create and print reports of dose history.
7
Page 8
RaySafe i2 dose manager user manual – Get to know dose manager
1
2 3 4
4
7 8
6
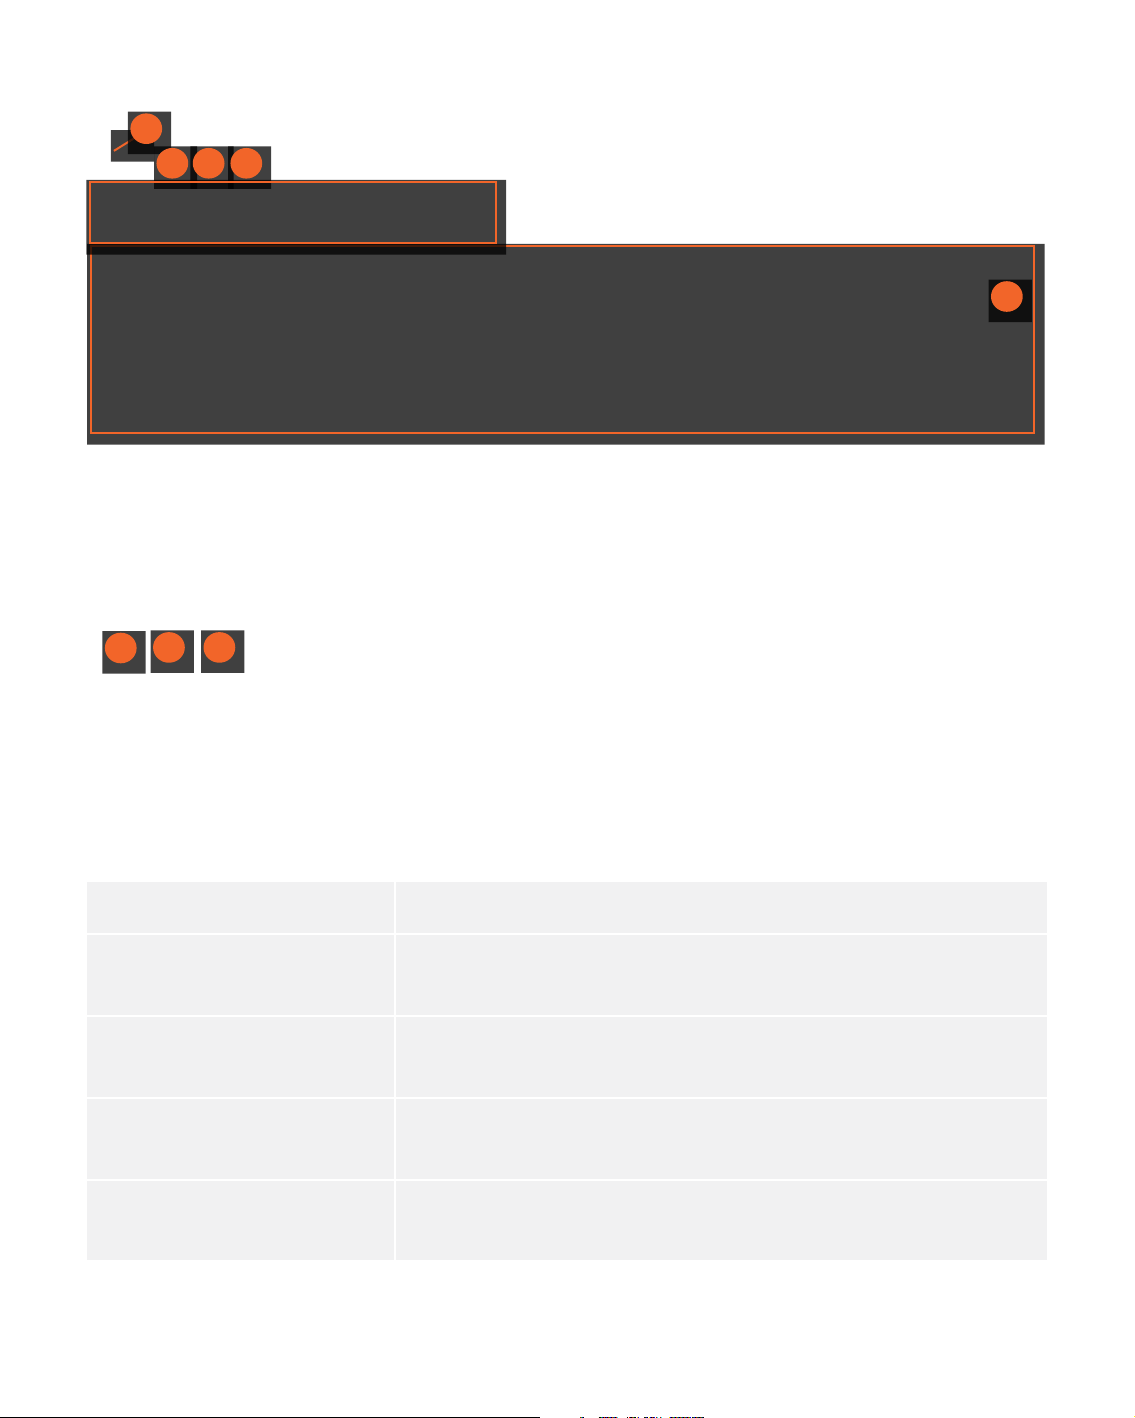
Figure 2. Dose manager overview
The following items are available when you start dose manager:
Table 1. Dose manager overview
ITEM DESCRIPTION
1 Application menu Manage databases and printing and access the Options dialogs (see
section “Application menu overview” on page 9).
2 Home Show and manage dosimeters, groups and reports (see section “Home
toolbar overview” on page 10).
3 Dose navigation Navigate in the dose history (see section “Dose navigation toolbar
overview” on page 18).
4 Report preview Preview and export reports (see section “Reports preview toolbar
overview” on page 22)
8
Page 9
RaySafe i2 dose manager user manual – Get to know dose manager
ITEM DESCRIPTION
5 All dosimeters Show available items (see section “All dosimeters window overview” on
page 24).
6 Details tab Display information of selected items (see section “Details tab
overview” on page 26).
7 Dose graph tab Show dose data as a graph (see section “Dose graph tab overview” on
page 29).
8 Dose table tab Show dose data as a table (see section”Dose table tab overview” on
page 32).
APPLICATION MENU OVERVIEW
Figure 3. Application menu
The application menu is where you work with dose manager databases and printing. This is also where you find
general dose manager settings. The following functions are available in the application menu:
9
Page 10
RaySafe i2 dose manager user manual – Get to know dose manager
Table 2. Application menu functions
FUNCTION DESCRIPTION
New Create a new database.
Open Open an existing database.
Save as Save your current database with a new name.
Print Print dose graphs, dose tables and reports.
Print preview Preview and customize dose graphs and dose tables. In this menu you
can also find tools to export and e-mail the current view.
Options Set or change an optional dose manager password, change the user
interface language.
NOTE The database can only be saved on a local drive. A network drive is not supported.
HOME TOOLBAR OVERVIEW
Figure 4. Home toolbar
The home toolbar provides you with tools to manage separate dosimeters, groups of dosimeters and dose data
reports. It is also where you find tools to synchronize dose data from dosimeters and real time displays.
DOSIMETERS
In the dosimeters group you can find the following tools:
Table 3. Dosimeter functions
FUNCTION DESCRIPTION
Show Show available dosimeters in a list.
10
Page 11
RaySafe i2 dose manager user manual – Get to know dose manager
FUNCTION DESCRIPTION
Dosimeter options Show and manage options for a dosimeter that is placed in a cradle.
You can only access and change dosimeter options when the
dosimeter is in a cradle.
When this information is changed in dose manager, it will be
synchronized to real time displays and dose viewer. The dosimeter
options dialog is separated in three tabs, see below.
Groups Show and manage groups of dosimeters. Use groups to arrange
dosimeters in dierent departments, clinical roles or for studies, for
example.
Delete Delete the selected dosimeter(s) or group(s).
11
Page 12

RaySafe i2 dose manager user manual – Get to know dose manager
DOSIMETER OPTIONS
INFORMATION TAB
The Information tab contains information about the person using the dosimeter.
Figure 5. Information tab
Table 4. Information tab functions
FUNCTION DESCRIPTION
Full name Full name of the person using the dosimeter. This text field is limited
to maximum 40 characters due to space limitations in the real time
display.
If dosimeters are shared with others, it may be convenient to name
the dosimeters “Doctor1”, “Doctor2”, and so on, for the clinical role
“Doctor”. Using dierent colors on the dosimeter can also help to
separate each clinical role.
12
Page 13
RaySafe i2 dose manager user manual – Get to know dose manager
FUNCTION DESCRIPTION
Displayed name The name that is displayed when the dosimeter appears in a real time
display. This name is also used to identify a dosimeter in dose viewer
and dose manager. This text field is limited to maximum 16 characters
due to space limitations in the real time display.
Dosimeter position Reflects where on the person the dosimeter is positioned and can be
set to one of Head, Torso, Hand, Belly, Leg or Other.
Clinical role Reflects the role of the person using the dosimeter and can be set to
one of Doctor, Nurse, Technician or Other.
Displayed symbol The color which is displayed when the dosimeter appears in a real time
display.
Annual dose limit This value is used to show the annual dose value in relation to the
annual dose limit in percent. If you do not want to show this relation,
set this value to 0.
NOTE The annual dose limit for the dosimeter is dependent of the shielding factor of the lead apron,
as well as other radiation protection used. The more protection the higher the limit can be for
the same eective dose to the user. The annual dose limit may or may not be chosen to reflect
the legal dose limit where it is used. It could reflect the legal limit or for example a lower
target for the clinical user case. These and other considerations need to be counted for when
choosing the annual dose limit.
13
Page 14
RaySafe i2 dose manager user manual – Get to know dose manager
SETTINGS TAB
The settings tab contains the dosimeter’s settings.
Figure 6. Settings tab
Table 5. Settings tab functions
FUNCTION DESCRIPTION
Dosimeter time See the dosimeter’s time and synchronize the dosimeter’s time with
your computer.
Real time display mode Enable or disable the dosimeter from appearing on real time display
screens.
14
Page 15

RaySafe i2 dose manager user manual – Get to know dose manager
FUNCTION DESCRIPTION
Power mode • On – Communication with real time displays will take place and
registration of dose data will occur
• O – Power saving mode. No communication with real time
displays will take place and no registration of dose data will occur.
Dose history The accumulated dose history, the dose rate history and Dose Sessions
1 and 2 will be reset to 0. The following happens when the dose history
is reset:
• In dose viewer and real time displays it will appear as if the
dosimeter has started measuring from 0 again. The deleted dose
history cannot be retrieved.
• In dose manager, the dose history that was available before reset
will be archived and possible to retrieve by clicking + next to the
dosimeter in the All dosimeters window. Dose manager will start
a new session for the dosimeter and it will appear as if the dose
history will start measuring from 0 in the new session.
Technical information Battery status indicates the dosimeter’s battery status:
• Green and yellow indicates normal use.
• Red indicates that the dosimeter need to be replaced in 4-6 months
at normal use.
• A crossed battery indicates that there is no battery left. The
dosimeter does not measure radiation and will not communicate
with real time displays.
Firmware version refers to the firmware that is currently installed in the
dosimeter.
15
Page 16
RaySafe i2 dose manager user manual – Get to know dose manager
DOSE TAB
The Dose tab shows and manages dose information.
Figure 7. Dose tab
Table 6. Dose tab functions
FUNCTION DESCRIPTION
Accumulated personal dose The dosimeter’s accumulated annual dose measured this calendar year
or since last reset, measured in Sv.
Time of last reset.
Percentage of yearly max The dosimeter’s accumulated annual dose measured this year or since
last manual reset, measured in Sv.
Dose Session 1 Trip meter for dose values. The accumulated dose for a session since
last Dose Session reset, measured in Sv. Use the Reset button to reset
this Dose Session to zero.
Time of last reset.
16
Page 17

RaySafe i2 dose manager user manual – Get to know dose manager
FUNCTION DESCRIPTION
Dose Session 2 Trip meter for dose values. The accumulated dose for a session since
last Dose Session reset, measured in Sv. Use the Reset button to reset
this Dose Session to zero.
Time of last reset.
Total personal dose The total dose exposure for a dosimeter since last dose history reset.
Time of last reset.
REPORTS
In the reports group you can find the following tools:
Table 7. Reports group functions
FUNCTION DESCRIPTION
Show Show all available reports.
New Enter the report wizard to create a new report. There are 4 standard
report templates available to base reports upon:
• Yearly dose report
• Monthly dose report
• Weekly dose report
• Dosimeter report
Delete Delete the selected report(s).
For information about how to work with reports, see section “Reports” on page 50. For information about
the reports preview, see section “Reports preview toolbar overview” on page 22.
17
Page 18
RaySafe i2 dose manager user manual – Get to know dose manager
REAL TIME DISPLAYS
The real time displays group provides the following tools:
Table 8. Real time displays group functions
FUNCTION DESCRIPTION
Synchronize Synchronize data from real time displays that are added to dose
manager.
Manage Find real time displays in your local network and add them to dose
manager. Manage real time displays that are added to dose manager.
Synchronize USB Synchronize real time display data from USB.
DOSE NAVIGATION TOOLBAR OVERVIEW
Figure 8. Dose navigation toolbar
The dose navigation toolbar, accessible when viewing dose graphs or dose tables, is where you find tools to
navigate in graphs and tables. The following items are available in the dose navigation toolbar:
NAVIGATION GROUP
The Navigation group contains access tools for dose history navigation.
Table 9. Navigation group functions
FUNCTION DESCRIPTION
Undo zoom Move one step back in a sequence of zoom actions, showing the last
selected time range.
Redo zoom Move one step forward in a sequence of zoom actions, showing the
time range that was selected before the last undo zoom action.
18
Page 19

RaySafe i2 dose manager user manual – Get to know dose manager
FUNCTION DESCRIPTION
Show all Show all available data for the selected dosimeter(s). The time range
will start the first date any dosimeter begun to measure dose and stop
the last date any dosimeter was synchronized.
Left Shift the time range one step backward. If you have selected year/
month/week/day, the time range will move one year/month/week/day
backward. If you have selected another time range, the time range will
move approximately 10% backward.
Right Shift the time range one step forward. If you have selected year/month/
week/day, the time range will move one year/month/week/day forward.
If you have selected another time range, the time range will move
approximately 10% forward.
Day View dose history for the current day.
Week View dose history for the current week.
Month View dose history for the current month.
Year View dose history for the current year.
Start time The viewed time range start day.
End time The viewed time range end day.
GRAPH DETAILS GROUP
The Graph Details group allows you to select which information is visible in the graph.
Table 10. Graph details group functions
FUNCTION DESCRIPTION
Accumulated dose Show/hide the accumulated dose in the graph.
Dose rate Show/hide the dose rate in the dose graph.
19
Page 20

RaySafe i2 dose manager user manual – Get to know dose manager
FUNCTION DESCRIPTION
Show details Checked: The graphs will display dose rate samples for every second,
where such data is available. Unchecked: the graphs will display mean
dose rate values per hour.
Events Show/hide events, such as synchronization occasions, in the dose
graph.
Graph options Enter the graph options dialog (small icon in the lower right corner
of the graph detail group), where you can access the graph visibility
settings and select to show/hide:
• Real time display to dosimeter synchronization occasions.
• Cradle to dose manager synchronization occasions.
• Session reset occasions.
• Event labels.
• Accumulated dose.
• Dose rate.
• Details.
EXPORT GROUP
The Export group allows you to export the dose table.
Table 11. Export group functions
FUNCTION DESCRIPTION
Export to clipboard Copy all data from the dose table to clipboard.
20
Page 21

RaySafe i2 dose manager user manual – Get to know dose manager
FUNCTION DESCRIPTION
Export Export all visible data from the dose table to one of the following
formats:
• Microsoft Excel
• CSV (Comma-Separated Values, which is a common standard for
text spread sheet files that can be used in most spread sheet and
database applications such as Excel, Access and Open oce.)
To make all data visible in the dose table, click Expand All, see section
“Export data from a dose table” on page 44.
Export raw data Export all visible data to a tab separated text file in a simple format that
is suited for processing and advanced excel analysis. To make all data
visible in the dose table, click Expand All.
SELECTION GROUP
The Selection groups allows you to manage selections in a dose graph.
Table 12. Selection group function
FUNCTION DESCRIPTION
Clear Clear the current selection in the dose graph.
21
Page 22

RaySafe i2 dose manager user manual – Get to know dose manager
REPORTS PREVIEW TOOLBAR OVERVIEW
Figure 9. Reports preview toolbar
The reports preview toolbar provides the following tools:
PAGE SETUP GROUP
Access tools to change the layout of the report.
Table 13. Page setup group functions
FUNCTION DESCRIPTION
Scale Resize the report to either a percentage of the normal size or to fit a
certain page width.
Page setup Change the page layout of the report.
NAVIGATION GROUP
Access tools to navigate in the report.
FUNCTION DESCRIPTION
Find Search in the report.
First page Go to the first page.
Previous page Go to the previous page.
Next page Go to the next page.
Last page Go to the last page.
Table 14. Navigation group functions
22
Page 23

RaySafe i2 dose manager user manual – Get to know dose manager
ZOOM GROUP
Access tools to customize the display of the report.
Table 15. Zoom group functions
FUNCTION DESCRIPTION
Select Select and drag guides in the report to increase or decrease the
margins.
Hand tool Move the report within the reports window.
Reports Preview toolbar overview
Magnifier Increase/decrease the view magnification in the reports window one
step.
Many pages View one or multiple pages.
Zoom out Decrease the view magnification in the reports window.
Zoom Increase/decrease the view magnification in the reports window to
predefined values.
Zoom in Decrease the view magnification in the reports window.
23
Page 24

RaySafe i2 dose manager user manual – Get to know dose manager
DOCUMENT GROUP
Access tools to export or e-mail the report.
Table 16. Document group functions
FUNCTION DESCRIPTION
Export Export a report in one of the following file formats:
• PDF
• HTML
• MHT
• RTF
• CSV
• XLS
• TXT
• Image (BMP, GIF, JPG, PNG, TIFF, EMF, WMF)
E-mail as E-mail a report in one of the file formats listed above.
PREVIEW GROUP
Manage the report preview.
Table 17. Preview group function
FUNCTION DESCRIPTION
Close Close the reports preview and return to the home screen.
ALL DOSIMETERS WINDOW OVERVIEW
The information that appears in this window is context sensitive, which means that it will change depending
on what you are currently working on. It is possible to customize which columns to be visible, see section
“Customize the columns” on page 39.
24
Page 25

RaySafe i2 dose manager user manual – Get to know dose manager
Figure 10. All dosimeters window
When show dosimeters is selected, the following information is visible in the All dosimeters window:
Table 18. All dosimeters window overview
ITEM DESCRIPTION
Dosimeter ID A unique dosimeter serial number.
Displayed name The name that is displayed in the real time display online view.
Full name Full name of the person using the dosimeter.
Clinical role One of doctor, nurse, technician or other.
Dosimeter position One of head, torso, hand, belly, leg or other.
Accumulated personal dose The dosimeter’s total dose measured this calendar year or since last
reset, measured in Sv.
Percentage of annual dose The dosimeter’s accumulated annual dose measured this year or since
last manual reset in relation to annual dose limit, measured in percent.
Dose Session 1 and 2 Trip meter for dose values. The accumulated dose for a session since
last dose Session reset, measured in Sv.
Total personal dose The total dose exposure for a dosimeter since last dose history reset.
25
Page 26

RaySafe i2 dose manager user manual – Get to know dose manager
ITEM DESCRIPTION
Battery status The dosimeter’s battery status:
• Green: normal use.
• Yellow: normal use.
• Red: the dosimeter need to be replaced in 4 – 6 months at normal
use.
• Crossed battery: there is no battery left. The dosimeter does
not measure radiation and will not communicate with real time
displays.
DETAILS TAB OVERVIEW
The information that appears in the details tab is context sensitive, which means that it will change depending
on what you are currently working on.
DOSIMETER DETAILS
Figure 11. Dosimeter details
When a dosimeter is selected in the All dosimeters window, you can access the following information in the
details tab:
26
Page 27

RaySafe i2 dose manager user manual – Get to know dose manager
Table 19. Dosimeter details items
ITEM DESCRIPTION
Dosimeter information For descriptions, see “Table 18. All dosimeters window overview” on
page 25.
Dose information For descriptions, see “Table 18. All dosimeters window overview” on
page 25.
Member of groups Shows the groups the dosimeter belongs to, if any.
Notes View and write optional notes about the dosimeter.
GROUP DETAILS
Figure 12. Group details
When a group is selected in the Groups window, you can access the following information in the details tab:
Table 20. Group details items
ITEM DESCRIPTION
Name View and change the group’s name
Description View and change an optional description for the group.
Group members Shows the group’s members.
Notes View and write optional notes about the group.
27
Page 28

RaySafe i2 dose manager user manual – Get to know dose manager
REPORT DETAILS
Figure 13. Report details
When a report is selected in the reports window, you can access the following information in the details tab:
Table 21. Report details items
ITEM DESCRIPTION
Period The report’s time period.
Name View and change the report’s name.
Header text View and change an introduction to the report.
Grouping enabled Check this box to enable group name in the report.
Group description Check this box to enable group description in the report.
Show graph Check this box to enable an optional pie chart in the report.
Report members Show the dosimeter(s) and group(s) that are members of the group.
Notes View and write optional notes about the report.
28
Page 29

RaySafe i2 dose manager user manual – Get to know dose manager
DOSE GRAPH TAB OVERVIEW
Figure 14. Dose graph overview
In the dose graph tab, data from one or several dosimeters will be presented as a graph. It is possible to
navigate in the graph and to customize the view according to your needs, see section “View dose history as a
graph” on page 40 and section “View dose history as a graph” on page 46 for instructions.
GRAPH LEGEND
In the graph legend you can see information about the graphs for dierent dosimeters.
29
Page 30

RaySafe i2 dose manager user manual – Get to know dose manager
Figure 15. Graph legend
SELECTIONS IN A DOSE GRAPH
Figure 16. A selection in a dose graph
Make selections in a dose graph to analyze a certain time span further, see section “Make a selection in a
graph” on page 41. When you have made a selection, the following information is available in the graph
legend:
Table 22. Dose graph selections
ITEM DESCRIPTION
Selection summary An overall description about the selection.
30
Page 31

RaySafe i2 dose manager user manual – Get to know dose manager
ITEM DESCRIPTION
Start The selection’s start date and time.
End The selection’s end date and time.
Span The selection’s duration in number of days and hours.
Name Sort the list of dosimeters in a selection either ascending or
descending.
Dose The total dose in the selected time span.
Peak dose rate The maximum dose rate in the selected time span.
Mean dose rate The mean dose rate in the selected time span.
EVENTS IN A DOSE GRAPH
The dose graph can show information about the following events:
Table 23. Dose graph events
EVENT DESCRIPTION
Real time display to dosimeter
synchronization
Cradle to dosimeter
synchronization
Session reset occasions Shows when Dose Session 1 or 2 has been reset.
Shows when a dosimeter has been synchronized via a occasions real
time display.
Shows when a dosimeter has been synchronized via a occasions
cradle.
31
Page 32

RaySafe i2 dose manager user manual – Get to know dose manager
DOSE TABLE TAB OVERVIEW
Figure 17. Dose table overview
In the dose table tab, data from one or several dosimeters will be presented as a table. It is possible to
navigate in the table and to customize the view according to your needs, see section “View dose history as a
table” on page 42 and section “View dose history as a table” on page 48 for instructions.
32
Page 33

RaySafe i2 dose manager user manual – Use dose manager
USE DOSE MANAGER
This chapter contains instructions and commonly used work flows in dose manager. Detailed descriptions of all
the available features are found in section “Get to know dose manager” on page 7.
GET STARTED WITH DOSE MANAGER
CHANGE DOSIMETER INFORMATION AND SETTINGS
When you change the dosimeter’s information and settings in dose manager the dosimeter will synchronize
these changes to real time displays and dose viewer.
NOTE It is only possible to access and change the dosimeter options when the dosimeter is placed in
a cradle.
Follow the instructions below to change dosimeter information and settings:
1. Make sure that a cradle is connected to your computer’s USB port.
2. Insert a dosimeter in the cradle.
The computer will detect the dosimeter automatically and the dosimeter information will appear in dose
manager.
3. Access the dosimeter options dialog by clicking the dosimeter options button in the dosimeter group in the
home tab.
The dosimeter options dialog is separated in three tabs. For descriptions about the information that is available
in these tabs, see section “Dosimeters” on page 10.
33
Page 34

RaySafe i2 dose manager user manual – Use dose manager
Figure 18. Dosimeter information tab
Information tab – Change information about the person using the dosimeter. Store or discard changes with
Save or Cancel.
Figure 19. Dosimeter settings tab
Settings tab – Change the dosimeter’s settings and access information about the dosimeter. The actions
synchronize time and reset dose history are applied immediately. Store or discard all other changes with Save
or Cancel.
34
Page 35

RaySafe i2 dose manager user manual – Use dose manager
Figure 20. Dosimeter settings Dose tab
Dose tab – View the current accumulated dose for the dosimeter and reset Dose Session 1 and 2. The action
reset Dose Session is applied immediately and also exits the dialog.
4. Wait for a few seconds before you remove the dosimeter from the cradle after you have saved the
changes.
COLLECT DATA FROM DOSIMETER
Follow the instructions below to collect data from a dosimeter:
1. Make sure that a cradle is connected to your computer’s USB port.
2. Insert a dosimeter in the cradle.
The computer will detect the dosimeter automatically and the dosimeter information will appear in dose
manager.
35
Page 36

RaySafe i2 dose manager user manual – Use dose manager
COLLECT DATA FROM REAL TIME DISPLAY
Follow the instructions below to collect data from one or several real time displays in your local network:
1
5
3
4
2
Figure 21. Collect data from real time display
1. Click the button Manage in the Home toolbar.
2. Select Find real time displays and wait while dose manager is searching for real time displays in your
network.
3. Select a real time display and click Select.
4. Check the box Include in synchronization and click OK.
5. Click the button Synchronize.
The dosimeter information will appear in dose manager.
Finding real time displays on a local network might not be possible due to the network configuration. If you
cannot find a real time display that is installed on your local network it can also be added to the list of real time
displays for dose manger using its network IP address. The IP address used by the real time display can be
found in its network setup menu.
36
Page 37

RaySafe i2 dose manager user manual – Use dose manager
TROUBLESHOOTING
If communication with a real time displays that has been manually added to the list by using its network
address does not work, it might be a result of network configuration. Make sure that the real time display and
Dose manager PC is connected to the same network and use the same subnet mask. If the problems cannot be
resolved, contact the local network administrator.
COLLECT DATA FROM USB
Follow the instructions below to collect data from USB:
1. Click the button Synchronize USB in the Home toolbar.
2. Select the folder from which to synchronize real time display data.
3. Click OK.
SHOW AND MANAGE GROUPS OF DOSIMETERS
1
2
3
Figure 22. Create a group of dosimeters
Follow the steps below to create a new group:
1. Click the button Groups in the Home toolbar to view the groups’ tree.
2. Right-click Groups in the groups’ tree to create a new sub group.
3. Go back to the All dosimeters window by clicking on Show in the dosimeters group; then drag dosimeter(s)
from the All dosimeters window to group(s) they are going to belong to.
Right-click on a group to delete or rename the group or access group properties.
37
Page 38

RaySafe i2 dose manager user manual – Use dose manager
WARNING Deleting a dosimeter from the All dosimeters window will result in removing the dosimeter and
all related dose history from the dose manager database.
WORK WITH DOSE SESSIONS
Use Dose Session 1 and 2 to measure dose for specific time spans, for example a specific procedure or a
working day.
The end user can easily reset these Dose Sessions in the real time display without the use of a computer. When
Dose Sessions are reset either on a real time display that is synchronized to dose manager, or directly in dose
manager, a Dose Session event will be added to the dose history. This event will be visible on the dosimeter’s
accumulated dose series when viewed.
NOTE Dose Session resets that are done in dose viewer will not be displayed as an event in dose
manager.
RESET DOSE HISTORY
The accumulated dose history, the dose rate history and Dose Sessions 1 and 2 will be reset to 0. The dose
history that was available before reset will be archived and possible to retrieve by clicking + next to the
dosimeter in the All dosimeters window. Dose manager will start a new session for the dosimeter and it will
appear as if the dose history will start measuring from 0 in the new session.
Follow the steps below to reset the dose history:
1. Make sure that a cradle is connected to your computer’s USB port.
2. Insert a dosimeter in the cradle.
The computer will detect the dosimeter automatically and the dosimeter information will appear in dose
manager.
3. Access the dosimeter settings dialog by clicking the dosimeter options button.
4. Select the Settings/dose tab.
5. Click Reset dose history. This action is applied immediately and also exits the dialog.
SAVE DATA
Dose manager automatically saves application and dose data to the database that you are currently working
on.
Use Save as to save the database you are currently working on with a new name.
NOTE The database can only be saved on a local drive. A network drive is not supported.
38
Page 39

RaySafe i2 dose manager user manual – Use dose manager
NOTE Dose manager does not handle backup and restore. Therefore you have to make sure that
you are saving the database in a location that is backed up.
WORK WITH THE MAIN WINDOW
CUSTOMIZE THE COLUMNS
Figure 23. Customize columns
Follow the instructions below to add or remove columns in the main window:
1. Right-click in the column header row in the main window and select Show field chooser.
2. Drag and drop column headers between the field chooser and the column header row in the main window.
The order of the selected column headers can be easily changed. Just drag and drop a column header to
move it to the left or to the right.
SORT INFORMATION IN THE COLUMNS
• Click on the dierent column headers to sort the list ascending or descending.
39
Page 40

RaySafe i2 dose manager user manual – Use dose manager
ANALYZE DOSE HISTORY FROM ONE DOSIMETER
VIEW DOSE HISTORY AS A GRAPH
3
4
1
5
2
Figure 24. View dose history as a graph
Follow the instructions below to view dose history as a graph:
1. Select the dosimeter you would like to analyze in the All dosimeters window.
2. Click the tab Dose Graph to see the dose data presented as a graph.
3. Click Show all.
All available data for the selected dosimeter will appear. The time range will start the first date the dosimeter
begun to measure dose and stop the last date the dosimeter was synchronized.
4. Use the Navigation and Graph details toolbars in the Dose Navigation toolbar to customize the graph and
navigate in it.
5. Click the button Legend to the left of the graph to see the graph legend.
To make the graph legend permanently visible, click the pin in the upper right corner. Click the pin again to hide
the graph legend.
40
Page 41

RaySafe i2 dose manager user manual – Use dose manager
To change the graph colors, select a dosimeter and right-click on it. Select either dose graph color or dose rate
graph color and choose your preferred color and click OK.
NAVIGATE IN A GRAPH
Figure 25. Zoom in a graph
Perform the following actions to navigate in a graph:
1. Use the mouse to left click and drag in the graph to increase the view magnification.
2. Use the tools in the dose navigation toolbar to navigate further in the graph.
MAKE A SELECTION IN A GRAPH
Figure 26. Make a selection in a graph
If you want to analyze a certain part of a graph further, follow the instructions below to make a selection, which
will give you more information:
1. Use the mouse to Shift-click and drag to select in the graph.
This makes a selection in a time span in the graph. The selection is indicated with vertical red dotted lines.
2. View detailed information from the selection in the graph legend.
3. Clear the selection by clicking Clear in the dose navigation toolbar.
41
Page 42

RaySafe i2 dose manager user manual – Use dose manager
VIEW DOSE HISTORY AS A TABLE
3
5
1
4
2
Figure 27. View dose history as a table
Follow the instructions below to view dose history as a table:
1. Select the dosimeter you would like to analyze in the All dosimeters window.
2. Click the tab Dose Table to see the dose data presented in a table.
3. Click Show all.
All available data for the selected dosimeter will appear. The time range will start the first date the dosimeter
begun to measure dose and stop the last date the dosimeter was synchronized.
4. Click Expand all to see detailed information.
5. Use the Navigation and Graph details toolbars in the Dose Navigation toolbar to customize the table and
navigate in it.
NOTE The data presented in the table depends on which time span that is used.
42
Page 43

RaySafe i2 dose manager user manual – Use dose manager
PRINT DATA FROM A DOSE GRAPH OR DOSE TABLE
Figure 28. Print dose history
The currently viewed dose graph or dose table can be printed. The same data that is displayed will be printed.
Follow the instructions below to print:
1. Enter the application menu and either select Print or continue with steps 2 – 3.
2. Select Print Preview to preview and customize the print area. In this menu you can also find tools to export
and e-mail the current view.
3. Select Print.
43
Page 44

RaySafe i2 dose manager user manual – Use dose manager
EXPORT DATA FROM A DOSE TABLE
2
3
4
1
Figure 29. Export data from dose table
Follow the instructions below to export data from a dose table for further analysis:
1. Make sure that you are in the Dose Table view.
2. Select the dosimeter(s) from which you want to export data.
Note that all dosimeters in a selection may not have been exposed to radiation during the same time.
3. Click the Export button and select your preferred file format.
4. Save the document on your computer.
NOTE Only the data that is currently visible in the dose table will be exported. Click the button
Expand all to make all data visible.
COPY SPECIFIC CELLS IN A TABLE
1. Make sure that you are in the Dose Table view.
2. Select the dosimeter(s) from which you want to export data.
44
Page 45

RaySafe i2 dose manager user manual – Use dose manager
Note that all dosimeters in a selection may not have been exposed to radiation during the same time.
3. Select the cells that you want to copy by clicking on the first and last row that are going to be included.
4. Copy the cells with the command ctrl + c.
5. Paste the copied cells in the target document with the command ctrl + v.
EXPORT DATA TO A TABSEPARATED TEXT FILE
1. Make sure that you are in the Dose Table view.
2. Select the dosimeter(s) from which you want to export data.
3. Note that all dosimeters in a selection may not have been exposed to radiation during the same time.
4. Click the Export raw data button.
5. Save the document on your computer.
NOTE Only the data that is currently visible in the dose table will be exported. Click the button
Expand all to make all data visible.
45
Page 46

RaySafe i2 dose manager user manual – Use dose manager
ANALYZE DOSE DATA FROM SEVERAL DOSIMETERS
VIEW DOSE HISTORY AS A GRAPH
3
1
4
2
Figure 30. Analyze dose history from several dosimeters
Follow the instructions below to view dose history from several dosimeters as a graph:
1. Select either:
• Several dosimeters in the All dosimeters window by holding down Ctrl while clicking on the
dosimeters.
Or
• A group of dosimeters.
2. Click the tab Dose Graph to see the dose data presented as a graph.
3. Click Show all.
All available data for the selected dosimeters will appear. The time range will start the first date any dosimeter
received dose and stop the last date any dosimeter received dose.
4. Click the button Legend to the left of the graph to see the graph legend.
46
Page 47

RaySafe i2 dose manager user manual – Use dose manager
To make the graph legend permanently visible, click the pin in the upper right corner. Click the pin again to hide
the graph legend.
To change the graph colors, select a dosimeter and right-click on it. Select either dose graph color or dose rate
graph color and choose your preferred color and click OK.
5 8
7
6
8
Figure 31. Make a selection in a graph
If you want to analyze a certain part of a graph further, follow the steps below to make a selection:
5. Make sure that the graphs you are interested in looking at are selected.
6. Click Shift in combination with using the mouse to left click and drag in the graph.
This makes a selection in a time span in the graph. The selection is indicated with vertical red dotted lines.
7. View information about this selection in the graph legend.
8. Click Clear, either in the graph legend or in the Dose Navigation toolbar, to clear your selection.
47
Page 48

RaySafe i2 dose manager user manual – Use dose manager
VIEW DOSE HISTORY AS A TABLE
3 4
1
2
Figure 32. View dose history as a table
Follow the instructions below to view dose history as a table:
1. Select either:
• Several dosimeters in the All dosimeters window by holding down Ctrl while clicking on the
dosimeters.
Or
• A group of dosimeters.
2. Click the tab Dose Table to see the dose data presented in a table.
3. Click Show all.
All available data for the selected dosimeter will appear. The time range will start the first date the dosimeter
begun to measure dose and stop the last date the dosimeter was synchronized.
4. Use the Navigation and Graph details toolbars in the Dose Navigation toolbar to customize the table and
navigate in it.
48
Page 49

RaySafe i2 dose manager user manual – Use dose manager
NOTE The data presented in the table depends on which time span is used.
PRINT DATA FROM A DOSE GRAPH OR DOSE TABLE
See section “Print data from a dose graph or dose table” on page 43
EXPORT DATA FROM A DOSE TABLE
See section “Export data from a dose table” on page 44
49
Page 50

RaySafe i2 dose manager user manual – Use dose manager
REPORTS
You can easily create reports for further analysis of both separate dosimeters and groups of dosimeters.
CREATE REPORTS
1 2
3
Figure 33. Create a report
Follow the instructions below to create a report for dose data:
1. Click the Show button in the reports group.
2. Click New.
Dose manager will open a Report Wizard.
3. Select one of the standard templates and press Next.
4. Select which dosimeter(s) and/or group(s) of dosimeters to include in the report by using the arrows and
press Next.
5. Select the time range for the report.
50
Page 51

RaySafe i2 dose manager user manual – Use dose manager
If the end time for the report is in the future, for example if you make a report for the current year before it is
ended, the report will be dynamically updated each month.
6. Click Create.
7. Access the report preview mode by double-clicking it in the Main toolbar. Exit the report preview by clicking
Close.
EXPORT OR EMAIL A REPORT
NOTE To be able to e-mail a report you need to have an external e-mail client installed on your
computer.
1
2
Figure 34. Select a report to export or e-mail
Follow the instructions below to export or e-mail a report:
1. Click the Show button in the reports group.
2. Double-click on the report you would like to export to enter the report preview mode.
51
Page 52

RaySafe i2 dose manager user manual – Use dose manager
3 5
4
Figure 35. Export or e-mail a report
3. Select either Export or E-mail as in the Document toolbar and select the preferred file format.
4. Enter export options.
5. Click Close to exit the report preview mode.
DOSE MANAGER OPTIONS
SET PASSWORD
To protect the information stored in dose manager, it is possible to set an optional password that will be
required when dose manager is launched. Follow the instructions below to set a password:
1. Click the Application menu.
2. Select Options.
3. Enter a password in the field New Password.
NOTE Contact you local administrator for password guidelines.
52
Page 53

RaySafe i2 dose manager user manual – Use dose manager
4. Repeat the password in the field Verify Password.
5. Click OK.
CHANGE PASSWORD
Follow the instructions below to change the current password:
1. Click the Application menu.
2. Select Options.
3. Enter your current password in the field Current Password.
4. Enter a new password in the field New Password.
5. Repeat the new password in the field Verify Password.
6. Click OK.
CHANGE LANGUAGE
Follow the instructions below to change the user interface language:
1. Click the Application menu.
2. Select Options.
3. Select your preferred language in the drop-down menu.
4. Click OK.
5. Re-start dose manager to apply the change.
DOSE MANAGER LICENSE
Dose manager shall be used only on the designated hardware and at the site of the licensee as specified in the
Customer Software License Agreement. A separate dose manager is required per each designated hardware
on which the dose manager is to be used.
53
Page 54
RaySafe i2 dose manager user manual – Using the dosimeter
USING THE DOSIMETER
INTRODUCTION
Figure 36. The dosimeter
The dosimeter is an active dose meter designed for maintenance-free usage throughout its lifetime.
You can personalize the dosimeter’s appearance by attaching one of the 8 inlays of dierent color, which are
delivered together with the dosimeter. (Select which color to show on the real time display, using the dosimeter
options dialog, see “Figure 5. Dosimeter options, information tab” on page 13.)
The dosimeter measures sta dose. The optimal usage for the dosimeter to measure dose is to use it
unshielded from any X-ray protection garment.
GETTING STARTED
Follow the instructions below to start using your dosimeter:
1. Make sure that the dosimeter’s power mode is set to “On”, see section “Change dosimeter information and
settings” on page 33.
2. Attach the dosimeter on your clothes using the clip, which is located on the back of the dosimeter, or the
lanyard holder that is provided with the dosimeter.
The dosimeter now records dose values and transmits them to real time displays within range. You can also
read out the recorded dose values by using dose manager via the cradle (see section “Collect data from
dosimeter” on page 35).
See section “Technical data” on page 58 to learn more about dosimeter memory.
54
Page 55

RaySafe i2 dose manager user manual – Using the cradle
USING THE CRADLE
INTRODUCTION
Figure 37. The cradle
The cradle is a dock station that lets you connect a dosimeter to a computer for data read out as well as
dosimeter options writing into the dosimeter.
GETTING STARTED
NOTE Do not connect the cradle to the computer unless dose viewer/dose manager and the cradle
driver are installed on the computer.
1. Start the dose manager application.
2. Connect a cradle to your computer’s USB port.
3. Put a dosimeter in the cradle.
Within a few seconds, dose manager will detect the dosimeter. This is indicated at the top of the dose manager
window by a note “Connected to dosimeter 100001158”, where dosimeter 100001158 is an example of a
dosimeter ID.
Dose manager will start loading the dosimeter dose history. This may take up to a few minutes. You can follow
the progress on the progress bar at the bottom of the dose manager window.
55
Page 56

RaySafe i2 dose manager user manual – Troubleshooting
TROUBLESHOOTING
DOSE MANAGER AND CRADLE
PROBLEM SOLUTION
Table 24. Dose manager and cradle troubleshooting
The dosimeter does not appear
in dose manager
Dose manager does not detect
the cradle
I have forgotten my password Contact your local administrator, who will have to re-install the software
Check that the dosimeter is correctly fitted into the cradle
• Check the USB connection between the cradle and the computer.
• Install the cradle driver manually. All the driver files are located on
the installation CD in the folder “CradleDriver”. These files are also
copied to the application installation folder when dose manager is
installed. When Windows detect a connected cradle and the dialog
about driver installation is displayed, select to use the driver files
located on the CD or in the application installation folder.
SYSTEM REQUIREMENTS
• Operating systems: Windows 7, Windows Vista or Windows XP.
• .NET 3.5.
• At least one USB port available.
• At least 2 GB of system memory available.
• At least 1 GB of hard disk space available.
• Recommended screen resolution at least 1280 x 1024.
OTHER USER MANUALS
• Dose viewer is described in a separate user manual, which can be found from the Help menu in dose
viewer software.
• The dosimeters are described in a quick guide, delivered together with the dosimeter.
56
Page 57

RaySafe i2 dose manager user manual – Troubleshooting
• The real time display is described in the system user manual..
• More information about installation and maintenance can be found in the service manual, delivered with
the system.
57
Page 58

RaySafe i2 dose manager user manual – Technical data
TECHNICAL DATA
DOSIMETER AND REAL TIME DISPLAY/DOSE MANAGER MEMORIES
Dose rate samples that have been overwritten in the dosimeter’s dose rate memory may still be available in the
real time display and dose manager memories.
If there are no dose rate samples neither in the real time display or dose manager memories, nor in the
dosimeter dose rate memory, the real time display and dose manager will instead display mean dose rate
values based on accumulated dose values.
Lack of dose rate samples in the real time display and/or dose manager memories occurs when the:
• Dosimeter is not within range of the real time display when it is exposed to radiation.
• Dose rate samples in the dosimeter dose rate memory are overwritten.
TIME MANAGEMENT
The dosimeter logs dose history in local time with no daylight saving time adjustments. Daylight saving time
adjustment is done in the real time display, dose viewer or dose manager when the dose history is presented.
The following happens when the daylight saving time is changed:
• When going to summertime, one extra hour with no dose data will be added to the dose log.
• When going to wintertime, two hours of dose data will be merged into one hour. This hour contains no
dose rate details. When changing from summertime to wintertime, dose date details in the two merged
hours will not be displayed.
SECURITY AND PRIVACY REQUIREMENTS
NETWORK PORTS
The following ports and protocols are open on the real time display for communication with the dose manager:
TCP/UDP PORT NUMBER PROTOCOL ADDITIONAL NOTE
TCP 8070 g SOAP httpd 2.7 Used for regular (bidirectional) communication
between real time display and dose manager
58
Page 59

RaySafe i2 dose manager user manual – Technical data
TCP/UDP PORT NUMBER PROTOCOL ADDITIONAL NOTE
UDP 8060 Proprietary
discovery
protocol
Protocol (bidirectional) used for real time display
discovery
ENCRYPTION
RaySafe i2 data is encrypted during transmission, at rest on the real time display and is stored in an encrypted
dose manager database.
59
 Loading...