

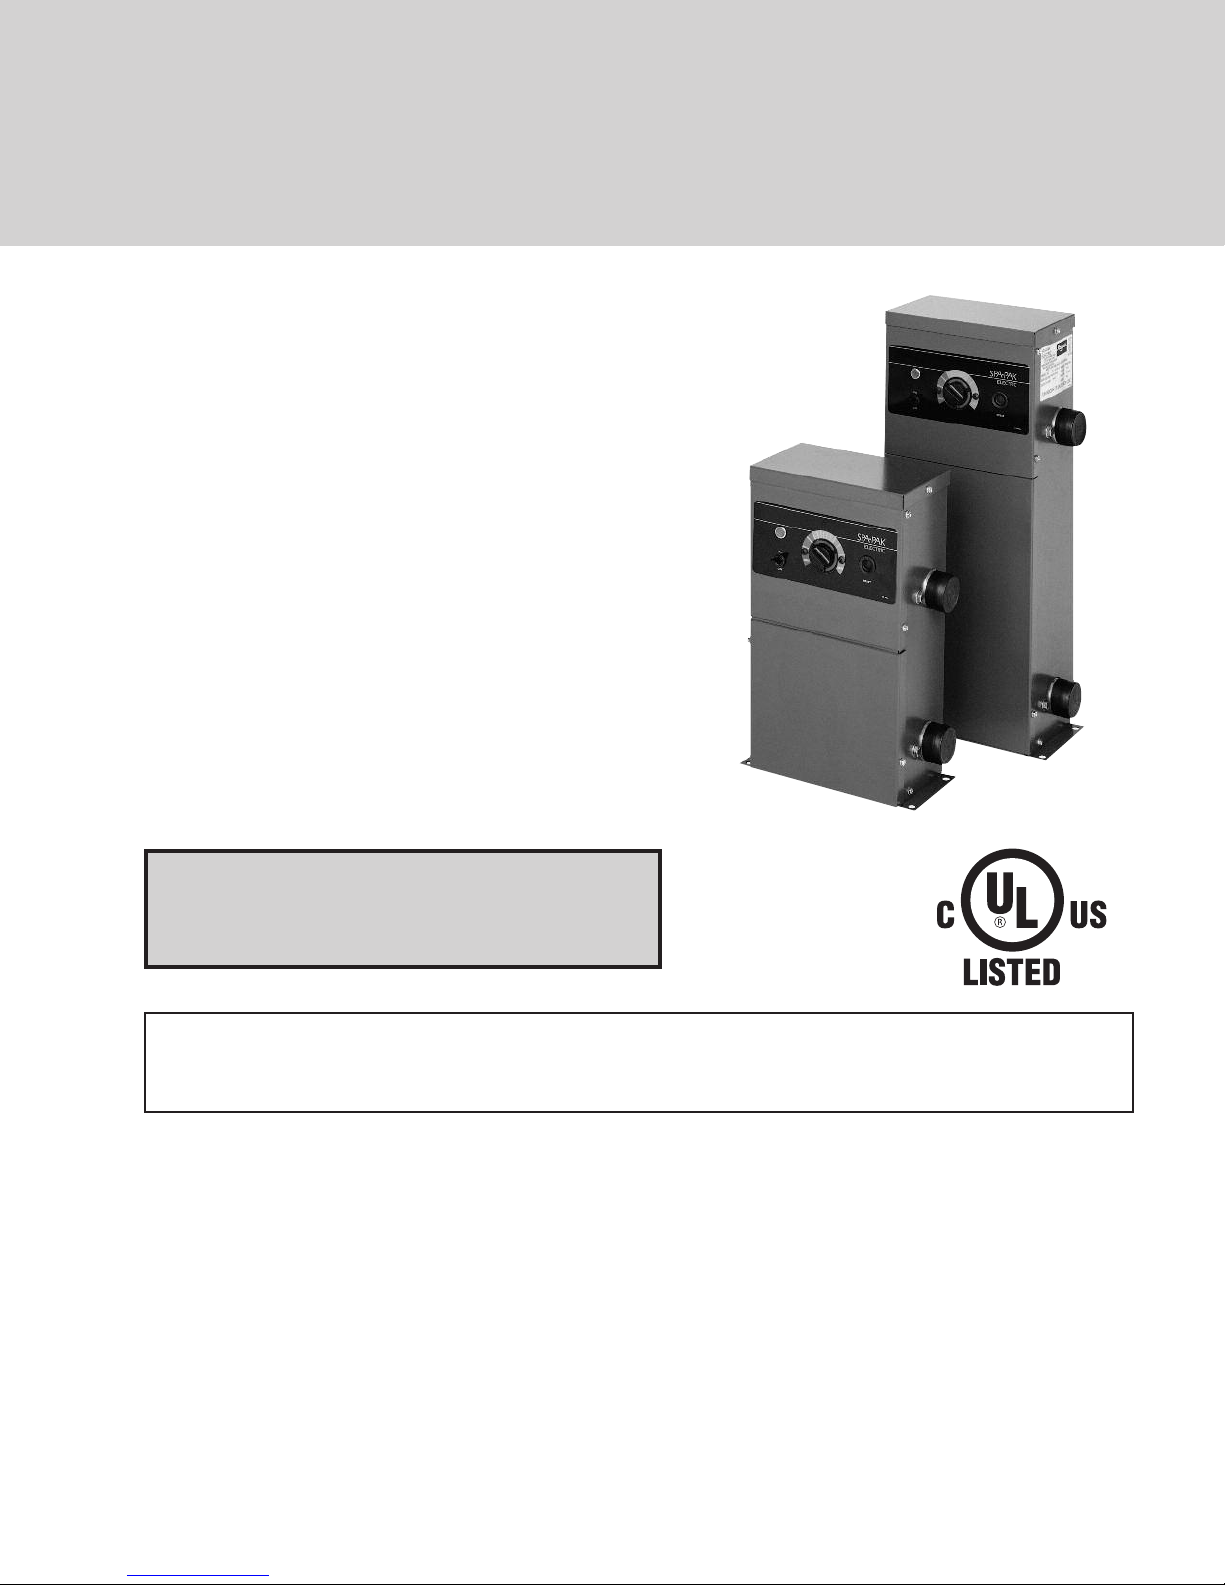
Raypak ELS 552-2, ELS 1102-2, Spa-Pak ELS 552-2, Spa-Pak ELS 1102-2 Installation & Operating Instructions Manual
Page 1
INSTALLATION & OPERATING
INSTRUCTIONS
Electric
SPA-PAK
Heater
Models
ELS 552-2 & ELS 1102-2
FOR YOUR SAFETY: Do not store or use gasoline or other flammable vapors and
liquids or other combustible materials in the vicinity of this or any other appliance. To
do so may result in an explosion or fire.
Catalog No. 6100.53U Effective: 09-28-09 Replaces: 11-11-08 P/N 240362 Rev. 22
Page 2

WATER CHEMISTRY
For your health and the protection of your pool equip-
ent, it is essential that your water be chemically
m
balanced. The following levels must be used as a
guide for balanced water.
Occasional chemical shock dosing of the pool or spa
should not damage the heater providing the water is
balanced.
Automatic chemical dosing devices and salt chlorinators are usually more efficient in heater water, unless
controlled, they can lead to excessive chlorine level
which can damage your heater.
CAUTION: Corrosive water voids all warranties.
Recommended
Level(s)
Water Temperature 68-88°F (20-31°C) 89-104°F (31-40°C) 68-104°F (20-40°C)
pH 7.3-7.4 7.3-7.4 7.6-7.8
Total Alkalinity (ppm) 120-150 120-150 80-120
Calcium Hardness (ppm) 200-300 150-200 200-400
Salt (ppm) 6000 Maximum 6000 Maximum 6000 Maximum
Free Chlorine (ppm)* 2-3 2-3 2-3
Total Dissolved Solids
(ppm)
*Free Chlorine MUST NOT EXCEED 5 ppm!
Fiberglass Pools Fiberglass Spas
3000 Maximum 3000 Maximum 3000 Maximum
Further advice should be obtained from your pool or
spa builder, accredited pool shop, or chemical supplier for the correct levels for your water.
Other Pool and Spa
Types
Rev. 22 reflects the following: Changes to: The C-UL Listed Mark on page 1.
2
Page 3
INTRODUCTION
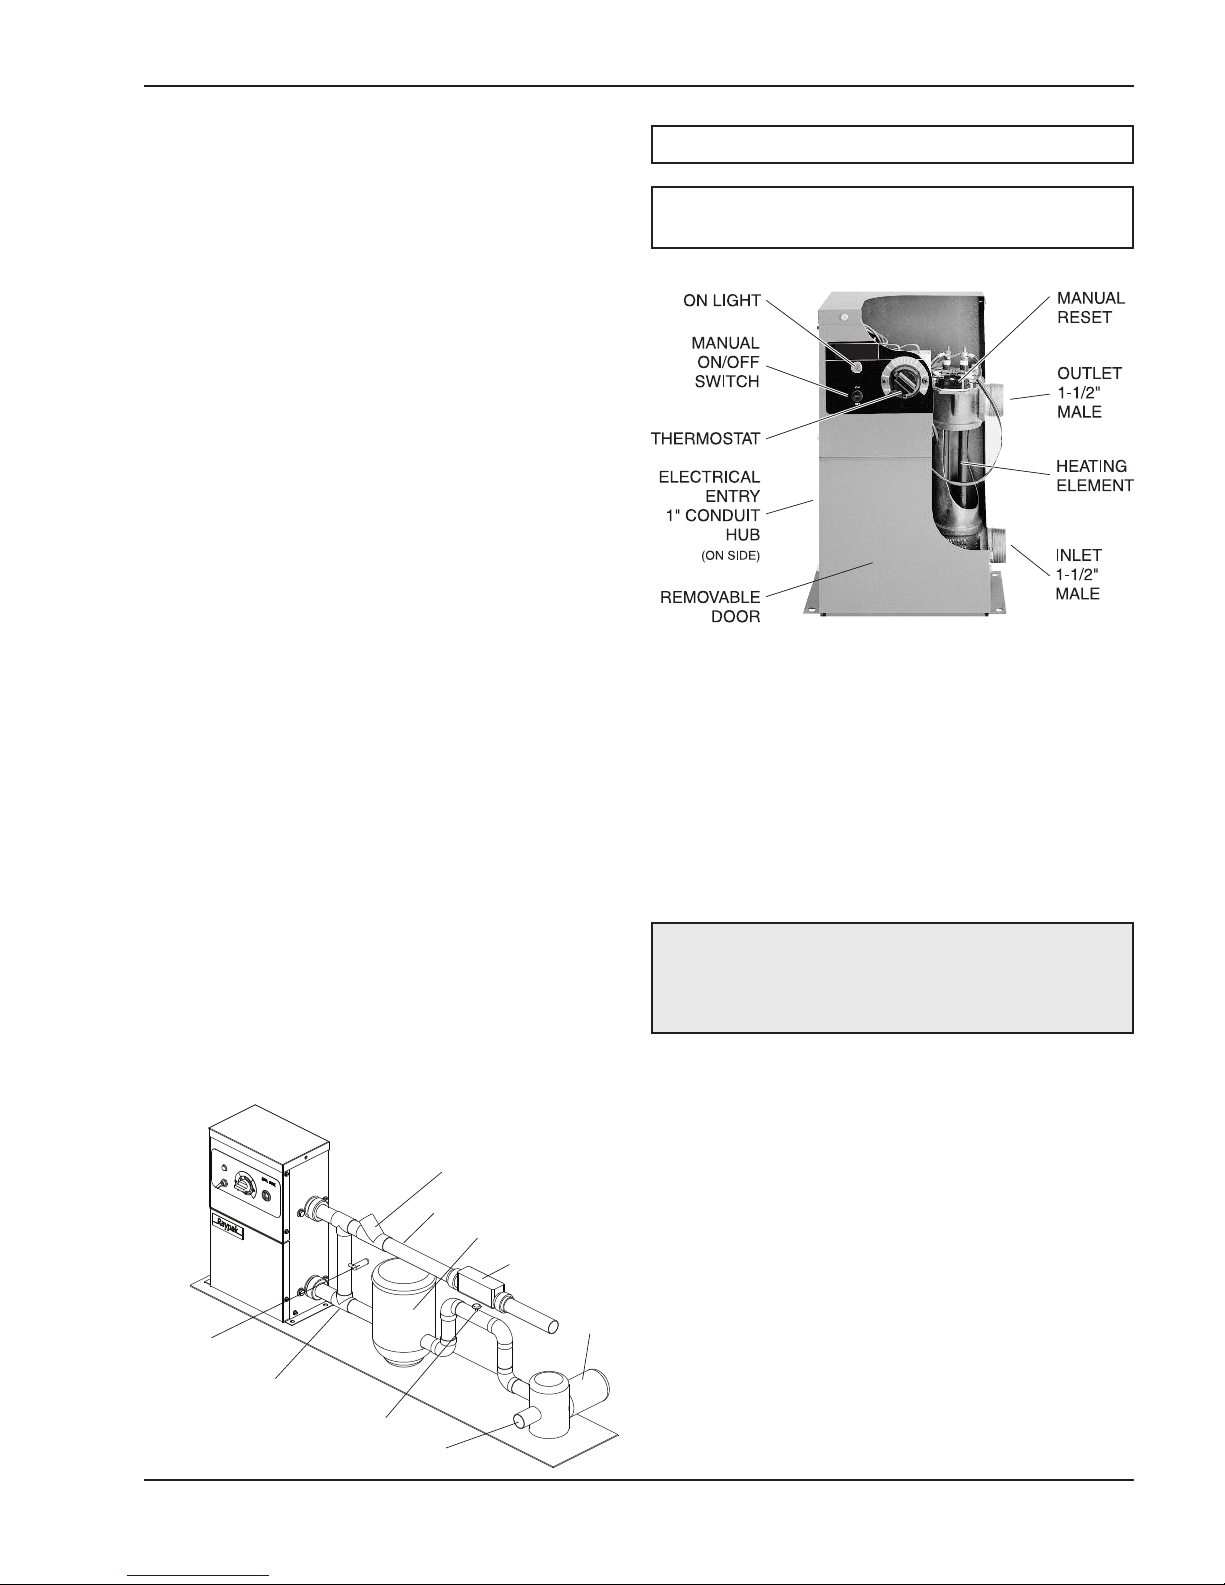
Check Valve
To Spa
Filter
Chlorinator
Pump
Bypass
(Customer Installed)
Drain Valve
(Customer Installed)
Gate Valve
From Spa
NOTE: PVC pipe may be used.
The Spa-Pak spa Heaters have been designed to pro-
ide efficient, pollution-free, electric pool heating while
v
requiring minimal installation. The Spa-Pak consists of
a sheathed resistance element installed in a copper
tank.
This tank has a 1-1/2” inlet and outlet on the side for
plumbing connections. The heater voltage is 208/240V
single-phase. The control circuit passes through a
manual switch, the temperature control, and the magnetic contactor coil. All items are pre-wired and
installed in a baked enamel steel case.
It is essential that the heater be installed in accordance with the instructions given herein. Failure to do
so may cause damage to the heater and to the equipment to which it is connected, or may prevent the
heater from operating in a correct manner. The heater
is to be installed in accordance with article 680 of the
National Electrical Code ANSI/NFPA No. 70. Consult
State and local codes BEFORE installing this unit.
Where such codes have requirements beyond the
instructions given herein, the codes shall have precedence over these instructions.
Location
These heaters are listed by UL for either indoor or outdoor use. Unit must be mounted on a level base
parallel to the ground. Allow 6” clearance at sides and
18” clearance at top and front for maintenance. Secure
the unit with 5/16” mounting hardware using the holes
provided. The heater must be located where leakage
of heat exchanger or connections will not damage the
area adjacent to the heater or structure.
NOTE: When using two speed pumps, do not install
ate valve on inlet.
g
The Spa-Pak has 1-1/2” male NPT inlet and outlet
connections at the right side of the heater. The inlet is
at the base of the heater and must be piped directly to
the filter discharge to ensure proper flow direction.
Minimum flow rate through the heater is 15 gpm, maximum is 60 gpm. If this is exceeded, an external
bypass must be added as shown. Unions should be
used on piping connections. A shut-off valve should be
included on the heater inlet to prevent draining the spa
when performing maintenance.
CAUTION: No shut-off valves are to be installed in
the piping between the heater outlet and the spa.
Any chlorinators, valves, etc., that can cause return
line blockage will void the warranty.
Water Connections
Automatic Chlorinators and
Chemical Feeders
All chemicals must be introduced and completely diluted into the spa water before being circulated through
the heater. Do not place chlorine tablets or bromine
sticks in the skimmer. High chemical concentrations
will result when the pump is not running (e.g.
overnight).
Chlorinators must feed downstream of the heater and
have an anti-siphoning device to prevent chemical
backup into the heater when the pump is shut off.
3
Page 4
CAUTION: High chemical concentrates from feed-
TYPICAL COMFORTABLE
TEMPERATURE
RANGE FOR POOLS
T
YPICAL COMFORTABLE
TEMPERATURE
RANGE FOR SPAS
ers and chlorinators that are out of adjustment will
cause very rapid corrosion to the heater. Such damage is not covered under the warranty.
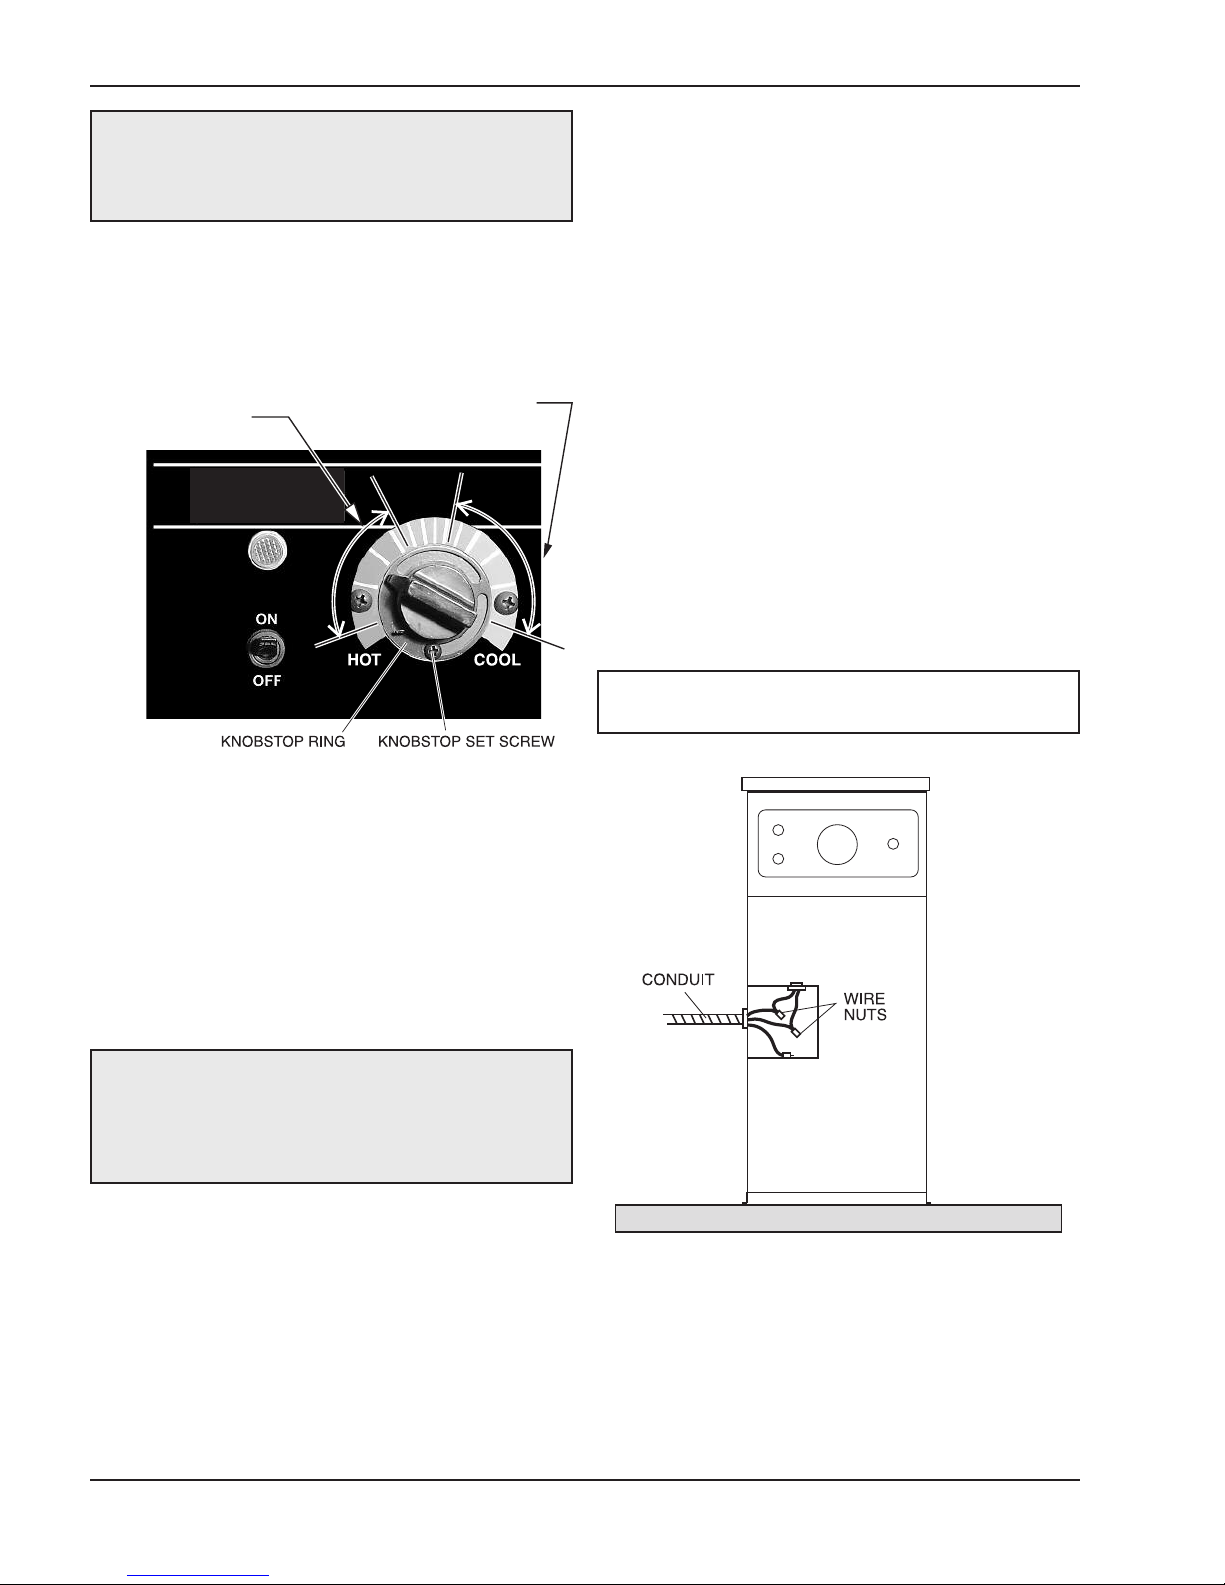
Thermostat
The heater thermostat located on the front of the unit,
may be set for any desired spa temperature.
odes. Keep wire runs as short as possible to mini-
c
mize voltage drop. Bring wires of size indicated from a
used disconnect switch (customer furnished) with an
f
amp rating of at least 125% of the amp rating shown
on the spa heater nameplate. A ground lug is provided
for connection to the supply ground. A wiring diagram
f the heater is shown at right. It is also affixed to the
o
inside front cover of the units.
Field Wiring
Heater requires three-wire service. With 240 VAC
there are two hot wires and a grounding conductor.
Even when metallic conduit is used, the grounding
conductor must be run to the supply ground.
Field wiring connections are made to the electrical
entry at the left side of the unit. A hole in the jacket is
provided for a 1” trade size conduit hub. The location
of the field wiring box is shown below. Wire nuts are
used to connect all leads except the grounding conductor, for which a pressure lug is provided.
NOTE: Heater grounding conductor shall be the
same or larger than the live power supply conductor.
Maximum Temperature Setpoint
(Knobstop Adjustment)
Adjustment to a different maximum setting is a simple
task. Loosen the small set screw on the knobstop and
rotate the knobstop ring until vertical “stop” tab is at the
desired maximum setting. Retighten the set screw.
ELECTRICAL
WARNING: The power supply circuit to this heater
shall be protected by a ground-fault circuit interrupter
(GFCI), in accordance with Art. 680 of the latest edition of the National Electrical Code (NEC). Failure to
do so could result in severe personal injury or death.
The GFCI devices shall be of the self-contained types,
circuit breaker types or the receptacle types. Feeder
ground-fault protection is not required where GFCI is
already provided in the branch circuits or receptacles
supplying power to the heater.
Electrical Disconnect
An electrical disconnect and over-current protection
device must be provided in accordance with local
Recommended Wire Sizes
for Field Connection
Use type THWN copper wire to the unit, with the AWG
wire sizes (Internal wire sizes may differ) listed in Table
A on the following page.
4
Page 5

ire Size
L1 L2
MODEL
ELS 552-2
ONLY
W
Model Amp Draw Conduit Size
(including
round)
g
Disconnect (amps)
ELS 1102-2 46 1” 6 60
ELS 552-2 23 *1/2” 10 30
*Use a reducer bushing.
Table A: Wire Sizes for Field Connection
LADDER DIAGRAM
Size of Fused
SCHEMATIC DIAGRAM
5
Page 6

Controls
IMPORTANT SAFETY
Spa-Pak spa heaters have integral thermostats and
ontactors. They are also equipped with a high tem-
c
perature limit thermostat which will open the circuit
utting off power to the heating element in the event of
c
excessive water temperature. This high limit thermostat is factory set at 140°F. A pressure switch is utilized
to ensure water flow through the heater before the unit
will function.
NOTE: The filter must be kept clean so the flow rate
will be maintained above 15 gpm. Failure to do so
will cause the pressure switch to drop out, and the
heater will become inoperative.
OPERATION
Preliminary
MAKE SURE THAT POWER TO THE UNIT IS OFF.
Remove any tools or other foreign objects from the
inside of the unit. Replace the removable lower panel.
Place temperature control in the off position. Check
tightness of electrical screw terminals.
Filling
INSTRUCTIONS
CAUTION: Elevated water temperature can be
hazardous.
The U.S. Consumer Product Safety Commission recommends the following guidelines. When using this
electrical equipment, basic safety precautions should
always be followed, including the following:
1. READ AND FOLLOW ALL INSTRUCTIONS.
2. To reduce the risk of injury:
a. The water in a pool or tub should never
exceed 104°F (40°C). A water temperature in
excess of 104°F is considered unsafe for all
persons. Lower water temperatures are recommended for extended use (exceeding 10 –
15 minutes) and for young children.
b. Since excessive water temperatures have a
high potential for causing fetal damage during
the early months of pregnancy, pregnant or
possibly pregnant women should limit pool or
tub water temperatures to 100°F (38°C).
Open all valves in the inlet piping and fill the system
with water. Turn on the filter pump and purge all air
from the system. On in-ground spa installations it may
be necessary to prime the pump. Check the unit and
all piping connections for leaks.
Start-up
FILTER PUMP MUST BE ON FOR THE HEATER TO
OPERATE. Turn on the main power to the unit, then
set the temperature control to the desired position and
turn the switch to the “ON” position to place the heater
in operation. Shut pump off and on to be certain that
heater shuts off when pump is off.
A thermal cutout prevents the unit from overheating.
Should overheating occur, the control circuit may be
made operational by depressing the manual reset button through the grommet on the front panel. This will
be possible only after the unit has cooled down for
several minutes.
c. Before entering a pool or tub, the user should
measure the water temperature at several
occupant locations using an accurate thermometer since the tolerance of water
temperature-regulating devices may vary as
much as ±5°F (±3°C).
d. Alcohol, drugs, or medication should not be
used before or during pool or tub use since
their use may lead to unconsciousness with
the possibility of drowning.
e. Persons suffering from obesity or with a med-
ical history of heart disease, low or high blood
pressure, circulatory system problems, or diabetes should consult a physician before using
a pool or tub.
f. Persons using medication should consult a
physician before using a pool or tub since
some medication may induce drowsiness
while other medication may affect heart rate,
blood pressure, and circulation.
6
Page 7

WARNING: The use of alcohol, drugs, or medication can greatly increase the risk of fatal
hyperthermia in pools and tubs.
NOTE: Hyperthermia occurs when the internal temperature of the body reaches a level several degrees
above the normal body temperature of 98.6°F
(37°C). The symptoms of hyperthermia include dizziness, fainting, drowsiness, lethargy, and an increase
in the internal temperature of the body. The effects of
hyperthermia include (1) unawareness of impending
hazard, (2) failure to perceive heat, (3) failure to recognize the need to exit pool or tub, (4) physical
inability to exit pool or tub, (5) fetal damage in pregnant women, and (6) unconsciousness resulting in a
danger of drowning.
3. A green terminal (or wire connector marked "G",
"GR", "GROUND" or "GROUNDING") is provided
within the control box. To reduce the risk of electric
shock, connect this terminal or connector to the
grounding terminal of the electric service or supply
panel with a continuous copper wire in accordance
with the Canadian Electrical Code, Part I.
4. This product shall be protected by a Class A
ground fault circuit interrupter (GFCI).
MAINTENANCE
ARNING: ONLY QUALIFIED PERSONNEL
W
SHOULD ATTEMPT MAINTENANCE ON THIS
QUIPMENT (N.E.C. ARTICLE 100-1971) (MAIN-
E
TENANCE MUST BE DONE WITH MAIN
DISCONNECT OPEN).
Spa Water Chemistry
Chemical imbalance can cause severe damage to
your heater and associated equipment. Maintain your
water chemistry according to the chart on page 8. If
the mineral content and dissolved solids in the water
become too high, scale forms inside the heat exchanger tubes, reducing heater efficiency and also
damaging the heater. If the pH drops below 7.2, the
heater will be severely damaged. This will result in corrosion of the heat exchanger. Heat exchanger
damage resulting from chemical imbalance is not
covered by the warranty.
Element Inspection and
Replacement
The element assembly head is removed as follows:
5. SAVE THESE INSTRUCTIONS.
Pressure Switch Adjustment
Pressure switch is normally factory set for universal
spa applications. Heater must not be installed more
than five feet above water level or five feet below. If the
heater is installed below the spa level or if a two speed
filter pump is used it is necessary to reset the pressure
switch as follows:
1. With pump and heater on, turn adjustment knob
clockwise until a click is heard.
2. Turn adjustment knob counter clockwise 1/4 turn.
3. Turn pump off and on several times. Heater should
shut off immediately. If it does not, repeat steps
above until proper adjustment is made.
Shut Down
Turn off electrical power to heater at main disconnect
when draining spa.
1. Turn off electrical power to heater at the main disconnect and turn off water supply line.
2. Drain the heater.
3. Remove access panel.
4. Disconnect all wires to terminals of elements.
5. Remove four bolts holding element in place.
6. Remove element assembly.
7. Replace element assembly and gasket using
reverse procedure.
Removing the Aquastat
1. Turn off electrical power to heater at main disconnect.
2. Remove screw holding aquastat to mounting
plate.
3. Disconnect wires from aquastat and control knob.
7
Page 8

. Remove retainer clip at bulb and remove capillary
4
bulb.
5. Remove aquastat, using extreme care to see that
he capillary tube is not kinked or broken. (Never
t
use anything but fingers to bend capillary tubing).
Removing the Magnetic
Contactor
1. Turn off electric power to heater at main disconect.
n
Removing the High Limit
1. Turn off electrical power to heater at main disconnect.
2. Disconnect wires from high limit.
3. Remove screws holding high limit to tank.
Removing the Pressure Switch
1. Turn off electrical power to heater at main disconnect.
2. Drain heater.
3. Disconnect pressure switch leads.
4. Unscrew pressure switch.
2. Remove wires from contactor.
3. Remove screw holding contactor to cabinet.
Winterizing
Damage will occur if water is allowed to freeze inside
the heater. Normally the heater will drain when the spa
is drained. If the heater is positioned lower than the
spa a drain valve must be added at the heater inlet.
The water must be drained from the heater and the
main disconnect switch shut off.
Filter
CAUTION: Do not allow filter to become clogged to
the extent that cycling of the pressure switch occurs.
This can result in accelerated wear of the magnetic
contactor. Contactor damage caused by dirty filter is
not covered by warranty.
8
Page 9

TROUBLESHOOTING
Problem Cause Solution
Nothing happens when the thermostat is turned on
It takes a long time to heat the spa Low input voltage…………………..
Low flow..........................................
High limit.........................................
Thermostat not calling for heat.......
Undersized heater……...................
Heat loss from poor weather con-
ditions (cold, high winds)……….....
Defective heating element………...
1. Check filter, skimmer basket,
pump.
2. If a 2-speed pump is used, turn
to high speed. If heater operates, adjust pressure switch for
low speed operation.
Push reset button.
Turn thermostat to higher temperature.
Call electric company.
Calculate temperature in Heat rise
°/hr.= Heater input (kw) x 410 divided by spa gallonage (This does not
take into account heat loss due to
weather).
Use spa cover.
Call electrician. Check resistance/
element bundle:
240V 11 kw = 5.0 to 5.8 OHMS
240V 5.5 kw = 10.0 to 11.6 OHMS
Spa does not reach temperature Mis-adjusted knob-stop……………
Low flow……………………………..
Heating element continuously
burning out
Continuous shutdown of manual
reset high limit
Fuses blow or circuit breaker
opens
Contactor hum Circuit breaker or fuses too small..
Contactor chatter Low flow…………………………….. Check filter skimmer basket and
High input voltage………………….
Poor water chemistry......................
Heating element split open………..
Mis-adjusted or defective pressure
switch…………………….................
Shorted heating elements………....
Undersized wire…………………….
Contactor contacts dirty or worn….
(NOTE: Some hum is normal)
Re-adjust knob-stop.
Check filter, skimmer basket,
pump.
Call electric company.
See Water Chemistry on page 11.
Over-acid condition. Watch pH,
add acid slowly.
Replace pressure switch.
Replace element.
Replace wire.
Replace.
Replace contactor.
pump.
9
Page 10

8
12
9
PART DESCRIPTION ELS 552-2 ELS 1102-2
F208100F108100tnemelE1
2 Element Gasket (Not Shown) 800164 800164
3
Element Tube Assy. 001805F 001808F
F780400F780400lleWrosneS4
5 Well Retaining Clip 300203 300203
6Pressure Switch 062237B 062237B
F118100F118100timiLhgiH7
8Contactor/Wire Kit 001813F 001813F
9Thermostat Control 003346F 003346F
167056167056hctiwSelggoT01
F218100F218100thgiLrotacidnI11
F588600F588600bonK21
F688600F688600potsbonK31
516009516009etalPlaiD41
15 Wire Kit (Complete) N/A N/A
A/NA/NpoTtekcaJ61
A/NA/NlenaPtnorFreppU71
A/NA/NlenaPtnorFrewoL81
10
Page 11

11
Page 12

www.raypak.com
Raypak, Inc., 2151 Eastman Avenue, Oxnard, CA 93030 (805) 278-5300 Fax (805) 278-5468
Litho in U.S.A.
 Loading...