

Page 1

Navionics
Platinum Chart
Card
User’s Guide
Document Number: 8 1259-1
Date: June 2005
Page 2

Navionics Platinum Chart Card - User’s Guide
Trademarks and registered trademarks
Autohelm, HSB Raymarine, RayTech, RayTech RNS, Sail Pilot, SeaTalk and Sportpilot
are registered trademarks of Raymarine Limited. Apelco is a registered trademark of
Raymarine Holdings Limited (Registered in all major marketing territories).
AST, Autoadapt, Auto GST, Autoseastate, Autotrim, Bidata, Marine Intelligence,
Maxiview, On Board, Raychart, Raynav, Raypilot, Raystar, ST40, ST60, Seaclutter,
Smart Route, Tridata and Waypoint Navigation are trademarks of Raymarine Limited.
Navionics is a registered trademark of Navionics SpA.
All other product names mentioned are trademarks or registered trademarks (if
applicable) of their respective companies.
Handbook contents © Raymarine Ltd 2005.
Page 3

Contents i
Contents
Important information .............................................................................................. 1
Introduction ................................................................................................... 1
Safety notices ................................................................................................. 1
Disclaimers .................................................................................................... 1
About this manual ......................................................................................... 2
Technical accuracy ......................................................................................... 2
Introduction ................................................................................................................ 3
2D cartography .............................................................................................. 3
Enhanced features ....................................................................................3
New features............................................................................................. 3
3D bathymetric charts ....................................................................................3
2D Chart Enhancements ............................................................................................. 4
Introduction ................................................................................................... 4
New Port Services ...............................................................................................6
Pilot book information ................................................................................... 6
Panoramic photos .......................................................................................... 7
New cartographic objects ...................................................................................8
Business services ........................................................................................... 8
Additional wrecks .......................................................................................... 9
Major coastal roads ....................................................................................... 9
New features ....................................................................................................10
Aerial photo overlay ..................................................................................... 10
Adjusting the level of opaqueness .......................................................... 10
Specifying the overlay area .....................................................................11
Increased coverage ...........................................................................................11
Changed control ...............................................................................................11
Additional menu items ......................................................................................11
3D Cartography ......................................................................................................... 12
An introduction .................................................................................................12
The application ............................................................................................ 13
Using the 3D chart ............................................................................................14
Set-up ..........................................................................................................14
Controls .......................................................................................................14
Page 4

ii Navionics Platinum Chart Card - User’s Guide
Rotary control ......................................................................................... 14
Range button .......................................................................................... 14
Trackpad ................................................................................................. 14
Soft keys..................................................................................................15
Changing the mode ..........................................................................................16
Active motion mode ..................................................................................... 16
Planning mode .............................................................................................16
Changing the view ............................................................................................17
View options ................................................................................................17
Multiple views ............................................................................................. 18
Making the view clearer ...................................................................................19
Exaggeration ...............................................................................................19
Declutter ......................................................................................................20
Using 2D and 3D charts together ......................................................................20
3D view locator ............................................................................................ 21
Chart synchronization .................................................................................. 21
Navigating with 3D charts ................................................................................22
Technical support ..............................................................................................24
For Raymarine products ............................................................................... 24
United States .......................................................................................... 24
Europe .................................................................................................... 24
For Navionics cartography ........................................................................... 25
Page 5

Important Information 1
Important information
Introduction
This handbook introduces the Navionics Platinum chart card and its features. These
chart cards are intended for recreational marine use.
Safety notices
WARNING:Navigation aid
When this product is used within a navigation system, it is only an
aid to navigation. Its accuracy can be affected by many factors,
including equipment failure or defects, environmental
conditions and improper handling. It is the user’s responsibility
to exercise common prudence and navigational judgements. This
product should not be relied upon as a substitute for such
prudence and judgement. Always maintain a permanent watch
so that you can respond to situations as they develop.
WARNING:Product installation
This equipment must be operated in accordance with the
Raymarine instructions provided. Failure to do so could result in
poor product performance, personal injury and/or damage to
your boat.
Disclaimers
This electronic chart is an aid to navigation designed to facilitate the use of authorized
government charts, not to replace them. Only official government charts and notices
to mariners contain the current information needed for the safety of navigation, and
the Captain is responsible for their prudent use.
This program and its charts do not exclude the user from carrying the required official
charts and documents.
Raymarine does not warrant that this product is error-free or that it is compatible with
products manufactured by any person or entity other than Raymarine.
This product utilizes digital chart data, and electronic information from the Global
Positioning System (GPS) which may contain errors. Raymarine does not warrant the
accuracy of such information and you are advised that errors in such information may
cause the product to malfunction or give incorrect readings. Raymarine is not
responsible for damages or injuries caused by your use or inability to use the product,
by the interaction of the product with products manufactured by others, or by errors in
chart data or information utilized by the product and supplied by third parties.
Page 6

2 Navionics Platinum Chart Card - User’s Guide
About this manual
This manual describes how to install and operate your display with the Navionics
Platinum Chart Card. It assumes that the display(s) in which the software is to be
installed meets the requirements for running this version of the software, and that all
peripheral equipment to be operated with it is compatible and has been correctly
installed.
This manual is intended for users of varying marine abilities, but assumes a general
level of knowledge of display use, nautical terminology and practices.
Technical accuracy
To the best of our knowledge, the technical information contained within this
handbook, was correct at the time of printing. However, Raymarine cannot accept
liability for any inaccuracies or omissions it may contain.
If you wish to file a report of an error or omission on a Navionics chart, please provide
the information to the Navionics web site, Discrepancy Report section at the link
below:
http://www.navionics.com/DiscrepancyReports.asp
For details of how to contact Raymarine or Navionics see
In addition, Raymarine’s policy of continuous product improvement may change
specifications without notice. As a result Raymarine cannot accept liability for any
differences between the product and this handbook.
page 24
and
page 25
.
Page 7

Introduction 3
Introduction
This User’s Guide introduces the Navionics Platinum chart card. Used in conjunction
with your Raymarine display, you will be able to access new and enhanced features
that will give you an accurate, easy-to-view image of the area around your boat.
Operation of the charts and their features is similar to the way in which existing chart
cards are operated. For full details please refer to the relevant display handbook.
Note:
The range at which these features appear may vary between display types and sizes.
2D cartography
The Platinum chart card enhances many of the conventional 2D cartographic features
and introduces several new ones.
Enhanced features
• Additional business services information e.g. local restaurants, shops etc.
• Additional wrecks data for new wrecks.
• Major coastal roads.
• US inland waterways.
New features
• Panoramic photos for many of the ports and marinas on the chart.
• Pilot book information for many ports.
• Aerial photo overlay of land and coastal waters.
• 2D and 3D (new application) synchronization.
• 3D locator indicating the area covered by the 3D view.
3D bathymetric charts
Navionics Platinum introduces the new 3D chart application. This provides you with a
three dimensional graphical view of land and sea contours around your boat.
3D cartography has the following features:
• Choice of operating modes, Active or Planning.
• Change of view point.
o
• 360
• Vertically exaggerate the view.
• Ability to indicate the area which your fishfinder transducer cone covers (if fitted).
degree rotation of the selected view.
To obtain the best results from thisapplication you should make sure that your display
is receiving accurate heading and position data from a suitable source.
Page 8
4 Navionics Platinum Chart Card - User’s Guide
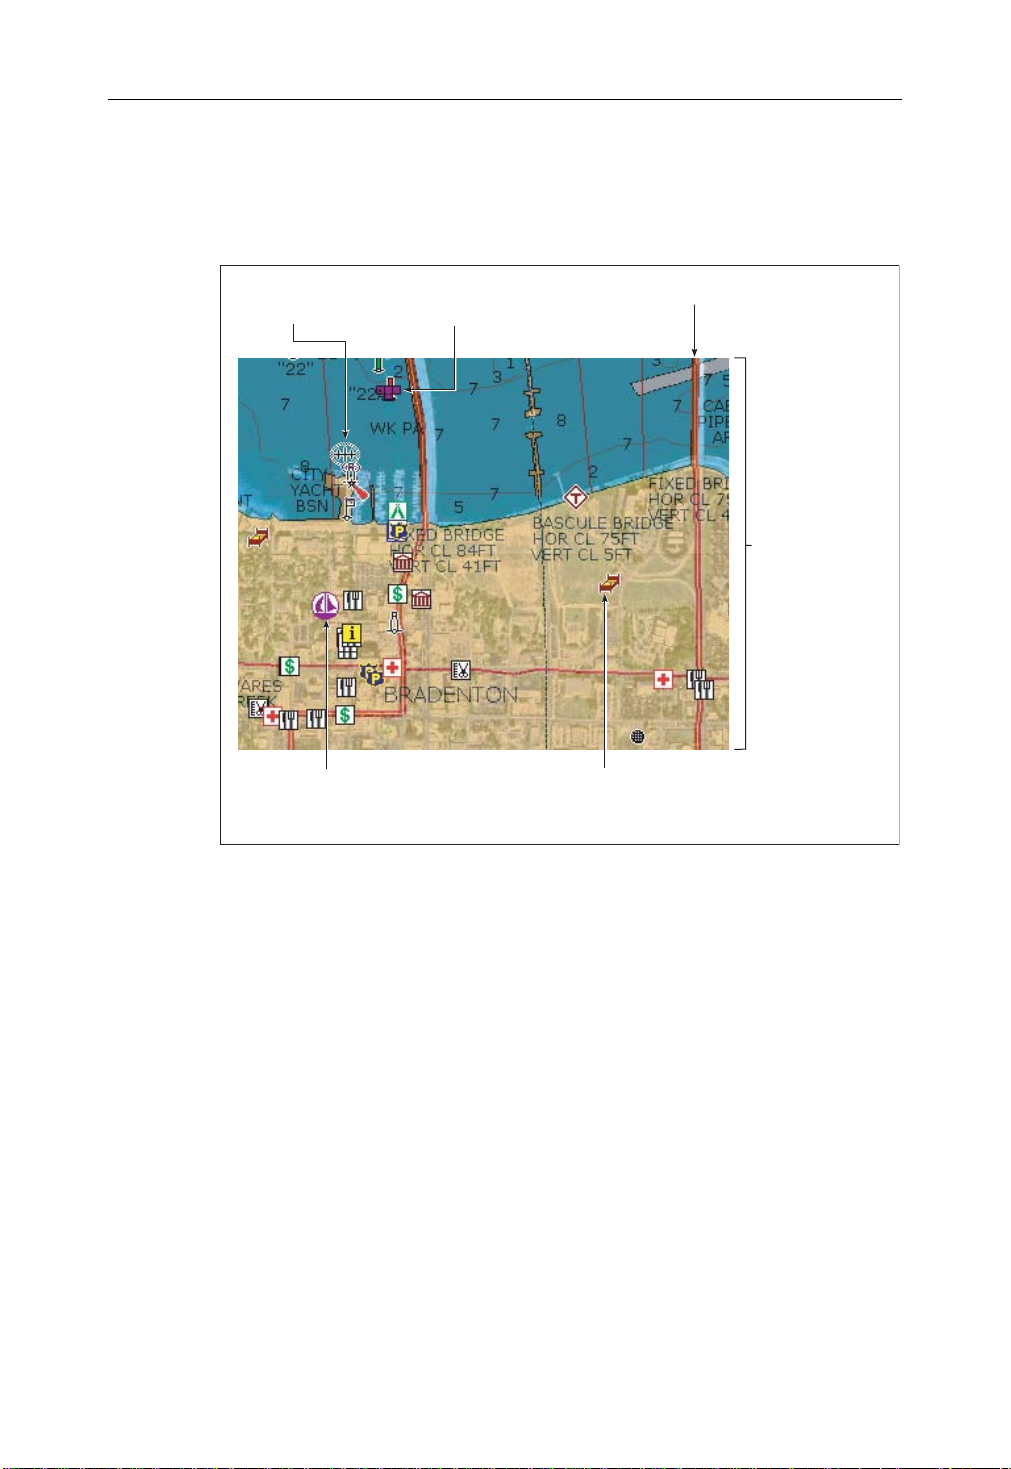
2D Chart Enhancements
Introduction
(when available)
Port services
(now includes Panoramic Photo
and Pilot Book information)
Panoramic photo symbol
(also accessed via Port Services)
Business services
information
Major coastal roadsAdditional wreck data
Aerial photo overlay
(60%, land and sea)
D7924_1
The Navionics Platinum chart card provides additional features that enhance the 2D
cartography described in your display’s manual.
New Port Services
• Panoramic photos.
• Pilot book information.
New cartographic objects
• Business services information.
• Additional wrecks data.
• Major coastal roads.
• Panoramic photos.
New features
In addition to Radar Overlay, Chart Layers now includes:
• Aerial photo overlay.
Page 9

2D Chart Enhancements 5
• 3D locator (see
• 2D/3D chart synchronization (see
page 21
).
page 21
).
Increased coverage
• In addition to coastal regions, the Platinum chart card also covers US lakes and
inland waterways.
Changed control
• The radar overlay is now controlled via the chart layers soft key and the radar/chart
synchronization via the chart mode and orientation soft key.
Additional menu items
• The Cartography Setup Menu now includes additional menu items to cover the
new cartographic objects and the aerial photo overlay.
Notes: (1)
For further information relating to your particular display, please refer to the individual User’s Manual.
(2)
For details of how to combine 2D and 3D features, please refer to page 20.
Page 10

6 Navionics Platinum Chart Card - User’s Guide
New Port Services
D8216_1
Port Services include pilot book information and panoramic photos (if available).
Panoramic photos are also shown as a camera symbol on the chart.
If required, you can remove port services from your chart by switching on the
DECLUTTER option accessed via the PRESENTATION soft key.
Pilot book information
This feature will enable you to view detailed information normally contained in an
almanac e.g.
D7927_1
To view pilot book information:
1. Select the Port Services symbol on screen and press OK.
2. Select the pilot book option and then scroll right to enter the option.
3. Select the required book/chapter and press VIEW PILOT BOOK to display the information.
You can now navigate around the book as follows:
• To move between the pages of the selected chapter, use the PREVIOUS PAGE or
NEXT PAGE soft keys.
• To display the various indexes, use the PAGE INDEX, CHAPTER INDEX or BOOK
INDEX soft keys.
• To scroll through an index or through the text within a page, use the trackpad (up/
down) or the rotary control.
Page 11

2D Chart Enhancements 7
Panoramic photos
D7925_1
You can display a panoramic photo(s) of many ports and marinas. The availability of
photos is indicated by a camera symbol on the chart. This symbol is placed where the
photo was taken and the angle of the shot is indicated by the camera symbol. You can
also view the photo from the port services information.
To display a panoramic photo, either:
• Select the appropriate port symbol and then the panoramic photos option. Press
VIEW PHOTO.
Or:
Select the appropriate camera icon and press VIEW PHOTO.
D8069_1
Page 12

8 Navionics Platinum Chart Card - User’s Guide
New cartographic objects
The following new cartographic objects are now available:
• Business services.
• Additional wrecks.
•Major roads.
If required, you can declutter your chart by either switching off the individual object
type on the Cartography Setup Menu or by switching on the DECLUTTER option
accessed via the PRESENTATION soft key.
Business services
Example:
Service
station
Boat
dealership
Restaurant
Doctors
Hairdressers
Bank
D7928_1
It is now possible to view the name, address, telephone number, and type of business
of an individual business by selecting its symbol on screen.
To display additional information about the service, select the appropriate symbol on
screen and then press OK.
Page 13

2D Chart Enhancements 9
Additional wrecks
D7929_1
Navionics Platinum cartography provides details of wrecks that you would find on a
paper chart together with detailed data for additional wrecks.
To display additional information about the object, select the wreck on the Object Info
screen.
Major coastal roads
Interstate highway/
Motorways
State highway/
Major roads
Highways/
Minor roads
With Platinum cartography you can view coastal interstate and state highways,
motorways and other major roads.
Note:
If the aerial overlay feature (see page 10) is switched on and set to Land and Sea Mode
in the Cartography Setup Menu, these roads will fade as the level of opaqueness is decreased.
D7919_1
Page 14

10 Navionics Platinum Chart Card - User’s Guide
New features
The Chart Layers option now includes:
• Aerial photo overlay.
• 3D locator (see
page 21
).
• 2D/3D chart synchronization (see
page 21
).
Aerial photo overlay
The aerial photo overlay feature will help you to interpret your environment and its
features. They cover the navigable waters up to 3 miles inside the coastline. Beyond
these limits the land will appear green (color charts) or grey (black and white charts).
The level of resolution and the availability of a colored overlay is dependent on the
region covered by the chart card.
D7923_1
Aerial photo overlay is accessed via the PRESENTATION and CHART LAYERS soft keys
and can be applied to individual chart windows.
Adjusting the level of opaqueness
You can adjust the balance between the chart and the aerial photograph by changing
the overlay’s level of opaqueness.
Examples:
20% level40% level70% level
D7920_1
Page 15

2D Chart Enhancements 11
Note:
Any changes that you make will affect all displays in your system.
Specifying the overlay area
You can specify whether the overlay is displayed for land areas only or for land and sea
areas, via the Cartography Setup menu.
Increased coverage
In addition to coastal regions, the Platinum chart card also covers US lakes and inland
waterways.
Changed control
• Radar Overlay - Now controlled via the PRESENTATION and CHART LAYERS soft
keys.
• Radar/chart synchronization - Now controlled via the PRESENTATION -
CHART MODE & ORIENTATION - CHART SYNC - RDR soft keys.
Note:
The 2D chart can be synchronised with either the radar or the 3D chart (see page 21),
but not both.
Additional menu items
The Cartography Setup Menu now includes controls to switch Business Services, Roads
and Additional Wrecks on/off, and to select either land or land and sea for the Aerial
Photo Overlay.
Land only overlayLand and sea overlay
D7921_1
Page 16

12 Navionics Platinum Chart Card - User’s Guide
3D Cartography
An introduction
D8042_1
3D cartography introduces an easy-to-use chart format that provides you with a
graphical view of land and sea contours around your boat. Land masses are shown in
green, the shade depending on the height above sea level. Water, the sea-bed and
submerged objects are shown in varying shades of blue.
Much of the information available on a conventional chart can be shown in three
dimensions, giving you an accurate easy-to-view image of the area around your boat
that can help you plan:
• Fishing spots.
• What fishing pattern to use.
•Safe routes.
If the area that you are in is new to you, or visibility is poor, 3D cartography can help to
give you the confidence to know where you are and what is around you. As with a
conventional chart, active waypoints and routes can also be shown on the 3D chart.
3D cartography has the following features:
• Choice of operating modes; Active or Planning.
• Ability to change view point.
o
• 360
•1
degree rotation of the selected view.
o
- 90o pitch angle.
• Exaggerate the view.
Page 17

3D Cartography 13
• Ability to synchronize 2D and 3D charts.
• Ability to indicate the area that your fishfinder transducer cone covers (if fitted).
To obtain the best results from the 3D cartography application you should make sure
that your display is receiving accurate heading and position data from a suitable
source.
The application
When you choose to set up your display to use 3D cartography, the application opens
in the selected window. Depending on how your display is set up, this can be full
screen, or part of a page set.
For full details of Page Set up refer to your display handbook.
Range
Horizontal distance across screen
(halfway up the window or at
center of view).
Shown in selected system units.
Cartographic objects
Select objects for display
via the 3D Chart Setup
menu.
Waypoint
With arrival circle
Mode
Shows the mode in
which the application
is working.
Center-of-view
White cross
indicates center of
chart view.
Boat symbol
Boat's position
on chart. Select
sail or power
boat.
Rotation
Shows in degrees true,
how far the on-screen
view has been rotated
from your boat's heading.
Depth scale
Approximate
depth beneath
your boat.
North arrow
3D indication
of True North
in relation to
the chart view.
D8054_1
Page 18

14 Navionics Platinum Chart Card - User’s Guide
Using the 3D chart
Set-up
Before using 3D cartography you should set-up the chart to show you the information
that is needed for the particular operation that you are doing. Settings for the chart are
accessed via the MENU hard key - 3D Chart Setup and let you change:
• Center-of-view indicator - Turn the center-of-view indicator (marked with a
white cross) ON/OFF.
• Boat symbol - Choose between power or sail.
• Aerial photo overlay - Turn aerial photo overlay ON/OFF.
• Chart text - Turn chart text ON/OFF.
• Navigation marks - Turn navigation marks ON/OFF.
Controls
The 3D chart is operated in a similar way to a 2D chart using the following controls:
• Rotary control.
• Range button
• Trackpad.
•Soft keys.
Rotary control
This is used to:
o
• Rotate the chart view (0
• Change the pitch (vertical angle of view) of the chart (1
Pressing the rotary knob will toggle control between the rotation and pitch functions.
A soft key indicates which function is active.
The rotary control is always active to adjust pitch/rotation (even when the soft key submenus are displayed, except when adjusting exaggeration).This is different to most
other uses of the rotary, which require you to press a soft key to enable adjustment.
-360o).
o
to 90o).
Range button
This lets you zoom in or out on the 3D chart in a similar way to 2D charts.
• Range In - shows a smaller area of the chart.
• Range Out (to approximately 8 nm) - shows a larger area of the chart.
Trackpad
This is used to pan around the chart - similar to 2D charts
Page 19

3D Cartography 15
Soft keys
FIND SHIP GO TO...
ADJUST ON
EYE CENTRE
You can also change the view of the 3D chart using the following soft keys:
FIND SHIP
Pressing this soft key at any time will return to the active motion mode, forward
looking chart view.
GO TO
This enables you to select an existing route to follow or a waypoint to go to.
ADJUST ON
This enables you to choose which point on the screen the chart will move around when
you use the rotary control and gives the following options:
• EYE - rotates or pitches the chart around the virtual eye point, maintaining a relative position from the virtual eye point to the on-screen boat. Useful to get an aerial
overview of the terrain.
• CENTER - rotates or pitches the chart around the center-of-view cross on the chart.
Useful to view a particular feature in close up.
ADJUST
ROTATE PITCH
PRESENTATION...
D8053_1
ADJUST
Enables you to choose how the rotary control adjusts the view and gives the following
options:
• ROTATE - enables you to rotate the chart through 360
o
. If you want to maintain a
view from a particular bearing, just use the rotary control to rotate the picture until
you see the required view. The chart will automatically update.
• PITCH - enables you to change the level at which you view the chart. This can be
from sea-level to a full aerial view. You cannot view the chart from underwater.
PRESENTATION
Enables you to access the following sub-menus:
• TRANSDUCER CONE
If you have a fishfinder in your system, you can display the transducer cone to indicate the area that it covers on the 3D chart. This is useful when fishing as it enables
you to compare the chart view with the information your fishfinder is showing you.
• DEPTH SCALE
You can display a line under your boat to indicate the depth. However, remember
that this depth is only approximate, a more accurate reading of depth is available
elsewhere in your system.
Page 20

16 Navionics Platinum Chart Card - User’s Guide
• 3D OPTIONS
You can change the direction of the view (see
(see
page 19
• WAYPOINT NAME
You can turn the waypoint name on or off as required.
• DECLUTTER
See
page 20
) or change the vessel offset.
.
page 17
), adjust the exaggeration
Changing the mode
You can choose to view the chart in one of two modes:
• Active motion mode.
• Planning mode.
Active motion mode
This is the default mode when you open the 3D application provided that there is a
valid fix. The screen shows an aerial view of the 3D chart as if you are above your boat,
slightly behind it and looking forward (eye point). You can also view the chart from
different positions relative to your boat - see “View options” on page 17. As your boat
moves forward the chart automatically updates and reveals the changing view ahead.
In active motion mode you can adjust the pitch when ADJUST ON is set to CENTER, but
rotating or panning the chart will put it into planning mode.
Planning mode
Planning mode enables you to view an area of the chart, different to the one in which
you are navigating.
To enter planning mode, just use the trackpad to pan to the area of the chart that you
want to view or turn the rotary control. This may require you to change the rotation of
the chart or change the range, making it easier to see a particular location.
All of the functions that are available in active motion mode can be used in planning
mode. Control of the chart is the same as working in active motion mode. However,
you will see that mode information in the status bar is shown in brackets to indicate
that you are in planning mode.
Pressing the FIND SHIP soft key will return the chart to active motion mode, showing
the chart in the forward looking view at your current position.
Page 21

3D Cartography 17
Changing the view
View options
In active motion mode there are four view options that you can choose from:
•Forward.
•Aft.
• Port.
• Starboard.
With each view the eye point is changed to show a different area of the chart.
FWD ROTATE 195oT2.431nm
2.431nm
AFT ROTATE 011
o
T
FWD
Forward
Default view.
Eye point above and behind the boat,
looking forward.
Pressing FIND SHIP resets to this view.
PRT ROTATE 106oT2.431nm
AFTPRT
Port
Eye point above and to starboard side of
boat, looking to port.
AFT
Aft
Eye point above and in front of the boat,
looking behind it.
STB ROTATE 280oT2.431nm
AFT
STB
Starboard
Eye point above and to port side of boat,
looking to starboard.
D8064_1
Page 22

18 Navionics Platinum Chart Card - User’s Guide
View options are accessed via the PRESENTATION - 3D VIEW OPTIONS - VIEW TO soft
keys. The current option is highlighted on the soft keys and displayed in the status bar.
Multiple views
You can display multiple 3D chart views by creating a page that shows 3D cartography
in up to 4 win dows. A s each window is a separate application , they can be set up to
operate in active motion mode or planning mode or a combination of the two.
These can be views of:
• The same area of the chart from different angles.
• Views of up to 4 different areas of the chart.
Note:
For full details of page set up and “active” windows refer to your display handbook.
Multiple 3D views
Example:
Four 3D application windows showing the same area of the chart but from 4 different angles.
D8052_1
Page 23

3D Cartography 19
Making the view clearer
You can make the view clearer using the following features:
• Exaggeration.
• Declutter.
Exaggeration
Exaggeration factor x1 Exaggeration factor x50
D8057_1
Sometimes it is easier to see certain topographical features by making them more
obvious. This could be particularly helpful if you are fishing, for example.
Adjusting the exaggeration has the effect of vertically stretching objects on the chart,
making it easier to see their shape and position.
Exaggeration is accessed via the PRESENTATION - 3D VIEW OPTIONS - ADJUST
EXAGGERATION soft keys. Once selected you can:
• Use the rotary control or trackpad to alter the exaggeration factor (1-50) displayed
in the sliding scale above the soft key.
• Press CANCEL at any time during adjustment to return exaggeration to its previous setting.
Page 24

20 Navionics Platinum Chart Card - User’s Guide
Declutter
Navigating in an area that shows a lot of information on the chart, such as navigation
marks, can be confusing. Depending on your chart view level it can make features or
even your position difficult to see. Declutter helps you to reduce this confusion and
make the chart clearer, by removing some objects from view.
Declutter is accessed via the PRESENTATION soft key sub-menu.
Using 2D and 3D charts together
Declutter ONDeclutter OFF
D8060_1
D8062_1
If the area in which you are navigating is unfamiliar, or visibility is poor, working with
2D and 3D chart applications on the screen side-by-side can give you extra confidence
and help you find out what is around you.
Page 25

3D Cartography 21
Your display handbook gives you details of how to set up a page set to view the two
applications together. With the charts displayed side by side, a comprehensive view of
the surrounding area is available.
As with all multiple page sets the active window is indicated by a red border. To make
changes to an application it must be the active window. For full details refer to your
display handbook.
3D view locator
View locator
Eye point icon
D8063_1
On the 2D chart you can choose to show the 3D view locator. This is a polygon outlined
in blue and extending from the eye point icon. This polygon indicates the boundaries of
the area shown on the current 3D chart. As you rotate, adjust pitch or pan the 3D chart
the view locator moves on the 2D chart and shows the area covered.
The 3D view locator can be turned ON and OFF as required in any active 2D window via
the PRESENTATION - CHART LAYERS soft keys.
Chart synchronization
D8058_1
Page 26

22 Navionics Platinum Chart Card - User’s Guide
Chart synchronization enables you to synchronize the heading, range and position
information on the 2D and 3D charts.
When chart synchronization is ON, please note the following:
• The 2D-3D synchronization is shown in the status bar of the applications.
• Soft key options that are not available with this feature are “grayed” out.
• Pressing FIND SHIP from any synchronized application, will return the 3D chart to
the default active motion mode view and synchronize the 2D chart to the same
view.
• Any changes made to the heading, range or position in either 2D or 3 D ch ar ts wi ll
be displayed in both 2D and 3D windows.
• If the chart view for the current window is set to SYSTEM and you have multiple
windows on a page/more than one display, any changes made to a chart will be
reflected in all windows in all displays.
• If the chart view for the current window is set to LOCAL, no other windows will be
affected.
• You can synchronize the 3D chart or the radar but not both.
Chart synchronization is accessed via the 2D application; PRESENTATION - CHART
MODE & ORIENTATION - CHART SYNC - 3D soft keys.
Navigating with 3D charts
In your 3D chart you can access the existing waypoint or route list by selecting GOTO -
FOLLOW ROUTE OPTIONS or GOTO - GO TO WAYPOINT OPTIONS.
D8059_1
Page 27

3D Cartography 23
To navigate to a new waypoint or route, you should first create the waypoint/route in
your 2D chart. Full details of how to create a route will be found in your display
handbook.
Once navigation is active, the 3D chart displays:
• The active waypoint using the same symbol as the 2D chart.
• The arrival circle of the waypoint
• The course of your route (if applicable).
REMEMBER: A route can only be edited using a 2D chart. Changes made on the 2D
chart are also shown on the 3D chart.
Page 28

24 Navionics Platinum Chart Card - User’s Guide
Technical support
For Raymarine products
www.raymarine.com
Visit the Customer Support area of our website for Frequently Asked Questions,
servicing information, e-mail access to the Raymarine Technical Support Departmenta
and details of Raymarine agents, worldwide.
United States
For accessories and parts
Contact your authorised Raymarine dealer or Raymarine Technical Services on:
1-800-539-5539 extension 2333 or (603)-881-5200
Opening hours: Monday through Friday 0815 - 1700, Eastern Standard or Eastern
Daylight Savings Time.
To verify your requirements:
Telephone 1-800-539-5539 extension 2444 or (603)-881-5200
For product repair and service
Contact your authorized Raymarine dealer or return the unit to:
Raymarine Product Repair Center
21 Manchester Street
Merrimack, NH03054 - 4801
1-800-539-5539
Europe
For technical support, service and accessories:
Contact your authorized Raymarine dealer or RaymarineTechnical Support at:
Anchorage Park
Portsmouth
P03 5TD
England
Tel: +44(0)23 92714713
Fax: +44(0)23 92661228
Page 29

Technical Support 25
For Navionics cartography
For questions about Navionics Platinum or Navionics Gold cartography, please contact
Navionics directly through their web site:
www.navionics.com
or contact Navionics customer support:
Navionics customer support
Navionics Italy Via Fondacci, 269
Z.I. Montramito
55054 Massarosa Italy
Navionics USA 6 Thatcher Lane
Wareham
MA 02571 USA
Navionics Australia 134/85 Reynolds Street
Balmain
NSW 2041 Australia
Navionics UK PO Box 38
Plymouth, PL9 8YY England
Tel: +39-0584-329111
Fax: +39-0584-962696
sales@navionics.it
Toll Free: 800-848-5896
Tel: 508-291-6000
Fax: 508-291-6006
sales@navionics.com
Tel: +61-2-9555-2522
Fax: +61-2-9555-2900
sales@navionics.com.au
Tel: +44-1752-204735
Fax: +44-1752-204736
sales@navionics.co.uk
If you wish to file a report of an error or omission on a Navionics chart, please provide
the information to Navionics web site, Discrepancy Report section at the link below:
http://www.navionics.com/DiscrepancyReports.asp
 Loading...