

Page 1
SeaTalk2 Keyboard
Owner's Handbook
Introduction
PAGE
WPTS
ACTIVE
MOB
DATA
MENU
OUT
.
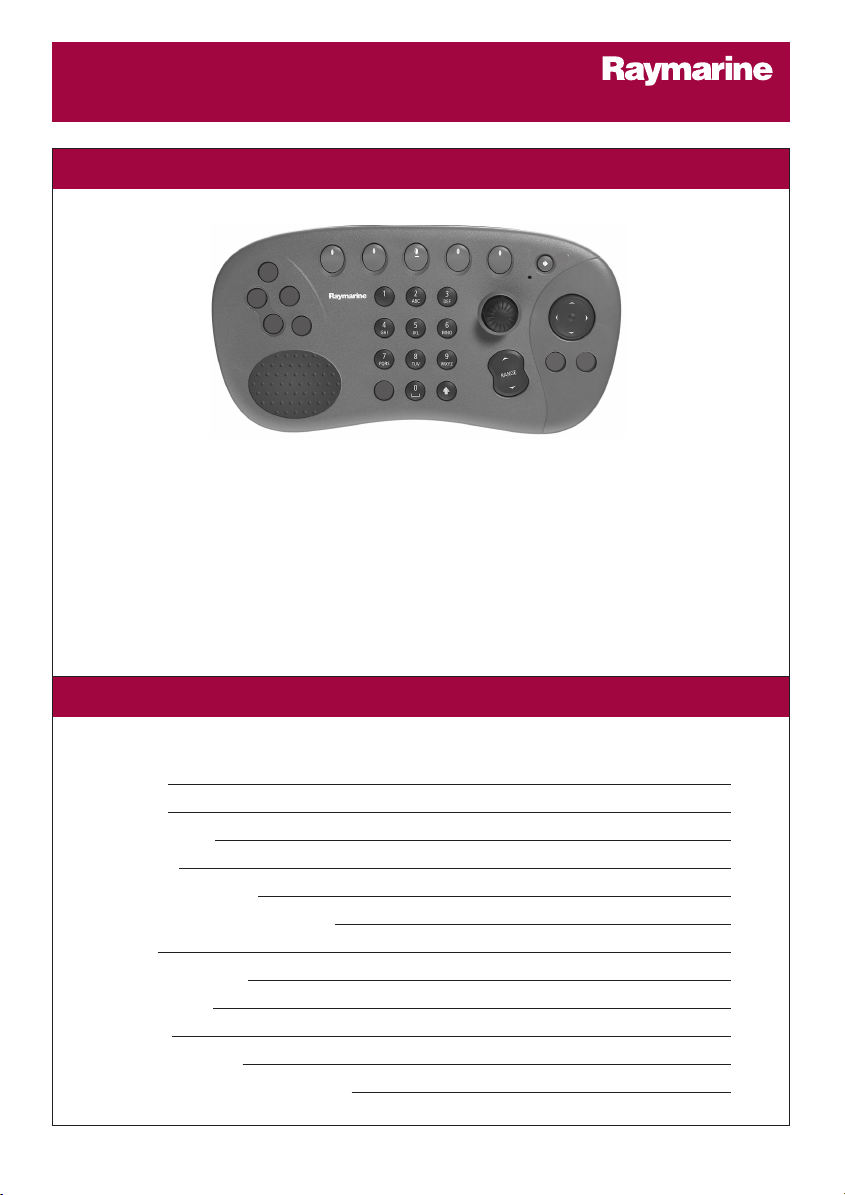
This handbook explains how to install, connect, operate and maintain your SeaTalk2
Keyboard (E55061). This keyboard is also supplied with the Remote Station Kit (T82005) details of how to integrate these devices is given on Page 6.
Intended use
This keyboard is intended for use with Raymarine's E-Series display aboard leisure marine
boats and workboats not covered by IMO/SOLAS carriage requirements. It can be integrated
into an existing SeaTalk
2
system, if required.
IN
www.raymarine.com
OK CANCEL
Contents
Subject Page
Introduction 1
The controls 2
What's in the box? 3
Safety notices 3
Planning the installation 4
Integrating the Remote Station Kit 6
Installation 7
Accessories and spares 9
Removing/refitting 10
Maintenance 10
Important information 11
Technical support and contact details 12
1
D7679-1
Page 2
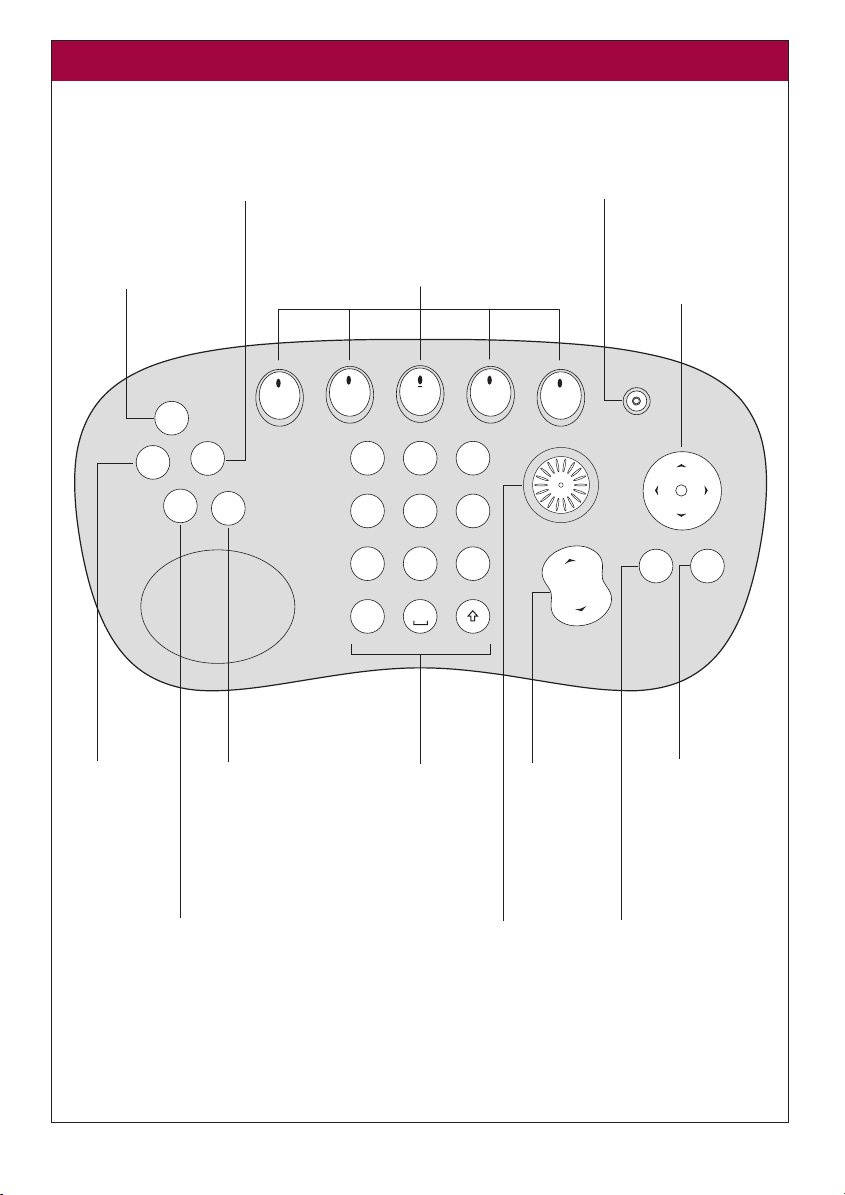
The controls
PAGE
To change page and
configure page sets.
PAGE
ACTIVE
DATA
WPTS
MOB
To manage waypoints and
initiate MOB.
Soft keys
Press to select corresponding function
identified by on-screen label.
WPTS
MOB
MENU
1
4
GHI5JKL
7
PQRS
.
2
ABC3DEF
MNO
8
WXYZ
TUV
0
Power
To turn display off and access
backlight functions and
scanner controls.
6
9
OUT
RANGE
IN
Trackpad
To control on-screen
cursor and scroll
through menu items.
CANCELOK
ACTIVE
To select the
active window.
MENU
To access set up
menus and help
information.
Keypad
For making alphanumeric entries in
on-screen dialog
Range
To change the
display scale.
boxes.
DATA
To access the ruler, chart
vectors, archive and transfer,
data bar on/off functions etc.
Rotary control
To scroll through lists
and edit alphanumeric values.
OK
To select on-screen option,
or return to the previous
soft key set/menu.
For further details of the control functions, please refer to your E-Series Display Reference Manual.
2
CANCEL
To cancel selected
on-screen option
when editing data
and to return to
previous soft key set
or menu.
D7702_1
Page 3
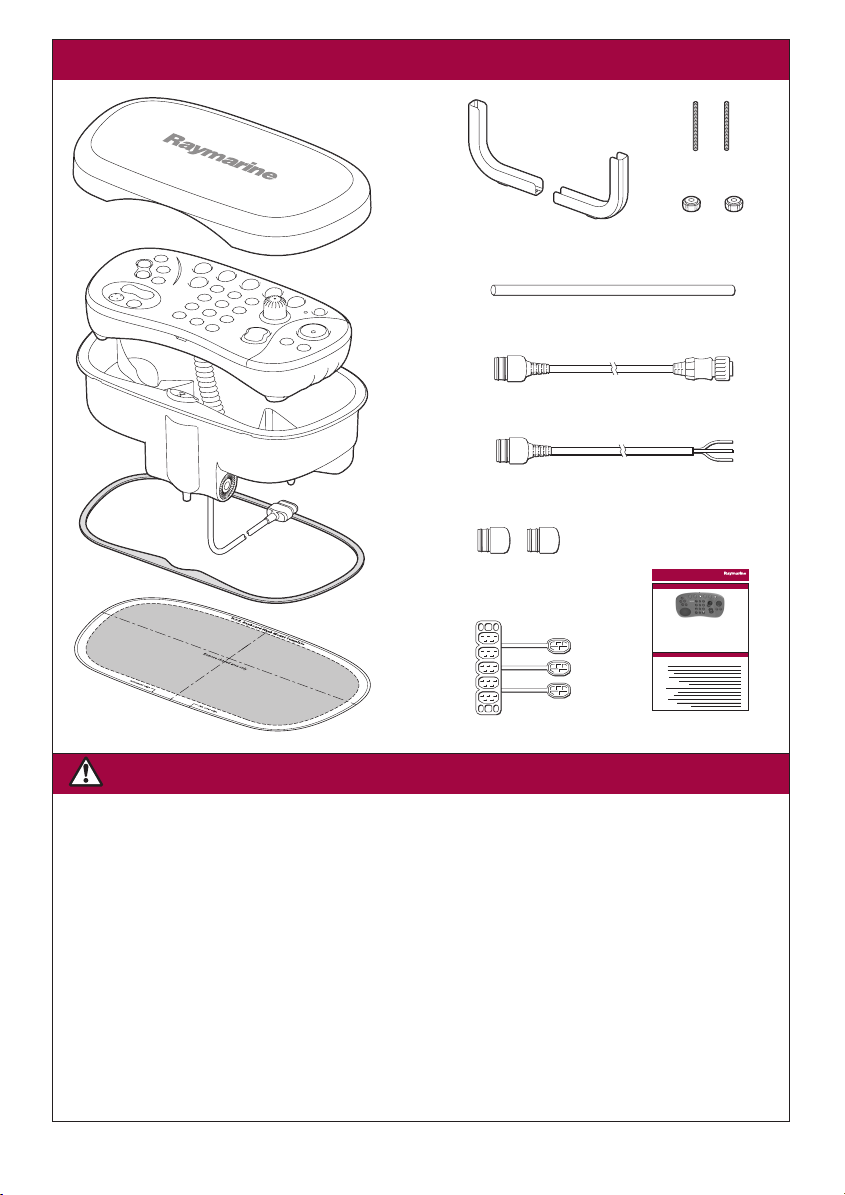
Whats in the box?. . . .
Suncover
SeaTalk
Keyboard
Cradle
Gasket
Template
Stud (x2)
Clamp (x2)
2
Thumb nut (x2)
Drain tube (8mm x 1m)
2
cable (1.5m)
SeaTalk
2
power/RF ground cable (1.5m)
SeaTalk
Terminator (x2)
5-way junction box
SeaTalk2 Keyboard
Owner's Handbook
Introduction to the SeaTalk2 Keyboard
This handbook explains how to install, connect, operate and maintain your SeaTalk2
Keyboard (E55061). This keyboard is also supplied with the Remote Station Kit (T82005) details of how to integrate these devices is given on Page 6.
Intended use
This product is a keyboard intended for use within a SeaTalk
junction box to Raymarine's E-Series display. The intended application is for leisure marine
boats and workboats not covered by IMO/SOLAS carriage requirements. The SeaTalk
keyboard is waterproof to CFR-46 standard.
Contents
Subject Page
Introduction 1
The controls 2
What's in the box? 3
Safety notices 3
Planning the installation 4
Integrating the Remote Station Kit 6
Installation 7
Spares and accessories 9
Removing/refitting 10
Maintenance 10
Important information 11
Technical support and contact details 12
PAGE
WPTS
ACTIVE
MOB
DATA
MENU
T
U
O
N
I
.
2
1
Handbook
www.raymarine.com
OK CANCEL
system and connected via a
2
D7679-1
Safety notices
WARNING: Navigation aid
Although this product has been
designed to be accurate and reliable,
many factors can affect its
performance. As a result, it should only
be used as an aid to navigation and
should never replace common sense and
navigational judgement. Always
maintain a permanent watch so you can
respond to situations as they develop.
WARNING: Cable
Do not disconnect the keyboard cable
from the keyboard.
WARNING: Product installation
This equipment must be installed and
operated in accordance with the
instructions contained in this handbook.
Failure to do so could result in poor
product performance, personal injury
and/or damage to your boat.
WARNING: Electrical safety
Make sure the power supply is switched
off before you make any electrical
connections.
D7701-1
3
Page 4
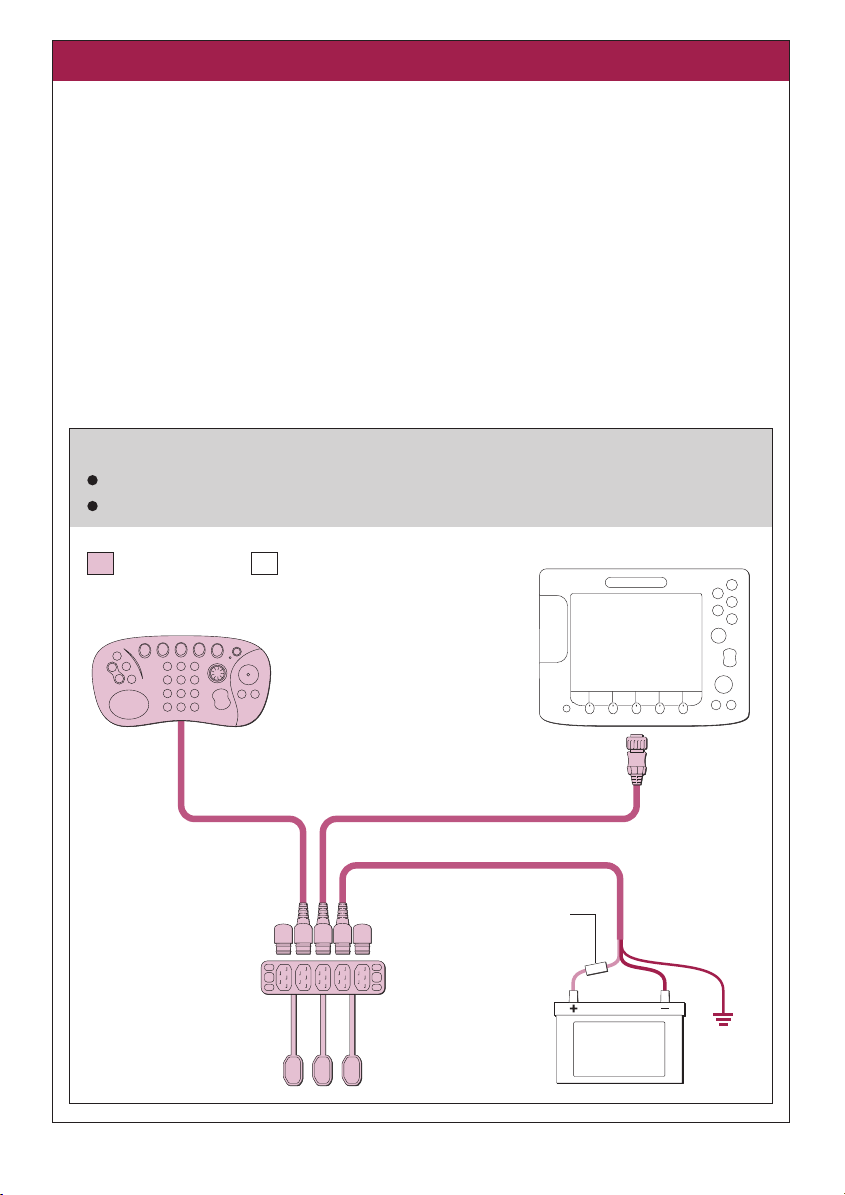
Planning the installation
Where can the SeaTalk2 Keyboard be mounted?
The Seatalk2 keyboard can be flush or trunnion mounted either indoors or outdoors. It is
waterproof to CFR-46 standard.
Important:
The drain tube is not required if the keyboard is mounted indoors or in an area protected
from rain and/or sea spray. If mounting the keyboard outdoors or in an unprotected area
the drain tube will need to run to a suitable exit point below the level of the keyboard.
What configuration should I use?
How you connect the keyboard depends on the distances between your E-Series Display, the
keyboard and power source and whether or not you are connecting the keyboard to an
existing SeaTalk
Configuration 1
Cable length between E-Series Display and keyboard less than 4.5m and
Not linking into an existing SeaTalk
2
system. Select the appropriate configuration from the following:
2
system.
Supplied in the box
SeaTalk2 Keyboard
Keyboard cable
(attached/3 m)
Junction box
Not supplied/accessory/
existing system
SeaTalk
SeaTalk2 Power/RF ground cable (1.5 m)
TerminatorTerminator
2
cable (1.5 m)
5A circuit breaker
Or:
Switch with 5A fuse
4
E-Series Display
red
12v supply
E Series display
black grey
D7680-1
Page 5

Configuration 2
Cable length between E-Series Display and keyboard exceeds 4.5m and
Not linking into an existing SeaTalk
Supplied in the box
SeaTalk2 Keyboard
Not supplied/accessory/
existing system
2
system.
E Series display
E-Series Display
SeaTalk
2
extension cable
SeaTalk
2
(see 'Accessories')
Keyboard cable
(attached/3m)
SeaTalk2 Power/RF ground cable (1.5m)
Terminator
Terminator
Additional
junction box
Junction box
Configuration 3
Integrating the keyboard into an existing SeaTalk
Supplied in the box
SeaTalk2 Keyboard
Keyboard cable (attached/3m)
2
SeaTalk
extension cable (see 'Accessories')
Not supplied/accessory/
existing system
cable (1.5m)
5A circuit breaker
Or:
Switch with 5A fuse
2
system.
2
SeaTalk
cable (1.5m)
red
black
12v supply
E Series display
E-Series Display
2
SeaTalk
extension cable
(see 'Accessories')
grey
To:
Existing SeaTalk
2
system
(incorporating terminators,
power/RF ground)
Junction box
To:
Existing SeaTalk
2
system
(incorporating terminators,
power/RF ground)
D7697-1
5
Page 6

Integrating the Remote Station Kit
Station 1
Red
12v
supply
Other SeaTalk
devices connected
Alarm Alarm
Black
White
Drain
OR
Black
Other
SeaTalk
devices
Brown
Red
Yellow
No other SeaTalk
devices connected
Red
Black
Brown
Red
Drain
Yellow
Black
White
M1500 monitor
OR
NOT waterproof
VGA out cable, 5m
2
SeaTalk
Keyboard
(see Accessories)
VGA out cable, waterproof
Station 2
Refer to
'Planning the
Installation',
diagrams on
pages 4 and 5.
Junction box
Remote Station Kit
E Series
SeaTalk/Alarm out cable,1.5m
2
SeaTalk
cable (1.5 m)
Keyboard cable (attached/3 m)
Not supplied/accessory/existing system
6
D7703-1
Page 7

Installation
Note: Before installing the keyboard, please read 'Planning the installation' on Pages 4 & 5.
What tools do I need to install the keyboard?
Drill
10 mm (
drill bit
3
/
in)
8
How do I install the keyboard?
1. Using self-adhesive or masking tape, fix the
template in the required position.
Note: Ensure that there are no cables or
other parts that will be damaged, when the
panel is drilled and sawn.
File
3. Saw around the shaded area of the template.
Jigsaw
Masking or
adhesive tape
2. Drill a pilot hole inside the shaded area of
the template.
4. Remove the tape and the template remains.
Smooth the sawn edges with a file.
D7699-1
7
Page 8

Installation - continued
5. Peel the backing from the gasket and stick it
to the underside of the cradle.
6. Finger tighten the studs into position.
7. If mounting the keyboard in an area
unprotected from rain and/or sea spray, fit
the drain tube and ensure that it runs to a
suitable exit point below the level of the
keyboard and the studs.
8. Fit the keyboard assembly into its housing.
With the dimples in the clamps fitting into
the nipples on the cradle, fit and secure the
clamps in place using the thumb nuts.
9. Ensuring that the power is connected last,
connect all the cables, terminators etc
in the appropriate configuration (see
'Planning the Installation' on pages 4 to 6).
Wrap any excess cable and tuck away.
Do not cut and resplice cables.
D7700-1
8
Page 9

Accessories and spares
What accessories are available? ...
Description Part no.
SeaTalk2 power/RF ground cable (1.5m) E55070
Auxiliary alarm E26033
M1500 monitor kit (includes 5m VGA Out cable) E02009
Terminator E25048
Junction box E25049
2
SeaTalk
1 metre E25040
3 metres E25042
5 metres E25043
10 metres E25038
20 metres E25044
E-Series SeaTalk
VGA Out cables (waterproof):
10 metres E55055
20 metres E55056
Trunnion mount kit E05012
extension cables:
2
cable (1.5m) E55053
What spares are available? ...
Description Part no.
Cradle assembly (includes cradle, cable, drain tube, gasket and latch) R58213
Flush mount kit (includes gasket, clamps, drain tube, studs and thumb nuts) R58211
Latch R89043
Suncover R58212
9
D7698-1
Page 10

Removing/refitting
How do I remove the keyboard? ...
1. Switch off the power.
2. Slide and hold the latch.
How do I refit the keyboard? ...
1. Position the top edge of the keyboard
under the lip of the cradle.
3. Push down at the top of the keyboard to
raise it from the cradle and lift the
it from the cradle.
2. Push the bottom of the keyboard into
the cradle to engage the latch.
Maintenance
What routine checks and servicing can I do? ...
On a regular basis, examine all cables for signs of damage, such as chafing, cuts or nicks and
check that all cables are securely connected.
The SeaTalk
How should I clean my keyboard? ...
Regularly clean your keyboard as follows:
1. Switch off the power.
2. Wipe the keyboard with a clean, soft cloth. To remove oily finger marks, use a spray
cleaning agent of the type used for cleaning eyeglasses or a mild detergent. Do not use
acid, ammonia based or abrasive products.
2
keyboard has no user serviceable parts.
10
D7706-1
Page 11

Important information
EMC conformance
All Raymarine equipment and accessories are designed to the best industry standards for
use in the recreational marine environment. The design and manufacture of Raymarine
equipment and accessories conforms to the appropriate Electromagnetic Compatibility
(EMC) standards, but correct installation is required to ensure that performance is not
compromised. For full details and installation guidelines refer to our web site at
www.raymarine.com
Warranty
To register your new Raymarine product, please take a few minutes to fill out the warranty
card. It is important that you complete the owner information and return the card to us to
receive full warranty benefits.
Your product can also be registered via our web site - www.raymarine.com
Handbook information
To the best of our knowledge, the information contained in this handbook was correct as it
went to press. Raymarine cannot accept any liability for any inaccuracies or omissions it may
contain. In addition, our policy of continuous product improvement may change
specifications without notice. As a result, Raymarine cannot accept liability for any
differences between the product and the handbook.
Disposal of this product
Disposal of this product should be in accordance with local regulations.
11
D7707-1
Page 12

Technical support & contact information
www.raymarine.com
Visit the Customer Support area of our website for Frequently Asked Questions, servicing
information, e-mail access to the Raymarine Technical Support Department and details of
Raymarine agents, worldwide.
United States
For accessories and parts contact:
Your authorized Raymarine dealer.
or
Raymarine Technical Services on:
1-800-539-5539 extension 2333,
or (603)-881-5200.
Opening hours:
Monday through Friday 0815 - 1700,
Eastern Standard or Eastern Daylight
Savings Time.
To verify your requirements
contact:
1-800-539-5539 extension 2444,
or (603)-881-5200.
For product repair & service
contact:
Your authorized Raymarine dealer.
or
Return the unit to:
Raymarine Product Repair Center
21 Manchester Street
Merrimack, NH03054 - 4801
1-800-539-5539
Europe
For technical support, service and
accessories contact:
Your authorized Raymarine dealer.
or
Technical Support
Raymarine UK Limited
Anchorage Park
Portsmouth
PO3 5TD
England
Tel: +44(0)23 9271 4713
Fax: +44(0)2392661228
Help us to help you
When requesting service, please quote the following product information:
Equipment type Model number Serial number
Raymarine UK Limited
Quay Point, Northarbour Road,
Portsmouth, Hampshire
England PO6 3TD
Tel: + 44 (0)23 9269 3611
Fax: + 44 (0)23 9269 4642
www.raymarine.com
Raymarine Incorporated
21 Manchester Street
Merrimack, NH03054 - 4801
USA
Tel: 603-881-5200
Fax: 603-864-4756
www.raymarine.com
12
D7708-1
Document No: 81253_1
Date: March 2005
Raymarine 2005
 Loading...