

Page 1

DS600X
Digital Fishfinder
Owner’s Handbook
Document number: 81235-2
Date: April 2004
Page 2

Page 3

DS600X Digital Fishfinder iii
Preface
This handbook describes the Raymarine DS600X Digital Fishfinder.
Conventions Used
Throughout this handbook, the labelled keys are shown in bold capitals; for
example, MENU. The software menu names and options are shown in
normal capitals; for example, AUTOMATIC.
Operating procedures, which may consist of a single key-press or a sequence
of numbered steps, are indicated by a ➤ symbol in the margin.
Technical Accuracy
The technical and graphical information contained in this handbook, to the
best of our knowledge, was correct as it went to press. However, the
Raymarine policy of continuous improvement and updating may change
product specifications without prior notice. As a result, unavoidable
differences between the product and handbook may occur from time to time,
for which liability cannot be accepted by Raymarine.
Warranty
To register your DS600X Digital Fishfinder ownership, please take a few
minutes to fill out the warranty registration card found at the end of this
handbook. It is very important that you complete the owner information and
return the card to the factory in order to receive full warranty benefits.
Page 4

iv DS600X Digital Fishfinder
Important Information
This handbook contains important information on the installation and
operation of your new equipment. In order to obtain the best results in
operation and performance, please read this handbook thoroughly.
Raymarine’s Product Support representatives, or your authorized dealer, are
available to answer any questions you may have.
Intended Use
Raymarine DS600X Digital Fishfinders are intended for recreational
fishfinding.
EMC Conformance
All Raymarine equipment and accessories are designed to the best industry
standards for use in the recreational marine environment.
Their design and manufacture conforms to the appropriate Electromagnetic
Compatibility (EMC) standards, but correct installation is required to ensure
that performance is not compromised. Although every effort has been taken
to ensure that they will perform under all conditions, it is important to
understand what factors could affect the operation of the product.
The guidelines given here describe the conditions for optimum EMC
performance, but it is recognized that it may not be possible to meet all of
these conditions in all situations. To ensure the best possible conditions for
EMC performance within the constraints imposed by any location, always
ensure the maximum separation possible between different items of
electrical equipment.
For optimum EMC performance, it is recommended that wherever
possible:
• Raymarine equipment and cables connected to it are:
• At least 3 ft (1 m) from any equipment transmitting or cables carrying
radio signals, e.g., VHF radios, cables and antennas.
• More than 7 ft (2 m) from the path of a radar beam. A radar beam can normally be assumed to spread 20 degrees above and below the radiating element.
Page 5
DS600X Digital Fishfinder v
• Raymarine specified cables are used. Cutting and rejoining these cables
can compromise EMC performance and must be avoided unless doing so
is detailed in the installation manual.
• If a suppression ferrite is attached to a cable, this ferrite should not be
removed. If the ferrite needs to be removed during installation it must be
reassembled in the same position.
Safety Notices
1. PRODUCT INSTALLATION. This equipment must be installed and
operated in accordance with the instructions contained in this handbook.
Failure to do so could result in poor product performance, personal injury
and/or damage to your boat.
2. HIGH VOLTAGE. The display unit, transducer cable, and transducer
contain high voltages. Adjustments require specialized service procedures
and tools only available to qualified service technicians - there are no user
serviceable parts or adjustments.
3. NAVIGATION AID. This unit is only an aid to navigation. Its accuracy
can be affected by many factors, including equipment failure or defects,
environmental conditions, and improper handling or use. It is the user’s
responsibility to exercise common prudence and navigational judgments.
This fishfinder should not be relied upon as a substitute for such prudence
and judgment.
4. ULTRASONIC ENERGY. The transducer transmits high frequency
energy while in use. The unit should be turned off when swimmers or divers
are in close proximity to the transducer. (There is a lack of scientifically
sound standards or guidelines for exposure levels and limits to ultrasound.
This notice is precautionary only.)
WARNING:
Do not disconnect the transducer cable without first powering off the
display unit. Removal of the transducer cable from the DS600X while
power is turned on can cause sparks.
Mount unit where it is well ventilated and free from gasoline fumes.
Page 6

vi DS600X Digital Fishfinder
Raymarine Products and Services
Raymarine products are supported by a network of Authorized Service
Representatives. Raymarine’s Technical Services representatives or your
local dealer will be available to answer any questions you may have. For
information on Raymarine products and services, contact either of the
following:
United States Raymarine, Incorporated
22 Cotton Road, Unit D
Nashua, New Hampshire
03063-4219 USA
Telephone:1-603-881-5200
1-800-539-5539
Fax: 1-603-864-4756
Europe Raymarine Limited
Anchorage Park
Portsmouth, Hampshire
PO3 5TD England
Telephone: +44 (0) 23 9269 3611
Fax: +44 (0) 23 9269 4642
Or, you may contact us on the World Wide Web at:
www.raymarine.com
© Raymarine Limited 2004
Page 7

vii
Contents
Preface ................................................................................................................... iii
Conventions Used ................................................................................... iii
Technical Accuracy .................................................................................iii
Warranty ..................................................................................................iii
Important Information ........................................................................................iv
Intended Use ............................................................................................ iv
EMC Conformance ................................................................................. iv
Safety Notices ........................................................................................... v
Raymarine Products and Services ...........................................................vi
Chapter 1: Overview ............................................................................................1
1.1 Introduction ...................................................................................... 1
Features ......................................................................................... 2
General .......................................................................................... 3
Transducer .............................................................................. 3
Chapter 2: Installation .........................................................................................5
2.1 Introduction ...................................................................................... 5
2.2 Unpacking and Inspecting the Components ..................................... 5
2.3 Selecting the Equipment Location ................................................... 6
Mounting Location ....................................................................... 6
2.4 Cable Runs ....................................................................................... 7
2.5 Mounting the Fishfinder ................................................................... 9
Bracket Mounting ......................................................................... 9
Console Mounting (optional) ....................................................... 9
2.6 System Connections ....................................................................... 11
DC Power and NMEA Connection ............................................. 11
Transducer Connection ............................................................... 13
Chapter 3: Getting Started ................................................................................15
3.1 Introduction .................................................................................... 15
3.2 Powering on the Fishfinder ............................................................ 15
3.3 Simulator Mode .............................................................................. 15
3.4 LCD Display .................................................................................. 16
3.5 Interpreting the Sounder Image ...................................................... 17
Target Indications ....................................................................... 18
3.6 Keypad Operation .......................................................................... 19
3.7 Using the Variable Range Marker (VRM) ..................................... 20
3.8 Selecting the Display Page .............................................................21
3.9 Menu Operation ............................................................................. 23
Menu Structure ........................................................................... 23
Page 8

viii DS600 Digital Fishfinder
Chapter 4: Main Menu .......................................................................................25
4.1 Introduction ....................................................................................25
Selecting MENU Items ............................................................... 25
4.2 Fishfinder Operation Controls ........................................................29
Scroll Speed ................................................................................30
Range .......................................................................................... 30
Frequency ................................................................................... 32
A-Scope ...................................................................................... 33
GAIN MODE... .......................................................................... 34
GAIN .................................................................................... 35
Color Gain ............................................................................. 35
Time Variable Gain (TVG) ................................................... 36
Sounder Interference Rejection (Int. Rej.) ............................ 36
Second Echo Rejection .........................................................37
Power .................................................................................... 37
Max. Ping Rate ...................................................................... 37
ZOOM... ..................................................................................... 37
View ...................................................................................... 38
Zoom x2, x3, x4 Magnification ............................................. 39
Mode ..................................................................................... 39
TRIP RESET... ............................................................................ 39
DISPLAY SET UP... ................................................................... 39
SOUNDER SET UP... .................................................................39
Chapter 5: Display Set Up ..................................................................................41
5.1 Introduction ....................................................................................41
Brightness ................................................................................... 44
Target Depth ID .......................................................................... 44
Depth Digit Size .......................................................................... 45
Transparent Menu ....................................................................... 45
PALETTE... ................................................................................46
Selection ............................................................................... 46
Background Color ................................................................. 47
DATA ITEMS... .......................................................................... 47
NAV. SET UP... (Navigation Data) ............................................. 48
Chapter 6: Sounder Set Up ................................................................................51
6.1 Introduction ....................................................................................51
ALARMS... ................................................................................ 55
Target Depth ID ..................................................................... 55
Fish Alarm ............................................................................ 56
Shallow Alarm ......................................................................56
Shallow Range ......................................................................56
Deep Alarm ........................................................................... 57
Page 9

ix
Deep Range ........................................................................... 57
Temp. Alarm .........................................................................57
Temp. Rng. High ................................................................... 58
Temp. Rng. Low ................................................................... 58
ALARM CLOCK... .............................................................. 58
UNITS... ..................................................................................... 59
Depth Units ........................................................................... 59
Temp. Units ........................................................................... 59
Speed Units ........................................................................... 59
Distance Units ....................................................................... 59
Bearing Mode ....................................................................... 60
Date Format .......................................................................... 60
Time Format ..........................................................................60
NMEA-OUT SET UP... .............................................................. 60
Language .................................................................................... 61
Key Beep .................................................................................... 61
Key Help ..................................................................................... 61
Depth Offset ................................................................................ 62
Speed Calibrate ........................................................................... 62
Temp Calibrate ............................................................................ 62
Sounder Simulator ...................................................................... 62
SW Version and Serial Number (read only) ................................ 62
Chapter 7: Maintenance and Problem Solving ...............................................63
7.1 Maintenance ................................................................................... 63
Routine Checks ........................................................................... 63
Cleaning Instructions .................................................................. 63
Cleaning the Unit ..................................................................63
Cleaning the Transducer ....................................................... 63
Cleaning the Hull ..................................................................64
EMC Servicing and Safety Guidelines .......................................64
7.2 Problem Solving ............................................................................. 65
Common Problems and Their Solutions ..................................... 65
7.3 How to Contact Raymarine ............................................................ 66
On the Internet ............................................................................ 66
Customer Support ................................................................. 66
In the US ..................................................................................... 66
Accessories and Parts ............................................................ 66
Technical Support .................................................................67
Product Repair and Service ................................................... 67
In Europe ..................................................................................... 68
Technical Support .................................................................68
Accessories and Parts ............................................................ 68
Page 10

x DS600 Digital Fishfinder
Worldwide Support ..................................................................... 68
Appendix A: Specifications ................................................................................69
Index ......................................................................................................................71
Page 11
Chapter 1: Overview 1
Chapter 1: Overview
1.1 Introduction
This handbook describes the DS600X Digital Fishfinder. The DS600X
features state-of-the-art High Definition Fish Imaging (HDFI) technology.
Constantly adjusting transmitter and receiver parameters throughout the
water column, the DS600X intelligently analyzes fish and bottom echoes
and automatically produces a crystal clear echo sounder display.
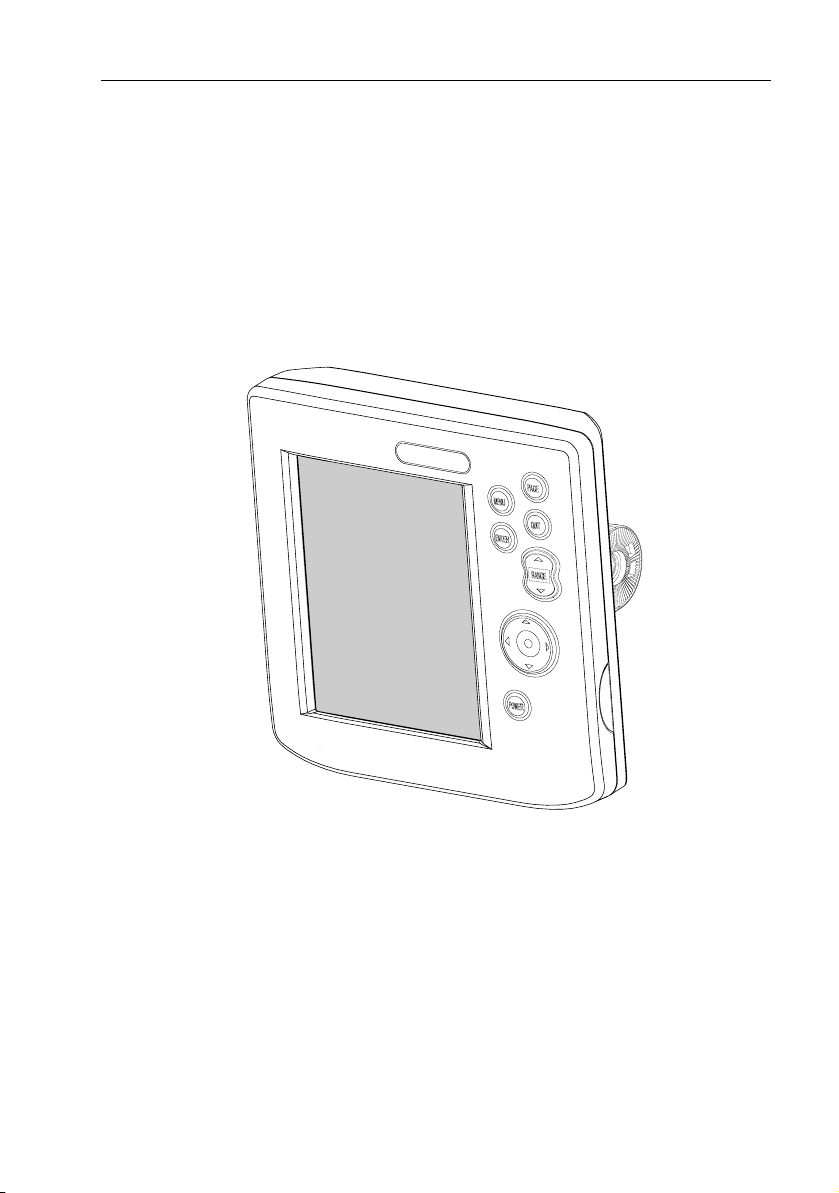
D6454-1
Figure 1-1: DS600X Digital Fishfinder
The DS600X employs a very high transmission repetition or “ping” rate
which, along with the digital adaptive high sample rate receiver, ensures that
fish and bottom structure are presented in superb detail and optimal color
allocation. The DS600X digital bandwidth adaptation adjusts the receiver
band width dynamically from very wide to very narrow, as required by the
actual water conditions. This provides superior fish and bottom detection in
all water conditions.
Page 12
2 DS600X Digital Fishfinder
Features
• 5.7" Transmissive High Brightness TFT Color LCD
•¼ VGA 76,800 Pixel Display Resolution
• Patented Digital HDFI Technology
• Hands-Off Adaptive Auto Adjustments
• Dual Frequency 200/50 kHz 500W RMS
• Depth/Temp/Speed transducer included with some models, which can
measure water depth, water temperature and speed
• Speedometer-style digital data screen overlay
• NMEA 0183 compliant
• Easy Bracket or Flush mounting
• Waterproof to IPX7
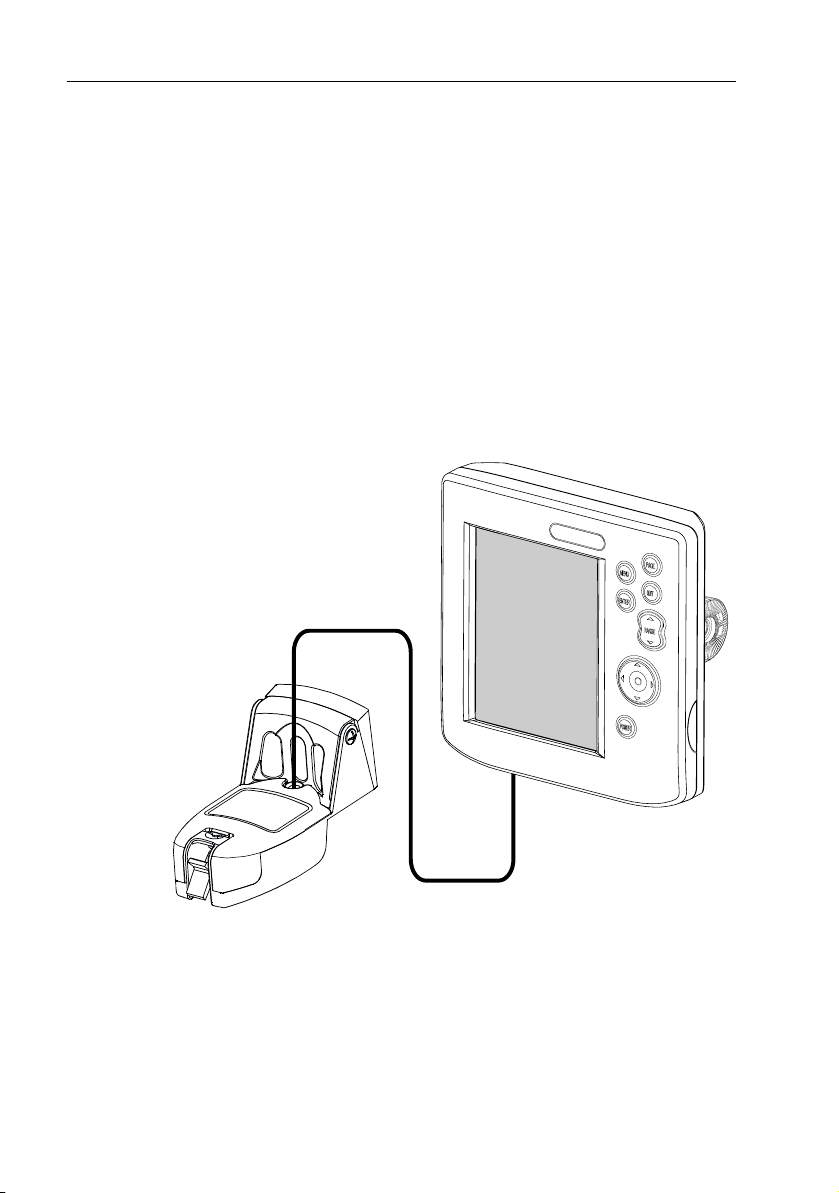
Transducer
Fishfinder
Figure 1-2: Basic Fishfinder System using the DS600X
D6458-1
Page 13

Chapter 1: Overview 3
General
The DS600X system, illustrated below, is comprised of the digital fishfinder,
transducer and associated cables.
The DS600X is waterproof to IPX7 and can be installed either above or
below deck.
The unit includes connections to:
• Power/NMEA
• the transducer
Transducer
The DS600X requires a transducer for measuring water depth, water
temperature, distance traveled, and speed. A transducer is included with
some fishfinder models. It is important to position your transducer correctly.
Details on your transducer, including location and installation instructions,
are included in the transducer box.
Page 14

4 DS600X Digital Fishfinder
Page 15

Chapter 2: Installation 5
Chapter 2: Installation
2.1 Introduction
This chapter provides installation instructions for your DS600X.
Note: If you wish to practice using the unit before installation, connect the
power cable and use the simulator mode as described in Chapter 3. For power, connect a 12VDC power supply, attaching the red wire to positive and the
black wire to negative. See Section 3.3 for details.
2.2 Unpacking and Inspecting the Components
Unpack your system carefully, to prevent damage to the equipment. Save the
carton and packing, in case you need to return a unit for service.
Check that you have all the correct system components. These depend on
your system package, as follows:
:
Table 2-1: Supplied Parts
Item Part No.
One of the following units:
DS600X Digital Fishfinder without Transducer, US version
DS600X Digital Fishfinder without Transducer, CE version
E63065
E63066
Sun Cover E32050
Mounting Bracket E35005
Mounting Bracket Knobs W145
Power/NMEA cable R69074
Handbook, DS600X 81235
Mounting hardware N/A
The following accessories are available for your A Series Fishfinder:
Table 2-2: Optional Accessories
Item Part No.
Flush Mount Kit E32051
Page 16

6 DS600X Digital Fishfinder
Transducers are supplied with some models and optional with others. The
following transducer options are available:
:
Table 2-3: Transducer Parts
Item Part No.
Transducer Adapter Cable for L365/L470 Style Transducers E66070
Transducer Adapter Cable for hsb
Transom Mount Transducer for DS400X/DS500X/DS600X (P58)
Bronze Thru-hull Transducer for DS400X/DS500X/DS600X (B744V)
2
/DSM250 Style Transducers
E66066
1
E66062
1
E66061
1
supplied with some models
2.3 Selecting the Equipment Location
Mounting Location
The DS600X is waterproof to IPX7 is and designed to be mounted either
above or below deck. The unit should be protected from physical damage and
excessive vibration.
CAUTION:
Mount the DS600X in a protected area away from prolonged exposure to rain, salt spray, and direct sunlight, but well ventilated.
When planning the installation, the following should be considered to ensure
reliable and trouble free operation:
• Access: There must be sufficient space below the unit to enable cable
connections to the panel connectors, avoiding tight bends in the cable.
• Interference: The selected location should be far enough away from
devices that may cause interference, such as motors, generators, and radio
transmitter/receivers. (See the EMC guidelines in the Preface.)
• Magnetic compass: Mount the unit at least 3 ft (1m) away from a mag-
netic compass.
• Cable runs: The unit must be located near a DC power source. The
power cable supplied is 5 ft (1.5 m), but a longer cable can be used if
desired. Refer to Section 2.4.
The maximum length of cable between the fishfinder and the transducer
unit should not normally exceed 25 ft (8 m).
• Environment: Good ventilation is required to prevent overheating.
Page 17

Chapter 2: Installation 7
WARNING:
Removing the transducer cable from the DS600X while power is turned on can cause sparks. As with any electronic device, be sure the fishfinder is mounted where it is well ventilated and free from gasoline fumes.
2.4 Cable Runs
Consider the following before installing the system cables:
• You will need to attach the power and transducer cables to the rear of the
unit.
• All cables should be adequately secured, protected from physical damage and exposure to heat.
• Avoid running cables through bilges or doorways, or close to moving or
hot objects.
• Avoid sharp bends.
• Where a cable passes through an exposed bulkhead or deckhead, use a
watertight feed-through.
• Secure cables in place using tie-wraps or lacing twine. Coil any extra
cable and tie it out of the way.
You will need to run the following cables:
• Power/NMEA cable, supplied with the unit. This 5 ft (1.5 m) cable has
a connector plug at one end for connecting to the fishfinder, and 3 wires at
the other end for connecting the power supply. The power cable may be
extended by up to 60 ft (20 m) using a wire gauge of AWG 12 or greater.
The DS600X is intended for use on the boat’s DC power systems rated
from 10-18 Volts DC (13.8V nominal).
• Transducer cable, supplied with the transducer. This 25 ft (8 m) cable
has a connector plug at one end for the display unit.
Cutting the transducer cable will severely reduce sonar performance:
• Do not cut the transducer cable or remove the connector.
• Do not shorten or splice the cable.
If the transducer cable is cut, it must be replaced—it cannot be repaired.
Cutting the cable will also void the warranty.
Page 18

8 DS600X Digital Fishfinder
7.48 in (190 mm)
6.93 in (176 mm)
1.57 in
(39.9 mm)
5.08 in (129 mm)
7.00 in (178 mm)
2.52 in (64 mm)
5.12 in (130 mm) plug clearance
3.74 in (95 mm)
1.26 in
(32 mm)
1.38 in
1.38 in
(35 mm)
(35 mm)
Figure 2-1: DS600X Unit Dimensions
5.28 in (134 mm)
D6455-1
4.72 in (120 mm)
Page 19

Chapter 2: Installation 9
2.5 Mounting the Fishfinder
The DS600X can be mounted on a dash, chart table, bulkhead or deckhead
using the supplied hardware. The unit can also be flush mounted directly into
the console.
Bracket Mounting
➤ To mount the DS600X on the supplied bracket:
1. Loosen the knobs and remove the mounting bracket from the unit.
2. Mark the locations of the mounting bracket screw holes on the mounting surface.
3. Drill 5/16" (7 mm) holes through the mounting surface at the marked locations.
4. Align the mounting bracket holes with the holes on the mounting surface.
5. Use the screws and nuts supplied to attach the mounting bracket to the mounting surface at the marked locations.
6. Attach the unit to the mounting bracket, adjust the display angle, and tighten the knobs.
Console Mounting (optional)
The fishfinder may also be installed directly into the console. This requires
the purchase of an optional Flush Mount kit, Raymarine part number
E32051.
➤ To flush mount the unit directly into the console using the optional kit:
1. Make sure there are no hidden electrical wires or other items behind the location before proceeding. Make sure there is sufficient rear access for mounting and cabling.
2. Check the selected location for the unit. A clear, flat area at least 7¼" (184
mm) wide by 7¼" (184 mm) high, with at least 3½" (89 mm) of clearance
behind the panel, is required.
3. Using the template supplied at the end of this handbook, trace out the unit opening and four mounting screw locations.
4. Drill a ½ in (12.7 mm) pilot hole in each corner of the cut-out area.
5. Using a suitable saw, cut along the inside edge of the cut-out line.
6. Remove the mounting bracket knobs and bracket from the unit. Make sure that the unit fits in the cut-out area.
7. Drill four 3/16" (5 mm) holes as indicated on the template.
Page 20
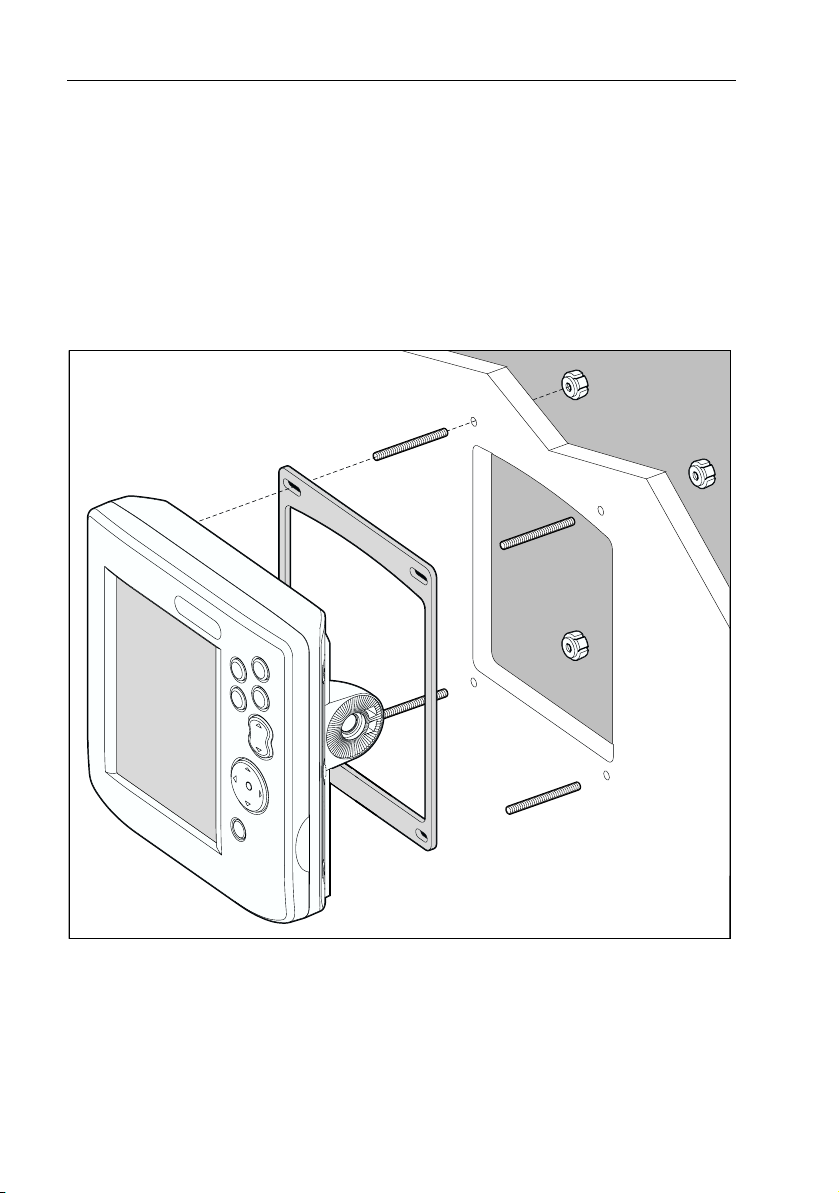
10 DS600X Digital Fishfinder
20.02
and -35.02
8. Hand tighten the studs into the holes provided at the rear of the unit.
9. Place the gasket on the rear of the fishfinder.
10. Run the Power/NMEA cable and transducer cables through the back of the cutout and connect to the unit. Avoid tight bends in the cables.
11. Slide the unit into the panel cut-out.
12. Hand tighten the nuts to secure the unit to the console.
13. Alternatively, place a spacer over each of the four studs and secure with thumb nuts.
2
.0
5
˚
-3
d
n
2
˚ a
.0
0
2
Figure 2-2: DS600X Flush Mounting Arrangement
D6645-1
Page 21
Chapter 2: Installation 11
2.6 System Connections
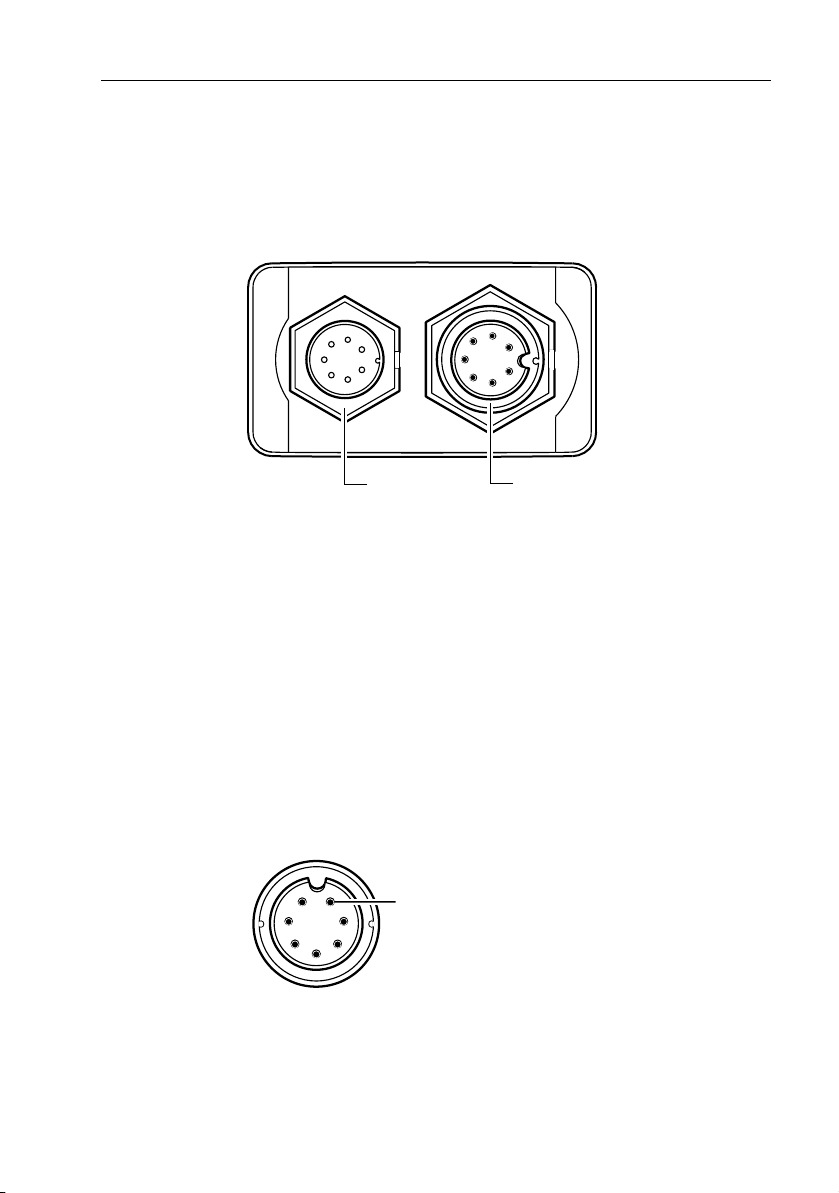
The rear of the fishfinder provides the following connection sockets:
• Power/NMEA
• Transducer
D6460-2
Power/NMEA Transducer
Figure 2-3: DS600X Connector Panel
DC Power and NMEA Connection
The DS600X is intended for use on boat’s DC power systems rated from 10-
18 Volts DC (13.8V nominal).
A 5 ft (1.5 m) cable is supplied for connecting the boat’s DC power and
NMEA interface to the unit. This Power/NMEA cable can be extended by up
to 60 ft (20 m) using a wire gauge of AWG 12 or greater.
The cable’s molded end attaches to the seven-pin Power/NMEA connector
on the unit’s connector panel.
The cable connector (viewed from the outside) is shown in the following
drawing.
pin1
D6462-2
Figure 2-4: Power Cable Connector
The exposed wires on the open end of the cable should be connected as
follows:
Page 22
12 DS600X Digital Fishfinder
Pin No. Function Color
1 Battery negative – Black
2 Battery positive + (10.0VDC to 18.0VDC) Red
3 NMEA Input + White
4NMEA Input – Green
5 CGND Gray
6 NMEA Output + Yellow
7NMEA Output – Brown
The red wire connects to the feed from the positive (+) battery terminal and
the black wire connects to the feed from the negative (–) battery terminal.
The shield wire (drain) connects to the boat’s RF ground. If your boat does
not have an RF system, you can trim off the drain wire.
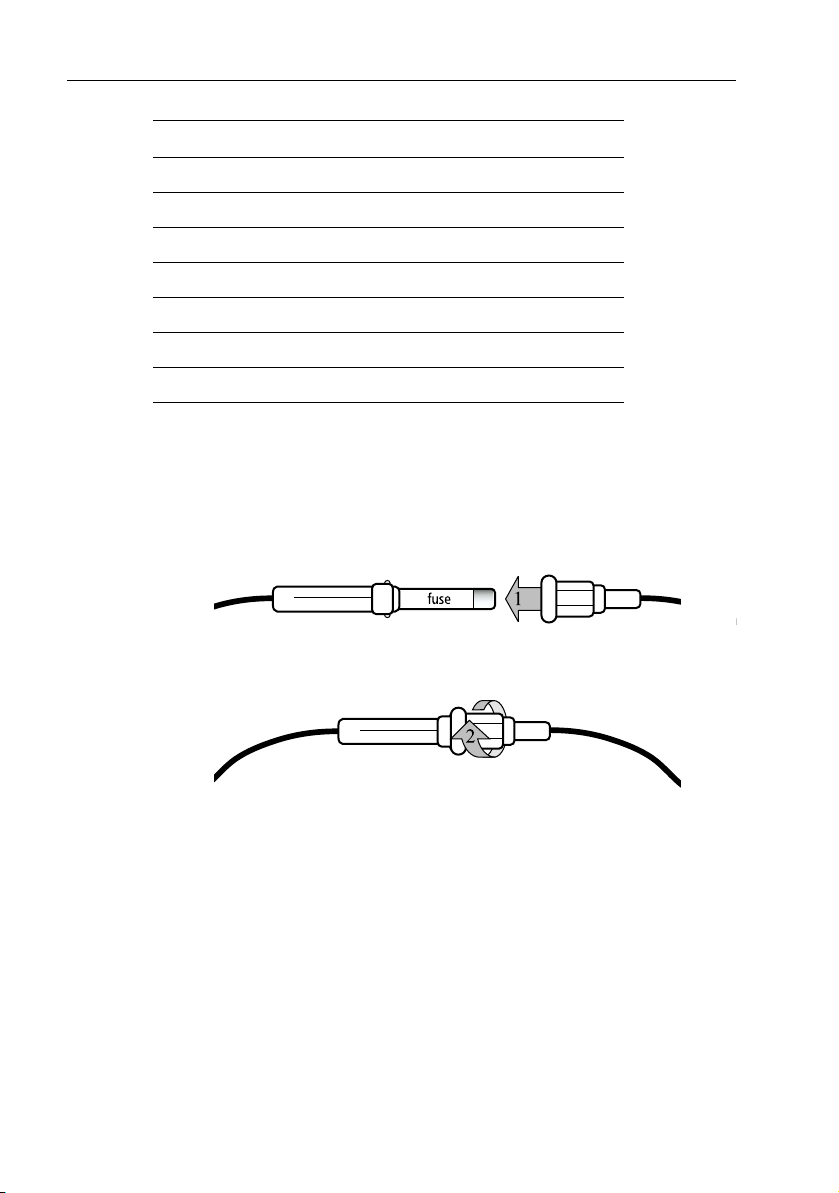
A fast blow 2 amp fuse is attached (in-line) to the red (positive) wire.
D6891-1
Figure 2-5: Installing the Fuse
CAUTION:
If the power connections are accidentally reversed the system will not work. Use a multimeter to ensure that the input power leads are connected for correct polarity.
Page 23

Chapter 2: Installation 13
Transducer Connection
A 25ft (8m) cable is supplied with the transducer. The transducer cable
connector has a nut that has been removed to aid installation. To enable you
to complete the installation without cutting the cable, ensure that any holes
you drill are large enough to accept the connector, with the nut removed
(approximately 13/16" or 21 mm).
Before attaching the transducer cable, you will need to attach the connector
nut, which is included in the transducer packaging.
The transducer cable is attached to the 7 pin male TRANSDUCER connector on
the connector panel of the DS600X. (See Figure 2-3 .)
CAUTION:
• Do not pull on the cable. This can damage the transducer wires.
• Do not cut the transducer cable or remove the connector.
• Do not try to shorten or splice the cable. Cutting the transducer cable will
severely reduce sonar performance.
• If the cable is cut, it must be replaced—it cannot be repaired. Cutting the
cable will also void the warranty.
WARNING:
Removing the transducer cable from the rear of the DS600X while the fishfinder is powered on can cause sparks. Only remove the transducer cable after power has been removed from the DS600X.
If the transducer cable is accidentally removed while the DS600X is
powered on, remove power from the fishfinder, replace the transducer
cable, and then restore power. As a safety feature, the DS600X only
recognizes that the transducer is connected at power-up.
Page 24

14 DS600X Digital Fishfinder
Page 25

Chapter 3: Getting Started 15
Chapter 3: Getting Started
3.1 Introduction
This chapter provides basic instructions to get you started using the DS600X
Digital Fishfinder. It describes Simulator mode and can help you to become
familiar with the basic functions of the fishfinder’s operation controls. More
detailed information on using the menu items and display controls is
provided in Chapter 4 and Chapter 5, respectively.
3.2 Powering on the Fishfinder
Connect the power cord to boat’s power source and plug into the power port
POWER
on the connector panel. Press the POWER button on the DS600X.
Details on setting up your DS600X and display are given in Chapter 6.
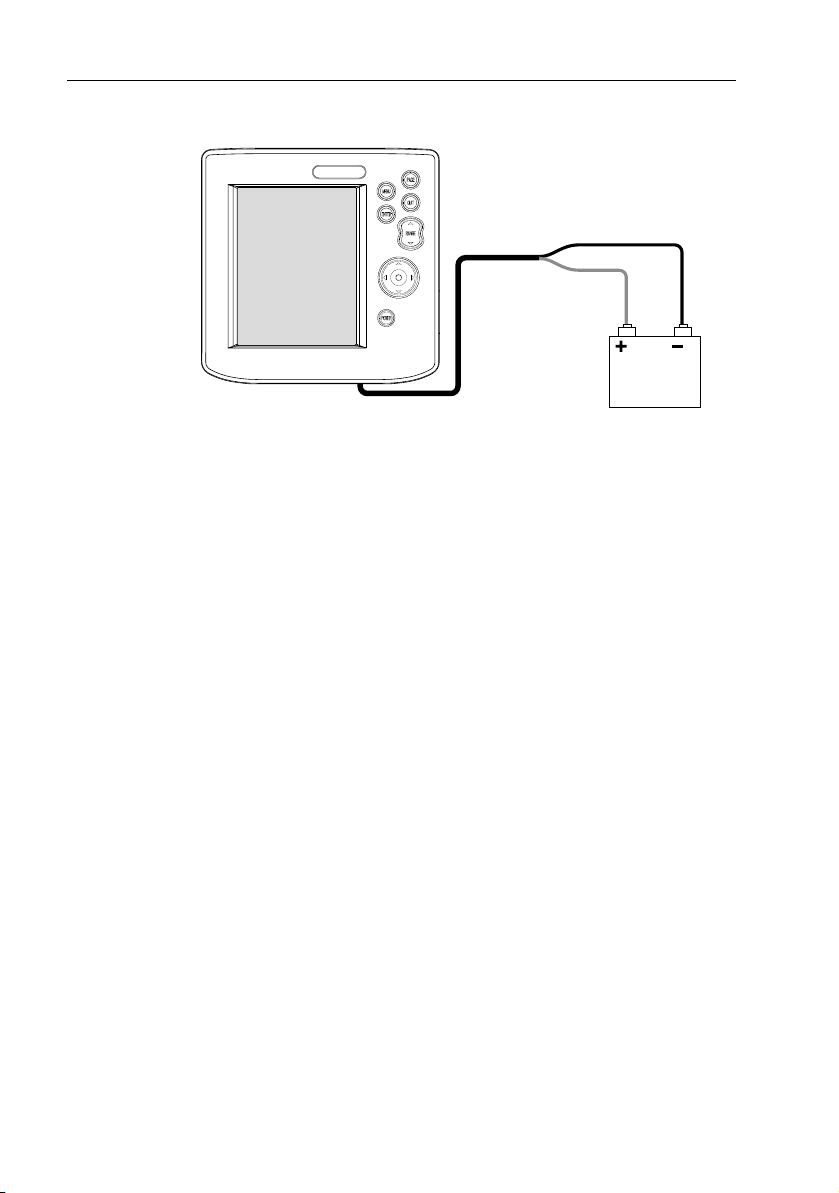
3.3 Simulator Mode
If you have not fully installed the fishfinder, you can still operate in Simulator
mode by connecting the fishfinder to a 12VDC power supply.
Figure 3-1 demonstrates how to setup the DS600X for Simulator mode.
Attach the red wire from the power lead to positive (+) and the black wire to
negative (–).
When you power up the
enters Demo mode. This provides a preprogrammed demonstration
highlighting the fishfinder’s main features. This function enables you to
practice operating the fishfinder without data from the transducer, using
simulated data.
If the transducer is connected, you can enter Simulator Mode by following
instructions outlined on page 62.
DS600X
without connecting the transducer, the unit
Page 26
16 DS600X Digital Fishfinder
Fishfinder
Figure 3-1: Demo/Simulator Mode Setup
3.4 LCD Display
When you first switch on the fishfinder, the scrolling bottom graph, or
Fishfinder Page, is displayed. This is a graphical representation of the echoes
seen by the DS600X. As time passes, this display scrolls from right to left and
becomes a record of the echoes seen. A typical display is shown in Figure 3-
2 .
The images at the right hand side of the display are the most recent echoes.
Some echoes indicate fish, and others show the bottom. It can also indicate
bottom structures, such as a reef or shipwreck. The upper and lower depth
range limits are shown.
You can customize the sounder by choosing what is displayed and how it is
displayed (including language and units). For example, you can set whether
the bottom graph display scrolls and you can select the range to adjust the
depth displayed.
You can view the cursor position and a variety of data (such as speed and
depth) from the transducer and other equipment in user-selectable data
boxes. These data boxes can be moved around the screen and they can be
switched on or off.
Red
Black
DC Volts
D6646-1
Chapter 5 includes details on adjusting the display, other set up options are
described in Chapter 6.
Page 27

Chapter 3: Getting Started 17
Frequency
Bottom of
transducer
34
36
47
44
43
Target depth
Bottom depth
42
43
43.9
Figure 3-2: Typical Fishfinder Display Screen
44
47
ft
3.5 Interpreting the Sounder Image
The DS600X uses sound waves to find fish and show bottom structure. The
transducer sends sound waves into the water; these sound waves strike fish,
the bottom, or other objects in the water and return as echoes. The DS600X
interprets these echoes to present an image of the fish and bottom.
The strength of echoes is indicated by different colors. You can use this
information to determine the size of fish and the bottom structure. Other
objects in the water, such as debris and air bubbles, also return echoes; these
echoes are generally weaker than the fish or bottom echoes and produce
background noise or clutter on the display. The digital sounder provides
controls to reduce the background noise and to adjust the way in which
echoes of different strengths are displayed.
43
20
40
60
60
D6637-2
Depth markers
Target images
Bottom
Range
Page 28

18 DS600X Digital Fishfinder
Target Indications
When the sounder detects a target echo such as a fish, it displays a
representative image on the LCD. The shape and size of this image is
influenced by a combination of factors:
Boat speed
The shape of the target changes along with your speed. Slower speeds return
flatter, more horizontal images. As your boat’s speed increases, the image
will tend to thicken and arch slightly.
The depth of the target
The closer the target to the surface the larger the image on screen.
To display the depth of individual targets, switch on the TARGET DEPTH ID
from the menu, as described on page 44.
The size of the target
The larger the target, the larger the return on the fishfinder display. The size of
a fish target is however dependent upon the size of the fish’s swim bladder
rather than its overall size. This swim bladder will vary in size between
different breeds of fish.
The frequency of the transducer
The same target will appear differently when the transducer frequency is
changed. Generally, the lower the frequency the broader the image.
Page 29

Chapter 3: Getting Started 19
3.6 Keypad Operation
The DS600X has seven control keys.
PAGE key toggles between scrolling bottom display,
PAGE
MENU
QUIT
ENTER
RANGE
temperature graph and navigation data pages
MENU key displays menu items
QUIT key returns to previous menu page or exits
menu mode
ENTER key selects highlighted menu item; Places VRM
RANGE key adjusts the displayed range
TRACKPAD navigates through menu options and
changes their value; Moves VRM
POWER
POWER key turns unit on and off; Shortcut to
DISPLAY SET UP...BRIGHTNESS Menu
D6453-2
Figure 3-3: Keypad Functions
PAGE
PAG E
Press this key to display a data page containing Temperature Graph over
time, Boat Speed, Boat Battery Voltage, Log and Trip Distances and Depth.
Press again to display Navigation data: Lat/Lon, Speed Over Ground (SOG),
Course Over Ground (COG), Waypoint location, Range and Bearing and
Time of day. This information is only available if the fishfinder is connected
via NMEA to another device outputting navigation data.
Press again to return to the Fishfinder Page, or scrolling bottom graph display.
MENU
MENU
Press this key to enter Main Menu setup mode.
QUIT
QUIT
Press this key to back up one menu level. If already at the first menu level, this
exits Menu mode.
ENTER
ENTER
Pressing this key when a Menu box is displayed selects the menu item
currently highlighted. When no Menu box is open, this key places the
Variable Range Marker (VRM).
Page 30

20 DS600X Digital Fishfinder
RANGE
RANGE
Press the arrow key to increase displayed range (deeper) and press the
arrow key to decrease it (shallower).
TRACKPAD
When a Menu databox is displayed, use the up and down arrow keys to move
the selection bar (item currently highlighted) up and down the list.
When in Zoom mode, use these keys to move the zoom area up or down on
the display.
TRACKPAD
When a Menu item has more than one possible response, use the left and right
keys to change the value.
When a menu item appears in UPPER CASE, it contains sub-menus. Press
the right arrow or ENTER to access the sub-menu items.
When the VRM is displayed, use the right and left arrow keys to change the
VRM’s position on the screen.
POWER
POWER
Press to turn on the fishfinder. Press and hold for three seconds to turn unit
off.
Press and release as a shortcut to the DISPLAY SET UP... Brightness setting.
3.7 Using the Variable Range Marker (VRM)
The VRM (Variable Range Marker) key is used to determine the distance
behind the boat of an object on the display. The VRM function is available on
the scrolling sonar display and zoom windows, if your transducer is equipped
with a paddlewheel for measuring speed and distance.
To display the VRM, press ENTER from the main fishfinder page. The VRM
ENTER
is displayed as a vertical line running the entire height of the display. You can
use the < and > keys of the trackpad to move the V RM over a particular object
to reference it from the boat.
Distance behind the boat is displayed next to the vertical line. The VRM
distance units correspond to the depth units assigned in the system set up
parameters you have assigned for your unit. However, when set to fathoms,
the VRM is displayed in feet.
The vertical line does not scroll with the scrolling sonar image. If the display
range changes, the VRM retains its position. When you switch on the VRM,
it is displayed at its last position.
Page 31

Chapter 3: Getting Started 21
Press QUIT to remove VRM from the screen.
QUIT
If the sounder is in split frequency display mode, the VRM is shown in only
one window at a time.
< 75ft >
ENTER
42.8
Figure 3-4: Using VRM
ft
3.8 Selecting the Display Page
The DS600X Fishfinder provides you with three Display Pages for
presenting information.
• Fishfinder Page
Displays sounder data. This is the default screen; it appears when you
first power on the unit.
• Temperature Graph Page
Displays a graph plotting water temperature readings from the transducer
over the past 60 minutes as well as current water temperature, boat speed
and a trip log.
< 75ft >
< 75ft >
20
40
60
60
D6640-2
VRM
Distance
from boat
Page 32

22 DS600X Digital Fishfinder
• Navigation Data Page
Displays position (if connected via NMEA) and current time, date, water
temperature, battery voltage and depth information.
➤ To change Display Pages:
PAG E
Press the PAGE key.
Each key press advances the Page screen.
20
35
36
40
42
43
44
47
43
43
44
47
Press to return to
Fishfinder Screen
Position
N 26°15:512
W 080°04:664
Waypoint
N 26°16:322
W 080°03:846
TTG
h
00 :16
Time
4:01:38 10/12/2004
Temperature 71.7°
Battery 13.7
50.2
m
AM
ft
WPT RNG
1 . 25
Date
V
nm
SOG
4
.
COG
048°
WPT BRG
042°
F
7
kts
Figure 3-5: Display Pages
ft
60
60
Press to display
Temp Screen
Temperature 71.5°F
74
73
72
T
T
Press
to display
Nav Data
71
70
69
68
60 50 40 30 20 10 0
Speed
Log
Trip
50.2
Minutes - +
4.6
kts
ft
nm
nm
13.5
74
73
72
71
70
69
68
V
D6634-1
Page 33

Chapter 3: Getting Started 23
3.9 Menu Operation
DS600X Fishfinder Page functions can be accessed using the controls that
are displayed when you press the MENU key. The Main Menu is displayed.
These function control:
• General Fishfinder Operations
• Display Control Functions
• Sounder Setup Functions
MAIN MENU
MAIN MENU
Scroll Speed
Range
Frequency
General Controls
Display Controls
Sounder Setup
A-Scope OFF
GAIN MODE...
ZOOM...
TRIP RESET...
DISPLAY SET UP...
SOUNDER SET UP...
Figure 3-6: Accessing the Main Menu
ON
AUTOMATIC
AUTOMATIC
AUTO FISHING
D6633-1
Figure 3-6 identifies these groupings. General Menu Controls are described
in Chapter 4. Display Setup functions are described in Chapter 5. Sounder
Setup functions are described in Chapter 6.
Menu Structure
Following is a diagram of the A Series Fishfinder menu structure.
Page 34

24 DS600X Digital Fishfinder
.
MENU
Scroll Speed
Range
Frequency
A-Scope
GAIN MODE
ZOOM
TRIP RESET
DISPLAY SETUP
SOUNDER SETUP
GAIN
COLOR GAIN
TVG
Sounder Int Rej.
Second Echo Rej.
Power
Max. Ping Rate
View
Zoom X
Mode
Brightness
Target Depth ID
Depth Digit Size
Transparent Menu
PALETTE
DATA ITEMS
NAV. SET UP
ALARMS
UNITS
NMEA-OUT SETUP
Language
Key Beep
Key Help
Depth Offset
Speed Calibrate
Temp Calibrate
Sounder Simulator
Selection
Background Color
SOG
LAT/LONG
Waypoint
RNG/BRG
COG
TTG
Bearing Mode
Time Offset
Time Format
Time
ALARM CLOCK
Date Format
Date
Depth Units
Temp. Units
Speed Units
Distance Units
Bearing Mode
Date Format
Time Format
Speed
Temperature
Battery
Log
Trip
Auto Scroll
Analog Gauges
Target Depth ID
Fish Alarm
Shallow Alarm
Shallow Range
Deep Alarm
Deep Range
Temp. Alarm
Temp. Rng. High
Temp. Rng. Low
ALARM CLOCK
BWC
BWR
DBT
DPT
GLL
MTH
VHW
VLW
VTG
ZDA
D6899-1
Page 35

Chapter 4: Main Menu 25
Chapter 4: Main Menu
4.1 Introduction
This chapter provides basic menu functions for using the DS600X Digital
Fishfinder. More detailed information on using the Display controls and
sounder setup is provided in Chapter 5 and Chapter 6, respectively.
Selecting MENU Items
This section provides an example of how to browse through the Main Menu
by demonstrating how to make a change to the Gain setting.
➤ To make changes to the menu settings:
1. Press the MENU key. The MAIN MENU screen appears. The currentlyselected menu item (in this case, Scroll Speed) is highlighted.
MAIN MENU
MAIN MENU
MENU
2. Press the trackpad keys to browse to GAIN MODE...
or
Scroll Speed
Range
Frequency
A-Scope OFF
GAIN MODE...
ZOOM...
TRIP RESET...
DISPLAY SET UP...
SOUNDER SET UP...
Continue holding the key down to scroll at a faster rate.
GAIN MODE... contains sub-menu items you can change. All menu items
that have sub-menus are shown with all capital letters followed by an
ellipsis (...).
ON
AUTOMATIC
AUTOMATIC
AUTO FISHING
D6632-1
Page 36

26 DS600X Digital Fishfinder
MAIN MENU
MAIN MENU
Scroll Speed
Range
Frequency
A-Scope OFF
GAIN MODE...
ZOOM...
TRIP RESET...
DISPLAY SET UP...
SOUNDER SET UP...
ON
AUTOMATIC
AUTOMATIC
AUTO FISHING
D6643-1
3. Press the trackpad > key or ENTER to browse the sub-menus.
GAIN MODE
GAIN MODE
ENTER
GAIN...
OR
COLOR GAIN...
TVG AUTOMATIC
Sounder Int Rej
Second Echo Rej.
Power
Max. Ping Rate
AUTO FISHING
AUTOMATIC
AUTO FISHING
LOW
AUTOMATIC
30
D6644-1
4. To edit the highlighted menu item, press the trackpad < or > keys to scroll through the available options. Once the item is changed, the change is accepted; you need not use the ENTER key to select.
Page 37

Chapter 4: Main Menu 27
GAIN MODE
GAIN MODE
GAIN...
COLOR GAIN...
AUTO TROLLING
AUTOMATIC
TVG AUTOMATIC
Sounder Int Rej
Second Echo Rej.
Power
Max. Ping Rate
AUTO FISHING
LOW
AUTOMATIC
30
D6647-1
5. For some numerical settings you will press the ENTER key to select and
then use the trackpad to increment or decrement the value.
For example, to change a manual setting:
i. Use the trackpad to browse to MANUAL.
ii. Press ENTER to accept. The MANUAL field is no longer highlighted.
iii. Use the trackpad to increment/decrement the value.
iv. Press ENTER again to accept The MANUAL field is again highlighted.
GAIN MODE
GAIN MODE
GAIN...
COLOR GAIN...
TVG
Sounder Int Rej
Second Echo Rej.
Power
Max. Ping Rate
MANUAL 75%
AUTOMATIC
AUTOMATIC
AUTO FISHING
LOW
AUTOMATIC
30
ENTER
GAIN MODE
GAIN MODE
GAIN...
COLOR GAIN...
TVG
Sounder Int Rej
Second Echo Rej.
Power
Max. Ping Rate
MANUAL 75%
AUTOMATIC
AUTOMATIC
AUTO FISHING
LOW
AUTOMATIC
30
GAIN MODE
GAIN MODE
GAIN...
COLOR GAIN...
TVG
Sounder Int Rej
Second Echo Rej.
Power
Max. Ping Rate
6. Press the QUIT key to exit. If you are currently in a sub-menu, pressing
QUIT
QUIT will return you to the previous page. You may have to press QUIT
MANUAL 50%
AUTOMATIC
AUTOMATIC
AUTO FISHING
LOW
AUTOMATIC
30
ENTER
GAIN MODE
GAIN MODE
GAIN... MANUAL 50%
COLOR GAIN...
TVG AUTOMATIC
Sounder Int Rej
Second Echo Rej.
Power
Max. Ping Rate
more than once to exit the Menu screen completely and return to the fishfinder page.
AUTOMATIC
AUTO FISHING
LOW
AUTOMATIC
30
D6648-1
Page 38

28 DS600X Digital Fishfinder
7. If enabled in the SOUNDER SET UP... menu, the Key Help function displays tips on which keys to press to make your menu selections. Key Help appears at the bottom of the screen, adjacent to the depth reading. See Key Help on page 61.
MAIN MENU
MAIN MENU
Scroll Speed
Range
Frequency
A-Scope
GAIN MODE...
ZOOM...
TRIP RESET...
DISPLAY SET UP...
SOUNDER SET UP...
42
43
44
47
ON
AUTOMATIC
AUTOMATIC
OFF
AUTO FISHING
36
ft
47
35
44
43
43
20
40
60
60
D6642-1
ARROW and ENTER key-help
symbols prompting you to use
Trackpad and ENTER keys to
change this menu item.
Note: Menu items that are displayed in all caps followed by an ellipsis (GAIN
MODE..., for example) contains sub-menus. Use the trackpad keys to scroll
through the sub-menus.
Page 39

Chapter 4: Main Menu 29
4.2 Fishfinder Operation Controls
The fishfinder operation menu items are outlined in Table 4-1 .
Table 4-1: Fishfinder Menu Items
Menu Sub-Menu Options Default
Scroll Speed — ON,
PAUS ED
Range — AUTOMATIC,
MANUAL
Frequency — AUTOMATIC,
A-Scope — OFF,
GAIN MODE... GAIN AUTO FISHING,
COLOR GAIN AUTOMATIC,
TVG
(Time Variable Gain)
. Sounder Int. Rej. AUTOMATIC,
200 kHz MAN,
50 kHz MAN,
DUAL MAN
ON-1,
ON-2,
ON-3
AUTO TROLLIN G,
AUTO CRU ISIN G,
MANUAL (0–99%)
MANUAL (0–99%)
AUTOMATIC,
MANUAL (0–100%)
LOW,
HIGH
ON
AUTOMATIC
AUTOMATIC
OFF
AUTO FISHIN G
AUTOMATIC
AUTOMATIC
AUTOMATIC
Second Echo Rej. OFF,
LOW,
HIGH
Power AUTOMATIC,
MANUAL (10–100%
in 10% increments)
Max. Ping Rate 5–30, in increments of 1 30
LOW
AUTOMATIC
Page 40

30 DS600X Digital Fishfinder
Menu Sub-Menu Options Default
ZOOM... View OFF,
Zoom X X2,
Mode AUTOMATIC,
TRIP RESET... — QUIT = no
DISPLAY SET UP... (See
SOUNDER SET UP... (See
Chapter 5
Chapter 6
SPLIT,
FULL SCREEN
X3,
X4
MANUAL
ENTER = yes
.)
.)
OFF
X2
AUTOMATIC
—
Scroll Speed
This menu item enables you to start and stop the bottom graph display from
moving across the screen.
• ON starts the bottom graph display.
• PAUSED stops the bottom graph display.
Note: The PAUSED setting doesn’t stop sonar pinging. Digital depth continues to be calculated while scrolling is paused.
The default is ON.
Range
By default, the sounder automatically adjusts the display range, selecting the
shallowest range that keeps the bottom in the lower half of the display
window. Alternatively, the Range setting enables you to select the maximum
depth displayed on the scrolling bottom and A-Scope displays.
This parameter determines whether the depth range displayed is set
automatically by the sounder or manually using the RANGE key.
• AUTOMATIC for the sounder to determine the range as dictated by the cur-
rent depth.
• Select MANUAL to enable the RANGE key for setting the range.
If you press the RANGE key to manually set the range while the automatic
setting is enabled displays, the fishfinder displays the following message:
Page 41

Chapter 4: Main Menu 31
The range mode must be set to MANUAL before the range will change.
Press UP, DOWN, or MENU.
Pressing on the RANGE key or pressing the MENU key opens the
or
Range field in the MAIN MENU so you can make the change if desired. If you
wish to remain in Automatic Range mode, press QUIT.
The following range/shift values are available:
Table 4-2: Range Values
Meters (CE
Feet Fathoms
51 2
10 2 4
15 3 6
20 4 8
30 6 10
40 8 15
50 10 20
60 15 25
models only)
80 20 30
100 25 40
150 30 50
200 40 60
250 50 80
300 60 100
400 80 150
600 100 200
800 150 300
1000 200 400
1500 250 500
2000 300 600
The default setting is AUTOMATIC.
Page 42

32 DS600X Digital Fishfinder
Frequency
The DS600X uses dual frequency sonar—50 kHz and 200 kHz—and can be
used in either auto or manual modes.
The DS600X can automatically select the appropriate frequency, based on
the current display range. As the depth increases while in Auto Frequency
mode, the fishfinder shifts from 200 kHz to 50 kHz. As the depth decreases,
the fishfinder switches from 50 kHz to 200 kHz.
You can select the transducer frequency for automatic or manual operation at
50 kHz, 200 kHz or both frequencies simultaneously.
• AUTOMATIC enables the digital fishfinder to determine the optimum fre-
quency based on the current conditions.
• 200 kHz MAN fixes the frequency at 200kHz no matter what depth you are
viewing. This frequency is typically used for shallower water and a more
detailed view. When using this frequency, the transducer scans a narrower area, but produces a more detailed view. The 200 kHz signal is
good for finding fish near the bottom or close together. It is better for use
in shallow water.
• 50 kHz MAN fixes the frequency at 50kHz no matter the depth. This fre-
quency is typically used for wide coverage and deep water. When using
this frequency, the transducer scans a wide area. The 50 kHz signal penetrates water well, so is good for use in deep water.
• DUAL MAN displays separate screens for both 50 and 200kHz. The trans-
ducer can operate in both 50 kHz and 200 kHz frequencies at the same
time. If you choose dual frequency operation, the scrolling bottom display is split vertically; the left half shows the 200 kHz detailed view and
the right half shows the 50 kHz image.
The default setting is AUTOMATIC.
Page 43

Chapter 4: Main Menu 33
A-Scope
Use the A-Scope screen to show raw sonar data directly from the transducer
beam. This gives you a “real time” image of fish and bottom structure
directly below the transducer. This function is very useful in showing the
strength of the echo returned from a fish. The display is split vertically, with
the A-Scope image in the right hand window and the scrolling bottom image
in the left hand window.
Select one of the three modes for A-Scope, as demonstrated in Figure 4-1 :
• OFF, in which A-Scope does not appear.
• ON-1, in which the image takes up the entire A-Scope window.
• ON-2, in which only the left side of the image displayed in Mode ON-1
expands to the entire A-Scope window. This mode provides the greatest resolution.
• ON-3, in which the A-Scope image is angled outward as the signal width
(indicated with dotted lines) increases with depth.
The default setting is OFF.
A-SCOPE Mode ON-1 Mode ON-2 Mode ON-3
45.2
20
40
ft
Figure 4-1: The Three Modes of A-Scope
D6629-2
Page 44

34 DS600X Digital Fishfinder
GAIN MODE...
The sounder provides GAIN controls to reduce background noise and
determine how different strength echoes are shown. Automatic adjustment
of each of these parameters is available or you can manually adjust the
settings using the trackpad.
MAIN MENU
MAIN MENU
Scroll Speed
Range
Frequency
A-Scope OFF
GAIN MODE...
ZOOM...
TRIP RESET...
DISPLAY SET UP...
SOUNDER SET UP...
ON
AUTOMATIC
AUTOMATIC
AUTO FISHING
ENTER
GAIN MODE
GAIN MODE
GAIN...
COLOR GAIN...
TVG
Sounder Int Rej
Second Echo Rej.
Power
Max. Ping Rate
AUTOMATIC
AUTOMATIC
AUTOMATIC
AUTO FISHING
LOW
AUTOMATIC
30
D6904-1
Figure 4-2: Accessing GAIN Mode
Note: Automatic Gain settings take advantage of the hardware’s advanced
digital technology. As a result, the sounder typically performs better in automatic mode than manual. For better performance Raymarine recommends
selecting AUTO mode for all Gain options.
Note that this menu item is in all caps and in followed by an ellipsis (...). This
is an indicator that the setting contains sub-menus. Gain Mode is comprised
of seven sub-menus.
• Gain
• Color Gain
• Time Variable Gain (TVG)
• Sounder Interference Rejection (Int. Rej.)
• Second Echo Rejection
• Power
• Maximum Ping Rate
Use the trackpad to scroll through the sub-menu items.
➤ To set a Manual Gain value in any of the following sub-menus:
1. Use the trackpad to highlight MANUAL.
2. Press ENTER. Normal (not highlighted) text appears.
3. Press the or > Trackpad key to increment and the or < Trackpad key to decrement the Gain setting.
4. Press ENTER to accept the MANUAL value.
Page 45

Chapter 4: Main Menu 35
GAIN
The gain, or sensitivity, of the display adjusts background noise by varying
echo strength for display. The value of the gain control determines the
strength above which echoes are displayed. If the gain is low only the
strongest echoes are displayed. As the gain is increased, weaker echoes (from
air bubbles, for example) are also displayed.
The automatic gain modes find the ideal sensitivity level for you, based on
depth and water conditions. Automatic gain modes take advantage of the
hardware’s advanced HDFI technology. As a result, the sounder typically
achieves a sharper image in any of the automatic gain modes than is possible
in manual mode.Automatic gain varies the gain throughout the water column
based on the current conditions.
The DS600X provides three pre-defined automatic gain settings:
• AUTO FISHING is the highest automatic gain setting. It gives the best
details of the targets you have located and is ideal for slow speeds and
drifting.
• AUTO TROLLING is a medium gain setting that is better suited for trolling
speeds.
• AUTO CRUISING is the lowest automatic gain setting, ideal for reducing
background noise or travelling to your fishing spot at high speeds.
• MANUAL gain should be set high enough to see fish and bottom detail but
without too much background noise. Generally, a high gain is used in
deep and/or clear water; a low gain in shallow and/or murky water.
The default setting is AUTO FISHING.
Color Gain
Color Gain determines how echoes of different strengths are displayed. 128
colors per palette are available, with the strongest signals displayed in colors
representing the strongest signals in the currently-selected palette. The Color
Gain control sets the lower limit (threshold) for the strongest signal and is
represented as a percentage of that strongest signal.
A lower Color Gain percentage means a stronger echo is required to be
displayed in the strongest signal colors. All echoes with a signal strength
above this value are displayed in darker colors. All echoes weaker than this
value are divided equally between the remaining colors.
Page 46

36 DS600X Digital Fishfinder
Your choices are:
• AUTOMATIC: Displays colors based on current conditions (with as many
colors as possible) while minimizing noise and clutter. As conditions
change the auto-color gain adjusts.
• MANUAL: Setting a low value produces a wide band for the weakest colors
but a small signal band for the other colors; setting a high value gives a
wide band for the strongest colors but a small signal band for the other colors. If you select manual adjustment, you will need to re-adjust the gain as
conditions change.
The default setting is AUTOMATIC.
Time Variable Gain (TVG)
TVG (Time Variable Gain) reduces clutter by varying the gain throughout
the water column. This function is useful for reducing “noise” that can
appear. Increasing the TVG value increases the maximum depth to which
TVG is applied. Decreasing reduces the maximum depth.
Although you can manually set the TVG level, Raymarine recommends
letting the unit choose the proper level for you by selecting AUTOMATIC.
The default setting is AUTOMATIC.
Sounder Interference Rejection (Int. Rej.)
Two or more sonar-equipped vessels operating within range of each other
can interfere with sounder operation. This usually appears as vertical streaks
on the display that do not represent actual targets.
This option can reduce such interference, either manually or automatically.
• AUTOMATIC selects the best rejection level for you
• LOW minimizes rejection of potential interference. Use this setting when
you want to be sure that what has been removed are really false returns.
• HIGH rejects much more interference but can potentially weaken the
appearance of actual targets.
The default setting is AUTOMATIC.
Page 47

Chapter 4: Main Menu 37
Second Echo Rejection
A so-called “second echo” can caused by the sonar signal returning from the
bottom, reflecting off the water’s surface, bouncing off the bottom again and
returning. This option helps eliminate identifying a false bottom.
Select from the following:
• OFF, which offers no rejection
• LOW, which provides minimal rejection by slightly reducing the ping rate
• HIGH, which offers the greatest signal rejection by decreasing the ping
rate further
The default setting is LOW. Only set this setting to HIGH if you notice second
echoes appear on your display.
Power
The Power setting provides adjustment of the transducer signal. Select from
the following:
• AUTOMATIC, in which the sounder automatically determines the optimal
power setting based on the current depth, speed, and (bottom) signal
strength
• MANUAL, in which the power is increased or decreased in 10% incre-
ments.
The default setting is AUTOMATIC.
Max. Ping Rate
The setting determines the maximum number of sonar pulses, or pings, the
transducer emits per second. You can set Max Ping Rate anywhere between
5–30, in increments of 1.
The default setting is 30 pings per second, the maximum. You can reduce this
number down to a minimum of 5 pings per second, if necessary, to help
reduce second echoes.
ZOOM...
Zoom enlarges all or part of the scrolling bottom display at x2, x3 or x4
magnification. You can select automatic zoom so the sounder keeps the
bottom in the lower portion of the zoom window or manually pick the area to
be zoomed. The ZOOM sub-menus are:
Page 48

38 DS600X Digital Fishfinder
• View
• Zoom magnification
• Zoom Mode
View
The View sub-menu determines how the zoomed area appears on the screen.
• OFF means the display is not zoomed.
• SPLIT means the display is split vertically, with the zoom image in the left
hand window and the scrolling bottom display in the right hand window.
See Figure 4-3 .
In a split window display, a zoom box appears, representing the range
being displayed in the zoom window. The depths of the upper and lower
boundaries of the zoom box are displayed in the upper and lower right
corners of the zoom window.
• FULL SCREEN zooms the entire screen.
Note: If also displaying dual frequencies, the zoomed image is displayed fully in both frequency windows.
ZOOM...
ZOOM...
View
Zoom X 2 3 4
Mode
SPLIT
x4
AUTOMATIC
x
4
ft
Figure 4-3: Zoom with Split Screen
20
40
60
60
D6641-1
Page 49

Chapter 4: Main Menu 39
Zoom x2, x3, x4 Magnification
This parameter sets the level of display magnification. The greater the zoom,
the smaller the area you are viewing, so the smaller the Zoom Range Bar.
Select from:
• x2
• x3
• x4
Mode
• AUTOMATIC adjusts the position of the zoom window so that bottom
details are always in view.
• MANUAL enables you to reposition the zoomed image.
TRIP RESET...
This option resets the trip log. Once TRIP RESET is selected you have the
option to press:
• QUIT to exit without resetting
• ENTER to confirm the reset.
DISPLAY SET UP...
These settings determine how information is displayed on the screen.
Options are described in Chapter 5.
SOUNDER SET UP...
These setup parameters are described in Chapter 6.
Page 50

40 DS600X Digital Fishfinder
Page 51

Chapter 5: Display Set Up 41
Chapter 5: Display Set Up
5.1 Introduction
This chapter will help you to become familiar with the functions of the
display’s controls. A general discussion of the fishfinder’s menu items was
provided in Chapter 4. Information on setting up the sounder is provided in
Chapter 6.
The Display Set Up menu items affect how data appears on the screen. In
most cases, you will only need to use these options when you first set up your
system. As you become more familiar with your system, you may decide to
customize some aspects.
➤ To access the Display Set Up menu items:
1. Press the MENU key. The Main Menu appears.
MENU
2. Press the trackpad keys to navigate to DISPLAY SET UP...
3. Press the trackpad > key or ENTER to select.
4. Press the trackpad keys to browse to the desired Display Menu item.
5. Press the trackpad < or > keys to select the desired option. For menu items with sub-menu items (menu title in all CAPITALS...), press the trackpad > key or ENTER to browse the sub-menus.
6. Press QUIT to exit when finished.
QUIT
Figure 5-1 also demonstrates how to access the Display Set Up menu items.
A description of how to browse the menu and make selections is outlined in
Selecting MENU Items on page 25.
or
or
Note: You can also access the DISPLAY SET UP... Brightness menu by
POWER
pressing and releasing the POWER key.
Page 52

42 DS600X Digital Fishfinder
MAIN MENU
MAIN MENU
MENU
Scroll Speed
Range
Frequency
A-Scope OFF
GAIN MODE...
ZOOM...
TRIP RESET...
DISPLAY SET UP...
SOUNDER SET UP...
MAIN MENU
MAIN MENU
Scroll Speed
Range
Frequency
A-Scope OFF
GAIN MODE...
ZOOM...
TRIP RESET...
DISPLAY SET UP...
SOUNDER SET UP...
ON
AUTOMATIC
AUTOMATIC
AUTO FISHING
ON
AUTOMATIC
AUTOMATIC
AUTO FISHING
DISPLAY SET UP
DISPLAY SET UP
ENTER
Brightness
Target Depth ID
OR
Depth Digit Size
Transparent Menu
PALETTE...
DATA ITEMS...
NAV. SET UP...
100%
OFF
LARGE
OFF
Figure 5-1: Accessing Display Set Up Menu Items
D6630-1
Page 53

Chapter 5: Display Set Up 43
The Display Set Up menu items are listed in Table 5-1 and then described
following that.
Table 5-1: DISPLAY SET UP... Menu
Menu Sub Menu Options Default
Brightness — 10–100%
in 10% increments
Tar get Dept h ID — OFF,
DEPTH,
FISH,
FISH & DEPTH
Depth Digit Size — LARGE,
SMALL
Transparent Menu — OFF,
ON
PALETTE... Selection CLASSIC,
SUNBURST,
GRAYSCALE,
INV. GRAY,
COPPER,
NIGHT VISION
Background Color WHITE,
BLACK,
BLUE
DATA ITEMS... Speed
Tem pe rat ur e
OFF,
ON
Battery
Log
Tri p
Auto Scroll
Analog Gauges
100% (Note: never powers up at less than 40%)
OFF
LARGE
OFF
CLASSIC
WHITE
OFF
NAV. SET UP... SOG OFF,
ON
LAT/LONG OFF,
ON
Waypoint OFF,
ON
RNG/BRG OFF,
ON
OFF (Note: not displayed
if Analog Gauges ON)
OFF
OFF
OFF
Page 54

44 DS600X Digital Fishfinder
Menu Sub Menu Options Default
COG ON,
OFF
TTG OFF,
ON
Bearing Mode TRUE,
MAGNETIC
Time Offset UTC,
–13 to +13 hours
Time Format 12 HOUR,
24 HOUR
Time OFF,
ON
ALARM CLOCK OFF,
ON
Date Format MM/DD/YY,
DD/MM/YY
Date OFF,
ON
OFF
OFF
TRUE
UTC
12 HOUR
OFF
OFF
MM/DD/YY
OFF
Brightness
Use the trackpad < and > keys to select the brightness value from a low of
10% to a high of 100%. Each trackpad key press changes the value in 10%
increments. The default is 100%.
Note: This setting will never be less than 40% at power up.
Target Depth ID
You can select whether the depth or a fish icon is shown for sonar echoes
displayed on the screen.
• OFF displays neither the depth or a fish icon. This is the default setting.
• DEPTH displays the depth just above each target echo.
• FISH displays a fish icon instead of an echo. Three different fish icons
appear, representing the size of the target detected: small, medium and
large.
• FISH & DEPTH displays both the depth and a fish icon.
Page 55

Chapter 5: Display Set Up 45
20
36
40
41
44.2
Figure 5-2: FISH & DEPTH Target Depth IDs
ft
38
40
60
60
D6900-1
Depth Digit Size
This setting controls the size of the digital depth readout at the lower left of
the screen. Choose from the following:
• LARGE (default)
• SMALL
Transparent Menu
This option removes the background white from the menu dialog box,
enabling you to see data that would normally be hidden.
• OFF selects a normal opaque Menu box, which is the default setting.
• ON selects the transparent Menu box.
Page 56

46 DS600X Digital Fishfinder
DISPLAY SET UP
DISPLAY SET UP
Brightness
Target Depth ID
Depth Digit Size
Transparent Menu
PALETTE...
DATA ITEMS...
NAV. SET UP...
40
44
47
43
42
44.5
Figure 5-3: Transparent Menu
39
ft
100%
DEPTH
LARGE
ON
23
42
43
28
20
40
60
60
D6901-1
PALETTE...
The DS600X offers you six different display color combinations. You can
select the color set, for a bold or soft color palette. The brightness of the
screen can be adjusted over a wide range, suitable for viewing in daylight
(high brightness level) or at night (low brightness level).
Selection
Select the optimal color scheme for your lighting conditions:
• CLASSIC (default)
• SUNBURST
• GRAYSCALE
• INV. GRAY
• COPPER
• NIGHT VISION
Page 57

Chapter 5: Display Set Up 47
Background Color
When the CLASSIC palette is selected, you can also choose the background
color used. Three colors are available for the sonar display background –
black, white and blue.
You will probably find that you need to change the background color in
different light conditions. For example, a white background is probably
easiest to see in bright sunlight, but a black background may be preferable at
night.
Select from the following:
• WHITE (default)
• BLACK
• BLUE
DATA ITEMS...
Data Items provide regularly-used data in a compact form so that most of the
graphics can still be seen. Each data item can be displayed in a separate data
field or scrolled through a single data field every three seconds.
Select ON or OFF for each item. The default is OFF.
• Speed
Reading from transducer’s paddlewheel.
• Temperature
Reading from transducer’s temperature-sensing thermistor.
• Battery
The boat’s battery voltage.
• Log
Total distance travelled by the boat.
• Trip
Distance travelled since the counter was reset.
• Auto Scroll
Scrolls each data item that has been turned ON one-at-a time in the upper
left corner of the screen every three seconds.
• Analog Gauges
Presents data items that have been turned ON as analog gauges rather than
in digital format.
Page 58

48 DS600X Digital Fishfinder
Note: When analog gauges are selected, the Navigation Items cannot be displayed on the Fishfinder page. You must switch to the Nav Data page using
the PAGE key to view that information.
20
40
60
60
D6902-1
Figure 5-4: Data Items Displayed as Analog Gauges
NAV. SET UP... (Navigation Data)
Similar to Data Items, this is a list of navigation data you can display on the
screen as separate data items. Select from the following:
• SOG
Speed Over Ground
Display ON or OFF
• LAT/LONG
Latitude and Longitude position of your boat
Display ON or OFF
• Waypoint
Latitude and longitude position of waypoint
Display ON or OFF
Page 59

Chapter 5: Display Set Up 49
• RNG/BRG
Range and bearing of waypoint
Display ON or OFF
• COG
Course Over Ground
Display ON or OFF
• TTG
Time to Go before reaching waypoint, at current course and speed
Display ON or OFF
• Bearing Mode
The mode of all the bearing and heading data displayed.
Select TRUE or MAGNETIC
• Time Offset
Number of hours to offset the displayed time from the Universal Time
Constant (UTC), otherwise known as Greenwich Mean Time.
Select UTC time or from +13 to –13 hours of UTC.
• Time Format
Display 12 HOUR or 24 HOUR
• Time
Display ON or OFF
• ALARM CLOCK
OFF or ON
• Date Format
Display MM/DD/YY or DD/MM/YY
• Date
Display ON or OFF
Note: When analog gauges are selected as Data Items, the Navigation Items
cannot be displayed on the Fishfinder page. You must switch to the Nav Data
page using the PAGE key to view this information.
Page 60

50 DS600X Digital Fishfinder
20
40
60
60
D6903-1
Figure 5-5: Displaying Navigation Data
Page 61

Chapter 6: Sounder Set Up 51
Chapter 6: Sounder Set Up
6.1 Introduction
Once you have installed your DS600X and are familiar with its basic
operation, you need to set it up so that it displays information according to
your preferences. The SYSTEM SET UP option enables you to set up your
system configuration and personal preferences.
In most cases, you will only need to use these options when you first set up
your system. As you become more familiar with your system, you may
decide to customize some aspects, such as the Alarms and Offset and
Calibrate settings.
In most cases, you will only need to use the Sounder Setup options when you
first set up your system. As you become more familiar with your system, you
may decide to customize some aspects. At the end are displayed the serial
number of your sounder and the software version running. This information
may be requested by Raymarine staff should technical support become
necessary.
➤ To access the Sounder Set Up menu items:
1. Press the MENU key. The Main Menu appears.
MENU
2. Press the trackpad keys to navigate to SOUNDER SET UP...
3. Press the trackpad > key or ENTER to select.
4. Press the trackpad keys to browse to the desired menu item.
5. Press the trackpad < or > keys to select the desired option. For menu items with sub-menu items (menu title in all CAPITALS...), press the trackpad > key or ENTER to browse the sub-menus.
6. Press QUIT to exit when finished.
QUIT
Figure 6-1 also demonstrates how to access the Sounder Set Up Menu Items.
A description of how to browse the menu and make selections is outlined in
Selecting MENU Items on page 25.
or
or
Page 62

52 DS600X Digital Fishfinder
MAIN MENU
MAIN MENU
MENU
Scroll Speed
Range
Frequency
A-Scope OFF
GAIN MODE...
ZOOM...
TRIP RESET...
DISPLAY SET UP...
SOUNDER SET UP...
MAIN MENU
MAIN MENU
Scroll Speed
Range
Frequency
A-Scope OFF
GAIN MODE...
ZOOM...
TRIP RESET...
DISPLAY SET UP...
SOUNDER SET UP...
ON
AUTOMATIC
AUTOMATIC
AUTO FISHING
ON
AUTOMATIC
AUTOMATIC
AUTO FISHING
SOUNDER SET UP
SOUNDER SET UP
ALARMS...
UNITS...
NMEA SET UP...
ENTER
Language
Key Beep
OR
Key Help
Depth Offset 0.00 ft
Speed Calibrate
Temp Calibrate
Sounder Simulator
--------------------------------
SW Version
Serial Number 25525532767
ENGLISH (US)
ON
ON
100%
0.0 °F
ON
V1.03
Figure 6-1: Accessing Sounder Set Up Menu Items
D6639-1
Page 63

Chapter 6: Sounder Set Up 53
The following table lists the setup menus and their options and shows the
factory default setting. Each parameter is described in the following
subsections.
Table 6-1: SOUNDER SET UP... Menu Items
Menu Sub-Menu Options Default
ALARMS... Target Depth ID OFF,
DEPTH,
FISH,
FISH & DEPTH
Fish A larm ON,
OFF
Shallow Alarm ON,
OFF
Shallow Range 2 – 1999 FEET,
0 – 332 FATHOMS,
1 – 608 METERS
Deep Alarm ON,
OFF
Deep Range 3 – 2000 FEET,
1 – 333 FATHOMS,
1 – 609 METERS
Temp . Alarm O FF,
ON
Temp. Rng. High 99.9 °F,
37.7°C
Temp . Rng. Lo w –9.9 °F,
–23.2°C
OFF
OFF
OFF
5 FEET,
1
1 FATHOM,
2 METERS
1
OFF
1500 FEET,
250 FATHOMS,
1
457 METERS
1
OFF
75°F,
23.9°C
60°F,
15.6°C
ALARM CLOCK... OFF,
ON
UNITS... Depth Units FEET,
FATH OMS,
METERS
Temp. Units FAHRENHEIT,
CENTIGRADE
OFF
FEET
1
FAHRENHEIT
Page 64

54 DS600X Digital Fishfinder
Menu Sub-Menu Options Default
Speed Units KNOTS,
MILES PER HOUR,
KM PER HOUR
Distance Units NAUTICAL MILES,
STATUTE MILES,
KILO METERS
KILO YARDS
Bearing Mode TRUE,
MAGNETIC
Date Format MM/DD/YY,
DD/MM/YY
Time Format 12 HOUR,
24 HOUR
NMEA-OUT SETUP BWC
BWR
OFF,
ON
DBT
DPT
GLL
MTW
VHW
VLW
VTG
ZDA
Language — ENGLISH (UK),
ENGLISH (US),
DANISH,
FRENCH,
GERMAN,
DUTCH,
ICELANDIC,
ITALIAN,
NOWEGIAN,
PORTUGUESE,
SPANISH,
SWEDISH,
FINNISH
KNOTS
NAUTICAL MILES
1
,
TRUE
MM/DD/YY
12 HOUR
OFF
ENGLISH (US)
Key Beep — ON,
OFF
Key Help — ON,
OFF
ON
ON
Page 65

Chapter 6: Sounder Set Up 55
Menu Sub-Menu Options Default
Depth Offset —–9.9 to +9.9 FEET,
Speed Calibrate — 1% to 200% in 1% incre-
Temp Calibrate —–5.0 to +5.0°C
Sounder Simulator — OFF,
–1.7 to +1.7 FATHOMS,
–3.0 to +3.0 METERS
ments
–9.0 to +9.0°F
ON
1
METERS settings only available in CE models
0
1
100%
0°
OFF when transducer
connected
ON when transducer not
connected
ALARMS...
This menu group is used to set up alarms that are available to alert you of
certain conditions. Each alarm can be toggled ON and OFF and you set the
threshold at which the alarms are triggered, except for the fish and battery
voltage alarms.
Alarms consist of an audible tone and moving arrows pointing to the data
display for that particular item. When an alarm is activated, press a key to
mute the tone. The visual indicator continues as long as the condition exists.
You may want to use the shallow and deep water alarms when you are
anchored. Set the limits to just above and below your anchor depth; the
sounder triggers an alarm if the anchor drags and the boats moves into
shallower or deeper water.
Note: After you have acknowledged the sounding of a shallow or deep water
alarm, a minimum of 30 seconds must elapse before a another shallow/deep
alarm can sound again. However, the visual indicator will continue as long
as the condition exists.
Target Depth ID
You can select whether the depth or a fish icon is shown for sonar echoes
displayed on the screen. The default setting is OFF.
• OFF displays neither the depth or a fish icon.
• DEPTH displays the depth just above each target echo.
• FISH displays a fish icon in place of each echo.
• FISH & DEPTH displays both the depth and a fish icon.
Page 66

56 DS600X Digital Fishfinder
20
36
40
41
44.2
Figure 6-2: FISH & DEPTH Target Depth IDs
ft
38
40
60
60
D6900-1
Fish Alarm
If this alarm is ON, the unit sounds a beeper whenever it finds a fish. The
default setting is OFF.
Shallow Alarm
If this alarm is ON and the depth below the boat is less than the value set using
the Shallow Range setting, the beeper sounds and moving arrow indicators
point to the digital depth display. You cannot set the shallow alarm to be
deeper than the deep alarm. The default setting is OFF.
Shallow Range
Use the < and > trackpad keys to decrement/increment the depth at which the
Shallow Alarm will sound. The depth units are dependent on the value set
using the UNITS... parameter. (See page 59.) Changing the value set for
Shallow Range automatically enables the Shallow Alarm.
Page 67

Chapter 6: Sounder Set Up 57
Deep Alarm
If this alarm is ON and the depth below the boat is greater than the value set
using the Deep Range setting, the beeper sounds and moving arrow
indicators point to the digital depth display. You cannot set the deep alarm to
be shallower than the shallow alarm. The default setting is OFF.
40
DEPTH ALARM
44.9
Figure 6-3: Shallow/Deep Alarm Condition
ft
60
60
D6681-2
Indicator scrolling
Deep Range
Use the < and > trackpad keys to decrement/increment the depth at which the
Deep Alarm will sound. The depth units are dependent on the value set using
the UNITS... parameter. (See page 59.) Changing the value set for Deep
Range automatically enables the Deep Alarm.
Temp. Alarm
If this alarm is ON and the water temperature falls within the range set using
the Temp. Rng. High and Te mp . Rng . L ow settings, the beeper sounds and
moving arrow indicators point to the temperature display. In an alarm
condition, the temperature display appears even if this data item has been set
OFF. (See DATA ITEMS... on page 47.) The temperature alarm also activates
if the temperature moves outside the set range. If data items are displayed as
analog gauges when the alarm is active, the temperature value flashes.
You cannot set the Temp. Rng. High setting to be lower than Te mp . R ng .
Low and vice-versa. The default setting is OFF.
Page 68

58 DS600X Digital Fishfinder
Temperature
71.9
°
F
Indicator scrolling
-or-
20
°F
85
70
55
71.9
20
40
Indicator flashing
D6757-2
Figure 6-4: Temperature Alarm with Standard & Analog Gauges
Temp. Rng. High
Use the < and > trackpad keys to decrement/increment the highest
temperature at which the Temp Alarm will sound. The temperature units are
dependent on the value set using the UNITS... parameter. (See page 59.)
Temp. Rng. Low
Use the < and > trackpad keys to decrement/increment the lowest
temperature at which the Temp Alarm will sound. The temperature units are
dependent on the value set using the UNITS... parameter. (See page 59.)
ALARM CLOCK...
Set this alarm to sound the beeper at a particular time of day.
Note: This function requires NMEA input of the current time.
➤ To enable the Alarm Clock:
1. Select (highlight) ALARM CLOCK.
2. Press the < or > trackpad key to change the setting from OFF to ON. The word ON and the alarm time are highlighted.
3. Press ENTER. The word ON and the time are no longer highlighted.
4. Press the < or > trackpad key to decrement/increment the alarm time.
5. When the time at which you want the alarm to sound is displayed, press ENTER again. The word ON and the time are highlighted again. The alarm is set.
Page 69

Chapter 6: Sounder Set Up 59
6. When the alarm clock sounds, it is accompanied by a message box labeled ALARM CLOCK displaying the time.
The default setting is OFF.
ALARM CLOCK...
MAIN MENU
09:09 am
D6758-1
Figure 6-5: Alarm Clock
UNITS...
You can set the units for each system parameter. The units you set will be
used to display all data, including information received from other
instruments on the system.
Depth Units
• FEET (default)
• FATHO MS
• METERS (Available in CE models only)
Temp. Units
• FAHRENHEIT (default)
• CENTIGRADE
Speed Units
• KNOTS (default)
• MILES PER HOUR
• KM PER HOUR
Distance Units
• NAUTICAL MILES (default)
• STATUTE MILES
• KILO METERS
Note: VRM distance is measured by the transducer’s paddlewheel and is
based on the Depth units you have set. If Depth is set in feet or fathoms, Distance is displayed in feet. If Depth is set in meters, Distance is also set in
meters. (METERS settings are only available in CE models.)
Page 70

60 DS600X Digital Fishfinder
Bearing Mode
• TRUE (default)
• MAGNETIC
Date Format
• MM/DD/YY (default)
• DD/MM/YY
Time Format
• 12 HOUR (default)
• 24 HOUR
NMEA-OUT SET UP...
This option lets you disable the transmission of specific NMEA sentences,
which may be necessary if you have other instruments sending the same data
as your sounder.
The factory default for all NMEA sentences is transmission ON. Disable the
sentence by selecting OFF.
The following table displays the available NMEA sentences and their
meanings.
Table 6-2: NMEA Sentences
Sentence Meaning
BWC
BWR
DBT Depth Below Transducer
DPT Depth
GLL
MTW Water Temperature
VHW Water Speed and Heading
VLW Distance Travelled through the Water
VTG
ZDA
Bearing & Distance to Waypoint
Bearing & Distance to Waypoint – Rhumb Line
Geographic Position – Latitude/Longitude
Course Over Ground and Ground Speed
Time and Date
1
1
Data repeated from external device
1
1
1
1
Page 71

Chapter 6: Sounder Set Up 61
Language
Select the language in which you wish information to be displayed. The
selected language will be used for all screen text. Select from the following:
• ENGLISH (UK) • ITALIAN
• ENGLISH (US) (default) • NORWEGIAN
• DANISH • PORTUGUESE
• FRENCH • SPANISH
• GERMAN • SWEDISH
• DUTCH • FINNISH
• ICELANDIC
Key Beep
When set ON, the keys sound a tone when you press them.
Key Help
When Help is set to ON, icons appear next to the digital depth display,
prompting you to make the appropriate key presses. The help message is
cleared when an action is selected.
MAIN MENU
MAIN MENU
Scroll Speed
Range
Frequency
A-Scope
GAIN MODE...
ZOOM...
TRIP RESET...
DISPLAY SET UP...
SOUNDER SET UP...
42
43
44
47
ft
ON
AUTOMATIC
AUTOMATIC
OFF
AUTO FISHING
35
36
43
44
47
43
20
40
60
60
D6642-1
ARROW and ENTER key-help
symbols prompting you to use
Trackpad and ENTER keys to
change this menu item.
Page 72

62 DS600X Digital Fishfinder
Depth Offset
The depth offset is added to the measured depth value before it is displayed.
You can specify the depth as a positive value (waterline offset) or a negative
value (keel offset). The depth offset can be adjusted in 0.1 increments of the
units you have assigned using the UNITS... parameter. (See page 59.)
Speed Calibrate
If the transducer is equipped with a speed paddlewheel, the DS600X
calculates the speed of the boat through the water. The Speed Calibrate
option enables you to adjust the displayed speed so that it matches your actual
speed through the water. You can adjust the displayed speed from 1% to
200%.
If the sounder reading is too low, set Speed Calibration to more than 100%. If
the sounder reading is too high, set Speed Calibration to less than 100%. This
setting also calibrates the Log, Trip and paddlewheel distance.
Temp Calibrate
If the transducer is equipped with a temperature-sensing thermistor, the
DS600X calculates the temperature of the water. The temperature calibrate
option enables you to adjust the displayed temperature.in 0.1 degree
increments of the temperature units you have assigned using the UNITS...
parameter. (See page 59.)
Sounder Simulator
The simulator enables you to operate your display without data from the
transducer, in order to become familiar with the sounder features and
functions. You can set the simulator ON or OFF. You cannot select OFF when
the unit is powered on without a transducer connected.
SW Version and Serial Number (read only)
The area at the bottom of the Sounder Setup screen gives version information
for the system. This area is informational only; it is not editable.
SW Version displays the software version of the DS600X.
Serial Number displays the serial number of the DS600X, which should also
be marked on the label on the rear of the unit.
Page 73

Chapter 7: Maintenance and Problem Solving 63
Chapter 7: Maintenance and Problem
Solving
This chapter provides information on routine maintenance and on possible
causes of problems you may experience with your DS600X.
7.1 Maintenance
CAUTION:
This unit contains high voltage. Adjustments require specialized service
procedures and tools only available to qualified service technicians there are no user serviceable parts or adjustments and the operator
should not attempt to service the equipment. The operator should not
remove the rear cover of the module.
Routine Checks
The DS600X is a sealed unit. Maintenance procedures are therefore limited
to the following periodic checks:
• Examine the cables for signs of damage, such as chafing, cuts or nicks.
• Check that the cable connectors are firmly attached.
Cleaning Instructions
Cleaning the Unit
The DS600X is a sealed unit and does not require regular cleaning. However,
if you find it necessary to clean the unit, please follow these basic procedures:
• Ensure power is off.
• Wipe the module clean with a damp cloth.
• If necessary, use IPA (isopropyl alcohol) or a mild detergent solution to
remove grease marks.
Cleaning the Transducer
Sea growth can collect quickly on the bottom of the transducer, this can
reduce the performance in just a few weeks. To prevent the build-up of sea
growth, coat the transducer with a thin layer of paint.
Use only a water-based antifouling paint, or a water-based paint specifically
designed for transducers. Apply the paint with a brush.
Page 74

64 DS600X Digital Fishfinder
If your transducer becomes fouled or stops working because of sand or sea
growth, use a stiff brush to clean it. You may sand the surface with a fine-grit
wet or dry sandpaper (#320 grade or finer), but this will affect the
performance of the unit when the boat is moving at higher speeds.
The paddlewheel mechanism may become jammed by dirt, grit or barnacles.
Work the contaminant out of the mechanism, then clean the unit with soap
and water or alcohol.
Cleaning the Hull
Use caution when sanding or cleaning the outside of the hull near the
transducer.
CAUTION:
Harsh cleaning solvents such as acetone may damage the transducer.
EMC Servicing and Safety Guidelines
• Raymarine equipment should be serviced only by authorized Raymarine
service technicians. They will ensure that service procedures and
replacement parts used will not affect performance. There are no user serviceable parts in any Raymarine product.
• Some products generate high voltages, so never handle the cables/connectors when power is being supplied to the equipment.
• When powered up, all electrical equipment produces electromagnetic
fields. These can cause adjacent pieces of electrical equipment to interact
with one another, with a consequent adverse effect on operation.
To minimize these effects and enable you to get the best possible performance from your Raymarine equipment, guidelines are given in the
installation instructions, to enable you to ensure minimum interaction
between different items of equipment, i.e. ensure optimum Electromagnetic Compatibility (EMC).
• Always report any EMC-related problem to your nearest Raymarine
dealer. We use such information to improve our quality standards.
• In some installations, it may not be possible to prevent the equipment
from being affected by external influences. In general this will not damage the equipment but it can lead to spurious resetting action, or may
result in momentary faulty operation.
Page 75

Chapter 7: Maintenance and Problem Solving 65
7.2 Problem Solving
All Raymarine products are, prior to packing and shipping, subjected to
comprehensive test and quality assurance programs. However, if this unit
should develop a fault, please refer to the following table to identify the most
likely cause and the corrective action required to restore normal operation.
If you still have a problem after referring to the table below, contact your
local dealer, national distributor or Raymarine Technical Services
Department for further advice. Always quote the product serial numbers.
The serial number is printed on the back of the unit.
Common Problems and Their Solutions
Table 7-1: Common Problems
Problem Correction
Unit does not function 1. Make sure that the power supply cable is sound and
that all connections are tight and free from corrosion.
2. Check the system fuse.
Display “freezes” 1. Check the Scroll Speed is not set to PAUSE.
Unit does not display fish 1. Fish arches may not be displayed if the boat is
Unit does not see bottom
or fish
Unit is unreliable at high
boat speeds
Unit displays a lot of background noise
2. Check the transducer cable for damage.
If damaged, the cable and transducer must be replaced
as a unit.
stopped; fish may appea r on the display as straight line.
2. Ensure the transducer is within 10 ° of vertical.
3. Check that the gain is not set too low.
1. Check that the transom-mount transducer hasn’t
kicked-up on hitting an object.
2. Check that the gain is not set too low.
3. Check that the transducer is within 10° of vertical.
4. Check that the transducer face is not covered or
fouled. If necessary clean the transducer.
5. Check the voltage from the power source; if this is too
low it can affect the transmitting power of the sounder.
Turbulence around the transducer may be confusing the
unit.
1. Check that the gain is not set too high.
2. Check that the trans ducer is mounted correctly and is
clean.
Page 76

66 DS600X Digital Fishfinder
Table 7-1: Common Problems
Problem Correction
Sounder speed or log readings are wrong
Temperature readings are
wrong
1. Check that the transducer paddlewheel is clean.
2. If necessary, adjust the SPEED CALIBRATE parameter.
If necessary, adjust the TEMP CALIBRATE parameter.
7.3 How to Contact Raymarine
On the Internet
Visit the Raymarine World Wide Web site for the latest information on
Raymarine electronic equipment and systems at:
www.raymarine.com
Customer Support
Navigate to the Customer Support page for links for:
• Finding Factory Service locations and Authorized Dealers near you
• Registering your Raymarine products
• Accessing handbooks in Adobe Acrobat format
• Downloading RayTech software updates
• Accessing the Raymarine solution database
Clicking the Find Answers link routes you to our solution database. Search
questions and answers by product, category, keywords, or phrases. If the
answer you are seeking is not available, click the Ask Raymarine tab to
submit your own question to our technical support staff, who will reply to
you by e-mail.
In the US
Accessories and Parts
Many Raymarine accessory items and parts can be obtained directly from
your authorized Raymarine dealer.
Page 77

Chapter 7: Maintenance and Problem Solving 67
However, if you are in need of an item not available from the retailer, please
contact Raymarine Technical Services at:
800-539-5539 ext. 2333, or
603-881-5200.
Technical Service is available Monday through Friday 4:00 AM to 6:00 PM
Eastern Time.
Please have the Raymarine item or part number ready when calling if placing
an order. If you are not sure which item is appropriate for your unit, you
should first contact the Technical Support Department to verify your
requirements:
800-539-5539 ext. 2444, or
603-881-5200.
Technical Support
For technical support, call:
800-539-5539 ext. 2444, or
603-881-5200.
Our Technical Support Specialists are available to answer questions about
installing, operating and trouble-shooting all Raymarine products.
Questions can be sent directly to our Technical Support Department via the
Internet. Point your browser to www.raymarine.com and click on the
Customer Support link. From there, select Find Answers and click the Ask
Raymarine tab.
Product Repair and Service
In the unlikely event your Raymarine unit should develop a problem, please
contact your authorized Raymarine dealer for assistance. The dealer is best
equipped to handle your service requirements and can offer timesaving help
in getting the equipment back into normal operation.
In the event that repairs can not be obtained conveniently, product service
may also be obtained by returning the unit to:
Raymarine, Inc.
Product Repair Center
22 Cotton Road, Unit D
Nashua, NH 03063-4219
Page 78

68 DS600X Digital Fishfinder
The Product Repair Center is open Monday through Friday 8:15 a.m. to
5:00 p.m. Eastern Time. All products returned to the Repair Center are
registered upon receipt. Should you wish to inquire about the repair status of
your unit, contact the Product Repair Center at:
800-539-5539
Please have the product reference number, or unit serial number, ready when
you call. We will do everything possible to make the repair and return your
unit as quickly as possible.
In Europe
In Europe, Raymarine support, service and accessories may be obtained
from your authorized dealer, or contact:
Raymarine Ltd
Anchorage Park
Portsmouth, Hampshire
England PO3 5TD
Tel: +44 (0) 23 9269 3611
Fax: +44 (0) 23 9269 4642
Technical Support
The Technical Services Department handles inquiries concerning
installation, operation, fault diagnosis and repair. For technical helpdesk
contact:
Tel: +44 (0) 23 9271 4713
Fax: +44 (0) 23 9266 1228
Accessories and Parts
Raymarine accessory items and parts are available through your authorized
Raymarine dealer. Please refer to the lists of component part numbers and
optional accessories in the Installation chapter of this manual and have the
Raymarine part number ready when speaking with your dealer.
If you are uncertain about what item to choose for your unit, please contact
our Customer Services Department prior to placing your order.
Worldwide Support
Please contact the authorized distributor in the country.
Page 79

Appendix A: Specifications 69
Appendix A: Specifications
General
CE Conforms to 89/336/EEC (EMC)
Size H x W x D, excluding mounting bracket
Weight 1.87 lb (848 g)
Environmental Waterproofing: Submersible to IPX7 standard;
Power Input 10.0VDC to 18.0VDC, 13.8 VDC nominal
Mounting Mounting Bracket or optional Flush Mount
Controls 6 defined keys and trackpad
Display 320 x 240 pixels (¼ VGA) color portrait
Display type 5.7” (145 mm) diagonal Transmissive TFT Color LCD
Interface 7 pin Power/NMEA NMEA 0183 receive and transmit
Connector 7 pin transducer
Sounder
Output Power: Adjustable to 500 watts RMS
6.93 x 7.0 x 2.52 in (176 x 178 x 64 mm)
suitable for external mounting
Temp Range - Operating: +14°F to +122°F (-10°C to +50°C)
Temp Range -Storage: +4°F to +158°F (-20°C to +70°C)
Humidity up to 95% at 35°C, non-condensing
Consumption - Typical <10W @ 12VDC
Frequency Dual 50 kHz and 200 kHz
Pulse Length 100 µsec to 4 msec
Max. Transmit
Rate
Depth 2 to 2000 ft (600 m), approx.(actual performance dependent upon
1428 pulses / min. @ 50’ range
transducer type and conditions in the water column)
Page 80

70 DS600X Digital Fishfinder
NMEA Data
Connector Received Transmitted
POWER/NMEA BWC, BWR, GLL, ZDA,
RMB, V TG, HDG, HDT
BWC, BWR, DBT, DPT,
GLL , MTW, V HW, VLW,
VTG, ZDA
Page 81

71
47
Index
A
Accessories 5
Obtaining
Alarm Clock
Alarms
Alarm Clock
Deep Alarm
Deep Range
Fish Alarm
Shallow Alarm
Shallow Range
Target Depth ID
Temp Ala rm
Temp Range
Analog Gauges
A-Scope
Auto Scroll
B
Background Color 47
Battery
Bearing
Bearing Mode
Brightness
C
Cables
Power
Running
Transducer
Cleaning Instructions
COG
49
Color Gain
Connections
Power
Transducer
Customer Support
D
Data Items 47
Analog Gauges
Auto Scroll
Battery
66
49, 58
55
58
57
57
56
57
58
47, 48
33
47
47
49
60
44
11
7
13
35
11
11
11, 13
66
47
47
56
56
55
63
47
Log
Speed
47
Te mp er at ur e
Trip
Date Format
Date Setting
Deep Alarm
Deep Range
Depth Digit Size
Depth Offset
Depth Units
Dimensions
Display Setup
Brightness
Data Items
Depth Digit Size
Menu List
Nav Set Up
Palette
Target Depth ID
Transparent Menu
Distance
Determining Using VRM 20
Distance Units
47
47
49, 60
49
57
57
45
62
59
8
41
44
47
Analog Gauges
Auto Scroll
Battery
Log
Speed
Temperature
Trip
47
47
47
47
47
45
43
Alarm Clock 49
49
Bearing
49
COG
Date
49
Date Format
LAT/LONG
RNG/BRG
SOG
Time
Time Format
Time Offset
TTG
Waypoint
49
48
49
49
48
46
Background Color
44
59
47
47
49
48
49
49
47
45
Page 82

72 DS600X Digital Fishfinder
E
Echoes 16
Strength
ENTER key
F
Features 2
Fish Alarm
Fishfinder
Basic System 2
Typical Display Screen
Fishfinder Page
Frequency
12
Fuse
G
Gain 35
Color Gain
Gain Mode
Int Rej
Max Ping Rate
Power
Second Echo Rejection
TVG
H
Help from Raymarine 66
I
Installation 5
Cables
EMC Guidelines
Location
Mounting
Int Rej
K
Key Beep 61
Key Help
Keypad
L
Language 61
LAT/LONG
List
Display Set Up Menu items 43
Main Menu items
17
19
56
16, 19, 21
32
35
34
36
37
37
36
7
5
6
9
36
61
19
48
29
17
37
Sounder Set Up Menu items 53
Location
Mounting 6
47
Log
M
Main Menu 25
29
List
Maintenance
Max Ping Rate
Menu
Menu Items
MENU key
Menu List
Mounting
N
Nav Data Page 19, 21
Nav Set Up
63
37
30
A-Scope
Frequency
Gain
Gain Mode
Main
Operation
Range
Scroll Speed
Selecting
Structure
Trip Reset
Zoom
33
32
Color Gain 35
34, 36
Gain Settings
Int Rej
36
Max Ping Rate
37
Power
Second Echo Rejection
25
23
30
30
25
23
39
37
Magnification
39
Mode
38
Vie w
29
19
29
Display Set Up
Main Menu
Sounder Set Up
43
29
53
9
48
Alarm Clock
Bearing
COG
49
49
49
35
37
37
39
Page 83

73
Date 49
Date Format
LAT/LONG
RNG/BRG
SOG
Time
Time Form at
Time Offset
TTG
Waypoint
Navigation Data
NMEA-out Set Up
P
Page 19, 21
Fishfinder
46
Palette
Background Color
5
Parts
37
Power
Cable
Connection
POWER key
Power on
Q
QUIT key 19
R
Range 30
Range and Bearing
RANGE key
Raymarine
Addresses
Phone numbers
Website
67
Repair
RNG/BRG
Routine Checks
S
Safety
EMC Guidelines
47
Scroll
Scroll Speed
Scrolling Bottom Graph
Second Echo Rejection
49
48
49
48
49
49
49
49
48
48
60
16
11
11
20
15
49
20
67
67
66
49
63
5
30
47
16
37
Selecting Menu Items 25
Serial Number
Service
Shallow Alarm
Shallow Range
Simulator
Software Version
SOG
48
Sonar
Basic System
Echoes
Image
Signal Strength
Target Indications
Sounder Setup
Alarms
Depth Offset
Key Beep
Key Help
Language
Menu List
NMEA-out Set Up
Serial Number
Sounder Simulator
Speed Calibrate
SW Version
Temp Calibrate
Units
Sounder Simulator
62
67
56
56
15, 62
62
2
16
17
51
55
Alarm Clock
Deep Alarm
Deep Range
Fish Alarm
Shallow Alarm
Shallow Range
Tar get D ep th I D
Tem p A lar m
Tem p Range
62
61
61
61
53
62
59
Bearing Mode
Date Format
Depth Units
Distance Units
Speed Units
Temp Units
Time Format
62
17
57
57
56
57
58
62
62
62
60
59
59
59
18
58
56
56
55
60
62
60
59
60
Page 84

74 DS600X Digital Fishfinder
Specifications 69
Speed
47
Speed Calibrate
Speed Units
Supplied Parts
System
Connections
T
Tar get D ep th I D 44, 55
Target Indications
Technical Support
Tem p A lar m
Temp Calibrate
Temp Graph Page
Tem p Range
Temp Units
Tem perat ure
Time Format
Time Offset
Time Setting
Trackpad
Transducer
Cable
Cleaning
Connections
Transparent Menu
47
Trip
Trip Reset
TTG
49
36
TVG
U
Units 59
Bearing Mode
Date Format
Depth Units
Distance Units
Speed Units
Temp Units
Time Format
V
VRM 19, 20
W
Warranty iii
62
59
5
11
18
67
57
62
19, 21
58
59
47
49, 60
49
49
20
3
13
63
11, 13
45
39
60
60
59
59
59
59
60
Waypoint 48
Website
66
Z
Zoom 20, 37
Magnification
39
Mode
38
Vie w
39
 Loading...