

Page 1

Technical and illustrative data are not binding and can be modifi ed without prior notice.
The descriptions and illustrations in the present booklet are for guidance purposes only.
RAVENHEAT MANUFACTURING LTD
CHARTISTS WAY, MORLEY, LEEDS, U.K. LS27 9ET
TEL.: 0113 252 7007 - FAX: 0113 238 0229
Website: www.ravenheat.co.uk - E-mail: sales@ravenheat.co.uk
Instructions for Use
Installation and Servicing
To be left with the user
HE 25 S COMPACT
Natural Gas (G20) II
2H3P
LPG (G31) II
2H3P
HE 30 S COMPACT
Natural Gas (G20) II
2H3P
LPG (G31) II
2H3P
1312
HIGH EFFICIENCY
CONDENSING
COMBINATION BOILER
Page 2

2
Page 3
3
HIGH
EFFICIENCY CONDENSING BOILER
FOR CENTRAL HEATING AND DOMESTIC HOT WATER
This new highly effi cient turbo-modulating boiler is designed to meet domestic hot water and central heating requirements at
super high effi ciency.
POSITION
The appliance is extremely versatile as it can be fi tted in almost any room. The appliance is room sealed so there is no contact
between the combustion chamber and living accommodation. This guarantees maximum safety and effi ciency. Each boiler
has been designed and manufactured in our modern plant to exacting ISO 9001 discipline, all boilers carry full CE marking of
approval. Technical sales and commercial services are available throughout the UK Mainland. This product is guaranteed by
Ravenheat manufacturing ltd, Chartists Way, Morley, LEEDS, LS27 9ET. Telephone No (0113) 252 7007.
Guarantee is a full 12 months from date of purchase providing the appliance has been fi tted in accordance with these instructions
and relevant codes of practice.
- Modulating
gas valve.
- Modulating pump head suitable for any type of central heating system.
- Burner with fl ame stabiliser designed to operate under all thermal conditions.
- Unique condensing heat exchanger for high thermal fl ue transfer from gases to water.
- Stainless steel plate heat exchanger for super high heat transfer to domestic hot water supply.
- Built in frost protection.
- Printed circuit board designed to connect to room stat and/or timer.
- Aesthetically pleasing panels and controls.
- On/Off ball valves for shutting off gas, central heating and domestic hot water circuit.
- Safety relief valve (for safety discharge).
- Programmable 7 day module with digital display (time clock version only).
NOTE: Due to the high effi ciency of this boiler a plume of water vapour will form at the fl ue
terminal during operation.
COSHH - CONTROL OF SUBSTANCES
HAZARDOUS TO HEALTH
IMPORTANT
It is the Users/Installers responsibility to ensure that the necessary personal protective clothing is worn when
handling this appliance, and where applicable the pertinent parts that contain any materials that could be interpreted
as being injurious to health and safety.
GENERAL INFORMATION:
GLUES AND SEALANTS - exercise caution - if these are still in liquid form.
RAVENHEAT use only high quality material for production of this product, in an eff ort to protect the environment
wherever possible components should be recycled.
WARNING: when installing the appliance, care should be taken to avoid any possibility of injury when handling sheet
metal parts.
MAJOR COMPONENTS
Page 4

4
Page 5
5
Page 6

6
It is the law that all gas appliances are installed by
a competent person, in accordance with the gas
safety installation and to the current Gas Safety
(Installation and Use) Regulations B.S.5440:2-(2009).
All registered installers carry a Gas Safe Register ID card
and have a registration number. Both should be recorded in
your boiler Log book. You can check your installer’s
registration at www.gassaferegister.co.uk.
ESCAPE OF GAS
Should a gas leak be suspected, contact your gas
supplier without delay.
GAS EMERGENCY NUMBER: 0800111999
Do NOT search for gas leaks with a naked fl ame.
WARNING: This appliance must be earthed.
1.1 INTRODUCTION
Please carefully read the information given in this
booklet to help you gain maximum control from your
appliance with minimum trouble and cost.
Your Ravenheat Condensing Low Nox combination boiler
has been designed to supply your Central Heating and
Domestic Hot Water directly from one unit.
When Central Heating is operating, the circulation will be
interrupted when Domestic Hot Water is being drawn off
(domestic hot water has priority).
This will normally not aff ect the level of Heating.
PLEASE NOTE:
Due to the high effi ciency of this appliance and resulting
low fl ue gas exhaust temperature a white plume of
condensation vapour (cool steam) will be emitted from the
fl ue outlet terminal, this is quite normal. It will be
particularly evident during periods of low outdoor
temperature or when the boiler is working at its optimum
performance (Plume Management kits are available on
request).
IMPORTANT:
In the unlikely event of the exhaust fl ue gases exceeding
the overheat temperature setting, the boiler operation will
be stopped to prevent damage to the appliance.
1.2 CLEARANCES AROUND THE APPLIANCE
Side clearance:
The position of the appliance must provide a
minimum clearance of only 5 mm as the side panels
do not require removing for servicing.
However, if the option is preferred to remove the
panels then a minimum clearance of 55 mm is
required.
Top clearance:
The top clearance should be a minimum of
125 mm.
Bottom clearance:
A minimum bottom clearance of 80 mm is
required between the appliance and any surface,
though 150 mm is preferred whenever
possible.
Front clearance:
A minimum of 450 mm is required in front of
the appliance for access during servicing, the
front clearance can be reduced when installed
in a cupboard to 25 mm from the access door.
USER CONTROLS
This appliance is designed to operate with the minimum
of ease for the user. All the controls are found on the
control panel on the front of the boiler.
1.3 OPERATING SAFETY CHECKS TO PROTECT
YOUR APPLIANCE (CHECKING THE SYSTEM
PRESSURE)
Before lighting the appliance check that the Central
Heating system pressure is not less than 1 bar. If it
is below this it will be necessary to re-pressurise the
system, between 1 and 1.5 bar to allow the boiler to
operate. To view the system pressure press the INFO
button once, this will display the current pressure (if the
pressure is on nil or too low, then error code 08E is
displayed).
A fi lling device (fi lling loop) will have been fi tted on the
system.
This is usually on the pipework near to the boiler. If you
are unsure of its position, or you cannot identify it, consult
the installer who fi tted the boiler.
The fi lling loop usually consists of two taps and a
separate silver coloured braided fl exible pipe with
connection fi ttings. Only when re-pressurising should the
braided fl exible pipe be connected between the two taps,
ensure that the nuts or the pipe ends are tightened
onto the taps.
Fully open one of the taps fi rst and then while monitoring
the water pressure on the digital display, carefully open
the second tap. When the water pressure is to a
maximum of 1.5 bar turn both taps off .
Disconnect the fl exible pipe from the taps (a small
amount of water may be present).
Keep the pipe in a safe place for future use.
Press the ESC button once to return to the main screen.
In the event of an error, the appliance will show a
sequence code displayed on the digital display of the
control panel (fi g. 1). By pressing the “RESET“
button it is possible to relight the boiler (see page 52
and 53 for list of error codes).
1 USERS GUIDE
Page 7
7
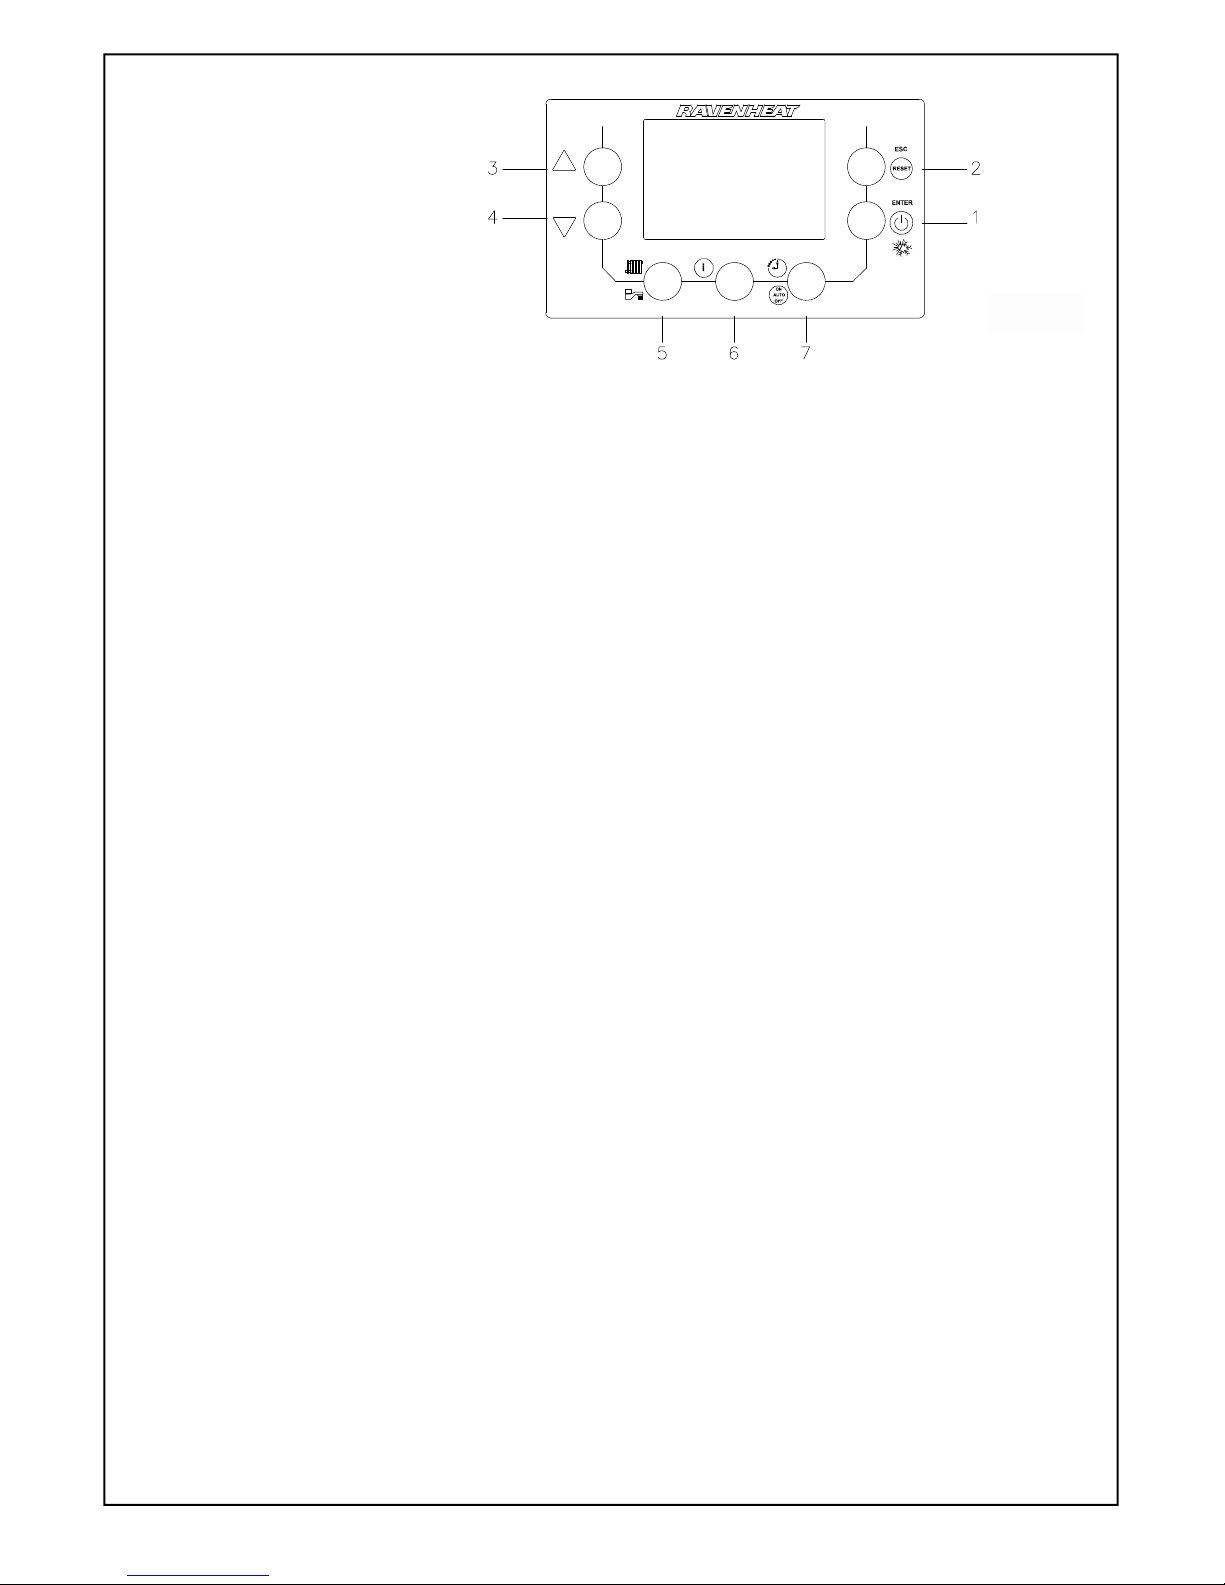
1.4 APPLIANCE STATUS INDICATORS
The boiler is equipped with a large LCD
display that indicates the appliance
operating status fi g. 1).
Fig. 1
KEY:
1 - ON/OFF button.
Press to turn the boiler ON, summer mode
(hot water symbol only), winter mode (hot
water and radiator symbol), and OFF.
Press the button also to confi rm selections.
2 - Press to RESET the appliance if ever an error
code is displayed or ESC to back-up from the
boiler menus.
3/4 - Temperature and function mode selectors.
Press the arrow up or the arrow down to
increase or decrease the heating or domestic
hot water outlet temperature, when the digital
display is in hot water or central heating
set-point temperature.
Press also to show the boiler values or to
show the options program when the digital
display is in INFO or in USER PARAMETERS.
5 - Press to set the Central Heating
Temperature required
Press once to view the central heating
temperature set-point (boiler must be in winter
mode).
Press the arrow up or the arrow down buttons
to increase or decrease the temperature.
5 - Press to set the Domestic Hot Water
Temperature required.
Press twice (once if in summer mode)
to see the domestic hot water temperature
set-point.
Press the arrow up or the arrow down buttons
to increase or decrease the temperature.
6 - INFO: press to show the boiler values.
- water pressure
- fl ow temperature (CHF).
- return temperature (CHR).
- domestic hot water temperature (DHW).
- % power of modulation.
- fan speed (FAN), the display show 2 digits
(e.g. 20 = 2000 rpm).
- external temperature, if the external
probe is present (OTC).
- error history.
- error history.
- error history.
- error history.
- error history.
Press ESC to esc INFO mode.
- USER PARAMETERS (for service people): press
the INFO and the arrow down buttons together for
5 seconds to show the boiler parameters (buttons
4 and 6).
- P001: C.H. max fan speed.
- P002: D.H.W. max fan speed.
- P003: Keep hot “0” disabled and “1” enabled
- P004: C.H. High/Low temperature:
“0” low (max 50°C) / “1” high (max80°C)
- P005: Climatic curve: default “20” (full instructions
are provided with the Outdoor Sensor Kit).
- P006: Enable locking pump “0” disable / “1”
enable.
- P007: Test mode: “0” disabled, “1” enable.
(the function is enable for maximum 15
minutes).
Press ESC to esc Test mode.
- P008: Weather compensator control.
0= Normal remote control.
1= Ravenheat remote control with
D.H.W. selection in boiler.
2= Honeywell remote control.
- P009: Ignition power. Is possible to set the soft
start power level (% of max boiler power,
range 0:99).
- P010: Boiler power selection
(“1” HE 80 S - “2” HE 98 S).
- P011: Boiler type
(“1” istantaneous - “2” only heating). -
- P012: Gas type
(“0” Natural gas - “1” LPG gas).
- P013: Modulating pump type selection
(“0” Wilo - “1” Grundfos).
- P014: Water pressure sensor selection:
“0” pressure switch - “1” transducer
Press ESC to esc USER PARAMETERS mode.
7 - TIMER MODE (time clock version only).
Press to select “Auto” (heating times set),
“Manual” (heating on all the time) and off
(heating off ).
It is possible to set the time and the current day
(Monday 1, Tuesday 2, Wednesday 3, Thursday 4,
Friday 5, Saturday 6, Sunday 7), see section 1.7.
Page 8
8
1.6 BOILER VALUE
It is possible to show the boiler value.
Press INFO button (item 6 fi g. 1) to show the
boiler values.
Use the arrow up and the arrow down
buttons, (item 3 and 4 fi g. 1) to show the
following info:
water pressure
fl ow temperature (CHF)
return temperature (CHR)
domestic hot water temperature (DHW)
% power of modulation
fan speed (FAN)
external temperature, if the external
probe is present (OTC)
error history
error history
error history
error history
error history
1.7 TIME (time clock version only)
SETTING THE TIME AND DAY
(time clock
version only):
1. Press and hold for 5 seconds the TIMER
MODE button (item 7 fi g. 1).
The hour value will fl ash.
2. Press the up and down arrow buttons (item
3 and 4 fi g. 1) to select the current hour
(24h). Then press the ENTER button
(item 1 fi g. 1) to begin to fl ash on the display
confi rm after this the minutes will fl ash.
3. Press the up and down arrow buttons
(item 3 and 4 fi g. 1) to select the current
minutes and then press the ENTER button
(item 1 fi g. 1) to confi rm, after this the day
indicator will begin to fl ash on the display.
4. Press the up and down arrow buttons (item
3 and 4 fi g. 1) to select the current day
(1=Mon, 2= Tue etc.) and then press the
ENTER button to confi rm.
The time is now set, press ESC button (item
2 fi g. 1) to esc time function.
KEY
1 - Day indicator:
(time clock version only)
1. Monday
2. Tuesday
3. Wednesday
4. Thursday
5. Friday
6. Saturday
7. Sunday
2 - Water temperature.
3 - Modulation fl ame level: When the burner is lit,
3 diff erent levels on icon 3 are displayed.
4 - Anomaly - Lock out.
5 - Manual: When the digital timer is set to
manual icon 5 is displayed, in this mode the
central heating is on permanently.
1.5 DIGITAL DISPLAY
Fig. 2
6 - Central Heating: when the appliance
is in central heating mode icon 6 will fl ash.
7 - Current time.
8 - Off (time clock version only): when the digital
clock is in off function icon 8 is displayed.
9 - Auto (time clock version only): when the
digital clock is in automatic function icon 9
is displayed.
10 - Domestic hot water: when the appliance is in
domestic hot water mode the icon 10 will fl ash.
11 - Test function.
12 - Water pressure: shows the current pressure in
the system or day settins in timer mode.
Page 9
1.8 PROGRAMMING THE HEATING TIMES
(time clock version only)
The appliance incorporates a digital clock
programmed with a default heating pattern (see
table 1); however this can be modifi ed to suit
individual needs.
To change the programmed times:
1. Press and hold the timer mode button (item 7
fi g. 1).
The dispaly shows the current time, set the
time if necessary.
2. Press and hold for 5 secons the timer mode
button (item 7 fi g. 1) again for another 5
seconds.
The display shows the fi rst heating period on
the fi rst day.
3. Press the up and down arrows (item 3 and 4
fi g. 1) to select the On1 time (fi rst on time)
and press the ENTER button (item 2 fi g. 1).
5. Press the up and down arrows to set the
Off 1 time (fi rst off ) and press ENTER button
(item 2 fi g. 1).
Repeat this process for the remaining 3
settings.
Note: if not all 4 times are required
then set the remaining on and off times with
the same hours, the display will show “------”.
This cancels the remaining on and off .
For example see the weekend settings in
table 1.
Once the times are set, press the ESC button
(item 2 fi g. 1).and this will return to the main
screen.
TABLE 1
9
NB: If setting the times in a group, the days in
the group will all be the same, however days
not in this group will remain at the default time.
For example, setting Mon-Sat will change all
these days but Sunday will remain the same
as table 1 unless changed individually.
If you wish to override these times, press
the timer mode button to select manual (Fig.2
icon 5), this puts the boiler in manual mode
which overrides the timer on the boiler so the
heating is on permanently (providing any
external controls fi tted are calling for heat).
To turn the heating off , press the timer mode
button to select off , this will now turn the heating
off permanently until either auto or manual is
selected.
To copy the days:
1. In programming time, press the up and down
arrows (item 3 and 4 fi g. 1) to select the day
to be copied.
2. Press INFO (item 6 fi g. 1) and arrow up (item
3 fi g. 1) buttons together to copy, the display
shows “COPY SRC”.
3. Press the up and down arrow (item 3 and 4
fi g. 1) to select the day that you want to
change.
4. Press and hold the INFO (item 6 fi g. 1) and
arrow down (item 4 fi g. 1) buttons together for
5 seconds to paste the settings, the display
shows “COPY DST”.
1.9 DIAGNOSTIC
The display shows eventual error or faulty
message.
Stop boiler: The boiler stops the operating cycle
and waits for the disappearance of the cause of
the error in order to go back to be operating
mode.
Block boiler: the boiler requires a manual reset
to become operational again.
Page 10
10
2.0 GENERAL LAYOUT (Fig. 3)
Fig. 3
KEY
1 - C.H. fl ow
2 - D.H.W. outlet
3 - Gas inlet
4 - D.H.W. fl ow detector
5 - Water inlet
6 - C.H. return
7 - Drain point
8 - Pump
9 - Safety pressure relief valv
10 - Water pressure
11 - Automatic air vent
12 - C.H. return sensor
13 - Fan
14 - Expansion vessel
15 - Spark electrode
16 - Flue temperature sensor
17 - Main heat exchanger
18 - Sensing electrode
19 - Condensate drain
20 - Overheat cut off thermostat
21 - C.H. flow sensor
22 - Silencer
23 - Condensate trap
24 - Plate heat exchanger
25 - Gas valve
Page 11
11
KEY
1 - Flue temperature sensor
2 - Main heat exchanger
3 - Sensing electrode
4 - Spark electrode
5 - CH return
6 - CH fl ow
7 - Condensate drain
8 - Fan
9 - CH return sensor
10 - Overheat cut off thermostat
11 - CH fl ow sensor
12 - Gas valve
13 - Expansion vessel
14 - Automatic air vent
15 - Pump
16 - Water pressure transducer
17 - Safety pressure system
18 - Diverter valve motor
19 - Plate heat exchanger
20 - DHW sensor
21 - DHW fl ow sensor
22 - Gas service cock
23 - CH compression ball valve
24 - DHW compression ball valve
25 - CH compression ball valve
2.1 OPERATING SCHEME (Fig. 4)
Fig. 4
Page 12

When starting, the fan will always start at the
set-point speed.
The boiler is fi tted with an anti-cycling device
on the control board. This delays the boiler
from re-fi ring within 10 minutes.
If the heating temperature goes 20 °C below
the set point, the burner restarts immediately.
The domestic hot water will always take
priority and is unaff ected by the anti-cycling
device.
2.6 GENERAL FUNCTION
The instrument panel allows adjustment of the
boiler to the heating requirements, between
the maximum and minimum settings.
Air and gas are drawn by the fan for
combustion. The fan also forces exhaust gas
through the fl ue to the outside, this creates
a lesser pressure in the sealed combustion
chamber, thus sucking in combustion air,
through the inlet duct.
The boiler water temperature is automatically
controlled by a built in thermostat.
Interior space temperature is set by the
room thermostat to be installed as part of the
heating system. The boiler already carries
connection terminals for this thermostat, as
well as for an external timer if required. The
burner continues to operate until it is stopped
by the digital clock or one of the thermostats.
When the internal CH temperature sensor
or the room thermostat intervenes the burner
shuts down. The fan stops but the pump
continues to operate for 3 minutes.
The boiler also incorporates an anti-block
system which powers the pump every 24
hours, allowing it to operate for 2 minutes if
the boiler has not been in use. This operation
may in some cases be heard for a short
period when the pump has been activated.
The heat exchanger in the DHW circuit is
a stainless steel plate heat exchanger water
to water, and domestic water is heated by
converting the water in the central heating
circuit. The transfer of heat is very high
because the two fl uids move in a counter
direction.
Select the winter position by pressing the
ON/OFF button (item 1 fi g. 1).
When a hot water tap is turned on the
diverter valve motor moves to exclude the
central heating circuit, the boiler
automatically modulates to maintain
the domestic hot water at a constant
temperature.
The water temperature can be regulated by
the digital display.
2.2 INTRODUCTION
This boiler is designed for the production of
central heating and domestic hot water
combined in one unit.
It is fi tted with an automatic domestic hot
water priority valve.
It is possible to select either a summer or
winter function with the summer position
only being for domestic hot water.
The winter position being for central heating
with domestic hot water priority.
2.3 DESCRIPTION OF CONTROL SYSTEM
AND SEQUENCE OF OPERATION
2.4 Domestic hot water mode
When the appliance is in rest mode, select
the summer position by pressing the ON/OFF
button (item 1 fi g. 1) please ensure that the
heating circuit is charged with water (above 1
bar).
If the domestic hot water tap is turned on, the
boiler will function in the following sequence:
The pump starts. The fan starts and sends a
signal back to the ignition board that the fan is
running.
The spark ignition system is powered which in
turn commences the spark igniter to operate
and light the burner.
At this point the ignition board opens the gas
valve to light the burner.
When the electrode sensor senses the signal
that the burner is alight, the spark igniter
stops.
The fan speed settings on the boiler increases
to the maximum permissible speed over
a period of 5 seconds and will remain at its
maximum required power until its maximum
regulated temperature is achieved and then
will modulate to maintain this.
When the domestic hot water tap is closed the
diverter valve goes back into rest mode, the
burner is shut down along with the fan which is
also switched off .
2.5 Central heating mode
If the appliance is in winter mode with a
demand for heat to supply radiators, etc. ,
with the heating circuit fully charged above
1 bar, so as to operate the low water sensor
device the boiler will start in the same way
as domestic hot water mode.
As the heating sensor reaches temperature
the fan speed modulates to maintain the
temperature set on the display panel.
12
Page 13
13
When there is a demand for domestic hot
water, the burner and pump perform as
they do during central heating except that
the burner is commanded by the DHW
thermostat.
When DHW is no longer called for (tap is
turned off ), the boiler will automatically return
to the central heating mode.
Select the summer position by pressing the
summer/winter button. The boiler functions
like an automatic gas hot water heater.
When DHW is no longer required the burner
and pump and fan will immediately turn off .
This also takes place when in winter mode,
if there is no demand for heat to the central
heating system or until the digital clock and
room thermostat (if fi tted) demands the
central heating circuit.
2.8 SAFETY DEVICE
In both central heating and domestic hot
water mode safe operation is ensured by a
control board which shuts off the main
burner, if the fan stops or the fl ue or
combustion air intake duct is obstructed.
An overheat cut off thermostat acts to turn
off the burner to resettable “lockout”.
A safety valve is fi tted on the central heating
circuit set at 3 bar.
A low water pressure switch set at 0.4 bar is
fi tted on heating circuit, to prevent the boiler
operating below this boiler system pressure.
2.7 OVERALL DIMENSION
(Fig. 5)
2.9 AVAILABLE PUMP HEAD
Fig. 5
Page 14
14
Nominal heat Input net QMS 21.0 kW
Minimum heat Input net 3.7 kW
Nominal heat output 20.4 kW
Nominal heat output condensing 22.1 kW
Minimum heat output 3.5 kW
Minimum heat output condensing 3.9 kW
Inlet pressure 20 mbar Gas rate after 10 minutes Max 2.1 m3/h - min. 0.4 m3/h
Fan speed Max 5200 rpm - 173 Hz Combustion % CO2 : 9.0 (+ 0.5 / - 0.5) Case On 9.0 (+ 0.5 / - 0.5) Case Off
C.H. min 1200 rpm - 40 Hz Combustion % CO2 : 8.5 (+ 0.5 / - 0.5) Case On 8.5 (+ 0.5 / - 0.5) Case Off
Electrical supply: 230 V ~ 50 Hz
External fuse rating: 3 A Internal fuse F1: 3.15 A (20 mm To BS 4265)
Dry weight : 31 Kg Water content C.H.: 0.8 Litre Water content D.H.W.: 0.2 Litre
Gas Supply Connection 15 mm compression isolating valve
Flow connection C.H. 22 mm compression isolating valve
Return connection C.H. 22 mm compression isolating valve
Inlet connection D.H.W. 15 mm compression isolating valve
Outlet connection D.H.W. 15 mm compression valve
Safety discharge C.H. 15 mm copper pipe
Condensation drain 3/4” (21.5 mm) push fi t over fl ow
Max cold water capacity without additional expansion vessel 110 Litre
Sealed water system C.H.
Max pressure PHS 2.5 bar
Minimum working pressure 0.5 bar
7 Litres expansion vessel pre-charge-pressure 0.5 bar
Central Heating operating temperature Max 80 °C min 35 °C
Design fl ow rate 1066 I/h 20 °C rise
Minimum fl ow rate C.H. 350 l/h
D.H.W. fl ow rate 30 °C rise 11.9 l/min
D.H.W. fl ow rate 35 °C rise 10.2 l/min
D.H.W. fl ow rate 40 °C rise 8.9 l/min 10°C Inlet temperature
D.H.W. temperature Max 60 °C min 35 °C
Fan speed D.H.W. Max 6200 rpm - 207 Hz min 1200 rpm - 40 Hz
Qmw Input Net Max 25.5 kW min 3.7 kW
D.H.W. Pressure Pmw Max 6.5 bar
D.H.W. Pressure Pmw min 0.5 bar
D.H.W. Minimum Flow Rate 2.5 I/min
Flue outlet nom. diameter 100 mm specially supplied with boilers (If required)
Destination: GB, IE Category: II2H3P
Flue Type: C13 - C33 - C53 SEDBUK A Electrical protection index: IP X4 D
LWA sound power level, indoors 50.5 dB NOx class 5 - 24.40 mg/kWh
ErP D.H.W.
Seasonal space heating energy effi ciency class Water heating energy effi ciency class
µs seasonal space heating energy effi ciency 91.7 % Load Profi le XL
Pn nominal heat input 21.0 kW µwh water heating energy effi ciency 85.1 %
P4 nominal heat output high temperature 20.4 kW Qfuel daily fuel consumption 22.774 kWh
P1 nominal heat output (30% Pn) low temperature 6.1 kW AFC Annual fuel consumption 17.284 GJ
Qelec daily electricity consumption 0.2046 kWh
AEC annual electricity consumption 44.802 kWh
µ4 effi ciency at nominal heat output high temperature 87.3 %
µ1 effi ciency at 30% nominal heat output low temperature 97.0 %
Auxiliary electricity consumption:
elmax at full load 0.034 kW PSB in standby mode 0.005 kW
elmin at part load 0.016 kW Pstby standby heat loss 0.028 kW
3 TECHNICAL DATA
HE 25 S Compact
TABLE 2/A
NATURAL GAS (G 20) П2H3P
Page 15
15
3.1 TECHNICAL DATA
HE 25 S Compact
TABLE 2/B
LPG ( G 31) П2H3P
Nominal heat Input net QMS 21.0 kW
Minimum heat Input net 3.7 kW
Nominal heat output 20.4 kW
Nominal heat output condensing 22.1 kW
Minimum heat output 3.5 kW
Minimum heat output condensing 3.9 kW
Inlet pressure 37 mbar Gas rate after 10 minutes Max 2.1 m3/h - min. 0.4 m3/h
Fan speed Max 5000 rpm - 167 Hz Combustion % CO2 : 10.5 (+ 0.5 / - 0.5) Case On 10.5 (+ 0.5 / - 0.5) Case Off
C.H. min 1200 rpm - 40 Hz Combustion % CO2 : 10.0 (+ 0.5 / - 0.5) Case On 10.0 (+ 0.5 / - 0.5) Case Off
Electrical supply: 230 V ~ 50 Hz
External fuse rating: 3 A Internal fuse F1: 3.15 A (20 mm To BS 4265)
Dry weight : 31 Kg Water content C.H.: 0.8 Litre Water content D.H.W.: 0.2 Litre
Gas Supply Connection 15 mm compression isolating valve
Flow connection C.H. 22 mm compression isolating valve
Return connection C.H. 22 mm compression isolating valve
Inlet connection D.H.W. 15 mm compression isolating valve
Outlet connection D.H.W. 15 mm compression valve
Safety discharge C.H. 15 mm copper pipe
Condensation drain 3/4” (21.5 mm) push fi t over fl ow
Max cold water capacity without additional expansion vessel 110 Litre
Sealed water system C.H.
Max pressure PHS 2.5 bar
Minimum working pressure 0.5 bar
7 Litres expansion vessel pre-charge-pressure 0.5 bar
Central Heating operating temperature Max 80 °C min 35 °C
Design fl ow rate 1066 I/h 20 °C rise
Minimum fl ow rate C.H. 350 l/h
D.H.W. fl ow rate 30 °C rise 11.9 l/min
D.H.W. fl ow rate 35 °C rise 10.2 l/min
D.H.W. fl ow rate 40 °C rise 8.9 l/min 10°C Inlet temperature
D.H.W. temperature Max 60 °C min 35 °C
Fan speed D.H.W. Max 6000 rpm - 200 Hz min 1200 rpm - 40 Hz
Qmw Input Net Max 25.5 kW min 3.7 kW
D.H.W. Pressure Pmw Max 6.5 bar
D.H.W. Pressure Pmw min 0.5 bar
D.H.W. Minimum Flow Rate 2.5 I/min
Flue outlet nom. diameter 100 mm specially supplied with boilers (If required)
Destination: GB, IE Category: II2H3P
Flue Type: C13 - C33 - C53 SEDBUK A Electrical protection index: IP X4 D
LWA sound power level, indoors 50.5 dB NOx class 5 - 24.40 mg/kWh
ErP D.H.W.
Seasonal space heating energy effi ciency class Water heating energy effi ciency class
µs seasonal space heating energy effi ciency 91.7 % Load Profi le XL
Pn nominal heat input 21.0 kW µwh water heating energy effi ciency 85.1 %
P4 nominal heat output high temperature 20.4 kW Qfuel daily fuel consumption 22.774 kWh
P1 nominal heat output (30% Pn) low temperature 6.1 kW AFC Annual fuel consumption 17.284 GJ
Qelec daily electricity consumption 0.2046 kWh
AEC annual electricity consumption 44.802 kWh
µ4 effi ciency at nominal heat output high temperature 87.3 %
µ1 effi ciency at 30% nominal heat output low temperature 97.0 %
Auxiliary electricity consumption:
elmax at full load 0.034 kW PSB in standby mode 0.005 kW
elmin at part load 0.016 kW Pstby standby heat loss 0.028 kW
15
Page 16
16
3.2 TECHNICAL DATA
TABLE 2/C HE 30 S
NATURAL GAS (G 20) П2H3P
Nominal heat Input net QMS 25.0 kW
Minimum heat Input net 4.0 kW
Nominal heat output 24.3 kW
Nominal heat output condensing 26.4 kW
Minimum heat output 3.7 kW
Minimum heat output condensing 4.2 kW
Inlet pressure 20 mbar Gas rate after 10 minutes Max 2.6 m3/h - min. 0.4 m3/h
Fan speed Max 5400 rpm - 180 Hz Combustion % CO2 : 9.0 (+ 0.5 / - 0.5) Case On
C.H. min 1200 rpm - 40 Hz 9.0 (+ 0.5 / - 0.5) Case Off
Electrical supply: 230 V ~ 50 Hz
External fuse rating: 3 A Internal fuse F1: 3.15 A (20 mm To BS 4265)
Dry weight : 32 Kg Water content C.H.: 0.8 Litre Water content D.H.W.: 0.2 Litre
Gas Supply Connection 15 mm compression isolating valve
Flow connection C.H. 22 mm compression isolating valve
Return connection C.H. 22 mm compression isolating valve
Inlet connection D.H.W. 15 mm compression isolating valve
Outlet connection D.H.W. 15 mm compression valve
Safety discharge C.H. 15 mm copper pipe
Condensation drain 3/4” (21.5 mm) push fi t over fl ow
Max cold water capacity without additional expansion vessel 110 Litre
Sealed water system C.H.
Max pressure PHS 2.5 bar
Minimum working pressure 0.5 bar
7 Litres expansion vessel pre-charge-pressure 0.5 bar
Central Heating operating temperature Max 80 °C min 35 °C
Design fl ow rate 1811 I/h 20 °C rise
Minimum fl ow rate C.H. 350 l/h
D.H.W. fl ow rate 30 °C rise 14.0 l/min
D.H.W. fl ow rate 35 °C rise 12.0 l/min
D.H.W. fl ow rate 40 °C rise 10.5 l/min 10°C Inlet temperature
D.H.W. temperature Max 60 °C min 35 °C
Fan speed D.H.W. Max 6600 rpm - 220 Hz min 1200 rpm - 40 Hz
Qmw Input Net Max 31.0 kW min 4.0 kW
D.H.W. Pressure Pmw Max 6.5 bar
D.H.W. Pressure Pmw min 0.5 bar
D.H.W. Minimum Flow Rate 2.5 I/min
Flue outlet nom. diameter 100 mm specially supplied with boilers (If required)
Destination: GB, IE Category: II2H3P
Flue Type: C13 - C33 - C53 SEDBUK A Electrical protection index: IP X4 D
LWA sound power level, indoors 52 dB NOx class 5 - 36.06 mg/kWh
ErP D.H.W.
Seasonal space heating energy effi ciency class Water heating energy effi ciency class
µs seasonal space heating energy effi ciency 92.0 % Load Profi le XL
Pn nominal heat input 25.0 kW µwh water heating energy effi ciency 84.86 %
P4 nominal heat output high temperature 24.3 kW Qfuel daily fuel consumption 22.991 kWh
P1 nominal heat output (30% Pn) low temperature 7.9 kW AFC Annual fuel consumption 17.415 GJ
Qelec daily electricity consumption 0.1533 kWh
AEC annual electricity consumption 33.564 kWh
µ4 effi ciency at nominal heat output high temperature 87.4 %
µ1 effi ciency at 30% nominal heat output low temperature 97.1 %
Auxiliary electricity consumption:
elmax at full load 0.034 kW PSB in standby mode 0.005 kW
elmin at part load 0.016 kW Pstby standby heat loss 0.028 kW
Page 17
17
3.3 TECHNICAL DATA
TABLE 2/D HE 30 S
LPG (G 31) П2H3P
Nominal heat Input net QMS 25.0 kW
Minimum heat Input net 4.0 kW
Nominal heat output 24.3 kW
Nominal heat output condensing 26.4 kW
Minimum heat output 3.7 kW
Minimum heat output condensing 4.2 kW
Inlet pressure 37 mbar Gas rate after 10 minutes Max 2.6 m3/h - min. 0.4 m3/h
Fan speed Max 5200 rpm - 173 Hz Combustion % CO2 : 10.5 (+ 0.5 / - 0.5) Case On
C.H. min 1200 rpm - 40 Hz 10.5 (+ 0.5 / - 0.5) Case Off
Electrical supply: 230 V ~ 50 Hz
External fuse rating: 3 A Internal fuse F1: 3.15 A (20 mm To BS 4265)
Dry weight : 32 Kg Water content C.H.: 0.8 Litre Water content D.H.W.: 0.2 Litre
Gas Supply Connection 15 mm compression isolating valve
Flow connection C.H. 22 mm compression isolating valve
Return connection C.H. 22 mm compression isolating valve
Inlet connection D.H.W. 15 mm compression isolating valve
Outlet connection D.H.W. 15 mm compression valve
Safety discharge C.H. 15 mm copper pipe
Condensation drain 3/4” (21.5 mm) push fi t over fl ow
Max cold water capacity without additional expansion vessel 110 Litre
Sealed water system C.H.
Max pressure PHS 2.5 bar
Minimum working pressure 0.5 bar
7 Litres expansion vessel pre-charge-pressure 0.5 bar
Central Heating operating temperature Max 80 °C min 35 °C
Design fl ow rate 1811 I/h 20 °C rise
Minimum fl ow rate C.H. 350 l/h
D.H.W. fl ow rate 30 °C rise 14.0 l/min
D.H.W. fl ow rate 35 °C rise 12.0 l/min
D.H.W. fl ow rate 40 °C rise 10.5 l/min 10°C Inlet temperature
D.H.W. temperature Max 60 °C min 35 °C
Fan speed D.H.W. Max 6400 rpm - 213 Hz min 1200 rpm - 40 Hz
Qmw Input Net Max 31.0 kW min 4.0 kW
D.H.W. Pressure Pmw Max 6.5 bar
D.H.W. Pressure Pmw min 0.5 bar
D.H.W. Minimum Flow Rate 2.5 I/min
Flue outlet nom. diameter 100 mm specially supplied with boilers (If required)
Destination: GB, IE Category: II2H3P
Flue Type: C13 - C33 - C53 SEDBUK A Electrical protection index: IP X4 D
LWA sound power level, indoors 52 dB NOx class 5 - 36.06 mg/kWh
ErP D.H.W.
Seasonal space heating energy effi ciency class Water heating energy effi ciency class
µs seasonal space heating energy effi ciency 92.0 % Load Profi le XL
Pn nominal heat input 25.0 kW µwh water heating energy effi ciency 84.86 %
P4 nominal heat output high temperature 24.3 kW Qfuel daily fuel consumption 22.991 kWh
P1 nominal heat output (30% Pn) low temperature 7.9 kW AFC Annual fuel consumption 17.415 GJ
Qelec daily electricity consumption 0.1533 kWh
AEC annual electricity consumption 33.564 kWh
µ4 effi ciency at nominal heat output high temperature 87.4 %
µ1 effi ciency at 30% nominal heat output low temperature 97.1 %
Auxiliary electricity consumption:
elmax at full load 0.034 kW PSB in standby mode 0.005 kW
elmin at part load 0.016 kW Pstby standby heat loss 0.028 kW
Page 18

18
BS5546: Installation of gas hot water
supplies domestic purposes
(2nd Family Gases).
BS5440: 1 Refers to flues.
BSEN 15502-2-2:2014, BS EN 155021:2012+A1:2015, BS EN 15502-2-1.2012:
Gas fired central heating boilers.
I.S. 813: Domestic gas Installations.
The followings standards give
valuable
additional information:
BS 7074: Expansion vessels and ancillary
equipment for sealed water system.
BS 7593: Treatment of water in domestic hot
water and central heating system.
Health & Safety Document No.635
The Electricity at Work Regulations, 1989.
IMPORTANT:
These appliances are CE certificated for
safety and performance. It is therefore
important that no external control devices e.g.
flue dampers, economisers etc., are directly
connected to this appliance unless covered
by these Installation and Service Instructions
or as otherwise recommended by Ravenheat
in writing. If in doubt please enquire.
Any direct connection of a control device
not approved by Ravenheat could invalidate
the certification and the normal appliance
warranty.
It could also infringe the Gas Safety
regulations and the above regulations.
NOTE:
The Ravenheat HE 25/30 S Compact combi
boiler has been tested and examined by
CERTIGAZ, in according to:
2006/95 EEC: the low voltage directive.
2004/108 ECC: EMC directive.
2009/142 EEC: gas directive
CE 1935/2004: materials into contact with
foodstuffs
2009/125/EC: Ecodesign for energy-using
appliance.
2010/30/UE: Indication by labelling of the
consumption of energy by
energy-related products.
811/2013: Delegated regulation.
813/2013: Delegated regulation.
4 GENERAL REQUIREMENTS
4.1 SAFETY
Gas Safety (Installation and Use).
Regulations.
It is law that all gas appliances are installed
and serviced by a Gas Safe registered installer
in accordance with the above regulations and
these installation instructions. All registered
installers carry a Gas Safe I.D. card and have a
registration number. Both should be recorded
in your Benchmark commissioning checklist.
You can check your installer on the Gas Safe
register (www.gassaferegister.co.uk). Failure
to install appliances correctly could lead to
prosecution. It is in your own interest, and that
of your safety, to ensure the law is complied
with. Check the boiler and flue is the correct
type for installation undertaken.
The instal lat ion of the boiler MU ST be in
accordance with the latest IET (BS 7671)
Wiring Regulations, local building regulations,
bye-laws of the local water authority,
the building regulations and the Building
Standards (Scotland) and any relevant
requirements of the local authority.
4.2 GENERAL INFORMATION
Both the user and the manufacturer rely
heavily on the installer, whose job it is to
install the combination boiler and connect
it to a correctly designed heating system.
Acquaint yourself with the relevant
British Standards concerning installation
requirements. If you need further advice on
any points contact the Technical Services
Office on 0113 2527007 who would be
pleased to help. It is recommended that tools
suitable for brass fittings are used, and have
a capability to accommodate hexagon sizes
up to 50 mm.
APPLICABLE CODES OF PRACTICE
Ref: Documents.
Detailed recommendations are contained in the
following British Standard Codes of Practice:
BS6891:2015: Low pressure installation
pipes.
BS6798: Installation of gas fired hot water
boilers of rated input not exceeding
70 kW.
BSEN12828: Design for water based heating
systems.
BSEN12831: Heating systems in buildings,
Method for calculation of the
design heat load.
BSEN14336: Installation & commissioning
of water based heating
systems.
Page 19

19
Manufacturers instructions must NOT be taken in
any way as overriding statutory obligations.
If in doubt on any point please consult Ravenheat.
4.3 LOCATION OF BOILER
Siting of Ravenheat HE 25/30 S Compact combi
boiler must be as follows.
The position of installation should be within the
building, unless otherwise protected by a suitable
enclosure.
Adequate space for installation, servicing and
air circulation around the boiler must be allowed
for.
Ravenheat HE 25/30 S Compact combi boiler
must be fitted on a flat and vertical wall capable
of adequately supporting the weight of the boiler
and any ancillary equipment.
The appliance may be fitted on a combustible
wall. Insulation between the wall and the boiler
is not necessary, unless required by the local
authority.
For electrical safety reasons there must be no
access available from the back of the boiler.
The boiler must not be fitted outside.
LPG versions of this appliance shall not be
installed in cellars or basements.
4.4 CLEARANCES AROUND THE APPLIANCE
Side clearance:
The position of the appliance must provide
minimum clearance of 5mm as the side panels
do not require removing for servicing.
However, if the option is preferred to remove the
panels then a minimum clearance of 55 mm is
required.
Top clearance:
The top clearance should be a minimum of
125 mm.
Bottom clearance:
A bottom clearance of 80 mm is required
between the appliance and any surface.
Though 150 mm is preferred whenever
possible.
Front clearance:
A minimum of 450 mm is required in front of
the appliance for access during servicing, the
front clearance can be reduced when installed
in a cupboard, to 25 mm from the access door.
4.5 IMPORTANT NOTICE
For installation into timber framed buildings,
please refer to the Institute of Gas Engineers
Document IGE/UP/7.
The boiler may be installed in any room or
internal space, although particular attention is
Regulations applicable in Scotland, with
respect to the installation of the combination
boiler in a room or internal space containing
a bath or shower.
Where a room sealed appliance is installed
in a room containing a bath or shower, any
electrical switch or appliance control, utilising
mains electricity should be situated so that it
cannot be touched by a person using a bath
or shower.
A compartment when used to enclose the
combination boiler MUST be designed and
constructed specifically for this purpose.
An existing cupboard, or compartment, may
be used provided it is modified accordingly.
Samples of the HE 25/30 S Compact combi
boiler have been examined by CERTIGAZ
notification body, and are certified to comply
with the essential requirements of the gas
appliance.
Directive 90/396/EEC, the Low Voltage.
Directive 72/23/EEC and shows compliance
with the Electro Magnetic Compatibility.
Directive 89/336/EEC and are therefore
permitted to carry the CE Mark.
The appliance has been tested and approved
by the WRc as meeting the requirements of
G3 and L of the Building regulations and water
Bylaws Scheme - Approved Products.
4.6 GAS SUPPLY
A gas meter is connected to the service pipe
by the Local Gas Supplier or the Local Gas
Supplier contractor. An existing meter should
be checked preferably by the Gas Supplierto
ensure that the meter is adequate to deal
with the rate of gas supply required for all
appliances it serves. Installation pipes should
be fitted in accordance with BS 6891:2015.
Pipework from the meter to the boiler must be
of adequate size
(22 mm) min to within at least one metre of
the boiler, (15 mm) min. can then be used
for remaining pipe work to the appliance.
A smaller size than the boiler inlet gas
connection should not be used. The complete
installation must be tested for soundness as
described in the above code.
.
N.B. It is the responsibility of the Gas Installer
to size the gas installation pipework in
accordance with BS 6891:2015. Whilst the
principle of the 1:1 gas valve ensures the
Ravenheat range is able to deliver the full
output at an inlet pressures as low as 14
mbar, other gas appliances in the property
may not be as tolerant.
When operating pressures are found to be
below the minimum meter outlet of 19 mbar
these should be checked to ensure this is
adequate for correct and safe operation.
Page 20
20
Allowing for the acceptable pressure loss of 1
mbar across the installation pipework, it can be
assumed that a minimum permitted operating
pressure of 18 mbar (nat gas) will be delivered
to the inlet of the appliance. (reference BS
6400-1 Clause 6.2 Pressure Absorption).
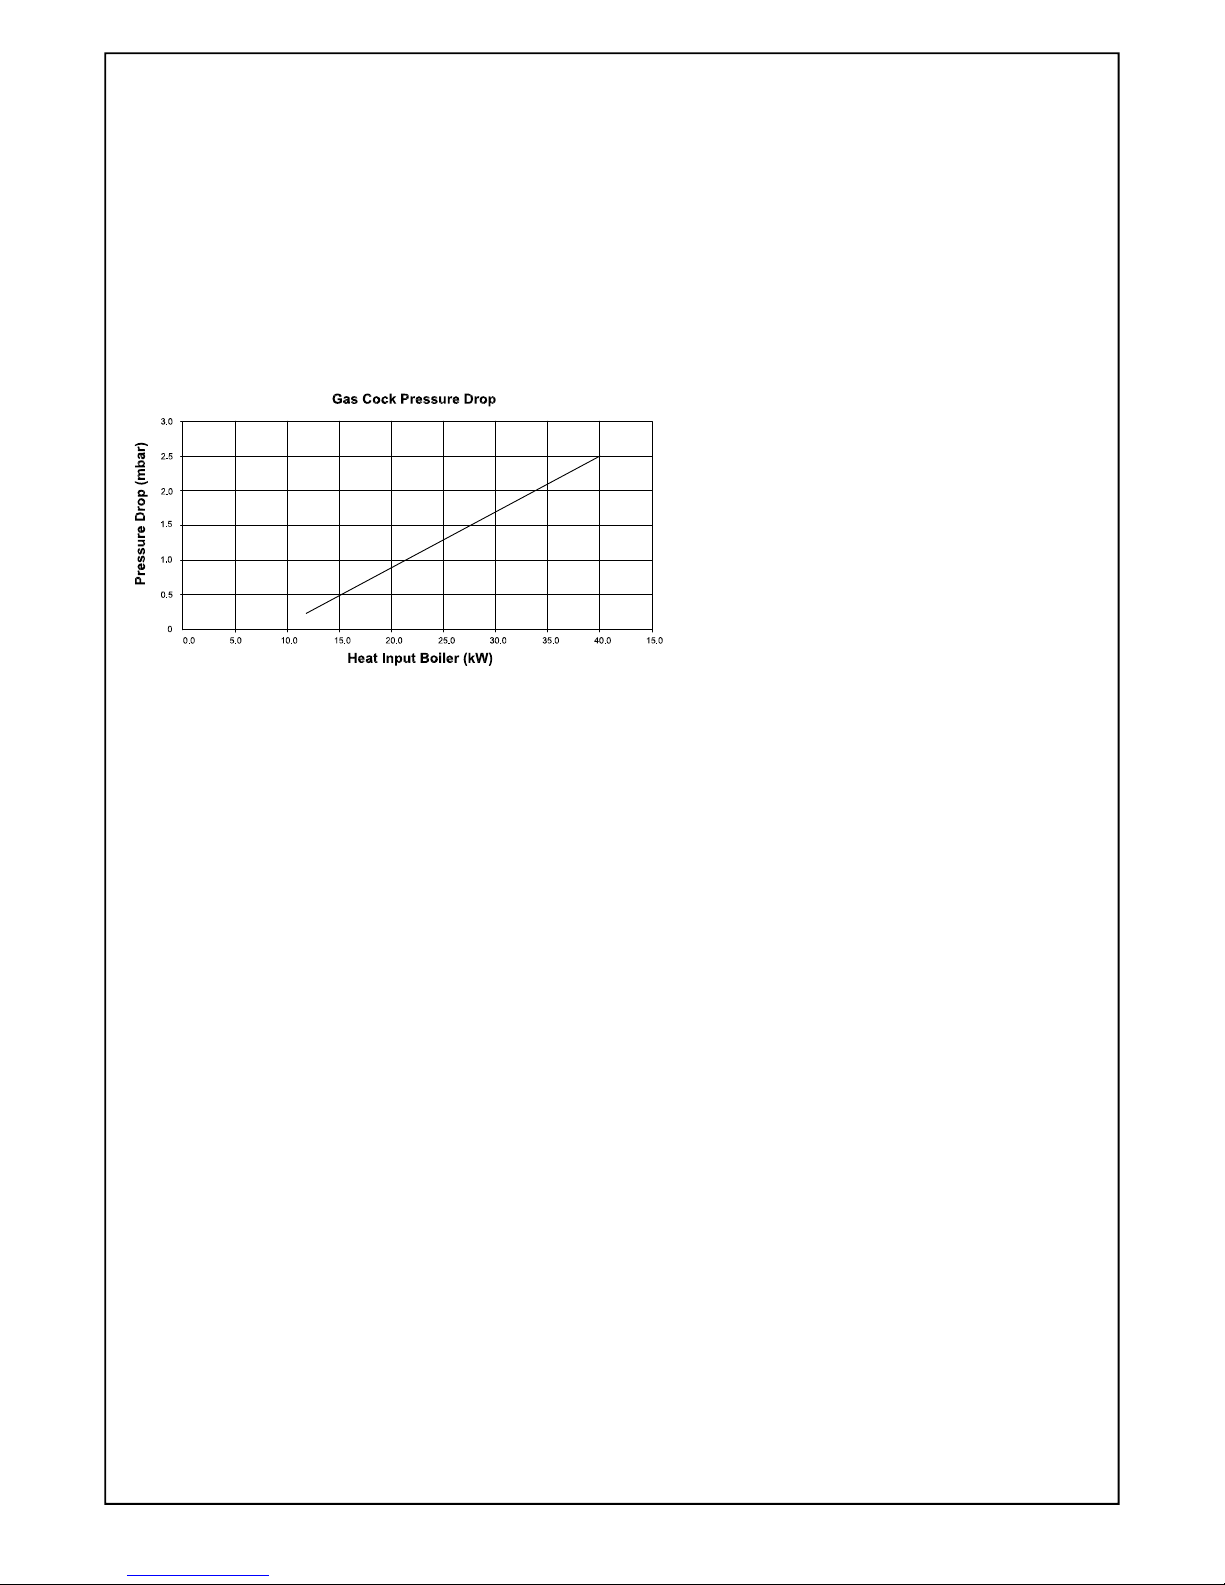
The external gas cock could further reduce the
operating pressure when measure
d at its test
point. The pressure drop is relative to the heat
input to the boiler (kW), refer to graph below.
4.7 FLUE SYSTEM
The terminal should be located where dispersal
of combustion products is not impeded and with
due regard for the damage or discolouration
that might occur to building products in the
vicinity (section 4.10).
The terminal must not be located in a place
where it is likely to cause a nuisance in cold
and/or humid weather as water vapour may
condense on leaving the flue terminal.
The effect of such pluming must be
considered.
The terminal must not be closer than 25 mm
(1 inch) to any combustible material for
protection of combustibles, refer to BS 5440:
Part1.
Pluming will occur at the terminal so, where
possible, terminal positions which could cause
a nuisance should be avoided.
The flue must be installed in accordance with
the recommendations of BS 5440: Part 1.
IMPORTANT NOTES:
For greater fl ue lengths see alternative fl ue
instructions. Flue must be positioned in a
place not likely to cause a nuisance from
pluming.
IMPORTANT NOTICE: If the fl ue terminates
below a balcony, above the ground, above a
fl at roof to which people have access, then
a suitable terminal guard must be fi tted if
less than 2 metres high.
IMPORTANT:
The following notes are intended for general
guidance.
The boiler MUST be installed so that the
terminal is exposed to external air.
It is important that the position of the terminal
allows the free passage of air across it at all
times.
Minimum acceptable spacing from the terminal to
obstructions and ventilation openings are
specifi ed in section 4.10.
Note positions: Due to the terminal design,
installation is possible with clearances less than
those specifi ed in BS 5440, Part 1
NOTE:
The flue must be terminated in a place not
likely to cause a nuisance.
A concentric vertical flue kit is available for
longer flueing applications (see table 5 page
26).
For further details see vertical flue installation
instructions.
4.8 AIR SUPPLY
The following notes are intended for general
guidance.
The room sealed fan flued boiler does not
require a permanent air vent for combustion air
supply.
Where installed in a cupboard or compartment
ventilation is not required.
4.9 WATER CIRCULATION (Central heating)
Detailed recommendations are given in BS
6798: 2014 - BSEN12828 - BSEN12831 BSEN14336 (for smallbore and microbore
central heating systems). The following notes
are given for general guidance.
Page 21

21
Fig.6
4.11 BOILER INTERLOCK CONTROL
Central heating system controls should be
installed to ensure the boiler is switched off
when there is no demand for heating, in
compliance with Building Regulations.
The boiler has its own built in bypass.
If the system has thermostatic radiator valves on
all radiators, or two port valves, then a bypass
circuit must be fitted with an automatic bypass
valve to ensure a flow of water should all valves
be in the closed position (fig. 6).
It is important that the system is flushed
thoroughly before the appliance is fitted or
left to operate (as recommended in BS 7593)
in order to maintain an efficiently operating
heating system. For replacement installations,
the system MUST be flushed with the old boiler
insitu, in order to prevent system debris. Once
the system has been flushed, an inhibitor
(suitable for stainless steel and aluminium heat
exchanger) should be added (see section
4.18).
4.12 DRAINING TAP
These must be located in accessible positions
to permit the draining of the whole system. The
taps must be at least 15 mm nominal size and
manufactured in accordance with BS 2879.
4.10 PIPEWORK
Copper tubing to BSEN 1057:1 2006, BSEN
1172, BSEN 1652 and BSEN 1653, is
recommended for water pipes. Jointing
should be either capillary soldered or with
compression fittings.
Where possible pipes should have a gradient
to ensure air is carried naturally to air release
points and water flows naturally to drain taps.
It should be ensured as far as possible that
the appliances heat exchanger is not a natural
collecting point for air except where providing
useful heat. Pipes should be insulated to
prevent heat loss and to avoid freezing.
Particular attention should be paid to pipes
passing through ventilated spaces in roofs
and under floors.
IMPORTANT:
A minimum length of 1 metre of copper pipe
MUST be fitted to both the flow and return, as
well as the cold mains inlet and the hot water
outlet connections from the boiler before
connecting to any plastic piping.
The water through the appliance heat exchanger
circuit must exceed the min. 2.38 gals/min. (650
L/h) when the burner is firing. It is important to
ensure that this rate is achieved when sections
of the system are shut off either manually or by
automatic controls.
If the volum e of circulating water is too low, the
boiler water temperature will rise too rapidly.
This could cause noise in the system or even
cause the safety thermostat to trip.
This appliance is designed to work on a two
pipe system as shown in fig.6.
Page 22

22
4.13 AIR RELEASE POINTS
These must be fitted at all high points where
air will naturally collect, and must be sited to
facilitate complete filling of the system.
The appliance has an integral sealed expansion
vessel to accommodate the increase of water
volume when the system is heated.
It can accept up to
7 L of expansion water
If the appliance is connected to a system with
an unusually high water content, calculate
the total expansion (see table 3) and add
additional sealed expansion capacity as
appropriate (Fig. 7). In general, modern
systems below 7 L should not present any
problem.
4.14 MAINS WATER FEED. CENTRAL HEATING
There must be no direct connection to the
mains water supply, even through a
non-return valve, without the approval of the
Local Water Authority.
Fig.7
4.15 PERMISSIBLE METHODS OF FILLING
Figure depicts the requirements of Diagram
R24.2a of the Water Supply (Water Fittings)
regulations 1999.
Fig.8
Page 23

23
If the capacity of the central heating system
should exceed 110 L, an additional vessel
should be installed on the return to the
combination boiler from the heating system
(fig. 7). Guidance on vessel sizing is given
(see table 3).
Reference should be made to British Gas
Publications. Draining taps should be at
least 1/2” in BSP nominal size and be in
accordance with BS 2879.
4.17 INSTALLATION TO AN EXISTING CENTRAL
HEATING SYSTEM
The combination boiler is designed to operate
on a sealed system only. Therefore if the
existing system is of the open water type it will
have to be modified to comply with BS 6798.
Before installing a new combination boiler to
an existing system, flush out the old system
with a recommended descaling agent.
If the boiler is installed in an existing system
any unsuitable additives MUST be removed
by thorough cleaning, and flushing out the
old system with recommended descaling
agent.
BS 7593:2006 details the steps necessary
to clean domestic central heating system.
Also check pipework and renew any
corroded pipework or fittings. Valve glands
must be repacked or replaced wherever
necessary and any defective controls
exchanged.
Debris from the system can damage the
boiler and reduce the efficiency. Failure
to comply with the guidelines for the use
of water treatment with the appliance will
invalidate the appliance guarantee and
contravene the Building Regulations.
It is recommended that you fit a primary
water cleanser to the system. We
recommend fitting a filter that will help
remove both magnetite and non-magnetic
debris.
4.18 WATER TREATMENT
This boiler has a stainless steel heat
exchanger, Ravenheat recommend the
use of FERNOX or SENTINEL, or other
treatm ent products recognised by Ravenheat
which must be used in accordance with the
manufacturer’s instructions.
Safety
valve setting (bar)
3.0
Vessel charge
pressure (bar)
0.5 1.0 1.5
Initial system
pressure (bar)
0.5 1.0 1.5 2.0 1.0 1.5 2.0 1.5 2.0
Total water
content of system
EXPANSION VESSEL VOLUME (LITRES)
Litres
25
50
75
100
125
150
175
200
225
250
275
300
325
350
375
400
425
450
475
500
2.1
4.2
6.3
8.3
10 . 4
12 . 5
14 . 6
16. 7
18. 7
20.8
22 .9
25 . 0
27 .0
29.1
31 .2
33 . 3
35.4
37 . 5
39 . 6
41.6
3.5
7.0
10 . 5
14 . 0
17 . 5
21 . 0
24 . 5
28 . 0
31 .5
35 .0
38 .5
42 .0
45 .5
49 .0
52 .5
56 . 0
59 . 5
63 . 0
66 . 5
70 .0
6.5
12 . 9
19 . 4
25 . 9
32 .4
38 . 8
45.3
51 .8
58 .3
64 . 7
71 .2
77 .7
84 . 1
90 .6
97 .1
103.6
110.1
116.5
123 .0
125.9
13 . 7
27.5
41.3
55 .1
68.9
82 .6
96.4
110.2
124.0
137 .7
151 .5
165.3
179 .1
192.8
206.6
220.4
239.2
247.9
261 .7
275.5
2.7
5.4
8.2
10.9
13 . 6
16.3
19 . 1
21.8
24.5
27 .2
30 .0
32 .7
35 .7
38 .1
40.9
43.6
46.3
49.0
51 .8
54 .5
4.7
9.5
14 . 2
19 . 0
23 . 7
28.5
33 . 2
38 . 0
42 .7
47.5
52..2
57 .0
61 .7
66.5
71 .2
76 .0
80 . 7
85 .5
90 . 2
95 . 0
10 . 3
20 . 6
30 .9
41 . 2
51 .5
61 .8
72 . 1
82 .4
92 . 7
103.0
113.3
123.6
133 .9
144 .2
154 .5
164.8
175 .1
185.4
195 .7
206.0
3.9
7.8
11. 7
15.6
19 . 5
23 . 4
27 .3
31 . 2
35 .1
39 . 0
42 .9
46 . 8
50 . 7
54 .6
58 .5
62.4
66.3
70 . 2
74 . 1
78 .0
8.3
16.5
24 . 8
33.1
41 . 3
49 . 6
57.9
66 . 2
74.5
82 . 7
91 .0
99 . 3
10 7 . 6
115 .8
12 4.1
132.4
140.7
14 8 . 9
15 7 . 2
16 5. 5
For system volumes
other than those given
above, multiply the
system volume by
the factor across
0.0833 0.140 0.259 0.551 0 .109 0.190 0.412 0.156 0.331
4.16 SIZING OF ADDITIONAL EXPANSION VESSEL TABLE 3
Deduct from the value given in the table the 7 litre vessel supplied.
Note: This pressure can be increased up to 1.5 bar to suit high static head situations.
Page 24

4.19 HARD WATER AREAS
If the area of installation is recognised as
a hard water area, it is recommended that a
suitable water treatment device is installed on
the mains supply. The water hardness can be
determined by using the standard test paper or
by referring to local water authority.
4.20 DOMESTIC WATER
The domestic hot water must be in accordance
with the relevant recommendations of BS 5546.
Copper tubing to BS EN 1057 is recommended
for water carrying pipework and MUST be used
for pipework carrying potable water.
Important:
It is important that at installation allowance
must be made for the expansion of DHW within
the appliance. If the DHW inlet has a back flow
prevention device fitted for example a nonreturn valve or water meter. Then additional
measure should be taken in the form of a mini
expansion vessel. Fitted in the cold inlet pipe
between the back flow prevention device and
the boiler.
4.21 ELECTRICAL SUPPLY
Warning: this appliance must be earthed
External wiring to the appliance must be
carried out by a competent person and be in
accordance with the current I.E.E. Regulations
and local regulations which apply. Ravenheat
boiler is supplied
with a connection to a 230 V
~ 50 Hz single phase supply.
The supply must be fused at 3 A.
NOTE: The method of connection to the
electricity supply MUST facilitate complete
electrical isolation of the appliance, by the
use of a fused, double pole isolator, having
a contact separation of at least 3 mm in all
poles. The point of connection to the electricity
supply must be readily accessible and adjacent
to the appliance except, where the appliance is
installed in a bathroom.
The current electrical IEE Wiring
regulations must be followed in UK.
5 INSTALLATION
5.1 WARNING
It is MOST IMPORTANT that this appliance is
installed in a HORIZONTAL POSITION, with
the flue air duct passing through the wall.
Make sure the flue is at a 1.5° incline, rising
from the boiler with 50 mm.
Flue terminal diagram states 1.5° - 25 mm,
fall back on flue (fig. 9).
5.2 DELIVERY
The appliance carton contains:
a) Installation instructions,
user instructions and Benchmark log
book
b) White paper template
c) Guarantee card
d) Polythene bag containing:
- 1-15 mm gas service valve
- 2-22 mm compression ball valves
complete with 3/4” washers
- 1-15 mm compression ball valves
complete with 1/2” washers
- 1- 15 mm compression ball valve
- 2 fi xing bolts and wall plugs
IMPORTANT NOTES:
This appliance will produce a plume of
condensation in cool weather. This is due to
the High Effi ciency and hence low fl ue gas
temperature of the boiler. A plume management kit
is available. (see section 5.7 fi g 12)
5.3 UNPACKING OF BOILER
IMPORTANT:
With regard to the Manual Handling
Operations, 1992 Regulations, the following
lift operation exceeds the recommended
weight for a one man lift.
- Stand the boiler carton upright.
- Open the top of the carton.
- Rest the carton on the fl oor
(keeping the fl aps open).
- Turn the carton over with the boiler inside
and then pull the carton up away from
the boiler.
- Rest the boiler on its back on the
fl oor to prepare it for installation.
5.4 POSITIONING OF THE BOILER
Unscrew the two lower screws that secure the
front panel and pull forward and lift up
(fig. 39).
Unscrew the 4 screws that fasten the lower
grating on the casing and remove it from the
bottom of the casing.
Make sure the casing and screws are put to
one side in a safe place.
Fig.9
24
Page 25

5.5 FLUE TERMINAL POSITION
25
Page 26

IMPORTANT: Please lubricate the
internal part of the seals before
fitting.
26
TYPE OF FLUE SYSTEM (All types) - minimum and maximum distance TABLE 4
Flue type C
13
C33 C
53
1
Flue Diameter 60/100 80/125 60/100 80/125 80 mm
(concentric) (concentric) (concentric) (concentric) single pipe
Minimum length (m) 0.3 0.3 1.0 1.0 0.5
(horizontal length) (horizontal length) (vertical length) (vertical length)
Maximum length (m) 8.0 23.0 13.0 26.0 43.0
Equivalent length of 45° bend (m) 0.5 1.25 0.5 1.25 1.25
Equivalent length of 90° bend (m) 1.0 2.5 1.0 2.5 2.5
5.6 OPTIONAL EXTRAS
HORIZONTAL FLUE KIT BOX CONTAINING
(Fig 10):
52 - Self-cutting joint securing screw
57 - Elbow header
59 - Rubber seal Ø 60
56 - Rubber seal Ø 100
60 - Fumes sample point
61 - Flue exhaust duct
62 - Air intake duct
69 - Air sample point
127 - Terminal Rubber wall seal
Fig 11
Fig 10
WARNING: With horizontal concentric fl ue, the
maximum fl ue length is 8 metres, duct extension can be
used with the standard fl ue (see table 4).
FLUE EXTENSION BOX CONTAINING (Fig. 11):
1000 mm fl ue extension duct as an extra cost only
when requested for side and vertical fl ue applications.
59 - Rubber seal Ø 60
63 - Air intake duct extension
64 - Flue exhaust duct extension
Generally speaking, oils and greases are not
suitable for the “peroxide -EPDM”,
therefore we suggest a correct lubrication
using silicon-substances, for instance
“Silikon Spray“ (Arexons).
Page 27
Plume Management Kit TABLE 5
Maximum Length (mm) 6000
minimum length (mm) 500
Equivalent length of 45° bend (mm) 500
Equivalent length of 90° bend (mm) 1000
IMPORTANT : Max fl ue length must not exceed
6 m with a horizontal concentric
60/100 fl ue of 3 m ( L )
Fig. 12
The Maximum permitted fl ue length is
measured from the centre line of the
fl ue terminal to the top of the outlet
terminal
5.7 PLUME MANAGEMENT KIT (Fig 12)
Max 6000 mm fl ue extension duct as an
extra cost only when requested to reduce
pluming nuisance of condensation from
60/100 horizontal concentric fl ue.
IMPORTANT: Please lubricate the
internal part of the seals before
fitting.
Fig. 12a
FLUE EXHAUST DEFLECTION BEND (Fig 12a)
Flue exhaust defl ection bend are also available.
These come in both 45° and 90° degree versions.
These bends fi t directly onto the fl ue exhaust terminal
to defl ect the fl ue gas plume in an upward
or sideways direction.
Although they are not substitute for a plume kit, they
can be considered useful where condensate pluming
is causing a nuisance or can be used to eliminate
condensate collecting on the end of the horizontal
fl ue terminal.
27
Plume Management Kit Part No.
Part. No. Description
TER110101 1 metre high plume kit containing:
(Fig. 12) n. 1 terminal bend
n. 1 90° elbow bend
n. 2 45° bend
n. 1 metre 60 M-F fl ue length
n. 1 fl ue length bracket
CUR110050 45° fl ue exhaust defl ection bend
(Fig. 12a)
CUR110100 90° fl ue exhaust defl ection bend
(Fig. 12a)
L+L max 6000 mm
minimum plume kit length 500 mm
Page 28

28
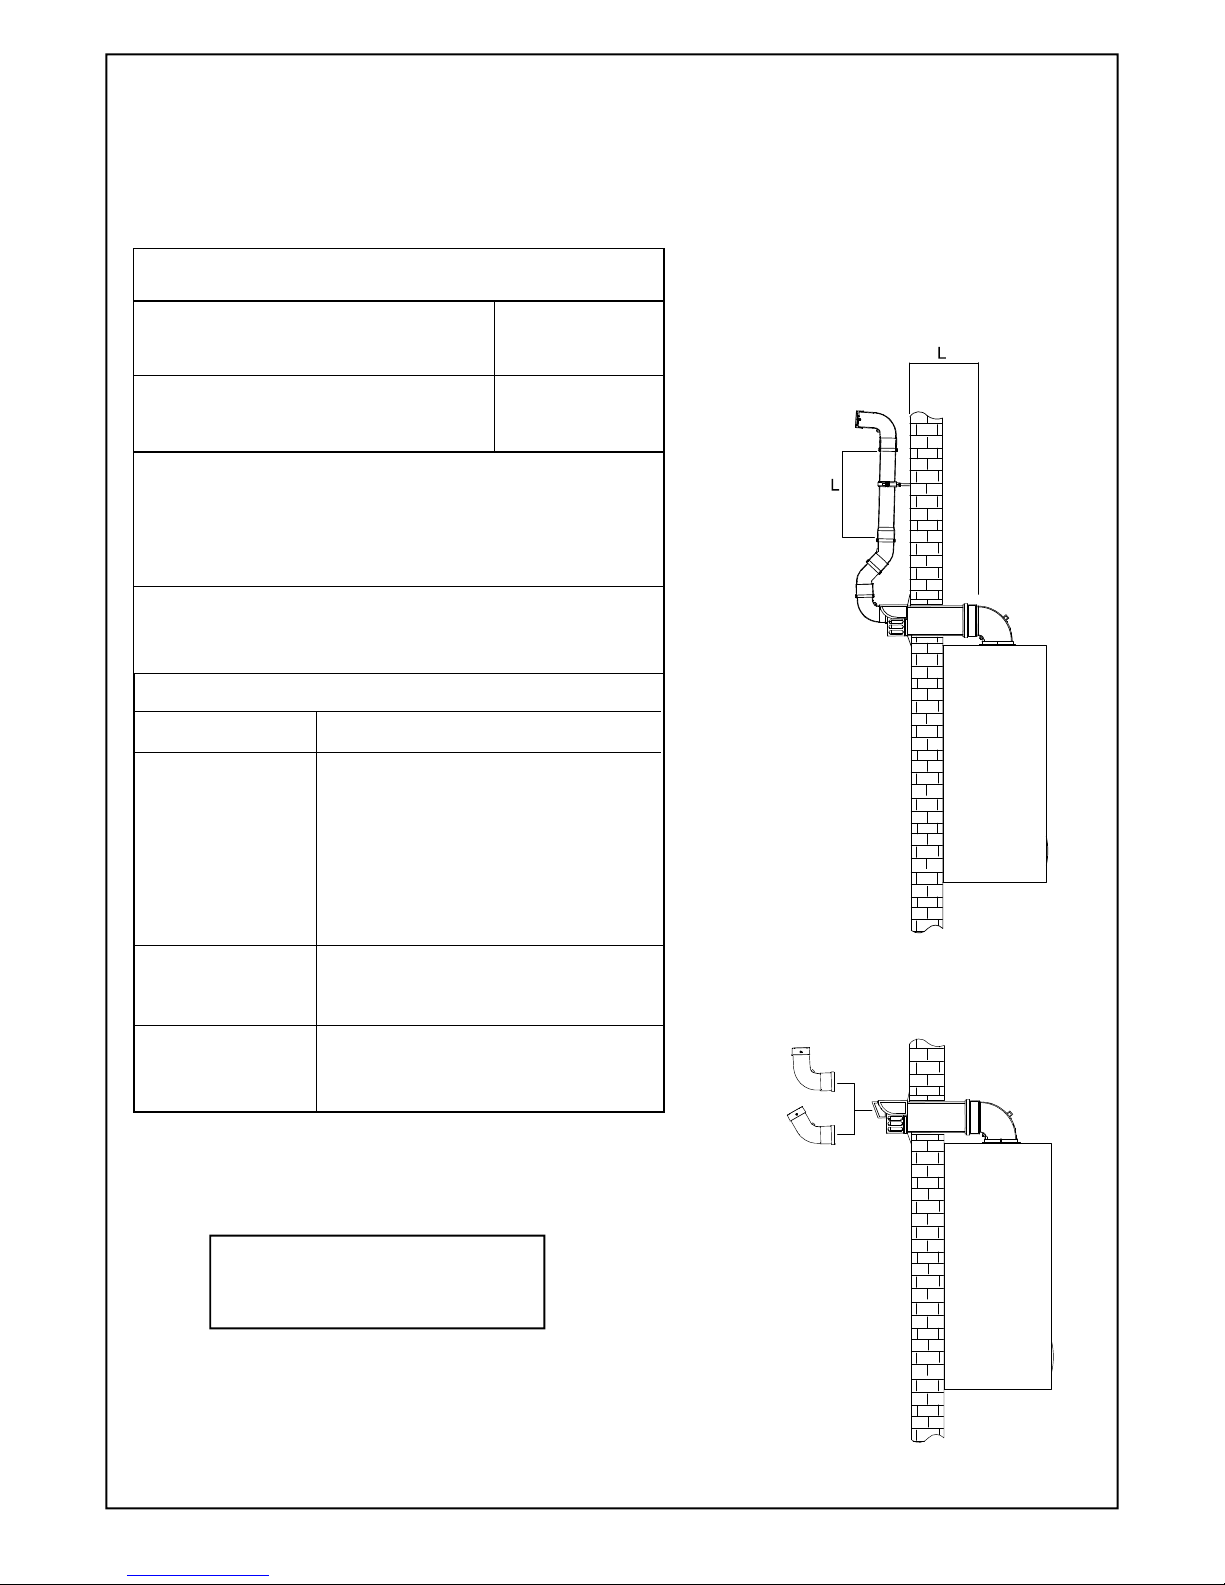
5.8 INSTALLING THE APPLIANCE FOR REAR
FLUE OUTLET (Fig. 13, 16, 17, 18).
FOR APPLIANCE CLEARANCES SEE
SECT. 4.4 AND SECT. 4.10
Use adhesive tape to attach the template to
the wall, making sure that the centre line is
vertical and that the clearance distance is no
less than that shown in fig. 13.
-
Mark the two holes for the top fixing bolts to
fix the boiler on the wall as well as the
centre of the flue duct.
- Detach the template from the wall.
- Use a 10 mm dia drill to make the 2 holes.
Insert the plastic expansion plugs.
- Cut or core drill a 105 mm dia hole for
inserting the flue duct.
Fit the elbow header into the flue flange on the
top of the boiler, positioning it towards the
required direction (fig 13).
Important: Make sure that the inner 60 mm
diameter of the elbow header is inserted
fully into the heat exchanger, and the
rubber seal is correctly fitted.
(Fig 17 item 65)
If using the horizontal flue duct and it is too
long it can be shortened. Should it be
necessary to cut the flue always cut on right
angles and ensure the cut is de-burred.
Note: Add 30 mm to allow for terminal rubber
wall seal (fig.10 item 127).
Insert the flue assembly locating it onto the
wall.
Lift the boiler on the wall, locating onto the top
two fixing bolts. Tighten the two bolts using a
spanner to secure to the wall.
Working above the boiler pull the flue exhaust
duct towards the boiler in order to engage tube
(fig. 18 item 61) into its header.
Position flue into elbow header and push so as
to locate inner and outer flue correctly ensuring
a good seal is made with O-rings. Tighten the
two screws on the flue flange to secure the
elbow header in place
Fit the terminal rubber wall seal and if
necessary terminal guard.
Extension kits are available to order for flue
extension of up to a total overall length of 8
metres (fig.18).
Each extension length extends the pipe by
approximately 1000 mm long up to a maximum
of seven extensions.
Extensions must be installed with the widened
end of the pipe and the tapered end of the flue
pipe aimed towards the exhaust terminal.
IMPORTANT:
Inline flue bend - 1000 mm must be deducted
from overall length for each 90°bend. Obtuse
flue bend - 500 mm must be deducted from
overall length for each 135° bend
(see table 4).
5.9 INSTALLING THE APPLIANCE FOR SIDE
FLUE OUTLET (Fig. 14, 15, 16, 17, 18)
- Attach the template to the wall with adhesive
tape, making sure that the centre line is
vertical and that the distance from the centre
line to the nearest side wall is not less than
measurement in fi
g.14.
- Mark the two fixing bolt securing holes on the
wall and extend the axis of the flue duct hole
to the side wall ensuring it is horizontal.
- Make sure flue slopes 1.5° down towards
the boiler and that there is a 25 mm fall per
metre of the flue length.
- Trace the centre of the flue duct hole and
measure distance from the corner of the
wall (fig.14), measure the distance 124 mm
between the centre of flue duct hole to the
corner.
Detach the template from the wall.
- Use a 10 mm. dia drill to make the 2 holes for
the
fixing bolts. Insert the plastic expansion
plugs. Core drill a 105 mm dia. hole in the
side wall for inserting the flue duct.
Fit the elbow header into the flue flange on
the top of the boiler, positioning it towards
the required direction.
Important: Make sure that the inner 60mm
diameter of the elbow header is inserted
fully into the heat exchanger, and the
rubber seal is correctly fitted.
(Fig 17 item 65)
If using the horizontal flue duct and it is too
long it can be shortened.
Should it be necessary to cut the flue
always cut on right angles and ensure the
cut is de-burred.
Note:
Add 30 mm to allow for terminal
rubber wall seal (fig.10 item 127).
Page 29

29
Fig 13
REAR FLUE OUTLET
Insert the flue assembly into the wall, making
sure it will not interfere when fixing the boiler
on the wall.
Lift the boiler on the wall, locating onto the
two fixing bolts. Tighten the two bolts using a
spanner to secure to the wall.
Working above the boiler pull the flue duct
towards the elbow in order to engage the
tube into its header (fig.10). Position the flue
elbow in line with the flue and push so as to
locate inner and outer flue correctly. Ensuring
a good seal is made with O-rings. Tighten the
two screws on the flue flange to secure the
elbow header in place.
IMPORTANT:
Terminal rubber wall seal must be fitted
(127 fig.10 item 127).
Each extension length extends the pipe
by approximately 1000 mm long up
to a maximum of seven extensions.
Pipe length can be established using the
instructions in section 5.5. Extensions must
be installed with the widened end of the air
intake pipe and the tapered end of the flue
pipe aimed towards the exhaust terminal.
NOTE: The position of the appliance must provide
minimum side clearances of 5mm as the
side panels do not require removing for
servicing. However, if the option is
preferred to remove the panels then a
minimum clearance of 55mm is required.
Extensions must be joined together with the
standard terminal pipe, and inserted in each
other as far as they can go.
If an extension must be shortened, this must
be done from the straight end, and not from
the widened or tapered end. To measure the
pipeline properly all components must be
assembled and total length measured before
cutting. The straight end of the extension
connects to the boiler. The flue output and air
intake pipes fits into the boiler header until it
stops (fig.17 - 18).
When cutting both inner and outer ducts of
the extension, always ensure that the reduced
end (male) of the inner and outer duct are
square and to the same length.
Page 30

30
Fig. 15
All joints must be sealed with the rubber seals
supplied.
It is important to put the centering spacer, supplied
with the unit, inside between the two pipes, from
the side opposite the extension’s straight end.
NOTE: A suitable support bracket (flue bracket)
is available from Ravenheat and should be used
to support the flue length at least every one
metre preferably at each joint this bracket should
be secured to wall and flue duct.
SIDE FLUE OUTLET
Fig. 14
NOTE: The position of the appliance must provide
minimum side clearances of 5mm as the
side panels do not require removing for
servicing. However, if the option is
preferred to remove the panels then a
minimum clearance of 55mm is required.
Page 31
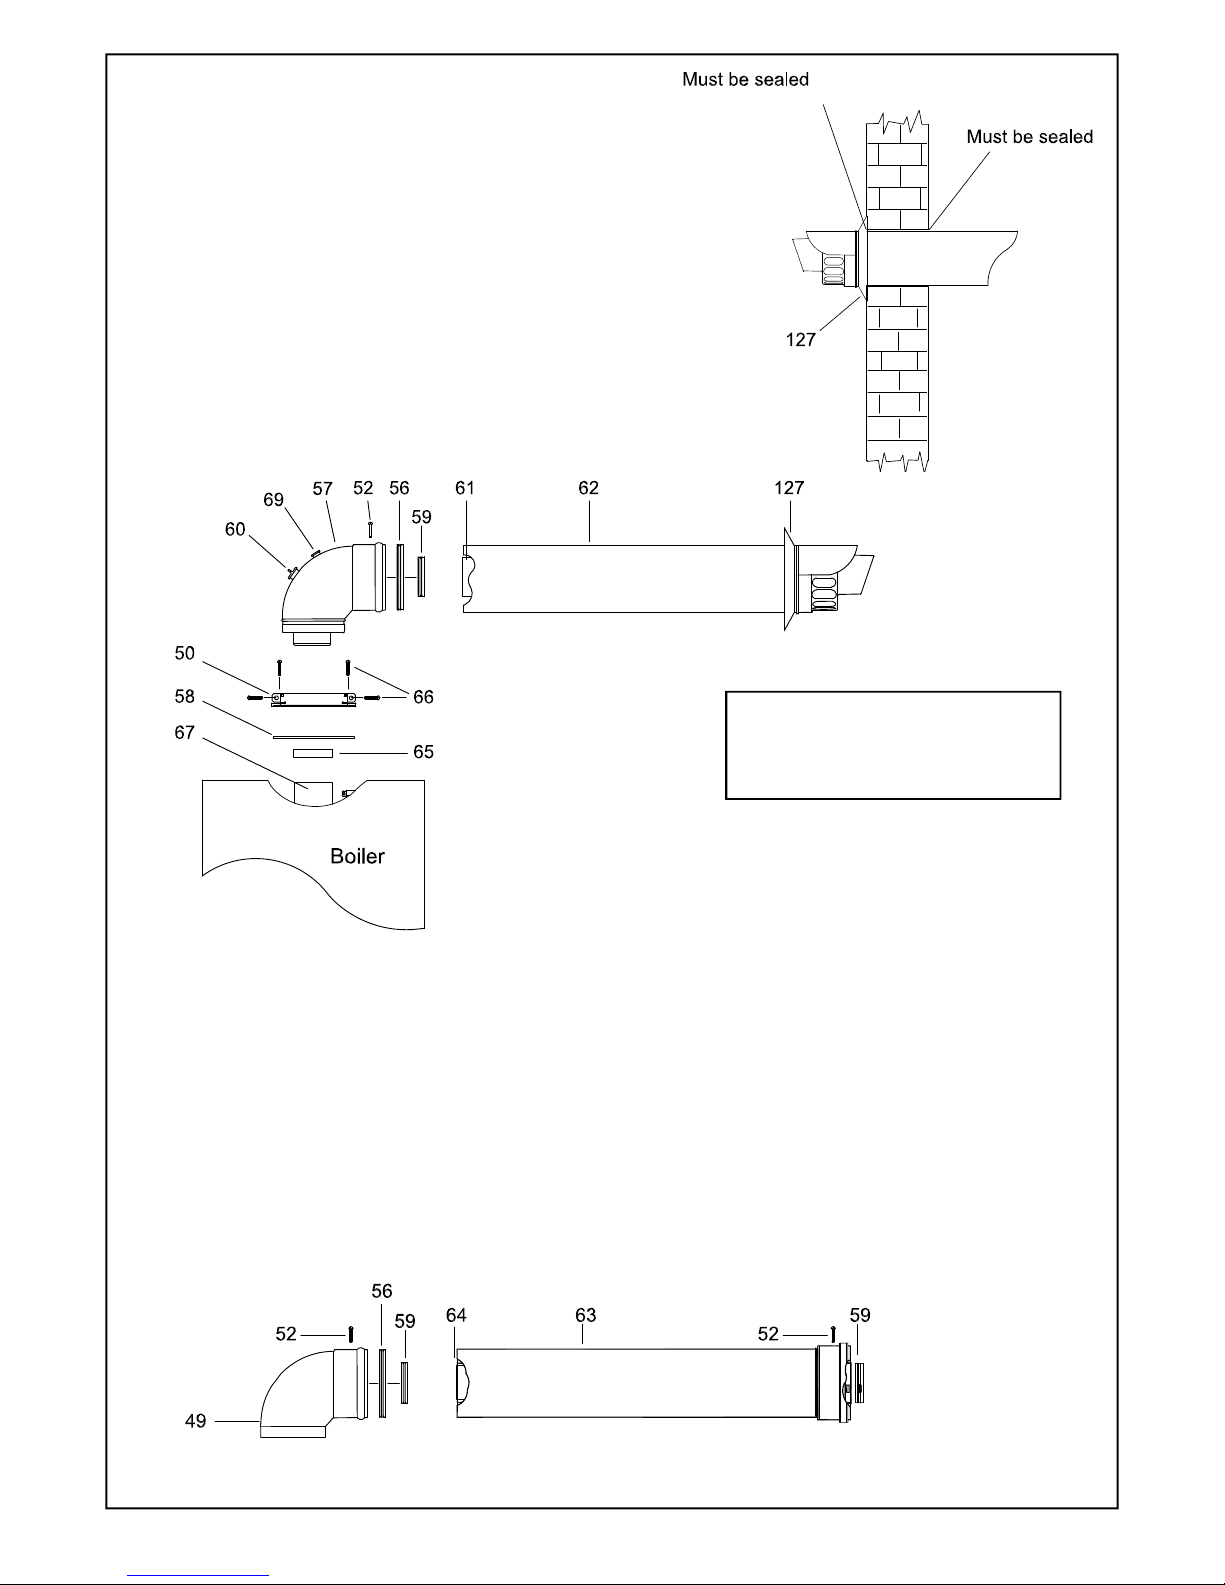
5.11 INTAKE AND EXHAUST TERMINAL COMPONENTS
Fig.17
IMPORTANT: Please lubricate the
internal part of the seals before
fitting.
5.12 IN-LINE FLUE BEND AND FLUE EXTENSION
Fig.18
49 - In-line Flue Bend
52 - Self-cutting joint securing screw
56 - Rubber seal Ø 100
59 - Rubber seal Ø 60
63 - Air intake duct extension
64 - Flue exhaust duct extension
31
KEY
50 - Flue adapter
52 - Self-cutting joint securing screw
56 - Rubber seal Ø 100
57 - Elbow header
58 - Header gasket
59 - Rubber seal Ø 60
60 - Fumes sample point
61 - STD fl ue exhaust duct
62 - Terminal
65 - Flue manifold rubber seal
66 - Securing screw
67 - Flue temperature sensor
69 - Air sample point
127 - Terminal Rubber wall seal
Fig 16
IN-LINE FLUE BEND
Measure the distance between the flue bends or
the flue/terminal assembly. The measurements
should be taken from the outer edge of the flue
and bend (fig. 18).
5.10 COMPLETING HORIZONTAL FLUE
INSTALLATION.
Ensure the flue system has been checked for
soundness, is stable and secure. Where the
horizontal flue terminal passes through the
external wall, it is essential that the flue must
be sealed on both in exterior and interior
part of the wall, and securing screws fitted.
The terminal rubber must also be fitted
(fig. 16-17 item 127).
Page 32

L + L = 8m Max
Fig. 19
Straight Flue Straight Flue Offset Flue Offset Flue
L = 12 m Max L = 12.0 m Max L = 10 m Max L = 11 m Max
plus Terminal plus Terminal plus 2 bend 90° plus 2 bend 45°
and Terminal and Terminal
Fig. 20
32
5.13 VERTICAL FLUE INSTRUCTION ONLY (Fig. 19-20-21)
SEE SECT. 4.10 FOR PERMISSIBLE FLUE POSITION
IN-LINE FLUE BEND - 1000 mm MUST BE DEDUCTED FROM OVERALL LENGTH FOR EACH 90° BEND
OBTUSE FLUE BEND - 500 mm MUST BE DEDUCTED FROM OVERALL LENGTH FOR EACH 135° BEND.
The vertical flue kit is intended for use where
a horizontal flue outlet is not possible or desired.
The vertical flue can be used either with a flat roof
or a pitched roof (maximum pitch 60°).
Where a straight vertical flue is not possible or desired,
an offset vertical flue can be used in conjunction with
a side horizontal flue extension piece and in-line
135°/90° flue bend (fig. 19).
Proceed with installation as detailed in section 5
ignoring all references to horizontal flue installations.
Use adhesive tape to attach the template to the wall,
making sure that the centre line is vertical and that the
flue centre line is virtually below the point at which the
flue will exit the roof.
- Ensure that the maximum permissible flue
length is not exceeded (fig. 20 and see table 5).
- Mark the two wall fixing bolt holes
- Detach the template from the wall.
- Use a 10 mm dia. drill to make the 2 holes.
- Insert plastic expansion plug.
- Screw in the two coach bolts.
- Position the flue sample point starter (straight
flue header which must be fitted) and tighten the
two screws on the flue flange (fig. 22 item 66),
and ensure that the gasket is correctly fitted.
Important: Make sure that the inner 60
mm diameter of the straight flue header is
inserted fully into the heat exchanger, and
the rubber seal is correctly fitted. (Fig 22
item 65)
IMPORTANT NOTES : For greater flue
length see twin flue or concentric 80/125
flue instructions
Page 33

IMPORTANT: Please lubricate the
internal part of the seals before
fitting.
Straight Flue Offset Flue Offset Flue
L = 12 m Max L = 12 m Max L = 11 m Max
plus Combi ridge plus 2 bend 90° plus 2 bend 45°
and Combi ridge and Combi ridge
33
Fig. 21
Starting at the appliance end, assemble the
extension duct sections, making each inner and
outer (flue) joint by inserting the spigot end into
the socket end of the next tube, making sure the
seal rings are correctly located (fig. 22). Make sure
that the entire flue is adequately supported. Use at
least one bracket for each extension used.
Ensure that all inner flue connections have a good
fit/seal, and that the space clips in each extension
are correctly positioned.
Fig.22
Fig.23
Cut a 105 mm diameter hole through the ceiling and/or
roof, at the point previously marked.
Fit a roof flashing slate to the roof, available from
Ravenheat. Insert the Vertical Flue terminal assembly
through the flashing slate from the outside.
Lift the boiler on the wall, locating onto the top two
fixing bolts. Tighten the two bolts using a spanner to
secure to the wall.
Measure the vertical distance between the top of the
flue and the bottom of the flue terminal assembly (fig.
21). The measurements should be taken from the outer
diameter of the flue.
NOTE: Where this length does not match any standard
combination of the extensions, only the extension can
be cut to the required length (fig. 23).
When cutting both inner and outer ducts of the
extension, always cut on spigot side, and they must
be de-burred.
KEY
52 - Self-cutting joint securing screw
56 - Flue adapter
58 - Header gasket
59 - Rubber seal Ø 60
60 - Fumes sample point
63 - Flue extension
64 - Flue exhaust duct extension
65 - Flue manifold rubber seal
66 - Securing screw
68 - Flue starter
69 - Air sample point
Part. No. Description
COL0160050 Straight fl ue header / sample point
60/100
PRFE Flue Extension 60/100 L1000
PR45FBI 45° bend 60/100
PR90FBI 90° Elbow bend 60/100
PR5023016 Horizontal terminal 60/100
TER110200 Vertical fl ue Terminal
TEG060050 Flashing Sleeve/Slate
ACCESSORIES CONCENTRIC FLUE 60/100 EXTRAS:
TABLE 6
Page 34

Fig. 24
IMPORTANT: Please, lubricate the
internal part of the seals before
fitting.
34
IMPORTANT:
These instructions must be read in
conjunction with the main installation and
servicing instructions.
As with all fl ues the kits must be installed
taking due account of the current issue of BS
5440 parts 1 & 2 and timber frame housing
DM2 is referenced to the Institute of Gas
Engineers Document IGE/UP/7.
Also note that the requirements will vary
depending upon the kit being installed.
Guidance is provided but unless otherwise
stated, always comply with the
recommendations of the relevant codes of
practice.
5.14 INSTALLATION INSTRUCTIONS FOR TWIN FLUE PIPE (ECCENTRIC FLUE DUCT SYSTEM)
5.15 TWIN FLUE INSTRUCTIONS
This part of the installation manual covers the
installation and fi xing instructions of the twin
fl ue eccentric fl ue duct systems only.
When ordering twin fl ue it must be stated for
HE 25/30 S Compact range.
Typical installation procedures are illustrated
by the drawing (fi g.24).
Remove the front panel of the case (sect.8.1).
Unscrew the screws (item 66 fi g. 17) on the
fl ue adapter.
Make sure that the heat exchanger rubber
seal is located, and lubricate the internal part
of the seal before assembly.
Locate the header gasket on the twin fl ue
header and push into the fl ue adaptor making
sure that the inner plastic exhaust locates fi rmly in the outlet spigot of the heat exchanger,
and screw the securing screws that secure
the twin fl ue header on to the boiler.
Locate the 2 x 80 mm O-rings in the twin
flue header and lubricate the internal part of
the seal before assembly to ensure an easy
snug fi t.
Measurements and bends must be calculated
correctly to ensure the maximum flue length
is not exceeded.
All located O-rings must be lubricated with a
silicone grease to ensure a snug fit.
NOTE: Exhaust flue must slope 1.5° down
towards the boiler 25 mm/m fall per metre of
flue length.
Spacing Clips
Spacing Clips are available on request should
they be required.
NOTE: for eccentric vertical flue a 125 mm
(5 in) diameter flashing plate will be required.
Part. No Description
SDO160050 Twin fl ue header F80/F80
PRO110200 Straight pipe L.1000 80
CUR110150 90° elbow bend 80
CUR110200 45° bend 80
GRI110050 Air inlet terminal 80
GRI110100 Exhaust terminal 80
TER060110 Vertical eccentric fl ue Terminal
TABLE 7
Page 35

Fig. 26
Fig. 25
35
Exhaust/suction system with concentric pipes for
fl at or sloping roofs. Extensions with two separate
pipes (fi g. 24).
Maximum distance: T = L = 21 + 21 = 42 metres + Terminal
Minimum distance: L = 0.5 + 0.5 = 1 metres + Terminal
Exhaust terminal must not be cut.
NOTE:
- If bends are used in the exhaust fl ue then horizontal
sections must be avoided and there must be a 1.5° slope
- Towards the boiler 25 mm fall per metre.
IMPORTANT:
-
See fi g. 6 for terminal clearances.
Exhaust/suction system with with two separate
rated 80 dia. pipes exhaust on fl at or sloping roof,
suction from vertical wall (fi g. 25).
Maximum distance D = L + L1 = 39.5 metres + Terminal
Minimum total length = 2 metres
NOTE: Exhaust fl ue must slope 1.5° down towards the
boiler 25 mm fall per metre.
Exhaust/suction system with two separate
pipes through a single vertical wall (fi g. 26).
Maximum distance: D = L + L1 = 37 metres
Minimum distance: D = L + L1 = 1 metres
Min distance between pipe 50 mm.
IMPORTANT NOTICE:
- Inlet and exhaust terminals must never
be installed on opposite walls of the building (PrEN 483).
- If the fl ue terminates less than 2 m above a balcony, above
the ground, or above a fl at roof to which people have access,
then a suitable terminal guard must be fi tted.
- Fit only recommended fl ue terminal guard by securing
concentrically around terminal with screws.
Available on request from:
RAVENHEAT MANUFACTURING LTD
Chartists way, Morley, Leeds, West Yorkshire
ENGLAND LS27 9ET - U.K.
Tel: 0113 252 7007
5.16
5.17
5.18
IMPORTANT: Please lubricate the
internal part of the seals before
fitting.
Page 36

36
5.19 INSTALLATION INSTRUCTIONS FOR CONCENTRIC 80/125 FLUE SYSTEM
L + L = 23.5m Max
Straight Flue Straight Flue 90° Offset Flue 135° Offset Flue
L = 25 m Max L = 20 m Max L = 20 m Max L = 22.5m Max
plus Terminal plus Terminal plus Terminal plus Terminal
The vertical 80/125 flue kit is intended for use
where a horizontal 60/100 flue outlet is not
possible or desired.
The vertical flue can be
installed on either a flat
roof or a pitched roof (maximum pitch 60°).
Where a straight vertical flue is not possible or
desired, an offset vertical flue can be used in
conjunction with a side horizontal flue extension
piece and an inline 135°/90° flue bend (fig. 27).
Part No Description
COL160050 Straight fl ue header / sample point
60/100
PRO110300 Flue Extension 80/125 L1000
RID110050 125/80 to 100/60 Flue reducer
CUR110250 45° fl ue bend 80/125
CUR110300 90° elbow fl ue bend 80/125
TER010050 Horizontal Flue Terminal 80/125
TER110200 Vertical Flue Terminal 80/125
TEG060051 Flashing sleeve/slate
IMPORTANT:
- See fi g. 6 for terminal clearances.
Fig. 27
IMPORTANT NOTICE:
When using our vertical fl ue kit the 125 mm x 100 reducer is supplied
complete with the vertical terminal simply remove this and fi x it into
the straight fl ue header (which must be fi tted) on the top of the boiler.
Fig. 28
NOTE : If using Flue arrangement in fi g. 27 then the 125x100 Flue reducer
must be purchased separately.
IMPORTANT: Please lubricate the
internal part of the seals before
fitting.
TABLE 8
Available on request from:
RAVENHEAT MANUFACTURING LTD
Chartists way, Morley, Leeds, West Yorkshire
ENGLAND LS27 9ET - U.K.
Tel: 0113 252 7007
Page 37

5.25 POSITION OF WATER/GAS
CONNECTIONS
37
5.20 ASSEMBLE BOILER
5.21 Fitting valve pack
Remove plastic caps from boiler connection
and fit valves as per fig. 29 using the washers
provided.
It is recommended fitting the valve pack
before installing the boiler on the wall.
5.22 GAS CONNECTION (Fig. 29)
A minimum working gas pressure of 20 mbar (8
in w.g.) must be available at the boiler inlet at
full flow rate (37 mbar for propane).
(Also see section 4.6)
Fit the gas service cock to the boiler via the
union nut and connect gas pipe. Do not over
tighten and use another spanner as a counter
force to avoid straining internal connections.
Important consult (sect 4.6).
5.23 CENTRAL HEATING CONNECTION
(Fig. 29)
Before any central heating connections are
made to the boiler all system valves should
be opened and the system thoroughly flushed
out with cold water.
- Connect the central heating return pipe to
the isolating cock.
- Connect the central heating flow pipe
to the isolating cock marked CHF.
- Pipe dimensions and positions are
marked on template supplied (fig. 30).
5.24 DOMESTIC HOT WATER CONNECTION
(Fig. 29)
The domestic hot water circuit does not need
a safety valve but it is essential to ensure that
the pressure of the cold water supply does
not exceed 10 bar. If in doubt it is advisable
to install a pressure reducing valve. The
minimum pressure needed to operate the
domestic hot water system is 0.5 bar with
a flow of approx 3 L per min. Flush out all
foreign matter from the supply pipe before
and after connecting to the appliance.
- Connect the 15 m m. cold water pipe to the
appliance inlet.
- Connect the 15 mm. hot water pipe to the
appliance outlet.
Fig. 30
Fig. 29
Page 38

38
5.26 SAFETY VALVE DISCHARGE
The safety valve is located to the rear
(15 mm copper) to permit a discharge pipe
to be connected. When connecting ensure the
discharge pipe does not restrict access. The
discharge should terminate facing downward
exterior to the building in a position where
discharging (possibly boiling water & steam)
will not create danger or nuisance, and not
to cause damage to electrical components
or wiring. The discharge must not be over an
entrance or a window or any other type of
access.
5.27 CONDENSATE DRAIN CONNECTION
It is important to verify that the
drip-plate with drain trap contains
water.
If necessary, the drip plate can be filled
using the trap provided (Fig. 49).
The condensate drain connection is a flexible
3/4” pipe and is therefore adjustable Fig. 49.
The drain pipe should have a fall of a least
2.5° away from the boiler. Condensate should,
if possible be discharged into the household
internal drainage system.
If this is not practicable, discharge can be
allowed into the external household drains or a
purpose designed soak away.
It is recommended that any external condensate
drain pipe is insulated and also must be of 40
mm (1” 1/2) diameter, through the outside wall to
prevent freezing in adverse weather conditions.
It is not necessary to provide air breaks or extra
traps in discharge pipe as there is already a 125
mm high trap inside the boiler.
Fitting an extra trap may cause the boiler siphon
to work incorrectly.
Refer to BS5546 or BS6798 for advice on
disposal of boiler condensate.
Notes: ALL EXTERNAL PIPE RUNS MUST BE IN ACCORDANCE WITH BS 6798
1 - INTERNAL TO SINK WASTE UPSTREAM OF
SINK WASTE TRAP
2 - INTERNAL CONNECTION TO SOIL VENT
STACK
Make connection to SVP using a solvent
welded saddle.
Fig. 32
Fig. 31
Page 39

39
3 - TERMINATION TO SOAK AWAY 4 - TERMINATION TO DRAIN / GULLY
WARNING:
If the supply cord is damaged, it must be
replaced by a service engineer (supply
cord available from Ravenheat).
5.29 OUTDOOR SENSOR
For use, consult Outdoor Sensor
instructions.
6 COMMISSIONING
Each boiler has been through a rigorous
operational testing procedure at our factory
and should not require any further
adjustment, if you are not the installer but
just commissioning this boiler check that the
boiler has been installed in accordance with
these instructions, and the integrity of the
flue system and the flue seals, as described
in the flue installation section.
IMPORTANT:
Also refer to the commissioning check list
attached to the front of the boiler.
6.1 GAS SUPPLY INSTALLATION
Inspect the entire installation including the
gas meter, test for soundness and purge, all
as described in BS 6891.
In Ireland refer to IS 813:2002.
6.2 ELECTRICAL INSTALLATION
Prelim inary electrical systems checks to
ensure electrical safety shall be carried out
by a competent person.
ALWAYS carry out the preliminary electrical
system checks:
i.e. earth continuity, polarity, resistance to
earth and short circuit, using a suitable test
meter.
Fig. 33
Fig. 34
5.28 EXTERNAL CONTROLS
IMPORTANT:
Electricity supply must be as specified in
clause (sect. 4.22).
- When controls external to the appliance are
required, design of the external electrical
circuits should be undertaken by a
competent person. In accordance with the
IEE wiring regulations.
It is essential that all external controls
are VOLT FREE.
Factory fitted internal wiring must not be
disturbed when wiring external controls.
- To gain access to the electrical box remove
the front panel of the case as described in
clauses sect.
8.2.
You can slide towards the top the
instrument panel box and push the retaining
latches and remove the instrument panel
(sect. 8.24).
- Heat resistant flexible cable is fitted
between the isolator and the terminal block
which is a 3 core cable of 0.75 mm2 (24x0,2
mm) to BS 6500.
Make sure all wires to the appliance are
routed away from sharp edges and hot
surfaces.
The cable must be fastened with its cord
anchorage and connected so that it should
make the cable slip from the anchorage until
the current carrying conductors become taut
before the earthing conductor.
Securely tighten all terminal screws and
arrange the cable with slack between the
cord anchorage and the terminal block.
Page 40

40
6.3 INITIAL FILLING OF THE SYSTEM
Open central heating flow and return valves
Unscrew the cap on automatic air release valve
positioned on the top of the pump housing one
full turn (leave open permanently).
- Close all air release taps on the central
heating system. Press the info button to
display the current pressure (code E08 will
display if the pressure is nil/too low).
- Gradually open stopcock at the filling point
connection to the central heating system
until water is heard to flow.
- Starting with the lowest radiator open each
air release tap in turn. Close when the
water is clear, free of bubbles and flows
out. In the same way release air from any
high points in the pipework.
- Continue filling the system until 1.5 bar
register on digital display. Press the ESC
button once again to return to the main
screen.
Then turn off the filling points stopcock.
- Inspect the system for water soundness
and remedy any leaks discovered.
6.4 SETTING THE HEATING SYSTEM DESIGN
PRESSURE
The design pressure must be a min. 1bar
and max. 1.5 bar. These figures are read
on the digital display by pressing the INFO
button.
The actual reading should ideally be 1 bar +
the height in metres to the highest point of
the system above the base of the
appliance (up to max of 1.5 bar).
N.B.: The safety valve is set to lift at
3 bar (30 m/42.5 psi).
To lower the system pressure to the
required value unscrew the drain
point (fig. 36) or drain on the heating
circuit.
6.5 FILLING THE HOT WATER SYSTEM
Close all hot water draw-off taps.
Open the cold water inlet cock.
Slowly open each draw-off tap until clear water
is discharged.
6.6 LIGHTING THE BOILER
Before lighting the boiler make sure that
the heating circuit flow and return valves are
open and also that the cold water input cock
is open.
- If external controls are installed (
E.g. time
clock and therm ostat) make sure that they
are calling for heat.
- Select winter function, the winter icon in
digital display will be flashing (item 3 fig.
2).
- To select the minimum heating temperature
press the radiator button.
IMPORTANT:
Before lighting the boiler select the minimum
central heating temperature. This must be left
at minimum for approx 5 mins to purge air
safely from the boiler.
Fig. 36
Fig. 35
- To select the minimum heating temperature
press the radiator button.
- Press arrow up and arrow down buttons to
adjust.
- The digital display shows the current set
temperature in central heating.
- After a few seconds the digital display shows
the central heating temperature in demand
(CH icon flashing, item 3 fig. 2).
- The fan starts and after a few seconds or
so the digital led display will show that the
ignition has commenced.
- NOTES: Put the digital clock in demand
position.
Page 41

41
IMPORTANT: Do not insert the analyser
probe into the sample point immediately
or leave in long periods. This will prevent
saturation of the analyser.
During the calibration function the
combustion ratio may increase for a
short time while the boiler performance is
optimised.
The person carrying out a combustion
measurement should have been assessed
as competent in the use of a flue gas
analyser.
The flue gas analyser used should be one
meeting the requirements of BS7927 or BSEN50379-3 and be calibrated in accordance
with the analyser manufacturer ’s
requirements.
Fig. 37
ELECTRODES POSITION
Anti-clockwise to increase CO2.
Clockwise to decrease CO2.
After any new regulation wait to stabilise
for about one minute.
Replace the front cover.
TABLE 9
- The ignition control will automatically make
three attempts to start, if it doesn’t start this
may be due to air in the gas supply line.
If the burner fails to light, the digital led
display and fan will stop, and the display will
show the lockout code (E01 depicts flame
failure).
- If necessary push the boiler Reset button
(item 2 fig.1) and the boiler will restart
automatically.
- After the boiler has lit, allow to warm at
minimum temperature setting to purge any
air from the system.
- Once the system has been purged of air,
set the heating temperature to the desired
setting.
6.8 CHECK THE GAS PRESSURE
Check the gas mains pressure at the gas
valve inlet pressure test point (fig.35) with the
boiler operating at full rate.
Check with the Local Gas supplier if the
pressure differs significantly from 20 mbar
G20 (natural gas), 37 mbar G31 (propane).
With leak detection fluid test for gas tightness
of all gas components and joints.
IMPORTANT:
The Gas Valve Throttle adjuster is required
to be sealed with tamper proof paint after
adjustment (fig. 35).
6.9 COMBUSTION CHECK
Check all gas carrying components along with,
the combustion of the appliance which should
be checked as follows.
Remove the front panel of the appliance.
Ensure the boiler and external controls are
calling for heat. Turn on the electrical supply.
open the hot water tap at maximum flow rate.
Wait at least five minutes or until the unit has
reached its operating temperature.
Unscrew the test sample screw on the boiler
elbow bend (item 60 fig. 10). Measure the level
of CO2. Check the reading against the
corresponding value in table 9.
It is essential that this test is repeated with
the casing on as this will check the integrity
of the flue.
If adjustment proves necessary then proceed
as follows.
IMPORTANT: Any adjustment to the gas
valve should only be carried out by a
qualified person.
Referring to the table 9, adjust the
maximum level of CO2 with the Throttle
using a 2.5 mm hex on the gas valve
(fig.35).
Page 42

Once the process of commissioning the boiler is complete, the
commissioning engineer MUST complete the relevant section in the Benchmark log book.
ATTENTION
IT IS A CONDITION OF THE MANUFACTURERS WARRANTY THAT THE BENCHMARK
COMMISSIONING CHECKLIST IS FULLY COMPLETED AND LEFT WITH THE APPLIANCE
6.10 CHECKING THE FLUE SYSTEM
The flue system should be visually checked for
soundness. Check all connections and fixings
are secure and tight.
6.11 CHECKING THE HEATING THERMOSTAT
Allow the system to warm up and then select
the C.H thermostat to ensure the main burner
modulates from “high” to “low” and “low”
to “off” and vice versa (scale range covers
approx. 35 °C - 80 °C, sec 1.5 key 5 to set
heating temperatures).
6.12 TESTING AND REGULATING THE
DOMESTIC HOT WATER SYSTEM
FLOW AND CHECK THE OPERATIONAL
(WORKING) INLET PRESSURE
Set up the boiler to operate at maximum rate
by opening the hot tap to maximum flow.
With the boiler operating at the maximum
rate check the operational dynamic (working)
gas pressure test complies with the
requirements.
Ensure that this inlet pressure can be
obtained with all other gas appliances in the
property working.
Put the appliance in summer position (item1
fig. 1).
- Open a domestic hot water tap (preferably
the bath tap). Ensure the cold water inlet
stopcock is open and the DHW is set at
maximum, press the arrow up (item 3 fig.
1) the digital display shows the set
temperature, if necessary adjust with
arrow up and arrow down buttons.
- After a few seconds the digital display
shows water temperature in demand
(D.H.W. icon flashing, item 10 fig. 2).
- If the boiler does not light check that the
water flow rate is above the min. required to
operate the differential pressure 2.8 L/min.
(0.61 gals/min).
- The temperature of the water will depend
on the rate at which it flows. If, due to high
water pressure, the flow rate is too high
(and the temperature too low for practical
use) the flow rate may be adjusted.
It is better to set for the lowest acceptable
temperature preferably at the bath tap since
the user can gain higher temperatures at
other restricted flow taps.
- If the cold supply is subject to large
fluctuations or is above the permitted max.
water pressure, a suitable pressure/flow
regulator should be fitted on the cold water
supply to the appliance.
- Slowly close the draw off tap to reduce the
flow rate to the min (approx. 2.8 L/min).
- Select a different temperature for DHW. to
ensure it operates at its various setting.
- Close the draw-off tap still further. The
burner should stop when the rate falls below
about 2.8 L/min (0.61 gals/min).
6.13 KEEP HOT
The boiler comes with an optional keep
hot facility.
This can be switched on
by a competent
person.
This will result in the boiler, at any time,
periodically firing to keep the water
within the boiler up to temperature to
reduce the time delay of hot water
delivered to any hot draw off point.
- Press INFO and arrow down buttons
together (item 6 and 4 fig. 1) for 5 seconds
to enter in USER PARAMETERS mode.
- Use arrow up and arrow down buttons
(item 3 and 4 fig. 1), to select P003, and
press ENTER (item 1 fig. 1).
- Use arrow up and arrow down buttons
(item 3 and 4 fig. 1) to select the followings
option: “0” disabled, “1” enable, adjust if
necessary and press ENTER (item 1 fig. 1)
to confirm.
6.14 C.H. HIGH/LOW TEMPERATURE
The boiler comes set, in Central heating,
at the 80°C flow temperature.
It is possible to adjust the max set-point to
max 50°.
- Press INFO and arrow down buttons
together (item 6 and 4 fig. 1) for 5 seconds
to enter in USER PARAMETERS mode.
- Use arrow up and arrow down buttons
(item 3 and 4 fig. 1), to select P004.
- Use arrow up and arrow down buttons
(item 3 and 4 fig. 1) to select the
followings option: “0” low temperature,
“1” hight temperature.
42
Page 43
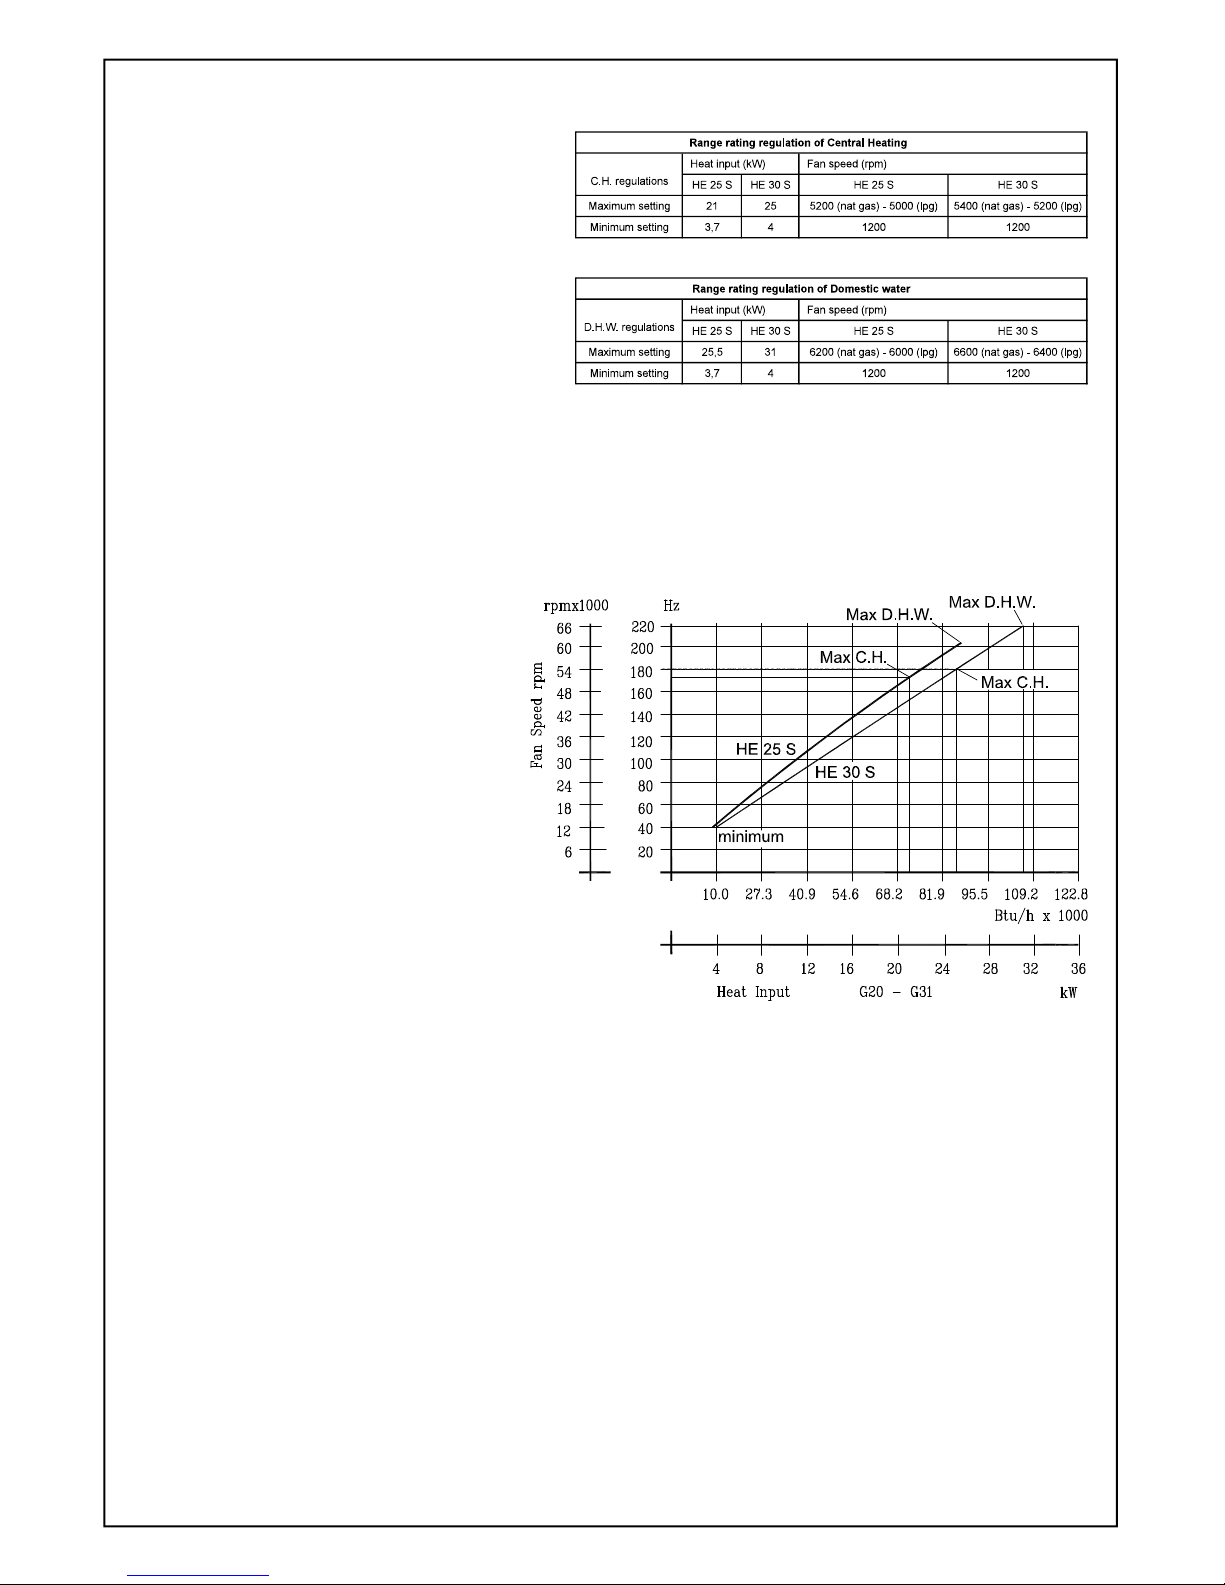
system, and to the building, in the event
of the system remaining inoperative during
frost conditions.
- Explain the function and the use of the
boiler, the summer/winter button, the
ON/OFF switch and the reset of the digital
display.
- Explain and demonstrate the function of the
temperature controls, radiator valves etc. for
the economic use of the system.
- If an external time clock is fitted, then draw
attention to ensure the boiler timer is left in
the manual position.
- Stress the importance of regular servicing
by a qualified Heating Engineer and that a
comprehensive service should be carried
out AT LEAST ONCE A YEAR.
- Fill in the Benchmark log book and leave
completed with the customer.
- Explain to the
user how to isolate the
appliance from the gas, water and
electricity supplies and the locations of
all drain points.
RATIO BETWEEN FAN SPEED
AND HEAT INPUT
Fig. 38
TABLE 10/A
TABLE 10/B
6.15 RANGE RATING CENTRAL HEATING
OR/AND DOMESTIC HOT WATER
The boiler comes set, in Central heating,
at the MID RANGE of its output.
The boiler has already been adjusted by the
manufacturer during production. If the
adjustments need to be made again, observe
the following procedures.
The adjustment to fan speed must be
strictly in the sequence indicated, by
qualified personnel only.
To check max fan speed, see tables 10/A
and 10/B.
Press INFO and arrow down buttons together
(item 6 and 4 fig. 1) for 5 seconds to enter in
USER PARAMETERS mode.
- Use arrow up and arrow down buttons
(item 3 and 4 fig. 1) to select the
followings options:
- P001 CH max fan speed.
- P002 DHW max fan speed.
- Press enter (item 1 fig. 1) to
select CH or DHW fan speed.
Adjust if necessary.
6.16 TEST MODE
It is possible to activate the test mode by
USER PARAMETERS (see section 1.4) or
directly by pressing
the INFO and the
RESET buttons together (item 6 and 2 fi g. 1)
for 5 seconds.
Press the arrow up and the arrow down
buttons to set the maximum or minimum fan
speed.
The function is enabled for maximum 15
minutes.
Press RESET to esc test mode.
6.17 INSTRUCTING THE USER
After completion of the installation and
commissioning of the system, the installer
should hand over to the householder by
taking the following actions:
- To the Householder explain his/her
responsibilities under The Gas Safety
(Installation and Use) Regulations
1998.
- Explain and demonstrate the lighting
and shutting down procedures.
- Show the user the location of the filling
valve and how to top-up the system
pressure correctly.
- Explain the operation of the boiler
including the use and adjustment of
ALL system controls which should be
fully explained to the householder. This
will ensure the optimum fuel economy
for the household requirements of both
heating and hot water consumption.
Advise the User of the precautions
necessary to prevent damage to the
43
Page 44

44
7 SERVICING INSTRUCTIONS
Ravenheat is a member of the Benchmark
initiative and fully supports the aims of the
programm e.
Benchmark was instructed to improve the
standards of installation and commissioning
of central heating systems in the UK and
to encourage the regular servicing of all
central heating systems to ensure safety and
efficiency.
During routine servicing, and after any
maintenance or change of part of the
combustion circuit, the following must be
checked:
- The integrity of the flue system and the
flue seals.
- The integrity of the boiler combustion
circuit and the relevant seals.
- The operational dynamic (working) gas
inlet pressure at maximum rate.
- The gas rate.
- The combustion performance (Refer to
page 65).
- Check all joints and connections in the
appliance and remake any that show signs
of leakage.
NOTE:
Service consumables are not covered by
the warranty.
To view warranty exclusions please visit
www.ravenheat.co.uk
or contact us on 01132 527007.
COMPETENCE TO CARRY OUT THE CHECK
OF COMBUSTION PERFORMANCE.
Please note: BS6798:2009 Specification for
installation and maintenance of gas-fired
boilers of rated input not exceeding 70 kW
net advises that:
- The person carrying out a combustion
measurement should have been assessed
as competent in the use of a flue gas
analyser and the interpretation of the
results.
- The flue gas analyser used should be one
meeting the requirements of BS7927 or
BS-EN 50379-3 and be calibrated in
accordance with the analyser
manufacturers requirements.
- Competence can be demonstrated by
satisfactory completion of the CPA1 ACS
assessment which covers the use of
electronic portable combustion gas
analysers in accordance with BS 7967,
Parts 1 to 4.
7.1 BOILER FROST PROTECTION
The appliance has a built in frost protection
device that protects the boiler from freezing.
With the gas and electric supplies ON and
irrespective of any room thermostat setting, the
frost protection device will operate the pump
when the temperature falls below 10 °C and
will operate the burner when the temperature
falls below 5°C.
The burner will switch off when the temperature
reaches 27 °C. When the frost protection
device operates “AF” is displayed on the digital
display.
IMPORTANT NOTE:
The system should be protected by incorporating
a system frost thermostat.
To ensure continued efficient operation of
the appliance it is necessary to carry out
servicing and cleaning at regular intervals.
The frequency of servicing and cleaning will
depend upon the particular installation
conditions and usage but in general, once a
year is advisable.
WARNING:
Before the start of any servicing or
replacement of components always
isolate the electricity supply to the
appliance and always turn off the
appliance gas supply at the gas
service cock.
The data badge is positioned low on the
inside left panel.
- The following notes apply to the appliance
and its controls but it should be remembered
that attention must also be paid to the heating
and hot water circuits with special attention to
radiator valves, thermostats, clocks, leaking
hot water taps etc.
- Where it is necessary to replace a gasket that
relies on adhesive for securing - this adhesive
will be supplied with the gasket as a spare
item.
- In all cases prior to servicing, remove the front
panel of the case. Operate the appliance by
turning the hot water services on to a high
water flow. Measurement of the products of
combustion can be achieved by connection
of a probe to the combustion analyser test
point.
Com bust ion test ing must be carr ied out by comp eten t pe rson
usin g a comb usti on a naly ser conf ormi ng t o BS7927 .
Page 45

- IMPORTANT NOTE:
After completing any servicing or
replacement of gas carrying components
it is essential that a test for gas soundness
is always carried out along with functional
checks in operation.
7.2 TO INSPECT AND CLEAN THE
APPLIANCE
Before carrying out the cleaning
operation, cover the electrical control
panel with a piece of waterproof material
to protect it from debris.
Inspect the heat exchanger for any
blockage. Deposits of any material should
be brushed away using a soft brush.
NOTE: Do not use brushes with metallic
bristles.
Examine internal pipe-work connections
and automatic air vent for any water leaks
and rectify if necessary.
Examine and remove loose debris from
the combustion chamber using a soft
brush and vacuum cleaner.
Carefully flush, by spraying water at any
remaining debris through the condensate
trap.
(Ensure the water is kept away from
electrical components).
It is important to verify that the
drip-plate with drain trap contains
water (this check is particulary
important if the boiler has not used for
extended periods of time).
If necessary, the drip plate can be filled
using the trap provided (Fig. 49).
Examine the spark and sensing electrodes
for any mechanical damage. Clean away
any debris and check the spark and
sensing gap.
Examine flue duct and flue manifold and
ensure that there is no obstruction.
Examine the gasket at the entry into the
flue manifold.
It is essential that a good seal is made at
the outlet to the flue manifold, renew this
gasket if there is any sign of damage or
deterioration.
45
Page 46

46
8.4 TO REMOVE/REPLACE FAN
(Fig. 41)
Remove the front panel (fig. 39).
Unscrew the gas pipe nut and remove
the retaining clip. Detach the connectors
from the fan.
Unscrew the four screws that fix the fan
and remove only in front screws.
Pull forward the fan.
Replace in reverse order (always fitting a
new gasket).
8.3 TO REMOVE LEFT AND RIGHT
PANELS (Fig. 40)
Remove the front panel (fig. 39).
Unscrew the four screws to the bottom
panel.
Unscrew the two screws to the side panel
and pull.
Fig.40
Fig.41
Fig. 39
8 REPLACEMENT OF PARTS
8.1 GENERAL
Replacement of parts must be carried
out by a competent person.
Before replacing any parts the boiler should
be isolated from the mains electric supply
and the gas should be turned off at the
service cock on the boiler.
After replacing any parts always test for
gas soundness and if necessary carry out
functional test of the controls.
For replacement of parts, the front, and
bottom panels of the boiler will need to be
removed (it is not necessary to remove the
side panels as all parts are accessible from
the front or beneath the boiler).
8.2 TO REMOVE THE BOILER PANELS
To remove the front panel unscrew the two
lower screws that secure the front panel to
the boiler and lift off.
Page 47

47
8.5 TO REMOVE/ REPLACE THE
ELECTRODES (Fig.37)
Remove the front panel (fig. 39).
Remove the ignition and/or sensing lead
plug.
Unscrew the securing screws with a
TORX T15 screwdriver and put them into
a suitable container so that they don’t get
lost.
Withdraw the Spark electrode and/or
Sensing electrode carefully from the burner
cover being careful not to damage the
seal.
Replace with a new electrode in reverse
order. Ensure the gap is correct and there
is a good seal when replaced (always
fitting a new gasket).
8.6 TO REMOVE/REPLACE THE BURNER
(FIG.42)
Remove the front panel (fig. 39).
Unscrew the gas pipe nut and remove
the retaining clip. Detach the connectors
from the fan.
Unscrew the four screws that fits the burner
door to the heat exchanger and remove it.
Remove the electrodes (sect. 8.5), and
remove the insulation pad, is helpful to use
a screwdriver to move the fastening clips.
To remove the burner, unscrew the screws
with a TORX T15 srewdriver.
Replace in reverse order.
Fig.42
8.7 TO REMOVE/REPLACE THE MAIN HEAT
EXCHANGER
Remove the front and bottom panels
(fig. 39-40).
Drain the boiler CH circuit and drain the
DHW circuit. Follow the instructions to
remove the burner (sect. 8.6). Pull down to
remove the condense pipe on the bottom
of the heat exchanger. Disconnect the flow
and return pipes at the heat exchanger.
Loosen the four heat exchanger securing
screws and clamps then carefully ease the
heat exchanger out.
CAUTION : There will be water in the heat
exchanger.
Replace in reverse order, always use new
O-ring seals.
Page 48

48
Fig.44
Fig.43
8.8 TO REMOVE/REPLACE EXPANSION
VESSEL (Fig.43)
Remove the front and bottom panels
(fig. 39-40).
Close the on/off valves for the heating
circuit and drain the water at the drain
point (fig.36). Unscrew the fixing
bracket and the nut connecting the
expansion vessel. Lift up the vessel
and remove.
Replace in reverse order. Use a new
gasket, taking care to ensure they are
replaced correctly.
8.9 TO REMOVE/REPLACE GAS VALVE
(Fig. 44)
Remove the front and bottom panels
(fig. 39-40).
Unscrew the nut at the top and the four
screws on the bottom of the gas valve.
Replace in reverse order.
IMPORTANT:
when the gas valve is re-fitted, check
combustion CO2 and adjust if
necessary (see section 6.9).
8.10 TO REMOVE/REPLACE PLATE HEAT
EXCHANGER (Fig. 44)
Remove the front and bottom panels
(fig. 39-40).
Remove the panel control box (sect.
8.22).
Close off the on/off valves for CH circuit
and DHW circuit and drain the boiler and
drain hot water from the lowest hot water
tap.
Unscrew the two allen screws that
connect the DHW heat exchanger and
pull it out from the boiler (fig. 46).
If necessary the pipes from the flow
manifold may have to be removed for
easier access. Lift up the plate heat
exchanger.
Replace in reverse order.
NOTE: Always use new O-rings.
8.11 TO REMOVE/REPLACE THE WATER
PRESSURE SWITCH (Fig. 46)
Remove the front and bottom panels
(fig. 39-40).
Close the on/off valves for the heating
circuit and drain the water at drain point
(fig.36).
Detach the wire connector, remove the
securing clip.
Replace in reverse order.
Fig.45
Page 49

8.12 TO REMOVE/REPLACE DIVERTER
VALVE MOTOR (Fig. 46)
Remove the front and bottom panels
(fig. 39-40).
Detach the electrical plug and remove the
retaining clip. Replace in reverse order.
8.13 TO REMOVE/REPLACE C.H.
DIVERTER VALVE (Fig. 46)
Remove the front and bottom panels
(fig. 39-40).
Remove the panel control box (sect.
8.222). Close the on/off valves for the
heating circuit and drain the water at drain
point (fig.46).
Remove diverter valve motor switch, to
allow access and unscrew the C.H.diverter
valve (fig.47).
Replace in reverse order.
NOTE: Always use new O-ring.
8.15 TO REMOVE/REPLACE PUMP (Fig.47)
Remove the front and bottom panels
(fig. 39-40).
Close the on/off valves for the heating
circuit and drain the water at drain point
(fig.36).
Detach the supply wire connector from the
pump.
Unscrew the nut that fastens the pump to
the CH pipe and remove the pump and
remove the securing clip at the pump
manifold.
Replace in reverse order.
NOTE: Always use new O-ring.
8.16 TO REMOVE/REPLACE AUTOMATIC
AIR VENT (Fig. 47)
Remove the front and bottom panels
(fig. 39-40).
Remove the panel control box (sect. 8.22).
Close the on/off valves for C.H. circuit and
drain the water from at drain point Fig.36.
Remove the clip and pull the automatic air
vent from the pump.
Replace in reverse order.
NOTE: Always use new O-ring.
8.14 TO REMOVE/REPLACE D.H.W.
DIVERTER VALVE MECHANISM
( Fig. 46)
Remove the front and bottom panels
(fig. 39-40).
Remove the panel control box (sect. 8.22).
Close the on/off valves for the heating
circuit and drain the water at drain point
(fig.36).
Remove flow detector and unscrew DHW
diverter valve.
Replace in reverse order.
NOTE: Always use new O-ring.
49
Fig.46
Fig.47
Page 50

8.17 TO REMOVE/REPLACE SAFETY RELIEF
VALVE (Fig. 46)
Remove the front and bottom panels
(fig. 39-40).
Close the on/off valves for C.H. circuit and
drain the water from at drain point fig.36.
Unscrew the safety relief valve screw and
pull up.
Replace in reverse order and using a new
gasket.
8.18 TO REMOVE/REPLACE D.H.W. SENSOR
(Fig. 46)
Remove the front and bottom panels
(fig. 39-40).
Close the on/off valve for the DHW circuit
and drain the hot water from the lowest hot
water tap.
Detach the wire connector and unscrew the
sensor.
Replace in reverse order.
8.19 TO REMOVE/REPLACE C.H. FLOW AND
RETURN SENSORS (Fig. 48)
Remove the front panel (fig. 39).
Detach the wire connector and remove
the retaining clip sensor from the pipe.
NOTE: When reconnecting ensure the
correct wires go to the relevant sensor
(the polarity on each one is unimportant).
8.20 TO REMOVE/REPLACE FLUE SENSOR
(Fig. 3 item 23)
Remove the front panel (fig. 39).
Detach the wire connector and
rotate the sensor.
Replace in reverse order.
Fig.48
8.21 TO CLEAN AND REMOVE/REPLACE
CONDENSING TRAP (Fig. 49)
Remove the
front panel (fig. 39), bottom
and left side panels (fig. 40).
Remove the securing clip and pull
out the plastic pipe that connects the
condensing trap at the heat exchanger.
Unscrew the nut that fastens the
condensing trap to the depression
chamber and remove it.
If the side panel can not be removed then
remove the gas valve (see sec 8.9) and
continue with the above instructions.
Replace in reverse order.
50
Fig.49
Page 51

Fig.53
Fig.51
8.22 TO REMOVE PANEL CONTROL BOX
(Fig. 50,51).
Remove the
front panel (fig. 39).
Pull the control panel box until it is
slightly out of the boiler.
As doing so move the box forward
until the control box becomes free.
This will allow free access to lower
part of the boiler.
Fig.52
51
Fig.50
8.23 TO REMOVE/REPLACE CONTROL
BOARD (Fig.52).
Remove the front panel (fig. 39).
Remove the the panel control box (sect.
8.22).
Detach all connectors from control board,
unscrew the four screws and lift up.
Replace in reverse order.
8.24 TO REMOVE/REPLACE DIGITAL
DISPLAY BOARD.
Remove the front panel (fig. 39).
Remove the panel control box (sect.
8.22), and let it fix at the depression
chamber like in fig. 52.
Unscrews the four screws that fix the
cover panel control box and lift up.
Detach all connectors from control board,
unscrew the four screws and lift up.
This will allow free access to digital
display. Detach the connector and
unscrew the four screws and lift up.
Replace in reverse order.
8.25 EXTERNAL CONTROL CONNECTION
(Fig. 53)
Remove the front panel (fig. 39).
Remove the external wire link on the
panel control box.
Replace with external wire controls.
(These must be volt free).
Page 52

9 FAULT FINDING CENTRAL HEATING
Before trying to operate the boiler make sure that: all gas supply cocks are open and the gas supply has been
purged of air. The heating system pressure is at least 1 bar min to 1.5 bar max, select winter position on the
digital display and set the central heating temperature to maximum. (sect. 1.5).
Ensure external controls are calling for heat (room thermostat/ digital clock) and check the following appliance
operations:
52
Page 53
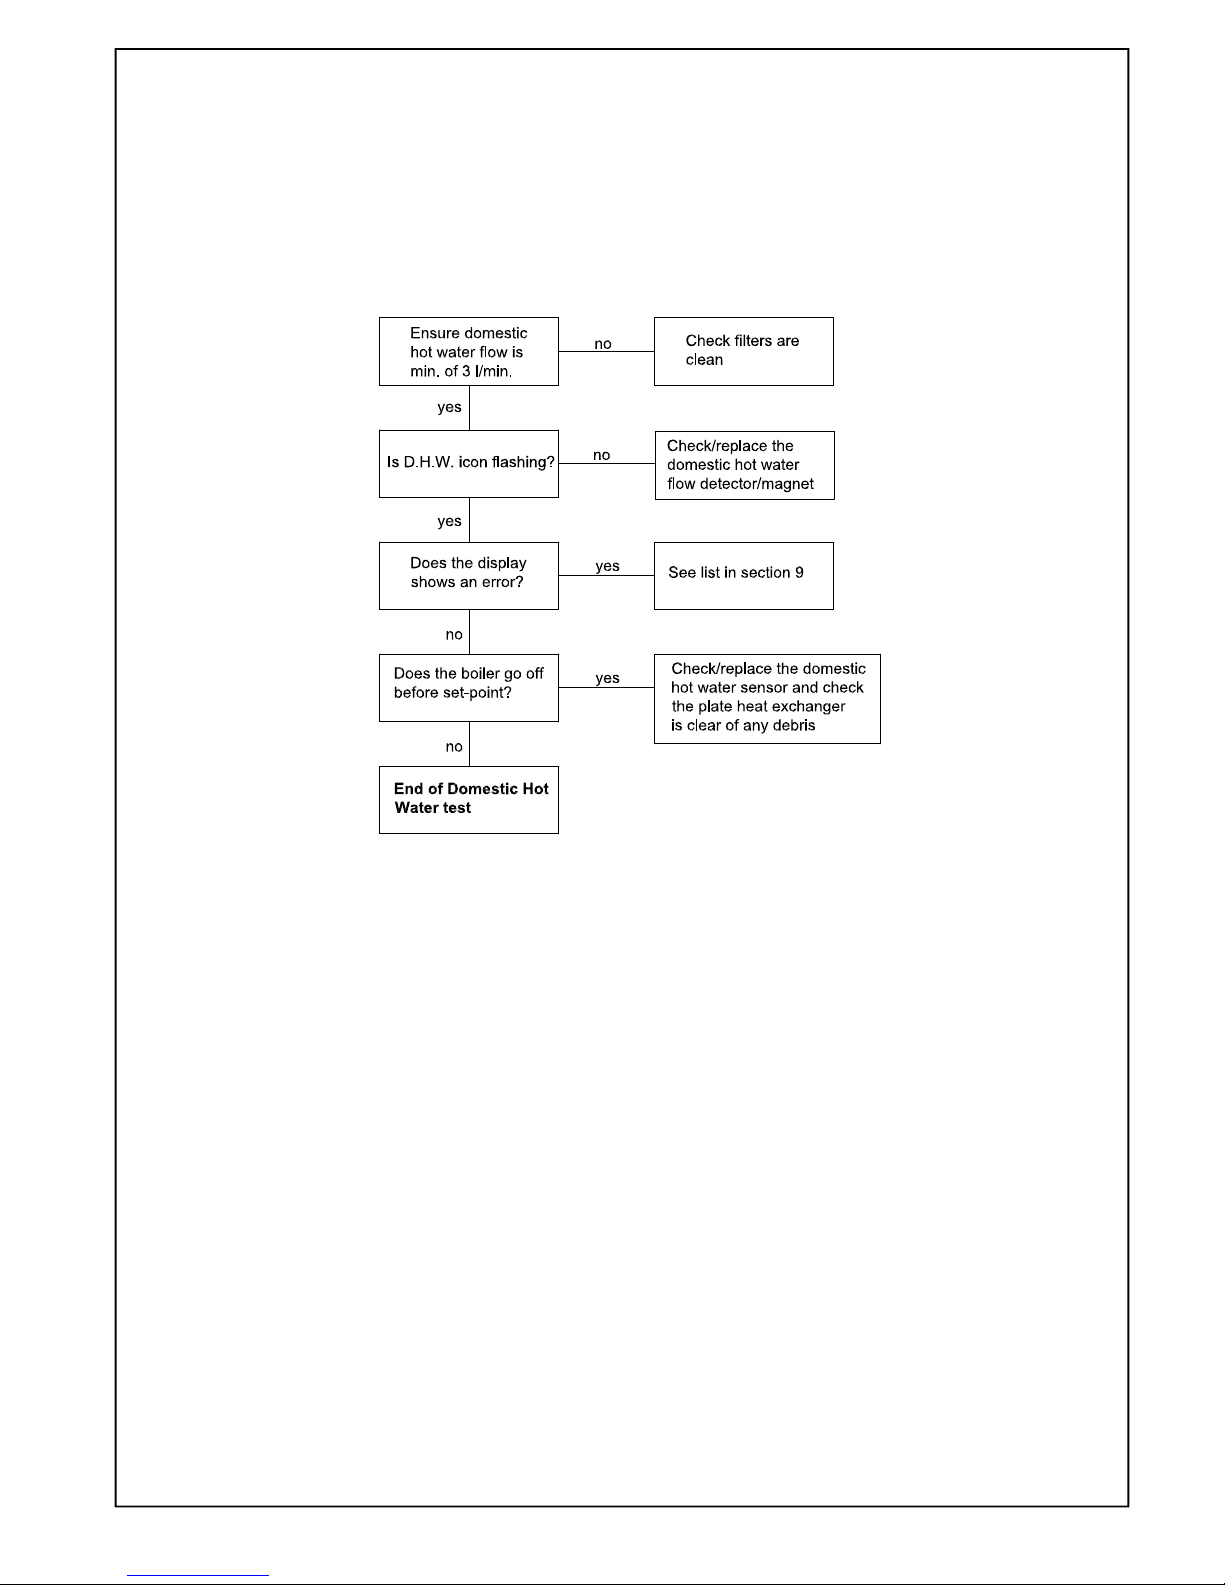
53
9.1 FAULT FINDING DOMESTIC HOT WATER
Before continuing see section 9, and after selecting the summer position on the digital display and setting
the domestic hot water temperature to maximum (sect.1.5).
Open the domestic hot tap and check the following appliance operations:
Page 54

10 ELECTRICAL SYSTEM DIAGRAM
54
Fig. 55
Page 55

55
11 SPARE PARTS
Fig. 56
Page 56

56
Pos. Part. No. G.C.
Part. No.
Description
1 CIR150200 Control board
2 FUS010150 Internal fuse 3.15 A
3 SCA190050 Control board box with panel instrument
4 CIR190100 Digital display
5 SCA190050 Instrument panel with control board box
6 GUA010310 1” gasket (GUA010311)
7 CIR150270 Pump
8 ORI150150 Pump O-ring
9 FOR150200 Pump clip
10 ORI110450 Plate heat exchanger O-ring
11 SCA150150 HE 25 S plate heat exchanger
11.1 SCA150200 HE 30 S plate heat exchanger
12 GRU160100 Return manifold
13 FOR150250 Water pressure transducer clip
14 TRA150100 Water pressure transducer
15 VAL150100 Safety relief valve
16 TUR150050 Turbine
17 RIV150050 Flow detector switch
18 GRU160060 Flow manifold
19 OTT150050 Diverter valve by-pass
20 SON150050 Safety relief valve pipe
21 FOR150150 Diverter valve motor clip
22 MOT150050 Diverter valve motor
23 TUB160080 Flow pipe
24 SON110100 C.H. FLOW and return sensors (SON110150)
25 TER130050 Overheat thermostat
26 ORI110250 Primary heat exchanger O-ring
27 MOL160050 Primary heat exchanger clip
28 TUB160140 Return pipe
29 RAC190050 Condensing trap
30 TUB110150 Flexible condensing pipe (TUB110300)
31 FAS150050 Condensing trap pipe hose clamp 12-22
32 TUB160050 Condensing pipe
33 SON130050 Temperature fl ow sensor
34 VAL150300 Gas valve
35 GUA010260 3/4” gas valve gasket
36 TUB160180 Gas valve inlet pipe
37 ORI160050 Air/gas mixer junction O-ring
38 FOR150100 Air/gas mixer junction clip
SHORT LIST OF SPARE PARTS AND FLUE ACCESSORIES
Page 57
57
Pos. Part. No. G.C.
Part. No.
Description
39 SIL150050 Silencer
40 MIX150050 HE 25 S air/gas mixer
40.1 MIX150150 HE 30 S air/gas mixer
41 ORI110050 Air/gas mixer - fan O-ring
42 VEN160050 Fan
43 GUA110052 Fan - burner gasket
44 BRU160100 Burner
45 GUA150050 Sensing/spark electrode gasket
46 CAN160100 Sensing electrode
47 CAN160050 Spark electrode
48 SCA160100 Main heat exchanger
49 VAS150050 Expansion vessel
50 GUA010050 1/4” gasket
/ IMP160100 Wiring harness
Page 58

Part. No. Description
TER160050 1 metre high plume kit
CUR110050 45° fl ue exhaust defl ection bend
CUR110100 90° fl ue exhaust defl ection bend
Plume Management Kit (see sect. 5.6)
Accessories concentric flue 60/100 (see sect. 5.12 - Table 7)
Part. No. Description
COL160050 Straight fl ue header / sample point 60/100
FLA110050 Flue adaptor
PRFE Flue Extension 60/100 L1000
PR45FBI 45° bend 60/100
PR90FBI 90° elbow bend 60/100
TER160050 Horizontal terminal 60/100
TER110200 Vertical fl ue Terminal
Accessories concentric flue 80/125 (see sect. 5.18)
Part. No. Description
COL160050 Straight fl ue header / sample point 60/10
PRO110300 Flue Extension 80/125 L1000
RID110050 125/80 to 100/60 Flue reducer
CUR110250 45° bend 80/125
CUR110300 90° elbow bend 80/125
TER010050 Horizontal Flue Terminal 80/125
TER110200 Vertical Flue Terminal 80/125
TEG060050 Flashing sleeve/slate
Accessories eccentric flue 80/80 (see sect. 5.13 - 5.14 - 5.15 - 5.16 - 5.17)
Part. No. Description
SDO160050 Twin fl ue header F80/80
PRO110200 Straight pipe L1000 80
CUR110150 90° elbow bend 80
CUR110200 45° bend 80
GRI110050 Air inlet terminal 80
GRI110100 Exhaust terminal 80
TER060110 Vertical eccentric fl ue terminal
58
Page 59

COD 0017LIB19005/0 04/2018
Chartists Way, Morley, Leeds, U.K. LS27 9ET
Telephone: 0113 252 7007
Fax: 0113 238 0229
Website: www.ravenheat.co.uk
E-mail: sales@ravenheat.co.uk
Ravenheat reserves the right to make changes and
improvements in our products which may aff ect the accuracy
of the information contained in this leafl et.
Page 60

For assistance please call Ravenheat technical helpline:
telephone: 0113 252 7007
fax: 0113 238 0229
e-mail: sales@ravenheat.co.uk
12 BENCHMARK COMMISSIONING CHECKLIST DETAILS
Boiler Page Page
Make and model ………………………………………14/17 Burner operating pressure............... ......................n/a
Appliance serial no. on data badge………..Left side panel Central heating fl ow temp……. .. measure and record
Controls Central heating return temp… ….measure and record
Temperature control to heating…………...................…12 For combination boilers only
Temperature control to hot water…………...............….12 Scale reducer………………………………..................25
Heating zone valves……………………………………..n/a Hot water mode
Auto by-pass………………………………………………22 Max. operating burner pressure….measure and record
Boiler interlock…………………………………….……....22 Max. operating water pressure…...measure and record
Cold water inlet temp…………….. measure and record
For all boilers Hot water temp……………………. measure and record
Flushing to BS7593………………………………...…….24 Water fl ow rate at max. setting…...measure and record
Inhibitor…………………………………………………….25 For condensing boiler only
Central heating mode Condensate drain………………………………......38/39
Heat input………………………………….to be calculated For all boilers: complete, sign & hand over to the customer.
60
Page 61

61
Page 62
62
Page 63

63
www.centralheating.co.uk
Benchmark Commissioning and
Servicing Section
Page 64

64
FLOWCHART FOR CO LEVEL AND COMBUSTION RATIO
CHECK ON COMMISSIONING A CONDENSING BOILER
Page 65

65
12.1 ANALYSER CHECK LIST
Page 66
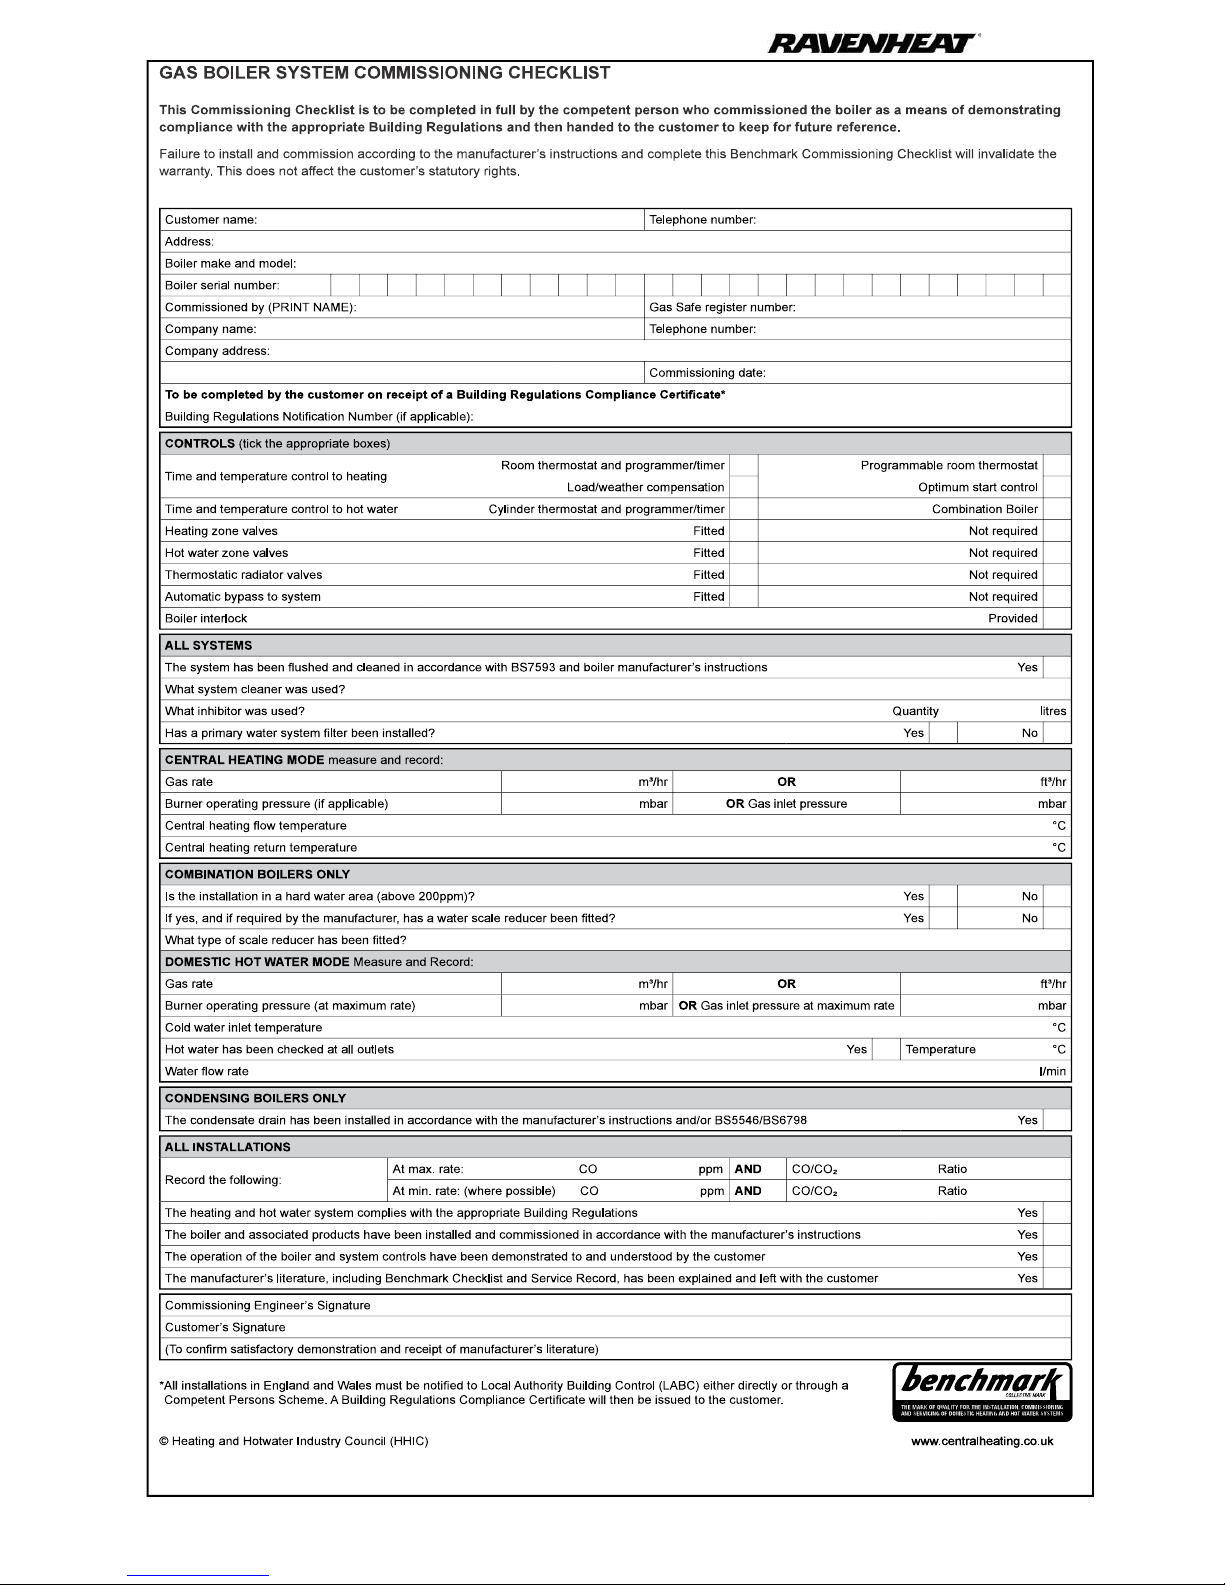
Page 67

It is recommended that your heating system is serviced regularly and that the appropriate Service Interval Record is completed.
Service Provider
SERVICE RECORD
SERVICE 01
AND
AND
SERVICE 02
AND
AND
SERVICE 03
AND
AND
SERVICE 04
AND
AND
SERVICE 05
AND
AND
SERVICE 06
AND
AND
SERVICE 07
AND
AND
SERVICE 08
AND
AND
SERVICE 09
AND
AND
SERVICE 10
AND
AND
 Loading...