

Page 1
CombiMaster
®
Plus
Original Operating Instructions
Page 2
RATIONAL ServicePlus
The all-inclusive package for an all-round service.
We want to maximize your return on investment from the very start.
Over the entire service life and without any hidden costs.
FREE OF CHARGE! - On-site training
We demonstrate to your kitchen team in your own kitchen how our appliances work and
how they can be best deployed to suit your specific requirements.
FREE OF CHARGE! - RATIONAL ConnectedCooking
Connecting your RATIONAL units is easy thanks to the world’s most
state-of-the-art cloud-based networking solution for professional
kitchens. ConnectedCooking helps you keep everything under
control: manage your units efficiently, access them remotely
via smartphone (iOS and Android devices), document HACCP
information automatically, and load recipes from the RATIONAL
library onto your units quickly and easily.
Simply log in at ConnectedCooking.com
FREE OF CHARGE! - Chef✆Line
We offer a telephone consulting service to answer any questions you have about
applications or recipes. Fast, uncomplicated, and from one chef to another, 365 days a
year. You can contact the ChefLine
USA 866-306-2433 / Canada +1-844-405-6211
2 / 112
®
at
®
Page 3
RATIONAL ServicePlus
RATIONAL Service Partner
Our appliances are reliable and have a long service life. However if
you should encounter technical difficulties, the RATIONAL Service
Partner can provide swift and efficient help. Guaranteed spare parts
supply and a weekend call-out team included:
USA 866-891-3528 / Canada +1 855-701-5777
2-year Warranty
We offer a 24-month warranty valid from the date of initial installation, provided
that your appliance is fully and correctly registered with us. You can do this
comfortably online at www.rational-online.com/warranty or by sending us
the postcard attached to this manual. The warranty excludes glass damage,
light bulbs, and seals as well as damage caused by improper installation, use,
maintenance, repair, or descaling.
Simply log in at www.rational-online.com/warranty
3 / 112
Page 4

CombiMaster – the power pack
Dear user,
Congratulations on your decision to purchase a CombiMaster
The CombiMaster
®
Plus stands for mature technology and excellent workmanship, and
offers entincing functions that ensure outstanding cooking results every time: crispy crusts,
succulent roasts, intensive flavors and colors. The rotary button operation is easy, clear,
and robust. Your CombiMaster
®
Plus will give you many years of reliable service in your
kitchen.
We give a 24 month warranty calculated from the date of initial installation, providing you
have filled in the warranty registration for your appliance completely and correctly. You can
do this conveniently online at www.rational-online.com/warranty or using the enclosed
postcard. The warranty excludes glass damage, light bulbs and seals as well as damage
caused by improper installation, use, maintenance, repair, or descaling.
Happy cooking!
Your,
RATIONAL AG
We reserve the right to make technical changes in the interest of progress!
®
Plus!
Dealer: Installer:
installed on:
Unit number:
Page 5
Contents
Explanation of the Pictograms 7
Initial start-up 8
Safety Instructions 10
Liability 13
Care, inspection, maintenance and repair 15
Function parts 18
Notes on using your appliance 19
Working with the Core Temperature Probe 22
Notes on using the USB interface 24
Working with the Hand Shower 25
Operating controls 26
General Notes 28
ClimaPlus ® 30
Overview of modes 32
Steam Mode 34
Dry Heat Mode 38
Combination Mode 42
Finishing ® Cooking Mode 46
Cool Down 50
Program Mode 51
Create program 51
Check program 54
Check program 56
Delete program 57
Download Program 58
Upload Program 60
HACCP 62
Page 6
Contents
Software Update 64
Settings Celsius/Fahrenheit 65
Settings Time/Date 67
Cleaning CombiMaster ® Plus 69
Start clean 69
Cleaning programmes 75
CleanJet ® abort 77
Cleaning CombiMaster ® 82
Steam generator descaling display 86
LAN cable connection 87
Network settings 89
Building services - steam generator descaling 91
Building services - steam generator drainage 97
Building services 98
Cleaning the cooking cabinet seal 98
Cleaning glass surfaces 98
Cleaning the LED covers (only XS units 6 2/3 GN) 98
Rinsing the drip pan and drain channel (tabletop units only) 98
Servicing the air filter 98
Replacing the door seal 98
Replacing lights 98
Replacing halogen bulbs 98
Service notifications 104
Before You Call Service: 107
EU Declaration of Conformity for Electrical Appliances 109
Page 7
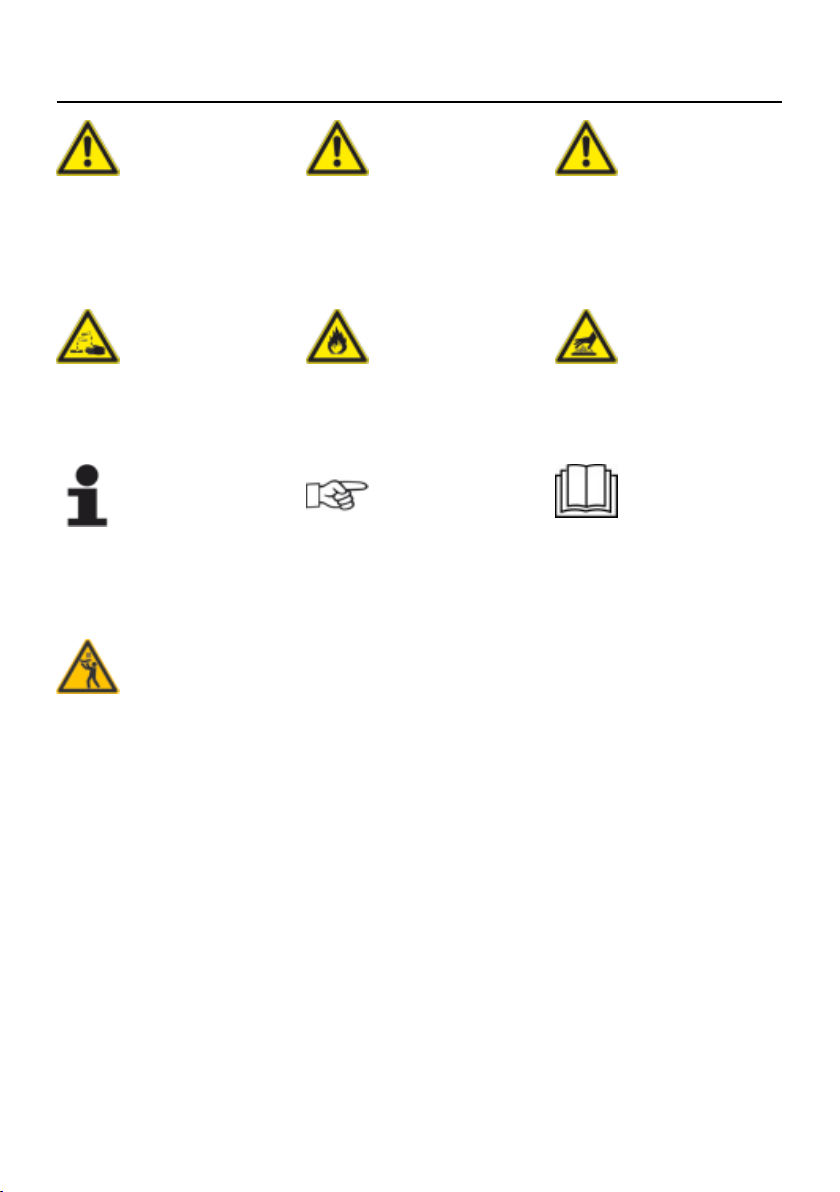
Explanation of the Pictograms
Danger!
Imminently hazardous
situation, which, if not
avoided, will result in severe
injuries or death.
Corrosive
substances
Note:
Damage may be caused if
this is ignored.
The maximum rack height is
160 cm.
Warning!
Potentially hazardous
situation, which, if not
avoided, may result in
serious injury or death.
Potentially hazardous
situation, which, if not
avoided, may result in slight
or minor injuries.
Caution!
Risk of fire! Risk of burning!
Handy tips for everyday
use.
Read the manual carefully
prior to initial start-up.
7 / 112
Page 8

Initial start-up
Please read the manual carefully prior to initial start-up.
During initial start-up of your new appliance, you will be requested to start an automatic oneoff self-test. This self-test takes about 45 minutes and is used to adapt the appliance to the
specific environmental conditions. Please note the following:
- For the self-test to be carried out, all the packaging materials must be have been removed
from the appliance; check the grid shelves and the air baffle for a correct fit.
- The appliance must be connected in accordance with the installation instructions.
- For appliance sizes 6 x 2/3, 6 x 1/1, 10 x 1/1, 6 x 2/1 and 10 x 2/1 GN place a flat GN
container with the opening facing downwards into the centre of the grid shelves.
- For the appliance size 20 x 1/1 and 20 x 2/1 GN place two GN containers in the mobile
oven rack. Place one flat GN container with the opening facing downwards in the centre
in front of both the upper and lower fan wheel.
- For further details please follow the instructions shown on the display and the installation
manual.
Risk of fire!
Remove the packaging material, starter kit as well as grids and containers.
The cooking chamber door must not be opened during the self-test. Opening the cooking
chamber door will lead to failure of the self-test. Restart the self-test by switching the appliance
off. Always allow a hot appliance to cool down first. If the test is interrupted you will be
requested next day by the appliance to start the self-test again.
Step Info/Button Instructions
8 / 112
Page 9
Initial start-up
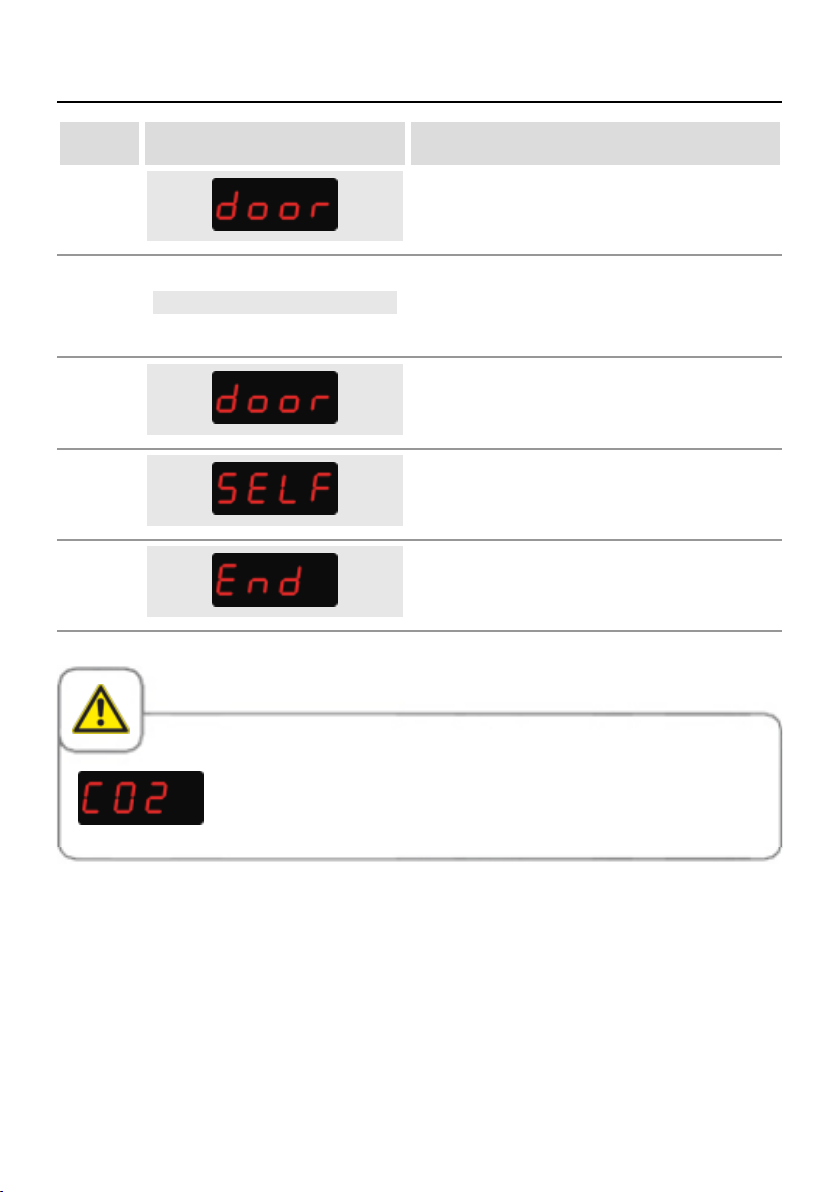
Step Info/Button Instructions
Open the cooking chamber door and remove
1
2
the packaging material, starter kit, grids and
containers.
Insert an empty GN sheet with the opening
facing downwards into the rack in front of
every fan wheel. Please read the installation
instructions for more details.
3
4
5
Where gas appliances are used, exhaust gas measurement must always
be carried out when the self-test has been completed.
Close the cooking chamber door to start the
self-test.
The following test will take place automatically.
The display indicates "self" - "test".
The self test is completed after approx. 45
minutes.
9 / 112
Page 10

Safety Instructions
Keep this manual in a safe place so that it can always be consulted by anyone using the
appliance.
This appliance may not be used by children or people with limited physical, sensor or mental
capacity or those without the necessary experience and/or knowledge, unless such people
are supervised by a person who is responsible for their safety. Unless such persons are
supervised by a person responsible for safety, and have been instructed as to the potential
dangers in operating the unit. Surfaces and accessories may be hot - please note when
supervising. Cleaning and maintenance work may not be performed by children, even if
supervised.
Operate using hands only. Damage caused by the use of pointed, sharp or other objects will
invalidate the warranty.
We recommend regular training of your staff to avoid the risk of accident or damage to the
appliance. Operators must also receive regular safety instruction.
In the event that the connection cable becomes damaged, it must be replaced by the
manufacturer, a service agent or qualified specialists to prevent any hazards or damages
to the appliance.
If the appliance is installed in a position where the highest rack is higher than 160 cm, the
supplied sticker must be affixed to the appliance.
Warning!
Daily checks before switching on and use
- Lock the air baffle at the top and bottom as per the instructions - risk of injury from the
rotating fan wheel.
- Make sure that the hanging racks or mobile oven rack are correctly locked in place in the
cooking chamber - containers with hot liquids can fall through or slip out of the cooking
chamber - risk of combustion.
- Make sure that there are no cleaning tab residues in the cooking chamber before you start
cooking with the appliance. Thoroughly rinse away any cleaning tab residues with the hand
shower - risk of chemical burns.
10 / 112
Page 11
Safety Instructions
Warning!
Specific national and regional standards and regulations which concern the installation and
operation of commercial cooking appliances must be complied with.
Incorrect installation, servicing, maintenance, cleaning or modifications to the appliance
may result in damage, injury or death. Read these operating instructions carefully before
you start to use the appliance.
This appliance must only be used to cook food in commercial kitchens. Any other use is not
intended and is therefore considered dangerous.
It must not be used to cook food containing flammable materials (such as food with
alcohol). Substances with a low flash point can ignite spontaneously - risk of fire.
Cleaning and descaling products and the associated accessories must only be used for
the purposes described in this manual. Any other use is not intended and is therefore
considered dangerous.
In case of damage to the glass plate, please replace the entire plate immediately.
IEC 60417-6332 certification allows the setting up of the electric version of the combisteamer in humid and warm environments.
Warning!
Smoking food in the appliance
Smoking food in the appliance may only be done using the original RATIONAL smoking
accessory, VarioSmoker.
Warning!
No objects on the appliance ceiling.
Do not place any objects on the appliance ceiling. Risk of injury if they fall down.
11 / 112
Page 12

Safety Instructions
Warning!
Gas appliances only
- If your appliance is installed under an extractor hood, this must be switched on when the
appliance is in use - combustion gases!
- If your appliance is connected to a chimney, the flue duct must be cleaned in compliance
with specific regional regulations - risk of fire! (Contact your installer).
- Do not put objects on your appliance's exhaust pipes - risk of fire!
- Do not let objects block or obstruct the area below the appliance's base - risk of fire!
- The appliance must only be used in still conditions - risk of fire!
What to do if you smell gas:
- Shut off the gas supply immediately!
- Do not touch any electrical controls!
- Make sure the room is well ventilated!
- Avoid naked flames or sparking!
- Use an external telephone to notify the appropriate gas supplier (if the gas supplier is
unobtainable call the nearest fire station)
12 / 112
Page 13

Safety instructions and liability
Warning!
Safety instructions during use
- When filling containers with liquids or if containers fill up with liquid food products during
cooking, only use the rack levels where the user can easily look into the inserted container
- risk of burns! Information sticker is enclosed with the unit.
- Always open the cooking cabinet door very slowly (hot vapours) - risk of burns!
- Always wear heat protective clothing when handling accessories and other objects in the
hot cooking cabinet with - risk of burns!
- The exterior temperatures of the unit can reach above 60 °C, only touch the appliance on
the operating controls - risk of burns!
- The hand shower and the water coming out of the hand shower can be hot - risk of burns!
- Cool Down operation - only activate the Cool Down function if the air baffle has been
locked as per instructions - risk of injury!
- Do not reach into the wheel fan - risk of injury!
- Cleaning - aggressive chemicals - risk of chemical burns! Appropriate protective clothing,
protective glasses, gloves and protective face masks must be worn for cleaning. Please
observe the safety instructions in the "Cleaning" section.
- Do not store any flammable or combustible substances near the unit - risk of fire!
- Apply the brakes on mobile units and mobile oven racks when not moving them. The racks
could roll away on uneven floors - risk of injury!
- During mobile use of mobile oven racks, you must always close the container locks. Cover
containers with liquids to prevent hot liquids from spilling out - risk of burns!
- The transport trolley must be properly fixed to the appliance when loading and unloading
the mobile plate rack and the mobile oven rack - risk of injury.
- Mobile oven racks, mobile plate racks, transport trolleys and units mounted on castors may
tip over during transportation over sloping surfaces or bumps - risk of injury!
13 / 112
Page 14

Safety instructions and liability
Liability
Installations and repairs that are not carried out by authorised specialists or using original
spare parts, and any technical modification that is not approved by the manufacturer will void
the manufacturer’s warranty and product liability.
14 / 112
Page 15

Care, inspection, maintenance and repair
In order to retain the high quality of the stainless steel, for hygienic reasons and to avoid
interferences to operation, the appliance must be cleaned daily or when prompted to clean.
Follow the instructions in the "Cleaning" section.
Constant operation at high cooking cabinet temperatures (≥ 260°C), the use of high browning
levels (browning 4/5) and preparation of food with high fat and gelatin content can subject
the press-fit door gasket to faster wear.
Cleaning the press-fit door gasket daily with a non-abrasive rinsing agent will extend the
service life.
Warning!
If the appliance is not cleaned or is not cleaned well enough, deposits of grease or
food residues in the cooking cabinet may catch fire - Risk of fire.
- If fat deposits and/or food waste in the cooking cabinet ignite, shut down the appliance
immediately and keep the cooking cabinet door closed to put out the fire! If further
extinguishing is required, disconnect the appliance from the mains and use a fire
extinguisher (do not use water to extinguish a fat fire!).
- To avoid corrosion in the cooking cabinet, your appliance must be cleaned every day, even
if it is only operated in “Moist Heat” (steaming) mode.
- Do not use a high pressure cleaner, steam cleaner or a direct water jet to clean the
appliance. Observe the protection class IPx5.
- Do not treat the appliance with acids or expose to acid fumes – this will damage the
passivated coating of the nickel-chromium steel and the appliances might discolour.
- To clean the exterior panelling, only use mild household cleaning agents such as
dishwashing detergent on a damp soft cloth. Corrosive or irritating substances must not
be used.
- Only use cleaning agents from the appliance manufacturer. Cleaning agents from other
manufacturers can damage the appliance. Damage to a device that has been caused by
using different cleaning and care products than those recommended by the manufacturer
is not covered under warranty.
- Do not use scouring products or abrasive cleaning agents.
15 / 112
Page 16

Care, inspection, maintenance and repair
Warning!
Inlet filter maintenance The device automatically detects if the air filter is dirty. You will receive
a service message and prompt to clean or replace the air filter when it is dirty. The appliance
may only be operated without an air filter. When replacing the air filter, please take into account
the following specifications:
Appliance size 6 x 2/3 GN, 6 x 1/1 GN, 6 x 2/1 GN, 10 x 1/1 GN
and 10 x 2/1 GN
Air filter article number 6 x 2/3 GN: 40.04.771
Air filter article number
6 x 1/1 GN, 6 x 2/1 GN, 10 x 1/1 GN, 10 x 2/1 GN: 40.03.461
This air filter may only be removed and cleaned by the user. When replacing the filter, make
sure that the air filter carefully locks into the correct position. To replace the air filter, please
follow the instructions in the "Domestic technology" section.
Appliance size 20 x 1/1 GN and 20 x 2/1 GN
This air filter may only be replaced by an authorised service partner.
Attention! The appliance is only guaranteed protection against sprayed water if the filter and
cover are assembled correctly.
16 / 112
Page 17

Care, inspection, maintenance and repair
Inspection, maintenance and repair
Danger - high voltage
- Inspection, maintenance and repair work must only be carried out by trained technicians.
-
The appliance must be disconnected from the mains for cleaning (apart from CleanJet
cleaning) and for inspection, maintenance or repair work.
- If the appliance is installed on casters (mobile), freedom of movement must be restricted
so that power, water and drainage pipes cannot be damaged when the appliance is
moved. If the appliance is moved, make sure that power, water and drainage lines are
correctly disconnected. If the appliance is returned to its original position, make sure that
the retention device, energy, water and drainage pipes are correctly attached.
- Your appliance should be serviced by an authorised service partner at least once a year
to ensure that it remains in perfect working order.
®
17 / 112
Page 18
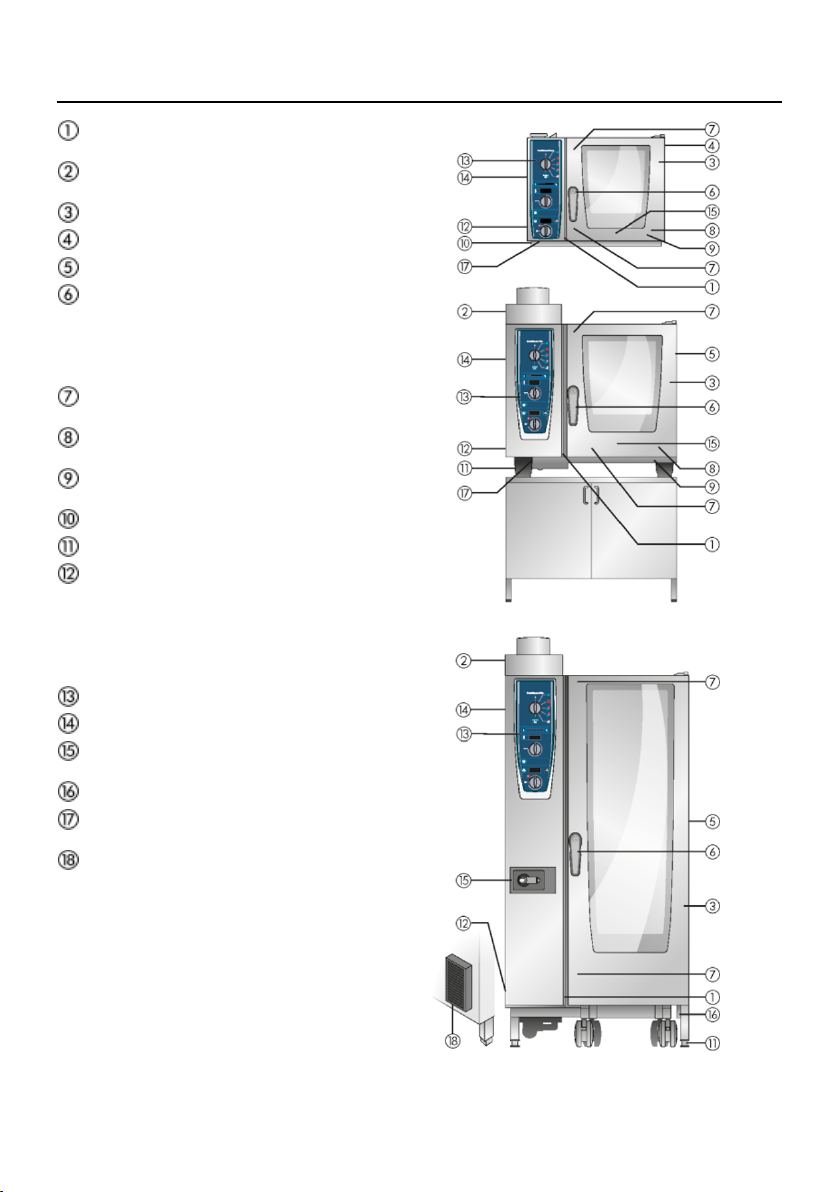
Function parts
Appliance number
(only visible when the door is open)
Flow guard (optional)
(for gas appliances only)
Cooking cabinet lighting
Appliance door with triple glazing
Appliance door with double glazing
Door handle
Tabletop units: One-handed operation
with sure-shut function
Standalone appliances: One-handed
operation
Unlocking mechanism to open the
glass pane (inside)
Integrated and self-emptying door drip
pan (inside)
Unit drip pan with direct connection to
the drain
Appliance plinth
Unit feet (height adjustable)
Type plate
(contains important data such as power
consumption, gas type, voltage, number
of phases and frequency as well as
appliance type, appliance number and
option number)
Control panel
Cover for the electric installation space
Hand shower (optional)
(with automatic return)
Positioning aid (standalone units)
Air filter for table-top unit (installation
space air inlet)
Air filter for standalone unit (installation
space air inlet, rear of unit)
18 / 112
CombiMaster Plus 61 on thermocabinet
Page 19

Notes on using your appliance
- Avoid having heat sources (e.g. grill plates, deep-fat fryers etc.) near the appliance.
- Only use the appliance in areas with a room temperature of > 5 °C. For ambient
temperatures of less than + 5 °C, you must heat the cooking cabinet to room temperature
(> + 5 °C) before starting.
- As soon as you open the cooking cabinet door, the heating and fan wheel shut down
automatically. The integral fan wheel brake is activated. The fan wheel keeps running for
a brief period only.
- With grilling and roasting applications (e.g. chickens) a fat collector should always be
pushed under the food which is cooking.
- Only use heat-resistant original accessories from the appliance manufacturer.
- Always clean accessories before use.
- Leave the appliance door slightly open if it is going to be idle for a prolonged period (e.g.
overnight).
- The cooking cabinet door has a sure shut function; the door of the floor appliance is not
closed tight unless the door handle is vertical.
- For long stoppages (e.g. non-work day), shut off the water, power and gas supplies to
the appliance.
- At the end of its service life, the appliance must not be disposed of with the general waste
or used electrical appliances at municipal collection points. We would be pleased to assist
you in disposing of the device.
Max. load sizes depending on appliance size
6 x 2/3 GN 20 kg (max. 10 kg for each rack)
6 x 1/1 GN 30 kg (max. 15 kg for each rack)
6 x 2/1 GN 60 kg (max. 30 kg for each rack)
10 x 1/1 GN 45 kg (max. 15 kg for each rack)
10 x 2/1 GN 90 kg (max. 30 kg for each rack)
20 x 1/1 GN 90 kg (max. 15 kg for each rack)
20 x 2/1 GN 180 kg (max. 30 kg for each rack)
19 / 112
Page 20
Notes on using your appliance
If the maximum load sizes are exceeded, this can damage the appliance.
Please also note the maximum load sizes for food in the "Manual Cookbook".
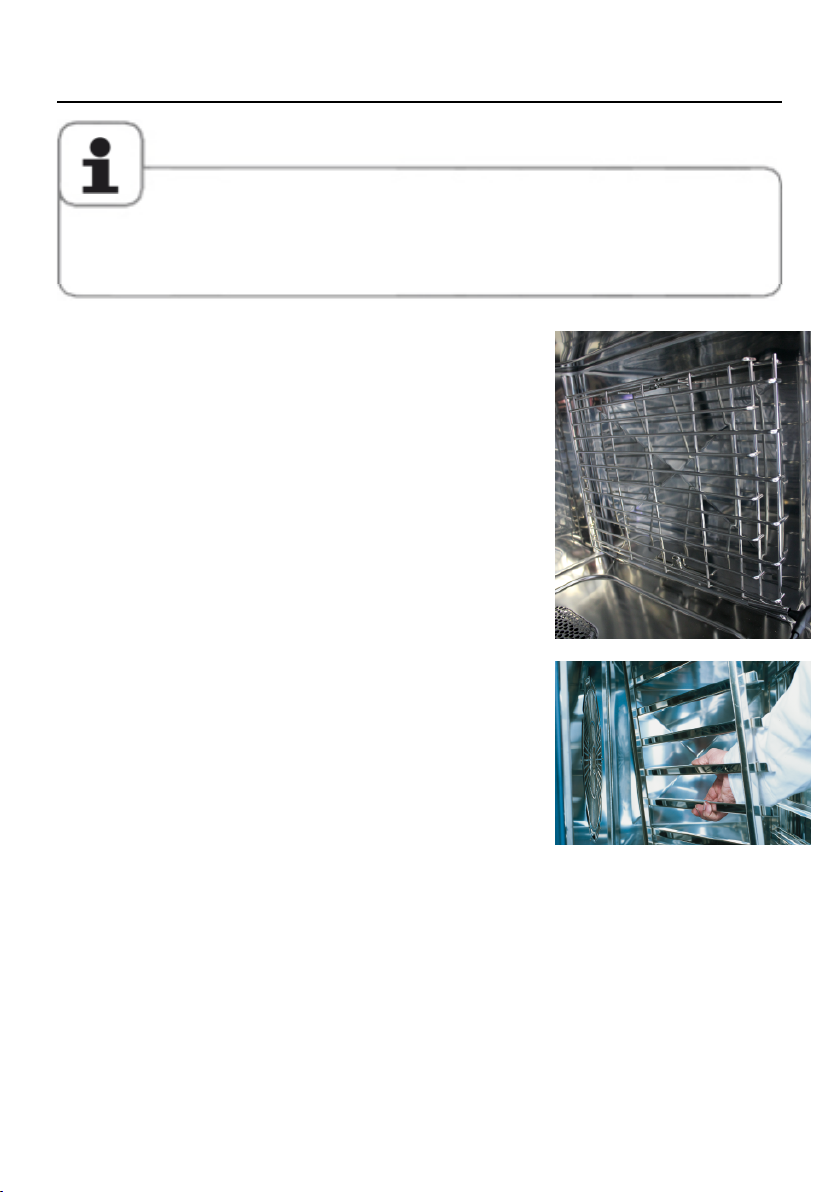
Table-top appliance 6 x 2/3 GN with hinging rack
- To remove the right hinging rack, hold the top of the
hinging rack and press it upwards. The hinging rack
releases from the 2 locking pins and can now be
removed.
- To install the hinging rack, align the hooks on the
hinging rack with the locking pins and press down on
the hooks until they engage in the locking bolts.
- To remove the left hinging rack, raise it slightly and
swivel it right into th cooking cabinet to release both
locking pins from the air baffle. Use a screwdriver to
loosen the upper and lower locking hooks on the air
baffle. You can now remove the hinging rack together
with the air baffle. The left hinging rack can now be
removed together with the air baffle.
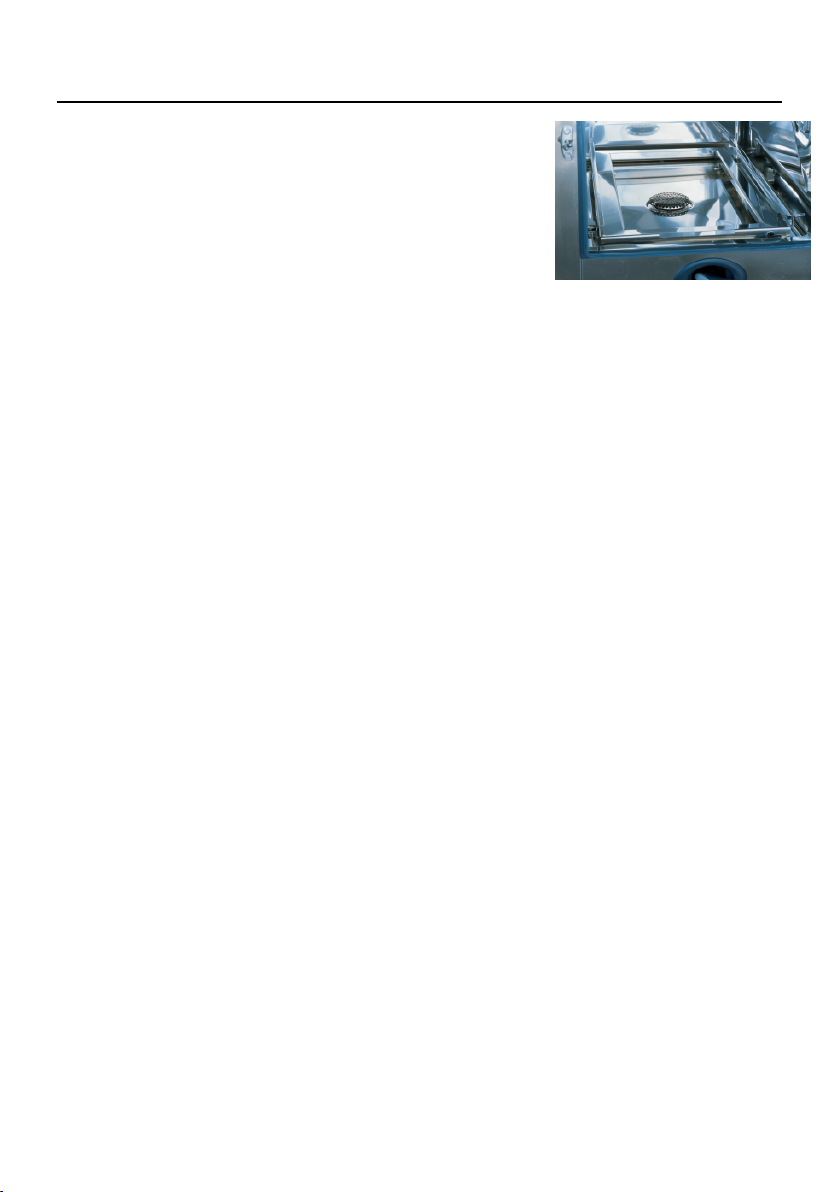
Table-top appliances with hinging racks
(6 x 1/1 GN, 6 x 2/1 GN, 10 x 1/1 GN, 10 x 2/1 GN)
- To remove, raise the hinging rack slightly in the middle.
Pull it out of the front, lower locking mechanism and
then from the top locking mechanism.
- Swivel the hinging rack to the middle of the cooking
cabinet.
- Lift the hinging rack out of its fixing by lifting it up.
Reverse the above sequence to reset.
20 / 112
Page 21
Notes on using your appliance
Working with mobile oven racks, mobile plate racks
and transport trolleys for table-top units (option)
- Remove the hinging rack as described above.
- Place the run-in rail on the fixing provided on the
appliance's base. Make sure it is fixed accurately in
place (4 pins).
- Remember that the appliance must be matched to
the exact height of the transport trolley and must be
levelled.
- Move the transport trolley as far as it will go on the
run-in rail and make sure that the transport trolley is
correctly locked on the appliance.
- Push the mobile oven rack or mobile plate rack into the
appliance as far as it will go, and check that the locking
mechanism in the appliance is working correctly.
- To remove the mobile oven rack or mobile plate rack,
release the locking mechanism and pull the rack out of
the cooking cabinet. First insert the core temperature
probe with the run-in rail in the park position.
- Make sure that the mobile oven rack or mobile plate
rack is securely locked on the transport trolley during
transportation.
21 / 112
Page 22
Notes on Using Your Unit
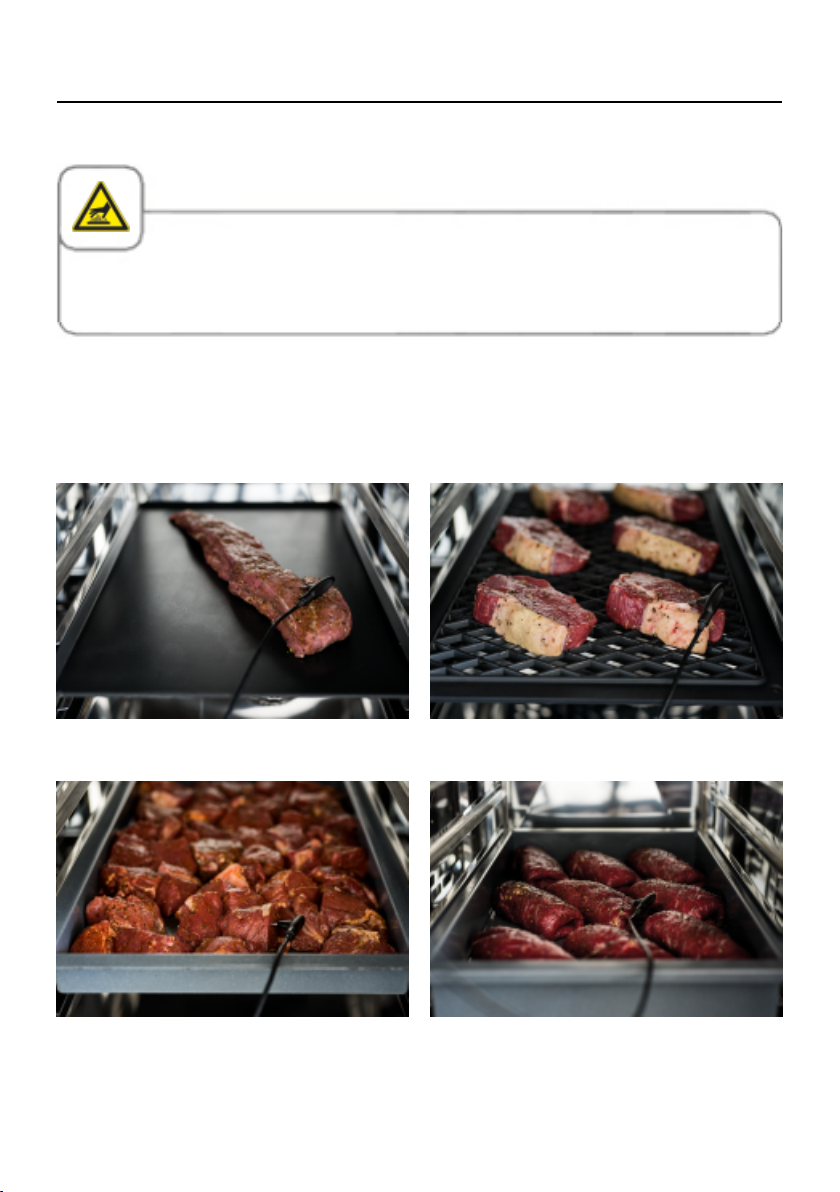
Working with the Core Temperature Probe
Caution!
The core temperature probe can be hot – Risk of burns.
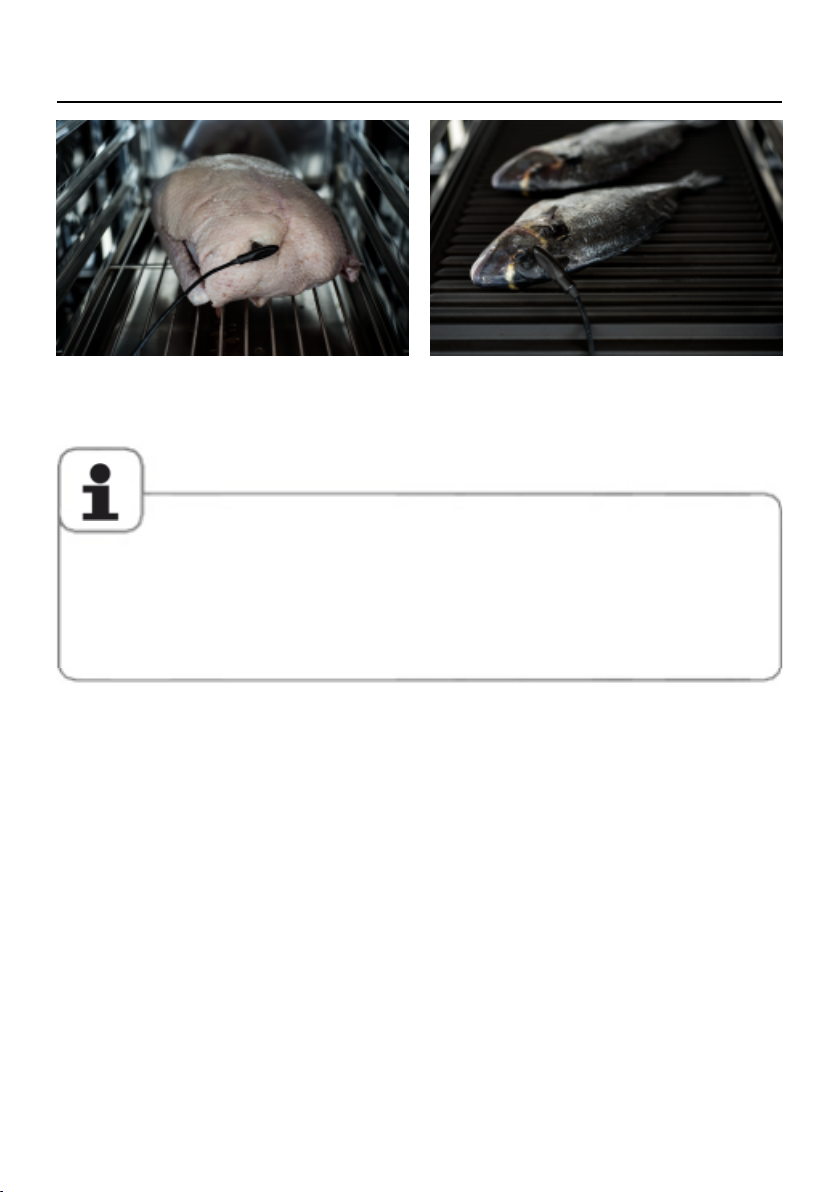
Always insert the core temperature probe into the thickest point on the product. Make sure
that a large part of the probe needle is in the product. Insert the core temperature probe at
an angle into the product. For bakery products that rise a long way during baking, position
the CT probe vertically in the middle of the product.
At the thickest point Position at an angle
Insert into several pieces of meat Position at an angle
22 / 112
Page 23
Notes on Using Your Unit
Into the breast meat At the thickest point on the product
- Always correctly position the core temperature probe in the park position provided – Risk of
damage!
- Do not let the core temperature probe hang out of cooking cabinet – risk of damage.
- Remove the core temperature probe from the food before you take the food from the cooking
cabinet – risk of damage.
23 / 112
Page 24

Notes on using the USB interface
The USB interface is designed to be used only for
importing and exporting data, and for performing
software updates using USB drives.
It is not suitable for charging or operating other
electronic equipment, such as cellular phones.
24 / 112
Page 25
Notes on Using Your Unit
Working with the Hand Shower
- If you use the hand shower, please pull the hose at least 7.78 Inches (20 cm) out of the
park position.
- You can select 2 jet strengths by pressing the control button.
- Always let the hand shower slide slowly back into the park position.
Caution!
The hand shower and water from the hand shower may be hot – risk of burns.
- If you pull hard on the hand shower and it exceeds the maximum available hose length, it will
damage the hose.
- Make sure that the hand shower hose is fully rewound after use.
- You must not use the hand shower to cool the cooking cabinet. – Risk of damage to the cooking
cabinet and air baffle, or of the cooking cabinet glass cracking.
25 / 112
Page 26
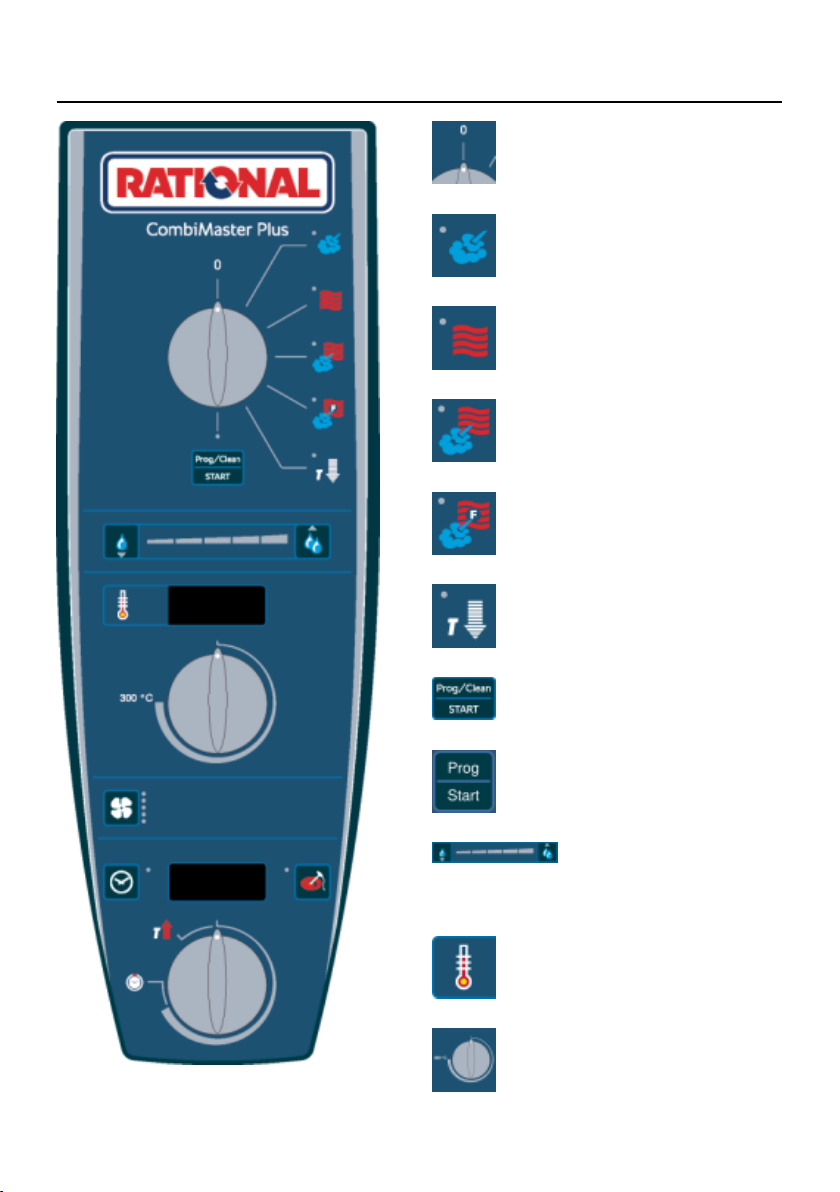
Operating controls
Operating mode switches
Steam (30 °C to 130 °C)
Convection (30 °C to 300 °C)
Combination of steam and
convection (30 °C to 300 °C)
Finishing (30 °C to 300 °C)
Cool down
26 / 112
Programming / Start programme
and clean
Sets humidity / displays
number of cleaner and
rinse aid tabs
Set the cooking cabinet
temperature
Selector switch for cooking
cabinet temperature
Page 27
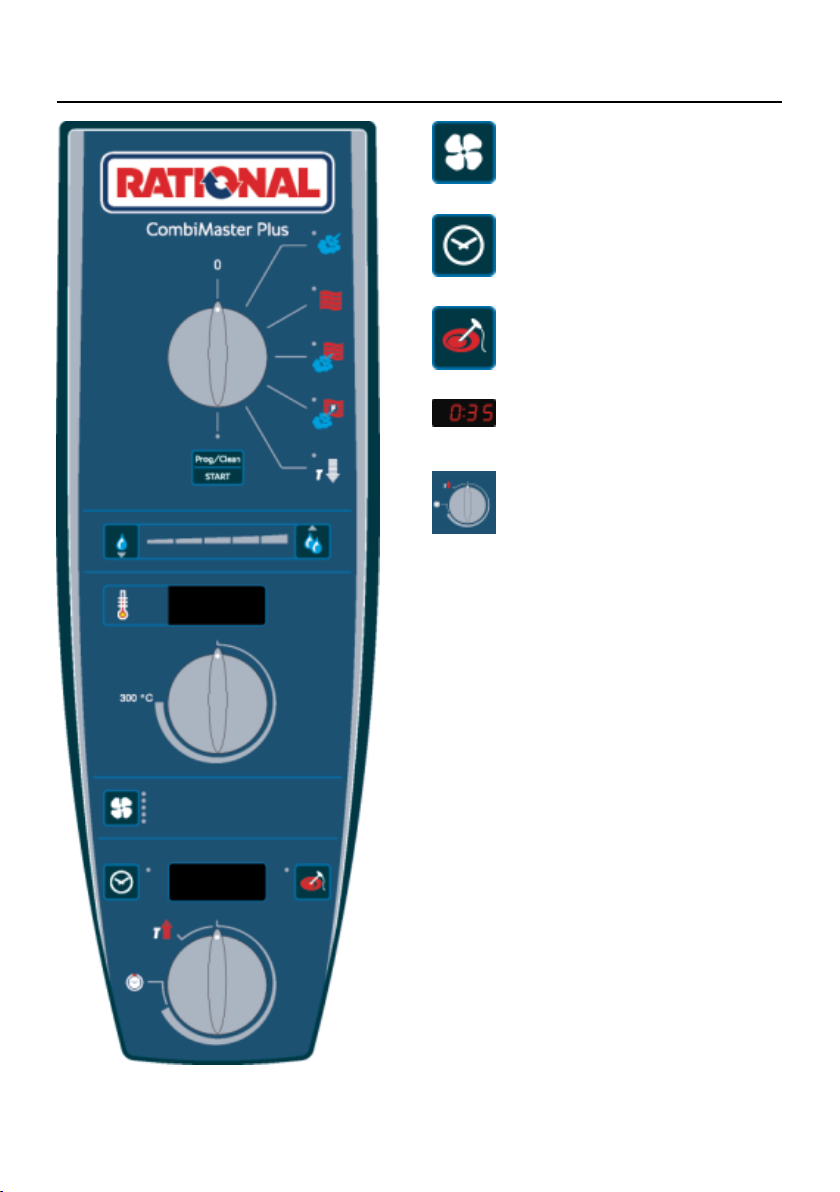
Operating controls
Air speed
Set the cooking time
(0 to 23 h 59 min)
Set the core temperature
(0 °C to 99 °C)
Displays cooking time/core
temperature/cleaning time
Selector switch for cooking time/
core temperature
27 / 112
Page 28

General Notes
Operation:
Choose the required
cooking mode.
Choose the required
cooking cabinet humidity
using the arrow buttons.
Choose the required
cooking cabinet
temperature.
Choose the required air
speed.
Choose the required
cooking time/core
temperature. The cooking
time can be set in minutes
for times between 0 and 2
hours, in 5-minute intervals
for times between 2 and 3
hours, in 15-minute intervals
for times between 3 and
6 hours and in 30-minute
intervals for times between
6 and 24 hours.
Turn the selection button
clockwise as far as it will go.
28 / 112
Page 29

General Notes
Notes:
A buzzer signals the end of
cooking.
The cooking mode display
flashes when the cooking
cabinet is too hot (see
the “Cool Down” section
on cooling the cooking
cabinet).
Fault messages:
Low water level – Open the
water tap. Display goes out
after filling.
Button lights up when the
heating is active.
“Gas burner fault”: Press
the “cooking time” button –
New ignition process. If the
display lights up repeatedly,
inform Service!
29 / 112
Page 30

ClimaPlus
®
ClimaPlus
®
measures and regulates the humidity in the cooking cabinet. You can set the
exact product-specific climate for each food in the climate window.
Steam:
The factory setting for
ClimaPlus
®
is 100%
humidity.
Dry heat:
ClimaPlus
®
allows you to
limit the humidity in the
cooking cabinet. Red bars
and associated percentages
show the maximum
permitted humidity level in
the cooking cabinet. The
Steam + dry heat:
You can set the mixture
of steam and dry heat.
The more blue visible in
the climate window, the
moister the cooking cabinet
atmosphere and the higher
the humidity level.
more red visible on the
display, the drier the cabinet
atmosphere and the lower
the humidity level.
Up arrow lit – moisture entering
cooking cabinet.
Down arrow lit - moisture being
removed from cooking cabinet.
30 / 112
Page 31

ClimaPlus
For continuous operation that is as resource-friendly as possible, we recommend using
standard cooking cabinet humidity, for example 100% for dry heat.
®
Press the cooking time or core temperature button to display the current
humidity in the cooking cabinet.
31 / 112
Page 32

Overview of modes
Steam mode (30 °C to 130 °C)
The high performance fresh steam generator with new steam control always
produces hygienic fresh steam. You can cook without adding water and without
waiting for the water to boil. Constant cooking cabinet temperatures and
maximum possible steam saturation guarantee a uniform and highly gentle
cooking process. Appetising colours, bite and retained nutrients and vitamins
are guaranteed, particularly for vegetables. The steaming mode is ideal for
stewing, blanching, steaming, poaching, heating through, simmering, brewing
and soaking.
Convection mode (30 °C to 300 °C)
The hot air circulated at high speed flows around the food from all sides. The
meat protein sets immediately, so it remains wonderfully succulent on the inside.
Constant hot air at up to 300 °C is not simply a technical detail; the necessary
reserve power is there even for full loads. This is the only way to get succulently
browned pan-fried dishes, frozen convenience or light baked goods.
Combination of steam and convection mode (30 °C to 300 °C)
Combination mode marries all the benefits of the hot steam, such as short
cooking time, minimal cooking losses, succulence, with the advantages of
convection, which is responsible for creating the intense aroma, appetising colour
and crispy crusts. In this way you will avoid up to 50 % of the normal cooking
losses, without turning the food and with considerably shorter cooking times.
Finishing mode (30 °C to 300 °C)
Finishing means the conscious separation of production and service. From side
dishes through to the complete menu, with the optimum climate you will heat
the food you prepared and then chilled up to serving temperature very quickly
- whether it is on trays, plates or in containers. You gain flexibility, and your
customers enjoy the experience more as the food is no longer kept warm for long
periods, thus losing quality.
32 / 112
Page 33

Overview of modes
"Cool down"
With the Cool Down function, you can quickly and gently cool a hot cooking
cabinet, e.g. for low temperature cooking or manual cleaning.
Programming/Programme Start/ Cleaning"
Using the programming function, create and save manual programmes. For
recurring cooking processes, there are 100 programme slots with up to 6 cooking
steps available. This ensures consistent quality - even when using temporary
staff.
The automatic cleaning programme restores the hygienic initial condition of your
appliance without additional staff expenditure.
33 / 112
Page 34

Steam Mode
In the “steam” cooking mode, the steam generator generates hygienic fresh steam. You can
set the cooking cabinet temperature from 86 °F - 266 °F / 30 °C -130 ℃ .
Cooking methods: Steaming, stewing, blanching, simmering, soaking, vacuum cooking,
thawing, preserving
Step Info/Button Instructions
1 Choose the “steam” mode.
To preheat, turn the selection button anticlockwise as far as it will go. “PreEH” is shown
2
on the display. The end of preheating is
indicated by an acoustic signal and “LoAd” on
the display.
3
4 Press the button to set the cooking time.
5
4
5 Choose the required core temperature.
Set the required temperature. The standard
value is boiling temperature.
Set the required cooking time: e.g. 1 h and 6
min. For continuous operation turn the selection
button clockwise as far as it will go.
Or alternatively press the “core temperature”
button and set the required core temperature.
34 / 112
Page 35

Steam Mode
- After preheating and loading, an acoustic signal and the 00:00 setting in the display will remind
you that you still have to set the required cooking time or core temperature.
- If no further action takes place after the preheat temperature is reached, heating mode is
switched off after 10 minutes.
- Set times or temperatures are fixed after 10 seconds. To change the settings later, turn
the selection button to the zero setting first (at the top) and then adjust the required time or
temperature.
- When the cooking cabinet humidity is queried in steam mode, either 0% or 100% is shown.
100% cooking cabinet humidity is only indicated when sufficient steam has been produced.
- Set the required cooking time. For continuous operation, please turn the selection button
clockwise as far as it will go.
35 / 112
Page 36

Steam Mode
Sample Dishes
Mise en place
Tomatoes concassé, garnishes (vegetables, fruit), mushrooms, blanching juliennes and
brunoises, blanching vegetables for stuffings, roulades, etc. peeling onions and chestnuts,
soaking pulses, blanching bacon and ham, poaching fish dishes, soups, sauces, stocks,
fumets, etc. pasteurising (semi-preserved foods).
Starters
Scrambled eggs, poached eggs, hard-boiled eggs, asparagus, vegetable flans, stuffed
vegetables (onions, turnips, leeks, celery, etc.), galantines, fish dumplings, terrines,
vacuum dishes.
Soup garnishes
Liver dumplings, spinach dumplings, maultaschen, ravioli, vegetable flan, fillings,
dumplings, egg garnish/flan.
Main courses
Boiled beef, cured ham, pickled knuckle of pork, tongue, boiling fowl, turkey legs, meat
in aspic, fish (salmon, sole, etc.), cured ham, poultry, vacuum dishes (chicken breast,
aitchbone, veal tongue), turkey fillet, chicken breasts, beef fillet, vitello sausage.
Side dishes
Risotto/rice, different types of dumplings, pasta (noodles), fresh and frozen vegetables,
vegetable casseroles, potato roulade, boiled/jacket potatoes, flan, vegetable casseroles,
polenta.
Desserts
Fresh or frozen fruit (e.g. hot raspberries), stewed fruit, rice pudding, crème caramel,
cabinet pudding.
36 / 112
Page 37

Steam Mode
To get the most out of your appliance, check daily the types of food which can be cooked
together using “steam” .
Remember that fish, meat, vegetables, side dishes and fruit can be cooked together (as long as
they are all being prepared by the same method).
Potatoes are cooked in perforated GN containers, the perforations let the steam circulate and
give faster, more intensive cooking.
Vegetable stock can be collected by inserting a container on the bottom rack.
It is better to use two shallower GN containers rather than one high one => this reduces bulk
and avoids heavy layers of food.
Dumplings should be placed in a shallow solid GN container, not too close together.
Rice and cereals are the only foods to which you should add water: 1 part grain, 1.5 to 2 parts
water.
Tomatoes are very easy to skin: “steam” for approx. 1 min, then plunge into cold water.
Approximate cooking cabinet temperatures
Soup garnishes: 167 °F - 194 °F (75 °C - 90 °C)
Fish, shellfish and crustaceans: 149 °F - 194 °F (65 °C - 90 °C)
Meat and sausages: 162 °F - 167 °F (72 °C - 75 °C)
Light meat: 167 °F - 185 °F (75 °C - 85 °C)
Dark meat: 176 °F - 194 °F (80 °C - 90 °C)
Poultry: 176 °F (80 °C)
Desserts: 149 °F - 194 °F (65 °C - 90 °C)
Seasoning
Season with care. Low cooking temperatures intensify the characteristic taste of seasonings.
When vacuum cooking be sure to add the exact amount of fumet, essence or reduction!
Preserving fruit/vegetables
Cover the food with hot or cold liquid, depending on the firmness of the raw product and
the type of preserve you want. The diameter of the preserving jars used should not exceed
3.9" (100 mm). The cooking temperature will depend on the type of product (ripeness, size of
pieces). Approximate temperature: 165 °F -210 °F (74 °C - 99 °C).
Please note: The jars must not be closed.
37 / 112
Page 38

Dry Heat Mode
In “dry heat” cooking mode, powerful heating elements heat up the dry air. You can set the
cooking cabinet temperature from 86 °F to 572 °F / 30 °C to 300 °C . You can limit the
cooking cabinet humidity if necessary.
Cooking methods: Baking, roasting, grilling, deep-frying, gratinating, glazing.
Step Info/Button Instructions
1 Choose the “dry heat” mode.
To preheat, turn the selection button anticlockwise as far as it will go. “PreEH” is shown
2
3 Set the required temperature.
on the display. The end of preheating is
indicated by an acoustic signal and “LoAd” on
the display.
4
5 Press the button to set the cooking time.
6
5
6 Choose the required core temperature.
38 / 112
Select the required cooking cabinet humidity or
work with the default setting.
Set the required cooking time, e.g. 35 minutes.
For continuous operation, please turn the
selection button clockwise as far as it will go.
Or alternatively press the “core temperature”
button and set the required core temperature.
Page 39

Dry Heat Mode
- After preheating and loading, an acoustic signal and the 00:00 setting in the display will remind
you that you still have to set the required cooking time or core temperature.
- If no further action takes place after the preheat temperature is reached, heating mode is
switched off after 10 minutes.
- Set times or temperatures are fixed after 10 seconds. To change the settings later, turn
the selection button to the zero setting first (at the top) and then adjust the required time or
temperature.
- Set the required cooking time. For continuous operation, please turn the selection button
clockwise as far as it will go.
39 / 112
Page 40

Dry Heat Mode
Sample Dishes
Mise en place
Sweating bacon, roasting bones, allowing dough (yeast) to rise.
Starters
Meatballs, vegetarian bakes, vegetables au gratin, vegetable pasties, pies, sirloin, chicken
wings, finger food, duck breasts, quiches, shortcrust pastry, tartlets.
Soup garnishes
Savoury straws, cheese croûtons.
Main courses
Steak, rump steak, T-bone steak, liver, rissoles, chicken breast, chicken legs, half / whole
chickens, turkey, pheasant, quail, breaded meat, breaded convenience food, vegetarian
cutlets, duck breasts, cutlets, pizza .
Side dishes
Potato pancakes, roast potatoes, potato gratin, rösti, baked potatoes, Idaho potatoes,
potato soufflés, Macaire potatoes, duchesse potatoes.
Desserts
Sponges, marble cakes, plain cakes, fancy cakes, flaky pastry, croissants, bread, rolls,
baguettes, shortcrust pastry, apple strudel, frozen bakery products (precooked).
40 / 112
Page 41

Dry Heat Mode
Cooking times
Cooking times will depend on product quality, weight and height. Do not overload grids
or containers so that air can circulate evenly.
General notes on pan-frying
- Preheat to as high a temperature as possible (572 °F / 300 °C) to build up sufficient stored
heat.
- Load as quickly as possible, in order to minimise cabinet temperature drop.
Breaded products
All types of breadcrumb coating can be used. Browning is improved by brushing with fat or a
blend of paprika and oil.
Rule of thumb: allow approx. 8 to 10 minutes per 0.39" (1 cm) thickness of meat
Preheat: to 572 °F / 300 °C (at least until heating indicator light goes out).
Optimum cut thickness: 0.59" to 0.79" (1.5 to 2 cm).
Accessories: Roasting and baking tray or granite-enamelled container. For even browning on
the top and bottom surfaces, make sure that the slices are of the same thickness or the same
size.
Gratinate
Light and dark meat dishes, fish, mussels, asparagus, chicory, broccoli, fennel, tomatoes, toast.
Preheat: to 572 °F /300 °C (at least until heating indicator light goes out). Set to desired
temperature after loading.
Accessories: e.g. grids or containers (0.79" /20 mm) for gratinating toast, steaks and soups.
Baking
Preheat: to baking temperature. For a full load you may need to select a higher preheating
temperature.
Baking temperature: approx. 68 °F - 77 °F (20 °C -25°C) lower than in a conventional oven.
For frozen convenience products preheat to 572 °F (300 °C).
Defrost frozen rolls and leave to rise for a short time.
Accessories: Use perforated Teflon-coated baking trays, baking and roasting trays or granite
enamelled GN containers.
41 / 112
Page 42

Combination Mode
The two operating modes “steam” and “dry heat” are combined. This combination creates a
hot humid cabinet climate for especially intensive cooking. You can set the cooking cabinet
temperature from 86 °F - 572 °F (30 °C - 300 °C) . You can set the cooking cabinet climate
if necessary.
Cooking methods: Roasting, baking, finishing.
Step Info/Button Instructions
1 Choose the “combination” mode.
To preheat, turn the selection button anticlockwise as far as it will go. “PreEH” is shown
2
3 Set the required temperature.
on the display. The end of preheating is
indicated by an acoustic signal and “LoAd” on
the display.
4
5 Press the button to set the cooking time.
6
5
6 Choose the required core temperature.
42 / 112
Select the required cooking cabinet humidity or
work with the default setting.
Set the required cooking time. For continuous
operation, please turn the selection button
clockwise as far as it will go.
Or alternatively press the “core temperature”
button and set the required core temperature.
Page 43

Combination Mode
- After preheating and loading, an acoustic signal and the 00:00 setting in the display will remind
you that you still have to set the required cooking time or core temperature.
- If no further action takes place after the preheat temperature is reached, heating mode is
switched off after 10 minutes.
- Set times or temperatures are fixed after 10 seconds. To change the settings later, turn
the selection button to the zero setting first (at the top) and then adjust the required time or
temperature.
- Set the required cooking time. For continuous operation, please turn the selection button
clockwise as far as it will go.
43 / 112
Page 44

Combination Mode
Sample Dishes
Mise en place
Roasting bones.
Starters
Quiche Lorraine, vegetable soufflés, flans, moussaka, lasagne, canneloni, paella, pasta
bakes.
Main courses
Roasts (beef, veal, pork, lamb, poultry, game), roulades, stuffed vegetables (peppers,
aubergines, cabbage, onions, kohlrabi), vegetable gratins (cauliflower), turkey legs, stuffed
breast of veal, ham with noodles, leg of pork, belly of pork, various omelettes.
Side dishes
Potato gratin, frozen products (potato turnovers etc.), potato bakes.
Desserts
Yeast dough.
Miscellaneous
Bread, rolls, pretzels (frozen dough portions).
44 / 112
Page 45

Combination Mode
Do not place joints too close together to allow even cooking.
Joints with rinds or larger joints should be steamed for approximately 1/3 of the cooking time.
Collect condensate in a container (additional rail) and make the gravy by adding it to the lightly
roasted bones.
Preparing sauces
– Place a solid container on an additional rail.
– Add bones, mirepoix, seasonings to the container and roast under the meat.
– Add the collected stock.
– Braise for the duration of cooking.
– Very concentrated stock for gravies/sauces.
Roulades
are placed in solid GN container, top with hot sauce and cover with container.
Baking
Prepare yeast doughs, flaky pastry, choux pastry on baking, and roasting trays.
45 / 112
Page 46

Finishing
®
Cooking Mode
The two operating modes steam and dry heat are combined. This produces the ideal cooking
climate, both preventing the food drying out and the formation of unwanted puddles. You can
set the cooking cabinet temperature from 86 °F - 572 °F (30 °C - 300 ℃) .
Step Info/Button Instructions
1
2
3
4
5 Press the button to set the cooking time.
6
Choose the “Finishing
To preheat, turn the selection button anticlockwise as far as it will go. “PreEH” is shown
on the display. The end of preheating is
indicated by an acoustic signal and “LoAd” on
the display.
We recommend a cabinet temperature of 284°
F / 140 °C, but the temperature can be varied
for different products.
Select the required cooking cabinet humidity or
work with the default setting.
Set the required cooking time. As a rule,
finishing time is approx. 8 minutes for food
arranged on plates. For continuous operation,
please turn the selection button clockwise as far
as it will go.
®
" mode.
5
6 Choose the required core temperature.
46 / 112
Or alternatively press the “core temperature”
button and set the required core temperature.
Page 47

Finishing
- After preheating and loading, an acoustic signal and the 00:00 setting in the display will remind
you that you still have to set the required cooking time or core temperature.
- If no further action takes place after the preheat temperature is reached, heating mode is
switched off after 10 minutes.
- Set times or temperatures are fixed after 10 seconds. To change the settings later, turn
the selection button to the zero setting first (at the top) and then adjust the required time or
temperature.
- Finishing time will vary depending on the product, product temperature, number of plates, how
full they are, and the desired serving temperature.
- Set the required cooking time. For continuous operation, please turn the selection button
clockwise as far as it will go.
®
Cooking Mode
47 / 112
Page 48

Finishing
®
Cooking Mode
Sample Dishes
Starters
All types of spaghetti, canneloni, lasagne, vegetable dishes, cheese and herb noodles,
quiche Lorraine, spring rolls, vegetarian cutlets, onion flans.
Main courses
All types of roast, meat loaves, bakes, ready-to-serve meals, roulades, stuffed vegetables.
Side Dishes
Rice, potatoes, noodles, pasta, vegetables, soufflés, gratins.
Desserts
Strudel, hot fruit.
48 / 112
Page 49

Finishing
Finishing utensils
Porcelain plates, earthenware, glass, silverware, copper pans, stainless steel, aluminium
dishes (brought in).
Banqueting service/tour groups
Reheat plates in the mobile plate rack.
– Large quantities in next to no time.
– Fast loading and unloading.
– Minimum serving times enable high hourly throughput.
– For plates up to 12.2 inches (31 cm) in diameter
Serving dishes are heated as well, storing heat until the food reaches the table.
Thermocover: for Holding short waiting periods or transporting food.
Arrange food evenly and not too closely on plates or dishes.
Before arranging vegetables and side dishes for finishing mix with a little butter or fat.
Sauces
Usually added after finishing.
Bulky items need more time to heat up.
®
Cooking Mode
49 / 112
Page 50

Cool Down
You have been operating your appliance at high cooking cabinet temperatures at first and
then want to continue working at low cabinet temperature. You can cool the cooking cabinet
down quickly but gently using “cool down”.
Warning!
- Do not use the “cool down” function unless the air baffle has been locked correctly – risk of
injury.
- During “cool down” the fan wheel does not switch off when the door is opened.
- Do not touch the fan wheel – risk of injury.
- During “cool down”, hot vapours emerge from the cooking cabinet – risk of burns.
Step Info/Button Instructions
1 Close cabinet door.
2 Select “cool down”
3 Open the cooking cabinet door
50 / 112
Page 51

Program Mode
You use the programming function to create and save programs manually. There are 2x50
program slots available with up to 6 cooking steps each for repeat cooking processes. So
that you can guarantee constant quality – even when you have assistants doing the cooking.
Create program
Step Info/Button Instructions
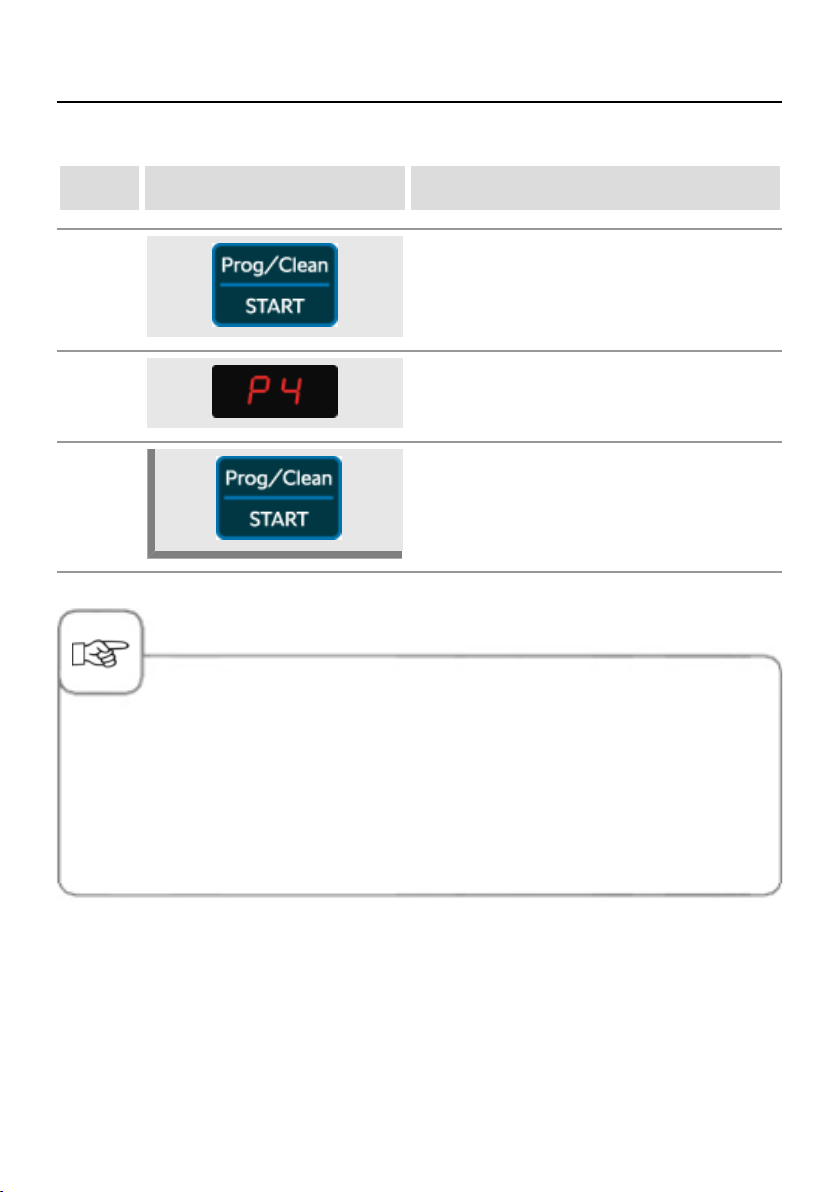
1
2
3 Select a free program slot e.g. P4.
4
5 Press the button.
6
Use the selection button to set “Prog/Clean |
Start”.
You can change between program places 1–
50 and 51–100 by selecting one of the settings
buttons for cooking cabinet climate.
The display flashes to confirm the program slot
is vacant.
“S1” for step 1 appears on the display, and the
“Prog/Clean | Start” button flashes.
7 Select a cooking mode e.g. “steam”.
8
Set the required temperature or work with the
default setting.
51 / 112
Page 52

Program Mode
Step Info/Button Instructions
9 Press the button to set the cooking time.
10 Set the required cooking time
11 Press the button.
Select a further cooking mode e.g. “dry heat”,
12
13 Set the required cooking temperature.
and this is confirmed by “S2” appearing on the
display.
14
15 Press the button to set the cooking time.
16 Set the required cooking time.
17
52 / 112
Select the required cooking cabinet humidity or
work with the default setting.
Or alternatively press the “core temperature”
button.
Page 53

Program Mode
Step Info/Button Instructions
18 Choose the required core temperature.
19 Press the button.
20
- Activate the “Prog/Clean | Start” button for programming again if it has gone out.
- If you would like to keep the same cooking mode in the next program step, choose another
cooking mode briefly in order to be able to start the next program step.
- Start a program with preheat (turn the selection button for cooking time anti-clockwise as far as it
will go).
- When you have occupied the maximum number of steps, “----” will appear on the display. Quit
by pressing “Prog/Clean | Start”.
- Set times or temperatures are fixed after 10 seconds. To change the settings later, turn
the selection button to the zero setting first (at the top) and then adjust the required time or
temperature.
Use the selection button to set “Prog/Clean |
Start” to save the program.
53 / 112
Page 54

Program Mode
Check program
Step Info/Button Instructions
1
2 Choose the required program.
3
Use the selection button to set “Prog/Clean |
Start”.
Start the program by pressing “Prog/Clean |
Start”.
54 / 112
Page 55
Program Mode
- If the display flashes, it means the program slot is vacant.
- The remaining cooking time is shown during operation in the “cooking time/core temperature”
display. If the program includes a step with core temperature, the remaining time is only shown
when this step has been finished.
- It is not possible to change between core temperature and cooking time or vice versa.
- Stop the program by opening the cooking cabinet door. Cancel the program by choosing a
different cooking mode or switching the appliance off.
- To change the settings later, turn the selection button to the zero setting first (at the top) and
then adjust the required time or temperature.
If you press the button during current operating you will change the cooking
time of the current step. The new value is not saved.
If you press the button during current operating you will change the core
temperature of the current step. The new value is not saved.
55 / 112
Page 56
Program Mode
Check program
Step Info/Button Instructions
1 Use the selection button to set “prog/start”.
2 Choose the required program.
Press “prog/start” to show the first program
3
step. Press the button again to request the next
step. The cooking cabinet door should be open.
- If the display flashes, it means the program slot is vacant.
- The remaining cooking time for the program is shown in the “cooking time/core temperature”
display. If the program includes a step with core temperature, the remaining time is only shown
when this step has been finished.
- After the last program step has been requested by pressing the “prog/start” button, you start
again.
56 / 112
Page 57

Program Mode
Delete program
Step Info/Button Instructions
1 Use the selection button to set “prog/start”.
2 Select a program, e.g. P4.
4
5 A flashing program slot confirms deletion.
Individual program steps can neither be deleted nor changed.
Keep the “prog/start” button pressed for 5
seconds.
57 / 112
Page 58

Download Program
Use the download function to save your own programs to a USB stick.
The USB stick should be connected when the unit is switched off.
Step Info/Button Instructions
1
2 Use the selection button to set “prog/start”.
3 Turn the selection button clockwise.
4 appears on the display.
5
Switch the unit off and insert the USB stick in
the slot underneath the control panel.
Press the button to save the programs to the
USB stick.
58 / 112
Page 59

Download Program
Step Info/Button Instructions
6
When the process has been completed, “end”
appears on the display. Remove the USB stick.
59 / 112
Page 60

Upload Program
- Connection of energy optimisation system. Copy your individual cooking porgrams to the
unit with the upload-funktion.
The USB stick should be connected when the unit is switched off.
Step Info/Button Instructions
1
2 Use the selection button to set “prog/start”.
3 Turn the selection button clockwise.
4 appears on the display.
5
Switch the unit off and insert the USB stick in
the slot underneath the control panel.
Press the button to transfer the programs to the
unit.
60 / 112
Page 61

Upload Program
Step Info/Button Instructions
6
When the upload function is used, all program slots on the unit are overwritten. Back up
existing programs on a USB stick before you transfer programs from another unit.
When the process has been completed, “end”
appears on the display. Remove the USB stick.
61 / 112
Page 62

HACCP
The data is stored for a period of 10 days and can be output via the USB interface on the unit
as required. To save HACCP data permanently on a USB stick, please follow the instructions.
The USB stick should be connected when the unit is switched off.
Step Info/Button Instructions
1
2 Use the selection button to set “prog/start”.
3 Turn the selection button clockwise.
4 appears on the display.
5
Switch the unit off and insert the USB stick in
the slot underneath the control panel.
Press the button to transfer the HACCP data to
the USB stick.
62 / 112
Page 63

HACCP
Step Info/Button Instructions
6
The following data is logged:
- Batch no.
- Time
- Cooking program name
- Cooking cabinet temperature
- Core temperature
- Door open /door closed
- Change of cooking mode
- Connection of energy optimization system.
- 1/2 energy
When the process has been completed, “end”
appears on the display. Remove the USB stick.
63 / 112
Page 64

Software Update
The units software can be updated with a USB-Stick.
The USB stick should be connected and disconnected when the unit is switched off.
Step Info/Button Instructions
1
2
Switch the unit off and insert the USB stick in
the slot underneath the control panel.
Keep the “ClimaPlus
®
” button and the “prog/
start” button pressed at the same time.
Switch the unit on. The update process has
3
been completed when the standard values
of the operating mode selected, e.g. cooking
cabinet temperature, are displayed.
64 / 112
Page 65

Settings Celsius/Fahrenheit
The temperatures of your unit can be shown in Celsius or Fahrenheit. To change the display,
proceed as follows.
Step Info/Button Instructions
1 "Prog/Start" press
2 Turn the selection button clockwise.
3 appears on the display.
4 Press the button.
5
6 Turn the selection button.
7
The temperatures of your unit can be shown in
Celsius or Fahrenheit.
The display changes from Celsius to
Fahrenheit.
65 / 112
Page 66

Settings Celsius/Fahrenheit
Step Info/Button Instructions
8 Press the button to save the setting.
66 / 112
Page 67

Settings Time/Date
You can set the time and date on your unit for correct evaluation of HACCP data. Carry out
the settings as follows.
Step Info/Button Instructions
1 Select "Prog/Start"
2 Turn the selection button clockwise.
3 appears on the display.
4 Press the button.
8
9
10
Shown on the upper display for the hour setting.
The current hour appears in the lower display.
Turn the lower selection button to set the hour
and save this using the “prog/start” button.
Shown on the upper display for the minute
setting. The current minute appears in the lower
display.
67 / 112
Page 68

Settings Time/Date
Step Info/Button Instructions
11
12
13
14
15
Turn the lower selection button to set the hour
and save this using the “prog/start” button.
Shown on the upper display for the minute
setting. The current day appears in the lower
display.
Turn the lower selection button to set the hour
and save this using the “prog/start” button.
Shown on the upper display for the minute
setting. The current month appears in the lower
display.
Turn the lower selection button to set the hour
and save this using the “prog/start” button.
16
17
68 / 112
Shown on the upper display for the minute
setting. The current year appears in the lower
display.
Turn the lower selection button to set the year,
save this using the “prog/start” button and leave
program mode.
Page 69

Cleaning CombiMaster
®
Plus
Start clean
CleanJet
cleaning programmes allow you to adapt the cleaning process to the particular level of
soiling.
®
is the automatic cleaning system for cleaning the cooking cabinet. The 3
Attention!
- For hygiene reasons and to prevent malfunctions it is essential to clean your appliance every
day - risk of fire!
- Your appliance must be cleaned every day, even if it is only operated in "Steam" mode.
- Only use cleaner and rinse aid tabs from the appliance manufacturer. The use of other cleaning
chemicals can damage the appliance. Liability is not assumed for damages as a consequence!
- If you use excessive cleaning chemicals, this can cause foaming.
- Never place the tabs in the hot cooking cabinet (> 50 °C).
- Leave the appliance door slightly open if it is going to be idle for a prolonged period (e.g.
overnight).
- Cleaning the press-fit door gasket daily will extend the service life. Use a soft cloth and washingup liquid to clean the press-fit door gasket - do not use a scouring agent.
- Clean the glass panes inside and out and the outer panels of the appliance, ideally using a
soft, damp cloth. Do not use any abrasive or aggressive cleaning agents. Use mild household
washing-up liquid and regularly clean the steel with a steel cleaning agent.
To clean the appliance, the cooking cabinet temperature must be below 50 °C (see Cool
Down section)..
You can choose between CLE1 (for heavy soiling), CLE2 (for light soiling) and CLE3
(Interim clean).
Step Info/Button Instructions
1
Turn the top dial to the "Prog/Clean | START"
button.
69 / 112
Page 70

Cleaning CombiMaster
Step Info/Button Instructions
2
3
4 Press the button.
5_1
®
Plus
Turn the temperature selector switch to the
right to select the desired cleaning programme
"CLE1", "CLE2" or "CLE3".
Depending on the cleaning programme
selected, either "CLE1", "CLE2" or "CLE3" will
appear on the display.
Now the display will alternately show how many
cleaner tabs or rinse aid tabs are required for
the relevant cleaning programme.
E.g.: if "CL 3" and "rl 2" appear alternately, 3
cleaner and 2 rinse aid tabs are required.
5_2
6_1
6_2
70 / 112
Now the display will alternately show how many
cleaner tabs or rinse aid tabs are required for
the relevant cleaning programme.
E.g.: if "CL 3" and "rl 2" appear alternately, 3
cleaner and 2 rinse aid tabs are required.
In addition to the display, the humidity bars
will also flash the tab colour. The illuminated
segments will indicate how many tabs should be
added.
E.g.: If the bars show 3 segments in red, this
means 3 cleaner tabs, or if the bars show 2
segments in blue, this means 2 rinse aid tabs
In addition to the display, the humidity bars
will also flash the tab colour. The illuminated
segments will indicate how many tabs should be
added.
E.g.: If the bars show 3 segments in red, this
means 3 cleaner tabs, or if the bars show 2
segments in blue, this means 2 rinse aid tabs
Page 71

Cleaning CombiMaster
Step Info/Button Instructions
®
Plus
10
11
7
8
9
Open the door
close door
Now open the cooking cabinet door to add the
cleaner and rinse aid tabs.
Warning!
Always wear protective gloves to handle the
cleaner tabs - risk of chemical burns.
Unpack the displayed number of rinse aid tabs
and place the tabs in the tab basket. See image
on the next page.
Unpack the displayed number of cleaner tabs
and place the tabs in the tab basket in the
cooking cabinet. See image on the next page.
The cleaning process will start automatically
when the cooking cabinet door is closed.
The colon in the time display at the bottom will
now flash. This signalises that the cleaning
programme is running. The time will run down.
12
Once the clean is complete, the time display
will switch from "00:00" to "End". The buzzer
will sound for 10 seconds or until the door is
opened.
71 / 112
Page 72

Cleaning CombiMaster
®
Plus
Warning!
- Do not open the cooking cabinet door while cleaning is in progress – chemical cleaner
and hot vapour may escape – risk of chemical burns and scalding. A horn sound is heard
if the door is opened during the cleaning process.
-
Once the CleanJet
cabinet (also behind the air baffle) for any cleaning tab residues. Thoroughly rinse away
any cleaning tab residues from the entire cooking cabinet (also behind the air baffle) with
the hand shower - risk of chemical burns.
- During cleaning, all external core temperature probes may not be inserted through the
cooking cabinet door in the cooking cabinet. These probes must not be cleaned with the
cabinet! This can cause leaks during cleaning.Danger of chemical burns and scalding!
®
cleaning process is aborted or has ended, check the entire cooking
72 / 112
Page 73

Cleaning CombiMaster
Chemical handling instructions
Warning!
Only use cleaner and rinse
aid tabs in compliance
with the relevant safety
measures, always wear, for
example, protective gloves
when handling the tabs risk of chemical burns!
®
Plus
Cleaner tab: Remove
protective film.
Rinse aid tab: Remove
exterior protective film
only. Do not damage the
transparent protective film.
Place the cleaner tabs on
top of the rinse aid tab.
Place the rinse aid tab with
the transparent protective
film in the tab basket.
Do not insert tabs into the
cooking cabinet - risk of
damage.
73 / 112
Page 74

Cleaning CombiMaster
®
Plus
Before starting the CleanJet
correctly inserted in the cooking cabinet.
When using softened water, the recommended quantity of cleaning tabs can be reduced by
up to 50%. If foam starts to collect despite adding the correct dosage of tabs, it is necessary to
reduce the number of cleaning tabs used. If the level of foam increases despite reducing the
cleaning tab dosage, please contact the Service Partner/customer service who can recommend
other measures, e.g. the defoaming tab.
®
clean, make sure that the hinging racks or mobile oven rack are
74 / 112
Page 75

Cleaning CombiMaster
®
Plus
Cleaning programmes
Cleaning Stage Description/Application Tabs
"Powerful clean"
CLE1
CLE2
CLE3
For heavy roasting and grilling deposits, e.g.
multiple loads of chicken, steaks, etc.
Duration approx. 3 hours 45 minutes.
Economical clean - "Eco"
For light soiling (up to 200°C) with the most
economical use of chemicals and water.
Duration approx. 2 hours 30 minutes.
Interim clean - "short cleaning time"
For all soiling, but without drying and rinsing.
Duration approx. 40 minutes.
CLE1
Cleaner & rinse aid
Cleaner & rinse aid
Cleaning agent
No soft water Soft waterAppliance
Cleaner tabs Rinse
aid tabs
6x 2/3 GN 2 1 2 1 03:30 h:mm
6x 1/1 GN 4 1 3 1 03:30 h:mm
10x 1/1 GN 4 1 3 1 03:30 h:mm
6x 2/1 GN 5 2 3 1 03:30 h:mm
10x 2/1 GN 5 2 3 1 03:30 h:mm
20x 1/1 GN 5 2 3 1 03:30 h:mm
20x 2/1 GN 6 2 3 1 03:30 h:mm
Cleaner tabs Rinse
aid tabs
Duration
75 / 112
Page 76

Cleaning CombiMaster
CLE2
®
Plus
No soft water Soft waterAppliance
Cleaner tabs Rinse
aid tabs
6x 2/3 GN 1 1 1 1 02:30 h:mm
6x 1/1 GN 2 1 1 1 02:30 h:mm
10x 1/1 GN 2 1 1 1 02:30 h:mm
6x 2/1 GN 3 2 2 1 02:30 h:mm
10x 2/1 GN 3 2 2 1 02:30 h:mm
20x 1/1 GN 3 2 2 1 02:30 h:mm
20x 2/1 GN 3 2 2 1 02:30 h:mm
Cleaner tabs Rinse
aid tabs
Duration
CLE3
No soft water Soft waterAppliance
Cleaner tabs Rinse
aid tabs
6x 2/3 GN 1 0 1 0 00:40 h:mm
6x 1/1 GN 1 0 1 0 00:40 h:mm
10x 1/1 GN 1 0 1 0 00:40 h:mm
6x 2/1 GN 2 0 1 0 00:40 h:mm
10x 2/1 GN 2 0 1 0 00:40 h:mm
20x 1/1 GN 2 0 1 0 00:40 h:mm
20x 2/1 GN 2 0 1 0 00:40 h:mm
Cleaner tabs Rinse
aid tabs
Duration
76 / 112
Page 77

Cleaning CombiMaster
®
Plus
CleanJet
®
abort
In the event of a power outage or after switching off the appliance, "StOP" will appear in the
temperature display and the "Prog/Clean | START" button will blink.
If the "Prog/Clean | START" button is not pressed, the clean will run for another 30 seconds.
To abort, the "Prog/Clean | START" button must be pressed.
There are two different abort operations:
Abort if the cleaner or rinse aid tabs have not yet come into contact with water
Abort if the cleaner or rinse aid tabs have come into contact with water
Abort if the cleaner or rinse aid tabs have not yet come into contact with water
Step Info/Button Instructions
1 "STOP" will appear in the temperature display
2
3_1
To abort, the "Prog/Clean | START" button must
be pressed.
If the abort operation is confirmed, "tAb" and
"out" will appear one under the other.
The number of tabs previously placed will flash
alternately in humidity bars.
If the abort operation is confirmed, "tAb" and
3_2
4
5 Press the "Prog/Clean | START" button again.
Open the door
"out" will appear one under the other.
The number of tabs previously placed will flash
alternately in humidity bars.
Open the door and remove the tabs.
Close the door when all tabs have been
removed from the cooking cabinet.
77 / 112
Page 78

Cleaning CombiMaster
Step Info/Button Instructions
6_1
®
Plus
The word "rInS" will then appear in the
temperature display and the full humidity display
will flash blue.
6_2
7
8
9
10 Press the "Prog/Clean | START" button again.
11
Open the door
close door
The word "cAb" will also appear on the time
display.
Open the door.
Rinse out the cooking cabinet (behind the air
baffle too) with water.
Close the door.
Then the display will switch to the mode
selected and the unit can be used to prepare
food.
78 / 112
Page 79

Cleaning CombiMaster
®
Plus
Abort if the cleaner or rinse aid tabs have come into contact with water
Step Info/Button Instructions
1 "STOP" will appear in the temperature display
2
3_1
3_2
4
5
6
Open the door
To abort, the "Prog/Clean | START" button must
be pressed.
If the abort operation is confirmed, "tAb" and
"out" will appear one under the other.
The number of tabs previously placed will flash
alternately in humidity bars.
If the abort operation is confirmed, "tAb" and
"out" will appear one under the other.
The number of tabs previously placed will flash
alternately in humidity bars.
Open the door and remove the tabs.
Close the door when all tabs have been
removed from the cooking cabinet.
Press the "Prog/Clean | START" button again to
start the abort programme.
The word "rInS" will then appear in the
temperature display and the remaining time for
the abort programme (approx. 20 minutes) will
appear in the time display.
At the end of the abort programme, the buzzer
will sound like when the clean ends as normal.
7
"End" is displayed. The abort programme has
been successfully completed.
79 / 112
Page 80

Cleaning CombiMaster
®
Plus
80 / 112
Page 81

Cleaning CombiMaster
If no water has yet been introduced into the cooking cabinet at the time of aborting or if a
defined time has not yet passed, the abort programme will not run. This means that the cooking
cabinet will not be automatically rinsed with water.
Once the tabs have been removed from the tab basket and the door closed, the display will
return to the mode selected.
®
Plus
81 / 112
Page 82

Cleaning CombiMaster
Warning!
- For hygiene reasons and to prevent malfunctions it is essential to clean the unit every day - risk
of fire.
- Please note that your unit must be cleaned every day, even if only “steaming” mode is used.
- Follow the safety instructions on the spray bottle and cleaner canister.
- Use only genuine cleaning agents and the genuine hand spray gun (article no.: 6004.0100) from
the unit manufacturer.
- Never leave hand spray guns under pressure.
- Never spray other people, animals, or objects.
®
For cleaning to be carried out, the cooking cabinet temperature must be below 132 °F / 60
°C (see “cool down” section).
You can choose between ‘CLE’ (for heavy soiling) and ‘CLES’ (for light soiling).
Step Info/Button Instructions
1 Switch unit off.
2 Swivel hanging rack and air baffle to the middle.
Warning!
Aggressive chemical fluid – risk of chemical
burns.
3
It is essential that you use:
protective clothing, safety goggles, gloves, face
mask, and the unit manufacturer's hand spray
gun.
82 / 112
Page 83

Cleaning CombiMaster
Step Info/Button Instructions
4
5
6 Select “prog/start”.
®
Spray the space behind the air baffle, cooking
cabinet, door seal, and inside of the door with
cleaner.
Reset and lock the air baffle and hanging rack
in place, close the cooking cabinet door.
Warning!
Do not open the cooking cabinet door while
cleaning is in progress – chemical cleaner and
hot vapor may escape – risk of chemical burns
and scalding.
7
8
9 Press the button.
10
11
Just turn the selector switch to the right to select
the desired cleaning program – CLES or CLE.
Depending on the cleaning program selected,
either ‘CLES’ or ‘CLE’ appears on the display.
The cleaning program starts.
CLES duration: 20 min.
CLE duration: 40 min.
Warning!
Aggressive chemical fluid – risk of chemical
burns.
It is essential that you use: protective clothing,
safety goggles, gloves, and face mask.
83 / 112
Page 84

Cleaning CombiMaster
Step Info/Button Instructions
®
12
13
14
15
16
At the end of the cleaning time, you will be
prompted to open the doors.
When the cleaning program has finished, rinse
the unit down, including behind the air baffle.
Wipe the cooking cabinet and cooking cabinet
seal with a damp cloth. If necessary, fold back
the inner pane and wipe it down as well.
Close the cooking cabinet door.
To dry the cooking cabinet, “dry heat” mode is
automatically switched on for 10 minutes after
the cabinet door is closed.
“End” appears on the display when cleaning is
complete.
After cleaning the display shows "Cool" and the
current temperature of the cooking cabinet. You
can now switch to a cooking mode. Otherwhise
the unit cools down to room temperature.
84 / 112
Page 85

Cleaning CombiMaster
®
If there is a power failure during cleaning, the following warning appears:
The cleaning program must be cancelled in these circumstances.
This is achieved by pressing the Prog/Start button. The device must then be
rinsed manually!
Warning!
Aggressive chemical fluid – risk of chemical burns.
It is essential that you use:
protective clothing, safety goggles, gloves, and face mask.
Rinse the spray gun nozzle and nozzle extension with clean water after every use.
Rinse the cleaning bottle with warm water after use.
Cancel the cleaning process by switching the unit off.
Warning!
Aggressive chemical fluid – risk of chemical burns.
It is essential that you use:
protective clothing, safety goggles, gloves, and face mask.
Always open the cooking cabinet door very slowly (hot vapors) – risk of burns.
Then rinse the unit out thoroughly, including behind the air baffle. Remove all chemical
residue before you continue with cooking.
- Cleaning the cooking cabinet seal every day will extend its service life.
- Do not use any scouring agents to clean the cooking cabinet seal.
- Clean the glass windows inside and out and the outer panels of the unit, ideally using a soft,
damp cloth. Do not use a scouring product.
- If there is heavy soiling, allow the residues soften for 10 minutes in “steam” mode before
cleaning.
- A couple of drops of salad oil will clear any stiffness in the pump plunger (manual spray gun).
85 / 112
Page 86

Steam generator descaling display
Your appliance is equipped with the CleanJet® automatic cleaning system. The steam
generator in your appliance still needs regular descaling, depending on water hardness
and use.
The descale level of your steam generator is determined with Calc Info. Once a critical
level of scale is reached, the unit display will indicate that the steam generator should
be descaled. It is recommended that the steam generator be descaled by a Service
Technician.
Once appliance cleaning with the automatic CleanJet® cleaning system is complete, the
next display will indicate that the steam generator should be descaled.
"CALC InFO" alternating with "CALL tECH" will be displayed on both displays.
86 / 112
Press the "Prog | Start | Clean" button to completely finish the clean.
Page 87

LAN cable connection
The following manual describes how to connect a LAN cable to the LAN interface of your
appliance (CombiMaster
The LAN interface is located
on the underside on the left
side of the appliance (for
the XS model, it is on the
rear panel on the right at the
back).
®
Plus optional).
Unscrew the splash
protection cover.
Now assemble all the
components (starting
from the appliance) back
together.
The components must be
assembled tightly without
using tools so as not to
damage the components
and the gasket elements.
Thread the individual
components on the cable,
as shown in the diagram.
Then plug the LAN cable
into the socket.
NOTE:
If gasket elements are
damaged, the splash
protection may not work.
Now screw together the
individual components of
the splash protection cover.
87 / 112
Page 88

LAN cable connection
Danger of burns.
When laying the LAN cable underneath the unit floor, make sure they do not come in contact
with hot components
Do not wrap the LAN cable around hot components.
The assembly and splash protection can only be guaranteed if you use an Ethernet cable with
the following specifications:
Maximum plug length of the Ethernet plug 45 mm
Maximum plug diameter diagonally of 18.5 mm
Cable diameter 5.5 - 7.5 mm
To ensure full functionality of the interface, a CAT-6 network cable must be used.
For a Combi-Duo installation, the two LAN cables must be installed by a Service Technician.
88 / 112
Page 89

Network settings
How to configure the network settings on your unit is described below. The following
settings may be made:
IP address
Subnet mask
Gateway
Step Info/Button Instructions
1
2
3 "IP" will appear on the display.
4 Press the button.
5
6
Turn the top dial to the "Prog/Clean | START"
button.
Turn the temperature selector to the right until
"IP" appears.
Now turn the temperature selector to the left
until it stops and "IP 1" appears on the display.
A number will now appear in the time display
(bottom display). This is the first block of four IP
addresses. E.g. 10.x.x.x.
Change the number with the time selection
switch.
89 / 112
Page 90

Network settings
Step Info/Button Instructions
10
11
7
8
9
Confirm the number with the "core temperature"
button.
Now turn the temperature selector slightly to
the right until "IP 2" appears on the temperature
display. Now you can enter the second position
of the IP address. E.g. 10.10.x.x
Next the subnet mask must be entered.
Proceed in the same manner as when entering
the IP address.
Finally, enter the gateway address. Proceed
in the same manner as when entering the IP
address and subnet mask.
Return to the top menu by pressing the "Prog/
Clean | Start" button. The network settings have
been saved.
90 / 112
Page 91

Building services - steam generator descaling
The steam generator must be descaled manually on a regular basis.
We recommend the following descaling intervals
based on 8 hours’ steaming per day:
- up to 18 °dH (to 3.2 mmol/litres) at least 1x annually
- up to 24 °dH (to 4.3 mmol/litres) at least 2x annually
- over 24 °dH (to 4.3 mmol/litres) at least 3x annually
These recommended descaling intervals may vary from the approximate values given above,
depending on the composition of the water (e.g. minerals).
You need:
Foot pump for descaling - article no.: 6004.0203
Descaler, 10 litre canister – article no.: 6006.0110
Heavier limescale deposits in the steam generator can only be removed by the Service
Technician.
If the steam generator has a heavier build up of limescale, the "Calc Infor" function will be
displayed at the end of the CleanJet
You can find more information on this in the descaling display sub-section in this operating
manual.
®
cleaning programme.
Step Info/Button Instructions
1 Select "Prog/Clean | Start".
2 Close the cooking cabinet door.
91 / 112
Page 92

Building services - steam generator descaling
Step Info/Button Instructions
3 Turn the selector switch to the right
4 appears in the display.
5
6
7
8 Open the cooking cabinet door.
9 Remove the left hinging rack and the air baffle.
Press the button. The descaling process is
started.
If the cooking cabinet temperature is over
40 °C when descaling commences, "Cool
Down" starts automatically – (see "Cool Down"
display).
Steam generator is drained. When pumping out
has finished the display shows "CALC".
You will be prompted to top up with descaling
fluid.
92 / 112
Page 93

Building services - steam generator descaling
Step Info/Button Instructions
Guide hose into steam inlet opening as far as
the mark.
10
11 Insert hinging rack and fix hose with wire hooks.
Tip:
The allocation of marks to appliance size is
described in the instructions for the descaler
pump.
Warning!
Aggressive chemical fluid – risk of chemical
burns.
It is essential that you use:
protective clothing, safety goggles, gloves,
face mask and the appliance manufacturer‘s
descaler pump.
12
Warning!
Aggressive chemical fluid – risk of chemical
burns.
There may be residues of the descaling fluid
in the hoses. Rinse the descaling accessories
thoroughly with water.
Please wear: protective clothing, safety goggles,
gloves, face mask
Place canister of descaling fluid in the cooking
cabinet and run the hose into the canister.
Tip:
Descaling fluid reacts with lime and can foam
over.
Very slowly fill with descaling fluid using the
appliance manufacturer’s descaling pump.
93 / 112
Page 94

Building services - steam generator descaling
Step Info/Button Instructions
Descaling quantities for electric appliances
6 x 2/3 GN
1.8 litres
6 x 1/1 GN
3.5 litres
6 x 2/1 GN
6 litres
10 x 1/1 GN
6 litres
10 x 2/1 GN
8.5 litres
20 x 1/1 GN
9 litres
20 x 2/1 GN
11.5 litres
Descaling quantities for gas appliances
6 x 1/1 GN
4 litres
6 x 2/1 GN
6.5 litres
Step Info/Button Instructions
15
10 x 1/1 GN
7 litres
10 x 2/1 GN
9 litres
20 x 1/1 GN
8 litres
20 x 2/1 GN
11 litres
Remove the descaling accessories from the
cooking cabinet.
Thoroughly rinse off any descaling fluid in the
cooking cabinet and descaler accessories with
water.
Insert air baffle and left hinging rack, and lock in
place.
16 appears in the display.
94 / 112
Page 95

Building services - steam generator descaling
Step Info/Button Instructions
17
18
19
20
Close the cooking cabinet door. The length of
the descaling phase is displayed.
The steam generator is automatically rinsed
several times. The appliance then automatically
switches to Steam.
"End” appears on the display when descaling is
complete.
Exit the descaling process by selecting a
cooking mode. Your appliance is now ready for
cooking again.
Aborting the descaling process
If necessary you can discontinue the descaling process.
Before filling with descaling fluid
Step Info/Button Instructions
1
2
Hold down the core temperature button for 10
seconds.
"End" now appears in the cooking time/core
temperature display. Your appliance is now
ready for cooking again.
After filling with descaling fluid
The abort programme lasts approx. 20 minutes.
95 / 112
Page 96

Building services - steam generator descaling
Step Info/Button Instructions
1 Switch appliance off and wait for 4 seconds.
2 Switch on the appliance.
Descaling will be aborted if the core
temperature button is pressed within 30
3
seconds.
If the core temperature button is not pressed
within 30 seconds descaling will continue.
4
5
96 / 112
The steam generator is automatically drained
and thoroughly rinsed.
"End" now appears in the cooking time/core
temperature display. Your appliance is now
ready for cooking again.
Page 97

Building services - steam generator drainage
You can drain the steam generator before transportation or for frost protection.
Step Info/Button Instructions
1 Close the water hose and open the doors
2 Set "Prog/Clean | Start" with the selector switch.
3 Turn the selector switch to the right
4 "ESG" will appear on the display.
5
Press the button.
The steam generator is drained.
97 / 112
Page 98

Building services
Cleaning the cooking cabinet seal
When the unit will remain unused for a longer period of time (e.g., overnight), leave the unit
door slightly ajar.
Cleaning the seal every day helps prolong its life. Clean the cooking cabinet seal using a
soft cloth and detergent—do not use abrasive cleaners!
Cleaning glass surfaces
The inside glass panes are very easy to clean because the unit doors are equipped with
hinged glass panes expressly for this purpose.
For XS units (6 2/3 GN)
To clean the glass, open the unit door until it clicks into place at an angle of 120°; after
that, press the two stops and swing the first glass panes open. Clean the surfaces of the
two panes with a soft cloth or a sponge, using glass cleaner or mild household dish soap.
After that, press the two stops again and then swing the second pane open so that you can
clean the second intermediate space and the LED covers (if necessary - see below) using
appropriate cleaning agents.
For all other units (6x1/1 GN through 20x2/1 GN)
Open the unit door until it clicks into place at an angle of 120°; after that, press the two
stops and swing the inner glass pane open. Clean the surfaces of the inner and outer
panes with a soft cloth or a sponge, using glass cleaner or mild household dish soap.
Do not use the integrated hand shower or other pressurized cleaners to clean the door.
Use only a soft cloth or sponge to clean the glass panes and the LED covers. Do not use
scouring pads or abrasive cleaners.
Use only gentle cleaning agents such as glass cleaner or dish soap.
Never apply cleaning agents to hot surfaces. Allow the door to cool completely before cleaning.
Always rinse cleaning agents away completely before heating up the unit.
Do not use any of the following cleaning agents:
- Abrasive cleaning agents
- Strong acids or bases
- Undiluted alcohols
- Acetone or methanol
- Oven cleaner, grill cleaner
- Benzine, benzene, toluene, or xylene
98 / 112
Page 99

Building services
Cleaning the LED covers (only XS units 6 2/3 GN)
The LED lighting covers are positioned behind the inner and middle glass panes, so they
are well-protected against soiling, but the area may still require cleaning on occasion.
Open the inner and middle panes to expose the LED covers so that they can be cleaned.
Clean the surfaces of the LED units using a soft cloth, sponge, or paper towel, applying
gentle pressure.
When cleaning the LED covers, keep the following in mind:
The transparent part of the LED cover is a high-quality component that ensures proper
illumination and light distribution within the unit.
Never clean this area using scouring pads, abrasive cleaners, or other aggressive agents
such as strong acids or bases, undiluted alcohols, acetone, methanol, oven cleaner,
benzine, benzene, toluene, or xylene.
Use only gentle, diluted cleaning agents, e.g., alcohol-based cleaners such as glass
cleaner (ethanol-based) or dish soap.
Never apply cleaning agents to hot surfaces - allow the door to cool before cleaning.
Apply cleaning agents for a brief period of time and then rinse the area with water. Never
heat up the unit unless cleanser has been completely rinsed away.
99 / 112
Page 100

Building services
Rinsing the drip pan and drain channel (tabletop units only)
Clean the drain channel of the drip pan every day if the unit is frequently being used for
grilling or preparing foods containing a large amount of grease or gelatin.
Use only the manufacturer’s cleaning brush (item no: 60.75.779) in order to prevent
damage to the drain system.
Carefully guide the cleaning brush into the drain opening up to the mark (Model 61/101: to
the marker flag; Model 62/102: to the plastic handle) and clear any blockages.
Avoid making jerky movements, which could damage the unit or the brush. After that,
rinse the drain channel with 1-2 liters of warm water. Do not use the spray jet on the hand
shower for this.
Servicing the air filter
Tabletop unit Model 6 x 2/3 GN:
To loosen the air filter, insert a suitable object (such
as a coin or a screwdriver) into the central slot on the
front, and push inward. This will release the catch on
the air filter. Draw the filter downward at an angle and
out of the unit.
Clean the air filter in the dishwasher (not CleanJet
and then let it dry. If the air filter is still sticky and soiled
after cleaning, replace it.
Insert the air filter into the unit from underneath at an
angle. Press the plastic filter casing upward until it
clicks into place.
Air filter no.: 40.04.771
®
)
100 / 112
 Loading...