

Page 1
2-year
RATIONAL
warranty
Secure your 2-year guarantee and your free
membership of ClubRATIONAL
www.rational-online.com/warranty
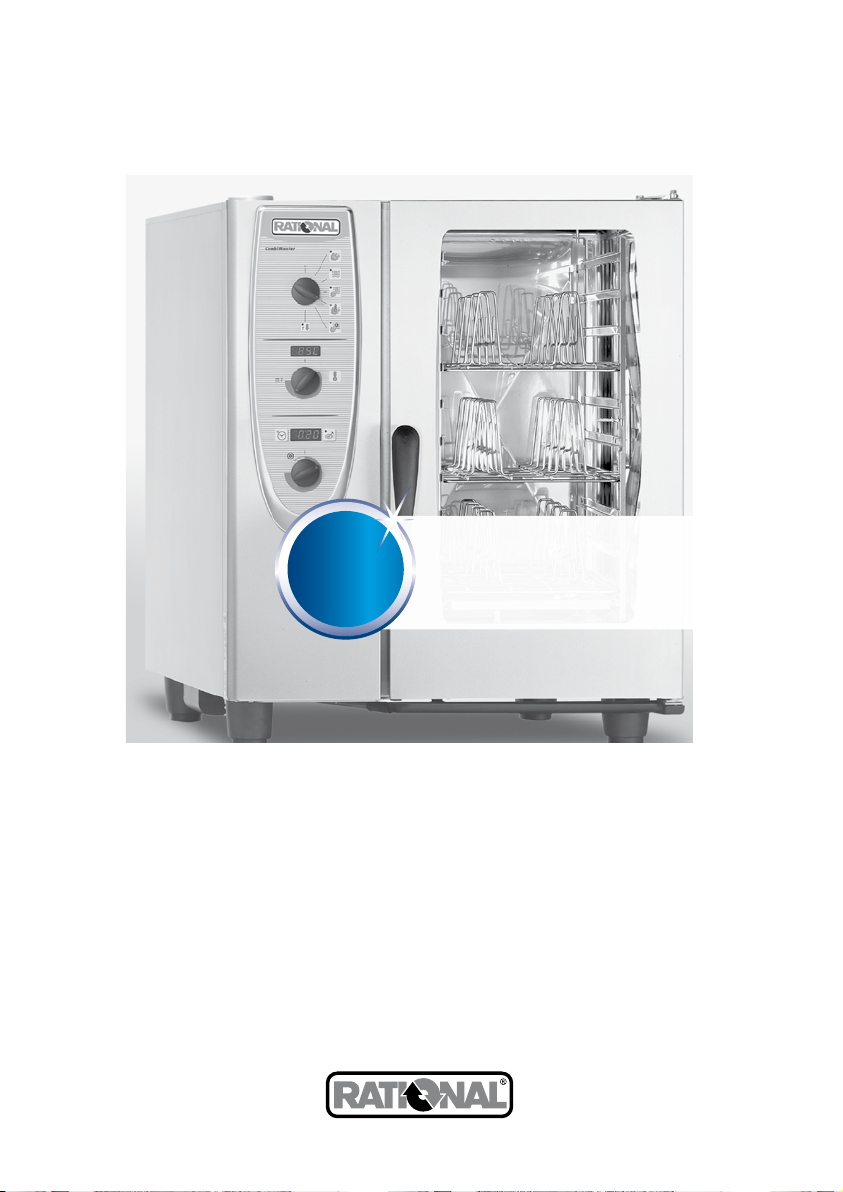
Operating instructions
CombiMaster
Page 2
Explanation of the pictograms
Danger!
Directly hazardous situation that
could result in very severe injury
or death.
Corrosive substances
Attention: Damage may be caused
if this is ignored.
Warning:
Potentially hazardous situation
that could result in severe injury
or death.
Risk of fire!
Handy tips for everyday use
Caution!
Potentially hazardous situation
that could result in minor injury.
Risk of burns!
- 2 -
Page 3

Dear Customer
Congratulations on the purchase of your new CombiMaster.
Your decision to buy a new CombiMaster means that you now have a top-of-the-range combi-steamer.
Your CombiMaster will give you many years of reliable service in your kitchen thanks to its outstanding
quality of workmanship and almost unlimited cooking potential.
We give a 12 month warranty from the date of initial installation.
The warranty excludes glass damage, light bulbs and seals as well as damage caused by improper
installation, use, maintenance, repair or descaling.
We hope that enjoy using your new CombiMaster.
Your
RATIONAL AG
You can reach our Technical Customer Support Service 7 days a week on: +44 1582 480388
For any queries relating to use please ring the RATIONAL Chef✆Line: +44 7743 389863
Dealer: Installer:
installed on:
Appliance serial number:
We reserve the right to make technical improvements!
- 3 -
Page 4

Contents
Safety Instructions 5
Liability 7
Care, inspection, maintenance and repair 8
Features 9
Notes on using your unit 10
Working with the hand shower 12
General instructions for use 13
Controls 14
Control modes 15
Moist Heat mode 16
Dry Heat mode 18
Combi-Steam mode 21
Vario-Steam mode 23
Finishing
Working with the core temperature probe 27
Cool Down Function 30
®
mode 25
Appliance settings – Celsius / Fahrenheit 30
Cleaning 31
Servicing - Steam generator descaling 33
Aborting the descaling process 36
Draining the steam generator 36
Fault indications 37
Sample applications 38
Before you call customer service 56
Maintenance 58
EU Declaration of Conformity for electrical units 59
EU Declaration of Conformity for gas units 60
ClubRATIONAL 61
- 4 -
Page 5

Safety Instructions
Warning:
Incorrect installation, servicing, maintenance, cleaning or modifications to the unit may result in
damage, injury or death. Read these operating instructions carefully before you start to use the unit.
This unit must only be used to cook food in catering establishments. Any other use is not intended and is
therefore considered dangerous.
It must not be used to cook food containing flammable materials (such as food with alcohol).
Substances with a low flash point can ignite spontaneously - Risk of fire.
Cleaning and descaling products and the associated accessories must only be used for the purposes
described in this manual. Any other use is not intended and is therefore considered dangerous.
In case of damage to the glass plate, please replace the entire plate immediately.
Warning:
Gas units only
- If your unit is installed under an extractor hood, this must be switched on when the unit is in use Combustion gases.
- If your unit is connected to a chimney, the flue duct must be cleaned in compliance with specific
regional regulations - Risk of fire. (Contact your installer.)
- Do not put objects on your unit's exhaust pipes - Risk of fire.
- Do not let objects block or obstruct the area below the unit's base. - Risk of fire!
- The unit must only be used in still conditions. - Risk of fire!
What to do if you smell gas:
- Shut off the gas supply immediately
- Do not touch any electrical controls
- Make sure the area is well ventilated
- Avoid naked flames or sparking
- Use an external telephone to notify the appropriate gas supplier (if the gas supplier is unobtainable
call the nearest fire station).
- 5 -
Page 6

Safety Instructions
Keep this manual handy so that it can always be consulted by anyone using the unit.
This unit must not be used by children or people with limited physical, sensor or mental capacity or those
without the necessary experience and/or knowledge, unless such people are supervised by a person who is
responsible for their safety.
Operate using hands only. Damage caused by the use of pointed, sharp or other objects will invalidate the
warranty.
We recommend regular training of your staff to avoid the risk of accident or damage to the unit. Operators
must also receive regular safety instruction.
Warning:
Daily checks before switching on and use
- Lock the air baffle at the top and bottom as per the instructions - risk of injury from the rotating fan
wheel.
- Make sure that the hanging racks or mobile oven rack are correctly locked in place in the cooking
cabinet - Containers with hot liquids can fall through or slip out of the cooking cabinet - Risk of
combustion.
- Make sure that there are no cleaning fluid residues in the cooking cabinet before you start cooking
with the unit. Thoroughly rinse away any residues with the hand shower - risk of chemical burns.
- 6 -
Page 7

Safety Instructions
Warning:
Safety instructions during use
- If containers are filled with liquid or contents which liquefy during cooking, do not use rack levels
higher than those that allow the user to see into the slide-in containers - Risk of burns!Warning sticker
is enclosed with appliance.
- Always open the cooking cabinet door very slowly (hot vapours) - Risk of burns.
- Always wear thermal protective clothing to hold accessories and other objects in the hot cooking
cabinet - Risk of burns.
- The external temperatures of the unit may exceed 60 °C. Only touch the unit at the controls - Risk of
burns.
- The hand shower and water from the hand shower may be hot – Risk of burns.
- Cool-down mode - Do not use the Cool-down function unless the air baffle has been locked correctly Risk of injury.
- Do not touch the fan wheel - Risk of injury.
- Cleaning - Aggressive chemical fluid - Risk of chemical burns.
Always wear the correct protective clothing, safety goggles, gloves and facemasks during cleaning.
Follow the safety instructions in the “Manual cleaning” section.
- Do not store highly flammable or combustible materials near the unit - Risk of fire
- If mobile units and mobile oven racks are not moved, you must apply the parking brakes to the wheels.
Racks could roll away on uneven floors - Risk of injury.
- If mobile oven racks are used, you must always apply the container lock. Cover any containers with
liquids to prevent the hot liquid spilling out - Risk of burns.
- The transport trolley must be correctly fixed to the unit when you load and remove the mobile plate
rack or mobile oven rack - Risk of injury.
- Mobile oven racks, mobile plate racks, transport trolleys and units on casters can tip over when being
moved over an inclined plane or threshold - Risk of injury.
Liability
Installations and repairs that are not carried out by authorised specialists or using original spare parts,
and any technical change to the machine that is not approved by the manufacturer will invalidate the
manufacturer’s warranty and product liability.
- 7 -
Page 8

Care
Your unit must be cleaned every day to maintain the high quality of the stainless steel, for hygiene reasons
and to avoid operating faults. To do this, follow the instructions in the “Manual cleaning” section..
Warning:
If the unit is not cleaned or is not cleaned well enough, deposits of
grease or food residues in the cooking cabinet may catch fire - Risk of fire.
- To avoid corrosion in the cooking cabinet, your unit must be cleaned every day, even if it is only operated in
“Moist Heat” (steaming) mode.
- Apply vegetable oil or grease to the inside of the cooking cabinet at regular intervals (every 2 weeks or so)
to prevent corrosion.
- Do not use a high pressure cleaner to clean the unit.
- Do not treat the unit with acids or expose to acid fumes – this will damage the passivated coating of the
nickel-chromium steel and the units might discolour.
- Only use cleaning agents made by the unit’s manufacturer. Cleaning agents from other manufacturers may
cause damage and invalidate the warranty.
- Do not use scouring products or scratchy cleaning agents.
- Daily cleaning of the cooking cabinet seal with a non-abrasive cleaning agent will extend the service life.
- Remove and clean the incoming air filter once per month (see Maintenance).
Inspection, maintenance and repair
Danger - High Voltage
- Inspection, maintenance and repair work must only be carried out by trained technicians.
- The unit must be switched off at the mains for cleaning (apart from manual cleaning) and for
inspection, maintenance or repair work.
- If the unit is installed on casters (mobile), freedom of movement must be restricted so that power,
water and drainage pipes cannot be damaged when the unit is moved. If the unit is moved, make sure
that power, water and drainage lines are correctly disconnected. If the unit is returned to its original
position, make sure that the retention device, energy, water and drainage pipes are correctly attached.
- Your unit should be serviced by an authorised service partner at least once a year to ensure that it
remains in perfect working order.
- 8 -
Page 9
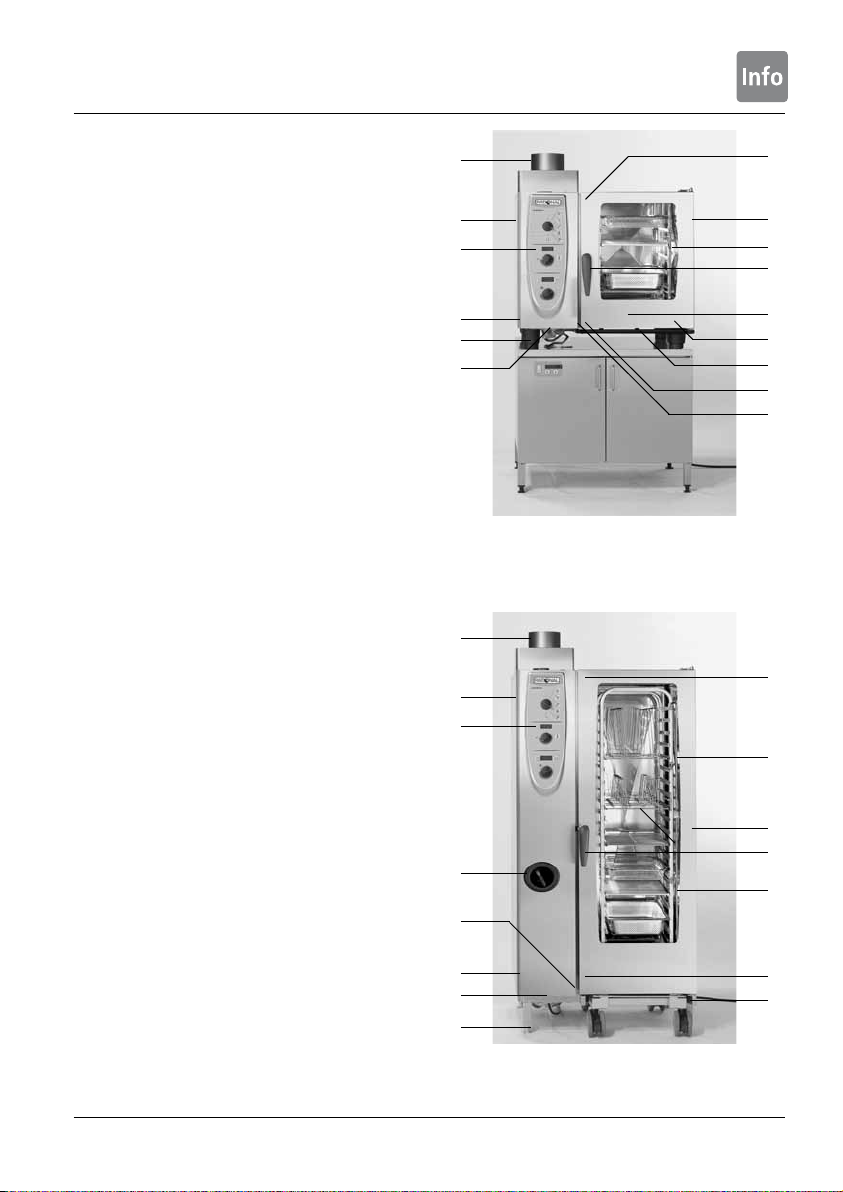
Features
Appliance serial number
(visible only when door is open)
Draft diverter (optional)
(gas appliances only)
Interior lighting
Appliance door with double glass pane
Door handle
Table-top units: one-handed operation with
slam function
Floor models: one-handed operation
Unlocking device to open double glass
door panel (inside)
Integral, self-draining door drip pan
(inside)
Drip collector connected directly to
appliance drain
Appliance feet
(height adjustable)
Unit data plate
(with all the important electrical data such as
power input, voltage, number of phases and
frequency, as well as appliance model and
appliance serial number, see also functions/
settings/model, Option number)
Control panel
Protective cover for electrical
installation area
m Hand shower (optional)
(with automatic rewind)
n Run-in guide (Floor models)
o Air filter (Installation area ventilation)
o
Table-top unit 6 x 1/1 GN, identical for 6 x 2/1 GN, 10 x 1/1 GN
and 10 x 2/1 GN.
m
o
Floor unit 20 x 1/1 GN, identical for 20 x 2/1 GN.
m
n
- 9 -
Page 10

Notes on using your unit
- Avoid having heat sources (e.g. grill plates, deep-fat fryers etc.) near the unit.
- You can only use the unit in areas with a room temperature > 5 °C. For ambient temperatures of less than
+ 5 °C, you must heat the cooking cabinet to room temperature (> + 5 °C) before starting.
- As soon as you open the cooking cabinet door, the heating and fan wheel shut down automatically. The
integral fan wheel brake is activated. The fan wheel keeps running for a brief period only.
- A drip tray should always be inserted when grilling and roasting (e.g. chicken) in order to catch the fat.
- Only use genuine heatproof accessories made by the unit manufacturer.
- Always clean accessories before use.
- Leave the unit door slightly open if it is going to be idle for a prolonged period (e.g. overnight).
- The cooking cabinet door has a slam function; the door of the floor unit is not closed tight unless the door
handle is vertical.
- For long stoppages (e.g. non-work day), shut off the water, power and gas supplies to the unit.
- At the end of its service life, the unit must not be disposed of with the general waste and must not be
placed in the recycling containers at local authority collection points. We will be happy to help you with the
disposal of your unit.
Max. load sizes for each unit size
6 x 1/1 GN 30 kg (max. 15 kg per rack)
10 x 1/1 GN 45 kg (max. 15 kg per rack)
20 x 1/1 GN 90 kg (max. 15 kg per rack)
6 x 2/1 GN 60 kg (max. 30 kg per rack)
10 x 2/1 GN 90 kg (max. 30 kg per rack)
20 x 2/1 GN 180 kg (max. 30 kg per rack)
If the maximum load sizes are exceeded, this can damage the unit.
Please note the maximum load sizes for food in the application manual.
- 10 -
Page 11
Notes on using your unit
Table-top units with hanging racks
(6 x 1/1 GN, 6 x 2/1 GN, 10 x 1/1 GN, 10 x 2/1 GN)
- To remove, raise the hanging rack slightly in the middle
and pull it out of the front locking mechanism.
- Swivel the hanging rack to the middle of the cooking
cabinet.
- Lift the hanging rack out of its fixing by lifting it up.
Reverse the above sequence to reset.
Working with mobile oven racks, mobile plate racks and transport
trolleys for table-top units (option)
- Remove the hanging rack as described above.
- Place the run-in rail on the fixing provided on the unit's
base. Make sure it is fixed accurately in place (4 pins).
- Remember that the unit must be matched to the exact
height of the transport trolley and must be levelled.
- Move the transport trolley as far as it will go on the
run-in rail and make sure that the transport trolley is
correctly locked on the unit.
- Push the mobile oven rack or mobile plate rack into the
unit as far as it will go, and check that the locking mechanism in the unit is working correctly.
- To remove the mobile oven rack or mobile plate rack, release the locking mechanism and pull the rack out
of the cooking cabinet. First insert the core temperature probe with the run-in rail in the park position.
- Make sure that the mobile oven rack or mobile plate rack is securely locked on the transport trolley during
transportation.
- 11 -
Page 12
Working with the hand shower
- If you use the hand shower, pull the hose at least 20 cm out of the park position.
- You can select 2 jet strengths by pressing the control button.
- Always let the hand shower slide slowly back into the park position.
Caution!
The hand shower and water from the hand shower may be hot – Risk of burns.
The hand shower has no latch position. If you pull hard on the hand shower and it exceeds the
maximum available hose length, it will damage the hose.
Make sure that the hand shower hose is fully rewound after use.
You must not use the hand shower to cool the cooking cabinet.
- 12 -
Page 13
General instructions for use
H2O
The message “H2O” may appear on the display when you switch on. This means that the steam generator is
not yet filled with water. When it is full the display goes out automatically.
If the cooking cabinet is hotter than the set temperature, the button for the selected mode will flash (e.g.
Steam).
(See the „Cool Down“ section for cooling the cooking cabinet).
0:35
Time settings
The cooking time can be set for up to 30 minutes in 1-minute intervals and in 5-minute intervals for more
than 30 minutes .
rES
“RESET” (gas units only)
If the burner malfunctions “rES” will light up on the display. After 15 sec. you will hear an audible signal.
Press the “Clock” button to restart the automatic ignition process. If the “rES” display does not light up
again after approx. 15 seconds, the flame is burning and the unit is operational. Please notify Customer
Support if the display is still lit after pressing the button repeatedly.
- 13 -
Page 14
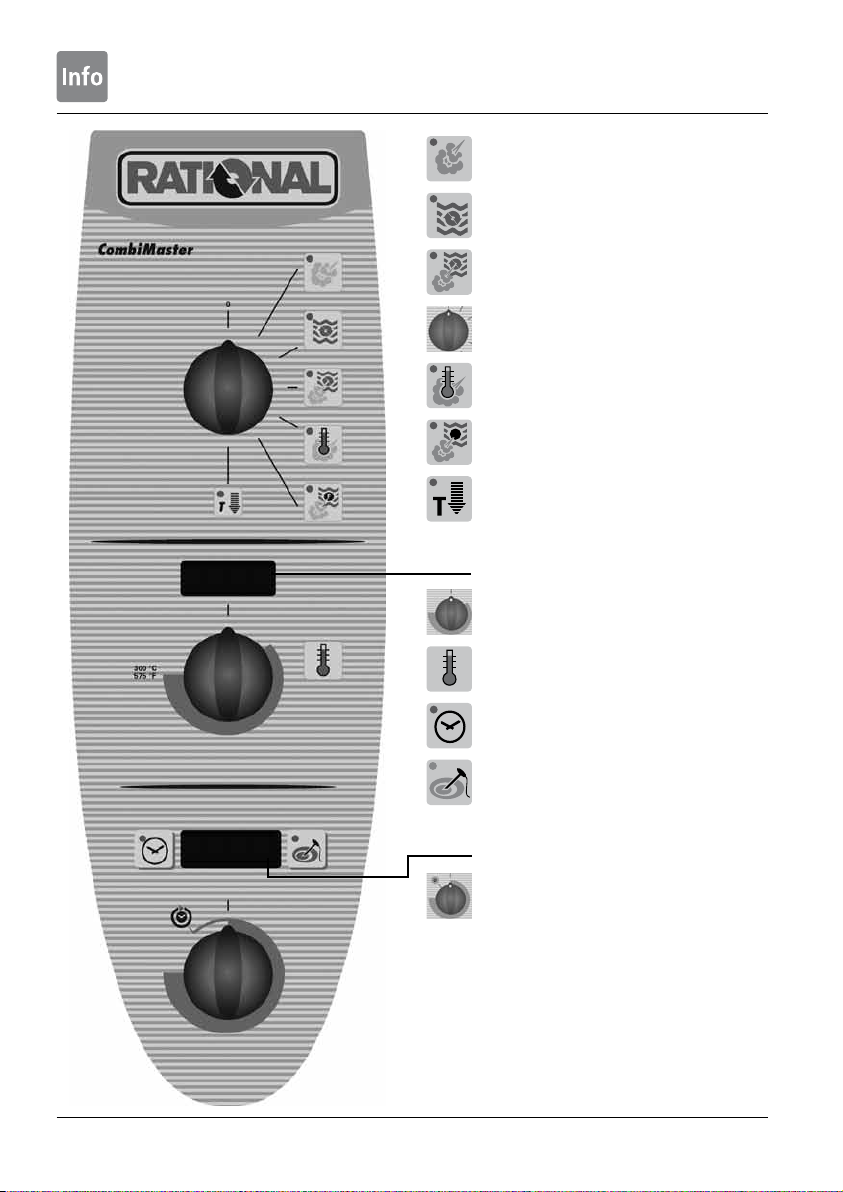
Controls
F
Moist Heat (100 °C)
Dry Heat (30 °C to 300 °C)
Combi-Steam (30 °C to 300 °C)
Control Mode switch
Vario-Steam (30 °C to 99 °C)
®
Finishing
(30 °C to 300 °C)
Additional „Cool Down“ function
Cabinet temperature display
Cabinet temperature dial
Heating mode display
Clock button (0 to 23 hours 59 min.)
Button for core temperature
(0 °C -99°C)
Display for time/core temperature
Dial for time of day/core temperature
- 14 -
Page 15

Control modes
F
„Moist Heat“ mode
The high-performance steam generator produces fresh steam. This is fed, unpressurised, into the
cooking cabinet and is circulated at high speed by the fan. The patented control system regulates
the input of steam, supplying only as much as the food is actually able to absorb. In this mode
cabinet temperature is set to a constant 100 °C.
„Dry Heat“ mode
Powerful heating elements heat the dry air. The fan circulates the hot air evenly throughout the
cabinet. Cabinet temperature can be set to between 30 °C and 300 °C.
„Combi-Steam“ mode
Moist Heat and Dry Heat modes are combined by a control system. This creates a hot, humid climate
for especially intensive cooking. The temperature can be set to between 30 °C and 300 °C.
The humidity is controlled continually to prevent the food drying out.
„Vario-Steam“ mode
An electronic control system with temperature sensors accurate to one degree maintains the prese-
lected temperature throughout the cabinet. Sensitive controls and automatic control engineering
ensure that the cooking climate is just right for the product. The cabinet temperature can be variably
set to between 30 °C and 99 °C.
„Finishing®“ mode
The two operating modes moist heat and dry heat are combined. This produces the ideal cook-
ing climate, both preventing the food drying out and the formation of unwanted puddles. Cabinet
temperature can be individually set to between 30° C and 300 °C.
- 15 -
Page 16

Moist Heat mode
„Moist Heat“
The steam generator produces hygienic fresh steam.
In this mode the cabinet temperature is set to a
constant 100 °C.
Cooking modes:
Steaming, stewing, blanching, poaching, simmering,
vacuum cooking, thawing, preserving.
1
Preheat until heating indicator light goes out
Sample dishes
• Mise en place
Tomatoes concassé, garnishes (vegetables, fruit),
mushrooms, blanching juliennes and brunoises,
blanching vegetables for stuffings, roulades etc.,
peeling onions and chestnuts, soaking pulses.
• Starters
Scrambled eggs, poached eggs, hard-boiled eggs,
asparagus, vegetable flans, stuffed vegetables
(onions, kohlrabi, leeks, celery, etc.).
• Soup garnishes
Dumplings, ravioli, vegetable royale.
2
3
Or work with the core
temperature probe
0:25
2
3
Target Actual
76°C 19°C
• Main courses
Boiled beef, cured ham, knuckle of pork, tongue,
boiling fowl, turkey legs, meat in aspic, fish.
• Side dishes
Risotto/rice, dumplings, pasta (noodles), fresh and
frozen vegetables, vegetable casseroles, potato
roulade, boiled/jacket potatoes.
• Desserts
Fresh or frozen fruit (e.g. hot raspberries), stewed
fruit, rice pudding.
- 16 -
Page 17

Moist Heat mode
Hints
• To get the most out of your Combi-Master check
daily the types of food which can be cooked
together using „Moist Heat“. Remember that
fish, meat, vegetables, side dishes and fruit can
be cooked together (as long as they are all being
prepared by the same method).
• Cook potatoes in perforated GN containers,
the perforations let the steam circulate and give
faster, more intensive cooking.
• Vegetable stock can be collected by inserting a
container on the bottom rack.
• It is better to use two shallower GN containers
rather than one high one => this reduces bulk
and avoids heavy layers of food.
• Dumplings should be placed in a shallow solid
GN container.
• Rice and cereals are the only foods to which
you should add water: 1 part grain, 1.5 to 2 parts
water.
• Tomatoes are easy to skin: „Moist Heat“ for
approx. 1 min, then plunge into cold water.
- 17 -
Page 18

Dry Heat mode
„Dry Heat“
Powerful heating elements heat the dry air. Cabinet
temperature can be set to between 30 °C and
300 °C.
Cooking methods:
Baking, roasting, grilling, deep-frying, gratinating,
glazing.
Sample dishes
• Mise en place
Sweating bacon, roasting bones, allowing dough
(yeast) to rise.
• Starters
Meatballs, vegetarian bakes, vegetables au gratin,
vegetable pasties, pies, sirloin, chicken wings,
finger food, duck breasts, quiches, shortcrust
pastry, tartlets.
1
Preheat until heating indicator light goes out.
2
160°C
3
4
Or work with the core
temperature probe
0:25
3
4
Target Actual
76°C 19°C
• Soup garnishes
Savoury straws, cheese croûtons.
• Main courses
Steak, rump steak, T-bone steak, liver, rissoles,
chicken breast, chicken legs, half / whole chickens,
turkey, pheasant, quail, breadcrumbed meat,
breaded convenience food, vegetarian cutlets,
duck breasts, cutlets, pizza.
• Side dishes
Potato pancakes, roast potatoes, potato gratin,
rösti, baked potatoes, Idaho potatoes, potato
soufflés, Macaire potatoes, duchesse potatoes.
• Desserts
Sponges, marble cakes, plain cakes, fancy cakes,
flaky pastry, croissants, bread, rolls, baguettes,
shortcrust pastry, apple strudel, bakery products
(precooked), frozen pastry.
- 18 -
Page 19

Dry Heat mode
Hints
• Cooking times
Cooking times will depend on product
quality, weight and height. Do not
overload grids or containers so that air
can circulate evenly.
• Breaded products
all types of breadcrumb coating can be used.
Browning is improved by brushing with fat or a
blend of paprika and oil. Press the breadcrumbs
in firmly, brush with melted fat and do not
overload the unit. Rule of thumb: allow approx.
8 to 10 minutes per 1cm thickness of meat.
• General notes on pan-frying
- Preheat to as high a temperature as possible
(300 °C) to build up sufficient stored heat.
- Load as quickly as possible in order to
minimise cabinet temperature drop.
- During cooking (with a full load) open the
door briefly to allow excess moisture to escape.
- With flash-fried and fried products which
give off a lot of moisture (e.g. chicken legs),
if possible reduce loads to 75 or up to a
maximum of 50% of the greatest theoretical
load.
Preheat: to 300 °C (at least until heating
indicator light goes out).
Optimum cut thickness: 1,5 to 2 cm.
Optimale Schnittstärken: 1,5 bis 2 cm.
Accessories: Roasting and baking tray or
granite-enamelled container. For even browning
on the top and bottom surfaces, make sure that
the slices are of the same thickness or the same
size.
• Gratinating
light and dark meat dishes, fish, mussels,
asparagus, chicory, broccoli, fennel, tomatoes,
toast.
Preheat: to 300 °C (at least until heating
indicator light goes out). Set to desired
temperature after loading.
E.G.: Grids or containers (20 mm) for
gratinating toast, steaks and soups.
- 19 -
Page 20

Dry Heat mode
• Baking
Preheat to baking temperature. For a full load
you may need to select a higher preheating
temperature.
Baking temperature: approx. 20 to 25 °C
lower than in a conventional oven.
For rolls use only every second shelf.
For frozen convenience products preheat
to 300 °C.
Defrost frozen rolls and leave to rise for a
short time.
Accessories:
Use perforated Teflon-coated baking trays,
Roasting and baking trays or granite enamelled GN
containers.
- 20 -
Page 21

Combi-Steam mode
„Combi-Steaming“
Moist Heat and Dry Heat modes are combined by a
control system. This creates a hot, humid climate for
especially intensive cooking.
The temperature can be set to between 30 °C and
300 °C.
Cooking modes: roasting, baking.
1
Preheat until heating indicator light goes out.
2
160°C
3
Sample dishes
• Mise en place
Roasting bones.
• Vorspeisen
Quiche Lorraine, Gemüseauflauf, Flans, Moussaka,
Lasagne, Canneloni, Paella, Nudelauflauf.
• Starters
Quiche Lorraine, vegetable soufflés, flans,
moussaka, lasagne, canneloni, paella, pasta
bakes.
• Side dishes
Potato gratin, frozen products (potato turnovers),
baked potatoes.
• Desserts
Yeast dough.
4
0:25
Or work with the core
temperature probe
3
4
Target Actual
76°C 19°C
• Miscellaneous
Bread, rolls, pretzels (frozen dough portions).
- 21 -
Page 22

Combi-Steam mode
Hints
• Do not place joints too close together to allow
even cooking.
• Joints with rinds or larger joints should be
steamed for approximately 1/3 of the cooking
time.
• Collect condensate in a container (additional
rail) and make the gravy by adding it to the
lightly roasted bones.
• Preparing sauces
– IPlace a solid container on an additional rail.
– Add bones, mirepoix, seasonings to the
container and roast under the meat.
– Add the collected stock
– Braise for the duration of cooking.
– Very concentrated stock for gravies/sauces.
• Roulades
place in solid GN container, top with hot sauce
and cover with container.
• Baking
Bake yeast dough, flaky pastry, choux pastry on
baking/roasting trays, Teflon trays can also be
used.
- 22 -
Page 23

Vario-Steam mode
„Vario-steaming“
The steam generator produces hygienic fresh steam.
Cabinet temperature can be variably set to between
30 °C and 99 °C.
1
Preheat until heating indicator light goes out.
2
160°C
3
4
Or work with the core
temperature probe
0:25
Sample dishes
• Mise en place
Blanching bacon and ham, poaching fish
garnishes, soups, sauces, stocks, fumets etc.,
pasteurising (semi-preserved foods).
• Starters
Galantines, fish dumplings, terrines, vacuum
dishes.
• Soup garnishes
Stuffing, dumplings, royale.
• Main courses
Fish (salmon, sole etc.), cured ham, poultry,
vacuum dishes (chicken breast, boiled beef, veal
tongue), turkey fillet, chicken breasts, beef fillet,
Vitello sausage.
• Side dishes
Flans, vegetable casseroles, polenta.
3
4
Target Actual
76°C 19°C
• Desserts
Fruit, crème caramel, cabinet pudding.
- 23 -
Page 24

Vario-Steam mode
Hints
• „Vario-Steam“ cooking times
Moist Heat cooking times can be used as
approximate values. As a general rule, the lower
the cooking temperature the longer the cooking
time.
• Approximate cabinet temperatures
„Vario-Steaming“:
Soup garnishes: 75 to 90 °C
Fish, shellfish and 65 to 90 °C
crustaceans: 65 to 90 °C
Meat and sausages 72 to 75 °C
Light meat 75 to 85 °C
Dark meat: 80 to 90 °C
Poultry: 80 °C
Desserts: 65 to 90 °C
• Seasoning
Season with care. Low cooking temperatures
intensify the characteristic taste of seasonings.
When vacuum cooking be sure to add the exact
amount of fumet, essence or reduction!
• Advantages:
– Firm textured fillings.
– Products have intenser taste and aroma.
– Stock loss very low in fatty material.
Approximate temperature: 72 to 80 °C.
• Cook direct in the serving dish,
e.g. fish.
• Preserving fruit/vegetables
Cover the food with hot or cold liquid,
depending on the firmness of the raw product
and the type of preserve you want. The diameter
of the preserving jars used should not exceed
100 mm. The cooking temperature will depend
on the type of product (ripeness, size of pieces).
Approximate temperature: 74 to 99 °C.
Note:
The jars must not be closed
- 24 -
Page 25

Finishing® mode
F
F
F
„Finishing®“
A combination of Moist Heat and Dry Heat
modes. This produces the ideal cooking climate,
by preventing the food drying out and also
the formation of unwanted puddles. Cabinet
temperature can be set to between 30 °C and
300 °C.
1
Preheat to operating temperature.
2
We recommend a cabinet temperature
of between 120 °C and 140 °C, but the
temperature can be varied for different products.
0:25
3
4
As a rule time is between 5 and 8 minutes
for food arranged on plates – but times will
vary depending on the product, product
temperature, number of plates, how full they are
and the desired serving temperature.
0:08
3
4
Target Actual
Sample dishes
• Starters
All types of spaghetti, canneloni, lasagne,
vegetable dishes, cheese and herb noodles,
quiche Lorraine, spring rolls, vegetarian cutlets,
onion flans.
• Main courses
All types of roast, meat loaves, bakes, ready-toserve meals, roulades, stuffed vegetables.
• Side dishes
Rice, potatoes, noodles, pasta, vegetables,
soufflés, gratins.
• Desserts
Strudel, hot fruit.
76°C 19°C
Or work with the core
temperature prober
- 25 -
Page 26

F
Finishing® mode
Hints
• Finishing® utensils
Porcelain plates, earthenware, glass, silverware,
copper pans, stainless steel, aluminium dishes
(brought in).
• Banqueting service/tour groups
Reheat plates in the mobile plate rack.
– Large quantities in next to no time.
– Fast loading and unloading.
– Shorter serving times, so high hourly
throughput, rapid table change, more
turnover.
– For plates up to 31 cm in diameter
• Serving dishes are heated as well, storing heat
until the food reaches the table.
• Thermocover: for bridging short waiting
periods or transporting food
• Arrange food evenly and not too closely on
plates or dishes.
• Before arranging vegetables and side dishes for
mix with a little butter or fat.
• Sauces
Usually added after .
• Bulky items need more time to heat up.
- 26 -
Page 27

Working with the core temperature probe
F
Can be selected for all control modes
Caution!
The core temperature probe can be hot – Risk
of burns.
Wear oven gloves.
1
Insert the needle of the core temperature probe into
the thickest point at an angle of 30-45 degrees.
You must insert the needle through the middle of
the food.
- Always correctly position the core temperature
probe in the park position provided – Risk of
damage.
- Do not let core temperature probe hang out of
cooking cabinet - Risk of damage.
- Remove the core temperature probe from
the food before you take the food from the
cooking cabinet - Risk of damage.
2
160°C
3
4
Target Actual
The timer is not operational.
A buzzer sounds when the preselected temperature
has been reached.
76°C 19°C
- 27 -
Page 28

Working with the core temperature probe
Hints
• When roasting meat for slicing set the core
temperature approx. 5 °C lower, as the joint will
continue to cook during the cool-down phase.
For example: „Roasting“, core temperature
– cooking time ratio.
• To avoid holes (protein coagulation) in the
product, cool the core temperature probe before
use.
• You can change the set temperatures and
cooking modes at any time.
• Core temperature measurement establishes the
optimum serving temperature when
®
.
Approximate core temperature
values
Core
Beef How well done temperature
Fillet of beef medium 55 - 58 °C
Sirloin medium 55 - 60 °C
Beef rose well done 85 - 90 °C
Roast beef well done 80 - 85 °C
Aitchbone well done 90 °C
Pork
Leg well done 75 °C
Leg pale pink 65 - 68 °C
Saddle pale pink 65 - 70 °C
Shoulder well done 75°C
Belly/ well done 75 - 80 °C
stuffed
Belly well done 80 - 85 °C
Knuckle, roasted well done 80 - 85 °C
Knuckle, cured well done 80 - 85 °C
Ham very succulent 64 - 68 °C
Smoked pork chops 65 - 70 °C
(Buffet slices) 55 - 60 °C
knuckle well done 75 - 80 °C
pickled
Cured rib of pork well done 65 °C
Ham in 65 - 68 °C
breadcrumbs
- 28 -
Page 29

Working with the core temperature probe
Approximate core temperature
values
CoreBeef How well done temperature
Veal
Saddle of veal pale pink 58 - 65 °C
Leg of veal, well done 78 °C
and topside
noisettes, fricandeau
Loin with kidneys well done 75 - 80 °C
Roast veal/ well done 75 - 80 °C
shoulder
Breast of veal well done 75 - 78 °C
Saddle of mutton rare 65 - 70 °C
Saddle of mutton well done 80 °C
Leg of mutton rare 70 - 75 °C
Leg of mutton 82 - 85 °C
Lamb
When the meat is well done the core temperature is
between 79 °C and 85 °C. The colour of the meat
core is grey, slightly pale pink. The meat juices are
clear.
Approximate core temperature
values
CoreBeef How well done temperature
Pies and similar
Poultry
Chicken well done 85 °C
Goose/duck well done 90 - 92 °C
Turkey well done 80 - 85 °C
Pies 72 - 74 °C
Meat loaf 72 - 78 °C
Terrines 60 - 70 °C
Galantines 65 °C
Ballotines 65 °C
Foie gras 45 °C
Fish, e.g. salmon medium 60 °C
Leg rare 60 - 62 °C
Leg well done 68 - 75 °C
Saddle rare 54 - 58 °C
Saddle well done 68 - 75 °C
Shoulder well done 78 - 85 °C
- 29 -
Page 30

Cool Down Function
Appliance settings – Celsius / Fahrenheit
You have been running your appliance at high
temperature and you now want to carry on working
at reduced cabinet temperature. Use the „Cool
Down“ function to cool the cabinet quickly and
gently.
Warning:
- Do not use the Cool-down function unless
the air baffle has been locked correctly - Risk
of injury.
- During "Cool Down", the fan wheel does not
switch off when the door is opened.
- Do not touch the fan wheel - Risk of injury.
- During "Cool Down", hot vapours emerge
from the cooking cabinet - Risk of burns.
1
Close door.
2
Open door.
3
Temperatures may be displayed in degrees Celsius
or degrees Fahrenheit.
Changing the Celsius / Fahrenheit display
Simultaneously press „Clock“ button and „Core
temperature“ button and hold down for more than
10 seconds.
100°C
or
212°F
Close cabinet doors before selecting „Cool
Down“.
- 30 -
Page 31

Cleaning
For hygiene reasons and to prevent malfunctions it
is essential to clean your unit every day.
• Follow the safety instructions on the spray
bottle and cleaner canister.
• Use only genuine cleaning agents and
the genuine hand spray gun (article no.:
6004.0100) from the unit manufacturer.
• Never leave hand spray guns under
pressure.
• Never spray other people, animals or
objects.
Here is what to do
1
Cool the cooking cabinet to below 60 °C (see
the “Cool Down” section).
2
Switch unit off.
3
4
Spray the space behind the air baffle, cooking
cabinet, inside of the door and door seal with
cleaner.
5
Reset and lock the air baffle and hanging rack in
place. Close the cooking cabinet door.
Warning:
Do not open the cooking cabinet door while
cleaning is in progress – chemical cleaner and hot
vapour may escape – risk of chemical burns and
scalding.
Swivel hanging rack and air baffle to the middle
Warning:
Aggressive chemical fluid – risk of chemical burns.
It is essential that you use: protective clothing,
safety goggles, gloves, facemask and the unit
manufacturer‘s hand spray gun.
6
7
Hold down the core temperature button for 10
seconds.
CLEn
8
The cleaning program starts.
0:50
- 31 -
Page 32

Cleaning
Warning:
Aggressive chemical fluid – risk of chemical burns.
It is essential that you use: protective clothing,
safety goggles, gloves and facemask.
At the end of the cleaning time, you will be
prompted to open the doors.
12
You exit the cleaning program by selecting a
cooking mode.
You need:
Hand spray gun – article no.: 6004.0100
door
9
When the cleaning program has
finished, rinse the appliance down,
including behind the air baffle.
10
Wipe the cooking cabinet and door seal with
a damp cloth. If necessary, fold back the inner
pane and wipe it down as well.
11
Close the cooking cabinet door.
To dry the cooking cabinet, “Hot air” mode
is automatically switched on for 10 minutes
after the cabinet door is closed.
0:10
Warning:
Aggressive chemical fluid – risk of chemical burns.
It is essential that you use: protective clothing,
safety goggles, gloves and facemask.
Rinse the spray gun nozzle and nozzle extension
with clean water after every use.
Rinse the cleaning bottle with warm water after
use.
Cleaning the cooking cabinet seal every
day will extend its service life. Use a soft cloth and
cleaning agent to clean the cooking cabinet seal.
Do not use scouring products.
Clean the glass windows inside and out and the
outer panels of the unit, ideally using a soft, damp
cloth. Do not use a scouring product.
If there is heavy soiling, allow the residues soften
for 10 minutes in “Moist Heat” mode before
cleaning.
A couple of drops of salad oil will clear any stiffness
in the pump plunger (manual spray gun).
End
- 32 -
Page 33

Servicing - Steam generator descaling
Your appliance is equipped with the patented
automatic Self Clean system. Automatic Self Clean
significantly extends the period between descaling
intervals. The steam generator in your appliance
still needs regular descaling, depending on water
hardness and use.
We recommend the following descaling intervals,
based on 8 hours’ steaming per day:
up to 18 °dH (to 3.2 mmol/litres) at least 1x
annually
up to 24 °dH (to 4.3 mmol/litres) at least 2x
annually
over 24 °dH (to 4.3 mmol/litres) at least 3x
annually
These recommended descaling intervals may
vary from the approximate values given above,
depending on the composition of the water
(e.g. minerals).
4
Rotate cabinet temperature knob to the right
until „CALC“ appears on the display.
CALC
5
The descaling process is started.
If the cabinet temperature is over 40 °C
when descaling commences, „Cool Down“ starts
automatically – see „Cool Down“ display
Steam generator is drained
----
Steam generator descaling
When pumping out has finished the display shows:
CALC
1
Close cabinet doors.
2
You will be asked to top up with descaling fluid.
FILL
3
Press core temperature button down for 10
seconds until the cabinet temperature display
shows „CLEn“.
CLEn
Open cabinet doors.
6
- 33 -
Page 34

Servicing - Steam generator descaling
7
Remove left grid shelf and air baffle.
8
Guide hose into steam inlet opening as far as
the mark
Note
The allocation of marks to unit size is described
in the instructions for the descaler pump.
Warning:
Aggressive chemical fluid – risk of chemical burns.
It is essential that you use: protective clothing,
safety goggles, gloves, facemask and the unit
manufacturer‘s descaler pump.
9
Insert hanging rack and fix hose with wire hooks
10
Place canister of descaling fluid in the cooking
cabinet and run the hose into the canister
Descaling fluid reacts with lime and can
foam over.
Very slowly fill with descaling fluid using the
11
appliance manufacturer’s descaling pump.
Warning:
Aggressive chemical fluid – risk of chemical burns.
There may be residues of the descaling fluid in the
hoses. Rinse the descaling accessories thoroughly
with water.
Wear: protective clothing, safety goggles, gloves
and facemask.
Electric appliances
6 x 1/1 GN 10 x 1/1 GN 6 x 2/1 GN
3,5 litres 6 litres 6 litres
10 x 2/1 GN 20 x 1/1 GN 20 x 2/1 GN
8,5 litres 9 litres 11,5 litres
Gas appliances
6 x 1/1 GN 10 x 1/1 GN 6 x 2/1 GN
4 litres 7 litres 6,5 litres
10 x 2/1 GN 20 x 1/1 GN 20 x 2/1 GN
9 litres 8 litres 11 litres
Remove the descaling accessories (hand
pump and canister) from the cabinet.
- 34 -
Page 35

Servicing - Steam generator descaling
12
Remove descaler accessories from the cooking
cabinet (hand pump and canister).
Thoroughly rinse off any descaling fluid in the
13
cooking cabinet and descaler accessories with
water.
17
You exit the descaling process by selecting a
cooking mode. You can now use your unit for
cooking.
14
Remove descaler accessories, insert air baffle
and left hanging rack, and lock in place
15
After 30 seconds, “door” appears on the
display.
FILL
16
Close the cooking cabinet door.
0:45
The length of the descaling phase is displayed.
0:15
0:30
Note:
You need:
Electric descaler pump – Article no.: 60.70.409
Descaler, 10 litre canister – Article no.: 6006.0110
The steam generator is automatically rinsed several
times. The appliance then automatically switches to
Steam.
End
“End” appears on the display when descaling is
complete.
- 35 -
Page 36

Aborting the descaling process
Draining the steam generator
Aborting the descaling process
If necessary you can discontinue the descaling
process.
Before filling with descaling fluid
1
please hold down the core temperature button
for 10 seconds.
End
Your appliance can now be used for cooking.
After filling with descaling fluid
1
Switch appliance off and wait for 4 seconds
2
Switch appliance on
3
Descaling is discontinued if the
core temperature button is pressed
within 30 seconds.
If the core temperature button is not pressed within
30 seconds descaling will continue.
Draining the steam generator
You can drain the steam generator before moving it
or to stop it freezing.
1
Open cabinet doors.
2
3
Press core temperature button for 10 seconds
until „CLEn“ appears on cabinet temperature
display.
CLEn
4
Rotate cabinet temperature knob to the right
until „SC“ appears on the display.
SC
5
The steam generator is drained.
End
The steam generator is automatically drained
and thoroughly rinsed.
Your appliance can now be used for cooking.
- 36 -
Page 37

Fault indications
Any faults in your appliance
will be indicated on the display.
E 11
Faults in your appliance which allow you to carry
on cooking can be suppressed by pressing the clock
button.
Fault Cause Remedial action
indication
E1 Appliance defective
E2 Heating switched off for more than 2 Check energy optimisation system!
minutes by an external energy
optimising system.
E3 Appliance defective Notify Customer Service!
E4 Appliance defectivet Notify Customer Service!
E5 Core temperature probe defective Appliance can be operated without core
temperature probe.
Notify Customer Service!
E6 Appliance defective Notify Customer Service!
E7 Appliance defective Notify Customer Service!
E8 Appliance defective Notify Customer Service!
E9 Appliance defective Notify Customer Service!
E10 Appliance defective Notify Customer Service!
E11 No control mode displayed after Notify Customer Service!
switching on
E13 Appliance defective Notify Customer Service!
E14 Appliance defective Notify Customer Service!
E15 Appliance defective Notify Customer Service!
E16 Appliance defective Notify Customer Service!
E17 Ambient temperature too low Room temperature must exceed 5 °C!
E18 Appliance defective Notify Customer Service!
E19 Appliance defective Notify Customer Service!
E20 Appliance defective Notify Customer Service!
E21 Appliance defective Notify Customer Service!
E22 Appliance defective Notify Customer Service!
- 37 -
Page 38

load per container Cooking process Maximum load quantity for each type of unit
1⁄1 2⁄1 pre- 10x2/1
st
Step 2nd Step 3rd Step 6x1/1 6x2/1 10x1/1 20x1/1 20x2/1
- 39 -
Sample applications: beef and veal
Product Hints Accessories
haeting 1
Fillet steak season, brush with oil CombiGrill
Rump steak season, brush with oil CombiGrill
do not flatten
Sirloin season, brush with oil Grid
and CNS
Roast beef add mirepoix 100 mm CNS
(Braised beef) Ø 80–100 mm, cover CNS
Beef roulades season, add hot 65 mm CNS
sauce, cover with 20 mm GN
Fillet of beef
Wellington 20 mm granite
Aitchbone Grid
and CNS
Fillet of veal season, brush with oil CombiGrill
Veal cutlets season just before loading CombiGrill
Roast veal Grid and
65 mm CNS
Knuckle of veal Grid and
40 mm CNS
Osso bucco cover CNS 65 mm CNS
Breast of veal Grid and
65 mm CNS
Saddle of veal Grid and
40 mm CNS
Shoulder of veal Grid and
40 mm CNS
9 pcs. 300 ° 230-250 ° 27 pcs. 45 pcs. 45 pcs. 54 pcs. 108 pcs.
7-10 Min.
9 pcs. 300 ° 260 ° 27 pcs. 45 pcs. 45 pcs. 54 pcs. 108 pcs.
8-10 Min.
6 kg 12 kg 200 ° 160-180 ° 120-140 ° 18 kg 36 kg 30 kg 60 kg 100 kg
5-10 Min. CT 56 °
6-8 kg 12-16 kg 200 ° 160-180 ° 120-140 ° 18 kg 36 kg 30 kg 60 kg 100 kg
90-120 Min. CT 80 °
20-25 40-50 200 ° 130-140 ° 75 pcs. 150 pcs. 125 pcs. 250 pcs. 500 pcs.
pcs. pcs. 60-80 Min.
6-8 kg 12-16 kg 200 ° 160-180 ° 120-140 ° 18 kg 36 kg 30 kg 60 kg 100 kg
CT 80-90 ° CT 56 °
6-8 kg 12-16 kg 100 ° 85 ° 18 kg 36 kg 30 kg 60 kg 100 kg
CT 80-90 °
8 pcs. 250 ° 160-180 ° 120-140 ° 24 pcs. 40 pcs. 40 pcs. 48 pcs. 96 pcs.
5-10 Min. CT 68 °
8 pcs. 250 ° 240 ° 24 pcs. 40 pcs. 40 pcs. 48 pcs. 96 pcs.
10-12 Min.
9 kg 16 kg 200 ° 160-180 ° 140 ° 18 kg 36 kg 30 kg 60 kg 100 kg
30 Min. CT 75 °
6 pcs. 12 pcs. 200 ° 140 ° 170 ° 18 pcs. 36 pcs. 30 pcs. 60 pcs. 120 pcs.
CT 85 ° 10 Min.
15 pcs. 30 pcs. 200 ° 130-140 ° 45 pcs. 90 pcs. 75 pcs. 150 pcs. 300 pcs.
ca. 90 Min.
1 pcs. 2 pcs. 100 ° 20 Min. 140 ° 160-200 ° 3 pcs. 6 pcs. 5 pcs. 10 pcs. 20 pcs.
CT 85 ° 10 Min.
1 pcs. 2 pcs. 200 ° 160-180 ° 120-140 ° 2 pcs. 4 pcs. 3 pcs. 6 pcs. 12 pcs.
10 Min. CT 68 °
6-8 kg 12-16 kg 200 ° 160-180 ° 140-160 ° 18 kg 36 kg 30 kg 60 kg 100 kg
10 Min. CT 80-85 °
CT - core temperature.
- 38 -
Page 39

st
Step 2nd Step 3rd Step 6x1/1 6x2/1 10x1/1 20x1/1 20x2/1
Please note that quantities given always refer to a full load. In certain instances reducing the load can improve food
quality. Foods are natural products, cooking times and temperatures are intended as guides and should, if necessary, be
adjusted to suit the individual product.
st
Step 2nd Step 3rd Step 6x1/1 6x2/1 10x1/1 20x1/1 20x2/1
- 39 -
Page 40

load per container Cooking process Maximum load quantity for each type of unit
1⁄1 2⁄1 pre- 10x2/1
st
Step 2nd Step 3rd Step 6x1/1 6x2/1 10x1/1 20x1/1 20x2/1
- 41 -
Sample applications: pork, mutton and lamb
Product Hints Accessories
haeting 1
Pork medallions season, brush with oil CombiGrill
approx. 70 to 80 g
Escalopes au naturel, brush with oil CombiGrill
Pork chops browning fat, Roasting and baking tray
(breaded)
Burgers Roasting and baking tray
Meat balls 20 mm granite
Saddle of pork Grid and
40 mm CNS
Roast pork Grid and
Neck 65 mm CNS
Roast pork with (stuffed pork belly), make portion-sized Grid and
crackling cuts after step 1, then season 40 mm CNS
Smoked neck of pork boned Grid and
65 mm CNS
Knuckle of pork save stock, for use e.g. with sauerkraut Grid and
65 mm CNS
Leg of pork make cuts after step 1, Grid
then season Potato Baker
Ham 3/4 precook ham, Roasting and baking tray
in breadcrumbs then coat
Mincemeat roast use grid if in tins 20 mm granite
Meat loaf pack into aluminium trays Grid
Spare ribs marinate for 12 h after steaming Grid and
20 mm granite
20 pcs. 300 ° 230-250 ° 60 pcs. 100 pcs. 100 pcs. 120 pcs. 240 pcs.
CT 68-72 °
9 pcs. 300 ° 250-270 ° 27 pcs. 45 pcs. 45 pcs. 54 pcs. 108 pcs.
10-12 Min.
8 pcs. 16 pcs. 250 ° 190-220 ° 24 pcs. 40 pcs. 40 pcs. 48 pcs. 96 pcs.
CT 72 °
10 pcs. 30 pcs. 300 ° 200-200 ° 30 pcs. 60 pcs. 50 pcs. 100 pcs. 150 pcs.
CT 76-80 °
45 pcs. 90 pcs. 250 ° 180-200 ° 135 pcs. 270 pcs. 225 pcs. 450 pcs. 900 pcs.
CT 76-80 °
8 kg 16 kg 250 ° 180 ° 130-150 ° 16 kg 32 kg 24 kg 48 kg 96 kg
30 Min. CT 65 °
8 kg 16 kg 250 ° 140-180 ° 16 kg 32 kg 24 kg 48 kg 96 kg
CT 76-80 °
5-7 kg 10-14 kg 100 ° 20 Min. 140-160 ° 200-220 ° 15 kg 30 kg 25 kg 50 kg 75 kg
CT 74-76 ° 15-20 Min.
6-8 kg 12-16 kg 100 ° 80 ° 16 kg 32 kg 24 kg 48 kg 96 kg
CT 65-72 °
7-9 14-18 100 ° 100 ° 18 pcs. 36 pcs. 30 pcs. 60 pcs. 90 pcs.
pcs. pcs. CT 87 °
6-8 100 ° 20 Min. 140-160 ° 220 ° 18 pcs. 36 pcs. 30 pcs. 60 pcs. 90 pcs.
pcs. CT 78-80 ° 15-20 Min.
ca. 6 kg ca. 12 kg 200 ° 160-180 ° 140-160 ° 12 kg 24 kg 18 kg 36 kg 72 kg
20-30 Min. CT 72-78 °
6 kg 12 kg 200 ° 140-160 ° 18 kg 36 kg 30 kg 60 kg 90 kg
CT 80 °
4-6 kg 8-12 kg 200 ° 130 ° 18 kg 36 kg 30 kg 60 kg 90 kg
CT 72-80 °
3 kg 6 kg 100 ° 60 Min. 180-220 ° 9 kg 18 kg 15 kg 30 kg 45 kg
10-15 Min.
CT - core temperature.
- 40 -
Page 41

st
Step 2nd Step 3rd Step 6x1/1 6x2/1 10x1/1 20x1/1 20x2/1
Please note that quantities given always refer to a full load. In certain instances reducing the load can improve food
quality. Foods are natural products, cooking times and temperatures are intended as guides and should, if necessary, be
adjusted to suit the individual product.
st
Step 2nd Step 3rd Step 6x1/1 6x2/1 10x1/1 20x1/1 20x2/1
- 41 -
Page 42

- 43 -
Sample applications: sausages and frozen food
Suitable load per container Cooking process Approx. loading capacity
Food Hints GN container/grid 1⁄1 2⁄1 pre- 10x2/1
haeting 1
Sausages, to reheat 40 mm CNS
Stuffing ffor mise en place cover with foil 20 mm CNS
Live dumplings lightly grease container 20 mm CNS
Semi-preserved filling weight 200 g 20 mm CNS
foods
Sausages in jars Attention: Cook without lid! 20 mm CNS
(250 g)
Test jars to make sure they can withstand heating
30 pcs. 60 pcs. 85 ° 85 ° 180 pcs. 360 pcs. 300 pcs. 600 pcs. 1200 pcs.
CT 72 °
50 pcs. 100 pcs. 85 ° 85 ° 300 pcs. 600 pcs. 500 pcs. 1000 pcs. 2000 pcs.
10-20 Min.
30 pcs. 60 pcs. 100 ° 100 ° 180 pcs. 360 pcs. 300 pcs. 600 pcs. 1200 pcs.
10-15 Min.
40 pcs. 80 pcs. 100 ° 100 ° 120 pcs. 240 pcs. 200 pcs. 400 pcs. 800 pcs.
40-60 Min.
40 pcs. 80 pcs. 100 ° 100 ° 120 pcs. 240 pcs. 200 pcs. 400 pcs. 800 pcs.
50-70 Min.
Frozen convenience
foods:
Chicken drumsticks- prefried 20 mm granite
and thighs
Fish fingers breaded Roasting and
baking tray
Quiche Lorraine Pre-baked in ø 8 cm aluminium tins 20 mm CNS or
2 cm high, preheat 300 °C Perforated aluminium
Lasagne precooked CNS 65 mm
Pizza precooked Perforated aluminium
20 pcs. 40 pcs. 250 ° 160 ° 120 pcs. 240 pcs. 200 pcs. 400 pcs. 800 pcs.
20-25 Min.
50 pcs. 100 pcs. 300 ° 200-220 ° 300 pcs. 600 pcs. 500 pcs. 1000 pcs. 2000 pcs.
20 Min.
24 pcs. 48 pcs. 300 ° 200 ° 144 pcs. 288 pcs. 450 pcs. 900 pcs. 1800 pcs.
20 Min.
10 port. 20 port. 200 ° 140 ° 30 port. 60 port. 50 port. 100 port. 200 port.
30-40 Min.
2 pcs. 4 pcs. 300 ° 200 ° 12 pcs. 24 pcs. 20 pcs. 40 pcs. 80 pcs.
10-12 Min.
CT - core temperature.
- 42 -
Page 43

Please note that quantities given always refer to a full load. In certain instances reducing the load can improve food
quality. Foods are natural products, cooking times and temperatures are intended as guides and should, if necessary, be
adjusted to suit the individual product.
st
Step 2nd Step 3rd Step 6x1/1 6x2/1 10x1/1 20x1/1 20x2/1
- 43 -
Page 44

load per container Cooking process Maximum load quantity for each type of unit
1⁄1 2⁄1 pre- 10x2/1
st
Step 2nd Step 3rd Step 6x1/1 6x2/1 10x1/1 20x1/1 20x2/1
- 45 -
Sample applications: Game, poultry and pies
Product Hints Accessories
haeting 1
Saddle of venison, Grid and
20 mm granit.
Leg of venison debone, season, bard, tie Grid and
CNS 40 mm
Haunch of venison marinate Grid and
CNS 40 mm
Saddle of hare season 20 mm granite
rare
Larded marinate, season, add granite
leg of hare hot sauce, cover with CNS container
Roast venison braised granite
Pheasant bard, season, 20 mm granite
Wild duck season 20 mm granite
Duck-Superspike
Turkey stuff if required CNS 40 mm
Goose stuff if required, season Grid and granite or
Duck-Superspike
Chicken rub seasoning in well Chicken-Superspike
(whole) vertical/horizontal H10
Chicken Grid and
(1/2) 20 mm granite
Chicken legs rub seasoning in well Grid and
20 mm granite
3 pcs. 4 pcs. 250 ° 180-200 ° 140-160 ° 6 pcs. 8 pcs. 10 pcs. 20 pcs. 40 pcs.
5-10 Min. CT 65-70 °
5-6 kg 10-12 kg 250 ° 180-200 ° 140-160 ° 16 kg 32 kg 24 kg 48 kg 96 kg
10 Min. CT 72-80 °
6 kg 12 kg 250 ° 180-200 ° 140-160 ° 16 kg 32 kg 24 kg 48 kg 96 kg
10 Min. CT 68-78 °
6-8 12-16 250 ° 180-200 ° 140-160 ° 24 pcs. 48 pcs. 40 pcs. 80 pcs. 160 pcs.
pcs. pcs. 10 Min. CT 65-70 °
12 pcs. 24 pcs. 250 ° 160-180 ° 140-160 ° 36 pcs. 72 pcs. 60 pcs. 120 pcs. 240 pcs.
5-10 Min. CT 72-80 °
8 kg 16 kg 200 ° 130 ° 24 kg 48 kg 40 kg 80 kg 160 kg
CT 72-80 °
6-8 12-16 200 ° 160-180 ° 18 pcs. 36 pcs. 30 pcs. 60 pcs. 90 pcs.
pcs. pcs. CT 72-80 °
3 pcs. 6 pcs. 200 ° 140-160 ° 18 pcs. 36 pcs. 30 pcs. 60 pcs. 90 pcs.
CT 88 °
1 pcs. 2 pcs. 180 ° 130-150 ° 2 pcs. 4 pcs. 3 pcs. 6 pcs. 12 pcs.
CT 72 °
2 pcs. 4 pcs. 200 ° 140-160 ° 140-160 ° 4 pcs. 8 pcs. 6 pcs. 12 pcs. 24 pcs.
20 Min. CT 88 °
6 pcs. 12 pcs. 200 ° 160-180 ° 20 pcs. 30 pcs. 40 pcs. 60 pcs. 120 pcs.
CT 88 °
8 pcs. 16 pcs. 200 ° 160-180 ° 24 pcs. 48 pcs. 40 pcs. 80 pcs. 120 pcs.
CT 88 °
10-12 20-24 200 ° 160-180 ° 30 pcs. 60 pcs. 50 pcs. 100 pcs. 150 pcs.
pcs. pcs. CT 88 °
CT - core temperature.
- 44 -
Page 45

st
Step 2nd Step 3rd Step 6x1/1 6x2/1 10x1/1 20x1/1 20x2/1
Please note that quantities given always refer to a full load. In certain instances reducing the load can improve food
quality. Foods are natural products, cooking times and temperatures are intended as guides and should, if necessary, be
adjusted to suit the individual product.
st
Step 2nd Step 3rd Step 6x1/1 6x2/1 10x1/1 20x1/1 20x2/1
- 45 -
Page 46

- 47 -
Sample applications: Fish, shellfish and crustaceans
Suitable
Food Hints GN container/grid 1⁄1 2⁄1 pre- 10x2/1
haeting 1
Salmon Salmon, put abdomen CNS 20 mm
(whole) flap outside
Salmon trout fillets, in serving dish, add CNS 20 mm
Salmon steaks fumet or wine
Halibut salt, pepper, chopped herbs CNS 20 mm
(portions)
Sole roulades can also be stuffed CNS 20 mm
Plaice pale side up Roasting and
baking tray
Pan fried trout season, brush with oil Roasting and
baking tray
Blue trout season stock with vinegar, put abdomen CNS 40 mm
flap to the side
Perch first blanch julienne CNS 20 mm
((on vegetable julienne)
Mussels add wine, vegetable julienne, etc. CNS 40 or 65 mm
Fish dumplings CNS 20 mm
Fish terrine Grid
Squid CNS 20 mm
(whole) Grid
load per container Cooking process Approx. loading capacity
1 pcs. 2 pcs. 100 ° 78 ° 2 pcs. 4 pcs. 3 pcs. 6 pcs. 12 pcs.
CT 67 °
20 pcs. 40 pcs. 100 ° 78 ° 120 pcs. 240 pcs. 200 pcs. 400 pcs. 800 pcs.
15 pcs. 30 pcs. CT 68 ° 90 pcs. 180 pcs. 150 pcs. 300 pcs. 600 pcs.
15 port. 30 port. 100 ° 78 ° 90 port. 180 port. 150 port. 300 port. 600 port.
CT 68 °
30 pcs. 60 pcs. 100 ° 78 ° 180 pcs. 360 pcs. 300 pcs. 600 pcs. 1200 pcs.
CT 67 °
4-5 pcs. 8-10 pcs. 250 ° 220-220 ° 30 pcs. 60 pcs. 50 pcs. 100 pcs. 200 pcs.
CT 66 °
3-5 6-10 250 ° 200-220 ° 30 pcs. 60 pcs. 50 pcs. 100 pcs. 200 pcs.
pcs. pcs. CT 66 °
8-10 16-20 100 ° 100 ° 30 pcs. 60 pcs. 50 pcs. 100 pcs. 200 pcs.
pcs. pcs. CT 68 °
10-12 20-24 100 ° 85 ° 36 pcs. 72 pcs. 60 pcs. 120 pcs. 240 pcs.
pcs. pcs. CT 68 °
1-2 kg 2-4 kg 100 ° 95 ° 6 kg 12 kg 10 kg 20 kg 40 kg
10-15 Min.
50 pcs. 100 pcs. 100 ° 75 ° 300 pcs. 600 pcs. 500 pcs. 1000 pcs. 2000 pcs.
8-15 Min.
3 pcs. 6 pcs. 70-75 ° 9 pcs. 18 pcs. 15 pcs. 30 pcs. 60 pcs.
CT 68 °
1 pcs. 2 pcs. 100 ° 100 ° 80 ° 6 pcs. 12 pcs. 10 pcs. 20 pcs. 40 pcs.
CT 90 ° 30 Min.
Frozen convenience
foods:
Fish, gratinated in CNS 20 mm
aluminium foil, multiple portions
Fish fillet CNS 20 mm
(pre-baked)
CT - core temperature.
- 46 -
12 pcs. 24 pcs. 250 ° 200-220 ° 72 pcs. 144 pcs. 120 pcs. 240 pcs. 480 pcs.
10-20 Min.
18 pcs. 36 pcs. 250 ° 180 ° 108 pcs. 216 pcs. 180 pcs. 360 pcs. 720 pcs.
CT 68 °
Page 47

Please note that quantities given always refer to a full load. In certain instances reducing the load can improve food
quality. Foods are natural products, cooking times and temperatures are intended as guides and should, if necessary, be
adjusted to suit the individual product.
st
Step 2nd Step 3rd Step 6x1/1 6x2/1 10x1/1 20x1/1 20x2/1
- 47 -
Page 48

load per container Cooking process Maximum load quantity for each type of unit
1⁄1 2⁄1 pre- 10x2/1
st
Step 2nd Step 3rd Step 6x1/1 6x2/1 10x1/1 20x1/1 20x2/1
- 49 -
Sample applications: vegetables, side dishes
Product Hints Accessories
haeting 1
Broccoli frozen (fresh, perforated container, CNS 65 mm
plunge in iced water) perforated
Cauliflower cut rosettes CNS 65 mm
perforated
Brussels sprouts frozen, season when frozen, butter CNS 65 mm
just before serving perforated
Spinach fresh CNS 65 mm
perforated
Kohlrabi CNS 65 mm
perforated
Carrots parisienne CNS 65 mm
perforated
Petits pois CNS 65 mm
perforated
Asparagus cook in stock/water CNS 65 mm
Tomatoes blanch for e.g. tomatoes concassé, 20 mm
salad perforated
Green beans frozen, whole or cut, fresh CNS 65 mm
blanch, plunge into iced water perforated
Mushrooms sprinkle with lemon, CNS 65 mm
add white wine if desired
Savoy cabbage cut out stalk, CNS 65 mm
(blanch) plunge fresh cabbage into iced water
Peppers use only red and yellow CNS 65 mm
(stuffed)
Cauliflower every 2nd rack Grid
au gratin CNS 20 mm
Vegetable platter pre-prepared, butter /fat Grid or
(Serving dish) just before serving CNS 20 mm
Baked vegetables CNS
65 mm granite
Stuffed cabbage rolls blanch leaves well, 65 mm perforated
(frozen, preheat 300 °C) CNS 65 mm
Peasant-style fill approx. 1- to 2 cm below edge CNS 40 mm
omelette
Soaking cereals preparing cold and leaving to soak CNS
shortens cooking time 65 mm granite
Moussaka fill 2 cm under top edge CNS
65 mm
5 kg 10 kg 100 ° 100 ° 15 kg 30 kg 25 kg 50 kg 75 kg
10-15 Min.
ca. 4 ca. 8 100 ° 100 ° 12 heads 24 heads 20 heads 40 heads 80 heads
heads heads 12-18 Min.
5 kg 10 kg 100 ° 100 ° 15 kg 30 kg 25 kg 50 kg 75 kg
14-18 Min.
2 kg 4 kg 100 ° 100 ° 6 kg 12 kg 10 kg 20 kg 30 kg
2-5 Min.
5 kg 10 kg 100 ° 100 ° 15 kg 30 kg 25 kg 50 kg 75 kg
15-20 Min.
5 kg 10 kg 100 ° 100 ° 15 kg 30 kg 25 kg 50 kg 75 kg
15-18 Min.
5 kg 10 kg 100 ° 100 ° 15 kg 30 kg 25 kg 50 kg 75 kg
15-18 Min.
2-3 kg 4-6 kg 100 ° 100 ° 9 kg 18 kg 15 kg 30 kg 45 kg
12-15 Min.
28 pcs. 56 pcs. 100 ° 100 ° 225 pcs. 336 pcs. 280 pcs. 560 pcs. 1120 pcs.
1-2 Min.
5 kg 10 kg 100 ° 100 ° 15 kg 30 pcs. 25 kg 50 kg 75 kg
15-18 Min.
2 kg 4 kg 100 ° 100 ° 6 kg 12kg 10 kg 20 kg 40 kg
10-12 Min.
2-3 4-6 100 ° 100 ° 9 heads 18 heads 15 heads 30 heads 60 heads
heads heads 6-8 Min.
20-25 40-50 200 ° 160-180 ° 75 pcs. 125 pcs. 125 pcs. 250 pcs. 375 pcs.
pcs. pcs. 45 Min.
30 port. 60 port. 300 ° 250 ° 90 port. 180 port. 150 port. 300 port. 600 port.
8-10 Min.
4 pcs. 8 pcs. 150 ° 110-130 ° 12 pcs. 24 pcs. 20 pcs. 40 pcs. 80 pcs.
8-12 Min.
30 port. 60 port. 180 ° 170 ° 190 ° 60 port. 120 port. 100 port. 200 port. 300 port.
CT 80 ° 10 Min.
25 pcs. 50 pcs. 180 ° 140-160 ° 60 pcs. 120 pcs. 100 pcs. 200 pcs. 300 pcs.
CT 76-80 °
30 port. 60 port. 150 ° 140 ° 160 ° 90 port. 180 port. 150 port. 300 port. 600 port.
35 Min. 10 Min.
2 kg 4 kg 100 ° 100 ° 12 kg 24 kg 20 kg 40 kg 80 kg
30 Min.
30 port. 60 port. 200 ° 140-180 ° 60 port. 120 port. 100 port. 200 port. 300 port.
15 Min. CT 72-78 °
CT - core temperature.
- 48 -
Page 49

st
Step 2nd Step 3rd Step 6x1/1 6x2/1 10x1/1 20x1/1 20x2/1
Please note that quantities given always refer to a full load. In certain instances reducing the load can improve food
quality. Foods are natural products, cooking times and temperatures are intended as guides and should, if necessary, be
adjusted to suit the individual product.
st
Step 2nd Step 3rd Step 6x1/1 6x2/1 10x1/1 20x1/1 20x2/1
- 49 -
Page 50

load per container Cooking process Maximum load quantity for each type of unit
1⁄1 2⁄1 pre- 10x2/1
st
Step 2nd Step 3rd Step 6x1/1 6x2/1 10x1/1 20x1/1 20x2/1
- 51 -
Sample applications: Eggs, side dishes
Product Hints Accessories
haeting 1
Eggs Soft 7 Min. CNS 65 mm perforated
(hard boiled) Hard 15 Min.
Royale in tins or GN containers CNS 65 mm
Egg soufflés bring milk to the boil, then blend in eggs, CNS 65 mm
cover with foil
Scrambled egg beat eggs, whisk in milk or cream, CNS 65 mm
cover
Quiche prebake base 20 mm granite
Boiled potatoes cut into quarters, salt, CNS 100-150
mix well perforated
Jacket potatoes large potatoes can also be cooked on CNS 100-150
the grid as Idaho potatoes perforated
Dumplings lightly oil CNS container CNS 20 mm
Roast potatoes cooked au point, 40 mm granite
watch bulk
Potatoes in foil wrap potatoes in foil, CNS 20 mm
lay on bed of salt
Potato gratin make sure slices are of equal thickness, 40 mm granite
Potatoes Macaire frozen product 20 mm granite
Vacuum cooked quartered, shaped Grid
Potatoes
Rice long grain, stock – water: CNS 65 mm
ratio 2:1, soaking shortens cooking time
Wild rice ratio 3:1, CNS 65 mm
shortened cooking time
Rice pudding 3 parts milk, 1 part round grain rice, CNS 65 mm
cinnamon stick, sugar, vanilla
Pasta spaghetti, noodles, tagliatelle etc. CNS 65 mm
®
(Finishing
)
Canneloni cover evenly with sauce CNS 65 mm
Lasagne CNS 65 mm
60-100 120-200 100 ° 100 ° 300 pcs. 600 pcs. 500 pcs. 1000 pcs. 2000 pcs.
pcs. pcs. 7-15 Min.
4 litre 8 litre 90 ° 77 ° 12 litre 24 litre 20 litre 40 litre 80 litre
50 Min.
4 litre 8 litre 90 ° 85 ° 12 litre 24 litre 20 litre 40 litre 80 litre
15-25 Min.
4 litre 8 litre 100 ° 100 ° 200 ° 12 litre 24 litre 20 litre 40 litre 80 litre
CT 75 ° 5-8 Min.
10 pcs. 20 pcs. 165 ° 150 ° 175 ° 60 pcs. 120 pcs. 100 pcs. 200 pcs. 400 pcs.
10 Min. 10 Min.
8-14 kg 16-28 kg 100 ° 100 ° 24 kg 48 kg 42 kg 80-90 160-180
40-55 Min. kg kg
6-12 kg 14-24 kg 100 ° 100 ° 18 kg 36 kg 36 kg 60-72 120-154
40-55 Min. kg kg
30 pcs. 60 pcs. 100 ° 100 ° 90 pcs. 180 pcs. 150 pcs. 300 pcs. 450 pcs.
30-40 Min.
2 kg 4 kg 300 ° 220 ° 6 kg 12 kg 10 kg 20 kg 30 kg
30-40 Min.
20 pcs. 40 pcs. 200 ° 180 ° 90 pcs. 180 pcs. 150 pcs. 300 pcs. 450 pcs.
45-50 Min.
30 port. 60 port. 140 ° 125 ° 150 ° 60 port. 120 port. 100 port. 200 port. 300 port.
CT 80 ° 10 Min.
40 pcs. 80 pcs. 250 ° 200-220 ° 120 pcs. 240 pcs. 200 pcs. 400 pcs. 800 pcs.
15-18 Min.
4-4,5 kg 8-9 kg 100 ° 20-25 kg 40-50kg 40-50 kg 90 kg 180 kg
30 Min.
2 kg 4 kg 100 ° 100 ° 6 kg 12 kg 10 kg 20 kg 40 kg
35-45 Min.
2 kg 4 kg 100 ° 100 ° 6 kg 12 kg 10 kg 20 kg 40 kg
45-55 Min.
2 kg 4 kg 99 ° 90-99 ° 6 kg 12 kg 10 kg 20 kg 40 kg
50-60 Min.
2 kg 4 kg 100 ° 100 ° 6 kg 12 kg 10 kg 20 kg 40 kg
F
10 Min.
30 port. 60 port. 200 ° 170 ° 90 port. 180 port. 150 port. 300 port. 450 port.
CT 80 °
20 port. 40 port. 160 ° 150 ° 170-190 ° 60 port. 120 port. 100 port. 200 port. 300 port.
CT 80 ° 10 Min.
Pasta soufflé blend egg mixture in well CNS or
granite
20 port. 40 port. 180 ° 150-170 ° 170-190 ° 60 port. 120 port. 100 port. 200 port. 300 port.
CT 80 ° 5 Min.
CT - core temperature.
- 50 -
Page 51

st
Step 2nd Step 3rd Step 6x1/1 6x2/1 10x1/1 20x1/1 20x2/1
Please note that quantities given always refer to a full load. In certain instances reducing the load can improve food
quality. Foods are natural products, cooking times and temperatures are intended as guides and should, if necessary, be
adjusted to suit the individual product.
st
Step 2nd Step 3rd Step 6x1/1 6x2/1 10x1/1 20x1/1 20x2/1
F
- 51 -
Page 52

load per container Cooking process Maximum load quantity for each type of unit
1⁄1 2⁄1 pre- 10x2/1
st
Step 2nd Step 3rd Step 6x1/1 6x2/1 10x1/1 20x1/1 20x2/1
- 53 -
Sample applications: Pasty, bread, rolls, desserts 1
Product Hints Accessories
haeting 1
Apple strudel brush with milk, egg or sugar-water Roasting and baking tray
(Strudel dough
Frozen brush with liaison if desired Roasting and baking tray
apple turnovers preheat
Sponge base 20 mm granite
(Swiss rolls)
Sponge base Ø 26 cm, every 2nd rack Roasting and baking tray
Ring
Flaky pastry, brush carefully with egg, Roasting and baking tray
pies, fleurons
Flaky pastry every 2nd rack Roasting and baking tray
tartlets - fresh
Puff pastries filled evtl. mit Ei bestreichen Roasting and baking tray
(with cheese etc.)
Tray cakes every 2nd rack 20 mm or
40 mm
Christmas stollen line tins well Roasting and baking tray
Croissants – fresh cook "Vario-Steam" 34 °C, Roasting and baking tray
Compote cut fruit up evenly, CNS 65 mm
leave to firm after steaming
Fruit garnishes Cut or shape 20 mm
apples, pears etc.
Hot fruit frozen fruit, raspberries, strawberries, Grid
blackberries, in serving dish
Fruit conserves Ø 10–12 cm, e.g. pears, Grid or
(Jars without lids) filling volume 1 litre 20 mm
Cabinet pudding line tins Grid
(foil or baking paper)
Crème caramel darioles, cocottes, timbales etc. Grid or
(glasses) 20 mm
2 pcs. 4 pcs. 200 ° 140-160 ° 6 pcs. 12 pcs. 10 pcs. 20 pcs. 40 pcs.
40-60 Min.
10 pcs. 20 pcs. 200 ° 150-170 ° 60 pcs. 120 pcs. 100 pcs. 200 pcs. 300 pcs.
15-25 Min.
1 kg 2 kg 200 ° 140-160 ° 6 kg 12 kg 10 kg 20 kg 40 kg
10-20 Min.
2 shapes 4 shapes 200 ° 140-160 ° 6 shapes 12 shapes 10 shapes 20 shapes 40 shapes
15-40 Min.
Dez 15 24-30 180 ° 150-170 ° 160-180 ° 45 pcs. 90 pcs. 75 pcs. 150 pcs. 300 pcs.
pcs. pcs. 8-15 Min. 5-20 Min.
je nach je nach 180 ° 150-170 ° 160-180 °
Größe Größe 5-10 Min. 2-10 Min.
12 pcs. 24 pcs. 180 ° 170 ° 160-180 ° 24 pcs. 48 pcs. 40 pcs. 80 pcs. 160 pcs.
20-25 Min. 5-20 Min.
30 port. 60 port. 180 ° 140-160 ° 90 port. 180 port. 150 port. 300 port. 600 port.
30-50 Min.
2 kg 4 kg 180 ° 140-160 ° 150-170 ° 6 kg 12 kg 10 kg 20 kg 40 kg
10-15 Min. 20-30 Min.
12 pcs. 24 pcs. 180 ° 150-170 ° 160-180 ° 24 pcs. 48 pcs. 40 pcs. 80 pcs. 160 pcs.
CT 85 ° 10 Min.
30 port. 60 port. 120 ° 120 ° 90 port. 180 port. 150 port. 300 port. 600 port.
20-25 Min.
30 pcs. 60 pcs. 100 ° 100 ° 180 pcs. 360 pcs. 300 pcs. 600 pcs. 1200 pcs.
6-8 Min.
15 pcs. 30 pcs. 90 ° 80-90 ° 90 pcs. 180 pcs. 150 pcs. 300 pcs. 600 pcs.
4-6 Min.
10 pcs. 20 pcs. 100 ° 100 ° 30 pcs. 60 pcs. 50 pcs. 100 pcs. 200 pcs.
50-60 Min.
4 pcs. 8 pcs. 90 ° 90 ° 12 pcs. 24 pcs. 20 pcs. 40 pcs. 80 pcs.
45 Min.
40 pcs. 80 pcs. 80 ° 77 ° 120 pcs. 240 pcs. 200 pcs. 400 pcs. 800 pcs.
40-50 Min.
CT - core temperature.
- 52 -
Page 53

st
Step 2nd Step 3rd Step 6x1/1 6x2/1 10x1/1 20x1/1 20x2/1
Please note that quantities given always refer to a full load. In certain instances reducing the load can improve food
quality. Foods are natural products, cooking times and temperatures are intended as guides and should, if necessary, be
adjusted to suit the individual product.
st
Step 2nd Step 3rd Step 6x1/1 6x2/1 10x1/1 20x1/1 20x2/1
- 53 -
Page 54

- 55 -
Sample applications: Pasty, bread, dessert 2
Suitable
Food Hints GN container/grid 1⁄1 2⁄1 pre- 10x2/1
haeting 1
Yeast cakes every 2nd rack 20 mm granite or
Roasting and baking tray
Yeast plaits 20 mm granite
500 g or baking tray perforaded
Cheesecake every 2nd rack 60 mm granite
Marble cake grease tins carefully, Grid or
cut top after baking for 10 minutes Roasting and baking tray
Mixed-grain bread 20 mm granite
or baking tray perforaded
Short pastry and make sure thickness is even 20 mm granite
piped biscuits every 2nd rack Roasting and baking tray
Danish pastries baking temperature depends on filling Roasting and baking tray
or baking tray perforaded
Madeira-type cake tins on grids Grid
Savarin butter and flour tins Grid
Stollen light mix Roasting and baking tray
approx. 200 g
Streusel cake spread crumble evenly 20 mm
granite
Viennese-style spread mix evenly 20 mm granite or
sponge Ø 26 cm flan ring Roasting and baking tray
Rolls frozen Perforated aluminium
Roasting and baking tray
White bread every 2nd rack 20 mm granite
tin (700 g) Roasting and baking tray
Crisp up baguettes, frozen portions, approx. 45-50 g Roasting and baking tray
rolls, day goods or baking tray perforaded
Toast butter lightly if desired Grid or
Roasting and baking tray
Vacuum cooked fruit add wine, liqueur etc. Grid
Cinnamon whirls cook "Variosteam" 30 °C 20 mm granite or.
Roasting and baking tray
Plum cake Yeast dough approx. 5mm thick/prove 20 mm granite or.
Roasting and baking tray
load per container Cooking process Approx. loading capacity
2 kg 4 kg 180 ° 140-160 ° 160-180 ° 6 kg 12 kg 10 kg 20 kg 40 kg
5-10 Min. 15-30 Min.
2 pcs. 4 pcs. 180 ° 140-160 ° 160-180 ° 6 pcs. 12 pcs. 10 pcs. 20 pcs. 40 pcs.
CT 85 ° 10-15 Min.
40 port. 80 port. 180 ° 140-150 ° 140-160 ° 60 port. 120 port. 100 port. 200 port. 300 port.
10-15 Min. 25-45 Min.
4 Kasten- 8 Kasten 180 ° 140-160 ° 12 shapes 24 shapes 20 shapes 40 shapes 80 shapes
shapes shapes 35-55 Min.
3 pcs. 6 pcs. 180 ° 160-180 ° 160-180 ° 9 pcs. 18 pcs. 15 pcs. 30 pcs. 60 pcs.
10 Min. 30-50 Min.
24 pcs. 48 pcs. 160 ° 140-160 ° 72 pcs. 144 pcs. 120 pcs. 240 pcs. 480 pcs.
5-15 Min.
10 pcs. 20 pcs. 200 ° 160-180 ° 160-180 ° 60 pcs. 120 pcs. 100 pcs. 200 pcs. 300 pcs.
CT 85 ° 5-10 Min.
4 pcs. 8 pcs. 200 ° 160-180 ° 12 pcs. 24 pcs. 20 pcs. 40 pcs. 80 pcs.
40-60 Min.
10 pcs. 20 pcs. 180 ° 150-170 ° 30 pcs. 60 pcs. 50 pcs. 100 pcs. 200 pcs.
8-12 Min.
4 shapes 8 shapes 180 ° 140-160 ° 150-170 ° 12 shapes 24 shapes 20 shapes 40 shapes 80 shapes
10-15 Min. 20-30 Min.
40 port. 80 port. 180 ° 140-160 ° 160-180 ° 120 port. 240 port. 200 port. 400 port. 600 port.
5-10 Min. 15-30 Min.
200 ° 140-160 ° 6 pcs. 12 pcs. 10 pcs. 20 pcs. 40 pcs.
10-20 Min.
15 pcs. 30 pcs. 180 ° 140 ° 160-170 ° 45 pcs. 90 pcs. 75 pcs. 150 pcs. 300 pcs.
5 Min. 8-15 Min.
4 pcs. 8 pcs. 180 ° 140 ° 170 ° 12 pcs. 24 pcs. 20 pcs. 40 pcs. 80 pcs.
5 Min. 30-35 Min.
10-12 20-24 180 ° 140-160 ° 140-160 ° 60 pcs. 120 pcs. 100 pcs. 200 pcs. 400 pcs.
pcs. pcs. 5 Min. 5-10 Min.
15-18 30-36 250 ° 250 ° 108 pcs. 216 pcs. 180 pcs. 360 pcs. 720 pcs.
pcs. pcs. 3-5 Min.
4 kg 8 kg 90 ° 80-99 ° 24 kg 48 kg 40 kg 80 kg 160 kg
20-30 Min.
12 pcs. 24 pcs. 180 ° 150-170 ° 150-170 ° 36 pcs. 72 pcs. 60 pcs. 120 pcs. 240 pcs.
5 Min. 5-15 Min.
30 port. 60 port. 180 ° 140-160 ° 90 port. 180 port. 150 port. 300 port. 450 port.
30-40 Min.
CT - core temperature.
- 54 -
Page 55

Please note that quantities given always refer to a full load. In certain instances reducing the load can improve food
quality. Foods are natural products, cooking times and temperatures are intended as guides and should, if necessary, be
adjusted to suit the individual product.
st
Step 2nd Step 3nd Step 6x1/1 6x2/1 10x1/1 20x1/1 20x2/1
- 55 -
Page 56

Before you call customer service
Error Possible cause To eliminate
Water dripping out of the
unit’s door
Noise is heard in the
cooking cabinet while the
unit is in use.
Door is not closed correctly.
Door seal is worn or
damaged.
Air baffles, grid shelves, etc,
are not fixed correctly.
If the door is closed correctly, the door handle
will point down on floor units.
Replace the door seal (see the „Maintenance”
section of the manual).
Care instructions for a maximum service life:
- At the end of production, clean the door seal
thoroughly with a damp cloth.
- If lots of grilled products are cooked
(considerable build-up of grease), then the
door seal must also be cleaned with a damp
cloth between cycles.
- If the unit is to be operated for a long time
without products, we recommend that the
cooking cabinet temperature should not
exceed 180 °C.
Fix the air baffles and grid shelves correctly in
the cooking cabinet.
Cooking cabinet light not
working.
Low water level: “Flashing
water valve symbol”.
Water running out of the
bottom of the unit.
Halogen lamp is defective. Replace the lamp (see the „Maintenance”
section of the manual).
Water valve closed.
Water intake filter on the unit
is clogged.
The unit is not level.
Drain is blocked.
- 56 -
Open the water valve.
Check and clean the filter. To do this: Close
the water valve, unscrew the water intake on
the unit, then remove and clean the filter in
the water intake. Insert the filter, connect the
water intake and check for leaks.
Level the unit using a spirit level (see
Installation Manual).
Remove and clean the outlet (HT pipe) on
the back of the unit. Blockages can occur if
products with a high proportion of fat are
cooked frequently or if the drop on the outlet
pipe is too shallow.
To remedy:
Run the outlet pipe as described in the
installation instructions.
Page 57

Before you call customer service
Error Possible cause To eliminate
The unit does not indicate a
function after it is switched
on.
The gas unit indicates
„PLO”.
Gas unit constantly displays
Reset.
Cooking mode button
flashing
External main switch is
switched off.
Fuse on the premises’
distribution board has
tripped.
The ambient temperature
after switching the unit off
remained below 5 °C (41 °F)
for a long time.
The power supply is not
connected with the correct
polarity.
The gas supply to the unit is
interrupted.
The gas pressure is too low.
The cooking cabinet is too
hot
Switch on at the main switch.
Check the fuses on the premises’ distribution
board.
Heat the cooking cabinet to above 20 °C
(68 °F).
The appliance must only be used in frost-free
conditions (see installation instructions).
If the gas unit is connected to a socket,
remove the connector and turn through 180°.
An electrician can permanently connect the
unit (without a connector) with the correct
polarity.
Open the gas valve.
Switch on the ventilation cover.
Have the gas supply to the unit checked.
Use Cool down to cool the cooking cabinet
(see the “Cool down” section of the “General
User Instructions” manual).
- 57 -
Page 58

Maintenance
The following inspections can be carried out by experienced employees. Only use genuine spare parts from
the unit manufacturer.
Cleaning the air filter Replacing the door
seal
Push the lever to the left in order
to release the lug. Then push the
filter to the left and pull down to
remove.
- Clean the air filter in the
dishwasher at least once a
month and replace in unit after
drying.
- Air filters should be replaced at
least twice a year.
- Do not run the unit without an
air filter.
The door seal is fitted in a groove
on the cooking cabinet.
- Pull the old seal out of the
groove
- Clean the guide rail
- Insert new seal into the groove
(moisten the retaining lips with
soapy water)
- The rectangular part of the
seal must be seated fully in the
holding frame.
Cooking cabinet seals:
Article no.:
6 x 1/1 GN 20.00.394
6 x 2/1 GN 20.00.395
10 x 1/1 GN 20.00.396
10 x 2/1 GN 20.00.397
20 x 1/1 GN 20.00.398
20 x 2/1 GN 20.00.399
Replacing the halogen
lamp
First switch off the unit at the
mains.
- Cover the unit drain in the
cooking cabinet
- Remove the frame with glass
and seal
- Replace halogen bulb (article
no.: 3024.0201), do not touch
the bulb with your hands)
- Replace sealing frame as well
(article no.: 40.00.094)
- Screw the frame in place with
glass and seal
- 58 -
Page 59

EU Declaration of Conformity for electrical units
geprüfte
Sicherheit
RATIONAL AG
Iglinger Straße 62
D-86899 Landsberg/Germany
www.rational-ag.com
Product: Commercial CombiSteam Ovens Electric Appliances
Types: CombiMaster CM61, CM62, CM101, CM102, CM201, CM202
SelfCooking Center SCC61, SCC62, SCC101, SCC102, SCC 201, SCC 202
BG Фирма Ратионал потвърждава, че тези продукти съответстват на следващите директиви на ЕС:
CZ Firma RATIONAL prohlašuje, že výrobky jsou v souladu s následujicimi směrnicemi EU:
D Konformitätserklärung. RATIONAL erklärt, dass diese Produkte mit den folgenden EU-Richtlinien übereinstimmen:
DK RATIONAL erklaerer at disse produkter er i overensstemmelse med følgende EU-direktiver:
E RATIONAL declara que estos productos son conformes con las siguientes Directivas Europeas:
EE RATIONAL kinnitab, et antud tooted vastavad järgmistele EU normidele:
F RATIONAL déclare que ces produits sont en conformité avec les directives de l’Union Européenne suivantes:
FIN RATIONAL vakuuttaa, että nämä tuotteet täyttävät seuraavien EU direktiivien vaatimukset:
GB RATIONAL declares that these products are in conformity with the following EU directives:
GR RATIONAL δηλώνει ότι τα προϊόντα αυτά συμμορφώνονται προς τις οδηγίες της Ε.Ε.
H Mi, a RATIONAL kijelentjük, hogy ezen termékek megfelelnek az Europal Unio kövelkezö irányelveinek:
HR RATIONAL izjavljuje da su ovi proizvodi sukladni slijedeĉim smjernicama EU:
I RATIONAL dichiara che questi prodotti sono conformi alle seguenti Direttive della Comunità Europea:
LT RATIONAL patvirtina, kad šie produktai atitinka žemiau išvardintas ES normas:
LV Firma RATIONAL pazino, ka izstrãdãjumi atbilst sekojoŝām ES normām:
NL RATIONAL verklaart, dat deze producten in overeenstemming zijn met de volgende richtlijnen:
P A RATIONAL declara que estes produtos estāo em conformidade com as seguintes directivas EU:
PL Firma RATIONAL oświadcza, że dane wyroby są zgodne z niniejszymi wytycznymi UE:
RO Societatea RATIONAL declară că aceste produse sunt in conformitate cu următoarele directive ale Uniunii Europene:
RU Фирма Ратионал заявляет, что данные изделия отвечают следующим нормам ЕС:
S RATIONAL försäkrar att dessa produkter är i överensstämmelse med följande EU-direktiv:
SER RATIONAL izjavljuje da su ovi proizvodi u saglasnosti sa sledeċim smernicama EU:
SI RATIONAL izlavlja, da so ti izdelki v skladu z naslednjimi smernicami EU:
SK Firma RATIONAL prehlasuje, že výrobky sú v súlade s nasledovnými smernicami EU:
TR RATIONAL bu ürünlerin Avrupa Birliği’ nin aşşağidaki Direktierine uygunluğunu onaylar:
Machinery Directive MD 2006/42/EC
Including Low Voltage Directive LVD 2006/95/EC
(EN 60335-1:2002+A11+A1+A12+Corr.+A2.2006; EN 60335-2-42:2003; EN 50366:2003+A12006)
Electro Magnetic Compatibility EMC 2004/108/EC
(EN 55014-1:2006; EN 61000-3-2:2006; EN 61000-3-11:2000; EN 55014-2:1997+A1:2001)
LVD and EMC: Product Certication and CE Surveillance by VDE (0366).
Restriction of Hazardous Substances RoHS 2002/95/EC
EN 1717: 2001-05 Protection against pollution of potable water in water installations and
general requirements of devices to prevent pollution by backow – certied by DVGW
Landsberg, 01.12.2009 i.V. Bruno Maas i.V. Roland Hegmann
Manager R & D Product Architect Electric Appliances
- 59 -
Page 60

EU Declaration of Conformity for gas units
RATIONAL AG
Iglinger Straße 62
D-86899 Landsberg/Germany
www.rational-ag.com
Product: Commercial CombiSteam Ovens Gas Heated Appliances
Types: CombiMaster CM61G, CM62G, CM101G, CM102G, CM201G, CM202G
SelfCooking Center SCC61G, SCC62G, SCC101G, SCC102G, SCC 201G, SCC 202G
BG Фирма Ратионал потвърждава, че тези продукти съответстват на следващите директиви на ЕС:
CZ Firma RATIONAL prohlašuje, že výrobky jsou v souladu s následujicimi směrnicemi EU:
D Konformitätserklärung. RATIONAL erklärt, dass diese Produkte mit den folgenden EU-Richtlinien übereinstimmen:
DK RATIONAL erklaerer at disse produkter er i overensstemmelse med følgende EU-direktiver:
E RATIONAL declara que estos productos son conformes con las siguientes Directivas Europeas:
EE RATIONAL kinnitab, et antud tooted vastavad järgmistele EU normidele:
F RATIONAL déclare que ces produits sont en conformité avec les directives de l’Union Européenne suivantes:
FIN RATIONAL vakuuttaa, että nämä tuotteet täyttävät seuraavien EU direktiivien vaatimukset:
GB RATIONAL declares that these products are in conformity with the following EU directives:
GR RATIONAL δηλώνει ότι τα προϊόντα αυτά συμμορφώνονται προς τις οδηγίες της Ε.Ε.
H Mi, a RATIONAL kijelentjük, hogy ezen termékek megfelelnek az Europal Unio kövelkezö irányelveinek:
HR RATIONAL izjavljuje da su ovi proizvodi sukladni slijedeĉim smjernicama EU:
I RATIONAL dichiara che questi prodotti sono conformi alle seguenti Direttive della Comunità Europea:
LT RATIONAL patvirtina, kad šie produktai atitinka žemiau išvardintas ES normas:
LV Firma RATIONAL pazino, ka izstrãdãjumi atbilst sekojoŝām ES normām:
NL RATIONAL verklaart, dat deze producten in overeenstemming zijn met de volgende richtlijnen:
P A RATIONAL declara que estes produtos estāo em conformidade com as seguintes directivas EU:
PL Firma RATIONAL oświadcza, że dane wyroby są zgodne z niniejszymi wytycznymi UE:
RO Societatea RATIONAL declară că aceste produse sunt in conformitate cu următoarele directive ale Uniunii Europene:
RU Фирма Ратионал заявляет, что данные изделия отвечают следующим нормам ЕС:
S RATIONAL försäkrar att dessa produkter är i överensstämmelse med följande EU-direktiv:
SER RATIONAL izjavljuje da su ovi proizvodi u saglasnosti sa sledeċim smernicama EU:
SI RATIONAL izlavlja, da so ti izdelki v skladu z naslednjimi smernicami EU:
SK Firma RATIONAL prehlasuje, že výrobky sú v súlade s nasledovnými smernicami EU:
TR RATIONAL bu ürünlerin Avrupa Birliği’ nin aşşağidaki Direktierine uygunluğunu onaylar:
Directive on Appliances Burning Gaseous Fuels 2009/142/EC (EN 203-1:2005 + A1:2008; EN 203-2-2:2006, EN 203-3:2009)
Including Low Voltage Directive LVD 2006/95/EC (EN 60335-1:2002 + C1:2002 + A1:2004 + A11:2004 + A2+C1:2006 +
A12:2006 + A1/C11:2007 + A13:2008; EN 60335-2-42:2003 + A1:2008; EN 60335-2-102:2006 + A1:2009; EN 62233:2008)
Including Electro Magnetic Compatibility EMC 2004/108/EC (EN 55014-1:2006;
EN 55014-2:1997+A1:2001 + A2:2008; EN 61000-3-2:2006; EN 61000-3-3:1995+A1:2001+A2:2005)
EC Type-Examination and CE Surveillance E 4470 by KIWA Gastec.
Machinery Directive MD 2006/42/EC
Restriction of Hazardous Substances RoHS 2002/95/EC
Gastec QA High Efciency Label (QA KE 174) and Gastec QA Low NOx Label (QA KE 175)
EN 1717: 2001-05 - Protection against pollution of potable water in water installations and general
requirements of devices to prevent pollution by backow – certied by DVGW.
Landsberg, 30.07.2010 i.V. Bruno Maas i.V. Rainer Otminghaus
Manager R & D Product Architect Gas Appliances
- 60 -
Page 61

ClubRATIONAL
Register now and become a member.
As a ClubRATIONAL member you have access to an Internet-based platform that is unique
within the industry and offers many services and benefits.
The Club benefits to you:
Quarterly newsletter
So you are always well-informed!
Answers to frequently-asked questions
What you‘ve always wanted to know!
Chef✆Line now available by e-mail
Expert help from one chef to another!
Service✆Info now available by e-mail
RATIONAL Service – always there for you!
Free upgrades
So you always have the latest SelfCooking Center
®
software!
Download area
Documentation for all unit series!
Recipes – simply at the push of a button
The best recipes for your SelfCooking Center
®
Membership of the Club is free!
Register right away!
www.club-rational.com
!
- 61 -
Page 62

- 62 -
Page 63

Page 64

RATIONAL Großküchentechnik
Iglinger Straße 62
RATIONAL Schweiz AG
RATIONAL Canada Inc.
86899 Landsberg a. Lech/Germany
Tel.: +49 8191 327387
E-Mail: info@rational-online.de
www.rational-online.de
RATIONAL Belgium nv
Zandvoortstraat 10 Bus 5
2800 Mechelen/Belgium
Tel: +32 15 285500
E-mail: info@rational.be
www.rational.be
FRIMA RATIONAL France S.A.S.
4 Rue de la Charente - BP 52
F-68271 WITTENHEIM Cedex
Tel: +33 389 570 555
E-mail: info@rational-france.fr
www.rational-france.fr
RATIONAL International AG HELLAS
19ο χλμ.Θεσ/νίκησ-Περαίασ Τ.Θ. 4317
57019 Θεσσαλονίκη
Τηλ: +30 23920 39410
rationalgreece@rational-online.gr
www.rational-online.gr
RATIONAL Ibérica Cooking Systems S.L.
Ctra. de Hospitalet, 147-149
Cityparc / Edif. Paris D
08940 Cornellá (Barcelona)/ SPAIN
Tel: +34 93 4751750
E-mail: rational@rational-iberica.com
www.rational-iberica.com
RATIONAL Italia S.r.l.
via Venier 21
30020 Marcon (VE)/ITALY
Tel: +39 041 5951909
E-mail: info@rationalitalia.it
www.rational-italia.it
RATIONAL Nederland
Grootkeukentechniek BV
Twentepoort West 7
7609 RD Almelo/THE NETHERLANDS
Tel: +31 546 546000
E-mail: info@rational.nl
www.rational.nl
RATIONAL Sp. z o.o.
ul. Trylogii 2/16
01-982 Warszawa/POLAND
Tel: +48 22 8649326
E-mail: info@rational-polska.pl
www.rational-polska.pl
RATIONAL Scandinavia AB
Kabingatan 11
212 39 Malmö/SWEDEN
Tel: +46 40 680 85 00
E-mail: info@rational-scandinavia.se
www.rational-scandinavia.se
Heinrich-Wild-Strasse 202
9435 Heerbrugg/SWITZERLAND
Tel.: +41 71 727 9092
E-Mail: info@rational-schweiz.ch
www.rational-schweiz.ch
RATIONAL Slovenija SLORATIONAL d.o.o.
Ronkova ulica 4
2380 Slovenj Gradec / Slovenija
Tel: +386 (0)2 8821900
E-mail: info@slorational.si
www.slorational.si
RATIONAL UK
Unit 4 Titan Court, Laporte Way
Portenway Business Park
Luton, Bedfordshire, LU 4 8EF
GREAT BRITAIN
Tel: 00 44 (0) 1582 480388
E-mail: rational@rational-uk.co.uk
www.rational-uk.com
RATIONAL AUSTRIA GmbH
Innsbrucker Bundesstrasse 67
5020 Salzburg/AUSTRIA
Tel.: 0043 (0)662-832799
E-Mail: office@rational-austria.at
www.rational-austria.at
РАЦИОНАЛЬ в России и СНГ
117105 г. Москва,
Варшавское шоссе, д. 25а, стр. 6
Тел: +7 495 663 24 56
Эл. почта: info@rational-russland.com
www.rational-russia.ru
RATIONAL International AG
İstanbul İrtibat Bürosu
Acıbadem Cad., İbrahimağa
Konutları, C1-C Blok, No.: 39,
Kadıköy, 34718 İstanbul
Tel./Faks: +90 (0) 216 339 98 18
E-mail: info@rational-international.com
www.rational-international.com
RATIONAL AUSTRALIA PTY LTD
156 Swann Drive
Derrimut, VIC 3030
Tel: +61 (0) 3 8369 4600
E-mail: info@rationalaustralia.com.au
www.rationalaustralia.com.au
RATIONAL NZ Ltd
208-210 Neilson Street
Onehunga, 1061
Auckland, 1643
Tel.: +64 (9) 633 0900
E-Mail: sales@rationalnz.co.nz
www.rationalnz.co.nz
RATIONAL International Middle East
Montana Building, Floor 303
Zaabeel Road, Dubai, UAE
Phone+971 4 337 5455
eMail: info@rational-middleeast.com
www.rational-middleeast.com
2410 Meadowpine Blvd., Unit 107
Mississauga, Ontario L5N 6S2/CANADA
Toll Free: 1-877-RATIONAL (728-4662)
E-mail: postmaster@rationalcanada.com
www.rational-canada.com
RATIONAL USA Inc.
895 American Lane
Schaumburg, IL 60173
Toll Free: 888-320-7274
E-mail: info@rationalusa.com
www.rational-usa.com
RATIONAL International AG
Office Mexico
Innoparc 01
Heinrich-Wild-Strasse 202
CH-9435 Heerbrugg
Switzerland
Tel. en México: +52 (55) 5292-7538
eMail info@rational-mexico.com.mx
www.rational-mexico.com.mx
RATIONAL BRASIL
Rua Prof. Carlos de Carvalho, 113 - Itaim Bibi
São Paulo, SP
CEP: 04531-080
Tel.: +55 (11) 3071-0018
Internet: www.rational-online.com.br
E-mail: info@rational-online.com.br
㪹㆞↩䯍ኔዄኧወವንዀኮዐ
ᇽ
㨀℻掌㠖℻◉㈛㰌ₐ䥽䟹⚆
⇞♚ₜ╤䞲歾䞿㳚ኰወ⚆殷ኃኀዐኍ
Tel: (03) 3812 -6222
ኾዙወቿኦዉኖ info@rational-japan.com
ኸዙኽዙን www.rational-japan.com
RATIONAL ₙ䀆
ₙ䀆ゑ化⢘㿫恾⚆
⧳棂⦌棔⟕┰ㄎ⧉%⸳
挽㟎冥䪐₼⦌
䟄幬᧶+86 21 64737473
䟄挽᧶shanghai.office@rational-china.com
www.rational-china.cn
RATIONAL Korea
ꄱ렍꿙驕뤉ꍡ껹ᎎ
끭闊驝霡ꩱꫦ鶎ꩱ꾽ꠁ點
鲵뼑ꖱ霢
놹쀉+82-2-545-4599
E-mail: info@rationalkorea.co.kr
www.rationalkorea.co.kr
RATIONAL India
Unit No 24, German Center
12th Floor, Building 9B
DLF Cyber City, Phase III
Gurgaon, 122002
Haryana, India
Phone +91 124 463 58 65
info@rational-online.in
www.rational-online.in
80.01.072 · V-12 · MDS/Ad · 10/10 · englisch
RATIONAL International AG
Heinrich-Wild-Straße 202
CH-9435 Heerbrugg
Tel: +41 71 727 9090
Fax: +41 71 727 9080
E-mail: info@rational-international.com
www.rational-international.com
RATIONAL AG
Iglinger Straße 62
86899 Landsberg a. Lech
Tel.: +49 8191 3270
Fax: +49 8191 21735
E-Mail: info@rational-ag.com
www.rational-ag.com
 Loading...