

Raritan MASTERCONSOLETM MCIP116, MASTERCONSOLETM MCIP18, MasterConsole IP MCIP18, MasterConsole IP MCIP116 Quick Installation And Setup Manual
MasterConsole
™
IP
Quick Installation and Setup Guide
Congratulations on your purchase of
Raritan’s MasterConsole IP.
Your MasterConsole IP (MCIP) unit is
designed for quick, easy installation and
operation:
1. Set up one-tier MCIP configuration.
2. Install MCIP and connect computers.
3. Configure MCIP software.
4. Assign computer names and set channel-specific scan rates for attached computers.
5. Turn ON security and change passwords to restrict access to computers connected to MCIP.
6. Operate MCIP using the On-Screen
User Interface.
I. One-tier Configuration
Your MasterConsole IP can be configured in
a one-tier configuration, in which up to 8 (with
MCIP18) or 16 (with MCIP116) computers
can be connected to a single MCIP unit.
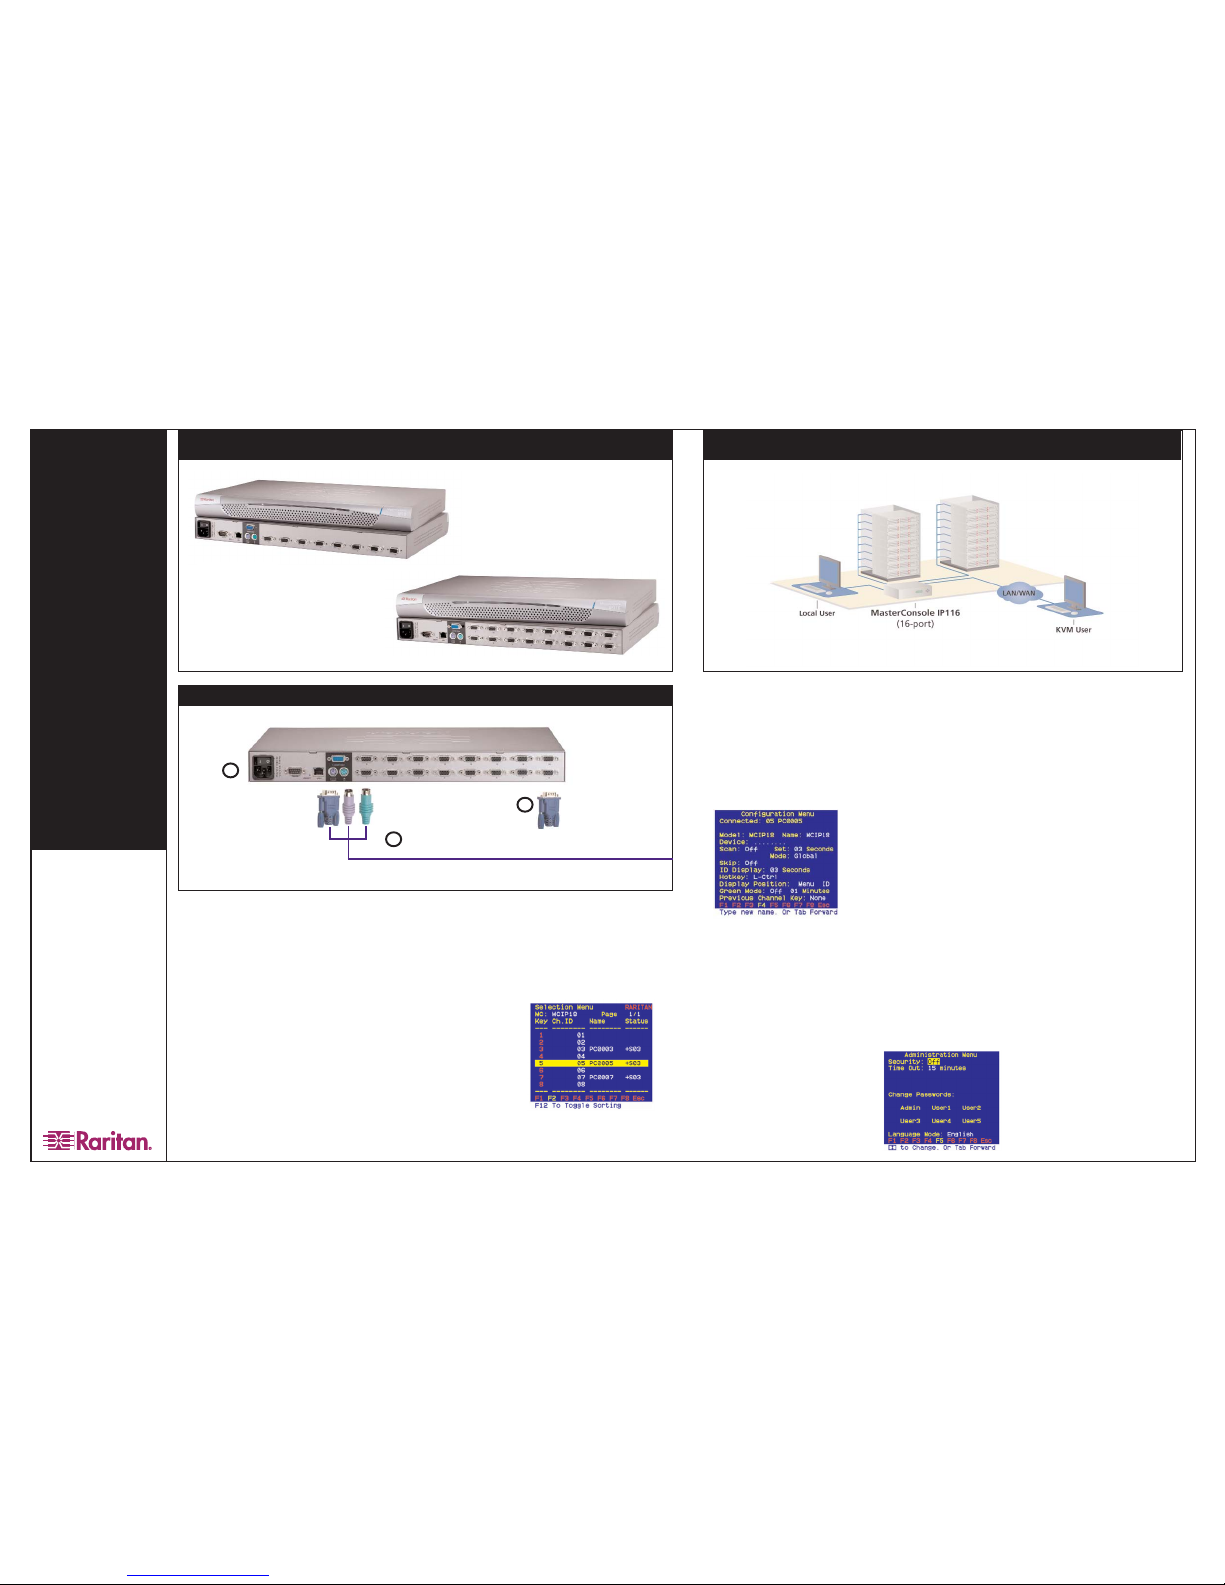
II. Installation
1. Power OFF all computers to be con-
nected to the MCIP unit.
2. Plug a keyboard, monitor, and mouse
into the keyboard, monitor, and mouse ports
on the rear panel of the MCIP.
3. Power ON MCIP.
4. Using an MCIPcable (CMCIP20, 40, or
90), plug the 15-pin connector into one of the
numbered channels on the MCIP rear panel.
5. Plug the cable's other connectors into
the computer's keyboard, monitor, and
mouse ports.
6. Power ON the connected computer.
7. Select the connected computer using
the OSUI (see next section). Verify that the
monitor attached to the MCIP unit displays
the video for the connected computer. Use
the keyboard and mouse attached to the
MCIP to verify that they operate the connected computer.
8. Repeat step s 4 through 7 to connect the
remaining computers to MCIP.
III. On-Screen User Interface
(OSUI) Operation
After connecting your computers to your
MCIP, explore MCIP operation and view factory default names and parameters. To activate the On-Screen User Interface (OSUI),
press the left CTRL key on your keyboard
three times rapidly. The Selection Menu
appears.
Use the up and down arrow keys on your
keyboard to highlight a channel (computer)
on the OSUI and press Enter OR press the
2
4
desired computer's Key Number, as listed in
the left column of the OSUI. To select a different computer, re-activate the OSUI ([Left
CTRL] three times rapidly).
IV. MCIP Software
Configuration
1. Activate the OSUI by pressing the Hot
Key (default: [Left CTRL]) three times rapidly. When the OSUI appears, press F4 to
access the Configuration Menu.
2. Use the Tab or the Shift + Tab keys to
move forward or back in the list and highlight the desired field. Make your changes
as follows:
a. To change Name (default is the
unit's model number): Move to Name and
type a name up to seven characters. This
field is used for identification purposes only.
b. To turn AutoScan ON/OFF
(default is OFF): Move to Scan and press
the up/down arrow keys to toggle. If you exit
the OSUI with AutoScan ON, MCIPwill scan
according to the currently set mode
(Individual/Global) and scan rate.
- To change the Global Scan Rate
(default is 3 seconds): Move to Set and type
a number from 01 to 99, or press the
up/down arrow keys to specify the Scan
Rate (in seconds) for Global AutoScan.
- To change AutoScan mode
(default setting is Global): Move to Mode
and press the up/down arrow keys to toggle
between Global and Individual.
c. To turn AutoSkip ON/OFF (default
is OFF): Move to Skip and press the
up/down arrow keys to toggle. With
AutoSkip ON, only active channels can be
selected.
d. To change the ID Display time
interval (default is 3 seconds): Move to ID
Display and type a number from 01 to 99, or
press the up/down arrow keys to specify the
interval (in seconds) you want the Channel
ID and Name to display when each computer is selected. Type 99 if you want the
Channel ID and Name to display continuously.
e. Green mode is disabled.
f. Previous channel key function is
disabled.
3. To exit the Configuration Menu, press
a Function key on your keyboard to access
a different menu, as displayed along the
bottom of the menu screen. Press Esc to
exit the OSUI and return to normal computer operation. Any changes made in the
Configuration Menu are automatically
saved.
V. MCIP Security and
Passwords
1. Activate the OSUI by pressing the Hot
Key (default: [Left CTRL]) three times rapidly. When it appears, press F5 to access the
Administration Password prompt.
2. Type the Administration Password and
press Enter. The Administration Menu
appears.
3. Press Tab or Shift+Tab to move for-
ward or back to the desired field and make
your changes as follows:
a. To turn Security ON/OFF (default
is OFF): Press the up/down arrow keys to
toggle.
b. To change Security activation
delay time (default is 15 minutes). Move to
the Time Out field, then type a number from
01 to 99, or use the up/down arrow keys to
specify a time interval. If the system will
remains inactive (no keyboard or mouse
operation) for this time interval, the next
user is required to enter a password to
access the MasterConsole IP.
c. To change the Administration
Password: Move to Change Passwords,
where Admin will be highlighted. Press the
Enter key and type a new password (up to
eight alphanumeric characters, no spaces).
Press Enter. Confirm the password by
retyping it. Press Enter.
d. To change a User Password,
press the Tab key to highlight the desired
User# field. Press Enter. Type a new password (up to eight alphanumeric characters,
no spaces). Press Enter. Confirm the password by typing it again. Press Enter.
Repeat this process for the remaining four
Users, pressing the Tab key to move from
one User field to the next. You can specify
up to five User Passwords.
e. To change the type of keyboard,
press the Tab key to highlight Language
Mode field. Press the up/down arrow keys
to select English, German, or French.
4. To exit the Administration Menu, press
a Function key on your keyboard to access
a different menu, as displayed along the
bottom of the menu screen. Press Esc to
exit the OSUI and return to normal computer operation.
For assistance in the North or South America, please contact the Raritan Technical Support Team by telephone
(732) 764-8886, by fax (732) 764-8887, or by e-mail
tech@raritan.com - Ask for Technical Support - Monday
through Friday, 8:00am to 8:00pm, Eastern.
MCIP18, MCIP116
MCIP Configuration
MCIP Installation
For more detailed instructions, please consult the User Manual found on the enclosed CD-ROM or visit www.raritan.com. Rev. A October 2005 255-18-0010
MCIP18
MCIP116
3
 Loading...