


 Loading...
Dominion KX IV-101
User Guide
Release 4.0.0
Copyright © Raritan, Inc. KX4101-0A-v4.0.0-E
April 2019 255-62-0023-00

This document contains proprietary information that is protected by copyright. All rights reserved. No part of this document may be photocopied, reproduced, or translated into another language without express prior written consent of Raritan, Inc.
© Copyright 2019 Raritan, Inc. All third-party software and hardware mentioned in this document are registered trademarks or trademarks of and are the property of their respective holders.
FCC Information
This equipment has been tested and found to comply with the limits for a Class A digital device, pursuant to Part 15 of the FCC Rules. These limits are designed to provide reasonable protection against harmful interference in a commercial installation. This equipment generates, uses, and can radiate radio frequency energy and if not installed and used in accordance with the instructions, may cause harmful interference to radio communications. Operation of this equipment in a residential environment may cause harmful interference.
VCCI Information (Japan)
Raritan is not responsible for damage to this product resulting from accident, disaster, misuse, abuse, non-Raritan modification of the product, or other events outside of Raritan's reasonable control or not arising under normal operating conditions.
If a power cable is included with this product, it must be used exclusively for this product.

Contents |
|
Chapter 1 Installation and Initial Configuration |
1 |
Supported Browsers ............................................................................................................................ |
1 |
Minimum Client and System Recommendations............................................................................... |
1 |
Package Contents ................................................................................................................................ |
2 |
Front View............................................................................................................................................. |
2 |
Rear View.............................................................................................................................................. |
3 |
Connecting the Equipment .................................................................................................................. |
4 |
Initial Configuration ............................................................................................................................. |
4 |
Option 1: Connect a PC to the LAN Port ............................................................................................. |
5 |
Option 2: Connect an iOS device at the Local Port............................................................................. |
5 |
Option 3: Serial configuration.............................................................................................................. |
5 |
Next Steps ............................................................................................................................................ |
6 |
KVM Client Options .............................................................................................................................. |
6 |
Chapter 2 Port Access and Configuration |
8 |
Port Access........................................................................................................................................... |
8 |
Port Configuration: KVM Port Settings............................................................................................... |
9 |
Port Configuration: USB Connection Settings.................................................................................. |
10 |
Chapter 3 KVM Clients |
12 |
Virtual KVM Client (VKCS) Help......................................................................................................... |
12 |
Java Requirements ................................................................................................................. |
13 |
Proxy Server Configuration .................................................................................................... |
14 |
Connection Properties ............................................................................................................ |
15 |
Connection Info........................................................................................................................ |
17 |
Keyboard.................................................................................................................................. |
17 |
Video Properties ...................................................................................................................... |
21 |
Mouse Options ......................................................................................................................... |
22 |
Tool Options............................................................................................................................. |
25 |
View Options ............................................................................................................................ |
30 |
Digital Audio ............................................................................................................................ |
31 |
External Device........................................................................................................................ |
36 |
Version Information - Virtual KVM Client............................................................................... |
37 |
Active KVM Client (AKC) Help............................................................................................................ |
37 |
Overview................................................................................................................................... |
37 |
AKC Supported Microsoft .NET Framework.......................................................................... |
38 |
AKC Supported Browsers ....................................................................................................... |
38 |
AKC Supported Operating Systems........................................................................................ |
38 |
|
iii |

Contents |
|
Prerequisites for Using AKC................................................................................................... |
38 |
Proxy Server Configuration .................................................................................................... |
39 |
HTML KVM Client (HKC) .................................................................................................................... |
40 |
Connection Properties ............................................................................................................ |
41 |
Connection Info........................................................................................................................ |
43 |
Input Menu............................................................................................................................... |
44 |
Video Menu .............................................................................................................................. |
53 |
View Menu................................................................................................................................ |
54 |
Virtual Media Menu ................................................................................................................. |
54 |
Audio Menu .............................................................................................................................. |
58 |
External Device Menu ............................................................................................................. |
60 |
Chapter 4 User Management |
61 |
Gathering LDAP/Radius Information ................................................................................................ |
62 |
Configuring Authentication................................................................................................................ |
62 |
LDAP Authentication ............................................................................................................... |
64 |
Radius Authentication............................................................................................................. |
67 |
Disabling External Authentication .................................................................................................... |
68 |
Change Your Password...................................................................................................................... |
68 |
Connected Users................................................................................................................................ |
68 |
Users and Groups .............................................................................................................................. |
69 |
Admin Group Special Privileges ............................................................................................. |
75 |
Chapter 5 Device Settings and Information |
76 |
Device Information............................................................................................................................. |
76 |
Date and Time .................................................................................................................................... |
78 |
Event Management ............................................................................................................................ |
79 |
Send Email............................................................................................................................... |
81 |
SNMP Notifications ................................................................................................................. |
82 |
Syslog Messages ..................................................................................................................... |
84 |
Network .............................................................................................................................................. |
85 |
Network Services............................................................................................................................... |
87 |
Discovery Port ......................................................................................................................... |
88 |
HTTP/HTTPS Ports.................................................................................................................. |
88 |
SMTP Server Settings ............................................................................................................. |
89 |
SNMP Settings......................................................................................................................... |
90 |
SSH Settings ............................................................................................................................ |
91 |
Serial Port .......................................................................................................................................... |
92 |
Terminal Block Control ..................................................................................................................... |
93 |
Connecting the Terminal Block to a Motherboard ................................................................ |
95 |
iv

|
|
Contents |
Virtual Media Shared Images ............................................................................................................ |
96 |
|
Chapter 6 |
Security |
97 |
Group Based Access Control............................................................................................................. |
97 |
|
IP Access Control............................................................................................................................... |
98 |
|
KVM Security .................................................................................................................................... |
100 |
|
|
Direct Port Access URL ........................................................................................................ |
102 |
Login Settings .................................................................................................................................. |
103 |
|
Password Policy ............................................................................................................................... |
104 |
|
SSL Certificate ................................................................................................................................. |
105 |
|
Service Agreement........................................................................................................................... |
109 |
|
Chapter 7 |
Maintenance |
110 |
Backup and Restore......................................................................................................................... |
110 |
|
Event Log .......................................................................................................................................... |
111 |
|
Firmware History ............................................................................................................................. |
112 |
|
Unit Reset ......................................................................................................................................... |
113 |
|
Update Firmware ............................................................................................................................. |
114 |
|
Chapter 8 |
Diagnostics |
116 |
Download Diagnostic ....................................................................................................................... |
116 |
|
Network Diagnostics........................................................................................................................ |
117 |
|
Chapter 9 |
CLI Commands |
119 |
CLI: check......................................................................................................................................... |
119 |
|
CLI: clear .......................................................................................................................................... |
119 |
|
CLI: config......................................................................................................................................... |
120 |
|
|
CLI: config device .................................................................................................................. |
120 |
|
CLI: config group ................................................................................................................... |
121 |
|
CLI: config history ................................................................................................................. |
122 |
|
CLI: config network ............................................................................................................... |
123 |
|
CLI: config password............................................................................................................. |
125 |
|
CLI: config security................................................................................................................ |
126 |
|
CLI: config serial ................................................................................................................... |
128 |
|
CLI: config terminalblock ..................................................................................................... |
128 |
|
CLI: config time ..................................................................................................................... |
129 |
|
CLI: config user ..................................................................................................................... |
129 |
v

Contents |
|
CLI: diag............................................................................................................................................ |
132 |
CLI: reset .......................................................................................................................................... |
133 |
CLI: show .......................................................................................................................................... |
134 |
CLI: exit............................................................................................................................................. |
139 |
Appendix A Specifications |
140 |
Index |
143 |
vi

Chapter 1 Installation and Initial Configuration
In This Chapter |
|
Supported Browsers ..................................................................................... |
1 |
Minimum Client and System Recommendations ........................................ |
1 |
Package Contents ......................................................................................... |
2 |
Front View...................................................................................................... |
2 |
Rear View....................................................................................................... |
3 |
Connecting the Equipment ........................................................................... |
4 |
Initial Configuration ...................................................................................... |
4 |
Option 1: Connect a PC to the LAN Port ...................................................... |
5 |
Option 2: Connect an iOS device at the Local Port...................................... |
5 |
Option 3: Serial configuration....................................................................... |
5 |
Next Steps ..................................................................................................... |
6 |
KVM Client Options ....................................................................................... |
6 |
Supported Browsers
•Chrome 71, 72, 73
•Edge 42
•Firefox 65, 66
•Internet Explorer 11
•Safari 12
See the Release Notes for more details on compatibility.
Minimum Client and System Recommendations
Minimum client requirements vary somewhat depending on what client you want to use, and what kind of video you plan to stream.
Network Speed Recommendation:
A fast network like Gigabit Ethernet or WiFi 802.11ac
Standalone Virtual KVM Client (VKCS) and Active KVM Client (AKC)
CPU:
1

Chapter 1: Installation and Initial Configuration
For FullHD video: a modern and fast dual core CPU, such as Intel Core i3 4xxx or newer, or a quad core CPU. If you plan to run more than one KVM session, a quad core CPU is recommended.
For 4K video: a modern and fast quad core CPU, such as Intel Core i5 4xxx or newer. If you plan to run more than one 4K stream, a CPU with 6 or more cores is recommended, such as Intel Core i5/i7 8xxx.
8GB RAM
Graphics Card: a modern OpenGL capable graphics card, such as GeForce or Radeon. At least 1GB.
HTML KVM Client (HKC):
4K video not recommended on HKC.
CPU: a modern and fast dual core CPU
8GB RAM
OpenGL capable graphic card
Package Contents
1 Dominion KX IV–101
1 locking power cord
1 HDMI cable
1 USB-B to USB-A cable
1 mounting bracket kit
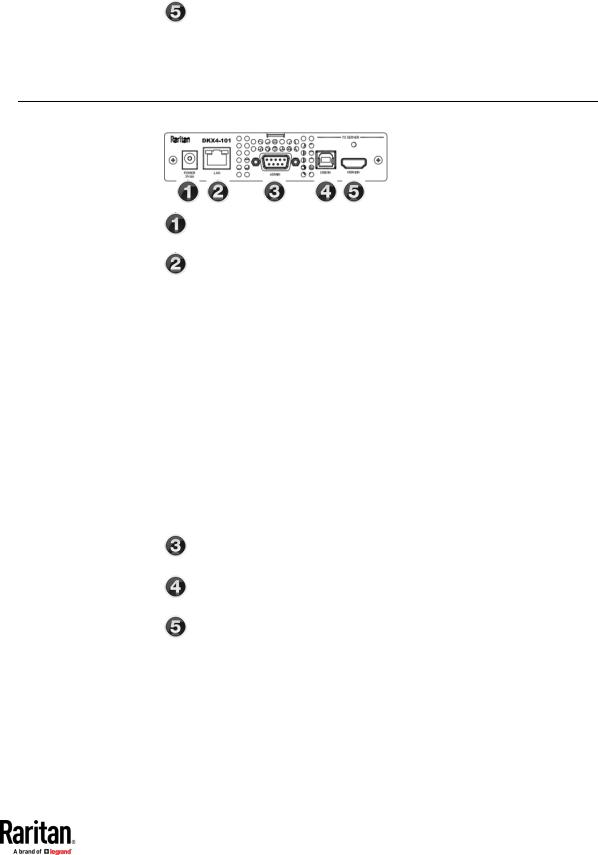
Front View
Local Port HDMI Out to local port monitor
Local Port USB K/M
Input/Output
Reset
2
Chapter 1: Installation and Initial Configuration
Power Status LED:
Green ON: Power on
Green BLINKING: Remote target connection
Rear View
Power 5V/4A from power adapter
RJ-45 LAN Network Port with 2 LEDs for network speed and activity:
Amber OFF/Green OFF: Link Inactive
Amber ON/Green OFF: 1000 MBps Link/No Activity
Amber BLINKING/Green OFF: 1000 MBps Link/Activity(RX, TX)
Amber OFF/Green ON: 100 MBps Link/No Activity
Amber OFF/Green BLINKING: 100 MBps Link/Activity(RX, TX)
Amber ON/Green ON: 10 MBps Link/No Activity
Amber BLINKING/Green BLINKING: 10 MBps Link/Activity(RX, TX)
Serial Admin Port
USB In from target server
HDMI In from target server
3
Chapter 1: Installation and Initial Configuration
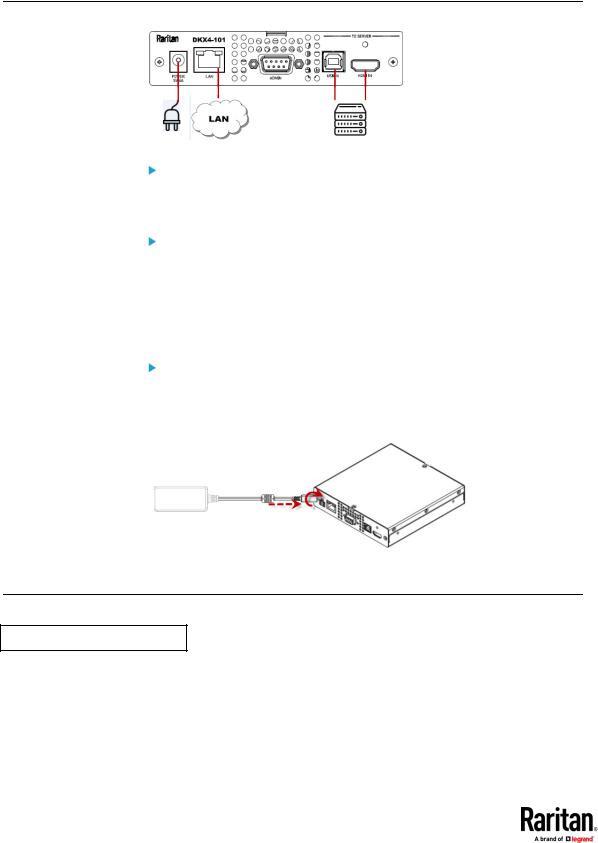
Connecting the Equipment
Connect the Dominion KX IV–101 to the network:
Connect the Dominion KX IV–101 to the network using the LAN port.
Connect your target server:
Connect the target server with an HDMI cable to the Dominion KX IV–101 HDMI IN port. If the target server video is not HDMI, purchase a Raritan cableor video-adapter.
Connect the target server to the Dominion KX IV–101 USB IN port using the included USB cable.
Connect the power adapter:
Connect the power adapter to the Dominion KX IV–101with the arrow facing up. Push in firmly and twist clockwise to lock. Check to ensure it is locked.
Power on all devices.
Initial Configuration
Default login: admin/raritan
4
Chapter 1: Installation and Initial Configuration
Option 1: Connect a PC to the LAN Port
Re-connect the Dominion KX IV–101 to the LAN after initial configuration.
•Disable the wireless interface of the PC.
•Connect a network cable between the PC and Dominion KX IV–101 LAN port.
•Open a browser. Enter the URL "https://kvm.local". The login page appears.
•Follow the prompts to change the default password.
Option 2: Connect an iOS device at the Local Port
Required App: Raritan KVM by Raritan: https://itunes.apple.com/us/app/raritan-kvm/id1455817539?mt=8
•Launch the Raritan KVM app on an iOS device.
•Connect the iOS device with the Raritan KVM app to the Dominion KX IV–101 USB port.
•Wait until the app detects the connected Dominion KX IV–101.
•Follow the prompts to change the default password.
Option 3: Serial configuration
5
Chapter 1: Installation and Initial Configuration
•Connect a DB9 serial cable or USB-Serial adapter between the PC and the Dominion KX IV–101 serial Admin port.
•Serial console configuration: (default) 115200bps/None/8bits/1stop
•To find the default DHCP IP address, use the "show" command to "show network".
•For help with all commands, see CLI Commands (on page 119).
Next Steps
•Configure network settings: See Network (on page 85)
•Configure time settings: See Date and Time (on page 78)
•Install certificates: See SSL Certificate (on page 105)
•Configure users: See User Management (on page 61)
•Configure port settings: Port Configuration: KVM Port Settings (on page 9)
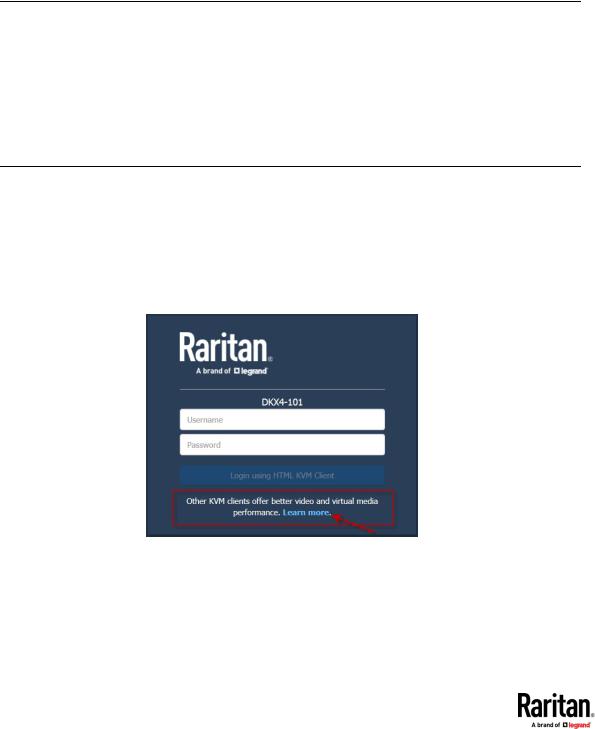
KVM Client Options
Dominion KX IV–101 offers a selection of KVM clients. Upon launching the Dominion KX IV–101 IP address in a supported browser, the login page appears.
The HTML KVM Client (HKC) is loaded by default.
•Click the Learn more link in the login page to view other KVM client options.
•The Learn more link launches a client options dialog. Click the provided links to launch a different client.
https://<IP address> launches HKC
https://<IP address>/akc launches AKC
6

Chapter 1: Installation and Initial Configuration
https://<IP address>/vkcs launches VKC
When a different client is selected, Dominion KX IV–101 automatically checks your system to make sure it meets the requirements of the client. If your system is ready, the selected client loads. If your system needs to meet additional requirements, another message displays with details.
Note: For AKC and VKCS, your browser may display a "This site is not secure" warning message until you have installed valid certificates. Click to accept the warnings and go to the site. See SSL Certificate (on page 105) for help installing certificates that prevent these warnings.
For more details and instructions for using all clients, see KVM Clients (on page 12).
7
Chapter 2 Port Access and Configuration
In This Chapter |
|
Port Access.................................................................................................... |
8 |
Port Configuration: KVM Port Settings........................................................ |
9 |
Port Configuration: USB Connection Settings........................................... |
10 |
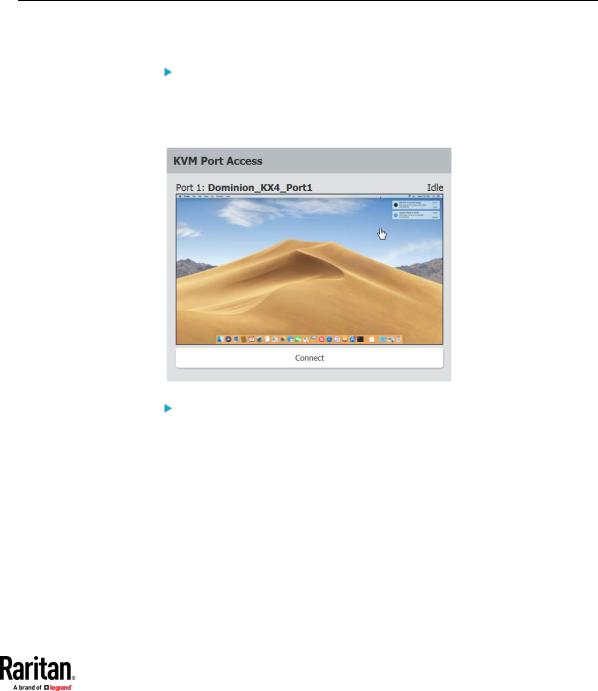
Port Access
Click Port Access to view the port preview and connect to the target.
Port Preview:
•The preview image refreshes every 5 seconds.
•Your ability to see the preview depends on your privileges. If you do not have sufficient privileges, a message displays with details.
Connect to the target:
•Click the Connect button to open a connection to the target server.
•For help with using the KVM clients, see KVM Clients (on page 12).
8
Chapter 2: Port Access and Configuration
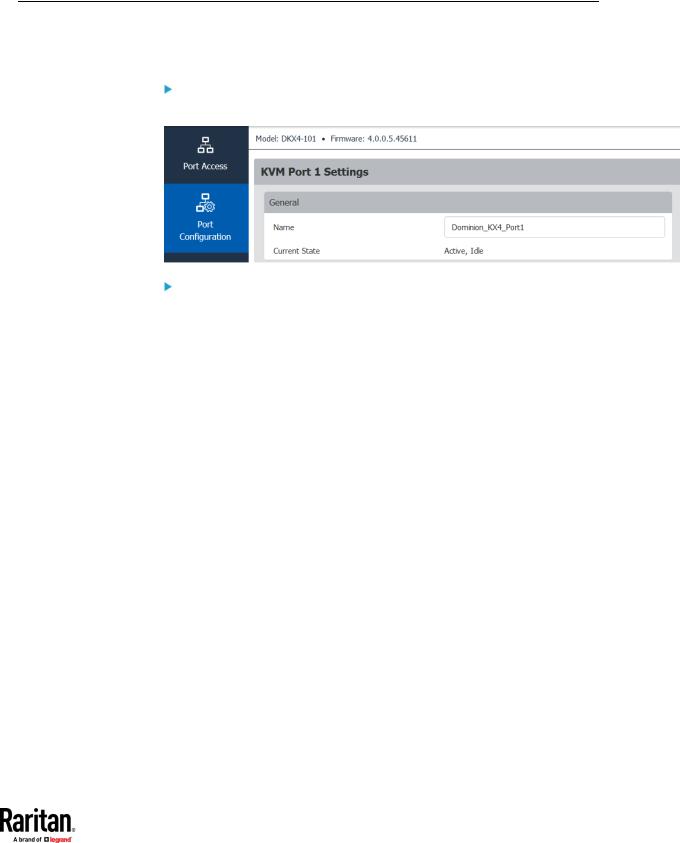
Port Configuration: KVM Port Settings
The Port Configuration page contains all port settings for the KVM port name and video resolution, as well as USB port settings.
To access all port configuration:
•Click Port Configuration.
KVM Port Settings:
General Settings:
•To rename the KVM port: enter a new name and click Save.
•View the Current Port Status:
Active, Idle
Active, Busy: Connected, but PC Share is disabled. See KVM Security (on page 100).
Active, Connected: Connected, and PC Share is enabled.
9

Chapter 2: Port Access and Configuration
Video Settings:
•Select Enable VGA Mode if the video input originates with a VGA or other analog source, through an HDMI adapter. In VGA mode, resolution is controlled on the video source device only.
•Select the Preferred Video Resolution: Important! The KX IV uses an “EDID” data structure to tell the target server what video resolution is wanted. To change the video resolution on the target server, change the Preferred Video Resolution to the new resolution. This should change the resolution when you connect to the target; if not, you can then also change the resolution on the target server.
•Set a longer Cycle Time if your target video is not responding properly to changes in preferred video resolution. Default is 200ms. A longer Cycle Time may allow your target to respond accurately to a new preferred video resolution.
•Click Save to apply the settings.
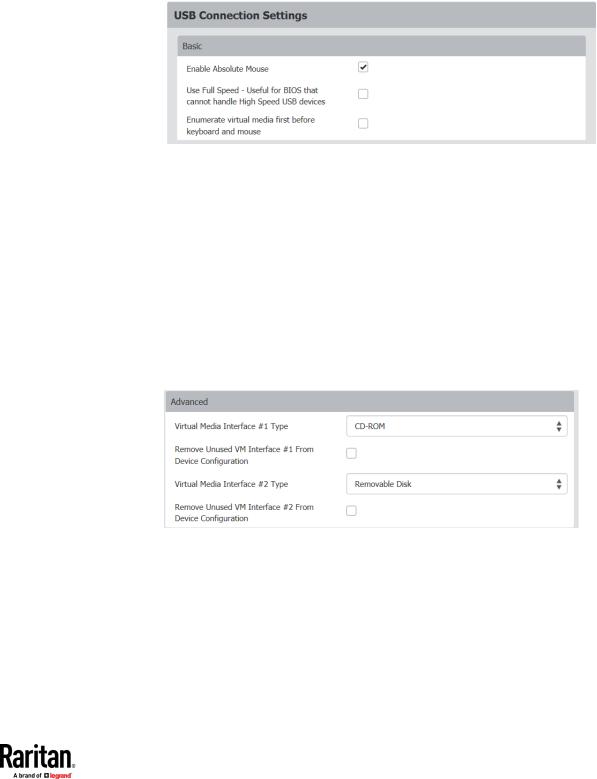
Port Configuration: USB Connection Settings
USB Connection Settings are disabled when the port is connected. All users must be disconnected from the KVM target to change the USB port settings.
To define USB connections for the target server:
•Click Port Configuration, then scroll down to USB Connection Settings.
•Select the USB connection settings you will be using:
Enable Absolute Mouse - Disable if the target does not support absolute mouse mode
Use Full Speed - Useful for BIOS that cannot accommodate High Speed USB devices. Clear the checkbox to allow negotiation to the target's highest USB speed capability.
10
Chapter 2: Port Access and Configuration
Enumerate virtual media first before keyboard and mouse: Useful to resolve issues when a target cannot detect USB mass storage at the BIOS.
•Click Save.
•Set Advanced Options as needed:
Virtual Media Interface Types: Both interfaces cannot be set to CDROM or Removable Disk.
Disabled
CDROM
Removable Disk
Auto - can function as either CDROM or Removable Drive but not both at the same time
Remove Unused VM Interface From Device Configuration: Select this option to remove the drive when VM is disconnected. Clear this option to allow empty drives.
•Click Save.
11

Chapter 3 KVM Clients
KVM Client |
Name |
Platforms |
Features |
|||
Active KVM Client |
AKC |
|
Windows |
|
Full-featured KVM Client |
|
|
|
|
Requires Microsoft .NET |
|
Java-Free |
|
|
|
|
|
|
|
|
Virtual KVM Client |
VKC |
|
Linux |
|
Full-featured KVM Client |
|
|
|
|
Mac |
|
Requires Java |
|
|
|
|
Windows |
|
|
|
|
|
|
|
|
||
HTML KVM Client |
HKC |
|
Linux |
Not all features are supported. |
||
|
|
|
Mac |
See HTML KVM Client (HKC) |
||
|
|
|
Windows |
|
Help for supported features. |
|
|
|
|
HTML and Javascript |
|
Java-Free |
|
|
|
|
|
|
|
|
•AKC is best for Windows Platforms, using Windows or Edge browsers.
•VKC is best for Linux and Mac users with Java.
•HKC is best for Linux and Mac users without Java.
In This Chapter |
|
Virtual KVM Client (VKCS) Help .................................................................. |
12 |
Active KVM Client (AKC) Help ..................................................................... |
37 |
HTML KVM Client (HKC).............................................................................. |
40 |
Virtual KVM Client (VKCS) Help |
|
To launch VKCS, enter https://<KX4-101 IP address>/vkcs in a browser. |
|
12
Chapter 3: KVM Clients
Java Requirements
•Java 1.8.0_191 or higher required
•If Java is not installed, a prompt is displayed that the file cannot be opened, with an option to search for the program.
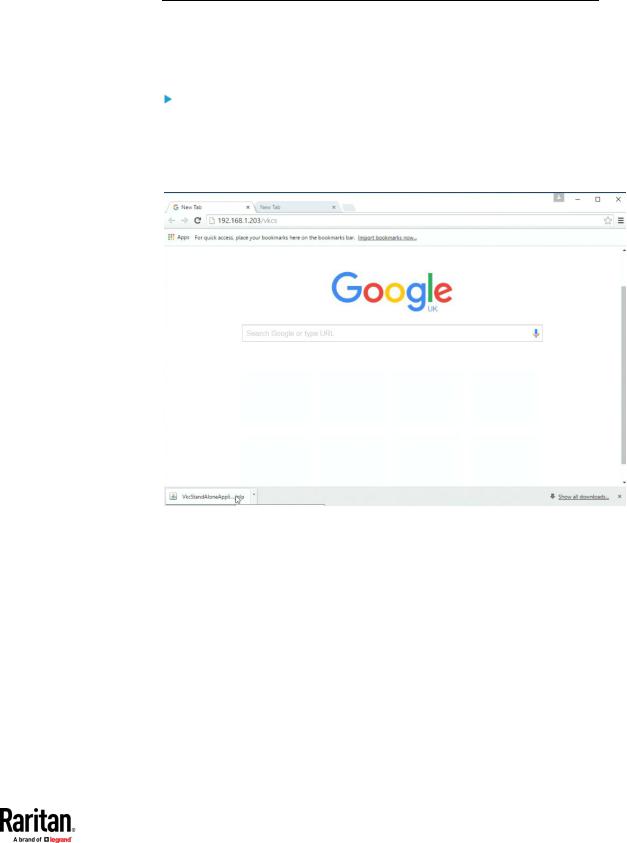
VKCS Launching:
For all browsers, the VKCS standalone application needs to be downloaded everytime you use it.
•Chrome: The downloaded VKCS jnlp file must always be clicked at bottom left corner of browser window to launch.
13
Chapter 3: KVM Clients
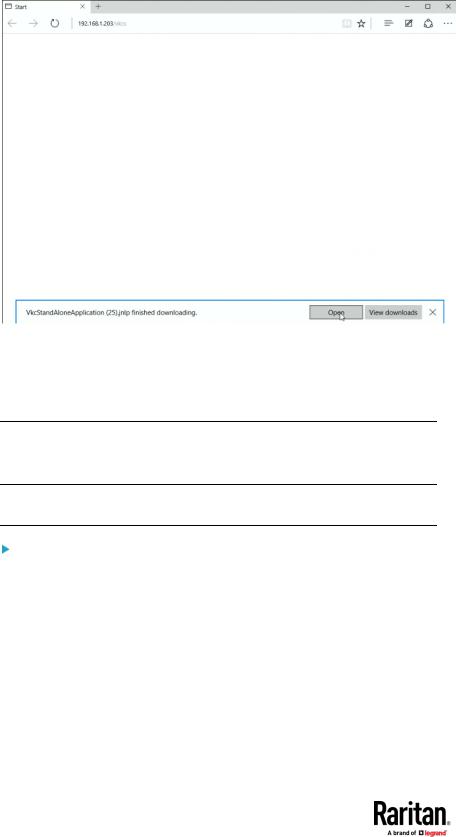
•Edge: You must click Open at the bottom of the browser to launch.
•Internet Explorer: Launches automatically.
•Firefox: Use the option "Do this automatically for files like this from now on", when the vkcs.jnlp file downloads, and it will launch automatically in future.
Proxy Server Configuration
When the use of a Proxy Server is required, a SOCKS proxy must also be provided and configured on the remote client PC.
Note: If the installed proxy server is only capable of the HTTP proxy protocol, you cannot connect.
To configure the SOCKS proxy:
1.On the remote client PC, select Control Panel > Internet Options.
a.On the Connections tab, click 'LAN settings'. The Local Area Network (LAN) Settings dialog opens.
b.Select 'Use a proxy server for your LAN'.
c.Click Advanced. The Proxy Settings dialog opens.
d.Configure the proxy servers for all protocols.
IMPORTANT: Do not select 'Use the same proxy server for all protocols'.
14
Chapter 3: KVM Clients
Note: The default port for a SOCKS proxy (1080) is different from HTTP proxy (3128).
e.Click OK at each dialog to apply the settings.
2.Next, configure the proxy settings for the Java™ applets:
a.Select Control Panel > Java.
b.On the General tab, click Network Settings. The Network Settings dialog opens.
c.Select "Use Proxy Server".
d.Click Advanced. The Advanced Network Settings dialog opens.
e.Configure the proxy servers for all protocols.
IMPORTANT: Do not select 'Use the same proxy server for all protocols'.
Note: The default port for a SOCKS proxy (1080) is different from HTTP proxy (3128).
Connection Properties
The Connection Properties dialog allows you to configure the video stream parameters to match your system capabilities with your performance needs.
Video Encoding
This section selects the video encoding algorithm and quality setting.
•Usage: specify your general application area. This selection optimizes the available choices elsewhere in this dialog.
General Purpose Video: video content where smooth color reproduction is most important, such as movies, video games, and animations.
15

Chapter 3: KVM Clients
Computer and IT Applications: video content where text sharpness and clarity are important, such as computer graphical interfaces.
•Encoder Mode: Choose the encoder mode from the row of eight buttons. Options will vary depending on the Usage selection. In general, modes towards the left of the button bar offer higher image quality but consume higher bandwidth, and might cause frame rate to drop depending on network speed and/or client performance. Modes towards the right consume lower bandwidth at the cost of reduced image quality. In networkor client-constrained situations, modes towards the right may achieve better frame rates.
The default video mode is always "Full Color 2", which is a high-quality mode and works well for most uses in LAN environments. If needed, experiment with modes further towards the right to find the right balance of image quality and frame rate.
Color Subsampling
Color subsampling reduces the color information in the encoded video stream.
•Automatic: Recommended. The optimal color subsampling mode will be enabled based on the selections in the video encoding section.
•4:4:4: Highest quality at significant bandwidth cost. Usually not necessary except for some situations in graphical user interfaces. Not supported for resolutions above 1920x1200, so for those resolutions color subsampling will automatically drop down to 4:2:2.
•4:2:2: Good blend of image quality and bandwidth.
•4:2:0: Maximum savings of network bandwidth and client load. Works fine for most general-purpose applications that don't emphasize high-resolution lines or text.
Current Status
Current status includes real-time video performance statistics. As you change settings in the dialog, you can immediately see the effects on performance.
•Source: resolution and frame rate of the incoming video source.
•Performance: frames per second (FPS) being rendered in the client, and the data rate of the incoming video stream. These values are where you will see the effects of your video settings.
•Encryption: whether the video stream is encrypted or not. Encrypted streams usually have lower frame rates and lower bandwidth. Encryption is a global setting in security → KVM Security → "Apply Encryption Mode to KVM and Virtual Media".
16
Chapter 3: KVM Clients
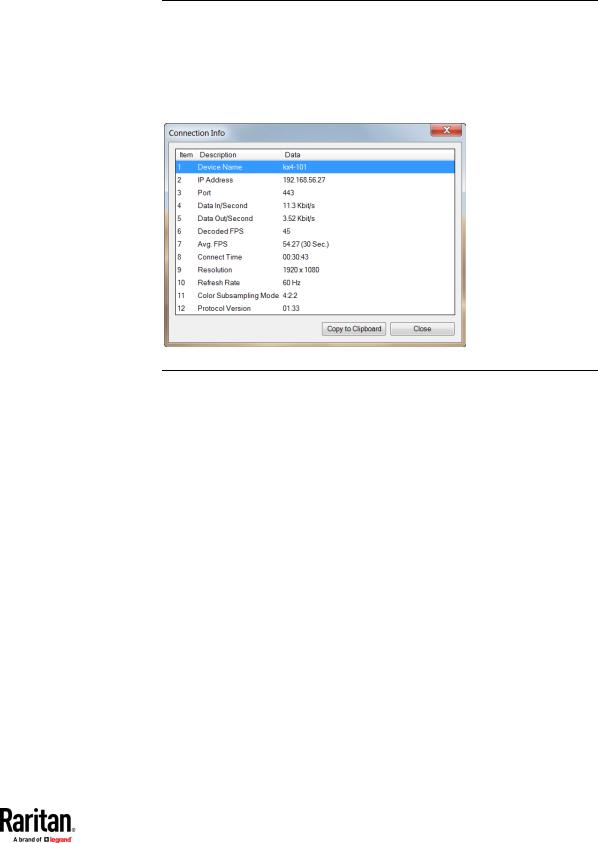
Connection Info
Open the Connection Information dialog for real-time connection information on your current connection, and copy the information from the dialog as needed. To edit the connection properties, see Connection Properties (on page 15).
•To view the Connection Info, choose Connection > Info...
Keyboard
Send Ctrl+Alt+Del Macro
Due to its frequent use, a Ctrl+Alt+Delete macro is preprogrammed. Selecting Keyboard > Send Ctrl+Alt+Del, or clicking on the
Ctrl+Alt+Delete button  in the toolbar sends this key sequence to the server or to the KVM switch to which you are currently connected.
In contrast, if you were to physically press the Ctrl+Alt+Del keys, the command would first be intercepted by your own PC due to the structure of the Windows operating system, instead of sending the key sequence to the target server as intended.
Send LeftAlt+Tab (Switch Between Open Windows on a Target Server)
Select Keyboard > Send LeftAlt + Tab to switch between open windows on the target server.
17

Chapter 3: KVM Clients
Send Text to Target
To use the Send Text to Target function for the macro:
1.Click the Keyboard > Send Text to Target. The Send Text to Target dialog appears.
2.Enter the text you want sent to the target.
Note: Non-English characters are not supported by the Send Text to Target function.
3.If the target uses a US/International keyboard layout, select the "Target system is set to the US/International keyboard layout" checkbox.
4.Click OK.
Keyboard Macros
Keyboard macros ensure that keystroke combinations intended for the target server are sent to and interpreted only by the target server. Otherwise, they might be interpreted by your client PC.
Macros are stored on the client PC and are PC-specific. If you use another PC, you cannot see your macros.
In addition, if another person uses your PC and logs in under a different name, that user will see your macros since they are computer-wide.
Build a New Macro
To build a macro:
1.Click Keyboard > Keyboard Macros. The Keyboard Macros dialog appears.
2.Click Add. The Add Keyboard Macro dialog appears.
3.Type a name for the macro in the Keyboard Macro Name field. This name appears in the Keyboard menu after it is created.
4.From the Hot-Key Combination field, select a keyboard combination from the drop-down list. This allows you to execute the macro with a predefined keystroke. Optional
5.In the Keys to Press drop-down list, select each key you would like to use to emulate the keystrokes that is used to perform the command. Select the keys in the order by which they are to be pressed. After each selection, select Add Key. As each key is selected, it appears in the Macro Sequence field and a Release Key command is automatically added after each selection.
18

Chapter 3: KVM Clients
For example, create a macro to close a window by selecting Left Ctrl + Esc. This appears in the Macro Sequence box as follows:
Press Left Alt Press F4
Esc Release F4 Esc
Release Left Alt
6.Review the Macro Sequence field to be sure the macro sequence is defined correctly.
a.To remove a step in the sequence, select it and click Remove.
b.To change the order of steps in the sequence, click the step and then click the up or down arrow buttons to reorder them as needed.
7.Click OK to save the macro. Click Clear to clear all field and start over. When you click OK, the Keyboard Macros dialog appears and lists the new keyboard macro.
8.Click Close to close the Keyboard Macros dialog. The macro now appears on the Keyboard menu in the application.
9.Select the new macro on the menu to run it or use the keystrokes you assigned to the macro.
Importing and Exporting Macros
Macros created in VKC cannot be used in AKC or vice versa. Macros created on HKC are only compatible with HKC, and cannot be used on AKC or VKC. Likewise, macros created on VKC or AKC cannot be used on HKC.
Import Macros
To import macros:
1.Choose Keyboard > Import Keyboard Macros to open the Import Macros dialog. Browse to the folder location of the macro file.
2.Click on the macro file and click Open to import the macro.
a.If too many macros are found in the file, an error message is displayed and the import terminates once OK is selected.
b.If the import fails, an error dialog appears and a message regarding why the import failed is displayed. Select OK to continue the import without importing the macros that cannot be imported.
19
Chapter 3: KVM Clients
3.Select the macros to be imported by checking their corresponding checkbox or using the Select All or Deselect All options.
4.Click OK to begin the import.
a.If a duplicate macro is found, the Import Macros dialog appears. Do one of the following:
Click Yes to replace the existing macro with the imported version.
Click Yes to All to replace the currently selected and any other duplicate macros that are found.
Click No to keep the original macro and proceed to the next macro
Click No to All keep the original macro and proceed to the next macro. Any other duplicates that are found are skipped as well.
Click Cancel to stop the import.
Alternatively, click Rename to rename the macro and import it. If Rename is selected, the Rename Macro dialog appears. Enter a new name for the macro in the field and click OK.
The dialog closes and the process proceeds. If the name that is entered is a duplicate of a macro, an alert appears and you are required to enter another name for the macro.
b.If during the import process the number of allowed, imported macros is exceeded, a dialog appears. Click OK to attempt to continue importing macros or click Cancel to stop the import process.
The macros are then imported. If a macro is imported that contains a hot key that already exists, the hot key for the imported macro is discarded.
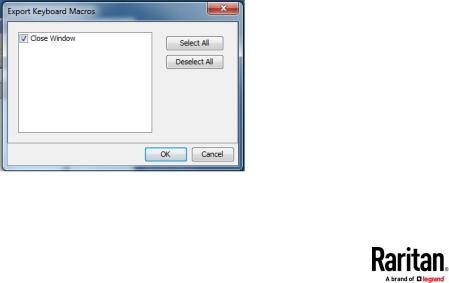
Export Macros
1.Choose Tools > Export Macros to open the Select Keyboard Macros to Export dialog.
20

Chapter 3: KVM Clients
2.Select the macros to be exported by checking their corresponding checkbox or using the Select All or Deselect All options.
3.Click Ok. An "Export Keyboard Macros to" dialog is displayed. Locate and select the macro file. By default, the macro exists on your desktop.
4.Select the folder to save the macro file to, enter a name for the file and click Save. If the macro already exists, you receive an alert message.
5.Select Yes to overwrite the existing macro or No to close the alert without overwriting the macro.
Video Properties
Refreshing the Screen
The Refresh Screen command forces a refresh of the video screen
•Choose Video > Refresh Screen, or click the Refresh Screen button
 in the toolbar.
Screenshot from Target Command (Target Screenshot)
Take a screenshot of a target server using the Screenshot from Target server command. If needed, save this screenshot to a file location of your choosing as a bitmap, JPEG or PNG file.
To take a screenshot of the target server:
1.Select Video > Screenshot from Target, or click the Target Screenshot button  on the toolbar.
2.In the Save dialog, choose the location to save the file, name the file, and select a file format from the 'Files of type' drop-down.
3.Click Save to save the screenshot.
21

Chapter 3: KVM Clients
Mouse Options
You can operate in either single mouse mode or dual mouse mode.
When in a dual mouse mode, and provided the option is properly configured, the mouse cursors align.
When controlling a target server, the Remote Console displays two mouse cursors - one belonging to your Dominion KX IV–101 client workstation, and the other belonging to the target server.
When there are two mouse cursors, the device offers several mouse modes:
•Absolute (Mouse Synchronization)
•Intelligent (Mouse Mode)
•Standard (Mouse Mode)
When the mouse pointer lies within the KVM Client target server window, mouse movements and clicks are directly transmitted to the connected target server.
While in motion, the client mouse pointer slightly leads the target mouse pointer due to mouse acceleration settings.
Single mouse mode allows you to view only the target server's pointer. You can use Single mouse mode when other modes don't work.
You can toggle between these two modes (single mouse and dual mouse).
Dual Mouse Modes
Absolute Mouse Synchronization
In this mode, absolute coordinates are used to keep the client and target cursors in synch, even when the target mouse is set to a different acceleration or speed.
This is the default mouse mode.
To enter Absolute Mouse Synchronization:
•Choose Mouse > Absolute from the KVM client.
Intelligent Mouse Mode
In Intelligent Mouse mode, the device can detect the target mouse settings and synchronize the mouse cursors accordingly, allowing mouse acceleration on the target. Use intelligent mouse mode if absolute mouse mode is not supported on the target.
22

Chapter 3: KVM Clients
Enter Intelligent Mouse Mode
To enter intelligent mouse mode:
•Choose Mouse > Intelligent.
Intelligent Mouse Synchronization Conditions
The Intelligent Mouse Synchronization command, available on the Mouse menu, automatically synchronizes mouse cursors during moments of inactivity. For this to work properly, however, the following conditions must be met:
•The active desktop should be disabled on the target.
•No windows should appear in the top left corner of the target page.
•There should not be an animated background in the top left corner of the target page.
•The target mouse cursor shape should be normal and not animated.
•The target mouse speeds should not be set to very slow or very high values.
•The target advanced mouse properties such as “Enhanced pointer precision" or “Snap mouse to default button in dialogs” should be disabled.
•The edges of the target video should be clearly visible (that is, a black border should be visible between the target desktop and the remote KVM console window when you scroll to an edge of the target video image).
•When using the intelligent mouse synchronization function, having a file icon or folder icon located in the upper left corner of your desktop may cause the function not to work properly. To be sure to avoid any problems with this function, do not have file icons or folder icons in the upper left corner of your desktop.
After autosensing the target video, manually initiate mouse synchronization by clicking the Synchronize Mouse button on the toolbar. This also applies when the resolution of the target changes if the mouse cursors start to desync from each other.
If intelligent mouse synchronization fails, this mode will revert to standard mouse synchronization behavior.
Please note that mouse configurations will vary on different target operating systems. Consult your OS guidelines for further details. Also note that intelligent mouse synchronization does not work with UNIX targets.
23

Chapter 3: KVM Clients
Standard Mouse Mode
Standard Mouse mode uses a standard mouse synchronization algorithm. The algorithm determines relative mouse positions on the client and target server.
In order for the client and target mouse cursors to stay in synch, mouse acceleration must be disabled. Additionally, specific mouse parameters must be set correctly.
To enter Standard Mouse mode:
•Choose Mouse > Standard.
Mouse Synchronization Tips
If you have an issue with mouse synchronization:
1.Verify that the selected video resolution and refresh rate are among those supported by the device. The KVM Client Connection Info dialog displays the actual values that the device is seeing.
2.If that does not improve the mouse synchronization (for Linux, UNIX, and Solaris KVM target servers):
3.Open a terminal window.
4.Enter the following command: xset mouse 1 1
5.Close the terminal window.
6.Click the "KVM Client mouse synchronization" button.
Synchronize Your Mouse
In dual mouse mode, the Synchronize Mouse command forces realignment of the target server mouse cursor with the client mouse cursor.
To synchronize the mouse cursors, do one of the following:
•Click the Synchronize Mouse button  in the KVM client toolbar, or select Mouse > Synchronize Mouse from the menu bar.
Note: This option is available only in Standard and Intelligent mouse modes.
24
Loading...