

Raritan MCIP18, MCIP116, MasterConsole IP MCIP18, MasterConsole IP MCIP116 User Manual
MasterConsole IP
MCIP18, MCIP116
User Guide
Copyright © 2007 Raritan Computer, Inc.
MCIP-0D-E
November 2007
255-18-0020

This page intentionally left blank.

Copyright and Trademark Information
This document contains proprietary information that is protected by copyright. All rights reserved.
No part of this document may be photocopied, reproduced, or translated into another language
without express prior written consent of Raritan Computer, Inc.
© Copyright 2007 Product names mentioned in this document are trademarks or registered
trademarks of their respective companies. MasterConsole, and its respective logos are registered
trademarks of Raritan Computer, Inc. PS/2, RS/6000, and PC/AT are registered trademarks of the
International Business Machines Corporation. Mac is a registered trademark of Apple Computer,
Inc. Sun is a registered trademark of Sun Microsystems. Alpha is a registered trademark of
Digital Equipment Corporation. HP9000 is a registered trademark of Hewlett Packard. SGI is a
registered trademark of Silicon Graphics, Inc. All other marks are the property of their respective
owners.
FCC Information
This equipment has been tested and found to comply with the limits for a Class A digital device,
pursuant to Part 15 of the FCC Rules. These limits are designed to provide reasonable protection
against harmful interference in a commercial installation. This equipment generates, uses, and can
radiate radio frequency energy and if not installed and used in accordance with the instructions,
may cause harmful interference to radio communications. Operation of this equipment in a
residential environment may cause harmful interference.
Japanese Approvals
Raritan is not responsible for damage to this product resulting from accident, disaster, misuse,
abuse, non-Raritan modification of the product, or other events outside of Raritan’s reasonable
control or not arising under normal operating conditions.
U
C
LI STED
For assistance in the North or South America, please contact the Raritan Technical Support Team
by telephone (732) 764-8886, by fax (732) 764-8887, or by e-mail tech@raritan.com
Ask for Technical Support – Monday through Friday, 8:00am to 8:00pm, Eastern.
1F61
US
L
I.T.E.
For assistance around the world, please see the last page of this guide for
regional Raritan office contact information.

Safety Guidelines
To avoid potentially fatal shock hazard and possible damage to Raritan equipment:
• Do not use a 2-wire power cord in any product configuration.
• Test AC outlets at your computer and monitor for proper polarity and grounding.
• Use only with grounded outlets at both the computer and monitor. When using a backup UPS,
power the computer, monitor and appliance off the supply.
Rack Mount Safety Guidelines
In Raritan products which require Rack Mounting, please follow these precautions:
• Operation temperature in a closed rack environment may be greater than room temperature.
Do not exceed the rated maximum ambient temperature of the appliances (see Appendix A:
Specifications).
• Ensure sufficient airflow through the rack environment.
• Mount equipment in the rack carefully to avoid uneven mechanical loading.
• Connect equipment to the supply circuit carefully to avoid overloading circuits.
• Ground all equipment properly, especially supply connections, such as power strips (other
than direct connections), to the branch circuit.

CONTENTS i
Contents
Chapter 1: Introduction .................................................................. 1
MasterConsole IP Overview........................................................................................1
Product Photo .............................................................................................................1
Product Features.........................................................................................................1
Chapter 2: Installation.................................................................... 3
Getting Started............................................................................................................3
Quick-Start Operation .................................................................................................3
Configuration...............................................................................................................3
Installation...................................................................................................................4
Chapter 3: Operation...................................................................... 5
Assigning Names and Scan Rates..............................................................................6
Using MasterConsole IP Security Feature..................................................................7
Passwords...........................................................................................................................7
Turning Security ON / OFF and Changing Passwords .......................................................7
Using the On-Screen User Interface (OSUI)...............................................................8
Selecting a Computer..........................................................................................................8
Activating AutoScan ............................................................................................................9
Assigning Names and Scan Rates............................................................................10
MasterConsole IP Operation.....................................................................................11
Selecting a Computer........................................................................................................11
Chapter 4: Remote Management and Operation.......................... 13
Initial Configuration ...................................................................................................13
Initial Configuration via DHCP Server...............................................................................13
Initial Configuration via Serial Interface.............................................................................13
Logging In
Navigation..........................................................................................................................15
The Remote Console.........................................................................................................16
.................................................................................................................14
Remote Management Settings..................................................................................22
Remote Control .................................................................................................................22
User Management.............................................................................................................24
KVM Settings.....................................................................................................................29
Device Settings..................................................................................................................34
Maintenance......................................................................................................................46
Appendix A: Specifications .......................................................... 51
Main Unit...................................................................................................................51
Model.................................................................................................................................51
Appendix B: System Default Settings.......................................... 53
Appendix C: On-Screen User Interface Function Keys................ 55
Appendix D: MCIP Configurations ................................................ 57
Programming MCIP at Power Up.............................................................................. 57
Appendix E: Glossary and Acronyms ........................................... 59
Glossary....................................................................................................................59
Acronyms ..................................................................................................................61
Appendix F: Troubleshooting ....................................................... 63
Initial IP Configuration .......................................................................................................65
Web interface ....................................................................................................................65
The Remote Console.........................................................................................................66

ii CONTENTS
Appendix G: MCIP Video Modes................................................... 67
Appendix H: FAQs......................................................................... 69

FIGURES iii
Figures
Figure 1 MCIP 116 Unit ...............................................................................................................................1
Figure 2 One-Tier Configuration ..................................................................................................................3
Figure 3 MCIP Rear Panel........................................................................................................................... 4
Figure 4 MCIP Front Panel Channel Lights .................................................................................................4
Figure 5 Configuration Menu........................................................................................................................5
Figure 6 Edit Names and Scan Rate Menu (One-Tier) ................................................................................ 6
Figure 7 Administration Menu...................................................................................................................... 7
Figure 8 Selection Menu (One-Tier, sorted by Channel ID)......................................................................... 8
Figure 9 Edit Names and Scan Rate Menu (Base MasterConsole IP)....................................................... 10
Figure 10 Selection Menu..........................................................................................................................11
Figure 11 MCIP Home Page...................................................................................................................... 15
Figure 12 Remote Console Screen............................................................................................................ 16
Figure 13 Remote Console Control Bar..................................................................................................... 17
Figure 14 Options Menu ............................................................................................................................18
Figure 15 Video Settings Panel..................................................................................................................19
Figure 16 Soft Keyboard Mapping Menu ...................................................................................................20
Figure 17 Remote Console Confirmation Dialog........................................................................................ 20
Figure 18 Remote Console Status Bar ......................................................................................................21
Figure 19 KVM Console Screen................................................................................................................. 22
Figure 20 Telnet Console Screen ..............................................................................................................23
Figure 21 Change Password Screen .........................................................................................................24
Figure 22 Users & Groups Screen.............................................................................................................24
Figure 23 Group Management Screen.......................................................................................................26
Figure 24 User/Groups Permission Screen................................................................................................27
Figure 25 Port Permissions Screen ...........................................................................................................28
Figure 26 User Console Screen.................................................................................................................29
Figure 27 Keyboard/Mouse Settings Screen.............................................................................................. 31
Figure 28Video Settings Screen ................................................................................................................32
Figure 29 KVM Port Settings Screen......................................................................................................... 33
Figure 30 Network Settings Screen ...........................................................................................................34
Figure 31 Dynamic DNS Settings Screen..................................................................................................35
Figure 32 Security Settings Screen............................................................................................................ 36
Figure 33 Certificate Settings Screen ........................................................................................................38
Figure 34 SSL Certificate Signing Request Screen ...................................................................................39
Figure 35 Serial Port Settings Screen........................................................................................................40
Figure 36 Date/Time Settings Screen........................................................................................................41
Figure 37 Authentication Settings .............................................................................................................. 42
Figure 38 Event Log Screen ......................................................................................................................44
Figure 39 Device Information Screen......................................................................................................... 46
Figure 40 Connected Users Screen........................................................................................................... 46
Figure 41 Event Log Screen ......................................................................................................................47
Figure 42 Update Firmware Screen...........................................................................................................47
Figure 43 Unit Reset Screen ...................................................................................................................... 49
Figure 44 Unit Reset Confirmation Screen ................................................................................................49

iv
This page is intentionally left blank.
CHAPTER 1: INTRODUCTION 1
Chapter 1: Introduction
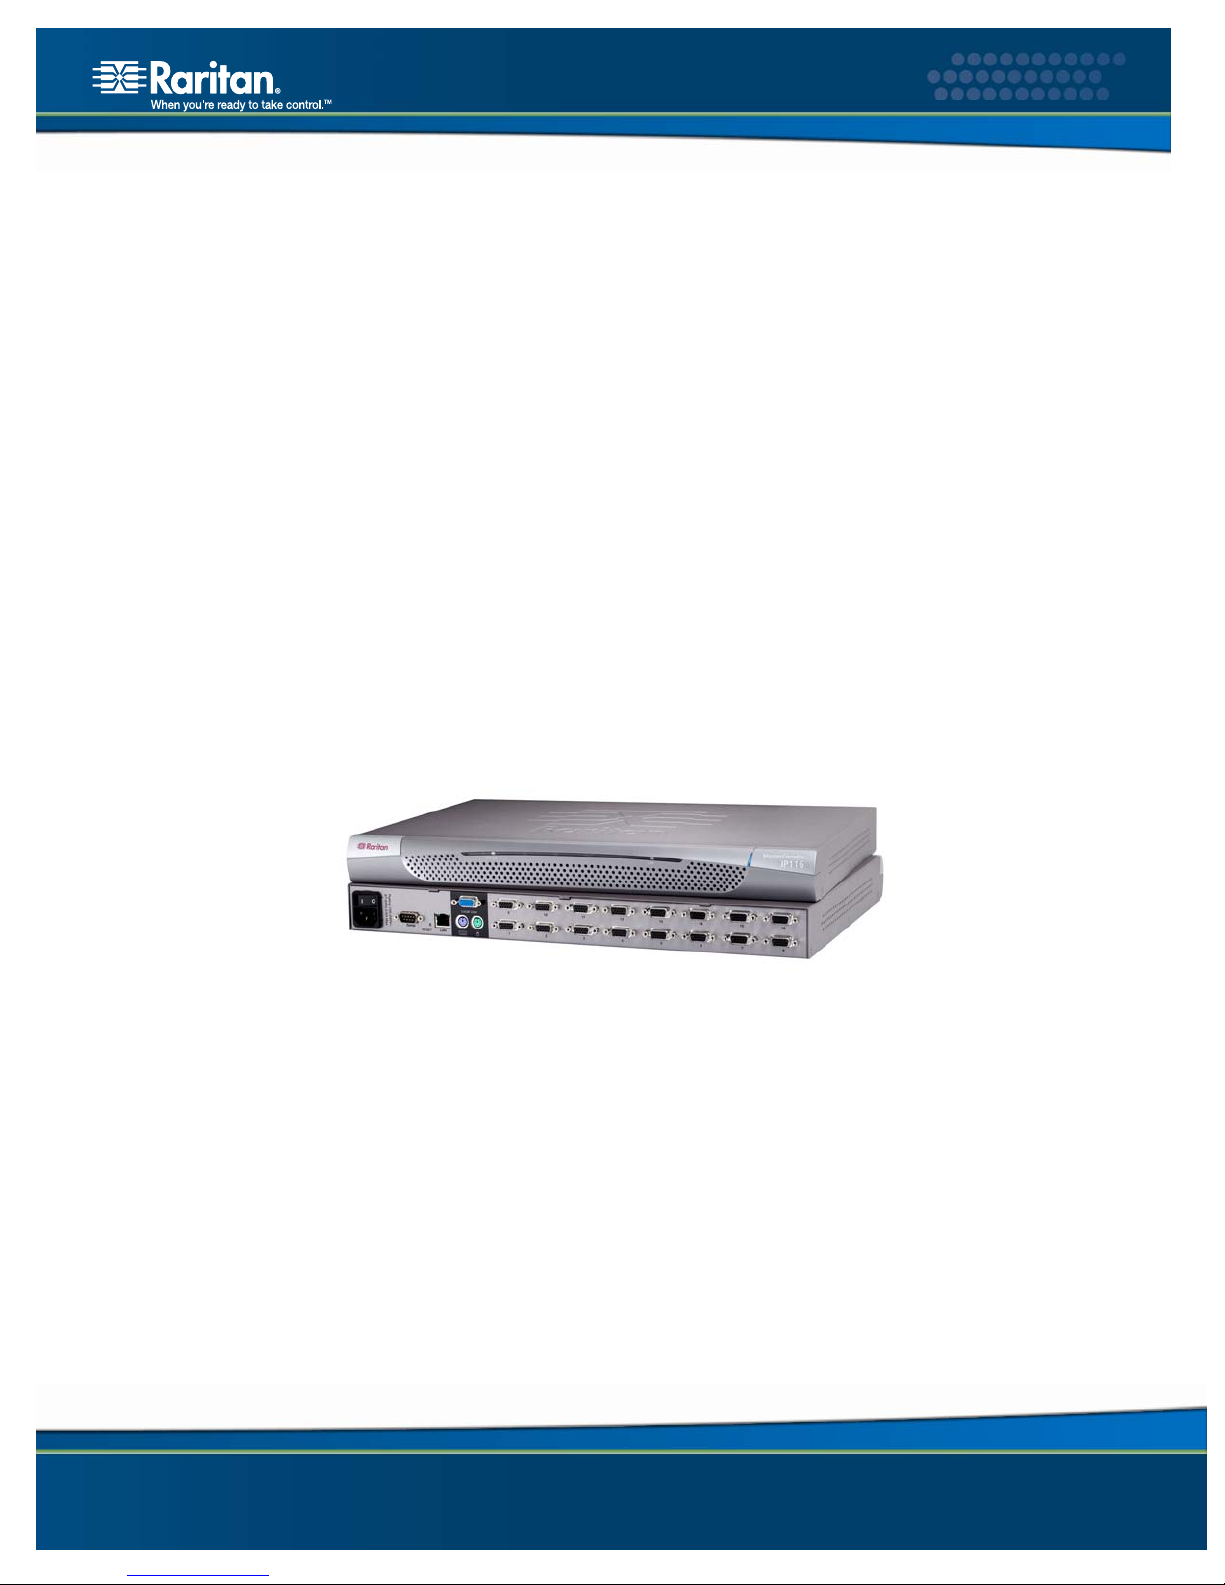
MasterConsole IP Overview
Raritan's keyboard/video/mouse (KVM) switches are engineered to provide reliable, costeffective, central control of multiple computers. This eliminates the cost and clutter of
unnecessary equipment, reclaims space, and improves productivity for a host of applications.
MasterConsole IP (MCIP) enables control of 8 to 16 computers from a single keyboard, monitor,
and mouse. The MasterConsole IP user interface provides simple on-screen control and system
management. Raritan's unique emulation technology dedicates a keyboard/mouse emulator for
each computer to ensure that each computer always 'sees' its own keyboard and mouse. This
means smooth, flawless switching and operation, even when computers are running the most
demanding operating systems.
MCIP defines a new class of remote KVM access devices. It combines an 8-port or 16-port KVM
switch with digital remote KVM access via IP networks and comprehensive system management.
Remote access and control software runs on the MCIP embedded processors only but not on
mission-critical servers, so that there is no interference with server operation.
MCIP offers convenient, remote KVM access and control via LAN or Internet. It captures,
digitizes, and compresses video and transmits it with keyboard and mouse signals to and from a
remote computer. MCIP provides a non-intrusive solution for remote access and control.
Product Photo
Figure 1 MCIP 116 Unit
Product Features
• MCIP Models available in 8-port and 16-port models
• KVM (keyboard, video, mouse) remote access over IP
• “Keep-alive” emulation ensures non-stop computer operation in the event of power loss to
the switch
• High-resolution video – 1600 x 1200 (Remote is not recommended)
• Tangle-proof, double-shielded coaxial cable in lengths from 2 to 30 feet
• On-screen user interface for simple control and system management
• Provision to mix any brand PCs, Macs USB, & Sun USB. Note: SUN & MAC can be
supported by connecting APSUSB
• Name assignment availability for quick identification and selection
• Operation from hot-keys with on-screen menus
• AutoScan function to view other computers at variable rates
• AutoSkip function provided to bypass inactive channels
• Password Security to ensure authorized access to computers

2 MASTERCONSOLE IP USER GUIDE
CHAPTER 2: INSTALLATION 3
Chapter 2: Installation
Getting Started
MasterConsole IP is designed for quick, easy installation and operation:
1. Physically configure MCIP.
2. Install MCIP and connect computers.
3. Configure MCIP software.
4. Assign computer names and set channel-specific scan rates for attached computers.
5. Turn ON security and change passwords to restrict access to computers connected to MCIP.
6. Operate using On-Screen User Interface.
7. Install optional Cat5 Reach for remote console or satellite unit.
Quick-Start Operation
After you connect computers to the MCIP unit, explore operation with the default names and
parameters.
You may operate using the On-Screen User Interface (OSUI). To activate the OSUI, press the
Left Ctrl key on your keyboard three times rapidly. The Selection Menu appears. Use the Ç (up
arrow) and È (down arrow) keys to highlight the desired channel (computer) and press the Enter
key OR press the computer's Key number, listed in the left-hand column on your screen. To select
another computer, re-activate the OSUI and reselect.
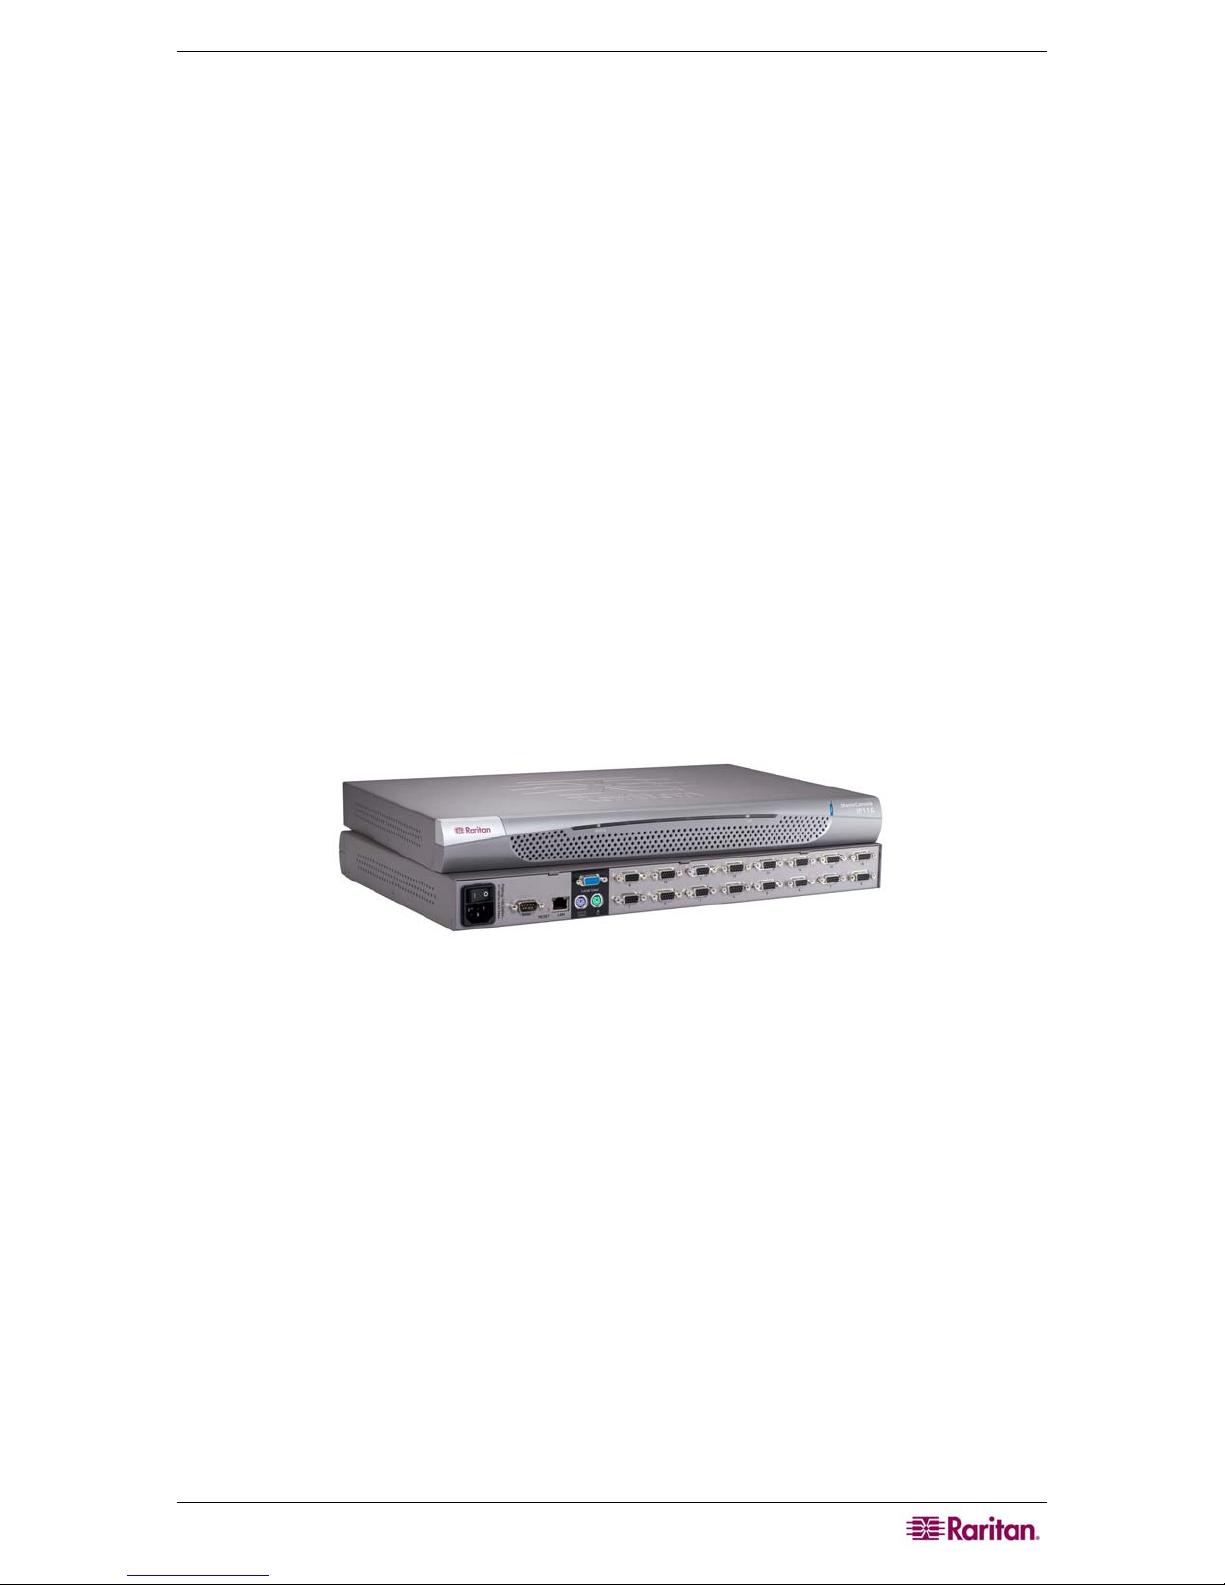
Configuration
MCIP can be configured only in a single configuration, and only computers can be connected to a
single MasterConsole IP unit. Configure up 8 computers using an MCIP18 model, and up to 16
computers using an MCIP116 model.
Figure 2 One-Tier Configuration
4 MASTERCONSOLE IP USER GUIDE
Installation
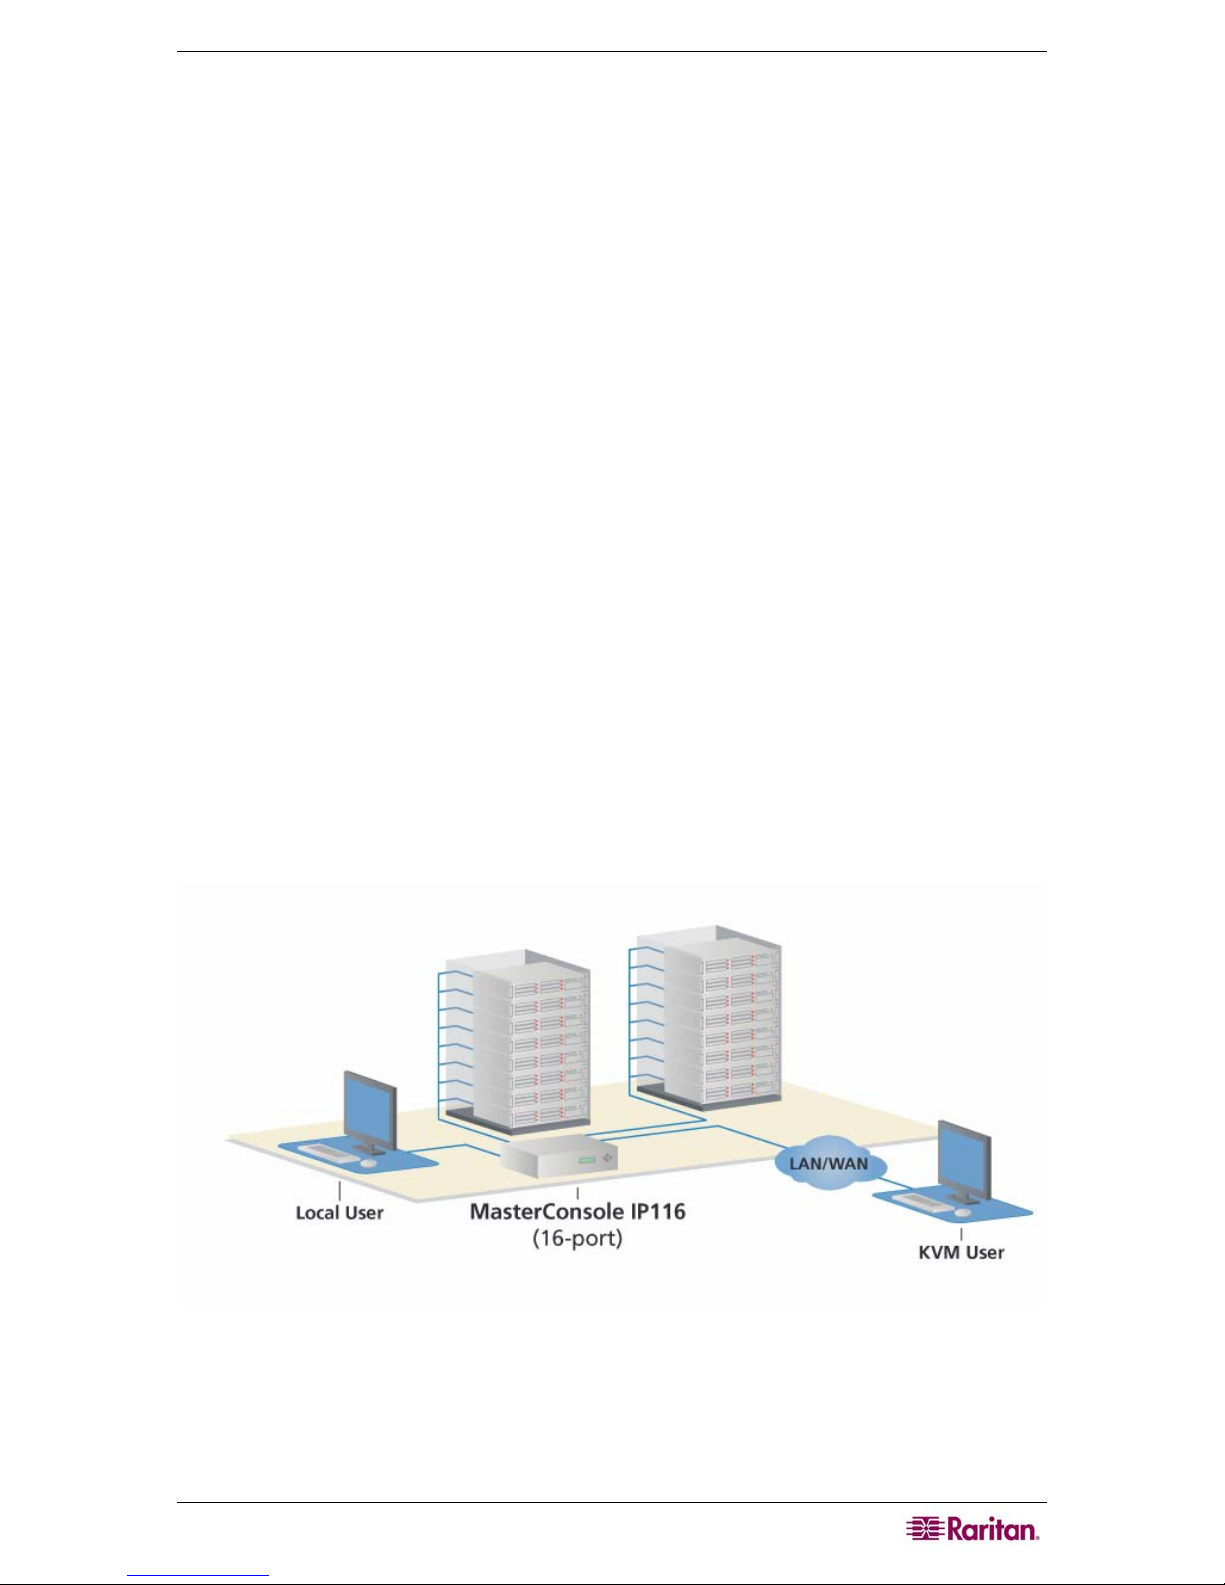
1. Power OFF all computers to be connected to MCIP.
2. Plug a keyboard, monitor, and mouse into the keyboard, monitor, and mouse ports on the rear
panel of the MCIP.
Figure 3 MCIP Rear Panel
3. Power ON MCIP.
4. Using an MCIP cable (CMCIP20, 40, or 90), plug the 15-pin connector into one of the
numbered channels on the MCIP rear panel.
5. Plug the cable's other connectors into the computer's keyboard, monitor, and mouse ports.
6. Power ON the connected computer.
7. Select the connected computer using the On-Screen User Interface (please see Chapter 3:
Operations for instructions). Verify that the monitor attached to MCIP displays the video for
the connected computer. Use the keyboard and mouse attached to MCIP to verify that they
operate the connected computer.
Figure 4 MCIP Front Panel Channel Lights
8. Repeat steps 4 through 7 to connect the remaining computers.
CHAPTER 3: OPERATION 5
Chapter 3: Operation
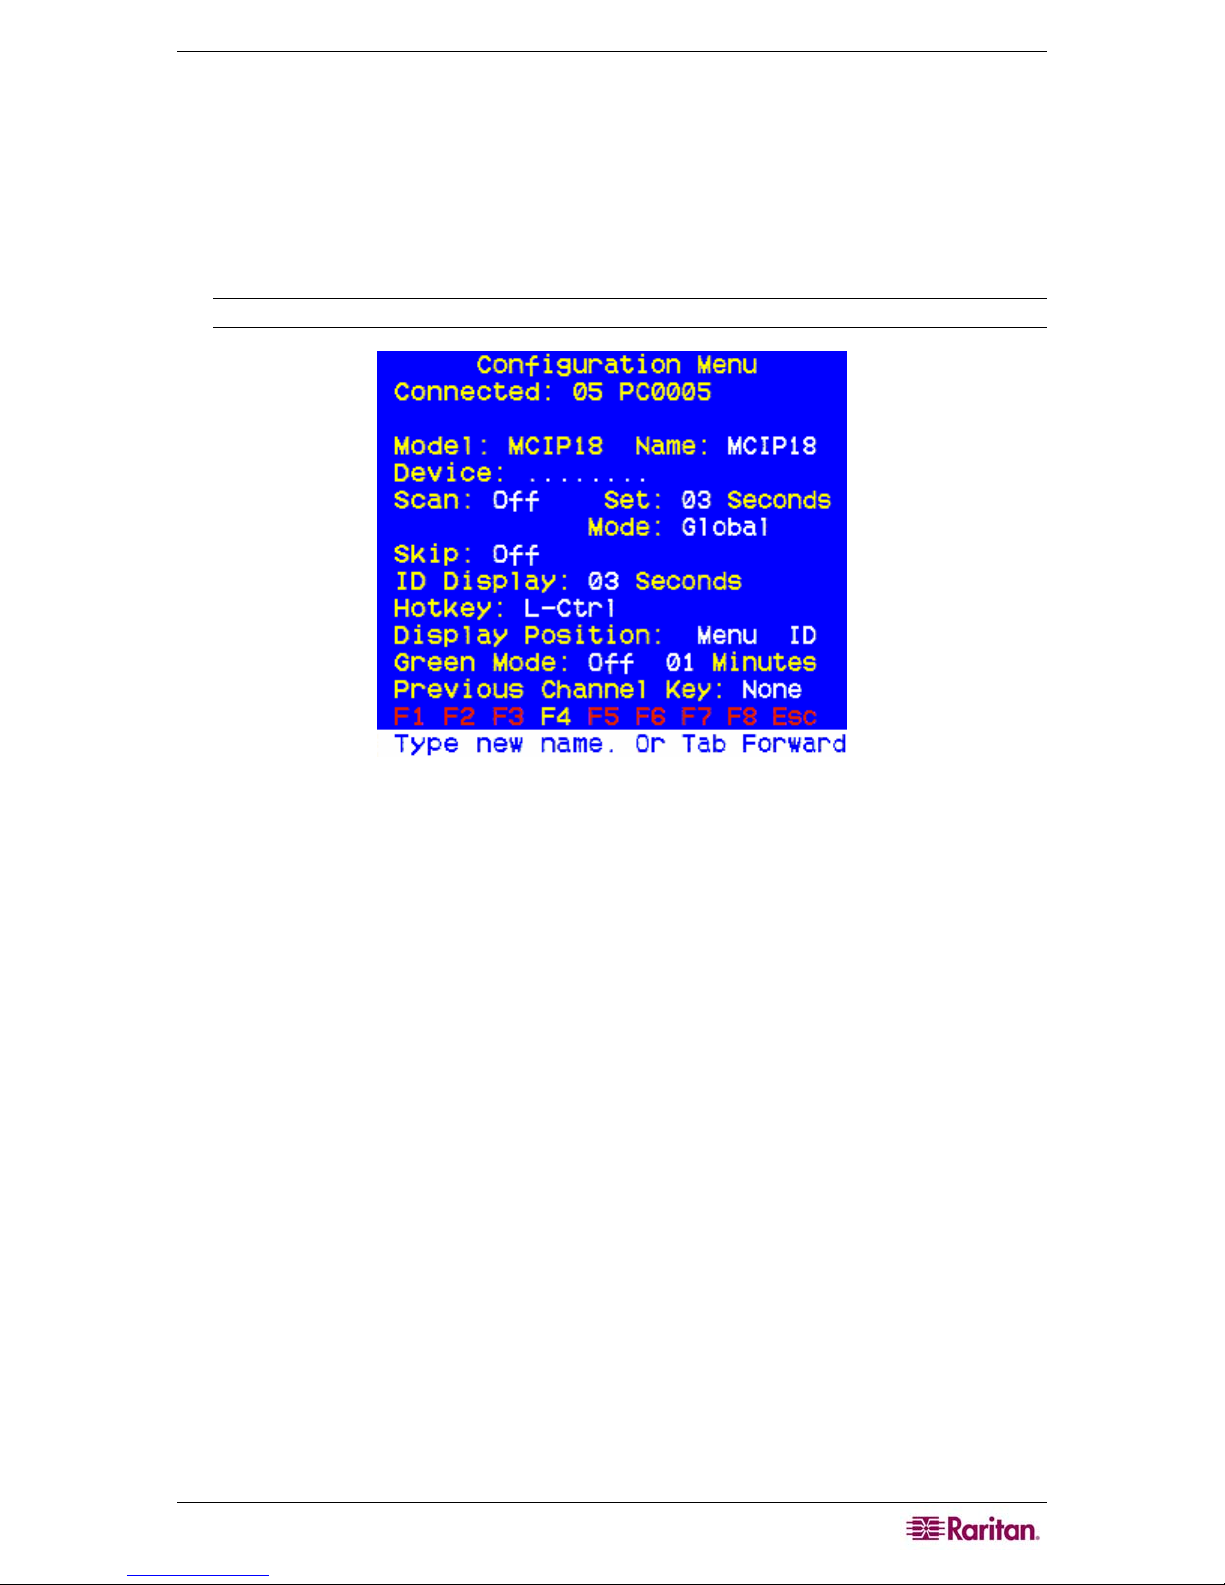
Use the Configuration Menu is to specify your MCIP configuration and to set or change operation
parameters.
1. Activate the On-Screen User Interface (OSUI) by pressing the Hot Key (default: Left CTRL
key on keyboard) three times rapidly. When the OSUI appears, press F4 to access the
Configuration Menu.
Note: Currently, Hotkey function is not enabled for further change.
Figure 5 Configuration Menu
a. The Connected field displays the Channel ID and Name of the currently selected
computer.
b. The Model field displays the model number of this MasterConsole unit.
2. Use the Tab (forward)/Shift + Tab (backward) keys to highlight the desired field and make
your changes as follows:
a. To change Name (default is the unit’s model number): Move to Name and type a name
up to seven characters. This field is used for identification purposes only.
b. To turn AutoScan ON/OFF (default is OFF): Move to Scan and press the Ç / È keys to
toggle. If you exit the OSUI with AutoScan ON, MCIP will scan according to the
currently set mode (Individual/Global) and scan rate.
To change the Global Scan Rate (default is 3 seconds): Move to Set and type a
number from 01 to 99, or press the Ç / È keys to specify the Scan Rate (in seconds)
for Global AutoScan.
To change AutoScan mode (default setting is Global): Move to Mode and press
the Ç / È keys to toggle between Global and Individual.
c. To turn AutoSkip ON/OFF (default is OFF): Move to Skip and press the Ç / È keys to
toggle. With AutoSkip ON, only active channels can be selected.
d. To change the ID Display time interval (default is 3 seconds): Move to ID Display and
type a number from 01 to 99, or press the Ç / È keys to specify the interval (in seconds)
you want the Channel ID and Name to display when each computer is selected. Type 99
if you want the Channel ID and Name to display continuously.
e. Green mode is disabled.
f. Previous channel key function is disabled.
6 MASTERCONSOLE IP USER GUIDE
Note: Both Green mode and Previous Channel Key functions are disabled, and no further
changes to their default values can be made..
3. To exit the Configuration Menu, press a Function key on your keyboard to access a different
menu, as displayed along the bottom of the menu screen. Press Esc to exit the OSUI and
return to normal computer operation. Any changes made in the Configuration Menu are
automatically saved.
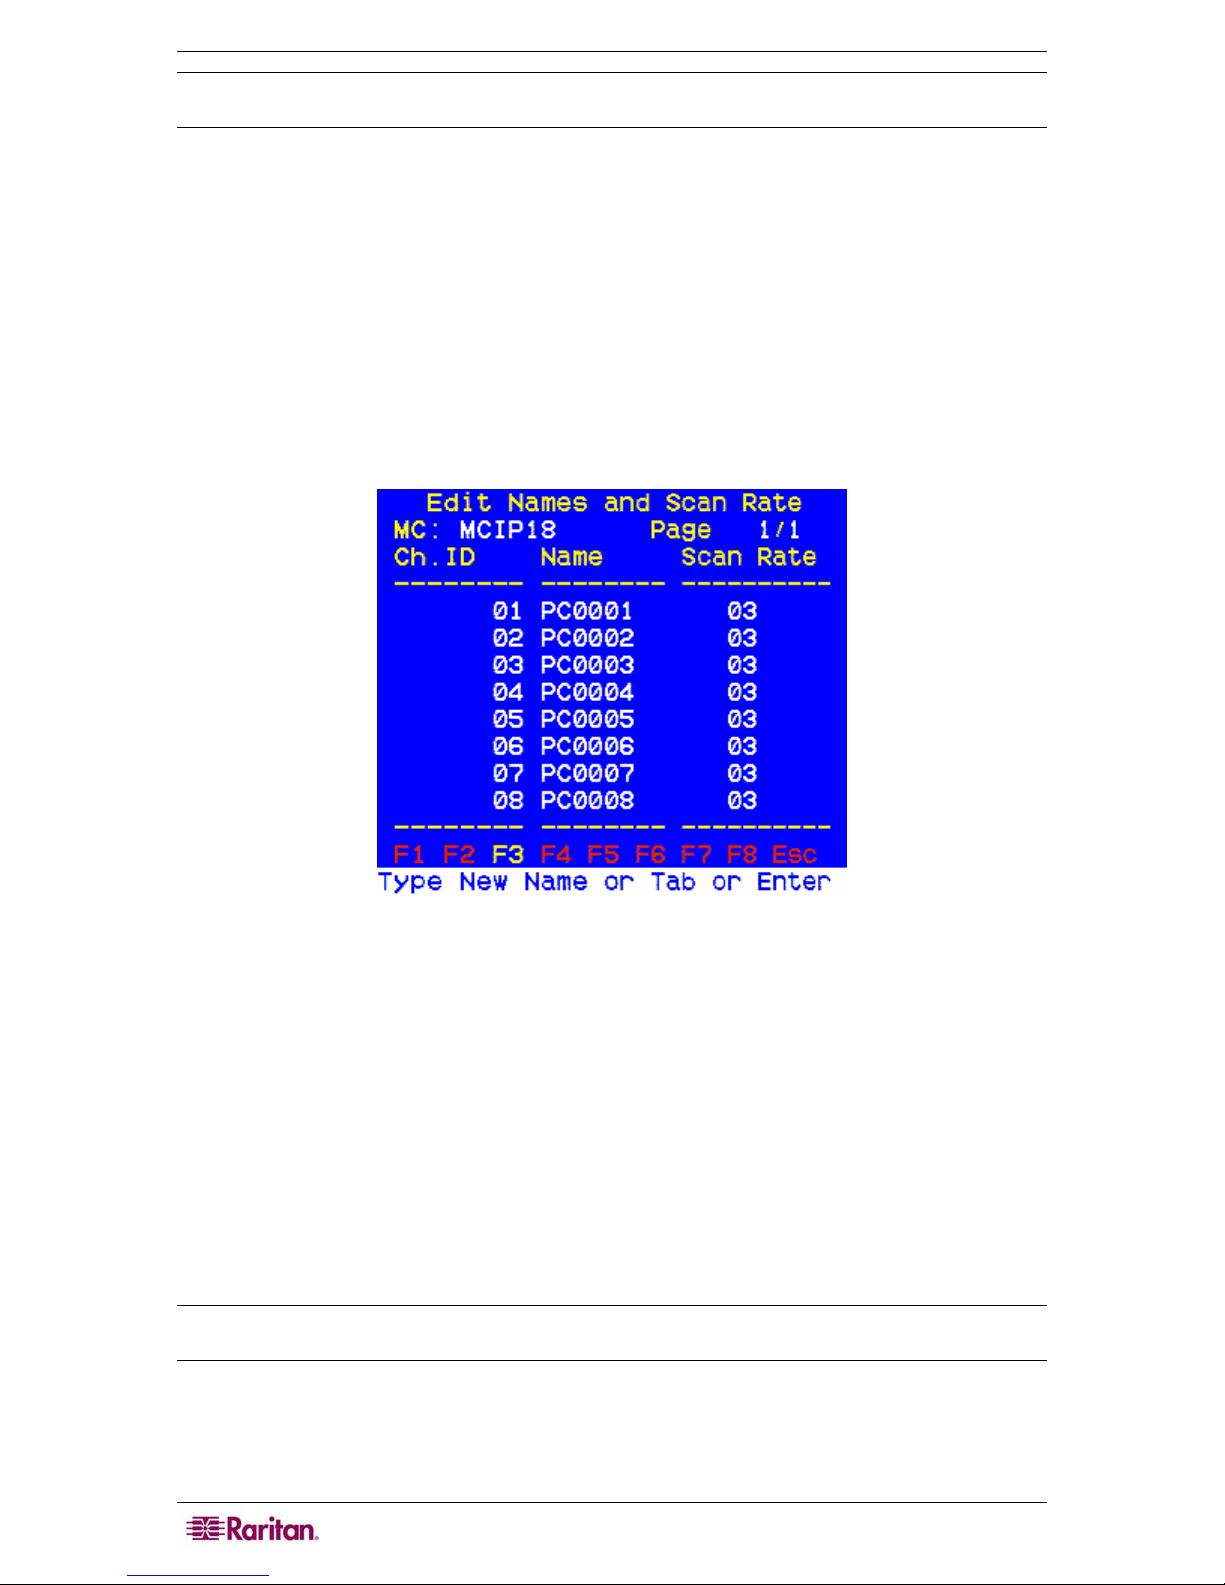
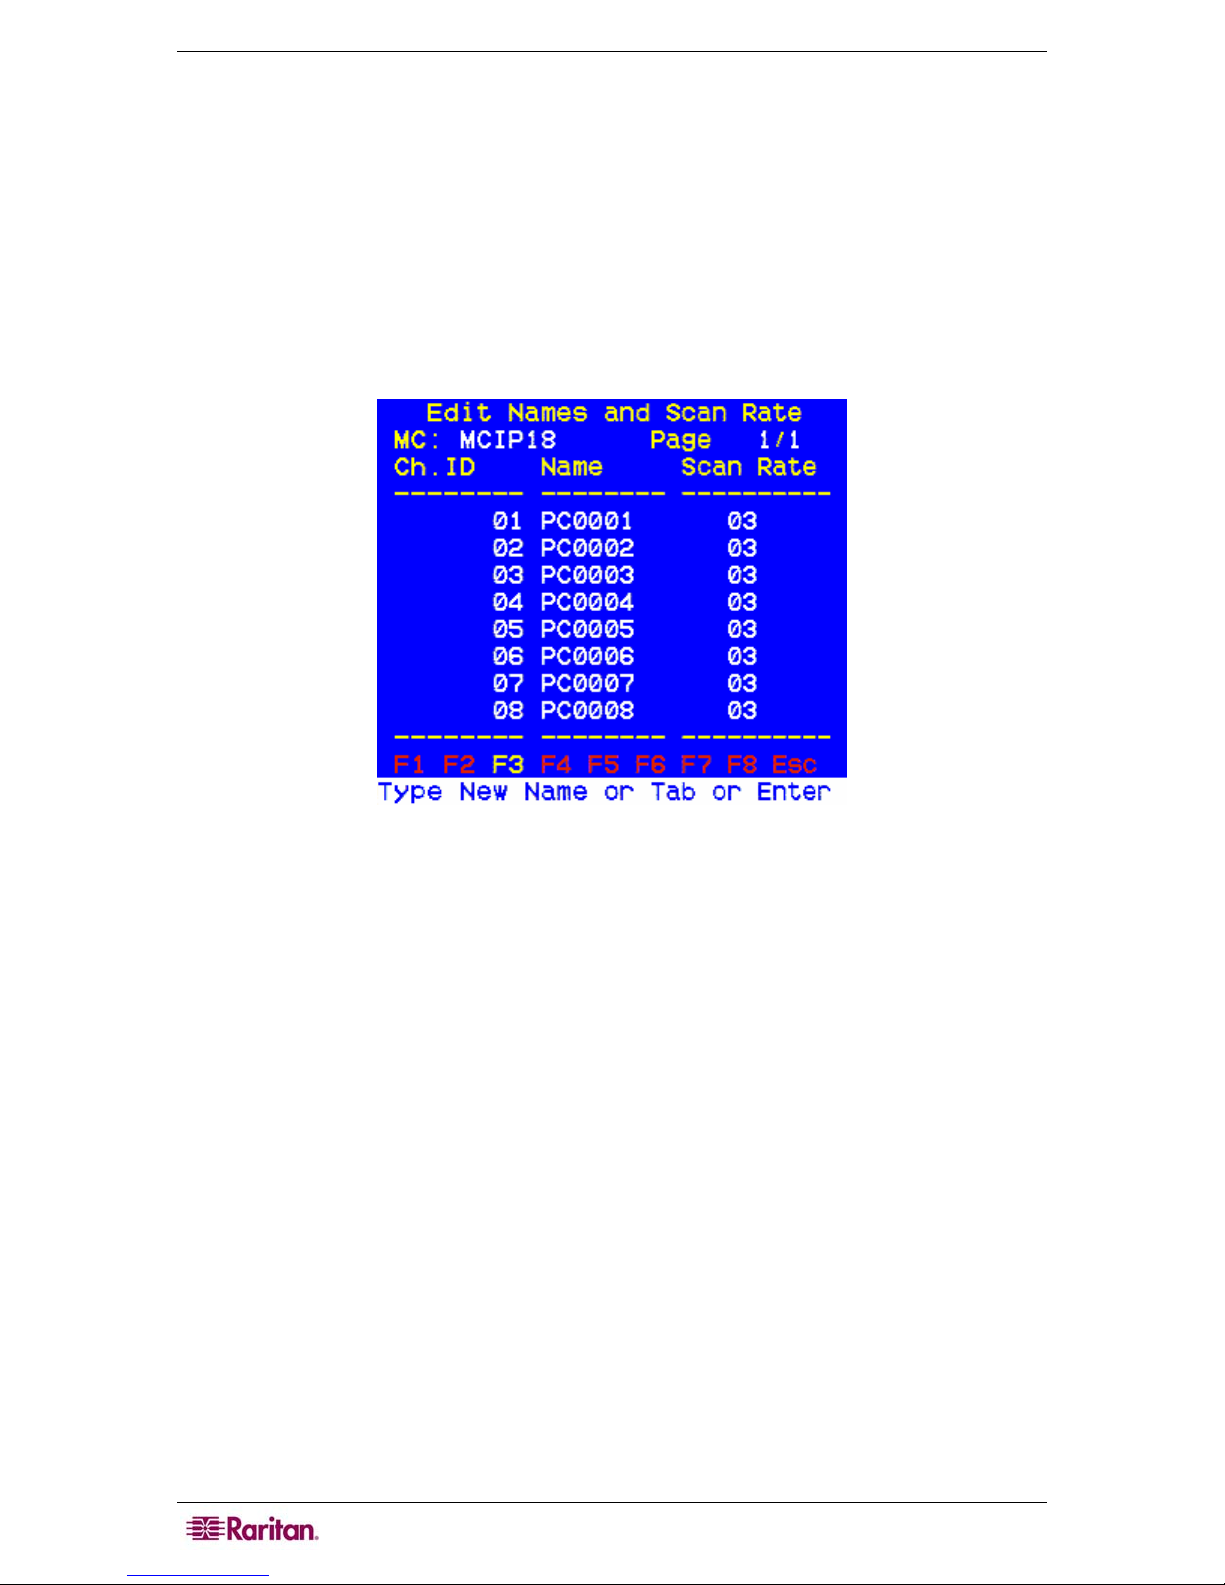
Assigning Names and Scan Rates
Assign meaningful names to easily identify and select connected computers. By default, the
channel name is PC00nn (where nn is the Channel ID Number) and the Channel-Specific Scan
Rate is 3 seconds.
1. Activate the OSUI by pressing the Hot Key (default: Left CTRL) three times rapidly. When
it appears, press F3 to access the Edit Names and Scan Rate menu.
Figure 6 Edit Names and Scan Rate Menu (One-Tier)
2. Use the Tab, Shift+Tab or Ç / È keys to move the cursor to the line you want to edit. Use
Å / Æ to move within a line.
a. To change the Name: Type up to eight characters without spaces.
b. To change the Channel-Specific Scan Rate (default is 3 seconds): Type a number from
00 to 99 (seconds). When the AutoScan Mode in the Configuration Menu is set to
Individual, these Channel-Specific Scan Rates are enabled. If the AutoScan mode is set to
Global, the global value will be used.
3. When you move to a different page or exit this Menu, you are prompted to save your changes.
Press Y to save.
4. To exit the Edit Names and Scan Rate Menu, press a Function key on your keyboard to
access a different menu, as displayed along the bottom of the menu screen, or press Esc to
return to the Selection Menu.
Note: If your MCIP unit is a 16-channel model, MCIP116, use the Page Up / Page Down keys on
your keyboard to view the next or previous screen of eight channels.
CHAPTER 3: OPERATION 7
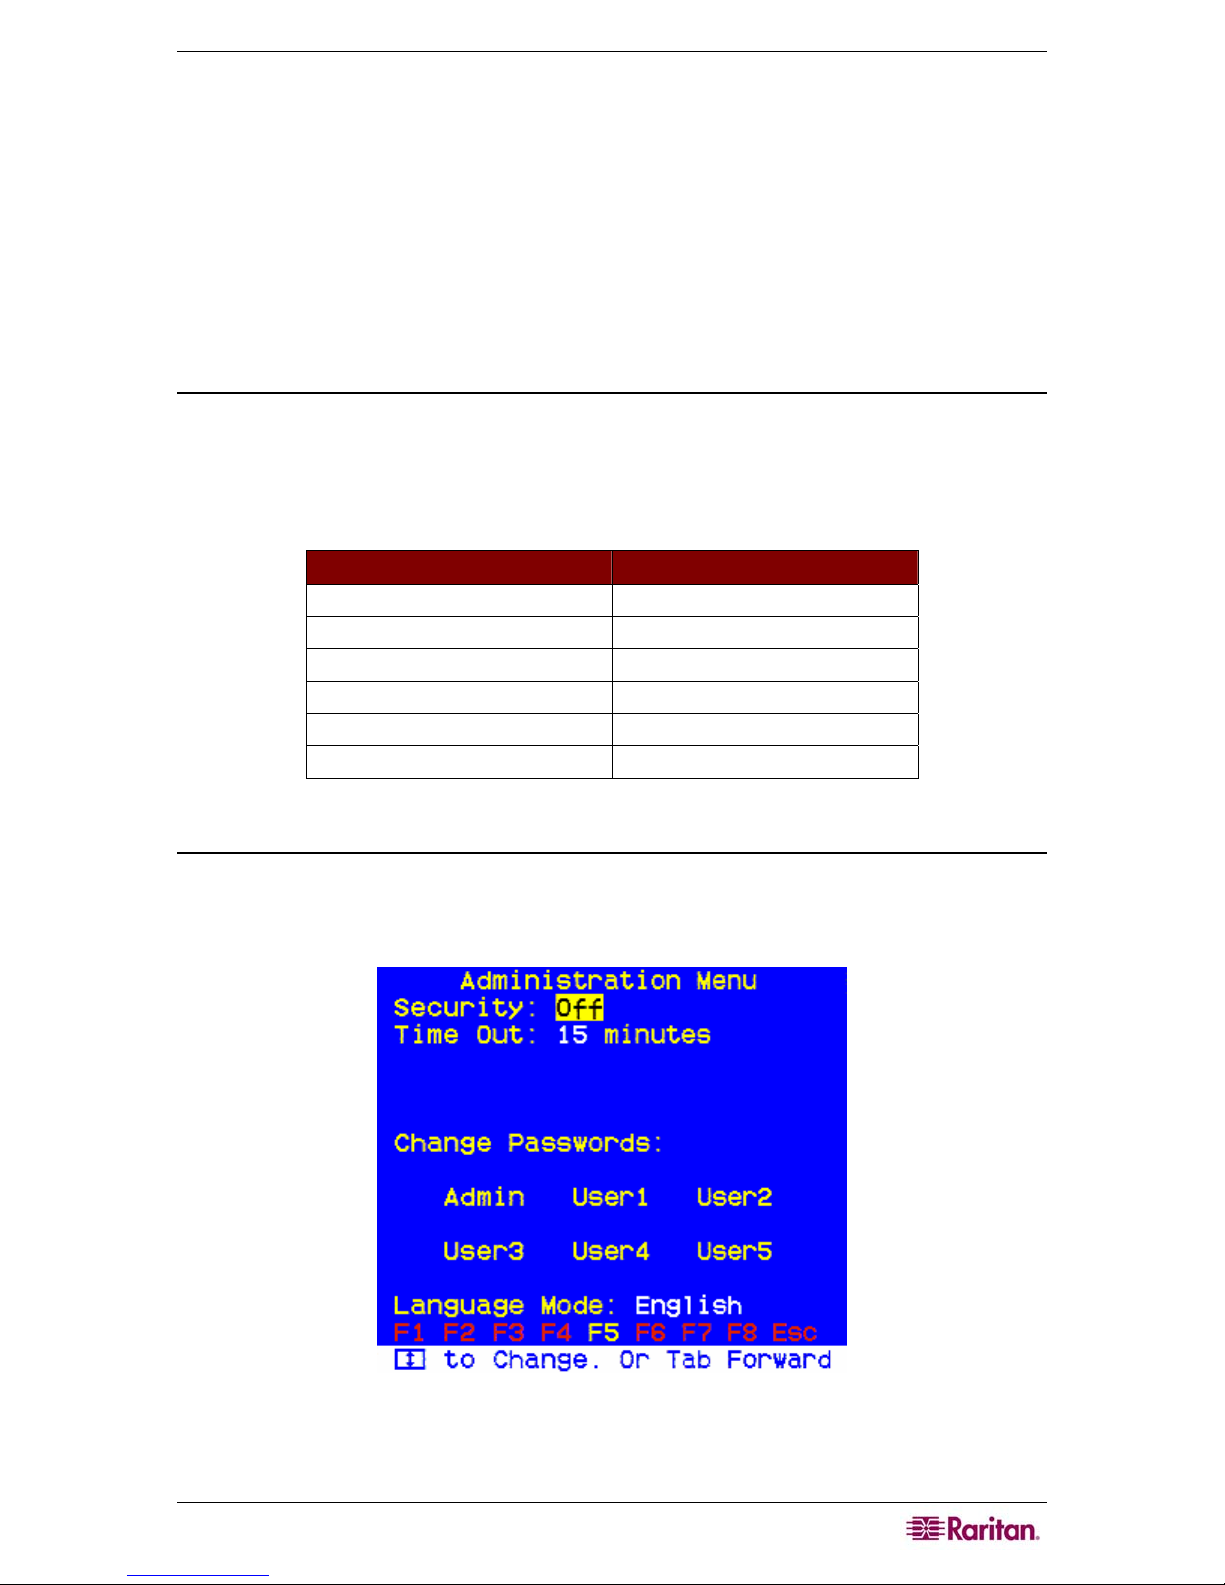
Using MasterConsole IP Security Feature
Restrict access to MCIP by turning security ON or OFF in the Administration Menu. Up to six
passwords can be defined in the Administration Menu – one Administration Password and five
User Passwords.
If security is ON and the system is idle (no keyboard or mouse activity for a time interval set by
the user [default: 15 minutes]), the next user to access MCIP must enter a user password to
establish access.
By default, MasterConsole IP operates with security OFF.
Passwords
Only the Administrator's password provides access to the Administration Menu, accessed to turn
security ON or OFF and to change passwords. Raritan recommends that administrators record and
store passwords where they will be handy to you and other authorized users.
MasterConsole IP is delivered with system default passwords. They are:
USER PASSWORD
Administrator raritan
User 1 111
User 2 222
User 3 333
User 4 444
User 5 555
Turning Security ON / OFF and Changing Passwords
1. Activate the OSUI by pressing the Hot Key three times rapidly. When it appears, press F5 to
access the Administration Password prompt.
2. Type the Administration Password and press Enter. The Administration Menu appears.
Figure 7 Administration Menu
3. Press Tab or Shift+Tab to move the cursor forward or back to the desired field and make
your changes as follows:
8 MASTERCONSOLE IP USER GUIDE
a. To turn Security ON/OFF (default is OFF): Press the Ç / È key s to toggle.
b. To change Security activation delay time (default is 15 minutes). Move to the Time Out
field, then type a number from 01 to 99, or use the Ç / È keys to specify a time interval.
If the system will remains inactive (no keyboard or mouse operation) for this time
interval, the next user is required to enter a password to access the MasterConsole IP.
c. To change the Administration Password: Move to Change Passwords, where Admin will
be highlighted. Press the Enter key and type a new password (up to eight alphanumeric
characters, no spaces). Press Enter. Confirm the password by retyping it. Press Enter.
d. To change a User Password, press the Tab key to highlight the desired User# field. Press
Enter. Type a new password (up to eight alphanumeric characters, no spaces). Press
Enter. Confirm the password by typing it again. Press Enter. Repeat this process for the
remaining four Users, pressing the Tab key to move from one User field to the next. You
can specify up to five User Passwords.
e. To change the type of keyboard, press the Tab key to highlight Language Mode field.
Press Ç / È to select English, German, or French.
4. To exit the Administration Menu, press a Function key on your keyboard to access a different
menu, as displayed along the bottom of the menu screen. Press Esc to exit the OSUI and
return to normal computer operation.
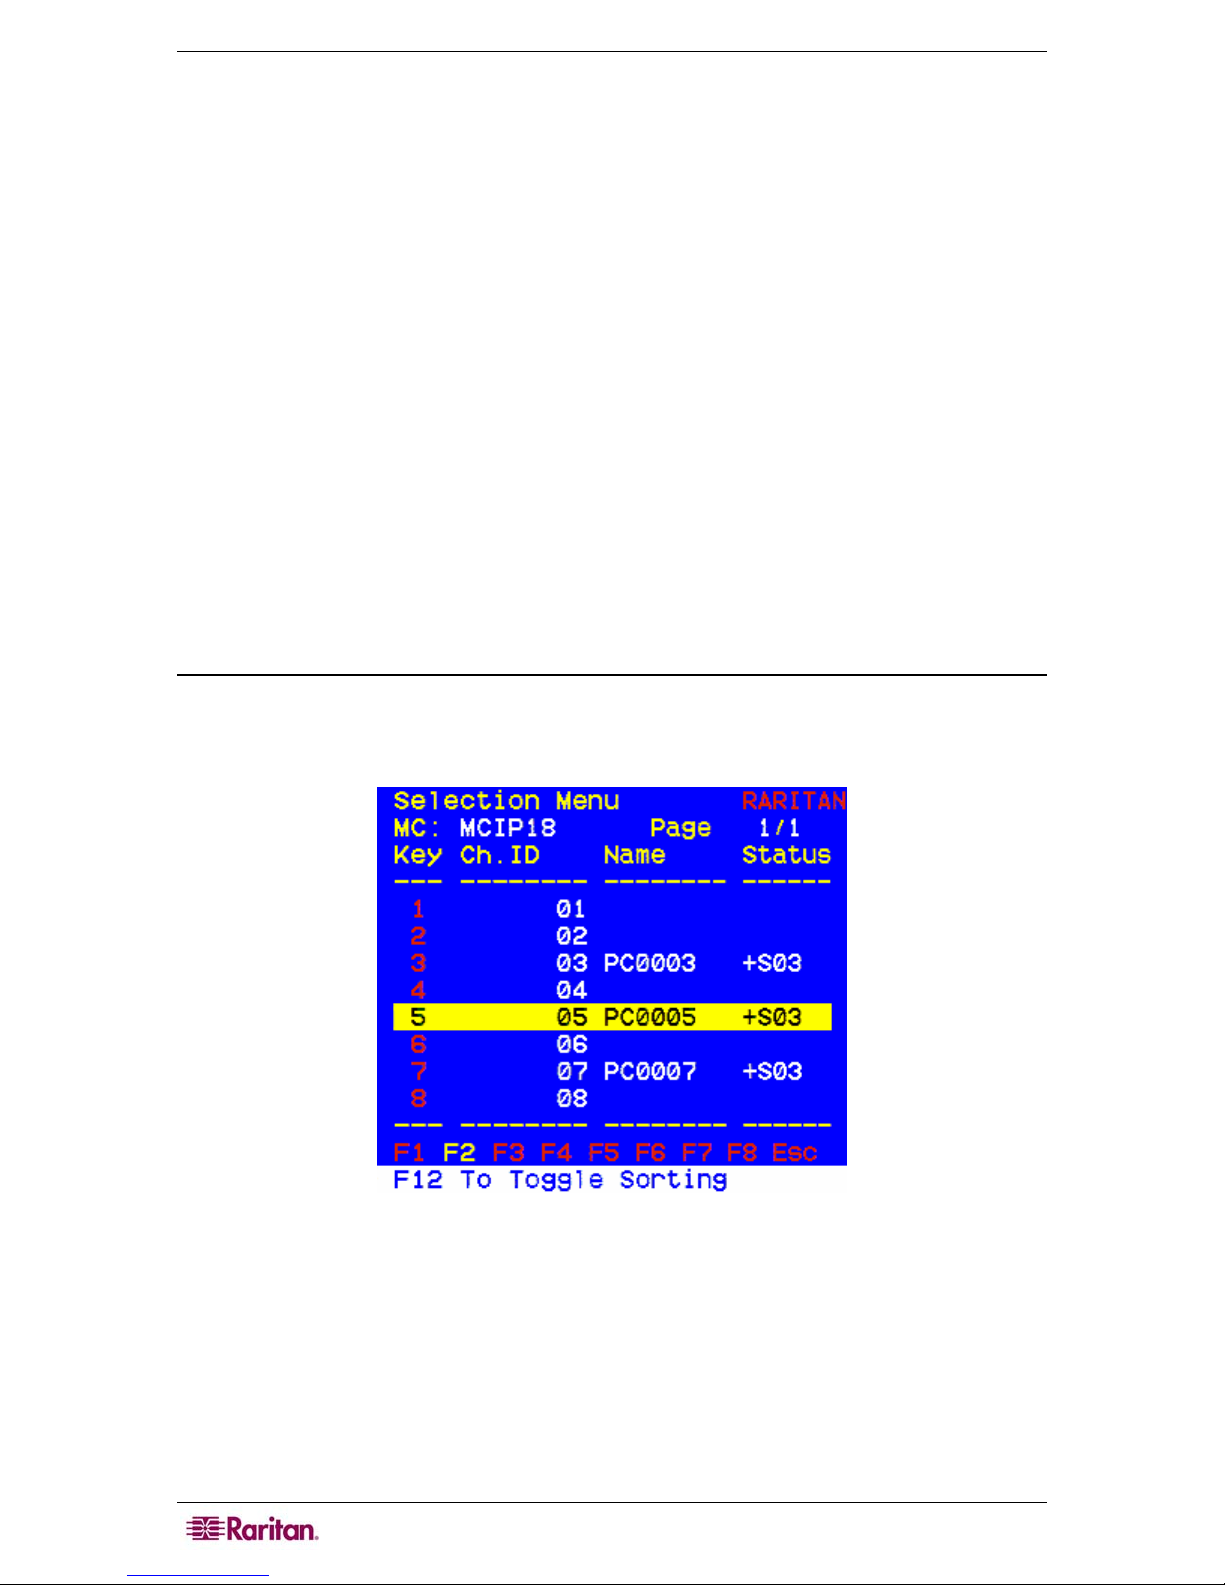
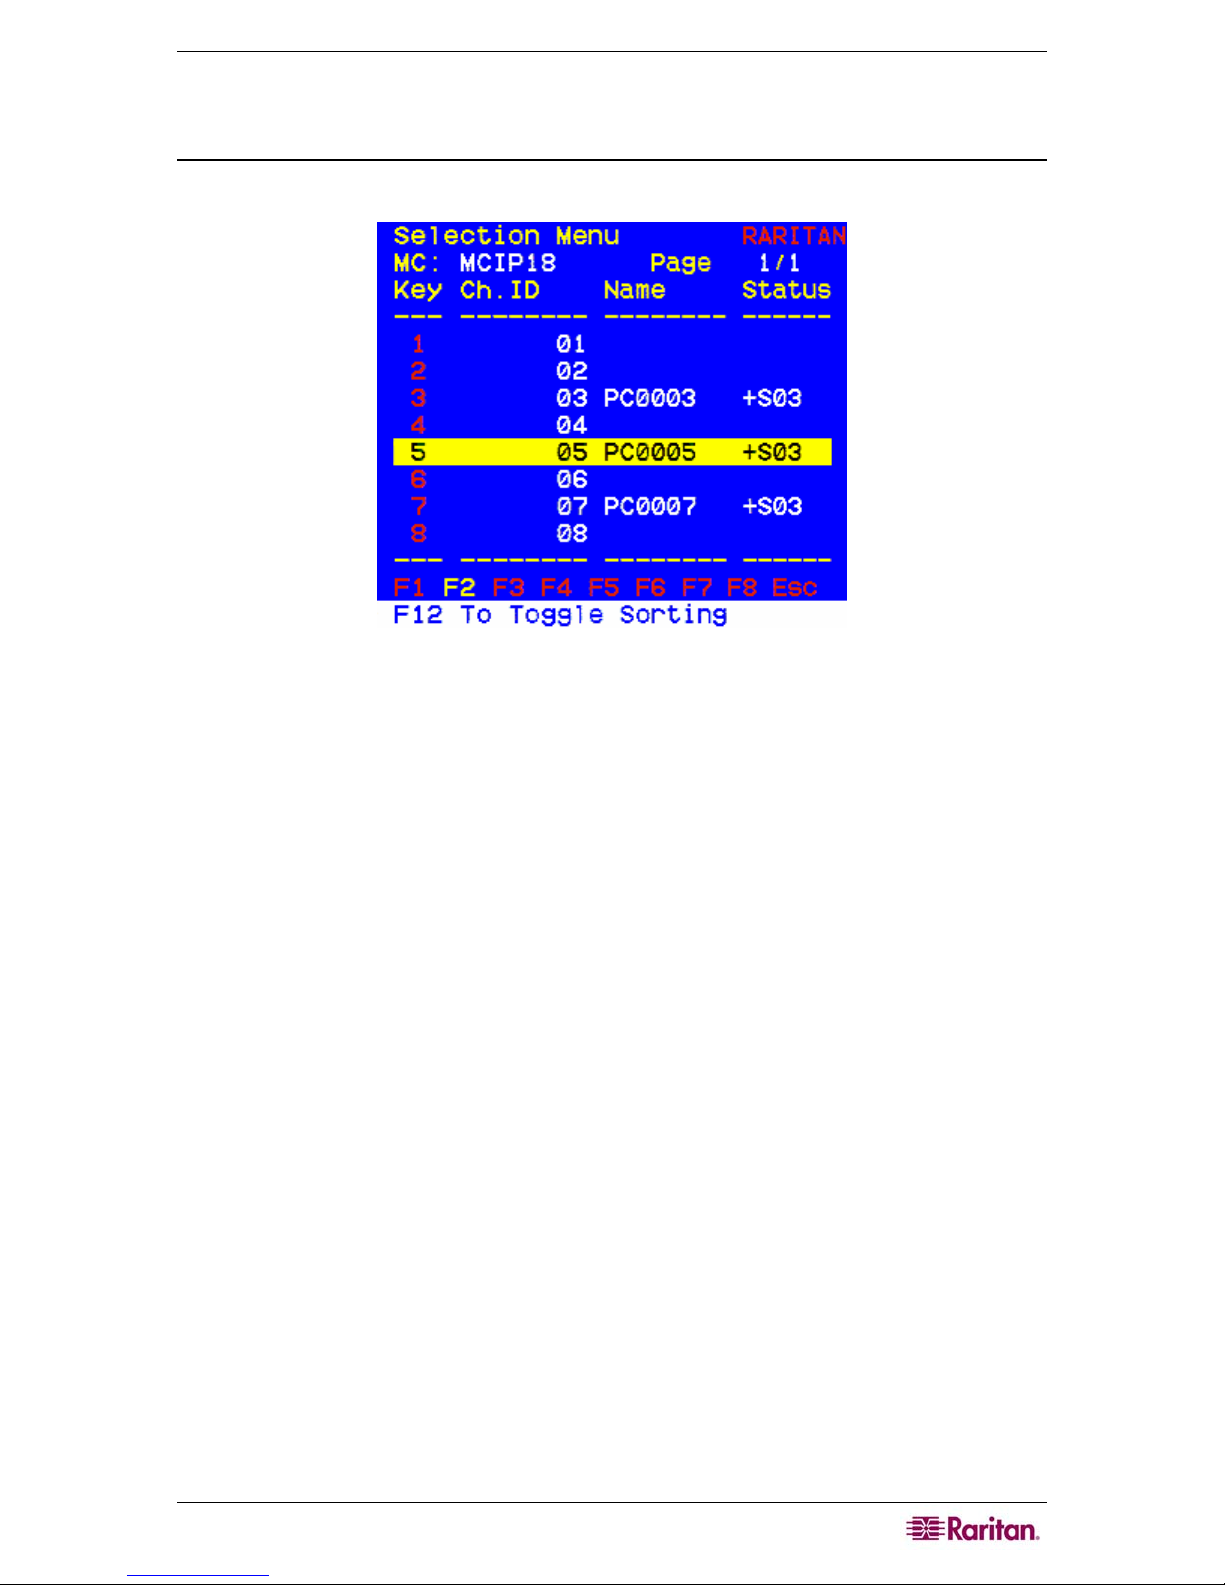
Using the On-Screen User Interface (OSUI)
Selecting a Computer
1. Activate the OSUI by pressing the Hot Key three times rapidly. To switch the channel you
are viewing, press [Left CTRL] two times, then press N, where N is the channel number you
want to see. The Selection Menu appears.
Figure 8 Selection Menu (One-Tier, sorted by Channel ID)
2. Channels are listed either numerically by Channel ID or alphabetically by Name (default:
sort numerically by Channel ID). Press F12 to toggle between numerical and alphabetical
sorting.
3. The Selection Menu displays a maximum of eight channels at a time.
a. The Status column shows each channel's activity and Channel-Specific Scan Rate. A "+"
in the first column indicates a device is connected and powered ON, while a blank
indicates the device is powered OFF or there is no device connected. "Snn" indicates the
Channel-Specific Scan Rate of nn seconds. (default is 3 seconds).

CHAPTER 3: OPERATION 9
b. As the computer status changes (active/inactive), the MCIP updates the Status column
periodically. To enable a user to see the new status immediately, activate the OSUI and
press F8-Upgrade Computer Status. The MCIP will scan the channels and update the
computer status and then return to the previous menu.
c. For any inactive channel, the ID bar will display only the channel ID and not the name
field, when sorted by channel and will not display anything when sorted by name-F12
toggle.
d. The non-displayed names are still available in the MCIP internal database and can be
edited with the F3 function.
4. To select a computer:
Use the Page Up / Page Down or Ç / È keys to highlight the desired computer
and press Enter
OR
When the Selection Menu is sorted by Channel ID, press the desired computer's
Key number (shown in the left-hand column);
OR
When the Selection Menu is sorted by name (arranged alphabetically), use the
Page Up / Page Down or Ç / È keys, or type the first character(s) of the desired
Name to quickly jump to the Name that most closely matches what you type. To back
up a character, press the Backspace key. Highlight the desired computer, and press
Enter.
a. When you select a computer, you automatically return to normal computer operation at
the selected computer.
b. The Channel ID and Name will be displayed on the monitor for the time interval
specified in the Configuration Menu.
c. Press Home at any time to return to the first page of the Configuration Menu (for 16-
channel.
Activating AutoScan
1. Activate the OSUI by pressing the Hot Key three times rapidly. Press the F6 Key.
2. On the front panel of the MCIP unit, a green light next to the Scan button will illuminate.
3. The unit will scan according to parameters set in the Configuration Menu.
10 MASTERCONSOLE IP USER GUIDE
Assigning Names and Scan Rates
When you specify non-computer devices (MasterConsole units) connected to base MCIP
channels, these devices are assigned default names in the base MCIP Selection Menu.
Because computers can be connected to each channel of an MCIP unit, a page is automatically
created for the MCIP in the Selection Menu, listing Channel IDs with default names for each
channel. These names may be changed using the Edit Names and Scan Rate Menu.
To change Names and/or Channel-Specific Scan Rates:
1. Activate the OSUI by pressing the Hot Key three times rapidly. When it appears, press F3 to
access the Edit Names and Scan Rate Menu.
Figure 9 Edit Names and Scan Rate Menu (Base MasterConsole IP)
2. Use the Tab, Shift-Tab or Ç / È keys to move the cursor to the line you want to edit. Use Å
/ Æ to move within a line.
a. To change the Name of any computer connected to the base unit, type up to eight
alphanumeric characters (no spaces).
b. To change the Channel-Specific scan Rate for any highlighted channel (default is 3
seconds): Type a number from 00 to 99 (in seconds). When the AutoScan Mode in the
Configuration Menu is set to Individual, these Channel-Specific Scan Rates are enabled.
If the AutoScan mode is set to Global, the global scan rate will be used.
3. When you move to a different page or exit this menu, you are prompted to save your changes.
Press Y to save.
4. To exit the Edit Names and Scan Rate Menu: Press any Menu F (Function) key to go to
another menu, or press Esc to return to the Selection Menu.
CHAPTER 3: OPERATION 11
MasterConsole IP Operation
Selecting a Computer
1. Activate the OSUI by pressing the Hot Key three times rapidly. The Selection Menu appears.
Figure 10 Selection Menu
2. The Selection Menu lists channels sorted either numerically by Channel ID or alphabetically
by Name. Default: by Channel ID. Press F12 to toggle.
a. The Selection Menu displays a maximum of eight channels at a time.
b. The Status column shows each channel's activity and Channel-Specific Scan Rate. A
“+”in the base unit's Selection Menu indicates the device is connected and powered ON,
while a blank indicates the device is powered OFF, or there is no device connected.. Snn
indicates the individual Scan Rate of nn seconds.
c. As the computer status changes (active/inactive), MCIP updates the Status column
periodically. To enable a user to see the new status immediately, activate the OSUI and
press F8-Upgrade Computer Status. MCIP will scan the channels and update the
computer status and then return to the previous menu.
d. For any inactive channel, the ID bar will display only the channel ID and not the name
field, when sorted by channel and will not display anything when sorted by name-F12
toggle.
e. The non-displayed names are still available in the MCIP internal database and can be
edited with the F3 function.
3. To select a computer:
Use the Page Up / Page Down or Ç / È keys to scroll to the desired computer
and press Enter
OR
When the Selection Menu is sorted by Channel ID, press the desired computer's
Key number (in the left-hand column)
OR
a. When the Selection Menu is sorted by name, use the Page Up / Page Down or Ç / È
keys, or type the first character(s) of the desired Name to quickly jump to a Name that
most closely matches what you type. To back up a character, press the Backspace key.
Highlight the desired computer, and press Enter.
b. When you select a computer, you automatically return to normal computer operation at
the selected computer.

12 MASTERCONSOLE IP USER GUIDE
c. The Channel ID and Name will display on the monitor for the time interval specified in
the Configuration Menu.
d. Press Home at any time to return to the first channel on the first page of the Selection
Menu. Press End at any time to advance to the last channel on the last page of the
Selection Menu.
CHAPTER 4: REMOTE MANAGEMENT AND OPERATION 13
Chapter 4: Remote Management and Operation
Initial Configuration
MCIP comes pre-configured with the values shown below, and its communication interfaces are
based on TCP/IP. You must perform an initial IP configuration to access MCIP for the first time.
PARAMETER VALUE
IP auto configuration DHCP
IP address 192.168.1.22
Netmask 255.255.255.0
Gateway None
IP access Disabled
LAN interface speed Auto
LAN interface duplex mode Auto
Initial Configuration via DHCP Server
By default, MCIP will try to contact a DHCP server in the subnet to which it is physically
connected. If a DHCP server is found, it may provide a valid IP address, gateway address, and net
mask.
Before you connect the MCIP unit to your local subnet, complete the corresponding configuration
of your DHCP server. Raritan recommends that you configure a fixed IP assignment to the MAC
address of MCIP. The MAC address is located on the outside of the shipping box and on the
bottom of the MCIP unit. If the DHCP connection fails on boot up, MCIP will not have an IPv4
address.
Initial Configuration via Serial Interface
MCIP has a serial line interface on its front panel. The connector is compliant to RS 232 serial
line standard. The serial interface must be configured with the parameters listed below.
PARAMETER VALUE
Bits/second 115200
Data bits 8
Parity No
Stop bits 1
Flow Control None
To configure MCIP via the serial interface:
1. Power OFF the MCIP unit, then power ON again to reset.
2. Press the ESC key on your keyboard. Device information and a prompt appear.
3. Type config and press the Enter key. After a few seconds, lines appear.
4. Type the answers as the questions appear, or press Enter to use the default value (shown here
in brackets).
IP auto configuration (none/dhcp/bootp) [dhcp]:

14 MASTERCONSOLE IP USER GUIDE
IP [192.168.1.22]:
NetMask [255.255.255.0]:
Gateway (0.0.0.0 for none) [0.0.0.0]:
• IP auto configuration: With this option you can specify whether MCIP should fetch it’s
network settings from a DHCP or BOOTP server. For DHCP you have to enter dhcp And for
BOOTP supply bootp accordingly. If you specify none then IP auto configuration is disabled
and you will subsequently be asked for the following network settings.
• IP address: The IP address the MCIP should use. This option is only available if IP auto
configuration is disabled.
• Subnet mask: The mask of the connected IP subnet. This option is only available if IP auto
configuration is disabled.
• Gateway address: The IP address of the default router of the connected IP subnet. If you
have no default router, you may enter 0.0.0.0. This option is only available if IP auto
configuration is disabled.
There may be default values which are enclosed in brackets. If you want to use the default value
of an option then you just need to press the Enter key.
You will be asked if the values are correct and get a chance to correct them. After confirming,
MCIP performs a reset.
Logging In
In your Web browser, type the MCIP address you configured during installation. For instance,
type the following in the address line of your browser when establishing an unsecured connection:
http://192.168.1.22/
When using a secure connection type:
https://192.168.1.22/
The MCIP login page appears. MCIP has a built-in “super user” who has all administrative
permissions for the MCIP unit. The super user login is admin and the password is raritan. Both
Login and Password are case-sensitive.
Please note that super user admin cannot log on via the serial interface of MCIP. Your web
browser must accept cookies or you will be unable to log in.
Note: Please change the super user password, raritan, immediately after you have installed and
accessed your MCIP for the first time. Leaving this password can be a severe security risk.
CHAPTER 4: REMOTE MANAGEMENT AND OPERATION 15
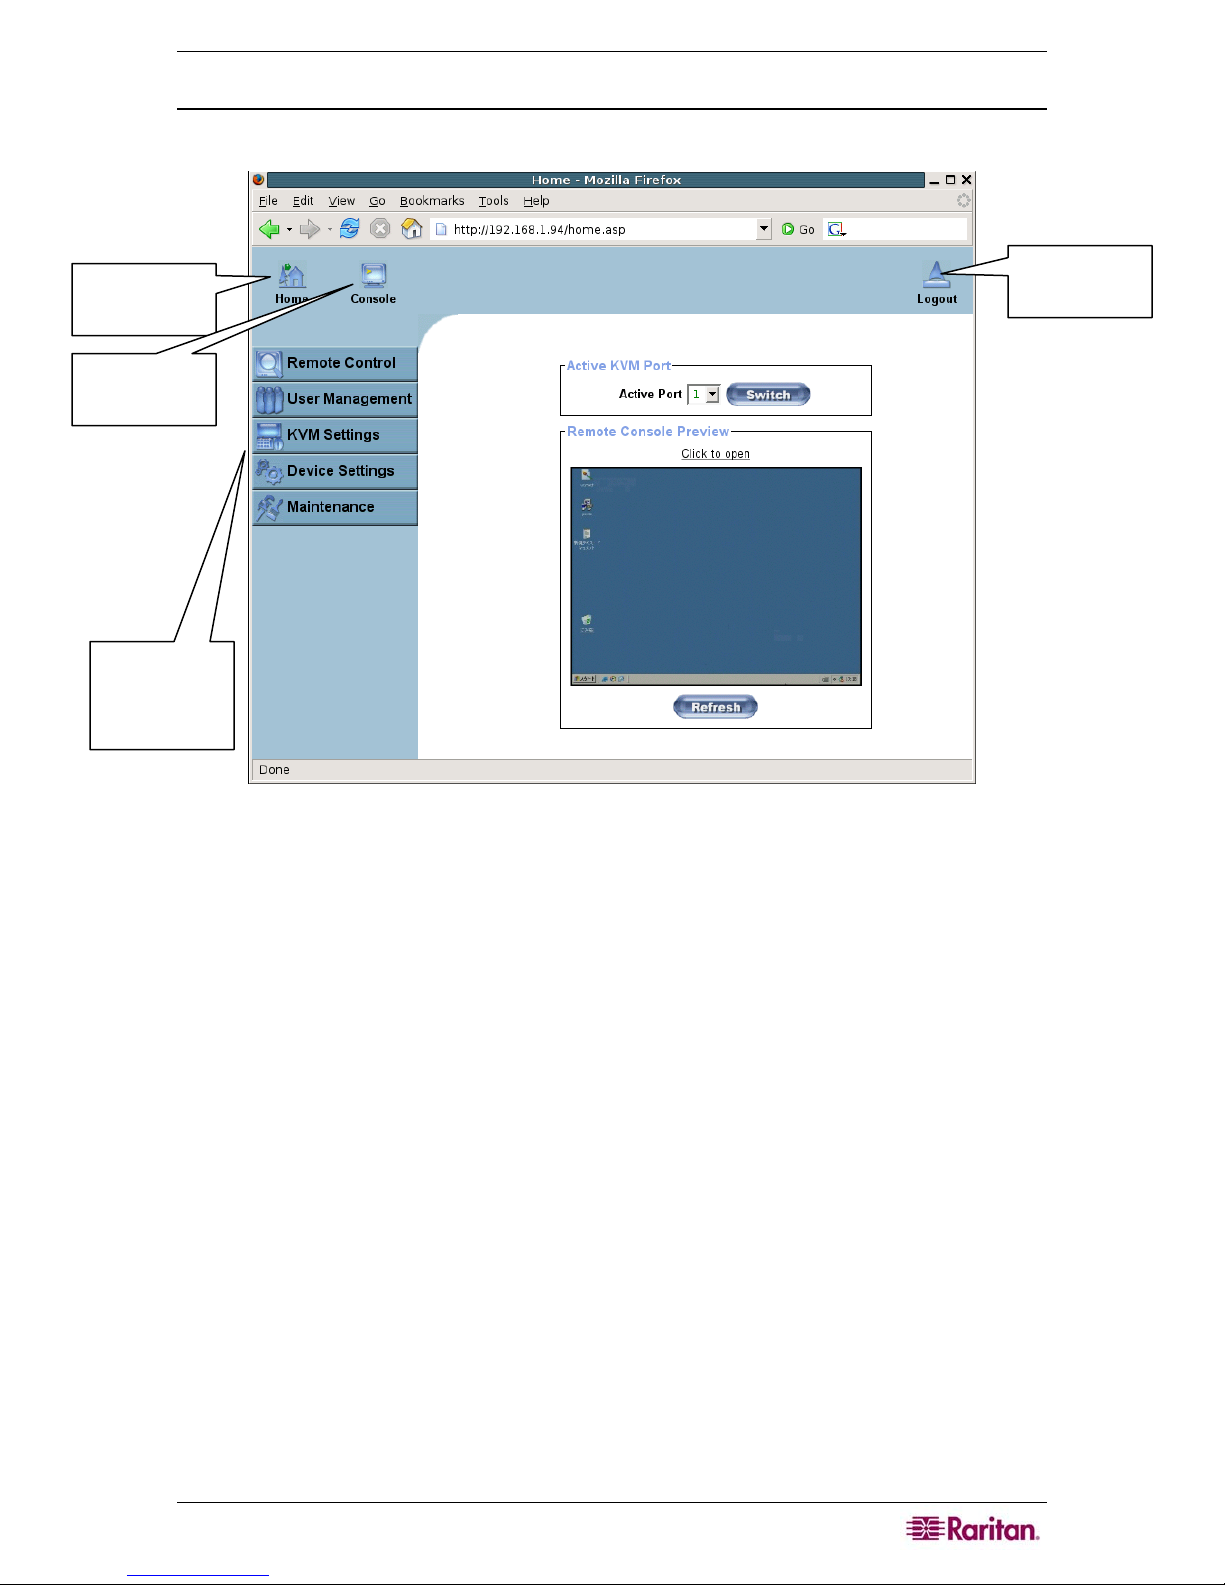
Navigation
Upon successful login, the MCIP Home appears.
Click Home to
return to this
Home Page.
Click Console to
launch MCIP
Remote Console.
Use these buttons
to toggle to
different sections
in MCIP
Click Logout to
exit MCIP.
Figure 11 MCIP Home Page
If there is no activity for 30 minutes, you will be logged out of MCIP automatically. Press any
key or move your mouse to return to the Login screen if this occurs.
16 MASTERCONSOLE IP USER GUIDE
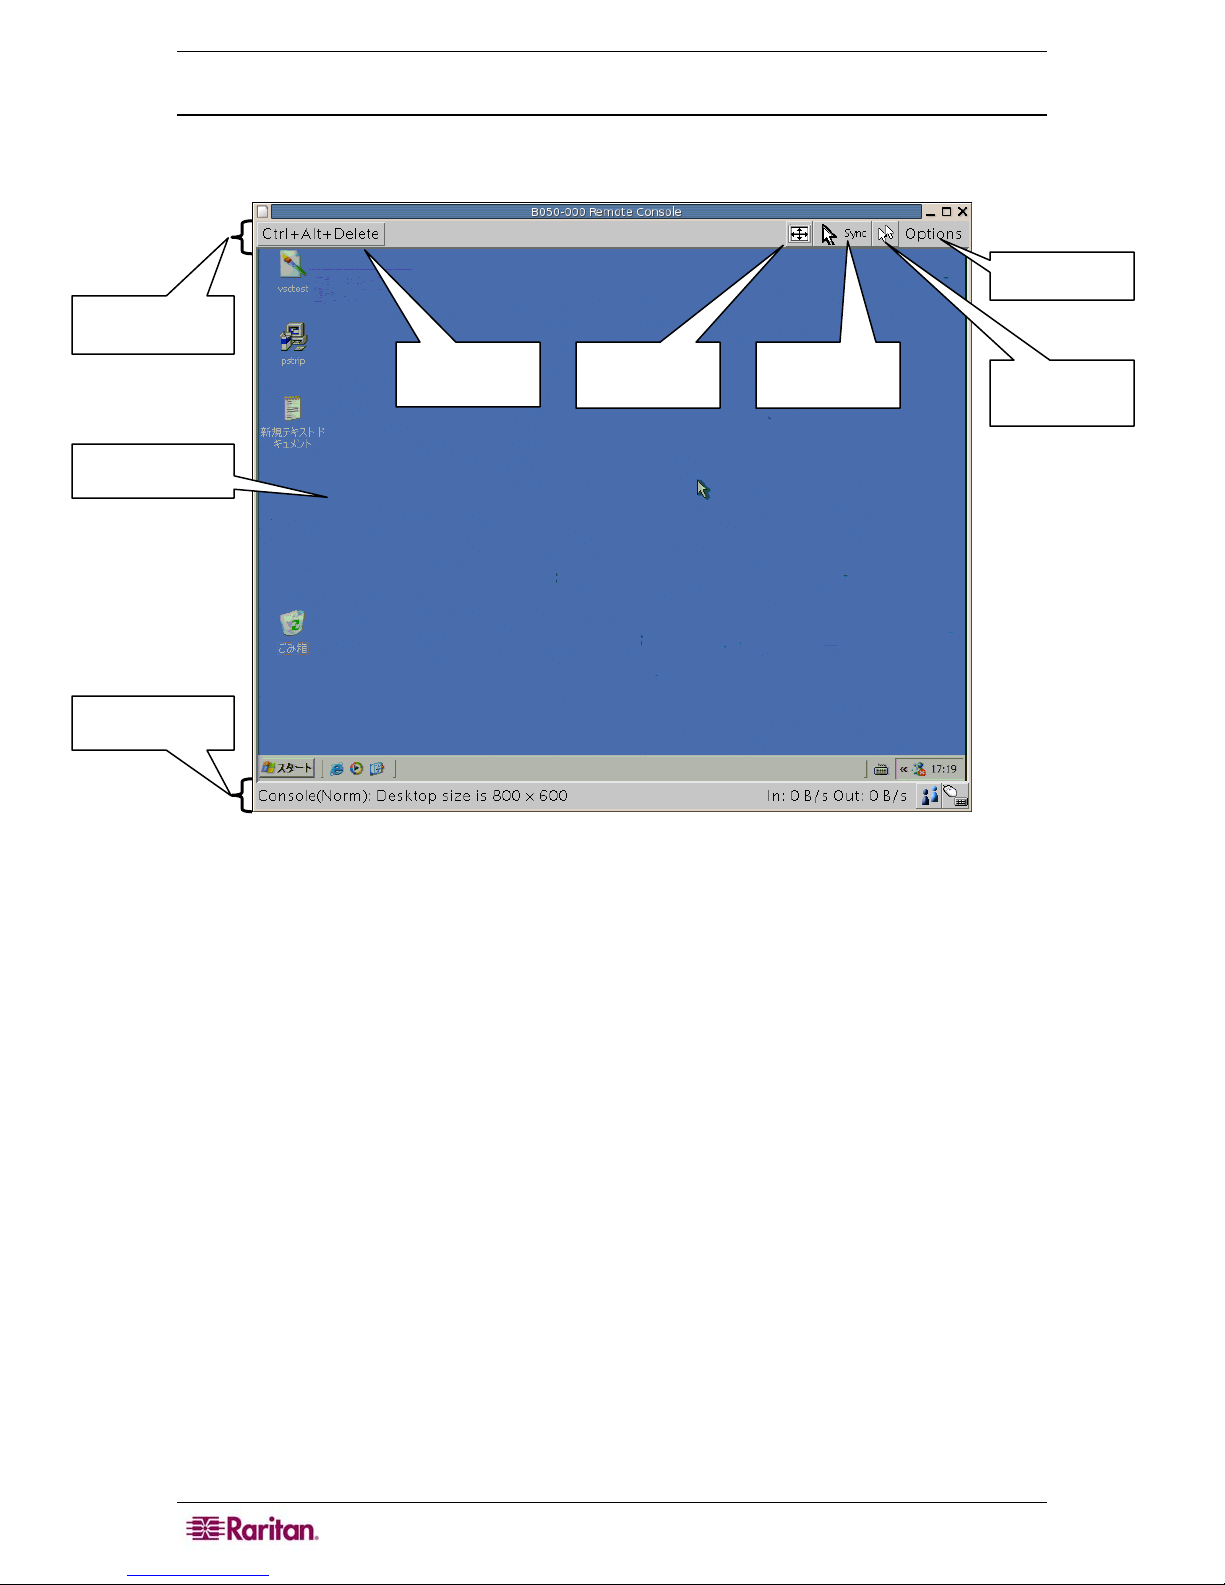
The Remote Console
The Remote Console is the redirected screen, keyboard, and mouse of the remote host system that
MCIP controls.
Remote Console
Control Bar
Main Window
Predefined
Shortcut button
Auto-adjust
button
Sync Mouse
button
Options button
Double Sync
button
Remote Console
Status Bar
Remote Console is a Java Applet that tries to establish its own TCP connection to the
MCIP. The protocol run over this connection is neither HTTP nor HTTPS, but Remote Frame
Buffer Protocol, or RFB.
Currently, RFB tries to establish a connection to port 443. Your local network environment must
allow this connection to be made, that is, your firewall and – in case you have a private internal
network – your Network Address Translation (NAT) settings must be configured accordingly. If
the MCIP unit is connected to your local network environment and your connection to the
Internet is available using a proxy server only without NAT being configured, the Remote
Console is very unlikely to be able to establish the according connection. This is because today’s
web proxies are not capable of relaying the RFB protocol. In case of problems, please consult
your network administrator to provide an appropriate network environment.
Main Window
Activating Remote Console opens a new window that displays the screen content of your host
system. The Remote Console behaves exactly as if you were sitting directly in front of the screen
of your remote system, meaning you can use the keyboard and mouse normally to work in the
remote system. There will be a slight delay in reacting to commands and actions, depending on
your connection bandwidth.
Remote keyboard usage may be incorrect, as your local keyboard changes its keyboard layout
according to the remote host system. For example, if you use a German administration system
and your host system uses a US English keyboard layout, special keys on the German keyboard
will not work as expected, but will instead act as they would on the US English counterpart. You
Figure 12 Remote Console Screen
 Loading...