

Raritan KX II, Dominion KX II Quick Setup Manual
Dominion KX II Quick Setup Guide 1
QSG-DKX2-v2.3.5-0I-E 255-62-4022-00-RoHS
Dominion KX II
Resolutions
640x350 @70Hz
1024x768@85
640x350 @85Hz
1024x768 @75Hz
640x400 @56Hz
1024x768 @90Hz
640x400 @84Hz
1024x768 @100Hz
640x400 @85Hz
1152x864 @60Hz
640x480 @60Hz
1152x864 @70Hz
640x480 @66.6Hz
1152x864 @75Hz
640x480 @72Hz
1152x864 @85Hz
640x480 @75Hz
1152x870 @75.1Hz
640x480 @85Hz
1152x900 @66Hz
720x400 @70Hz
1152x900 @76Hz
720x400 @84Hz
1280x720@60Hz
720x400 @85Hz
1280x960 @60Hz
Resolutions
800x600 @56Hz
1280x960 @85Hz
800x600 @60Hz
1280x1024 @60Hz
800x600 @70Hz
1280x1024 @75Hz
800x600 @72Hz
1280x1024 @85Hz
800x600 @75Hz
1360x768@60Hz
800x600 @85Hz
1366x768@60Hz
800x600 @90Hz
1368x768@60Hz
800x600 @100Hz
1400x1050@60Hz
832x624 @75.1Hz
1440x900@60Hz
1024x768 @60Hz
1600x1200 @60Hz
1024x768@70
1680x1050@60Hz
1024x768@72
1920x1080@60Hz
Quick Setup Guide
Thank you for your purchase of the KX II, the industry's most full-featured, enterprise-class, secure, digital KVM
(Keyboard, Video, Mouse) switch.
This Quick Setup Guide explains how to install and configure the KX II. For additional information on any aspect of the
KX II, see the accompanying online help accessed from the KX II or from the KX II User Guide, which can be
downloaded from the Firmware and Documentation section of Raritan's website
(http://www.raritan.com/support/firmware-and-documentation/).
Step 1: Configure the KVM Target Servers
For optimal bandwidth efficiency and video performance, KVM
target servers running graphical user interfaces such as
Windows®, Linux®, X-Windows, Solaris™, and KDE require
configuration. The desktop background need not be
completely solid but desktop backgrounds featuring photos or
complex gradients might degrade performance.
Ensure that the server video resolution and refresh rate are
supported by KX II and that the signal is non-interlaced. The
KX II supports these resolutions:
Mouse Modes
The KX II operates in several mouse modes:
Absolute Mouse Mode™ (D2CIM-VUSB only)
Intelligent Mouse Mode (do not use an animated mouse)
Standard Mouse Mode
Mouse parameters do not have to be altered for Absolute
Mouse Synchronization but D2CIM-VUSB or D2CIM-DVUSB
is required for this mode. For both the Standard and Intelligent
mouse modes, mouse parameters must be set to specific
values, which are described here. Mouse configurations will
Dominion KX II Quick Setup Guide 2
QSG-DKX2-v2.3.5-0I-E 255-62-4022-00-RoHS
vary on different target operating systems. Consult your OS
documentation for additional detail.
Windows 2000 Settings
To configure KVM target servers running Microsoft
Windows 2000® operating system:
1. Configure the mouse settings:
a. Choose Start > Control Panel > Mouse.
b. Click the Motion tab.
Set the acceleration to None.
Set the mouse motion speed setting to exactly the
middle speed.
Click OK.
2. Disable transition effects:
a. Select the Display option from the Control Panel.
b. Click the Effects tab.
Deselect the "Use the following transition effect for
menus and tooltips" option.
3. Click OK and close the Control Panel.
Windows XP, Windows 2003 and Windows 2008
Settings
To configure KVM target servers running Windows
XP®, Windows 2003® and Windows 2008®:
1. Configure the mouse settings:
a. Choose Start > Control Panel > Mouse.
b. Click the Pointer Options tab.
c. In the Motion group:
Set the mouse motion speed setting to exactly the
middle speed.
Disable the "Enhance pointer precision" option.
Disable the Snap To option.
Click OK.
2. Disable transition effects:
a. Select the Display option from the Control Panel.
b. Click the Appearance tab.
Click the Effects button.
Deselect the "Use the following transition effect for
menus and tooltips" option.
3. Click OK and close the Control Panel.
Note: For KVM target servers running Windows XP, Windows
2000 or Windows 2008, you may wish to create a user name
that will be used only for remote connections through the KX
II. This will enable you to keep the target server's slow mouse
pointer motion/acceleration settings exclusive to the KX II
connection.
Windows XP, 2000, and 2008 login pages revert to preset
mouse parameters that differ from those suggested for
optimal KX II performance. As a result, mouse
synchronization may not be optimal for these screens.
WARNING! Proceed only if you are comfortable adjusting the
registry on Windows KVM target servers. You can obtain
better KX II mouse synchronization at the login pages by
using the Windows registry editor to change the following
settings: HKey_USERS\.DEFAULT\Control Panel\Mouse: >
MouseSpeed = 0;MouseThreshold 1=0;MouseThreshold
2=0.
Microsoft Windows 7 and Windows Vista Settings
To configure KVM target servers running Windows
Vista® operating system:
1. Configure the mouse settings:
a. Choose Start > Settings > Control Panel > Mouse.
b. Select "Advanced system settings" from the left
navigation panel. The System Properties dialog opens.
c. Click the Pointer Options tab.
d. In the Motion group:
Set the mouse motion speed setting to exactly the
middle speed.
Disable the "Enhanced pointer precision" option.
Click OK.
2. Disable animation and fade effects:
a. Select the System option from the Control Panel.
b. Select Performance Information then Tools >
Advanced Tools > Adjust to adjust the appearance and
performance of Windows.
c. Click the Advanced tab.
d. Click the Settings button in the Performance group to
open the Performance Options dialog.
e. Under Custom options, deselect the following
checkboxes:
Animation options:
Animate controls and elements inside windows
Animate windows when minimizing and maximizing
Fade options:
Fade or slide menus into view
Fade or slide ToolTips into view
Fade out menu items after clicking
3. Click OK and Close the Control Panel.
To configure KVM target servers running Windows 7
operating system:
1. Configure the mouse settings:
a. Choose Start > Control Panel > Hardware and Sound
> Mouse.
b. Click the Pointer Options tab.
c. In the Motion group:
Set the mouse motion speed setting to exactly the
middle speed.
Disable the "Enhanced pointer precision" option.
Click OK.
®
Dominion KX II Quick Setup Guide 3
QSG-DKX2-v2.3.5-0I-E 255-62-4022-00-RoHS
2. Disable animation and fade effects:
a. Select Control Panel > System and Security.
b. Select System and then select "Advanced system
settings" from the left navigation panel. The System
Properties dialog appears.
c. Click the Advanced tab.
d. Click the Settings button in the Performance group to
open the Performance Options dialog.
e. Under Custom options, deselect the following
checkboxes:
Animation options:
Animate controls and elements inside windows
Animate windows when minimizing and maximizing
Fade options:
Fade or slide menus into view
Fade or slide ToolTips into view
Fade out menu items after clicking
3. Click OK and Close the Control Panel.
Linux Settings
To configure KVM target servers running Linux
(Standard Mouse Mode only) Set the mouse acceleration
to exactly 1 and set the threshold to exactly 1. Enter the
following command: xset mouse 1 1. This should be set
for execution upon login.
®
:
Sun Solaris Settings
To configure KVM target servers running Sun
Solaris™:
1. Set the mouse acceleration value to exactly 1 and the
threshold to exactly 1.
2. Ensure that your video card is set to a supported
resolution and that its output is VGA, not composite sync.
®
Apple Macintosh Settings
To configure KVM target servers running Apple Mac:
For KVM target servers running an Apple Macintosh®
operating system, the preferred method is to use the
D2CIM-VUSB and Absolute Mouse Synchronization.
Note: 'USB Profile 'Mac OS-X, version 10.4.9 and later' must
be selected from the USB Profile menu or the Port
Configuration page.
IBM AIX Settings
To configure KVM target servers running IBM AIX
Go to the Style Manager, click on Mouse Settings and set
Mouse Acceleration to 1.0 and Threshold to 3.0.
QS Rule
®
:
Step 2: Configure Network Firewall Settings
To enable remote access to the KX II, your network and
firewall must allow communication on TCP Port 5000. You
can also configure the KX II to use a different TCP port, then
allow communication on that port.
To access the KX II via a web browser, your firewall must also
allow access to TCP Port 443 (Standard HTTPS). Access to
TCP Port 80 (Standard HTTP) enables automatic redirection
of HTTP requests to HTTPS.
QS Rule
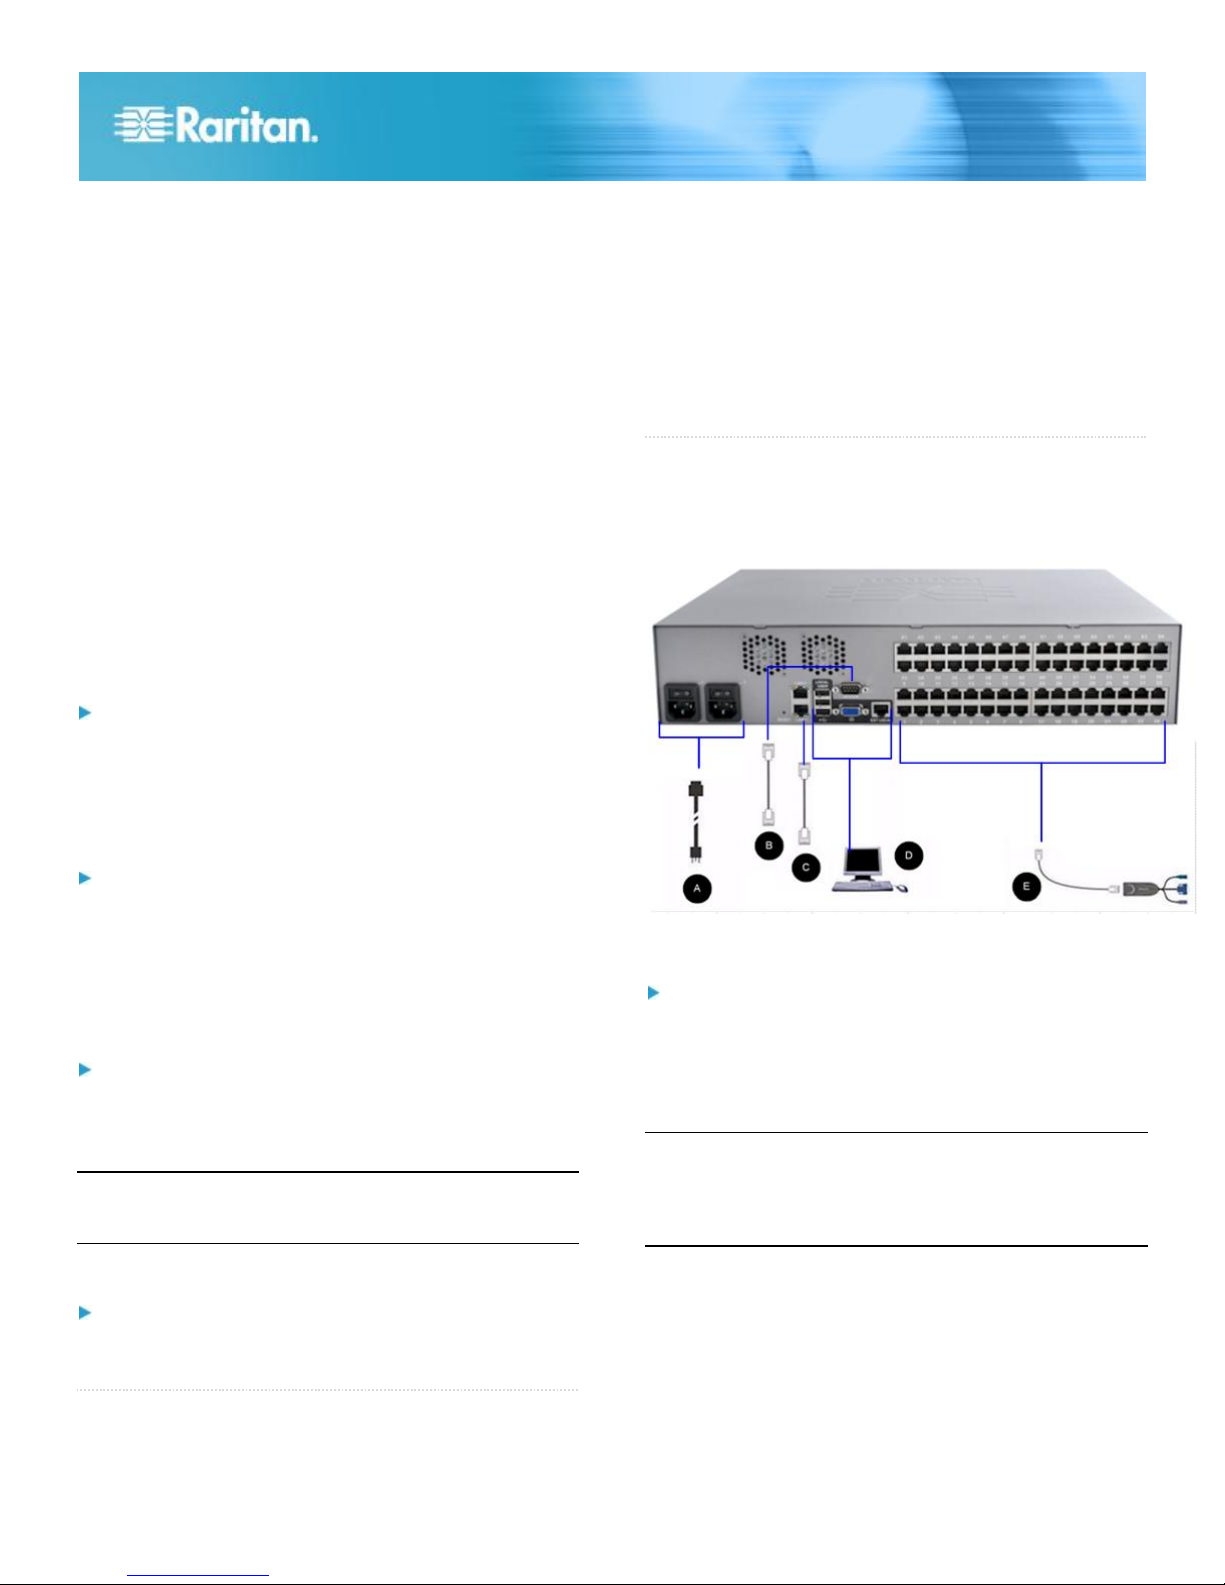
Step 3: Connect the Equipment
Connect the KX II to the power supply, network, local PC, and
target servers. The letters in the diagram correspond to the
topics in this section that describe the connection.
A. AC Power
To connect the power supply:
1. Attach the included AC power cord to the KX II and plug
into an AC power outlet.
2. For dual power failover protection, attach the second
included AC power cord and plug it into a different power
source than the first power cord.
Note: If you only attach one power cord, the power LED on
the KX II front panel will be red because the system is set to
automatically detect both sources. See Power Supply Setup
in the KX II help for information about turning off automatic
detection for the power source that is not in use.
B. Modem Port (Optional)
Please see the KX II User Guide for information on connecting
modems.
C. Network Port
The KX II provides two Ethernet ports for failover purposes
(not for load-balancing). By default, only LAN1 is active and
 Loading...