

Raritan ICER-ETTE 84, ICER-ETTE 85 Installation, Operation, Maintenance And Troubleshooting Manual
ICER-ETTE™
MODEL 84 and 85 AUTOMATIC ICE CUBE MAKER
INSTALLATION, OPERATION, MAINTENANCE AND TROUBLESHOOTING
WARNING: Raritan Engineering Company, Inc. recommends that a qualified technician install, troubleshoot
and repair this product. Equipment damage, injury to personnel or death could result from
improper installation. Raritan Engineering Company, Inc. accepts no responsibility or liability
from damage to equipment, or injury or death to personnel that may result from improper
installation of this product.
WARNING: Refrigeration Equipment contains refrigerant fluids under very HIGH PRESSURE. Danger of
sudden pressure release may cause injury, death or severe frostbite resulting from not following
instructions.
CAUTIONS:DO NOT plug a 120 volt unit into a 240 volt power source.
DO NOT plug a 240 volt unit into a 120 volt power source.
DO NOT use a transformer to step down 240 volt 50 HZ power supply to 120 volt.
Equipment designed for 60 HZ may run slow on 50 HZ, resulting in inferior operation and possible
overheating of the motor(s).
WARNING: This device is not ignition protected. DO NOT install in compartments containing gasoline tanks
or in areas in which
ignition protected equipment is required.
INTRODUCTION
Series 84 and 85 Icer-ettes are CFC-Free automatic
icemakers designed and manufactured especially for
the marine environment. They produce up to 22 lbs
(10kg) of crescent shaped ice per day and can store 11
lbs (5kg). Two cabinet configurations are offered,
allowing counter height installations and shorter
limited height installations. Installation and
maintenance are simple because no drain is required
and the thermostat is fixed; never needing adjustment.
OPERATION
The Icer-ette's on-off switch is just beneath the door.
A unit begins to produce ice within 60 minutes after
start-up. Ice production stops automatically when
the bucket is full enough to interfere with the wire
shut-off arm. The unit should not be turned "off" with
the door closed and ice or water inside.
NOTES:
1. Due to fast freezing, ice cubes may appear
"cloudy". This is trapped air in the water and
does not affect the taste or quality of the ice.
2. "Hollow" ice cubes may result from fastfreezing under certain climatic conditions such
as high humidity, etc. and is not an indication
of a problem with the icemaker.
MAINTENANCE
Periodically vacuum dust and dirt from the condenser,
located behind louvered grill at the bottom front of
the unit; taking care not to damage aluminum fins in
the process. Regularly inspect plumbing connections
to insure that no leaks are present.
When necessary, defrost and thoroughly clean the
inside of the unit with mild soap and water. Do not
use electrical heating devices, sharp or pointed tools
when defrosting. When defrosting or leaving the unit
turned off, prop and leave the door open using door
lock link. This allows air to dry the inside of the
cabinet, reducing the chance for mildew and damage
to the mold mechanism's components.
WINTERIZING
WARNING: Disconnect power at source before
working on the unit. Do not winterize this unit
with ANY type of anti-freeze; damage to the mold
coating will occur, invalidating product's Limited
Warranty and creating potential health hazard.
1. Shut off the water supply to the unit.
2. Disconnect as follows:
Model 85: Disconnect water supply connector behind
front grille at solenoid valve (garden hose connector).
Remove white plastic tubing and nut from bottom of
solenoid valve.
Model 84: Disconnect the in-line water supply
connector behind the front grille.
3. Turn power on. Allow unit to run for an hour.
Remove any cubes that may have been ejected
1
during this period. Turn off power and prop door
open to allow the inside to defrost. After it has
defrosted, wipe it dry and leave door open using
door lock link.
RECOMMISSIONING
Connect water supply lines, turn on water, check for
leaks, then restore power to the unit. After initial cool
down of 45-60 minutes, the unit will cycle
approximately every 40 minutes.
MOUNTING
WARNING: If rubber feet are removed from the
bottom of 85 series units, the mounting screws
must be reinstalled into the bottom of the cabinet
to avoid damage to components mounted to the
base pan.
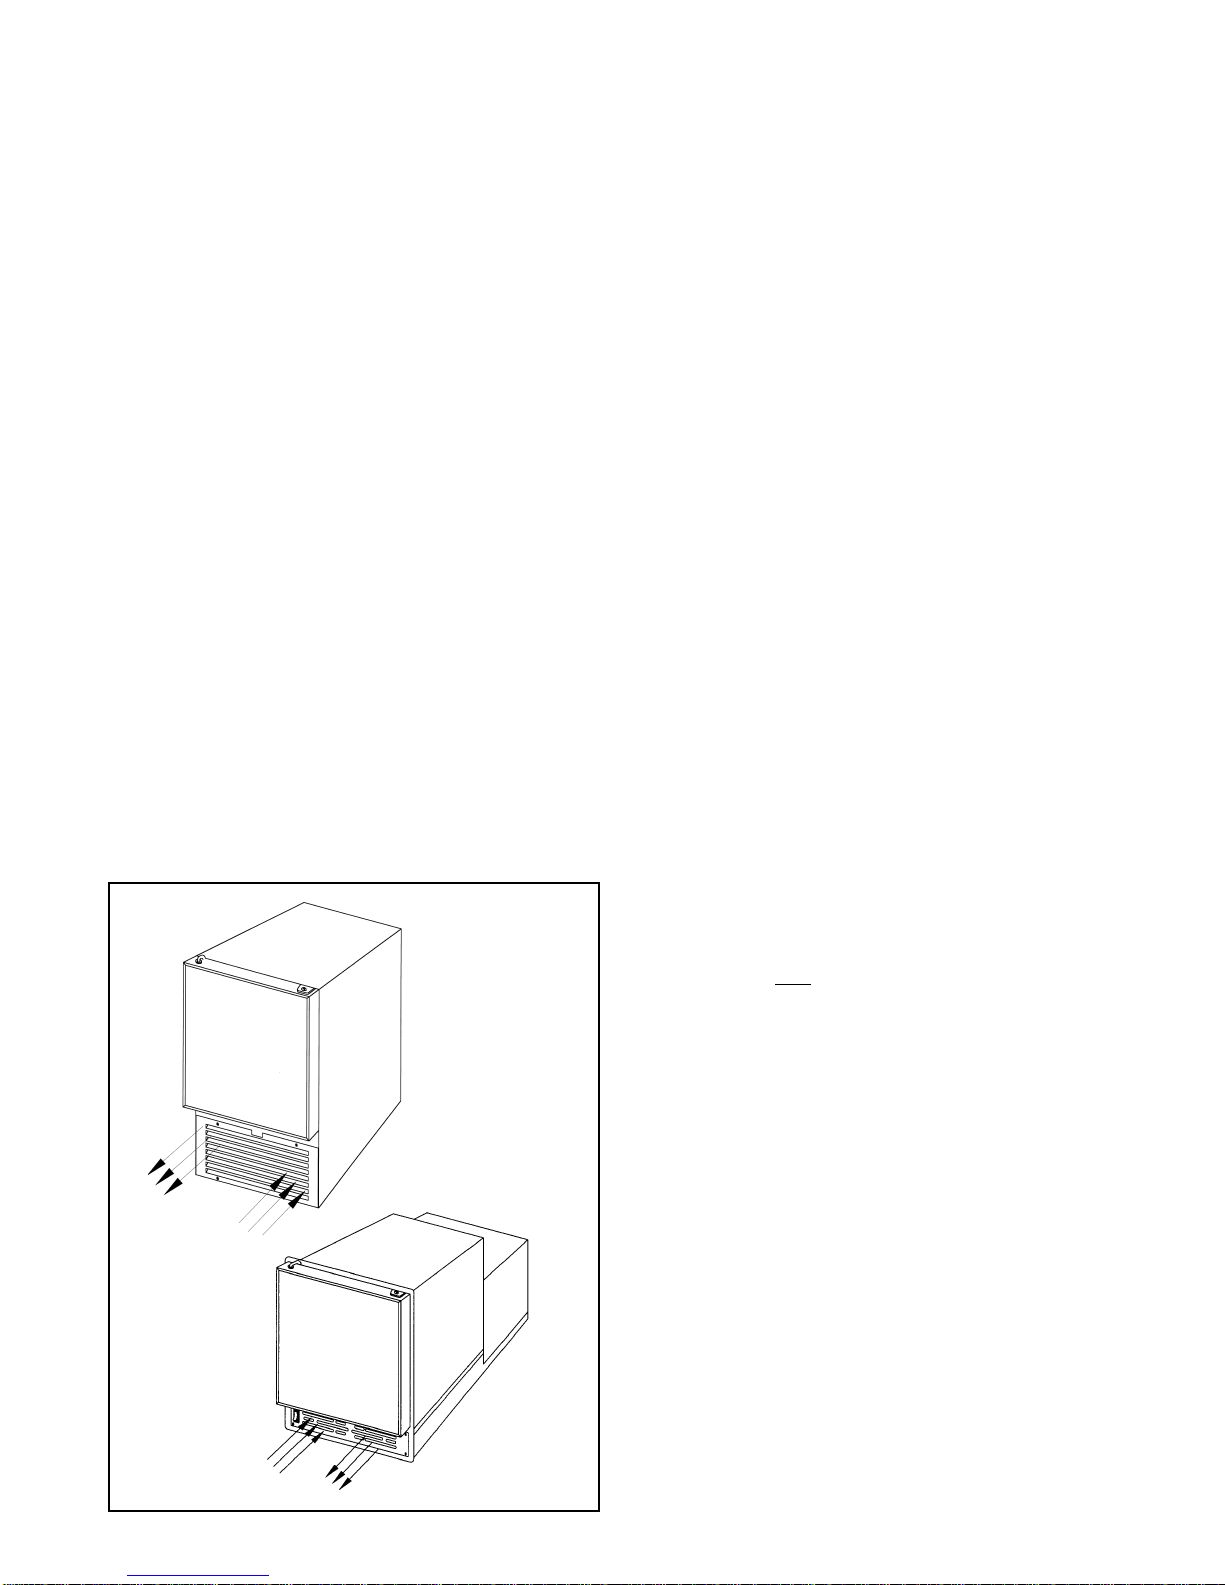
If unit is to be built-in, 3/4" (2cm) or more must be
allowed behind the unit for water line and plug
clearance for proper operation. Built-in units are
designed for zero clearance at the top and each side
of the unit. Fan-forced condenser cooling is used.
This requires air circulation through lower section of
unit (see Fig. #1). If Icer-ette is to be installed behind
closed doors, contact Raritan Technical Support.
CAUTION: Any restriction of airflow or
ventilation will disrupt normal operation of the
unit, resulting in damage to components and voids
warranty.
FIG. #1 Ventilation
Model 85
Unit must sit on a secure level surface. Mounting
flange must NOT be used to support the unit's weight.
When installing the unit it should be noted that some
servicing requires access to the rear of the unit and
that the unit must be readily removable should
servicing be necessary.
When mounting unit within cabinetry, make sure
that the door has the desired range of motion. All
doors are hinged on the right (facing the unit) but may
be reversed in the field.
PLUMBING
A minimum of 22 P.S.I. (152kPa) is required for
proper operation of the water valve (see #27, page 4).
When plumbing the Model 85 remove front grille.
Run a 1/4" O.D. water line through the rear of the
cabinet (hole provided) and attach to the garden hose
adapter on the solenoid water valve. Replace front
grille.
When plumbing the Model 84, 18" (45cm) of water
line extends from the back with a 1/4" plastic female
compression fitting. Drains are not required; just a
water supply.
WIRING
WARNING: HAZARD OF ELECTRIC SHOCK
- Never use extension cords or plug adapters to
power unit. Never remove the ground prong from
the plug.
Power Requirements: 120 volts 60 HZ AC
(alternating current); a three-wire cord with grounded
plug is supplied,
OR: 240 volts 50 HZ AC (alternating
current), supplied with Euro-plug.
OUT
IN
IN
OUT
Air path for exhaust
and fresh air intake
must be unrestricted!
Recirculation between
fresh air intake and
exhaust air must be
prevented.
Model 84
START-UP
Turn on water, check for leaks and then turn on
power. Turn on switch (located just below Icer-ette
door). Fan and compressor will normally turn on
immediately, resulting in air circulation through the
grille and a faint hum from the compressor. If
machine was shut off while in ice harvesting cycle, it
will have to complete the cycle before compressor
and fan turn on (approximately 5 minutes). Interior
temperature will drop below freezing. First harvest
of ice should occur within 60 minutes of start-up.
After lines are purged of air, normal harvesting and
refilling occur every 40 minutes or less, under normal
conditions.
2
 Loading...