

Raritan Home Security System User Manual

CommandCenter Secure Gateway
Administrators Guide
Release 4.3
Copyright © 2010 Raritan, Inc.
CCA-0K-v4.3-E
December 2009
255-80-5140-00

This document contains proprietary information that is protected by copyright. All rights reserved. No
part of this document may be photocopied, reproduced, or translated into another language without
express prior written consent of Raritan, Inc.
© Copyright 2009 Raritan, Inc., CommandCenter®, Dominion®, Paragon® and the Raritan company
logo are trademarks or registered trademarks of Raritan, Inc. All rights reserved. Java® is a
registered trademark of Sun Microsystems, Inc. Internet Explorer® is a registered trademark of
Microsoft Corporation. Netscape® and Netscape Navigator® are registered trademarks of Netscape
Communication Corporation. All other trademarks or registered tradema rks a re the prope rty of their
respective holders.
FCC Information
This equipment has been tested and found to comply with the limits for a Class A digital device,
pursuant to Part 15 of the FCC Rules. These limits are designed to provide reasonable protection
against harmful interference in a commercial installation. This equipment generates, uses, and can
radiate radio frequency energy and if not installed and used in accordance with the instructions, may
cause harmful interference to radio communications. Operation of this equipment in a residential
environment may cause harmful interference.
VCCI Information (Japan)
Raritan is not responsible for damage to this product resulting from accident, disaster, misuse, abuse,
non-Raritan modification of the product, or other events outside of Raritan's rea son able control or not
arising under normal operating conditions.

Contents
What's New in the CC-SG Administrators Guide xvi
Chapter 1 Introduction 1
Prerequisites..................................................................................................................................1
Terminology/Acronyms..................................................................................................................2
Client Browser Requirements........................................................................................................4
Chapter 2 Accessing CC-SG 5
Browser-Based Access via the CC-SG Admin Client....................................................................5
JRE Incompatibility..............................................................................................................6
Thick Client Access........................................................................................................................6
Install the Thick Client .........................................................................................................6
Use the Thick Client ............................................................................................................7
CC-SG Admin Client......................................................................................................................8
Chapter 3 Getting Started 10
Confirming IP Address.................................................................................................................10
Setting CC-SG Server Time ........................................................................................................10
Checking the Compatibility Matrix ...............................................................................................11
Checking and Upgrading Application Versions ...........................................................................11
Chapter 4 Configuring CC-SG with Guided Setup 13
Before You Use Guided Setup ....................................................................................................13
Associations in Guided Setup......................................................................................................14
Create Categories and Elements ......................................................................................14
Device Setup................................................................................................................................14
Discover and Add Devices ................................................................................................15
Creating Groups...........................................................................................................................16
Add Device Groups and Node Groups..............................................................................16
User Management .......................................................................................................................18
Add User Groups and Users .............................................................................................19
Chapter 5 Associations, Categories, and Elements 21
About Associations ............................................................................................................. .........21
Association Terminology ...................................................................................................21
Associations - Defining Categories and Elements............................................................21
iii

Contents
How to Create Associations ..............................................................................................22
Adding, Editing, and Deleting Categories and Elements.............................................................22
Add a Category..................................................................................................................22
Delete a Category..............................................................................................................23
Add an Element.................................................................................................................23
Adding Categories and Elements with CSV File Import..............................................................23
Categories and Elements CSV File Requirements ...........................................................24
Sample Categories and Elements CSV File......................................................................25
Import Categories and Elements.......................................................................................25
Export Categories and Elements.......................................................................................26
Chapter 6 Devices, Device Groups, and Ports 27
Viewing Devices...........................................................................................................................28
The Devices Tab................................................................................................................28
Device and Port Icons .......................................................................................................28
Port Sorting Options ..........................................................................................................29
Device Profile Screen........................................................................................................30
Topology View...................................................................................................................31
Right Click Options in the Devices Tab.............................................................................32
Searching for Devices..................................................................................................................32
Wildcards for Search .........................................................................................................32
Wildcard Examples............................................................................................................32
Discovering Devices ....................................................................................................................33
Adding a Device...........................................................................................................................34
Add a KVM or Serial Device..............................................................................................34
Add a PowerStrip Device...................................................................................................36
Add a Dominion PX Device...............................................................................................36
Editing a Device...........................................................................................................................37
Editing a PowerStrip Device or a Dominion PX Device...............................................................37
Adding Notes to a Device Profile.................................................................................................38
Adding Location and Contacts to a Device Profile ......................................................................38
Deleting a Device.........................................................................................................................39
Configuring Ports.........................................................................................................................39
Configure a Serial Port......................................................................................................39
Configure a KVM Port........................................................................................................40
Nodes Created by Configuring Ports.................................................................................40
Editing a Port ...............................................................................................................................41
Deleting a Port.............................................................................................................................42
Configuring a Blade Chassis Device Connected to KX2.............................................................42
Blade Chassis Overview....................................................................................................42
Add a Blade Chassis Device.............................................................................................43
Edit a Blade Chassis Device .............................................................................................46
Delete a Blade Chassis Device.........................................................................................47
Move a Blade Chassis Device to a Different Port .............................................................47
Restore Blade Servers Ports to Normal KX2 Ports.....................................................................47
Bulk Copying for Device Associations, Location and Contacts...................................................48
Device Group Manager................................................................................................................49
Device Groups Overview...................................................................................................49
Add a Device Group..........................................................................................................50
Edit a Device Group ..........................................................................................................53
iv

Contents
Delete a Device Group......................................................................................................54
Adding Devices with CSV File Import..........................................................................................54
Devices CSV File Requirements.......................................................................................55
Sample Devices CSV File .................................................................................................58
Import Devices...................................................................................................................58
Export Devices...................................................................................................................59
Upgrading a Device .....................................................................................................................59
Backing Up a Device Configuration.............................................................................................60
Restoring Device Configurations.................................................................................................61
Restore a Device Configuration (KX, KSX, KX101, SX, IP-Reach)..................................61
Restore All Configuration Data Except Network Settings to a KX2, KSX2, or KX2-101
Device......................................................................................................................... .......62
Restore Only Device Settings or User and User Group Data to a KX2, KSX2, or KX2-101
Device......................................................................................................................... .......62
Restore All Configuration Data to a KX2, KSX2, or KX2-101 Device ...............................63
Save, Upload, and Delete Device Backup Files................................................................63
Copying Device Configuration.....................................................................................................64
Restarting a Device......................................................................................................................65
Pinging the Device.......................................................................................................................65
Pausing CC-SG's Management of a Device................................................................................65
Resuming Management...............................................................................................................65
Device Power Manager................................................................................................................66
Launching a Device's Administrative Page..................................................................................66
Disconnecting Users....................................................................................................................67
Special Access to Paragon II System Devices............................................................................67
Paragon II System Controller (P2-SC) ..............................................................................67
IP-Reach and UST-IP Administration................................................................................68
Chapter 7 Managed Powerstrips 69
Configuring Powerstrips that are Managed by Another Device in CC-SG..................................70
Configuring PowerStrips Connected to KX, KX2, KX2-101, KSX2, and P2SC...........................71
Add a PowerStrip Device Connected to a KX, KX2, KX2-101, KSX2, or P2SC Device...71
Move a KX, KX2, KX2-101, KSX2, or P2SC's PowerStrip to a Different Port...................71
Delete a PowerStrip Connected to a KX, KX2, KX2-101, KSX2, or P2SC Device...........72
Configuring PowerStrips Connected to SX 3.0 and KSX ............................................................72
Add a PowerStrip Connected to an SX 3.0 or KSX device ...............................................72
Delete a PowerStrip Connected to an SX 3.0 or KSX Device...........................................73
Change a PowerStrip's Device or Port Association (SX 3.0, KSX)...................................73
Configuring Powerstrips Connected to SX 3.1 ............................................................................74
Add a Powerstrip Connected to an SX 3.1 Device............................................................74
Move an SX 3.1's Powerstrip to a Different Port...............................................................75
Delete a PowerStrip Connected to an SX 3.1 Device.......................................................75
Configuring Outlets on a Powerstrip............................................................................................75
Chapter 8 Nodes, Node Groups, and Interfaces 77
Nodes and Interfaces Overview...................................................................................................77
About Nodes......................................................................................................................77
Node Names......................................................................................................................78
v

Contents
About Interfaces.................................................................................................................78
Viewing Nodes.............................................................................................................................78
Nodes Tab.........................................................................................................................78
Node Profile.......................................................................................................................79
Node and Interface Icons ..................................................................................................81
Service Accounts.........................................................................................................................82
Service Accounts Overview...............................................................................................82
Add, Edit, and Delete Service Accounts............................................................................83
Change the Password for a Service Account....................................................................83
Assign Service Accounts to Interfaces..............................................................................84
Adding, Editing, and Deleting Nodes...........................................................................................85
Add a Node........................................................................................................................85
Nodes Created by Configuring Ports.................................................................................86
Edit a Node........................................................................................................................86
Delete a Node....................................................................................................................86
Adding Location and Contacts to a Node Profile.........................................................................87
Adding Notes to a Node Profile ...................................................................................................87
Configuring the Virtual Infrastructure in CC-SG ..........................................................................88
Terminology for Virtual Infrastructure................................................................................88
Virtual Nodes Overview.....................................................................................................89
Add a Control System with Virtual Hosts and Virtual Machines........................................89
Add a Virtual Host with Virtual Machines ..........................................................................91
Edit Control Systems, Virtual Hosts, and Virtual Machines...............................................94
Delete Control Systems and Virtual Hosts........................................................................95
Delete a Virtual Machine Node..........................................................................................96
Delete a Virtual Infrastructure............................................................................................96
Synchronizing the Virtual Infrastructure with CC-SG...................................................................96
Synchronize the Virtual Infrastructure ...............................................................................96
Enable or Disable Daily Synchronization of the Virtual Infrastructure...............................97
Reboot or Force Reboot a Virtual Host Node..............................................................................97
Accessing the Virtual Topology View...........................................................................................98
Connecting to a Node..................................................................................................................98
Pinging a Node ............................................................................................................................99
Adding, Editing, and Deleting Interfaces......................................................................................99
Add an Interface ................................................................................................................99
Edit an Interface ..............................................................................................................108
Delete an Interface ..........................................................................................................109
Bookmarking an Interface..........................................................................................................109
Configuring Direct Port Access to a Node.................................................................................110
Bulk Copying for Node Associations, Location and Contacts ...................................................110
Using Chat.................................................................................................................................111
Adding Nodes with CSV File Import ..........................................................................................112
Nodes CSV File Requirements........................................................................................113
Sample Nodes CSV File..................................................................................................122
Import Nodes...................................................................................................................122
Export Nodes...................................................................................................................123
Adding, Editing, and Deleting Node Groups..............................................................................124
Node Groups Overview...................................................................................................124
Add a Node Group...........................................................................................................124
Edit a Node Group...........................................................................................................128
Delete a Node Group.......................................................................................................128
vi

Contents
Chapter 9 Users and User Groups 129
The Users Tab...........................................................................................................................130
Default User Groups..................................................................................................................131
CC Super-User Group.....................................................................................................131
System Administrators Group..........................................................................................131
CC Users Group..............................................................................................................131
Adding, Editing, and Deleting User Groups...............................................................................132
Add a User Group............................................................................................................132
Edit a User Group............................................................................................................133
Delete a User Group........................................................................................................134
Limit the Number of KVM Sessions per User............................................................................135
Configuring Access Auditing for User Groups...........................................................................135
Adding, Editing, and Deleting Users..........................................................................................136
Add a User.......................................................................................................................136
Edit a User.......................................................................................................................137
Delete a User...................................................................................................................138
Assigning a User to a Group......................................................................................................139
Deleting a User From a Group...................................................................................................139
Adding Users with CSV File Import ...........................................................................................140
Users CSV File Requirements.........................................................................................140
Sample Users CSV File...................................................................................................144
Import Users....................................................................................................................144
Export Users....................................................................................................................145
Your User Profile........................................................................................................................145
Change your password....................................................................................................145
Change your name..........................................................................................................146
Change your default search preference..........................................................................146
Change the CC-SG default font size...............................................................................146
Change your email address.............................................................................................146
Change the CC-SG Super User's Username..................................................................147
Logging Users Out.....................................................................................................................147
Bulk Copying Users ...................................................................................................................148
Chapter 10 Policies for Access Control 149
Adding a Policy..........................................................................................................................150
Editing a Policy ..........................................................................................................................151
Deleting a Policy........................................................................................................................152
Support for Virtual Media...........................................................................................................153
Assigning Policies To User Groups...........................................................................................153
Chapter 11 Custom Views for Devices and Nodes 154
Types of Custom Views.............................................................................................................154
View by Category ............................................................................................................154
Filter by Node Group.......................................................................................................154
Filter by Device Group.....................................................................................................154
vii

Contents
Using Custom Views in the Admin Client ..................................................................................155
Custom Views for Nodes.................................................................................................155
Custom Views for Devices...............................................................................................157
Chapter 12 Remote Authentication 161
Authentication and Authorization (AA) Overview.......................................................................161
Flow for Authentication....................................................................................................161
User Accounts .................................................................................................................162
Distinguished Names for LDAP and AD....................................................................................162
Specify a Distinguished Name for AD.............................................................................162
Specify a Distinguished Name for LDAP.........................................................................162
Specify a Username for AD.............................................................................................163
Specify a Base DN ..........................................................................................................163
Specifying Modules for Authentication and Authorization .........................................................163
Establishing Order of External AA Servers................................................................................163
AD and CC-SG Overview..........................................................................................................164
Adding an AD Module to CC-SG...............................................................................................164
AD General Settings........................................................................................................165
AD Advanced Settings.....................................................................................................166
AD Group Settings...........................................................................................................167
AD Trust Settings ............................................................................................................168
Editing an AD Module................................................................................................................168
Importing AD User Groups ........................................................................................................169
Synchronizing AD with CC-SG..................................................................................................170
Synchronize All User Groups with AD.............................................................................171
Synchronize All AD Modules...........................................................................................172
Enable or Disable Daily Synchronization of All AD Modules...........................................172
Change the Daily AD Synchronization Time...................................................................173
About LDAP and CC-SG ...........................................................................................................173
Add an LDAP (Netscape) Module to CC-SG.............................................................................173
LDAP General Settings ...................................................................................................174
LDAP Advanced Settings................................................................................................174
Sun One LDAP (iPlanet) Configuration Settings.............................................................175
OpenLDAP (eDirectory) Configuration Settings..............................................................176
IBM LDAP Configuration Settings ...................................................................................176
About TACACS+ and CC-SG....................................................................................................177
Add a TACACS+ Module...........................................................................................................177
TACACS+ General Settings............................................................................................177
About RADIUS and CC-SG.......................................................................................................178
Add a RADIUS Module..............................................................................................................178
RADIUS General Settings...............................................................................................178
Two-Factor Authentication Using RADIUS......................................................................179
Chapter 13 Reports 180
Using Reports............................................................................................................................180
Sort Report Data..............................................................................................................180
Resize Report Column Width..........................................................................................180
View Report Details.........................................................................................................181
viii

Contents
Navigate Multiple Page Reports......................................................................................181
Print a Report...................................................................................................................181
Save a Report to a File....................................................................................................181
Purge a Report's Data From CC-SG...............................................................................182
Hide or Show Report Filters ............................................................................................182
Audit Trail Report.......................................................................................................................182
Error Log Report........................................................................................................................183
Access Report............................................................................................................................184
Availability Report......................................................................................................................184
Active Users Report...................................................................................................................185
Locked Out Users Report..........................................................................................................185
All Users Data Report................................................................................................................185
User Group Data Report............................................................................................................186
Device Asset Report..................................................................................................................186
Device Group Data Report ........................................................................................................187
Query Port Report......................................................................................................................187
Node Asset Report.....................................................................................................................188
Active Nodes Report..................................................................................................................189
Node Creation Report................................................................................................................189
Node Group Data Report...........................................................................................................190
AD User Group Report ..............................................................................................................190
Scheduled Reports ....................................................................................................................191
Upgrade Device Firmware Report.............................................................................................192
Chapter 14 System Maintenance 193
Maintenance Mode ....................................................................................................................193
Scheduled Tasks and Maintenance Mode......................................................................193
Entering Maintenance Mode......................................................................................................193
Exiting Maintenance Mode ........................................................................................................194
Backing Up CC-SG....................................................................................................................194
What is the difference between Full backup and Standard backup?..............................196
Saving and Deleting Backup Files.............................................................................................196
Save a Backup File..........................................................................................................196
Delete a Backup File .......................................................................................................196
Restoring CC-SG.......................................................................................................................197
Resetting CC-SG.......................................................................................................................198
Restarting CC-SG......................................................................................................................200
Upgrading CC-SG......................................................................................................................201
Clear the Browser's Cache..............................................................................................203
Clear the Java Cache......................................................................................................203
CC-SG Shutdown ......................................................................................................................203
Restarting CC-SG after Shutdown.............................................................................................204
Powering Down CC-SG.............................................................................................................204
Ending CC-SG Session .............................................................................................................205
Log Out of CC-SG...........................................................................................................205
Exit CC-SG......................................................................................................................205
ix

Contents
Chapter 15 Advanced Administration 206
Configuring a Message of the Day ............................................................................................206
Configuring Applications for Accessing Nodes..........................................................................207
About Applications for Accessing Nodes.........................................................................207
Checking and Upgrading Application Versions...............................................................207
Older Version of Application Opens After Upgrading......................................................208
Add an Application...........................................................................................................208
Delete an Application.......................................................................................................209
Prerequisites for Using AKC............................................................................................209
Configuring Default Applications................................................................................................209
About Default Applications ..............................................................................................209
View the Default Application Assignments......................................................................210
Set the Default Application for an Interface or Port Type................................................210
Managing Device Firmware.......................................................................................................210
Upload Firmware .............................................................................................................210
Delete Firmware ..............................................................................................................211
Configuring the CC-SG Network................................................................................................211
About Network Setup.......................................................................................................211
About CC-SG LAN Ports.................................................................................................211
What is IP Failover mode? ..............................................................................................212
What is IP Isolation mode?..............................................................................................215
Recommended DHCP Configurations for CC-SG...........................................................217
Configuring Logging Activity......................................................................................................217
Purge CC-SG's Internal Log............................................................................................217
Configuring the CC-SG Server Time and Date .........................................................................218
Connection Modes: Direct and Proxy........................................................................................219
About Connection Modes................................................................................................219
Configure Direct Mode for All Client Connections...........................................................219
Configure Proxy Mode for All Client Connections...........................................................220
Configure a Combination of Direct Mode and Proxy Mode.............................................220
Device Settings..........................................................................................................................220
Enable AKC Download Server Certificate Validation Overview......................................222
Configuring Custom JRE Settings.............................................................................................223
Configuring SNMP.....................................................................................................................224
MIB Files...................................................................................................................... ....225
Configuring CC-SG Clusters......................................................................................................225
Requirements for CC-SG Clusters..................................................................................226
Access a CC-SG Cluster.................................................................................................226
Create a Cluster...............................................................................................................226
Configure Cluster Settings...............................................................................................227
Switch the Primary and Secondary Node Status ............................................................228
Recover a Cluster............................................................................................................228
Delete a Cluster...............................................................................................................229
Configuring a Neighborhood......................................................................................................229
What is a Neighborhood?................................................................................................229
Create a Neighborhood...................................................................................................230
Edit a Neighborhood........................................................................................................231
Refresh a Neighborhood .................................................................................................233
Delete a Neighborhood....................................................................................................233
x

Contents
Security Manager............................................................................................................... ........234
Remote Authentication....................................................................................................234
AES Encryption................................................................................................................234
Configure Browser Connection Protocol: HTTP or HTTPS/SSL.....................................236
Set the Port Number for SSH Access to CC-SG.............................................................236
Login Settings..................................................................................................................236
Configure the Inactivity Timer..........................................................................................239
Portal ...............................................................................................................................239
Certificates.......................................................................................................................241
Access Control List..........................................................................................................244
Notification Manager..................................................................................................................245
Configure an External SMTP Server...............................................................................245
Task Manager............................................................................................................................246
Task Types......................................................................................................................246
Schedule Sequential Tasks.............................................................................................247
Email Notifications for Tasks...........................................................................................247
Scheduled Reports..........................................................................................................247
Find and View Tasks.......................................................................................................247
Schedule a Task..............................................................................................................248
Schedule a Device Firmware Upgrade............................................................................250
Change a Scheduled Task..............................................................................................252
Reschedule a Task..........................................................................................................252
Schedule a Task that is Similar to Another Task.............................................................252
Delete a Task...................................................................................................................253
SSH Access to CC-SG ..............................................................................................................253
Get Help for SSH Commands .........................................................................................254
SSH Commands and Parameters...................................................................................255
Command Tips................................................................................................................257
Create an SSH Connection to a Serial-Enabled Device.................................................258
Use SSH to Connect to a Node via a Serial Out-of-Band Interface................................259
End SSH Connections.....................................................................................................260
Serial Admin Port.......................................................................................................................261
About Terminal Emulation Programs...............................................................................261
Finding Your CC-SG Serial Number................................................................................261
Web Services API......................................................................................................................262
CC-NOC.....................................................................................................................................263
Chapter 16 Diagnostic Console 264
Accessing Diagnostic Console ..................................................................................................264
Access Diagnostic Console via VGA/Keyboard/Mouse Port...........................................264
Access Diagnostic Console via SSH...............................................................................264
Status Console...........................................................................................................................265
About Status Console......................................................................................................265
Access Status Console....................................................................................................265
Status Console Information.............................................................................................266
Administrator Console ...............................................................................................................271
About Administrator Console...........................................................................................271
Access Administrator Console.........................................................................................271
Navigate Administrator Console......................................................................................273
Edit Diagnostic Console Configuration............................................................................274
xi

Contents
Edit Network Interfaces Configuration (Network Interfaces) ...........................................275
Ping an IP Address..........................................................................................................276
Use Traceroute................................................................................................................277
Edit Static Routes............................................................................................................278
View Log Files in Diagnostic Console .............................................................................280
Restart CC-SG with Diagnostic Console.........................................................................283
Reboot CC-SG with Diagnostic Console.........................................................................284
Power Off CC-SG System from Diagnostic Console.......................................................285
Reset CC Super-User Password with Diagnostic Console.............................................286
Reset CC-SG Factory Configuration (Admin) .................................................................287
Diagnostic Console Password Settings...........................................................................289
Diagnostic Console Account Configuration.....................................................................291
Configure Remote System Monitoring ............................................................................293
Display Historical Data Trending Reports .......................................................................294
Display RAID Status and Disk Utilization........................................................................295
Perform Disk or RAID Tests............................................................................................296
Schedule Disk Tests........................................................................................................298
Repair or Rebuild RAID Disks.........................................................................................299
View Top Display with Diagnostic Console.....................................................................301
Display NTP Status .........................................................................................................301
Take a System Snapshot ................................................................................................303
Change the Video Resolution for Diagnostic Console....................................................304
Chapter 17 Power IQ Integration 305
Power Control of Power IQ IT Devices......................................................................................305
Configuring Power IQ Services .......................................................................................305
Configuring Power Control of Power IQ IT Devices........................................................306
Importing and Exporting Dominion PX Data from Power IQ .....................................................306
Import Power Strips from Power IQ.................................................................................307
Export Dominion PX Data to Use in Power IQ................................................................308
Appendix A Specifications for V1 and E1 310
V1 Model....................................................................................................................................310
V1 General Specifications...............................................................................................310
V1 Environmental Requirements.....................................................................................310
E1 Model....................................................................................................................................311
E1 General Specifications...............................................................................................311
E1 Environmental Requirements.....................................................................................311
Appendix B CC-SG and Network Configuration 313
Required Open Ports for CC-SG Networks: Executive Summary.............................................313
CC-SG Communication Channels.............................................................................................314
CC-SG and Raritan Devices............................................................................................315
CC-SG Clustering............................................................................................................315
Access to Infrastructure Services....................................................................................316
PC Clients to CC-SG.......................................................................................................316
PC Clients to Nodes........................................................................................................317
xii

Contents
CC-SG and Client for IPMI, iLO/RILOE, DRAC, RSA.....................................................318
CC-SG and SNMP...........................................................................................................318
CC-SG Internal Ports.......................................................................................................319
CC-SG Access via NAT-enabled Firewall.......................................................................319
RDP Access to Nodes.....................................................................................................319
VNC Access to Nodes.....................................................................................................320
SSH Access to Nodes.....................................................................................................320
Remote System Monitoring Port......................................................................................320
xiii

Contents
Appendix C User Group Privileges 321
Appendix D SNMP Traps 330
Appendix E CSV File Imports 332
Common CSV File Requirements..............................................................................................333
Audit Trail Entries for Importing.................................................................................................334
Troubleshoot CSV File Problems ..............................................................................................335
Appendix F Troubleshooting 336
Appendix G Diagnostic Utilities 338
Memory Diagnostic....................................................................................................................338
Debug Mode ..............................................................................................................................339
CC-SG Disk Monitoring .............................................................................................................340
Appendix H Two-Factor Authentication 343
Supported Environments for Two-Factor Authentication...........................................................343
Two-Factor Authentication Setup Requirements.......................................................................343
Two-Factor Authentication Known Issues.................................................................................343
Appendix I FAQs 344
General FAQs............................................................................................................................344
Authentication FAQs..................................................................................................................346
Security FAQs............................................................................................................................347
Accounting FAQs.......................................................................................................................348
Performance FAQs....................................................................................................................348
Grouping FAQs..........................................................................................................................349
Interoperability FAQs.................................................................................................................350
Authorization FAQs....................................................................................................................350
User Experience FAQs..............................................................................................................350
Appendix J Keyboard Shortcuts 352
Appendix K Naming Conventions 353
User Information ........................................................................................................................353
xiv

Contents
Node Information .......................................................................................................................353
Location Information ..................................................................................................................354
Contact Information....................................................................................................................354
Service Accounts.......................................................................................................................354
Device Information.....................................................................................................................354
Port Information .........................................................................................................................355
Associations...............................................................................................................................355
Administration............................................................................................................................355
Appendix L Diagnostic Console Bootup Messages 356
Index 357
xv

What's New in the CC-SG
Administrators Guide
The following sections have changed or information has been added to
the CommandCenter Secure Gateway Administrators Guide based on
enhancements and changes to the equipment and/or documentation.
• Discover and Add Devices (on page 15)
• Add User Gr
• Add a KVM
• Devic
• Add an Inter
• Interface
• DRAC 5 Con
• M
• Java RDP Connec
• Interface
• Interface
• Interface
• Node
• Add a User
• Edit a User
• Limit the Nu
• Use
• IBM
• Older Versio
• Con
• What is IP F
• What is IP Is
• Requir
• Acc
• Switch th
• Edit Network
• Power Control of Power IQ IT Devices (on pa
• Con
es CSV File Requirements (on page 55)
icrosoft RDP Connection Details (on page 102)
Control Connections (on page 103)
page 105)
s CSV File Requirements (on page 113)
rs CSV File Requirements (on page 140)
LDAP Configuration Settings (on page 176)
208)
figuring the CC-SG Network (on page 211)
ess a CC-SG Cluster (on page 226)
page 275)
figuring Power IQ Services (on page 305)
oups and Users (on page 19)
or Serial Device (on page 34)
face (on page 99)
s for In-Band Connections (on page 101)
nection Details (on page 101)
tion Details (on page 102)
s for DRAC Power Control Connections (on page 103)
s for ILO Processor, Integrity ILO2 , and RSA Power
s for Power IQ Proxy Power Control Connections (on
Group (on page 132)
Group (on page 133)
mber of KVM Sessions per User (on page 135)
n of Application Opens After Upgrading (on page
ailover mode? (on page 212)
olation mode? (on page 215)
ements for CC-SG Clusters (on page 226)
e Primary and Secondary Node Status (on page 228)
Interfaces Configuration (Network Interfaces) (on
ge 305)
xvi

What's New in the CC-SG Administrators Guide
• Configuring Power Control of Power IQ IT Devices (on page 306)
• CC-SG Clustering (on page 315)
See the Rel
ease Notes for a more detailed explanation of the changes
applied to this version of the CommandCenter Secure Gateway.
xvii


Chapter 1
Prerequisites
Introduction
The CommandCenter Secure Gateway (CC-SG) Administrators Guide
offers instructions for administering and maintaining your CC-SG.
This guide is intended for administrators who typically have all available
privileges.
Users who are not administrators should see Raritan's CommandCenter
Secure Gateway User Guide.
In This Chapter
Prerequisites..............................................................................................1
Terminology/Acronyms..............................................................................2
Client Browser Requi
Before configuring a CC-SG according to the procedures in this
document, see Raritan's CommandCenter Secure Gateway
Deployment Guide for more comprehensive instructions on deploying
Raritan devices that are managed by CC-SG.
rements....................................................................4
1

Chapter 1: Introduction
Terminology/Acronyms
Terms and acronyms found in this document include:
Access Client - HTML-based client intended for use by normal access
users who need to access a node managed by CC-SG. The Access
Client does not allow the use of administration functions.
Admin Client - Java-based client for CC-SG useable by both normal
access users and administrators. It is the only client that permits
administration.
Associations - relationships between categories, elements of a category,
and ports or devices or both. For example, if you want to associate the
“Location” category with a device, create associations before adding
devices and ports in CC-SG.
Category - a variable that contains a set of values or elements. An
example of a Category is Location, which may have elements such as
“New York City,” “Philadelphia,” or “Data Center 1.” When you add
devices and ports to CC-SG, you will associate this information with
them. It is easier if you set up associations correctly first, before adding
devices and ports to them. Another example of a Category is “OS Type,”
which may have elements such as “Windows” or “Unix” or “Linux.”
CIM (Computer Interface Module) - hardware used to connect a target
server and a Raritan device. Each target requires a CIM, except for the
Dominion KX101, which is attached directly to one target and therefore
does not require a CIM. Target servers should be powered on and
connected to CIMs, and CIMs should be connected to the Raritan device
BEFORE adding the device and configuring ports in CC-SG. Otherwise,
a blank CIM name will overwrite the CC-SG port name. Servers must be
rebooted after connecting to a CIM.
Device Group - defined group of devices that are accessible to a user.
Device groups are used when creating a policy to control access to the
devices in the group.
Devices - Raritan products such as Dominion KX, Dominion KX II,
Dominion SX, Dominion KSX, IP-Reach, Paragon II System Controller,
and Paragon II UMT832 with USTIP that are managed by CC-SG. These
devices control the target servers and systems, or "nodes" that are
connected to them. Check the CC-SG Compatibility Matrix on the Raritan
Support web site for a list of supported devices.
Elements - values of a category. For example, the “New York City”
element belongs to the “Location” category, and the “Windows” element
belongs to the “OS Type” category.
2

Chapter 1: Introduction
Ghosted Ports - when managing Paragon devices, a ghosted port can
occur when a CIM or target server is removed from the system or
powered off (manually or accidentally). See Raritan's Paragon II User
Guide.
Hostname - can be used if DNS server support is enabled. See About
Network Setup (on page 211).
The ho
stname and its Fully-Qualified Domain Name (FQDN = Hostname
+ Suffix) cannot exceed 257 characters. It can consist of any number of
components, as long as they are separated by “.”.
Each component has a maximum size of 63 characters and the first
character must be alphabetic. The remaining characters can be
alphabetic, numeric, or “-” (hyphen or minus).
The last character of a component may not be “-”.
While the system preserves the case of the characters entered into the
system, the FQDN is case-insensitive when used.
iLO/RILOE and iLO2/RILOE2 - Hewlett Packard's Integrated Lights
Out/Remote Insight Lights Out servers that can be managed by CC-SG.
Targets of an iLO/RILOE device are powered on/off and recycled
directly. iLO/RILOE devices cannot be discovered by CC-SG; they have
to be manually added as nodes. In this guide, the term iLO/RILOE
includes both iLO/RILOE and iLO2/RILOE2.
In-band Access - going through the TCP/IP network to correct or
troubleshoot a target in your network. KVM and Serial devices can be
accessed via these in-band applications: RemoteDesktop Viewer, SSH
Client, RSA Client, VNC Viewer.
IPMI Servers (Intelligent Platform Management Interface) - servers that
can be controlled by CC-SG. IPMI are discovered automatically but can
be added manually as well.
Out-of-Band Access - using applications such as Raritan Remote
Console (RRC), Raritan Console (RC), Multi-Platform Client (MPC),
Virtual KVM Client (VKC) or Active KVM Client (AKC) to correct or
troubleshoot a KVM or serial managed node in your network.
Policies - define a user group's access within the CC-SG network.
Policies are applied to a user group and have several control param eters
to determine the level of control, such as date and time of access.
Nodes - target systems, such as servers, desktop PCs, and other
networked equipment, that CC-SG users can access.
Interfaces - the different ways a Node can be accessed, whether through
an out-of-band solution such as a Dominion KX2 connection, or through
an in-band solution, such as a VNC server.
3

Chapter 1: Introduction
Node Groups - a defined group of nodes that are accessible to a user.
Node groups are used when creating a policy to control access to the
nodes in the group.
Ports - connection points between a Raritan device and a node. Ports
exist only on Raritan devices, and they identify a pathway from that
device to a node.
SASL (Simple Authentication and Security Layer) - method for adding
authentication support to connection-based protocols.
SSH - clients, such as PuTTY or OpenSSH, that provide a command line
interface to CC-SG. Only a subset of CC-SG commands is provided via
SSH to administer devices and CC-SG itself.
User Groups - sets of users that share the same level of access and
privileges.
Client Browser Requirements
For a complete list of supported browsers, see the Compatibility Matrix
on the Raritan Support web site.
4

Chapter 2
Accessing CC-SG
You can access CC-SG in several way s:
• Browser: CC-SG supports numerous web browsers (for a complete
list of supported browsers, see the Compatibility Matrix on the
Raritan Support website).
• Thick Client: You can install a Java Web Start thick client on your
client computer. The thick client functions exactly like the browserbased client.
• SSH: Remote devices connected via the serial port can be accessed
using SSH.
• Diagnostic Console: Provides emergency repair and diagnostics only
and is not a replacement for the browser-based GUI to configure and
operate CC-SG. See Diagnostic Console (on page 264).
Note: Use
client, and SSH while accessing CC-SG.
rs can be connected simultaneously, using the browser, thick
In This Chapter
Browser-Based Access via the CC-SG Admin Client ...............................5
Thick Client Access...................................................................................6
CC-SG Admin Client
..................................................................................8
Browser-Based Access via the CC-SG Admin Client
The CC-SG Admin client is a Java-based client that provides a GUI for
both administrative and access tasks, depending on your permissions.
1. Using a supported Internet browser, type the URL of the CC-SG and
then type /admin: http(s)://IP address/admin, for example,
http://10.0.3.30/admin (https://10.0.3.30/admin) or
https://10.0.3.30/admi
If you see the JRE Incompatibility Warning window, select the JRE
version that is appropriate for your client computer and install it.
Once JRE is installed, try this procedure again. See JRE
Incompatibility (on page 6).
u can continue without installing a new JRE version.
Or, yo
n.
2. If you see a Restricted Service Agreement, read the agreement text
3. Type your Username and Password and click Log In.
4. Upon valid login, the CC-SG Admin Client opens.
and select the I Understand and Accept the Restricted Service
Agreement checkbox.
5

Chapter 2: Accessing CC-SG
JRE Incompatibility
If you do not have the minimum required version of JRE installed on your
client computer, you will see a warning message before you can access
the CC-SG Admin Client. The JRE Incompatibility Warning window
opens when CC-SG cannot find the required JRE file on your client
computer.
If you see the JRE Incompatibility Warning window, select the JRE
version that is appropriate for your client computer and install it, or you
can continue without installing a new JRE version.
You must launch CC-SG again once JRE is installed.
Administrators can configure the JRE minimum version that is
recommended and the message that appears in the JRE Incompatibility
Warning window. See Configuring Custom JRE Settings (on page
223).
Thick Client Access
The CC-SG thick client allows you to connect to CC-SG by launching a
Java Web Start application instead of running an applet through a web
browser. The advantage of using the thick client instead of a browser is
that the client can outperform the browser in terms of speed and
efficiency. The minimum Java version required for running the thick client
is 1.5.0.10.
Install the Thick Client
To download the thick client from CC-SG:
1. Launch a web browser and type this URL:
http(s)://<IP_address>/install where <IP_address> is
the IP address of the CC-SG.
If a security warning message appears, click Start to continue the
download.
2. When the download is complete, a new window in which you can
specify the CC-SG IP address opens.
3. Type the IP address of the CC-SG unit you want to access in the IP
to Connect field. Once you have connected, this address will be
available from the IP to Connect drop-down list. The IP addresses
are stored in a properties file that is saved to your desktop.
4. If the CC-SG is configured for secure browser co nnections, you must
select the Secure Socket Layer (SSL) checkbox. If the CC-SG is not
configured for secure browser connections, you must deselect the
Secure Socket Layer (SSL) checkbox. This setting must be correct
or the thick client will not be able to connect to CC-SG.
6

Chapter 2: Accessing CC-SG
5. To check the setting in CC-SG: Choose Administration > Security. In
the Encryption tab, look at the Browser Connection Protocol option. If
the HTTPS/SSL option is selected, then you must select the Secure
Socket Layer SSL checkbox in the thick client's IP address
specification window. If the HTTP option is selected, deselect the
Secure Socket Layer SSL checkbox in the thick client's IP address
specification window.
6. Click Start.
A warning message appears if you are using an unsupported
Java Runtime Environment version on your machine. Follow the
prompts to either download a supported Java version, or
continue with the currently installed version.
7. The login screen appears.
8. If the Restricted Service Agreement is enabled, read the agreement
text, and then select the I Understand and Accept the Restricted
Service Agreement checkbox.
9. Type your Username and Password in the corresponding fields, and
then click Login to continue.
Use the Thick Client
The minimum Java version required for running the thick client is
1.5.0.10. Java version 1.6.0 is also supported.
Once the thick client is installed, there are two ways to access it on your
client computer.
To access the thick client:
• Launch the thick client from the Java Control Panel's Java
Application Cache Viewer.
• Use the Java Control Panel's Java Application Cache Viewer to
install a shortcut icon on your desktop for the thick client.
7
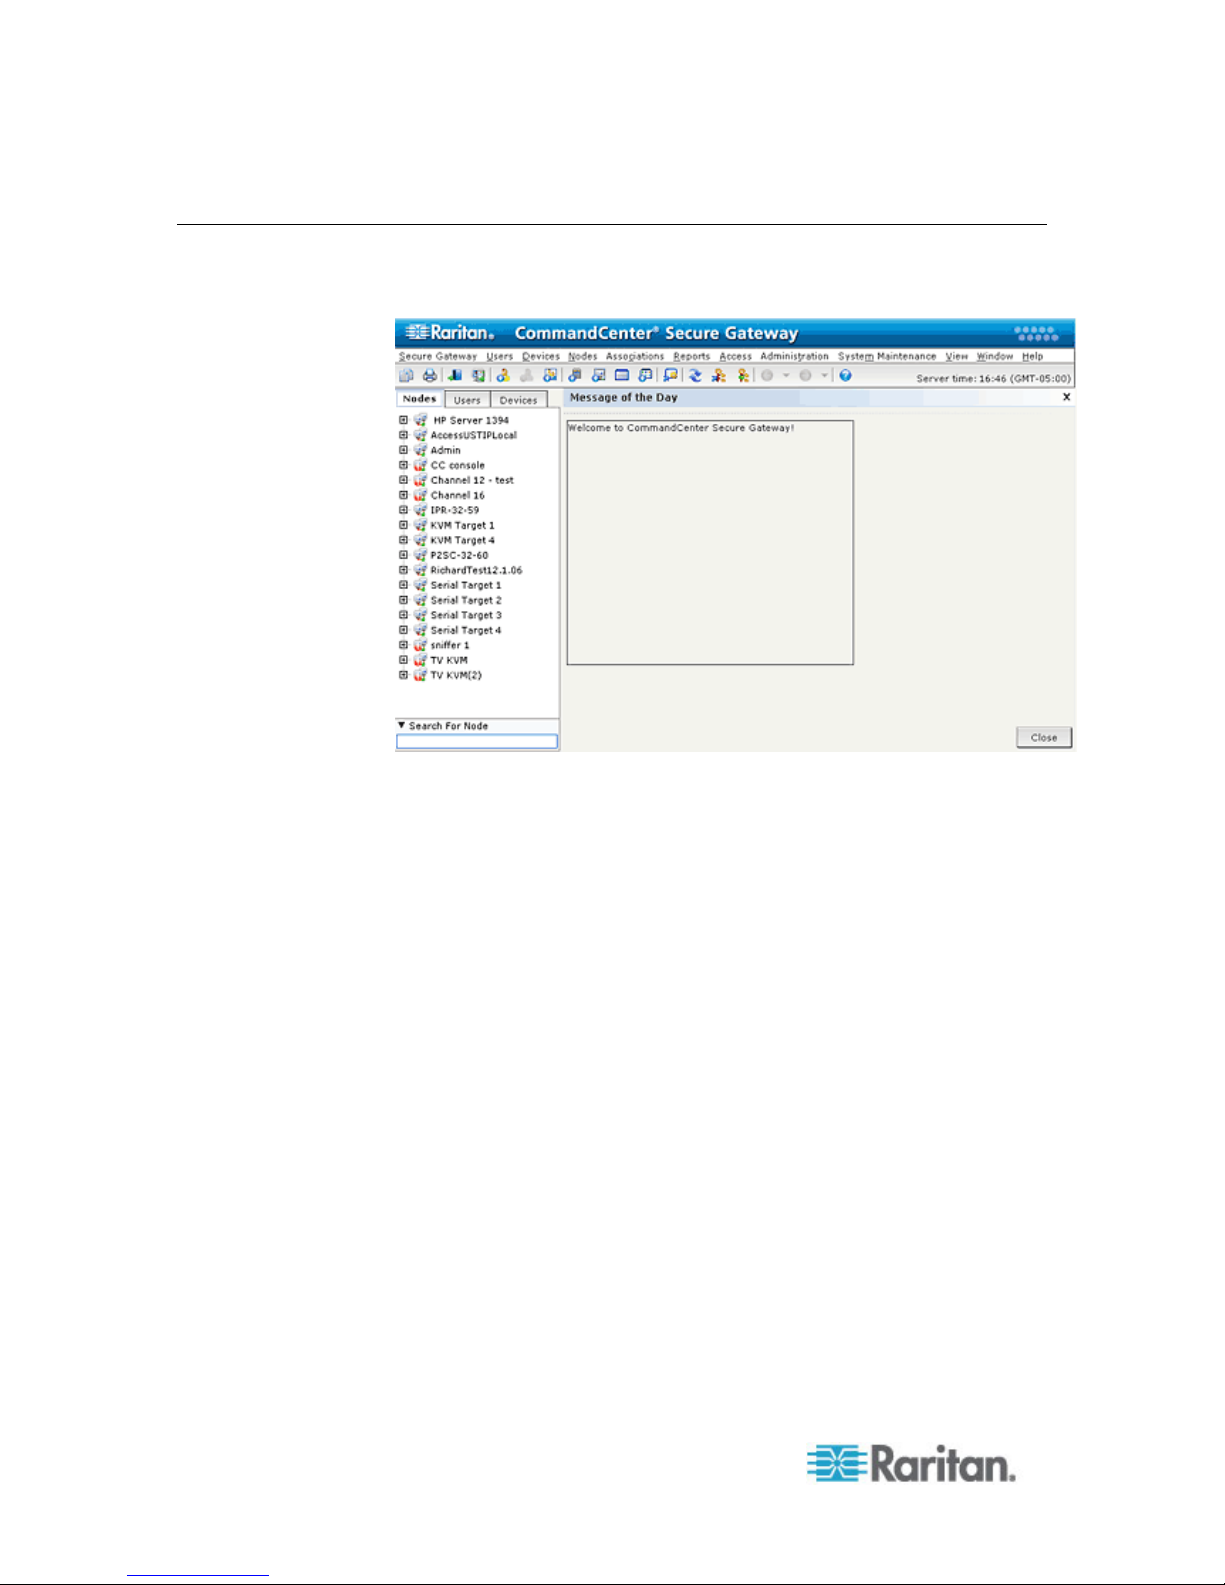
Chapter 2: Accessing CC-SG
CC-SG Admin Client
Upon valid login, the CC-SG Admin Client appears.
8

Chapter 2: Accessing CC-SG
• Nodes tab: Click the Nodes tab to display all known target nodes in a
tree view. Click a node to view the Node Profile. Interfaces are
grouped under their parent nodes. Click the + and - signs to expand
or collapse the tree. Right-click an interface and select Connect to
connect to that interface. You can sort the nodes by Node Name
(alphabetically) or Node Status (Available, Busy, Unavailable). Rightclick the tree view, select Node Sorting Options, and then select By
Node Name or By Node Status.
• Users tab: Click the Users tab to display all registered Users and
Groups in a tree view. Click the + and - signs to expand or collapse
the tree.
• Devices tab: Click the Devices tab to display all known Raritan
devices in a tree view. Different device types have different icons.
Ports are grouped under their parent devices. Click the + and - signs
to expand or collapse the tree. Click a port to view the Port Profile.
Right-click a port and select Connect to connect to that port. You can
sort the ports by Port Name (alphabetical), Port Status (Available,
Busy, Unavailable) or Port Number (numerical). Right-click the tree
view, select Port Sorting Options, and then select By Node Name or
By Node Status.
• Quick Commands toolbar: This toolbar offers shortcut buttons for
executing common commands.
• Operation and Configuration menu bar: These menus contain
commands to operate and configure CC-SG. You can access some
of these commands by right-clicking on the icons in the Nodes,
Users, and Devices Selection tabs. The menus and menu items you
see are based on your user access privileges.
• Server time: The current time and time zone as configured on CC-
SG in Configuration Manager. This time is used when scheduling
tasks in Task Manager. See Task Manager (on page 246). This time
may be different than the time your cli
ent PC uses.
9

Chapter 3
Getting Started
Upon the first login to CC-SG, you should confirm the IP address, set the
CC-SG server time, and check the firmware and application versions
installed. You may need to upgrade the firmware and applications.
Once you have completed your initial configurations, proceed to Guided
Setup. See Configuring CC-SG with Guided Setup (on page 13).
In This Chapter
Confirming IP Address.............................................................................10
Setting CC-SG Server Time
Checking the Compatibility Matrix
Checking and Upgrading Application Vers
Confirming IP Address
1. Choose Administration > Configuration.
2. Click the Network Setup tab.
....................................................................10
...........................................................11
ions.......................................11
3. Check that the network settings are correct, and make changes if
needed. See About Network Setup (on page 211). Optional.
4. Click
5. Click Restart Now to confirm your settings and restart CC-SG.
Setting CC-SG Server Time
CC-SG's time and date must be accurately maintained to provide
credibility for its device-management capabilities.
Important: The Time/Date configuration is used when scheduling
tasks in Task Manager. See
set on your client PC may be different than the time set on CC-SG.
Only the CC Super-User and users with similar privileges can configure
Time and Date.
Changing the time zone is disabled in a cluster configuration.
To configure the CC-SG server time and date:
1. Choose Administration > Configuration.
2. Click the Time/Date tab.
a. To set the date and time manually:
Update Configuration to submit your changes.
Task Manager
(on page 246). The time
10

Chapter 3: Getting Started
Date - click the drop-down arrow to select the Month, use the up
and down arrows to select the Year, and then click the Day in
the calendar area.
Time - use the up and down arrows to set the Hour, Minutes, and
Seconds, and then click the Time zone drop-down arrow to
select the time zone in which you are operating CC-SG.
a. To set the date and time via NTP: Select the Enable Network
Time Protocol checkbox at the bottom of the window, and then
type the IP addresses for the Primary NTP server and the
Secondary NTP server in the corresponding fields.
Note: Network Time Protocol (NTP) is the protocol used to
synchronize the attached computer's date and time data with a
referenced NTP server. When CC-SG is configured with NTP, it can
synchronize its clock time with the publicly available NTP reference
server to maintain correct and consistent time.
3. Click Update Configuration to apply the time and date changes to
CC-SG.
4. Click Refresh to reload the new server time in the Current Time field.
Choose System Maintenance > Restart to restart CC-SG.
Checking the Compatibility Matrix
The Compatibility Matrix lists the firmware versions of Raritan devices
and software versions of applications that are compatible with the current
version of CC-SG. CC-SG checks against this data when you add a
device, upgrade device firmware, or select an application for use. If the
firmware or software version is incompatible, CC-SG displays a message
to warn you before you continue. Each version of CC-SG will support
only the current and previous firmware versions for Raritan devices at
the time of release. You can view the compatibility matrix on the Raritan
Support web site.
To check the Compatibility Matrix:
• Choose Administration > Compatibility Matrix.
Checking and Upgrading Application Versions
Check and upgrade the CC-SG applications, including Raritan Console
(RC) and Raritan Remote Client (RRC).
To check an application version:
1. Choose Administration > Applications.
11

Chapter 3: Getting Started
2. Select an Application name from the list. Note the number in the
Version field. Some applications do not automatically show a version
number.
To upgrade an application:
If the application version is not current, you must upgrade the
application. You can download the application upgrade file from the
Raritan website. For a complete list of supported application versions,
see the Compatibility Matrix on the Raritan Support website.
The best practice is to enter Maintenance Mode before upgrading
applications. See Entering Maintenance Mode (on page 193).
Save the application file to your client PC.
1.
2. Click the Application name drop-down arrow and select the
application that must be upgraded from the list. If you do not see the
application, you must add it first. See Add an Application (on page
208).
Click Browse, locate and select the application upgrade file from the
3.
dialog that appears then click Open.
4. The application name appears in the New Application File field in the
Application Manager screen.
5. Click Upload. A progress window indicates that the new application
is being uploaded. When complete, a new window will indicate that
the application has been added to the CC-SG database and is
available to use.
6. If the Version field does not automatically update, type the new
version number in the Version field. The Version field will
automatically update for some applications.
7. Click Update.
Note: Users who were logged in during the upgrade must log out of CCSG then log in again to ensure that the new version of the application is
launched. Also, see Older Version of Application Opens After
Upgrading (on page 208).
12
 Loading...