

Raritan EMX2-888 User Manual

Raritan EMX
User Guide
Release 3.2.10
Copyright © 2016 Raritan, Inc.
EMX-0J-v3.2.10-E
March 2016
255-80-6107-00

This document contains proprietary information that is protected by copyright. All rights reserved. No
part of this document may be photocopied, reproduced, or translated into another language without
express prior written consent of Raritan, Inc.
© Copyright 2016 Raritan, Inc. All third-party software and hardware mentioned in this document are
registered trademarks or trademarks of and are the property of their respective holders.
FCC Information
This equipment has been tested and found to comply with the limits for a Class A digital device,
pursuant to Part 15 of the FCC Rules. These limits are designed to provide reasonable protection
against harmful interference in a commercial installation. This equipment generates, uses, and can
radiate radio frequency energy and if not installed and used in accordance with the instructions, may
cause harmful interference to radio communications. Operation of this equipment in a residential
environment may cause harmful interference.
VCCI Information (Japan)
Raritan is not responsible for damage to this product resulting from accident, disaster, misuse, abuse,
non-Raritan modification of the product, or other events outside of Raritan's reasonable control or not
arising under normal operating conditions.
If a power cable is included with this product, it must be used exclusively for this product.

Contents
What's New in the EMX User Guide xii
Chapter 1 Introduction 1
Overview ........................................................................................................................................1
Product Models ..............................................................................................................................2
EMX2-111............................................................................................................................2
EMX2-888............................................................................................................................3
Package Contents..........................................................................................................................3
APIPA and Link-Local Addressing.................................................................................................4
Chapter 2 Rack Mounting an EMX 6
Mounting a Zero U EMX ................................................................................................................6
Mounting a 1U EMX....................................................................................................................... 7
Chapter 3 Installation and Configuration 9
Before You Begin........................................................................................................................... 9
Connecting the EMX to a Power Source ....................................................................................... 9
Configuring the EMX.................................................................................................................... 10
Connecting the EMX to a Computer.................................................................................. 11
Installing the USB-to-Serial Driver (Optional).................................................................... 12
Connecting the EMX to Your Network............................................................................... 14
Initial Network Configuration via CLI .................................................................................15
Bulk Configuration Methods......................................................................................................... 21
Cascading the EMX via USB ....................................................................................................... 22
Chapter 4 Connecting External Equipment (Optional) 25
Connecting Asset Management Sensors ....................................................................................25
Combining Regular Asset Sensors....................................................................................26
Introduction to Asset Tags.................................................................................................28
Connecting Regular Asset Sensors to the EMX................................................................28
Connecting Blade Extension Strips ................................................................................... 32
Connecting Composite Asset Sensors (AMS-Mx-Z) ......................................................... 35
iii

Contents
Connecting Environmental Sensor Packages .............................................................................39
DPX Sensor Packages ...................................................................................................... 40
DPX2 Sensor Packages .................................................................................................... 46
DPX3 Sensor Packages .................................................................................................... 48
DX Sensor Packages ........................................................................................................51
Using an Optional DPX3-ENVHUB4 Sensor Hub .............................................................53
Mixing Diverse Sensor Types............................................................................................55
Connecting a Logitech Webcam..................................................................................................59
Connecting a GSM Modem .........................................................................................................60
Connecting an Analog Modem ....................................................................................................60
Connecting an External Beeper...................................................................................................61
Connecting a Schroff LHX/SHX Heat Exchanger........................................................................61
Connecting the Schneider Electric PowerLogic PM710 .............................................................. 63
Chapter 5 Using the EMX 64
Power Switch ............................................................................................................................... 64
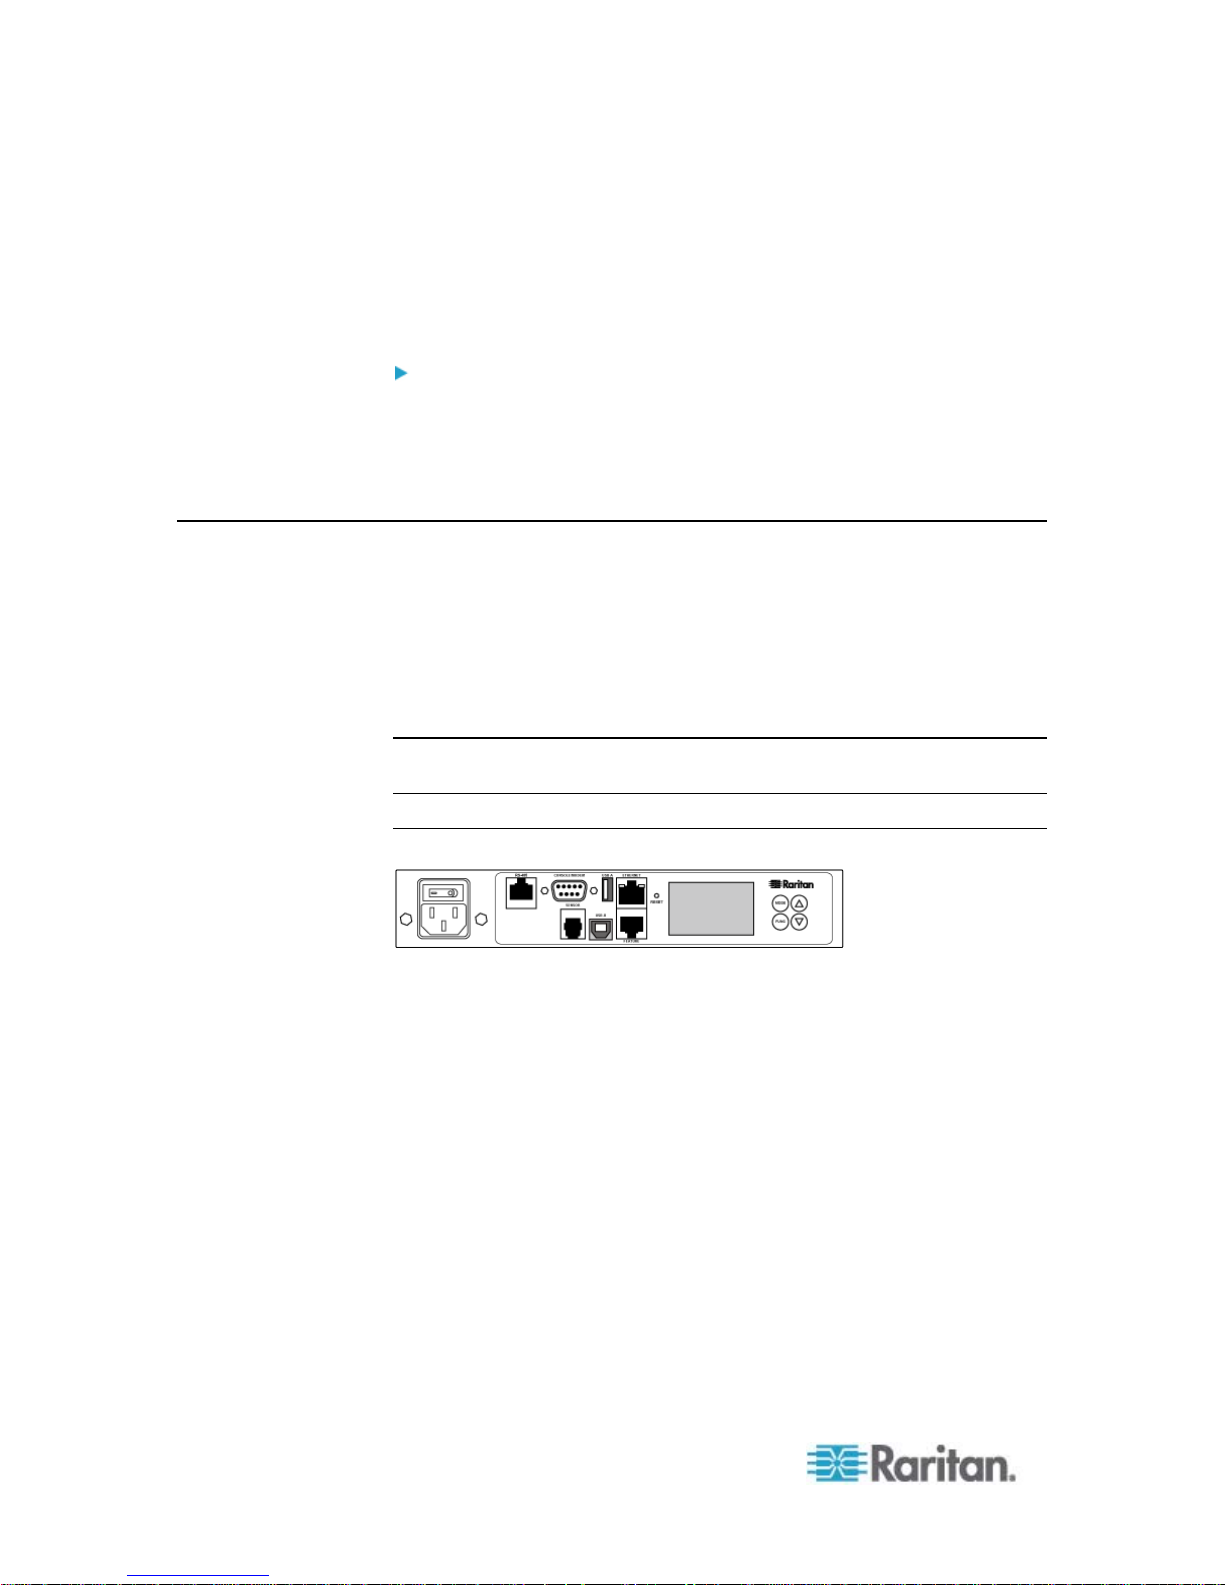
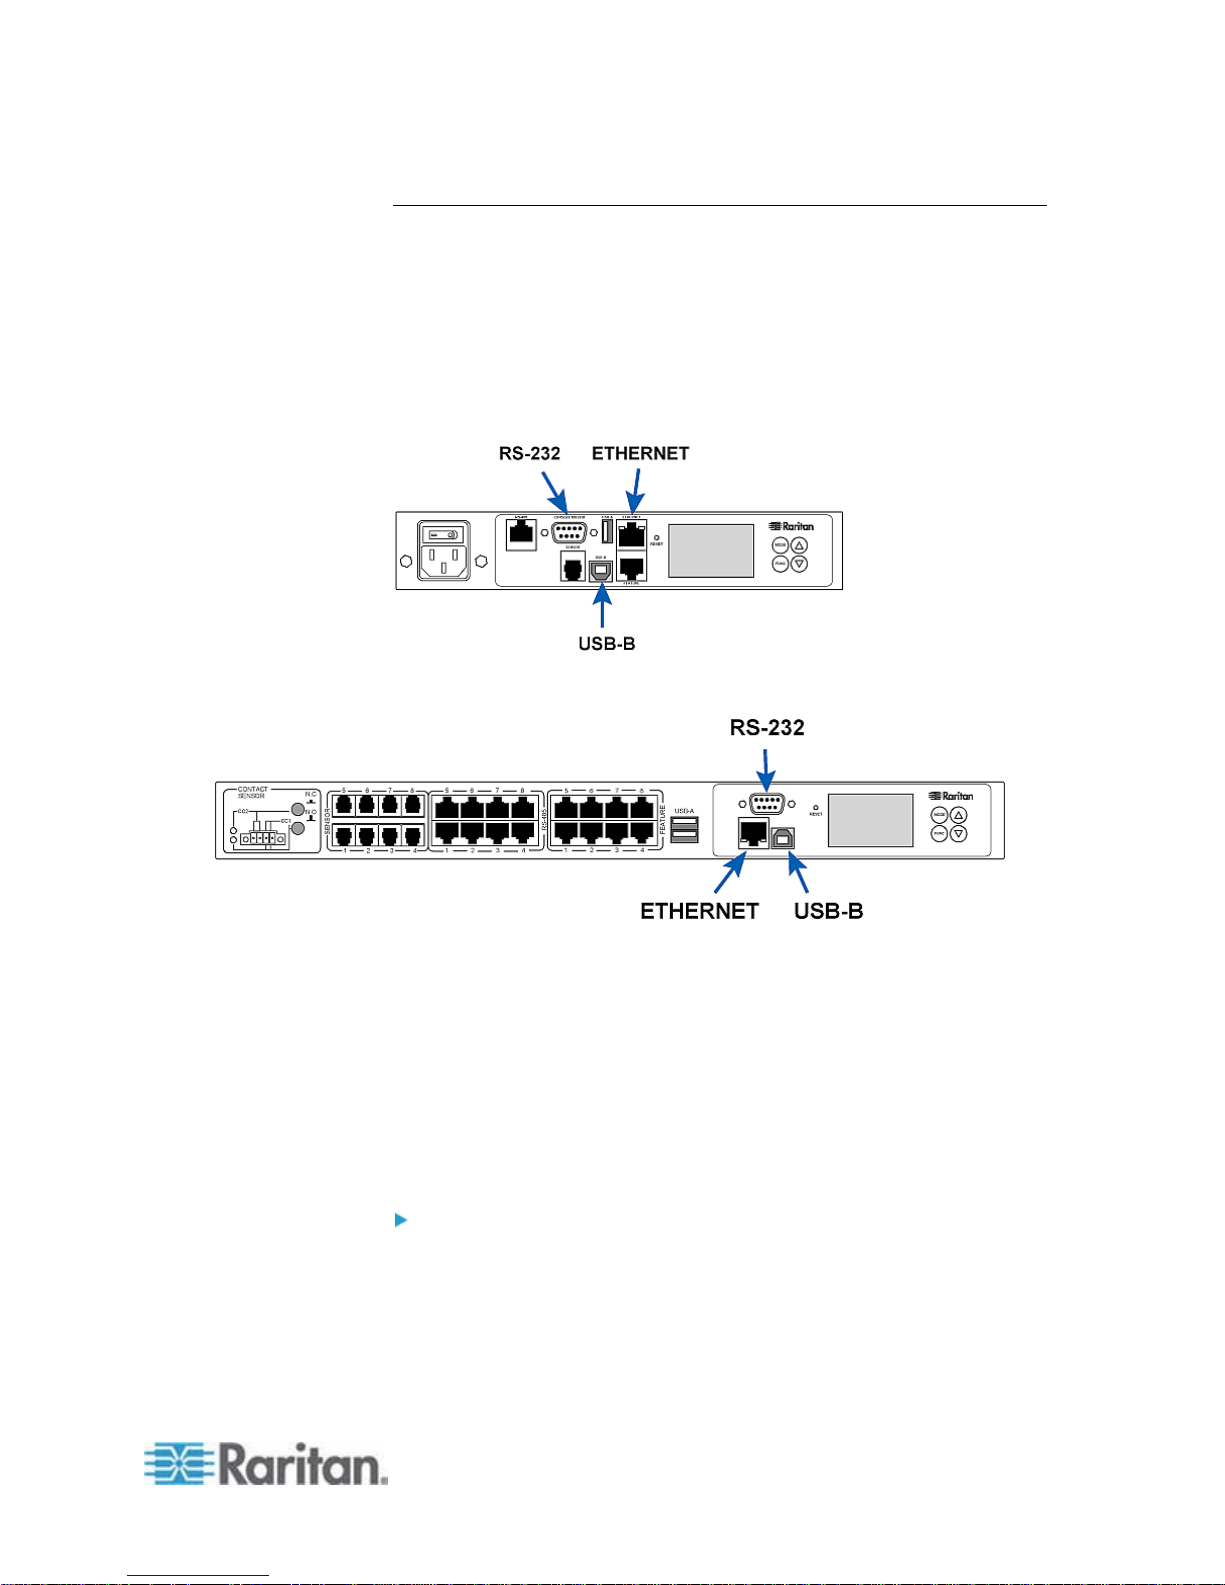
Connection Ports .........................................................................................................................64
LCD Display Panel....................................................................................................................... 66
Overview of the LCD Display.............................................................................................67
Control Buttons..................................................................................................................68
Operating the LCD Display................................................................................................68
EMX2-888 Contact Closure Sensor Termination ........................................................................76
Connecting Contact Closure Sensors to EMX2-888 ......................................................... 77
EMX2-888 Contact Closure Sensor LEDs ........................................................................81
Reset Button ................................................................................................................................ 82
Beeper .........................................................................................................................................82
Chapter 6 Using the Web Interface 83
Supported Web Browsers............................................................................................................83
Logging in to the Web Interface...................................................................................................84
Login .................................................................................................................................. 84
Changing Your Password..................................................................................................87
Remembering User Names and Passwords ..................................................................... 87
Logout ..........................................................................................................................................87
Introduction to the Web Interface.................................................................................................88
Menus ................................................................................................................................ 89
EMX Explorer Pane ...........................................................................................................89
Setup Button...................................................................................................................... 96
Status Bar .......................................................................................................................... 96
Add Page Icon ...................................................................................................................97
Data Pane..........................................................................................................................98
More Information ...............................................................................................................99
Dashboard .................................................................................................................................103
Alarms List ....................................................................................................................... 105
Alerted Sensors ...............................................................................................................106
Device Management.................................................................................................................. 106
Displaying the Device Information................................................................................... 106
iv

Contents
Naming the EMX .............................................................................................................110
Modifying the Network Configuration...............................................................................110
Modifying Network Service Settings................................................................................120
Setting the Date and Time...............................................................................................127
Setting Default Measurement Units................................................................................. 131
Configuring the Feature Port ...........................................................................................132
Configuring the Auxiliary Port..........................................................................................133
Configuring the Serial Port ..............................................................................................135
Setting the Cascading Mode ...........................................................................................136
Specifying the Device Altitude ......................................................................................... 143
Setting Data Logging ....................................................................................................... 144
Configuring SMTP Settings ............................................................................................. 145
Configuring Data Push Settings ......................................................................................147
Checking the Internal Beeper State ................................................................................148
User and Role Management......................................................................................................149
Creating a User Profile .................................................................................................... 149
Modifying a User Profile ..................................................................................................152
Deleting a User Profile..................................................................................................... 153
Setting Up Your Preferred Measurement Units...............................................................153
Setting Up Roles ........................................................................................................................ 154
Creating a Role................................................................................................................ 155
Modifying a Role..............................................................................................................155
Deleting a Role ................................................................................................................156
Access Security Control............................................................................................................. 157
Forcing HTTPS Encryption..............................................................................................157
Configuring the Firewall...................................................................................................157
Setting Up User Login Controls.......................................................................................164
Setting Up Role-Based Access Control Rules ................................................................168
Setting Up a TLS Certificate ...................................................................................................... 172
Certificate Signing Request ............................................................................................. 173
Creating a Self-Signed Certificate ...................................................................................175
Installing Existing Key and Certificate Files.....................................................................177
Downloading Key and Certificate Files............................................................................ 177
Setting Up External Authentication ............................................................................................ 178
Gathering the External Authentication Information..........................................................178
Adding Authentication Servers ........................................................................................ 180
Sorting the Access Order ................................................................................................184
Testing the Server Connection........................................................................................ 184
Editing Authentication Server Settings ............................................................................185
Deleting Authentication Server Settings..........................................................................185
Disabling External Authentication.................................................................................... 185
Enabling External and Local Authentication Services.....................................................186
Event Rules and Actions............................................................................................................ 187
Components of an Event Rule.........................................................................................187
Creating an Event Rule ...................................................................................................188
Sample Event Rules ........................................................................................................ 226
A Note about Infinite Loop ............................................................................................... 228
Modifying an Event Rule..................................................................................................229
Modifying an Action .........................................................................................................231
Deleting an Event Rule or Action.....................................................................................231
A Note about Untriggered Rules......................................................................................232
v

Contents
Managing Event Logging ........................................................................................................... 232
Viewing the Local Event Log ........................................................................................... 232
Viewing the Wireless LAN Diagnostic Log ......................................................................233
Clearing Event Entries.....................................................................................................234
Viewing Connected Users .........................................................................................................234
Monitoring Server Accessibility..................................................................................................235
Adding IT Devices for Ping Monitoring ............................................................................235
Editing Ping Monitoring Settings......................................................................................238
Deleting Ping Monitoring Settings ...................................................................................238
Checking Server Monitoring States ................................................................................. 239
Environmental Sensors and Actuators ......................................................................................239
Identifying Environmental Sensors and Actuators...........................................................240
Managing Environmental Sensors or Actuators .............................................................. 244
Configuring Environmental Sensors or Actuators ...........................................................246
Viewing Sensor and Actuator Data..................................................................................251
Unmanaging Environmental Sensors or Actuators .........................................................256
Disabling the Automatic Management Function.............................................................. 257
Controlling Actuators ....................................................................................................... 257
Asset Management....................................................................................................................258
Configuring the Asset Sensor..........................................................................................258
Setting Asset Sensor LED Colors....................................................................................260
Configuring a Specific Rack Unit ..................................................................................... 261
Expanding a Blade Extension Strip .................................................................................262
Displaying the Asset Sensor Information ........................................................................263
Webcam Management............................................................................................................... 264
Configuring Webcams ..................................................................................................... 264
Configuring Webcam Storage .........................................................................................265
Adjusting Image Properties .............................................................................................266
Viewing Webcam Snapshots or Videos ..........................................................................267
Saving Snapshots............................................................................................................ 268
Sending Snapshots or Videos in an Email or Instant Message ......................................269
Managing the Snapshots Saved to EMX......................................................................... 270
Managing the Schroff LHX/SHX Heat Exchanger ..................................................................... 272
Enabling and Disabling Schroff LHX/SHX Heat Exchanger Support .............................. 273
Configuring the LHX/SHX................................................................................................274
Monitoring the LHX/SHX .................................................................................................277
Turning the LHX/SHX On or Off ......................................................................................282
Requesting Maximum Cooling for an SHX-30................................................................. 284
Managing Schneider Electric PowerLogic PM710..................................................................... 285
Configuring the PM710 and Configuring Threshold Settings .......................................... 285
Resetting the PM710 Minimum and Maximum Values....................................................286
Clearing the PM710 Energy Accumulators .....................................................................286
Bulk Configuration......................................................................................................................287
Saving the EMX Configuration ........................................................................................288
Copying the EMX Configuration ......................................................................................289
Backup and Restore of EMX Device Settings ...........................................................................290
Firmware Upgrade .....................................................................................................................291
Updating the EMX Firmware ...........................................................................................291
Viewing Firmware Update History ...................................................................................292
Full Disaster Recovery ....................................................................................................293
Updating the Asset Sensor Firmware.............................................................................. 293
vi

Contents
Network Diagnostics .................................................................................................................. 293
Pinging a Host .................................................................................................................293
Tracing the Network Route..............................................................................................294
Listing TCP Connections ................................................................................................. 294
Downloading Diagnostic Information ......................................................................................... 294
Rebooting the EMX.................................................................................................................... 295
Accessing the Help ....................................................................................................................296
Retrieving Software Packages Information ..................................................................... 296
Browsing through the Online Help................................................................................... 296
Chapter 7 Using SNMP 298
Enabling SNMP..........................................................................................................................298
Configuring Users for Encrypted SNMP v3 ...............................................................................299
Configuring SNMP Notifications ................................................................................................300
SNMPv2c Notifications ....................................................................................................301
SNMPv3 Notifications......................................................................................................303
SNMP Gets and Sets................................................................................................................. 305
The EMX MIB ..................................................................................................................306
A Note about Enabling Thresholds.................................................................................. 308
Chapter 8 Using the Command Line Interface 309
About the Interface.....................................................................................................................309
Logging in to CLI........................................................................................................................ 310
With HyperTerminal.........................................................................................................310
With SSH or Telnet..........................................................................................................311
With an Analog Modem ................................................................................................... 312
Different CLI Modes and Prompts ...................................................................................313
Closing a Local Connection.............................................................................................313
Help Command .......................................................................................................................... 314
Querying Available Parameters for a Command ....................................................................... 315
Showing Information ..................................................................................................................315
Network Configuration ..................................................................................................... 316
Device Configuration ....................................................................................................... 318
Date and Time Settings ................................................................................................... 318
Default Measurement Units ............................................................................................. 319
Environmental Sensor Information ..................................................................................320
Environmental Sensor Package Information ................................................................... 322
Actuator Information ........................................................................................................323
Environmental Sensor Threshold Information ................................................................. 324
Environmental Sensor Default Thresholds......................................................................325
Security Settings.............................................................................................................. 326
Existing User Profiles ......................................................................................................327
Existing Roles .................................................................................................................. 328
Serial Port Settings..........................................................................................................328
USB-Cascading Configuration Information .....................................................................328
Asset Sensor Settings .....................................................................................................329
Rack Unit Settings of an Asset Sensor ...........................................................................329
vii

Contents
Blade Extension Strip Settings ........................................................................................330
Event Log.........................................................................................................................331
Wireless LAN Diagnostic Log .......................................................................................... 332
Server Reachability Information ......................................................................................332
Command History............................................................................................................334
History Buffer Length.......................................................................................................334
Reliability Data................................................................................................................. 334
Reliability Error Log .........................................................................................................334
Examples ......................................................................................................................... 335
Clearing Information...................................................................................................................336
Clearing Event Log ..........................................................................................................337
Clearing WLAN Log.........................................................................................................337
Configuring the EMX Device and Network ................................................................................337
Entering Configuration Mode........................................................................................... 338
Quitting Configuration Mode............................................................................................338
Device Configuration Commands.................................................................................... 339
Network Configuration Commands..................................................................................341
Time Configuration Commands....................................................................................... 365
Checking the Accessibility of NTP Servers ..................................................................... 369
Security Configuration Commands.................................................................................. 370
User Configuration Commands .......................................................................................389
Role Configuration Commands .......................................................................................402
Environmental Sensor Configuration Commands ........................................................... 407
Configuring Environmental Sensors' Default Thresholds................................................412
Environmental Sensor Threshold Configuration Commands .......................................... 414
Actuator Configuration Commands .................................................................................417
Server Reachability Configuration Commands ...............................................................418
USB-Cascading Configuration Commands ..................................................................... 422
Asset Management Commands ......................................................................................422
Serial Port Configuration Commands..............................................................................429
Setting the History Buffer Length.....................................................................................431
Multi-Command Syntax ................................................................................................... 431
Actuator Control Operations ...................................................................................................... 432
Switching On an Actuator ................................................................................................ 433
Switching Off an Actuator ................................................................................................ 433
Example - Turning On a Specific Actuator ...................................................................... 434
Unblocking a User......................................................................................................................434
Resetting the EMX ..................................................................................................................... 434
Restarting the Device ...................................................................................................... 435
Resetting to Factory Defaults .......................................................................................... 435
Network Troubleshooting...........................................................................................................435
Entering Diagnostic Mode ...............................................................................................436
Quitting Diagnostic Mode ................................................................................................436
Diagnostic Commands ....................................................................................................436
viii

Contents
Retrieving Previous Commands ................................................................................................ 438
Automatically Completing a Command......................................................................................439
Logging out of CLI......................................................................................................................439
Appendix A Specifications 440
Maximum Ambient Operating Temperature ..............................................................................440
EMX2-111 Feature RJ-45 Port Pinouts .....................................................................................440
EMX2-888 Feature RJ-45 Port Pinouts .....................................................................................441
Sensor RJ-12 Port Pinouts ........................................................................................................441
Serial RS-232 Port Pinouts........................................................................................................441
RS-485 Port Pinouts ..................................................................................................................442
Appendix B Configuration or Firmware Upgrade with a USB Drive 443
System and USB Requirements ................................................................................................ 444
Configuration Files ..................................................................................................................... 444
fwupdate.cfg ....................................................................................................................446
config.txt ..........................................................................................................................449
devices.csv ...................................................................................................................... 451
Creating Configuration Files via Mass Deployment Utility ..............................................452
ix

Contents
Firmware Upgrade via USB ....................................................................................................... 453
Appendix C Bulk Configuration or Firmware Upgrade via DHCP/TFTP 454
Bulk Configuration/Upgrade Procedure ..................................................................................... 454
TFTP Requirements...................................................................................................................455
DHCP IPv4 Configuration in Windows.......................................................................................456
DHCP IPv6 Configuration in Windows.......................................................................................466
DHCP IPv4 Configuration in Linux.............................................................................................473
DHCP IPv6 Configuration in Linux.............................................................................................475
Appendix D Resetting to Factory Defaults 477
Using the Reset Button..............................................................................................................477
Using the CLI Command ...........................................................................................................478
Appendix E Available SCP Commands 480
Firmware Update via SCP ......................................................................................................... 480
Bulk Configuration via SCP .......................................................................................................481
Backup and Restore via SCP .................................................................................................... 482
Appendix F LDAP Configuration Illustration 484
Step A. Determine User Accounts and Roles............................................................................ 484
Step B. Configure User Groups on the AD Server .................................................................... 485
Step C. Configure LDAP Authentication on the EMX Device.................................................... 487
Step D. Configure Roles on the EMX Device ............................................................................489
Appendix G Updating the LDAP Schema 493
Returning User Group Information.............................................................................................493
From LDAP/LDAPS .........................................................................................................493
From Microsoft Active Directory ......................................................................................493
Setting the Registry to Permit Write Operations to the Schema ...............................................494
Creating a New Attribute............................................................................................................ 494
Adding Attributes to the Class ...................................................................................................495
Updating the Schema Cache.....................................................................................................497
Editing rciusergroup Attributes for User Members..................................................................... 497
Appendix H RADIUS Configuration Illustration 501
Microsoft Network Policy Server................................................................................................501
Step A: Add Your EMX as a RADIUS Client ................................................................... 502
x

Contents
Step B: Configure Connection Request Policies ............................................................. 505
Step C: Configure a Vendor-Specific Attribute................................................................ 520
AD-Related Configuration................................................................................................522
Non-Windows RADIUS Server .................................................................................................. 525
Dictionary File .................................................................................................................. 525
Format of the "string".......................................................................................................526
Appendix I Additional EMX Information 528
Reserving IP Addresses in Windows DHCP Servers ................................................................ 528
Sensor Threshold Settings ........................................................................................................529
Thresholds and Sensor States ........................................................................................ 530
"To Assert" and Assertion Timeout..................................................................................532
"To De-assert" and Deassertion Hysteresis .................................................................... 534
PDView App for Viewing the EMX ............................................................................................. 536
Altitude Correction Factors ........................................................................................................539
Ways to Probe Existing User Profiles ........................................................................................ 539
Truncated Data in the Web Interface.........................................................................................540
Raritan Training Website ........................................................................................................... 540
Connecting Contact Closure Sensors to OLD EMX2-888 ......................................................... 541
Appendix J Integrating Asset Management Sensors with Other Products 543
Asset Management Sensors and Raritan PDUs .......................................................................543
Asset Management Sensors and dcTrack................................................................................. 543
Index 545
xi

What's New in the EMX User Guide
Important: Raritan disables SSL 3.0 and uses TLS for releases 3.0.4,
3.0.20 and later releases due to published security vulnerabilities in
SSL 3.0. Make sure your network infrastructure, such as LDAP and
mail services, uses TLS rather than SSL 3.0.
The following sections have changed or information has been added to
the EMX User Guide based on enhancements and changes to the
equipment and/or user documentation.
Overview (on page 1)
Product M
APIPA and L
Con
Conn
Bulk Co
Cas
cading the EMX via USB (on page 22)
Conn
EM
X2-111 Connection (on page 29)
EM
X2-888 Connection (on page 31)
Daisy
Conn
DPX Sensor
DPX3 Senso
Conn
Using an Op
odels (on page 2)
ink-Local Addressing (on page 4)
figuring the EMX (on page 10)
ecting the EMX to a Computer (on page 11)
nfiguration Methods (on page 21)
ecting Regular Asset Sensors to the EMX (on page 28)
-Chain Limitations of Composite Asset Sensors (on page 36)
ecting Environmental Sensor Packages (on page 39)
Packages (on page 40)
r Packages (on page 48)
ecting a DPX2 Sensor Package to DPX3 (on page 50)
tional DPX3-ENVHUB4 Sensor Hub (on page 53)
M
Conn
Power Switch (on pa
Over
Con
Environmental Sensor Information (on
Asset Sensor Information (on pa
ixing Diverse Sensor Types (on page 55)
ecting an External Beeper (on page 61)
ge 64)
view of the LCD Display (on page 67)
trol Buttons (on page 68)
page 68)
ge 71)
xii

What's New in the EMX User Guide
IPv4 Address (on page 72)
MAC Address (on page 73)
USB-Casc
EM
X2-888 Contact Closure Sensor Termination (on page 76)
Conn
EM
X2-888 Contact Closure Sensor LEDs (on page 81)
Bee
per (on page 82)
Supported Web
Login (on p
Rememb
Enabling the
Con
Over
Che
Adding L
Cre
ating Actions (on page 188)
Scheduling an Ac
aded Device's Position (on page 74)
ecting Contact Closure Sensors to EMX2-888 (on page 77)
Browsers (on page 83)
age 84)
ering User Names and Passwords (on page 87)
Modbus Gateway (on page 124)
figuring the Serial Port (on page 135)
view of the Cascading Modes (on page 138)
cking the Internal Beeper State (on page 148)
DAP Server Settings (on page 180)
tion (on page 211)
Send Sensor
De
fault Log Messages (on page 216)
Email and SM
M
atching the Position (on page 242)
States of
Unman
Con
figuring the LHX/SHX (on page 274)
Con
figuring Temperature and Fan Thresholds (on page 276)
Viewing the
Downlo
Devic
e Configuration (on page 318)
Event Log (o
Clearing WL
Report Example (on page 213)
S Message Placeholders (on page 224)
Unmanaged Sensors or Actuators (on page 255)
aging Environmental Sensors or Actuators (on page 256)
Summary (on page 277)
ading Diagnostic Information (on page 294)
n page 331)
AN Log (on page 337)
xiii

Chapter 1: What's New in the EMX User Guide
Specifying the Device Altitude (on page 340)
Enabling or Disabling Peripheral Device Auto Management (on page
341)
termining the SSH Authentication Method (on page 361)
De
Cus
tomizing the Date and Time (on page 368)
All Privileges (on p
Setting
Forcing th
EM
EM
Con
Bulk Co
the Baud Rates (on page 430)
e Device Detection Mode (on page 430)
X2-111 Feature RJ-45 Port Pinouts (on page 440)
X2-888 Feature RJ-45 Port Pinouts (on page 441)
figuration or Firmware Upgrade with a USB Drive (on page 443)
nfiguration or Firmware Upgrade via DHCP/TFTP (on page
age 403)
454)
Available SCP Command
Upda
ting the LDAP Schema (on page 493)
RA
DIUS Configuration Illustration (on page 501)
Res
erving IP Addresses in Windows DHCP Servers (on page 528)
Sensor Thr
eshold Settings (on page 529)
s (on page 480)
PDView App for Viewing the EMX (on page 536)
Conn
ecting Contact Closure Sensors to OLD EMX2-888 (on page
541)
Please se
changes applied to this version of EMX.
xiv
e the Release Notes for a more detailed explanation of the

Chapter 1
Overview
Introduction
In This Chapter
Overview....................................................................................................1
Product Models..........................................................................................2
Package Contents .....................................................................................3
APIPA and Link-Local Addressi
The EMX provides a rack management solution that combines the
capabilities of asset management, environmental monitoring, image
surveillance, event notifications and support for Schroff
exchangers.
Asset management:
You can remotely track the location of IT equipment after tagging IT
devices electronically. This feature is especially useful when there
are hundreds of IT devices to administer.
ng ............................................................4
®
heat
The following items are required for setting up the asset
management system:
Raritan asset tags: You tag an IT device by sticking an electronic
asset tag on it.
Raritan asset management sensors (asset sensors): Each asset
sensor transmits the tag and position information to the EMX.
An EMX device: You can remotely locate each tagged IT device
through the EMX.
Environmental monitoring and/or system control:
After connecting Raritan environmental sensor packages to the EMX,
you can remotely monitor environmental conditions, such as
temperature or humidity in the data center, or control a system if
actuators are connected.
Image surveillance:
®
With a Logitech
surveillance system is established so that you can remotely view
real-time snapshots or videos of the data center.
Event notifications:
Event rules and actions that are triggered when an event occurs are
supported by the EMX.
webcam connected, a simple camera and video
1
Chapter 1: Introduction
Product Models
Email messages, log events, syslog messages, webcam snapshots,
SNMP traps and SMS messages can be triggered when the events
you define occur.
In addition, images captured by the webcam can be emailed to users
in response to a specific event.
Integration with Schroff® LHX/SHX heat exchangers:
®
The EMX can integrate with a Schroff
LHX-20, LHX-40 and SHX-30
heat exchanger, which draws warm air into the air/water heat
exchanger to cool the air. This integration provides a solution for
remotely monitoring the heat exchanger.
There are two EMX models:
EMX2-111
EMX2-888
All models are functionally identical, but vary in the dimension and total
number of ports.
Note: For a list of available asset sensor kits and tags, visit the Raritan
website's Product Selector page (http://www.findmypdu.com/).
EMX2-111
EMX2-111 has the following ports and components:
1 Sensor port
1 Feature port
1 RS-485 port
2 USB ports (1 USB-A and 1 USB-B)
1 RS-232 port
1 Ethernet port
1 LCD display
Control buttons
For details on each port, see Connection Ports (on page 64).
2

Chapter 1: Introduction
EMX2-888
EMX2-888 has the following ports and components:
8 Sensor ports
8 Feature ports
8 RS-485 ports
3 USB ports (2 USB-A and 1 USB-B)
1 RS-232 port
1 Ethernet port
1 LCD display
Control buttons
Contact closure sensor termination
For details on each port, see Connection Ports (on page 64).
Package Contents
Note: If y
our EMX is EMX2-888, which contains built-in contact closure
sensor terminals, see Connecting Contact Closure Sensors to OLD
EMX2-888 (on page 541) and Conne
cting Contact Closure Sensors
to EMX2-888 (on page 77), respectively, based on your device type.
The following describes the equipment shipped with an EMX device. If
anything is missing or damaged, contact the local dealer or Raritan
Technical Support for help.
The EMX device
Power cord
Bracket pack and screws
Asset sensors (optional)
Asset tags (optional)
3

Chapter 1: Introduction
APIPA and Link-Local Addressing
The EMX supports Automatic Private Internet Protocol Addressing
(APIPA) as of release 3.2.0.
With APIPA, your EMX automatically configures a link-local IP address
and a link-local host name when it cannot obtain a valid IP address from
any DHCP server in the TCP/IP network.
Only IT devices connected to the same subnet can access the EMX
using the link-local address/host name. Those in a different subnet
cannot access it.
Exception: The EMX in the Port Forwarding mode does not support
APIPA. See Setting the Cascading Mode (on page 136).
Once the EMX can get a DHCP-assigned IP address, it stops using
APIPA and the link-local address is replaced by the DHCP-assigned
address.
Scenarios where APIPA applies:
DHCP is enabled on the EMX, but no IP address is assigned to the
EMX.
This may be caused by the absence or malfunction of DHCP servers
in the network.
Note: Configuration by connecting the EMX to a computer using a
network cable is an application of this scenario. See Connecting the
EMX to a Computer (on page 11).
The EMX previously obtained an IP address from the DHCP server,
but the lease of this IP address has expired, and the lease cannot be
renewed, or no new IP address can be obtained.
Link-local addressing:
IPv4 address:
Factory default is to enable IPv4 only. The link-local IPv4 address is
169.254.x.x/16, which ranges between 169.254.1.0 and
169.254.254.255.
IPv6 address:
A link-local IPv6 address is available only after IPv6 is enabled on
the EMX. See Selecting the Internet Protocol (on page 114).
Ho
st name - pdu.local:
You can type https://pdu.local to access the EMX instead of typing
the link-local IP address.
4

Chapter 1: Introduction
Retrieval of the link-local IPv4 address:
See IPv4 Address (on page 72).
5
Chapter 2
Rack Mounting an EMX
Depending on the model you purchased, the way to mount an EMX
device varies.
In This Chapter
Mounting a Zero U EMX ............................................................................6
Mounting a 1U EMX
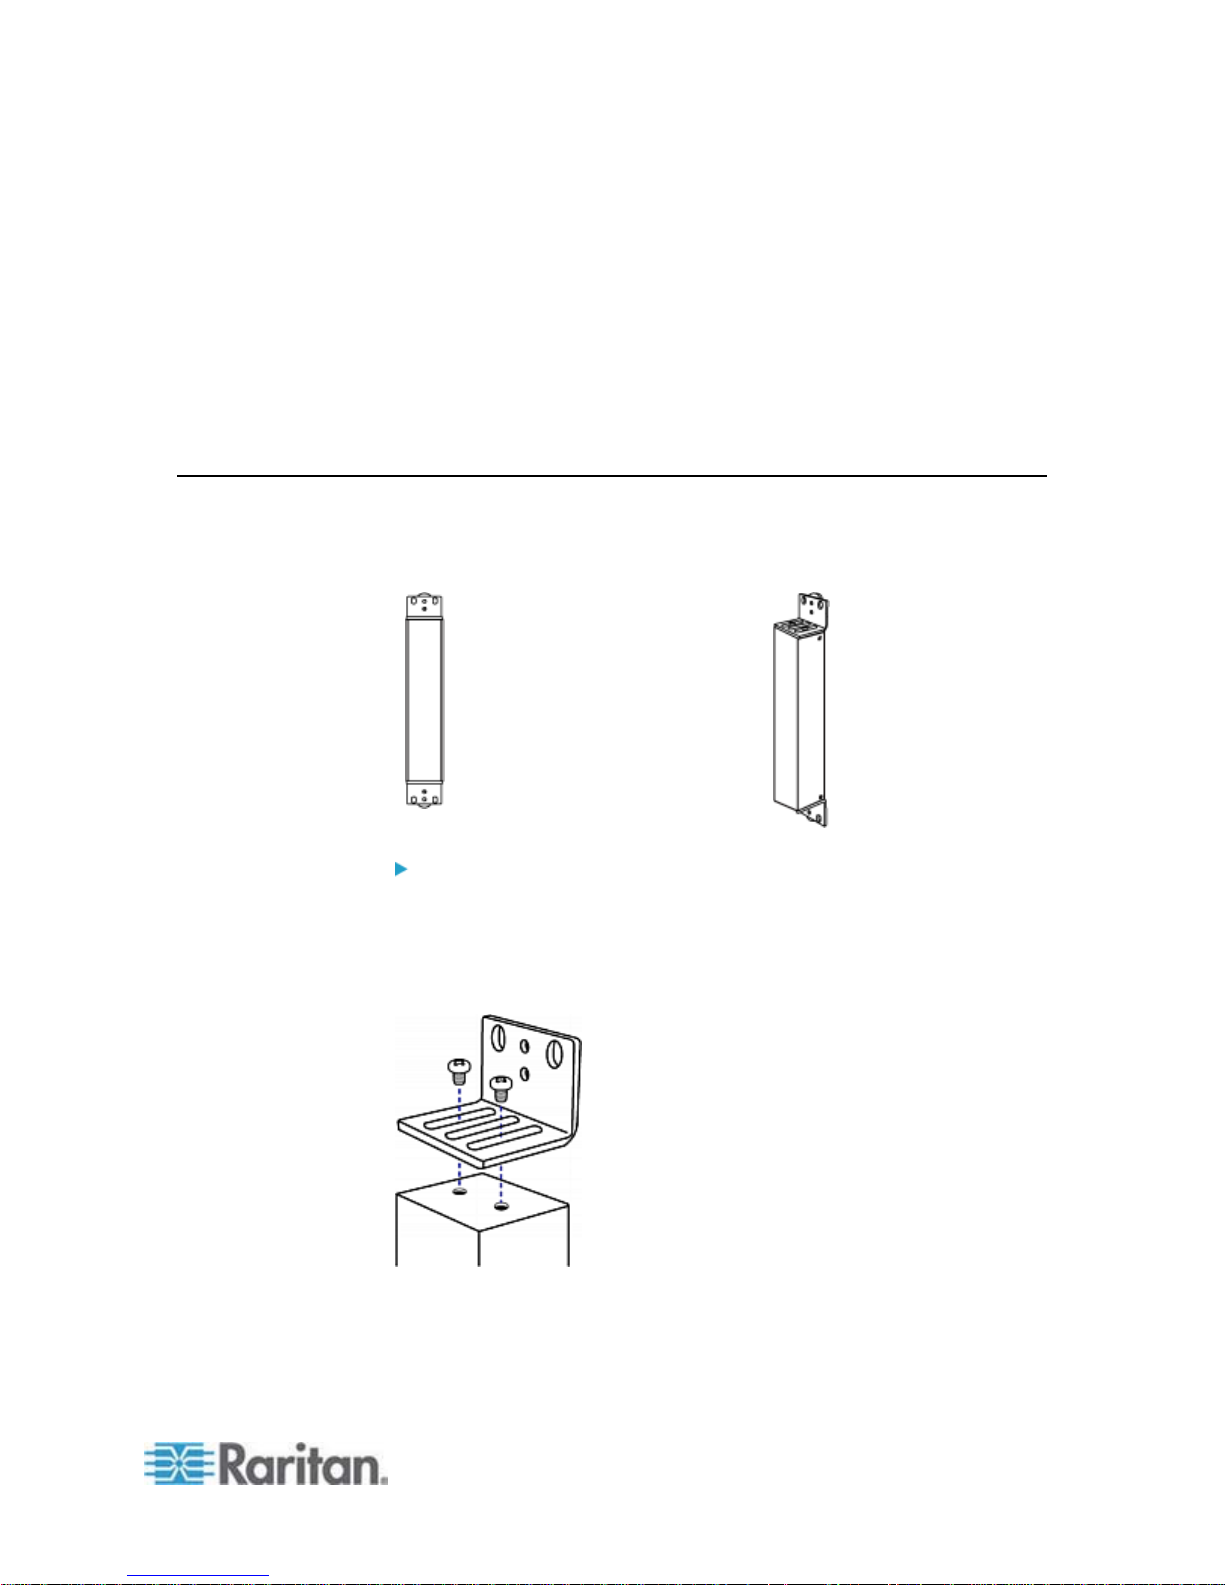
Mounting a Zero U EMX
This section describes how to mount a Zero U EMX device using
L-brackets and two buttons.
..................................................................................7
To mount Zero U models using L-brackets and two buttons:
1. Align the two edge slots of the L-bracket with the two screw holes on
the top of the EMX device.
2. Screw the L-bracket to the device and ensure the bracket is fastened
securely.
3. Repeat Steps 1 to 2 to screw another L-bracket to the bottom of the
device.
6
Chapter 2: Rack Mounting an EMX
4. After both L-brackets are installed, you can choose either of the
following ways to mount the device in the rack.
Using rack screws, fasten the device to the rack through two
identical holes near the edge of each L-bracket.
Mount the device by screwing a mounting button in the back
center of each L-bracket and then having both buttons engage
the mounting holes in the rack. The recommended torque for the
button is 1.96 N·m (20 kgf·cm).
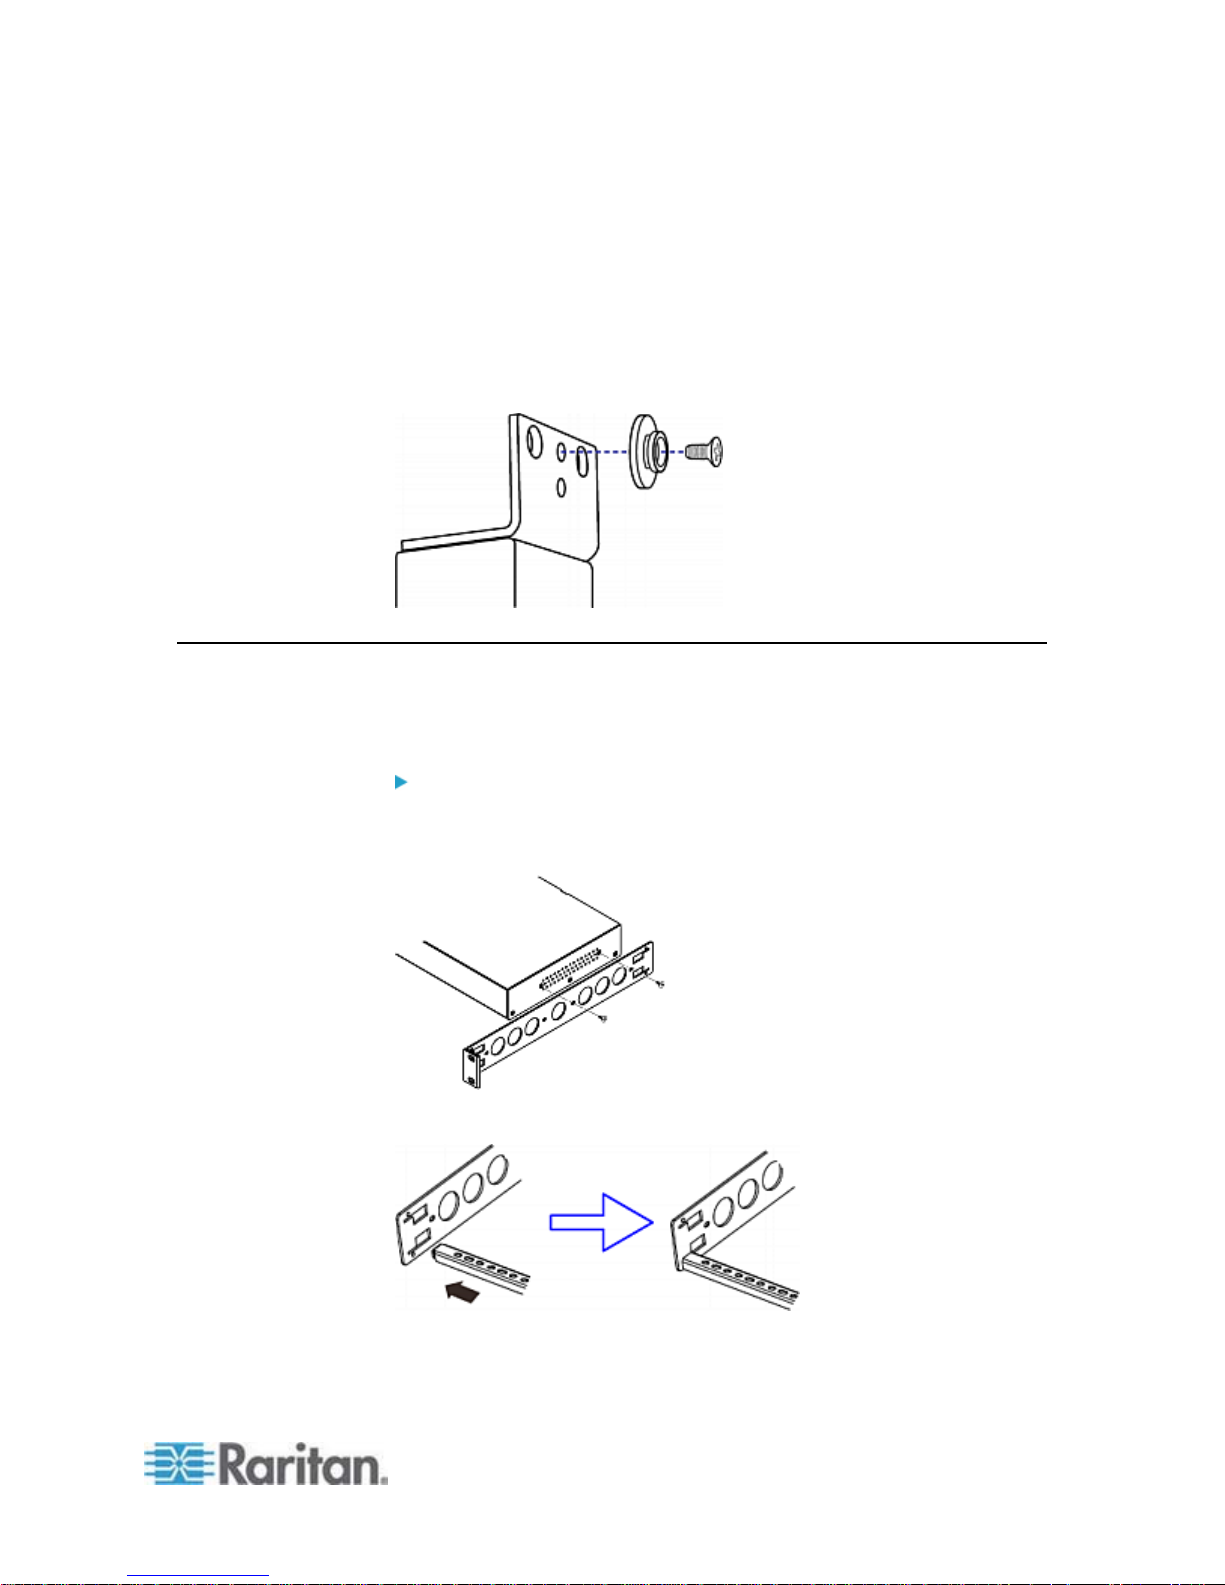
Mounting a 1U EMX
Using the appropriate brackets and tools, fasten the 1U EMX device to
the rack or cabinet.
To mount the 1U EMX device:
1. Attach a rackmount bracket to both sides of the EMX with the
provided screws.
2. Insert the cable-support bar into rackmount brackets.
7
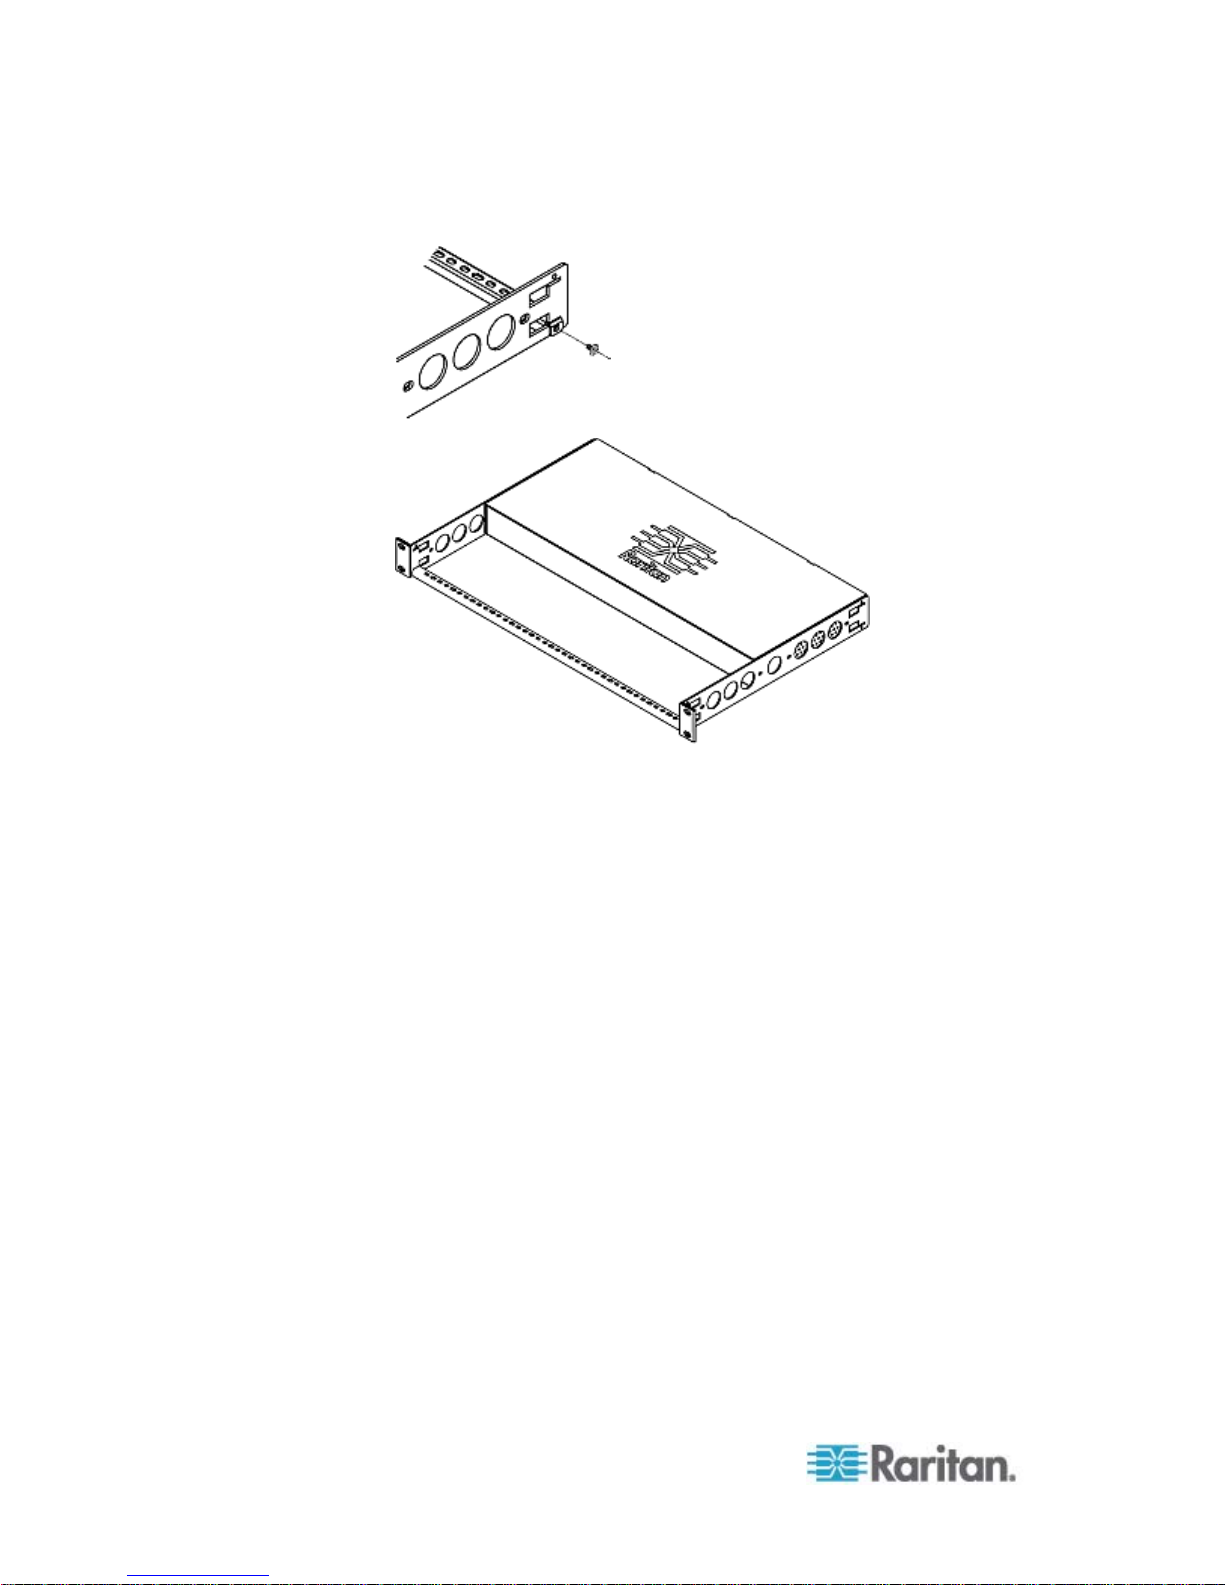
Chapter 2: Rack Mounting an EMX
3. Secure with the provided end cap screws.
4. Fasten the rackmount brackets' ears to the rack using your own
fasteners.
8

Chapter 3
Installation and Configuration
In This Chapter
Before You Begin ......................................................................................9
Connecting the EMX to a Power Source
Configuring the EMX
Bulk Configuration Methods
Cascading the EMX via USB
...............................................................................10
Before You Begin
Prepare the installation site. Make sure the installation area is clean and
not exposed to extreme temperatures or humidity. Allow sufficient space
around the EMX for cabling and asset sensor connections.
Connecting the EMX to a Power Source
If your EMX device is designed to use a cable retention clip, install the
clip before connecting a power cord. A cable retention clip prevents the
connected power cord from coming loose or falling off.
...................................................9
....................................................................21
...................................................................22
The use of cable retention clips is highly recommended for regions with
high seismic activities, and environments where shocks and vibrations
are expected.
To connect the EMX device to a power source:
1. Install the cable retention clip by inserting both ends into the tiny
holes on two hexagon screws adjacent to the power socket.
2. Plug one end of the Raritan-provided power cord into the power
socket, and press the cable retention clip toward the power cord until
it holds the cord firmly.
9

Chapter 3: Installation and Configuration
3. Connect the other end of the power cord to an appropriate power
source.
Configuring the EMX
You can initially configure the EMX by connecting it to a computer, or to
a TCP/IP network that supports DHCP.
Configuration over a DHCP-enabled network:
1. Connect the EMX to a DHCP network. See Connecting the EMX to
Your Network (on page 14).
Retrieve the DHCP-assigned IPv4 address. Use the front panel LCD
2.
display to retrieve it. See IPv4 Address (on page 72).
3.
Launch a web browser to configure the EMX. See Login (on page
84).
Configuration using a connected computer:
1. Connect the EMX to a computer. See Connecting the EMX to a
Computer (on page 11).
Use the connected computer to configure the EMX via the command
2.
line or web interface.
Command line interface: See Initial Network Configuration via
CLI (on page 15).
Web interface: Launch the web browser on the computer, and
type the link-local IP address or pdu.local to access the EMX.
See Login (on page 84). For IP address retrieval, see IPv4
ess (on page 72).
Addr
Tip: To config
ure a number of EMX devices quickly, see Bulk
Configuration Methods (on page 21).
10
Chapter 3: Installation and Configuration
Connecting the EMX to a Computer
The EMX can be connected to a computer for configuration via one of
the following ports.
ETHERNET port (female)
USB-B port (male)
RS-232 serial port (male)
EMX2-111:
EMX2-888:
To use the command line interface (CLI) for configuration, establish an
RS-232 or USB connection.
To use a web browser for configuration, make a network connection to
the computer. The EMX is automatically configured with the following
link-local addressing in any network without DHCP available:
https://169.254.x.x (where x is a number)
https://pdu.local
Establish one of the following connections to a computer.
Serial RS-232 connection:
1. Connect one end of the null-modem cable to the male RS-232 port
labeled CONSOLE / MODEM on the EMX.
2. Connect the other end to your computer's RS-232 port (COM).
3. Perform Initial Network Configuration via CLI (on page 15).
11

Chapter 3: Installation and Configuration
USB connection:
1. A USB-to-serial driver is required in Windows
before connecting the USB cable. See Installing the USB-to-Serial
Driver (Optional) (on page 12).
Connect a USB cable between the EMX device's USB-B port and a
2.
computer's USB-A port.
3. Perform Initial Network Configuration via CLI (on page 15).
®
. Install this driver
Note: Not all
serial-to-USB converters work properly with the EMX so
Raritan does not introduce the use of such converters.
Direct network connection:
1. Connect one end of a standard network patch cable to the
ETHERNET port of the EMX.
2. Connect the other end to a computer's Ethernet port.
3. On the connected computer, launch a web browser to access the
EMX, using either link-local addressing: pdu.local or 169.254.x.x.
See Login (on page 84).
Installing the USB-to-Serial Driver (Optional)
The EMX can emulate a USB-to-serial converter over a USB connection.
A USB-to-serial driver named "Dominion EMX Serial Console" is required
for Microsoft
®
Windows® operating systems.
Download the USB serial console driver from the Raritan website's
Support page (http://www.raritan.com/support/).
The driver contains
the dominion-serial.inf, dominion-serial.cat and
dominion-serial-setup-<n>.exe files.
Note: <n> in the filename of "dominion-serial-setup-<n>.exe" represents
the file's version number.
There are two ways to install this driver: automatic and manual
installation. Automatic driver installation is highly recommended.
Automatic driver installation in Windows®:
1. Make sure the EMX is NOT connected to the computer via a USB
2. Run dominion-serial-setup-<n>.exe on the computer and follow
12
cable.
online instructions to install the driver.
Note: If any Windows security warning appears, accept it to continue
the installation.

Chapter 3: Installation and Configuration
3. Connect the EMX to the computer via a USB cable. The driver is
automatically installed.
Manual driver installation in Windows®:
1. Make sure the EMX has been connected to the computer via a USB
cable.
2. The computer detects the new device and the "Found New Hardware
Wizard" dialog appears. If this dialog does not appear, choose
Control Panel > System > Hardware > Device Manager, right-click
the Dominion EMX Serial Console, and choose Update Driver.
3. Select the option of driver installation from a specific location, and
then specify the location where both dominion-serial.inf and
dominion-serial.cat are stored.
Note: If any Windows security warning appears, accept it to continue
the installation.
4. Wait until the installation is complete.
Note: If the EMX enters the disaster recovery mode when the USB serial
driver is not installed yet, it may be shown as a 'GPS camera' in the
Device Manager on the computer connected to it.
In Linux:
No additional drivers are required, but you must provide the name of the
tty device, which can be found in the output of the "dmesg" after
connecting the EMX to the computer. Usually the tty device is
"/dev/ttyACM#" or "/dev/ttyUSB#," where # is an integer number.
For example, if you are using the kermit terminal program, and the tty
device is "/dev/ttyACM0," perform the following commands:
> set line /dev/ttyACM0
> Connect
13
Chapter 3: Installation and Configuration
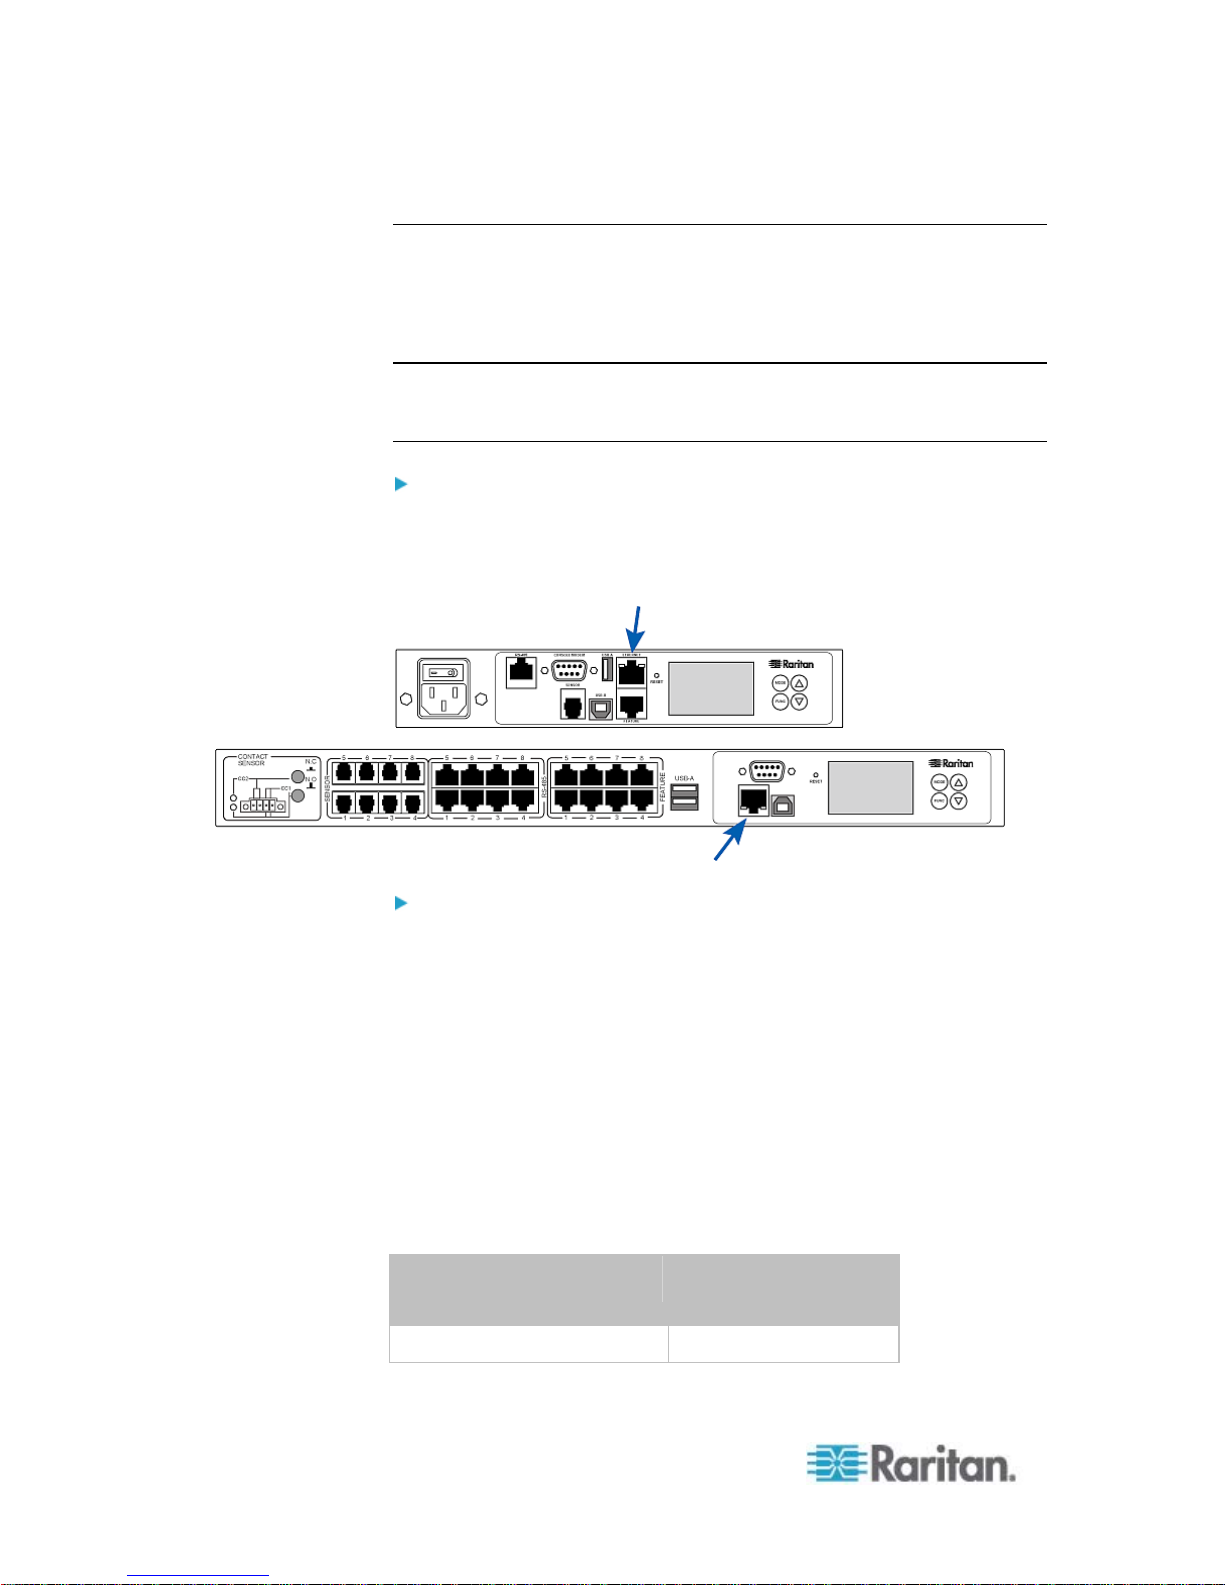
Connecting the EMX to Your Network
To remotely administer the EMX, you must connect the EMX to your
local area network (LAN).
The EMX can be connected to a wired or wireless network.
Note: If your EMX will be used as a master device in the USB-cascading
configuration where the bridging mode applies, make a wired connection.
See Cascading the EMX via USB (on page 22).
To make a wired connection:
1. Connect a standard network patch cable to the ETHERNET port on
the EMX.
2. Connect the other end of the cable to your LAN.
To make a wireless connection:
Do one of the following:
Plug a supported USB wireless LAN adapter into the USB-A port
on your EMX.
Connect a USB docking station to the USB-A port on the EMX.
Then plug the supported USB wireless LAN adapter into the
appropriate USB port on the docking station.
See USB Wireless LAN Adapters (on page 14) for a list of supported
wirele
ss LAN adapters.
USB Wireless LAN Adapters
The EMX supports the following USB Wi-Fi LAN adapters.
Wi-Fi LAN adapters Supported 802.11
protocols
Proxim Orinoco 8494 A/B/G
14

Chapter 3: Installation and Configuration
Wi-Fi LAN adapters Supported 802.11
protocols
Zyxel NWD271N B/G
Edimax EW-7722UnD A/B/G/N
TP-Link TL-WDN3200 v1 A/B/G/N
Raritan USB WIFI A/B/G/N
Note: To use the Edimax EW-7722UnD or Raritan USB WIFI wireless
LAN adapter to connect to an 802.11n wireless network, the handshake
timeout setting must be changed to 500 or greater, or the wireless
connection will fail.
Supported Wireless LAN Configuration
If wireless networking is preferred, ensure that the wireless LAN
configuration of your EMX matches the access point. The following is the
wireless LAN configuration that the EMX supports.
Network type: 802.11 A/B/G/N
Protocol: WPA2 (RSN)
Key management: WPA-PSK, or WPA-EAP with PEAP and
MSCHAPv2 authentication
Encryption: CCMP (AES)
Important: Supported 802.11 network protocols vary according to the
wireless LAN adapter being used with the EMX. See
Adapters
(on page 14).
USB Wireless LAN
Initial Network Configuration via CLI
After the EMX is connected to your network, you must provide it with an
IP address and some additional networking information.
This section describes the initial network configuration via a serial
RS-232 or USB connection. To configure the network settings using the
web interface, see Modifying the Network Configuration (on page
110).
To configure the EMX device:
1. On the computer connected to the EMX, open a communications
program such as HyperTerminal or PuTTY.
2. Select the appropriate COM port, and set the following port settings:
Bits per second = 115200 (115.2Kbps)
Data bits = 8
15

Chapter 3: Installation and Configuration
Stop bits = 1
Parity = None
Flow control = None
Tip: For a USB connection, you can determine the COM port by
choosing Control Panel > System > Hardware > Device Mana ger,
and locating the "Dominion EMX Serial Console" under the Ports
group.
3. In the communications program, press Enter to send a carriage
return to the EMX.
4. The EMX prompts you to log in. Both user name and password are
case sensitive.
a. Username: admin
b. Password: raritan (or a new password if you have changed it).
5. If prompted to change the default password, change or ignore it.
To change it, follow onscreen instructions to type your new
To ignore it, simply press Enter.
password.
6. The # prompt appears.
7. Type config and press Enter.
8. To configure network settings, type appropriate commands and
press Enter. All commands are case sensitive.
a. To set the networking mode, type this command:
network mode <mode>
where <mode> is wired (default) or wireless.
b. For the wired network mode, you may configure the LAN
interface settings. In most scenarios, the default setting (auto)
works well and should not be changed unless required.
To set Use this command
LAN interface
speed
network interface
LANInterfaceSpeed <option>
<option> = auto, 10Mbps, or 100Mbps.
LAN interface
duplex mode
network interface
LANInterfaceDuplexMode <mode>
<mode> = half, full or auto.
16
 Loading...