

Page 1
Raritan EMX Quick Setup Guide 1
QSG-EMX-0I-v2.5.0 255-80-6106-00 RoHS
EMX®
Quick Setup Guide
Thank you for purchasing the EMX rack management system and asset management sensors (asset sensors). This product provides
a rack management solution that integrates both asset management and environment monitoring capabilities in the data center and
server room.
This Quick Setup Guide explains how to install and configure the EMX. For additional information on any aspect of EMX, access the
product's online help from the application GUI or on the Raritan website in the Product Online Help section
(http://www.raritan.com/support/online-help/).
For more detailed information, see the latest release notes provided by Raritan.
Package Contents
The following describes the equipment shipped with an EMX
device. If anything is missing or damaged, contact the local
dealer or Raritan Technical Support for help.
The EMX device
Power cord
Bracket pack and screws
Asset sensors (optional)
Asset tags (optional)
QS Rule
Before You Begin
Prepare the installation site. Make sure the installation area is
clean and not exposed to extreme temperatures or humidity.
Allow sufficient space around the EMX for cabling and asset
sensor connections.
QS Rule
Mounting a Zero U EMX Device
This section describes how to mount a Zero U EMX device
using L-brackets and two buttons.
To mount Zero U models using L-brackets and two
buttons:
1. Align the two edge slots of the L-bracket with the two
screw holes on the top of the EMX device.
2. Screw the L-bracket to the device and ensure the bracket
is fastened securely.
3. Repeat Steps 1 to 2 to screw another L-bracket to the
bottom of the device.
4. After both L-brackets are installed on the device, you can
choose either of the following ways to mount the device in
the rack.
Using rack screws, fasten the device to the rack
through two identical holes near the edge of each
L-bracket.
Page 2
Raritan EMX Quick Setup Guide 2
QSG-EMX-0I-v2.5.0 255-80-6106-00 RoHS
Mount the device by screwing a mounting button in the
back center of each L-bracket and then having both
buttons engage the mounting holes in the rack. The
recommended torque for the button is 1.96 N·m (20
kgf·cm).
3. Secure with the provided end cap screws.
QS Rule
Mounting a 1U EMX Device
Using the appropriate brackets and tools, fasten the 1U EMX
device to the rack or cabinet.
To mount the 1U EMX device:
1. Attach a rackmount bracket to each side of the EMX with
the provided screws.
2. Insert the cable-support bar into rackmount brackets.
4. Mount the EMX device on the rack by securing the
rackmount brackets' ears to the rack's front rails with your
own screws, bolts, cage nuts, or the like.
QS Rule
Connecting the EMX to a Power Source
If your EMX device is designed to use a cable retention clip,
install the clip before connecting a power cord. A cable
retention clip prevents the connected power cord from coming
loose or falling off.
The use of cable retention clips is highly recommended for
regions with high seismic activities, and environments where
shocks and vibrations are expected.
To connect the EMX device to a power source:
1. Install the cable retention clip by inserting both ends into
the tiny holes on two hexagon screws adjacent to the
power socket.
Page 3
Raritan EMX Quick Setup Guide 3
QSG-EMX-0I-v2.5.0 255-80-6106-00 RoHS
2. Plug one end of the Raritan-provided power cord into the
power socket, and press the cable retention clip toward
the power cord until it holds the cord firmly.
2. Run dominion-serial-setup-2.0.exe. A Dominion Serial
Console Driver Setup Wizard appears.
Note: If any Windows security warning appears, accept it
to continue the installation.
3. Click Install to install the driver.
4. Click Finish when the installation is complete.
5. Connect the EMX device's USB cable back to the
computer. The driver is automatically installed.
®
:
3. Connect the other end of the power cord to an appropriate
power source.
QS Rule
Connecting the EMX to a Computer
Connect the EMX to a computer for initial configuration by
following either of the procedures below.
Manual driver installation in Windows
1. Make sure the EMX has been connected to the computer
via a USB cable.
2. The computer detects the new device and the "Found New
Hardware Wizard" dialog appears. If this dialog does not
appear, choose Control Panel > System > Hardware >
Device Manager, right-click the xxx Serial Console (where
xxx represents the product name), and choose Update
Driver.
To make a serial connection:
1. Connect one end of the null-modem cable to the RS-232
port labeled CONSOLE / MODEM on the EMX.
2. Connect the other end of the null-modem cable to the
serial port (COM) on the computer.
To make a USB connection:
1. The USB-to-serial driver is required in Windows® for a
USB connection. It is recommended to perform automatic
driver installation in Windows® before connecting the USB
cable. See Installing the USB-to-Serial Driver
(Optional) (on page 3).
3. Select the option of driver installation from a specific
location, and then specify the location where both
dominion-serial.inf and dominion-serial.cat are stored.
Note: If any Windows security warning appears, accept it
to continue the installation.
4. Wait until the installation is complete.
Note: If the EMX enters the disaster recovery mode when the
USB serial driver is not installed yet, it may be shown as a
'GPS camera' in the Device Manager on the computer
connected to it.
2. Connect one end of a regular USB cable to the USB-B
port on the EMX.
3. Connect the other end of the USB cable to the USB-A port
on the computer.
QS Rule
Installing the USB-to-Serial Driver (Optional)
The EMX can emulate a serial port over a USB connection. A
USB-to-serial driver named "Dominion Serial Console" is
required for Microsoft® Windows® operating systems, including
Windows® XP, Vista, 7 and 8. Download the USB Serial Setup
In Linux:
No additional drivers are required, but you must provide the
name of the tty device, which can be found in the output of the
"dmesg" after connecting the EMX to the computer. Usually
the tty device is "/dev/ttyACM#" or "/dev/ttyUSB#," where # is
an integer number.
For example, if you are using the kermit terminal program,
and the tty device is "/dev/ttyACM0," perform the following
commands:
driver file, which contains dominion-serial.inf,
dominion-serial.cat and dominion-serial-setup-2.0.exe files,
from the PX2 page on the Raritan website's Firmware and
Documentation section
(http://www.raritan.com/support/firmware-and-documenta
tion/).
There are two ways to install this driver: automatic and
manual installation. Automatic driver installation is highly
recommended. You should perform manual driver installation
> set line /dev/ttyACM0
> connect
QS Rule
Connecting the EMX to Your Network
To use the web interface to administer the EMX, you must
connect the EMX to your local area network (LAN). The EMX
can be connected to a wired or wireless network.
only if the automatic installation fails.
Automatic driver installation in Windows
1. Make sure the EMX is NOT connected to the computer via
®
:
a USB cable.
To make a wired connection:
1. Connect a standard Category 5e/6 UTP cable to the
ETHERNET port on the EMX.
2. Connect the other end of the cable to your LAN.
Page 4
Raritan EMX Quick Setup Guide 4
QSG-EMX-0I-v2.5.0 255-80-6106-00 RoHS
To make a wireless connection:
To set
Use this command
LAN interface
speed
network interface
LANInterfaceSpeed <option>
<option> = auto, 10Mbps, or 100Mbps.
LAN interface
duplex mode
network interface
LANInterfaceDuplexMode <mode>
<mode> = half, full or auto.
To set
Use this command
SSID
network wireless SSID <ssid>
<ssid> = SSID string
To set
Use this command
BSSID
network wireless BSSID <bssid>
<bssid> = AP MAC address or none
Authentication
method
network wireless authMethod
<method>
<method> = psk or eap
PSK
network wireless PSK <psk>
<psk> = PSK string
Do one of the following:
Plug a supported USB wireless LAN adapter into the
USB-A port on your EMX.
Connect a USB docking station to the USB-A port on
the EMX and plug the supported USB wireless LAN
adapter into the appropriate USB port on the docking
station.
See USB Wireless LAN Adapters in online help for a list of
supported wireless LAN adapters.
Supported Wireless LAN Configuration
If a wireless connection is preferred, ensure that the wireless
LAN configuration of your EMX matches the access point. The
following is the wireless LAN configuration that the EMX
supports.
Network type: 802.11 A/B/G/N
Protocol: WPA2 (RSN)
Key management: WPA-PSK, or WPA-EAP with PEAP
and MSCHAPv2 authentication
Encryption: CCMP (AES)
Important: Raritan only supports specific wireless LAN
adapters. Supported 802.11 network protocols vary
according to the wireless LAN adapter being used with
the EMX. See USB Wireless LAN Adapters.
QS Rule
Configuring the EMX
1. Go to the computer that you connected to the EMX and
open a communications program such as HyperTerminal
or PuTTY.
2. Select the appropriate COM port, and make sure the port
settings are configured as follows:
Bits per second = 115200 (115.2Kbps)
Data bits = 8
Stop bits = 1
Parity = None
Flow control = None
Tip: For a USB connection, you can find out which COM
port is assigned to the EMX by choosing Control Panel >
System > Hardware > Device Manager, and locating the
"XXX Serial Console" under the Ports group, where XXX
represents this product's name.
6. The # prompt appears when you log in successfully.
7. Type config and press Enter.
8. To configure network settings, type appropriate
commands, and press Enter. All commands are case
sensitive.
a. To set the networking mode, type this command:
network mode <mode>
where <mode> is wired (default) or wireless.
b. For the wired network mode, you may configure the
LAN interface settings. In most scenarios, the default
setting (auto) works well and should not be changed
unless required.
Tip: You can combine multiple commands to configure
multiple parameters at a time. For example,
network interface LANInterfaceSpeed <option>
LANInterfaceDuplexMode <mode>
c. For the wireless network mode, you must configure the
Service Set Identifier (SSID) parameter.
If necessary, configure more wireless parameters
shown in the following table.
3. Press Enter.
4. The EMX prompts you to log in. Note that both of user
name and password are case sensitive.
a. At the Username prompt, type admin and press Enter.
b. At the Password prompt, type raritan and press
Enter.
5. You are prompted to change the password if this is the
first time you log in to the EMX. Follow the onscreen
instructions to type your new password.
Page 5
Raritan EMX Quick Setup Guide 5
QSG-EMX-0I-v2.5.0 255-80-6106-00 RoHS
To set
Use this command
EAP outer
authentication
network wireless
eapOuterAuthentication
<outer_auth>
<outer_auth> = PEAP
EAP inner
authentication
network wireless
eapInnerAuthentication
<inner_auth>
<inner_auth> = MSCHAPv2
EAP identity
network wireless eapIdentity
<identity>
<identity> = your user name for EAP
authentication
EAP passord
network wireless eapPassword
When prompted to enter the password for
EAP authentication, type the password.
EAP CA
certificate
network wireless eapCACertificate
When prompted to enter the CA certificate,
open the certificate with a text editor, copy
and paste the content into the
communications program.
Note: The content to be copied from the CA certificate
To set
Use this command
IP protocol
network ip proto <protocol>
<protocol> = v4Only, v6Only or both
IP address
returned by the
DNS server
network ip dnsResolverPreference
<resolver>
<resolver> = preferV4 or preferV6
To set
Use this command
IPv4
configuration
method
network ipv4 ipConfigurationMode
<mode>
<mode> = dhcp (default) or static
IPv6
configuration
method
network ipv6 ipConfigurationMode
<mode>
<mode> = automatic (default) or static
To set
Use this command
Preferred host
name (optional)
network <version>
preferredHostName <name>
<name> = preferred host name
To set
Use this command
Static IPv4 or
IPv6 address
network <version> ipAddress <ip
address>
<ip address> = static IP address
IPv4 subnet
mask
network ipv4 subnetMask <netmask>
<netmask> = subnet mask
IPv4 or IPv6
gateway
network <version> gateway <ip
address>
<ip address> = gateway's IP address
does NOT include the first line containing "BEGIN
CERTIFICATE" and the final line containing "END
CERTIFICATE."
d. To determine which IP protocol (IPv4 or IPv6) is
enabled and which IP address (IPv4 or IPv6) returned
by the DNS server is used, configure the following
parameters.
Configure the preferred host name for the IPv4
DHCP or IPv6 automatic configuration.
Note: The <version> variable in all of the following
commands is either ipv4 or ipv6, depending on the type
of the IP protocol you have enabled.
Tip: To override the DHCP-assigned DNS servers with
those you specify manually, type this command:
network <version> overrideDNS <option>
where <option> is enable or disable. See the table
below for the commands for manually specifying DNS
servers.
For the static IP configuration, configure these
parameters.
e. After enabling the IPv4 or IPv6 protocol in the earlier
step, configure the IPv4 or IPv6 network parameters.
Page 6
Raritan EMX Quick Setup Guide 6
QSG-EMX-0I-v2.5.0 255-80-6106-00 RoHS
To set
Use this command
IPv4 or IPv6
primary DNS
server
network <version>
primaryDNSServer <ip address>
<ip address> = IP address of the primary
DNS server
IPv4 or IPv6
secondary DNS
server (optional)
network <version>
secondaryDNSServer <ip address>
<ip address> = IP address of the
secondary DNS server
9. To quit the configuration mode, type either of the following
Command
Description
apply
Save all configuration changes and exit.
cancel
Abort all configuration changes and exit.
Command
Description
show network
Show network parameters.
show network ip all
Show all IP configuration
parameters.
show network
wireless details
Show all wireless parameters.
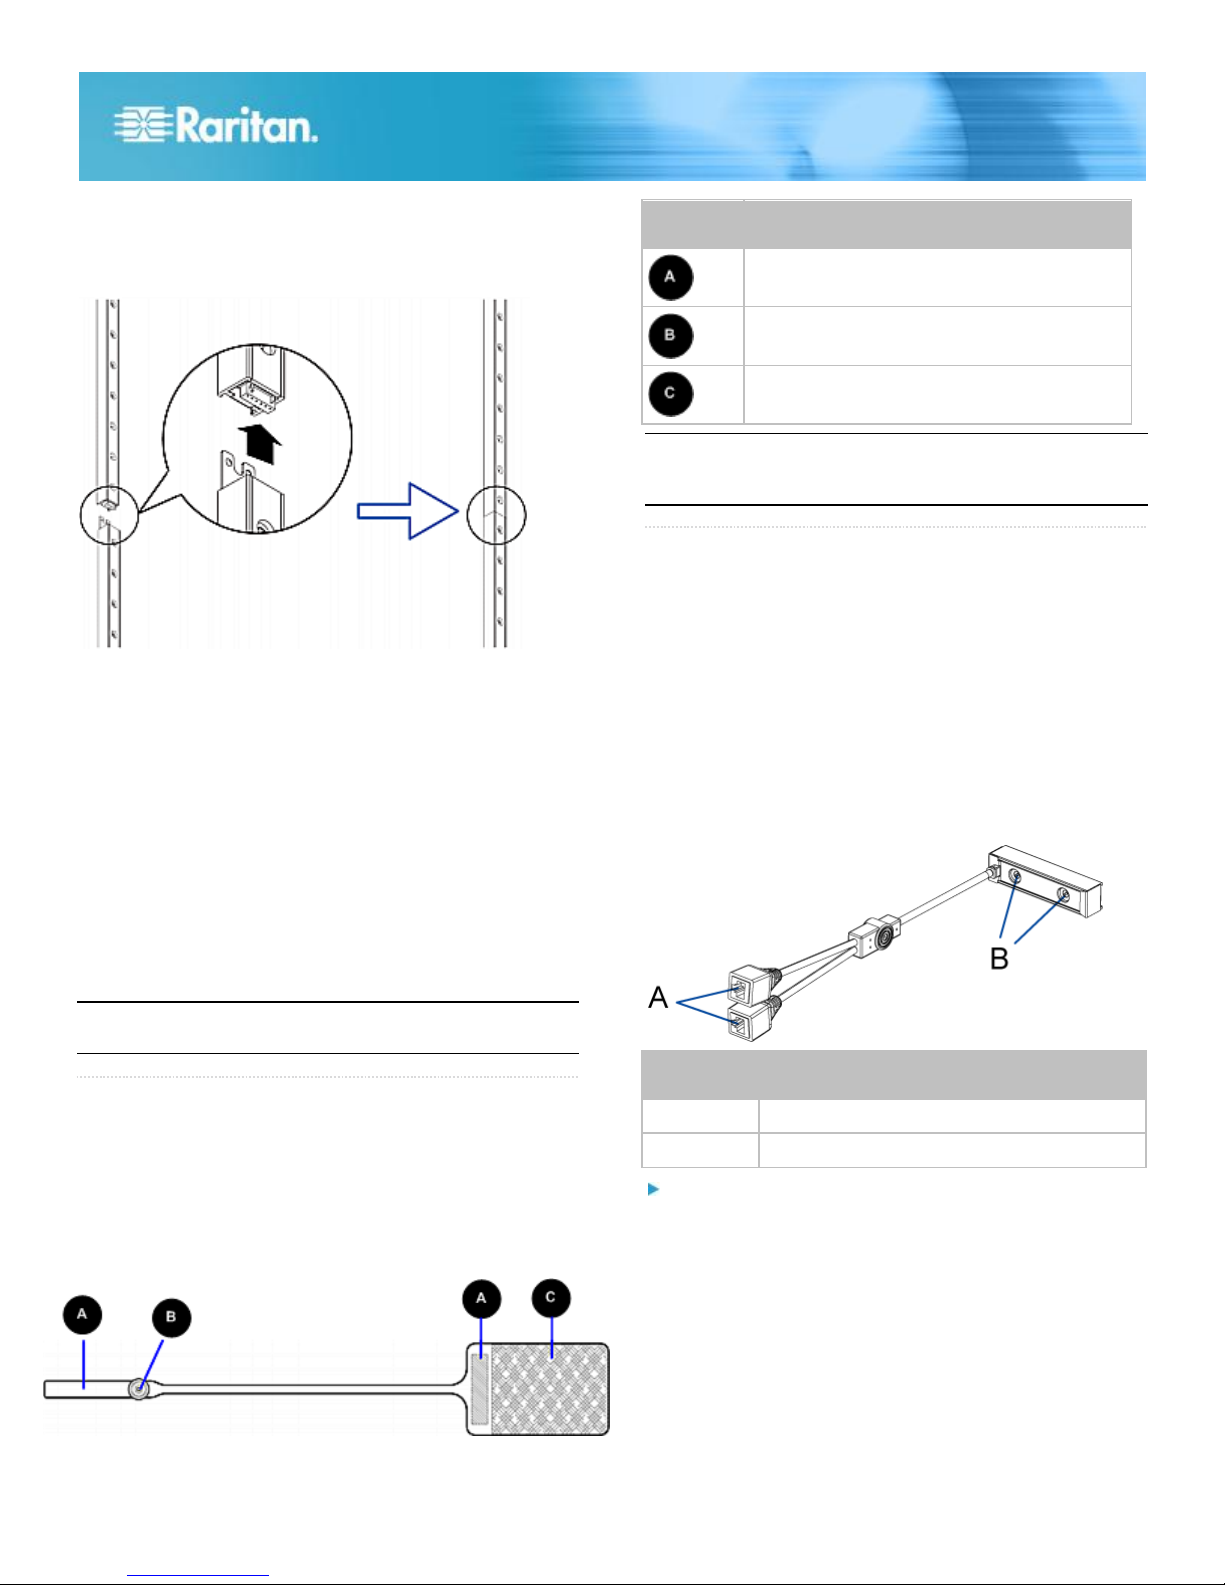
Number
Item
8U MASTER asset sensor with 8 tag ports
8U SLAVE asset sensor with 8 tag ports
5U "ending" SLAVE asset sensor with 5 tag
ports
commands, and press Enter.
The # prompt appears, indicating that you have quit the
configuration mode.
10. To verify whether all settings are correct, type the
following commands one by one.
The following diagram illustrates some asset sensors. Note
that Raritan provides more types of asset sensors than the
diagram.
Tip: You can type "show network wireless" to display
a shortened version of wireless settings.
11. If all are correct, type exit to log out of the EMX. If any
are incorrect, repeat Steps 7 to 10 to change network
settings.
QS Rule
Combining Asset Sensors
Each tag port on the asset sensors corresponds to a rack unit
and can be used to locate IT devices on a specific rack (or
cabinet). For each rack, you can attach asset sensors up to
64U long, consisting of one MASTER and multiple SLAVE
asset sensors. The difference between the master and slave
asset sensors is that the master asset sensor has an RJ-45
connector while the slave one does not.
Note: Unlike regular slave asset sensors, which have one DIN
connector respectively on either end, the ending slave asset
sensor has one DIN connector on only one end. An ending
asset sensor is installed at the end of the asset sensor
assembly.
To assemble asset sensors:
1. Connect a MASTER asset sensor to an 8U SLAVE asset
sensor.
Plug the white male DIN connector of the slave asset
sensor into the white female DIN connector of the
master asset sensor.
Page 7
Raritan EMX Quick Setup Guide 7
QSG-EMX-0I-v2.5.0 255-80-6106-00 RoHS
Make sure that the U-shaped sheet metal adjacent to
Letter
Item
Barcode (ID number), which is available on
either end of the asset tag
Tag connector
Adhesive area with the tape
Item
Description
A
RJ-45 connectors
B
Tag ports
the male DIN connector is inserted into the rear slot of
the master asset sensor. Screw up the U-shaped
sheet metal to reinforce the connection.
2. Connect another 8U slave asset sensor to the one being
attached to the master asset sensor in the same manner
as Step 1.
3. Repeat the above step to connect more slave asset
sensors. The length of the asset sensor assembly can be
up to 64U.
The final asset sensor can be 8U or 5U, depending on
the actual height of your rack.
Using the "ending" asset sensor as the final asset
sensor is strongly recommended.
4. Vertically attach the asset sensor assembly to the rack,
next to the IT equipment, making each tag port
horizontally align with a rack unit. The asset sensors are
automatically attracted to the rack because of magnetic
stripes on the back.
Note: The barcode of each asset tag is unique and is
displayed in the EMX web interface so it can easily be
identified.
QS Rule
Connecting AMS-M2-Z Asset Sensors
(Optional)
The AMS-M2-Z is a special type of asset sensor that functions
the same as regular MASTER asset sensors with the
following differences:
It provides two RJ-45 connectors
Multiple AMS-M2-Z asset sensors can be daisy chained
Only two tag ports are available on each AMS-M2-Z so
only two asset tags can be connected
This product is especially useful for tracking large devices
such as SAN boxes in the cabinet.
Note: The asset sensor is implemented with a tilt sensor so it
can be mounted upside down.
QS Rule
Connecting Asset Sensors to the EMX
You need both asset sensors and asset tags for tracking
devices. Asset tags, which are adhered to devices, provide an
ID number for each device, while the asset sensors transmit
ID numbers and positioning information to the connected EMX
device.
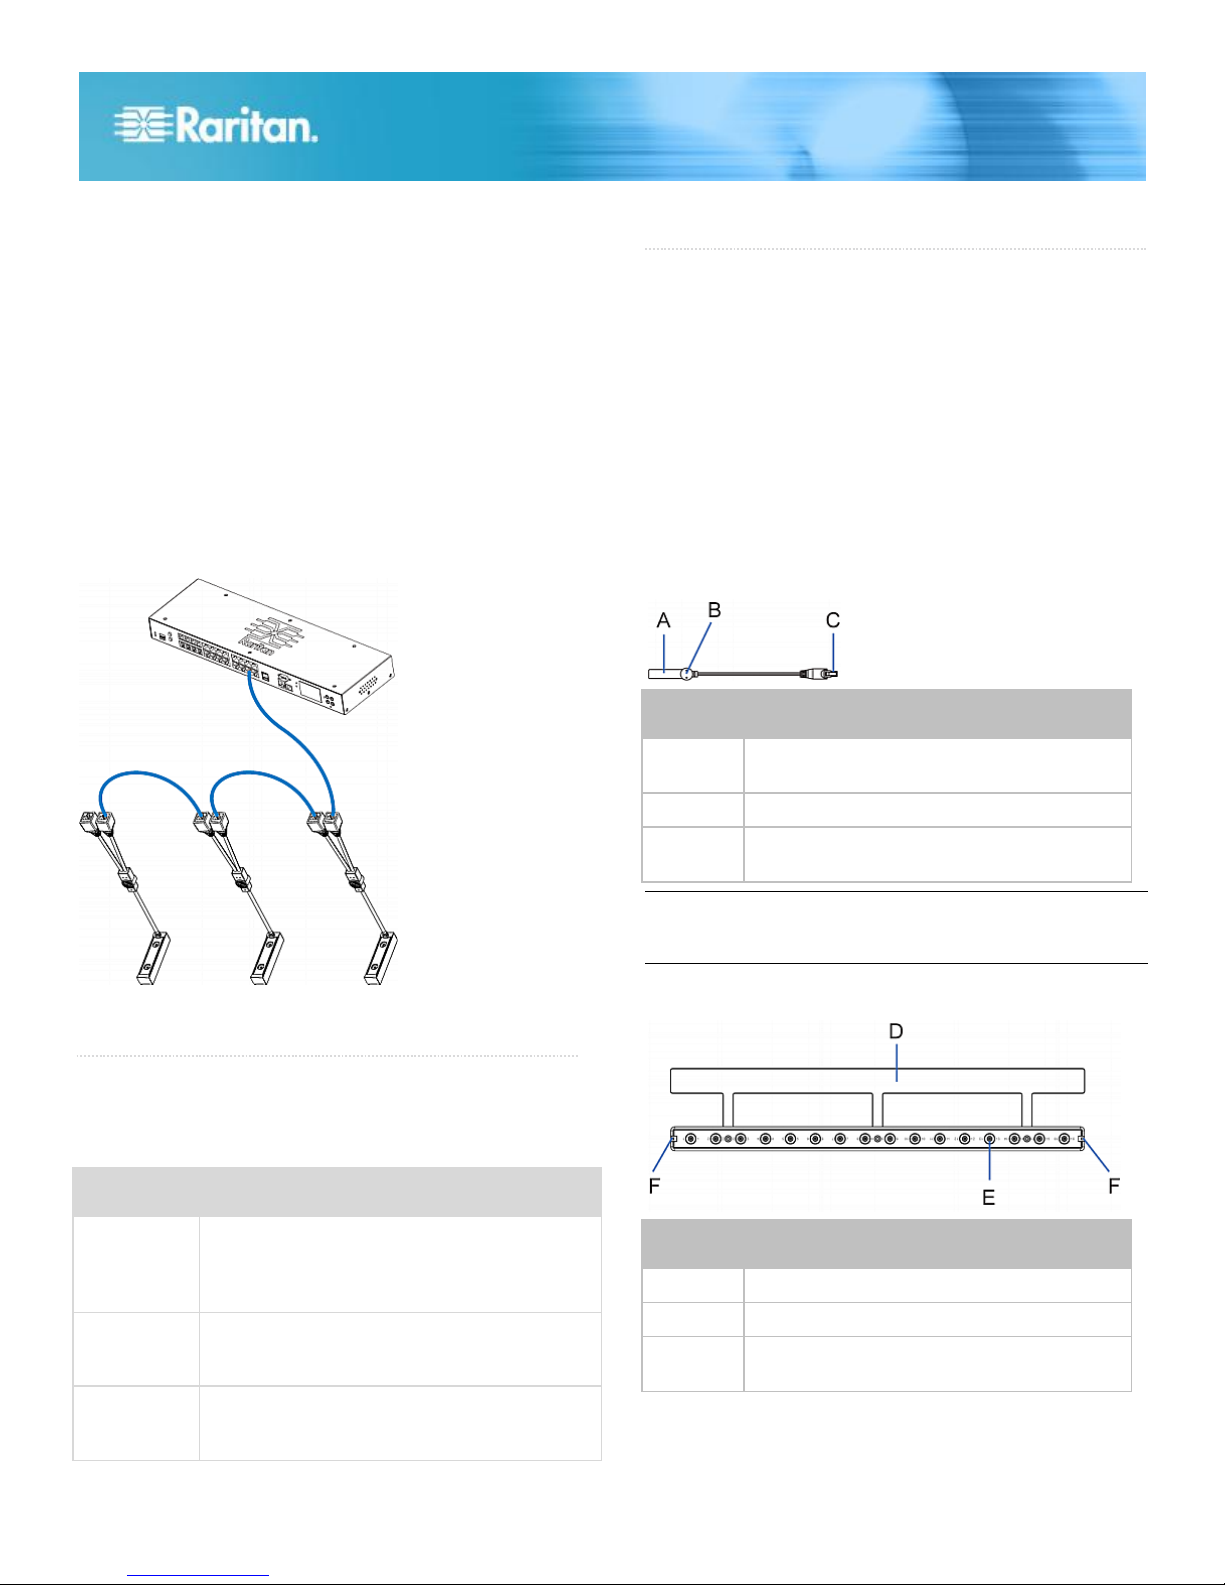
The following diagram illustrates an asset tag.
To connect the AMS-M2-Z asset sensors to the EMX:
1. Connect the AMS-M2-Z to the EMX via a Category 5e/6
cable.
a. Connect one end of the cable to the RJ-45 port labeled
"Input" on the AMS-M2-Z.
b. Connect the other end of the cable to the FEATURE
port on the EMX.
2. Affix an asset tag to the IT device and connect this asset
tag to the AMS-M2-Z by plugging the tag connector into
the tag port on the AMS-M2-Z. See Connecting Asset
Sensors to the EMX (on page 7) for details.
Page 8
Raritan EMX Quick Setup Guide 8
QSG-EMX-0I-v2.5.0 255-80-6106-00 RoHS
3. If necessary, daisy chain multiple AMS-M2-Z to track more
Models
Daisy-chain limitations
All PDUs
whose model
names begin
with PX2
Up to 4 AMS-M2-Z can be daisy chained.
The maximum cable length between each
AMS-M2-Z in the chain is 2 meters.
EMX2-111
Up to 2 AMS-M2-Z can be daisy chained.
The maximum cable length between each
AMS-M2-Z in the chain is 2 meters.
EMX2-888
Up to 6 AMS-M2-Z can be daisy chained.
The maximum cable length between each
AMS-M2-Z in the chain is 3 meters.
Item
Description
A
Barcode (ID number) for the tag connector
cable
B
Tag connector
C
Cable connector for connecting the blade
extension strip
Item
Description
D
Mylar section with the adhesive tape
E
Tag ports
F
Cable socket(s) for connecting the tag
connector cable
than two IT devices via this EMX.
a. Verify that the Category 5e/6 cable length is within the
limitation. See AMS-M2-Z Daisy-Chain Limitations
(on page 8) for the cable length limitations.
b. Connect one end of the Category 5e/6 cable to the
RJ-45 connector labeled "Output" on the AMS-M2-Z
being connected to the EMX.
c. Connect the other end of the cable to the RJ-45
connector labeled "Input" on another AMS-M2-Z.
d. Repeat the above steps to daisy chain additional
AMS-M2-Z. See AMS-M2-Z Daisy-Chain Limitations
(on page 8) for the maximum number of AMS-M2-Z
asset sensors supported in the chain.
e. It is highly recommended using the cable ties to help
hold the weight of all connecting cables.
QS Rule
Connecting Blade Extension Strips
For blade servers, which are contained in a single chassis,
you can use a blade extension strip to track individual blade
servers.
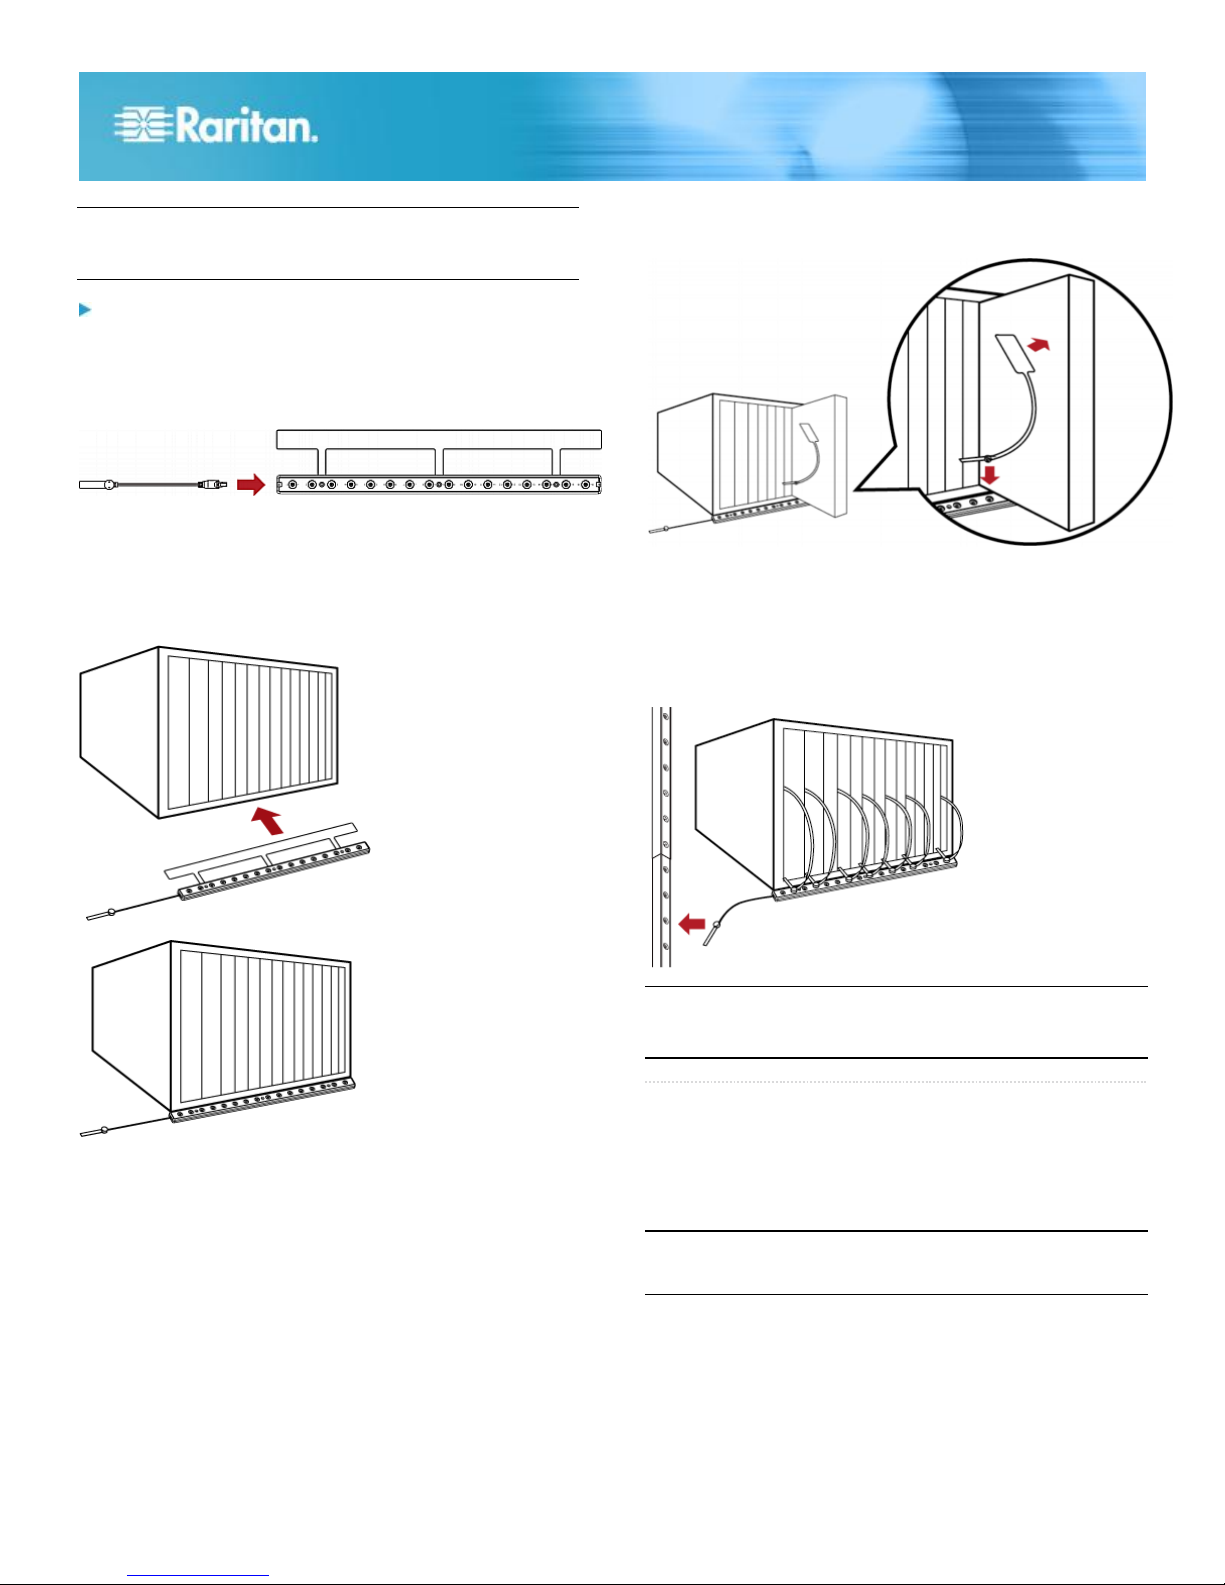
Raritan's blade extension strip functions similar to a Raritan
asset sensor but requires a tag connector cable for
connecting to a tag port on the regular asset sensor or
AMS-M2-Z. The blade extension strip contains 4 to 16 tag
ports, depending on which model you purchased.
The diagram illustrates a tag connector cable and a blade
extension strip with 16 tag ports.
Tag connector cable
4. Repeat Step 2 to connect IT devices to the other
AMS-M2-Z's in the chain via the asset tags.
QS Rule
AMS-M2-Z Daisy-Chain Limitations
There are some limitations when daisy chaining the
AMS-M2-Z asset sensors. The limitations vary according to
the Raritan product model connected to the first AMS-M2-Z.
Note: A tag connector cable has a unique barcode, which is
displayed in the EMX web interface for identifying each blade
extension strip where it is connected.
Blade extension strip
Page 9
Raritan EMX Quick Setup Guide 9
QSG-EMX-0I-v2.5.0 255-80-6106-00 RoHS
Note: Each tag port on the blade extension strip is labeled a
number, which is displayed as the slot number in the EMX
web interface.
To install a blade extension strip:
1. Connect the tag connector cable to the blade extension
strip.
Plug the cable's connector into the socket at either end
of the blade extension strip.
2. Move the blade extension strip toward the bottom of the
blade chassis until its mylar section is fully under the
chassis, and verify that the blade extension strip does not
fall off easily. If necessary, you may use the adhesive tape
in the back of the mylar section to help fix the strip in
place.
b. Plug the tag connector of the asset tag into the tag port
on the blade extension strip.
4. Repeat the above step until all blade servers in the
chassis are connected to the blade extension strip via
asset tags.
5. Plug the tag connector of the blade extension strip into the
closest tag port of the asset sensor assembly or the
AMS-M2-Z asset sensor on the rack.
3. Connect one end of an asset tag to a blade server and
connect the other end to the blade extension strip.
a. Affix the adhesive part of the asset tag to one side of a
blade server through the tag's tape.
Note: If you need to temporarily disconnect the tag connector
of the blade extension strip, wait at least 1 second before
connecting it back, or the EMX may not detect it.
QS Rule
Connecting Contact Closure Environmental
Sensors to EMX (Optional)
With Raritan environmental sensors connected, the EMX
device can remotely monitor environmental factors, such as
temperature and humidity, around the rack.
It is not guaranteed that all third-party detectors/switches
are compatible with the EMX device. You need to test the
compatibility after properly installing them.
The EMX2-888 provides two channels (on/off) for contact
closure sensor termination points, allowing for direct
connection of third-party contact closure detectors/switches.
If you have a device with a spring loaded terminal connector
built in to the front device, see EMX Devices with a Built In
Terminal Module (on page 10) and EMX Devices with
Page 10
Raritan EMX Quick Setup Guide 10
QSG-EMX-0I-v2.5.0 255-80-6106-00 RoHS
Removable Terminal Modules (on page 10), respectively,
Diagram key
Contact closure sensor
Removable terminal module
based on your device model.
EMX Devices with a Built In Terminal Module
Follow these steps if you are using an EMX device with a
spring loaded terminal module built in to the device. If you are
using an EMX with a removable terminal module, see EMX
Devices with Removable Terminal Modules (on page 10).
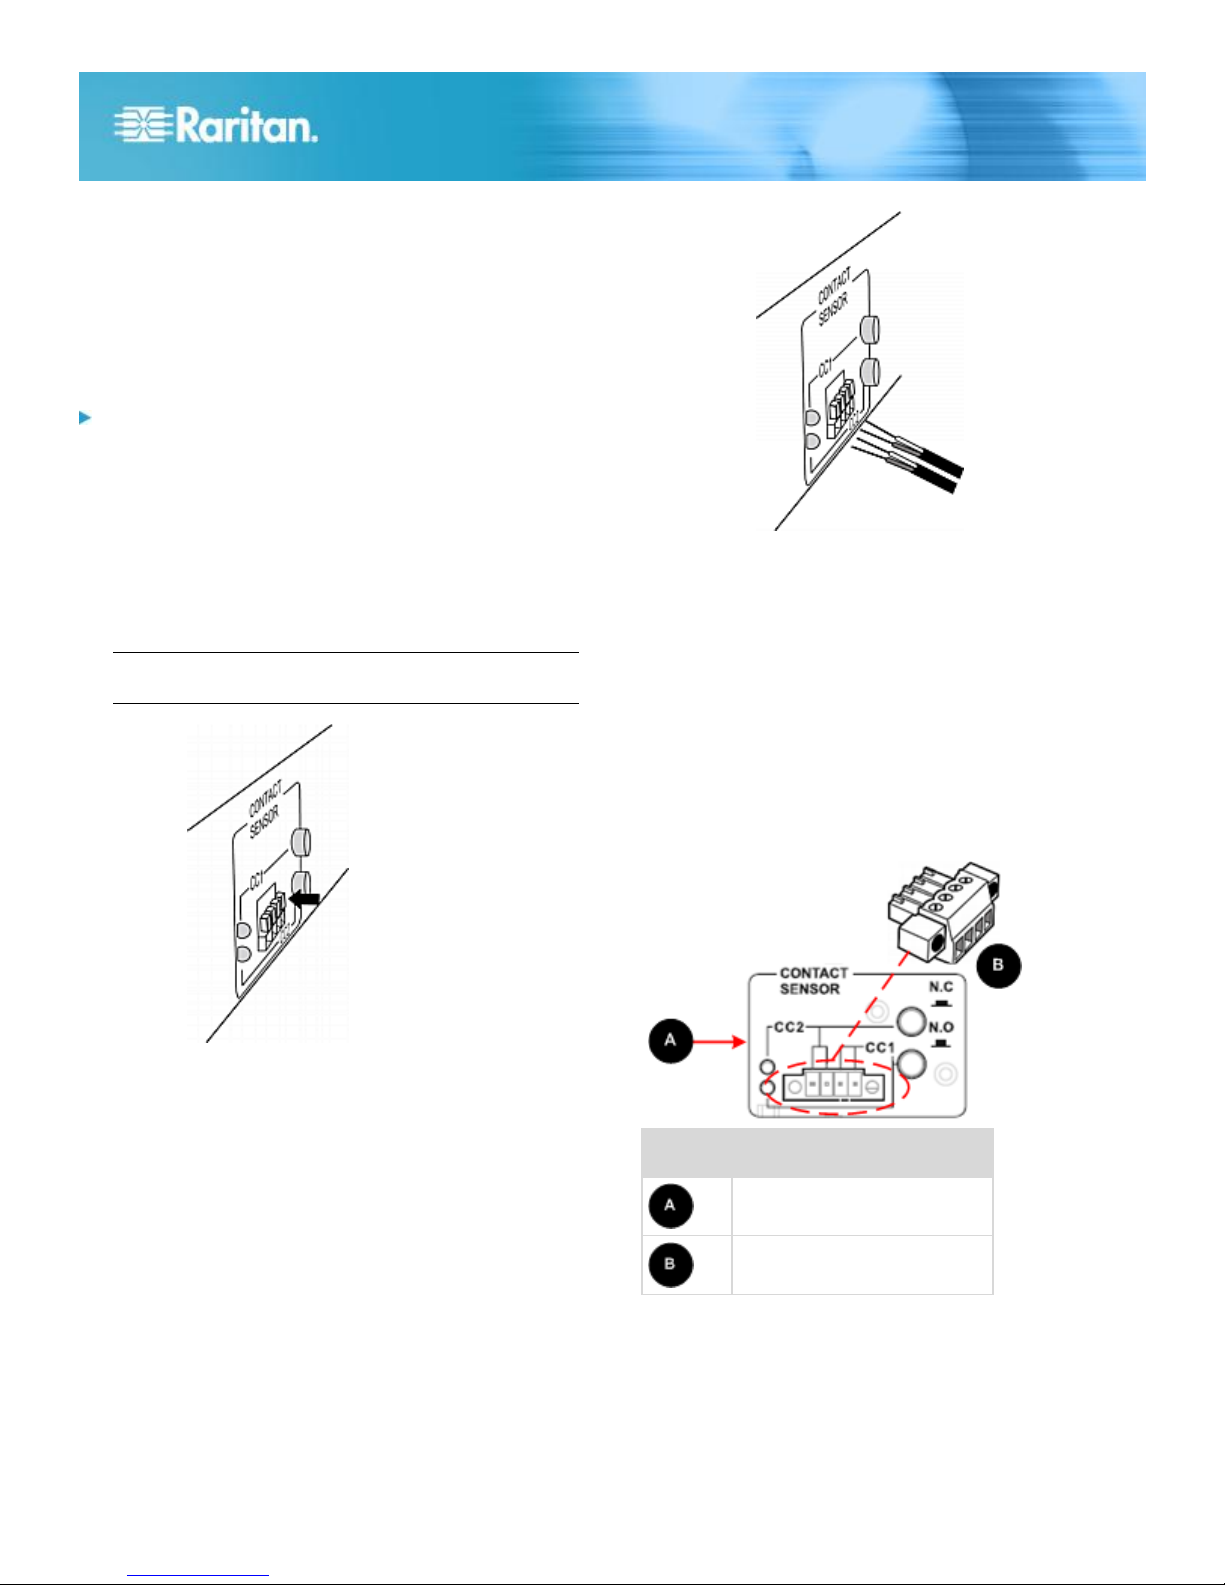
To connect environmental sensors to EMX devices:
1. Plug one Raritan environmental sensor into one of the
SENSOR ports on the EMX device. To connect additional
sensors, repeat this step.
2. To connect two third-party probes to the termination points
labeled CONTACT SENSOR, follow the procedure:
a. Strip the insulation around 12mm from the end of each
wire of discrete detectors/switches.
b. Press and hold down the tiny rectangular buttons
above the termination points.
Note: Each button controls the spring of each
corresponding termination point.
4. Release the tiny rectangular buttons after inserting the
wires properly.
a. Verify that these wires are firmly fastened.
b. By default, the open status of the detector/switch is
considered normal. To set the "normal" setting to
"closed" , press down the corresponding button
adjacent to the termination points.
EMX Devices with Removable Terminal Modules
Follow these steps if you are using an EMX device with a
removable terminal module. In this design, the contact closure
sensor comprises two parts: contact sensor module and
terminal module. The terminal module is removable.
3. Fully insert each wire of both detectors/switches into each
termination point.
Plug both wires of a detector/switch into the two
termination points to the left.
Plug both wires of the other detector/switch into the
two termination points to the right.
Four termination points are available. The two to the right
(CC1) are associated with channel number 1 (as indicated by
the LED number), and the two to the left (CC2) are associated
with channel number 2.
With this design, there are two ways to plug discrete
detectors/switches:
Page 11
Raritan EMX Quick Setup Guide 11
QSG-EMX-0I-v2.5.0 255-80-6106-00 RoHS
Connect the discrete detectors/switches while the terminal
module is attached to the EMX.
Connect the discrete detectors/switches while the terminal
module is separated from the EMX.
It is not guaranteed that all third-party detectors/switches
are compatible with the EMX device. You need to test the
compatibility after properly installing them.
Note: If the detector/switch plugged into the contact closure
sensor is Raritan's floor water sensor, verify that the total
cable length from the port of the EMX to the water detector
does not exceed 30 meters/100 feet.
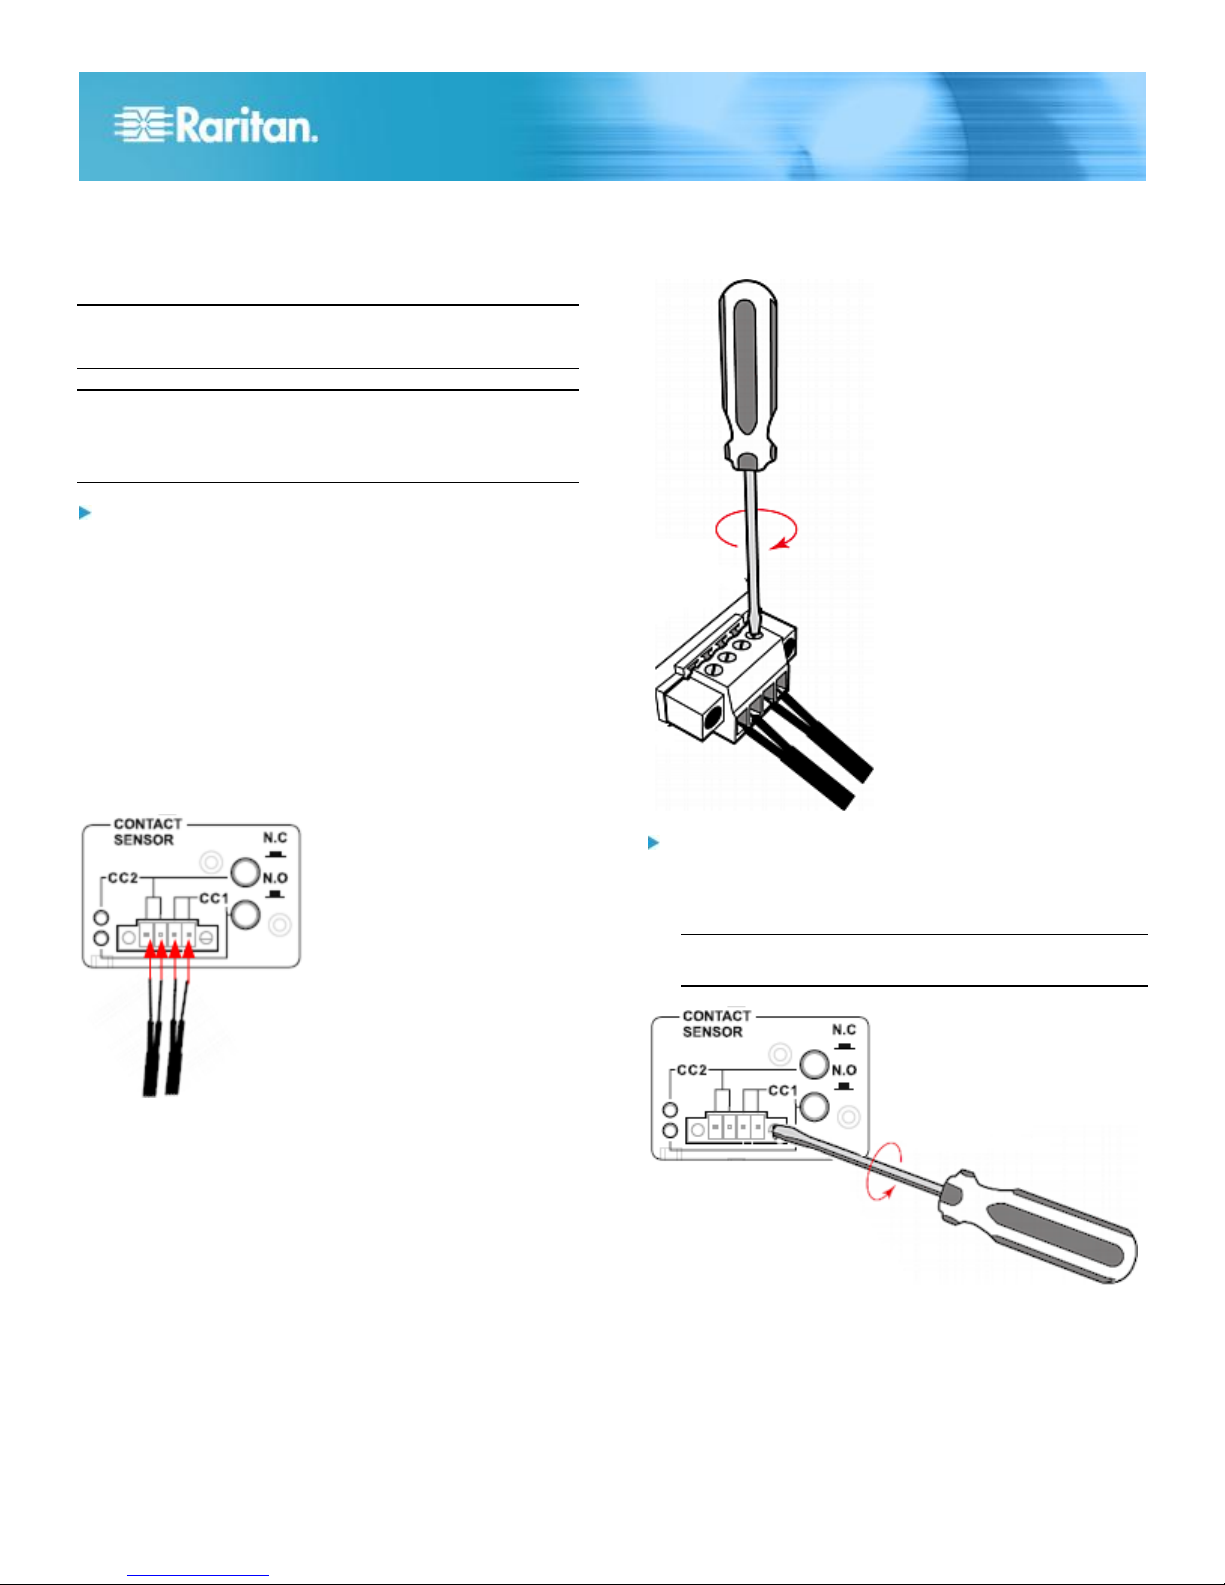
To make connections when the terminal module is
attached to the EMX console sensor:
1. Plug one Raritan environmental sensor into one of the
SENSOR ports on the EMX device. To connect additional
sensors, repeat this step.
2. Strip the insulation around 12mm from the end of each
wire of discrete detectors/switches.
3. Fully insert each wire of both detectors/switches into each
termination point.
Plug both wires of a detector/switch into the two
termination points to the left.
Plug both wires of the other detector/switch into the
two termination points to the right.
4. Use an appropriate screw driver to tighten the screws
above each termination point until the connected wires are
securely fastened.
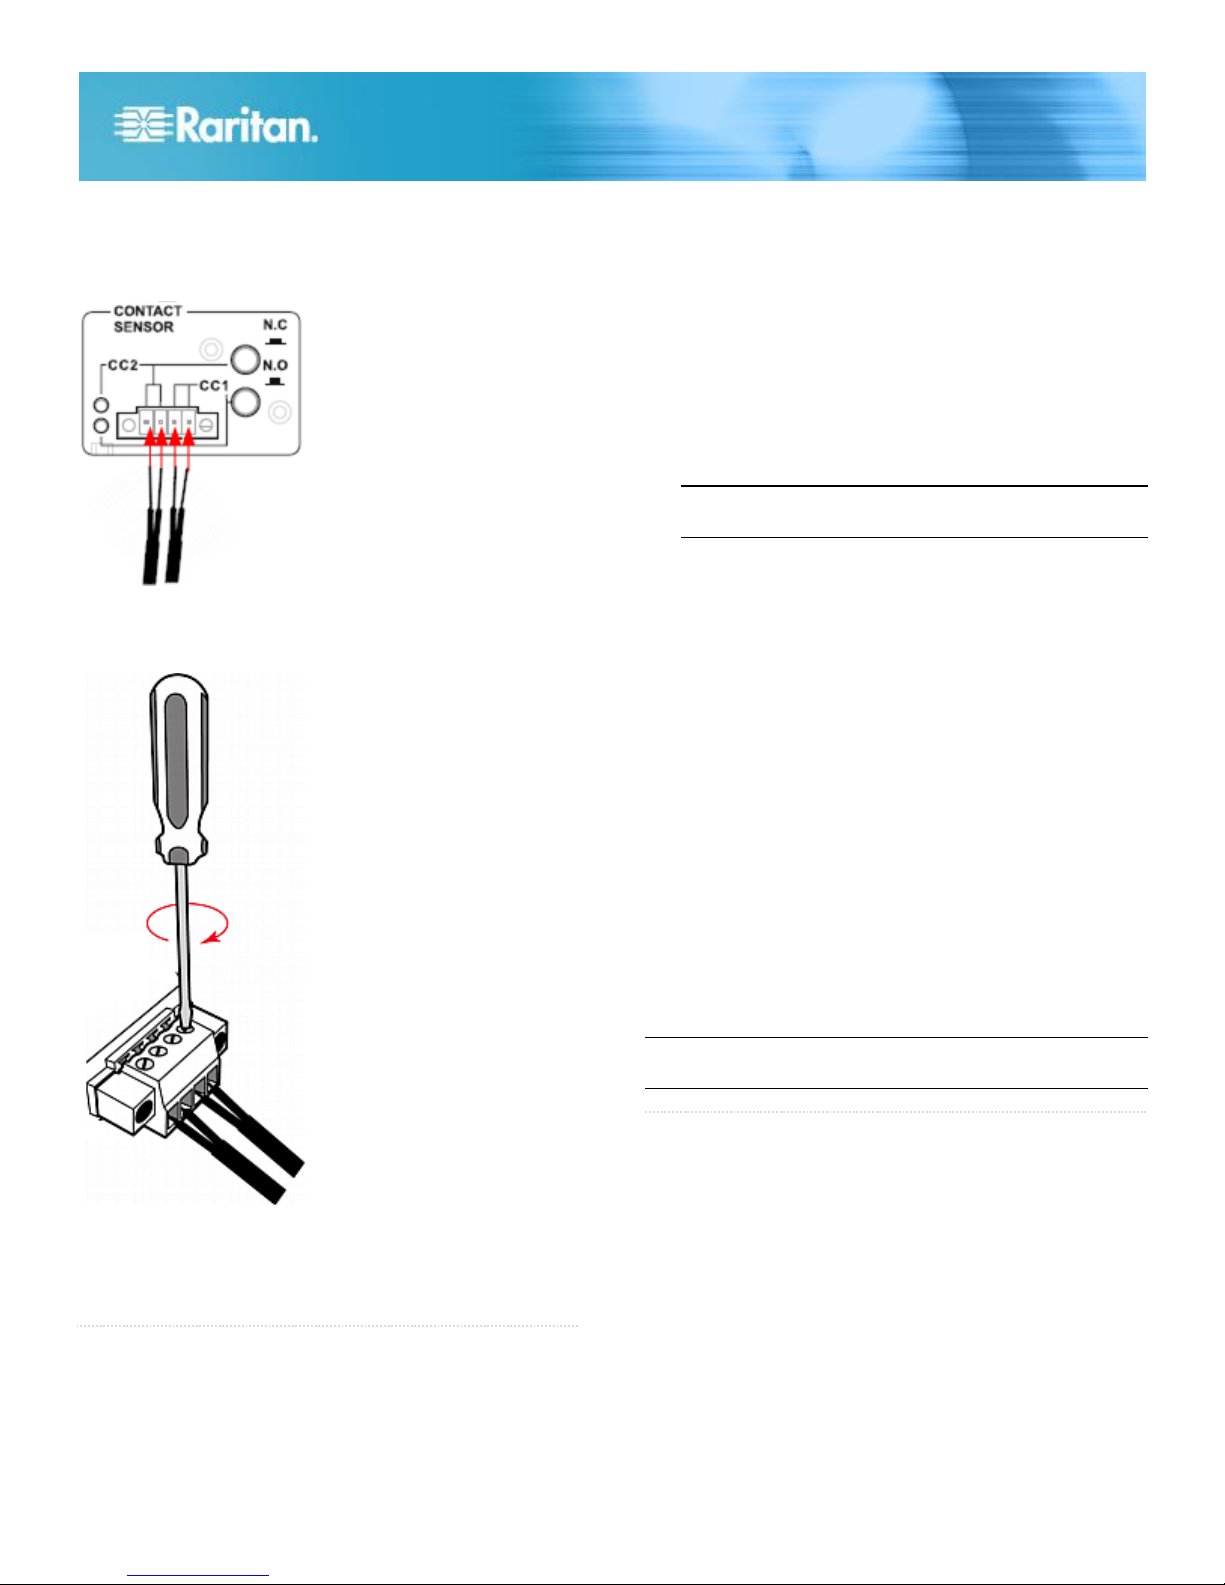
To make connections when the terminal module is
separated:
1. Loosen the two screws on each side of the terminal
module.
Note: The two screws are not removable, so just loosen
them.
2. Separate the terminal module from the CONTACT
SENSOR panel.
3. Strip the insulation around 12mm from the end of each
wire of discrete detectors/switches.
4. Fully insert each wire of both detectors/switches into each
termination point.
Page 12
Raritan EMX Quick Setup Guide 12
QSG-EMX-0I-v2.5.0 255-80-6106-00 RoHS
Plug both wires of a detector/switch into the two
termination points to the left.
Plug both wires of the other detector/switch into the
two termination points to the right.
2. When prompted for a user name and password, enter
admin and the new password you assigned during the
initial network configuration.
3. The EMX page opens.
4. Choose Device Settings > Date/Time to configure EMX
with the proper date and time or synchronize it with an
NTP server. EMX's time must be in sync with the LDAP
server to use LDAP authentication.
5. Configure each asset sensor assembly in the web
interface.
a. Locate the Feature Ports folder in the left pane, which
contains a list of asset sensor icons.
Note: If there is only one FEATURE port on your EMX
device, only one asset sensor icon is available.
5. Use an appropriate screw driver to tighten the screws
above each termination point until the connected wires are
securely fastened.
6. Plug the terminal module back into the CONTACT
SENSOR panel.
7. Tighten the two screws on each side of the terminal
module to secure it onto the CONTACT SENSOR panel.
QS Rule
What to Do Next
1. Open a browser and type the IP address of the EMX
device.
b. Click the desired asset sensor icon in the left pane.
c. Click Setup in the right pane. The setup dialog for the
selected asset sensor assembly appears.
d. Provide necessary information, including the desired
name for the asset sensor assembly, the total number
of rack units (tag ports), orientation of the asset sensor
assembly and so on.
6. EMX is sent from the factory with all the AMS LEDs set to
the Automatic Operation mode. The LED color on the
asset sensor changes according to whether an asset tag
is detected. You can configure the LED color settings from
the web interface:
a. Click the desired asset sensor icon in the left pane.
b. Select the desired rack unit (tag port) of the selected
asset sensor in the right pane.
c. Click Configure Rack Unit to configure the rack unit
settings, including the LED mode and colors.
7. Use the menu at the top of the page to create user
profiles, set privileges and security. Use the tree in the left
pane to configure asset sensors and environmental
sensors.
Note: Detailed instructions are available in the EMX online
help.
QS Rule
Additional Information
For more information about the EMX® and the entire Raritan
product line, see Raritan's website (www.raritan.com). For
technical issues, contact Raritan Technical Support. See the
Contact Support page in the Support section on Raritan's
website for technical support contact information worldwide.
Raritan's products use code licensed under the GPL and LGPL. You can request
a copy of the open source code. For details, see the Open Source Software
Statement at
(http://www.raritan.com/about/legal-statements/open-source-software-statement/)
on Raritan's website.
 Loading...