

Raritan Dominion SX II User Manual
Dominion SX II
User Guide
2.0.0
Copyright © 2015 Raritan, Inc.
DSX2-v2.0.0.-0A-E
August 2015
255-62-0001-00

This document contains proprietary information that is protected by copyright. All rights reserved. No
part of this document may be photocopied, reproduced, or translated into another language without
express prior written consent of Raritan, Inc.
© Copyright 2015 Raritan, Inc. All third-party software and hardware mentioned in this document are
registered trademarks or trademarks of and are the property of their respective holders.
FCC Information
This equipment has been tested and found to comply with the limits for a Class A digital device,
pursuant to Part 15 of the FCC Rules. These limits are designed to provide reasonable protection
against harmful interference in a commercial installation. This equipment generates, uses, and can
radiate radio frequency energy and if not installed and used in accordance with the instructions, may
cause harmful interference to radio communications. Operation of this equipment in a residential
environment may cause harmful interference.
VCCI Information (Japan)
Raritan is not responsible for damage to this product resulting from accident, disaster, misuse, abuse,
non-Raritan modification of the product, or other events outside of Raritan's reasonable control or not
arising under normal operating conditions.
If a power cable is included with this product, it must be used exclusively for this product.

iii
Contents
CS03 Certification - DSX2-16 and DSX2-48 vi
Chapter 1 Features and Benefits 1
Chapter 2 Access and Use Remote Console Features 12
Chapter 3 Access Targets 31
Package Contents .......................................................................................................................... 8
SX II Models ................................................................................................................................... 9
SX II Appliance Diagram ................................................................................................................ 9
Supported Serial Devices ............................................................................................................ 10
SX II Access Clients ..................................................................................................................... 11
Allow Pop-Ups ............................................................................................................................. 13
Security War nings and Vali dati on Mess ages .............................................................................. 13
Java Validation and Access W arning ................................................................................ 14
Additional Security Warnings ............................................................................................. 15
Initial SX II Configuration from the Remote Console ................................................................... 15
Connect a Laptop to SX II Using a Cross-Over Cable (Optional) ..................................... 16
Installing a Certificate................................................................................................................... 16
Example 1: Import the Certificate into the Browser ........................................................... 17
Example 2: Add the SX II to Trusted Sites and Import the Certificate .............................. 19
Converting a Binary Certificate to a Base64-Encoded DER Certificate (Optional) ........... 21
Log In to SX II .............................................................................................................................. 23
Change Your Password from the Remote Console ..................................................................... 23
SX II Port Access Page................................................................................................................ 24
SX II Left Panel ............................................................................................................................ 25
Enable Favorites .......................................................................................................................... 28
Change How Favorites are Displayed ............................................................................... 28
Discover Devices Product Subnet ..................................................................................... 29
Port Action Menu Options - Connect, Disconnect, Power On, Power Off and Power Cycle
Targets ......................................................................................................................................... 31
Connect to a Target ........................................................................................................... 33
Disconnect from a Target or Power Strip .......................................................................... 34
Power On a Target or Power Strip .................................................................................... 35
Power Off a Target or Power Strip .................................................................................... 36

Contents
iv
Power Cycle a Target or Power Strip ................................................................................ 37
Chapter 4 Raritan Serial Console (RSC) Help 43
Connect to Targets Using CLI - Connect, Disconnect, Power On, Power Off and Power Cycle
Targets ......................................................................................................................................... 37
Command Line Interface Protocols ................................................................................... 40
Command Line Interface Partial Searches ........................................................................ 41
Command Line Interface Tips ........................................................................................... 41
Command Line Interface Shortcuts ................................................................................... 41
Command Line Interface High-Level Commands ............................................................. 42
Standalone Raritan Serial Console Requirements ...................................................................... 44
Set Windows OS Variables and Install Standalone Raritan Serial Console (RSC) .......... 44
Set Linux OS Variables and Install Standalone Raritan Serial Console (RSC) for Linux . 47
Setting UNIX OS Variables ................................................................................................ 48
Launching RSC on Windows Systems .............................................................................. 49
Raritan Serial Console (RSC) Functions ..................................................................................... 49
Emulator ............................................................................................................................ 49
Edit ..................................................................................................................................... 56
Start and Stop Logging ...................................................................................................... 57
Send a Text File................................................................................................................. 59
Toggle Power ..................................................................................................................... 60
Power On a Target ............................................................................................................ 61
Power Off a Target ............................................................................................................ 62
Power Cycle a Target ........................................................................................................ 63
Chat ................................................................................................................................... 65
Help and About .................................................................................................................. 66

Contents
v
Chapter 5 Connect a Rack PDU to SX II and Configure Power Control Options 67
Appendix A Specifications 70
Appendix B FAQs 79
Appendix C SX II Support 91
Connecting the SX II to the PX2 Serial Port ................................................................................ 67
Connecting the SX II to the PX2 FEATURE Port ........................................................................ 68
SX II Dimensions and Physical Specifications ............................................................................ 70
Supported Remote Connections .................................................................................................. 70
Supported Number of Ports and Remote Users per SX II Model ................................................ 71
Maximum Number of Users Session ........................................................................................... 71
Maximum Number of Support Users Per Por t ............................................................................. 71
Port Access Protocol Requirements ............................................................................................ 71
SX II Port Pins .............................................................................................................................. 74
SX2 Port Ranges ......................................................................................................................... 75
Network Speed Settings .............................................................................................................. 75
Default User Session Timeouts ................................................................................................... 76
SX II Supported Local Port DVI Resolutions ............................................................................... 77
SX II Appliance LED Status Indicators ........................................................................................ 77
Target Cable Connection Distances and Rates .......................................................................... 78
SX II Release Notes and Help ..................................................................................................... 91
Contact the Documentation Team with Feedback ....................................................................... 92

vi
CS03 Certificat ion - DSX2-16 and
DSX2-48
To avoid potentially fatal shock hazard and possible damage to Raritan
equipment:
• Do not use a 2-wire power cord in any product configuration.
• Test AC outlets at your computer and monitor for proper polarity and
grounding.
• Use only with grounded outlets at both the computer and monitor.
• When using a backup UPS, power the computer, monitor and
appliance off the supply.
NOTICE: This equipment meets the applicable Industry Canada
Terminal Equipment Technical Specifications. This is confirmed by the
registration number. The abbreviation IC, before the registration number,
signifies that registration was performed based on a Declaration of
Conformity, indicating that Indust r y Canada tec hnical specifications were
met. It does not imply that Industry Canada approved the equipment.
NOTICE: The Ringer Equivalence Number (REN) for this terminal
equipment is 01. The REN assigned to each terminal equipment
provides an indication of the maximum number of terminals allowed to be
connected to a telephone interface. The termination on an interface may
consist of any combination of devices subject only to the requirement
that the sum of the Ringer Equivalence Numbers of all the devices does
not exceed five.
AVIS : Le présent matériel est conforme aux spécifications techniques
d’Industrie Canadaapplicables au matériel terminal. Cette conformité est
confirmée par le numérod'enregistrement. Le sigle IC, placé devant le
numéro d'enregistrement, signifie quel’enregistrement s’est effectué
conformément à une déclaration de conformité et indique queles
spécifications techniques d'Industrie Canada ont été respectées. Il
n’implique pasqu’Industrie Canada a approuvé le matériel.
AVIS : L'indice d'équivalence de la sonnerie (IES) du présent matériel
est de 01. L'IESassigné à chaque dispositif terminal indique le nombre
maximal de terminaux qui peuvent êtreraccordés à une interface
téléphonique. La terminaison d'une interface peut consister en
unecombinaison quelconque de dispositifs, à la seule condition que la
somme d'indicesd'équivalence de la sonnerie de tous les dispositifs
n'excède pas 5.

1
Next-Generation Console Server
lly all the
based Configuration and
rack access options,
hundreds or even thousands of serial devices, spread across multiple
Chapter 1
Features and Benefits
Raritan's Next-Generation Serial
Console Server
Ten Years of Serial Console
Experience
Dominion Platform, User
Interface and Management
Full CLIAuto-Configuration
Exciting New Features and
Innovations
The Dominion SX II is Raritan's next-generation Serial Console
Server (also known as Terminal Server) that provides IT and network
administrators secure IP access and control of serial devices,
anytime, anywhere. The new SX II is the most powerful, secure,
reliable, easy-to-use and manageable serial-over-IP console server
on the market. SX II provides convenient and productive access to
networking devices, servers, PDUs, telecommunications and other
serial devices.
For over ten years, thousands of customers have relied on the first
generation Dominion SX for access and control of hundreds of
thousands of serial devices, representing over 500 million hours of
total operation. The SX II builds upon that exper ienc e with a w ide
range of advancements and innovations.
Starting with a powerful, Dominion hardware platform providing
performance, reliability and security, the SX II includes virtua
Serial-over-IP features of its predecessor, Dominion compatible user
interfaces and management features, plus exciting new capabilities.
The SX II offers complete CLI access and management via SSH ,
Telnet and web-based user interface, with convenient direct port
access. Two script-based automatic configuration methods are
available for a fast installation and for subsequent configuration
changes.
The SX II new features include: military grade security features with
256-bit AES encryption and FIPS encryption mode, automatic
DTE/DCE serial port detection, inn ovati ve at-thewireless modem support, IPv6 networking, script based autoconfiguration and Dominion compatible user interfaces and
management.
CommandCenter Management &
With Raritan’s CommandCenter, organizations can manage
Scalability
locations, including branch of fices.

Chapter 1: Features and Benefits
2
Powerful Hardware Platform
dual power supplies and dual Gigabit Ethernet LAN ports. Models are
Productive Serial-over-IP Access
Powerful New Hardware Platform
Wide Variety of 1U Models
Powerful Serial Processing
Engine
Dual AC Power Supplies
Dual DC Powered Models
Dual Gigabit Ethernet LAN on all
Models
Five USB Ports
Powerful new hardware platform with 1GHz CPU engine, with an 8fold increase in RAM. Increased flash memory, up to 8 GB, for
storage and logging. Front panel LED's show port connection status.
Rackable, 1U models available in 4, 8, 16, 32 and 48 ports. All have
available with an optional built-in modem. At-the-rack access
includes RJ-45/serial, USB and KVM console.
The Dominion SX II with its powerful hardware platform provides
high-powered serial processing for the most extreme use cases. Up
to 10 users can simultaneously connect to a serial device connected
to a SX II port. Up to 200 simultaneous user sessions are supported
by a given SX II console server. Port configuration time is up to 23
times faster than the original SX. Connection times are over 50 times
faster.
All models have dual, 100-240 volt AC, aut o-switching power
supplies with automatic failover for increased reliability.
Dual power and dual LAN, 8, 32 and 48 port DC powered models are
available. These models provide the same features, serial access
and performance as the AC powered models.
Dual gigabit Ethernet LAN ports, wh ich can be conf ig u red for
simultaneous operation or automatic failover. Dual stack IPv4 and
IPv6 networking.
The Dominion SX II has four USB 2.0 ports, three on the back panel
and one on the front panel. These are available for local
keyboard/mouse, 3G/4G cellular modem and for automatic
configuration via USB drive. A USB 2.0 mini-B port is available for
local laptop connection.
Optional Telephone Modem
with RJ11 connection for emergency access and disaster recovery.
The Dominion SX II's local console provides multiple ways for at-the-
All models have the option for an internal, 56K telephone modem
Innovative Local Console
rack access. The console includes a traditional RJ45 serial port,
USB mini-B port, and even a DVI/USB KVM console.

Chapter 1: Features and Benefits
3
Productive Serial-over-IP Access
Widest Variety of Serial-over-IP
desktop, laptop, or handheld device.
based access for Telnet and SSHv2 clients.
sessions results as serial sessions are automatically closed upon
Access
The Dominion SX II supports the widest variety of serial-over-IP
connections via SSH/Telnet Clients, web-browser, CommandCenter,
telephony modem, cellular modem and at-the-rack access. This
includes CLI, GUI and multiple Direct Port Ac ces s methods .
SSH/Telnet Client Access
Web Browser Access
Convenient Direct Port Access
Cellular and Telephone Modem
Access
Innovative At-the-Rack Access
Port Keyword Monitoring and
Alerting
SSH/Telnet client access from a
Direct Port Access via SSH Client using a username/port string
syntax. Customer can upload, view and delete SSH keys for greater
security.
Web browser access via Dominion SX II or CommandCenter user
interfaces and the Raritan Serial Client (RSC).
Convenient Direct Port Access methods via SSH, Telnet & HTTP.
IP address and TCP portIndependent IP addresses or TCP port numbers can be assigned to
access each SX II port. HTTPS-based direct access via URL. Com
Port Redirection can be supported for third-party software
redirectors.
Optional external Cellular (3G/4G) modem and internal Telephone
modem access for emergency access, business continuity and
disaster recovery.
With the Dominion SX II, you get multiple types of local access atthe-rack. This includes: (1) Traditional RJ45 serial port, (2) MiniUSB port for laptop connection, and (3) DVI & USB-based KVM
console for connection to a rackmount keyboard tray or even a KVM
switch.
Users can define up to 14 keywords per port. The SX II will scan the
data coming from the port, and if one of the keywords is detected, it
will send an alert via SNMP or e-mail. Serial devices are monitored,
even when no user is connected! This results in faster notification
that reduces Mean Time to Repair (MTTR).
Port Logging to Syslog, NFS and
Local File
NFS Logging Features
SecureChat Instant Messaging
Automatic Serial Device Logoff
Port activity to and from serial devices can be logged to a Syslog
server, Network File System (NFS) server or locally to the SX II
device with up to 8 Gb of storage.
Allows logging of all user keystrokes and server/device responses to
NFS server(s). Can even be stored on the NFS server with userdefined encryption keys for greater security. Keep-alive messages in
the NFS log allow easy monitoring if the managed server/device
goes down.
Allows for secure, instant messaging among SX II users. Enables
collaboration of distributed users to increase their productivity,
troubleshoot, reduce the time to resolve problems and for training
purposes.
Once a user is timed out for inactivity, a user defined "logoff"
command can be sent to the target. Improved security of user

Chapter 1: Features and Benefits
4
Productive Serial-over-IP Access
time out and not left open for possible un-authorized access.
Comprehensive Serial Device Access
Connections
Security - Encryption
Over Ten Years of Serial Device
Management
Automatic DTE/DCE Serial Port
Detection
Support for the Widest Variety of
Serial Devices
Up to 230,400 Baud Serial
Flexible Serial Port Options
VT100/220/320/ ANSI suppo rt
The first generation Dominion SX has been serving customers for
over ten years, with over 500,000 ports sold. This represents
hundreds of millions of hours of operation across a wide variety of
serial devices.
This feature allows for a straight Cat5 connections to Cisco
equipment (and other compatible devices), without rollover cables. It
also means that a SX II can replace the first generation SX with its
existing serial device connections.
Supports the widest variety of serial equipment including: networking
routers, Ethernet switches, firewalls, UNIX/LINUX servers, Windows
Servers, virtual hosts, rack PDU's, UPS systems, telecom/wireless
gear. Supports multiple operating systems including SUN® Solaris,
HP-UX, AIX, Linux®, Windows® Server 2012, and UNIX®.
Supports operating speeds of 1,200 to 230,400 bits-per-second for
serial connections.
Flexible per-port serial options, including BPS, emulation, encoding,
parity, flow control, stop bits, character and line delays, always-active
connections and more. Multiple users can optionally write to a port
simultaneously. Can define an exit command when the user times
out, as well as enable an in-line menu for port commands and power
control.
Increased choice of terminal emulation options, allows support of a
broader range of devices. SX II supports the following code-sets:
US-ASCII (ISO 646); ISO 8859-1 (Latin-1); ISO 8859-15 (Latin-9);
UTF-8 and others.
Remote Power Control of Raritan
PDU’s (With Power Control
Menu)
Dominion SX II for remote power control of the equipment connected
to the PDU. Remote power control can be done via the SX II GUI,
SSH/Telnet Client or CommandCenter. Outlet associations can be
created for serial devices with multiple power supplies, such that
these outlets can be controlled with a single power command. The
SX II has "Control P" style menu commands for power control
Raritan rack PDU's (PX, PX2, PX3, RPC) can be connected to the
available during a serial session.

Chapter 1: Features and Benefits
5
Strong 256 Bit AES Encryption
Security - Authentication
The SX II utilizes the Advanced Encryption Standard (AES)
encryption for added security. 128- and 256-b it AE S encryption is
available. AES is a U.S. government -approved cryptographic
algorithm that is recommended by the National Institute of Standards
and Technology (NIST) in the FIPS Standard 197.
Validated FIPS 140-2
Cryptographic Module
Enhanced Encryption Options
External authentication with
LDAP, Radius, TACACS & Active
Directory
Upload Customer-Provided SSL
Certificates
Configurable Strong Password
Checking
Configurable Security Banner
For government, military and other high security applications, the
Dominion SX II utilizes a validated FIPS 140-2 Cryptographic Module
for enhanced encryption. Modules tested and validated as
conforming to FIPS 140-2 are accepted by federal agencies of the
U.S. and Canada for the protection of sensitive information.
Support more encryption options: web-browser security through 256
and 128-bit SSL encryption; for SSHv2 connections, AES and 3DES
are supported (client-dependent).
Dominion SX II integrates with industry-standard directory servers,
such as Microsoft Active Directory, using the LDAP, RADIUS and
TACACS protocols. This allows Dominion SX II to use pre-existing
username/password databases for security and convenience.
SecureID is supported via RADIUS for added security.
Customers can upload to the Dominion SX II digital certificates (selfsigned or certificate authority provided) for enhanced authentication
and secure communication.
The Dominion SX II has administrator-configurable, strong password
checking to ensure that user-created passwords meet corporate
and/or government standards and are resistant to brute force
hacking.
For government, military and other security-conscious customers
requiring a security message before user login, the SX II can display
a user-configurable banner message and require acceptance before
user login.
SSH Client Certificate
Authentication
Local Authentication with Users,
Groups and Permissions
Login and Password Security
SHA-2 Certificate Support
In addition to authentication via login/password, on the SSH interface
users can be authenticated via SSH certificates. Each local user can
be assigned up to 10 SSH keys. The key authentication takes the
place of the login/password
In addition to external authentication, the Dominion SX II supports
local authentication. Administrators can define users and groups with
customizable administration and port access permissions.
The SX II includes multiple login and password security features
including password aging, idle timeout, user blocking and login
limitations. Failed login attempts can be result in lockouts and user
deactivation.
Support for the more secure SHA-2 certificates.

Chapter 1: Features and Benefits
6
Security - Networking
Dual Stack IP Networking – IPv4
and IPv6
Attacks
Modem Dial-Back Security
End User Experience
Equivalence
Browsers
The Dominion SX II provides dual-stack IP networking with
simultaneous support of IPv4 and IP v6.
IPTables Firewall support
Selective Static Routing Support
TCP/IP Port Management
Prevent Man In The Middle
Rejects SSHv1 Requests
Multiple User Interfaces
Fully configurable "iptables" firewall support. User selectable and
customizable system security levels catering to wide range of
security needs.
Supports connections between modem and LAN 1, modem and LAN
2 or LAN 1 and LAN 2. This allows users to utilize two different
networks (Public and Private) and modem access to KVM or
Ethernet controlled devices. When used with the firewall function,
secure access can be enabled.
Can disable TELNET and SSH access if desired. Ability to change
these ports in addition to HTTP, HTTPS and discovery ports
Enhanced security of communication channels by using client and
server SSL certificates.
For enhanced security, Dominion SX supports modem dial-back.
Due to the many known security vulner abi lities of the SSHv1
protocol, the Dominion SX will automatically reject SSHv1
connections.
The SX II supports multiple user interfaces giving the user the
freedom to use the interface best suited for the job at hand. This
includes remote access via Raritan or third party serial client via CLI,
Raritan graphical user interface (GUI), at-the-rack access or via
CommandCenter. Convenient direct port access methods available.
Full Modern CLI – GUI
Broad Range of Supported
International Language Support
PC Share Mode
Full CLI management and configuration, thereby allowing scripting of
any command.
Offers broad range of browsers Firefox, Internet Explorer and
Chrome.
The web-based user interface supports English, Japanese and
Chinese languages. The Raritan Serial Console can support four
languages: English, Japanese, Korean and Chinese
Up to ten users can connect and remotely access each connected
serial device up to a maximum of 200 serial sessions. Sharing
feature is very useful for collaboration, troubleshooting and training.

Chapter 1: Features and Benefits
7
Easy to Install and Manage
Full CLI-
based Configuration and
Automatic Configuration via USB
Raritan CommandCenter® Management and Scalability
Management
Drive
The SX II offers complete CLI administration and management via
SSH, Telnet and we b -based user interface. Two script-based
automatic configuration methods are available for a fast installation
and for subsequent configuration changes.
The SX II can be optionally configured via a CLI script on a US B
drive connected to one of its USB ports. This can be used for initial
configuration or subsequent updates.
Automatic Configuration via
TFTP Server
Dominion-Compatible
Management
Easy to Install
Configurable Event Management
and Logging
The SX II can be optionally configured via a second method, i.e. via
a CLI script contained in a TFTP server. This can be used for initial
configuration or subsequent updates. The TFTP server address can
be retrieved via DHCP or set by the administrator.
Dominion-compatible management features are available via a webbased user interface or CLI. This includes Dominion-style User
Management, Device Settings, Security, Maintenance, Diagnostic
and Help features. Firmware update via web browser without the
use of an FTP server.
Installation in minutes, with just a web browser, CLI or automatic
configuration. Some competitive products require burdensome
editing of multiple files to complete a basic installation.
The SX II generates a large variety of device and user events
including: device operation, device management changes, security,
user activity and user administration. These can be selectively
delivered to: SNMP, Syslog, email (SMTP) as well as stored on the
SX II in the audit log. Support for SNMP v2 and v3,

Chapter 1: Features and Benefits
8
Raritan’s CommandCenter
SX II and other Raritan devices into
Centralized Management
Like the rest of the Dominion series, Dominion SX II features
complete CommandCenter Secure Gateway integration, allowing
users to consolidate all Dominion
a single logical system, accessible from a single IP address, and
under a single remote management interface.
Manage Hundreds of Serial
Devices
Single IP Address for
Administration and Device
Connection
Bulk Firmware Upgrades
Remote Power Control via
CommandCenter Secure
Gateway
Package Contents
Each SX II ships as a fully-configured stand-alone product in a standard
1U 19" rackmount chassis.
The SX II package includes -
• 1 - SX II appliance
• 1 - Rackmount kit
• 2 - AC power cords
• 1 - Set of 4 rubber feet (for desktop use)
• 1 - Warranty card
• 1 - SX II Quick Setup Guide
When deployed with CommandCenter Secure Gateway, hundreds of
Dominion SX II devices (and thousands of serial devices) can be
centrally accessed and managed.
Administrators and users can connect to a single IP address via
CommandCenter Secure Gateway to manage the SX II or access
the attached serial devices. This connection can be via web browser
or through SSH. Option for SX II at-the-rack access while under CCSG management.
Administrators can schedule firmware upgrades (and other
operations) for multiple SX II devices from CommandCenter.
CommandCenter supports remote power control of Raritan PX rack
PDU’s connected to serial ports on the Dominion SX II. For
equipment with multiple power feeds, multiple power outlets can be
associated together to switch equipment on or off with a single click
of the mouse.
Chapter 1: Features and Benefits
9
SX II Models
Appliance diagram key
The following SX II models are available.
Models with an M include an internal modem in addition to the standard
features that are provided on all SX II models. For a list of standard
features, see Introduction (see "Features and Benefits" on page 1).
• DSX2-4 and DSX-4M - 4-port serial console server
• DSX2-8 and DSX-8M - 8-port serial console server
• DSX2-16 and DSX-16M - 16-port serial console server
• DSX2-32 and DSX-32M - 32-port serial console server
• DSX2-48 and DSX-48M - 48-port serial console server
Model size, weight, temperature and other specifications are found in SX
II Dimensions and Physical Specifications (on page 70).
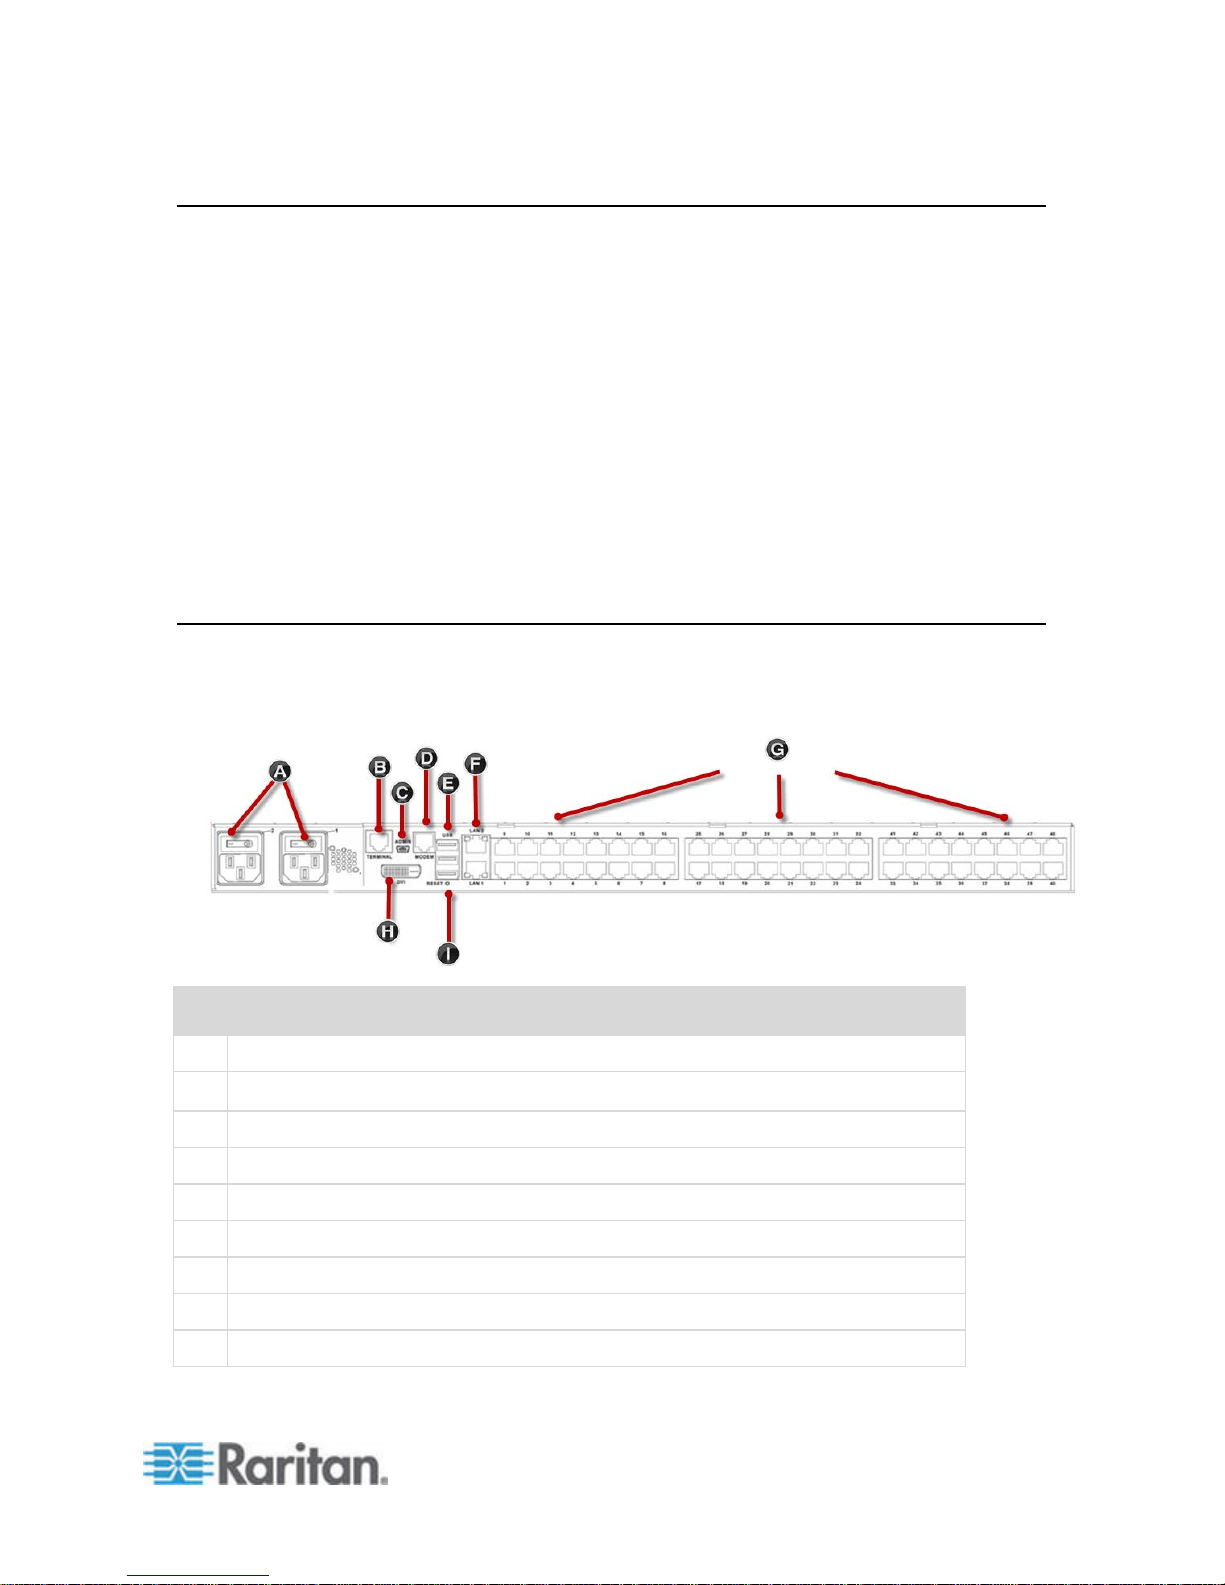
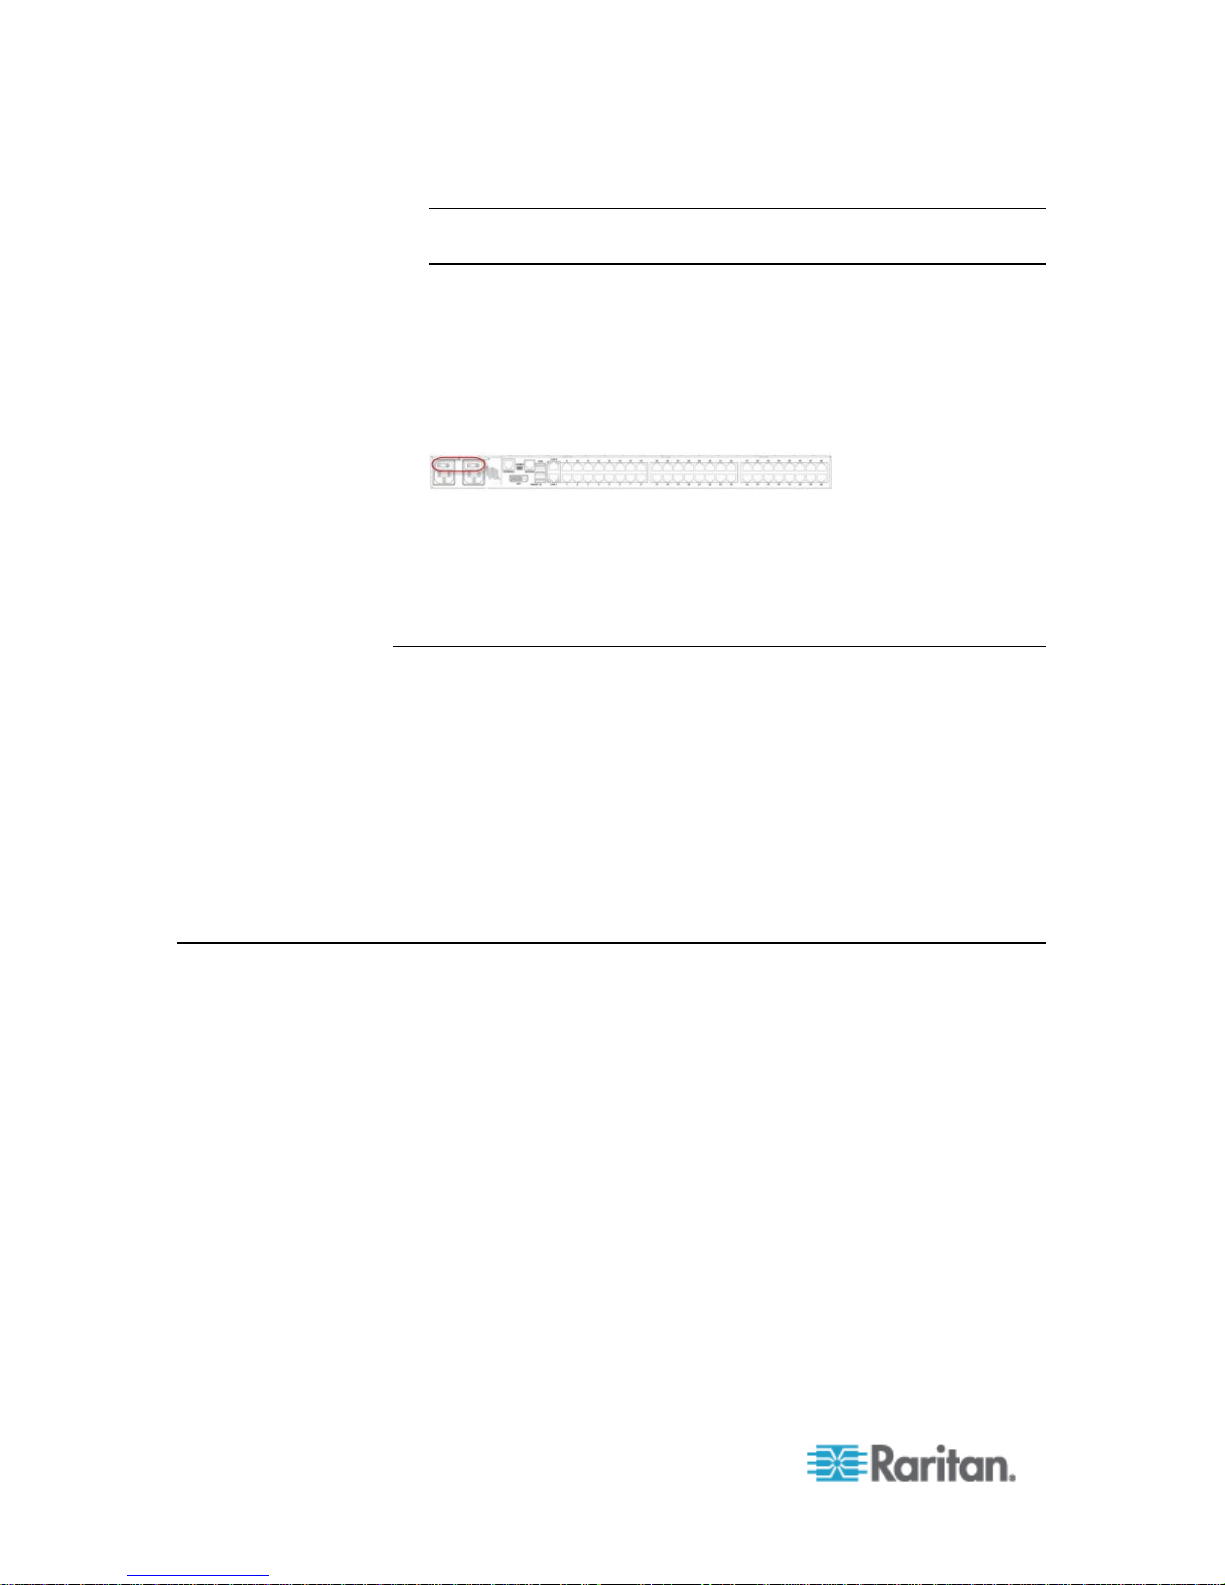
SX II Appliance Diagram
Note the image shown here is an example, so it may be different from
your model.
A
AC power outlet(s) 1 and 2 with independent power on/off switches
B
Terminal port/console port
C
Admin Mini-USB port
D
Modem port (based on model)
E
3 USB ports
F
LAN1 and LAN2 ports
G
Server ports
H
DVI-D port
I
Reset button
Chapter 1: Features and Benefits
10
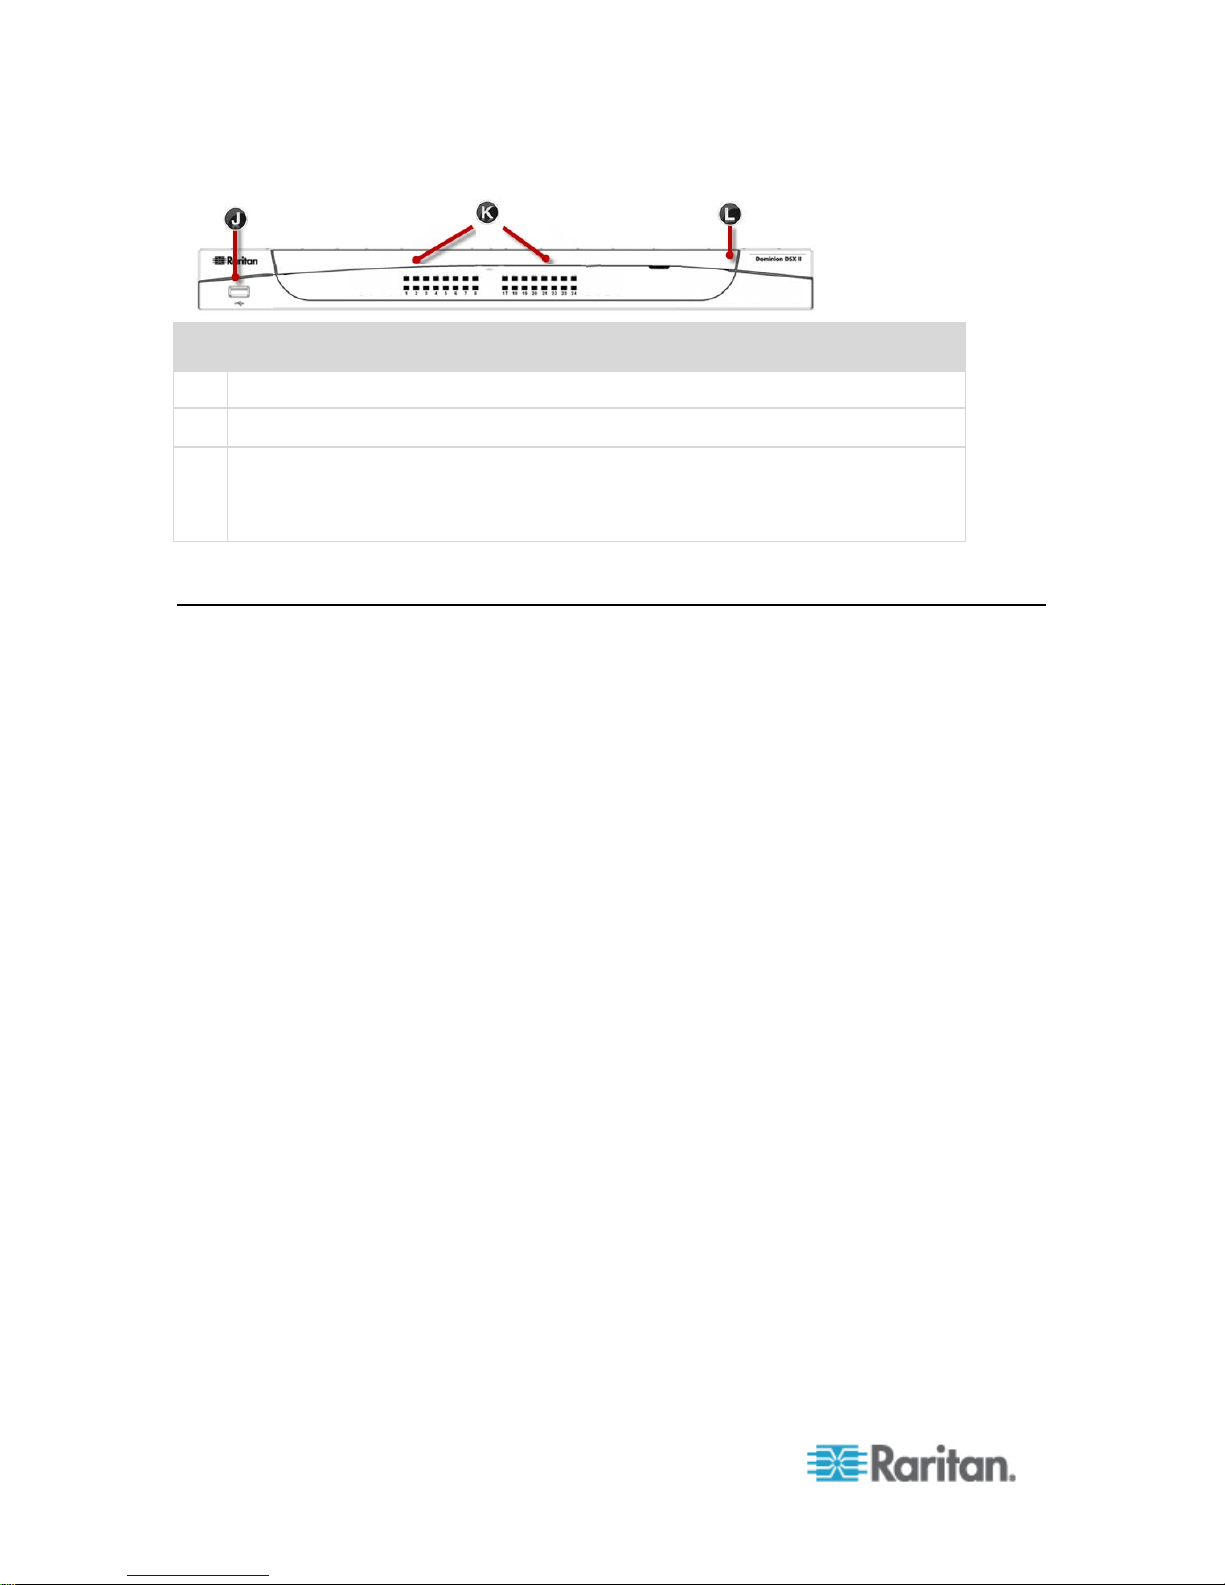
Appliance diagram key
J
USB port
K
LED port indicators
L
Power status
(Note SX II 48 port models have their power status located above the front-panel
USB port.)
Supported Serial Devices
• Routers
• LAN switches
• Rack PDUs
• Wireless modems
• Telecom modems
• Windows servers
• UNIX servers
• Linux servers
• Virtual hosts
• Firewalls

Chapter 1: Features and Benefits
11
SX II Access Clients
Raritan Serial Console (RSC) (RSC)
Access RSC by connecting from the Remote Console or use standalone
RSC to access targets directly.
See Raritan Serial Console (RSC) Help (on page 43)
Direct Port Access
Direct Port Access allows users to bypass having to use the SX II's Login
dialog and Port Access page.
This feature also provides the ability to enter a username and password
directly to proceed to the target, if the username and password is not
contained in the URL.
command line interface (CLI)
Connect using CLI via SSH or Telnet.
See Command Line Interface SX2
12
Enable Favorites ..................................................................................... 28
Chapter 2
Access and Use Remote Console
Features
The Remote Console is a browser-based interface accessed when you
log in to SX II via a network connection.
Administrator Functions in the Remote Console
Administrators perform SX II configuration and maintenance functions
from the Remote Console, such as configuring network access, adding
and managing users, managing device IP addresses and so on.
End User Functions in the Remote
From the Remote Console, end users access targets, manage favorites,
change passwords and so on.
Note that these functions can also be performed via command line
interface.
In This Chapter
Allow Pop-Ups ........................................................................................ 13
Security Warnings and Validation Mes s ages ......................................... 13
Initial SX II Configuration from the Remote Console .............................. 15
Installing a Certificate ............................................................................. 16
Log In to SX II ......................................................................................... 23
Change Your Password from the Remote Console ............................... 23
SX II Port Access Page .......................................................................... 24
SX II Left Panel ....................................................................................... 25

Chapter 2: Access and Use Remote Console Features
13
Allow Pop-Ups
Regardless of the browser you are using, you must allow pop-ups in
order to launch the SX II Remote Console.
Security Warnings and Validation Messages
When logging in to SX II, security warnings and application validation
message may appear.
These include -
™
• Java
• Additional security warnings based on your browser and security
security warnings and requests to validate SX II
See Java Validation and Acce ss Warn in g (on page 14) and
Installing a Certificate (on page 16)
settings
See Additional Security Warnings (on page 15)
Chapter 2: Access and Use Remote Console Features
14
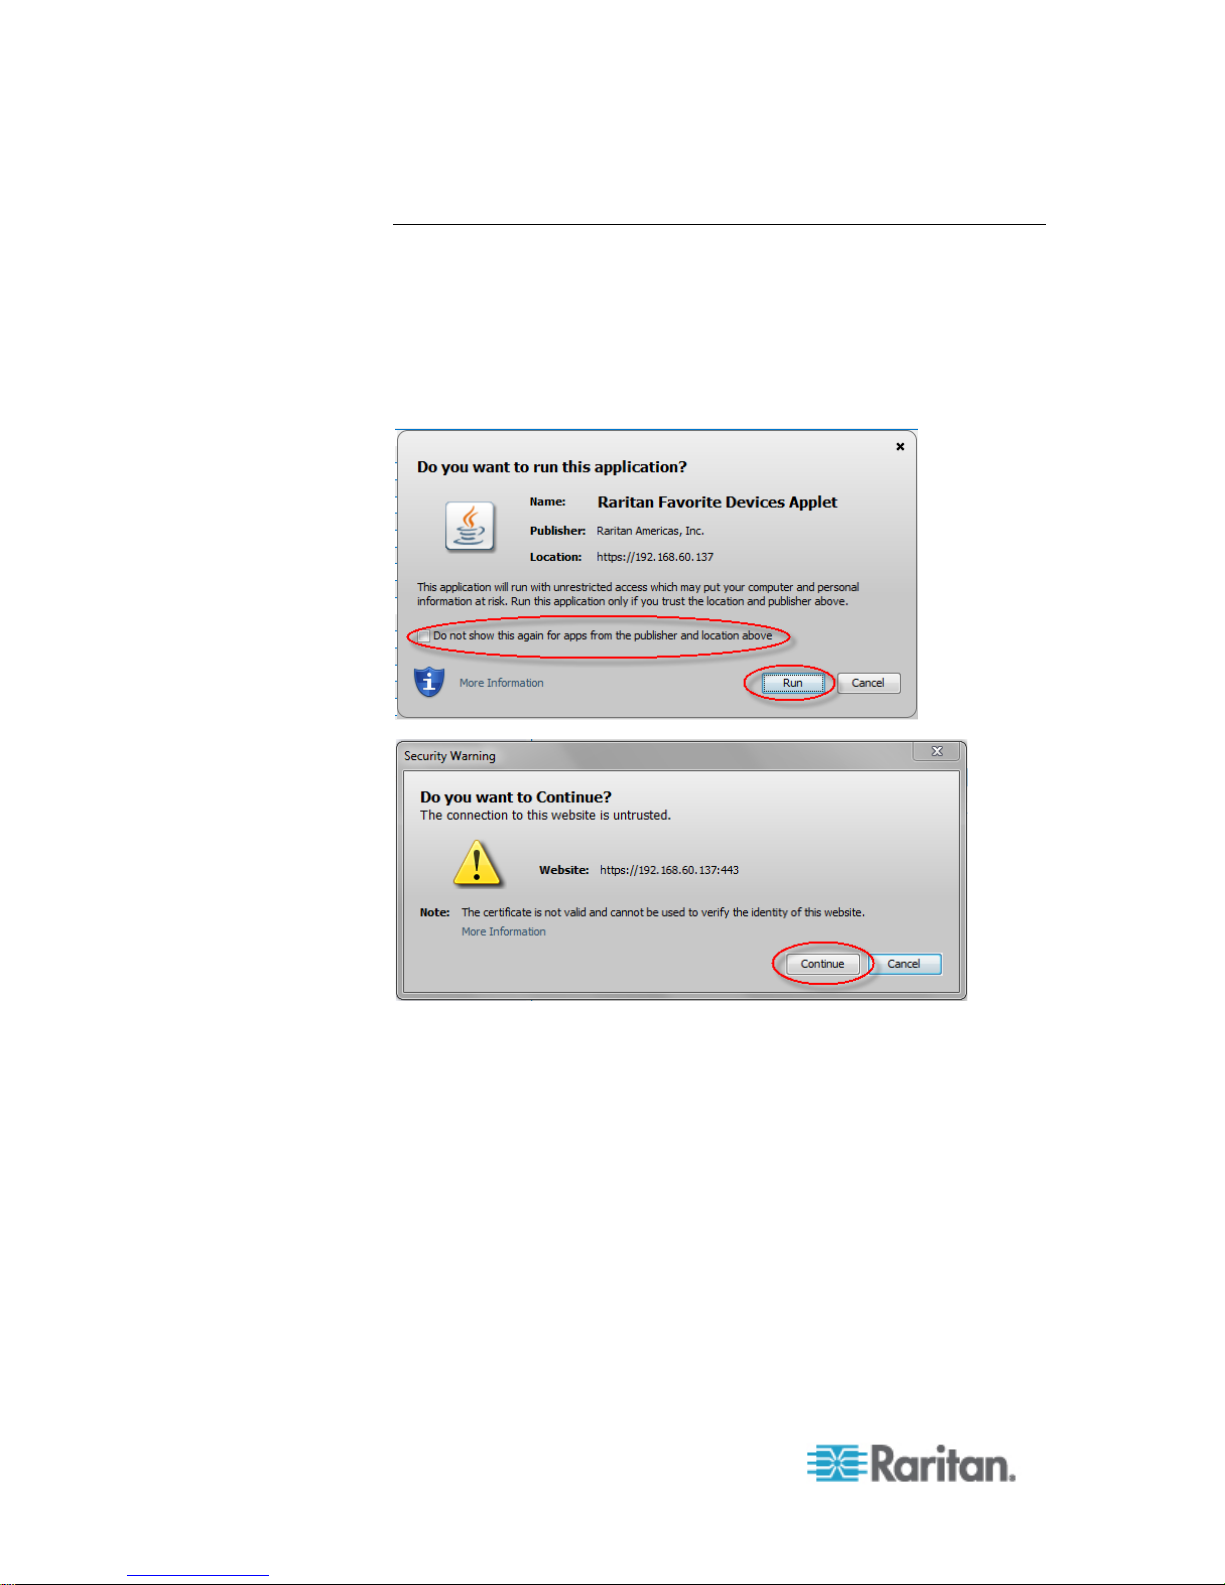
Java Validation and Access Warning
When logging in to SX II, Java™ prompts you to validate SX II, and to
allow access to the application.
Raritan recommends installing an SSL certificate in each SX II device in
order to reduce Java warnings, and enhance security.
See SSL Certificates

Chapter 2: Access and Use Remote Console Features
15
Additional Security Warnings
Even after an SSL certificate is installed in the SX II, depending on your
browser and security settings, additional security warnings may be
displayed when you log in to SX II.
It is necessary to accept these warnings to launch the SX II Remote
Console.
Reduce the number of warning messages during subsequent log ins by
checking the following options on the security and certificate warning
messages:
• In the future, do not show this warning
• Always trust content from this publisher
Initial SX II Configuration from the Remote Console
1. After you have installed the SX II at the rack, connect the power
cord(s) between the power connector on the SX II and an external,
AC or DC power source (depending on your model).
2. You can connect the second power connector to a backup power
source.
Use the power cords that came with SX II.
3. Connect an external modem (optional). Se e Connec t and Ena bl e
Global Access to an External ModelOnline Help
4. Connect your target devices or other serially managed devices to the
server ports on the SX II.
Use a standard Cat5 cable to connect your target device to an
available port on the back of SX II.
Chapter 2: Access and Use Remote Console Features
16
Note: Check the pin definition of the RJ45 port on the target. It
should match the pin definition on SX II.
Or
If needed, connect a Raritan Nulling Serial Adapter to the serial port
on your target, then plug a standard Cat5 cable into the adapter.
Connect the other end of the cable to an available port on the back of
SX II.
5. Flip the power switch(s) to turn SX II on.
Next, connect SX II to your network and configure your network settings
for the first time.
See Initial SX II Configuration Using Command Line Interface (Optional)
or Configure SX II Network Settings from the Remote Console.
Connect a Laptop to SX II Using a Cross-Over Cable (Optional)
The first time you configure SX II, if you are connecting from the LAN
port on laptop to the LAN1 port on SX II using a crossover cable, do the
following -
1. Use cross-over cable to connect between SX II LAN1 and the laptop
LAN port.
2. Set the Static IP of the LAN port that is connected to SX II to
3. Launch your browser and access SX II via 192.168.0.192.
Installing a Certificate
You may be prompted by the browser to accept and validate the SX II's
SSL certificate.
Depending on your browser and security settings, additional security
warnings may be displ a yed when you log in to SX II.
It is necessary to accept these warnings to launch the SX II Remote
Console. For more information, see Security Warnings and Validation
Messages (on page 13).
Two sample methods on how to install an SSL Certificate in the browser
are provided here, both using Microsoft Internet Explorer 8
Windows 7
Specific methods and steps depend on your browser and operating
system. See your browser and operating system help for details.
192.168.0.191 and Network Mask to 255.255.255.0.
®
®
.
and
Chapter 2: Access and Use Remote Console Features
17
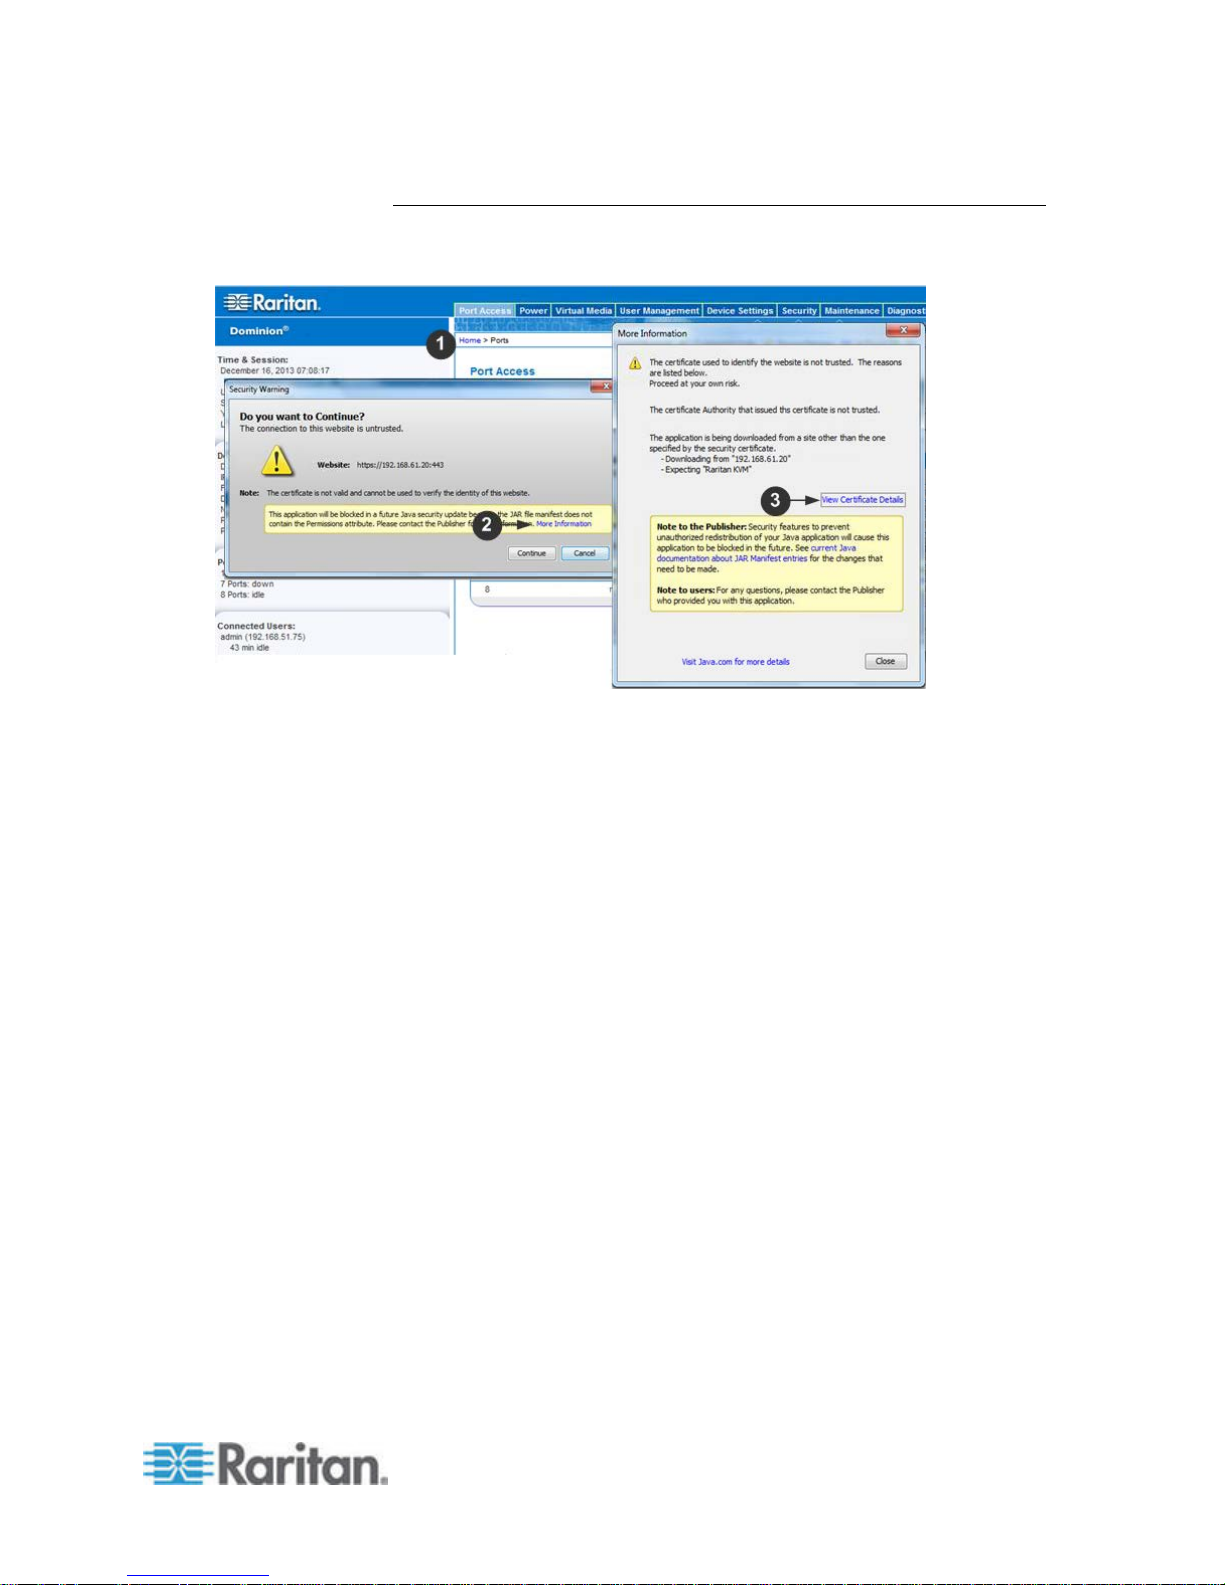
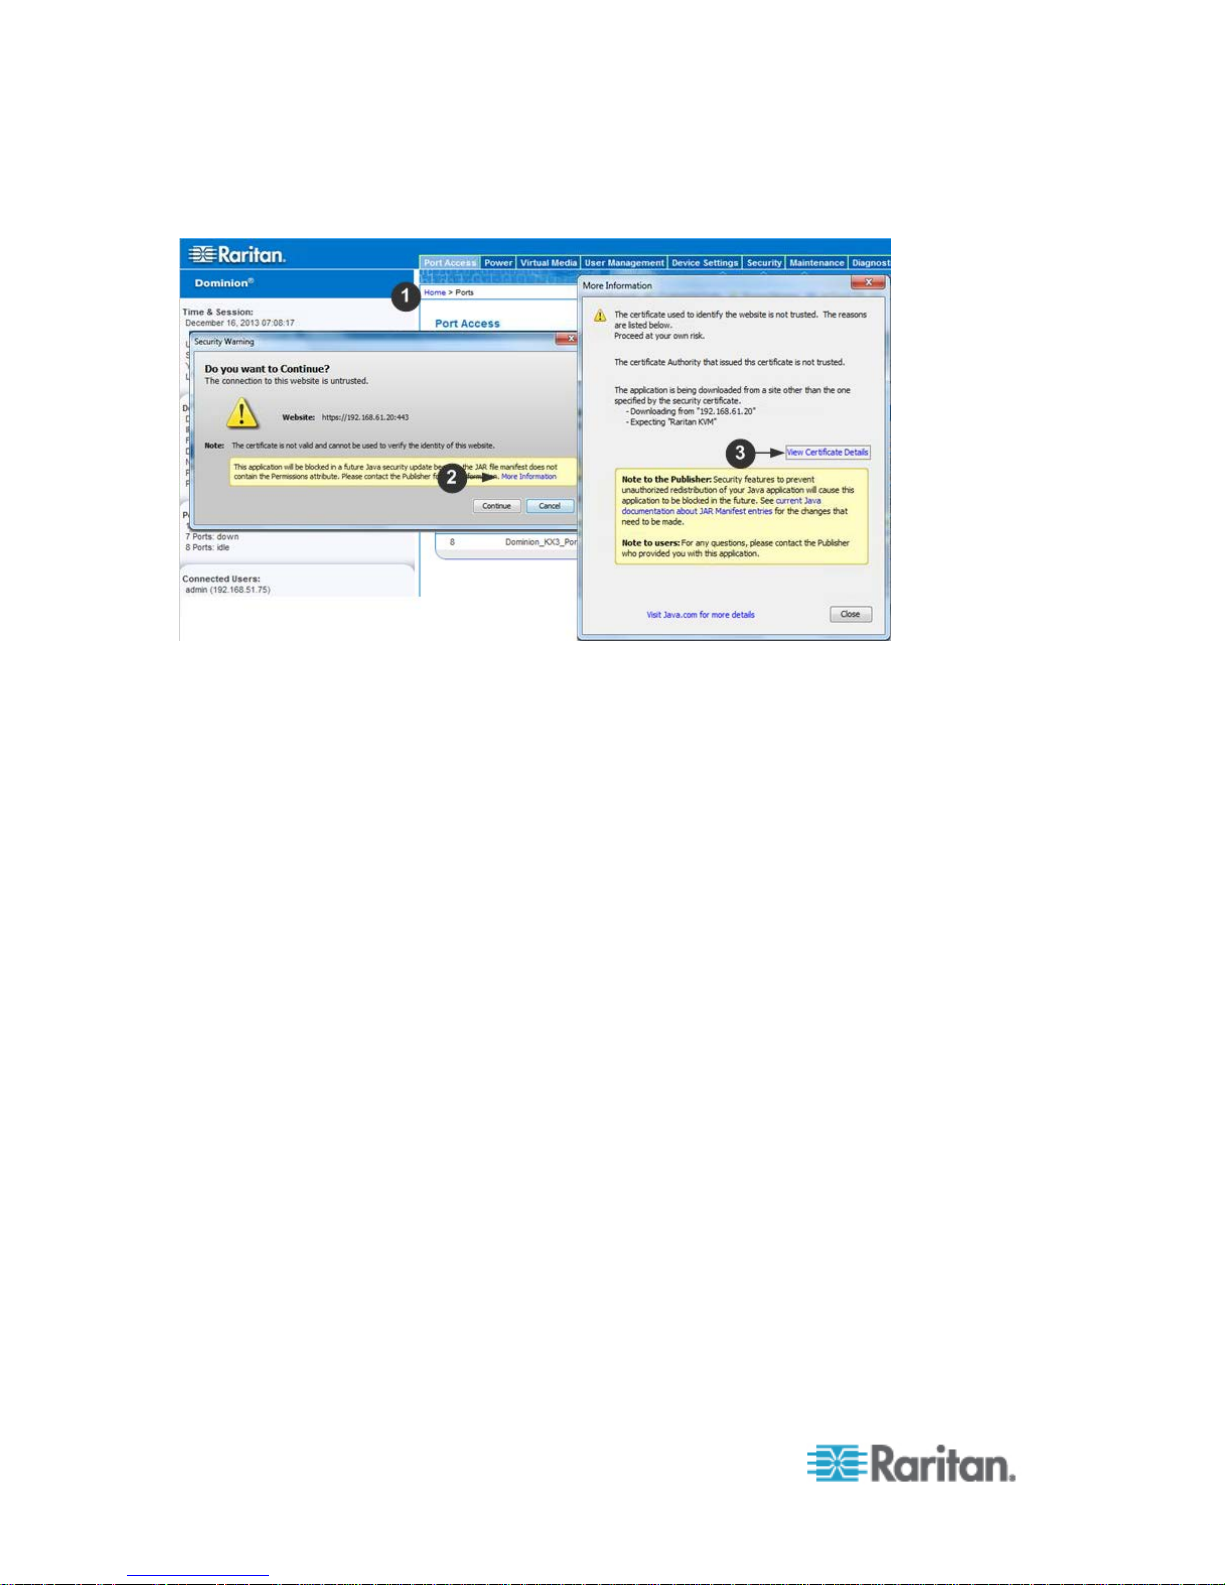
Example 1: Import the Certificate into the Browser
In this example, you import the Certificate into the browser.
1. Open an IE browser, then log in to SX II.
™
2. Click More Information on the first Java
security warning.
3. Click View Certificate Details on the More Information dialog. You
are prompted to install the certificate. Follow the wizard steps.

Chapter 2: Access and Use Remote Console Features
18
Note: If you are not prompted by the browser, manually select Tools >
Internet Options to open the Internet Options dialog.
1. Click the Content tab.
2. Click Certificates.
The Certificate Import Wizard opens and walks you through each
step.
File to Import - Browse to locate the Certificate
Certificate Store - Select the location to store the Certificate
3. Click Finish on the last step of the Wizard.
The Certificate is imported. Close the success message.
4. Click OK on the Internet Options dialog to apply the changes, then
close and reopen the browser.
Chapter 2: Access and Use Remote Console Features
19
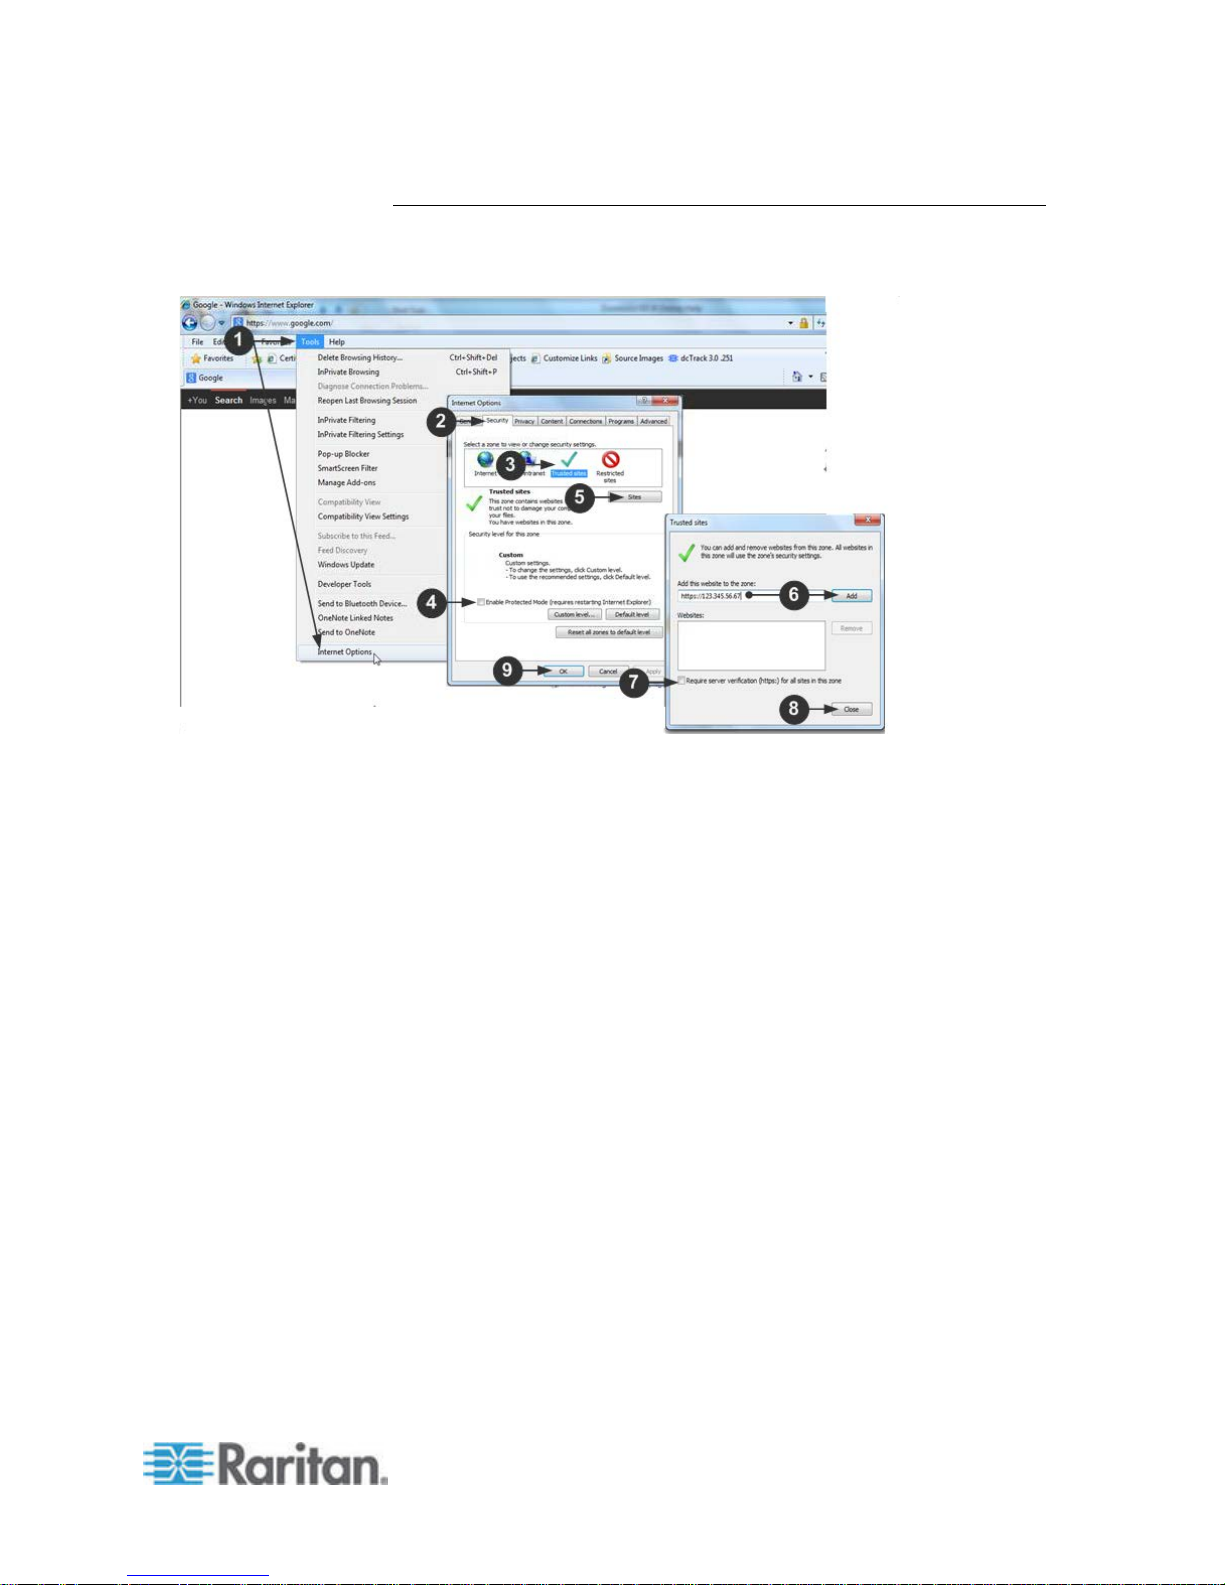
Example 2: Add the SX II to Trusted Sites an d Import the Certificate
In this example, the SX II's URL is added as a Trusted Site, and the Self
Signed Certificate is added as part of the process.
1. Open an IE browser, then select Tools > Internet Options to open the
Internet Options dialog
2. Click the Security tab.
3. Click on Trusted Sites.
4. Disable Protected Mode, and accept any warnings.
5. Click Sites to open the Trusted Sites dialog.
6. Enter the SX II URL, then click Add.
7. Deselect server verification for the zone (if applicable).
8. Click Close.
9. Click OK on the Internet Options dialog to apply the changes, then
close and reopen the browser.
Chapter 2: Access and Use Remote Console Features
20
Next, import the Certificate.
1. Open an IE browser, then log in to SX II.
2. Click More Information on the first Java
™
security warning.
3. Click View Certificate Details on the More Information dialog. You
are prompted to install the certificate. Follow the wizard steps.
For details see, Example 1: Import the Certificate into the
Browser (on page 17).
Chapter 2: Access and Use Remote Console Features
21
Converting a Binary Certificate to a Base64-Encoded DER
Certificate (Optional)
SX II requires an SSL certificate in either Base64-Encoded DER format
or PEM format.
If you are using an SSL certificate in binary format, you cannot install it.
However, you can convert your binary SSL certificate.
1. Locate the DEGHKVM0001.cer binary file on your Windows
machine.
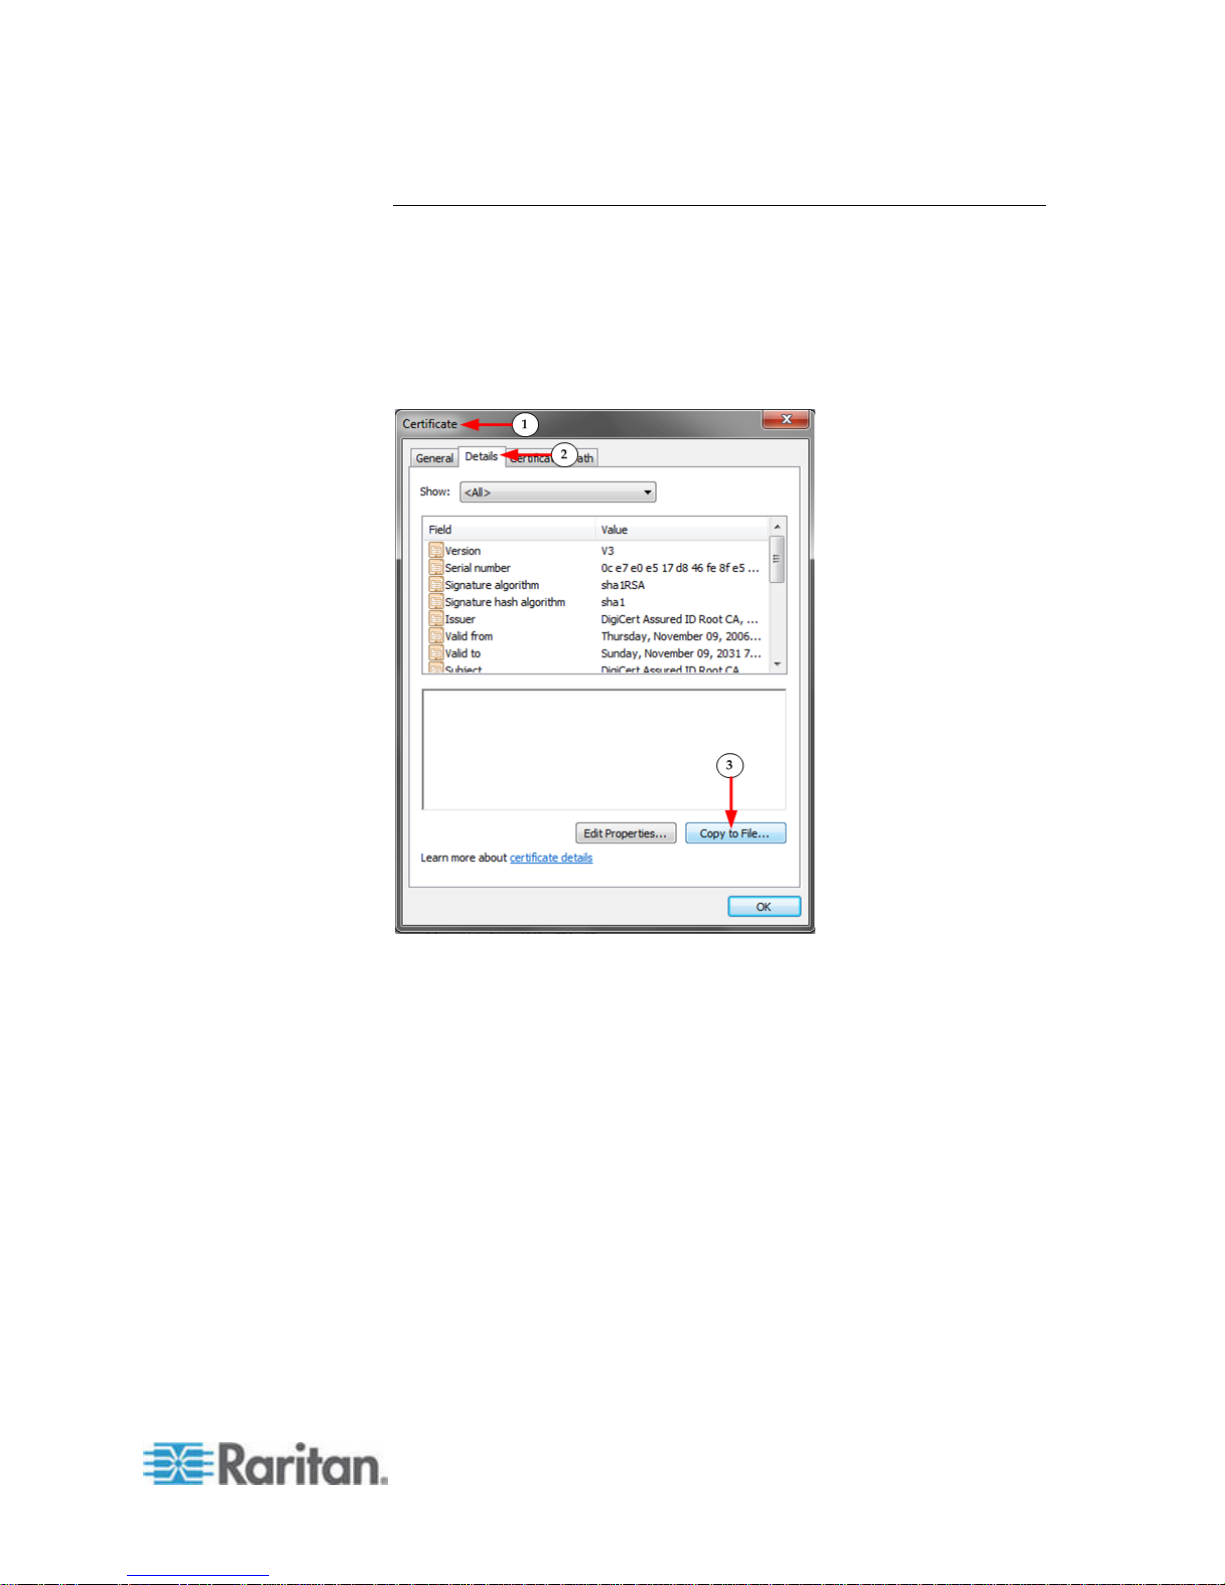
Double-click on the DEGHKVM0001.cer file to open its Certificate
dialog.
2. Click the Detail tab.

Chapter 2: Access and Use Remote Console Features
22
3. Click "Copy to File...".
4. The Certificate Export Wizard opens. Click Next to start the Wizard.
5. Select "Base-64 encoded X.509" in the second Wizard dialog.
6. Click Next to save the file as a Base-64 encoded X.509.
You can now install the certificate on your SX II.
Chapter 2: Access and Use Remote Console Features
23
Log In to SX II
Important: If the administrator password is forgotten, SX II must be reset
to the factory default from the Reset button on the rear panel and the
initial configuration tasks must be performed again.
1. Launch a supported web browser.
2. Enter the SX II HTTP, HTTPS or DNS address provided to you by
your Administrator.
Note: You are always redirected to the IP address from HTTP t o
HTTPS.
3. Enter your username and password, then click Login.
4. Accept the user agreement (if applicable).
5. If security warnings appear, accept and/or allow access.
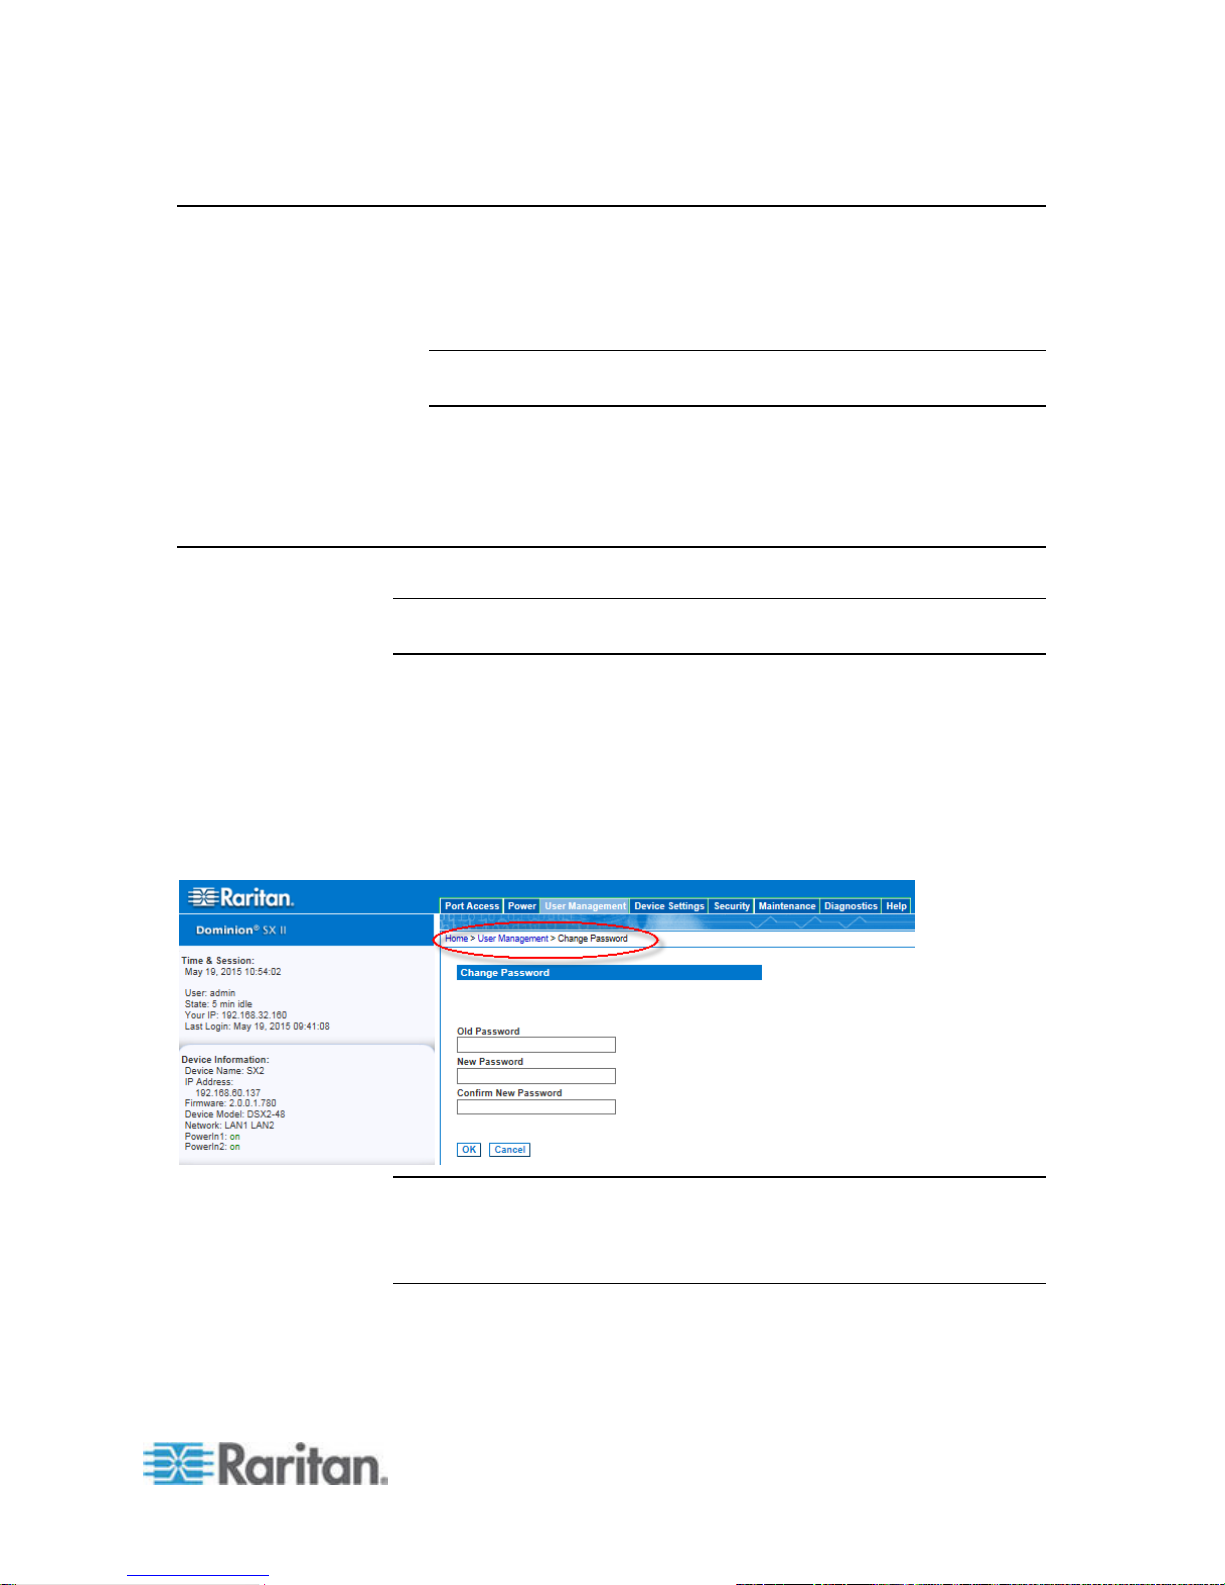
Change Your Password from the Remote Console
Note: You can also update passwords usin g command line interface.
See Change Your Password Using CLI.
• To change your password, open the Change Password page by
selecting User Management > Change Password.
A confirmation that the password was successfully changed is displayed
after you change it.
If strong passwords are in use, this page displays information about the
format required for the passwords.
For more information, see Strong Passwords.
Chapter 2: Access and Use Remote Console Features
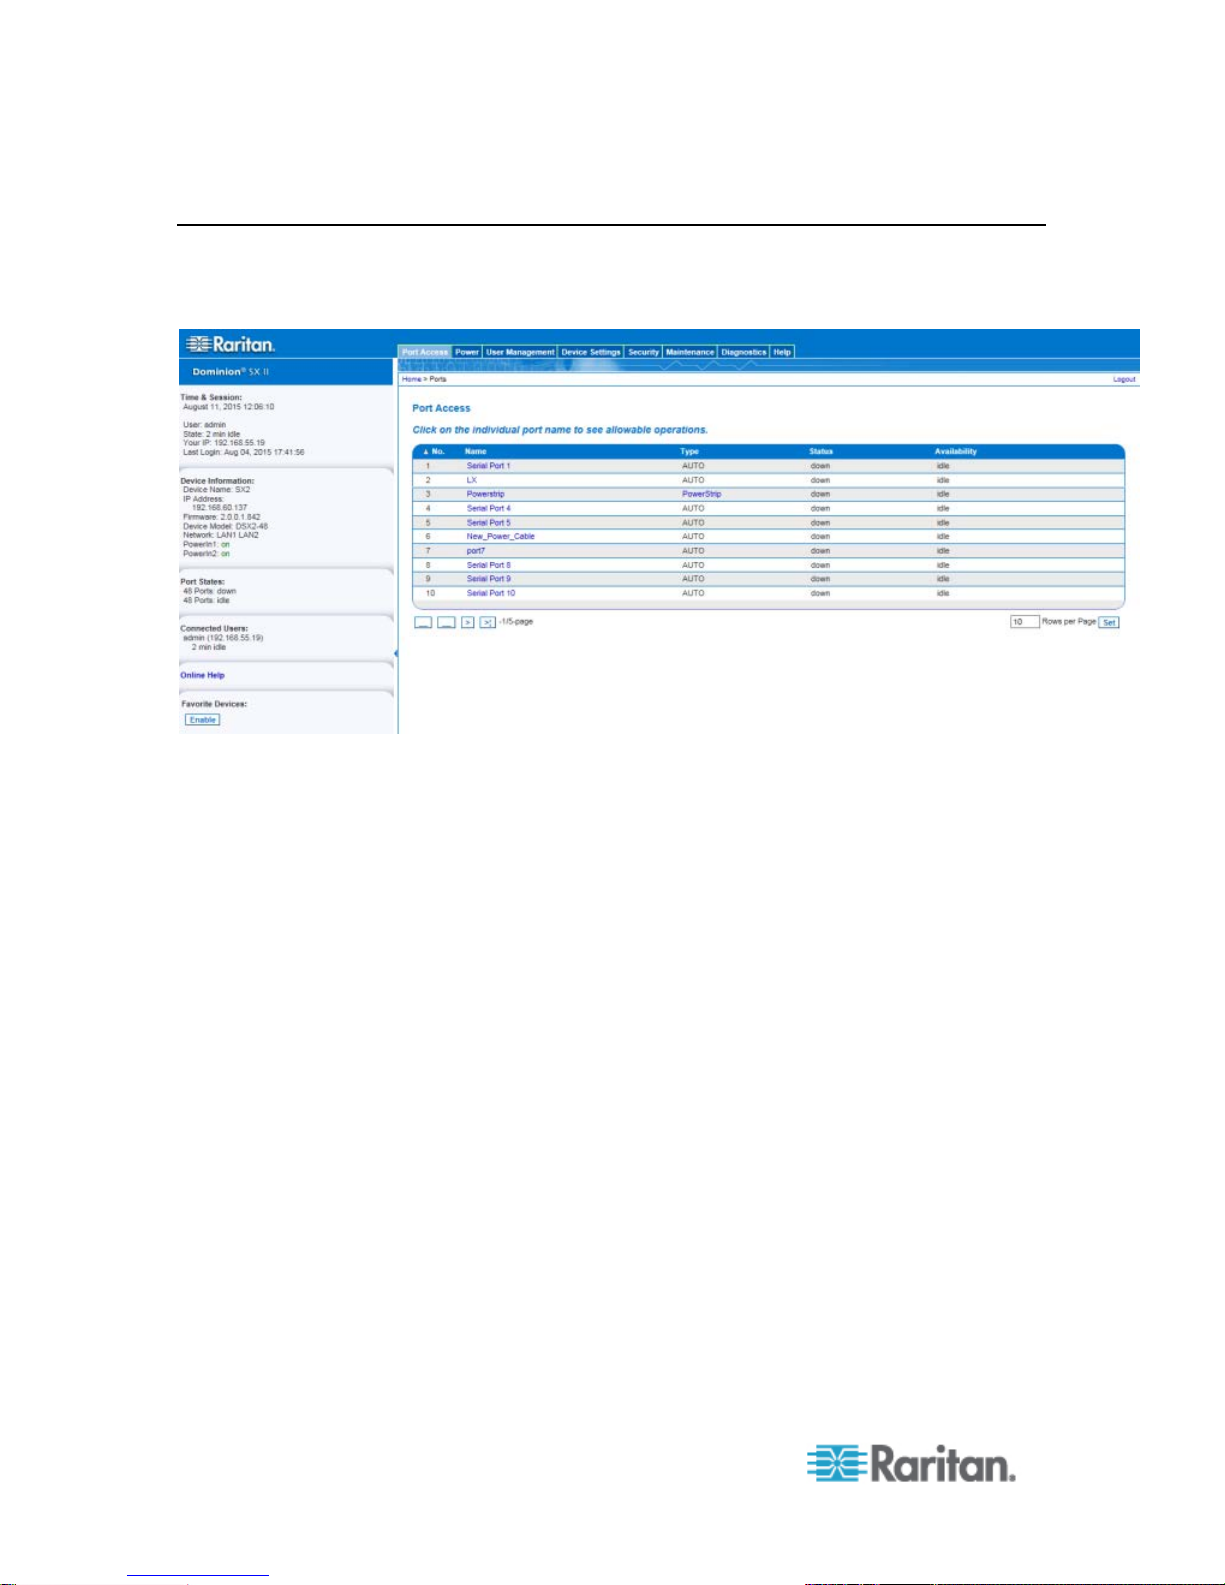
24
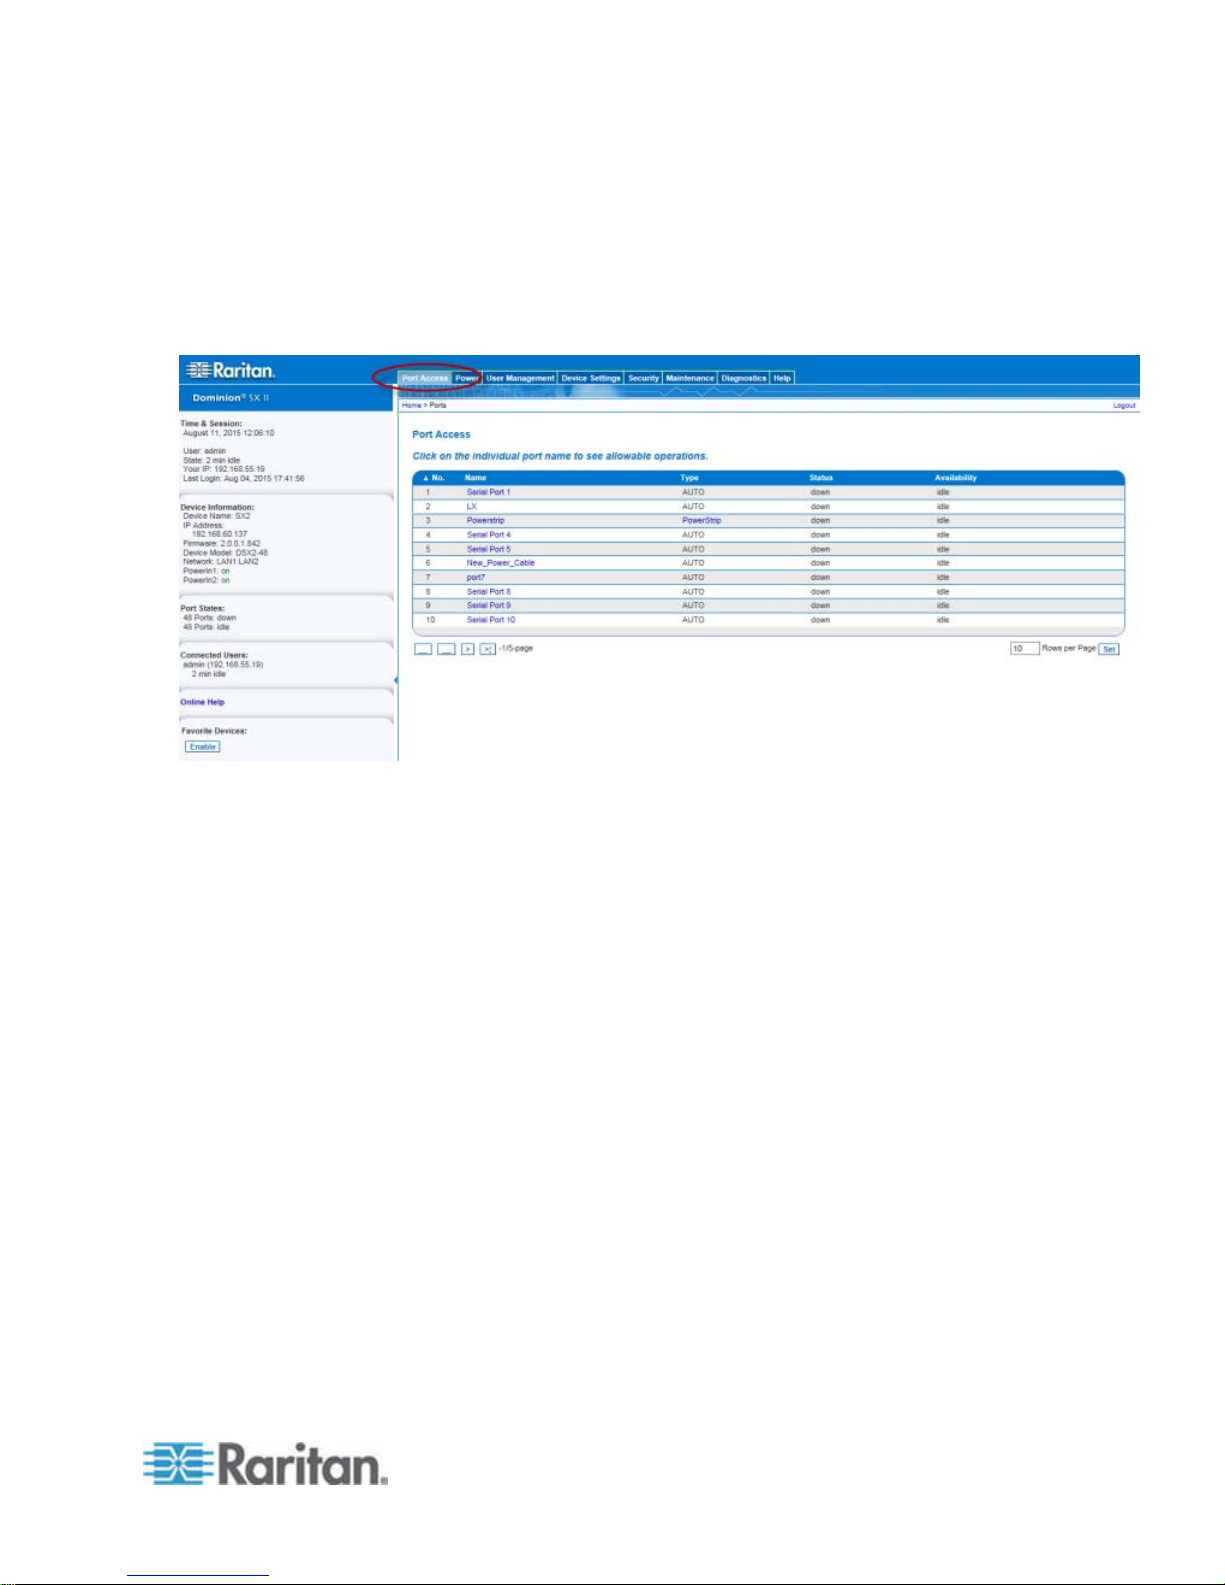
SX II Port Access Page
After a successful login, the Port Access page opens listing all ports
along with their status and availabilit y.
 Loading...