

Raritan Dominion SX16, Dominion SX32 Installation And Operation Manual

Installation and
Operations Manual
SX16
SX32

This page intentionally left blank.

D
Installation and
Operations Manual
SX16
SX32
U
US
C
L
LISTE
Copyright ©2003 Raritan Computer, Inc.
DSX-0A-E
October 2003
255-60-2000
Raritan Computer Inc.
400 Cottontail Lane
Somerset, NJ 08873
USA
Tel. 1-732-764-8886
Fax. 1-732-764-8887
sales@raritan.com
http://www.raritan.com
Raritan Computer Europe, B.V.
Eglantierbaan 16
2908 LV Capelle aan den IJssel
The Netherlands
Tel. 31-10-284-4040
Fax. 31-10-284-4049
sales.europe@raritan.com
http://www.raritan.com
1F61
I.T.E.
Raritan Computer Japan, Inc.
Kuga Building 7F
11-6, Kuramae 4-chome
Taitoo-ku, Tokyo 111-0051, Japan
Tel. 81-3-5833-6360
Fax. 81-3-5833-6336
sales.japan@raritan.com
http://www.raritan.co.jp
Raritan Computer Taiwan, Inc.
5F, 121, Lane 235,
Pao-Chiao Rd., Hsin Tien
Taipei Hsien, Taiwan, ROC
Tel. 886-2-8919-1333
Fax. 886-2-8919-1338
sales.asia@raritan.com
http://www.raritan.com.tw

This page intentionally left blank.

Copyright and Trademark Information
This document contains proprietary information that is protected by copyright. All rights reserved. No part of this
document may be photocopied, reproduced, or translated into another language without express prior written
consent of Raritan Computer, Inc.
©Copyright 2003 Raritan Computer, Inc., Dominion™, RaritanConsole™, SecureChat™, Remote Power Control™,
Paragon®, Powerboard™ and the Raritan company logo are trademarks of Raritan Computer, Inc. All rights
reserved. Java® is a registered trademark of Sun Microsystems, Inc. Internet Explorer® is a registered trademark of
Microsoft Corporation. Netscape® and Netscape Navigator® are registered trademarks of Netscape Communication
Corporation. RC4® is a registered trademark of RSA Corporation. Other trademarks or registered trademarks are the
property of their respective holders.
EXPORT NOTICE
Dominion SX models contain 128-bit encryption software. Export of this product is restricted under U.S. law.
Information is available from the U.S. Department of Commerce, Bureau of Export Administration at
www.bxa.doc.gov.
Contact Raritan Technical Support Team at (732) 764-8886 or e-mail us at support@raritan.com
Ask for Technical Support – Monday through Friday, 8:00am to 8:00pm, EST.

This page intentionally left blank.

TABLE OF CONTENTS i
Table of Contents
Chapter 1: Introduction............................................................................1
Dominion SX Overview...........................................................................................................................1
Product Photos .......................................................................................................................................1
Product Features ....................................................................................................................................1
Package Contents...................................................................................................................................2
Chapter 2: Installation .............................................................................3
Pre-Configuration Notes .........................................................................................................................3
Hardware Installation..............................................................................................................................3
Initial Software Configuration ...........................................................................................................5
Configuration....................................................................................................................................5
Step-by-Step Configuration..............................................................................................................6
Time and Date Configuration..................................................................................................................8
Deployment.............................................................................................................................................9
Chapter 3: Operation..............................................................................11
Overview...............................................................................................................................................11
Accessing the Remote Device..............................................................................................................11
Browser-Based Access ..................................................................................................................11
Security Dialog for Console Display......................................................................................................13
Internet Explorer.............................................................................................................................13
Netscape Navigator........................................................................................................................14
Sending a Break / Null..........................................................................................................................15
Chapter 4: Console Features .................................................................17
Emulator................................................................................................................................................17
Settings...........................................................................................................................................17
History ............................................................................................................................................18
Write Access...................................................................................................................................19
User List .........................................................................................................................................21
Close ..............................................................................................................................................22
Edit........................................................................................................................................................23
Tools .....................................................................................................................................................24
Start Logging..................................................................................................................................24
Stop Logging ..................................................................................................................................25
Script.....................................................................................................................................................26
SecureChat...........................................................................................................................................27
Help.......................................................................................................................................................28
Help Topics.....................................................................................................................................28
About RaritanConsole ....................................................................................................................29
Direct Port Access ................................................................................................................................30
URL with Password and Username and Port.................................................................................30
URL with Port Number....................................................................................................................31
Exit the Application ...............................................................................................................................32
Dominion SX Management...................................................................................................................34
Display............................................................................................................................................34
Configuration Lock and the Configuration Save Commands.........................................................35
Update............................................................................................................................................35
Save and Reload............................................................................................................................35
Configuration.........................................................................................................................................37
Report.............................................................................................................................................37
Network ..........................................................................................................................................38
Ports ...............................................................................................................................................41
Users ..............................................................................................................................................43
IP ACL ............................................................................................................................................46
Certificate .......................................................................................................................................48
RADIUS..........................................................................................................................................55

ii TABLE OF CONTENTS
Time................................................................................................................................................59
Notification......................................................................................................................................60
Upgrade ................................................................................................................................................64
Reset.....................................................................................................................................................66
Soft Reset.......................................................................................................................................66
Factory Reset.................................................................................................................................67
Chapter 5: Dominion SX Connectivity and Serial Pin-Out Guides .........69
Connectivity Table: ...............................................................................................................................69
Dominion SX Serial Pinouts..................................................................................................................69
Appendix A: Specifications ....................................................................71
Appendix B: System Defaults.................................................................73
Appendix C: Certificates ........................................................................75
Certificate..............................................................................................................................................75
Certificate Contents........................................................................................................................75
Certificate Authority........................................................................................................................76
Installing Dominion SX CA-Root Certificate to a Browser ....................................................................77
Installing CA Root for IE Browsers .......................................................................................................78
Accept a Certificate (Session-Based).............................................................................................78
Install the Raritan Root Certificate..................................................................................................78
Remove an Accepted Certificate....................................................................................................81
Install CA Root for Netscape Navigator................................................................................................82
Accept a Certificate (Session-Based).............................................................................................82
Install the Dominion SX Root Certificate........................................................................................83
Remove an Accepted Certificate....................................................................................................85
Install a Third-Party Root Certificate.....................................................................................................86
Appendix D: RADIUS Server...................................................................89
Overview...............................................................................................................................................89
Install and Configure the RADIUS Server for Windows 2000...............................................................90
Appendix E: Configuring Cisco ACS RADIUS Server .............................97
Appendix F: RSA ACE/Server Configuration.........................................101
Appendix G: Modem Configuration ......................................................107
Client Dialup Networking Configuration..............................................................................................107
Windows NT Dialup Networking Configuration...................................................................................107
Windows 98 Dialup Networking Configuration....................................................................................109
Windows 2000 Dialup Networking Configuration................................................................................111
Appendix H: Client Software Installation ............................................115
IE on Windows NT/2000/98................................................................................................................115
Netscape on Windows NT/2000/98....................................................................................................116
Remove RaritanConsole on Windows NT/2000/98............................................................................117
With IE..........................................................................................................................................117
With Netscape..............................................................................................................................117
Client for Sun Solaris and other UNIX platforms ................................................................................117
Netscape Installation....................................................................................................................117
Appendix I: TCL Programming Guide...................................................119
Overview.............................................................................................................................................119
TCL Architecture with Target System.................................................................................................119
Boot Script Support ......................................................................................................................121
File System...................................................................................................................................121

TABLE OF CONTENTS iii
File Directory Structure.................................................................................................................121
File System API through TCL.......................................................................................................121
TCL Commands ...........................................................................................................................122
Accessing TCL Window ...............................................................................................................123
Resetting TCL Interpreter.............................................................................................................123
Editing TCL Scripts.......................................................................................................................123
Executing TCL Scripts..................................................................................................................124
Automatic Execution of a TCL Script upon Power Up..................................................................124
Generating a User Event ....................................................................................................................125
Extensions to TCL...............................................................................................................................126
Basic TCL Server Example.................................................................................................................135
Basic CPU Utilization Monitoring Example.........................................................................................136
TCL Server designed to interact with a TCL user........................................................................139
Appendix J: Troubleshooting ...............................................................141
Problems and Suggested Solutions....................................................................................................141
Page Access.................................................................................................................................141
Firewall .........................................................................................................................................142
Login.............................................................................................................................................142
Port Access ..................................................................................................................................143
Upgrade........................................................................................................................................143
Modem..........................................................................................................................................143
Appendix K: Technical FAQs ...............................................................145

iv TABLE OF CONTENTS

TABLE OF FIGURES v
Table of Figures
Figure 1 Dominion SX32 Unit........................................................................................................................1
Figure 2 Rear Panel ......................................................................................................................................3
Figure 3 Default Settings for Factory Reset Mode........................................................................................4
Figure 4 Hardware Setup for Initial Software Configuration..........................................................................5
Figure 5 Initial Configuration showing Physical Installation was successful.................................................6
Figure 6 Initial Configuration screen for the First Administrator Account......................................................7
Figure 7 Initial Configuration screen for Network Settings............................................................................7
Figure 8 End of Initial Setup..........................................................................................................................8
Figure 9 Time Configuration Display.............................................................................................................8
Figure 10 Deployment...................................................................................................................................9
Figure 11 Security Alert Display..................................................................................................................11
Figure 12 Login Display...............................................................................................................................12
Figure 13 Main Display with Available Ports...............................................................................................12
Figure 14 Security Dialog in Internet Explorer.............................................................................................13
Figure 15 Security Dialog for Logging in Netscape Navigator ....................................................................14
Figure 16 Security Dialog for Copy Paste in Netscape Navigator ..............................................................14
Figure 17 Console Window .........................................................................................................................15
Figure 18 Settings Command and Settings Window...................................................................................17
Figure 19 History Command .......................................................................................................................18
Figure 20 Get Write Access Command.......................................................................................................19
Figure 21 Console without Write Access; with Write Access Warning Window..........................................20
Figure 22 User List Command and User List Window................................................................................21
Figure 23 Close Command..........................................................................................................................22
Figure 24 Edit Commands - Copy, Paste, and Select All Text....................................................................23
Figure 25 Start Logging Command and Select File Window ......................................................................24
Figure 26 Stop Logging Command .............................................................................................................25
Figure 27 Script Shell Command ................................................................................................................26
Figure 28 SecureChat Command and User Chat Window .........................................................................27
Figure 29 Help Topics Command and Help File Window ...........................................................................28
Figure 30 About RaritanConsole Command and About Window................................................................29
Figure 31 Direct Port Access Initial Display ................................................................................................30
Figure 32 Security Warning Display............................................................................................................30
Figure 33 Direct Port Access Display..........................................................................................................31
Figure 34 Invalid Port Number Error Display ..............................................................................................31
Figure 35 Incomplete Parameter Error Display...........................................................................................32
Figure 36 Save the Changed Configuration Window..................................................................................32
Figure 37 Exit Confirmation Display............................................................................................................33
Figure 38 Unit Disconnection Display .........................................................................................................33
Figure 39 Display Overview.........................................................................................................................34
Figure 40 Report Display.............................................................................................................................37
Figure 41 Network Configuration Display....................................................................................................38
Figure 42 Modem Connection to a Dominion SX unit.................................................................................40
Figure 43 Port Configuration Display ..........................................................................................................41

vi TABLE OF FIGURES
Figure 44 Port Editing Display.....................................................................................................................41
Figure 45 Users Tab Display.......................................................................................................................43
Figure 46 New User Creation......................................................................................................................44
Figure 47 User Modification ........................................................................................................................45
Figure 48 IP ACL Configuration Display......................................................................................................46
Figure 49 Invalid Subnet Mask Message....................................................................................................47
Figure 50 Certificate Tab Display................................................................................................................48
Figure 51 Certificate Configuration Display.................................................................................................49
Figure 52 Generate Certificate Display.......................................................................................................50
Figure 53 View Self-Signed Certificate Display...........................................................................................50
Figure 54 Activating Default Certificate.......................................................................................................51
Figure 55 Generate CSR Request Display .................................................................................................51
Figure 56 CSR Configurable Parameters....................................................................................................52
Figure 57 View CSR Display.......................................................................................................................52
Figure 58 User Certificate............................................................................................................................53
Figure 59 Schematic of External Certificate Utilization...............................................................................54
Figure 60 RADIUS Users Login Mechanism...............................................................................................55
Figure 61 Unsuccessful Login Message Window .......................................................................................56
Figure 62 RADIUS Configuration Display ...................................................................................................57
Figure 63 Current Users List .......................................................................................................................58
Figure 64 Time Configuration Display.........................................................................................................59
Figure 65 Notification Display......................................................................................................................60
Figure 66 New Notification Display .............................................................................................................61
Figure 67 Edit Notification Destination........................................................................................................62
Figure 68 Upgrade Display..........................................................................................................................64
Figure 69 Confirmation for Reset................................................................................................................66
Figure 70 Confirmation on Users to be Disconnected ................................................................................66
Figure 71 Factory Reset Connector Location..............................................................................................67
Figure 72 Administrative Information...........................................................................................................75
Figure 73 Hierarchies of Certificate Authorities...........................................................................................76
Figure 74 Schematic Diagram of Certificate Authentication Scheme.........................................................77
Figure 75 Install Session Based Certificate.................................................................................................78
Figure 76 View of CA_ROOT.cer................................................................................................................79
Figure 77 Certificate Manager Import Wizard .............................................................................................79
Figure 78 Import Wizard, Select a Certificate Page....................................................................................80
Figure 79 Certificate Manager Import Wizard, Completion Page................................................................80
Figure 80 Internet Options Display..............................................................................................................81
Figure 81 Certificate Manager Display........................................................................................................81
Figure 82 Netscape New Site Certificate Window ......................................................................................82
Figure 83 Netscape New Site Certificate Acceptance Window..................................................................82
Figure 84 Viewing the Certificate ................................................................................................................83
Figure 85 Netscape New Type Window......................................................................................................83
Figure 86 Netscape New Certificate Authority Window ..............................................................................84
Figure 87 Netscape Web Site Certificates Window ....................................................................................85
Figure 88 Certificate Already Exists Alert Window for Netscape................................................................86

TABLE OF FIGURES vii
Figure 89 Certificate Signers’ Certificates Window in Netscape.................................................................86
Figure 90 New Certificate Authority Window in Netscape...........................................................................87
Figure 91 Cisco ACS Main Display ............................................................................................................97
Figure 92 Unit Configuration Display...........................................................................................................97
Figure 93 Interface Configuration Display...................................................................................................98
Figure 94 RADIUS Properties Display ........................................................................................................98
Figure 95 New User Display.......................................................................................................................99
Figure 96 User Properties Display ..............................................................................................................99
Figure 97 Launching RSA Administration Application...............................................................................101
Figure 98 Add Agent Host Selection.........................................................................................................101
Figure 99 Add Agent Host Display............................................................................................................102
Figure 100 RADIUS Secret Key Display...................................................................................................102
Figure 101 Add Profile Selection...............................................................................................................103
Figure 102 Add Profile Display..................................................................................................................103
Figure 103 Add Attribute Display...............................................................................................................104
Figure 104 Add User Display ...................................................................................................................104
Figure 105 Profile Selection Display .........................................................................................................105
Figure 106 Unit Selection Display per User .............................................................................................105
Figure 107 Dial-Up Networking Display ....................................................................................................107
Figure 108 New Phone Entry Display .......................................................................................................108
Figure 109 Dial-Up Security Display .........................................................................................................108
Figure 110 Configuring Windows 98 Dialup Networking...........................................................................109
Figure 111 Make New Connection – Connection Name...........................................................................109
Figure 112 Make New Connection – Complete ........................................................................................110
Figure 113 Connect Window.....................................................................................................................110
Figure 114 Windows 2000 Network and Dialup Connections...................................................................111
Figure 115 Welcome to the Network Connection Wizard.........................................................................111
Figure 116 Network Connection Type.......................................................................................................112
Figure 117 Device Selection .....................................................................................................................112
Figure 118 Phone Number to Dial.............................................................................................................113
Figure 119 Connection Availability............................................................................................................113
Figure 120 Network Connection Wizard Completion................................................................................114
Figure 121 IE Client Download Display.....................................................................................................115
Figure 122 Raritan Plugin Security Warning Display................................................................................115
Figure 123 Netscape Plugin Redirection Display......................................................................................116
Figure 124 TCL Architecture .....................................................................................................................119
Figure 125 Activating TCL Scripting Window............................................................................................123

viii TABLE OF FIGURES
CHAPTER 1: INTRODUCTION 1
Chapter 1: Introduction
Dominion SX Overview
The Dominion SX Series of Serial over IP Console Servers offers convenient and secure, remote access and control
via LAN/WAN, Internet or Dial-up modem of all networking devices. Dominion SX connects to any networking
device (servers, firewalls, load balancer, etc.) via the serial port and provides the ability to remotely and securely
manage the device using any Web browser. Dominion SX provides a non-intrusive solution for managing network
elements and does not require any software agents to be installed on the target device.
Product Photos
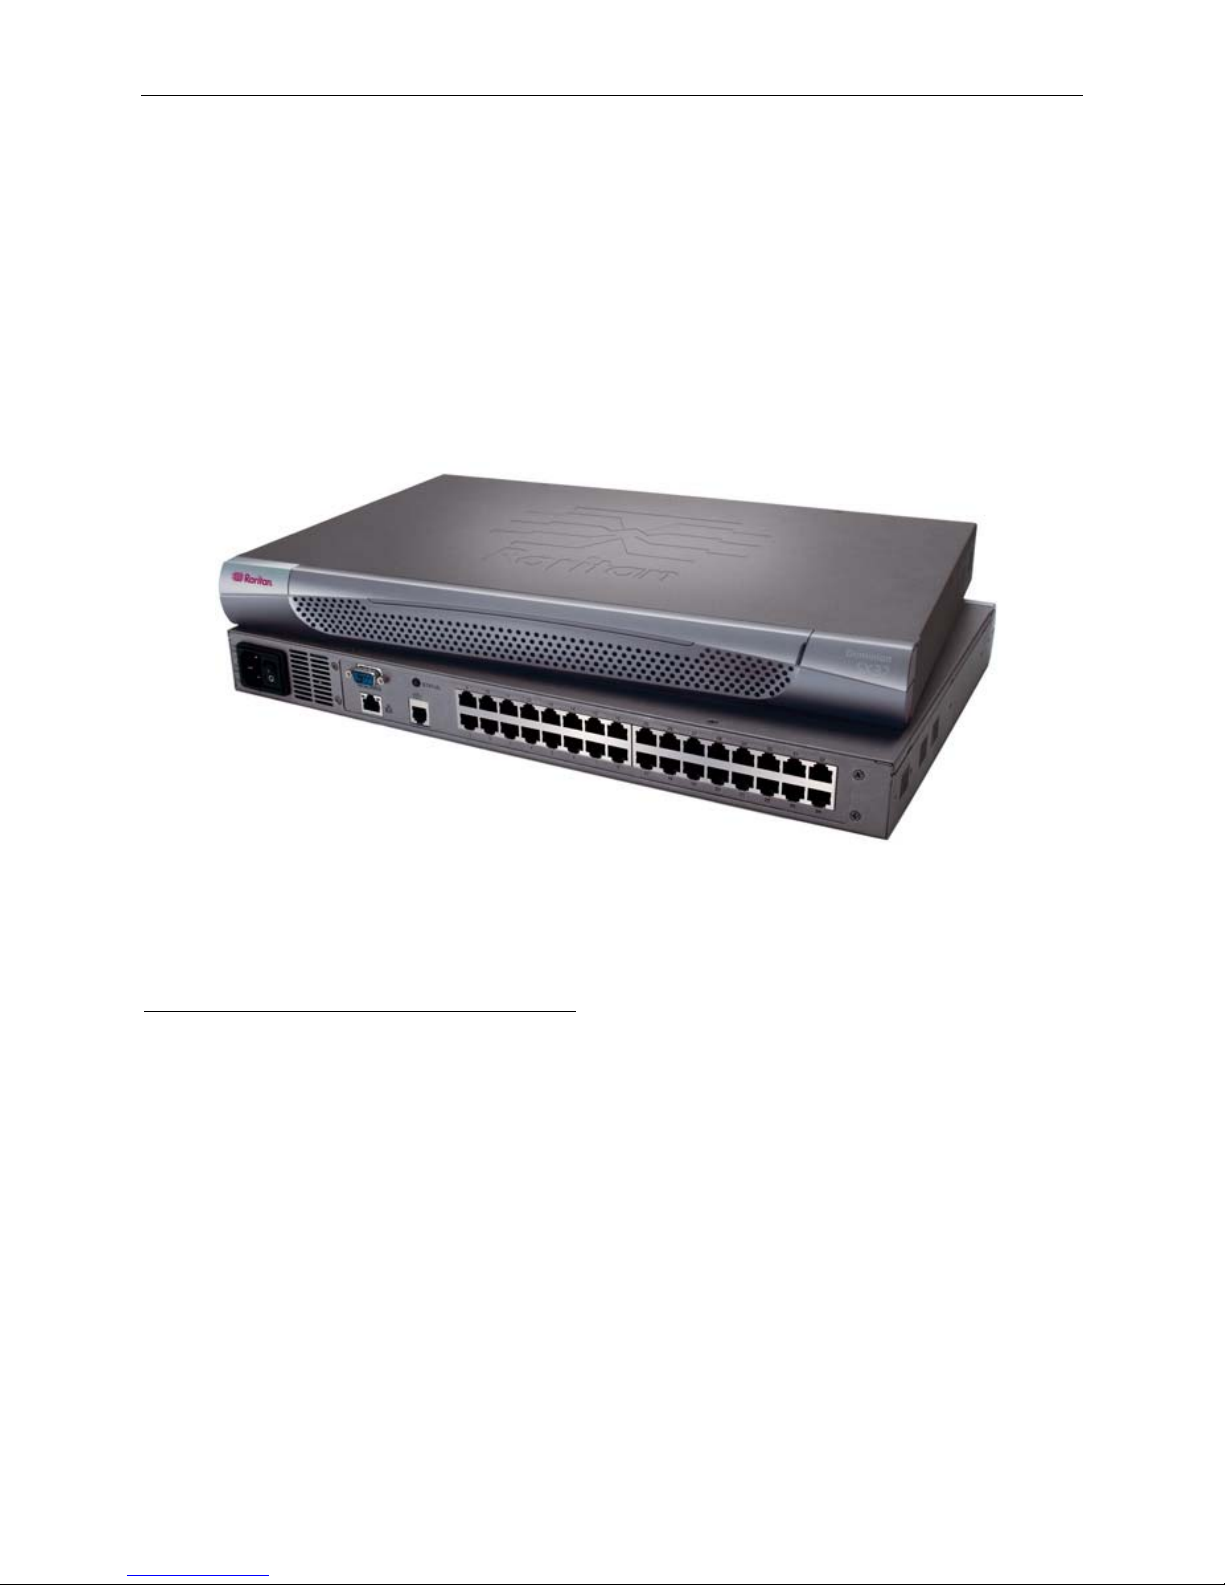
Dominion SX is a fully configured stand-alone product in a standard 1U 19” rack mount chassis
Figure 1 Dominion SX32 Unit
Product Features
Comprehensive Console Management
• Remote Management: Access, monitor, administer, and troubleshoot up to 16 or 32 target devices (depending
on model) from any Web browser while consuming only one IP address.
• Scripting: Create, store and execute scripts either on demand or on a continuous basis
• Notification: Create notification messages via email alerts
• Collaborative Management and Training: Access pots simultaneously; up to 10 users per port at any time.
• SecureChat™: “Instant message” other users securely and collaborate on device management, troubleshooting,
and training activities.
• Get History: Get up to 999 lines of recent console history to assist with debugging.
• VT100 Console Window: View VT100 terminal emulation including copy/paste and record/playback
functionality.
• Three Levels of User Access:
− Administrator: Has read and write access to the console window; can modify the configuration of unit.
− Operator: Has read and write access to the console window; cannot modify the configuration of unit
(except own password).
− Observer: Has read-only access to the console window; cannot modify the configuration of unit (except
own password).

2 DOMINION SX INSTALLATION AND OPERATIONS MANUAL
Strong Security and User-Authentication
• Encryption Security: 128-bit Secure Socket Layer (SSL) handshake protocol and RC4 encryption.
• User Authentication Security: Login Name and Password scheme (MD5 Hash) with global Access Control List
(ACL).
• Supports RADIUS (can be configured as a RADIUS client).
• Supports User-defined and installable security Certificates.
Reliable Connectivity
• Modem Connectivity: For emergency remote access if the network has failed.
• Target Device Connectivity: Simplified RJ45-based CAT5 cable scheme; serial port adapters are available from
Raritan.
Simplified User Experience
• Browser-based Interface: Graphical User Interface provides intuitive access to target devices (click on the
appropriate button to select the desired target device).
• Upgrades: Built-in firmware upgrade capability via FTP/Internet.
• Ability to load specific applications per console port for ease of use; specific applications are available from
Raritan.
Package Contents
Each Dominion SX ships with the following:
• (1) Dominion SX unit with mounting racks installed (Rackmount kit is optional on some units)
• (1) Raritan User Manual CD-ROM containing the Dominion SX Installation and Operations Manual
• (1) Power cord
• (1) Release Note page
• (1) Packing List page
CHAPTER 2: INSTALLATION 3
Chapter 2: Installation
This section describes the steps necessary to configure Dominion SX for use on a local area network (LAN). All
new Dominion SX units come with default network settings, illustrated in the table below. Once units are connected
to the network, these default settings will allow the user to configure Dominion SX for normal use.
There are three separate tasks you must complete to use Dominion SX on the network: Hardware Installation, Initial
Software Configuration, and Dominion SX Deployment, usually completed in this order, and each described in this
chapter.
Hardware Installation describes how to connect the Dominion SX unit to a computer to perform the initial
configuration of the unit. This step requires an additional computer that will be used to log into the Dominion SX
unit and configure it for the first time in the next section.
Initial Software Configuration describes how to connect to Dominion SX in its default state and to configure it for
use in a specific network environment.
Dominion SX Deployment describes how to install a Dominion SX unit on the network once the Initial Software
Configuration is complete.
Pre-Configuration Notes
The following list includes information that you will be required to supply to complete the configuration of the
Dominion SX. Obtain all required configuration information prior to performing the configuration steps outlined
below. If you are uncertain of any information, contact your system administrator for assistance.
Network Information:
• Raritan Unit Name: The name of this unit, a generic term for the Dominion SX unit. This can be 64 characters
maximum, no minimum, no spaces.
• IP address: The IP address of the unit, as directed by your network administrator.
• IP subnet mask: The IP subnet mask for the unit, as directed by your network administrator.
• IP gateway: The IP gateway for the unit, as directed by your network administrator.
• Port Address: Any number from 2000 to 2400, as directed by your network administrator; default value is 23.
Choosing a number other than 23 can potentially improve security.
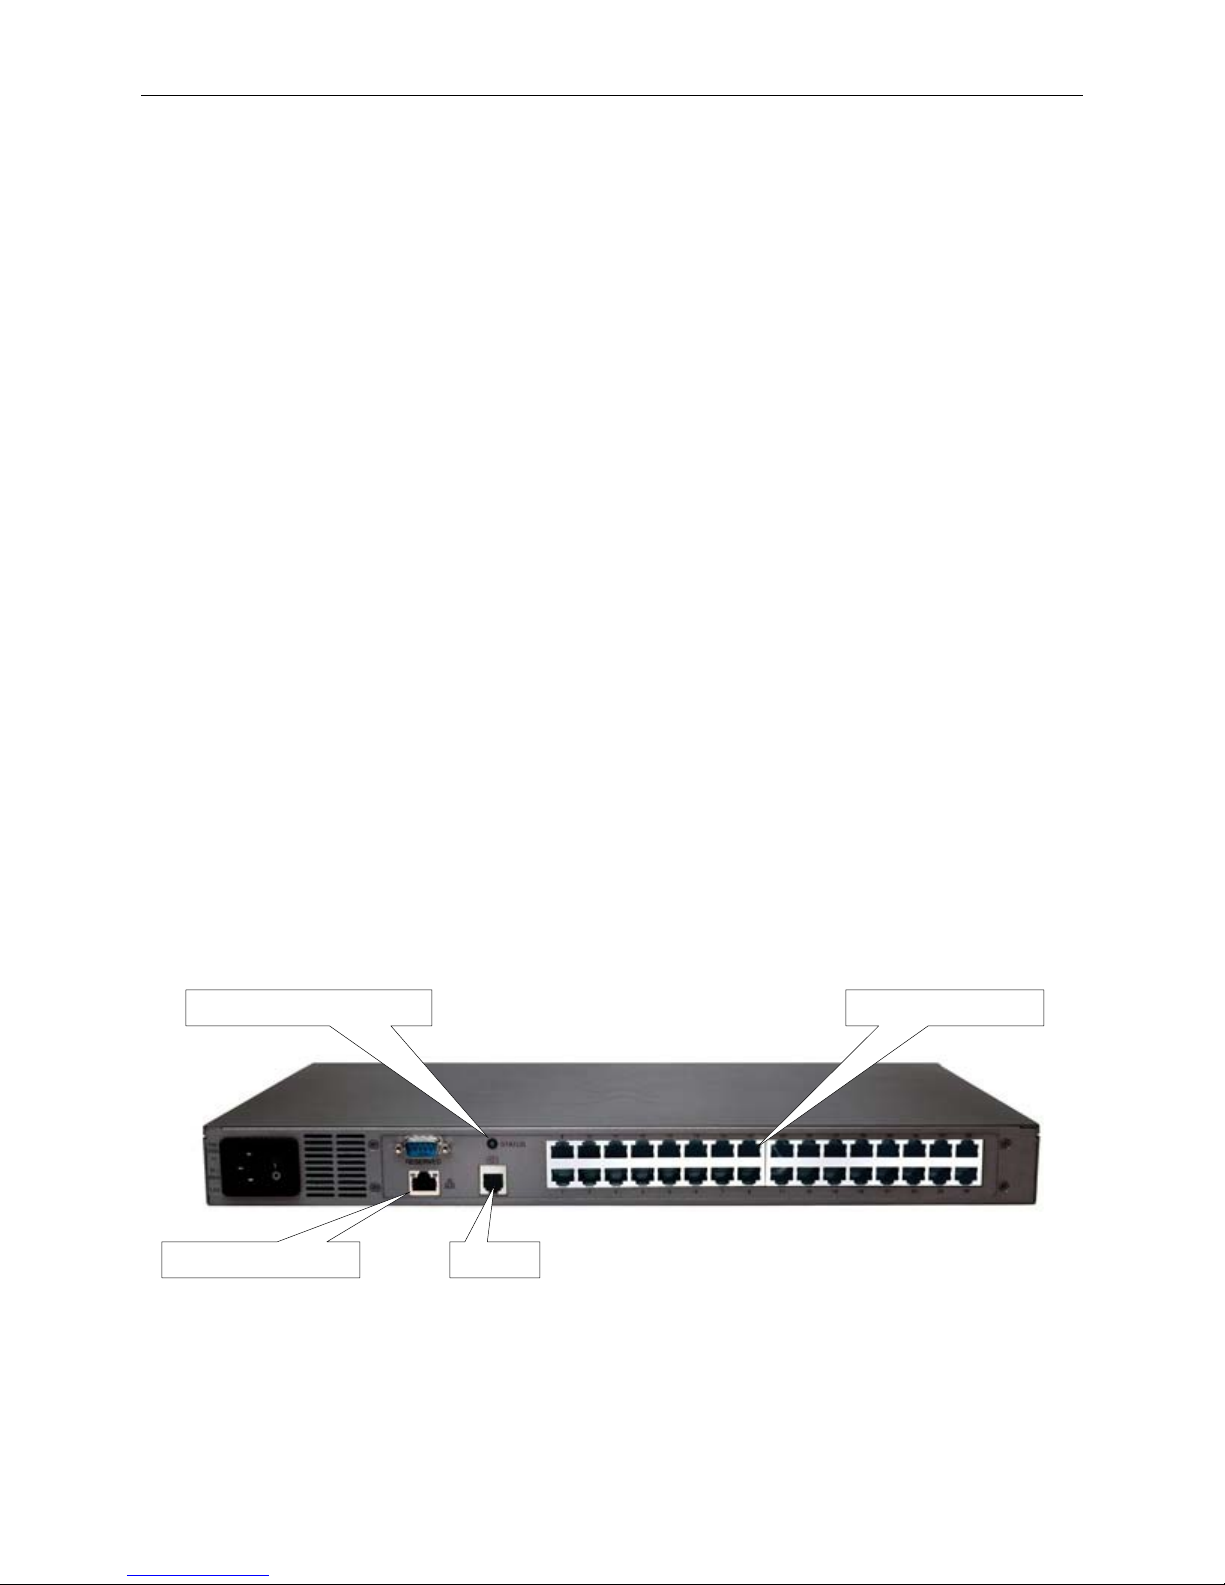
Hardware Installation
SelfTest and Factory Reset LED
Primary LAN Connection
RJ45 serial ports
Modem
Figure 2 Rear Panel

4 DOMINION SX INSTALLATION AND OPERATIONS MANUAL
Physical Installation of Dominion SX for Initial Configuration:
1. Obtain a computer with a network card and crossover network cable. This computer will be referred to as the
‘installation computer.’
2. A unique MAC address for each unit is shown on a sticker on the chassis. Make a note of this address prior to
physical installation.
3. Physically mount the unit in an ergonomically sound manner. The unit is designed to be easily rack-mounted,
and rack mounting is recommended.
4. Connect the crossover network LAN cable to the primary LAN connection on the back of the chassis. Connect
the other end to the network card in the installation computer.
5. Connect the female end of the external power cord to the back of the chassis.
6. Connect the male end of the external power cord to the power supply outlet. Power ON the Dominion SX unit.
Note: The unit will perform a hardware and firmware self-test, indicated by the green light on the
back of the chassis, and then start the software boot sequence. The boot sequence takes
approximately 30-60 seconds, and is complete when the green light goes on and remains on.
7. Each unit comes with a certain set of configuration defaults henceforth referred to as Factory Reset Mode. The
default network settings for this mode are:
Internet Address (IP)
192.0.0.192
Gateway Address 192.0.0.192
Subnet Mask 255.255.0.0
Port Address 23
Figure 3 Default Settings for Factory Reset Mode
8. Ensure that your installation computer can communicate with IP address 192.0.0.192. First, verify that the
installation computer has the route for 192.0.0.192:
a. On the command line interface of the installation computer, enter the command route print.
b. If 192.0.0.192 is on the gateway list, proceed to the next step. Otherwise, add 192.0.0.192 to the gateway
list: type the following commands into either a DOS or UNIX command line interface on the installation
computer where your browser is running:
i. On a Windows NT/95/98/2000 system: route add 192.0.0.192 <client_host IP address>
Example:
route add 192.0.0.192 15.128.122.12
ii. On a UNIX (incl. Sun Solaris) system: route add 192.0.0.192 <client_host IP address> -interface
Example:
route add 192.0.0.192 15.128.122.12 -interface
9. On the command line interface, type: ping 192.0.0.192.
a. If this command successfully produces a reply from the Dominion SX unit, please proceed to step 10.
b. If this does not produce a reply, verify that the default IP address is entered correctly and there is a route to
that IP address.
10. Use the installation computer to connect to the unit, typing the factory default IP address 192.0.0.192 in the
installation computer Web browser’s address line. Once you have reached the unit’s initial configuration screen,
proceed to the Initial Software Configuration section that follows.
CHAPTER 2: INSTALLATION 5
N
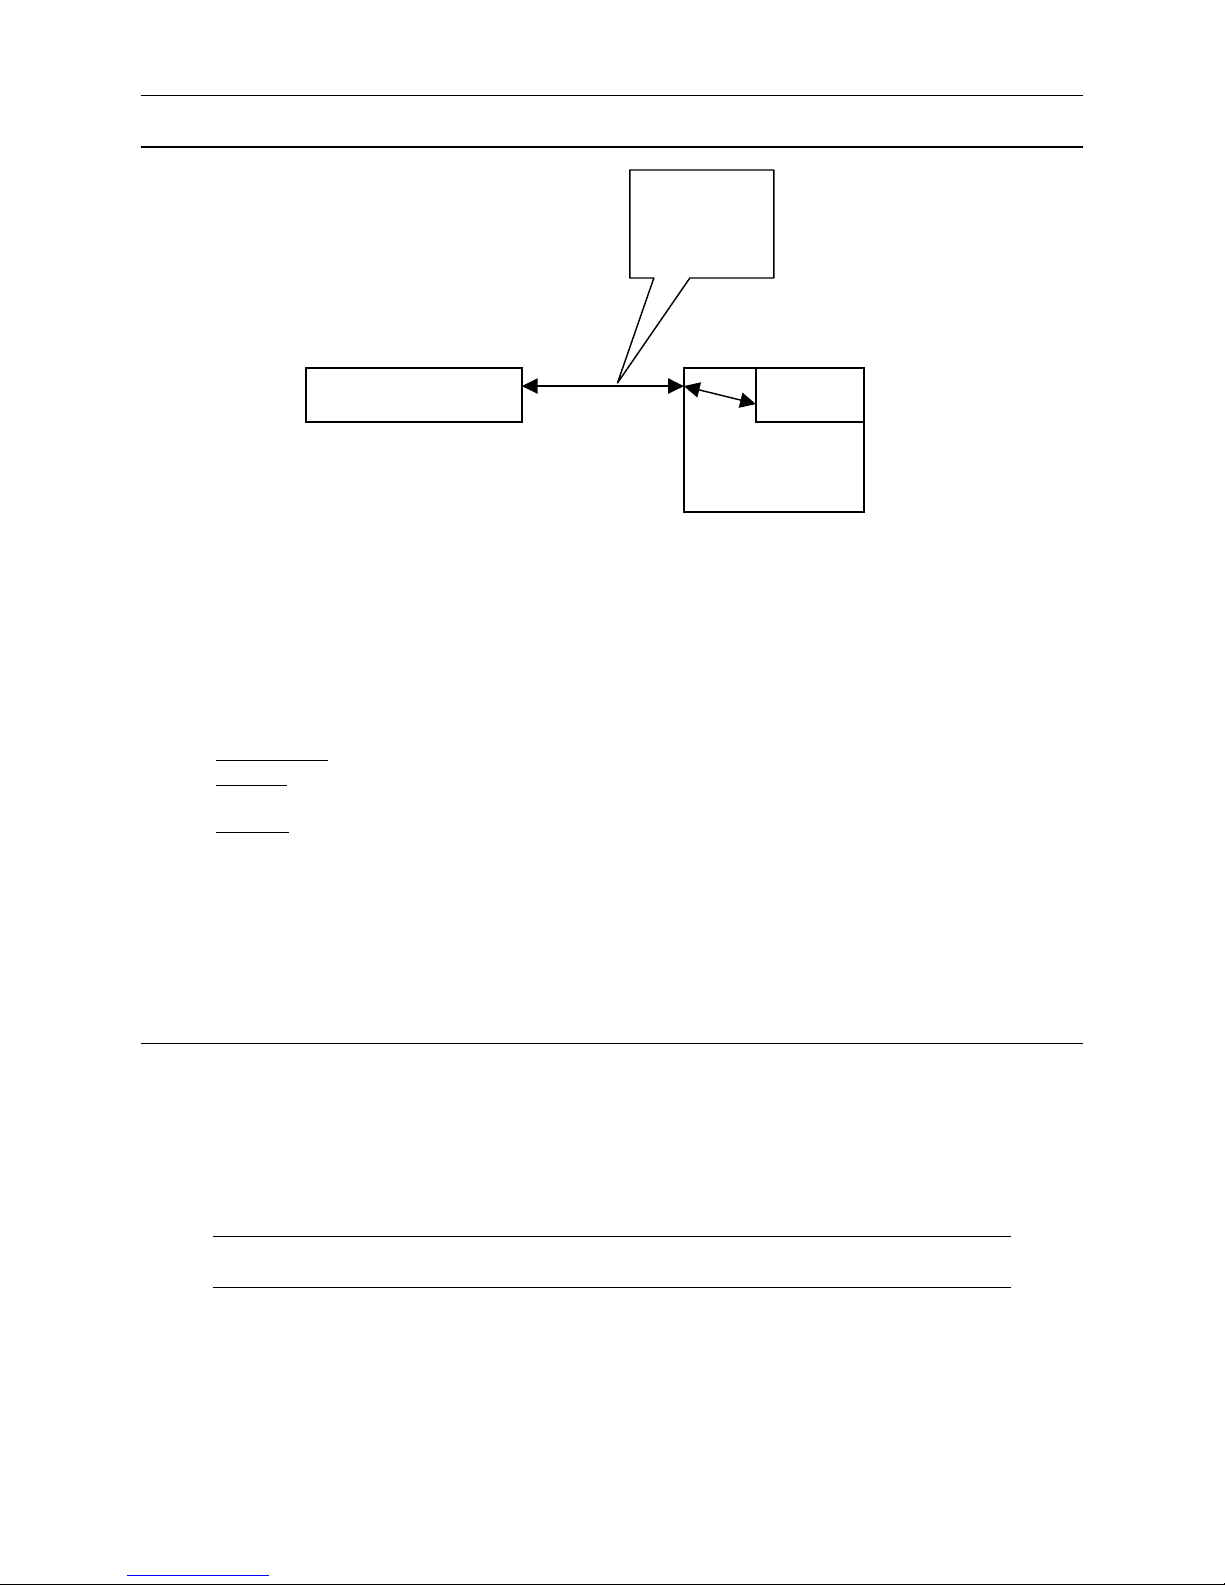
Initial Software Configuration
Crossover
etwork
Cable
Dominion SX Unit
Browser
Installation
Computer
Figure 4 Hardware Setup for Initial Software Configuration
User Information:
This information should be entered for each user, up to 50 user accounts, with at least one administrator for each
Dominion SX unit:
• User Name: 32 characters maximum, one character minimum, spaces permitted.
• Login Name: 20 characters maximum, one character minimum, no spaces.
• User Type:
− Administrator
− Operator
: Can modify configuration of the unit, has read/write access to the console window.
: Cannot modify configuration of the unit (except own password), has read/write access to the
console window.
− Observer
: Cannot modify configuration of the unit (except own password), has read-only access to the
console window.
• Information: Any additional information (text) you want associated with this user. Can be 64 characters
maximum, no minimum, spaces permitted.
• Password: Alphanumeric text, 6–16 characters in length, no spaces. The first six characters of the password
must contain at least two alpha and one numeric character; the first four characters cannot be the same as the
user name.
Configuration
1. Disable Proxies in the installation computer Web browser.
Use “no Proxies” or temporarily add 192.0.0.192 to the list of URLs for which no proxy is configured.
2. Enable Java™ Applet Execution in the installation computer Web browser.
3. Access the unit through your installation computer Web browser on the same subnet by typing the URL
https://192.0.0.192 into the address/location field.
4. Follow the configuration instructions on the screen.
Note: At this point you will enter all of the initial configuration information listed in PreConfiguration Notes.
5. The unit will reboot automatically once it has been configured. The unit now has the user-defined configuration
settings, including a new IP address and is ready to be powered off, disconnected from the installation computer,
and moved to its intended location.
6 DOMINION SX INSTALLATION AND OPERATIONS MANUAL
Step-by-Step Configuration
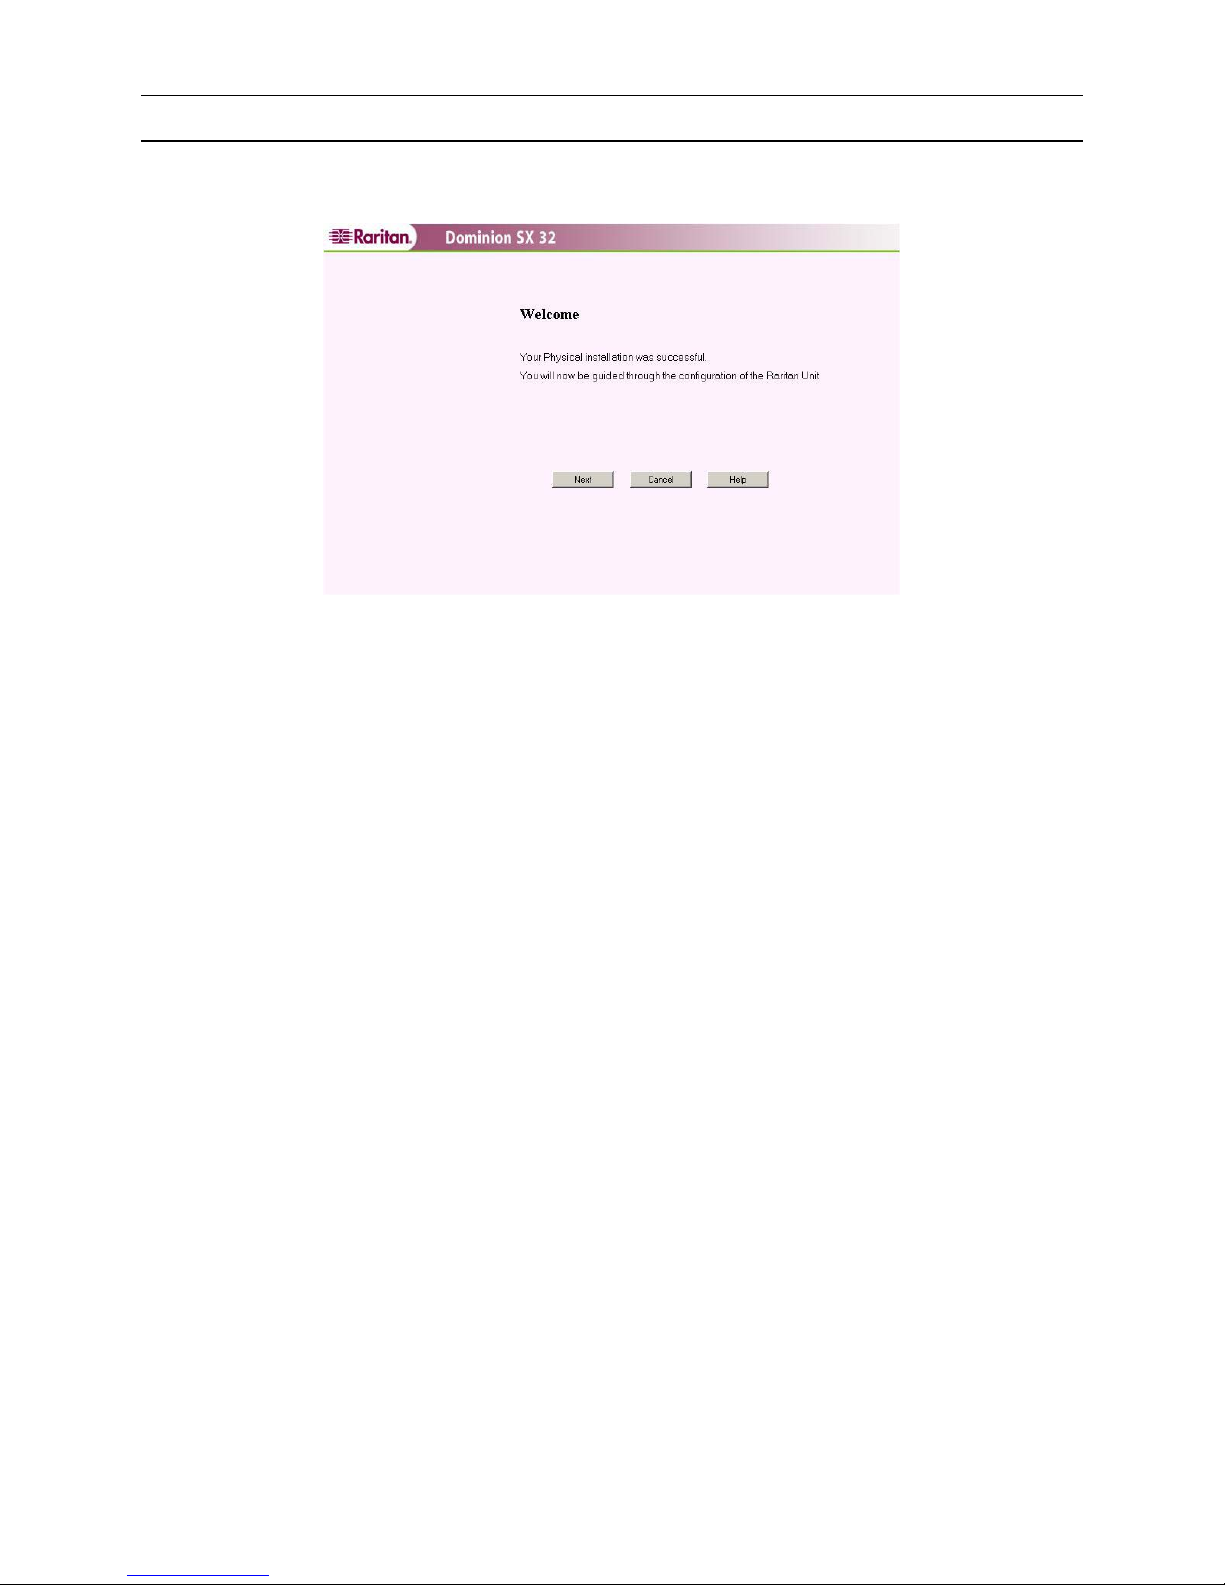
1. Access the unit through your Web browser on an installation computer that is on the same subnet by typing the
URL: https://192.0.0.192.
Figure 5 Initial Configuration showing Physical Installation was successful
2. Click on the [Next] button to add users.
CHAPTER 2: INSTALLATION 7
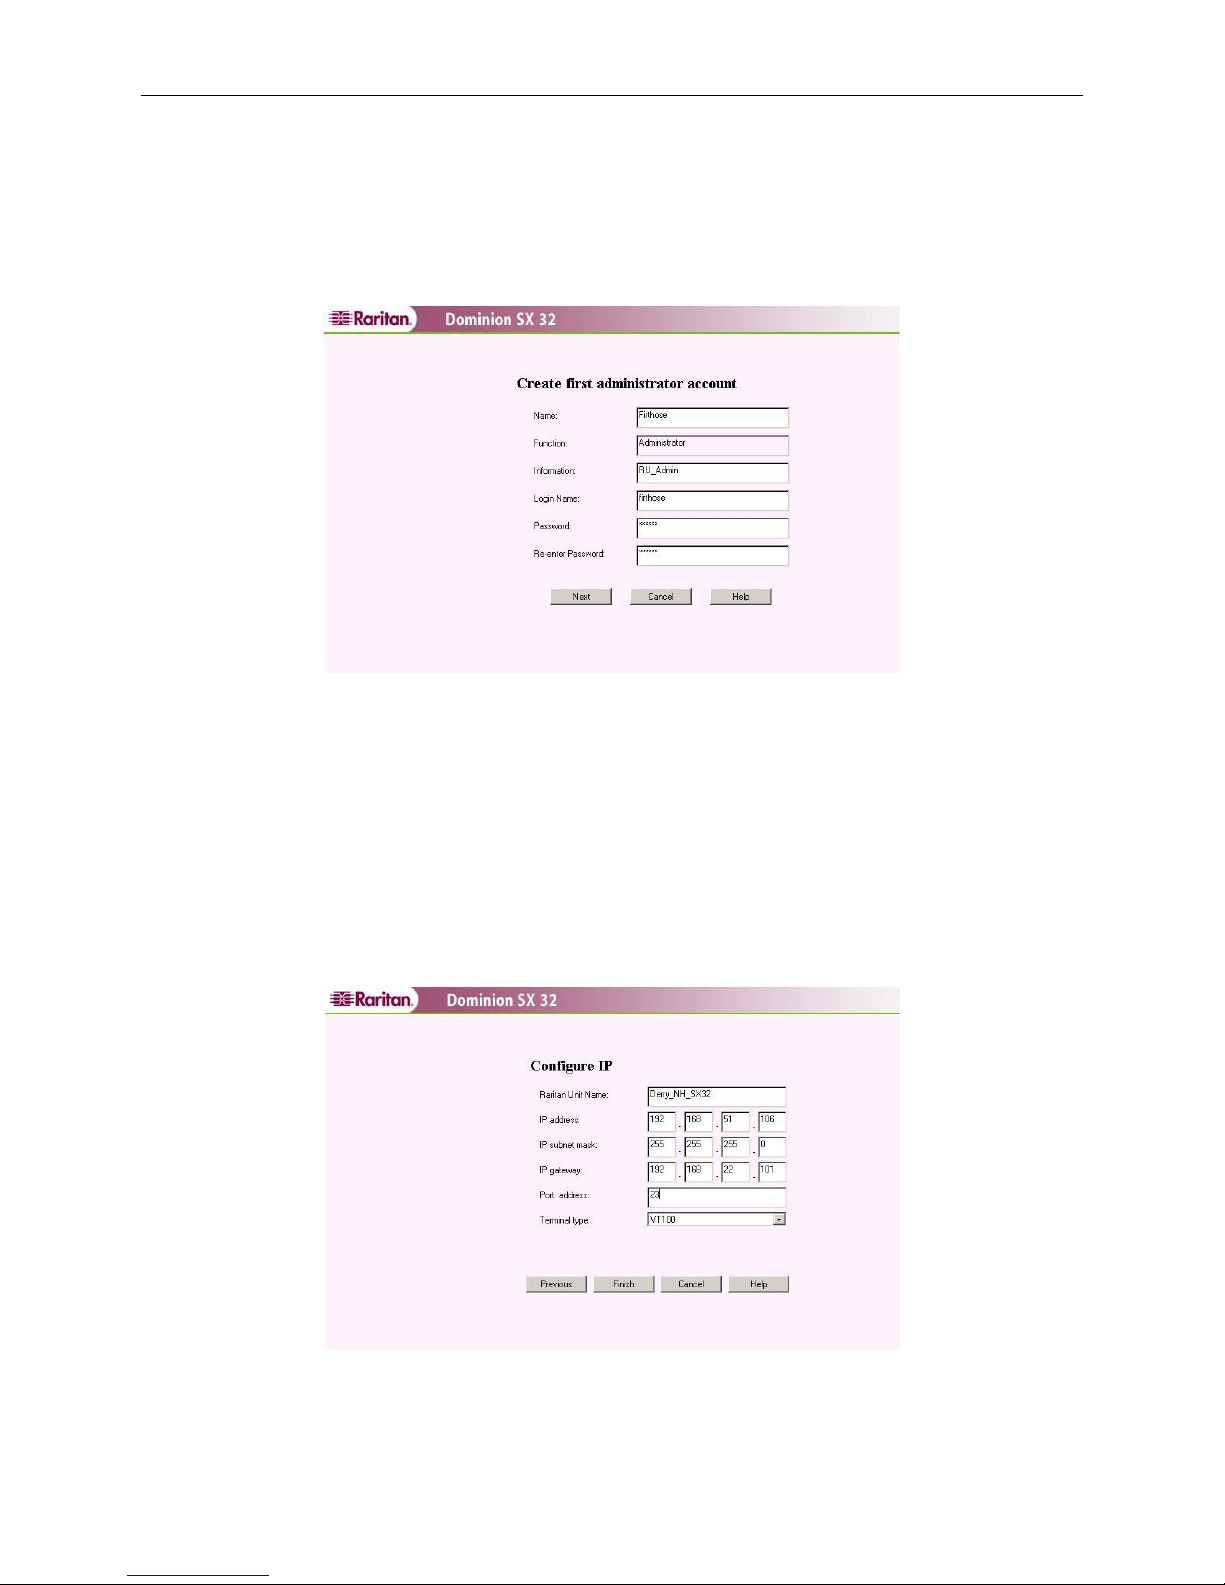
3. When the User Configuration Window appears, enter the information for the first user for Dominion SX. By
default, the first user will have Administrator privileges. All fields except for the Information field are required.
− Name: User’s (real) name
− Information: Descriptive information about this user
− Login Name: Unique login identifier
− Password: User’s password
− Re-enter Password: Confirm password by re-typing it
Figure 6 Initial Configuration screen for the First Administrator Account
4. Click on the [Next] button to proceed to the Network Configuration window.
5. The Network Configuration Window allows the user to specify the network settings for the unit. A network
administrator typically assigns the values for these parameters. All fields are required:
− Raritan Unit Name: Descriptive name for this unit
− IP Address: Network address for this unit
− Subnet Mask: Subnet mask for the network where this unit will reside
− IP Gateway: Default gateway for this unit
− Port Address: Default application communication port
− Terminal Type: Terminal emulation type; fixed vT100
Figure 7 Initial Configuration screen for Network Settings
8 DOMINION SX INSTALLATION AND OPERATIONS MANUAL
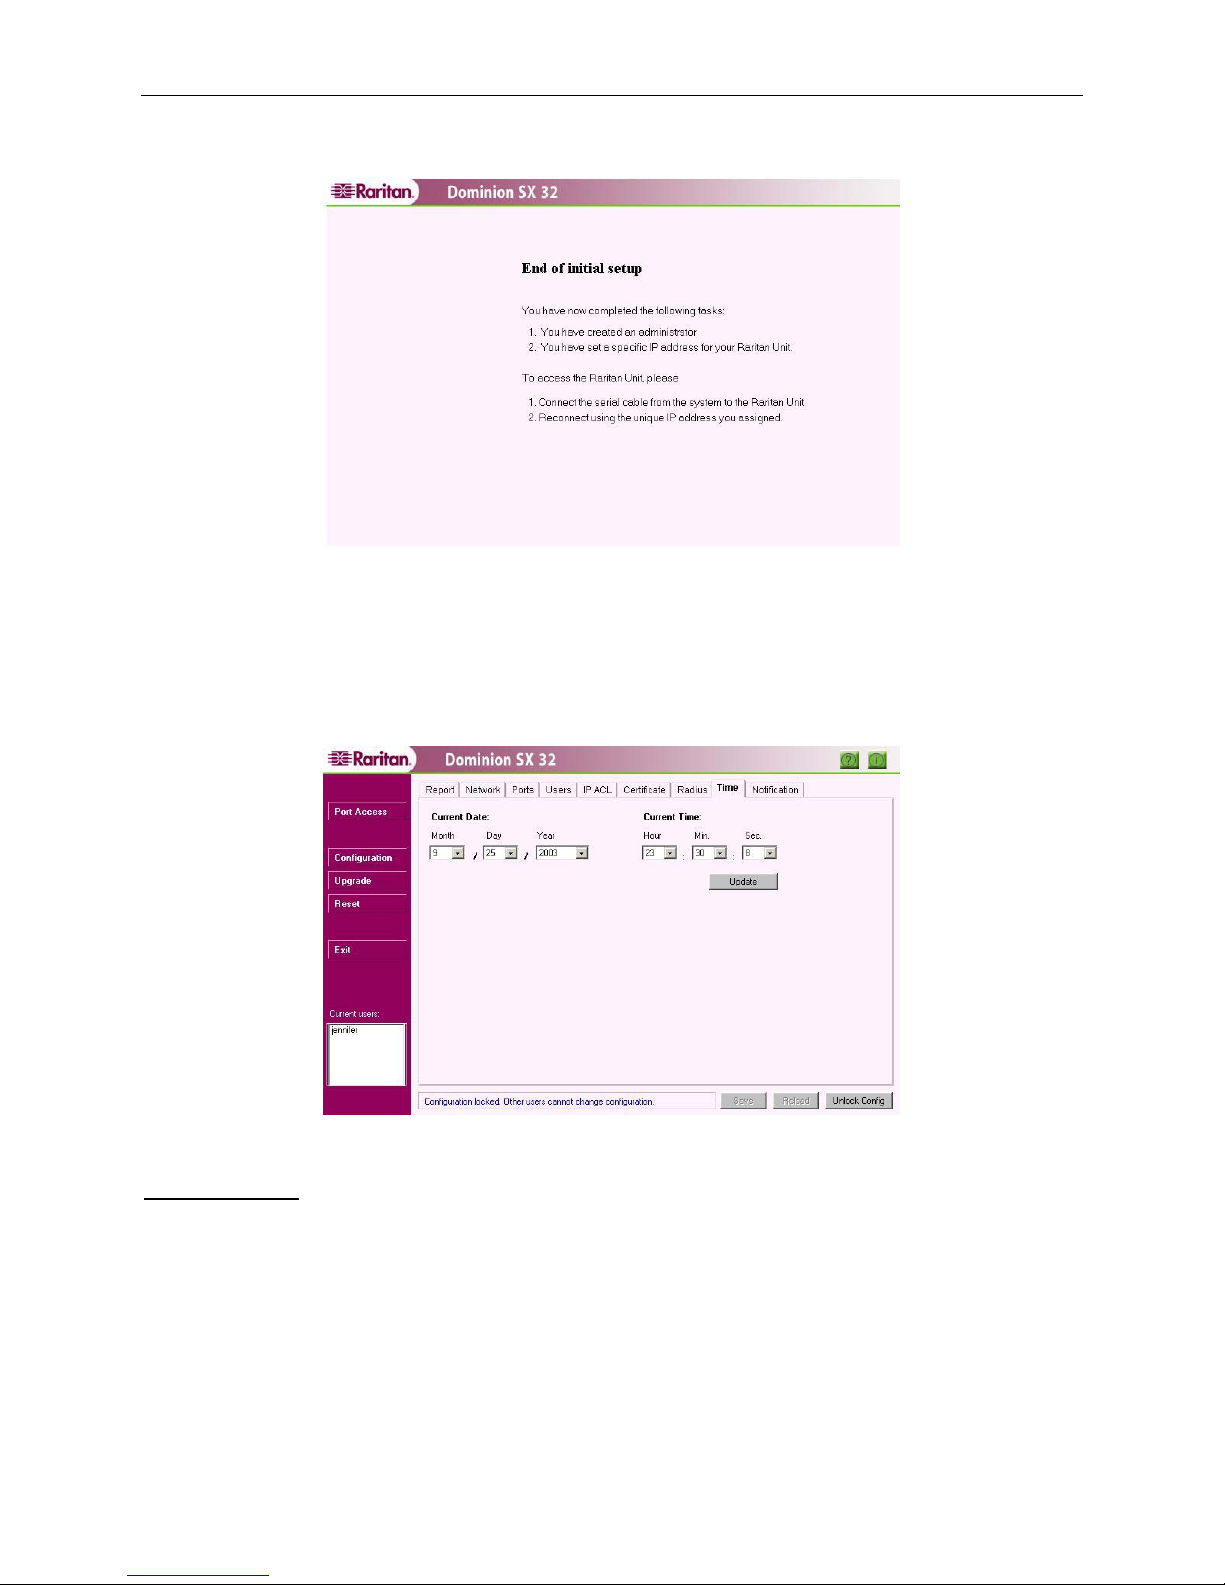
6. Click on the [Finish] button to complete the initial configuration of Dominion SX. You will see a screen that
indicates successful configuration of the unit. The system will reboot and apply the new settings.
Figure 8 End of Initial Setup
Time and Date Configuration
We recommend that you configure the local Date and Time in the Dominion SX unit as soon as it is configured.
Some features in Dominion SX, for example, Certificate generation, depend on the correct Timestamp, which is
used to check the validity period of the certificate.
Figure 9 Time Configuration Display
Configuration
7. Set the Current Date and Current Time.
8. Click on the [Update] button.
9. Click on the [Save] button.
CHAPTER 2: INSTALLATION 9
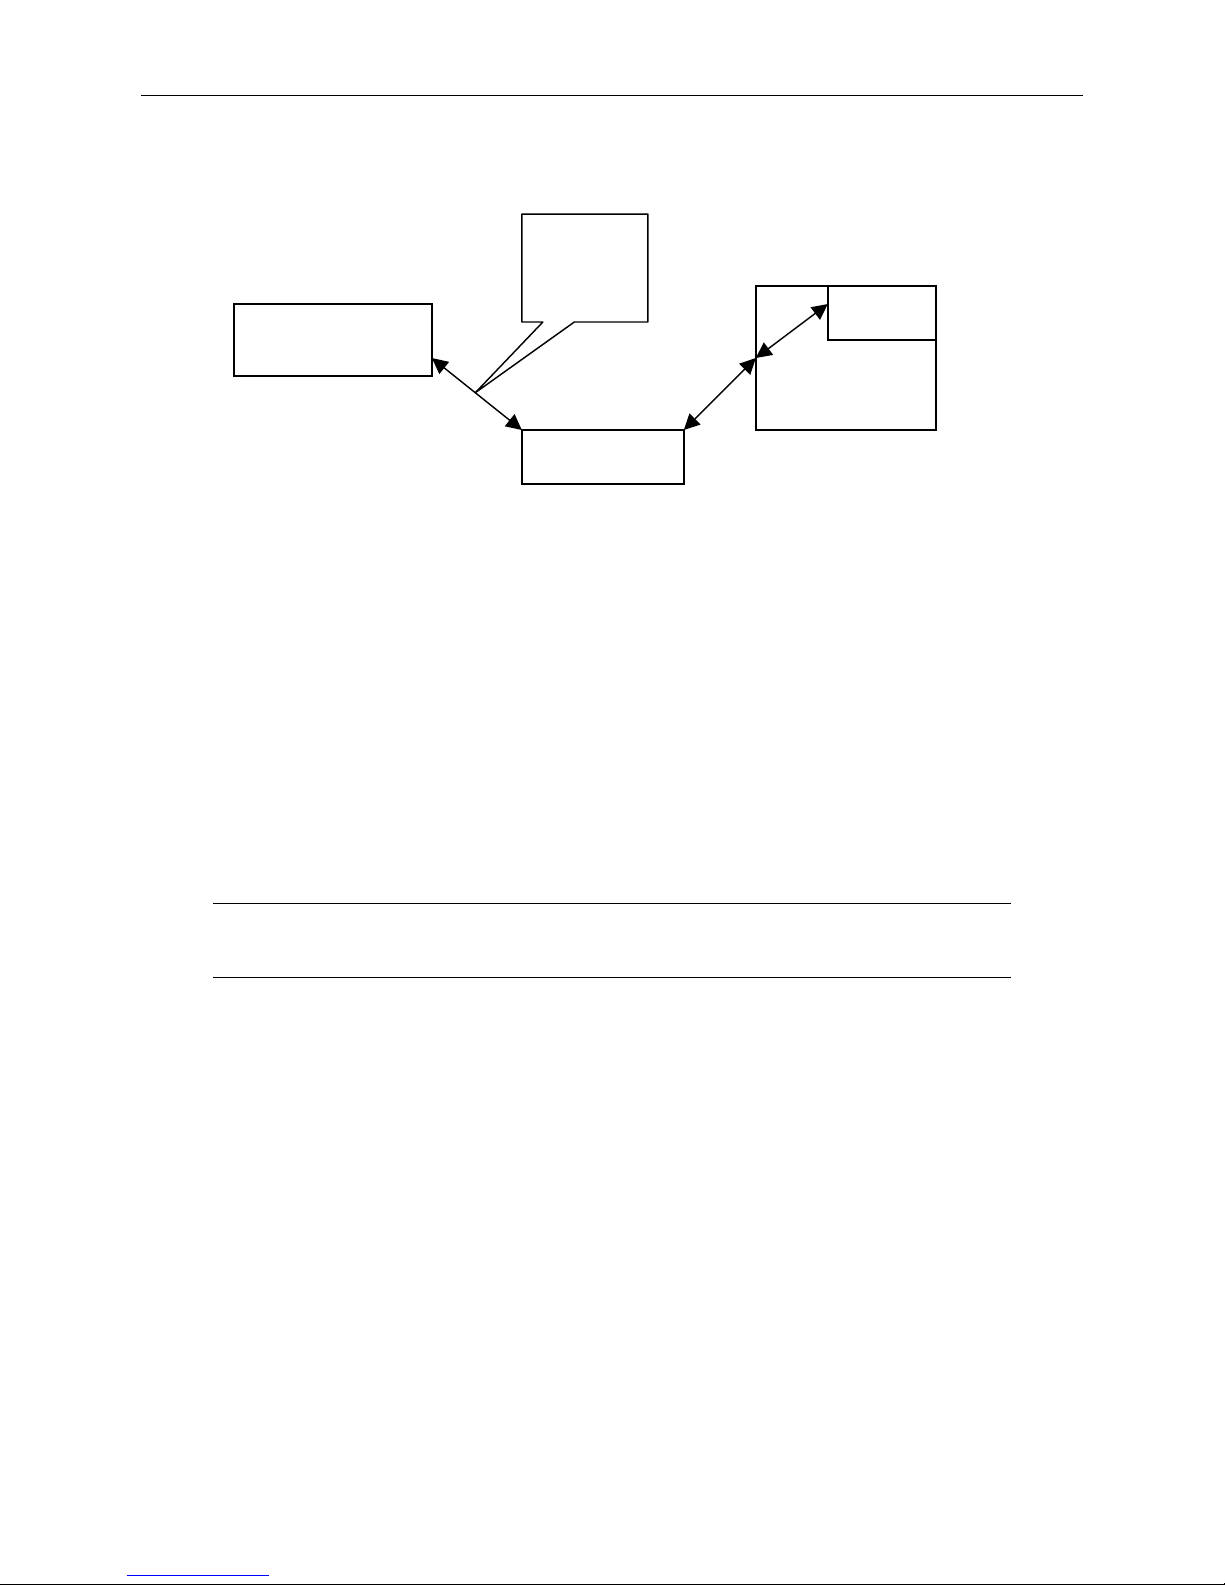
Deployment
After the Initial Software Configuration phase, a Dominion SX unit is configured for operation on the LAN.
Ethernet
Connection
Dominion SX Unit
LAN
Installation
Computer
Browser
Figure 10 Deployment
1. Make sure you have an allocated Ethernet cable connected to the network for use with the unit.
2. Physically mount the unit in an ergonomically sound manner.
3. Connect the LAN cable to the primary LAN connection on the back of the chassis. Connect and/or verify that
the other end of the cable is connected to the proper network. If the unit has a failover module, connect the
secondary network LAN connection as well.
4. Connect the female end of the external power cord to the back of the chassis.
5. Serial Connection to Target Devices: This manual contains detailed information on connecting the Dominion
SX unit to the console port of target devices.
6. Modem Connection (optional): Connect a phone line to the modem port. Remember to write down the phone
number for this line, as it will be necessary later when the user configures a client for dialup networking.
7. Connect the male end of the external power cord to the power supply outlet and power ON the Dominion SX
unit.
Note: The unit will perform hardware and firmware self-test, indicated by the green light on the
back of the chassis, and then start the software boot sequence. The boot sequence takes
approximately 30-60 seconds and is complete when the green light goes out.
8. Perform a quick connectivity check by connecting to the device using either IE or Netscape. In the address line,
enter https://<IPAddress> where IPAddress is the IP address of the unit as previously configured. The login
display should appear verifying that the unit has been properly configured and can be accessed from the
network.
9. Enter the Configuration window and enter the various configuration parameters for each console port. Enter
specific operational parameters for the unit (please see Chapter 4: Console Features for additional
information).

10 DOMINION SX INSTALLATION AND OPERATIONS MANUAL
CHAPTER 3: OPERATION 11
Chapter 3: Operation
Overview
Once the Dominion SX unit has been deployed in its final destination, you can access the console of the target
device. This chapter explains the normal operational procedures.
Accessing the Remote Device
The remote device can be accessed in one of two ways, either browser-based or by direct port access, used either as
a user based remote device access method or used for application programs to access the target device
programmatically.
Note: For the purpose of illustration, all discussion in this manual is based on using Internet
Explorer as the browser.
Browser-Based Access
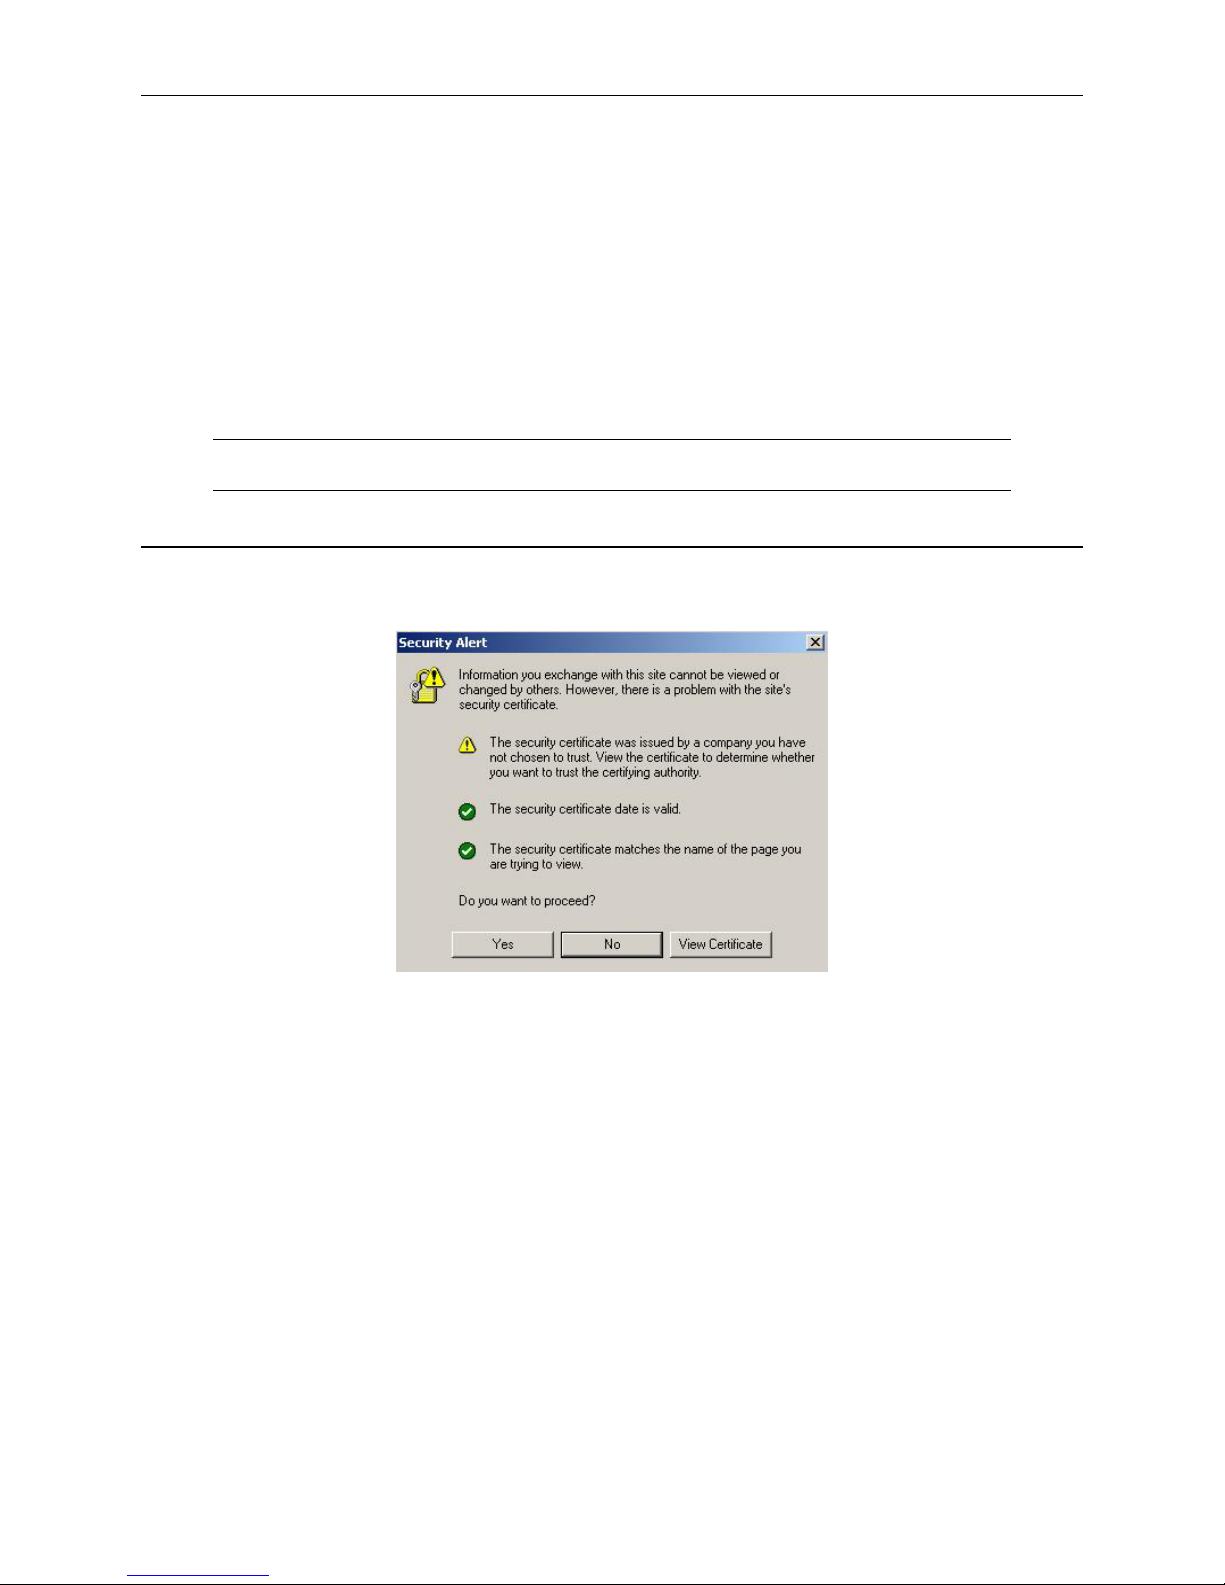
1. Using a browser (IE or Netscape) on your client desktop, enter the IP address of the unit. A security alert
window will appear.
Figure 11 Security Alert Display
The unit is always SSL enabled. When you try to connect to the Dominion SX unit, a Security Alert is
displayed ; this is because the CA root certificate is not installed in the browser. Please see Appendix C:
Certificates for additional information.
2. Click on the [Yes] button to continue.
12 DOMINION SX INSTALLATION AND OPERATIONS MANUAL
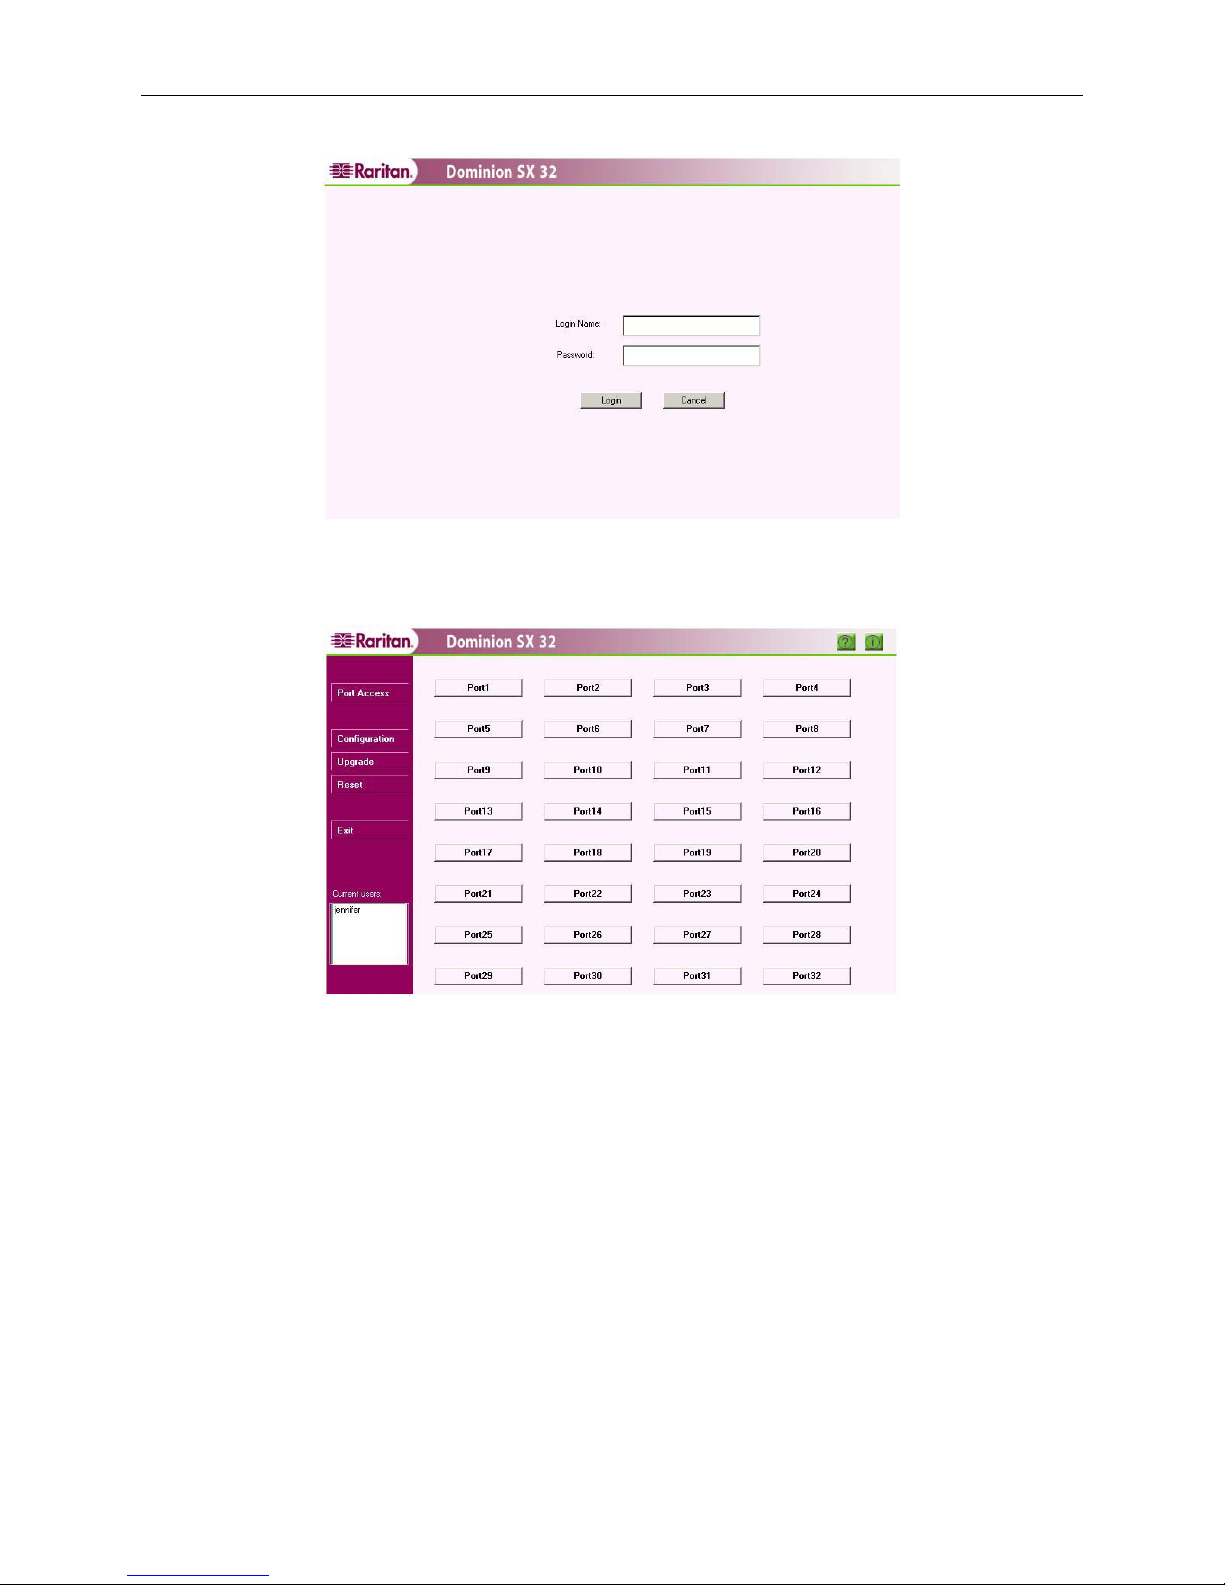
3. When the login screen appears, enter your Login Name and Password, and click on the [Login] button.
Figure 12 Login Display
4. When the main display page appears, click on the desired [Port#] button to launch that port’s console display.
Figure 13 Main Display with Available Ports
CHAPTER 3: OPERATION 13
Security Dialog for Console Display
RaritanConsole, an applet included with your Dominion SX unit, is designed by Raritan to enable the applet to
access the resources of the user’s computer. Both the copy and paste and the logging features of these applications
require the use of the client computer system resources. Both operations require the user’s permission to operate,
and Internet Explorer and Netscape Navigator request these permissions in different fashions. In addition, the default
code set preferences are stored on the user’s computer.
Internet Explorer
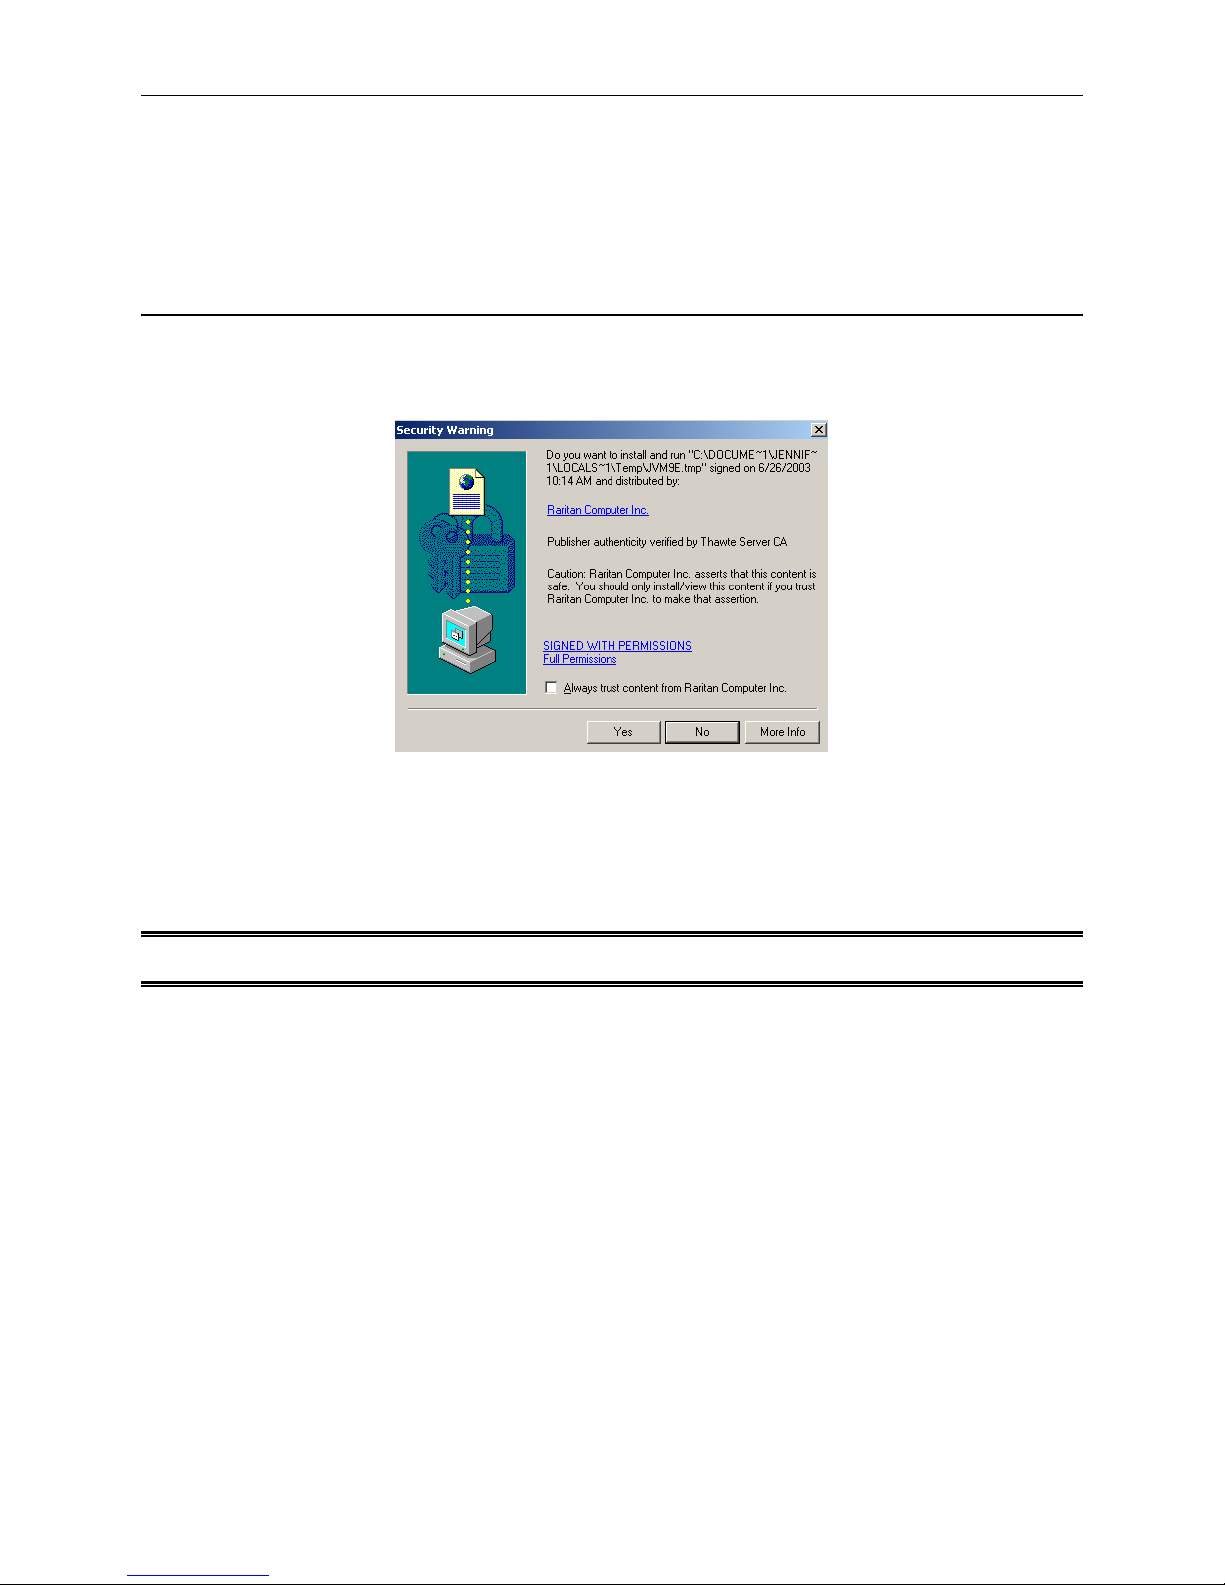
Before the RaritanConsole window appears, a Security Warning screen requests permission to access computer
resources. The dialog indicates that the authenticity of the signer, Raritan, has been verified by Thawte Server CA,
and it specifies the permissions requested from the user.
Figure 14 Security Dialog in Internet Explorer
• Click on the [Yes] button to accept all requested permissions. These permissions will not be requested again in
the same session. Check the [Always trust content from…] checkbox to avoid being asked for permissions at
the start of every new session.
• Click on the [No] button on the dialog box cancels the RaritanConsole window.
Important! Once [No] is selected, the console will not pop up until the browser is closed and a new
session is started.
14 DOMINION SX INSTALLATION AND OPERATIONS MANUAL
Netscape Navigator
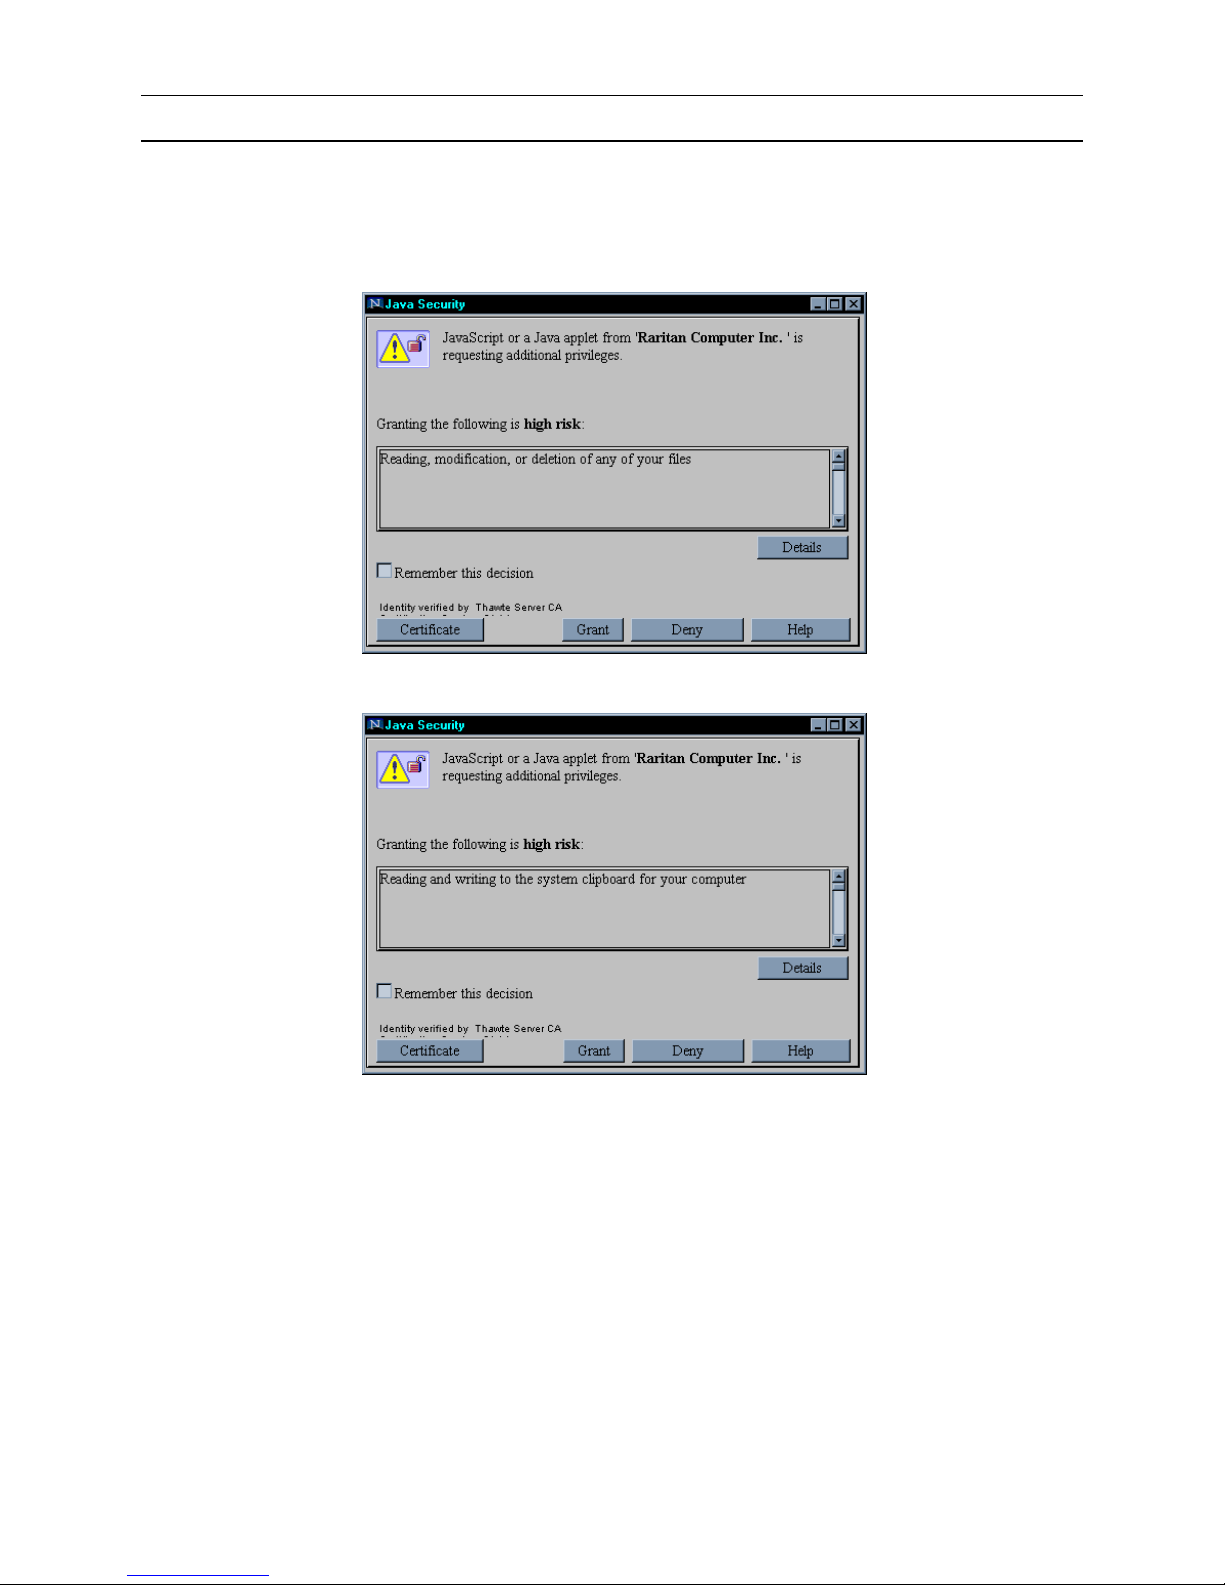
RaritanConsole loads without displaying a Security Warning window. When actions that require user permissions
are performed, a security dialog will appear. Each operation requires a unique permission. The Start Logging and
Copy/Paste operations will prompt the user with a security dialog window. Once permissions are granted, they will
not be requested again in the same session. Users can also check the [Remember this decision] checkbox to avoid
being asked for permissions every new session.
Figure 15 Security Dialog for Logging in Netscape Navigator
Figure 16 Security Dialog for Copy Paste in Netscape Navigator
CHAPTER 3: OPERATION 15
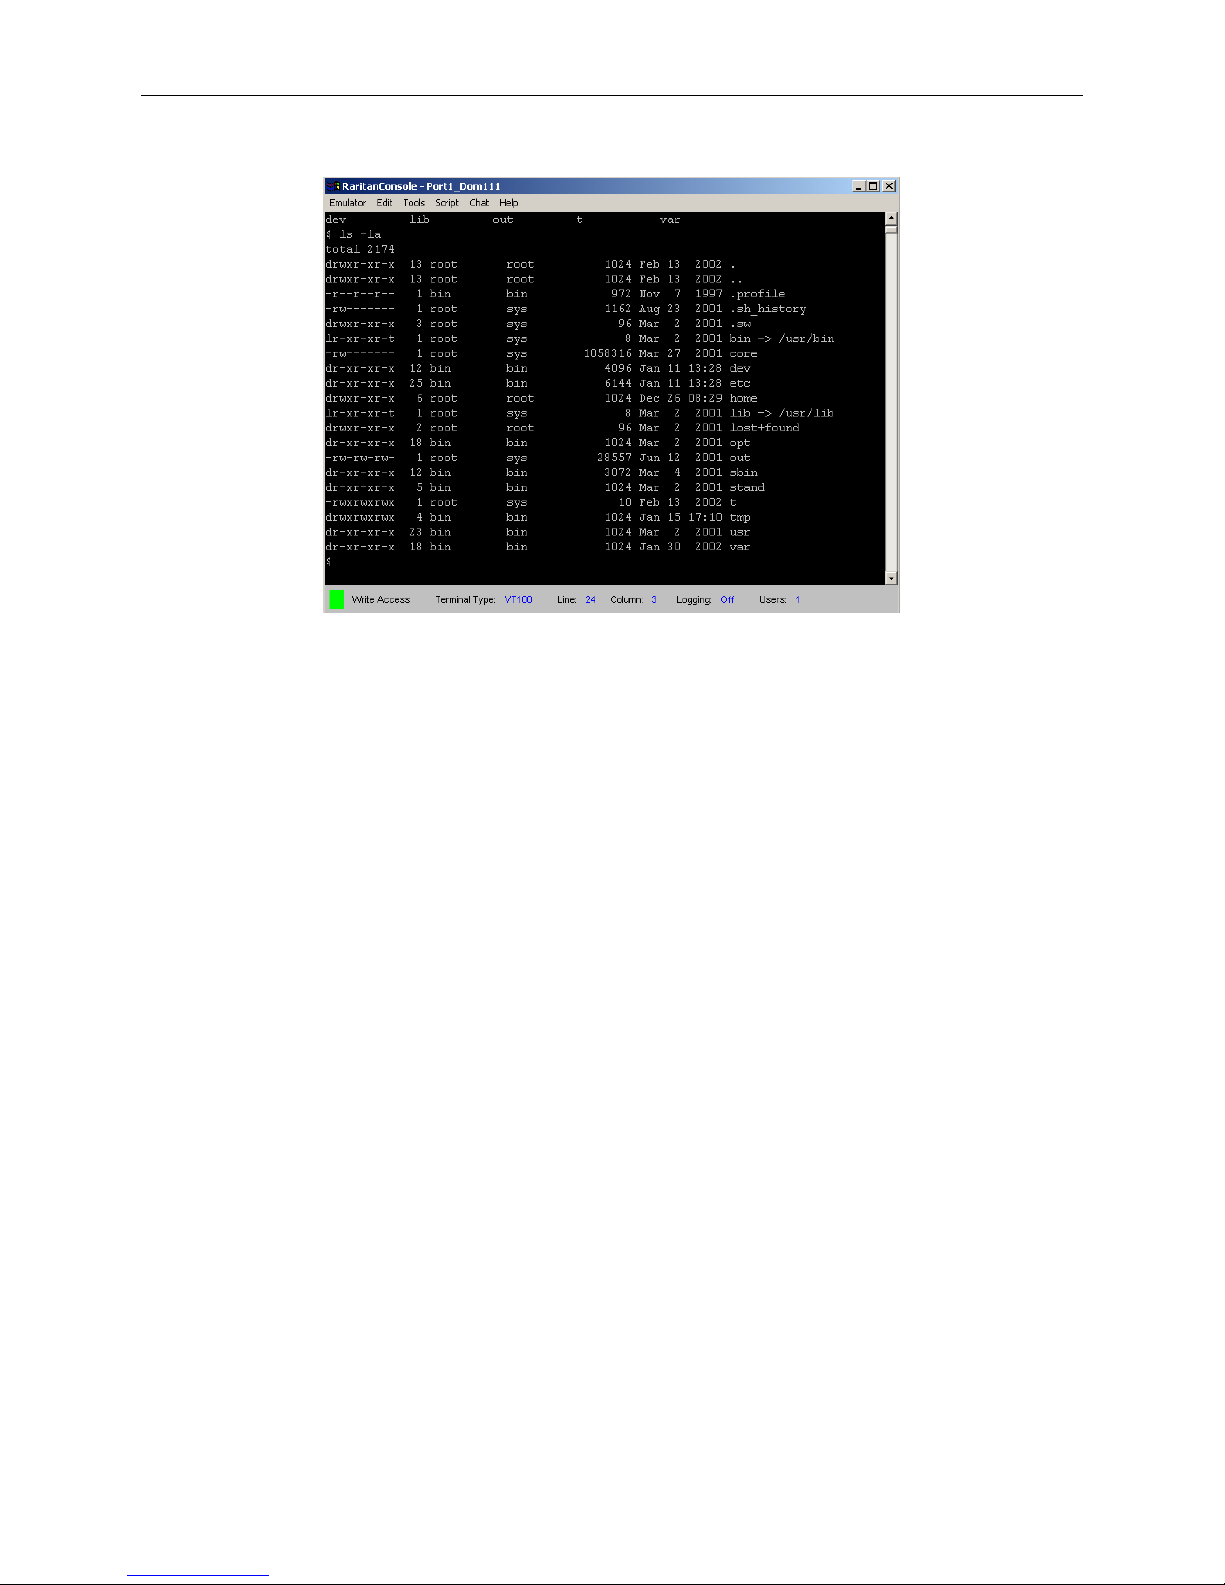
Once the Security screens are completed, the console window appears, and the user can begin working with the
remote target system.
Figure 17 Console Window
Sending a Break / Null
Some target systems, such as Sun Servers, require a null character (Break) to be sent from the console. Pressing the
<F8> function key sends a null character to the target device. To send a break / null:
1. Verify that you have write access. If not, you can either press the <F8> key, or can use the drop-down menu to
obtain write access, as described in the Write Access section of Chapter 4: Console Features.
2. Press the <F8> key to send the break / null.
Note: <F8> is a multifunction key. It is used to obtain write access when the user does not have write access and is
also used to send a break / null character to the remote target system once the user obtains write access.

16 DOMINION SX INSTALLATION AND OPERATIONS MANUAL
 Loading...