

SERVICE MANUAL
AA-99-01.1AA-99-01.1
AA-99-01.1
AA-99-01.1AA-99-01.1
(Replaces AA-99-01)
June - 2007
SOLSOL
SOL
SOLSOL
TMTM
TM
EFMEFM
EFM
EFMEFM
VENTBORNE ROBOTIC AVENTBORNE ROBOTIC A
VENTBORNE ROBOTIC A
VENTBORNE ROBOTIC AVENTBORNE ROBOTIC A
TMTM
AND EFMD AND EFMD
AND EFMD
AND EFMD AND EFMD
TMTM
TM
TMTM
TT
OMIZERSOMIZERS
T
OMIZERS
TT
OMIZERSOMIZERS
MODEL: 76480, 76482, 76485, 76488MODEL: 76480, 76482, 76485, 76488
MODEL: 76480, 76482, 76485, 76488
MODEL: 76480, 76482, 76485, 76488MODEL: 76480, 76482, 76485, 76488
IMPORIMPOR
IMPOR
IMPORIMPOR
carefully read SAFETY PRECAUTIONS,carefully read SAFETY PRECAUTIONS,
carefully read SAFETY PRECAUTIONS,
carefully read SAFETY PRECAUTIONS,carefully read SAFETY PRECAUTIONS,
starting on page 1, and all instructions instarting on page 1, and all instructions in
starting on page 1, and all instructions in
starting on page 1, and all instructions instarting on page 1, and all instructions in
this manual. Keep this Service Manual forthis manual. Keep this Service Manual for
this manual. Keep this Service Manual for
this manual. Keep this Service Manual forthis manual. Keep this Service Manual for
future reference.future reference.
future reference.
future reference.future reference.
TT
ANTANT
T
ANT
TT
ANTANT
: Before using this equipment,: Before using this equipment,
: Before using this equipment,
: Before using this equipment,: Before using this equipment,
Service Manual Price: Service Manual Price:
Service Manual Price: €
Service Manual Price: Service Manual Price:
40.00 (Euro)40.00 (Euro)
40.00 (Euro)
40.00 (Euro)40.00 (Euro)
$50.00 (U.S.)$50.00 (U.S.)
$50.00 (U.S.)
$50.00 (U.S.)$50.00 (U.S.)

NOTE:NOTE:
NOTE: This manual has been changed from revision
NOTE:NOTE:
AA-99-01AA-99-01
AA-99-01 to revision
AA-99-01AA-99-01
AA-99-01.1AA-99-01.1
AA-99-01.1.
AA-99-01.1AA-99-01.1
Reasons for this change are noted under “Manual Change Summary” inside the back cover of this
manual.
AA-99-01.1

CONTENTSCONTENTS
CONTENTS
CONTENTSCONTENTS
SAFETY:SAFETY:
SAFETY:
SAFETY:SAFETY:
EFM(D) Solventborne Robotic Atomizers - Contents
PAGEPAGE
PAGE
PAGEPAGE
1-41-4
1-4
1-41-4
SAFETY PRECAUTIONS............................................................................................................
HAZARDS / SAFEGUARDS.......................................................................................................
INTRODUCTION:INTRODUCTION:
INTRODUCTION:
INTRODUCTION:INTRODUCTION:
THE ITW RANSBURG ELECTROSTATIC PROCESS.............................................................
EFM AND EFMD SOLVENTBORNE GUNS..............................................................................
SPECIFICATIONS.......................................................................................................................
MANIFOLD SELECTION GUIDE................................................................................................
APPLICATOR TOOL-POINT REPRESENTATION...................................................................
INSTALLATION:INSTALLATION:
INSTALLATION:
INSTALLATION:INSTALLATION:
EFM AND EFMD ROBOTIC ATOMIZER INSTALLATION........................................................
POWER SUPPLY ASSEMBLY...................................................................................................
LOW VOLTAGE CABLE CONNECTIONS.................................................................................
ROBOT MANIFOLD ASSEMBLY................................................................................................
EFM SPRAY GUN.......................................................................................................................
ROBOT MANIFOLD AND SPRAY GUN INSTALLATION /
PARTS LIST.................................................................................................................................
OPERATION:OPERATION:
OPERATION:
OPERATION:OPERATION:
1
2-4
5-85-8
5-8
5-85-8
5
5-6
6
7
8
9-149-14
9-14
9-149-14
9
9
10
11
11
13-14
15-1815-18
15-18
15-1815-18
SPRAY APPLICATOR CONTROLS...........................................................................................
POWER SUPPLY CONTROLS..................................................................................................
GENERAL INFORMATION AND ADJUSTMENTS...................................................................
SIMPLIFIED AIR AND FLUID FLOW PASSAGE LAYOUT.......................................................
INTRINSIC SAFE WIRING..........................................................................................................
MAINTENANCE:MAINTENANCE:
MAINTENANCE:
MAINTENANCE:MAINTENANCE:
ROUTINE MAINTENANCE SCHEDULE....................................................................................
PROCEDURES............................................................................................................................
SERVICE......................................................................................................................................
SPRAY HEAD ASSEMBLY / PARTS LIST.................................................................................
FLUID REGULATOR OR DUMP VALVE / PARTS LIST...........................................................
REMOVING GUN FROM THE ROBOT MANIFOLD
ASSEMBLY / PARTS LIST..........................................................................................................
AIR CARTRIDGE VALVES.........................................................................................................
SOLENOID TRIGGER VALVES / PARTS LIST.........................................................................
LECU5004 MICROPAK CONTROL UNIT..................................................................................
76494-XXX ROBOT MANIFOLD ASSEMBLY............................................................................
ACCESSORIES...........................................................................................................................
(Continued On Next Page)(Continued On Next Page)
(Continued On Next Page)
(Continued On Next Page)(Continued On Next Page)
15
15
15-17
17
18
19-3419-34
19-34
19-3419-34
19-20
20-21
21
22-24
25-26
27
28-29
29-30
31
31
31-34
AA-99-01.1

EFM(D) Solventborne Robotic Atomizers - Contents
PARTS IDENTIFICATION:PARTS IDENTIFICATION:
PARTS IDENTIFICATION:
PARTS IDENTIFICATION:PARTS IDENTIFICATION:
PAGEPAGE
PAGE
PAGEPAGE
35-7035-70
35-70
35-7035-70
76479 SPRAY HEAD ASSEMBLY / PARTS LIST.......................................................................
76490 APPLICATOR MANIFOLD PLATE ASSEMBLY / PARTS LIST......................................
76494 MANIFOLD ASSEMBLY / PARTS LIST............................................................................
76480 EFM APPLICATOR ASSEMBLY / PARTS LIST..............................................................
76366 VALVE MANIFOLD ASSEMBLY / PARTS LIST...............................................................
76481 APPLICATOR HOUSING ASSEMBLY / PARTS LIST....................................................
76482 EFM APPLICATOR ASSEMBLY / PARTS LIST..............................................................
76484 VALVE MANIFOLD ASSEMBLY / PARTS LIST...............................................................
76483 APPLICATOR HOUSING ASSEMBLY / PARTS LIST....................................................
76485 EFMD APPLICATOR ASSEMBLY / PARTS LIST............................................................
76487 VALVE MANIFOLD ASSEMBLY / PARTS LIST...............................................................
76486 APPLICATOR HOUSING ASSEMBLY / PARTS LIST....................................................
76488 EFMD APPLICATOR ASSEMBLY / PARTS LIST............................................................
76368 VALVE MANIFOLD ASSEMBLY / PARTS LIST...............................................................
76489 APPLICATOR HOUSING ASSEMBLY / PARTS LIST....................................................
WARRANTY POLICIES:WARRANTY POLICIES:
WARRANTY POLICIES:
WARRANTY POLICIES:WARRANTY POLICIES:
LIMITED WARRANTY..................................................................................................................
35-36
37-38
39-42
43-44
45-46
47-48
49-50
51-52
53-54
55-56
57-59
61-62
63-64
65-67
69-70
7171
71
7171
71
AA-99-01.1

AA-99-01.1
EFM(D) Solventborne Robotic Atomizers - Safety
SAFETYSAFETY
SAFETY
SAFETYSAFETY
SAFETY PRECAUTIONSSAFETY PRECAUTIONS
SAFETY PRECAUTIONS
SAFETY PRECAUTIONSSAFETY PRECAUTIONS
Before operating, maintaining or servicing any
ITW Ransburg electrostatic coating system, read
and understand all of the technical and safety
literature for your ITW Ransburg products. This
manual contains information that is important for
you to know and understand. This information
relates to USER SAFETY and PREVENTING
EQUIPMENT PROBLEMS. To help you recognize this information, we use the following symbols. Please pay particular attention to these
sections.
A WARNING!A WARNING!
A WARNING!
A WARNING!A WARNING!
to a situation that might cause serious injuryto a situation that might cause serious injury
to a situation that might cause serious injury
to a situation that might cause serious injuryto a situation that might cause serious injury
if instructions are not followed.if instructions are not followed.
if instructions are not followed.
if instructions are not followed.if instructions are not followed.
A CAUTION! states information that tellsA CAUTION! states information that tells
A CAUTION! states information that tells
A CAUTION! states information that tellsA CAUTION! states information that tells
how to prevent damage to equipment or howhow to prevent damage to equipment or how
how to prevent damage to equipment or how
how to prevent damage to equipment or howhow to prevent damage to equipment or how
to avoid a situation that might cause minorto avoid a situation that might cause minor
to avoid a situation that might cause minor
to avoid a situation that might cause minorto avoid a situation that might cause minor
injury.injury.
injury.
injury.injury.
states information to alert youstates information to alert you
states information to alert you
states information to alert youstates information to alert you
> The user
the Safety Section in this manual and the
ITW Ransburg safety literature therein identified.
> This manual
oughly understood by
operate, clean or maintain this equipment!
Special care should be taken to ensure that
WARNINGSWARNINGS
the
WARNINGS and safety requirements
WARNINGSWARNINGS
for operating and servicing the equipment
are followed. The user should be aware of
and adhere to
codes and ordinances as well as
33 SAFETY STANDARD, 33 SAFETY STANDARD,
33 SAFETY STANDARD, prior to install-
33 SAFETY STANDARD, 33 SAFETY STANDARD,
ing, operating, and/or servicing this equipment.
W A R N I N GW A R N I N G
W A R N I N G
W A R N I N GW A R N I N G
!!
!
!!
MUSTMUST
MUST read and be familiar with
MUSTMUST
MUSTMUST
MUST be read and thor-
MUSTMUST
ALLALL
ALL personnel who
ALLALL
ALLALL
ALL local building and fire
ALLALL
NFPA-NFPA-
NFPA-
NFPA-NFPA-
A NOTE is information relevant to the pro-A NOTE is information relevant to the pro-
A NOTE is information relevant to the pro-
A NOTE is information relevant to the pro-A NOTE is information relevant to the procedure in progress.cedure in progress.
cedure in progress.
cedure in progress.cedure in progress.
While this manual lists standard specifications
and service procedures, some minor deviations
may be found between this literature and your
equipment. Differences in local codes and plant
requirements, material delivery requirements, etc.,
make such variations inevitable. Compare this
manual with your system installation drawings
and appropriate ITW Ransburg equipment
manuals to reconcile such differences.
Careful study and continued use of this manual will
provide a better understanding of the equipment
and process, resulting in more efficient operation,
longer trouble-free service and faster, easier
troubleshooting. If you do not have the manuals
and safety literature for your Ransburg system,
contact your local ITW Ransburg representative
or ITW Ransburg.
W A R N I N GW A R N I N G
W A R N I N G
W A R N I N GW A R N I N G
!!
!
!!
> The hazards shown on the following page
may occur during the normal use of this
equipment. Please read the hazard chart
beginning on page 2.
11
1
11
AA-99-01.1

EFM(D) Solventborne Robotic Atomizers - Safety
AREAAREA
AREA
AREAAREA
Tells where hazards
may occur.
Spray AreaSpray Area
Spray Area
Spray AreaSpray Area
HAZARDHAZARD
HAZARD
HAZARDHAZARD
Tells what the hazard is.
Fire Hazard
Improper or inadequate operation
and maintenance procedures will
cause a fire hazard.
Protection against inadvertent
arcing that is capable of causing
fire or explosion is lost if any safety
interlocks are disabled during
operation. Frequent power supply
shutdown indicates a problem in
the system requiring correction.
SAFEGUARDSSAFEGUARDS
SAFEGUARDS
SAFEGUARDSSAFEGUARDS
Tells how to avoid the hazard.
Fire extinguishing equipment must be present in the
spray area and tested periodically.
Spray areas must be kept clean to prevent the
accumulation of combustible residues.
Smoking must never be allowed in the spray area.
The high voltage supplied to the atomizer must be
turned off prior to cleaning, flushing or maintenance.
When using solvents for cleaning:
Those used for equipment flushing should have flash
points equal to or higher than those of the coating
material.
Those used for general cleaning must have flash
points above 100°F (37.8°C).
Spray booth ventilation must be kept at the rates
required by NFPA-33, OSHA, and local codes. In
addition, ventilation must be maintained during
cleaning operations using flammable or combustible
solvents.
Electrostatic arcing must be prevented.
Test only in areas free of combustible material.
Testing may require high voltage to be on, but only as
instructed.
Non-factory replacement parts or unauthorized
equipment modifications may cause fire or injury.
If used, the key switch bypass is intended for use only
during setup operations. Production should never be
done with safety interlocks disabled.
Never use equipment intended for use in waterborne
installations to spray solvent based materials.
The paint process and equipment should be set up
and operated in accordance with NFPA-33, NEC, and
OSHA requirements.
AA-99-01.1
22
2
22

EFM(D) Solventborne Robotic Atomizers - Safety
AREAAREA
AREA
AREAAREA
Tells where hazards
may occur.
General UseGeneral Use
General Use
General UseGeneral Use
andand
and
andand
MaintenanceMaintenance
Maintenance
MaintenanceMaintenance
ElectricalElectrical
Electrical
ElectricalElectrical
EquipmentEquipment
Equipment
EquipmentEquipment
HAZARDHAZARD
HAZARD
HAZARDHAZARD
Tells what the hazard is.
Improper operation or maintenance
may create a hazard.
Personnel must be properly trained
in the use of this equipment.
High voltage equipment is utilized.
Arcing in areas of flammable or
combustible materials may occur.
Personnel are exposed to high
voltage during operation and
maintenance.
Protection against inadvertent
arcing that may cause a fire or
explosion is lost if safety circuits
are disabled during operation.
Frequent power supply shut-down
indicates a problem in the system
which requires correction.
An electrical arc can ignite coating
materials and cause a fire or
explosion.
SAFEGUARDSSAFEGUARDS
SAFEGUARDS
SAFEGUARDSSAFEGUARDS
Tells how to avoid the hazard.
Personnel must be given training in accordance with
the requirements of NFPA-33.
Instructions and safety precautions must be read and
understood prior to using this equipment.
Comply with appropriate local, state, and national
codes governing ventilation, fire protection, operation
maintenance, and housekeeping. Reference OSHA,
NFPA-33, and your insurance company requirements.
The power supply, optional remote control cabinet,
and all other electrical equipment must be located
outside Class I or II, Division 1 and 2 hazardous
areas. Refer to NFPA-33.
Turn the power supply OFF before working on the
equipment.
Test only in areas free of flammable or combustible
material.
Testing may require high voltage to be on, but only as
instructed.
Production should never be done with the safety
circuits disabled.
Before turning the high voltage on, make sure no
objects are within the sparking distance.
Explosion Hazard /Explosion Hazard /
Explosion Hazard /
Explosion Hazard /Explosion Hazard /
IncompatibleIncompatible
Incompatible
IncompatibleIncompatible
MaterialsMaterials
Materials
MaterialsMaterials
33
3
33
Halogenated hydrocarbon solvents
for example: methylene chloride
and 1,1,1,-Trichloroethane are not
chemically compatible with the
aluminum that might be used in
many system components. The
chemical reaction caused by these
solvents reacting with aluminum
can become violent and lead to an
equipment explosion.
Aluminum is widely used in other spray application
equipment - such as material pumps, regulators,
triggering valves, etc. Halogenated hydrocarbon
solvents must never be used with aluminum equipment during spraying, flushing, or cleaning. Read the
label or data sheet for the material you intend to spray.
If in doubt as to whether or not a coating or cleaning
material is compatible, contact your material supplier. Any other type of solvent may be used with
aluminum equipment.
AA-99-01.1
EFM(D) Solventborne Robotic Atomizers - Safety
AREAAREA
AREA
AREAAREA
Tells where hazards
may occur.
Toxic SubstancesToxic Substances
Toxic Substances
Toxic SubstancesToxic Substances
Spray Area /Spray Area /
Spray Area /
Spray Area /Spray Area /
High VoltageHigh Voltage
High Voltage
High VoltageHigh Voltage
EquipmentEquipment
Equipment
EquipmentEquipment
HAZARDHAZARD
HAZARD
HAZARDHAZARD
Tells what the hazard is.
Certain material may be harmful if
inhaled, or if there is contact with
the skin.
There is a high voltage device that
can induce an electrical charge on
objects which is capable of igniting
coating materials.
Inadequate grounding will cause a
spark hazard. A spark can ignite
many coating materials and cause
a fire or explosion.
SAFEGUARDSSAFEGUARDS
SAFEGUARDS
SAFEGUARDSSAFEGUARDS
Tells how to avoid the hazard.
Follow the requirements of the Material Safety Data
Sheet supplied by coating material manufacturer.
Adequate exhaust must be provided to keep the air
free of accumulations of toxic materials.
Use a mask or respirator whenever there is a chance
of inhaling sprayed materials. The mask must be
compatible with the material being sprayed and its
concentration. Equipment must be as prescribed by
an industrial hygienist or safety expert, and be
NIOSH approved.
Parts being sprayed must be supported on conveyors
or hangers and be grounded. The resistance between
the part and ground must not exceed 1 megohm.
All electrically conductive objects in the spray area,
with the exception of those objects required by the
process to be at high voltage, must be grounded.
Any person working in the spray area must be
grounded.
Robot Work Area -Robot Work Area -
Robot Work Area -
Robot Work Area -Robot Work Area General Use andGeneral Use and
General Use and
General Use andGeneral Use and
MaintenanceMaintenance
Maintenance
MaintenanceMaintenance
Personnel SafetyPersonnel Safety
Personnel Safety
Personnel SafetyPersonnel Safety
Unless specifically approved for use in hazardous
locations, the power supply and other electrical
control equipment must not be used in Class 1,
Division 1 or 2 locations.
Improper use or maintenance can
lead to hazardous conditions,
particularly from unexpected robot
manipulator movement.
Skin puncturing by sharp electrode. Take precautions to see that flesh is not punctured
Applicator adjustments or maintenance should be
done after the robot is taken out of service. Do not
adjust or repair the applicator if the robot is operating
or standing ready to start.
Refer to robot operating instructions for the procedures
to take the robot out of service.
by sharp electrode.
AA-99-01.1
44
4
44

EFM(D) Solventborne Robotic Atomizers - Introduction
INTRODUCTIONINTRODUCTION
INTRODUCTION
INTRODUCTIONINTRODUCTION
THE ITW RANSBURGTHE ITW RANSBURG
THE ITW RANSBURG
THE ITW RANSBURGTHE ITW RANSBURG
ELECTROSTELECTROST
ELECTROST
ELECTROSTELECTROST
PROCESSPROCESS
PROCESS
PROCESSPROCESS
This process is a method for electrostatically
applying coatings to objects. A power supply
produces a high voltage charge which is supplied
to the applicator, creating an electrostatic field
between the applicator and the target object. The
target is electrostatically grounded through its
support which may be either stationary or moving.
A regulated fluid system delivers coating material
to the applicator, where it is atomized forming a
spray mist. There, under the influence of the
electrostatic field, the atomized coating becomes
electrostatically charged. The charged particles
are attracted to and deposited on the grounded
target object. The forces between the charged
particles and the target are sufficient to turn
overspray around and deposit it on the back
surface of the target. Therefore, a higher
percentage of the spray is deposited.
AA
TICTIC
A
TIC
AA
TICTIC
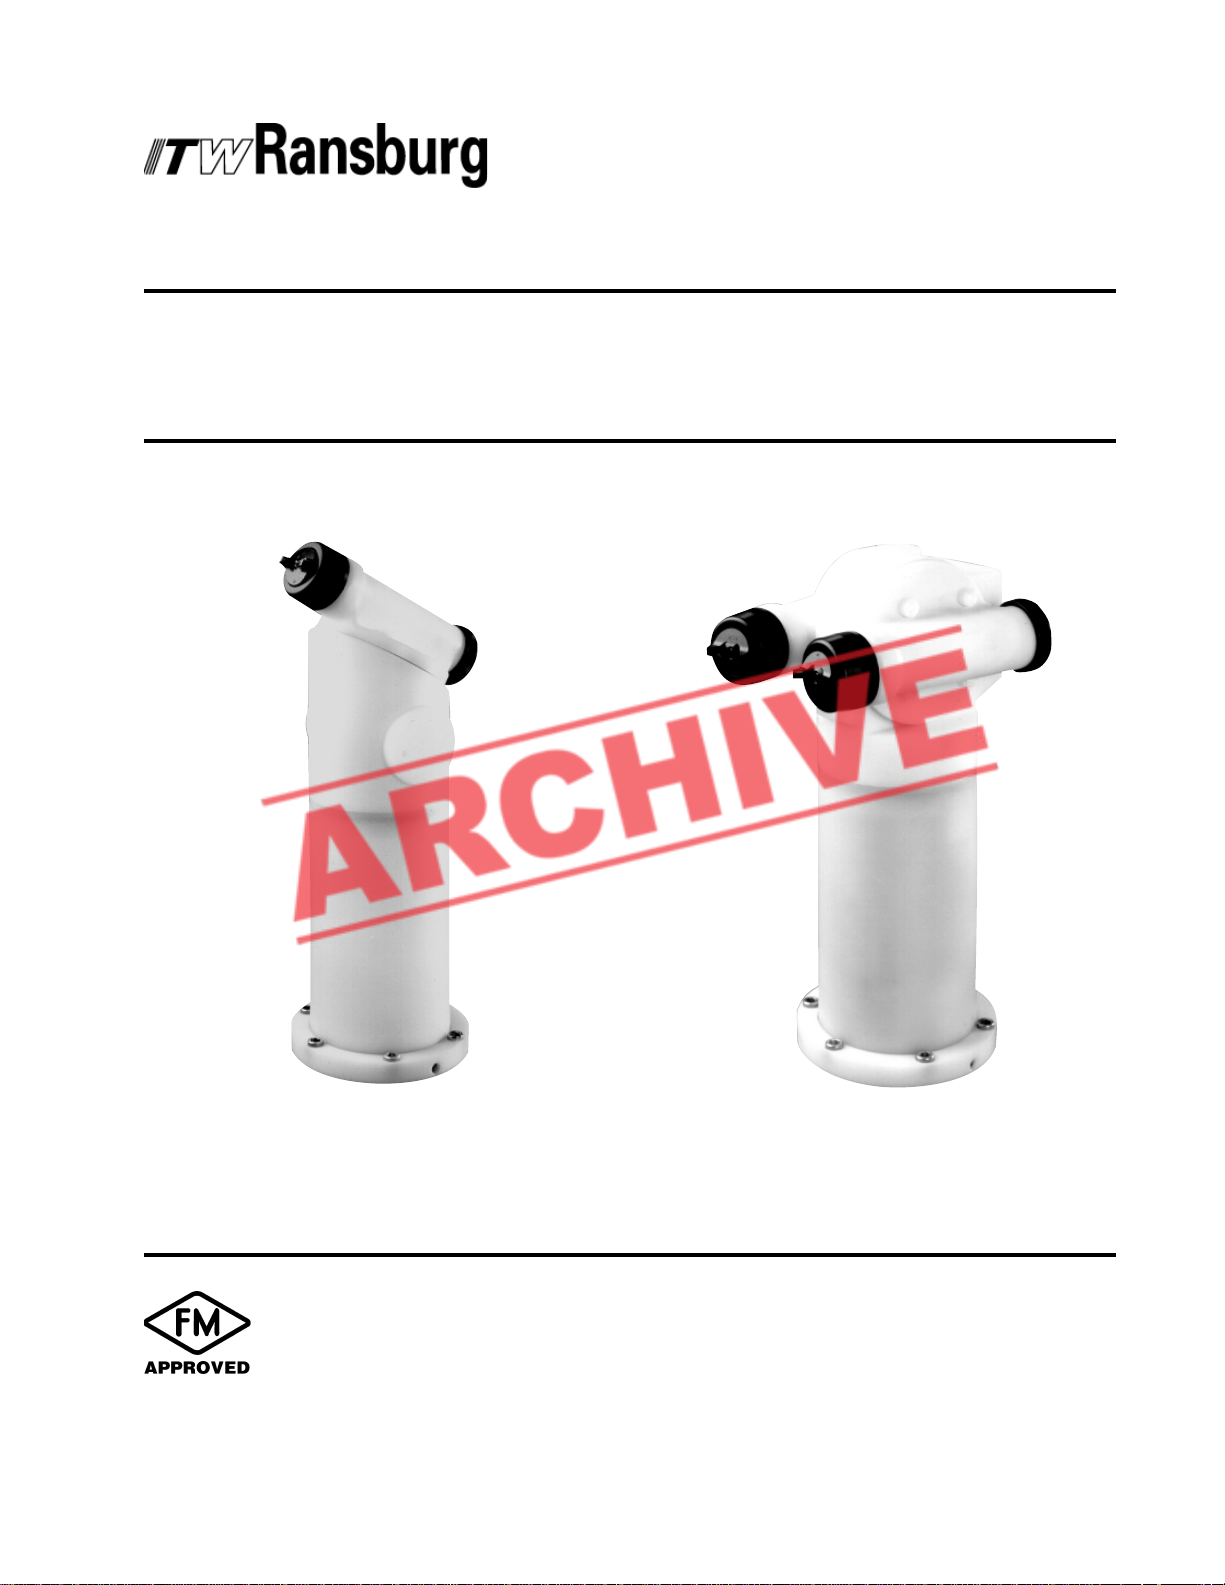
There are two single-head models of the EFM
Applicator. Each model differs in the applicator to
axis orientation of the spray head, these models
are:
76480-02 EFM 60° Applicator
76482-02 EFM 90° Applicator
Two dual-head versions of the EFM Solventborne
Applicator are also available, designated EFMDTM.
The dual-head version is identical to the EFM
applicator with the exception of an additional spray
head mounted to the applicator body. EFMD
Solventborne Applicators are primarily used where
high volume fluid delivery is required. These
applicators supply twice the fluid delivery over
Single-Head EFM Solventborne Applicators. The
EFMD Solventborne Applicator is available in two
different configurations as follows:
76485-02 EFMD 60° Applicator
76488-02 EFMD 90° Applicator
Both EFM and EFMD Solventborne Applicators
are comprised of five major sections:
EFM AND EFMDEFM AND EFMD
EFM AND EFMD
EFM AND EFMDEFM AND EFMD
SOLSOL
SOL
SOLSOL
APPLICAAPPLICA
APPLICA
APPLICAAPPLICA
The EFMTM Solventborne Applicator line consists
of single and dual-headed 100 kV automatic
electrostatic spray applicators. Developed for
use on robots or reciprocators, the EFM
solventborne applicator incorporates a quickdisconnect manifold and swivel tubing connections
to minimize downtime. Internal fluid and air
solenoids and an internal high voltage power supply
provide the user a compact, efficient tool for the
application of electrostatic coatings. Because this
is a grounded fluid system, the EFM solventborne
applicator is highly suitable for applying a wide
range of solvent reduced coatings such as enamels,
lacquers, two-component and other such coatings.
55
5
55
VENTBORNEVENTBORNE
VENTBORNE
VENTBORNEVENTBORNE
TT
ORSORS
T
ORS
TT
ORSORS
1. Spray head(s)
2. Valve manifold assembly
3. Quick-disconnect base manifold
assembly
4. Robot-mounted manifold assembly
5. High voltage cascade.
The spray head(s) and valve manifold contain the
fluid, air, and high voltage passages. Although the
quick-disconnect base manifold and robotmounted manifold are fabricated from aluminum,
all fluid passages are contained within stainless
steel and nylon fittings and are compatible with
halogenated hydrocarbon solvents. The robot
manifold incorporates stainless steel swivel fluid
connections. The swivel connections reduce
stress on the fluid lines minimizing breakage. No
aluminum parts are exposed to the fluid path on
either manifold. The high voltage cascade is
entirely encapsulated with a solvent resistant
epoxy.
AA-99-01.1

EFM(D) Solventborne Robotic Atomizers - Introduction
The high voltage supply for the EFM and EFMD
applicators consists of two major components:
The MicroPakTM Power Supply Control Unit
(LECU5004), and the HP404 Cascade (75933-
00).
The MicroPak power supply control unit provides
a low voltage signal through the robot manifold to
the EFM or EFMD spray applicator. The high
voltage cascade located within the applicator
converts the low voltage DC signal to a high
voltage electrostatic output. See
Control Unit Service ManualControl Unit Service Manual
Control Unit Service Manual
Control Unit Service ManualControl Unit Service Manual
LECU5004, MicroPak control unit.
SPECIFICASPECIFICA
SPECIFICA
SPECIFICASPECIFICA
Robot/Mounting Compatibility:Robot/Mounting Compatibility:
Robot/Mounting Compatibility:
Robot/Mounting Compatibility:Robot/Mounting Compatibility:
Applicator ControlApplicator Control
Applicator Control
Applicator ControlApplicator Control
Unit:Unit:
Unit:
Unit:Unit:
TIONSTIONS
TIONS
TIONSTIONS
ABB Robotics
Fanuc P150/155/200
Motion Machine Gun Bar
LECU5004 MicroPak
control unit
for details of the
MicroPakMicroPak
MicroPak
MicroPakMicroPak
Output Voltage:Output Voltage:
Output Voltage: 30-100 kV
Output Voltage:Output Voltage:
Output Range:Output Range:
Output Range: 0-125 μA
Output Range:Output Range:
SolenoidSolenoid
Solenoid
SolenoidSolenoid
Parameters:Parameters:
Parameters:
Parameters:Parameters:
Paint Flow Rate:Paint Flow Rate:
Paint Flow Rate:
Paint Flow Rate:Paint Flow Rate:
Operating Air PressuresOperating Air Pressures
Operating Air Pressures
Operating Air PressuresOperating Air Pressures
Atomizing Air:Atomizing Air:
Atomizing Air: 100 psig max.
Atomizing Air:Atomizing Air:
Fan Air:Fan Air:
Fan Air:
Fan Air:Fan Air:
Trigger Air:Trigger Air:
Trigger Air: 70 psig min./100 psig max.
Trigger Air:Trigger Air:
Regulator Pilot:Regulator Pilot:
Regulator Pilot: 60 psig max.
Regulator Pilot:Regulator Pilot:
Dump Pilot:Dump Pilot:
Dump Pilot:
Dump Pilot:Dump Pilot:
Operating FluidOperating Fluid
Operating Fluid
Operating FluidOperating Fluid
Pressure: Pressure:
Pressure:
Pressure: Pressure:
Robot Manifold Tubing RequirementsRobot Manifold Tubing Requirements
Robot Manifold Tubing Requirements
Robot Manifold Tubing RequirementsRobot Manifold Tubing Requirements
Atomizing Air:Atomizing Air:
Atomizing Air:
Atomizing Air:Atomizing Air:
Fan Air:Fan Air:
Fan Air: 1/2" OD Nylon
Fan Air:Fan Air:
15.5 VDC@0.035A, 1/2W
Variable to 1500 cc/min.
100 psig max.
60 psig max.
300 psig max.
1/2" OD Nylon
WeightWeight
Weight
WeightWeight
Single-Headed:Single-Headed:
Single-Headed:
Single-Headed:Single-Headed:
Dual-Headed:Dual-Headed:
Dual-Headed: 76485-02 (60°) 9.50 lbs.
Dual-Headed:Dual-Headed:
Manifold:Manifold:
Manifold: 76494-XX 2.00lbs.
Manifold:Manifold:
LengthLength
Length
LengthLength
Single-Headed:Single-Headed:
Single-Headed: 76480-02 (60°) 15-5/8"
Single-Headed:Single-Headed:
Dual-Headed:Dual-Headed:
Dual-Headed:
Dual-Headed:Dual-Headed:
Manifold:Manifold:
Manifold:
Manifold:Manifold:
76480-02 (60°) 8.25 lbs.
76482-02 (90°) 8.25 lbs.
76488-02 (90°) 9.50 lbs.
(No tubing or Cable)
76482-02 (90°) 14-1/2"
76485-02 (60°) 13-7/8"
76488-02 (90°) 13-3/8"
76494-16X 16'
76494-25X 25'
76494-50X 50'
Trigger Air:Trigger Air:
Trigger Air: 3/16" OD Nylon
Trigger Air:Trigger Air:
Regulator Pilot:Regulator Pilot:
Regulator Pilot: 3/16" OD Nylon
Regulator Pilot:Regulator Pilot:
Dump Pilot:Dump Pilot:
Dump Pilot: 3/16" OD Nylon
Dump Pilot:Dump Pilot:
Fluid:Fluid:
Fluid:
Fluid:Fluid:
Polyethylene: 1/4" or 3/16" ID
Teflon: 1/4" or 3/16" ID
Dump:Dump:
Dump:
Dump:Dump:
Polyethylene: 1/4" or 3/16" ID
Teflon: 1/4" or 3/16" ID
* See "Manifold Selection Guide" in the "Introductin"
section for proper manifold tubing size, material length
order number.
AA-99-01.1
66
6
66

EFM(D) Solventborne Robotic Atomizers - Introduction
MANIFOLD SELECTION GUIDEMANIFOLD SELECTION GUIDE
MANIFOLD SELECTION GUIDE
MANIFOLD SELECTION GUIDEMANIFOLD SELECTION GUIDE
WITH 3/16" ID POLYETHYLENE PAINT AND DUMP TUBING, ORDER:WITH 3/16" ID POLYETHYLENE PAINT AND DUMP TUBING, ORDER:
WITH 3/16" ID POLYETHYLENE PAINT AND DUMP TUBING, ORDER:
WITH 3/16" ID POLYETHYLENE PAINT AND DUMP TUBING, ORDER:WITH 3/16" ID POLYETHYLENE PAINT AND DUMP TUBING, ORDER:
76494-16A for 16' length tubing
76494-25A for 25' length tubing
76494-50A for 50' length tubing
WITH 1/4" ID TEFLON PAINT AND DUMP TUBING, ORDER:WITH 1/4" ID TEFLON PAINT AND DUMP TUBING, ORDER:
WITH 1/4" ID TEFLON PAINT AND DUMP TUBING, ORDER:
WITH 1/4" ID TEFLON PAINT AND DUMP TUBING, ORDER:WITH 1/4" ID TEFLON PAINT AND DUMP TUBING, ORDER:
76494-16B for 16' length tubing
76494-25B for 25' length tubing
76494-50B for 50' length tubing
WITH 3/16" ID TEFLON PAINT AND DUMP TUBING, ORDER:WITH 3/16" ID TEFLON PAINT AND DUMP TUBING, ORDER:
WITH 3/16" ID TEFLON PAINT AND DUMP TUBING, ORDER:
WITH 3/16" ID TEFLON PAINT AND DUMP TUBING, ORDER:WITH 3/16" ID TEFLON PAINT AND DUMP TUBING, ORDER:
76494-16C for 16' length tubing
76494-25C for 25' length tubing
76494-50C for 50' length tubing
WITH 1/4" ID POLYETHYLENE PAINT AND DUMP TUBING, ORDER:WITH 1/4" ID POLYETHYLENE PAINT AND DUMP TUBING, ORDER:
WITH 1/4" ID POLYETHYLENE PAINT AND DUMP TUBING, ORDER:
WITH 1/4" ID POLYETHYLENE PAINT AND DUMP TUBING, ORDER:WITH 1/4" ID POLYETHYLENE PAINT AND DUMP TUBING, ORDER:
76494-16D for 16' length tubing
76494-25D for 25' length tubing
76494-50D for 50' length tubing
WITH 3/16" ID TEFLON PAINT AND 1/4" ID TEFLON DUMP TUBING, ORDER:WITH 3/16" ID TEFLON PAINT AND 1/4" ID TEFLON DUMP TUBING, ORDER:
WITH 3/16" ID TEFLON PAINT AND 1/4" ID TEFLON DUMP TUBING, ORDER:
WITH 3/16" ID TEFLON PAINT AND 1/4" ID TEFLON DUMP TUBING, ORDER:WITH 3/16" ID TEFLON PAINT AND 1/4" ID TEFLON DUMP TUBING, ORDER:
76494-16E for 16' length tubing
76494-25E for 25' length tubing
76494-50E for 50' length tubing
77
7
77
AA-99-01.1
EFM(D) Solventborne Robotic Atomizers - Introduction
To allow for ease of configuration, operation, and modification of robot teach patterns, the following
spray point verticies are provided. Refer to Figure 1 for explanation of coordinates.
XX
X
XX
76480-02 EFM-6076480-02 EFM-60
76480-02 EFM-60° 14.812 13.397
76480-02 EFM-6076480-02 EFM-60
76482-02 EFM-9076482-02 EFM-90
76482-02 EFM-90° 12.894 14.313
76482-02 EFM-9076482-02 EFM-90
76485-02 EFMD-6076485-02 EFMD-60
76485-02 EFMD-60° 13.252 14.738
76485-02 EFMD-6076485-02 EFMD-60
76488-02 EFMD-9076488-02 EFMD-90
76488-02 EFMD-90° 11.240 15.078
76488-02 EFMD-9076488-02 EFMD-90
Y Y
Y
Y Y
AA-99-01.1
Figure 1: Applicator Tool-Point RepresentationFigure 1: Applicator Tool-Point Representation
Figure 1: Applicator Tool-Point Representation
Figure 1: Applicator Tool-Point RepresentationFigure 1: Applicator Tool-Point Representation
88
8
88
EFM(D) Solventborne Robotic Atomizers - Installation
INSTINST
INST
INSTINST
EFM AND EFMDEFM AND EFMD
EFM AND EFMD
EFM AND EFMDEFM AND EFMD
ROBOTIC AROBOTIC A
ROBOTIC A
ROBOTIC AROBOTIC A
INSTINST
INST
INSTINST
This information is intended
general installation parameters of this product
and, where applicable, its working relationship to
other ITW Ransburg system components in typical
use. Each installation is unique and should be
directed by an authorized ITW Ransburg
representative or conducted from the ITW
Ransburg installation drawings provided for your
particular installation.
POWER SUPPLPOWER SUPPL
POWER SUPPL
POWER SUPPLPOWER SUPPL
ASSEMBLASSEMBL
ASSEMBL
ASSEMBLASSEMBL
ALLAALLA
ALLA
ALLAALLA
ALLAALLA
ALLA
ALLAALLA
TIONTION
TION
TIONTION
TT
OMIZEROMIZER
T
OMIZER
TT
OMIZEROMIZER
TIONTION
TION
TIONTION
YY
Y
YY
ONLYONLY
ONLY to indicate the
ONLYONLY
YY
Y
YY
NOTESNOTES
NOTES
NOTESNOTES
Refer to the ITW Ransburg Service Manual
MicroPak Control UnitMicroPak Control Unit
MicroPak Control Unit
MicroPak Control UnitMicroPak Control Unit
regarding power supply installation.
Two low voltage control cables, 76495 and 76496,
connect from the Output terminal connection
(J3), located on the back of the power supply
assembly. These cables connect from the terminal
block (J3) to the robot manifold plate.
W A R N I N GW A R N I N G
W A R N I N G
W A R N I N GW A R N I N G
!!
!
!!
> The power supply
outside the
OSHA and NFPA-33).
> User should be aware of, and adhere to,
all local fire codes and ordinances.
> The user
disconnect between the power source and the
power supply which complies with appropriate codes.
HAZARDOUSHAZARDOUS
HAZARDOUS area (Reference
HAZARDOUSHAZARDOUS
MUSTMUST
MUST provide a properly fused
MUSTMUST
, for complete information
MUSTMUST
MUST be located
MUSTMUST
99
9
99
AA-99-01.1
EFM(D) Solventborne Robotic Atomizers - Installation
AA-99-01.1
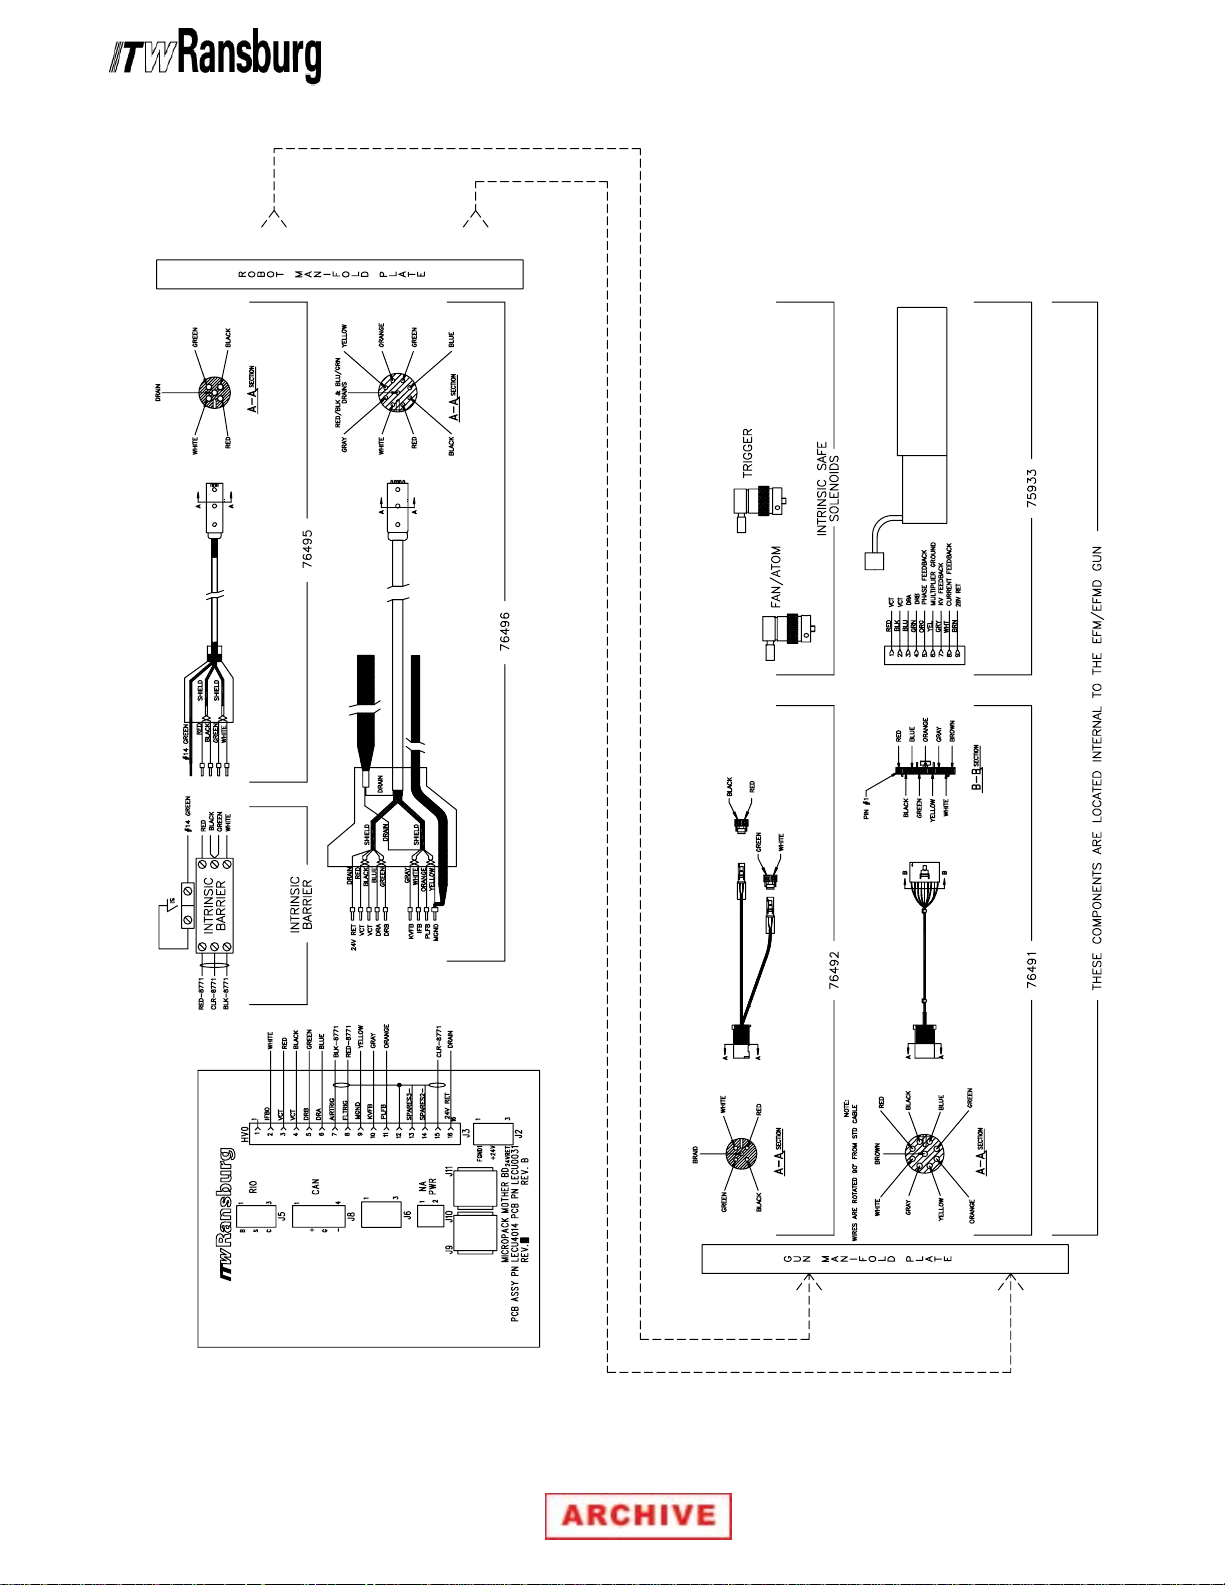
Figure 2: Low Voltage Cable ConnectionsFigure 2: Low Voltage Cable Connections
Figure 2: Low Voltage Cable Connections
Figure 2: Low Voltage Cable ConnectionsFigure 2: Low Voltage Cable Connections
1010
10
1010
EFM(D) Solventborne Robotic Atomizers - Installation
ROBOT MANIFOLDROBOT MANIFOLD
ROBOT MANIFOLD
ROBOT MANIFOLDROBOT MANIFOLD
ASSEMBLASSEMBL
ASSEMBL
ASSEMBLASSEMBL
(See Figure 3)(See Figure 3)
(See Figure 3)
(See Figure 3)(See Figure 3)
Bundle the seven lengths of tubing along with the
two low voltage power cables [6 & 7] and route
them through the center of the robot face plate past
the horizontal arm to the bulkhead bracket. Use
the six 5mm x 20mm socket head cap screws [2]
included with the robot manifold assembly to attach
the manifold assembly to the face plate of the
robot.
Connect the tubes to the appropriate fittings on the
bulkhead bracket. Connect low voltage power
cables [6 & 7] of the robot manifold assembly to the
MicroPak Controller. Shown is the version used
with the P-150 series robots which connects to a
terminal strip.
If a terminal strip or connectors are used at the
bulkhead plates, you must run the exact same
cable from the terminal strip back to the MicroPak
controller. Intrinsic safety rules must be followed
when running these cables. See "Intrinisic Safe
Wiring" in the "Operation" section of this manual.
!!
!
!!
YY
Y
YY
C A U T I O NC A U T I O N
C A U T I O N
C A U T I O NC A U T I O N
EFM SPRAEFM SPRA
EFM SPRA
EFM SPRAEFM SPRA
APPLICAAPPLICA
APPLICA
APPLICAAPPLICA
(See Figure 3)(See Figure 3)
(See Figure 3)
(See Figure 3)(See Figure 3)
Attach EFM spray applicator [1])to robot manifold
plate [4] with six (6) 5/16-18 x 1 inch hex socket
screws [5] included with each applicator.
Nylon guide pins (A10004-00) and nylon hex
socket screws (EMF-204-1) are offered as an
option. These nylon parts may be used in place of
the metal hex socket screws and metal guide pins.
The plastic parts are designed to break quickly if
aa applicator crash occurs. Possible applicator
or robot damage may be avoided if the spray
applicator breaks away from the robot wrist during
contact with the workpiece.
W A R N I N GW A R N I N G
W A R N I N G
W A R N I N GW A R N I N G
!!
!
!!
> Install and route the hoses and cable so
that they are
excess of 120
cable bends are
(15cm) radius and are not subjected to more
than 360° of torsional twist. Failure to comply
with these parameters could cause equipment
malfunctions that might create
CONDITIONS!CONDITIONS!
CONDITIONS!
CONDITIONS!CONDITIONS!
YY
Y
YY
TT
OROR
T
OR
TT
OROR
NOTNOT
NOT exposed to temperatures in
NOTNOT
° F. Ensure that all hose and
NOT LESS THANNOT LESS THAN
NOT LESS THAN a 6 inch
NOT LESS THANNOT LESS THAN
HAZARDOUSHAZARDOUS
HAZARDOUS
HAZARDOUSHAZARDOUS
> Leave 12-24 inches of extra length on all
lines to prevent extreme tension being applied
to these lines during robot movement.
1111
11
1111
AA-99-01.1

EFM(D) Solventborne Robotic Atomizers - Installation
NOTES
AA-99-01.1
1212
12
1212
EFM(D) Solventborne Robotic Atomizers - Installation
1313
13
1313
Figure 3: Robot Manifold and Spray Applicator InstallationFigure 3: Robot Manifold and Spray Applicator Installation
Figure 3: Robot Manifold and Spray Applicator Installation
Figure 3: Robot Manifold and Spray Applicator InstallationFigure 3: Robot Manifold and Spray Applicator Installation
AA-99-01.1
EFM(D) Solventborne Robotic Atomizers - Installation
ROBOTROBOT
ROBOT
ROBOTROBOT
(Figure 3)(Figure 3)
(Figure 3)
(Figure 3)(Figure 3)
Item #Item #
Item #
Item #Item #
1 76488-02 EFM Spray Applicator 1
2 TR-SSF-024 5mm x 20mm Socket Head Cap Screws 6
3 76494-xx Robot Manifold Assembly 1
4 76560-01 Manifold Plate 1
5 SSF-3125 5/16-18 x 1" Hex Socket Screws 6
6 76496-xx Low Voltage Power Cable 1
7 76495-xx Intrinsic Safe Solenoid Cable 1
MANIFOLD MANIFOLD
MANIFOLD
MANIFOLD MANIFOLD
Part #Part #
Part #
Part #Part #
AND SPRA AND SPRA
AND SPRA
AND SPRA AND SPRA
DescriptionDescription
Description
DescriptionDescription
YY
APPLICA APPLICA
Y
APPLICA
YY
APPLICA APPLICA
TT
OR OR
T
OR
TT
OR OR
- P- P
- P
- P- P
ARAR
TS LISTTS LIST
AR
TS LIST
ARAR
TS LISTTS LIST
QtyQty
Qty
QtyQty
AA-99-01.1
1414
14
1414
EFM(D) Solventborne Robotic Atomizers - Operation
OPERAOPERA
OPERA
OPERAOPERA
These instructions indicate the general operating
parameters for this product in a normal working
relationship with other ITW Ransburg system
components in typical use. Each user application
is unique and operation should be initiated under
the guidance of an authorized ITW Ransburg
representative and/or be based on carefully
conducted tests and on careful observation of the
initial production characteristics.
SPRASPRA
SPRA
SPRASPRA
CONTROLSCONTROLS
CONTROLS
CONTROLSCONTROLS
Fluid flow, trigger, dump, atomization air pressure,
and fan air pressure are all remotely controlled
from the robot PLC. Atomization air, fan air, and
fluid trigger timing are adjusted electronically from
the LECU5004 MicroPak Control Unit. Figure 4 in
the "Operation" section generalizes the function of
the air and fluid passages internal to the applicator.
POWER SUPPLPOWER SUPPL
POWER SUPPL
POWER SUPPLPOWER SUPPL
CONTROLSCONTROLS
CONTROLS
CONTROLSCONTROLS
Refer to ITW Ransburg Service Manual
Control UnitControl Unit
Control Unit
Control UnitControl Unit
power supply operation.
YY
Y
YY
TIONTION
TION
TIONTION
APPLCIA APPLCIA
APPLCIA
APPLCIA APPLCIA
, for complete information regarding
YY
Y
YY
TT
T
TT
OROR
OR
OROR
MicroPakMicroPak
MicroPak
MicroPakMicroPak
All of the display signals are buffered and
continuously available for remote panels or PLC
monitoring. There is also an array of LEDs, which
display the status of the controller for operator
convenience.
GENERALGENERAL
GENERAL
GENERALGENERAL
AND ADJUSTMENTSAND ADJUSTMENTS
AND ADJUSTMENTS
AND ADJUSTMENTSAND ADJUSTMENTS
Paint ConductivityPaint Conductivity
Paint Conductivity
Paint ConductivityPaint Conductivity
The EFM/EFMD spray applicators are capable of
spraying typical automotive and industrial solvent
base paints including metallic and mica paints.
Spray tests, however, should always be conducted
before selecting an atomizer for use with highly
conductive paints.
TT
arget Distancearget Distance
T
arget Distance
TT
arget Distancearget Distance
The distance between the applicator tip and the
article being painted should be between 10 and 14
inches. Excessive distance causes a waste of
coating material and wrap back (paint particles
being deposited on the applicator body or the robot
arm). At close distances the voltage at the tip of
the applicator will be reduced, which decreases
the charging effect of the applicator.
INFORMA INFORMA
INFORMA
INFORMA INFORMA
NOTENOTE
NOTE
NOTENOTE
TIONTION
TION
TIONTION
VV
oltageoltage
V
oltage
VV
oltageoltage
The LECU5004 MicroPak Control Unit provides a
low voltage signal to the high voltage cascade
within the spray applicator. The unit may be
configured for local mode operation. The output
voltage/current levels are set by potentiometers
on the front panel in this mode. The unit may also
be configured for remote analog control (0-10
VDC) from a PLC controller.
Display FunctionDisplay Function
Display Function
Display FunctionDisplay Function
The display board continually displays the kV and
current output information.
1515
15
1515
> When using paints with metal par-
ticles, a problem of alignment may occur. When alignment is achieved, applicator current increases to maximum and
applicator tip voltage decreases to near
zero kV. Alignment can normally be
controlled by making sure that the power
supply is turned on slightly after paint
begins to flow and by turning the power
supply off shortly before the paint stops
flowing. This timing function is controlled
by the LECU5004 MicroPak Control Unit
and is adjustable by the user. Refer to
ITW Ransburg Service Manual
MicroPak Control UnitMicroPak Control Unit
MicroPak Control Unit
MicroPak Control UnitMicroPak Control Unit
tails.
, for more de-
AA-99-01.1
EFM(D) Solventborne Robotic Atomizers - Operation
NOTENOTE
NOTE
NOTENOTE
> If alignment occurs, turning off the
power supply will not usually break the
aligned metal particles. The paint located
between the applicator and the point of
first ground must be purged from the fluid
passages before normal spray can resume.
W A R N I N GW A R N I N G
W A R N I N G
W A R N I N GW A R N I N G
!!
!
!!
> Most paints and solvents, including those
listed in "Polar and Non-Polar Solvents Chart"
in the "Maintenance" section, are toxic to a
certain degree and flammable or combustible.
Use them only in a well ventilated atmosphere.
Use protective equipment as required in the
Material Safety Data Sheet supplied with the
substance.
Fluid Flow RateFluid Flow Rate
Fluid Flow Rate
Fluid Flow RateFluid Flow Rate
Fluid flow is adjusted through the robot PLC by
varying the pilot pressure to the fluid regulator
within the EFM or EFMD spray applicator. Fluid
pressures from the circulating system may be as
high as 300 psig.
Atomizing AirAtomizing Air
Atomizing Air
Atomizing AirAtomizing Air
Adjustments are made through the robot PLC or a
manually adjustable air regulator. The lowest air
pressure required to break up the paint should be
used. Lower atomizing air pressures result in less
overspray and increased transfer efficiency.
Fan AirFan Air
Fan Air
Fan AirFan Air
Adjusting the fan air increases or decreases the
size of the spray pattern. Increasing pressure
decreases pattern size. Pattern adjustment should
be made to suit the size and shape of the object
being painted. This adjustment is made through
the robot PLC or a manually adjustable air regulator.
TT
rigger Control Airrigger Control Air
T
rigger Control Air
TT
rigger Control Airrigger Control Air
The EFM and EFMD applicators require a minimum
of 70 psig trigger control air pressure to ensure
proper operation of the applicator piston and air
shuttle valves.
TT
rigger Trigger T
T
rigger T
TT
rigger Trigger T
The LECU5004 MicroPak Control Unit provides a
means for the adjustment of the timing interval
between air, fluid, and high voltage. When the
applicator receives a trigger on signal from the
robot PLC, the air solenoid valve actuates. At the
same time the fluid solenoid valve timer is activated.
After the timer times out, the fluid solenoid and the
high voltage timer are activated. This timer delays
the start of the high voltage until after both the air
and fluid are activated.
Timing can be set in nine different timing
sequences, from a minimum of zero to a maximum
of 450 milliseconds. When the electrical signal
from the robot PLC is removed, the timing operates
in reverse. High voltage is shut off, fluid shuts off,
and, finally, the air solenoid valve shuts off. See
ITW Ransburg Service Manual
Control UnitControl Unit
Control Unit
Control UnitControl Unit
supply operation and control features.
imingiming
iming
imingiming
, MicroPak, MicroPak
, MicroPak
, MicroPak, MicroPak
, for additional information on power
> It has been observed when spraying
metallic paints that mottling (marble effect) can be reduced by increasing the
fan air pressure slightly higher than the
atomizing air.
AA-99-01.1
NOTENOTE
NOTE
NOTENOTE
1616
16
1616
EFM(D) Solventborne Robotic Atomizers - Operation
Electrostatic VElectrostatic V
Electrostatic V
Electrostatic VElectrostatic V
Normally the voltage should be set to 90 kV at the
power supply. Some conditions may dictate lower
voltage settings. If Faraday cage areas are
predominant on the item being painted, a lower
voltage setting will aid in coating these areas.
Paints having high metallic flake content will
sometimes align at high voltages. Metallic flakes,
when aligned, become a direct electrical path to
ground and will reduce tip voltage. This problem
can be minimized by making sure that the paint is
being sprayed from the applicator prior to turning
the voltage on. In some cases, a reduction in
applied voltage may be the only way to reduce
alignment.
oltageoltage
oltage
oltageoltage
W A R N I N GW A R N I N G
W A R N I N G
W A R N I N GW A R N I N G
!!
!
!!
> If target distance is less than 4 inches, an
arc could occur.
1717
17
1717
Figure 4: Simplified Air and Fluid Flow Passage LayoutFigure 4: Simplified Air and Fluid Flow Passage Layout
Figure 4: Simplified Air and Fluid Flow Passage Layout
Figure 4: Simplified Air and Fluid Flow Passage LayoutFigure 4: Simplified Air and Fluid Flow Passage Layout
AA-99-01.1
EFM(D) Solventborne Robotic Atomizers - Operation
INTRINSIC SAFE WIRINGINTRINSIC SAFE WIRING
INTRINSIC SAFE WIRING
INTRINSIC SAFE WIRINGINTRINSIC SAFE WIRING
Wiring PracticesWiring Practices
Wiring Practices
Wiring PracticesWiring Practices
Instrinsically safe wiring must be separated from
non-intrinsically safe wiring in order to prevent the
transfer of unsafe levels of energy to the hazardous
area. The following are a few recommended
practices:
Safe AreaSafe Area
Safe Area
Safe AreaSafe Area
In the non-hazardous area, intrinsically safe and
non-intrinsically safe wiring must be separated by
one of the following methods:
1. Raceway or conduit
2. Grounded metal or insulated partition between
the intrinsically safe and non-intrinsically safe
wiring
NOTENOTE
NOTE
NOTENOTE
> These sections are to be used as
guidelines or recommendations only. For
rules and more detailed practices, refer
to National Electrical Code.
Hazardous AreaHazardous Area
Hazardous Area
Hazardous AreaHazardous Area
In the hazardous area, all intrinsically safe and
non-intrinsically safe wiring must be separated by
the same methods suggested for the safe area.
However, the following requirements must also be
followed:
1. In enclosures containing multiple intrinsically
safe circuits, the terminals for connection must
have a spacing of at least 6mm or a grounded or
insulated partition between the circuits.
2. Devices like limit switches or pressure switches
must not contain a non-intrinsically safe circuit in
addition to an intrinsically safe circuit unless:
3. Airspace of at least 50mm (2 inches) between
intrinsically safe and non-intrinsically safe wiring
and the wires must be tied down to prevent
loosening and shorting together.
The same methods are used for intrinsically safe
and non-intrinsically safe terminals.
RequirementsRequirements
Requirements
RequirementsRequirements
Intrinsically safe wiring must be identified, preferably by color coding of light blue. If light blue is
used on non-intrinsically safe wiring, the intrinsically safe wiring may be marked by other means
such as tagging. This alternate means, however,
must be visible after installation.
a. It is enclosed in a separate compartment, or
b. It is separated by 50mm spacing or contains
a grounded metal or insulated partition.
3. When conduit or raceway is utilized to enclose
intrinsically safe wiring, it must be sealed or vented
so not to transfer the hazardous atmosphere to a
safe area.
AA-99-01.1
1818
18
1818
EFM(D) Solventborne Robotic Atomizers - Maintenance
MAINTENANCEMAINTENANCE
MAINTENANCE
MAINTENANCEMAINTENANCE
Good maintenance is essential to safe and
productive operation. Schedules should be
established by the user, based on the following
general information and observations of the initial
production requirements. The ITW Ransburg
maintenance and safety information should be
made available to each operator.
Normal fire protection measures are necessary,
including proper storage of paints and solvents
and the proper disposal of waste. Ready access
to appropriate fire extinguishing equipment is
required. For details, consult the appropriate
NFPA safety information, your local fire codes,
local painting equipment standards. Reference
OSHA, NFPA-33, and your insurance carrier's
information for additional information.
W A R N I N GW A R N I N G
W A R N I N G
W A R N I N GW A R N I N G
!!
!
!!
> An electrical discharge or spark may
create an electrical and/or fire hazard during
maintenance. Do not clean or service the
spray applicator with the power supply on.
Verify that the power supply has been locked
out and tagged out per OSHA.
ROUTINE MAINTENANCEROUTINE MAINTENANCE
ROUTINE MAINTENANCE
ROUTINE MAINTENANCEROUTINE MAINTENANCE
SCHEDULESCHEDULE
SCHEDULE
SCHEDULESCHEDULE
Follow these maintenance steps to extend the life
of the applicator and ensure efficient operation:
Several Times DailySeveral Times Daily
Several Times Daily
Several Times DailySeveral Times Daily
1. Turn the LECU5004 MicroPak Control Unit
OFFOFF
OFF!
OFFOFF
2. Inspect the fluid nozzle and electrode wire for
paint accumulation. Clean as frequently as
necessary. (See "Procedures"
nance" section.)
W A R N I N GW A R N I N G
W A R N I N G
W A R N I N GW A R N I N G
!!
!
!!
> Take precautions to see that skin is not
punctured by sharp electrode.
Daily (Or at Shift Start)Daily (Or at Shift Start)
Daily (Or at Shift Start)
Daily (Or at Shift Start)Daily (Or at Shift Start)
1. Turn the LECU5004 MicroPak Control Unit
OFFOFF
OFF and:
OFFOFF
in the "Mainte-
> Unexpected robot movement can be
hazardous. Do not adjust or repair the spray
applicator when the robot is operating or waiting to start. The robot must be locked out and
tagged out per OSHA.
> Solvents used for equipment flushing must
have flash point ratings equal to or greater than
the flash point rating of the coating material.
Solvents used for general cleaning must have
flash point ratings higher than 100
1919
19
1919
°F (37.8°C).
• Check within 20 feet of the point of operation
(of the applicator) and remove or ground
ALLALL
ALL loose or ungrounded containers.
ALLALL
• Inspect workholders for accumulated coating
materials (remove such accumulations if
present)
• Check that the nozzle assembly is clean
and undamaged.
• Straighten the applicator electrode if
necessary.
C A U T I O NC A U T I O N
C A U T I O N
C A U T I O NC A U T I O N
!!
!
!!
> Do not bend the applicator electrode while
wiping. Never immerse the applicator in solvents. This will cause damage to the electrical
components.
AA-99-01.1

EFM(D) Solventborne Robotic Atomizers - Maintenance
2. Turn the LECU5004 MicroPak Control Unit
ONON
ON! Energize high voltage.
ONON
Shut-Down (Or at Shift End)Shut-Down (Or at Shift End)
Shut-Down (Or at Shift End)
Shut-Down (Or at Shift End)Shut-Down (Or at Shift End)
1. Turn the LECU5004 MicroPak Control Unit
OFF.
2. Flush the lines and allow the solvent to remain
in the lines. See "Procedures" in the "Maintenance"
section.
1. Turn the LECU5004 MicroPak Control Unit
OFF.
2. Flush the lines and allow the solvent to remain
in the lines. See "Procedures"
section.
3. Wipe the applicator and robot wrist with a cloth
and a suitable, clean non-polar solvent.
WeeklyWeekly
Weekly
WeeklyWeekly
1. Check the entire system for damage, leaks and
paint accumulation.
2. Clean the atomizer assembly.
in the "Maintenance"
2. Turn off the solvent supply, actuate paint
pushout air at color changer and trigger the applicator. Allow all of the fluid to drain from the spray
applicator fluid passages.
3. Clean the exterior surfaces of the spray gun
with a solvent soaked rag. As long as the gun is
intact, a
ing, however, after cleaning, wipe off all surfaces
with a
residue on the applicator's surface. See "Polar
and Non-Polar Solvents" below regarding proper
solvent selection.
4. Remove piston cap [1]. Removing the piston
cap releases tension on all internal spray head
components. Remove spring retainer [2] and
piston spring [3], which are loose after removing
the piston cap.
5. Remove the air cap retainer [21] and air cap
[20]. Soak in a non-polar solvent if necessary. If
paint remains in the air cap holes, clean with a
toothpick or similar soft wood object. Air caps are
best cleaned in an ultrasonic cleaner.
polarpolar
polar solvent may be used for all clean-
polarpolar
nonpolarnonpolar
nonpolar solvent to reduce conductive
nonpolarnonpolar
3. Conduct a current output test. See "Procedures"
in the "Maintenance" section.
PROCEDURESPROCEDURES
PROCEDURES
PROCEDURESPROCEDURES
Gun Cleaning/ServiceGun Cleaning/Service
Gun Cleaning/Service
Gun Cleaning/ServiceGun Cleaning/Service
(See Figure 5)(See Figure 5)
(See Figure 5)
(See Figure 5)(See Figure 5)
1. Flush the paint supply line and the applicator
paint passages using a solvent which is compatible with the material being sprayed. Continue to
flush until all traces of paint are gone.
POLAR AND NON-POLAR SOLPOLAR AND NON-POLAR SOL
POLAR AND NON-POLAR SOL
POLAR AND NON-POLAR SOLPOLAR AND NON-POLAR SOL
Nonconductive (non-polar)Nonconductive (non-polar)
Nonconductive (non-polar)
Nonconductive (non-polar)Nonconductive (non-polar)
Amyl Acetate
Methyl Amyl Acetate
Toluene
Xylene
High Flash Naptha
Mineral Spirits
Moderately ConductiveModerately Conductive
Moderately Conductive
Moderately ConductiveModerately Conductive
Methyl Isobutyl Ketone
Ethyl Acetate
Methyl Ethyl Ketone
Butyl Carbitol
C A U T I O NC A U T I O N
C A U T I O N
C A U T I O NC A U T I O N
!!
!
!!
> Never attempt to clean the air cap holes
with a wire or other metal object. Doing so
may damage the air cap, resulting in distortion of the spray pattern.
VENTSVENTS
VENTS
VENTSVENTS
Extremely Conductive (polar)Extremely Conductive (polar)
Extremely Conductive (polar)
Extremely Conductive (polar)Extremely Conductive (polar)
Methanol
Carbitol
Diacetone
Butyl Alcohol
Acetone
Butyl Cellosolve
AA-99-01.1
2020
20
2020

EFM(D) Solventborne Robotic Atomizers - Maintenance
6. Remove the air cap clip [19] and fluid tip [18].
Clean using a non-polar solvent.
7. Tightly grip the plastic needle [16] and unscrew
counter-clockwise to remove the front needle
assembly. A short piece of H-2339 tubing (1/4 "
OD x 0.175" ID) pressed over the front needle will
assist in unscrewing the assembly. If required,
use needle nose pliers with masking tape or duct
tape. Carefully clean with a non-polar solvent.
Replace any parts that show signs of wear or
damage.
8. Remove fluid nozzle [15] by unscrewing
counterclockwise. Inspect o-ring [11] and all
passages for build up or damage. Clean or replace
as necessary. Reinsert o-ring into applicator
barrel and reinstall fluid nozzle. Torque fluid
nozzle to 25 lbs•in.
C A U T I O NC A U T I O N
C A U T I O N
C A U T I O NC A U T I O N
!!
!
!!
12. Apply a thin film of petroleum jelly to piston
spring [3]. Install piston spring and spring retainer
[2] back into the rear of the spray head assembly.
13. Screw piston cap [1] back on.
Current Output TCurrent Output T
Current Output T
Current Output TCurrent Output T
1. Turn the control unit power
2. Flush applicator with non-conductive solvent.
3. Activate high voltage and slowly approach the
applicator electrode with ground hook or wire.
4. Monitor the current output on LECU-5004.
Current should rise as ground approaches. At
approximately 80 microamperes, the LECU5004
will begin limiting current. If ground approaches
the applicator quickly, an overcurrent fault should
occur. The
come on.
OVERCURRENTOVERCURRENT
OVERCURRENT indicator should
OVERCURRENTOVERCURRENT
estest
est
estest
ONON
ON.
ONON
> If using needle nose pliers to unscrew the
front needle, be very careful. Do not grip on the
tapered sealing surface. If the pliers slip, they
could damage the tapered sealing surface of
the needle.
NOTENOTE
NOTE
NOTENOTE
> There should be a small gap between
the fluid nozzle and the applicator barrel
after tightening.
9. After cleaning, insert the electrode assembly
back into the spray head assembly. Apply Loctite
#222, low strength (purple) thread-locker, to the
threads of the electrode assembly [16] before
reassembly.
10. Screw fluid tip [18] back into place. Hand
tighten first, then with a small wrench, tighten an
additional 30 degrees.
SERVICESERVICE
SERVICE
SERVICESERVICE
Because we want to provide our users with the
most up-to-date technology possible, we are constantly seeking to improve products. If a change
in product configuration occurs after it is on the
market, we will implement that technology in future
production and, if practical, make it available to
current users. The following service information is
based on standard specifications and procedures
for this product. If you find some minor deviations
between this information and your equipment because of design or manufacturing changes, contact your ITW Ransburg representative to resolve
the difference.
11. Replace air cap clip [19], air cap [20], and air
cap retainer [21].
2121
21
2121
AA-99-01.1

EFM(D) Solventborne Robotic Atomizers - Maintenance
W A R N I N GW A R N I N G
W A R N I N G
W A R N I N GW A R N I N G
!!
!
!!
> An electrical discharge or spark may create
an electrical and/or fire hazard during maintenance. Do not service the spray applicator
with the power supply on. Verify that the
power supply on/off switch has been turned
off.
> Unexpected robot movement can be haz-
ardous. Do not adjust or repair the spray
applicator when the robot is operating or waiting to start. The robot must be locked out and
tagged out per OSHA prior to removing the
applicator from the robot manifold assembly.
Before performing any work on the spray applicator, always flush the fluid passages and blow dry
with pushout air, and wipe the spray applicator
clean. Refer to "Applicator Cleaning", earlier in the
"Maintenance" section, for instructions on how to
properly clean the spray applicator. Depressurize
all fluid and air pressures before removing the
applicator from its manifold. Always work in a
clear, clean space to minimize parts loss and
damage.
C A U T I O NC A U T I O N
C A U T I O N
C A U T I O NC A U T I O N
!!
!
!!
> As the spray head is removed from the
valve manifold assembly, a certain amount of
residual fluid may be present. Care must be
taken not to allow this fluid to drain into the high
voltage terminal rings or air passages.
SPRASPRA
SPRA
SPRASPRA
Fluid TFluid T
Fluid T
Fluid TFluid T
Needle ReplacementNeedle Replacement
Needle Replacement
Needle ReplacementNeedle Replacement
YY
HEAD ASSEMBL HEAD ASSEMBL
Y
HEAD ASSEMBL
YY
HEAD ASSEMBL HEAD ASSEMBL
ip, Nozzle, and Frontip, Nozzle, and Front
ip, Nozzle, and Front
ip, Nozzle, and Frontip, Nozzle, and Front
NOTENOTE
NOTE
NOTENOTE
> In any disassembly or reassembly
procedure involving o-rings, care must
be taken not to lose them. O-rings (gray
color) are very expensive; always reuse
them unless they are damaged.
> Disassemble spray head only enough
to remove and replace defective parts.
For instance, if only replacing the front
needle it is not necessary to remove the
fluid nozzle.
NOTENOTE
NOTE
NOTENOTE
> At assembly, apply a small amount of
dielectric grease to grooves in spray head
and valve manifold to reduce high voltage
breakdown. Excessive grease will not
allow Spray Head [1] to seat fully against
Applicator Housing Assembly [2]. (See
Figure 6b.)
YY
Y
YY
W A R N I N GW A R N I N G
W A R N I N G
W A R N I N GW A R N I N G
!!
!
!!
> Eye protection should be worn while
servicing applicator.
AA-99-01.1
2222
22
2222

EFM(D) Solventborne Robotic Atomizers - Maintenance
Figure 5: Spray Head RemovalFigure 5: Spray Head Removal
Figure 5: Spray Head Removal
Figure 5: Spray Head RemovalFigure 5: Spray Head Removal
7647976479
76479
7647976479
Item #Item #
Item #
Item #Item #
SPRA SPRA
SPRA
SPRA SPRA
Part #Part #
Part #
Part #Part #
1 EMF-13 Piston Cap 1
2 EMF-22 Retainer Spring 1
3 RME-36 Piston Spring 1
4 RME-66 Piston Nut 1
5 RME-69 Piston 1
6 SST-7714 Piston Seal 1
8 76096-00 Piston Rod Assembly 1
9 76094-00 N eedl e Sec tion , Rear 1
10 76497-00 Applicator Barrel Assembly, Resistive, EFM 1
11 SSG-8149 O-Ring, Solvent Resistant 1
12 RME-38 Seal Spring 1
13 EMF-7 Seal Washer 1
14 RME-32 Seal 1
15 EMF-195 Fluid Nozzle, High Flow, Black W/Grove 1
16 70430-00 Electrode Assembly 1
17 EMF-192 Air Cap Locator 1
18 76132-02 Fluid Tip, EMF Gun, .055" Dia. Orifice 1
19 EMF-10 Air Cap Clip 1
20 76131-00 Air Cap 1
21 EFX-8 Air Cap Retainer 1
YY
HEAD ASSEMBL HEAD ASSEMBL
Y
HEAD ASSEMBL
YY
HEAD ASSEMBL HEAD ASSEMBL
DescriptionDescription
Description
DescriptionDescription
YY
- P - P
Y
- P
YY
- P - P
ARAR
TS LISTTS LIST
AR
TS LIST
ARAR
TS LISTTS LIST
(Figure 5) (Figure 5)
(Figure 5)
(Figure 5) (Figure 5)
QtyQty
Qty
QtyQty
2323
23
2323
AA-99-01.1

EFM(D) Solventborne Robotic Atomizers - Maintenance
Rear Needle ReplacementRear Needle Replacement
Rear Needle Replacement
Rear Needle ReplacementRear Needle Replacement
(See Figure 5)(See Figure 5)
(See Figure 5)
(See Figure 5)(See Figure 5)
1. Remove the air cap, fluid tip and the fluid nozzle
as described in Steps 1 through 8 of the "Fluid Tip,
Nozzle, and Front Needle Replacement" in the
"Maintenance" section.
2. Remove metal rear needle [9], piston rod [8],
piston seal [6], piston [5], and piston nut [4]
assemblyassembly
assembly. Pull the assembly out from the rear of
assemblyassembly
the spray head.
3. Piston [5] and piston seal [6] can be removed
from the piston rod by unscrewing piston nut [4]. If
replacing piston seal [6], press flat side of seal
down onto piston. Apply a thin film of petroleum
jelly to outside of seal.
C A U T I O NC A U T I O N
C A U T I O N
C A U T I O NC A U T I O N
!!
!
!!
as anas an
as an
as anas an
> Fluid seal [14], seal washer [13], and seal
spring [12], will come free at this point. Place
hand over end as not to drop parts.
6. Place seal spring [12] over the rear needle in
the front end of the spray head. Hold the spray
head upward as the spring will want to fall out.
7. Still holding the spray head upward, place oring [11] into its seat and seal washer [13] and fluid
seal [14] onto the rear needle. The tapered end of
the fluid seal should be pointed toward the front of
the applicator.
8. Reassemble fluid nozzle [15] by pushing the
nozzle into the spray head until the threads
engage. Screw the nozzle into the spray head.
Torque to 23-25 lbs•in. Plastic threads damage
easily; do not over-tighten. Note the front flange of
the fluid nozzle will not seat flush against the spray
head.
9. Apply Loctite #222 Low Strength (purple)
Threadlocker into the threads of plastic front
needle [16] before assembling onto the rear needle.
Be sure that the rear needle assembly is pushed
all the way forward before threading on front
needle.
NOTENOTE
NOTE
NOTENOTE
> Damage will occur to the piston seal
if removed. If removed, replace piston
seal.
> Do not remove the metal rear needle
from the rod unless it is damaged and
must be replaced.
4. Inspect metal rear needle [9] for excessive
wear. If wear is observed (longitudinal grooves or
a noticeable reduction in diameter), replace the
needle. Whenever replacing rear needle section,
you must also replace the seal [14] at the same
time. Upon reassembly, apply Loctite Locquip
Primer Grade T #747-56 and Loctite #290 Medium
Strength (green) to the end of rear needle and ID
of piston rod [8] before assembling into piston rod.
5. Place the rear needle assembly back into the
spray head. Push on the piston until the assembly
is firmly seated in the spray head.
10. Reassemble fluid tip [18]. Hand tighten first;
then with a small wrench turn an additional 30
degrees. Place air cap clip [19] into groove in the
fluid tip.
11. Reassemble air cap [20] and air cap retainer
[21]. Do not let air cap rotate while loosening or
tightening.
12. Apply a thin film of petroleum jelly to piston
spring [3]. Install piston spring, and spring retainer
[2]. Screw piston cap [1] back on.
13. Lubricate all of the o-rings on the underside of
the spray head with petroleum jelly, and apply a
thin coat of dielectric grease EPS-4109 (syringe)
to the grooves of the spray head and the valve
manifold before reassembly.
14. Refer to Figure 6b and replace spray head
assembly [1] back onto applicator housing
assembly [2]. Screw four socket head cap
screws [5] back into place. Do not overtighten
nylon screws, as they can break.
AA-99-01.1
2424
24
2424

EFM(D) Solventborne Robotic Atomizers - Maintenance
FLUID REGULAFLUID REGULA
FLUID REGULA
FLUID REGULAFLUID REGULA
OR DUMPOR DUMP
OR DUMP
OR DUMPOR DUMP
(See Figure 6a)(See Figure 6a)
(See Figure 6a)
(See Figure 6a)(See Figure 6a)
1. Remove all pressures, both air and fluid from
the line leading to the spray applicator.
2. Purge all fluid from the applicator prior to
performing any service.
3. Remove dump cap [15] or regulator cap [9].
Use EMF-445 Cap Tool for dump cap removal,
EMF-438 Cap Tool for regulator cap removal,
provided in the tool kit.
> Once regulator cap [9] or dump cap
[15] is removed, diaphragm support [8 or
14] will be loose and may fall out.
V V
ALAL
V
AL
V V
ALAL
NOTENOTE
NOTE
NOTENOTE
TT
T
TT
VEVE
VE
VEVE
OROR
OR
OROR
7. Inspect poppet seat assembly [2] for wear. If
wear or damage is evident, replace. Replace both
poppet and seat at the same time because they
are a matched set. Inspect o-ring for damage,
replace as necessary, Part Number SSG-8172.
8. Reassemble the fluid regulator by inserting the
spring, poppet and seat [1 and 2] back into the
valve manifold housing. Be sure to lube o-ring
before trying to insert back into manifold. Secure
the poppet/seat assembly by screwing the seat
retainer [4] into the valve manifold housing until a
torque of 8-10 lbs•in is obtained.
NOTENOTE
NOTE
NOTENOTE
> When replacing the poppet seat or the
regulator/dump cap, be cautious so that
the plastic threads are not stripped by
cross threading.
4. Remove diaphragm support [8 or 14] and
carefully remove elastomeric diaphragm [6 or
13]. Use a small screwdriver blade and pry loose
one edge and lift it out.
5. Inspect the diaphragm for wear or damage.
Pay particular attention to the air side, since this is
a Buna-N elastomer and can be damaged by
solvent contact. Replace if necessary.
6. Use the poppet seat tool provided, 76382-00,
to unscrew the poppet seat retainer. The tungsten
carbide poppet seat may come out now because
of the spring force trying to push it out. If it does not
come out on its own, insert seat extraction tool,
76385-00, into hole in seat retainer. Tighten tool in
hole and pull seat retainer out.
NOTENOTE
NOTE
NOTENOTE
9. When placing the diaphragm [6 or 13], remove
the screw [16] that holds both halves together.
Inspect o-ring for damage. To reassemble, make
sure that the Teflon side is toward the lower
support [5 or 10]. Reinstall screw and tighten. Be
careful not to over tighten. If the diaphragm is
inserted wrong, damage will occur. Push the
diaphragm assembly down in valve body.
10. Place diaphragm support [8 or 14] back into
the housing, with the "hump" side up.
11. Tighten the regulator cap [9] to 125-135 lbs•in
using the EMF-438 Cap Tool. Tighten the regulator
cap [9] by hand at first; then use the cap tool.
Tighten the dump cap [15] to 50-65 lbs•in using the
EMF-445 Cap Tool.
2525
25
2525
> Regulator cap and dump cap replace-
ment procedures are identical. They differ only in size.
AA-99-01.1

EFM(D) Solventborne Robotic Atomizers - Maintenance
Figure 6a: 2" Regulator AssemblyFigure 6a: 2" Regulator Assembly
Figure 6a: 2" Regulator Assembly
Figure 6a: 2" Regulator AssemblyFigure 6a: 2" Regulator Assembly
Figure 6b: 1" Dump AssemblyFigure 6b: 1" Dump Assembly
Figure 6b: 1" Dump Assembly
Figure 6b: 1" Dump AssemblyFigure 6b: 1" Dump Assembly
FLUIDFLUID
FLUID
FLUIDFLUID
Item #Item #
Item #
Item #Item #
REGULA REGULA
REGULA
REGULA REGULA
Part #Part #
Part #
Part #Part #
1 74161-00 Spring, Compression 2
2 74160-00 Needle and Seat Assembly 2
3 SSG-8172 O-Ring, Solvent Resistant 3
4 76369-00 Retainer, Seat 2
5 76407-00 Support, Lower, Diaphragm, 2.00" 1
6 76378-00 Diaphragm, 2.00" 1
7 76406-00 Support, Upper, Diaphragm, 2.00" 1
8 76405-00 Spacer, Diaphragm, Support, 2.00" 1
9 76404-00 Regulator Cap, 2.00" 1
10 76370-00 Support, Lower, Diaphragm, 1.00" 1
11 SSG-8128 O-Ring, Solvent Resistant 1
12 76371-00 Support, Upper, Diaphragm, 1.00" 1
13 76377-00 Diaphragm, 1.00" 1
14 76375-00 Spacer, Diaphragm, Support, 1.00" 1
15 76376-00 Regulator Cap, 1.00" 1
16 76374-08C Screw, PHMS, #4-40 x .25" Long, Stainless Steel 2
TT
OR ASSEMBLOR ASSEMBL
T
OR ASSEMBL
TT
OR ASSEMBLOR ASSEMBL
DescriptionDescription
Description
DescriptionDescription
YY
- P - P
Y
- P
YY
- P - P
ARAR
TS LISTTS LIST
AR
TS LIST
ARAR
TS LISTTS LIST
(Figures 6a & 6b) (Figures 6a & 6b)
(Figures 6a & 6b)
(Figures 6a & 6b) (Figures 6a & 6b)
QtyQty
Qty
QtyQty
AA-99-01.1
2626
26
2626

EFM(D) Solventborne Robotic Atomizers - Maintenance
REMOVING APPLICAREMOVING APPLICA
REMOVING APPLICA
REMOVING APPLICAREMOVING APPLICA
FROM THE ROBOTFROM THE ROBOT
FROM THE ROBOT
FROM THE ROBOTFROM THE ROBOT
MANIFOLD ASSEMBLMANIFOLD ASSEMBL
MANIFOLD ASSEMBL
MANIFOLD ASSEMBLMANIFOLD ASSEMBL
(See Figure 7)(See Figure 7)
(See Figure 7)
(See Figure 7)(See Figure 7)
Any time service is required within the applicator
shroud, the applicator must be removed from the
robot manifold assembly. After the applicator is
removed from the robot manifold, always move to
a clear, clean work area to remove the applicator
shroud and begin servicing.
1. Purge all fluid from the system and blow lines
dry with pushout air before the applicator is removed.
TT
T
TT
YY
Y
YY
OROR
OR
OROR
2. All pressures must be removed, both air and
fluid, before removing the applicator. Fluid pressure
can be removed by actuating the applicator trigger
with the paint regulator open.
3. Remove the applicator from the robot manifold
assembly by unscrewing six socket head cap
screws [7]. The screws are retained in the mounting
flange and only need to be unscrewed far enough
to release the threads from the robot manifold.
W A R N I N GW A R N I N G
W A R N I N G
W A R N I N GW A R N I N G
!!
!
!!
> Eye protection should be worn while servic-
ing applicator.
76480 EFM APPLICA76480 EFM APPLICA
76480 EFM APPLICA
76480 EFM APPLICA76480 EFM APPLICA
Item #Item #
Item #
2727
27
2727
Item #Item #
1 76479-00 Spray Head Assembly, Resistive, EFM 1
2 76481-00 Applicator Housing Assembly, Single, 60 Degree 1
3 EMF0600-02 Shroud, ITW Logo, EFM 1
4 7554-08 O-Ring, #2-011, Fluorocarbon, Viton 4
5 SSF-3125 Screw, SHCS, 5/16-18 x .75" Long, Nylon 4
6 EMF-97 Locating Pin 3
7 EMF-204 Socket Head Cap Screw, Captive 6
8 76554-00 Flange, Mounting Ring 1
Part #Part #
Part #
Part #Part #
Figure 7: Applicator Removal from Robot ManifoldFigure 7: Applicator Removal from Robot Manifold
Figure 7: Applicator Removal from Robot Manifold
Figure 7: Applicator Removal from Robot ManifoldFigure 7: Applicator Removal from Robot Manifold
TT
OR ASSEMBLOR ASSEMBL
T
OR ASSEMBL
TT
OR ASSEMBLOR ASSEMBL
DescriptionDescription
Description
DescriptionDescription
YY
- P - P
Y
- P
YY
- P - P
ARAR
TS LISTTS LIST
AR
TS LIST
ARAR
TS LISTTS LIST
(Figure 7) (Figure 7)
(Figure 7)
(Figure 7) (Figure 7)
QtyQty
Qty
QtyQty
AA-99-01.1

EFM(D) Solventborne Robotic Atomizers - Maintenance
AIR CARAIR CAR
AIR CAR
AIR CARAIR CAR
See Figures 6b, 7, 12, 15, andSee Figures 6b, 7, 12, 15, and
See Figures 6b, 7, 12, 15, and
See Figures 6b, 7, 12, 15, andSee Figures 6b, 7, 12, 15, and
16)16)
16)
16)16)
1. Referring to Figure 6b, remove flange [8] from
the applicator shroud by loosening three slotted
dog style set screws [6].
2. To remove applicator shroud [3], pick up the
applicator assembly, place the two locating pins
projecting from the applicator manifold plate onto
a rigid surface. Grasp the shroud in both hands
and firmly push downward. The shroud will slide
off of the valve manifold assembly.
3. Referring to Figure 16, remove three metal
socket head cap screws [11] and o-rings [12]
holding applicator manifold plate assembly [5] to
tie rods [3 and 7].
> Press against locating pins only. Pressing
against fluid fittings could cause damage.
TRIDGE VTRIDGE V
TRIDGE V
TRIDGE VTRIDGE V
C A U T I O NC A U T I O N
C A U T I O N
C A U T I O NC A U T I O N
!!
!
!!
ALAL
AL
ALAL
VESVES
VES
VESVES
9. Referring to Figure 7, check valve piston [2] for
free movement and the four o-rings for damage or
wear. One of the o-rings [5] is located on the valve
piston within the assembly. Use two screwdrivers,
engaged into the slots on both ends of the
assembly, to disassemble. Replace any damaged
o-rings.
NOTENOTE
NOTE
NOTENOTE
> When applying Loctite, use very
sparingly. Apply one small drop to first
thread of [2], then carefully assemble. Do
not get any Loctite on ID of [1] or OD of [2],
Figure 7. Cartridge valve may malfunction.
10. Apply Loctite Primer T-602 “Locquip” #747-56
and Loctite #222 Medium Strength, (purple) to the
threads of piston [2] before reassembly. Allow
assembly to set (with piston end down) for at least
3 hours prior to use. Apply a thin film of petroleum
jelly to all o-rings [4, 5 and 6] before reassembly.
Apply petroleum jelly to the inner surface of both
ends of spool valve body [1] before reassembly.
4. Remove nylon socket head cap screw [10]
holding L-shaped bracket [6] to the valve cover
assembly, and set aside. Remove two screws [9]
holding the bracket to short tie rod [7] and set
aside.
5. Referring to Figure 12, disconnect air
atomization tube [6] and fan air tube [8] from air
fittings [3] (see Figure 15) on either edge of the
valve cover assembly.
6. Remove two air fittings [3] (see Figure 15).
7. Remove three small metal socket head cap
screws [6] (see Figure 15). This enables valve
cover assembly [2] (see Figure 15) to be
removed.
8. Referring to Figure 15, thread a #8-32 screw
into the threaded hole at the center of valve piston.
Pull screw, enabling the cartridge valve assembly
[16] to come out.
11. Referring to Figure 15, reassemble cartridge
valve [16]. Lubricate bore of valve manifold with a
thin film of petroleum jelly. Insert cartridge valve
back into valve manifold housing [1].
12. Examine valve cover o-rings [20 and 21] for
any damage. Replace is necessary.
13. Apply a thin film of petroleum jelly to o-rings [20
and 21] before reassembling.
14. Use three small metal socket head cap screws
[6] to attach valve cover assembly [2] back to
valve manifold housing [1].
15. Replace two air fittings [3] using care not to
damage the plastic threads.
AA-99-01.1
2828
28
2828

EFM(D) Solventborne Robotic Atomizers - Maintenance
16. Reconnect two air supply tubes [6 and 8]
(Figure 12), making sure that both ferrules [25 and
26] (Figure 15) are in place.
17. Referring to Figure 16, replace L-shaped
bracket [6] and short tie rod [7]. Replace two
screws [9] through bracket into short tie rod.
18. Attach manifold plate [5] back into three tie
rods using metal socket head cap screws [11]
and o-rings [12].
19. Referring to Figure 6b, replace applicator
shroud [3] and flange [8]. Push shroud on as far as
possible by hand. Align tab on shroud with notch
in applicator body. Use upside down applicator
flange to assist in pushing shroud until shroud tab
is fully engaged. Replace flange [8] on bottom of
applicator and retighten the three slotted dog style
set screws [6].
20. Vasoline all manifold o-rings. The applicator is
now ready to be remounted to the robot manifold
assembly.
NOTENOTE
NOTE
NOTENOTE
> While holding the EFM applicator with
the spray head pointed down and away,
the fluid solenoid is on the right and the air
solenoid is on the left.
3. Using a standard screwdriver, gently pry off the
top plastic cap of the solenoid. Slide the lower
plastic shroud of the solenoid upward until the
solenoid's positioning holes are revealed. Using a
small spanner wrench or Allen wrench, loosen the
solenoid from its mounting to the manifold plate.
4. To reassemble, reverse the procedure of Step
3.
C A U T I O NC A U T I O N
C A U T I O N
C A U T I O NC A U T I O N
!!
!
!!
> Make sure the solenoid's wire terminal
remains confined to the inside area of the
manifold plate.
NOTENOTE
NOTE
NOTENOTE
> Do not over-tighten air fitting [3].
Over-tightening will cause the part to
break in half.
SOLENOID TRIGGERSOLENOID TRIGGER
SOLENOID TRIGGER
SOLENOID TRIGGERSOLENOID TRIGGER
VV
ALAL
AL
ALAL
VESVES
VES
VESVES
in the
V
VV
(Refer to Figure 12)(Refer to Figure 12)
(Refer to Figure 12)
(Refer to Figure 12)(Refer to Figure 12)
1. To access the two solenoid trigger valves,
follow Steps 1 through 3 under "Removing Gun
from the Robot Manifold Assembly"
"Maintenance" section.
2. Remove two wire connector [3] from the solenoid
to be replaced. Observe that a black wire and a
red wire connect to the right hand valve (fluid
solenoid), and a white wire and a green wire
connect to the left hand valve (air solenoid).
> Some slight force may be required to
properly seat the top plastic cap onto the
solenoid. Tapping with the handle end of
a screwdriver or light use of a dead-blow
hammer is sufficient.
5. Replace wire connectors [3].
connector (white & green) into air solenoid and
plug long wire connector (black & red) into fluid
solenoid.
6. Refer to Figure 6b and reinstall shroud [3] and
flange [8]. Remount the applicator to the robot
manifold. Make sure that all o-rings are in place.
Plug short wire
2929
29
2929
AA-99-01.1

EFM(D) Solventborne Robotic Atomizers - Maintenance
CARCAR
CAR
CARCAR
Item #Item #
Item #
Item #Item #
1 EMF-65 Spool Valve Body 1
2 EMF-64 Piston, Spool Valve 1
3 EMF-63 Poppet, Spool Valve 1
4 SSG-8149 O-Ring, Solvent Resistant 2
5 SSG-8137 O-Ring, Solvent Resistant 1
6 SSG-8127 O-Ring, Solvent Resistant 1
AA-99-01.1
TRIDGE VTRIDGE V
TRIDGE V
TRIDGE VTRIDGE V
Part #Part #
Part #
Part #Part #
ALAL
AL
ALAL
Figure 8: Air Cartridge Valve ServicingFigure 8: Air Cartridge Valve Servicing
Figure 8: Air Cartridge Valve Servicing
Figure 8: Air Cartridge Valve ServicingFigure 8: Air Cartridge Valve Servicing
VEVE
ASSEMBL ASSEMBL
VE
ASSEMBL
VEVE
ASSEMBL ASSEMBL
DescriptionDescription
Description
DescriptionDescription
YY
- P - P
Y
- P
YY
- P - P
ARAR
TS LISTTS LIST
AR
TS LIST
ARAR
TS LISTTS LIST
(Figure 8) (Figure 8)
(Figure 8)
(Figure 8) (Figure 8)
QtyQty
Qty
QtyQty
3030
30
3030

EFM(D) Solventborne Robotic Atomizers - Maintenance
LECU5004 MICROPLECU5004 MICROP
LECU5004 MICROP
LECU5004 MICROPLECU5004 MICROP
CONTROL UNITCONTROL UNIT
CONTROL UNIT
CONTROL UNITCONTROL UNIT
MicroPak Control Unit Service ManualMicroPak Control Unit Service Manual
See
MicroPak Control Unit Service Manual
MicroPak Control Unit Service ManualMicroPak Control Unit Service Manual
for service information.
76494-XXX ROBOT76494-XXX ROBOT
76494-XXX ROBOT
76494-XXX ROBOT76494-XXX ROBOT
MANIFOLD ASSEMBLMANIFOLD ASSEMBL
MANIFOLD ASSEMBL
MANIFOLD ASSEMBLMANIFOLD ASSEMBL
The 76494-XXX Robot Manifold Assembly is
mounted to the robot wrist and includes two low
voltage power cables and the fluid/pneumatic tubing
required to operate the EFM applicator. This
manifold assembly utilizes swivel fitting fluid and
dump lines that eliminate hose breakage due to
twisting. The fluid and dump lines can quickly be
removed from the manifold by backing out the
radially mounted spring loaded retaining pins.
This manifold assembly is designed to mount
directly to a GMF P150 robot wrist. When mounting
to an ABB robot is desired, an EMFD-54 adaptor
plate is required. This adaptor plate will move the
face of the manifold plate out 1.250 inches from the
robot wrist. EMFD-54-1 (2.250" thick) and EMFD54-2 (3.250" thick) adaptor plates are also available
if required.
ACCESSORIESACCESSORIES
ACCESSORIES
ACCESSORIESACCESSORIES
Accessories for the EFM and EFMD Solventborne
Spray Applicators include:
Misc. Intrinsic Safe Barrier
75777-XX Applicator Covers
EMF-430-1 Test Air Cap, with Gauges
EMF-176 Electrode and Air Cap Protectors
76381-XX Tool Kit
Misc. Shunts
Misc. Dump Plugs
9410-01 Plug Nut
76740-XX O-Ring Kit
AKAK
AK
AKAK
YY
Y
YY
INTRINSIC SAFE BARRIERINTRINSIC SAFE BARRIER
INTRINSIC SAFE BARRIER
INTRINSIC SAFE BARRIERINTRINSIC SAFE BARRIER
AND HARDWAND HARDW
AND HARDW
AND HARDWAND HARDW
Part #Part #
Part #
Part #Part #
76741-00 Barrier, Intrinsic Safe, Dual Channel
76761-01 Ground Bar, Support Bracket
76761-02 Ground Bar, Solid Bus Bar
76761-03 Ground Bar, Clamp Screw
76762-00 Label, Intrinsic Safe Wiring, Blue
76760-00 Rail, DIN Mounting, 35mm
TR-SSEH-382 End Anchor, 35mm DIN
75777 APPLICA75777 APPLICA
75777 APPLICA
75777 APPLICA75777 APPLICA
Part #Part #
Part #
Part #Part #
75777-01 Single Head Applicator
75777-02 Dual Head Applicator
75777-03 Robot Wrist Flange
EMF-430-1 TEMF-430-1 T
EMF-430-1 T
EMF-430-1 TEMF-430-1 T
The EMF-430-1, Test Air Cap, is designed for use
with a Test Station or while the applicator is
connected to the robot or reciprocator. The test air
cap is comprised of two air pressure gauges,
pressure gauge stand, special 76131 air cap, and
all required tubing and fittings.
The air cap has two tapped holes for small barbed
tube fittings. The fittings are located so that the
gauges connected to them will measure the actual
cap pressure of the atomization and pattern air.
Using this test cap will assure uniform atomization
and pattern quality, regardless of air supply tube
lengths from one applicator to another.
EMF-176 Electrode andEMF-176 Electrode and
EMF-176 Electrode and
EMF-176 Electrode andEMF-176 Electrode and
Air Cap ProtectorAir Cap Protector
Air Cap Protector
Air Cap ProtectorAir Cap Protector
The EMF-176 is a plastic cylinder that fits over the
air cap retainer. The protector keeps the electrode
and other spray head parts from being damaged
during booth cleaning and at other times when the
spray applicator is not in use.
AREARE
ARE
AREARE
DescriptionDescription
Description
DescriptionDescription
TT
OR COVERSOR COVERS
T
OR COVERS
TT
OR COVERSOR COVERS
DescriptionDescription
Description
DescriptionDescription
est Air Capest Air Cap
est Air Cap
est Air Capest Air Cap
3131
31
3131
AA-99-01.1

EFM(D) Solventborne Robotic Atomizers - Maintenance
76381 T76381 T
76381 T
76381 T76381 T
Provided with each applicator is a tool kit to aid in
the disassembly and assembly of the applicator
during servicing. The contents of the tool kit differs
depending on which applicator is to be serviced.
The following is a breakdown of the two tool kits
offered.
7638176381
76381
7638176381
(For Dual Head Applicators)(For Dual Head Applicators)
(For Dual Head Applicators)
(For Dual Head Applicators)(For Dual Head Applicators)
Part #Part #
Part #
Part #Part #
76382-00 Tool, Seat Retainer
76385-00 Tool, Seat Extraction
EMF-445 Tool, 1" Cap
EMF-438 Tool, 2" Cap
SSH-9023 Tool, 3/16" Hex Ball Driver
75777-03 Cover, Robot Wrist Flange
75777-02 Cover, Dual Head Applicator
ool Kitool Kit
ool Kit
ool Kitool Kit
-01 TOOL KIT-01 TOOL KIT
-01 TOOL KIT
-01 TOOL KIT-01 TOOL KIT
DescriptionDescription
Description
DescriptionDescription
7638176381
76381
7638176381
(For Single Head Applicators)(For Single Head Applicators)
(For Single Head Applicators)
(For Single Head Applicators)(For Single Head Applicators)
Part #Part #
Part #
Part #Part #
76382-00 Tool, Seat Retainer
76385-00 Tool, Seat Extraction
EMF-438 Tool, 2" Cap
SSH-9023 Tool, 3/16" Hex Ball Driver
75777-03 Cover, Robot Wrist Flange
75777-01 Cover, Single Head Applicator
-02 TOOL KIT-02 TOOL KIT
-02 TOOL KIT
-02 TOOL KIT-02 TOOL KIT
DescriptionDescription
Description
DescriptionDescription
7638276382
76382
7638276382
7638576385
76385
7638576385
SSH-9023SSH-9023
SSH-9023
SSH-9023SSH-9023
EMF-445EMF-445
EMF-445
EMF-445EMF-445
EMF-438EMF-438
EMF-438
EMF-438EMF-438
AA-99-01.1
Figure 9: 76381 Tool KitFigure 9: 76381 Tool Kit
Figure 9: 76381 Tool Kit
Figure 9: 76381 Tool KitFigure 9: 76381 Tool Kit
3232
32
3232

EFM(D) Solventborne Robotic Atomizers - Maintenance
Misc. ShuntsMisc. Shunts
Misc. Shunts
Misc. ShuntsMisc. Shunts
77109-00 Regulator Shunt, EFM
77107-01 Regulator Shunt, EFMD-90°
77107-02 Regulator Shunt, EFMD-60°
These shunts are used to bypass the regulators
in the applicator.
Misc. Dump PlugsMisc. Dump Plugs
Misc. Dump Plugs
Misc. Dump PlugsMisc. Dump Plugs
EMF-98 Front Plug
EMF-99 Rear Plug
SSG-8161 O-Ring
These dump plugs are used to block the dump
ports in the spray heads when the dump feature
is not desired.
76740 O-RING KIT 76740 O-RING KIT
76740 O-RING KIT
76740 O-RING KIT 76740 O-RING KIT
(Figure 10)(Figure 10)
(Figure 10)
(Figure 10)(Figure 10)
9410-01 Plug Nut9410-01 Plug Nut
9410-01 Plug Nut
9410-01 Plug Nut9410-01 Plug Nut
The 9410-01, Plug Nut, is used in conjunction with
the dump plugs to keep paint from going out the
dump lines. This plugs the dump port on the
valve manifold.
76740 O-Ring Kit76740 O-Ring Kit
76740 O-Ring Kit
76740 O-Ring Kit76740 O-Ring Kit
This kit is used to convert the EFM/EFMD applicators to a 100% solvent resistant o-ring applicator.
76740-0176740-01
76740-01
76740-0176740-01
Item #Item #
Item #
Item #Item #
1 76630-007 O-Ring, Solvent Resistant 2 2
2 SSG-8127 O-Ring, Solvent Resistant 2 3
3 SSG-8163 O-Ring, Solvent Resistant 5 6
4 SSG-8134 O-Ring, Solvent Resistant 6 10
5 SSG-8137 O-Ring, Solvent Resistant 2 2
6 SSG-8136 O-Ring, Solvent Resistant 2 4
7 SSG-8172 O-Ring, Solvent Resistant 1 1
8 SSG-8165 O-Ring, Solvent Resistant 2 2
9 SSG-8149 O-Ring, Solvent Resistant 1 1
10 SSG-8159 O-Ring, Solvent Resistant 2 2
11 SSG-8150 O-Ring, Solvent Resistant 1 1
12 SSG-8151 O-Ring, Solvent Resistant 1 2
13 SSG-8155 O-Ring, Solvent Resistant 1 1
Part #Part #
Part #
Part #Part #
DescriptionDescription
Description
DescriptionDescription
(Single Head)(Single Head)
(Single Head)
(Single Head)(Single Head)
QtyQty
Qty
QtyQty
(Dual Head)(Dual Head)
(Dual Head)
(Dual Head)(Dual Head)
76740-0276740-02
76740-02
76740-0276740-02
QtyQty
Qty
QtyQty
3333
33
3333
AA-99-01.1

EFM(D) Solventborne Robotic Atomizers - Maintenance
Electrostatic Systems
AA-99-01.1
Figure 10: Solvent Resistant O-Ring KitFigure 10: Solvent Resistant O-Ring Kit
Figure 10: Solvent Resistant O-Ring Kit
Figure 10: Solvent Resistant O-Ring KitFigure 10: Solvent Resistant O-Ring Kit
3434
34
3434

EFM(D) Solventborne Robotic Atomizers - Parts Identification
PP
P
PP
ARAR
AR
ARAR
TS IDENTIFICATS IDENTIFICA
TS IDENTIFICA
TS IDENTIFICATS IDENTIFICA
TIONTION
TION
TIONTION
3535
35
3535
Figure 11: 76479 Spray Head AssemblyFigure 11: 76479 Spray Head Assembly
Figure 11: 76479 Spray Head Assembly
Figure 11: 76479 Spray Head AssemblyFigure 11: 76479 Spray Head Assembly
AA-99-01.1

EFM(D) Solventborne Robotic Atomizers - Parts Identification
7647976479
76479
7647976479
Item #Item #
Item #
Item #Item #
SPRA SPRA
SPRA
SPRA SPRA
Part #Part #
Part #
Part #Part #
1 EMF-13 Piston Cap 1
2 EMF-22 Retainer Spring 1
3 RME-36 Piston Spring 1
4 RME-66 Piston Nut 1
5 RME-69 Piston 1
6 SST-7714 Piston Seal 1
7 7554-05 O-Ring, Fluorocarbon, Viton 1
8 76096-00 Piston Rod Assembly 1
9 76094-00 Needle Section, Rear 1
10 76497-00 Gun Barrel Assembly, Resistive, EFM 1
11 SSG-8149 O-Ring, Solvent Resistant 1
12 RME-38 Seal Spring 1
13 EMF-7 Seal Washer 1
14 RME-32 Seal 1
15 EMF-195 Fluid Nozzle, High Flow, Black W/Groove 1
16 70430-00 Electrode Assembly 1
17 EMF-192 Air Cap Locator 1
18 76132-02 Fluid Tip, EMF Gun, .055" Dia. Orifice 1
19 EMF-10 Air Cap Clip 1
20 76131-00 Air Cap 1
21 EFX-8 Air Cap Retainer 1
22 7554-10 O-Ring, Fluorocarbon, Viton 1
23 LSOR0005-08 O-Ring, Teflon Encapsulated 1
24 7554-06 O-Ring, Fluorocarbon, Viton 1
YY
HEAD ASSEMBL HEAD ASSEMBL
Y
HEAD ASSEMBL
YY
HEAD ASSEMBL HEAD ASSEMBL
DescriptionDescription
Description
DescriptionDescription
YY
- P - P
Y
- P
YY
- P - P
ARAR
TS LISTTS LIST
AR
TS LIST
ARAR
TS LISTTS LIST
(Figure 1 (Figure 1
(Figure 1
(Figure 1 (Figure 1
1)1)
1)
1)1)
QtyQty
Qty
QtyQty
AA-99-01.1
3636
36
3636

EFM(D) Solventborne Robotic Atomizers - Parts Identification
3737
37
3737
Figure 14: 76490 Applicator Manifold Plate AssemblyFigure 14: 76490 Applicator Manifold Plate Assembly
Figure 14: 76490 Applicator Manifold Plate Assembly
Figure 14: 76490 Applicator Manifold Plate AssemblyFigure 14: 76490 Applicator Manifold Plate Assembly
AA-99-01.1

EFM(D) Solventborne Robotic Atomizers - Parts Identification
76490 APPLICA76490 APPLICA
76490 APPLICA
76490 APPLICA76490 APPLICA
(Figure 12)(Figure 12)
(Figure 12)
(Figure 12)(Figure 12)
Item #Item #
Item #
Item #Item #
1 76533-00 Plate, Manifold, EFM Applicator 1
2 76491-00 Wiring Harness, Cascade, Adapter, EFM 1
3 76492-00 Wiring Harness, Intrinsic Solenoids, Adapter 1
4 76538-00 Solenoid Valve Assembly 2
5 76534-00 Fitting, Paint, EFM 2
6 EMF-103 Air Atomization Tube "H", Formed 1
7 SSP-5010 Tubing, 5/16" OD x 3/16" ID 1
8 EMF-102 Fan Air Tube "E", Formed 1
9 EMF-6 Paint Coil Tube "F", Formed 1
10 A10014-01 Plug, Threaded, #10-32 UNF, Nylon 1
11 7554-06 O-Ring, Fluorocarbon, Viton 4
12 7554-08 O-Ring, Fluorocarbon, Viton 2
13 7554-12 O-Ring, Fluorocarbon, Viton 1
14 7554-11 O-Ring, Fluorocarbon, Viton 1
15 LSOR0005-07 O-Ring, Teflon Encapsulated 1
16 SSG-8162 O-Ring, Solvent Resistant 2
17 EMF-172 Fitting, Modified, 3/8" OD Tubing, Press-In 2
18 75699-01 Tube Fitting, Barb, 1/16" ID Tube 4
19 SSF-2052 Screw, Set, 10-24 x 3/8" Long, Nylon Tip 2
20 21132-027 Pin, Roll, 3/16" x 1.00" Long, Steel 2
21 70591-06 Nut, Fitting 2
22 70606-06 Ferrule, Back, 5/16", Stainless Steel 2
23 70607-06 Ferrule, Front, 5/16", Stainless Steel 2
Part #Part #
Part #
Part #Part #
TT
OR MANIFOLD PLAOR MANIFOLD PLA
T
OR MANIFOLD PLA
TT
OR MANIFOLD PLAOR MANIFOLD PLA
DescriptionDescription
Description
DescriptionDescription
TE ASSEMBLTE ASSEMBL
TE ASSEMBL
TE ASSEMBLTE ASSEMBL
YY
- P - P
Y
- P
YY
- P - P
ARAR
AR
ARAR
TS LISTTS LIST
TS LIST
TS LISTTS LIST
QtyQty
Qty
QtyQty
AA-99-01.1
3838
38
3838

EFM(D) Solventborne Robotic Atomizers - Parts Identification
3939
39
3939
Figure 13a: 76494 Manifold Assembly (Sheet 1 of 2)Figure 13a: 76494 Manifold Assembly (Sheet 1 of 2)
Figure 13a: 76494 Manifold Assembly (Sheet 1 of 2)
Figure 13a: 76494 Manifold Assembly (Sheet 1 of 2)Figure 13a: 76494 Manifold Assembly (Sheet 1 of 2)
AA-99-01.1

EFM(D) Solventborne Robotic Atomizers - Parts Identification
AA-99-01.1
Figure 13b: 76494 Manifold Assembly (Sheet 2 of 2)Figure 13b: 76494 Manifold Assembly (Sheet 2 of 2)
Figure 13b: 76494 Manifold Assembly (Sheet 2 of 2)
Figure 13b: 76494 Manifold Assembly (Sheet 2 of 2)Figure 13b: 76494 Manifold Assembly (Sheet 2 of 2)
4040
40
4040

EFM(D) Solventborne Robotic Atomizers - Parts Identification
7649476494
76494
7649476494
Item #Item #
Item #
Item #Item #
MANIFOLD ASSEMBL MANIFOLD ASSEMBL
MANIFOLD ASSEMBL
MANIFOLD ASSEMBL MANIFOLD ASSEMBL
Part #Part #
Part #
Part #Part #
1 76560-01 Plate, Manifold, EMF Applicator, P150 Robot Arm 1
2 EMFD-428-1 Fitting, Cartridge Check Valve 1
3 EMF-82-1 Fitting, Air Pilot 3
4 76574-00 Fitting, Modified, 3/8" OD Tubing, 1/4" NPT 2
5 76583-01 Screw, Retaining, Elec. Connector, 1.144" 1
6 76583-02 Screw, Retaining, Elec. Connector, 1.435" 1
7 SSP-5013 Tubing, 3/8" OD x .040" Wall, 250 PSI, Paraflex 29"
8 SSP-7512 Union, Reducing, 1/2" x 3/8" Tubing 2
9 A10008-01 Bearing, Ball, Miniature, Flanged 2
10 A10008-02 Bearing, Ball, Miniature, Flanged 2
11 SSG-8134 O-Ring, Solvent Resistant 2
12 75706-01 Retaining Pin, Body Short 1
13 75706-02 Retaining Pin, Body Long 1
14 A10306-01 Retaining Pin Assembly, Spring Loaded 2
15 75673-02 Fitting, Ferrule 2
16 75687-00 Nut, Ferrule, Fluid/Dump Lines 2
17 SSG-8127 O-Ring, Solvent Resistant 2
18 9704-07 Tubing, 1/2" OD x 3/8" ID, Poly-Flo, White
19 SSP-5014 Tubing, 3/16" OD x .025" Wall, 250 PSI, Paraflex
C*C*
C * See Chart Paint Fitting 1
C*C*
D*D*
D * See Chart Dump Fitting 1
D*D*
E*E*
E * See Chart Paint Line Fluid Hose
E*E*
F*F*
F * See Chart Dump Line Fluid Hose
F*F*
G*G*
G* See Chart Wiring Harness, Intrinsic Solenoid Valves 1
G*G*
H*H*
H * See Chart Wiring Harness, Cascade 1
H*H*
DescriptionDescription
Description
DescriptionDescription
YY
- P - P
Y
- P
YY
- P - P
ARAR
TS LISTTS LIST
AR
TS LIST
ARAR
TS LISTTS LIST
(Figures 13a & 13b) (Figures 13a & 13b)
(Figures 13a & 13b)
(Figures 13a & 13b) (Figures 13a & 13b)
QtyQty
Qty
QtyQty
L*L*
L*
L*L*
L*L*
L*
L*L*
L*L*
L*
L*L*
L*L*
L*
L*L*
**
* See "Parts List Reference Table".
**
PP
ARAR
TS LISTTS LIST
P
AR
TS LIST
PP
ARAR
TS LISTTS LIST
1
Apply 7969-05, Loctite thread locker (blue) to threads prior to assembly.
2
Apply 7969-10, Loctite thread sealer (white) to threads prior to assembly.
3
Apply thread lubricant (i.e., tube lube) to threads of fitting prior to assembly.
4
After connecting 3/8" OD lines to 1/2" OD lines with reducing union, wrap unions with SS-9816 (black
electrical tape) to prevent union tube nuts from coming loose.
5
Torque retaining screws to 1.50-4.0 lbs•in.
6
Align slot in plugs with slot in manifold plate.
BULLET BULLET
BULLET
BULLET BULLET
DEFINITION T DEFINITION T
DEFINITION T
DEFINITION T DEFINITION T
ABLE (Figures 13a & 13b)ABLE (Figures 13a & 13b)
ABLE (Figures 13a & 13b)
ABLE (Figures 13a & 13b)ABLE (Figures 13a & 13b)
4141
41
4141
AA-99-01.1

LengthLength
LengthLength
Length
16 Feet
25 Feet
LL
LL
L
CascadeCascade
CascadeCascade
Cascade
HarnessHarness
HarnessHarness
Harness
76496-16
76496-25
HH
HH
H
I.S. WiringI.S. Wiring
I.S. WiringI.S. Wiring
I.S. Wiring
Harness Harness
Harness Harness
Harness
76495-16
76495-25
GG
GG
G
EFM(D) Solventborne Robotic Atomizers - Parts Identification
50 Feet
16 Feet
25 Feet
50 Feet
16 Feet
25 Feet
50 Feet
16 Feet
25 Feet
50 Feet
16 Feet
25 Feet
50 Feet
76496-50
76496-16
76496-25
76496-50
76496-16
76496-25
76496-50
76496-16
76496-25
76496-50
76496-16
76496-25
76496-50
76495-50
76495-16
76495-25
76495-50
76495-16
76495-25
76495-50
76495-16
76495-25
76495-50
76495-16
76495-25
76495-50
72313-00
72313-00
72313-00
74178-01
74178-01
74178-01
74178-02
74178-02
74178-02
72313-01
Dump LineDump Line
Dump LineDump Line
Fluid HoseFluid Hose
Fluid HoseFluid Hose
Dump Line
Fluid Hose
FF
FF
F
Paint LinePaint Line
Paint LinePaint Line
Fluid HoseFluid Hose
Fluid HoseFluid Hose
Paint Line
Fluid Hose
72313-00
72313-00
72313-00
74178-01
74178-01
74178-01
74178-02
74178-02
74178-02
EE
EE
E
DumpDump
DumpDump
Dump
FittingFitting
FittingFitting
Fitting
75705-02
75705-02
75705-02
75705-01
75705-01
75705-01
75705-02
75705-02
DD
DD
D
ABLE (Figures 13a and 13b)ABLE (Figures 13a and 13b)
ABLE (Figures 13a and 13b)ABLE (Figures 13a and 13b)
ABLE (Figures 13a and 13b)
PaintPaint
PaintPaint
Paint
FittingFitting
FittingFitting
Fitting
75705-02
75705-02
75705-02
75705-01
75705-01
1/4"
75705-01
1/4"
1/4"
CC
CC
C
3/16"
3/16"
DumpDump
DumpDump
Dump
Hose IDHose ID
Hose IDHose ID
Hose ID
REFERENCE T REFERENCE T
REFERENCE T REFERENCE T
REFERENCE T
3/16"
75705-02
75705-02
75705-02
75705-02
3/16"
3/16"
3/16"
72313-01
72313-01
72313-01
75705-01
75705-01
75705-01
75705-01
1/4"
1/4"
72313-01
74178-01
74178-01
72313-01
74178-02
74178-02
75705-01
75705-01
75705-01
75705-01
75705-02
75705-02
1/4"
1/4"
1/4"
74178-01
74178-02
75705-01
75705-02
1/4"
TS LISTTS LIST
TS LISTTS LIST
TS LIST
ARAR
ARAR
AR
* P* P
* P* P
* P
AA-99-01.1
PaintPaint
PaintPaint
Paint
Hose IDHose ID
Hose IDHose ID
Hose ID
Part #Part #
Part #Part #
Part #
3/16"
3/16"
3/16"
76494-16A
76494-25A
76494-50A
1/4"
1/4"
1/4"
76494-16B
76494-25B
76494-50B
3/16"
3/16"
3/16"
76494-16C
76494-25C
76494-50C
1/4"
1/4"
1/4"
76494-16D
76494-25D
76494-50D
3/16"
3/16"
3/16"
76494-16E
76494-25E
76494-50E
4242
42
4242

EFM(D) Solventborne Robotic Atomizers - Parts Identification
4343
43
4343
Figure 14: 76480 EFM Applicator Assembly (Single 60Figure 14: 76480 EFM Applicator Assembly (Single 60
Figure 14: 76480 EFM Applicator Assembly (Single 60°
Figure 14: 76480 EFM Applicator Assembly (Single 60Figure 14: 76480 EFM Applicator Assembly (Single 60
))
)
))
AA-99-01.1

EFM(D) Solventborne Robotic Atomizers - Parts Identification
76480 EFM APPLICA76480 EFM APPLICA
76480 EFM APPLICA
76480 EFM APPLICA76480 EFM APPLICA
Item #Item #
Item #
Item #Item #
1 76479-00 Spray Head Assembly, Resistive, EFM 1
2 76481-00 Applicator Housing Assembly, Single, 60 Degree 1
3 EMF0600-02 Shroud, ITW Logo, EFM 1
4 7554-08 O-Ring, Fluorocarbon, Viton 4
5 SSF-3125 Screw, SHCS, 5/16-18 x .75" Long, Nylon 4
6 EMF-97 Locating Pin 3
7 EMF-204 Socket Head Cap Screw, Captive 6
8 76554-00 Flange, Mounting Ring 1
Part #Part #
Part #
Part #Part #
TT
OR ASSEMBLOR ASSEMBL
T
OR ASSEMBL
TT
OR ASSEMBLOR ASSEMBL
DescriptionDescription
Description
DescriptionDescription
YY
- P - P
Y
- P
YY
- P - P
ARAR
TS LISTTS LIST
AR
TS LIST
ARAR
TS LISTTS LIST
(Figure 14) (Figure 14)
(Figure 14)
(Figure 14) (Figure 14)
QtyQty
Qty
QtyQty
AA-99-01.1
4444
44
4444

EFM(D) Solventborne Robotic Atomizers - Parts Identification
4545
45
4545
Figure 15: 76366 Valve Manifold Assembly (Single 60Figure 15: 76366 Valve Manifold Assembly (Single 60
Figure 15: 76366 Valve Manifold Assembly (Single 60°
Figure 15: 76366 Valve Manifold Assembly (Single 60Figure 15: 76366 Valve Manifold Assembly (Single 60
))
)
))
AA-99-01.1

EFM(D) Solventborne Robotic Atomizers - Parts Identification
7636676366
76366
7636676366
Item #Item #
Item #
Item #Item #
V V
ALAL
V
V V
1 76367-00 Manifold, Applicator Body, Single, 60 Degree 1
2 EMF-406 Valve Cover Assembly 1
3 EMF-20 Air Fitting 2
4 SSP-6076 Tube Fitting, Nylon, 5/16"T 2
5 75699-01 Tube Fitting, Barb, 1/16" ID Tube 4
6 SSF-3129 Screw, SHCS, 6-32 x 1.00" Long, Steel, Black 3
7 74161-00 Spring, Compression 2
8 74160-00 Needle and Seat Assembly 2
9 76369-00 Retainer, Seat 2
10 76407-00 Support, Lower, Diaphragm, 2.00" 2
11 76406-00 Support, Upper, Diaphragm, 2.00" 2
12 76404-00 Cap, Regulator, EMF, 2.00" 2
13 76405-00 Diaphragm Support, EMF, 2.00" 2
14 76374-08C Screw, PHMS, #4-40 x .25" Long, Stainless Steel 2
15 76378-00 Diaphragm, 2.00" 2
16 EMF-413 Air Cartridge Valve Assembly 2
17 7554-09 O-Ring, Fluorocarbon, Viton 2
18 SSP-7816 Nut, Nylon, 3/8"T 2
19 SSG-8172 O-Ring, Solvent Resistant 4
20 7554-05 O-Ring, Fluorocarbon, Viton 1
21 7554-33 O-Ring, Fluorocarbon, Viton 2
22 LSOR0005-06 O-Ring, Teflon Encapsulated 1
23 SSG-8136 O-Ring, Solvent Resistant 2
24 76379-00 Spring, High Voltage Contact 1
25 SSP-9011 Ferrule, Front, 3/8"T, Nylon 2
26 SSP-9012 Ferrule, Back, 3/8"T, Nylon 2
VE MANIFOLD ASSEMBLVE MANIFOLD ASSEMBL
AL
VE MANIFOLD ASSEMBL
ALAL
VE MANIFOLD ASSEMBLVE MANIFOLD ASSEMBL
Part #Part #
Part #
Part #Part #
DescriptionDescription
Description
DescriptionDescription
YY
- P - P
Y
- P
YY
- P - P
ARAR
TS LISTTS LIST
AR
TS LIST
ARAR
TS LISTTS LIST
(Figure 15) (Figure 15)
(Figure 15)
(Figure 15) (Figure 15)
QtyQty
Qty
QtyQty
AA-99-01.1
4646
46
4646

EFM(D) Solventborne Robotic Atomizers - Parts Identification
4747
47
4747
Figure 16: 76481 Applicator Housing Assembly (Single 60Figure 16: 76481 Applicator Housing Assembly (Single 60
Figure 16: 76481 Applicator Housing Assembly (Single 60°
Figure 16: 76481 Applicator Housing Assembly (Single 60Figure 16: 76481 Applicator Housing Assembly (Single 60
))
)
))
AA-99-01.1

EFM(D) Solventborne Robotic Atomizers - Parts Identification
76481 APPLICA76481 APPLICA
76481 APPLICA
76481 APPLICA76481 APPLICA
Item #Item #
Item #
Item #Item #
1 76366-00 Valve Manifold Assembly, Single, 60 Degree Head 1
2 75933-00 Cascade Assembly, HP404 1
3 76530-00 Tie Rod, Long 2
4 76529-00 Bracket, Cascade Mounting 1
5 76490-00 Manifold Plate Assembly, EMF 1
6 EMF-72 Bracket, Tie Rod Mounting 1
7 EMF-74 Tie Rod, Short 1
8 H-2382 1/8 O.D. Polyurethane Tube 2
9 SSF-3134 Screw, SHCS, 10-24 x .75" Long, Nylon 2
10 SSF-3135 Screw, SHCS, 1/4-20 x .5" Long, Nylon 1
11 SS-7942-CD Screw, SHCS, 1/4-20 x 1" Long, Steel 3
12 13076-10 O-Ring, Teflon 3
13 75702-05 Washer, Flat, #10, Nylon 2
14 LSMM0067-32 Stud, Threaded, 3/8-16 2
** P** P
ARAR
** P
AR
** P** P
ARAR
1
59972-00, dielectric grease, spread a small amount evenly in each groove of both parts.
Part #Part #
Part #
Part #Part #
TS LISTTS LIST
TS LIST
TS LISTTS LIST
TT
OR HOUSING ASSEMBLOR HOUSING ASSEMBL
T
OR HOUSING ASSEMBL
TT
OR HOUSING ASSEMBLOR HOUSING ASSEMBL
DescriptionDescription
Description
DescriptionDescription
BULLET BULLET
BULLET
BULLET BULLET
DEFINITION T DEFINITION T
DEFINITION T
DEFINITION T DEFINITION T
YY
- P - P
ARAR
Y
- P
YY
- P - P
ABLE (Figure 16)ABLE (Figure 16)
ABLE (Figure 16)
ABLE (Figure 16)ABLE (Figure 16)
TS LISTTS LIST
AR
TS LIST
ARAR
TS LISTTS LIST
(Figure 16) (Figure 16)
(Figure 16)
(Figure 16) (Figure 16)
QtyQty
Qty
QtyQty
TUBE FUNCTIONS (Figure 16)TUBE FUNCTIONS (Figure 16)
TUBE FUNCTIONS (Figure 16)
TUBE FUNCTIONS (Figure 16)TUBE FUNCTIONS (Figure 16)
Tube IDTube ID
Tube ID
Tube IDTube ID
Tube "A"
Tube "B"
Tube "C"
Tube "D"
Tube "E"
Tube "F"
Tube "G"
Tube "H"
Part No.Part No.
Part No.
Part No.Part No.
H-2382
H-2382
H-2382
H-2382
EMF-103
EMF-102
SSP-5010
EMF-6
LengthLength
Length
LengthLength
6"
6"
6"
6"
-----
-----
4-1/2"
-----
Routing InstructionsRouting Instructions
Routing Instructions
Routing InstructionsRouting Instructions
Route thru Paint Coil
Route thru Paint Coil
Route thru Paint Coil
Route thru Paint Coil
Route thru Paint Coil
Route thru Paint Coil
Route thru Paint Coil
Install with Smaller Tapered End Towards Rear of Applicator
DescriptionDescription
Description
DescriptionDescription
Fluid Trigger
Air Trigger
Fluid Regulator Pilot
Dump Regulator Pilot
Atomizer Air Supply
Fan Air Supply
Dump Line
Paint Line
AA-99-01.1
4848
48
4848

EFM(D) Solventborne Robotic Atomizers - Parts Identification
Electrostatic Systems
4949
49
4949
Figure 17: 76482 EFM Applicator Assembly (Single 90Figure 17: 76482 EFM Applicator Assembly (Single 90
Figure 17: 76482 EFM Applicator Assembly (Single 90°
Figure 17: 76482 EFM Applicator Assembly (Single 90Figure 17: 76482 EFM Applicator Assembly (Single 90
))
)
))
AA-99-01.1

EFM(D) Solventborne Robotic Atomizers - Parts Identification
76482 EFM APPLICA76482 EFM APPLICA
76482 EFM APPLICA
76482 EFM APPLICA76482 EFM APPLICA
Item #Item #
Item #
Item #Item #
1 76479-00 Spray Head Assembly, Resistive, EFM 1
2 76483-00 Applicator Housing Assembly, Single, 90 Degree 1
3 EMF0600-02 Shroud, ITW Logo, EFM 1
4 7554-08 O-Ring, Fluorocarbon, Viton 4
5 SSF-3125 Screw, SHCS, 5/16-18 x .75" Long, Nylon 4
6 EMF-97 Screw, Locating Pin, Ring 3
7 EMF-204 Socket Head Cap Screw, Captive 6
8 76554-00 Flange, Mounting Ring 1
Part #Part #
Part #
Part #Part #
TT
OR ASSEMBLOR ASSEMBL
T
OR ASSEMBL
TT
OR ASSEMBLOR ASSEMBL
DescriptionDescription
Description
DescriptionDescription
YY
- P - P
Y
- P
YY
- P - P
ARAR
TS LISTTS LIST
AR
TS LIST
ARAR
TS LISTTS LIST
(Figure 17) (Figure 17)
(Figure 17)
(Figure 17) (Figure 17)
QtyQty
Qty
QtyQty
AA-99-01.1
5050
50
5050

EFM(D) Solventborne Robotic Atomizers - Parts Identification
5151
51
5151
Figure 18: 76484 Valve Manifold Assembly (Single 90Figure 18: 76484 Valve Manifold Assembly (Single 90
Figure 18: 76484 Valve Manifold Assembly (Single 90°
Figure 18: 76484 Valve Manifold Assembly (Single 90Figure 18: 76484 Valve Manifold Assembly (Single 90
))
)
))
AA-99-01.1

EFM(D) Solventborne Robotic Atomizers - Parts Identification
7648476484
76484
7648476484
Item #Item #
Item #
Item #Item #
V V
ALAL
V
V V
1 76528-00 Applicator Valve Body, Single, 90 Degree Head 1
2 EMF-406 Valve Cover Assembly 1
3 EMF-20 Air Fitting 2
4 SSP-6076 Tube Fitting, Nylon, 5/16"T 2
5 75699-01 Tube Fitting, Nylon, Barb, 1/16" ID Tube 4
6 SSF-3129 Screw, SHCS, 6-32 x 1.00" Long, Steel, Black 3
7 74161-00 Spring, Compression 2
8 74160-00 Needle and Seat Assembly 2
9 76369-00 Retainer, Seat 2
10 76407-00 Support, Lower, Diaphragm, 2.00" 2
11 76406-00 Support, Upper, Diaphragm, 2.00" 2
12 76404-00 Cap, Regulator, 2.00" 2
13 76405-00 Spacer, Diaphragm Support, 2.00" 2
14 76374-08C Screw, PHMS, #4-40 x .25" Long, Stainless Steel 2
15 76378-00 Diaphragm, 2.00" 2
16 EMF-413 Air Cartridge Valve Assembly 2
17 7554-09 O-Ring, Fluorocarbon, Viton 2
18 SSP-7816 Nut, Nylon, 3/8"T 2
19 SSG-8172 O-Ring, Solvent Resistant 4
20 7554-05 O-Ring, Fluorocarbon, Viton 1
21 7554-33 O-Ring, Fluorocarbon, Viton 2
22 LSOR0005-06 O-Ring, Teflon Encapsulated 1
23 SSG-8136 O-Ring, Solvent Resistant 2
24 EMF-119 Spring, High Voltage Contact 1
25 SSP-9011 Ferrule, Front, 3/8"T, Nylon 2
26 SSP-9012 Ferrule, Back, 3/8"T, Nylon 2
VE MANIFOLD ASSEMBLVE MANIFOLD ASSEMBL
AL
VE MANIFOLD ASSEMBL
ALAL
VE MANIFOLD ASSEMBLVE MANIFOLD ASSEMBL
Part #Part #
Part #
Part #Part #
DescriptionDescription
Description
DescriptionDescription
YY
- P - P
Y
- P
YY
- P - P
ARAR
TS LISTTS LIST
AR
TS LIST
ARAR
TS LISTTS LIST
(Figure 18) (Figure 18)
(Figure 18)
(Figure 18) (Figure 18)
QtyQty
Qty
QtyQty
AA-99-01.1
5252
52
5252

EFM(D) Solventborne Robotic Atomizers - Parts Identification
5353
53
5353
Figure 19: 76483 Applicator Housing Assembly (Single 90Figure 19: 76483 Applicator Housing Assembly (Single 90
Figure 19: 76483 Applicator Housing Assembly (Single 90°
Figure 19: 76483 Applicator Housing Assembly (Single 90Figure 19: 76483 Applicator Housing Assembly (Single 90
))
)
))
AA-99-01.1

EFM(D) Solventborne Robotic Atomizers - Parts Identification
76483 APPLICA76483 APPLICA
76483 APPLICA
76483 APPLICA76483 APPLICA
Item #Item #
Item #
Item #Item #
1 76484-00 Valve Manifold Assembly, Single, 90 Head 1
2 75933-00 Cascade Assembly, HP404 1
3 76530-00 Tie Rod, Long 2
4 76529-00 Bracket, Cascade Mounting 1
5 76490-00 Manifold Plate Assembly, EFM 1
6 EMF-72 Bracket, Tie Rod Mounting 1
7 EMF-74 Tie Rod, Short 1
8 H-2382 1/8" OD Polyurethane Tube 2
9 SSF-3134 Screw, SHCS, 10-24 x .75" Long, Nylon 2
10 SSF-3135 Screw, SHCS, 1/4-20 x .5" Long, Nylon 1
11 SS-7942-CD Screw, SHCS, 1/4-20 x 1" Long, Steel 3
12 13076-10 O-Ring, Teflon 3
13 75702-05 Washer, Flat, #10, Nylon 2
14 LSMM0067-32 Stud, Threaded, 3/8-16 2
** P** P
ARAR
** P
AR
** P** P
ARAR
1
59972-00, dielectric grease, spread a small amount evenly in each groove of both parts.
Part #Part #
Part #
Part #Part #
TS LISTTS LIST
TS LIST
TS LISTTS LIST
TT
OR HOUSING ASSEMBLOR HOUSING ASSEMBL
T
OR HOUSING ASSEMBL
TT
OR HOUSING ASSEMBLOR HOUSING ASSEMBL
DescriptionDescription
Description
DescriptionDescription
BULLET BULLET
BULLET
BULLET BULLET
DEFINITION T DEFINITION T
DEFINITION T
DEFINITION T DEFINITION T
YY
- P - P
ARAR
Y
- P
YY
- P - P
ABLE (Figure 19)ABLE (Figure 19)
ABLE (Figure 19)
ABLE (Figure 19)ABLE (Figure 19)
TS LISTTS LIST
AR
TS LIST
ARAR
TS LISTTS LIST
(Figure 19) (Figure 19)
(Figure 19)
(Figure 19) (Figure 19)
QtyQty
Qty
QtyQty
TUBE FUNCTIONS (TUBE FUNCTIONS (
TUBE FUNCTIONS (
TUBE FUNCTIONS (TUBE FUNCTIONS (
Tube IDTube ID
Tube ID
Tube IDTube ID
Tube "A"
Tube "B"
Tube "C"
Tube "D"
Tube "E"
Tube "F"
Tube "G"
Tube "H"
Part No.Part No.
Part No.
Part No.Part No.
H-2382
H-2382
H-2382
H-2382
EMF-103
EMF-102
SSP-5010
EMF-6
LengthLength
Length
LengthLength
6"
6"
6"
6"
-----
-----
4-1/2"
-----
Figure 19Figure 19
Figure 19
Figure 19Figure 19
Routing InstructionsRouting Instructions
Routing Instructions
Routing InstructionsRouting Instructions
Route thru Paint Coil
Route thru Paint Coil
Route thru Paint Coil
Route thru Paint Coil
Route thru Paint Coil
Route thru Paint Coil
Route thru Paint Coil
Install W/Smaller Tapered End Towards the Rear of Applicator
))
)
))
DescriptionDescription
Description
DescriptionDescription
Fluid Trigger
Air Trigger
Fluid Regulator Pilot
Dump Regulator Pilot
Atomizer Air Supply
Fan Air Supply
Dump Line
Paint Line
AA-99-01.1
5454
54
5454

EFM(D) Solventborne Robotic Atomizers - Parts Identification
5555
55
5555
Figure 20: 76485 EFM Applicator Assembly (Dual 60Figure 20: 76485 EFM Applicator Assembly (Dual 60
Figure 20: 76485 EFM Applicator Assembly (Dual 60°
Figure 20: 76485 EFM Applicator Assembly (Dual 60Figure 20: 76485 EFM Applicator Assembly (Dual 60
))
)
))
AA-99-01.1

EFM(D) Solventborne Robotic Atomizers - Parts Identification
76485 EFM APPLICA76485 EFM APPLICA
76485 EFM APPLICA
76485 EFM APPLICA76485 EFM APPLICA
Item #Item #
Item #
Item #Item #
1 76479-00 Spray Head Assembly, Resistive, EFM 2
2 76486-00 Applicator Housing Assembly, Dual, 60 Degree 1
3 EMF0600-02 Shroud, ITW Logo, EFM 1
4 7554-08 O-Ring, Fluorocarbon, Viton 8
5 SSF-3125 Screw, SHCS, 5/16-18 x .75" Long, Nylon 8
6 EMF-97 Screw, Locating Pin, Ring 3
7 EMF-204 Socket Head Cap Screw, Captive 6
8 76554-00 Flange, Mounting Ring 1
Part #Part #
Part #
Part #Part #
TT
OR ASSEMBLOR ASSEMBL
T
OR ASSEMBL
TT
OR ASSEMBLOR ASSEMBL
DescriptionDescription
Description
DescriptionDescription
YY
- P - P
Y
- P
YY
- P - P
ARAR
TS LISTTS LIST
AR
TS LIST
ARAR
TS LISTTS LIST
(Figure 20) (Figure 20)
(Figure 20)
(Figure 20) (Figure 20)
QtyQty
Qty
QtyQty
AA-99-01.1
5656
56
5656

EFM(D) Solventborne Robotic Atomizers - Parts Identification
5757
57
5757
Figure 21a: 76487 Valve Manifold Assembly (Dual 60Figure 21a: 76487 Valve Manifold Assembly (Dual 60
Figure 21a: 76487 Valve Manifold Assembly (Dual 60°
Figure 21a: 76487 Valve Manifold Assembly (Dual 60Figure 21a: 76487 Valve Manifold Assembly (Dual 60
) (Sheet 1 of 2)) (Sheet 1 of 2)
) (Sheet 1 of 2)
) (Sheet 1 of 2)) (Sheet 1 of 2)
AA-99-01.1

EFM(D) Solventborne Robotic Atomizers - Parts Identification
AA-99-01.1
Figure 21b: 76487 Valve Manifold Assembly (Dual 60Figure 21b: 76487 Valve Manifold Assembly (Dual 60
Figure 21b: 76487 Valve Manifold Assembly (Dual 60°
Figure 21b: 76487 Valve Manifold Assembly (Dual 60Figure 21b: 76487 Valve Manifold Assembly (Dual 60
) (Sheet 2 of 2)) (Sheet 2 of 2)
) (Sheet 2 of 2)
) (Sheet 2 of 2)) (Sheet 2 of 2)
5858
58
5858

EFM(D) Solventborne Robotic Atomizers - Parts Identification
7648776487
76487
7648776487
(Figures 21a & 21b)(Figures 21a & 21b)
(Figures 21a & 21b)
(Figures 21a & 21b)(Figures 21a & 21b)
Item #Item #
Item #
Item #Item #
V V
ALAL
V
V V
1 76545-00 Applicator Valve Body, Dual, 60 Heads 1
2 EMF-406 Valve Cover Assembly 1
3 EMF-20 Air Fitting 2
4 SSP-6076 Tube Fitting, Nylon, 5/16"T 2
5 75699-01 Tube Fitting, Barb, 1/16" ID Tube 5
6 SSF-3129 Screw, SHCS, 6-32 x 1.00" Long, Steel, Black 3
7 74161-00 Spring, Compression 2
8 74160-00 Needle and Seat Assembly 2
9 76369-00 Retainer, Seat 2
10 76370-00 Support, Lower, Diaphragm, 1.00" 1
11 76371-00 Support, Upper, Diaphragm, 1.00" 1
12 76404-00 Cap, Regulator, 2.00" 1
13 76405-00 Spacer, Diaphragm, Support, 2.00" 1
14 76374-08C Screw, PHMS, #4-40 x .25" Long, Stainless Steel 2
15 76378-00 Diaphragm, 2.00" 1
16 SSG-8172 O-Ring, Solvent Resistant 3
17 76376-00 Regulator Cap, 1.00" 1
18 76375-00 Spacer, Diaphragm, Support, 1.00" 1
19 ---- ---- -20 7554-09 O-Ring, Fluorocarbon, Viton 2
21 76377-00 Diaphragm, 1.00" 1
22 SSG-8128 O-Ring, Solvent Resistant 1
23 SSP-7816 Nut, Nylon, 3/8"T 2
24 7554-05 O-Ring, Fluorocarbon, Viton 1
25 7554-33 O-Ring, Fluorocarbon, Viton 2
26 LSOR0005-06 O-Ring, Teflon Encapsulated 1
27 SSG-8136 O-Ring, Solvent Resistant 4
28 EMFD-407 High Voltage Extension Assembly 1
29 EMF-413 Air Cartridge Valve Assembly 2
30 EMFD-9 Spring, H.V. Contact 2
31 76407-00 Support, Lower, Diaphragm, 2.00" 1
32 76406-00 Support, Upper, Diaphragm, 2.00" 1
33 SSP-9011 Ferrule, Front, 3/8"T, Nylon 2
34 SSP-9012 Ferrule, Back, 3/8"T, Nylon 2
VE MANIFOLD ASSEMBLVE MANIFOLD ASSEMBL
AL
VE MANIFOLD ASSEMBL
ALAL
VE MANIFOLD ASSEMBLVE MANIFOLD ASSEMBL
Part #Part #
Part #
Part #Part #
DescriptionDescription
Description
DescriptionDescription
YY
- P - P
Y
- P
YY
- P - P
ARAR
TS LISTTS LIST
AR
TS LIST
ARAR
TS LISTTS LIST
QtyQty
Qty
QtyQty
5959
59
5959
AA-99-01.1

EFM(D) Solventborne Robotic Atomizers - Parts Identification
NOTESNOTES
NOTES
NOTESNOTES
AA-99-01.1
6060
60
6060

EFM(D) Solventborne Robotic Atomizers - Parts Identification
6161
61
6161
Figure 22: 76486 Applicator Housing Assembly (Dual 60Figure 22: 76486 Applicator Housing Assembly (Dual 60
Figure 22: 76486 Applicator Housing Assembly (Dual 60°
Figure 22: 76486 Applicator Housing Assembly (Dual 60Figure 22: 76486 Applicator Housing Assembly (Dual 60
))
)
))
AA-99-01.1

EFM(D) Solventborne Robotic Atomizers - Parts Identification
76486 APPLICA76486 APPLICA
76486 APPLICA
76486 APPLICA76486 APPLICA
Item #Item #
Item #
Item #Item #
1 76487-00 Valve Manifold Assembly, Dual, 60 Degree Head 1
2 75933-00 Cascade Assembly, HP404 1
3 76530-00 Tie Rod, Long 2
4 76529-00 Bracket, Cascade Mounting 1
5 76490-00 Manifold Plate Assembly, EFM 1
6 EMF-72 Bracket, Tie Rod Mounting 1
7 EMF-74 Tie Rod, Short 1
8 H-2382 1/8" OD Polyurethane Tube 29"
9 SSF-3134 Screw, SHCS, 10-24 x .75" Long, Nylon 2
10 SSF-3135 Screw, SHCS, 1/4-20 x .5" Long, Nylon 1
11 SS-7942-CD Screw, SHCS, 1/4-20 x 1" Long, Steel 3
12 13076-10 O-Ring, Teflon 3
13 75702-05 Washer, Flat, #10, Nylon 2
14 SSP-6814 Tee, Tube, 1/16" ID 1
TUBE FUNCTIONS (TUBE FUNCTIONS (
TUBE FUNCTIONS (
TUBE FUNCTIONS (TUBE FUNCTIONS (
Tube IDTube ID
Tube ID
Tube IDTube ID
Part #Part #
Part #
Part #Part #
Part No.Part No.
Part No.
Part No.Part No.
TT
OR HOUSING ASSEMBLOR HOUSING ASSEMBL
T
OR HOUSING ASSEMBL
TT
OR HOUSING ASSEMBLOR HOUSING ASSEMBL
DescriptionDescription
Description
DescriptionDescription
LengthLength
Length
LengthLength
Figure 22Figure 22
Figure 22
Figure 22Figure 22
Routing InstructionsRouting Instructions
Routing Instructions
Routing InstructionsRouting Instructions
))
)
))
YY
- P - P
Y
- P
YY
- P - P
ARAR
TS LISTTS LIST
AR
TS LIST
ARAR
TS LISTTS LIST
(Figure 22) (Figure 22)
(Figure 22)
(Figure 22) (Figure 22)
DescriptionDescription
Description
DescriptionDescription
QtyQty
Qty
QtyQty
Tube "A"
Tube "B"
Tube "C"
Tube "D"
Tube "E"
Tube "F"
Tube "G"
Tube "H"
H-2382
H-2382
H-2382
H-2382
EMF-103
EMF-102
SSP-5010
EMF-6
5", 3", 3"
6"
6"
6"
-----
-----
4 1/2"
-----
Route thru Paint Coil
Route thru Paint Coil
Route thru Paint Coil
Route thru Paint Coil
Route thru Paint Coil
Route thru Paint Coil
Route thru Paint Coil
Install W/Smaller Tapered End Towards the Rear of Applicator
Fluid Trigger
Air Trigger
Fluid Regulator Pilot
Dump Regulator Pilot
Atomizer Air Supply
Fan Air Supply
Dump Line
Paint Line
AA-99-01.1
6262
62
6262

EFM(D) Solventborne Robotic Atomizers - Parts Identification
6363
63
6363
Figure 23a: 76488 EFM Applicator Assembly (Dual 90Figure 23a: 76488 EFM Applicator Assembly (Dual 90
Figure 23a: 76488 EFM Applicator Assembly (Dual 90°
Figure 23a: 76488 EFM Applicator Assembly (Dual 90Figure 23a: 76488 EFM Applicator Assembly (Dual 90
) (Sheet 1 of 2)) (Sheet 1 of 2)
) (Sheet 1 of 2)
) (Sheet 1 of 2)) (Sheet 1 of 2)
AA-99-01.1

EFM(D) Solventborne Robotic Atomizers - Parts Identification
Figure 23b: 76488 EFM Applicator Assembly (Dual 90Figure 23b: 76488 EFM Applicator Assembly (Dual 90
Figure 23b: 76488 EFM Applicator Assembly (Dual 90°
Figure 23b: 76488 EFM Applicator Assembly (Dual 90Figure 23b: 76488 EFM Applicator Assembly (Dual 90
76488 EFM APPLICA76488 EFM APPLICA
76488 EFM APPLICA
76488 EFM APPLICA76488 EFM APPLICA
(Figures 23a & 23b)(Figures 23a & 23b)
(Figures 23a & 23b)
(Figures 23a & 23b)(Figures 23a & 23b)
Item #Item #
Item #
Item #Item #
1 76479-00 Spray Head Assembly, Resistive, EFM 2
2 76489-00 Applicator Housing Assembly, Dual, 90 Degree 1
3 EMF0600-02 Shroud, ITW Logo, EFM 1
4 7554-08 O-Ring, Fluorocarbon, Viton 8
5 SSF-3125 Screw, SHCS, 5/16-18" x .75" Long, Nylon 8
6 EMF-97 Screw, Locating Pin, Ring 3
7 EMF-204 Socket Head Cap Screw, Captive 6
8 76554-00 Flange, Mounting Ring 1
Part #Part #
Part #
Part #Part #
TT
OR ASSEMBLOR ASSEMBL
T
OR ASSEMBL
TT
OR ASSEMBLOR ASSEMBL
DescriptionDescription
Description
DescriptionDescription
YY
- P - P
Y
- P
YY
- P - P
ARAR
AR
ARAR
) (Sheet 2 of 2)) (Sheet 2 of 2)
) (Sheet 2 of 2)
) (Sheet 2 of 2)) (Sheet 2 of 2)
TS LISTTS LIST
TS LIST
TS LISTTS LIST
QtyQty
Qty
QtyQty
AA-99-01.1
6464
64
6464

EFM(D) Solventborne Robotic Atomizers - Parts Identification
6565
65
6565
Figure 24a: 76368 Valve Manifold Assembly (Dual 90Figure 24a: 76368 Valve Manifold Assembly (Dual 90
Figure 24a: 76368 Valve Manifold Assembly (Dual 90°
Figure 24a: 76368 Valve Manifold Assembly (Dual 90Figure 24a: 76368 Valve Manifold Assembly (Dual 90
) (Sheet 1 of 2)) (Sheet 1 of 2)
) (Sheet 1 of 2)
) (Sheet 1 of 2)) (Sheet 1 of 2)
AA-99-01.1

EFM(D) Solventborne Robotic Atomizers - Parts Identification
AA-99-01.1
Figure 24b: 76368 Valve Manifold Assembly (Dual 90Figure 24b: 76368 Valve Manifold Assembly (Dual 90
Figure 24b: 76368 Valve Manifold Assembly (Dual 90°
Figure 24b: 76368 Valve Manifold Assembly (Dual 90Figure 24b: 76368 Valve Manifold Assembly (Dual 90
) (Sheet 2 of 2)) (Sheet 2 of 2)
) (Sheet 2 of 2)
) (Sheet 2 of 2)) (Sheet 2 of 2)
6666
66
6666

EFM(D) Solventborne Robotic Atomizers - Parts Identification
7636876368
76368
7636876368
(Figures 24a & 24b)(Figures 24a & 24b)
(Figures 24a & 24b)
(Figures 24a & 24b)(Figures 24a & 24b)
Item #Item #
Item #
Item #Item #
V V
ALAL
V
V V
1 76380-00 Applicator Valve Body, Dual, 90 Degree Heads 1
2 EMF-406 Valve Cover Assembly 1
3 EMF-20 Air Fitting 2
4 SSP-6076 Tube Fitting, Nylon, 5/16"T 2
5 75699-01 Tube Fitting, Barb, 1/16" ID Tube 5
6 SSF-3129 Screw, SHCS, 6-32 x 1.00" Long, Steel, Black 3
7 74161-00 Spring, Compression 2
8 74160-00 Needle and Seat Assembly 2
9 76369-00 Retainer, Seat 2
10 76370-00 Support, Lower, Diaphragm, 1.00" 1
11 76371-00 Support, Upper, Diaphragm, 1.00" 1
12 76404-00 Cap, Regulator, EMF, 2.00" 1
13 76405-00 Diaphragm Support, EMF, 2.00" 1
14 76374-08C Screw, PHMS, #4-40 x .25" Long, Stainless Steel 2
15 76378-00 Diaphragm, 2.00" 1
16 SSG-8172 O-Ring, Solvent Resistant 3
17 76376-00 Regulator Cap, 1.00" 1
18 76375-00 Spacer, Diaphragm, Support, 1.00" 1
19 ---- ---- -20 7554-09 O-Ring, Fluorocarbon, Viton 2
21 76377-00 Diaphragm, 1.00" 1
22 SSG-8128 O-Ring, Solvent Resistant 1
23 SSP-7816 Nut, Nylon, 3/8"T 2
24 7554-05 O-Ring, Fluorocarbon, Viton 1
25 7554-33 O-Ring, Fluorocarbon, Viton 2
26 LSOR0005-06 O-Ring, Teflon Encapsulated 1
27 SSG-8136 O-Ring, Solvent Resistant 4
28 EMFD-403 High Voltage Extension Assembly 1
29 EMF-413 Air Cartridge Valve Assembly 2
30 EMFD-9 Spring, High Voltage Contact 2
31 76407-00 Support, Lower, Diaphragm, 2.00" 1
32 76406-00 Support, Upper, Diaphragm, 2.00" 1
33 SSP-9011 Ferrule, Front, 3/8"T, Nylon 2
34 SSP-9012 Ferrule, Back, 3/8"T, Nylon 2
VE MANIFOLD ASSEMBLVE MANIFOLD ASSEMBL
AL
VE MANIFOLD ASSEMBL
ALAL
VE MANIFOLD ASSEMBLVE MANIFOLD ASSEMBL
Part #Part #
Part #
Part #Part #
DescriptionDescription
Description
DescriptionDescription
YY
- P - P
Y
- P
YY
- P - P
ARAR
TS LISTTS LIST
AR
TS LIST
ARAR
TS LISTTS LIST
QtyQty
Qty
QtyQty
6767
67
6767
AA-99-01.1

EFM(D) Solventborne Robotic Atomizers - Parts Identification
NOTESNOTES
NOTES
NOTESNOTES
AA-99-01.1
6868
68
6868

EFM(D) Solventborne Robotic Atomizers - Parts Identification
6969
69
6969
Figure 25: 76489 Applicator Housing Assembly (Dual 90Figure 25: 76489 Applicator Housing Assembly (Dual 90
Figure 25: 76489 Applicator Housing Assembly (Dual 90°
Figure 25: 76489 Applicator Housing Assembly (Dual 90Figure 25: 76489 Applicator Housing Assembly (Dual 90
))
)
))
AA-99-01.1

EFM(D) Solventborne Robotic Atomizers - Parts Identification
76486 APPLICA76486 APPLICA
76486 APPLICA
76486 APPLICA76486 APPLICA
Item #Item #
Item #
Item #Item #
1 76368-00 Valve Manifold Assembly, Dual, 90 Degree Head 1
2 75933-00 Cascade Assembly, HP404 1
3 76530-00 Tie Rod, Long 2
4 76529-00 Bracket, Cascade Mounting 1
5 76490-00 Manifold Plate Assembly, EFM 1
6 EMF-72 Bracket, Tie Rod Mounting 1
7 EMF-74 Tie Rod, Short 1
8 H-2382 1/8" OD Polyurethane Tube 29"
9 SSF-3134 Screw, SHCS, 10-24 x .75" Long, Nylon 2
10 SSF-3135 Screw, SHCS, 1/4-20 x .5" Long, Nylon 1
11 SS-7942-CD Screw, SHCS, 1/4-20 x 1" Long, Steel 3
12 13076-10 O-Ring, Teflon 3
13 75702-05 Washer, Flat, #10, Nylon 2
14 SSP-6814 Tee, Tube, 1/16" ID 1
** P** P
ARAR
** P
AR
** P** P
ARAR
1
59972-00, dielectric grease, spread a small amount evenly in each groove of both parts.
Part #Part #
Part #
Part #Part #
TS LISTTS LIST
TS LIST
TS LISTTS LIST
TT
OR HOUSING ASSEMBLOR HOUSING ASSEMBL
T
OR HOUSING ASSEMBL
TT
OR HOUSING ASSEMBLOR HOUSING ASSEMBL
DescriptionDescription
Description
DescriptionDescription
BULLET BULLET
BULLET
BULLET BULLET
DEFINITION T DEFINITION T
DEFINITION T
DEFINITION T DEFINITION T
YY
- P - P
ARAR
Y
- P
YY
- P - P
ABLE (Figure 25)ABLE (Figure 25)
ABLE (Figure 25)
ABLE (Figure 25)ABLE (Figure 25)
TS LISTTS LIST
AR
TS LIST
ARAR
TS LISTTS LIST
(Figure 25) (Figure 25)
(Figure 25)
(Figure 25) (Figure 25)
QtyQty
Qty
QtyQty
TUBE FUNCTIONS (TUBE FUNCTIONS (
TUBE FUNCTIONS (
TUBE FUNCTIONS (TUBE FUNCTIONS (
Tube IDTube ID
Tube ID
Tube IDTube ID
Tube "A"
Tube "B"
Tube "C"
Tube "D"
Tube "E"
Tube "F"
Tube "G"
Tube "H"
Part No.Part No.
Part No.
Part No.Part No.
H-2382
H-2382
H-2382
H-2382
EMF-103
EMF-102
SSP-5010
EMF-6
LengthLength
Length
LengthLength
5", 3", 3"
6"
6"
6"
-----
-----
4 1/2"
-----
Figure 25Figure 25
Figure 25
Figure 25Figure 25
Routing InstructionsRouting Instructions
Routing Instructions
Routing InstructionsRouting Instructions
Route thru Paint Coil
Route thru Paint Coil
Route thru Paint Coil
Route thru Paint Coil
Route thru Paint Coil
Route thru Paint Coil
Route thru Paint Coil
Install W/Smaller Tapered End Towards the Rear of Applicator
))
)
))
DescriptionDescription
Description
DescriptionDescription
Fluid Trigger
Air Trigger
Fluid Regulator Pilot
Dump Regulator Pilot
Atomizer Air Supply
Fan Air Supply
Dump Line
Paint Line
AA-99-01.1
7070
70
7070

EFM(D) Solventborne Robotic Atomizers - Warranty Policies
WW
ARRANTYARRANTY
W
ARRANTY
WW
ARRANTYARRANTY
LIMITED WLIMITED W
LIMITED W
LIMITED WLIMITED W
ITW RansburgITW Ransburg
ITW Ransburg will replace or repair without
ITW RansburgITW Ransburg
charge any part and/or equipment that fails within
the specified time (see below) because of faulty
workmanship or material, provided that the equipment has been used and maintained in accordance with ITW Ransburg’s written safety and
operating instructions, and has been used under
normal operating conditions. Normal wear items
are excluded.
THE USE OF OTHER THAN ITW RANS-THE USE OF OTHER THAN ITW RANS-
THE USE OF OTHER THAN ITW RANS-
THE USE OF OTHER THAN ITW RANS-THE USE OF OTHER THAN ITW RANSBURG APPROVED PARTS VOIDS ALLBURG APPROVED PARTS VOIDS ALL
BURG APPROVED PARTS VOIDS ALL
BURG APPROVED PARTS VOIDS ALLBURG APPROVED PARTS VOIDS ALL
WARRANTIES.WARRANTIES.
WARRANTIES.
WARRANTIES.WARRANTIES.
SPARE PARTS: One hundred and eighty (180)
days from date of purchase, except for rebuilt
parts (any part number ending in “R”) for which the
warranty period is ninety (90) days.
ARRANTYARRANTY
ARRANTY
ARRANTYARRANTY
POLICIES POLICIES
POLICIES
POLICIES POLICIES
ITW RANSBURG’S ONLY OBLIGATIONITW RANSBURG’S ONLY OBLIGATION
ITW RANSBURG’S ONLY OBLIGATION
ITW RANSBURG’S ONLY OBLIGATIONITW RANSBURG’S ONLY OBLIGATION
UNDER THIS WARRANTY IS TO REPLACEUNDER THIS WARRANTY IS TO REPLACE
UNDER THIS WARRANTY IS TO REPLACE
UNDER THIS WARRANTY IS TO REPLACEUNDER THIS WARRANTY IS TO REPLACE
PARTS THAT HAVE FAILED BECAUSEPARTS THAT HAVE FAILED BECAUSE
PARTS THAT HAVE FAILED BECAUSE
PARTS THAT HAVE FAILED BECAUSEPARTS THAT HAVE FAILED BECAUSE
OF FAULTY WORKMANSHIP OR MATE-OF FAULTY WORKMANSHIP OR MATE-
OF FAULTY WORKMANSHIP OR MATE-
OF FAULTY WORKMANSHIP OR MATE-OF FAULTY WORKMANSHIP OR MATERIALS. THERE ARE NO IMPLIED WAR-RIALS. THERE ARE NO IMPLIED WAR-
RIALS. THERE ARE NO IMPLIED WAR-
RIALS. THERE ARE NO IMPLIED WAR-RIALS. THERE ARE NO IMPLIED WARRANTIES NOR WARRANTIES OF EITHERRANTIES NOR WARRANTIES OF EITHER
RANTIES NOR WARRANTIES OF EITHER
RANTIES NOR WARRANTIES OF EITHERRANTIES NOR WARRANTIES OF EITHER
MERCHANTABILITY OR FITNESS FOR AMERCHANTABILITY OR FITNESS FOR A
MERCHANTABILITY OR FITNESS FOR A
MERCHANTABILITY OR FITNESS FOR AMERCHANTABILITY OR FITNESS FOR A
PARTICULAR PURPOSE. ITW RANS-PARTICULAR PURPOSE. ITW RANS-
PARTICULAR PURPOSE. ITW RANS-
PARTICULAR PURPOSE. ITW RANS-PARTICULAR PURPOSE. ITW RANSBURG ASSUMES NO LIABILITY FOR IN-BURG ASSUMES NO LIABILITY FOR IN-
BURG ASSUMES NO LIABILITY FOR IN-
BURG ASSUMES NO LIABILITY FOR IN-BURG ASSUMES NO LIABILITY FOR INJURY, DAMAGE TO PROPERTY OR FORJURY, DAMAGE TO PROPERTY OR FOR
JURY, DAMAGE TO PROPERTY OR FOR
JURY, DAMAGE TO PROPERTY OR FORJURY, DAMAGE TO PROPERTY OR FOR
CONSEQUENTIAL DAMAGES FOR LOSSCONSEQUENTIAL DAMAGES FOR LOSS
CONSEQUENTIAL DAMAGES FOR LOSS
CONSEQUENTIAL DAMAGES FOR LOSSCONSEQUENTIAL DAMAGES FOR LOSS
OF GOODWILL OR PRODUCTION OROF GOODWILL OR PRODUCTION OR
OF GOODWILL OR PRODUCTION OR
OF GOODWILL OR PRODUCTION OROF GOODWILL OR PRODUCTION OR
INCOME, WHICH RESULT FROM USE ORINCOME, WHICH RESULT FROM USE OR
INCOME, WHICH RESULT FROM USE OR
INCOME, WHICH RESULT FROM USE ORINCOME, WHICH RESULT FROM USE OR
MISUSE OF THE EQUIPMENT BY PUR-MISUSE OF THE EQUIPMENT BY PUR-
MISUSE OF THE EQUIPMENT BY PUR-
MISUSE OF THE EQUIPMENT BY PUR-MISUSE OF THE EQUIPMENT BY PURCHASER OR OTHERS.CHASER OR OTHERS.
CHASER OR OTHERS.
CHASER OR OTHERS.CHASER OR OTHERS.
EXCLUSIONS:EXCLUSIONS:
EXCLUSIONS:
EXCLUSIONS:EXCLUSIONS:
EQUIPMENT: When purchased as a complete
unit, (i.e., guns, power supplies, control units,
etc.), is one (1) year from date of purchase.
WRAPPING THE APPLICATOR IN PLAS-WRAPPING THE APPLICATOR IN PLAS-
WRAPPING THE APPLICATOR IN PLAS-
WRAPPING THE APPLICATOR IN PLAS-WRAPPING THE APPLICATOR IN PLASTIC, SHRINK-WRAP, ETC., WILL VOIDTIC, SHRINK-WRAP, ETC., WILL VOID
TIC, SHRINK-WRAP, ETC., WILL VOID
TIC, SHRINK-WRAP, ETC., WILL VOIDTIC, SHRINK-WRAP, ETC., WILL VOID
THIS WARRANTY.THIS WARRANTY.
THIS WARRANTY.
THIS WARRANTY.THIS WARRANTY.
If, in ITW Ransburg’s opinion the warranty item in
question, or other items damaged by this part was
improperly installed, operated or maintained, ITW
Ransburg will assume no responsibility for repair
or replacement of the item or items. The purchaser, therefore will assume all responsibility for
any cost of repair or replacement and service
related costs if applicable.
7171
71
7171
AA-99-01.1

MANUALMANUAL
MANUAL
MANUALMANUAL
CHANGE SUMMAR CHANGE SUMMAR
CHANGE SUMMAR
CHANGE SUMMAR CHANGE SUMMAR
YY
Y
YY
This manual was published to supercede
Manuals
9000LA Automatic Electrostatic Spray Guns9000LA Automatic Electrostatic Spray Guns
9000LA Automatic Electrostatic Spray Guns
9000LA Automatic Electrostatic Spray Guns9000LA Automatic Electrostatic Spray Guns
Dual Atomization TechnologyDual Atomization Technology
Dual Atomization Technology
Dual Atomization TechnologyDual Atomization Technology
01.1, 01.1,
01.1,
01.1, 01.1,
matic Electrostaic Robot Mount Spray Gunsmatic Electrostaic Robot Mount Spray Guns
matic Electrostaic Robot Mount Spray Guns
matic Electrostaic Robot Mount Spray Gunsmatic Electrostaic Robot Mount Spray Guns
Dual Atomization Technology Dual Atomization Technology
Dual Atomization Technology
Dual Atomization Technology Dual Atomization Technology
following changes:
1. To publish into Service Manual, that list all
present REA Automatic Electrostatic Spray
Applicators, including their updated information.
(All Manual Sections.)
3. To include a "Warranty Policies" section to the
Service Manual.
4. Remove" Appendix" section. See "Literature
IL-307 Technical Supplement for All Products".
5. Added "www.itwransburg.com" to the "Back
Cover".
AA-96-01.1, AA-96-01.1,
AA-96-01.1,
AA-96-01.1, AA-96-01.1,
REA-9000R and REA-9000RL Auto-REA-9000R and REA-9000RL Auto-
REA-9000R and REA-9000RL Auto-
REA-9000R and REA-9000RL Auto-REA-9000R and REA-9000RL Auto-
REA-9000A and REA-REA-9000A and REA-
REA-9000A and REA-
REA-9000A and REA-REA-9000A and REA-
, and AA-97-, and AA-97-
, and AA-97-
, and AA-97-, and AA-97-
Service
to make the
AA-99-01.1

Service Manual Price:Service Manual Price:
Service Manual Price: €
Service Manual Price:Service Manual Price:
ManufacturingManufacturing
Manufacturing
ManufacturingManufacturing
40.00 (Euro)40.00 (Euro)
40.00 (Euro)
40.00 (Euro)40.00 (Euro)
$50.00 (U.S.)$50.00 (U.S.)
$50.00 (U.S.)
$50.00 (U.S.)$50.00 (U.S.)
1910 North Wayne Street
Angola, Indiana 46703-9100
Telephone: 260/665-8800
Fax: 260/665-8516
Technical/Service AssistanceTechnical/Service Assistance
Technical/Service Assistance
Technical/Service AssistanceTechnical/Service Assistance
Automotive Assembly and Tier I Telephone: 800/ 626-3565 Fax: 419/ 470-2040
Industrial Systems Telephone: 800/ 233-3366 Fax: 419/ 470-2071
Ransburg Guns Telephone: 800/ 233-3366 Fax: 419/ 470-2071
www.itwransburg.com
Technical Support Representative will direct you to the appropriate telephone numberTechnical Support Representative will direct you to the appropriate telephone number
Technical Support Representative will direct you to the appropriate telephone number
Technical Support Representative will direct you to the appropriate telephone numberTechnical Support Representative will direct you to the appropriate telephone number
for ordering Spare Parts.for ordering Spare Parts.
for ordering Spare Parts.
for ordering Spare Parts.for ordering Spare Parts.
© 2007 Illinois Tool Works Inc. All rights reserved.
Models and specifications subject to change without notice.
Form No. AA-99-01.1
Litho in U.S.A.
06/07
 Loading...