

Page 1
OPERATORS MANUAL
HEADPHONE AMPLIFIER
MH 4
QUICK START
Conect the output from any stereo source such as a mixer or tape deck, and plug the left and right inputs into the
respective INPUT jacks. The Inputs accept balanced or unbalanced sources. Just plug them in. This source is now routed to
each of the four Outputs.
For a single mono source feeding all headphones, connect it to either one of the INPUT jacks and engage the STEREO/
MONO switch. Set the CHANNEL LEVEL controls for individual headphone levels.
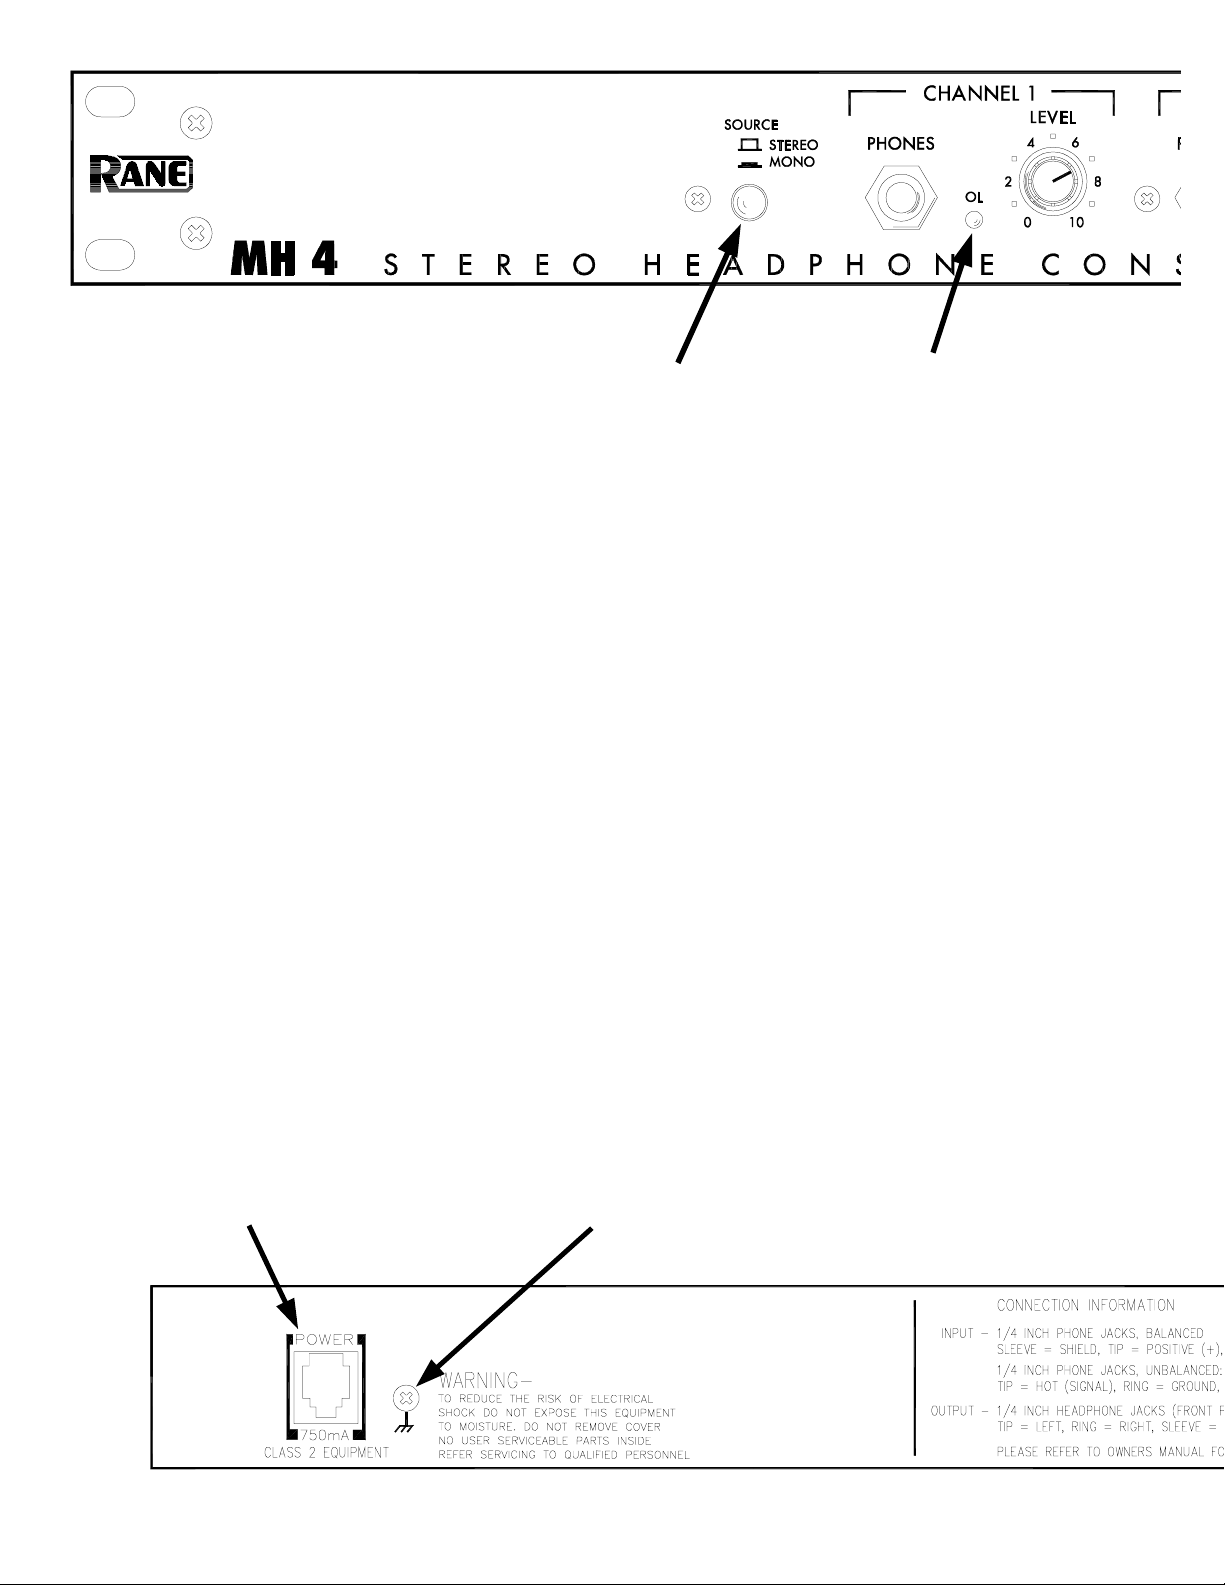
Never connect anything except a Rane power supply to the thing that looks like a telephone jack on the rear of the
unit. This is an AC input and requires special attention if you do not have a power supply exactly like the one originally
packed with your unit. See the full explanation of the power supply requirements elsewhere in this manual.
WEAR PARTS: This product contains no wear parts.
Manual-1
Page 2
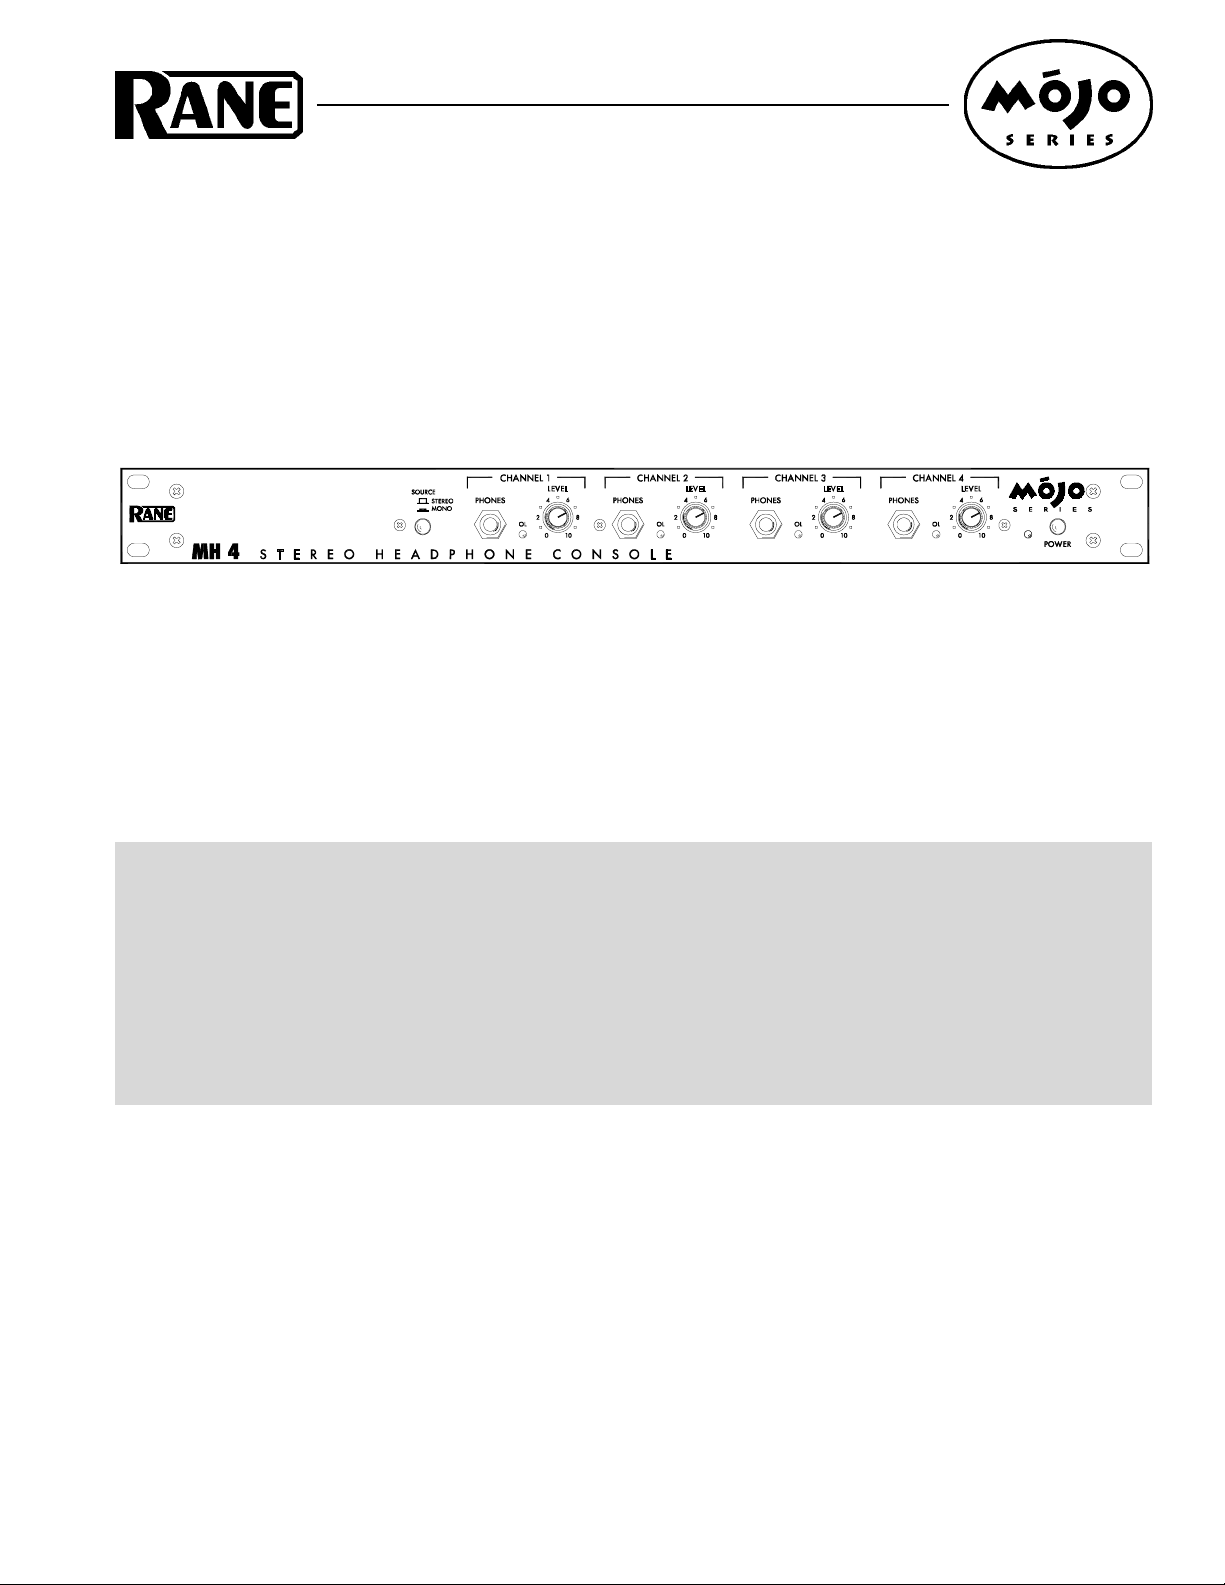
STEREO/MONO switch
OVERLOAD indicators
Remote POWER supply input
The unit is supplied from the factory with a
Model RS 1 remote power supply suitable for
connection to this input jack. The power
requirements of the unit call for an 18 volt
AC center-tapped transformer only. This is
Converts the INPUTS from stereo to mono so
that a single input cable drives both sides of
the headphones. In some instances a
STEREO program may be confusing for live
monitoring purposes, and switching to MONO
improves intelligibility by summing the Left
and Right signals.
Chassis ground point
A screw is supplied for chassis grounding
purposes. This unit comes with an outboard
power supply which does not ground the
The red LEDs light when the input signal
exceeds the MH 4’s output capability (3 dB
below maximum). Occasional flickering is
acceptable.The overload point automatically
varies with the headphones used.
not a telephone jack. Never use a
power supply with your unit other than
the one supplied or a replacement
approved by Rane Corporation. Using any
other type of supply may damage the unit
and void the warranty.
Manual-2
chassis through the line cord. The MH 4 can
be grounded either to another chassis which
is earth grounded, or directly to the
grounding screw on an AC outlet cover by
means of a wire connected to this chassis
grounding screw.
Page 3
PHONE Output jacks
Individual LEVEL controls
POWER switch and LED
These stereo ¼" TRS jacks accept standard
¼" TRS stereo headphone plugs.
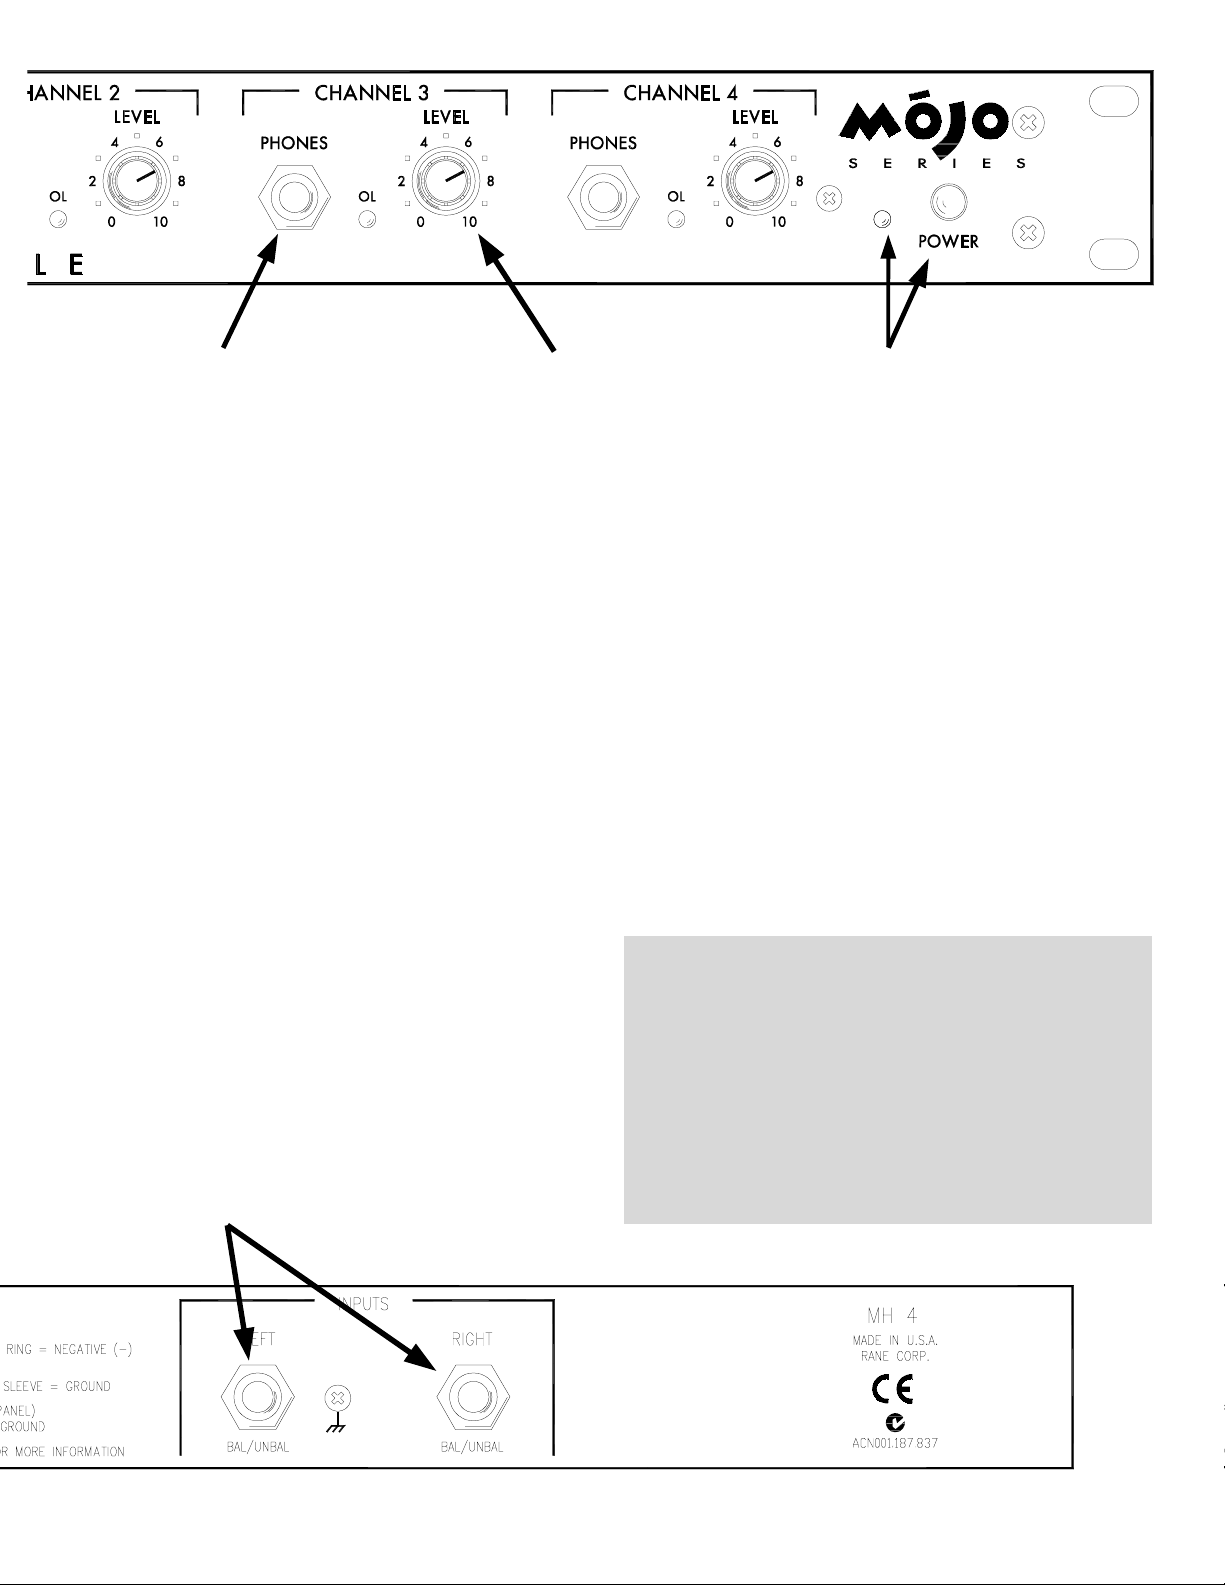
INPUT jacks
These are automatic balanced/unbalanced
Inputs, which accept either a ¼" TRS (TipRing-Sleeve) plug for balanced operation, or
a ¼" TS (Tip-Sleeve) plug for unbalanced
operation. A balanced line is best when
connecting a cable over 10 feet in length.
You do nothing different when hooking up
balanced or unbalanced lines. The MH 4 is
one smart animal.
These control the volume for each set of
headphones as they are driven from the
INPUTS. It’s always a good idea to keep this
control turned down before plugging in a
pair of phones, then turn it up slowly.
MH 4 CONNECTION
With the power switch in the off (out) position, plug the
power cord into the appropriate AC power source indicated
on the rear panel. Locate the power supply case away from
the MH 4 and other hum sensitive equipment.
Begin with all LEVEL controls counterclockwise at “0”.
Plug the outputs from a mono or stereo source into the
INPUTS.
See Sound System Interconnection on page 8 for more
information on proper cable wiring between devices.
Your basic, straightforward power switch.
When the yellow LED is lit, the MH 4 is
ready to go.
Manual-3
Page 4

UNDERSTANDING HEADPHONE POWER REQUIREMENTS
HEADPHONE SENSITIVITY
Headphone manufacturers specify a “sensitivity” rating
for their products that is very similar to loudspeaker sensitivity ratings. For loudspeakers, the standard is to apply 1 watt
and then measure the sound pressure level (SPL) at a distance
of 1 meter. For headphones, the standard is to apply 1
milliwatt (1 mW = 1/1000 of a watt) and then measure the
sound pressure level at the earpiece (using a dummy head
with built-in microphones). Sensitivity is then stated as the
number of dB of actual sound level (SPL) produced by the
headphones with 1 mW of input; headphone specifications
commonly refer to this by the misleading term “dB/mW.”
What they really mean is dB SPL for 1 mW input.
Think about these sensitivity definitions a moment:
headphone sensitivity is rated using 1/1000 of a watt; loudspeaker sensitivity is rated using 1 watt. So a quick rule-ofthumb is that you are going to need about 1/1000 as much
power to drive your headphones as to drive your loudspeakers
since both of their sensitivity ratings are similar (around 90110 dB-SPL). For example, if your hi-fi amp is rated at 65
watts, then you would need only 65 mW to drive comparable
headphones. (Actually you need less than 65 mW since most
people don’t listen to their loudspeakers at 1 meter.) And this
is exactly what you find in hi-fi receivers—their headphone
jacks typically provide only 10-20 mW of output Power.
Take another moment and think about all those portable
tape players. Ever hear one? They sound great, and loud. Why
you can even hear the headphones ten feet away as the
teenage skateboarder that ran over your foot escapes.
Power output? About 12 mW.
As you can see from the chart below, headphones near 75
ohms impedance produce the highest power levels from the
MH 4. However, heaphone sensitivities vary widely, and are
not merely a function of power.
THE LIST
As an aid in finding out how much power is available
from the MH 4 Headphone Console we have compiled a
listing of popular headphones. To the right is a column giving
the maximum SPL obtainable using the MH 4 and any
particular headphone—ultimately, it all gets down to actual
SPL. The power rating really doesn’t matter at all—either it’s
loud enough or it isn’t (of course it has to be clean power, not
clipped and distorted). The SPL numbers shown are for
maximum continuous SPL; for momentary peak SPL add 3
dB.
Note that the maximum achievable SPL varies widely for
different models and manufacturers, ranging from a low of
107 dB to a harmful 133 dB! The table also shows there is
very little relationship between headphone impedance and
sensitivity, and that power output alone means nothing, since
in one case 89 mW produces a maximum SPL of 107 dB, yet
in another case the same 89 mW yields an SPL of 117 dB!
Sensitivity dB is measured sound pressure level with
1 mW of power. The MH 4 Max Power mW column is typical
continuous average power, 20 Hz-20 kHz, with THD less than
0.1%.
If headphones are not yet owned, or replacements are
desired, use this listing as a guide for selecting head-phones
with sufficient sensitivity for the maximum desired SPL.
Note: headphones with an impedance of less than 32 ohms
are not recommended for use with the MH 4.
Manual-4
0.250
0.200
0.150
0.100
POWER IN WATTS
0.050
0.000
0.089
600 300 150 75 50 32 16 8
MH 4 power with all Channels driven simultaneously or with any combination
0.146
MH 4 POW ER
0.207
0.239
LOAD IN OH MS
0.233
0.207
0.146
0.089
Page 5

Manufacturer Model
AKG
Audio-Technica ATH-COM1, ATH-COM2, ATH-908 40 90 220 113
Beyerdynamic DT150 250 97 160 119
Fostex
Grado SR 325 40 96 220 119
Hosa HDS-701 40 91 220 114
Koss A/250, A/200, A/130, TD/80 60 98 238 123
R/80, R/35S, R/20, Porta Pros 60 101 238 124
R/70B, R/55B, SB/50, SB/35 60 101 238 124
MB Quart
Sennheiser
HD265, 525, 535, 545, 565 150 94 207 117
Sony
MDR-D33, MDR-D55, MDR-7504 45 104 230 127
Stanton ST PRO, DJ PRO 1000 32 100 200 123
Technics RP-DJ1200 32 200
Tel ex PH-6 600 105 89 124
Yamaha RH5MA 32 98 200 121
K141M 600 98 89 117
K240M, K240DF 600 88 89 107
K270S 75 92 239 115
K301 100 94 225 118
K401, K501 120 94 220 117
ATH-910 40 92 220 115
ATH-P5 40 100 220 123
ATH-M40 60 100 238 123
ATH-D40 66 102 235 126
ATH- M2 X, AT H- M3X 45 100 230 1 23
DT211, DT311 40 98 220 121
DT250 80 98 240 121
DT411 250 102 160 124
DT 531 250 95 160 116
DT431, DT331 40 86 220 109
DT770PRO, DT990PRO 600 96 89 115
DT801, DT811, DT511 250 94 160 116
DT901, DT911 250 98 160 120
T-5 44 96 225 119
T-7 70 9 8 24 0 1 21
T-20 50 96 233 120
T-40 50 98 233 122
R/200 60 84 238 108
R/100, R/45 60 85 238 109
R/90, HD/2, SB/15 60 100 238 123
R/40 60 90 238 114
R/30S 60 106 238 130
R/10 60 103 238 127
TD/75 60 95 238 119
TD/65 90 101 235 124
TD/61 38 93 212 116
QP 805 300 98 145 120
HD 400, 433, 435, 470 32 94 200 117
HD25 70 120 240 144
HD445 52 97 235 121
HD25SP 85 100 235 123
HD455, 475 60 94 238 118
HD465 100 94 225 118
HD 570 120 95 220 110
HD580, 600 300 97 145 118
MDR-V100MK2 32 98 200 121
MDR-85 40 102 220 125
MDR-V600, MDR-D77 45 106 230 129
MDR-CD10 32 96 200 119
MDR-CD550, CD750 45 100 230 123
MDR-CD6 45 110 230 133
MDR-CD850, CD950 32 102 200 125
MDR-CD1000, CD3000 32 104 200 127
MDR-7506 63 106 240 129
MDR-75 02 45 102 230 125
RH1 32 90 200 113
RH2 32 95 200 118
RH3 60 95 238 119
RH10M 40 102 220 125
RH40M 32 103 200 126
Impedance
(ohms)
Sensitivity
(dB)
MH 4 Max
Power (mW)
MH 4 Max
SPL (dB)
Manual-5
Page 6

SOUND SYSTEM INTERCONNECTION
Rane’s policy is to accommodate rather than dictate.
However, this document contains suggestions for external
wiring changes that should ideally only be implemented by
trained technical personnel. Safety regulations require that all
original grounding means provided from the factory be left
intact for safe operation. No guarantee of responsibility for
incidental or consequential damages can be provided. (In
other words, don’t modify cables, or try your own version of
grounding unless you really understand exactly what type of
output and input you have to connect.)
THE ABSOLUTE BEST RIGHT WAY TO DO IT
Use balanced lines and tie the cable shield to the metal
chassis (right where it enters the chassis) at both ends of the
cable.
A balanced line requires three separate conductors, two of
which are signal (+ and –) and one shield. The shield serves
to guard the sensitive audio lines from interference. Only by
using balanced line interconnects can you guarantee (yes,
guarantee) hum-free results. Always use twisted pair cable.
Chassis tying the shield at each end also guarantees the best
possible protection from RFI [radio frequency interference]
and other noises [neon signs, lighting dimmers].
THE NEXT BEST RIGHT WAY TO DO IT
The quickest, quietest and most foolproof method to
connect balanced and unbalanced is to transformer isolate
all unbalanced connections. Your audio dealer can recommend such a transformer.
The goal of transformer adaptors is to allow the use of
standard cables. With these transformer isolation boxes,
modification of cable assemblies is unnecessary. Virtually
any two pieces of audio equipment can be successfully
interfaced without risk of unwanted hum and noise.
Another way to create the necessary isolation is to use a
direct box. Originally named for its use to convert the high
impedance, high level output of an electric guitar to the low
impedance, low level input of a recording console, it allowed
the player to plug “directly” into the console. Now this term is
commonly used to describe any box used to convert unbalanced lines to balanced lines.
THE LAST BEST RIGHT WAY TO DO IT
If transformer isolation is not an option, special cable
assemblies are a last resort. The key here is to prevent the
shield currents from flowing into a unit whose grounding
scheme creates ground loops (hum) in the audio path (i.e.,
most audio equipment). Do not be tempted to use 3-prong to
2-prong “cheater” adapters to lift grounds. This is a dangerous and illegal practice.
It is true that connecting both ends of the shield is theoretically the best way to interconnect equipment – though this
assumes the interconnected equipment is internally grounded
properly. Since most equipment is not internally grounded
properly, connecting both ends of the shield is not often
practiced, since doing so can create noisy interconnections.
involves disconnecting one end of the shield, even though one
can not buy off-the-shelf cables with the shield disconnected
at one end. The best end to disconnect is a matter of personal
preference and should be religiously obeyed; choose inputs or
outputs and always lift the side you choose (our drawings
happen to disconnect the outputs). If one end of the shield is
disconnected, the noisy hum current stops flowing and away
goes the hum — but only at low frequencies. A one-end-only
shield connection increases the possibility of high frequency
(radio) interference since the shield may act as an antenna.
Many reduce this potential RF interference by providing an
RF path through a small capacitor (0.1 or 0.01 microfarad
ceramic disc) connected from the lifted end of the shield to
the chassis. The fact that many modern day installers still
follow this one-end-only rule with consistent success indicates this and other acceptable solutions to RF issues exist,
though the increasing use of digital and wireless technology
greatly increases the possibility of future RF problems.
your particular interconnection needs. Find the appropriate
output configuration from your mixer output(down the left
side), and then match this with the correct balanced or
unbalanced input to the MH 4 (down the right side.) An “offthe-shelf” cable may be available or modifiable. Soldering
should only be attempted by those trained in the art.
SUMMARY
balanced wiring with shields tied to the chassis at the point of
entry, or transformer isolate all unbalanced signals from
balanced signals) then there is no guarantee that a hum free
interconnect can be achieved, nor is there a definite scheme
that will assure noise free operation in all configurations.
WINNING THE WIRING WARS
• Use balanced connections whenever possible.
• Transformer isolate all unbalanced connections from
• Use special cable assemblies when unbalanced lines cannot
• Any unbalanced cable must be kept under ten feet (three
“Sound System Interconnection”. If you would like the
complete note, call or email the factory, download it from
Rane's web site, or ask your dealer for a copy.
A common solution to these noisy hum and buzz problems
See the following page for suggested cable assemblies for
If you are unable to do things correctly (i.e. use fully
balanced connections.
be transformer isolated.
meters) in length. Lengths longer than this will amplify
the nasty side effects of unbalanced circuitry's ground
loops.
This information was condensed from Rane Note 110,
Manual-6
Page 7

VARIOUS MH 4 INPUT CABLE ASSEMBLIES
Manual-7
Page 8

MOJO GLOSSARY
balanced line The recommended method of interconnecting audio
equipment. A balanced line requires three conductors: a twisted-pair
for the signal (positive and negative) and an overall shield. The
shield must be tied to the chassis at both ends for hum-free interconnect.
bandwidth Abbr. BW The numerical difference between the upper
and lower -3 dB points of an audio band.
clipping What occurs when a unit tries to produce a signal larger
than its power supply. The signal takes on a flat-topped, or clipped
shape. When an amplifier tries to go above its max power, it clips.
compressor A signal processing device used to reduce the
dynamic range of the signal passing through it. For instance, an
input dynamic range of 110 dB might pass through a compressor and
exit with a new dynamic range of 70 dB. The modern usage for
compressors is to turn down (or reduce the dynamic range of) just
the loudest signals. Other applications use compressors to control the
creation of sound. When used in conjunction with microphones and
musical instrument pick-ups, compressors help determine the final
timbre by selectively compressing specific frequencies and waveforms.
connectors Audio equipment uses different styles:
RCA An unbalanced pin connector commonly used on
consumer and some pro equipment; aka phono plug
XLR A 3-pin connector common on pro audio equipment.
Preferred for balanced line interconnect; aka Cannon plug
¼" TRS 1. Stereo ¼" connector consisting of tip (T), ring (R),
and sleeve (S) sections, with T = left, R = right, and S =
ground/shield. 2. Balanced interconnect with the pos & neg
signal lines tied to T and R respectively and S acting only as an
overall shield. 3. Insert loop interconnect with T = send, R =
return, and S = ground/shield. [Think: ring, right, return]
¼" TS Mono ¼" connector consisting of tip (T) [signal] and
sleeve (S) [ground & shield] for unbalanced wiring.
constant-Q equalizer (also constant-bandwidth) The
bandwidth remains constant for all boost/cut levels. Since Q and
bandwidth are interrelated, the terms are fully interchangeable.
decibel Abbr. dB (named after Alexander Graham Bell). The
preferred method and term for representing the ratio of different
audio levels. Being a ratio, decibels have no units. Everything is
relative. So it must be relative to some 0 dB reference point. A suffix
letter is added to distinguish between reference points:
0 dBu A reference point equal to 0.775 V
+4 dBu Standard pro reference level equal to 1.23 V
0 dBV A reference point equal to 1.0 V
-10 dBV Standard reference level for consumer and some pro
audio use, equal to 0.316 V. RCA (phono) connectors are a
good indicator of units operating at -10 dBV
dynamic range The ratio of the loudest signal to the quietest
signal in a unit or system as expressed in decibels (dB).
expander A signal processing device used to increase the dynamic
range of the signal passing through it. Expanders complement
compressors. For example, a compressed input dynamic range of 70
dB might pass through a expander and exit with a new expanded
dynamic range of 110 dB. Modern expanders usually operate only
below a set threshold point, i.e., they operate only on low-level
audio. The term downward expander describes this type of application.
ground Any electrical reference point for measuring voltage levels.
Usually a large conducting body, such as the earth or an electric
circuit connected to the earth. Chassis should always be at earth
potential.
WARNING: SHOCK HAZARD Never use an AC line cord groundlift adapter or cut off the 3rd pin. It is illegal and dangerous.
headroom The level in dB between the typical operating level and
clipping. For example, a nominal +4 dBu system that clips at +20
dBu has 16 dB of headroom.
hum Unwanted sound contaminating audio paths due to EMI
(electro-magnetic interference) caused by AC power-lines &
transformers getting into unbalanced, poorly shielded, or improperly
grounded connecting cables. Hum has a definite smooth (sine wave)
repetitive sound based on the harmonics of 50/60 Hz such as 100/
120 Hz and 150/180 Hz.
interpolating Term meaning to insert between two points. If a
graphic equalizer’s adjacent bands, when moved together, produce
a smooth response without a dip in the center, they are interpolat-
ing between the fixed center frequencies.
levels Terms used to describe relative audio signal levels:
mic-level Nominal signal coming directly from a microphone.
Very low, in the microvolts, and requires a preamp with at least 60
dB gain before using with any line-level equipment.
line-level Standard +4 dBu or -10 dBV audio levels.
instrument-level Nominal signal from musical instruments
using electrical pick-ups. Varies widely, from very low mic-levels
to quite large line-levels.
limiter A compressor with a fixed ratio of 10:1 or greater. The
dynamic action prevents the audio signal from becoming larger than
the threshold setting.
Linkwitz-Riley crossover The most preferred active crossover
design. It features steep 24 dB/octave slopes, in-phase outputs, and
flat amplitude response. Due to the in-phase outputs the acoustic
lobe resulting when both loudspeakers reproduce the crossover
frequency is always on-axis (not tilted up or down) and has no
peaking.
noise 1. Interconnect. Unwanted sounds contaminating audio paths.
RFI (radio frequency interference) caused by broadcast signals
leaking into unbalanced, poorly shielded, or improperly grounded
connecting cables. Also by light dimmers, motor controls and
computers. 2. Music. A random mix of audio frequencies not
harmonically related, sounding like radio static.
polarity A signals electromechanical potential with respect to a
reference. For example, a microphone has positive polarity if a
positive pressure on its diaphragm results in a positive output
voltage. polarity vs. phase shift: polarity refers to a signals
reference NOT to its phase shift. Being 180 degrees out-of-phase and
having inverse polarity are DIFFERENT things. We wrongly say
something is out-of-phase when we mean it is inverted. One occurs
over a period of time; the other occurs instantaneously.
Q (upper-case) Quality factor. Defined to be the ratio of the center
frequency f divided by the bandwidth BW for a bandpass filter.
signal-to-noise ratio The ratio in dB between a reference level
and the noise floor. For example, a signal-to-noise ratio of 90 dB re
+4 dBu, means the noise floor is 90 dB below a +4 dBu ref.
unbalanced line An audio interconnect scheme using one wire
with an overall shield. The shield must perform two functions: act as
the return signal path (ground) and to protect the conductor from
noise (shield). Consequently this method is vulnerable to hum &
noise problems.
unity gain A gain setting of one. The level out equals the level in.
©Rane Corporation 10802 47th Ave. W., Mukilteo WA 98275-5098 TEL (425)355-6000 FAX (425)347-7757 WEB http://www.rane.com
Manual-8
All features & specifications subject to change without notice. 102942
 Loading...