


Ramili®
|
|
® |
|
ili |
|
m |
|
|
Ra |
|
|
MODEL: RV1000
EN RAMILI® BABY MONITOR RV1000 |
|
USER’S MANUAL |
2-7, 8 |
RU ВИДЕОНЯНЯ RAMILI®BABY RV1000 |
|
ИНСТРУКЦИЯ ПОЛЬЗОВАТЕЛЯ |
2-7, 20 |
KZ RAMILI®BABY БЕЙНЕКҮТУШІ RV1000 |
|
ПАЙДАЛАНУШЫНЫҢ НҰСҚАУЛЫҒЫ |
2-7, 32 |
Copyright © Ramili Group

EN FIGURES & QUICK GUIDE |
RU ИЛЛЮСТРАЦИИ К ИНСТРУКЦИИ |
PRODUCT LAYOUT |
ВНЕШНИЙ ВИД |
Camera |
Камера |
|
KZ НҰСҚАУЛЫҚҚА АРНАЛҒАН СУРЕТТЕР |
Камера |
СЫРТҚЫ ТҮРІ |
|
1
2
3
4
6 |
10 |
|
5 |
7 |
8 9
|
|
|
F. 1 |
EN Monitor |
|
|
RU Монитор |
|
|
|
KZ Монитор |
8 |
9 |
10 |
11 |
|
|
12 |
1 |
|
|
2 |
5 |
|
|
|
|
3 |
6 |
13 |
|
||
4 |
|
|
|
7 |
|
F. 2
2 Ramili® RV1000

EN SETUP |
RU ВКЛЮЧЕНИЕ |
1. Camera Setup |
1. Включение камеры |
1.1 Power Supply - Using AC Power |
1.1 Подключение адаптера питания |
|
KZ ҚОСУ |
|
1. Камераны қосу |
|
1.1 Тоқ беруадаптерін қосу |
F. 3
EN 2. Monitor Setup |
RU 2. Включение монитора |
|
2.1 Power Supply - Using AC Power |
2.1 |
Подключение адаптера питания |
|
KZ 2. Мониторды қосу |
|
|
2.1 |
Тоқ беруадаптерін қосу |
|
|
3 |
1 |
F. 4 |
|
2 |
||
|
3

EN 2.2 Talkback Function |
RU 2.2 Обратная связь |
|
KZ 2.2 Кері байланыс |
F. 5
EN 2.3 Volume Settings |
RU 2.3 Регулировка громкости |
|
KZ 2.3 Дауысын реттеу |
|
F. 6 |
EN 3. Hot Key Options |
RU 3. Кнопки быстрого доступа |
|
KZ 3. Тез қолжетімділік түймешелері |
F. 7
4 Ramili® RV1000
EN 3.1 Audio Mode |
RU 3.1 Режим «только звук» |
|
KZ 3.1 «Тек қана дыбыс» режімі |
F. 8
EN 3.2 Zoom in Function |
RU 3.2 Приближение |
|
KZ 3.2 Жақындату |
|
F. 9 |
EN 3.3 Music Function |
RU 3.3 Колыбельные мелодии |
|
KZ 3.3 Бесік жырлары |
F. 10
5

EN 3.4 Monitor Remote Control Function |
RU 3.4 Управление вращением камеры |
|
KZ 3.4 Камераны айналдыруды басқару |
|
Tilt |
Pan 
F. 11
EN 4. Menu Options |
RU 4. Опции меню |
|
KZ 4. Мәзірдің опциялары |
|
F. 12 |
EN 4.1 Temperature Setting |
RU 4.1 Настройки термометра |
|
KZ 4.1 Термометрдің баптаулары |
F. 13
6 Ramili® RV1000

EN 4.2 Brightness Setting |
RU 4.2 Регулировка яркости |
|
KZ 4.2 Жарықтылығын реттеу |
|
F. 14 |
EN 4.3 VOX Sensitivity |
RU 4.3 Чувствительность к громкости звука |
|
KZ 4.3 Дауыстың қаттылығына сезімталдық |
|
|
|
|
|
|
|
F. 15 |
|
EN 5. Status Information |
|
|
RU 5. Информационная панель |
|
||||
1 |
2 |
3 |
4 |
5 |
KZ 5. Ақпараттық панель |
8 |
9 |
|
6 |
7 |
|||||||
F. 16
7

RAMILI® BABY MONITOR RV1000
PACKAGE CONTENTS
1 |
Х Camera |
2 |
Х Cable Clips |
1 |
Х One Monitor |
1 |
Х Screw and One Wall Anchor |
2 |
Х Power Adapters |
1 |
Х User’s Manual |
1 |
Х Power Bank cable |
|
|
DESCRIPTION AND INTENDED USAGE
The Ramili Baby Video Monitor RV1000 consists of two units: a transmitter unit with a camera to monitor the child, and a receiving unit with a monitor for the parents. The video baby monitor is designed to assist with the remote supervision of children, the ill and elderly,
or animals. The camera goes in the child’s room, whilst the parent’s unit can be placed anywhere, so long as it is within the transmission range of the camera. The transmission range will depend on the conditions where the video baby monitor is being used. The video baby monitor can be watched from anywhere in the world on a smartphone or tablet once connected to home Wi-Fi.
PRODUCT LAYOUT
Camera (Fig. 1).
1.Light sensor
2.Microphone
3.Lens
4.Infrared LEDs
5.Speaker
6.Power adapter plug
7.Pairing button (connect camera to router)
8.Antenna
9.Temperature sensor
10.Power indicator LED
Monitor (Fig. 2).
1.LCD screen
2.Volume indicator LEDs
3.VOX indicator LED
4.Power indicator LED
5.Volume up button
6.Volume down button
7.Microphone
8.Power ON/OFF switch
9.Antenna
10.Menu button
11.Talkback button
12.Speaker
13.Power adapter plug
8 |
Ramili® RV1000 |
EN |
|
|
|

SETUP
1. CAMERA SETUP
1.1. Power Supply - Using AC Power or Power Bank
Plug one end of the provided power adapter into a wall outlet and the other end into the back of the camera. Or use a cable to connect to your Power Bank (Power Bank not included). The camera automatically turns on when plugged in. See Fig. 3.
Note: Use the adapter or Power Bank labeled OUTPUT: DC 5V 2.0A for the camera.
1.2. Fine Tuning
Place the camera in a convenient location, point the lens toward the observation area.
1.3. Night Vision
The camera has eight high-intensity LEDs for picking up clear images in the dark. When the light sensor detects low ambient light levels, the LEDs will be automatically activated.
1.4. Room Temperature Measurement
The temperature sensor can measure the room temperature on the camera side and the room temperature indicator will be displayed on the screen of the monitor unit.
2. MONITOR SETUP
2.1. Power Supply - Using AC Power
The monitor has a built in 3.7V 2600mAh (Li-ion) battery and uses household AC power current.
1.Plug one end of the provided power adapter into a wall outlet and the other end into the monitor. See Fig. 4.
Note: Use the adapter labeled OUTPUT: DC 5V 1.0A for the monitor.
2.Slide the Power switch to ‘‘ON’’. See Fig. 4.
Note 1: When monitor is turned on, the green ‘‘Power‘‘ LED will light up.
When the battery is low, the red LED will start blinking. When the battery is charging, the red LED will light up.
When charging finishes (fully charged), the ‘‘Power‘‘ LED will turn off (when the monitor is switched off).
Note 2: ‘‘Out of Range’’ will be displayed on the LCD screen if the monitor goes out of range.
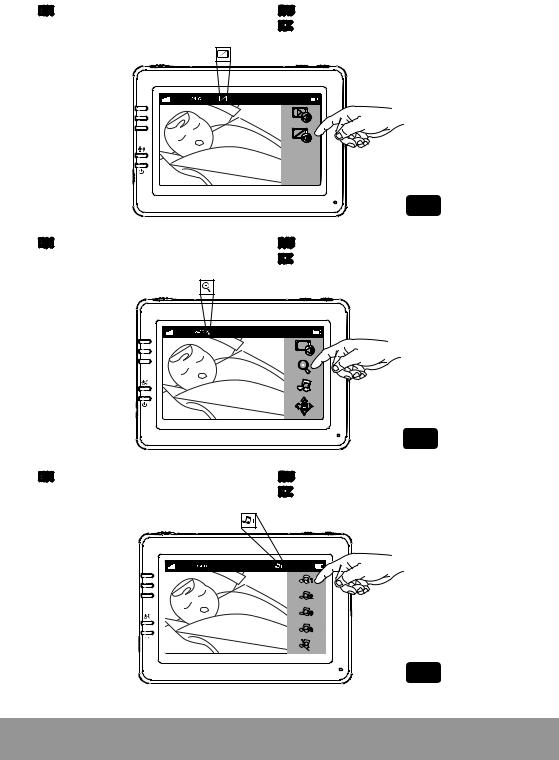
2.2. Talkback Function |
|
|
Press the talkback button |
to speak through the camera unit, and the |
icon will then |
be displayed on the screen. See Fig. 5. |
|
|
2.3. Volume Setting
Press the volume up  or volume down
 buttons to adjust the volume level. See Fig. 6.
User Instructions |
EN |
9 |
|
|
|

3. HOT KEY OPTIONS
1.Tap the screen and the Hot Key will display on the right side of the screen. See Fig. 7.
2.Hot Key settings need to be completed within 5 seconds. After 5 seconds, the system will automatically return to the live view.
3.1. Audio Only Mode
Tap the icon to enable audio mode. This will turn off the video feed after 10 seconds with audio continuing to play. You can touch the screen to wake it up for 10 seconds. See Fig 8.
3.2. Zoom in Function
Tap the “Zoom in” icon  on the monitor once to 2X zoom into the image and tap it again to revert back to normal view. See Fig. 9.
3.3. Music Function
You can play music with the camera with three choices of music. Tap the music icon to make the camera unit play music. See Fig. 10.
3.4. Monitor Remote Control Function
The monitor can control the movement of the camera. The camera head has the ability to rotate up, down, right and left. Tap the up or down
 icons on the screen to move the camera up or down. Tap the left
 or right
 icons on screen to move the camera left or right. See Fig. 11.
Note: The monitor will be in silent mode when the camera rotates.
4. MENU OPTIONS
Press the menu button on the monitor unit to display the main menu on the screen. See Fig. 12. The main menu contains 3 submenus
4.1. Temperature Setting (Temp. Setting)
In this submenu you can choose between degrees Celsius or degrees Fahrenheit for the temperature unit. See Fig. 13.
You can set the range for the temperature alert. If you select ‘‘Alert On’’ to enable the temperature alert and the temperature falls or rises outside the range, a warning sound will be emitted from the monitor unit. See Fig. 13.
4.2. Brightness Setting (Brightness)
In this submenu you can adjust the screen brightness. See Fig. 14.
4.3. VOX Sensitivity (VOX Sensitivity)
This submenu lets you choose the VOX (voice activation) sensitivity level. When the level is set to high, quieter sounds will activate the screen.See Fig. 15.
10 |
Ramili® RV1000 |
EN |
|
|
|
5. STATUS INFORMATION
The status bar is displayed at the top of the screen. See Fig. 16.
1.Signal strength indicator
2.Temperature alert on/off indicator
3.Room temperature indicator
4.Zoom in indicator
5.Audio-only mode indicator
6.Music indicator
7.Mute indicator
8.Talkback indicator
9.Battery status/Charging indicator
6. INTERNET VIEWING
6.1. Watch the things that matter to you anytime and anywhere.
Internet
6.2. Before you start, you need:
|
|
|
|
|
|
|
|
|
|
|
|
|
|
|
|
|
|
|
|
|
|
|
|
|
|
|
|
|
|
|
|
|
|
|
|
|
|
|
|
|
|
|
|
|
|
|
|
|
|
|
|
|
|
|
|
|
|
|
|
|
|
|
|
|
|
|
|
|
|
|
|
|
|
|
|
|
|
iPhone, iPad, Android |
Camera |
Wi-Fi Router |
||||||||||
smartphone or tablet |
Ramili Baby RV1000 |
|
||||||||||
Note: 2.4 GHz Wi-Fi network frequency is supported. Make sure the router has usual security settings.
User Instructions |
EN |
11 |
|
|
|

6.3. Download and run the APP
Android: Go to the Google Play Store, search for “iCareViewer” and install. iOS: Go to the App Store, search for “iCareViewer” and install.
Android iOS
6.4. Add and connect camera wirelessly via your router
1.Tap the  icon to add the camera. Tap the icon to connect the camera to the internet. (See A1).
А1 |
А2 |
А3 |
2.Plug one end of the provided power adapter into a wall outlet and the other end into the camera.
3.The camera will be ready after 30 seconds.
4.Tap  to go to the next step. (See A2)
Press and hold the PAIR button for at least 5 seconds until the green LED indicator on the camera starts blinking.
5.Tap  to go to the next step. (See A3)
Note 1: If the monitor is switched on, it will disconnect and reconnect after 5 seconds. Note 2: If the camera has been paired before, pairing the camera again will overwrite the previous association.
6.Android: The app will automatically search for the camera.
iOS: A. Press the “Home” key, go to “Settings” . B. Turn on Wi-Fi. C. Tap the name of camera “iCareViewer-XXXXXX” and join it, then go back to the app. (See A4)
12 |
Ramili® RV1000 |
EN |
|
|
|

A4
7.The camera will scan for available Wi-Fi networks in range. Select your Wi-Fi network, then enter the password for your Wi-Fi router if necessary. (See A5)
Note: Please make sure you enter the correct password for the Wi-Fi connection, otherwise a connection error may occur.
It will take a few minutes for the camera to connect to your Wi-Fi network. Tap the camera on the list to watch live video. (See A6-A7)
Note: If your monitor is switched on, the monitor will disconnect and reconnect after 10 seconds.
А5 А6
*iPhone, iPad are trademarks of Apple Inc., registered in the U.S. and other countries.
*Google Play is a trademark of Google Inc.
User Instructions |
EN |
13 |
|
|
|

6.5. Camera List |
A7 |
5. |
|
4. |
|
1. |
Camera name |
|
|
||
2. |
Connection status |
|
|
1. |
2. |
3. |
Settings |
|
|
|
|
4. |
Refresh |
|
|
3. |
|
5. |
Quit |
|
|
|
|
6. |
Add camera |
|
|
|
|
7. |
App information |
|
|
|
|
6.6. App functions (See A8) |
А8 |
1.Back: Tap this icon to go back to the last page.
2.Temperature measure: Displayed beneath the live video view.
3.Photo: Tap icon to save a photo on your smartphone or tablet.
4.Video: Tap icon to start/stop recording. (3 minute limit for each recording).
Note: Photos and video will be stored on the internal memory of your smartphone or tablet.
5.Camera Album: Tap icon to view and manage photos/videos. Tap and hold to delete on Android, or press “Edit” on iOS.
6.Volume: Tap icon to adjust volume.
7. Pan and tilt: Tap |
icons to pan/tilt. |
8.Two-way talk: Tap icon to talk, tap again to stop talking.
6.7.
1.5.
2.
6.
3.
7.
4.8.
6.7. Camera settings |
А9 |
|
1. Tap icon |
on the page. (See A9) |
|
1.
14 |
Ramili® RV1000 |
EN |
|
|
|
 Loading...