

Page 1

Page 2
IF YOU ARE THE FIRST REGISTERED RETAIL OWNER OF
YOUR VEHICLE, YOU MAY OBTAIN A COMPLIMENTARY
PRINTED COPY OF THE OWNER’S MANUAL, NAVIGATION/
UCONNECT MANUALS OR WARRANTY BOOKLETS BY
CALLING 1 866 726-4636 (U.S.) OR 1 800 387-1143 (CANADA)
OR BY CONTACTING YOUR DEALER.
IMPORTANT
This User Guide is intended to familiarize you with the
important features of your vehicle. Your Owner’s Manual,
Navigation/Uconnect Manuals and Warranty Booklets can be
found on your DVD (if applicable) or by visiting the website on
the back cover of your User Guide. We hope you nd it useful.
U.S. residents can purchase replacement kits by visiting
www.techauthority.com and Canadian residents can
purchase replacement kits by calling 1 800 387-1143.
The driver’s primary responsibility is the safe operation of the vehicle.
Driving while distracted can result in loss of vehicle control, resulting
in a collision and personal injury. FCA US LLC strongly recommends
that the driver use extreme caution when using any device or feature
that may take their attention off the road. Use of any electrical devices,
such as cellular telephones, computers, portable radios, vehicle
navigation or other devices, by the driver while the vehicle is moving
is dangerous and could lead to a serious collision. Texting while
driving is also dangerous and should never be done while the vehicle
is moving. If you nd yourself unable to devote your full attention to
vehicle operation, pull off the road to a safe location and stop your
vehicle. Some states or provinces prohibit the use of cellular
telephones or texting while driving. It is always the driver’s
responsibility to comply with all local laws.
Page 3

TABLE OF CONTENTS
INTRODUCTION/WELCOME
WELCOME FROM FCA US LLC .......3
CONTROLS AT A GLANCE
DRIVER COCKPIT ...............6
INSTRUMENT CLUSTER ...........8
GETTING STARTED
KEYFOB ...................10
KEYLESS ENTER-N-GO —
PASSIVE ENTRY ...............13
KEYLESS ENTER-N-GO —
IGNITION ...................15
REMOTE START ...............16
VEHICLE SECURITY ALARM .......16
OCCUPANT RESTRAINT SYSTEMS . . . 17
HEAD RESTRAINTS ............. 63
FRONT SEATS ................ 65
HEATED/VENTILATED SEATS ....... 71
HEATED STEERING WHEEL ........73
TILT STEERING COLUMN ......... 74
POWER FOLDING OUTSIDE MIRRORS
FOR STANDARD AND TRAILER TOW . . 76
OPERATING YOUR VEHICLE
ENGINE BREAK-IN
RECOMMENDATIONS ............77
TURN SIGNALS/WIPER/WASHER/
HIGH BEAMS LEVER ............ 78
HEADLIGHT SWITCH ............ 79
SPEED CONTROL ..............81
STARTING PROCEDURES ......... 84
EIGHT-SPEED AUTOMATIC
TRANSMISSION — IF EQUIPPED ....88
ELECTRONIC RANGE SELECT (ERS) . . 88
AIR SUSPENSION SYSTEM
(1500 MODELS) — IF EQUIPPED .... 90
AIR SUSPENSION SYSTEM (REBEL
MODELS ONLY) — IF EQUIPPED .... 93
AIR SUSPENSION SYSTEM (2500/
3500 MODELS) — IF EQUIPPED .... 96
MANUAL CLIMATE CONTROLS
WITHOUT TOUCHSCREEN ........ 98
MANUAL CLIMATE CONTROLS
WITH TOUCHSCREEN ...........99
AUTOMATIC CLIMATE CONTROLS
WITH TOUCHSCREEN ..........101
PARKSENSE FRONT AND REAR
PARK ASSIST — IF EQUIPPED ....104
PARKVIEW REAR BACK UP CAMERA —
IF EQUIPPED ...............105
POWER SLIDING REAR WINDOW . . . 107
POWER SUNROOF ............ 107
WIND BUFFETING ............. 109
ELECTRONICS
YOUR VEHICLE'S SOUND SYSTEM . . 110
CYBERSECURITY ............. 112
IDENTIFYING YOUR RADIO ....... 113
UCONNECT ACCESS ........... 115
RADIO 3.0 .................131
UCONNECT 3.0 .............. 133
UCONNECT 3.0 VOICE RECOGNITION
QUICKTIPS ................. 136
UCONNECT 5.0 .............. 140
UCONNECT 5.0 VOICE RECOGNITION
QUICKTIPS ................. 144
UCONNECT 8.4/8.4 NAV ......... 151
UCONNECT 8.4/8.4 NAV VOICE
RECOGNITION QUICK TIPS .......165
UCONNECT PHONE ...........182
STEERING WHEEL AUDIO
CONTROLS ................. 193
INSTRUMENT CLUSTER DISPLAY . . . 193
PROGRAMMABLE FEATURES ...... 194
UNIVERSAL GARAGE DOOR OPENER
(HomeLink) .................197
POWER INVERTER ............200
POWER OUTLETS .............201
AUXILIARY SWITCHES —
IF EQUIPPED ...............203
OFF-ROAD CAPABILITIES
FOUR-WHEEL DRIVE OPERATION —
IF EQUIPPED ...............204
UTILITY
TONNEAU COVER .............212
EASY-OFF TAILGATE ...........212
PICKUP BOX ................213
RAMBOX ................... 215
TOWING & PAYLOAD ...........219
TOW/HAUL MODE ............ 219
INTEGRATED TRAILER BRAKE
MODULE .................. 220
RECREATIONAL TOWING
(BEHIND MOTORHOME, ETC.) .....222
1500 3.0L DIESEL
DIESEL ENGINE BREAK-IN
RECOMMENDATIONS ...........227
DIESEL ENGINE STARTING
PROCEDURES ...............227
DIESEL FUEL FILTER/WATER
SEPARATOR.................232
EXHAUST REGENERATION ....... 233
COOL-DOWN IDLE CHART ........ 235
ADDING FUEL —
DIESEL ENGINE ONLY .......... 235
DIESEL EXHAUST FLUID ........236
Page 4

TABLE OF CONTENTS
6.7L CUMMINS DIESEL
DIESEL ENGINE BREAK-IN
RECOMMENDATIONS ..........241
DIESEL ENGINE STARTING
PROCEDURES ...............241
DIESEL EXHAUST BRAKE
(ENGINE BRAKING) ...........244
IDLE-UP FEATURE (AUTOMATIC
TRANSMISSION ONLY) ......... 245
ENGINE MOUNTED FUEL FILTER/
WATERSEPARATOR ............246
UNDERBODY MOUNTED FUEL
FILTER/WATER SEPARATOR ....... 247
EXHAUST REGENERATION ....... 248
COOL-DOWN IDLE CHART ........ 250
ADDING FUEL —
DIESEL ENGINE ONLY .......... 251
DIESEL EXHAUST FLUID ........252
WHAT TO DO IN EMERGENCIES
ROADSIDE ASSISTANCE ......... 258
WARNING AND INDICATOR LIGHTS . . 258
IF YOUR ENGINE OVERHEATS .....265
JACKING AND TIRE CHANGING .... 266
JUMP STARTING PROCEDURES ....281
EMERGENCY TOW HOOKS ........284
GEAR SELECTOR OVERRIDE —
6-SPEED TRANSMISSION ........ 285
MANUAL PARK RELEASE —
8 SPEED TRANSMISSION ....... 287
TOWING A DISABLED VEHICLE .... 289
FREEING A STUCK VEHICLE ......289
ENHANCED ACCIDENT RESPONSE
SYSTEM (EARS) .............. 290
EVENT DATA RECORDER (EDR) ..... 290
MAINTAINING YOUR VEHICLE
TO OPEN AND CLOSE THE HOOD . . . 291
ENGINE COMPARTMENT — 3.6L . . . 292
ENGINE COMPARTMENT — 5.7L . . . 294
ENGINE COMPARTMENT — 6.4L . . . 296
ENGINE COMPARTMENT — 3.0L
DIESEL ...................298
ENGINE COMPARTMENT —
6.7L DIESEL WITH 68RFE
TRANSMISSION ..............300
ENGINE COMPARTMENT —
6.7L DIESEL WITH AS69RC
TRANSMISSION ..............302
FLUID CAPACITIES — GAS ENGINE . . 304
FLUIDS, LUBRICANTS, AND
GENUINE PARTS — GAS ENGINE . . . 305
FLUID CAPACITIES —
1500 3.0L DIESEL ............307
FLUIDS, LUBRICANTS, AND
GENUINE PARTS —
1500 3.0L DIESEL ............308
FLUID CAPACITIES —
6.7L CUMMINS DIESEL ENGINE .... 310
FLUIDS, LUBRICANTS, AND
GENUINE PARTS —
6.7L CUMMINS DIESEL ENGINE .... 310
MAINTENANCE PROCEDURES .....312
MAINTENANCE SCHEDULE —
GASOLINE ENGINE ............312
MAINTENANCE SCHEDULE —
1500 3.0L DIESEL ENGINE .......318
MAINTENANCE SCHEDULE —
6.7L CUMMINS DIESEL ENGINE .... 323
FUSES ...................331
TIRE SAFETY INFORMATION ......335
TIRES — GENERAL INFORMATION . . 342
DEPARTMENT OF TRANSPORTATION
UNIFORM TIRE QUALITY GRADES . . . 352
REPLACEMENT BULBS .........353
CONSUMER ASSISTANCE
FCA US LLC CUSTOMER CENTER . . . 355
FCA CANADA INC. CUSTOMER
CENTER .................. 355
ASSISTANCE FOR THE HEARING
IMPAIRED ................. 355
PUBLICATIONS ORDERING ....... 355
REPORTING SAFETY DEFECTS
INTHEUNITEDSTATES .........356
MOPAR® ACCESSORIES
AUTHENTIC ACCESSORIES
BYMOPAR ................. 357
FAQ’s
FREQUENTLY ASKED QUESTIONS . . . 358
INDEX
...................360
2
Page 5

INTRODUCTION/WELCOME
WELCOME FROM FCA US LLC
Congratulations on selecting your new FCA US LLC (“FCA US”) vehicle. Be assured
that it represents precision workmanship, distinctive styling, and high quality.
Your new FCA US vehicle has characteristics to enhance the driver's control under
some driving conditions. These are to assist the driver and are never a substitute for
attentive driving. They can never take the driver's place. Always drive carefully.
Your new vehicle has many features for the comfort and convenience of you and your
passengers. Some of these should not be used when driving because they take your
eyes from the road or your attention from driving. Never text while driving or take your
eyes, more than momentarily, off the road.
This guide illustrates and describes the operation of features and equipment that are
either standard or optional on this vehicle. This guide may also include a description
of features and equipment that are no longer available or were not ordered on this
vehicle. Please disregard any features and equipment described in this guide that are
not available on this vehicle. FCA US reserves the right to make changes in design
and specifications and/or make additions to or improvements to its products without
imposing any obligation upon itself to install them on products previously manufactured.
This User Guide has been prepared to help you quickly become acquainted with the
important features of your vehicle. It contains most things you will need to operate
and maintain the vehicle, including emergency information.
The DVD includes a computer application containing detailed Owner's information
which can be viewed on a personal computer or MAC computer. The multimedia DVD
also includes videos which can be played on any standard DVD player (including the
Uconnect Touchscreen Radios if equipped with DVD player capabilities). Additional
DVD operational information is located on the back of the DVD sleeve.
For complete owner information, refer to your Owner's Manual on www.ramtrucks.com/
en/owners/manuals.
FCA US is committed to protecting our environment and natural resources. By
converting from paper to electronic delivery for the majority of the user information
for your vehicle, together we greatly reduce the demand for tree-based products and
lessen the stress on our environment.
3
Page 6

INTRODUCTION/WELCOME
VEHICLES SOLD IN CANADA
With respect to any vehicles sold in Canada, the name FCA US LLC shall be deemed
to be deleted and the name FCA Canada Inc. used in substitution (excluding legal
lines).
WARNING!
• Pedals that cannot move freely can cause loss of vehicle control and increase
the risk of serious personal injury.
• Always make sure that objects cannot fall into the driver foot well while the
vehicle is moving. Objects can become trapped under the brake pedal and
accelerator pedal causing a loss of vehicle control.
• Failure to properly follow floor mat installation or mounting can cause interference with the brake pedal and accelerator pedal operation causing loss of
control of the vehicle.
• Never leave children alone in a vehicle, or with access to an unlocked vehicle.
Allowing children to be in a vehicle unattended is dangerous for a number of
reasons. A child or others could be seriously or fatally injured. Children should
be warned not to touch the parking brake, brake pedal or the transmission gear
selector.
• Do not leave the key fob in or near the vehicle, or in a location accessible to
children. A child could operate power windows, other controls, or move the
vehicle.
• Never use the ‘PARK’ position as a substitute for the parking brake. Always apply
the parking brake fully when parked to guard against vehicle movement and
possible injury or damage.
• Refer to your Owner's Manual for further details.
USE OF AFTERMARKET PRODUCTS (ELECTRONICS)
The use of aftermarket devices including cell phones, MP3 players, GPS systems, or
chargers may affect the performance of on-board wireless features including Keyless
Enter-N-Go and Remote Start range. If you are experiencing difficulties with any of
your wireless features, try disconnecting your aftermarket devices to see if the
situation improves. If your symptoms persist, please see an authorized dealer.
When it comes to service, remember that your authorized dealer knows your vehicle
best, has factory-trained technicians and genuine MOPAR
your satisfaction.
4
®
parts, and cares about
Page 7

INTRODUCTION/WELCOME
5
Page 8

CONTROLS AT A GLANCE
DRIVER COCKPIT
1. Headlight Switch pg. 79
2. Instrument Cluster Display Controls pg. 193
3. Turn Signal/Wiper/Washer/High Beams Lever pg. 78
4. Instrument Cluster pg. 8
5. Instrument Cluster Display pg. 193
6. Electronic Speed Control pg. 81
7. Engine Start/Stop Button
8. Four Wheel Drive Operation pg. 204
9. Uconnect Radio pg. 113
10. Climate Controls pg. 98
6
Page 9

CONTROLS AT A GLANCE
11. Switch Panel
12. Power Inverter Outlet pg. 200
13. Glove Compartment
14. Power Outlet
15. Gear Selector
16. Hood Release (below steering wheel at base of instrument panel) pg. 291
17. Parking Brake Release
18. Power Windows
19. Power Door Locks
20. Power Mirrors
7
Page 10

CONTROLS AT A GLANCE
INSTRUMENT CLUSTER
1. Temperature Gauge
2. Tachometer
3. Voltmeter
(See page 258 for Instrument Cluster Warning Lights.)
8
Page 11

CONTROLS AT A GLANCE
4. Instrument Cluster Display
5. Oil Pressure Gauge
6. Speedometer
7. Fuel Gauge
(See page 264 for Instrument Cluster Indicator Lights.)
9
Page 12

GETTING STARTED
KEY FOB
This feature allows the driver to operate
the ignition switch with the push of a
button, as long as the Remote Keyless
Entry (RKE) key fob is in the passenger
compartment.
The Keyless Push Button Ignition has
four operating positions, three of which
are labeled and will illuminate when in
position. The three positions are OFF,
ACC, and ON/RUN. The fourth position is
START, during start RUN will illuminate.
Key Fob
1 — Air Suspension
2 — Unlock
3 — Lock
4 — Remote Start
5 — Panic
10
Page 13

GETTING STARTED
NOTE:
In case the ignition switch does not change with the push of a button, the key fob may
have a low or dead battery. In this situation a back up method can be used to operate
the ignition switch. Put the nose side (side opposite of the emergency key) of the key
fob against the ENGINE START/STOP button and push to operate the ignition switch.
Key Fob
1 — Lock
2 — Unlock
3 — Remote Start
4 — Emergency Key Release
5 — Emergency Key
The Wireless Ignition Node (WIN) operates similar to an ignition switch. It has four
operating positions, three with detents and one that is spring-loaded. The detent
positions are OFF, ACC, and ON/RUN. The START position is a spring-loaded
momentary contact position. When released from the START position, the switch
automatically returns to the ON/RUN position.
Locking And Unlocking The Doors
Push and release the unlock button on the key fob once to unlock the driver’s door.
Push and release the unlock button twice within five seconds to unlock all doors, the
tailgate, and the RamBox (if equipped). The turn signal lights will flash to acknowledge the unlock signal. The illuminated entry system will also turn on.
All doors can be programmed to unlock on the first push of the unlock button. Refer
to “Programmable Features” in “Electronics” for further information.
11
Page 14

GETTING STARTED
Panic Alarm
1. Push the PANIC button once to turn the Panic Alarm on.
2. Wait approximately three seconds and push the button a second time to turn the
Panic Alarm off.
WARNING!
• When exiting the vehicle, always make sure the keyless ignition node is in “OFF”
mode, remove the key fob from the vehicle and lock the vehicle.
• Never leave children alone in a vehicle, or with access to an unlocked vehicle.
Leaving children in a vehicle unattended is dangerous for a number of reasons.
A child or others could be seriously or fatally injured. Children should be warned
not to touch the parking brake, brake pedal or the transmission gear selector.
• Do not leave the key fob in or near the vehicle (or in a location accessible to
children), and do not leave the ignition (of a vehicle equipped with Keyless
Enter-N-Go) in the ACC or ON/RUN mode. A child could operate power windows,
other controls, or move the vehicle.
• Do not leave children or animals inside parked vehicles in hot weather. Interior
heat build-up may cause serious injury or death.
Air Suspension (Remote Lowering Of Vehicle) — If Equipped
x
2
• This vehicle may be equipped with a feature that can lower the vehicle to a height
which will improve ease of passenger entry/exit and cargo loading/unloading. The
feature is accessed by pushing the air suspension lowering button twice on the key
fob.
• When remote key fob lowering is requested, the vehicle will send a series of chirps
and flashes to alert the customer that the operation has begun and will continue
these alerts until it successfully lowers.
• If the feature is unable to lower the vehicle due to certain conditions not being
met, the horn will chirp twice and the vehicle will not lower.
12
Page 15

GETTING STARTED
Emergency Key
Should the battery in the vehicle or the key fob go dead, there is an emergency key
located in the key fob that can be used for locking and unlocking the doors.
• To remove the emergency key, slide the button on the key fob with your thumb.
Then, pull the key out with your other hand.
WARNING!
• Never leave children alone in a vehicle, or with access to an unlocked vehicle.
Allowing children to be in a vehicle unattended is dangerous for a number of
reasons. A child or others could be severely injured or killed. Children should be
warned not to touch the parking brake, brake pedal, or the transmission gear
selector. Do not leave the key fob in or near the vehicle, or in a location
accessible to children, and do not leave the ignition of a vehicle equipped with
Keyless Enter-N-Go in the ACC or ON/RUN mode. A child could start the vehicle,
operate power windows, other controls, or move the vehicle.
• Do not leave children or animals inside parked vehicles in hot weather. Interior
heat build-up may cause them to be severely injured or killed.
KEYLESS ENTER-N-GO — PASSIVE ENTRY
Introduction To Keyless Enter-N-Go
The Keyless Enter-N-Go — Passive Entry system is an enhancement to the vehicles
key fob. This feature allows you to lock and unlock the vehicle’s door(s) without
having to push the key fob lock or unlock buttons as well as starting and stopping the
vehicle with the push of a button.
NOTE:
The key fob may not be found if it is located next to a mobile phone, lap top or other
electronic device; these devices may block the key fob’s wireless signal.
13
Page 16

GETTING STARTED
To Lock The Vehicle’s Doors:
With a valid Keyless Enter-N-Go key fob within 5 ft (1.5 m) of the driver or passenger
front door handles, push door handle lock button to lock all doors.
Do NOT grab the door handle, when pushing the door handle lock button. This could
unlock the door(s).
NOTE:
Push The Button To Lock
• After pushing the door handle lock button, you must wait two seconds before you
can lock or unlock the doors, using either Passive Entry door handle. This is done
to allow you to check if the vehicle is locked by pulling the door handle without the
vehicle reacting and unlocking.
• The Passive Entry system will not operate if the key fob battery is dead.
The vehicle doors can also be locked by using the key fob lock button or the lock
button located on the vehicles interior door panel.
Do NOT Grab The Handle When Locking
To Unlock From The Driver Or Passenger Side:
With a valid Keyless Enter-N-Go key fob
located outside the vehicle and within
5 ft (1.5 m) of the driver or passenger
side door handle, grab either front door
handle to unlock the door automatically.
For further information and applicable
warnings and cautions, please refer to your
Owner’s Manual at
en/owners/manuals.
www.ramtrucks.com/
Grab The Door Handle To Unlock
14
Page 17

GETTING STARTED
KEYLESS ENTER-N-GO — IGNITION
Starting
With a valid Keyless Enter-N-Go key fob
inside the vehicle:
1. Shift the transmission into PARK (P).
2. While pressing the brake pedal, push
the ENGINE START/STOP button
once. If the engine fails to start, the
starter will disengage automatically
after 10 seconds.
3. To stop the cranking of the engine
prior to the engine starting, push the
button again.
NOTE:
In case the ignition switch does not change with the push of a button, the key fob may
have a low or dead battery. In this situation, a back up method can be used to operate
the ignition switch. Put the nose side of the key fob (side opposite of the emergency
key) against the ENGINE START/STOP button and push to operate the ignition
button.
Start/Stop Button
Stopping
1. Bring the vehicle to a complete stop.
2. Shift the transmission to PARK (P).
3. Push the ENGINE START/STOP button once. The ignition will return to the OFF
mode.
NOTE:
If the transmission is not in PARK and the vehicle is in motion, the ENGINE
START/STOP button must be held for two seconds with the vehicle speed above
5 mph (8 km/h) before the engine will shut off.
For further information and applicable warnings and cautions, please refer to your
Owner’s Manual at www.ramtrucks.com/en/owners/manuals.
15
Page 18

GETTING STARTED
REMOTE START
• Push remote start button on the key fob twice within five seconds. Pushing the
remote start button a third time shuts the engine off.
• To drive the vehicle, push and release the unlock button on the key fob to unlock
the doors and disarm the vehicle security alarm system (if equipped). Then cycle
the ignition to the ON/RUN position.
With Remote Start, the engine will only run for 15 minutes (timeout) unless the
ignition is cycled to the ON/RUN position.
The vehicle must be started with the key fob after two consecutive timeouts.
WARNING!
• Do not start or run an engine in a closed garage or confined area. Exhaust gas
contains Carbon Monoxide (CO) which is odorless and colorless. Carbon Monoxide is poisonous and can cause you or others to be severely injured or killed
when inhaled.
• Keep key fobs away from children. Operation of the Remote Start System,
windows, door locks or other controls could cause you and others to be severely
injured or killed.
VEHICLE SECURITY ALARM
The vehicle security alarm monitors the vehicle doors for unauthorized entry and the
ignition for unauthorized operation. While the vehicle security alarm is armed,
interior switches for door locks and tailgate are disabled. If something triggers the
alarm, the vehicle security alarm will provide the following audible and visible
signals: the horn will pulse, the park lamps and/or turn signals will flash, and the
vehicle security light in the instrument cluster will flash.
To Arm The System
Lock the door using either the power door lock switch (one door must be open) or the
lock button on the key fob (doors can be open or closed), and close all doors.
The vehicle security light in the instrument cluster will flash for 16 seconds. This
shows that the vehicle security alarm is arming. During this period, if a door is
opened, the ignition is cycled to ON/RUN, or the power door locks are unlocked in any
manner, the vehicle security alarm will automatically disarm.
NOTE:
• The vehicle security alarm will not arm if you lock the doors with the manual door
lock plungers.
• Once armed, the vehicle security alarm disables the unlock switch on the driver
door trim panel and passenger door trim panel.
16
Page 19

GETTING STARTED
To Disarm The System
Push the key fob unlock button or cycle the ignition to the ON/RUN position.
The vehicle security alarm is designed to protect your vehicle. However, you can
create conditions where the vehicle security alarm will give you a false alarm. If one
of the previously described arming sequences has occurred, the vehicle security
alarm will arm regardless of whether you are in the vehicle or not. If you remain in the
vehicle and open a door, the alarm will sound. If this occurs, disarm the vehicle
security alarm.
If the vehicle security alarm is armed and the battery becomes disconnected, the
vehicle security alarm will remain armed when the battery is reconnected. The
exterior lights will flash, and the horn will sound. If this occurs, disarm the vehicle
security alarm.
OCCUPANT RESTRAINT SYSTEMS
Some of the most important safety features in your vehicle are the restraint systems:
Occupant Restraint Systems Features
• Seat Belt Systems
• Supplemental Restraint Systems (SRS) Air Bags
• Child Restraints
Some of the safety features described in this section may be standard equipment on
some models, or may be optional equipment on others. If you are not sure, ask your
authorized dealer.
Important Safety Precautions
Please pay close attention to the information in this section. It tells you how to use
your restraint system properly, to keep you and your passengers as safe as possible.
Here are some simple steps you can take to minimize the risk of harm from a
deploying air bag:
1. Children 12 years old and under should always ride buckled up in a vehicle with
a rear seat.
2. If a child from 2 to 12 years old (not in a rear-facing child restraint) must ride in
the front passenger seat, move the seat as far back as possible and use the proper
child restraint (refer to “Child Restraints” in this section for further information).
3. Children that are not big enough to wear the vehicle seat belt properly (refer to
“Child Restraints” in this section for further information) should be secured in a
vehicle with a rear seat in child restraints or belt-positioning booster seats. Older
children who do not use child restraints or belt-positioning booster seats should
ride properly buckled up in a vehicle with a rear seat.
17
Page 20

GETTING STARTED
4. Never allow children to slide the shoulder belt behind them or under their arm.
5. You should read the instructions provided with your child restraint to make sure
that you are using it properly.
6. All occupants should always wear their lap and shoulder belts properly.
7. The driver and front passenger seats should be moved back as far as practical to
allow the front air bags room to inflate.
8. Do not lean against the door or window. If your vehicle has side air bags, and
deployment occurs, the side air bags will inflate forcefully into the space between
occupants and the door and occupants could be injured.
9. If the air bag system in this vehicle needs to be modified to accommodate a
disabled person, refer to the “Consumer Assistance” section for customer service
contact information.
WARNING!
• Never place a rear-facing child restraint in front of an air bag. A deploying
passenger front air bag can cause death or serious injury to a child 12 years or
younger, including a child in a rear-facing child restraint.
• Only use a rear-facing child restraint in a vehicle with a rear seat.
Seat Belt Systems
Buckle up even though you are an excellent driver, even on short trips. Someone on
the road may be a poor driver and could cause a collision that includes you. This can
happen far away from home or on your own street.
Research has shown that seat belts save lives, and they can reduce the seriousness
of injuries in a collision. Some of the worst injuries happen when people are thrown
from the vehicle. Seat belts reduce the possibility of ejection and the risk of injury
caused by striking the inside of the vehicle. Everyone in a motor vehicle should be
belted at all times.
Enhanced Seat Belt Use Reminder System (BeltAlert)
Driver And Passenger BeltAlert — If Equipped
BeltAlert is a feature intended to remind the driver and outboard front seat
passenger (if equipped with outboard front passenger seat BeltAlert) to buckle their
seat belts. The Belt Alert feature is active whenever the ignition switch is in the
START or ON/RUN position.
18
Page 21

GETTING STARTED
Initial Indication
If the driver is unbuckled when the ignition switch is first in the START or ON/RUN
position, a chime will signal for a few seconds. If the driver or outboard front seat
passenger (if equipped with outboard front passenger seat BeltAlert) is unbuckled
when the ignition switch is first in the START or ON/RUN position the Seat Belt
Reminder Light will turn on and remain on until both outboard front seat belts are
buckled. The outboard front passenger seat BeltAlert is not active when an outboard
front passenger seat is unoccupied.
BeltAlert Warning Sequence
The BeltAlert warning sequence is activated when the vehicle is moving above a
specified vehicle speed range and the driver or outboard front seat passenger is
unbuckled (if equipped with outboard front passenger seat BeltAlert) (the outboard
front passenger seat BeltAlert is not active when the outboard front passenger seat is
unoccupied). The BeltAlert warning sequence starts by blinking the Seat Belt
Reminder Light and sounding an intermittent chime. Once the BeltAlert warning
sequence has completed, the Seat Belt Reminder Light will remain on until the seat
belts are buckled. The BeltAlert warning sequence may repeat based on vehicle
speed until the driver and occupied outboard front seat passenger seat belts are
buckled. The driver should instruct all occupants to buckle their seat belts.
Change Of Status
If the driver or outboard front seat passenger (if equipped with outboard front
passenger seat BeltAlert) unbuckles their seat belt while the vehicle is traveling, the
BeltAlert warning sequence will begin until the seat belts are buckled again.
The outboard front passenger seat BeltAlert is not active when the outboard front
passenger seat is unoccupied. BeltAlert may be triggered when an animal or other
items are placed on the outboard front passenger seat or when the seat is folded flat
(if equipped). It is recommended that pets be restrained in the rear seat (if equipped)
in pet harnesses or pet carriers that are secured by seat belts, and cargo is properly
stowed.
BeltAlert can be activated or deactivated by your authorized dealer. FCA US LLC does
not recommend deactivating BeltAlert.
NOTE:
If BeltAlert has been deactivated and the driver or outboard front seat passenger (if
equipped with outboard front passenger seat BeltAlert) is unbuckled the Seat Belt
Reminder Light will turn on and remain on until the driver and outboard front seat
passenger seat belts are buckled.
19
Page 22

GETTING STARTED
Lap/Shoulder Belts
All seating positions except the Quad Cab, Mega Cab and Crew Cab front center
seating position have combination lap/shoulder belts.
The seat belt webbing retractor will lock only during very sudden stops or collisions.
This feature allows the shoulder part of the seat belt to move freely with you under
normal conditions. However, in a collision the seat belt will lock and reduce your risk
of striking the inside of the vehicle or being thrown out of the vehicle.
WARNING!
• Relying on the air bags alone could lead to more severe injuries in a collision.
The air bags work with your seat belt to restrain you properly. In some collisions,
the air bags won’t deploy at all. Always wear your seat belt even though you have
air bags.
• In a collision, you and your passengers can suffer much greater injuries if you are
not properly buckled up. You can strike the interior of your vehicle or other
passengers, or you can be thrown out of the vehicle. Always be sure you and
others in your vehicle are buckled up properly.
• It is dangerous to ride in a cargo area, inside or outside of a vehicle. In a
collision, people riding in these areas are more likely to be seriously injured or
killed.
• Do not allow people to ride in any area of your vehicle that is not equipped with
seats and seat belts.
• Be sure everyone in your vehicle is in a seat and using a seat belt properly.
Occupants, including the driver, should always wear their seat belts whether or
not an air bag is also provided at their seating position to minimize the risk of
severe injury or death in the event of a crash.
• Wearing your seat belt incorrectly could make your injuries in a collision much
worse. You might suffer internal injuries, or you could even slide out of the seat
belt. Follow these instructions to wear your seat belt safely and to keep your
passengers safe, too.
• Two people should never be belted into a single seat belt. People belted together
can crash into one another in a collision, hurting one another badly. Never use
a lap/shoulder belt or a lap belt for more than one person, no matter what their
size.
20
Page 23

GETTING STARTED
WARNING!
• A lap belt worn too high can increase the risk of injury in a collision. The seat belt
forces won’t be at the strong hip and pelvic bones, but across your abdomen.
Always wear the lap part of your seat belt as low as possible and keep it snug.
• A twisted seat belt may not protect you properly. In a collision, it could even cut
into you. Be sure the seat belt is flat against your body, without twists. If you
can’t straighten a seat belt in your vehicle, take it to your authorized dealer
immediately and have it fixed.
• A seat belt that is buckled into the wrong buckle will not protect you properly.
The lap portion could ride too high on your body, possibly causing internal
injuries. Always buckle your seat belt into the buckle nearest you.
• A seat belt that is too loose will not protect you properly. In a sudden stop, you
could move too far forward, increasing the possibility of injury. Wear your seat
belt snugly.
• A seat belt that is worn under your arm is dangerous. Your body could strike the
inside surfaces of the vehicle in a collision, increasing head and neck injury. A
seat belt worn under the arm can cause internal injuries. Ribs aren’t as strong as
shoulder bones. Wear the seat belt over your shoulder so that your strongest
bones will take the force in a collision.
• A shoulder belt placed behind you will not protect you from injury during a
collision. You are more likely to hit your head in a collision if you do not wear your
shoulder belt. The lap and shoulder belt are meant to be used together.
• A frayed or torn seat belt could rip apart in a collision and leave you with no
protection. Inspect the seat belt system periodically, checking for cuts, frays, or
loose parts. Damaged parts must be replaced immediately. Do not disassemble
or modify the seat belt system. Seat belt assemblies must be replaced after a
collision.
21
Page 24

GETTING STARTED
Lap/Shoulder Belt Operating Instructions
1. Enter the vehicle and close the door. Sit back and adjust the seat.
2. The seat belt latch plate is above the back of the front seat, and next to your arm
in the rear seat (for vehicles equipped with a rear seat). Grasp the latch plate and
pull out the seat belt. Slide the latch plate up the webbing as far as necessary to
allow the seat belt to go around your lap.
Pulling Out The Latch Plate
3. When the seat belt is long enough to fit, insert the latch plate into the buckle until
you hear a “click.”
22
Inserting Latch Plate Into Buckle
Page 25

GETTING STARTED
4. Position the lap belt so that it is snug and lies low across your hips, below your
abdomen. To remove slack in the lap belt portion, pull up on the shoulder belt.
To loosen the lap belt if it is too tight, tilt the latch plate and pull on the lap belt.
A snug seat belt reduces the risk of sliding under the seat belt in a collision.
5. Position the shoulder belt across the
shoulder and chest with minimal, if
any slack so that it is comfortable and
not resting on your neck. The retractor
will withdraw any slack in the shoulder belt.
6. To release the seat belt, push the red
button on the buckle. The seat belt
will automatically retract to its stowed
position. If necessary, slide the latch
plate down the webbing to allow the
seat belt to retract fully.
Positioning The Lap Belt
Lap/Shoulder Belt Untwisting Procedure
Use the following procedure to untwist a twisted lap/shoulder belt.
1. Position the latch plate as close as possible to the anchor point.
2. At about 6 to 12 inches (15 to 30 cm) above the latch plate, grasp and twist the
seat belt webbing 180 degrees to create a fold that begins immediately above the
latch plate.
3. Slide the latch plate upward over the folded webbing. The folded webbing must
enter the slot at the top of the latch plate.
4. Continue to slide the latch plate up until it clears the folded webbing and the seat
belt is no longer twisted.
23
Page 26

GETTING STARTED
Adjustable Upper Shoulder Belt Anchorage
In the driver and front passenger seats, the top of the shoulder belt can be adjusted
upward or downward to position the seat belt away from your neck. Push or squeeze
the anchorage button to release the anchorage, and move it up or down to the
position that serves you best.
As a guide, if you are shorter than average, you will prefer the shoulder belt
anchorage in a lower position, and if you
are taller than average, you will prefer the
shoulder belt anchorage in a higher position. After you release the anchorage button, try to move it up or down to make
sure that it is locked in position.
Adjustable Anchorage
NOTE:
The adjustable upper shoulder belt anchorage is equipped with an Easy Up feature.
This feature allows the shoulder belt anchorage to be adjusted in the upward position
without pushing or squeezing the release button. To verify the shoulder belt
anchorage is latched, pull downward on the shoulder belt anchorage until it is locked
into position.
WARNING!
• Wearing your seat belt incorrectly could make your injuries in a collision much
worse. You might suffer internal injuries, or you could even slide out of the seat
belt. Follow these instructions to wear your seat belt safely and to keep your
passengers safe, too.
• Position the shoulder belt across the shoulder and chest with minimal, if any
slack so that it is comfortable and not resting on your neck. The retractor will
withdraw any slack in the shoulder belt.
• Misadjustment of the seat belt could reduce the effectiveness of the safety belt
in a crash.
24
Page 27

GETTING STARTED
First Row Center Seat Belt Operating Instructions (Regular Cab Only)
The first row center seat belt (Regular Cab only) features a seat belt with a mini-latch
plate and buckle, which allows the seat belt to detach from the lower anchor when
the seat is folded. The latch plate and regular latch plate can then be stored out of
the way in the seat for added convenience to open up utilization of the storage areas
behind the front seats when the seat is not occupied.
1. Remove the mini-latch plate and regular latch plate from its stowed position on
the seat.
2. Grasp the mini-latch plate and pull
the seat belt over the seat.
3. Route the shoulder belt to the inside
of the right head restraint.
4. When the seat belt is long enough to
fit, insert the mini-latch plate into the
mini-buckle until you hear a “click.”
5. Sit back in seat. Slide the regular
latch plate up the webbing as far as
necessary to allow the seat belt to go
around your lap.
6. When the seat belt is long enough to
fit, insert the latch plate into the
buckle until you hear a “click.”
7. Position the lap belt so that it is snug
and lies low across your hips, below
your abdomen. To remove slack in the
lap belt portion, pull up on the shoulder belt. To loosen the lap belt if it is
too tight, pull on the lap belt. A snug
seat belt reduces the risk of sliding
under the seat belt in a collision.
8. Position the shoulder belt on your
chest so that it is comfortable and not
resting on your neck. The retractor will
withdraw any slack in the seat belt.
9. To release the seat belt, push the red
button on the buckle.
Inserting Latch Plate
In Use Position
25
Page 28

GETTING STARTED
10. To disengage the mini-latch plate from the mini-buckle for storage, insert the
regular latch plate into the center red slot on the mini-buckle. The seat belt will
automatically retract to its stowed position. If necessary, slide the latch plate
down the webbing to allow the seat belt to retract fully. Insert the mini-latch
plate and regular latch plate into its stowed position.
Detaching Buckle With Seat Belt Tongue
WARNING!
• If the mini-latch plate and mini-buckle are not properly connected when the seat
belt is used by an occupant, the seat belt will not be able to provide proper
restraint and will increase the risk of injury in a collision.
• When reattaching the mini-latch plate and mini-buckle, ensure the seat belt
webbing is not twisted. If the webbing is twisted, follow the preceding procedure
to detach the mini-latch plate and mini-buckle, untwist the webbing, and
reattach the mini-latch plate and mini-buckle.
First Row Center Lap Belt Operating Instructions — If Equipped
The center seating position for the Quad Cab, Mega Cab and Crew Cab front seat has
a lap belt only. To buckle the lap belt, slide the latch plate into the buckle until you
hear a "click." To lengthen the lap belt, tilt the latch plate and pull.
To remove slack, pull the loose end of the webbing. Wear the lap belt snug against the
hips. Sit back and upright in the seat, then adjust the seat belt as tightly as is
comfortable.
26
Page 29
GETTING STARTED
Seat Belt Extender
If a seat belt is not long enough to fit properly, even when the webbing is fully
extended and the adjustable upper shoulder belt anchorage (if equipped) is in its
lowest position, your authorized dealer can provide you with a Seat Belt Extender.
The Seat Belt Extender should be used only if the existing seat belt is not long
enough. When the Seat Belt Extender is not required for a different occupant, it must
be removed.
WARNING!
• ONLY use the Seat Belt Extender if it is physically required in order to properly
fit the original seat belt system. DO NOT USE the Seat Belt Extender if, when
worn, the distance between the front edge of the Seat Belt Extender buckle and
the center of the occupant’s body is LESS than 6 inches.
• Using a Seat Belt Extender when not needed can increase the risk of serious
injury or death in a collision. Only use the Seat Belt Extender when the lap belt
is not long enough and only use in the recommended seating positions. Remove
and store the Seat Belt Extender when not needed.
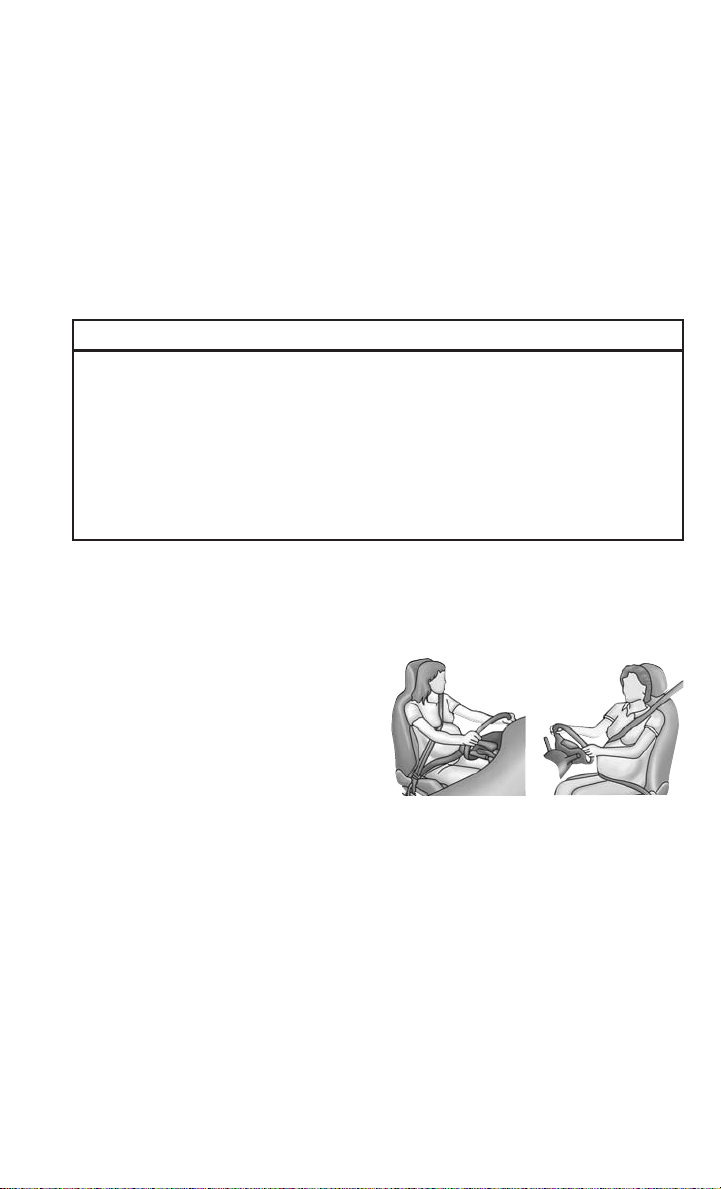
Seat Belts And Pregnant Women
Seat belts must be worn by all occupants
including pregnant women: the risk of
injury in the event of an accident is reduced for the mother and the unborn
child if they are wearing a seat belt.
Position the lap belt snug and low below
the abdomen and across the strong bones
of the hips. Place the shoulder belt
across the chest and away from the neck.
Never place the shoulder belt behind the
back or under the arm.
Seat Belt Pretensioner
The front seat belt system is equipped
with pretensioning devices that are designed to remove slack from the seat belt
in the event of a collision. These devices may improve the performance of the seat
belt by removing slack from the seat belt early in a collision. Pretensioners work for
all size occupants, including those in child restraints.
NOTE:
These devices are not a substitute for proper seat belt placement by the occupant.
The seat belt still must be worn snugly and positioned properly.
Pregnant Women And Seat Belts
27
Page 30
GETTING STARTED
The pretensioners are triggered by the Occupant Restraint Controller (ORC). Like the
air bags, the pretensioners are single use items. A deployed pretensioner or a
deployed air bag must be replaced immediately.
Energy Management Feature
The front seat belt system is equipped with an Energy Management feature that may
help further reduce the risk of injury in the event of a collision. The seat belt system
has a retractor assembly that is designed to release webbing in a controlled manner.
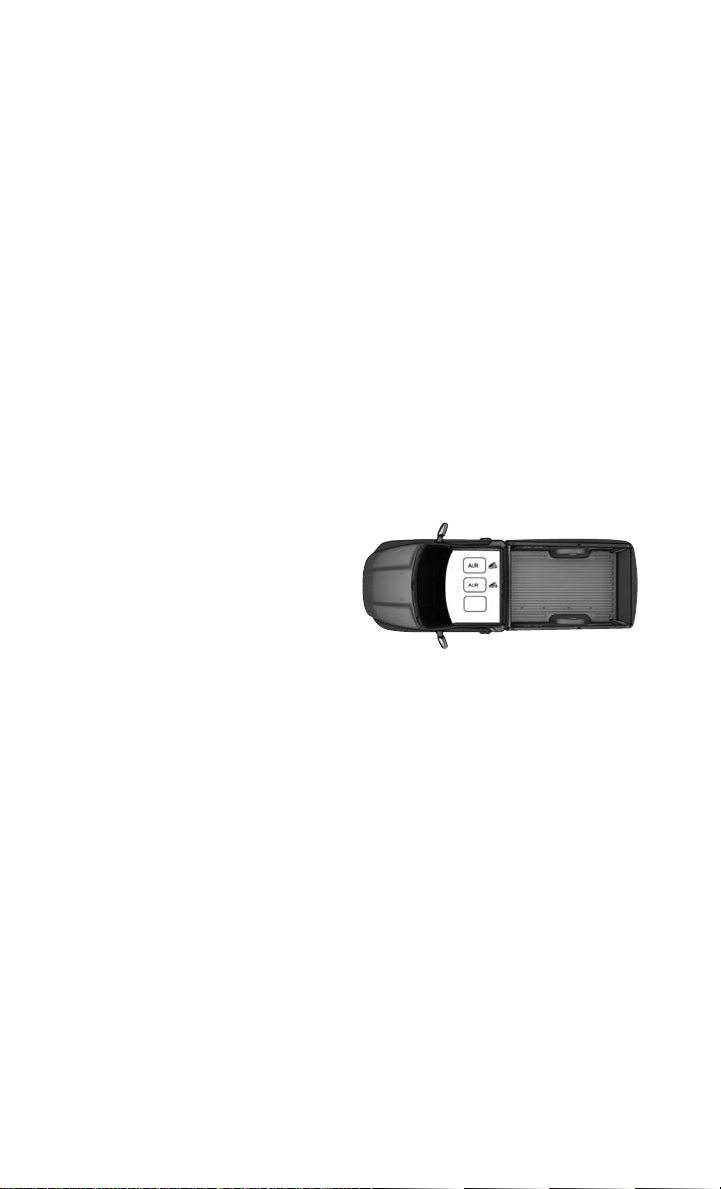
Switchable Automatic Locking Retractors (ALR) — If Equipped
The seat belts in the passenger seating positions are equipped with a Switchable
Automatic Locking Retractor (ALR) which is used to secure a child restraint system.
For additional information, refer to “Installing Child Restraints Using The Vehicle
Seat Belt” under the “Child Restraints” section of this manual. The figure below
illustrates the locking feature for each seating position.
If the passenger seating position is
equipped with an ALR and is being used
for normal usage, only pull the seat belt
webbing out far enough to comfortably
wrap around the occupant’s mid-section
so as to not activate the ALR. If the ALR
is activated, you will hear a clicking
sound as the seat belt retracts. Allow the
webbing to retract completely in this case
and then carefully pull out only the
amount of webbing necessary to comfortably wrap around the occupant’s midsection. Slide the latch plate into the
buckle until you hear a "click."
In Automatic Locking Mode, the shoulder
belt is automatically pre-locked. The seat
belt will still retract to remove any slack
in the shoulder belt. Use the Automatic
Locking Mode anytime a child restraint is
installed in a seating position that has a
seat belt with this feature. Children
12 years old and under should always be
properly restrained in a vehicle with a
rear seat.
Regular Cab Automatic Locking Retractor
(ALR) Locations
Quad Cab/Mega Cab/Crew Cab Automatic
Locking Retractor (ALR) Locations
28
Page 31

GETTING STARTED
WARNING!
• Never place a rear-facing child restraint in front of an air bag. A deploying
passenger front air bag can cause death or serious injury to a child 12 years or
younger, including a child in a rear-facing child restraint.
• Only use a rear-facing child restraint in a vehicle with a rear seat.
How To Engage The Automatic Locking Mode
1. Buckle the combination lap and shoulder belt.
2. Grasp the shoulder portion and pull downward until the entire seat belt is
extracted.
3. Allow the seat belt to retract. As the seat belt retracts, you will hear a clicking
sound. This indicates the seat belt is now in the Automatic Locking Mode.
How To Disengage The Automatic Locking Mode
Unbuckle the combination lap/shoulder belt and allow it to retract completely to
disengage the Automatic Locking Mode and activate the vehicle sensitive (emergency) locking mode.
WARNING!
• The seat belt assembly must be replaced if the switchable Automatic Locking
Retractor (ALR) feature or any other seat belt function is not working properly
when checked according to the procedures in the Service Manual.
• Failure to replace the seat belt assembly could increase the risk of injury in
collisions.
• Do not use the Automatic Locking Mode to restrain occupants who are wearing
the seat belt or children who are using booster seats. The locked mode is only
used to install rear-facing or forward-facing child restraints that have a harness
for restraining the child.
Supplemental Restraint Systems (SRS)
Some of the safety features described in this section may be standard equipment on
some models, or may be optional equipment on others. If you are not sure, ask your
authorized dealer.
The air bag system must be ready to protect you in a collision. The Occupant
Restraint Controller (ORC) monitors the internal circuits and interconnecting wiring
associated with the electrical Air Bag System Components. Your vehicle may be
equipped with the following Air Bag System Components:
29
Page 32

GETTING STARTED
Air Bag System Components
• Occupant Restraint Controller (ORC)
• Air Bag Warning Light
• Steering Wheel and Column
• Instrument Panel
• Knee Impact Bolsters
• Driver and Front Passenger Air Bags
• Supplemental Side Air Bags
• Front and Side Impact Sensors — If Equipped
• Seat Belt Pretensioners
• Seat Belt Buckle Switch
Air Bag Warning Light
The ORC monitors the readiness of the electronic parts of the air bag system
whenever the ignition switch is in the START or ON/RUN position. If the ignition
switch is in the OFF position or in the ACC position, the air bag system is not on and
the air bags will not inflate.
The ORC contains a backup power supply system that may deploy the air bag system
even if the battery loses power or it becomes disconnected prior to deployment.
The ORC turns on the Air Bag Warning Light in the instrument panel for approximately four to eight seconds for a self-check when the ignition switch is first in the
ON/RUN position. After the self-check, the Air Bag Warning Light will turn off. If the
ORC detects a malfunction in any part of the system, it turns on the Air Bag Warning
Light, either momentarily or continuously. A single chime will sound to alert you if the
light comes on again after initial startup.
The ORC also includes diagnostics that will illuminate the instrument panel Air Bag
Warning Light if a malfunction is detected that could affect the air bag system. The
diagnostics also record the nature of the malfunction. While the air bag system is
designed to be maintenance free, if any of the following occurs, have an authorized
dealer service the air bag system immediately.
• The Air Bag Warning Light does not come on during the four to eight seconds when
the ignition switch is first in the ON/RUN position.
• The Air Bag Warning Light remains on after the four to eight-second interval.
• The Air Bag Warning Light comes on intermittently or remains on while driving.
NOTE:
If the speedometer, tachometer, or any engine related gauges are not working, the
Occupant Restraint Controller (ORC) may also be disabled. In this condition the air
bags may not be ready to inflate for your protection. Have an authorized dealer
service the air bag system immediately.
30
Page 33

GETTING STARTED
WARNING!
Ignoring the Air Bag Warning Light in your instrument panel could mean you won’t
have the air bag system to protect you in a collision. If the light does not come on
as a bulb check when the ignition is first turned on, stays on after you start the
vehicle, or if it comes on as you drive, have an authorized dealer service the air bag
system immediately.
Front Air Bags
This vehicle has front air bags and lap/shoulder belts for both the driver and front
passenger. The front air bags are a supplement to the seat belt restraint systems. The
driver front air bag is mounted in the center of the steering wheel. The passenger
front air bag is mounted in the instrument panel, above the glove compartment. The
words “SRS AIRBAG” or “AIRBAG” are embossed on the air bag covers.
Front Air Bag/Knee Bolster Locations
1 — Driver And Passenger
Front Air Bags
2 — Driver And Passenger
Knee Impact Bolsters
WARNING!
• Being too close to the steering wheel or instrument panel during front air bag
deployment could cause serious injury, including death. Air bags need room to
inflate. Sit back, comfortably extending your arms to reach the steering wheel or
instrument panel.
• Never place a rear-facing child restraint in front of an air bag. A deploying
passenger front air bag can cause death or serious injury to a child 12 years or
younger, including a child in a rear-facing child restraint.
• Only use a rear-facing child restraint in a vehicle with a rear seat.
31
Page 34

GETTING STARTED
Driver And Passenger Front Air Bag Features
The Advanced Front Air Bag system has multistage driver and front passenger air
bags. This system provides output appropriate to the severity and type of collision as
determined by the Occupant Restraint Controller (ORC), which may receive information from the front impact sensors (if equipped) or other system components.
The first stage inflator is triggered immediately during an impact that requires air bag
deployment. A low energy output is used in less severe collisions. A higher energy
output is used for more severe collisions.
This vehicle may be equipped with a driver and/or front passenger seat belt buckle
switch that detects whether the driver or front passenger seat belt is buckled. The
seat belt buckle switch may adjust the inflation rate of the Advanced Front Air Bags.
WARNING!
• No objects should be placed over or near the air bag on the instrument panel or
steering wheel because any such objects could cause harm if the vehicle is in a
collision severe enough to cause the air bag to inflate.
• Do not put anything on or around the air bag covers or attempt to open them
manually. You may damage the air bags and you could be injured because the air
bags may no longer be functional. The protective covers for the air bag cushions
are designed to open only when the air bags are inflating.
• Relying on the air bags alone could lead to more severe injuries in a collision.
The air bags work with your seat belt to restrain you properly. In some collisions,
air bags won’t deploy at all. Always wear your seat belts even though you have air
bags.
Front Air Bag Operation
Front Air Bags are designed to provide additional protection by supplementing the
seat belts. Front air bags are not expected to reduce the risk of injury in rear, side, or
rollover collisions. The front air bags will not deploy in all frontal collisions, including
some that may produce substantial vehicle damage — for example, some pole
collisions, truck underrides, and angle offset collisions.
On the other hand, depending on the type and location of impact, front air bags may
deploy in crashes with little vehicle front-end damage but that produce a severe
initial deceleration.
Because air bag sensors measure vehicle deceleration over time, vehicle speed and
damage by themselves are not good indicators of whether or not an air bag should
have deployed.
Seat belts are necessary for your protection in all collisions, and also are needed to
help keep you in position, away from an inflating air bag.
When the ORC detects a collision requiring the front air bags, it signals the inflator
units. A large quantity of non-toxic gas is generated to inflate the front air bags.
32
Page 35

GETTING STARTED
The steering wheel hub trim cover and the upper right side of the instrument panel
separate and fold out of the way as the air bags inflate to their full size. The front air
bags fully inflate in less time than it takes to blink your eyes. The front air bags then
quickly deflate while helping to restrain the driver and front passenger.
Knee Impact Bolsters
The Knee Impact Bolsters help protect the knees of the driver and front passenger,
and position the front occupants for improved interaction with the front air bags.
WARNING!
• Do not drill, cut, or tamper with the knee impact bolsters in any way.
• Do not mount any accessories to the knee impact bolsters such as alarm lights,
stereos, citizen band radios, etc.
Supplemental Side Air Bags
Your vehicle is equipped with two types of side air bags:
1. Supplemental Seat-Mounted Side Air Bags (SABs): Located in the outboard side of the
front seats. The SABs are marked with a “SRS AIRBAG” or “AIRBAG” label sewn into
the outboard side of the seats.
The SABs may help to reduce the risk
of occupant injury during certain side
impacts and/or vehicle rollover
events, in addition to the injury reduction potential provided by the
seat belts and body structure.
When the SAB deploys, it opens the
seam on the outboard side of the
seatback’s trim cover. The inflating
SAB deploys through the seat seam
into the space between the occupant
and the door. The SAB moves at a
very high speed and with such a high
force that it could injure occupants if
they are not seated properly, or if
items are positioned in the area
where the SAB inflates. Children are
at an even greater risk of injury from a deploying air bag.
Supplemental Seat-Mounted
Side Air Bag Label
WARNING!
Do not use accessory seat covers or place objects between you and the Side Air
Bags; the performance could be adversely affected and/or objects could be pushed
into you, causing serious injury.
33
Page 36

GETTING STARTED
2. Supplemental Side Air Bag Inflatable Curtains (SABICs): Located above the side
windows. The trim covering the SABICs is labeled “SRS AIRBAG” or “AIRBAG.”
SABICs may help reduce the risk of
head or other injuries to front and rear
seat outboard occupants in certain
side impacts and/or vehicle rollover
events, in addition to the injury reduction potential provided by the
seat belts and body structure.
The SABICs deploy downward, covering the side windows. An inflating
SABIC pushes the outside edge of the
trim out of the way and covers the
window. The SABICs inflate with
enough force to injure occupants if
they are not belted and seated properly, or if items are positioned in the
area where the SABICs inflate. Children are at an even greater risk of
injury from a deploying air bag.
•Do not stack luggage or other cargo up high enough to block the deployment of
the SABICs. The trim covering above the side windows where the SABIC and its
deployment path are located should remain free from any obstructions.
•In order for the SABICs to work as intended, do not install any accessory items
in your vehicle which could alter the roof. Do not add an aftermarket sunroof to
your vehicle. Do not add roof racks that require permanent attachments (bolts or
screws) for installation on the vehicle roof. Do not drill into the roof of the vehicle
for any reason.
Supplemental Side Air Bag Inflatable Curtain
(SABIC) Label Location
WARNING!
The SABICs and SABs (Side Air Bags) are designed to activate in certain side
impacts and certain rollover events. The Occupant Restraint Controller (ORC)
determines whether the deployment of the Side Air Bags in a particular side impact
or rollover event is appropriate, based on the severity and type of collision. Vehicle
damage by itself is not a good indicator of whether or not Side Air Bags should have
deployed.
Side Air Bags are a supplement to the seat belt restraint system. Side Air Bags deploy
in less time than it takes to blink your eyes.
34
Page 37

GETTING STARTED
WARNING!
• Occupants, including children, who are up against or very close to Side Air Bags
can be seriously injured or killed. Occupants, including children, should never
lean on or sleep against the door, side windows, or area where the side air bags
inflate, even if they are in an infant or child restraint.
• Seat belts (and child restraints where appropriate) are necessary for your
protection in all collisions. They also help keep you in position, away from an
inflating Side Air Bag. To get the best protection from the Side Air Bags,
occupants must wear their seat belts properly and sit upright with their backs
against the seats. Children must be properly restrained in a child restraint or
booster seat that is appropriate for the size of the child.
WARNING!
• Side Air Bags need room to inflate. Do not lean against the door or window. Sit
upright in the center of the seat.
• Being too close to the Side Air Bags during deployment could cause you to be
severely injured or killed.
• Relying on the Side Air Bags alone could lead to more severe injuries in a
collision. The Side Air Bags work with your seat belt to restrain you properly. In
some collisions, Side Air Bags won’t deploy at all. Always wear your seat belt
even though you have Side Air Bags.
NOTE:
Air bag covers may not be obvious in the interior trim, but they will open during air
bag deployment.
Side Impacts
In side impacts, the side impact sensors aid the ORC in determining the appropriate
response to impact events. The system is calibrated to deploy the Side Air Bags on
the impact side of the vehicle during impacts that require Side Air Bag occupant
protection. In side impacts, the Side Air Bags deploy independently; a left side
impact deploys the left Side Air Bags only and a right side impact deploys the right
Side Air Bags only.
The Side Air Bags will not deploy in all side collisions, including some collisions at
certain angles, or some side collisions that do not impact the area of the passenger
compartment. The Side Air Bags may deploy during angled or offset frontal collisions
where the front air bags deploy.
35
Page 38

GETTING STARTED
Rollover Events
Side Air Bags are designed to activate in certain rollover events. The ORC determines
whether the deployment of the Side Air Bags in a particular rollover event is
appropriate, based on the severity and type of collision. Vehicle damage by itself is
not a good indicator of whether or not Side Air Bags should have deployed.
The Side Air Bags will not deploy in all rollover events. The rollover sensing-system
determines if a rollover event may be in progress and whether deployment is
appropriate. A slower-developing event may deploy the seat belt pretensioners on
both sides of the vehicle. A faster-developing event may deploy the seat belt
pretensioners as well as the Side Air Bags on both sides of the vehicle. The rollover
sensing-system may also deploy the seat belt pretensioners, with or without the Side
Air Bags, on both sides of the vehicle if the vehicle experiences a near rollover event.
The SABICs may help reduce the risk of partial or complete ejection of vehicle
occupants through side windows in certain rollover or side impact events.
The Occupant Restraint Controller (ORC) monitors the internal circuits and interconnecting wiring associated with electrical Air Bag System Components listed below:
Air Bag System Components
• Occupant Restraint Controller (ORC)
• Air Bag Warning Light
• Steering Wheel and Column
• Instrument Panel
• Knee Impact Bolsters
• Driver and Front Passenger Air Bags
• Supplemental Side Air Bags
• Front and Side Impact Sensors — If Equipped
• Seat Belt Pretensioners
• Seat Belt Buckle Switch
36
Page 39

GETTING STARTED
If A Deployment Occurs
The front air bags are designed to deflate immediately after deployment.
NOTE:
Front and/or side air bags will not deploy in all collisions. This does not mean
something is wrong with the air bag system.
If you do have a collision which deploys the air bags, any or all of the following may
occur:
• The air bag material may sometimes cause abrasions and/or skin reddening to the
occupants as the air bags deploy and unfold. The abrasions are similar to friction
rope burns or those you might get sliding along a carpet or gymnasium floor. They
are not caused by contact with chemicals. They are not permanent and normally
heal quickly. However, if you haven’t healed significantly within a few days, or if
you have any blistering, see your doctor immediately.
• As the air bags deflate, you may see some smoke-like particles. The particles are
a normal by-product of the process that generates the non-toxic gas used for air
bag inflation. These airborne particles may irritate the skin, eyes, nose, or throat.
If you have skin or eye irritation, rinse the area with cool water. For nose or throat
irritation, move to fresh air. If the irritation continues, see your doctor. If these
particles settle on your clothing, follow the garment manufacturer’s instructions
for cleaning.
Do not drive your vehicle after the air bags have deployed. If you are involved in
another collision, the air bags will not be in place to protect you.
WARNING!
Deployed air bags and seat belt pretensioners cannot protect you in another
collision. Have the air bags, seat belt pretensioners, and the seat belt retractor
assemblies replaced by an authorized dealer immediately. Also, have the Occupant Restraint Controller System serviced as well.
NOTE:
• Air bag covers may not be obvious in the interior trim, but they will open during air
bag deployment.
• After any collision, the vehicle should be taken to an authorized dealer
immediately.
37
Page 40

GETTING STARTED
Enhanced Accident Response System
In the event of an impact, if the communication network remains intact, and the
power remains intact, depending on the nature of the event, the ORC will determine
whether to have the Enhanced Accident Response System perform the following
functions:
• Cut off fuel to the engine.
• Flash hazard lights as long as the battery has power or until the hazard light button
is pressed. The hazard lights can be deactivated by pressing the hazard light
button.
• Turn on the interior lights, which remain on as long as the battery has power.
• Unlock the power door locks.
Enhanced Accident Response System Reset Procedure
In order to reset the Enhanced Accident Response System functions after an event,
the ignition switch must be changed from ignition START or ON/RUN to ignition OFF.
Carefully check the vehicle for fuel leaks in the engine compartment and on the
ground near the engine compartment and fuel tank before resetting the system and
starting the engine.
Maintaining Your Air Bag System
WARNING!
• Modifications to any part of the air bag system could cause it to fail when you
need it. You could be injured if the air bag system is not there to protect you. Do
not modify the components or wiring, including adding any kind of badges or
stickers to the steering wheel hub trim cover or the upper right side of the
instrument panel. Do not modify the front bumper, vehicle body structure, or
add aftermarket side steps or running boards.
• It is dangerous to try to repair any part of the air bag system yourself. Be sure to
tell anyone who works on your vehicle that it has an air bag system.
• Do not attempt to modify any part of your air bag system. The air bag may inflate
accidentally or may not function properly if modifications are made. Take your
vehicle to an authorized dealer for any air bag system service. If your seat,
including your trim cover and cushion, needs to be serviced in any way
(including removal or loosening/tightening of seat attachment bolts), take the
vehicle to your authorized dealer. Only manufacturer approved seat accessories
may be used. If it is necessary to modify the air bag system for persons with
disabilities, contact your authorized dealer.
38
Page 41

GETTING STARTED
Event Data Recorder (EDR)
This vehicle is equipped with an event data recorder (EDR). The main purpose of an
EDR is to record, in certain crash or near crash-like situations, such as an air bag
deployment or hitting a road obstacle, data that will assist in understanding how a
vehicle’s systems performed. The EDR is designed to record data related to vehicle
dynamics and safety systems for a short period of time, typically 30 seconds or less.
The EDR in this vehicle is designed to record such data as:
• How various systems in your vehicle were operating;
• Whether or not the driver and passenger safety belts were buckled/fastened;
• How far (if at all) the driver was depressing the accelerator and/or brake pedal;
and,
• How fast the vehicle was traveling.
These data can help provide a better understanding of the circumstances in which
crashes and injuries occur.
NOTE:
EDR data are recorded by your vehicle only if a non-trivial crash situation occurs; no
data are recorded by the EDR under normal driving conditions and no personal data
(e.g., name, gender, age, and crash location) are recorded. However, other parties,
such as law enforcement, could combine the EDR data with the type of personally
identifying data routinely acquired during a crash investigation.
To read data recorded by an EDR, special equipment is required, and access to the
vehicle or the EDR is needed. In addition to the vehicle manufacturer, other parties,
such as law enforcement, that have the special equipment, can read the information
if they have access to the vehicle or the EDR.
Child Restraints
Everyone in your vehicle needs to be buckled up at all times, including babies and
children. Every state in the United States, and every Canadian province, requires that
small children ride in proper restraint systems. This is the law, and you can be
prosecuted for ignoring it.
Children 12 years or younger should ride properly buckled up in a rear seat, if
available. According to crash statistics, children are safer when properly restrained in
the rear seats rather than in the front.
WARNING!
In a collision, an unrestrained child can become a projectile inside the vehicle.
The force required to hold even an infant on your lap could become so great that
you could not hold the child, no matter how strong you are. The child and others
could be badly injured. Any child riding in your vehicle should be in a proper
restraint for the child’s size.
39
Page 42

GETTING STARTED
There are different sizes and types of restraints for children from newborn size to the
child almost large enough for an adult safety belt. Always check the child seat
Owner’s Manual to make sure you have the correct seat for your child. Carefully read
and follow all the instructions and warnings in the child restraint Owner’s Manual and
on all the labels attached to the child restraint.
Before buying any restraint system, make sure that it has a label certifying that it
meets all applicable Safety Standards. You should also make sure that you can install
it in the vehicle where you will use it.
NOTE:
• For additional information, refer to www.safercar.gov/parents/index.htm or
call: 1–888–327–4236
• Canadian residents should refer to Transport Canada’s website for additional
information:
http://www.tc.gc.ca/eng/motorvehiclesafety/safedrivers-childsafety-index-53.htm
Summary Of Recommendations For Restraining Children In Vehicles
Infants and Toddlers
Small Children
Larger Children
Children Too Large for
Child Restraints
Child Size, Height, Weight
or Age
Children who are two years
old or younger and who
have not reached the
height or weight limits of
their child restraint
Children who are at least
two years old or who have
out-grown the height or
weight limit of their rear-
facing child restraint
Children who have outgrown their forward-facing
child restraint, but are too
small to properly fit the
vehicle’s seat belt
Children 12 years old or
younger, who have out-
grown the height or weight
limit of their booster seat
Recommended Type of
Child Restraint
Either an Infant Carrier or
a Convertible Child Re-
straint, facing rearward in
the rear seat of the vehicle
Forward-Facing Child
Restraint with a five-point
Harness, facing forward in
the rear seat of the vehicle
Belt Positioning Booster
Seat and the vehicle seat
belt, seated in the rear
seat of the vehicle
Vehicle Seat Belt,
seated in the rear seat
of the vehicle
40
Page 43
GETTING STARTED
Infant And Child Restraints
Safety experts recommend that children ride rear-facing in the vehicle until they are
two years old or until they reach either the height or weight limit of their rear-facing
child restraint. Two types of child restraints can be used rear-facing: infant carriers
and convertible child seats.
The infant carrier is only used rear-facing in the vehicle. It is recommended for
children from birth until they reach the weight or height limit of the infant carrier.
Convertible child seats can be used either rear-facing or forward-facing in the
vehicle. Convertible child seats often have a higher weight limit in the rear-facing
direction than infant carriers do, so they can be used rear-facing by children who have
outgrown their infant carrier but are still less than at least two years old. Children
should remain rear-facing until they reach the highest weight or height allowed by
their convertible child seat.
WARNING!
• Never place a rear-facing child restraint in front of an air bag. A deploying
passenger front air bag can cause death or serious injury to a child 12 years or
younger, including a child in a rear-facing child restraint.
• Only use a rear-facing child restraint in a vehicle with a rear seat.
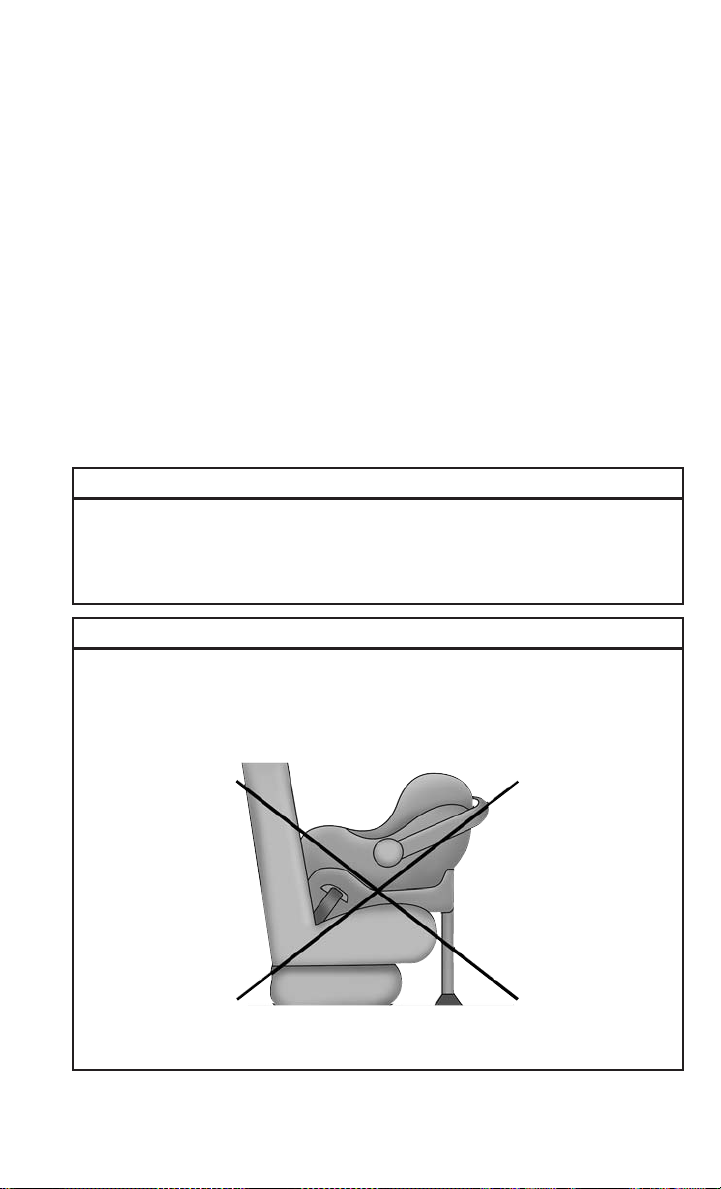
WARNING!
Do not install a rear-facing car seat using a rear support leg in this vehicle. The
floor of this vehicle is not designed to manage the crash forces of this type of car
seat. In a crash, the support leg may not function as it was designed by the car seat
manufacturer, and your child may be more severely injured as a result.
41
Page 44

GETTING STARTED
Older Children And Child Restraints
Children who are two years old or who have outgrown their rear-facing convertible
child seat can ride forward-facing in the vehicle. Forward-facing child seats and
convertible child seats used in the forward-facing direction are for children who are
over two years old or who have outgrown the rear-facing weight or height limit of their
rear-facing convertible child seat. Children should remain in a forward-facing child
seat with a harness for as long as possible, up to the highest weight or height allowed
by the child seat.
All children whose weight or height is above the forward-facing limit for the child seat
should use a belt-positioning booster seat until the vehicle’s seat belts fit properly. If
the child cannot sit with knees bent over the vehicle’s seat cushion while the child’s
back is against the seatback, they should use a belt-positioning booster seat. The
child and belt-positioning booster seat are held in the vehicle by the seat belt.
WARNING!
• Improper installation can lead to failure of an infant or child restraint. It could
come loose in a collision. The child could be badly injured or killed. Follow the
child restraint manufacturer’s directions exactly when installing an infant or
child restraint.
• After a child restraint is installed in the vehicle, do not move the vehicle seat
forward or rearward because it can loosen the child restraint attachments.
Remove the child restraint before adjusting the vehicle seat position. When the
vehicle seat has been adjusted, reinstall the child restraint.
• When your child restraint is not in use, secure it in the vehicle with a seat belt
or LATCH anchorages, or remove it from the vehicle. Do not leave it loose in the
vehicle. In a sudden stop or accident, it could strike the occupants or seatbacks
and cause serious personal injury.
42
Page 45

GETTING STARTED
Children Too Large For Booster Seats
Children who are large enough to wear the shoulder belt comfortably, and whose legs
are long enough to bend over the front of the seat when their back is against the
seatback, should use the seat belt in a rear seat. Use this simple 5-step test to decide
whether the child can use the vehicle’s seat belt alone:
1. Can the child sit all the way back against the back of the vehicle seat?
2. Do the child’s knees bend comfortably over the front of the vehicle seat – while
they are still sitting all the way back?
3. Does the shoulder belt cross the child’s shoulder between their neck and arm?
4. Is the lap part of the belt as low as possible, touching the child’s thighs and not
their stomach?
5. Can the child stay seated like this for the whole trip?
If the answer to any of these questions was “no,” then the child still needs to use a
booster seat in this vehicle. If the child is using the lap/shoulder belt, check seat belt
fit periodically and make sure the seat belt buckle is latched. A child’s squirming or
slouching can move the belt out of position. If the shoulder belt contacts the face or
neck, move the child closer to the center of the vehicle, or use a booster seat to
position the seat belt on the child correctly.
WARNING!
Never allow a child to put the shoulder belt under an arm or behind their back. In
a crash, the shoulder belt will not protect a child properly, which may result in
serious injury or death. A child must always wear both the lap and shoulder
portions of the seat belt correctly.
43
Page 46

GETTING STARTED
Recommendations For Attaching Child Restraints
Restraint
Type
Rear-Facing
Child
Restraint
Rear-Facing
Child
Restraint
Forward-
Facing Child
Restraint
Forward-
Facing Child
Restraint
Lower Anchors And Tethers For CHildren (LATCH) Restraint System
Combined
Weight of the
Child + Child
Restraint
Up to 65 lbs
(29.5 kg) X X
More than
65 lbs
(29.5 kg)
Up to 65 lbs
(29.5 kg)
More than
65 lbs
(29.5 kg)
Use Any Attachment Method Shown With An “X” Below
LATCH –
Lower
Anchors Only
Seat Belt
Only
X
LATCH –
Lower
Anchors +
Top Tether
Anchor
XX
Seat Belt +
Top Tether
Anchor
X
LATCH Label
Your vehicle is equipped with the child restraint anchorage system called LATCH,
which stands for Lower Anchors and Tethers for CHildren. The LATCH system has
three vehicle anchor points for installing LATCH-equipped child seats. There are two
lower anchorages located at the back of the seat cushion where it meets the seatback
and one top tether anchorage located behind the seating position. These anchorages
are used to install LATCH-equipped child seats without using the vehicle’s seat belts.
Some seating positions may have a top tether anchorage but no lower anchorages. In
these seating positions, the seat belt must be used with the top tether anchorage to
install the child restraint. Please see the following table for more information.
44
Page 47

GETTING STARTED
LATCH Positions For Installing Child Restraints In This Vehicle
Regular Cab LATCH Positions
Top Tether Anchorage Symbol
Crew/Mega Cabs 60/40 Split Bench
Top Tether Anchorage Symbol
LATCH Positions
Lower Anchorage Symbol
(2 Anchorages Per
Seating Position)
45
Page 48
GETTING STARTED
Quad Cab 60/40 Split Bench
LATCH Positions
Lower Anchorage Symbol
(2 Anchorages Per
Seating Position)
Top Tether Anchorage Symbol
Frequently Asked Questions About Installing Child Restraints With LATCH
What is the weight limit (child’s
weight + weight of the child
restraint) for using the LATCH
anchorage system to attach the
child restraint?
46
Quad/Crew Cabs Full Bench LATCH Positions
Lower Anchorage Symbol
(2 Anchorages Per
Seating Position)
Top Tether Anchorage Symbol
Use the LATCH anchorage
system until the combined
weight of the child and the child
65 lbs
(29.5 kg)
restraint is 65 lbs (29.5 kg).
Use the seat belt and tether
anchor instead of the LATCH
system once the combined
weight is more than
65 lbs (29.5 kg).
Page 49

GETTING STARTED
Frequently Asked Questions About Installing Child Restraints With LATCH
Do not use the seat belt when
you use the LATCH anchorage
Can the LATCH anchorages and
the seat belt be used together to
attach a rear-facing or forward-
facing child restraint?
Can a child seat be installed
in the center position using the
inner LATCH lower anchorages?
Can two child restraints be
attached using a common lower
LATCH anchorage?
Can the rear-facing child
restraint touch the back of the
front passenger seat?
Can the head restraints be
removed?
No
No
No
Yes
No
system to attach a rear-facing or
forward-facing child restraint.
Booster seats may be attached
to the LATCH anchorages if
allowed by the booster seat
manufacturer. See your booster
seat owner’s manual for
Quad Cab or Crew with Full
bench rear seat: Use the seat
belt and tether anchor to install
a child seat in the center
Never “share” a LATCH anchor-
age with two or more child
restraints. If the center position
does not have dedicated LATCH
lower anchorages, use the seat
belt to install a child seat in the
center position next to a child
seat using the LATCH anchor-
ages in an outboard position.
The child seat may touch the
back of the front passenger seat
if the child restraint manufac-
turer also allows contact. See
your child restraint owner’s
manual for more information.
more information.
seating position
47
Page 50

GETTING STARTED
Locating The LATCH Anchorages
The lower anchorages are round bars that are found at the rear of the seat
cushion where it meets the seatback. They are just visible when you lean into the rear
seat to install the child restraint. You will easily feel them if you run your finger along
the gap between the seatback and seat cushion.
Lower Anchors
48
Page 51
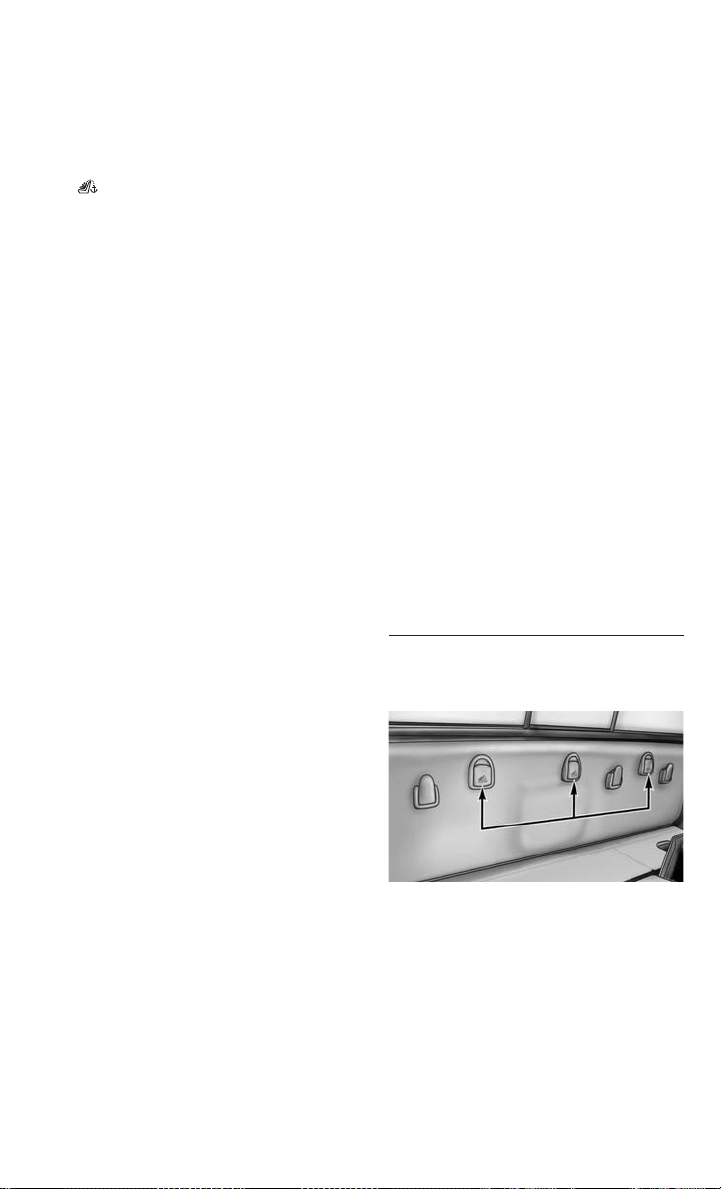
GETTING STARTED
Locating The Upper Tether Anchorages
Regular Cab models have tether strap anchorages behind the front center and
right seats. Quad Cab, Mega Cab and Crew Cab models have tether strap anchorages
located behind each of the rear seats.
LATCH-compatible child restraint systems will be equipped with a rigid bar or
a flexible strap on each side. Each will
have a hook or connector to attach to the
lower anchorage and a way to tighten the
connection to the anchorage. Forwardfacing child restraints and some rearfacing child restraints will also be
equipped with a tether strap. The tether
strap will have a hook at the end to attach
to the top tether anchorage and a way to
tighten the strap after it is attached to the
anchorage.
Regular Cab Tether Anchorages
1 — Tether Strap Hook
2 — Tether Strap To Child Restraint
3 — Tether Anchor
Mega Cab Tether Anchorages
(Behind Covers)
49
Page 52

GETTING STARTED
Center Seat LATCH
Quad Cab Or Crew Cab Full Bench Rear Seat: No Lower Center LATCH Anchorages
Available
WARNING!
• Do not install a child restraint in the center position using the LATCH system.
This position is not approved for installing child seats using the LATCH
attachments. You must use the seat belt and tether anchor to install a child seat
in the center seating position.
• Never use the same lower anchorage to attach more than one child restraint.
Please refer to “To Install A LATCH-Compatible Child Restraint” for typical
installation instructions.
Mega Cab Or Crew Cab Split Bench Rear Seat: Center LATCH Anchorages Available
If a child restraint installed in the center position blocks the seat belt webbing or
buckle for the outboard position, do not use that outboard position. If a child seat in
the center position blocks the outboard LATCH anchors or seat belt, do not install a
child seat in that outboard position.
WARNING!
Never use the same lower anchorage to attach more than one child restraint.
Please refer to “To Install A LATCH-Compatible Child Restraint” for typical
installation instructions.
Always follow the directions of the child restraint manufacturer when installing your
child restraint. Not all child restraint systems will be installed as described here.
To Install A LATCH-Compatible Child Restraint
If the selected seating position has a Switchable Automatic Locking Retractor (ALR)
seat belt, stow the seat belt, following the instructions below. See the section
“Installing Child Restraints Using The Vehicle Seat Belt” to check what type of seat
belt each seating position has.
1. Loosen the adjusters on the lower straps and on the tether strap of the child seat
so that you can more easily attach the hooks or connectors to the vehicle
anchorages.
2. Place the child seat between the lower anchorages for that seating position. For
some second row seats, you may need to recline the seat and/or raise the head
restraint to get a better fit. If the rear seat can be moved forward and rearward in
the vehicle, you may wish to move it to its rear-most position to make room for the
child seat. You may also move the front seat forward to allow more room for the
child seat.
50
Page 53

GETTING STARTED
3. Attach the lower hooks or connectors of the child restraint to the lower anchorages
in the selected seating position.
4. If the child restraint has a tether strap, connect it to the top tether anchorage. See
the section “Installing Child Restraints Using The Top Tether Anchorage” for
directions to attach a tether anchor.
5. Tighten all of the straps as you push the child restraint rearward and downward
into the seat. Remove slack in the straps according to the child restraint
manufacturer’s instructions.
6. Test that the child restraint is installed tightly by pulling back and forth on the
child seat at the belt path. It should not move more than 1 inch (25.4 mm) in any
direction.
How To Stow An Unused Switchable-ALR (ALR) Seat Belt:
When using the LATCH attaching system to install a child restraint, stow all ALR seat
belts that are not being used by other occupants or being used to secure child
restraints. An unused belt could injure a child if they play with it and accidentally
lock the seat belt retractor. Before installing a child restraint using the LATCH
system, buckle the seat belt behind the child restraint and out of the child’s reach.
If the buckled seat belt interferes with the child restraint installation, instead of
buckling it behind the child restraint, route the seat belt through the child restraint
belt path and then buckle it. Do not lock the seat belt. Remind all children in the
vehicle that the seat belts are not toys and that they should not play with them.
WARNING!
• Improper installation of a child restraint to the LATCH anchorages can lead to
failure of the restraint. The child could be badly injured or killed. Follow the
child restraint manufacturer’s directions exactly when installing an infant or
child restraint.
• Child restraint anchorages are designed to withstand only those loads imposed
by correctly-fitted child restraints. Under no circumstances are they to be used
for adult seat belts, harnesses, or for attaching other items or equipment to the
vehicle.
51
Page 54

GETTING STARTED
Installing Child Restraints Using The Vehicle Seat Belt
Child restraint systems are designed to be secured in vehicle seats by lap belts or the
lap belt portion of a lap/shoulder belt.
WARNING!
• Improper installation or failure to properly secure a child restraint can lead to
failure of the restraint. The child could be badly injured or killed.
• Follow the child restraint manufacturer’s directions exactly when installing an
infant or child restraint.
The seat belts in the passenger seating positions are equipped with either a
Switchable Automatic Locking Retractor (ALR) or a cinching latch plate or both. Both
types of seat belts are designed to keep the lap portion of the seat belt tight around
the child restraint so that it is not necessary to use a locking clip. The ALR retractor
can be “switched” into a locked mode by pulling all of the webbing out of the
retractor and then letting the webbing retract back into the retractor. If it is locked,
the ALR will make a clicking noise while the webbing is pulled back into the retractor.
Refer to the “Automatic Locking Mode” description in “Switchable Automatic
Locking Retractors (ALR)” under “Occupant Restraint Systems” for additional
information on ALR. The cinching latch plate is designed to hold the lap portion of
the seat belt tight when webbing is pulled tight and straight through a child
restraint’s belt path.
Please see the table below and the following sections for more information.
52
Page 55

GETTING STARTED
Lap/Shoulder Belt Systems For Installing Child Restraints In This Vehicle
Regular Cab Automatic Locking Retractor
ALR = Switchable Automatic Locking
Top Tether Anchorage Symbol
Quad Cab/Mega Cab/Crew Cab Automatic
Cinch = Cinching Latch Plate
ALR = Switchable Automatic Locking
Top Tether Anchorage Symbol
Frequently Asked Questions About Installing Child Restraints With Seat Belts
What is the weight limit (child’s
weight + weight of the child
restraint) for using the Tether
Anchor with the seat belt to
attach a forward facing child
restraint?
Weight limit
of the Child
Restraint
(ALR) Locations
Retractor
Locking Retractor (ALR) Locations
Retractor
Always use the tether anchor
when using the seat belt to
install a forward facing child
restraint, up to the
recommended weight limit of the
child restraint.
53
Page 56

GETTING STARTED
Frequently Asked Questions About Installing Child Restraints With Seat Belts
Can the rear-facing child
restraint touch the back of the
front passenger seat?
Can the head restraints
be removed?
Can the buckle stalk be twisted
to tighten the seat belt against
the belt path of the child
restraint?
Yes
No
Yes
Installing A Child Restraint With A Switchable Automatic Locking Retractor (ALR):
Child restraint systems are designed to be secured in vehicle seats by lap belts or the
lap belt portion of a lap/shoulder belt.
WARNING!
• Improper installation or failure to properly secure a child restraint can lead to
failure of the restraint. The child could be badly injured or killed.
• Follow the child restraint manufacturer’s directions exactly when installing an
infant or child restraint.
Contact between the front
passenger seat and the child
restraint is allowed, if the child
restraint manufacturer also
allows contact.
Head restraints may not
be removed.
In positions with cinching latch
plates (CINCH), the buckle stalk
may be twisted up to 3 full
turns. Do not twist the buckle
stalk in a seating position with
an ALR retractor.
1. For Crew, Mega, And Quad Cab Models
Place the child seat in the center of the seating position. For some second row
seats, you may need to recline the seat and/or raise the head restraint to get a
better fit. If the rear seat can be moved forward and rearward in the vehicle, you
may wish to move it to its rear-most position to make room for the child seat. You
may also move the front seat forward to allow more room for the child seat.
For Regular Cab Models
Place the child seat in the center of the seating position. Move the vehicle seat
as far rearward as possible to keep the child as far from the advanced passenger
air bag as possible.
2. Pull enough of the seat belt webbing from the retractor to pass it through the belt
path of the child restraint. Do not twist the belt webbing in the belt path.
3. Slide the latch plate into the buckle until you hear a “click.”
4. Pull on the webbing to make the lap portion tight against the child seat.
54
Page 57

GETTING STARTED
5. To lock the seat belt, pull down on the shoulder part of the belt until you have
pulled all the seat belt webbing out of the retractor. Then, allow the webbing to
retract back into the retractor. As the webbing retracts, you will hear a clicking
sound. This means the seat belt is now in the Automatic Locking mode.
6. Try to pull the webbing out of the retractor. If it is locked, you should not be able
to pull out any webbing. If the retractor is not locked, repeat step 5.
7. Finally, pull up on any excess webbing to tighten the lap portion around the child
restraint while you push the child restraint rearward and downward into the
vehicle seat.
8. If the child restraint has a top tether strap and the seating position has a top tether
anchorage, connect the tether strap to the anchorage and tighten the tether strap.
See the section “Installing Child Restraints Using the Top Tether Anchorage” for
directions to attach a tether anchor.
9. Test that the child restraint is installed tightly by pulling back and forth on the
child seat at the belt path. It should not move more than 1 inch (25.4 mm) in any
direction.
Any seat belt system will loosen with time, so check the belt occasionally, and pull it
tight if necessary.
Installing A Child Restraint With A Cinching Latch Plate (CINCH) — If Equipped:
Child restraint systems are designed to be secured in vehicle seats by lap belts or the
lap belt portion of a lap/shoulder belt.
WARNING!
• Improper installation or failure to properly secure a child restraint can lead to
failure of the restraint. The child could be badly injured or killed.
• Follow the child restraint manufacturer’s directions exactly when installing an
infant or child restraint.
1. Place the child seat in the center of the seating position. For some second row
seats, you may need to recline the seat and / or raise the head restraint to get a
better fit. If the rear seat can be moved forward and rearward in the vehicle, you
may wish to move it to its rear-most position to make room for the child seat. You
may also move the front seat forward to allow more room for the child seat.
2. Next, pull enough of the seat belt webbing from the retractor to pass it through the
belt path of the child restraint. Do not twist the belt webbing in the belt path.
3. Slide the latch plate into the buckle until you hear a “click.”
4. Finally, pull up on any excess webbing to tighten the lap portion around the child
restraint while you push the child restraint rearward and downward into the
vehicle seat.
55
Page 58
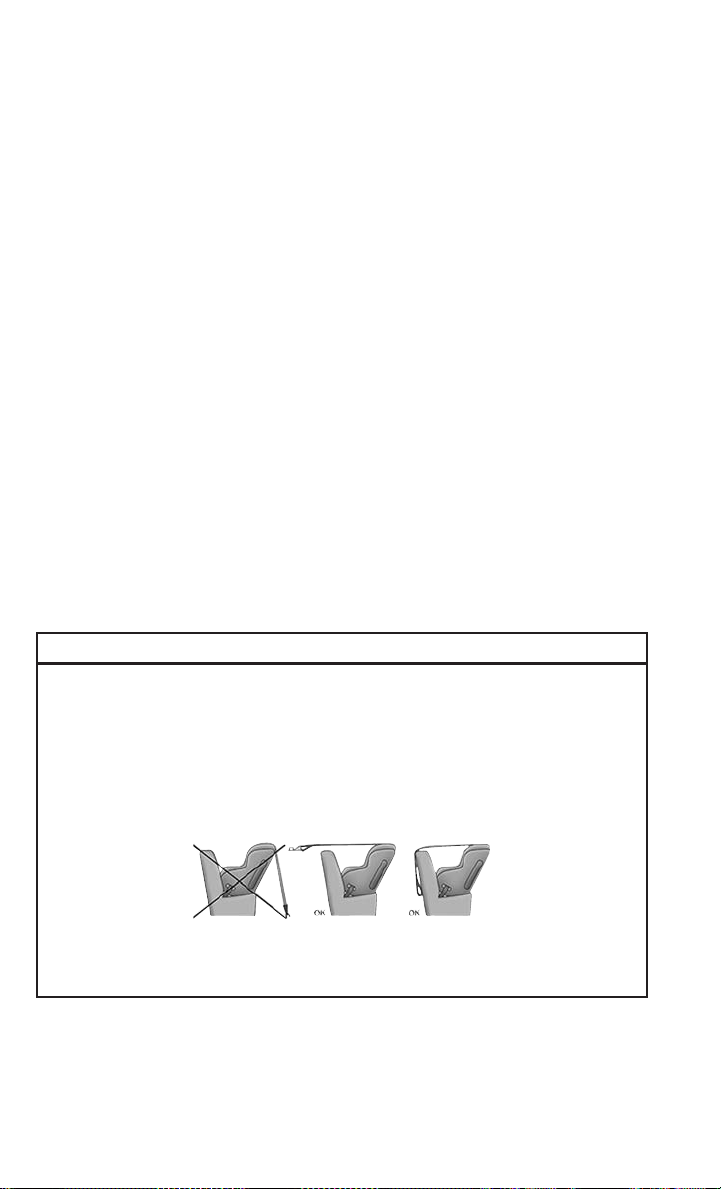
GETTING STARTED
5. If the child restraint has a top tether strap and the seating position has a top tether
anchorage, connect the tether strap to the anchorage and tighten the tether strap.
See the section “Installing Child Restraints Using the Top Tether Anchorage” for
directions to attach a tether anchor.
6. Test that the child restraint is installed tightly by pulling back and forth on the
child seat at the belt path. It should not move more than 1 inch (25.4 mm) in any
direction.
Any seat belt system will loosen with time, so check the belt occasionally, and pull it
tight if necessary.
If the buckle or the cinching latch plate is too close to the belt path opening of the
child restraint, you may have trouble tightening the seat belt. If this happens,
disconnect the latch plate from the buckle and twist the short buckle-end belt up to
three full turns to shorten it. Insert the latch plate into the buckle with the release
button facing out, away from the child restraint. Repeat steps 4 to 6, above, to
complete the installation of the child restraint.
If the belt still cannot be tightened after you shorten the buckle, disconnect the latch
plate from the buckle, turn the buckle around one half turn, and insert the latch plate
into the buckle again. If you still cannot make the child restraint installation tight, try
a different seating position.
Installing Child Restraints Using The Top Tether Anchorage
WARNING!
Do not attach a tether strap for a rear-facing car seat to any location in front of the
car seat, including the seat frame or a tether anchorage. Only attach the tether
strap of a rear-facing car seat to the tether anchorage that is approved for that
seating position, located behind the top of the vehicle seat. See the section
“Lower Anchors and Tethers for CHildren (LATCH) Restraint System” for the
location of approved tether anchorages in your vehicle.
56
Page 59

GETTING STARTED
Regular And Mega Cab Trucks:
In the regular cab truck, the top tether anchorages are located behind the center and
right passenger seats. In the mega cab truck, the top tether anchorages are located
behind each rear seating position. There is a plastic cover over each anchorage. To
attach the tether strap of the child restraint:
1. Place the child restraint on the seat and adjust the tether strap so that it will reach
over the seat back, under the head restraint and to the tether anchor directly
behind the seat.
2. Route the tether strap to provide the
most direct path between the anchorage and the child seat. The tether
strap should go between the head
restraint posts underneath the head
restraint. You may need to adjust the
head restraint to the upward position
to pass the tether strap underneath
the head restraint and between its
posts.
Regular Cab Tether Anchorages
1 — Tether Strap Hook
2 — Tether Strap To Child Restraint
3 — Tether Anchor
57
Page 60
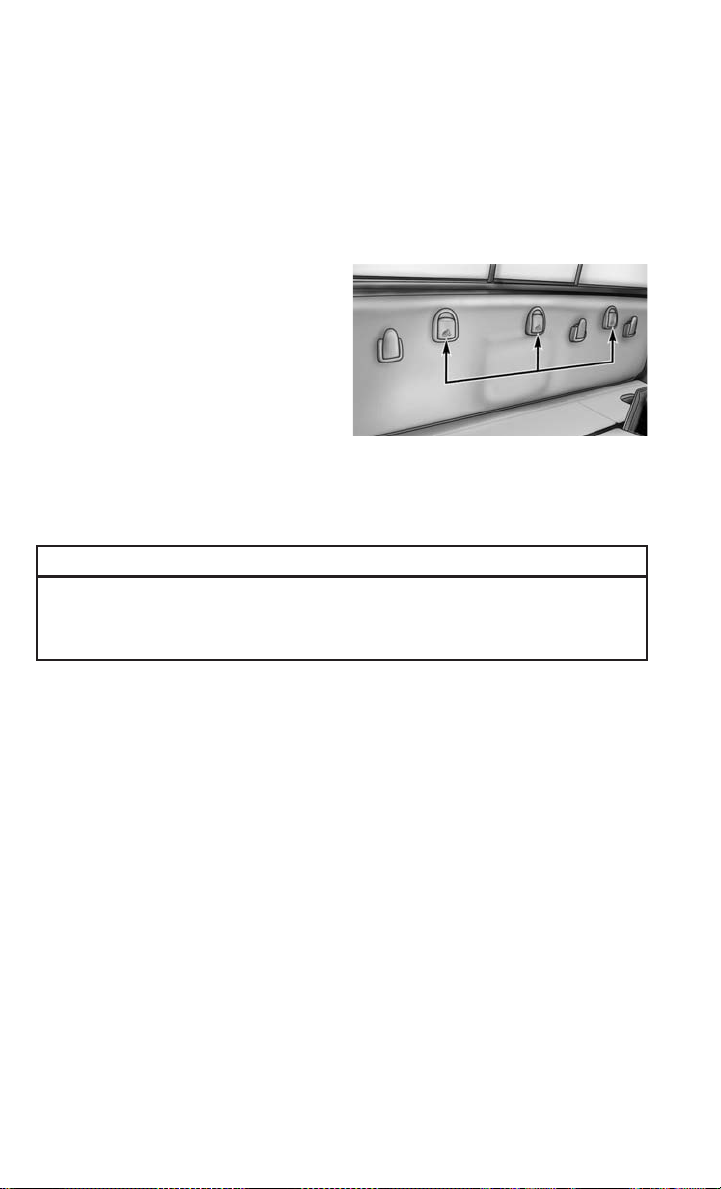
GETTING STARTED
3. Lift the cover (if so equipped), and attach the hook to the square opening in the
sheet metal. Tighten the tether strap according to the child seat manufacturer’s
instructions.
Mega Cab Tether Anchorages
WARNING!
Never place a rear-facing child restraint in front of an air bag. A deploying
Passenger Advanced Front Air Bag can cause death or serious injury to a child
12 years or younger, including a child in a rear-facing child restraint.
Quad Cab Or Crew Cab Trucks:
The top tether anchorages in this vehicle are tether strap loops located between the
rear glass and the back of the rear seat. There is a tether strap loop located behind
each seating position. Follow the steps below to attach the tether strap of the child
restraint.
58
Page 61

GETTING STARTED
Right Or Left Outboard Seats:
1. Raise the head restraint and reach between the rear seat and rear glass to access
the tether strap loop.
2. Place a child restraint on the seat and
adjust the tether strap so that it will
reach over the seat back, under the
head restraint, through the tether
strap loop behind the seat and over to
the tether strap loop behind the center seat.
Head Restraint In Raised Position
Tether Strap Loop With Center Head
Restraint In Raised Position
3. Pass the tether strap hook under the head restraint behind the child seat, though
the tether strap loop behind the seat and over to the center tether strap loop.
Tether Strap Through Outboard
Tether Strap Loop
59
Page 62

GETTING STARTED
4. Attach the hook to the center tether strap loop (see diagram). Tighten the tether
strap according to the child seat manufacturer’s instructions.
NOTE:
If there are child seats in both of the
outboard (left and right) seating positions, the tether strap hooks of both child
seats should be connected to the center
tether strap loop. This is the correct way
to tether two outboard child seats.
Tether Strap Through Outboard
Tether Strap Loop And Attached To
Center Tether Strap Loop
Center Seat:
1. Raise the head restraint and reach between the rear seat and rear glass to access
the tether strap loop.
2. Place a child restraint on the seat and
adjust the tether strap so that it will
reach over the seat back, under the
head restraint, through the tether
strap loop behind the seat and over to
the tether strap loop behind either the
right or left outboard seat.
60
Tether Strap Loop With Head Restraint
In Raised Position
Page 63

GETTING STARTED
3. Pass the tether strap hook under the head restraint behind the child seat, though
the tether strap loop behind the seat and over to the right or left outboard tether
strap loop.
Tether Strap Through Center
Tether Strap Loop
4. Attach the hook to the outboard tether strap loop (see diagram). Tighten the tether
strap according to the child seat manufacturer’s instructions.
Tether Strap Through Center Tether Strap
Loop And Attached To
Outboard Tether Strap Loop
61
Page 64

GETTING STARTED
Installing Three Child Restraints:
1. Place a child restraint on each outboard rear seat. Route the tether straps
following the directions for right and left seating positions, above.
2. Attach both hooks to the center tether strap loop, but do not tighten the straps yet.
3. Place a child restraint on the center rear seat. Route the tether strap following the
directions for the center seating position, above.
4. Attach the hook to the outboard tether strap loop.
5. Tighten the tether straps according to the child seat manufacturer’s instructions,
tightening the right and left tether straps before the center tether strap.
Left Outboard And Center
Seating Position Shown
WARNING!
• An incorrectly anchored tether strap could lead to increased head motion and
possible injury to the child. Use only the anchorage position directly behind the
child seat to secure a child restraint top tether strap.
• If your vehicle is equipped with a split rear seat, make sure the tether strap does
not slip into the opening between the seatbacks as you remove slack in the strap.
Transporting Pets
Air Bags deploying in the front seat could harm your pet. An unrestrained pet will be
thrown about and possibly injured, or injure a passenger during panic braking or in a
collision.
Pets should be restrained in the rear seat in pet harnesses or pet carriers that are
secured by seat belts.
62
Page 65

GETTING STARTED
HEAD RESTRAINTS
Head restraints are designed to reduce the risk of injury by restricting head
movement in the event of a rear impact. Head restraints should be adjusted so that
the top of the head restraint is located above the top of your ear.
WARNING!
• All occupants, including the driver, should not operate a vehicle or sit in a
vehicle’s seat until the head restraints are placed in their proper positions in
order to minimize the risk of neck injury in the event of a crash.
• Head restraints should never be adjusted while the vehicle is in motion. Driving
a vehicle with the head restraints improperly adjusted or removed could cause
serious injury or death in the event of a collision.
Front Head Restraints
To raise the head restraint, pull upward on the head restraint. To lower the head
restraint, push the adjustment button located on the base of the head restraint and
push downward on the head restraint.
To remove the head restraint, raise it up as far as it can go. Then, push the adjustment
button and the release button at the base of each post while pulling the head restraint
up. To reinstall the head restraint, put the head restraint posts into the holes. Then,
adjust it to the appropriate height.
Head Restraint
1 — Release Button
2 — Adjustment Button
63
Page 66
GETTING STARTED
WARNING!
• A loose head restraint thrown forward in a collision or hard stop could cause
serious injury or death to occupants of the vehicle. Always securely stow
removed head restraints in a location outside the occupant compartment.
• ALL the head restraints MUST be reinstalled in the vehicle to properly protect
the occupants. Follow the re-installation instructions above prior to operating
the vehicle or occupying a seat.
NOTE:
Do not reposition the head restraint 180 degrees to the incorrect position in an
attempt to gain additional clearance to the back of the head.
Rear Head Restraints
The rear seats are equipped with adjustable and removable head restraints. To raise
the head restraint, pull upward on the head restraint. To lower the head restraint,
push the adjustment button located on the base of the head restraint and push
downward on the head restraint.
To remove the head restraint, push the adjustment button and the release button
while pulling upward on the whole assembly. To reinstall the head restraint, put the
head restraint posts into the holes and adjust it to the appropriate height.
NOTE:
To remove outboard restraints, the rear seat bottom must be folded up.
WARNING!
A loose head restraint thrown forward in a collision or hard stop could cause
serious injury or death to occupants of the vehicle. Always securely stow removed
head restraints in a location outside the occupant compartment.
NOTE:
• The rear center head restraint (Crew Cab and Quad Cab) has only one adjustment
position that is used to aid in the routing of a tether. Refer to “Occupant
Restraints” in “Things To Know Before Starting Your Vehicle” in the Owner's
Manual on www.ramtrucks.com/en/owners/manuals for further information.
• Do not reposition the head restraint 180 degrees to the incorrect position in an
attempt to gain additional clearance to the back of the head.
WARNING!
ALL the head restraints MUST be reinstalled in the vehicle to properly protect the
occupants. Follow the re-installation instructions above prior to operating the
vehicle or occupying a seat.
64
Page 67

GETTING STARTED
FRONT SEATS
Driver's Power Seat — If Equipped
Some models may be equipped with an eight-way power driver's seat. The power seat
switches are located on the outboard side of the driver's seat cushion. There are two
power seat switches that are used to control the movement of the seat cushion and
the seatback.
Adjusting The Seat Forward Or Rearward
The seat can be adjusted both forward
and rearward. Push the seat switch forward or rearward. The seat will move in
the direction of the switch. Release the
switch when the desired position has
been reached.
Adjusting The Seat Up Or Down
The height of the seats can be adjusted
up or down. Pull upward or push downward on the seat switch. The seat will
move in the direction of the switch. Release the switch when the desired position is reached.
Tilting The Seat Up Or Down
The angle of the seat cushion can be
adjusted in four directions. Pull upward
or push downward on the front or rear of
the seat switch, the front or rear of the seat cushion will move in the direction of the
switch. Release the switch when the desired position is reached.
1 — Power Seat Switch
2 — Recline Switch
3 — Power Lumbar Switch
Power Seat Switches
65
Page 68
GETTING STARTED
Reclining The Seatback
The angle of the seatback can be adjusted forward or rearward. Push the seatback
switch forward or rearward, the seat will move in the direction of the switch. Release
the switch when the desired position is reached.
WARNING!
• Adjusting a seat while driving may be dangerous. Moving a seat while driving
could result in loss of control which could cause a collision and serious injury or
death.
• Seats should be adjusted before fastening the seat belts and while the vehicle
is parked. Serious injury or death could result from a poorly adjusted seat belt.
• Do not ride with the seatback reclined so that the shoulder belt is no longer
resting against your chest. In a collision, you could slide under the seat belt,
which could result in serious injury or death.
CAUTION!
Do not place any article under a power seat or impede its ability to move as it may
cause damage to the seat controls. Seat travel may become limited if movement
is stopped by an obstruction in the seat’s path.
Passenger’s Power Seat — If Equipped
Some models are equipped with a six-way power passenger seat. The power seat
switch is located on the outboard side of the seat. The switch is used to control the
movement of the seat and seat cushion.
Power Lumbar — If Equipped
Vehicles equipped with power driver or passenger seats may be also be equipped with
power lumbar. The power lumbar switch is located on the outboard side of the power
seat. Push the switch forward to increase the lumbar support. Push the switch
rearward to decrease the lumbar support.
66
Page 69

GETTING STARTED
Driver Memory Seat — If Equipped
This feature allows the driver to store up to two different memory profiles for easy
recall through a memory switch. Each memory profile contains desired position
settings for the driver’s seat, side mirrors, adjustable pedals (if equipped) and a set
of desired radio station presets. Your remote keyless entry key fob can also be
programmed to recall the same positions when the unlock button is pushed.
NOTE:
Your vehicle is equipped with two key fobs, one key fob can be linked to memory
position 1 and the other key fob can be linked to memory position 2.
The memory seat buttons are located on the outboard side of the driver’s seat
cushion.
Programming The Memory Feature
To create a new memory profile, perform
the following:
1. Cycle the vehicle’s ignition to the ON/
RUN position (do not start the engine).
2. Adjust all memory profile settings to
desired preferences (seat, side mirrors, adjustable pedals and radio station presets).
3. Push and release the S (set) button on
the memory switch.
4. Within five seconds, push and release
either of the memory buttons (1) or
(2). The instrument cluster display will show which memory position has been set.
NOTE:
• Memory profiles can be set without the vehicle in PARK, but the vehicle must be
in PARK to recall a memory profile.
• To set a memory profile to your key fob, refer to “Linking And Unlinking The
Remote Keyless Entry Key Fob To Memory” in this section.
Memory Seat Button Location
67
Page 70

GETTING STARTED
Linking And Unlinking The Remote Keyless Entry Key Fob To Memory
Your key fobs can be programmed to recall one of two pre-programmed memory
profiles by pushing the unlock button on the key fob.
NOTE:
Before programming your key fobs to memory the feature has to be selected.
• If your vehicle is equipped with a touchscreen, you must select the “Memory To
Fob” feature through the Uconnect system. Refer to “Uconnect Settings” in
“Understanding Your Instrument Panel” in the Owner’s Manual on
www.ramtrucks.com/en/owners/manuals for further information.
If your vehicle is not equipped with a touchscreen, you must select the “Key Fob Linked
•
To Memory” feature through the instrument cluster display. Refer to “Instrument
Cluster Display” in “Understanding Your Instrument Panel” in the Owner’s Manual on
www.ramtrucks.com/en/owners/manuals for further information.
To program your key fobs, perform the following:
1. Cycle the vehicle’s ignition to the OFF position.
2. Select desired memory profile (1) or (2).
NOTE:
If a memory profile has not already been set, refer to "Programming The Memory
Feature" for instructions on how to set a memory profile.
3. Once the profile has been recalled, push and release the S (set) button on the
memory switch, then push and release button (1) or (2) accordingly. “Memory
Profile Set” (1 or 2) will display in the instrument cluster display.
4. Push and release the lock button on the key fob within 10 seconds.
NOTE:
Your key fobs can be unlinked to your memory settings by pushing the S (set) button,
and within 10 seconds, followed by pushing the unlock button on the key fob.
Memory Position Recall
NOTE:
• For vehicles equipped with an automatic transmission, the vehicle must be in
PARK to recall memory positions. If a recall is attempted when the vehicle is not
in PARK, a message will appear in the instrument cluster display.
• For vehicles equipped with a manual transmission, the vehicle speed must be at
0 mph (0 km/h) to recall memory positions. If a recall is attempted with the
vehicle speed above 0 mph (0 km/h), a message will appear in the instrument
cluster display.
Driver One Memory Position Recall
• To recall the memory settings for driver one using the memory switch, push
memory button (1) on the memory switch.
68
Page 71

GETTING STARTED
• To recall the memory settings for driver one using the key fob, push the unlock
button on the key fob linked to memory position 1.
Driver Two Memory Position Recall
• To recall the memory setting for driver two using the memory switch, push memory
button (2) on the memory switch.
• To recall the memory settings for driver two using the key fob, push the unlock
button on the key fob linked to memory position 2.
A recall can be cancelled by pushing any of the memory buttons during a recall (S,
1, or 2). When a recall is cancelled, the driver's seat and the power pedals (if
equipped) stop moving. A delay of one second will occur before another recall can be
selected.
Easy Entry/Exit Seat
This feature provides automatic driver’s seat positioning to enhance driver mobility
when entering and exiting the vehicle.
The distance the driver’s seat moves depends on where you have the driver’s seat
positioned when you remove the key fob from the ignition (or change the ignition to
OFF, for vehicles equipped with Keyless Enter-N-Go).
• When you remove the key fob from the ignition (or change the ignition to OFF, for
vehicles equipped with Keyless Enter-N-Go), the driver’s seat will move about
2.4 inches (60 mm) rearward if the driver’s seat position is greater than or equal
to 2.7 inches (67.7 mm) forward of the rear stop. The seat will return to its
previously set position when you place the ignition into the ACC or RUN position.
• When you remove the key fob from the ignition (or change the ignition to OFF, for
vehicles equipped with Keyless Enter-N-Go), the driver’s seat will move to a
position 0.3 inches (7.7 mm) forward of the rear stop if the driver’s seat position
is between 0.9 inches and 2.7 inches (22.7 mm and 67.7 mm) forward of the rear
stop. The seat will return to its previously set position when you place the ignition
to the ACC or RUN position.
• The Easy Entry/Easy Exit feature is disabled when the driver’s seat position is less
than 0.9 inches (22.7 mm) forward of the rear stop. At this position, there is no
benefit to the driver by moving the seat for Easy Exit or Easy Entry.
Each stored memory setting will have an associated Easy Entry and Easy Exit
position.
NOTE:
The Easy Entry/Exit feature is not enabled when the vehicle is delivered from the factory.
The Easy Entry/Exit feature is enabled (or later disabled) through the programmable
features in the Uconnect system. Refer to “Uconnect Settings/Customer Programmable
Features” in “Understanding Your Instrument Panel” in the Owner’s Manual on
www.ramtrucks.com/en/owners/manuals for further information.
http://
69
Page 72

GETTING STARTED
Manual Seat Adjuster — If Equipped
Both front seats are adjustable forward or rearward. The manual seat adjustment
handle is located under the seat cushion at the front edge of each seat.
While sitting in the seat, pull up on the
handle and slide the seat forward or rearward. Release the bar once you have
reached the desired position. Then, using
body pressure, move forward and rearward on the seat to be sure that the seat
adjusters have latched.
Manual Seat Adjusting Bar/Recline Lever
1 — Recline Lever
2 — Adjusting Bar
WARNING!
• Adjusting a seat while driving may be dangerous. Moving a seat while driving
could result in loss of control which could cause a collision and serious injury or
death.
•
Seats should be adjusted before fastening the seat belts and while the vehicle is
parked. Serious injury or death could result from a poorly adjusted seat belt.
Dump Feature (Manual Recline Seat Only) — Standard Cab
Actuating the recliner handle will allow the seatback to swing (dump) forward on
manual recliner seats. This “dump” feature allows access to the storage bin behind
the seat.
WARNING!
• Do not stand or lean in front of the seat while actuating the handle. The seatback
may swing forward and hit you causing injury.
• To avoid injury, place your hand on the seatback and actuate the handle, then
position the seatback in the desired position.
70
Page 73

GETTING STARTED
HEATED/VENTILATED SEATS
Front Heated Seats
The front heated seats control buttons are located on the center instrument panel
below the climate controls.
If your vehicle is equipped with a touchscreen, the front heated seats control buttons
are also located within the climate or controls screen of the touchscreen.
• Press the heated seat button
• Press the heated seat button
• Press the heated seat button
When the HI-level setting is selected, the heater will provide a boosted heat level
during the first four minutes of operation. Then, the heat output will drop to the
normal HI-level. If the HI-level setting is selected, the system will automatically
switch to LO-level after approximately 60 minutes of continuous operation. At that
time, the display will change from HI to LO, indicating the change. The LO-level
setting will turn off automatically after approximately 45 minutes.
NOTE:
The engine must be running for the heated seats to operate.
Vehicles Equipped With Remote Start
On models that are equipped with remote start, the driver’s seat can be programmed
to come on during a remote start.
If your vehicle is equipped with a touchscreen, this feature can be programmed through
the Uconnect system. Refer to “Uconnect Settings” in “Understanding Your Instrument
Panel” in the Owner’s Manual on
information.
If your vehicle is not equipped with a touchscreen, this feature can be programmed
through the instrument cluster display. Refer to “Instrument Cluster Display” in
“Understanding Your Instrument Panel” in the Owner’s Manual on
www.ramtrucks.com/en/owners/manuals for further information.
once to turn the HI setting on.
a second time to turn the LO setting on.
a third time to turn the heating elements off.
www.ramtrucks.com/en/owners/manuals for further
71
Page 74

GETTING STARTED
Rear Heated Seats
The rear heated seat switches are located on the rear of the center console.
• Push the heated seat button
• Push the heated seat button
• Push the heated seat button
When the HI-level setting is selected, the heater will provide a boosted heat level
during the first four minutes of operation. Then, the heat output will drop to the
normal HI-level. If the HI-level setting is selected, the system will automatically
switch to LO-level after a maximum of 60 minutes of continuous operation. At that
time, the number of illuminated LEDs changes from two to one, indicating the
change. The LO-level setting will turn off automatically after a maximum of
45 minutes.
• Persons who are unable to feel pain to the skin because of advanced age,
chronic illness, diabetes, spinal cord injury, medication, alcohol use, exhaustion
or other physical conditions must exercise care when using the seat heater. It
may cause burns even at low temperatures, especially if used for long periods of
time.
• Do not place anything on the seat that insulates against heat, such as a blanket
or cushion. This may cause the seat heater to overheat. Sitting in a seat that has
been overheated could cause serious burns due to the increased surface
temperature of the seat.
once to turn the HI setting on.
a second time to turn the LO setting on.
a third time to turn the heating elements off.
WARNING!
Ventilated Seats — If Equipped
Located in the seat cushion are small fans that draw the air from the passenger
compartment and move air through fine perforations in the seat cover to help keep
the driver and front passenger cooler in higher ambient temperatures. The fans
operate at two speeds, HI and LO.
The front ventilated seats control buttons are located on the center instrument panel
below the climate controls.
If your vehicle is equipped with a touchscreen, the front ventilated seats control
buttons are also located within the climate or controls screen of the touchscreen.
• Press the ventilated seat button
• Press the ventilated seat button
• Press the ventilated seat button
NOTE:
The engine must be running for the ventilated seats to operate.
72
once to choose HI.
a second time to choose LO.
a third time to turn the ventilated seat off.
Page 75

GETTING STARTED
Vehicles Equipped With Remote Start
On models that are equipped with remote start, the ventilated seats can be
programmed to come on during a remote start.
If your vehicle is equipped with a touchscreen, this feature can be programmed through
the Uconnect system. Refer to “Uconnect Settings” in “Understanding Your Instrument
Panel” in the Owner’s Manual on
information.
If your vehicle is not equipped with a touchscreen, this feature can be programmed
through the instrument cluster display. Refer to “Instrument Cluster Display” in
“Understanding Your Instrument Panel” in the Owner’s Manual on
www.ramtrucks.com/en/owners/manuals for further information.
HEATED STEERING WHEEL
The steering wheel contains a heating element that helps warm your hands in cold
weather. The heated steering wheel has only one temperature setting. Once the
heated steering wheel has been turned on, it will operate for an average of
80 minutes before automatically shutting off. This time may vary based on the
temperature of the surrounding environment or the heated steering wheel may not
turn on when it is already warm.
The heated steering wheel control button is located on the center of the instrument
panel below the climate controls.
If your vehicle is equipped with a touchscreen, the heated steering wheel control
button is located within the climate or controls screen of the touchscreen.
• Press the heated steering wheel button
• Press the heated steering wheel button
element off.
NOTE:
The engine must be running for the heated steering wheel to operate.
Vehicles Equipped With Remote Start
On models that are equipped with remote start, the heated steering wheel can be
programmed to come on during a remote start.
If your vehicle is equipped with a touchscreen, this feature can be programmed through
the Uconnect system. Refer to “Uconnect Settings” in “Understanding Your Instrument
Panel” in the Owner’s Manual on
information.
If your vehicle is not equipped with a touchscreen, this feature can be programmed
through the instrument cluster display. Refer to “Instrument Cluster Display” in
“Understanding Your Instrument Panel” in the Owner’s Manual on
www.ramtrucks.com/en/owners/manuals for further information.
www.ramtrucks.com/en/owners/manuals for further
once to turn the heating element on.
a second time to turn the heating
www.ramtrucks.com/en/owners/manuals for further
73
Page 76

GETTING STARTED
WARNING!
• Persons who are unable to feel pain to the skin because of advanced age,
chronic illness, diabetes, spinal cord injury, medication, alcohol use, exhaustion, or other physical conditions must exercise care when using the steering
wheel heater. It may cause burns even at low temperatures, especially if used for
long periods.
• Do not place anything on the steering wheel that insulates against heat, such as
a blanket or steering wheel covers of any type and material. This may cause the
steering wheel heater to overheat.
TILT STEERING COLUMN
This feature allows you to tilt the steering column upward or downward. The tilt lever
is located on the steering column, below the multifunction lever.
Pull the lever toward the steering wheel
to unlock the steering column. With one
hand firmly on the steering wheel, move
the steering column up or down, as desired. Release the lever to lock the steering column firmly in place.
Tilt Lever Location
1 — Adjustable Pedal Switch
2 — Tilt Lever
WARNING!
Do not adjust the steering column while driving. Adjusting the steering column
while driving or driving with the steering column unlocked, could cause the driver
to lose control of the vehicle. Failure to follow this warning may result in serious
injury or death.
74
Page 77

GETTING STARTED
DRIVER ADJUSTABLE PEDALS — IF EQUIPPED
The adjustable pedals system is designed to allow a greater range of driver comfort
for steering wheel tilt and seat position. This feature allows the brake, accelerator,
and clutch pedals (if equipped) to move toward or away from the driver to provide
improved position with the steering wheel.
The adjustable pedal switch is located to the left side of the steering column.
• The pedals can be adjusted with the ignition OFF.
• The pedals cannot be adjusted when the vehicle is in REVERSE or when the Speed
Control System is on. The following messages will appear on vehicles equipped
with an instrument cluster display if the pedals are attempted to be adjusted when
the system is locked out: “Adjustable Pedal Disabled — Cruise Control Engaged”
or “Adjustable Pedal Disabled — Vehicle In Reverse”.
NOTE:
• Always adjust the pedals to a position that allows full pedal travel.
• Further small adjustments may be necessary to find the best possible seat/pedal
position.
• For vehicles equipped with Driver Memory Seat, you can use your remote keyless
entry key fob or the memory switch on the driver’s door trim panel to return the
adjustable pedals to pre-programmed positions. Refer to “Front Seats” in “Getting Started” for further information.
WARNING!
Do not adjust the pedals while the vehicle is moving. You could lose control and
have an accident. Always adjust the pedals while the vehicle is parked.
CAUTION!
Do not place any article under the adjustable pedals or impede its ability to move
as it may cause damage to the pedal controls. Pedal travel may become limited if
movement is stopped by an obstruction in the adjustable pedal's path.
75
Page 78

GETTING STARTED
POWER FOLDING OUTSIDE MIRRORS FOR STANDARD AND TRAILER TOW
If equipped with power folding mirrors, they can be electrically folded rearward and
unfolded into the drive position.
The switch for the power folding mirrors is located between the power mirror switches
L (left) and R (right). Push the switch once and the mirrors will fold in, push the
switch a second time and the mirrors will return to the normal driving position.
If the mirror is manually folded after electrically cycled, a potential extra button push
is required to get the mirrors back to the home position. If the mirror does not
electrically fold, check for ice or dirt build up at the pivot area which can cause
excessive drag.
Resetting The Power Folding Outside
Mirrors
You may need to reset the power folding
mirrors if the following occurs:
• The mirrors are accidentally blocked
while folding.
• The mirrors are accidentally manually
folded/unfolded.
• The mirrors come out of the unfolded
position.
• The mirrors shake and vibrate at normal driving speeds.
To Reset The Power Folding Mirrors:
1. Using the power folding mirror switch,
move the mirror to its full forward position.
2. Using the power folding mirror switch, move the mirror to the full retract position
(this may require multiple button pushes). This resets them to their normal
position.
NOTE:
• The power fold mirrors are designed to operate while the vehicle is stationary or
traveling at moderate speeds. If you attempt to power fold the mirrors at high
speeds they may not fully open or close. You should slow down to a moderate
speed and complete the operation.
• When pushing the power fold button 10 or more times in one minute the system
shuts down for one minute to protect the motors from over heating.
Power Folding Mirror Switch
76
Page 79

OPERATING YOUR VEHICLE
ENGINE BREAK-IN RECOMMENDATIONS
A long break-in period is not required for the engine and drivetrain (transmission and
axle) in your vehicle.
Drive moderately during the first 300 miles (500 km). After the initial 60 miles
(100 km), speeds up to 50 or 55 mph (80 or 90 km/h) are desirable.
While cruising, brief full-throttle acceleration within the limits of local traffic laws
contributes to a good break-in. Wide-open throttle acceleration in low gear can be
detrimental and should be avoided.
The engine oil installed in the engine at the factory is a high-quality energy conserving type
lubricant. Oil changes should be consistent with anticipated climate conditions under
which vehicle operations will occur. Refer to “Maintenance Procedures” in “Maintaining
Your Vehicle” in your Owner’s Manual on
further details.
NOTE:
A new engine may consume some oil during its first few thousand miles (kilometers)
of operation. This should be considered a normal part of the break-in and not
interpreted as an indication of an engine problem or malfunction.
Never use Non-Detergent Oil or Straight Mineral Oil in the engine or damage may
result.
www.ramtrucks.com/en/owners/manuals for
CAUTION!
Diesel Engine Break-In Recommendations
• For 3.0L diesel engine break-in recommendations, refer to Diesel Engine Break-In
Recommendations on pg. 227
• For 6.7L Cummins diesel engine break-in recommendations, refer to Diesel
Engine Break-In Recommendations on pg. 241
77
Page 80

OPERATING YOUR VEHICLE
TURN SIGNALS/WIPER/WASHER/HIGH BEAMS LEVER
Turn Signal/Wiper/Washer/High Beam Lever
Turn Signals/Lane Change Assist
Tap the lever up or down once and the turn signal (right or left) will flash three times
and automatically turn off.
Wipers
Intermittent, Low And High Operation
Rotate the end of the lever to the first detent position for one of five intermittent
settings, the second detent for low wiper operation and the third detent for high wiper
operation.
Washer Operation
Push the end of the lever inward to the second detent and hold for as long as spray
is desired.
Mist Feature
When a single wipe to clear off road mist or spray from a passing vehicle is needed,
push the washer knob, located on the end of the multifunction lever, inward to the
first detent and release. The wipers will cycle one time and automatically shut off.
78
Page 81

OPERATING YOUR VEHICLE
High Beams
Push the lever away from you to activate the high beams. A high beam symbol will
illuminate in the cluster to indicate the high beams are on.
NOTE:
For safe driving, turn off the high beams when oncoming traffic is present to prevent
headlight glare and as a courtesy to other motorists.
HEADLIGHT SWITCH
NOTE:
If your vehicle is equipped with illuminated
approach lights under the outside mirrors,
they can be turned off through the instrument cluster or the Uconnect radio. For
further information, refer to the Owner’s
Manual on
owners/manuals for further information.
www.ramtrucks.com/en/
Headlight Switch
1 — Auto
2 — Rotate Headlight Switch
3 — Push Cargo Light
4 — Rotate Dimmer
5 — Push Fog Light
Automatic Headlights/Parking Lights/Headlights
Rotate the headlight switch, located on the instrument panel to the left of the
steering wheel, to the first detent
headlights
With the parking lights or low beam headlights on, push the headlight switch once for
fog lights.
Rotate the headlight switch to AUTO for Automatic headlights.
When set to AUTO, the system automatically turns the headlights on or off based on
ambient light levels.
.
for parking lights and to the second detent for
79
Page 82

OPERATING YOUR VEHICLE
Automatic High Beams
The Automatic High Beams system provides increased forward lighting at night by
automating high beam control through the use of a digital camera mounted above the
inside rearview mirror. This camera detects vehicle specific light and automatically
switches from high beams to low beams until the approaching vehicle is out of view.
This feature is programmable through the Uconnect system. Refer to “Uconnect
Settings” in “Understanding Your Instrument Panel” in your Owner’s Manual on
www.ramtrucks.com/en/owners/manuals for further information.
Instrument Panel Dimmer
• Rotate the dimmer control to the extreme left position to fully dim the instrument
panel lights and prevent the interior lights from illuminating when a door is
opened.
• Rotate the dimmer control right to increase the brightness of the instrument panel
when the parking lights or headlights are on.
• Rotate the dimmer control right to the next detent position to fully brighten the
odometer and radio when the parking lights or headlights are on.
• Rotate the dimmer control right to the last detent position to turn on the interior
lighting.
NOTE:
If your vehicle is equipped with a touchscreen, the dimming is programmable through the
Uconnect system. Refer to “Uconnect Settings ” in “Understanding Your Instrument
Panel” in the Owner's Manual on
information.
www.ramtrucks.com/en/owners/manuals for further
Cargo Light With Bed Lights — If Equipped
The cargo light and bed lights (if equipped) are turned on by pushing on the cargo
lights button.
The cargo light and bed lights (if equipped) will also turn on for approximately
60 seconds when a key fob unlock button is pushed, as part of the Illuminated Entry
feature.
80
Page 83

OPERATING YOUR VEHICLE
SPEED CONTROL
When engaged, the Speed Control takes over accelerator operations at speeds greater
than 25 mph (40 km/h).
The Speed Control buttons are located on the right side of the steering wheel.
NOTE:
In order to ensure proper operation, the
Speed Control System has been designed
to shut down if multiple speed control
functions are operated at the same time.
If this occurs, the Speed Control System
can be reactivated by pushing the Speed
Control ON/OFF button and resetting the
desired vehicle set speed.
To Activate
Push the ON/OFF button. The cruise control indicator light in the instrument cluster display will illuminate. To turn the
system off, push the ON/OFF button a
second time. The cruise control indicator
light will turn off. The system should be
turned off when not in use.
1 — Push Cancel
2 — Push On/Off
3 — Push Resume/Accel
4 — Push Set/Decel
Speed Control Buttons
WARNING!
Leaving the Speed Control system on when not in use is dangerous. You could
accidentally set the system or cause it to go faster than you want. You could lose
control and have an accident. Always leave the system off when you are not using it.
81
Page 84

OPERATING YOUR VEHICLE
To Set A Desired Speed
Turn the Speed Control on. When the vehicle has reached the desired speed, push the
SET (-) button and release. Release the accelerator and the vehicle will operate at the
selected speed.
NOTE:
The vehicle should be traveling at a steady speed and on level ground before pushing
the SET (-) button.
To Deactivate
A soft tap on the brake pedal, pushing the CANCEL button, or normal brake pressure
while slowing the vehicle will deactivate Speed Control without erasing the set speed
memory. Pushing the ON/OFF button or turning the ignition switch OFF erases the set
speed memory.
To Resume Speed
To resume a previously set speed, push the RES (+) button and release. Resume can
be used at any speed above 20 mph (32 km/h).
To Vary The Speed Setting
To Increase Speed
When the Speed Control is set, you can increase speed by pushing the RES (+)
button.
The drivers preferred units can be selected through the instrument panel settings if
equipped. Refer to “Understanding Your Instrument Panel” in the Owner’s Manual
on www.ramtrucks.com/en/owners/manuals for further information. The speed increment shown is dependant on the chosen speed unit of U.S. (mph) or Metric (km/h):
U.S. Speed (mph)
• Pushing the RES (+) button once will result in a 1 mph increase in set speed. Each
subsequent tap of the button results in an increase of 1 mph.
• If the button is continually pushed, the set speed will continue to increase until
the button is released, then the new set speed will be established.
Metric Speed (km/h)
• Pushing the RES (+) button once will result in a 1 km/h increase in set speed.
Each subsequent tap of the button results in an increase of 1 km/h.
• If the button is continually pushed, the set speed will continue to increase until
the button is released, then the new set speed will be established.
82
Page 85

OPERATING YOUR VEHICLE
To Decrease Speed
When the Speed Control is set, you can decrease speed by pushing the SET (-)
button.
The drivers preferred units can be selected through the instrument panel settings if
equipped. Refer to “Understanding Your Instrument Panel” in the Owner’s Manual
on www.ramtrucks.com/en/owners/manuals for further information. The speed increment shown is dependant on the chosen speed unit of U.S. (mph) or Metric (km/h):
U.S. Speed (mph)
• Pushing the SET (-) button once will result in a 1 mph decrease in set speed. Each
subsequent tap of the button results in a decrease of 1 mph.
• If the button is continually pushed, the set speed will continue to decrease until
the button is released, then the new set speed will be established.
Metric Speed (km/h)
• Pushing the SET (-) button once will result in a 1 km/h decrease in set speed. Each
subsequent tap of the button results in a decrease of 1 km/h.
• If the button is continually pushed, the set speed will continue to decrease until
the button is released, then the new set speed will be established.
To Accelerate For Passing
Press the accelerator as you would normally. When the pedal is released, the vehicle
will return to the set speed.
Using Speed Control On Hills
The transmission may downshift on hills to maintain the vehicle set speed.
NOTE:
The Speed Control system maintains speed up and down hills. A slight speed change
on moderate hills is normal.
On steep hills, a greater speed loss or gain may occur, it may be preferable to drive
without Speed Control.
WARNING!
Speed Control can be dangerous where the system cannot maintain a constant
speed. Your vehicle could go too fast for the conditions, and you could lose control
and have an accident. Do not use Speed Control in heavy traffic or on roads that
are winding, icy, snow-covered or slippery.
83
Page 86

OPERATING YOUR VEHICLE
STARTING PROCEDURES
Before starting your vehicle, adjust your seat, adjust both inside and outside mirrors,
and fasten your seat belt.
The starter should not be operated for more than 10-second intervals. Waiting a few
seconds between such intervals will protect the starter from overheating.
WARNING!
• When leaving the vehicle, always make sure the keyless ignition node is in the
"OFF" mode, remove the key fob from the vehicle and lock the vehicle.
• Never leave children alone in a vehicle, or with access to an unlocked vehicle.
Allowing children to be in a vehicle unattended is dangerous for a number of
reasons. A child or others could be seriously or fatally injured. Children should
be warned not to touch the parking brake, brake pedal or the gear selector.
• Do not leave the key fob in or near the vehicle, or in a location accessible to
children, and do not leave the ignition of a vehicle equipped with Keyless
Enter-N-Go in the ACC or ON/RUN mode. A child could operate power windows,
other controls, or move the vehicle.
• Do not leave children or animals inside parked vehicles in hot weather. Interior
heat build-up may cause serious injury or death.
Normal Starting Using ENGINE START/STOP Button
To Turn On The Engine Using The ENGINE START/STOP Button
1. The transmission must be in PARK.
2. Press and hold the brake pedal while pushing the ENGINE START/STOP button
once.
3. The system takes over and attempts to start the vehicle. If the vehicle fails to start,
the starter will disengage automatically after 10 seconds.
4. If you wish to stop the cranking of the engine prior to the engine starting, push the
button again.
NOTE:
Normal starting of either a cold or a warm engine is obtained without pumping or
pressing the accelerator pedal.
84
Page 87

OPERATING YOUR VEHICLE
To Turn Off The Engine Using ENGINE START/STOP Button
1. Place the gear selector in PARK, then push and release the ENGINE START/STOP
button.
2. The ignition will return to the OFF mode.
3. If the gear selector is not in PARK, the ENGINE START/STOP button must be held
for two seconds or three short pushes in a row with the vehicle speed above 5 MPH
(8 km/h) before the engine will shut off. The ignition will remain in the ACC mode
until the gear selector is in PARK and the button is pushed twice to the OFF mode.
4. If the gear selector is not in PARK and the ENGINE START/STOP button is pushed
once with the vehicle speed above 5 MPH (8 km/h), the instrument cluster will
display a “Vehicle Not In Park” message and the engine will remain running. Never
leave a vehicle out of the PARK position, or it could roll.
NOTE:
If the gear selector is not in PARK, and the ENGINE START/STOP button is pushed
once with the vehicle speed below 5 MPH (8 km/h), the engine will shut off and the
ignition will remain in the ACC position. If vehicle speed drops below 1.2 MPH
(1.9 km/h), the vehicle may AutoPark. See AutoPark section for further details.
ENGINE START/STOP Button Functions — With Driver’s Foot OFF The Brake Pedal
(In PARK Or NEUTRAL Position)
The ENGINE START/STOP button operates similar to an ignition switch. It has three
modes: OFF, ACC, and RUN. To change the ignition modes without starting the
vehicle and use the accessories, follow these directions:
1. Start with the ignition in the OFF mode.
2. Push the ENGINE START/STOP button once to place the ignition to the ACC
mode.
3. Push the ENGINE START/STOP button a second time to place the ignition to the
RUN mode.
4. Push the ENGINE START/STOP button a third time to return the ignition to the
OFF mode.
85
Page 88

OPERATING YOUR VEHICLE
AutoPark — Rotary Shifter and 8-Speed Trans Only (If Equipped)
AutoPark is a supplemental feature to assist in placing the vehicle in PARK should
the situations on the following pages occur. It is a back up system and should not be
relied upon as the primary method by which the driver shifts the vehicle into PARK.
The conditions under which AutoPark will engage are outlined on the following pages.
WARNING!
• Driver inattention could lead to failure to place the vehicle in PARK. ALWAYS DO
A VISUAL CHECK that your vehicle is in PARK by verifying that a solid (not
blinking) “P” is indicated in the Instrument Cluster Display and near the gear
selector. If the "P" indicator is blinking, your vehicle is not in PARK. As an added
precaution, always apply the parking brake when exiting the vehicle.
• AutoPark is a supplemental feature. It is not designed to replace the need to
shift your vehicle into PARK. It is a back up system and should not be relied
upon as the primary method by which the driver shifts the vehicle into PARK.
If the vehicle is not in PARK and the driver turns off the engine, the vehicle may AutoPark.
AutoPark will engage when all of these conditions are met:
• Vehicle is equipped with a rotary shifter and an 8-speed transmission
• Vehicle is not in PARK
• Vehicle Speed is 1.2 MPH (1.9 km/h) or less
• Ignition switched from RUN to ACC
NOTE:
For Keyless Go equipped vehicles, The engine will turn off and the ignition switch will
change to ACC mode. After 30 minutes the ignition switches to OFF automatically,
unless the driver turns the ignition switch OFF.
If the vehicle is not in PARK and the driver exits the vehicle with the engine running, the
vehicle may AutoPark.
AutoPark will engage when all of these conditions are met:
• Vehicle is equipped with a rotary shifter and an 8-speed transmission
• Vehicle is not in PARK
• Vehicle speed is 1.2 MPH (1.9 km/h) or less
• Driver’s seat belt is unbuckled
• Driver’s door is ajar
• Brake Pedal is not depressed
86
Page 89

OPERATING YOUR VEHICLE
The MESSAGE “AutoPark Engaged Shift to P then Shift to Gear” will display in the
instrument cluster.
NOTE:
In some cases the ParkSense graphic will be displayed in the instrument cluster,
causing the “AutoPark Engaged Shift to P then Shift to Gear” to not be seen. In these
cases, the shifter must be returned to “P” to select desired gear.
If the driver shifts into PARK while moving, the vehicle may AutoPark.
AutoPark will engage ONLY when vehicle speed is 1.2 MPH (1.9 km/h) or less.
The MESSAGE “Vehicle Speed is Too High to Shift to P”will be displayed in the
instrument cluster if vehicle speed is above 1.2 MPH (1.9 km/h).
WARNING!
If vehicle speed is above 1.2 MPH (1.9 km/h), the transmission will default to
NEUTRAL until the vehicle speed drops below 1.2 MPH (1.9 km). A vehicle left
in the NEUTRAL position can roll. As an added precaution, always apply the
parking brake when exiting the vehicle.
4WD LOW — If Equipped
AutoPark will be disabled when operating the vehicle in 4WD LOW.
The MESSAGE “AutoPark Disabled” will be displayed in the instrument cluster.
Additional customer warnings will be given when all of these conditions are met:
• Vehicle is not in PARK
• Driver’s Door is ajar
• Vehicle is in 4WD LOW range
The MESSAGE “AutoPark Not Engaged” will be displayed in the instrument cluster. A
warning chime will continue until you shift the vehicle into PARK or the Driver’s Door
is closed.
ALWAYS DO A VISUAL CHECK that your vehicle is in PARK by looking for the "P" in the
Instrument Cluster Display and near the shifter. As an added precaution, always
apply the parking brake when exiting the vehicle.
87
Page 90

OPERATING YOUR VEHICLE
EIGHT-SPEED AUTOMATIC TRANSMISSION — IF EQUIPPED
Your vehicle may be equipped with a fuel efficient eight-speed transmission. The
electronic transmission gear selector is located on the instrument panel. The
transmission gear (PRND) is displayed both above the rotary gear selector control and
in the instrument cluster.
• To select a gear range, simply rotate
the gear selector.
NOTE:
You must press the brake pedal to shift
the transmission out of PARK or from
NEUTRAL into DRIVE or REVERSE.
• To shift past multiple gear ranges at
once (such as PARK to DRIVE), simply
rotate the switch to the appropriate
detent.
• Select the DRIVE range for normal
driving.
Rotary Gear Selector
WARNING!
The transmission may not engage PARK if the vehicle is moving. Always bring the
vehicle to a complete stop before shifting to PARK, and verify that the transmission gear position indicator solidly indicates PARK (P) without blinking. Ensure
that the vehicle is completely stopped, and the PARK position is properly
indicated, before exiting the vehicle.
ELECTRONIC RANGE SELECT (ERS)
Electronic Range Select (ERS) allows you to limit the highest available transmission
gear, and can be activated during any driving condition. When towing a trailer or
operating the vehicle in off-road conditions, using ERS shift control will help you
maximize both performance and engine braking.
You can switch between ERS and DRIVE mode at any vehicle speed.
Refer to your Owner's Manual on www.ramtrucks.com/en/owners/manuals for further
details.
88
Page 91

OPERATING YOUR VEHICLE
ERS Operation — Six-Speed Transmission
• Toggle the switch on the column gear selector down (-) or up (+) to select the
desired top gear.
• For maximum deceleration (engine braking) push and hold the (-) switch on the
column gear selector. Your vehicle will automatically select the lowest safe gear for
optimal engine braking.
• To disable ERS, push and hold the (+) switch until “D” is displayed in the
odometer.
ERS Control On The Gear Selector
Electronic Range Select (ERS) Operation — Eight-Speed Transmission
• Tapping the ERS (-) switch (on the
steering wheel) will activate ERS
mode.
• Once in ERS mode, tapping the ERS
(-) or (+) switch will change the top
available gear.
• To exit ERS mode, simply push and
hold the ERS (+) switch until “D” is
once again displayed in the transmission gear position indicator in the instrument cluster.
ERS Control
89
Page 92

OPERATING YOUR VEHICLE
AIR SUSPENSION SYSTEM (1500 MODELS) — IF EQUIPPED
Description
The air suspension system provides full time load leveling capability along with the
benefit of being able to adjust vehicle height by the push of a button.
Automatic height changes will occur
based on vehicle speed and the current
vehicle height. The indicator lamps and
instrument cluster messages will operate
the same for automatic changes and user
requested changes.
• Normal Ride Height (NRH) – This is the
standard position of the suspension
and is meant for normal driving.
• Off-Road 1 (OR1) (Raises the vehicle
approximately 1 in (26 mm) - This position should be the primary position for
all off-road driving until Off Road 2
(OR2) is needed. A smoother and
more comfortable ride will result. To
enter OR1, push the “Up” button once
from the NRH position while the vehicle speed is below 35 mph (56 km/
h). When in the OR1 position, if the vehicle speed remains between 40 mph
(64 km/h) and 50 mph (80 km/h) for greater than 20 seconds or if the vehicle
speed exceeds 50 mph (80 km/h), the vehicle will be automatically lowered to
NRH. Off-Road 1 may not be available due to vehicle payload, an instrument
cluster message will be displayed when this occurs. Refer to “Instrument Cluster
Display” in “Understanding Your Instrument Panel” in the Owner’s Manual on
www.ramtrucks.com/en/owners/manuals for further information.
• Off-Road 2 (OR2) (Raises the vehicle approximately 2 in (51 mm) - This position is
intended for off-roading use only where maximum ground clearance is required. To
enter OR2, push the “Up” button twice from the NRH position or once from the
OR1 position while vehicle speed is below 20 mph (32 km/h). While in OR2, if the
vehicle speed exceeds 25 mph (40 km/h) the vehicle height will be automatically
lowered to OR1. Off-Road 2 may not be available due to vehicle payload, an
instrument cluster message will be displayed when this occurs. Refer to “Instrument Cluster Display” in “Understanding Your Instrument Panel” in the Owner’s
Manual on www.ramtrucks.com/en/owners/manuals for further information.
1500 Air Suspension Controls
1 — Off-Road 1 Indicator
2 — Off-Road 2 Indicator
3 — Up Button
4 — Down Button
5 — Entry/Exit Mode Indicator
6 — Normal Ride Height Indicator
90
Page 93

OPERATING YOUR VEHICLE
• Aero Mode (Lowers the vehicle approximately .6 in [15 mm]) – This position provides
improved aerodynamics by lowering the vehicle. The vehicle will automatically
enter Aero Mode when the vehicle speed remains between 62 mph (100 km/h)
and 66 mph (106 km/h) for greater than 20 seconds or if the vehicle speed
exceeds 66 mph (106 km/h). The vehicle will return to NRH from Aero Mode if the
vehicle speed remains between 30 mph (48 km/h) and 35 mph (56 km/h) for
greater than 20 seconds or if the vehicle speed falls below 30 mph (48 km/h).
NOTE:
Automatic Aero Mode may be disabled through vehicle settings in the instrument
cluster when equipped with Uconnect 3.0, or your Uconnect Radio when equipped
with Uconnect 5.0, 8.4A, or 8.4AN.
• Entry/Exit Mode (Lowers the vehicle approximately 2 in (51 mm) - This position lowers
the vehicle for easier passenger entry and exit as well as lowering the rear of the
vehicle for easier loading and unloading of cargo. To enter Entry/Exit Mode, push
the “Down” button once from the NHR while the vehicle speed is below 33 mph
(53 km/h). Once the vehicle speed goes below 15 mph (24 km/h) the vehicle
height will begin to lower. If the vehicle speed remains between 15 mph (24 km/h)
and 25 mph (40 km/h) for greater than 60 seconds, or the vehicle speed exceeds
25 mph (40 km/h) the Entry/Exit change will be cancelled. To return to Normal
Height Mode, push the “Up” button once while in Entry/Exit or drive the vehicle
over 15 mph (24 km/h). Entry/Exit mode may not be available due to vehicle
payload, an instrument cluster message will be displayed when this occurs. Refer
to “Instrument Cluster Display” in “Understanding Your Instrument Panel” in the
Owner’s Manual on www.ramtrucks.com/en/owners/manuals for further
information.
Air Suspension Modes
The Air Suspension system has multiple modes to protect the system in unique
situations:
AERO Mode
To improve aerodynamics, the air suspension system has a feature which will put the
vehicle into AERO height automatically. Refer to “Instrument Cluster Display” in
“Understanding Your Instrument Panel” in the Owner’s Manual on
www.ramtrucks.com/en/owners/manuals for further information.
NOTE:
This mode is intended to be enabled with engine running.
91
Page 94

OPERATING YOUR VEHICLE
Tire/Jack Mode
To assist with changing a tire, the air suspension system has a feature which allows
the automatic leveling to be disabled. Refer to “Instrument Cluster Display” in
“Understanding Your Instrument Panel” in the Owner’s Manual on
www.ramtrucks.com/en/owners/manuals for further information.
NOTE:
This mode is intended to be enabled with engine running.
Transport Mode
For towing your vehicle with four wheels off the ground, the air suspension system
has a feature which will put the vehicle into Entry/Exit height and disable the
automatic load leveling system. Refer to “Instrument Cluster Display” in “Understanding Your Instrument Panel” in the Owner’s Manual on
www.ramtrucks.com/en/owners/manuals for further information.
NOTE:
This mode is intended to be enabled with engine running.
Wheel Alignment Mode
Before performing a wheel alignment, this mode must be enabled. Refer to “Instrument Cluster Display” in “Understanding Your Instrument Panel” in the Owner’s
Manual on www.ramtrucks.com/en/owners/manuals for further information.
NOTE:
This mode is intended to be enabled with engine running.
Protection Strategy
In order to “protect” the air suspension system, the vehicle will disable load leveling
as required (suspension overloaded, battery charge low, etc.). Load leveling will
automatically resume as soon as system operation requirements are met. See your
authorized dealer if system does not resume.
NOTE:
If towing with air suspension refer to “Trailer Towing” in “Starting And Operating” for
further information.
92
Page 95

OPERATING YOUR VEHICLE
AIR SUSPENSION SYSTEM (REBEL MODELS ONLY) — IF EQUIPPED
Description
The air suspension system provides full time load leveling capability along with the
benefit of being able to adjust vehicle height by the push of a button.
Automatic height changes will occur based on vehicle speed and the current vehicle
height. The indicator lamps and instrument cluster messages will operate the same
for automatic changes and user requested changes.
NOTE:
The vehicle will automatically enter Aero
Mode when the vehicle speed remains
between 62 mph (100 km/h) and
66 mph (106 km/h) for greater than 20
seconds or if the vehicle speed exceeds
66 mph (106 km/h).
• Normal Ride Height (NRH) – This is the
standard position of the suspension
and is meant for normal driving.
• Off-Road (OR) (Raises the vehicle ap-
proximately 1 in [26 mm]) – This position is intended for off-roading use
only where maximum ground clearance is required. To enter OR, push
the “Up” button once from the NRH
position while vehicle speed is below
20 mph (32 km/h). While in OR, if the
vehicle speed exceeds 25 mph
(40 km/h) the vehicle height will be automatically lowered to NRH. Off-Road may
not be available due to vehicle payload, an instrument cluster display message will
be shown when this occurs. Refer to “Instrument Cluster Display” in “Understanding Your Instrument Panel” in your Owner’s Manual on
www.ramtrucks.com/en/owners/manuals for further information.
• Aero Mode (Lowers the vehicle approximately .6 in [15 mm]) – This position provides
improved aerodynamics by lowering the vehicle. The vehicle will automatically
enter Aero Mode when the vehicle speed remains between 62 mph (100 km/h)
and 66 mph (106 km/h) for greater than 20 seconds or if the vehicle speed
exceeds 66 mph (106 km/h). The vehicle will return to NRH from Aero Mode if the
vehicle speed remains between 30 mph (48 km/h) and 35 mph (56 km/h) for
greater than 20 seconds or if the vehicle speed falls below 30 mph (48 km/h).
Rebel Air Suspension Controls
1 — Normal Ride Height Indicator
Lamp
2 — Off-Road Indicator Lamp
3 — Up Button
4 — Down Button
5 — Entry/Exit Mode Indicator Lamp
6 — Aero Mode Indicator Lamp
93
Page 96

OPERATING YOUR VEHICLE
To enter Aero Mode manually push the down button once from NRH at any vehicle
speed. To return to NRH push the up button once while vehicle speed is less than
56 mph (90 km/h).
NOTE:
Automatic Aero Mode may be disabled through vehicle settings on your Uconnect
Radio when equipped with UConnect 5.0, 8.4A, or 8.4AN. Refer to “Uconnect
Settings” in “Understanding Your Instrument Panel” in your Owner’s Manual on
www.ramtrucks.com/en/owners/manuals for further information.
• Entry/Exit Mode (Lowers the vehicle approximately 3 in [73 mm]) –
the vehicle for easier passenger entry and exit as well as lowering the rear of the vehicle
for easier loading and unloading of cargo. To enter Entry/Exit Mode, push the “Down”
button twice from the NRH while the vehicle speed is below 33 mph (53 km/h). Once
the vehicle speed goes below 15 mph (24 km/h) the vehicle height will begin to lower.
If the vehicle speed remains between 15 mph (24 km/h) and 25 mph (40 km/h) for
greater than 60 seconds, or the vehicle speed exceeds 25 mph (40 km/h) the Entry/Exit
change will be cancelled. To return to Normal Height Mode, push the “Up” button twice
while in Entry/Exit or drive the vehicle over 15 mph (24 km/h). Entry/Exit mode may not
be available due to vehicle payload, an instrument cluster display message will be
shown when this occurs. Refer to “Instrument Cluster Display” in “Understanding Your
Instrument Panel” in your Owner’s Manual on
owners/manuals for further information.
Air Suspension Modes
The Air Suspension system has multiple modes to protect the system in unique
situations:
AERO Mode
To improve aerodynamics, the air suspension system has a feature which will put the
vehicle into AERO height automatically. Refer to “Instrument Cluster Display” in
“Understanding Your Instrument Panel” in the Owner’s Manual on
www.ramtrucks.com/en/owners/manuals for further information.
NOTE:
This mode is intended to be enabled with engine running.
This position lowers
www.ramtrucks.com/en/
94
Page 97

OPERATING YOUR VEHICLE
Tire/Jack Mode
To assist with changing a tire, the air suspension system has a feature which allows
the automatic leveling to be disabled. Refer to “Instrument Cluster Display” in
“Understanding Your Instrument Panel” in the Owner’s Manual on
www.ramtrucks.com/en/owners/manuals for further information.
NOTE:
This mode is intended to be enabled with engine running.
Transport Mode
For towing your vehicle with four wheels off the ground, the air suspension system
has a feature which will put the vehicle into Entry/Exit height and disable the
automatic load leveling system. Refer to “Instrument Cluster Display” in “Understanding Your Instrument Panel” in the Owner’s Manual on
www.ramtrucks.com/en/owners/manuals for further information.
NOTE:
This mode is intended to be enabled with engine running.
Wheel Alignment Mode
Before performing a wheel alignment, this mode must be enabled. Refer to “Instrument Cluster Display” in “Understanding Your Instrument Panel” in the Owner’s
Manual on www.ramtrucks.com/en/owners/manuals for further information.
NOTE:
This mode is intended to be enabled with engine running.
Protection Strategy
In order to “protect” the air suspension system, the vehicle will disable load leveling
as required (suspension overloaded, battery charge low, etc.). Load leveling will
automatically resume as soon as system operation requirements are met. See your
authorized dealer if system does not resume.
NOTE:
If towing with air suspension refer to “Trailer Towing” in “Starting And Operating” for
further information.
95
Page 98

OPERATING YOUR VEHICLE
AIR SUSPENSION SYSTEM (2500/3500 MODELS) — IF EQUIPPED
Description
This air suspension system is a rear leveling ride height system. The main purpose of
this system is to maintain the truck’s rear ride height level. There are two selectable
heights that can be chosen based on your operating conditions.
The system requires that the ignition be in ON/RUN position or the engine running
with zero vehicle speed for all user requested changes and load leveling.
Normal Ride Height (NRH) – This is the
standard position of the suspension and
is meant for normal driving. It will automatically adjust to maintain the rear ride
height as conditions change.
Alternate Trailer Height (ATH) – Lowers the
vehicle approximately 1 in (25 mm) for a
level truck, to be used as required while
trailer towing. It will automatically adjust
to maintain the rear ride height as conditions change.
Trailer Decoupling/Unloading – The air suspension system will load level (lower/
exhaust only) for up to 10 minutes after the vehicle is turned off. This allows for easy
removal of a trailer and/or load from the back of the truck by maintaining the ride
height. After 10 minutes you will need to turn the ignition to the run position for the
air suspension to maintain ride height. If the air suspension system is disabled using
the settings menu (Tire Jack Mode, Transport Mode or Alignment Mode) the system
will remain disabled when the vehicle is turned off. Reactivating the air suspension
can be accomplished via the settings menu or driving the vehicle above 5 mph
(8 km/h) for Tire Jack Mode or Alignment Mode and 16 mph (26 km/h) for Transport
Mode.
NOTE:
• Most 3500 models will not lower to Alternate Trailer Height (ATH) when unloaded.
• Refer to “Trailer Towing” in “Starting And Operating” for further information.
Ignition OFF Behavior
For a predetermined amount of time after the ignition is off the air suspension may
adjust to maintain a proper appearance.
Refer to your Owner’s Manual on www.ramtrucks.com/en/owners/manuals for further
details.
Alt Trailer Height Button
96
Page 99

OPERATING YOUR VEHICLE
WARNING!
The air suspension system uses a high pressure volume of air to operate the
system. To avoid personal injury or damage to the system, see your authorized
dealer for service.
Air Suspension Modes
The air suspension system has multiple modes to protect the system in unique
situations:
Tire/Jack Mode
To assist with changing a tire, the air suspension system has a feature which allows the
automatic leveling to be disabled. This mode is intended to be enabled with engine
running. Refer to “Instrument Cluster Display” in “Understanding Your Instrument
Panel” or “Uconnect Settings” in “Understanding Your Instrument Panel” if equipped
with a touch screen radio, on
information.
NOTE:
This mode is intended to be enabled with engine running.
Transport Mode
To assist with flat bed towing, the air suspension system has a feature which will put the
vehicle below Normal Ride Height (NRH) and disable the automatic load leveling
system. This mode is intended to be enabled with engine running. Refer to “Instrument
Cluster Display” in “Understanding Your Instrument Panel” or “Uconnect Settings” in
“Understanding Your Instrument Panel” if equipped with a touch screen radio, on
www.ramtrucks.com/en/owners/manuals for further information.
NOTE:
This mode is intended to be enabled with engine running.
Wheel Alignment Mode
Before performing a wheel alignment this mode must be enabled. Refer to “Instrument Cluster Display” in “Understanding Your Instrument Panel” or “Uconnect
Settings” in “Understanding Your Instrument Panel” if equipped with a touch screen
radio, on www.ramtrucks.com/en/owners/manuals for further information.
NOTE:
This mode is intended to be enabled with engine running.
Protection Strategy
In order to “protect” the air suspension system, the vehicle will disable load leveling
as required (suspension overloaded, battery charge low, etc.). Load leveling will
automatically resume as soon as system operation requirements are met. See your
authorized dealer if system does not resume.
www.ramtrucks.com/en/owners/manuals for further
97
Page 100

OPERATING YOUR VEHICLE
MANUAL CLIMATE CONT ROLS WITHOUT TOUCHSCREEN
Manual Climate Controls
1 — Rotate Blower Control
2 — Push Air Recirculation Button
3 — Rotate Temperature Control
Air Recirculation /Max A/C
• Use Recirculation for maximum A/C operation.
• For window defogging, turn the Recirculation button off.
• Recirculation is not allowed in defrost.
• Recirculation is allowed in floor mode and defrost/floor (mix modes) for approximately five minutes.
4 — Push A/C Button
5 — Rotate Mode Control
6 — Push Rear Defroster Button
Heated Mirrors
The mirrors are heated to melt frost or ice. This feature is activated whenever you turn
on the defroster.
98
 Loading...