

Page 1
Technotes
WP SERIES
WP 2 / WP 4 / WP 6 / WP 8
09/2004
1
18
35
52
69
86
103
120
137
Page 2

18
Master valve :
The terminal marked “P” is used to activate a Master
Valve. It is STRONGLY RECOMMENDED to use a
Master Valve to ensure proper operation of your system
in case, for example, the valve wiring is accidentally cut,
etc
Important :
Maximum distance between the controller and the valves
using wire sized 1.5mm²: 30m
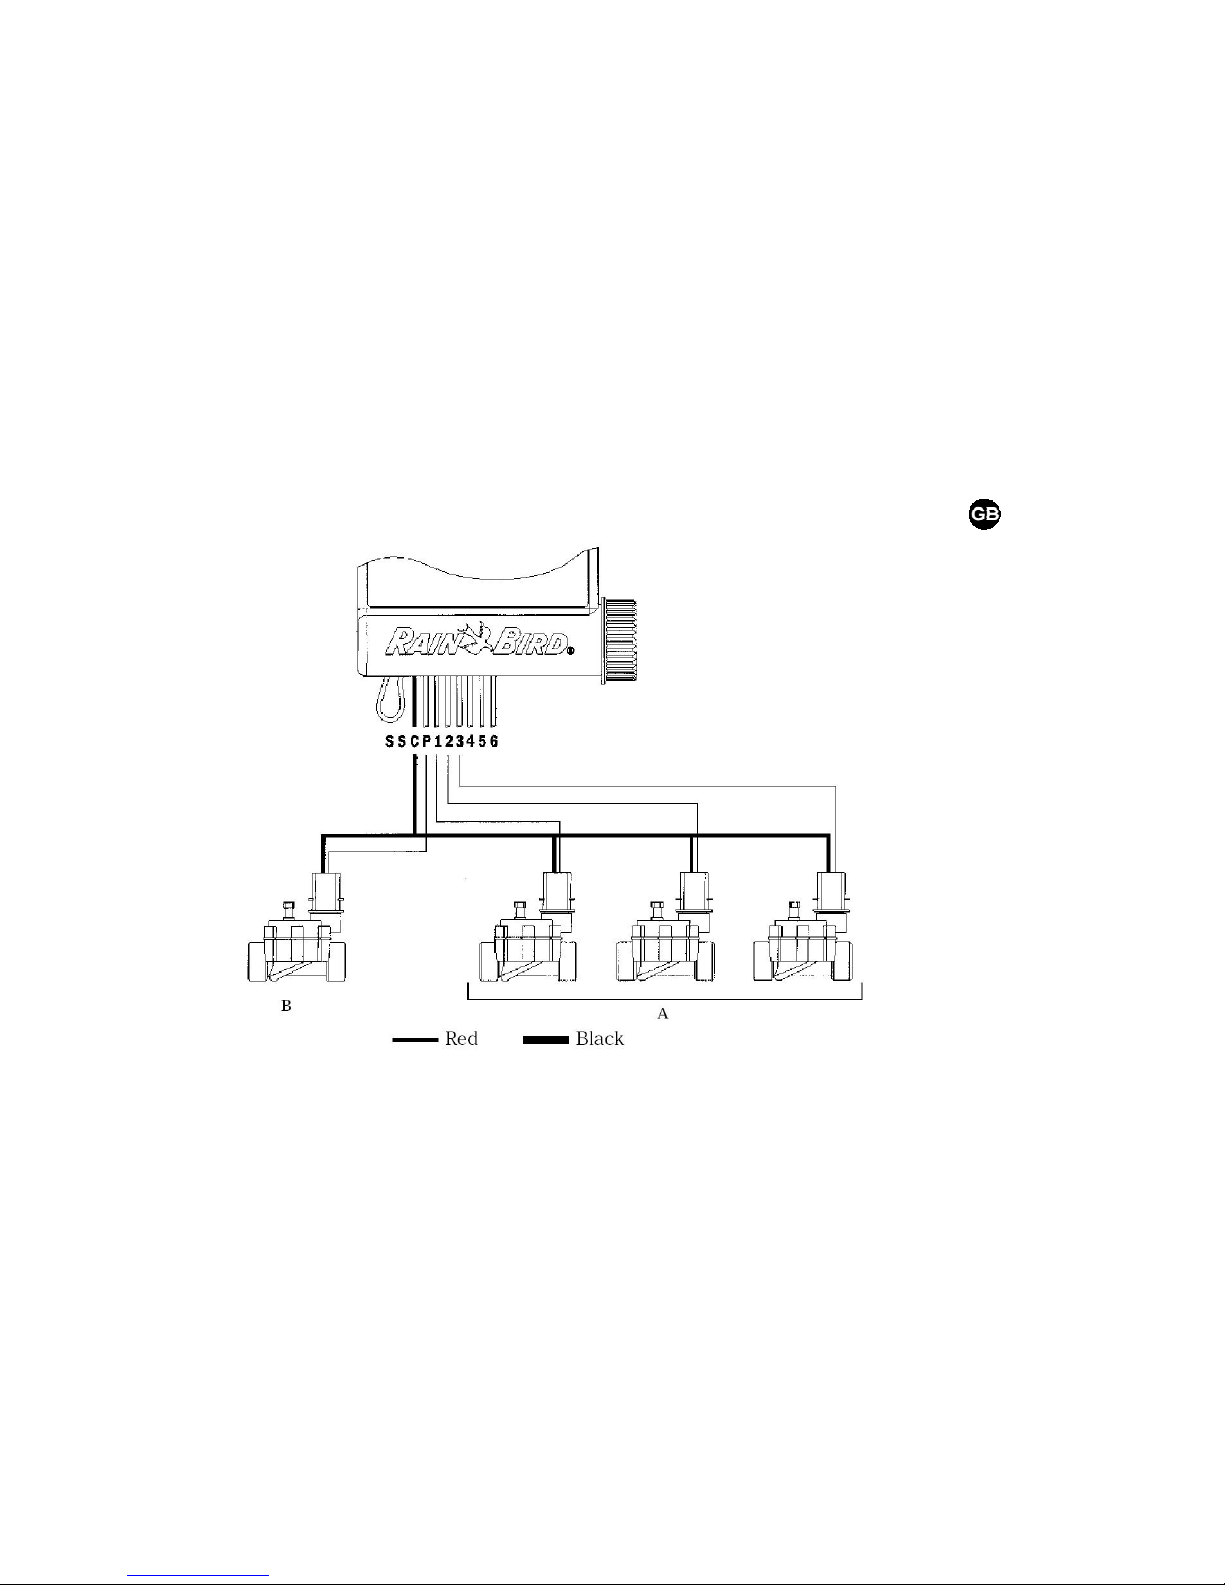
WIRING TO THE ELECTRIC VALVE
Controller capacity
1 Rain Bird 9V latching solenoid per station and possibility to use 1 master valve
equipped with a Rain 9V latching solenoid for the system
Make sure all wire from the controller to the valves is code-approved for
underground low voltage use. Select the suitable wire size. All connections to the
valve leads and any splice in the field must be watertight. Use Rain Bird Quick
Connect “King” connectors supplied with the product or “DBY” connectors.
See wiring diagram below.
Rain Bird 9V
latching
solenoid
Page 3
19
WIRING TO THE ELECTRIC VALVES
A
: Valve box
Use Rain Bird 9V
latching solenoid for
each valve.
B: master valve with
Rain Bird 9V latching
solenoid
Page 4
20
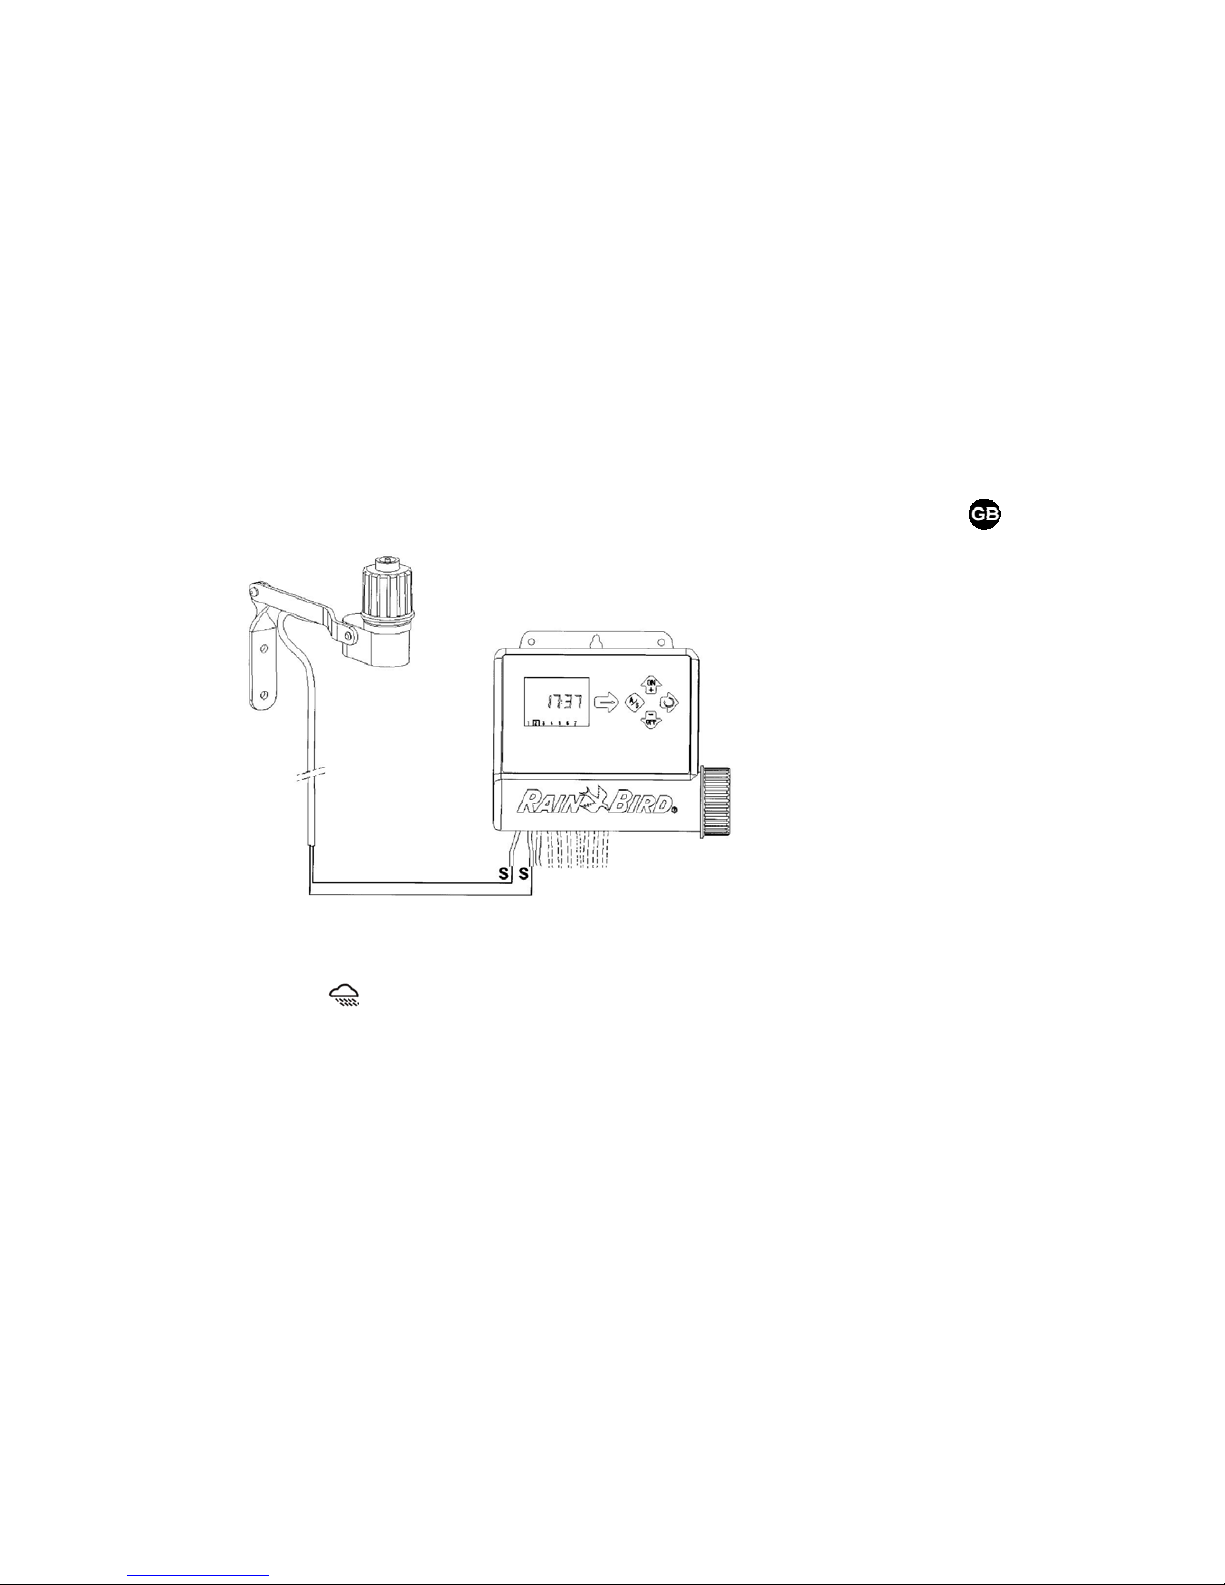
WIRING TO THE RAIN SENSOR
Active Rain Sensor input immediately stops watering if it rains.
Note: The
icon will appear in all screens when the rain sensor is activated.
Rain Sensor RSD-BEx (option)
Page 5
21
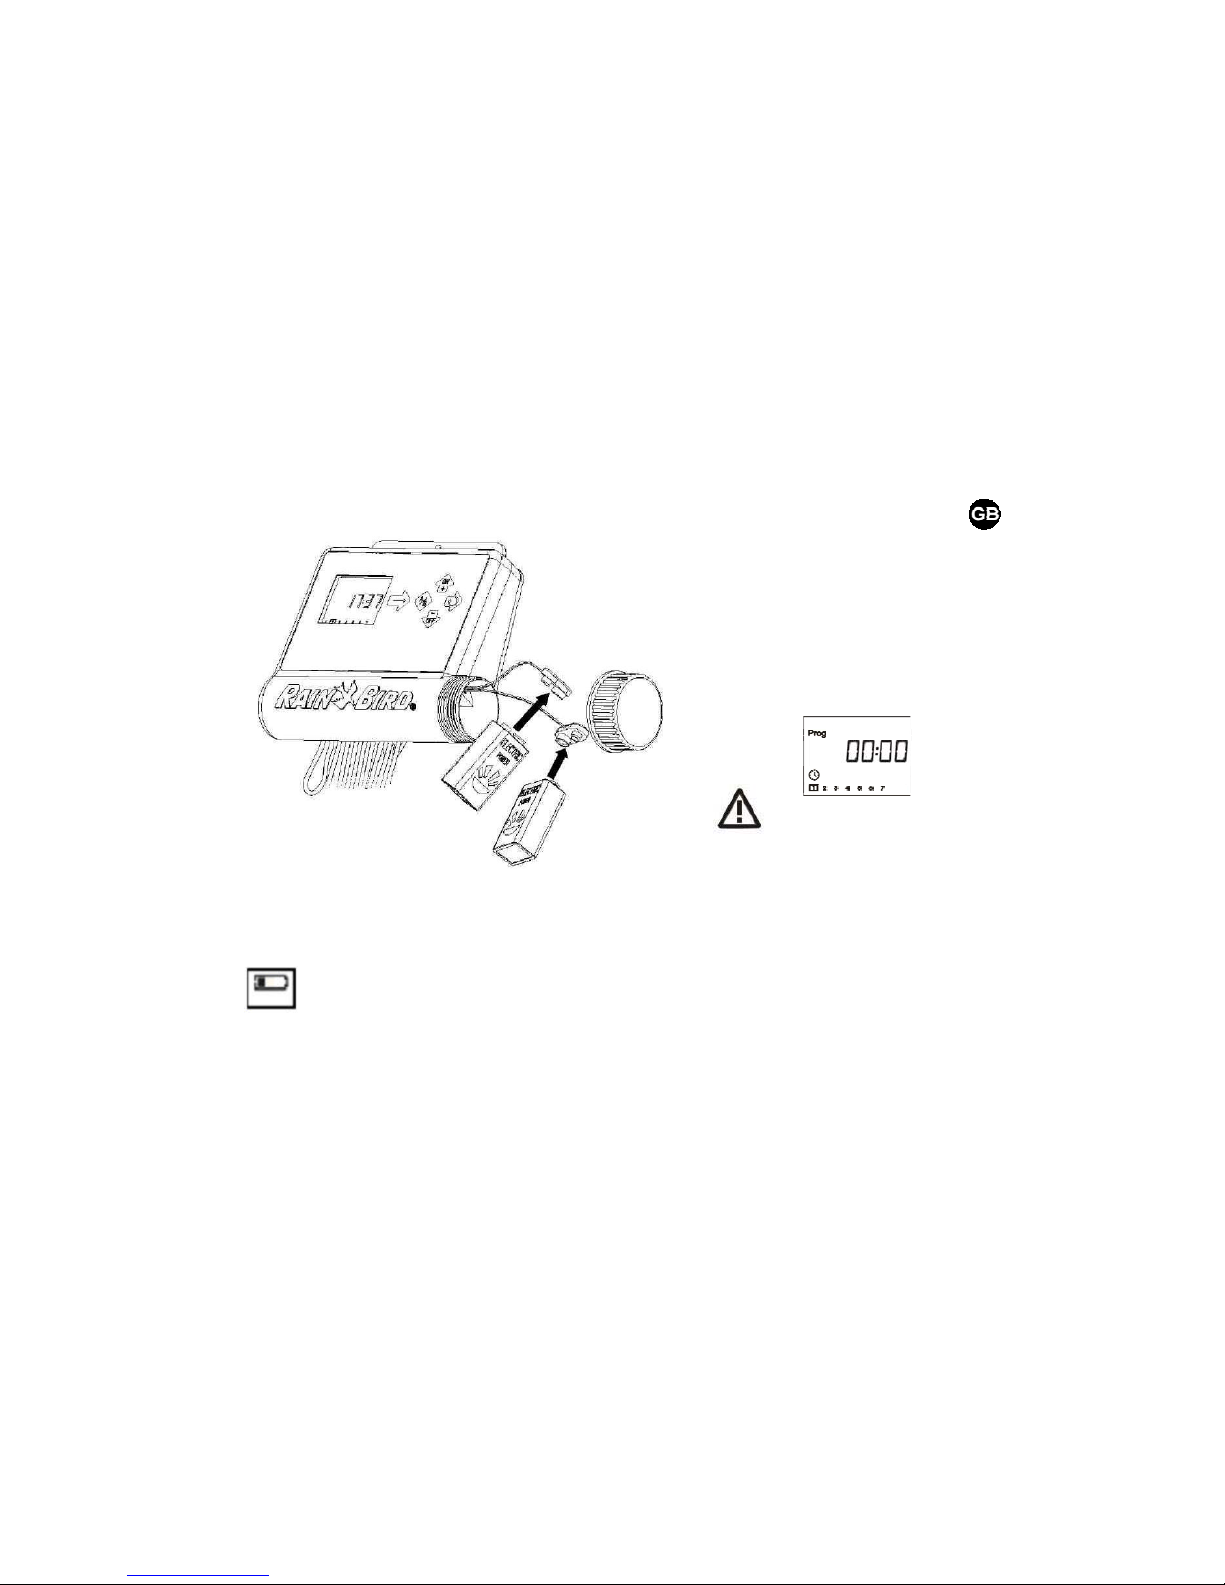
CONNECT THE BATTERIES
Note: To prolong battery life, the screen automatically goes blank after 1 minute if no keys
are pressed.
Important : This icon means you must replace batteries. Use only a top quality
brand such as Varta or equivalent
.
Always replace both batteries
simultaneously
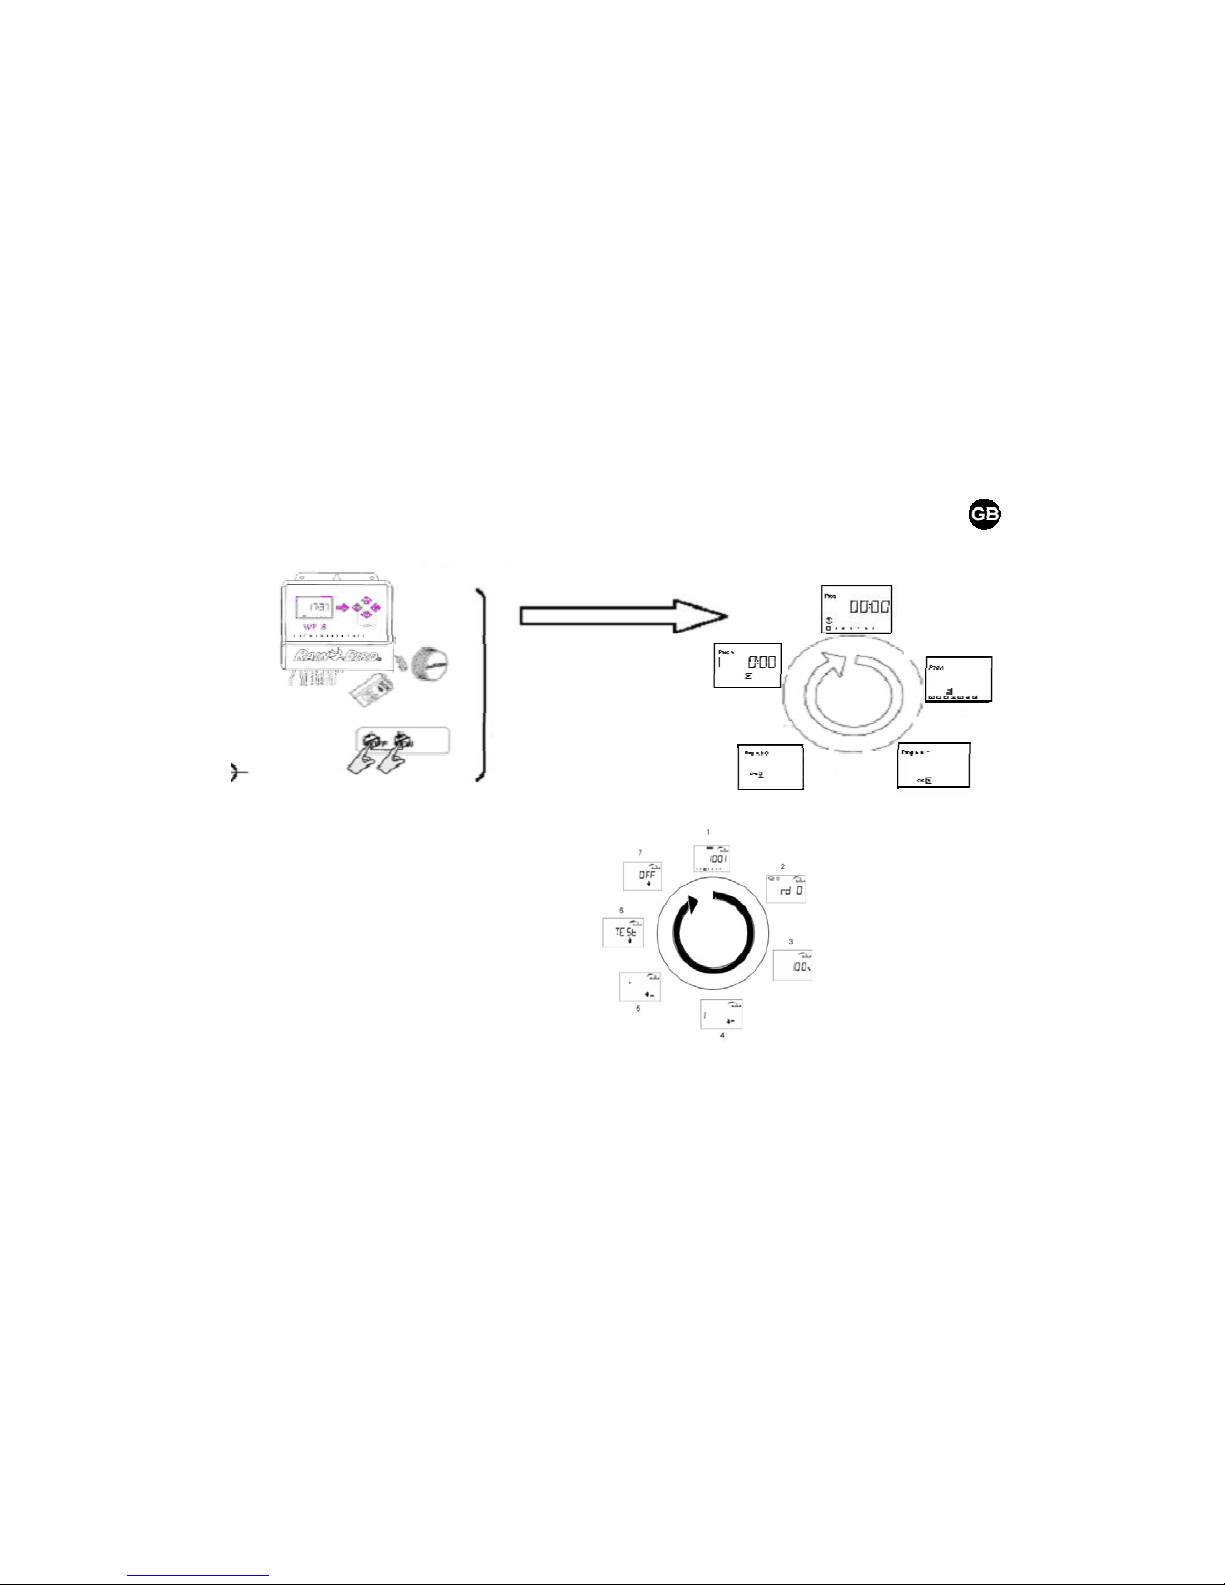
Start-up / Programming:
Connect 2- top-grade 9V alkaline
batteries (6AM6/6LR61) Varta or
equivalent.
As soon as the batteries are
installed, this screen appears:
Page 6
22
ACCESS TO PROGRAMMING AND BASIC MENU
BASIC MENU
1/ Ecran par défaut (écran d’état)
2/ Réglage du Rain Delay
3/ Water Budget
4/ Démarrage manuel d’une station
5/ Démarrage manuel d’un cycle
6/ Test de toutes les stations
7/ Position ON/OFF
1/ Set Clock and current day
2/ Set water days
3/ Set length of watering time
4/ Set time to start watering
5/ Controller status screen
Or press simultaneously
Page 7

23
1.1/ PROGRAMMING MENU
WP-series have a « protected » programming menu to avoid
accidentally modifying the programming schedules. You can access
this menu by :
- Connecting the batteries
- Pressing both keys simultaneously
and .
Note : As soon as you are in the programming menu, " PROG " appears on the screen.
Set clock and day
Note : if those 3 parameters are already set, press the
key to move to next screen.
1.1.1/ Set current time of the day
Use the
and keys to set the hours.
To confirm and move to next step press the
key.
Use the
and keys to set the minutes.
If you want to go directly to the next step and confirm this setting press the
key.
Page 8

24
1.1.2/ Set current day.
Press the
key to move the square cursor through the days of the week numbered 1 to 7 (
1= Monday, 2= Tuesday, etc.). Place the cursor on the current day of the week.
Example
: Today is Wednesday. Place the cursor on « 3 ».
Press the
key to confirm and move to the next screen.
1.2/ Set water days
Press the key to move the square cursor through the days of
the week numbered 1 to 7.
Use the
and keys to set or cancel water days.
The
key cancels water days and the square disappears.
To set a water day, place the cursor on the corresponding day number and press the
key.
Press the
key to set water days for the next program if desired. Repeat the above steps to
set or cancel water days.
Press the
to confirm and move to the next screen.
Page 9

25
1.3/ Set the length of watering time per station and assign each station to a
program
Use the and keys to set the station watering time from
1 minute to 12 hours in 1-minute increments.
The station watering time appears in hours and minutes
Move to the next station by pressing the
key.
Repeatedly press the
key to assign the station to the selected program.
Once you set station watering time and assign a station to a program, move to next screen by
pressing the
key.
Page 10
26
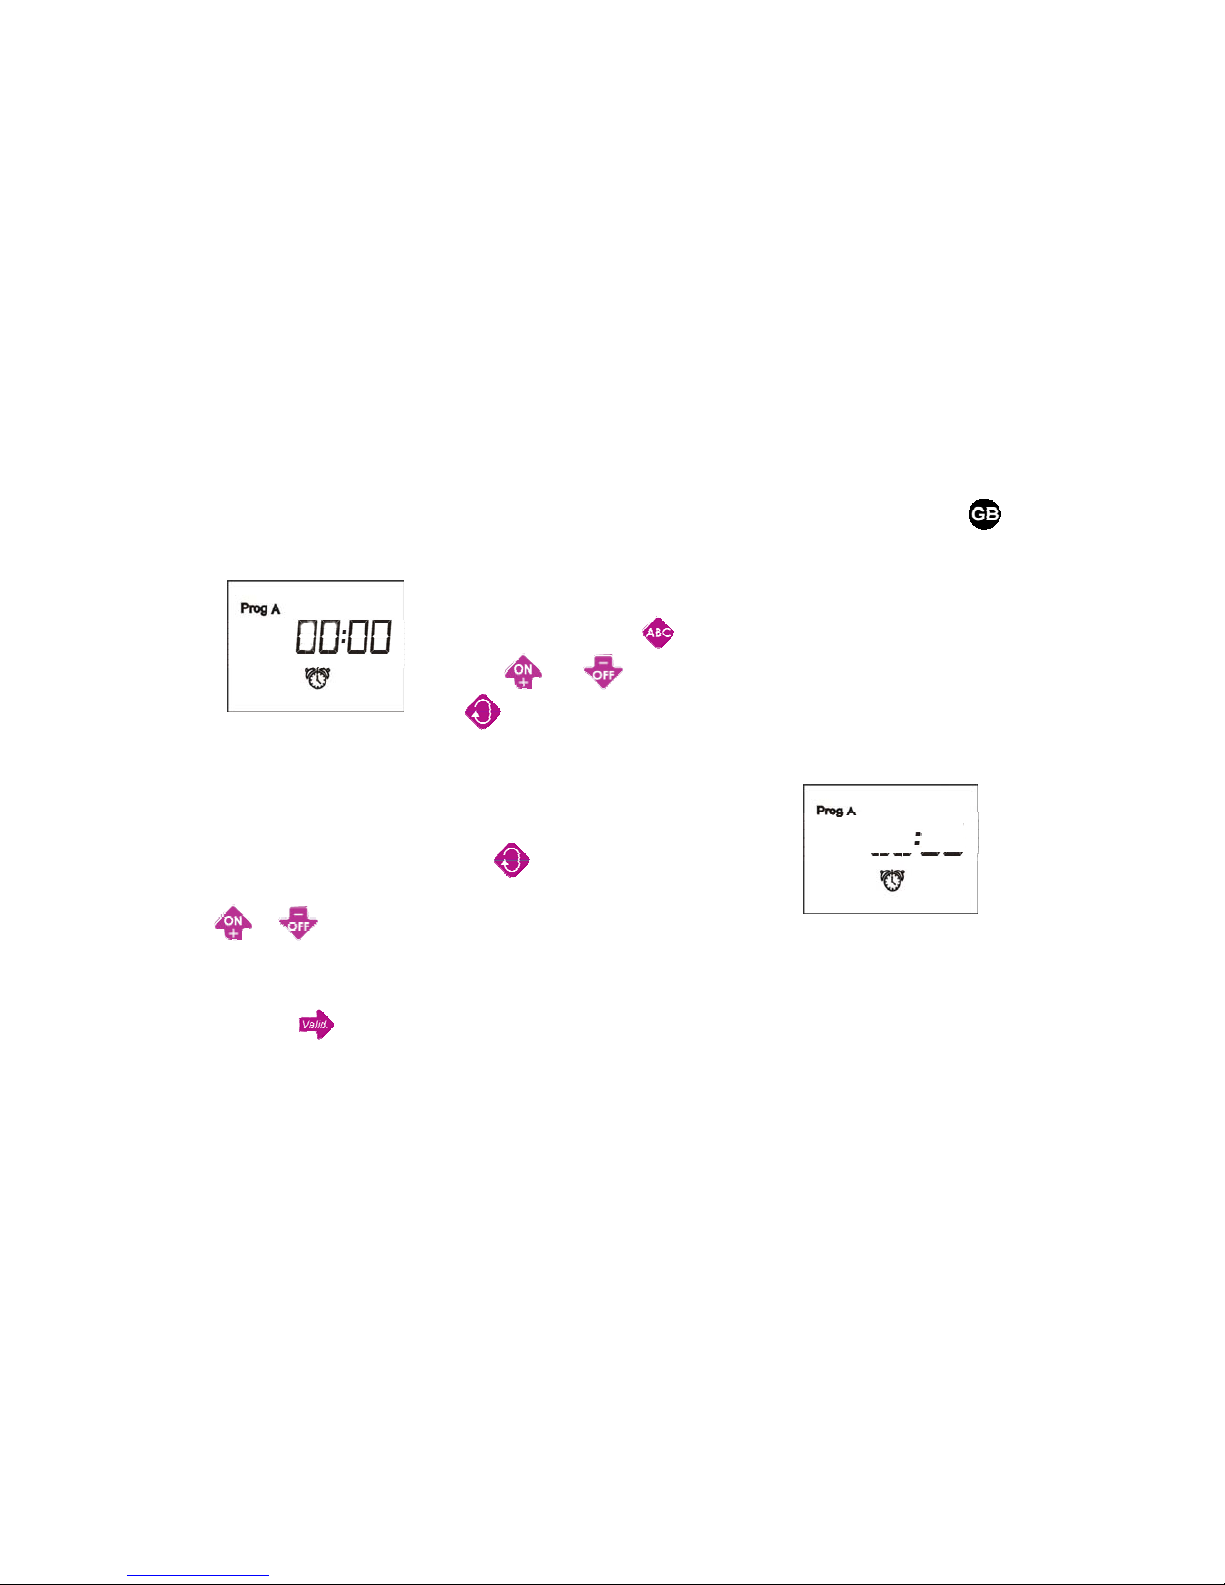
1.4/ Set time of the day to start watering
You can start a watering cycle up to 8 times per day and per
program if you prefer short watering cycles. Select the desired
program by pressing the
key to set the first start time;
Use the
and keys to set the first start time. Then press
the
key to move to the next start time.
Repeat above procedure;
Note: It is not necessary to use all 8 start times. The controller will
automatically file your start times in chronological order from 00:00
to 23:59.
To cancel a start time : Press the
key to display the start
times. When you see the start time you want to cancel, press the
or keys until you see this screen (between 11 :59 and
12 :00 and between 23 :59 and 00 :00).
Once all start times are set for all your programs, basic programming is complete.
Press the
key to leave the programming menu and move to controller status screen.
Page 11

27
2.1/ Controller status screen
You have now completed all programming for automatic irrigation.
This screen shows current time, system ON/OFF, etc.
When screen is blank, this screen will appear if you press any key.
Note: to return to the programming menu press both the
and
keys simultaneously.
Optional functions follow. Press the
key.
2.2/ Réglage du Rain Delay
You can delay watering from 1 to 15 days during rainy weather.
Press the
or keys to make the settings. The icons
and
icon appear in all screens. Each day the controller
counts down the number of days remaining before automatic
irrigation programs will resume normal watering schedules. Restart
is automatic.
Page 12
28
Note: To cancel a Rain Delay, access the screen and reset the number of days to 0.
Remember that it is impossible to manually start irrigation during a Rain Delay.
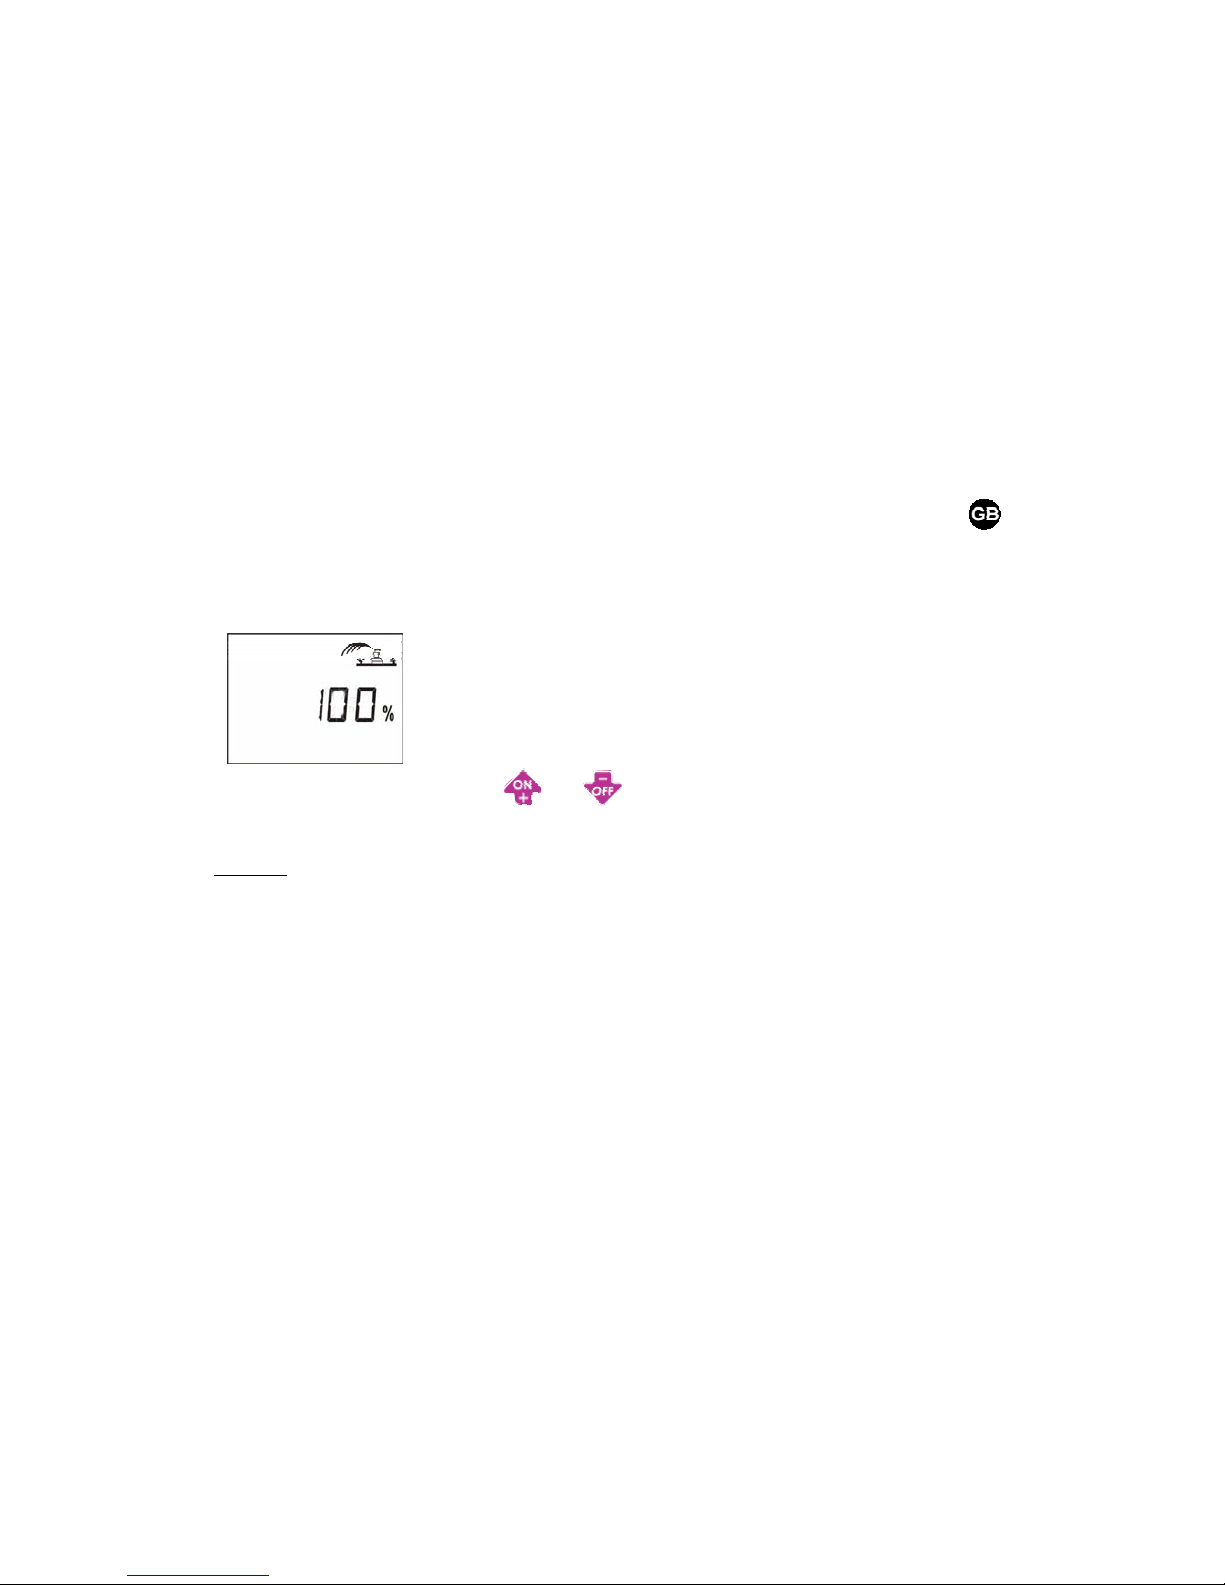
2.3/ Water Budget
The controller has a Water Budget function used to adjust watering
time for all programs from 0 to 200%, without re-setting the length
of watering time for each station. A setting of 100% means that all
stations will run according to their programmed watering time. The
Water budget feature can be useful for cutting back watering during
cool winter months, or for increasing watering during periods of
unusual heat.
Use the
and keys to increase or decrease the watering
time in 10% increments.
Example
: « 80 » in the display means you have reduced watering time by 20% on all
stations. An initial duration of 10 minutes which you previously programmed will be cut to 8
minutes. The increased or decreased run time will not appear in the display. However, the %
icon appears on the controller status screen when the water budget is being used.
To turn off the Water Budget, access the % screen and set the water budget percentage to
100%.
Page 13
29
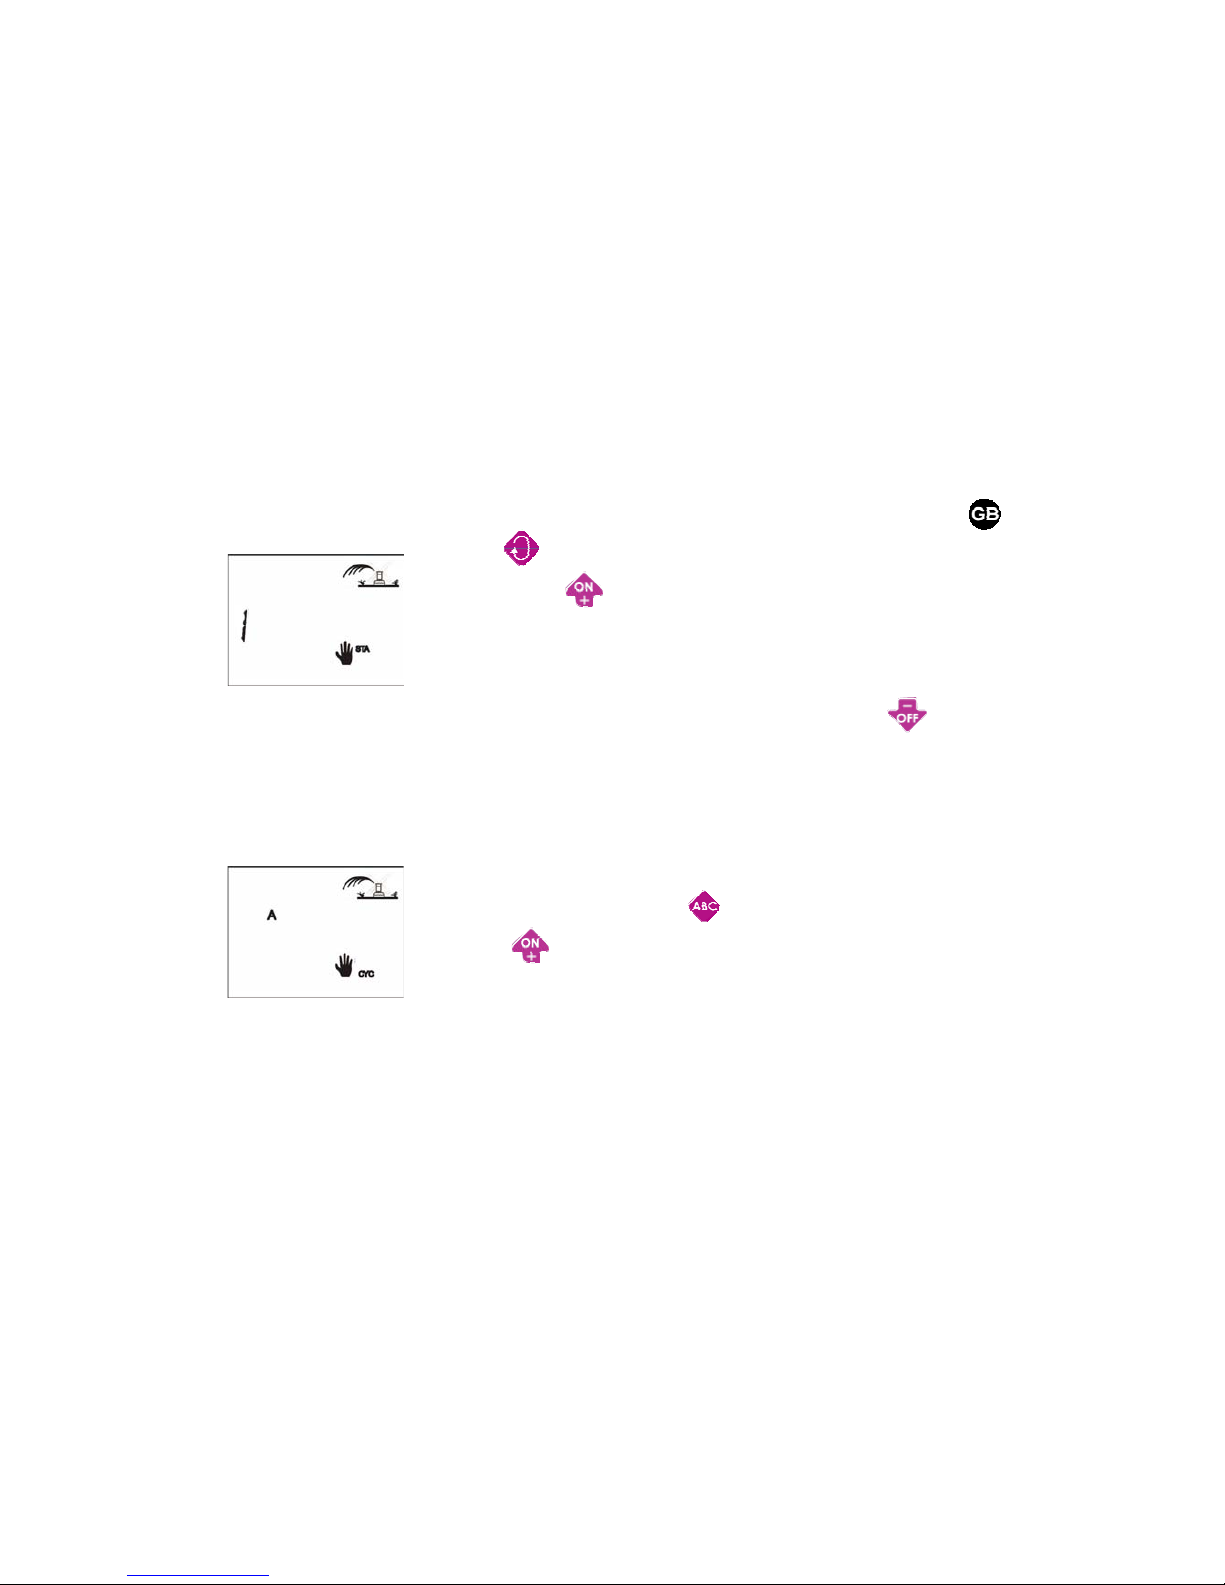
2.4/ Manual single station start
Use the key to selet the desired station.
Then press the
key. Watering starts and is indicated on the
screen by a blinking sprinkler stream. The display counts down the
remaining programmed watering time in 1-minute increments. It
corresponds to the watering time set in step 1.3.
If you wish to stop watering before the programmed time is completed, press the
key.
The blinking stream disappears.
Note : Water Budget does not operate in the manual single station mode.
2.5/ Manual cycle start
A cycle consists of the sequential operation of all stations assigned
to the same program. Use the
key to select the program. Then
press the
key to start the cycle. The sprinkler stream will blink.
The 1st station number in the program appears and the remaining
watering time for the station is counted down. The rest of the stations will appear in sequence.
Page 14

30
To stop watering before the cycle is completed, press the key. The controller will revert to
the controller status screen.
2.6/ Test of all stations
This function tests all the stations connected to the controller using
a 2-minutes cycle and allows you to check that your irrigation
system is working properly.
Then press the
key to start the cycle test.
To move to the next station before the watering time of the previous
station is completed press the
key.
During the test period, « TEST » and remaining watering time will be displayed alternatively
on the screen.
To stop the test press the
key
Page 15

31
2.7/ System On/Shutdown
The default mode is "On" which allows programmed watering to
take place.
You can prevent watering (rainy weather shutdown) without
changing the scheduled watering programs.
ON and OFF blink on the screen along with the cross on the
sprinkler. Press the
key to prevent watering. The cross stops blinking
If you move through the menu by pressing repeatedly the
key, you will see that the nonblinking cross appears in all the displays except one. No watering, either automatic or manual,
will take place.
To return to the watering mode, press the
key until the blinking cross display appears in
the screen above.
Now press the
key. The cross disappears.
Page 16

32
TROUBLESHOOTING
Symptom Possible cause
Station does not come on
• Make sure a 9V lautching solenoid is used
• Check electric wiring
• No run time has been set for the station
• Sensor system is preventing irrigation
• Start time has not been entered for the
program to which the station is assigned
Water budget for the station’s program is
set to 0%
I remove batteries from the controller but the
irrigation continues
• Battery powered controllers operate by
impulses. To stop watering, the electric
valve needs to receive a shutdown
impulse.
Removing batteries prevent the controller
from sending the shutdown impulse.
Page 17

33
TECHNICAL ASSISTANCE
If your are not able to solve a problem with your controller , please contact your authorised
Rain Bird after-sales service.
For further information, please contact :
Rain Bird Europe
900, rue Ampère, BP 72000
13792 Aix en Provence Cedex 3
France
Tél : (33) 4 42 24 44 61
Fax : (33) 4 42 24 24 72
sav@rainbird.fr
WARRANTY
A Rain Bird 3-years warranty covers this product.
For further details, please consult our turf catalog.
Page 18

34
DECLARATION OF CONFORMITY TO EUROPEAN DIRECTIVES
I declare that the WP-series type devices, an irrigation controllers, conforms to the European
Directives 89/336/CE and 93/91/CEE concerning electromagnetic compatibility. The WP
Series is battery powered. General information about your WP Series controller is located on
the back of the unit.
.
Aix en Provence, 12/08/2004
General Manager
RAIN BIRD EUROPE
Signature
 Loading...