

Page 1
Irrigation System Manager
ISM SPRINKLER TIMER
ISM INSTRUCTION MANUAL
6991 E. Southpoint Road, Bldg #1 Tucson, Arizona 85706, U.S.A.
Expert Advice: 1800 RAINBIRD • http://www.rainbird.com
Rain Bird Corporation Consumer Products
Page 2
WARNING: A CIRCUIT BREAKER OR
CUTOFF SWITCH IS TO BE PROVIDED IN
THE FIXED WIRING TO ISOLATE THE
CONTROLLER. MEMORY IS RETAINED BY
A BATTERY WHICH IS TO BE DISPOSED OF
IN ACCORDANCE WITH LOCAL REGULATIONS.
CAUTION ICONS
The lightning flash with arrowhead
symbol, within an equilateral triangle,
is intended to alert the user to the
presence of uninsulated “dangerous
voltage” within the product’s
enclosure that may be of sufficient
magnitude to constitute a risk of
electronic shock to persons.
The exclamation point within an
equilateral triangle is intended to
alert the user to the presence of
important operating and maintenance (servicing) instructions in the
literature accompanying the product.
Page 2
ATTENTION: UN DISJONCTEUR OU UN
INTERRUPTEUR DOIT ETRE INSTALLE SUR
LE PRIMAIRE POUR ISOLER LE
PROGRAMMATEUR. LA MEMOIRE EST
MAINTENUE GRACE A UNE BATTERIE
RECHARGEABLE A DISPOSER SELON LA
REGLEMENTATION LOCALE.
CAUTION ICONS
L ’éclair avec le symbole de la flèche,
placé dans les limites d’un triangle
èquilatéral est prévu pour avertir
l’utilisateur de la présence de
“tension dangereuse” non isolé dans
l’enceinte du produit qui pourrait ëtre
d’une importance suffisante pour
présenter un risque d’électrocution
aux personnes.
Le point d’exclamation dans un
triangle èquilatéral est prévu pour
avertir l’utilisateur de la présence
d’instructions importantes pour les
opérations et l’entretien (service)
dans les manuels fournis avec
l’appareil.
ISM Installation, Programming & Operation Guide
Page 3

Contents
Introduction....................................................4
ISM Sprinkler Timer ............................ 4
Sprinkler Timer Stations ...................... 4
What Is a Program? ............................ 6
Sprinkler Timer Basics ................................... 7
Programming Under Battery Power ....7
Installing the Battery ........................... 8
Controls and Indicators.....................10
Programming Checklist.....................11
Sprinkler Timer Programming Chart ..12
Programming the Sprinkler Timer ............... 15
Erase Any Existing Programming ...... 15
Set Year............................................ 15
Set Month and Day...........................16
Set Time ...........................................17
Programmed Schedules ................... 18
Select Program (A, B or C)................19
Set Watering Day Cycle .................... 20
Select the Watering Days.................. 21
2, 3, 4, 5 or 6-Day Watering Cycle .... 22
Set Program Watering Start Time(s) ..23
Delete Program Watering Start Time(s) .
ISM Installation, Programming & Operation Guide
24
Set Station Duration Times ...............25
Operating the Sprinkler Timer ..................... 26
System Off........................................26
System On .......................................27
Seasonal Adjust (SA) ........................28
Manually Run Stations and Programs .
Run a Test Program ..........................32
Installing the Sprinkler Timer...................... 33
Choose a Proper Location ................33
Mount the Sprinkler Timer................. 34
Connect Main Power Wires ..............35
Connect Field Wires to Remote
Control Valves...................................36
Troubleshooting........................................... 38
Have a question, problem, or comment?
Call Rain Bird Technical Assistance at
1-800-RAINBIRD.
30
Page 3
Page 4

Introduction
ISM Sprinkler Timer
Thank you for purchasing a Rain Bird ISM
Sprinkler Timer. This manual shows how to
install, program, and operate your irrigation
system timer (sometimes called a “controller”). Please read these instructions carefully
and keep this manual in the slot behind the
timer for future reference.
The Rain Bird ISM is a compact, easy-to-use
sprinkler timer that offers the following
features:
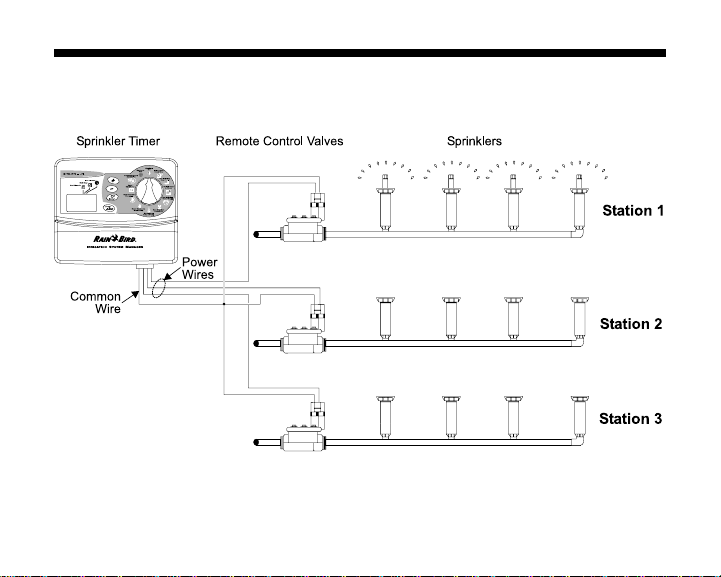
Sprinkler Timer Stations
The Rain Bird ISM is an electronic timer that
controls when your sprinkler system turns on,
and how long the sprinklers run.
The ISM can control 4, 6 or 9 watering
“stations” (depending on the model). A
station is a series of sprinklers, or other
irrigation devices, connected to a common
remote control valve. When the valve
Page 4
• Three programs, with independent
watering days
• Up to four watering start times per
program
• Option to set any day of the week as a
watering day
• Seasonal adjust feature across all
programs
• Battery backup to retain time, date, and
programming during power outages
• Three-year Customer Satisfaction Policy
receives a signal from the timer, the valve
opens and turns on the sprinklers connected
to it.
This illustration shows a diagram of a station
layout. Station 1 is currently watering. When
station 1 finishes, the timer shuts it off and
turns on station 2. When station 2 finishes
watering, station 3 begins, and so on.
ISM Installation, Programming & Operation Guide
Page 5
ISM Installation, Programming & Operation Guide
Page 5
Page 6
What Is a Program?
Programming is the process of telling the
timer exactly when and how long you want to
water. The timer opens and closes the
remote control valves for each station
according to the program you set.
The ISM offers three independent programs;
A, B and C. Each program controls from one
to nine stations, and lets you customize your
watering schedules to meet the needs of
different types of plants, soil conditions,
slopes, shady or sunny areas, etc.
You will need to understand the following
terms to successfully program your ISM
sprinkler timer.
• Watering day cycle - The period of days in
which the timer repeats the program you
set. For example, a 5-day cycle is a
weekly schedule that repeats once every
five days. A 2-day cycle repeats every
other day.
• Days to water - The specific days within
the watering day cycle when watering
Page 6
takes place. In a 7-day cycle, you may
select multiple watering days within the
cycle. For example, you might water on
day 1 (Monday), day 3 (Wednesday), and
day 5 (Friday). In a 2, 3, 4, 5 or 6-day
cycle, day 1 is always the only watering
day. A 2-day cycle waters on day 1, skips
a day, and then waters again on day 1 as
the cycle repeats. A 3-day cycle waters on
day 1, skips 2 days, and then repeats.
• Watering Start time - This is the time the
first station in a program begins watering.
All other programmed stations then follow
in sequence. Each program may have up
to four start times. For example, a program could begin watering at 6:00 a.m.,
10:00 a.m., 12:00 noon, and 6:00 p.m.
NOTE: The term “watering start time”
refers to the time the program
begins - not duration of time that
each station will run.
• Duration - The number of minutes that
each station runs.
ISM Installation, Programming & Operation Guide
Page 7
Sprinkler Timer Basics
Programming Under Battery Power
If you wish, you can program the timer under
battery power. This feature can be useful if
the timer is installed in an area that is not
readily accessible. This feature also allows
you to enter program information before
installing the timer.
To program the ISM sprinkler timer under
battery power, you must first install the
battery.
NOTE: To save battery power, the ISM
goes into “sleep” mode after a
period of inactivity on the programming dial or buttons. Press any
button once to reactivate the timer.
ISM Installation, Programming & Operation Guide
Page 7
Page 8
Installing the Battery
The battery back-up feature retains time,
date, and programming information during
power outages. The battery also lets you
program the timer under battery power
before it is connected to an AC power
supply.
For best results, use a long-life, 9-Volt
alkaline battery. A new battery will normally
provide power for up to one year. Replace
the battery yearly to ensure an uninterrupted
power supply.
NOTE: Make sure the timer is
connected to an AC power supply
when replacing the battery, or you
will lose all programming information
including date and time.
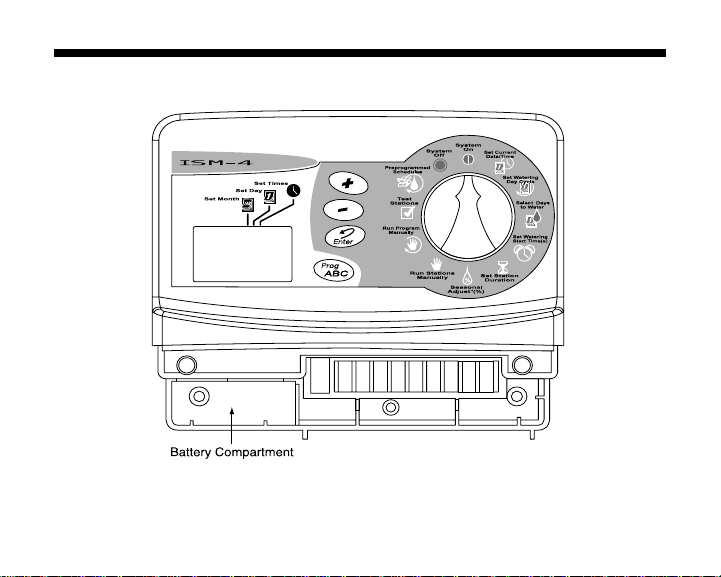
To install the battery:
1. Remove the timer’s lower access cover to
expose the battery compartment.
2. Snap the two-wire battery clip onto the
terminals of the new battery. If you are
replacing an old battery, dispose of the old
battery properly.
3. Insert the new battery snugly into the
battery compartment.
4. Replace the lower access cover.
NOTE: If no battery is installed, short
circuit detection may not function as
desired. Please ensure the battery is
installed prior to the operation.
Page 8
ISM Installation, Programming & Operation Guide
Page 9
ISM Installation, Programming & Operation Guide
Page 9
Page 10
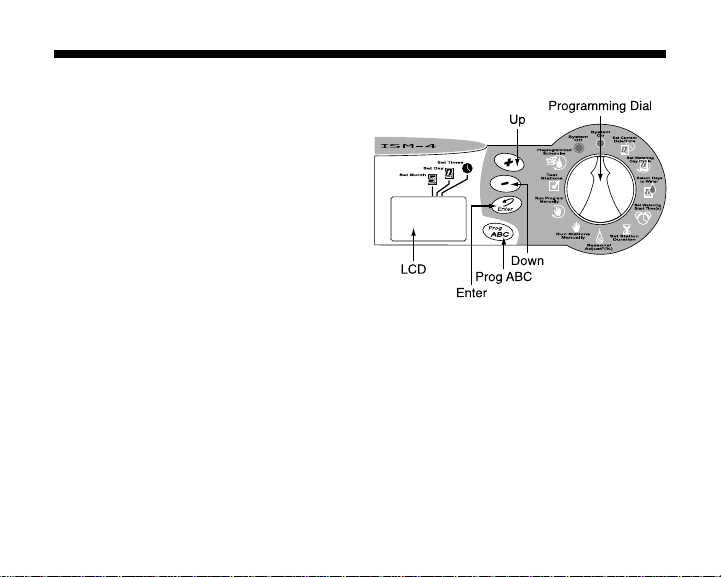
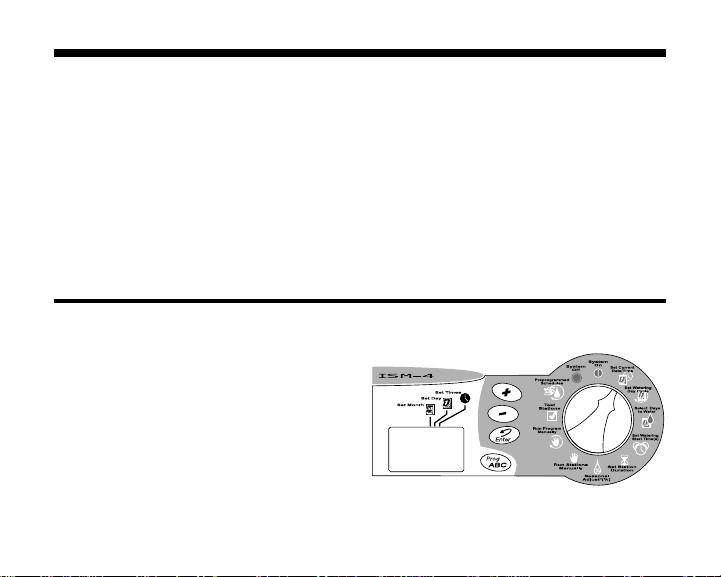
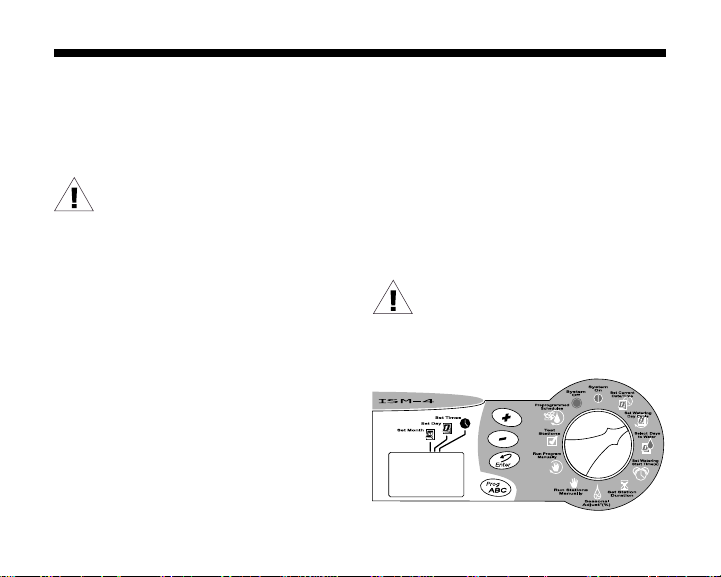
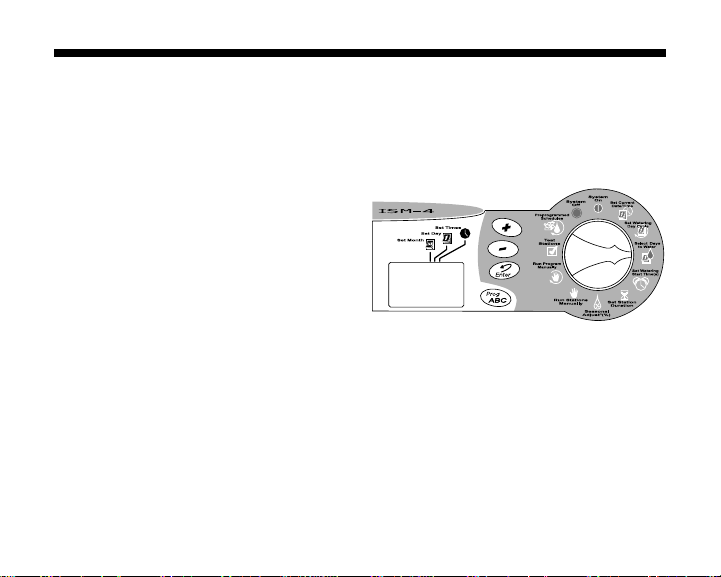
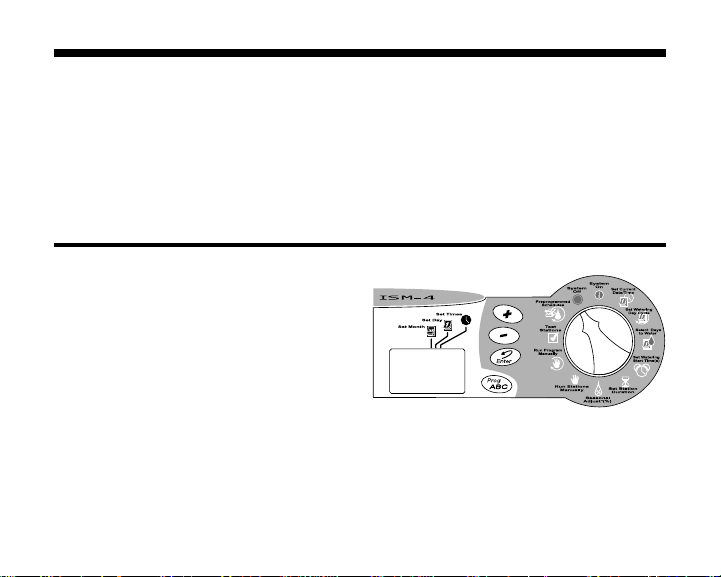
Controls and Indicators
This illustration shows the programming
controls on the face of the ISM sprinkler
timer. These controls include:
1. Liquid Crystal Display (LCD) - During
normal operation, displays the time of day
and the programs that will run today.
During programming, shows the results of
your commands. During watering, shows
the station that is running, the minutes
remaining in the station’s run time, and
whether another program is waiting to
water.
2. Up and Down (+) or (-) buttons - Set start
times and days, and make programming
changes.
3. Enter button - Enters programming
commands, and starts manual operation.
4. Prog ABC button - Selects watering
program A, B or C.
5. Programming Dial - Turns the timer off or
on and selects other programming
functions.
Page 10
ISM Installation, Programming & Operation Guide
Page 11

Programming Checklist
To program your ISM sprinkler timer for the
first time, we recommend that you complete
the following steps in the order listed below.
❐ Fill out the Programming Chart .....................................page 12
❐ Set the current year/month/day/time ............................ page 15
For each program:
A B C
❐ ❐ ❐ Select pre-programmed schedules............page 18
❐ ❐ ❐ Select program (A, B or C) ........................page 19
❐ ❐ ❐ Set the watering day cycle ........................page 20
❐ ❐ ❐ Select days to water.................................. page 21
❐ ❐ ❐ Set the program watering start time(s) .......page 23
❐ ❐ ❐ Set the station duration(s).......................... page 25
❐ Set the timer to “system on”......................................... page 27
For your convenience, a check-off box ( ❐ ) is
provided for each step.
ISM Installation, Programming & Operation Guide
Page 11
Page 12

Sprinkler Timer Programming Chart
Before programming your ISM, fill out the
Programming Chart included with your timer.
Then program the timer in the order shown
on the Programming Checklist. Page 14
shows a completed programming chart.
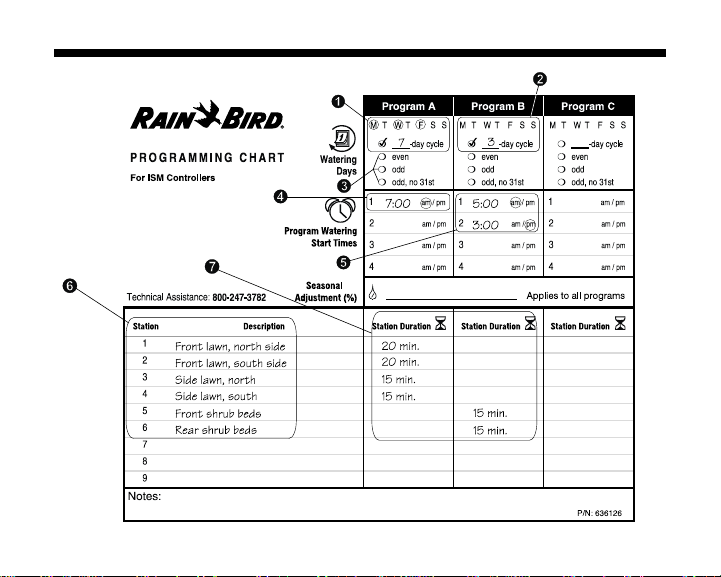
1. Select the watering day cycle you wish to
use, and circle the watering days within
the cycle. In the example shown for
program A, the operator has chosen a 7day watering cycle and circled M, W, and
F as watering days. This means that
program A will water every Monday,
Wednesday, and Friday.
2. For program B, the operator selected a 3day watering cycle. With these selections,
program B will water once, skip two days,
and then water again on the first day of a
new three day cycle.
3. You may also choose three special watering day cycles that do not require you to
select watering days. These cycles are:
• Ev = Waters only on even-numbered
Page 12
days of the month.
• Od = Waters only on odd-numbered
days of the month.
• Od31 = Waters only on odd-numbered
days of the month, but not on the 31st of
any month or on February 29. (This watering day cycle complies with special ordinances in some water-restricted areas).
4. In the Start Times box for program A,
write the time you want the program to
begin watering. You may assign up to four
watering start times to each program. If
you want the program to water only once
each watering day, enter only one start
time. Enter other start times only if you
want to repeat the entire program more
than once each watering day.
5. Enter the watering start time for program
B (if any). In the example, Program A
begins watering at 7 a.m. Program B
begins watering twice each watering day,
once at 5 a.m. and again at 3 p.m.
ISM Installation, Programming & Operation Guide
Page 13
NOTE: If the total run time for one
program overlaps the start time for a
second program, the timer will
automatically “stack” the programs
and delay the start time of the
second program until the first
program finishes watering.
6. Next to each station number, enter a brief
description of the area covered by each
timer station. Remember, a “station” is a
set of sprinklers operated by one remote
control valve.
This example shows six currently assigned
stations, but your ISM may be able to
control more or less depending on the
model.
7. In the Station Duration column for each
program, enter the number of minutes you
want each station to run.
Notice that stations 1 through 4 are
assigned to program A, while stations 5
and 6 are assigned to program B. The ISM
allows you to use the same station in
multiple programs for special watering
needs. However, for most applications,
choosing not to repeat a station makes
programming simpler.
NOTE: Anytime you use the
“Seasonal Adjustment” feature (see
page 28) the setting applies to all
programs (A, B and C).
ISM Installation, Programming & Operation Guide
Page 13
Page 14
Page 14
ISM Installation, Programming & Operation Guide
Page 15
Programming the Sprinkler Timer
Erase Any Existing Programming
Use the following procedure any time you
want to erase all programming in the timer’s
memory and “start from scratch”.
1. Unplug the transformer from the wall.
2. Disconnect the battery clip from the
battery.
3. Wait 10 seconds.
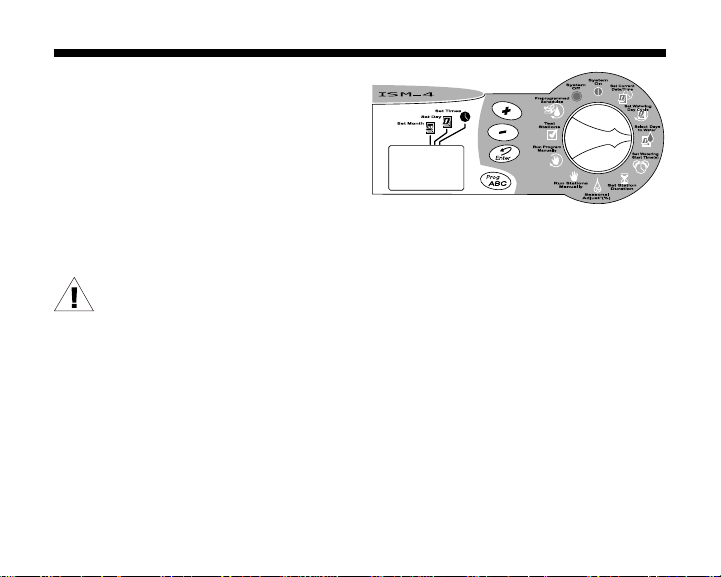
Set Year
1. Turn the Programming Dial to Set Current
DATE/TIME position.
2. Press the (+) or (-) buttons to set the
current year.
3. Press Enter.
4. Reconnect the battery clip to the battery.
5. Plug the transformer back into the wall.
“AM 12:00” will appear in the display. All
previous programming is now erased, and
you may turn the Programming Dial to the
Set Current DATE/TIME position and begin
setting the Year, Month, Day, and Time.
ISM Installation, Programming & Operation Guide
Page 15
Page 16

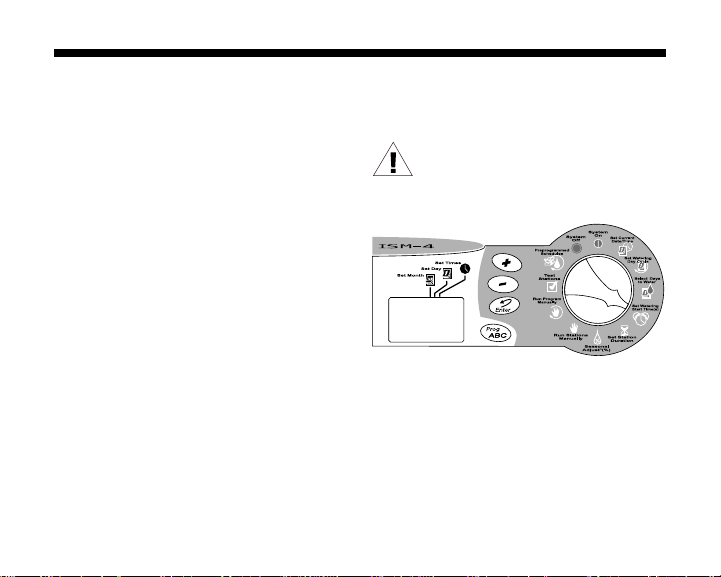
Set Month and Day
1. After setting the correct year, leave the
Programming Dial on Set Current DATE/
TIME.
2. The month and day appear as “01 01,”
with the first “01” flashing (representing the
month). A cursor will appear under the Set
Month icon.
3. Press the (+) or (-) buttons to set the
current month (1 through 12).
4. Press Enter.
5. The second “01” begins flashing
(representing the day of the month). A
cursor will appear under the Set Day icon.
6. Press the (+) or (-) buttons to set the
current day (1 through 31).
7. Press Enter.
Page 16
ISM Installation, Programming & Operation Guide
Page 17

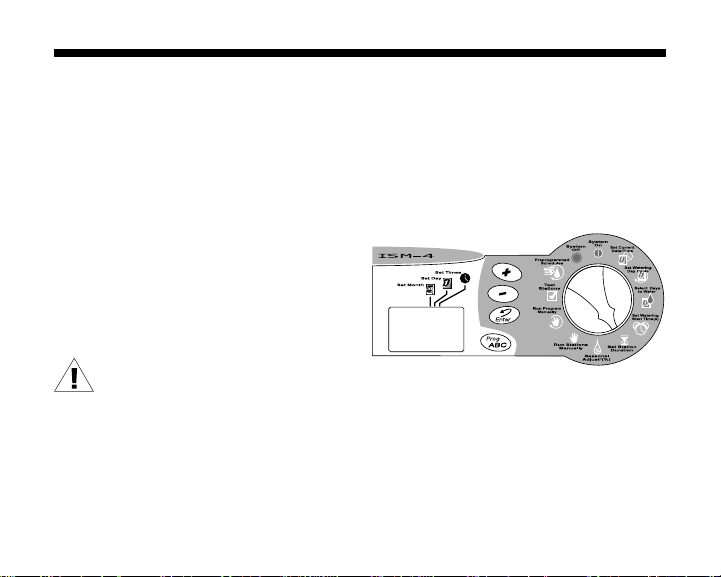
Set Time
1. After setting the correct month and date,
leave the Programming Dial on Set Current
DATE/TIME.
2. The time of day appears in the display. The
display will also show AM or PM (for
example, 12:01 AM).
A cursor will appear under the Set Times
icon.
3. Press the (+) or (-) buttons to set the
current hour (1 through 12 AM or PM).
4. Press Enter.
5. The minute digits begin flashing.
6. Press the (+) or (-) buttons to set the
current minute (1 through 59).
7. Press Enter. Turn the Programming Dial
back to the SYSTEM ON position.
ISM Installation, Programming & Operation Guide
Page 17
Page 18

Pre-Programmed Schedules
Use this procedure if you want to select a
pre-programmed schedule. If you want to set
your own custom watering schedule, go
directly to Select Program (A, B or C) on
page 19.
For your convenience, the ISM has THREE
PRE-PROGRAMMED watering schedules
you can select for any program (A, B or C).
These schedules are already programmed
into the timer, and are shown below.
• Pre-Programmed 1 (5 Pr E1) - Waters all
stations for five minutes three times every
day at 6 a.m., 10 a.m., and 2 p.m.
• Pre-Programmed 2 (10 Pr E2) - Waters all
stations for ten minutes every other day at
6 a.m.
• Pre-Programmed 3 (10 Pr E3) - Waters all
stations for ten minutes every third day at
6 a.m.
1. Turn the Programming Dial to PRE-
PROGRAMMED SCHEDULES.
2. The first pre-programmed schedule (5 Pr
Page 18
E1) appears in the display.
3. To select one of the other pre-programmed schedules, press the (+) or (-)
buttons until the desired schedule appears
in the display .
4. Press the Prog ABC button until the desired
program letter (A, B or C) appears in the
display with the pre-programmed
schedule.
5. Then press Enter. The program letter
flashes to confirm your selection.
After selecting a pre-programmed schedule,
you can modify the program settings
(watering day, watering start time, etc.) by
using the programming steps given on the
following pages.
6. Turn the Programming Dial back to the
SYSTEM ON position.
ISM Installation, Programming & Operation Guide
Page 19

Select Program (A, B or C)
Program A is already programmed for your
convenience. You can also completely
customize your own watering schedules by
following the steps on page 20-25.
Programs B and C are not pre-programmed.
1. Turn the Programming Dial to SET
WATERING DAY CYCLE.
2. The letter of the currently selected
program (A, B or C) appears in the display.
3. Press the Prog ABC button until the desired
program (A, B or C) appears in the display.
Remember, if you plan to use only one
program, use program A.
NOTE: It is easier to select one
program (A, B or C) and program it
completely before moving on to the
next program. Switching from
program to program can be
confusing.
ISM Installation, Programming & Operation Guide
Page 19
Page 20
Set Watering Day Cycle
Use the procedure below if you want to set
your own custom watering schedule. Make
sure the Programming Dial is on SET
WATERING DAY CYCLE.
NOTE: If you have selected a pre-
programmed schedule (page 18),
skip this page. Go directly to “Set
Program Watering Start Time(s)” on
page 23.
1. Press the (+) or (-) buttons until the
watering day cycle you want to use
appears in the display along with the
selected program (A, B or C). Available
watering day cycles include:
• 7-day (Custom) - Waters on a weekly
cycle; any day of the week can be a
watering day.
• Ev -
Waters only on even-numbered days.
• Od -
Waters only on odd-numbered days.
• Od31 - Waters only on odd-numbered
days, except the 31st of any month and
February 29th. (This watering day cycle
complies with special ordinances in some
water-restricted areas).
• 2-, 3-, 4-, 5 or 6-day - Waters only on
the first day of a repeating 2-, 3-, or 5-day
cycle.
2. If you select a 7-day, or a 2-, 3-, 4-, 5 or
6-day watering cycle, go to “Select Days
to Water” on page 22.
NOTE: If you select Ev, Od, Od31 or 1
day as your watering day cycle, you
do not have to select the watering
days. Go directly to “Set Program
Watering Start Time(s)” on page 23.
Page 20
ISM Installation, Programming & Operation Guide
Page 21
Select Days to Water
Use the procedure below to select the
watering days for a 7-day custom watering
cycle.
7-Day Watering Cycle
1. Turn the Programming Dial to SELECT DAYS
TO WATER.
2. If you selected a 7-day watering cycle, the
seven weekdays appear as a row of
numbers and the number “1” in the day
cycle flashes (day 1 is Monday, day 2 is
Tuesday, etc).
3. The display shows the program’s letter (A,
B or C).
4. A number appears, indicating the “today”
number (the day on which you are
programming the timer). The day’s
abbreviation also appears in the display.
5. Press the (+) or (-) buttons to turn a
particular watering day ON or OFF. An ON
day has a box around it. An OFF day has
no box around it.
ISM Installation, Programming & Operation Guide
6. Press Enter to move to the next day.
7. Repeat steps 5 through 7 for each day.
8. Proceed to set to SET WA TERING ST ART
TIME(S).
Page 21
Page 22
2-, 3-, 4-, 5 or 6-Day
Watering Cycle
Use the procedure below if you selected a 2-,
3-, 4-, 5 or 6-day watering cycle.
1. Turn the Programming Dial to SELECT DAYS
TO WATER .
2. If you selected a 2-, 3-, 4-, 5 or 6-day
watering cycle, the row of days in that
cycle appears in the display with a box
around day 1.
NOTE: The only watering day in a 2-,
3-, 4-, 5 or 6-day cycle is day 1.
3. The display shows the program’s letter (A,
B or C).
4. A flashing number appears in the display,
indicating where “today” is in the watering
cycle.
5. Press the (+) or (-) buttons to move
today’s position in the watering cycle.
You may now set program watering start
times as shown on page 23.
Page 22
ISM Installation, Programming & Operation Guide
Page 23
Set Program Watering Start Time(s)
The watering start time for your program is
the time that the first programmed station
begins to run. Up to 4 watering start times
may be entered per program. Each
subsequent station will then run in sequence.
There is a 2-second delay between the
activation of stations.
1. Turn the Programming Dial to SET
WATERING START TIME.
2. The program letter (A, B or C), the number
“1” (indicating the earliest start time), and
a row of four dashes “--.--” appear in the
display.
3. Press the (+) or (-) buttons to set the
program start time. If you want all the
stations on the program to run only once
each watering day, enter only one start
time for the program.
4. To enter another watering start time, press
Enter. The next watering start time number
(2-, 3 or 4) and a row of four dashes
appear in the display. Repeat steps 3 and
ISM Installation, Programming & Operation Guide
4 to set up to four separate watering start
times for each program, if needed.
NOTE: If you selected one of the preprogrammed schedules, you will see
the default watering start time(s) for
that schedule.
Page 23
Page 24

Delete Program Watering Start Time(s)
1. If you want to delete an unwanted
watering start time from a program, turn
the Programming Dial to SET WA TERING
START TIME(S).
2. Press Enter to select the start time number
(1, 2, 3 or 4) you want to delete.
NOTE: Watering start times appear in
chronological order. The earliest
watering start time is number 1, the
next later watering start time is
number 2, and so on. If you delete a
watering start time, all later start
times are automatically advanced by
one watering start time number. This
re-numbering only occurs after you
move the Programming Dial from the
SET WATERING ST AR T TIME(S) position
to another function.
3. The watering start time number to be
deleted appears in the display.
4. Press the (+) or (-) buttons until the blank
position (four dashes, “--.--”) appears in
Page 24
the display.
5. Turn the Programming Dial back to the
SYSTEM ON position. The unwanted
watering start time is now deleted.
ISM Installation, Programming & Operation Guide
Page 25
Set Station Duration
1. Turn the Programming Dial to SET STATION
DURATION.
2. The program letter (A, B or C), the number
“1” (indicating the station number), and “0”
appear in the display.
3. Press the (+) or (-) buttons to set the
amount of time you want it to run for
station number 1. You can set a station to
run from 0 minutes up to 240 minutes
(four hours), in one-minute increments. All
durations display in minutes (for example,
a two hour duration will appear as 120
minutes).
NOTE: If you do not want to include a
particular station in the selected
program, set that station’s duration
to zero “0”.
4. Press Enter to display additional stations.
Repeat steps 3 and 4 to set a duration for
each station.
You have now completed all programming
ISM Installation, Programming & Operation Guide
steps for one program. If you are finished
programming, turn the Programming Dial to
the SYSTEM ON position to run all programs
automatically. If you want to enter settings for
another program, repeat the programming
instructions, beginning with “Select Program
(A, B or C)” on page 19.
Page 25
Page 26
Operating the Sprinkler Timer
After programming the timer, you will
normally set it to SYSTEM ON mode to operate
all programs automatically. You can also
manually run one or more programs, or
manually run a single station or several
stations.
In addition, you can adjust for changes in the
weather or time of year with the Seasonal
Adjust feature to increase or decrease the
run time of all programs by a selected
percentage (in 10% increments). You may
also wish to run a test program to make sure
all sprinklers in the system operate properly.
System Off
1. To turn the timer off and suspend all
watering, turn the Programming Dial to
SYSTEM OFF.
2. In the SYSTEM OFF position, the LCD
displays OFF. The timer remembers the
current time and date and retains all
programming, but no watering occurs.
You may wish to turn the timer OFF during
a rainy period, or for any day(s) when you
do not want watering programs to run as
scheduled.
Page 26
ISM Installation, Programming & Operation Guide
Page 27

System On
1. To return the timer to automatic operation,
turn the Programming Dial to SYSTEM ON.
2. When the timer IS NOT watering, it
displays:
• Any program (A, B or C, or none)
scheduled to water today.
• The current time.
• %A %B %C, if there is a Seasonal
Adjust setting other than 100%.
3. When the timer IS watering, it displays:
• Any programs (A, B or C) scheduled to
run today.
• The station number currently running.
• The duration time remaining for that
station.
• %A %B %C, if there is a Seasonal
Adjust setting other than 100%.
4. If a problem or short is detected in any of
the stations, the display toggles every 3
seconds and shows an error message "Err
#", # being the station where the problem
was detected. For example, if the master
ISM Installation, Programming & Operation Guide
valve has a problem, it shows "Err M". For
station 3 - "Err 3". The station is
automatically ignored until the cause of
error is corrected. Refer to the Troubleshooting section of this manual for more
information.
Page 27
Page 28

Seasonal Adjust (SA)
The Seasonal Adjust feature is the easiest
way to increase or decrease the duration
times of all stations on a program. You can
use Seasonal Adjust to decrease watering
during cool winter months, or to increase
watering during hot, dry periods.
You can set the Seasonal Adjust percentage
from 10% to 200% in increments of 10%.
Changing the percentage affects all stations
on all programs (A, B and C).
Seasonal Adjust percentages are calculated
on the normal programmed duration time for
each station. For example, if a station is
programmed to run for 10 minutes, and you
set the (SA) to 80%, the station will only run
for 8 minutes (80% of 10 minutes). If you set
the (SA) to 120%, that same station will run
for 12 minutes (120% of 10 minutes).
NOTES: (SA) will not split a minute.
One whole minute is the lowest
duration time allowed.
All duration times for every
Page 28
programmed station will be
increased or decreased when you
use the (SA) feature.
1. Turn the Programming Dial to Seasonal
Adjust.
2. The current Seasonal Adjust setting
number appears in the display.
3. Press (+) button to increase the Seasonal
Adjust percentage, or press the (-) button
to decrease the SA percentage.
4. When the Seasonal Adjust percentage is
set to any figure other than 100%, all
programs (A, B and C) display a percent
ISM Installation, Programming & Operation Guide
Page 29

sign (%) in front of the program letter. The
percent sign appears on all programs (A,
B and C) even if they are not selected.
5. After setting the desired SA percentage,
turn the Programming Dial back to
SYSTEM ON. All station run times will be
increased or decreased by the selected
Seasonal Adjust (SA) percentage.
ISM Installation, Programming & Operation Guide
Page 29
Page 30

Manually Run Stations and Programs
You can run individual stations or an entire
program if you think a particular area needs
additional watering.
Manually Run a Station(s)
1. Turn the Programming Dial to RUN
STATIONS MANUALLY.
2. The number “1” followed by “0” appears in
the display. This means that station
number 1 is set for zero manual run time.
3. If you want to manually run a station other
than number 1, press Enter until the desired station number appears in the display.
4. If you want to manually run the displayed
station, press the (+) or (-) buttons to set
the station’s manual run time (from 1
minute to 240 minutes).
5. Press Enter to begin watering.
6. After setting the manual run time for all
stations desired, turn the Programming
Dial back to SYSTEM ON. The number of
the first manually operated station appears
Page 30
in the display, along with its remaining run
time. You can press Enter to manually
advance to the next station.
When manual operation finishes, the timer
returns to SYSTEM ON mode and awaits the
next scheduled program start time.
ISM Installation, Programming & Operation Guide
Page 31

Manually Run a Program
1. Turn the Programming Dial to RUN
PROGRAM MANUALLY (RPM).
2. The current program “A, B or C” appears
in the display .
3. To choose another program, press the
Prog ABC button until the desired program
letter appears in the display.
4. Press Enter to start the selected program.
NOTES: You can “stack” programs (A,
B and C) to operate manually by
pressing Enter after selecting each
program. Programs will run in order
in which they are entered.
5. Turn the Programming Dial back to
SYSTEM ON. The station currently running
and the time remaining is shown in the
display.
NOTE: “Seasonal Adjust” settings
apply to manually operated
programs.
After the last manual program runs, the timer
returns to SYSTEM ON mode and awaits the
next scheduled program start time.
NOTE: Manually operating a station
does not affect the station’s run
time(s) in the automatic programs (A,
B or C).
ISM Installation, Programming & Operation Guide
Page 31
Page 32

Run a Test Program
The ISM’s built-in test program will run each
station that has a non-zero watering time.
When you run the test program, the timer
operates each station in numerical sequence,
from lowest to highest. You can use this
feature to check the operation of all sprinklers
in the system.
1. To test all timer stations, turn the
Programming Dial to TEST STATIONS.
NOTE: If you want to test less than
the maximum number of stations,
follow the procedure in “Manually
Run a Station(s)” on page 30.
2. The number “2” appears in the display,
representing a two-minute test run per
station. Adjust the test time per station
using the (+) or (-) buttons (from 1 minute
to 10 minutes).
3. Press Enter to start the all-stations test.
4. Then turn the Programming Dial back to
the SYSTEM ON position.
During the test, the number of each
operating station appears in the display,
along with the station’s remaining run time.
Any station set for a zero run time in the
automatic programs (A, B or C) will be
skipped in the all-stations test.
NOTE: At any time during the allstations test, you can press Enter to
manually advance to the next
station.
When the all-stations test is complete, the
timer returns to SYSTEM ON mode and awaits
the next scheduled program start time.
Page 32
ISM Installation, Programming & Operation Guide
Page 33

Installing the Sprinkler Timer
Although this manual provides directions for
connecting the wiring to the timer, local
electrical codes may vary in their requirements for proper and safe installation.
NOTES: This timer must be installed in
full compliance with local electrical
codes.
The ISM sprinkler timer must be
installed indoors only.
Choose a Proper Location
Choose a secure location where you can
easily reach the timer. We recommend
mounting the timer at eye level in a utility
room (garage, laundry room, etc.)
1. The mounting location must be within 5
feet (1,5m) of an electrical wall outlet.
NOTE: To minimize electrical
interference, select a location at least
15 feet (4,6 m) away from high-draw
ISM Installation, Programming & Operation Guide
If you must install it outdoors, use a
water-resistant cabinet, such as the
Rain Bird TC-2 Timer Cabinet. The
TC-2 is a heavy-duty, weather
resistant plastic case that lets you
convert any indoor timer to outdoor
use.
motors such as air conditioners,
refrigerators, or pool pumps.
2. When selecting a location, choose a flat,
stable vertical surface on which to mount
the timer. Make sure to allow enough
clearance for electrical conduit and
connections at the bottom of the timer
case.
Page 33
Page 34

Mount the Sprinkler Timer
1. Hold the template provided against the
wall in the desired mounting location. Use
a pencil to mark the location of the three
holes for the mounting fasteners, as
shown on the template.
2. Use a nail to tap a small pilot hole on each
pencil mark for the mounting fasteners.
Using the mounting fasteners provided,
drive the top two fasteners into the wall.
3. Use the keyhole-shaped slots on the back
of the timer to hang the timer on the two
mounting fasteners. Make sure the shafts
of the fasteners are well up into the narrow
part of the keyhole slot.
4. Remove the lower access cover and drive
the third mounting fastener through the
hole in the timer’s lower access panel.
Page 34
ISM Installation, Programming & Operation Guide
Page 35

Connect Main Power Wires
The ISM sprinkler timer has an external
transformer that reduces standard supply
voltage to 24 VAC to operate the remote
valves connected to the timer.
CAUTION: To avoid electrical shock,
DO NOT plug in the transformer until
you have connected it to the timer.
To connect the transformer cable to the
terminal strip in the timer cabinet:
1. Make sure the transformer is NOT plugged
in.
2. Plug the snap-on connector on the
transformer cable into the “24VAC”
connection point on the timer terminal
strip.
3. Plug the transformer into any standard,
three-prong grounded wall plug.
ISM Installation, Programming & Operation Guide
Page 35
Page 36

Connect Field Wires to Remote Control Valves
The wires coming back to the timer from the
electric valves in the field can be routed into
the timer through the hole in the bottom of
the cabinet.
Fig. A shows the various wire runs and
connections between the timer and the other
devices. Each valve should have its own,
separate control wire. Use only wire that is
code-approved for underground, low-voltage
purposes.
1. Connect one end of the control wire to a
numbered station terminal on the timer’s
terminal strip.
2. Connect the other end of the control wire
to one of the wire leads on the valve
solenoid. The wire connectors at the
valves must be waterproof. Connect the
valve common wire to the “COM” terminal
on the terminal strip. Route the common
wire out to the furthest valve, and connect
the valve common wire to the remaining
wire lead on each valve.
Page 36
3. If your system includes a master valve on
its main line supply, or a 24-volt pump
start relay (for activating a pump during
irrigation), connect a wire from the device
to the “MV” terminal on the timer’s terminal
strip. (The timer does not provide the main
power for a pump.) Connect the other wire
lead on the device to the valve common
wire.
4. That completes the mounting and wiring
procedures for your ISM sprinkler timer.
Replace the lower access cover on the
timer, and you are ready to begin
programming. Refer to “Programming the
Sprinkler Timer” on page 15.
ISM Installation, Programming & Operation Guide
Page 37

Fig. A
ISM Installation, Programming & Operation Guide
Page 37
Page 38

Troubleshooting
SYMPTOM POSSIBLE CAUSE CORRECTION
LCD display is blank.
LCD display is partially
or completely blank.
LCD display shows a
station operating, but
no watering occurs.
Program does not
begin watering as
scheduled.
Page 38
1. Power is off to the timer.
2. If under battery power ,
the timer may be in
“sleep” mode.
3. An electrical surge or
lightning strike may have
affected the timer’s
electronics.
4. The valve may have a
defective diaphragm, a
clogged pilot port, or other
malfunction.
5. Programming Dial is set
to the SYSTEM OFF
position.
Re-establish power to the timer. If the current time is
not shown, or your program is no longer in memory,
reprogram the timer.
Press any button to reactivate the timer.
Turn off the timer and disconnect the 9-V olt battery.
Let the timer sit for two or three minutes. Then reconnect the battery and restore power to the timer. Reset
the time and date as described on page 15. If the
electrical surge did no permanent damage, the timer
will accept programming commands and function
normally. If the timer does not operate properly, contact
Rain Bird Technical Assistance at 1-800-RAINBIRD
Check and repair the valve.
Set the Programming Dial to SYSTEM ON.
ISM Installation, Programming & Operation Guide
Page 39

SYMPTOM POSSIBLE CAUSE CORRECTION
6. Start time has not been
properly entered for the
program.
Turn the dial to SET WATERING START TIME and
check the start times entered for the program. If the
start time is missing or incorrect, enter it as described
on page 23.
7. Today may not be set as
a watering day for the
program.
If today is a watering day for a program, the program
letter appears in the display. Turn the dial to SELECT
DAYS TO WATER to check the watering days for the
program. If necessary, set watering days as described
on page 21.
8. Water supply may be
Make sure water supply line has pressure.
shut off.
A particular station
does not come on as
scheduled.
9. No run time has been
set for the station.
10. A short circuit in the
Turn the Programming Dial to SET STATION
DURATION to check the run times set for the station.
To add a run time, see page 25.
Identify and repair the fault in the electrical circuit.
solenoid or valve wiring
has disabled the station.
11. A start time has not
been entered for the
station’s assigned
program.
Turn the dial to SET WATERING START TIME(S) and
check the start times entered for the program. If the
station’s start time is missing, enter it as described on
page 23.
ISM Installation, Programming & Operation Guide
Page 39
Page 40

SYMPTOM POSSIBLE CAUSE CORRECTION
Watering starts when it
should not.
12. One of the preprogrammed schedules
Clear all start times from unwanted program. See page
24.
may be selected.
13. An unwanted program
start time may have been
entered.
Turn the dial to SET WATERING START TIME and
check to see if any programs have an unwanted start
time. See the instructions beginning on page 23 for
setting and deleting start times.
Watering does not stop
as scheduled.
14. Programs may have
accidentally been set to
overlap.
Check to see if another program’s start time began
during the previous program’s run cycle. The
overlapped program would immediately follow the
earlier one. Reprogram if necessary.
15. A valve is stuck in the
open position.
Turn the Programming Dial to SYSTEM OFF and wait
10-20 seconds. If the irrigation does not stop, shut off
the water supply manually and repair the valve.
LCD display shows
”Err.”
16. The automatic circuit
breaker has detected an
electrical problem
The “Err” in the display indicates a short circuit
overload on a particular station. The station’s number
should also be displayed. For example, “ Err 2” means
the problem is in the circuit for Station 2.
Usually, the short circuit is in the solenoid on the
elecric valve, but shorts can also occur in the wire
connectors at the valve. Occasionally, nicked or
“skinned” field wires can cause a short. A large pump
Page 40
ISM Installation, Programming & Operation Guide
Page 41

SYMPTOM POSSIBLE CAUSE CORRECTION
start relay can also produce a momentary overload
that may be detected by the controller.
Locate and repair the cause of the short circuit. Press
enter with dial in SYSTEM ON position when “Err” is
displayed.
LCD display shows
17. Same as Cause #16.
See correction for Cause #16.
“Err” for a few seconds
and then shows the
station operating for a
few seconds.
ISM Installation, Programming & Operation Guide
Page 41
Page 42

Page 43

Guía de instalación, programación y operación
CONTROLADOR ISM PARA ASPERSORES
Rain Bird Corporation División de Productos para Consumidores
6991 E. Southpoint Road, Bldg #1 Tucson, Arizona 85706, U.S.A.
Servicios Técnicos: 1800 RAINBIRD • http://www.rainbird.com
MANUAL DE INSTRUCCIONES
Page 44
ATENCIÓN: EL CABLEADO PERMANENTE
DEBERÁ INCLUIR UN CORTACIRCUITOS O UN
INTERRUPTOR PARA AISLAR EL
CONTROLADOR PARA ASPERSORES. LA
MEMORIA ES CONSERVADA POR UNA
BATERÍA, LA CUAL DEBERÁ DESECHARSE DE
CONFORMIDAD CON LOS REGLAMENTOS DE
SU LOCALIDAD.
ICONOS DE ADVERTENCIA
El símbolo de relámpago con punta de
flecha dentro de un triángulo equilátero
sirve para advertir al usuario de la
presencia de “voltaje peligroso” no
aislado dentro del compartimiento del
producto. La magnitud de este voltaje
representa un riesgo de electrocución
para las personas.
El signo de admiración dentro de un
triángulo equilátero tiene el propósito
de advertir al usuario de la existencia
de instrucciones importantes sobre el
uso o el mantenimiento (servicio), las
cuales se presentan en la
documentación entregada con el
producto.
Página 44
ATTENTION: UN DISJONCTEUR OU UN
INTERRUPTEUR DOIT ETRE INSTALLE SUR LE
PRIMAIRE POUR ISOLER LE
PROGRAMMATEUR. LA MEMOIRE EST
MAINTENUE GRACE A UNE BATTERIE
RECHARGEABLE A DISPOSER SELON LA
REGLEMENTATION LOCALE.
CAUTION ICONS
L’éclair avec le symbole de la flèche,
placé dans les limites d’un triangle
èquilatéral est prévu pour avertir
l’utilisateur de la présence de “tension
dangereuse” non isolé dans l’enceinte
du produit qui pourrait ëtre d’une
importance suffisante pour présenter
un risque d’électrocution aux
personnes.
Le point d’exclamation dans un triangle
èquilatéral est prévu pour avertir
l’utilisateur de la présence
d’instructions importantes pour les
opérations et l’entretien (service) dans
les manuels fournis avec l’appareil.
Guía de Instalación, operación y programación ISM
Page 45

Contentido
Introducción ................................................ 46
Controlador de aspersores ISM.................... 46
Estaciones del controlador para aspersores.. 46
¿Qué es un programa? ............................... 48
Conceptos básicos del controlador para
aspersores .................................................. 50
Programación con alimentación por batería.. 50
Instalación de la batería .............................. 51
Controles e indicadores .............................. 53
Lista de verificación para la programación ... 54
Tabla de programación del controlador ........ 55
Programación del controlador para
aspersores .................................................. 58
Eliminar los programas existentes ............... 58
Especificar el año ....................................... 59
Especificar el mes y día .............................. 60
Especificar la hora ...................................... 61
Programas pre-determinados...................... 62
Seleccionar el programa (A, B o C) .............. 63
Especificar el ciclo de riego......................... 64
Especificar los dias de riego ........................ 65
Ciclo de riego de 2, 3, 4, 5 ó 6 dias ............. 66
Guía de Instalación, operación y programación ISM
Especificar las horas de inicio del progrma... 67
Eliminar las horas de inicio del programa..........
Especificar los tiempos de riego de las
estaciones ................................................. 69
Operación del controlador para
aspersores .................................................. 70
Modalidad de apagado ............................... 70
Modalidad de encendido ............................. 71
Ajuste del porcentaje de consumo de agua .. 72
Operación manual de estaciones y programas .
Ejecutar un programa de prueba ................. 76
Instalación del controlador para
aspersores .................................................. 78
Seleccionar un lugar apropiado ................... 78
Montaje del controlador para aspersores ..... 79
Conexión de los cables de energía principal ...
Conexión de los cables de campo a las
válvulas de control...................................... 81
Identificación y resolución de problemas ... 83
Si tiene alguna pregunta, problema o comentario, llame
a la línea de asistencia técnica 1-800 RAINBIRD
68
74
80
Página 45
Page 46

Introducción
Controlador para aspersores ISM
Gracias por haber comprado un controlador
para aspersores Rain Bird ISM. En este
manual se le explicará cómo instalar,
programar y utilizar el controlador para
sistemas de riego (también llamado
“cronómetro”). Por favor lea estas
instrucciones detenidamente y conserve el
manual en la parte posterior del controlador
para futuras referencias.
El controlador para aspersores Rain Bird ISM
es un controlador compacto, fácil de usar,
que le ofrece las siguientes funciones:
• Tres programas con días de riego
Estaciones del controlador para aspersores
El controlador para aspersores Rain Bird ISM
es un controlador electrónico que controla el
encendido y apagado del sistema de
aspersores y cuánto tiempo funcionarán los
aspersores.
Página 46
independientes.
• Hasta cuatro horas de inicio de riego por
programa.
• La opción de designar cualquier día de la
semana como día de riego.
• Función de ajuste de porcentaje de consumo de agua en todos los programas.
• Batería de respaldo para conservar la
hora, la fecha y la programación cuando
se interrumpe el suministro eléctrico.
• Póliza de garantía de satisfacción del
cliente por tres años.
El controlador ISM puede controlar 4, 6 ó 9
“estaciones” de riego. Una estación es un
conjunto de aspersores u otros dispositivos
de riego conectados a una válvula común
de control remoto. Cuando la válvula recibe
Guía de Instalación, operación y programación ISM
Page 47

una señal del controlador, se abre y enciende
los aspersores conectados a ella.
En la siguiente figura se presenta un
diagrama de disposición de estaciones. En el
ejemplo, la estación 1 está regando. Cuando
la estación 1 termine de regar, el controlador
la apagará y encenderá la estación 2.
Cuando la estación 2 termine de regar,
comenzará la estación 3, y asi
sucesivamente.
Guía de Instalación, operación y programación ISM
Página 47
Page 48

¿Qué es un programa?
La programación es el proceso de indicarle al
controlador cuándo y durante cuánto tiempo
se quiere regar. El controlador abre y cierra
las válvulas remotas de cada estación de
acuerdo con el programa que usted
especifique.
El controlador ISM tiene tres programas
independientes: A, B y C. Cada programa
puede controlar de una a nueve estaciones y
le permite personalizar los calendarios de
riego de acuerdo con las necesidades de
distintos tipos de plantas, condiciones del
suelo, pendientes, áreas sombreadas o
soleadas, etc.
Para que pueda programar correctamente el
controlador para aspersores ISM es
necesario que conozca los siguientes
términos.
• Ciclo de riego (Watering day cycle) - El
período (en días) de repetición del
programa que usted especifica. Por
ejemplo, un ciclo de cinco días es un
Página 48
calendario de riego semanal que se repite
una vez cada cinco días. Un ciclo de dos
días se repite cada segundo día.
• Días de riego ( Days to water) - Los días
específicos del ciclo de riego en los cuales
se lleva a cabo el riego. En un ciclo de 7
días usted podrá seleccionar varios días
de riego dentro del ciclo. Por ejemplo,
podría regar los días 1 (lunes), día 3
(miércoles) y día 5 (viernes). En los ciclos
de 2, 3, 4, 5 ó 6 días, el día 1 siempre
será el único día de riego. Un ciclo de 2
días riega el día 1, no riega el día 2 y luego
vuelve a regar el día 1 al repetirse el ciclo.
Un ciclo de tres días riega el día 1, deja de
regar los días 2 y 3 y luego se repite.
• Hora de inicio de riego (Watering start time)
- Es la hora a la que comenzará a regar la
primera estación de un programa. Las
demás estaciones programadas le
seguirán en secuencia. Cada programa
puede tener hasta cuatro horas de inicio.
Por ejemplo, un programa podría iniciar el
Guía de Instalación, operación y programación ISM
Page 49

riego a las 6:00 a.m., 10:00 a.m., 12:00
p.m. y 6:00 p.m.
NOTA: El término “hora de inicio” se
refiere a la hora en que comienza la
ejecución del programa, no a la
duración en que cada estación
funciona.
• Tiempo de riego o Duración (Duration) - Es
el número de minutos que funcionará
cada estación.
Guía de Instalación, operación y programación ISM
Página 49
Page 50

Conceptos básicos
del controlador para aspersores
Programación con alimentación por batería
Si lo desea, puede programar el controlador
mientras éste es alimentado por la batería.
Esta función puede ser útil si el controlador
será instalado en un lugar de difícil acceso.
Asimismo, esta función le permite especificar
la información de programación antes de
instalar el controlador.
Para programar el controlador para
aspersores ISM mientras es alimentado por
la batería, primero tendrá que instalar la
batería.
NOTA: Con el fin de ahorrar la energía
de la batería, el controlador pasará a
la modalidad de ahorro de energía si
transcurre un lapso de inactividad en
la perilla de programación o en los
botones. Oprima cualquier botón
para reactivar el controlador.
Página 50
Guía de Instalación, operación y programación ISM
Page 51

Instalación de la batería
La batería de respaldo conserva la
información de hora, fecha y programación
cuando hay interrupciones en el suministro
eléctrico. La batería también le permite
programar el controlador mientras es
alimentado por la batería, antes de
conectarlo a una fuente de corriente alterna.
Para obtener los mejores resultados, utilice
una batería alcalina de 9 V de larga duración.
Una batería nueva por lo general proveerá
energía suficiente para un año. Reemplace la
batería cada año para asegurar que se
mantenga un suministro de energía
ininterrumpido.
NOTA: Asegúrese de que el
controlador esté conectado a una
fuente de corriente alterna al
reemplazar la batería, pues de lo
contrario perderá toda la información
de programación, hora y fecha.
Para instalar la batería:
1. Quite la tapa de acceso inferior del
controlador para abrir el compartimiento
de la batería.
2. Una el conector de dos alambres a las
terminales de la batería nueva. Si está
reemplazando una batería usada, deseche
ésta de manera apropiada.
3. Inserte la nueva batería firmemente en el
compartimiento.
4. Vuelva a colocar la tapa de acceso inferior.
NOTA: Si no hay batería instalada, la
función de detección de corto
circuito puede no funcionar
apropiadamente. Por favor
asegúrese que la batería sea
instalada antes de la operación.
Guía de Instalación, operación y programación ISM
Página 51
Page 52

Página 52
Guía de Instalación, operación y programación ISM
Page 53

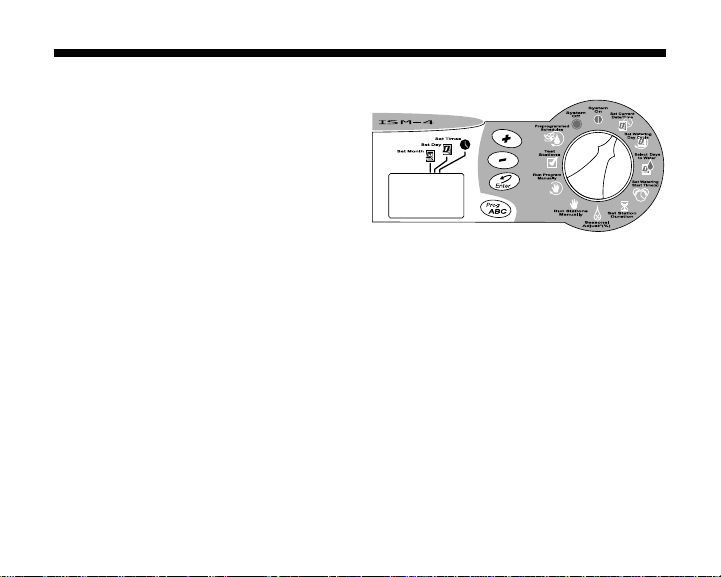
Controles e indicadores
En la figura de la derecha se muestran los
controles de programación de la carátula del
controlador para aspersores ISM. Estos
controles son los siguientes:
1. Pantalla de cristal líquido (LCD) - Durante
el funcionamiento normal, en la pantalla se
presenta la hora y los programas que se
ejecutarán ese día. Durante la
programación, en la pantalla aparecen los
resultados de sus instrucciones. Durante
el riego, en la pantalla se presenta la
estación que está funcionando, los
minutos que faltan del tiempo de riego de
la estación y si hay otro programa
esperando para iniciar el riego.
2. Botones ascendente (+) y descendente (-) Se utilizan para especificar horas y días y
para efectuar cambios de programación.
3. Botón Enter - Registra las instrucciones de
programación e inicia la operación
manual.
4. Botón Prog ABC - Selecciona el programa
Guía de Instalación, operación y programación ISM
de riego A, B o C.
5. Perilla de programación - Apaga o
enciende el controlador y selecciona otras
funciones de programación.
Página 53
Page 54

Lista de verificación para la programación
La primera vez que programe el controlador
para aspersores ISM, le recomendamos que
lleve a cabo los pasos indicados a
continuación, en el orden en que se
presentan.
❐ Llene la tabla de programación...............................................................página 55
❐ Especifique el año, mes, día y hora actuales...........................................página 59
Para cada programa:
A B C
❐ ❐ ❐ Seleccione los programas predeterminados ........................página 62
❐ ❐ ❐ Seleccione el programa (A, B o C) .......................................página 63
❐ ❐ ❐ Especifique el ciclo de riego ................................................página 64
❐ ❐ ❐ Especifique los días de riego ............................................... página 65
❐ ❐ ❐ Especifique las horas de inicio del programa ....................... página 67
❐ ❐ ❐ Especifique los tiempos de riego de las estaciones .............página 69
❐ Ajuste el controlador a la modalidad automática.....................................página 71
A la izquierda de cada paso se incluye un
recuadro (❐) para que marque el paso al
completarlo.
Página 54
Guía de Instalación, operación y programación ISM
Page 55

Tabla de programación del controlador para aspersores
Antes de comenzar a programar el
controlador ISM, llene la tabla de
programación incluida con el controlador.
Después programe el controlador en el orden
indicado en la lista de verificación para la
programación. La página 57 muestra un
ejemplo de esta tabla.
1. Seleccione el ciclo de día de riego
deseado y encierre en un círculo los días
de riego del ciclo. En el ejemplo del
programa A, el operador eligió un ciclo de
riego de siete días y marcó los días L, M y
V como días de riego. Esto significa que el
programa A regará todos los lunes,
miércoles y viernes.
2. Para el programa B, el operador
seleccionó un ciclo de riego de tres días.
Con esta opción, el programa B regará un
día, dejará de regar dos días y comenzará
a regar nuevamente en el primer día de un
nuevo ciclo de tres días.
3. También puede elegir uno de tres ciclos
Guía de Instalación, operación y programación ISM
de riego especiales, para los cuales no
tiene que especificar los días de riego:
• Ev (par) = Riega únicamente los días
pares del mes.
• Od (non) = Riega únicamente los días
impares del mes.
• Od31 (non 31) = Riega únicamente los
días impares del mes, pero no los días 31
ni el 29 de febrero. (Este ciclo de riego
permite cumplir los ordenamientos locales
de algunas zonas con restricciones de uso
de agua).
4. En el recuadro de horas de inicio del
programa A, escriba la hora a la que
quiere que comience a regar el programa.
Puede asignar hasta cuatro horas de inicio
a cada programa. Si quiere que el
programa riegue únicamente una vez
cada día de riego, marque sólo una hora
de inicio. Especifique las otras horas de
inicio sólo si quiere repetir el programa en
su totalidad más de una vez por día de
riego.
Página 55
Page 56

5. Anote las horas de inicio del programa B
(si se utilizará). En el ejemplo, el programa
A comienza a regar a las 7:00 a.m. El
programa B riega dos veces cada día de
riego, a las 5:00 a.m. y a las 3:00 p.m.
NOTA: Si el tiempo de riego total de
un programa se sobrepone a la hora
de inicio de otro programa, el
controlador colocará los programas
en una secuencia posponiendo la
ejecución del segundo programa
hasta que el primero termine de
regar.
6. Junto a cada número de estación escriba
una descripción breve del área cubierta
por la estación. Recuerde que una
“estación” es un conjunto de aspersores
conectados a una misma válvula de
control remoto.
En este ejemplo se muestran seis
estaciones asignadas. Sin embargo, el
controlador ISM puede controlar más o
menos, dependiendo del modelo.
7. En la columna de tiempo de riego de cada
programa, anote el número de minutos de
operación de cada estación.
Observe que las estaciones 1 a 4 están
asignadas al programa A, mientras que las
estaciones 5 y 6 están asignadas al
programa B.
El controlador ISM le permite utilizar la
misma estación en distintos programas,
para satisfacer necesidades de riego
especiales. Sin embargo, en la mayoría de
las aplicaciones la programación será más
sencilla si no repite las estaciones.
NOTA: El valor de ajuste de
porcentaje de consumo de agua
(Seasonal Adjust %) se aplica a los
programas (A, B y C). Vea página
74.
Página 56
Guía de Instalación, operación y programación ISM
Page 57

Guía de Instalación, operación y programación ISM
Página 57
Page 58

Programación del controlador
para aspersores
Elimine los programas existentes
Siga el procedimiento descrito a
continuación siempre que desee borrar
todos los programas de la memoria del
controlador e iniciar la programación “desde
cero”.
1. Desconecte el transformador de la toma
de la pared.
2. Desconecte el conector de la batería.
3. Espere 10 segundos.
4. Vuelva a conectar el conector a la batería.
5. Conecte el transformador a la toma de la
pared.
En la pantalla aparecerá “AM 12:00”. Esto
indica que los programas anteriores han sido
borrados. Ahora podrá girar la perilla de
programación a la posición Set Current DATE/
TIME (fecha y hora) para comenzar a
especificar el año, mes, día y hora.
Página 58
Guía de Instalación, operación y programación ISM
Page 59

Especifique el año
1. Gire la perilla de programación a la
posición Set Current DATE/TIME.
2. Oprima los botones ascendente (+) o
descendente (-) para especificar el año.
3. Oprima el botón Enter.
Guía de Instalación, operación y programación ISM
Página 59
Page 60
Especifique el mes y el día
1. Después de especificar el año correcto,
deje la perilla de programación en la
posición Set Current DATE/TIME.
2. El mes y el día aparecerán como “01 01”,
con el primer “01” (que representa el mes)
parpadeando. Aparecerá un cursor debajo
del icono Set Month (ajuste de mes).
3. Oprima los botones ascendente (+) o
descendente (-) para especificar el mes
actual (1 a 12).
4. Oprima el botón Enter.
5. Comenzará a parpadear el segundo “01”
(que representa el día del mes). Un cursor
aparecerá debajo del icono Set Day
(ajuste del día).
6. Oprima los botones de (+) o (-) para para
especificar la fecha actual (1 a 31).
7. Oprima el botón Enter.
Página 60
Guía de Instalación, operación y programación ISM
Page 61

Especifique la hora
1. Después de especificar el mes y la fecha
correctos, deje la perilla de programación
en la posición Set Current DATE/TIME.
2. En la pantalla aparecerá la hora y la
leyenda AM o PM (por ejemplo, 12:01
AM). Aparecerá un cursor debajo del
icono Set Times (ajuste de la hora).
3. Oprima los botones de (+) o (-) para
especificar la hora actual (1 a 12 AM o
PM).
4. Oprima el botón Enter.
5. Los dígitos de los minutos aparecen de
manera intermitente.
6. Oprima los botones ascendente (+) o
descendente (-) para especificar el minuto
actual (1 a 59).
7. Oprima el botón Enter. Gire la perilla de
programación a la posición SYSTEM ON.
Guía de Instalación, operación y programación ISM
Página 61
Page 62

Seleccione los programas de riego pre-determinados
Siga este procedimiento si desea utilizar uno
de los calendarios de riego predeterminados
del controlador. Si prefiere especificar su
propio calendario de riego, pase
directamente a la sección “Seleccione el
programa (A, B o C)” en la página 21.
Para su conveniencia, el controlador ISM
tiene TRES PROGRAMAS DE RIEGO PRE-
DETERMINADOS que puede seleccionar para
cualquiera de los programas (A, B o C).
Estos calendarios ya están programados y
se explican a continuación.
• Programa predeterminado 1 (5 Pr E1).
Riega en todas las estaciones durante
cinco minutos, tres veces al día (6:00
a.m., 10:00 a.m. y 2:00 p.m.).
• Programa predeterminado 2 (10 Pr E2).
Riega en todas las estaciones durante
diez minutos, en días alternos, a las 6:00
a.m.
• Programa predeterminado 3 (10 Pr E3).
Riega en todas las estaciones durante
Página 62
diez minutos cada tercer día, a las 6:00
a.m.
1. Gire la perilla de programación a la
posición PRE-PROGRAMMED SCHEDULES
(programas de riego pre-determinados).
2. En la pantalla aparecerá el primer
programa pre-grabado (5 Pr E1).
3. Si quiere seleccionar otro programa predeterminado, oprima el botón (+) o (-)
hasta que el programa deseado aparezca
en la pantalla.
4. Oprima el botón Prog ABC hasta que la
letra del programa deseado (A, B o C)
aparezca en la pantalla junto con el
programa pre-determinado.
5. Oprima el botón Enter. La letra del
programa parpadeará para confirmar la
selección del calendario de riego
predeterminado.
Después de seleccionar un calendario de
riego predeterminado, podrá modificar los
Guía de Instalación, operación y programación ISM
Page 63

parámetros del programa (día de riego,
hora de inicio, etc.) siguiendo los pasos de
programación que se presentan en las
páginas siguientes.
6. Gire la perilla de programación de nuevo a
la posición SYSTEM ON.
Seleccione el programa (A, B o C)
El programa A han sido pre-determinado
para su conveniencia. También puede
personalizar sus propios calendarios de riego
siguiendo los pasos en la página 64-69. Los
programas B y C no están pre-determinados
1. Gire la perilla de programación a la
posición SET WATERING DAY CYCLE (ciclo de
riego).
2. En la pantalla aparecerá la letra del
programa seleccionado en ese momento
(A, B o C).
3. Oprima el botón Prog ABC hasta que el
programa deseado (A, B o C) aparezca en
la pantalla. Recuerde que si únicamente
utilizará un programa, deberá seleccionar
Guía de Instalación, operación y programación ISM
el programa A.
NOTA: Es más fácil seleccionar un
programa (A, B o C) y programarlo
por completo antes de avanzar al
siguiente programa. Los cambios de
un programa a otro pueden provocar
confusiones.
Página 63
Page 64

Especifique el ciclo de riego
Siga el procedimiento descrito a
continuación si quiere especificar su propio
programa de riego.
Asegúrese de que la perilla de programación
esté en la posición SET WATERING DAY CYCLE
(ciclo de riego).
NOTA: Si seleccionó uno de los
calendarios de riego
predeterminados (página 62), omita
esta página y pase directamente a
“Especifique las horas de inicio del
programa”, en la página 67.
1. Oprima los botones ascendente (+) o
descendente (-) hasta que aparezcan en
la pantalla el ciclo de riego que quiere
utilizar y el programa seleccionado (A, B o
C). Los ciclos de riego disponibles son los
siguientes:
• 7 días (programa personalizado). Sigue
un ciclo de riego semanal. Puede
seleccionar cualquier día como día de
riego.
Página 64
• Ev. Riega únicamente los días pares.
• Od. Riega únicamente los días impares.
• Od31. Riega únicamente los días
impares, excepto los días 31 y el 29 de
febrero. (Este ciclo de riego cumple los
ordenamientos especiales de algunas
zonas con restricciones de uso de agua).
• 2, 3, 4, 5 o 6 días. Riega únicamente el
primer día de un ciclo de 2, 3, 4, 5 ó 6
días de duración.
2. Si selecciona un ciclo de riego de 2, 3, 5 ó
7 días, continúe en “Especifique los días
de riego”, página 65.
NOTA: Si selecciona Ev, Od, Od31 ó
1 día como ciclo de riego, no tendrá
que especificar los días de riego. En
este caso, continúe en “Especifique
las horas de inicio del programa”,
página 67.
Guía de Instalación, operación y programación ISM
Page 65

Especifique los días de riego
Siga el procedimiento descrito a
continuación para especificar los días de
riego de un ciclo de riego de siete días.
Ciclo de riego de 7 días
1. Gire la perilla de programación a la
posición SELECT DAYS TO WATER
(seleccione dias de riego).
2. Si seleccionó un ciclo de riego de 7 días,
en la pantalla aparecerá una fila de siete
números (1 a 7) que representan los días
de la semana (el “1” representa el lunes, el
“2” el martes, etc.). El número “1”
aparecerá de forma intermitente.
3. En la pantalla se presenta la letra del
programa (A, B o C).
4. Aparecerá un número que indica el día
actual (es decir, el día en que está
programando el controlador). También se
presenta en la pantalla la abreviatura del
nombre del día.
5. Oprima los botones (+) o (-) para activar o
desactivar el riego en un día determinado.
Los días con riego tienen un recuadro
alrededor del número; los días sin riego no
tienen este recuadro.
6. Oprima el botón Enter para avanzar al
siguiente día.
7. Repita los pasos 5 a 7 para todos los
días.
8. Proceda a SET WATERING STAR T TIMES.
Guía de Instalación, operación y programación ISM
Página 65
Page 66

Ciclo de riego de
2, 3, 4, 5 o 6 días
Siga el procedimiento descrito a
continuación si seleccionó un ciclo de riego
de 2, 3, 4, 5 ó 6 días.
1. Gire la perilla de programación a la
posición SELECT DAYS TO WATER (día de
riego).
2. Si seleccionó un ciclo de riego de 2, 3, 4,
5 ó 6 días, aparecerá en la pantalla una fila
de números correspondientes a los días
del ciclo, con un recuadro alrededor del
número 1.
NOTA: El único día de riego de un
ciclo de 2, 3, 4, 5 ó 6 días es el día
1.
3. En la pantalla aparecerá la letra del
programa (A, B o C).
4. Un número parpadeante aparecerá en la
pantalla para indicar la posición del día
actual dentro del ciclo.
5. Oprima los botones ascendente (+) o
descendente (-) para mover la posición
del día actual dentro del ciclo de riego.
Ahora podrá comenzar a especificar las
horas de inicio del programa, tal como se
describe en la página 67.
Página 66
Guía de Instalación, operación y programación ISM
Page 67

Especifique las horas de inicio del programa
La hora de inicio de un programa es la hora
cuando empezará a regar la primera estación
del programa. Hasta 4 tiempos de inicio
pueden programarse por programa. Las
estaciones subsecuentes comenzarán a
regar en secuencia. Hay un retraso de 2
segundos entre la activación de las
estaciones.
1. Gire la perilla de programación a la
posición SET WATERIGN ST AR T TIME(S)
(hora de inicio).
2. En la pantalla se presentarán la letra del
programa (A, B o C), el número “1” (que
indica la primera hora de inicio) y cuatro
guiones “--.--”.
3. Oprima los botones (+) o (-) para
especificar la hora de inicio de cada
programa. Si quiere que todas las
estaciones del programa rieguen una sola
vez cada día de riego, especifique
solamente una hora de inicio para el
programa.
Guía de Instalación, operación y programación ISM
4. Si quiere especificar otra hora de inicio,
oprima el botón Enter. En la pantalla
aparecerán el número de la siguiente hora
de inicio (2, 3 ó 4) y los cuatro guiones.
Repita los pasos 3 y 4 para especificar
hasta cuatro horas de inicio para cada
programa, si las requiere.
NOTA: Si seleccionó uno de los calendarios de riego pre-determinados,
verá las horas de inicio predeterminadas de ese calendario de riego.
Página 67
Page 68

Elimine las horas de inicio del programa
1. Si desea eliminar una hora de inicio
incorrecta de un programa, gire la perilla
de programación a la posición SET
WATERING START TIME(S) (hora de inicio).
2. Oprima el Enter para seleccionar el
número de la hora de inicio (1, 2, 3 ó 4)
que quiere eliminar.
NOTA: Las horas de inicio se
presentan en orden cronológico. La
primera hora de inicio será la número
1, la siguiente hora de inicio será la
número 2, etc. Si elimina una hora
de inicio, las horas de inicio
posteriores se recorrerán un número.
Esta renumeración únicamente
ocurre al mover la perilla de
programación de la posición SET
WATERING START TIME(S) a otra
función.
3. En la pantalla aparecerá el número de la
hora de inicio que será eliminada.
4. Oprima el botón ascendente (+) o
Página 68
descendente (-) hasta que los cuatro
guiones (“--.--”) aparezcan en la pantalla.
5. Gire la perilla de programación de nuevo a
la posición SYSTEM ON. La hora de inicio
ya ha sido eliminada.
Guía de Instalación, operación y programación ISM
Page 69

Especifique los tiempos de riego de las estaciones
1. Gire la perilla de programación a la
posición SET STATION DURATION (tiempo de
riego de estación).
2. En la pantalla aparecerán la letra del
programa (A, B o C), el número “1” (que
indica el número de la estación) y “0”.
3. Oprima los botones (+) o (-) para
especificar el tiempo de riego de la
estación 1. Puede especificar la duración
del riego de 0 a 240 minutos (cuatro
horas), en incrementos de un minuto. Los
tiempos de riego se presentan en minutos
(por ejemplo, un tiempo de riego de dos
horas aparecerá como 120 minutos).
NOTA: Si no quiere incluir una
estación como parte del programa
seleccionado, ajuste el tiempo de
riego de esa estación a cero (0).
4. Oprima el botón Enter para pasar a la
siguiente estación. Repita los pasos 3 y 4
para asignar los tiempos de riego de las
demás estaciones.
Guía de Instalación, operación y programación ISM
Con esto concluyen los pasos de
programación de un programa. Si ya terminó
de programar el controlador, gire la perilla de
programación a la posición SYSTEM ON para
ejecutar los programas en forma automática.
Si quiere especificar los parámetros de otro
programa, repita las instrucciones de
programación a partir del procedimiento
“Seleccione el programa (A, B o C)” de la
página 63.
Página 69
Page 70

Operación del controlador para aspersores
Después de programar el controlador, lo más
usual es que lo ajuste a la modalidad
automática (SYSTEM ON) para que los
programas se ejecuten automáticamente.
También es posible ejecutar uno o más
programas manualmente, o iniciar el riego de
una o varias estaciones en forma manual.
También puede ajustar la función de
porcentaje de consumo de agua (Seasonal
Adjust™ %) para aumentar o reducir el
tiempo de riego de todas las estaciones en
un porcentaje específico (en incrementos del
10%). Asimismo, podrá ejecutar un
programa de prueba para comprobar que
todos los aspersores del sistema funcionan
como es debido.
Sistema Apagado (SYSTEM OFF)
1. Para apagar el controlador y suspender
todo el riego, gire la perilla de
programación a la posición SYSTEM OFF.
2. En la posición SYSTEM OFF la pantalla
muestra la leyenda “off”. El controlador
recordará la hora y los programas, pero
no habrá riego. Puede apagar el
controlador durante períodos de lluvia o
durante los días en los que no quiere que
los programas se ejecuten en la forma
especificada.
Página 70
Guía de Instalación, operación y programación ISM
Page 71

Sistema de encendido
(System On)
1. Para regresar el controlador a operación
automática, gire la perilla a SYSTEM ON.
2. Cuando el controlador no está regando
aparecerá:
• Los programas (A, B, C o ninguno)
programados para regar el día actual.
• La hora actual.
• %A, %B, %C, si se especificó un
porcentaje de consumo de agua distinto
del 100%.
3. Cuando el controlador está regando, en la
pantalla aparece lo siguiente:
• El programa (A, B o C) en ejecución.
• El número de la estación que está
regando en ese momento.
• El tiempo de riego restante para la
estación.
• %A %B %C, si se especificó un
porcentaje de consumo de agua distinto
del 100%.
4. Si algún problema es detectado en alguna
de las estaciones, la pantalla parpadea
cada 3 segundos y muestra un mensaje
de error “Err#”, siendo “#” la estación
donde el problema ha sido detectado. Por
ejemplo, si la válvula maestra tiene algún
problema, muestra “ErrM”, para la
estación 3, “Err3”. La estación es
automáticamente ignorada hasta que la
causa del error es corregida.
Guía de Instalación, operación y programación ISM
Página 71
Page 72

Ajuste del porcentaje de consumo de agua
(Seasonal Adjust %)
La función de ajuste de porcentaje de
consumo de agua es la forma más sencilla
de aumentar o reducir el tiempo de riego de
todas las estaciones de un programa. La
función de ajuste de porcentaje de consumo
de agua puede utilizarse para reducir el
riego en los meses fríos o aumentarlo en los
períodos secos o de calor intenso.
El porcentaje de consumo de agua puede
ajustarse del 10% al 200% (el doble del
tiempo de riego de las estaciones), en
incrementos del 10%. Los ajustes al porcentaje de consumo de agua afectan a las
estaciones de todos los programas (A, B o
C).
Los porcentajes de consumo de agua se
calculan a partir del tiempo de riego normal
programado para la estación. Por ejemplo,
si una estación tiene un tiempo de riego
programado de 10 minutos y el porcentaje
de consumo de agua se ajusta al 80%, la
Página 72
estación regará únicamente durante 8
minutos (el 80% de 10 minutos). Si ajusta el
porcentaje de consumo de agua al 120%,
esa misma estación regará durante 12
minutos (el 120% de 10 minutos).
NOTAS: El porcentaje de consumo de
agua sólo maneja minutos enteros.
El tiempo de riego mínimo es de un
minuto.
Los tiempos de riego de todas las
estaciones programadas
aumentarán o disminuirán al utilizar
la función de ajuste de porcentaje de
consumo de agua.
1. Gire la perilla de programación a la
posición SEASONAL ADJUST % (porcentaje
de consumo de agua).
2. El porcentaje de consumo actual aparece
en la pantalla.
3. Oprima el botón (+) para aumentar el
porcentaje de consumo de agua o el
Guía de Instalación, operación y programación ISM
Page 73

botón (-) para reducir el porcentaje de
consumo de agua.
4. Si ajusta el porcentaje de consumo de
agua a una cifra distinta del 100%, se
presentará un signo de porcentaje (%)
frente a la letra de los programas (A, B, C).
El signo de porcentaje aparecerá en
ambos programas (A, B o C) incluso si no
están seleccionados.
5. Después de ajustar el porcentaje de
consumo de agua, devuelva la perilla de
programación a la posición SYSTEM ON.
Los tiempos de riego de todas las
estaciones aumentarán o disminuirán en el
porcentaje especificado.
Guía de Instalación, operación y programación ISM
Página 73
Page 74

Operación manual de estaciones y programas
Es posible operar una estación o un
programa en forma manual si considera que
una zona necesita riego adicional.
Operación manual de estaciones
1. Gire la perilla de programación a la
posición RUN STATIONS MANUALLY
(estación manual).
2. En la pantalla aparecerá el número “1”
seguido por “0”. Esto indica que la
estación 1 tiene un tiempo de riego
manual de cero.
3. Para seleccionar una estación que no sea
la número 1, oprima el botón Enter hasta
que el número de la estación aparezca en
la pantalla.
4. Si quiere iniciar el riego de la estación que
aparece en la pantalla, oprima los botones
(+) o (-) para especificar el tiempo de
riego manual de la estación (de 1 a 240
minutos).
5. Oprima el botón Enter para iniciar el riego.
6. Después de especificar el tiempo de riego
manual de todas las estaciones, gire la
perilla de programación de nuevo a la
posición SYSTEM ON. En la pantalla
aparecerá el número de la primera
estación para riego manual y el tiempo de
riego restante. Puede oprimir el botón
Enter para avanzar a la siguiente estación.
Al terminar la operación manual, el
controlador regresará a la modalidad
automática (SYSTEM ON) y esperará al inicio
del siguiente programa.
Página 74
Guía de Instalación, operación y programación ISM
Page 75

Ejecución manual de un
programa
1. Gire la perilla de programación a la
posición RUN PROGRAM MANUALLY (inicio
manual de programa).
2. En la pantalla aparecerá el programa “A, B
o C”.
3. Si desea elegir otro programa, oprima el
botón Prog ABC hasta que el programa
deseado aparezca en la pantalla.
4. Oprima el botón Enter para iniciar la
ejecución del programa seleccionado.
NOTA: Puede colocar los programas
(A, B o C) en secuencia para la
operación manual, oprimiendo el
Guía de Instalación, operación y programación ISM
botón Enter después de seleccionar
cada programa. Los programas
serán ejecutados en el orden en que
fueron programados.
5. Gire la perilla de programación de nuevo a
la posición SYSTEM ON. En la pantalla se
presentará la estación en funcionamiento
y el tiempo por completar.
NOTA: La función de ajuste de
porcentaje de consumo de agua
(Seasonal Adjust %) se aplica a los
programas operados en forma
manual.
Al terminar la ejecución del último
programa manual, el controlador
regresará a la modalidad SYSTEM ON
y esperará a la hora de inicio del
siguiente programa.
NOTAS: La operación manual de una
estación no afecta los tiempos de
riego de la estación en los
programas automáticos (A, B y C).
Página 75
Page 76

Ejecute un programa de prueba
El programa de prueba incorporado en el
controlador ISM iniciará el riego en todas las
estaciones con tiempo de riego distinto de
cero. Al ejecutar el programa de prueba, el
controlador opera las estaciones en orden
numérico, de menor a mayor. Puede utilizar
esta función para comprobar el
funcionamiento de todos los aspersores del
sistema.
1. Para probar todas las estaciones del
controlador, gire la perilla de programación
a la posición TEST STATIONS (prueba de
estaciones).
Página 76
2. En la pantalla aparecerá el número “2”,
que indica una prueba de dos minutos por
estación. Ajuste el tiempo de prueba por
estación utilizando los botones (+) o (-)
(desde un minuto hasta 10 minutos).
3. Oprima el botón Enter para iniciar la
prueba de todas las estaciones.
4. Después gire la perilla de programación
NOTA: Si sólo quiere probar una o
varias estaciones, siendo estas
menores al máximo de estaciones,
siga el procedimiento descrito en
“Operación manual de estaciones”,
en la página 74.
Guía de Instalación, operación y programación ISM
Page 77

de nuevo a la posición SYSTEM ON.
Durante la prueba, en la pantalla se
presentará el número de la estación en
funcionamiento y el tiempo de riego restante
de la estación. Las estaciones sin tiempo de
riego asignado en los programas
automáticos (A, B o C) serán omitidas
durante la prueba de todas las estaciones.
NOTA: En cualquier momento de la
prueba de las estaciones puede
oprimir el botón Enter para avanzar a
la siguiente estación.
Al concluir la prueba de todas las
estaciones, el controlador regresará
a la modalidad automática y
esperará a la siguiente hora de inicio
de programa.
Guía de Instalación, operación y programación ISM
Página 77
Page 78

Instalación del controlador
para aspersores
Aunque en este manual se presentan las
instrucciones de conexión del cableado al
controlador, los códigos eléctricos de su
localidad pueden especificar otros requisitos
para una instalación correcta y segura.
NOTAS: Este controlador deberá
instalarse de conformidad con todos
los códigos eléctricos de su
localidad.
Seleccionar un lugar apropiado
Seleccione un lugar donde tenga acceso fácil
al controlador. Le recomendamos montar el
controlador a la altura de los ojos en un
cuarto de servicio (por ejemplo, un garaje, un
cuarto de lavado, etc.).
1. El punto de montaje deberá estar a
menos de 1,5 m (5 pies) de una toma
eléctrica de pared.
Página 78
El controlador ISM únicamente deberá
instalarse bajo techo.
Si debe instalar en el exterior, use un
gabinete contra el agua tal como el
TC2 de Rain Bird. El TC2 es de
plástico durable, resistente a
inclemencias del tiempo que permite
convertir cualquier controlador para
uso interior a uso exterior.
NOTA: Para minimizar la interferencia
eléctrica, seleccione un lugar que
esté a una distancia mínima de 4,6
m (15 pies) del equipo de alto
consumo de energía, como serían
acondicionadores de aire, refrigeradores o bombas para piscina.
2. Al seleccionar el lugar de montaje del
controlador, busque una superficie plana,
Guía de Instalación, operación y programación ISM
Page 79

estable y vertical. Cerciórese de que
quede espacio libre suficiente para el
conducto eléctrico y las conexiones en la
parte inferior del gabinete del controlador.
Montaje del controlador
para aspersores
1. Sostenga la plantilla provista contra la
pared, en el punto de montaje
seleccionado. Utilice un lápiz para marcar
la posición de los tres orificios de los
sujetadores de montaje, tal como se
indica en la plantilla.
2. Con un clavo, haga un pequeño agujero
guía en las marcas a lápiz que hizo para
los sujetadores de montaje. Después
introduzca los dos sujetadores superiores
provistos en la pared.
3. Cuelgue el controlador de los dos
sujetadores de montaje, utilizando las
ranuras en forma de bocallave de la parte
posterior del controlador. Cerciórese de
que los postes de los sujetadores entren
en la parte estrecha de las ranuras en
forma de bocallave.
Guía de Instalación, operación y programación ISM
4. Quite la tapa de acceso inferior e
introduzca el tercer sujetador de montaje
a través del agujero del panel de acceso
inferior del controlador.
Página 79
Page 80

Conexión de los cables de energía principal
El controlador para aspersores ISM tiene un
transformador externo que reduce la
alimentación eléctrica normal a 24 VCA para
operar las válvulas remotas conectadas al
controlador.
CUIDADO: Para evitar descargas
eléctricas, NO conecte el
transformador a la toma de la pared
sin antes haberlo conectado al
controlador.
Para conectar el cable del transformador a la
tira de terminales del gabinete del
controlador, siga los siguientes pasos:
1. Asegúrese de que el transformador NO
esté conectado a la toma de la pared.
2. Coloque el conector a presión del cable
del transformador en el punto de conexión
“24VAC” de la tira de terminales del
controlador.
3. Conecte el transformador a una toma de
pared estándar de tres vías, puesta a
tierra.
Página 80
Guía de Instalación, operación y programación ISM
Page 81

Conexión de los cables de campo a las válvulas de
control remoto
Los cables que van de las válvulas eléctricas
en el campo al controlador pueden
introducirse en el controlador a través del
agujero en la parte inferior del gabinete.
En la figura A de la siguiente página se
muestran las trayectorias de cables y las
conexiones entre el controlador y otros
dispositivos. Cada válvula deberá tener su
propio cable de energía. Utilice únicamente
cable clasificado para aplicaciones
subterráneas de bajo voltaje.
1. Conecte un extremo del cable de energía
a una terminal de estación numerado de la
tira de terminales del controlador.
2. Conecte el otro extremo del cable de
energía a uno de los cables de conexión
del solenoide de la válvula. Los
conectores de cable de las válvulas
deberán ser a prueba de agua. Conecte el
cable común de las válvulas al terminal
“COM” de la tira de terminal. Dirija el cable
Guía de Instalación, operación y programación ISM
común hasta la válvula más lejana y
conéctelo al cable de conexión libre del
solenoide de cada válvula.
3. Si su sistema incluye una válvula maestra
en la línea de suministro principal o un
relevador de arranque de bomba de 24 V
(para activar una bomba durante el riego),
conecte un cable del dispositivo al
terminal “MV” de la tira de terminales del
controlador. (El controlador no suministra
la energía principal de la bomba.) Conecte
el otro cable de conexión del dispositivo al
cable común de las válvulas.
4. Con esto concluyen los procedimientos
de montaje y cableado del controlador
para aspersores ISM. Vuelva a colocar la
tapa de acceso inferior del controlador y
estará listo para iniciar la programación.
Consulte la sección “Programación del
controlador para aspersores” en la página
58.
Página 81
Page 82

Fig. A
Página 82
Guía de Instalación, operación y programación ISM
Page 83

Identificación y resolución de problemas
SÍNTOMA CAUSA PROBABLE CORRECCIÓN
La pantalla LCD está en
blanco.
La pantalla está total o
parcialmente en blanco.
1. No hay alimentación
eléctrica al controlador.
2. El controlador está en la
modalidad de ahorro de
energía durante la
alimentación por batería.
3. Una sobrecarga
eléctrica o un rayo pudo
afectar los circuitos
electrónicos del
controlador.
Vuelva a establecer la alimentación eléctrica del
controlador. Si la hora actual no aparece en la pantalla
o sus programas ya no están en memoria, vuelva a
programar el controlador.
Oprima cualquier botón para activar el controlador.
Apague el controlador y desconecte la batería de 9 V.
Espere dos o tres minutos. Conecte la batería y
restablezca la alimentación eléctrica. Restablezca la
hora y la fecha tal como se describe en la página 59.
Si la sobrecarga eléctrica no provocó daños
permanentes en el controlador, éste aceptará las
instrucciones de programación y funcionará
normalmente. Si el controlador no funciona de manera
correcta, llame al Departamento de Asistencia
Técnica de Rain Bird, al 1-800-RAINBIRD.
Guía de Instalación, operación y programación ISM
Página 83
Page 84

SÍNTOMA CAUSA PROBABLE CORRECCIÓN
La pantalla indica que
una estación está
funcionando, pero no
hay riego.
La estación no riega
como se programó.
4. La válvula puede tener
un diafragma defectuoso,
un orificio piloto obstruido
u otra avería.
5. La perilla de
programación está en la
Revise y repare la válvula.
Mueva la perilla de programación a la posición
SYSTEM ON.
posición SYSTEM OFF
(sistema apagado).
6. No se especificó
correctamente la hora de
inicio del programa.
Gire la perilla de programación a la posición SET
WATERING START TIME(S) (hora de inicio) y
compruebe las horas de inicio especificadas para el
programa. Si la hora de inicio falta o es incorrecta,
especifíquela tal como se describe en la página 67.
7. El día actual no está
especificado como día de
riego del programa.
Si el día actual es un día de riego del programa, la
letra del programa aparecerá en la pantalla. Gire la
perilla a la posición SELECT DAYS TO WATER (día de
riego) y revise los días de riego del programa. De ser
necesario, especifique los días de riego en la forma
descrita en la página 65.
8. El suministro de agua
puede estar apagado.
Compruebe que la línea de suministro de agua tenga
presión.
Página 84
Guía de Instalación, operación y programación ISM
Page 85

SÍNTOMA CAUSA PROBABLE CORRECCIÓN
Una estación no
comienza a regar en la
forma programada.
9. No se especificó tiempo
de riego para la estación.
Gire la perilla de programación a la posición SET
STATION DURATION (tiempo de riego de estación) para revisar los tiempos de riego asignados a la estación.
Consulte la página 69 para añadir un tiempo de riego.
10. Un cortocircuito en el
Identifique y repare el problema en el circuito eléctrico.
solenoide o el cableado de
la válvula ha desactivado
la estación.
11. No se especificó una
hora de inicio para el
programa al cual está
asignada la estación.
Gire la perilla a la posición SET WATERING START
TIME (hora de inicio) y revise las horas de inicio
especificadas para el programa. Si falta la hora de
inicio de la estación, especifíquela tal como se
describe en la página 67.
El riego inicia cuando no
debería.
12. Se seleccionó uno de
los calendarios de riego
Borre todos los tiempos de inicio de riego del
programa no deseado. Consulte la página 68.
predeterminados.
13. Se especificó una hora
de inicio incorrecta para el
programa.
Guía de Instalación, operación y programación ISM
Gire la perilla a la posición SET WATERING START
TIME (hora de inicio) y revise si alguno de los
programas tiene una hora de inicio incorrecta.
Consulte las instrucciones que se presentan a partir de
la página 67 para especificar y eliminar las horas de
inicio.
Página 85
Page 86

SÍNTOMA CAUSA PROBABLE CORRECCIÓN
El riego no se detiene
en la forma
programada.
14. Los programas tal vez
se hayan empalmado
accidentalmente.
Revise si la hora de inicio de otro programa empezó
durante el ciclo de operación del programa anterior. El
programa empalmado iniciaría inmediatamente
después de que concluyera el programa anterior.
Cambie la programación si es necesario.
15. Una válvula está
atorada en la posición
abierta.
Gire la perilla de programación a la posición SYSTEM
OFF (sistema apagado) y espere unos 10 a 20
segundos. Si el riego no se detiene, cierre el
suministro de agua manualmente y repare la válvula.
La pantalla muestra
“Err”.
La pantalla muestra
“Err” por unos cuantos
segundos y después
muestra la estación
operando por unos
cuantos segundos.
16. El interruptor
automático detectó un
problema eléctrico.
El mensaje "Err" en la pantalla indica que hay un
cortocircuito o una sobrecarga eléctrica en la estación
indicada. Por ejemplo, "Err2" significa que el problema
está en el circuito de la estación 2. El corto circuito por
lo general se localiza en el solenoide de la válvula
eléctrica, pero también puede ocurrir en los conectores
de los cables de la válvula. En algunos casos, los ca-
bles de campo desforrados provocan el corto circuito.
Otra posibilidad es que un relevador de arranque de
bomba de alto nivel de consumo de corriente provoque
una sobrecarga momentánea que sea detectada por el
controlador. Localice y corrija la cause del corto
circuito. Presione Enter con la perilla en la posición
"SYSTEM ON" cuando "Err" aparezca.
Página 86
Guía de Instalación, operación y programación ISM
Page 87

Este controlador para aspersores genera energía de
radiofrecuencia y puede causar interferencia en las
recepciones de radio y televisión. El controlador ha
sido sometido a pruebas de tipo y cumple con los
límites para dispositivos de computación Clase B
establecidos por las especificaciones de la Subparte J
de la Parte 15 de las reglas de la FCC, las cuales han
sido diseñadas para proporcionar protección
razonable contra este tipo de interferencia en
instalaciones residenciales. Sin embargo, no se
garantiza que no existirá dicha interferencia en una
instalación específica.
Si el equipo causa interferencia en las recepciones de
radio o televisión, la cual puede determinarse
apagando y encendiendo el equipo, el usuario puede
intentar corregir el problema con una o más de las
medidas siguientes:
1. Reorientar la antena receptora.
2. Alejar el controlador del receptor.
3. Conectar el controlador a una toma de corriente
distinta para que el controlador y el receptor estén
en circuitos de ramificación diferentes.
De ser necesario, el usuario deberá consultar al
proveedor o a un técnico de radio y televisión
experimentado para obtener sugerencias adicionales.
El folleto siguiente, preparado por la Comisión Federal
de Comunicaciones, también puede ser útil:
“How to Identify and Resolve Radio-TV Interference
Problems” (Cómo identificar y resolver problemas de
interferencia en radio y televisión)
El folleto está disponible de la U.S. Government
Printing Office, Washington, D.C. 20402, no. de
inventario 004000003454.
6991 E. Southpoint Road, Bldg #1 Tucson, Arizona 85706, U.S.A.
Servicios Técnicos: 1800 RAINBIRD • http://www.rainbird.com
Rain Bird Corporation Consumer Products
P/N: 636469 REV. A
Page 88

This sprinkler timer generates radio frequency energy
and may cause interference to radio and television
reception. It has been type tested and found to comply
with the limits for a Class B computing device in
accordance with the specifications in Subpart J of Part
15 of FCC Rules, which are designed to provide
reasonable protection against such interference in a
residential installation. However, there is no guarantee
that interference will not occur in a particular
installation.
If this equipment does cause interference to radio or
television reception, which can be determined by
turning the equipment off and on, the user is
encouraged to try to correct the interference by one or
more of the following measures:
1. Reorient the receiving antenna.
2. Move the timer away from the receiver.
3. Plug the timer into a different outlet so that the
timer and receiver are on different branch circuits.
If necessary, the user should consult the dealer or an
experienced radio / television technician for additional
suggestions. The user may find the following booklet
prepared by the Federal Communications Commission
helpful:
“How to Identify and Resolve Radio-TV Interference
Problems.”
This booklet is available from the U.S. Government
Printing Office, Washington, D.C. 20402, Stock No.
004000003454.
6991 E. Southpoint Road, Bldg #1 Tucson, Arizona 85706, U.S.A.
Expert Advice: 1800 RAINBIRD • http://www.rainbird.com
Rain Bird Corporation Consumer Products
P/N: 636469 REV. A
 Loading...