

Page 1

Operations Guide
ESP-MC, ESP-SAT, ESP-SITE-Satellite and Maxicom2Interface Board (MIB) Kit
P/N 634593 REV F
Page 2
Safety Information
ii
Warning!
Important safety information and warning messages appear throughout this manual. To ensure correct operation
and to avoid additional expense, read this manual thoroughly before you begin installation.
“WARNING: A CIRCUIT BREAKER OR CUTOFF
SWITCH IS TO BE PROVIDED IN THE FIXED WIRING
TO ISOLATE THE CONTROLLER”
“MEMORY IS RETAINED BY A BATTERY WHICH IS
TO BE DISPOSED OF IN ACCORDANCE WITH
LOCAL REGULATIONS”
Caution icons
The lightening flash with arrowhead
symbol, within an equilateral triangle, is
intended to alert the user to the
presence of uninsulated “dangerous
voltage” within the product’s enclosure
that may be of sufficient magnitude to
constitute a risk of electric shock to
persons.
The exclamation point within an
equilateral triangle is intended to alert
the user to the presence of important
operating and maintenance (servicing)
instructions in the literature
accompanying the product.
“ATTENTION: UN DISJONCTEUR OU UN
IMTERRUPTEUR DOIT ETRE INSTALLE SUR LE
PRIMAIRE POUR ISOLER LE PROGRAMMATEUR”
“LA MEMOIRE EST MAINTENUE GRACE A UNE
BATTERIE RECHARGEABLE A DISPOSER SELON LA
REGLEMENTATION LOCALE”
L’éclair avec is symbole de la flèche,
placé dans les limites d’un triangle
équilatéral est prévu pour avertir
l’utilisateur de la présence de “tension
dangereuse” non isolée dans l’enceinte
du produit qui pourrait ëtre d’une
importance suffisante pour présenter un
risque d’électrocution aux personnes.
Le point d’exclamation dans un triangle
équilatéral est prévu pour avertir
l’utilisateur de la présence d’instructions
importantes pour les opérations et
l’entretien (service) dans les manuels
fournis avec l’appareil.
Page 3

Contents
iii
Introduction . . . . . . . . . . . . . . . . . . . . . . . . . . . . . . . . . . . . . . . . . . . . . . . . . . . . . .1
Welcome to Rain Bird . . . . . . . . . . . . . . . . . . . . . . . . . . . . . . . . . . . . . . . . . . . . . . . . . . . . . . . . . . . . .1
The ESP-MC Controller . . . . . . . . . . . . . . . . . . . . . . . . . . . . . . . . . . . . . . . . . . . . . . . . . . . . . . . .1
The ESP-SAT Controller . . . . . . . . . . . . . . . . . . . . . . . . . . . . . . . . . . . . . . . . . . . . . . . . . . . . . . . .1
The Maxicom
2
Interface Board (MIB) . . . . . . . . . . . . . . . . . . . . . . . . . . . . . . . . . . . . . . . . . . . .1
The ESP-SITE-Satellite Controller . . . . . . . . . . . . . . . . . . . . . . . . . . . . . . . . . . . . . . . . . . . . . . .1
Special Features . . . . . . . . . . . . . . . . . . . . . . . . . . . . . . . . . . . . . . . . . . . . . . . . . . . . . . . . . . . . . . . . . .2
*For installation instructions see poster included in controller box
Looking at the Controller’s Faceplate . . . . . . . . . . . . . . . . . . . . . . . . . . . . . . . . .3
Rain Bird RASTER
TM
(Rapid Station Test Routine) . . . . . . . . . . . . . . . . . . . . . . .7
Introduction . . . . . . . . . . . . . . . . . . . . . . . . . . . . . . . . . . . . . . . . . . . . . . . . . . . . . . . . . . . . . . . . . . . . . .7
RASTER
TM
Operation . . . . . . . . . . . . . . . . . . . . . . . . . . . . . . . . . . . . . . . . . . . . . . . . . . . . . . . . . . . . . .8
Beginning the RASTER
TM
. . . . . . . . . . . . . . . . . . . . . . . . . . . . . . . . . . . . . . . . . . . . . . . . . . . . . . .8
Station Valve Testing . . . . . . . . . . . . . . . . . . . . . . . . . . . . . . . . . . . . . . . . . . . . . . . . . . . . . . . . . .10
Troubleshooting Open and Shorted Valve Circuits . . . . . . . . . . . . . . . . . . . . . . . . . . . . . . . . . . .11
Open Circuits . . . . . . . . . . . . . . . . . . . . . . . . . . . . . . . . . . . . . . . . . . . . . . . . . . . . . . . . . . . . . . . .11
Short Circuits . . . . . . . . . . . . . . . . . . . . . . . . . . . . . . . . . . . . . . . . . . . . . . . . . . . . . . . . . . . . . . . .12
Troubleshooting Opens and Shorts . . . . . . . . . . . . . . . . . . . . . . . . . . . . . . . . . . . . . . . . . . . . .12
Programming the Controller . . . . . . . . . . . . . . . . . . . . . . . . . . . . . . . . . . . . . . .13
Preparing to Program the Controller . . . . . . . . . . . . . . . . . . . . . . . . . . . . . . . . . . . . . . . . . . . . . . .13
Setting the Time and Date . . . . . . . . . . . . . . . . . . . . . . . . . . . . . . . . . . . . . . . . . . . . . . . . . . . . .14
Setting up a Program . . . . . . . . . . . . . . . . . . . . . . . . . . . . . . . . . . . . . . . . . . . . . . . . . . . . . . . . . . . . .15
Step 1: Selecting a Program . . . . . . . . . . . . . . . . . . . . . . . . . . . . . . . . . . . . . . . . . . . . . . . . . . . .15
Step 2: Selecting the Cycle . . . . . . . . . . . . . . . . . . . . . . . . . . . . . . . . . . . . . . . . . . . . . . . . . . . . .15
Step 3: Setting the Length of a Station’s Watering Time . . . . . . . . . . . . . . . . . . . . . . . . . . . .17
Step 4: Setting Watering Start Times . . . . . . . . . . . . . . . . . . . . . . . . . . . . . . . . . . . . . . . . . . . .17
Step 5: Setting Programs to Stack or Overlap . . . . . . . . . . . . . . . . . . . . . . . . . . . . . . . . . . . .18
Step 6: Setting the MV/PUMP Start . . . . . . . . . . . . . . . . . . . . . . . . . . . . . . . . . . . . . . . . . . . . .18
Setting Rain Delay . . . . . . . . . . . . . . . . . . . . . . . . . . . . . . . . . . . . . . . . . . . . . . . . . . . . . . . . . . . . . . .19
Setting Cycle + Soak
TM
. . . . . . . . . . . . . . . . . . . . . . . . . . . . . . . . . . . . . . . . . . . . . . . . . . . . . . . . . . . .19
Setting the Water Budget . . . . . . . . . . . . . . . . . . . . . . . . . . . . . . . . . . . . . . . . . . . . . . . . . . . . . . . . . .20
Setting Event Day Off . . . . . . . . . . . . . . . . . . . . . . . . . . . . . . . . . . . . . . . . . . . . . . . . . . . . . . . . . . . .21
Page 4

Contents, continued
iv
Setting a Delay between Stations . . . . . . . . . . . . . . . . . . . . . . . . . . . . . . . . . . . . . . . . . . . . . . . . . .21
Clearing All Programs . . . . . . . . . . . . . . . . . . . . . . . . . . . . . . . . . . . . . . . . . . . . . . . . . . . . . . . . . . . .22
Operating the Controller . . . . . . . . . . . . . . . . . . . . . . . . . . . . . . . . . . . . . . . . . . .23
Operating Automatically . . . . . . . . . . . . . . . . . . . . . . . . . . . . . . . . . . . . . . . . . . . . . . . . . . . . . . . . . .24
Operating Manually . . . . . . . . . . . . . . . . . . . . . . . . . . . . . . . . . . . . . . . . . . . . . . . . . . . . . . . . . . . . . .24
Operating a Program or Programs Manually . . . . . . . . . . . . . . . . . . . . . . . . . . . . . . . . . . . . .24
Operating a Station or Stations Manually . . . . . . . . . . . . . . . . . . . . . . . . . . . . . . . . . . . . . . .25
Using the Test Program . . . . . . . . . . . . . . . . . . . . . . . . . . . . . . . . . . . . . . . . . . . . . . . . . . . . . . .25
Using the Sensor Option . . . . . . . . . . . . . . . . . . . . . . . . . . . . . . . . . . . . . . . . . . . . . . . . . . . . . . . . . .26
Fuse Detection . . . . . . . . . . . . . . . . . . . . . . . . . . . . . . . . . . . . . . . . . . . . . . . . . . . . . . . . . . . . . . . . . .26
Using the Diagnostic Circuit Breaker . . . . . . . . . . . . . . . . . . . . . . . . . . . . . . . . . . . . . . . . . . . . . . .26
Replacing the Battery . . . . . . . . . . . . . . . . . . . . . . . . . . . . . . . . . . . . . . . . . . . . . . . . . . . . . . . . . . . . .26
Troubleshooting . . . . . . . . . . . . . . . . . . . . . . . . . . . . . . . . . . . . . . . . . . . . . . . . .27
General Troubleshooting . . . . . . . . . . . . . . . . . . . . . . . . . . . . . . . . . . . . . . . . . . . . . . . . . . . . . . . . .27
Maxicom
2
-specific Troubleshooting . . . . . . . . . . . . . . . . . . . . . . . . . . . . . . . . . . . . . . . . . . . . . . . .30
Appendix A: Scheduling Chart . . . . . . . . . . . . . . . . . . . . . . . . . . . . . . . . . . . . . .31
ESP-MC and ESP-SAT Controllers . . . . . . . . . . . . . . . . . . . . . . . . . . . . . . . . . . . . . . . . . . . . . . . . . .34
Appendix B: Maxicom2Central Control System Overview . . . . . . . . . . . . . . .34
ESP-SITE-Satellite Controller . . . . . . . . . . . . . . . . . . . . . . . . . . . . . . . . . . . . . . . . . . . . . . . . . . . . . .36
Appendix C: Setting the Channel Number . . . . . . . . . . . . . . . . . . . . . . . . . . . .38
Appendix D: ESP-MC Controller Spare Parts List . . . . . . . . . . . . . . . . . . . . . .39
Glossary . . . . . . . . . . . . . . . . . . . . . . . . . . . . . . . . . . . . . . . . . . . . . . . . . . . . . . . .40
Service Information . . . . . . . . . . . . . . . . . . . . . . . . . . . . . . . . . . . . . . . . . . . . . . .44
Warranty . . . . . . . . . . . . . . . . . . . . . . . . . . . . . . . . . . . . . . . . . . .
inside back cover
Page 5

Introduction
1
Welcome to Rain Bird
Thank you for purchasing your new, state-of-the-art Rain Bird controller. For more than six decades, Rain Bird has
led the irrigation industry in meeting all of your water management needs by providing the highest quality
products and services available. Your new Rain Bird controller is designed to give you a lifetime of on-site watering
control.
The ESP-MC Controller
The ESP-MC series controller is a stand-alone controller appropriate for residential or commercial use. Thin easy-touse built-in computers offer four programs for up to 40 watering stations. It can also be upgraded to function as a
satellite controller that is part of the Maxicom2irrigation system. For more information about using your
controller with the Maxicom2system, see Appendix B, on page 34.
The ESP-SAT Controller
The ESP-SAT series controller is ready to be used in conjunction with the Maxicom2irrigation system or as a
stand-alone unit. It is appropriate for residential or commercial use and its easy-to-use, built-in computer offers
four programs for up to 40 watering stations.
The Maxicom2Interface Board (MIB)
The Maxicom2Interface Board (MIB) kit for the ESP-MC controller converts the stand-alone ESP-MC to an ESP-SAT
controller that can be linked to the Maxicom2system.
The ESP-SITE-Satellite Controller
The ESP-SITE-Satellite controller is ready to be used in conjunction with the Maxicom2irrigation system. It is
appropriate for residential or commercial use and its easy-to-use, built-in computer offers four programs for up to
40 watering stations. For information specific to the ESP-SITE-Satellite controller, see Appendix B, page 36 and the
ESP-SITE-Satellite Installation Guide that came with your controller.
The ESP-SITE-Satellite Upgrade Kit for ESP-MC or ESP-SAT controllers converts these controllers to ESP-SITE-Satellite
controllers.
Page 6

Introduction, continued
2
Special Features
The ESP-MC, ESP-SAT and ESP-SITE-Satellite controllers are available as metal wall-mount (WM)
or stainless steel pedestal-mount (SS) models, with 8-, 12-, 16-, 24-, 28, 32, 36- or 40-station capability.
All configurations have the following special features:
• Anti-rust, corrosion-resistant design
• Four independent programs
• Cycle + Soak
TM
feature for water conservation and erosion control
• Programs and time are retained, even during power outages
• Diagnostic circuit breaker that identifies a station with a short circuit
• Convenient Test Program
• Rain Delay from 1 to 99 days
• 365-day calendar with various scheduling options for watering cycles
• Option to set any day of the month as a non-watering day
• Cycle and fault indicator lights
• Easy-to-read liquid crystal display
• Optional sensors that suspend watering when the soil is wet
• Universal remote-ready connections
• True independent day cycles by program
• Programmable program overlap
• Station timing from one minute to 12 hours
Note: For installation instructions see poster included in controller box.
Page 7

Looking at the Controller’s Faceplate
3
Before beginning to program or operate your controller, take a moment to become familiar with the controller’s
faceplate. The following pages contain a short description of each of the keys and indicators. Specific instructions for
all of the operations you can perform begin on page 7.
Page 8

Looking at the Controller’s Faceplate, continued
4
WATERING SUSPENDED BY SENSOR
This light is on when watering has been suspended by a sensor or the sensor jumper wire has been removed and
the sensor switch is in the ACTIVE position.
SENSOR OFF/ACTIVE
If you want to activate the sensor, set the switch to ACTIVE. If you wish to override the sensor or there is no sensor
connected to the controller, set the switch to OFF. When no sensor is connected, be certain that the jumper cable
connecting the SENSOR terminals on the controller’s circuit board is installed. If you set the SENSOR switch to
ACTIVE without a sensor or jumper cable connected, the controller cannot operate the valves and no watering
will occur.
▲/ON
Press to turn a setting on or to advance the setting in the display.
▼/OFF
Press to turn a setting off or to decrease the setting in the display.
PGM
Press to change the program displayed on the screen. When the PGM key is pressed, the indicator on the left side
of the screen cycles through programs A, B, C and D.
MAN START/ADV.
Press to advance to the next setting in the display or to manually start an operation.
FAULT RESET
Press to clear the fault reading from the display. Press this key after you have fixed the short circuit indicated by
the diagnostic fault indicator in the display.
PUMP/MV STATUS
This light is on when the Master Valve 1 (MV1) circuit is enabled for the active station.
STATION STATUS
This light is on when a valve is active.
LINKED TO Maxicom2(ESP-SAT and ESP-SITE-Satellite versions only)
This light is on when the STAND ALONE/MAXICOM switch is in the MAXICOM position and the controller is
physically linked to the Maxicom2system.
EVEN DAY CYCLE
This light is on when the controller’s active program is set to water on even days of the month.
Page 9

Looking at the Controller’s Faceplate, continued
5
ODD DAY CYCLE
This light is on when the controller’s active program is set to water on odd days of the month.
CYCLICAL DAY CYCLE
This light is on when the controller’s active program is set to water in a cycle with a specified number of days.
CUSTOM DAY CYCLE
This light is on when the controller’s active program is set to water on specific days of the week.
AUTO
Set the dial here to have the controller automatically run the programs you set.
STATION WATERING TIME
Set the dial here to set the length of an individual station’s watering time.
WATERING START TIME
Set the dial here to set a program’s watering start times. Eight start times are available for each program.
MV PUMP START
Set the dial here to enable or disable Master Valve 1 (MV1) for a particular station.
PROGRAM OVERLAP
Set the dial here to set programs to either stack or overlap. The default for all programs is stack.
TIME/CALENDAR
Set the dial here to set the time and date.
EVENT DAY OFF
Set the dial here to set optional day(s) off within the month.
RAIN DELAY
Set the dial here to delay watering for a specified number of days.
MON — SUN
Set the dial to the day of the week to turn that day off or on when setting a custom program cycle.
CUSTOM
Set the dial here to set a program cycle to water on specific days of the week.
CYCLICAL
Set the dial here to set a program cycle to water at specific intervals, such as every day, every second day, every
third day, etc.
Page 10

Looking at the Controller’s Faceplate, continued
6
ODD DAYS
Set the dial here to set a program cycle that waters on odd days of the month.
EVEN DAYS
Set the dial here to set a program cycle that waters on even days of the month.
WATER BUDGET
Set the dial here to set the water budget percentage for a program. The default is 100%.
CYCLE + SOAK
TM
Set the dial here to break a station’s watering time into intervals to conserve water and prevent erosion.
TEST PROGRAM/STATION DELAY
Set the dial here to set and start a test program cycle for all stations. Also, access the Station Delay feature by
placing the dial in this position and holding down the ▲/ON and ▼/OFF keys simultaneously.
MANUAL WATERING
Set the dial here to water a station manually.
OFF/PROGRAM RESET
Set the dial here to shut the controller and its valves down, such as during the winter months. Also reset all
programs by placing the dial in this position and holding down the ▲/ON and MAN START/ADV keys for 10
seconds.
STAND ALONE/MAXICOM (located on the back of the front panel)
If you want your controller to function as a stand-alone unit, set this switch to STAND ALONE. If you want it to function
as a satellite connected to the Maxicom2system, set this switch to MAXICOM (ESP-SAT and ESP-SITE-Satellite versions
only). If the controller is not connected to Maxicom2, the position of this switch will have no effect on watering.
Page 11

Rain Bird RASTERTM(Rapid Station Test Routine)
7
Introduction
Rain Bird’s new RApid Station TEst Routine (RASTERTM) lets you diagnose field wiring and solenoid problems
quickly and easily.
The RASTERTMsends an electronic signal to each valve on the controller and then displays the valve’s current
operating condition in the easy-to-read digital display.
The RASTERTMtests and displays two different valve operating conditions:
• Open — Indicates an open circuit between the controller and the valve.
• Short — Indicates a short circuit between the controller and the valve.
The RASTER
TM
is a fast and easy way to make sure the controller’s master valves and all station valves are operating
properly.
The new RASTERTMfeature is available on the Rain Bird ESP-MC, ESP-SAT, ESP-SITE-SAT and ESP-LX+ controllers.
Page 12
Rain Bird RASTERTM(Rapid Station Test Routine), continued
8
RASTERTMOperation
Use the following procedure to perform the
RASTERTMon the master valves and all other
controller station valves.
Beginning the RASTER
TM
1. Turn the Programming Dial to “OFF.”
2. Press and release the
▲/ON and ▼/OFF
at the same time.
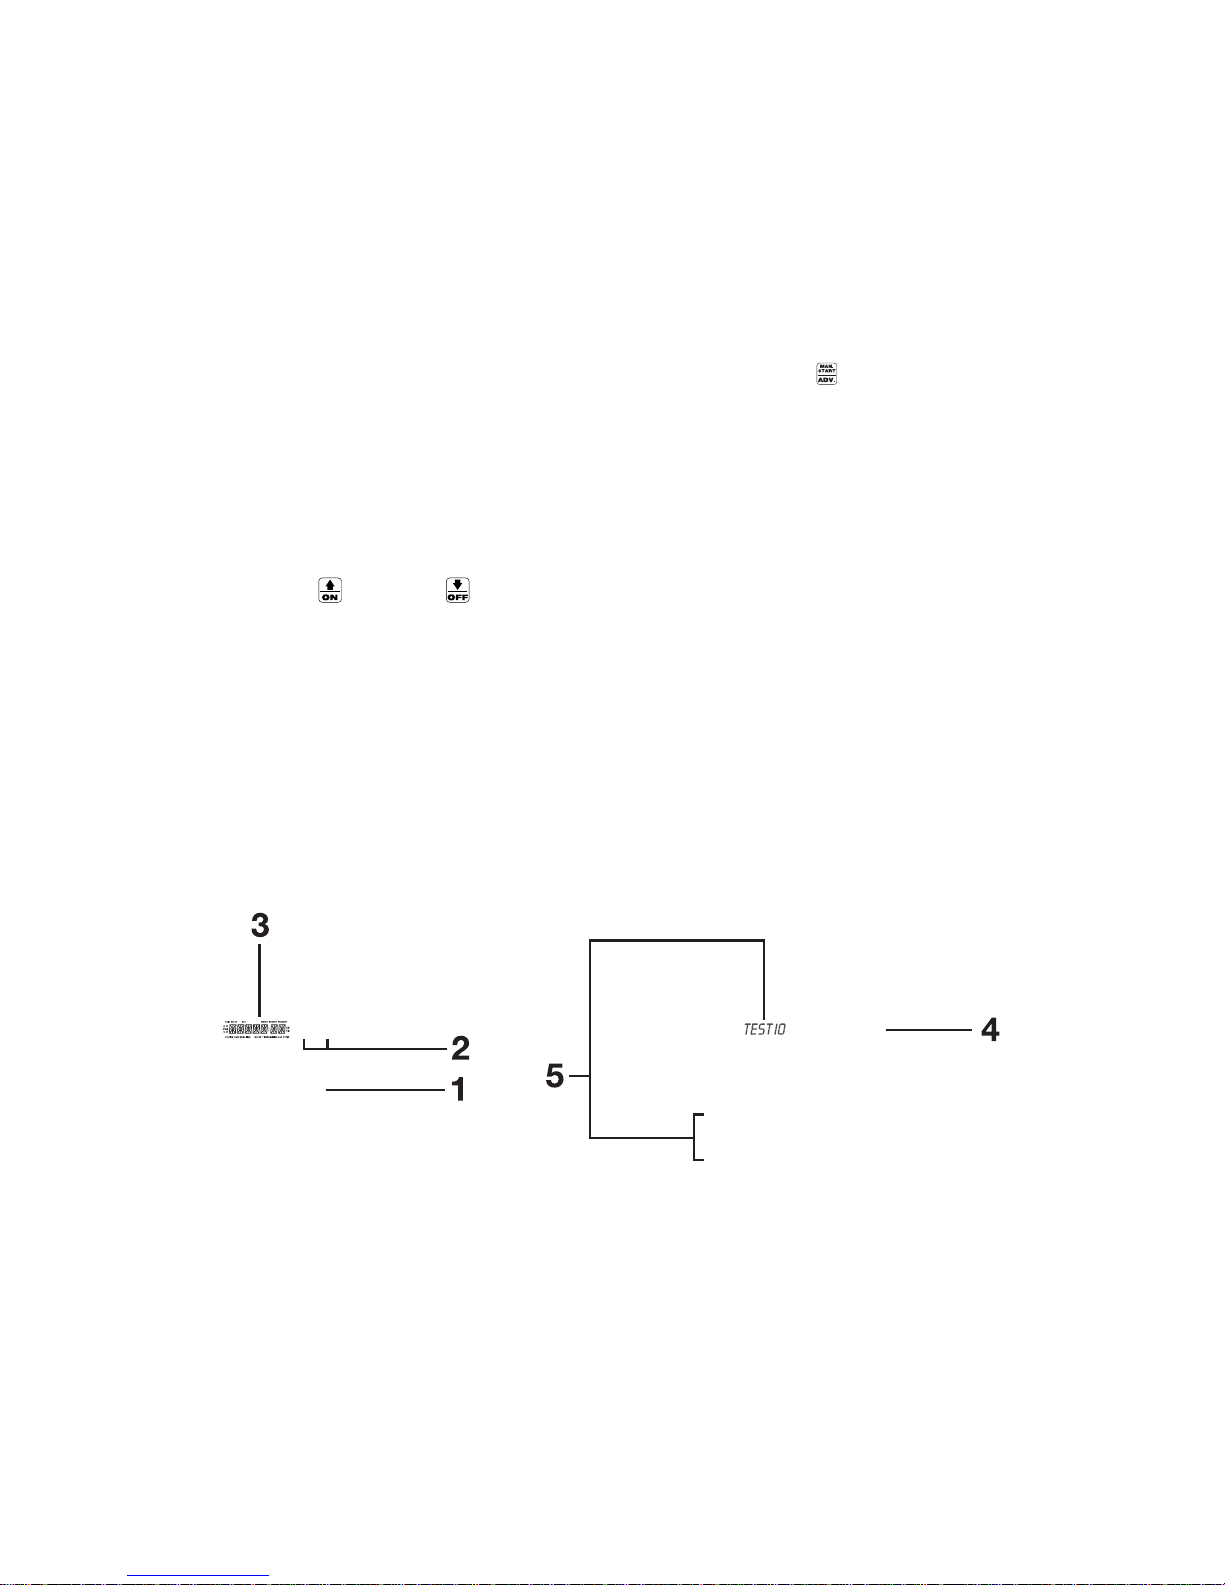
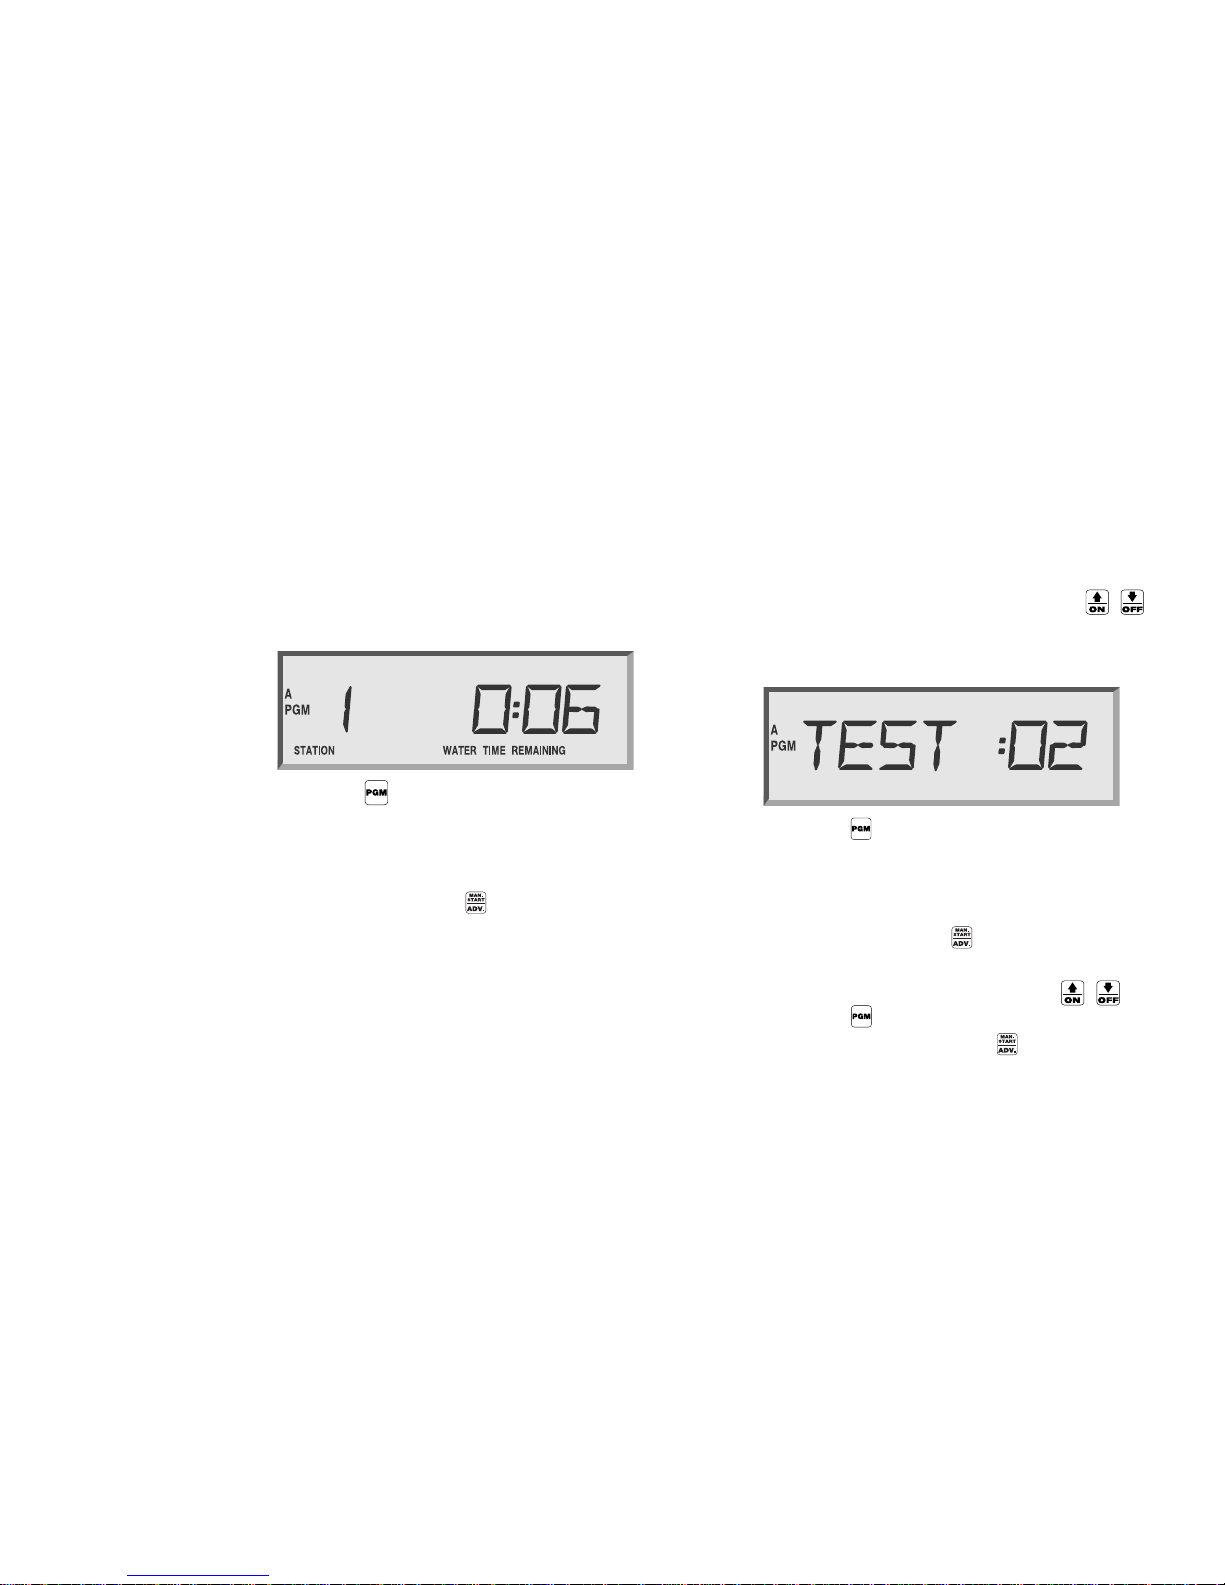
3. The display will look like the illustration below.
4. Press the “MAN START/ADV” to begin the
RASTER
TM
.
5. The display shows “TEST IO” and the indicator
lights on the front panel flash once as the
RASTER
TM
confirms the proper operation of the
controller’s front panel lights.
NOTE: If the front panel is not connected to the
output board or the controller is disconnected
from the main power the display will show the
message “
NO OUT.”
The RASTERTMthen automatically begins the test
on the controller’s master valves and each station
valve, beginning with the master valve 1.
Page 13
Rain Bird RASTERTM(Rapid Station Test Routine), continued
9
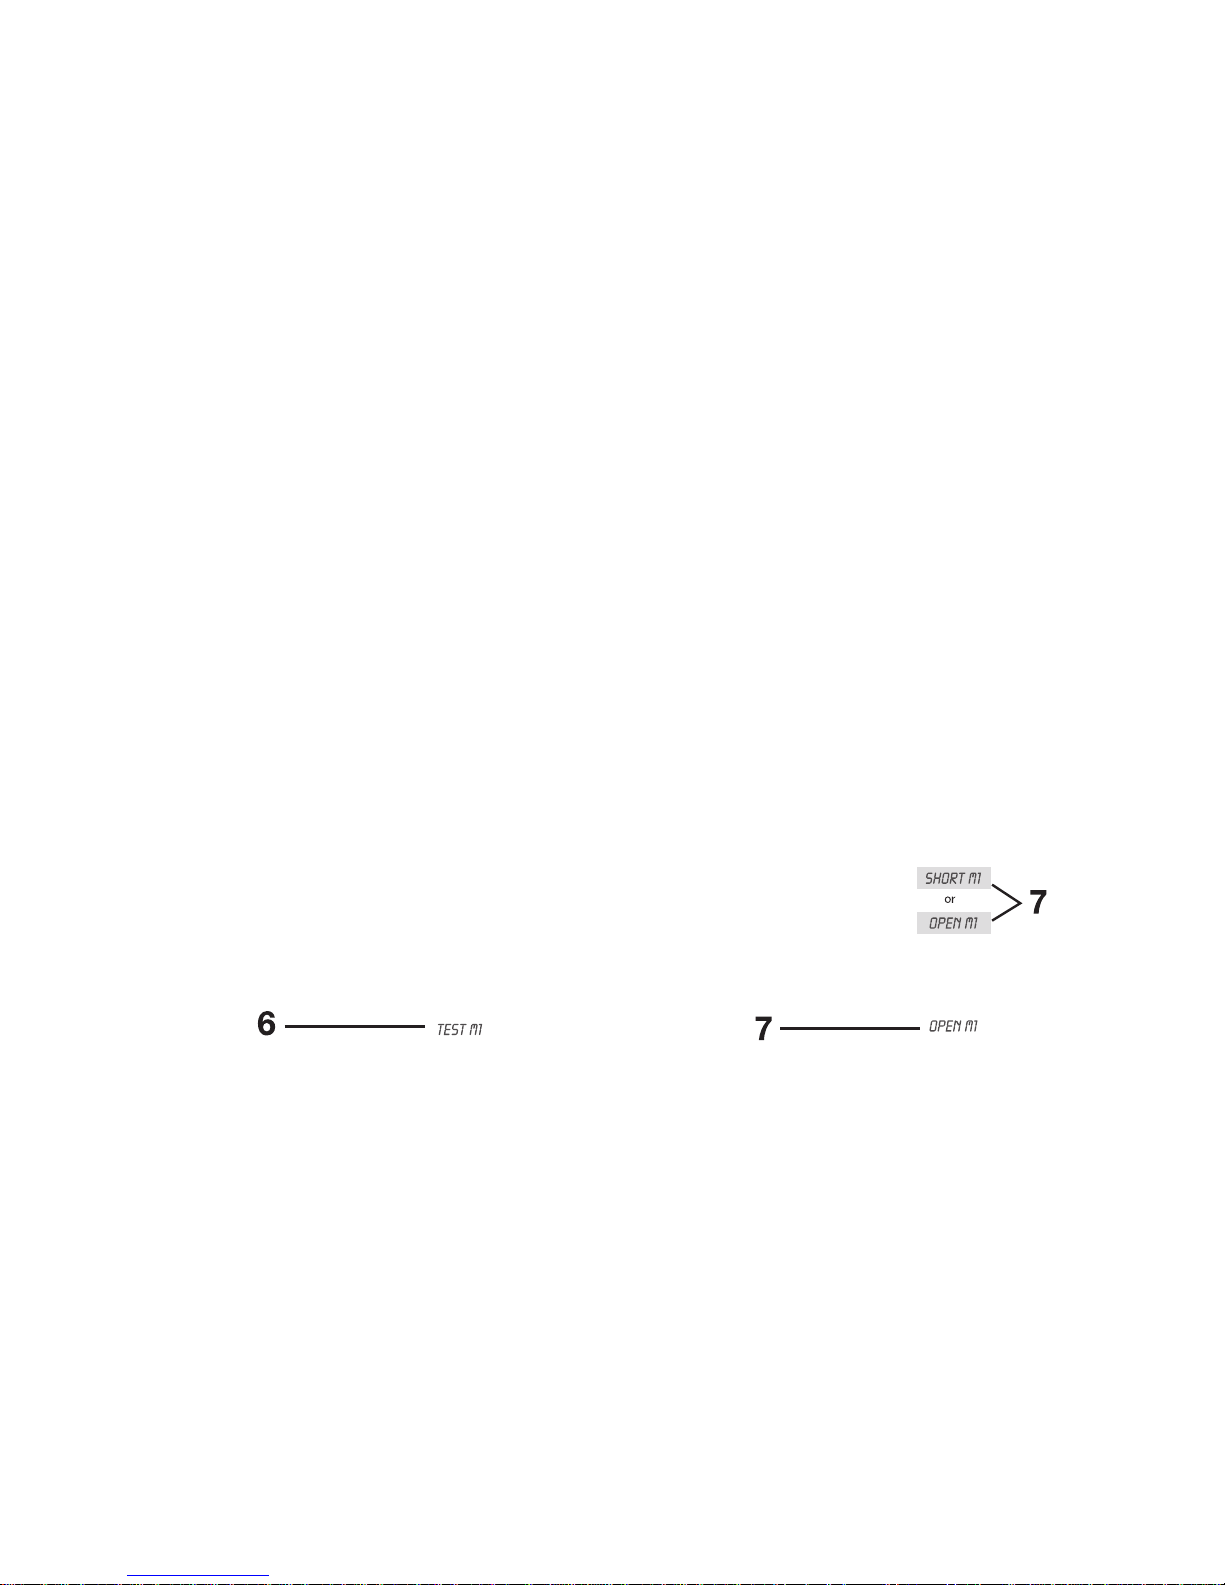
6. The display shows “TEST M1” and “TEST M2” as
the RASTERTMbegins to check the operation of the
master valves (an automatic valve installed on the
mainline pipe upstream from the station valves).
7. If the display shows “SHORT M1” or “OPEN M1”
or “SHORT M2” or “OPEN M2” there may be a
faulty circuit between the controller and the
master valve. (On irrigation systems not equipped
with a master valve, the “OPEN M1” or “OPEN
M2” indicator is normal and requires no service.)
See “Troubleshooting Open and Shorted Valve
Circuits” on page 11 for more information.
Page 14

Rain Bird RASTERTM(Rapid Station Test Routine), continued
10
Station Valve Testing
After testing the master valves, the RASTER
TM
automatically tests each valve station, in numerical
order, from lowest to highest.
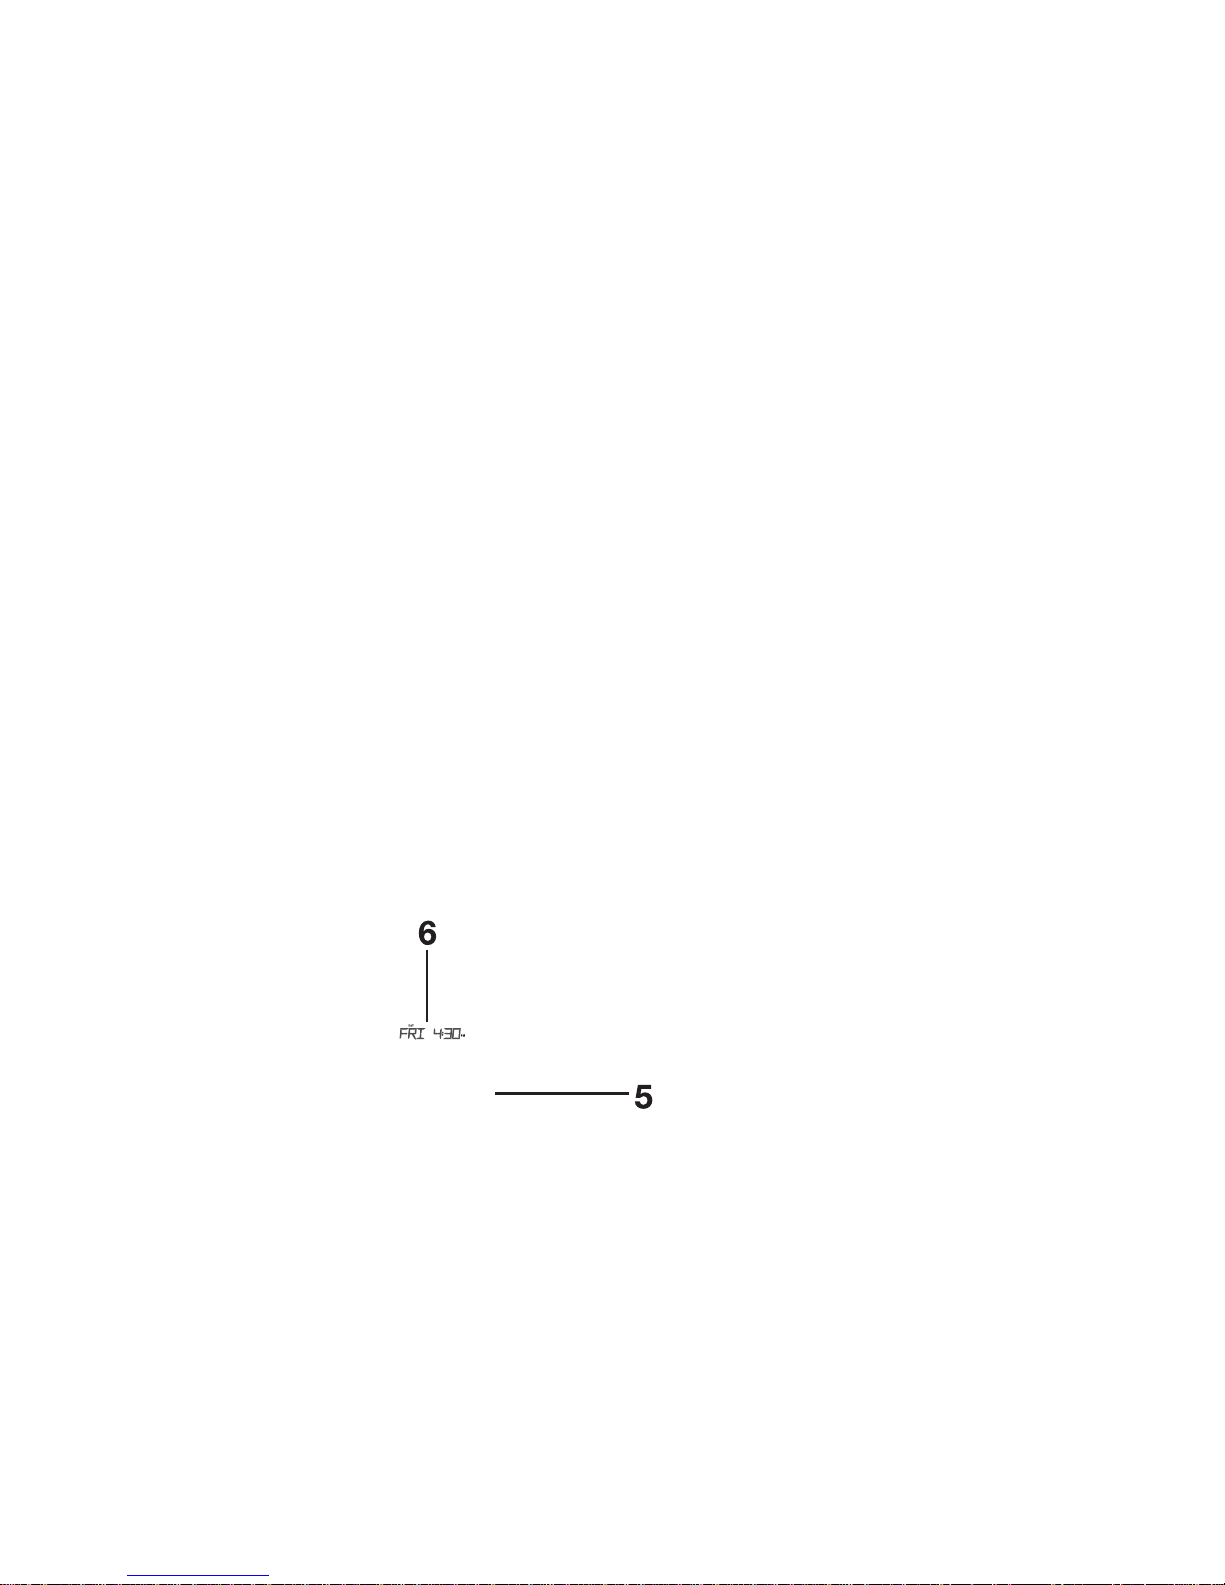
1. The display shows the valve’s operating condition
(OPEN or SHORT), followed by the station
number (up to 40 stations, depending on
controller model). This sample display indicates
there is a short on valve station number 4.
2. The RASTERTMdisplays the condition of each valve
being tested for 10 seconds, and then moves to
the next valve. You can press “MAN/START/ADV”
(or any other magenta button) at any time to
advance to the next station to be tested.
NOTE: Any controller station that does not have a
valve connected to it will display an OPEN signal.
For example, if you have a 12-station controller and
only have stations 1 through 10 connected to valves,
stations 11 and 12 will show “OPEN” on the
RASTER
TM
. This is normal and does not indicate any
problem with the controller or system valves.
3. If the master valves and all station valves pass the
RASTERTM, the display flashes “PASS” for 10
seconds.
4. If the RASTERTMdetected a problem on the master
valves or any station valve, the display flashes
“CHECK” for three seconds and then displays the
valve’s problem condition (OPEN or SHORT) and
station number or master valve.
Each problem valve will flash in the display for
five seconds. Press “MAN START/ADV” at any
time to display the next problem valve detected.
Any valve displaying “OPEN” or “SHORT” should
be checked for field wiring or other circuit
problems. See “Troubleshooting Open and
Shorted Valve Circuits” on page 11 for more
information.
Page 15
Rain Bird RASTERTM(Rapid Station Test Routine), continued
11
5. Turn the Programming Dial from “OFF” to
“AUTO” (or any other dial position) at any time to
exit RASTERTMmode.
6. The controller returns to normal operation.
Troubleshooting Open and
Shorted Valve Circuits
Open Circuits
When the RASTERTMshows an “OPEN” valve circuit,
it indicates a complete break in the current flow
between the controller and the valve.
NOTE: The RASTERTMwill display an “OPEN”
indicator if no valve solenoid is connected to the
controller station. This is normal and the system
does
not need service.
These are the most common causes of open circuits:
• A malfunctioning valve solenoid
• Field wires that have been cut or pulled loose
• Loose wire connections on the controller’s
terminal strip or at the valve solenoid
• A damaged component on the controller’s
internal circuit board
Page 16

Rain Bird RASTERTM(Rapid Station Test Routine), continued
12
Short Circuits
When the RASTERTMshows a “SHORT” test result, it
indicates an unintended re-routing of the current
flow somewhere between the controller and the
valve.
These are some of the most common causes of
short circuits:
• A shorted valve solenoid
• Nicked or “skinned” field wires
• Loose or corroded wire connections on the
controller’s terminal strip or at the valve solenoid
• A malfunctioning component on the controller’s
internal circuit board.
Troubleshooting Opens and Shorts
Use the following procedure to troubleshoot any
valve identified as “OPEN” or “SHORT.”
1. Make sure the problem valve’s station wires are
securely connected on the controller’s terminal
strip.
2. If the wires were securely connected, move the
problem station’s wires to a station that passed
the RASTERTMand re-start the test.
3. If the “OPEN” or “SHORT” moves to the new
station, check the problem valve’s solenoid and
field wiring.
4. If the “OPEN” or “SHORT” reoccurs on the
original station, the controller’s internal circuitry
may need service.
Page 17

Programming the Controller
13
Using the keys and dial on the controller's faceplate, you can set up the controller to operate automatically. You
can also run the controller manually without making changes in the programs you have set.
This chapter will guide you through the use of the controller's keys and dial and will give you step-by-step
instructions for setting up the four programs to suit your needs.
Preparing to Program the Controller
The controller comes from the factory without a pre-set default program. The following table presents a summary
of the controller’s default program settings:
Before you begin programming, it is a good idea to chart your watering schedule on a piece of paper, taking into
account the schedule for all stations and how often you want to repeat the schedule. A blank schedule is provided
for you on pages 32-33.
Custom Cycle
Progr.
Station#Water
Time
Start
Time
A All 0 Min 8:00A on on on on on on on
1
(MON)2(TUES)3(WED)4(THU)5(FRI)6(SAT)7(SUN)
Page 18
Programming the Controller, continued
14
Setting the Time and Date
The first step in programming the controller is
setting the controller’s internal clock and calendar.
To do so,
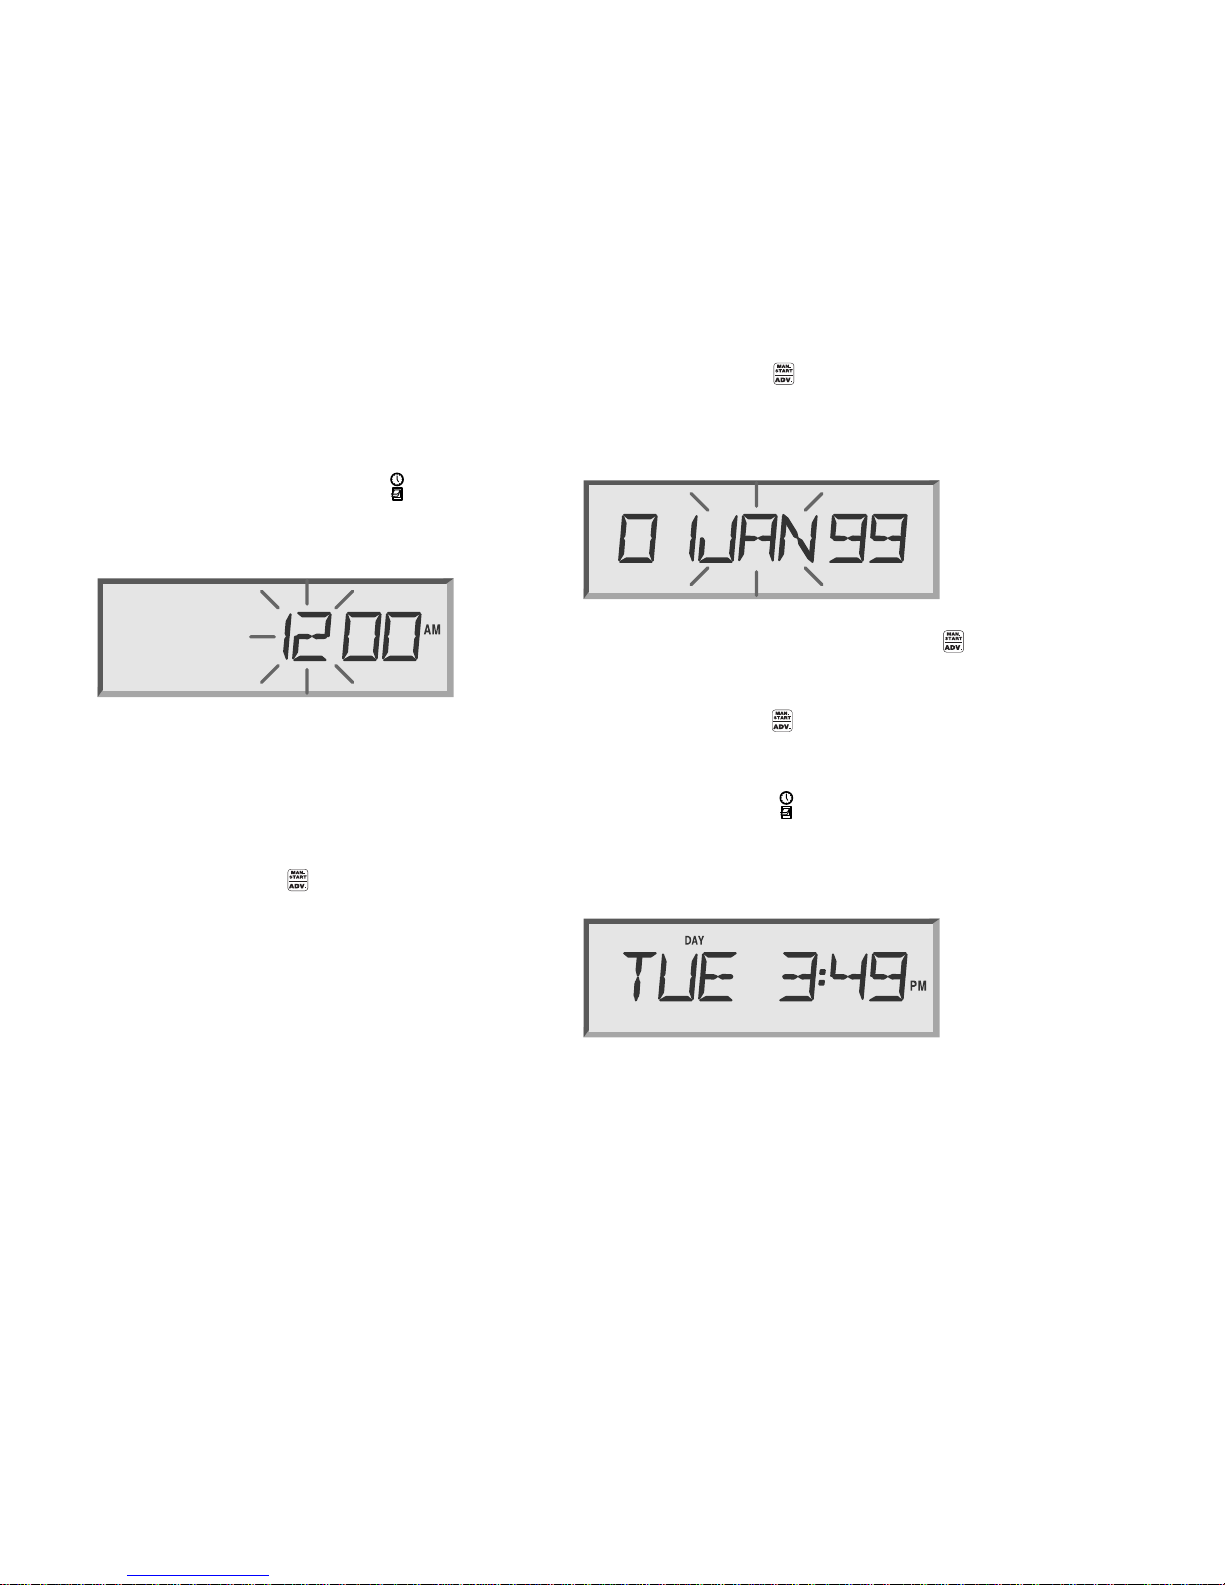
1. Rotate the dial to TIME/CALENDAR.
The hour digits in the display flash, indicating
that they are ready to be set.
2. Use the arrow keys to set the hour.
If you have a 60 Hz model, as you pass 12:00 the
am/pm designation changes.
Note: The 60 Hz model displays time in the
12-hour am/pm mode. The 50 Hz model displays
time in the 24-hour mode.
3. Press MAN START/ADV.
The minute digits flash, indicating that they are
ready to be set.
4. Use the arrow keys to set the minutes to the
current time.
5. Press MAN START/ADV.
A new display appears with the day, month and
year. The month flashes, indicating that it is ready
to be set.
6. Use the arrow keys and the MAN START/ADV
key to set the month, day and year the same way
you set the hour and minutes.
7. Press MAN START/ADV twice to return to the
time of day display.
The hour continues to flash as long as the dial is
left at TIME/CALENDAR .
8. Return the dial to AUTO.
The display shows the day of the week and time
of day.
Page 19
Programming the Controller, continued
15
Setting up a Program
There are four independent programs available with
the controller: A, B, C, and D. You can set each
program to operate according to your specifications.
When you set up a program, you:
• select the program
• choose a cycle setting for the program
• assign stations and set the station’s watering
durations and start times
It is easier to select a program and program it
completely. Jumping from program to program can
be confusing.
Step 1: Selecting a Program
To select the program you want to set up,
Press PGM to cycle through the available
programs.
The program indicator on the far left side of the
display changes.
Step 2: Selecting the Cycle
Each program can operate in one of four cycle modes:
• CUSTOM waters on the days of the week you select.
• CYCLICAL waters according to a cycle with a
specified number of days.
• ODD waters only on odd days of the month.
• EVEN waters only on even days of the month.
Note: All programs default to the custom cycle.
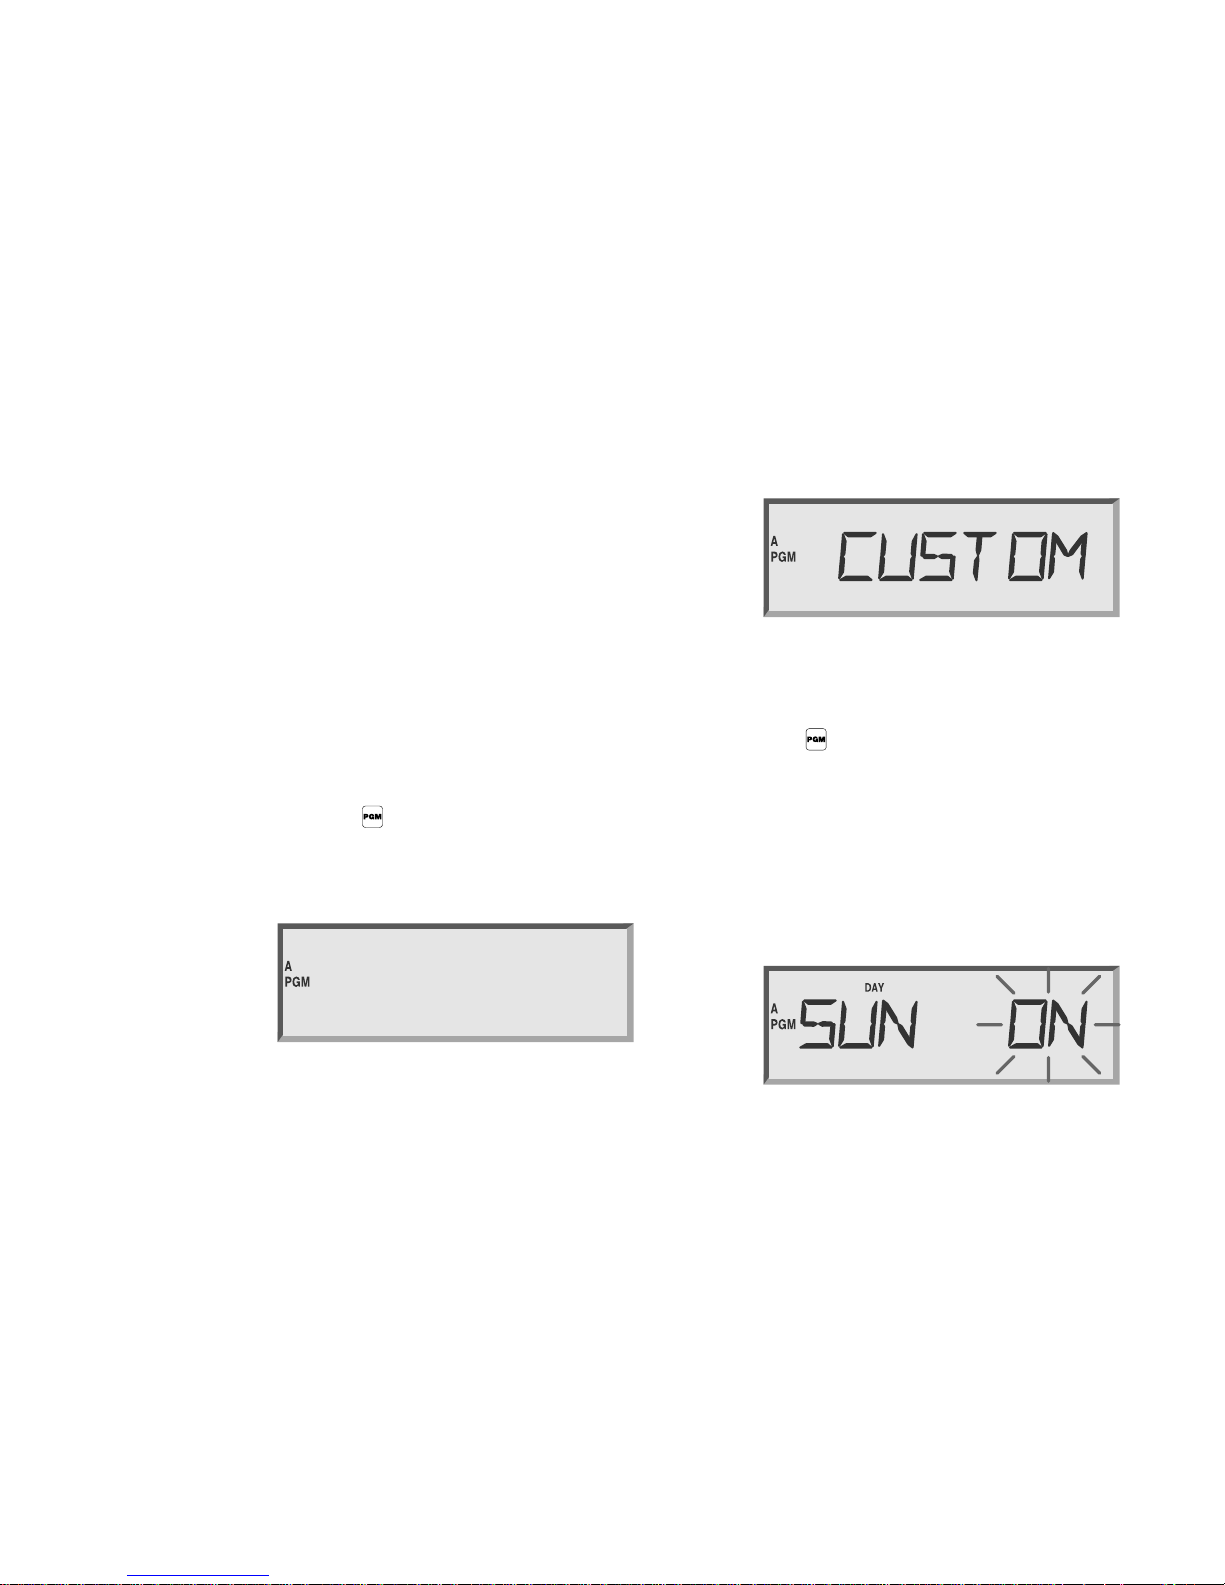
To set a custom cycle,
1. Rotate the dial to CUSTOM.
The display shows the program and CUSTOM.
The display shows USED if the program is active
and using a different cycle mode. If desired, you
can override the previous setting.
2. If the program you want is not displayed, press
PGM until it is.
3. Press ON.
The display shows CUSTOM and the custom
light on the faceplate illuminates.
4. Rotate the dial to the first day of the week and use
the ON and OFF keys to turn the day on or off.
The display shows the day and the ON/OFF
setting.
5. Repeat step 4 for all the days of the week you
want to change.
6. Return the dial to AUTO.
The controller returns to the time of day display
and waters on the days you have specified.
Page 20
Programming the Controller, continued
16
To set a cyclical cycle,
1. If the program you want is not displayed, press
PGM until it is.
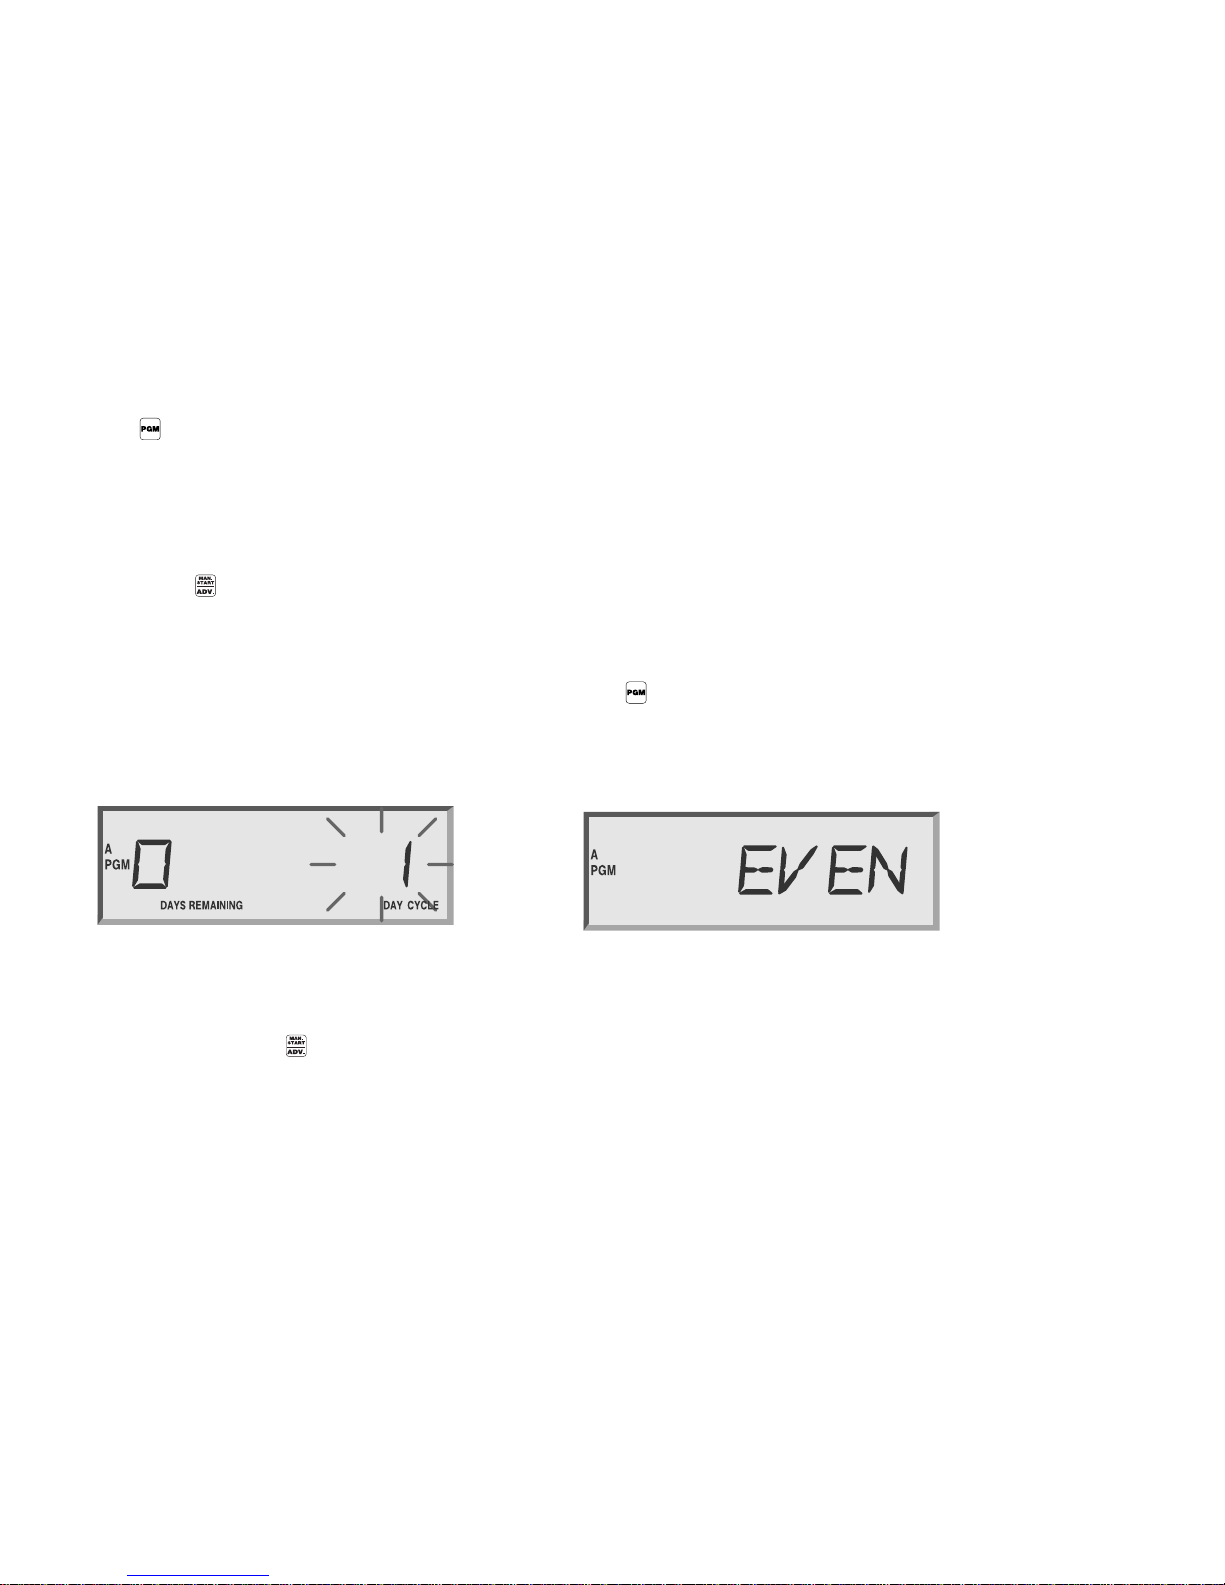
2. Rotate the dial to CYCLICAL.
The display shows the number of days remaining
and the number of days in the cycle. The number
of days in the cycle is flashing, indicating that it is
ready to be set. If it is not flashing, press MAN
START/ADV until the number of days in the
cycle is flashing.
The display shows USED if the program is active
and using a different cycle mode. If this is the
case, you can override the previous setting.
3. Press ON.
The cyclical display appears and the cyclical light
on the faceplate illuminates.
4. Use the arrow keys to set the number of days in
the cycle.
For example, if you set a 3-day cycle, the controller
skips two days and waters on the third.
5. Press MAN START/ADV to toggle to the left
side of the display.
The number of days remaining in the cycle
flashes, indicating that it is ready to be set.
6. Use the arrow keys to set the number of days
remaining before the next watering day. This tells
the controller where today is in the cycle you
have just set. For example, if DAYS REMAINING
is set to “0,” watering will occur today. If DAYS
REMAINING is set to “1,” watering will occur
tomorrow.
7. Return the dial to AUTO.
The controller returns to the time of day display
and waters on the days you have specified.
To set an
odd or even cycle,
1. If the program you want is not displayed, press
PGM until it is.
2. Rotate the dial to ODD DAYS or EVEN DAYS.
The display shows the program and ODD or
EVEN.
The display shows USED if the program is active
and using a different cycle mode. If this is the
case, you can override the previous setting.
3. Press ON.
The display shows either ODD or EVEN and the
corresponding light on the faceplate illuminates.
4. Return the dial to AUTO.
The controller returns to the time of day display
and waters on the days you have specified.
Note: The 31st day of the month defaults to ON, so
if you do not want to water on the 31st, you must set
that day to OFF. See page 21 for more information
.
Page 21
Programming the Controller, continued
17
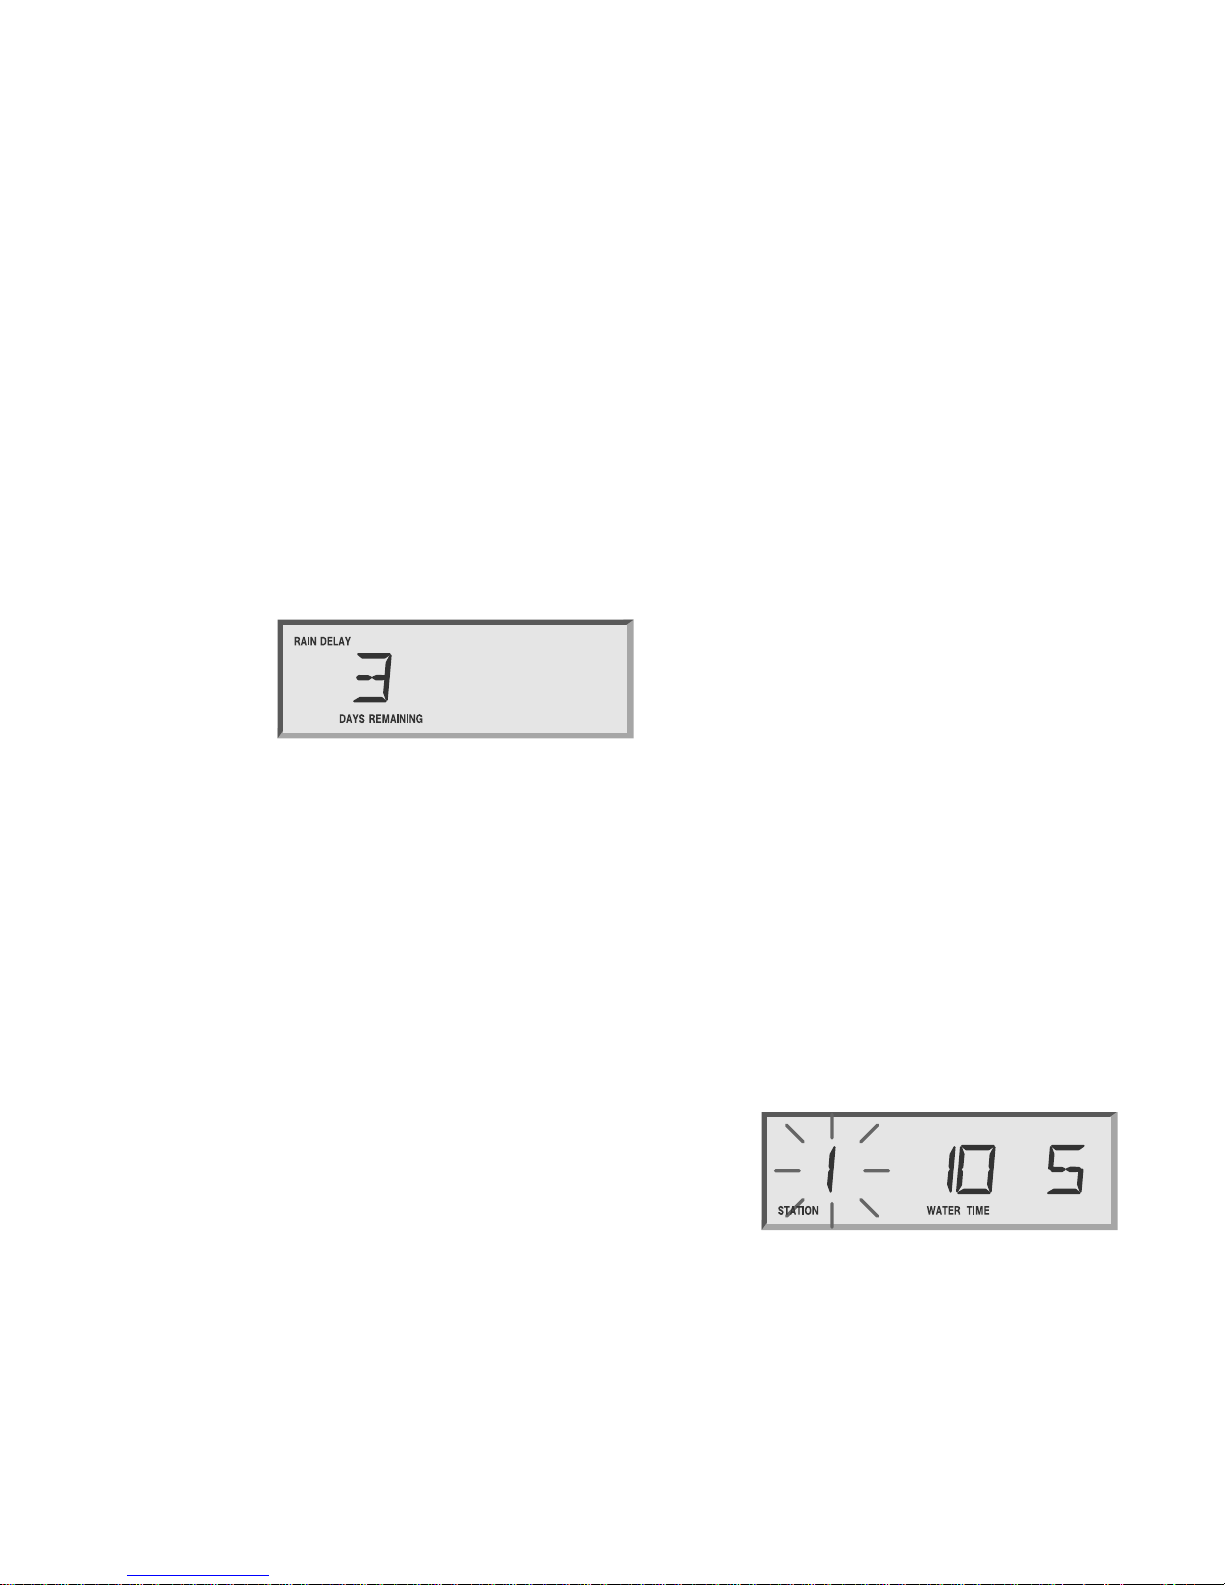
Step 3: Setting the Length of
a Station’s Watering Time
Within the program you are setting, you can set the
length of a station’s watering time from 0 minutes to
12 hours. Set the time in one-minute increments for
up to two hours; set it in 10-minute increments
from two hours to 12 hours.
To set the length of a station’s watering time,
1. If the program you want is not displayed, press
PGM until it is.
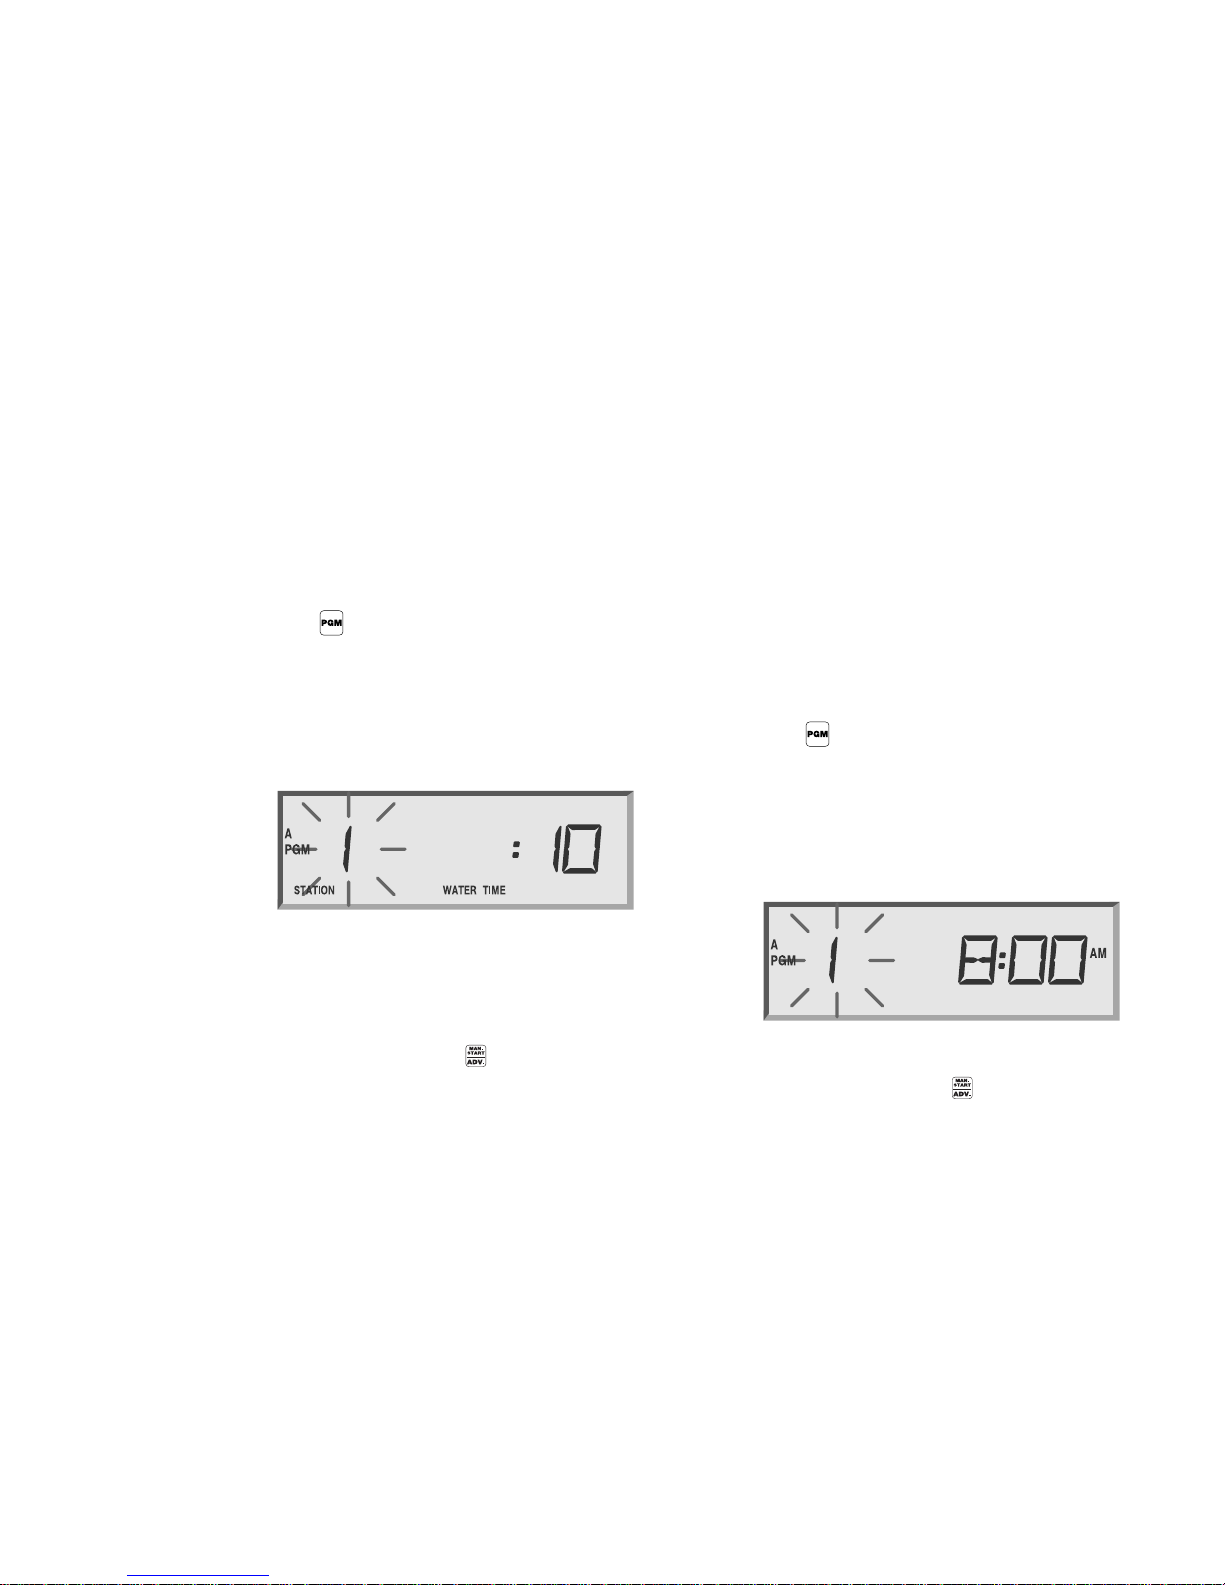
2. Rotate the dial to STATION WATERING TIME.
The display shows the program, the station
number and the length of watering time. The
station number is flashing, indicating that it is
ready to be set.
If the station is included in any other program,
the controller will let you know by replacing the
length of watering time with USED.
3. Use the arrow keys to display the station number
you wish to set.
4. Press MAN START/ADV to toggle to the right
side of the display.
The length of watering time flashes, indicating
that it is ready to be set.
5. Use the arrow keys to set the length of time.
If USED is displayed, you can still set the length
of time. (You can include the same station in
different programs and give that station different
lengths of watering time.)
6. Return the dial to AUTO.
The controller returns to the time of day display.
Step 4: Setting Watering Start Times
For each program, you may assign up to eight start
times per day, available on the quarter hour.
To assign start times,
1. If the program you want is not displayed, press
PGM until it is.
2. Rotate the dial to WATERING START TIME.
The display shows the program, the number of the
start time and the start time. The number of the
start time is flashing, indicating that it is ready to
be set.
3. Use the arrow keys to select one of the eight start
times.
4. Press MAN START/ADV to toggle to the right
side of the display.
The start time flashes, indicating that it is ready
to be set.
Page 22
Programming the Controller, continued
18
5. Use the arrow keys to select a start time. Start
times are available in 15 minute intervals, with an
OFF setting available between the 11:45 pm and
12:00 am options on the 60 Hz model (and
between 23:45 and 24:00 on the 50 Hz model).
Note: Start times are displayed in chronological
order. If a start time is deleted by setting it to OFF,
all later start times are automatically moved down
one start time number. When a start time is added
to any start time number, the controller automatically
reorganizes the times so that times appear in
chronological order. This reorganization only occurs
after the dial has been moved off the WATERING
START TIMES position.
6.
If you want to set additional start times, press MAN
START/ADV to toggle back to the left side of the
display and the next available start time number. Set
the next start time in the same fashion as the first.
7. Return the dial to AUTO.
The controller returns to the time of day display.
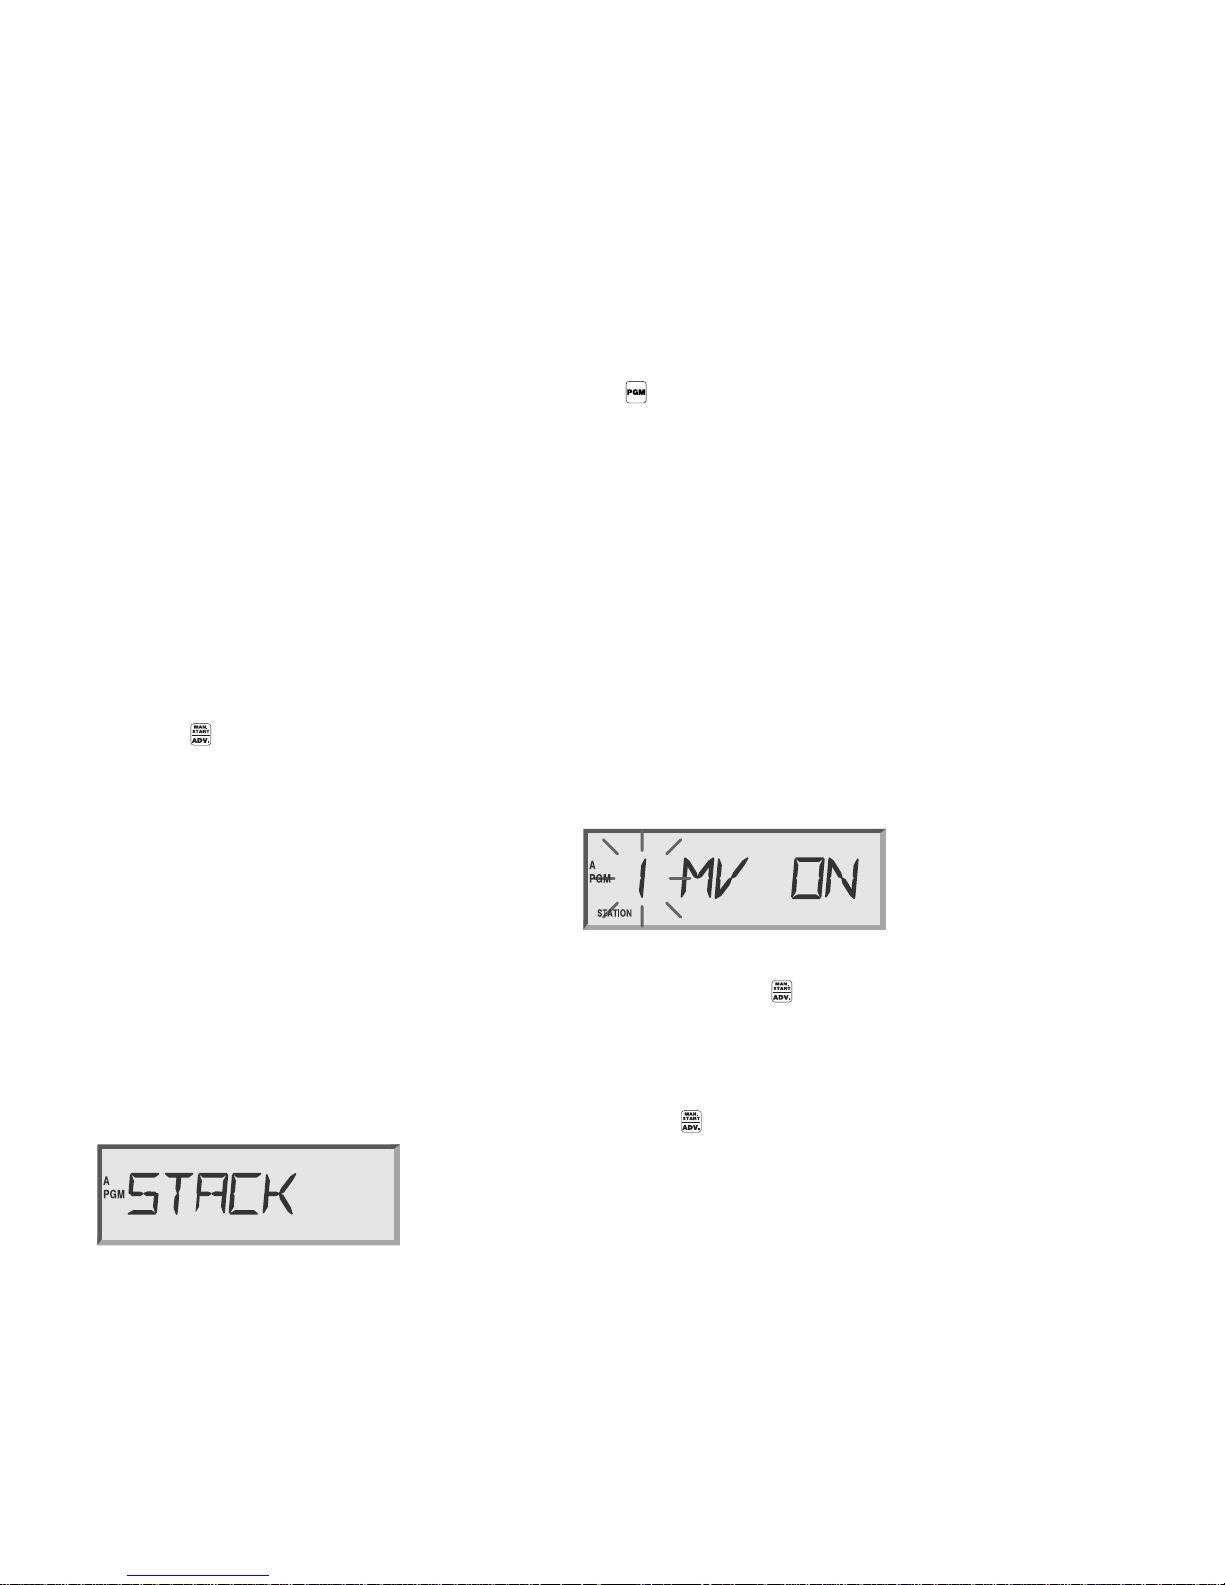
Step 5: Setting Programs to Stack or Overlap
You can set a program to stack (run one at a time) or
overlap (run simultaneously). The controller can run
up to nine valves simultaneously. The default setting
is to stack all programs.
To set programs to stack or overlap,
1. Rotate the dial to PROGRAM OVERLAP.
The display shows the program and STACK or
OVERLAP.
2. If the program you want is not displayed, press
PGM until it is.
3. Use the arrow keys to set the program to either
STACK or OVERLAP.
4. Return the dial to AUTO.
The controller returns to the time of day display.
Step 6: Setting the MV/PUMP Start
The controller has two master valve terminals on its
circuit board. MV2 (master valve 2) is enabled when
any station operates. MV1 (master valve 1) can be
enabled or disabled for each individual station.
To set MV1 for a station,
1. Rotate the dial to MV PUMP START.
The display shows the station number and MV
ON or OFF. The station number is flashing,
indicating that it is ready to be set.
2. Use the arrow keys to select the station number.
3. Press MAN START/ADV to toggle to the right
side of the display. The ON or OFF flashes,
indicating that it is ready to be set.
4. Press either the ON or OFF key.
5. If you want to set another station, press MAN
START/ADV to toggle back to the left side of
the display to continue setting stations.
6. When you are finished setting stations, return the
dial to AUTO.
The controller returns to the time of day display.
Page 23
Programming the Controller, continued
19
Setting Rain Delay
The controller allows you to delay watering for a
specified number of days up to a maximum of 99
days. The Rain Delay setting affects all programs.
To set a Rain Delay,
1. Rotate the dial to RAIN DELAY.
The display shows RAIN DELAY and the number
of days until watering will resume.
2. Use the arrow keys to set the number of days to
begin watering.
3. Return the dial to AUTO.
The controller returns to the time of day display
and will delay watering for the number of days
you have specified.
Note: To cancel a Rain Delay, reset the number of
days to 0.
Setting Cycle + Soak
TM
The Cycle + SoakTMfeature is designed to conserve
water that might puddle in tight soils, such as clay,
or end up as runoff on slopes. Cycle + SoakTMlets
you break up the total watering time of a station
into shorter cycles with a soak time between cycles.
You set the maximum watering time length and the
minimum soak time. This setting affects all
programs in which the station is included.
For example, if you want to water a station for a 20
minutes, but runoff occurs after five minutes, you
can set the station for five-minute maximum cycles
and a minimum of 25 minutes between cycles.
While the station is in soak mode, the controller
operates other stations in the program.
Note: If there is nothing left for the controller to do
but wait until a soak time elapses, the display shows
SK.
Note: The test program does not respond to Cycle +
Soak
TM
settings.
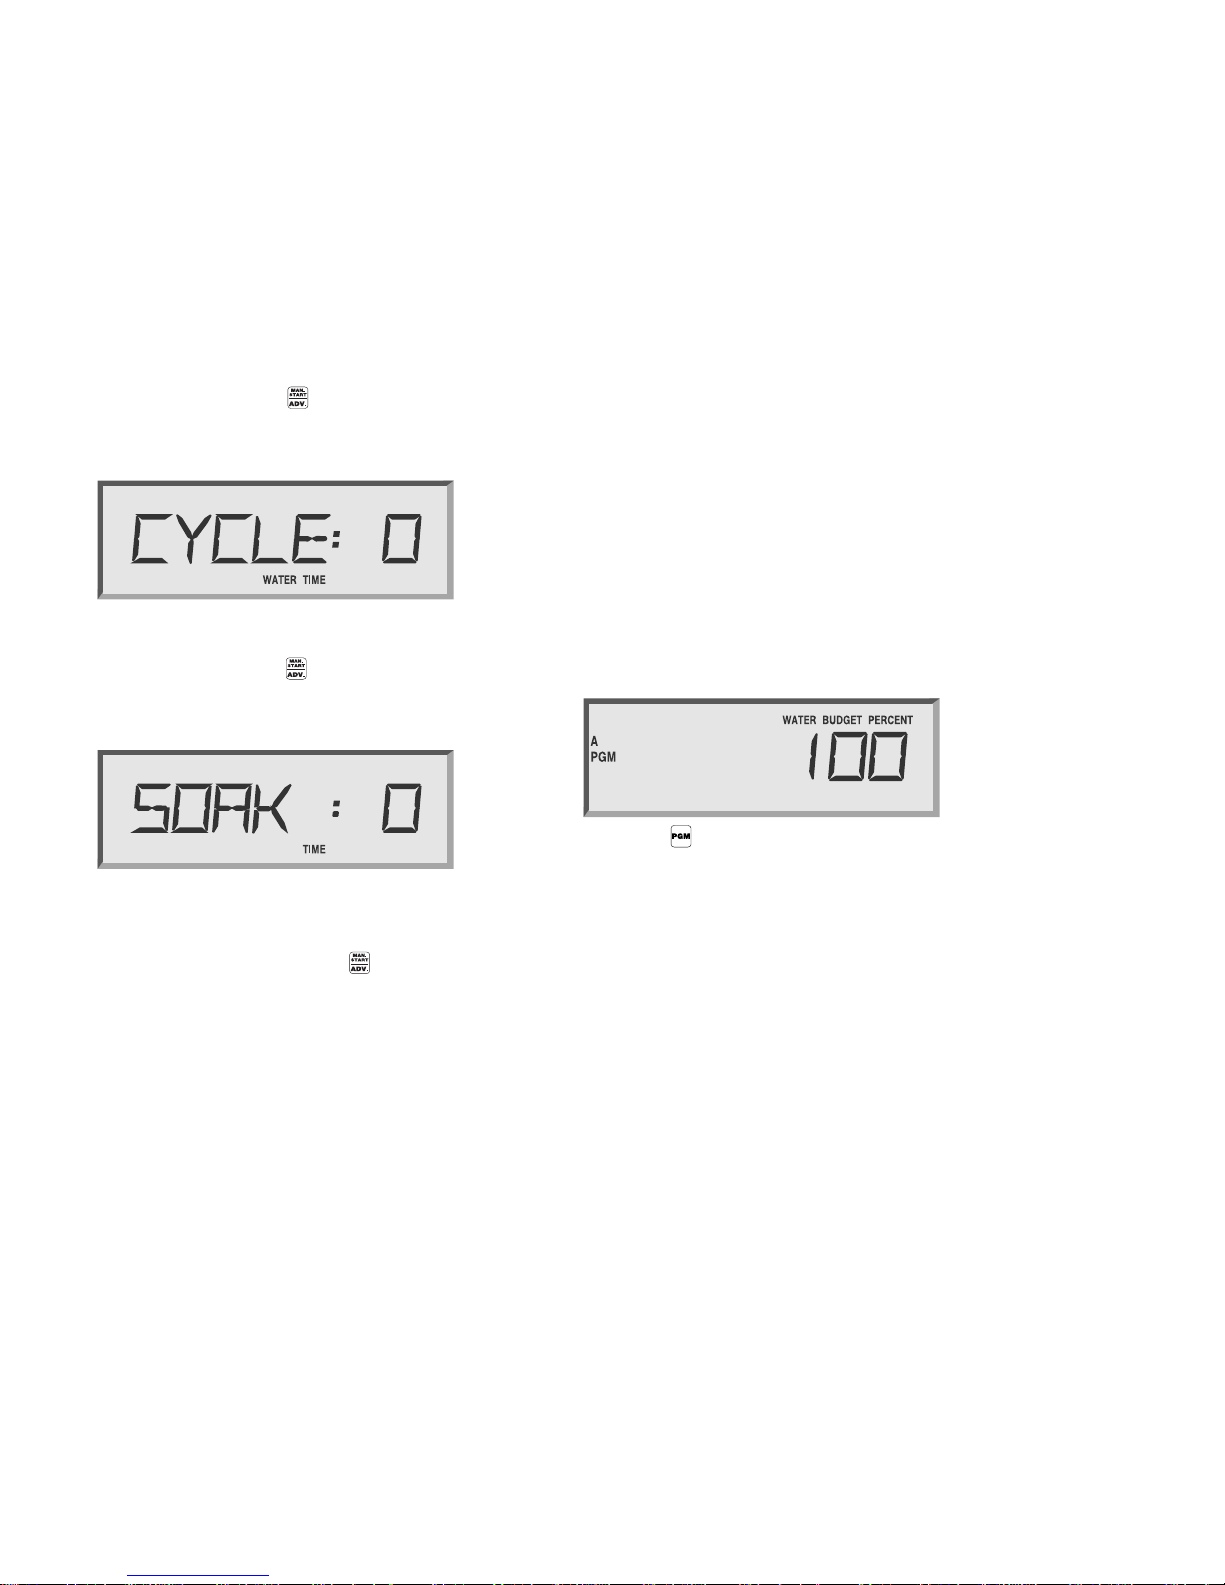
To set Cycle + SoakTM,
1. Rotate the dial to CYCLE + SOAK
TM
.
The display shows the station number, the
maximum length of time to water and the
minimum soak time. The station number flashes,
indicating that it is ready to be set.
Page 24
Programming the Controller, continued
20
2. Use the arrow keys to select the station.
3. Press MAN START/ADV.
The length of time to water flashes, indicating
that it is ready to be set.
4. Use the arrow keys to set the maximum watering
time from 1 to 99 minutes.
5. Press MAN START/ADV .
The length of time to soak flashes, indicating that
it is ready to be set.
6. Use the arrow keys to set the minimum soak time
from 1 to 99 minutes.
7. If you want to set Cycle + Soak
TM
for another
station, press MAN START/ADV again.
8. When you have finished setting Cycle + Soak
TM
,
return the dial to AUTO.
The controller returns to the time of day display.
Setting the Water Budget
The water budget feature allows you to increase or
decrease a program’s watering time in increments of
1% without having to reset the timing for each
station in the program. You can set the budget for
0% to 300%. You can use the 0% setting to shut a
program down temporarily.
To set the water budget,
1. Rotate the dial to WATER BUDGET.
The display shows the program and the water
budget percentage.
2. Press PGM until the program you want is
displayed.
3. Use the arrow keys to set the percentage.
4. Return the dial to AUTO.
The controller returns to the time of day display.
The default percentage for all programs is 100%.
When the water budget for a program is set to
other than 100%, WATER BUDGET will show in
the display whenever that program is selected.
Note: The maximum watering time with WATER
BUDGET is 16 hours.
Page 25
Programming the Controller, continued
21
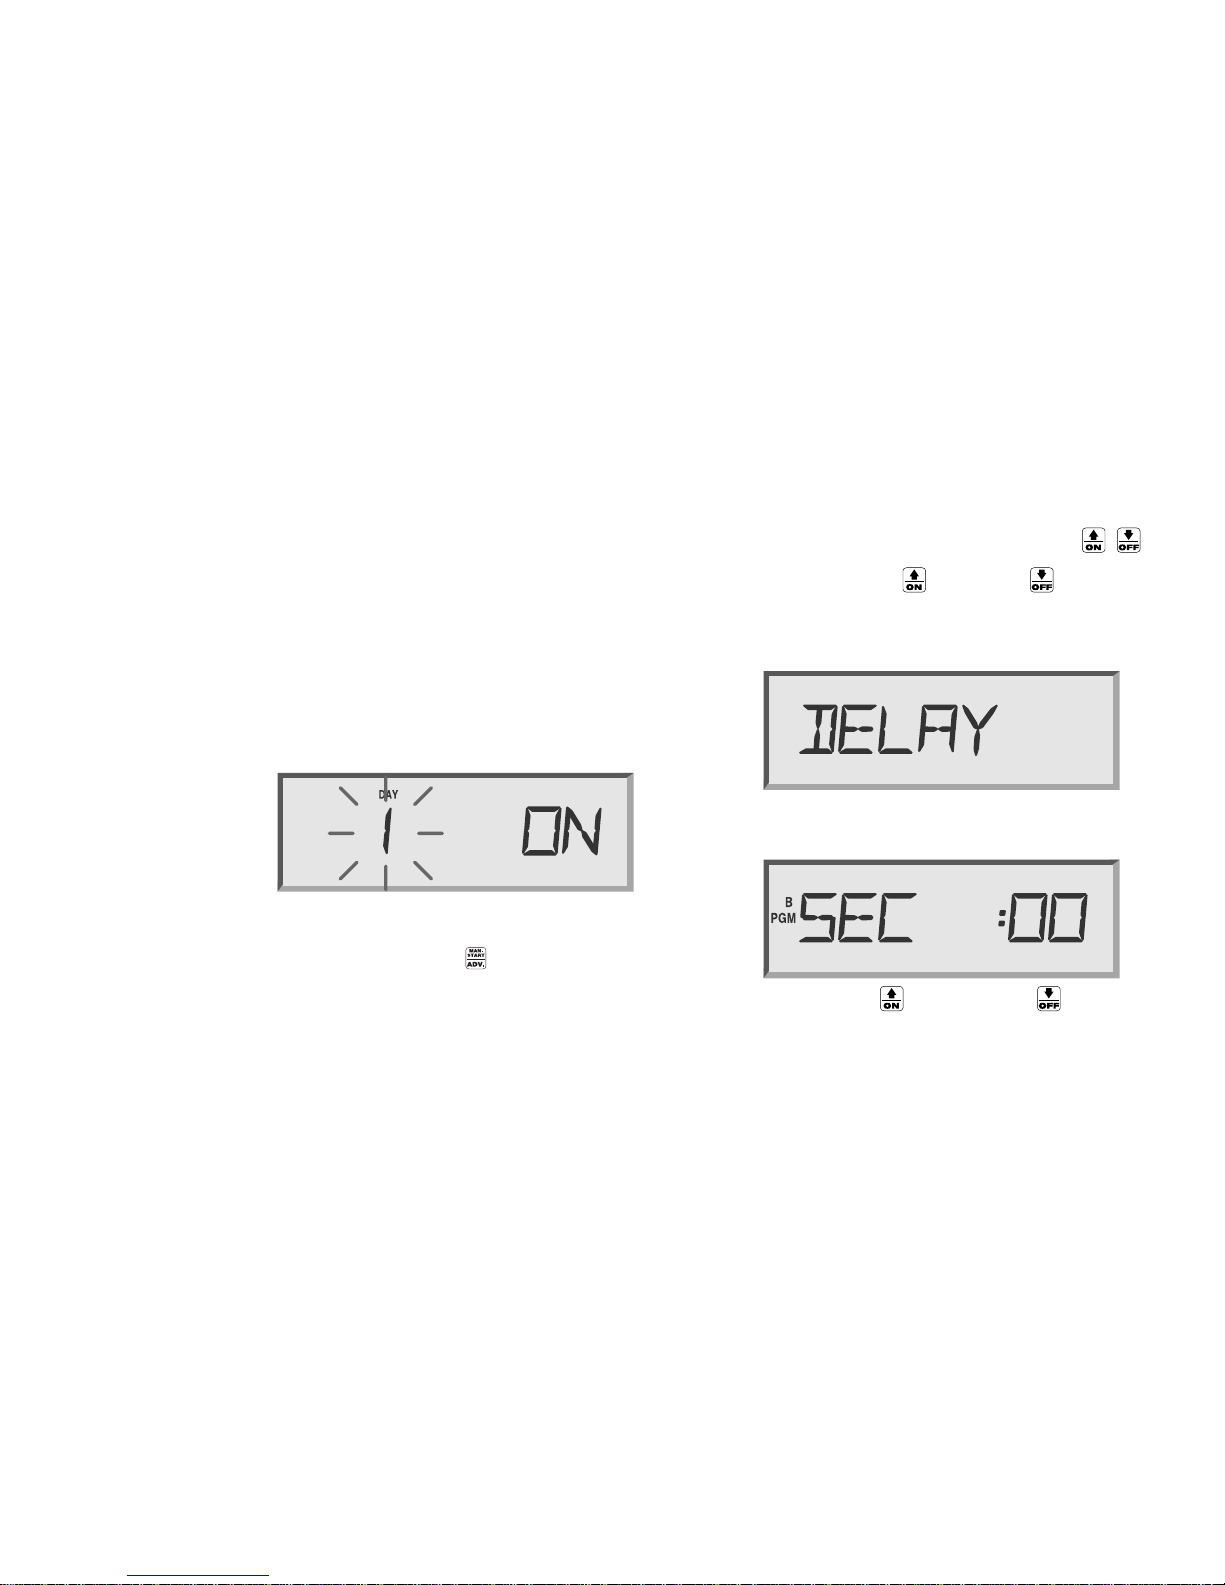
Setting Event Day Off
The Event Day Off feature allows you to omit
temporarily a calendar day or days from the
watering cycle. After a calendar day passes, that day
returns to the default setting. The default for all days
is ON. If the 31st is set to OFF, it remains off until it is
set to ON. This is to accommodate odd day watering
cycles which do not allow watering on the 31st.
To set a day off,
1. Rotate the dial to EVENT DAY OFF.
The display shows the day of the month on the
left and the ON or OFF setting on the right. The
day of the month is flashing, indicating that it is
ready to be set.
2. Use the arrow keys to set the day of the month
you wish to change.
3. Press MAN START/ADV to toggle to the right
side of the display.
The ON/OFF setting flashes, indicating that it is
ready to be set.
4. If you are setting the day to on, press ON; if you
are setting the day to off, press OFF.
5. Return the dial to AUTO.
When a day off arrives, the display shows NON
(for non-watering day) and the controller does
not allow watering.
Setting a Delay between Stations
The controller allows you to set a delay between
stations for each program. The delay can be from 0
seconds (default) to nine hours.
To set a delay between stations,
1. Rotate the dial to TEST/STATION DELAY .
2. Press both
▲/ON and ▼/OFF keys
simultaneously.
The display shows DELAY.
3. Press the PGM key to select the program to which
the delay is to be applied.
4. Use the
▲/ON and the ▼/OFF keys to
select the delay time you desire. The delay time
can be set in:
•
one-second increments, between one second
and five minutes
• one-minute
increments, between five min-
utes and nine
hours
Page 26

Programming the Controller, continued
22
Clearing All Programs
The controller allows you to clear all programs. This
function erases all settings and programs previously
set, allowing you to completely reprogram the
controller.
To clear all programs from the controller,
1. Rotate the dial to OFF.
2. Hold down the
▲/ON and MAN START/ADV
keys for 10 seconds.
The display cycles through various items on the
screen as the controller clears the registers.
When the screen returns to Thu 12:00 am, all
programs have been cleared and you may begin
programming the controller.
Page 27

Operating the Controller
23
Once you have programmed the controller, operating it is easy. You may choose to operate it completely
automatically or to operate it manually from time to time. When you operate the controller manually, you do not
disturb any of the programmed instructions.
Page 28

Operating the Controller, continued
24
Operating Automatically
To operate the controller automatically,
Rotate the dial to AUTO.
The controller runs each of the programs as you
have specified.
Note: The controller will operate automatically in any
position except for OFF. However, there will be no
display of the day, time or program status. When the
controller is in the OFF position, the controller will
not operate.
Operating Manually
There are a number of functions you can perform
manually. Each one is described in this section.
Operating a Program or
Programs Manually
You can select, start and manually advance
programs for semi-automatic operation.
To do so,
1. Rotate the dial to AUTO.
The display shows the day of the week and the
time of day.
2. Press PGM until the program you wish to
operate is displayed.
3. Press MAN START/ADV to start the selected
program.
4. If you want to operate more than one program,
press PGM to select another program and
press MAN START/ADV again.
The second program runs when the first is
complete. You can stack all four programs in this
way.
Page 29
Operating the Controller, continued
25
Operating a Station or Stations Manually
You can initiate one-time operation of a single
station or a combination of stations. If you run more
than one station, they will run in the order in which
they were selected.
To operate one station or multiple stations,
1. Rotate the dial to MANUAL WATERING.
The display shows the program, the station
number and any watering time remaining on that
station.
2. Press PGM until the program using the
desired station is displayed.
3. Use the arrow keys to select the station you want
to operate.
4. Press MAN START/ADV to start the selected
station.
5. If you want to operate more than one station,
repeat steps 2 through 4.
6. Return the dial to AUTO.
The stations operate in the sequence they were
selected. After the stations finish watering, the
controller returns to the automatic mode.
Note: If you are operating a station manually, you
cannot change the amount of time the station will
water. The controller will water the programmed
amount.
Using the Test Program
This program allows you to run a test cycle for all
the stations on a particular program. You may select
how long the test will last.
To set and then start a test program,
1. Rotate the dial to OFF for 3 seconds, to cancel any
pending work. Otherwise the test program will be
executed after the automatic mode work finishes.
2. Rotate the dial to TEST/STATION DELAY .
The display shows the program, TEST and the
length of time to test.
3. Press PGM until the program you want to test
is displayed.
4. Use the arrow keys to set the length of time to test
each station, from one to 99 minutes.
5. Press MAN START/ADV to start the test.
6. If you want to add other programs to the test, with
the dial set to TEST/STATION DELAY ,
press PGM to select the program.
Then press MAN START/ ADV to stack the new
program after the first one. You can stack four
programs.
Note: To cancel the test on all programs, rotate the
dial to OFF.
Page 30

Operating the controller, continued
26
Using the Sensor Option
The controller allows you to connect a sensor that
can disable watering. When a sensor is connected to
the controller and it suspends watering, the sensor
light on the front panel illuminates.
To enable the sensor,
Set the sensor switch to ACTIVE.
The controller operates as usual until the sensor
suspends watering and the SUSPENDED BY
SENSOR light is on.
Note: When no sensor is attached, the jumper cable
supplied with each controller must be in place,
connecting the SENSOR terminals on the controller
circuit board. If you set the SENSOR switch to
ACTIVE with neither a sensor nor the jumper cable
connected, the controller cannot operate the valves
and no watering will occur.
Fuse Detection
The controller display will show FUSE if a fuse is
missing or blown.
Using the Diagnostic Circuit Breaker
The controller is equipped with a circuit overload
protection system. This system causes the controller
to skip over a station that has an electrical short
circuit, rather than blow a fuse which would shut
down the entire system. When the controller tries to
start a station that has a short circuit, the electronic
circuit breaker senses the short circuit and skips that
station. The controller skips to the next station, but
flashes the skipped station number and FAULT in
the display.
Once you have corrected the problem, push the
FAULT RESET key to clear the flashing fault
indicator.
Note: The diagnostic circuit breaker allows detection
on all stations, as well as the master valve.
Replacing the Battery
1. Open the cabinet door.
2. Release the latch by sliding it to the left and swing
the panel open.
3. Open the battery cover on the back of the
faceplate. Remove the 9-volt battery.
4. Install a new rechargeable 9-volt battery and
close the cover.
5. Close the faceplate.
IMPORTANT! Use only rechargeable batteries in
your controller. Non-rechargeable batteries could
damage the controller or be a fire hazard.
Page 31

Troubleshooting
27
The following pages contain possible problems you may encounter and some solutions. Before calling
Rain Bird, check this list. If you cannot solve the problem yourself, call our Technical Service Hotline at
1-800-247-3782 (1-800-BIRD-SVC) and we will be glad to help you.
General Troubleshooting
Problem
The display is flashing.
Solution
There may be a power outage. Or, check the battery; it may be dead or improperly connected.
Problem
Parts are missing or damaged.
Solutions
Try one of the following solutions:
• Damage occurred during shipping. Return the controller.
•
Lightning has damaged the controller. If the controller is installed, replace the piece that is
damaged (front panel, output board, transformer, cabinet, etc.).
Problem
The controller is dead; the display is blank and there is no station output.
Solutions
Try one of the following solutions:
• There is no power to the controller. Check that the main power source is on.
• The transformer is not connected properly. Check that the 5-wire cable from the transformer is
properly connected to J7 on the controller output board.
• The transformer is bad. Check if there are 24 V AC between the “24VAC” and “COM” terminals.
Page 32

Troubleshooting, continued
28
Problem
The display and programming operate normally, but stations and master valves will not activate.
Solutions
Try one of the following solutions:
• Watering has been suspended by a sensor. Check if the sensor LED on the front panel is lit. If so,
then watering has been suspended by your sensor. If watering is required immediately, move the
Sensor Bypass switch to OFF.
• No sensor is installed. The Sensor Bypass switch is in the ACTIVE position and the jumper wire
across the sensor inputs has been removed. Place the Sensor Bypass switch in the OFF position
and add a wire jumper across the two Sensor terminals on the output board.
• The sensor is malfunctioning. Remove the sensor and place the Sensor Bypass switch in the OFF
position and attempt to activate the valves. If this works, place the Sensor Bypass switch in the
ACTIVE position and attempt to activate the valves. If the display indicates that valves are active,
but they are not coming on and the WATERING SUSPENDED BY SENSOR LED is on, then the
sensor input is not working properly. Repair or replace the sensor.
• The main fuse is blown. If the word FUSE appears in the display, replace the 2.5 A fuse located on
the output board.
Problem
The controller will not execute the programmed schedule.
Solutions
Try one of the following solutions:
• The controller dial is in the OFF position. Place the dial in the AUTO position.
• The Rain Delay feature has been activated. When the Rain Delay feature is active, the words RAIN
DELAY appear in the upper left corner of the controller display. There is also a number indicating
the number of days remaining before the controller will start running its schedule. To eliminate
the Rain Delay, turn the dial to the RAIN DELAY position and use the ▼/Off key to set the
number of days remaining to zero.
• There is no start time programmed for one or more programs. Place the dial in the WATERING
START TIMES position and select the desired program with the PGM key. Check to see if an
appropriate start time is entered for each program.
• Today has been programmed as a Non-Watering Day. If this is a Non-Watering Day, the word
NON will appear in the display. If you would like to water today, move the dial to the EVENT DAY
OFF position, select the appropriate day of the month and set it to ON.
Page 33

Troubleshooting, continued
29
• The fuse is blown and the battery is still charged. Replace the fuse.
• There is no power to the controller and the battery is still charged. Check the input power source.
Problem
A station will not activate.
Solutions
Try one of the following solutions:
• No run time has been programmed. Place the dial in the STATION WATERING TIME position, select
the desired program, select the station you would like to water and set the desired watering time.
• There is no start time for the program containing the desired station. Place the dial in the
WATERING START TIMES position and select the desired program with the PGM key. Check
to see if the appropriate start times are entered.
• There is a short circuit in the valve wiring or solenoid. In this case, the message FAULT XX will
flash in the display. Check station wiring and the solenoid. After the short circuit is repaired, press
the FAULT RESET key on the controller front panel.
• The MOV or Triac failed. Remove the output board and take it to your local Rain Bird distributor
for repair or warranty replacement.
Problem
The controller activates stations at unexpected times.
Solutions
Try one of the following solutions:
• The MAN START/ADV. key is stuck, causing a program to start unexpectedly. Press the MAN
START/ADV. key and make sure that it releases when you remove your finger.
• Additional program times have been entered accidentally. Check the program start times for all
four programs. Delete any that should not be there.
• The controller’s panel is temporally scrambled due to power fluctuations and surges. Shut off the
power to the controller by removing the main power AND removing the battery. Let the controller
sit for about five minutes, then restore the power to the controller. If this does not work, reset the
controller by holding down the ▲/ON. and MAN START/ADV. keys until words in the
display begin to change. When the display shows “12:00,” reprogram the controller.
• Stations may be wired to the wrong terminal locations. Check which station wires lead to which zone
by connecting the wiring (one station at a time) to the 24 V AC terminal on the controller. When you
confirm that the wiring turns on the desired zone, reconnect the wires to the corresponding station.
Page 34

Troubleshooting, continued
30
Problem
The actual watering time is different from the time programmed.
The Water Budget feature is active. Check the Water Budget for the program containing the station(s)
exhibiting the problem.
Problem
The display is blank, partial or displays something which is not readable.
Solution
A surge caused the display to scramble. Turn off the main power to the controller, remove the
rechargeable battery and let the controller sit for about five minutes. Reconnect the power and reattach
the rechargeable battery. If there has been no permanent damage, the controller will operate normally.
Maxicom2-specific Troubleshooting
Problem
The controller is not operating under Maxicom2control.
Solution
Try one of the following solutions:
• Check the MAXICOM...STAND ALONE switch on the back of the controller front panel. It should
be in the MAXICOM position.
• Contact the Rain Bird Technical Service Hotline for assistance.
Problem
The controller does not water, but the Maxicom2system reports normal operation.
Solution
The SENSOR switch is in the incorrect position. Move the SENSOR switch to OFF.
Problem
A Maxicom2feature appears to operate correctly at the computer, but will not function when it is
sent to the controller.
Solution
Verify that the channel assignment on the controller matches the CCU channel assignment. The
controller has a maximum of 28 channel assignments, depending on the type of CCU the controller
is connected to. ESP-SITE-Satellite controllers must be set to channel 1.
Page 35

Appendix A: Scheduling Chart
31
Before you begin programming, it is a good idea to chart your watering schedule, taking into account the schedule
for all stations and how often you want to repeat the schedule. For specific programming instructions, see page 13.
A sample schedule appears below. A blank schedule that you can copy and fill in appears on the following pages.
15
14
13
12
11
10
9
8
7
6
5
4
3
2
1
PROGRAMMING CHART
For ESP-MC Controllers
Rain Bird Technical Services: 800-247-3782
Station Description
MV/Pump
Relay 1
Station Delay
Water Budget
Program
Start Times
Watering
Days
STK OVR STK OVR STK OVRSTK OVR
1
2
3
4
5
6
7
8
1
2
3
4
5
6
7
8
1
2
3
4
5
6
7
8
1
2
3
4
5
6
7
8
Run Time Run Time Run Time Run TimeCycle Soak
*
%
%
%
%
Back turf #2
Back turf #1
Front shrubs
Back shrubs
Side shrubs
Front turf #4
Front turf #3
Front turf #2
Front turf #1
4
10
10
20
20
5
10
10
20
20
20
100% 100%
120%
43%
3
8:00
7:00
8:45
6:00
7:00
9:00
11:00
2:00
4:00
8:00
10:00
11:45
9:00
3:00
Page 36

32
16
15
14
13
12
11
10
9
8
7
6
5
4
3
2
1
Rain Bird Technical Services: 800-247-3782
Station Description
MV/Pump
Relay 1
Station Delay
Water Budget
Program
Start Times
Watering
Days
STK OVR STK OVR STK OVRSTK OVR
1
2
3
4
5
6
7
8
1
2
3
4
5
6
7
8
1
2
3
4
5
6
7
8
1
2
3
4
5
6
7
8
Run Time Run Time Run Time Run TimeCycle Soak
*
%
%
%
%
Page 37

33
24
23
22
21
20
19
18
17
25
26
27
28
29
30
31
32
33
34
35
36
37
38
39
40
Notes:
Days Off:
*
MV/Pump Relay #2 is always on whenever any station operates.
Page 38

Appendix B: Maxicom2Central Control System Overview
34
ESP-MC and ESP-SAT Controllers
The controller is one part of Rain Bird’s Maxicom2Central Control System. (See the illustration on the next page.)
The satellite controllers receive commands from the Cluster Control Unit (CCU) and operate stations according to
schedules programmed at the central computer.
The Maxicom2Central Control System for ESP-MC and ESP-SAT controllers chiefly consists of seven parts:
1. Central Computer uses the Maxicom2software program to control the entire irrigation system
2. Computer Data Path transfers information from the central computer to the CCU by phone
communication or by radio/direct communication
3. Cluster Control Unit operates field devices by executing commands received from the central
computer
4. Satellite Data Path transfers information from the cluster control unit to the field devices by a
two-wire path (TW) or by MAXILink radio communication
5. Field Devices includes either satellite controllers or decoders:
Satellite controllers — send a 24 VAC power signal to each station
Decoders — control and monitor system functions
6. Stations consist of irrigation valves, sensors or switch-operated devices
7. Weather Station interprets weather conditions and sends information to the central computer
Page 39

Appendix B, continued
35
Central Computer
Phone
Point-to-point
Radio
Link
Trunk
Radio
Cellular
Telephone
Satellite
Controller
Decoder
Satellite
Controller
Valve
Sensor
Hardwire/
Short-haul
Modem
Two-wire Path (TW) MAXILink Radio (LINK/R)
Weather Station
Sensor
Switch
or
CCU
at site
CCU
at site
Valve Valve
Valve
1. Central
Computer
2. Computer
Data Path
Options
3. CCU
4. Satellite Data
Path Options
5. Field Devices
6. Stations
7. Weather
Station
Phone (PH) Version Radio/Direct Version
Page 40

Appendix B, continued
36
ESP-SITE-Satellite Controller
The controller is one part of Rain Bird’s Maxicom2Central Control System. (See the illustration on the next page).
The satellite controllers receive commands from the central computer and operate stations according to
schedules programmed at the central computer.
The Maxicom2Central Control System for ESP-SITE-Satellite controllers chiefly consists of five parts:
1. Central Computer uses the Maxicom2software program to control the entire irrigation system
2. Computer Data Path transfers information from the central computer to the ESP-SITE-Satellite by
phone communication or by radio/direct communication
3. Controller operates stations by executing commands received from the central
computer
4. Stations consist of irrigation valves, sensors or switch-operated devices
5. Weather Station interprets weather conditions and sends information to the central computer
Page 41

Appendix B, continued
37
Central Computer
Phone
Point-to-point
Radio
Link
Trunk
Radio
Cellular
Telephone
Hardwire/
Short-haul
Modem
Weather Station
Switch
or
ESP-SITE-Satellite
Controller
ESP-SITE-Satellite
Controller
Fiber Optic
Cable
Valve Valve
Sensor
Valve Valve
Sensor
1. Central Computer
2. Computer Data
Path Options
3. ESP-SITE-Satellite
Controller
4. Stations
5. Weather Station
Phone (PH) Version Radio/Direct Version
Page 42

Appendix C: Setting the Channel Number
38
If you are using an ESP-SAT or ESP-SITE-Satellite
controller, each Maxicom2satellite on a CCU must
have a channel number for successful
communication.
To set the channel number,
1. Turn the dial on the controller’s faceplate to the
TIME/CALENDAR position.
2. Press the MAN. START/ADV. key on the
faceplate until the number “1” and the word
“CHAN” appear in the display.
3. Use the
▲/ON and ▼/OFF keys to select
the channel number you desire.
Note: If the satellite is a 32- or 40-station model,
the controller will operate the first 24 stations on
the channel number you select and the remaining
stations on the next number in the sequence. For
example, if you select channel 5 on a 40-station
satellite, stations 1-24 will operate on channel 5,
and stations 25-40 will operate on channel 6.
Warning! Never select channel 28 (on a CCU-28)
or channel 6 (on a CCU-6) for a 32- or 40-station
satellite. There are no channels higher than 28 for
the CCU-28 and no channels higher than 6 for the
CCU-6. Stations will not operate when assigned to
channels higher than 28 (CCU-28) or 6 (CCU-6).
Note: ESP-SITE Satellite controllers must be set
to channel 1.
Page 43

Appendix D: ESP-MC Controller Spare Parts
39
Part Description
ESP-8MC Front Panel
ESP-12MC Front Panel
ESP-16MC Front Panel
ESP-24MC Front Panel
ESP-28MC Front Panel
ESP-32MC Front Panel
ESP-36MC Front Panel
ESP-40MC Front Panel
Cabinet
PED-DD16 Terminal Board, 1-24 Stations
PED-DD16 Terminal Board, 25-40 Stations
ESP-8MC Output Board
ESP-12MC Output Board
ESP-16MC Output Board
ESP-24MC Output Board
ESP-28MC Output Board
ESP-32MC Output Board
ESP-36MC Output Board
ESP-40MC Output Board
120V Transformer
230V Transformer
Manual — English and Spanish
Fuse (2.5 Amp)
Rechargeable Battery
Door Lock
Appendix D: ESP-MC Controller Spare Parts List
Page 44

Glossary
40
circuit board
One of the etched, copper clad sheets of insulating material onto which electronic components and terminals are
assembled. Controllers contain circuit boards.
controller
A device that activates the field solenoid valves.
CPU board
The central processing unit (CPU) circuit board inside the controller.
Cycle + Soak
TM
A feature that allows you to conserve water that might puddle in tight soils (such as clay) or end up as runoff on
slopes. Cycle + SoakTMlets you break up the total watering time of a station into shorter cycles with a soak time
between cycles.
default setting
The start-up settings for the controller. The default settings cannot be changed.
ESP-MC
An 8-, 12-, 16-, 24-, 28-, 32-, 36-, or 40-independent station controller that is a stand-alone unit, but is upgradable
to a satellite controller linked to Maxicom2.
ESP-SAT and ESP-SITE-Satellite
A controller that can operate as a stand-alone unit or as a satellite controller linked to Maxicom2.
GPM
Gallons per minute.
hardwire
Communication cable used to transmit data between devices.
liquid crystal display (LCD)
The illuminated display used on the faceplate of most controllers.
manual
Requires user input, rather than being automatically performed by the PC program.
Page 45

Glossary, continued
41
master valve (MV)
An electrically operated valve located on a system’s main line that controls the flow of water to all other electric
and manual valves downstream of it.
master valve circuit
An electrical circuit located on many controllers used to control a master valve. If the master valve circuit is not
programmable, regardless of what station is on at the controller, the master valve circuit produces voltage to
control the master valve. When all of the stations on the controller are off, the master valve circuit turns off. If,
however, the master valve circuit is programmable, then it can be set to operate only when certain stations are
active.
MIB
Maxicom2Interface Board (MIB). Allows for satellite controller operation. The MIB is preinstalled in ESP-SAT
controllers, but can also be installed in ESP-MC controllers to add satellite capability.
monitor
To observe conditions in and around the irrigation system and send the information to the different components
in the system for appropriate action.
program
A single station or group of stations operating with the same scheduling parameters. All stations in a given
program operate the same day cycle, start times and water budget.
satellite
A controller in the field capable of communicating with the Cluster Control Unit (CCU).
satellite controller
Same as satellite.
sensor system
An optional addition to the controller that disables watering. An example is the Rain Bird Rain Check.
site
A single, remote irrigated area controlled by a CCU. For example, one park is a site in a city-wide park system.
Page 46

Glossary, continued
42
soil infiltration rate
The rate at which soils accept water.
solenoid
A portion of a field valve that receives a 24 V AC electrical current from the controller.
station schedule
The watering schedule for one of the stations controlled by the controller.
valve
A manual or electrically operated device used to control flow of water in an irrigation system.
water budget
A feature available in some controllers and central control systems allowing adjustment of water application times
without reprogramming each station or irrigation schedule.
watering cycle
The complete cycle of watering for all stations controlled by the controller.
Page 47

Page 48

Service Information
44
In the unlikely event this equipment should malfunction, all repairs should be performed by an
authorized Rain Bird Maxicom2Authorized Service Center.
For information on Maxicom2Authorized Service Centers, contact Rain Bird at:
Rain Bird Corporation
Turf Products
6991 East Southpoint Rd.
Tucson, AZ 85706
Phone: (520)
741-6100
Fax: (520)
741-6522
Rain Bird Technical Service Hotline
1-800-247-3782 (1-800-BIRD-SVC)
Rain Bird Specifications Hotline
1-800-458-3005
www.rainbird.com
Page 49

Warranty
45
This product is covered by Rain Bird’s Three-year Trade Warranty. For details, see the Rain Bird
Landscape Irrigation Products Catalog.
Page 50

Notes
Page 51

Guía de Operación
Controladores ESP-MC, ESP-SAT, controlador de satélite ESP-SITE
y conjunto de tarjeta de interface Maxicom2(MIB)
P/N 634593 REV F
Page 52

“ADVERTENCIA: ES NECESARIO INSTALAR UN
INTERRUPTOR AUTOMÁTICO O DE DESCONEXIÓN
EN EL CABLEADO FIJO PARA AISLAR AL
CONTROLADOR”
“LA MEMORIA ES MANTENIDA POR UNA BATERÍA
LA CUAL DEBE DESCARTARSE SEGÚN LAS
REGULACIONES LOCALES”
Iconos de precaución
El símbolo de relámpago con punta en
forma de flecha, dentro de un triángulo
equilátero, está diseñado para alertar al
usuario de la presencia de “voltaje
peligroso” sin aislamiento dentro del
envolvente del producto que puede ser
de una magnitud suficiente como para
constituir un riesgo de choque eléctrico
para las personas.
El signo de exclamación dentro de un
triángulo equilátero está diseñado para
alertar al usuario de la existencia de
instrucciones importantes de
funcionamiento y mantenimiento
(servicio) en la literatura que acompaña
al producto.
“WARNING: A CIRCUIT BREAKER OR CUTOFF
SWITCH IS TO BE PROVIDED IN THE FIXED WIRING
TO ISOLATE THE CONTROLLER”
“MEMORY IS RETAINED BY A BATTERY WHICH IS
TO BE DISPOSED OF IN ACCORDANCE WITH
LOCAL REGULATIONS”
Caution icons
The lightening flash with arrowhead
symbol, within an equilateral triangle, is
intended to alert the user to the
presence of uninsulated “dangerous
voltage” within the product’s enclosure
that may be of sufficient magnitude to
constitute a risk of electric shock to
persons.
The exclamation point within an
equilateral triangle is intended to alert
the user to the presence of important
operating and maintenance (servicing)
instructions in the literature
accompanying the product.
Información sobre medidas de seguridad
ii
¡Advertencia!
En este manual figuran importantes advertencias y medidas de seguridad. Para garantizar el manejo adecuado y
evitar gastos adicionales, lea bien este manual antes de comenzar a instalar el aparato.
Page 53

Introducción . . . . . . . . . . . . . . . . . . . . . . . . . . . . . . . . . . . . . . . . . . . . . . . . . . . . .1
Bienvenidos a Rain Bird . . . . . . . . . . . . . . . . . . . . . . . . . . . . . . . . . . . . . . . . . . . . . . . . . . . . . . . . . . .1
El controlador ESP-MC . . . . . . . . . . . . . . . . . . . . . . . . . . . . . . . . . . . . . . . . . . . . . . . . . . . . . . . .1
El controlador ESP-SAT . . . . . . . . . . . . . . . . . . . . . . . . . . . . . . . . . . . . . . . . . . . . . . . . . . . . . . . .1
La tarjeta de interface Maxicom
2
(MIB) . . . . . . . . . . . . . . . . . . . . . . . . . . . . . . . . . . . . . . . . . .1
El controlador de satélite ESP-SITE . . . . . . . . . . . . . . . . . . . . . . . . . . . . . . . . . . . . . . . . . . . . . .1
Características especiales . . . . . . . . . . . . . . . . . . . . . . . . . . . . . . . . . . . . . . . . . . . . . . . . . . . . . . . . . .2
*Para instrucciones de instalación ver poster incluído en la caja del controlador
Familiarícese con la placa frontal del controlador . . . . . . . . . . . . . . . . . . . . . . .3
Rutina de Prueba de Estaciones Rápida — RASTER
TM
. . . . . . . . . . . . . . . . . . .7
Introducción . . . . . . . . . . . . . . . . . . . . . . . . . . . . . . . . . . . . . . . . . . . . . . . . . . . . . . . . . . . . . . . . . . . . .7
Operación del RASTER
TM
. . . . . . . . . . . . . . . . . . . . . . . . . . . . . . . . . . . . . . . . . . . . . . . . . . . . . . . . . . .8
Iniciar el RASTER
TM
. . . . . . . . . . . . . . . . . . . . . . . . . . . . . . . . . . . . . . . . . . . . . . . . . . . . . . . . . . . .8
Prueba de Válvulas . . . . . . . . . . . . . . . . . . . . . . . . . . . . . . . . . . . . . . . . . . . . . . . . . . . . . . . . . . .10
Solución de Problemas de Cortos y Circuitos Abiertos en las Válvulas . . . . . . . . . . . . . . . . . .12
Circuitos Abiertos . . . . . . . . . . . . . . . . . . . . . . . . . . . . . . . . . . . . . . . . . . . . . . . . . . . . . . . . . . . .12
Corto Circuitos . . . . . . . . . . . . . . . . . . . . . . . . . . . . . . . . . . . . . . . . . . . . . . . . . . . . . . . . . . . . . .13
Resolver Cortos y Circuitos Abiertos . . . . . . . . . . . . . . . . . . . . . . . . . . . . . . . . . . . . . . . . . . . .13
Programación del controlador . . . . . . . . . . . . . . . . . . . . . . . . . . . . . . . . . . . . .14
Antes de programar el controlador . . . . . . . . . . . . . . . . . . . . . . . . . . . . . . . . . . . . . . . . . . . . . . . .14
Programación del reloj y el calendario . . . . . . . . . . . . . . . . . . . . . . . . . . . . . . . . . . . . . . . . . .15
Configuración de un programa . . . . . . . . . . . . . . . . . . . . . . . . . . . . . . . . . . . . . . . . . . . . . . . . . . .16
Primer paso: Selección del programa . . . . . . . . . . . . . . . . . . . . . . . . . . . . . . . . . . . . . . . . . . .16
Segundo paso: Selección del ciclo . . . . . . . . . . . . . . . . . . . . . . . . . . . . . . . . . . . . . . . . . . . . . .16
Tercer paso: Programación de la duración del riego de una estación . . . . . . . . . . . . . . .18
Cuarto paso: Programación de las horas de inicio del riego . . . . . . . . . . . . . . . . . . . . . . .19
Quinto paso: Configuración de programas para apilarlos o sobreponerlos . . . . . . . . .20
Sexto paso: Configuración del arranque de la bomba de la válvula principal . . . . . . . .20
Programación del ajuste Rain Delay (Demora por lluvia) . . . . . . . . . . . . . . . . . . . . . . . . . . . . .21
Programación del ajuste Cycle + Soak
TM
(Ciclo y remojo) . . . . . . . . . . . . . . . . . . . . . . . . . . . . .21
Programación del ajuste Water Budget (Ahorro de agua) . . . . . . . . . . . . . . . . . . . . . . . . . . . . .22
Programación del ajuste Event Day Off (Apagado en días especiales) . . . . . . . . . . . . . . . . . .23
Contenido
iii
Page 54

Programación del ajuste de demora entre estaciones . . . . . . . . . . . . . . . . . . . . . . . . . . . . . . . .24
Función para borrar todos los programas . . . . . . . . . . . . . . . . . . . . . . . . . . . . . . . . . . . . . . . . . . .24
Operación del controlador . . . . . . . . . . . . . . . . . . . . . . . . . . . . . . . . . . . . . . . . .25
Operación automática . . . . . . . . . . . . . . . . . . . . . . . . . . . . . . . . . . . . . . . . . . . . . . . . . . . . . . . . . . . .26
Operación manual . . . . . . . . . . . . . . . . . . . . . . . . . . . . . . . . . . . . . . . . . . . . . . . . . . . . . . . . . . . . . . .26
Operación manual de uno o varios programas . . . . . . . . . . . . . . . . . . . . . . . . . . . . . . . . . .26
Operación manual de una o varias estaciones . . . . . . . . . . . . . . . . . . . . . . . . . . . . . . . . . . .27
Uso del programa de prueba . . . . . . . . . . . . . . . . . . . . . . . . . . . . . . . . . . . . . . . . . . . . . . . . . .27
Uso de la opción del sensor . . . . . . . . . . . . . . . . . . . . . . . . . . . . . . . . . . . . . . . . . . . . . . . . . . . . . . .28
Detección de fusible . . . . . . . . . . . . . . . . . . . . . . . . . . . . . . . . . . . . . . . . . . . . . . . . . . . . . . . . . . . . .28
Uso del circuito de protección para diagnóstico de corto circuito . . . . . . . . . . . . . . . . . . . . .28
Cambio de la batería . . . . . . . . . . . . . . . . . . . . . . . . . . . . . . . . . . . . . . . . . . . . . . . . . . . . . . . . . . . . .28
Solución de problemas . . . . . . . . . . . . . . . . . . . . . . . . . . . . . . . . . . . . . . . . . . . .30
Solución de problemas generales . . . . . . . . . . . . . . . . . . . . . . . . . . . . . . . . . . . . . . . . . . . . . . . . . .30
Solución de problemas específicos de Maxicom
2
. . . . . . . . . . . . . . . . . . . . . . . . . . . . . . . . . . . .34
Apéndice A: Tabla de riego . . . . . . . . . . . . . . . . . . . . . . . . . . . . . . . . . . . . . . . .35
Apéndice B: Descripción general
del sistema de control central MAXICOM
2
. . . . . . . . . . . . . . . . . . . . . . . . . . . .38
Los controladores ESP-MC y ESP-SAT . . . . . . . . . . . . . . . . . . . . . . . . . . . . . . . . . . . . . . . . . . . . . .38
Controlador de satélite ESP-SITE . . . . . . . . . . . . . . . . . . . . . . . . . . . . . . . . . . . . . . . . . . . . . . . . . .40
Apéndice C: Configuración del número de canal . . . . . . . . . . . . . . . . . . . . . . .42
Apéndice D: Lista de partes de repuesto del controlador ESP-MC . . . . . . . .43
Glosario . . . . . . . . . . . . . . . . . . . . . . . . . . . . . . . . . . . . . . . . . . . . . . . . . . . . . . . .44
Información sobre el servicio de reparación . . . . . . . . . . . . . . . . . . . . . . . . . .47
Información sobre la garantía . . . . . . . . . . . . . . . . . .dentro de la contracubierta
Contenido, continuación
iv
Page 55

Bienvenidos a Rain Bird
Le agradecemos la compra de su nuevo controlador Rain Bird, equipado con la tecnología más avanzada. Durante
más de seis décadas, Rain Bird ha estado a la cabeza de la industria del riego, atendiendo todas las necesidades de
sus clientes en materia de manejo del agua, ofreciendo productos y servicios de la más alta calidad. El nuevo
controlador Rain Bird ha sido diseñado para ofrecerle control de riego en sitio durante toda una vida.
El controlador ESP-MC
El controlador de la serie Extra Simple Programming-Maxicom Compatible ESP-MC es un controlador autónomo
adecuado para el uso residencial o comercial. Su computadora integrada es fácil de usar y ofrece cuatro
programas para un máximo de cuarenta estaciones de riego. También se puede ampliar para que funcione como
controlador satélite que forme parte de un sistema de riego Maxicom2. Para obtener más información sobre el uso
del controlador con el sistema Maxicom2, vea el Apéndice B en la página 38.
El controlador ESP-SAT
El controlador de la serie Extra Simple Programming-Satellite (ESP-SAT) está preparado para usarse
conjuntamente con el sistema de irrigación Maxicom2o como una unidad autónoma. Es adecuado para el uso
residencial o comercial. Su computadora incorporada es fácil de usar y ofrece cuatro programas para un máximo
de cuarenta estaciones de riego.
La tarjeta de interface Maxicom2(MIB)
El paquete de la tarjeta de interface Maxicom2(MIB) del controlador ESP-MC convierte el ESP-MC autónomo a un
controlador ESP-SAT que puede integrarse con el sistema Maxicom2.
El controlador de satélite ESP-SITE
El controlador de satélite ESP-SITE está preparado para usarse conjuntamente con el sistema de irrigación
Maxicom2. Es adecuado para el uso residencial o comercial. Su computadora incorporada es fácil de usar y ofrece
cuatro programas para un máximo de cuarenta estaciones de riego. Para obtener información específica sobre el
controlador ESP-SITE-Satellite, vea el Apéndice B en la página 40 y la Guía de Instalación del controlador de
satélite ESP-SITE que viene con el controlador.
El paquete de actualización del controlador de satélite ESP-SITE para los controladores ESP-MC o ESP-SAT
convierte estos controladores a controladores de satélite ESP-SITE.
Introducción
1
Page 56

Introducción, continuación
2
Características especiales
Los controladores ESP-MC, ESP-SAT y el controlador de satélite ESP-SITE están disponibles en modelos para
montar en la pared (WM) y para montar en pedestales de acero inoxidable (SS) ambos con la capacidad para
controlar 8-, 12-, 16-, 24-, 28-, 32-, 36- ó 40- estaciones. Todas las configuraciones tienen las siguientes
características especiales:
• Diseño antioxidante resistente a la corrosión
• Cuatro programas independientes
• Regulación de ciclo y remojo para conservar agua y controlar erosión
• Conservación de programas y tiempos de riego durante interrupciones del suministro eléctrico
• Circuito de protección para diagnóstico de cortocircuito que ayuda a identificar las estaciones afectadas por
cortocircuitos
• Práctico programa de prueba
• Demora pluvial de 1 a 99 días
• Calendario de 365 días con opciones de programación diversas para ciclos de riego
• Opción de programar cualquier día del mes para suspender el riego
• Luces indicadoras de ciclos y fallas
• Pantalla de cristal líquido fácil de leer
• Sensores de humedad opcionales que suspenden el riego cuando el suelo está mojado
• Conexiones universales listas para control remoto
• Ciclos diurnos realmente independientes por programa
• Superposición de programas programable
• Programación de tiempo de estaciones de un minuto a 12 horas
Nota: Para instrucciones de instalación ver poster incluído en la caja del controlador.
Page 57

Familiarícese con la placa frontal del controlador
3
Antes de comenzar a programar u operar el controlador, dedique unos momentos a familiarizarse con la placa
frontal del controlador. Las páginas siguientes contienen una breve descripción de cada uno de los botones e
indicadores. Las instrucciones especiales para todas las operaciones que usted puede realizar comienzan en la
página 7.
Page 58

WATERING SUSPENDED BY SENSOR (RIEGO SUSPENDIDO POR EL SENSOR)
Esta luz se enciende cuando el sensor suspende el riego o cuando se retira el cable puente del sensor y el
interruptor del sensor está en la posición ACTIVE (ACTIVO).
SENSOR OFF/ACTIVE (APAGADO/ACTIVO)
Si desea activar el sensor, mueva el interruptor a la posición ACTIVE (ACTIVO). Si desea anular la señal del sensor
o si el controlador no está conectado a ningún sensor, mueva el interruptor a la posición OFF (APAGADO).
Cuando no hay ningún sensor conectado, asegúrese de que el cable del puente que conecta los terminales del
SENSOR en el tablero de circuitos del controlador esté instalado. Si se mueve el interruptor de SENSOR a ACTIVE
(ACTIVO) sin haber conectado un cable de puente o sensor puente, el controlador no puede hacer funcionar las
válvulas y no se producirá riego.
▲/ON (▲/
ENCENDIDO)
Presione este botón para activar un parámetro o avanzarlo en la pantalla.
▼/OFF (▼/
APAGADO)
Presione este botón para desactivar un parámetro o disminuirlo en la pantalla.
PGM (PROG.)
Presione este botón para cambiar el indicador de programa en la pantalla. Cuando se presiona el botón PGM, el
indicador ubicado en la parte izquierda de la pantalla recorre los programas A, B, C y D.
MAN START/ADV. (INICIO MANUAL/AVANCE)
Presione este botón para pasar al siguiente parámetro en la pantalla o para iniciar manualmente una operación.
FAULT RESET (RESTABLECER FALLO)
Presione este botón para borrar el mensaje de error en la pantalla. Presione el botón después de arreglar el
cortocircuito señalado por el indicador de fallo de diagnósticos en la pantalla.
PUMP/MV STATUS (ESTADO BOMBA/VÁLVULA PRINCIPAL)
Esta luz se enciende cuando se activa el circuito de la válvula principal 1 (MV1) para la estación activa.
STATION STATUS (ESTADO ESTACIÓN)
Esta luz se enciende cuando una válvula está activa.
LINKED TO Maxicom2(CONECTADO A Maxicom2) Versiones ESP-SAT y de satélite ESP-SITE solamente
Esta luz se enciende cuando el interruptor STAND ALONE/MAXICOM se encuentra en la posición MAXICOM y el
controlador se encuentra conectado al sistema Maxicom2.
EVEN DAY CYCLE (CICLO DE DÍAS PARES)
Esta luz se enciende cuando el programa activo del controlador ha sido configurado para operar en los días pares del mes.
Familiarícese con la placa frontal del controlador
, continuación
4
Page 59

Familiarícese con la placa frontal del controlador
, continuación
5
ODD DAY CYCLE (CICLO DE DÍAS IMPARES)
Esta luz se enciende cuando el programa activo del controlador ha sido configurado para operar en los días
impares del mes.
CYCLICAL DAY CYCLE (CICLO DE DÍAS CÍCLICOS)
Esta luz se enciende cuando el programa activo del controlador ha sido configurado para operar en un ciclo con
un número de días determinado.
CUSTOM DAY CYCLE (CICLO DE DÍAS ESPECÍFICOS)
Esta luz se enciende cuando el programa activo del controlador ha sido configurado para operar en días
específicos de la semana.
AUTO (AUTOMÁTICO)
Mueva el dial a esta posición para que el controlador opere automáticamente con los programas especificados.
STATION WATERING TIME (DURACIÓN DE RIEGO DE LA ESTACIÓN)
Mueva el dial a esta posición para programar la duración del riego de una estación.
WATERING START TIME (HORA DE INICIO DEL RIEGO)
Mueva el dial a esta posición para registrar las horas de inicio de riego del programa. En cada programa hay ocho
horas de inicio disponibles.
MV PUMP START (INICIO DE LA BOMBA DE LA VÁLVULA PRINCIPAL)
Mueva el dial a esta posición para activar o desactivar la válvula principal 1 (MV1) para una estación en particular.
PROGRAM OVERLAP (SUPERPOSICIÓN DE PROGRAMAS)
Mueva el dial a esta posición para hacer que los programas queden apilados o superpuestos. La posición
predeterminada para todos los programas es el apilamiento.
TIME/CALENDAR (HORARIO/CALENDARIO)
Mueva el dial a esta posición para programar el horario y el calendario.
EVENT DAY OFF (APAGADO EN DÍAS ESPECIALES)
Mueva el dial a esta posición para especificar uno o varios días en el mes cuando se suspenderá el riego.
RAIN DELAY (DEMORA POR LLUVIA)
Mueva el dial a esta posición para posponer el riego un número de días determinado.
MON — SUN (LUN – DOM)
Mueva el dial al día de la semana en el cual desea regar o suspender el riego cuando programe un ciclo especial.
Page 60

Familiarícese con la placa frontal del controlador
, continuación
6
CUSTOM (ESPECIAL)
Mueva el dial a esta posición para programar un ciclo de riego que funcione en días específicos de la semana.
CYCLICAL (CÍCLICO)
Mueva el dial a esta posición para programar un ciclo de riego que funcione a intervalos específicos; por ejemplo,
todos los días, días alternos, cada tercer día, etc.
ODD DAYS (DÍAS IMPARES)
Mueva el dial a esta posición para programar un ciclo de riego en los días impares del mes.
EVEN DAYS (DÍAS PARES)
Mueva el dial a esta posición para programar un ciclo de riego en los días pares del mes.
WATER BUDGET (AHORRO DE AGUA)
Mueva el dial a esta posición para programar el porcentaje de agua asignado a un programa. La posición
predeterminada es 100%.
CYCLE + SOAKTM(CICLO Y REMOJO)
Mueva el dial a esta posición para dividir el tiempo de riego en intervalos a fin de conservar agua y evitar erosión.
TEST PROGRAM/STATION DELAY (PROGRAMA DE PRUEBA/DEMORA DE ESTACIÓN)
Mueva el dial a esta posición para iniciar el ciclo de programa de prueba para todas las estaciones. Además,
obtenga acceso a la característica Station Delay (Demora de Estación) moviendo el dial a esta posición y
presionando los botones ▲/ON y ▼/OFF simultáneamente.
MANUAL WATERING (RIEGO MANUAL)
Mueva el dial a esta posición para regar una estación manualmente.
OFF/PROGRAM RESET (APAGADO/RESTABLECIMIENTO DE PROGRAMA)
Mueva el dial a esta posición para apagar el controlador y las válvulas; por ejemplo, durante los meses de invierno.
Además, restablezca todos los programas moviendo el dial a esta posición y presionando los botones ▲/ON y
MAN START/ADV durante 10 segundos.
STAND ALONE/MAXICOM (AUTÓNOMO/MAXICOM) (ubicado en la parte posterior del panel frontal)
Si desea que el controlador funcione como una unidad autónoma, mueva este interruptor a la posición STAND
ALONE. Si desea que funcione como un satélite conectado al sistema Maxicom2, mueva este interruptor a la
posición MAXICOM (versiones ESP-SAT y de satélite ESP-SITE solamente). Si el controlador no está conectado a
Maxicom2, la posición de este interruptor no tendrá ningún efecto sobre el riego.
Page 61

Rutina de Prueba de Estaciones Rápida — RASTER
TM
7
Introducción
La prueba RASTERTM(Rutina de Prueba de Estaciones Rápida) de Rain Bird le permite diagnosticar y resolver
problemas con el cableado y selenoides de manera rápida y sencilla.
El RASTERTMenvía una señal eléctrica a las terminales de las válvulas en el controlador e indica la condición
operativa actual de cada válvula. Los resultados aparecen en la pantalla digital.
El RASTERTMrevisa cada estación e indica en pantalla una de las dos posibles condiciones:
• Open (Abierto) — El circuito entre el controlador y la válvula se encuentra abierto.
• Short (Corto) — El circuito entre el controlador y la válvula tiene un corto.
El RASTER
TM
es una manera rápida y sencilla de revisar que las válvulas maestras y las válvulas de estaciones están
trabajando correctamente.
La nueva rutina RASTERTMestá disponible en los controladores ESP-MC, ESP-SAT, ESP-SITE-SAT y el ESP-LX+ de
Rain Bird.
Page 62

Rutina de Prueba de Estaciones Rápida — RASTERTM, continuación
8
Operación del RASTER
TM
Utilice el siguiente procedimiento para ejecutar la
rutina RASTERTMen las válvulas maestras y en las
válvulas de estación.
Iniciar el RASTER
TM
1. Gire la perilla de programación a la posición
“OFF”.
2. Presione simultáneamente los botones
▲/ON y ▼/OFF
.
3. La pantalla se verá como lo muestra la ilustración
abajo.
4. Presione el botón “MAN START/ADV” para
iniciar la rutina RASTER
TM
.
5. En la pantalla aparece “TEST IO” y en la placa
frontal las luces indicadoras parpadean una vez
de manera que el RASTER
TM
confirma que están
operando correctamente.
NOTA: Si la placa frontal no está conectada a la
placa de salidas o el controlador no está
conectado a la fuente principal de energía
eléctrica, la pantalla mostrará el mensaje “NO
OUT”.
Inmediatamente después el RASTERTMrevisa
automáticamente las válvulas maestras y cada
una de las válvulas de estación (en orden
numérico) del controlador.
Page 63

Rutina de Prueba de Estaciones Rápida — RASTERTM, continuación
9
6. La pantalla muestra “TEST M1” y “TEST M2” de
manera que el RASTERTMempieza a revisar la
operación de las válvulas maestras (una válvula
automática instalada en la línea de la tubería
principal que se extiende hasta las válvulas de
estación).
7. Si la pantalla muestra “SHORT M1”, “OPEN M1”,
“SHORT M2” u “OPEN M2”, puede haber un
circuito dañado entre el controlador y la válvula
maestra. (En sistemas de riego no equipados con
una válvula maestra, el indicador “OPEN M1” u
“OPEN M2” es normal y no requiere de servicio).
Ver “Solución de Problemas de Cortos y Circuitos
Abiertos en las Válvulas” en la página 12 para
mayor información sobre como identificar y
reparar cortos y circuitos abiertos.
Page 64

Rutina de Prueba de Estaciones Rápida — RASTERTM, continuación
10
Prueba de Válvulas
Después de revisar las válvulas maestras, el
RASTERTMprueba automáticamente cada válvula, en
orden numérico de menor a mayor.
1. La pantalla muestra la condición operativa de la
válvula (OPEN o SHORT), seguida por el número
de estación (hasta 40 estaciones, dependiendo del
modelo del controlador). En este ejemplo la
pantalla indica un corto en la válvula de la
estación número 4.
2. El RASTER
TM
indica en pantalla la condición de
cada válvula por 10 segundos, y luego pasa a la
siguiente válvula. Usted puede presionar el botón
“MAN/START/ADV” (o cualquier otro botón
de color magenta) en cualquier momento para
avanzar y probar la siguiente estación.
NOTA: Cualquier estación del controlador que no
tenga conectada una válvula aparecerá como
abierta “OPEN”. Por ejemplo, si usted tiene un
controlador de 12 estaciones y tiene conectadas
las válvulas en las estaciones del 1 hasta el 10,
las estaciones 11 y 12 indicarán “OPEN” en el
RASTER
TM
. Esto es normal y no indica algún
problema con el controlador o con las válvulas
del sistema.
Page 65

Rutina de Prueba de Estaciones Rápida — RASTERTM, continuación
11
3. Si las válvulas maestras y todas las válvulas de las
estaciones pasan el RASTERTM, la pantalla
mostrará parpadeando “PASS” por 10 segundos.
Entonces el controlador regresará a su
funcionamiento normal.
4. Si el RASTERTMdetecta algún problema con la
vávula maestra o con alguna válvula de estación,
la pantalla indicará “CHECK” por 3 segundos,
después indicará en la pantalla el problema de la
válvula (OPEN o SHORT) y el número de estación
o válvula maestra.
Cada estación con problema será indicada en
pantalla y parpadeará por 5 segundos. Presione
“MAN/START/ADV” en cualquier momento
para pasar a la siguiente estación con problema.
Cualquier válvula que indique “OPEN” o
“SHORT” debe ser revisada por problemas de
cableado o cualquier otro problema con el
circuito. Para mayor información, véase la página
12 “Solución de Problemas de Cortos y Circuitos
Abiertos en las Válvulas.”
Page 66

Rutina de Prueba de Estaciones Rápida — RASTERTM, continuación
12
5. Para salir del RASTERTM, gire la perilla de
programación de la posición “OFF” a la posición
“AUTO” (o cualquier otra posición).
6. El controlador regresa a su funcionamiento
normal.
Solución de Problemas de Cortos
y Circuitos Abiertos en las Válvulas
Circuitos Abiertos
Una condición abierta “OPEN”reportada por el
RASTERTMindica una interrupción completa del
flujo de corriente entre el controlador y la válvula.
NOTA: El RASTERTMindicará en pantalla la
condición abierta “OPEN” si no hay conectado
ningún solenoide a la válvula del controlador. Esto es
normal y el sistema no necesita de ningún servicio.
Los circuitos abiertos pueden ser ocasionados por:
• Solenoide dañado en la válvula.
• Cables de conexión del solenoide cortados o
desconectados.
• Desconexión del cable en la terminal de conexión
del controlador o en el solenoide de la válvula.
• Componente dañado en la placa interna del
controlador.
Page 67

Rutina de Prueba de Estaciones Rápida — RASTERTM, continuación
13
Corto Circuitos
Una condición de corto “SHORT” reportada por el
RASTERTMindica una variación no intencionada de
la trayectoria del flujo de corriente en algún punto
entre el controlador y la válvula.
Los corto circuitos pueden ser ocasionados por:
• Solenoide en corto circuito en la válvula.
• Aislamiento del cable de conexión dañado.
• Conexión oxidada o suelta en la terminal de
conexión del controlador o en el solenoide de la
válvula.
• Componente dañado en la placa interna del
controlador.
Resolver Cortos y Circuitos Abiertos
Para resolver el problema de una estación de
válvulas cuando se identifica una condición abierta
“OPEN” o con corto “SHORT”:
1. Asegúrese que los cables de la válvula se
encuentren bien conectados a la terminal de
conexión del controlador.
2. Si los cables están bien conectados, mueva el
cable de la estación a una estación que haya
pasado el RASTERTMy repita la prueba.
3. Si la condición “OPEN” o “SHORT” se mueve a la
nueva estación revise el cable o el solenoide de la
válvula.
4. Si se repite la condición “OPEN” o “SHORT” en la
estación original significa que la placa interna
requiere servicio.
Page 68

Programación del controlador
14
Usando los botones y el dial en la placa frontal del controlador, se puede programar el controlador para que
funcione automáticamente. También se puede hacer funcionar el controlador manualmente sin hacer cambios en
los programas que ya están configurados.
Este capítulo describe el uso de los botones y el dial del controlador y proporciona instrucciones paso a paso para
configurar los cuatro programas de acuerdo a sus requerimientos.
Antes de programar el controlador
El controlador viene de la fábrica sin un programa predeterminado. La tabla siguiente presenta un resumen de las
configuraciones de programa predeterminadas del controlador:
Antes de empezar a programar el controlador, le recomendamos que planifique el horario de riego en una hoja de
papel teniendo en cuenta el horario de todas las estaciones y la frecuencia con la que se desea repetir dicho
horario. En las páginas 36 y 37 proporcionamos un horario en blanco.
Ciclo especial
Prog.
No. de
estación
Duración
de riego
Hora de
inicio
A Todas 0 Min 8:00A encendido encendido encendido encendido encendido encendido encendido
1
(LUN)2(MAR)3(MIE)4(JUE)5(VIE)6(SÁB)7(DOM)
Page 69

Programación del controlador, continuación
15
Programación del reloj y el calendario
Para programar el controlador, primero se debe
ajustar el reloj y el calendario internos del
controlador.
Para ello, haga lo siguiente:
1. Gire el selector a la posición TIME/CALENDAR
(HORA/CALENDARIO).
Los números horarios intermitentes en la
pantalla indican que están listos para ajustarse.
2. Utilice las teclas con flechas para asignar la hora
correcta.
Si tiene un modelo de 60 Hz, cuando pase las
12:00, cambiará la denominación am/pm.
Nota: El modelo de 60 Hz presenta la hora en
formato de 12 horas (am y pm). El modelo de 50
Hz presenta la hora en formato de 24 horas.
3. Presione MAN START/ADV
(INICIO MANUAL/AVANCE).
Los números de los minutos aparecerán
intermitentemente indicando que están listos
para ser especificados.
4. Utilice las teclas con flechas para especificar los
minutos de la hora correcta.
5. Presione MAN START/ADV
(INICIO MANUAL/AVANCE).
Aparece una nueva presentación con el día, el
mes y el año. El mes parpadea indicando que está
listo para ser programado.
6. Utilice las teclas con flechas y MAN START/ADV
(INICIO MANUAL/AVANCE) para indicar el
mes, el día y el año tal como programó la hora y
los minutos en el paso anterior.
7. Presione MAN START/ADV (INICIO
MANUAL/AVANCE) dos veces para volver a la
presentación de la hora del día.
La hora aparecerá intermitentemente mientras
que el dial quede en TIME/CALENDAR
(HORA/CALENDARIO).
8. Regrese el dial a AUTO (AUTOMÁTICO).
En la pantalla aparecerá el día de la semana y la
hora del día.
Page 70

Programación del controlador, continuación
16
Configuración de un programa
El controlador ofrece cuatro programas
independientes: A, B, C y D. Cada uno de ellos se
puede configurar para que funcione conforme a lo
que usted disponga. Al configurar un programa se
hace lo siguiente:
• se selecciona el programa
• se especifica un ciclo para el programa
• se asignan las estaciones y se programan las dura-
ciones de riego y las horas de inicio de la estación
Es más fácil seleccionar un programa y configurarlo
totalmente. Saltar de un programa a otro puede
causar confusiones.
Primer paso: Selección del programa
Para seleccionar el programa que desea configurar,
haga lo siguiente:
Presione PGM (PROG.) para pasar por los
programas disponibles.
El indicador de programa ubicado en el lado
extremo izquierdo de la pantalla cambia.
Segundo paso: Selección del ciclo
Cada programa puede funcionar en una de cuatro
modalidades de ciclo:
• CUSTOM (ESPECIAL) para regar los días de la
semana que usted especifique.
• CYCLICAL (CÍCLICO) para regar conforme a un
ciclo con un número determinado de días.
• ODD (IMPAR) para regar únicamente los días
impares del mes.
• EVEN (PAR) para regar únicamente los días pares
del mes.
Nota: La posición predeterminada de todos los
programas es el ciclo Custom (especial).
Para programar un ciclo especial, haga lo siguiente:
1. Gire el dial a la posición CUSTOM (ESPECIAL).
La pantalla muestra el programa y el texto
CUSTOM (ESPECIAL).
El texto USED (USADO) aparecerá en la pantalla
si el programa está activo y está utilizando una
modalidad de ciclo diferente. Si lo desea, es
posible cancelar la programación anterior.
2. Si el programa que usted desea utilizar no es el
que se muestra en la pantalla, presione PGM
(PROG.) hasta que aparezca.
3. Presione ON (ENCENDIDO).
En la pantalla aparece la palabra CUSTOM
(ESPECIAL) y se enciende la luz correspondiente
en la placa frontal.
Page 71

Programación del controlador, continuación
17
4. Gire el dial hasta llegar al primer día de la semana
y utilice ON (ENCENDIDO) y OFF (APAGADO)
para activar o desactivar el día.
La pantalla indica el día y el parámetro ON/OFF
(ENCENDIDO/APAGADO).
5. Repita el paso 4 para todos los días de la semana
que desee cambiar.
6. Regrese el dial a la posición AUTO
(AUTOMÁTICO).
El controlador vuelve a indicar la hora del día y
funcionará los días que usted ha programado.
Para programar un ciclo cíclico, haga lo siguiente:
1. Si el programa que desea no se muestra en la
pantalla, presione PGM (PROG.) hasta que
aparezca.
2. Gire el dial hasta llegar a CYCLICAL (CÍCLICO).
La pantalla muestra el número de días que
quedan y el número de días que componen el
ciclo. El número de días del ciclo parece
intermitentemente indicando que está listo para
ser programado. Si no está parpadeando presione
MAN START/ADV (INICIO MANUAL/AVANCE)
hasta que el número de días en el ciclo esté
intermitente.
Si el programa está activo y un ciclo diferente está
siendo usado, la palabra USED (USADO)
aparecerá en la pantalla. En este caso, es posible
cancelar la programación anterior.
3. Presione ON (ENCENDIDO).
La indicación cíclica aparecerá y la luz de la
modalidad cíclica se encenderá en la placa
frontal.
4. Utilice las teclas con flechas para programar el
número de días que integran el ciclo.
Por ejemplo, si programa un ciclo de tres días, el
controlador salta dos días y activa el riego el
tercer día.
5. Presione MAN START/ADV (INICIO
MANUAL/AVANCE) para pasar al lado izquierdo
de la pantalla.
El número de días que quedan en el ciclo
aparecerá intermitentemente, indicando que está
listo para programarse.
6. Utilice las teclas con flechas para programar el
número de días hasta el siguiente día de riego.
Esto le indica al controlador en qué parte del
ciclo que usted acaba de programar figura el día
de hoy. Por ejemplo, si DAYS REMAINING (DÍAS
QUE FALTAN) se coloca a “0,” se regará ese día. Si
DAYS REMAINING (DÍAS QUE FALTAN) se coloca
a “1,” se regará el día siguiente.
7. Devuelva el dial a AUTO (AUTOMÁTICO).
En la pantalla el controlador vuelve a indicar la
hora del día y activará el riego los días que usted
ha especificado.
Page 72

Programación del controlador, continuación
18
Para programar un ciclo de días pares o impares,
haga lo siguiente:
1. Si el programa que desea utilizar no es el que
aparece en la pantalla, presione PGM (PROG.)
hasta que aparezca.
2. Gire el dial hasta llegar a ODD DAYS (DÍAS
IMPARES) o EVEN DAYS (DÍAS PARES).
En la pantalla se indica el programa y si este es
ODD (IMPAR) o EVEN (PAR).
Si el programa está activo y un ciclo diferente está
siendo usado, la palabra USED (USADO)
aparecerá en la pantalla. En este caso, es posible
cancelar la programación anterior.
3. Presione ON (ENCENDIDO).
En la pantalla aparece ODD (IMPAR) o EVEN
(PAR) y la luz correspondiente se ilumina en la
placa frontal.
4. Regrese el dial a AUTO (AUTOMÁTICO).
En la pantalla se vuelve a indicar la hora del día y
el controlador iniciará el riego en los días que
usted ha indicado.
Nota: El trigésimo primer día del mes se enciende
automáticamente, de manera que si usted no
desea regar en esa fecha, deberá programar el
controlador para que no accione el riego ese día.
Consulte la página 23 para obtener más
información.
Tercer paso: Programación de la
duración del riego de una estación
En el programa que usted configura, es posible ajustar la
duración del riego de una estación de 0 minutos hasta
12 horas. Ajuste el tiempo de riego en incrementos de
un minuto hasta un máximo de dos horas; y en
incrementos de diez minutos de dos a doce horas.
Para ajustar la duración del riego de una estación,
haga lo siguiente:
1. Si el programa que usted desea utilizar no es el
que aparece en la pantalla, presione PGM
(PROG.) hasta que aparezca.
2. Gire el dial hasta llegar a STATION WATERING
TIME (DURACIÓN DE RIEGO DE LA ESTACIÓN).
En la pantalla se indica el programa, el número
de la estación y la duración de riego. El número
de la estación aparece intermitentemente para
indicar que está listo para programarse.
Si la estación está incluida en otro programa, el
controlador le avisará substituyendo la duración
de riego con la palabra USED (USADO).
3. Utilice las teclas con flechas para mostrar el
número de la estación que desea programar.
4. Presione MAN START/ADV (INICIO MANUAL
/AVANCE) para pasar al lado derecho de la pantalla.
El número que indica la duración del riego
aparece intermitentemente para indicar que está
listo para programarse.
Page 73

Programación del controlador, continuación
19
5. Utilice las teclas con flechas para programar la
duración del riego.
Si aparece la palabra USED (USADO), aún es
posible cambiar la duración del riego. (Se puede
incluir la misma estación en diferentes
programas y programar diferentes duraciones de
riego para dicha estación).
6. Regrese el dial a AUTO (AUTOMÁTICO).
El controlador regresa a la pantalla que muestra
la hora del día.
Cuarto paso: Programación de las horas
de inicio del riego
Es posible asignar hasta ocho horas de inicio por día
a cada programa, las cuales pueden comenzar en
los cuartos de hora.
Para asignar las horas de inicio, haga lo siguiente:
1. Si el programa que usted desea utilizar no es el
que se muestra en la pantalla, presiones PGM
(PROG.) hasta que aparezca.
2. Gire el dial hasta llegar a WATERING START TIME
(HORA DE INICIO DEL RIEGO).
En la pantalla aparece el programa, el número de
la hora de inicio y la hora de inicio. El número de
la hora de inicio aparece intermitentemente para
indicar que está listo para programarse.
3. Utilice las teclas con flechas para seleccionar una
de las ocho horas de inicio.
4. Presione MAN START/ADV (INICIO
MANUAL/AVANCE) para pasar al lado derecho
de la pantalla.
La hora de inicio aparece intermitentemente para
indicar que está lista para programarse.
5. Utilice las teclas con flechas para seleccionar la
hora de inicio. Dichas horas están disponibles en
intervalos de quince minutos. El modelo de 60 Hz
tiene un ajuste que le permite apagarse entre las
11:45 pm y las 12:00 am (el de 50 Hz, entre las
23:45 y 24:00).
Nota: Las horas de inicio se presentan en orden
cronológico. Si borra una hora de inicio apagándola,
todas las horas subsiguientes se indicarán con un
número de inicio menos. Cuando se agrega un
tiempo de inicio a cualquier número de hora de
inicio, el controlador reorganiza automáticamente las
horas de tal forma que aparezcan en orden
cronológico. Esta reorganización ocurre únicamente
después de que el dial se ha movido fuera de la
posición WATERING START TIMES (HORAS DE
INICIO DEL RIEGO).
6. Si desea programar horas de inicio adicionales,
presione MAN START/ADV (INICIO
MANUAL/AVANCE) para volver al lado izquierdo
de la pantalla y al siguiente número de hora de
inicio disponible. Programe la siguiente hora de
inicio tal como programó la primera.
7. Regrese el dial a AUTO (AUTOMÁTICO).
El controlador regresa a la pantalla de la hora del día.
Page 74

Programación del controlador, continuación
20
Quinto paso: Configuración de
programas para apilarlos o sobreponerlos
Se pueden configurar los programas para apilarlos
(ejecutarlos uno por uno) o sobreponerlos
(ejecutarlos simultáneamente). El controlador
puede operar hasta nueve válvulas simultáneamente.
La configuración predeterminada es que los
programas se apilen.
Para configurar los programas a fin de apilarlos o
sobreponerlos, haga lo siguiente:
1. Gire el dial hasta llegar a PROGRAM OVERLAP
(SUPERPOSICIÓN DE PROGRAMAS).
En la pantalla se muestra el programa y la indicación
STACK (APILADO) u OVERLAP (SOBREPUESTO).
2. Si el programa que usted desea utilizar no es el
que se muestra en la pantalla, presione PGM
(PROG.) hasta que aparezca.
3. Utilice las teclas con flechas para configurar el
programa a fin de APILADO o SOBREPUESTO.
4. Regrese el dial a AUTO (AUTOMÁTICO).
El controlador regresa a la pantalla que muestra
la hora del día.
Sexto paso: Configuración del arranque
de la bomba de la válvula principal
El controlador tiene terminales para dos válvulas
principales en el tablero de circuitos. La válvula
principal 2 (MV2) se activa cuando funciona cualquiera
de las estaciones. La válvula principal 1 (MV1) se puede
activar o desactivar para cada estación.
Para configurar la válvula principal 1 (MV1) para
una estación, haga lo siguiente:
1. Gire el dial hasta llegar a MV PUMP START
(INICIO DE LA VÁLVULA PRINCIPAL PARA LA
BOMBA).
En la pantalla se muestra el número de la
estación y si la válvula está ENCENDIDA (MV
ON) ó APAGADA (MV OFF). El número de la
estación aparece intermitentemente para indicar
que puede programarse.
2. Utilice las teclas con flechas para seleccionar el
número de la estación.
3. Presione MAN START/ADV (INICIO
MANUAL/AVANCE) para pasar al lado derecho
de la pantalla. La indicación ON (ENCENDIDO) u
OFF (APAGADO) aparece intermitentemente
para indicar que está lista para programarse.
4. Presione ON (ENCENDIDO) u OFF (APAGADO).
5. Si desea programar otra estación, presione MAN
START/ADV (INICIO MANUAL/AVANCE)
para volver al lado izquierdo de la pantalla a fin
de seguir programando las estaciones.
6. Cuando termine de programar las estaciones,
regrese el dial a AUTO (AUTOMÁTICO).
El controlador regresa a la pantalla en donde se
muestra la hora del día.
Page 75

Programación del controlador, continuación
21
Programación del ajuste Rain
Delay (Demora por lluvia)
El controlador le permite retrasar el riego durante
un número determinado de días hasta un máximo
de 99 días. El ajuste rain Delay (Demora por lluvia)
afecta a todos los programas.
Para programar el ajuste mencionado, haga lo
siguiente:
1. Gire el dial hasta llegar a RAIN DELAY (DEMORA
POR LLUVIA).
En la pantalla aparece la leyenda RAIN DELAY y
el número de días que quedan hasta el comienzo
del próximo ciclo.
2. Utilice las teclas con flechas para programar el
número de días que faltan para el comienzo del
ciclo siguiente.
3. Regrese el dial a AUTO (AUTOMÁTICO).
En la pantalla se vuelve a mostrar la hora del día y
el controlador retrasará el riego el número de
días que usted haya indicado.
Note: Para cancelar el Rain Delay (Demora por
lluvia), cambie el número de días a 0.
Programación del ajuste
Cycle + Soak
TM
(Ciclo y remojo)
Este ajuste ha sido diseñado para conservar agua
que podría acumularse en charcos en suelos poco
permeables (arcillosos) o escurrirse por las
pendientes. Cycle + SoakTM(Ciclo y remojo) permite
dividir el tiempo total de riego de una estación en
ciclos más cortos, introduciendo un período de
remojo entre un ciclo y otro. Se programa la
duración máxima del riego y la duración mínima
del remojo. Esta configuración afecta todos los
programas en los que la estación está incluida.
Por ejemplo, si desea regar una estación durante un
total de 20 minutos, pero el agua comienza a
escurrirse después de los primeros 5 minutos, es
posible programar la estación para que los ciclos de
riego duren un máximo de cinco minutos y entre un
ciclo y otro haya una pausa de un mínimo de 25
minutos. Mientras la estación se encuentre en la
modalidad de remojo, el controlador operará otras
estaciones del programa.
Nota: Si el controlador no tiene nada más que hacer,
aparte de esperar a que transcurra un ciclo de
remojo, el indicador mostrará SK (REMOJO).
Nota: El programa de prueba no responde a las
configuraciones de Cycle + Soak
TM
(Ciclo y remojo).
Para programar el ajuste Cycle + SoakTM(Ciclo y
remojo), haga lo siguiente:
1. Gire el dial hasta llegar a CYCLE + SOAK
TM
(CICLO
Y REMOJO).
Page 76

Programación del controlador, continuación
22
La pantalla muestra el número de la estación, la
duración máxima del riego y el tiempo mínimo
de remojo. El número de la estación aparece
intermitentemente indicando que está listo para
programarse.
2. Utilice las teclas con flechas para seleccionar la
estación.
3. Presione MAN START/ADV (INICIO
MANUAL/AVANCE)
El número correspondiente a la duración del
riego aparece intermitentemente para indicar
que está listo para programarse.
4. Utilice las teclas con flechas para programar la
máxima duración del riego, de 1 a 99 minutos.
5. Presione MAN START/ADV (INICIO
MANUAL/AVANCE).
El número correspondiente a la duración del
remojo aparece intermitentemente para indicar
que está listo para programarse.
6. Utilice las teclas con flechas para programar la
duración mínima de remojo, de 1 a 99 minutos.
7. Si desea programar el ajuste Cycle + SoakTM(Ciclo
y remojo) para otra estación, presione MAN START/
ADV (INICIO MANUAL(AVANCE) otra vez.
8. Cuando termine de programar el ajuste Cycle +
Soak
TM
(Ciclo y remojo), regrese el dial a AUTO
(AUTOMÁTICO).
El controlador regresa a la pantalla en donde
aparece la hora del día.
Programación del ajuste Water
Budget (Ahorro de agua)
El ajuste de ahorro de agua le permite aumentar o
disminuir la duración de riego de un programa en
incrementos de 1%, sin tener que volver a
especificar el tiempo asignado a cada estación. Es
posible ajustar el ahorro del 0 al 300%. El ajuste del
0% se puede utilizar para desactivar temporalmente
el programa.
Para programar el ahorro de agua, haga lo siguiente:
1. Gire el dial hasta llegar a WATER BUDGET
(AHORRO DE AGUA).
En la pantalla aparece el programa y el
porcentaje de ahorro de agua.
2. Presione PGM (PROG.) hasta que el programa
que usted desea utilizar aparezca en la pantalla.
Page 77

Programación del controlador, continuación
23
3. Utilice las teclas con flechas para programar el
porcentaje.
4. Regrese el dial a auto AUTO (AUTOMÁTICO).
El controlador regresa a la pantalla en donde
aparece la hora del día. El porcentaje
predeterminado de todos los programas es el
100%. Cuando la asignación de agua de un
programa se configura a otra cantidad que no sea
el 100%, la leyenda WATER BUDGET (AHORRO
DE AGUA) aparecerá en la pantalla al seleccionar
el programa.
Nota: El tiempo de riego máximo con el ajuste
WATER BUDGET (AHORRO DE AGUA) es de 16
horas.
Programación del ajuste Event
Day Off (Apagado en días
especiales)
La opción Event Day Off (Apagado en días
especiales) permite omitir temporalmente uno o
varios días del calendario de los ciclos de riego.
Después de que transcurre un día del calendario,
este día vuelve al ajuste predeterminado, es decir,
ENCENDIDO. Si el controlador se programa para
desactivar el trigésimo primer día, dicho día
permanecerá desactivado hasta que se vuelva a
ENCENDER, lo cual se hace para ajustar los ciclos
de riego de días impares que no permiten regar los
días 31.
Para desactivar un día, haga lo siguiente:
1. Gire el dial hasta llegar a EVENT DAY OFF
(APAGADO EN DÍAS ESPECIALES)
En el lado izquierdo de la pantalla aparece el día
del mes y en el derecho ON (ENCENDIDO) u
OFF (APAGADO). El número correspondiente al
día del mes aparece intermitentemente para
indicar que está listo para programarse.
2. Utilice las teclas con flechas para seleccionar el
días del mes que desea modificar.
3. Presione MAN START/ADV (INICIO
MANUAL/AVANCE) para pasar al lado derecho
de la pantalla.
La leyenda ON/OFF (ENCENDIDO/APAGADO)
aparece intermitentemente para indicar que está
lista para programarse.
4. Si desea activar el riego en un día, presione ON
(ENCENDIDO); si desea desactivarlo, presione
OFF (APAGADO).
5. Regrese el dial a AUTO (AUTOMÁTICO).
Cuando llega un día de riego desactivado,
aparece la indicación NON (NO – para indicar
que en ese día no hay riego) y el controlador no
permite el riego.
Page 78

Programación del controlador, continuación
24
Programación del ajuste de
demora entre estaciones
El controlador le permite programar una demora
entre estaciones para cada programa. La demora
puede ser de 0 segundos (predeterminado) a nueve
horas.
Para programar una demora entre estaciones, haga
lo siguiente:
1. Gire el dial hasta llegar a TEST/STATION DELAY
(PROGRAMA DE PRUEBA).
2. Presione ▲/ON (ENCENDIDO) y ▼/OFF
(APAGADO) simultáneamente.
Aparece en la pantalla la leyenda DELAY
(DEMORA).
3. Presione PGM (PROG.) para seleccionar el
programa al cual se le va a hacer un ajuste de
demora.
4. Utilice ▲/ON (ENCENDIDO) y ▼/OFF
(APAGADO) para seleccionar el tiempo de
demora deseado. El tiempo de demora se puede
establecer en:
• incrementos de un segundo, entre un segundo
y cinco minutos
• incrementos de un minuto, entre cinco minu-
tos y nueve horas
Función para borrar todos los
programas
El controlador le permite borrar todos los
programas. Esta función borra todas las
configuraciones y programas previamente
establecidos, a fin de permitirle reprogramar el
controlador.
Para borrar todos los programas del controlador,
haga lo siguiente:
1. Gire el dial hasta llegar a OFF (APAGADO).
2. Mantenga presionadas ▲/ON (ENCENDIDO)
y MAN START/ADV (INICIO MANUAL/
AVANCE) durante diez segundos.
La pantalla muestra que el programa está
recorriendo varios ajustes a medida que el
controlador los borra.
Cuando en la pantalla aparece la leyenda Thu
12:00 am (Jue 12:00 am), esto indica que se han
borrado todos los programas y se puede
comenzar a programar el controlador.
Page 79

Operación del controlador
25
Una vez que se ha programado el controlador, su operación es muy sencilla. Puede operarlo en forma totalmente
automática, o manualmente de vez en cuando. Cuando el aparato se maneja en forma manual, no se interrumpe
ninguna de las instrucciones programadas.
Page 80

Operación del controlador, continuación
26
Operación automática
Para operar el controlador automáticamente, haga
lo siguiente:
Gire el dial hasta llegar a AUTO (AUTOMÁTICO).
El controlador ejecuta cada programa tal como
usted ha indicado.
Nota: El controlador funcionará automáticamente en
cualquier posición excepto OFF (APAGADO). Sin
embargo, no aparecerá en la pantalla el día, la hora
ni el estado del programa. El controlador no
funcionará cuando está en la posición OFF
(APAGADO).
Operación manual
Existen varias funciones que se pueden ejecutar
manualmente. Estas funciones se describen en esta
sección.
Operación manual de uno o varios
programas
Es posible seleccionar, iniciar y avanzar
manualmente los programas para una operación
semiautomática. Para ello debe hacer lo siguiente:
1. Gire el dial hasta llegar a AUTO (AUTOMÁTICO).
La pantalla muestra el día de la semana y la hora
del día.
2. Presione PGM (PROG.) hasta que aparezca el
programa que desea utilizar.
3. Presione MAN START/ADV (INICIO
MANUAL/AVANCE) para iniciar el programa que
ha seleccionado.
4. Si desea operar más de un programa, presione
PGM (PROG.) para seleccionar otro programa
y presione MAN START/ADV (INICIO
MANUAL/AVANCE) de nuevo.
El segundo programa empieza cuando termina el
primero. De esta manera es posible apilar los
cuatro programas.
Page 81

Operación del controlador, continuación
27
Operación manual de una o varias
estaciones
Es posible iniciar el funcionamiento de una o varias
estaciones una sola vez. Si se ponen en marcha varias
estaciones, ellas funcionarán en el orden de selección.
Para operar una o varias estaciones, haga lo
siguiente:
1. Gire el dial hasta llegar a MANUAL WATERING
(RIEGO MANUAL).
En la pantalla se indica el programa, el número
de la estación y el tiempo de riego restante de
dicha estación.
2. Presione PGM (PROG.) hasta que el
programa que usted desea utilizar aparezca en la
pantalla.
3. Utilice las teclas con flechas para seleccionar la
estación que desea manejar.
4. Presione MAN START/ADV (INICIO
MANUAL/AVANCE) para iniciar la operación de
la estación que seleccionó.
5. Si desea operar más de una estación, repita los
pasos 2, 3 y 4.
6. Regrese el dial a AUTO (AUTOMÁTICO).
Las estaciones funcionan en la secuencia
seleccionada. Después de que las estaciones
terminan de regar, el controlador vuelve al modo
automático.
Nota: cuando una estación se opera manualmente,
no se puede cambiar el tiempo de riego asignado a
la estación. El controlador regará el tiempo que se
programó.
Uso del programa de prueba
El programa de prueba le permite ejecutar un ciclo
de prueba para todas las estaciones de un programa
en particular. También permite determinar la
duración de la prueba.
Para configurar e iniciar un programa de prueba,
haga lo siguiente:
1. Gire el dial hasta llegar a OFF durante 3
segundos, para cancelar cualquier operación en
curso. De otra manera el programa de prueba
será ejecutado después de que el modo
automático termine.
2. Gire el dial hasta llegar a TEST/STATION DELAY
(PROGRAMA DE PRUEBA).
En la pantalla aparece el programa, la palabra
TEST (PRUEBA) y la duración de la prueba.
3. Presione PGM (PROG.) hasta que el programa
que usted desea utilizar aparezca en la pantalla.
4. Utilice las teclas con flechas para programar la
duración de la prueba de cada estación, de 1 a 99
minutos.
5. Presione MAN START/ADV (INICIO
MANUAL/AVANCE) para iniciar la prueba.
Page 82

Operación del controlador, continuación
28
6. Si desea agregar otros programas a la prueba, gire el
dial hasta llegar TEST/STATION DELAY
(PROGRAMA DE PRUEBA), presione PGM
(PROG.) para seleccionar el programa. Después
presione MAN START/ ADV (INICIO MANUAL/
AVANCE) para apilar el nuevo programa después del
primero. Es posible apilar cuatro programas.
Nota: Para cancelar la prueba de todos los programas,
gire el dial hasta llegar a OFF (APAGADO).
Uso de la opción del sensor
El controlador permite conectar un sensor que puede
desactivar el riego. Cuando se conecta el sensor al
controlador y éste suspende el riego, la luz del sensor
ubicada en el panel frontal se ilumina.
Para activar el sensor, haga lo siguiente:
Mueva el interruptor del sensor a ACTIVE (ACTIVO).
El controlador funciona como de costumbre hasta
que el sensor suspende el riego y la luz indicadora
del mensaje SUSPENDED BY SENSOR
(SUSPENDIDO POR EL SENSOR) se ilumina.
Nota: Si no hay sensor conectado al aparato, el cable
del puente suministrado con cada controlador debe
estar en su lugar, conectando los terminales del
SENSOR que se encuentran en el tablero de circuitos.
Si se coloca el interruptor del SENSOR en la posición
de ACTIVE (ACTIVO) sin haber conectado un sensor ni
el cable del puente, el controlador no podrá operar las
válvulas y no se producirá riego.
Detección de fusible
La pantalla del controlador mostrará el mensaje FUSE
(FUSIBLE) si un fusible falta o se ha fundido.
Uso del circuito de protección para
diagnóstico de corto circuito
El controlador viene equipado con un sistema de
protección contra sobrecarga de los circuitos. Este
sistema hace que el controlador ignore las estaciones
que tienen cortocircuito en vez de fundir un fusible
que podría paralizar el sistema. Cuando el controlador
trata de iniciar una estación que tiene un cortocircuito,
el circuito de protección detecta el problema e ignora
esa estación. El controlador pasa a la siguiente
estación, pero presenta en pantalla un número
intermitente correspondiente a la estación omitida y
muestra el mensaje FAULT (FALLO).
Una vez que corrija el problema, presione el botón
FAULT RESET (RESTABLECER FALLO) para desactivar
el mensaje intermitente de fallo.
Nota: El circuito de protección permite la detección en
todas las estaciones incluyendo la válvula principal.
Cambio de la batería
1. Abra la puerta del gabinete donde se encuentra la
batería.
2. Libere el seguro deslizándolo hacia la izquierda y
abra la placa frontal.
3. Abra la tapa de la batería en la parte trasera de la
placa frontal. Retire la batería de 9-volt.
4. Instale una nueva batería recargable de 9-volt y
cierre la tapa.
Page 83

Operación del controlador, continuación
29
5. Cierre la placa frontal.
¡IMPORTANTE! El controlador debe usar baterías
recargables solamente. Las baterías no
recargables pueden dañar el controlador u
ocasionar peligro de incendio.
Page 84

Solución de problemas
30
Las páginas siguientes describen problemas que se podrían encontrar así como algunas soluciones. Antes de
llamar a Rain Bird, revise la lista. Si no puede resolver el problema usted mismo, llame a nuestro número de
emergencias de servicio técnico 1-800-247-3782 (1-800-BIRD-SVC) y estaremos a su disposición para ayudarle.
Solución de problemas generales
Problema
Los indicadores de la pantalla se encienden intermitentemente.
Solución
Puede haberse producido un corte de energía eléctrica. También revise la batería; puede estar
descargada o mal conectada.
Problema
Algunas partes faltan o están dañadas.
Soluciones
Intente una de las soluciones siguientes:
• Si el daño se produjo durante el envío, devuelva el controlador.
• Un relámpago dañó el controlador. Si el controlador está instalado, cambie la pieza que se daño
(panel frontal, tarjeta de salidas, transformador, gabinete, etc.).
Problema
El controlador no funciona; la pantalla está en blanco y no hay salidas de las estaciones.
Soluciones
Intente una de las soluciones siguientes:
• No hay energía eléctrica conectada al controlador. Asegúrese de que la fuente principal de energía
eléctrica esté funcionando.
• El transformador no está conectado correctamente. Asegúrese de que el cable de cinco filamentos
del transformador esté conectado correctamente al puente J7 de la tarjeta de salidas.
• El transformador está defectuoso. Asegúrese de que hayan 24 V CA entre los terminales “24VAC” y
“COM”.
Page 85

Solución de problemas, continuación
31
Problema
La pantalla y los ajustes de programación funcionan normalmente, pero las válvulas de las
estaciones y la principal no se pueden activar.
Soluciones
Intente una de las soluciones siguientes:
• El sensor ha suspendido el riego. Verifique que el indicador LED del sensor en el panel frontal esté
encendido. Si es así, el sensor ha suspendido el riego. Si es necesario regar inmediatamente,
mueva el interruptor de Sensor Bypass (Desconexión del sensor) a OFF (APAGADO).
• No se ha instalado sensor. El interruptor de Sensor Bypass (Desconexión del sensor) está en la
posición ACTIVE (ACTIVO) y no está el cable del puente a través de las entradas del sensor.
Coloque el interruptor Sensor Bypass (Desconexión del sensor) en la posición OFF (APAGADO) e
instale un puente de cable a través de los dos terminales del sensor que se encuentran en la
tarjeta de salidas.
• El sensor no está funcionando bien. Retire el sensor y coloque el interruptor Sensor bypass
(Desconexión del sensor) en la posición OFF (APAGADO) e intente activar las válvulas. Si esto
funciona, coloque el interruptor Sensor Bypass (Desconexión del sensor) en la posición ACTIVE
(ACTIVO) e intenta activar las válvulas. Si la pantalla indica que las válvulas están activas, pero
éstas no funcionan y el indicador LED WATERING SUSPENDED BY SENSOR (RIEGO
SUSPENDIDO POR SENSOR) está encendido, eso significa que la entrada del sensor no está
funcionando correctamente. Repare o cambie el sensor.
• El fusible principal se ha fundido. Si la palabra FUSE (FUSIBLE) aparece en la pantalla, cambia el
fusible 2.5 A que se encuentra en la tarjeta de salidas.
Problema
El controlador no ejecuta el cronograma programado.
Soluciones
Intente una de las soluciones siguientes:
• El dial del controlador está en la posición OFF (APAGADO). Mueva el dial hasta llegar a la posición
AUTO (AUTOMÁTICO).
• La característica Rain Delay (Demora por lluvia) ha sido activada. Cuando la característica Rain
Delay (Demora por lluvia) se activa, las palabras RAIN DELAY (DEMORA POR LLUVIA) aparecen en
la esquina superior izquierda de la pantalla del controlador. También aparece un número que indica
los días que faltan antes de que el controlador comience a ejecutar el programa. Para desactivar la
característica Rain Delay (Demora por lluvia), gire el dial hasta llegar a la posición RAIN DELAY
(DEMORA POR LLUVIA) y utilice ▼/Off para colocar el número de días que faltan a cero.
Page 86

Solución de problemas, continuación
32
• No se ha programado la hora de inicio para uno o varios programas. Gire el dial hasta llegar a la
posición WATERING START TIMES (HORAS DE INICIO DE RIEGO) y seleccione el programa
deseado con PGM (PROG.). Asegúrese de que se haya seleccionado la hora de inicio
apropiada para cada programa.
• Se ha programado para que el día de hoy no haya riego. Si éste es un día programado para que no
haya riego, la palabra NON (NO) aparecerá en la pantalla. Si desea regar hoy, mueva el dial hasta
llegar a la posición EVENT DAY OFF (APAGADO EN DÍAS ESPECIALES), seleccione el día del mes
apropiado y configúrelo en ON (ENCENDIDO).
• Se fundió el fusible y la batería todavía está cargada. Cambie el fusible.
• El controlador no recibe alimentación eléctrica y la batería todavía está cargada. Revise la fuente
de alimentación eléctrica de entrada.
Problema
Una estación no se puede activar.
Soluciones
Intente una de las soluciones siguientes:
• No se ha programado el tiempo de ejecución. Mueva el dial hasta llegar a la posición STATION
WATERING TIME (TIEMPO DE RIEGO DE LA ESTACIÓN), seleccione la estación que desea regar
y el tiempo de riego deseado.
• No se ha seleccionado el tiempo de inicio para el programa que contiene la estación deseada.
Mueva el dial hasta llegar a la posición WATERING START TIMES (HORA DE INICIO DEL RIEGO)
y seleccione el programa deseado con PGM (PROG.). Verifique que se hayan seleccionado los
tiempos de inicio apropiados.
• Hay un corto circuito en el cableado de la válvula o en el solenoide. En este caso, el mensaje
FAULT XX (FALLO XX) aparecerá intermitentemente en la pantalla. Revise el cableado de la
estación y el solenoide. Después de reparar el cortocircuito, presione FAULT RESET
(RESTABLECIMIENTO DE FALLO) que se encuentra en el panel frontal del controlador.
• Hubo un fallo en el MOV o el Triac. Retire la tarjeta de salidas y llévela al distribuidor local de Rain
Bird para su reparación o reemplazo si está dentro de la garantía.
Page 87

Solución de problemas, continuación
33
Problema
El controlador activa estaciones a horas inesperadas.
Soluciones
Intente una de las soluciones siguientes:
• La tecla MAN START/ADV. (INICIO MANUAL/AVANCE) está atascada lo cual hace que un
programa comience inesperadamente.
Presione la tecla MAN START/ADV. (INICIO MANUAL/AVANCE) y asegúrese de que regrese a
su lugar después de levantar el dedo.
• Se han introducido tiempos de programa adicionales accidentalmente. Revise las horas de inicio
de programa de los cuatro programas. Borre las que no debieran existir.
• El panel del controlador aparece alterado temporalmente debido a fluctuaciones y
sobretensiones de la alimentación eléctrica. Desconecte la alimentación eléctrica principal del
controlador Y también retire la batería. Deje que el controlador descanse durante cinco minutos
aproximadamente, luego vuelva a conectar la alimentación eléctrica al controlador. Si esto no
funciona, restablezca el controlador manteniendo presionadas ▲/ON (ENCENDIDO) y MAN
START/ADV. (INICIO MANUAL/AVANCE) hasta que las palabras en la pantalla empiecen a
cambiar. Cuando la pantalla muestre “12:00”, vuelva a programar el controlador.
• Las estaciones pueden estar conectadas a los terminales incorrectos. Revise qué cables de
estación están conectados con qué zonas conectando los cables (una estación por vez) al terminal
de 24 V CA del controlador. Cuando confirme que el cable enciende la zona deseada, vuelva a
conectar los cables a la estación correspondiente.
Problema
El tiempo de riego efectivo es diferente del tiempo programado.
La función de ahorro de agua está activada. Revise la característica de ahorro de agua para el
programa correspondiente que contiene la estación o estaciones que presentan el problema.
Problema
La pantalla está en blanco completamente o parcialmente,o muestra algo ilegible.
Solución
Una condición de sobretensión ha alterado la pantalla. Desconecte la alimentación eléctrica del
controlador, desinstale la batería recargable y deje que el controlador descanse durante cinco
minutos aproximadamente. Vuelva a conectar la alimentación eléctrica e instale la batería
recargable. Si no se ha producido un daño permanente, el controlador funcionará normalmente.
Page 88

Solución de problemas, continuación
34
Solución de problemas específicos de Maxicom
2
Problema
El controlador no está funcionando bajo el control Maxicom2.
Solución
Intente una de las soluciones siguientes:
• Revise el interruptor MAXICOM...STAND ALONE (MAXICOM…AUTÓNOMO) que se encuentra
en la parte posterior del panel frontal del controlador. Debe estar en la posición MAXICOM.
• Llame al número de emergencia del servicio técnico de Rain Bird para solicitar ayuda.
Problema
El controlador no riega, pero el sistema Maxicom2indica que la operación es normal.
Solución
El interruptor SENSOR está en la posición incorrecta. Mueva el interruptor SENSOR a la posición
OFF (APAGADO).
Problema
Una característica de Maxicom2parece que funciona correctamente en la computadora,pero no
funciona cuando se envía al controlador.
Solución
Asegúrese de que la asignación de canal en el controlador sea la misma que la asignación de canal
CCU. El controlador tiene un máximo de 28 asignaciones de canal, dependiendo del tipo de CCU al
cual esté conectado el controlador. Los controladores de satélite ESP-SITE deben estar configurados
para el canal 1.
Page 89

Apéndice A: Tabla de riego
35
Antes de comenzar a programar el controlador, le recomendamos que prepare un calendario de riego teniendo en
cuenta el horario de todas las estaciones y la frecuencia con que desea repetir dicho horario. Para obtener
instrucciones específicas sobre la programación del riego, consulte la página 14. A continuación se encuentra una
muestra del calendario. En las páginas siguientes se encuentra un calendario en blanco que usted puede copiar y
llenar.
15
14
13
12
11
10
9
8
7
6
5
4
3
2
1
CARTA DE LA PROGRAMACIÓN
Para Controlador ESP-MC
Línea directa para servicio técnico de Rain Bird: 800-247-3782
Estación Descripción
Válvula Principal/
Bomba 1*
Demora de Estación
Ahorro de Agua
Horas de Inicio
del Programa
Días del
Riego
APIL
SUPERPOSE
1
2
3
4
5
6
7
8
1
2
3
4
5
6
7
8
1
2
3
4
5
6
7
8
1
2
3
4
5
6
7
8
Tiempo de
ejecución
Ciclo Remonjo
%
%
%
%
Posterior Césped #2
Posterior Césped #1
Delanteros Arbustos
Posteriores Arbustos
Laterales Arbustos
Delantero Césped #4
Delantero Césped #3
Delantero Césped #2
Delantero Césped #1
4
10
10
20
20
5
10
10
20
20
20
100% 100%
120%
43%
8:00
7:00
8:45
6:00
7:00
9:00
11:00
2:00
4:00
8:00
10:00
11:45
9:00
3:00
APIL
SUPERPOSE
APIL
SUPERPOSE
APIL
SUPERPOSE
días ciclo
pares
impares
días ciclo
pares
impares
3
días ciclo
pares
impares
días ciclo
pares
impares
Programa D
Programa CPrograma BPrograma A
encendido
encendido
encendido
encendido
encendido
encendido
encendido
encendido
encendido
encendido
encendido
encendido
encendido
DLMMJVS
DLMMJVS
DLMMJVS DLMMJVS
Tiempo de
ejecución
Tiempo de
ejecución
Tiempo de
ejecución
Page 90

36
15
14
13
12
11
10
9
8
7
6
5
4
3
2
1
CARTA DE LA PROGRAMACIÓN
Para Controlador ESP-MC
Línea directa para servicio técnico de Rain Bird: 800-247-3782
Estación Descripción
Válvula
Principal/
Bomba 1*
Demora de Estación
Ahorro de Agua
Horas de Inicio
del Programa
Días del
Riego
APIL
SUPERPOSE
1
2
3
4
5
6
7
8
1
2
3
4
5
6
7
8
1
2
3
4
5
6
7
8
1
2
3
4
5
6
7
8
Tiempo de
ejecución
Ciclo Remonjo
%
%
%
%
APIL
SUPERPOSE
APIL
SUPERPOSE
APIL
SUPERPOSE
días ciclo
pares
impares
días ciclo
pares
impares
días ciclo
pares
impares
días ciclo
pares
impares
Programa D
Programa CPrograma BPrograma A
encendido
encendido
encendido
encendido
encendido
encendido
encendido
encendido
encendido
encendido
encendido
encendido
encendido
DLMMJVS
DLMMJVS
DLMMJVS DLMMJVS
Tiempo de
ejecución
Tiempo de
ejecución
Tiempo de
ejecución
encendido
16
encendido
encendido
Page 91

37
24
23
22
21
20
19
18
17
25
26
27
28
29
30
31
32
33
34
35
36
37
38
39
40
Notas:
Días Apagados:
*
La válvula principal 2 (MV2) se activa cuando funciona cualquiera de las estaciones.
encendido
encendido
encendido
encendido
encendido
encendido
encendido
encendido
encendido
encendido
encendido
encendido
encendido
encendido
encendido
encendido
encendido
encendido
encendido
encendido
encendido
encendido
encendido
encendido
Page 92

Apéndice B: Descripción general del sistema de control central MAXICOM
2
38
Los controladores ESP-MC y ESP-SAT
El controlador es una parte del sistema de control central Maxicom2de Rain Bird. (Vea el gráfico de la página
siguiente). Los controladores de satélite reciben comandos desde la unidad de control de grupos (CCU) y operan
las estaciones según el calendario de riego programado en la computadora central.
El sistema de control central Maxicom2para los controladores ESP-MC y ESP-SAT consta de las siguientes partes
principales:
1. Computadora central utiliza el programa de software Maxicom2para controlar todo el sistema
de riego
2. Opciones de vía de acceso de transfieren información desde la computadora central al CCU mediante
los datos informáticos comunicación telefónica o comunicación de radio/directa
3. Unidad de control de grupos opera dispositivos de campo mediante la ejecución de comandos
recibidos desde la computadora central
4. Opciones de vía de acceso de transfieren información desde la unidad de control de grupos a los
los datos del satélite dispositivos de campo mediante una ruta de acceso de dos cables (TW)
o mediante comunicación de radio MAXILink
5. Dispositivos de campo incluyen controladores de satélite o decodificadores:
Controladores de satélite — envían una señal de energía de 24 VCA a cada
estación
Decodificador — controla y monitorea las funciones del sistema
6. Estaciones constan de válvulas de riego, sensores o dispositivos operados mediante
interruptores
7. Estación climatológica interpreta las condiciones climatológicas y envía la información a la
computadora central
Page 93

39
Apéndice B, continuación
Computadora central
Teléfono
Radio
troncal
Teléfono
celular
Controlador
de satélite
Decodificador
Controlador
de satélite
Válvula
Sensor
Módem
alámbrico
de corta
distancia
Vía de acceso bialámbrica (TW) Radio MAXILink (LINK/R)
Estación climatológica
Sensor
Interruptor
o
Unidad de
control de
grupos en el
emplazamiento
Unidad de
control de
grupos en el
emplazamiento
Válvula Válvula
Válvula
Radioenlace
de punto
a punto
1.
Computadora
central
2.
Opciones de
vía de acceso
de los datos
informáticos
3.
Unidad de
control de
grupos (CCU)
4.
Opciones de
vía de acceso
de los datos
del satélite
5.
Dispositivos de
campo
6.
Estaciones
7.
Estación
climatológica
Versión teléfonica (PH) Versión de radio/directa
Page 94

Apéndice B, continuación
40
Controlador de satélite ESP-SITE
El controlador es una parte del sistema de control central Maxicom2de Rain Bird. (Vea el gráfico en la página
siguiente). Los controladores de satélite reciben comandos desde la computadora central y operan las estaciones
según el calendario de riego programado en la computadora central.
El sistema de control central Maxicom2para el controlador de satélite ESP-SITE consta de cinco partes
principales:
1. Computadora central utiliza el programa de software Maxicom2para controlar todo el sistema de
riego
2. Opciones de vía de acceso de transfieren información desde la computadora central al controlador de
los datos informáticos satélite ESP-SITE mediante comunicación telefónica o comunicación de
radio/directa
3. Controlador opera las estaciones mediante la ejecución de comandos recibidos desde la
computadora central
4. Estaciones constan de válvulas de riego, sensores o dispositivos operados mediante
interruptores
5. Estación climatológica interpreta las condiciones climatológicas y envía la información a la
computadora central
Page 95

41
Apéndice B, continuación
Computadora central
Teléfono
Radioenlace
de punto a punto
Radio
trancal
Teléfono
celular
Módem
alámbrico
de carta
distancia
Estación climatológica
Interruptor
o
Controlador
de Satélite
ESP-SITE
Controlador
de Satélite
ESP-SITE
Cable de
fibra óptica
Válvula Válvula
Sensor
Válvula Válvula
Sensor
1. Computadora central
2. Opciones de vía
de acceso de
los datos
informáticos
3. Controlador de satélite
ESP-SITE
4. Estaciones
5. Estación climatológica
Versión teléfonica (PH) Versión de radio/directa
Page 96

Apéndice C: Configuración del número de canal
42
Si está utilizando un controlador ESP-SAT o
controlador de satélite ESP-SITE, cada satélite
Maxicom2ubicado en una unidad de control de
grupo debe tener un número de canal para que
pueda efectuarse la comunicación.
Para configurar el número de canal, haga lo
siguiente:
1. Gire el dial que se encuentra en la placa frontal
del controlador hasta llegar a la posición
TIME/CALENDAR (HORARIO/CALENDARIO).
2. Presione MAN. START/ADV. (INICIO
MANUAL/AVANCE) que se encuentra en la placa
frontal hasta que aparezca el número “1” y la
palabra CHAN (CANAL) en la pantalla.
3. Utilice ▲/ON (ENCENDIDO) y ▼/OFF
(APAGADO) para seleccionar el número de canal
deseado.
Nota: Si el satélite es un modelo de 32 ó 40
estaciones, el controlador hará funcionar las
primeras 24 estaciones en el número de canal
seleccionado y las estaciones restantes en el
número siguiente de la secuencia. Por ejemplo, si
seleccionó el canal 5 en un satélite de 40
estaciones, las estaciones 1 a 24 funcionarán en
el canal 5 y las estaciones 25 a 40 en el canal 6.
¡Advertencia! Nunca seleccione el canal 28 (en una
unidad de control de grupo (CCU) de 28 canales) ni
el canal 6 (en una unidad de control de grupo (CCU)
de 6 canales) de un satélite de 32 ó 40 estaciones. No
existen más de 28 canales en una unidad de control
de grupo (CCU) de 28 canales y no más de 6 en una
unidad de control de grupo de 6 canales. Las
estaciones no funcionarán si están asignadas a
canales superiores a 28 (para una unidad de control
de grupo de 28 canales) ó 6 (para una unidad de
control de grupo de 6 canales).
Nota: Los controladores de satélite ESP-SITE deben
programarse en el canal 1.
Page 97

Apéndice D: Lista de partes de repuesto del controlador ESP-MC
43
Descripción de la parte
Panel frontal ESP-8MC
Panel frontal ESP-12MC
Panel frontal ESP-16MC
Panel frontal ESP-24MC
Panel frontal ESP-28MC
Panel frontal ESP-32MC
Panel frontal ESP-36MC
Panel frontal ESP-40MC
Gabinete
Tarjeta de terminales PED de 1-24 estaciones
Tarjeta de terminales PED de 25-40 estaciones
Tarjeta de salidas ESP-8MC
Tarjeta de salidas ESP-12MC
Tarjeta de salidas ESP-16MC
Tarjeta de salidas ESP-24MC
Tarjeta de salidas ESP-28MC
Tarjeta de salidas ESP-32MC
Tarjeta de salidas ESP-36MC
Tarjeta de salidas ESP-40MC
Transformador de 120 V
Transformador de 230 V
Manual — Inglés y Español
Fusible (2.5 Amp)
Batería recargable
Seguro para puerta
Page 98

Glosario
44
Glosario
ahorro de agua
Característica disponible en algunos controladores y sistemas de control central que permite cambiar los tiempos
de riego sin tener que volver a programar cada estación u horario de riego.
cable
Cable de comunicaciones que se utiliza para transmitir datos entre un dispositivo y otro.
calendario de la estación
Calendario de riego de una estación controlada por el controlador.
ciclo de riego
Ciclo de riego completo de todas las estaciones controladas por el controlador.
circuito de la válvula principal
Circuito eléctrico que en varios controladores sirve para controlar una válvula principal. Sin importar qué estación
esté encendida en el controlador, este circuito produce el voltaje necesario para controlar la válvula principal. El
circuito de la válvula principal se apaga al desactivarse todas las estaciones del controlador. Sin embargo, si el
circuito de la válvula principal es programable, entonces se puede configurar para que opere solamente cuando
ciertas estaciones están activadas.
configuración predeterminada
La configuración inicial del controlador. La configuración predeterminada no puede ser cambiada.
controlador
Dispositivo que activa las válvulas de campo accionadas por solenoide.
controlador satélite
Lo mismo que un satélite.
Cycle + SoakTM(Ciclo y remojo)
Una característica que permite conservar agua que podría acumularse en charcos en suelos poco permeables
(arcillosos) o escurrirse por las pendientes. Cycle + SoakTM(Ciclo y remojo) permite dividir el tiempo total de riego
de una estación en ciclos más cortos, introduciendo un período de remojo entre un ciclo y otro.
emplazamiento
Una zona regada en forma remota bajo el control de una unidad de control de grupos. Por ejemplo, un parque
constituye un emplazamiento de un conjunto de parques a nivel urbano.
Page 99

Glosario, continuación
45
ESP-MC
Controlador de 8-, 12-, 16-, 24-, 28-, 32-, 36-, ó 40- estaciones independientes que constituye un aparato
autónomo, pero que se puede actualizar como controlador satélite vinculado con Maxicom2.
ESP-SAT y ESP-SITE-Satellite
Un controlador que puede operar como un dispositivo autónomo o como un controlador de satélite vinculado
con Maxicom2.
GPM
Galones por minuto.
manual
Método que requiere la intervención del usuario en lugar del manejo automático por medio de un programa
informático.
MIB
Maxicom2Interface Board (MIB) – Tarjeta de interface Maxicom2. Permite la operación mediante controlador de
satélite. El MIB está preinstalado en los controladores ESP-MC para que se pueda añadir la capacidad de utilizar
satélite.
monitoreo o vigilancia
Significa observar las condiciones del sistema de riego y enviar la información a los diversos componentes del
sistema para tomar las medidas apropiadas.
pantalla de cristal líquido (LCD)
Pantalla iluminada que se utiliza en la placa frontal de la mayoría de los controladores.
programa
Una estación o grupo de estaciones que están operando con los mismos parámetros de cronograma de riego.
Todas las estaciones de un programa operan el mismo ciclo, las horas de inicio y el ahorro de agua del día
correspondiente.
satélite
Controlador ubicado en el campo, que puede comunicarse con la unidad de control de grupos (CCU).
Page 100

Glosario, continuación
46
sistema de sensor
Una adición opcional al controlador que desactiva el riego. Un ejemplo es el Rain Bird Rain Check (Control de
lluvia Rain Bird).
solenoide
Porción de una válvula de campo que recibe una corriente eléctrica de 24 VCA del controlador.
tarjeta de circuitos
Una de las placas de material aislante, forradas de cobre impreso, sobre la cual se ensamblan componentes y
terminales electrónicos. Los controladores contienen tarjetas de circuitos.
tarjeta de la unidad central de procesamiento (CPU)
La tarjeta de circuitos de la unidad de procesamiento central (CPU) que se encuentra dentro del controlador.
tasa de infiltración del suelo
Velocidad a la que el suelo absorbe el agua.
válvula
Dispositivo operado en forma manual o eléctrica, utilizado para controlar el caudal de agua de una red de riego.
válvula principal (MV)
Válvula operada con electricidad, ubicada en la red principal del sistema, que controla el caudal de agua que se
dirige a las demás válvulas eléctricas y manuales ubicadas más adelante.
 Loading...